Elephant rock paintings are one of my favorite ways to turn a simple stone into something full of personality. With the right shape and a few playful details, you can make anything from a sweet cartoon elephant to a surprisingly realistic mini wildlife portrait.
Simple Side-Profile Elephant Silhouette

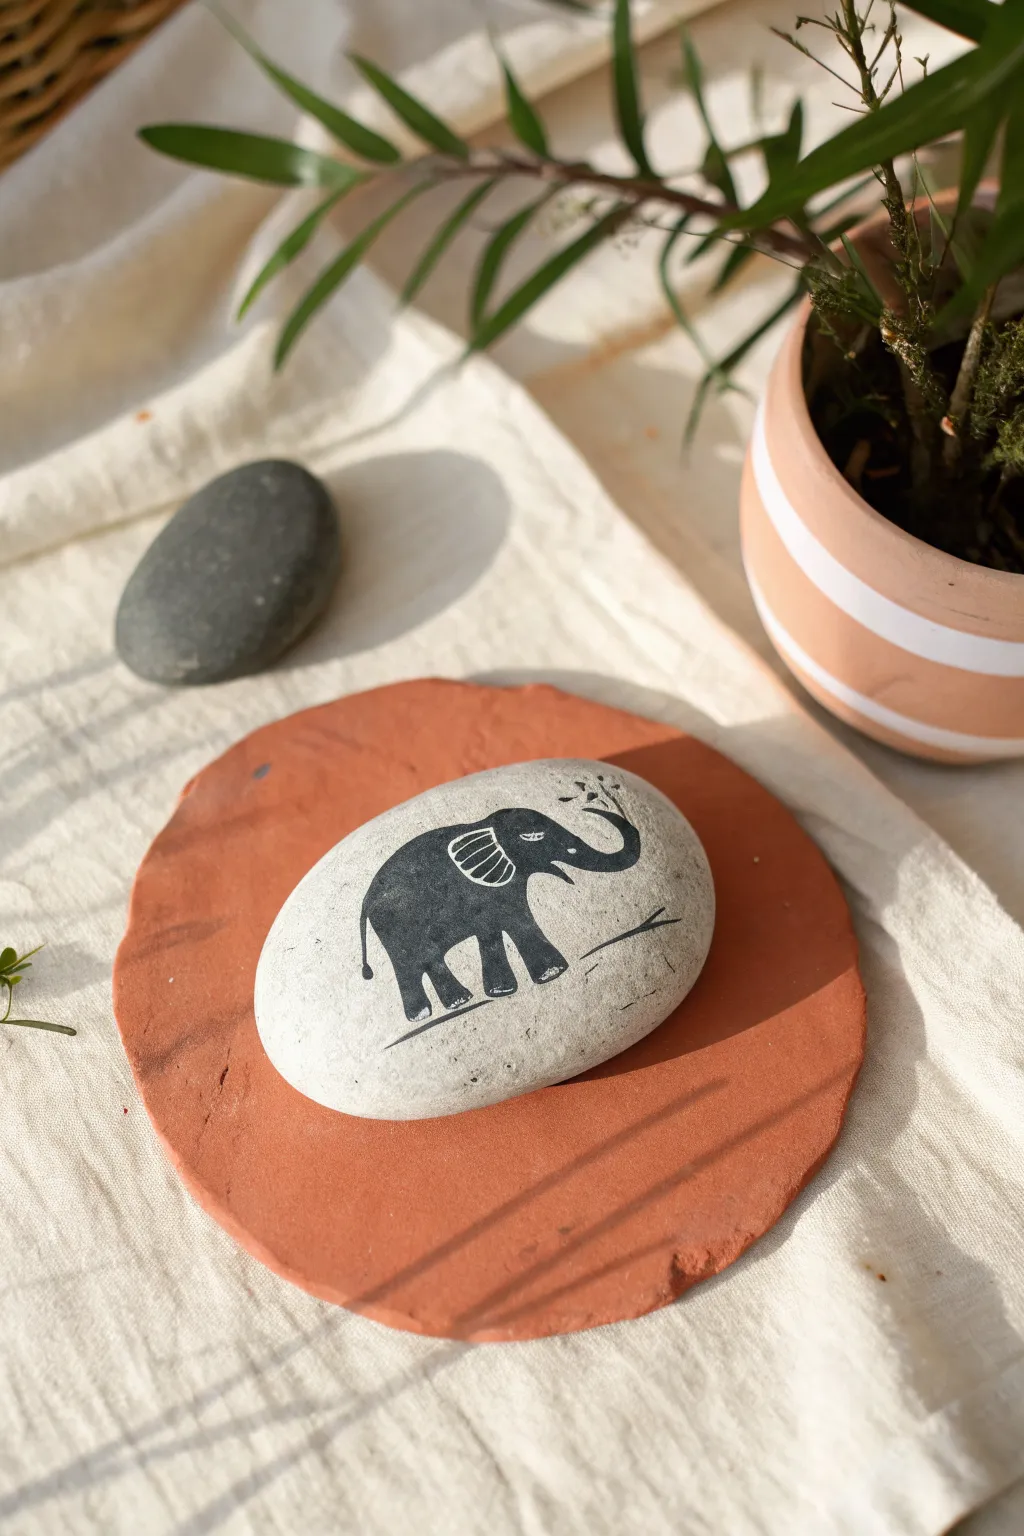
This elegant rock painting project captures the gentle strength of an elephant using a striking high-contrast silhouette. The natural texture of a smooth, light-colored stone serves as the perfect canvas for bold black ink or paint.
Step-by-Step Guide
Materials
- Smooth, light-colored river rock (oval shape preferred)
- Fine grit sandpaper (optional)
- Pencil (HB or lighter)
- Black acrylic paint or black paint pen (fine tip)
- Detail brush (size 00 or 0) if using bottled paint
- Micro-tip black pen for finest details (0.1mm)
- Clear matte varnish or sealant spray
- Cotton swabs
- Water cup and paper towel
Step 1: Preparation and Sketching
-
Clean the stone surface:
Begin by washing your stone with warm soapy water to remove any dirt or oils. Scrub gently with an old toothbrush if needed to get into the pores. -
Dry completely:
Allow the rock to dry fully. It might look dry on the surface, but give it extra time to ensure moisture has evaporated from the stone’s interior. -
Smooth the canvas:
If your rock has rough patches that might interrupt your pen lines, lightly sand specific areas with fine-grit sandpaper, then wipe away the dust. -
Visualize placement:
Hold the stone and decide where the elephant will walk. The natural curve of the stone can mimic the ground, so aim to center the figure slightly lower than the middle. -
Sketch the main body shape:
Using a light pencil touch, draw a kidney-bean shape for the main body. The back should be rounded, dipping slightly at the neck before rising into the head. -
Outline the head and trunk:
Extend the shape forward to form the head, curving upward into the trunk. The trunk should curve like a gentle ‘S’ shape, pointing towards the sky. -
Add the legs:
Sketch four thick, sturdy legs. Notice how the back leg has a slight bend at the ‘knee,’ and the front legs are positioned to suggest a walking motion. -
Refine the tail:
Draw a very thin, wispy line for the tail at the rear, curving it slightly to match the relaxed movement of the animal.
Pro Tip: Negative Space
The white line defining the ear isn’t painted white; it’s the bare rock showing through! Plan this gap carefully before filling the black body.
Step 2: Painting the Silhouette
-
Choose your tool:
For beginner painters, a fine-tip paint marker is easiest for control. If you prefer a brush, dilute your black acrylic slightly for smoother flow. -
Outline the perimeter:
Carefully trace over your pencil lines with your black paint or pen. Keep your hand steady and rest your wrist on the table for stability. -
Define the ear:
This is a key negative space technique. Instead of painting the whole ear black, draw the outline of the ear flap, but leave a thin gap of bare stone between the ear edge and the body. -
Detail the ear interior:
Add small, curved lines inside the ear shape to suggest texture, while still leaving enough unpainted stone to separate the ear from the rest of the head. -
Fill the body:
Begin filling in the main body area with solid black. Work in small sections to keep the paint application even and opaque. -
Refine the eye:
Locate where the eye should be. You can either paint around a tiny circle to leave it unpainted or paint the head solid black and dot the eye in later with white paint. -
Sharp corners:
Use your finest tip tool to sharpen the points of the tusks (if you choose to add them) and the very tip of the trunk. -
Fill the legs:
Fill in the legs completely. Ensure the feet have a flat bottom edge so the elephant looks grounded. -
Double-check opacity:
Once the first layer is dry, hold the rock up to the light. If the stone texture shows through too much, apply a second coat of black to the solid areas.
Step 3: Finishing Touches
-
Clean up edges:
If you made any smudges or jagged lines, dampen a cotton swab or a stiff brush with water (or alcohol if the paint is dry and stubborn) and gently rub away the mistake. -
Erase guidelines:
I like to wait at least an hour for the paint to fully cure, then gently erase any visible pencil marks remaining around the edges. -
Seal the artwork:
To protect your design from chipping, spray the rock with a clear matte varnish. Two light coats are better than one heavy dripping coat.
Troubleshooting: Uneven Paint
If the rock’s porous surface absorbs the ink making it look grey, let it dry completely and apply a second layer for that deep, rich black.
Place this serene little artwork in a planter or on a desk for a daily reminder of gentle giants


Cute Front-Facing Baby Elephant
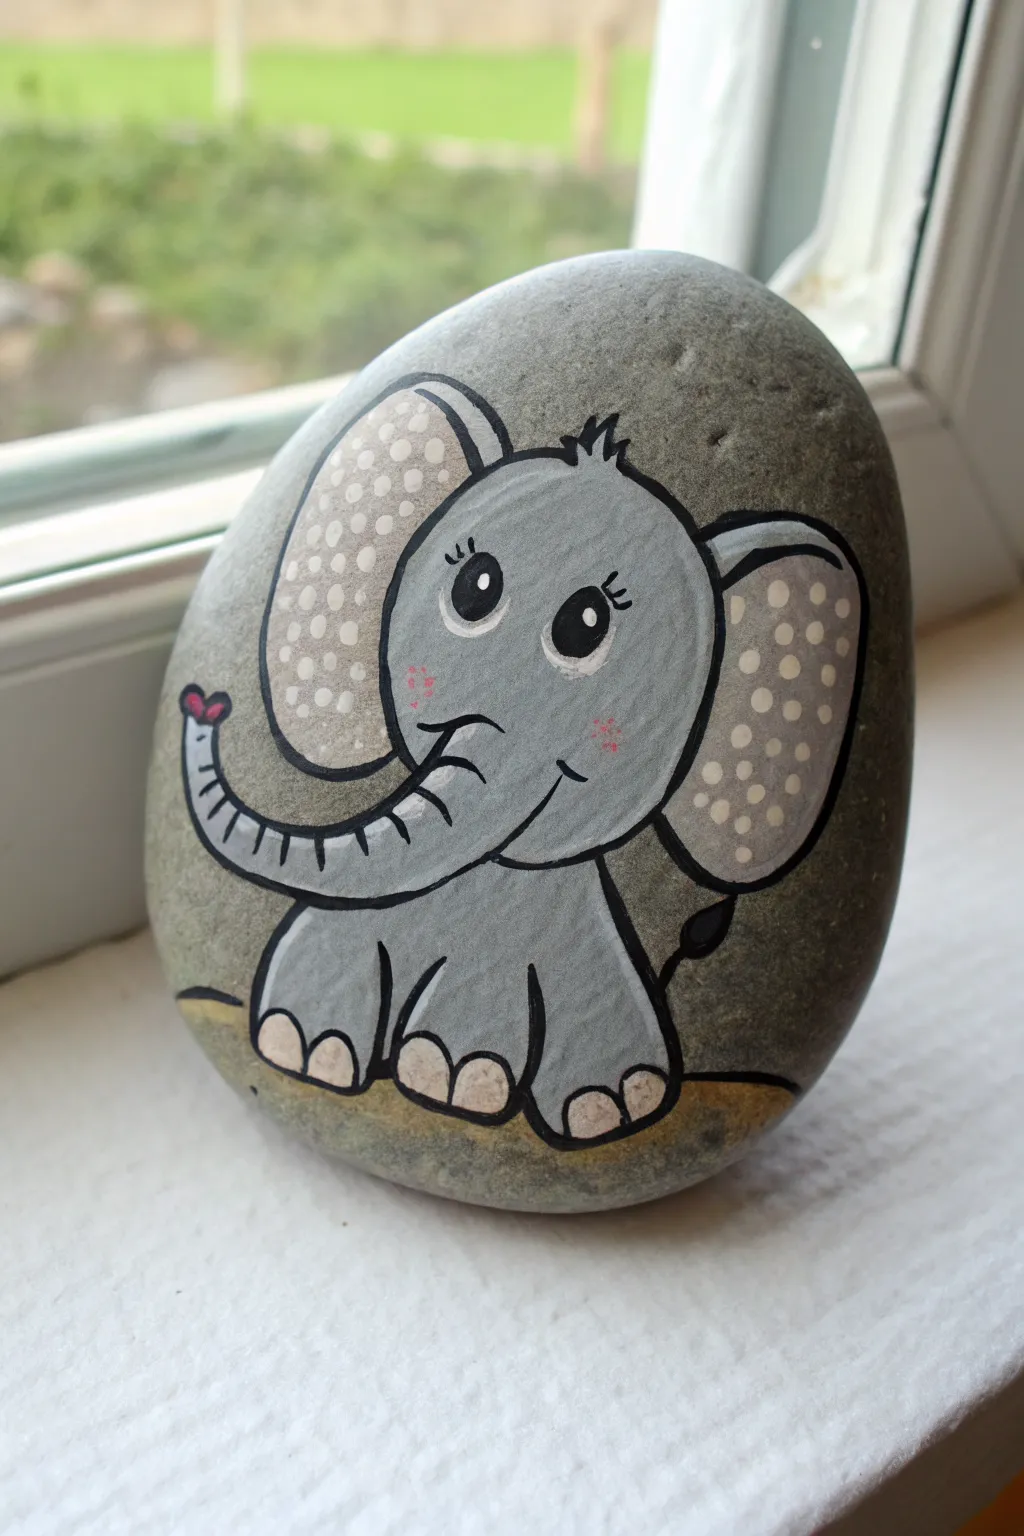
Transform a smooth garden stone into an adorable, wide-eyed baby elephant sitting happily on the ground. This cartoon-style design features sweet polka-dot ears and blushing cheeks that bring instant character to any rock collection.
Step-by-Step
Materials
- Smooth, rounded river rock (medium size)
- Acrylic paints: Light grey, dark grey, white, black, pale pink, and brownish-yellow
- Fine liner brush (size 0 or 00)
- Flat shader brush (small)
- Dotting tool or toothpick
- Pencil for sketching
- Matte or satin sealant spray
Step 1: Base and Sketch
-
Prep the Surface:
Clean and dry your rock thoroughly. If the natural stone color is too dark or uneven, paint a thin base coat of very light grey over the front face to give yourself a neutral canvas, but leaving the natural texture showing is also nice. -
Map Out the Head:
Using a pencil, lightly sketch a large, rounded oval shape in the center of the rock for the elephant’s head. It should be slightly wider at the bottom than the top. -
Add the Ears:
Draw two large, floppy ear shapes extending from the sides of the head. Make them curved like kidney beans, ensuring the outer edges stay within the rock’s surface. -
Sketch the Body:
Below the head, draw a smaller, stout body shape. Add two semi-circles at the bottom for the feet, making sure the elephant looks like it is sitting down. -
Draw the Trunk:
Create the trunk by extending a curved tube shape from the lower left side of the face, curling it upwards in a ‘U’ shape. Add a small heart shape at the very tip for a cute detail.
Smooth Operator
Add a drop of water to your black paint until it has an inky consistency. This helps the liner brush glide smoothly over the rock’s texture for crisp outlines.
Step 2: Color Blocking
-
Paint the Grey Areas:
Load a flat brush with light grey acrylic paint. Fill in the entire head, the trunk, the body, and the outer rims of the ears. You might need two coats for opaque coverage. -
Fill the Ears:
Mix a very pale beige or warm white color. Carefully paint the inner sections of the ears, leaving a distinct grey border around them. -
Add the Ground:
Using a brownish-yellow ochre shade, paint a small patch of ground underneath the elephant’s bottom, extending slightly to the sides. -
Paint the Toes:
Use the same pale beige warmth you used for the ears to fill in the half-circles on the feet for the toenails. -
Let it Dry:
Allow these base layers to dry completely before moving on to outlining, otherwise the black paint will bleed into the wet grey.
Party Elephant
Instead of a heart at the end of the trunk, paint a tiny balloon on a string, or add a colorful party hat on the head for a birthday-themed gift rock.
Step 3: Details and Outlines
-
Outline the Shape:
Switch to your finest rigour or liner brush and black acrylic paint. Carefully outline the entire elephant, including the head, ears, trunk, and body. Keep your hand steady by resting your pinky on the dry part of the rock. -
Define the Trunk:
Paint small, curved lines horizontally across the trunk to create wrinkles and texture. -
Draw the Face:
Paint two large solid black circles for the eyes. Add curved eyebrows above them and three small eyelashes extending from the outer corners of each eye. -
Add the Mouth:
Paint a small, curved smile just under the trunk overlap on the right side of the face. -
Create the Tail:
Paint a thin, wavy black line coming from the back of the elephant on the right side, ending in a small teardrop shape for the tail tuft. -
Highlight the Eyes:
Once the black eyes are dry, use a dotting tool or the back of a brush to place a single white dot in the upper right of each pupil. Then add a tiny white crescent underneath the pupil for depth. -
Dot the Ears:
Dip your dotting tool into white paint and add rows of white polka dots inside the beige sections of the ears for texture. -
Blush and Heart:
Dilute a tiny bit of pink paint with water. Gently dab rosy cheeks under the eyes. Use regular pigmented pink to fill in the tiny heart at the tip of the trunk. -
Tuft of Hair:
Finish the painting by adding a few small jagged spikes of black on top of the head for a messy tuft of hair.
Seal your new grey friend with a clear coat to protect it from the elements if you plan to hide it in the garden


Mother and Calf Touching Trunks
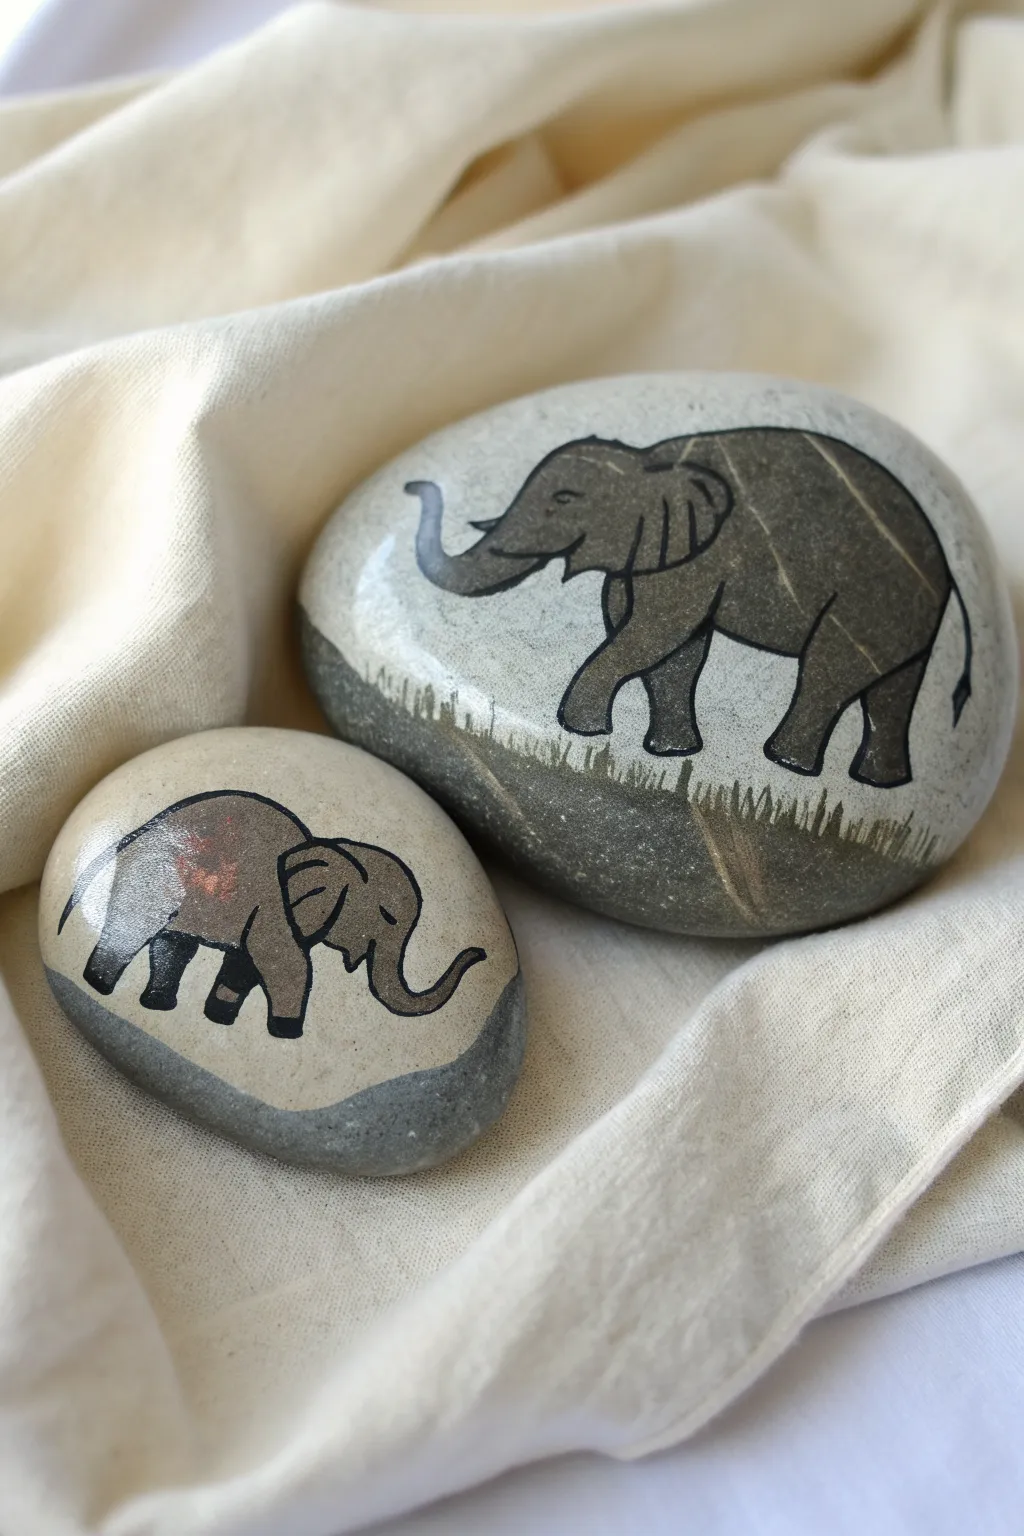
Capture a tender moment between mother and calf with this charming painted rock project. Using the natural grey of the stones to your advantage, this design features simple silhouettes and clever use of negative space for a serene, organic look.
Step-by-Step Guide
Materials
- Two smooth, oval river rocks (one large, one medium)
- Grey acrylic paint (light warm grey)
- Dark charcoal or black acrylic paint
- Fine liner brush (size 0 or 00)
- Small flat brush
- Pencil or chalk for sketching
- Olive green or sage acrylic paint (optional for grass)
- Matte or satin spray sealer
Step 1: Preparing the Stone Canvas
-
Select your stones:
Choose two stones that complement each other in size. The larger one will act as the mother elephant’s canvas, whilst the smaller, flatter stone is perfect for the calf. -
Clean the surface:
Wash the rocks thoroughly with soap and water to remove any dirt or oils. Let them dry completely, ensuring no moisture is trapped in porous areas. -
Basecoat the background:
Instead of painting the whole rock, we will create a defined lighter area on the top half. Mix a very light warm grey paint. Using the flat brush, paint a soft, curvy ‘hill’ shape that covers the upper 60% of the rock, leaving the natural dark stone exposed at the bottom. -
Apply a second coat:
Acrylics can be translucent. Once the first layer is dry to the touch, apply a second coat of the light grey to ensure a solid, opaque background that will make your elephants pop.
Fixing Wobbly Lines
If your outline gets messy, don’t panic. Let it dry, then use the light background color to paint ‘over’ the mistake, effectively erasing it from the outside in.
Step 2: Sketching and Silhouettes
-
Sketch the mother:
On the larger stone, lightly pencil in the outline of the adult elephant walking towards the left. Focus on the large hump of the back, the wide ear, and the trunk curling upwards. -
Sketch the calf:
On the smaller stone, draw the baby elephant facing right. Keep the proportions cute and chunky—a rounder body and a smaller trunk curling up as if reaching back towards its mother. -
Outline the main shapes:
Switch to your fine liner brush and dark charcoal paint. Carefully trace over your pencil lines to establish the permanent outline. I find resting my pinky on the table helps steady my hand for these curves. -
Fill the bodies:
Use a slightly watered-down dark grey or brown-grey to fill in the bodies. You want this color to be darker than the background but not pitch black, allowing you to add details later. -
Dry thoroughly:
Let this main body layer dry completely before moving on to the defining lines.
Step 3: Details and Finishing Touches
-
Define the ears:
Using your thinnest liner brush and black paint, draw the ear flaps. For the mother, create a large, slightly ragged C-shape. For the baby, a smaller, simpler ear shape works best. -
Add facial features:
Paint a very small, closed eye (like a crescent moon) on each elephant. Add a small clear line separating the head from the trunk slightly to give it dimension. -
Refine the legs:
Outline the legs clearly with black. Ensure the feet look flat at the bottom to give the impression of weight. -
Add wrinkles and texture:
Mix a slightly lighter grey than the body color. Paint faint, curved lines on the trunk and around the knees to suggest wrinkled elephant skin. -
Paint the tail:
Add a thin, wisp of a tail to the rear of the mother elephant, ending in a tiny tuft of black hair. -
Create the grassy ground:
Where the painted light grey background meets the natural dark rock, paint jagged, uneven strokes of grass. Use a mix of the background grey or a subtle sage green to blend the painted area into the raw stone. -
Seal the artwork:
Once absolutely dry, take the rocks outside and spray them with a matte or satin sealer. This protects the paint from chipping and deepens the natural color of the unpainted stone.
Interactive Display
Paint the mother and baby on separate rocks so you can arrange them in different scenes—touching trunks, following each other, or grazing apart.
Now you have a sweet, distinctive set of stone decor pieces that brings a calm, natural touch to any shelf or garden


Elephant Holding a Heart Balloon
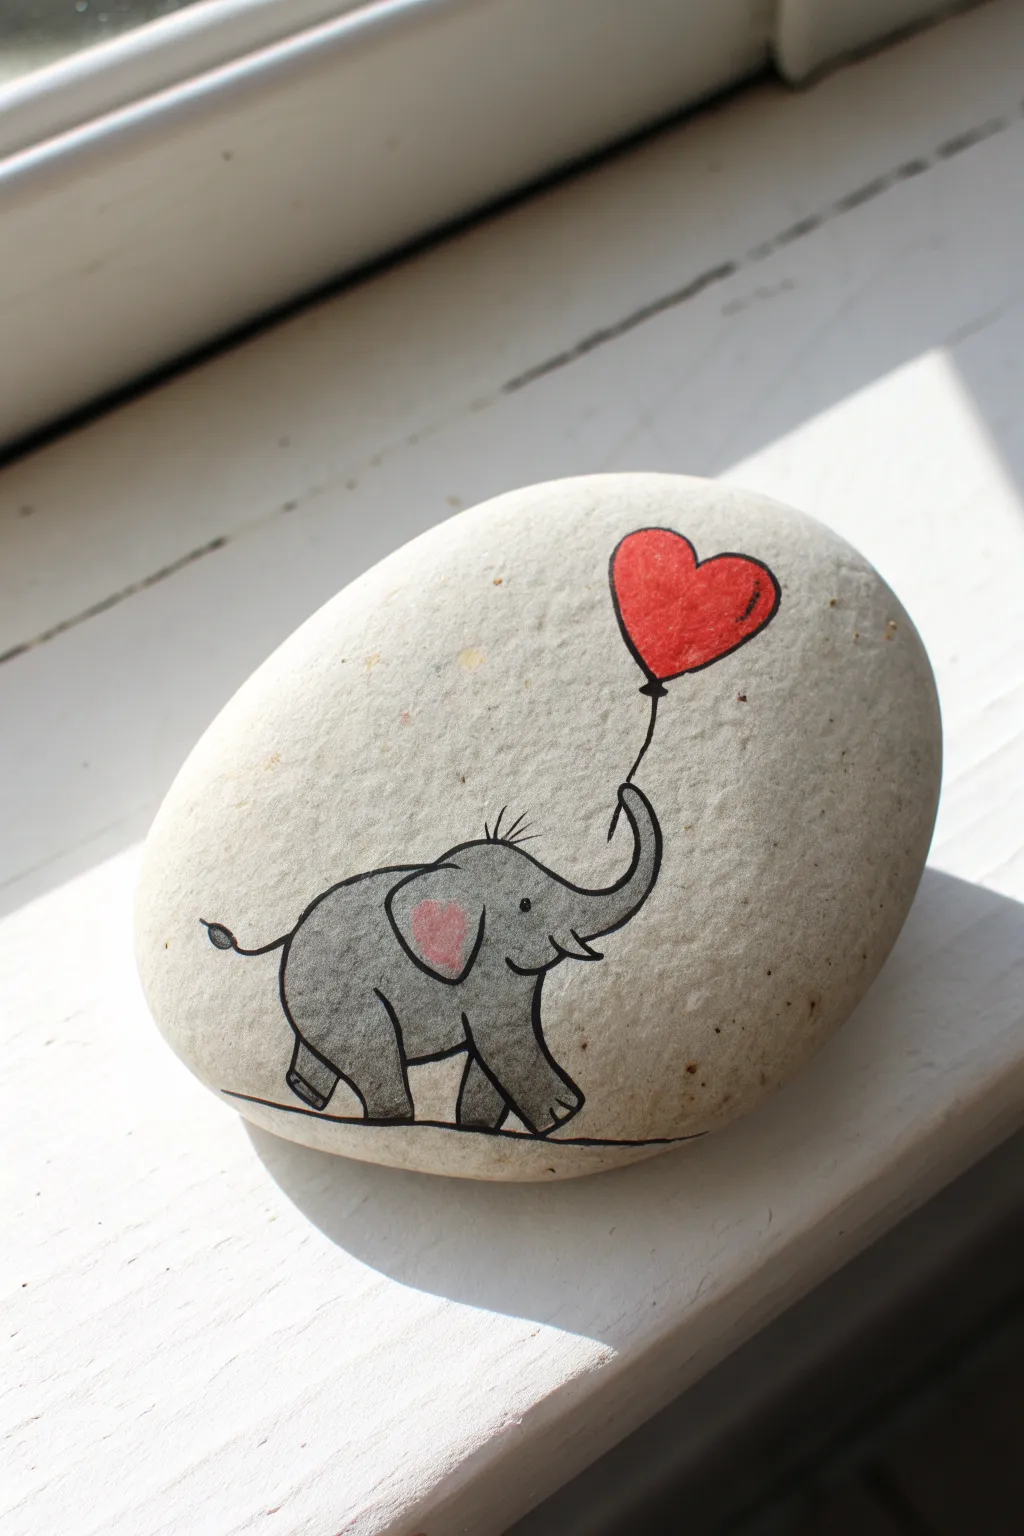
This sweet and simple design captures a joyful grey elephant holding onto a bright red heart balloon. Its minimalist style looks striking against a smooth white stone, making it a perfect keepsake or a thoughtful gift for someone special.
How-To Guide
Materials
- Smooth, flat river stone (preferably light-colored or white)
- Acrylic paint (Light Grey, Dark Grey, Red, Pink, Black, White)
- Fine liner brush (size 00 or 0)
- Flat brush (size 4 or 6 for base coat)
- Black fine-tip paint pen or permanent marker (0.5mm or 0.7mm)
- Pencil and eraser
- Water cup and palette
- Sealant (matte or gloss varnish)
Step 1: Preparation & Sketching
-
Clean and Prep:
Begin by washing your stone with warm soapy water to remove any dirt or oils. Let it dry completely. If your stone has a lot of texture, you might want to sand it lightly for a smoother painting surface. -
Base Coat (Optional):
If your stone is naturally dark or uneven in color, paint a layer of white or cream acrylic over the surface. I like to do this to help the grey elephant stand out, but if your rock is already pale like the one in the photo, you can paint directly onto the stone. -
Sketch the Outline:
Using a pencil, very lightly draw the outline of the elephant. Start with an oval for the body and a smaller circle for the head, connecting them smoothly. Sketch the trunk curving upward toward the right. -
Add Details:
Lightly sketch the legs—two closest to you and two slightly behind. Add the ear shape, the small tail, and finally, draw a heart shape floating floating above and to the right of the trunk.
Use the Wrist Trick
For the balloon string, anchor the heel of your hand on the table and pivot from your wrist. This stabilizes your hand for a much straighter, smoother line than drawing from the shoulder.
Step 2: Painting the Elephant
-
Fill the Grey Body:
Mix a medium grey acrylic paint. Using a small round brush, fill in the entire body, head, trunk, and legs of the elephant. Be careful to stay within your pencil lines. -
Paint the Ear:
While the grey is still slightly wet or just after it dries, paint the main ear shape with the same grey tone. -
Add Pink Accents:
Mix a soft pink color using red and lots of white. Carefully paint the inner part of the ear. This adds a lovely touch of warmth to the character. -
Paint the Balloon:
Using a bright red acrylic paint, carefully fill in the heart shape you sketched earlier. You may need two coats here to ensure the red is vibrant and opaque. -
Let it Dry:
Allow these base colors to dry completely before moving on to the outlining stage. If the paint is wet, your pens might snag or bleed.
Make it a Pair
Paint a second rock with a matching mouse holding a tiny balloon, or another elephant facing the opposite way, so the two rocks can be displayed together ‘interacting’ on a shelf.
Step 3: Outlining & Defining
-
Outline the Balloon:
Using your ultra-fine black paint pen or a liner brush with black paint, trace the outline of the red heart. Add a tiny black triangle at the bottom where the string connects. -
Draw the String:
With a steady hand, draw a single, thin black line connecting the bottom of the balloon to the tip of the elephant’s trunk. A quick, confident stroke usually produces the straightest line. -
Outline the Elephant:
Trace the outer edge of the elephant’s body with your fine black pen. Pay attention to the trunk’s curve and the separation between the legs. -
Define the Features:
Outline the ear and the pink inner section. Add a small curved line for the mouth, a dot for the eye, and a few small wispy lines on top of the head for hair. -
Detail the Tail & Toes:
Draw the thin tail with a little tuft at the end. Add small curved lines at the bottom of each foot to represent toenails. -
Add Dimension:
To give the elephant volume, add very subtle shading lines or cross-hatching near the bottom of the belly and legs using your black pen. Keep these lines fine and sparse.
Step 4: Finishing Touches
-
Ground the Figure:
Swipe a thin, slightly uneven horizontal line under the elephant’s feet using black paint or your pen. This creates the ground so your elephant isn’t floating in space. -
Highlight the Balloon:
Once the red paint and black outline are totally dry, add a tiny curved line of white paint on the upper right side of the heart to make it look shiny. -
Erase Sketches:
Check for any visible pencil lines that weren’t covered by paint. Gently erase them, being careful not to rub off any paint. -
Seal the Stone:
Apply a coat of varnish or spray sealant to protect your artwork. A matte finish looks natural, while gloss will make the colors pop.
This charming little elephant is now ready to bring a smile to anyone’s face.
BRUSH GUIDE
The Right Brush for Every Stroke
From clean lines to bold texture — master brush choice, stroke control, and essential techniques.
Explore the Full Guide
Classic Gray Elephant With Soft Highlights
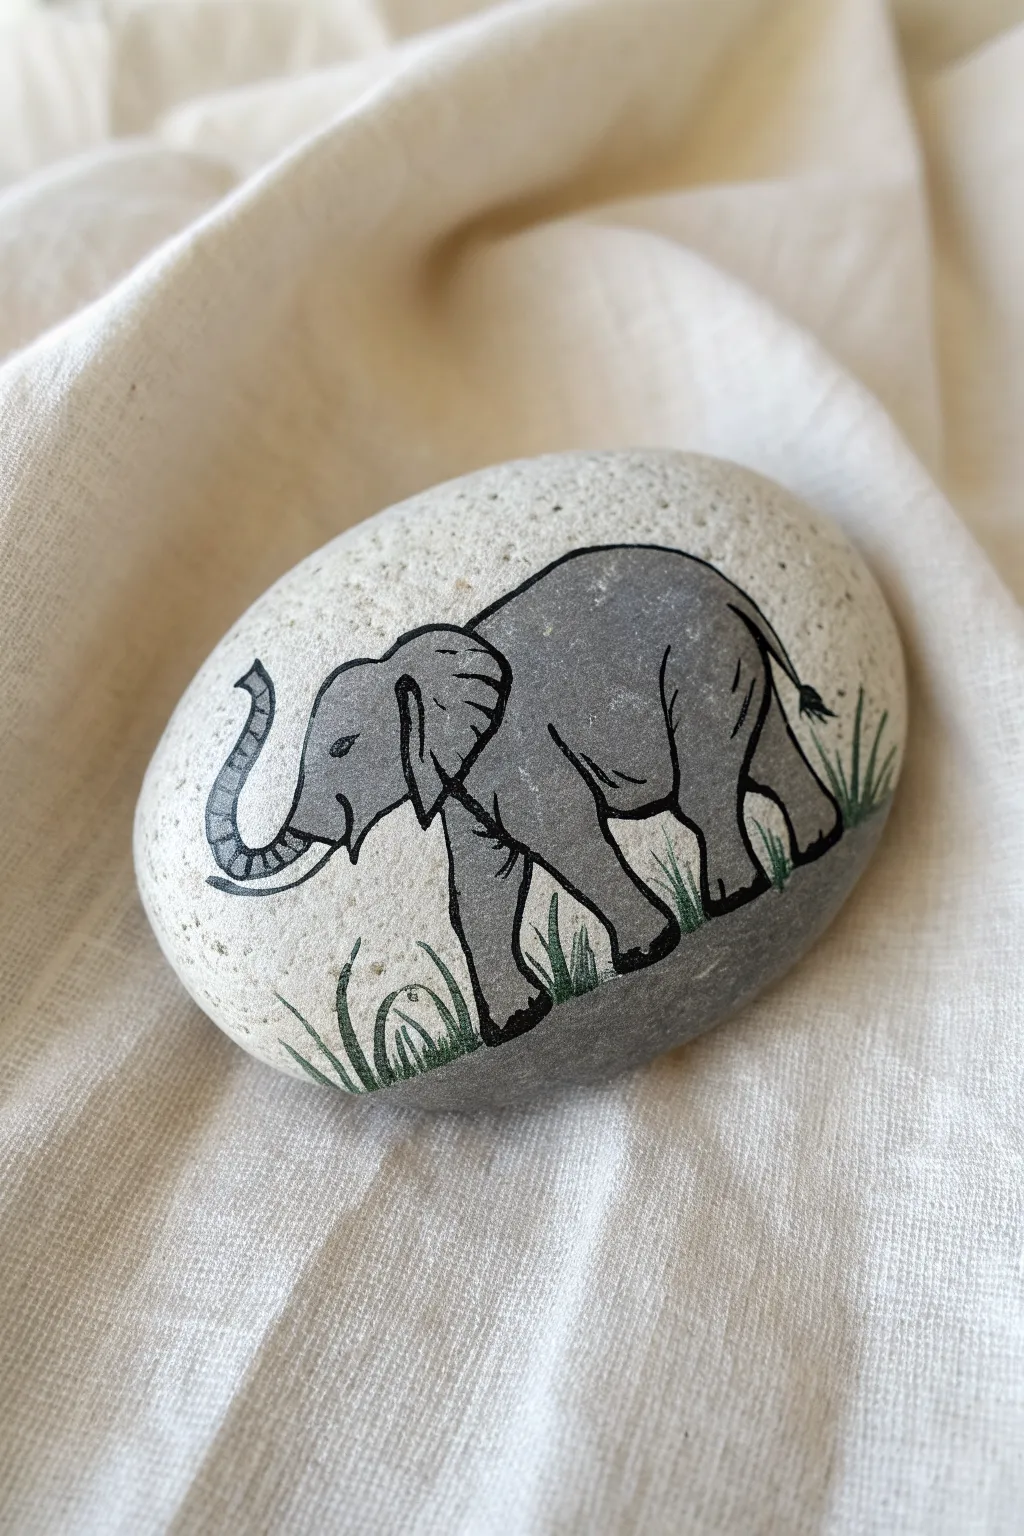
For this project, you’ll capture the steady, calm nature of an elephant on a smooth, rounded stone. The design features strong, clean outlines and soft gray shading, making it a perfect piece for beginners looking to practice animal forms.
Step-by-Step Guide
Materials
- Smooth, oval-shaped river rock (light base color preferred)
- Pencil and eraser
- Gray acrylic paint (medium shade)
- Black acrylic paint pen (fine tip) or fine liner brush
- White acrylic paint or paint pen
- Green acrylic paint (grass green)
- Fine detail paintbrush
- Small flat paintbrush
- matte or satin sealer (spray or brush-on)
Step 1: Sketching the Outline
-
Prep your surface:
Ensure your rock is clean and dry. Since this design uses the natural rock color for the background, you won’t need a base coat unless your rock is very dark. -
Map the body shape:
Start by lightly sketching a large oval shape towards the center-right of the rock. This will form the main body of the elephant. -
Add the head:
Draw a smaller rounded shape overlapping the top left of the body oval to represent the head. -
Draw the trunk:
Extend a curved line down from the head, curling it upwards at the end to create the trunk. It should look like a relaxed ‘J’ shape. -
Sketch the legs:
Add four stout legs beneath the body. Position the front leg slightly forward as if mid-step, and angle the back legs to show movement. -
Refine the details:
Sketch the large ear flap on the head, add a small tail at the rear, and define the tusk curving out near the trunk.
Step 2: Painting the Base Colors
-
Paint the gray body:
Using a small flat paintbrush, fill in the entire elephant shape (except the tusk) with a medium gray acrylic paint. -
Wait for drying:
Allow the gray layer to dry completely. If the rock’s texture shows through too much, apply a second coat for opacity. -
Paint the tusk:
Carefully paint the small tusk shape with white paint. Use a very fine brush for this tiny area. -
Add the ground shadow:
Mix a darker gray or watery black and paint a rough, uneven patch of ground beneath the elephant’s feet to ground the figure.
Smooth Moves
For the cleanest black outlines, wipe the nib of your paint pen on a paper towel occasionally to prevent ink blobbing.
Step 3: Adding Details and Outlines
-
Start the outlining:
Once the base paint is bone dry, take your black paint pen or fine liner brush. Slowly trace the outer perimeter of the elephant. -
Define the ear:
Draw the outline of the large ear. I like to add a few small, curved lines inside the ear shape to suggest folds and texture. -
Face details:
Draw a small almond-shaped eye near the top of the trunk. Add a tiny dot in the center for the pupil. -
Trunk texture:
Add small horizontal lines along the curve of the trunk to replicate the wrinkled skin texture. -
Leg definition:
Outline the legs clearly. Add small semi-circles at the bottom of each foot to represent toenails. -
Body wrinkles:
Use very light, short strokes with your pen to add wrinkle lines near the shoulder, elbow joints, and belly for a realistic touch.
Make It Pop
Add a tiny stroke of lighter gray or watered-down white on the top of the elephant’s back to create a subtle highlight.
Step 4: Finishing Touches
-
Paint the grass:
Dip a fine detail brush into green paint. Create upward flicking motions starting from the ground shadow to simulate blades of grass peeking up around the feet. -
Vary the grass:
Make some grass blades taller and some shorter. Overlap a few slightly in front of the legs to enhance the depth. -
Final check:
Review your lines. If any black lines look too faint, carefully go over them once more to ensure a crisp, comic-book style contrast. -
Seal the rock:
After the paint is fully cured (usually 24 hours), spray or brush on a clear matte sealer to protect your artwork from chipping.
Now you have a sturdy little elephant companion ready to be displayed on a desk or hidden in a garden
Realistic Elephant Face Close-Up
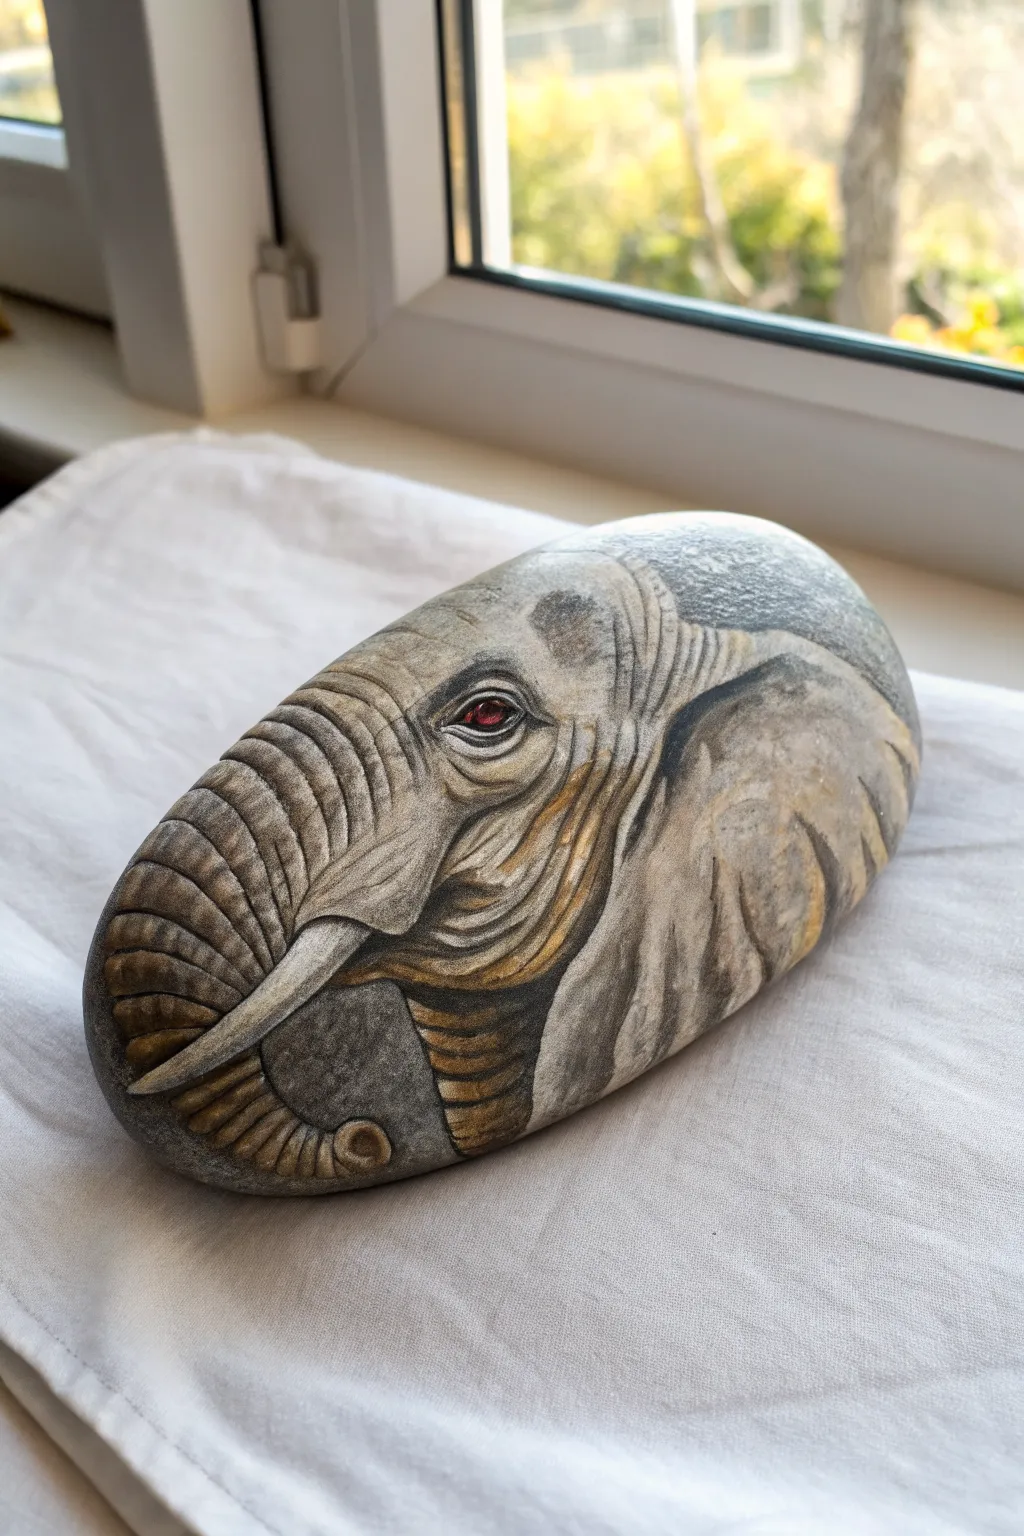
Transform a smooth, elongated river rock into a stunningly realistic elephant profile, capturing the intricate textures of wrinkled skin and wise eyes. This project focuses on subtle shading and contrasting details to bring the majestic creature to life on a natural canvas.
How-To Guide
Materials
- Smooth, elongated river rock (cleaned and dried)
- Acrylic paints (black, white, various grays, burnt umber/brown, yellow ochre, small amount of red)
- Pencil or white charcoal pencil for sketching
- Assorted paintbrushes (flat base brush, small round brush, fine liner script brush)
- Palette for mixing
- Cup of water and paper towels
- Clear acrylic sealer (matte or satin finish)
Step 1: Preparing the Canvas and Sketching
-
Clean and prime:
Begin by washing your rock thoroughly with soap and water to remove any dirt or oils. Once completely dry, you can choose to apply a base coat of neutral gray paint, or if your rock is already a pleasing gray tone, leave the natural stone visible as the background. -
Map out the profile:
Using a pencil or a white charcoal pencil, lightly sketch the outline of the elephant’s head. Start with the large curve for the forehead and ear, then trace the long, S-shaped curve of the trunk wrapping around the bottom. -
Define the features:
Sketch the position of the eye, sitting centrally in the upper third. Mark the tusk emerging from near the trunk base, and lightly indicate the major wrinkle lines on the trunk and forehead.
Fixing Flatness
If the trunk looks flat and cartoonish, your shadows aren’t dark enough. Go back with a translucent black glaze into the deepest crevices to force the highlighted areas to pop forward.
Step 2: Blocking in Color and Values
-
Base shading:
Mix a medium-dark gray acrylic. Using a small round brush, paint the shadowed areas first: under the ear flap, the creases where the trunk bends, and the deep recess around the eye socket. -
Highlight the forms:
Switch to a lighter gray (mix white with a touch of black and maybe a tiny bit of yellow ochre for warmth). Paint the bulging areas of the trunk segments, the forehead, and the top ridge of the ear to establish volume. -
Establish the tusk:
Paint the tusk with an off-white color (white mixed with a tiny drop of brown). Keep the edges crisp where it meets the gray skin. -
Deepen the shadows:
Create a near-black mixture. Carefully darken the deepest shadows, particularly the gap between the trunk and the tusk, and the inner folds of the ear, to create depth.
Dusty Texture
Create a ‘dust bath’ effect by lightly spattering tiny specks of watered-down tan paint over the forehead using an old toothbrush, mimicking real dirt.
Step 3: Detailed Texture Work
-
Painting the wrinkles:
This is the most crucial step. Using a fine liner brush and dark gray paint, create the network of fine lines across the skin. Follow the contours of the face—lines should curve around the trunk like rings and fan out across the forehead. -
Adding skin highlights:
Using your finest brush and a very light gray or diluted white, paint thin lines immediately next to the dark wrinkle lines. This “highlight next to shadow” technique makes the wrinkles look 3D and raised. -
Warming the tones:
I like to glaze a thin wash of burnt umber or yellow ochre over the cheek and lower trunk areas. This subtle brownish tint mimics the dust often found on elephant skin and breaks up the monotony of the gray. -
Refining the ear:
Use dry-brushing on the large ear flap. Dip a dry brush in light gray, wipe most of it off, and lightly drag it over the texture to catch the high points, making the skin look rough and leathery.
Step 4: The Eye and Final Touches
-
Painting the eye base:
Fill the eye shape with black paint. Let it dry completely. -
Adding the iris:
Paint a very small crescent or circle of dark reddish-brown within the black eye to suggest the iris, leaving a black pupil in the center. -
The vital spark:
Place a single, tiny dot of pure white paint in the upper quadrant of the eye. This reflection brings the entire animal to life. -
Defining the eyelid:
Paint the wrinkled lids around the eye using light gray highlights and dark gray shadows, giving the elephant its characteristic weary, wise expression. -
Tusk details:
Add subtle vertical cracks or grain lines to the tusk using a diluted brown paint to make it look like organic ivory. -
Sealing:
Allow the paint to cure for at least 24 hours. Apply a matte or satin sealer to protect your artwork without creating an unnatural glossy shine.
Now you have a timeless piece of wildlife art that captures the gentleness of these giants

PENCIL GUIDE
Understanding Pencil Grades from H to B
From first sketch to finished drawing — learn pencil grades, line control, and shading techniques.
Explore the Full Guide
Elephant With Bold Background Color Block
Embrace the natural beauty of stone with this project that lets the rock’s raw texture shine through. By using negative space and crisp ink lines, you’ll create a striking silhouette of an elephant that feels both ancient and modern.
Step-by-Step
Materials
- Smooth, light-colored river rock (flat oval shape)
- Black acrylic paint or fine tip paint pen (Posca or similar)
- Pencil and eraser
- Small round detail brush (size 0 or 1, if using paint)
- Matte spray varnish or sealant
Step 1: Preparation & Sketching
-
Clean the canvas:
Before starting, ensure your rock is thoroughly washed with soapy water and completely dried. Any dust will prevent the ink from adhering smoothly. -
Position the subject:
Visualize the oval shape of the rock as a frame. You want the elephant centered but slightly grounded towards the bottom third. -
Light sketch:
Using a pencil, lightly sketch the outline of the elephant. Start with a large oval for the body and a smaller circle for the head to get the proportions right before connecting them. -
Refine the shape:
Add the details to your sketch: drawing the trunk raised upwards in a gentle ‘S’ curve, four sturdy legs, and the distinguishing large ear on the side. -
Ground the figure:
Sketch a simple, uneven line beneath the feet to suggest ground or a path, ensuring the elephant doesn’t look like it’s floating.
Uneven Coverage?
If the black looks streaky or grey after drying, apply a second coat. Paint pens often require two thin layers for true opacity on porous stone.
Step 2: Inking the Silhouette
-
Outline the body:
Using your black paint pen or fine brush, carefully trace over your pencil lines for the main body shape. I prefer to start at the top of the back to avoid smudging as I work down. -
Fill the form:
Begin filling in the body with solid black. Use smooth, consistent strokes to avoid streaks. The goal is a solid, opaque silhouette. -
Reserve the details:
Crucial step: Do *not* paint the inside of the ear completely black yet. Leave a thin gap or negative space to define the ear’s edge against the body. -
Define the ear:
Inside the ear shape, draw three or four curved lines to represent the texture and folds of the elephant’s skin. This adds immediate character. -
Paint the eye:
Paint a small, almond-shaped eye. Leave a tiny dot of the raw rock showing in the center for a highlight, or go back with white later. -
Detail the tail:
Draw a thin, wispy line for the tail at the rear, adding a small tuft of varying lengths at the very end.
Step 3: Finishing Touches
-
Add movement:
At the tip of the trunk, make small, scattered dot marks or tiny dashes to represent water or dust being sprayed. -
Grounding line:
Go over the ground line beneath the feet. A broken, sketchy line often looks more artistic than a solid ruler-straight one. -
Background element:
To the right of the elephant, draw a simple, singular branch or twig shape interacting with the ground line to balance the composition. -
Cleanup:
Let the black ink dry completely. Once dry, gently erase any visible pencil marks that weren’t covered by paint. -
Seal it up:
Finish with a matte spray sealant. A glossy finish might reflect too much light and obscure the clean silhouette, so matte works best here.
Level Up
Use a metallic gold paint pen for the ear details and the water spray. The subtle shimmer adds a luxurious touch against the matte stone.
Place your finished stone near a potted plant or on a desk for a peaceful, miniature piece of natural art
Trunk-Up Good Luck Pose
Capture the charm of a gentle giant with this delightful rock painting project featuring a lucky elephant with its trunk raised high. The simple color palette of greys, gold, and white creates a serene and magical little keepsake perfect for gifting.
Detailed Instructions
Materials
- Smooth, oval-shaped river rock (cleaned and dried)
- White matte acrylic paint or gesso
- Grey acrylic paint (medium shade)
- Black fine-liner paint pen or permanent marker
- Gold acrylic paint or metallic paint pen
- Small round paintbrushes (sizes 0 and 2)
- White or light grey paint pen for details
- Pencil and eraser
- Matte spray varnish
Step 1: Preparing the Canvas
-
Clean and Dry:
Begin by washing your stone with warm soapy water to remove any dirt or oils. Let it dry completely before starting. -
Base Coat:
Apply a coat of white matte acrylic paint over the entire top surface of the rock. This acts as a primer and ensures your colors will pop. -
Second Layer:
Once the first coat is dry, add a second layer of white if needed to get full, opaque coverage. Allow this to dry thoroughly.
Step 2: Sketching the Design
-
Outline the Hill:
Lightly sketch a curved line near the bottom third of the rock with a pencil. This will be the gentle slope the elephant walks on. -
Elephant Shape:
Sketch the oval body of the elephant above the hill line. Add a smaller circle for the head, overlapping the body slightly. -
Adding Limbs:
Draw the four legs. Notice how the back legs are slightly bent for walking, and the front legs are stepping forward. -
Trunk and Tail:
Sketch the trunk curving upward in an ‘S’ shape. Add a small, thin tail flicking out behind the elephant.
Steady Hand Trick
Rest your wrist on the table or a book while doing the fine black outlines. This stabilizes your hand for cleaner, smoother lines.
Step 3: Painting the Elephant
-
Grey Body:
Using your medium grey paint and a size 2 brush, fill in the entire body, head, trunk, and legs of the elephant. Be careful to stay within your pencil lines. -
Drying Time:
Let the grey paint dry completely. I like to let this dry briefly while I prepare the gold paint for the next step. -
Golden Ground:
Paint the curved hill area beneath the elephant’s feet with gold acrylic paint. You might need two coats for a rich metallic shine. -
Ground Details:
Once the gold is dry, use a very fine brush or a black pen to add a thin, sketchy outline along the top edge of the hill to define the ground.
Add Dimension
Mix a tiny drop of white into your grey paint to create a lighter shade, then highlight the top curve of the trunk and back for a 3D effect.
Step 4: Refining Details
-
Black Outlines:
Using a black fine-liner paint pen or a size 0 brush, carefully outline the entire elephant. Outline the ears, legs, and trunk clearly. -
Ear Details:
Paint the large ear flap on the side of the head. Use your thin black liner to draw vertical vein lines inside the ear for texture. -
Facial Features:
Draw a small almond-shaped eye with a white highlight. Add a small tusk using white paint just below the trunk base. -
Toenails:
Using a white paint pen or a tiny dot of white paint, add small semi-circles at the bottom of each foot to create toenails. -
Skin Texture:
Add tiny white or light grey tick marks across the elephant’s back and legs to give the suggestion of wrinkled skin and texture.
Step 5: Magical Touches
-
Sprinkle Magic:
paint tiny black dots spraying out from the tip of the trunk. Intersperse these with a few tiny grey dots. -
Starry Sky:
Using a gold pen or paint, add small star shapes or dots scattered around the background, especially near the trunk spray. -
Final Seal:
Once absolutely everything is dry (give it a few hours), spray the rock with a matte varnish to protect your artwork from scratches and fading.
Place this lucky little elephant on your desk or give it to a friend who needs a smile


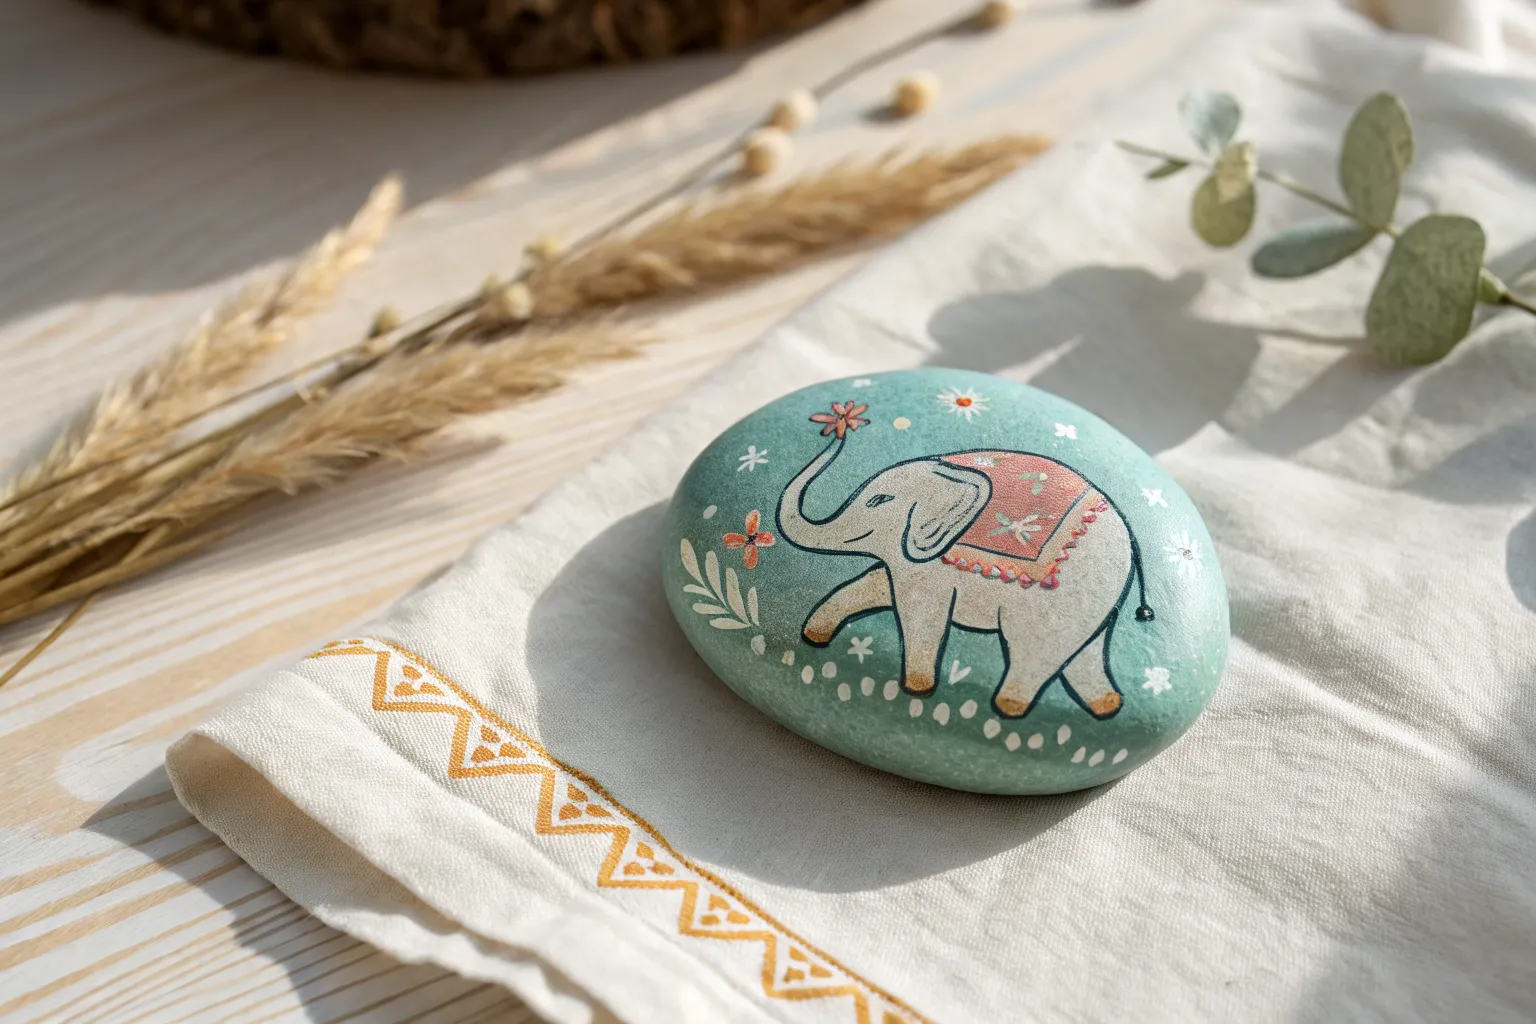
Mandala Pattern Elephant Body
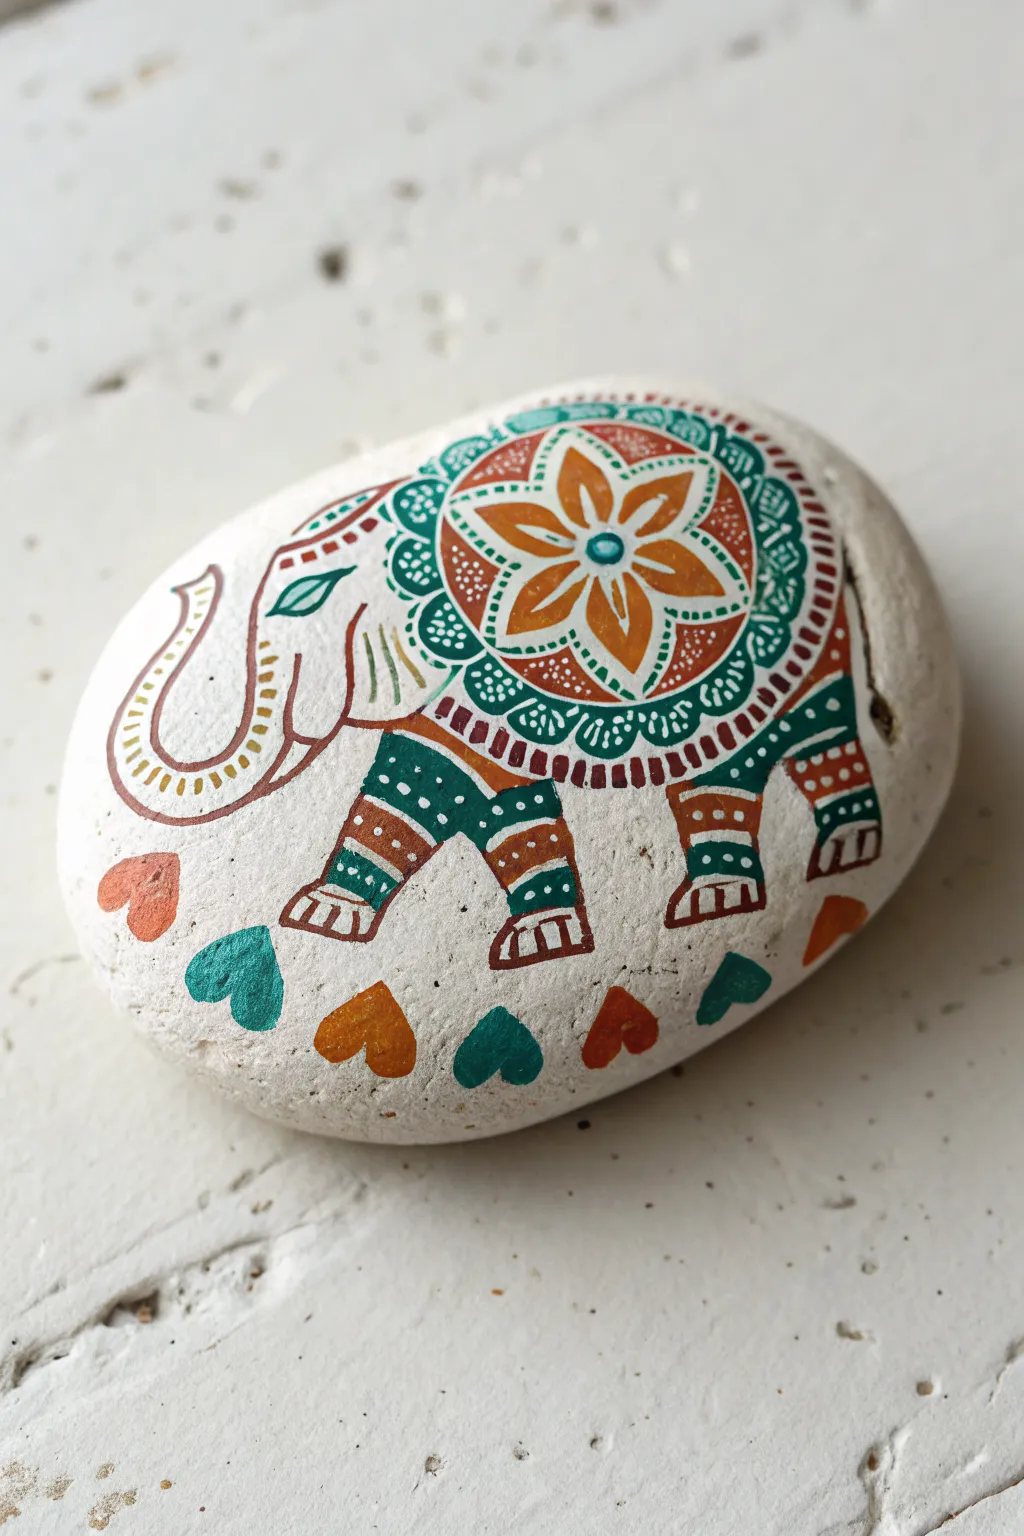
Transform a simple smooth stone into a charming decorative piece with this intricate mandala-style elephant design. The warm, earthy palette of rust, teal, and gold gives it a lovely bohemian feel perfect for garden decor or a paperweight.
Step-by-Step Guide
Materials
- Smooth, flat, light-colored river rock (oval shape works best)
- Acrylic paints (Rust Orange, Teal/Turquoise, Dark Green, Golden Yellow, White)
- Fine detail paintbrushes (sizes 0, 00, or 000)
- Pencil and eraser
- Acrylic paint markers (optional, for fine lines)
- Matte or glossy clear varnish spray
Step 1: Preparation & Sketching
-
Clean the surface:
Begin by washing your stone with soapy water and drying it completely to ensure the paint adheres properly. -
Outline the elephant shape:
Use a pencil to lightly sketch the elephant’s silhouette. Start with a large oval for the body in the center. -
Add head and trunk:
Draw the head shape on the left side, flowing into a curved trunk that curls upward. Don’t forget the large ear shape overlapping the shoulder. -
Sketch the legs:
Add four legs descending from the body: two visible in the foreground and two slightly offset in the background. -
Draw the mandala pattern guide:
Lightly sketch a large circle on the elephant’s back. This will be the main ‘blanket’ for the mandala design.
Uneven Lines?
If your brush strokes feel shaky or thick, switch to acrylic paint pens for the outlining and fine dot work. They offer much more control for beginners.
Step 2: Painting the Mandala Blanket
-
Base coat the flower:
Inside the circular guide on the back, paint a central six-petaled flower shape using golden yellow. -
Add the first ring:
Paint a ring of rust orange around the flower petals, filling the negative space between the petals and the circle’s edge. -
Paint the outer scalloped edge:
Using teal or dark green, paint a scalloped or lace-like border around the rust circle. This creates the outer rim of the mandala blanket. -
Detail the flower center:
Once the yellow is dry, add a small teal dot in the very center of the flower. -
Add white dot accents:
Using a very fine brush or a toothpick, add tiny white dots along the edges of the petals and inside the rust ring to mimic embroidery.
Make it Shine
Add tiny adhesive rhinestones to the center of the mandala flower or the hearts for a mixed-media 3D effect that catches the light.
Step 3: Painting Body & Legs
-
Paint leg bands:
Paint horizontal stripes on the legs using alternating bands of teal, rust, and dark green. Leave thin gaps of the stone’s natural color or paint them white for separation. -
Define the toes:
At the bottom of each leg, paint small arched shapes in rust to represent the elephant’s toenails. -
Outline the main body:
Using a fine brush with rust or reddish-brown paint, carefully outline the entire elephant silhouette, including the trunk, head, and ear. -
Detail the trunk:
Add small horizontal hash marks or dots along the trunk in yellow and rust to give it texture. -
Paint the eye and ear:
Draw a stylized eye shape on the head. Inside the ear outline, paint a small green leaf shape for decoration.
Step 4: Final Details
-
Paint the ground decoration:
Along the bottom curved edge of the stone, underneath the elephant’s feet, paint a row of small hearts alternating between teal, rust, and dark green. -
Add intricate white details:
Go back over the colored bands on the legs and the mandala blanket with white paint. Add lines, dots, and zig-zags to make the patterns pop. -
Refine outlines:
I find that doing a final pass over the main outlines with a steady hand sharpens the whole look. Use your darkest rust or brown for this. -
Erase pencil marks:
Once you are absolutely certain the paint is bone dry, gently erase any visible pencil sketch lines. -
Seal the artwork:
Protect your painting with a coat of clear spray varnish to prevent chipping and enhance the colors.
Now you have a beautifully patterned elephant stone ready to gift or keep
Henna-Inspired Paisley Elephant Design
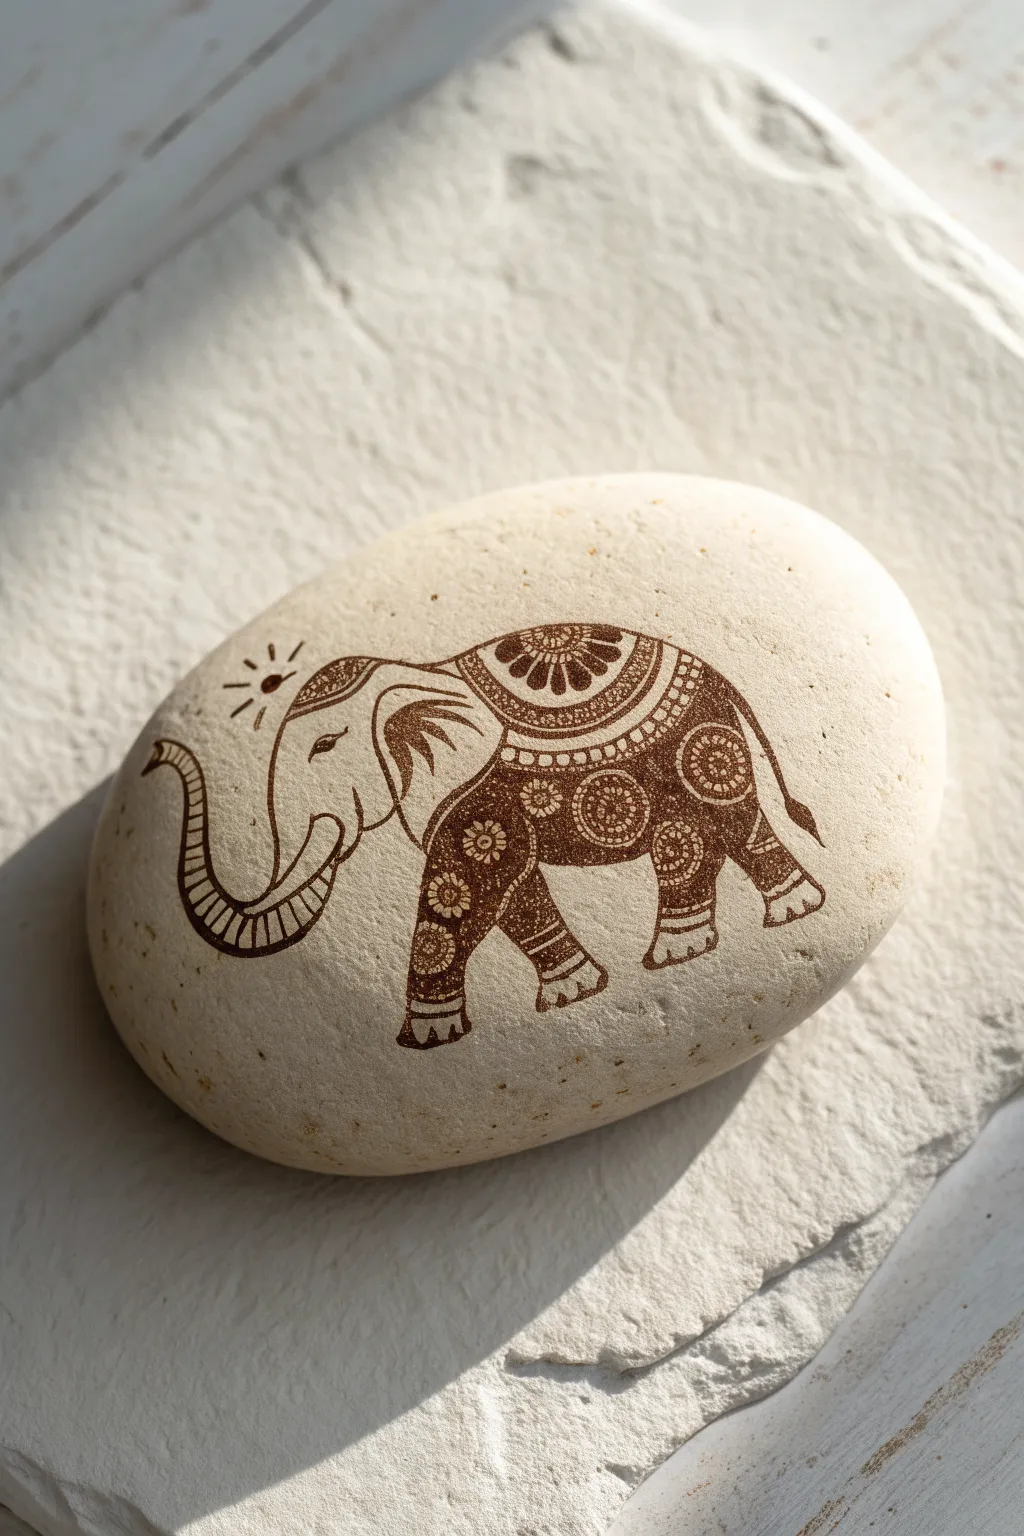
This elegant project transforms a simple white pebble into a piece of art that mimics the intricate beauty of henna tattoos. By using a single earthy brown tone, you can focus entirely on creating delicate patterns and flowing lines without worrying about color mixing.
How-To Guide
Materials
- Smooth, flat white or light beige river rock (approx. 4-5 inches wide)
- Fine grit sandpaper (optional for smoothing)
- Pencil (HB or H)
- Eraser
- Fine tip acrylic paint pen (brown/sepia) OR
- Fine liner brush (size 0 or 00) and fluid brown acrylic paint
- Matte spray varnish or sealant
Step 1: Preparation and Outline
-
Select and clean:
Choose a stone with a smooth, relatively flat surface to ensure your fine lines don’t skip. Wash it thoroughly with soap and water to remove any dirt or oils, then let it dry completely. -
Initial sketch:
Lightly sketch the basic oval shape of the elephant’s body in the center of the rock using your pencil. Keep the lines very faint so they are easy to erase later. -
Add anatomy:
Attach a curved trunk to the front, lifting upward for ‘good luck’. Draw the rounded head shape and extend the back leg and front leg down from the body oval. -
Refine the shape:
Sketch the large ear, starting from the top of the head and curving back. Add the smaller details like the tusk, the tail with a tufted end, and the slight curve of the belly. -
Trace the outline:
Using your brown paint pen or fine brush, carefully trace over your pencil outline. I find it helpful to anchor my pinky finger on the table to keep my hand steady for these long curves.
Steady Hands
If you’re nervous about painting directly, practice the pattern on paper first. For the rock, use a paint pen with a 0.5mm nib for the ultimate control over tiny details.
Step 2: Intricate Patterning
-
Define sections:
Divide the elephant’s body into distinct sections. Draw a saddle-like curve on the back, separate bands on the legs, and a section on the forehead. -
Draw the saddle flower:
Inside the saddle area on the back, draw a large flower shape. Start with a center circle and add radiating petals. -
Fill the saddle:
Fill the negative space around the flower petals with solid brown ink, leaving the petals themselves uncolored or outlined in negative space. Add small dots or lines inside the petals for texture. -
Leg mandalas:
On the thigh area of the back leg and the shoulder of the front leg, draw circular mandala patterns. These should look like wheels with concentric rings of dots and tiny geometric shapes. -
Connect with texture:
Fill the spaces between these main motifs with a dense stippling pattern or tiny cross-hatching. This creates a shaded, textured look that mimics traditional henna application. -
Decorate the trunk:
Draw horizontal bands across the trunk. Leave small gaps between them to suggest the natural wrinkles of the skin, giving the trunk dimension. -
Ear details:
Inside the ear, draw three or four curved lines fanning out from the head to represent the ear folds. Keep these simple to contrast with the busy body patterns. -
Facial features:
Carefully draw the eye as a small almond shape with a dark pupil. Add a decorative band across the forehead, perhaps with tiny scallops or dots.
Metallic Accent
Add tiny dots of gold paint pen inside the center of the flowers or along the forehead band. This subtle shimmer elevates the henna look beautifully.
Step 3: Final Touches
-
Add the sun:
Just above the dip in the trunk, draw a small circle with radiating lines to represent a stylized sun or a burst of energy. -
Clean up:
Once you are absolutely certain the ink is dry, gently erase any visible pencil marks. Be gentle so you don’t smudge the design. -
Check for contrast:
Review your design. If some areas look too light, go back and thicken the lines or darken the filled-in areas to create stronger contrast against the light stone. -
Seal the work:
To protect your intricate work, apply a thin coat of matte spray varnish. High gloss might hide the details with glare, so a matte finish is best for this graphic style.
Display this serene pebble on your desk or use it as a sophisticated paperweight
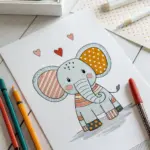
Dot-Painted Elephant With Gradient Dots
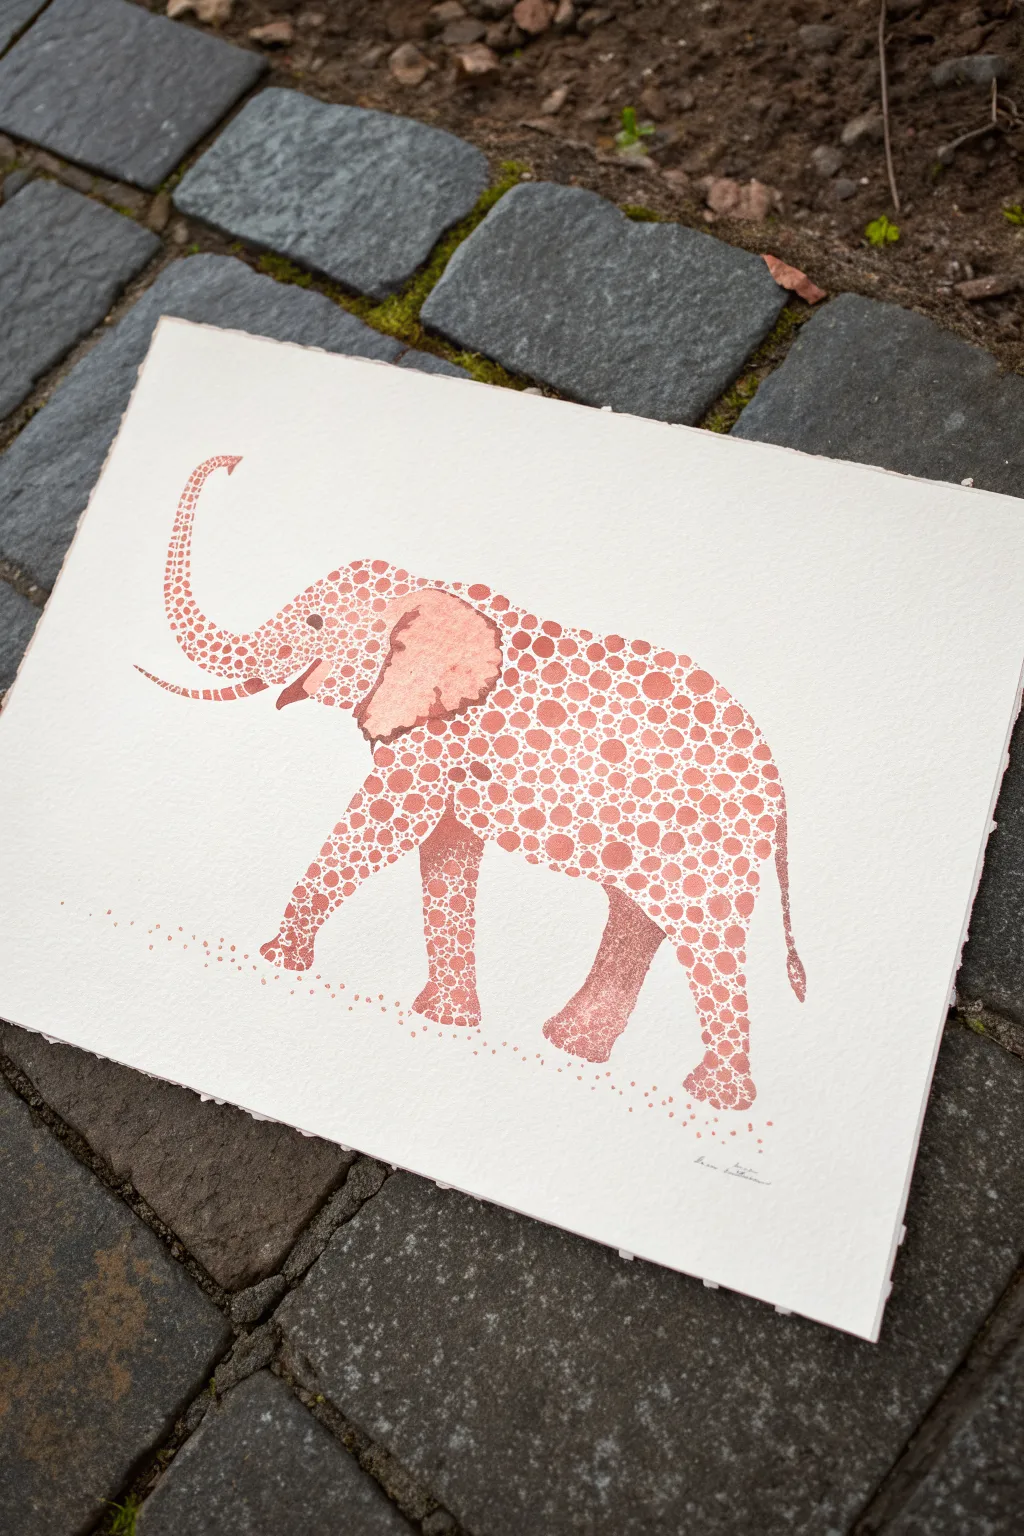
Capture the gentle majesty of an elephant using a unique negative-space dotting technique on high-quality watercolor paper. This monochromatic piece relies on precision and patience to create a textured, mosaic-like effect in a lovely dusty rose hue.
Step-by-Step
Materials
- High-quality cold press watercolor paper (deckled edge optional)
- Dusty rose or terracotta watercolor paint
- Liquid frisket (masking fluid)
- Fine-point masking fluid applicator or old synthetic brush
- Rubber cement pick-up eraser
- Fine detail watercolor brush (size 0 or 1)
- Medium round watercolor brush (size 4 or 6)
- HB Pencil
- Eraser
- Reference photo of an elephant silhouette
Step 1: Preparation and Sketching
-
Prepare your workspace:
Tape down your watercolor paper to a board to prevent warping. Since this piece features a clean white background, ensure your hands and surface are spotless. -
Outline the silhouette:
Lightly sketch the outline of a walking elephant in the center of your paper using an HB pencil. Focus on capturing the curve of the trunk, the large ears, and the walking legs. -
Define interior details:
Sketch just a few key interior lines, specifically separating the ear from the head and defining the tusk. Keep these lines very faint as you will erase them later. -
Refine the shape:
Step back and check your proportions. The beauty of this piece relies on a recognizable silhouette, so take a moment to adjust the trunk or leg positioning if needed.
Soap Your Brush
If using a brush for masking fluid, dip it in dish soap first. This coats the bristles and prevents the fluid from drying deep in the ferrule and ruining the brush.
Step 2: Applying the Masking Fluid
-
Plan your dot density:
The ‘dots’ in this artwork are actually the white paper showing through. You will use masking fluid to preserve these white circles. Notice how the dots are denser on the back and looser on the legs. -
Apply dots to the body:
Using your fine-point applicator or an old brush dipped in sizing, apply small, circular drops of masking fluid inside the elephant outline. Vary the sizes slightly for an organic look. -
Working the edges:
Be careful near the pencil outline. You want the dots to come close to the edge without breaking the silhouette’s integrity. -
Detail areas:
For the trunk and tail, use much smaller dots. On the ear, leave the main flap largely free of dots initially, as this area will be painted solid later to create depth. -
Protect the tusk:
Fill the entire tusk area with masking fluid to keep it completely white. -
Let it cure:
Allow the masking fluid to dry completely. It should feel firm to the touch and not tacky. Rushing this step can ruin your brushes and the paper.
Step 3: Painting and Revealing
-
Mix your color:
Create a watery wash of your dusty rose or terracotta watercolor. You want a consistent, semi-transparent consistency, not a thick paste. -
Apply the first wash:
Paint over the entire elephant shape, going right over your dried masking fluid dots. Keep your edges crisp and stay strictly within your pencil outline. -
Darken the ear:
I like to add a slightly more concentrated pigment to the ear flap while the paint is still wet, creating a subtle shadow and differentiation from the head. -
Create the ground:
With a very dry brush and a tiny amount of pigment, stipple a few faint dots under the feet to suggest dusty ground without drawing a horizon line. -
Dry completely:
Let the paint dry thoroughly. The paper must be bone dry before you attempt to remove the mask. -
Remove masking fluid:
Gently rub the rubber cement pick-up square over the painting to lift the masking fluid dots, revealing the crisp white paper beneath. -
Clean up edges:
Erase any visible pencil lines around the exterior of the silhouette. -
Add final texture:
Using your smallest brush, paint tiny dots of color *inside* some of the larger white circles you just revealed. This creates the ‘bullseye’ texture seen in the reference.
Paper Tearing?
If the paper tears when removing the mask, you likely removed it before the paper was 100% dry. Wait longer or use a heat gun on low setting next time.
Frame this delightful piece in a simple wood frame to let the intricate textures shine.
Using the Rock Hump as the Elephant Back
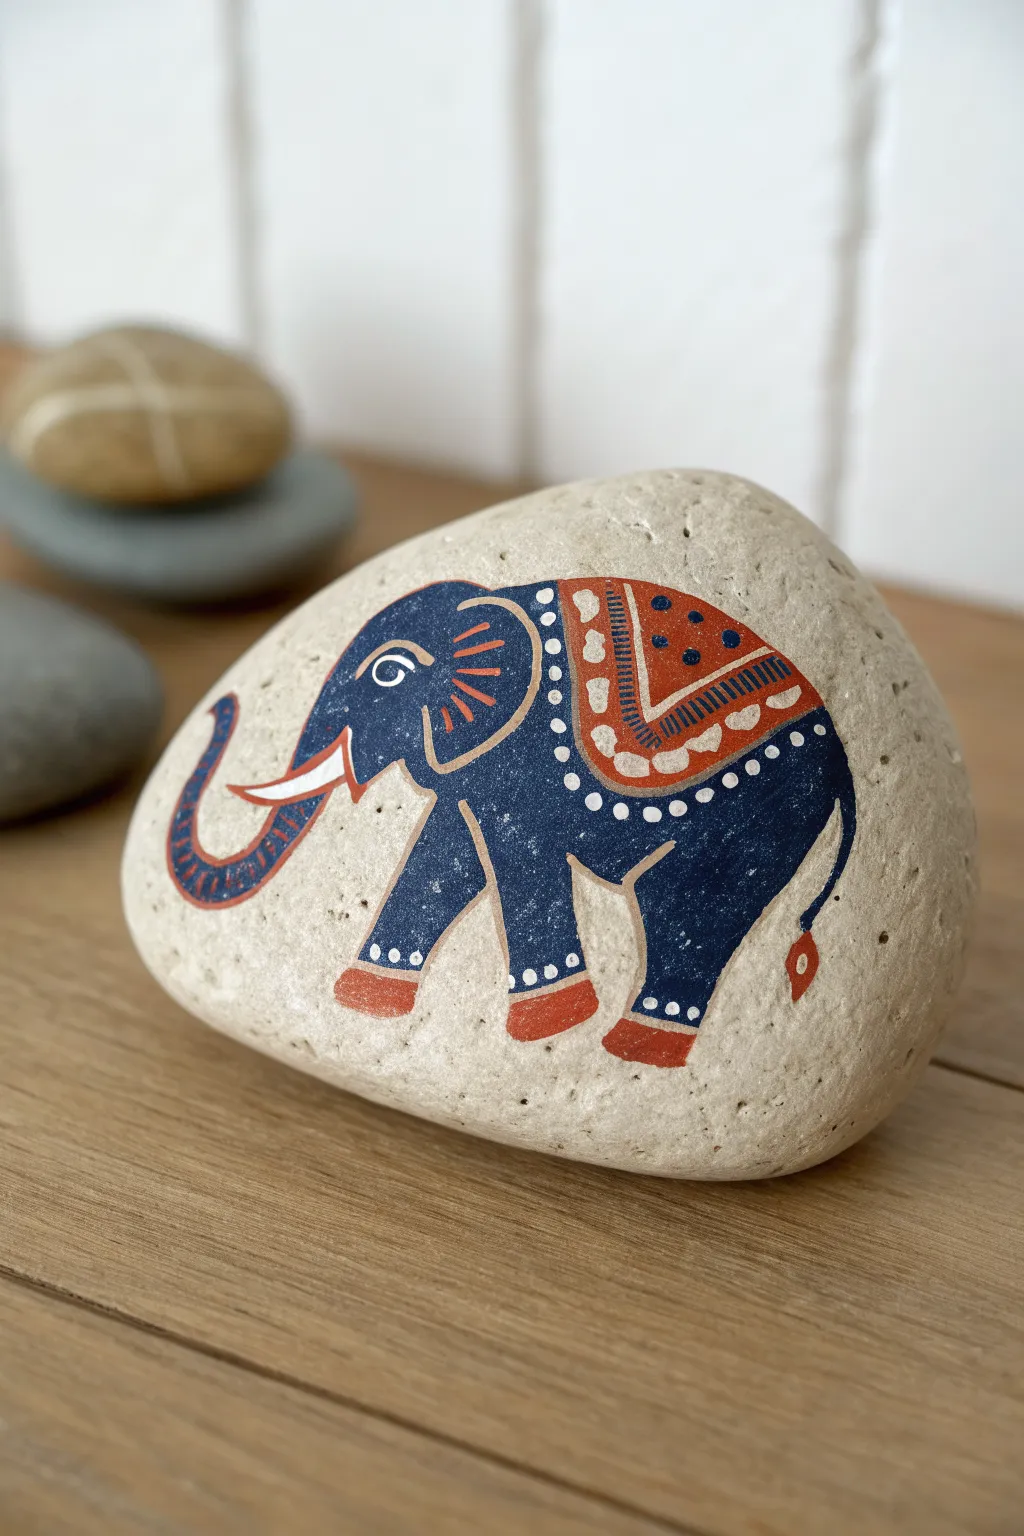
This project transforms an ordinary oval stone into a charming elephant, cleverly using the rock’s natural curve to serve as the animal’s back. The design features a matte finish with folk-art inspired details in navy blue, rust red, and crisp white.
Step-by-Step Tutorial
Materials
- Smooth, oval-shaped river rock (white or light beige)
- Acrylic paints: Navy Blue, Rust Red/Terracotta, Titanium White
- Fine detail brushes (size 000 and 00)
- Small flat brush
- Pencil and eraser
- Palette or small tray
- Matte sealing varnish (spray or brush-on)
- Cup of water and paper towels
Step 1: Planning and Sketching
-
Select the Right Stone:
Choose a smooth, light-colored stone that has a slight hump or dome shape on top, which will naturally mimic the elephant’s spine. -
Outline the Main Shape:
Using a light pencil, sketch the outline of the elephant. Start with the large curve of the back following the rock’s upper edge, then draw the trunk curving upward and the legs. -
Sketch the Details:
Lightly draw the decorative blanket saddle on the back, the ear shape, and the tusk to guide your painting later.
Step 2: Base Colors
-
Paint the Body:
Load a small flat brush with navy blue acrylic paint. Carefully fill in the main body of the elephant, working around the tusk, the saddle area, and the feet. -
Refine the Edges:
Switch to a finer brush to tidy up the edges of the trunk and tail, ensuring nice sharp lines against the bare rock background. -
Paint the Saddle Base:
Mix a warm rust red or terracotta color. Paint the central part of the saddle blanket and the bottom section of the feet using this shade. -
Add the Tail Tip:
Use a tiny dot of the rust red paint to create the tuft at the very end of the tail. -
Let it Dry:
Allow these base layers to dry completely. Since we are layering colors, wet paint will cause smudging.
Steady Hands
Rest your pinky finger on the dry part of the rock while painting. This anchors your hand, giving you better control for those microscopic dots and lines.
Step 3: Decorative Details
-
Outline the Saddle:
Using your finest brush (size 000) and white paint, carefully outline the rust red saddle shape. Add a second inner line if space permits. -
Decorate the Saddle Interior:
Paint small blue triangles or dots inside the red saddle area to create a patterned textile look. -
Add the Necklace Dots:
Dip the non-brush end (the handle) of a paintbrush into white paint to stamp a row of perfect dots along the neckline and the bottom edge of the saddle. -
Highlight the Tusk:
Paint the tusk pure white. Once dry, add a very thin red line along the bottom edge to separate it from the trunk. -
Detail the Ear:
Using a very thinned-down rust red or orange, paint fine lines inside the ear area to represent wrinkles or veins. -
Ankle Bands:
Paint a row of tiny white dots just above the red ‘shoes’ on the elephant’s feet to create ankle cuffs. -
Paint the Eye:
Paint a small white circle for the eye. Once dry, add a tiny black or navy dot in the center for the pupil and a curved line above for the eyelid. -
Trunk Details:
Add fine red horizontal stripes along the curve of the trunk for texture.
Metallic Magic
Swap the white details on the saddle for gold or silver paint. This gives the elephant a regal, ceremonial look that catches the light beautifully.
Step 4: Finishing Touches
-
Clean Up:
If you made any stray marks on the bare rock, use a slightly damp cotton swab or an eraser to gently remove them. -
Seal the Rock:
Once the paint is fully cured (usually overnight), apply a matte varnish. I find a spray varnish works best here to avoid smearing the tiny details.
Place your finished elephant on a shelf where its curved back can be fully appreciated
Elephant Painted on Bare Stone Texture
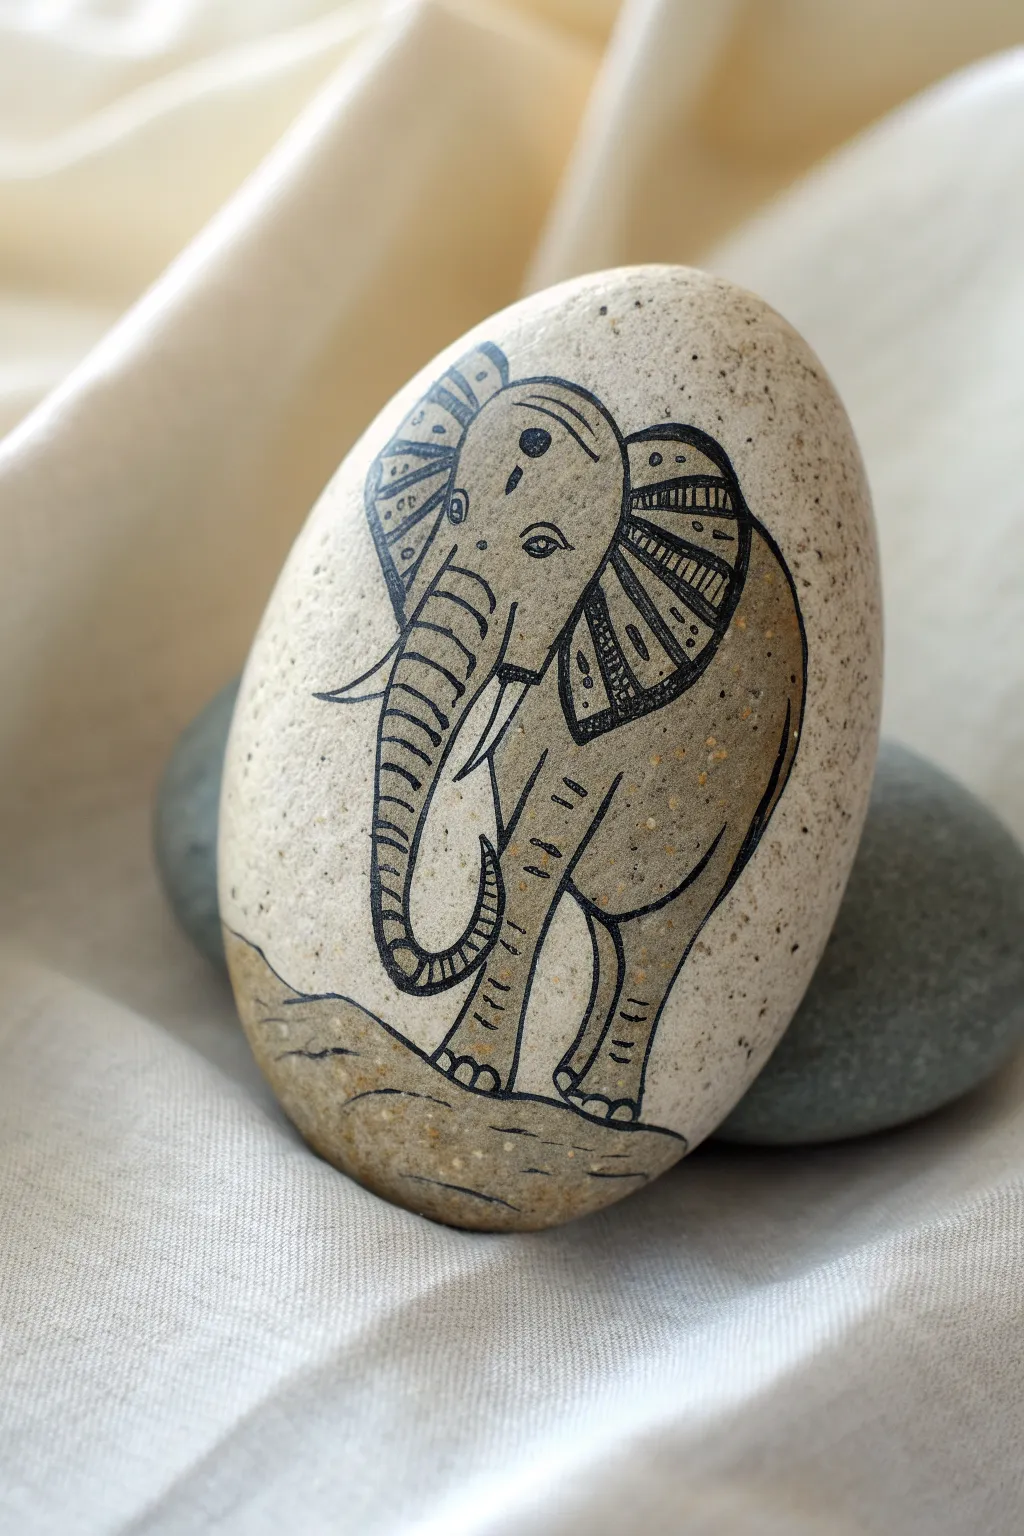
This elegant project embraces the natural beauty of the rock itself by using the stone’s tan color as the elephant’s skin. The fine black linework creates a striking contrast against the organic texture, resulting in a piece that feels both rustic and refined.
Detailed Instructions
Materials
- Smooth, oval-shaped river stone (lighter color preferred)
- Fine-point black paint pen (0.5mm or 0.7mm)
- Medium-point black paint pen (1mm)
- Pencil (HB or lighter)
- Eraser
- Matte spray varnish or sealant
- Soap and water for cleaning
Step 1: Preparation & Sketching
-
Clean the surface:
Begin by scrubbing your stone with soap and warm water to remove any dirt or oils. This is crucial because paint pens can clog easily on dusty surfaces. Let the stone dry completely. -
Outline the head shape:
Using a light pencil, sketch the large inverted teardrop shape for the elephant’s head near the top center of the rock. Keep your lines faint so they are easy to erase later. -
Add the ears:
Draw two large, butterfly-wing shapes extending from either side of the head. The left ear should angle slightly backward, and the right ear should fan forward, giving the elephant a dynamic pose. -
Draft the trunk and tusks:
Sketch a long, curving trunk that sweeps down and to the left, curling slightly upward at the tip of the rock. Add two pointed tusks emerging from just below the cheek area on either side of the trunk. -
Define the body and legs:
Draw the body shape behind the head, curving down to the right side of the rock. Sketch the front legs standing straight and the back legs angled slightly, ensuring the feet rest near the bottom of the stone.
Ink Flow Tip
If your paint pen tip feels dry or scratchy on the rock, press it a few times on a separate scrap piece of cardboard to get the ink flowing smoothly again before returning to the stone.
Step 2: Inking the Outline
-
Trace major outlines:
Using your medium-point black paint pen, carefully trace over your pencil lines for the main silhouette: the head, ears, trunk, and body. I like to lift the pen at natural corners to keep the lines crisp. -
Refine the trunk texture:
Switch to the fine-point pen. Along the length of the trunk, draw horizontal curved hatching lines. These should be spaced evenly to represent the wrinkled texture of the skin. -
Detail the ears:
Inside the ear outlines, use the fine-point pen to draw segments that radiate outward. Fill these segments with diagonal hatching or small patterns to distinguish the ear texture from the smooth head. -
Add facial features:
Draw the eye just below the forehead area using the fine tip. Add a small pupil and a few wrinkles around it. Place a few small dots or dashes on the forehead for subtle texture. -
Define the legs and feet:
Inking the legs requires valid attention to the knees and ankles. Use short, horizontal dashes on the knees and define the toenails with simple semi-circles at the bottom of each foot. -
Create body volume:
Add a few curved lines on the flank and side of the body to suggest the roundness of the elephant’s belly. Keep these lines minimal to maintain the clean look. -
Erase pencil marks:
Wait at least 15 minutes to ensure the ink is bone dry. Gently erase any visible pencil sketch lines, being careful not to smudge the ink.
Step 3: Shading & Finishing
-
Add shadow accents:
Go back with your fine-point pen and thicken the lines in areas where shadows would naturally fall, such as under the ears, beneath the tusks, and along the underside of the belly. -
Draw the ground:
At the very bottom of the rock, sketch a simple, uneven horizon line beneath the elephant’s feet to ground the figure. Add a few small squiggles to suggest dirt or uneven terrain. -
Shade the ground:
You can lightly dilute a tiny drop of black acrylic paint with water to create a transparent wash, or simply use stippling (lots of tiny dots) with your pen to darken the ground area slightly. -
Final inspection:
Check your linework for any gaps or inconsistent thickness. touch up any faded areas with the fine liner. -
Seal the artwork:
Place the rock in a well-ventilated area and apply a light coat of matte spray varnish. This protects the ink from chipping without making the rock unnaturally shiny.
Make It 3D
Add a tiny dot of white acrylic paint to the elephant’s eye as a highlight, and use a white charcoal pencil to add subtle highlights on the trunk or forehead for extra dimension.
Now you have a timeless piece of stone art that celebrates the majestic nature of the elephant using minimal materials
Night Sky Elephant With Tiny Stars
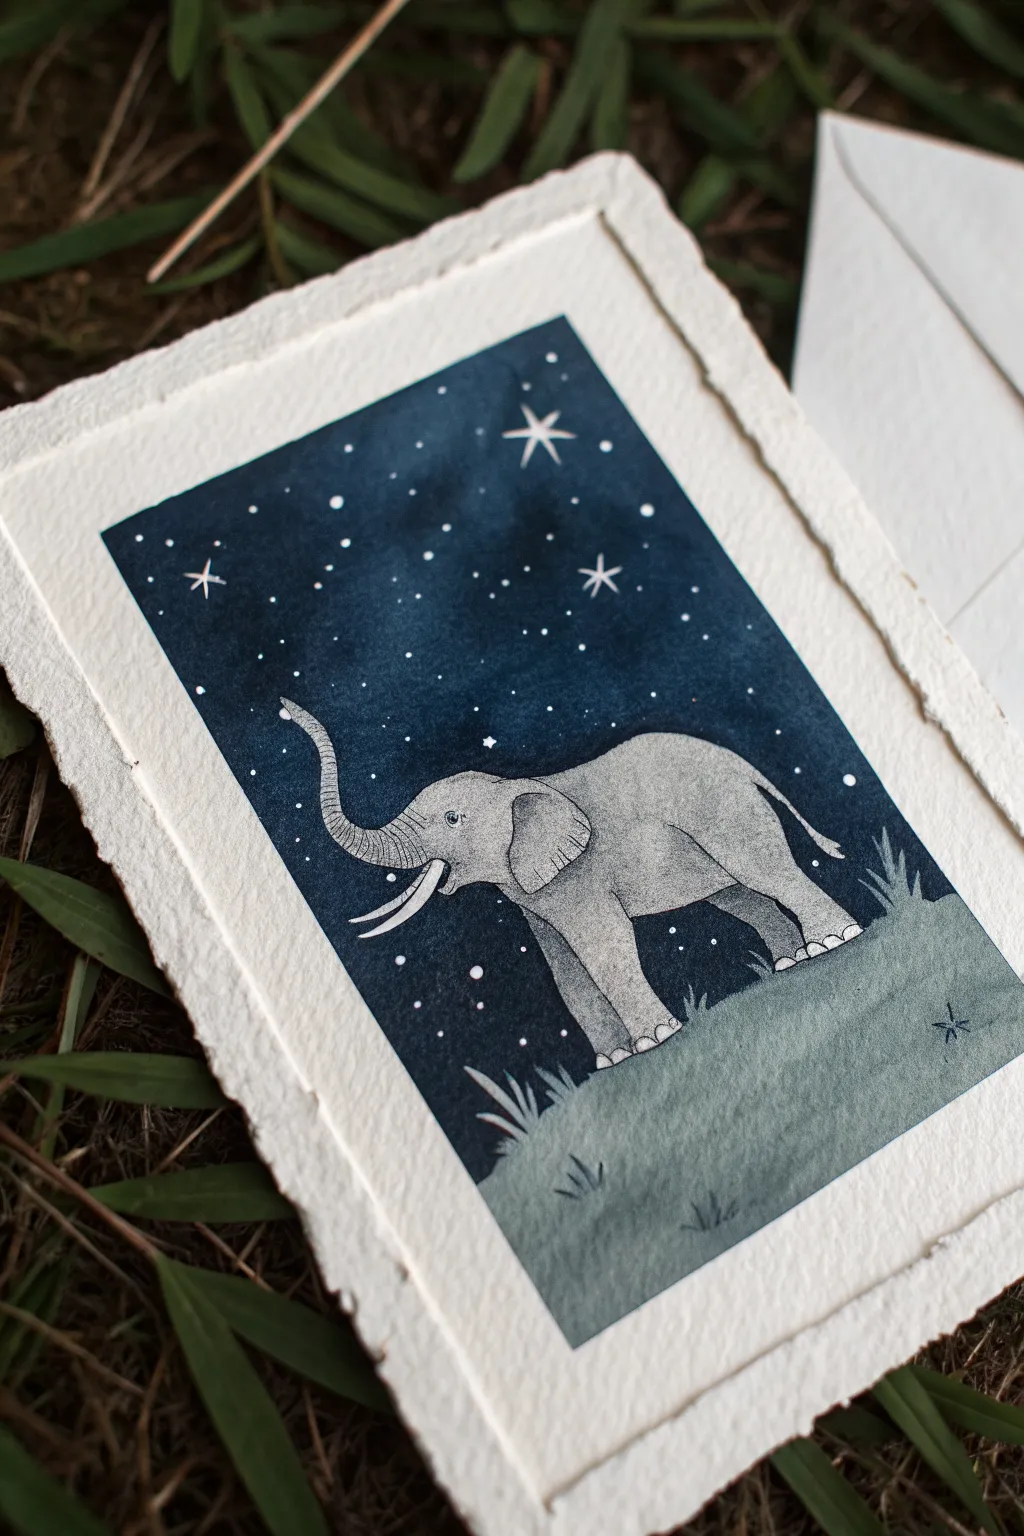
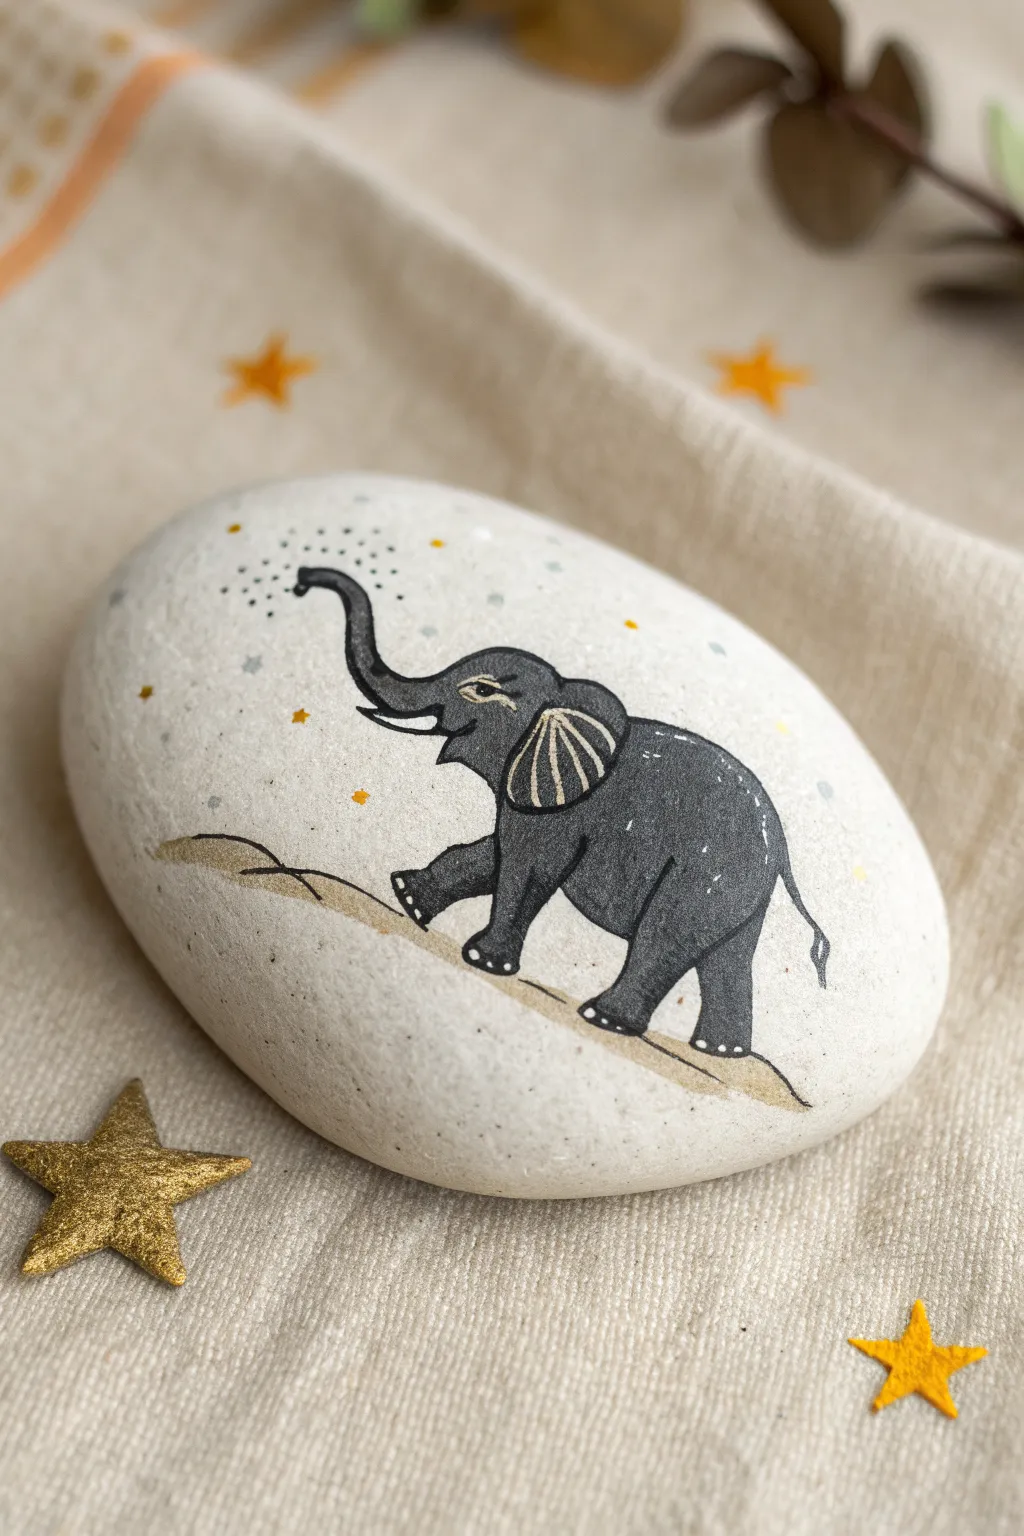
Capture the magic of a peaceful night with this whimsical illustration featuring a gentle elephant gazing up at a starry sky. Using watercolor and ink on handmade paper creates a beautiful, textured finish that feels both rustic and refined.
How-To Guide
Materials
- Heavyweight handmade watercolor paper (with deckled edges)
- Watercolor paints (Indigo, Payne’s Grey, Deep Blue)
- White gouache or white gel pen
- Fine liner waterproof pen (01 or 03 size, black)
- Round watercolor brushes (size 4 and 8)
- Small flat brush
- Pencil and eraser
- Masking fluid (optional)
- Palette for mixing
Step 1: Preparation and Sketching
-
Prepare your paper:
Select a piece of heavyweight handmade paper. If your paper doesn’t have a natural deckled edge, you can create one by carefully tearing the paper against a ruler instead of cutting it, giving it that lovely rustic border. -
Outline the composition:
Using a light pencil touch, draw a rectangular border within the paper, leaving a generous margin of white space around the edges. This frames your future night sky. -
Sketch the horizon:
Draw a gentle, sloping curve near the bottom of your rectangle to define the grassy hill where the elephant will stand. -
Draw the elephant:
Sketch the elephant standing on the hill. Focus on simple shapes first: a large oval for the body and a smaller circle for the head. Add the trunk raised upwards, the legs, and the tail flicking slightly behind.
Uneven Wash?
If your sky dries with tide marks or “cauliflowers,” don’t panic. Gently wet the area with clean water and lift excess pigment, or embrace the texture as clouds in the night sky.
Step 2: Painting the Background
-
Mix your night sky color:
Create a deep, rich midnight blue by mixing Indigo with a touch of Payne’s Grey. You want a color that is dark enough to make white stars pop later. -
Paint the sky:
Carefully paint the sky area around the elephant. Use a pointed round brush to get close to the elephant’s outline without painting over it. I like to keep the wash fairly even, but slight variations add to the watercolor charm. -
Add the grassy hill:
Mix a muted blue-green or a soft teal color for the ground. Paint the hill area, blending it slightly where it meets the night sky if the sky is still damp, or letting it meet a dry edge for a crisp look. -
Dry completely:
Let the background dry fully. If the paper feels cold to the touch, it’s still wet. Patience here prevents the colors from bleeding into your elephant.
Pro Tip: Precise Stars
For the tiniest, most natural-looking stars, dip an old toothbrush in white gouache and flick the bristles with your thumb over the paper. Cover the elephant with a scrap paper mask first!
Step 3: Details and Texture
-
Base coat the elephant:
Mix a very watery, pale grey wash. Fill in the elephant’s body. This shouldn’t be dark; it’s just to take away the stark white of the paper. -
Add simple shading:
While the grey wash is drying, create shadows on the underside of the belly and legs using a slightly darker grey to give the figure some volume. -
Ink the outline:
Once the paint is bone dry, use your black fine liner to trace the elephant’s silhouette. Use a steady hand to define the ears, tusks, trunk, and tail. -
Stipple for texture:
This is the secret to the look: use tiny dots (stippling) with your pen to shade the elephant. Concentrate the dots on the lower legs, under the chin, and near the ear to imply rough skin texture. -
Define the eye:
Draw the eye carefully, leaving a tiny speck of white paper for the highlight, or add it back later with a white pen.
Step 4: Finishing Touches
-
Add grass details:
Using a darker shade of your hill color or a fine brush with blue-grey paint, flick small strokes upward along the curve of the hill to represent blades of grass. -
Create the stars:
Dip a small brush into white gouache (consistency of heavy cream) or use a white gel pen. Dot random stars throughout the blue sky. -
Draw feature stars:
Select three or four spots to create larger, twinkling stars. Draw a cross shape and then add smaller diagonal lines between the arms. -
Final highlights:
Add a touch of white to the elephant’s tusks and toenails to make them stand out against the grey body and dark grass.
Now you have a serene piece of art perfect for a thoughtful greeting card or a small framed gallery wall addition
Watercolor-Style Elephant Wash Effect

Capture the serene beauty of the savannah with this delicate elephant portrait on a smooth river rock. Using watercolor techniques with acrylics, you’ll build up soft washes of blue-grey tones to create a piece that feels both realistic and dreamlike.
Detailed Instructions
Materials
- Smooth, flat white river rock (sanitized and dried)
- Fine-grit sandpaper (optional)
- Pencil (HB or lighter)
- White eraser
- Acrylic paints (Payne’s Grey, Burnt Umber, White, Yellow Ochre, Ultramarine Blue, hint of Burnt Sienna)
- Watercolor medium or flow improver for acrylics
- Small round brushes (Size 0, 1, and 3)
- Fine liner brush (Size 00 or 000)
- Palette for mixing
- Water cups and paper towels
- Matte spray varnish
Step 1: Preparation and Sketching
-
Prep surface:
Ensure your stone is completely clean and dry. If the surface is slightly rough, sand it gently with fine-grit sandpaper to create the smoothest possible canvas for delicate brushwork. -
Light outline:
Using a very sharp, light pencil, sketch the basic oval shape for the elephant’s body and the large flaps for the ears. Keep the positioning central on the rock. -
Refine features:
Add the details of the trunk curving downward, the tusks flanking it, and the small eyes. Keep your lines extremely faint; watercolor-style painting is transparent, so heavy pencil marks will show through.
Step 2: Base Washes
-
Mix the wash:
Mix a tiny amount of Payne’s Grey and Ultramarine Blue with a lot of water and a drop of flow improver. You want a consistency like stained water, not heavy paint. -
Initial body layer:
With a size 3 brush, apply this watery grey-blue wash over the elephant’s body and ears, intentionally leaving the tusks and the center of the forehead/trunk unpainted to act as highlights. -
Adding warmth:
While the first layer is barely damp, touch in a very watery mix of Burnt Sienna and Yellow Ochre on the ear flaps and parts of the forehead. This wet-on-wet technique lets the colors bleed softly into the grey. -
Background hint:
Take a diluted light blue and brush a very faint, cloudy patch behind the elephant’s back leg to suggest the sky, fading it out to nothing as it reaches the rock’s edge.
Water Control is Key
Work with very little paint on your brush. It’s easier to add another layer of wash to darken a shadow than to remove acrylic once it’s dried. Test opacity on paper first.
Step 3: Building Form and Shadow
-
Deepening shadows:
Once the base is dry, mix a slightly more opaque dark grey. Use a size 1 brush to paint the shadows under the ears, beneath the chin, and along the back leg. -
Defining the trunk:
Paint horizontal, curved lines down the length of the trunk using a medium grey tone. These shouldn’t be solid lines, but broken strokes that suggest wrinkled skin. -
Ear texture:
Add vertical striations inside the ears using a mix of the grey and the brownish tone. Follow the natural curve of the ear flap to create volume. -
Facial structure:
Darken the area around the eyes significantly to make them pop. Add subtle shading on the forehead to show the skull structure beneath the skin.
Wrinkly Texture Trick
To get realistic skin texture, try ‘stippling’ or blotting the wet paint gently with a crumpled tissue or a dry brush. This creates a natural, uneven leathery look.
Step 4: Fine Details and Anchoring
-
The eyes:
Using your finest liner brush and nearly black paint (Payne’s Grey + Umber), carefully paint the eye pupil. Add a tiny dot of pure white for the reflection once the dark paint is dry. -
Trunk refinement:
Use the liner brush to deepen the deepest crevices in the trunk wrinkles with a dark grey wash. This high contrast brings the texture to life. -
Tusk definition:
Use diluted white mixed with a speck of yellow ochre to gently color the tusks, keeping them brighter than the rest of the painting. Outline them very faintly with grey to separate them from the trunk. -
Grounding shadow:
Mix Burnt Umber with a little water. Paint a horizontal patch of ‘ground’ under the feet, letting the brown wash fade out naturally at the edges. -
Grassy accents:
With the liner brush and a diluted green-grey, flick a few quick, upward strokes near the feet to suggest sparse savannah grass. -
Final touches:
Assess the contrast. If the painting looks too flat, I like to go back in with the darkest grey closest to the tusks and under the ear flaps to deepen the recession. -
Seal:
Allow the stone to dry for at least 24 hours. Seal with a matte spray varnish to protect the delicate wash effect without adding an unnatural shine.
Now you have a peaceful piece of wildlife art that preserves the raw, organic beauty of the stone
Patchwork Quilt Elephant With Patterns
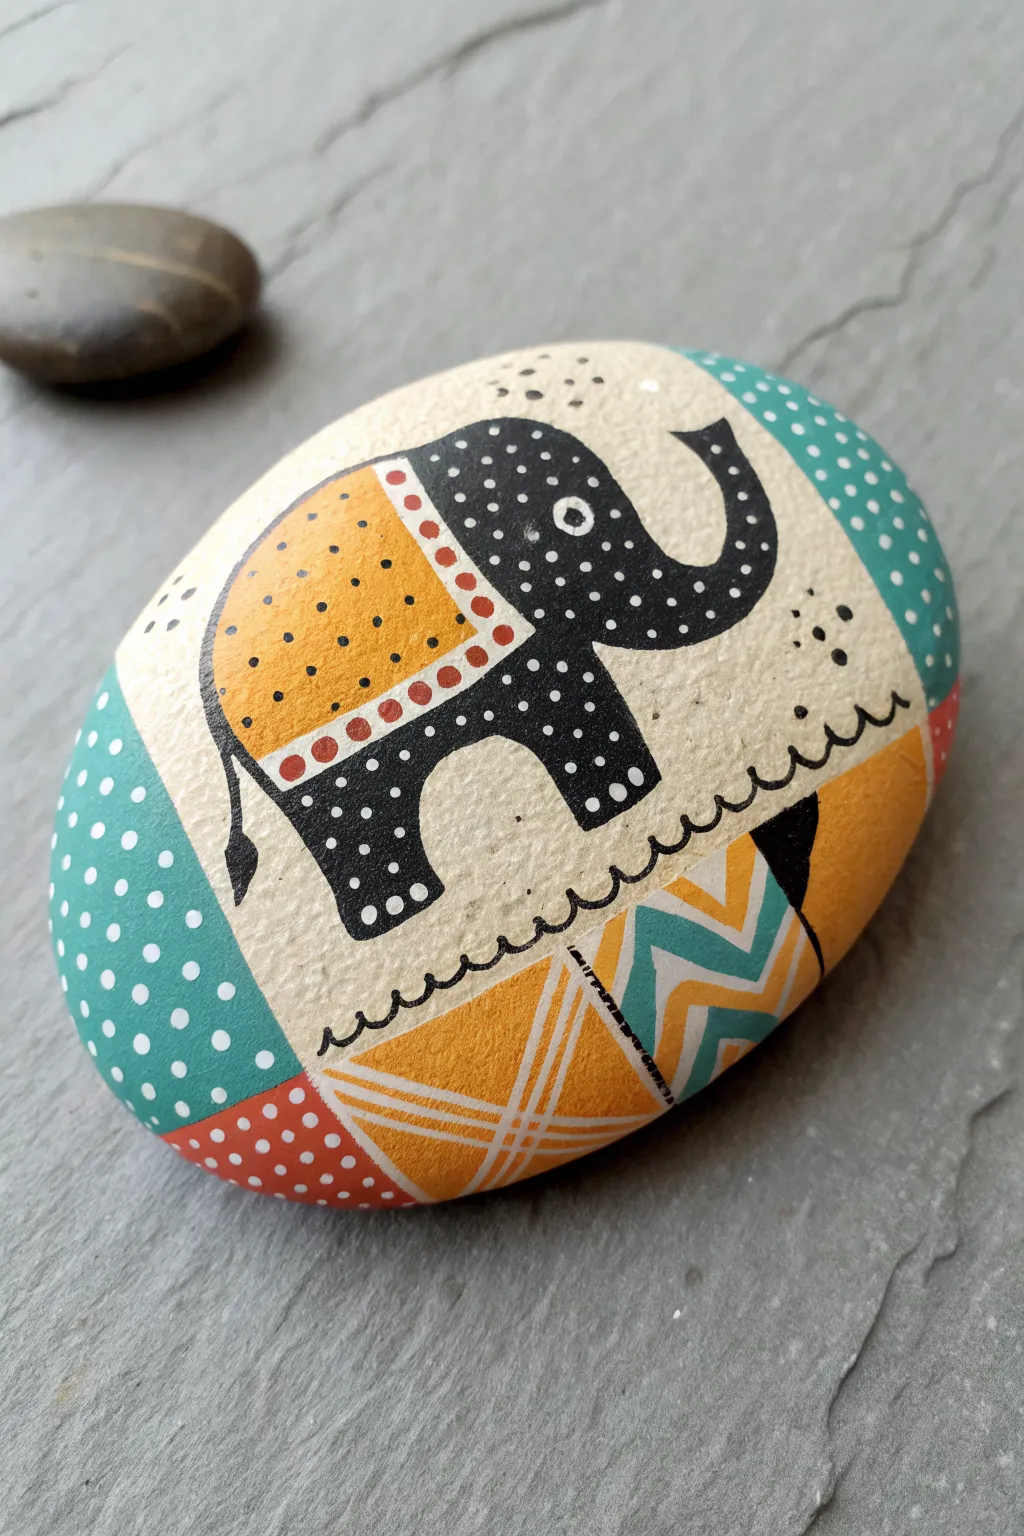
This charming rock painting features a stylized elephant set against a background of bold patchwork quilt squares. The design uses geometric patterns, dots, and contrasting colors like teal, ochre, and rust to create a warm, folk-art aesthetic.
Step-by-Step Tutorial
Materials
- Smooth, oval-shaped river rock (palm-sized)
- Acrylic paints: Cream/Off-White, Black, Teal, Red-Orange/Rust, Yellow Ochre
- Fine liner brushes (size 00 or 000)
- Flat shader brush (size 4 or 6)
- Dotting tools (mixed sizes) or toothpick
- Pencil and eraser
- Mod Podge or spray sealer (matte finish)
Step 1: Base and Sketching
-
Clean the canvas:
Start by scrubbing your rock with warm soapy water to remove any dirt or oils. Let it dry completely before starting, as moisture can trap bubbles under the paint. -
Paint the background:
Using your flat shader brush, coat the entire top surface of the stone with a creamy off-white acrylic paint. You will likely need two or three thin coats to get a solid, opaque finish. Allow each layer to dry fully. -
Sketch the elephant:
Once the cream base is bone dry, lightly sketch the outline of the elephant in the center. Draw a large curved shape for the body and a trunk curling upwards. Keep the lines faint so they are easy to cover later. -
Map the patchwork:
Around the elephant, sketch curved lines to section off the corners of the rock. These will become your patchwork fabric blocks. Add a wavy line underneath the elephant’s feet to simulate the ground or a rug edge.
Step 2: Blocking Colors
-
Paint the elephant body:
Fill in the elephant’s body with black acrylic paint, leaving the ear space empty for now. Use a fine brush to keep the edges crisp, especially along the trunk and legs. -
Color the ear:
Paint the elephant’s large ear shape using yellow ochre. Create a rounded rectangular shape that overlaps the black body slightly. -
Fill the teal sections:
Paint the top-right and bottom-left corner patches with a muted teal color. Apply two coats if the cream background shows through. -
Add warm tones:
Paint the bottom-right corner patch with yellow ochre. For the small sliver of patchwork at the very bottom center, use a rust-red or red-orange paint. -
Create the patterned patch:
In the remaining patchwork section (bottom right, near the ochre), paint alternating zigzag stripes of teal, cream, and ochre. I usually use my smallest liner brush here for precision.
Stitch It Up
To make the patchwork look even more realistic, paint tiny dash marks across the black dividing lines. This mimics the look of actual thread stitching joining the fabric.
Step 3: Pattern and Detail Work
-
Outline the ear:
Using a rust red color, paint a medium-thick border along the outer edge of the yellow ochre ear to frame it distinctively. -
Add ear details:
Dip a small dotting tool into black paint and add small dots across the yellow part of the ear. Then, switch to cream paint and add dots along the red border you just painted. -
Decorate the elephant:
With a fine dotting tool or toothpick, add tiny cream or white dots all over the black body of the elephant. Add a larger white circle with a black center for the eye. -
Define the borders:
Using your finest liner brush and black paint, go over the wavy line under the elephant’s feet. Draw straight black lines to separate the different color patches in the background, making them look like stitched seams. -
Detail the teal patches:
On the teal sections, use a medium dotting tool to add evenly spaced white polka dots. Try to keep them in a grid pattern for a neat fabric look. -
Detail the red patch:
Add white polka dots to the rust-red section at the bottom to match the other fabric patterns. -
Add background texture:
In the open cream space around the elephant’s head and trunk, add a few tiny black specks or micro-dots to give the ‘fabric’ some texture and age. -
Line the zigzags:
If your zigzag patch needs definition, carefully outline the chevron shapes with very thin black lines.
Texture Twist
Instead of just dots, try small crosses, hearts, or swirls on one of the background patches to give each ‘fabric square’ a unique personality.
Step 4: Finishing Touches
-
Check for gaps:
Look over the rock for any uneven edges. You can use a black fine-tip paint pen to clean up the outline of the elephant or the ‘stitches’ if painting them was too difficult. -
Seal the artwork:
Once the paint is cured (I recommend waiting overnight), apply a coat of matte Mod Podge or a spray sealant. A matte finish looks best for this design as it mimics the texture of fabric and stone.
Place this lovely folk-art piece in a garden corner or use it as a cozy paperweight on your desk.


Have a question or want to share your own experience? I'd love to hear from you in the comments below!