If you love turning a simple stone into a tiny art piece, abstract rock painting is the most satisfying little canvas I know. These ideas are all about color, pattern, and playful marks—no realistic drawing skills required.
Dot Mandalas on Smooth Rocks
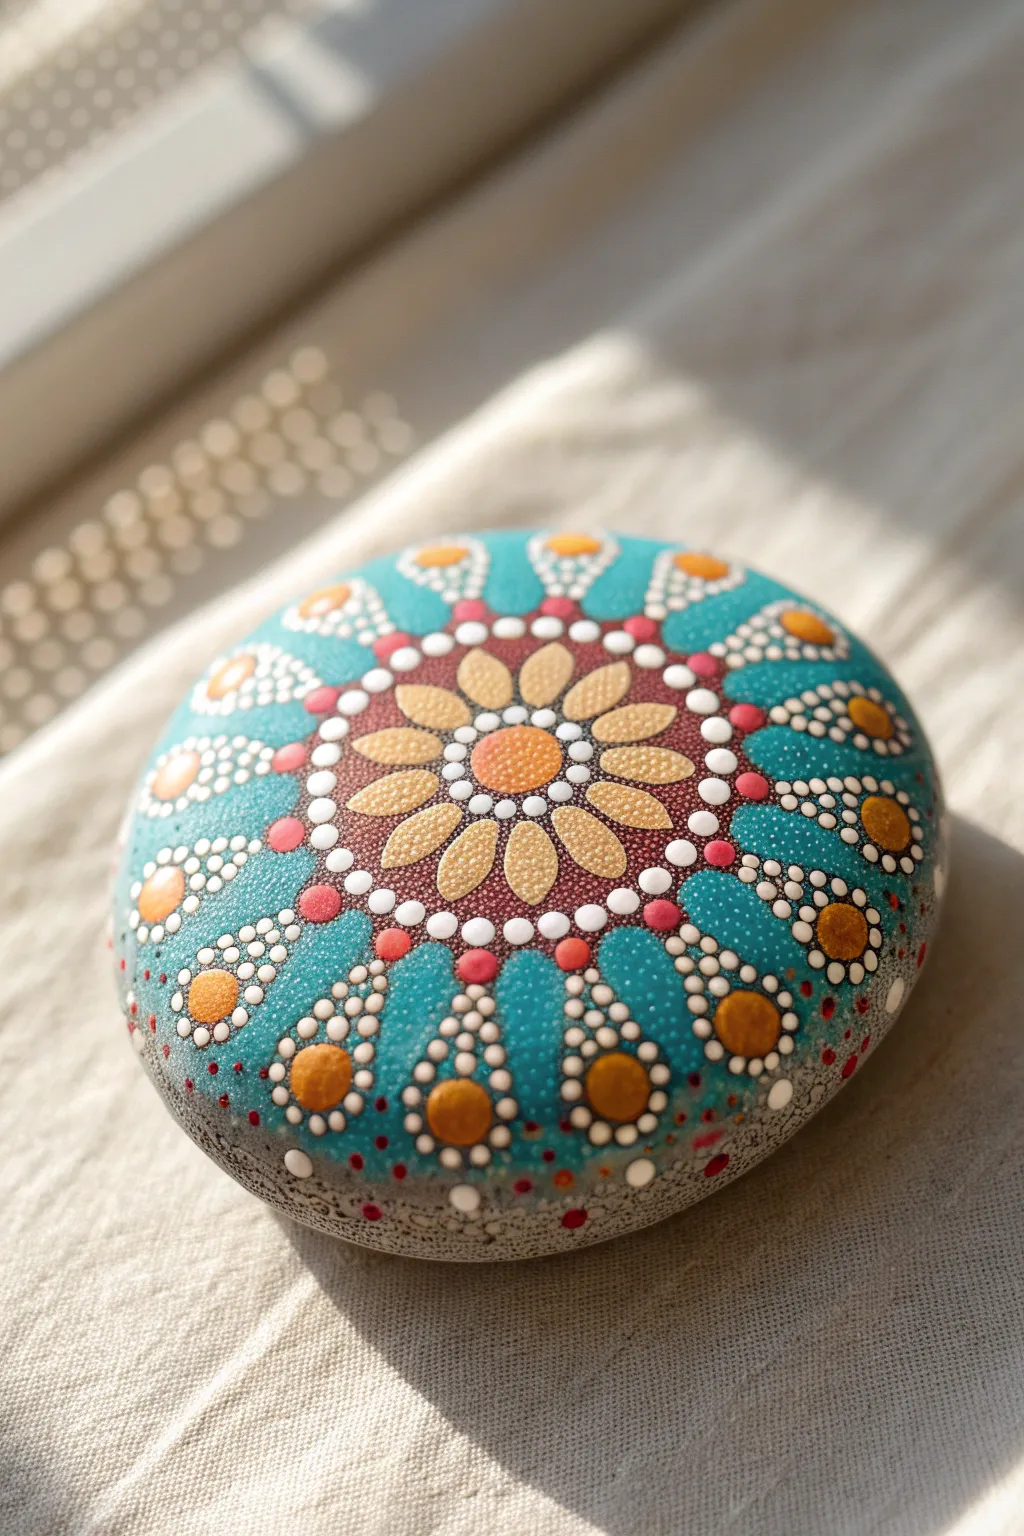
Transform a simple smooth stone into a mesmerizing piece of art using the soothing technique of dot painting. This design features a central flower motif blooming outward into vibrant turquoise fields accented with warm gold and crisp white details.
Step-by-Step
Materials
- Smooth, round river rock (approx. 3-4 inches diameter)
- Acrylic paints: Multi-surface or heavy body (Turquoise, Deep Maroon, Gold/Ochre, White, Deep Orange)
- Black or dark grey acrylic paint (or gesso) for base coat
- Dotting tools (set of varying sizes from fine styluses to larger dowels)
- Compass and white chalk pencil (optional for guidelines)
- Gloss varnish or resin for sealing
- Palette or small tray
- Damp cloth for clean up
Step 1: Preparation and Center
-
Prepare the canvas:
Begin by washing and drying your rock thoroughly. Apply a solid base coat of dark grey or black paint to the entire surface. This dark background is crucial as it makes the colors pop vividly. Let it dry completely. -
Mark guidelines:
To ensure symmetry, lightly find the center of the rock. Use a compass and white chalk pencil to draw faint concentric circles radiating from the center. Mark 8 or 10 evenly spaced dividing lines like a pizza slices to help guide your petal placement. -
The central anchor:
Dip a medium-large dotting tool into Deep Orange paint. Place a single, crisp dot right in the center of your rock. This is the heart of your mandala. -
First ring:
Using a small tool and white paint, place a ring of tiny dots immediately surrounding the central orange dot. Try to keep them evenly spaced and touching neither the center dot nor each other.
Paint Consistency Pro-Tip
For perfect round dots, your paint should be the consistency of heavy cream. If it forms ‘peaks’ when you lift the tool, it’s too thick—add a tiny drop of pouring medium.
Step 2: The Flower Burst
-
Base petals:
Load a medium tool with Gold or Ochre paint. Place about 8 oval-shaped dots (or simply large round dots that you drag slightly inward) around the white ring to form the first set of flower petals. -
Outline the petals:
Switch to a very fine stylus and white paint. Carefully ‘walk the dots’ around each gold petal. This means placing a series of tiny white dots that outline the shape of the gold petal, giving it definition. -
Secondary layer:
In the ‘valleys’ between the gold petals, place a medium-sized dot using the Deep Maroon paint. This creates a contrasting background layer that pushes the gold forward. -
Expanding the maroon:
Add a slightly larger Deep Maroon dot above each gold petal tip. You are now beginning to expand the pattern outward. Ensure your spacing remains consistent with your chalk guidelines.
Step 3: Turquoise Fields
-
Establish the teal zone:
This is the largest section. Using your Turquoise paint, create large, sweeping petal shapes that extend from the maroon layer outward. These aren’t just dots; use a brush or large tool to fill in these petal shapes with solid turquoise. -
Bordering the teal:
Once the turquoise shapes are dry, use a fine tool and white paint to outline these large petals with small, precise dots. This separates the teal from the background. -
Internal details:
Inside the large turquoise area, use very diluted white or light teal paint to add tiny stippling or micro-dots, giving the solid color a textured, sandy appearance. -
Golden accents:
At the very tip of each large turquoise petal (furthest from the center), place a prominent Gold dot. This acts as a ‘crown’ for each section.
Uneven Dots?
If a dot isn’t round or smears, don’t wipe it while wet! Let it dry completely, paint over it with your black base color, and try again. It’s much cleaner.
Step 4: Outer Rim and Finish
-
Connecting swags:
Create ‘swags’ or draped lines of white dots connecting the golden crown dots. The largest white dots should be near the gold, getting progressively smaller as they curve inward toward the maroon section. -
Final border dots:
Fill the remaining gaps near the bottom edge of the rock with graduated dots in Gold and Deep Orange. Start large near the main pattern and let them trail off into tiny specks as they disappear down the side of the rock. -
Top dots:
Go back to your large Gold dots and the central Orange dot. Apply a smaller, lighter colored dot on top of them (a technique called ‘top dotting’) to create a 3D bubble effect. I find this step really brings the whole piece to life. -
Clean up:
Once the paint is fully dry, gently wipe away any visible chalk guidelines with a damp Q-tip or cloth. -
Seal:
Protect your work with a coat of gloss varnish or resin. This not only seals the paint but gives the rock that wet, polished look.
Place your finished mandala on a desk or in a garden corner to enjoy a daily moment of zen


Zentangle-Style Doodles on Rocks
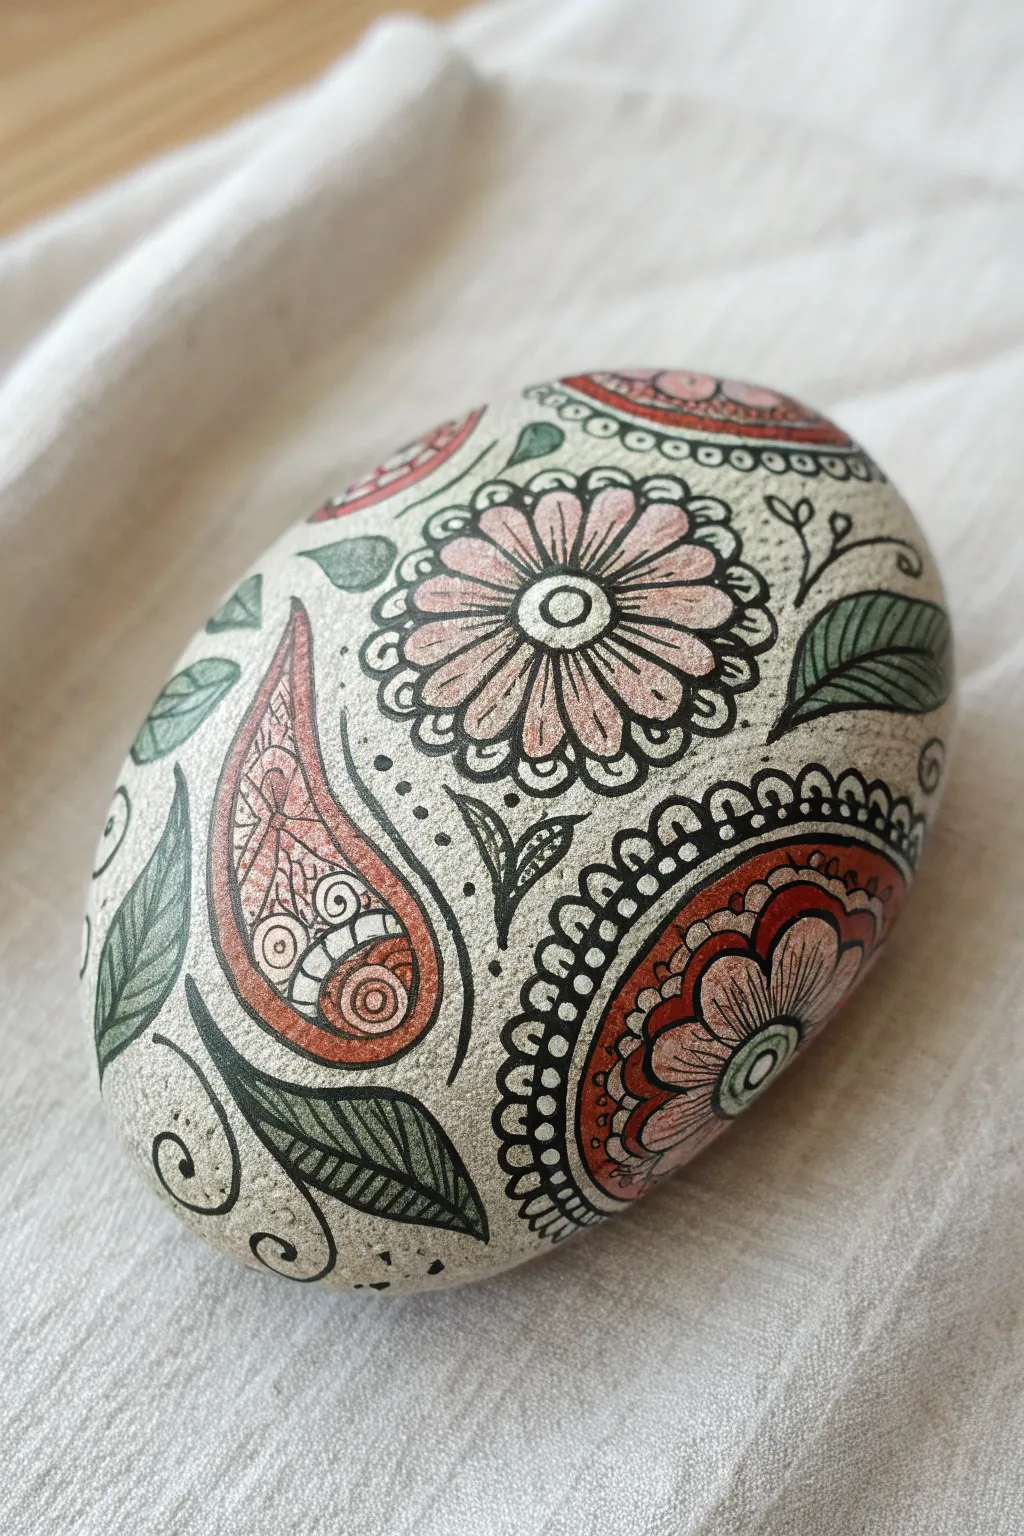
Transform a simple river rock into a stunning piece of decor with this intricate, Zentangle-inspired design. Featuring muted floral motifs and paisley swirls, the finished stone has a soothing, bohemian aesthetic perfect for a desk or garden.
Step-by-Step Tutorial
Materials
- Smooth, oval river rock (cleaned and dried)
- Fine-point black permanent marker or acrylic paint pen (0.5mm or 0.7mm)
- Ultra-fine black liner pen (0.1mm – optional for tiny details)
- Acrylic paint pens or acrylic paints: Sage Green, Terracotta/Salmon, Off-White/Cream
- Pencil and eraser
- Matte spray varnish or sealant
Step 1: Preparation & Mapping
-
Surface Prep:
Begin by ensuring your rock is completely clean and dry. If the natural stone color is dark or uneven, you can apply a sheer wash of off-white acrylic paint to create a uniform, sandy-colored canvas. Allow this to dry fully. -
Sketch the Focal Flower:
Using a pencil, lightly sketch a circle slightly off-center on the upper face of the rock. This will become the main flower. Draw a smaller concentric circle inside for the center. -
Outline the Paisley Shapes:
Sketch two large paisley teardrop shapes next. Place one flowing downwards on the left side, and a large semi-circular motif curving along the bottom right edge. -
Add Leaf Motifs:
Fill the empty spaces between the main shapes by drawing simple leaf outlines. Aim for a mix of large, pointed leaves and delicate vine-like sprigs to balance the composition.
Ink Bleeding?
If your black ink bleeds into the stone’s texture, apply a layer of clear matte medium or white acrylic first to seal the porous surface.
Step 2: Inking the Outlines
-
Define the Flower Center:
Switch to your fine-point black marker. Trace the center of the main flower, drawing a distinct black ring. Inside this ring, leave a small white dot in the very center for a highlight. -
Draw Flower Petals:
Draw the petals radiating from the center. Make them long and slender ovals. Once the main petals are drawn, add a scalloped border around the entire flower head to frame it. -
Ink the Paisley Borders:
Trace your paisley pencil lines with a steady hand. For the large bottom-right curve, create a double line to allow space for a decorative border pattern later. -
Detail the Leaves:
Outline your leaf shapes. For the larger leaves, draw a central vein line running from the base to the tip.
Add Dimension
Use a white gel pen to add tiny highlight dots or lines on top of the dried black and colored sections for a pop of 3D contrast.
Step 3: Adding Color
-
Fill the Leaves:
Using the Sage Green paint pen, carefully fill in the leaf shapes. The paint should be opaque enough to cover the stone but not so thick it obscures your black outlines. If you go over the lines, simply re-trace them after the paint dries. -
Color the Flower Petals:
Color the flower petals with the Terracotta/Salmon shade. I like to leave a tiny sliver of unpainted stone near the base of each petal to create contrast and depth. -
Fill Paisley Accents:
Apply the Terracotta color to the inner sections of the paisley swirls and the outer scalloped rim of the bottom-right pattern. -
Inner Paisley Details:
Inside the left paisley shape, use a lighter touch or a mix of cream and terracotta to fill the detailed webbing. Let all paint dry completely before moving to the final inking stage.
Step 4: Detailed Zentangle Patterns
-
Leaf Veins:
Once the green paint is dry, use the black marker to draw diagonal veins inside the leaves. Keep the lines thin and closely spaced for texture. -
Scallop Borders:
Add a row of small, repetitive semi-circles (scallops) around the outer edges of the main paisley shapes. To add intricacy, place a tiny black dot in the center of every other scallop. -
Paisley Webbing:
Inside the salmon-colored section of the left paisley, draw a fine ‘cracked earth’ or web-like pattern using your finest pen. This adds that classic Zentangle complexity. -
Floating Elements:
Look for empty negative space on the rock. Draw small, floating circles, tiny dots, and curling vine tendrils to connect the main elements visually. -
Flower Texture:
Add texture to the flower petals by drawing very short, fine lines radiating from the center outward on top of the dried salmon paint.
Step 5: Finishing Touches
-
Erase Guide Lines:
Check the entire rock for any visible pencil sketch lines. Use a soft eraser to gently remove them without scrubbing off the paint. -
Seal the Rock:
To protect your intricate work from chipping or fading, spray the rock with a matte varnish. Use light, even coats and let it dry fully between applications.
Place your finished mandala stone on a shelf or gift it to a friend as a symbol of creativity and calm


Geometric Color Blocking on Rocks
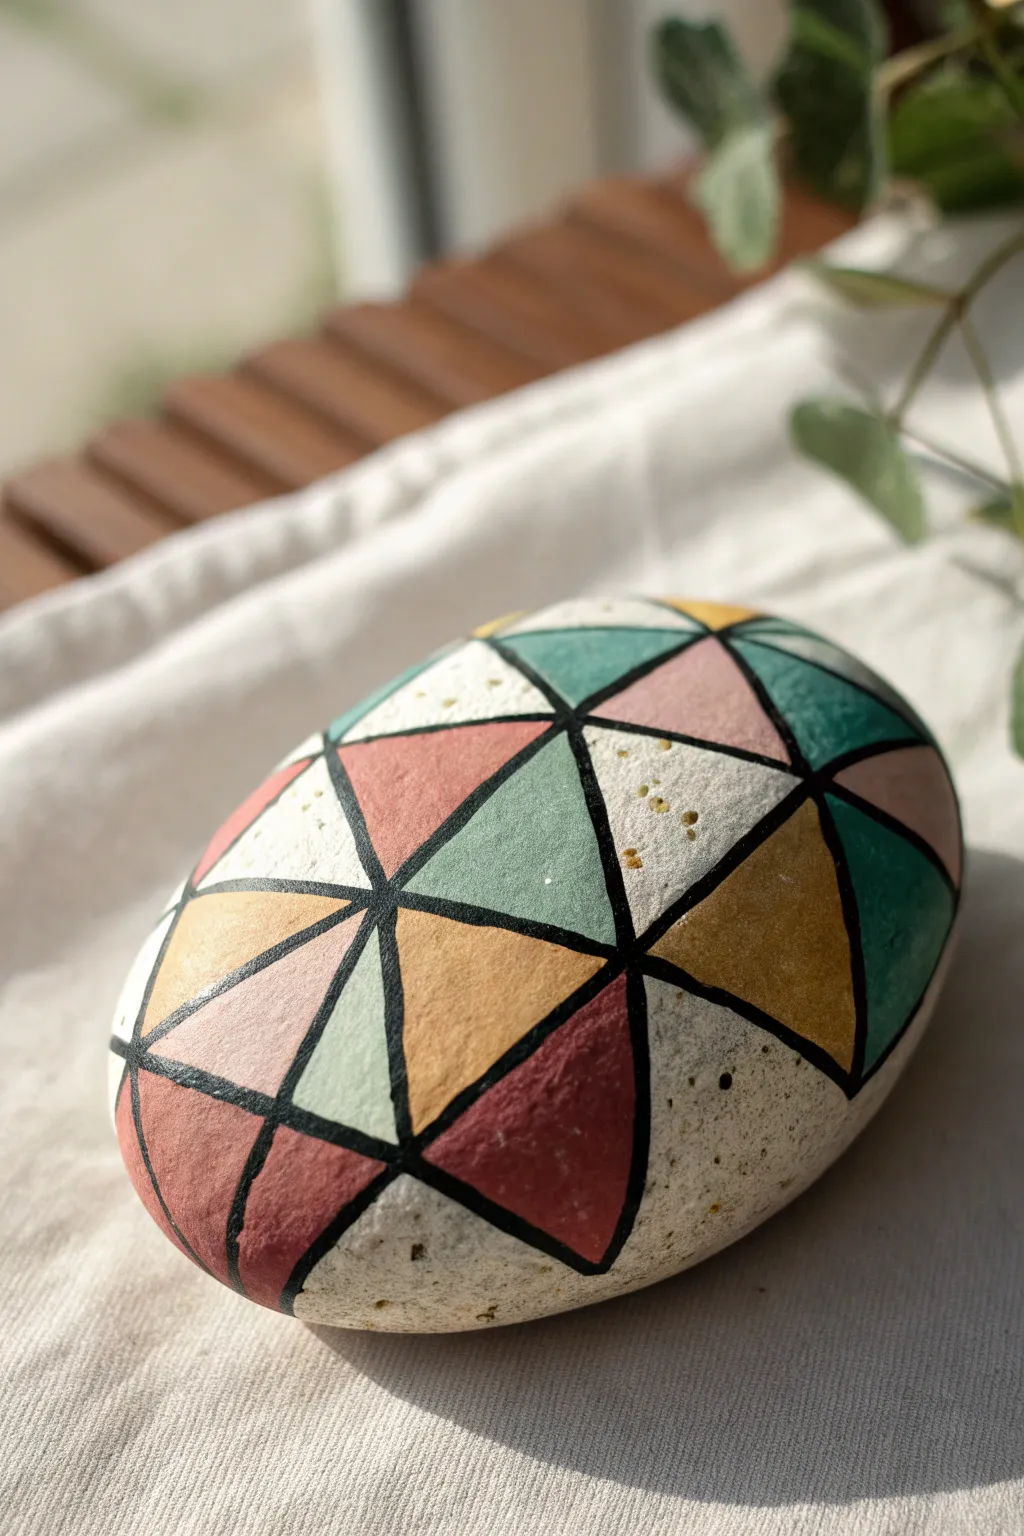
Transform a simple smooth stone into a modern art piece with this crisp, geometric color-blocking design. The interplay of bold black lines with soft, earthy pastels creates a sophisticated look that fits perfectly in any contemporary home decor setting.
How-To Guide
Materials
- Smooth, oval river rock (light or white color preferred)
- Acrylic paints (muted pink, teal/mint, mustard yellow, reddish-brown)
- Black acrylic paint pen (fine tip) or fine black liner brush and fluid acrylics
- Flat shader brush (small size, approx. size 2 or 4)
- Pencil
- Eraser
- Clear matte varnish or sealant spray
- Ruler (optional, but helpful for straight lines)
- Palette or small dish for mixing
Step 1: Preparation and Planning
-
Clean and dry your canvas:
Begin by thoroughly scrubbing your rock with warm, soapy water to remove any dirt or oils that might repel paint. Rinse it well and let it dry completely, preferably in the sun. -
Examine the surface:
Look for the flattest or smoothest side of the rock to serve as your primary painting surface. The natural texture adds character, so don’t worry about tiny imperfections. -
Draft the grid:
Using a pencil, lightly sketch a large ‘X’ across the face of the rock. This doesn’t need to be perfectly centered; an off-center origin point often looks more dynamic. -
Subdivide the spaces:
Draw additional straight lines radiating from the center of your ‘X’ outward to the edges of the rock, creating several large triangular pie slices. -
Create the triangles:
Connect the radiating lines with straight cross-lines. Vary the angles to create a network of smaller triangles rather than a uniform spiderweb pattern. Aim for a mix of sizes for visual interest.
Step 2: Adding Color
-
Select your palette:
Prepare your acrylic paints. If your colors are too bright, mix in a tiny touch of white or grey to achieve that muted, matte aesthetic shown in the example. -
Paint the first color:
Choose a section for your first color, perhaps the reddish-brown. Use your small flat brush to carefully fill in non-adjacent triangles. Painting non-adjacent shapes prevents wet paint from bleeding into neighboring sections. -
Apply the second tone:
While the first color sets, rinse your brush and switch to the mustard yellow. Fill in a few scattered triangles, ensuring you leave some sections empty if you want the natural stone to show through. -
Add cool tones:
Introduce the teal or mint green shade. This cool color balances the warm reds and yellows nicely. Apply it to a few select triangles, keeping your edges as neat as possible. -
Finish with pink:
Fill remaining designated spots with the soft pink. I usually like to step back at this point to check the balance; if one side feels too heavy with color, add a small splash of pink to the opposite side. -
Leave negative space:
Crucially, leave several triangles unpainted, exposing the natural white stone texture. This ‘negative space’ acts as a fifth color and adds organic texture to the geometric design. -
Let it cure:
Allow the paint layers to dry completely. If the colors look streaky, apply a second thin coat to make them opaque and solid.
Clean Lines Hack
If you struggle with shaky hands, use strips of washi tape to mask off the triangles before painting. Peel them off when the paint is dry for razor-sharp edges.
Step 3: Defining the Lines
-
Start the outlining:
Once the paint is bone dry, take your fine-tip black paint pen. Begin tracing over your original pencil lines. Shake the pen well first to ensure a consistent ink flow. -
Anchor the lines:
It helps to start from the center point where the lines intersect and pull the pen outward toward the edges of the rock. This usually results in straighter, more confident strokes. -
Thicken the intersections:
Go over the lines a second time if necessary to create a bold, uniform thickness. The black lines act as the ‘lead’ in this stained-glass style, so they should be prominent. -
Clean up details:
Check for any pencil marks that might still be visible outside the paint or ink. Once the black ink is 100% dry, gently erase any stray graphite. -
Seal the artwork:
To protect your design from chipping or fading, apply a coat of clear matte varnish. A spray varnish is often easier to apply evenly without smudging the black lines.
Metallic Accent
Swap one of the pastel colors for gold leaf or metallic gold paint. Just one or two gold triangles will catch the light and make the piece look high-end.
Place your finished geometric stone on a stack of books or a windowsill to enjoy its modern flair


Rainbow Stripes and Bands on Rocks
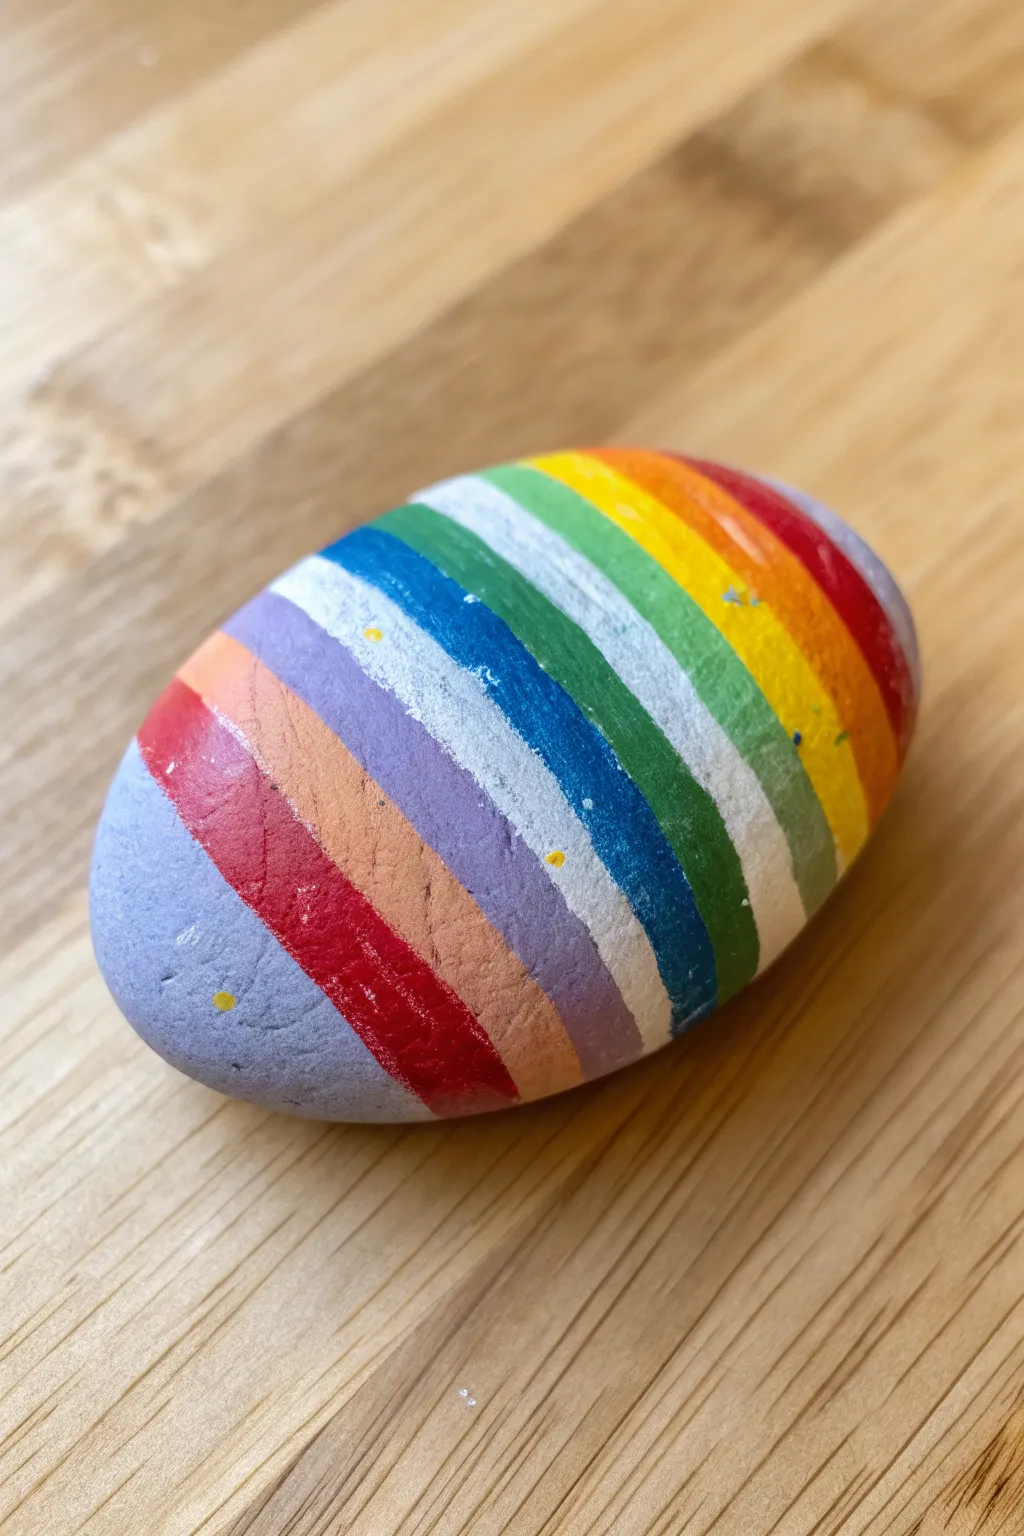
Transform a simple garden stone into a vibrant pop of color with this cheerful striped design. The alternating bands of bright primary colors and softer pastels create a smooth, mesmerizing pattern that wraps beautifully around the rock’s natural curve.
Detailed Instructions
Materials
- Smooth, oval-shaped river rock
- Acrylic paints (Red, Orange, Yellow, Green, Blue, Purple, White, Peach/Light Orange)
- Flat paintbrushes (various widths depending on stripe size)
- Fine detail brush (for touch-ups)
- Pencil (optional)
- Bowl of water
- Paper towels
- Clear acrylic sealer (gloss or matte spray)
Step 1: Preparation & Base Work
-
Clean the canvas:
Begin by thoroughly washing your rock with warm, soapy water to remove any dirt or oils. Scrub it gently and let it dry completely before applying any paint, as moisture will prevent adhesion. -
Prime with white:
Using a flat brush, apply a coat of white acrylic paint over the entire top surface of the rock. This doesn’t have to be perfect, but it ensures your rainbow colors will pop vibrantly rather than getting lost on the grey stone background. -
Dry properly:
Allow the white base coat to dry fully. If the stone is dark, I often apply a second coat of white to ensure a truly neutral canvas.
Step 2: Planning the Stripes
-
Mark the center:
Optionally, lightly sketch your lines with a pencil to guide your painting. Start by marking the center stripe to help keep the bands symmetrical as they move outward. -
Sketch the curve:
Follow the natural curvature of the stone when sketching your lines. Straight lines on a round rock can look distorted, so slightly curving them makes the final result look more organic.
Wobbly Lines?
If you struggle with freehand straight lines, try using thin washi tape or painter’s tape to mask off sections. Ensure paint is 100% dry before moving tape to avoid peeling.
Step 3: Painting the Bands
-
Start with the center band:
Load a flat brush with green paint and fill in the central stripe. Use smooth, long strokes to get clean edges without needing tape. -
Add the adjacent blue:
Next to the green, paint a stripe of dark blue. Try to have the edges just barely touch so there is no white gap, but be careful not to blend them into a muddy color. -
Paint the yellow stripe:
On the other side of the green band, apply a vibrant yellow stripe. Yellow is often transparent, so apply it thickly or plan for a second coat. -
Continue with white:
Next to the dark blue band, paint a crisp white stripe. Since you already primed the rock white, this just refreshes the brightness and defines the edge. -
Add the purple layer:
Beside the white stripe, add a band of light violet or lavender. This acts as a cool transition color before moving back to warmer tones. -
Apply the warm orange:
On the yellow side, paint an orange stripe. This creates a lovely gradient effect moving horizontally across the rock. -
Paint a peach tone:
Next to the violet band, mix a little white with orange to create a soft peach color and paint this stripe. This softer tone balances the bold primary colors. -
Finish with red ends:
Paint the remaining ends of the rock with a bold red. Depending on the size of your rock, these might be stripes or just solid caps covering the tips. -
Fill the final gap:
If there is any space left on the far end (past the warm orange), add a final dark red or deep orange stripe to complete the pattern.
Color Pop Secret
To make neon or bright colors really stand out against the darker stripes, mix a tiny dot of white paint into them. It increases opacity without washing out the hue.
Step 4: Refining & Sealing
-
Touch up edges:
Once the stripes are dry to the touch, inspect the lines where colors meet. Use a fine detail brush to carefully straighten any wobbly edges or cover accidental smudges. -
Second coats:
Review your colors for opacity. The yellow and lighter peach tones might need a second layer to look solid and uniform. -
Final drying time:
Let the rock sit undisturbed for several hours (or overnight) to ensure the acrylic paint cures completely. -
Seal the artwork:
Take the rock outside or to a well-ventilated area and apply a clear acrylic spray sealer. This protects the paint from chipping and gives the rock a professional, finished sheen.
Place your colorful stone on a desk or in the garden for a little spot of daily joy
BRUSH GUIDE
The Right Brush for Every Stroke
From clean lines to bold texture — master brush choice, stroke control, and essential techniques.
Explore the Full Guide
Stained-Glass Outlines on Rocks
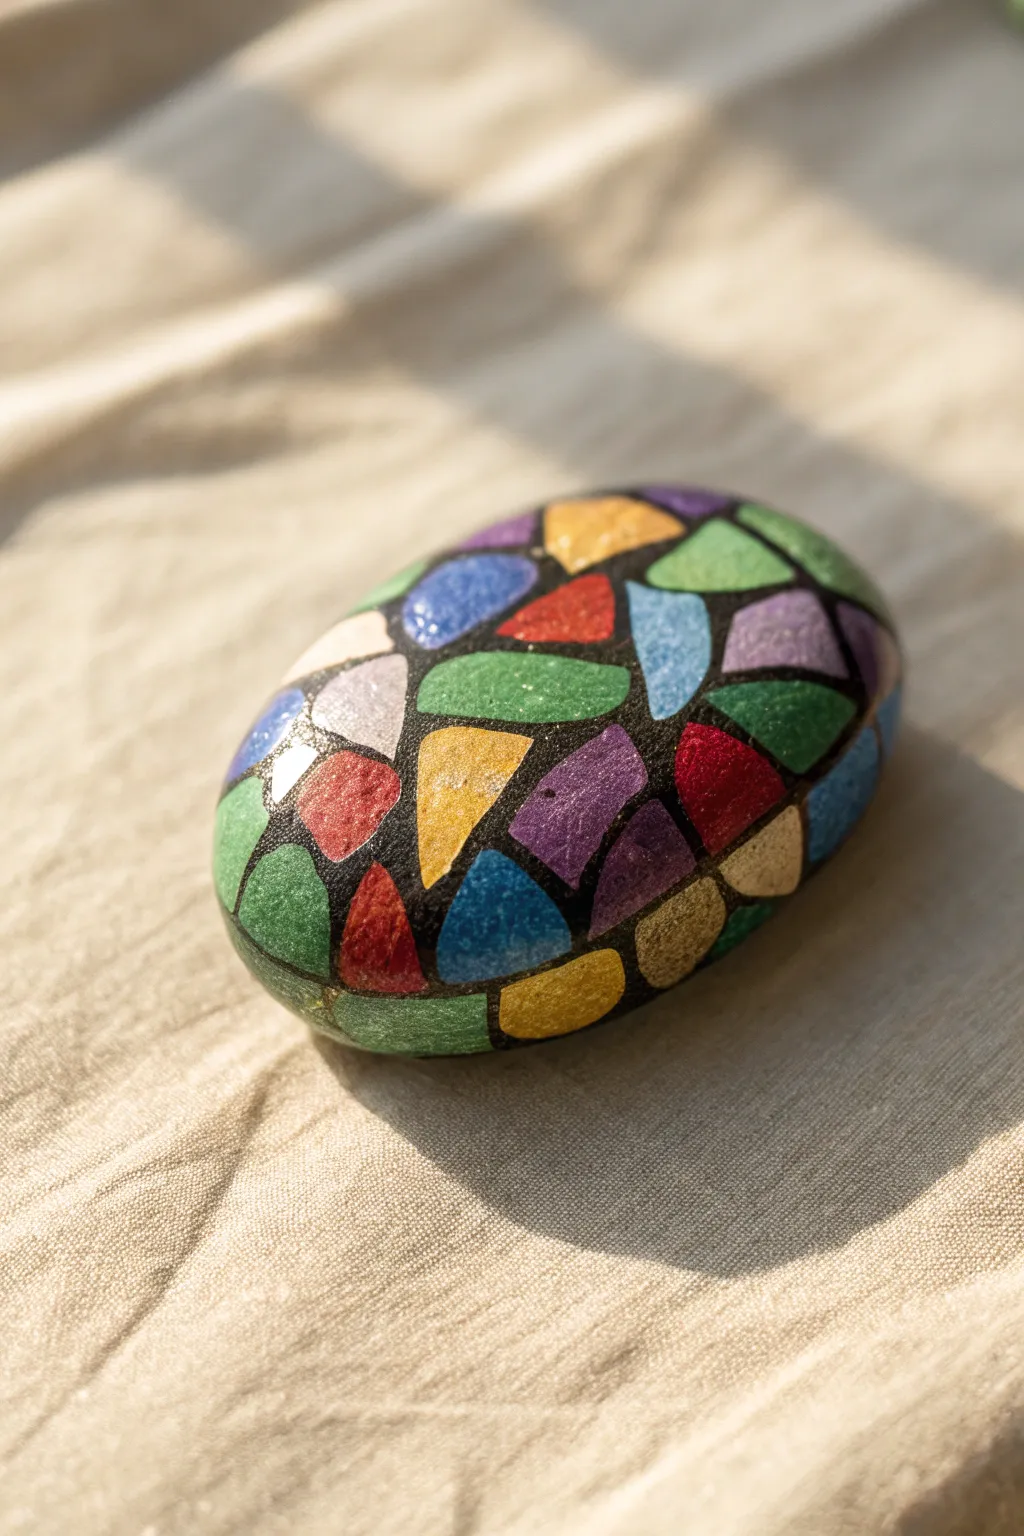
Transform a simple river rock into a vibrant piece of art that mimics the glowing beauty of a stained-glass window. This project uses bold black outlines and bright, jewel-toned colors to create a striking mosaic effect without any glass cutting required.
Step-by-Step Tutorial
Materials
- Smooth oval river rock (clean and dry)
- Black acrylic paint or black paint marker (medium tip)
- Assorted acrylic paints (red, blue, green, yellow, purple, white)
- Fine detail paintbrushes
- Pencil (optional)
- Clear spray sealant or brush-on varnish (glossy finish recommended)
- Palette or small mixing dish
- Paper towels
- Water cup
Step 1: Preparation and Mapping
-
Select your canvas:
Choose a rock that is relatively smooth and flat. Bumps and ridges can make it harder to get clean lines, so tactile inspection matters here. -
Clean surface:
Wash the rock thoroughly with soap and water to remove any dirt or oils. Let it dry completely before applying any paint. -
Sketch the pattern:
Lightly sketch your mosaic design using a pencil. Aim for a mix of triangles and irregular quadrilaterals that fit together like puzzle pieces. -
Vary the sizes:
Keep the shapes somewhat uniform but vary their angles. Avoid creating perfectly straight grid lines; the charm comes from the organic, fractured look.
Fixing Smudges
If you accidentally smear wet paint across a line, wait for it to dry completely. Then, simply paint over the mistake with the correct color or re-draw the black line on top.
Step 2: Creating the Grid
-
Start the outlines:
Using a black paint marker or a fine brush with black acrylic paint, trace over your pencil lines. These will be the ‘lead’ lines of your stained glass. -
Thicken intersections:
Go back over any lines that look too thin. The black lines should be bold enough to separate the colors clearly without overwhelming the small shapes. -
Let the framework dry:
Allow the black outlines to dry completely. This is crucial so the colors you add later don’t mix with the wet black paint and become muddy.
Step 3: Filling with Color
-
Choose your palette:
Select 5-6 distinct colors. Bright, saturated hues work best to mimic illuminated glass. -
First color application:
Start with one color, such as cobalt blue. Paint a few random shapes across the rock with this color, ensuring none of them touch each other directly. -
Distribute colors evenly:
Switch to your next color, perhaps a bright red, and fill in several more empty shapes. I find it helps to rotate the rock to see where a pop of that specific color is needed for balance. -
Add lighter tones:
Incorporate lighter shades like yellow or even a pale lavender. These lighter sections help simulate light passing through the ‘glass’. -
Use white sparingly:
Paint one or two small sections white or very pale grey. This acts as a high-contrast accent. -
Working the edges:
Carefully paint up to the black lines. It’s okay if you accidentally paint slightly over the black, as we can fix it later. -
Opacity check:
Some acrylics are translucent. If a color looks streaky, let the first coat dry and apply a second layer for a solid, opaque look.
Glow Effect
Mix a tiny bit of metallic medium or glitter paint into your colors before applying. It catches the sunlight and enhances the stained-glass illusion.
Step 4: Refining and Sealing
-
Touch up the lines:
Once all the colored sections are fully dry, take your black marker or liner brush again. Retrace the black grid lines to cover any messy edges where the color overlapped. -
Inspect for gaps:
Look closely for any tiny pinholes of unpainted rock showing through and dab them with the appropriate color or black liner. -
Dry time:
Let the entire rock cure for at least a few hours, or overnight if possible. -
Apply gloss:
Finish with a coat of glossy varnish or spray sealant. The gloss is essential here—it’s what makes the paint look like shiny, polished glass.
Place your colorful stone in a sunny spot on a windowsill or garden path to enjoy its vibrant shine
Soft Ombre Color Washes on Rocks
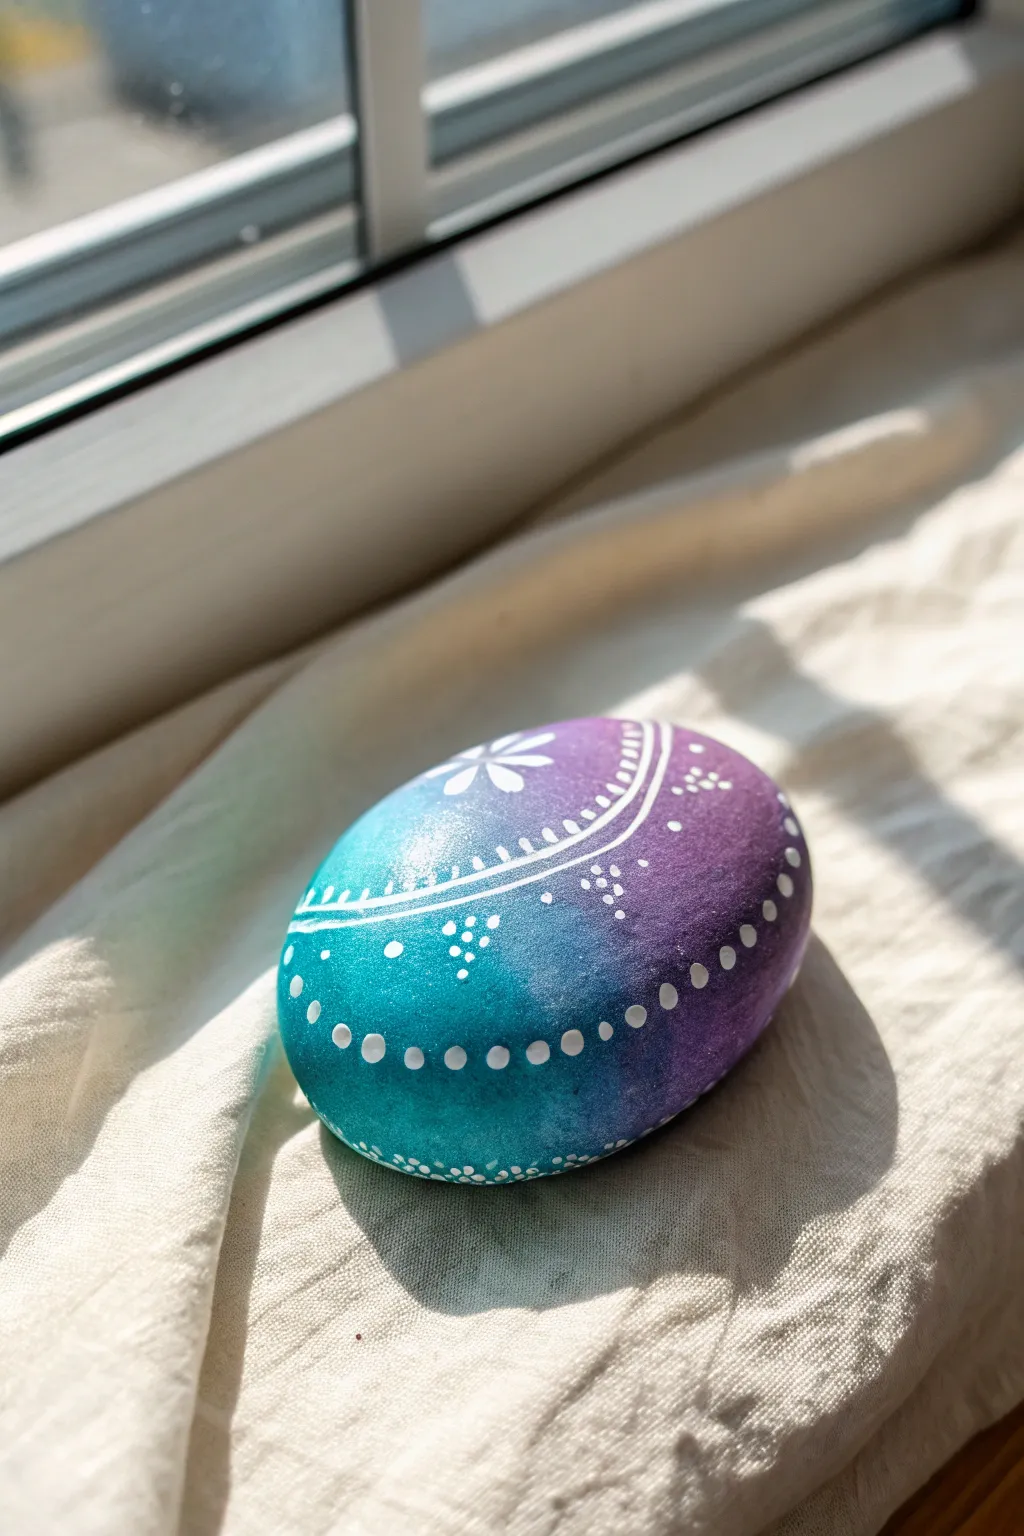
Transform an ordinary smooth stone into a dreamy piece of art featuring a seamless teal-to-purple gradient. This project combines soothing color blending with delicate white linework for a result that feels both cosmic and grounded.
Step-by-Step
Materials
- Smooth, oval river rock
- Gesso or white acrylic primer
- Acrylic paints: Turquoise/Teal, Violet/Purple, White
- Makeup sponge or small dense foam sponge
- Fine detail brush (size 0 or 00)
- Dotting tools (various sizes) or toothpicks/brush ends
- Palette or paper plate
- Water cup and paper towels
- Clear acrylic sealer (matte or gloss)
Step 1: Preparing the Base
-
Clean surface:
Begin by washing your stone with warm soapy water to remove any dirt or oils. Let it dry completely in the sun or with a cloth. -
Prime the stone:
Apply a coat of white gesso or white acrylic paint to the top surface of the rock. This creates a bright base that will make your ombre colors pop. -
Smooth the base:
If your primer layer looks streaky, apply a second thin coat in the opposite direction once the first is dry. Aim for a smooth, opaque white surface.
Sticky Sponge?
If the sponge starts lifting paint off the rock instead of depositing it, the paint is tacky. Stop immediately and let it fully dry before adding the next layer.
Step 2: Creating the Ombre Wash
-
Prepare gradient colors:
Squeeze out your teal and purple acrylic paints onto your palette. Ensure they are fluid; add a tiny drop of water if they feel too thick. -
Sponge application:
Dip one end of your makeup sponge into the teal paint and dab it onto the left half of the rock using a stippling (tapping) motion. -
Add the second color:
Using a clean section of the sponge (or a new one), pick up the purple paint and stipple it onto the right half of the rock. -
Blend the middle:
While the paints are still wet, gently tap the area where the two colors meet. Let the sponge pick up a bit of both pigments to create a soft, blurred transition. -
Build opacity:
Allow the first layer to dry to the touch. Repeat the sponging process with a second layer to achieve the deep, rich saturation seen in the photo. -
Verify the blend:
Check your transition zone. If it looks too harsh, lightly sponge a little more teal or purple into the center until the gradient looks seamless. Let the rock dry completely.
Step 3: Painting the Details
-
Center flower:
Load your fine detail brush with white acrylic paint. Paint a small flower shape with six or seven petals slightly off-center near the top of the curve. -
Main curves:
Paint two widely spaced, curving parallel lines that sweep from the flower area down toward the right side, following the rock’s natural contour. -
Hatching details:
Between those two parallel lines, add tiny, short hash marks perpendicular to the curves, creating a ladder-like effect. -
Large dot border:
Use a medium-sized dotting tool (or the end of a paintbrush handle) to stamp a row of distinct white dots along the bottom edge of your painted curves. -
Tiny accent dots:
Switch to a smaller dotting tool or toothpick. Add clusters of three tiny dots in the open teal space and near the purple edge for texture. -
Flower stamens:
Add a tiny white dot in the center of your flower and very fine lines radiating outward from the center if you wish to add more detail. -
Highlighting:
I find that going back over just the largest dots with a second dab of white paint after the first dries makes them look raised and bright. -
Curve accents:
Add a few stray, larger dots floating above the main curve lines to balance the composition on the purple side. -
Final dry:
Allow the white detail work to dry for at least an hour to ensure the thick dots don’t smear during sealing. -
Seal the art:
Finish by applying a clear acrylic sealer (spray or brush-on) to protect your design from scratches and fading.
Make it Sparkle
Mix a tiny amount of iridescent medium or pearl white paint into your teal and purple colors for a subtle, shimmering galaxy effect.
Place your finished stone on a windowsill or desk to enjoy its calming colors every day

PENCIL GUIDE
Understanding Pencil Grades from H to B
From first sketch to finished drawing — learn pencil grades, line control, and shading techniques.
Explore the Full Guide
Terrazzo Confetti Rocks
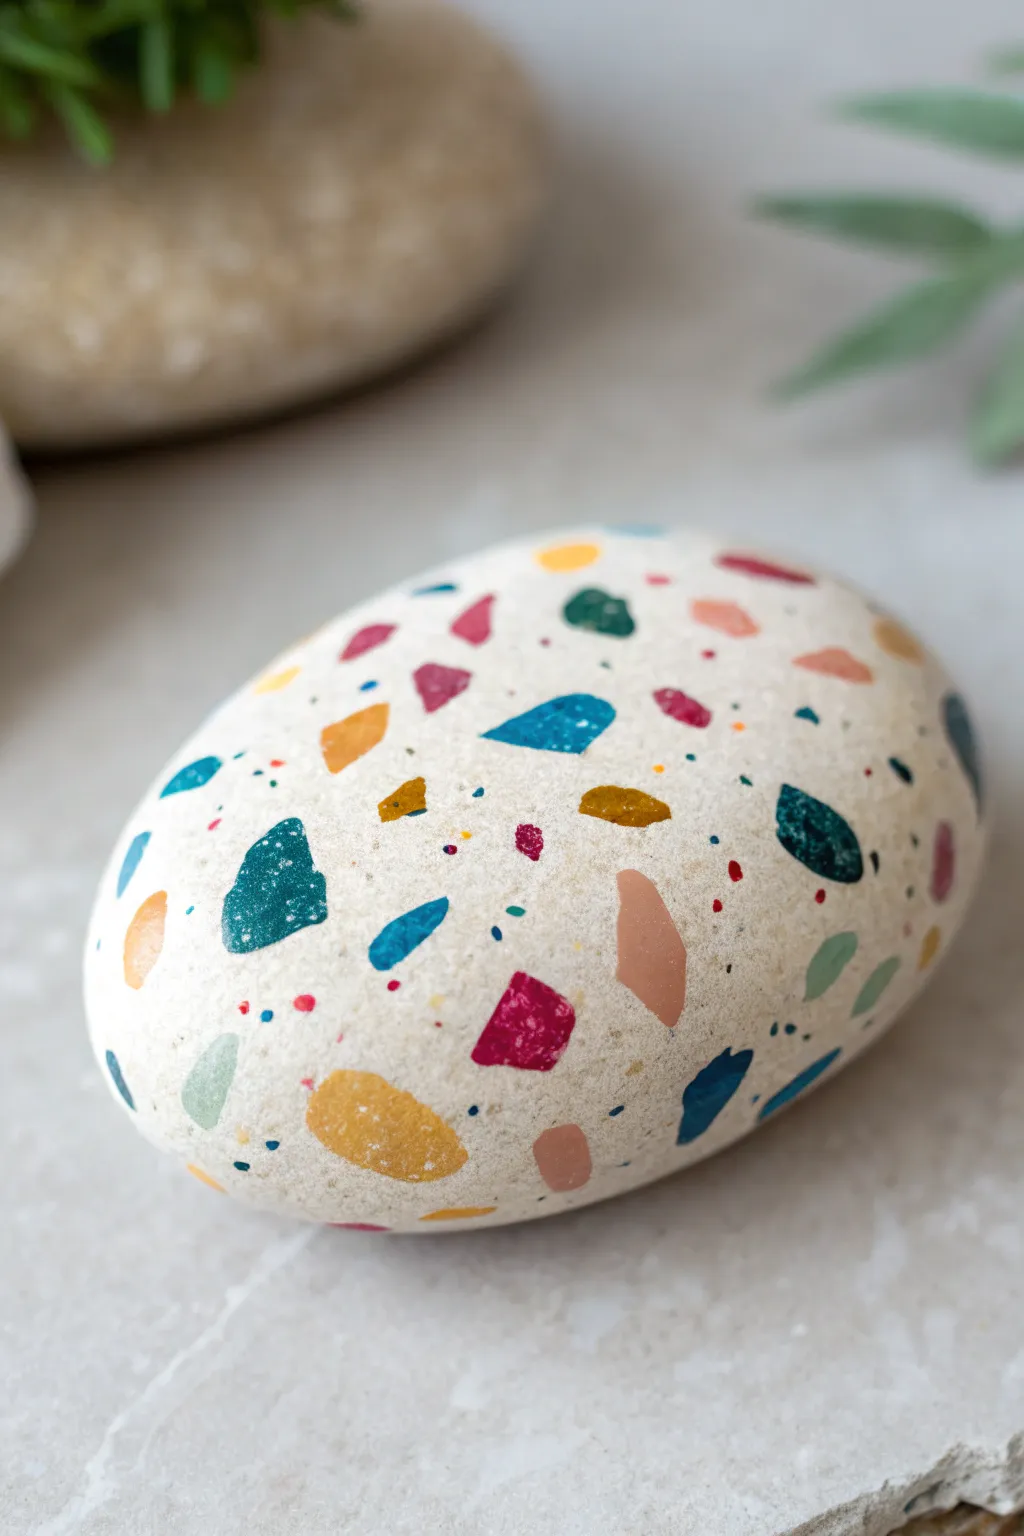
Turn a simple river rock into a piece of modern art with this playful terrazzo-inspired design. The creamy background sets off a cheerful mix of jagged geometric shapes and tiny specks for a sophisticated yet whimsical finish.
Step-by-Step Tutorial
Materials
- Smooth, oval river rock (clean and dry)
- Acrylic paints (creamy beige/off-white, teal, mustard yellow, magenta, blush pink, navy blue, mint green)
- Flat paintbrush (medium size)
- Fine detail paintbrush (size 0 or 00)
- Small dotting tool or toothpick
- Palette or paper plate
- Water cup and paper towels
- Matte finish sealer/varnish (spray or brush-on)
Step 1: Base Preparation
-
Clean surface:
Begin by scrubbing your rock with warm soapy water to remove any dirt or oils. Let it dry completely, as moisture will prevent the paint from adhering properly. -
Mix base color:
Create a warm, neutral base color. I like to mix white with a tiny drop of tan or beige create a creamy, off-white shade that mimics ceramic or speckled stone. -
Apply first coat:
Using your medium flat brush, paint the entire top surface of the rock with your base color. Don’t worry about the bottom just yet. -
Base opacity:
Let the first layer dry for about 15 minutes. Apply a second or third coat until the natural color of the stone is completely covered and the finish looks solid and opaque.
Paint Lifting?
If the base coat lifts while painting shapes, you likely didn’t wait long enough for it to dry. Let it cure fully, or lightly sand the base layer.
Step 2: Creating the Terrazzo Shapes
-
Plan your palette:
Squeeze dime-sized amounts of your accent colors onto your palette: teal, mustard yellow, magenta, blush pink, navy blue, and mint green. -
Start with teal:
Using the fine detail brush, paint a few random, irregular shapes in teal. Think of broken tile shards—triangles, trapezoids, or jagged polygons—scattered widely apart. -
Add mustard yellow:
Clean your brush thoroughly. Paint similar shard-like shapes using the mustard yellow, filling in some of the larger gaps between the teal shapes. -
Incorporate magenta:
Switch to magenta paint. Add a few bold, angular spots. Try to vary the sizes, making some slightly larger and others quite small. -
Layer in blush pink:
Using blush pink, add softer shapes. These lighter tones help balance the bold colors and add depth to the faux-terrazzo look. -
Dark accents:
With the navy blue, paint a few very small, distinct shards. The dark color draws the eye, so use these sparingly to avoid overpowering the design. -
Final mint shapes:
Fill any remaining large empty spaces with mint green shapes. Step back to ensure the distribution of colors feels balanced across the rock surface.
Step 3: Detailing and Sealing
-
Micro-dotting technique:
Dip a small dotting tool or the very tip of a toothpick into your different paint colors. Gently tap tiny specks around the larger shapes to mimic the grit found in real terrazzo. -
Varying the speckles:
Use multiple colors for the dots—a blue dot next to a yellow shape creates nice contrast. Keep these dots quite sparse; you want a sprinkled effect, not a covered surface. -
Shape refinement:
Once the shapes are dry, inspect your edges. If any look too messy or transparent, carefully touch them up with a second layer of paint for crisp, solid color. -
Full dry time:
Allow the entire rock to dry for at least an hour. The thick layers of the shapes need to be fully set before sealing. -
Seal the deal:
Apply a coat of matte varnish over the top to protect your work. A matte finish looks most authentic for this stone style. -
Bottom side (optional):
If you wish, flip the rock over once the top is cured and repeat the base coat process on the bottom for a fully finished object.
Metallic Pop
Swap out the mustard yellow for gold leaf paint to give your terrazzo rock unexpected shimmer and a high-end, jewelry-like finish.
Set this on your desk as a chic paperweight or gift it to a friend who loves modern design
Bold Brushstroke Abstract Rocks
Transform a simple river rock into an artifact that looks like it belongs in a museum display. This project uses warm earthy tones, bold black lines, and geometric precision to create a striking decorative piece.
Step-by-Step Guide
Materials
- Smooth, oval river rock (medium to large size)
- Acrylic paints: Terra cotta (red-orange), Black, Cream (or Off-White), Ochre/Mustard Yellow
- Flat shader brushes (sizes 4 and 6)
- Fine liner brush (size 0 or 00) for detailing
- Pencil for sketching
- Matte or Satin varnish sealant
- Palette
- Water cup and paper towels
Step 1: Preparation and Base Sketch
-
Clean the canvas:
Begin by thoroughly washing your rock with warm, soapy water to remove any dirt or oils that might prevent the paint from adhering. Let it dry completely. -
Establish the centerline:
Using a pencil, lightly draw a line lengthwise down the center of the rock. This doesn’t need to be perfectly straight but will act as the spine for your symmetrical design. -
sketch the primary X:
Sketch a large, elongated ‘X’ shape across the top surface, using your centerline as the crossing point. This divides the rock into four main quadrants. -
Map out secondary zones:
Within the triangular spaces created by your X, sketch slightly smaller V-shapes or echoing lines to designate where the color blocks will go.
Step 2: Blocking in Color
-
First coat of cream:
Use your cream or off-white paint to fill in the background areas that separate the main design elements. This often works best on the outer edges and the borders between heavy colors. -
Apply the terra cotta:
Paint the large, bold triangle shapes in terra cotta. Look for the ‘starburst’ quality in the design and fill these prominent sections. You may need two coats for full opacity. -
Add the black contrast:
Using a steady hand and a smaller flat brush, fill in the dark geometric wedges. In the reference, these sit adjacent to the terra cotta sections to create high contrast. -
Paint the ochre accents:
Identify the thinner stripes or internal geometric shapes within the larger blocks and paint them with the yellow ochre. This adds a nice mid-tone warmth. -
Let it cure:
Allow these base blocks of color to dry completely before moving to the next stage to prevent muddying your crisp lines.
Shaky Hands?
Rest your painting hand’s wrist on the table or even on the rock itself (if dry) to stabilize your detailed liner work.
Step 3: Detailing and Refinement
-
Define the borders:
Switch to your fine liner brush and black paint. Carefully outline the major color blocks to sharpen the geometric look. -
Create the saw-tooth pattern:
On the black bands running across the rock, use the cream paint and a very fine brush to paint small triangles or ‘saw-teeth’ along one edge. -
Add circular motifs:
Paint small circles—like target shapes—along the central spine or key intersections. Paint a terra cotta ring, and once dry, place a cream dot in the center. -
Layering the dash marks:
On the large terra cotta sections, paint thin, curved white or cream lines. These should look like stylized ribbing or brushstroke highlights. -
Refine the dark wedges:
Go back into your black sections and add small cream dots or tiny triangles to break up the solid darkness. -
Check for symmetry:
Rotate the rock and look for any uneven edges. Use the background cream color to ‘erase’ or tidy up any lines that got too thick.
Ancient Artifact Look
Mix a tiny drop of brown into your cream paint for an ‘aged bone’ color instead of stark white for a more authentic historic vibe.
Step 4: Finishing Touches
-
Dry brush texture (optional):
If the rock looks too new, you can lightly dry-brush a tiny amount of off-white over the painted areas to give it a weathered, ancient feel. -
Final cure:
Let the paint dry for at least 24 hours to ensure all layers are hardened. -
Seal the artwork:
Choose a matte or satin varnish to protect the paint without making it look like plastic. Apply a thin, even coat.
Place this striking painted stone on a sunny windowsill or use it as a sophisticated paperweight


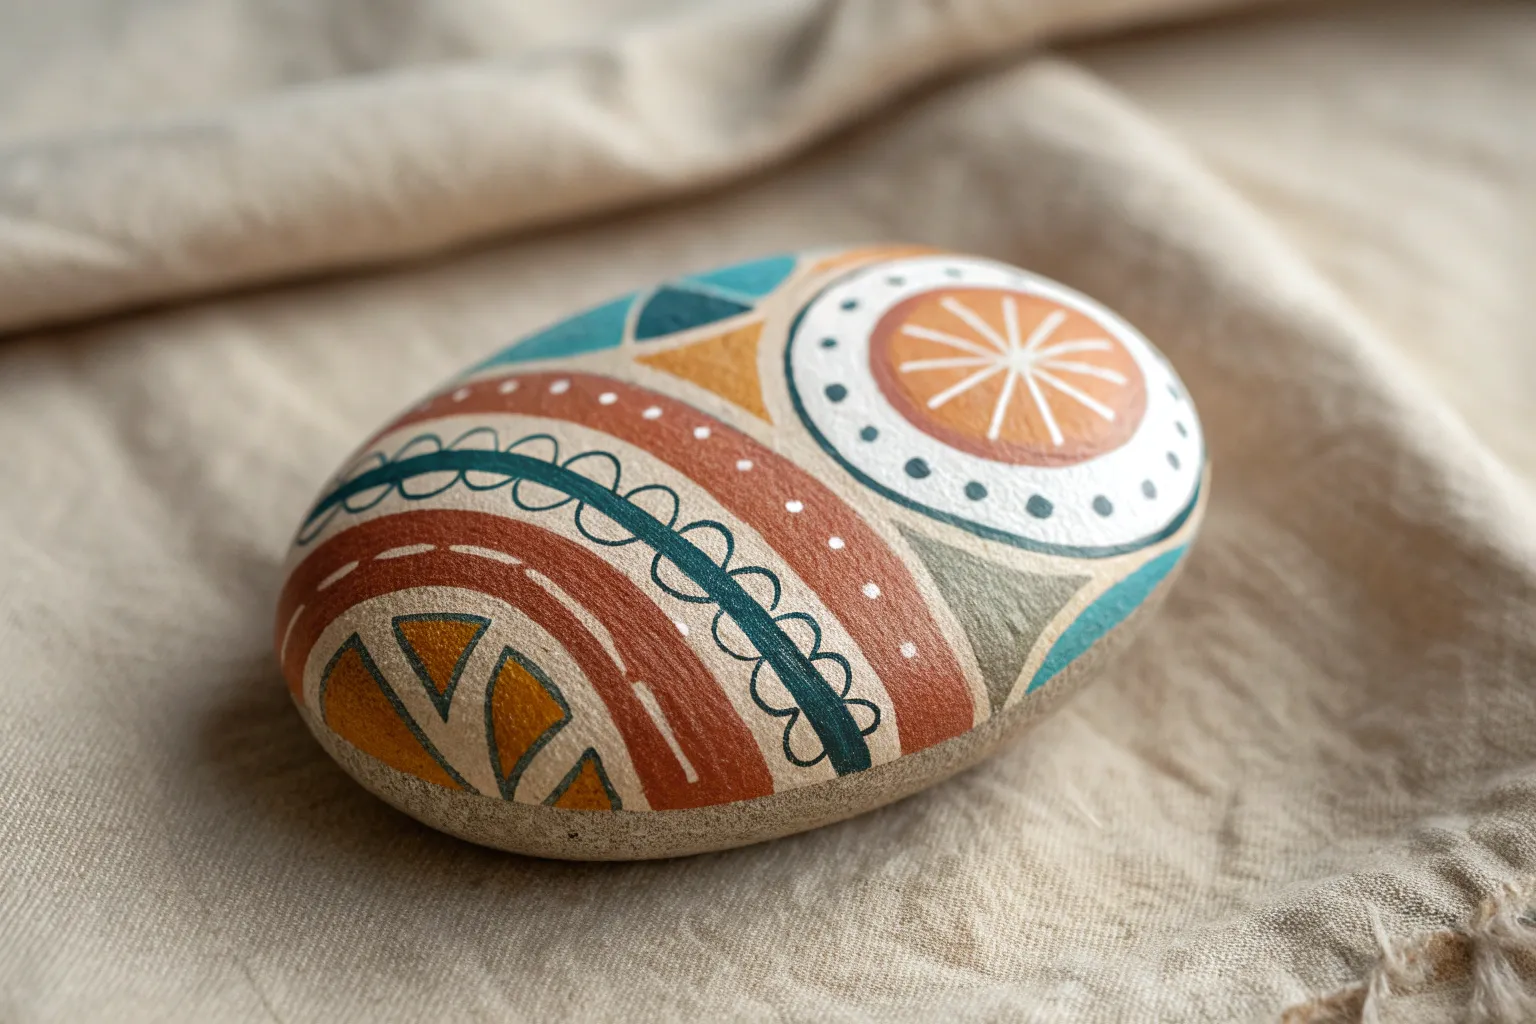
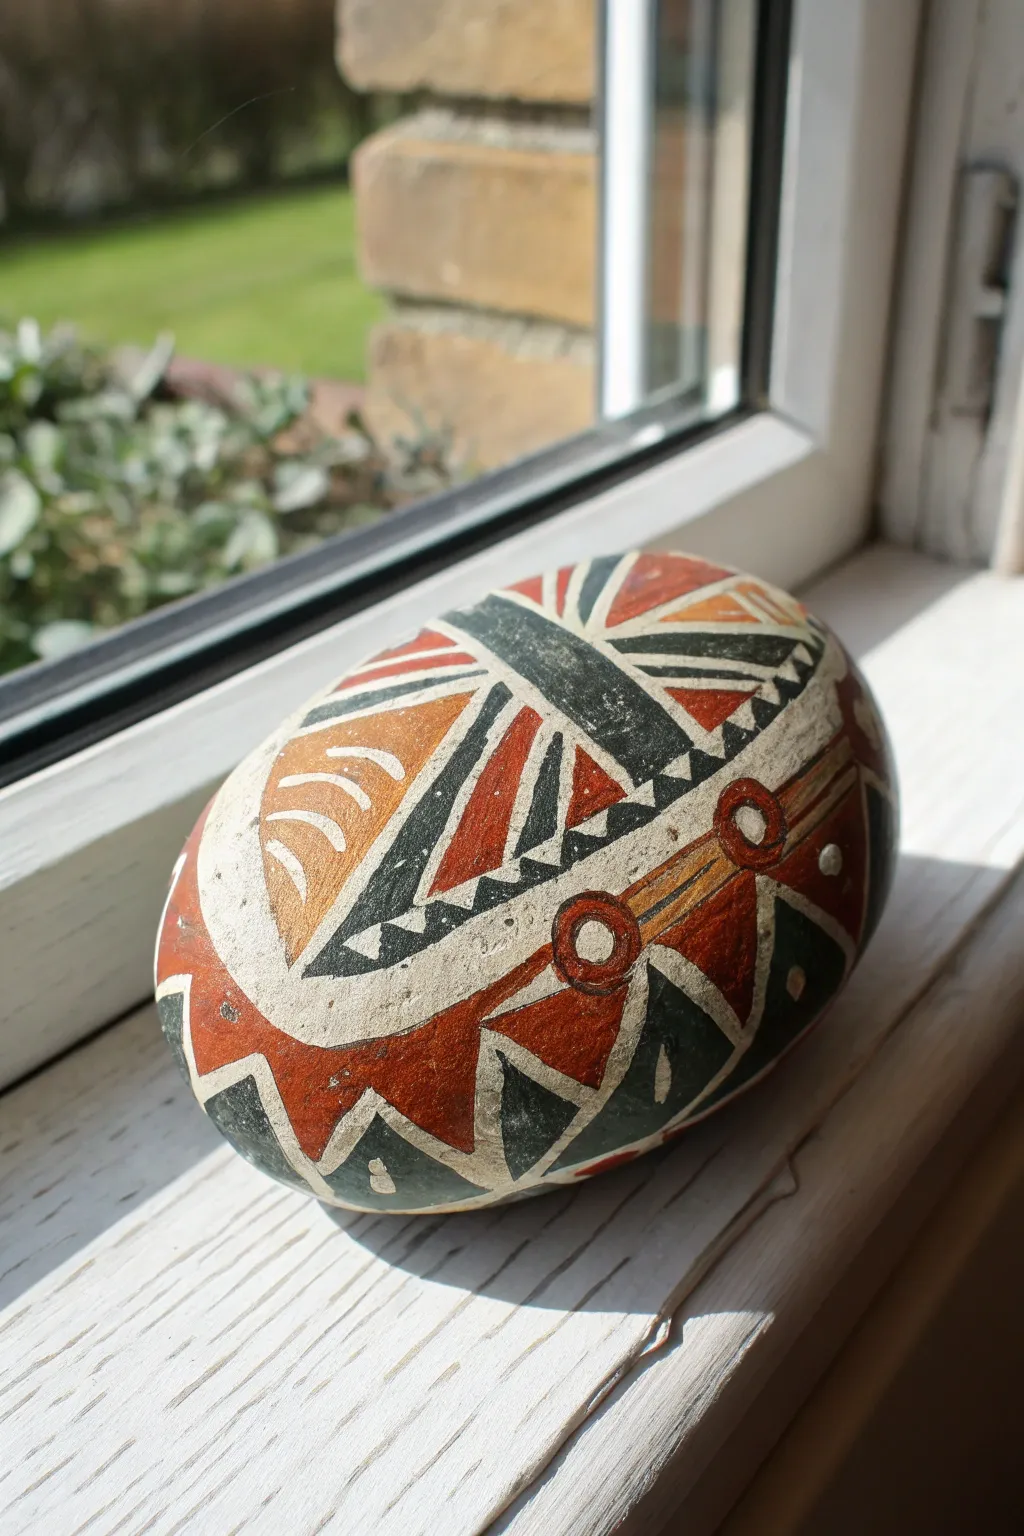
Concentric Rings and Ripples on Rocks
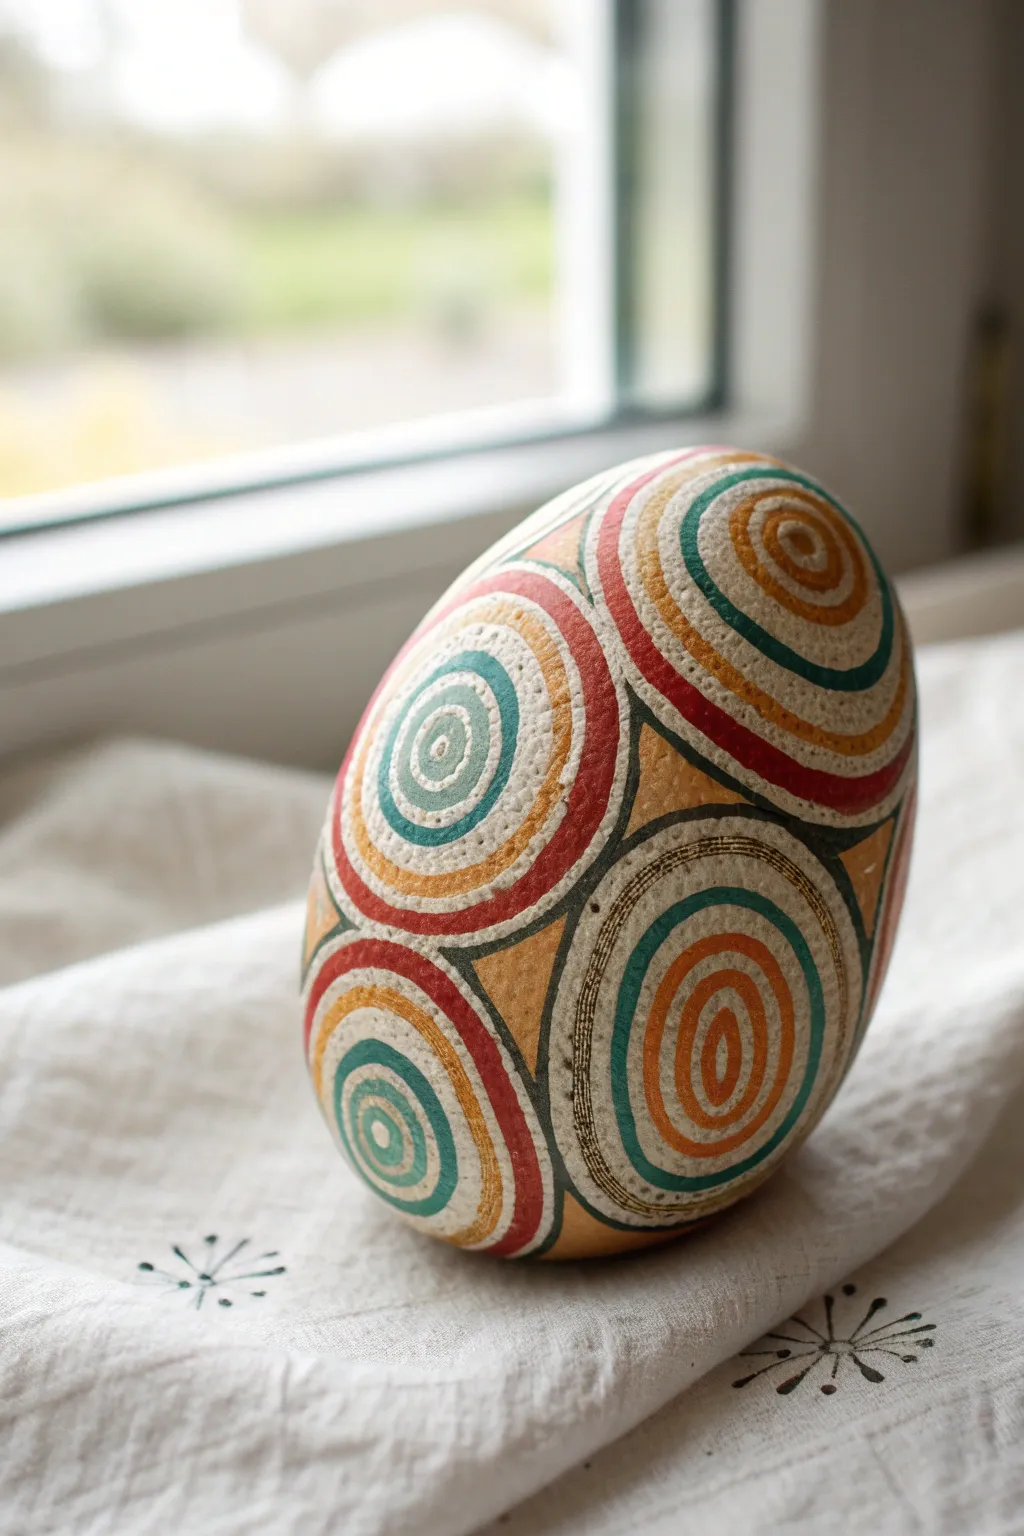
Transform a smooth, oval-shaped stone into a mesmerizing piece of décor with this repeating circular pattern. The combination of earthy tones like rust red, ochre, and teal creates a warm, folk-art aesthetic reminiscent of traditional textiles.
Detailed Instructions
Materials
- Smooth, egg-shaped river rock
- Fine grit sandpaper (optional)
- Acrylic paints (rust red, teal green, ochre yellow, creamy white)
- Pencil for sketching
- Compass or circle stencils
- Fine detail brushes (sizes 0 and 00)
- Medium round brush (size 2 or 4)
- Black fine-tip acrylic paint pen or liner brush
- Matte finish sealant spray
Step 1: Preparation and Mapping
-
Clean surface:
Begin by washing your rock thoroughly with soap and water to remove any dirt or oils. Let it dry completely. If the surface feels rough, give it a quick sanding with fine-grit sandpaper to ensure your painted circles come out crisp. -
Base sketch:
Using a pencil, lightly map out where your large circles will go. Aim for three to four large, evenly spaced circles around the circumference of the rock. They should touch or nearly touch at their edges. -
Connecting curves:
The pattern thrives on connectivity. Sketch curved triangular shapes in the negative spaces between your main circles to create a continuous, interlocking feel.
Step 2: Painting the Concentric Rings
-
Center point:
Starting with one of your main circles, find the center point. Paint a small, solid oval or circle right in the middle using your ochre or teal paint. -
First ring:
Using a fine brush, paint a ring of creamy white around your center point. Keep the line thickness consistent, but don’t worry about machine-perfection; a little hand-painted wobble adds charm. -
Second color band:
Move outwards with your next color, perhaps the rust red. Paint a wider band this time. I find that loading the brush well helps create a smooth, continuous stroke without having to lift your hand too often. -
Detailing texture:
Once that wider band is dry, use your finest brush or a toothpick to add tiny dots or dashed lines inside the band using a contrasting color (like white on red) to mimic the texture seen in the photo. -
Outer rings:
Continue adding concentric rings, alternating between thick and thin bands. Use your full palette—teal, ochre, red, and white—to create visual rhythm. Ensure each layer is dry before starting the next to avoid smudging. -
Repeat the process:
Move to the next large circular section you sketched and repeat the concentric ring process. Try to keep the color order similar for a uniform look, or vary it slightly for an eclectic vibe.
Wobbly Lines?
If your circles look shaky, stabilize your painting hand by resting your pinky finger on the rock surface (on a dry spot!) as a pivot point while you rotate the rock.
Step 3: Filling and Defining
-
Negative space:
Locate the triangular gaps between your large circular motifs. Fill these spaces with solid triangles of ochre or rust red to make the circles pop. -
Black outlining:
This step brings the whole piece together. Using a black acrylic paint pen or a very steady hand with a liner brush, outline every distinct color band. -
Refining lines:
Go over the main borders where the large circles meet the background shapes with a slightly thicker black line. This creates a bold, graphic separation. -
Adding micro-details:
Inspect your bands. If a wide band looks too plain, add a very thin, concentric black line running through the center of it for extra complexity.
Level Up: Textile Texture
Before the final seal, use a scrunched-up piece of fabric to lightly stamp a diluted white glaze over the dried paint. This creates a worn, fabric-like patina.
Step 4: Final Touches
-
Cleanup:
Check for any stray pencil marks still visible and gently erase them if the paint is fully cured. Touch up any areas where the color might be transparent with a second coat. -
Texture check:
The original image has a slightly matte, textured look. If your paint dried too glossy, you can lightly dab it with a dry sponge before sealing to knock back the shine. -
Sealing:
Take the rock outside and spray it with a matte finish sealant. This protects the paint from chipping and gives it that professional, non-reflective stone finish.
Place your finished stone on a windowsill or shelf to enjoy its calming, repetitive geometry
Drippy Paint Lines on Rocks

Transform a smooth, dark river rock into a textured art piece using dimensional paint to create satisfyingly tactile lines. The contrast between the matte stone and the raised, pastel drips creates a modern, abstract look that is surprisingly simple to achieve.
Step-by-Step Tutorial
Materials
- Smooth, dark-colored river rock (oval shape is best)
- Dimensional fabric paint or ‘puffy’ paint (in pastel pink, blue, yellow, and white)
- Damp cloth or paper towel
- Parchment paper or scrap paper (for practice)
Step 1: Preparation
-
Clean the surface:
Begin by thoroughly washing your rock with mild soap and water to remove any dirt or oils that might prevent the paint from sticking. -
Dry completely:
Wipe the stone with a cloth and let it air dry completely; even a little moisture can mess up your lines. -
Test your flow:
Before touching the rock, grab your first bottle of dimensional paint and squeeze a test line onto a piece of parchment paper to get a feel for the flow rate and pressure needed.
Fixing Blobs
If you squeeze too hard and make a large blob, use a toothpick to gently lift the excess wet paint off immediately, or reshape it into a funky drip.
Step 2: Creating the Lines
-
Choose your orientation:
Hold the rock in your non-dominant hand or place it securely on your work surface so the long side is vertical. -
Start the first drip:
Using a pastel pink puffy paint, start at the very top curve of the rock and gently squeeze while dragging the bottle tip downward. -
Vary the pressure:
As you move down, relax your pressure slightly to create a natural, somewhat uneven line width that mimics a real paint drip. -
Add a contrasting color:
Switch to a seafoam green or blue shade. Leave a small gap next to your pink line and repeat the dripping motion, starting slightly lower or higher than the first line for variety. -
Create a thick yellow line:
For the yellow stripe, try moving a bit slower to deposit more paint, creating a thicker, more raised texture on the stone. -
Incorporate white accents:
Use white dimensional paint to add a thinner line between the colored ones, acting as a bright separator that makes the pastels pop. -
Embrace the wobble:
Don’t try to make the lines perfectly straight; let your hand waver slightly to give the art an organic, abstract feel. -
Check spacing:
Step back and look at your composition. Ensure you have a balanced mix of colors without overcrowding one specific area. -
Continue patterning:
Repeat the color sequence—pink, blue, yellow, white—until you have covered the front face of the rock. -
Taper the ends:
When finishing a line near the bottom, release pressure on the bottle before lifting it away to create a clean, tapered end rather than a messy blob.
Metallic Magic
Swap one of the pastel colors for a metallic gold or silver puffy paint to add a glamorous shimmer to your abstract design.
Step 3: Finishing Touches
-
Add speckles:
To fill empty negative space, gently dot tiny amounts of paint in the gaps between lines, creating a terrazzo-like confetti effect. -
Review for gaps:
Look for any skipped spots in your lines and carefully fill them in if necessary, though breaks in the line can add character. -
Level drying:
Place the rock flat on a safe surface where it won’t be bumped. -
Extended drying time:
Dimensional paint takes much longer to dry than standard acrylics. I usually leave these overnight to ensure the inside of the thick paint is fully hardened. -
Optional sealing:
Once fully cured (after 24 hours), you can spray a clear matte fixative over the rock if you plan to keep it outdoors, though this is optional for indoor display.
place your new textured art piece on a desk or shelf for a satisfying pop of color and tactile interest
Splatter-and-Stripe Abstract Rocks
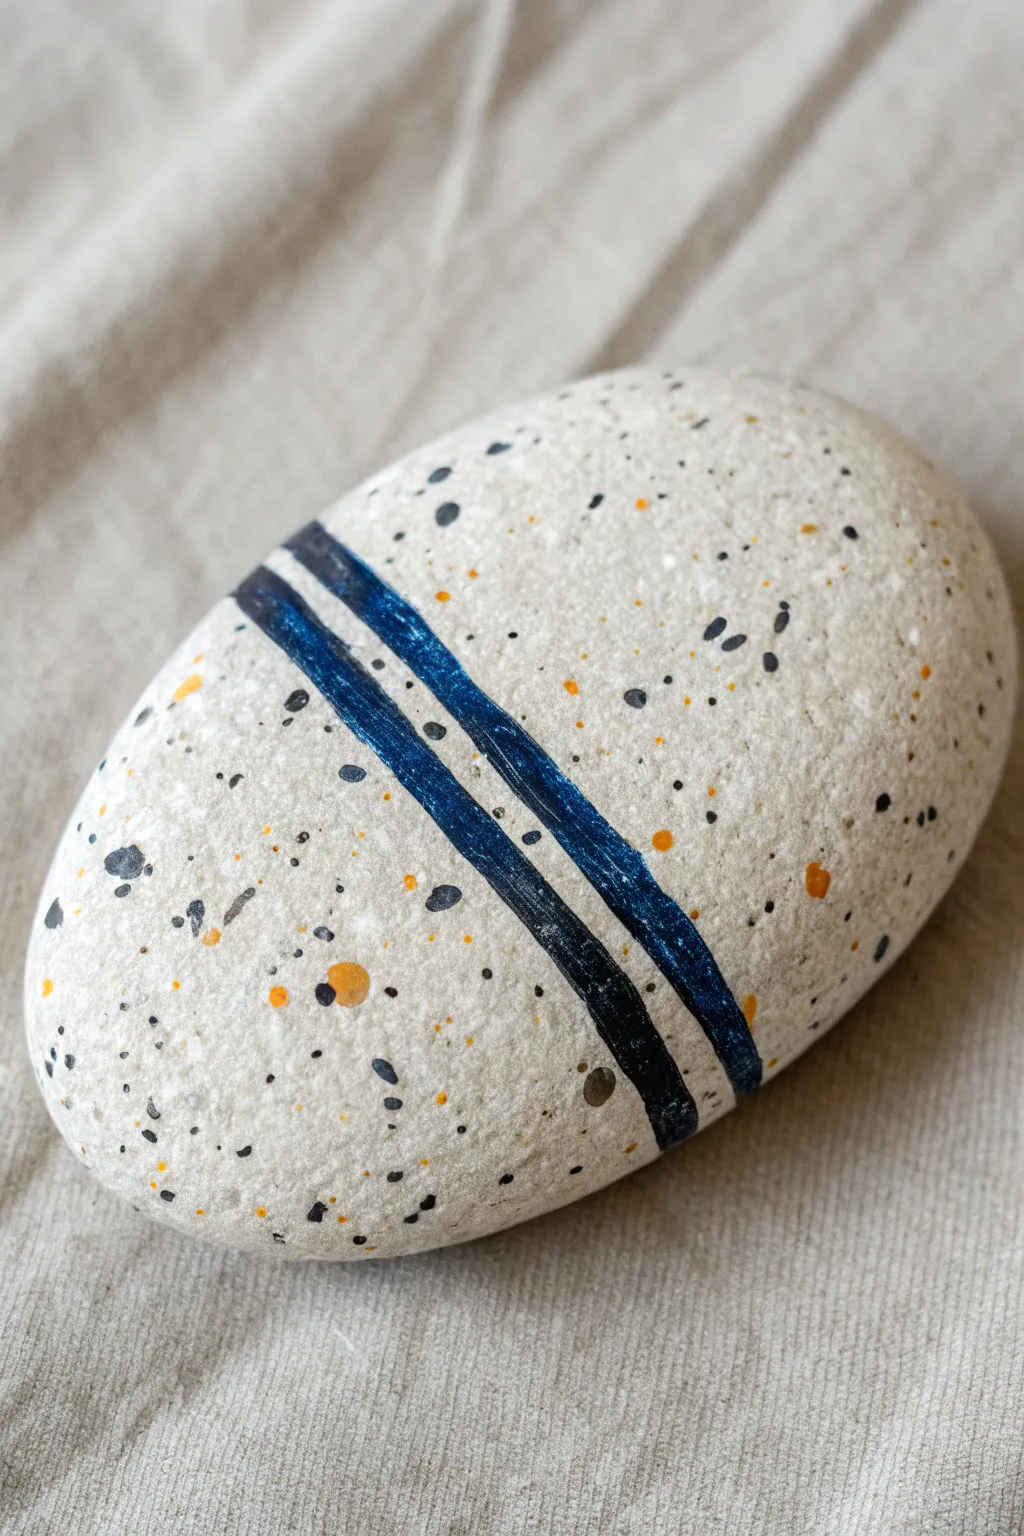
Transform a simple river rock into a piece of modern art with this minimalist design that balances chaos and order. The combination of spontaneous splatters with crisp, bold stripes creates a striking visual contrast perfect for home decor.
Step-by-Step Guide
Materials
- Smooth, light-colored river rock (approximately palm-sized)
- Acrylic paints (black, metallic dark blue, orange/amber, grey)
- Painter’s tape or masking tape (1/4 inch width is ideal)
- Stiff-bristled toothbrush or splatter brush
- Small flat paintbrush
- Fine detail paintbrush
- Matte or satin varnish/sealer
- Cardboard box or drop cloth (for messy work)
- Water cup and paper towels
Step 1: Preparation and Base Splatter
-
Clean your canvas:
Begin by washing your stone thoroughly with soap and water to remove any dirt or oils. Let it dry completely in the sun or use a hair dryer to speed things up. -
Set up your splatter station:
Place your clean rock inside a cardboard box or on a wide drop cloth. Splatter painting is notoriously messy, and this will protect your surrounding furniture. -
Mix your splatter paint:
Dilute a small amount of black acrylic paint with water. You want a consistency similar to heavy cream—thin enough to fly off the bristles, but thick enough to hold an opaque dot. -
Test your technique:
Before hitting the rock, test your splatter by running your thumb across the bristles of a toothbrush aimed at a piece of scrap paper. Adjust the paint thickness if needed. -
Apply the black speckles:
Holding the brush about 6 inches above the rock, flick the bristles to create a shower of fine black dots across the entire surface. -
Add grey dimension:
Clean your brush or switch to a new one, then mix a watered-down medium grey. Splatter this sparingly over the rock to add depth to your background texture. -
Introduce the accent color:
Using the same technique, add a few flicks of orange or amber paint. Aim for fewer, slightly larger dots here to create pops of color rather than a full coating. -
Create variation:
For some larger, purposeful spots (visible in the reference as bigger black and orange dots), dip a fine paintbrush or a toothpick into undiluted paint and manually tap a few distinct dots onto the surface. -
Let it cure:
Allow the splatter layer to dry completely. This is crucial—if the paint is wet when you apply tape in the next phase, you will ruin the effect.
Uneven Splatter?
If your splatters look more like streaks, your paint is too thick or your brush is too wet. Blot the brush on a paper towel first, and try holding it further away from the rock.
Step 2: Creating the Graphic Stripes
-
Mask the first stripe:
Choose a diagonal angle across the rock. Apply two strips of painter’s tape to create a channel for your thickest stripe. Press the edges down firmly with your fingernail to prevent bleed-under. -
Paint the metallic band:
Using your small flat brush, fill in the space between the tape with metallic dark blue paint. Apply two thin coats rather than one thick one for the smoothest finish, letting the first dry before adding the second. -
Remove tape carefully:
While the second coat is still slightly tacky (not fully dry), gently peel back the tape at a 45-degree angle to reveal a crisp edge. -
Mask the parallel stripe:
Once the blue stripe is totally dry, position new tape parallel to it, leaving a thinner gap this time for the black accent line. -
Paint the black detail:
Fill this thinner channel with solid black paint. I find a flat brush works best here to get good coverage right up to the tape edge. -
Revealing the design:
Remove the tape again carefully. You should now have two sharp, parallel lines sitting on top of your chaotic splatter background. -
Touch ups:
Inspect the edges of your stripes. If any paint bled under the tape, carefully scrape it away with a craft knife or cover it with a tiny dab of paint that matches the stone color.
Step 3: Finishing
-
Dry time:
Let the stripes cure for at least an hour to ensure the thick paint is hardened all the way through. -
Sealing the work:
Apply a coat of matte or satin varnish over the entire rock. This protects the paint from chipping and unifies the sheen of the different paint types.
Level Up: Gold Leaf
Instead of metallic blue paint, apply a thin line of gold leaf sizing and lay down real gold leaf for a luxurious, high-contrast texture against the raw stone.
Place your finished stone on a stack of books or a side table for an instant touch of modern elegance
Negative Space Heart Abstract Rocks

This simple yet striking project features a smooth grey river rock adorned with a hand-painted white heart. The design combines a solid painted center with a loose, sketchy outline to create depth and an artistic, casual feel.
Step-by-Step Tutorial
Materials
- Smooth, rounded grey river rock (approx. palm-sized)
- White acrylic paint (high pigment or heavy body works best)
- White paint pen (fine tip) or a very thin liner brush
- Small flat paintbrush
- Pencil or white charcoal pencil (optional for sketching)
- Matte spray varnish or sealer
- Water cup and paper towels
Step 1: Preparation
-
Select your stone:
Choose a rock that is naturally smooth and has a nice medium-grey tone. The grey acts as the background, so a clean surface without too much existing pattern is ideal. -
Clean and dry:
Scrub the rock thoroughly with warm soapy water to remove any dirt, moss, or oils. Let it dry completely before starting; paint won’t adhere well to a damp surface.
Dry Brush Trick
For that chalky, textured look inside the heart, wipe most paint off your brush onto a paper towel before dabbing the stone.
Step 2: Painting the Heart
-
Draft the shape:
Lightly sketch a simple heart shape in the center of the rock using a pencil. If the pencil doesn’t show up well, a white charcoal pencil is a great alternative that wipes off easily. -
Paint the solid center:
Using your small flat brush and white acrylic paint, fill in the sketched heart shape. Don’t worry about perfectly sharp edges just yet. -
Check opacity:
Acrylic paint can be translucent on dark rocks. Let the first layer dry for about 5-10 minutes, then apply a second coat if you can still see the grey stone through the white. -
Create the sketchy texture:
Once the solid heart is dry to the touch, take a very small amount of white paint on an older, slightly dry brush. Gently dab or stipple over the solid white area to give it a slightly textured, organic look rather than a flat plastic finish.
Add a Pop of Color
Try painting a tiny, bright red dot or a small metallic gold accent inside the white heart for a unique focal point.
Step 3: Adding the Outline Detail
-
Prepare the outlining tool:
For the outer ring, you can use a fine-tip white paint pen for control, or a thin liner brush with thinned-down white paint for a more painterly effect. -
Draw the loose outline:
Draw a larger heart shape surrounding your solid center. Keep a gap of about 3-5mm between the solid heart and this new line. -
Keep it imperfect:
The charm of this design lies in its sketchiness. Don’t try to make a perfect single line. Instead, let your hand be loose, perhaps going over certain sections twice to mimic a pencil sketch. -
Connect casually:
Where the lines meet at the top dip and bottom point of the heart, allow them to overlap or cross slightly. This reinforces the hand-drawn aesthetic. -
Feather the edges:
I sometimes like to use a mostly dry brush to lightly whisk a tiny bit of white ‘dust’ between the solid heart and the outline, softening the transition so it isn’t too stark.
Step 4: Finishing Touches
-
Final dry time:
Allow the entire stone to dry completely. Since the paint layers are thin, 20 minutes should be sufficient. -
Seal the artwork:
To protect your heart from the elements, spray the rock with a matte varnish. A matte finish keeps the natural look of the stone, whereas gloss might make it look wet or plastic.
Now you have a charming, hand-painted token perfect for hiding in a park or gifting to a friend
Metallic Accents on Abstract Rocks
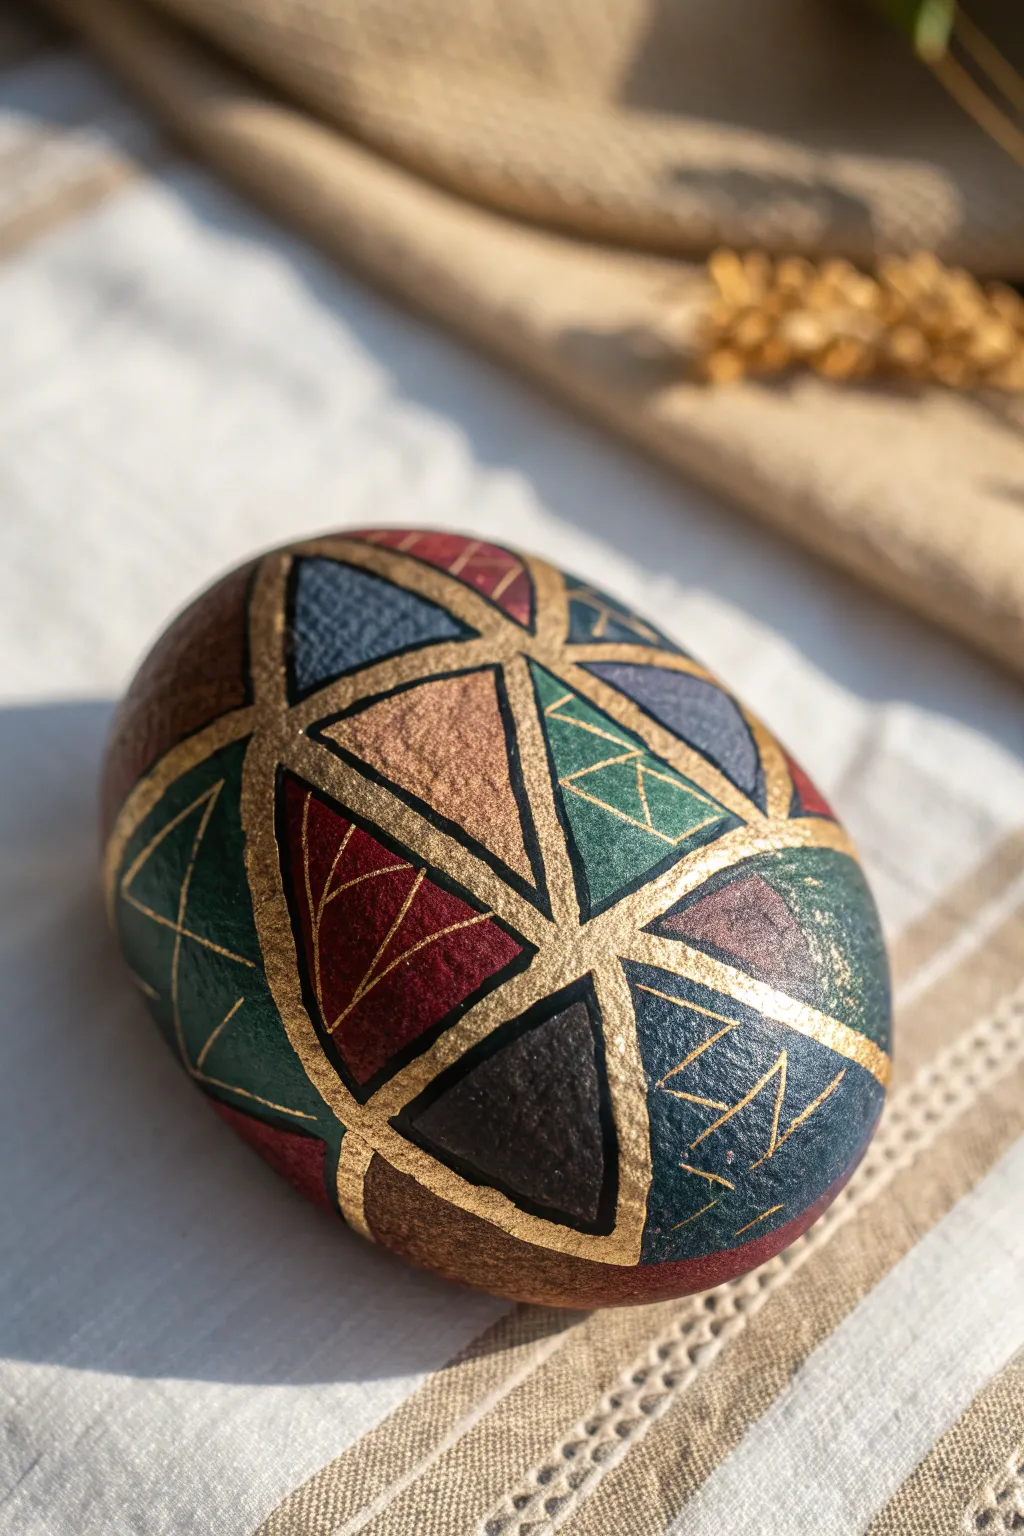
Transform a simple river rock into a sophisticated piece of decor with this geometric design featuring deep jewel tones and shimmering metallic borders. The contrast between the matte, rich colors and the bright gold lines creates a stained-glass effect that feels both modern and timeless.
Step-by-Step Guide
Materials
- Smooth, oval river rock (cleaned and dried)
- Acrylic paints (dark red, forest green, navy blue, beige/tan, dark brown)
- Metallic gold paint marker (medium tip)
- Metallic gold acrylic paint (for details)
- Fine liner brush (size 0 or 00)
- Flat brush (size 4 or 6)
- Pencil
- Eraser
- Matte or satin sealant spray
Step 1: Preparation & Mapping
-
Clean surface:
Begin by thoroughly scrubbing your rock with soap and water to remove any dirt or oils, then let it dry completely to ensure the paint adheres properly. -
Sketch the grid:
Using a pencil, lightly draw a series of intersecting lines across the rounded surface of the rock. Aim to create a network of triangles; start with a central point or line and branch out to create a tessellated look. -
Define the borders:
Specify which lines will become your thick gold borders. You want to create clusters of triangles that meet at central points, like slices of a pie or a geometric flower.
Clean Lines Hack
If your hand isn’t steady with a paint marker, distinct masking tape strips (washi tape works best) can block off the triangles while you paint the colors, leaving perfect gaps for gold.
Step 2: Color Blocking
-
Base coat triangles:
Select your deep jewel tone colors. Using the flat brush, paint inside the pencil triangles, alternating colors so that no two adjacent shapes (unless separated by a future gold line) are the same hue. -
Apply second coats:
Acrylics often dry darker or more transparent on stone. Apply a second coat to each triangle to achieve the rich, opaque saturation seen in the reference image, especially for the navy and forest green. -
Dry time:
Allow the colorful base layers to dry completely. If the paint is tacky, the gold marker in the next steps might drag or skip.
Step 3: The Gold Framework
-
Outline main structures:
Using your gold paint marker, trace over the main pencil grid lines. Make these lines deliberate and fairly thick to separate the colored sections boldly. -
Thicken intersections:
Where multiple lines meet at a vertex, slightly thicken the gold to create a smooth, rounded connection point rather than a sharp, jagged intersection. -
Second gold pass:
I usually go over the gold lines a second time once the first pass is dry to ensure the metallic finish is solid and reflective.
Level Up: 3D Effect
Use ‘dimensional fabric paint’ or ‘relief paste’ in gold instead of a standard marker. This creates physically raised borders you can feel, mimicking true cloisonné metalwork.
Step 4: Internal Details
-
Mix fine gold:
Pour a small drop of liquid gold acrylic paint onto your palette. You want a consistency that flows easily from a fine liner brush. -
Add geometric hatching:
Inside specific color blocks (like the deep red and blue triangles), paint very thin gold lines. Create “V” shapes, zig-zags, or straight hatching lines. -
Vary the patterns:
Don’t fill every triangle with the same pattern. Leave the beige/tan ones textured but unpatterned, and use simple diagonal lines on the green ones to create visual variety. -
Add stone texture:
For the beige or lighter brown sections, lightly stipple a slightly darker shade of brown using a dry brush before adding the gold borders, giving those specific shapes a sandstone-like texture.
Step 5: Finishing Touches
-
Correction work:
Check for any spots where the color might have bled onto the gold, or vice versa. Use a tiny bit of the background color to touch up edges for a crisp look. -
Final dry:
Let the rock sit undisturbed for at least an hour to ensure the thick metallic marker lines are fully hardened. -
Seal the work:
Spray the rock with a clear matte or satin sealant. Avoid high gloss, as you want the gold lines to shine against a more muted, natural-looking stone surface.
Place your finished geometric rock on a desk or shelf to catch the light and show off those metallic details
Textured Abstract Rocks With Grit
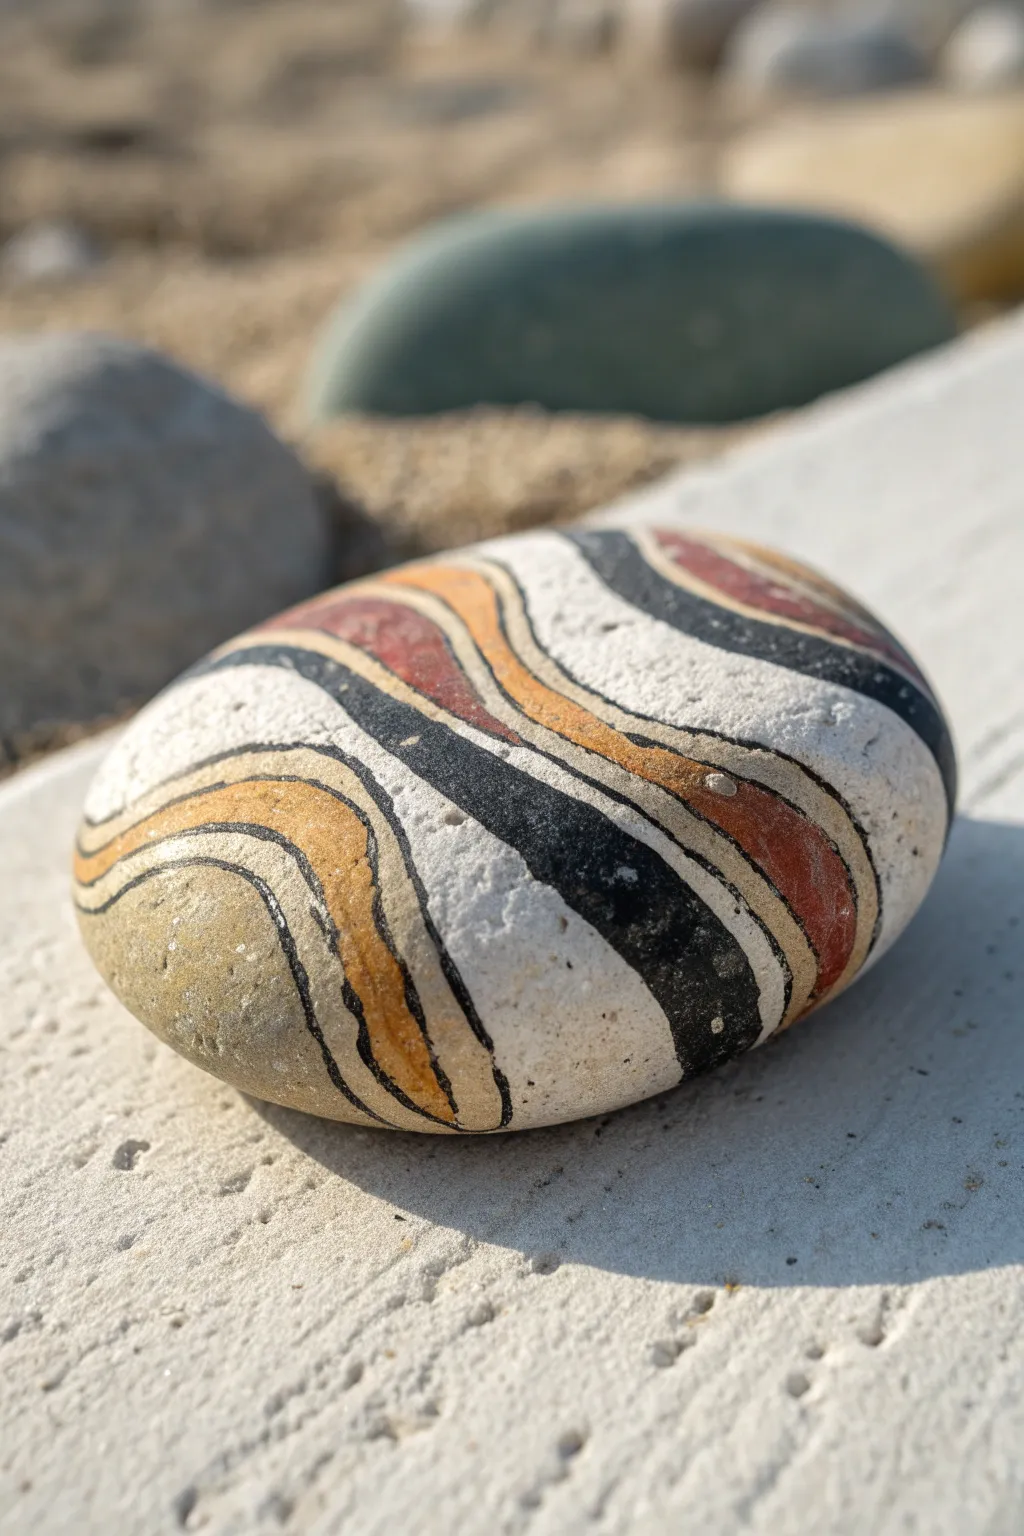
Embrace the natural shape of your stone with this flowing, organic design that mimics layers of sediment or topographical maps. Using a palette of warm earth tones against stark black and white creates a striking, modern look with a delightful tactile finish.
How-To Guide
Materials
- Smooth river rock (round or oval)
- White acrylic paint or gesso
- Acrylic paints: Black, Yellow Ochre, Burnt Sienna (rust)
- Fine grit texture medium or clean, fine sand
- Small flat brush
- Fine liner brush (size 0 or 1)
- Matte varnish
- Palette for mixing
- Pencil (optional)
Step 1: Preparation and Texture Base
-
Clean the stone:
Start by scrubbing your rock with warm soapy water to remove any dirt or oils. Let it dry completely in the sun or with a hair dryer. -
Mix the texture base:
On your palette, mix a generous amount of white acrylic paint with your texture medium. If you don’t have a medium, mix in a pinch of very fine sand. Aim for a consistency like gritty yogurt. -
Apply the base coat:
Paint the entire top surface of the rock with your textured white mixture. You want this layer opaque, so the stone’s natural gray doesn’t show through. -
Add a second layer:
Once the first coat is dry to the touch, apply a second layer of the textured white to ensure a solid, bright canvas. The grit should feel rough when dry. -
Dry thoroughly:
Allow the base to cure completely. Because of the added texture, this might take a bit longer than standard paint—give it at least 30 minutes.
Uneven Lines?
If the textured surface makes painting straight lines difficult, thin your black paint slightly with water. This helps the brush glide over the grit without skipping.
Step 2: Designing the Flow
-
Plan the curves:
Observe the rock’s natural contours. Using a pencil lightly, sketch flowing, wavy lines that run across the width of the stone. Let the lines undulate organically rather than keeping them straight. -
Create variation:
Vary the spacing between your pencil lines. Some bands should be wide and bold, while others narrow down to thin stripes. -
Curving edges:
Extend your sketch lines over the curve of the rock towards the bottom, so the design doesn’t just look like a sticker on top.
Metallic Accent
For a subtle luxe touch, paint one of the very thin separating lines with metallic copper or gold paint instead of plain black.
Step 3: Adding Color
-
Paint the black ribbons:
Using your small flat brush or liner brush, fill in select bands with black acrylic paint. Choose bands that are separated by white space to create strong contrast. -
Refine black edges:
Go back over the edges of your black bands with the fine liner brush to ensure the curves are smooth and crisp against the textured white background. -
Add the ochre:
Select a band next to a white or black section and fill it with Yellow Ochre. This warm, sandy yellow acts as a beautiful mid-tone. -
Introduce rust:
Paint one or two bands with Burnt Sienna or a rust-colored red. This color provides a deep, earthy warmth that anchors the palette. -
Maintain white space:
Crucially, leave several bands unpainted to show the textured white base. This negative space is essential for the design to breathe. -
Touch up lines:
Once the colors are blocked in, use your fine liner brush with black paint to add thin outlining stripes between some of the colored sections. This defines the shapes clearly.
Step 4: Finishing Touches
-
Check for opacity:
Inspect your colors. Does the ochre need a second coat to be solid? Apply additional layers where the paint looks streaky. -
Clean up stray marks:
If any paint wobbled outside the lines, use a small amount of textured white to cover the mistake once the color is dry. -
Seal the artwork:
Apply a coat of matte varnish over the entire painted surface. A matte finish preserves the stony, natural look better than gloss would. -
Final dry:
Set the rock aside in a dust-free area to let the varnish cure fully before handling or displaying.
Place your finished stone on a shelf or use it as a sophisticated paperweight to bring a touch of earthy calm to your space
Cubist-Inspired Faces on Rocks
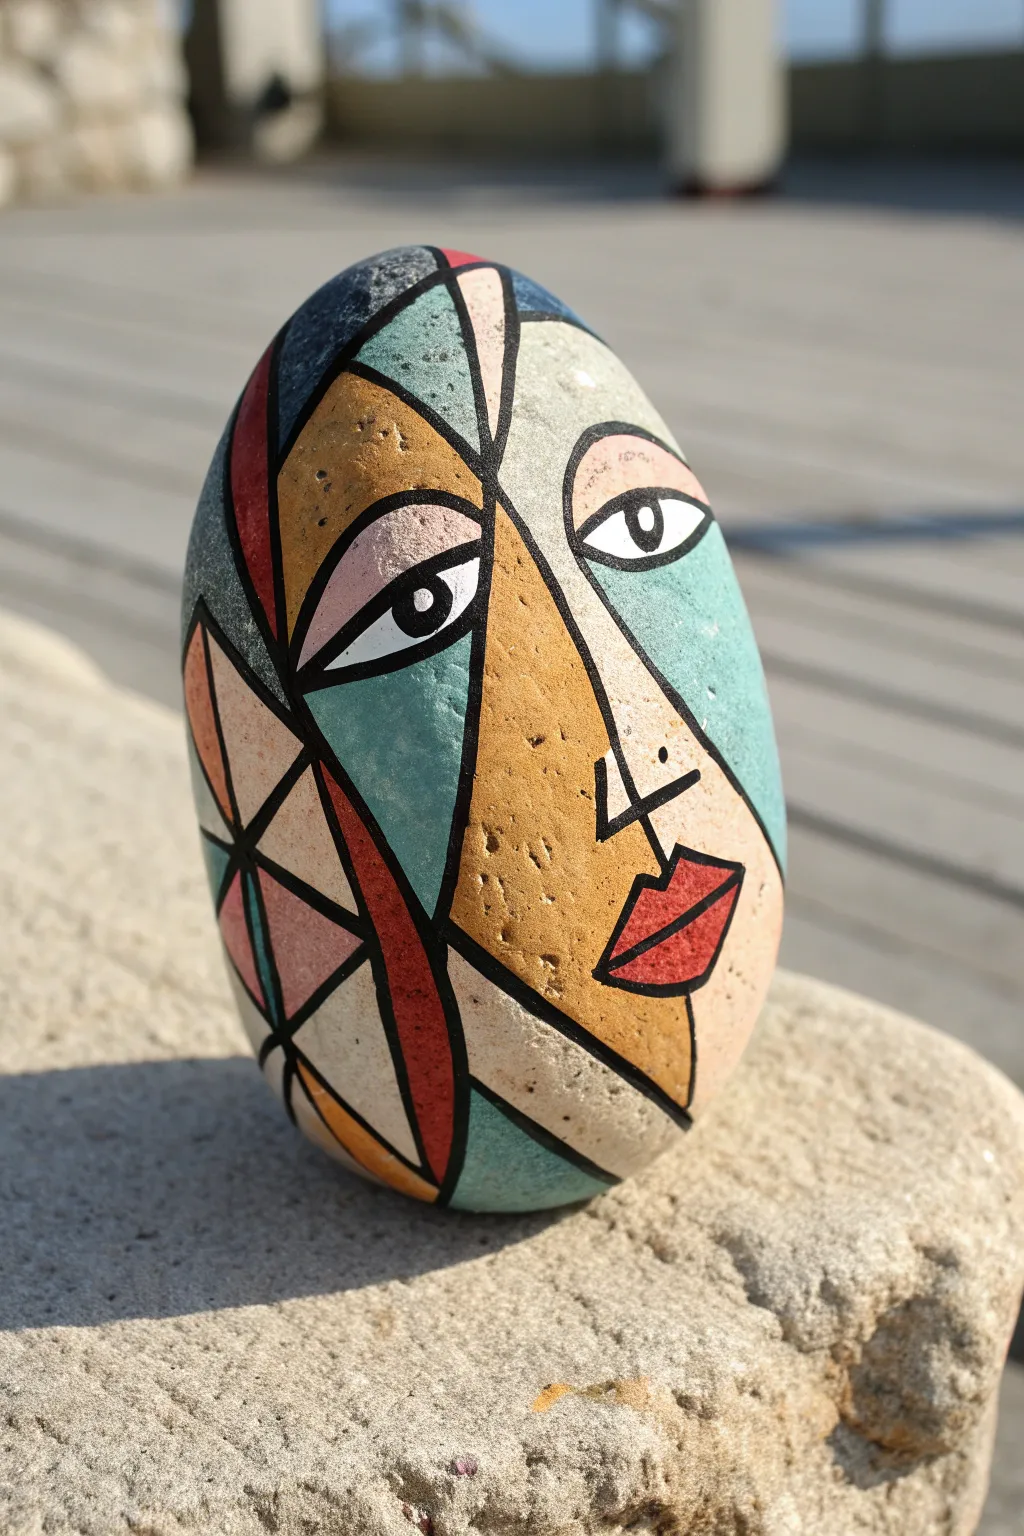
Transform an ordinary smooth stone into a striking piece of modern art with this Cubist-inspired face design. Using bold geometric shapes and contrasting colors, you’ll create a conversation starter that looks deceptively complex but relies on simple segments.
Step-by-Step Tutorial
Materials
- Smooth, oval-shaped river rock (cleaned and dried)
- Acrylic paints (Yellow ochre, teal/turquoise, deep navy blue, warm red, light pink, parchment/off-white)
- Black acrylic paint pen (fine and medium tip)
- Clear acrylic sealer (spray or brush-on)
- Pencil and eraser
- Small flat synthetic brushes
- Small round detail brush
- Palette or paper plate
- Water cup and paper towels
Step 1: Preparation and Sketching
-
Clean your canvas:
Begin by thoroughly washing your rock with soap and water to remove any dirt or oils. Let it dry completely in the sun or with a hair dryer to ensure the paint adheres properly. -
Establish the main division:
Using a pencil, draw a sweeping vertical curved line down the center of the rock. This line will serve as the profile of the nose and separate the two main sides of the face. -
Map facial features:
Sketch a large almond-shaped eye on the right side and a more angular, stylized eye on the left. Add a triangular shape for the nose along the center line and a geometric mouth near the bottom right. -
Segment the space:
Draw intersecting lines across the forehead and cheeks to break the background into distinct geometric shards. Think about creating triangles and trapezoids that radiate from the facial features. -
Add side patterns:
On the far left curve of the rock, sketch a ‘stained glass’ pattern of smaller triangles. This adds complexity and balances the larger shapes of the main face.
Step 2: Blocking in Color
-
Paint the main face area:
Fill the central face segment (including the nose area) with a warm yellow ochre. You may need two coats to get an opaque, solid finish that hides the stone texture. -
Apply the coolness:
Use your teal or turquoise paint for the upper right area surrounding the right eye and the section just below the left eye. This creates a bold temperature contrast with the ochre. -
Deepen the shadows:
Paint the upper left segments and the bottom curve of the rock with deep navy blue. This dark tone anchors the design and makes the brighter colors pop. -
Add warmth:
Fill the lips with a bright, warm red. I also like to use this red for a specific curved segment on the left side to create a visual rhythm across the stone. -
Soft highlights:
Use a light pink for the eyelid area of the left eye and a few of the small geometric triangles on the side. This softness balances the bold primary colors. -
Neutral spaces:
Paint the remaining segments, including the right eyelid and the bottom jaw area, with a parchment or off-white color. Leave the whites of the eyes unpainted for now if your rock is light, or paint them pure white. -
Let it cure:
Allow all the base colors to dry completely. If any areas look streaky, apply a second thin coat now before moving to the outlining stage.
Shaky Lines?
If your hand shakes while outlining, rest your wrist on a dense sponge or a bag of rice. This stabilizes your hand while raising it just enough to keep wet paint safe.
Step 3: Outlining and Details
-
Outline the main features:
Shake your medium-tip black paint pen well. Trace over your initial pencil lines, starting with the prominent profile line of the nose and the outlines of the eyes. -
Define the lips:
Outline the red lips with a sharp, crisp line. Draw a straight horizontal line through the middle to separate the upper and lower lip. -
Pupil placement:
Inside the eye whites, draw bold black circles for the iris/pupil. For the left eye, place it looking forward; for the right eye, center it to create that engaging, slightly surreal gaze. -
Grid the geometrics:
Go over all the intersecting lines that separate your color blocks. Keep your pressure consistent so the black lines have a uniform thickness, mimicking lead in a stained glass window. -
Refine the triangles:
Carefully outline the smaller triangular cluster on the left side. Switch to a fine-tip pen here if the shapes are very small to prevent lines from bleeding together. -
Add character marks:
Using a fine tip pen or a very small brush, add tiny details like the nostril curve and a few playful dots or freckles on the yellow cheek area for texture. -
Clean up edges:
Review your black lines. If any lines look shaky or thin, go over them one last time to make them bold and confident.
Color Pop Secret
Paint a layer of white gesso or acrylic primer on the rock before adding colors. This makes the ochre and teal much more vibrant than painting directly on grey stone.
Step 4: Finishing Touches
-
Erase guidelines:
Once you are absolutely certain the paint and ink are dry, gently erase any visible pencil marks that weren’t covered by the black outlines. -
Seal the deal:
Apply a coat of clear acrylic sealer. A spray sealer works best to avoid smearing the black ink, but if you brush it on, be extremely gentle and float the varnish over the surface.
Place your finished abstract masterpiece on a desk or shelf where it can add a touch of artistic flair to your day


Have a question or want to share your own experience? I'd love to hear from you in the comments below!