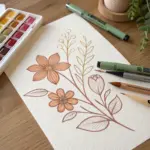
Whenever I want bold color and super crisp linework without hauling out a whole paint setup, I grab my acrylic paint pens. Here are my favorite ideas that really show off their opacity, vibrancy, and how happily they work on all kinds of surfaces.
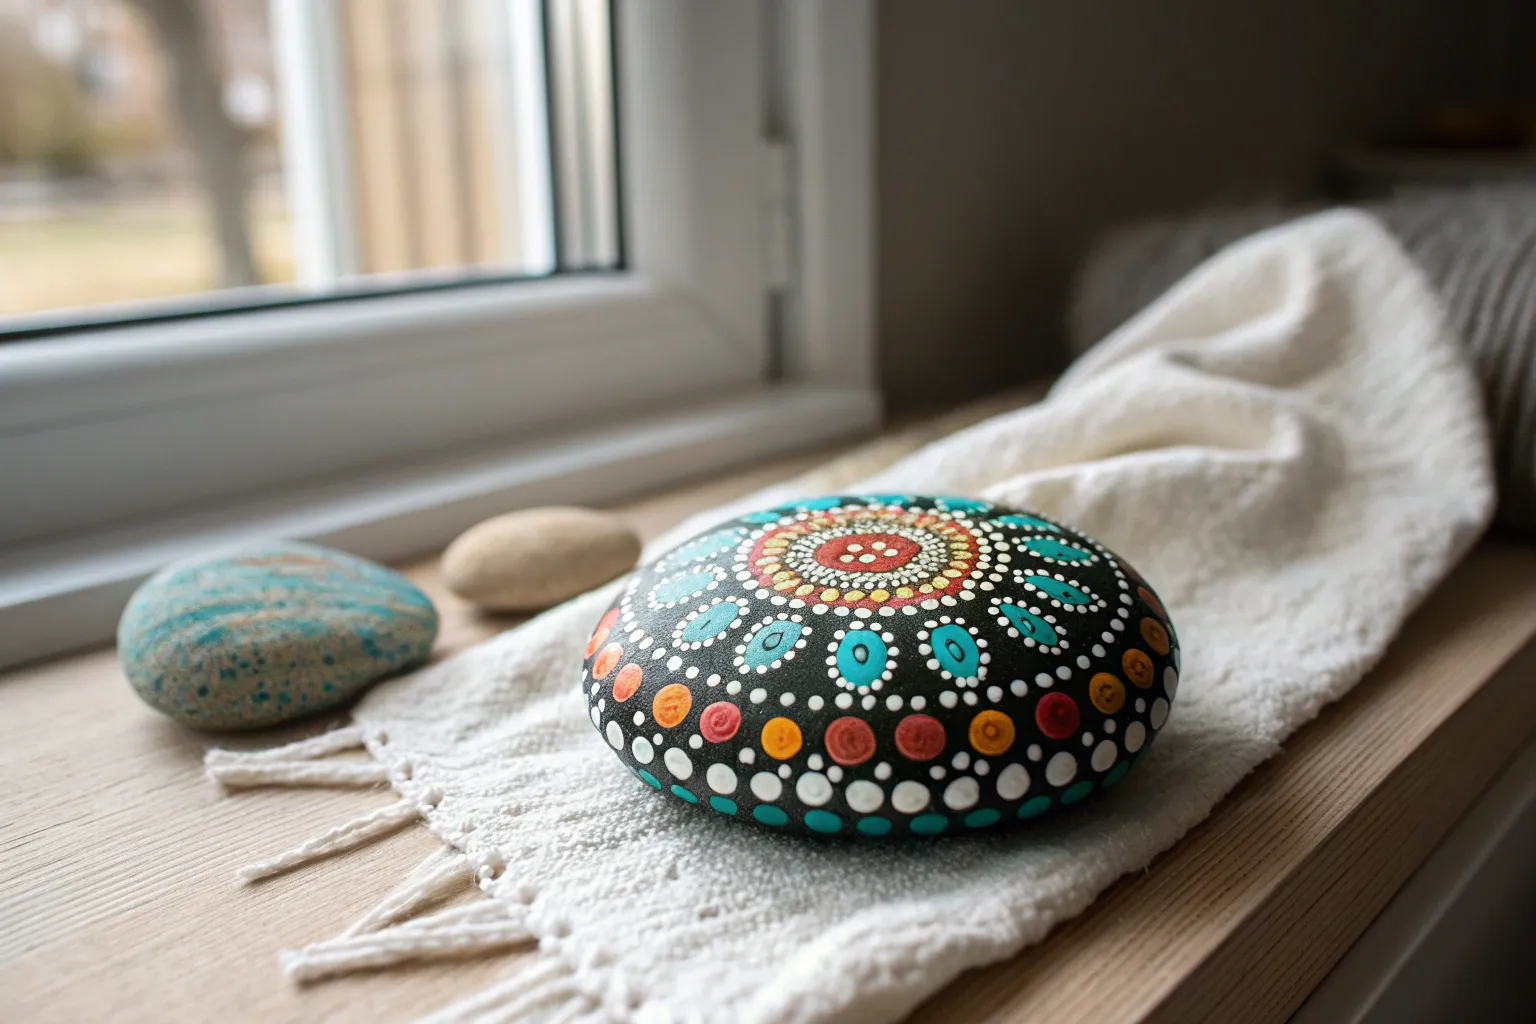
Painted Rocks With Doodles and Patterns
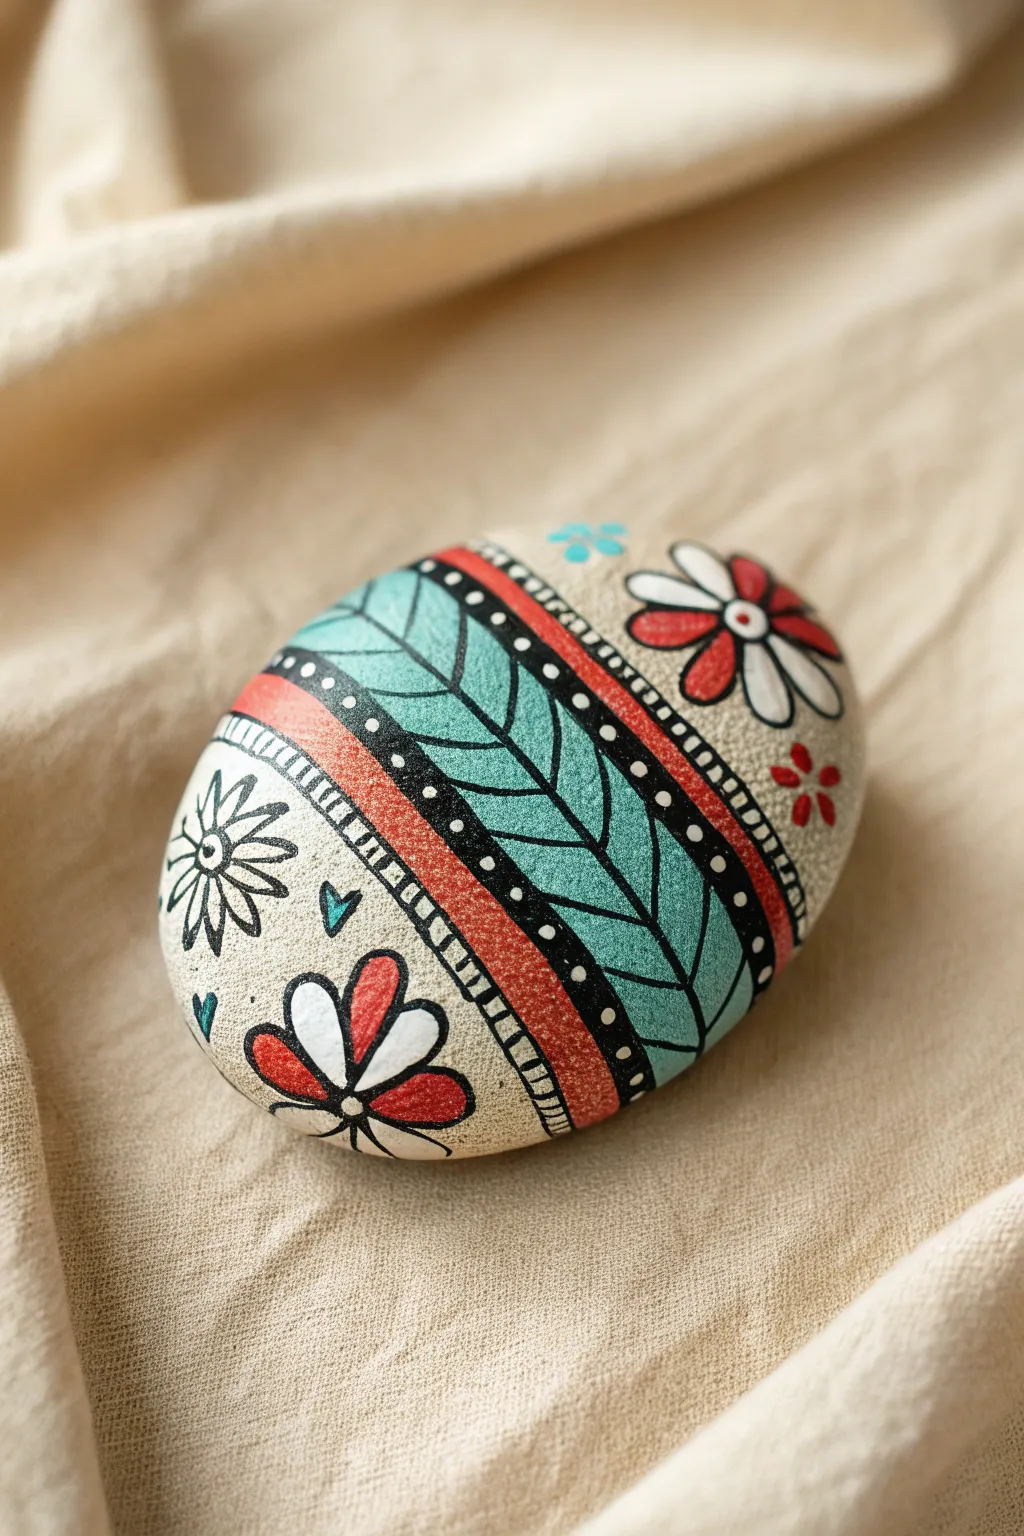
Transform a simple garden stone into a vibrant piece of art with this structured floral and geometric design. By layering bands of color and delicate line work, you will create a beautifully balanced rock painting perfect for decoration or hiding in your neighborhood.
Step-by-Step Guide
Materials
- Smooth, oval river rock (beige or light gray)
- Acrylic paint pens (extra fine and fine tip)
- Colors: Teal/Turquoise, Burnt Orange/Red-Orange, Black, White, Red
- Pencil and eraser
- Matte or glossy spray varnish (optional)
Step 1: Preparation and Base Sketch
-
Clean the surface:
Begin by scrubbing your rock with warm soapy water to remove any dirt or oils. Let it dry completely, as any moisture trapped inside can ruin the paint later. -
Mark the center band:
Using a pencil, lightly draw two parallel curves across the middle of the rock. This will be the main housing for the teal leaf pattern. Try to follow the natural curvature of the stone. -
Draft the outer bands:
Sketch a second set of lines outside the first pair, creating two narrower bands on either side of the center section. These will eventually be the orange stripes. -
Add detail guidelines:
Lightly sketch the flower shapes on the remaining top and bottom sections of the rock. Don’t worry about perfection here; these are just guides for placement.
Uneven Ink Flow?
If your paint pen creates puddles or stops flowing, press the nib on a scrap piece of paper to recharge it, never directly on your artwork.
Step 2: Color Blocking
-
Paint the central vine:
Fill the wide central band with teal or turquoise paint. If the rock is dark, you may need two coats to get a solid, opaque color. Let this dry fully before moving on. -
Add the orange stripes:
Color in the narrower bands flanking the center with burnt orange or red-orange. I prefer to pull the pen toward me in short strokes to keep the edges neat. -
Block in the flowers:
Using white and red paint pens, fill in the petal shapes you sketched earlier. Use white for the daisies and red for the accent petals. Leave the background rock color visible around them. -
Add small leaves:
Paint small teal heart-shaped leaves floating in the open space near the flowers.
Add Metallic Flair
Swap the white dots in the border for gold or silver paint pen to give the rock a sophisticated, jewelry-like shimmer.
Step 3: Line Work and Details
-
Outline the main bands:
Once the color blocks are bone dry, use a fine-tip black pen to draw thick lines separating the colored sections. This creates a bold barrier between the designs. -
Create the vine pattern:
Draw a thin black line down the center of the teal band. From this stem, draw curved lines outward to create the leaf veins, giving the teal strip a vine-like appearance. -
Add the dotted borders:
Inside the thick black lines bordering the teal section, carefully tap a series of white dots. Space them evenly for a clean, professional look. -
Detail the orange bands:
Draw tiny black hatch marks or dashes along the outer edge of the orange stripes to create a textured border effect. -
Outline the flowers:
Trace your painted flower petals with the black fine-tip pen. Add a small circle in the center of the daisies. -
Fill flower centers:
Place a small red dot in the center of the white daisies to make them pop. -
Add floating doodles:
Draw small, freehand doodle flowers or asterisks in any remaining large empty spaces using black ink. -
Final touches:
Check for any smudges or uneven lines and touch them up. If you want a longer-lasting finish, seal the rock with a spray varnish once the ink is cured.
Enjoy the calming process of painting these structured patterns and display your stone with pride
Rock Mini Landscapes in Tiny Panels
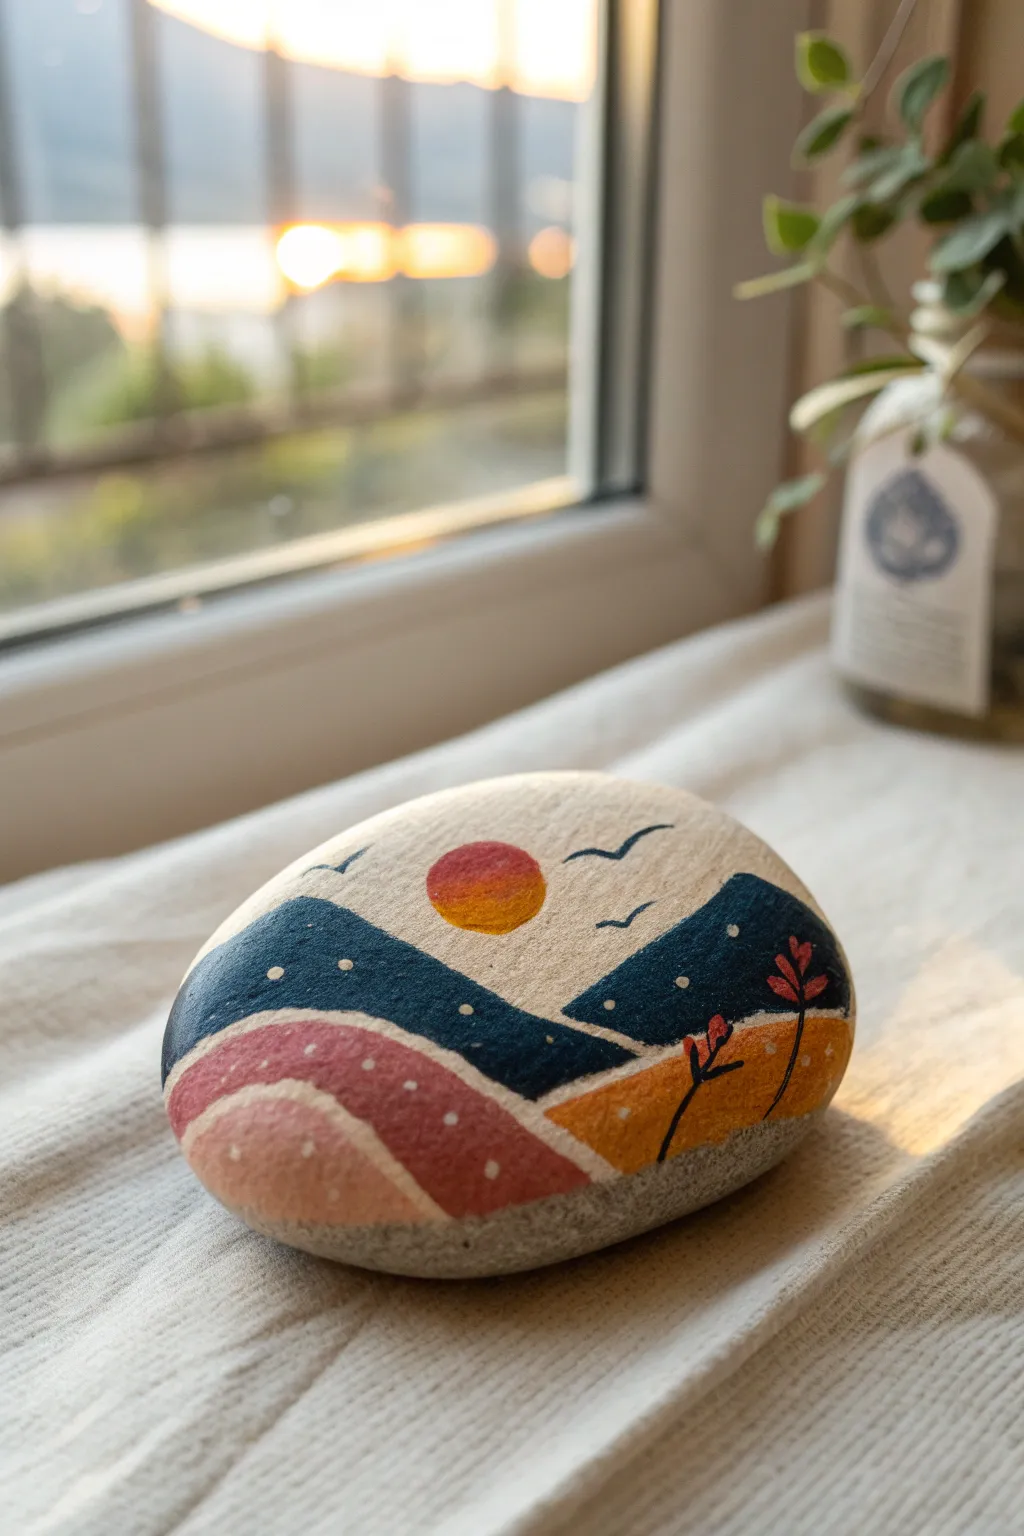
Transform a smooth river stone into a serene mountain vista with this stylized landscape project. Using flat blocks of color and simple dotted details, you will capture the cozy warmth of a sunset over rolling hills.
Detailed Instructions
Materials
- Smooth, oval river stone (cleaned and dried)
- Acrylic paint pens (fine and medium tips)
- Colors: Dark blue, deep yellow/mustard, orange, coral pink, light pink, black, and white
- Pencil (optional)
- Clear spray sealant or varnish
Step 1: Base Shapes
-
Clean your canvas:
Ensure your stone is completely free of dirt and dust as paint won’t adhere to grit. Wash it with warm soapy water and let it dry fully before starting. -
Sketch the horizon:
Lightly sketch the outlines of your landscape with a pencil if you feel unsure, or go straight in with pens. Start by visualizing the rock divided into three overlapping sections: foreground, middle ground, and sky. -
Paint the background sky:
Leave the very top area of the stone natural/unpainted to serve as the sky color, which gives the piece an organic feel. -
Create the sun:
Using an orange or deep yellow paint pen, draw a solid circle tucked centrally into where the mountain peaks will go. Fill it in completely. -
Add sun details:
If you want a gradient look like the reference, blend a touch of darker orange at the bottom of the sun while the paint is still slightly wet, or layer it on top once dry.
Step 2: Mountain Layers
-
Draw the main mountains:
With a dark navy or deep blue pen, draw two large mountain triangles that overlap the bottom third of your sun. The left peak should be slightly higher than the right one. -
Fill the mountains:
Color in the mountain shapes fully with the dark blue ink. Ensure the coverage is opaque; you may need a second coat once the first is dry to hide the stone’s texture. -
Add the right-side hill:
Below the right mountain, draw a rolling hill shape using a mustard or deep yellow pen. This section should curve upwards slightly to support the future flower details. -
Create the left-side hills:
On the bottom left, draw two curved bands. Paint the upper band in a deep coral or terracotta color, and the lower band in a soft pastel pink. -
Refine the edges:
Go back over the borders where different colors meet. The lines should be crisp and clean, creating a ‘paper cut-out’ aesthetic.
Smooth Surface Strategy
Rocks with a super smooth texture work best for paint pens. If your rock is pitted, apply a clear matte medium first to create a level painting surface.
Step 3: Details & Finish
-
Dot the night sky:
Once the dark blue mountains are totally dry, use a fine-tip white pen to add tiny dots scattered across the blue peaks. These represent stars or distant snow. -
Texture the hills:
Add white dots to the pink and coral hills on the left as well. Keep the pattern random but fairly sparse to avoid cluttering the design. -
Draw the birds:
Using a fine-tip black pen (or dark blue), draw three simple ‘V’ shapes in the unpainted sky area to represent birds in flight. Vary their sizes for perspective. -
Plant the flowers:
On the yellow hill to the right, use a black fine liner to draw two thin stems. Top them with small three-petaled red flowers and add a few black leaves to the stems. -
Final drying:
Let the entire stone sit undisturbed for at least an hour to ensure the thick layers of acrylic paint are cured all the way through. -
Seal the artwork:
To protect your landscape from chipping, especially if it will be outside, apply a coat of clear spray sealant or varnish.
Streaky Paint Fix
If lighter colors like yellow look streaky over the dark stone, let the first layer dry completely, then apply a second coat. Don’t overwork wet paint.
Place your finished stone near a window or in a potted plant to enjoy your miniature view

Hand Lettering on Mugs and Cups

Transform a plain white mug into a charming morning companion with this simple black ink design. The playful “HeLLo” lettering, surrounded by delicate botanical doodles and hearts, creates a personalized piece perfect for sipping coffee or gifting to a friend.
How-To Guide
Materials
- Plain white ceramic mug (clean and dry)
- Black acrylic paint pen (fine tip, 0.7mm or 1mm)
- Black acrylic paint pen (medium tip, 2-3mm)
- Rubbing alcohol and cotton pad
- Paper towel
- Pencil (optional for sketching)
- Oven (for baking/setting the paint)
Step 1: Preparation and Planning
-
Clean surface:
Before uncapping any pens, wipe the entire surface of your mug with rubbing alcohol on a cotton pad. This removes invisible oils and dust that prevent paint from adhering properly. -
Draft layout (optional):
If you are nervous about freehanding, lightly sketch the word “HeLLo” and the placement of the decorative elements using a pencil. The graphite won’t stick perfectly, but it gives you a faint guide.
Oops! Paint Splattered?
Keep a Q-tip dipped in rubbing alcohol nearby. If you make a mistake, wipe it away immediately while wet. If it dries, scrape gently with a toothpick.
Step 2: Lettering the Greeting
-
Draw the H:
Using the medium tip pen, draw a tall, sans-serif uppercase ‘H’ on the left side of the mug. Keep the lines relatively uniform in thickness. -
Add the e:
Draw a lowercase ‘e’ next to the H. Make the loop generous and round, keeping the baseline slightly bouncy and uneven for a whimsical determination. -
Create the striped Ls:
Draw the outlines for two tall uppercase ‘L’s. Instead of filling them in solid, use the fine tip pen to draw horizontal stripes inside the vertical stem of each ‘L’ to add texture. -
Finish with O:
Draw a large uppercase ‘O’ at the end. For this letter, draw a concentric circle inside the main stroke, creating a hollow ring effect. Then, draw small vertical tick marks inside the ring, resembling a stitched pattern. -
Thicken strokes:
Go back over your main letter outlines (particularly the H and e) with the medium tip pen to smooth out any shaky edges and give the text bold definition.
Make It Yours
Try using a gold or metallic marker for the dots and hearts to add a bit of sparkle to your morning coffee routine.
Step 3: Adding Decorative Details
-
Draw the floating heart:
Above the space between the ‘H’ and ‘e’, draw a simple outline of a heart. Keep the lines thin and crisp using the fine tip pen. -
Add the bottom heart:
Below the word, centered roughly under the ‘L’s, draw a second heart. Inside this heart, draw a smaller heart outline to create a double-line effect. -
Sketch left foliage:
To the left of the bottom heart, draw two small vertical stems. Add small, leaf-shaped loops on either side of the stems, making them look like simple vines growing upward. -
Sketch right foliage:
Repeat the vine process on the right side of the bottom heart. Vary the height slightly so the design feels organic rather than perfectly symmetrical. -
Add top sprig:
Above the ‘O’, draw a single thin stem branching out into three lines. Add tiny circle ‘berries’ at the end of each branch tip. -
Add floating dots:
Scatter small dots around the lettering and foliage. Place them randomly to fill negative space, varying their placement to create a confetti-like look.
Step 4: Final Touches and Curing
-
Detail the letters:
Add tiny decorative elements near the top left, like the word “hoto” or a small signature if desired, keeping the scale very small. -
Clean up:
If you used pencil guidelines and can still see them, wait until the paint is fiercely dry—I usually give it at least an hour—before gently wiping them away with a damp paper towel or eraser. -
Correct mistakes:
If you made a stray mark, use a Q-tip dipped in rubbing alcohol to wipe it away while the paint is still wet. For dry mistakes, you can gently scrape them off with a craft knife or fingernail. -
Air dry:
Let the mug sit undisturbed for 24 hours. This allows the paint to bond initially with the surface before heat setting. -
Bake to set:
Place the mug in a cold oven. Set the temperature to 350°F (176°C) and bake for 30 minutes. Turn the oven off and let the mug cool completely inside the oven to prevent cracking.
Now you have a custom, cafe-style mug ready for your favorite hot beverage

Custom Sneakers With Graphic Panels
Transform plain white canvas sneakers into a statement piece with this pastel geometric design. Featuring crisp color blocking, playful stars, and checkerboard details, this project proves that a few paint pens can completely reinvent your footwear.
Step-by-Step Guide
Materials
- White canvas sneakers (clean and dry)
- Painter’s tape or masking tape
- Acrylic paint pens (Teal/Mint Green, Salmon/Peach, Black, White)
- Pencil
- X-Acto knife or craft knife (optional)
- Matte or satin acrylic finisher/sealer spray
Step 1: Preparation & Color Blocking
-
Prepare the canvas:
Ensure your sneakers are completely clean and dry before starting. Remove the laces to give yourself full access to the side panels and tongue area. -
Map out the design:
Using a pencil, very lightly sketch diagonal lines on the side of the shoe to map out your sections. You’ll need a triangle near the lace eyelets, a diagonal strip for the checkerboard, a wider middle panel, and a large heel section. -
Mask the first section:
Apply painter’s tape along the pencil lines to protect the areas you don’t want to paint yet. Focus on isolating the salmon-colored triangle near the laces first. -
Paint the pink accents:
Fill in the small triangle near the eyelets and the large heel section with your salmon/peach paint pen. Depending on opacity, you may need a second coat after the first dries. -
Paint the mint panel:
Once the pink sections are dry to the touch, move your masking tape to expose the middle diagonal strip. Fill this area entirely with the teal or mint green paint pen. -
Create the checkerboard base:
For the checkerboard strip separating the mint and heel sections, first paint a sold black diagonal band. Let this dry completely—I find this crucial to prevent the white from turning gray later.
Tape Trick
Press the edge of your masking tape down firmly with your fingernail or a credit card to prevent paint from bleeding under the tape and ruining your crisp lines.
Step 2: Adding Graphic Details
-
Draw the checkerboard:
Once the black band is fully dry, use a fine-tip white paint pen to draw small squares in a checkerboard pattern over the black base. -
Add the stars:
Using a black fine-tip pen, draw several five-pointed stars on the mint green panel and one large star on the salmon heel section. -
Detail with dots:
Add clusters of small black dots or stippling around the stars on the mint panel to add texture and whimsy to the design. -
Paint the heel motif:
On the far back of the salmon heel section, draw a vertical geometric plant or arrow motif using bold black lines. -
Add sole details:
Along the white rubber sidewall of the sole, use a red or salmon marker to create a line of evenly spaced dots running from the heel towards the toe.
Step 3: Finishing Touches
-
Clean up edges:
Inspect your lines where the colors meet the white rubber sole. If any paint bled, use a little white acrylic paint or a remover pen to tidy up the edges. -
Let it cure:
Allow the paint to dry completely for at least 24 hours. This ensures all layers are hardened before sealing. -
Seal the deal:
Spray the painted canvas areas with a matte or satin acrylic finisher. Apply thin, even coats to protect your artwork from water and dirt. -
Re-lace:
Once the sealer is dry, lace your sneakers back up to complete the look.
Level Up: Leather Laces
Swap out the standard white cotton laces for leather cords or satin ribbons to elevate the custom look and match the painted aesthetic.
Step out in style knowing you have a completely unique pair of shoes designed by you

PENCIL GUIDE
Understanding Pencil Grades from H to B
From first sketch to finished drawing — learn pencil grades, line control, and shading techniques.
Explore the Full Guide
Phone Case Pop Icons and Stickers Look
Transform a plain phone case into a trendy accessory featuring playful doodles like lightning bolts, smiley hearts, and daisy-like flowers. This project uses acrylic paint pens to mimic the look of custom sticker art on a chic, muted terracotta background.
How-To Guide
Materials
- Plain phone case (clear or solid color)
- Matte acrylic paint (terracotta or dusky pink)
- Foam brush or wide flat paintbrush
- Fine tip acrylic paint pens (black, white, red, light pink, orange)
- Mod Podge or spray sealant (matte finish recommended)
- Pencil (optional for sketching)
- Isopropyl alcohol and cotton pad
Step 1: Preparation & Base Coat
-
Clean surface:
Remove your phone from the case. Wipe the entire exterior surface of the case with isopropyl alcohol and a cotton pad to remove any oils or grease, which ensures the paint adheres properly. -
Apply base color:
Using a foam brush for a smooth finish without brushstrokes, apply a layer of terracotta or dusky pink acrylic paint over the entire back and sides of the case. Let it dry completely. -
Second coat:
Apply a second coat of the base color to ensure full opacity. If the original case color is dark, you might even need a third thin layer. Allow this to dry for at least an hour until it is not tacky to the touch.
Prime Before You Paint
If your case is slick plastic, lightly sand the surface with fine-grit sandpaper before painting. This gives the acrylic paint ‘tooth’ to grip onto.
Step 2: Drawing the Icons
-
Plan the layout:
Visualize where your larger icons will go. You want a random, scattered effect. You can lightly sketch the placement with a pencil if you feel unsure about freehanding directly with markers. -
Draw red hearts:
Start with your red paint pen. Draw a few solid red hearts scattered across the surface. Vary their rotation slightly so they don’t all look uniform. -
Add white daisies:
Switch to a white paint pen. Draw simple five-petal flower shapes. Create a few different sizes—some large, some medium—leaving space in the center for a dot later. -
Create distinct flowers:
For variety, draw a second type of flower using a light pink or unpainted space for petals, outlining them later to create a ‘hollow’ look. -
Add quirky hearts:
Draw one or two hearts using the white pen. I like to make these slightly wonky or asymmetrical for a hand-drawn sticker vibe. -
Insert lightning bolts:
Using a black or dark red pen, draw sharp lightning bolt outlines. Leave the insides empty so the background color shows through. -
Fill small details:
Add centers to your flowers using orange or red dots. Add small accent dots or groups of three dots in empty background spaces to balance the composition.
Fixing Wobbly Lines
Line too shaky? Don’t panic. Wait for the black ink to dry completely, then use a tiny brush with your background color to ‘erase’ and reshape the edge.
Step 3: Outlining & Defining
-
Outline the hearts:
Once the red paint is fully dry, use a fine-tip black paint pen to outline the red hearts. Keep the line weight consistent. -
Outline the flowers:
Carefully trace around your white flower petals with the black pen. Add a small circle outline around the center colored dot to define it. -
Add character to white hearts:
Outline your white hearts in black. To make them unique, add a tiny ‘m’ shape or a small smiley face inside one of them for extra personality. -
Define the bolts:
Go over your lightning bolt shapes to ensure the black lines are crisp and bold. Add a small interior line or ‘shadow’ line inside the bolt for depth if desired. -
Draw tiny sunbursts:
Find a small gap and draw a white circle with radiating lines to create a mini sun or spark icon. -
Add mini flowers:
Draw very small, simple sketched flowers (just outlines) in black in any remaining large gaps. -
Final check:
Look over the case for any smudges or uneven lines. You can carefully touch up the background paint if you made a mistake with the black liner.
Step 4: Sealing
-
Dry time:
Let the paint pen designs dry for at least 2-3 hours. If you seal it while the ink is wet, the black lines will smear instantly. -
Apply sealant:
Apply a clear top coat. A spray sealant is safest to prevent smearing, but you can also carefully brush on Mod Podge. Two thin coats are better than one thick one.
Allow the varnish to cure fully overnight before snapping your phone back in to enjoy your custom art piece
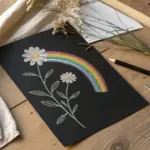
Black Paper Florals With Opaque Highlights

Embrace the drama of high contrast by creating this stunning botanical arrangement on deep black cardstock. Using opaque white and muted color paint pens, you’ll layer delicate line work over solid shapes for a modern, illustrative look.
Step-by-Step
Materials
- High-quality black cardstock or heavy mixed media paper (A4 or similar)
- White acrylic paint pen (extra fine 0.7mm or fine 1mm)
- White acrylic paint pen (medium tip for filling)
- Muted mauve or dusty rose acrylic paint pen
- Light sage green acrylic paint pen
- Beige or tan acrylic paint pen
- Graphite pencil and soft eraser (optional)
- Scrap paper for testing ink flow
Step 1: Planning and Base Shapes
-
Map out the composition:
Visualize a diagonal flow for your bouquet, starting from the bottom left and reaching up towards the top right. You can lightly sketch the main flower circles and leaf directions with a pencil, but keep the lines very faint to avoid smudging the black paper. -
Block in the main mauve flower:
Using your dusty rose or mauve paint pen, draw the large five-petaled flower on the right side. Fill the petals in completely to create a solid base color. Don’t worry about the details yet; just focus on a smooth, opaque fill. -
Add the secondary rose shape:
On the left side, slightly higher than the first flower, draw a rounded, cup-like shape for the rose bud using the same mauve color. Fill it in solid. -
Create the white flower bases:
Switch to your medium white paint pen to draw the two smaller flowers near the center. Draw their petals and fill them in solidly with white ink. White can sometimes be translucent on black, so I like to let the first layer dry and apply a second coat if needed for pure opacity. -
Draw the beige leaf cluster:
At the bottom center, draw three large, pointed oval leaf shapes using your beige or tan pen. Fill these heavily so they stand out against the dark background.
Ink Flow Problems?
If the white ink looks streaky or absorbs into the black paper, wait for it to fully dry and apply a second coat. Never scrub wet ink into paper.
Step 2: Line Work and Details
-
Outline the large mauve flower:
Once the mauve base is completely dry, take your fine-tip white pen. Carefully outline each petal. Inside each petal, draw fine lines that curve from the center outward, mimicking the texture of veins. -
Detail the flower center:
Draw a small circle in the center of the mauve flower with a light green or beige pen. Surround this center with tiny white dots or stamens radiating outward. -
Define the white flowers:
Use a very fine black fineliner (or just leave negative space if you are precise) to add details to the white flowers, but typically with paint pens on black paper, it’s easier to layer darker colors on top. Use a fine black pen or a dark grey paint pen to draw the center circles and radiating lines on the white flowers to give them definition. -
Detail the rose bud:
Go back to the mauve rose bud on the left. Use a fine black pen or dark purple to draw a spiral line inside the shape, suggesting tightly wrapped petals. -
add veins to beige leaves:
Using a fine black pen or the mauve pen, draw a central vein and angled side veins on the three large beige leaves at the bottom.
Make It Shimmer
Swap the beige or mauve paint pen for a metallic gold or copper pen for the flower centers and accents to give the piece a luxurious feel.
Step 3: Foliage and Flourishes
-
Draw the contour leaves:
Using your fine white paint pen, draw several large, open leaf shapes that are just outlines (no fill). Draw a central vein and simple side veins. Place one prominently in the center pointing up, and smaller ones tucked behind the main flowers. -
Add sage green sprigs:
With the light green pen, draw a stem rising from the left side. Add small, paired leaves along the stem. You can also outline shape of the rose’s stem and calyx with this green. -
Create delicate filler branches:
Using the fine white pen, draw thin, wispy stems curving upwards. Add tiny dots or small teardrop shapes along these stems to create look of baby’s breath or berries. -
Add pink accents:
Draw tiny five-petaled flower fillers scattered around the composition using the mauve pen. Add a small dot in the center of each with the white or beige pen. -
Incorporate decorative dots:
To fill empty black space and add magic to the piece, place clusters of three tiny white dots in open areas. Add single dots sporadically like stardust. -
Final highlights:
Review your work. If any white lines have faded into the paper, re-trace them gently to make them pop. Add a crisp white highlight to the edge of the green leaves or the rose stem for dimension.
Step back and admire how the opaque colors vibrate against the dark background, creating a moody and sophisticated piece of art
BRUSH GUIDE
The Right Brush for Every Stroke
From clean lines to bold texture — master brush choice, stroke control, and essential techniques.
Explore the Full Guide
Mandalas With Super Crisp Symmetry
Embrace the warmth of natural tones by creating this delicate mandala on tan paper, where white highlights truly pop against the earthy background. The combination of precise black ink lines and soft peach acrylic paint creates a stunning balance of strength and softness.
Detailed Instructions
Materials
- Square sheet of heavy kraft or tan toned paper (approx. 8×8 inches)
- Compass with a pencil holder
- HB or 2H pencil
- Ruler and eraser
- Fine liner pen (Black, 0.3mm and 0.5mm)
- Acrylic paint markers (White, extra fine tip)
- Acrylic paint markers (Muted peach or blush pink, fine tip)
- Acrylic paint markers (Light brown or beige, fine tip)
Step 1: Building the Grid
-
Find the center:
Begin by lightly marking the exact center of your kraft paper square. This central point is the anchor for the entire symmetry of the piece. -
Draw guide circles:
Using your compass, draw a series of concentric circles radiating from the center. Start with a small inner circle (about 1 inch diameter) and add roughly 6-7 increasingly larger rings, leaving the outermost ring about an inch from the paper’s edge. -
Add radial lines:
Use your ruler to draw straight lines passing through the center point like slices of a pie. I find dividing the circle into 16 equal sections provides the perfect density for these petal shapes.
Step 2: Drafting the Design
-
Sketch the center flower:
In the innermost circles, lightly pencil in an eight-petaled flower shape. The petals should be rounded but slightly pointed at the tips, fitting neatly within your second circle guide. -
Create the sunburst ring:
Around the central flower, sketch a wide band. inside this band, draw radiating straight lines to create a zone for texture later. -
Draft the middle scallops:
Moving outward, draw a ring of small semi-circles or scallops. These should sit on one of your middle guide circles, acting as a border for the larger details. -
Outline the main petals:
In the broad outer ring, pencil in large, pointed petal shapes that extend toward your outer boundary. Ensure the tips of these petals align with your radial guide lines for perfect symmetry.
Keep it Clean
Place a scrap piece of paper under your drawing hand while you work. This prevents the natural oils from your skin from smudging the pencil lines or transferring wet acrylic ink.
Step 3: Inking and Coloring
-
Outline the center:
Switch to your 0.5mm black fine liner. Carefully go over your pencil lines for the central flower. Add a small circle in the very center and fill the surrounding space with tiny stippled dots. -
Add peach accents:
Shake your peach acrylic paint pen well. Fill in the petals of the central flower, leaving a tiny gap between the paint and your black outline to keep things crisp. -
Detail the sunburst layer:
Use the finer 0.3mm black pen to draw the radiating lines in the band surrounding the flower. Then, take the light brown paint marker and shade the background of this ring lightly to add depth. -
Create the white scallops:
For the scallop ring, outline the semi-circles with the black pen first. Once the ink is dry, use your white acrylic marker to draw spirals inside each scallop. This white-on-tan contrast is key to the look. -
Draw the secondary petals:
Between the scallop ring and the large outer petals, ink a layer of smaller, secondary petals. Fill the tips of these with a touch of peach paint. -
Define the outer rim:
Ink the large outer petals with steady strokes. Inside each large petal, draw a smaller internal petal shape that mimics the outer contour. -
Fill the outer petals:
Color these inner petal shapes with the peach marker. Add a small white dot at the base of each peach section for a decorative highlight. -
Add texture:
Using the beige/light brown marker, add subtle coloring to the tips of the large outer petals. This creates a gradient effect that softens the transition to the paper. -
Enhance with white dots:
Take your extra-fine white paint pen and add tiny dots around the perimeter of the central flower and along the scallop ring. Grouping dots in threes often looks very elegant. -
Final outer details:
To finish the composition, add a dusting of white dots floating freely around the very outside of the mandala, fading out into the empty paper space like stardust. -
Erase guidelines:
Wait at least 15 minutes to ensure all paint and ink is completely cured. Gently erase any visible pencil guidelines to reveal the clean, finished design.
Layer for Luminescence
For ultra-bright white details on kraft paper, let the first layer of white paint dry completely, then apply a second coat directly on top to increase opacity.
Step back and admire how the earthy paper transforms the simple palette into something warm and intricate
Geometric Color Blocking on Mini Canvas Panels
Transform a tiny canvas panel into a striking piece of modern geometric art using simple masking techniques. This radial color-blocking design features bold sections of navy, teal, mustard, and rust separated by crisp white lines for a clean, professional finish.
Step-by-Step Guide
Materials
- Mini square canvas panel (approx. 4×4 or 6×6 inches)
- Acrylic paint pens (navy blue, teal, mustard yellow, rust red, light blue)
- White acrylic paint pen (fine tip) or painters tape (thin, ideally 1/4 inch or less)
- Ruler or straight edge
- Pencil
- Eraser
Step 1: Planning and Taping
-
Find the center:
Begin by laying your mini canvas on a flat surface. Use your ruler to lightly measure and mark the exact center point of the square with a pencil. -
Draw the grid:
Lightly sketch lines connecting opposite corners to create an ‘X’ through the center. Then, draw a vertical line and a horizontal line through the center point, dividing the canvas into eight equal triangular wedges. -
Create the secondary angles:
To achieve the specific dynamic look in the photo, you aren’t just filling the eight wedges. You need to create angular slants within them. Draw straight lines that cut across your existing triangles at varying angles, creating trapezoids and smaller triangles. -
Tape the lines:
This is the most crucial step for crisp edges. Apply thin masking tape or painter’s tape directly over every pencil line you drew. Press down firmly on the edges of the tape to prevent paint bleed. -
Seal the tape edges:
For razor-sharp lines, I like to run a fingernail or a bone folder over the tape edges one last time to ensure a perfect seal against the canvas texture.
Bleeding Lines?
If you have trouble with bleeding, paint a layer of white or clear matte medium over the tape edges first. This seals the tape, so any seepage is invisible, keeping your colors perfect.
Step 2: Applying Color
-
Plan your color palette:
Select your five key colors: navy blue, teal, light blue, rust red, and mustard yellow. Look at the reference image to see how colors are distributed—notice how dark blues often sit opposite warm tones for contrast. -
Start with the first color:
Take your navy blue paint pen and fill in a few non-adjacent sections. Shake the pen well to ensure opaque coverage. -
Fill the warm sections:
Move on to the rust red and mustard yellow pens. Color in sections that are positioned away from the blues to create visual balance across the canvas. -
Add the lighter tones:
Use the teal and light blue pens for the remaining geometric shapes. Be generous with the ink or paint—canvas absorbs more than paper, so you may need a second coat for full vibrancy. -
Check the edges:
Ensure you paint slightly onto the tape itself. This guarantees that when you peel the tape away, the color meets the white line perfectly with no gaps. -
Let it dry completely:
Allow the paint to fully cure. Acrylic markers dry fast, but wait at least 30 minutes to be safe. If you peel too early, wet paint might smear.
Step 3: Refining and Finishing
-
The exciting reveal:
Gently peel away the tape slowly at a 45-degree angle. This should reveal crisp white lines of raw canvas underneath. -
Touch up any bleeds:
If a little color crept under the tape, don’t panic. Use a fine-tip white acrylic paint pen to carefully cover exactly where the bleed occurred. -
Clean up the center:
The center point where all tapes met can sometimes look messy. Use your white paint pen to dab a neat, tiny white dot in the middle to cover any intersection flaws. -
Paint the sides:
Since this is a canvas panel, finish the look by painting the thin outer edges white (or one of your main colors) for a polished, framed appearance.
Make It Glossy
Once the paint is totally cured, apply a coat of high-gloss varnish or resin over the entire surface. It makes the colors pop and gives the mini canvas a ceramic tile or mosaic effect.
Display your new geometric mini-masterpiece on a tiny easel or arrange several together for a gallery wall effect


Wood Slice Quotes and Botanical Sprigs
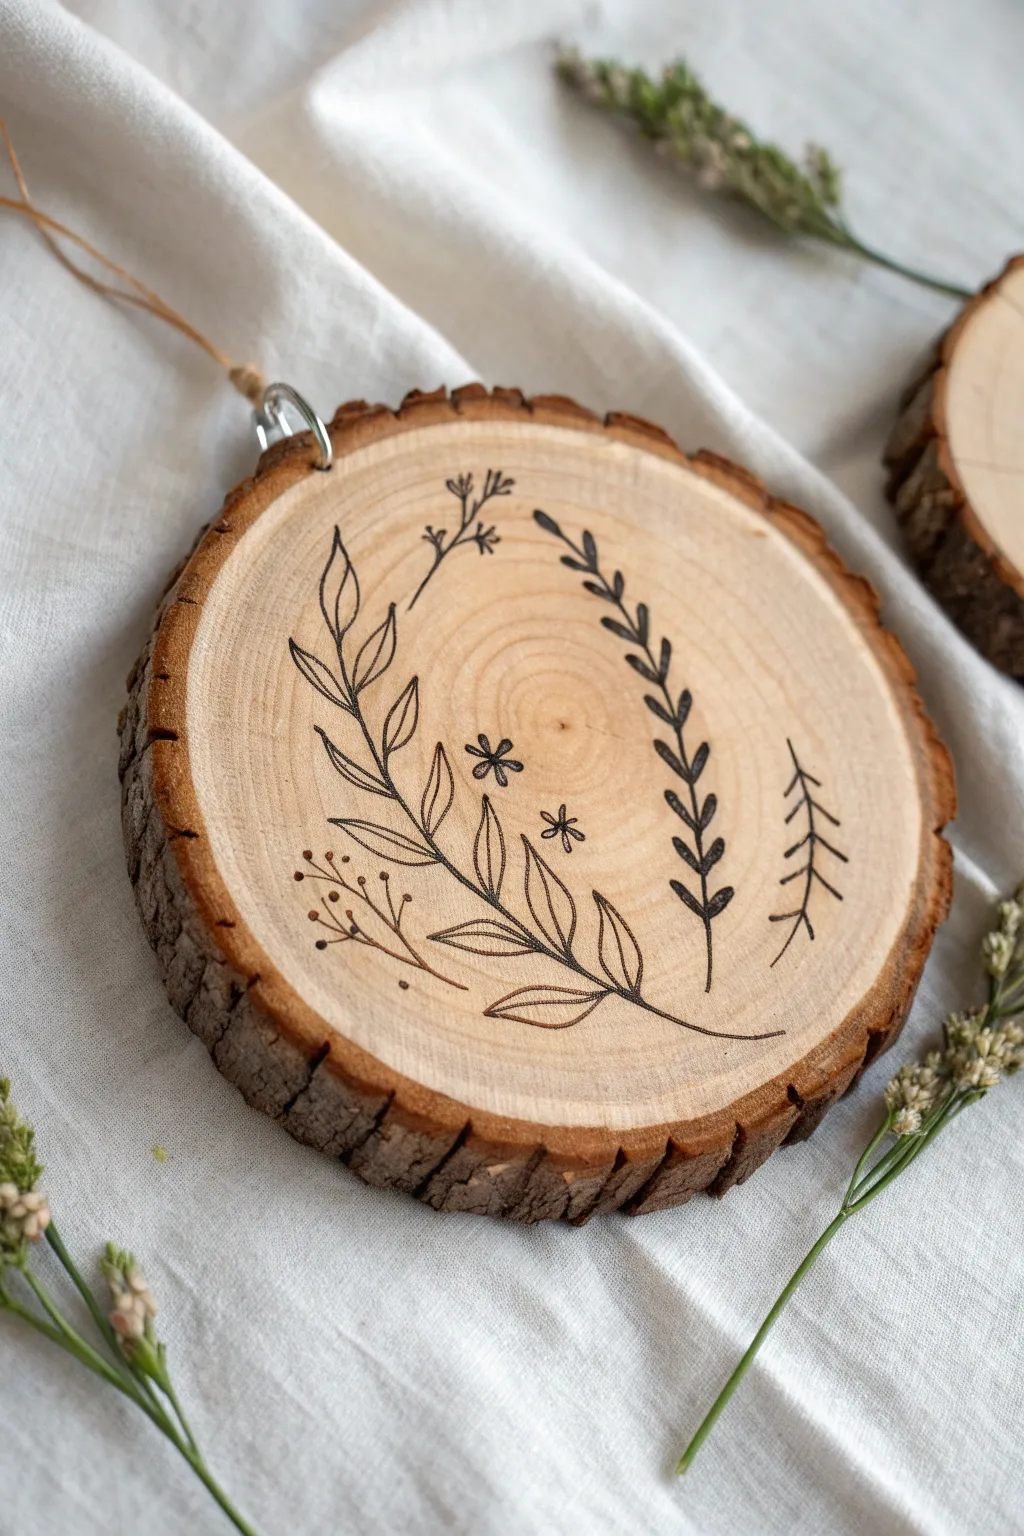
Embrace the rustic charm of nature with this delicate wood slice ornament featuring simple botanical line art. The contrast between raw wood grain and crisp black ink creates a timeless piece perfect for hanging or gifting.
Step-by-Step Tutorial
Materials
- Raw wood slice (approx. 3-4 inches diameter) with bark edge
- Fine-grit sandpaper (220 grit or higher)
- Black extra-fine tip acrylic paint pen (0.7mm or smaller) or archival ink pen
- Pencil (HB or lighter)
- Kneaded eraser
- Small screw eye hook
- Twine or jute string
- Clear matte varnish or sealant spray (optional)
Step 1: Preparation
-
Prepare the surface:
Since wood slices can be rough, start by lightly sanding the face of the wood slice with fine-grit sandpaper. You want it stripped of any distinct fuzz or splinters that might snag your pen tip later. -
Clean the dust:
Wipe the surface thoroughly with a dry cloth or tack cloth to remove all sanding dust. -
Plan the layout:
Using a pencil, very lightly sketch your main curve. This design features a C-shape or crescent composition, leaving open space in the center.
Bleed Prevention
If your ink feathers into the grain, apply a thin coat of clear matte sealer/mod podge *before* drawing to create a barrier.
Step 2: Drawing the Botanicals
-
Sketch the main sprig:
Lightly pencil in the largest leafy branch on the left side. It should curve upwards, following the round edge of the wood. -
Outline the fern branch:
On the right side, pencil a simpler, vine-like branch with small leaves that mirrors the curve of the first branch. -
Add filler elements:
Determine placement for the smaller details: a tiny berry sprig at the bottom left, a straight pine-needle twig on the far right, and two small star-flowers in the center. -
Inking the main stem:
Take your black extra-fine tip pen. Starting seamlessly from the bottom center, trace the main stem of the large left branch. Keep your pressure light to prevent the ink from bleeding into the wood grain. -
Drawing the large leaves:
Add the leaves to the main stem. Draw each leaf with a pointed oval shape, adding a central vein line down the middle of each one for dimension. -
Inking the right vine:
Move to the right side vine. Draw the central line first, then add small, filled-in leaf shapes along the stem. These are solid black, contrasting with the open leaves on the left. -
Creating the pine sprig:
To the right of the vine, draw a simple vertical line. Add downward-angled distinct strokes on either side to create a stylized pine or wheat accent. -
Adding texture details:
Ink the small berry sprig at the bottom left, using tiny circles for the berries. Draw the two small five-petal flowers floating in the negative space between the main branches. -
Top accent sprig:
If you have space near the top, add a tiny, delicate twig branching off the main stem to balance the composition.
Step 3: Finishing Touches
-
Let it cure:
Allow the ink to dry completely. Wood is porous and can hold ink wet longer than paper, so give it at least 15-20 minutes. -
Erase pencil lines:
Gently dab—don’t rub aggressively—with a kneaded eraser to lift any visible graphite marks without smearing the ink. -
Attach hardware:
Locate the top center of the slice. firmly twist the screw eye hook into the bark or the wood just inside the bark layer. -
Add the hanger:
Thread a piece of jute twine through the eye hook and knot it securely to create a hanging loop.
Fixing Mistakes
Did a line go rogue? Use a scrap of sandpaper to gently sand away the ink error, then redraw over the fresh wood.
Now you have a charming piece of woodland art ready to display on your wall or tree
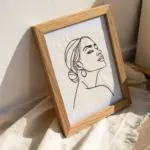
Minimal Line Art on Plant Pots
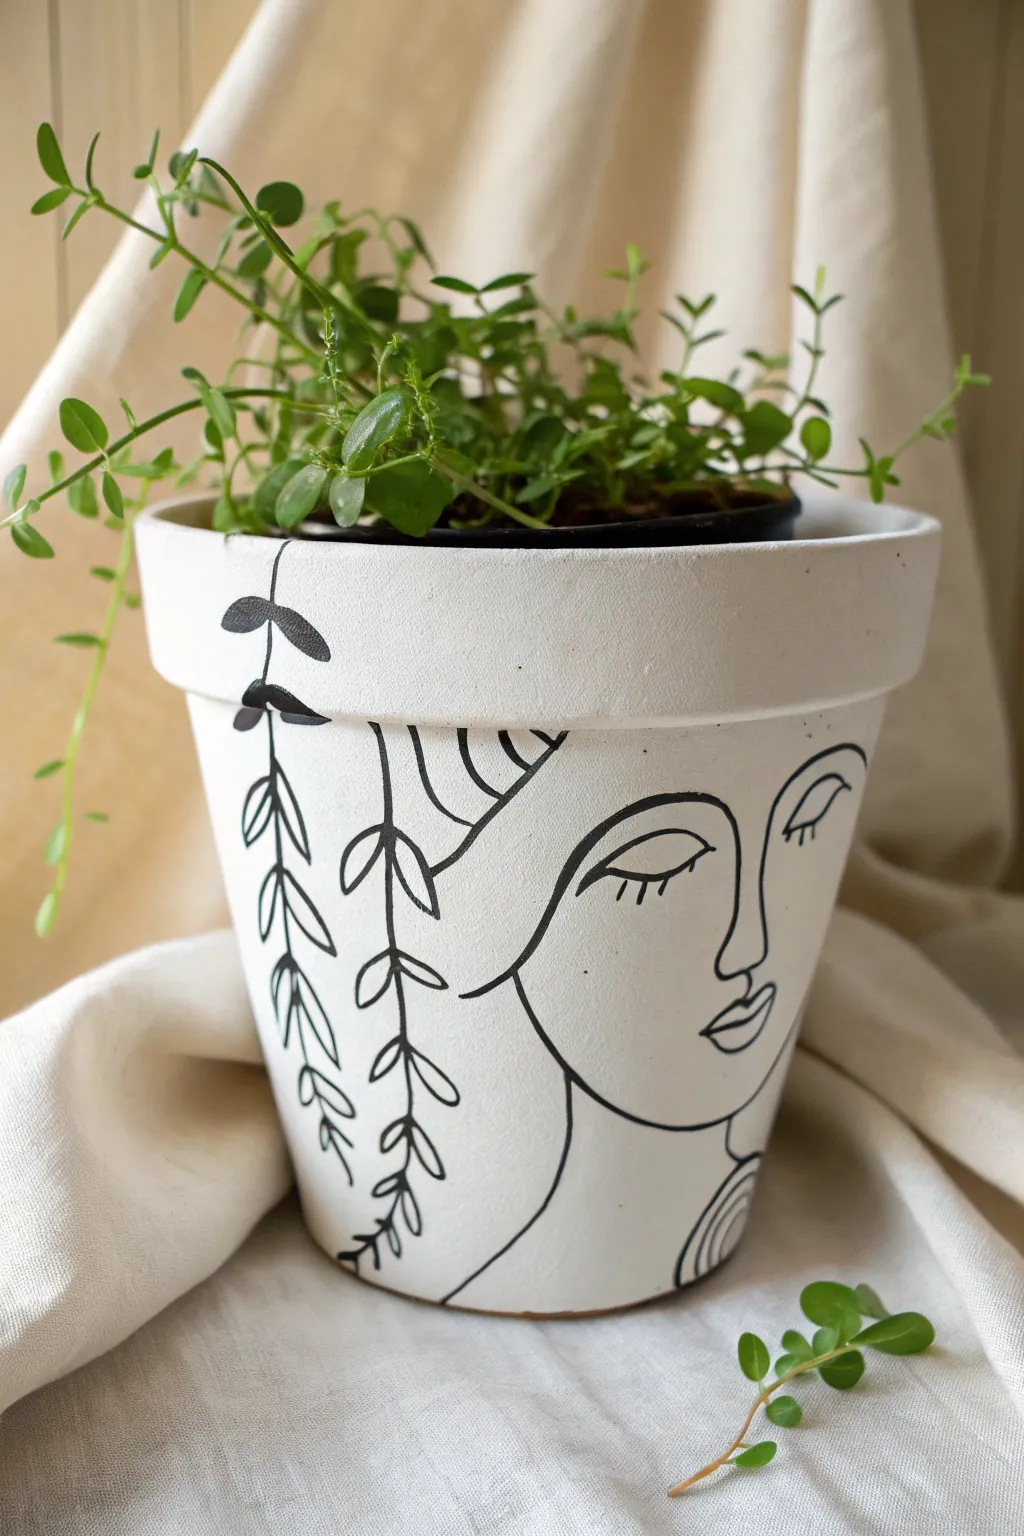
Transform a plain terracotta pot into a modern art piece using nothing but white paint and a steady black line. This project combines serene botanical motifs with a simple, abstract face profile for an elegant, understated look.
Step-by-Step
Materials
- Terracotta pot (clean and dry)
- White acrylic paint (matte finish)
- Black acrylic paint pen (medium or fine tip)
- Flat paintbrush (medium size)
- Pencil for sketching
- Clear sealant spray (matte or satin)
- Paper plate or palette
- Water cup and paper towels
Step 1: Preparing the Canvas
-
Base Coating:
Squeeze a generous amount of white acrylic paint onto your palette. Using a flat brush, apply a smooth, even layer of white paint over the entire exterior of the terracotta pot. -
Painting the Rim:
Don’t forget the rim! carefully paint the top edge and go about an inch down the inside of the pot so the raw clay doesn’t show when it’s filled with soil. -
Second Coat:
Allow the first coat to dry completely for about 20-30 minutes. Apply a second coat to ensure full opacity, covering any streaks or terracotta color that peeked through the first layer. Let this dry fully.
Step 2: Sketching the Design
-
Planning the Face:
Lightly sketch the outline of the face using a pencil. Start with the profile line—the forehead, nose, and lips—positioned on the right side of the pot. -
Adding Details:
Sketch the eye as a simple curved line with lashes, then add the eyebrow and the curve of the jawline. -
Mapping the hair:
Draw the hair outline sweeping back from the forehead, creating a few curved sections to suggest volume or a head wrap style. -
Drafting the Vines:
On the left side of the face, sketch long, vertical vines hanging down from the rim. Draw small, simple almond-shaped leaves branching off the stems. -
Rim Details:
Sketch a few leaves or vine stems extending up onto the rim itself to connect the design across the structure of the pot.
Smooth Lines Pro Tip
If your hand feels shaky, rest your pinky finger against the pot surface to stabilize your hand while drawing the long profile lines with the pen.
Step 3: Inking the Art
-
Testing the Pen:
Before touching the pot, press your black acrylic paint pen onto a scrap piece of paper to prime the nib and ensure the ink flows smoothly without blotting. -
Tracing the Profile:
Begin tracing your pencil lines with the paint pen. Start with the face profile for a confident anchor point. Keep your pressure consistent for a uniform line width. -
Defining the Eye:
Carefully ink the closed eyelid and draw small, distinct strokes for the eyelashes. This is a focal point, so take your time here. -
Drawing the Hair:
Trace the hair outlines. I find it helpful to rotate the pot as I draw these longer curves to keep my hand in a comfortable position. -
Inking the Vines:
Go over the hanging vine sketches. Use a confident, fluid motion for the main stems, then add the leaves. -
Solid Accents:
Identify a few specific leaves, particularly near the rim or connection points, and color them in solid black. This adds visual weight and contrast to the line work. -
Neck Detail:
Add the circular or spiral detail at the base of the neck to finish the figure’s form.
Level Up: Gold Leaf
Add small touches of gold leaf to the solid black leaves or the figure’s earring area for a luxe, mixed-media finish.
Step 4: Finishing Touches
-
Cleanup:
Once the black ink is completely dry (give it at least 15 minutes), gently erase any visible pencil marks that weren’t covered by the ink. -
Sealing:
Take the pot to a well-ventilated area. Spray a light, even coat of clear matte sealant over the entire painted surface to protect your artwork from water damage and soil.
Now you have a chic custom planter ready to showcase your favorite trailing houseplant
Decorated Gift Boxes With Repeat Patterns

Transform plain brown wrapping paper into custom-designed gift wrap using nothing but a white marker and your imagination. These three stacked boxes showcase the charm of simple geometric patterns, proving that minimalist designs can have maximum festive impact.
Step-by-Step Guide
Materials
- White fine-tip acrylic paint pen (0.7mm or 1mm)
- Brown kraft wrapping paper
- Jute twine or rustic string
- Scissors
- Tape
- Three boxes of varying sizes
- Pencil (optional)
- Ruler
Step 1: Preparation & Wrapping
-
Measure and Cut:
Begin by rolling out your brown kraft paper. Place your first box on the paper and measure enough to fully cover it, leaving a few inches of overlap on all sides. -
Wrap the Boxes:
Wrap each of your three boxes tightly and neatly. Crisp corners and clean tape lines on the bottom or back will provide the best canvas for your artwork. Repeat for all three box sizes. -
Test Your Pen:
Before touching the box, scribble on a scrap piece of kraft paper with your white paint pen. Pump the nib if necessary to ensure the ink flows opaque and smooth rather than scratchy. -
Plan the Orientation:
Decide which side will be the ‘top’ face for each box. You want to ensure your main patterns are centered nicely on the visible surfaces.
Ink Flow Tip
If the pen starts to streak or fade, press the nib down on a scrap paper scrap, not your box. Paint pens can sometimes release a puddle of ink when pumped.
Step 2: Bottom Box: Waves & Ribbons
-
Draw the Faux Ribbon:
On the largest box, start by drawing a wide vertical band off-center to the right. Use a ruler to lightly pencil guide lines if you’re worried about straightness. -
Decorate the Ribbon:
Fill this band with alternating details. Draw zig-zag lines, small dots, and straight lines to create a patterned ‘ribbon’ effect directly on the paper. -
Create the Wave Pattern:
On the large open space to the left of your faux ribbon, draw a series of wavy, horizontal lines. Space them out generously. -
Add Secondary Waves:
In between your primary wave lines, add a second, parallel wave line very close to the first one to create a ‘double line’ effect for visual weight. -
Fill with Stars:
On the side panels of this bottom box, draw small 8-point asterisks or simple crisscross stars to fill the negative space without overcrowding it.
Cardboard Tag Accent
Cut a small tag shape from leftover brown paper, decorate it with a matching white border, and tie it to the jute twine on the middle box.
Step 3: Middle Box: Stars & Strings
-
Draw the Large Stars:
Move to the medium-sized box. Draw a large, five-point star shape. Instead of a single line, use a double-outline technique where you draw a smaller star inside a slightly larger one. -
Detail the Striped Band:
Create a vertical band on the left side of the box. Fill this column with vertical straight lines, small circles, and teardrop shapes to mimic beaded embroidery. -
Add Twine Texture:
Take your actual jute twine and wrap it vertically around the right side of the box 3-4 times. Tie it off securely on the bottom so the knot is hidden.
Step 4: Top Box: Moons & Dots
-
Create the Wavy Ribbon:
For the smallest top box, draw a wide band slightly to the right of the center. Fill this entire width with closely spaced, vertical wavy lines. -
Section the Left Side:
To the left of the wavy ribbon, draw crescent moon shapes in vertical columns. Make these quirky by giving them internal patterns like stripes or zig-zags. -
Dot the Right Side:
On the remaining space to the right, create a playful polka dot pattern using open circles of varying sizes—some small solid dots and some larger open rings. -
Final Assembly:
Stack your boxes from largest to smallest. For extra stability, you can use a small loop of double-sided tape between the layers to keep them perfectly aligned.
Now you have a stunning, cohesive stack of gifts that look beautiful under the tree or as a standalone holiday display
Photo Frame Doodle Borders
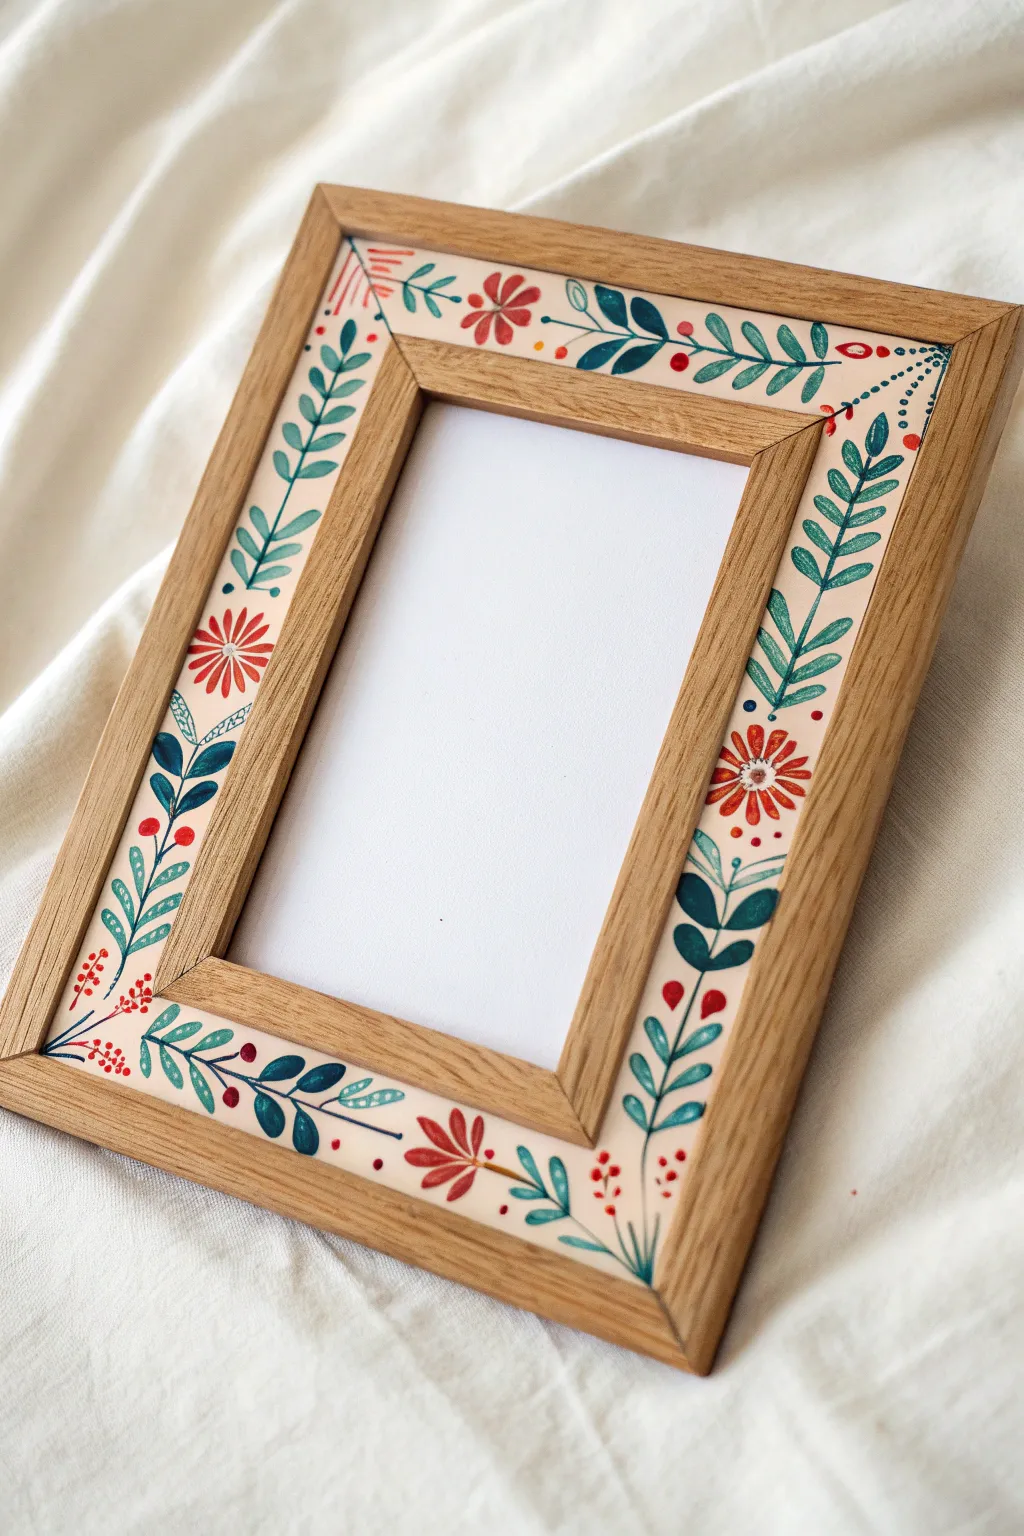
Transform a plain wooden frame into a charming piece of home decor with this intricate vine and floral design. Using acrylic paint pens allows for precise control over the delicate leaves and berries, creating a beautiful, hand-painted look that feels both rustic and refined.
Detailed Instructions
Materials
- Flat, wide, unfinished wooden picture frame (with a inset/recessed border)
- Sandpaper (fine grit, 220 or higher)
- Cream or off-white acrylic paint (base coat)
- Flat paintbrush (medium size)
- Acrylic paint pens (fine tip): Deep red, teal/light blue, dark hunter green/navy
- Pencil and eraser
- Clear matte or satin varnish spray
Step 1: Preparation and Base Coat
-
Prepare the surface:
Remove the glass and backing from your frame. Lightly sand the wooden surface, specifically the flat, recessed area where the design will go, to ensure it’s smooth and free of splinters. -
Wipe it down:
Use a slightly damp cloth to wipe away all the sanding dust. The surface needs to be completely clean for the paint to adhere properly. -
Apply the background color:
Using your flat paintbrush, apply a coat of cream or off-white acrylic paint to the recessed border area. Be careful to keep the inner and outer raised wooden edges clean, or mask them off with tape if you have an unsteady hand. -
Let it dry and repeat:
Allow the first coat to dry completely. Apply a second or third coat until the wood grain is fully covered and the background is opaque and smooth.
Step 2: Drafting the Design
-
Sketch the main vines:
Once the paint is bone dry, use a pencil to very lightly sketch a wavy line that meanders around the frame. This will be the spine for your vines. Try to make the waves roughly symmetrical on opposite sides. -
Mark flower placements:
Draw small circles where you want your main red flowers to sit. In the reference, these appear roughly in the center of the vertical sides and the top/bottom horizontal sides. -
Plan the leaf direction:
Lightly mark the direction of the leaves coming off the main vine. They should generally flow outward or follow the curve of the vine.
Oops! Blobs of Ink?
If a paint pen releases a puddle of ink, don’t wipe it! Let it dry completely as a raised bump, then carefully sand it flat and paint over it with the cream base coat.
Step 3: Painting the Greenery
-
Draw the main stems:
Take your teal or light blue paint pen and trace over your pencil vine lines. Keep the pressure steady to maintain a consistent line width. -
Create the two-toned leaves:
Start adding leaves along the vine. For visual interest, alternate between using the teal pen for some sprigs and the dark hunter green pen for others. This creates depth. -
Add vein details:
If your leaves are large enough, you can draw a simple central line inside them using the same color, or leave them as solid silhouettes for a bolder folk-art look. -
Incorporate contrasting leaves:
Draw smaller, rounded leaf clusters using the dark blue/green pen near the corners or in empty gaps to balance the composition.
Level Up: Metallic Pop
Go back over the dried design with a gold or silver paint pen, adding tiny dots to the flower centers or highlighting one side of the leaves for a touch of elegance.
Step 4: Adding Flowers and Accents
-
Draw the main daisy shapes:
Switch to your deep red paint pen. Draw the petals for the main flowers. These consist of simple, elongated teardrop shapes radiating from a center point. -
Add the flower centers:
Once the red petals are dry, use a contrasting color (like the cream background paint or a yellow if you have it) to dot the center of the flowers. -
Scatter the berries:
Look for empty white spaces along the vine. Add clusters of three small red dots to look like berries, or draw single red dots at the end of tiny stems. -
Add fine decorative lines:
Using a very fine point on your red pen, draw tiny parallel lines or ‘hatch marks’ in corners or near the leaf bases to add texture. -
Include geometric dots:
Use the dark green pen to add small rows of dots specifically in the corners of the frame. This frames the design nicely.
Step 5: Finishing Touches
-
Erase pencil marks:
Wait until you are absolutely certain all ink is dry—I usually give it an hour just to be safe. Gently erase any visible pencil sketch lines. -
Clean up edges:
If any paint got onto the raised natural wood rim, carefully scrape it off with a craft knife or use a damp Q-tip to clean it up. -
Seal the artwork:
To protect your handiwork from scratches and fading, spray the entire painted surface with a clear matte or satin varnish. Apply two light coats rather than one heavy one.
Reassemble your frame and enjoy your custom piece of folk art
Glass Jar Labels and Pantry Illustrations
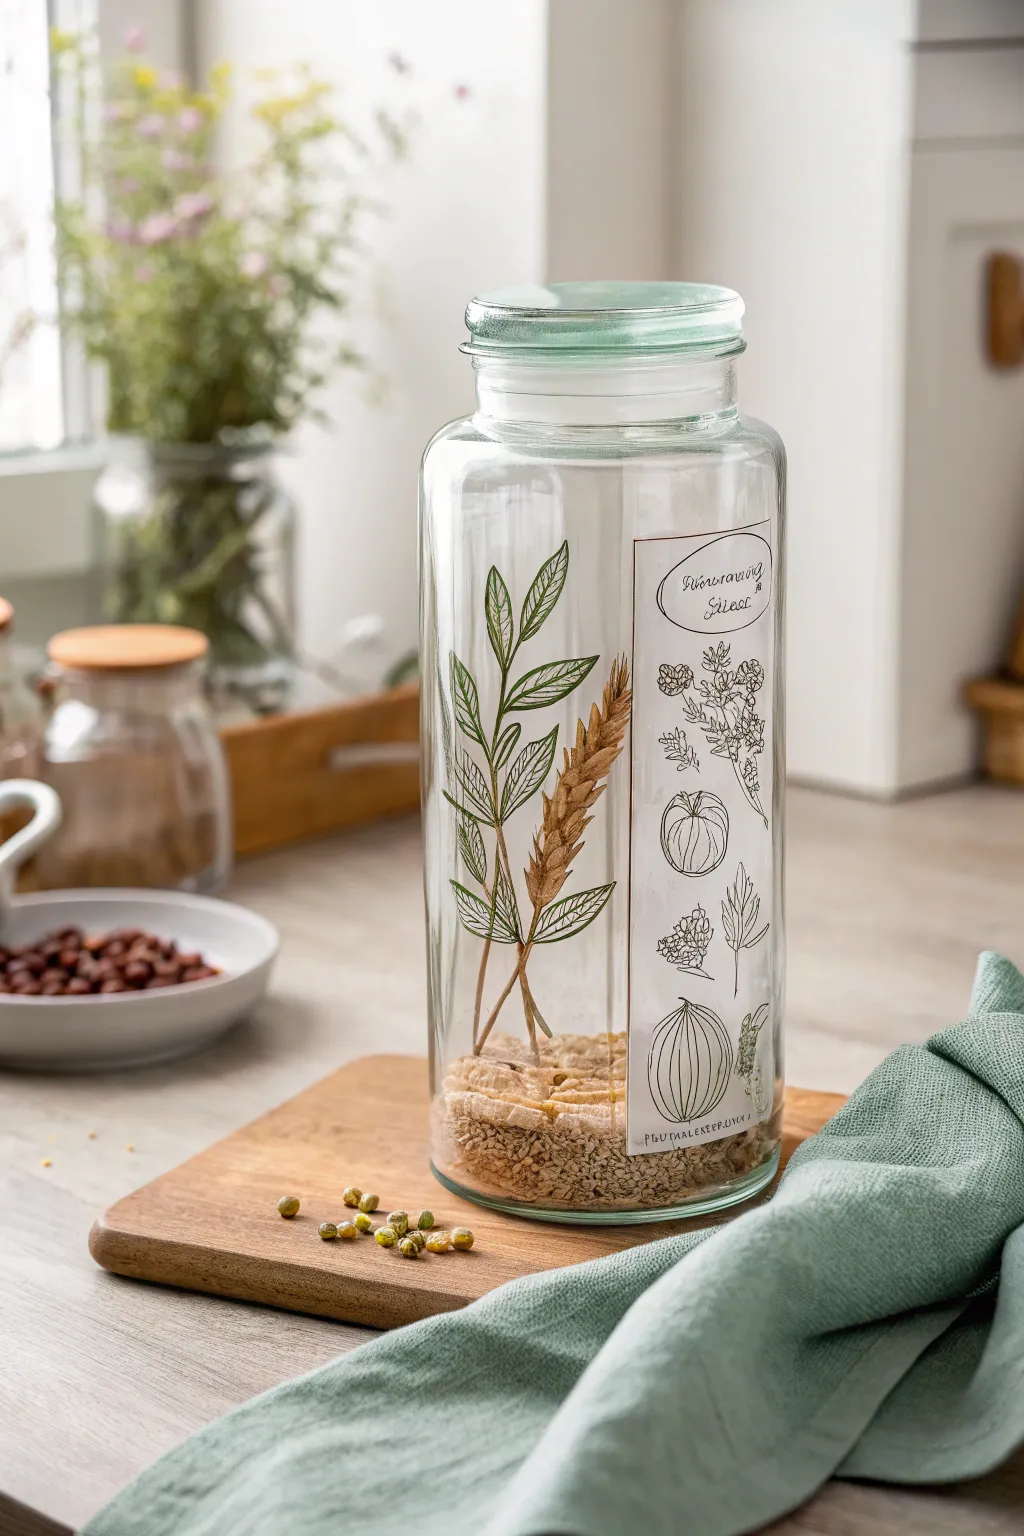
Transform ordinary kitchen storage into an elegant display piece with this delicate glass illustration project. Using acrylic paint pens, you’ll create fine-line botanical drawings directly on the glass surface, mimicking the look of vintage scientific illustrations.
Step-by-Step Tutorial
Materials
- Tall clear glass jar with lid (wiped clean with vinegar)
- Fine-point black acrylic paint pen (0.7mm or extra fine)
- White acrylic paint pen (medium tip)
- Paper and pencil for sketching
- Painter’s tape or masking tape
- Ruler
- Rubbing alcohol and paper towel
- Cotton swabs (for cleanup)
Step 1: Preparation & Layout
-
Clean the surface:
Before uncapping any pens, thoroughly clean the outside of your glass jar with rubbing alcohol or white vinegar. This removes oily fingerprints that can prevent the acrylic ink from adhering properly. Let it air dry completely. -
Plan the label area:
Decide where your ‘label’ illustration will live on the jar. Use painter’s tape to mark off a tall, rectangular column on the right side of the jar face. This tape boundary will help you keep straight edges for the white background box you’ll paint later. -
Draft on paper:
Measure the space inside your taped area and draw a rectangle of that size on a piece of scrap paper. Roughly sketch your botanical elements—garlic bulbs, herbs, and flowers—inside this box first to get the spacing right.
Fixing Smudges
Make a mistake with the ink? Don’t panic. While wet, wipe it with a damp cloth. If dried, a toothpick can gently scratch away stray acrylic marks on glass.
Step 2: Creating the Faux Label
-
Paint the background:
Using your white acrylic paint pen, fill in the rectangular area you taped off. You might need to pump the pen first on a scrap paper to get the flow going. Apply even strokes. -
Layering opacity:
Glass is slippery, so the first coat might look streaky. Let it dry for about 10–15 minutes, then apply a second coat of white to ensure a solid, opaque background for your line art. -
Remove tape:
Once the white paint is tacky but semi-dry, carefully peel away the painter’s tape to reveal clean, sharp edges. If any paint bled under the tape, clean it up immediately with a damp cotton swab. -
Add boundary lines:
Take your fine-point black pen and carefully draw a thin frame just inside the edge of your white rectangle. This creates that classic apothecary label look. -
Lettering:
At the top of the white box, use your best cursive handwriting to add a title like ‘Preserving’ or ‘Flavoring.’ If you’re nervous, sketch it lightly with a pencil directly on the dry white paint first.
Step 3: Drawing the Botanicals
-
Garlic bulb outline:
Near the bottom of your label, draw the outline of a garlic bulb. Start with a rounded shape that tapers slightly at the top. Keep your hand steady and use light pressure. -
Adding texture:
Fill the garlic bulb with thin, vertical curved lines to mimic the papery skin texture. Minimal strokes are better here; don’t overwork it. -
Mid-section herbs:
Above the garlic, draw a few sprigs of herbs like rosemary or thyme. Focus on rapid, short strokes for the leaves attached to a central stem. -
Top floral elements:
Complete the label illustration with a cluster of small flowers or clover near the top creating a balanced vertical composition. -
The free-floating leaves:
Now, move to the clear glass section to the left of your label. Here, you will draw a large leafy branch. Start by drawing the main stem lines in black. -
Leaf details:
Draw the outline of several large leaves extending from the stem. Inside each leaf, draw a central vein and delicate diagonal veins branching out. -
Green tinting (optional):
If you have a transparent green glass paint or a very watery green acrylic, you can carefully tint the inside of these floating leaves on the glass, but the stark black outline looks equally striking.
Use a Template
Can’t freehand? Print your desired botanical images, tape the paper inside the jar facing out, and simply trace the lines through the glass.
Step 4: Finishing Touches
-
Wheat stalk addition:
To the right of your leafy branch, draw a single wheat stalk. Create the ‘v’ shaped kernels stacking on top of each other, ending with long, whisker-like awns extending upward. -
Curing the paint:
Allow the jar to sit undisturbed for at least 24 hours. For extra durability, you can place the jar in a cool oven, heat it to 350°F (175°C) for 30 minutes, and let it cool inside, though air drying is sufficient for decorative use. -
Styling:
Once fully cured, fill the bottom of the jar with grains or textured salt to complete the aesthetic.
Now you have a stunning, custom storage piece that looks perfectly at home on any open shelf or countertop
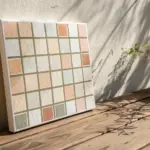
Ceramic Tile Coasters With Bold Linework
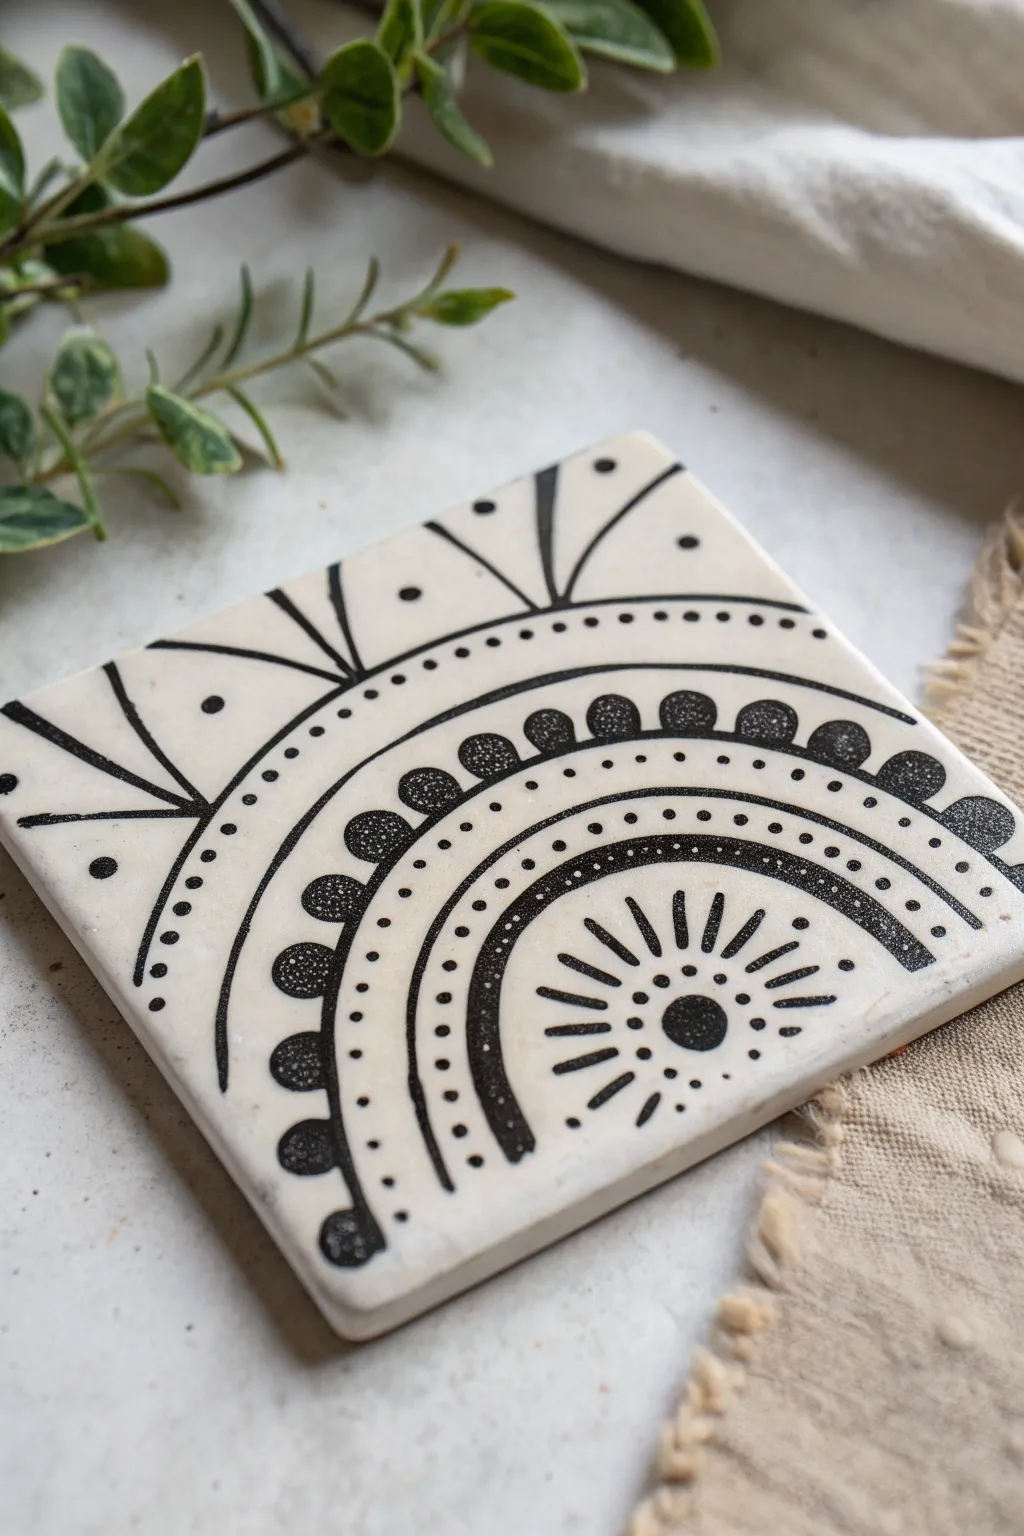
Transform a plain ceramic tile into a piece of modern bohemian decor with nothing more than a steady hand and a black marker. This project relies on high-contrast linework and repetitive geometric patterns to create a striking sunburst design that looks far more complex than it actually is.
Step-by-Step Guide
Materials
- 4×4 White ceramic tile (unglazed stone or tumbled marble works best for texture)
- Black acrylic paint pen (fine tip/0.7mm)
- Black acrylic paint pen (medium tip/3mm)
- Pencil (HB or lighter)
- Clean eraser
- Ruler or straight edge
- Compass (optional but helpful)
- Clear spray sealant (matte or satin finish)
Step 1: Planning the Layout
-
Clean surface:
Before starting, wipe down your tile with a damp cloth or a little rubbing alcohol to remove any stone dust or oils. Let it dry completely. -
Mark the center:
Using your pencil, lightly find the center point near the bottom edge of the tile. This semicircle design radiates from the bottom center, not the middle of the tile. -
Sketch the arches:
Lightly sketch three main concentric arches radiating from that bottom center point. They don’t need to be mathematically perfect; a little hand-drawn charm is welcomed here. -
Add dividing lines:
Sketch a horizontal line dividing the sunburst from the upper corners. Then, draw the radiating lines in the top corners and the center sun rays to ensure your spacing looks balanced before committing to ink.
Step 2: Inking the Core Design
-
Draw the main arches:
Take your medium-tip black paint pen and trace the three main arched lines you sketched. I find it helps to rotate the tile as I draw to keep my hand at a comfortable angle. -
Create the sun center:
In the very center (at the bottom edge), draw a solid black circle. Use the fine-tip pen to draw short, straight rays radiating outward from it. -
Add floating dots:
Between the sun rays, add small, delicate dots with the fine tip to add texture to the innermost section. -
Thick inner arch:
Move to the next arch out. Using the medium tip, thicken this line substantially so it becomes a bold, dark band. -
Inner arch details:
Once the thick band is dry, use the fine tip to add a row of evenly spaced dots just above it.
Smudged Ink?
If you accidentally smudge wet paint, wait for it to fully dry. Then, gently scratch the mistake off the stone surface with an X-Acto knife or craft blade.
Step 3: Adding the Scallop Texture
-
Outline the scallops:
On top of the next major arch line, draw a series of small semi-circles (scallops) sitting along the curve. -
Fill the scallops:
The image shows a unique texture here—don’t fill them solidly black. instead, use the fine tip to ‘stipple’ or dot the inside of each scallop until they look dark and textured. -
Outer dot border:
Draw another simple arch line above the scallop row, followed by a row of larger, bold dots spacing out comfortably.
Add a Cork Backing
To protect your furniture, cut a square of adhesive cork sheet or glue small felt pads to the four corners on the underside of the finished tile.
Step 4: Corner Radiance
-
Corner rays:
Moving to the top distinct sections, draw three straight lines radiating from the main arch toward the top corners. -
Leaf shapes:
Connect the tips of these lines with curved strokes back to the base to create petal or leaf shapes. -
Final accents:
Add a single floating dot inside each open space of the corner rays to tie the design together.
Step 5: Finishing Touches
-
Clean up sketch lines:
Wait at least 30 minutes for the paint to cure fully. Gently erase any visible pencil marks, being careful not to scratch the paint. -
Seal the coaster:
In a well-ventilated area, spray a thin, even coat of clear acrylic sealer over the tile to waterproof your artwork against condensation.
Now you have a stylish, functional piece of art ready for your next coffee break
Upcycled Tin Cans as Painted Desk Organizers
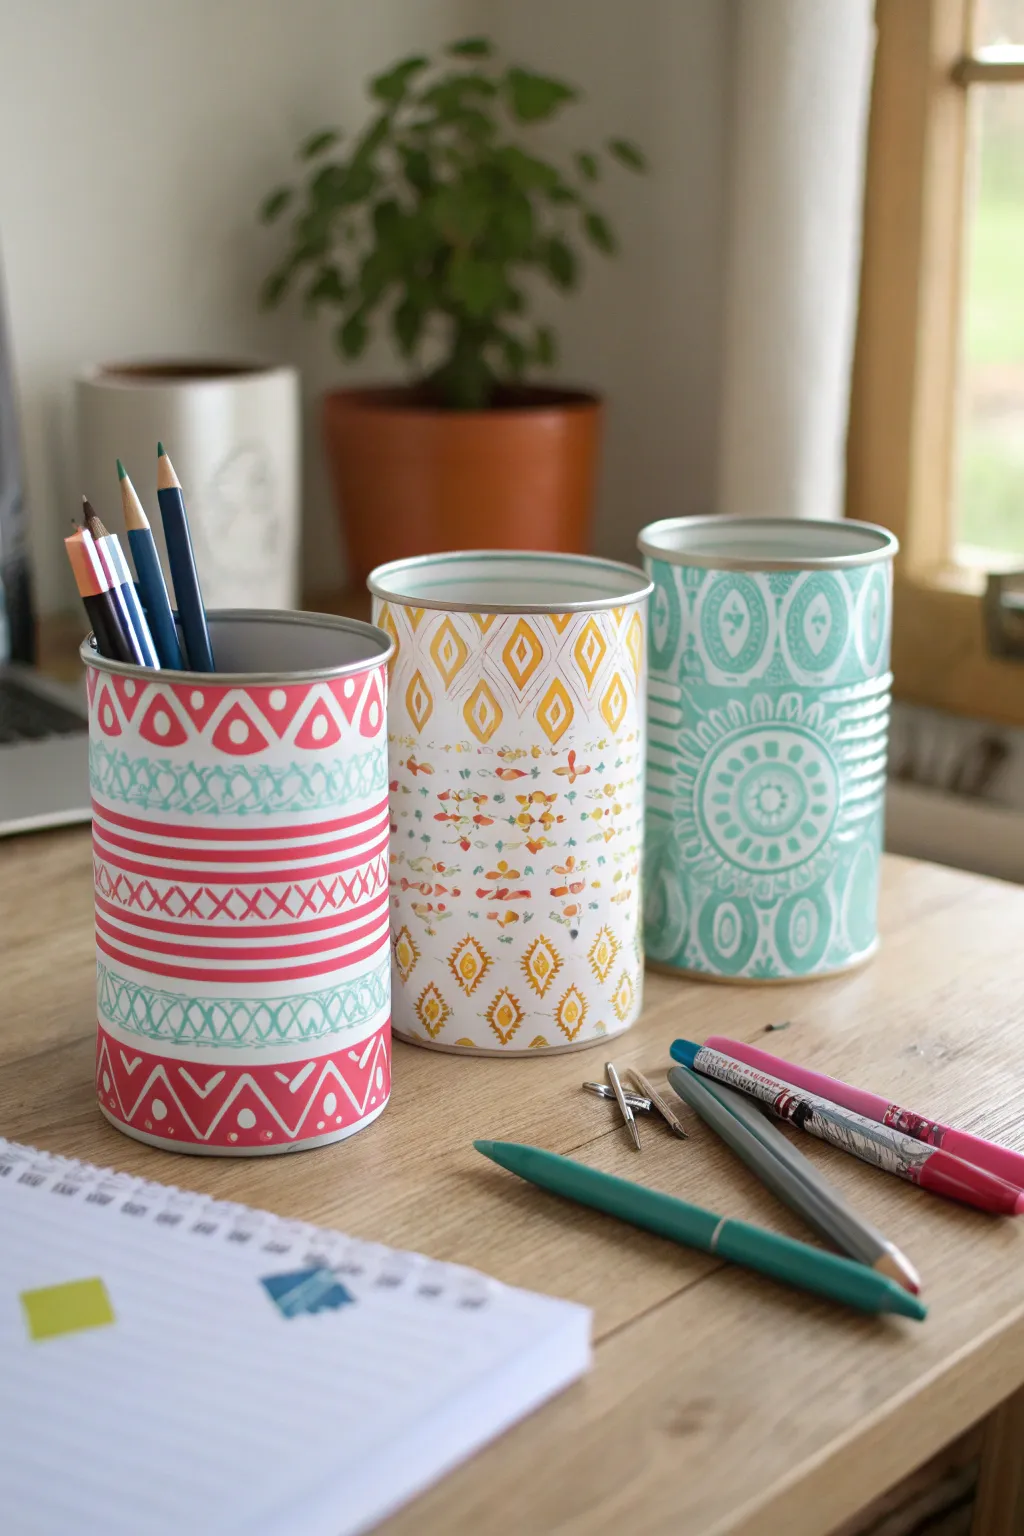
Transform everyday recycling items into stylish, functional desk decor with this straightforward upcycling project. Using acrylic paint pens, you’ll create a trio of patterned organizers featuring geometric, tribal, and mandala-inspired designs in a soft palette of teal, pink, and mustard yellow.
Step-by-Step
Materials
- 3 clean, empty tin cans (soup or vegetable size)
- White matte acrylic spray paint (or gesso primer)
- Acrylic paint pens (fine and medium tips in Teal, Coral Pink, Mustard Yellow, and Dark Grey)
- Fine-grit sandpaper
- Pencil
- Ruler or measuring tape
- Clear matte sealer spray
Step 1: Preparation & Base Coat
-
Safety First:
Inspect the rims of your empty tin cans carefully. If there are any sharp edges from the lid removal, use pliers to flatten them or a metal file to smooth them down. -
Clean Surfaces:
Wash the cans thoroughly with warm soapy water to remove label residue and grease. Dry them completely with a lint-free cloth. -
Priming:
Take the cans to a well-ventilated area. Apply two coats of matte white acrylic spray paint or gesso primer. I find that light coats work best to avoid drips. -
Smooth Finish:
Once the primer is fully dry (check the can instructions, usually 1-2 hours), lightly scuff the surface with fine-grit sandpaper if you feel any bumps, then wipe away the dust.
Rest Your Hand
To keep steady lines on a curved surface, place the can on a towel so it doesn’t roll, and rest your drawing hand on a stack of books equal to the can’s height.
Step 2: Design 1: Pink Tribal Geometrics
-
Marking Guides:
Using a pencil and ruler, lightly mark horizontal rings around the can to act as guidelines for your pattern bands. -
Top Border:
Start with your Coral Pink marker. Draw a bold zigzag line near the top rim, adding a small dot inside each upward-pointing triangle. -
Middle Stripes:
In the center section, draw a series of parallel horizontal lines. Between two of the wider spaced lines, add a row of ‘X’ shapes to create a cross-stitch effect. -
Teal Accents:
Switch to your Teal marker. Add a band of cross-hatching or simple zigzag lines between your pink stripes to break up the color. -
Bottom Border:
Mirror the top design at the bottom edge using the Coral Pink marker, creating another row of triangles with dots.
Ink Flow Issues
If the paint stops flowing, don’t press hard on the artwork. Press the nib down on a scrap piece of paper or cardboard to re-saturate the tip before returning to the can.
Step 3: Design 2: Yellow Diamond Grid
-
Create the Grid:
Visualize a loose diamond grid pattern. With the Mustard Yellow marker, draw vertical rows of diamond shapes. Keep them hand-drawn and slightly imperfect for a rustic look. -
Inner details:
Inside each large yellow diamond, draw a smaller diamond shape. In the alternating rows, fill the diamonds with vertical lines instead. -
Speckled Texture:
Using both the Coral Pink and Teal markers, add tiny clusters of dots or small dashes in the negative space between the yellow diamonds to add texture without overwhelming the pattern.
Step 4: Design 3: Minimalist Mandala
-
Center Focus:
For the third can, we’ll use primarily Teal. Draw a large circle in the center of the can’s face. -
Radiating Petals:
Draw small petals or loops radiating outward from your central circle. Add a second ring of larger loops around that. -
Background Fill:
Fill the rest of the can’s surface with rows of half-circles and scallops, stacking them like fish scales. Leave the lines white but fill the spaces with teal, or vice-versa. -
Erase and Seal:
Allow all paint to cure for at least 24 hours. Gently erase any visible pencil marks, then spray with a clear matte sealer to protect your artwork from chipping.
Fill your new custom organizers with pencils and brushes to instantly brighten your creative space
Optical Illusions With 3D Shading Lines
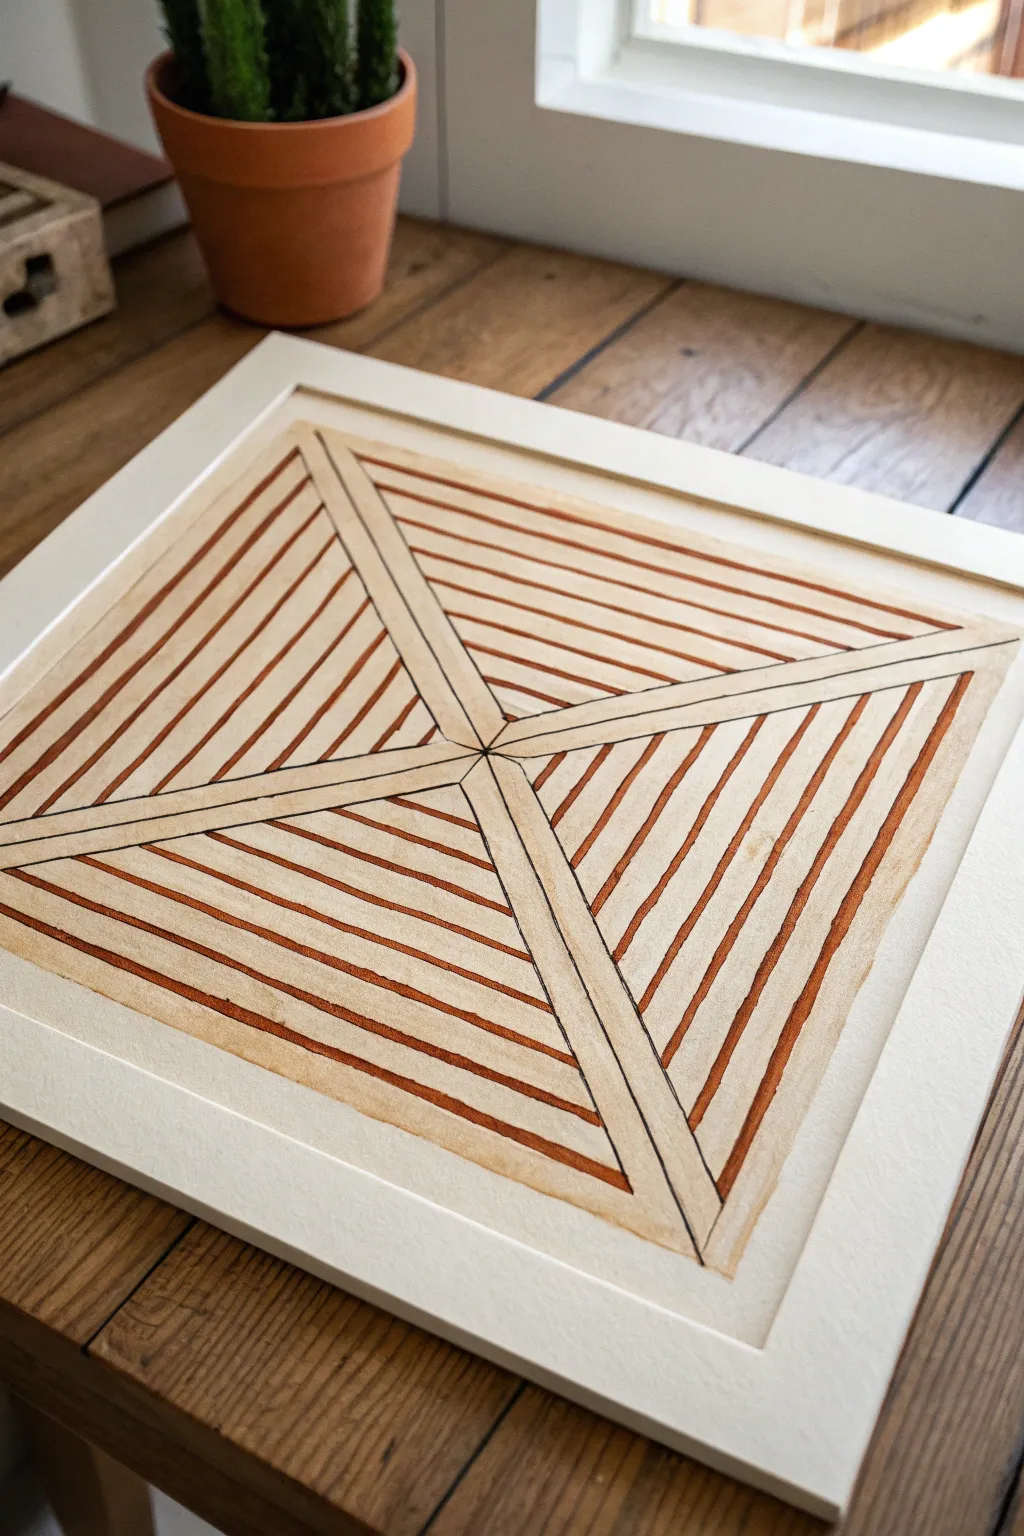
Using simple lines and perspective, this project creates a fascinating 3D effect that looks like a tunnel or pyramid rising from the page. The warm copper tones combined with stark black lines give it a modern, architectural feel that is surprisingly easy to achieve.
How-To Guide
Materials
- Square watercolor paper or mixed media paper (approx. 8×8 inches)
- Square picture mat (off-white or cream)
- Ruler or straight edge
- Pencil (HB or lighter)
- Eraser
- Compass or protractor (optional for precision)
- Black fine-tip acrylic paint pen (0.7mm)
- Copper or rust-colored acrylic paint pen (medium tip)
- Masking tape or painter’s tape
Step 1: Setting the Foundation
-
Prepare the paper:
Begin by taping your square paper down to your work surface to prevent shifting. Place your picture mat over the paper to visualize the final framing, and lightly mark the inside corners of the mat aperture onto the paper with a pencil so you know your working boundaries. -
Find the center:
Remove the mat. Use your ruler to lightly draw diagonal lines from corner to corner of your working area. The point where they intersect is your absolute center. -
Draw the main cross:
From that center point, draw four lines radiating out toward the centers of each side, but slightly skewed. If you look closely at the reference, the main distinct shape isn’t a perfect ‘X’ but rather a distorted cross shape that creates perspective. Draw two lines extending horizontally (but angled slightly down) and two extending vertically (angled slightly right). -
Create the structural beams:
To make these central dividing lines look like thick beams, draw parallel lines on either side of your initial four guide lines. These ‘beams’ should be about 1/4 inch wide. Connect them at the center point with sharp angles.
Smudge Prevention
Running a ruler over wet acrylic pen ink is a disaster. Tape a penny to the underside of your ruler. This lifts the straight edge off the paper slightly, preventing ink drags.
Step 2: Inking the Structure
-
Outline the beams:
Taking your fine-tip black acrylic paint pen, carefully trace over the pencil lines that define the four main ‘beams’ of the cross structure. Use a ruler to ensure these lines are razor-sharp. -
Add the center detail:
At the very center where the four beams meet, draw a small diamond or starburst shape to cleanly join the inner lines. -
Erase guide lines:
Once the black ink is completely dry—give it a few minutes to be safe—gently erase the initial pencil guide lines from inside the beams so they are perfectly clean.
Step 3: Creating the Illusion
-
Pencil the filler lines:
Now for the optical illusion part. In each of the four triangular quadrants created by the beams, you need to draw lines parallel to the *outer edge* of the paper, moving inward. -
Check line spacing:
I find it helpful to mark subtle tick marks along the beam edges first to ensure even spacing. These lines should get progressively shorter as they approach the center. -
Ink the shading lines:
Switch to your copper or rust-colored paint pen. Place your ruler against your pencil guides and draw the colored lines within the four quadrants. Do not let these lines cross over the black beams; stop right at the black border. -
Varying the line weight:
For a more organic, hand-drawn look seen in the example, you don’t need these copper lines to be mechanically perfect. A little natural variation in pressure adds character. -
Add depth to the border:
If your composition doesn’t quite fill the square, you can create a border line connecting the outer edges of your triangles, essentially framing the ‘pyramid’ shape.
Alternative Colorways
Try a ‘cyberpunk’ aesthetic by swapping the background for black paper and using neon blue for the beams and hot pink for the filler lines.
Step 4: Finishing Touches
-
Clean up:
Wait at least 15 minutes for the acrylic paint to fully cure. Use a high-quality eraser to remove any remaining visible pencil marks between the copper lines. -
Mount the artwork:
Place the picture mat back over the artwork. Align it so the center point is perfectly positioned. Use tape on the back of the artwork to secure it to the mat. -
Final inspection:
Check for any gaps where the copper lines meet the black beams. You can carefully touch these up with the paint pen if needed to make the connection solid.
Step back and admire how simple lines have transformed flat paper into a deep, structured geometric space


Have a question or want to share your own experience? I'd love to hear from you in the comments below!