If you love that sleek, modern look, acrylic sheet projects are such a fun way to make gifts and home pieces that feel instantly polished. I’m sharing a mix of classic go-to ideas and some more “wait, you made that?” builds—all centered on cut, engraved, and assembled acrylic.
Personalized Acrylic Keychains
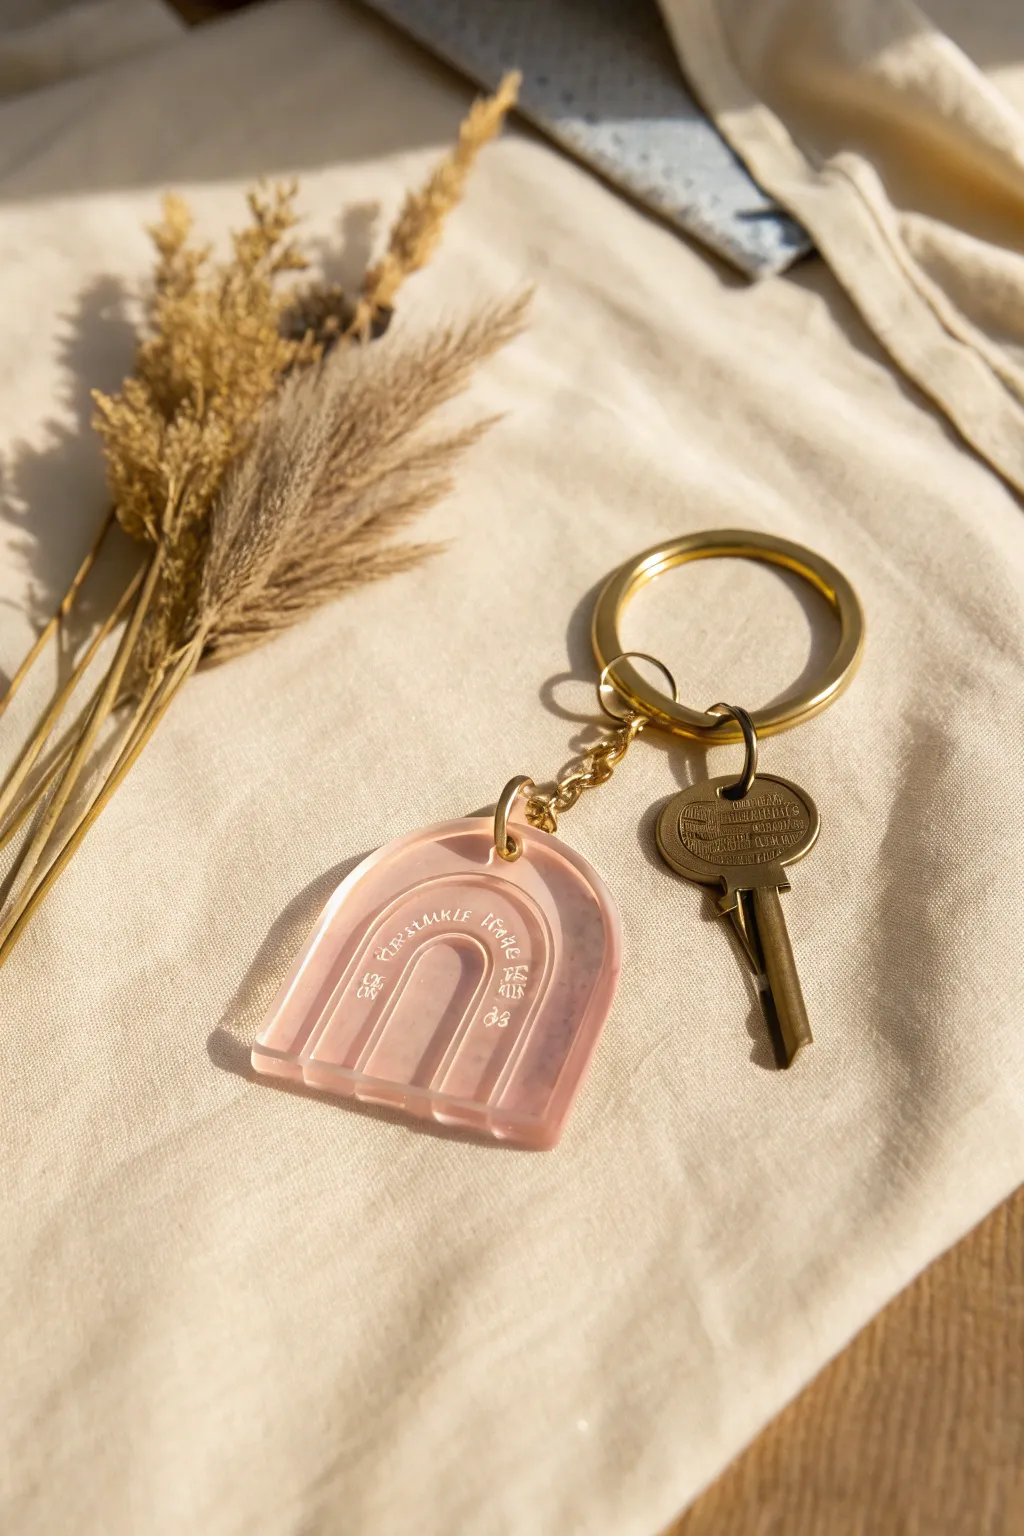
This project transforms a simple acrylic blank into a sophisticated matte-style keychain with delicate engraved details. The muted pink tone and golden hardware give it a warm, modern boho aesthetic perfect for gifting or personal use.
Step-by-Step Guide
Materials
- Arch-shaped clear acrylic keychain blank (approx. 2.5 inches)
- Cricut Maker or similar cutting machine with engraving tool (tip 41)
- Strong Grip mat for cutting machine
- Painter’s tape or masking tape
- Alcohol ink (warm pink/blush tone) or translucent acrylic paint
- White or gold acrylic paint (for filling engraving)
- Rubbing alcohol and lint-free cloth
- Small paintbrush or foam dauber
- Gold jump ring (10mm or similar)
- Gold keychain hardware (split ring and chain)
- Jewelry pliers (flat nose and bent nose)
- Paper towel or tissue
Step 1: Designing and Engraving
-
Prepare the design file:
In your design software, create an arch shape that matches your physical blank’s dimensions exactly. Add an internal offset of concentric arches to create a rainbow pattern. -
Add text elements:
Desgin your text to curve along the rainbow arches. Choose a sans-serif font for readability and position it to sit comfortably between the engraved lines. -
Configure software settings:
Set the line type for your rainbow lines and text to ‘Engrave’. Ensure your design is centered within the template shape you created. -
Prep the acrylic blank:
Peel the protective plastic film off *one* side of the acrylic blank. Wipe this side down with rubbing alcohol to remove any fingerprints or oils. -
Secure the blank:
Place the blank onto the center of your Strong Grip mat. Use painter’s tape to tape down all edges of the blank firmly to the mat so it doesn’t shift during the high-pressure engraving process. -
Calibrate position:
On your machine’s preview screen, move the design so it aligns perfectly with where you taped the blank on the grid. Accuracy is key here. -
Engrave the design:
Load the mat and the engraving tip into the machine. Run the cut. Brush away the acrylic debris with a soft brush once finished before unloading.
Step 2: Coloring and Assembly
-
Fill the engraving:
Squeeze a small amount of white or light gold acrylic paint onto a palette. Using a brush or your finger, rub the paint firmly into the engraved grooves. -
Clean up excess:
Let the fill paint sit for about 10–15 seconds, then gently wipe the surface flat with a paper towel. You want to remove paint from the surface but leave it trapped in the etched lines. -
Tint the background:
Flip the blank over to the back side (keep the protective film on if you want a clear back, or peel it off for a double-sided texture). I prefer to peel it for a consistent matte look. -
Apply the wash:
Mix a drop of warm pink alcohol ink with a tiny splash of rubbing alcohol to dilute it. Dab this mixture onto the *back* of the keychain using a foam dauber for a soft, semi-transparent blush effect. -
Consider optional texture:
To mimic the matte, clouded look in the photo, you can lightly sand the back of the acrylic with fine-grit sandpaper (400 grit) before applying the ink, which helps diffuse the light. -
Inspect the finish:
Hold the piece up to the light to check for uneven streaks. If the pink is too light, add a second coat of the alcohol ink wash and let it dry completely. -
Open the jump ring:
Using your two pairs of pliers, grip the jump ring on either side of the split. Twist one hand forward and one backward to open the ring (never pull it apart sideways). -
Attach hardware:
Thread the open jump ring through the hole in the acrylic arch, then loop in the bottom link of your gold keychain chain. -
Close the loop:
Twist the jump ring back into place using the pliers, ensuring the two ends meet perfectly flush so the chain doesn’t slip out. -
Final polish:
Give the front surface a final wipe with a microfiber cloth to make the white engraving pop against the pink background.
Fixing Paint Smears
If the fill paint dries on the surface outside the lines, dampen a Q-tip with a tiny bit of rubbing alcohol and gently spot-clean the area without touching the grooves.
Add Subtle Shimmer
Mix a tiny pinch of mica powder into your back-side paint wash. This adds a hidden pearlescent dimension when the keychain catches the sunlight.
Attach your favorite keys and enjoy the custom charm you’ve created.


Lightweight Acrylic Earrings
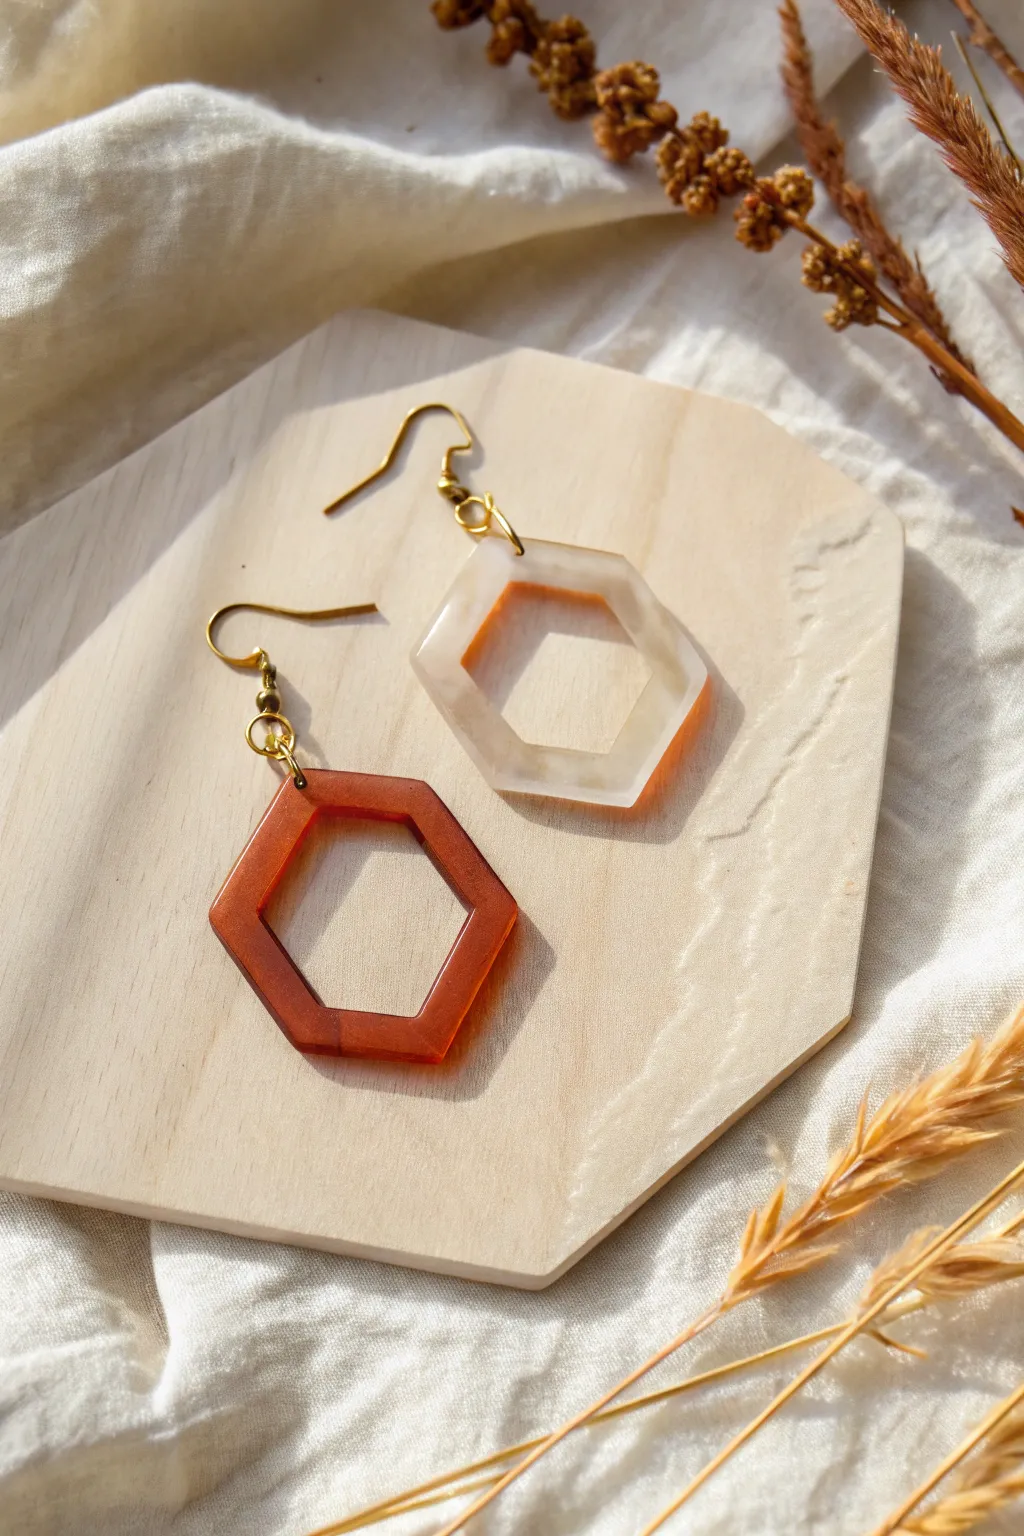
These stylish, modern earrings feature an open hexagonal shape in warm, earthy tones of amber and pearl. They are surprisingly lightweight and catch the light beautifully, making them the perfect accessory for both casual days and special occasions.
Step-by-Step
Materials
- Open hexagon silicone mold (approx. 1-1.5 inch size)
- Two-part epoxy resin (A and B)
- Amber or brown alcohol ink
- White or pearl mica powder
- Mixing cups and stir sticks
- Heat gun or lighter
- Hand drill or pin vise with small drill bit
- 4 Gold jump rings (4-6mm)
- 2 Gold fishhook ear wires
- Jewelry pliers (flat nose and round nose)
- Gloves and respirator mask
- Sandpaper (high grit, optional)
Step 1: Mixing and Coloring Resin
-
Safety First:
Before you begin, ensure you are working in a well-ventilated area. Put on your protective gloves and respirator mask to stay safe while handling the chemical components. -
Measure Components:
Pour equal parts of resin (Side A) and hardener (Side B) into a clean mixing cup. Check your specific brand’s instructions, as some require a different ratio, but 1:1 is most common. -
The Mixing Process:
Stir the mixture slowly and steadily for about 3 to 5 minutes. Scraping the sides and bottom of the cup often is crucial to ensure completely unmixed resin doesn’t wreak havoc on your cure. -
Divide the Batch:
Pour half of your mixed resin into a second small cup. You will need separate containers for the two different color effects shown in the image. -
Create the Amber Tone:
In the first cup, add 1-2 drops of amber or brown alcohol ink. Stir gently until the color is uniform but still translucent. If you want it darker, add one more drop, but go slowly. -
Create the Pearl Tone:
In the second cup, add a small pinch of white or pearl mica powder. Mix this thoroughly until the powder is fully dispersed and creates a milky, shimmering effect.
Step 2: Pouring and Curing
-
Prepare the Mold:
Ensure your silicone hexagon mold is clean and free of dust or lint. Place it on a level surface where it won’t be disturbed for at least 24 hours. -
Pour the Amber Resin:
Carefully pour the amber mixture into one of the hexagon cavities. I prefer to pour in a thin stream to help prevent trapped air bubbles, filling it slightly below the brim to avoid overflow. -
Pour the Pearl Resin:
Repeat the process for the second hexagon cavity using the white pearl mixture. Take your time to ensure the resin reaches all the sharp corners of the geometric shape. -
Pop Bubbles:
Wait about 5-10 minutes for bubbles to rise to the surface. Quickly pass a heat gun or lighter over the surface of the resin to pop them, being careful not to burn the mold itself. -
Let it Cure:
Cover the mold with a box to protect it from dust and let it sit for 24-48 hours, depending on your resin’s cure time requirements.
Clearer Transparency
For the amber earring, warm your resin bottles in warm water before mixing. This thins the liquid and releases bubbles much faster, resulting in glass-like clarity.
Step 3: Assembly and Finishing
-
Unmold:
Once fully hard, gently peel back the silicone mold to release your hexagon pieces. Check the edges for any sharpness; if needed, sand lightly with wet sandpaper. -
Mark Drilling Spot:
Using a fine-tip marker, place a tiny dot on the top corner of each hexagon where you want the hardware to attach. Ensure the hole isn’t too close to the edge to prevent breakage. -
Drill Holes:
Secure the resin piece and use a hand drill or pin vise to carefully bore a hole straight through the marked spot. Go slowly to keep the resin from cracking. -
Attach Jump Rings:
Open two jump rings using your pliers (twist them open sideways, don’t pull apart). Thread one through the drilled hole of the amber earring and close it. -
Add Secondary Rings:
If extra length or movement is desired, attach a second jump ring to the first one. This also helps the earring sit forward correctly on the ear. -
Connect Ear Wires:
Attach the gold fishhook ear wire to the top jump ring. Repeat the entire assembly process for the pearl earring. -
Final Polish:
Wipe the finished earrings with a soft microfiber cloth to remove any fingerprints or dust before wearing.
Gold Flake Glam
Add tiny flecks of gold leaf into the amber resin mixture just before pouring. Suspended gold creates a stunning, high-end contrast against the transparent brown.
You now have a chic, mismatched set of geometric earrings that look professionally made


Engraved Acrylic Coasters
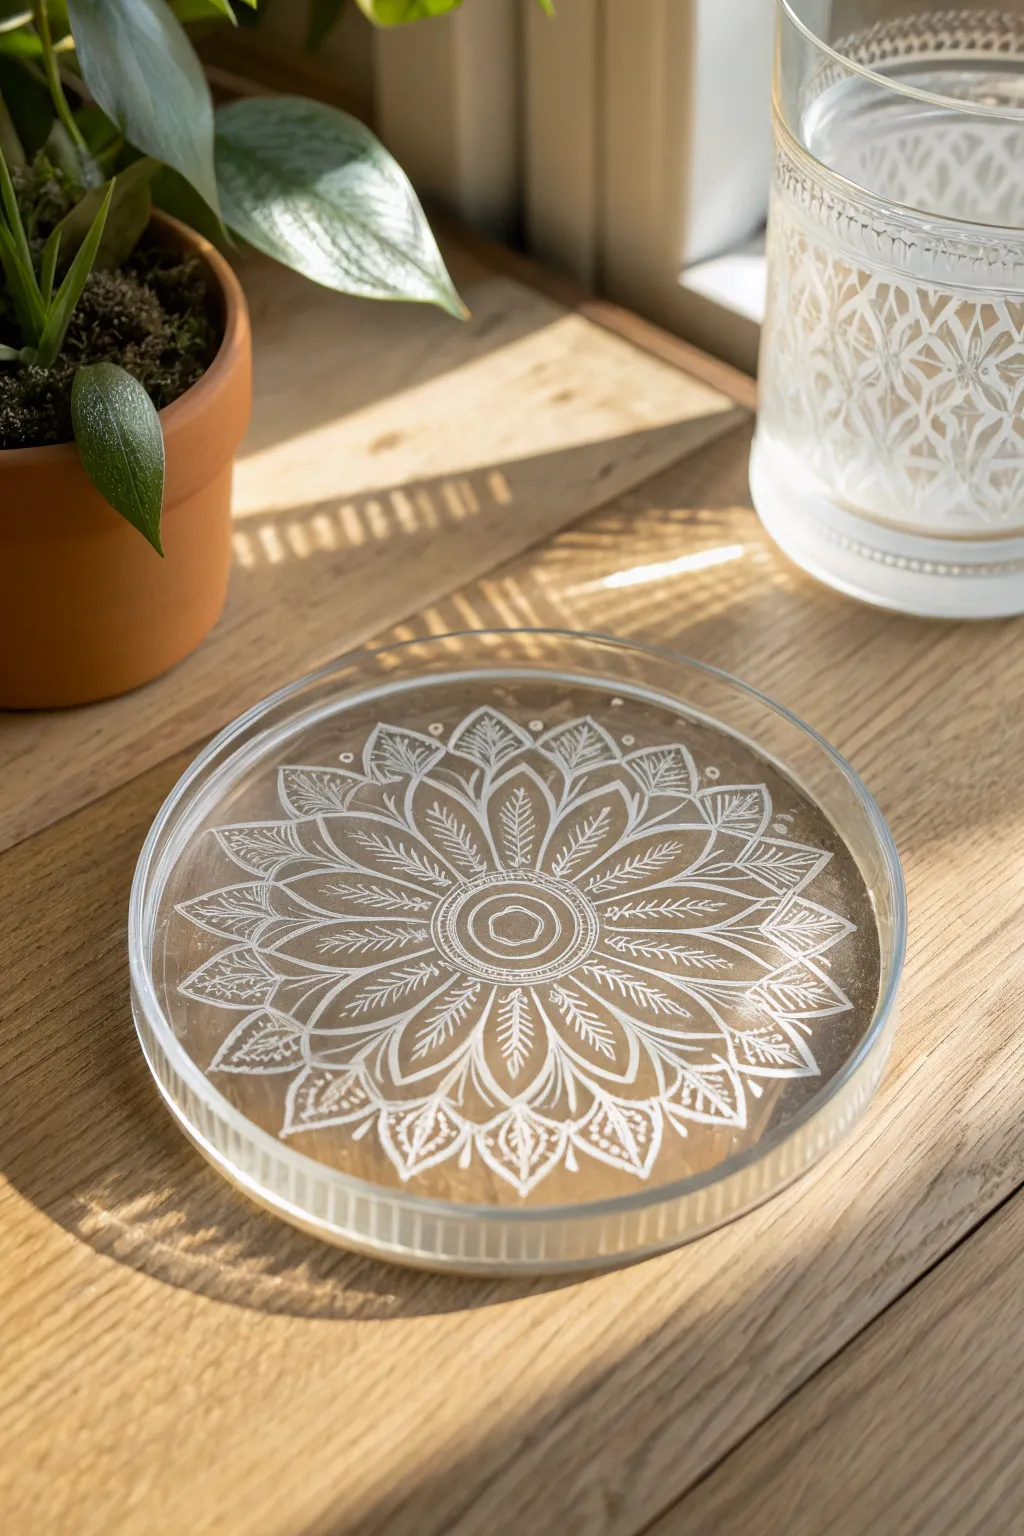
Transform a simple clear acrylic disc into a sophisticated piece of home decor with this delicate mandala design. The white engraving catches the light beautifully, creating a stunning contrast that elevates any coffee table setting.
Step-by-Step Guide
Materials
- Clear acrylic disc (4-inch diameter, 3mm thickness)
- Engraving tool (Cricut Maker with Engraving Tip OR Dremel with fine carving bit)
- Mandala SVG or PNG file (high contrast)
- Strong grip cutting mat (if using Cricut)
- Painters tape or masking tape
- Soft cloth or microfiber towel
- Isopropyl alcohol
- Compressed air (optional)
- Safety glasses
Step 1: Preparation & Setup
-
Clean the Surface:
Before doing anything, peel off the protective plastic film from both sides of your acrylic disc. Wipe it down thoroughly with isopropyl alcohol and a microfiber cloth to remove any oils or fingerprints. -
Prepare the Design:
For this intricate mandala, you’ll need a vector file. If you are using a Cricut, upload your mandala SVG to Design Space. Ensure the design is centered and resize it to about 3.5 inches to leave a nice clear border around the edge. -
Configure Settings:
If using a cutting machine, select ‘Acrylic’ as your material setting. Change the operation type from ‘Cut’ to ‘Engrave’. If you are engraving by hand with a Dremel, print the pattern to size and tape it underneath the clear disc.
Highlight with Paint
To make the mandala pop even more, rub white acrylic paint into the engraved grooves, then wipe the surface clean. The paint stays in the cuts.
Step 2: Engraving Process
-
Secure the Acrylic:
Place the acrylic disc onto the center of your Strong Grip mat. It is crucial that this does not move, so I always add strips of painter’s tape along the very edges of the disc to lock it down completely. -
Load the Machine:
Install the Engraving Tip (Tip 41 for Cricut users) into the machine housing. Move the white star wheels on the roller bar all the way to the right side so they don’t roll over your acrylic and leave track marks. -
Start the Engraving:
Load the mat into the machine and press the start button. Watch as the tool scratches the design into the surface. The machine will make multiple passes to deepen the white lines of the mandala pattern. -
Hand-Engraving Alternative:
If using a rotary tool, trace the pattern you taped underneath. Use a fine diamond bit and keep a steady hand, using light pressure to ‘draw’ the design onto the surface. Wear safety glasses for this part!
Step 3: Finishing Touches
-
Remove Debris:
Once the engraving is complete, don’t unload the mat immediately. Use a soft brush or compressed air to blow away the fine acrylic dust that has accumulated in the grooves. -
Inspect the Depth:
Check if the design looks deep and bright enough. If the lines look faint, you can often run the engraving program a second time without unloading the mat to ensure perfect alignment. -
Unload and Clean:
Carefully peel the tape off and lift the coaster from the mat. The engraving process creates static and dust, so give it a final vigorous wipe with a lint-free cloth or wash it gently with mild soap and water. -
Seal the Edges (Optional):
If the edges of the acrylic look cloudy from handling, you can quickly run a flame polish (using a culinary torch) lightly around the rim, though be careful not to melt the shape.
Cloudy Engraving?
If the engraving looks rough or dusty, use a soft toothbrush with a tiny drop of dish soap to scrub inside the intricate grooves.
Place your glass down and enjoy the intricate shadows cast by your new custom coaster


Crystal-Clear Acrylic Bookmarks
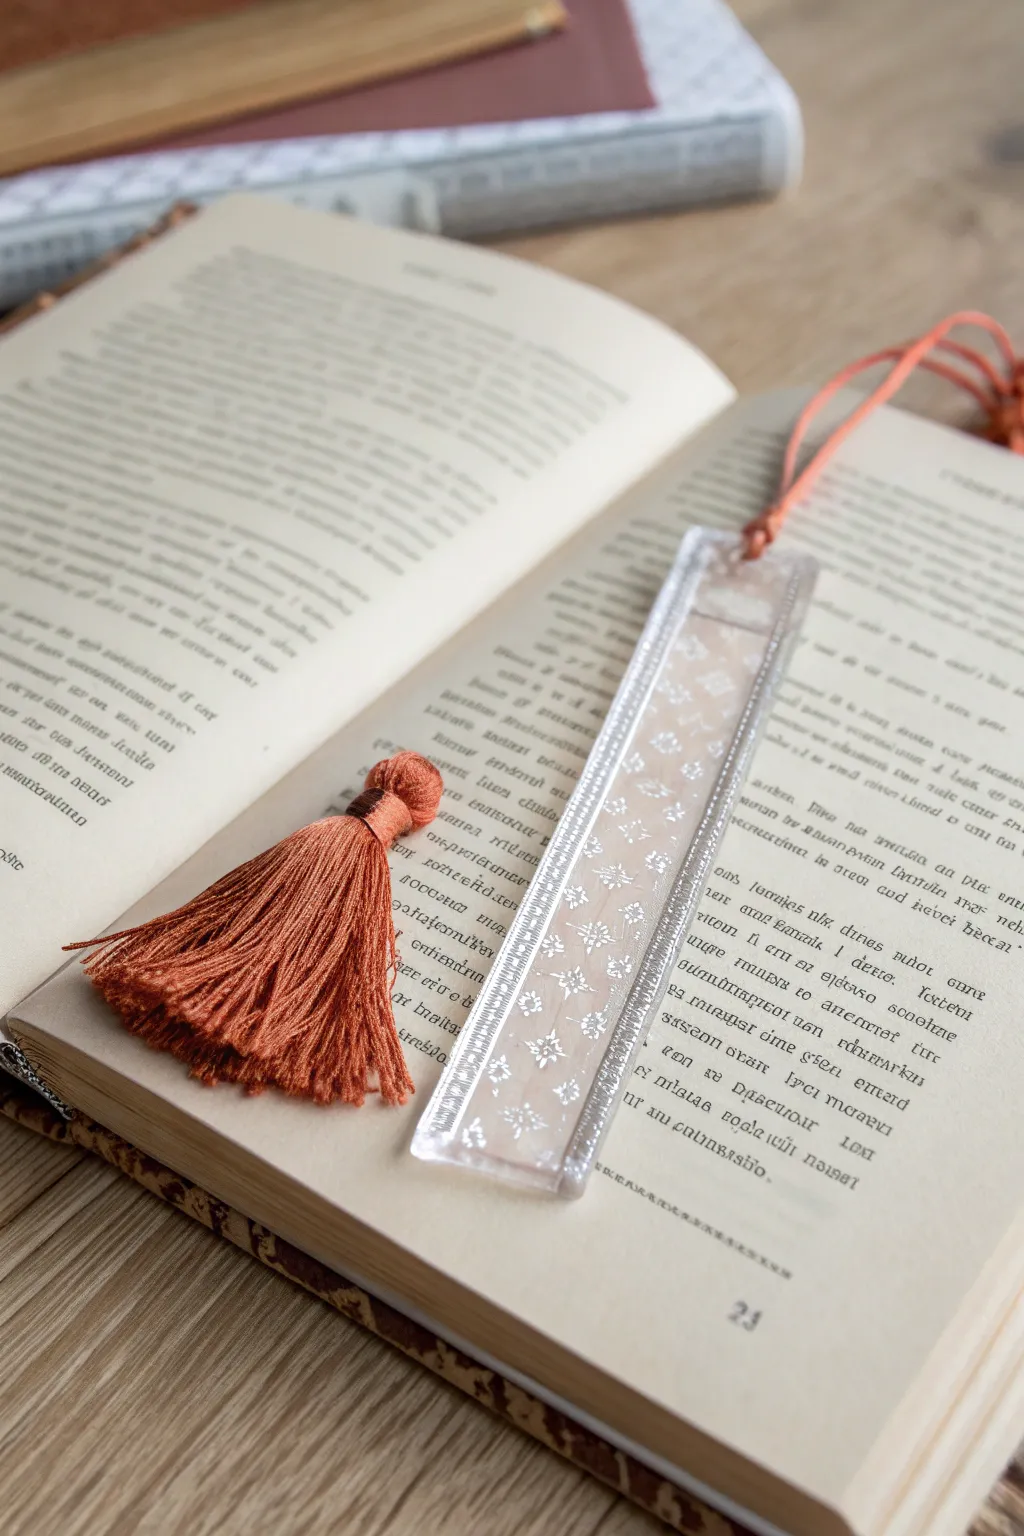
Capture the delicate beauty of vintage textiles forever suspended in crystal-clear resin with this elegant bookmark project. The result is a sturdy, glass-like reading companion that highlights intricate patterns without the fragility of actual fabric.
How-To Guide
Materials
- High-quality clear casting epoxy resin (2-part system)
- Rectangular silicone bookmark mold
- Strip of white or off-white lace trim (or patterned washi tape)
- Orange or terracotta embroidery floss (for the tassel)
- Small jump ring (6mm or 8mm)
- Jewelry pliers
- Mixing cups and stirring sticks
- Heat gun or long-neck lighter
- Scissors
Step 1: Preparing the Inclusion
-
Measure the mold:
Before mixing any chemisty, lay your silicone mold on a flat surface and measure the internal length and width. -
Trim the lace:
Cut your strip of lace or patterned fabric slightly smaller than the mold’s dimensions. You want a clear border of resin around the edges so the fabric is fully encapsulated. -
Seal the fabric (Optional):
If your lace is very thick or fuzzy, brush a thin coat of Mod Podge or clear drying glue over it and let it dry. This prevents persistent bubbles, though thin synthetic lace often works fine without this step.
Clearer than Glass
Warm your resin bottles in a bowl of warm water before mixing. Warm resin is thinner, which releases bubbles much faster for a flawless finish.
Step 2: Resin Casting
-
Mix the resin:
Combine your two-part epoxy resin according to the manufacturer’s volume ratios. Stir slowly and thoroughly for at least 3-4 minutes, scraping the sides and bottom of the cup to ensure a complete chemical blend. -
Let it rest:
Let the mixed cup sit for about 2-5 minutes. This allows many of the air bubbles created during stirring to rise to the surface and pop naturally. -
Pour the base layer:
Pour a thin layer of clear resin into the mold, filling it just about halfway. I find it helpful to pour slowly down a stir stick to minimize splashing. -
Insert the lace:
Using tweezers, carefully place your trimmed lace strip into the wet resin. Press it down gently to ensure it is submerged and to push out any air trapped underneath the intricate patterns. -
Remove bubbles:
Use a heat gun or lighter to quickly pass over the surface of the resin. This will pop remaining bubbles, but keep the heat moving so you don’t damage the mold. -
Top it off:
Pour the remaining resin over the lace until the mold is filled to the brim, creating a slight dome effect due to surface tension. -
Final cure:
Cover the mold with a clean box to prevent dust from landing on it and let it cure for 24-48 hours until solid.
Step 3: Finishing Touches
-
Demold the piece:
Gently flex the silicone mold to release the hardened bookmark. Inspect the edges for any sharp bits and sand slightly with fine-grit sandpaper if needed. -
Create the tassel:
Wrap your orange embroidery floss around four fingers or a piece of cardboard about 20 times to create a loop. -
Tie the neck:
Slide the loop off your hand. Cut a separate piece of floss and tie it tightly around the top quarter of the loop to create the ‘neck’ of the tassel. -
Cut the ends:
Cut through the bottom loops of the floss to create the fringe, then trim them evenly so the tassel looks neat. -
Attach the hardware:
Open a jump ring using your pliers. Loop it through the hole at the top of the resin bookmark (most molds create this hole automatically) and hook the top loop of your tassel onto it. -
Secure the ring:
Close the jump ring tightly with the pliers, ensuring the gap is completely shut so the thread doesn’t slip out.
Metallic Accent Level-Up
Add snippets of gold leaf foil along with the lace before the top pour. The gold flakes suspended around the fabric add a luxurious, antique feel.
Slip this durable piece of art between the pages of your current read and enjoy the light catching the embedded lace
BRUSH GUIDE
The Right Brush for Every Stroke
From clean lines to bold texture — master brush choice, stroke control, and essential techniques.
Explore the Full Guide
Floating Acrylic Photo Frames
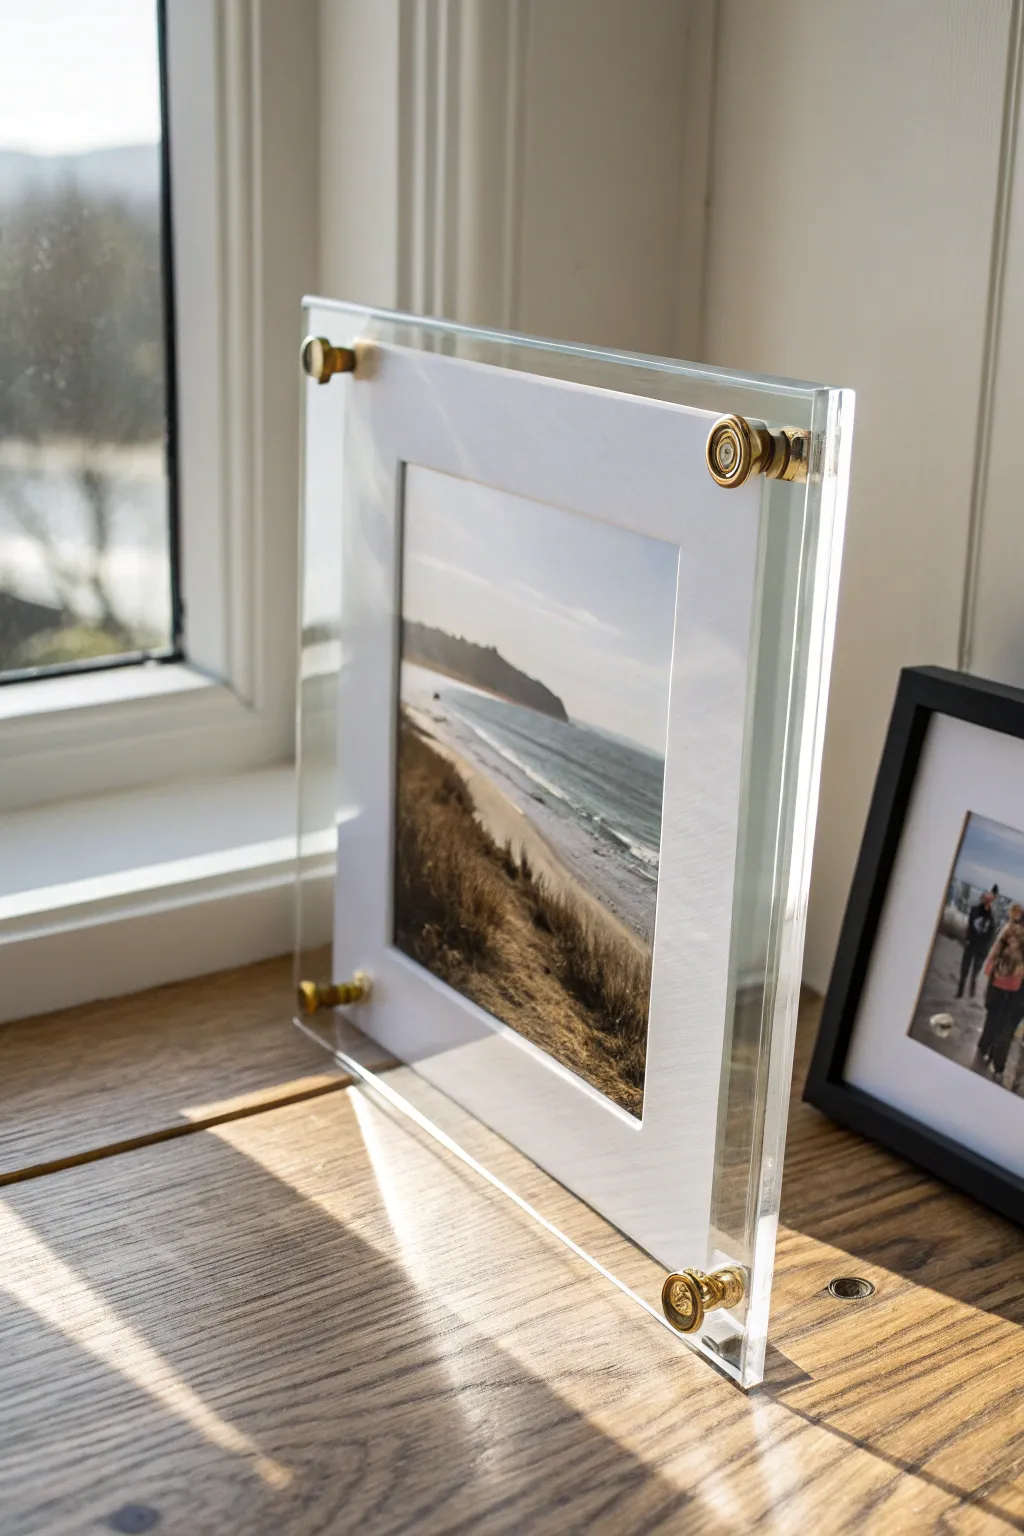
Elevate your favorite landscape photo with this sleek, modern display that creates the illusion of your image floating in mid-air. The combination of crystal-clear acrylic and brass hardware adds a sophisticated, gallery-quality touch to any shelf or windowsill.
Detailed Instructions
Materials
- Two sheets of 5mm or 6mm clear cast acrylic (cut to desired size)
- Four gold/brass standoff bolts (or binding screws)
- White mat board (mount board)
- Archival photo print
- Acid-free double-sided tape or photo corners
- Drill with a bit matching your bolt diameter
- Clamps
- Scrap wood board
- Masking tape
- Ruler and pencil
- Microfiber cloth
- Acrylic polish (optional)
Step 1: Preparing the Acrylic
-
Assess your materials:
Start by determining the size of your frame. For a stable freestanding frame like the one pictured, use thicker acrylic (at least 5-6mm per sheet). Ensure both sheets are cut to identical dimensions. -
Protect the surface:
Keep the protective film on your acrylic sheets for as long as possible. This prevents scratches during the drilling process. -
Mark the holes:
With the protective film still on, measure partially into one corner—about 1.5 to 2 cm from the edges is standard. Mark this spot with a pencil. -
Create a template:
To ensure perfect alignment, stack your two acrylic sheets together. Use masking tape to bind them tightly so they cannot shift, or clamp them securely to a scrap board. -
Drill the corners:
Place a piece of scrap wood underneath the stack to prevent the acrylic from cracking as the drill exits. Drill through both sheets simultaneously at your marked corners using a specialized plastic drill bit or a standard bit at a low speed. -
Clean the edges:
Once drilled, separate the sheets and gently remove any plastic burrs from the holes. If the outer edges feel rough, you can lightly sand them with fine-grit sandpaper for a polished look.
Cracked Corners?
If your acrylic cracks while drilling, you likely pressed too hard. Let the drill do the work, use a slow speed, and always keep a wood block underneath for support.
Step 2: Mounting the Photo
-
Cut the mat board:
Cut a piece of white mat board slightly smaller than your acrylic frame. Cut a window in the center that fits your chosen photograph perfectly. -
Check the fit:
Lay the mat board on one sheet of acrylic to ensure the margins are even. The mat should float freely inside the bolts, not touch them. -
Secure the photo:
Using acid-free tape, attach your photo to the back of the mat board. I prefer to tape only the top edge of the photo to the board, allowing the paper to expand and contract with humidity changes. -
Prepare the back sheet:
Peel the protective film off the inside face of the back acrylic sheet. Wipe it down with a microfiber cloth to remove any dust or static. -
Center the artwork:
Place a small dab of double-sided tape or adhesive dots on the back corners of the mat board. Center the mounted photo onto the back acrylic sheet and press gently to hold it in position.
Go Wider
Try leaving a wider border of clear acrylic around the mat board. Seeing through the edges to the scenery behind enhances the ‘floating’ effect significantly.
Step 3: Final Assembly
-
Peel and clean:
Remove the protective film from the inside face of the front acrylic sheet. Inspect for dust one last time; trapped specks are very visible later. -
Sandwich the layers:
Carefully place the front acrylic sheet over the mounted photo, aligning the drill holes perfectly. -
Insert hardware:
Push the female side of the gold standoff post through the back hole. Depending on your hardware, these might be simple binding screws or larger standoffs. -
Tighten the bolts:
Screw the male end of the bolt into the front. Tighten them by hand until snug. Do not overtighten, as this can cause stress fractures in the acrylic. -
Remove outer film:
Now peel away the final outer layers of protective film from the front and back of the assembled frame. -
Final polish:
Give the entire piece a wipe with a clean microfiber cloth and a dedicated acrylic cleaner to make it shine.
Now you have a stunning, transparent frame that lets light pass through and truly highlights your photography
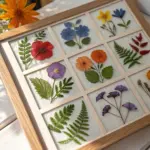
Acrylic Place Cards and Name Tags
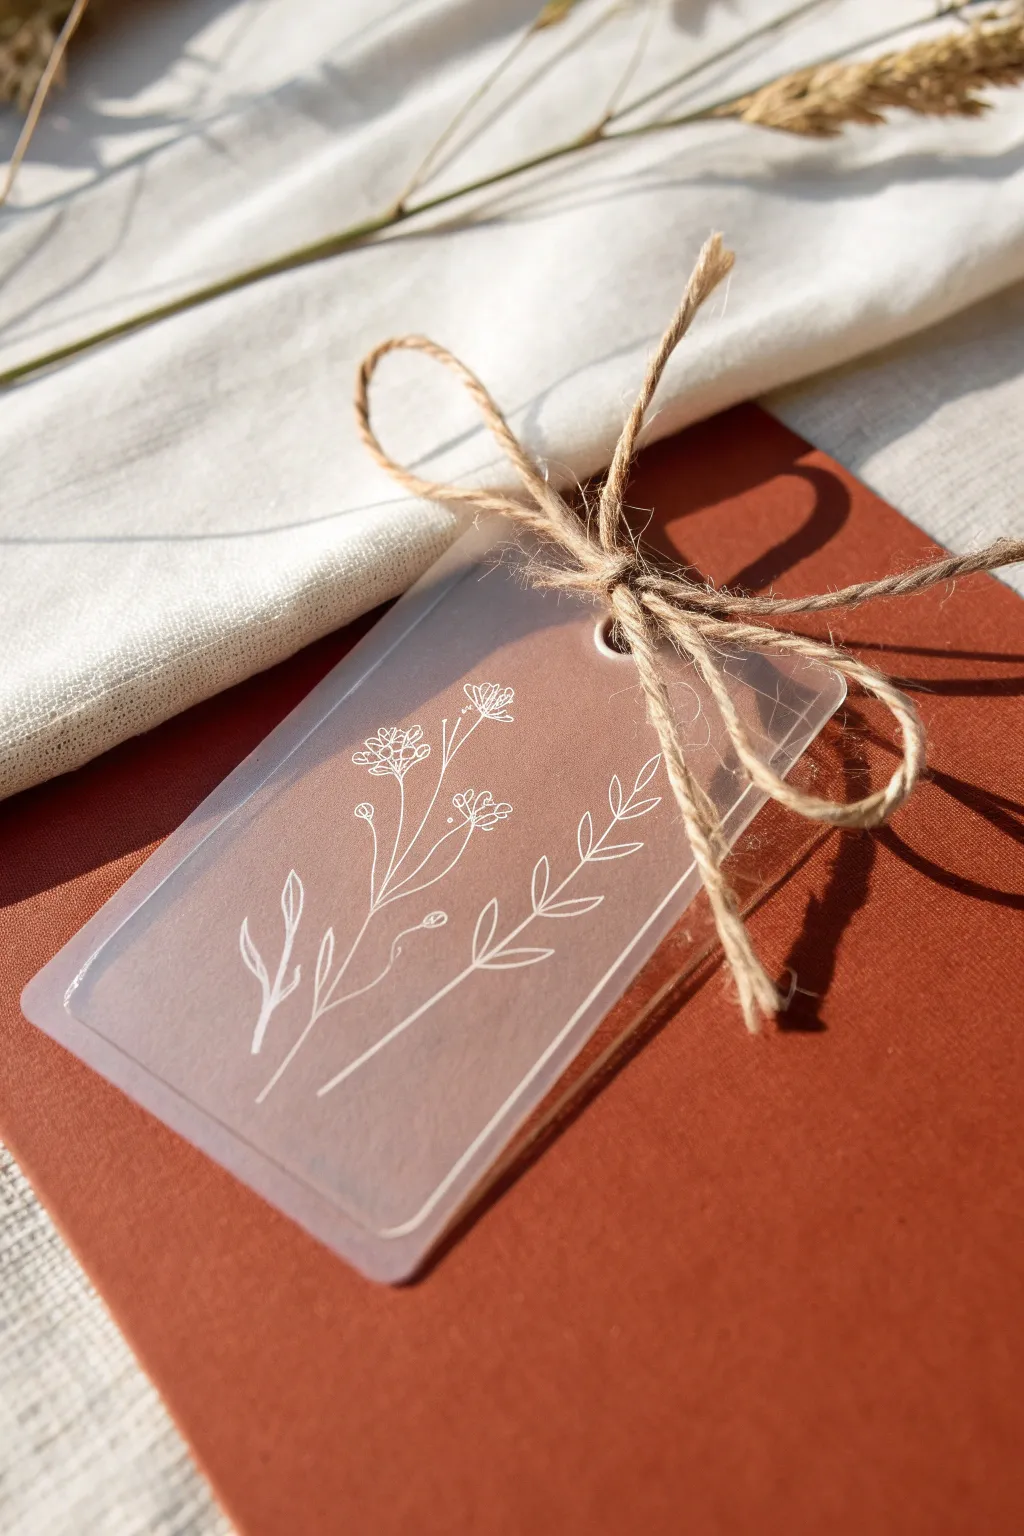
Achieve a delicate, high-end look with these frosted acrylic tags featuring graceful white botanical illustrations. The contrast between the matte, misty surface and the crisp line art makes them perfect for wedding favors, place settings, or boutique gift wrapping.
Step-by-Step
Materials
- Rectangular acrylic blanks (frosted/matte finish, with pre-drilled hole)
- White extra-fine tip paint pen (oil-based or acrylic)
- Scrap paper for sketching
- Pencil
- Jute twine or hemp cord
- Rust-colored cardstock or envelope (for presentation)
- Painter’s tape (optional)
- Glass cleaner and microfiber cloth
Step 1: Preparation & Planning
-
Clean the surface:
Begin by thoroughly cleaning your acrylic blank. Even if it looks clean, oils from your fingers can repel paint. Use a little glass cleaner and a microfiber cloth to wipe both sides, focusing on the side you plan to draw on. -
Remove protective film:
Most acrylic blanks come with a protective plastic film to prevent scratches during shipping. Peel this off carefully from both sides. You should now see that lovely semi-transparent, cloudy effect characteristic of frosted acrylic. -
Draft your design:
On a piece of scrap paper, trace the outline of your acrylic tag. Sketch out your botanical design within this border first. This helps you get the proportions right without committing ink to the plastic immediately. -
Set up a guide:
Once you are happy with your paper sketch, I like to tape it down to my work surface. Place the clear/frosted acrylic blank directly on top of the sketch. Because the acrylic is semi-transparent, you’ll be able to see your pencil lines through it to use as a guide.
Clean Lines Tip
Make a mistake? Use a Q-tip dipped in rubbing alcohol to quickly erase stray paint marks while they are still wet without ruining the finish.
Step 2: Drawing the Botanicals
-
Prime the pen:
Shake your white paint pen vigorously. Press the nib down on a scrap piece of paper a few times until the ink flows smoothly. Do not do this directly on the acrylic, or you might get a puddle. -
Draw the main stems:
Start by drawing the primary curve of the longest stem. Use a steady hand and pull the pen towards you. For this specific design, create two main stems: one slightly taller leaning left, and a shorter one leaning right. -
Add secondary branches:
Branch off from your main stems with very thin, delicate lines. Keep the angles natural—plants rarely grow at perfect 90-degree angles. Aim for upward-sweeping curves. -
Create the leaves:
On the right-hand stem, draw small, simple leaf shapes. These are just elongated loops attached to the stem. Try to keep them somewhat symmetrical in pairs as you move up the stem. -
Detail the floral heads:
For the left-hand stem, draw clusters of small circles or tiny scallops at the tips of the branches to represent flower buds. Group them tightly together to mimic a wildflower look. -
Refine the lines:
Look closely at your drawing. If you need to thicken any lines, do so carefully now. However, the beauty of this project lies in the fineness of the lines, so avoid making them too heavy. -
Add decorative border (optional):
If you want the framed look seen in the photo, use a ruler to draw a very thin line about 3mm from the edge of the tag, following the perimeter. Stop the line just before it hits the stem at the bottom, creating a ‘breaking the frame’ effect. -
Let it cure:
Allow the paint to dry completely. Oil-based pens usually dry within a few minutes, but give it 15-20 minutes to be safe so you don’t smudge your hard work.
Personalize It
Instead of botanical drawings, write guest names in modern calligraphy for weddings, or use gold ink for a luxe holiday variation.
Step 3: Assembly
-
Cut the twine:
Cut a length of jute twine, approximately 12-15 inches long. This gives you enough slack to tie a generous bow without struggling. -
thread the tag:
Fold the twine in half to find the center, then thread the looped end through the pre-drilled hole at the top of the acrylic tag. -
Tie the knot:
Pull the two loose ends of the twine through the loop you just pushed through the hole. Pull tight to secure the twine to the tag with a lark’s head knot. -
Tie the bow:
To attach it to your cardstock or gift, wrap the loose ends around the item (or just tie them together if using as a standalone tag) and finish with a standard bow. Fluff the loops to make them look full. -
Final placement:
Lay the finished tag against a warm-toned background, like the rust cardstock shown, to really make that white ink pop against the frosted texture.
Now you have a stunning, ethereal tag ready to elevate any gift or table setting

PENCIL GUIDE
Understanding Pencil Grades from H to B
From first sketch to finished drawing — learn pencil grades, line control, and shading techniques.
Explore the Full Guide
Desk Name Plates With Frosted Engraving
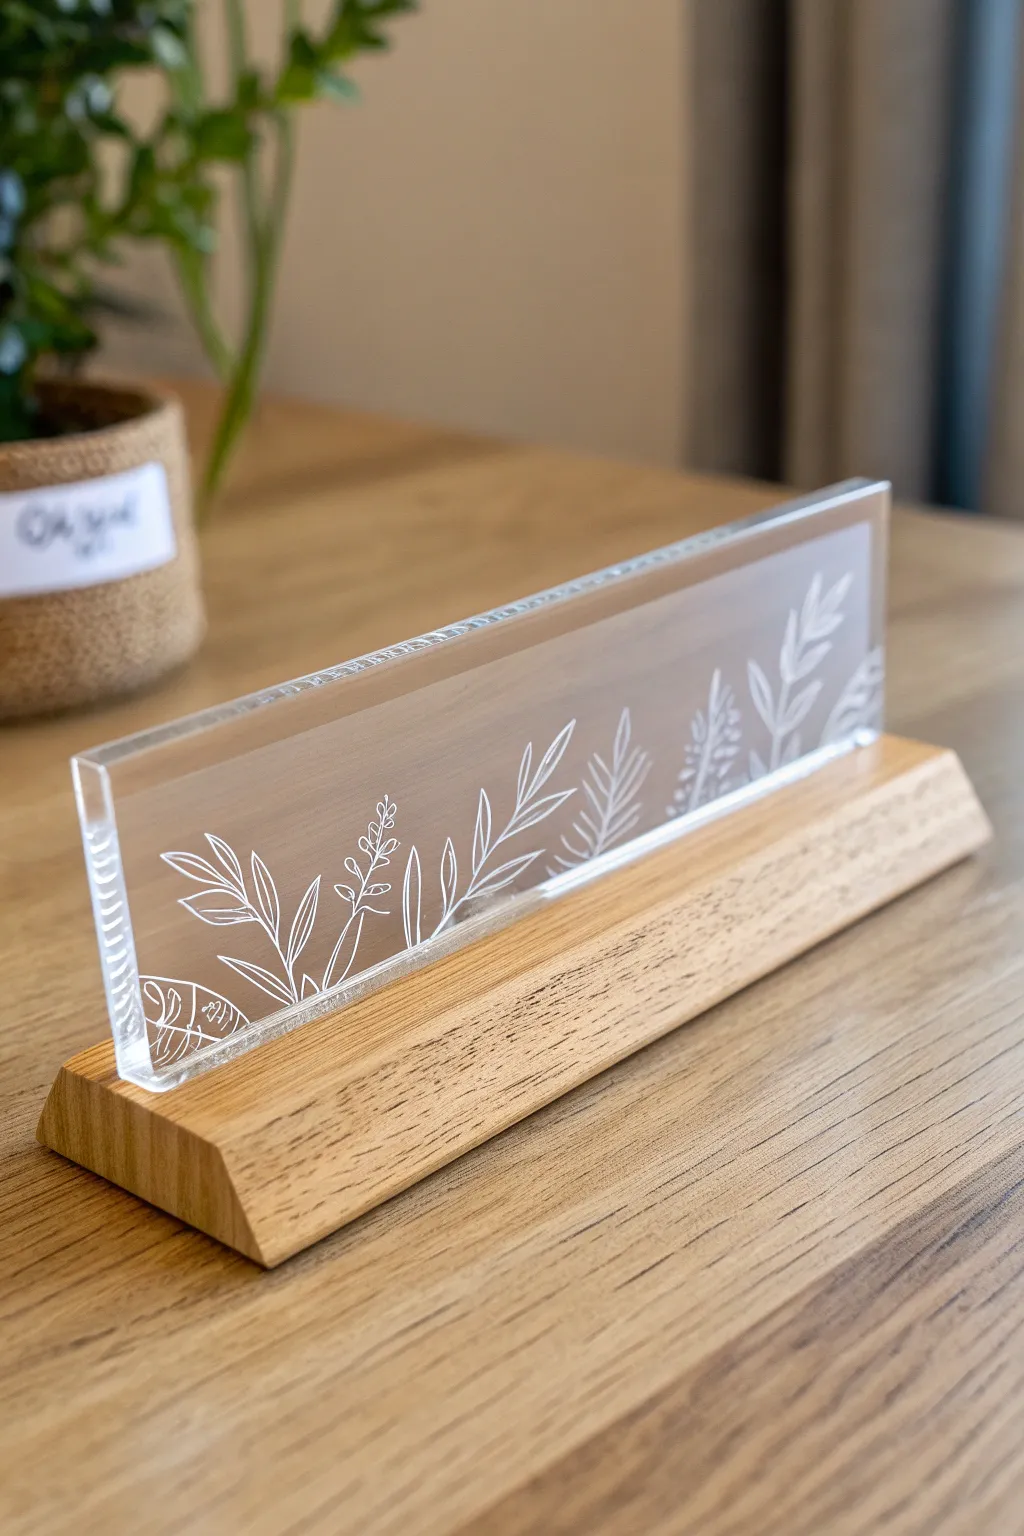
Bring a touch of elegance to any workspace with this sleek desk accessory that combines warm wood with crisp, modern acrylic. The delicate white floral line art appears to float inside the clear block, creating a sophisticated and professional look.
How-To Guide
Materials
- Clear cast acrylic sheet (1/4 inch or 6mm thick)
- Unfinished hardwood block (oak or pine recommended, approx. 8″ x 2″ x 1″)
- Table saw or circular saw
- Dado blade or router (optional, but helpful)
- Sandpaper (120, 220, and 400 grit)
- Cricut Maker or laser engraving machine
- Engraving tip (if using Cricut)
- Strong grip cutting mat
- Masking tape
- White acrylic paint (optional, for fill)
- Lint-free cloth
- Wood stain or clear matte varnish
- Microfiber cleaning cloth
Step 1: Preparing the Base
-
Cut the wood base:
Start by cutting your hardwood block to the desired length. For a standard desk plate, 8 to 10 inches is usually perfect, allowing the acrylic to sit comfortably with a small margin on each side. -
Angle the edges:
To achieve the beveled look shown in the photo, set your table saw blade to a 45-degree angle. Carefully run the long edges of the wooden block through to chamfer the sides, giving it a lower profile. -
Create the heavy channel:
You need a slot for the acrylic to sit in. Use a table saw with a dado blade or make multiple passes with a standard blade to create a groove down the center of the top face. Determine the width needed by measuring your acrylic sheet’s thickness precisely. -
Test the fit:
Before sanding, test the acrylic scrap in the slot. It should be snug enough to stand upright without wobbling, but loose enough to insert without forcing it. -
Sand the wood:
Sand the wooden base thoroughly, starting with 120 grit to smooth any saw marks, moving to 220, and finishing with 400 grit for a silky finish. Pay special attention to the beveled edges. -
Seal the wood:
Apply a clear matte varnish or a light wood stain to protect the grain. I find a simple wax finish also works beautifully here for a natural look. Let this cure completely.
Cloudy Edges?
If sanding doesn’t clear up the cut edges of your acrylic, try ‘flame polishing.’ Quickly pass a butane torch over the rough edge to melt it smooth, but keep moving to avoid bubbling.
Step 2: Engraving the Acrylic
-
Design your artwork:
Create or download a botanical line art vector file. The design needs to be single-line vector paths rather than solid shapes. Arrange the leaves and stems horizontally to fit the dimensions of your acrylic strip. -
Cut the acrylic to size:
If you haven’t already, cut your acrylic sheet into a rectangle that matches the length of your wooden base minus a half-inch, and about 3-4 inches tall. Leave the protective film on while cutting to prevent chipping. -
Prepare the machine:
If using a Cricut Maker, place the acrylic onto a Strong Grip mat and secure the edges firmly with masking tape so it doesn’t shift during the engraving process. Install the engraving tip. -
Engrave the design:
Send the job to your machine. The engraving tool will scratch the surface of the acrylic, creating the frosted white lines. If you are using a laser cutter, use settings for vector scoring rather than raster engraving for crisp lines. -
Clean the debris:
Once finished, remove the acrylic from the machine. Use a soft brush or compressed air to blow away the fine plastic dust created by the engraving tip. Do not wipe it yet, as the dust can scratch the clear areas. -
Enhance visibility (Optional):
If the engraving looks too faint, you can apply a small amount of white acrylic paint over the lines, wipe it into the grooves, and immediately wipe away the excess from the surface. This makes the design pop.
Use LED Lighting
Add an LED strip inside the wooden groove before inserting the acrylic. The light will travel up through the clear plastic and catch on the engraved lines, making the artwork glow.
Step 3: Final Assembly
-
Polish the edges:
If the cut edges of your acrylic look cloudy, sand them with high-grit sandpaper (up to 2000 grit) or use a plastic polishing compound to make them crystal clear. -
Remove protective films:
Peel off any remaining protective backing from the non-engraved side of the acrylic. Use a microfiber cloth to remove fingerprints. -
Insert the plate:
Gently press the acrylic plate into the wooden slot. It should slide in firmly. If it’s too loose, a small dot of clear silicone adhesive in the groove can secure it instantly.
Place your finished name plate on your desk and enjoy the clean, modern vibe it adds to your workspace
Slot-Together Acrylic Phone Stands
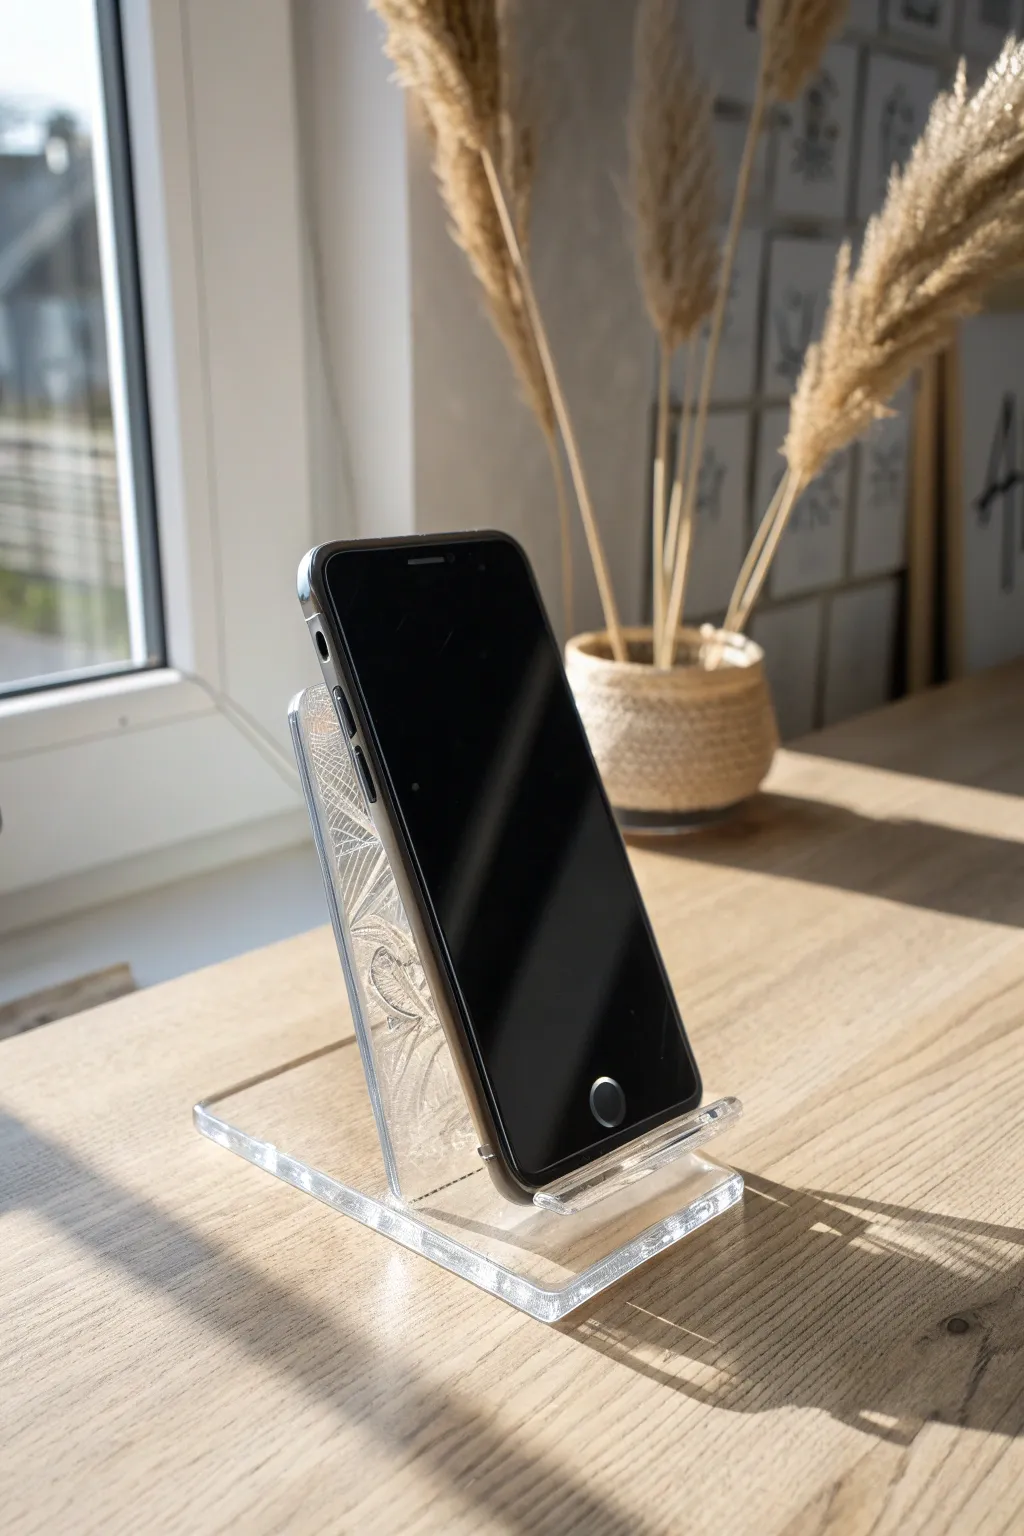
This elegant phone stand combines minimalist design with delicate engraving, creating a functional piece of art for your desk. Using clear acrylic allows sunlight to catch the engraved botanical details, giving it a light, airy presence.
Step-by-Step Guide
Materials
- 3mm or 5mm clear cast acrylic sheet
- Laser cutter (e.g., Glowforge, xTool) or CNC machine
- Vector software (Illustrator or Inkscape)
- Botanical vector pattern file
- Acrylic cleaner or mild soap solution
- Microfiber cloth
- Digital calipers
- Masking tape (if sheet isn’t pre-masked)
Step 1: Design & Preparation
-
Measure your material:
Before opening your software, use digital calipers to measure the exact thickness of your acrylic sheet. Acrylic often varies slightly from the stated 3mm or 5mm, and this precise measurement is crucial for a tight slot fit. -
Draft the profile:
In your vector software, design the side profile of the stand. Create an ‘L’ shape for the main body that reclines at roughly a 60-degree angle for comfortable viewing. -
Create the support leg:
Design the second piece, which will serve as the rear support leg. This piece needs to be wide enough to provide stability but shorter than the main phone backrest. -
Design the slot mechanism:
Add a slot cut-out to the main body piece and a corresponding notch or tab on the support leg. The width of these slots should match your caliper measurement exactly, or be 0.1mm tighter for a friction fit. -
Incorporate the lip:
Ensure the main body piece has a distinct upward-curved lip at the bottom to cradle the phone securely, just like the clear hook seen in the example.
Step 2: Engraving Setup
-
Import texture artwork:
Import your botanical line art or leaf pattern. Position it on the main backrest piece of your design file. -
Adjust engraving settings:
Set the pattern lines to ‘score’ or a low-power vector engrave operation rather than a deep raster fill. This creates the delicate, sketched look shown in the image without frosting the entire surface. -
Mirror flexibility:
I usually prefer to mirror the image horizontally if I’m engraving on the back side of the acrylic. This keeps the front face completely smooth to the touch. -
Masking check:
Keep the protective paper masking on the acrylic sheet to prevent smoke damage and potential scorch marks during the laser process.
Clean Cuts Pro-Tip
To get that crystal-clear ‘flame polished’ edge straight off the laser, slightly lower your cutting speed and increase the frequency (PPI) settings.
Step 3: Cutting & Assembly
-
Run the job:
Place your acrylic in the laser cutter and run the job. Remember to process the engraving or scoring steps first, followed by the interior cuts, and finally the outer perimeter cuts. -
Remove masking:
Once the cutting is complete, carefully peel away the protective masking from both sides of the acrylic parts. Use a fingernail or a plastic razor blade to lift the edge. -
Weeding detail:
If small bits of masking remain inside the engraved lines, use a piece of strong duct tape to dab at the surface; it lifts the tiny scraps out effortlessly. -
Clean the edges:
Wipe the edges with a microfiber cloth. If there is sticky residue from the masking adhesive, a little isopropyl alcohol or specialized acrylic cleaner works wonders. -
Test the fit:
Gently slide the two pieces together. They should slot firmly without forcing. If it’s too tight, lightly sand the slot edge; if too loose, a tiny drop of clear acrylic cement can secure it permanently. -
Final polish:
Give the entire stand a final buff with a clean cloth to remove fingerprints before placing it on your desk.
Level Up: LED Base
Build a simple wooden base with an embedded LED strip. When you slot the acrylic in, the light will travel up and make the engraved leaves glow.
Enjoy the sleek modern look this brings to your workspace


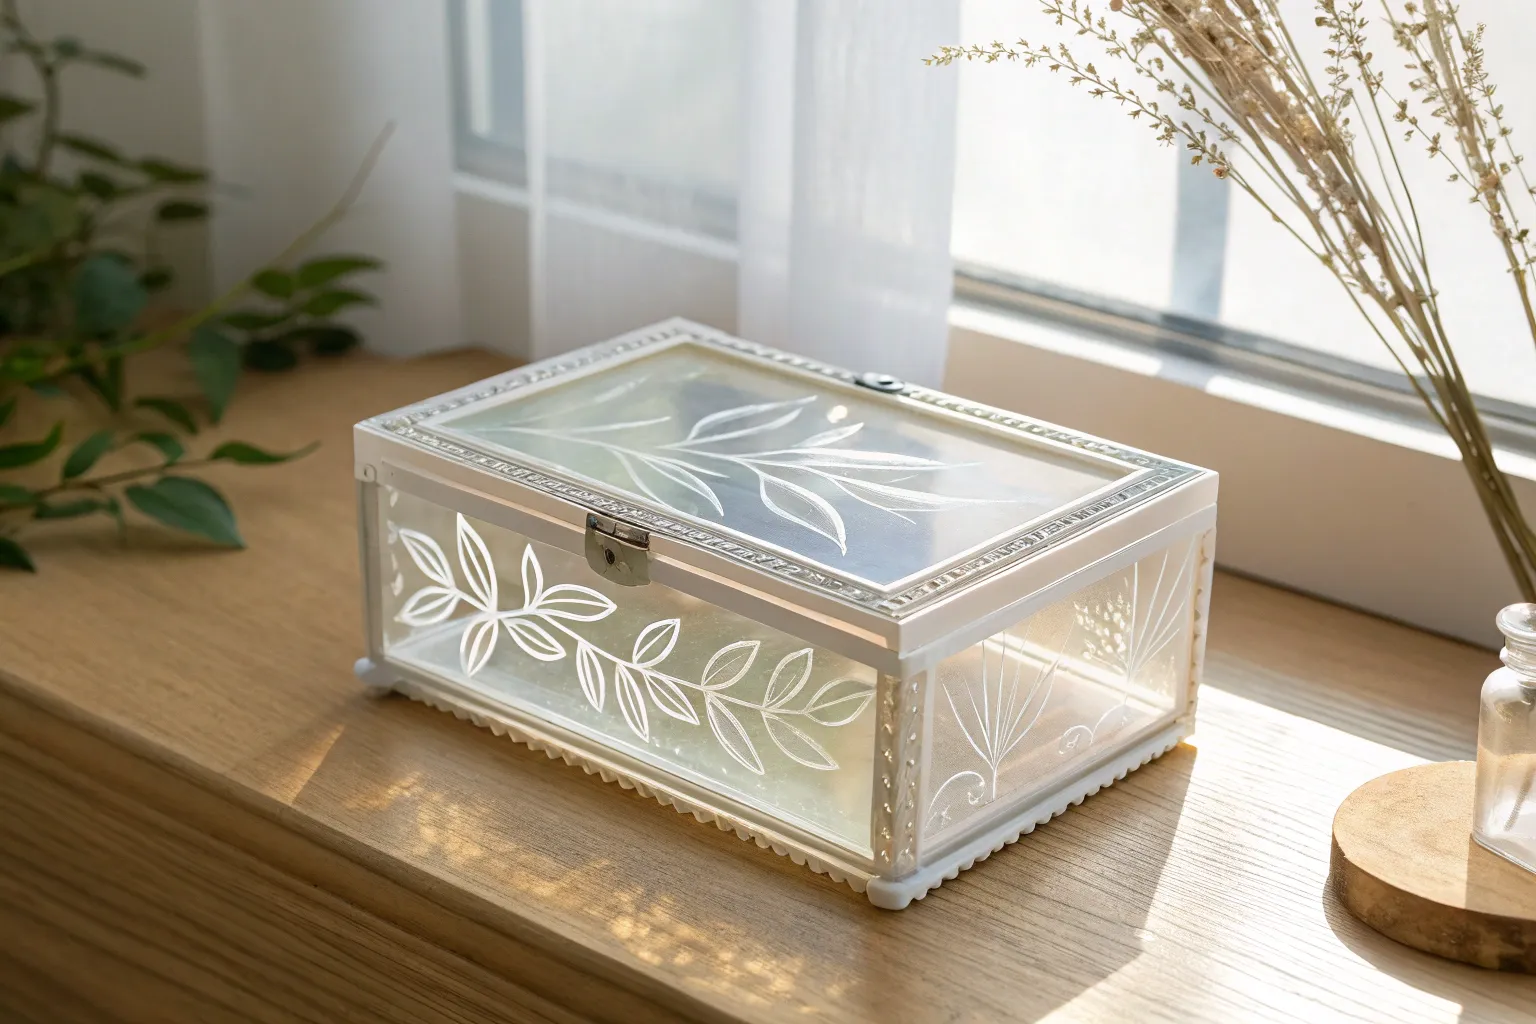
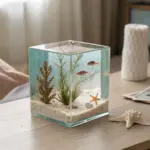
Clear Acrylic Display Boxes for Keepsakes

Preserve the delicate beauty of a dried flower inside a custom-assembled acrylic cube that catches the light from every angle. This minimalist display turns a simple botanical specimen into a striking modern heirloom perfect for shelves or side tables.
How-To Guide
Materials
- Clear acrylic sheet (1/8 inch or 3mm thick)
- Acrylic cement (solvent welder) with needle applicator
- Plastic scoring knife or table saw with plastic-cutting blade
- Fine-grit sandpaper (400 and 600 grit)
- Painter’s tape or masking tape
- Straight edge ruler
- Dried flower (such as a pink strawflower or helichrysum)
- Microfiber cloth
- Acrylic cleaner or weak soapy water
- Safety goggles
Step 1: Planning and Cutting
-
Determine dimensions:
Measure your specific dried flower to decide on the size of your cube. For a single bloom like the one shown, a 4x4x4 inch box is usually perfect, allowing negative space around the petals without drowning them. -
Map the panels:
You will need five panels for an open-bottom box (or six if you want it fully sealed). Remember to account for the thickness of the acrylic in your measurements; typically, you need top/bottom panels to be the full width, and side panels to be slightly shorter if they are sandwiched between them. -
Leave protective film on:
Keep the protective paper or plastic film on the acrylic sheet while measuring and marking your cut lines to prevent scratches during the early stages. -
Score the acrylic:
If using a scoring knife, place your straight edge along the cut line and firmly drag the knife across multiple times until you’ve cut about halfway through the material. -
Snap the pieces:
Place the scored line directly over the edge of a table and apply quick, firm downward pressure to snap the piece cleanly.
Cloudy Seams?
If you drip solvent on the face of the acrylic, do NOT wipe it immediately. Let it evaporate. Wiping wet solvent smudges the plastic permanently.
Step 2: Edge Prep and Assembly
-
Refine the edges:
Use 400-grit sandpaper to smooth any rough spots from the snap lines. Follow up with 600-grit for a smoother finish, ensuring the edges are perfectly flat for a strong bond. -
Clean everything:
Peel back just the edges of the protective film or remove it entirely now. Wipe every panel down with a microfiber cloth to remove dust, as static can trap particles inside the box later. -
Dry fit the box:
Assemble the four walls and top panel using painter’s tape to hold them in place. This lets you check that all corners meet squarely before applying any permanent adhesive. -
Apply the solvent:
Using the needle applicator, carefully run a thin bead of acrylic cement along the inside seams where the panels meet. Capillary action will pull the water-thin solvent into the joint. -
Let it cure:
Hold the pieces steady for a minute until the bond grabs, then leave the taped structure to cure fully according to your adhesive’s instructions, usually about 24 hours for maximum strength.
Make It Float
Drill a tiny hole in the bottom panel before assembly. Insert the flower stem into the hole so the bloom stands upright, appearing to float inside the cube.
Step 3: Finishing and Display
-
Prepare the flower:
Ensure your flower is completely dried to prevent mold. Trim the stem to fit diagonally or comfortably within your cube’s dimensions. -
Final polish:
Once the box is cured, remove the tape. Check for any fingerprints or smudges and gently buff them away with a clean microfiber cloth and plastic cleaner. -
Position the bloom:
Place your flower on the table or base you intend to use. If you created a 5-sided box, simply lower the acrylic cube over the flower carefully. -
Optional sealing:
If you cut a sixth panel for the bottom, I like to place the flower inside, apply a tiny dot of glue to the stem to anchor it, and then weld the final bottom panel on for a permanent enclosure.
Now you have a pristine, museum-quality display that protects your fragile keepsake while showcasing it beautifully in the light
Edge-Lit Acrylic Night Light Panels
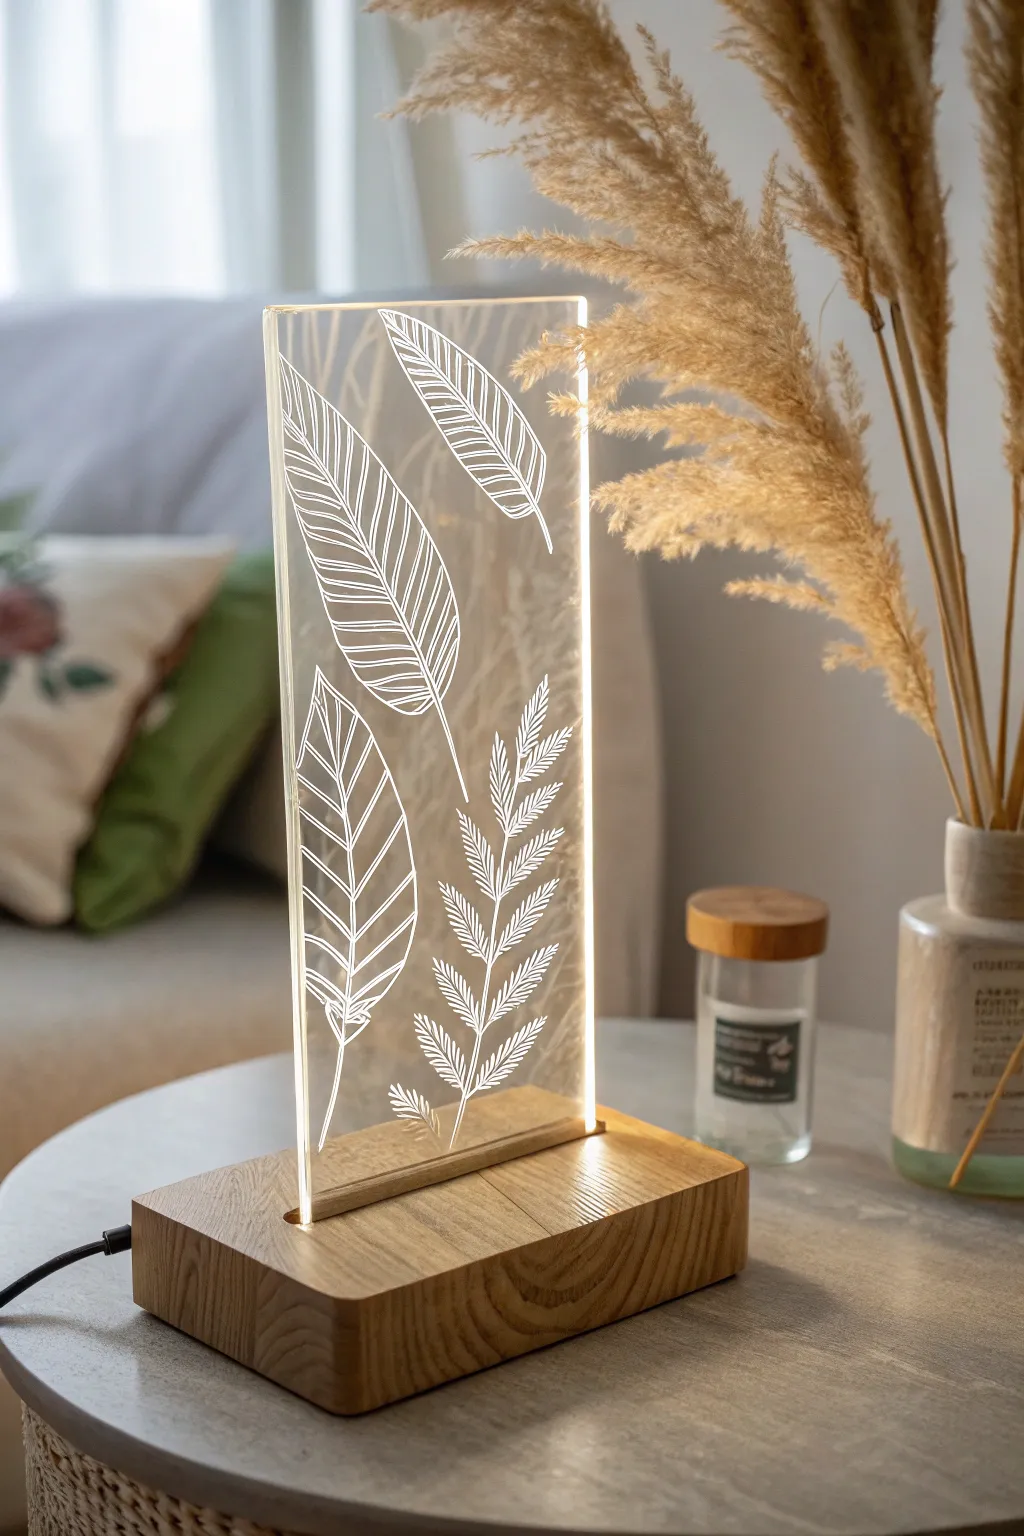
Transform a plain sheet of acrylic into a glowing botanical masterpiece that doubles as a functional night light. This project uses the principle of total internal reflection to make your etched leaf designs shine brilliantly against the clear background.
Step-by-Step Guide
Materials
- Clear acrylic sheet (4-6mm thick)
- Wooden block or pre-made LED display base
- LED strip light (warm white) with USB connector
- Rotary tool (e.g., Dremel) with diamond engraving bits
- Fine-grit sandpaper (400-800 grit)
- Printed leaf template
- Masking tape
- Router or chisel (for the wooden base)
- Acrylic cleaner and microfiber cloth
- Safety goggles and dust mask
Step 1: Preparing the Base
-
Select your wood:
Choose a solid block of wood, such as oak or pine, slightly wider than your acrylic sheet. Cut it to your desired base dimensions, ensuring the bottom is flat and stable. -
Create the slot:
Using a router or a table saw, cut a groove down the center of the wooden block. Test the fit frequently; it should be snug enough to hold the acrylic upright but not so tight that you have to force it. -
Channel for LEDs:
The groove needs to be deep enough to conceal the LED strip at the bottom while still gripping the acrylic. If necessary, deepen the central channel just for the light strip. -
Install the lights:
Adhere the LED strip into the bottom of the groove. If your base has a closed bottom, drill a small hole through the back or side to route the power cable out cleanly. -
Sand and finish:
Sand the wooden base until smooth, breaking any sharp edges. Apply a clear varnish or wood stain to protect the timber and enhance the grain, then let it dry completely.
Clearer Lines
Keep your rotary tool speed medium-low. Too high, and the friction melts the acrylic rather than cutting it, resulting in messy, white blobs instead of crisp lines.
Step 2: Etching the Design
-
Prepare the acrylic:
Leave the protective film on the acrylic for now. Cut the sheet to fit your base’s slot dimensions, then sand the edges, specifically the bottom edge where the light enters, to a high polish for maximum light transmission. -
Attach the template:
Print out a line drawing of three stylized leaves—two broad ones and one fern-like branch. Tape this template securely to the back of the acrylic sheet. -
Trace the outline:
Peel off the protective film from the front face only. Using a fine-point engraving bit on your rotary tool, carefully trace the outermost contours of the leaves first. -
Fill in the veins:
Switch to a slightly broader bit if available, or use a gentle shading motion. Etch the internal veins of the broad leaves, ensuring the lines are deep enough to catch the light effectively. -
Detail the fern:
For the fern-like sprig, use short, flicking motions to mimic the feathery texture of the fronds. Variation in depth here creates a lovely organic look. -
Clean up debris:
Pause occasionally to blow away acrylic dust. I find it helpful to wipe the surface with a dry cloth to see exactly where my lines need more definition. -
Review the etching:
Hold the panel up to a light source to check for consistency. Any spot that looks ‘scratchy’ or too faint can be gone over again lightly to unify the texture. -
Remove the backing:
Once fully satisfied with the engraving, peel the remaining protective film off the back of the acrylic sheet and discard the paper template.
Layered Depth
Try etching on BOTH sides of the acrylic. Etch the background leaves on the back and foreground detailed leaves on the front for a cool 3D parallax effect.
Step 3: Final Assembly
-
Clean the panel:
Use acrylic cleaner and a microfiber cloth to remove fingerprints and remaining dust. Any smudge left on the surface will be highlighted by the LEDs, so be thorough. -
Mount clearly:
Insert the acrylic panel firmly into the wooden slot, ensuring it sits flush against the LED strip for the best illumination. -
First light:
Plug in the USB connector and switch on the LEDs. The light should travel up through the acrylic and catch on your etched lines, making the leaves glow brightly.
Enjoy the soft, ambient glow of your handmade botanical art piece


Have a question or want to share your own experience? I'd love to hear from you in the comments below!