Alien paintings are the perfect excuse to play with glow effects, dramatic night skies, and characters that can be as cute or as mysterious as you want. Here are my favorite alien painting ideas you can riff on in your own style, from classic scenes to delightfully weird twists.
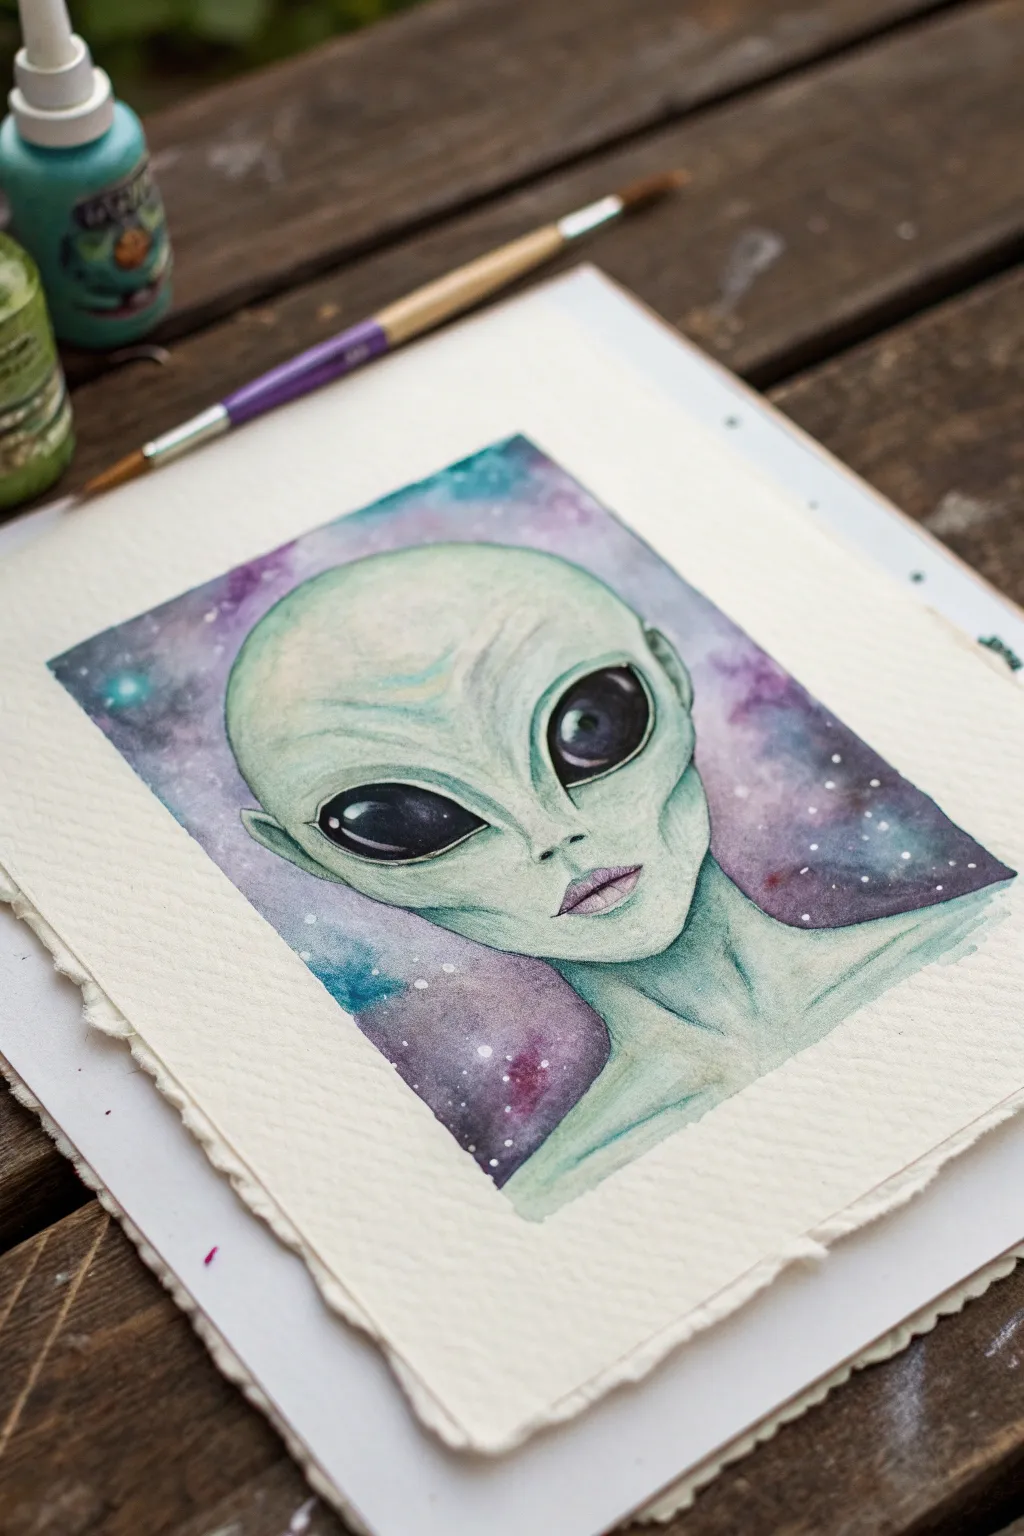
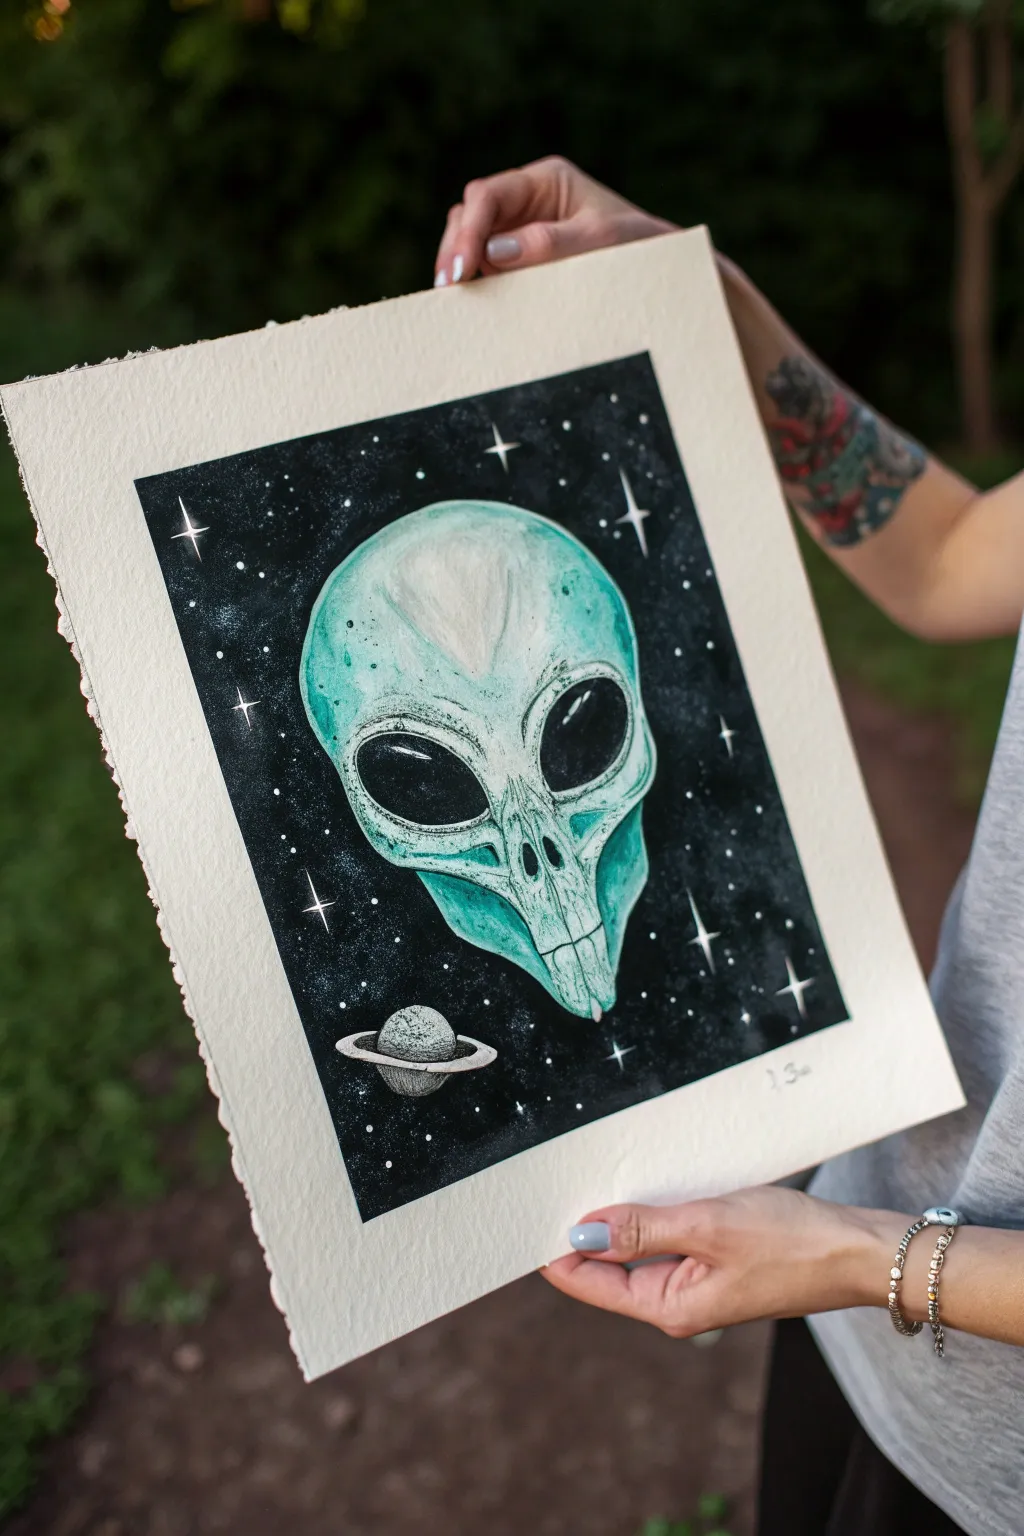
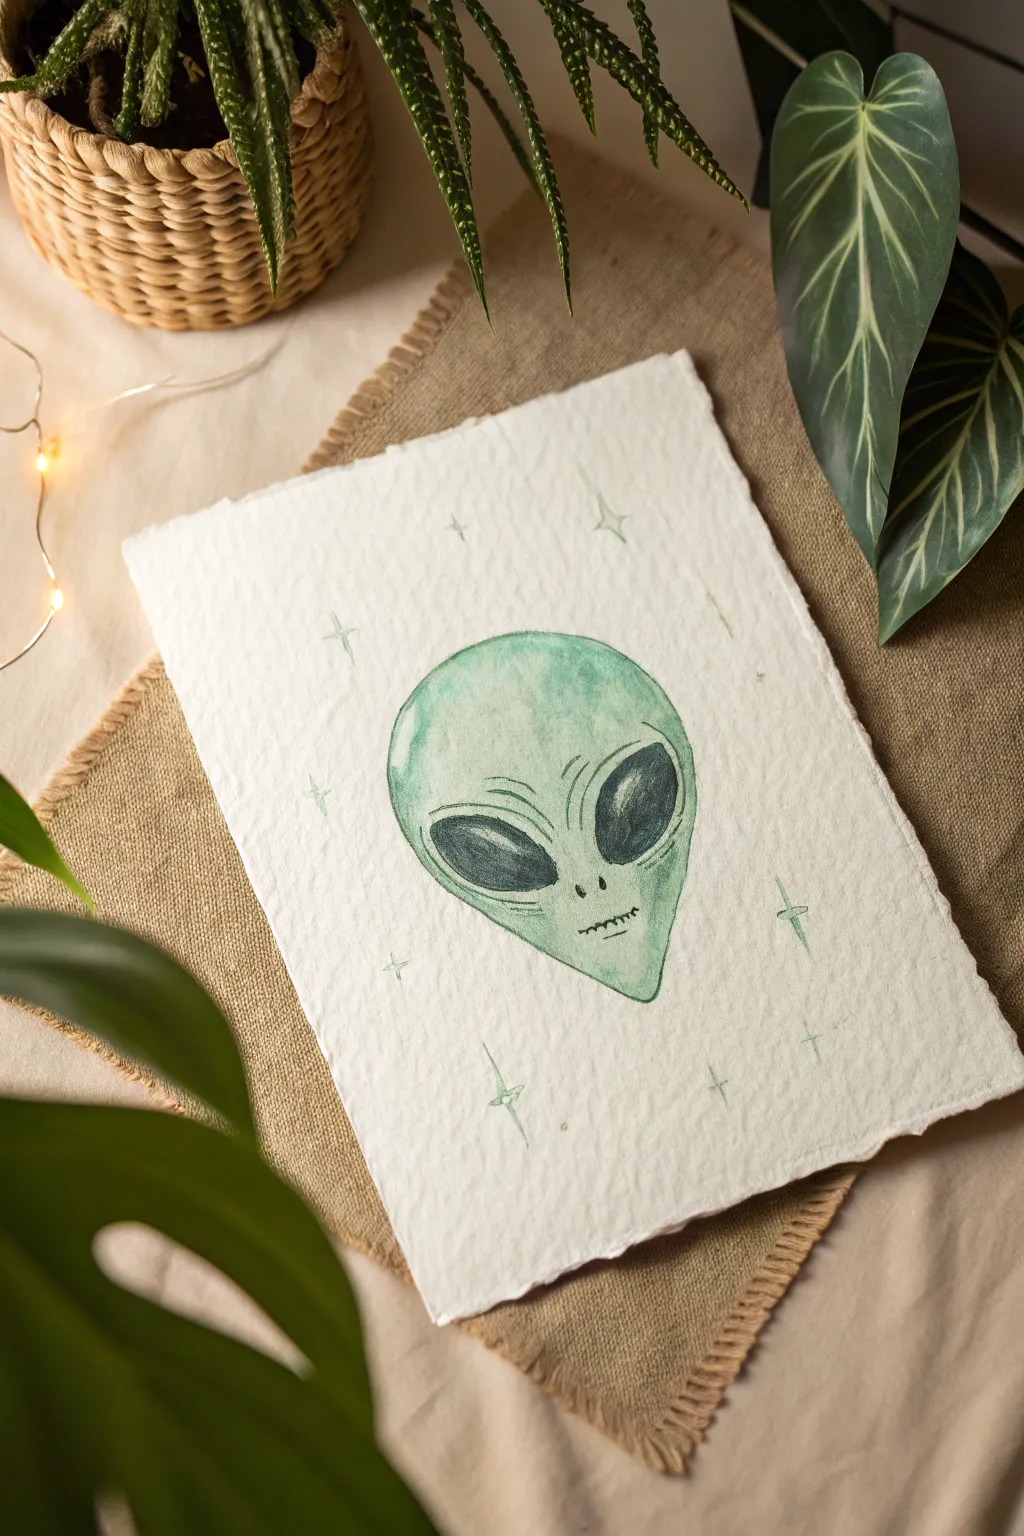
Classic Grey Alien Portrait
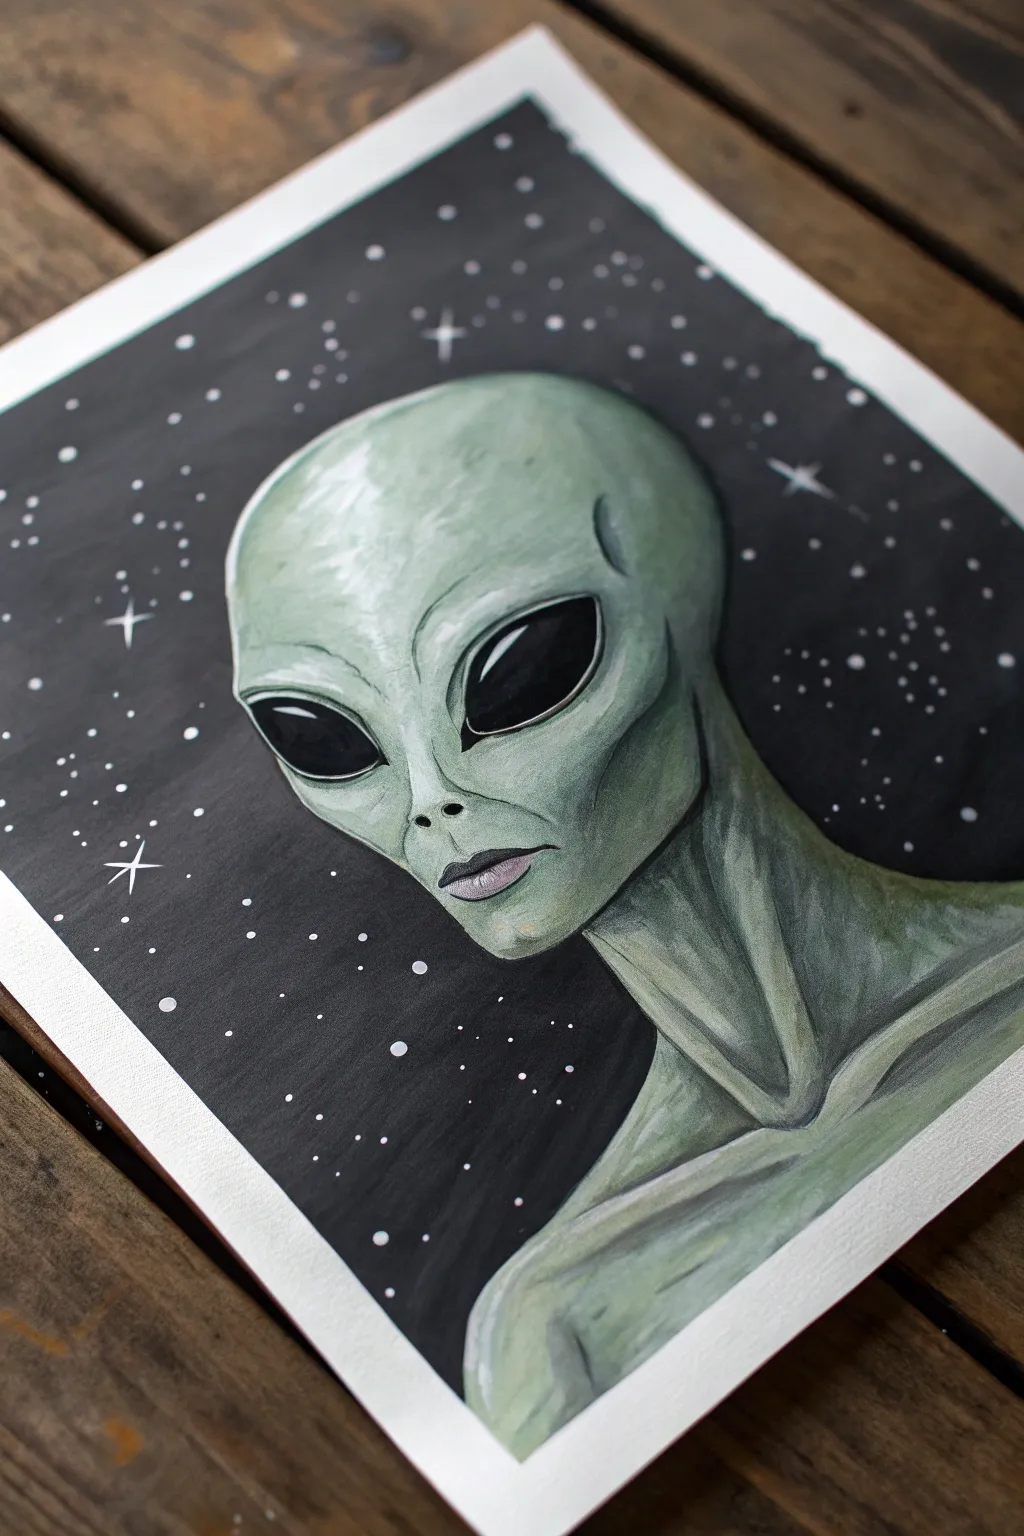
Capture the enigmatic gaze of a classic extraterrestrial being in this striking acrylic painting project. With its smooth, pale green skin tones set against a deep, starry void, this portrait balances eerie mystery with beautiful, soft shading techniques.
Step-by-Step Guide
Materials
- Heavyweight mixed media paper or canvas board
- Masking tape
- Acrylic paints (black, white, sap green, yellow ochre, burnt umber)
- Flat brushes (medium and large)
- Round detail brushes (size 0 and 2)
- Pencil and eraser
- Palette for mixing
- Cup of water and paper towels
Step 1: Sketching and Background
-
Prepare your surface:
Tape down the edges of your paper to a flat surface using masking tape to create a crisp white border later. This also prevents the paper from buckling when wet. -
Draft the outline:
Lightly sketch the alien’s head shape. Start with an inverted teardrop shape, keeping the top bulbous and the chin narrow. Add the elongated neck and shoulders. -
Add facial features:
Draw the iconic large, slanted almond eyes. Place two small nostrils near the bottom third, and a thin, slightly downturned line for the mouth. Keep pencil lines faint so they don’t show through the paint. -
Paint the void:
Mix a small amount of water into your black acrylic paint to improve flow. Carefully paint the entire background around the alien figure, using a medium flat brush to get close to your sketch lines without crossing them. -
Second coat:
Once the first layer of black is dry, apply a second coat if needed to ensure a solid, opaque darkness. Let this dry completely before moving to the stars.
Uneven Background?
If your black background looks streaky, paint in alternating directions for each layer (horizontal then vertical) to weave a solid, opaque matte finish.
Step 2: Base Layers and Skin Tones
-
Mix the base skin color:
Create a pale, sickly green by mixing white with a touch of sap green and a tiny dot of yellow ochre. You want a very light, desaturated pastel green. -
Apply the base coat:
Fill in the entire face, neck, and shoulder area with this base green mixture. Don’t worry about shading yet; just aim for flat, even coverage. -
Mix a shadow tone:
Take your base green mixture and add a very small amount of burnt umber and a touch more sap green. This will be your primary shadow color for sculpting the face. -
Define the structure:
While the base is dry, apply this shadow tone to the sides of the head, under the chin, along the sides of the neck, and into the hollows of the clavicle. I find blending the edges with a slightly damp brush helps create a smoother transition. -
Deepen the shadows:
Mix a darker version of the shadow tone by adding a hint of black. Paint this into the deepest recesses: right under the jawline, the eye sockets, and the distinct muscle lines in the neck.
Pro Tip: Smooth Blending
Acrylics dry fast. Use a ‘slow drying medium’ or keep a mister bottle handy to lightly spray your palette, keeping the paints usable for longer smooth blending.
Step 3: Details and Highlights
-
Highlight the form:
Mix a nearly white shade with just a whisper of green. Paint highlights on the most protruding areas: the top of the forehead, the bridge of the nose, the upper cheekbones, and the ridges of the neck muscles. -
Blend the skin:
Use a clean, slightly damp brush to soften the boundaries between your highlights, mid-tones, and shadows. The goal is a smooth, skin-like texture without harsh lines. -
Paint the eyes:
Using your smallest round brush and pure black paint, fill in the large almond eyes. Be very precise with the edges to keep them sharp and terrifyingly deep. -
Eye reflections:
Once the black eyes are fully dry, add reflection lines. Use pure white paint to create a curved highlight along the top or side of the eye, giving it a wet, glassy appearance. -
Facial details:
Using a dark grey-green mix and a size 0 brush, carefully define the nostrils and the line of the mouth. You can add faint lips with a slightly pinkish-grey tone if desired. -
Create the stars:
Dip a detail brush or a toothbrush into slightly watered-down white paint. Flick the bristles or carefully dot the background to create a scatter of stars. Paint a few larger ‘cross’ shapes for twinkling stars.
Step 4: Finishing Touches
-
Final assessment:
Step back and look at your contrast. If the skin looks too flat, glaze a tiny bit of watered-down black/green into the deepest shadows to make the head pop. -
Reveal the border:
Wait until the painting is 100% dry to the touch. Slowly peel away the masking tape at a 45-degree angle to reveal your clean, crisp white border.
Now you have a cosmic traveler staring back at you from the canvas, ready to spark conversations about what lies beyond


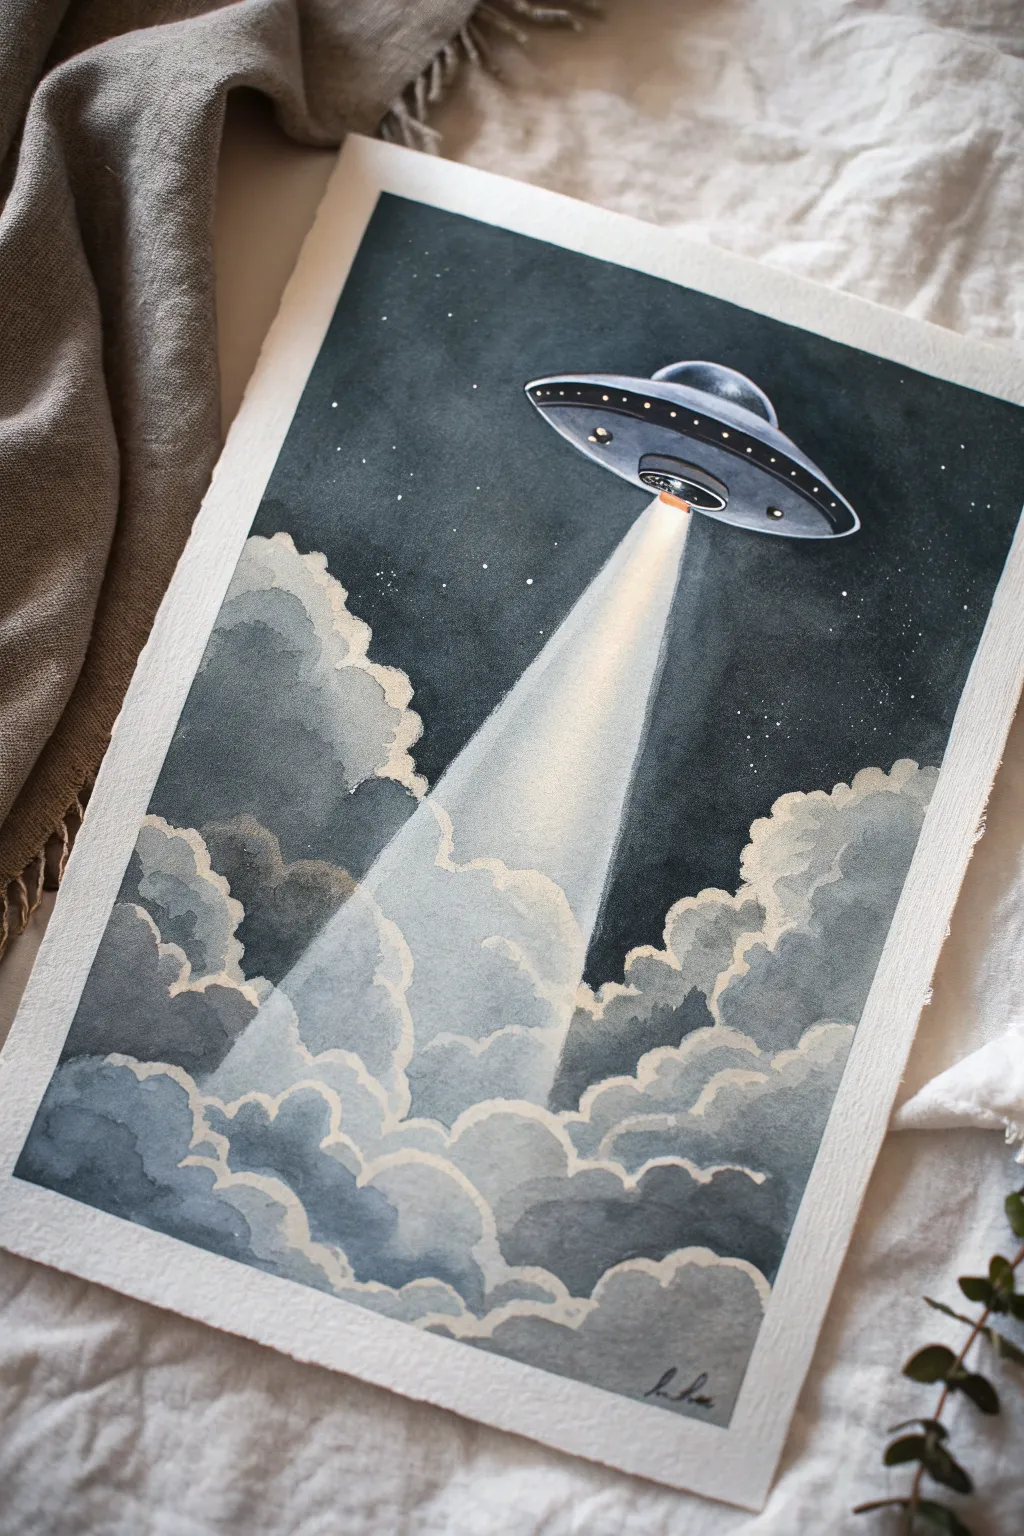
UFO Abduction Beam Scene
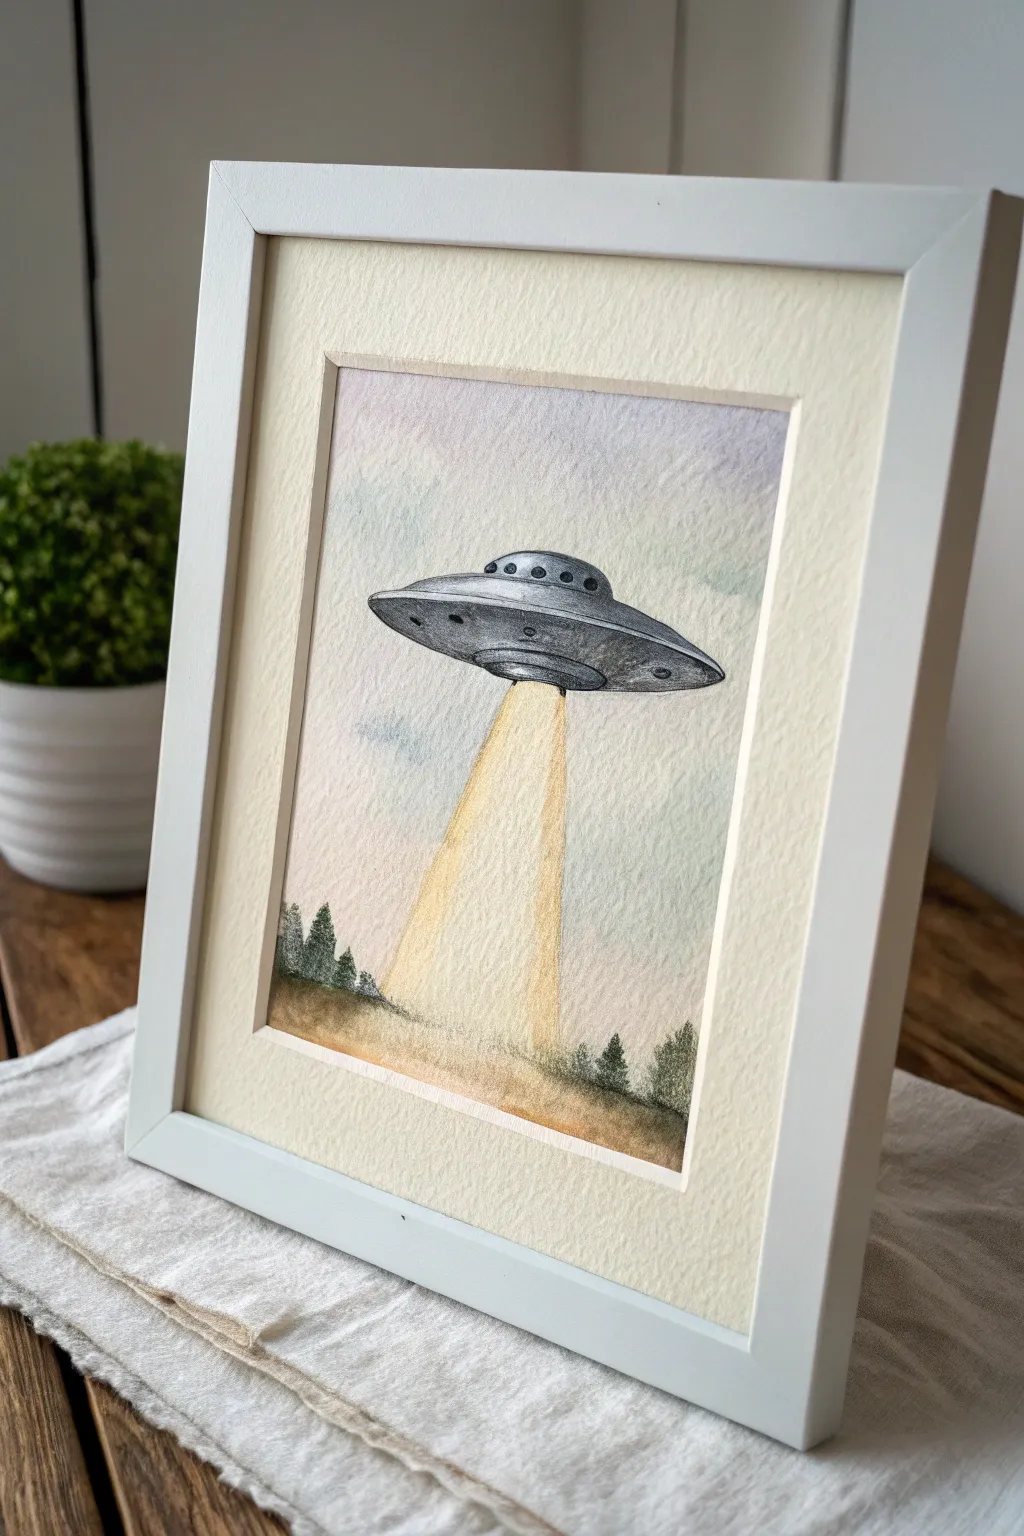
Capture the eerie beauty of a classic sci-fi moment with this delicate watercolor and pencil illustration. The soft washes create an atmospheric sky, while the distinct beam of light cuts through the landscape, perfect for framing as modern wall art.
Step-by-Step Tutorial
Materials
- Cold press watercolor paper (A4 or similar size)
- Watercolor paints (Payne’s Grey, Indigo, Yellow Ochre, Burnt Sienna, Sap Green)
- White gouache or white gel pen
- HB or 2B graphite pencil
- Fine liner pen (0.1mm, grey or black)
- Watercolor brushes (medium round brush #6 or #8, fine detail brush #0 or #1)
- Masking tape
- Ruler
- Paper towel
- Clean water
Step 1: Setting the Scene
-
Prepare the paper:
Begin by taping down all four edges of your watercolor paper to a hard board using masking tape. This prevents buckling and creates that crisp, clean border seen in the final framed piece. -
Sketch the composition:
Using your graphite pencil, lightly sketch the horizon line about a third of the way up from the bottom. Sketch a flattened oval shape for the UFO body floating in the upper center, and use a ruler to draw two faint lines diverging downward from the craft to represent the beam. -
Define the saucer details:
Refine the UFO sketch by adding a dome on top and a rim around the central oval. Draw small circles along the upper dome for windows and a few rectangular vents on the underside. -
Sketch the terrain:
Roughly indicate where the tree line will be along the horizon. Keep these shapes loose since the paint will do most of the work here later.
Master the Beam
To make the abduction beam really glow, paint the background sky slightly darker right next to the beam lines. High contrast creates luminosity.
Step 2: Painting the Atmosphere
-
Wet-on-wet sky base:
Apply clean water to the entire sky area, carefully avoiding the inside of the beam and the UFO shape. You want the paper damp but not puddling. -
Add subtle sky colors:
Drop in very diluted washes of Indigo and a touch of diluted Payne’s Grey into the wet sky. Let the colors bleed naturally to create a hazy atmosphere, keeping it lighter near the horizon. -
Paint the beam:
Once the sky is dry, mix a very watery Yellow Ochre. Paint the interior of the beam shape you masked off earlier. Keep the wash flat and consistent so it looks like a ray of light. -
Ground layer:
Paint the ground area with a wash of Yellow Ochre and Burnt Sienna. Let these warm earth tones blend together loosely.
Step 3: The Saucer and Shadows
-
Base coat for the UFO:
Mix a light wash of Payne’s Grey and fill in the metallic body of the spaceship. Leave small highlights white on the top of the dome to suggest reflection. -
Deepen the metal tones:
I prefer to wait until the base layer is bone dry before adding shadows. Use a more concentrated Payne’s Grey to paint the underside of the rim and the right side of the dome to give it 3D form. -
Detail the windows:
Fill in the small window circles with virtually pure black or Indigo. This high contrast makes the metal look shiny and the interior look mysterious. -
Add panel lines:
Using your fine liner pen or the very tip of your smallest brush, carefully outline the rim segments and the division between the dome and the saucer body.
Fixing Muddy Colors
If your ground colors are bleeding into the yellow beam, ensure the beam section is 100% dry before painting adjacent areas. Patience is key for sharp lines.
Step 4: Finishing Touches
-
Paint the trees:
Mix Sap Green with a little Indigo for a dark, evergreen color. Paint small, jagged vertical strokes along the horizon line to create pine trees. -
Light up the beam landing:
Where the yellow beam hits the ground, lift out a little pigment with a clean, damp brush or dab it with paper towel to show the intense light hitting the grass. -
Add texture to the beam:
Using a very dry brush and slightly darker yellow paint, drag vertical streaks down the length of the beam. This dry-brush technique simulates the shimmering particles of light. -
Highlight the metal:
Use white gouache or a white gel pen to add sharp, tiny bright spots on the dome and the edge of the saucer rim closest to the light source. -
Final border reveal:
Wait until the painting is completely dry to the touch—warm it with a hairdryer if you’re impatient—and then slowly peel away the masking tape at a 45-degree angle to reveal your crisp white edges.
Frame your finished piece in a simple white frame, as shown, to let the delicate colors truly pop.


Alien in a Silhouetted Forest
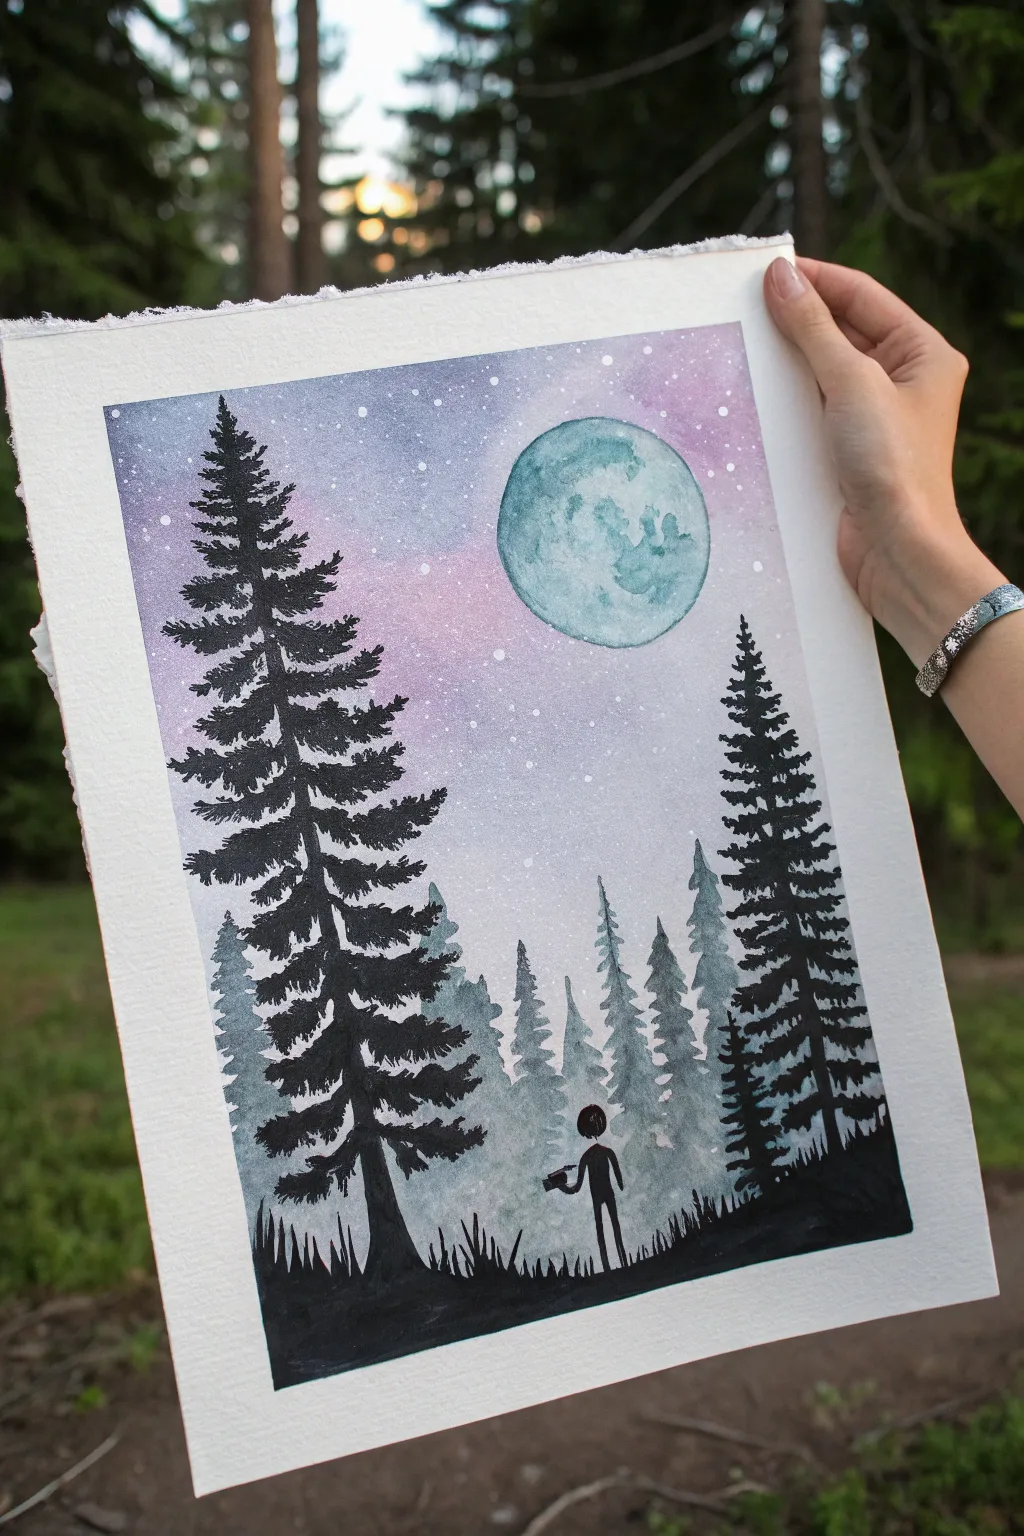
Capture the mystery of specific visitors in the night with this atmospheric watercolor scene. You’ll create a glowing lunar backdrop and layers of misty forest depth, framing a tiny wanderer exploring our world.
Detailed Instructions
Materials
- Cold Press watercolor paper (300 gsm)
- Masking tape
- Circle stencil or compass
- Masking fluid
- Watercolor paints (Indigo, Purple, Magenta, Turquoise/Teal, Black)
- White gel pen or opaque white gouache
- Round brushes (sizes 2, 6, and 10)
- Detail liner brush
- Two jars of water
- Paper towels
Step 1: Setting the Celestial Scene
-
Prep the paper:
Begin by taping down all four edges of your watercolor paper to a board. This creates that crisp white border and prevents buckling when we add water. -
Mask the moon:
Use a circle stencil or lightly trace a lid to pencil in your moon placement in the upper right quadrant. Carefully fill this circle with masking fluid and let it dry completely. -
Paint the sky gradient:
Wet the entire sky area with clean water. Starting at the top left, drop in a mix of Indigo and Purple. While wet, blend this down into lighter Magentas and diluted Purples as you move toward the horizon line. -
Create stars:
While the sky is still slightly damp but not soaking, splatter clean water droplets or white gouache over the sky to create star clusters. Let the background dry completely.
Step 2: Painting the Moon
-
Reveal the moon:
Once the sky is bone-dry, gently rub away the masking fluid to reveal the stark white circle. -
Base layer:
Wet the moon circle with clean water. Drop in a very dilute wash of Turquoise or Teal, leaving some areas nearly white for highlights. -
Add craters:
While the moon is damp, dab in concentrated Turquoise in irregular patches to create the illusion of craters and lunar seas (maria). Let the pigment bloom naturally.
Pro Tip: Texture Trick
Sprinkle a tiny pinch of table salt onto the wet moon paint. When it dries and you brush it off, it leaves behind incredible crater-like textures perfect for lunar surfaces.
Step 3: Layers of the Forest
-
Mix the mist color:
Create a watery, pale grey-blue mix. You want this to look like distant fog, so keep it transparent. -
Background trees:
Paint the first row of distant pine trees along the bottom third of the paper. Use jagged, loose strokes for the branches; they don’t need to be perfect as they represent the foggy distance. -
Mid-ground trees:
Add a bit more pigment to your grey-blue mix to make it darker. Paint a second layer of trees slightly lower and overlapping the first set to build depth. -
Dry time:
Ensure these misty layers create a soft backdrop before moving to the high-contrast foreground. I always double-check dryness here to prevent the black ink from bleeding.
Level Up: Glowing Effect
After the black silhouette dries, re-wet the area around the alien’s tool and drop in a tiny bit of neon yellow or bright green to make it look like a glowing device.
Step 4: The Silhouette Foreground
-
Tall pine outlines:
Using smooth black watercolor or ink and a size 6 brush, paint the central trunk line for a large pine tree on the left side, reaching nearly to the top border. -
Foliage details:
Work down the trunk with horizontal, zig-zag motions to create the pine branches. Keep the tips sharp and the bottom branches wider than the top. -
Right-side balance:
Paint a second, slightly shorter black silhouette tree on the right side to frame the composition. -
Ground cover:
Fill the bottom inch of the paper with solid black to create the forest floor. Use quick upward flicks with a detail brush to suggest grass blades.
Step 5: The Visitor
-
Sketch the silhouette:
Using a very fine liner brush and black paint, carefully outline a small, thin figure standing in the clearing between the trees. -
Define the alien:
Fill in the silhouette. distinct shape features a large, slightly oval head and thin limbs. Add a small object in their hand, like a watering can or specimen collector. -
Final stars:
Once everything is dry, use a white gel pen to add a few purposeful, sharp stars over the purple sky areas for extra sparkle.
Now you have a mysterious little scene that sparks the imagination


Friendly Alien Peace Sign
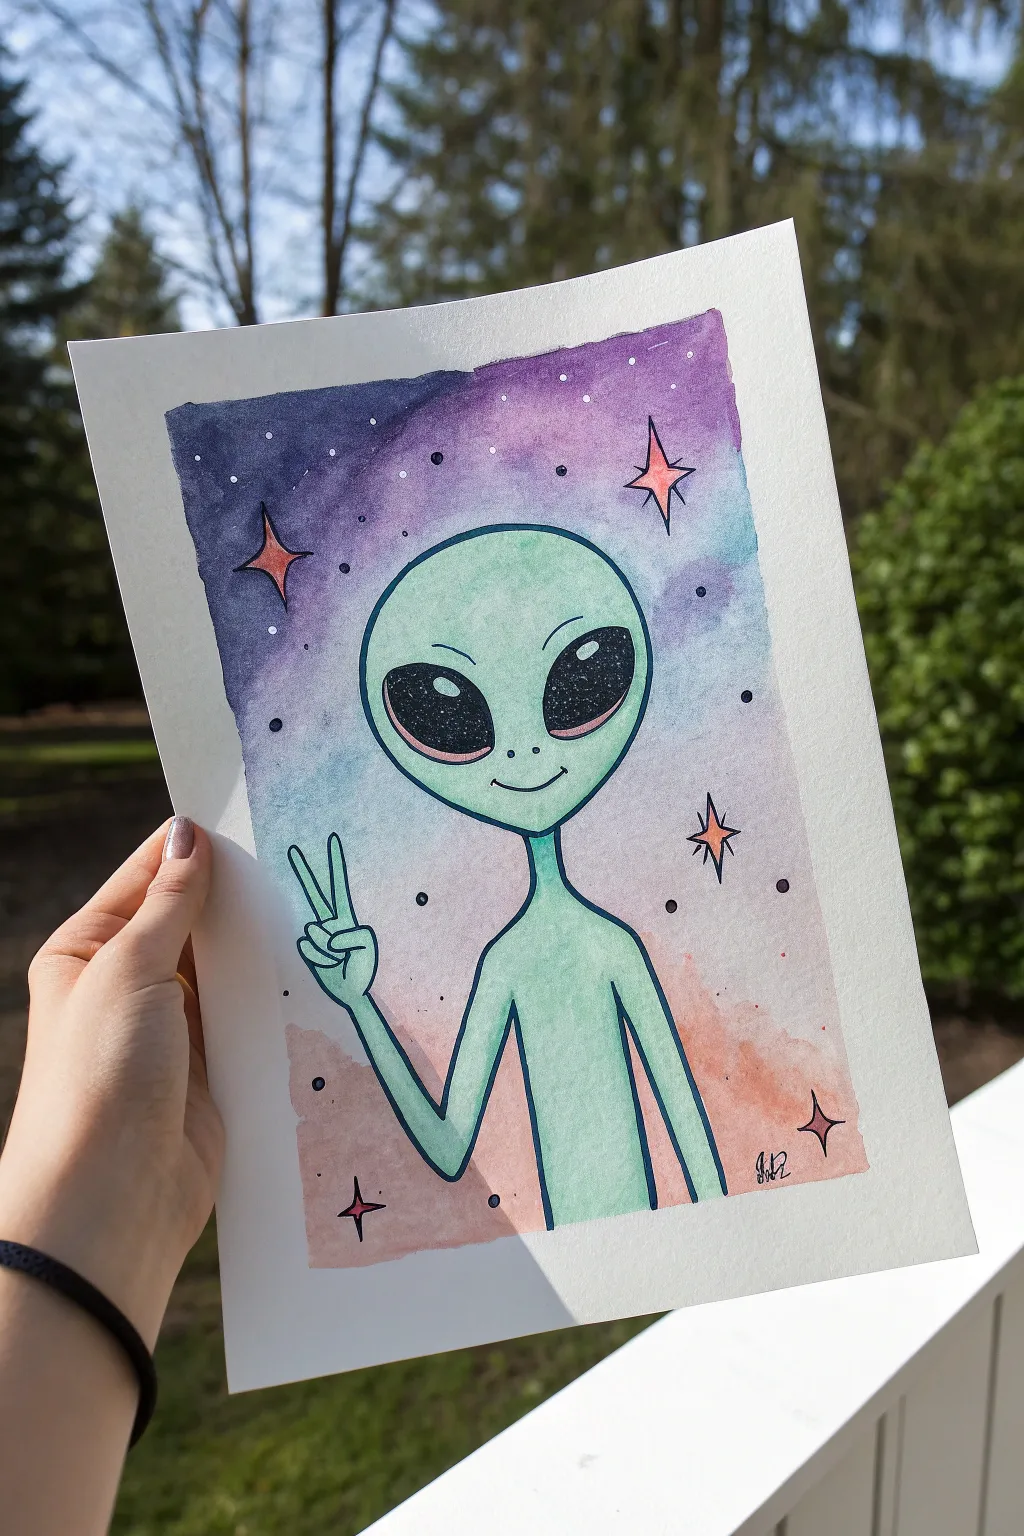
Capture extraterrestrial vibes with this cheerful watercolor painting featuring a classic green alien giving a peace sign. The artwork combines a vibrant galaxy wash background with crisp ink outlines for a fun, illustrative style.
Step-by-Step
Materials
- Cold press watercolor paper (A5 or similar size)
- Watercolor paints (purple, indigo, teal, sap green, pink/peach)
- Round watercolor brushes (size 4 and 8)
- Fine liner pen (black, waterproof, size 03 or 05)
- White gel pen or white gouache
- Pencil and eraser
- Masking tape
- Jars of water
- Paper towels
Step 1: Preparation & Sketching
-
Prepare the paper:
Begin by taping the edges of your watercolor paper down to a hard surface or board. This creates a clean white border and prevents the paper from buckling when wet. -
Sketch the head shape:
Lightly sketch a large, inverted tear-drop shape for the alien’s head in the center of the paper. Make the top quite wide and round, tapering down to a small chin. -
Add facial features:
Draw two large, slanted oval eyes that dominate the face. Add two tiny dots for nostrils and a simple curved line for a friendly smile. -
Draw the body and hand:
Sketch a very slender neck leading into sloping shoulders. Draw a thin arm raised on the left side, forming a ‘V’ peace sign with two long fingers. Keep the anatomy stylized and noodle-like. -
Outline contours:
Once happy with the sketch, trace over your pencil lines with a waterproof black fineliner. I prefer a slightly thicker line here to make the character pop against the background. -
Erase guidelines:
Wait a moment for the ink to dry completely, then gently erase all visible pencil marks so the paper is clean.
Step 2: Painting the Galaxy Background
-
Wet on wet technique:
Apply clean water to the background area around the alien, being careful not to get water inside the character’s outline. Work in sections if necessary. -
Drop in purple and blue:
While the paper is wet, load your brush with deep purple and indigo. Dab these colors into the upper corners and around the top of the head, letting them bloom and mix naturally. -
Add lighter tones:
Transition into lighter sections using a washed-out teal or light blue near the middle of the background. Blend this gently into the darker top section. -
Finish the bottom gradient:
For the bottom area, introduce a soft pink or peach tone. Allow this to blend slightly with the blue, creating a dreamy, sunset-like gradient at the base. -
Paint background stars:
While the wash is still drying, you can drop in tiny concentrated dots of darker purple or black to suggest distant space texture. Let the background dry completely.
Uneven Background?
If your galaxy wash dries with hard edges, re-wet the area slightly with a clean damp brush and gently soften the transition between colors before it dries again.
Step 3: Bringing the Alien to Life
-
Base skin tone:
Mix a watery mint green or sap green. Paint the entire skin surface—head, neck, body, and hand—with a flat, even wash of this color. -
Shadowing the skin:
While the green is still slightly damp, add a tiny bit of darker green or teal to the right side of the neck and under the chin to create simple dimension. -
Fill the eyes:
Paint the large oval eyes with solid black ink or very concentrated black watercolor. Leave them solid dark for now; we will add sparkles later. -
Paint the sparkles:
Use a coral or pink watercolor to fill in the prominent 4-point star shapes floating in the background.
Add Some Shimmer
Mix a tiny amount of iridescent drawing ink or metallic watercolor into your background purple for a galaxy that actually sparkles in the light.
Step 4: Cosmic Details
-
Outline stars:
Use your black fineliner to outline the pink stars you just painted, giving them crisp edges. -
Draw varying stars:
Draw small circles and tiny 4-point stars directly onto the dried background wash with your black pen to add complexity to the galaxy. -
Add white highlights:
Using a white gel pen or white gouache, add small dots inside the black background circles. Add typical ‘galaxy’ speckles by tapping the pen lightly over the dark purple areas. -
Highlight the eyes:
Place small clusters of white dots inside the black eyes to mimic the reflection of stars. This gives the alien a magical, glassy look. -
Final touches:
Remove the masking tape carefully to reveal the crisp white border.
Now you have a universally adorable friend ready to hang on your wall
BRUSH GUIDE
The Right Brush for Every Stroke
From clean lines to bold texture — master brush choice, stroke control, and essential techniques.
Explore the Full Guide
Galaxy Reflections in Alien Eyes
This ethereal watercolor project captures the classic mystique of an extraterrestrial visitor, featuring mesmerizing, galaxy-filled eyes set against a starry nebulous background. Using wet-on-wet techniques, you will build up soft layers of teal and violet to create a hauntingly beautiful portrait on textured paper.
How-To Guide
Materials
- Cold-pressed watercolor paper (deckled edge optional)
- Watercolor paints (Emerald Green, Teal, Indigo, Violet, Magenta, Black)
- White gouache or white gel pen
- Round watercolor brushes (Size 4 and Size 8)
- Fine liner brush (Size 0 or 00)
- HB Pencil and kneaded eraser
- Masking fluid (optional)
- Two jars of water
- Paper towels
Step 1: Sketching and Preparation
-
Outline the head shape:
Begin by lightly sketching a large, inverted teardrop shape for the alien’s head. Keep the top bulbous and the chin narrow and pointed. -
Place facial features:
Draw two large, slanted ovals for the eyes, positioning them roughly halfway down the face. Add two small vertical slits for the nose and a small, subtle line for the mouth. -
Define the neck and shoulders:
Sketch a slender neck extending downwards, widening slightly into visible collarbones and shoulders to ground the portrait.
Muddy Galaxy Blues?
If your background colors are turning brown or gray, let each layer dry completely before adding a new color. Only mix analogous colors (like blue and purple) while wet.
Step 2: Painting the Alien Skin
-
Apply base wash:
Dilute Emerald Green with plenty of water to create a very pale, transparent wash. Paint the entire face and neck, avoiding the eye sockets completely. -
Shadow mapping:
While the paper is still slightly damp, drop in a slightly more concentrated teal mix along the sides of the head, under the chin, and in the hollows of the neck. -
Deepen facial contours:
Once the first layer is dry, use your size 4 brush to paint sharper shadows around the eye sockets, the brow ridge, and the philtrum (above the lip) using a mix of Teal and a touch of gray. -
Add skin texture:
Using a nearly dry brush, lightly scumble faint lines across the forehead and under the eyes to suggest subtle wrinkles and alien skin texture. -
Tint the lips:
Mix a tiny amount of Violet into your skin tone mix and carefully paint the lips, blending the edges so they don’t look like lipstick.
Step 3: Creating the Galaxy Background
-
Wet the background area:
Clean your brush thoroughly. Paint clear water onto the background area surrounding the alien, being careful not to touch the green skin. -
Drop in nebula colors:
While the background is wet, drop in patches of Violet, Magenta, and Teal. Let them bleed and blend naturally on the paper to create a nebulous effect. -
Deepen space depth:
Add concentrated Indigo or Payne’s Gray to the corners and edges of the painting to create the darkness of deep space. -
Lift reflected light:
While the background is drying but still damp, use a clean, thirsty brush to lift a little pigment right next to the alien’s cheek, creating a soft glow effect.
Level Up: Holo-Glow
Mix a small amount of iridescent medium or pearlescent watercolor into your white gouache for the starry highlights. The eyes will shimmer when the light hits the paper.
Step 4: The Cosmic Eyes
-
Base layer for eyes:
Fill the large eye shapes with a solid coat of black watercolor or ink. Ensure the edges are crisp and smooth. -
Add reflection depth:
Before the black completely dries, or by re-wetting slightly, add a curved stroke of concentrated violet or dark blue to the bottom curve of the eye to suggest dimension. -
Highlight placement:
Once the eyes are fully 100% dry, take your white gouache or gel pen. Add a large, crisp white highlight near the top of the eye, and a smaller secondary dot nearby. -
Space dust details:
Flick white gouache gently over the dried background to create stars. I also like to add tiny white specks inside the black of the eyes to reflect the galaxy.
Step 5: Final Touches
-
Enhance outlines:
Use your finest liner brush with a dark teal-gray mix to very subtly reinforce key lines, like the edge of the jaw and the crease of the eyelids. -
Review contrast:
Step back and check if the alien stands out enough from the background. If not, glaze a thin layer of indigo over the background directly adjacent to the pale skin.
Let your cosmic creation dry completely before framing or displaying your new interstellar friend
Flying Saucer Over Desert Horizon
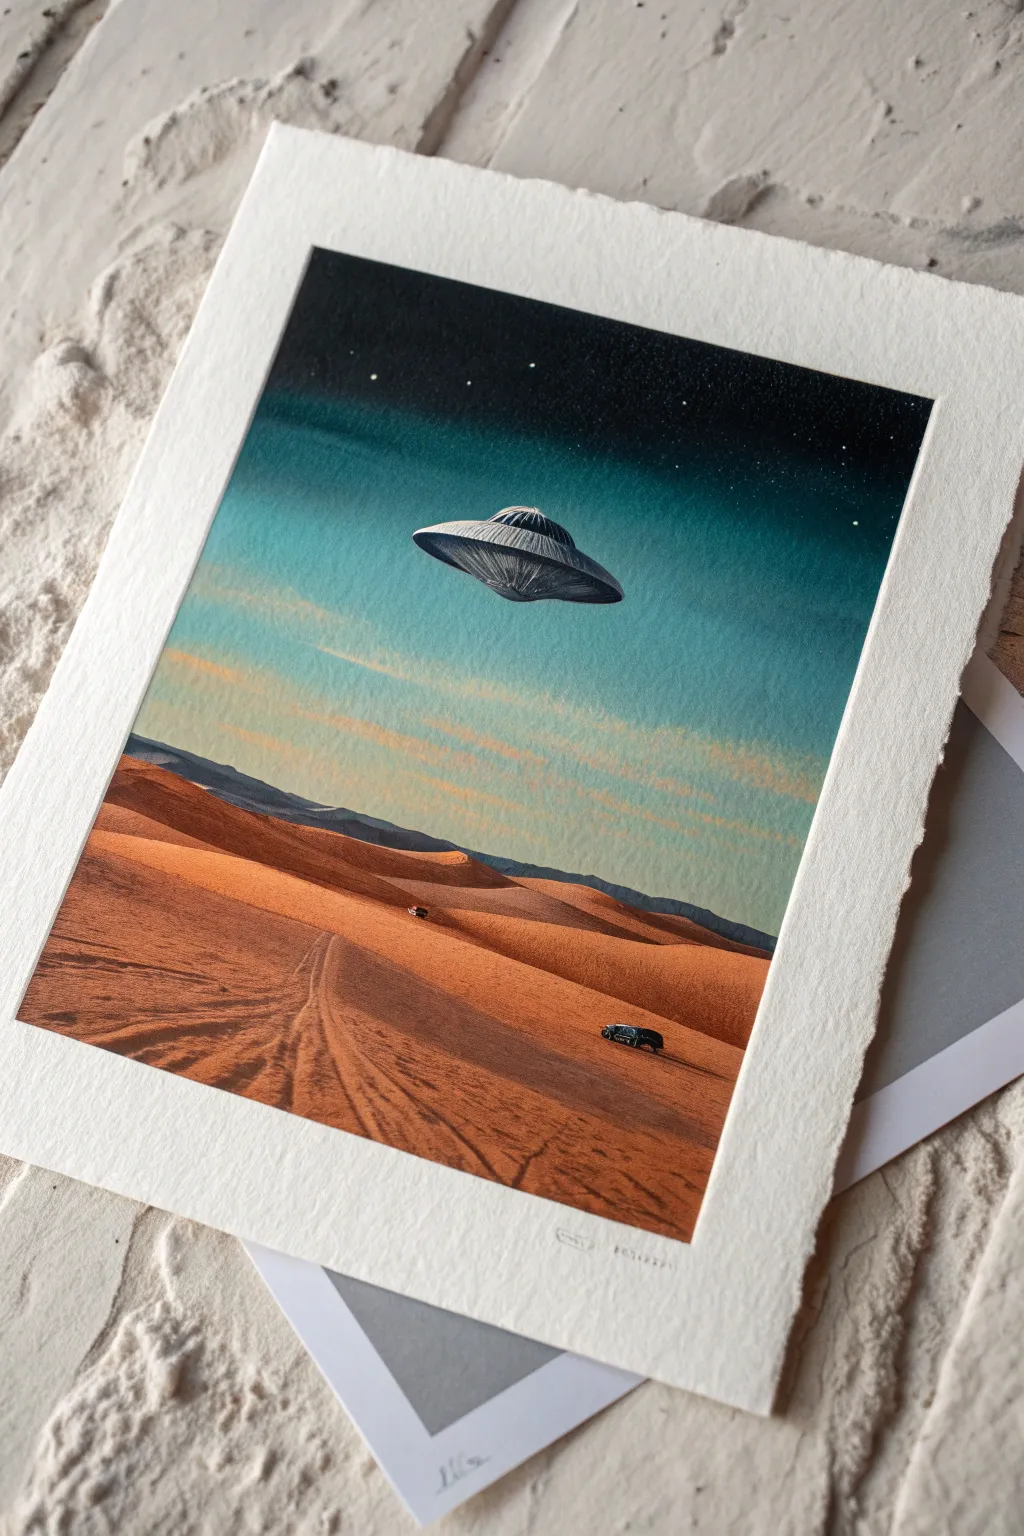
Capture a moment of otherworldly mystery with this desert landscape painting, featuring a classic flying saucer hovering silently over rolling dunes. The contrast between warm, rusty sands and a cool, starry teal sky creates a striking visual drama perfect for framing.
Step-by-Step Tutorial
Materials
- Cold press watercolor paper (300 gsm)
- Masking tape
- Watercolor paints (burnt sienna, yellow ochre, cadmium red, Prussian blue, turquoise, indigo, lamp black, Payne’s gray)
- Gouache (white and metallic silver)
- Round brushes (sizes 2, 6, and 10)
- Pencil (HB)
- Fine liner pen (optional)
- Mixing palette
- Two jars of water
- Paper towels
Step 1: Preparation and Sketching
-
Tape the edges:
Secure your watercolor paper to a board using masking tape, creating a clean white border around the entire image area. Press the edges firmly to prevent paint seepage. -
Establish the horizon:
Lightly sketch a line across the lower third of the paper to mark where the distant mountains meet the sky. -
Outline the dunes:
Draw sweeping, curvy lines below the horizon to map out the primary sand dunes, creating a sense of depth leading into the foreground. -
Place the saucer:
Sketch a flattened oval shape in the sky area, adding a small dome on top and a rim around the center to define the classic UFO silhouette.
Keep it Clean
When flicking paint for stars, cover the desert portion of your painting with a scrap piece of paper so you don’t get white speckles on your sand dunes.
Step 2: Painting the Sky
-
Wet-on-wet gradient:
Using your largest brush, wet the entire sky area with clean water. While wet, apply turquoise near the horizon, blending smoothly upward into Prussian blue. -
Deepen the cosmos:
At the very top of the paper, introduce indigo and lamp black, blending downwards into the blue to create a seamless transition from atmosphere to deep space. -
Create atmospheric clouds:
While the lower sky is still damp, lightly dab in faint horizontal streaks of yellow ochre mixed with white gouache to suggest illuminated wisps of clouds near the horizon. -
Dry thoroughly:
Allow the sky layer to dry completely before proceeding. I find using a hair dryer on a low setting speeds this up without buckling the paper. -
Paint the mountains:
Mix a dark, muted blue-grey using indigo and burnt sienna. Paint the distant mountain range along the horizon line with a crisp top edge to separate it from the sky.
Step 3: Rendering the Dunes
-
Base wash for sand:
Mix a warm, sandy tone using yellow ochre and burnt sienna. Apply a light wash over the entire desert area. -
Add warmth and shadow:
While the base is damp, drop concentrated burnt sienna and a touch of cadmium red into the shadowed sides of the dunes to create volume. -
Define the ridges:
Once the initial wash is dry, use a size 6 brush with a darker mix of burnt sienna and purple to paint sharp lines along the crests of the dunes. -
Texture the sand:
Use a nearly dry brush with the dark brown mix to dry-brush texture across the foreground, simulating ripples and tire tracks in the sand. -
Paint the vehicles:
Using a fine brush (size 2), paint the tiny silhouette of an SUV in the distance and a larger vehicle in the foreground using black and dark grey.
Beam Me Up
Mix a very watery, translucent white gouache and paint a faint, cone-shaped beam of light extending from the bottom of the craft to the cars below.
Step 4: The Flying Saucer and Details
-
Base coat the UFO:
Fill in the sketched UFO shape with a light grey wash made from Payne’s gray and plenty of water. -
Add metallic volume:
Using a thicker mix of Payne’s gray or silver gouache, paint the underside of the saucer darker to give it weight, leaving the top dome lighter. -
Detail the craft:
Use your smallest brush to add thin vertical lines on the craft’s rim and small dark windows or vents for structural detail. -
Highlight the metal:
Add tiny strokes of pure white gouache to the top of the dome and the rim where the light hits the metal surface. -
Starry night:
Load a toothbrush or stiff brush with white gouache. Flick the bristles to splatter tiny stars exclusively over the dark, upper portion of the sky. -
Final reveal:
Once the painting is completely bone-dry, carefully peel away the masking tape at a 45-degree angle to reveal your crisp white border.
This atmospheric piece looks stunning when placed in a minimalist frame or propped on strictly textured backgrounds.

PENCIL GUIDE
Understanding Pencil Grades from H to B
From first sketch to finished drawing — learn pencil grades, line control, and shading techniques.
Explore the Full Guide
Neon Rim-Light Alien Profile
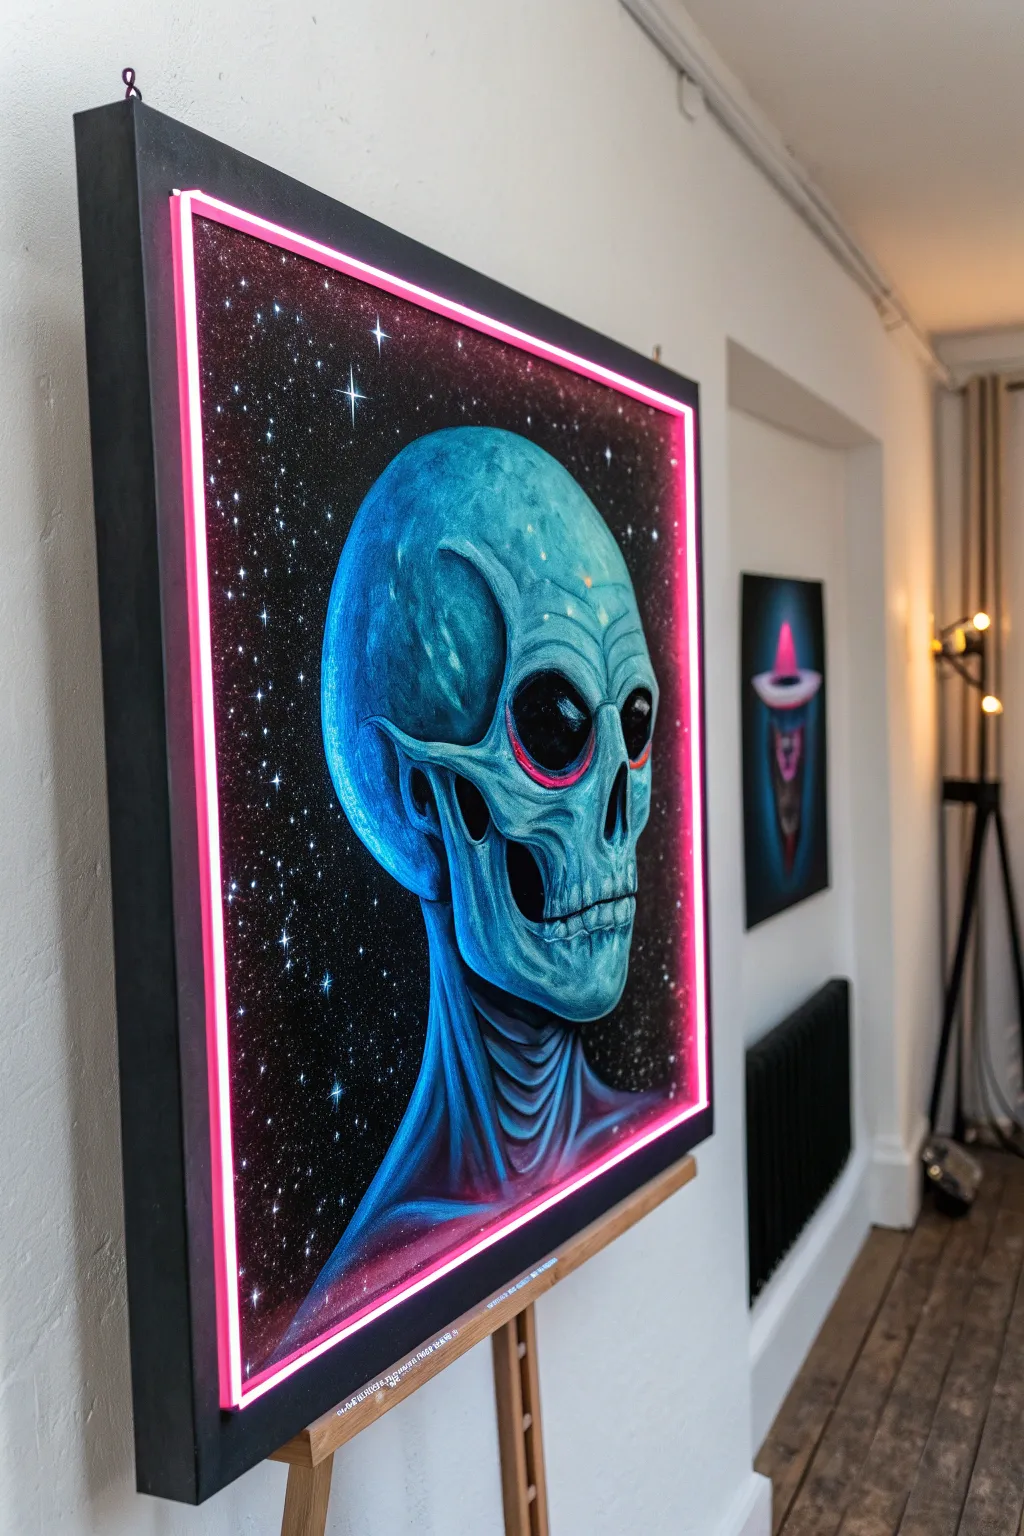
Merge traditional acrylic painting with modern lighting to create this striking piece featuring a skeletal extraterrestrial set against the void of space. The vibrant pink LED border adds a literal glow that transforms a standard canvas into a futuristic installation piece.
Step-by-Step Guide
Materials
- Deep canvas or wooden panel (approx 24×30 inches)
- Heavy body acrylic paints (Phthalo Blue, Turquoise, Titanium White, Mars Black, Magenta)
- Black gesso
- Synthetic brightness brushes (filbert, round, and rigger)
- Old toothbrush (for the stars)
- Pink LED neon flex strip (generous length for the perimeter)
- Super glue or strong double-sided mounting tape
- Drill with bit size matching LED wire
- Battery pack or power adapter for LED strip
- Matte varnish
Step 1: Preparing the Void
-
Prime the Surface:
Begin by coating your entire canvas or panel with two coats of black gesso. Let the first coat dry completely before applying the second to ensure a deep, opaque void for your background. -
Drafting the Profile:
Using a white charcoal pencil or chalk, lightly sketch the outline of the alien’s profile. Focus on the elongated cranium, the large orbital socket, and the skeletal jaw structure. -
Creating the Starfield:
Before painting the subject, protect your sketch area with a piece of paper. Dilute some Titanium White paint with water, load an old toothbrush, and flick the bristles to spray fine mist stars across the black background. -
Adding Larger Stars:
Use a rigger brush or a fine detailing tool to manually paint a few larger, four-point glimmer stars to add depth to your galaxy.
Glue Ghosting?
If super glue leaves a white haze on your black background near the strip, a tiny dab of olive oil on a cloth can rub the residue away without damaging acrylics.
Step 2: Painting the Entity
-
Blocking Base Colors:
Mix Phthalo Blue with a touch of Mars Black to create a deep navy. Apply this to the shadowed areas of the alien’s neck and the back of the skull. -
Mid-Tone Application:
Using pure Turquoise, paint the main facial structures—the cheekbones, the brow ridge, and the jawline. Blend this wet-into-wet with the darker shadowy areas. -
Highlighting Bone Structure:
Mix Turquoise with Titanium White. Apply this lighter shade to the top of the cranium, the tip of the nose cavity, and the prominent chin bone to make the form pop forward. -
Deepening the Sockets:
Fill the eye socket and nasal cavity with pure Mars Black. I find adding a tiny drop of dark purple here adds richness compared to flat black. -
Texturing the Skin:
Using a nearly dry filbert brush, scumble lighter blue tones over the mid-tones to create a mottled, skin-like texture rather than a perfectly smooth plastic finish. -
Defining the Jaw:
Use a small round brush to paint the teeth and separation lines of the jaw. Keep these lines sketchy and organic rather than perfectly straight. -
Adding the Pink Glow:
Mix a glaze of Magenta and water. Lightly brush this onto the lower neck and under the jaw to simulate the reflection of the pink light we will install later. -
Final White Highlights:
Add tiny, sharp dots of pure white to the highest points of the skull and the wet-looking rim of the eye socket to create a glistening effect. -
Varnishing:
Once the paint is fully cured (give it at least 24 hours), apply a coat of matte varnish to protect the surface and unify the sheen.
Upgrade Potential
Use a Wi-Fi enabled RGB LED strip instead of a single color. This lets you change the border color from pink to teal or green via phone app.
Step 3: Installing the Neon Rim
-
Drilling Access Holes:
Mark a spot in the bottom corner of your canvas frame where the wire will exit. Carefully drill a hole just large enough for the LED power wire to pass through to the back. -
Measuring the Strip:
Lay your pink LED neon flex strip along the inner perimeter of the canvas face to ensure you have the correct length. Cut it at the designated cut-points if necessary. -
Adhering the Light:
Apply strong super glue or heavy-duty mounting tape to the back of the LED strip. Press it firmly along the edge of the canvas face, creating a border. -
Wiring:
Feed the power connector wire through your drilled hole. Secure the battery pack or power adapter to the back of the frame using velcro strips or tape so it remains hidden. -
Final Test:
Flip the switch and watch your painted reflected highlights merge with the real light for a seamless sci-fi effect.
Mount your artwork in a dim room and enjoy the eerie, futuristic glow of your creation
Psychedelic Alien Head Background
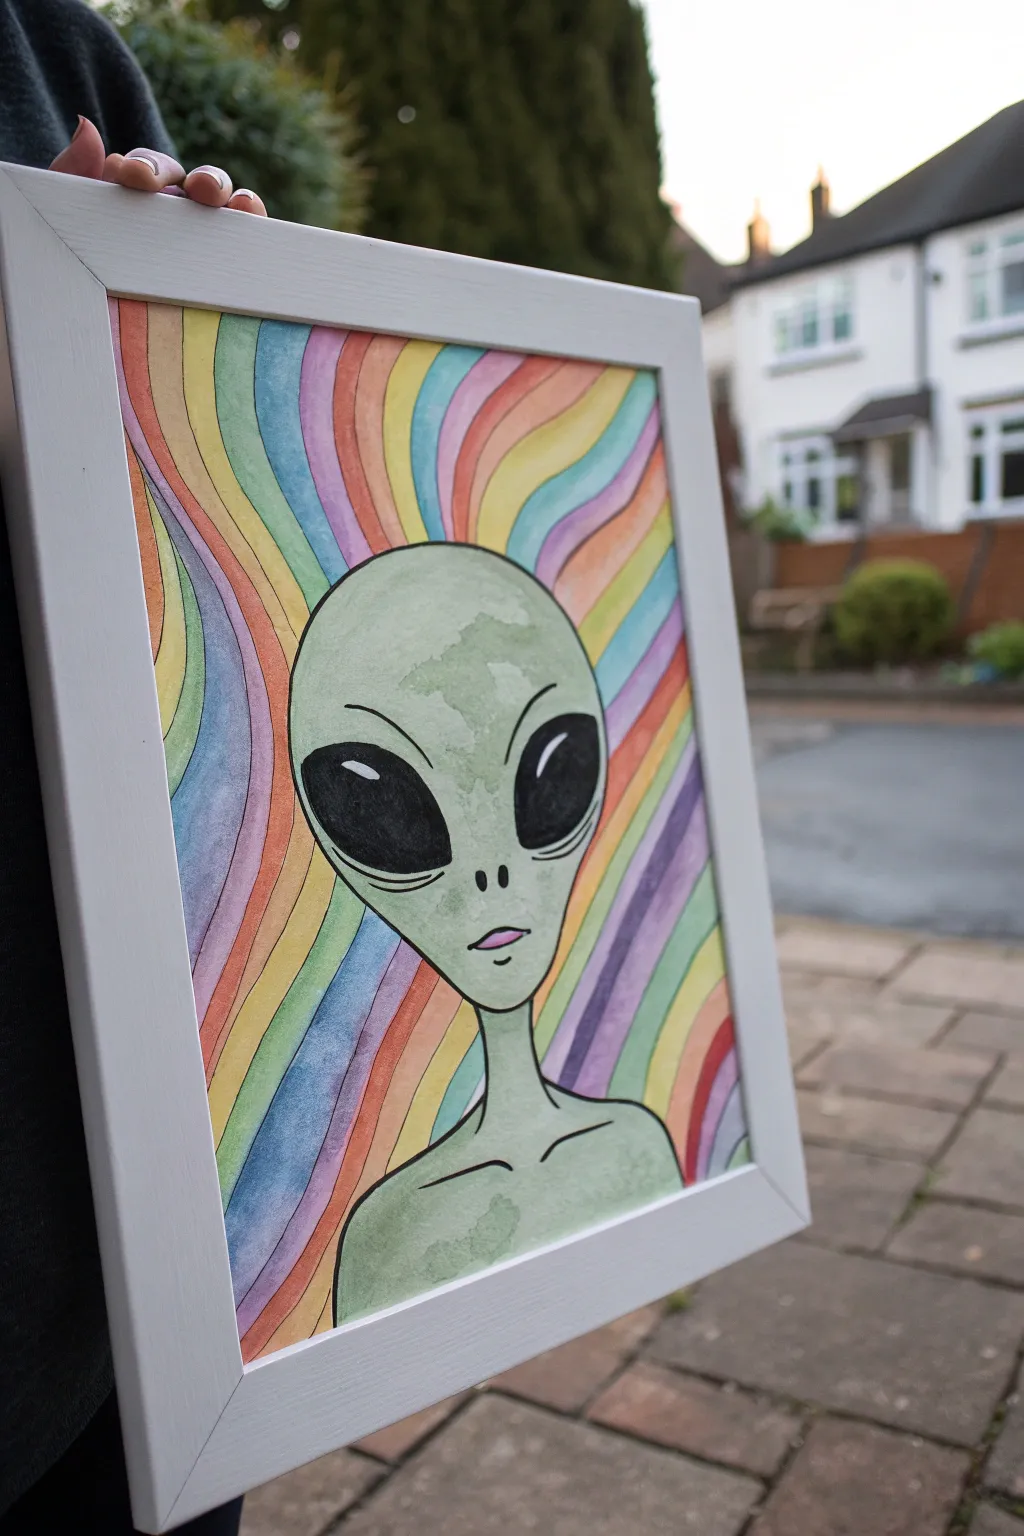
Capture the mystery of the cosmos with this vibrant watercolor project featuring a classic extraterrestrial portrait against a hypnotic, wavy rainbow backdrop. This tutorial guides you through creating crisp lines and smooth watercolor washes for a look that is both retro and otherworldly.
Step-by-Step
Materials
- Cold press watercolor paper (A4 or similar size)
- Pencil (HB or H for light lines)
- Eraser
- Watercolor paints (pan or tube)
- Water container and paper towels
- Fine liner pen (black, waterproof, size 0.5 or 0.8)
- Round brushes (size 6 or 8 for background, size 2 or 4 for details)
- White or light wood frame (optional)
Step 1: Sketching the Visitor
-
Center the Subject:
Begin by lightly sketching a large inverted teardrop shape in the lower center of your paper. This will be the alien’s head. Add a slender neck extending downwards to the shoulders. -
Refine the Features:
Draw the large, almond-shaped eyes iconic to ‘grey’ aliens. They should angle slightly upwards at the outer edges. Add two small dots for nostrils and a very simple, short line for the mouth. -
Add Anatomical Detail:
Lightly sketch collarbones and the tops of the shoulders to ground the figure. Keep these lines smooth and organic. -
Draft the Background:
Starting from behind the alien’s head, draw wavy lines radiating outward to the edges of the paper. Think of these like sun rays, but give them a gentle ‘S’ curve to create a psychedelic ripple effect.
Step 2: Inking the Outlines
-
Trace Main Lines:
Using your waterproof black fine liner, carefully trace over your pencil sketch of the alien’s head, neck, and shoulders. Do not ink the wavy background lines yet, as we want those to be defined by color only or very thin lines. -
Define the Eyes:
Outline the large oval eyes. Draw a small, curved shape inside the upper part of each eye to represent a highlight; you will leave this white later. -
Erase Construction Lines:
Once the ink is completely dry (give it a few minutes to avoid smudges), gently erase all the pencil marks on the alien figure. Leave the background pencil lines faint but visible as guides.
Clean Lines Pro Tip
If you struggle with steady hands for the long wavy lines, draw them primarily by moving your entire arm from the shoulder, rather than just twisting your wrist.
Step 3: Painting the Void
-
Fill the Eyes:
Mix a dense black watercolor or use black ink to fill in the large eyes. Be extremely careful to paint around the small highlight shapes you drew earlier. -
Add Depth:
While the black is drying, you can touch up the nostrils and mouth line with the fine liner if they need more definition.
Cosmic Level Up
Sprinkle fine salt onto the wet green skin paint. As it dries, the salt absorbs pigment, creating a crater-like, starry texture on the alien’s face.
Step 4: The Psychedelic Background
-
Plan Your Palette:
Select a rainbow sequence of colors: red, orange, yellow, green, light blue, indigo, and violet. Dilute them slightly so they are vibrant but transparent. -
Paint Alternate Stripes:
Start painting the wavy background sections. To prevent colors from bleeding into each other, paint every other stripe first (e.g., paint a red stripe, skip one, paint a yellow stripe). -
Wait and Fill:
Let the first set of stripes dry completely. Then, fill in the remaining gaps with your alternating colors (orange, green, etc.). This wet-on-dry technique ensures crisp edges between the rainbow bands. -
Outline the Stripes:
Once the background is totally dry, carefully trace the separation lines between colors with your black fine liner. This gives the piece a illustrative, comic-book style pop.
Step 5: Bringing the Alien to Life
-
Base Green Layer:
Mix a watery, pale sage or alien green. Wash this color over the entire skin area of the alien. -
Create Texture:
While the base layer is still wet, drop in slightly darker green pigment in random splotches or near the edges of the head. This technique, called ‘blooming,’ creates a mottled, organic skin texture perfect for an extraterrestrial. -
Detail Shading:
Add a touch of shading under the chin and along the neck using a slightly more concentrated green. I like to add a tiny dab of purple to the lips for a subtle pop. -
Final Highlights:
Let the skin dry completely. If the white highlights in the eyes got covered or aren’t bright enough, use a white gel pen or opaque white gouache to reclaim them. -
Framing:
Once your masterpiece is fully dry and flattened, place it into a simple white or light wood frame to complement the bright colors without distracting from the subject.
Hang your artwork in a well-lit spot and enjoy the colorful, interstellar energy it brings to the room


UFO Spotlight Through Clouds
Capture the mystery of a midnight sighting with this soft, illustrative watercolor painting. Using a limited palette of indigo and Payne’s gray, you’ll create fluffy, backlit clouds and a brilliant beam of light descending from a classic saucer.
How-To Guide
Materials
- Cold press watercolor paper (300 gsm)
- Watercolor paints: Indigo, Payne’s Gray, Lamp Black, Titanium White (opaque/gouache)
- Round brushes: sizes 2, 6, and 10
- Masking fluid (drawing gum) and old brush
- Finetec or metallic silver watercolor (optional)
- Painter’s tape
- Pencil and eraser
- Ruler
- Clean water jars and paper towel
Step 1: Preparation and Sketching
-
Tape your borders:
Secure your paper to a hard board using painter’s tape on all four sides. This ensures a clean white border like the reference image and keeps the paper flat while working with wet washes. -
Draft the layout:
Lightly sketch the scene with a pencil. Start with the UFO saucer shape in the upper right quadrant—draw an oval for the rim and a dome on top. Use a ruler to define the edges of the light beam extending downward. -
Outline the clouds:
Sketch the cloud formations loosely. Focus on creating fluffy, scalloped edges that surround the beam and fill the bottom third of the composition. Keep your pencil pressure very light so it doesn’t show through later. -
Mask the beam:
Using an old brush (one you don’t care about), apply masking fluid carefully to the entire area of the main light beam and the small lights on the UFO. This preserves the white paper for the luminous effect later.
Step 2: Painting the Sky and Clouds
-
Mix your darks:
Prepare a large puddle of deep indigo mixed with a touch of black. You want a rich, dark night sky color that is fully saturated. -
Paint the background sky:
Wet the sky area above the clouds with clean water first. Drop in your dark indigo mix, working around the UFO saucer but painting right over the masked beam area. Let the color bloom but keep it darkest at the top. -
Define the cloud tops:
While the sky wash is still damp at the bottom edge, use a clean, slightly damp brush to soften the transition where the sky meets the cloud tops, creating a misty effect. -
Layer the clouds:
Switch to a lighter wash of Payne’s gray. Paint the body of the clouds, leaving thin strips of unpainted white paper along the scalloped top edges to act as highlights. -
Deepen cloud shadows:
While the gray cloud shapes are still wet, drop stronger indigo pigment into the bottom-center of each cloud puff. This creates volume and dimension, making them look pillowy. -
Dry thoroughly:
Allow the entire painting to bone dry. If the paper feels cool to the touch, it’s still wet. This is crucial before removing any masking.
Troubleshooting: Blooms
If ‘cauliflowers’ (water marks) form in your dark sky, don’t panic. They add texture. If unwanted, wait until dry, then gently scrub with a damp stiff brush to soften edges.
Step 3: The UFO and Light Beam
-
Remove the mask:
Gently rub away the masking fluid with your clean finger or a rubber cement pickup tool to reveal the stark white paper underneath. -
Paint the beam:
The beam shouldn’t be stark white. Mix a very watery, pale cream or diluted yellow-ochre wash. Glaze this over the beam area, fading it out near the bottom where it hits the clouds. -
Detail the saucer:
Paint the metal body of the UFO using a medium gray. Add a darker charcoal stripe around the rim, leaving small dots unpainted for the windows/lights (or use white gouache later). -
Add metallic sheen:
If you have metallic watercolor, add a sheer glaze of silver to the top of the saucer dome to suggest metal reflecting the starlight. -
Enhance the glow:
Use a semi-opaque white or diluted gouache to dry-brush the edges of the beam where it cuts through the darkness, softening the hard lines left by the masking fluid.
Level Up: Color Shift
Make the scene eerie by adding a drop of teal or emerald green to your beam color, or create a ‘retro’ abduction vibe by making the beam a neon magenta wash.
Step 4: Starry Details
-
Splatter stars:
Cover the UFO and cloud area with a scrap piece of paper. Load a toothbrush or stiff brush with white gouache and flick tiny specks onto the dark indigo sky area. -
Hand-paint larger stars:
Use your smallest size 2 brush and opaque white paint to manually place a few larger, brighter stars or distant planets in the open sky areas. -
Final highlights:
Add tiny crisp white lines to the very tops of the clouds nearest the light beam to emphasize the intense illumination. -
Reveal the artwork:
Slowly peel off the painter’s tape at a 45-degree angle to reveal your crisp, clean borders.
Sign your new masterpiece in the corner with a fine liner pen once everything is perfectly dry
Alien Hand Reaching Out
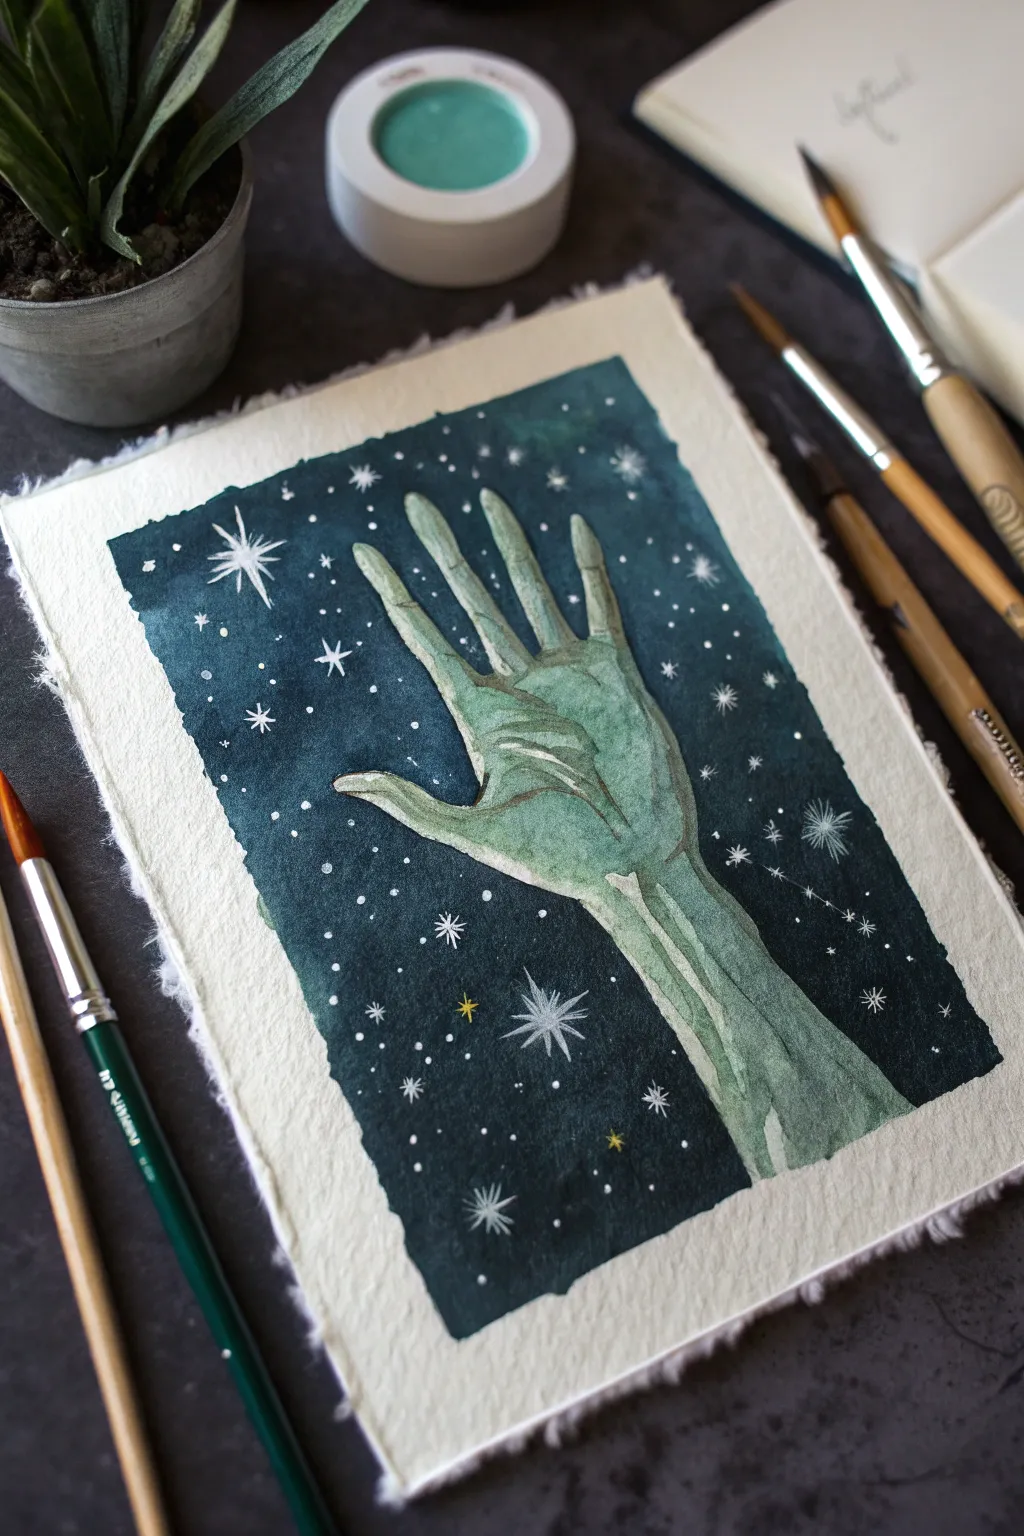
Capture the eerie beauty of the cosmos with this striking watercolor painting featuring a pale, otherworldly hand reaching into a deep, starry void. The contrast between the translucent green skin and the dark, celestial background creates a captivating focal point perfect for sci-fi enthusiasts.
Step-by-Step
Materials
- Cold press watercolor paper (with deckled edges if possible)
- Watercolor paints (Indigo, Prussian Blue, Sap Green, Burnt Umber, Hooker’s Green)
- White gouache or white gel pen
- Pencil for sketching (HB or 2B)
- Kneaded eraser
- Round watercolor brushes (sizes 2, 6, and 8)
- Fine liner brush (size 0 or 00)
- Masking fluid (optional)
- Palette for mixing
- Two jars of water
- Paper towels
Step 1: Preparation and Sketching
-
Prepare the paper:
If your paper doesn’t have deckled edges, you can gently tear the edges of your watercolor sheet against a ruler to create that organic, vintage look. Tape the paper down to your work surface. -
Sketch the hand outline:
Lightly sketch the alien hand reaching upwards. Focus on elongating the fingers and emphasizing the knuckles to give it a skeletal, non-human anatomy. The wrist should taper into a thin forearm. -
Define the anatomy:
Add faint lines to indicate tendons and bone structure. The key is to make it look emaciated; draw prominent carpal bones and distinct phalanges. -
Mask the stars (optional):
If you are using masking fluid, use a fine applicator to dot tiny stars into the background area around the hand. Let this dry completely before painting.
Uneven Background?
If your dark background dries with unwanted hard lines, re-wet the entire background area gently with clean water and drop in more pigment to smooth it out.
Step 2: Painting the Alien Skin
-
Mix the skin tone:
Create a watery, pale green mix using Sap Green with a touch of Burnt Umber to desaturate it. You want a sickly, muted tone rather than a vibrant leaf green. -
Apply the base wash:
Using a size 6 brush, fill in the hand shape with your pale green mix. Keep this layer very light and watery to establish the base luminosity. -
Add shadows:
While the base is still slightly damp, drop in a slightly darker mix of Hooker’s Green into the sides of the fingers and the wrist area to create volume. -
Define the knuckles:
Once the first layer is dry, mix a more concentrated green-brown shade. Use a smaller brush to paint the wrinkles on the knuckles and the shadows between the tendons on the back of the hand. -
Deepen the contrast:
Add a third layer of shadow using a very watery Indigo mixed with green on the underside of the thumb and the darkest recesses of the palm. I find this helps ‘pop’ the hand forward.
Step 3: Creating the Cosmos
-
Mix the background darkness:
Prepare a rich, dark mixture using Indigo and Prussian Blue. You want this to be very saturated to contrast with the pale hand. -
Outline the hand:
Carefully paint around the hand with your dark blue mix using a size 2 brush. Be precise here—this edge defines the silhouette. -
Fill the background:
Switch to a larger brush (size 8) to fill in the rest of the rectangular background. Work quickly to keep a wet edge so the background color dries mainly flat, though some watercolor bloom adds to the nebula effect. -
Soften edges:
Before the background dries completely, you can drop in tiny amounts of clear water in random spots to create faint ‘bloom’ textures that look like distant galaxies.
Galaxy Glow
Mix a tiny amount of iridescent medium or metallic watercolor into your dark blue background wash for a subtle, shimmering effect that catches the light.
Step 4: Celestial Details
-
Add the stars:
Once the dark background is bone dry, use white gouache or a gel pen to dot in the stars. If you used masking fluid, rub it off now to reveal the white paper underneath. -
Paint starbursts:
Select a few larger stars and carefully draw a cross shape through them with a fine liner brush and white gouache to create a twinkling effect. -
Highlight the hand:
Use a very diluted white gouache or a clean, damp brush to lift a tiny bit of color from the top edges of the fingers, suggesting starlight hitting the skin. -
Final adjustments:
Add tiny yellow or faint blue dots among the white stars for color variation in your galaxy. Assess the hand contrast and deepen any final shadows if the watercolor dried too light.
Step back and admire how the pale hand glows against your handmade universe
Mini UFO Pattern Painting
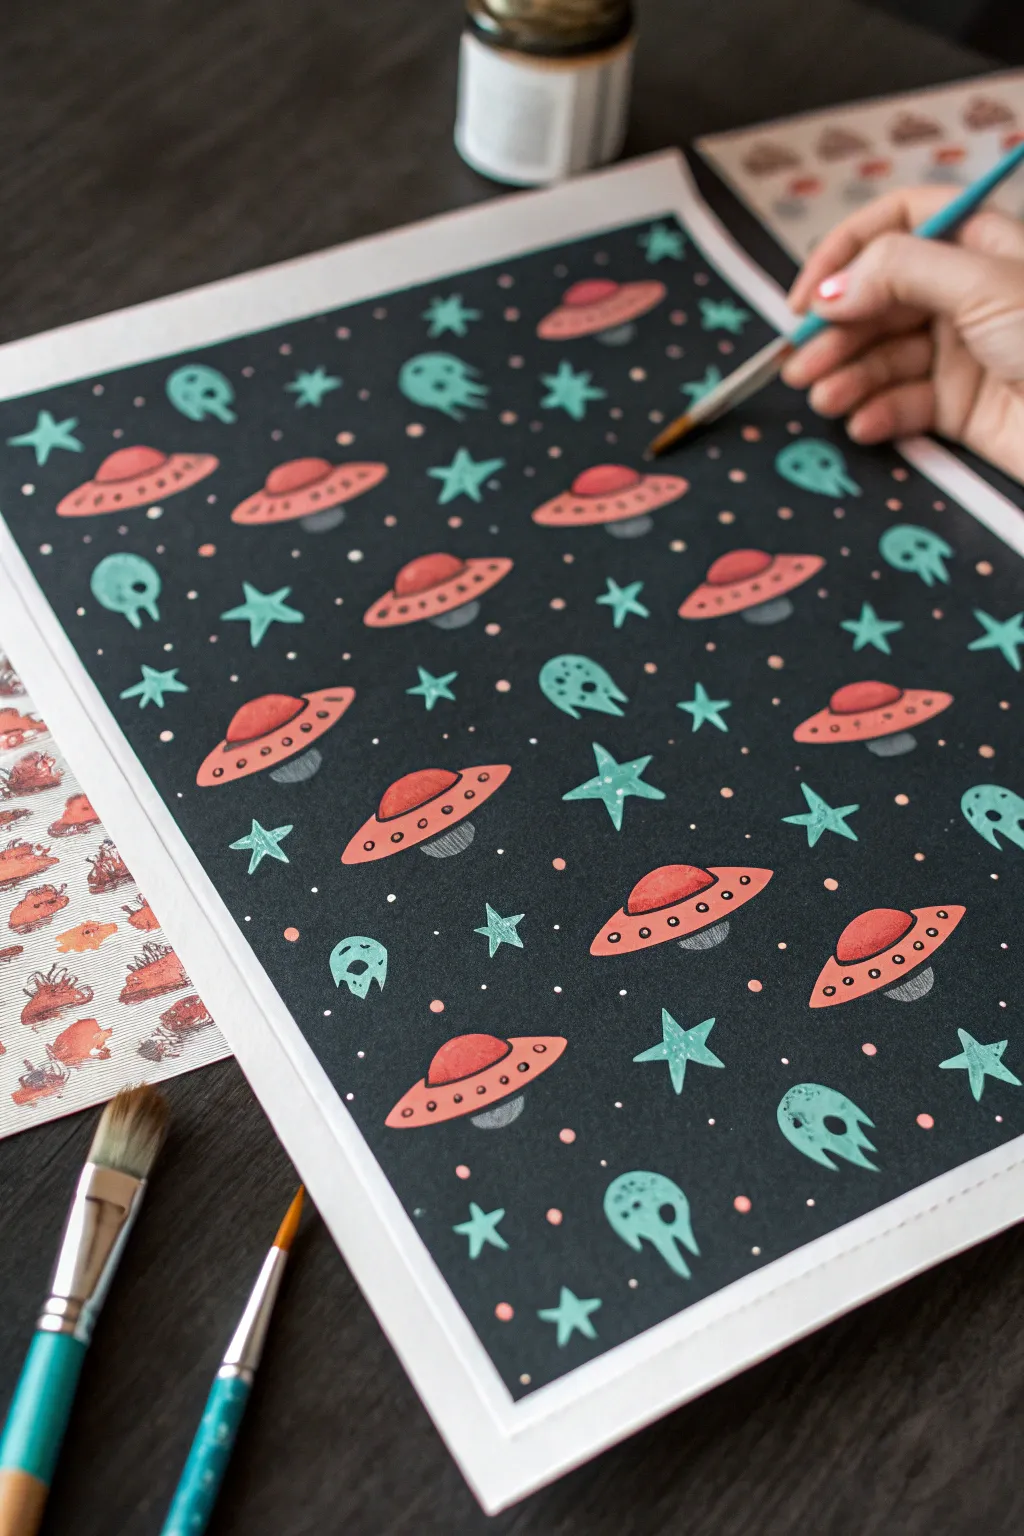
Create your own cosmic wrapping paper or wall art with this charming hand-painted pattern. Featuring retro-style flying saucers and playful alien skulls, this gouache project pops beautifully against a deep black background.
Step-by-Step Tutorial
Materials
- Heavyweight black paper or cardstock (A4 or A3)
- Gouache paints (Red, Pink, Teal/Mint, Grey, White)
- Small round detail brush (size 0 or 1)
- Medium round brush (size 4)
- Pencil and eraser
- Ruler
- Mixing palette
- Water cup and paper towels
Step 1: Painting the Base Shapes
-
Map out the grid:
Begin by lightly sketching a loose grid on your black paper using a ruler and pencil. You don’t need perfect squares, but having a general guide will help you space the UFOs evenly. Aim for a staggered pattern, like bricks on a wall. -
Sketch the motifs:
Lightly draw your main shape: a classic flying saucer dome and disc. Between these, sketch small five-pointed stars and the occasional floating alien skull shape for variety. -
Paint the UFO discs:
Mix a soft coral-pink gouache. Using your medium round brush, fill in the bottom disc shape of every flying saucer. The opacity of gouache works perfectly here to cover the black paper. -
Add the domes:
Switch to a darker, more saturated red. Carefully paint the semi-circle dome on top of each pink disc. If the paint feels too dry, add just a drop of water to make it flow smoothly. -
Paint the teal elements:
Mix a bright mint or teal color with a touch of white to ensure it stands out. Paint all your stars and the little floating alien skulls with this fresh hue.
Paint looking streaky?
Gouache needs a creamy consistency. If it’s streaky, add a tiny bit more water. If it’s too transparent, let the first layer dry and add a second coat.
Step 2: Adding Details and Depth
-
Create the metallic underbelly:
Mix a medium grey using black and white gouache. Paint a small, curved shape underneath each pink saucer disc to represent the shadowy metal bottom of the ship. -
Detail the saucers:
Using your smallest detail brush and black paint (or a very fine black liner pen), carefully outline the red domes and the pink discs if you want a sharper look, though the example shows free-floating shapes without heavy outlines. -
Add the portholes:
With the detail brush and black paint, add a row of tiny dots or small circles along the pink rim of the saucer. This simple step instantly makes it look like a spaceship. -
Give the skulls faces:
Use the black paint to add three simple dots—two for eyes, one for a mouth—onto each teal skull shape. This gives them their spooky-cute character. -
Highlight the stars:
To make the teal stars pop, you can add a tiny central line or dot of a lighter mint shade in the center, though flat color works beautifully too.
Step 3: Finishing Touches
-
The starry background:
This is the tedious but satisfying part. Dip the very tip of your smallest brush into white or very pale pink paint. Dot the background space between your main illustrations to create distant stars. -
Vary the dot sizes:
I like to vary the pressure here—some dots should be tiny pricks of light, while others can be slightly larger planets. -
Add confetti dots:
Mix a little extra water into your coral pink paint and add a few pink dots scattered among the white stars to tie the color palette together. -
Clean up edges:
If your main shapes have rough edges, use a clean, slightly damp brush to gently lift excess paint or use a black marker to neaten the negative space around them. -
Let it cure:
Allow the entire sheet to dry completely flat for at least an hour to prevent the thick gouache from cracking when you move it.
Make a stencil
If you struggle drawing identical UFOs, cut a simple stencil from thick cardstock and trace the main saucer shape faintly with a white pencil first.
Once dry, frame your cosmic creation or use it as a unique background for other project photos
Alien Skull X-Ray Style
Blend scientific anatomy with extraterrestrial mystery in this striking watercolor piece. By combining vibrant teal washes with a deep black background, you’ll create an eerie, x-ray-like alien skull floating in the depths of space.
Step-by-Step Guide
Materials
- Cold press watercolor paper (deckled edge optional)
- Watercolor paints (Teal, Paynes Gray, Black)
- White opacity agent (White gouache or white ink)
- Pencil (HB for sketching)
- Kneaded eraser
- Assorted round brushes (sizes 2, 6, and 10)
- Masking fluid (optional)
- Palette for mixing
- Two jars of water
- Paper towels
Step 1: Sketching the Visitor
-
Define the frame:
Using a ruler, lightly mark out a rectangular border on your paper, leaving a generous margin of white space around the edges to frame your composition. -
Basic shapes:
Start sketching the skull by drawing a large, inverted egg shape centered in the top two-thirds of your rectangle. This iconic bulbous cranium is key to the extraterrestrial look. -
Facial features:
Draw huge, angled teardrop shapes for the eye sockets. Below them, sketch a small, triangular nasal cavity and protruding cheekbones that narrow down to a pointed jawline. -
Refining anatomy:
Add details like the suture lines on the forehead and the upper teeth structure, keeping the jaw slightly open or elongated for a skeletal feel. Sketch a small planet in the lower left quadrant to balance the composition.
Keep it Clean
Use two water jars: one for cleaning dirty brushes and one for clean water. This prevents your vibrant teal from getting muddy when switching from the black background.
Step 2: Painting the Skull
-
Base wash:
Mix a watery wash of teal watercolor. Apply this loosely over the entire skull area, avoiding the deep black eye sockets. Let the pigment pool slightly in areas like the cheeks to create natural texture. -
Deepening shadows:
While the base is still slightly damp, drop in concentrated teal or a mix of teal and Paynes Gray into the recessed areas: under the cheekbones, the sides of the cranium, and the nasal cavity. -
Bone texture:
Once the first layer is dry, use a smaller brush to paint thin, darker lines mimicking cracks and ridges in the bone. I find that stippling small dots adds a great porous bone texture. -
Highlighting:
Lift out pigment with a clean, damp brush on the high points of the forehead and nose bridge to create volume. -
The eyes:
Fill the large eye sockets with solid black paint. Leave a tiny sliver of white paper or add white gouache later for a wet, reflective glint if desired, though pure black void works perfectly here.
Step 3: The Void of Space
-
Protecting the subject:
Carefully outline your painted skull and planet with water first, or apply masking fluid if you are worried about your hand stability. -
Filling the background:
Using a large brush loaded with concentrated black watercolor or black gouache, fill in the negative space around the skull. Work carefully up to your pencil border for a crisp edge. -
Planet details:
Paint the small planet with a grey wash, adding a simple ring around it using white gouache or ink once the black background is completely dry. -
Star field:
Dip a toothbrush or stiff brush into white gouache diluted with a little water. Flick the bristles to splatter tiny stars across the black background. -
Major stars:
Use a fine detail brush and white gouache to paint a few larger, four-pointed distinct stars (‘lens flares’) to add depth to your galaxy.
Glow Effect
Mix a tiny drop of neon green or fluorescent paint into your teal wash. Under blue light or blacklight, your alien skull will actually glow.
Peeling off the tape reveals a crisp border, leaving you with a hauntingly beautiful specimen study ready for display
Underwater Alien Visitor
This whimsical watercolor piece features a classic alien visage rendered in soft sea-foam greens, giving it an ethereal, underwater quality. The painting comes to life on textured paper with delicate starburst accents, creating a calm yet mysterious galactic traveler.
How-To Guide
Materials
- Heavyweight cold-press watercolor paper (deckle edge optional)
- Watercolor paints (Emerald Green, Teal, Payne’s Grey, Black)
- Round watercolor brushes (size 4 and size 0 or 00 for details)
- HB Pencil for sketching
- Kneaded eraser
- Jar of clean water
- Paper towels
- Mixing palette
Step 1: Sketching the Visitor
-
Paper preparation:
Begin with a piece of textured watercolor paper. If your paper doesn’t have a deckle edge naturally, you can create a faux vintage look by carefully tearing the edges against a ruler rather than cutting them with scissors. -
Outline the head:
Lightly sketch an inverted teardrop shape in the center of the paper. Widen the top section for the cranium and taper it down to a narrow chin. -
Feature placement:
Draw faint horizontal guidelines to help with symmetry. Place two large, almond-shaped ovals for the eyes, slanting them inward toward the bottom. -
Adding details:
Sketch two tiny slits for the nostrils and a small horizontal line for the mouth. Add subtle frown lines on the forehead and bags under the eyes to give the alien character. -
Lighten the lines:
Roll your kneaded eraser gently over the entire sketch. You want the graphite to be barely visible so it doesn’t muddy the translucent watercolor later.
Uneven Wash?
If you get ‘cauliflower’ blooms in the skin paint, don’t panic. These textures actually enhance the aquatic, organic look of the alien’s skin. Embrace the imperfections.
Step 2: Painting the Wash
-
Mixing the skin tone:
Create a watery mix of Emerald Green and a touch of Teal. You want a very pale, transparent ‘sea glass’ color. -
Wet-on-dry application:
Apply this pale green wash over the entire head shape, carefully avoiding the eye sockets. Keep the edges crisp. -
Building dimension:
While the first layer is still slightly damp, drop a slightly more concentrated green mix onto the left side of the head and along the jawline to establish a light source coming from the top right. -
Forehead texture:
Use the tip of your size 4 brush to dab a little extra pigment into the forehead wrinkles, letting the paint bleed slightly into the damp paper for a soft shadow effect. -
Drying time:
Allow the green skin layer to dry completely before moving on to the darker features. If the paper feels cool to the touch, it’s still wet.
Cosmic Shimmer
Mix a small amount of iridescent medium or pearlescent watercolor into your green wash. The alien will shimmer subtly when the light hits the textured paper.
Step 3: Defining the Eyes and Details
-
First eye layer:
Mix a dark grey using Payne’s Grey and a little Black. Fill in the almond shapes of the eyes. This shouldn’t be pitch black yet; we want some depth. -
Deepening the gaze:
Once the grey creates a base, layer pure black paint into the center of the eyes, feathering it out towards the edges. Leave the very edges slightly lighter to suggest roundness. -
Adding highlights:
For that wet, glossy aquatic look, lift a tiny amount of paint from the upper right of each eye using a clean, damp brush, or wait until dry and add a dot of white gouache or gel pen. -
Facial features:
Switch to your size 00 detail brush. Mix a dark green-grey color and carefully trace the nostril slits and the mouth line. -
Emphasis lines:
Use the same dark thin mix to lightly outline the jaw and accentuate the forehead wrinkles. Keep these lines broken and organic rather than solid outlines. -
Celestial accents:
Using a very dilute, watery green mix, paint small four-point stars (diamond shapes with extended lines) randomly around the head. -
Final touches:
Add tiny cross-hatches or small dots within the background space to balance the composition, keeping them very faint.
Now your extraterrestrial portrait is ready to observe the world from your wall
Alien Graffiti-Style Drips
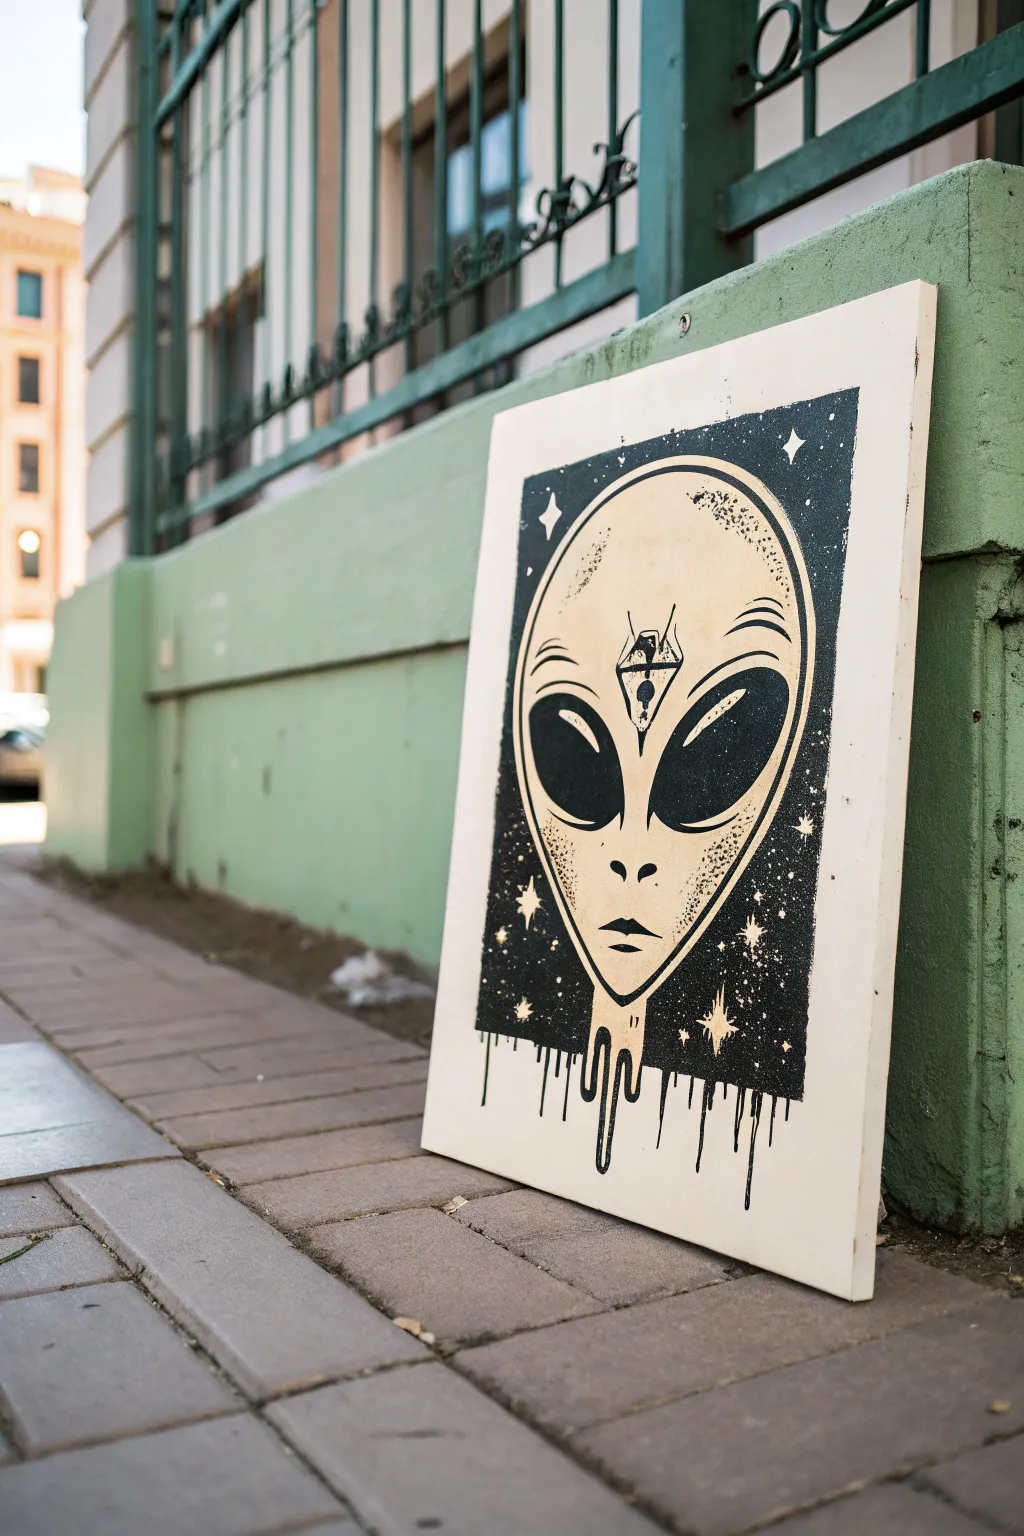
Capture the mystery of the cosmos with this striking high-contrast alien portrait featuring distinctive graffiti-style drips. The design mimics the bold look of a linocut print or street art stencil, using negative space to create a dramatic impact.
Step-by-Step Tutorial
Materials
- Rectangular canvas or primed wood panel (approx. 16×24 inches)
- Cream or off-white acrylic paint (matte)
- Black acrylic paint (heavy body preferred)
- Graphite transfer paper
- Pencil
- Painter’s tape or low-tack masking tape
- Fine liner brush (size 0 or 1)
- Flat shader brush (size 6 or 8)
- Large flat brush for background
- Ruler or T-square
- Easel or flat work surface
- Printed reference image of the alien design
Step 1: Base Preparation
-
Prime the Surface:
Begin by covering your entire canvas with a solid coat of cream or off-white acrylic paint. This will serve as both the background color and the eventual color of the alien’s skin. -
Ensuring Opacity:
Let the first coat dry completely to the touch. If the canvas texture is still showing through too much, apply a second coat to ensure a smooth, opaque foundation. -
Define the Borders:
Once the base is fully cured, use a ruler to lightly measure a rectangular border about 1-2 inches from the edge of the canvas. This creates the ‘framed’ look of the artwork. -
Masking Off:
Apply painter’s tape exactly along the pencil lines on the outside edge. This protects the outer cream border and ensures your inner black rectangle has crisp, sharp edges.
Clean Edges Pro-Tip
To prevent paint bleed, paint a thin layer of your base cream color over the tape edge first. This seals the gap, so any leaking paint matches the background perfectly.
Step 2: Sketching the Visitor
-
Transfer the Design:
Place your graphite transfer paper over the inner rectangle area. Position your printed alien reference image on top, centering the head vertically. -
Tracing Key Features:
Trace the outline of the head, the large almond eyes, the geometric forehead symbol, and the dripping neck area. Don’t worry about shading yet; just focus on the clean outlines. -
Adding Celestial Details:
Mark the positions of the stars and sparkles surrounding the head. A simple ‘plus’ sign or diamond shape works perfectly for these. -
Refining the Lines:
Remove the paper and inspect your transferred graphite lines. If any are faint, lightly go over them with your pencil so they are clearly visible before painting.
Troubleshoot: Shaky Lines
Struggling with smooth curves? Dilute your black paint slightly with water or flow improver until it has an inky consistency. It will drag much smoother.
Step 3: Painting the Void
-
Outlining the Negative Space:
Switch to your medium flat brush and black paint. Carefully paint along the *outside* of the alien’s head outline, filling in the space between the head and the tape border. -
Cutting in Details:
Use a smaller round brush to cut in around the intricate drip shapes at the bottom of the neck. Take your time here to keep the drips looking fluid and gravity-heavy. -
Filling the Background:
Fill in the rest of the black rectangular background. I prefer to work in sections to keep the paint wet edge active, which helps avoid streak marks. -
Lifting the Stars:
Paint carefully around your star markings, leaving the cream base coat showing through. If you accidentally paint over one, don’t panic; you can paint it back in with cream later.
Step 4: Facial Features & Texture
-
The Eyes:
Fill in the large almond eyes with solid black paint. Leave a very thin sliver of negative space or add a tiny highlight if you want more depth, though the flat black look is classic. -
Forehead Symbol:
Use your finest liner brush to paint the geometric symbol on the forehead. Ensure the lines are sharp and the small diamond shape is symmetrical. -
Nose and Mouth:
Paint the two small nostrils and the simple line for the mouth. Keep these features minimal to maintain the stylized, graphic aesthetic. -
Stippling Texture:
Dip an old, stiff brush or a toothbrush into a tiny amount of black paint. Gently stipple or flick speckles onto the top of the alien’s head and cheeks to create that grainy, stone-like texture. -
Defining Contours:
Add thin, curved lines around the temples and under the eyes using the liner brush. These act as shadow lines to give the flat face a slight sense of volume. -
Drip Extensions:
Extend thin black lines down from the main drips at the bottom. Vary their lengths to make the melting effect look organic and uneven.
Step 5: Finishing Touches
-
Star Brightening:
If your stars look a bit dull or got messy, use a small brush with fresh cream paint to touch them up, making them sharp and bright against the black void. -
The Reveal:
While the paint is just barely tacky (not fully cured), carefully peel away the painter’s tape at a 45-degree angle to reveal your crisp border.
Hang your piece and let this interstellar traveler bring a touch of the unknown to your space
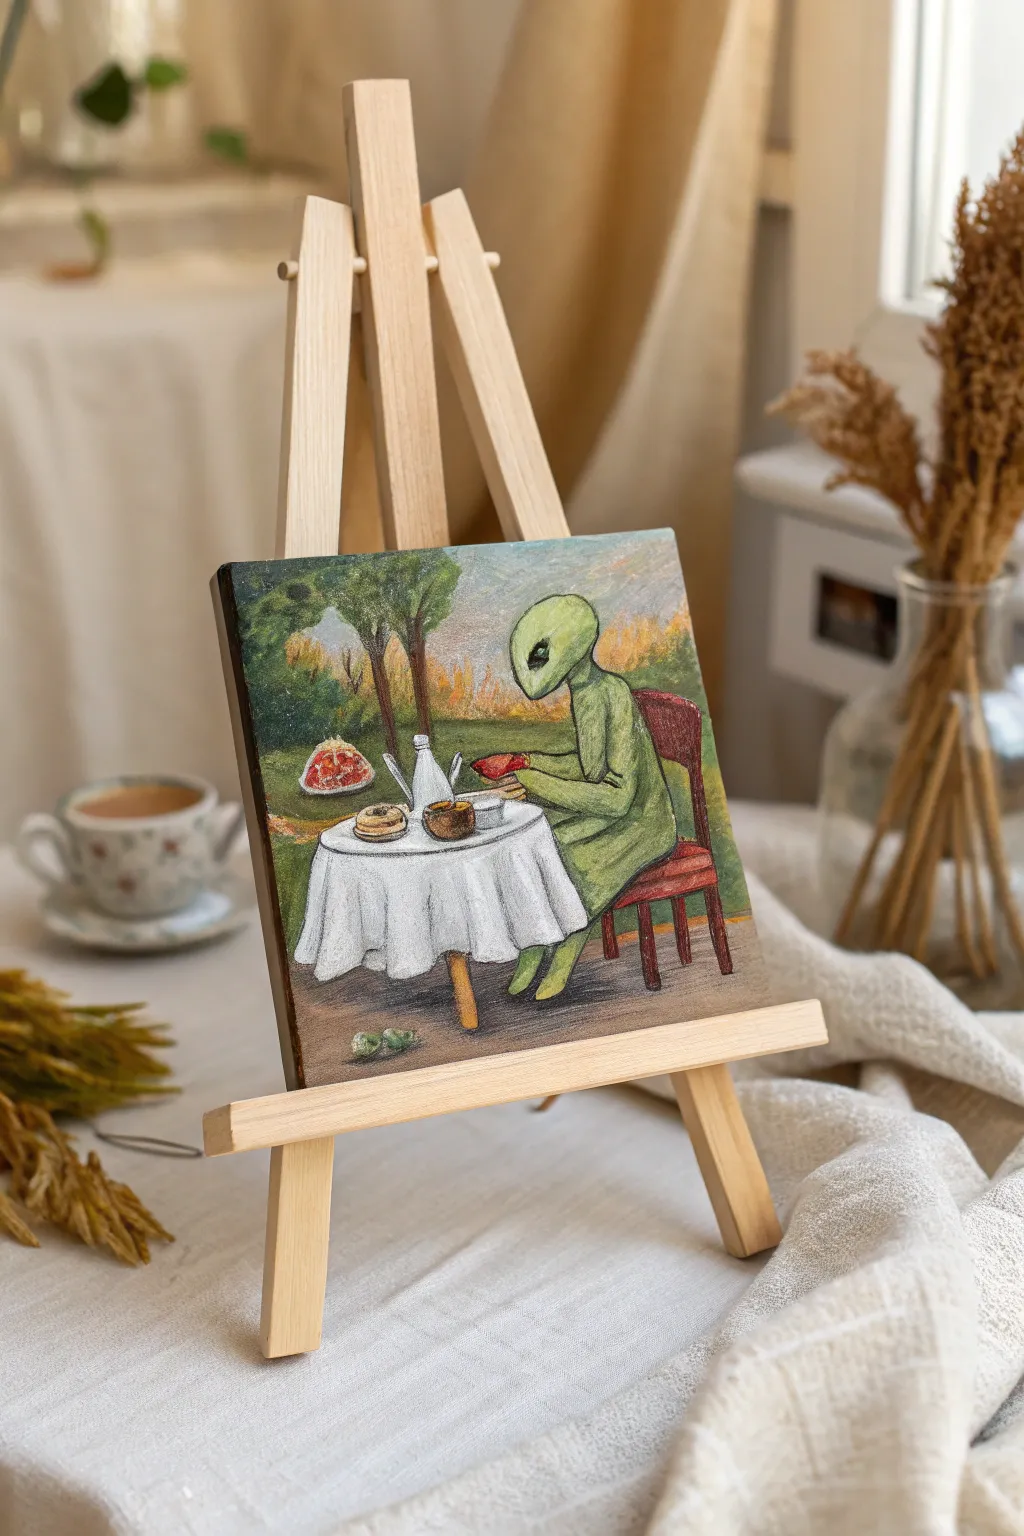
Surreal Alien Tea Party Scene

Capture a whimsical moment of extraterrestrial leisure with this charming painting of an alien enjoying a solo tea party. Using acrylics or gouache, you’ll create a serene, slightly surreal scene that blends the ordinary with the otherworldly on a small canvas board.
Step-by-Step
Materials
- Small square canvas board or wood panel (approx. 6×6 or 8×8 inches)
- Acrylic paints (Titanium White, Sap Green, Burnt Umber, Yellow Ochre, Cadmium Red, Cerulean Blue, Lamp Black)
- Set of synthetic brushes (flat shader, small round, fine liner)
- Palette for mixing
- Cup of water and paper towels
- Pencil for sketching
- Miniature wooden easel for display
Step 1: Planning and Background
-
Sketch the composition:
Begin by lightly sketching the scene onto your canvas board. Place the horizon line a bit above the center. Outline a large tree on the left, the café table in the foreground, and the alien figure seated on the right side. -
Block in the sky:
Mix Titanium White with a tiny touch of Cerulean Blue and perhaps a hint of Yellow Ochre for a soft, overcast afternoon sky. Paint the upper section above the horizon, keeping the strokes loose. -
Paint the distant foliage:
For the trees and bushes in the background, mix Sap Green with a little Burnt Umber and White. Dab the paint on with an older or stiffer brush to create a leafy texture, letting some of the background color peek through. -
Lay the grassy ground:
Cover the ground area with a mix of Sap Green and Yellow Ochre. As you move closer to the foreground (the bottom of the canvas), darken the green slightly with Burnt Umber to create depth and perspective.
Brush Control Tip
For the tiny outlines, thin your black paint with water until it has an ink-like consistency. This allows the paint to flow smoothly without clumping.
Step 2: The Main Subjects
-
Base coat the table and chair:
Paint the tablecloth with pure Titanium White. For the wooden chair, mix a reddish-brown using Burnt Umber and Cadmium Red. Don’t worry about shadows yet; just get the solid shapes filled in. -
Alien skin tone:
Mix a unique alien green using Sap Green, White, and a dot of Yellow. Fill in the alien’s head, neck, arms, and legs. I find applying two thin coats often looks smoother than one thick glob. -
Clothing the alien:
Paint the alien’s jumpsuit or robe using a slightly darker, more olive green tone to distinguish it from the skin. Use long, sweeping strokes to suggest the drape of fabric over the seated body. -
Table accessories:
Paint the small items on the table: a white teapot, a small teacup, a plate with pastries (using ochres and browns), and the slice of watermelon on the grass (red with a green rind).
Go Retro Sci-Fi
Change the setting to a moonscape! Instead of green grass and trees, paint a grey cratered surface and a starry black sky for the background.
Step 3: Shading and Details
-
Tablecloth folds:
Mix a very light grey (White with a tiny dot of Black). Use a round brush to paint vertical shadow lines on the tablecloth to create the illusion of draped fabric folds. -
Defining the face:
Using a fine liner brush and black paint, carefully draw the large, almond-shaped eyes. Add a small white reflection dot in each eye to make them look glossy and alive. -
Shadows on the figure:
Mix a darker green and apply it under the alien’s chin, beneath the arms, and where the legs bend at the knee. This gives the figure weight and dimension. -
Detailed outlining:
With your finest liner brush and thinned black or dark brown paint, loosely outline the alien, the chair, and the table items. This illustrative style helps separate the subjects from the background. -
Chair texture:
Add highlight lines to the red chair using a lighter red-orange mix. Define the spindles and the seat cushion to make it look like furniture. -
Ground shadows:
Glaze a transparent dark brown or black shadow underneath the table and the chair legs to anchor them to the ground. -
Final highlights:
Add final touches of pure white to the teapot shine, the top of the pastries, and the alien’s forehead to simulate light hitting the scene.
Place your finished miniature masterpiece on the easel to add a quirky conversation starter to your desk or shelf


Have a question or want to share your own experience? I'd love to hear from you in the comments below!