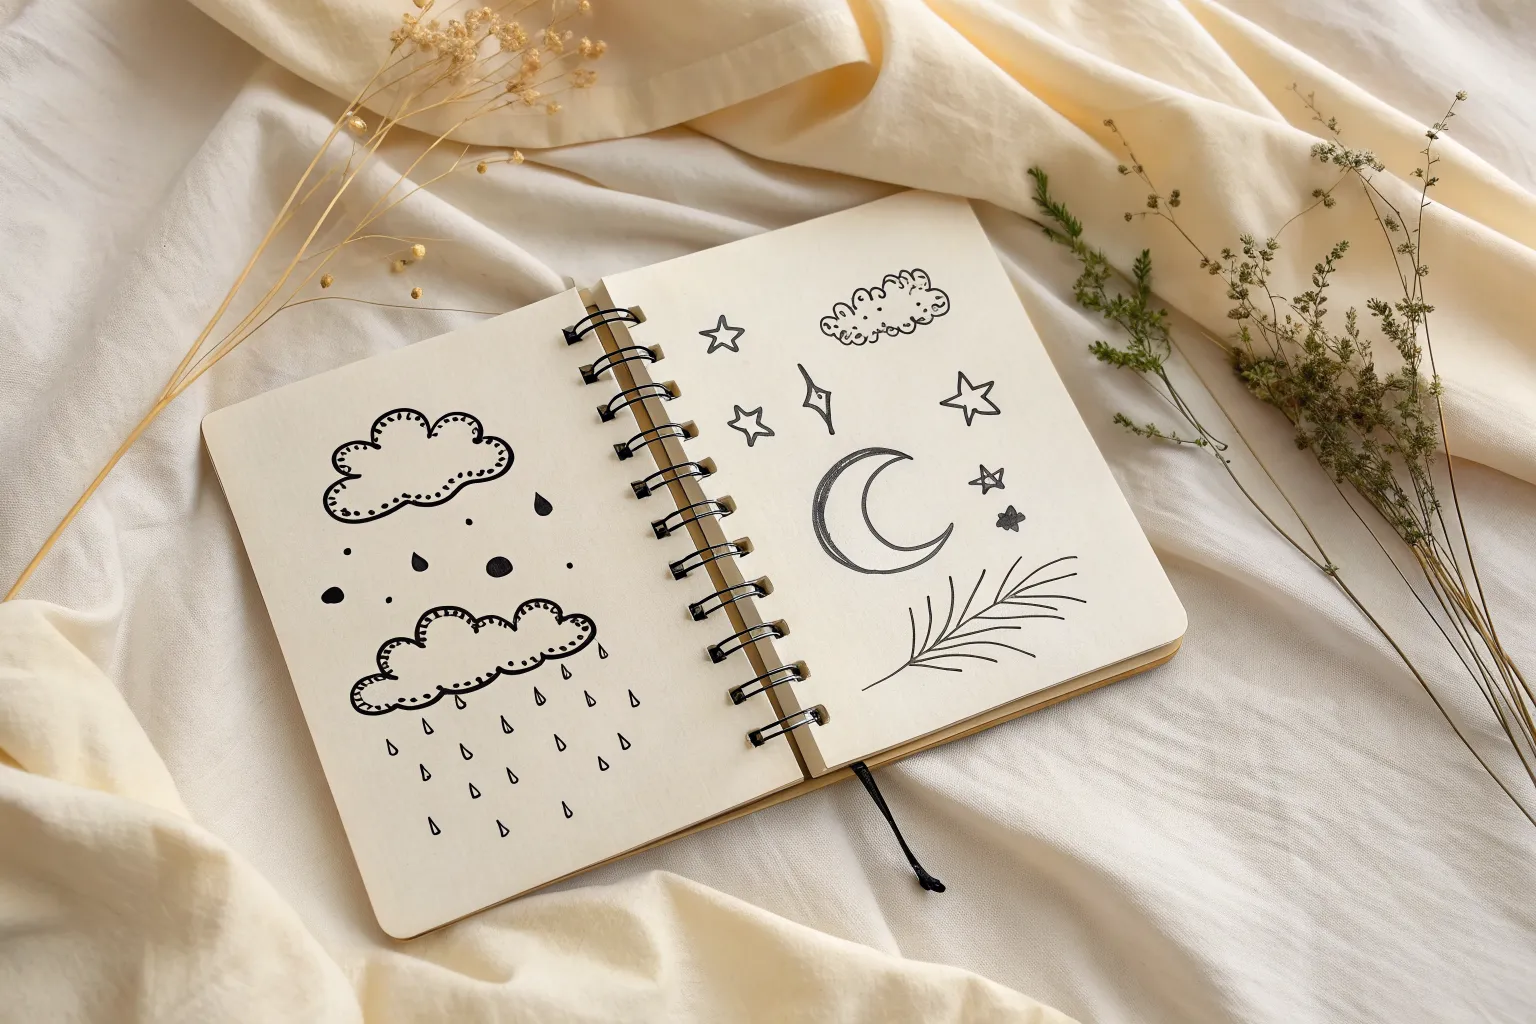
Clouds are my favorite thing to draw when I want something calming but still full of personality. Here are a bunch of artistic cloud ideas you can try right away, from classic fluffy forms to playful, surreal twists.
Classic Puffy Cumulus Clouds
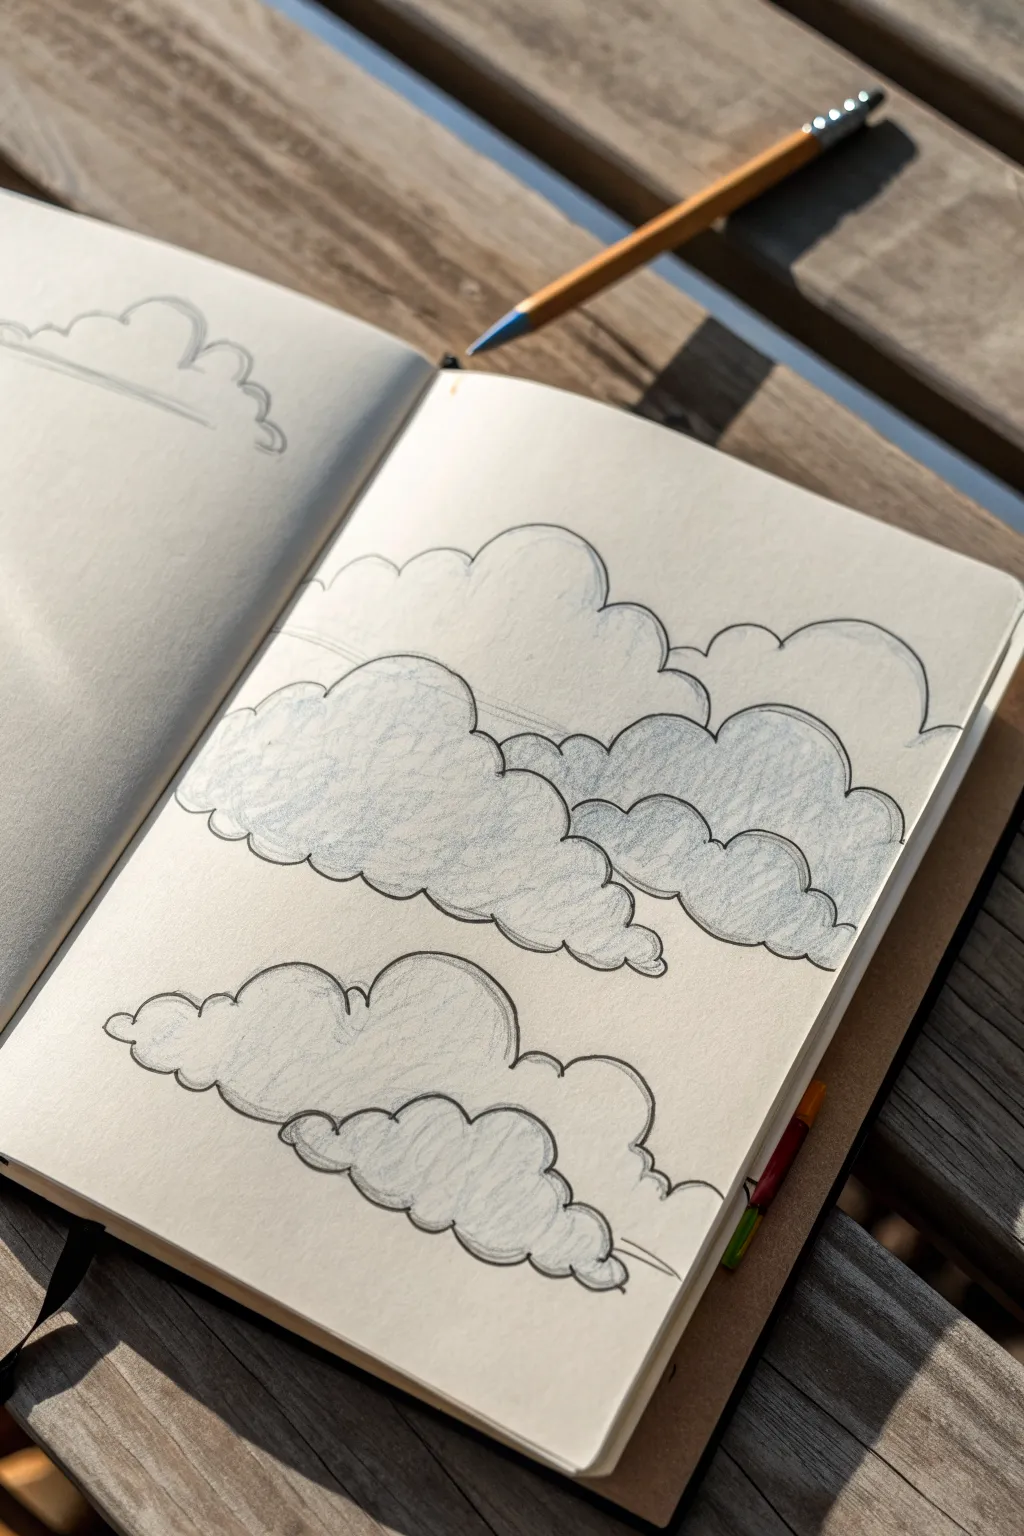
Capture the soft, rolling forms of classic cumulus clouds with this gentle pencil study. Using simple overlapping curves and careful shading, you’ll build up volume and depth to create a dreamy skies page in your sketchbook.
How-To Guide
Materials
- Sketchbook with smooth or medium-tooth paper
- H or HB pencil (for initial outlines)
- 2B or 4B pencil (for shading and darker lines)
- Eraser
- Blending stump (optional)
Step 1: Planning and Outlining
-
Visualize the composition:
Before putting pencil to paper, decide on the placement of your three main cloud clusters. Aim for a vertical arrangement, leaving plenty of white space between them to keep the page feeling airy. -
Draw the top cloud’s baseline:
Starting near the top of the page, lightly sketch a horizontal, slightly uneven line to serve as the flat bottom of your first cloud formation. -
Add first curves:
Begin drawing the billowing tops. Use a series of connected, semi-circular humps. Vary the size of these curves—make sure some are large and dominant while others are smaller connectors. -
Overlap the shapes:
To create depth, draw the main front curves first, then add secondary humps that appear to tuck behind them. This layering is crucial for the 3D effect. -
Outline the middle formation:
Move to the center of the page. Sketch a larger, wider cloud mass. Instead of a single flat bottom, let this one feel more rolling and interconnected, consisting of two main clumps joined together. -
Define the bottom cloud:
Sketch the final cloud cluster near the bottom. Give this one a distinct ‘front’ section that sits lower than the rest, creating a stepped appearance.
Flat Looking Clouds?
If your clouds lack volume, darken the ‘crevices’ where two curved humps meet. A deeper shadow in these V-shapes instantly pushes one shape behind the other.
Step 2: Refining and Shading
-
Darken the outlines:
Switch to a softer pencil (like a 2B) or apply slightly more pressure. Go over your initial contour lines to define them clearly. Keep your hand loose so the lines remain fluid rather than stiff. -
Identify light source:
Assume the light is coming from the top left. This means shadows will naturally fall on the bottom right of each individual puff. -
Start shading the middle cloud:
Using the side of your pencil lead, gently shade the lower portions of each hump in the middle cloud formation. Keep the tops bright white. -
Build up the graphite:
Layer your shading with small, circular motions or light scumbling. This texture mimics the vaporous nature of clouds better than harsh directional lines. -
Deepen the crevices:
Find the V-shapes where two curves meet. Press harder here to create a small, dark accent shadow. This emphasizes the separation between the cloud pillows. -
Shade the bottom formation:
Repeat the shading process on the lowest cloud. I like to make the shading slightly heavier on the bottom-most curves to weight the drawing down visually. -
Add gentle top shadows:
Even the top cloud needs volume. Add very faint shading just along the bottom edge of the top formation, but keep this one significantly lighter than the others to suggest it’s higher and brighter. -
Refine the edges:
Go back over the outer perimeter. If your shading blurred the lines, re-state the edge with a confident, dark graphite stroke to enforce that cartoon-illustrative style. -
Add distant details:
Draw very faint, thin horizontal lines extending from the sides of your clouds. These suggest distant strata or the horizon, placing your clouds in a sky context. -
Clean up:
Use your eraser to lift any stray graphite smudges from the white areas of the clouds. These highlights need to stay crisp for the volume to read correctly.
Color It In
Try swapping your graphite pencil for a light blue or lavender colored pencil for the shading steps. It adds a magical, sunset vibe while keeping the classic sketch look.
Now you have a page of fluffy, dimensional clouds ready to drift across your sketchbook


Soft Shading for Cloud Volume
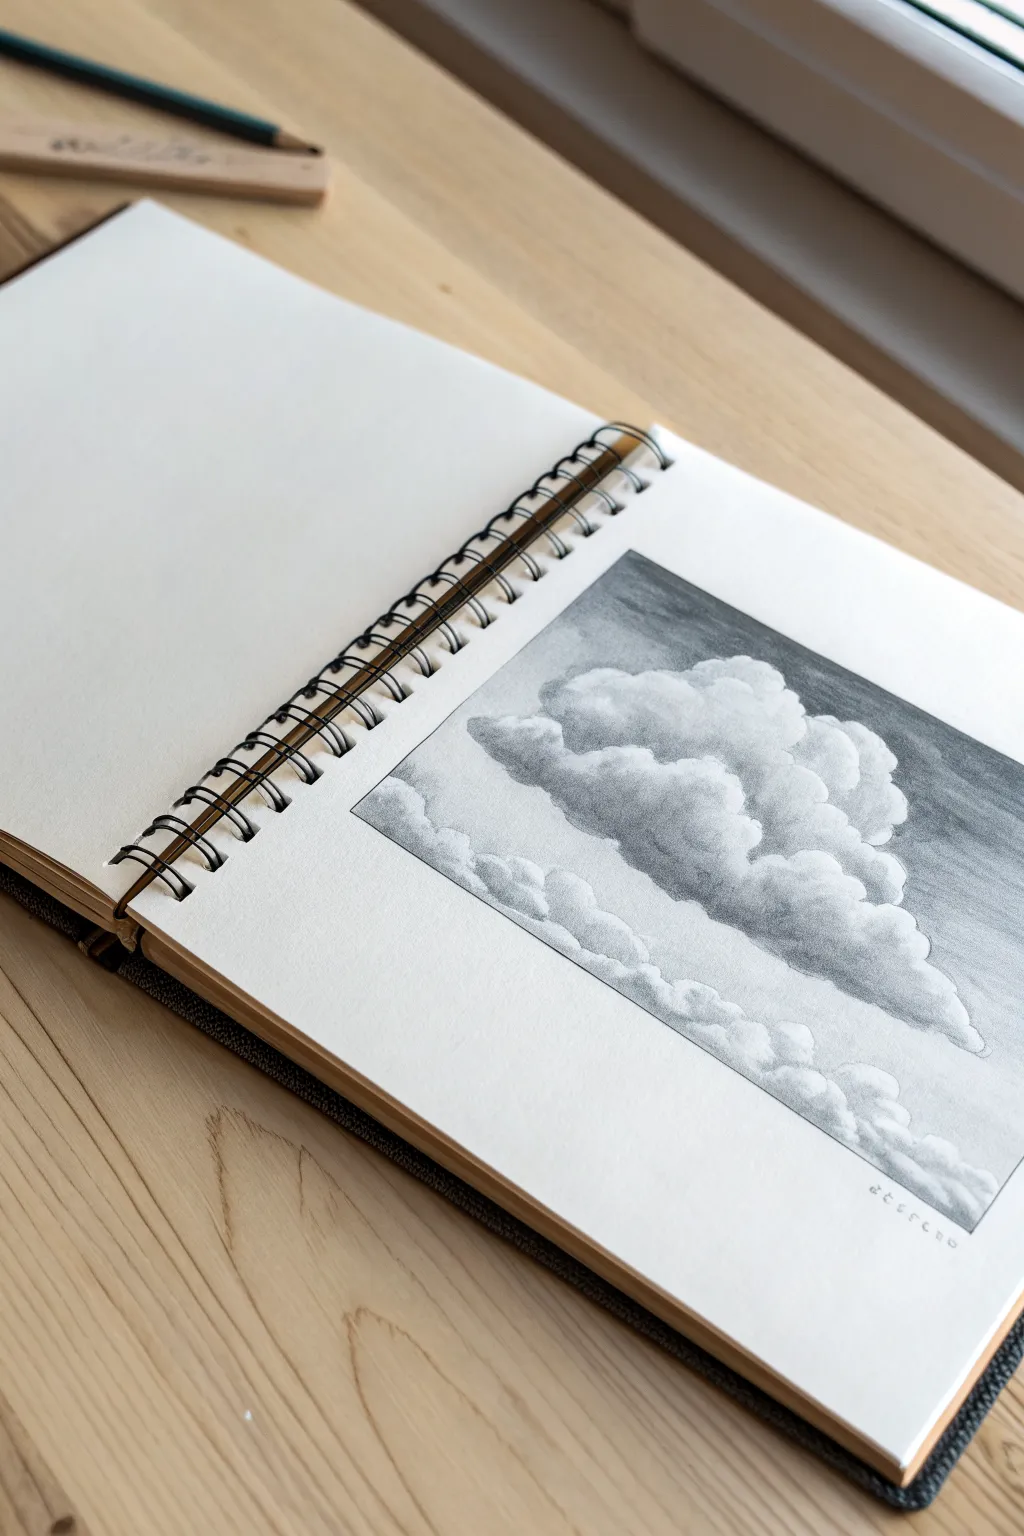
This project captures the ephemeral beauty of cumulus clouds using simple graphite techniques to build impressive volume. You’ll create a contained, postcard-sized vignette that contrasts fluffy white forms against a moody, darkened sky.
Step-by-Step Tutorial
Materials
- Spiral-bound sketchbook (smooth or vellum bristol paper preferred)
- Graphite pencils (2H, HB, 2B, 4B)
- Ruler
- Masking tape or drafting tape
- Kneaded eraser
- Blending stump (tortillon) or cotton swab
- Tissue or chamois cloth
Step 1: Preparation and Outline
-
Define the boundaries:
Start by lightly drawing a rectangle in the center of your sketchbook page using a ruler and a 2H pencil. This frame gives the drawing a polished, finished look. If you want ultra-crisp edges, apply drafting tape along the outside of these lines. -
Map the cloud shapes:
With an HB pencil, sketch the basic contour of the main cloud mass. Keep your pressure extremely light. Focus on the ‘cauliflower’ shape of cumulus clouds—rounded, bubbling tops and a flatter, more horizontal base. -
Add secondary formations:
Sketch a lower bank of smaller, fragmented clouds near the bottom of the frame. These should look thinner and less developed than the massive cloud above, creating a sense of depth and distance.
Smudge Patrol
Place a piece of scrap paper under your drawing hand while you work. This prevents oils from your skin and friction from smearing your smooth sky gradients.
Step 2: Establishing the Sky
-
Apply the base sky layer:
Using a 2B pencil, begin shading the sky area surrounding the clouds. Hold the pencil at a low angle to use the side of the lead, creating a broad, even wash of graphite. -
Darken the upper gradient:
Switch to a 4B pencil to deepen the sky tone, especially at the top of the rectangle. Press harder here to create a gradient that fades slightly as it approaches the horizon line. -
Refine the edges:
Carefully work the dark sky tone right up to the edge of your cloud outline. This negative space drawing defines the white tops of the clouds without actually drawing an outline around them. -
Smooth the texture:
Use a blending stump or a folded tissue to gently rub the graphite in the sky area. Blend in small circular motions to remove pencil strokes and create a smooth, atmospheric backdrop. Be careful not to smudge into the white cloud areas.
Level Up: Dramatic Light
Try ‘silver lining’ lighting: make the center of the cloud dark grey and leave only the very outer rim pure white to simulate the sun hiding directly behind the cloud.
Step 3: Sculpting Volume
-
Identify the light source:
Assume the light is coming from the upper left. This means the tops and left sides of the cloud billows will remain pure white, while the shadows will form on the bottom and right sides. -
Lay down base shadows:
With a 2H or HB pencil, lightly shade the underside of the main cloud mass. Use soft, circular strokes (scumbling) to mimic the texture of water vapor rather than hard lines. -
Build the mid-tones:
Layer a 2B pencil over the shadow areas to deepen them. Focus on the crevices where different cloud ‘bubbles’ overlap. I find that deepening these crevices instantly makes the cloud pop forward. -
Soften the transitions:
Use a clean blending stump (or a fresh corner of your tissue) to smudge the graphite from the shadow areas slightly upward into the white areas. This creates a soft gradient, essential for that fluffy look. -
Darken the cloud base:
The flattest bottom part of the cloud should be the darkest. Use a 4B pencil here to give weight to the formation, ensuring it feels heavy with moisture.
Step 4: Detail and Final Polish
-
Shade the lower clouds:
Repeat the shading process for the smaller cloud bank at the bottom. Keep these slightly lighter overall than the main cloud to suggest they are further away or less dense. -
Lift highlights:
Take your kneaded eraser and shape it into a fine point or wedge. Dab—don’t rub—at the upper edges of the clouds to lift off any stray graphite smudge and reclaim the bright white paper highlights. -
crisp up the frame:
If you used tape, peel it away slowly at a 45-degree angle. If you drew lines, use a ruler and eraser to clean up any shading that went outside the rectangular border. -
Final contrast check:
Step back and look at the drawing. Strengthen the darks in the sky corners or the deepest cloud shadows if the image looks too gray. High contrast makes the white paper look brighter.
Start with light pressure and build your layers slowly for the softest, most realistic effect


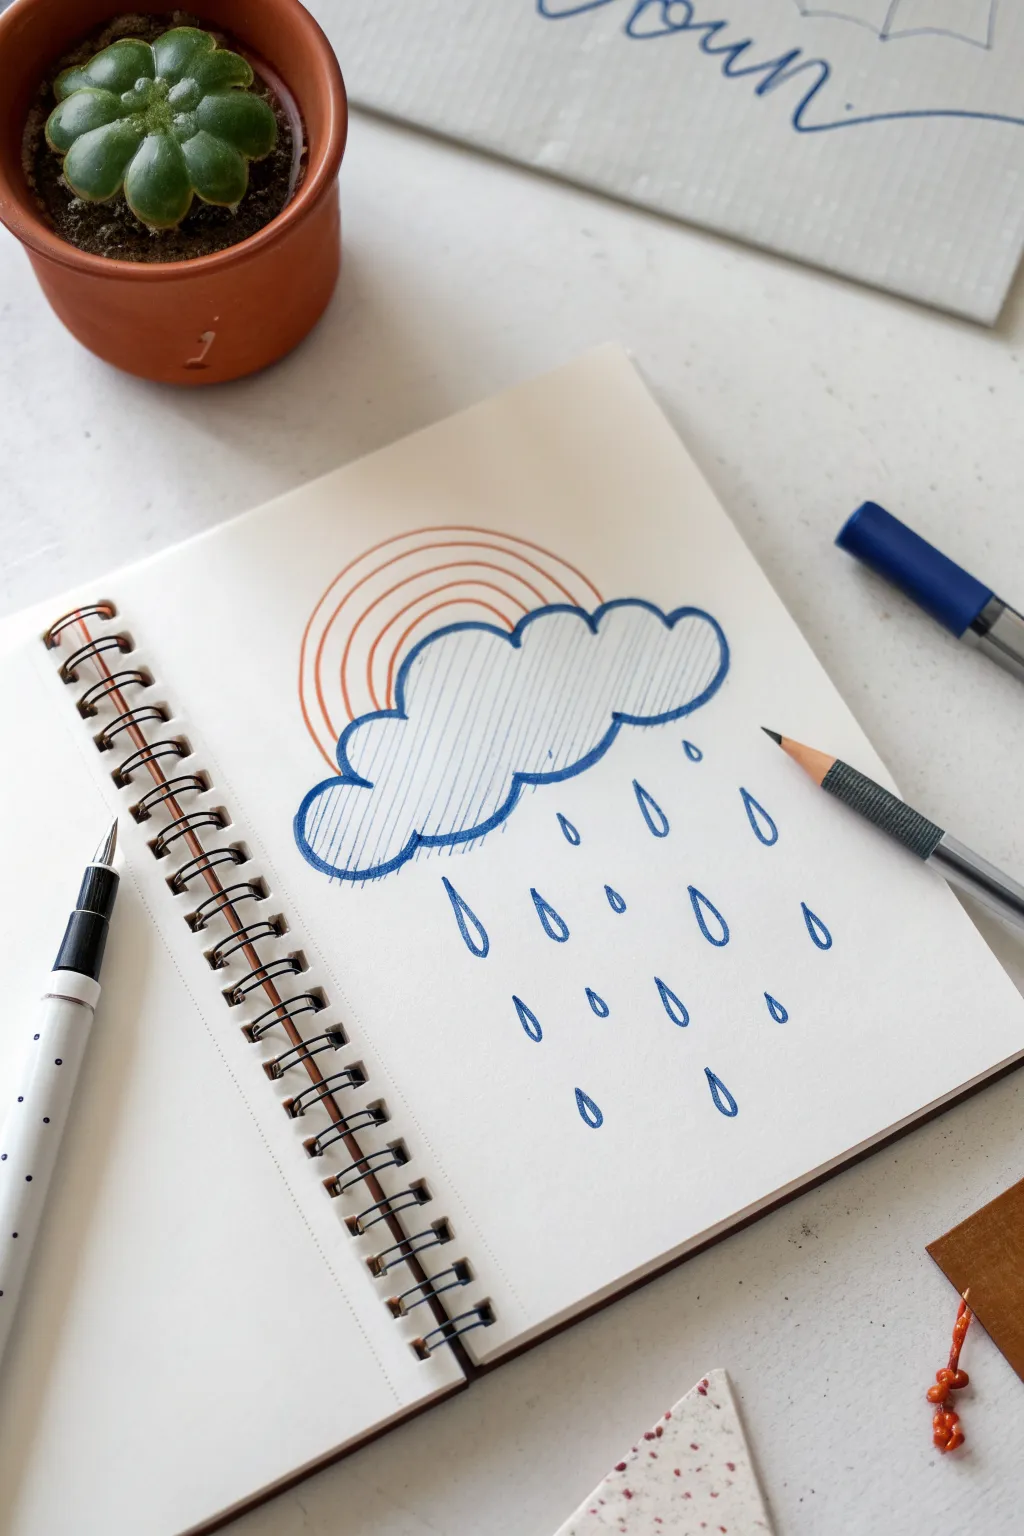
Storm Clouds With Heavy Undersides
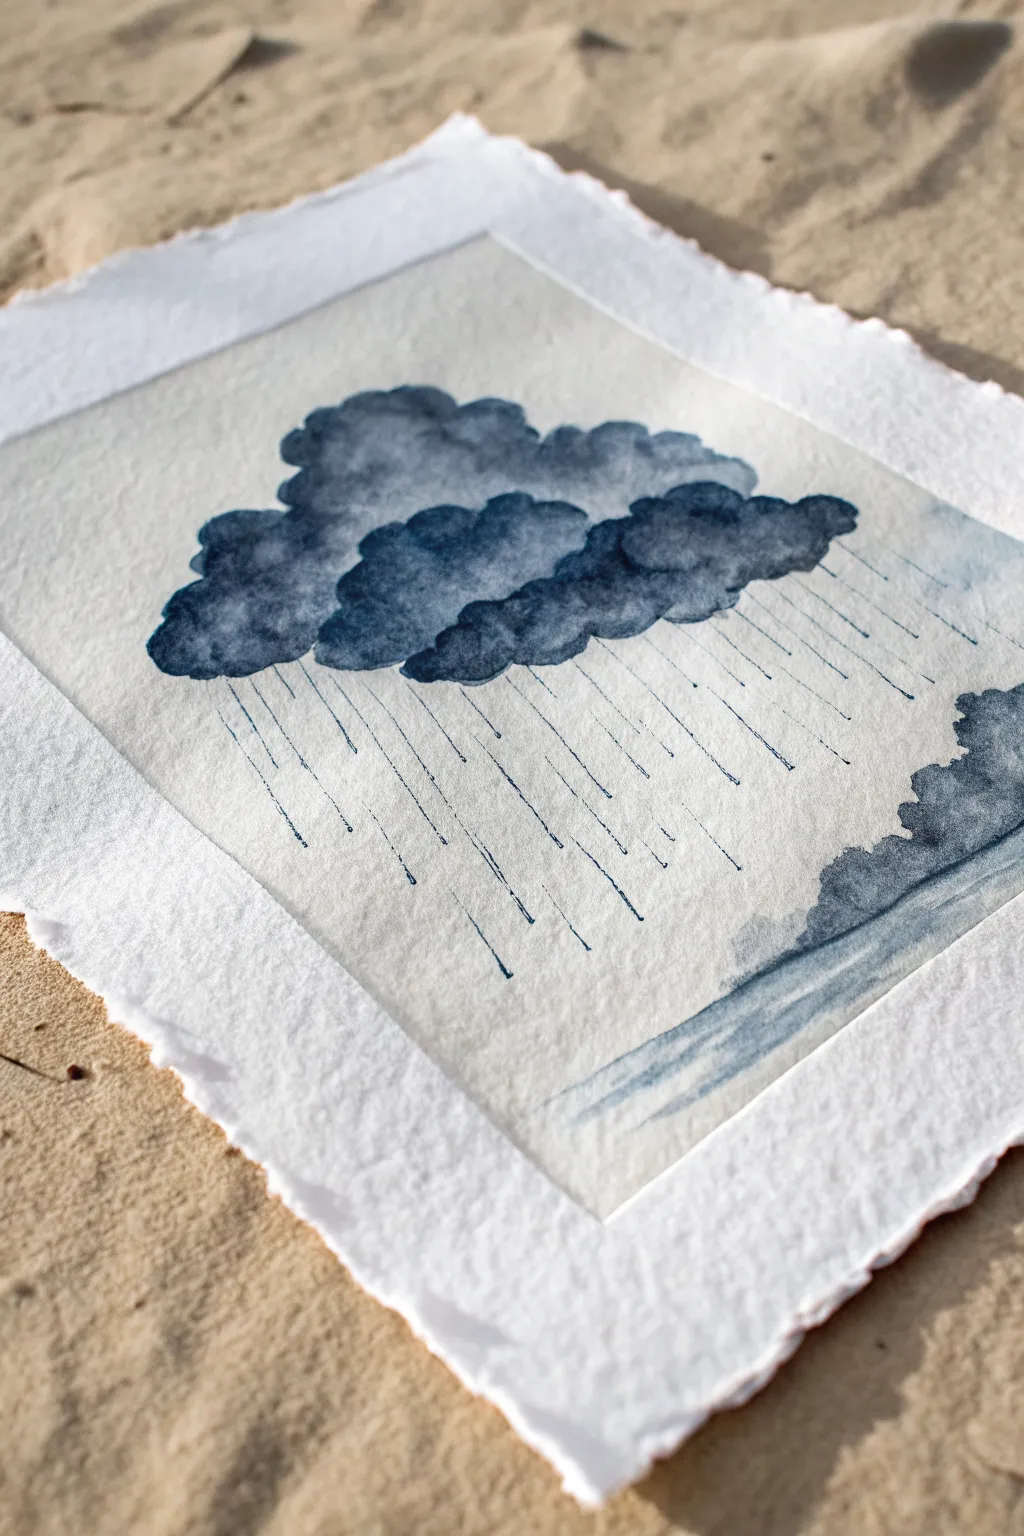
Capture the moody elegance of a passing storm with this monochromatic watercolor project. Using a single deep blue hue on textured, deckle-edged paper creates a striking contrast between the soft, watery clouds and the crisp, deliberate rain lines.
Step-by-Step Tutorial
Materials
- Cold press watercolor paper (300gsm or heavier)
- Ruler for tearing paper (optional)
- Indigo or Payne’s Grey watercolor paint
- Medium round brush (size 6 or 8)
- Fine liner or rigger brush (size 0 or 1)
- Jar of clean water
- Paper towels for blotting
- Pencil (HB or lighter) for light sketching
Step 1: Preparing the Paper
-
Create the deckle edge:
If your paper doesn’t already have torn edges, place a ruler firmly against the paper where you want the edge to be. Carefully tear the paper upwards against the ruler’s edge to create that organic, fibrous deckle look on all four sides. -
Define the painting area:
Unlike standard paintings, we aren’t taping this down. Instead, lightly pencil a rectangular border about an inch inward from your torn edges. This will act as a guide for your ‘frame’ but won’t be filled in completely.
Edge Control
For fluffier clouds, soften the top edges with a clean, damp brush immediately after painting them. This lifts pigment and creates a mistier look.
Step 2: Painting the Clouds
-
Mix your base wash:
Dilute your Indigo or Payne’s Grey with plenty of water to create a light, transparent wash. You want a very pale ghostly blue for the initial shapes. -
Outline the cloud tops:
Using your medium round brush, paint the fluffy, rounded tops of the clouds within the upper center of your penciled border. Keep the edges soft and uneven. -
Build the first layer:
Fill in the body of the cloud with this light wash. While it’s still damp, drop in slightly more pigment near the bottom of the cloud shapes to start suggesting weight. -
Deepen the shadows:
Mix a much richer, thicker consistency of paint with less water. While the paper is just barely damp (not soaking), dab this dark pigment into the undersides of the cloud puffs. -
Create the heavy undersides:
Focus the darkest pigment at the very bottom edge of the main cloud mass. Let the paint bleed slightly upward, but keep the bottom edge fairly distinct to show the heavy base typical of storm clouds. -
Paint the secondary cloud:
Add a smaller, partial cloud formation in the bottom right corner, mirroring the technique: light fluffy tops and a dark, heavy base that fades into the imaginary horizon line.
Step 3: Adding the Rain
-
Let the clouds dry:
It is crucial to let the cloud layer dry completely before starting the rain. If the paper is wet, your crisp rain lines will blur into a fuzzy mess. -
Switch brushes:
Pick up your fine liner or rigger brush. These long-bristled brushes are perfect for holding paint while creating thin, consistent lines. -
Mix a medium tone:
Prepare a puddle of paint that is darker than the lightest cloud tufts but lighter than the deepest shadows. It should flow easily off the brush. -
Test your stroke:
I always test the viscosity on a scrap piece of paper first. You want a consistent line that doesn’t skip or blob. -
Paint diagonal rain:
Starting just below the dark belly of the main cloud, pull your brush diagonally downward and to the right. Create short to medium parallel streaks. -
Vary the lengths:
Don’t make every rain line the same length. Stagger them to create a natural, falling rhythm. Avoid drawing lines that go all the way from top to bottom in one stroke. -
Connect the scene:
Continue the rain effect all the way down toward the bottom right cloud, visualising the storm passing between the two formations.
Blooms & Backruns
If you see ‘cauliflower’ blooms in your clouds, you added water to drying paint. Don’t fight it—these textures actually look great in storm clouds.
Step 4: Grounding the Scene
-
Suggest the ground:
Underneath the rain, use a very watery wash to paint a faint, blurry horizon line or ground plane. It should look distant and obscured by the weather. -
Add ground details:
While the ground wash is wet, add a single stripe of darker pigment to anchor the bottom right corner, suggesting a wet landscape reflecting the sky. -
Final assessment:
Step back and look at the contrast. If the cloud bottoms aren’t dark enough, you can glaze a final layer of deep indigo over them once everything is bone dry. -
Erase guidelines:
Once the painting is completely dry—give it an hour just to be safe—gently erase the pencil border you drew in the beginning, leaving your storm suspended in the center of the textured paper.
Allow the finished piece to dry flat overnight to minimize buckling before displaying your moody masterpiece


Moonlit Clouds With Rim Light
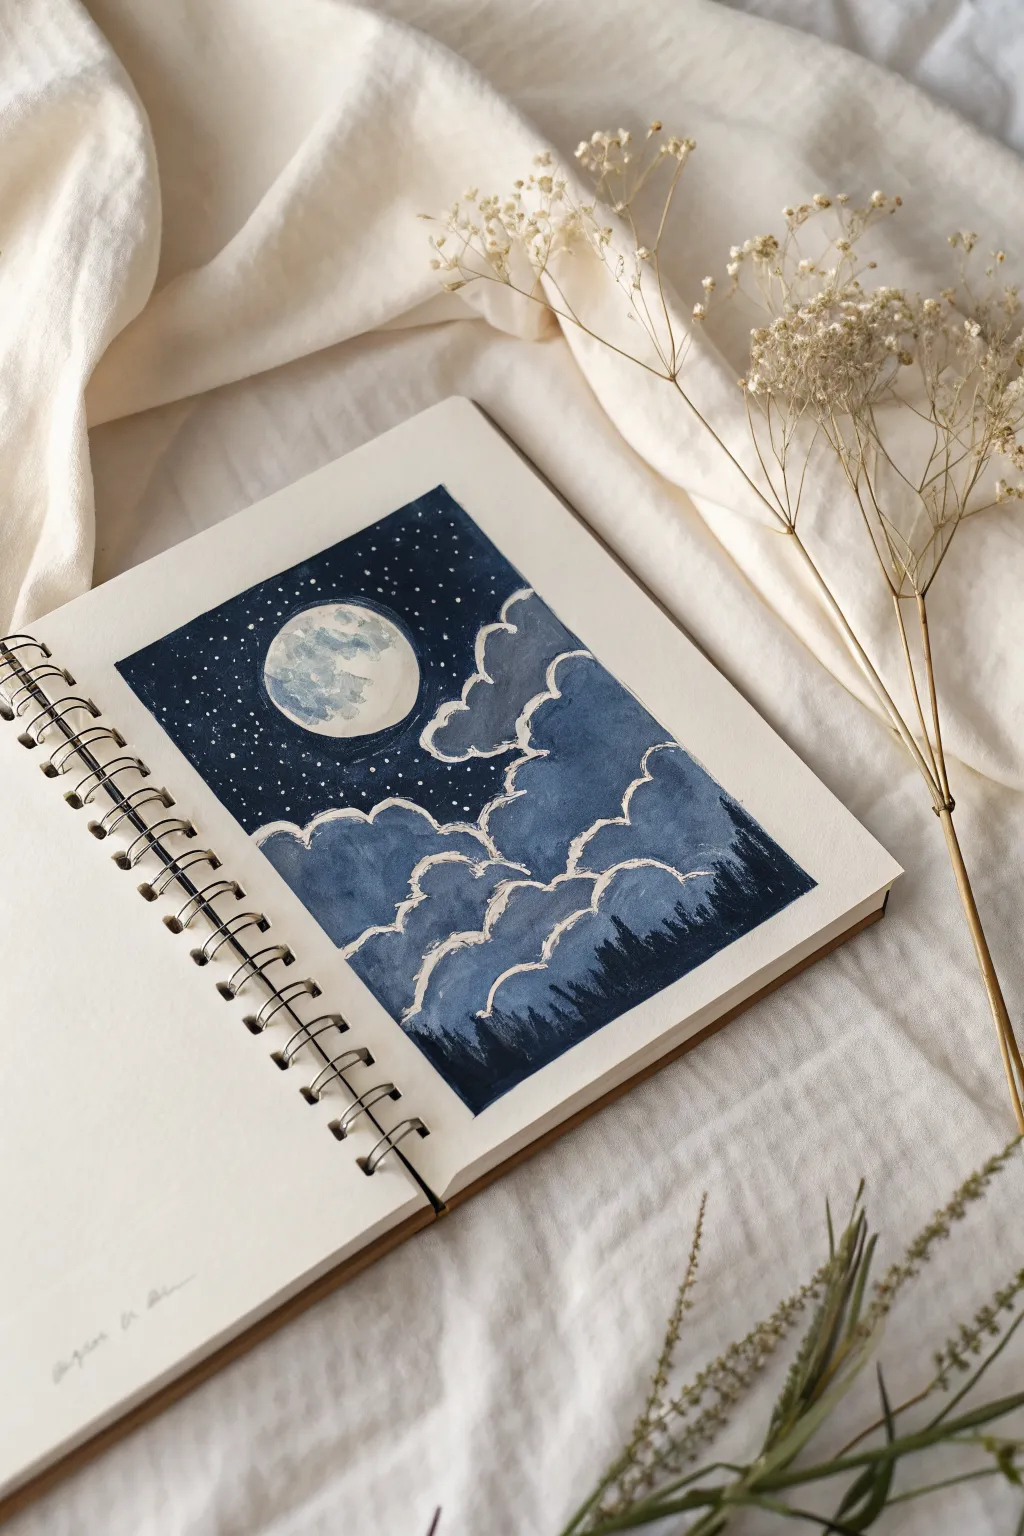
Capture the serene beauty of a moonlit sky with this charming gouache painting featuring billowing clouds rimmed in light. The contrast between the deep midnight blues and the bright moon creates a magical atmosphere perfect for any sketchbook spread.
Detailed Instructions
Materials
- Sketchbook with mixed media or watercolor paper (at least 160gsm)
- Painter’s tape or masking tape
- Gouache paints (Prussian Blue, Ultramarine Blue, Black, White)
- Flat brush (small/medium) for backgrounds
- Round brush (size 2 or 4) for clouds
- Fine detail brush (size 0) for stars and pines
- Palette for mixing
- Compass or round object for tracing
- Pencil and eraser
- Jar of water and paper towels
Step 1: Preparation & Sketching
-
Tape the Edges:
Start by taping off a rectangular border on your sketchbook page. Press the tape down firmly, especially along the inner edges, to ensure you get those crisp, clean lines when you peel it off later. -
Outline the Moon:
Using a compass or a small circular object like a bottle cap, lightly trace a circle in the upper-left quadrant of the rectangle. Keep your pencil lines faint so they don’t show through the paint. -
Map the Clouds:
Sketch the rough shapes of your clouds. Focus on creating fluffy, billowing layers that start wide at the bottom and rise up toward the right side of the page, leaving the top left open for the night sky.
Step 2: Painting the Sky
-
Mix the Midnight Blue:
Create a deep, dark blue by mixing Prussian Blue with a touch of Black. You want a very pigmented, opaque mixture that resembles the night sky. -
Paint the Upper Sky:
Fill in the area around the moon and above the cloud line with your midnight blue mix. Be careful to cut in neatly around the circular moon shape. -
Fade the Edges:
As you get closer to the top outline of the clouds, you can slightly dilute the paint or add a tiny bit of white to create a transition, though a sharp contrast also looks striking here.
Bleeding Edges?
If paint bled under the tape, wait for it to dry fully, then use white gouache (or white acrylic for more coverage) to carefully touch up the border line.
Step 3: Creating the Clouds
-
Mix a Cloud Base Color:
Mix a medium steel blue shade using Ultramarine Blue, a little White, and a tiny dot of Black to desaturate it. This will be the main body color of the clouds. -
Fill the Cloud Shapes:
Paint the interior of your cloud sketches with this steel blue color. Don’t worry about the edges being perfect just yet; we will refine them with highlights later. -
Add Depth:
While the base cloud layer is still slightly damp, mix a slightly darker version of your blue and dab it into the bottom-right sections of the individual cloud puffs to suggest shadow and volume. -
Paint the Moon:
Mix a pale grey-white. Fill in the moon circle. Once dry, dab irregular patches of slightly darker grey and muted blue on the surface to mimic lunar craters and texture.
Make It Sparkle
Mix a tiny amount of iridescent medium or silver watercolor into your white paint for the cloud rims to give the moonlight a subtle, shimmering effect.
Step 4: Highlights & Details
-
Rim Lighting Technique:
Load your round brush with pure opaque White gouache. It should be thick, with a creamy consistency like yogurt. -
Outline the Clouds:
Carefully paint the top ridges of each cloud shape with the white paint. Use jagged, slightly uneven strokes to give the clouds a fluffy, organic texture rather than a smooth cartoon outline. -
Blend the Rims:
On the inner side of the white outline, use a clean, slightly damp brush to soften the transition into the blue cloud body, making the light look like it’s glowing. -
Add Inner Cloud Layers:
Paint sweeping curved lines of white inside the main cloud masses to suggest tiers of fluffiness, ensuring the visual flow moves diagonally upward. -
Create the Stars:
With your smallest detail brush or a white gel pen, dot tiny stars throughout the dark sky area. Vary the pressure to create different sizes, clustering a few for interest.
Step 5: Finishing Touches
-
Paint the Silhouettes:
Mix a very dark blue-black color. Using a fine brush, paint tiny vertical strokes along the bottom edge of the clouds to create a distant pine forest silhouette. -
Vary Tree Heights:
Ensure the tree tops are uneven, with some poking higher than others, to make the forest line look natural. -
Dry Completely:
Wait until the painting is bone dry to the touch. Gouache can smudge easily if damp. -
The Reveal:
Slowly peel the painter’s tape away at a 45-degree angle, away from the painting area, to reveal your crisp white borders.
Enjoy the peaceful atmosphere of your new miniature moonlit world
BRUSH GUIDE
The Right Brush for Every Stroke
From clean lines to bold texture — master brush choice, stroke control, and essential techniques.
Explore the Full Guide
Sun Peeking Behind a Cloud
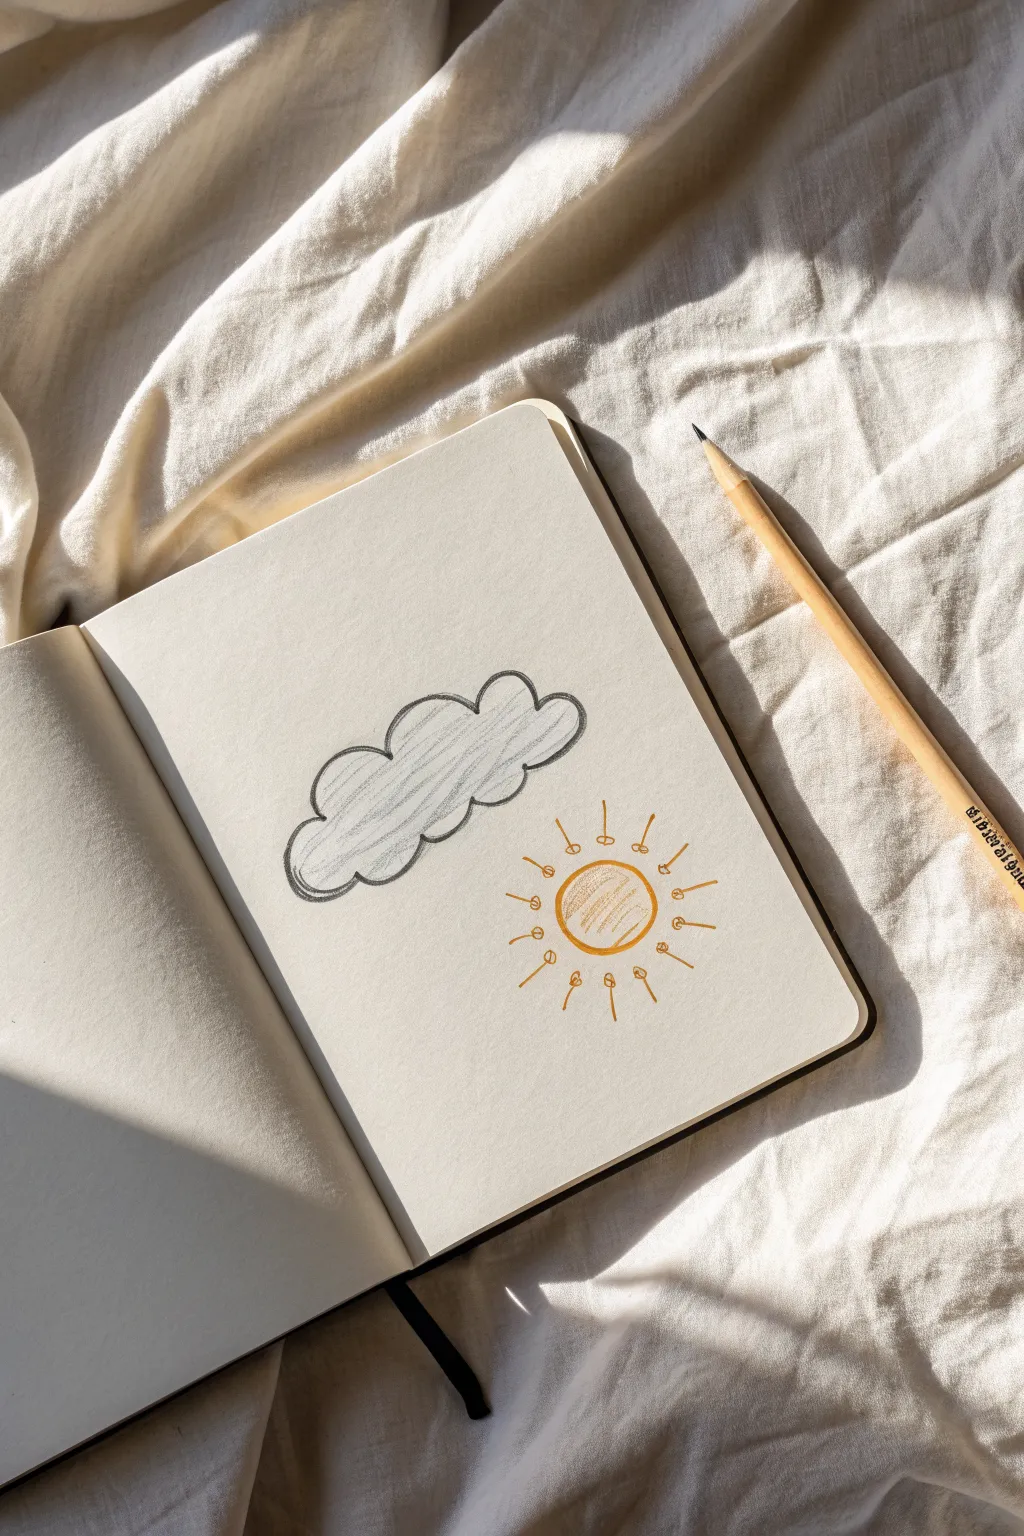
Capture the warmth of a bright day with this minimalistic cloud and sun illustration. The sketch uses gentle lines and soft shading to create a charming, airy feel perfect for doodling in your sketchbook.
Step-by-Step Tutorial
Materials
- Sketchbook or drawing paper (cream or off-white works best)
- Graphite pencil (HB or B)
- Yellow colored pencil or fine-tip marker
- Eraser
- Pencil sharpener
Step 1: Drawing the Cloud
-
Start the base:
Begin by lightly sketching the bottom curve of the cloud. Draw a fairly flat, horizontal line that curves up slightly at both ends to form a gentle ‘U’ shape. -
Add fluffy tops:
Create the top of the cloud by drawing a series of connected semicircles. Aim for three or four distinct humps, varying their sizes slightly to keep it looking organic. -
Close the shape:
Connect the last rounded hump back down to the right edge of your bottom line, completing the cloud outline. -
Refine the outline:
Go over your perimeter line again with your graphite pencil. Press a little harder this time to create a deliberate, dark grey outline that stands out. -
Shade the interior:
Using the side of your pencil lead, lightly shade the inside of the cloud. Use diagonal strokes moving from bottom-left to top-right. -
Even out the texture:
I like to go back over the shading lightly to fill in any large white gaps, but keep the texture visible—it adds to that hand-drawn charm.
Uneven Shading?
If your pencil strokes look too scratchy, dull the tip of your pencil slightly on a scrap piece of paper. A blunter tip creates softer, wider shading lines.
Step 2: Adding the Sun
-
Position the sun:
Locate a spot slightly below and to the right of your cloud. This off-center placement creates a balanced composition. -
Draw the circle:
With your yellow pencil or marker, draw a simple circle. It doesn’t need to be geometrically perfect; a hand-drawn feel is better here. -
Fill with color:
Shade inside the yellow circle using diagonal strokes similar to the cloud’s shading. Keep the pressure consistent for a warm, solid glow. -
Outline the sun:
Deepen the edge of the sun by tracing over the circumference a second time to define the shape clearly. -
Start the rays:
Draw short, straight lines radiating outward from the sun’s edge. Space them out evenly around the circle, sketching about 10 to 12 main rays. -
Add ray details:
At the very tip of each sun ray, draw a tiny loop or squiggle. This small detail mimics a playful sparkle or heat shimmer. -
Check balance:
Step back and look at the spacing between the cloud and the sun. If the space feels too empty, you can slightly extend the sun’s rays.
Make It Golden
Add a second layer of orange pencil just to the bottom edge of the sun circle. This creates a subtle gradient effect, making the sun look warmer and more dimension.
Step 3: Final Touches
-
Clean up:
Use your eraser to remove any stray graphite marks or smudges around the outside of your drawing. -
Enhance contrast:
If the cloud outline looks too faint against the paper, give it one final pass with the pencil tip to make it pop.
Enjoy the peaceful vibe of your new weather doodle
Cloud Banks Over Mountain Peaks

Capture the majestic atmosphere of high-altitude peaks with this mixed-media sketchbook study that blends graphite precision with soft washes. This project focuses on translating jagged rock textures and rolling cloud banks onto paper while sitting right in the landscape.
Step-by-Step
Materials
- Hardbound sketchbook (heavyweight paper suitable for light washes)
- Graphite pencils (HB, 2B, 4B)
- Watercolor or gouache (Payne’s Grey or Indigo)
- Small round travel brush (size 4 or 6)
- Fine liner pen (0.1mm, black)
- Water container
- Paper towel
Step 1: Establishing the Horizon
-
Plan the Composition:
Visualize your sketchbook spread as a panoramic canvas. Instead of centering the peaks, place them slightly lower to leave ample room for the dramatic sky, just like in the reference photo. -
Lightly Sketch Contour Lines:
Using an HB pencil, draw very faint guidelines across both pages. Map out the V-shape of the valley and the primary triangles of the mountain peaks. -
Mark the Cloud Banks:
Don’t just draw the rocks; outline the negative space where the low-hanging clouds hug the mountain base. Keep these lines extremely light so they can disappear later. -
Define the Foreground Ridge:
Sketch the nearest mountain slope on the right side of the page with bolder strokes, establishing that it is closer to the viewer than the distant peaks on the left.
Don’t Overwork the White
The most important ‘color’ in a cloud study is the white of the paper. Resist the urge to paint the white clouds; instead, paint around them to define their shape.
Step 2: Building Rock Texture
-
Base Layer Wash:
Mix a very dilute wash of Payne’s Grey watercolor. Apply this pale, watery grey to the mountain shapes, leaving the cloud areas completely white to preserve the paper’s luminosity. -
Add Shadow Depth:
While the first layer is still slightly damp, drop in a slightly more saturated grey into the crevices and shadow sides of the mountains. This wet-on-wet technique creates soft, natural gradients. -
Let it Dry:
Wait for the paint to dry completely. If you rush this step, your pencil lines will dig into the wet paper and create muddy textures. -
Pencil Detailing – The Peaks:
Switch to your 2B pencil. Begin etching the jagged, vertical striations of the dolomite rock faces. Use quick, downward strokes to mimic the look of falling rock and erosion. -
Darken the Crevices:
With a 4B pencil, go back into the deepest folds of the mountain. Press harder to create high contrast against the lighter wash, emphasizing the rugged topography.
Add Atmospheric Perspective
Make distant peaks lighter and bluer, and foreground peaks darker and sharper. This visual trick instantly adds miles of depth to your small sketch.
Step 3: Atmosphere and Text
-
Soften the Cloud Edges:
Use a clean, slightly damp brush to gently scrub the hard edges where the paint meets the white paper ‘clouds.’ This creates a misty, vaporous transition. -
Sky Wash:
For the upper sky, apply a very faint, uneven wash of blue-grey. Leave random gaps and streaks to suggest the chaotic movement of high-altitude clouds. -
Foreground Details:
On the right-hand foreground slope, add scribbly texture with the 4B pencil to suggest grass and scrubby vegetation, differentiating it from the rocky peaks behind. -
Journaling Layout:
On the left page, lightly rule some horizontal lines in the negative space of the valley or sky area using your straight edge or a spare pencil. -
Add Handwritten Notes:
Using a fine liner or sharp pencil, write down your thoughts, the location, or the weather conditions. Keep the text small and airy to complement the delicate drawing. -
Final Contrast Check:
step back and look at the spread. Add a few dots of pure black ink or heavy graphite in the deepest rock shadows to make the white clouds pop even more.
Close your sketchbook knowing you’ve captured a fleeting moment of mountain light

PENCIL GUIDE
Understanding Pencil Grades from H to B
From first sketch to finished drawing — learn pencil grades, line control, and shading techniques.
Explore the Full Guide
Sky-Filling Cloud Scatter Pattern
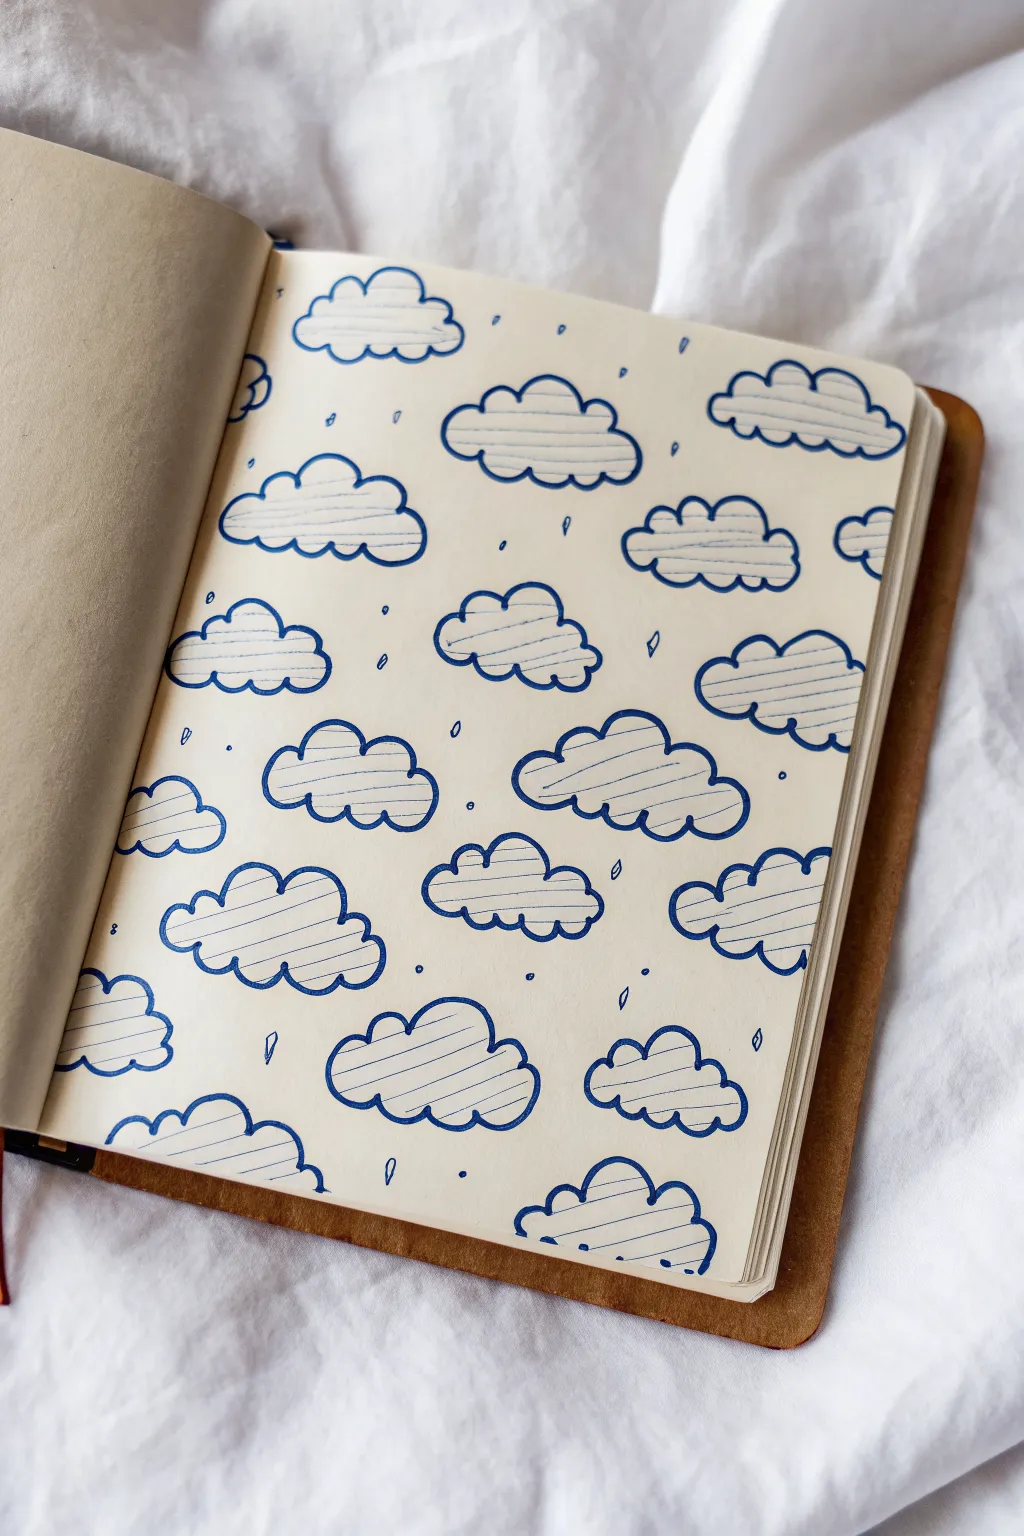
Transform a blank page into a serene sky with this simple yet satisfying cloud pattern. Using just a single blue pen, you’ll create a cohesive, repeating design that fills the space with fluffy textures and gentle rain.
How-To Guide
Materials
- Cream or off-white sketchbook paper (unlined)
- Blue fineliner or gel pen (0.5mm or 0.7mm)
- Pencil (optional for drafting)
- Eraser (optional)
Step 1: Planning the Layout
-
Visualize the spacing:
Before putting pen to paper, look at your blank page. Imagine an invisible grid where each cloud will sit. You want them to be staggered, like bricks in a wall, rather than perfectly aligned in columns. -
Drafting lightly (optional):
If you are nervous about placement, lightly sketch ovals with a pencil where you want the main body of each cloud to go. This helps ensure you don’t run out of space at the edges.
Keep the Angle
When hatching the insides of the clouds, rotate your notebook slightly. It’s often easier to draw diagonal lines by pulling the pen toward you rather than pushing it away.
Step 2: Drawing the Cloud Outlines
-
Start at the top left:
Begin with your first cloud near the top left corner. Draw a flat horizontal line for the base of the cloud. -
Add the fluff:
From the ends of the base line, draw a series of bumpy, curved lines arching upward to create the fluffy top. Vary the size of the humps—I usually do one large central hump flanked by two smaller ones. -
Move to the next cloud:
Move to the right, leaving a gap about the width of half a cloud. Draw the next cloud outline. Repeat this until you reach the right edge of the page. -
Start the second row:
Drop down for the next row. Position these clouds so they sit in the empty spaces between the clouds above them (the staggered ‘brick’ effect). -
Handle the edges:
When you reach the left or right edge of the paper, draw only a partial cloud, as if the pattern continues off the page. This makes the design look professional and boundless. -
Fill the page:
Continue this staggered pattern all the way to the bottom of the page. Don’t worry if every cloud isn’t identical; slight variations add character.
Ink Smearing?
If you’re left-handed or find your hand dragging through wet ink, work from right to left (or place a scrap piece of paper under your hand) to protect your fresh lines.
Step 3: Adding Texture and Details
-
Hatching the first cloud:
Go back to your very first cloud. Draw thin, diagonal hatching lines across the entire interior of the shape. -
Keep lines consistent:
Try to keep the angle and spacing of these diagonal lines consistent. They don’t need to be ruler-straight, but a steady rhythm looks best. -
Fill all clouds:
Work your way through every cloud on the page, filling them with the same diagonal hatching pattern. Take your time here; it’s quite meditative. -
Add floating clouds:
If there are large awkward gaps between your main clouds, draw tiny, single-hump cloud shapes to fill the void without overcrowding.
Step 4: Finishing Touches
-
Check for empty space:
Scan the page for areas that feel too white or empty compared to the rest of the composition. -
Draw raindrops:
In the open spaces between clouds, draw small, simple teardrop shapes or tiny circles falling downwards to represent rain. -
Vary the rain:
Scatter these raindrops randomly rather than in straight lines. Place some closer to the clouds and others floating freely in the ‘sky’ area. -
Erase pencil marks:
If you sketched an under-drawing, wait at least five minutes for the ink to fully dry, then gently erase the pencil lines. -
Final assessment:
Look at the overall balance. If a particular spot feels too light, you can add an extra tiny raindrop or dot to weight it properly.
Enjoy the calming rhythm of your new sky-filled page
Minimal Cloud Doodles With Clean Lines
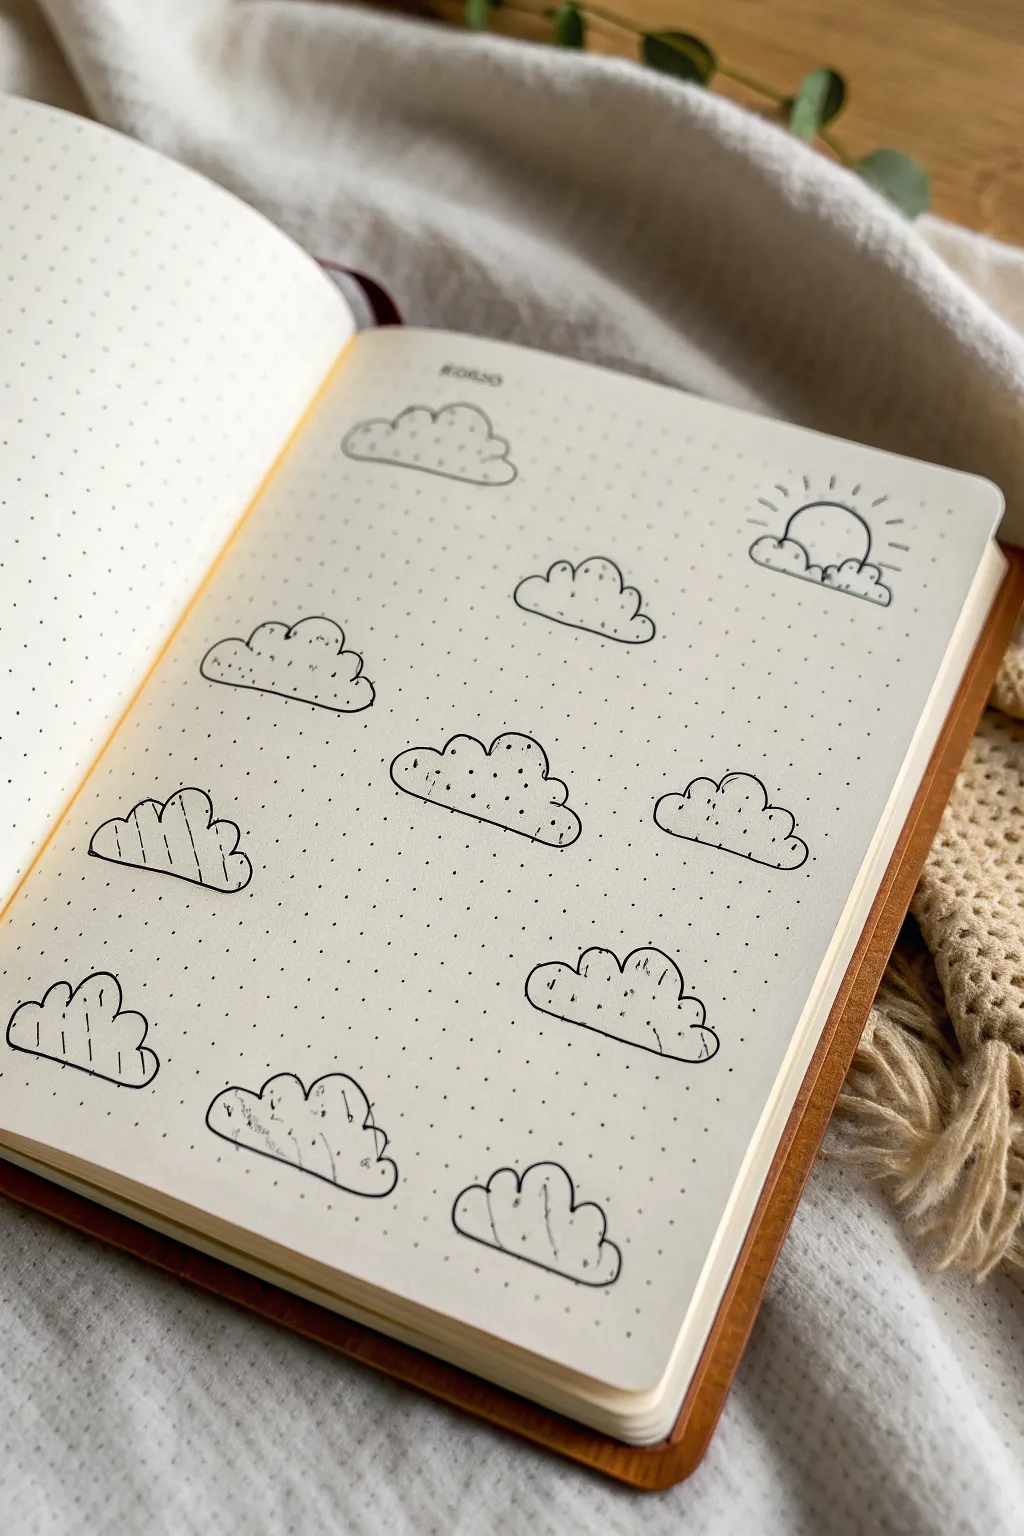
This minimalist spread turns simple cloud doodles into a charming visual element for your bullet journal. Using clean lines and subtle hatching, you’ll create a varied sky that serves perfectly as a mood tracker or just a delightful page decoration.
Step-by-Step
Materials
- A5 dotted notebook or bullet journal
- Black fineliner pen (0.3mm or 0.5mm)
- Pencil (HB or lighter)
- White eraser
Step 1: Planning the Layout
-
Define the grid:
Visualize the page as an invisible grid to space your clouds evenly. You’ll want roughly four rows of clouds with two to three clouds in each row. -
Rough sketching:
Using a light pencil grip, sketch irregular oval shapes where each cloud will go. Don’t worry about the fluffy edges yet; just mark the territory for each doodle to ensure good balance.
Oops! Look smudged?
If you smudge wet ink, turn the mistake into a feature! transform the smudge into a gray rain cloud by adding vertical hatching lines over the blurred area.
Step 2: Drawing the Base Clouds
-
Start the curves:
Begin with the first cloud in the top left. Using your fineliner, draw a series of connected “half-circles” or scallops along the bottom edge of your pencil guide. Keep the bottom relatively flat. -
Build the fluff:
Continue the scalloped line up the sides and over the top. Vary the size of the humps—make some wide and some narrow to keep the cloud looking organic rather than geometric. -
Close the shape:
Connect the final curve back to your starting point. Don’t stress if lines slightly overlap; it adds to the hand-drawn charm. -
Repeat across the page:
Move across the page, drawing the outlines for the remaining clouds. Try to make each one slightly different in shape—some longer and flatter, some taller and puffier.
Make it Colorful
Use mild highlighters to color-code the clouds based on your daily mood. Soft blues, greys, and yellows work beautifully without overwhelming the simple lines.
Step 3: Adding Variations
-
The sunny cloud:
Select a cloud in the upper right quadrant to be your sunny spot. Draw a simple semi-circle rising from the top curves of this cloud. -
Sun rays:
Add small, dashed lines radiating outward from that semi-circle to represent sunlight. -
Simple layering:
For a few clouds, draw a second, smaller scalloped line inside the main shape, usually near the top, to suggest a fluffy layer or dimension. -
Hatching details:
Pick 2-3 random clouds to texturize. Draw thin, vertical or diagonal hatching lines inside them. Keep the strokes quick and loose. -
Rainy mood:
I like to designate one looking a bit heavier, perhaps with vertical lines filling the bottom half, implying rain or a darker mood.
Step 4: Finishing Touches
-
Grounding marks:
Add tiny specks or dots around a few of the clouds to meaningful integrate them with the dot grid background, making them feel settled on the page. -
Let ink set:
Wait at least 5-10 minutes for the fineliner ink to dry completely. This is crucial to avoid smearing your crisp lines. -
Erase pencil guides:
Gently erase your initial oval sketches. Hold the paper taut with one hand while erasing to prevent wrinkling the page. -
Review and refine:
Look over the spread. If any cloud lines look too thin or broken, go over them once more to bold the outline. -
Add a title:
Write a tiny, simple title like “Moods” or the month name at the very top center in small caps letters.
Now you have a serene, custom sky ready to track your month


Bold Outline Sticker-Style Clouds

Achieve a trendy, modern aesthetic with this sticker-style cloud drawing that pops off the page. The thick, prominent outline mimics the die-cut edge of a vinyl sticker, making it a perfect, simple doodle for bullet journals or sketchbooks.
Step-by-Step Guide
Materials
- Sketchbook or drawing paper (heavyweight preferred)
- Pencil (HB or lighter)
- Eraser
- Thick black marker (chisel tip or large brush pen)
- Fine liner pen (black, 0.5mm)
- White gel pen (optional for highlights)
Step 1: Planning the Shape
-
Lightly sketch the base:
Begin by using a pencil to barely graze the paper, sketching out an elongated oval shape. This will serve as the general footprint for your cloud so it doesn’t end up lopsided. -
Define the bumps:
Along the top edge of your oval, sketch three distinct, rounded humps. Make the center hump slightly larger and taller than the ones on the left and right. -
Flatten the bottom:
Sketch the bottom line of the cloud. Unlike a traditional fluffy cloud, keep this bottom edge relatively straight but with softly rounded corners connecting to the side humps. -
Refine the perimeter:
Go over your pencil lines to create a single, continuous contour. Smooth out any awkward intersections between the bumps so the line flows organically. -
Erase guidelines:
Once you are happy with the cloud shape, gently erase the initial oval guideline, leaving only the final cloud perimeter visible.
Uneven Outline?
If your thick outline looks shaky, don’t just keep adding layers. Use a ruler or a french curve for the straight bottom section to crisp up at least one major edge.
Step 2: Inking the Outline
-
Select your bold marker:
Choose a thick black marker. A chisel tip works well here for consistent width, or a brush pen if you have steady control. -
Trace the outer edge:
Carefully trace over your pencil lines. The key to the sticker look is a consistent, heavy line weight, so move your hand slowly and deliberately. -
Thicken the line:
To enhance the bold effect, go over the outline a second time. I find it helpful to focus on making the line uniform in thickness all the way around, correcting any thin spots. -
Let the ink set:
Pause for a moment to let this heavy layer of ink dry completely. Smudging the bold outline now would ruin the crisp sticker effect. -
Clean up stray marks:
Use your eraser to remove any remaining visible pencil marks from underneath the ink.
Drop Shadow Pop
Use a light gray marker to add a simple drop shadow just outside the right and bottom edges. This lifts the ‘sticker’ off the page visually.
Step 3: Adding the Inner Detail
-
Switch to a fine liner:
Pick up your thinner black pen (0.5mm is ideal). This contrast in line weight is essential for depth. -
Draw the inner border:
Draw a second line inside the cloud shape, staying about 2-3 millimeters away from the thick outer border. -
Create the decorative dashes:
Instead of a solid line, create this inner border using tiny, subtle marks. In the example, these look like very small, irregular dashes or tiny floral-like scribbles. -
Maintain spacing:
Keep the spacing between your tiny dashes consistent as you follow the curves of the cloud. -
Add subtle texture:
If you want slightly more detail, add a few microscopic dots smoothly nestled between the dashed patterns. -
Check the contrast:
Step back and ensure there is a clear distinction between the heavy outer ‘sticker’ edge and the delicate inner pattern. -
Dry and protect:
Allow the fine liner ink to dry fully before closing your sketchbook or touching the drawing.
Now you have a crisp, graphic cloud illustration ready to anchor your page layout
Vintage Hatching and Etched Clouds
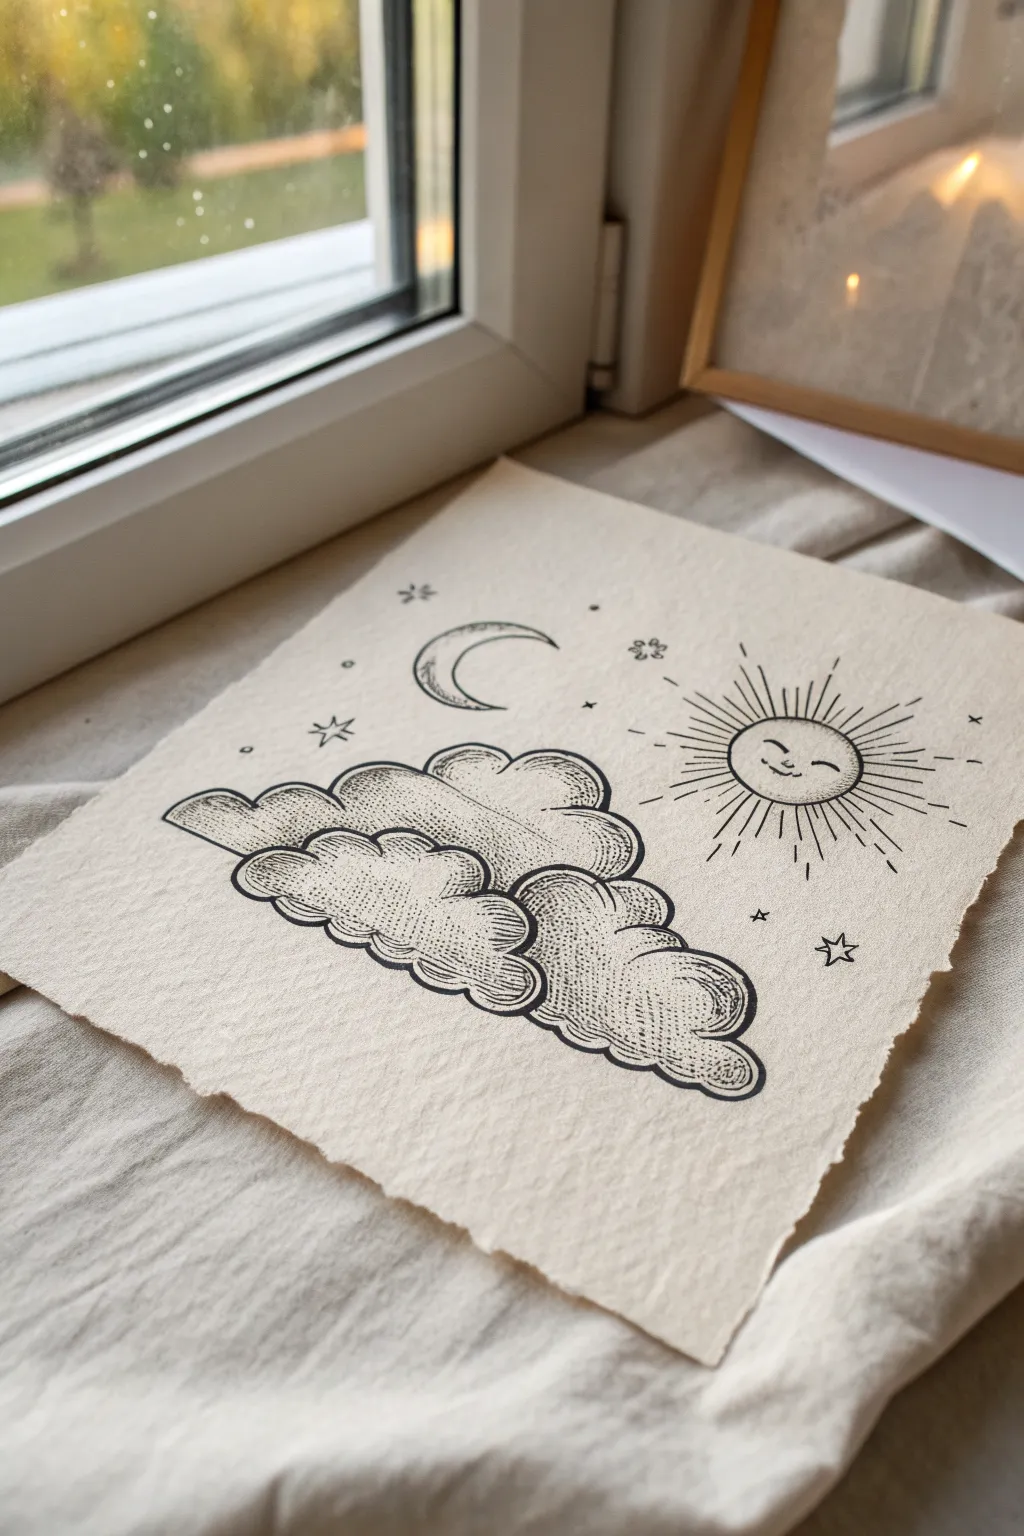
Capture the charm of vintage storybook illustrations with this etching-style drawing. Using precise hatching techniques on textured paper creates a timeless, celestial scene featuring fluffy cumulus clouds, a smiling sun, and a crescent moon.
How-To Guide
Materials
- Fine-grain textured paper with deckled edges (creamy or off-white)
- Black fine-liner pens (0.1mm, 0.3mm, and 0.5mm)
- HB Drawing pencil
- Kneadable eraser
- Ruler (optional)
Step 1: Planning and Sketching
-
Establish the composition:
Begin by lightly visualizing the placement of your three main elements: the large cloud formation at the bottom center, the sun on the right, and the moon on the left. -
Outline the clouds:
With your HB pencil, sketch the cloud structure. Draw a series of connected, puffy semi-circles. Think of them as three main tiered clusters: a lower base layer, a middle layer, and a smaller top puff. -
Add the celestial bodies:
Sketch a circle for the sun’s face in the upper right quadrant. To the left, draw a simple crescent moon shape facing inward toward the sun. -
Detail sunlight and stars:
Lightly mark the radiating rays around the sun, alternating between long and short lines. Scatter a few small stars and simple four-point sparkles around the empty spaces to balance the composition.
Clean Lines Tip
Work from top-left to bottom-right (if right-handed) when inking to prevent your hand from smudging wet ink on the textured paper surface.
Step 2: Inking the Outlines
-
Ink the cloud forms:
Switch to a 0.5mm pen for the main cloud outlines. Use a confident hand to trace your pencil lines, making the bottom curves of each cloud puff slightly thicker than the tops to suggest weight. -
Define the sun:
Outline the sun’s circle. Draw the facial features—closed, happy eyes and a simple smile—using a 0.3mm pen. Ink the rays, ensuring they radiate straight outward from the center point. -
Ink the moon and stars:
Trace the crescent moon with the 0.5mm pen. Carefully go over the small stars and sparkles with a finer 0.1mm pen to keep them delicate. -
Erase pencil guides:
Once the ink is completely dry, gently roll a kneadable eraser over the entire page to lift strictly the graphite without damaging the paper surface.
Coffee Stain Effect
Before drawing, lightly stain your paper with diluted tea or coffee and let it dry flat. This enhances the antique, parchment-like aesthetic significantly.
Step 3: Creating the Vintage Texture
-
Begin hatching the clouds:
Using a 0.1mm pen, start adding texture to the bottom-left cloud puff. Draw series of short, vertical lines that follow the curve of the cloud’s bottom edge. This is the ‘hatching’ technique. -
Build darker values:
On the undersides of the cloud tiers, apply cross-hatching by drawing diagonal lines over your vertical ones. This creates deep shadows consistent with the engraving style. -
Stippling for softness:
At the top of the cloud curves where the light would hit, transition from lines to tiny dots. I find this helps fade the shadow into the white of the paper smoothly. -
Detail the moon:
Add very fine, curved hatching lines inside the crescent moon, focusing the density at the bottom tip and fading out as you move upward.
Step 4: Finishing Touches
-
Enhance the perimeter lines:
Return to the outer edges of the entire cloud formation with the 0.5mm pen. Re-trace specifically the bottom-most curves to create a ‘shadow line’ that visually grounds the floating clouds. -
Refine the sun rays:
Add tiny ticks or broken lines between the main sun rays using the 0.1mm pen. This adds a vibrating, glowing effect typical of old maps or tarot cards. -
Balance the contrast:
Step back and look at the drawing. If the clouds look too flat, add more hatching layers to the deepest crevices where the cloud puffs overlap. -
Final inspection:
Check for any stray pencil marks and brush away eraser dust. The textured paper should now contrast beautifully with the crisp black ink work.
Enjoy the rhythmic process of hatching as your vintage celestial scene comes to life on the page
Dripping Clouds With Stylized Rain
This charming sketchbook doodle combines bold outlines with delicate hatching for a cozy, illustrative feel. The simple combination of a classic cloud shape, stylized raindrops, and a peeking rainbow creates a perfectly balanced weather scene.
Detailed Instructions
Materials
- Spiral-bound sketchbook or drawing paper
- Blue felt-tip pen or fineliner (medium thickness)
- Orange or terracotta fineliner pen
- Pencil (optional, for sketching)
- Eraser
Step 1: Drawing the Cloud Base
-
Define the cloud shape:
Using your blue marker, draw the bottom edge first. Create three distinct, flattened curves that join together to form the cloud’s underside. -
Close the loop:
Complete the cloud by drawing the upper curves. Aim for about four or five puffy bumps along the top, making the overall shape slightly wider than it is tall. -
Thicken the outline:
Go over your blue outline a second time to create slightly bolder, more uneven lines. I find this gives the drawing a nice hand-touched, organic weight. -
Add internal texture:
Inside the cloud, draw thin, diagonal hatching lines. Keep them evenly spaced and parallel, moving from the top right to bottom left. Don’t worry if they aren’t perfectly straight; that’s part of the charm.
Consistent Angles
Keep your internal hatching lines diagonal at the same angle throughout the cloud. It makes the drawing look tidy even if the lines themselves are sketchy.
Step 2: Adding the Rainbow
-
Start the first arc:
Switch to your orange or terracotta pen. Draw a large semi-circle starting from the top left of the cloud and ending at the top right. -
Layer the arcs:
Draw three more concentric arcs inside the first one, spacing them relatively close together. -
Connect the lines:
Ensure the ends of your orange arcs touch the blue outline of the cloud so the rainbow looks like it is tucked behind it.
Uneven Ink Flow?
If your marker skips, don’t color over it heavily. Instead, embrace the texture or re-trace the line slowly once the first layer is fully dry to avoid tearing paper.
Step 3: Creating the Rain
-
Draw the main drops:
Switch back to your blue pen. Draw stylized teardrop shapes falling from the cloud. Start with the largest drops closest to the cloud base. -
Stagger the placement:
Arrange the drops in loose columns but vary the height so they don’t look like a grid. Notice how the drops in the reference image are scattered playfully. -
Vary drop sizes:
Make the drops lower down on the page slightly smaller than the ones directly beneath the cloud to create a little depth. -
Add tiny droplets:
Draw very small, simple dashes or tiny ovals interspersed among the larger teardrops to represent light mist or smaller rain. -
Add highlights (optional):
If you want extra detail, leave a tiny gap in the line of each raindrop or add a small tick mark inside to suggest a reflection on the water.
Now you have a whimsical weather doodle perfect for brightening up a journal page
Hanging Stars From a Cloud Mobile
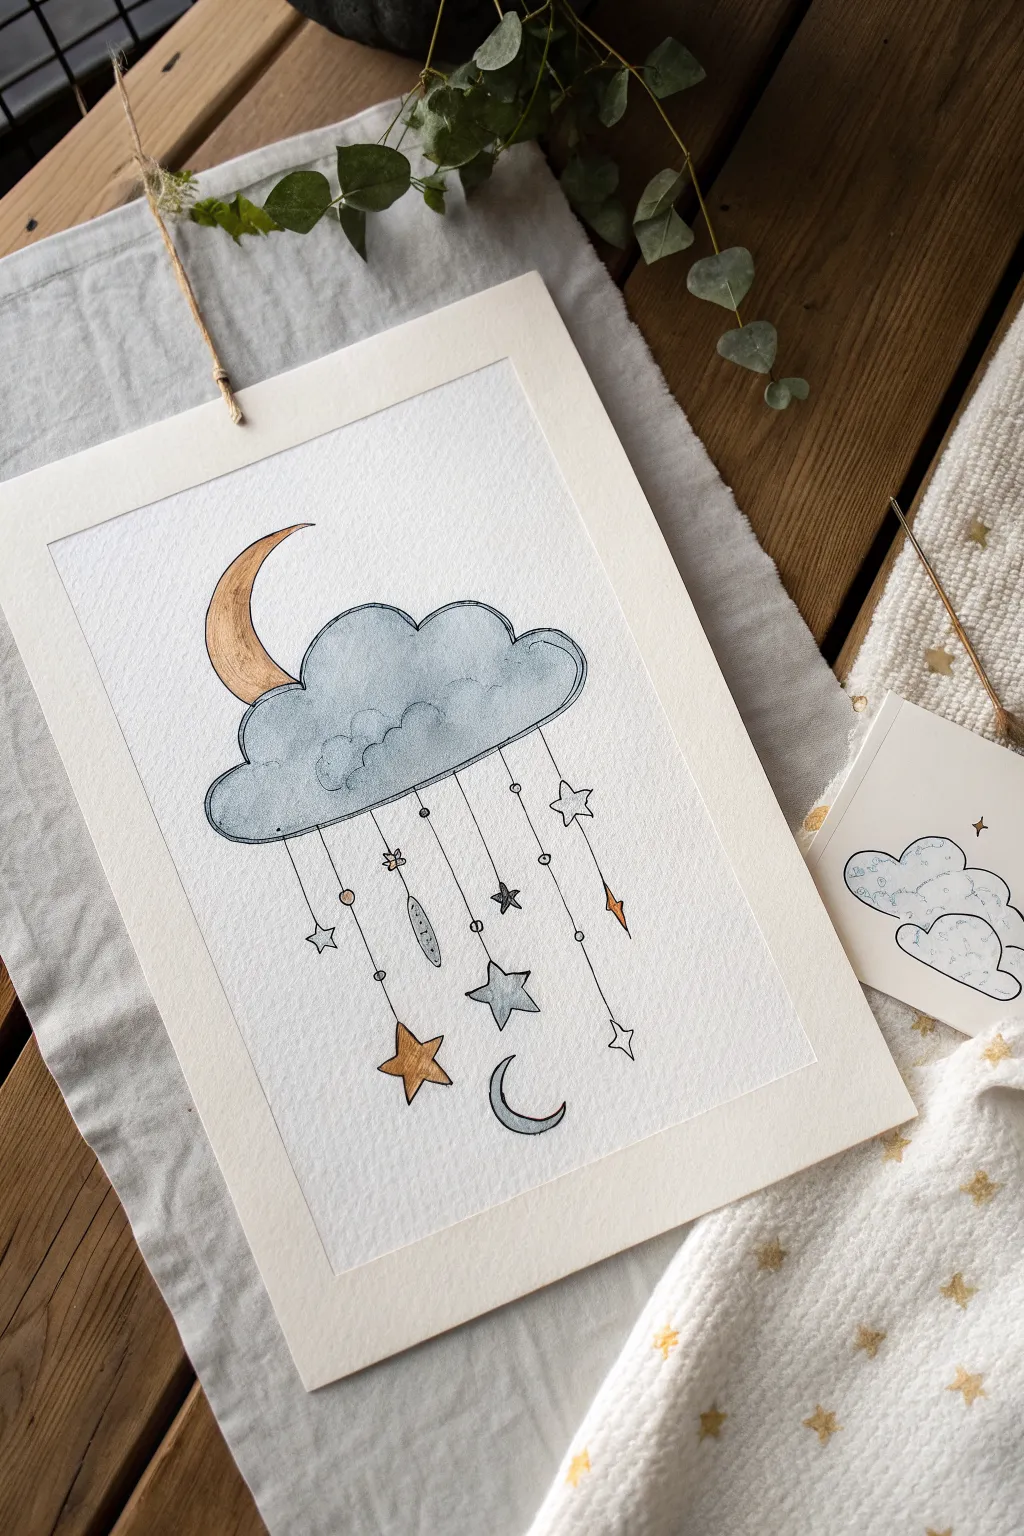
Capture the magic of a nursery mobile on paper with this delicate watercolor and ink illustration. Featuring a soft, pillowy cloud suspending a collection of playful stars and moons, this piece uses gentle washes and fine linework to create a serene, dreamy atmosphere.
Step-by-Step Tutorial
Materials
- Cold press watercolor paper (A4 or similar size)
- Pencil (HB) and soft eraser
- Waterproof fine liner pens (0.1, 0.3, and 0.5mm)
- Watercolor paints (Payne’s Grey/Indigo, Yellow Ochre/Gold, Burnt Sienna)
- Round watercolor brushes (size 4 for washes, size 0 or 2 for details)
- Ruler
- Jute twine or rustic string (optional, for hanging effect)
- Cardboard backing or matte board (for mounting)
Step 1: Drafting the Design
-
Outline the cloud shape:
Begin by lightly sketching a wide, fluffy cloud shape in the center of your paper. Focus on creating varied curves—some large and billowing, others smaller and tighter—to give it character. -
Position the crescent moon:
Draw a crescent moon tucking behind the top left curve of the cloud. The moon should look like it is resting on or rising from behind the cloud form. -
Plan the mobile strings:
Using a ruler, lightly draw five vertical lines descending from the bottom edge of the cloud. Vary their lengths to create a dynamic composition, keeping the central string slightly longer or shorter than its neighbors. -
Add celestial charms:
At the end of each string, sketch a different charm. Include five-pointed stars, a second crescent moon at the bottom, and perhaps a teardrop shape. You can mix in smaller stars or circles further up the strings as beads.
Smudge Prevention
Right-handed? Work from left to right when inking to avoid hand-smudging wet ink. Lefties should work right to left. Always test ink dryness before erasing.
Step 2: Inking the Structure
-
Outline the main forms:
Switch to your 0.3mm or 0.5mm waterproof fine liner. Carefully trace over your cloud and moon outlines. For the cloud, I like to use a slightly broken or uneven line weight to suggest softness rather than a rigid shape. -
Draw the strings:
Use a ruler and a thinner 0.1mm pen to ink the vertical strings. Start exactly at the cloud’s edge and stop right before your charm sketches. -
Refine the charms:
Ink the hanging stars and moons with the 0.3mm pen. Add small circles where the string meets the charm to represent knots or beads. -
Erase pencil marks:
Once the ink is completely dry—wait at least 10 minutes to be safe—gently erase all the underlying pencil sketches to leave a clean black-and-white framework.
Metallic Magic
Swap the yellow ochre paint for metallic gold watercolor or gold ink. The stars and moon will catch the light beautifully when hung.
Step 3: Watercolor Application
-
Paint the cloud base:
Mix a watery, pale wash of Payne’s Grey or a diluted Indigo. Apply this to the cloud using the wet-on-dry technique. Keep the wash uneven to simulate fluffy texture. -
Add cloud shadows:
While the cloud is still slightly damp, drop in a slightly more concentrated grey-blue pigment along the bottom edge and into the ‘valleys’ of the cloud humps to create volume. -
Color the moons:
Mix a warm Yellow Ochre with a tiny touch of Burnt Sienna. Paint the large crescent moon behind the cloud and the smaller hanging moon. Let the color pool slightly at the points for depth. -
Paint the stars:
Use the same gold-yellow mix for the larger stars. For visual variety, leave some of the smaller stars or the teardrop shape unpainted or use a very pale grey wash instead. -
Add subtle splatters:
If you want a more magical feel, load your brush with very watery blue paint and tap it against your finger to create tiny speckles on the cloud, mimicking texture.
Step 4: Final Touches & Mounting
-
Enhance details:
Once the paint is bone dry, look for areas that need contrast. You can use your 0.1mm pen to add tiny stippling (dots) inside the cloud shadows or on the moon for texture. -
Create the hanging illusion:
To mimic the reference image, create a hole at the very top center of your paper. Thread a piece of rustic jute twine through it. -
Mount artwork:
Ideally, mount your finished piece onto a stiff card backing or matte board. This gives it the finished ‘hanging decor’ look shown in the photo.
Hang your finished artwork on a wall or pinboard to enjoy a peaceful, dreamy vignette
Clouds Trapped in a Jar
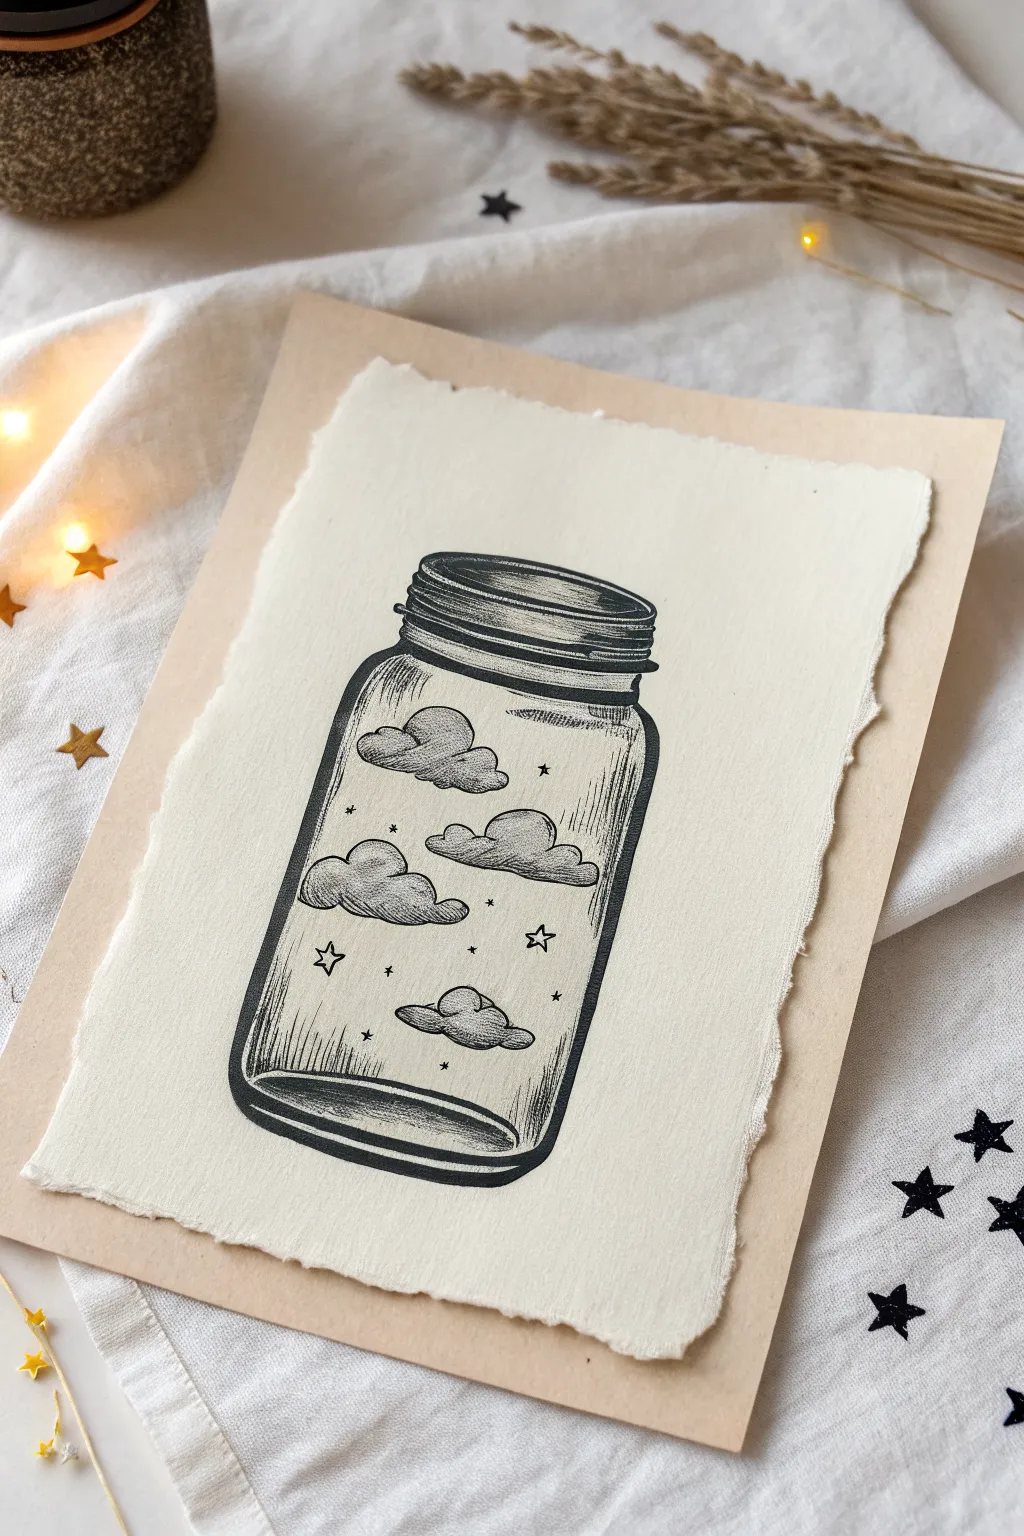
Capture a slice of daydreaming with this charming pen-and-ink illustration. You’ll create a vintage-style mason jar filled with fluffy clouds and twinkling stars, drawn on textured paper for a handmade, boutique feel.
Step-by-Step Guide
Materials
- Cream-colored mixed media or watercolor paper (for the top layer)
- Beige or kraft cardstock (for the backing layer)
- Fine liner pens (sizes 0.05, 0.1, 0.3, and 0.5, black)
- Pencil (HB or H)
- Kneaded eraser
- Ruler
- Double-sided tape or glue stick
- Paper tearing tool or a ruler with a rough edge (optional)
Step 1: Preparing the Canvas
-
Prepare the backing:
Start by cutting your beige or kraft cardstock to your desired frame size, roughly 5×7 inches or A5. -
Tear the art paper:
Take your cream mixed media paper and cut it slightly smaller than the backing. To achieve the rustic, deckled edge look shown in the reference, carefully tear the edges by hand rather than cutting them straight. Tearing against a ruler helps guide the line while keeping it rough. -
Center the composition:
Lightly mark the center of your torn paper with a pencil to help position the jar symmetrically.
Wobbly Lines?
If your jar symmetry feels off, trace a real cup or circular object for the lid and bottom curves, then use a ruler to connect the sides for perfect straightness.
Step 2: Drafting the Jar
-
Sketch the jar outlines:
Using a pencil, lightly sketch the basic cylinder shape of a mason jar. Draw two parallel vertical lines for the sides and distinct curved lines for the rounded bottom and shoulders. -
Define the lid:
Sketch an oval at the top for the opening, then add the layers of the screw-top lid. Think of these as stacked, flattened rings. -
Sketch the contents:
Lightly draw three or four puffy cloud shapes floating inside the jar. They don’t need to be perfect; irregular bumps make them look fluffier. Add tiny scattered stars around them.
Step 3: Inking the Outlines
-
Outline the jar:
Switch to a 0.3 or 0.5 fine liner. Carefully trace over your pencil lines for the jar’s outer shape. I find bold, confident strokes work best here to give the glass weight. -
Detail the lid:
Use the same pen to ink the lid. Pay attention to the threads of the screw top; simple horizontal lines with curved ends convey the 3D metal ridges effectively. -
Ink the clouds:
Use a slightly thinner pen, like a 0.1 or 0.2, to outline the clouds. Keep your hand loose to maintain the soft, billowy shape.
Add a Glow
Use a white gel pen to add tiny highlights on the darkest parts of the glass rim or the center of the stars to make the drawing pop against the cream paper.
Step 4: Shading and Texture
-
Shade the lid:
Using your 0.1 pen, add dense horizontal hatching lines on the dark parts of the lid to create shadow and metallic contrast. Leave thin strips of white to suggest light reflecting off the metal. -
Create glass reflections:
To make the jar look like glass, add vertical hatching lines along the sides of the jar, following the curve. Keep these lines closer together near the edges and sparser toward the center. -
Shade the jar bottom:
The bottom of a glass jar is usually thick. Use heavy lines or multiple overlapping strokes at the very base to show this thickness and shadow. -
Add cloud volume:
Now for the texture. Use a 0.05 or 0.1 pen to add stippling (tiny dots) or very fine dashed lines to the bottom and sides of each cloud puff. This gives them volume and makes them look 3D. -
Draw the stars:
Ink the small stars. You can mix hollow outlines of five-pointed stars with simple solid black dots or asterisks to create variety in the ‘sky’ inside.
Step 5: Final Assembly
-
Erasure:
Wait at least 15 minutes for the ink to fully dry to avoid smudging. Then, gently erase all visible pencil sketches with your kneaded eraser. -
Mounting:
Apply double-sided tape or a thin layer of glue to the back of your drawing. Center it on the beige backing paper and press down firmly. -
Enhance the deckle:
If the torn edges of your paper flattened during gluing, gently ruffle them upward with your fingernail to bring back that tactile, handcrafted texture.
Now you have a whimsical piece of art that keeps your head in the clouds and your feet on the ground
Surreal Clouds That Become Creatures
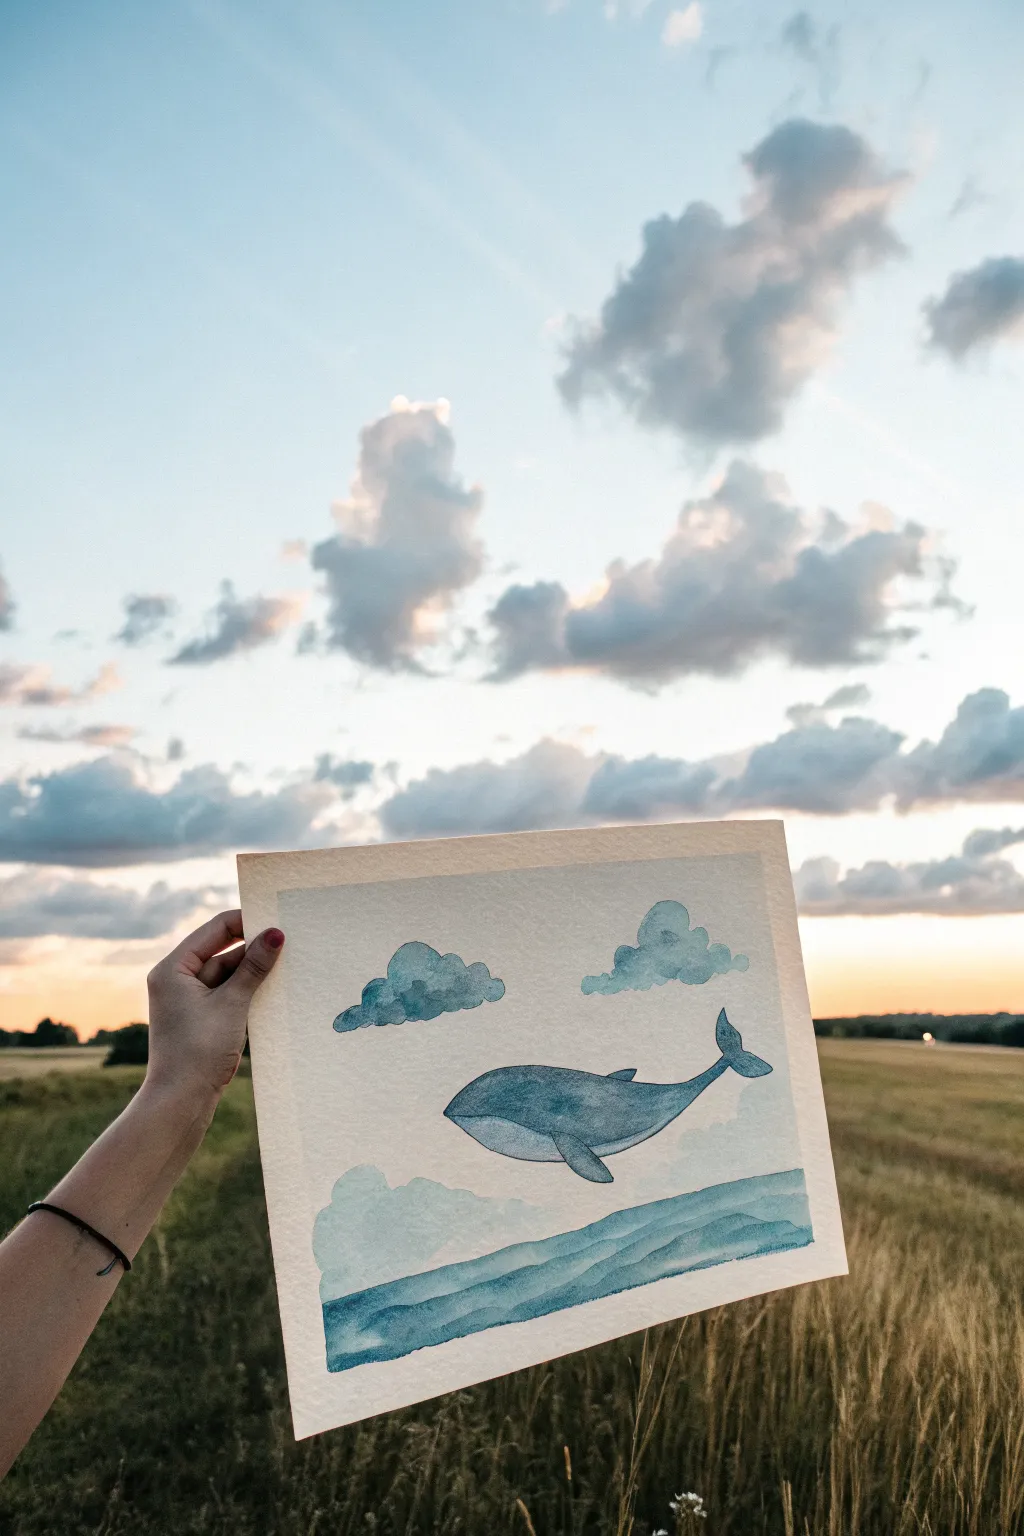
Blend the boundaries between ocean and air with this serene watercolor piece featuring a gentle whale floating amongst the clouds. Using a limited blue palette, you’ll learn to create dreamy atmospheric effects and simple yet expressive subjects.
Step-by-Step Tutorial
Materials
- Cold press watercolor paper (square format)
- Watercolor paints (Indigo, Prussian Blue, Cerulean Blue)
- Round watercolor brushes (sizes 4 and 8)
- Jar of clean water
- Paper towels
- HB pencil
- Kneaded eraser
- Masking tape
Step 1: Preparation and Sketching
-
Tape your edges:
Secure your watercolor paper to a sturdy board or table using masking tape on all four sides. This creates a crisp white border and prevents the paper from buckling when wet. -
Outline the whale:
Using an HB pencil, lightly sketch the oval-like body of a whale in the center of the page. Keep the lines faint so they can be easily erased or covered by paint later. -
Add fins and tail:
Draw the dorsal fin on top, a pectoral fin on the side closest to you, and the tail flukes at the rear, angled slightly upward to suggest swimming motion. -
Sketch the clouds:
Draw two fluffy cloud clusters above the whale and a larger cloud formation below it. For the bottom section, sketch rolling shapes that mimic ocean waves merging into clouds.
Clean Edges Only
To prevent paint from bleeding under your tape, run a fingernail or a bone folder firmly along the tape’s inner edge before you start painting to ensure a tight seal.
Step 2: Painting the Elements
-
Mix your blues:
Prepare a watery wash of Cerulean Blue for the lighter areas and a thicker mix of Indigo or Prussian Blue for shadows. I like to keep these separate on the palette before blending. -
Paint the upper clouds:
Using the size 8 brush, fill in the top two clouds with the lighter blue wash. While wet, drop in a slightly darker blue at the bottom edges to give them volume and weight. -
Create the wave-clouds:
Paint the bottom formation in layers. Start with a pale blue wash for the distant ‘cloud-waves’ in the background. -
Layer the foreground:
Once the pale wash is damp but not soaking, paint the foreground wave shapes with a medium-strength blue, letting the colors bleed slightly for a soft look. -
Deepen the bottom edge:
Apply your darkest Indigo mix to the very bottom band of the wave formation to anchor the composition.
Starry Night
Once the painting is dry, flick a stiff toothbrush dipped in white gouache or acrylic ink over the paper to create a sprinkle of stars for a magical night sky effect.
Step 3: Bringing the Whale to Life
-
Base coat for the whale:
Switch to your size 4 brush. Paint the entire body of the whale with a diluted, pale blue wash, carefully painting around the eye area if you wish to leave a highlight. -
Shadowing the belly:
While the base coat is still wet, run a stroke of darker blue along the bottom curve of the whale’s belly. Let the paint naturally diffuse upward to create a rounded 3D form. -
Define the fins:
Paint the pectoral fin and tail flukes with a slightly more pigmented blue than the body. Shadow the areas where the fins attach to the body for definition. -
Add texture:
Once the first layer is semi-dry, use the tip of your brush to tap in small blotches of texture on the whale’s back, mimicking skin patterns. -
Final whale details:
Use your darkest blue mix to outline the belly line more crisply and define the edges of the tail and fins.
Step 4: Finishing Touches
-
Assess the values:
Step back and look at your painting. If the clouds look too flat, add another glaze of blue to their undersides once the paper is completely dry. -
Remove tape:
Wait until the paper is bone dry—cool to the touch—before slowly peeling off the masking tape at a 45-degree angle away from the painting.
Frame your new surreal masterpiece and enjoy the calm atmosphere it brings to your space


Have a question or want to share your own experience? I'd love to hear from you in the comments below!