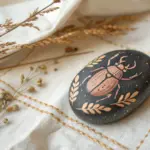
If you’re in the mood to paint something sweet, lively, and full of color, bees are basically the perfect little muse. Here are my favorite bee painting ideas—starting with the classics you’ll recognize right away, then drifting into more playful, artsy experiments.
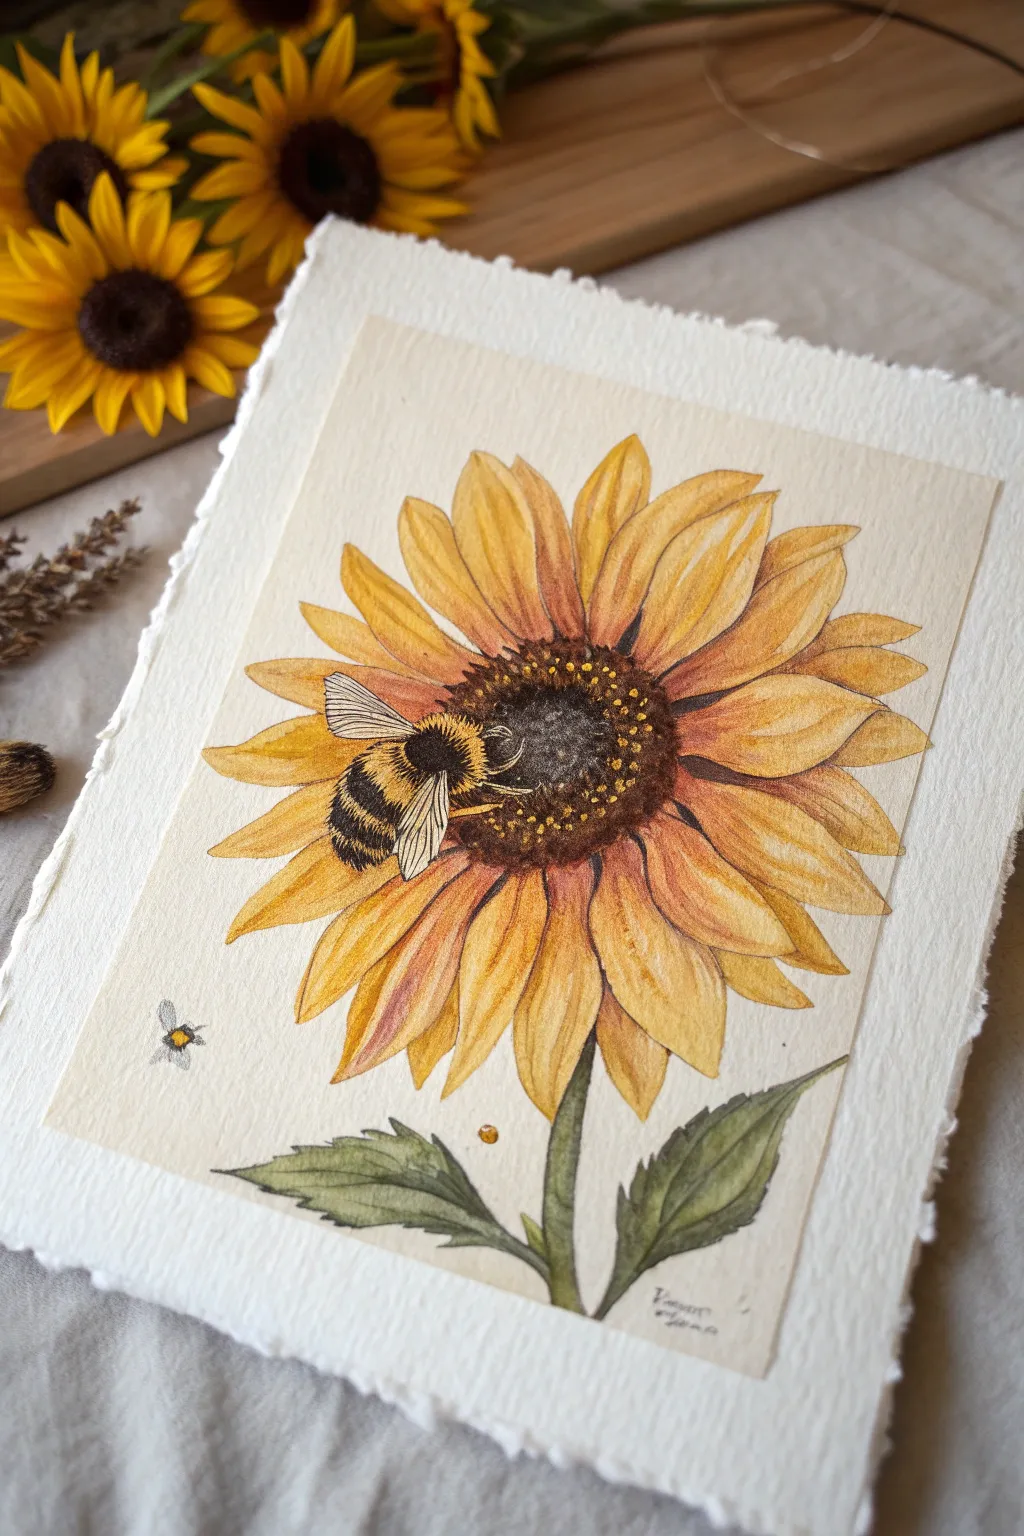
Bee in a Wildflower Meadow
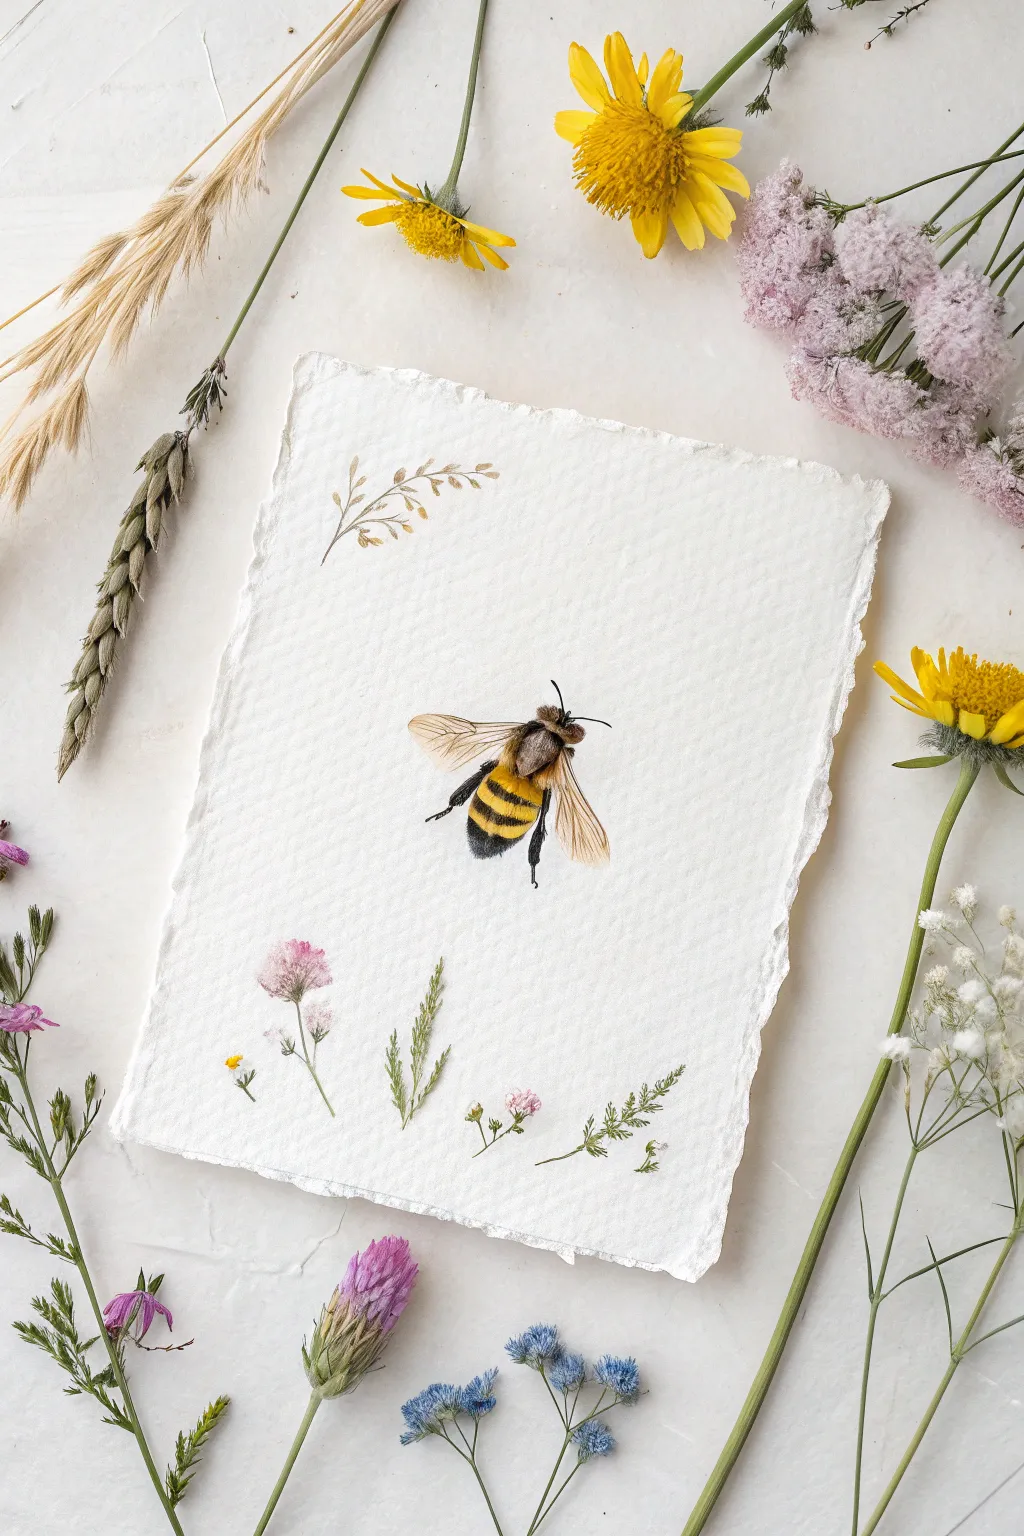
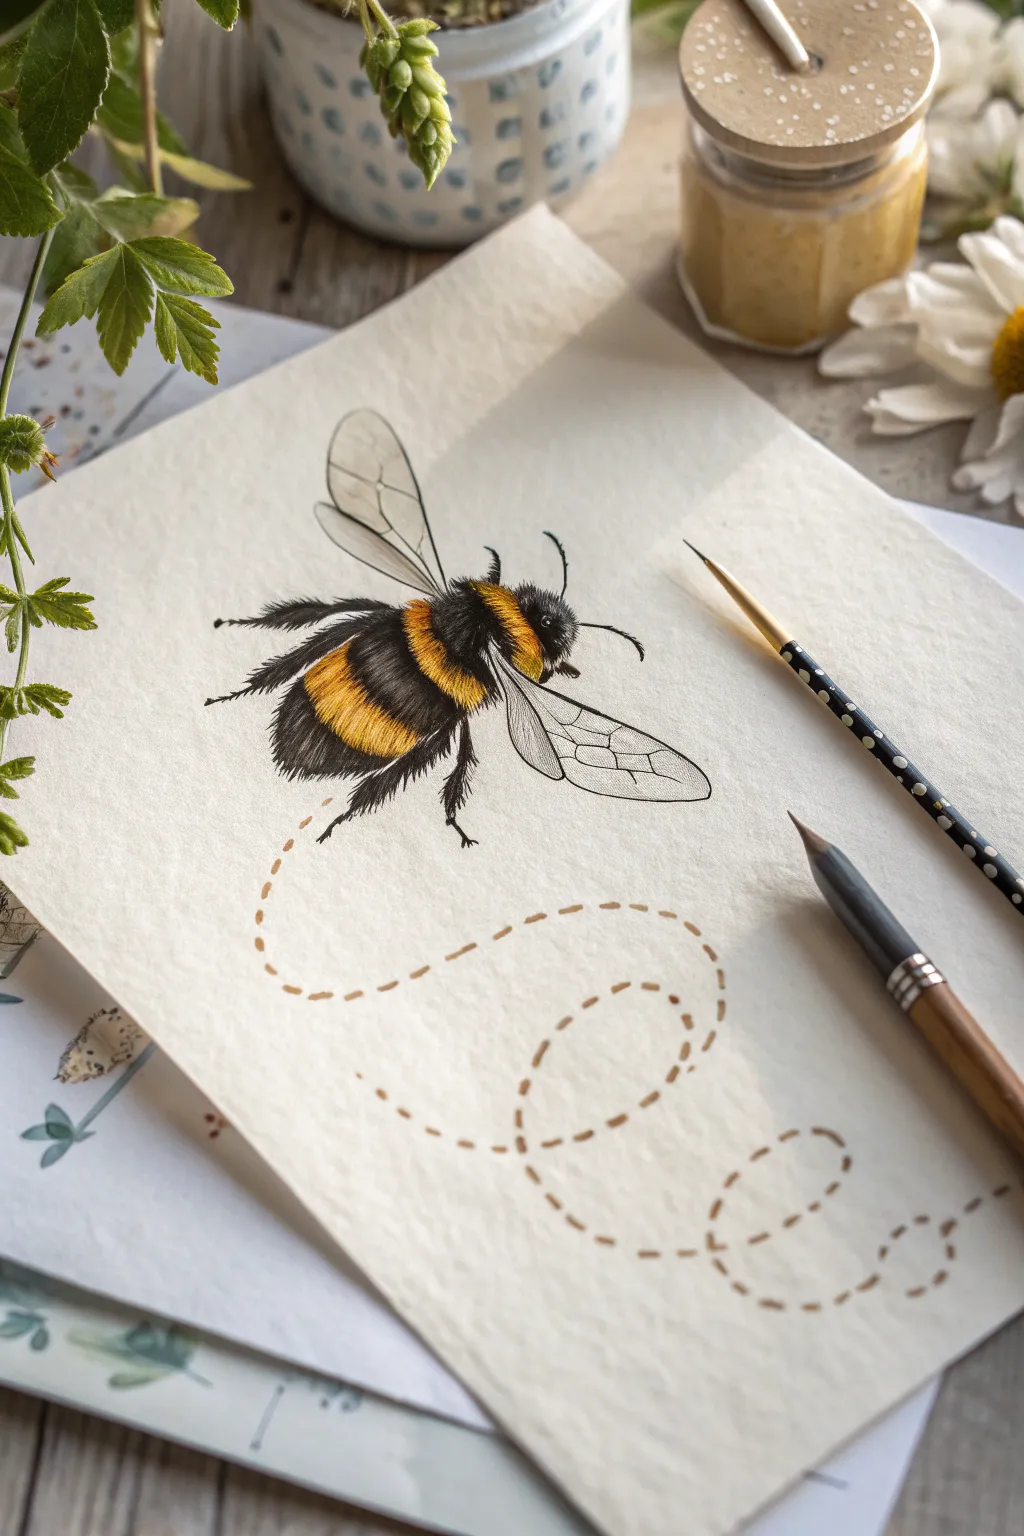
This delicate watercolor project captures the soft, fuzzy texture of a bumblebee resting in a field of wildflowers. Painted on beautiful deckle-edge paper, it makes for a sophisticated piece of nature-inspired art perfect for framing or gifting.
Step-by-Step Guide
Materials
- Heavyweight handmade cotton paper (roughly A5 size, with deckle edges)
- Watercolor paints (Yellow Ochre, Burnt Umber, Lamp Black, Sap Green, Alizarin Crimson, Cobalt Blue)
- Small round synthetic brushes (sizes 0, 2, and 4)
- Fine liner brush (size 000)
- HB Pencil
- Kneaded eraser
- Clean water jar and paper towels
- White gouache (optional, for highlights)
Step 1: Sketching & Preparation
-
Prepare your paper:
Start with a piece of quality handmade paper. The texture is key here, so tape it down lightly at the corners if it curls, but leave the beautiful rough edges exposed. -
Rough placement:
Visualizing the center of the paper, lightly mark the position for the main bee body. It should be the focal point, floating in plenty of negative space. -
Outline the bee:
Use an HB pencil to gently sketch the bee’s anatomy. Draw the oval thorax, the slightly longer abdomen, and the head. Keep lines faint so they won’t show through the yellow paint later. -
Map the wings:
Sketch the wings extending outwards. Note how the upper wings are larger and the lower ones tuck slightly underneath. Don’t worry about vein details yet, just the overall shape. -
Florals placement:
Lightly sketch the positions of the surrounding wildflowers. Place a drooping sprig at the top left and a small meadow scene at the bottom, ensuring they frame the bee without crowding it.
Step 2: Painting the Bee
-
First yellow wash:
Load a size 4 brush with Yellow Ochre mixed with a touch of water. Paint the yellow bands on the thorax and abdomen using a ‘stippling’ motion (tiny dots) to mimic fur rather than solid strokes. -
Dark fur base:
While the yellow is drying, mix Lamp Black with a tiny bit of Burnt Umber to warm it up. Apply this to the head and the black bands of the bee, again using broken, dabbing strokes to suggest texture. -
Wing transparency:
Dilute a very small amount of Burnt Umber until it’s a watery tea color. Paint the wings with this transparent wash. While wet, lift a little pigment from the center of the wings with a clean, damp brush to create a sheen. -
Deepening the blacks:
Once the first black layer is dry, go back in with more concentrated Lamp Black. Use a size 0 brush to darken the center of the black bands, leaving the edges slightly lighter to look round and fuzzy. -
Building yellow fur:
Add a second layer of cleaner, brighter yellow to the center of the yellow bands. I like to let this dry briefly, then flick tiny lines outward where the yellow meets the black using a fine liner brush to blend the fuzzy edges. -
Legs and antennae:
Using the fine liner brush and black paint, carefully draw the segmented legs and antennae. Vary the pressure so the lines aren’t uniform; they should be thicker near the body and taper at the ends. -
Wing veins:
With the finest brush and a mix of watery black, paint the delicate network of veins on the wings. Keep these lines incredibly thin and broken in places so they don’t look heavy.
Fuzzy Texture Tip
Don’t outline the bee with a solid line! Always use outward flicking motions at the edges of the body to simulate tiny hairs sticking out.
Step 3: Wildflower Details
-
Painting stems:
Mix Sap Green with a touch of Burnt Umber for a natural, earthy green. Using the size 0 brush, paint thin, wispy stems for the bottom floral border and the upper sprig. -
Adding leaves:
Press down and lift up with the brush tip to create small, elongated leaves along the stems. Keep them sparse and delicate to match the scale of the bee. -
Pink blooms:
Mix a watery Alizarin Crimson. paint small, fluffy clover-like flower heads on the lower left stems. Use a tapping motion to create a clustered petal texture. -
Golden grains:
For the upper left sprig, use the Yellow Ochre mix to paint small grain-like seeds hanging from the curved stem. -
Tiny accents:
Add microscopic pops of Cobalt Blue or yellow for wildflowers near the bottom right. These should be mere suggestions of flowers rather than detailed botanical studies. -
Final highlights:
If needed, use a tiny amount of white gouache to add a glint of light to the bee’s eye or the very edge of a wing to make it pop.
Shadow Play
Paint a very faint, watery grey shadow underneath the bee (offset slightly) to make it look like it’s hovering above the paper.
Allow the paper to dry completely flat to preserve that beautiful texture before displaying your intricate nature study.

Watercolor Transparent Wings Study
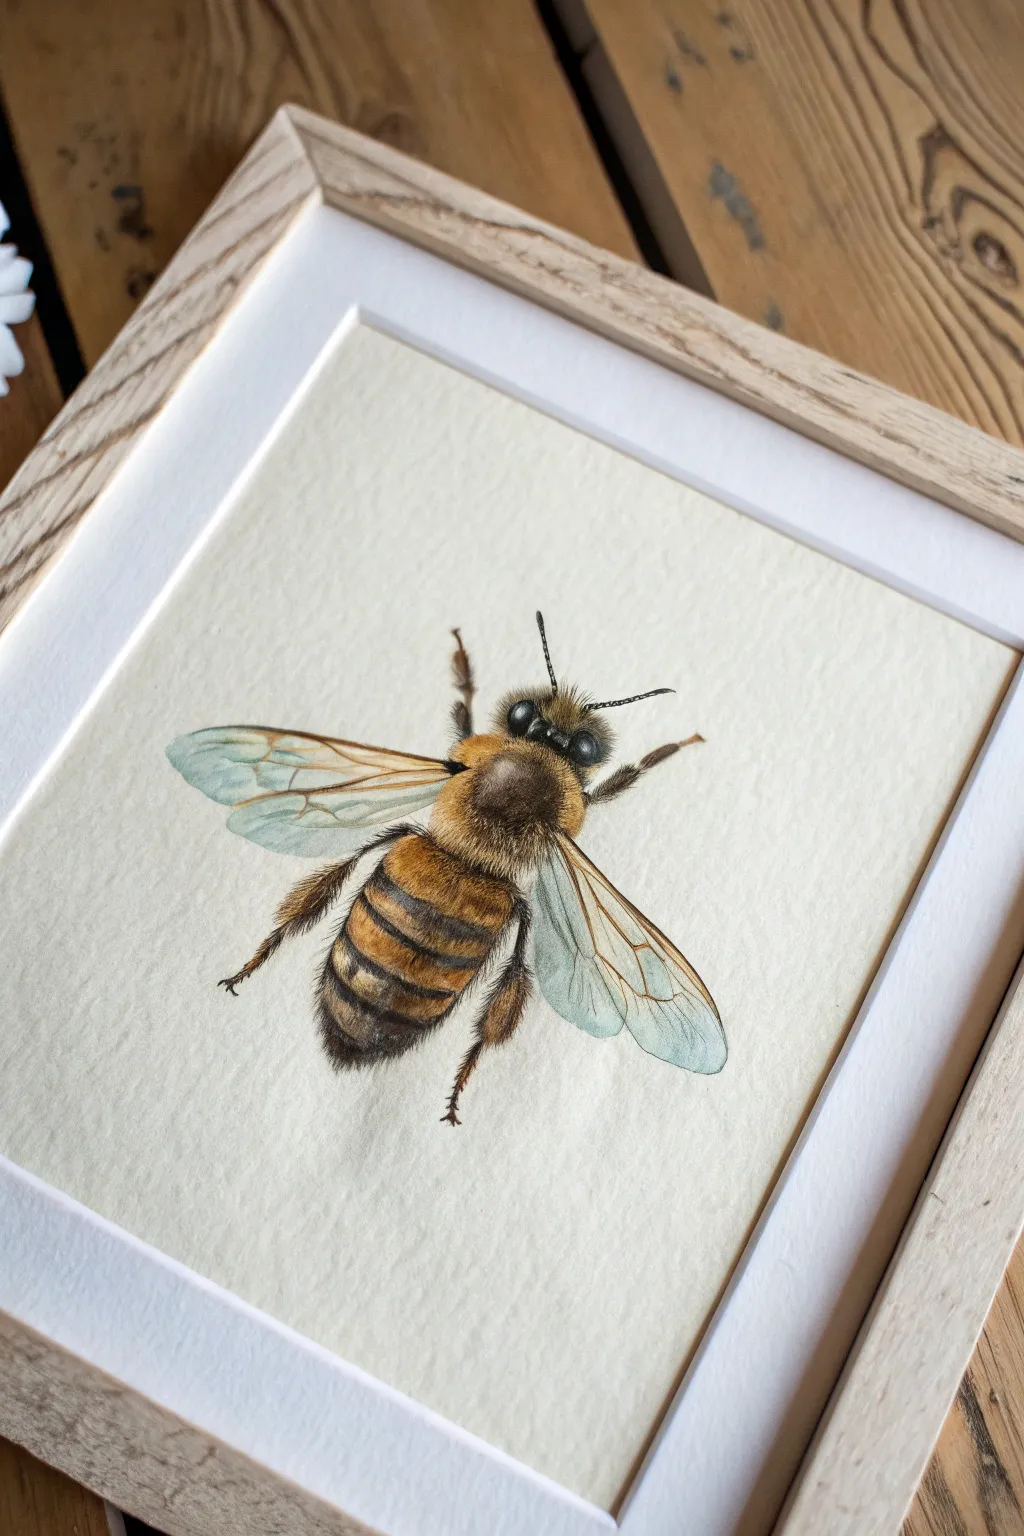
Capture the delicate fuzz and translucent beauty of a honeybee with this detailed watercolor study. By carefully layering dry-brush textures over wet washes, you’ll create a lifelike specimen that seems ready to fly right out of the frame.
Step-by-Step Guide
Materials
- Hot press watercolor paper (smooth texture is key for detail)
- Watercolor paints (Yellow Ochre, Burnt Sienna, Burnt Umber, Payne’s Grey, Cerulean Blue)
- Small round brushes (Size 0, 2, and 4)
- Mechanical pencil (HB)
- Kneaded eraser
- Water jars
- Paper towels
- White gouache or white gel pen
- Light wood box frame and mat board
Step 1: Sketch and Base Layers
-
Outline the anatomy:
Begin with a very light pencil sketch on hot press paper. Focus on the three main segments: the head, the fuzzy thorax, and the striped abdomen. Sketch the wings extending outwards, paying attention to their delicate vein structure. -
Initial yellow wash:
Mix a watery wash of Yellow Ochre. Generally, apply this to the thorax and the lighter stripes of the abdomen. Keep this layer pale and transparent to let light shine through later. -
Thorax texture base:
While the thorax area is slightly damp, dab in a mix of Burnt Sienna to suggest the rounded form, keeping the center highest in value (lightest) to show dimension. -
Wing foundation:
For the wings, use an extremely diluted Cerulean Blue with plenty of water. Paint the wing shapes but leave tiny gaps where the veins will go, or paint the whole shape and lift color later.
Muddy Fur Fix
If your fur texture looks like a blob, let it dry completely. Then, use white gouache with a fine liner brush to paint individual ‘light’ hairs over the dark mass.
Step 2: Building Form and Fuzz
-
Darkening the abdomen:
Once the initial yellow is bone dry, mix Burnt Umber and a touch of Payne’s Grey. Carefully paint the dark stripes on the abdomen, curving your brush strokes to follow the roundness of the bee’s body. -
Creating the thorax fur:
Switch to your size 0 or 2 brush. Using a ‘dry brush’ technique with Burnt Sienna and Burnt Umber, create short, flicking strokes radiating from the center of the thorax. This mimics the dense, fuzzy hair. -
Head details:
Paint the head primarily with Payne’s Grey, leaving small white highlights on the large compound eyes to make them look shiny and convex. -
Leg structure:
Paint the legs using the dark umber mix. Pay close attention to the joints; the hind legs are thicker (where pollen baskets would be) and quite hairy. Use short flicks to add texture here.
Step 3: Refining Translucency
-
Wing veins:
Using your finest brush (Size 0) and a very thin mix of Burnt Umber, trace the delicate veins of the wings. Keep your hand steady and let the line break occasionally so it doesn’t look too rigid. -
Wing transparency effect:
To make the wings look transparent where they overlap the body, glaze a tiny bit of the body color (yellow or brown) into the wing area that sits on top of the abdomen. -
Shadows under wings:
Add a very faint, cool grey shadow on the paper just underneath the edges of the wings. This lifts the wings off the page visually.
Add Some Sparkle
Mix a tiny amount of iridescent medium into your wing wash. It simulates the natural shimmer of insect wings without looking like glitter.
Step 4: Final Details and Framing
-
Deepening contrast:
Mix a saturated black using Burnt Umber and Payne’s Grey. Apply this into the darkest crevices between body segments and the underside of the bee to ground it. -
Adding distinct hairs:
Using the dark mix and a dry brush, flick tiny hairs extending slightly outside the painted edges of the thorax and legs. This breaks the hard outline and adds realism. -
Antennae:
Paint the antennae with confident, sweeping curves. They should be dark but with a tiny highlight to show their tubular shape. -
Highlights:
I usually use a touch of white gouache or a gel pen to add sharp specularity to the eyes and the very tips of the wings. -
Prepare for framing:
Allow the painting to dry overnight to ensure no moisture is trapped. Erase any visible pencil marks gently with a kneaded eraser. -
Mount and frame:
Center your artwork behind a clean white mat. Place it into a light wood frame to complement the natural tones of the bee.
Now you have a stunning, detailed nature study that brings a quiet buzz of life to your wall


Bee in Flight With Motion Marks
Capture the buzzing energy of a bumblebee mid-flight with this delicate illustration. Combining precise linear details with soft textual painting creates a charming sense of motion that brings the insect to life on paper.
Detailed Instructions
Materials
- Hot press watercolor paper (smooth texture)
- Fine liner pens (black, 0.05mm and 0.1mm)
- Watercolor paints (Yellow Ochre, Burnt Sienna, Lamp Black)
- Small round brushes (Size 0 and Size 2)
- White gouache or gel pen
- HB pencil and eraser
Step 1: Sketching the Framework
-
Outline the body:
Start with a light pencil sketch. Draw an oval shape for the thorax (middle section) and a slightly larger, rounder shape for the abdomen. Add a small, rounded head at the front. -
Position the wings:
Sketch the wings extending upwards and backwards. The forewing should be larger and obscure part of the hindwing. Keep lines faint as these will be transparent later. -
Add leg placement:
Mark the positions of the legs. The back leg should dangle slightly lower, helping to emphasize the flight posture. -
Draft the motion trail:
Lightly pencil a looping, dashed line trailing behind the bee’s abdomen. This simple addition is crucial for suggesting movement and whimsy.
Pro Tip: Fur texture
To make the bee look truly fuzzy, ensure your brush is fairly ‘dry’ when painting the hair strokes. Too much water will create blobs rather than fine hairs.
Step 2: Adding Color and Fur
-
Base yellow wash:
Mix a vibrant yellow using Yellow Ochre with a touch of warmth. Apply this to the thorax and the striped band on the abdomen using a Size 2 brush. -
Texturing the yellow:
While the yellow is still slightly damp, drop in tiny touches of Burnt Sienna near the bottom edges of the yellow stripes to create shadow and depth. -
Painting the black sections:
Using Lamp Black, fill in the head, the space between the yellow stripes, and the bottom of the abdomen. Don’t worry about perfect edges yet; we will add fur texture later. -
Creating the fuzzy texture:
Once the base layers are dry, take your smallest brush (Size 0) with somewhat dry black paint. Flick tiny, short strokes outward from the black sections into the yellow and deeply into the white background to simulate soft bee fuzz. -
Yellow fur details:
Repeat the flicking motion with a concentrated yellow mix, pulling yellow hairs slightly over the black sections to blend the transition naturally.
Troubleshooting: Flat wings
If the wings look too flat, add a heavily watered-down wash of grey to just a few cells near the body, leaving the rest paper-white for transparency.
Step 3: Defining Details
-
Wing outlining:
Switch to your 0.05mm fine liner. Carefully trace the outline of the transparent wings. Keep the line weight very delicate. -
Vein structure:
Draw the internal vein structure of the wings. Look closely at the reference; the cells are larger near the base and get smaller toward the tips. -
Leg definition:
Use the brush or a thicker pen (0.1mm) to define the legs. add tiny, jagged hairs along the edges of the legs so they don’t look like smooth sticks. -
Facial features:
Define the antennae with two curved strokes. Add a small highlight to the eye to give the bee focus. -
Final highlights:
As a finishing touch, use white gouache or a gel pen to add a few stray white hairs on the back and a subtle sheen on the blackest part of the body.
Step 4: The Motion Trail
-
Painting the dashes:
Mix a very diluted, watery brown (Burnt Sienna). Using the tip of your round brush, paint over your pencil dashes. -
Varying the pressure:
I like to vary the pressure slightly on these dashes, making some faint and others distinct, to enhance the airy feel of the flight path. -
Clean up:
Once the paint is completely dry, gently erase any visible pencil lines from your initial sketch.
Step back and admire the lively movement you have captured in your nature study

Bee on a Sunflower Center
Capture the late-summer warmth with this detailed watercolor study featuring a vibrant sunflower and its fuzzy visitor. This project uses warm yellows and rich browns to create a cozy, realistic botanical illustration on textured paper.
How-To Guide
Materials
- Cold-pressed watercolor paper (deckle-edged or torn)
- Watercolor paints (Cadmium Yellow, Yellow Ochre, Burnt Sienna, Burnt Umber, Lamp Black, Sap Green)
- Round watercolor brushes (sizes 2, 4, and 0 for details)
- Pencil (HB or H)
- Kneaded eraser
- Fine liner pen (brown or sepia, 0.1mm)
- White gouache or white gel pen
- Clean water and paper towels
Step 1: Sketching the Layout
-
Prepare the paper:
If your paper doesn’t have a deckle edge, carefully tear the edges against a ruler to create that rustic, fibrous look. Tape the paper down to your workspace. -
Outline the flower:
Lightly sketch a large oval for the sunflower’s center, positioned slightly off-center. Draw the radiating petals, varying their sizes and curves to make them look organic, not perfectly uniform. -
Place the bumblebee:
Sketch the oval body of the bee directly over the left side of the flower’s center. Add the wings extending outward and the legs gripping the flower texture. -
Add secondary elements:
Draw the stem curving gently downwards and two large, jagged leaves at the base. Don’t forget the tiny, simplified bee hovering to the left for a touch of whimsy.
Step 2: Watercoating the Flower
-
First petal wash:
Mix a watery Cadmium Yellow. Paint the petals, leaving tiny white gaps between them to separate the forms. Let this layer dry completely. -
Building petal depth:
Layer Yellow Ochre near the base of the petals (closest to the center) and along the petal veins. Use a damp, clean brush to soften the edges where the ochre meets the yellow. -
Deepening shadows:
Mix Burnt Sienna with a touch of yellow. Apply this to the underside of the petals and where petals overlap, creating distinct shadows that give the flower volume. -
Defining the center:
Paint the sunflower center with a wash of Burnt Sienna. While still damp, drop in concentrated Burnt Umber around the outer ring and directly under the bee to ground it. -
Stem and leaves:
Paint the stem and leaves with Sap Green. Drop in a little brown or dark green while wet to create variation and shadow near the veins.
Muddy Centers?
If the flower center bleeds into the petals, let the petals dry 100% first. Use a hair dryer on low heat to speed this up before painting adjacent wet areas.
Step 3: Detailed Bee Illustration
-
Bee underpainting:
Paint the yellow stripes of the bee with a bright, opaque yellow mix. Paint the black sections with a dark grey (watered down Lamp Black), being careful not to touch the yellow yet. -
Creating texture:
Once the bee’s base is dry, use your smallest brush (size 0) with concentrated black to paint tiny, flicks of fur. Make the edges of the bee look ‘fuzzy’ rather than outlining it sharply. -
Transparent wings:
Use a very watery grey wash for the wings. Let it dry, then use your fine liner pen or a very dry brush with black paint to draw the delicate vein structure. -
Tiny companion:
Paint the small bee on the left simply: a yellow dot for the body, grey wings, and a tiny black head. Keep it loose and less detailed than the main subject.
Make it Pop
Add a few tiny drops of “honey” or dew on a petal using a darker yellow outline and a tiny white reflection dot to simulate liquid.
Step 4: Final Textures and Highlights
-
Pollen details:
Mix a thick, creamy consistency of yellow or use gouache. Dot tiny points of pollen onto the dark center of the flower, clustered mostly around the middle ring. -
Petal veins:
Use a mix of Burnt Sienna and a thin brush to accentuate the veins on the petals. Keep these lines broken and faint so they don’t look like stripes. -
Defining the legs:
Reinforce the bee’s legs with dark brown or black, ensuring they look like they are touching the pollen. -
White highlights:
Use white gouache or a gel pen to add shine to the bee’s wings and a few stray highlights on the darkest part of the sunflower center. -
Final assessment:
Check your contrast levels. If the leaves look too flat, add a glaze of dark green to the shadowed side. Erase any remaining visible pencil lines gently.
Now you have a charming botanical piece that feels like a warm afternoon in the garden
BRUSH GUIDE
The Right Brush for Every Stroke
From clean lines to bold texture — master brush choice, stroke control, and essential techniques.
Explore the Full Guide
Honeycomb Background and One Bee
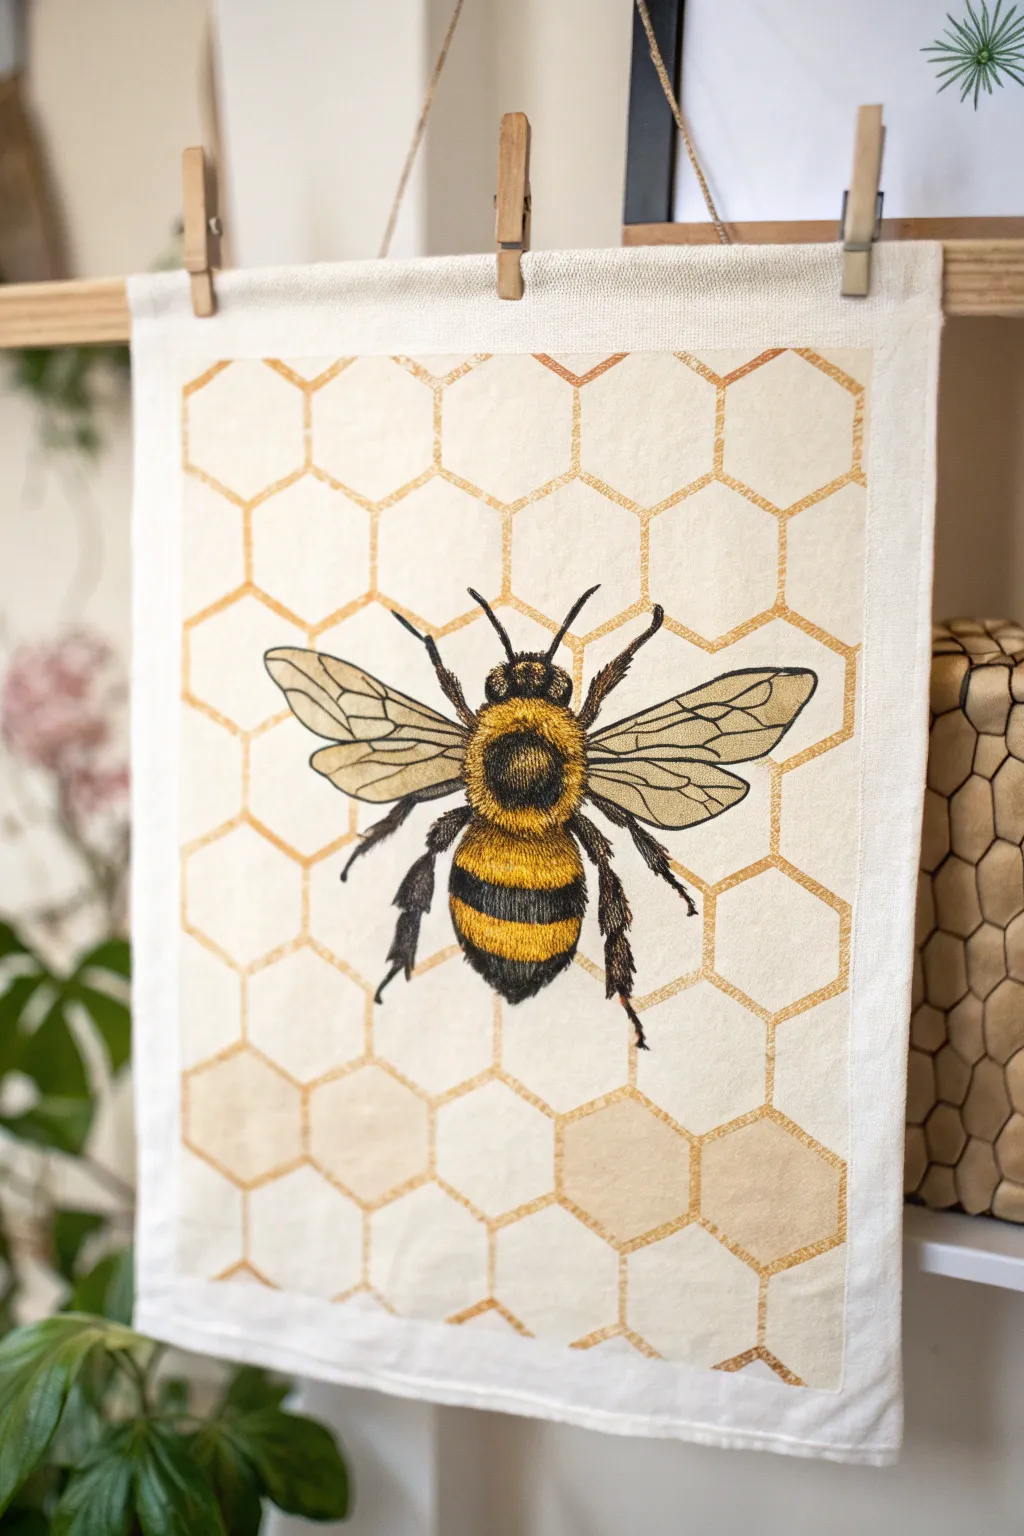
Bring the warmth of a summer apiary into your home with this stunning fabric wall hanging. Featuring a delicate honeycomb grid and a realistic, fuzzy bumblebee centerpiece, this project blends structured pattern with organic painterly details for a sophisticated finish.
Step-by-Step Guide
Materials
- Cotton or linen tea towel (natural or off-white)
- Fabric medium
- Acrylic paints (gold/ochre, black, yellow, white, brown)
- Masking tape
- Honeycomb/hexagon stencil (approx. 2-3 inch cells)
- Stencil brush or cosmetic sponge
- Fine detail brushes (sizes 0, 1, and 2)
- Flat shader brush
- Carbon transfer paper
- Pencil
- Wooden dowel or pants hanger for display
- Cardboard or plastic sheet (to place under fabric)
Step 1: Preparation & Background
-
Prepare the fabric canvas:
Begin by ironing your fabric completely flat to remove any creases that could distort your stencil work. Lay the fabric on a flat surface and place a piece of cardboard or plastic underneath it to prevent paint from bleeding through to your table. -
Secure the stencil:
Position your honeycomb stencil in the center of the fabric. Use masking tape to hold the edges firmly in place so it doesn’t shift while you work. If your stencil is smaller than the fabric, plan to work in sections. -
Mix the honeycomb gold:
Mix a warm golden-ochre acrylic paint with fabric medium according to the bottle’s instructions usually 1:1 or 2:1 ratio. This ensures the paint stays flexible on the cloth. -
Stipple the pattern:
Dip your stencil brush or sponge lightly into the paint, then dab off the excess onto a paper towel until the brush is almost dry. Apply the paint over the stencil using a vertical up-and-down pouncing motion. Keep the application light and somewhat uneven to create a vintage, stamped texture rather than a solid block of color. -
Extend the pattern:
Carefully lift the stencil and reposition it to cover the rest of the fabric, aligning the edges with the previously painted hexagons. Continue stippling until the entire background is filled, then let it dry completely.
Step 2: Painting the Bee
-
Transfer the bee outline:
Once the background is dry, place a sheet of carbon transfer paper in the center of the honeycomb grid. Place your bee reference or sketch on top and trace the outline firmly with a pencil to transfer the design onto the fabric. -
Block in the body shape:
Mix a dark charcoal grey or black with fabric medium. Using a small flat brush, fill in the head, thorax, and abdominal stripes of the bee. Don’t worry about texture yet; just get the solid dark shapes down. -
Add the yellow bands:
Paint the yellow stripes on the bee’s abdomen and the fuzzy collar near the head. Use a bright yellow mixed with a touch of ochre to match the warmth of the background stenciling. -
Paint the translucent wings:
For the wings, mix a very watery wash of white and a tiny dot of brown. You want this to be semi-transparent so the honeycomb pattern faintly shows through. Fill in the wing shapes carefully. -
Define wing veins:
Switch to your finest detail brush (size 0) and slightly watered-down black paint. Carefully draw the delicate vein structure within the wings, keeping your hand steady and pressure light. -
Create fuzzy texture:
To make the bee look realistic, use a small, dry brush to flick tiny strokes of yellow over the edges of the black sections, and black strokes over the yellow sections. I find that quick, short, outward flicks mimic the texture of bee fuzz perfectly. -
Add legs and antennae:
Paint the spindly legs and antennae using black paint. Add tiny highlights of white or light grey on the joints of the legs to give them dimension and shine. -
Highlight the body:
Add a central highlight to the black thorax (the middle section) using a dry-brushed lighter grey. This makes the bee’s body look round and three-dimensional rather than flat.
Bleeding Lines?
If paint bleeds under the stencil, don’t panic. Use a small stiff brush with a tiny bit of water to scrub the error gently, or dampen a Q-tip to lift it while wet.
Step 3: Finishing Touches
-
Heat set the paint:
Allow the painting to dry for at least 24 hours. Once fully dry, place a thin cloth over the artwork and iron it on a medium-high setting (no steam) for several minutes to permanently set the fabric paint. -
Prepare for hanging:
Fold the top edge of the fabric over by about an inch and sew or glue it to create a channel for a dowel, or simply prepare wooden clips as shown in the inspiration image. -
Clip and display:
Attach the fabric to a wooden hanger or clipping system. Hang your masterpiece on the wall and enjoy the golden glow of your handmade art.
Add Some Shimmer
Mix a small amount of metallic gold paint into your yellow for the bee’s stripes. It catches the light beautifully and mimics the iridescence of real insect wings.
Now you have a charming piece of nature-inspired art ready to brighten up any corner of your room
Pollen Baskets Detail Sketch
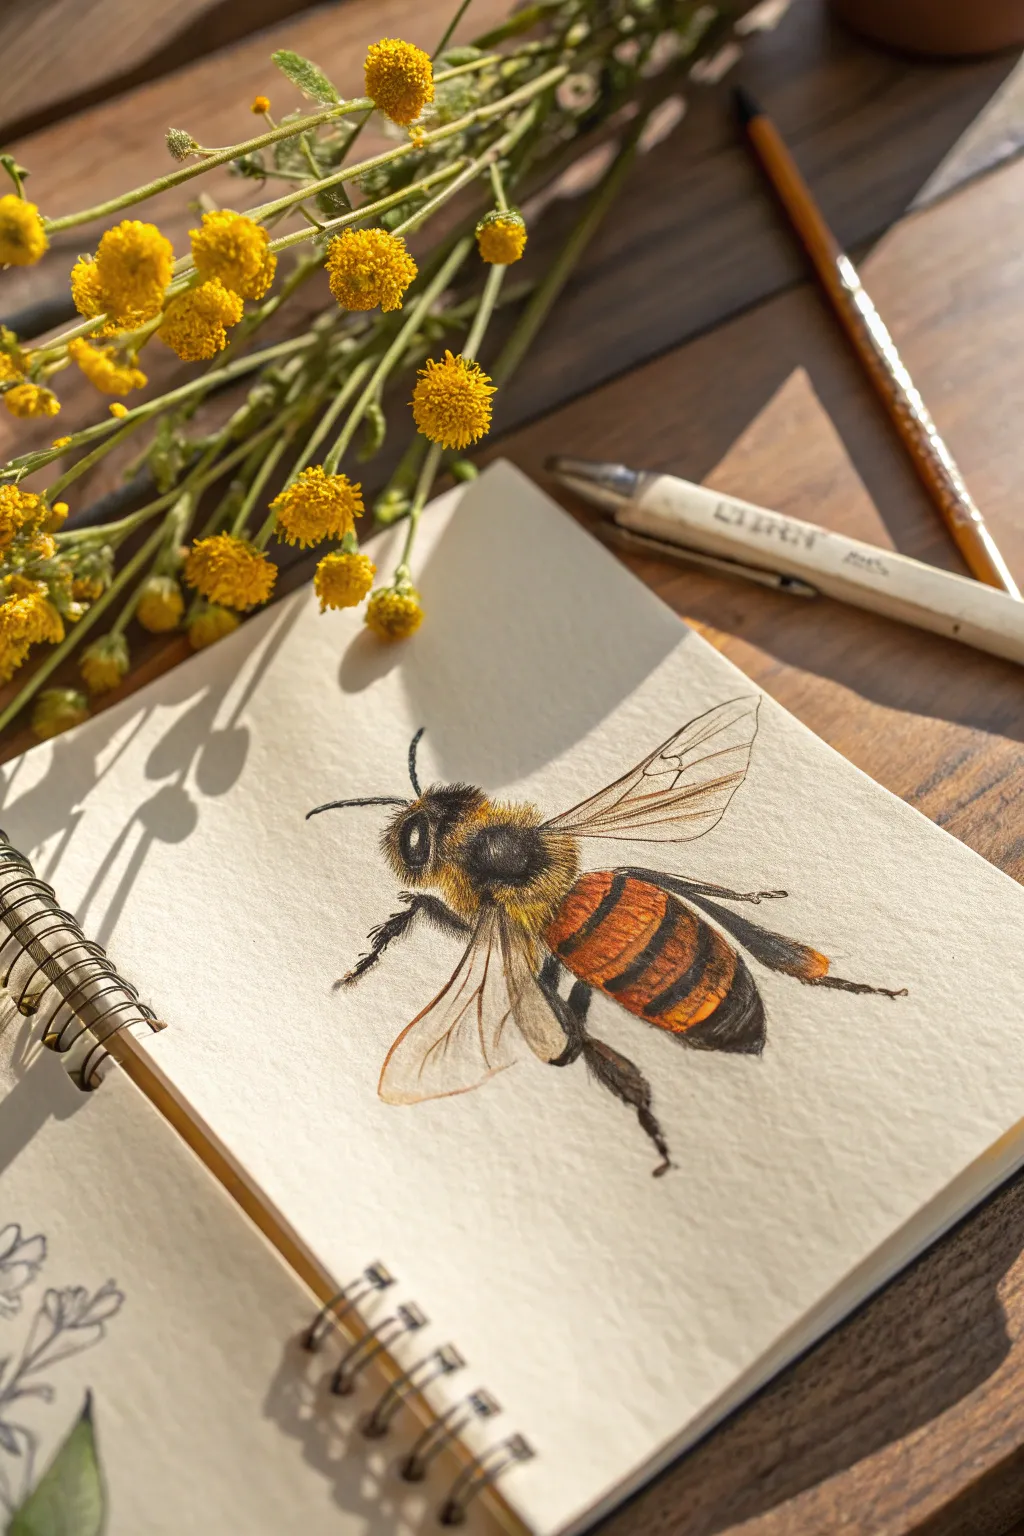
Capture the delicate fuzz and iridescent wings of a honeybee in this realistic sketchbook study. Using a mix of watercolor and colored pencils creates a warm, textural finish that brings the insect to life on the page.
Detailed Instructions
Materials
- Heavyweight sketchbook paper (hot press or mixed media)
- H or HB graphite pencil for outlining
- Watercolor paints (Yellow Ochre, Burnt Sienna, Lamp Black/Payne’s Grey, Indigo)
- Round sable brush (size 2 or 4)
- Fine liner brush (size 00 or 0)
- Colored pencils (Black, Dark Brown, White, Golden Yellow)
- White gouache or gel pen
- Kneaded eraser
Step 1: Initial Sketching
-
Basic shapes:
Start by lightly blocking in the three main segments of the bee’s body—head, thorax, and abdomen—using oval shapes. Keep your pencil pressure extremely light so lines can be erased later. -
Wing placement:
Sketch the outline of the wings extending from the thorax. Notice how the forewing is larger and overlaps the smaller hindwing. Angle them slightly backward to suggest a resting pose. -
Leg structure:
Draw the legs, paying close attention to the joints. The hind leg is the thickest and most prominent, while the front legs are more delicate and reach forward.
Step 2: Watercolor Base Layer
-
Thorax wash:
Mix a watery wash of Yellow Ochre and a touch of Burnt Sienna. Apply this loosely to the thorax (the middle segment), letting the color bloom slightly to suggest softness. -
Abdomen stripes:
Paint the amber stripes on the abdomen with a stronger mix of Burnt Sienna and Orange. Leave gaps of clean paper where the black stripes will eventually go to keep the colors bright. -
Base blacks:
Using a diluted Lamp Black or Payne’s Grey, fill in the head and the black stripe areas of the abdomen. Don’t go too dark yet; watercolor dries lighter, and we want to build depth gradually. -
Wing transparency:
For the wings, use very watered-down Indigo or a dirty wash water mix. Paint the shapes but lift a little pigment out of the center with a thirsty brush to create a transparent, glassy effect.
Muddy Fur?
If your yellow fur looks dirty, you likely applied the pencil while the black paint was still damp. Wait for total dryness, or spray a fixative between layers to keep colors separate.
Step 3: Building Texture with Pencils
-
Fur texture:
Once the paint is bone dry, use a sharp black colored pencil to draw short, quick strokes over the thorax. Follow the direction of the hair growth, radiating outward from the center. -
Deepening the blacks:
Layer black colored pencil over the painted dark stripes and the head. Press harder in the shadow areas, like underneath the abdomen, to give the bee volume and roundness. -
Leg details:
Define the legs with the black pencil. Create the ‘pollen basket’ look on the hind leg by broadening the shape and adding tiny, jagged hairs along the edges. -
Wing veins:
Switch to a sharp dark grey or brown pencil. Very lightly trace the delicate venation pattern inside the wings. Keep these lines significantly thinner than your outline strokes.
Add Realism
To make the bee look like it’s been working, dab a tiny bit of opaque yellow or orange gouache on the hind leg to simulate a full pollen basket.
Step 4: Highlights & Final Details
-
Golden fuzz:
Take a Golden Yellow or Ochre colored pencil and add fur texture over the yellow painted areas. Overlap some of these yellow strokes onto the black sections to make the fur look seamlessly integrated. -
Eye reflection:
The eye needs to look wet and glossy. Use a tiny dot of white gouache or a gel pen to place a highlight on the upper curve of the large black eye. -
Wing shimmer:
add striking white lines along the top edge of the wings and a few subtle strokes inside the wing membrane to mimic light catching the surface. -
Cast shadow:
Mix a cool grey wash and paint a soft shadow beneath the bee, specifically under the legs and abdomen. This grounds the drawing so the bee doesn’t look like it’s floating in space. -
Cleanup:
I always use a kneaded eraser at the very end to lift any visible graphite outlines that haven’t been covered by paint or pencil, leaving a clean, professional illustration.
Now step back and admire the vibrant, buzzing creature you’ve brought to life on paper

PENCIL GUIDE
Understanding Pencil Grades from H to B
From first sketch to finished drawing — learn pencil grades, line control, and shading techniques.
Explore the Full Guide
Loose Splashy Watercolor Bee
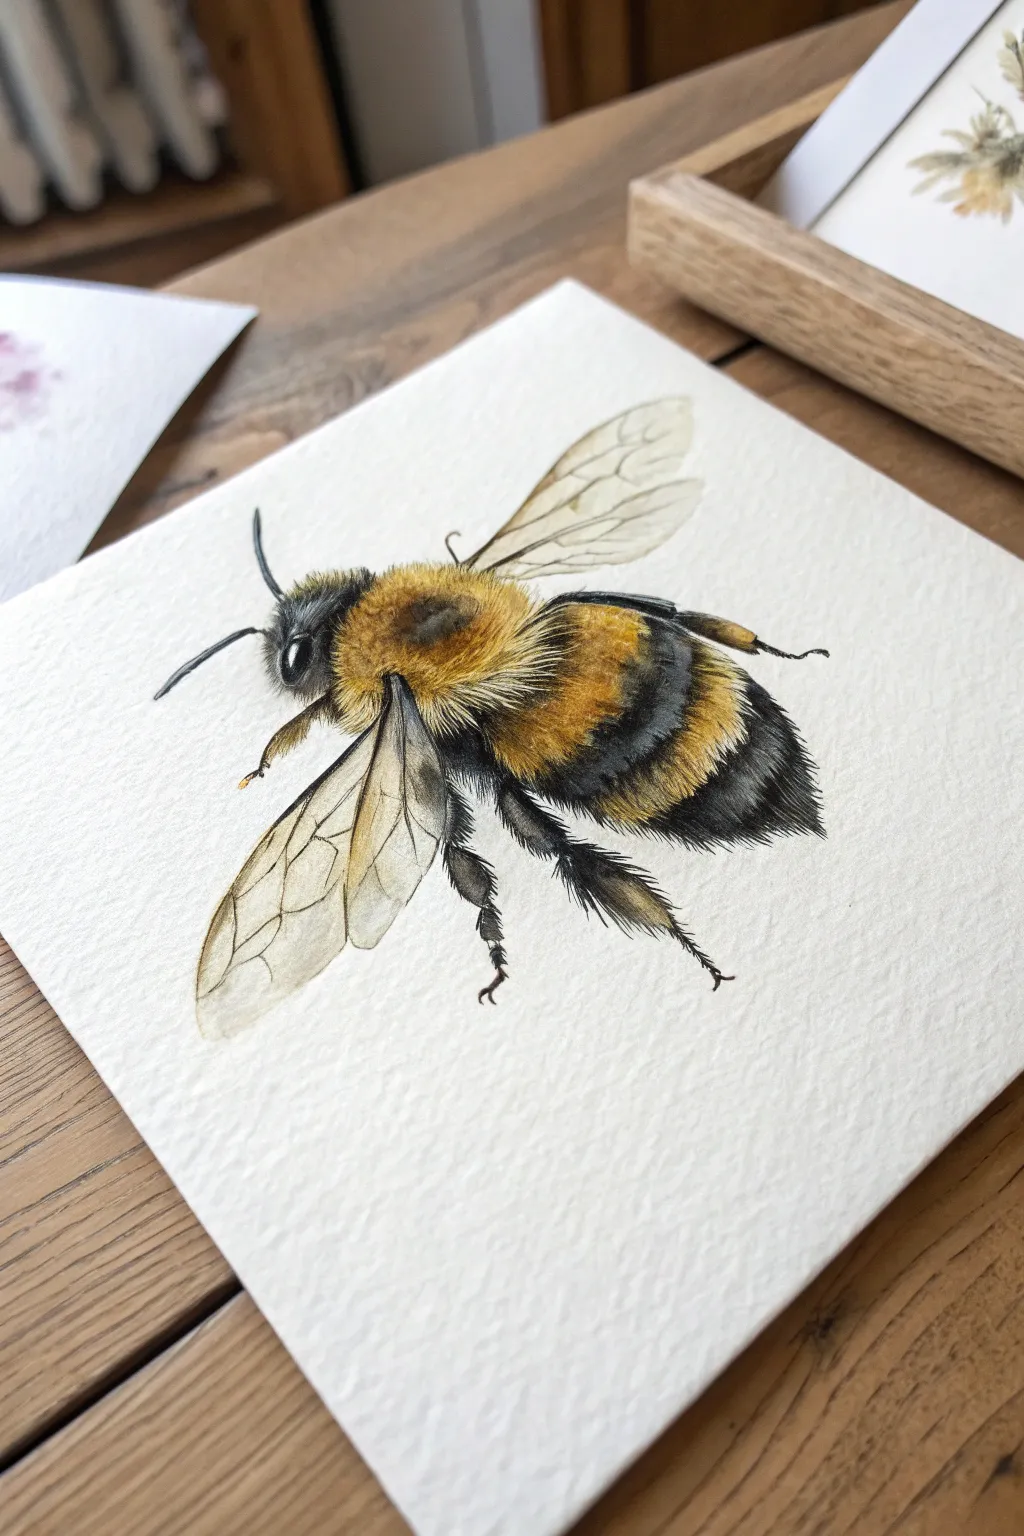
Capture the fuzzy charm of a bumblebee with this detailed watercolor tutorial that focuses on building realistic fur texture and delicate, translucent wings. By layering warm ochres and deep blacks on cold press paper, you can create a lifelike pollinator that seemingly buzzes right off the page.
Step-by-Step Tutorial
Materials
- Cold Press watercolor paper (300gsm/140lb)
- H or HB pencil for sketching
- Kneaded eraser
- Watercolor paints (Yellow Ochre, Burnt Sienna, Lamp Black or Neutral Tint, Ultramarine Blue, Burnt Umber)
- Round brushes (sizes 4 and 6)
- Detail liner brush (size 0 or 00)
- Clean water and mixing palette
- Paper towels
Step 1: Sketching and Base Layers
-
Light Outline:
Begin with a very faint pencil sketch of the bee’s body. Break it down into oval shapes for the head, thorax, and abdomen. Sketch the position of the legs and map out the large wings extending from the upper back, ensuring the pencil lines are barely visible so they won’t show through the translucent wings later. -
Initial Yellow Wash:
Mix a watery wash of Yellow Ochre with a touch of Burnt Sienna. Apply this color to the thorax (middle section) and the colored stripes on the abdomen. Use a wet-on-dry technique here, but feather the edges slightly with a damp brush to suggest the beginning of soft fur. -
Underpainting the Black:
Creating a true black often looks flat, so mix Lamp Black with a tiny bit of Burnt Umber for warmth. Apply a light, diluted wash of this grey-black to the head, the center band of the body, and the tip of the abdomen, leaving the yellow areas clean. -
Wing Foundation:
For the wings, use an extremely diluted mix of Lamp Black and Ultramarine Blue—it should be almost clear water. Wash this over the wing shapes. While it’s still wet, drop in tiny hints of Yellow Ochre near the base where the wing connects to the body to show warmth.
Dry Brush for Fur
For the best fur texture, blot your brush on a paper towel before painting. This ‘dry brush’ leaves broken lines that perfectly mimic coarse insect hair.
Step 2: Building Fur Texture
-
Deepening yellows:
Once the first layer is completely dry, mix a more saturated Yellow Ochre. Using the size 4 brush, paint short, flicking strokes over the yellow sections. I like to start from the center of the color band and flick outward to create a jagged, fuzzy edge. -
Dark Fur Texture:
Switch to a darker, creamy mix of your black. Using the tip of your brush, apply the same short, flicking strokes to the black sections of the bee. Overlap these dark flicks slightly onto the yellow areas to blend the sections naturally, mimicking how hair grows. -
Adding Volume:
To make the bee look round, you need shadow. Mix a little purple or brown into your yellow mix to darken it. Glaze this shadow color along the bottom edge of the thorax and abdomen to create a 3D effect, softening the edge with clean water. -
Leg Structure:
Paint the legs using the black mix. Start with the segments closest to the body, making them slightly thicker. As you move to the lower leg segments and claws, switch to your smaller liner brush for precision. -
Fuzzy Legs:
Bumblebee legs are hairy, not smooth. Use the detail brush to pull tiny, hair-like strokes outward from the main leg shapes, especially on the hind legs where pollen baskets would be.
Muddying Colors?
If your black and yellow mix into green where they meet, let the yellow layer dry 100% before adding nearby black strokes.
Step 3: Details and Wings
-
Defining the Head:
Use concentrated black to define the eye, leaving a tiny spot of white paper for a highlight reflection. Add tiny hairs around the face and mandibles using the liner brush. -
Wing Veins:
For the delicate veins, use your liner brush with a pale grey mix (much lighter than the body black). Paint thin, branching lines through the wings. Ensure your hand is steady and the lines are broken or thinner in some areas to keep them looking fragile. -
Wing Transparency:
To show the wing is transparent, carefully glaze the color of the body (yellow or black) where the wing overlaps the bee’s back. This ‘see-through’ effect is crucial for realism. -
Final Fur Highlights:
If you lost some highlights, you can use a tiny amount of white gouache or a white gel pen to add a few stray, light-catching hairs on the top of the thorax, but use this very sparingly. -
Antennae Finish:
Paint the antennae with a smooth, dark stroke. They should be crisp and sharp, contrasting with the fuzzy texture of the body. -
Shadowing:
Creating a cast shadow grounds the insect. Mix a cool grey and paint a soft, diffuse shape underneath the legs and body segments, blurring the edges so it doesn’t look like a solid object.
Step back and admire the soft textures you have built up layer by layer
Simple Cartoon Bee for Beginners
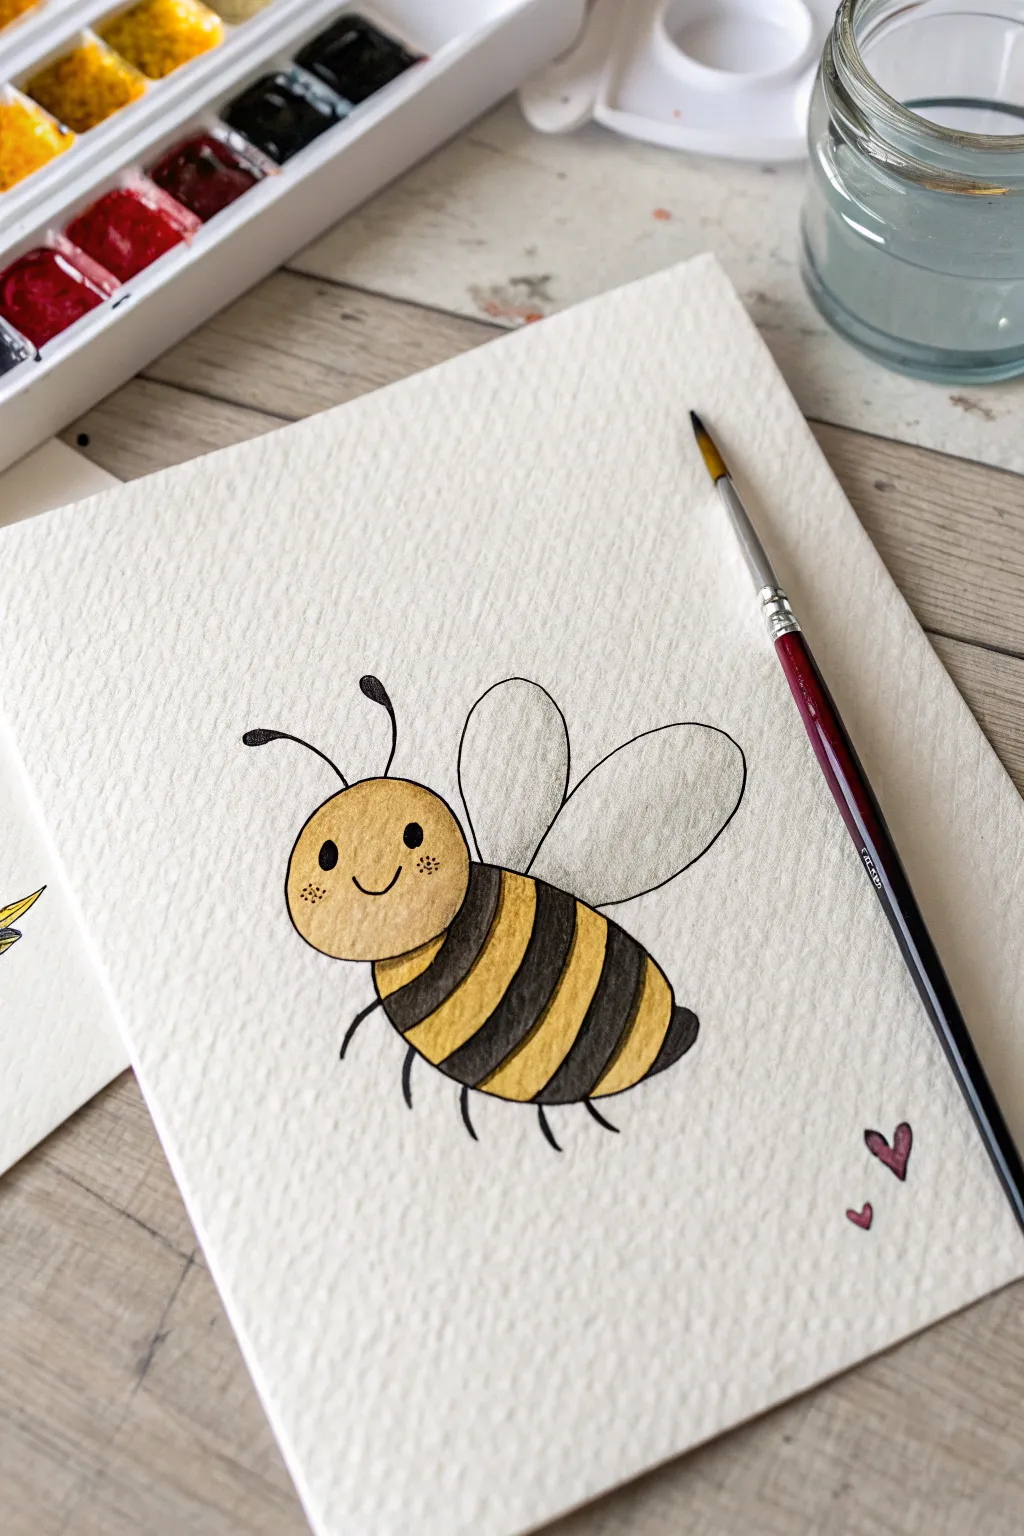
Create a buzz with this adorable cartoon bee illustration, perfect for beginner watercolor artists looking to practice simple shapes and smooth washes. Using a combination of ink outlines and soft yellow hues, this project results in a charming, textured greeting card or wall art piece.
Step-by-Step
Materials
- Cold press watercolor paper (textured)
- Black liquid ink or waterproof fine liner pens (0.3mm and 0.5mm)
- Watercolor paints (Yellow Ochre, Lemon Yellow, Paynes Grey or Lamp Black)
- Small round watercolor brush (size 2 or 3)
- HB Pencil
- Eraser
- Jar of clean water
- Paper towel
Step 1: Sketching the Outline
-
Draw the head:
Start near the center-left of your paper. Lightly sketch a circle that is slightly flattened at the top and bottom to create an oval shape for the bee’s head. -
Add the body:
Attach a larger oval shape to the back of the head. This body section should be angled slightly downward and taper towards a rounded point at the end. -
Position the wings:
Sketch two tear-drop shapes emerging from the top of the body section. Make the front wing slightly larger and more vertical, while the back wing angles further behind. -
Detail the face:
Inside the head oval, draw two small solid ovals for eyes, wide apart. Add a simple curved ‘U’ shape for a smile right between them. -
Add antennae and legs:
Draw two curved lines coming from the top of the head with small teardrop shapes at the ends. Sketch four to six simple, curved lines hanging from the bottom of the body for legs.
Ink Smart
Ensure your pen is waterproof before painting! Test it on scrap paper with water first. If it smears, do the painting steps first and ink last.
Step 2: Inking the Design
-
Trace the main lines:
Using a waterproof fine liner or a dip pen with black ink, carefully trace over your pencil sketch. Keep your hand steady to create smooth, clean curves. -
Fill the eyes:
Color in the eyes with solid black ink. This high contrast is essential for the cute cartoon look. -
Thicken select lines:
Go over the antennae tips and leg lines once more to give them just a bit more weight compared to the wings. -
Erase pencil marks:
Wait for the ink to dry completely to avoid smudging. Gently erase all visible pencil guidelines underneath your ink work.
Step 3: Painting the Bee
-
Mix the head color:
Mix a warm yellow, perhaps combining a bit of Yellow Ochre with plenty of water for a translucent look. Test it on a scrap piece of paper first. -
Wash the head:
Apply the wet yellow mix to the head area. Keep the wash even, but don’t worry about perfect consistency; the paper’s texture will add character. -
Paint the yellow stripes:
On the body, identify where the yellow stripes will go. Paint alternating bands of yellow, leaving white gaps in between for the black stripes later. I find it helpful to paint the yellow stripes slightly wider than the black ones. -
Dry the yellow layer:
Let the yellow paint dry completely. If you paint the adjacent stripes too soon, colors will bleed together. -
Paint the black stripes:
Mix a dark grey or black watercolor (like Paynes Grey). Carefully fill in the remaining stripes on the body. Using watercolor instead of ink here gives a softer texture that matches the yellow. -
Add wing tint:
Dilute a tiny amount of black paint with lots of water until it’s a barely-there grey. lightly wash over the wings to separate them from the white paper background.
Glitter Wings
Mix a tiny amount of iridescent medium or pearlescent watercolor into your light grey wing wash for a magical, shimmering effect.
Step 4: Final Details
-
Add blushing cheeks:
Once the face is dry, use your fine liner to clear stipple three or four tiny dots under each eye to create adorable freckled cheeks. -
Paint tiny hearts:
Mix a light red or pink watercolor. Paint two tiny floating hearts near the bottom right of the bee to balance the composition. -
Check contrast:
If the black watercolor stripes dried too light, add a second layer to darken them for better contrast against the yellow.
Allow your artwork to dry flat completely before framing or gifting to a friend


Stamped Bee Shapes With Texture
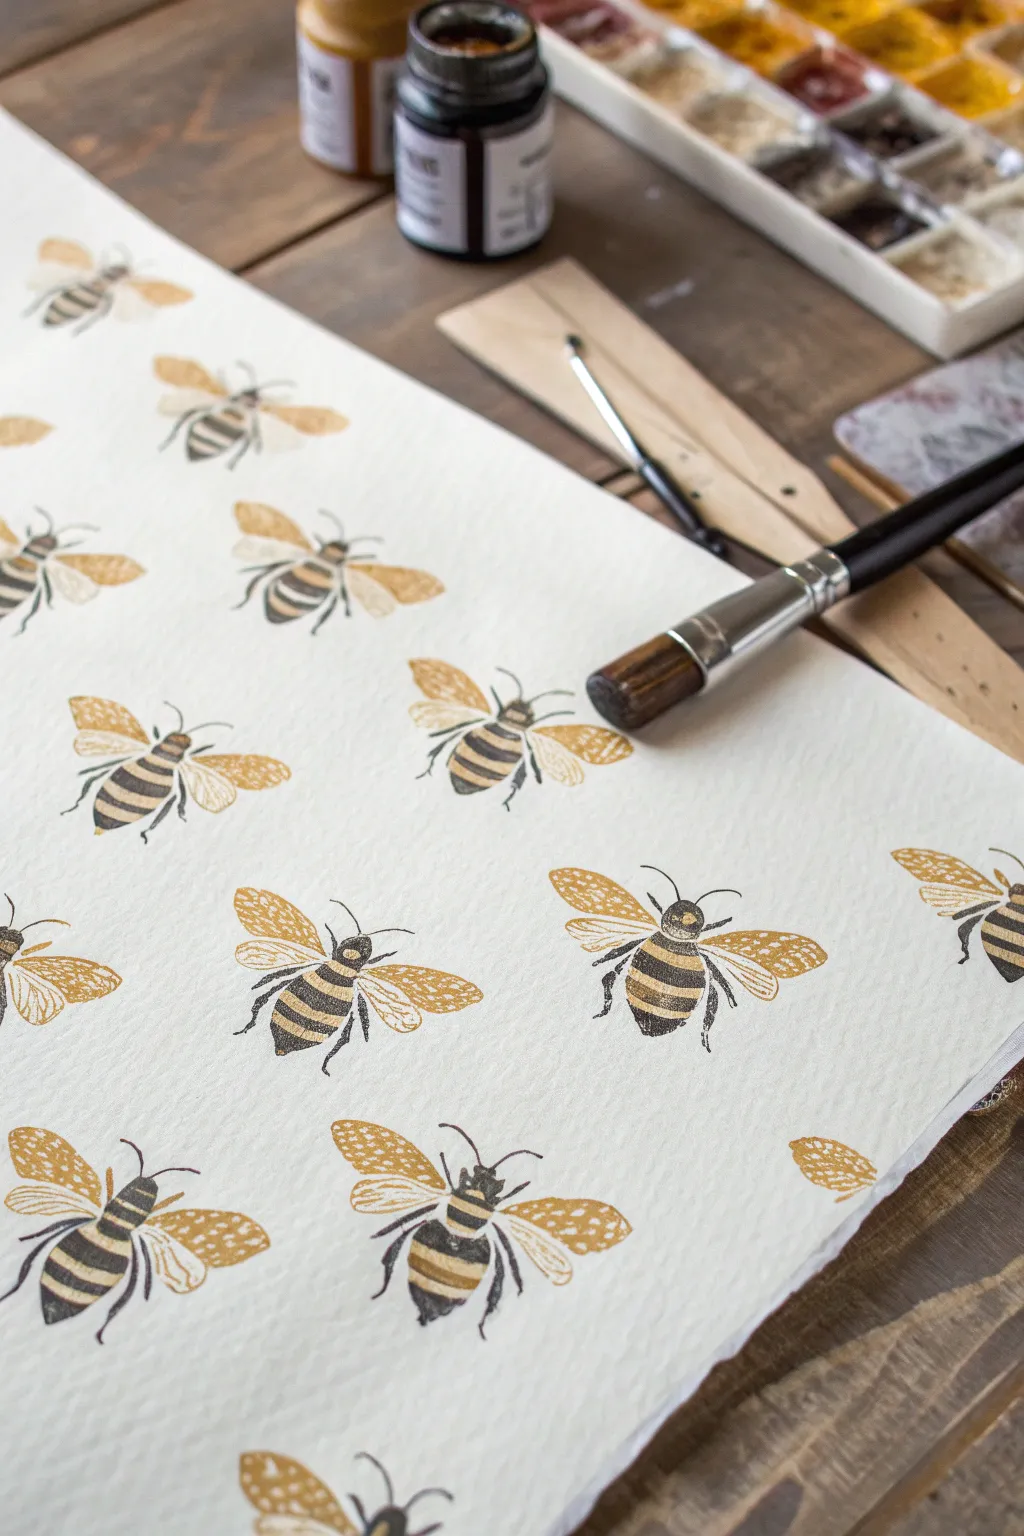
Create a buzzing repeating pattern using a simple block printing technique combined with hand-painted touches. This project captures the charm of vintage botanical illustrations with a lovely textured, handmade feel.
Detailed Instructions
Materials
- Heavyweight watercolor paper (hot press preferred for smoother texture)
- Linoleum carving block or soft rubber carving block
- Linoleum carving tools (V-gouge and U-gouge)
- Pencil and tracing paper
- Black block printing ink (water-soluble)
- Brayer (rubber roller)
- Golden-yellow watercolor paint or gouache
- Small round paintbrush (size 2 or 4)
- Glass or acrylic sheet (for rolling ink)
- Baren or wooden spoon (for pressing)
Step 1: Carving the Bee Block
-
Draft your design:
Sketch a simple bee silhouette on a piece of paper. Since we are carving a stamp, focus on the main body segments (head, thorax, abdomen) and the wings. Keep the shapes bold and distinct. -
Transfer to the block:
Place a piece of tracing paper over your sketch and trace the outline with a soft pencil. Flip the tracing paper onto your carving block and rub the back to transfer the graphite design. -
Carve the negative space:
Using a V-gouge tool, carefully carve away the material right around your pencil lines first. This outlines your bee shape. -
Clear the background:
Switch to a wider U-gouge to clear away the rest of the background material on the block. You want the bee shape to be raised. -
Add wing details:
Using your finest carving tip, create a few deliberate scratches or lines inside the wing area. These will remain un-inked, creating the delicate texture seen in the final print. -
Separate the stripes:
Carve two or three thin horizontal lines across the abdomen to create the iconic bee stripes. Remove the material where you want the yellow paint to go later.
Step 2: Printing the Texture
-
Prepare the ink:
Squeeze a small amount of black block printing ink onto your glass or acrylic sheet. Use the brayer to roll it out until you hear a sticky ‘hissing’ sound and the texture looks velvety. -
Ink the block:
Roll the inked brayer over your carved bee block. Apply a thin, even coat. I prefer a slightly lighter application here so the paper texture shows through the black ink. -
Test print:
Press your stamp onto a scrap piece of paper first to check if you need to carve away any stray background ridges that picked up ink. -
Start the pattern:
Place your large watercolor paper on a flat surface. Press the inked block firmly onto the paper. Use a baren or the back of a wooden spoon to rub the back of the block in a circular motion for even transfer. -
Repeat the motif:
Re-ink the block for every single impression. Stamp the bees in a loose, scattered pattern or a structured grid, rotating the block slightly each time to make them look like they are flying in different directions. -
Let the ink dry:
Allow the stamped black ink to dry completely. Water-soluble ink can smudge if we paint over it too soon, so give it at least an hour.
Clean Edges Trick
Before printing, wipe the edges of your rubber block with a rag. This removes stray ink that often collects on the perimeter and prevents unwanted ‘halo’ marks.
Step 3: Adding Golden Details
-
Mix the gold hue:
Prepare a warm, golden-yellow watercolor or gouache. Test the color on a scrap; it should be semi-transparent to blend beautifully with the paper. -
Paint the wings:
With a damp (not soaking) brush, carefully fill in the wing shapes. The paint will naturally pool slightly in the un-inked texture lines you carved, highlighting them. -
Fill the stripes:
Paint the negative spaces you carved on the abdomen with the yellow paint. You don’t need to be perfectly precise, a little overlap adds to the hand-touched look. -
Add a darker wash:
While the yellow is still slightly damp, touch the very tips of the wings with a tiny bit of diluted brown paint to add depth and variation.
Metallic Shine
For a magical finish, use metallic gold watercolor paint for the wings. It will catch the light beautifully when the artwork is framed.
Once the watercolor is dry, you’ll have a stunning sheet of custom artwork perfect for framing or wrapping a special gift
Impasto Bee With Thick Paint
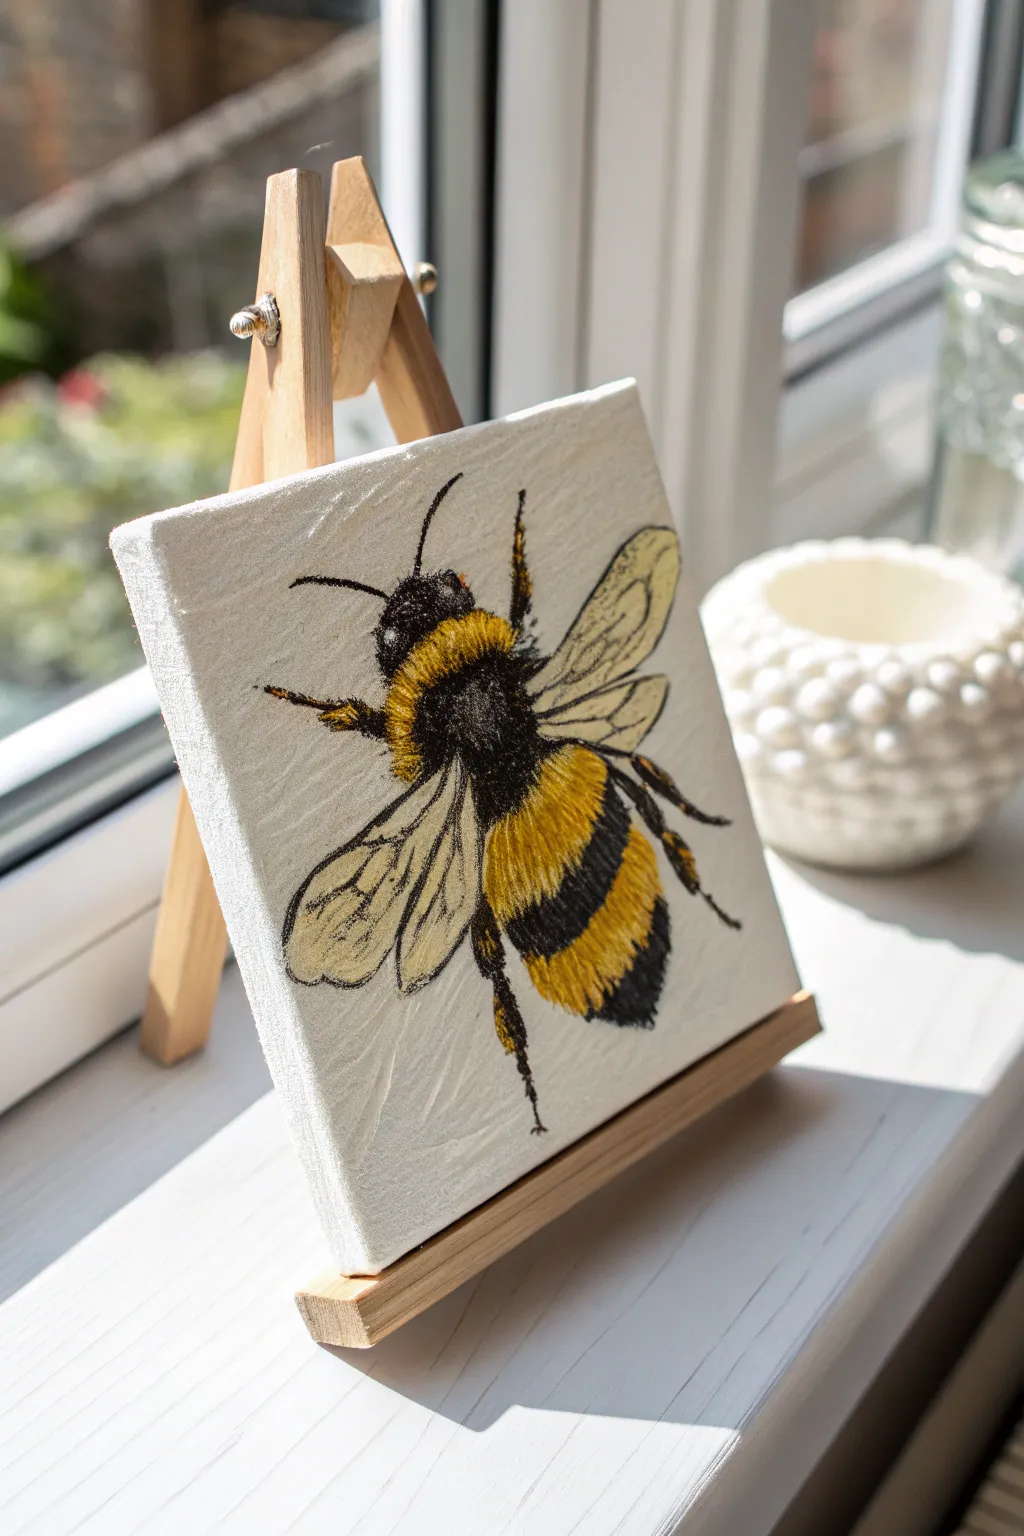
This charming project combines the texture of embroidery with the boldness of acrylics to create a stunning mixed-media bee. By stitching directly onto a small canvas, you achieve a fuzzy, lifelike quality that flat paint alone can’t replicate.
How-To Guide
Materials
- Small square stretched canvas (approx. 6×6 inches)
- Black embroidery floss
- Yellow/gold embroidery floss
- Embroidery needle (sharp tip)
- Pencil
- Acrylic paints: Black, White, Yellow Ochre, Burnt Umber
- Fine detail paint brushes (size 0 and 00)
- Small wooden easel for display
- Awl or push pin (optional, for pre-punching holes)
Step 1: Planning and Sketching
-
Prepare the canvas:
Start with a clean, small stretched canvas. If the surface feels too slick, you can give it a very light sanding, but usually, the raw canvas texture works well for this mixed-media approach. -
Sketch the outline:
Using a light pencil, draw the outline of the bumblebee in the center of the canvas. Focus on the three main body segments: the head, the thorax (middle), and the abdomen. -
Add detail lines:
Sketch in the wings extending outwards and the six legs. Mark the boundaries where the yellow stripes will go on the thorax and abdomen so you know exactly where to stitch later.
Needle won’t go through?
Canvas can be tough! If you’re struggling to push the needle through, use a thimble or pre-poke your holes with a sharp embroidery awl or a thick push-pin before stitching.
Step 2: Painting the Base
-
Paint the wings:
Before stitching, paint the wings. Use a mix of white with a tiny dot of yellow ochre to create a translucent cream color. Paint the wing shapes, letting the canvas texture show through slightly. -
Outline the wings:
Once the cream base is dry, use a very fine brush and watered-down black paint (or a fine-liner pen) to draw the delicate veins inside the wings and outline their shape. -
Underpaint the body:
Paint a base layer for the bee’s body using flat black and yellow acrylics. This doesn’t need to be perfect; it just ensures no white canvas shows through your stitching later. -
Paint the legs and antennae:
Using your black paint, carefully paint the legs and antennae. Since these are too thin to stitch easily, painting them creates a solid foundation. You can add tiny highlights with white later.
Pro Tip: Wing Transparency
To make the wings look truly transparent, mix a tiny bit of glazing medium into your wing paint. This lets the canvas weave show through, mimicking insect wing texture.
Step 3: Stitching the Texture
-
Prepare for stitching:
Thread your needle with black embroidery floss. I find using 3-4 strands gives a nice thickness without being too bulky to pull through the canvas. -
Stitch the black segments:
Begin stitching the head and the black stripe on the abdomen. Use a ‘long and short’ stitch technique, overlapping your stitches to create a fur-like texture. Be gentle pulling the needle through so you don’t warp the canvas. -
Create the fuzzy texture:
Layer your stitches. Don’t just make flat lines; cross them slightly and vary the lengths to mimic the chaotic growth of bee fur. -
Switch to yellow:
Change to your yellow or gold thread. Stitch the thorax (the upper back) and the yellow stripe on the abdomen. Overlap the yellow stitches slightly with the black ones to blend the ‘fur’ naturally. -
Add dimension:
For extra fluffiness on the yellow sections, you can leave the stitches slightly looser or add a second layer of stitching on top of the first.
Step 4: Final Details
-
Detail the legs:
Go back to the painted legs. Use a single strand of black thread to add tiny stitches where the legs join the body, blending the painted legs into the stitched body. -
Add visual weight:
If the body looks too flat, add a few stitches of Burnt Umber thread mixed into the yellow sections to create shadows and depth. -
Highlight the eye:
Use a tiny dot of white paint or a single French knot with white thread to create a glint in the bee’s eye on the black head section. -
Clean up the back:
Flip the canvas over and secure your thread ends with a knot or a piece of masking tape to keep everything tight. -
Display:
Place your finished textural masterpiece on the mini wooden easel to showcase the beautiful contrast between the paint and thread.
Enjoy your buzzing little creation, bringing a touch of nature indoors
Bee and Flower Wreath Composition
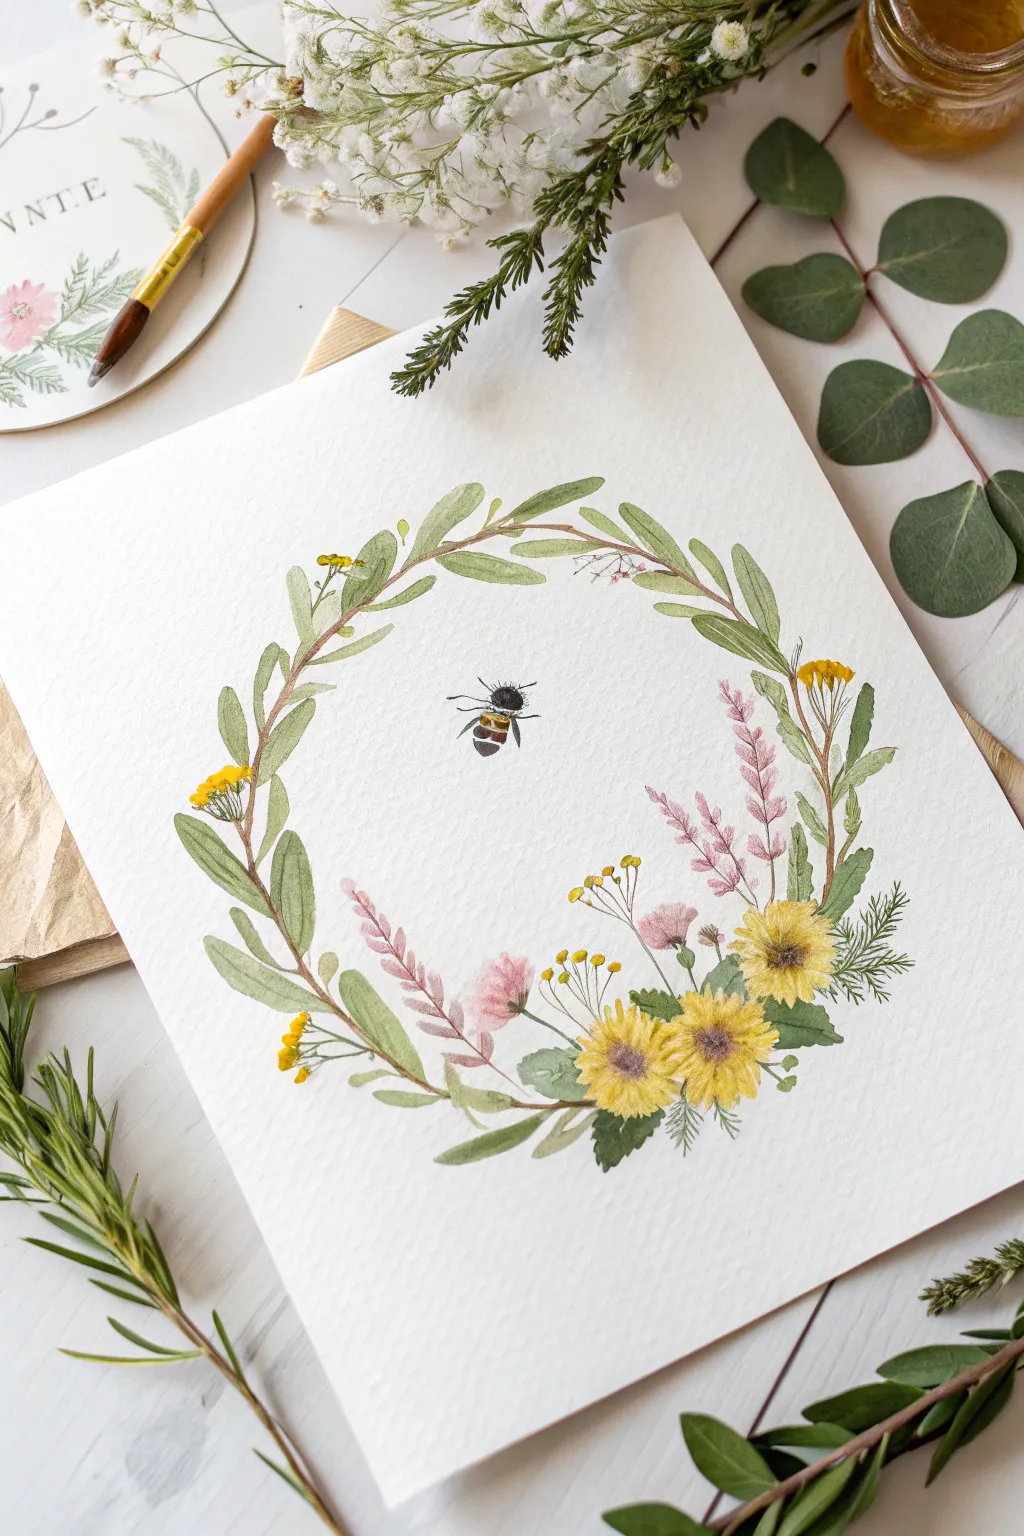
Capture the delicate beauty of a summer garden with this watercolor project, featuring a dainty floral wreath encircling a solitary, detailed bee. The soft greens and warm yellows create an inviting, natural composition perfect for botanical art lovers.
How-To Guide
Materials
- Cold press watercolor paper (300 gsm)
- Round watercolor brushes (sizes 2, 4, and 6)
- Pencil (HB) and kneaded eraser
- Watercolor paints: Sap Green, Olive Green, Lemon Yellow, Cadmium Yellow, Yellow Ochre, Alizarin Crimson, Lamp Black, Burnt Sienna
- Compass or circular object for tracing
- Jar of clean water
- Paper towels
Step 1: Sketching the Layout
-
Draw the guide circle:
Begin by lightly tracing a perfect circle in the center of your paper using a compass or a bowl. This will be the backbone of your wreath. -
Map out the foliage:
Lightly sketch the main leafy stems curving along the circle’s path. Focus the density of the leaves on the left side and the bottom right, leaving the top right slightly more open. -
Place the flowers:
Sketch small clusters of three aster-like flowers in the bottom right quadrant. Add vertical stalks for pink heather and small circles for yellow filler flowers. -
Outline the bee:
In the exact center of the open white space, draw the bee. Start with an oval for the thorax and a slightly pointed oval for the abdomen, adding thin lines for wings and legs. -
Clean up lines:
Use a kneaded eraser to gently lift the graphite until the lines are barely visible, ensuring your pencil marks won’t show through the transparent watercolor.
Pro Tip: Wing Texture
To make the bee wings look iridescent, lift a tiny bit of the wet grey wash out of the center of the wing using a thirsty (clean, damp) brush before it dries completely.
Step 2: Painting the Greenery
-
Base layer for leaves:
Mix a watery Sap Green and paint the long, pointed leaves on the left side using a size 6 brush. Use a single stroke method: press down for the belly of the leaf and lift for the tip. -
Varying the greens:
For complexity, mix a little Olive Green or Burnt Sienna into your green mix for the leaves on the bottom right. This warmth contrasts nicely with the cooler leaves on the left. -
Adding delicate stems:
Switch to a size 2 brush and paint the thin, twiggy stems connecting your leaves. Keep these lines fine and graceful, following the curve of your original circle guide. -
Pine or rosemary textures:
On the far right edge, paint feathery, needle-like textures using quick, short strokes with a darker green mix to simulate rosemary or pine sprigs.
Level Up: Lettering
The empty space within the wreath is perfect for calligraphy. Use a Micron pen to write a short quote, initials, or a date underneath the bee.
Step 3: Adding Floral Color
-
Yellow aster blooms:
Load your size 4 brush with Cadmium Yellow. Paint the petals of the three main flowers in the bottom right, pulling strokes outward from the center. -
Deepening the flower centers:
While the yellow petals are still slightly damp, drop a tiny touch of Yellow Ochre or diluted Burnt Sienna into the very center of each bloom to add depth. -
Pink heather stalks:
Mix a very watery Alizarin Crimson. Paint small, irregular dots up the vertical stems on the right side to create the look of heather or lavender spikes. -
Golden filler flowers:
Using pure Lemon Yellow on the tip of a size 2 brush, dab small dots throughout the wreath, particularly near the top left and bottom center, to represent billy balls or mimosa. -
Connecting the blooms:
Use a pale green mix to draw very thin lines connecting these floating yellow and pink flower clusters back to the main wreath structure.
Step 4: Detailing the Bee
-
Painting the bee’s body:
Mix a strong Lamp Black. Carefully paint the head and the thorax (middle section), leaving a tiny highlight unpainted on the thorax if possible for sheen. -
The striped abdomen:
Paint the stripes on the abdomen, alternating between the black mix and a rich Yellow Ochre. I like to let the yellow dry before adding the black stripes to prevent bleeding. -
Translucent wings:
Dilute a tiny amount of black or blue-grey with lots of water. Paint the wings with this sheer wash, outlining them very faintly with a size 0 or 2 brush. -
Fine details:
Use your smallest brush with black ink or concentrated paint to add the delicate antennae and the thin legs extending from the body.
Step 5: Final Touches
-
Defining the leaves:
Once the first layer of leaves is bone dry, mix a darker green and paint a thin central vein down the middle of the larger leaves for added realism. -
Review and refine:
Step back and look at the overall balance. If any area looks too sparse, add a few extra yellow dots or small green sprigs to fill the gaps.
Now you have a gentle garden scene that brings a buzz of nature indoors.
Night Garden Bee Glow Scene
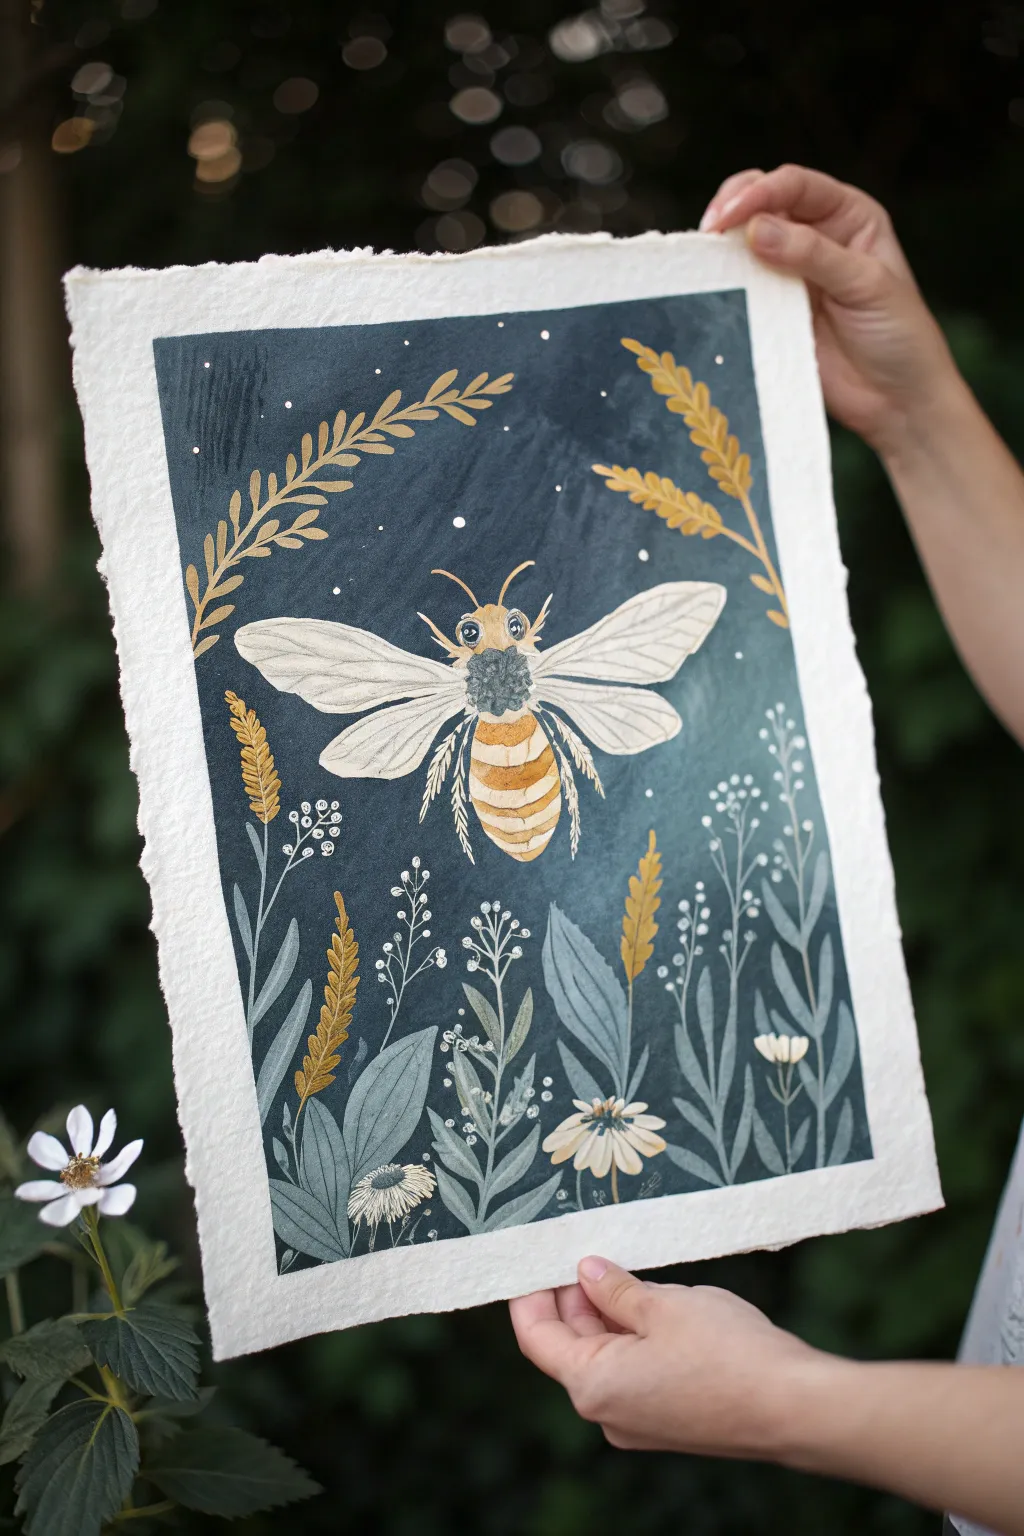
This enchanting project captures the magic of a bee navigating a moonlit garden, using deep teal washes and opaque details to create a glowing effect. The textured, handmade paper adds an organic, vintage feel that perfectly complements the whimsical subject matter.
Step-by-Step Guide
Materials
- Heavyweight handmade watercolor paper with deckled edges
- Gouache paints (Indigo, Teal, White, Yellow Ochre, Burnt Sienna, Black)
- Watercolor paints (optional, for transparent layers)
- Small round brushes (size 0, 2, and 4)
- Flat wash brush (size 1/2 inch or 3/4 inch)
- Masking tape or painter’s tape
- Pencil and eraser
- Mixing palette
- Two jars of water
Step 1: Preparation and Background
-
Prepare the paper borders:
Since we want a clean rectangular border within the irregular handmade paper, measure a rectangle in the center of your sheet. Apply masking tape firmly along these lines to create a crisp frame, pressing down the edges well to prevent paint bleed. -
Sketch the composition:
Using a light touch with your pencil, sketch the central bee shape. It should be the focal point. Add the surrounding stems, leaves, and wheat-like stalks curving inward to frame the insect. -
Mix the night sky color:
Combine Indigo and a touch of Teal gouache to create a deep, moody blue. You want this color to be rich and dark to contrast with the bee later. -
Apply the background wash:
Using your flat brush, paint the entire background area around your sketch. Don’t worry about being perfectly solid; slightly uneven strokes add atmosphere to the night sky. Carefully cut around the main shapes of the bee and the larger leaves.
Fixing “Chalky” Darks
If your dark background dries looking too pale or chalky, apply a second thin layer of the indigo mix. Gouache often dries lighter than it looks when wet.
Step 2: Painting the Bee
-
Base coat for the body:
Mix Yellow Ochre with a tiny bit of White. Paint the alternating stripes on the bee’s abdomen. Use a darker greyish-brown (Burnt Sienna mixed with a little Black) for the fuzzy thorax section. -
Adding the wings:
For the wings, use a very watered-down White gouache or a pale grey. You want them to look semi-transparent. Let this layer dry completely before adding veins. -
Refining the abdomen:
Once the yellow stripes are dry, use a fine liner brush and the brown mix to paint the thin, dark dividing lines between the segments. Add tiny curved strokes to the yellow areas to suggest texture. -
Creating the fuzzy texture:
Take your smallest brush and stipple small dots of grey and dark blue onto the thorax area. This mimics the fluffy texture of a bumblebee. -
Detailing the face:
Paint the large eyes with solid Black, leaving a tiny dot of white paper or adding a dot of white paint later for the reflection. Paint the antennae using a thin, steady stroke.
Step 3: Botanical Elements
-
Painting the golden wheat:
Use a mix of Yellow Ochre and a hint of Burnt Sienna for the wheat-like stalks at the top and sides. Paint individual grains using small, teardrop-shaped brushstrokes that stack on top of each other. -
Layering the leaves:
Mix a lighter, muted teal (White + Teal + tiny bit of Black). Paint the leaves at the bottom of the composition. Vary the opacity—some leaves can be more transparent to look further away. -
Adding white flowers:
Use pure White gouache to paint the small wildflowers and the larger daisy-like blooms at the bottom. The opacity of gouache allows you to paint right over the dark background if needed. -
Stems and fine lines:
I like to dilute the white paint slightly for this part to make it flow better. Use your size 0 brush to pull long, thin lines for the flower stems and the delicate sprays of tiny white dots/buds.
Pro Tip: Wing Transparency
To make wings look truly gossamer, mix a tiny drop of your background blue color into your white wing paint. It simulates transparency effortlessly.
Step 4: Final Details
-
Adding wing veins:
Mix a very pale grey. Carefully paint the vein structure on top of the dried white wings. Keep the pressure light to maintain faint, delicate lines. -
The starry glow:
Dip a toothbrush or a stiff bristled brush into watered-down White paint. Use your thumb to flick the bristles, splattering tiny ‘stars’ across the dark blue background. Add a few larger specific stars with a brush if desired. -
Highlighting the bee:
Add tiny lines of pure White on the bee’s legs and the edges of the wings to make them pop against the dark background. -
The reveal:
Wait until the painting is 100% dry—cool to the touch. Slowly peel away the masking tape at a 45-degree angle to reveal the crisp rectangular border.
Frame your moonlit masterpiece in a floating frame to show off those beautiful deckled edges
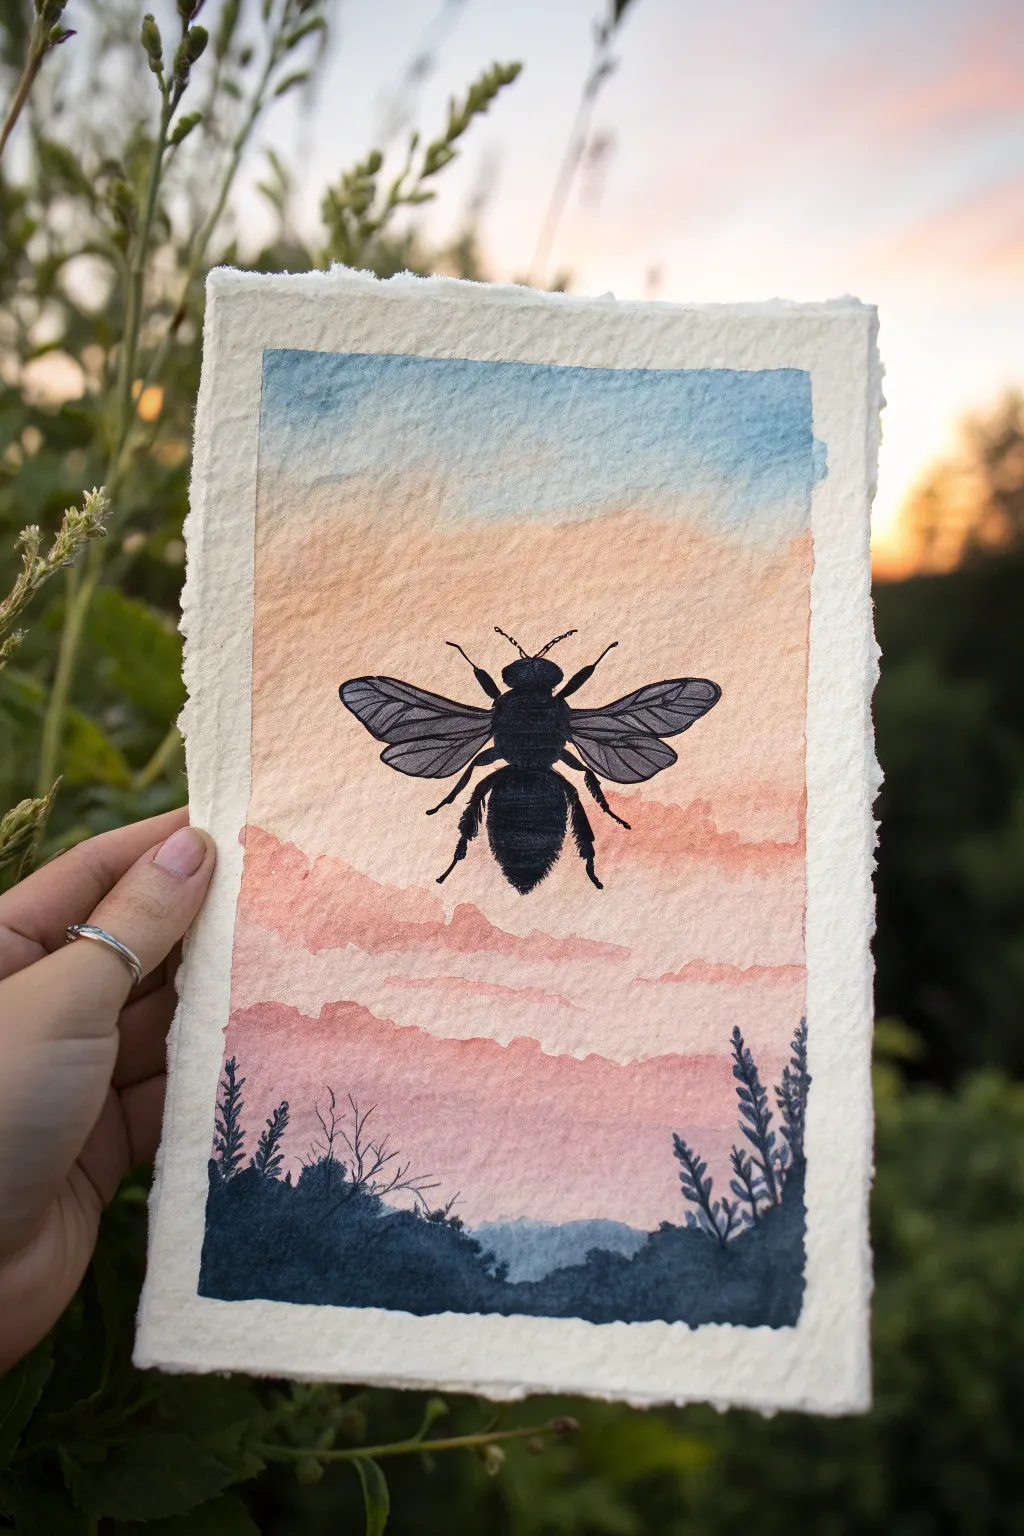
Bee Silhouette Against a Gradient Sky

Capture the delicate beauty of twilight with this atmospheric watercolor piece. Featuring a warm gradient sky and a striking, detailed bee silhouette, this project balances softness with bold contrast.
Detailed Instructions
Materials
- Heavyweight watercolor paper (300gsm or higher), ideally with deckled edges
- Watercolor paints (Cerulean or Cobalt Blue, Peach, Rose/Light Pink, Paynes Gray or Black)
- Masking tape (optional, only if not using deckled paper)
- Flat wash brush (1/2 inch or 3/4 inch)
- Fine detail round brush (size 0 or 00)
- Medium round brush (size 4 or 6)
- Pencil and eraser
- Jar of clean water
- Paper towels
Step 1: Setting the Sky
-
Prepare the wash:
Begin by wetting the entire paper surface lightly with clean water using your large flat brush. The paper should be damp and glistening, but not swimming in puddles. -
Apply the blue:
Load your brush with a diluted, watery mix of blue. Start at the very top edge and paint a horizontal band, letting the color naturally diffuse downwards about an inch or two. -
Transition to peach:
Clean your brush thoroughly. Pick up a soft peach or pale orange color. Start painting below the blue, leaving a tiny gap of white paper initially, then gently blending the peach upwards to meet the fading blue edge. -
Create the sunset glow:
While the peach layer is still wet, mix a little rose or light pink into your peach tone. Apply this warmer mixture to the middle section of the paper, creating soft, horizontal cloud-like streaks. -
Deepen the horizon:
Toward the bottom third of the paper, add a slightly stronger concentration of the pink-peach mix. This simulates the intensity of the sun just below the horizon line. -
Add cloud texture:
If you want the subtle cloud shapes seen in the reference, lift out pigment gently with a thirsty, semi-dry brush, or dab in a slightly thicker pink mixture while the paper is still damp. -
Let it dry totally:
This is crucial. The paper must be bone dry before you add the silhouette, or the black ink will bleed into the sky. Use a hairdryer on low heat if you’re impatient.
Step 2: Painting the Foreground
-
Mix the darks:
Create a very dark, saturated mix using Paynes Gray or mixing blue with dark brown. You want a near-black that still has some cool, atmospheric depth. -
Base foliage layer:
Using your medium round brush, paint an uneven, organic shape along the very bottom edge of the paper. Vary the height to simulate hills or bushes. -
Add plant details:
Switch to your fine detail brush. Pull thin, wispy lines upward from the dark mass to create sprigs of grass, twigs, and leaves. -
Texture the sides:
On the bottom right and left corners, paint taller, distinct botanical shapes—like the small fern-like leaves seen in the reference—to frame the scene.
Wing Transparency
To make wings look realistic, use 70% water and 30% pigment for the fill, but 100% pigment for the veins. The contrast creates the illusion of glass.
Step 3: The Bee Centerpiece
-
Sketch the outline:
Lightly sketch the bee shape in the center of the sky. Mark the head, thorax (middle), abdomen (bottom), and the four wing shapes extending outward. -
Fill the body:
Using your blackest paint mix and the detail brush, fill in the head and thorax first. These should be solid and opaque. -
Detail the abdomen:
Paint the abdomen, but instead of a solid block, use tiny, flicking brushstrokes on the edges to suggest fuzziness and texture. -
Wing transparency:
Dilute your black paint with water to make a translucent grey. Fill in the wing shapes with this lighter wash so the sunset colors subtly show through. -
Wing veins:
Once the grey wing wash is dry, go back in with the fine brush and opaque black paint to draw the delicate veins and outline of the wings. -
Legs and antennae:
Carefully paint the six legs hanging down from the thorax and the two antennae curving from the head. Keep these lines crisp and confident. -
Final touches:
Check your silhouette for any gaps. If the wings need more definition, add a second, very thin glaze of grey near the base of the wings where they attach to the body.
Add Golden Highlights
Mix a tiny amount of gold metallic watercolor or gouache over the bee’s abdomen fuzz or wing tips to catch the light.
Step back and admire how your bold silhouette pops against that soft evening sky


Have a question or want to share your own experience? I'd love to hear from you in the comments below!