If you’ve got a plain wine glass and a little paint, you’re already minutes away from something seriously cute. These beginner wine glass painting designs are my go-to ideas when you want pretty results without stressing over fancy drawing skills.
Polka Dot Confetti
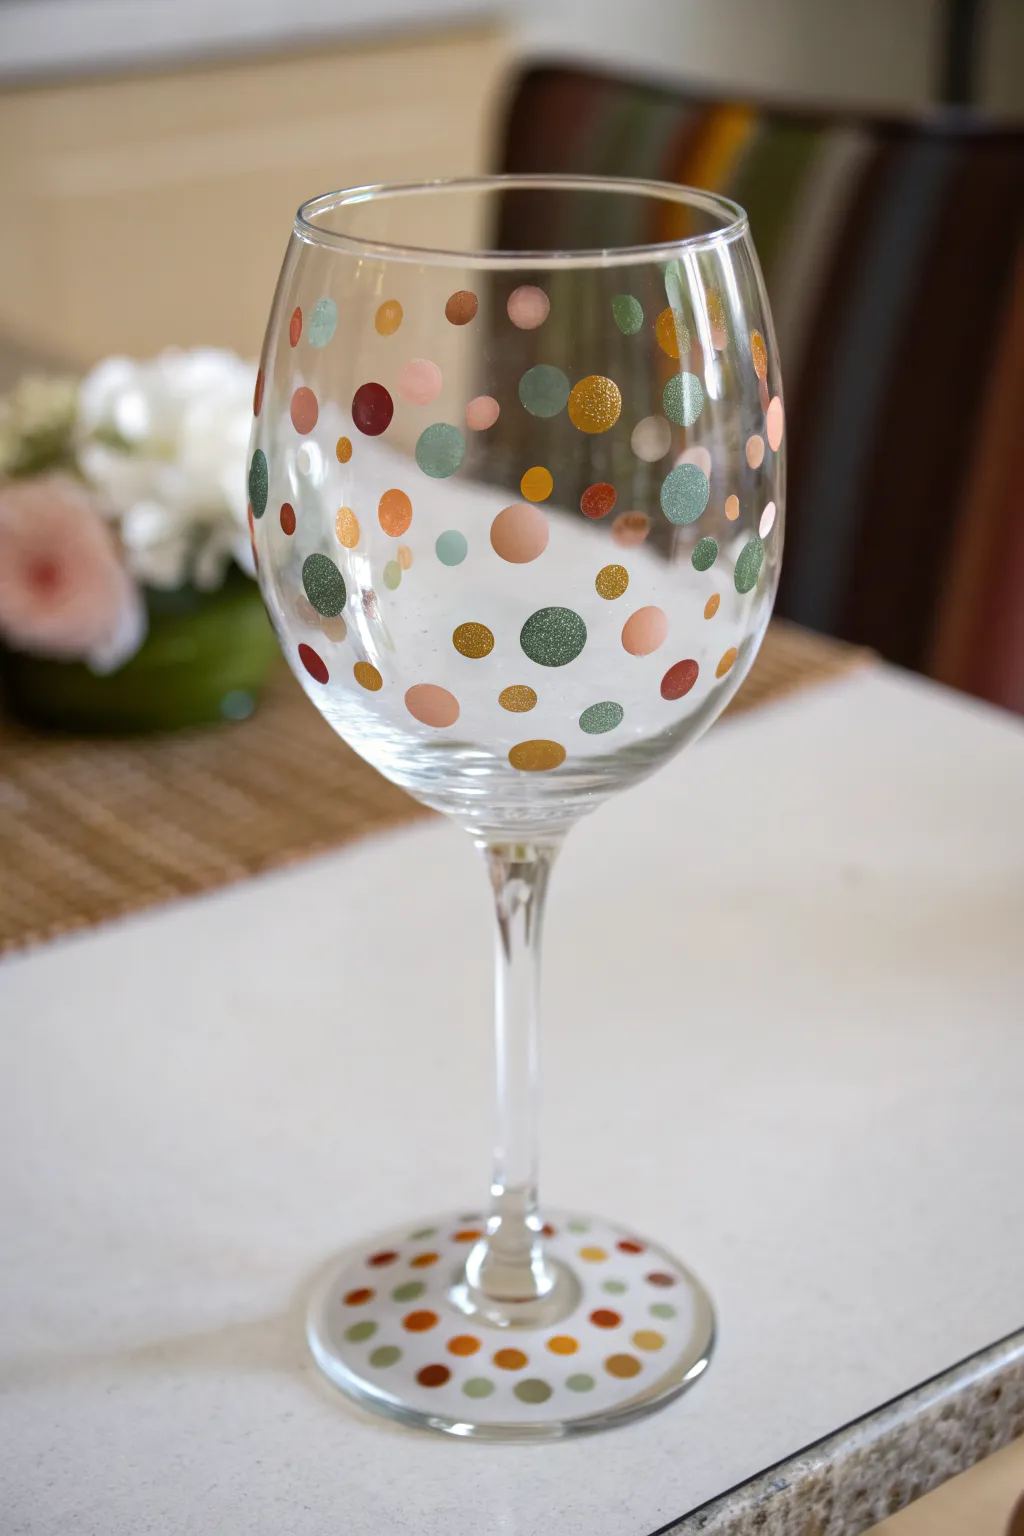
Bring a festive effervescence to your stemware with this scattered confetti design. Using a palette of warm earth tones and metallic accents, these varying dot sizes create a playful yet sophisticated look that mimics falling leaves or holiday glitter.
Step-by-Step Tutorial
Materials
- Clear wine glass
- Rubbing alcohol
- Cotton pads
- Enamel glass paints (opaque olive green, metallic gold, burnt orange, burgundy, chocolate brown)
- Foam pouncers (various sizes: small, medium, large)
- Q-tips (for the smallest dots)
- Paper plate or palette
- Oven (for curing)
Step 1: Preparation & Planning
-
Clean the surface:
Before dipping into any paint, ensure your glass is pristine. Wipe down the entire exterior of the wine glass bowl and the top of the base with rubbing alcohol on a cotton pad to remove oils and fingerprints. -
Dry completely:
Allow the alcohol to evaporate fully. Avoid touching the areas you are about to paint, as natural skin oils can prevent the enamel from adhering properly. -
Prepare your palette:
Squeeze dime-sized amounts of your enamel paints onto a paper plate. Keep the colors separated so your tools don’t accidentally mix muddy shades.
Perfect Pouncer Tip
Don’t press too hard with the foam pouncer. A light, straight-down blurry stamping motion creates a crisp circle; hard squishing causes paint to bleed underneath.
Step 2: Painting the Bowl
-
Load the large pouncer:
Dip your largest foam pouncer into the metallic gold paint. Dab it once or twice on a clean spot of the plate to ensure an even coat without globs. -
Apply anchor dots:
Press the generous gold dots randomly around the bowl of the glass. Think of these as your ‘anchor’ pieces; space them out widely to leave room for other colors. -
Switch colors and sizes:
Using a medium-sized pouncer, dip into the opaque olive green. Add these dots in the empty spaces, occasionally slightly overlapping a gold dot for a layered, confetti effect. -
Add warmth:
Repeat the process with the burnt orange and chocolate brown paints. I find it helpful to step back occasionally to ensure the distribution of color feels balanced and not too clustered in one spot. -
Incorporate small details:
Dip a Q-tip or the handle end of a paintbrush into the burgundy paint to create smaller, precise dots. Place these in the tighter gaps between larger circles. -
Vary opacities:
If you have sheer or glitter paints, add a few dots now. The mix of opaque, metallic, and sheer finishes gives the glass a lovely depth. -
Keep the rim clear:
Ensure you stop painting about an inch below the rim. This makes for a more comfortable drinking experience and looks cleaner.
Step 3: Painting the Base
-
Mirror the design:
Move down to the foot of the glass. You want to replicate the same energy here, so start with your larger gold and green dots. -
Fill the circle:
Work your way around the flat top of the base with the medium and small pouncers, using the orange and brown tones. -
Leave the stem bare:
For this specific look, leave the thin stem completely clear. This negative space creates a nice visual break between the busy bowl and the decorated base.
Daughter Dots?
If a bubble forms in the center of your dot while painting, lightly tap it with a dry brush or a needle to pop it before the paint begins to set and dry.
Step 4: Curing & Finishing
-
Air dry first:
Let the glass sit undisturbed for at least one hour, or up to 24 hours depending on your specific paint brand instructions. -
Place in cold oven:
Place the glass on a baking sheet inside a cold oven. Do not preheat the oven, as the sudden temperature change could shatter the glass. -
Bake to cure:
Set the oven to 350°F (175°C) and bake for 30 minutes. The time starts once the oven reaches temperature. -
Cool down slowly:
Turn the oven off after 30 minutes but leave the door closed. Let the glass cool down completely inside the oven before removing it.
Once fully cured, your custom confetti glasses are ready to sparkle at your next dinner party


Mini Heart Scatter
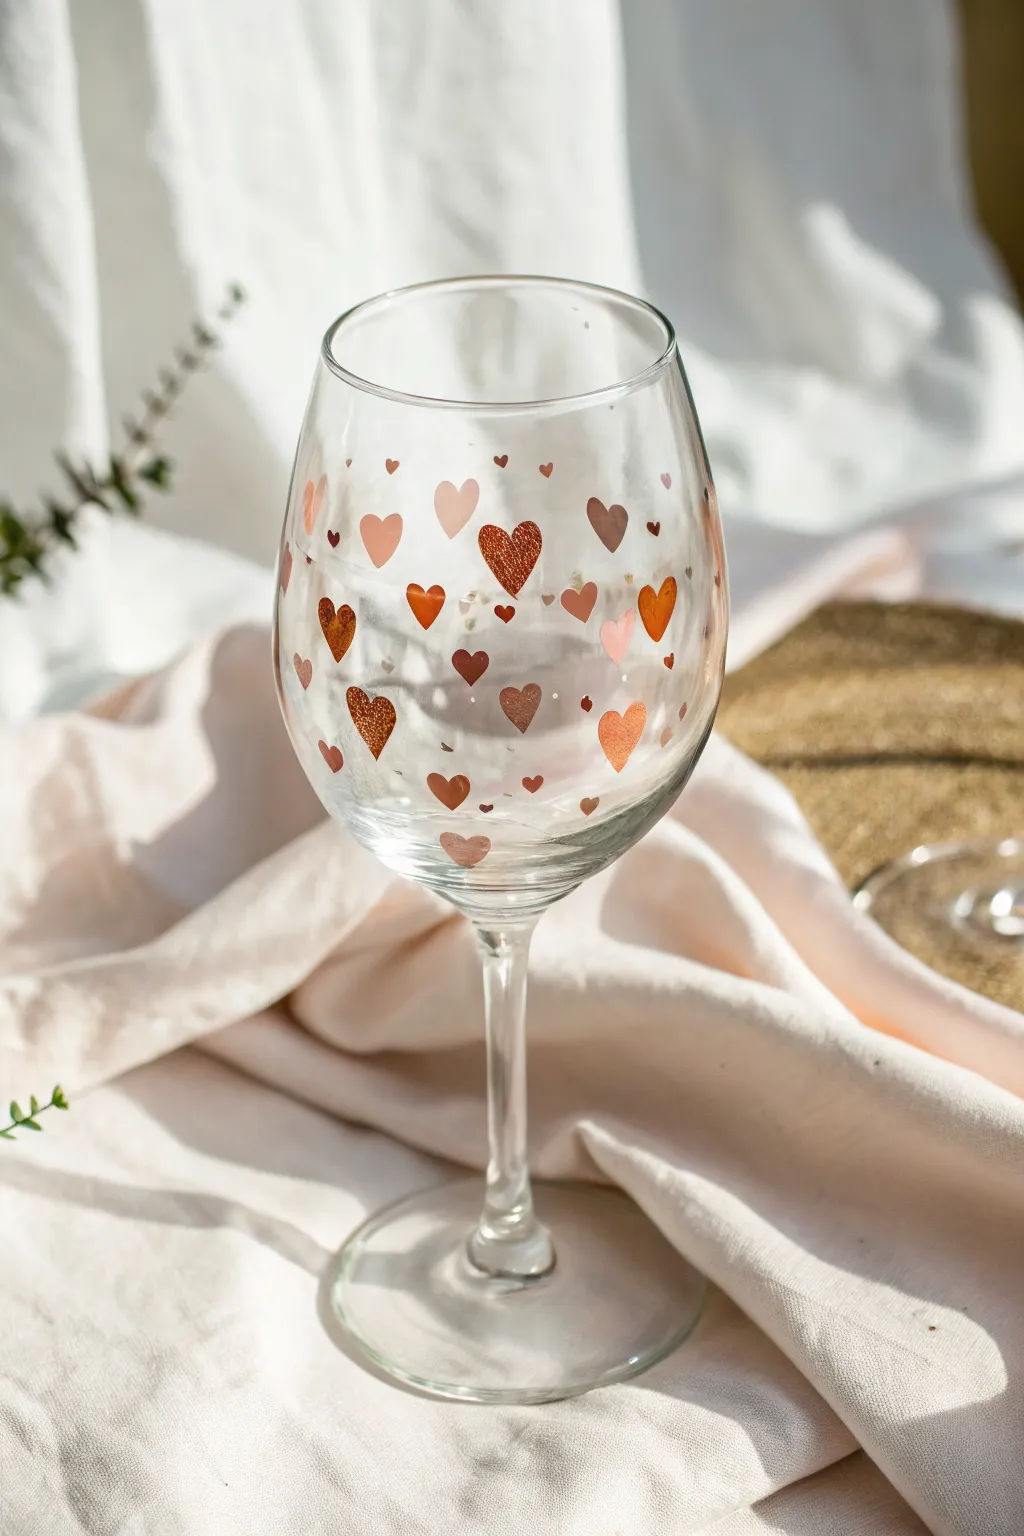
Transform a plain wine glass into a charming, romantic piece with this simple scatter design. Using a palette of warm, earthy tones like terra cotta, rust, and soft pink, you’ll create a lovely confetti effect that feels modern yet handmade.
Step-by-Step
Materials
- Clear stemmed wine glass
- Rubbing alcohol
- Cotton rounds or paper towels
- Enamel glass paints (terra cotta, rust/burnt orange, coffee brown, pale pink)
- Small round paintbrushes (sizes 0 and 1)
- Paper plate or palette
- Cotton swabs (for clean up)
- Oven (for curing)
Step 1: Preparation and Planning
-
Clean surface:
Begin by thoroughly cleaning the wine glass with warm soapy water to remove any stickers or residue. -
Degrease glass:
Once dry, wipe the entire outer surface of the glass bowl with rubbing alcohol on a cotton round. This step is crucial because oils from your fingers will prevent the paint from adhering properly. -
Prepare palette:
Dispense dime-sized amounts of your four paint colors onto your palette. If you want more variety, mix a little white into the rust color to create a fifth, intermediate shade. -
Plan spacing:
Visualize the glass bowl as a canvas, knowing you want a random, scattered look mostly concentrated on the middle and lower curve of the bowl, fading out slightly near the rim.
Heart Shape Hack
Struggling with the shape? Dip the non-brush end of your paintbrush in paint and stamp two dots side-by-side, then use the brush tip to drag them down into a V.
Step 2: Painting the Hearts
-
Start with darkest shade:
Load your size 1 brush with the coffee brown paint. Paint small hearts randomly around the glass. To make a heart easily, paint two small tear-drop shapes that connect at the bottom point. -
Vary the sizes:
Make sure some brown hearts are slightly larger and plump, while others are tiny specks. Rotation is key here; turn the glass frequently so you don’t smudge wet paint. -
Add rust tones:
Clean your brush or switch to a fresh one, then dip into the rust/burnt orange paint. Fill in the empty spaces between the brown hearts with this vibrant color, keeping the random spacing. -
Incorporate terra cotta:
Using the terra cotta shade, add more hearts to the mix. I like to overlap these very slightly with the edges of dry hearts occasionally to create depth, but be careful not to muddy wet colors. -
Lighten with pink:
Finally, come in with your smallest brush (size 0) and the pale pink paint. Use this color primarily for smaller hearts to act as highlights among the darker earthy tones. -
Check density:
Hold the glass up to the light to check the distribution. If you see largely empty gaps, add a tiny heart in whichever color is least represented in that area. -
Clean edges:
If any heart looks wonky or smeared, quickly dip a cotton swab in rubbing alcohol and wipe it away before it dries, then repaint. -
Rim check:
Ensure no paint is touching the varying rim where lips would touch; keep the design about an inch below the top edge for safety and comfort.
Step 3: Curing and Care
-
Initial dry time:
Let the glass sit undisturbed for at least 1 hour until the paint is dry to the touch, or follow the specific manufacturer instructions on your paint bottle. -
Full cure waiting period:
Most air-dry enamels require 21 days to fully cure on the shelf, but for a quicker finish, we will bake it. -
Oven loading:
Place the cold glass into a cold oven. Do not preheat the oven, as the sudden temperature change can shatter the glass. -
Baking process:
Set the oven to 350°F (175°C) and set a timer for 30 minutes. The timer starts once the oven reaches temperature. -
Cooling down:
After 30 minutes, turn the oven off and leave the door closed. Let the glass cool down completely inside the oven along with it.
Paint Slipping?
If the paint slides or separates on the glass, the surface is likely oily. Clean the specific spot again with alcohol and let dry completely before reapplying.
Enjoy your new custom glassware for your next dinner party or gift giving occasion


Bold Tape-Guided Stripes
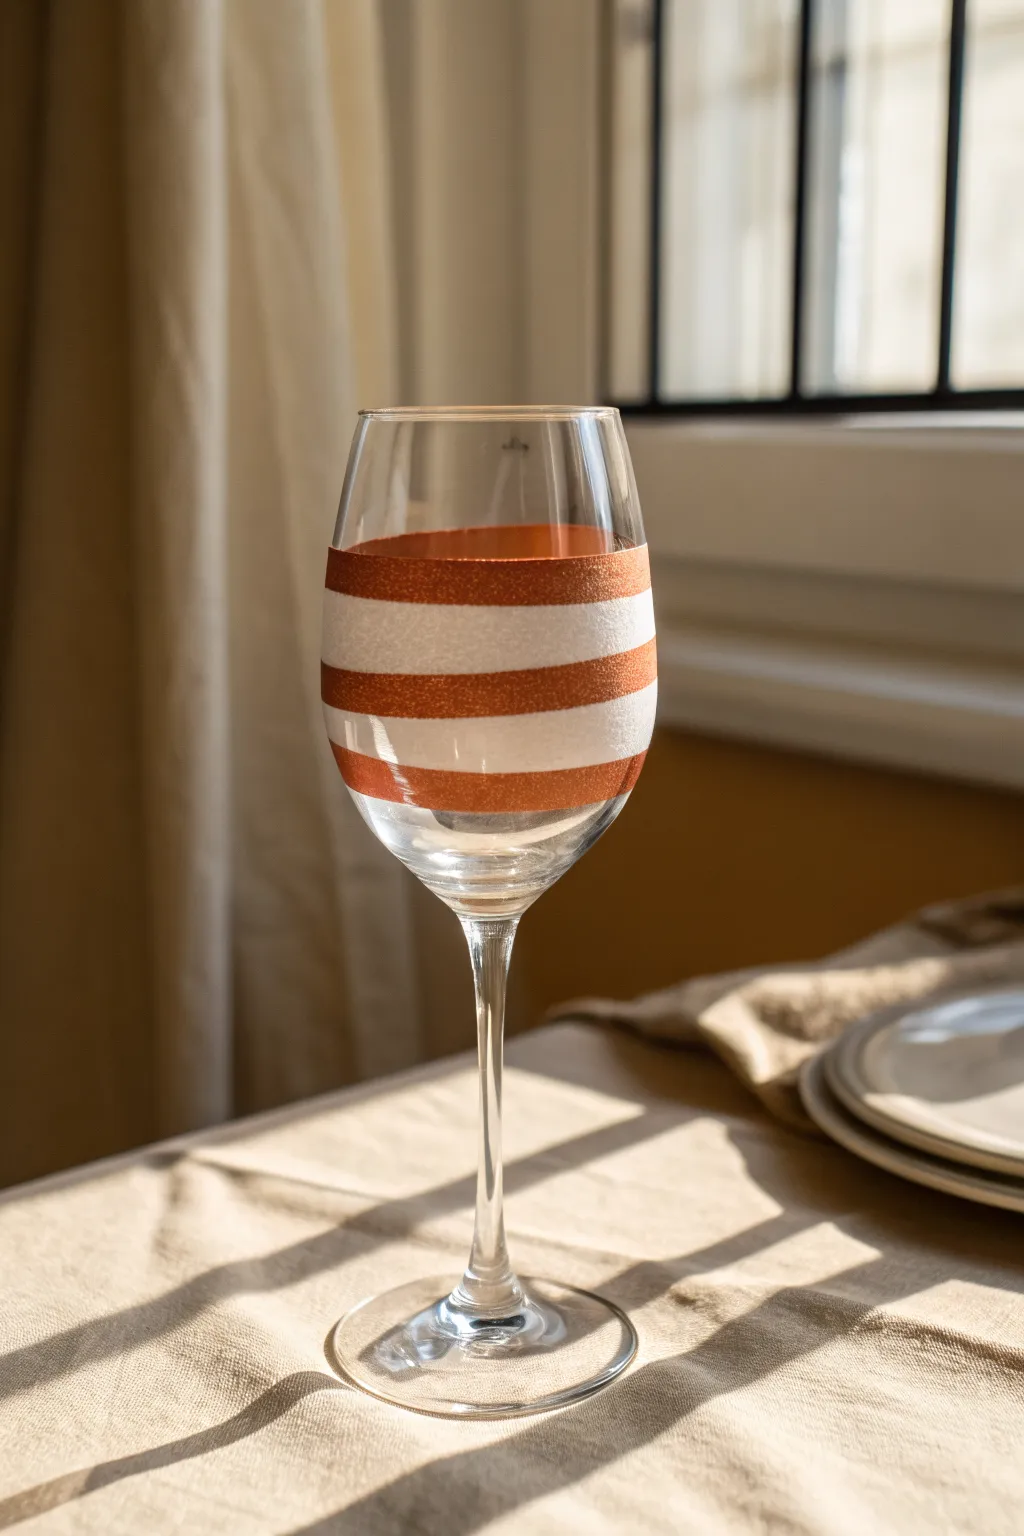
Achieve a chic, modern look for your glassware with this combination of glittering copper and soft matte white frosting. The use of masking tape creates crisp, professional lines, making this an ideal project for beginners wanting stunning results.
Detailed Instructions
Materials
- Wine glass (thoroughly cleaned)
- Rubbing alcohol
- Cotton rounds or paper towels
- Painter’s tape or masking tape (approx. 1/2 inch width)
- Metallic copper or bronze glass paint
- Frosting medium or white frosted glass spray paint
- Soft flat paintbrush (if brushing frosting)
- Sponge dabber or stippling brush
- Palette or paper plate
- Scissors
Step 1: Preparation and Taping
-
Clean the surface:
Before applying any design, wipe the exterior of the wine glass thoroughly with rubbing alcohol on a cotton pad. This removes invisible oils and fingerprints that could prevent the paint from adhering properly. -
Establish the top rim:
Decide where you want your design to start. I usually like to leave the top inch of the glass clear for comfortable drinking. Place a strip of tape horizontally around the glass at this height to mark your upper boundary. -
Create the first stripe:
Place a second ring of tape around the glass, parallel to the first one, leaving a gap of about 1/2 inch to 3/4 inch. This open gap will become your first painted stripe. -
Continue the pattern:
Repeat the taping process down the bowl of the glass. You want to alternate between taped areas (which will remain clear or become a different color) and exposed glass stripes. -
Secure the edges:
Once all tape is placed, run your fingernail or a credit card firmly over the edges of every tape strip. A tight seal is crucial to prevent paint from bleeding underneath and ruining your crisp lines.
Bleed Prevention
Before painting your color, brush a very thin layer of clear medium or varnish over the tape edge. This seals the gap so any bleeding is clear and invisible.
Step 2: Applying the Paint
-
Prepare the copper paint:
Squeeze a small amount of metallic copper glass paint onto your palette. If the paint seems thin, you might need to apply multiple coats, so plan accordingly. -
Sponge the metallic stripes:
Load your sponge dabber or stippling brush with the copper paint. Using an up-and-down dabbing motion, fill in the first and third exposed stripes (or whichever pattern you prefer). Dabbing creates a textured, glitter-like finish rather than brush strokes. -
Let the copper set:
Allow the copper paint to dry to the touch, usually about 15-20 minutes. If the coverage looks translucent, dab on a second layer to intensify the metallic effect. -
Apply the frosting:
For the alternating stripes (the ones not painted copper), apply your white frosting medium. You can brush this on carefully, or if using a spray, you’ll need to mask off the dried copper sections first. -
Smooth the frosting:
If brushing the frosting medium, use smooth, horizontal strokes to minimize texture, contrasting with the stippled look of the copper. -
Partial drying time:
Let the paint sit until it is tacky but not fully hardened. Waiting too long can cause the paint to peel up with the tape.
Ombré Effect
Mix a tiny drop of orange into your frosting medium for the middle stripes to create a soft gradient transition between the copper and the white.
Step 3: Finishing Touches
-
Remove the tape:
Carefully peel away the painter’s tape slowly at a 45-degree angle. This is the magic moment where your crisp lines are revealed. -
Clean stickiness:
If the tape left any sticky residue on the clear sections of glass, gently spot-clean those areas with a q-tip dipped in rubbing alcohol, being very careful not to touch the fresh paint. -
Cure the paint:
Follow the instructions on your specific bottle of glass paint. Most require air-drying for 21 days or baking in a conventional oven to make the design dishwasher safe. -
Baking method:
If baking, place the glass in a cool oven, set the temperature (usually 350°F), bake for 30 minutes, and then let it cool down inside the oven to prevent cracking.
Once cured, these elegant glasses are ready to add a warm, metallic glow to your next dinner party table setting


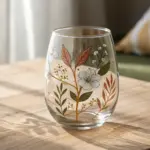
Easy Daisy Blooms
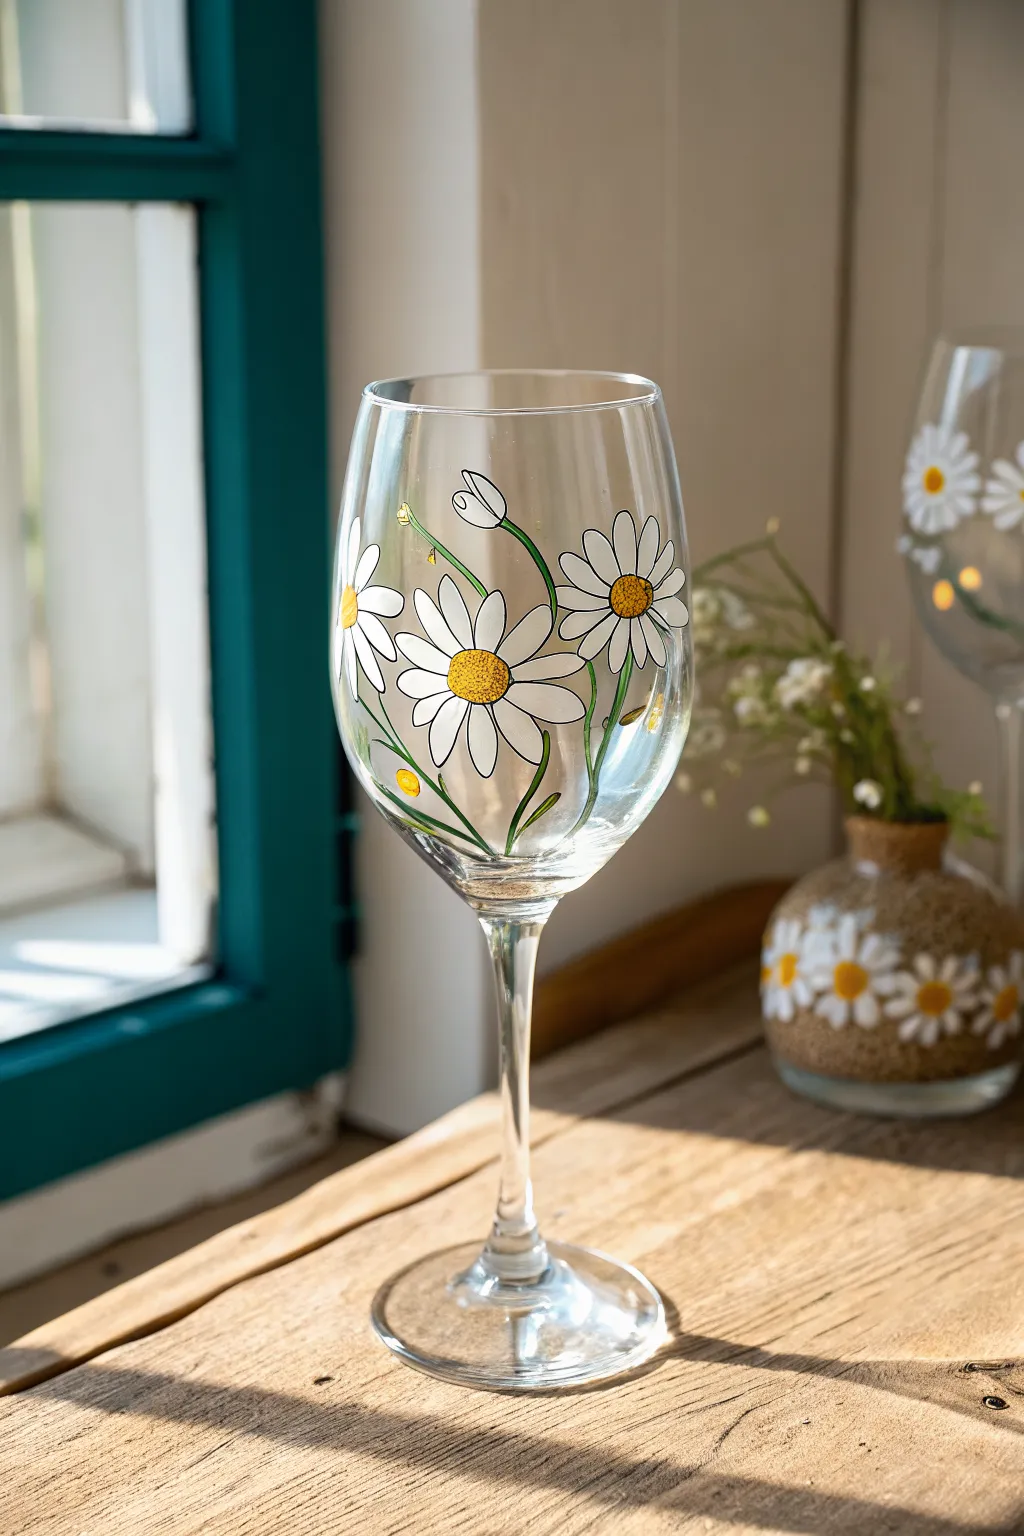
Transform plain glassware into a cheerful meadow scene with these bright, illustrative daisies. The crisp black outlines give the flowers a professional, finished look that pops beautifully against the clear glass.
Step-by-Step Tutorial
Materials
- Clear wine glass (washed and dried)
- Rubbing alcohol
- Cotton pads or paper towel
- Enamel glass paints (Opaque White, Sunny Yellow, Grass Green)
- Black glass liner paint (in a squeeze tube) or fine-tip oil-based paint marker
- Small round paintbrush (sz 2 or 3)
- Fine detail paintbrush (sz 0 or 00)
- Paper plate or palette
- Q-tips (for cleanup)
Step 1: Preparation & Planning
-
Clean the Surface:
Before painting anything, wipe the entire exterior bowl of the wine glass with rubbing alcohol on a cotton pad. This removes invisible oils and fingerprints that prevent paint adhesion. -
Plan Your Composition:
Visualize where your main three large daisies will go. Place one higher up, one slightly lower, and one turned to the side to create dynamic movement around the curve of the glass.
Step 2: Painting the Blooms
-
Paint the Petals:
Using your small round brush and opaque white enamel, paint the daisy petals. Start from the outer edge of a petal and stroke inward toward the center. -
Shape the Flowers:
Don’t worry about perfect gaps between petals yet. Paint long, oval shapes. For the side-facing flower, paint shorter petals on the top side to create perspective. -
Add a Second Coat:
Glass paint can be translucent. Once the first white layer is dry to the touch (usually 15-20 minutes), carefully dab a second layer of white on top for solid opacity. -
Create the Centers:
Dip a clean brush or the rounded end of your paintbrush handle into the yellow paint. Dot a generous amount into the center of each flower to make the pollen disk. -
Texturize the Center:
While the yellow paint is wet, gently stipple it with a dry bristles to give it a fuzzy, pollen-like texture. -
Paint Buds:
Near the top rim or between flowers, paint delicate white teardrop shapes to represent closed flower buds waiting to open.
Clean Lines Secret
If using a squeeze bottle for outlining, tap the nozzle on a paper towel first to release air bubbles. This prevents the line from spluttering or blobbing on the glass.
Step 3: Stems & Foliage
-
Paint Main Stems:
Using your fine detail brush and green paint, draw long, sweeping lines from the base of each flower head down toward the bottom of the glass bowl. -
Connect the Buds:
Paint thin, curved green lines connecting your white teardrop buds to the main cluster of stems. -
Add Leaves:
Paint long, slender leaves coming off the stems. Keep your strokes fluid and vary the lengths to make the bouquet look natural. -
Base Leaf Detail:
Add a small touch of green at the very base of the white buds to form the sepal (the green cup holding the petals). -
Let Everything Dry:
This is crucial. Allow all your color layers to dry completely for at least one hour before moving to the outlining phase to prevent smearing.
Make It a Set
Paint a matching glass vase or carafe with a full field of these daisies to create a cohesive brunch set perfect for spring get-togethers.
Step 4: Detailing & Curing
-
Start Outlining:
Using black glass liner paint or a black paint marker, carefully trace the outer edge of every white petal. -
Define the Petals:
Draw lines between the individual petals to separate them, giving the flower that distinct illustrative style. I find it easiest to pull the line from the center outward. -
Outline Centers:
Circle the yellow centers with your black liner. Add tiny stippled dots of black inside the yellow area to enhance the seed texture. -
Highlight the Stems:
Add very thin black lines along one side of the green stems and leaves to add dimension and shadow. -
Add Floating Details:
Paint a few tiny, free-floating yellow dots around the leaves to mimic falling pollen or tiny wildflowers in the background. -
Final Cure:
Follow the instructions on your specific paint bottle. Most glass paints require either 21 days of air drying or baking in a cool oven (usually 350°F for 30 mins) to become dishwasher safe.
Enjoy sipping from your new floral masterpiece, knowing the design is permanently set.
BRUSH GUIDE
The Right Brush for Every Stroke
From clean lines to bold texture — master brush choice, stroke control, and essential techniques.
Explore the Full Guide
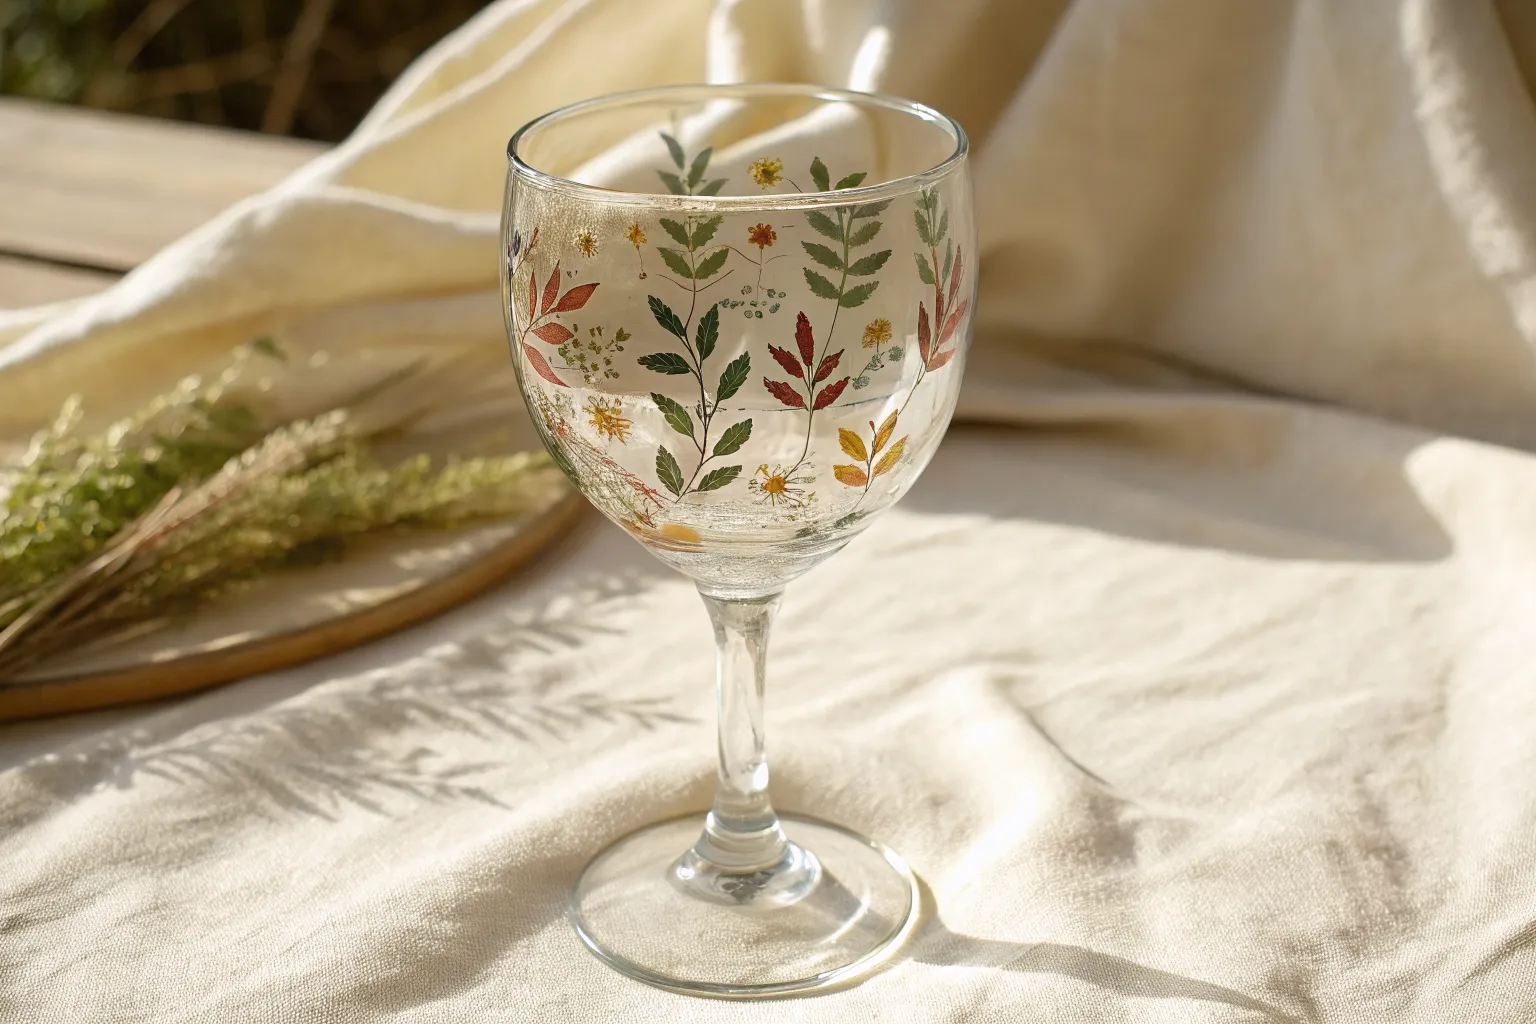
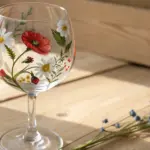
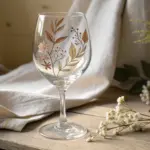
Trailing Flower Vine
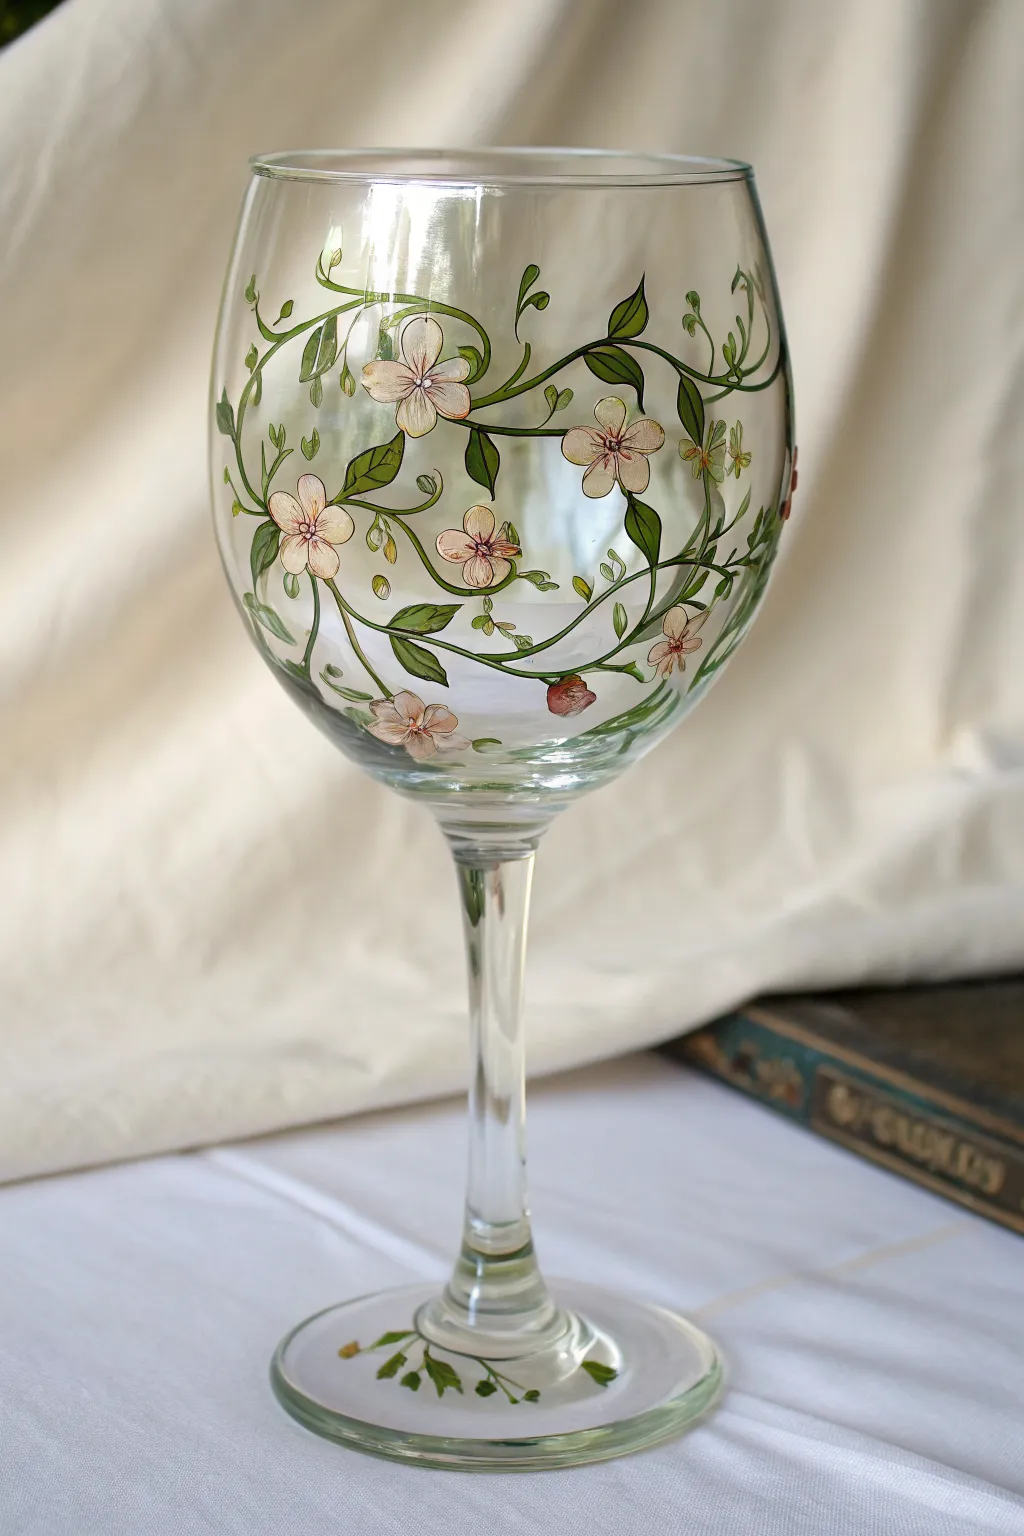
Capture the essence of spring with this elegant design featuring intertwining vines and soft, blush-colored blossoms. This project uses translucent layers to create a light, airy feel that wraps beautifully around the curvature of the glass.
Step-by-Step
Materials
- Clear wine glass (washed with soap and alcohol)
- Enamel glass paints (Olive Green, Dark Green, White, Soft Pink, Burgundy/Dark Red)
- Fine liner brush (size 0 or 00)
- Small round brush (size 1 or 2)
- Palette or small plate
- Paper towels
- Rubbing alcohol
- Cotton swabs
- Oven or curing instructions (based on paint brand)
Step 1: Preparation and Main Vines
-
Clean the surface:
Before you paint a single stroke, wipe the entire exterior of the wine glass with rubbing alcohol on a paper towel. This removes oils and fingerprints that prevent paint adhesion. -
Plan your flow:
Visualize an ‘S’ curve or a spiral wrapping around the bowl of the glass. You want the vines to look like they are naturally growing upward. -
Mix your vine green:
On your palette, mix a touch of Olive Green with a tiny bit of Dark Green to create a natural, medium-tone stem color. -
Paint the primary vines:
Using your fine liner brush and the mixed green, paint long, thin, flowing lines that wrap around the curvature of the glass. Vary the pressure: press slightly harder for thicker sections and lift off for wispy ends. -
Add secondary branches:
Branch off from your main vines with shorter, thinner strokes. These will hold your leaves and flowers later along the process.
Natural Variation
Don’t make your green too solid. I like to barely mix the greens on the palette so the brush picks up streaks of light and dark, giving the leaves instant shading in one stroke.
Step 2: Adding Foliage
-
Paint the leaves:
Switch to the small round brush. Load it with Olive Green and press the body of the brush against the glass next to a vine, then lift and pull outward to create a pointed leaf shape. -
Vary the leaf sizes:
Create clusters of two or three small leaves near the tips of vines, and place larger single leaves along the thicker parts of the stem. -
Add depth to leaves:
While the green is still slightly wet, pick up a tiny amount of Dark Green on the tip of your liner brush and add a vein or a shadow to the base of the larger leaves. -
Include tiny tendrils:
Go back to your fine liner brush with thinned green paint. Add tiny, curly cues (tendrils) springing off the main vines to give it a wild, organic look.
Step 3: Blossoms and Details
-
Create the flower base:
Mix White with a very small drop of Soft Pink. Using the small round brush, paint five-petal flower shapes scattered along the vines. Keep the paint somewhat sheer for a delicate look. -
Add flower definition:
Once the base pink is tacky or dry, use the liner brush with a slightly darker pink mix to outline the petals very loosely. This separates the petals visually. -
Detail the centers:
Dip the very tip of your liner brush (or a toothpick) into the Burgundy or Dark Red paint and dot the center of each flower. Add tiny lines radiating from the center outward. -
Paint flower buds:
Add small, closed buds at the ends of some branches using a teardrop shape in pink, cupped by a small green stroke at the bottom. -
Decorate the base:
Don’t forget the foot of the glass. Paint a few small sprigs of greenery and perhaps one fallen petal on the flat base to tie the whole design together. -
Clean up edges:
If you made any stray marks or want to sharpen a leaf tip, use a damp cotton swab or a toothpick to scrape away excess paint while it’s still workable.
Shaky Hands?
If you struggle with steady lines on the curve, rest your painting hand’s pinky finger gently on a dry part of the glass (or stem) to stabilize your brush strokes.
Step 4: Curing
-
Air dry completely:
Allow the glass to sit undisturbed for at least 24 hours (or as instructed by your paint manufacturer) to ensure the surface is fully dry throughout the layers. -
Bake to set:
Place the glass in a cold oven. Set the temperature to the manufacturer’s specification (usually around 350°F) and bake for 30 minutes. Turn the oven off and let the glass cool completely inside before removing.
Once cured, your beautiful botanical glass is ready for a crisp white wine and admiring glances
Thin Rim Accent Line
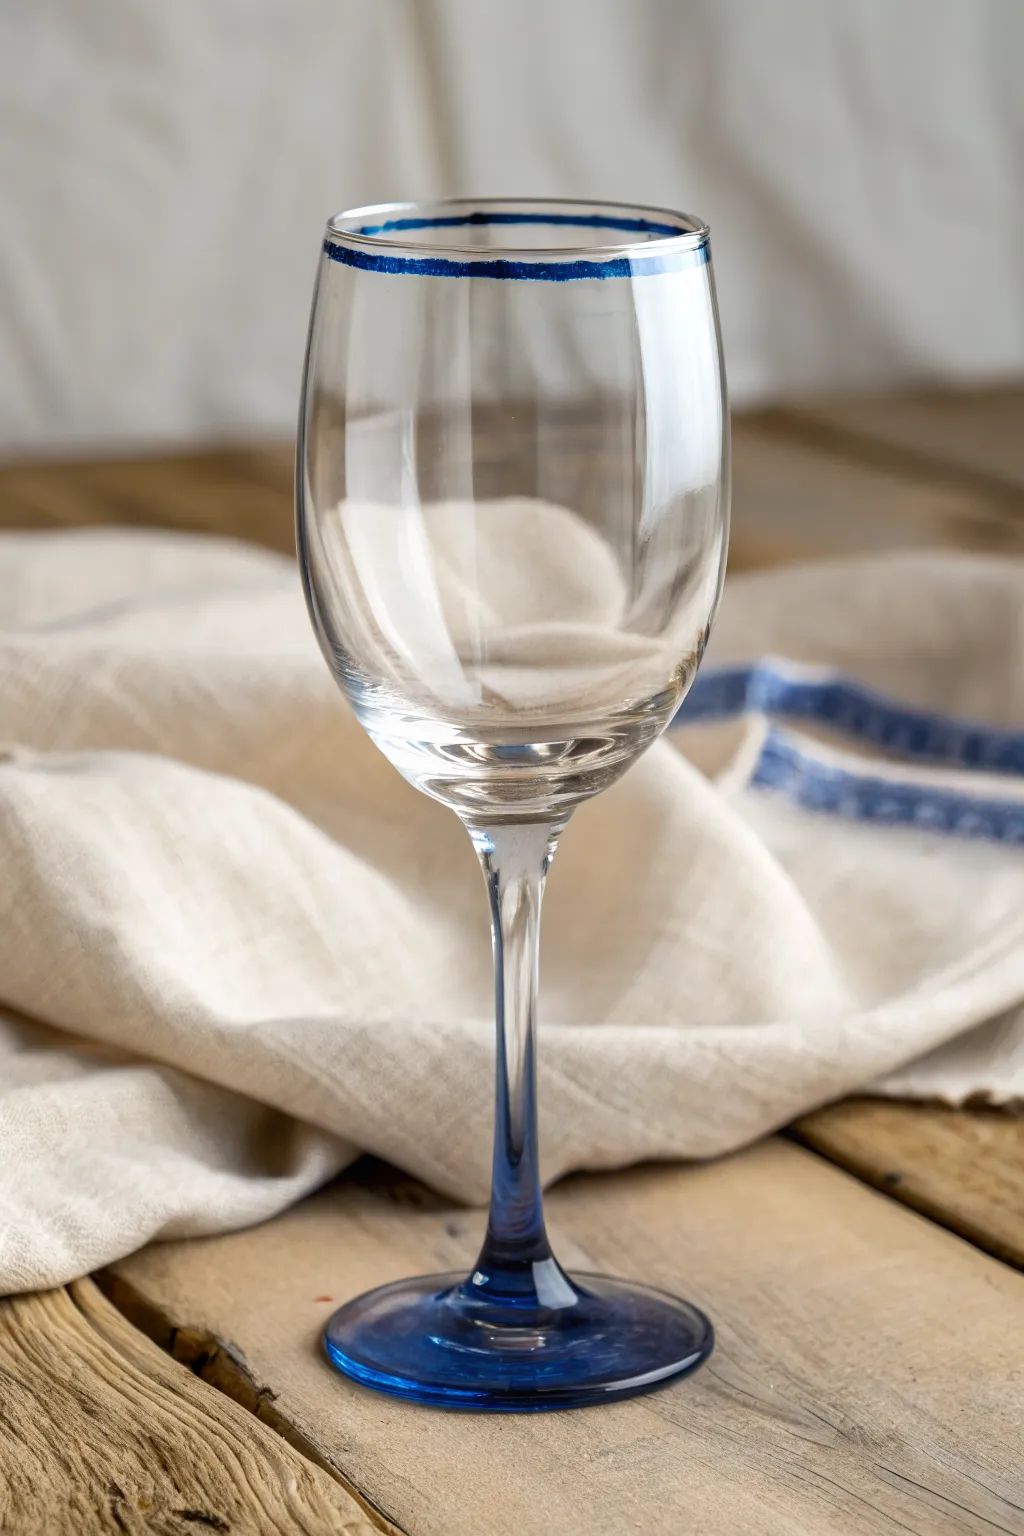
Transform a plain wine glass into a sophisticated piece of drinkware with just a few touches of color. This beginner-friendly design features a translucent blue base and stem that leads up to a delicate, matching accent line around the rim.
Detailed Instructions
Materials
- Clear wine glass
- Rubbing alcohol
- Cotton pads or paper towels
- Translucent or frosted glass paint (Royal Blue or Cobalt Blue)
- Small flat synthetic brush (size 4 or 6)
- Very fine detail brush (liner brush, size 0 or 00)
- Painter’s tape (optional, for the stem)
- Q-tips (for cleanup)
- Oven (for curing, if paint requires)
Step 1: Preparation & Cleaning
-
Clean the surface:
Before applying any paint, it is crucial to remove oils and dirt. Wipe the entire glass down thoroughly with rubbing alcohol and a cotton pad. -
Dry completely:
Let the alcohol evaporate completely. Avoid touching the areas you plan to paint with your bare fingers, as skin oils can prevent the paint from adhering properly.
Steady Hand Trick
Rest your pinky finger on the glass surface (on a dry spot) while holding the brush. This anchors your hand and stabilizes the brush stroke for the rim.
Step 2: Painting the Base & Stem
-
Load the flat brush:
Dip your flat synthetic brush into the translucent blue glass paint. You want enough paint to cover smoothly, but not so much that it drips. -
Calculate the stopping point:
Look at the stem. You want the color to travel up the stem and just slightly flare out where it meets the bowl of the glass, creating a natural transition. -
Apply the first coat on the base:
Start painting at the very bottom disc of the glass. Use long, even strokes following the curve of the base. I find it easiest to hold the bowl and rotate the glass while keeping the brush steady. -
Move up the stem:
Continue brushing the translucent blue paint upwards along the stem. Ensure you get coverage all the way around the thin neck. -
Create the fade:
As you reach the point where the stem widens into the bowl, lighten your touch. Feather the paint edge slightly so there isn’t a harsh, thick ridge of paint. -
Check for smoothness:
Look at the paint against the light. If you see significant streaks, smooth them out gently with the tip of the brush while the paint is still wet. -
Let the base dry:
Allow this section to dry according to the manufacturer’s instructions (usually 1 hour) before adding a second coat if you want a deeper blue color.
Ombré Effect
Mix a drop of clear medium into your blue paint as you move up the stem. This dilutes the pigment, creating a stunning gradient fade into the clear bowl.
Step 3: Detailing the Rim
-
Get the right angle:
Place the glass upside down on a flat surface if steadying your hand is difficult, or hold it comfortably by the painted stem once it is dry to the touch. -
Load the fine liner brush:
Switch to your size 0 or 00 liner brush. Dip just the tip into the blue paint. Consistency is key here; the paint should flow easily but not be runny. -
Start the rim line:
Gently touch the brush to the very top edge of the rim. Use the side of the bristles slightly to help guide you along the glass edge. -
Rotate and paint:
The secret to a straight line is moving the object, not the brush. Keep your hand steady and slowly rotate the glass to let the line draw itself. -
Refining the line width:
This style looks best with a slightly imperfect, hand-painted look, but try to keep the width relatively consistent—about 1/8th of an inch thick. -
Immediate cleanup:
If you smudge the paint or the line gets too thick, dampen a Q-tip with a tiny bit of rubbing alcohol and wipe away the mistake immediately while wet. -
Lip safety check:
Ensure the paint is on the *outside* of the rim, leaving the very top lip free of heavy paint for comfortable sipping, unless your paint is specifically rated food-safe for lip contact.
Step 4: Curing & Finishing
-
Final drying time:
Let the finished piece sit undisturbed for at least 24 hours to allow the paint to fully harden. -
Bake to cure:
For a durable, dishwasher-safe finish, place the glass in a cool oven. Set the temperature to 350°F (176°C) and bake for 30 minutes. Turn the oven off and let the glass cool down inside the oven completely.
Once fully cured, your custom blue-accented glassware is ready for your next dinner party

PENCIL GUIDE
Understanding Pencil Grades from H to B
From first sketch to finished drawing — learn pencil grades, line control, and shading techniques.
Explore the Full Guide
Dipped Color Block Base
This sophisticated yet surprisingly simple design mimics the look of a heavy, colored glass base while adding a delicate touch of frost. By combining enamel glass paint with a simple etching or frosted glass medium, you can transform a plain dollar-store find into a custom piece of tableware.
Step-by-Step
Materials
- Clear wine glass
- Rubbing alcohol
- Cotton pads or paper towels
- Painter’s tape or masking tape (low tack)
- Gloss enamel glass paint (Ruby or Crimson Red)
- Frosted glass medium or etching cream
- Soft flat paintbrush (medium size)
- Small foam pouncer or sponge
- Oven (for curing, if required by paint type)
Step 1: Preparation & Masking
-
Clean the glass:
Before anything touches the glass, it needs to be perfectly clean. Wipe down the entire exterior surface, especially the stem and lower bowl, with rubbing alcohol to remove oils and fingerprints. -
Establish the color line:
Decide how high you want the red color to go up the bowl. Apply a strip of painter’s tape horizontally around the bowl at this level. Press down firmly to seal the edge so paint won’t bleed under. -
Establish the frost line:
Place a second piece of tape about half an inch to an inch above the first piece. This narrow gap between the two tape lines will become your frosted band. -
Protect the upper glass:
It’s a good idea to loosely tape some paper or plastic around the top rim of the glass to protect it from accidental smudges while you work on the base.
Smooth Operator
To avoid brushstrokes in the red base, pour a small amount of paint into a dish and dip a cosmetic wedge sponge in it, patting the paint onto the glass.
Step 2: Painting the Base
-
First coat on the base:
Dip your soft flat brush into the red gloss enamel. Start painting the flat foot of the glass, working your way up the stem. Use long, smooth strokes to minimize brush marks. -
Painting the lower bowl:
Continue painting up the stem until you reach the bottom strip of tape. Carefully paint right up to and slightly over the tape edge to ensure a crisp line later. -
Check for coverage:
Glass paint is often semi-transparent. Hold the glass up to the light to check for streaks. Let this first layer dry for about an hour (or according to bottle instructions). -
Apply second coat:
Apply a second, slightly thicker coat of red paint over the same area. This will give that rich, ‘dipped’ look. I find dabbing gently with a sponge here can sometimes create a smoother finish than brushing if you’re seeing too many streaks. -
Remove the lower tape immediately:
While the second coat of red paint is still wet, carefully peel off the bottom strip of tape. Pulling it while wet prevents the paint from drying to the tape and peeling off in chunks.
Step 3: Adding the Frost & Curing
-
Let the red dry:
Allow the red paint to dry completely to the touch before moving on to the frosting phase. You don’t want to smudge your crisp red line. -
Retape the red edge:
Apply a fresh piece of painter’s tape exactly over the top edge of your dried red paint. This protects the red section and creates the bottom boundary for the frosted band. -
Apply the frost medium:
Using a small foam pouncer or sponge, dab the frosted glass medium (or etching cream) into the open band between your two tape lines. Use a pouncing motion to create an even, cloudy texture. -
Peel and reveal:
Once you have covered the band, carefully peel away both the top tape line and the tape covering the red paint. Do this before the frost medium fully hardens. -
Clean up edges:
If any paint or frost medium seeped where it shouldn’t have, use a toothpick or a cotton swab dipped in alcohol to tidy up the edges immediately. -
Curing the glass:
Follow the manufacturer’s instructions for your specific paint. Most glass enamels require air drying for 21 days or baking in a non-preheated oven for 30 minutes at 350°F to become dishwasher safe.
Ombré Effect
Instead of a solid red block, mix a drop of white into your red as you move up the stem to create a gradient that fades into the frosted band.
Now you have a stunning piece of glassware that looks professionally dipped and etched right in your own kitchen
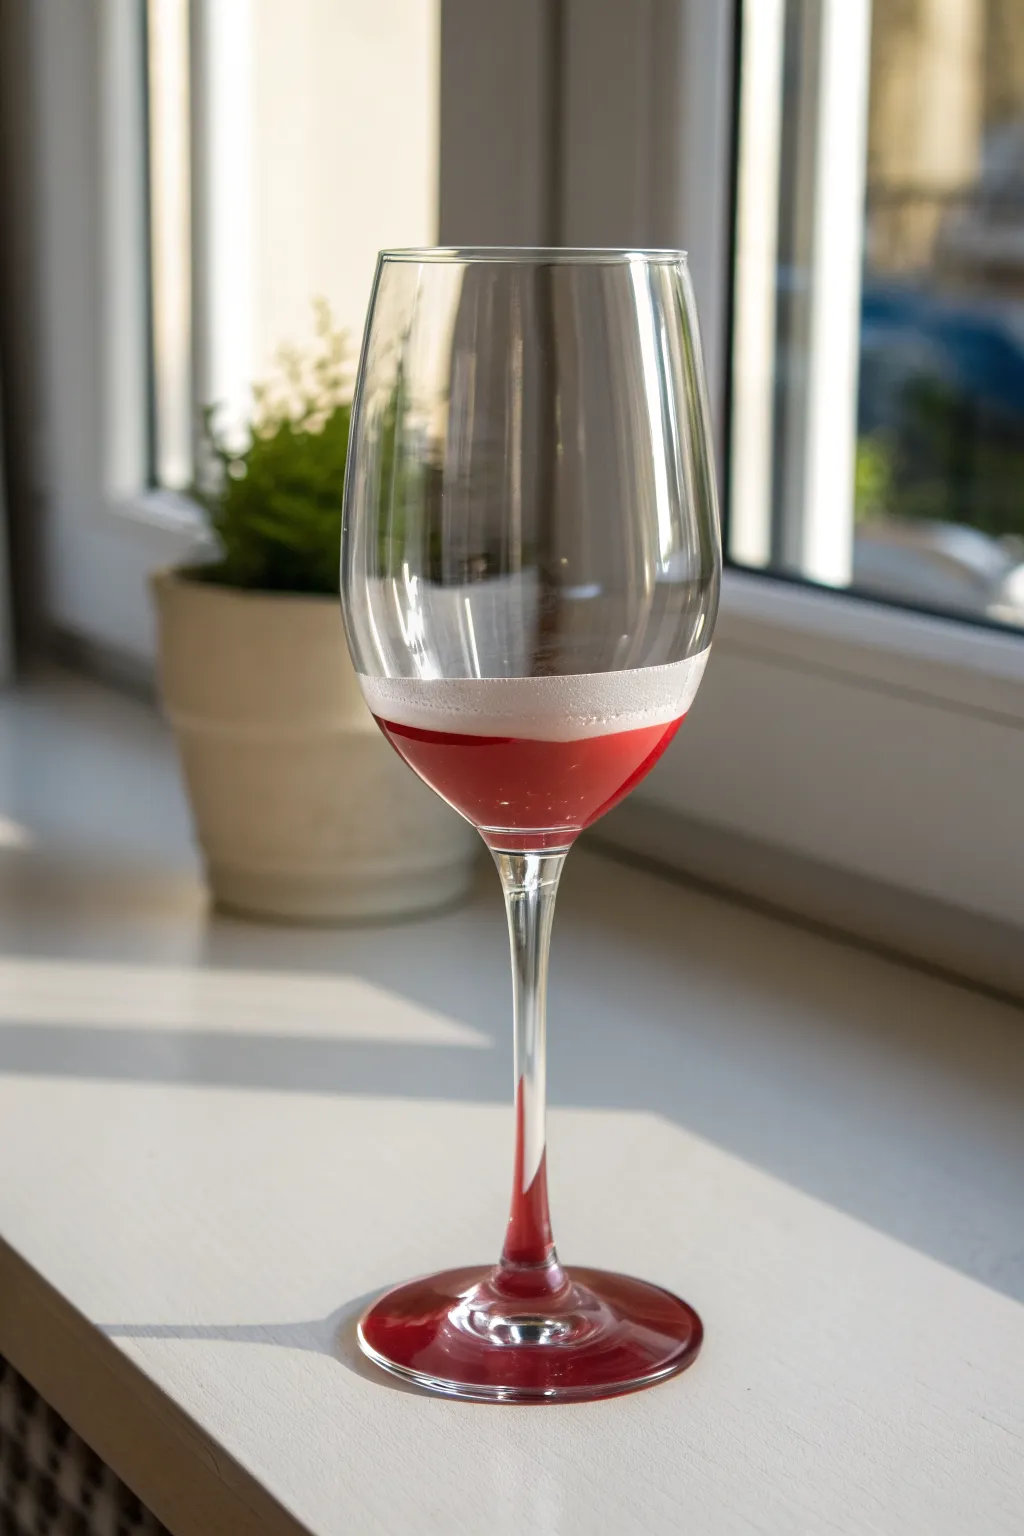
Soft Ombré Fade Upward
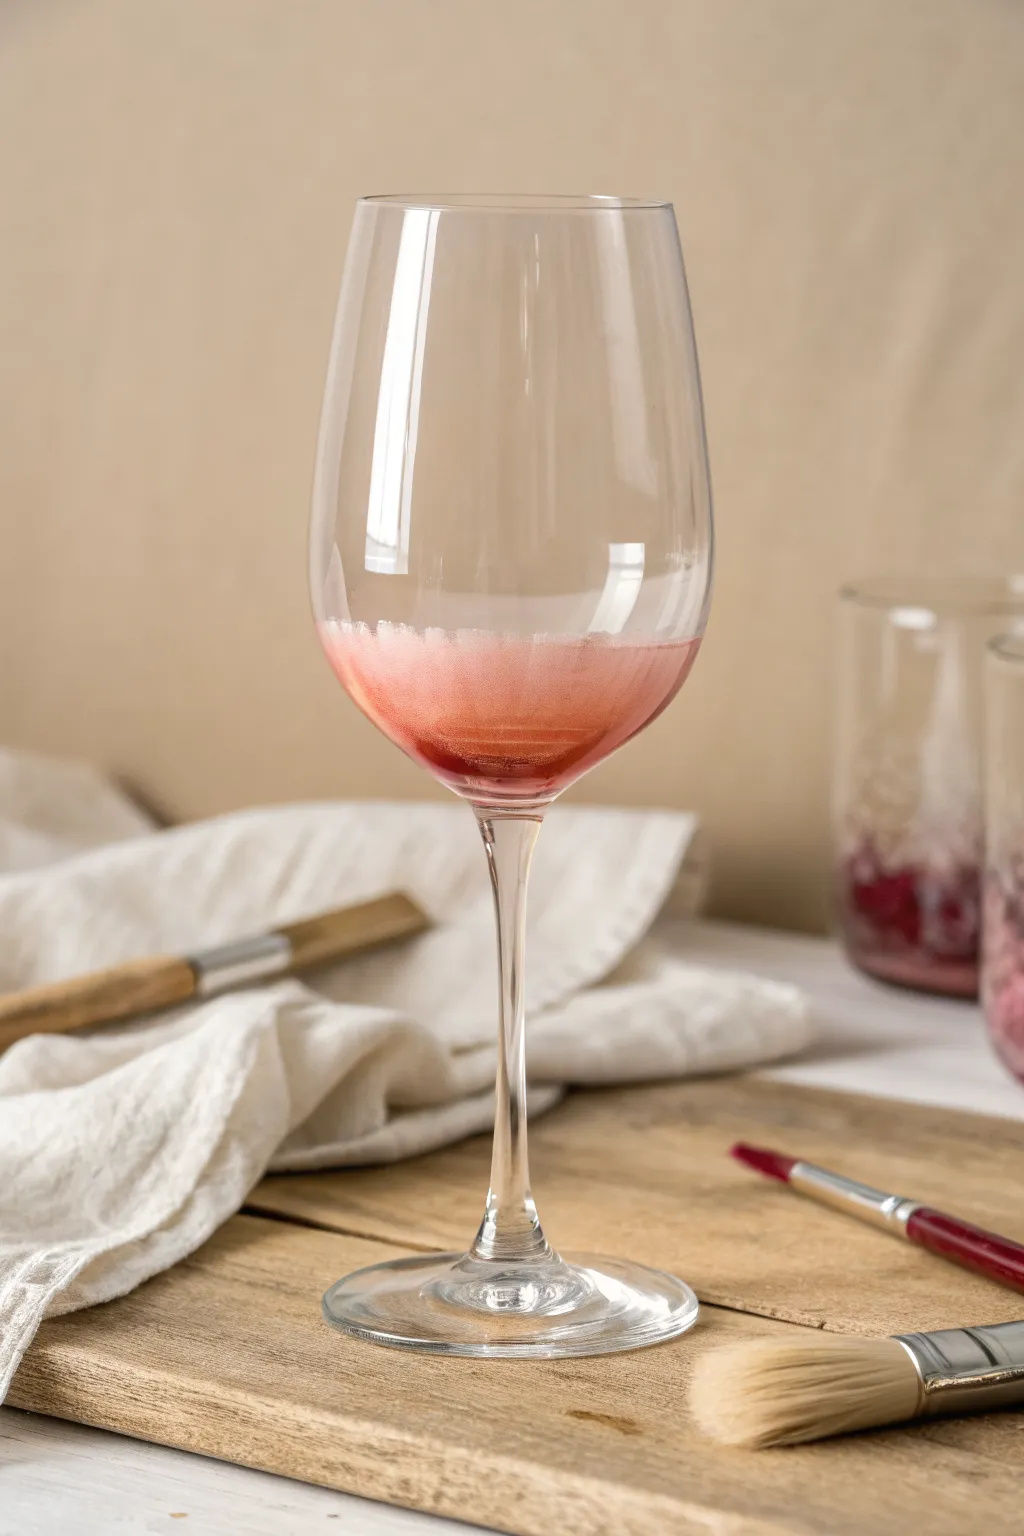
Create a sophisticated, minimalist look that mimics the effervescence of rosé or sparkling wine settling in a glass. This soft ombré design fades gently upward from a deep berry red into a frothy, translucent white, adding a permanent splash of elegance to your stemware.
How-To Guide
Materials
- Clear wine glass (washed and dried)
- Rubbing alcohol
- Cotton pads or paper towel
- Enamel glass paint (Berry Red or Burgundy)
- Enamel glass paint (White)
- Frosting medium or clear glazing medium (optional, for smoother fades)
- Cosmetic sponge wedges
- Small flat synthetic brush
- Palette or small plate
- Oven (for curing)
Step 1: Preparation & Base Layer
-
Clean surface:
Before you start painting, it’s crucial to remove any oils or fingerprints. Wipe down the entire outer surface of the wine glass bowl with rubbing alcohol and a cotton pad, then let it dry for a moment. -
Prepare the palette:
Squeeze out a dime-sized amount of your berry red paint and a slightly larger amount of white paint onto your palette. It helps to have them separated but close enough to pull from both. -
Mix a mid-tone:
Take a small amount of red and mix it into a portion of the white to create a soft pink transition color. You want three distinct pools: deep red, soft pink, and pure white. -
Load the sponge:
Dab the wide end of a cosmetic sponge into the deep berry red paint. Blot the excess onto a clean part of your palette; you want the sponge loaded but not dripping.
Step 2: Creating the Gradient
-
Apply the dark base:
Start sponging at the very bottom of the glass bowl, right where the stem meets the cup. Use an up-and-down dabbing motion to create a dense, opaque layer of red at the lowest point. -
Begin the transition:
Without cleaning the sponge, dip the very edge into your mixed pink color. move slightly up the glass—about a half-inch—and continue dabbing. The leftover red on the sponge will naturally blend with the pink. -
Add white for frothiness:
Switch to a fresh side of the sponge or a new wedge. Pick up just a tiny bit of white paint. Dab this immediately above the pink section, using a very light touch to keep it airy. -
Blend the fade:
Tap lightly over the line where the pink meets the white to blur the boundary. The texture of the sponge creates that lovely ‘fizzy’ or bubbly look. -
Feather the top edge:
As you move upward into the clear glass, use almost no paint on the sponge. I find that tapping with a nearly dry sponge creates the best ‘fade to nothing’ effect at the top rim of the design. -
Review density:
Hold the glass up to a light source. If the bottom red section looks too streaky or transparent, let it dry for 10 minutes and dab on a second coat just at the base for richness.
Fixing Blotchy Fades
If the gradient looks clumpy, your sponge is too wet. Blot excess paint onto paper first. If paint lifts off, let the layer dry for 5 mins before re-sponging.
Step 3: Finishing Touches
-
Clean the stem:
It’s easy to get stray paint marks on the stem while sponging. Use a Q-tip dipped in rubbing alcohol to wipe the stem completely clean, ensuring a sharp line where the paint starts at the bowl. -
Remove upper splatters:
Check the upper rim and the main body of the glass for any accidental smudges. Use a clean damp cloth or alcohol wipe to remove them before the paint sets. -
Air dry:
Allow the glass to cure securely on its base for at least one hour (or up to 24 hours depending on your specific paint instructions) before baking. -
Bake to set:
Place the glass in a cool oven. Turn the oven on to 350°F (175°C). Once it reaches temperature, bake for 30 minutes. Turn the oven off and let the glass cool down completely inside the oven to prevent cracking.
Add Some Sparkle
While the white top layer is still wet, sprinkle a pinch of ultra-fine edible glitter or painting glitter onto the wet paint for a fizzy champagne effect.
Now you have a stunning custom glass that looks filled with bubbly even when empty


Citrus Slice Medallions
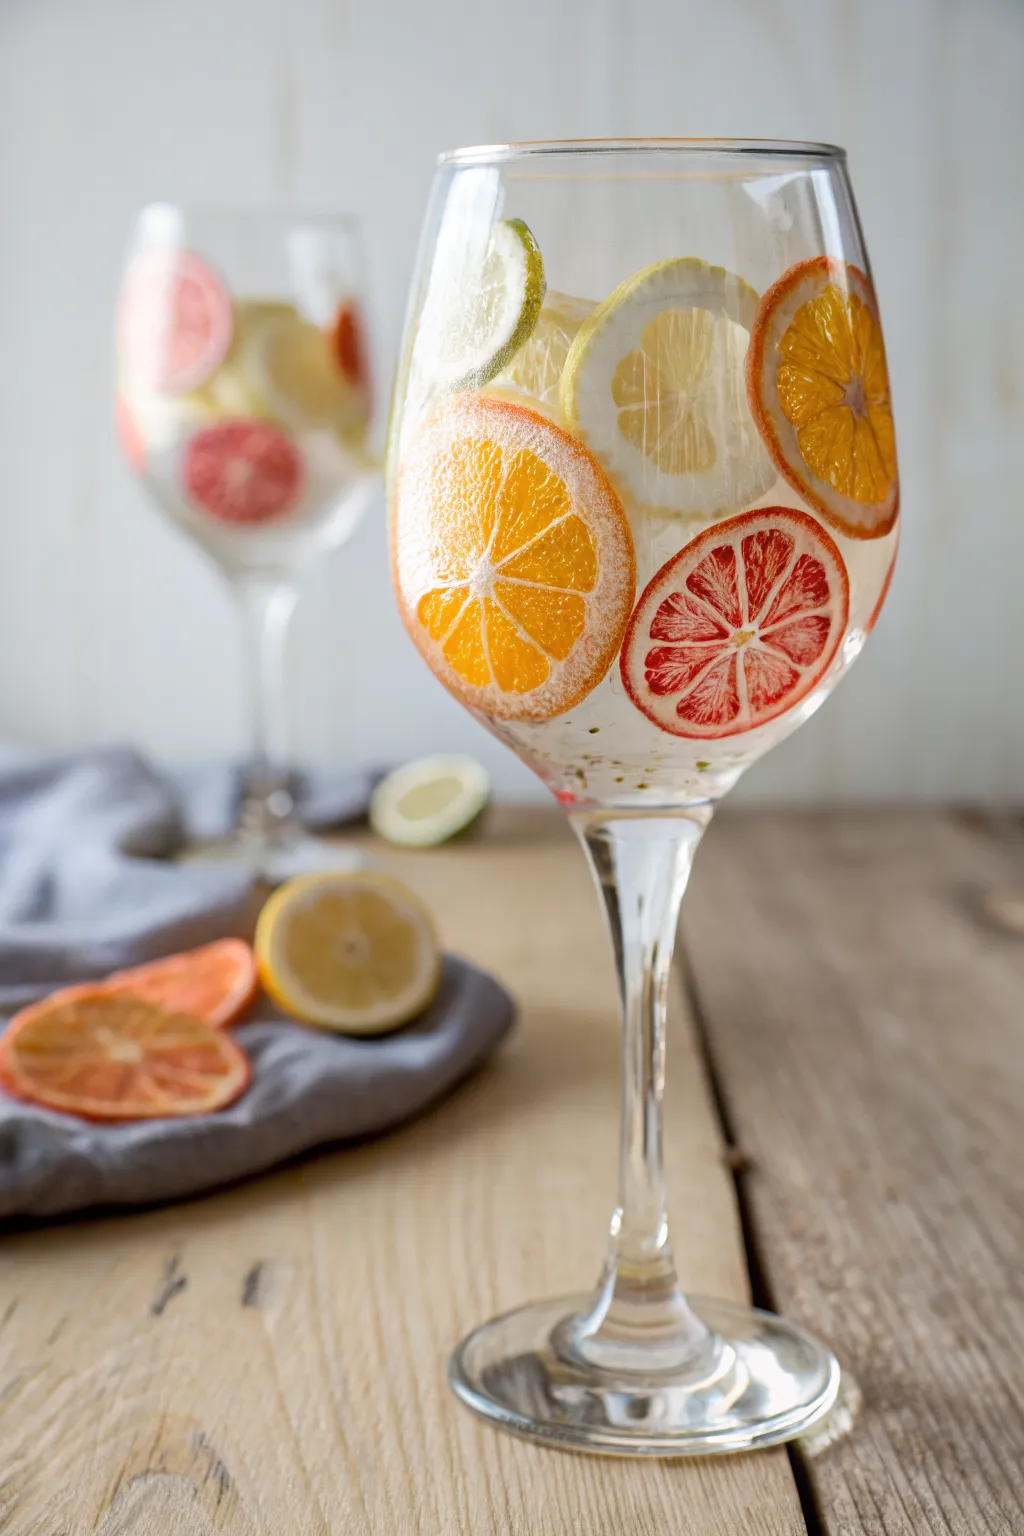
Capture the refreshing essence of a summer Spritz by painting realistic, translucent citrus slices directly onto your glassware. This technique creates a ‘floating fruit’ effect that looks incredibly high-end but relies on simple layering methods.
Step-by-Step Guide
Materials
- Wine glasses (clean and grease-free)
- Rubbing alcohol
- Gloss enamel glass paints (transparent yellow, orange, red, white, green)
- Frost or matte medium glass paint (optional for ice effect)
- Small flat shader brush (size 4 or 6)
- Fine liner brush (size 0 or 00)
- Small round sponge pouncer (optional)
- Paper, pencil, and tape (for templates)
- Palette or small plate
Step 1: Preparation & Mapping
-
Clean the surface:
Before you begin, wipe down the entire outer surface of the wine glass with rubbing alcohol. This removes any fingerprints or oils that could prevent the paint from adhering properly. -
Draft your design:
Draw circles of various sizes (1.5 to 2 inches) on a piece of paper to represent your citrus slices. Sketch the internal segments—usually 8-10 triangles radiating from a center point—inside each circle. -
Position the templates:
Cut out your paper circles and tape them to the *inside* of the glass, facing outward. Positioning them randomly at different heights creates a natural, floating look.
Uneven Coverage?
If your paint looks streaky, don’t overwork it while wet. Let the first coat dry completely, then stipple on a second layer for a textured, juicy look.
Step 2: Painting the Fruit Flesh
-
Mix your base colors:
Prepare your palette with transparent glass paints. For lemons, use yellow; for oranges, mix orange with a tiny touch of yellow; for blood oranges, mix red with a drop of orange. -
Paint the segments:
Using the small flat brush, fill in the triangular segments of your fruit shapes. Follow the lines of your template inside the glass. Leave a small gap of unpainted glass between each triangle and around the outer rim. -
Create texture:
While the paint is wet, dab it gently with the tip of your brush or a dry sponge. This removes brushstrokes and mimics the juicy texture of citrus pulp. -
Add color variation:
I like to add depth here by dropping a tiny amount of a darker shade (like red into the orange) near the outer edge of the segment and letting it bleed inward slightly. -
Let it set:
Allow this first layer of color to dry to the touch, usually about 15-20 minutes depending on your paint brand.
Step 3: Adding Rinds & Pith
-
Paint the pith:
Mix a small amount of white enamel paint. Using your fine liner brush, carefully paint the thin lines between the fruit segments and a circle around the entire fruit to form the inner rind. -
Soften the white:
The white lines shouldn’t be too stark. If they look too solid, lightly go over them with a damp brush to make them semi-translucent. -
Add the outer skin:
Clean your liner brush and pick up your main fruit hue (yellow, green, or orange). Paint a thin line directly bordering the outside of the white pith circle to create the colorful skin. -
Refine the skin texture:
Stipple (dot) the outer skin line gently with the very tip of your brush to give it that bumpy citrus texture, rather than a perfectly smooth line.
Add Some Fizz
Use a toothpick to dot tiny specks of white or silver paint rising from the bottom of the glass to mimic carbonation bubbles around the fruit.
Step 4: Frosty Finish & Curing
-
Paint faint slices:
To create the illusion of fruit pushed against the back of the glass, mix your colors with a lot of clear medium or water (if water-based). Paint a few very faint, ghostly circles in the background. -
Add ice details:
If you have frost medium, dab small, irregular shapes in the negative space between the fruit slices to look like crushed ice floating in the drink. -
Check for opacity:
Hold the glass up to the light. If the fruit colors look too thin, add a second coat to the fleshy segments once the first layer is fully dry. -
Remove templates:
Carefully peel the paper templates out from the inside of the glass. -
Cure the paint:
Follow the manufacturer’s instructions for curing. This usually involves air drying for 21 days or baking the glass in a cool oven that heats up to 350°F for 30 minutes.
Now your glassware is ready to add a splash of artistry to your next summer gathering
Watermelon Wedge Border

Brighten up your summer sipping with this playful watermelon wedge design that wraps seamlessly around the glass. The vibrant pink flesh and geometric rind border create a fresh, juicy look that is perfect for outdoor picnics or warm evenings on the patio.
How-To Guide
Materials
- Clear wine glass (washed and dried with rubbing alcohol)
- Enamel craft paint (watermelon pink or light red)
- Enamel craft paint (white)
- Enamel craft paint (medium green)
- Enamel craft paint (black)
- Flat paint brushes (medium and small)
- Fine liner or detail brush
- Rubbing alcohol
- Paper towels
- Cotton swabs (for cleanup)
- Palette or paper plate
Step 1: Preparation & Base Shape
-
Prep the Surface:
Before you begin painting, wipe the entire outer surface of the wine glass with rubbing alcohol on a paper towel. This removes oils and fingerprints, ensuring your design adheres perfectly to the glass. -
Map the Wedge:
Visualize a wide band around the middle of the glass bowl. Using your medium flat brush and the watermelon pink paint, create a large semi-circle shape. Think of it like a very wide smile or a boat hull shape. -
Fill the Fruit:
Fill in the entire semi-circle area with the pink paint. Apply the paint smoothly, but don’t worry if it looks slightly streaky on the first coat; glass painting often requires layers. -
Let it Dry:
Allow this pink layer to dry completely according to your paint bottle instructions. Rushing this step can cause the brush to lift the wet paint underneath. -
Second Coat:
Once dry, apply a second coat of pink. This will make the color opaque and vibrant, giving you that juicy watermelon look.
Step 2: Adding the Rind
-
The White Layer:
Using a clean flat brush and white paint, carefully paint a stripe along the bottom curve of the pink semi-circle. This line should hug the pink shape directly. -
Smoothing the Edge:
Make sure the white band is even in thickness. If you wobble, use a damp cotton swab to immediately wipe away mistakes before they set. -
The Green Skin:
Switch to your medium green paint. Paint a green stripe directly beneath the white stripe you just created. This completes the traditional watermelon layering. -
Drying Time:
Pause here and let these rind layers dry thoroughly so you have a stable surface for the next detailed steps.
Uneven Coverage?
If your paint looks streaky, use a cosmetic sponge to dab the second coat on instead of brushing. This creates a textured, stippled look that hides brushstrokes well.
Step 3: seeds & Geometric Detail
-
Top Border Guide:
Using the white paint again, paint a thin, horizontal line right across the straight top edge of the pink semi-circle. This acts as a separator for the geometric pattern. -
Painting Triangles:
Load a small flat brush or detail brush with green paint. Along that white top line, paint a series of small, inverted triangles pointing downward into the white line. -
Spacing the Pattern:
Try to keep the green triangles evenly spaced. They mimic a stylized rind edge and add a fun, modern touch to the design. -
Prepping Seeds:
While the border dries, get your fine liner brush ready with black paint. I find slightly thinning the black paint with a tiny drop of water helps it flow better for small details. -
Painting Seeds:
Paint scattered teardrop shapes onto the pink area. Start with the round bottom of the seed and flick the brush upward to create a point. -
Varying Direction:
Don’t make them all perfectly uniform. Tilt some seeds left and some right to make the fruit look more natural and organic. -
Final Adjustments:
Check the whole design. If any pink shows through the seeds, add a tiny second dab of black once the first dab is tacky. -
Curing:
Follow the manufacturer’s instructions for curing the paint. This usually involves air drying for 21 days or baking the glass in the oven to make it top-rack dishwasher safe.
Add a Gradient
While the pink paint is wet, blend a tiny bit of white near the center of the wedge. This highlight makes the watermelon look extra juicy and dimensional.
Enjoy your refreshing new glassware at your next summer gathering
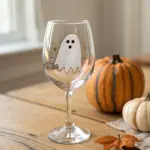
Dotted Pineapple Motif
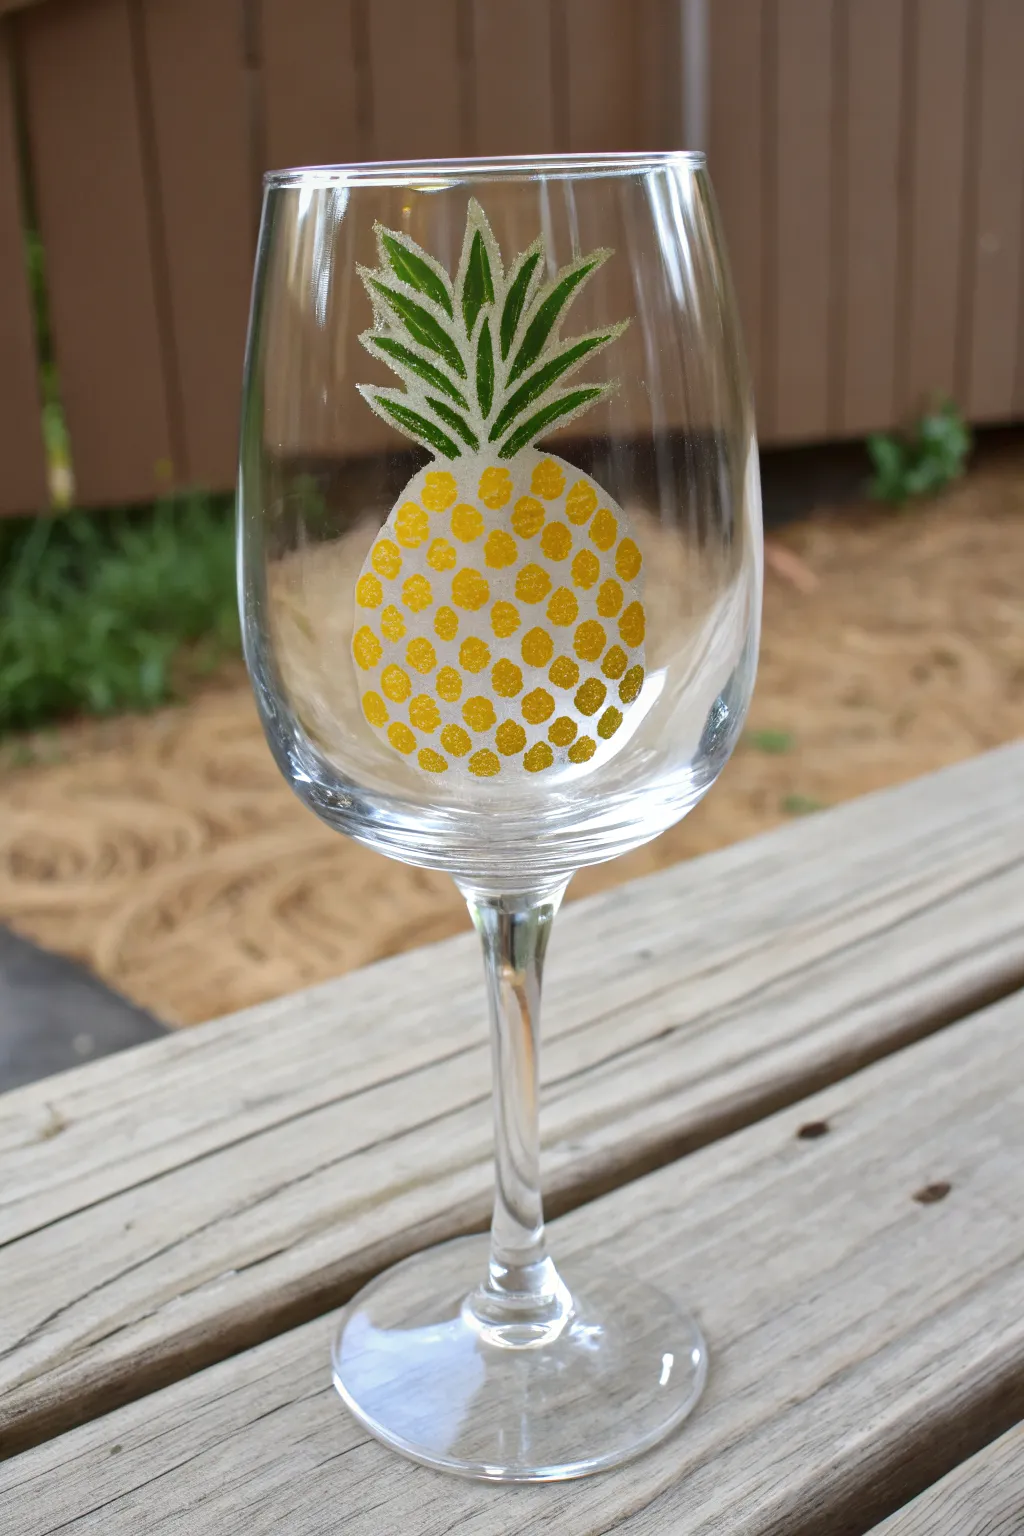
This refreshing tutorial transforms a plain wine glass into a tropical delight with a sunny pineapple motif. Using simple dotting techniques and frosted paint effects, you will create a design that looks both textured and sophisticated.
Step-by-Step
Materials
- White or clear wine glass
- Rubbing alcohol and cotton pads
- Enamel craft paint (yellow)
- Enamel craft paint (green)
- Frosting medium or white enamel paint (for the base shape)
- Small round paintbrush
- Fine liner brush
- Q-tips or a distinct small round foam dauber
- Tape (optional, for placement guidance)
Step 1: Glass Preparation
-
Clean the surface:
Before painting, thoroughly wipe the exterior of the wine glass with rubbing alcohol on a cotton pad to remove any oils or fingerprints. -
Dry completely:
Allow the alcohol to air dry completely for a minute or two to ensure the best paint adhesion. -
Positioning check:
Ideally, hold the glass by the stem or place your hand inside the bowl to avoid touching the painting area. Locate the center of the bowl where the pineapple body will sit.
Clean Edges
If your dots smudge, wait for them to dry completely, then gently scrape the mistake off with a craft knife or fingernail rather than wiping while wet.
Step 2: Creating the Pineapple Body
-
Outline the oval:
Using a small brush and a mix of frosting medium and a tiny drop of yellow (or plain white enamel), lightly paint a solid oval shape for the pineapple’s body. This creates that frosty, translucent background visible in the original image. -
Let the base set:
Allow this frosty base layer to dry until it is tacky but not wet; this usually takes about 10-15 minutes depending on the paint brand. -
Prepare the yellow:
Pour a small amount of bright yellow enamel paint onto your palette. I prefer to stir it well to ensure the pigment is rich and opaque. -
Start the dots:
Using a Q-tip or a small round brush, dip into the yellow paint and press a dot onto the top center of your frosted oval base. -
Create horizontal rows:
Continue adding yellow dots in horizontal rows, working your way down the oval. -
Stagger the pattern:
For a natural look, try to stagger the dots in each subsequent row so they sit in the gaps of the row above, resembling actual pineapple scales. -
Fill the shape:
Complete the dotting all the way to the bottom of the oval, ensuring the yellow dots stay mostly within the boundaries of your initial frosted base. -
Add dimension:
Once the initial yellow dots are semi-dry, you can add a tiny second dab of yellow on top of some dots to give them a slight raised texture.
Add Sparkle
Sprinkle fine clear glitter over the wet yellow dots before they dry. This adds a texture that mimics the rough skin of a real pineapple perfectly.
Step 3: Painting the Crown
-
Mix the green:
Prepare your green enamel paint. If it’s too dark, mix in a tiny bit of white or yellow to brighten it up for a tropical feel. -
First leaf stroke:
Using a fine liner brush, start at the top center of the yellow pineapple body and pull a stroke upward and slightly outward to create the central leaf. -
Build the fan:
Add two more leaves on either side of the central one, curving them slightly outwards like a fountain spray. -
Add lower leaves:
Paint shorter, wider leaves at the base of the crown, connecting directly to the top of the yellow dotted section. -
Frost the leaves:
To match the body’s aesthetic, take a clean brush with a tiny bit of frosting medium (or white) and lightly streak over the green leaves once dry to give them that sugary, frosted texture shown in the photo. -
Refine the edges:
Use a damp Q-tip to clean up any stray paint marks around the edges of the design while the paint is still workable.
Step 4: Curing
-
Air cure:
Consult your specific paint bottle instructions, but generally, let the glass sit undisturbed for at least 1 hour to surface dry. -
Final cure:
For durability, most enamel paints require significantly longer to cure fully—often 21 days for air curing or a specific baking method in the oven.
Now you have a festive, hand-painted glass ready for your next summer gathering
Cute Cactus in a Pot
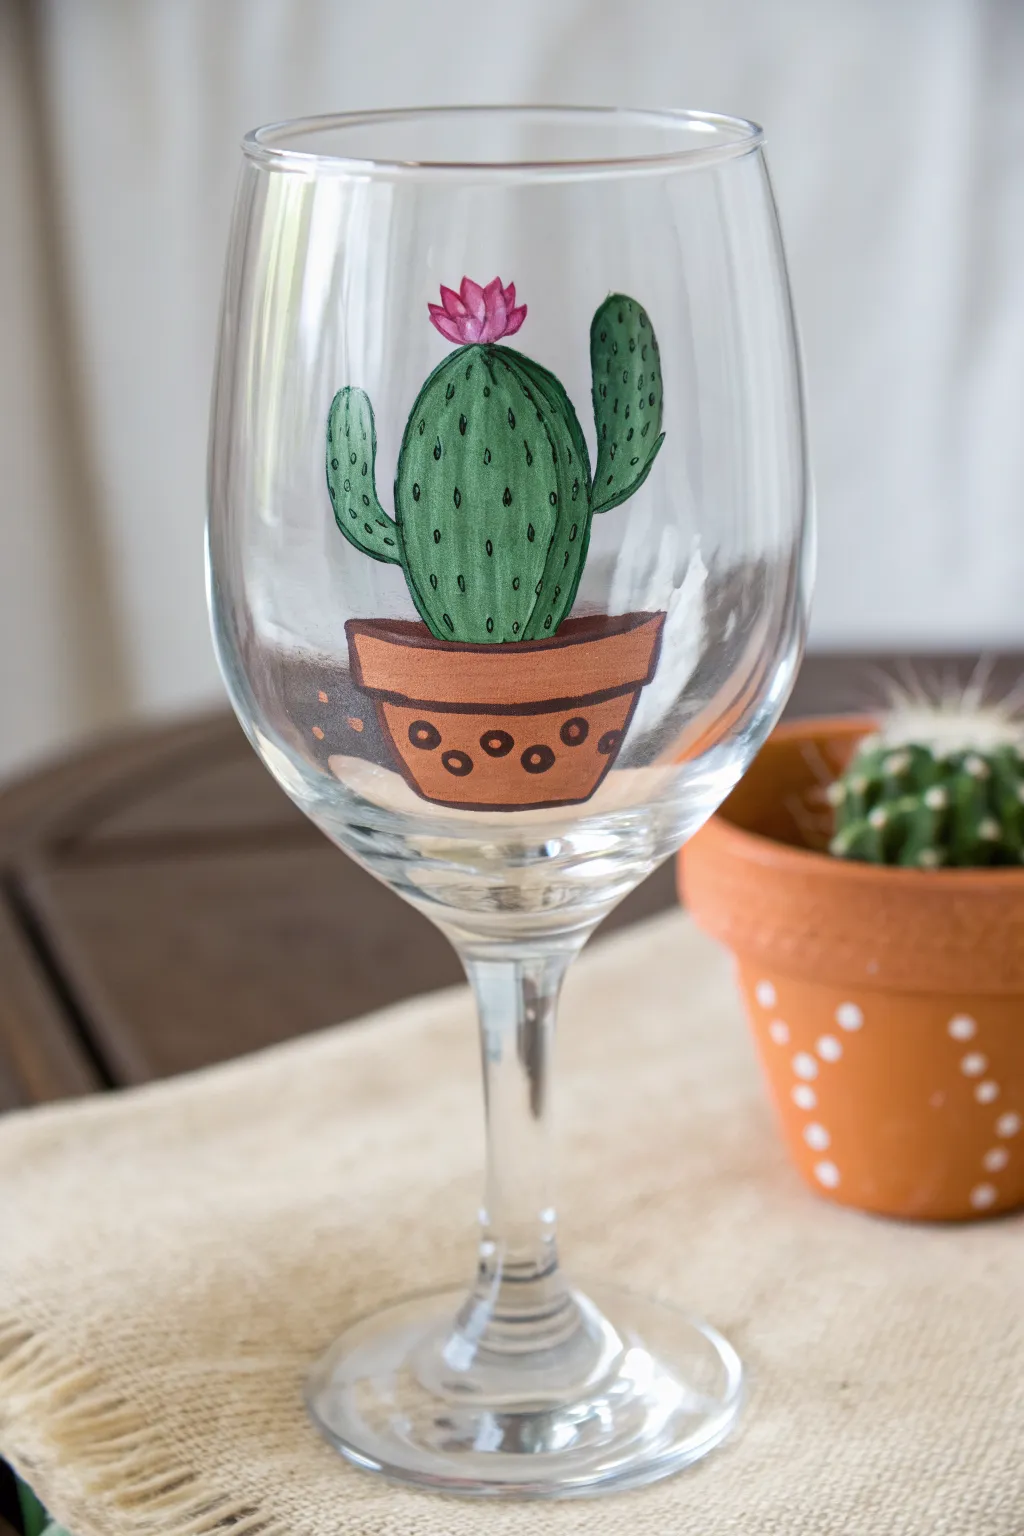
Bring a touch of the Southwest to your next happy hour with this adorable hand-painted wine glass featuring a flowering cactus. The design uses bold outlines and simple shapes, making it a perfect project for beginners to practice painting on curved glass surfaces.
Step-by-Step Guide
Materials
- Clear wine glass
- Rubbing alcohol and cotton pads
- Enamel glass craft paints (Green, Terracotta/Brown, Black, Hot Pink)
- Small flat brush (size 4 or 6)
- Fine liner brush (size 0 or 00)
- Paint palette or foil
- Water cup and paper towels
- Oven (for curing, optional)
Step 1: Preparation & Base shapes
-
Clean the surface:
Before painting, wipe the outside of the wine glass thoroughly with rubbing alcohol on a cotton pad to remove any oils or fingerprints. Let it dry completely. -
Paint the pot rim:
Using your flat brush and terracotta paint, create the rim of the pot first. Paint a horizontal, slightly curved rectangle near the bottom center of the glass bowl. Make it slightly wider at the top. -
Paint the pot base:
Underneath the rim, paint a tapered U-shape for the body of the pot. Fill this area in with the same terracotta color, ensuring the paint is opaque but smooth. -
Paint the main cactus body:
Switch to green paint. Starting from the center of the pot’s rim, paint a large, tall oval shape extending upwards. This reflects the main stem of the cactus. -
Add the cactus arms:
While the green paint is still wet or slightly tacky, add two smaller oval shapes coming off the main body—one on the left pointing slightly up, and one on the right doing the same. Vary their heights for a more natural look. -
First drying phase:
Allow these base layers to dry to the touch. I usually wait about 20-30 minutes here to prevent the colors from muddying when we add details.
Clean Lines Hack
Make a mistake with the black outline? Wait for it to dry completely, then gently scratch the unwanted paint off with a toothpick.
Step 2: Details & Outlining
-
Add the flower base:
Dip a small brush into hot pink paint. Create small, petal-like strokes on the very top of the central cactus stem to form a blooming flower. -
Decorate the pot:
Using the back end of a paintbrush or a dotting tool dipped in dark brown or black, add a row of small dots or circles across the body of the pot for decoration. -
Prepare the black liner:
Use your fine liner brush with black enamel paint. You want the paint to flow smoothly, so if it’s too thick, thin it with the tiniest drop of water. -
Outline the pot:
Carefully trace the outer edges of the terracotta pot and the rim. Add a line separating the rim from the base of the pot to give it dimension. -
Outline the cactus:
Outline the green cactus body and arms. Use a light hand to keep the lines relatively thin and consistent. -
Outline the flower:
Add very delicate black outlines around the pink flower petals to make them pop against the clear glass.
Step 3: Texture & Finishing
-
Add vertical ribs:
Paint thin, vertical black lines down the length of the main cactus body and the arms. These lines create the ribbed texture typical of cacti. -
Create the spines:
Along the vertical rib lines you just painted, add tiny, short dashes or small ‘v’ shapes to represent the cactus needles. -
Add final highlights:
If you want extra dimension, add a tiny streak of lighter green or white on the sun-facing side of the cactus arms once the black is dry. -
Clean up edges:
If you made any mistakes, use a toothpick or a damp cotton swab to gently scrape away excess paint before it fully cures. -
Cure the glass:
Follow the instructions on your specific paint bottle for curing. This typically involves baking the glass in a non-preheated oven for 30 minutes at 350°F to make it dishwasher safe.
Opacity Secret
Glass paint is often translucent. For a solid cartoon look like this, paint a layer of white first, let it dry, then apply your colors on top.
Now pour your favorite beverage and enjoy your unique, hand-painted creation
Cherry Blossom Branch
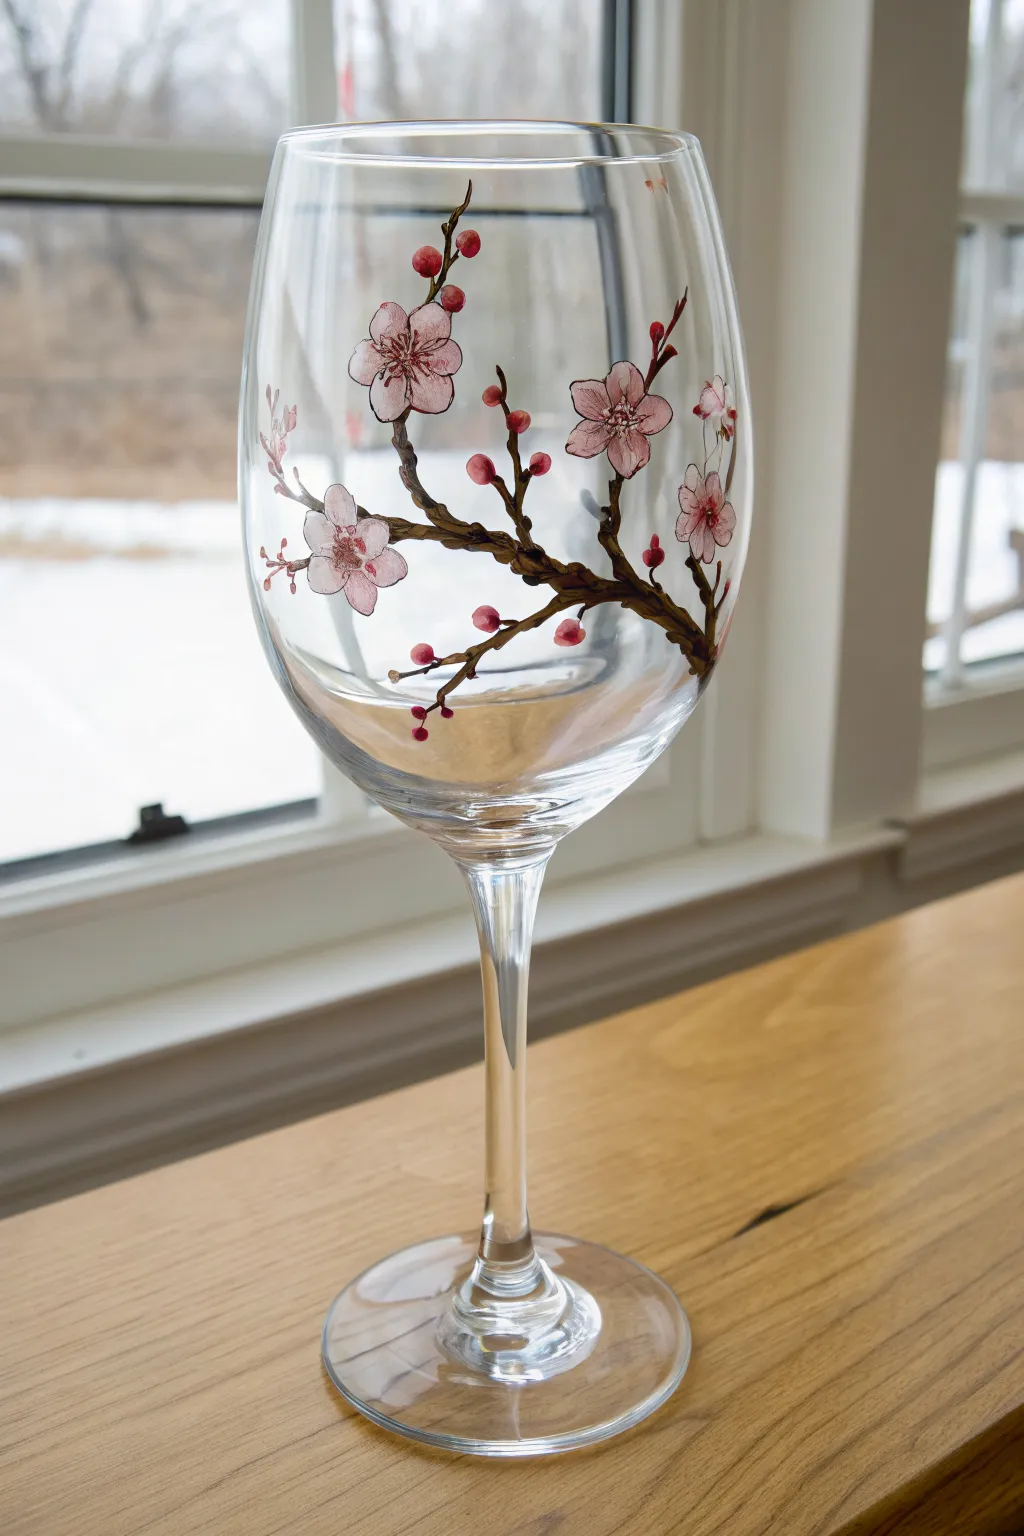
Transform a plain wine glass into a delicate piece of art with this cherry blossom design. The winding brown branches and soft pink petals create an elegant, organic look that feels perfect for spring sipping or gifting.
Step-by-Step Tutorial
Materials
- Standard white wine glass (washed and dried)
- Rubbing alcohol and cotton pads
- Enamel or multi-surface acrylic glass paint: Dark Brown
- Enamel or multi-surface acrylic glass paint: White
- Enamel or multi-surface acrylic glass paint: True Red or Pink
- Fine liner brush (size 0 or 00)
- Small round brush (size 2 or 3)
- Palette or paper plate
- Oven (for curing, optional depending on paint brand)
Step 1: Preparation & Branch Structure
-
Clean the surface:
Before you begin, wipe the entire outer surface of the wine glass with rubbing alcohol on a cotton pad. This removes oils and fingerprints, ensuring the paint adheres properly. -
Mix the branch color:
On your palette, squeeze out a small amount of dark brown paint. If the brown feels too flat, I sometimes mix in a tiny dot of black to give it depth, but pure brown works well for a natural wood look. -
Paint the main stem:
Using your fine liner brush, start the main branch near the bottom of the bowl, angling it diagonally upwards. Use a shaky, uneven hand intentionally; nature isn’t perfectly straight, and the wiggles make the bark look realistic. -
Add secondary branches:
Extend 2-3 smaller offshoots from the main branch. Let them curve gently around the glass, thinking about where you want your flowers to sit. Keep the ends of these twigs thin and tapered. -
Create texture:
Go back over thicker parts of the branch with a slightly heavier load of paint on your liner brush. Dab small dots or short lines along the wood to simulate knots and rough bark texture. -
Let the foundation set:
Allow the branch structure to dry for about 15-20 minutes. You don’t want the brown paint to muddy your delicate pink flowers in the next step.
Step 2: Blossoms & Buds
-
Mix the petal pink:
Create a soft pink by mixing a large amount of white with just a tiny drop of red. You want a pastel shade that will show up clearly against the clear glass. -
Paint the first petals:
Using the small round brush, choose a spot on a branch tip and press the brush down gently to form a tear-drop shape. Repeat this five times in a circle to create a classic cherry blossom shape. -
Paint the remaining flowers:
Continue adding full 5-petal flowers scattered across the branches. Aim for odd numbers—3 or 5 full flowers usually looks most balanced visually. -
Add deeper pink buds:
Mix a slightly darker shade of pink. Using the liner brush or the tip of the round brush, dab small round dots at the very ends of the finest twigs to represent unbloomed buds. -
Detail the flower centers:
Once the pink petals are tacky or dry, use your finest liner brush with dark brown paint (or a dark maroon) to draw tiny, hair-thin lines radiating from the center of each flower. -
Add the stamens:
Dip the very tip of a toothpick or the handle end of your brush into white or dark red paint. Dot the ends of those tiny center lines to create the flower’s pollen-bearing stamens. -
Highlight the buds:
Take a tiny bit of white paint and add a microscopic highlight to the top curve of your dark pink buds to make them look spherical and dimensional.
Fixing Translucent Paint
If your pink paint looks too see-through on the glass, let the first layer dry completely, then paint a second layer exactly on top to increase opacity.
Step 3: Finishing Touches
-
Clean up edges:
Look for any stray paint marks or mistakes. You can gently scratch these away with a damp toothpick or a cotton swab dipped in rubbing alcohol while the paint is still fresh. -
Initial dry time:
Let the glass sit undisturbed for at least 1 hour to ensure the surface is dry to the touch before moving it. -
Cure the paint:
Follow the instructions on your specific paint bottle. Most glass enamels require either 21 days of air drying or baking in a cool oven (usually 350°F for 30 mins, placing the glass in while the oven is cold).
Level Up: Pearlescent Pop
Mix a drop of pearl medium or metallic white into your petal color. The shimmer mimics the delicate sheen of real silk flowers.
Enjoy your beautiful hand-painted glass with your favorite vintage or display it as a stunning centerpiece
Minimal Lavender Sprigs

Transform a standard glass into a botanical treasure with these elegant, minimalist lavender sprigs. The design features slender green stems rising from the base, topped with textured clusters of purple buds that seem to sway in a gentle breeze.
How-To Guide
Materials
- Clear wine glass (washed with soap and cleaned with rubbing alcohol)
- Enamel glass paint (Olive Green or Sap Green)
- Enamel glass paint (Deep Purple or Violet)
- Enamel glass paint (Lavender or light Lilac)
- Enamel glass paint (White)
- Fine liner brush (size 0 or 00)
- Small round detail brush (size 1 or 2)
- Rubbing alcohol
- Paper towels
- Palette or small plate
- Cotton swabs (for mistakes)
Step 1: Preparation & Stems
-
Clean surface:
Before dipping your brush, wipe the entire exterior surface of the glass with rubbing alcohol on a paper towel. This removes invisible oils and fingerprints which prevent paint adhesion. -
Prepare your greens:
Squeeze a small amount of dark green enamel paint onto your palette. If you want a more natural look, mix in a tiny drop of yellow or brown to break the vibrancy of the store-bought green. -
Load the liner brush:
Dip your fine liner brush into the green paint. You want a fluid consistency, so if the paint feels thick or drags, add a tiny drop of water or paint thinner specifically made for your enamel brand. -
Anchor the first stem:
Start near the bottom curve of the bowl, just above where the stem meets the glass. Pull your brush upward in a gentle, slightly curving motion to create a long, thin stalk. Lift pressure at the end to taper the tip. -
Create variation:
Paint 4-6 more main stems around the glass. Vary their heights—some tall reaching toward the rim, some shorter—and curve them slightly in different directions to mimic natural growth. -
Add side branches:
From the main stalks, paint tiny, short off-shoot stems on the upper third of the lines. These will hold the flower buds later. -
Paint leaves:
Using the same green and liner brush, add long, slender leaves near the base of the stems. Press down slightly to widen the stroke and lift up quickly to create a sharp point, resembling blades of grass. -
Initial drying:
Let the green stems dry for about 15-20 minutes. They don’t need to be fully cured, but surface dry prevents the purple from smearing into the green.
Natural Texture
Don’t overmix your purples on the palette. Let the colors marble slightly on the brush so each dot you deposit has a natural, multi-tonal variation.
Step 2: Blossoms & Details
-
Mix purple shades:
Prepare your palette with a dark purple, a lighter lavender, and a bit of white. Creating a gradient gives the flowers depth. -
Start with dark buds:
Using the small round detail brush or the tip of your liner, dip into the darkest purple. Dabbing gently, create small, irregular dots along the top inch of your stems. -
Cluster formation:
Group these dots in small clusters, leaving tiny gaps between them so the stem peeks through occasionally. Avoid making a solid purple blob; lavender is airy. -
Add floating buds:
Add a few stray purple dots just slightly detached from the main clusters, suggesting buds that are about to open or are caught in movement. -
Layer light tones:
Once the dark purple is tacky, clean your brush and pick up the lighter lavender shad. Dot this randomly over the dark purple areas, focusing on the tips and outer edges. -
Highlighting:
For a sun-kissed look, mix a tiny bit of white into your lightest purple. I like to add just two or three tiny specks of this highlight color to the very top of each flower sprig. -
Cleanup:
Inspect your work. If you have any smudges, use a damp cotton swab or a toothpick to gently scrape away the unwanted paint while it’s still relatively fresh. -
Curing process:
Follow the instructions on your specific paint bottle for curing. Most enamel paints require air drying for 21 days or baking in a cool oven that heats up to 350°F for 30 minutes for distinct durability.
Add a Bee
Paint a tiny yellow and black fuzzy bumblebee hovering near one of the lavender sprigs to add a lively, summery narrative to your glass.
Enjoy sipping your favorite vintage from your beautiful, hand-painted floral glassware.
Under-the-Sea Bubbles
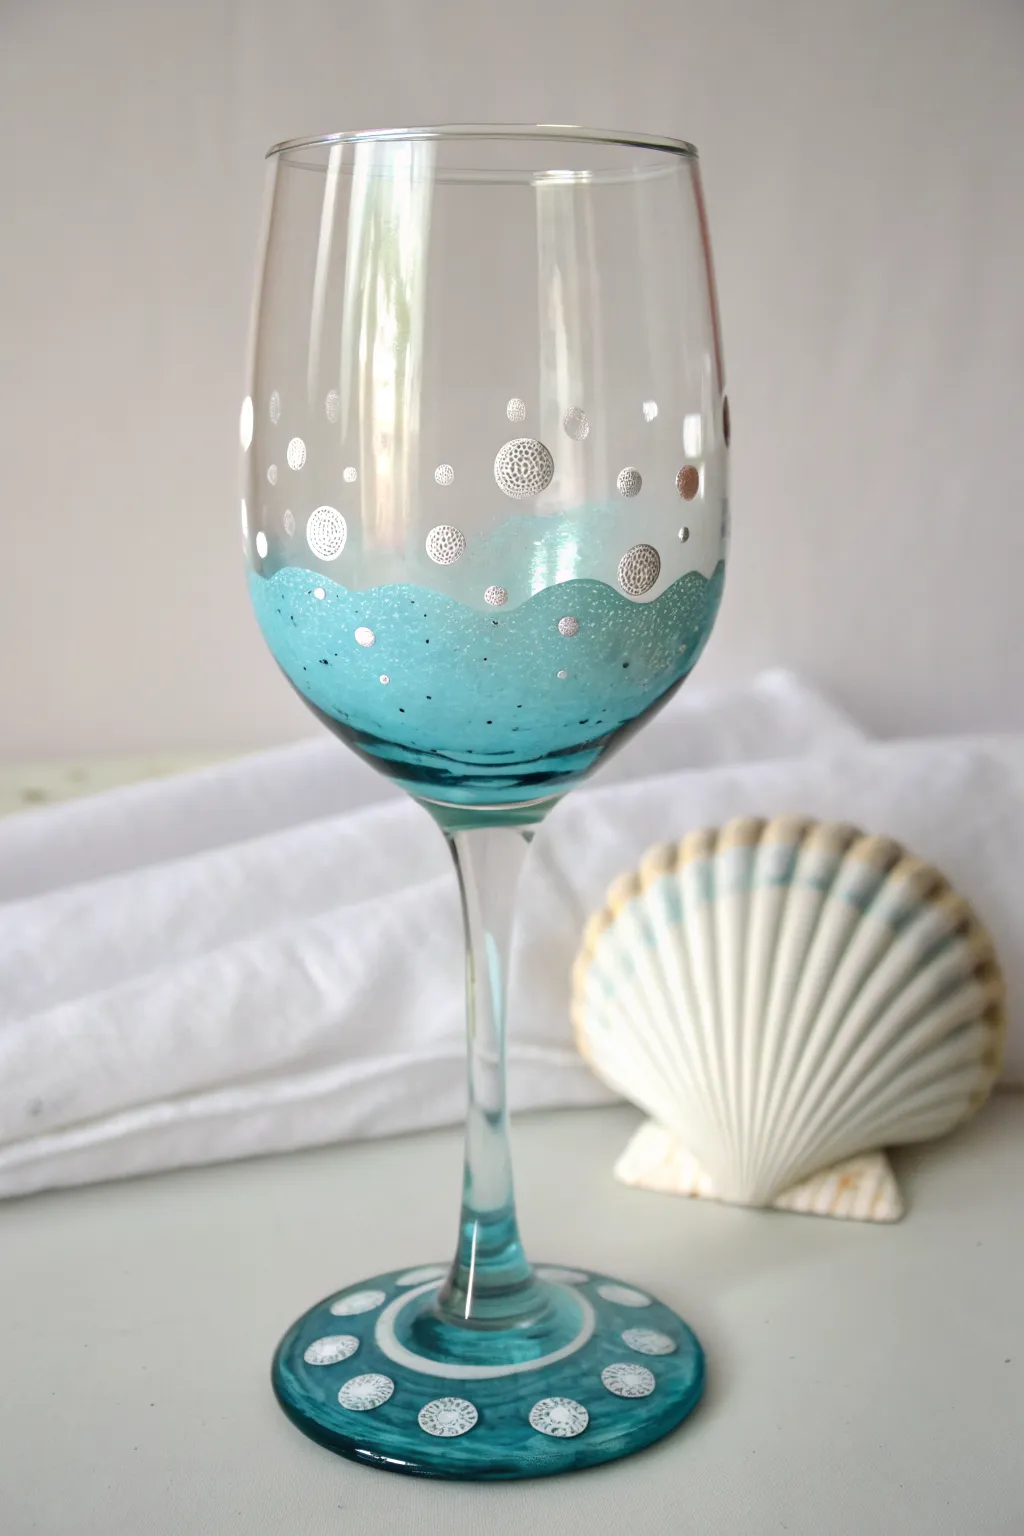
Bring the calming tide of the ocean to your glassware with this delightful teal and silver design. The look is achieved with a clever textured sponge technique that mimics foaming waves, topped with delicate rising bubbles for a truly aquatic feel.
Step-by-Step Guide
Materials
- White wine glass
- Rubbing alcohol
- Cotton pads
- Teal enamels or glass paint (translucent finish)
- White or silver metallic glass paint (opaque)
- Small sea sponge
- Two small circular sponge daubers (different sizes)
- Fine-tipped paintbrush
- Silver dimensional paint or puffy paint (fine tip)
- Paper plate or palette
- Oven (for curing, optional depending on paint)
Step 1: Preparation and Base Layer
-
Clean surface:
Before you even think about paint, wipe down the entire outer surface of the wine glass with rubbing alcohol on a cotton pad to remove oils and fingerprints; this is crucial for adhesion. -
Load the sponge:
Pour a small amount of teal glass paint onto your palette. Dampen your sea sponge slightly, squeeze out the excess water, and dab it into the paint. -
Dab off excess:
Pat the loaded sponge onto a clean section of your palette or a paper towel a few times. You want a textured, airy imprint, not a solid glob of color. -
Apply the first wave:
Starting at the bottom of the glass bowl (near the stem), gently dab the sponge onto the glass, working your way upward about an inch to create the base of your ocean. -
Shape the waterline:
Without reloading the sponge too heavily, continue dabbing upward to create an uneven, wavy top edge. This doesn’t need to be a straight line; let it mimic the natural crests of waves. -
Add stem detail:
While the sponge is still teal-tinted, lightly press it along the stem of the glass to carry the color down, fading it out before you reach the foot. -
Paint the foot:
Dab the remaining teal paint onto the very top surface of the glass foot, creating a solid teal base to anchor the design. -
Let it tack:
Allow this teal layer to dry until it is tacky but not fully hard, which usually takes about 15 to 20 minutes depending on the brand.
Sponge Consistency
Natural sea sponges create much better organic texture than synthetic kitchen sponges. Turn the sponge as you dab to avoid a repetitive pattern.
Step 2: Adding Bubbles and Details
-
Create large bubbles:
Dip your larger round sponge dauber into the silver or white metallic paint. Press it gently onto the clear glass above the teal wave line to create a few large, solid circles. -
Add medium bubbles:
Switch to the smaller sponge dauber and add smaller circles interspersed among the large ones, and perhaps one or two floating right at the edge of the wave. -
Detail with texture:
Once the flat silver circles are touch-dry, use your fine-tipped brush or a silver dimensional paint tube to stipple tiny dots inside the circles, giving them a fizzing texture. -
Add floating dots:
Using the tip of a paintbrush handle or a dotting tool, dip into silver paint and add tiny, solid dots floating high up near the rim and down within the teal wave section. -
Decorate the foot:
Repeat the circle technique on the teal-painted foot base. Add a ring of silver circles around the edge of the base to mirror the bubbles above. -
Outline the stem:
Carefully paint a thin silver ring where the stem meets the foot base to create a clean visual separation between the components. -
Add wave highlights:
If you want extra sparkle, add a few tiny dots of silver dimensional paint directly onto the teal sponge-painted area to look like sea foam catching the light. -
Curing stage:
Follow the manufacturer’s instructions for your specific paint to cure the glass. This often involves baking it in a non-preheated oven for a set time to make it dishwasher safe.
Drips & Slips
If you smudge a bubble or the paint drips, use a Q-tip dipped in rubbing alcohol to wipe it away immediately. Let the spot dry before repainting.
Now your glass is ready for a relaxing evening inspired by the deep blue sea
Goldfish and Wavy Kelp
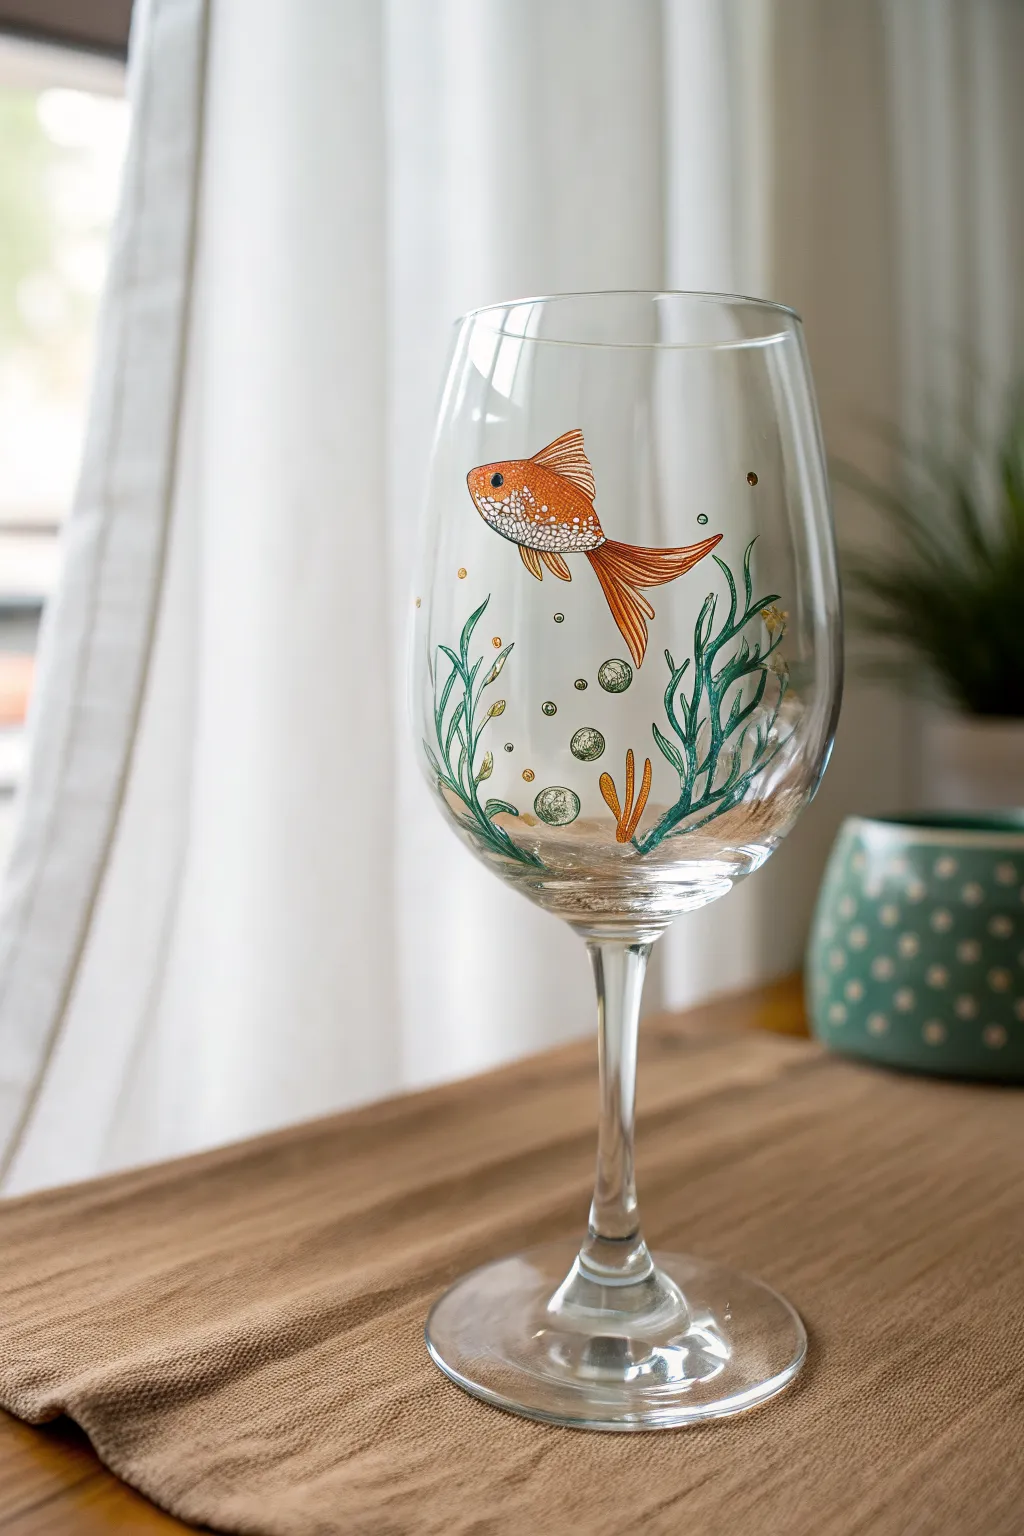
Transform a plain wine glass into a serene underwater scene with this charming goldfish design. Featuring delicate waving kelp and a vibrant orange fish, this project uses simple strokes to create a sophisticated, hand-painted look that captures the light beautifully.
Detailed Instructions
Materials
- Clear stemmed wine glass
- Rubbing alcohol and cotton pads
- Enamel glass paints (Orange, White, Dark Green, Light Green, Gold/Yellow)
- Fine detail brushes (size 0 and 00)
- Small round brush (size 2)
- Palette or small plate
- Paper towels
- Oven (for curing)
Step 1: Preparation and Planning
-
Clean surface:
Begin by thoroughly cleaning the outside of your wine glass with rubbing alcohol and a cotton pad. This removes oils and fingerprints that could prevent the paint from adhering properly. -
Plan placement:
Visualize where your elements will go. The kelp will rise from the bottom of the bowl, while the goldfish should be positioned slightly higher up in the open space, swimming towards the left.
Steady Hands
Rest your painting wrist on a rolled-up towel or a sturdy mug while you work. This stabilizes your hand for those fine fin details and prevents smudging.
Step 2: Painting the Goldfish
-
Outline the body:
Using a fine detail brush and orange enamel paint, carefully outline the almond-shaped body of the fish. Keep the lines thin and steady. -
Fill the color:
Fill in the body shape with the orange paint. For a more dimensional look, mix a tiny bit of yellow or gold into the center of the body before the orange dries, creating a subtle gradient. -
Add dorsal fins:
Paint the spiky top fin (dorsal fin) using swift, upward strokes with your orange paint. The strokes should be slightly separated to mimic the fin’s texture. -
Create the tail:
Paint the flowing tail fin extending to the right. Use long, sweeping strokes that curve slightly downward, letting the brush lift off at the end for a tapered effect. -
Add lower fins:
Add the smaller pectoral and ventral fins on the bottom of the fish using short, angled strokes. -
Scales and details:
Once the base coat is tacky but not fully dry, use a very fine brush or a toothpick to dab small white dots onto the lower half of the fish’s body. This creates a shimmery scale texture. -
The eye:
Dip the handle end of a small brush into black paint (or dark blue) and dot the eye near the front of the face. Let this dry completely before adding a tiny white highlight dot.
Step 3: Painting the Flora
-
Start the kelp base:
Switch to your dark green paint. Starting from the very bottom curve of the glass bowl, pull long, wavy lines upward. Keep your hand loose to create natural, organic curves. -
Add branching leaves:
Paint smaller, thinner branches shooting off the main stems. Vary the lengths and directions so the seaweed looks like it’s drifting in a current. -
Layer with light green:
I prefer to clean my brush and pick up the light green paint while the dark green is still wet. Paint over some of the existing strands and add new ones to create depth and highlights. -
Paint the coral:
Using a gold or yellowish-orange paint, add a small cluster of finger-like coral shapes near the bottom center, nestled between the kelp strands.
School of Fish
Paint a second fish on the opposite side of the glass at a lower level. This creates a 3D aquarium effect when you look through the front of the glass.
Step 4: Bubbles and Finishing
-
Create bubbles:
Mix a very watery wash of light green or use pearlescent white. Paint small circles of varying sizes rising from the plants. Keep the centers mostly clear, just outlining the bubble shape. -
Define the bubbles:
Add a tiny, crisp white highlight to the top right curve of each bubble to make them look spherical and shiny. -
Small filler details:
For extra whimsy, dot tiny specks of gold or orange around the kelp to represent floating plankton or sand particles catching the light. -
Dry time:
Allow the glass to air dry for at least one hour to ensure the surface is dry to the touch, though full curing usually takes much longer. -
Cure the paint:
Follow the manufacturer’s instructions for your specific brand of enamel paint. This usually involves placing the glass in a cold oven, heating it to around 350°F, baking for 30 minutes, and letting it cool inside the oven.
Enjoy sipping from your new aquatic masterpiece or gift it to a fish-loving friend.
Night Sky Constellation Dots
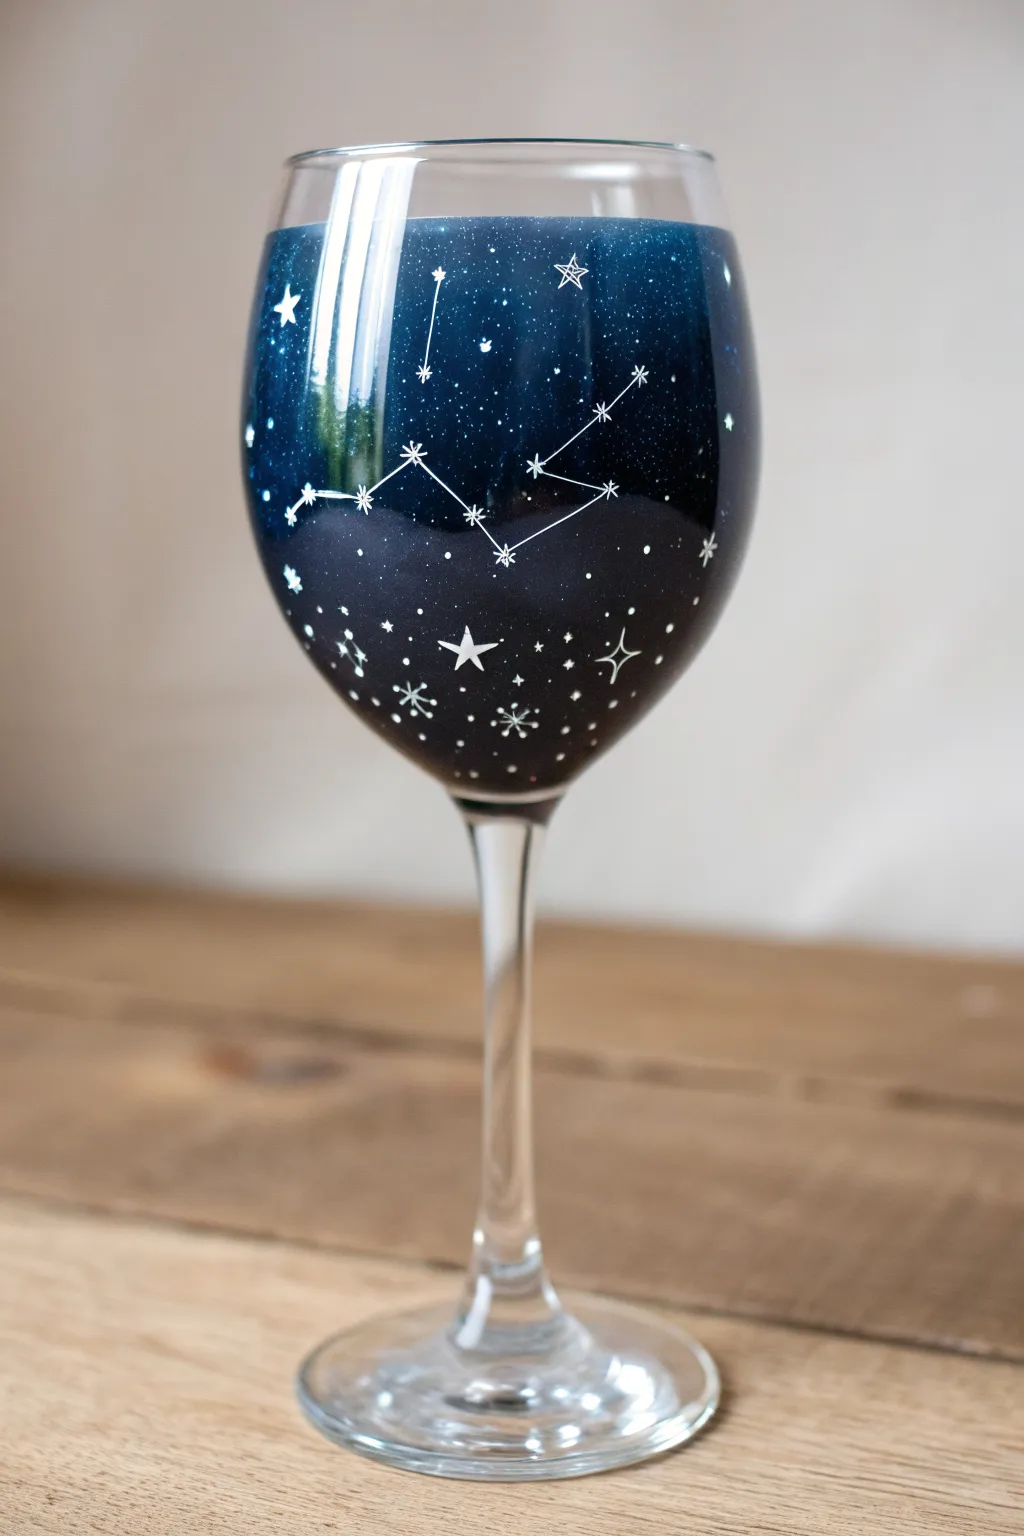
Transform a plain wine glass into a mesmerizing piece of the cosmos with this deep blue, star-studded design. The dark, glittery background creates the perfect canvas for delicate white constellations and scattered starlight.
Step-by-Step Guide
Materials
- Clear wine glass
- Rubbing alcohol
- Paper towels
- Dark blue enamel glass paint
- Black enamel glass paint
- White enamel glass paint
- Fine glitter (silver or holographic)
- Small sponge applicator
- Fine liner brush (size 00 or 000)
- Dotting tool or toothpick
- Palette or small dish
Step 1: Preparing the Base
-
Clean the surface:
Before painting, thoroughly wipe down the wine glass with rubbing alcohol and a paper towel. This removes oils and fingerprints that could prevent the paint from adhering properly. -
Mix the night sky color:
On your palette, mix a generous amount of dark blue enamel paint with a small drop of black. You want a deep navy that feels like midnight, not bright royal blue. -
Add the sparkle:
Sprinkle a pinch of fine silver or holographic glitter directly into your wet paint mixture. Stir it well so the sparkles are evenly distributed throughout the dark color. -
Apply the first layer:
Dip your sponge applicator into the glittery blue mix. Dab the paint onto the bowl of the glass starting from the stem and working upwards. -
Create the fade:
As you move up the glass, use less paint on the sponge to create a gradual fade-out effect near the rim, leaving the lip of the glass clear for drinking safety. -
Dry and repeat:
Let this base layer dry according to the bottle instructions (usually an hour). If the blue looks too translucent, apply a second coat using the same sponging motion for better opacity.
Star struggles?
If your lines are too thick, quickly wipe them away with a damp Q-tip before they dry. You can also thin your white paint slightly with a drop of water for smoother flowing lines.
Step 2: Mapping the Stars
-
Prepare the fine tools:
Dispense a small puddle of white enamel paint. Ensure your fine liner brush is clean and stiff enough to hold a sharp point. -
Paint constellation nodes:
Dip the very tip of your brush (or a toothpick) into the white paint. Gently touch the glass to create small dots representing the main stars of your chosen constellations, like the Big Dipper or Cassiopeia. -
Connect the lines:
Using the fine liner brush, carefully draw extremely thin straight lines connecting your star dots. I find it helps to exhale slowly while drawing the line to keep my hand steady. -
Add detail to main stars:
Go back to the larger constellation dots and add tiny cross-hatches or sparkles over them to make them look like twinkling stars rather than simple circles.
Step 3: Adding Depth and Magic
-
Paint larger feature stars:
Choose two or three empty spots in the dark blue area. Paint larger, five-pointed stars here to act as focal points, making the tips sharp and elongated. -
Fill the void:
Dip a dotting tool or the end of a paintbrush handle into white paint. Add tiny dots randomly throughout the dark blue background to represent distant galaxies. -
Vary dot sizes:
Switch to a toothpick for even tinier specks. The key to a realistic sky is having a wide variety of dot sizes, clustering some together and leaving other areas sparse. -
Adding drawn sparkles:
Use your liner brush to paint small four-point ‘glint’ shapes (like a plus sign with curved sides) scattered among the dots for extra magic. -
Clean up edges:
If any paint got onto the stem or the clear rim area, use a cotton swab dipped in rubbing alcohol to wipe it away for a crisp finish. -
Cure the glass:
Allow the glass to air dry for at least 21 days or bake it according to your paint manufacturer’s instructions to make the design top-rack dishwasher safe.
Make it Zodiac
Personalize this gift by painting the specific zodiac constellation of the recipient on the front, and adding their birth date in tiny numerals near the stem.
Now you have a stunning piece of functional art that captures the mystery of the night sky in the palm of your hand


Have a question or want to share your own experience? I'd love to hear from you in the comments below!