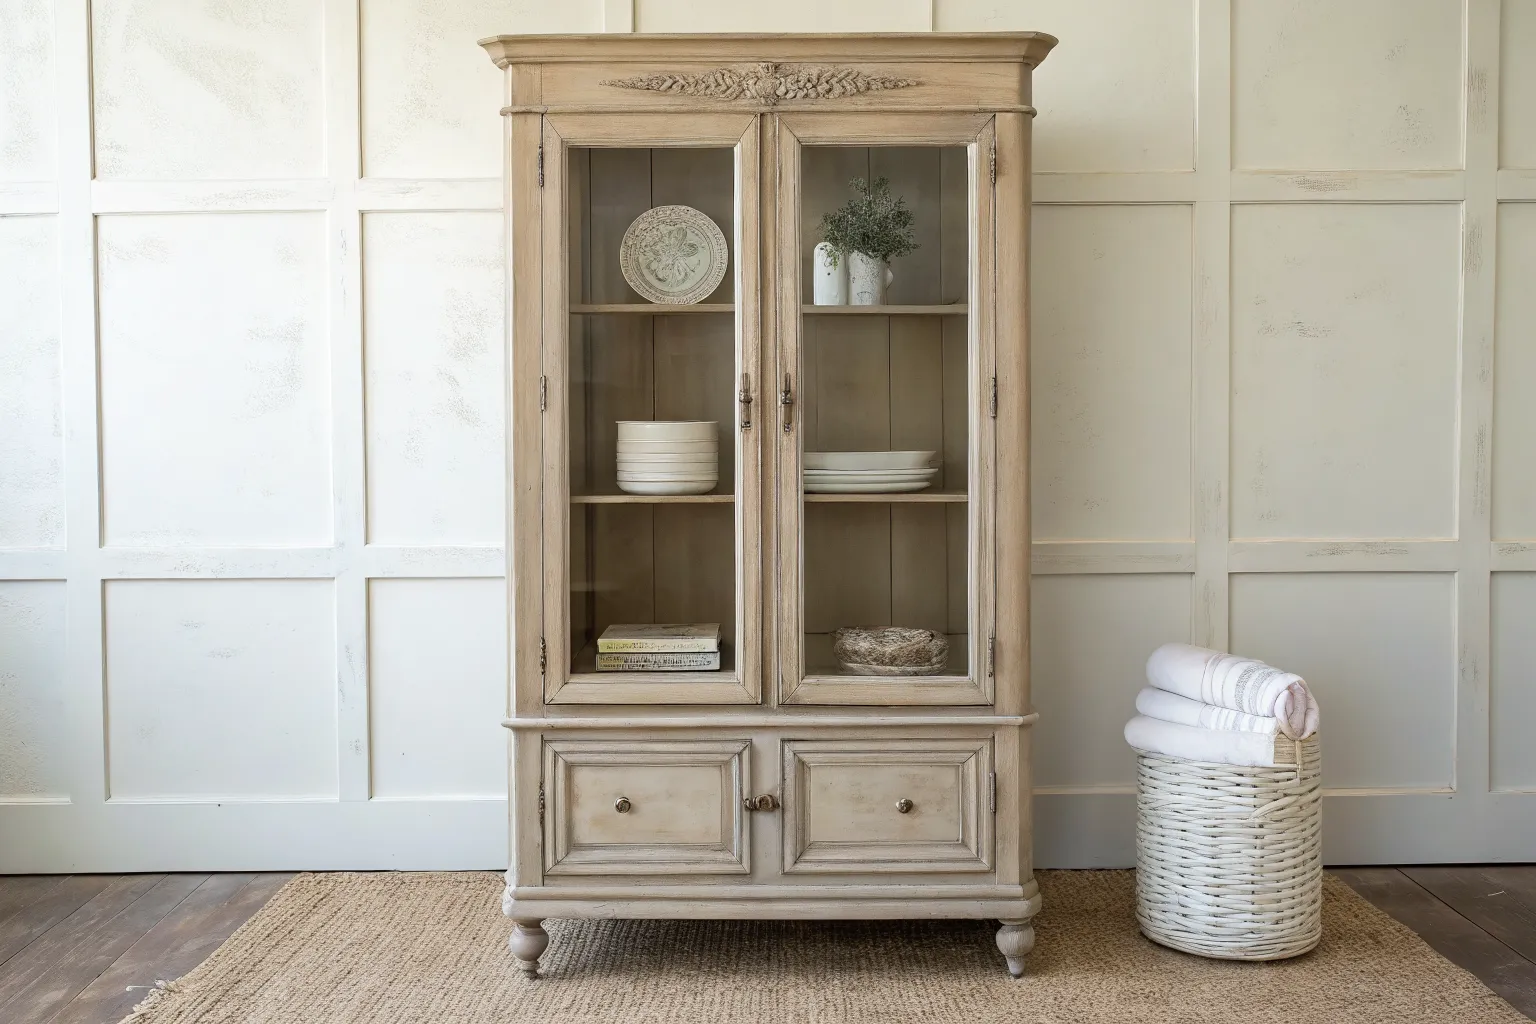
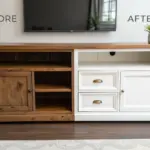
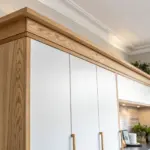
A chalk paint china cabinet makeover is one of those projects that can instantly change the whole mood of a room—especially when you’re starting with heavy, dark wood. Here are my favorite chalk paint china cabinet ideas that give you that satisfying “how is this the same piece?” transformation.
Bright White Chalk-Painted China Cabinet
Transform an outdated dark wood piece into a luminous focal point with this classic distressed white finish. The combination of clean chalk white paint and subtle edge-wearing gives this cabinet a timeless, lived-in farmhouse aesthetic.
Step-by-Step Guide
Materials
- Old china cabinet (preferably dark wood)
- White chalk-style paint (e.g., Annie Sloan ‘Old White’ or similar warm white)
- Clear furniture wax
- Dark furniture wax (optional, for deeper aging)
- Medium-grit sandpaper (120-150 grit)
- Fine-grit sandpaper (220 grit)
- TSP substitute or degreaser
- Painter’s tape
- Round chalk paint brush
- Lint-free waxing cloths or wax brush
- Screwdriver (for hardware removal)
- Glass scraper or razor blade
Step 1: Preparation & Cleaning
-
Remove Hardware and Doors:
Start by taking off all knobs, pulls, and hinges using a screwdriver. Keep the screws and hardware organized in labeled baggies so reassembly is easy later. -
Take Out Shelves:
If the shelving is removable, take it out carefully. This makes painting the interior backboard much easier and ensures you don’t miss any tricky corners. -
Deep Clean surfaces:
Scrub the entire piece thoroughly with a TSP substitute or a strong degreaser. Old furniture often has built-up oils or wax that will prevent paint from adhering properly. -
Tape Glass Panes:
Apply painter’s tape along the edges of the glass panes. While chalk paint scrapes off glass easily, taping saves significant cleanup time on the muntins. -
Light Scuffing:
Give the glossy surfaces a very quick scuff with medium-grit sandpaper. You aren’t stripping the finish, just giving the slick wood a little ‘tooth’ for the paint to grab onto.
Step 2: Painting Process
-
First Coat Application:
Open your white chalk paint and stir well. Using a round chalk paint brush, apply the first coat. Don’t worry about perfect coverage here; the first coat often looks streaky or patchy. -
Paint the Interior:
While the exterior dries, paint the interior backboard and side walls. I prefer to paint the shelves separately on a drop cloth so I can get all sides easily. -
Drying Time:
Allow the first coat to dry completely, usually about 1-2 hours depending on humidity. It should feel chalky and dry to the touch. -
Second Coat Application:
Apply a second coat of white paint. Use smooth, long strokes to minimize brush marks, although a little texture is desirable for this style. This coat should provide solid opacity. -
Check for Coverage:
Inspect the piece for any spots where the dark wood is still showing through unintentionally. Depending on the brand of paint, a light third coat might be necessary on high-visibility areas like the doors.
Bleed-Through Blues?
If pink or yellow stains appear through the white paint, the wood has tannins. Stop painting and seal the area with shellac-based primer, then repaint over it.
Step 3: Distressing & Finishing
-
Sand for Distressing:
Once the paint is fully cured (give it overnight if possible), take your medium-grit sandpaper to the edges. Gently sand areas where natural wear would occur: corners, molding ridges, and around the handles. -
Smooth the Flat Surfaces:
Switch to fine-grit sandpaper (220) and very lightly verify the flat surfaces. This knocks down brush strokes and makes the chalk paint feel buttery smooth without removing the color. -
Clean Up Dust:
Vacuum up all the sanding dust and wipe the piece down with a dry or barely damp microfiber cloth. You need a dust-free surface for waxing. -
Apply Clear Wax:
Dip a wax brush or lint-free cloth into clear furniture wax. Massage it into the paint in small sections, working it into the pores of the paint. -
Buff the Finish:
Let the wax sit for about 10-15 minutes, then buff it briskly with a clean cloth. This hardens the finish and adds a soft, subtle sheen. -
Reassemble:
Reattach your hardware. If desired, you can spray paint the old hardware black or oil-rubbed bronze before reinstalling to create a sharp contrast against the white. -
Clean the Glass:
Remove the painter’s tape. Use a razor blade or glass scraper to gently remove any paint that bled onto the glass for a crisp, professional edge.
Pro Tip: Wet Distressing
For a softer, less scratched look, wet a kitchen sponge (scrubby side) and rub the paint while it’s still slightly damp to reveal the wood underneath.
Step back and admire how this fresh coat of white breathes new life and light into your dining space


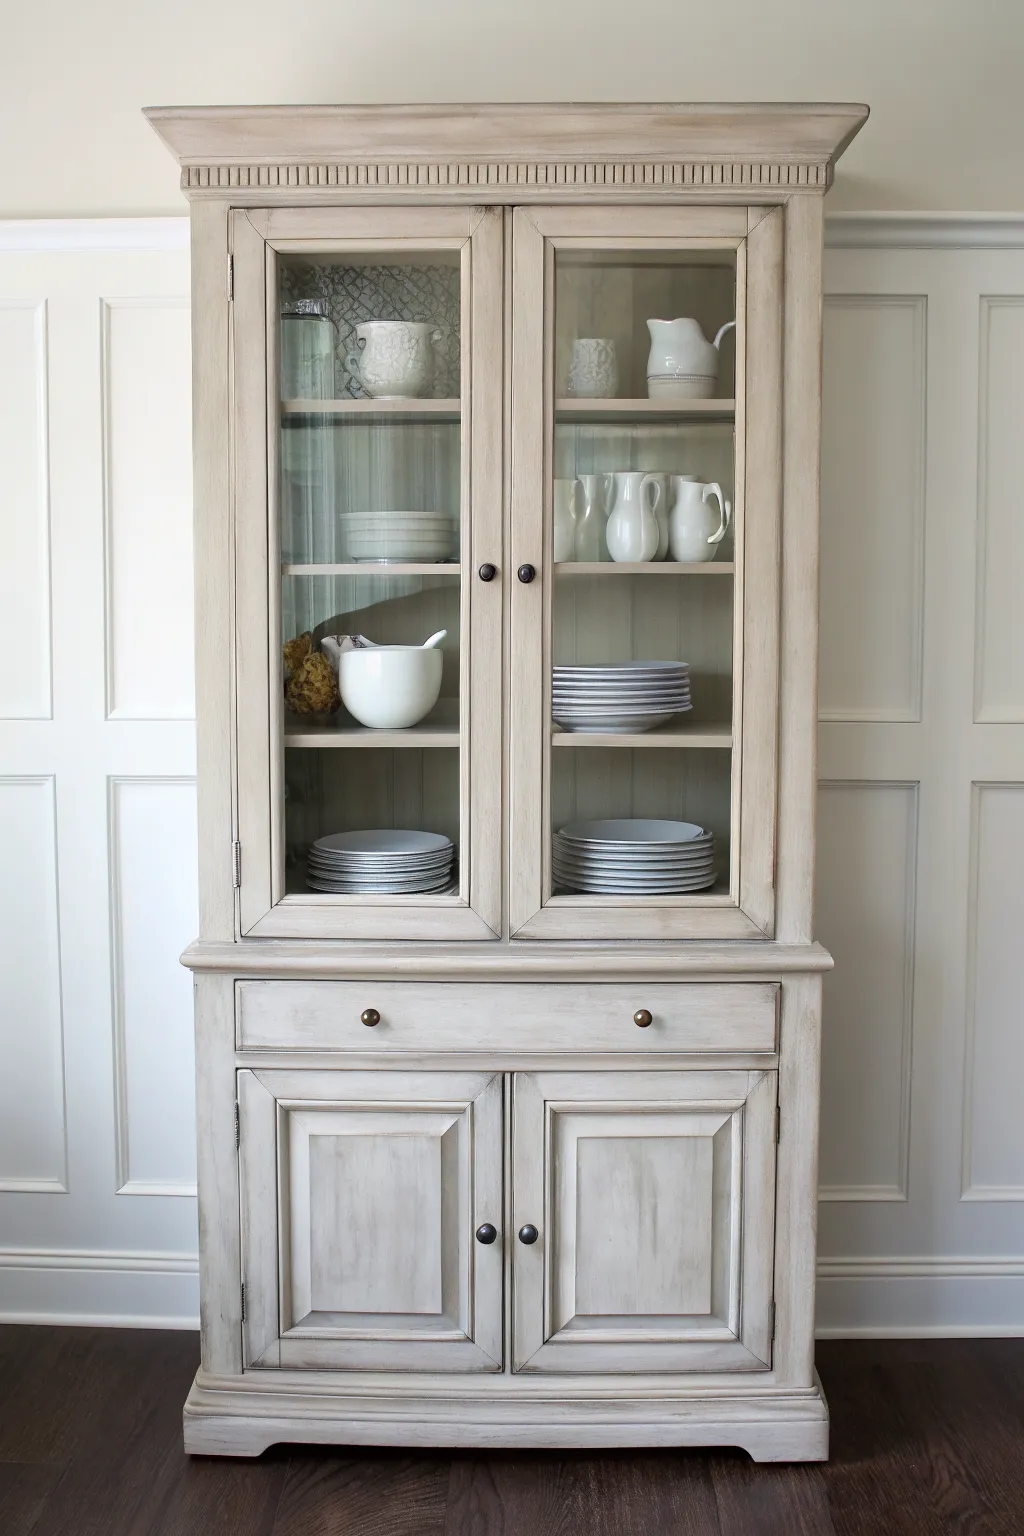
Soft Cream China Cabinet With Vintage Warmth
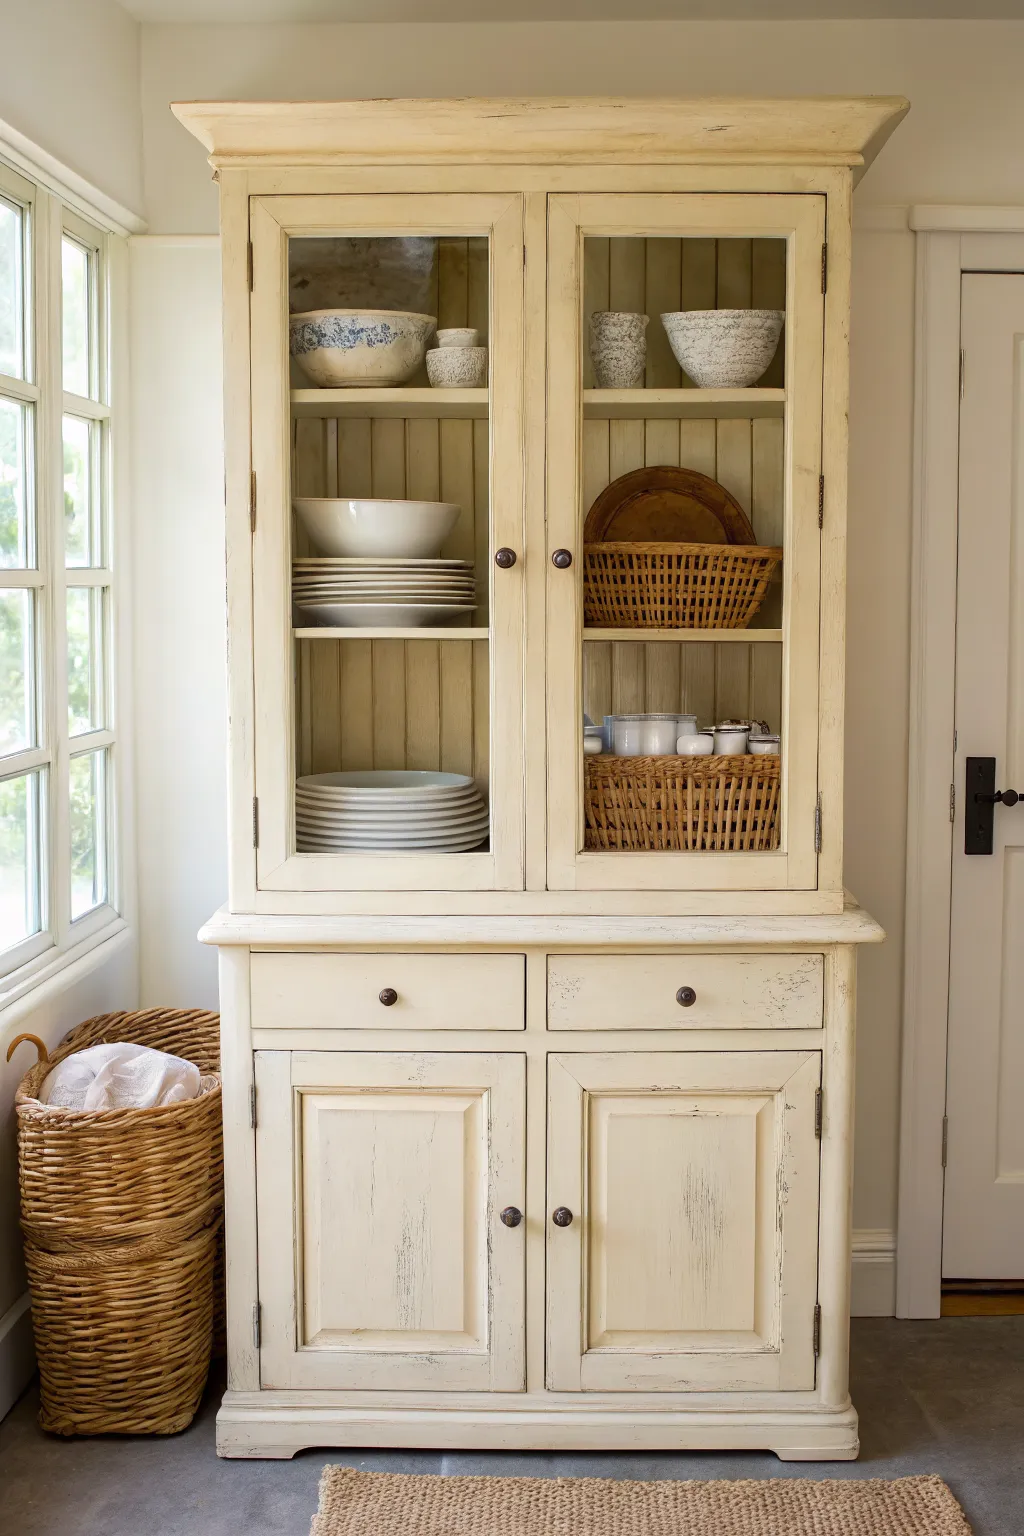
Transform a dated wooden china cabinet into a soft, inviting focal point with a distressed cream finish. This project uses the forgiving nature of chalk paint to achieve a warm, time-worn look that feels like an inherited heirloom rather than a fresh DIY.
How-To Guide
Materials
- Wooden china cabinet or hutch
- Degreaser cleaner (TSP substitute)
- Medium-grit sanding block (120-grit)
- Fine-grit sandpaper (220-grit)
- Cream or warm off-white chalk paint
- Dark wax or antique glaze (optional, for aging)
- Clear furniture wax
- Synthetic oval paint brush
- Wax brush or lint-free rags
- Painter’s tape
- Screwdriver (for hardware removal)
Step 1: Preparation
-
Remove Hardware:
Begin by unscrewing all knobs, handles, and hinges. Place them in labeled bags so you know exactly which door or drawer they belong to later. -
Clean Thoroughly:
Scrub the entire piece with a degreaser cleaner like a TSP substitute. Old furniture often has built-up oils or wax that can repel paint, so take your time here. -
Light Scuff Sanding:
Although chalk paint adheres well, I like to give glossy surfaces a quick scuff with medium-grit sandpaper to create a better ‘tooth’ for the paint to grip. -
Masking Off:
Apply painter’s tape carefully around the glass panes on the doors to protect them from stray brushstrokes. Run a credit card along the edge of the tape to ensure a tight seal.
Bleed-Through Blues?
If pink or yellow stains appear through the cream paint, seal the spot with clear shellac or a stain-blocking primer, let dry, then repaint that area.
Step 2: Painting
-
First Coat Application:
Dip your synthetic oval brush into the cream chalk paint. Apply the first coat using long, smooth strokes following the wood grain. Don’t worry if it looks patchy; the first coat is just a base. -
Dry Time:
Allow the first coat to dry completely, which usually takes about 1-2 hours depending on humidity. It should feel dry and not cool to the touch. -
Second Coat for Coverage:
Apply a second coat of paint. This layer provides the solid, opaque cream color. Pay special attention to the molding and recessed areas on the doors. -
Check for Drips:
While the second coat is still wet, scan the corners and edges for any paint drips and smooth them out gently with your brush. -
Interior Painting (Optional):
If you want the interior to match, paint the back panel and shelves now. Leaving the interior wood unpainted can create a nice contrast, however.
Add Subtle Age
Mix a tiny amount of dark brown wax with your clear wax and apply it only into the deep crevices and corners for an authentic antique shadow effect.
Step 3: Distressing and Finishing
-
Wet Distressing Technique:
For a natural aged look, take a damp (not soaking) lint-free cloth and gently rub over raised edges, corners, and handle areas. This removes paint to reveal the wood underneath without the dust of sanding. -
Sandpaper Distressing:
If you prefer heavier wear, wait until the paint is fully dry and use fine-grit sandpaper on high-traffic areas like drawer fronts and door frames to expose more wood. -
Clean Up Dust:
Wipe the entire piece down with a clean, dry cloth or a tack cloth to remove any sanding dust or loose paint particles. -
Apply Clear Wax:
Dip your wax brush into clear furniture wax. Apply it in small sections, working it into the paint to seal and protect the surface. -
Buffing the Finish:
Let the wax cure for about 15-20 minutes, then buff it vigorously with a clean lint-free rag to achieve a soft, subtle sheen. -
Reinstall Hardware:
Once the finish feels smooth and dry, screw the original hardware back into place to complete the vintage aesthetic. -
Glass Cleanup:
Remove the painter’s tape from the glass. If any paint seeped through, carefully scrape it off with a razor blade held at a 45-degree angle.
Now you have a stunning, character-filled piece ready to display your favorite dishes and linens


Light Greige China Cabinet That Feels Built-In
Achieve the look of custom joinery without the renovation costs by transforming a standard china cabinet with a sophisticated light greige finish. This project uses chalk paint and subtle waxing techniques to create a soft, matte texture that feels both modern and eternally classic.
Step-by-Step Guide
Materials
- China cabinet (solid wood preferred)
- TSP or degreasing cleaner
- Medium and fine grit sandpaper (120 and 220 grit)
- Painter’s tape
- Chalk paint in a light greige color (e.g., Annie Sloan ‘French Linen’ mixed with ‘Old White’)
- Clear finishing wax
- Dark or antique furniture wax (optional for depth)
- Oval chalk paint brush
- Wax brush or lint-free cotton cloth
- Screwdriver for hardware removal
- Tack cloth
Step 1: Preparation & Cleaning
-
Remove Hardware and Shelves:
Begin by taking off all knobs, handles, and hinges using a screwdriver. Keep these organized in a labeled baggie so nothing gets lost. Carefully remove any internal glass shelves and set them aside in a safe spot. -
Clean Thoroughly:
Scrub the entire piece with a TSP (trisodium phosphate) substitute or a strong degreaser to remove years of furniture polish, oil, and dust. This is crucial for paint adhesion; rinse with a damp cloth afterward and let dry. -
Tape Glass Panes:
Apply painter’s tape precisely along the edges of the glass panes on the doors. Take your time here to ensure straight lines, as scraping paint off glass corners later can be tedious. -
Light Scuff Sanding:
While chalk paint adheres well, a quick scuff sand with 120-grit paper ensures a durable bond. Focus on shiny areas to break the surface tension, then wipe away all dust with a tack cloth.
Bleed-Through Blues?
If pink or yellow stains seep through your greige paint from the wood tannins, stop painting immediately. Apply a coat of clear shellac or stain-blocking primer to seal the wood, let dry, then repaint.
Step 2: Painting
-
First Coat Application:
Stir your greige chalk paint thoroughly. Using an oval brush, apply the first coat using long, even strokes with the grain of the wood. Don’t worry if it looks streaky or translucent initially; coverage improves significantly with the second layer. -
Watch for Drips:
Check corners and recessed molding areas frequently for paint pooling or drips. Smooth these out immediately with your brush tip before they begin to dry. -
Dry and Sand Lightly:
Allow the first coat to dry completely, typically 1-2 hours. Once dry, run a piece of fine 220-grit sandpaper over the surface very lightly to knock down any brush textures or bumps. -
Second Coat Application:
Apply a second coat of paint. I find that painting in sections (top doors, then drawer, then bottom) helps maintain a wet edge. Ensure full coverage, especially on the detail work around the dental molding. -
Remove Tape:
Carefully peel away the painter’s tape while the second coat is still slightly tacky to prevent the paint from peeling up with the tape.
Interior Contrast
Make your white dishware pop by painting the back panel of the cabinet interior a shade darker or lighter than the exterior, or line it with a subtle texture like beadboard wallpaper.
Step 3: Waxing & Finishing
-
Clear Wax Application:
Once the paint is fully cured (usually overnight), load a wax brush with clear furniture wax. Massage it into the paint in small circular motions, working in manageable sections like one door at a time. -
Wipe Away Excess:
Immediately follow the wax application by wiping the area with a clean, lint-free cloth. You want to remove excess wax so the surface doesn’t feel sticky, leaving just a thin protective layer. -
Create Depth (Optional):
To mimic the depth seen in the photo, mix a tiny amount of dark wax with clear wax. Apply this strictly into the crevices of the molding and corners, then wipe back aggressively with clear wax to soften tight shadows. -
Buff for Sheen:
Allow the wax to harden for about 24 hours. Then, take a clean cotton cloth and buff the entire cabinet vigorously. The friction creates a soft, satin sheen that highlights the panel details. -
Reinstall Hardware:
Reattach your knobs and pulls. If the original hardware was dated, consider spray painting them oil-rubbed bronze before reinstalling to match the project’s aesthetic.
Enjoy styling your newly refreshed cabinet with your favorite ceramics and linens for a look that completely transforms the room

Matte Black Chalk Paint China Cabinet

Transform a dated wooden hutch into a sophisticated focal point using the power of matte black chalk paint. This project balances the striking depth of charcoal black with a bright, contrasting interior to make your china collection pop.
Step-by-Step Tutorial
Materials
- Vintage wooden china cabinet or hutch
- Degreasing cleaner (TSP or similar)
- Medium-grit sandpaper (120-150 grit)
- Painter’s tape
- Matte black chalk paint
- High-quality synthetic bristle brush (oval or flat)
- Small artist brush for corners
- Clear furniture wax (or matte polycrylic)
- Lint-free wax cloths or wax brush
- Screwdriver for hardware removal
- Cream or off-white chalk paint (for interior)
Step 1: Preparation & Cleaning
-
Remove Hardware and Doors:
Start by unscrewing all knobs, handles, and hinges. Place them in labeled bags so you don’t lose any tiny screws. If the glass panels are removable, take them out carefully; if not, you will tape them later. -
Deep Clean surfaces:
Scrub the entire piece thoroughly with a degreasing cleaner like TSP. Old furniture often has years of furniture polish buildup that will repel paint, so don’t rush this step. -
Light Sanding:
Once dry, lightly scuff the exterior surfaces with medium-grit sandpaper. You aren’t trying to strip the wood, just creating a ‘tooth’ for the chalk paint to grab onto. -
Wipe Down:
Use a damp, lint-free cloth or a tack cloth to remove every speck of sanding dust. Dust is the enemy of a smooth matte finish. -
Masking:
Using painter’s tape, carefully mask off the glass panes if they couldn’t be removed. Press the edging of the tape down firmly with a credit card to prevent paint bleed.
Smooth Finish Trick
Between paint coats, very lightly sand the surface with a fine sanding sponge (220 grit or higher). This knocks down brush strokes for a factory-smooth finish.
Step 2: Painting the Exterior
-
First Black Coat:
Stir your matte black chalk paint thoroughly. Apply the first coat using long, smooth strokes with the grain of the wood. Don’t worry if it looks patchy or streak; the first coat is all about coverage. -
Drying Time:
Allow this first coat to dry completely, usually about an hour depending on your humidity levels. -
Second Black Coat:
Apply a second coat of black paint. I find that two coats are usually sufficient for a deep, opaque charcoal look, but inspect it closely for any missed spots. -
Detail Work:
Use a small artist’s brush to get paint into any intricate carvings or tight corners around the window molding where the larger brush couldn’t reach.
Step 3: Interior & Finishing
-
Interior Assessment:
Decide on the interior look. If the original wood is light and in good condition, you can leave it natural. To replicate the look in the photo, paint the back wall and shelves with a cream or off-white chalk paint. -
Painting the Interior:
Apply two coats of your lighter interior color. This contrast is crucial as it reflects light and prevents the cabinet from looking like a dark cave. -
Distressing (Optional):
For a subtle aged look, very lightly run high-grit sandpaper over the raised edges and corners of the black exterior. This reveals a tiny bit of wood, adding dimension. -
Sealing with Wax:
Once the paint is fully cured (give it 24 hours), apply a clear furniture wax. Use a wax brush to massage it into the paint, working in small sections. -
Buffing:
Let the wax sit for about 15 minutes, then buff it vigorously with a clean lint-free cloth. This creates that soft, velvety sheen seen in the image rather than a glossy shine. -
Hardware Refresh:
While the wax cures, clean your hardware. If the original metal looks dated, a quick rub with Gold Leaf Rub ‘n Buff can add an elegant metallic accent. -
Reassembly:
Carefully peel off the painter’s tape (pulling away from the paint edge). Reattach the doors and screw the hardware back into place.
Make It Moody
Instead of a white interior, try a wallpaper backing with a botanical print or a metallic gold geometric pattern for a surprising pop of modern luxury.
Now step back and admire how this elegant dark transformation completely redefines the atmosphere of your room
BRUSH GUIDE
The Right Brush for Every Stroke
From clean lines to bold texture — master brush choice, stroke control, and essential techniques.
Explore the Full Guide
Charcoal China Cabinet With Natural Wood Top
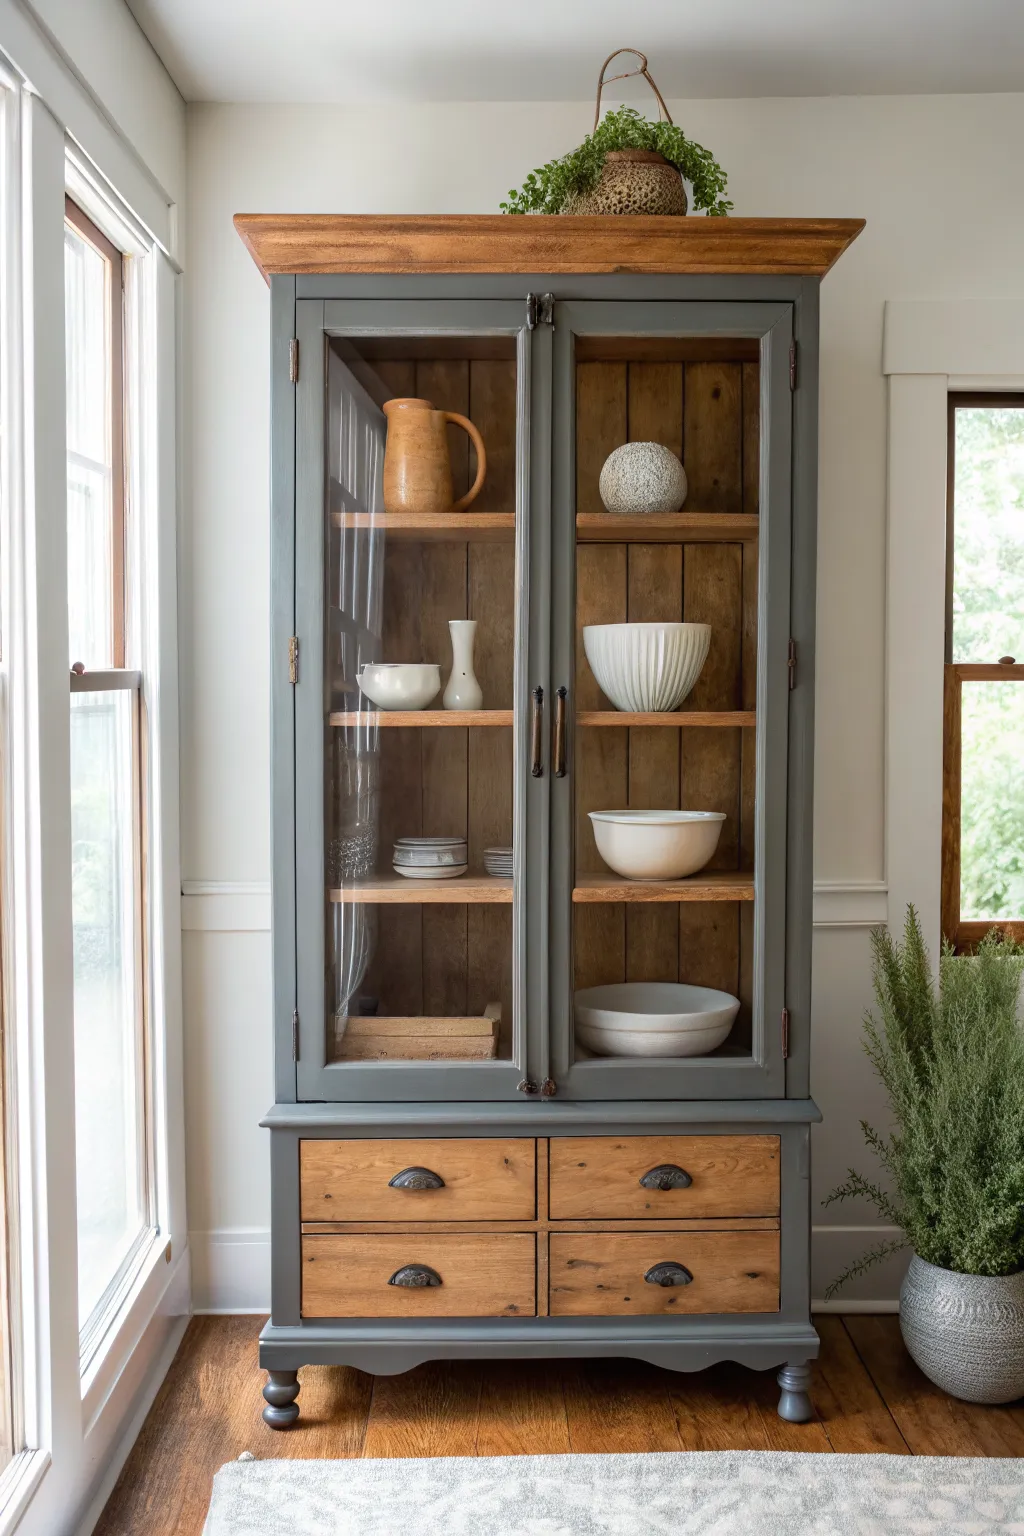
This elegant update breathes modern life into a dated hutch by pairing matte charcoal chalk paint with warm, natural wood tones. The contrast between the moody grey frame and the rich, exposed grain of the drawers and interior creates a sophisticated focal point for any dining room.
Step-by-Step
Materials
- China cabinet or hutch with good wood bones
- Charcoal grey chalk paint (e.g., Annie Sloan Graphite or similar)
- Clear furniture wax
- Dark wood stain (optional, for enhancing raw wood)
- Paint stripper or chemical wood stripper
- Plastic putty knife/scraper
- Medium and fine-grit sandpaper (120 and 220 grit)
- Painter’s tape
- High-quality synthetic bristle brush
- Wax brush or lint-free cloths
- Screwdriver (for hardware removal)
- Tack cloth
- Drop cloths
Step 1: Preparation & Stripping
-
Assess and Disassemble:
Begin by removing all contents from the cabinet. Take off the doors by unscrewing the hinges, remove all drawers, and unscrew all hardware knobs and pulls. Label the hardware in small bags so you know exactly where each piece goes later. -
Clean Thoroughly:
Wipe down the entire piece with a degreaser or a mixture of warm water and mild dish soap to remove years of furniture polish, dust, and grime. A clean surface ensures the paint and stripper work effectively. -
Identify Wood Zones:
Decide which areas will remain natural wood. For this look, we are keeping the top cornice, the interior shelving area, and the front faces of the four bottom drawers as exposed wood. -
Strip the Drawers and Top:
Apply a thick layer of chemical paint stripper to the drawer fronts and the top cornice molding. Let it sit according to the manufacturer’s instructions until the old finish bubbles up. -
Scrape Away Old Finish:
Gently scrape off the goopy finish using a plastic putty knife to avoid gouging the wood. You may need a second coat of stripper for stubborn varnish. Use steel wool dipped in mineral spirits to clean out any detailed crevices in the molding. -
Clean the Interior:
If the interior is already natural wood, simply clean it well. If it has a shiny varnish you want to remove, lightly sand it by hand with 120-grit sandpaper to scuff it up or remove the sheen without full stripping.
Bleed-Through Blues
If reddish stains appear through the grey paint, sleek raw wood tannins are bleeding. Seal the affected spot with clear shellac, let dry, then repaint.
Step 2: Sanding & Masking
-
Sand Stripped Areas:
Once dry, sand the stripped wood (drawers and top) with 120-grit sandpaper to remove residue, followed by 220-grit for a smooth, raw finish. Wipe away all dust with a tack cloth. -
Scuff the Frame:
Lightly sand the areas you intend to paint—the main side panels, the face frame, the legs, and the door frames—using 120-grit paper. You don’t need to strip these; just create a ‘tooth’ for the chalk paint to grab. -
Protect the Glass:
Carefully apply painter’s tape to the glass panes on the doors. Press the edges down firmly with a credit card to prevent paint from seeping underneath. -
Tape Off Wood Zones:
Tape off the edges where the painted frame meets the natural top cornice and the interior opening. Precision here makes the final line look professional.
Step 3: Painting & Finishing
-
First Coat of Charcoal:
Stir your charcoal chalk paint thoroughly. Using a synthetic bristle brush, apply the first coat to the exterior frame and legs. Work in long, smooth strokes. Don’t worry if it looks streaky; the first coat is just for coverage. -
Check for Drips:
While painting, keep an eye on corners and detailed edges for drips. Smooth them out immediately before they dry. -
Second Coat Application:
Allow the first coat to dry completely (usually 1-2 hours). Apply a second coat for full, opaque coverage. I like to paint in varied directions on the second pass to create that subtle, textured chalk finish. -
Touch Up Door Frames:
Don’t forget the window mullions and frames on the detached doors. Paint these carefully, ensuring you get the inside edges that face the glass. -
Enhance the Natural Wood (Optional):
If the raw wood looks too pale or dry, apply a light coat of wood stain or hemp oil to the drawers, top, and interior to bring out the grain warmth. Wipe off excess immediately. -
Seal with Wax:
Once the paint is fully dry (overnight is best), apply clear furniture wax over the painted areas using a wax brush. Work in sections, massaging the wax into the paint, then wipe off the excess with a lint-free cloth. -
Reassemble:
Remove the painter’s tape carefully. Reattach the hardware to the drawers and doors. Place the drawers back in their slots and screw the oversized hinges back onto the main frame to hang the doors.
Hardware Harmony
If the original brass hardware clashes with the charcoal, spray paint the knobs and hinges matte black or oil-rubbed bronze to match the darker aesthetic.
Step back and admire how the dark frame perfectly highlights your displayed treasures and the beautiful natural grain of the wood
Two-Tone China Cabinet: Light Outside, Color Inside
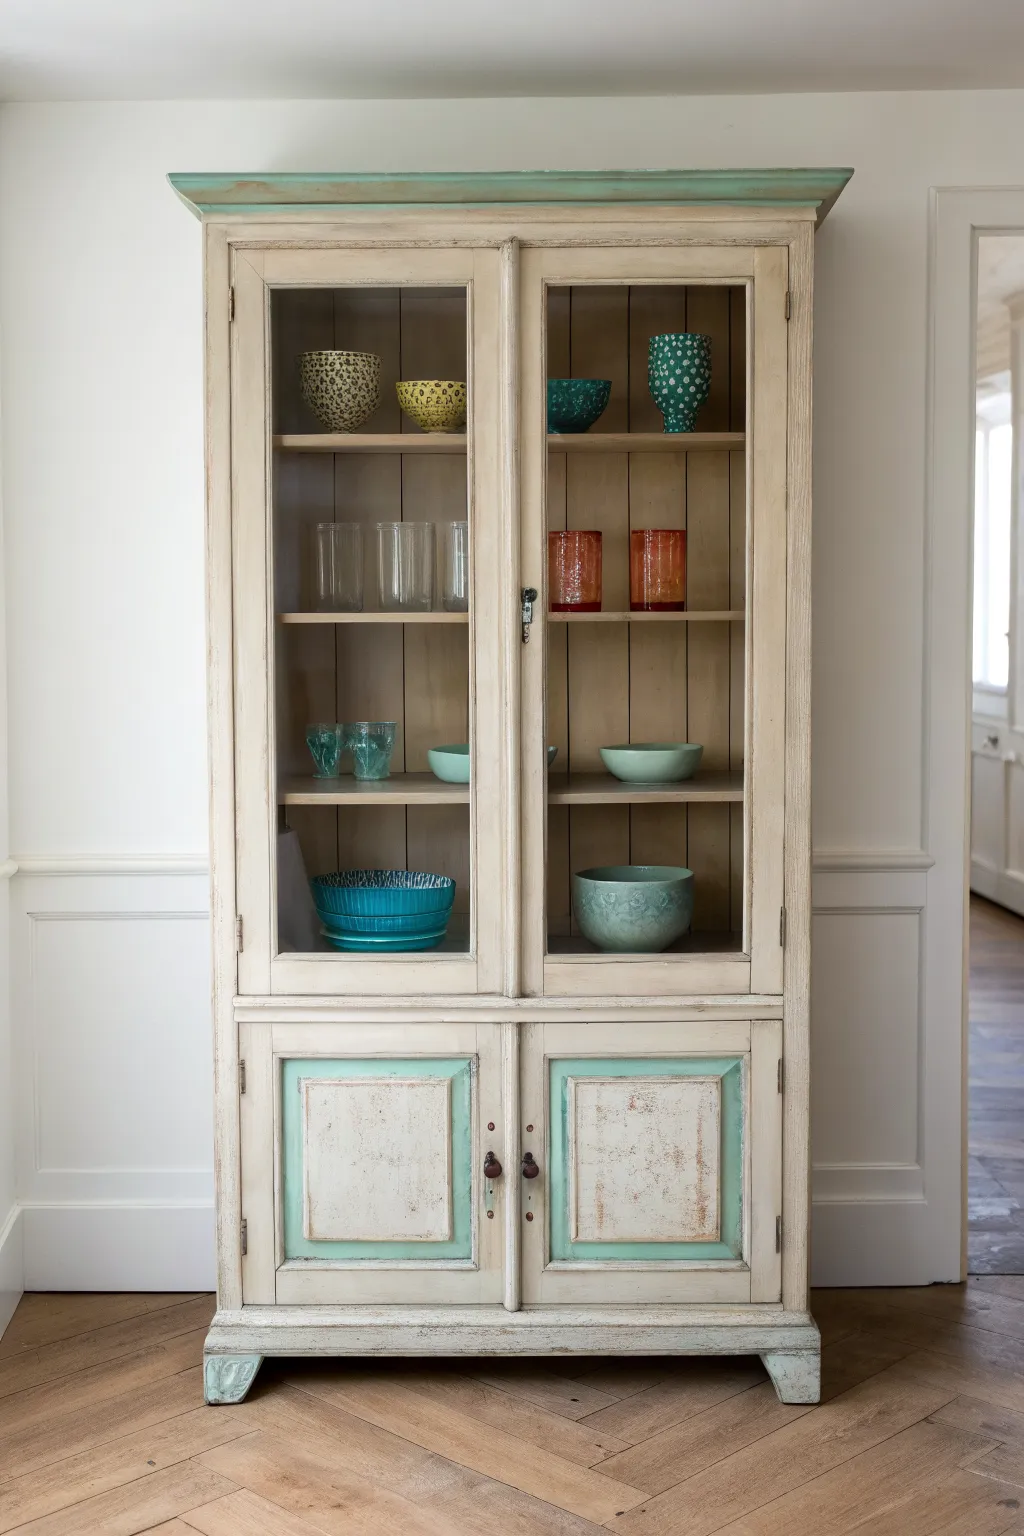
Transform a dated cabinet into a charming focal point using this subtle two-tone technique. The combination of creamy beige and soft mint green, finished with heavy distressing, creates an authentic timeworn feel that brightens any dining space.
Step-by-Step Tutorial
Materials
- Wooden china cabinet (glass doors removed)
- Cream/beige chalk paint
- Mint/teal chalk paint
- Clear furniture wax
- Dark antique furniture wax
- Medium-grit sandpaper (120-150 grit)
- Clean lint-free cloths
- Painter’s tape
- 2-inch synthetic brush
- Small artist brush for details
- Screwdriver (for hardware removal)
- Mild degreaser or TSP substitute
Step 1: Preparation
-
Remove Hardware and Doors:
Begin by unscrewing all knobs, handles, and hinges. Carefully remove the glass doors and the bottom cabinet doors. Store all hardware in a labeled bag so nothing gets lost. -
Clean Surfaces:
Wipe down the entire exterior of the cabinet with a mild degreaser or TSP substitute to remove oils, dust, and old furniture polish. This ensures the chalk paint adheres properly. -
Mask the Glass:
If the glass panes aren’t removable, carefully apply painter’s tape along the edges of the glass on both sides of the doors to protect them from paint drips. -
Interior Check:
Decide if you are painting the interior. For the look in the photo, the interior remains unpainted wood. If yours needs refreshing, clean it well, but tape off the inner edges so paint doesn’t bleed inside.
Bleed-Through Blues?
If you see pink or yellow stains seeping through your cream paint, seal the wood with a clear shellac primer before painting another coat to lock in the tannins.
Step 2: Painting the Base Coat
-
First Cream Coat:
Stir your cream chalk paint thoroughly. Apply the first coat to the main body of the cabinet, the door frames, and the side panels. Don’t worry about full opacity yet; chalk paint often needs two coats. -
Painting the Accents:
While the cream dries, identify your accent areas. I like to target the top crown molding, the inset panels on the bottom doors, and the feet. Paint these areas with your mint/teal chalk paint. -
Second Cream Coat:
Once the first layer is dry to the touch (usually 30-60 minutes), apply a second coat of cream. Use long, smooth strokes to minimize texture, unless you prefer a rougher look. -
Second Accent Coat:
Apply a second coat of mint paint to the accent areas. Ensure you get into the corners of the door molding. -
Layering the Door Panels:
To achieve the specific look on the bottom doors, paint the center of the mint panels with the cream color, leaving a border of mint visible around the edges. You don’t need to be perfectly neat here, as distressing will blend it.
Wet Distressing Pro Tip
For a smoother distressed look without dust, use a damp kitchen sponge instead of sandpaper. Gently rub the paint away from edges before it fully cures.
Step 3: Distressing and Finishing
-
Initial Sanding:
Once all paint is completely dry, use medium-grit sandpaper to distress the piece. Focus on high-traffic areas: edges, corners, raised moldings, and around the door handles. -
Heavy Distressing:
Sand more aggressively on the mint accent areas, revealing some of the wood underneath and blending the cream center of the bottom panels into the mint border. The goal is to make the paint layers look worn over time. -
Clean Dust:
Wipe away all sanding dust with a slightly damp cloth or a tack cloth. A dust-free surface is crucial for the wax application. -
Apply Clear Wax:
Using a wax brush or lint-free cloth, apply a thin layer of clear furniture wax over the entire painted surface. Work in small sections, massaging the wax into the paint. -
Apply Dark Wax:
Dip a brush lightly into dark antique wax and offload most of it onto a paper towel. Gently apply it into crevices, corners, and over the distressed areas to add age and depth. -
Buff to Shine:
Allow the wax to cure for about 20 minutes, then buff the entire piece with a clean, dry cloth to achieve a soft sheen. -
Reassembly:
Carefully remove the painter’s tape from the glass. Reattach the doors and reinstall the hardware to complete the transformation.
Enjoy styling your newly refreshed cabinet with your favorite ceramics and glassware for a lovely, curated display

PENCIL GUIDE
Understanding Pencil Grades from H to B
From first sketch to finished drawing — learn pencil grades, line control, and shading techniques.
Explore the Full Guide
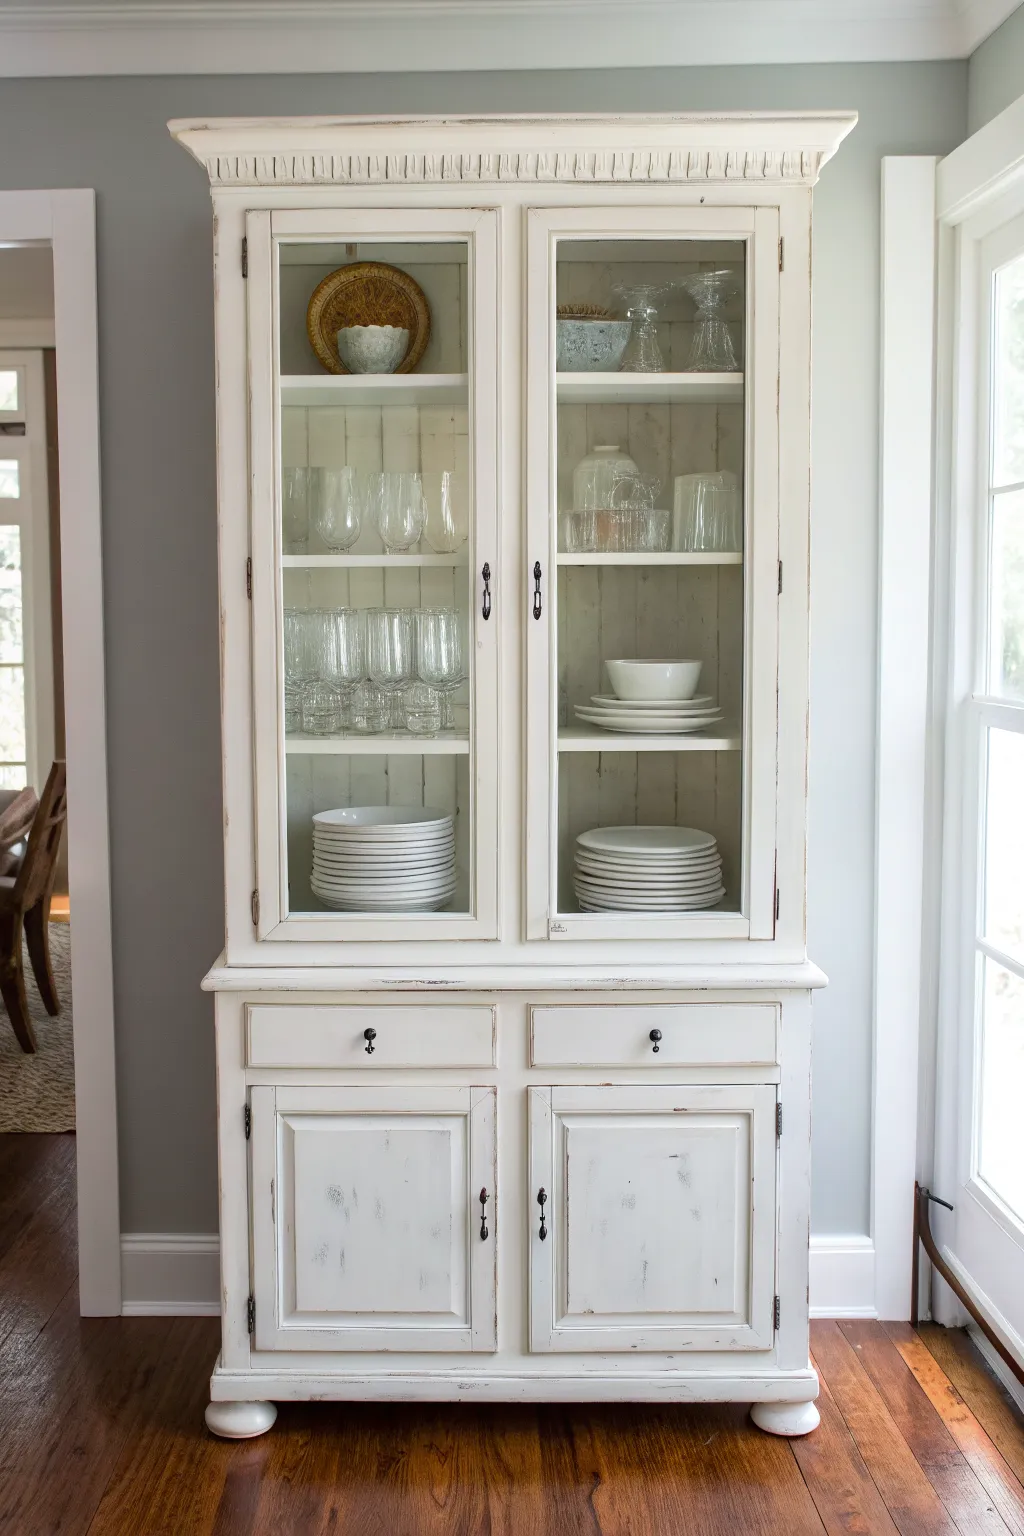
Painted Back Panel to Make China Stand Out
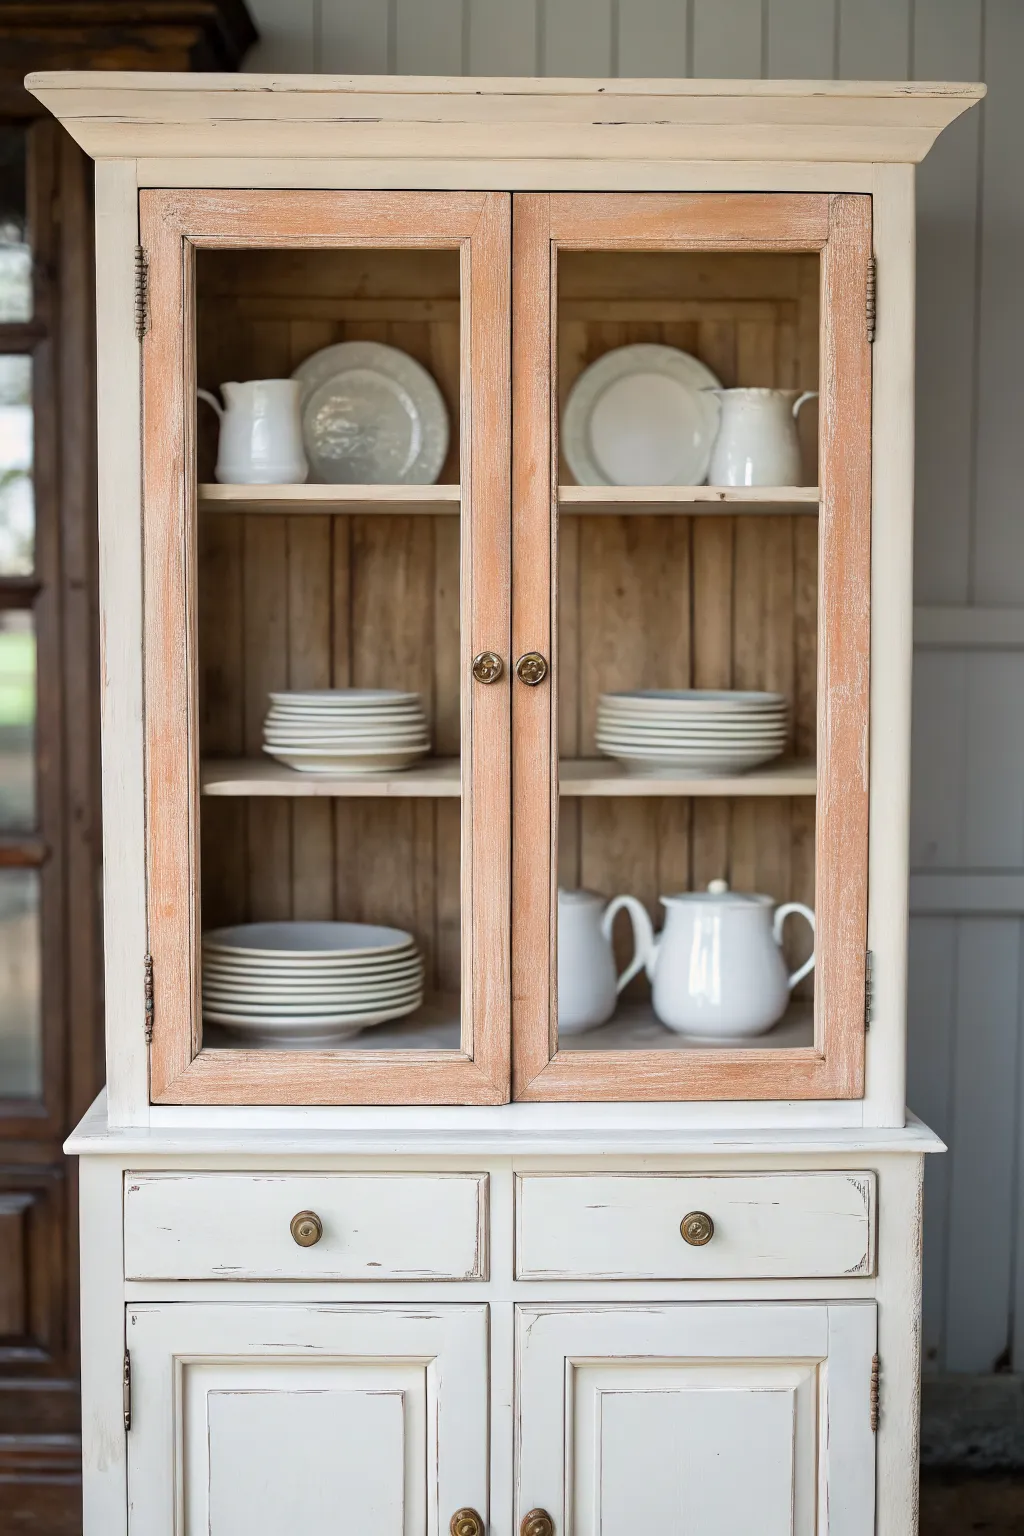
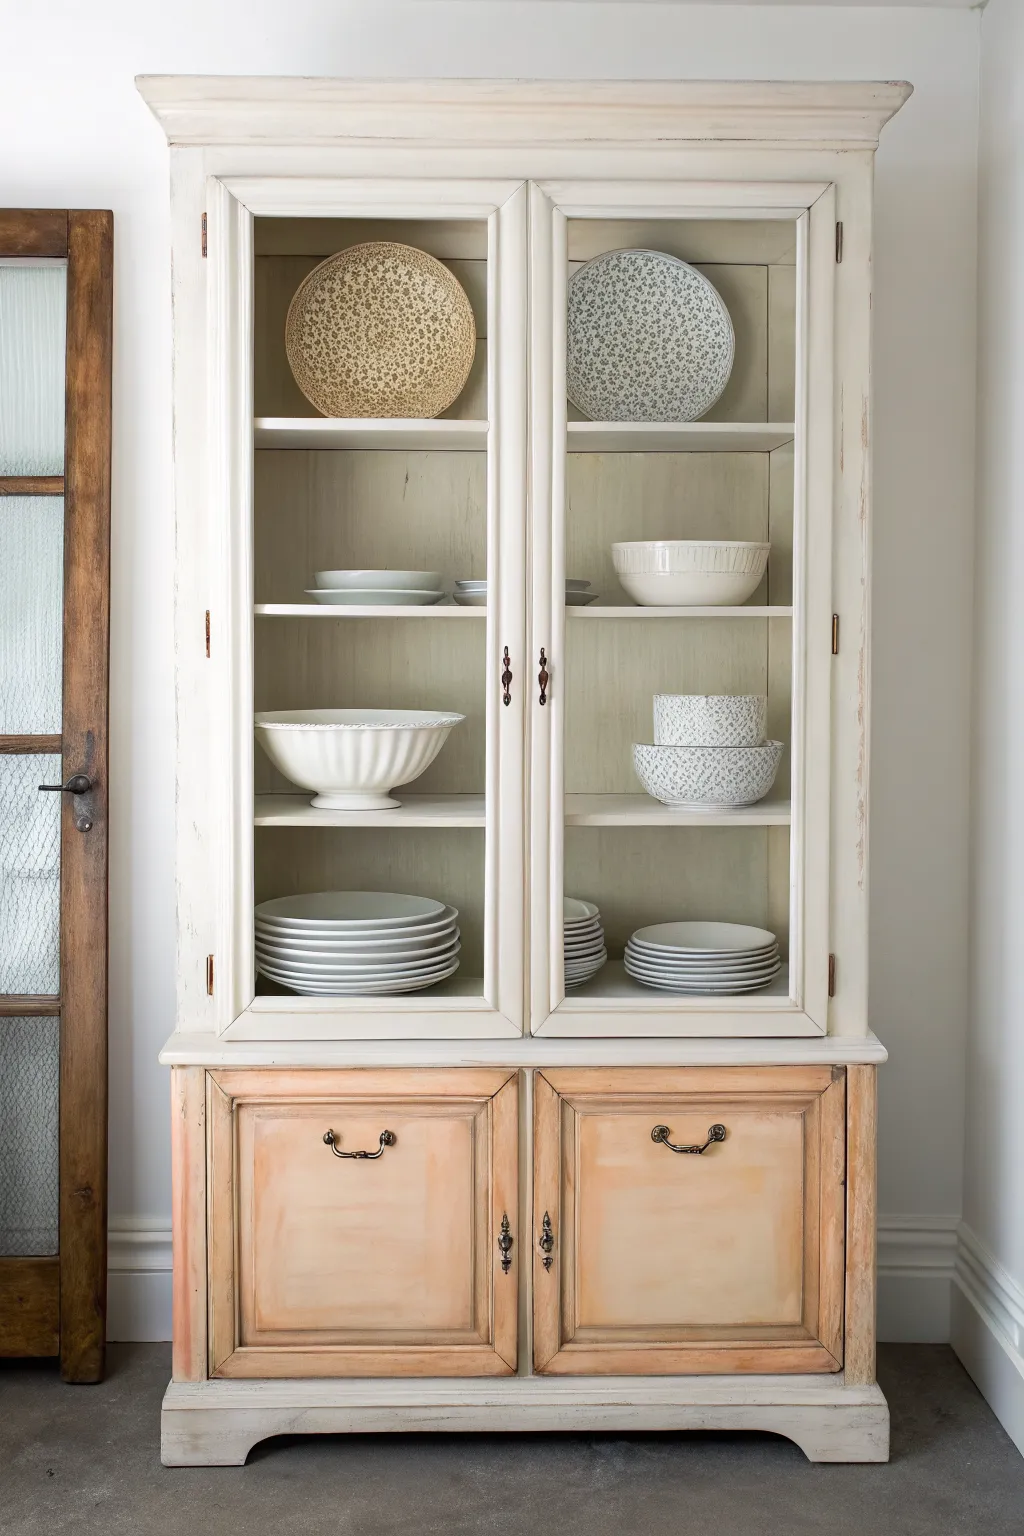
This project transforms a standard china cabinet into a stunning two-tone display piece by pairing a soft, creamy white exterior with exposed natural wood accents. The result is a perfect balance of rustic warmth and clean farmhouse elegance that lets your white china truly shine.
How-To Guide
Materials
- China cabinet (solid wood preferred)
- Chalk paint (Cream or Antique White)
- Clear furniture wax
- Dark furniture wax (optional for aging)
- Paint stripper or chemical stripper
- Medium and fine grit sandpaper (120 and 220 grit)
- Painter’s tape
- Drop cloths
- Scraper tool
- Steel wool (0000 grade)
- Lint-free rags
- Quality synthetic paint brush
- Natural bristle wax brush
- Screwdriver (for hardware removal)
- TSP or degreasing cleaner
Step 1: Preparation & Stripping
-
Remove Hardware and Doors:
Start by taking off all knobs, hinges, and handles. Store them in a marked bag so nothing gets lost. Carefully remove the glass doors and lay them flat on a safe, covered work surface. -
Clean the Surface:
Scrub the entire piece down with a TSP substitute or a strong degreaser to remove years of furniture polish, dust, and grime. Let it dry completely. -
Protect the Glass:
Use painter’s tape to meticulously mask off the glass panes on both the inside and outside of the doors. Run a credit card along the tape edge to ensure a tight seal against paint seepage. -
Strip the Doors:
Since we want a natural wood look for the door frames, apply a chemical stripper to the wooden frames of the doors. Follow the manufacturer’s safety instructions carefully. -
Scrape and Clean:
Once the finish bubbles, gently scrape it away. Clean the residue with mineral spirits and steel wool to reveal the raw wood underneath.
Bleached Wood Hack
If sanding doesn’t lighten the wood enough, use household bleach. Apply it carefully to raw wood, let it dry in the sun, and neutralize with vinegar water before finishing.
Step 2: Painting the Exterior
-
Sand the Body:
Lightly scuff sand the main body of the cabinet (the parts that will be painted white) with 120-grit sandpaper. You don’t need to remove the old finish entirely, just give the paint something to grip. -
Mask the Interior:
If you are keeping the interior back panel natural wood as shown, tape off the interior edges carefully so your white paint doesn’t messy the inside. -
First Coat of Paint:
Apply your first coat of creamy white chalk paint to the cabinet frame and the drawer fronts. Use long, smooth strokes. Don’t worry if it looks patchy; chalk paint covers well in layers. -
Dry and Repeat:
Allow the first coat to dry for about 1-2 hours. Apply a second coat for full, opaque coverage. I usually find two coats are sufficient for a solid finish. -
Distress the Paint:
Once the paint is fully dry, take a 220-grit sanding block to the edges, corners, and raised details. Gently sand away the white paint to reveal some of the dark wood underneath, creating that aged, time-worn look.
Paint Bleed on Glass?
If paint seeped under your tape onto the glass, don’t use chemicals. Wait until it’s fully dry, then gently scrape it off with a fresh razor blade at a 45-degree angle.
Step 3: Refining the Wood Accents
-
Sand the Stripped Doors:
Return to your stripped door frames. Sand them smooth with 220-grit sandpaper to remove any lingering finish and fuzziness. -
Create a Wash (Optional):
If the raw wood is too dark or red, mix a little white paint with water (50/50 ratio) and brush it over the raw wood, wiping it back immediately with a rag. This gives that soft, bleached look seen in the photo. -
Seal the Wood:
Apply a coat of clear wax to the raw wood door frames to protect them and bring out a subtle grain.
Step 4: Finishing Touches
-
Wax the Painted Areas:
Use a wax brush to apply a layer of clear wax over all the white painted surfaces. Work in sections, massaging the wax into the paint. -
Buff the Finish:
After the wax has sat for about 15 minutes, buff it rigorously with a clean, lint-free cloth to achieve a soft, satin sheen. -
Reassemble:
Remove all painter’s tape from the glass. Reattach the hinges and hang the doors back onto the cabinet frame. -
Add Hardware:
Screw the knobs and pulls back into place. Whether you reuse the original brass or choose new hardware, this is the jewelry that finishes the look.
Now you have a stunning focal point that perfectly highlights your favorite dishes.
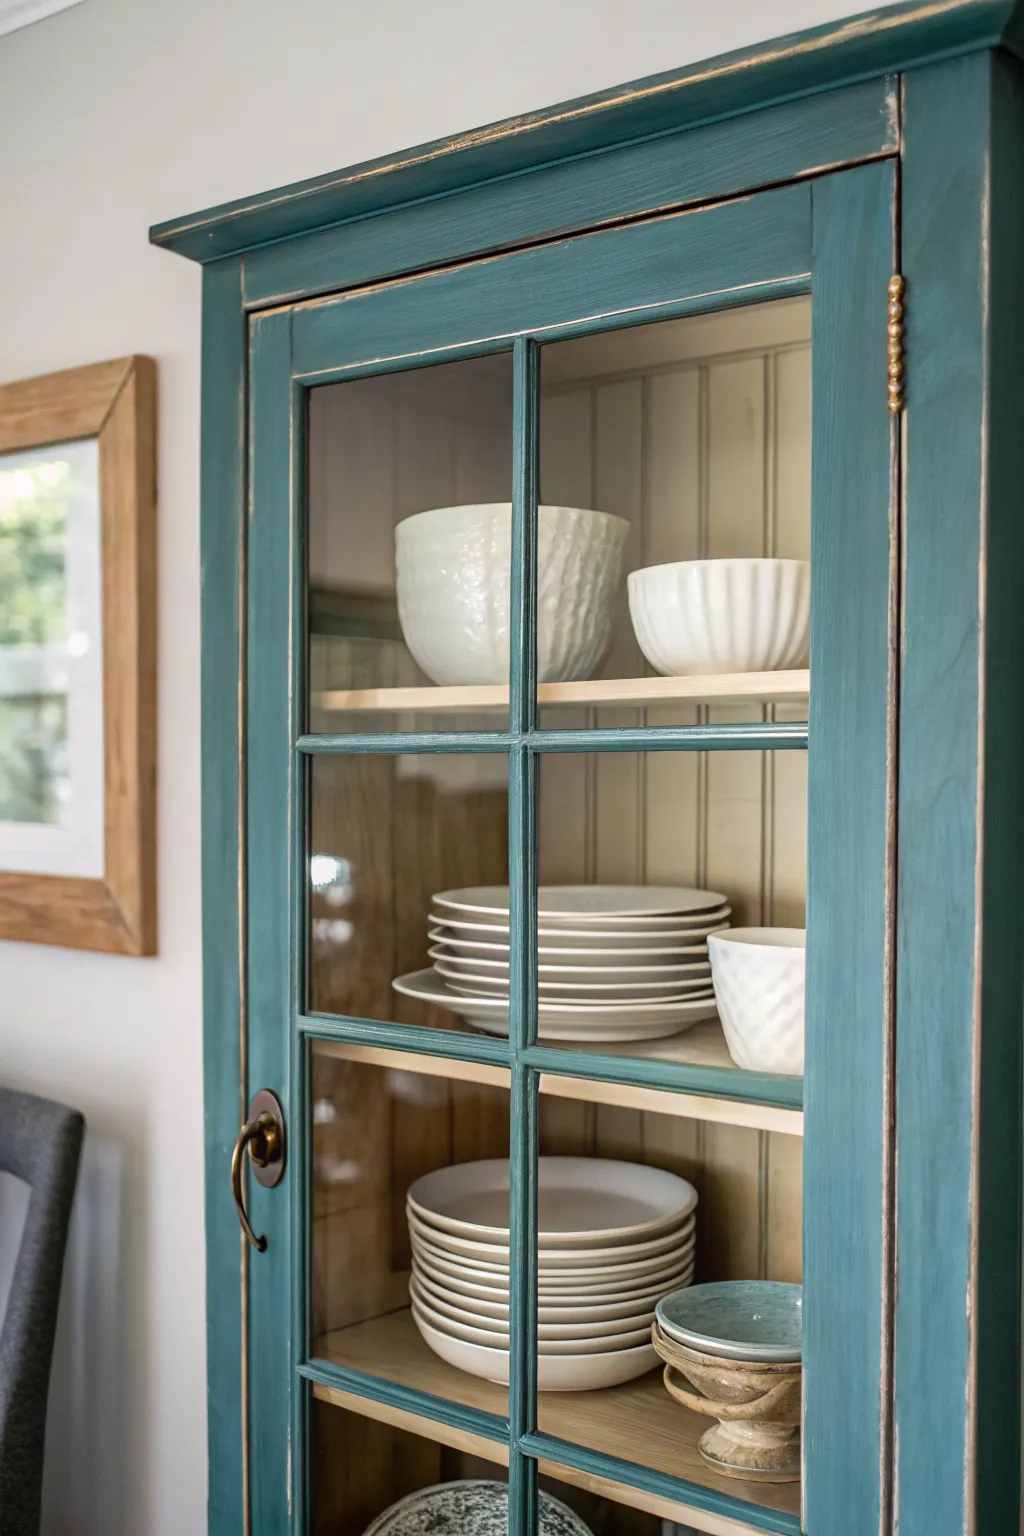
Classic Distressed Edges on a Chalk-Painted China Cabinet
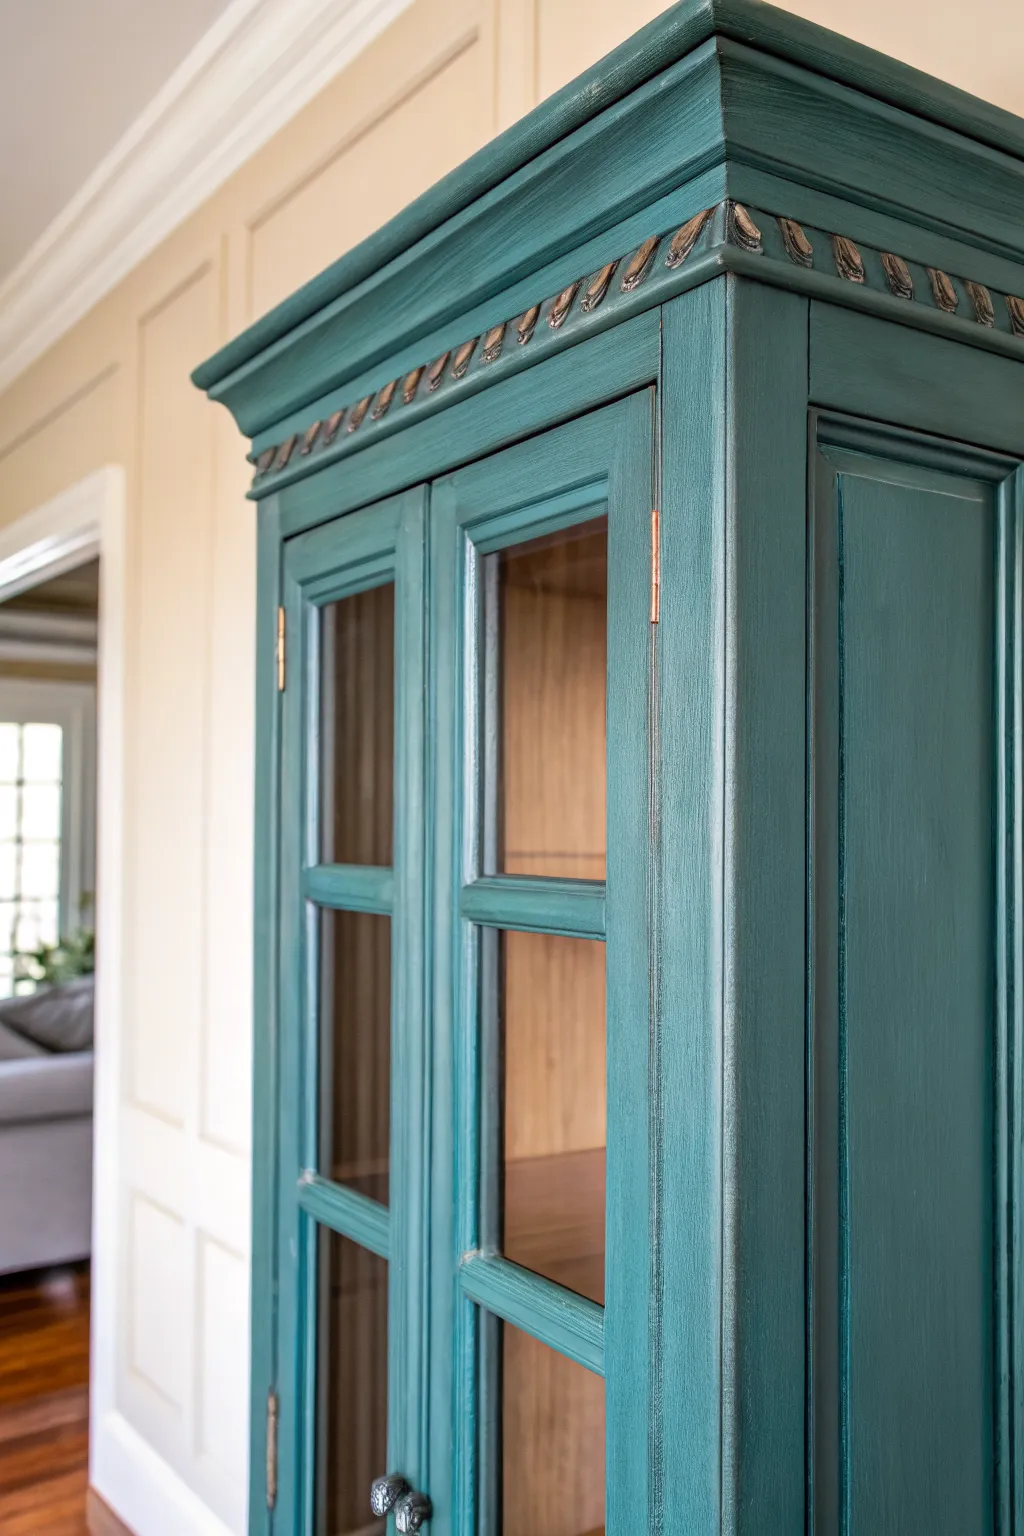
Transform an outdated wooden cabinet into a stunning statement piece with this rich, deep teal makeover. The vintage charm is amplified by strategic distressing along the moulding and edges, revealing the natural wood tones beneath for a beautifully aged look.
Step-by-Step Guide
Materials
- China cabinet (wooden)
- Chalk-style paint (deep teal or peacock blue)
- Dark wax or antiquing glaze
- Clear finishing wax
- Medium-grit sandpaper (150-180 grit)
- High-quality synthetic brush (for paint)
- Wax brush or lint-free cloths
- Painter’s tape
- Mild degreaser or TSP substitute
- Drop cloths
- Screwdriver (for hardware removal)
Step 1: Preparation
-
Remove Hardware and Doors:
Begin by carefully removing all knobs, handles, and hinges. Place the hardware in labeled bags so you don’t lose any screws. If possible, take the doors off the hinges to make painting the frames easier giving you access to all angles. -
Clean Surfaces:
Thoroughly clean the entire cabinet with a mild degreaser or TSP substitute. Old furniture often has built-up oils or furniture polish that can repel paint, so ensure the surface is completely clean and dry before moving forward. -
Taping Off:
Apply painter’s tape to the glass panes on the inside and outside to protect them from stray brushstrokes. Run your fingernail or a credit card along the edge of the tape to ensure a tight seal against the wood.
Uneven Distressing?
If you sand off too much paint, don’t panic. Just dab a small amount of paint back onto that spot, let it dry, and gently re-sand with a lighter touch.
Step 2: Painting
-
First Coat Application:
Stir your deep teal chalk paint thoroughly to mix the pigments. Using a high-quality synthetic brush, apply the first coat of paint. Paint in long, smooth strokes following the direction of the wood grain. -
Painting Moulding:
When painting the decorative moulding at the top, use a dabbing or stippling motion to work the paint into the deep crevices of the carving, then smooth it out lightly. -
Drying Time:
Allow the first coat to dry completely. Chalk paint dries relatively quickly, usually within 1-2 hours depending on humidity, but don’t rush this step. -
Second Coat Application:
Apply a second coat of paint to ensure full, opaque coverage. This color is rich, so a second coat will hide any streaks and give you that solid, velvety finish seen in the photo. -
Final Dry:
Let the second coat dry fully, preferably overnight, to ensure the paint has hardened slightly before you begin the distressing process.
Step 3: Distressing and Finishing
-
Targeting Edges:
Take your medium-grit sandpaper (around 150-180 grit) and gently sand the edges where natural wear would occur. Focus on the sharp corners of the door frames and the vertical lines of the cabinet body. -
Distressing the Moulding:
Pay special attention to the decorative moulding at the top. Sand firmly over the raised ‘beads’ or pattern details to reveal the original dark wood underneath, creating high contrast against the teal. -
Dust Clean Up:
Wipe down the entire piece with a clean, dry cloth or a tack cloth to remove all sanding dust. You want a completely dust-free surface before sealing. -
Applying Clear Wax:
Dip a wax brush or a lint-free cloth into clear furniture wax. Apply a thin, even layer over the entire painted surface, working in small sections so the wax doesn’t dry out before you can buff it. -
Adding Dimension:
To deepen the color further, you can lightly apply a dark wax into the crevices of the moulding or corners. Wipe back the excess immediately so it just sits in the recesses. -
Buffing:
Once the wax has set for about 15-20 minutes, use a clean, soft cloth to buff the surface. I like to use a circular motion here to generate a bit of heat and bring out a soft, satin sheen. -
Reassembly:
Remove the painter’s tape from the glass. Reattach the hinges, hang the doors, and screw the knobs back into place to complete your restoration.
Interior Contrast
Make the teal exterior pop by leaving the interior wood natural (as shown) or painting the back panel a soft Cream or patterned wallpaper for a surprise.
Step back and admire how a bold color choice and a little sanding have given this classic piece a completely new life


Smooth Modern Chalk Paint Finish on a China Cabinet
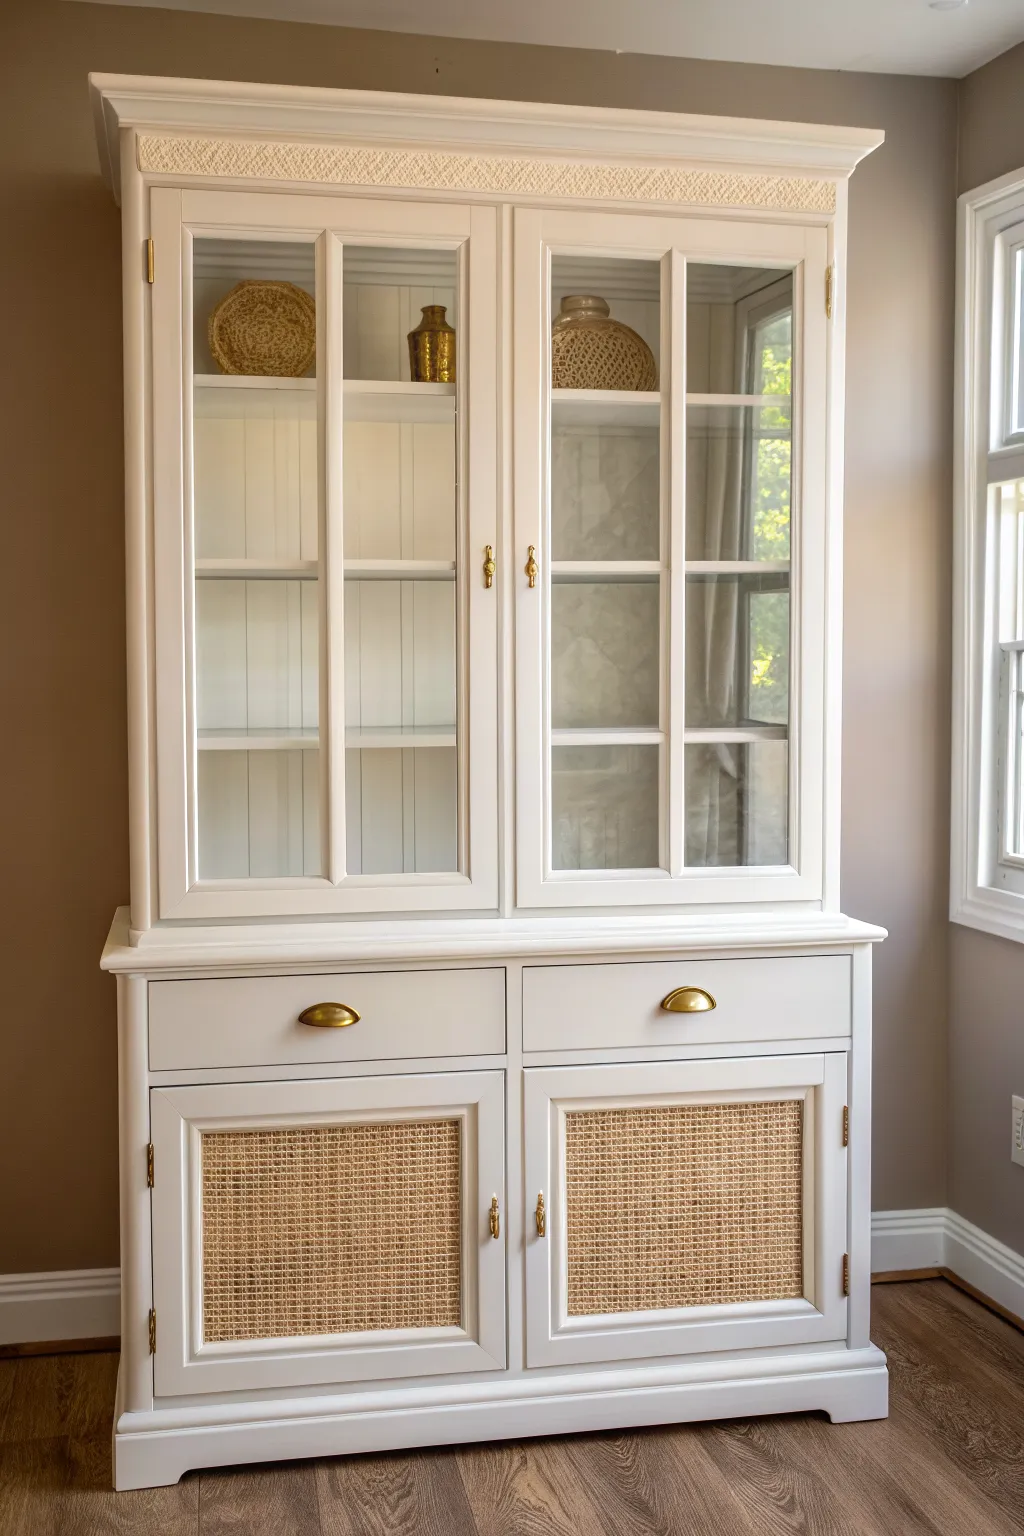
Transform a dated, heavy-looking china cabinet into a bright, modern focal point with this clean white finish and trendy cane webbing accents. This project balances a sleek, smooth chalk paint application with natural textures for a sophisticated, airy feel.
Detailed Instructions
Materials
- Large wooden china cabinet with glass doors
- Chalk mineral paint in a warm white (e.g., Dixie Belle ‘Cotton’ or similar)
- High-quality synthetic paint brushes (angled sash brush and flat brush)
- Foam roller for smooth surfaces
- Sanding sponges and sandpaper (120 and 220 grit)
- TSP cleaner or degreaser
- Painter’s tape
- Wood filler
- Water-based clear coat or wax for sealing
- Cane webbing (mesh rattan)
- Staple gun and staples
- Trim scissors
- Bowl of warm water (for soaking cane)
- Gold or brass cleaner (for hardware)
Step 1: Preparation and Cleaning
-
Dissamble the cabinet:
Begin by removing all doors, drawers, and shelving. If the hardware is dated but salvageable, remove it carefully and set it aside in a ziplock bag. If you plan to replace the hardware, fill the old holes with wood filler now. -
Clean thoroughly:
Scrub every inch of the cabinet with a TSP cleaner or a strong degreaser. Old furniture often has built-up wax or furniture polish that will repel paint, so don’t skip this scrub down. -
Scuff sand:
Once the piece is dry, use 120-grit sandpaper to scuff the entire surface. You aren’t trying to remove the old finish completely, just creating ‘tooth’ for the chalk paint to grip. Wipe away all dust with a tack cloth. -
Tape off glass:
Carefully apply painter’s tape to the glass panes on the upper doors. Take your time here to ensure crisp lines later, pressing the tape firmly into the corners.
Step 2: Painting for a Smooth Finish
-
First coat application:
Stir your chalk paint well. Using a damp synthetic brush, apply the first coat of white paint. Paint with the grain of the wood. For the large flat back panel and sides, I prefer to use a flock foam roller to minimize brush strokes. -
Sand between coats:
Let the first coat dry completely (usually 1-2 hours). Once dry, lightly sand the surface with a fine 220-grit sanding sponge. This knocks down any raised wood grain or brush textures, which is the secret to that ultra-smooth modern look. -
Second coat:
Apply your second coat of paint. Because you are going for a solid, opaque coverage, ensure you get into all the crevices of the molding. If the original wood was very dark, a third thin coat might be necessary for full coverage. -
Painting the details:
Don’t forget to paint the interior back panel if you want the items inside to pop, as seen in the inspiration image. Use an angled brush to cut in around the corners. -
Sealing the paint:
Once the final coat is dry and lightly sanded one last time, apply a water-based clear topcoat. Use a sponge applicator or a clean brush, applying thin, even layers to protect that white finish from yellowing.
Bleed-Through Blues?
If pink or yellow stains appear through your fresh white paint, stop painting! Apply a coat of shellac-based primer (like BOSS or BIN) to seal the tannins, then resume painting.
Step 3: Adding the Cane Webbing
-
Soak the cane:
While your paint dries, cut your cane webbing roughly to size for the bottom door panels, leaving 1-2 inches of overhang. Soak the cane in warm water for at least 30 minutes to make it pliable. -
Prepare the door panels:
If your bottom doors have solid wood centers, you may need to use a jig saw to carefully remove the center panel, leaving the frame intact. If they are already open or have glass, simply remove the existing insert. -
Attach the cane:
Remove the cane from the water and pat it dry. Position it over the back of the door frame. Staple one side down, pull the cane tight across to the opposite side, and staple. Repeat for top and bottom. -
Trim excess:
Once stapled securely, trim the excess cane material with sharp scissors. As the cane dries, it will shrink slightly, becoming drum-tight and flat. -
Cover the edges:
If the back of the door looks messy where the staples are, you can glue a small strip of wood trim over the cut edges of the cane for a professional finish.
Pro Tip: Misting
Keep a continuous misting water bottle handy. A light mist on your brush helps the chalk paint glide better and levels out brush strokes for that modern, factory-smooth finish.
Step 4: Assembly and Styling
-
Hardware update:
Clean your original brass hardware with a specialized cleaner to bring back the shine, or spray paint them gold if the finish is damaged. Reattach the pulls and knobs. -
Reassemble:
Carefully remove the painter’s tape from the glass. Reattach the doors to the hinges and slide the drawers back in.
Now step back and admire how this fresh update completely changes the energy of your dining space
Beadboard or Planked Backing in a Chalk-Painted China Cabinet
Transform a dated china cabinet into a bright, farmhouse-style focal point by adding texture and a fresh coat of paint. This project combines the classic charm of beadboard paneling with the soft, matte finish of chalk paint to create a timeless display piece for your dishware.
Step-by-Step
Materials
- Old china cabinet or hutch
- Beadboard paneling sheets (or beadboard wallpaper for a lighter option)
- Chalk paint (creamy white or antique white)
- Clear furniture wax
- Dark antique wax (optional for distressing)
- Construction adhesive (e.g., Liquid Nails)
- Circular saw or jigsaw
- Sandpaper (120 and 220 grit)
- Painter’s tape
- High-quality synthetic paint brushes
- Wax brush or lint-free cloth
- Screwdriver (to remove hardware)
- Wood filler
- Measuring tape
Step 1: Preparation & Disassembly
-
Remove hardware and doors:
Begin by unscrewing all hinges and handles. Place the hardware in labeled bags so you don’t lose any small screws. While the doors are off, it’s much easier to paint the nooks and crannies. -
Clean the surface:
Wipe down the entire cabinet with a mild degreaser or a mix of vinegar and water. Chalk paint adheres well, but removing decades of furniture polish or kitchen grease is crucial for a durable finish. -
Assess the back panel:
Check if the existing back panel is removable. If it’s a thin piece of plywood held in by staples, gently pry it off. If it is structural or difficult to remove, you plan to install the beadboard directly over it.
Pro Tip: Groove Strategy
When painting beadboard, paint into the vertical grooves first with the brush tip, then smooth the flat surfaces horizontally. This prevents drips from collecting in the channels.
Step 2: Installing the Beadboard
-
Measure the interior:
Measure the height and width of the cabinet’s back interior precisely. Measure in three places (top, middle, bottom) to account for any warping in older furniture. -
Cut the beadboard:
Using a circular saw, cut your beadboard sheet to size. If you are inserting it over an existing back, cut slightly smaller (about 1/8 inch) to ensure a smooth fit without forcing it. -
Test fit the panel:
Slide the cut beadboard into the cabinet to verify the fit. It should sit flush against the back. If you encounter resistance, sand down the edges or trim slightly with a jigsaw. -
Adhere the panel:
Apply a generous zigzag of construction adhesive to the back of the beadboard (or the existing cabinet back). Press the beadboard firmly into place. I like to use a few small brad nails in the corners to hold it secure while the glue dries.
Troubleshooting: Bleed Through
If reddish stains appear through the white paint, stop painting immediately. Seal the stain with clear shellac or heavy-duty primer, let it dry, then repaint that area.
Step 3: Painting & Distressing
-
First coat of chalk paint:
Stir your creamy white chalk paint thoroughly. Apply the first coat using long, even strokes. Don’t worry if it looks streaky; chalk paint is meant to be layered. Paint the beadboard back, the shelves, and the exterior. -
Dry and assess:
Let the first coat dry completely, usually about an hour depending on humidity. Look for any bleed-through (tan or pink stains) from the wood tannins. If you see this, spot-prime with a shellac-based primer before continuing. -
Second coat application:
Apply a second coat of paint. This should provide full, opaque coverage. Pay special attention to the grooves in the beadboard; use the tip of your brush to ensure paint gets into the recesses without pooling. -
Distress the edges:
Once fully dry, take 220-grit sandpaper and gently sand along the high points—edges of doors, corners of the frame, and raised details. The goal is to reveal a bit of the wood underneath for a naturally worn look. -
Smooth the surfaces:
lightly execute a quick pass with fine sandpaper over the flat surfaces to knock down any rough brush strokes, making the finish feel buttery smooth.
Step 4: Sealing & Finishing
-
Apply clear wax:
Using a wax brush or a lint-free cloth, massage clear furniture wax into the paint. Work in small sections, wiping off excess as you go. The wax seals the porous chalk paint and protects it from scratches. -
Hardware considerations:
Clean your original hardware. If the old finish doesn’t match your new look, you can spray paint them a matte black or oil-rubbed bronze before reinstalling. -
Reassemble:
Screw the doors back onto the hinges. Check that they open and close smoothly; the layers of paint might require you to adjust the hinges slightly. -
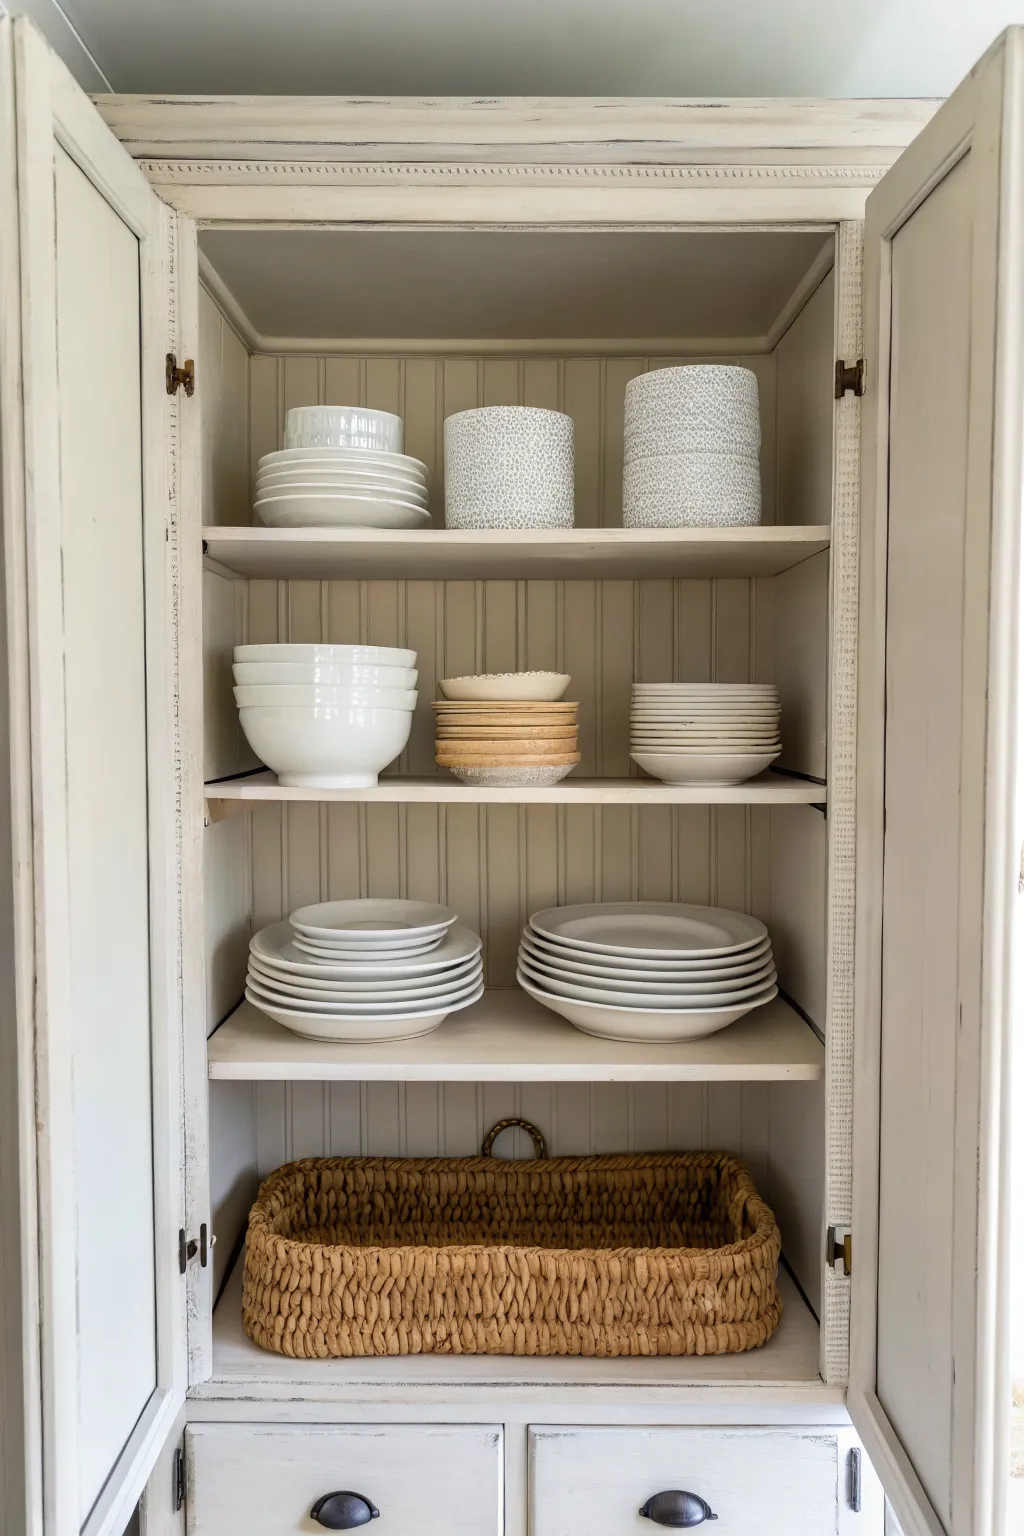
Style the shelves:
Place your shelves back inside. Arrange your white dishes, textured bowls, and baskets to complement the neutral palette of the cabinet.
Now step back and admire how a simple backing and fresh paint have completely reinvented your furniture piece
Stenciled Pattern Accent Inside the China Cabinet
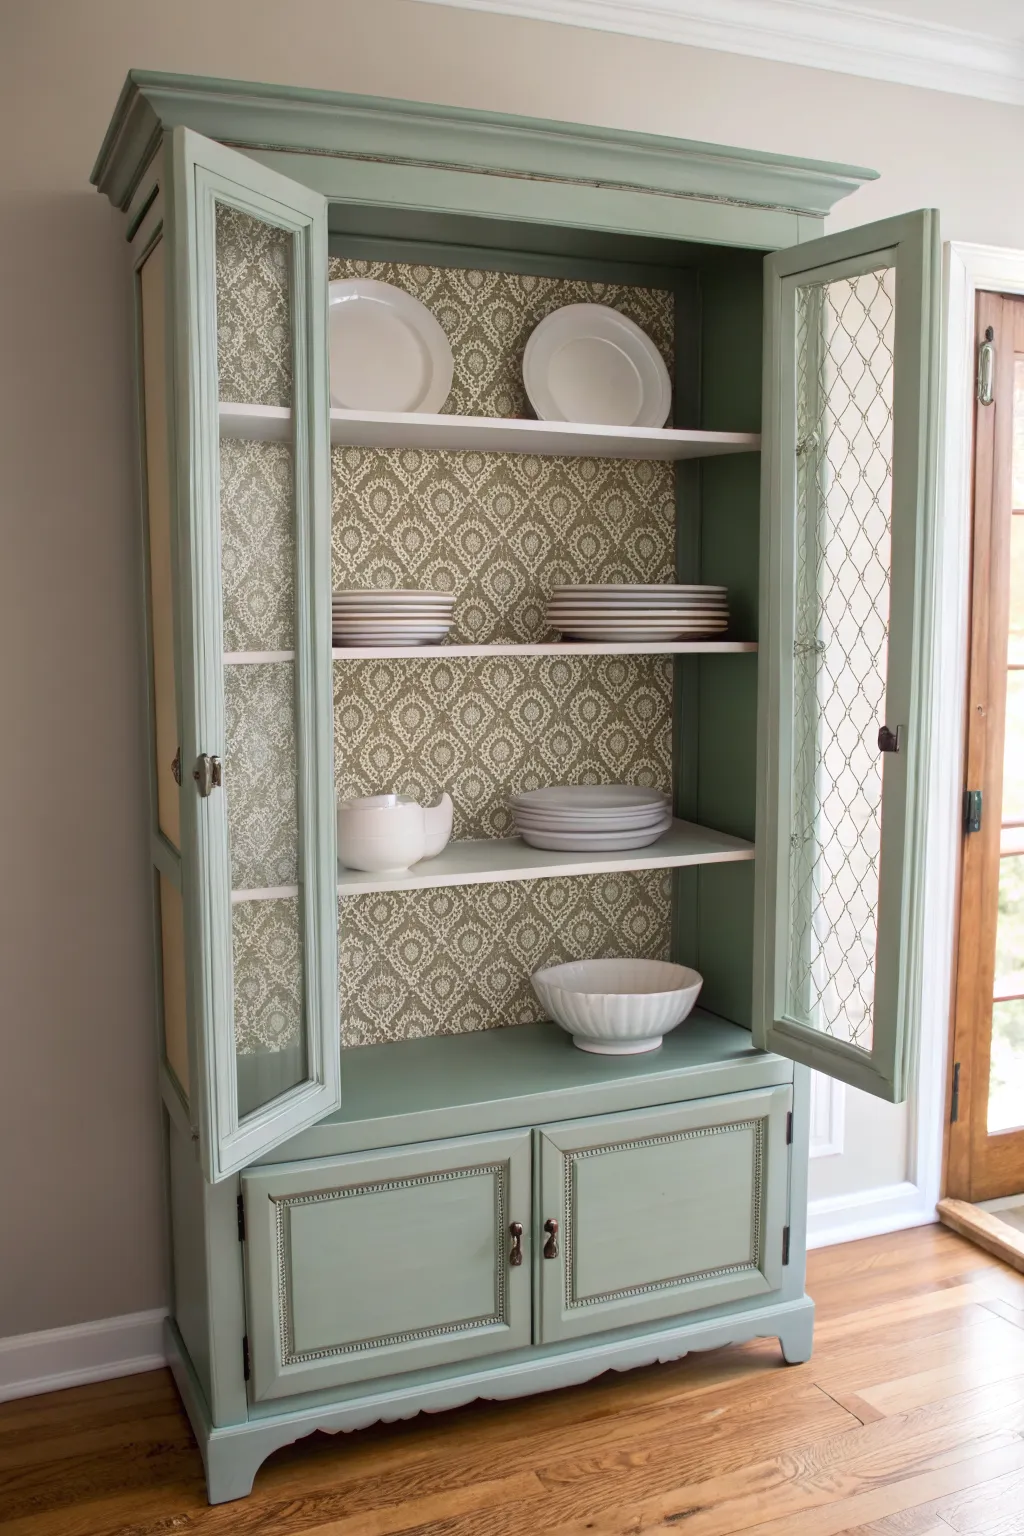
Transform an outdated china cabinet into a cottage-core centerpiece with this chalk paint makeover featuring a custom stenciled backing. The soft sage green exterior pairs beautifully with the crisp white interior and delicate damask pattern, while replacing glass with chicken wire adds authentic farmhouse charm.
How-To Guide
Materials
- Old china cabinet (glass removed)
- Sage green chalk paint (e.g., Annie Sloan Duck Egg Blue or similar)
- Creamy white chalk paint
- Clear furniture wax
- Dark furniture wax (optional for antique effect)
- Large damask wall stencil
- Stencil brush or foam roller
- Painter’s tape
- Chicken wire/hardware cloth roll
- Wire snips
- Heavy-duty staple gun
- Sanding block (medium and fine grit)
- TSP or degreasing cleaner
- Paint brushes (oval and angled)
- Screwdriver
Step 1: Preparation & Dismantling
-
Disassemble the cabinet:
Begin by removing all doors, drawers, and hardware from the cabinet. Label the hardware in small bags so you know exactly where each screw goes later. -
Remove the glass:
Carefully remove the glass panels from the cabinet doors. This usually involves prying off small wood trim pieces or bending back glazier points. Discard the glass or save it for another project, as we are replacing it with wire. -
Clean thoroughly:
Scrub the entire piece down with a TSP substitute or a strong degreaser to remove years of furniture polish, oil, and dust. This is crucial for paint adhesion. -
Light sanding:
Once dry, give the entire surface a quick scuff sand with medium-grit sandpaper. You aren’t stripping the finish, just creating ‘tooth’ for the chalk paint to grab onto.
Step 2: Painting the Structure
-
Paint the interior base:
Start by painting the interior backing board and shelves with your creamy white chalk paint. Apply two coats, letting it dry completely between layers until you have a solid, opaque base for your stencil. -
Apply the exterior color:
Paint the exterior frame, doors, and drawer fronts with the sage green chalk paint. Chalk paint is thick, so watch for drips in corners. I find two coats usually gives perfect coverage. -
Distress edges:
Once the green paint is dry, take a fine-grit sanding block and gently rub along the raised edges, corners, and details where natural wear would occur. This reveals a bit of the wood underneath for that aged look. -
Wax the finish:
Apply a coat of clear wax over the painted surfaces with a lint-free cloth or wax brush to seal the paint. If you want more dimension, apply dark wax sparingly into the crevices and wipe back the excess immediately.
Paint Bleeding Under Stencil?
If lines aren’t crisp, your brush is too wet. Paint over the mistake with the white base color, let dry, and try again with an extremely dry brush. Less is more!
Step 3: Stenciling the Interior
-
Position the stencil:
Place your damask stencil at the top center of the back panel inside the cabinet. Use painter’s tape to secure it firmly so it doesn’t shift. -
Load the brush sparingly:
Dip your stencil brush into the sage green paint, then offload almost all of it onto a paper towel. The brush should feel almost dry to touch. -
Apply the pattern:
Using a vertical dabbing motion or a circular swirling motion, apply the paint over the stencil cutouts. Do not press hard or paint will bleed under the edges. -
Repeat the design:
Carefully lift the stencil and realign it using the registration marks usually found on the edges. Continue this process until the entire back panel is covered in the pattern. -
Seal the interior:
Once the stencil paint is fully cured (give it at least 24 hours), apply a light coat of clear wax over the back panel to protect your artwork.
Level Up: Interior Lighting
Install battery-operated puck lights or a small LED strip under the top shelves. This highlights your beautiful stencil work and makes the china sparkle.
Step 4: Installing Mesh & Reassembly
-
Measure the openings:
Measure the openings on the back of the cabinet doors where the glass used to be. Add about one inch to the height and width measurements. -
Cut the wire:
Using wire snips and wearing protective gloves, cut the chicken wire to your measurements. Flatten the wire out as best as you can before installing. -
Staple the mesh:
Place the wire mesh over the opening on the back of the door. Use a heavy-duty staple gun to secure it to the wood frame, pulling the wire taut as you go to prevent sagging. -
Trim excess wire:
Snip off any sharp wire ends that stick out beyond the staples so they don’t snag on anything later. -
Reattach hardware:
Screw the original hardware back onto the drawers and doors. If the old hardware looks too shiny, you can rub a little dark wax on it to antique the metal. -
Final assembly:
Rehang the doors and slide the drawers back into place. Step back and check that everything is aligned properly.
Now you have a stunning, customized display piece that perfectly balances rustic texture with elegant design.
Color-Blocked Lower Half on a Chalk Paint China Cabinet
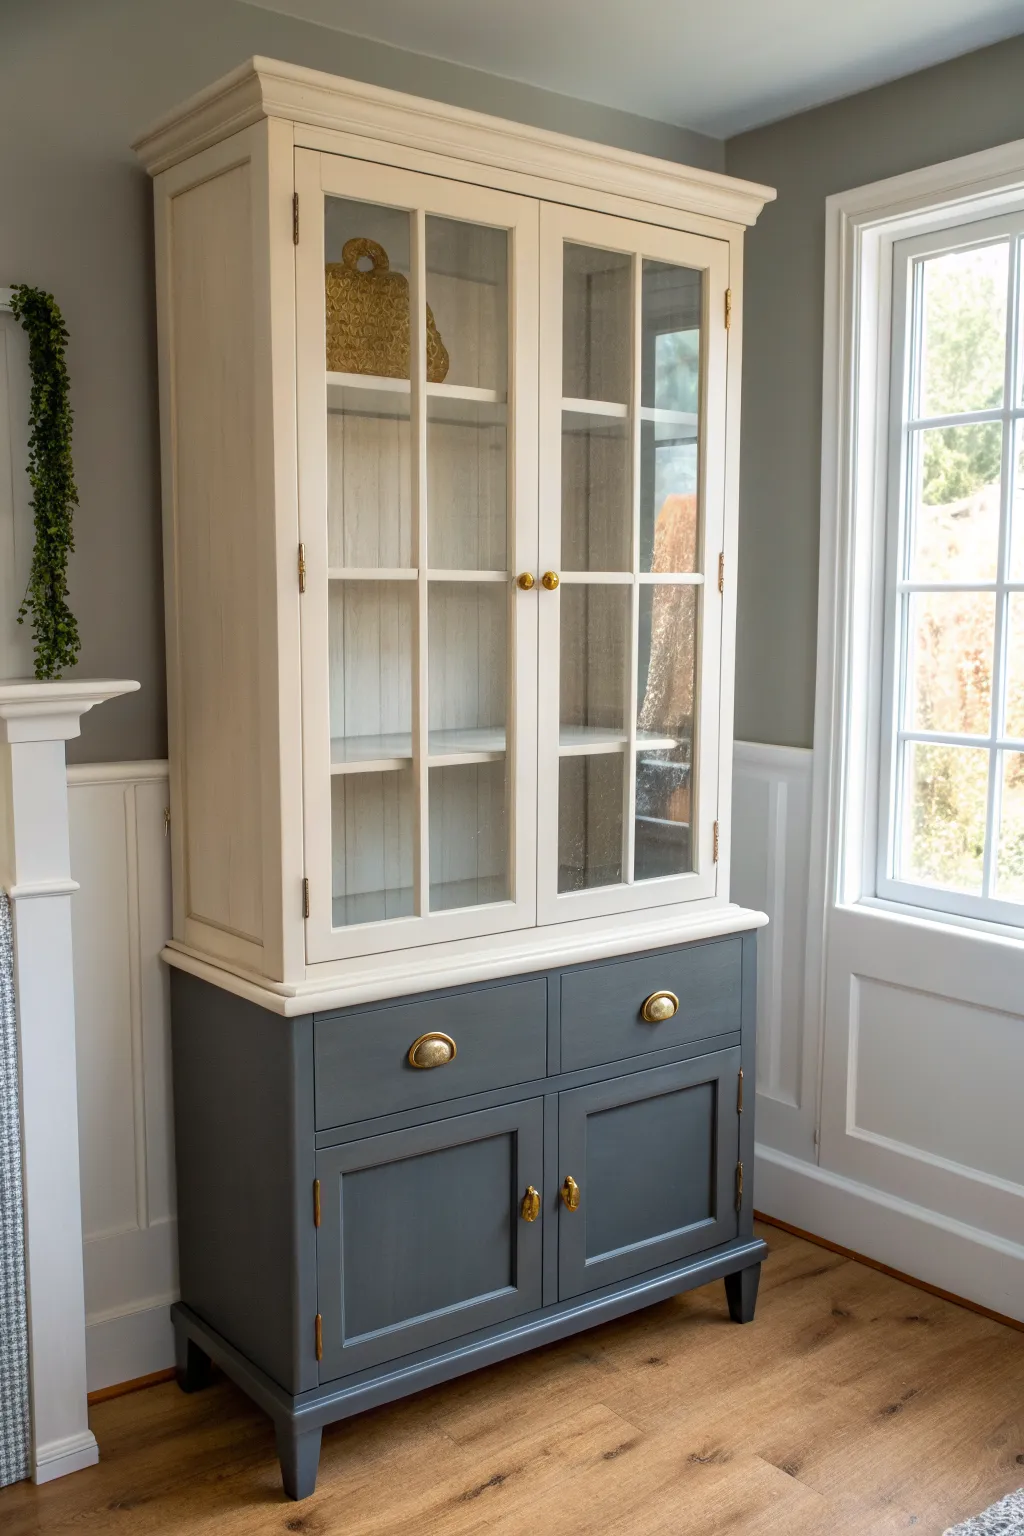
This elegant update transforms a dated china cabinet into a modern masterpiece by pairing a creamy, neutral upper hutch with a grounding, slate-blue base. The color-blocked design adds visual weight to the bottom while keeping the display area airy and bright, finished with sophisticated gold accents.
Step-by-Step
Materials
- Solid wood china cabinet with separate hutch and base
- Chalk-style paint (Cream/Off-White for top)
- Chalk-style paint (Deep Slate Blue or Charcoal Grey for bottom)
- Degreaser or TSP alternative (e.g., Krud Kutter)
- Medium and fine grit sandpaper (120 and 220 grit)
- Painter’s tape
- High-quality synthetic bristle brushes (oval and angled)
- Small artist brush for corners
- Gold finish hardware (knobs and pulls)
- Gold metallic wax or spray paint (optional for hardware)
- Clear furniture wax or matte polychrylic topcoat
- Lint-free rags or wax brush
- Screwdriver
- Glass cleaner
Step 1: Preparation
-
Remove Hardware and Doors:
Begin by removing all knobs, pulls, and hinges using a screwdriver. Keep these organized in labeled baggies. While you can paint with doors on, taking them off usually results in a cleaner finish. -
Clean Thoroughly:
Scrub the entire piece with a degreaser like Krud Kutter. Old furniture often has built-up wax or polish that will repel paint, so I like to be extra diligent here to ensure good adhesion. -
Separate the Pieces:
If your china cabinet comes in two parts (a hutch and a buffet base), separate them now. This makes painting the distinct top and bottom colors much easier without worrying about crossover. -
Scuff Sand:
Give the entire piece a light sanding with 120-grit sandpaper. You aren’t trying to strip it to bare wood, just creating ‘teeth’ for the chalk paint to grab onto. Wipe away all dust with a damp cloth. -
Protect the Glass:
Apply painter’s tape carefully around the edges of the glass panes on the upper doors. Take your time to get the tape right up to the wood molding to avoid scraping paint off the glass later.
Smooth Operator
To minimize brush strokes on the large flat areas, dip your brush in a tiny bit of water before loading paint. It helps the chalk paint self-level.
Step 2: Painting the Base
-
Cut In the Edges:
Using your angled brush and the slate blue chalk paint, cut in the corners, recessed panels of the doors, and around the leg details of the base unit. -
Apply First Blue Coat:
Paint the flat surfaces of the base using long, smooth strokes in the direction of the wood grain. Chalk paint dries quickly, so avoid overworking the paint once it starts to tack up. -
Sand Between Coats:
Once the first coat is completely dry, lightly run a fine-grit sandpaper sponge over the surface to smooth out brush strokes. -
Apply Second Blue Coat:
Apply a second coat of the slate blue paint for full specific opacity. If the original wood was very dark, a third thin coat might be necessary for perfect coverage.
Pattern Play
Add wallpaper or a patterned fabric to the back panel of the upper hutch before restocking your shelves for a hidden pop of personality.
Step 3: Painting the Upper Hutch
-
Paint the Interior (Optional):
Decide if you want the interior back panel to match the exterior cream or contrast. Painting the interior cream brightens the display area significantly. -
Paint the Exterior Cream:
Using a clean brush, apply the cream chalk paint to the upper hutch section. Pay special attention to the muntins (the wood strips separating the glass panes), using a smaller brush if needed. -
Layer and Refine:
Apply 2-3 coats of the cream paint, allowing adequate drying time between each. Since lighter colors cover dark wood less effectively, thin, multiple layers are better than one thick one. -
Clean Up Glass Edges:
Remove the painter’s tape while the final coat is slightly damp to prevent peeling. Use a razor blade to gently scrape off any paint that seeped onto the glass.
Step 4: Finishing and Assembly
-
Seal the piece:
Apply a clear wax with a wax brush or lint-free rag to seal both the top and bottom sections. Buff it to a soft sheen once dry. Alternatively, use a matte polycrylic for a more durable, non-yellowing finish. -
Update Hardware:
If your original hardware is dated, clean it and spray paint it with a bright gold metallic spray paint, or replace it with new gold cup pulls and knobs to match the image. -
Reassemble:
Reattach the doors and hardware carefully. Ask a partner to help you lift the painted hutch back onto the base unit, ensuring you don’t scratch the fresh finish.
Enjoy styling your refreshed cabinet with your favorite dishes and décor items
Faux Mullions for a Fresh Glass-Door China Cabinet
Transform a dated wooden china cabinet into a striking farmhouse focal point with this bold teal finish. By using chalk paint and strategic distressing, you can create a piece that feels both vintage and freshly modern.
Step-by-Step Tutorial
Materials
- Wooden china cabinet with glass doors
- Sandpaper (120 and 220 grit)
- TSP substitute or degreaser
- Painter’s tape
- Deep teal chalk paint
- Oval paint brush (synthetic)
- Small artist brush for corners
- Clear furniture wax
- Dark antique wax (optional for depth)
- Lint-free rags
- Wax brush
Step 1: Preparation
-
Remove Hardware:
Begin by unscrewing and removing all knobs, handles, and hinges. Store them in a marked bag so nothing gets lost during the painting process. -
Clean Thoroughly:
Scrub the entire piece with a TSP substitute or degreaser to remove years of furniture polish, oil, and dust. This step is crucial for paint adhesion. -
Light Sanding:
Once dry, scuff sand the entire surface with 120-grit sandpaper. You don’t need to strip the finish, just roughen it up enough to give the paint distinct ‘tooth’ to grab onto. -
Tape the Glass:
Because you are painting the mullions (the grid strips on the glass), carefully apply painter’s tape to the glass panes. Press the edges down firmly to prevent seepage.
Step 2: Painting
-
First Coat Application:
Dip your oval brush into the teal chalk paint and apply the first coat. Work in long, smooth strokes with the grain of the wood. Don’t worry if it looks streaky; chalk paint often needs two coats. -
Painting the Mullions:
Use a smaller brush or the edge of your oval brush to carefully paint the vertical and horizontal mullions on the door. Ensure you get into the corners where the wood meets the tape. -
Dry Time:
Allow the first coat to dry completely, which usually takes about 1-2 hours depending on humidity. -
Second Coat:
Apply a second coat of teal paint to ensure full, opaque coverage. Watch for drips along the edges and smooth them out immediately. -
Remove Tape:
I prefer to peel off the painter’s tape while the second coat is still slightly tacky. This helps create a crisp line and prevents the paint from peeling up with the tape later.
Paint Bleeding?
If paint seeped under the tape onto the glass, don’t panic. Once dry, use a razor blade scraper held at a 45-degree angle to gently scrape the excess paint away.
Step 3: Distressing & Finishing
-
Natural Distressing:
Once the paint is fully cured (overnight is best), take a 220-grit sandpaper block to the edges and raised details. Focus on areas where natural wear would occur, like corners, molding ridges, and around the handle placement. -
Reveal the Wood:
Sand until the original wood tone peeks through the teal paint. Vary the pressure to create an authentic, time-worn appearance rather than a uniform pattern. -
Clean Dust:
Wipe down the entire cabinet with a tack cloth or slightly damp rag to remove all the fine sanding dust before sealing. -
Wax Application:
Load a wax brush with clear furniture wax and massage it into the paint using circular motions. Work in small sections to ensure even coverage. -
Buffing:
After the wax has sat for about 10-15 minutes, use a clean, lint-free cloth to buff the surface vigorously. This cures the finish and adds a soft, subtle sheen. -
Reattach Hardware:
reinstall your hinges and door pulls. If the original brass is too shiny, consider rubbing a little dark wax on them to matche the distressed vibe.
Smooth Operator
To get a buttery smooth finish, lightly sand with a very fine grit paper (like 400) between the dried paint coats before applying your final wax seal.
Step back and admire how this splash of color completely revitalizes your dining space with vintage charm
Ombre Surprise Shelves Inside a Chalk-Painted China Cabinet
Transform a dated wooden hutch into a stunning, airy focal piece using layers of chalk paint and subtle distressing. This project combines a classic creamy exterior with a surprising, warm ombre wash on the lower doors to create a perfectly imperfect vintage feel.
How-To Guide
Materials
- Vintage wooden china cabinet
- Chalk paint (Creamy White)
- Chalk paint (Soft Peach/Terracotta)
- Chalk paint (Sage Green)
- Clear finishing wax
- Dark antique wax (optional for hardware)
- Medium-grit sanding block
- Lint-free rags
- Painters tape
- Oval chalk paint brush
- Small artist brush
- Screwdriver
Step 1: Preparation
-
Remove Hardware:
Begin by removing all doors, drawers, and hardware from your cabinet. Keep screws labeled in small bags so you don’t lose them during the process. -
Clean Thoroughly:
Scrub the entire piece with a heavy-duty degreaser or a mix of vinegar and water to remove years of furniture polish and dust. -
Light Sanding:
Give the shiny surfaces a quick scuff sand with a medium-grit block. You aren’t stripping the wood, just giving the paint something to grip onto. -
Masking Off:
Use painter’s tape to protect the glass panes on the upper doors. Take your time here to ensure clean lines later.
Clean Glass Hack
Use a razor blade to scrape off any paint that sneaked under the tape onto the glass. It scrapes off cleanly once dry without scratching.
Step 2: The Exterior & Interior
-
Base Coat White:
Apply your first coat of creamy white chalk paint to the entire exterior frame and the upper door frames. Don’t worry about full coverage yet; chalk paint often needs two thin coats. -
Interior Color:
While the exterior dries, tackle the inside of the upper cabinet. Paint the back panel and shelves with your soft sage green. Two coats usually provide the best depth. -
Second White Coat:
Apply a second coat of white to the exterior. Watch for drips in corners and smooth them out with your brush before they dry. -
Distressing the Edges:
Once fully dry, take your sanding block to the edges, corners, and raised details. Sand until the original wood peeks through, creating that time-worn look shown in the image.
Add Fabric Texture
For extra farmhouse charm, replace the glass in the upper doors with chicken wire or attach a linen fabric behind the glass panels.
Step 3: The Ombre Wash Technique
-
Create a Wash:
Mix your peach/terracotta paint with water in a 1:1 ratio. You want a consistency closer to milk than heavy cream. -
Apply the Wash:
Brush the watered-down mixture onto the raw wood of the lower doors. I like to work in sections to keep the wood wet. -
Wipe Back:
Immediately wipe the paint back with a lint-free rag. This acts like a stain, letting the wood grain show through the color. -
Build the Ombre:
To create the subtle gradient, apply a second layer of wash just to the bottom third of the doors and blend upward with a damp rag while wet. -
Dry Brushing Highlights:
Dip a dry brush lightly into your white paint, offload most of it onto a paper towel, and gently whisk it over the raised trim of the lower doors to unify them with the top.
Step 4: Finishing Touches
-
Waxing:
Apply a clear wax over the entire piece with a wax brush or clean rag. This seals the chalk paint and adds durability. -
Buffing:
After the wax has sat for about 20 minutes, buff it vigorously with a soft cloth to create a gentle sheen. -
Hardware Update:
If your original hardware looks too shiny, rub a little dark antique wax over the metal to age it before reinstalling. -
Reassembly:
Remove the painter’s tape from the glass carefully. Reattach the doors and drawers to complete the transformation.
Enjoy styling your refreshed cabinet with your favorite ceramics for a look that feels both curated and cozy


Have a question or want to share your own experience? I'd love to hear from you in the comments below!