If you’ve ever looked at a plain white charger brick and thought, “You could be way cuter,” you’re my kind of person. Here are my favorite charger drawing ideas that stay simple, readable at a tiny scale, and still feel super personal.
Cute Kawaii Face on a Charger Brick
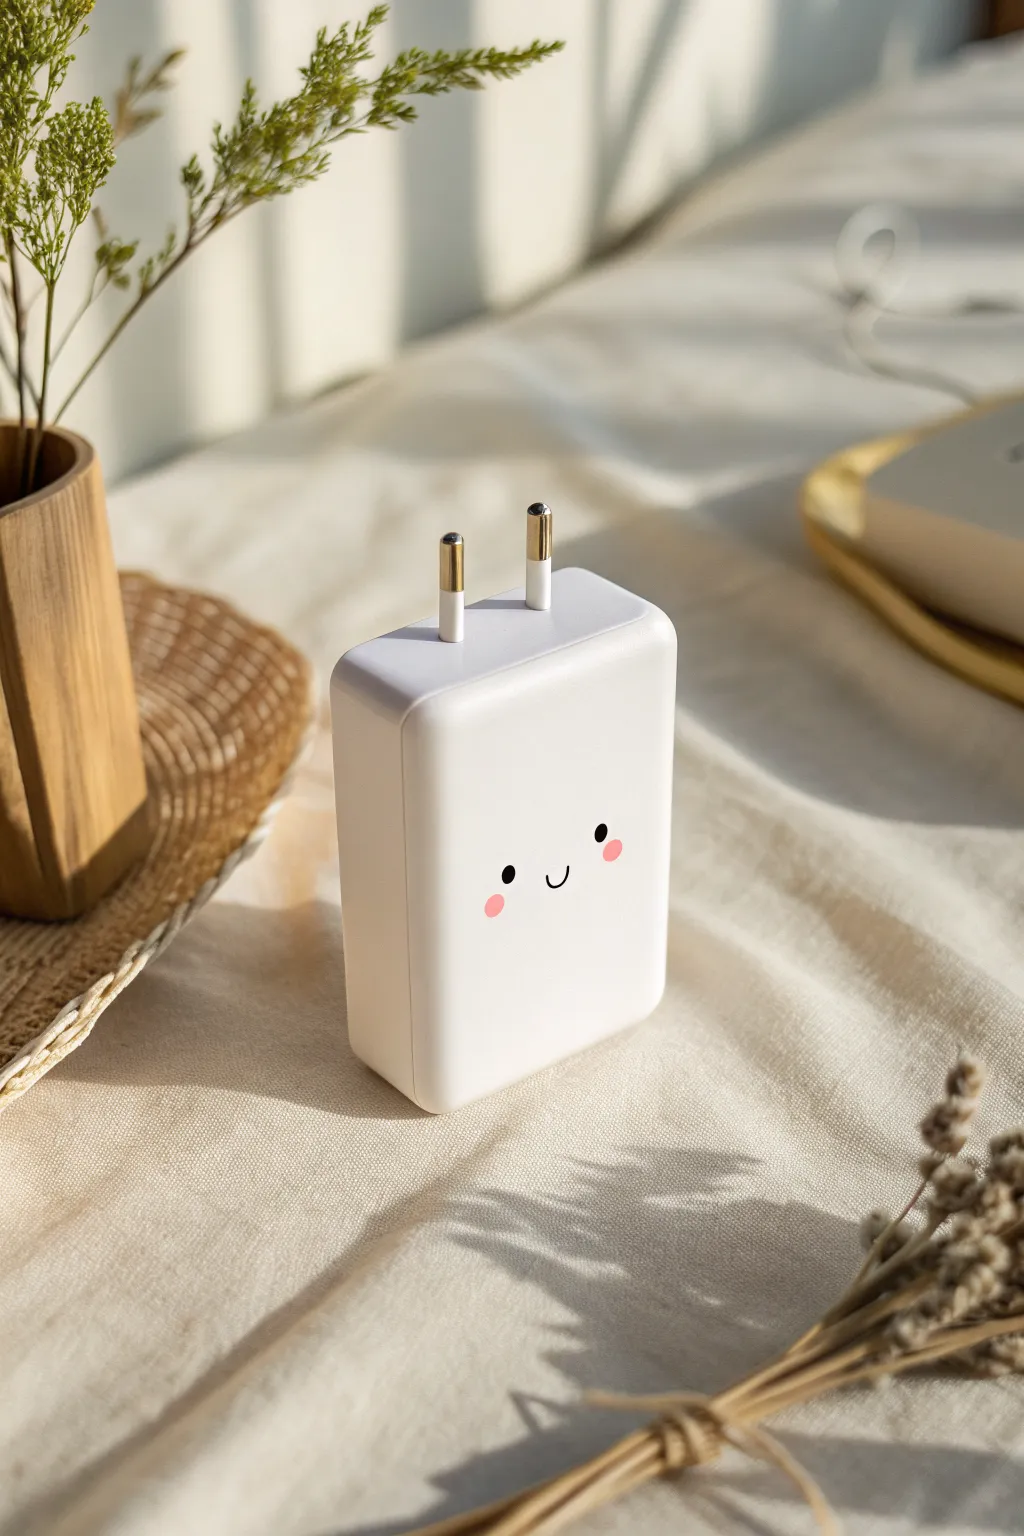
Transform a plain, boring charger brick into slightly happier tech gear with this minimalist kawaii face design. The clean lines and minimal elements create a charming look that personalizes your electronics without cluttering them.
Detailed Instructions
Materials
- White wall charger brick
- Rubbing alcohol and cotton pad
- Black permanent marker (fine tip)
- Black permanent marker (ultra-fine tip)
- Pink posca paint pen (fine tip) or acrylic paint
- Pencil and eraser
- Clear nail polish or sealant spray
Step 1: Preparation & Sketching
-
Clean surface:
Before anything touches the surface, wipe down the face of the charger thoroughly with rubbing alcohol and a cotton pad. This removes oils and dust that prevent markers from abiding properly. -
Find the center:
Visualize the center of the charger face. The face looks best placed slightly lower than the absolute center to achieve that ‘cute’ proportion typical of kawaii art. -
Sketch the eyes:
Lightly sketch two small circles for the eyes using a pencil. Space them widely apart—wider than you might think—to exaggerate the look. -
Place the mouth:
Mark the center point exactly between the eyes but dropped slightly lower. Sketch a tiny ‘U’ shape for the smile. -
Check symmetry:
Step back and look at your pencil marks. Ensure the eye circles are roughly the same size and level with each other. It helps to turn the charger upside down to check your alignment fresh. -
Cheek placement:
Lightly mark where the pink cheeks will go, sitting just outside and slightly below the eyes.
Ink refusing to stick?
If the ink beads up on the plastic, the surface is too glossy or oily. Lightly buff the drawing area with fine-grit sandpaper, clean again, and redraw.
Step 2: Inking the Features
-
Outline the eyes:
Using your fine-tipped black permanent marker, carefully trace the outline of your eye circles. Keep your hand steady and rest your wrist on the table for support. -
Fill the eyes:
Fill in the circles completely with the black marker. Go slowly to keep the edges crisp and round. I find doing small circular motions helps get good coverage without streaking. -
Draw the smile:
Switch to the ultra-fine tip marker for the mouth. Trace your ‘U’ shape with a single, confident stroke. A thinner line here makes the face look more delicate. -
Correction time:
If any pencil lines are still visible outside your marker lines, wait a full minute for the ink to set, then gently erase them.
Add some sparkle
Use a white gel pen to add tiny ‘catchlights’ (small white dots) in the upper corners of the black eyes for extra life and sparkle.
Step 3: Adding Color & Protection
-
Prepare the pink:
Shake your pink paint pen well to mix the pigment. Press the tip on a scrap piece of paper first to ensure the flow is consistent, not blobby. -
Apply the cheeks:
Press the pink tip gently onto your cheek markings. Depending on the size of the tip, a single dot might be enough, or use a tiny circular motion to create blurred oval shapes. -
Second coat check:
If the pink looks a bit translucent against the white plastic, let it dry for five minutes and add a second layer directly on top. -
Let it cure:
Allow the entire design to dry completely. Permanent marker dries fast, but paint pens on plastic can tackle a while to truly set. -
Seal the deal:
Apply a very thin layer of clear nail polish or a quick spray of sealant over the face. This stops the design from rubbing off when you toss the charger in your bag.
Now your little charging buddy is ready to brighten up your wall socket


Blushing Bunny With Minimal Lines
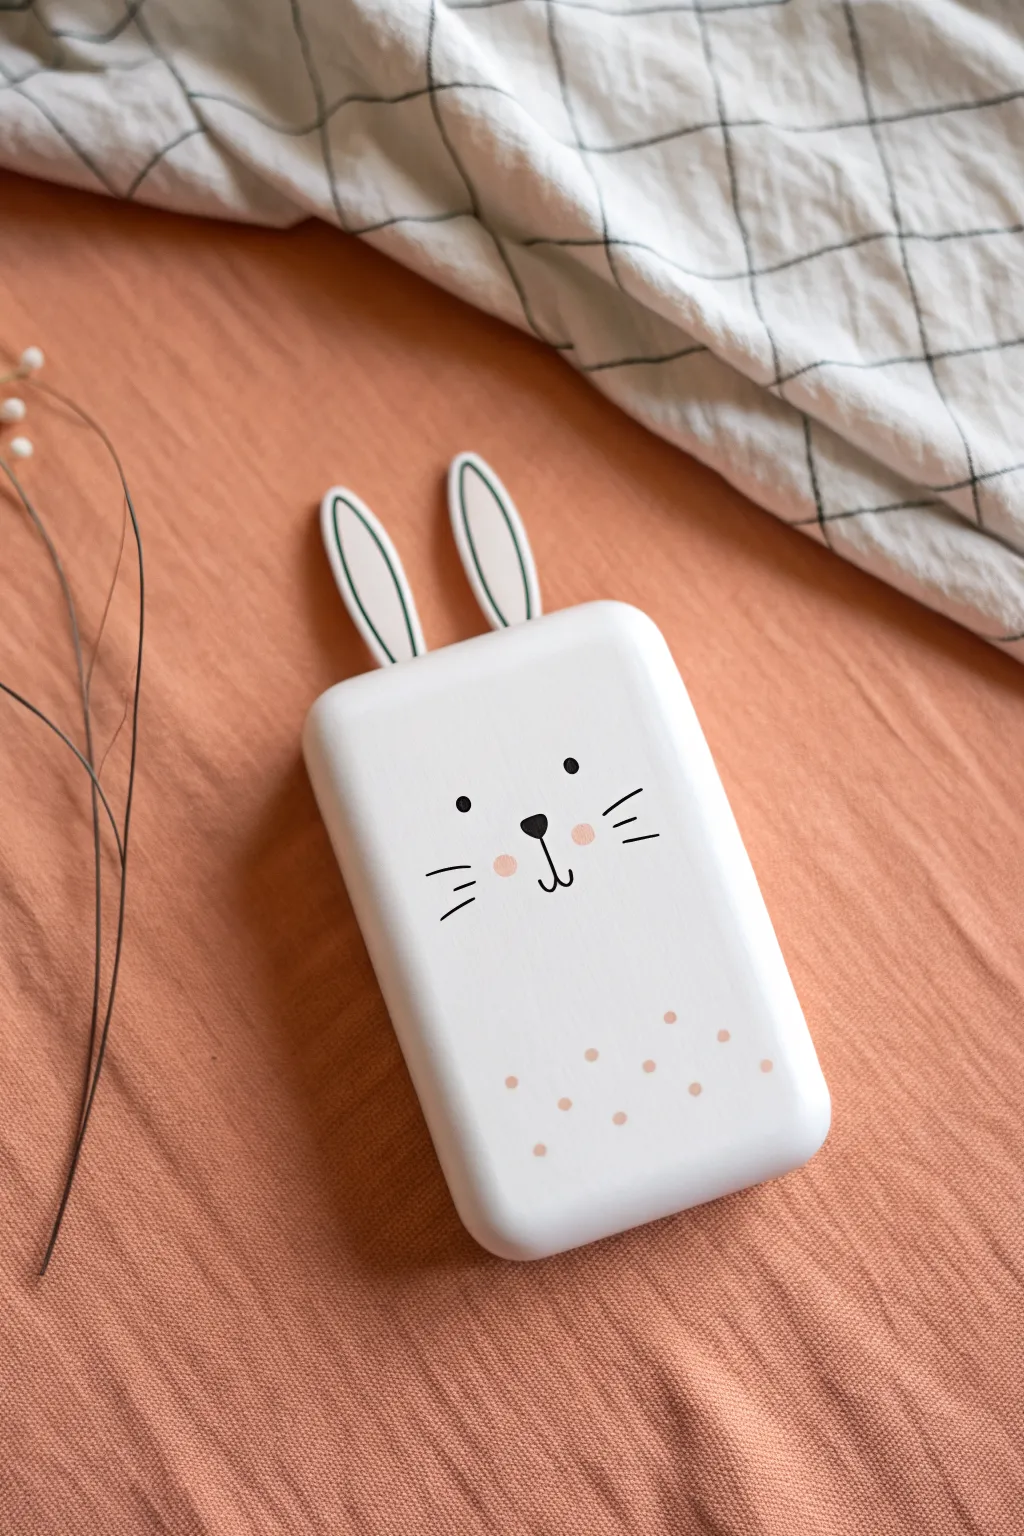
Turn a plain white portable charger into an adorable companion with this simple, minimalist bunny design. The clean lines and soft pink accents create a modern, sweet aesthetic that makes charging your device a little more cheerful.
Step-by-Step
Materials
- White portable charger (smooth surface works best)
- Clean cloth and rubbing alcohol
- Fine-point black permanent marker or acrylic paint pen
- Pale pink acrylic paint or paint pen
- Small round paintbrush (size 0 or 1)
- Pencil with a clean eraser
- Drafting tape or low-tack painter’s tape
- White or matching thick cardstock
- Green fine-point marker or pen
- Scissors
- Clear spray sealant or Mod Podge (matte finish)
Step 1: Surface Preparation
-
Clean the surface:
Before adding any art, wipe down the entire front surface of your charger with a cloth dampened with rubbing alcohol. This removes finger oils and ensures the ink and paint adhere properly. -
Wait for drying:
Allow the charger to air dry completely for a minute or two. A dry surface is crucial to prevent markers from bleeding.
Ink Bleeding Issues?
If your marker ink feathers or bleeds on the plastic, try spraying a very light coat of matte fixative first to give the surface some ‘tooth’ before drawing.
Step 2: Drafting the Design
-
Mark the center:
Lightly visualize or mark a faint vertical centerline with a pencil to help you place the facial features symmetrically. -
Sketch the nose:
Using your pencil very lightly, draw a small inverted triangle in the center of the charger, slightly above the vertical midpoint. -
Add the mouth:
Extend a tiny vertical line down from the bottom point of the nose, then curve it outward to the left and right to create the classic ‘J’ anchor shape for the bunny mouth. -
Position the eyes:
Place two small dots for eyes wide apart, roughly level with the top edge of the nose triangle.
Step 3: Inking the Face
-
Draw the nose and mouth:
Using your fine-point black permanent marker or acrylic paint pen, carefully trace over your pencil sketch for the nose and mouth. Fill in the nose completely black. -
Dot the eyes:
Press down firmly with the marker tip to create the round eyes. You can slightly swirl the tip to make them a bit larger if needed, but keep them solid black. -
Add whiskers:
Draw three short, straight lines on each cheek area. Keep them horizontal and slightly fanned out, ensuring they don’t touch the mouth or nose.
Pro Tip: Eraser Stamp
For perfectly uniform cheek circles, use the flat end of a new pencil eraser as a stamp. Dip it in pink paint, blog it once on scrap paper, then press onto the charger.
Step 4: Adding Color Accents
-
Create the cheeks:
Dip the very tip of your small paintbrush or a toothpick into pale pink acrylic paint. Gently dab a small circle onto each cheek area, just below the eyes and inside the whiskers. -
Dot the bottom pattern:
Using the same pink paint, create a random pattern of small polka dots across the bottom third of the charger. I find it helps to stagger the rows to keep it looking balanced but playful. -
Let the paint set:
Allow the pink paint to dry completely. This usually takes about 10-15 minutes depending on how thick the dots are.
Step 5: Creating the Ears
-
Cut the ear shapes:
Cut two long, rounded bunny ear shapes out of white cardstock. They should be proportionate to the size of your charger. -
Draw the inner ear:
Using the green fine-point marker, draw a smaller outline inside each ear shape to represent the inner ear detail. -
Attach the ears:
Using strong double-sided tape or a dab of craft glue, attach the ears to the back of the charger so they peek out over the top edge. -
Seal the artwork:
Once everything is perfectly dry, give the front of the charger a light coat of clear matte spray sealant to protect your design from scratches in your bag.
Now you have a custom, sweet accessory that makes charging your batteries a little more fun


Smiley Cupcake in Tiny Color Blocks
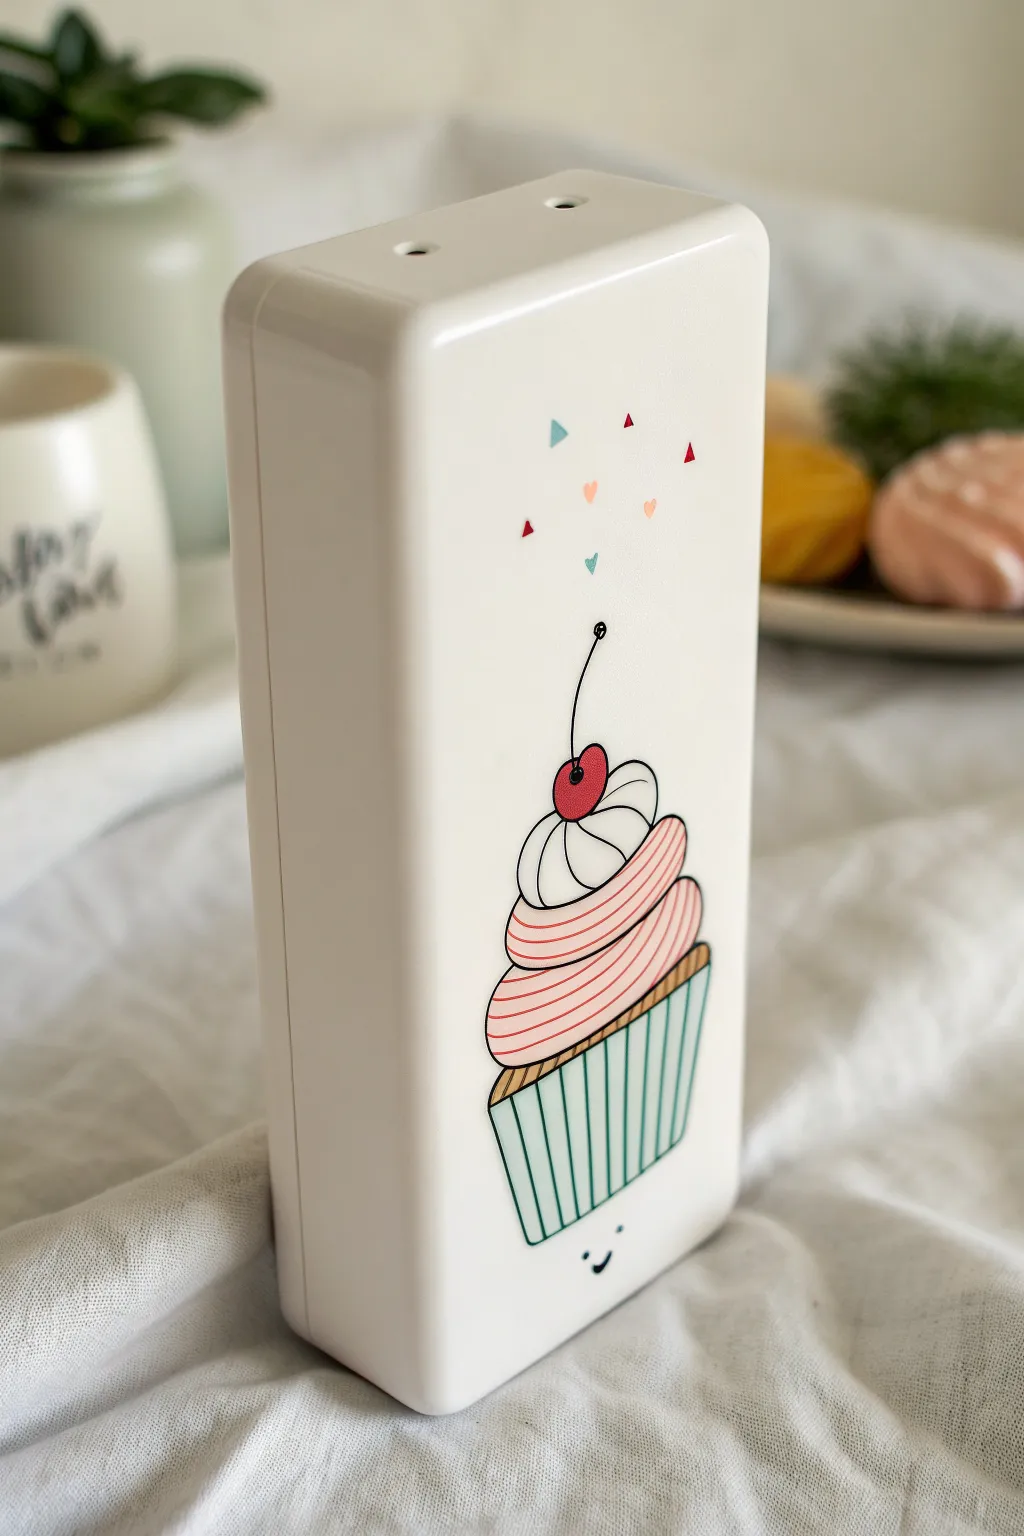
Transform a plain white power bank into a delightful accessory with this charming cupcake illustration. Featuring crisp lines, soft pastel stripes, and a tiny smiley face, this project turns tech into a sweet treat.
How-To Guide
Materials
- White rectangular power bank (clean and dry)
- Pencil (HB or lighter)
- Fine-point permanent black marker (0.3mm or 0.5mm)
- Extra-fine permanent markers or acrylic paint pens (teal, light pink, white, red)
- Rubbing alcohol and cotton pads
- Clear spray sealant or matte varnish
- Eraser
Step 1: Preparation & Sketching
-
Clean the Surface:
Before starting any art, wipe down the entire front surface of the power bank with rubbing alcohol. This removes finger oils and ensures your drawing sticks properly. -
Draft the Wrapper Shape:
Using a light pencil, sketch a trapezoid shape centrally near the bottom of the device. The bottom line should be slightly narrower than the top line to form the cupcake liner. -
Add the Frosting Base:
Draw a flattened oval shape directly on top of the wrapper. This will be the bottom layer of your frosting swirl. -
Create the Swirls:
Sketch a second, slightly smaller oval layer on top of the first one, then finish with a rounded dollop shape for the peak of the whipped cream. -
Top with a Cherry:
Draw a small circle slightly offset on the whipped cream peak. Add a long, thin, curved stem extending upwards.
Step 2: Inking & Coloring
-
Outline the Wrapper:
Trace over your pencil lines for the cupcake wrapper using the fine-point black marker. Keep the lines steady and clean. -
Define the Frosting:
Carefully ink the outlines of the three frosting tiers. Make sure the lines connect smoothly where the layers overlap. -
Add Wrapper Stripes:
Using your teal paint pen or marker, draw vertical stripes inside the wrapper. Space them evenly to mimic the folded paper texture. -
Color the Frosting:
Fill the bottom two oval layers with light pink ink. It helps to shade in the direction of the swirl to maintain the illusion of volume. -
Detail the Whipped Cream:
For the top dollop, leave the background white but add curved internal lines with the black fine-liner to suggest volume and softness. -
Stripe the Pink Frosting:
Once the pink base is completely dry, draw thin, curved parallel lines across the pink sections with your black marker to add texture. -
Color the Cherry:
Fill in the circle at the top with bright red ink. Leave a tiny speck of white uncolored (or add a white dot later) for a highlight. -
Add the Face:
Just below the wrapper, draw a tiny, simple curved line for a smile and two minuscule dots for eyes. This minimal touch adds massive personality.
Smudged Lines?
If a paint pen line goes rogue, quickly dampen a cotton swag with a tiny bit of rubbing alcohol to ‘erase’ the wet paint before it dries permanently.
Step 3: Finishing Details
-
Scatter the Confetti:
Above the cherry stem, draw small floating shapes. Sketch tiny triangles in red and teal, and minuscule hearts in orange or peach. -
Erase Pencil Marks:
Wait at least 15 minutes to ensure all ink is totally set. I prefer to wait closer to 30 minutes just to be safe. Then, gently erase any visible pencil guidelines. -
Seal the Design:
To protect your artwork from scratches in your bag, spray a thin, even coat of clear sealant over the face to lock the design in place.
Glossy Finish
Add a drop of dimensional glaze or clear nail polish specifically over the red cherry to make it look shiny, raised, and juicy.
Enjoy your sweet new accessory every time you need to power up


Simple Cat Whiskers and Nose
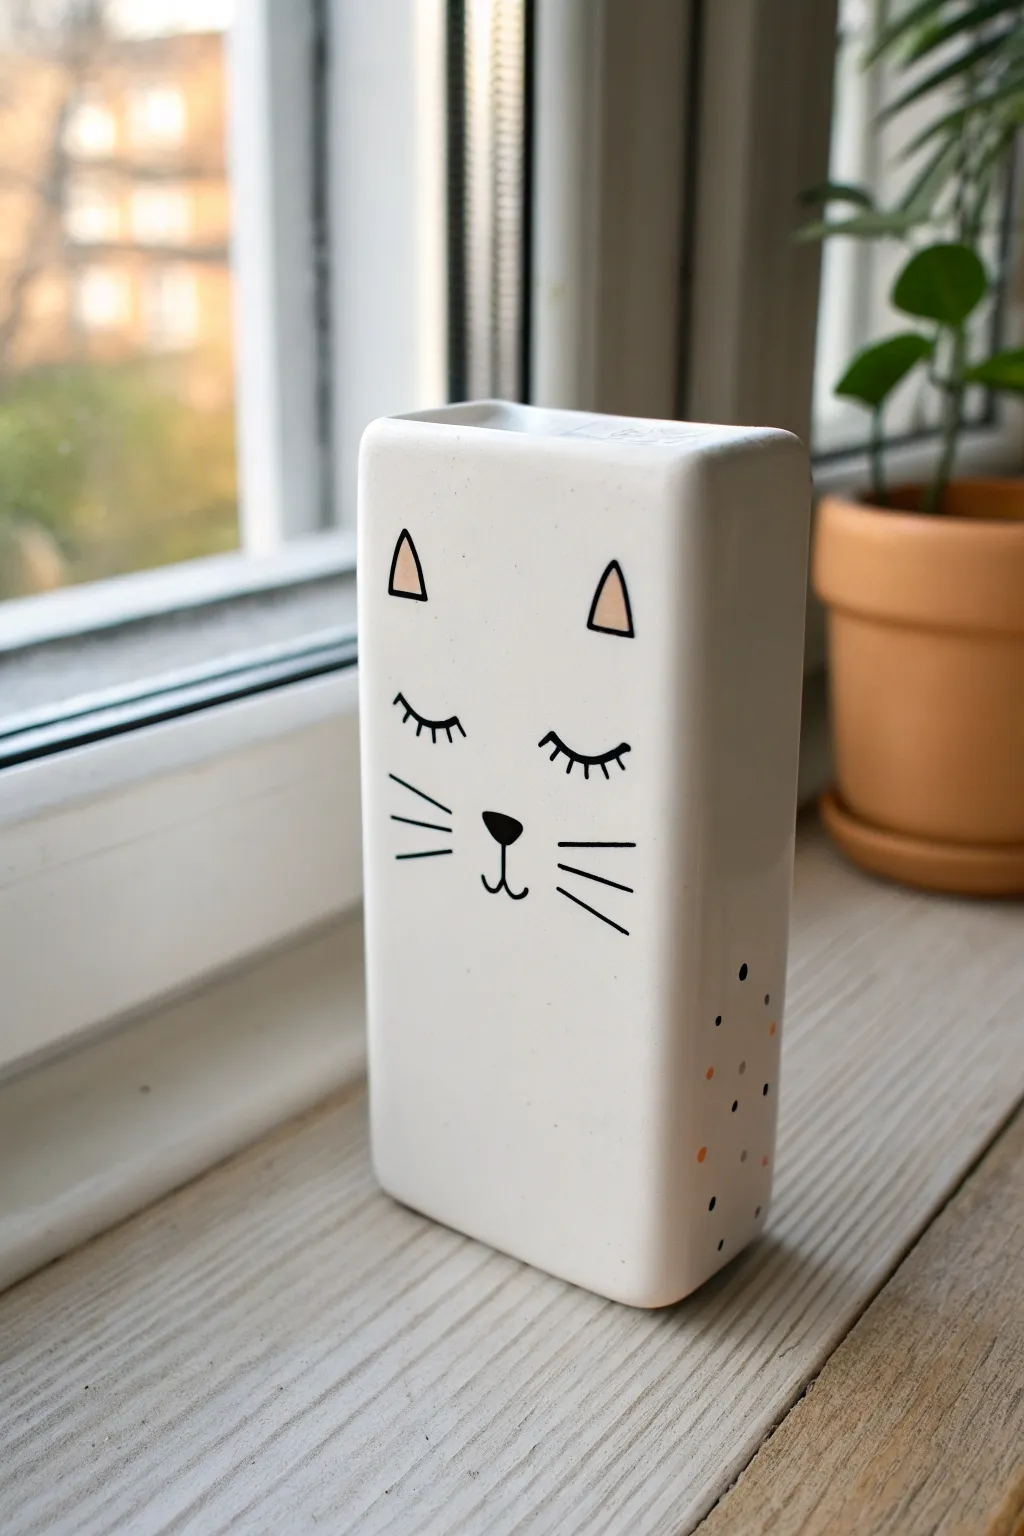
Transform a plain white power bank or ceramic container into a charming feline companion with just a few permanent markers. This minimalist design features sleepy eyes and simple geometric shapes for a clean, modern aesthetic.
Step-by-Step
Materials
- White ceramic or matte plastic rectangular object (power bank or vase)
- Black fine-point permanent marker
- Black ultra-fine point permanent marker
- Light peach or pink permanent marker
- Rubbing alcohol
- Cotton pads
- Pencil (HB or lighter)
- White eraser
Step 1: Preparation and Sketching
-
Clean the surface:
Before starting any artwork, it is crucial to remove any oils or dust. Wipe the entire surface of your white object with rubbing alcohol on a cotton pad and let it dry completely. -
Draft the ears:
Using a light pencil, sketch two triangles near the top of the object. Position them so they are mirrored on the left and right sides. -
Sketch the eyes:
About an inch below the ears, lightly draw two small downward-curving arcs for the closed eyelids. Ensure they are spaced evenly. -
Mark the nose:
Find the center point between and slightly below the eyes. Sketch a small, soft triangle pointing downward for the nose. -
Position the mouth:
Draw a small vertical line dropping from the bottom tip of the nose, splitting into two small upward curves to create the classic ‘w’ cat mouth shape. -
Whiskers and details:
Lightly mark three horizontal lines on each cheek area for whiskers. If you plan to add side dots like the original photo, sketch a few tiny circles on the lower right corner.
Step 2: Inking the Design
-
Outline the nose:
Switch to your fine-point black marker. I like to start with the nose because it centers the face. Outline the triangle carefully. -
Fill the nose:
Color in the nose completely with solid black ink. Allow it a moment to dry so you don’t smudge it while working on the mouth. -
Draw the mouth:
Trace over your pencil lines for the mouth anchor and curves using the ultra-fine point marker for a delicate look. -
Define the eyes:
Using the fine-point marker, trace the downward arcs of the eyes. To make the eyelashes, add short, slightly curved strokes extending downward from the main arc. -
Outline the ears:
Trace the outer triangles of the ears with the fine-point black marker. -
Add ear color:
Take your peach or pink marker and draw a smaller solid triangle inside each black ear outline to represent the inner ear. -
Draw the whiskers:
Using a quick, confident motion, draw the three whisker lines on each side with the fine-point marker. Hesitating here can make lines wobble, so swift strokes are best. -
Add decorative dots:
If you are recreating the side pattern, use the ultra-fine black marker to add small dots in a random cluster near the bottom corner. -
Include colored accents:
intersperse a few peach or orange dots among the black ones on the side to tie the color palette together.
Oops! Smudged Ink?
If you make a mistake with permanent marker on ceramic or plastic, dampen a Q-tip with rubbing alcohol and gently wipe the error away immediately before it sets.
Step 3: Final Touches
-
Let ink cure:
Allow the permanent ink to sit for at least 15 minutes. This ensures it sets fully on the non-porous surface. -
Erase guidelines:
Gently erase any visible pencil marks. Be careful not to scrub too hard over the inked areas, although permanent marker should hold up well.
Make it Last
For high-handling items like chargers, spray a thin layer of clear matte acrylic sealant over the finished drawing to prevent the design from rubbing off over time.
Now you have a customized accessory that adds a touch of whimsy to your tech collection
BRUSH GUIDE
The Right Brush for Every Stroke
From clean lines to bold texture — master brush choice, stroke control, and essential techniques.
Explore the Full Guide
Heart Pattern Color Block Charger
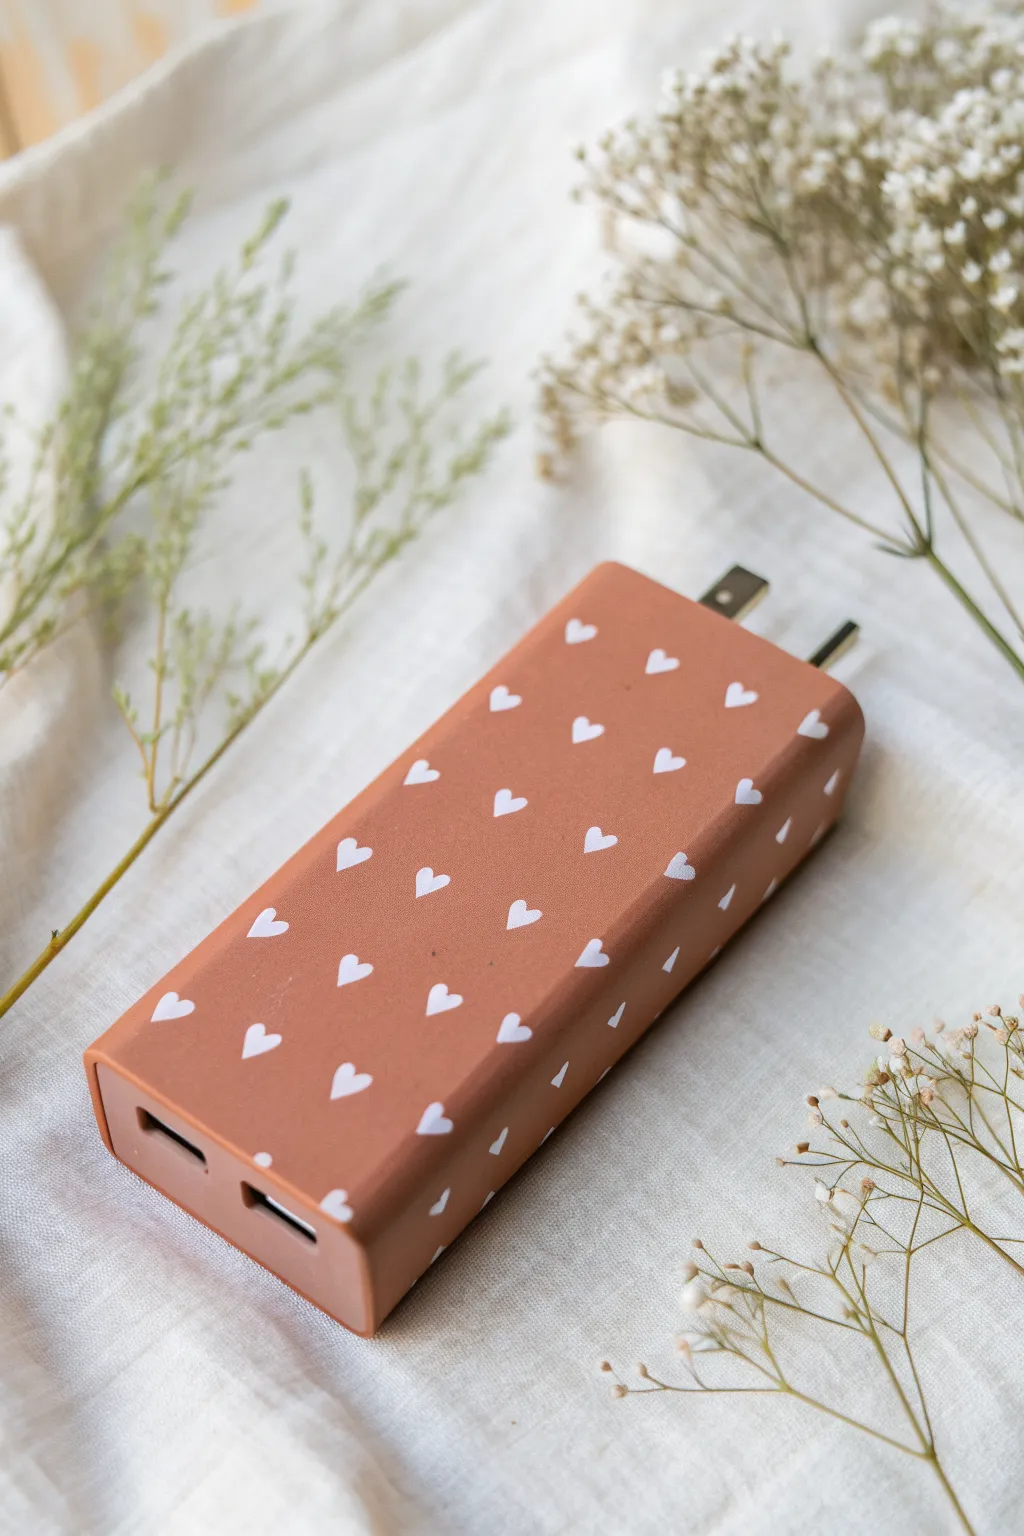
Transform a plain tech accessory into a sweet statement piece with this warm, earthy design. The matte terracotta base paired with delicate white hearts creates a cozy, boho aesthetic that makes charging your devices feel a little more personal.
How-To Guide
Materials
- Plastic portable charger (power bank)
- Sandpaper (fine grit, 220 or higher)
- Painter’s tape or masking tape
- Multi-surface acrylic craft paint (Terracotta/Burnt Orange)
- Multi-surface acrylic craft paint (White)
- Flat shader paintbrush (medium size)
- Fine detail paintbrush (size 0 or 00)
- Matte spray sealer or modulation medium
- Rubbing alcohol and cotton pads
- Disposable palette or paper plate
Step 1: Preparation & Base Coat
-
Clean the surface:
Begin by wiping down the entire charger with rubbing alcohol and a cotton pad. This removes oils and factory residues that could prevent the paint from adhering properly. -
Lightly sand:
Using your fine-grit sandpaper, gently scuff the plastic casing. You don’t want deep scratches, just enough texture to break the slick surface so the paint can grip. -
Tape off ports:
Carefully apply painter’s tape over the USB ports, charging inputs, and the metal prongs (if it’s a wall charger style). Ensure the tape edges are sealed tight to prevent seepage. -
Mix your base color:
Squeeze out your terracotta paint. If the shade is too bright, I sometimes mix in a tiny drop of brown to deepen it for that earthy clay look seen in the photo. -
Apply the first coat:
Using the flat shader brush, apply a thin, even layer of the terracotta paint. Don’t worry if it looks streaky; thin layers are key to a smooth finish. -
Let it dry:
Allow this first layer to dry completely according to the bottle instructions, usually about 20-30 minutes. -
Apply second coat:
Paint a second coat of the terracotta color. Brush in the opposite direction of your first coat to help eliminate brushstrokes. -
Inspect and touch up:
Check for any plastic showing through. If necessary, apply a third thin coat for full opacity and let it cure fully before moving on.
Step 2: Painting the Heart Pattern
-
Plan the layout:
Visualize a grid on the charger. The hearts in the reference are arranged in a staggered, repeating pattern (like the number 5 side of a die), not straight rows. -
Start the first heart:
Dip your fine detail brush into the white paint. Start near the top corner. Paint a small ‘V’ shape first to establish the bottom of the heart. -
Round the tops:
Add two small curves to the top of the ‘V’ to complete the heart shape. Keep them small—about the size of a grain of rice. -
Establish the pattern:
Paint your next heart about an inch away in the same horizontal line. Continue this spacing across the width of the charger. -
Stagger the second row:
Start the second row of hearts below the first, but position each heart so it sits in the gap between the hearts above it. -
Continue painting:
Work your way down the charger, maintaining that staggered spacing. Remember to wrap the pattern around the sides for a professional look. -
Handle edges:
For hearts that land on the corner or edge, paint only half of the heart on the face, as if the pattern is flowing off the object.
Paint Peeling?
If paint peels when removing tape, score the edge where the tape meets the paint with a sharp craft knife before pulling. This breaks the seal cleanly.
Step 3: Finishing Touches
-
Dry completely:
Let the white hearts dry fully. Since the paint is thicker here, give it at least an hour to be safe. -
Remove tape:
Carefully peel away the painter’s tape from the ports. Do this slowly to avoid ripping the dried paint at the edges. -
Clean edges:
If any paint seeped under the tape, use a toothpick or a clean brush dipped in rubbing alcohol to gently scrape it away. -
Apply sealer:
In a well-ventilated area, spray the entire charger with a matte clear coat. This is crucial for protecting the design from being scratched while in your bag.
Make It 3D
Use ‘Puffy Paint’ or dimensional fabric paint for the white hearts. This adds a fun tactile element that lets you feel the pattern when holding the charger.
Now you have a stylish, customized charger that looks great on your desk and is easy to spot in your bag
Minimal One-Line Doodle on the Front
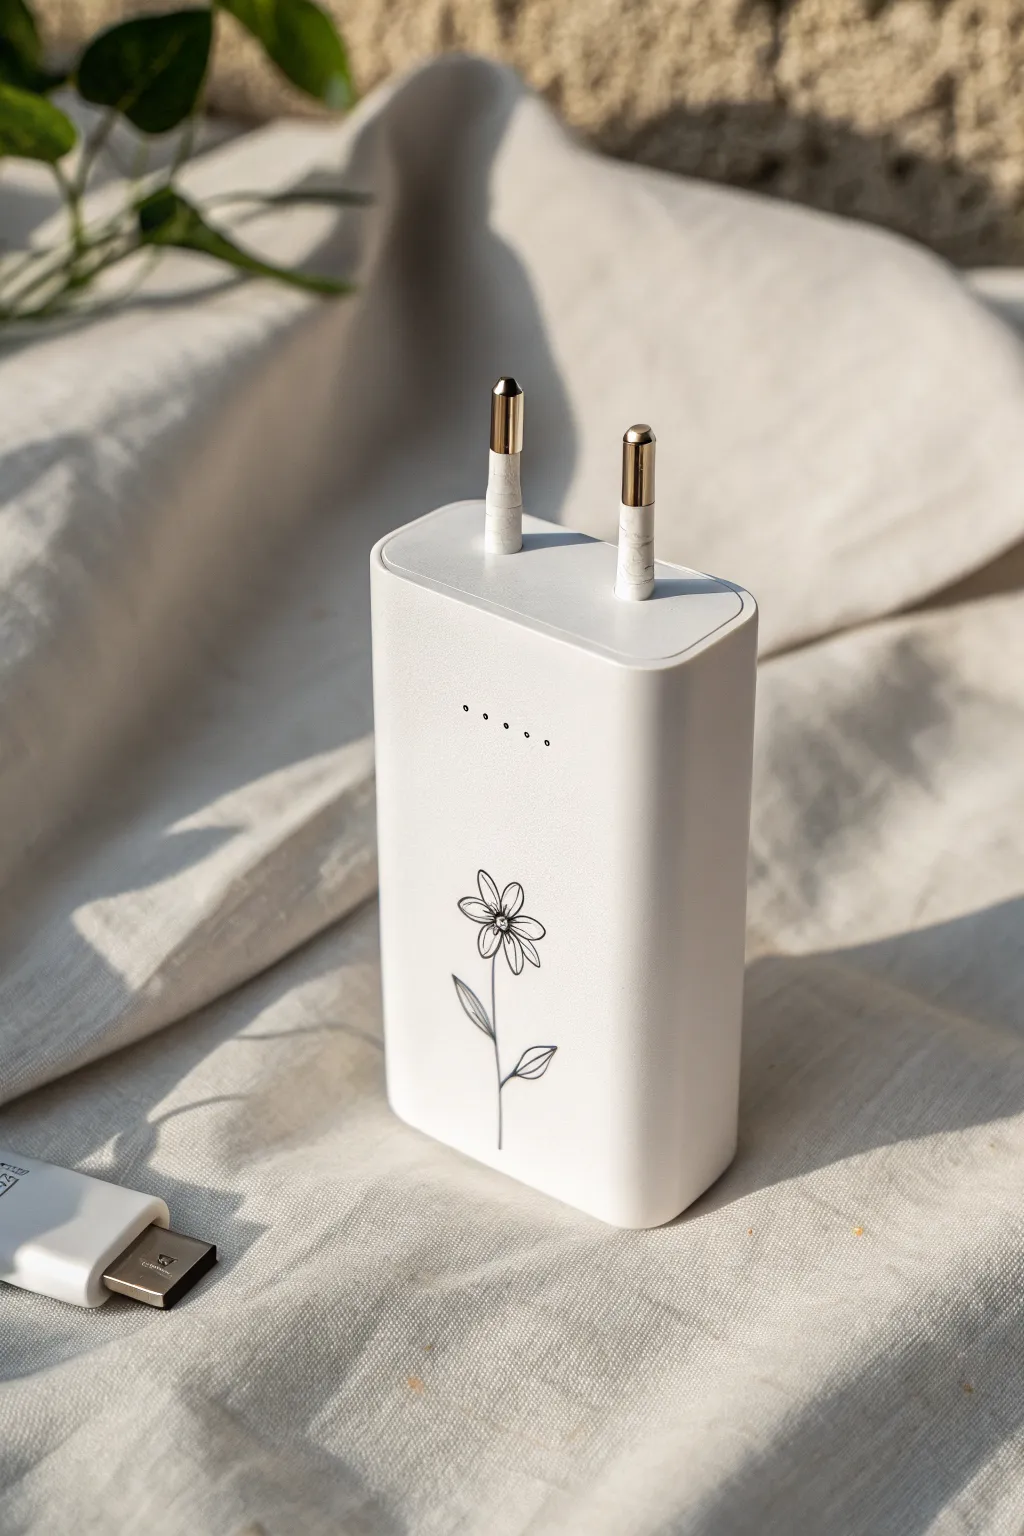
Transform a plain white charger into a bespoke accessory with this delicate floral line art. Using a simple fineliner technique, you’ll create a crisp, modern aesthetic that feels personal without being cluttered.
Step-by-Step
Materials
- White power bank or charger (smooth surface)
- Isopropyl alcohol or rubbing alcohol
- Cotton pads or lint-free cloth
- Pencil (HB or lighter)
- Soft eraser
- Black ultra-fine permanent marker (0.3mm or 0.5mm)
- Clear matte sealant spray (optional but recommended)
- Scrap paper for practice
Step 1: Preparation & Sketching
-
Clean the Surface:
Before you begin, wipe down the front of the charger thoroughly with a cotton pad soaked in isopropyl alcohol. This removes invisible oils from your fingers that could prevent the ink from setting properly. -
Dry Completely:
Wait a moment for the alcohol to evaporate completely. A dry, oil-free surface is the most critical step for sharp lines. -
Practice the Stem:
Grab your scrap paper and sketch a slight ‘S’ curve. This will form the main stem of your flower. Practice keeping your hand relaxed to avoid shaky lines. -
Draft on the Charger:
Using your pencil very lightly, draw the central vertical line on the charger. Start about an inch from the bottom edge and stop halfway up the device. -
Position the Flower Head:
At the top of your pencil stem, draw a small circle for the center of the flower. This helps you center the design before committing to details. -
Map the Petals:
Lightly sketch five or six oval shapes radiating from that center circle. Keep them loose; you just want to ensure the proportions look balanced against the charger’s width. -
Add Leaf Placement:
Mark the position of two leaves on the stem—one lower on the left and one slightly higher on the right. Simple teardrop shapes work best here.
Ink refusing to stick?
If the marker beads up, the plastic surface is too smooth. use a very fine-grit sandpaper (like 1000 grit) to gently buff the area, then clean again before drawing.
Step 2: Inking the Design
-
Begin with the Center:
uncap your ultrafine permanent marker. Carefully trace the small center circle first. You can add a tiny dot in the very middle for extra detail. -
Draw the Petals:
Outline your petals one by one. I like to overlap the lines slightly near the center to give the flower a bit of organic depth. Make the tips of the petals slightly pointed rather than perfectly round. -
Add Petal Details:
Inside each petal, draw a very short, faint line extending from the center outward. This small detail mimics the natural veins of a flower. -
Trace the Stem:
Draw the main stem line now. Instead of trying to trace exactly over your pencil mark, focus on making one confident, fluid stroke downward. -
Outline the Leaves:
Ink the outlines of your leaves. Connect them directly to the stem with a smooth curve. -
Detail the Leaves:
Draw a central line through each leaf, mirroring the curve of the outer edge. Add tiny diagonal veins if you are feeling confident, or keep it plain for a cleaner look. -
Let the Ink Set:
Put the pen down and walk away for at least 15 minutes. Permanent marker on plastic smears easily if it isn’t perfectly dry. -
Erase Guidelines:
Once you are certain the ink is dry, gently dab deeply with your soft eraser to lift the pencil marks. Avoid vigorous rubbing, as this can sometimes fade the sharpie. -
Final Clean Up:
Brush away the eraser shavings with a soft brush or your breath, not your hand, to avoid re-introducing oils. -
Seal the Work:
If you want the design to last through daily travel, take the charger outside and give it a very light misting of clear matte sealant. One thin coat is better than a thick one that might drip.
Fixing wobbly lines
Made a mistake? Don’t panic. A Q-tip dipped in rubbing alcohol acts like a magic eraser for permanent marker on plastic. Wipe it away and try again.
Now your essential tech accessory carries a touch of nature wherever you go

PENCIL GUIDE
Understanding Pencil Grades from H to B
From first sketch to finished drawing — learn pencil grades, line control, and shading techniques.
Explore the Full Guide
Soft Pastel Ombré Charger Brick
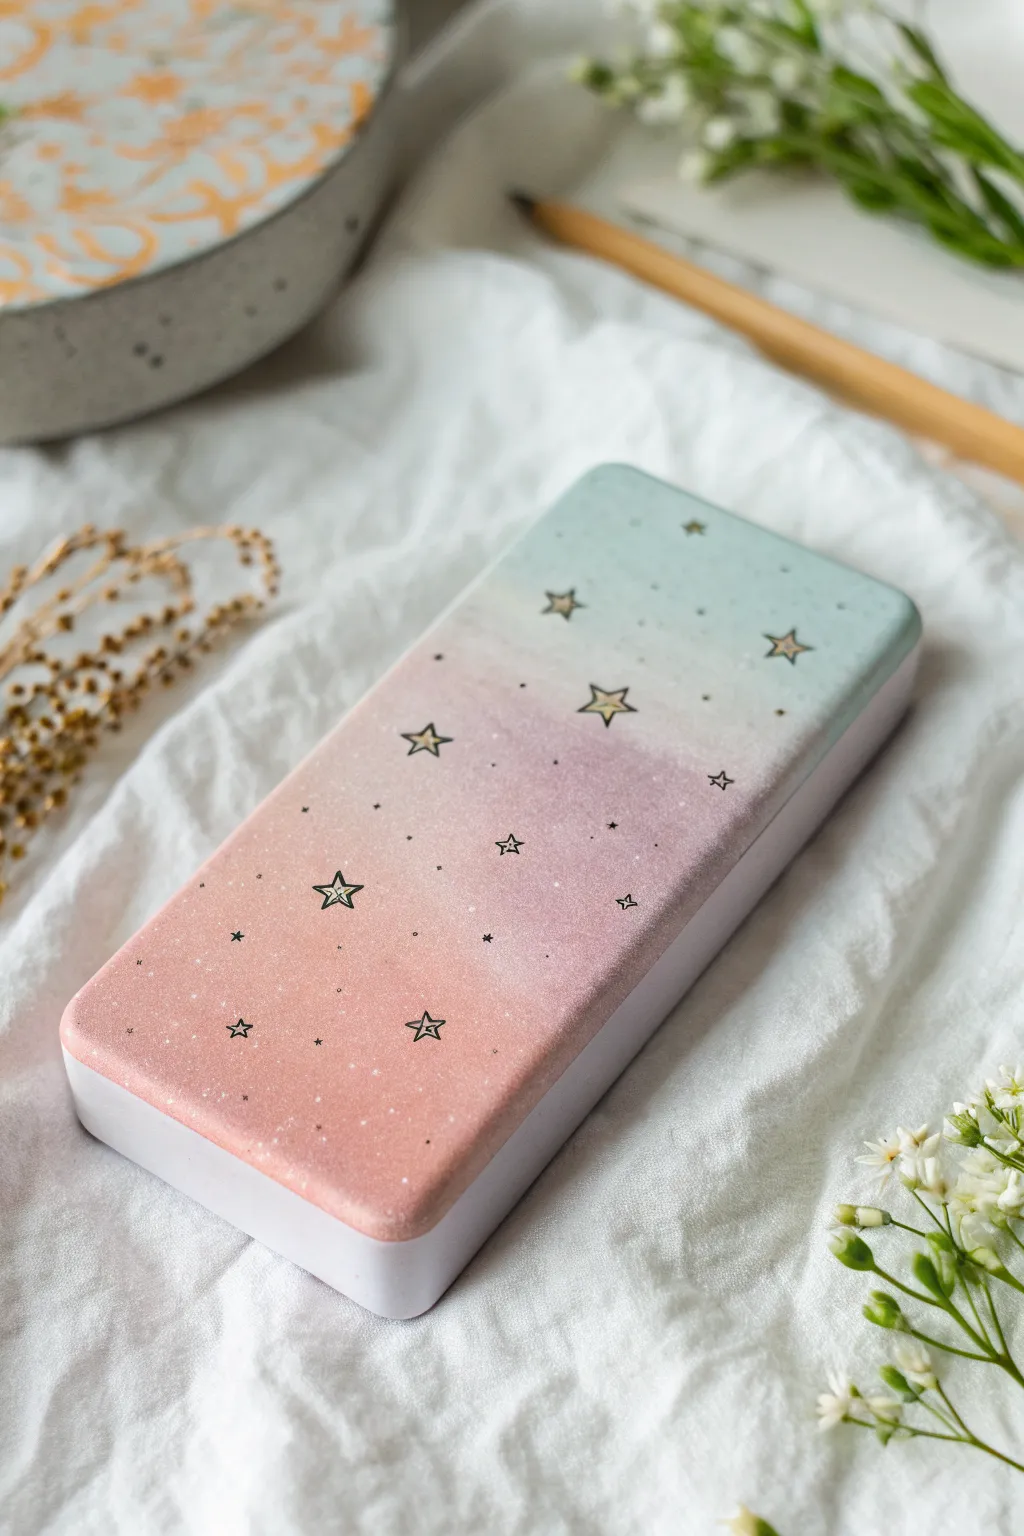
Transform a plain tech essential into a celestial accessory with this soft, dreamy gradient design. The gentle transition from blush pink to minty teal creates a calming backdrop for delicate, hand-drawn stars.
How-To Guide
Materials
- Plastic charger brick (clean and dry)
- Fine-grit sandpaper
- Painter’s tape
- Acrylic paints (White, pastel pink, pastel mint/teal)
- Makeup sponges or foam pouncers
- Fine-tip black permanent marker or acrylic paint pen
- Gold or silver metallic gel pen (optional for star centers)
- White acrylic paint pen (extra fine) for speckles
- Matte spray sealant or clear varnish
Step 1: Preparation & Base Coat
-
Prep the surface:
Before you begin painting, lightly sand the surface of the charger brick with fine-grit sandpaper. This creates a slightly rough texture, helping the acrylic paint adhere better to the smooth plastic casing. Wipe away any dust with a damp cloth. -
Protect the ports:
Using painter’s tape, carefully mask off any USB ports, charging inputs, or buttons. You want precise lines here so paint doesn’t clog the functionality of your device. -
Apply the primer layer:
Squeeze a small amount of white acrylic paint onto a palette. Using a makeup sponge, dab a thin, even coat over the entire surface you plan to decorate. Let this primer layer dry completely; it will make your pastel colors pop later.
Uneven Gradients?
If your color transition looks muddy or harsh, let it dry completely. Then, sponge a very thin layer of white over the middle seam before re-applying the colors for a fresh blend.
Step 2: Creating the Ombré Gradient
-
Set up your palette:
Prepare your main colors: a soft pastel pink and a cool mint or teal. You might want a third intermediate shade—mix a little pink and teal with plenty of white to create a transitional lavender-grey, or just blend the two main colors directly on the brick. -
Apply the pink base:
Load a clean makeup sponge with the pastel pink paint. Start dabbing at the bottom of the charger, working your way up to about the halfway point. Keep the layer relatively thin to avoid globs. -
Apply the mint top:
Take a separate sponge for the mint color. Start at the top edge and dab downwards, stopping just before you hit the solid pink section. You should have a gap of unpainted white or lightly dusted color in the middle. -
Blend the transition:
While the paint is still slightly tacky, use a clean sponge to lightly tap the area where the pink and mint meet. Gently pull the pink up slightly and the mint down slightly to blur the hard line. I like to keep a very light touch here to achieve that airy, cloud-like fade. -
Build opacity:
Once the first gradient layer is dry to the touch, repeat the sponge process. A second coat ensures the colors are solid and vibrant, while smoothing out the blended middle section even further.
Step 3: Celestial Details
-
Splatter the stars:
To create the tiny background stardust, water down a tiny bit of white acrylic paint. Dip a stiff brush (or old toothbrush) into it, and drag your thumb across the bristles to flick tiny speckles over the gradient. Practice on a paper scrap first to control the spray. -
Draw the star outlines:
Using a fine-tip black permanent marker or acrylic paint pen, draw scattered five-point stars. Vary the sizes, placing larger ‘hero’ stars near the transition line and smaller ones towards the edges. -
Add simple sparkles:
Fill in empty spaces with tiny four-point sparkles (just a small cross shape) and simple dots. This adds depth to the galaxy effect without overcrowding the design. -
Highlight the stars:
carefully color inside the larger stars with a metallic gold or silver gel pen, or simply leave them the underlying gradient color. For a dimensional look, add a tiny white dot on one point of each star.
Glow Up
Use glow-in-the-dark acrylic paint for the white speckles and star centers. Practical for finding your charger in a dark bag and adds a magical night-sky vibe.
Step 4: Sealing the Artwork
-
Remove the tape:
Before sealing, carefully peel off the painter’s tape protecting the ports. Do this slowly to ensure you don’t rip up any dried paint edges. -
Clean up edges:
If any paint seeped under the tape, use a toothpick or a damp cotton swab to gently scrape or wipe it away for a crisp finish. -
Apply sealant:
Take your project to a well-ventilated area. Apply a light, even coat of matte spray sealant over the painted surface. This protects your artwork from scratches and handling oils without adding a glossy shine that might distract from the soft aesthetic. -
Final cure:
Allow the sealant to cure fully according to the manufacturer’s instructions—usually 24 hours—before tossing it into your bag.
Enjoy carrying a piece of the cosmos with you wherever you need a power boost
Galaxy Speckle Night Sky on a Charger
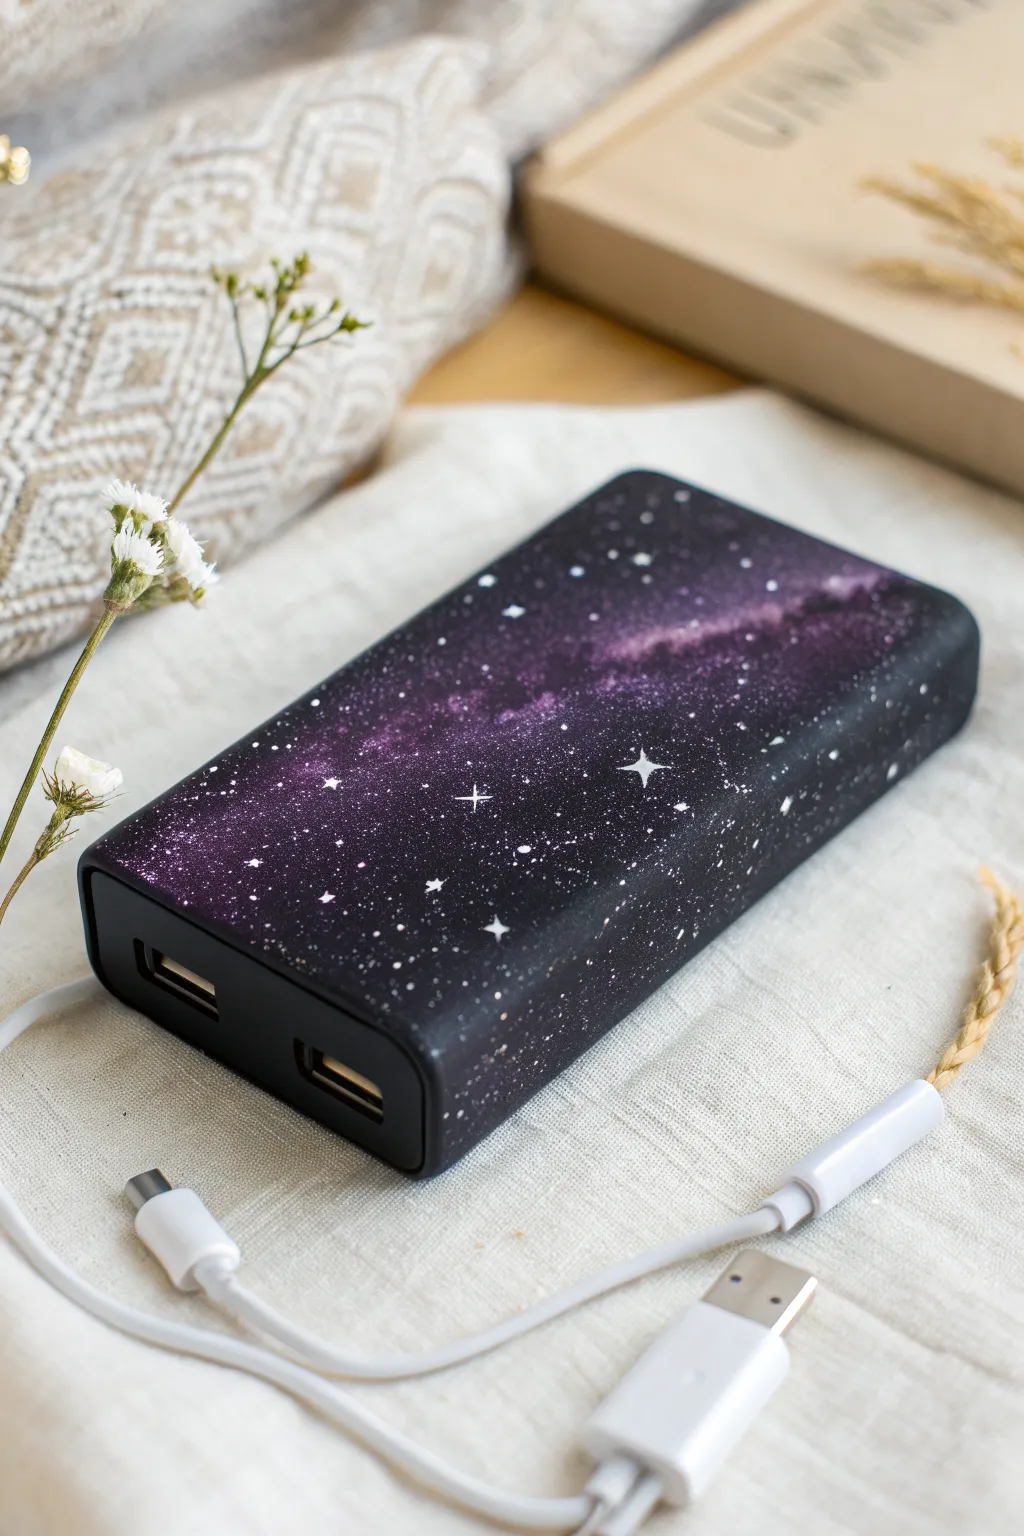
Transform a plain tech accessory into a pocket-sized window to the universe with this dreamy galaxy paint job. By layering deep cosmic violets and bright starlight speckles, you can give your power bank a stunning, nebulous finish that looks professional yet is surprisingly simple to achieve.
Step-by-Step
Materials
- Plastic-cased power bank (charger)
- Painter’s tape or masking tape
- Rubbing alcohol and cotton pads
- Black acrylic paint or multi-surface craft paint
- Dark purple acrylic paint
- Light lavender or lilac acrylic paint
- White acrylic paint
- Makeup sponge wedges
- Small stiff-bristled brush (for splattering)
- Fine liner brush (size 0 or 00)
- Clear spray sealant (matte or satin finish)
Step 1: Preparation & Base Coat
-
Clean surface:
Before anything touches your charger, wipe the entire surface down thoroughly with rubbing alcohol and a cotton pad. This removes oils and residue that prevent paint from sticking. -
Mask ports:
Carefully apply painter’s tape over all USB ports, charging inputs, buttons, and indicator lights. Press the edges down firmly to ensure no paint sneaks underneath. -
Prime with black:
Squeeze a small amount of black acrylic paint onto a palette. Using the wide end of a makeup sponge, dab the paint all over the charger’s casing in thin, even layers. -
Dry and repeat:
Let the first black coat dry completely. Apply a second coat using the same dabbing motion to ensure full opacity and hide the original color of the plastic.
Step 2: Creating the Nebula
-
Sponge dark purple:
Rip a clean piece of makeup sponge for a textured edge. Dip it lightly into dark purple paint, dab off the excess on paper, and sponge irregular cloud shapes randomly across the black surface. -
Blend the edges:
While the purple is still slightly wet, use a clean part of the sponge to soften the edges where the purple meets the black, creating a seamless fade. -
Add the Milky Way:
Load a sponge corner with the lighter lavender or lilac paint. Dab a diagonal swoosh or irregular band across the center of your dark purple clouds to represent the galaxy’s core. -
Soften intense spots:
If the lavender looks too harsh, go back in with the dark purple sponge and dab lightly over the edges of the light band to push it back into the background. -
Dry thoroughly:
Allow these colorful atmospheric layers to dry completely before moving on to the stars. This prevents the colors from stripping off during the next steps.
Starry Precision
If you are nervous about flicking paint, cover the areas you want to keep dark with a piece of paper while splattering, revealing only the ‘Milky Way’ section for the dense stars.
Step 3: Starlight & Finishing
-
Prepare splatter:
Mix a small amount of white acrylic paint with a tiny drop of water. You want a consistency similar to heavy cream or melted ice cream—fluid enough to fly off a brush, but opaque. -
Test the splatter:
Dip a stiff-bristled brush (or an old toothbrush) into the watered-down white. Use your thumb to flick the bristles over a scrap piece of paper first to gauge the spray pattern. -
Apply star field:
Flick the bristles over the charger to create a spray of tiny white dots. Aim for a denser cluster of stars along the lighter lavender ‘Milky Way’ band. -
Paint major stars:
Dip your fine liner brush into un-thinned white paint. Carefully paint a few larger, distinct dots randomly over the surface to represent closer stars. -
Add sparkles:
Choose 3 to 5 of your larger white dots. Using the very tip of your liner brush, pull tiny lines outward from the center—up, down, left, right—to create four-pointed diamond sparkles. -
Refine sparkles:
Go back over the center of your four-pointed stars with a tiny dot of white to make the core shine brightest. -
Remove tape:
Once the artwork is dry to the touch, very gently peel away the painter’s tape from the ports and buttons. -
Seal the work:
Take the charger outside or to a well-ventilated area. Apply two light coats of clear spray sealant to protect against scratches and daily handling.
Glow Up
Mix glow-in-the-dark medium into your white paint for the final stars. Your charger will look cool during the day, but absolutely magical when you turn off the lights at night.
Once the sealant cures, your cosmic charger is ready to power up your devices in interstellar style


Geometric Checker and Tile Patterns

Transform a plain white charger into a miniature piece of geometric art using simple markers or paint pens. This project mimics the look of classic ceramic tiles with interplaying shades of navy blue, terracotta, and beige.
Step-by-Step
Materials
- White USB wall charger adapter
- Fine-tip permanent markers or acrylic paint pens (Navy Blue, Terracotta/Rust Red, Beige/Sand)
- Pencil (HB or lighter)
- Ruler or straight edge
- Eraser
- Clear matte varnish or sealant spray
- Rubbing alcohol and cotton pad
- Painter’s tape (optional)
Step 1: Preparation & Mapping
-
Clean the surface:
Before creating any art, wipe down the entire charger with rubbing alcohol on a cotton pad. This removes oils and creates a grippy surface for the ink. -
Define your work areas:
Visualize the charger as three separate canvases: the top face, the longer side face, and the square end face. You can use painter’s tape to mask off the plug prongs if you’re worried about accidental marks. -
Draft the grid:
Using a very light touch with your pencil and a ruler, draw a foundational grid on all three surfaces. For the end face, make a simple 4×4 checkerboard grid. For the longer sides, draw a horizontal centerline.
Ink Smearing?
If your markers are smearing on the slick plastic, lightly sand the surface with fine-grit sandpaper (1000 grit) before drawing to give the ink more ‘tooth’ to grab onto.
Step 2: Drawing the Patterns
-
Sketch the top face geometry:
On the top surface, pencil in a pattern of connecting hourglass shapes. Draw X-shapes within your grid structure that meet at the center line, creating triangles that point toward each other. -
Sketch the side triangles:
Move to the long side of the charger. Here, pencil in a series of alternating triangles. Imagine a zig-zag line running through the center, separating upward-pointing triangles from downward ones. -
Refine the checkerboard:
On the small square end face, ensure your grid lines are straight. Mark lightly with a ‘B’ or ‘R’ where your Blue and Rust colors will go to avoid confusion later. -
Erase excess graphite:
Once your geometric shapes are mapped out, gently dab—don’t rub—with a kneaded eraser to lighten the pencil lines until they are just barely visible guides.
Go Metallic
Swap the beige sections for gold leaf paint or a metallic gold marker. This creates a ‘kintsugi’ effect, making the charger look like mended pottery.
Step 3: Adding Color
-
Start with Beige:
Begin by filling in the ‘negative space’ areas with your beige marker. On the top face, these are the diamond shapes between the hourglasses. On the side, fill every third triangle or the background areas. -
Apply the Terracotta:
Switch to the rust-red marker. Fill in the large central diamond shapes on the top face and the downward-pointing triangles on the side. For the checkerboard end, fill in the alternating squares. -
Add the Navy accents:
Use the navy blue marker to fill in the remaining geometric sections. These are typically the smaller corner triangles that frame the terracotta shapes, creating high contrast. -
Create the texture:
To mimic the stone-like texture seen in the image, I like to stipple the second layer of ink. Instead of smooth strokes, tap the marker tip repeatedly over the dried color to add a speckled, grainy look. -
Let it cure:
Allow the ink or paint to dry completely. If you used acrylic paint pens, give it at least 30 minutes to ensure it won’t smudge during the final steps.
Step 4: Finishing Touches
-
Clean up edges:
If any lines went astray, use a Q-tip dipped in a tiny amount of rubbing alcohol to clean up the white plastic borders. -
Seal the artwork:
To protect your design from the heat of charging and daily handling, spray a thin, even coat of clear matte varnish over the painted areas. -
Dry and reveal:
Let the sealant dry according to the manufacturer’s instructions. Remove any painter’s tape you applied earlier.
Now your essential tech accessory has a custom look that matches your decor style
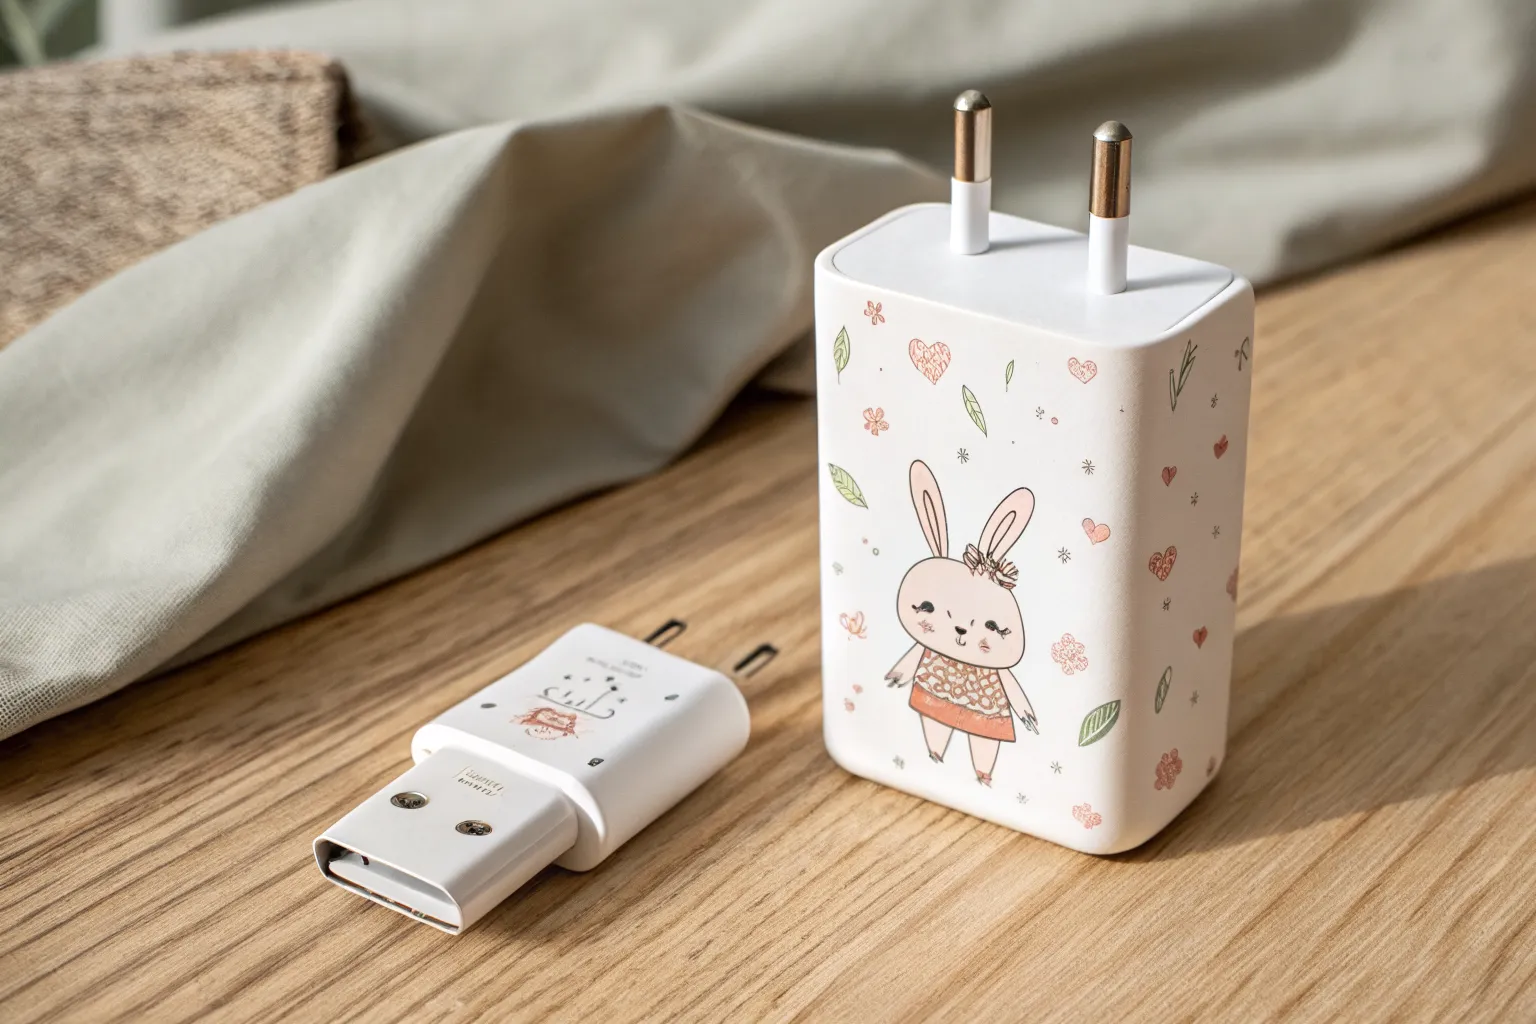
Mini Comic Scene Across Brick and Cable
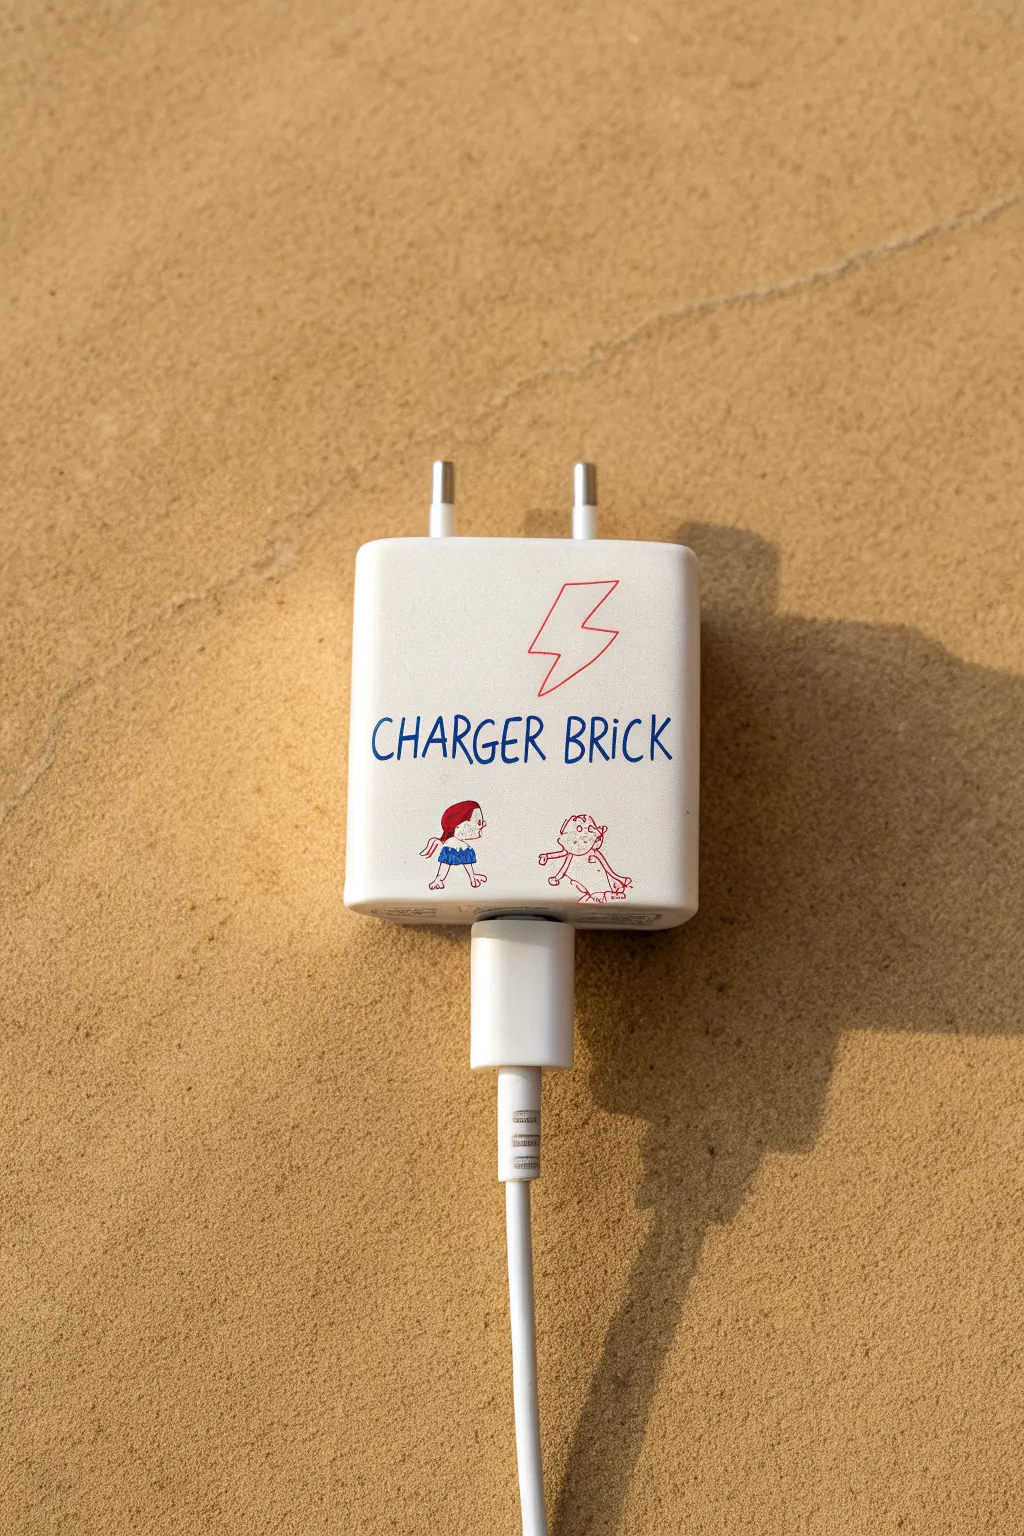
Transform a mundane white charger into a quirky mini-canvas with this simple yet charming customization project. Using fine-tip markers on the smooth plastic surface creates a playful, doodle-style design that makes your tech uniquely yours.
Step-by-Step
Materials
- White USB charger brick
- Matching white USB cable
- Rubbing alcohol or alcohol wipes
- Permanent markers (extra-fine tip only) in red and blue
- Clear matte varnish spray or clear nail polish (optional)
- Cotton swabs
- Paper towels
- Pencil (very soft lead, optional)
Step 1: Preparation
-
Clean the Surface:
Begin by thoroughly wiping down the face of the charger brick and the upper plastic housing of the USB connector with rubbing alcohol. This removes unseen finger oils and manufacturing residue that could cause the ink to bead up or smudge. -
Dry Completely:
Allow the alcohol to evaporate fully. The surface must be bone-dry before you attempt any drawing. -
Sketch Layout (Optional):
If you are nervous about freehanding, very lightly sketch the placement of your text and lightning bolt using a soft pencil. Keep the lines incredibly faint so they don’t smear into the permanent ink later.
Step 2: The Main Design
-
Draw the Lightning Bolt:
Using your red extra-fine permanent marker, draw a lightning bolt shape near the top center of the brick face. Aim for a slightly imperfect, hand-drawn look rather than geometric precision. -
Lettering the Text:
Switch to the blue marker. Directly below the lightning bolt, write the words ‘CHARGER BRICK’ in loose, casual capital letters. I find that purposefully varying the height of the letters slightly adds to the sketchbook vibe. -
Let Ink Set:
Pause for a minute or two to let this primary layer of ink cure. The plastic surface is non-porous, meaning the ink sits on top and smears easily while wet.
Ink Adhesion Pro-Tip
If the marker ink beads up instantly, lightly buff the plastic surface with a very fine grit sandpaper (1000+) to give the surface ‘tooth’ for the ink to grab.
Step 3: Character Illustration
-
First Figure Outline:
On the bottom left, draw a small figure using the red marker for the hair and legs. Keep the style rudimentary and cartoonish. -
First Figure Details:
Use the blue marker to fill in the shirt or dress of the left figure. Use tiny dots for eyes to keep the expression simple. -
Second Figure Outline:
To the right, draw a second, slightly goofier character using only red lines. This creates a nice visual contrast with the filled-in figure on the left. -
Adding Whimsy:
Add tiny gestural lines near the hands or feet of the figures to suggest movement or interaction.
Smudge Rescue
Did you accidentally smudge wet ink? Don’t wipe it! Let it dry fully first, then use a Q-tip with alcohol to precisely remove the specific smudge without spreading it.
Step 4: Finishing Touches
-
Correcting Mistakes:
If a line went stray, dip a cotton swab in a tiny amount of rubbing alcohol and carefully ‘erase’ the error. Let that spot dry completely before redrawing. -
The Cable Connection:
Look closely at where the cable plugs into the brick. On the plastic sheath of the USB cable itself, use your finest black or blue pen to draw small hash marks or tiny doodle details that mimic the main drawing style. -
Sealing the Work (Recommended):
Because chargers are handled frequently, the ink will eventually rub off without protection. In a well-ventilated area, mist a very light coat of clear matte varnish over the face of the charger. -
Drying Time:
Let the scanner sit for at least an hour (or according to your varnish instructions) before handling it to ensure the finish is hard and non-tacky.
Now you have a custom piece of tech accessories that brings a smile every time you power up your device


Have a question or want to share your own experience? I'd love to hear from you in the comments below!