When I need my brain to loosen up, I reach for pattern design—it’s simple, satisfying, and instantly makes a page feel alive. Here are my favorite cool pattern ideas, starting with the classics and moving into the fun, unexpected stuff.
Classic Stripe Mix-Ups
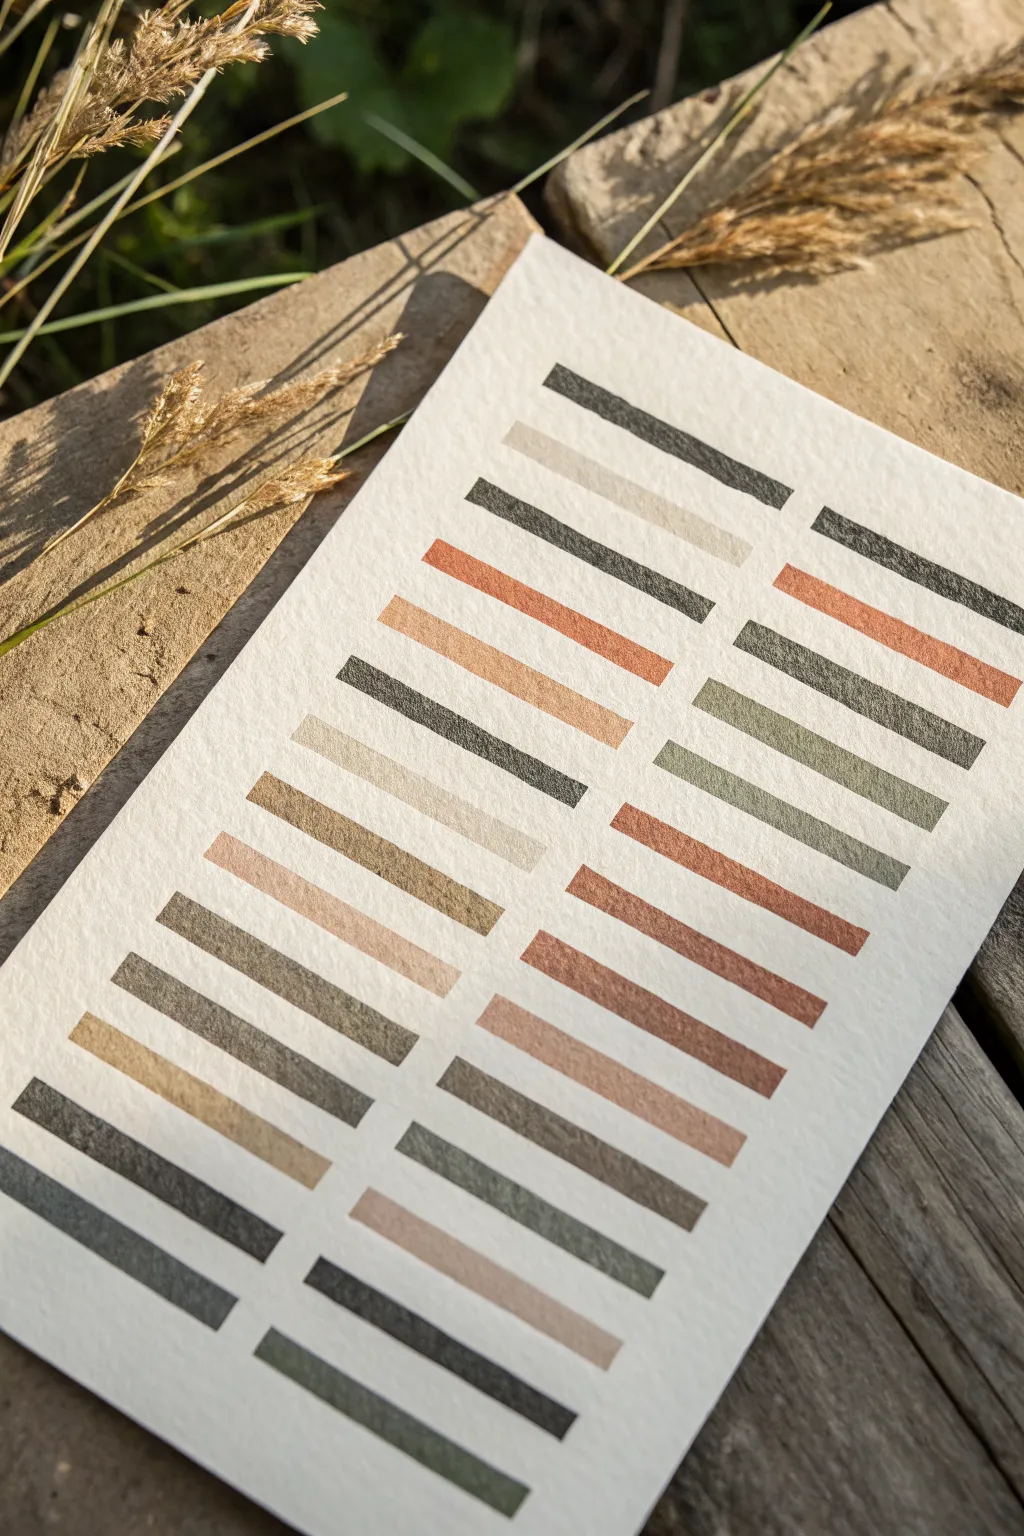
This serene project explores the beauty of repetition and muted earth tones through a series of carefully painted rectangular stripes. The result is a calming, modern piece of art that celebrates the subtle textures of watercolor paper and the harmony of nature-inspired colors.
Step-by-Step Guide
Materials
- Cold-pressed watercolor paper (300 gsm)
- Watercolor paints or gouache (Earthy tones: olive green, charcoal, terracotta, beige, blush)
- Flat shader brush (approx. 1/2 inch or size 6-8)
- Ruler
- Pencil (HB or lighter)
- Masking tape or washi tape (optional but helpful)
- Water jar
- Paper towels
- Mixing palette
Step 1: Preparation & Layout
-
Prepare your paper:
Begin by taping down your cold-pressed watercolor paper to a flat work surface. This prevents buckling when the paper gets wet and keeps your workspace tidy. -
Mark the center:
Using a ruler and a light pencil, find the horizontal center of your paper. Draw a very faint vertical line down the middle to act as a spacer between your two columns of stripes. -
Define the columns:
Measure about 1/2 inch to the left and right of your center line. These new marks will be the starting inner edges for your left and right columns, ensuring a clean gap in the middle. -
Grid the rows:
Decide on the height of your stripes (e.g., 1/2 inch tall) and the gap between them (e.g., 1/4 inch). Lightly mark horizontal guides down the length of the paper to keep your rows straight and evenly spaced.
Wobbly Edges?
If freehanding straight lines is tricky, use low-tack washi tape to mask off each rectangle. Press edges down firmly to stop bleed-through.
Step 2: Mixing the Palettes
-
Create base colors:
On your palette, squeeze out your primary earthy tones. You’ll want a dark charcoal grey, a deep sage green, a warm terracotta, and a neutral beige. -
Mix secondary shades:
To achieve that nuanced, organic look, mix variations. Add a touch of charcoal to your green for a deep olive, or water down the terracotta significantly to create a soft blush pink. -
Test opacity:
I always keep a scrap piece of paper nearby to test paint consistency. Gouache will give you uniform, matte coverage, while watercolor will show more paper texture. Choose the opacity that speaks to you.
Step 3: Painting the Stripes
-
Start at the top:
Load your flat brush with a dark charcoal or slate grey color. Starting with the top left stripe, place your brush down and pull it horizontally towards the outer edge. -
Control the edges:
For crisp ends without tape, press the brush flat at the start of the stroke, drag, and lift cleanly. If you prefer perfect rectangles, apply small strips of masking tape along your pencil guides before painting. -
Alternate colors randomly:
Move down to the next row. Switch to a beige or light sand color. The beauty of this pattern lies in the random but balanced distribution of darks and lights. -
Mirror or stagger:
Paint the corresponding stripe in the right column. You can choose to match the color of the left stripe for symmetry, or stagger them for a more dynamic, ‘mixed-up’ feel as seen in the reference. -
Introduce warmth:
Every few rows, introduce a warm tone like terracotta or blush pink. This breaks up the greens and greys and adds a focal point to the composition. -
Maintain water control:
Keep your brush damp but not dripping. Too much water will cause the pigment to pool at the edges of the stripe, ruining the flat, graphic look we are aiming for. -
Vary the greens:
As you work down the paper, alternate between your deep forest green and lighter sage mixes. This tonal variety adds depth without needing new colors. -
Complete the grid:
Continue working your way down until all pencil guides are filled. If painting freehand, maintain a steady hand to keep widths consistent.
Color Harmony
Limit your palette to 4-5 core colors. Mix them with each other (e.g. add a dot of green to your red) to ensure all tones relate harmoniously.
Step 4: Finishing Touches
-
Let it dry completely:
Allow the paint to fully dry. Watercolor and gouache can look different when wet, so wait until the sheen disappears to judge the final colors. -
Erase guidelines:
Once the paper is bone dry, gently erase any visible pencil marks between the stripes. Be careful not to rub over the painted areas, as pigment can smudge. -
Flatten the paper:
If your paper has buckled slightly from the moisture, place it under a heavy book overnight to press it flat and crisp.
Now you have a structured yet organic piece of modern art ready to frame


Polka Dots With Size Shifts
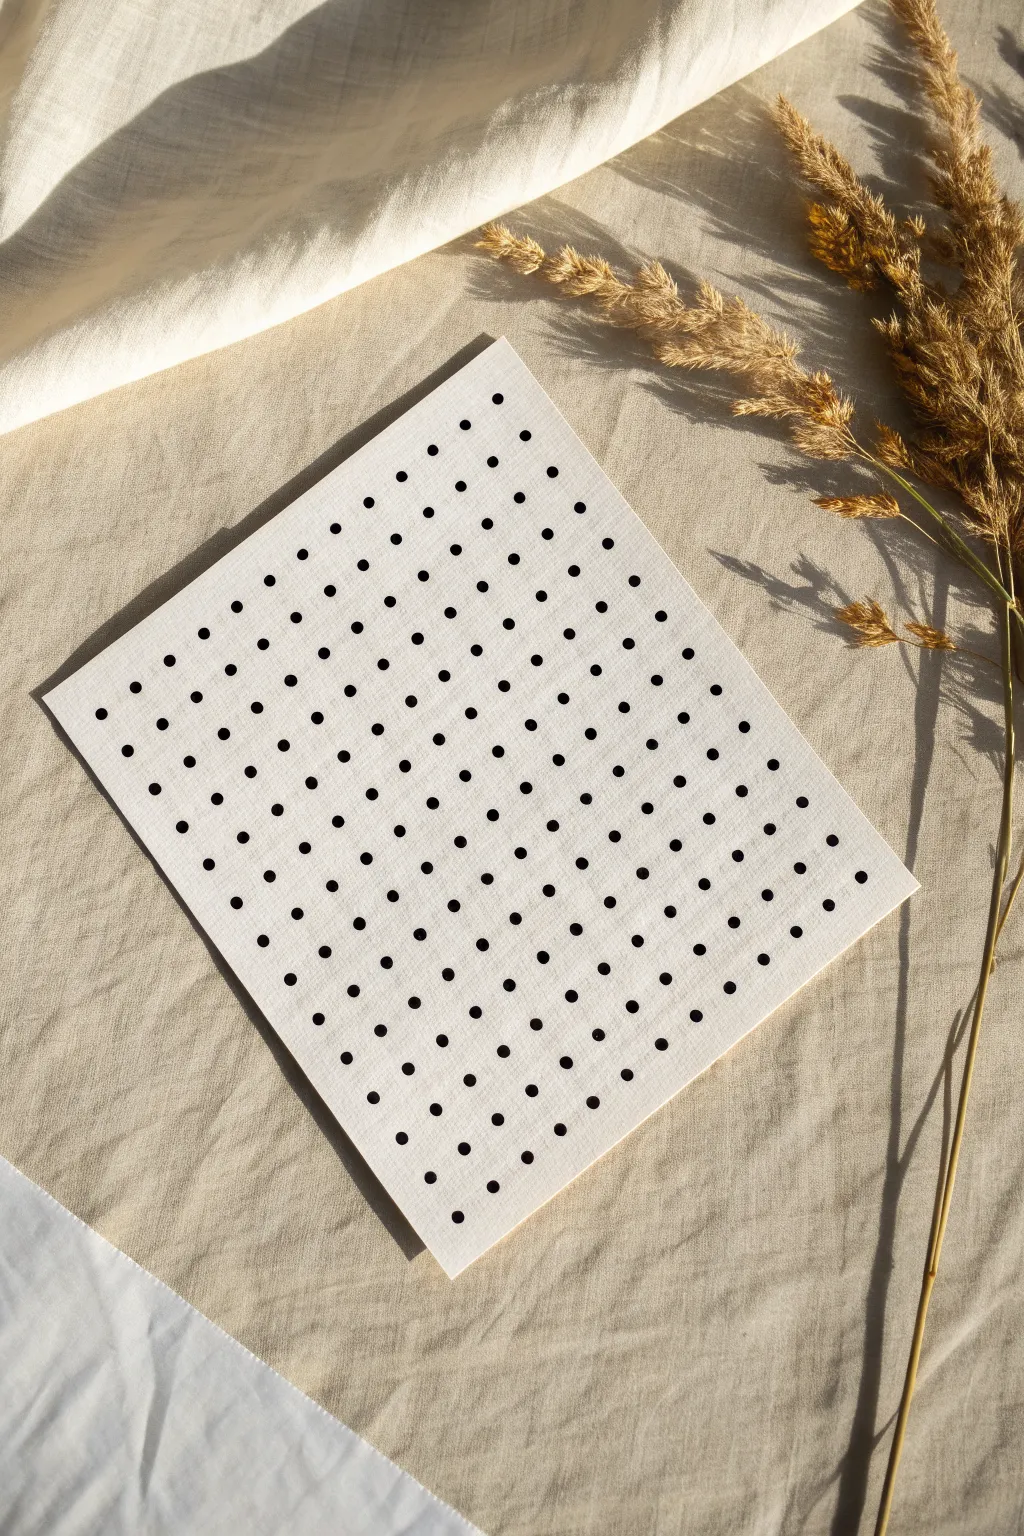
This project embraces the beauty of simplicity with a clean, high-contrast array of black dots on a crisp white background. It’s a perfect exercise in precision and patience, resulting in a modern piece of geometrical art that fits seamlessly into contemporary decor.
Step-by-Step
Materials
- Rectangular canvas panel or heavy mixed-media paper (e.g., 9×12 inch)
- White gesso or acrylic paint (titanium white)
- Black acrylic paint (carbon black or mars black)
- Ruler (preferably clear)
- Sharp pencil (H or HB)
- Flat paintbrush (1-inch width)
- Dotting tools (set with varying sizes) or the back of a drill bit
- Bubble level (optional)
- Eraser (kneaded is best)
Step 1: Preparing the Base
-
Prime the Surface:
Start by applying a generous coat of white gesso or titanium white acrylic paint to your canvas panel. Use smooth, long strokes to minimize texture. -
Apply Second Coat:
Once the first layer is touch-dry, apply a second coat in the opposite direction (cross-hatching) to ensure opaque coverage and a smooth finish. -
Let it Cure:
Allow the white base to dry completely. I like to leave it overnight to ensure the surface is hard enough to withstand pencil markings without denting.
Step 2: Mapping the Grid
-
Calculate Spacing:
Measure the width of your canvas. Decide on a margin size (e.g., 1 inch) and deduct it from the total width, then divide the remaining space by the number of dots you want per row to determine spacing. -
Mark Vertical Guides:
Using your ruler, lightly mark small tick marks along the top and bottom edges of the canvas at your calculated intervals. -
Mark Horizontal Guides:
Repeat the measurement process for the sides, placing tick marks along the left and right edges. -
Draw the Grid lines:
Very lightly connect the opposing tick marks with a ruler and pencil to create a faint grid. Press lightly so these lines are easy to erase later. -
Check for Accuracy:
Step back and look at your grid. If any intersections look wonky, erase and re-measure that specific line now.
Clean Precision
Keep a damp Q-tip handy while working. If a dot smudges or loses shape, quickly wipe it away while wet, dry the spot, and re-dot.
Step 3: Painting the Dots
-
Prepare the Paint:
Squeeze a small amount of black acrylic paint onto a palette. The paint should be fluid but opaque; if it’s too thick (like heavy body acrylic), add a tiny drop of water or flow medium. -
Test Your Tool:
Dip your chosen dotting tool into the paint and practice on a scrap piece of paper to ensure the size matches your vision. -
Load the Tool:
Dip the tool vertically into the paint puddle. You want a nice bead of paint on the tip, but not so much that it will drip. -
Place First Dot:
Start at the top-left intersection of your grid. Hold the tool perpendicular to the canvas and touch it down gently, lifting straight up. -
Continue the Row:
Work your way across the first horizontal row. Reload your tool with fresh paint every 1-2 dots to keep the size consistent. -
Work Downwards:
Complete the grid row by row, moving from top to bottom. This prevents your hand from accidentally smudging wet dots. -
Touch Ups:
If a dot looks uneven or too light, wait for it to dry slightly, then carefully re-dot directly over it with a fresh load of paint.
Gradient Effect
Create visual interest by using progressively smaller dotting tools for each row, making the dots shrink as they move down the canvas.
Step 4: Finishing Touches
-
Dry Completely:
Allow the artwork to sit undisturbed for at least 2-3 hours. The centers of the dots are thicker and take longer to dry than flat paint. -
Erase Guidelines:
Once you are 100% sure the black paint is cured, gently run a kneaded eraser over the pencil lines to remove the grid. -
Seal (Optional):
Apply a spray varnish if desired to protect the surface from dust, keeping the can 12 inches away to avoid disturbing the paint.
Hang your new geometric masterpiece in a spot with good lighting to highlight the subtle texture of the raised dots

Checkerboards and Broken Checks
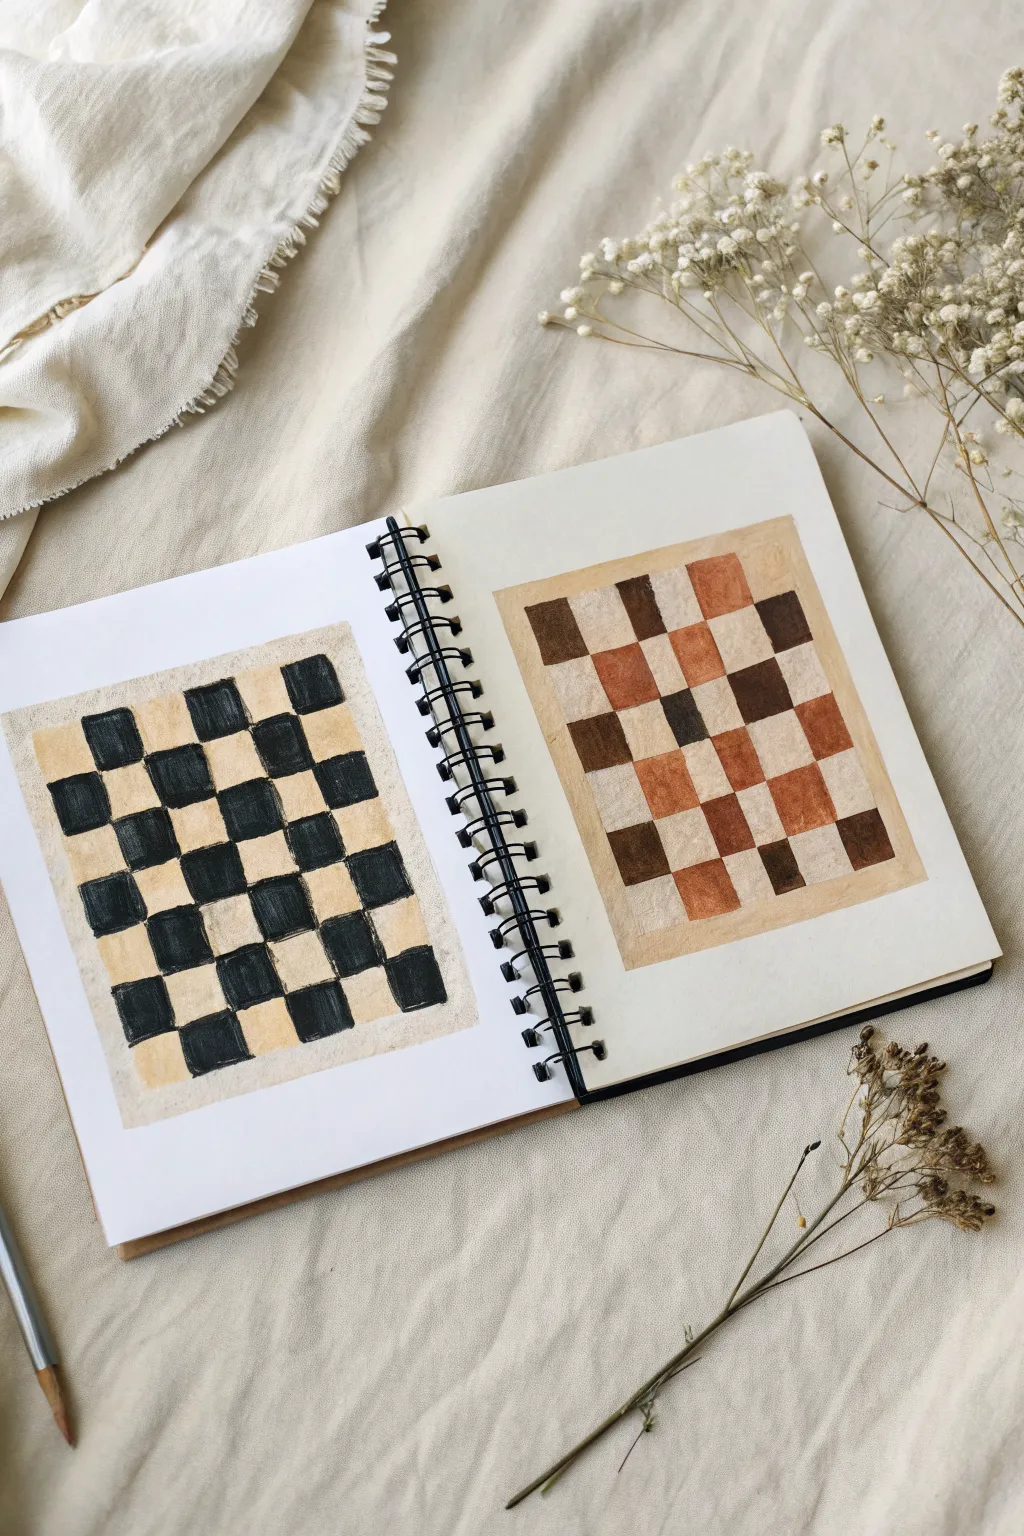
Embrace imperfection with these charmingly uneven checkerboard paintings that celebrate wobbly lines and organic forms. Using opaque gouache or acrylics, you’ll create two distinct variations—one in classic high-contrast monochrome and another in warm, earthy autumn tones.
Step-by-Step Tutorial
Materials
- Spiral-bound mixed media sketchbook or watercolor paper
- Gouache or acrylic paints (Black, White, Burnt Sienna, Yellow Ochre, Burnt Umber)
- Flat shader brush (size 6 or 8)
- Small round detail brush (size 2)
- Pencil (HB or H)
- Ruler
- Palette for mixing
- Jar of water
- Paper towels
Step 1: Planning the Grid
-
Define the boundaries:
Start by lightly drawing two rectangular boxes on your sketchbook pages—one on the left and one on the right. Leave a generous margin of white space around each box to frame the artwork. -
Outline the background:
Within these rectangles, sketch a slightly smaller internal rectangle. This creates a border effect that we will fill with a base color later. -
Draw vertical waves:
Using your pencil, draw vertical lines inside the internal rectangles. Instead of using a ruler for straight lines, deliberately wobble your hand slightly to create soft, undulating waves. Aim for about 5-6 columns. -
Draw horizontal waves:
Cross those vertical lines with horizontal wavy lines to form the grid. Again, avoid perfection—let the lines dip and curve naturally. This creates the ‘warped’ checkerboard effect.
Step 2: The Classic Monochrome (Left Page)
-
Mix the background beige:
On your palette, mix a generous amount of warm beige. Combine White with a touch of Yellow Ochre and a tiny dot of Burnt Sienna. You want a creamy, vintage paper tone. -
Paint the background:
Using your flat brush, paint the entire designated rectangular area on the left page with this beige mix. Paint right over your pencil grid lines—you should still be able to see them faintly through the paint. Let this dry completely. -
Prepare the black:
Squeeze out some black gouache. If it feels too stiff, add a drop of water to improve the flow, but keep it opaque. -
Fill the dark checks:
Starting from the top left corner, paint every other square black. Use the flat edge of your brush to define the wobbly edges, following your pencil guide. -
Refine the edges:
Switch to your small round brush to tidy up corners or fill in any small gaps in the black squares. The goal isn’t razor-sharp precision, but rather a clean, hand-painted look. -
Second coat (optional):
If the black looks streaky once dry, apply a second thin layer to ensure a solid, matte finish.
Pencil Marks Showing?
If pencil lines are too dark under the light paint, lightly dab them with a kneaded eraser before painting. Don’t rub, just lift the excess graphite so it doesn’t smudge the paint.
Step 3: The Earthy Palette (Right Page)
-
Mix the warm base:
For the right page background, mix a slightly deeper, warmer beige than the first one. Add a bit more Yellow Ochre or a touch of Burnt Umber to your previous mix. -
Apply the base coat:
Paint the entire rectangular area on the right page with this warm beige foundation. Allow it to fully dry. -
Mix earth tones:
Prepare three distinct colors on your palette: a deep chocolate brown (Burnt Umber), a rust orange (Burnt Sienna + Yellow Ochre), and a darker charcoal brown (Burnt Umber + a dot of Black). -
Plan the random pattern:
Unlike the left page, this isn’t a strict A/B pattern. Visualize a random scattering of light and dark squares. -
Paint the darkest squares:
Start with the charcoal brown mix. Select random squares throughout the grid and fill them in. Leave plenty of empty squares between them. -
Add the rust tones:
Clean your brush and pick up the rust orange mix. Fill in several more squares, trying to place them next to empty spaces or dark squares for contrast. -
Fill with medium brown:
Use the chocolate brown to fill the remaining empty squares in the grid. If two similar colors end up touching, that’s perfectly fine—it adds to the organic feel. -
Final touches:
Once everything is dry, erase any stray pencil marks visible in the white margins around your paintings.
Clean Edges Pro Tip
Load your brush with paint but wipe the excess off on the palette’s edge. A heavily loaded brush makes blobby corners; a controlled amount gives you those crisp-but-wobbly lines.
Now you have a beautiful double-page spread of pattern studies that look cozy and inviting


Simple Zigzags and Chevrons
Create your own bold chevron patterns on fabric using simple block printing techniques or stencils. These graphic swatches bring a touch of mid-century modern flair to your textiles with their striking zigzag motifs in cool teal and warm rust tones.
Step-by-Step Guide
Materials
- Cotton or linen fabric (white or cream)
- Fabric paint or screen printing ink (Teal and Rust colors)
- Freezer paper or stencil film (for stencil method)
- Craft knife and cutting mat
- Iron and ironing board
- Foam pouncer or sponge brush
- Ruler
- Pencil
- Masking tape
- Small roller (brayer) for applying paint evenly
Step 1: Preparation and Design
-
Prepare the fabric base:
Start by washing and drying your fabric to remove any sizing chemicals that might prevent the paint from sticking. Iron it completely flat so you have a smooth working surface. -
Cut to size:
Cut your fabric into rectangular swatches. For this project, rectangles roughly A4 or letter size work well for testing patterns or making placemats. -
Choose your method:
Decide whether you want to use a stencil (cleaner lines) or a stamp (more texture). For the crisp look in the image, the freezer paper stencil method is ideal. -
Draw the chevron grid:
On the non-shiny side of your freezer paper, lightly draw a grid. Determine the width of your zigzags—about 1 inch wide—and mark vertical guidelines across the paper. -
Sketch the zigzags:
Using the grid, connect diagonal lines to form the chevron peaks and valleys. Ensure the angles are consistent; a 45-degree angle usually creates a classic sharp zigzag.
Step 2: Creating the Stencil
-
Trace the pattern:
Go over your pencil lines with a darker marker if needed so you can see exactly where to cut. You want to cut out the shapes that will represent the colored parts of the design. -
Cut the stencil:
Place the freezer paper on a cutting mat. Using a sharp craft knife, carefully cut out the zigzag strips. Keep the negative space (the paper that is left) intact, as this will be your mask. -
Attach the stencil:
Lay the cut freezer paper, shiny side down, onto your fabric. Ensure it is perfectly aligned with the grain of the fabric. -
Secure with heat:
Run a hot, dry iron over the freezer paper. The heat will temporarily fuse the waxy side to the fabric, creating a tight seal that prevents paint from bleeding under the edges.
Crisp Lines Secret
Use a credit card to smooth the freezer paper edges right before painting. This extra pressure ensures the seal is tightest right where the paint meets the fabric.
Step 3: Painting the Pattern
-
Prepare the paint:
Pour a small amount of teal fabric paint onto a palette or paper plate. I like to mix in a tiny drop of white if the pigment looks too dark straight from the bottle. -
Load the applicator:
Dip your foam pouncer or sponge brush into the paint, then dab it on a scrap paper to remove excess. You want a thin, even coat rather than a gloopy one. -
Apply the first color:
Using an up-and-down pouncing motion, apply the teal paint over the stencil openings. Focus on the edges first to ensure a crisp line, then fill in the center. -
Repeat for the second swatch:
Repeat the stencil process with a second piece of fabric, but this time use the rust or terra-cotta colored paint. This creates the complementary set seen in the photo. -
Let it set:
Allow the paint to dry to the touch. This usually takes about 20-30 minutes, depending on the thickness of your paint layer.
Level Up: Texture
Instead of solid paint, lightly sponge the color on to create a ‘heathered’ or vintage worn look. Varrying the pressure creates natural highs and lows in the tone.
Step 4: Finishing Touches
-
Remove the stencil:
Carefully peel away the freezer paper. This is the most satisfying part, revealing the crisp zigzag lines underneath. -
Heat set the design:
Once the paint is fully dry (wait 24 hours for best results), place a pressing cloth over the design and iron on a high heat setting to permanently fix the color to the fibers. -
Trim the edges:
You can leave the edges slightly raw for a rustic look, or use pinking shears to prevent fraying while maintaining a textured edge.
Now you have a set of custom-printed fabrics ready to be sewn into pouches, pillows, or simply framed as modern art pieces
BRUSH GUIDE
The Right Brush for Every Stroke
From clean lines to bold texture — master brush choice, stroke control, and essential techniques.
Explore the Full Guide
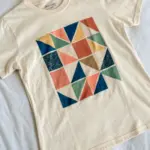
Easy Triangles in Repeat
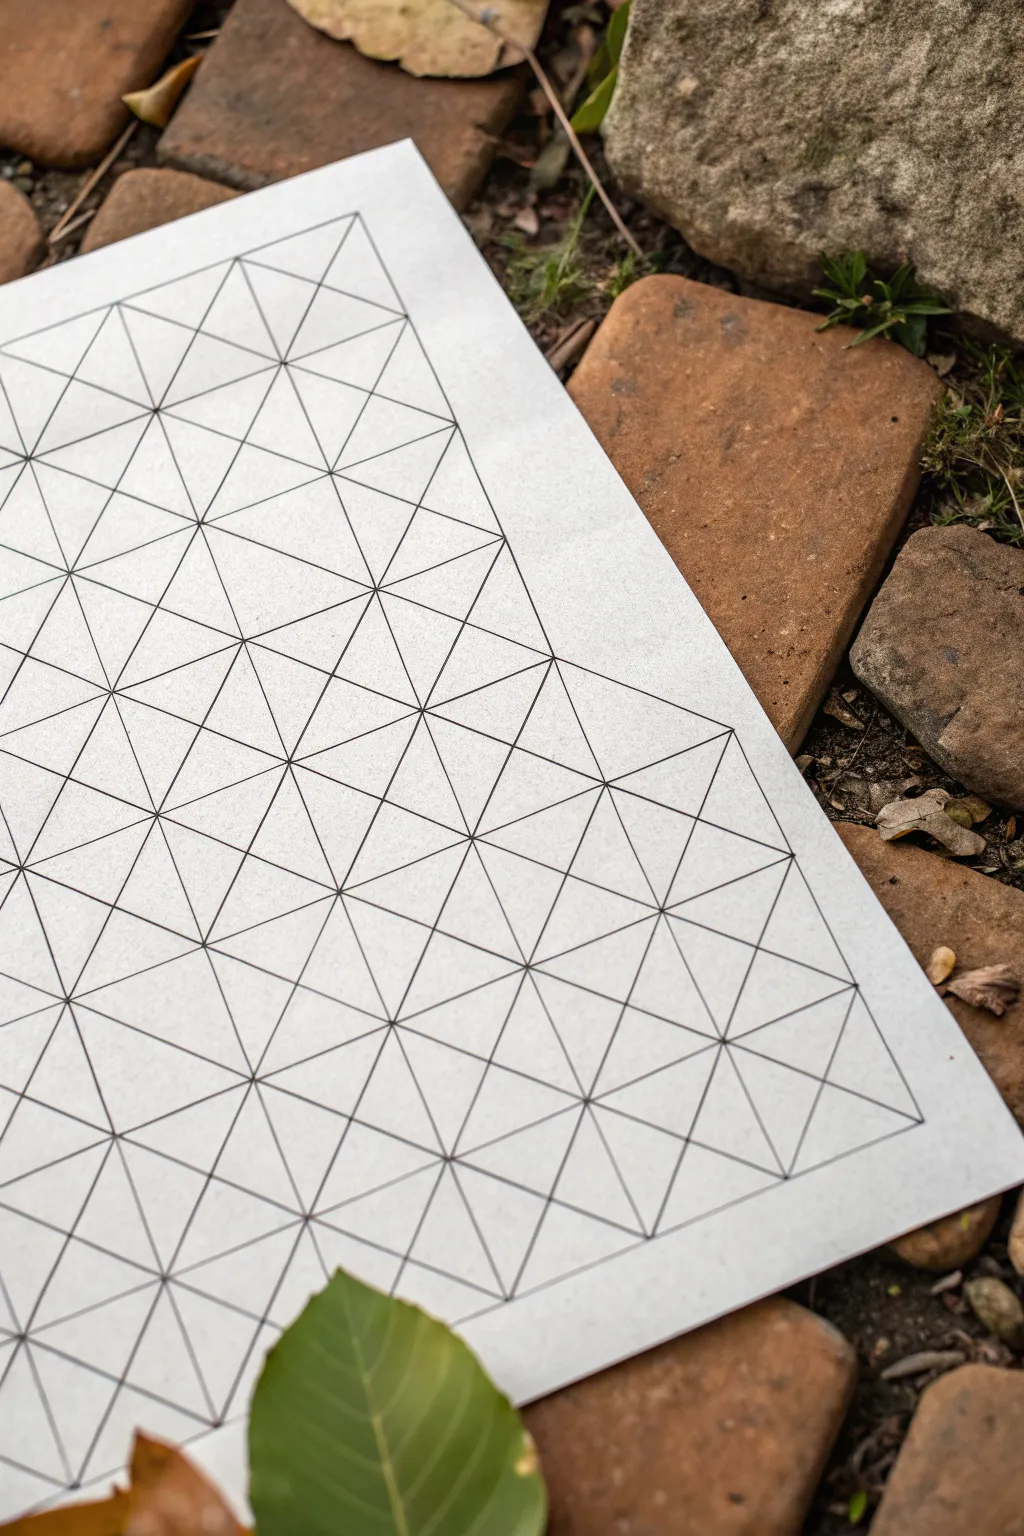
Master the art of precise repetition with this mesmerizing geometric grid pattern. By combining simple squares and diagonal lines, you’ll create a complex web of triangles that serves as a perfect foundation for coloring or optical illusion art.
Step-by-Step
Materials
- High-quality white drawing paper (heavyweight or cardstock)
- Ruler or straight edge (transparent is helpful)
- Drawing pencil (HB or H)
- Fine-point black liner pen or marker (0.5mm or 0.8mm)
- Eraser (kneaded or vinyl)
- Masking tape or drafting dots (optional)
Step 1: Setting the Foundation
-
Paper Preparation:
Begin by securing your paper to a flat, smooth surface. Small pieces of masking tape on the corners can prevent the paper from shifting while you measure, which is crucial for geometric accuracy. -
Measure the Grid:
Decide on the size of your base squares; 1 inch or 2 centimeters works well for this scale. Using your ruler, lightly mark even intervals along the top and bottom edges of your paper with a pencil. -
Draw Vertical Guidelines:
Connect the top and bottom marks to create a series of parallel vertical lines across the page. Keep your pencil pressure very light so these lines can be easily erased later if needed. -
Mark Horizontal Intervals:
Turn your ruler perpendicular to the lines you just drew. Mark the same interval spacing (e.g., 1 inch) along the left and right edges of the paper to set up your horizontal grid. -
Complete the Grid:
Connect the left and right marks to form horizontal lines. You should now have a page filled with perfect, uniform squares drafted in light graphite.
Smudge Prevention
Tape a penny to the underside of your ruler. This lifts the edge slightly off the paper, preventing ink from bleeding under the ruler and smearing when you slide it.
Step 2: Creating the Triangles
-
First Diagonal pass:
Starting from the top-left corner of your first square, draw a diagonal line through the corners of the grid squares going downwards to the right. Continue creating parallel diagonal lines until every square is bisected in this direction. -
Second Diagonal Pass:
Now, create the opposing diagonals. Start from the top-right and draw lines sloping downwards to the left, crossing through the intersections of your previous lines. Every square on your grid should now contain an ‘X’. -
Check for Accuracy:
Pause to scan your grid. Ensure that all lines intersect cleanly at the center of each square and at the corners. If a line has drifted, fix it now with your pencil before committing to ink.
Color Dimensions
Use three shades of the same color to fill the triangles. This creates a stunning 3D ‘pyramid’ effect that makes the flat paper look like a textured surface.
Step 3: Inking the design
-
Vertical Lines First:
Switch to your black fine-point pen. I find it easiest to ink all lines in one direction first to maintain a consistent hand position. Trace over all your vertical pencil lines carefully. -
Horizontal Lines Next:
Proceed to trace all horizontal lines. Rotate the paper if it helps you pull the pen stroke more naturally towards your body. -
Diagonal Inking – Set One:
Ink the first set of diagonal lines. Be mindful of the ruler’s edge; if you use a ruler for inking, wipe the edge frequently to prevent ink smudging. -
Diagonal Inking – Set Two:
Complete the pattern by inking the final set of diagonals. Watch as the field of squares transforms into a dense network of triangles. -
Drying Time:
Allow the ink to dry completely. This might take a few minutes depending on your pen, but patience here prevents ruinous smudges during the final step. -
Final Cleanup:
Once the ink is bone-dry, use your eraser to gently remove all visible pencil guidelines. Brush away the eraser crumbs to reveal your crisp, finished geometric lattice.
Now you have a flawless geometric canvas ready for further artistic exploration
Honeycomb Hexagon Grids
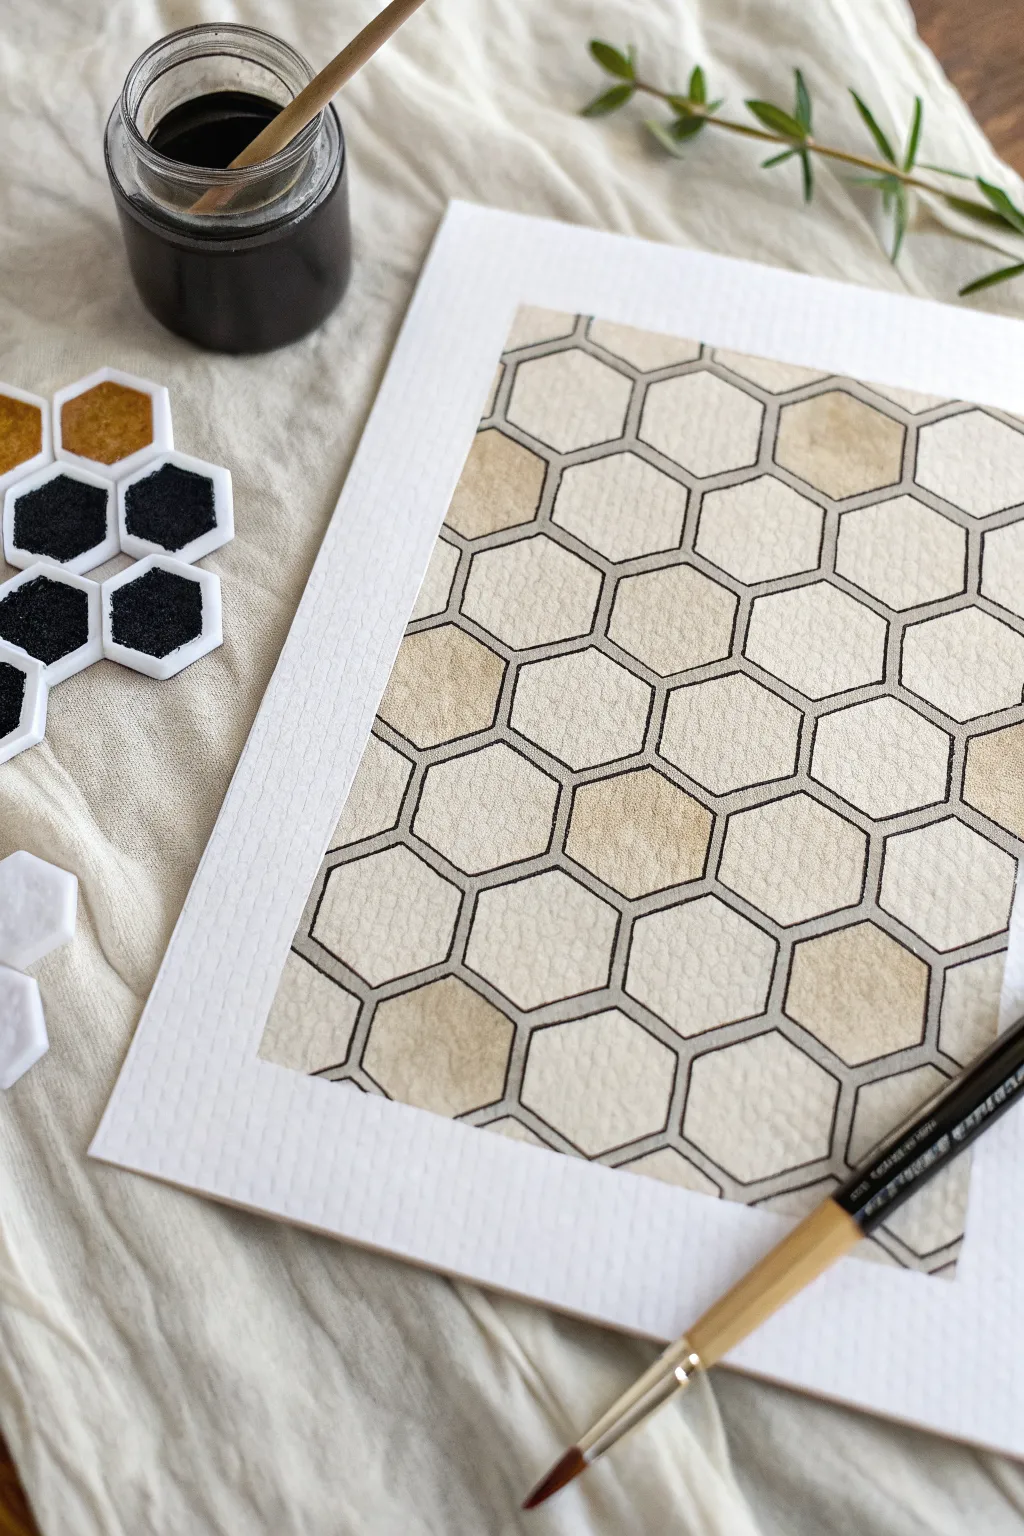
Capture the organic precision of nature with this calming honeycomb watercolor study. Using a muted, monochromatic palette, you’ll build up layers of soft beige and charcoal outlines to create a satisfying, rhythmical grid.
Step-by-Step Guide
Materials
- Cold-pressed watercolor paper (300 gsm)
- Ruler
- Pencil (HB or H)
- Waterproof fine-liner pen (black, 0.3 or 0.5mm) or black ink with dip pen
- Watercolor paints (Yellow Ochre, Burnt Umber, Ivory Black)
- Round watercolor brush (size 4 or 6)
- Small mixing palette
- Masking tape
- Jar of water
Step 1: Preparation & Drawing
-
Surface setup:
Begin by taping down all four edges of your watercolor paper to a board or table. This creates that crisp white border you see in the final piece and prevents the paper from buckling when wet. -
Grid layout:
Lightly mark vertical guidelines across your paper using a ruler. These lines will serve as the centers for your hexagonal columns. -
Drafting the hexagons:
Using your pencil, carefully draw the hexagon shapes. Start by drawing the zig-zag vertical lines, then connect them horizontally. Don’t worry if they aren’t mathematically perfect; slight variations add to the hand-painted charm. -
Refining lines:
Go over your pencil grid to ensure the shapes are clear. If you press too hard, gently lift some graphite with an eraser so it doesn’t dirty the paint later.
Step 2: Painting the Washes
-
Mixing the base tone:
Mix a watery wash of Yellow Ochre with a tiny touch of Burnt Umber. You want a very pale, warm beige color that mimics natural beeswax clarity. -
First random application:
Select random hexagons to fill with this lightest wash. Leave plenty of empty neighbors between them to prevent wet paint from bleeding into adjacent cells. -
Wait for drying:
Allow these first cells to dry completely. This is crucial for maintaining crisp edges between the shapes. -
Mixing a darker tone:
Add a little more pigment to your beige mix to create a slightly deeper, toastier shade. I like to test this on a scrap piece of paper first to ensure the contrast is subtle. -
Filling remaining cells:
Paint the remaining empty hexagons with this slightly darker tone. This variation creates the gentle checkered depth seen in the completed piece. -
Adding gradients:
While some cells are still damp, drop a tiny amount of darker pigment into one corner. Let it bloom naturally to create texture and volume within individual hexagons. -
Final drying time:
Let the entire sheet dry thoroughly. If the paper feels cold to the touch, it is still damp deep down, so give it a few more minutes.
Wet-on-Dry Precision
Use the ‘wet-on-dry’ technique: apply wet paint to completely dry paper. This gives you distinct, hard edges on your hexagons rather than soft, blurry ones.
Step 3: Inking & Finishing
-
Outline preparation:
Prepare your black ink or fine-liner. If using the dip pen shown in the photo, dip and tap off excess ink to ensure a consistent flow. -
Tracing the grid:
Carefully trace over your initial pencil lines. Work from top-left to bottom-right (if you are right-handed) to avoid smudging your fresh ink lines. -
Double-lining:
For added definition, add a second, very thin line just inside or next to the main grid lines on select hexagons. This varying line weight mimics the organic construction of a real hive. -
Cleanup:
Once the ink is fully cured, erase any visible pencil marks that strayed outside the ink lines. -
The reveal:
Peel away the masking tape slowly at a 45-degree angle away from the painting. This reveals the satisfying clean white border that frames your pattern.
Metallic Accent
Mix a small amount of gold mica powder or watercolor into your beige wash. When the light hits the finished piece, certain cells will shimmer like honey.
Enjoy the meditative rhythm of filling these geometric forms as your pattern comes to life.

PENCIL GUIDE
Understanding Pencil Grades from H to B
From first sketch to finished drawing — learn pencil grades, line control, and shading techniques.
Explore the Full Guide
Scallops and Half-Circle Waves

Transform a plain notebook page into a meditative piece of art with this rhythmically satisfying scallop pattern. The high-contrast black ink against white paper creates a modern, geometric look that mimics fish scales or Art Deco waves.
Step-by-Step
Materials
- Spiral-bound notebook with blank or lined pages
- Fine-liner pen (black, size 0.5mm or 0.8mm)
- Pencil (HB or H)
- Ruler
- Compass or circle stencil (optional, for guidelines)
- Eraser
Step 1: Planning the Grid
-
Assess your page:
Open your notebook to a fresh, flat page. If the paper is thin, place a scrap piece of cardstock underneath to prevent ink bleeding through to the next sheet. -
Mark horizontal guides:
Using your ruler and pencil, lightly mark horizontal lines across the page. Space them evenly, about 1 inch (2.5 cm) apart, depending on how large you want your scallops to be. -
Add vertical guides:
Mark vertical tick marks along your first horizontal line to determine the width of each scallop. If your scallops are 1 inch high, make the width roughly 2 inches for a balanced, semi-circle look. -
Create the staggered grid:
On the second horizontal line, place your tick marks exactly in the middle of the marks from the line above. This staggered arrangement is crucial for the interlocking scale effect.
Wobbly Arches?
If your curves are uneven, use a coin or a circle stencil as a physical guide for the first layer, then freehand the inner lines for an organic look.
Step 2: Drawing the Base Pattern
-
Start the first row:
Switch to your black fine-liner. Starting at the bottom left corner, draw your first arch. Start the pen tip on the horizontal line, curve up to touch the line above, and come back down. -
Complete the bottom row:
Continue drawing connected arches across the entire bottom row. Keep your wrist loose to ensure the curves look fluid rather than jagged. -
Begin the second row:
Move to the horizontal guideline above. Start your arch from the peak of the scallop below you. This creates that classic overlapping fish-scale appearance. -
Handle the edges:
When you reach the left or right edge of the paper, draw only a partial arch, letting the line run off the page or stop at the spiral binding naturally. -
Fill the page:
Work your way up the page row by row. I find it helpful to rotate the notebook slightly if my hand starts to cramp or the angle feels awkward.
Pro Tip: Line Variation
Switch to a thicker pen (like a 0.8mm) for the outer arches and a thinner 0.3mm for the inner arches to create instant visual depth.
Step 3: Adding Line Weight and Detail
-
Thicken the initial lines:
Go back over your first set of arches. tracing them a second time to thicken the line weight. This corrects any shaky hand movements from the first pass. -
Create the inner aura:
Draw a second, slightly smaller arch inside every single scallop. Try to keep an even distance—about 2-3mm—between the outer line and this new inner line. -
Connect the corners:
Where the arches meet at the bottom points, ensure your inner lines taper neatly into existing intersections so the pattern looks cohesive. -
Review consistency:
Scan the page for any spots where the ink looks thin or uneven. Touch up the black lines to ensure high contrast against the white paper.
Step 4: Finishing Touches
-
Let the ink cure:
Wait at least 15 to 20 minutes to ensure the ink is completely dry. Fine-liners preserve detail but can smudge if erased too quickly. -
Erase pencil guides:
Gently run your eraser over the entire page to remove the horizontal guidelines and tick marks. Brush away the eraser shavings. -
Final inspection:
Check the very edges near the spiral binding. Sometimes the pen misses distinct spots there, so carefully fill in any gaps for a polished finish.
Enjoy the calming rhythm of your new geometric journal page
Bubbles With Tiny Highlights
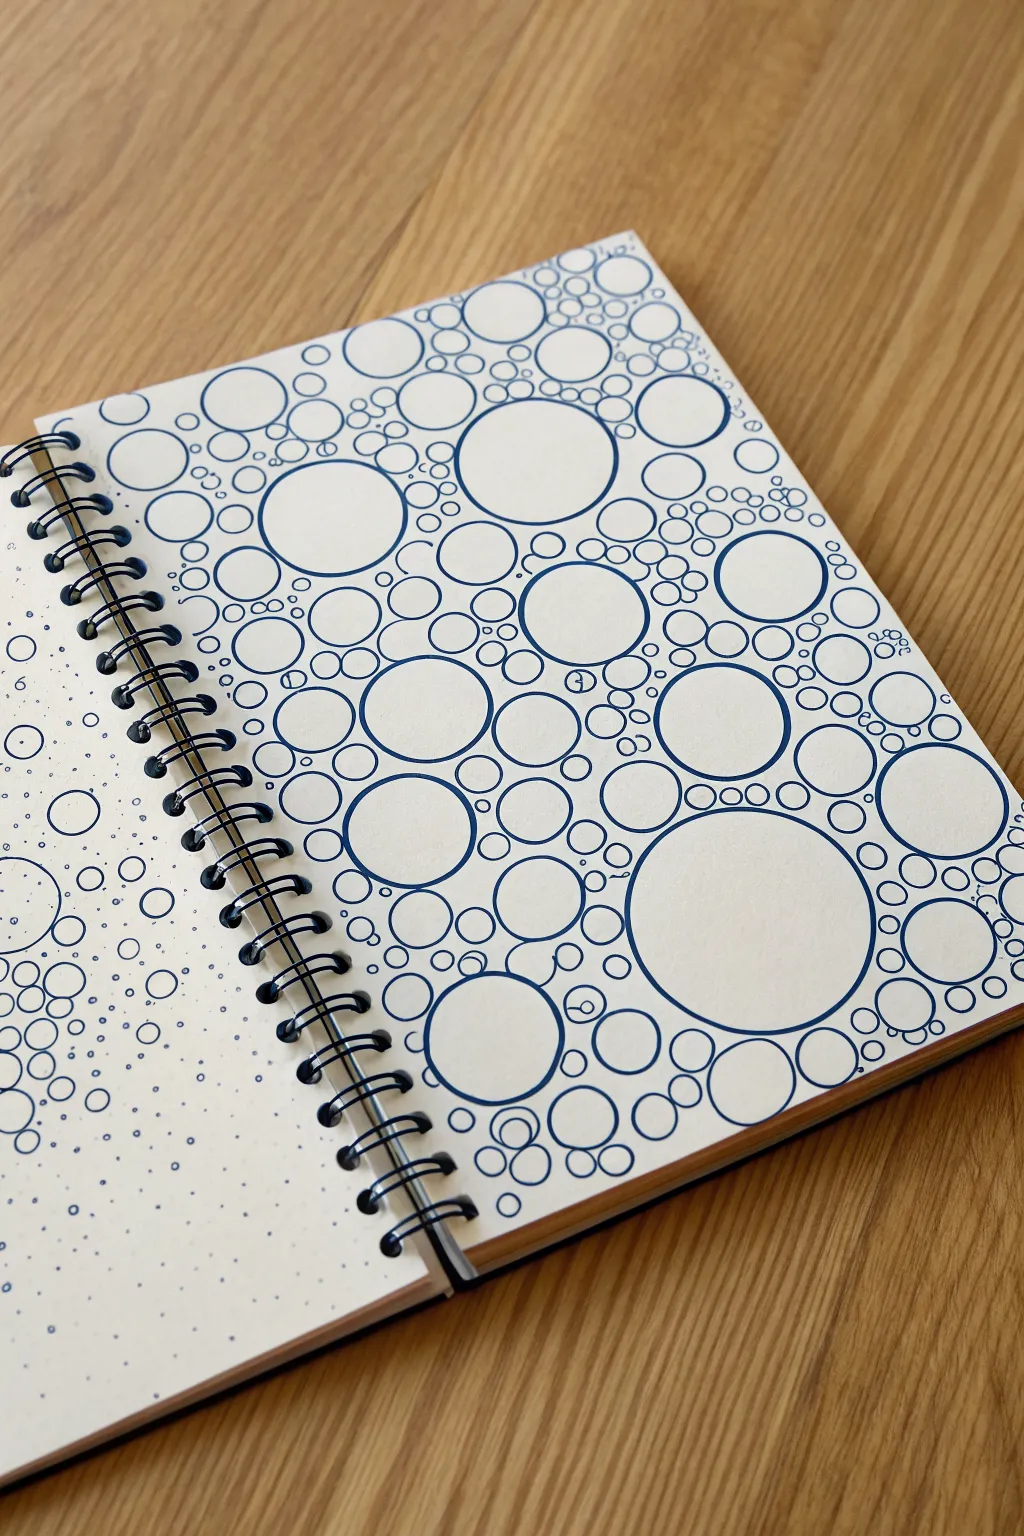
This satisfying pen-and-ink exercise transforms simple circles into a complex, effervescent texture perfect for backgrounds or standalone art. By varying circle sizes and packing them tightly, you create a mesmerizing organic pattern that looks far more intricate than it actually is.
Step-by-Step Guide
Materials
- White sketchbook paper (smooth or mixed media)
- Blue fine liner pen (0.5mm or 0.8mm)
- Thinner blue fine liner pen (0.1mm or 0.2mm)
- Dark blue pigment ink pen (for darker dots)
- Circle stencil (optional but helpful)
- Pencil and eraser (optional)
Step 1: Drafting the Layout
-
Start with the focal points:
Choose a medium-thick blue pen (around 0.5mm). Begin by drawing five or six large circles scattered randomly across the page. These will act as the anchors for your composition, so space them out well. If you aren’t confident with freehand circles, a circle stencil is a great tool here. -
Add medium companions:
Switch to slightly smaller circles and draw them close to the large ones. Try to let them almost touch the edges of the big circles without overlapping the lines. -
Fill the gaps:
Continue adding medium-sized bubbles in the spaces between your initial clusters. Aim for an organic flow rather than a grid-like structure. -
Avoid perfection:
Don’t worry if your circles aren’t perfectly round. The slight wobble in hand-drawn lines adds character and makes the final pattern feel more energetic.
Step 2: Packing the Pattern
-
The packing technique:
Now, start drawing much smaller circles to fill the triangular gaps formed where three larger circles meet. This is the secret to the ‘bubble’ look—no empty space should go unclaimed. -
Vary the line weight:
I like to switch to a slightly thinner pen for some of these filler bubbles. This subtle variation creates depth, making the heavier lines pop forward. -
Edge-to-edge sketching:
Work your way toward the edges of the page. Allow some circles to fall off the edge of the paper for a dynamic, cropped composition look. -
Cluster check:
Step back and look for any large white spaces. If a gap is too small for a circle, leave it; trying to squeeze a tiny dot into every crevice can make the drawing look cluttered rather than cohesive.
Keep it Organic
Rotate your sketchbook occasionally while drawing. This prevents your hand from falling into a repetitive motion and ensures the bubbles don’t accidentally start forming straight rows.
Step 3: Detailing and Texture
-
Highlight planning:
Identify a light source direction (usually top-left or top-right). You can lightly mark a small crescent or dot in each bubble with a pencil to remind you where the shine goes, though freehanding is fine too. -
Adding the ‘glint’:
Using your thinnest pen, draw a very small oval or comma shape inside the bubbles on the side facing your light source. This simple mark instantly transforms flat circles into spheres. -
Micro-detailing:
On the opposite page or in empty areas, you can experiment with stippling. Use the very tip of your pen to create a field of tiny dots that fade from dense to sparse. -
Stippling practice:
Try creating ‘ghost bubbles’ using only dots. Draw a cluster of heavy dots in a circular shape and disperse them outward. This contrasting texture on the facing page balances the solid lines of the main artwork. -
Final assessment:
Scan the main bubble page for any unintentional gaps. You can add tiny rogue bubbles floating freely inside larger open spaces to break up the monotony. -
Clean up:
If you used any pencil guidelines for placement or highlights, wait at least ten minutes for the ink to fully cure, then gently erase them.
Smudge Alert
If you are right-handed, work from left to right across the page (and vice versa) to avoid dragging your hand through wet ink, especially with slower-drying gel pens.
Enjoy the meditative process of watching the page fill up with these buoyant forms


Spirals as a Full-Page Texture
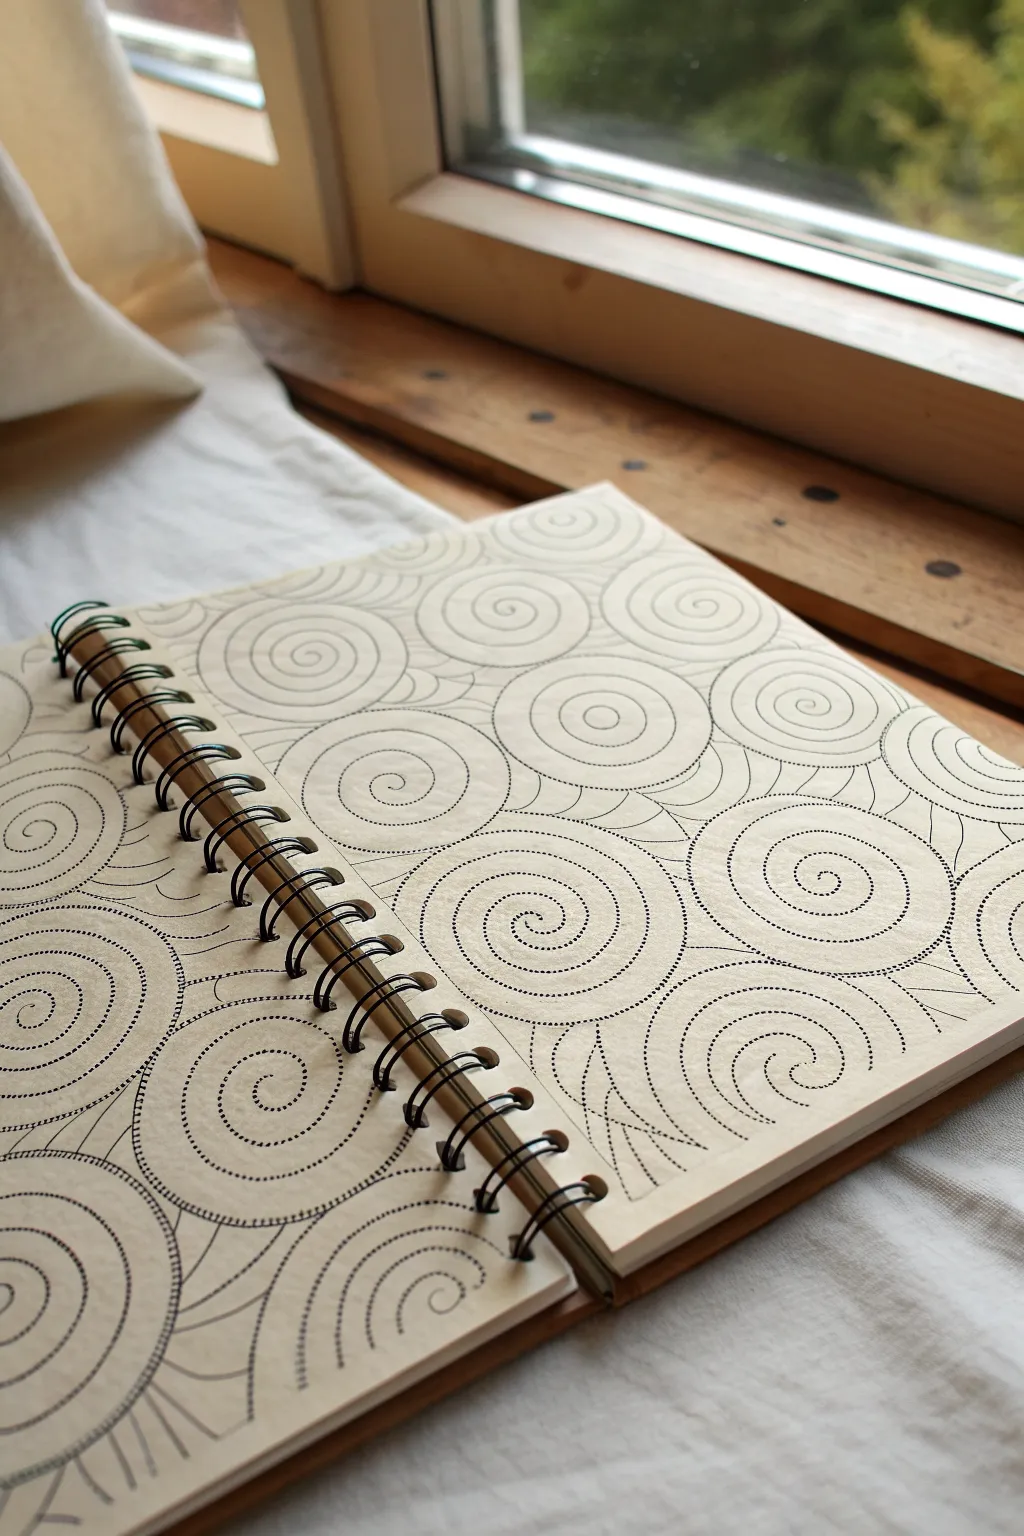
Transform a blank sketchbook page into a mesmerizing sea of texture using nothing but simple spirals and repetitive mark-making. This meditative drawing project creates a stunning full-page pattern that feels organic and intricate, yet relies on the most basic of shapes.
Step-by-Step Tutorial
Materials
- Spiral-bound sketchbook (smooth or mixed media paper recommended)
- Fine liner pen (0.3mm or 0.5mm, black)
- Pencil (HB or 2H for light guidelines)
- Eraser
- Circular stencil or compass (optional)
Step 1: Planning the Layout
-
Observe the page:
Start with a fresh two-page spread in your sketchbook. Visualize a loose grid where your spirals will sit. They don’t need to be perfectly aligned rows; an offset or honeycomb arrangement often looks more natural. -
Draft circle placeholders:
Using a pencil and a very light touch, lightly sketch circles across the page to map out where your main spirals will go. These should touch or nearly touch each other. -
Vary the sizes:
While uniformity is nice, allowing some circles to be slightly larger or smaller adds movement to the composition. Ensure you fill the space all the way to the spiral binding and the outer edges. -
Add filler shapes:
Look for the triangular gaps between your main circles. Sketch small, curved triangular shapes or tiny partial circles in these negative spaces to ensure the pattern feels dense and connected.
Oops! Uneven Spacing?
If your spiral rings got too wide or narrow, don’t erase. Just add an intermediate line of dots between the wide gaps to balance the density.
Step 2: Drawing the Spirals
-
Start the center:
Pick a circle near the center of the page to begin. With your fine liner pen, place a small dot right in the middle of your penciled circle. -
Begin the dotted line:
Instead of drawing a solid line, start creating a spiral moving outward from the center using small, rhythmic dashes or dots. Keep the spacing between dots consistent. -
Maintain gap consistency:
As you spiral outward, try to keep the distance between the ‘rings’ of the spiral roughly equal. This creates that hypnotic optical effect seen in the example. -
Follow the curve:
Continue spiraling until you reach the edge of your penciled guideline. Don’t worry if your hand wobbles slightly; the dotted texture hides imperfections beautifully. -
Repeat the process:
Move to the adjacent circle and repeat the process. I find it relaxing to finish one complete spiral before moving to the next, rather than jumping around.
Step 3: Connecting the Elements
-
Handle the edges:
When you reach the edge of a circle that touches another finished spiral, stop your dotted line just shy of touching the neighbor’s marks. This creates a subtle visual boundary. -
Fill the negative space:
Return to those small triangular gaps between the main spirals. Fill them with curved, echoing lines or smaller partial spirals that hug the contours of the larger circles. -
Check the perimeter:
For spirals that go off the edge of the paper, imagine the center point is off the page and draw only the visible arcs of the spiral. -
Manage the binding:
Draw right up to the spiral binding holes. Let the pattern disappear ‘behind’ the metal coils rather than trying to squeeze distinct shapes into the margins.
Level Up: Depth
Use a thicker pen (0.8mm) for the center dots of each spiral, fading to a 0.1mm pen for the outer rings to create a 3D bulging effect.
Step 4: Refining and Finishing
-
assess density:
Step back and look at the overall texture. If there are awkward white gaps, add a few stray dashes to bridge the visual break. -
Let ink dry:
Give the page a good ten minutes to ensure the ink is completely set. Smudging a full page of work at the last second is heartbreaking. -
Erase guidelines:
Gently erase your initial pencil circles. Be careful not to crinkle the paper, as the heavy ink coverage might make it slightly buckled. -
Flatten the page:
If the paper has curled from the ink, close the sketchbook and place a heavy book on top of it overnight to flatten the spread.
Now you have a stunning, textural backdrop that looks perfect on its own or as a frame for written notes
Wavy Lines for Chill Motion
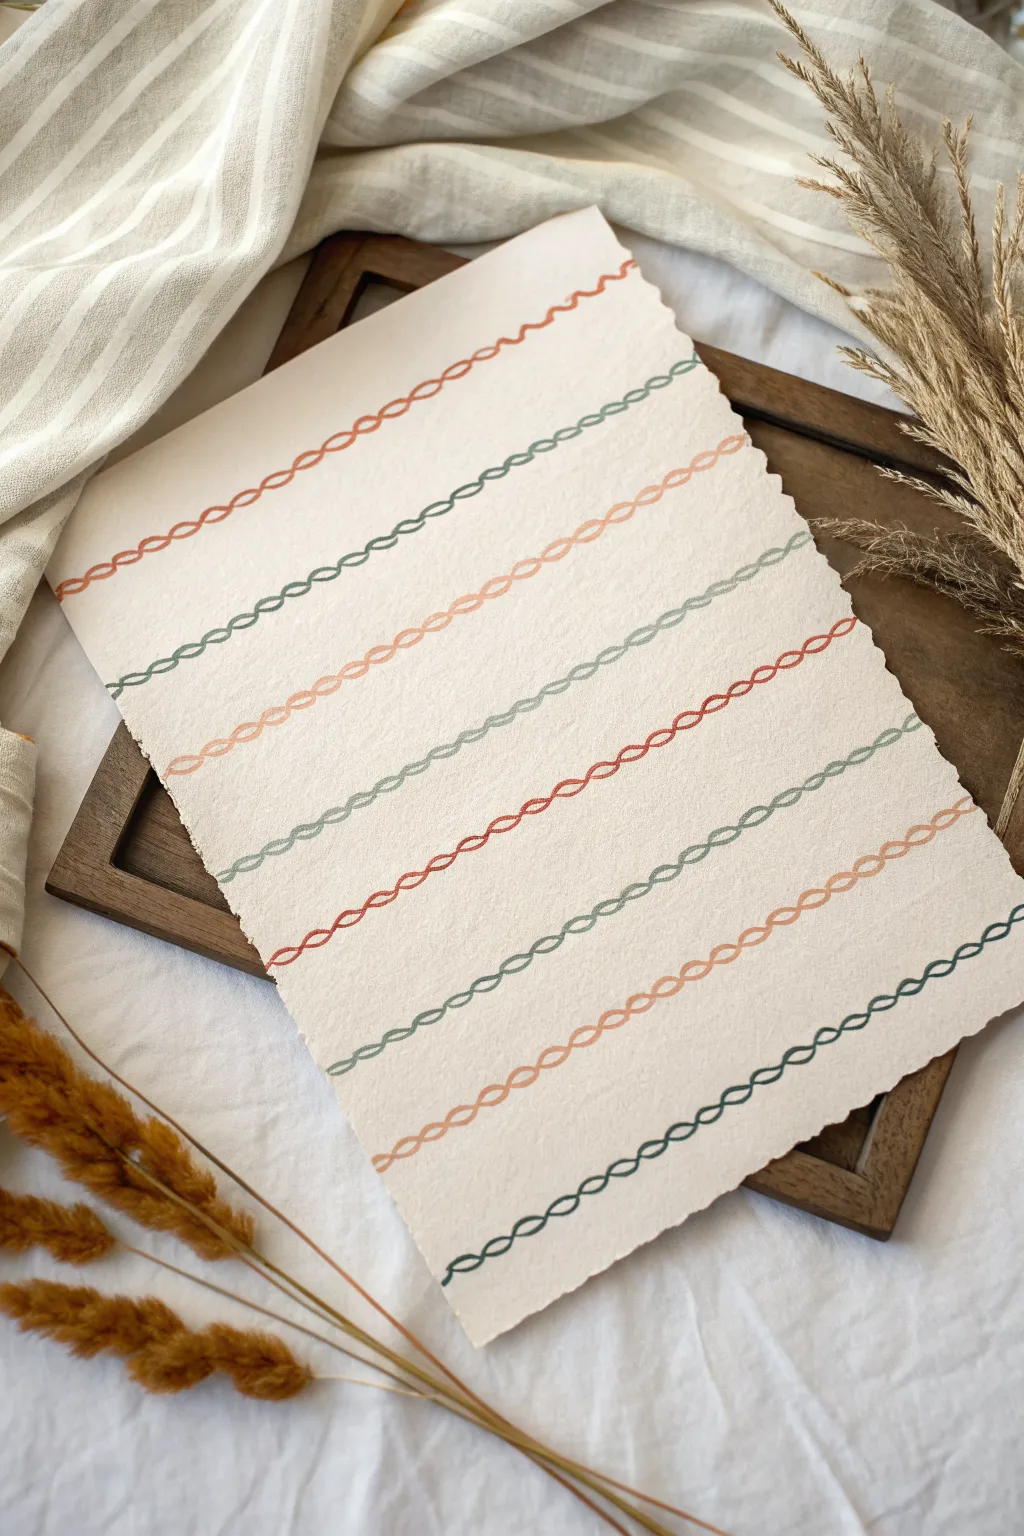
Create a soothing piece of stationery art featuring rhythmic, alternating chains of looped lines. This project embraces the imperfections of drawing by hand on textured paper, resulting in a warm, organic aesthetic perfect for framing or gifting.
How-To Guide
Materials
- Heavyweight textured paper (cold press watercolor or handmade cotton paper)
- Ruler or straight edge
- Light pencil (HB or 2H)
- Fine liner pens or thin markers in a muted palette (terracotta, sage green, pale peach, teal)
- Kneaded eraser
Step 1: Setting the Foundation
-
Selecting your paper:
Start with a high-quality sheet of textured paper. If your paper doesn’t already have deckled edges, you can create a faux-deckle look by carefully tearing the edges against a ruler or using a dedicated deckle-edge ruler. -
Planning the orientation:
Orient your paper vertically. This design relies on evenly spaced horizontal rows, so visualize how many lines you want based on the paper’s height. -
Marking horizontal guides:
Using a ruler and a very light pencil, lightly mark small ticks on the left and right edges of the paper to designate where each line will go. Space them about 1 to 1.5 inches apart. -
Drawing the baselines:
Connect your edge marks with extremely faint pencil lines across the width of the page. These will serve as the center guide for your looped chains, ensuring they don’t wander up or down.
Step 2: Drawing the Loops
-
Choosing your first color:
Pick your first marker color—perhaps the terracotta shade. We will be working from the top down to avoid smudging ink with your hand. -
Understanding the motion:
Practice the motion on a scrap piece of paper first. You are aiming for a continuous, flowing line that loops back on itself, resembling a stretched spring or a series of cursive ‘e’ shapes laid flat. -
Starting the first row:
Begin your first row on the top pencil line. Place your pen tip on the left side and start the looping motion. -
maintaining consistency:
Try to keep the width of each loop fairly consistent, putting the center of the ‘chain’ directly over your pencil guideline. Don’t worry if it wobbles slightly; that adds character. -
Completing the line:
Continue the motion all the way off the right edge of the paper for a seamless look. -
Switching colors:
Select your second color, like the sage green, for the next row down. Ensure there is enough space between rows so the loops don’t touch. -
Varying the palette:
Continue down the page, alternating colors in a repeating pattern. The example uses a four-color rotation: terracotta, green, peach, teal. -
Adjusting pressure:
Keep your hand relaxed. Use an even pressure to maintain a consistent line weight throughout the row. -
Checking spacing:
As you move down the page, visually check that your loops are roughly the same size as the rows above.
Keeping it Straight
Can’t draw a straight line freely? Use a second sheet of thick paper as a guide mask. Place it just below your pencil line and glide your hand along its top edge while drawing the loops.
Step 3: Finishing Touches
-
Drying time:
Let the artwork sit for at least 15 to 20 minutes. Textured paper can hold onto ink a bit longer than smooth paper, and you don’t want smears. -
Erasing guidelines:
Once fully dry, take your kneaded eraser and gently dab or roll it over the pencil lines to lift the graphite without damaging the paper surface. -
Inspect edges:
Check the start and end of your lines. If a line stops abruptly before the edge, carefully extend it just a tiny bit so it looks like it runs off the page. -
Flattening the paper:
If the ink saturation caused any buckling, place the drawing under a heavy book overnight to flatten it out perfectly.
Metallic Accent
Add a touch of elegance by retracing every third loop with a fine-tip gold or copper metallic pen, or draw tiny dots inside each loop for extra texture.
Enjoy the rhythmic simplicity of your new patterned artwork
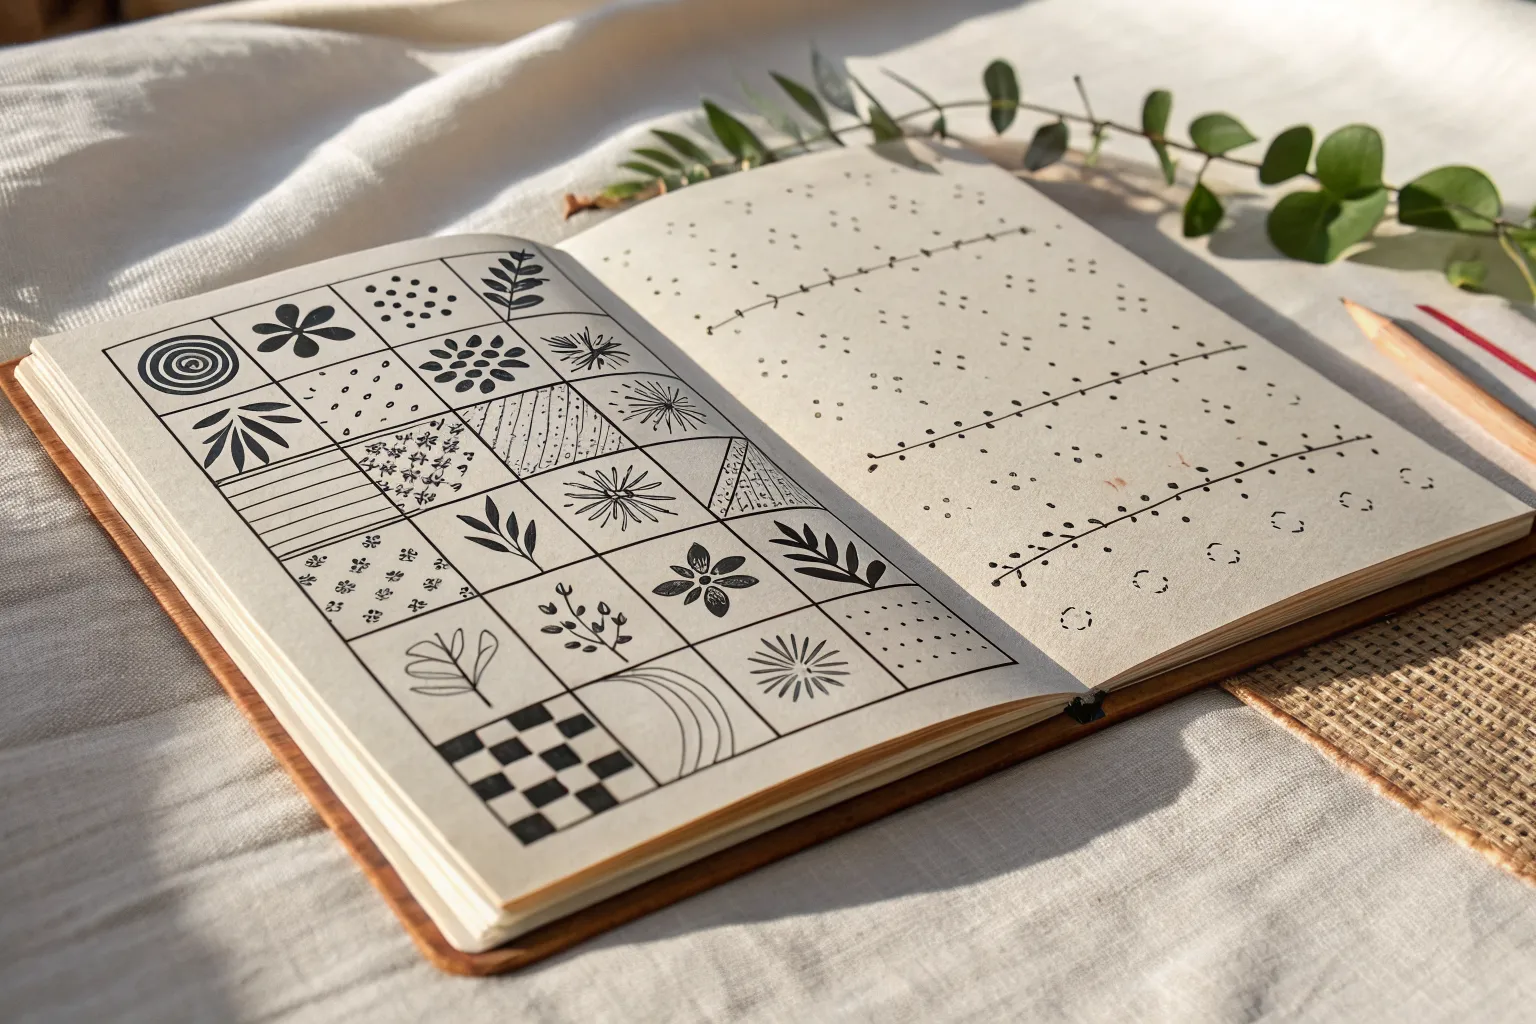
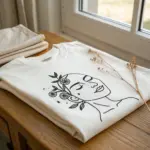
Leafy Vines in Loose Repeat
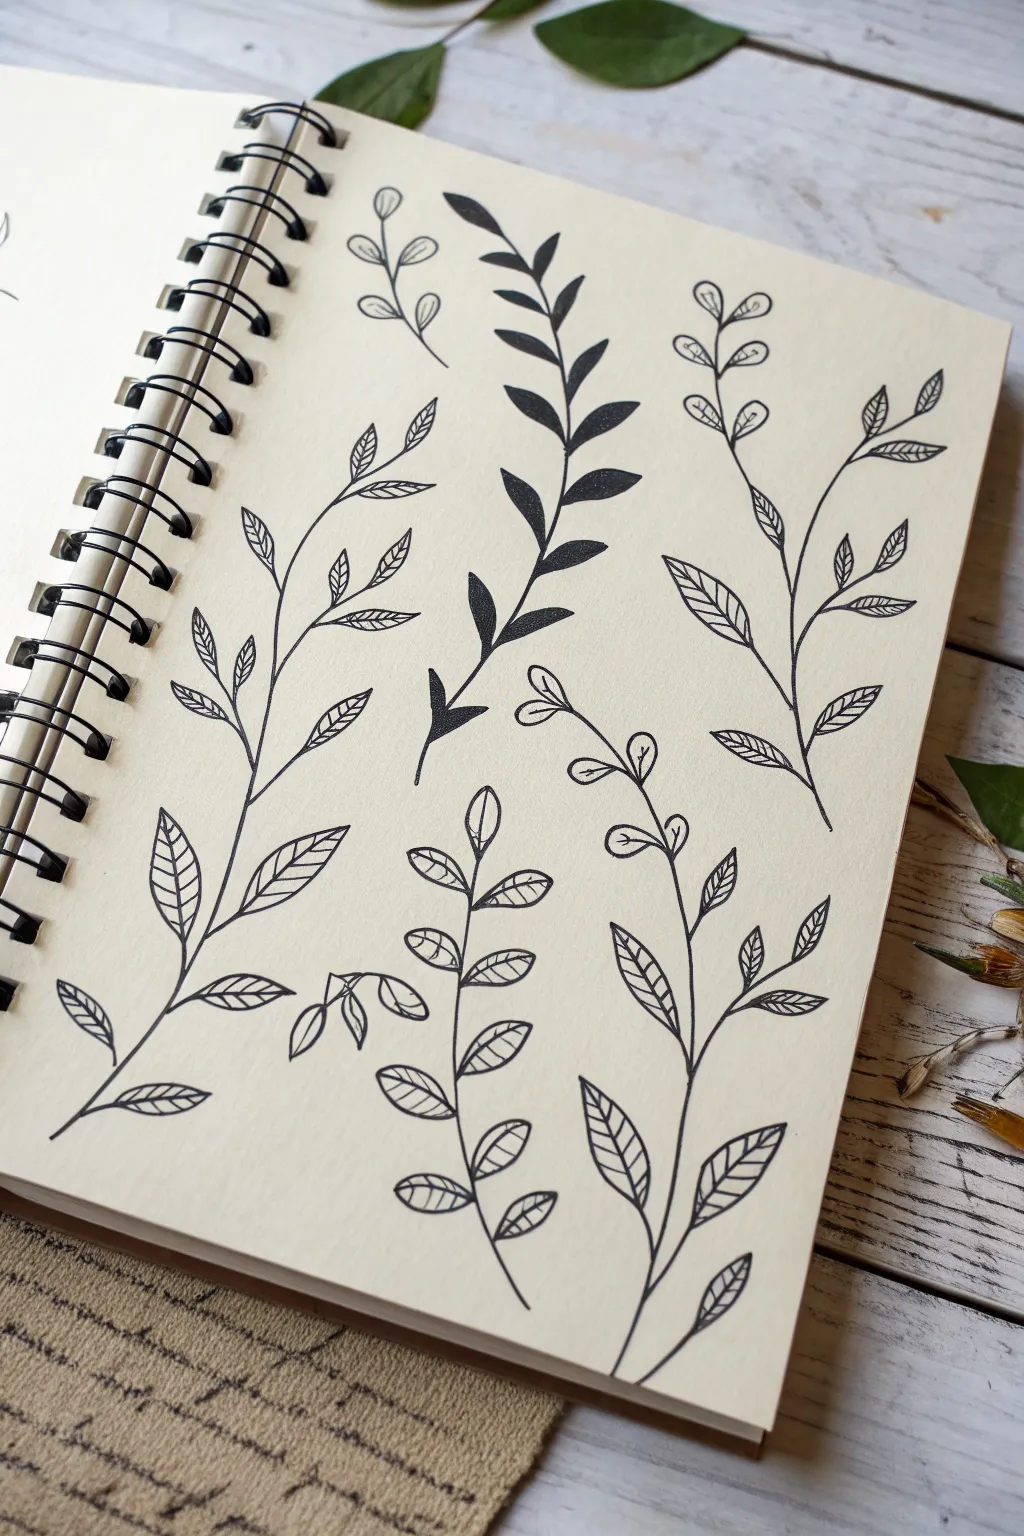
Embrace the relaxing art of doodling with this study of varied vine and leaf shapes. By repeating simple strokes, you create a beautiful, organic pattern that fills the page with life and movement.
Step-by-Step Tutorial
Materials
- Spiral-bound sketchbook (cream or off-white paper)
- Fine liner pen (black, size 03 or 05)
- Brush pen or thicker marker (black, for solid leaves)
- Pencil (optional, for guidelines)
- Eraser
Step 1: Planning the Layout
-
Visualize the spacing:
Before putting ink to paper, look at your blank page and imagine invisible vertical columns. You want to space your vines so they originate from the bottom and grow upward, leaving enough breathing room between them so the leaves don’t tangle messily. -
Sketch the spines:
Using a pencil very lightly, draw gently curving lines starting from the bottom of the page and reaching toward the top. These will be the main stems or ‘spines’ for your vines. Vary the curvature slightly—some straighter, some with an S-curve—to keep it natural.
Step 2: Drawing the Solid Vine
-
Start the center vine:
Focus on the central vine first, which anchors the composition. Using a brush pen or a thicker marker, trace over your central pencil spine to create a bold, dark stem. -
Add alternate leaves:
Starting from the bottom, draw leaves on alternating sides of the stem. For this specific vine, create elongated, pointed oval shapes. -
Fill the leaves:
Instead of outlining, use the brush pen to fill these leaves in completely solid black. This visual weight contrasts beautifully with the delicate line work coming next. -
Taper the tips:
Ensure the tips of these solid leaves are sharp and crisp. You can go back in with a fine liner to refine the points if your brush pen is too blunt.
Smudge Control
Place a scrap piece of paper under your drawing hand. This acts as a shield, preventing oils from your skin from warping the paper and stops you from accidentally smearing wet ink across the page.
Step 3: Creating Use-sketched Vines
-
Draw the left-side stem:
Switch to your fine liner pen (size 03 or 05). To the left of the solid vine, draw a long, slightly wavy stem line from bottom to top. -
Outline the leaves:
Draw medium-sized, lance-shaped leaves (like a classic willow leaf) extending from the stem. Keep these as open outlines. -
Add vein detail:
Inside each leaf outline, draw a central vein line almost to the tip. Then, add diagonal hatching lines on just one side of the leaf to suggest shading and texture without cluttering the design. -
Repeat the pattern:
Continue this pattern up the entire stem, keeping the leaf sizes generally consistent but slightly smaller as you reach the top.
Make It Grow
Don’t stop at black ink! Once the outline is dry, use watercolor or colored pencils to fill only specific leaves (like the rounded ones) for a ‘pop of color’ effect against the monochrome vines.
Step 4: Designing Rounded Leaf Variations
-
Begin the right-side vine:
To the right of the center, draw another vertical stem with your fine liner. This one will feel lighter and airier. -
Draw detailed leaf shapes:
For this vine, draw leaves that are wider at the base and pointed at the tip. These are roughly diamond or teardrop shaped. -
Detail the interiors:
Draw a central line in each leaf, then add symmetrical veins branching out like a feather or fishbone pattern. This create a classic botanical illustration look.
Step 5: Adding Delicate Filler Vines
-
Insert the rounded vine:
In the spaces between the larger vines, we’ll add a different texture. Draw a stem that has more prominent branches coming off it. -
Add circular leaves:
At the end of each small branch, draw small, rounded leaves. Instead of veins, draw a simple line across the middle or a small loop to suggest dimension. -
Create the tiny sprig:
Near the top left, draw a small, floating sprig. Sketches like this don’t have to be rooted at the bottom; floating elements fill empty negative space nicely. -
Draw heart-shaped leaves:
On this small floating sprig, draw small, heart-shaped or clover-like leaves with simple central lines.
Step 6: Refining and Cleaning
-
Check for gaps:
Step back and look at the whole page. If there are large awkward white spaces, add a few stray leaves or a small new branch to balance the composition. -
Thicken connections:
I find that adding a tiny bit of extra ink where the leaf stems meet the main vine adds a nice, organic ‘joint’ look and strengthens the drawing. -
Erase pencil lines:
Wait at least 5-10 minutes to ensure the ink is completely dry. Then, gently erase any visible pencil guidelines to leave a crisp, clean finish.
Now you have a full page of elegant botanical studies ready to be digitized or enjoyed as is
Raindrops and Teardrop Petals
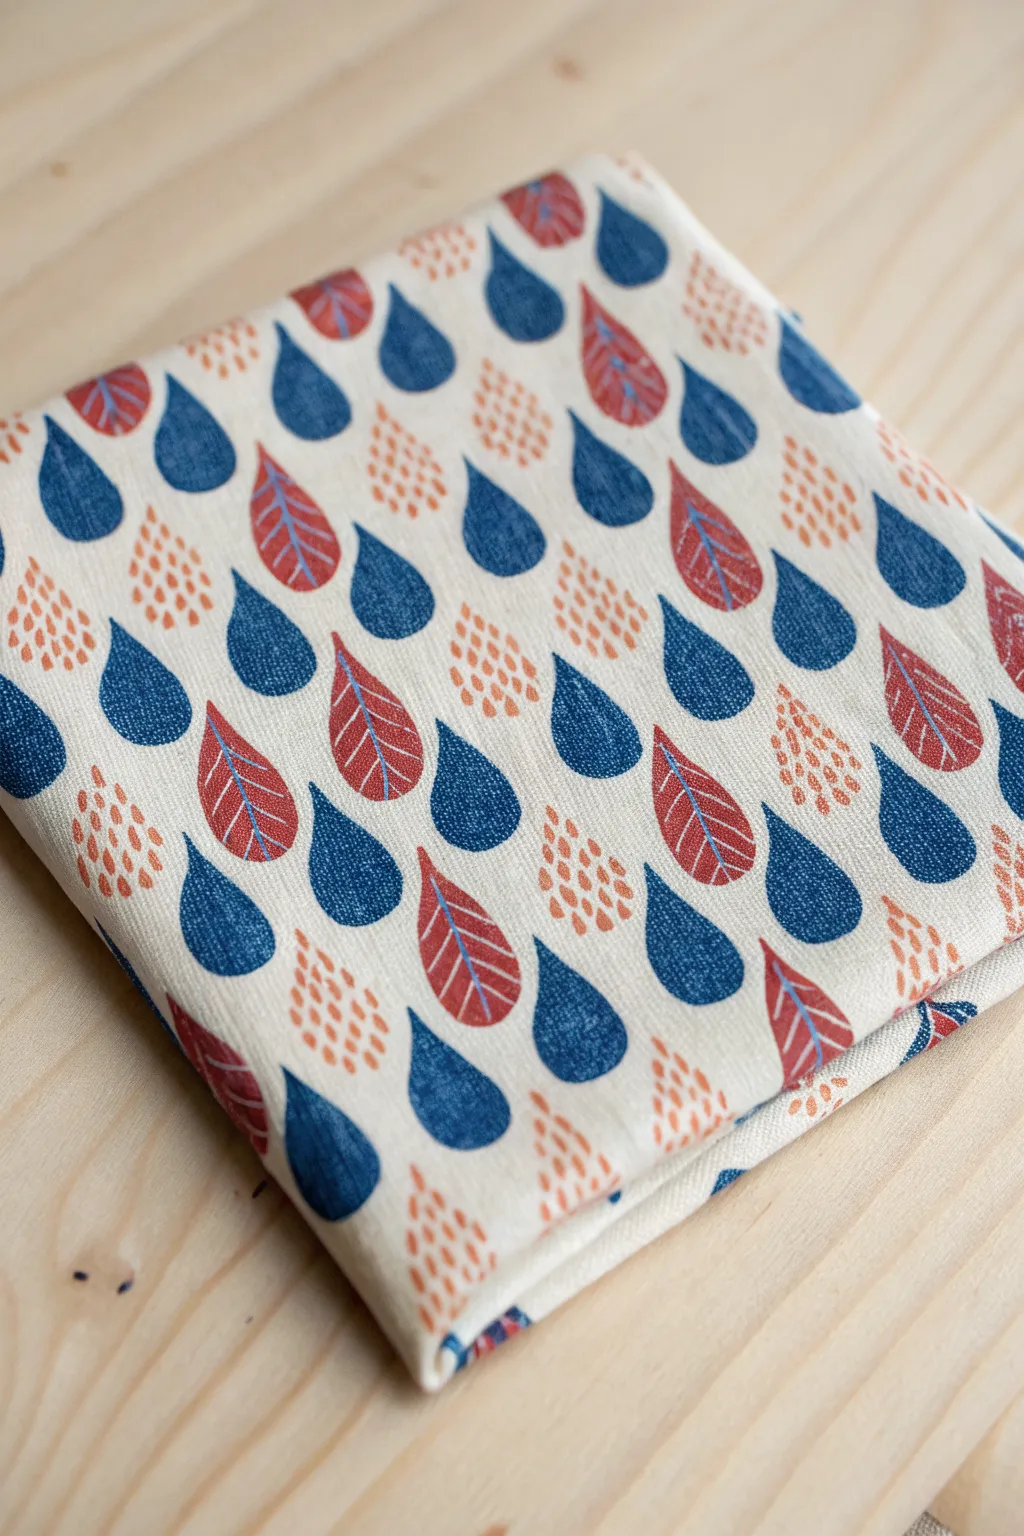
This project transforms plain fabric into a charming textile featuring a repeating pattern of indigo raindrops, veined autumn leaves, and dotted outlines. The motifs create a soothing rhythm that feels both organic and modern, perfect for sewing projects or home decor.
How-To Guide
Materials
- Light-colored cotton or linen fabric (pre-washed)
- Fabric paint or fabric markers (Deep Indigo Blue, Rust/Terracotta, Burnished Orange)
- Small round paintbrush (size 2 or 4)
- Fine-liner fabric pen (Blue or White)
- Pencil or disappearing fabric ink pen
- Teardrop-shaped stencil or cardstock template
- Iron (for heat setting)
- Piece of cardboard (to place under fabric)
Step 1: Preparation & Layout
-
Prepare your workspace:
Lay your pre-washed and ironed fabric flat on a hard surface. Place a piece of cardboard underneath the fabric layer you are working on to prevent any paint bleed-through to the surface below. -
Create a template:
Cut a simple teardrop shape out of cardstock or heavy paper. This should be about 1 to 1.5 inches tall. This will serve as your master guide to ensure consistent sizing for all three motif types. -
Mark the grid:
Using a ruler and a disappearing ink pen, faint mark a staggered grid or diamond pattern on the fabric. The drops are arranged in diagonal rows, so visualize where the center of each drop will sit to keep the spacing even. -
Trace the outlines:
Lightly trace your teardrop template onto the fabric at the designated grid points. Rotate the orientation slightly if you want a more tossed look, or keep them all pointing generally upward for a uniform rain effect.
Clean Edges Trick
If you struggle painting smooth curves freehand, cut the teardrop shape out of freezer paper. Iron the paper shiny-side down onto the fabric to create a temporary stencil.
Step 2: Painting the Motifs
-
Paint the solid blue drops:
Load your round brush with the Deep Indigo Blue fabric paint. Fill in approximately one-third of the traced teardrop shapes. Use smooth strokes to keep the edges crisp and opaque. -
Refine the blue edges:
While the paint is wet, check the pointed top of the drop. I find using just the very tip of the brush helps get that sharp, clean point at the top of the raindrop. -
Create the dotted drops:
Select another third of the traced shapes for the dotted motif. Using a fine-tip brush with Rust or Orange paint, or a fabric marker, apply small stippled dots to fill the teardrop shape without outlining it solid. The dots should suggest the shape through negative space. -
Paint the leaf base:
For the final third of the shapes, fill them in solidly with the Rust/Terracotta paint. These will become the leaves. -
Dry the base layers:
Allow all the painted shapes to dry completely. This is crucial before adding the fine details on top of the leaves to avoid muddying the colors.
Variations
Try reversing the colors for a completely different mood, or use metallic gold paint for the leaf veins to add a subtle shimmering highlight.
Step 3: Adding Details & Finishing
-
Add leaf veins:
Once the terracotta leaves are dry, use a fine blue fabric pen or a very thin brush with the Indigo paint. Draw a central vein line straight down the middle of the leaf shape. -
Detail the leaf structure:
Draw small diagonal offshoot lines from the central vein to create the skeletal structure of the leaf. Keep these lines delicate for a refined look. -
Review the pattern:
Step back and look at the overall distribution. If there are large empty gaps, you can add partial drops or dots on the edges to make the fabric look like a continuous yardage print. -
Texture check:
If using fabric paint, ensure the indigo drops are fully opaque. If they look streaky, apply a second thin coat of blue for that deep, saturated denim look. -
Heat set the design:
Once the fabric is 100% dry (usually 24 hours is best), follow the manufacturer’s instructions for your specific paint. Typically, this involves ironing the back side of the fabric on a medium-high setting for several minutes. -
Wash and fluff:
After heat setting, you can gently wash the fabric to remove any stencil marks and soften the hand of the painted areas.
Now your custom-printed fabric is ready to be sewn into a unique tote bag or throw pillow
Brickwork and Stacked Blocks
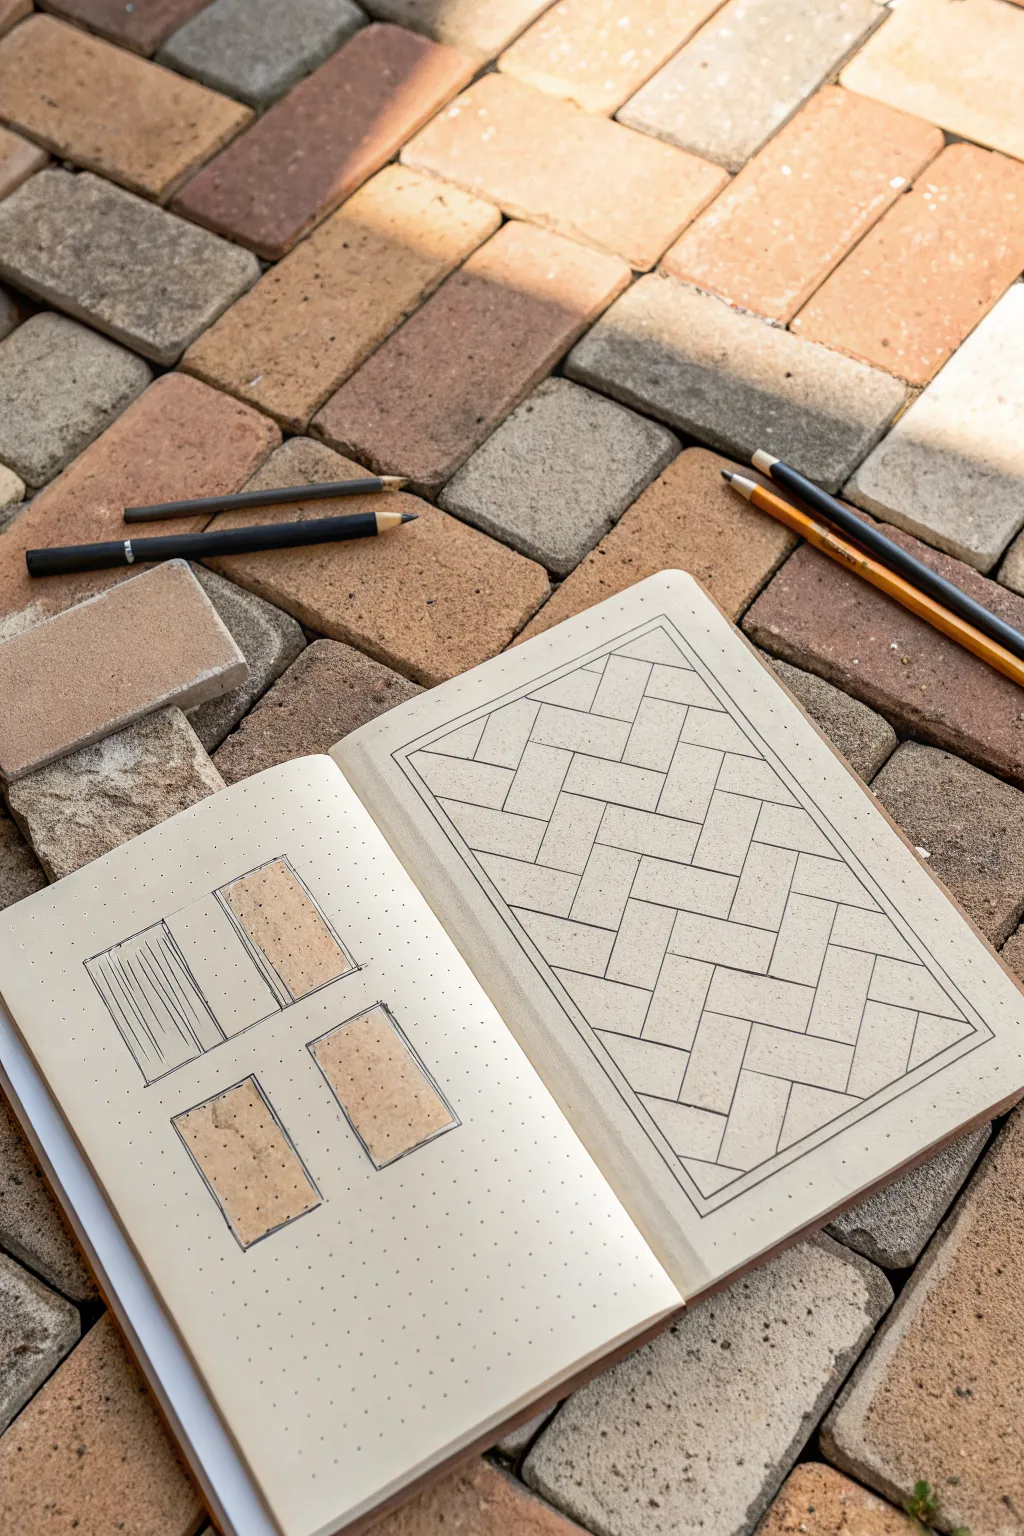
Capture the geometric beauty of masonry with this detailed pencil study in a dot grid journal. You’ll create both isolated texture samples and a complex herringbone paving pattern, learning to build structure and depth with graphite.
Step-by-Step Guide
Materials
- Dot grid notebook or sketchbook
- Graphite pencils (HB, 2B, and 4B)
- Ruler or straight edge
- Fine-liner pen (optional for final outlines)
- Eraser (kneaded preferred)
- Blending stump or cotton swab
Step 1: Drafting the Left Page Studies
-
Define the boundaries:
On the left page, lightly mark out three rectangular boxes using your ruler. Place one near the top left, one near the top right, and one centered below them. These will frame your texture experiments. -
Sketch the first brick:
In the top-left box, draw a simple rectangle to represent a single paver. Keep your lines light at this stage so adjustments are easy. -
Add linear texture:
Fill this first brick with closely spaced vertical lines to mimic the striations often found in wire-cut bricks. Vary the pressure slightly to create a natural, imperfect look. -
Outline the texture blocks:
For the other two boxes, draw identical rectangles. These will focus on surface grain rather than linear patterns. -
Stipple for grain:
Using a softer pencil like a 2B, gently stipple and scumble the interior of these two bricks. Focus on creating a sandy, speckled texture that mimics concrete or sandstone. -
Reinforce the edges:
Go back over the outlines of your three study boxes with firmer pressure or a darker pencil to make them pop against the dots.
Step 2: Constructing the Herringbone Pattern
-
Set the main frame:
On the right page, draw a large rectangle that fills most of the page, leaving a generous margin. Inside this, draw a second, smaller rectangle about a half-inch inward to create a double border. -
Establish the 45-degree angle:
Herringbone relies on a diagonal grid. Lightly draw a reference line at a 45-degree angle across the center of your inner frame using the journal’s dots as a guide. -
Mark the brick width:
Determine the width of your bricks (e.g., two dot spaces). Draw parallel diagonal lines across the whole frame at this specific interval. -
Create the zig-zag:
Perpendicular to your first set of lines, begin marking off the lengths of the bricks. The pattern interlocks, so the end of one brick should hit the side of the next at a right angle. -
Draw the individual pavers:
Darken the segment lines to form the distinct rectangular brick shapes. Follow the zig-zag formation carefully: one brick goes ‘up-right’, the next goes ‘up-left’. -
Fill the field:
Continue this pattern until the entire inner rectangle is filled. Where the pattern hits the border, simply truncate the brick shapes to create a clean, cropped edge. -
Clean up the grid:
Erase any of the initial long construction lines that run through the bricks, leaving only the individual block outlines.
Grid Misalignment?
If your pattern starts drifting, pause and count the journal dots. Re-verify your 45-degree angle every few rows to ensure the diagonal axis remains perfectly straight.
Step 3: Refining and Shading
-
Darken the border:
Trace over the double-line border with a heavy hand or a 4B pencil to create a strong frame for your artwork. -
Add texture to the herringbone:
Select random bricks within the pattern and add subtle stippling spots. Don’t texture every single brick; leaving some blank creates visual breathing room. -
Color blocking (optional):
If you want the look of the reference image, lightly shade some of the bricks on the left page with a warm beige pencil or smudged graphite to suggest a clay color. -
Final polish:
Check for any smudges outside the borders and erase them. I find a quick pass with a kneaded eraser lifts stray graphite dust without damaging the paper tooth.
Add Realism
To make the bricks look aged, round off a few sharp corners slightly and add tiny cracks to random pavers. Uneven line weight makes it look more organic.
Now you have a precise architectural study that celebrates simple materials
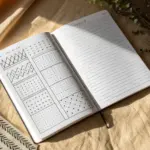
Hatching, Crosshatching, and Bands
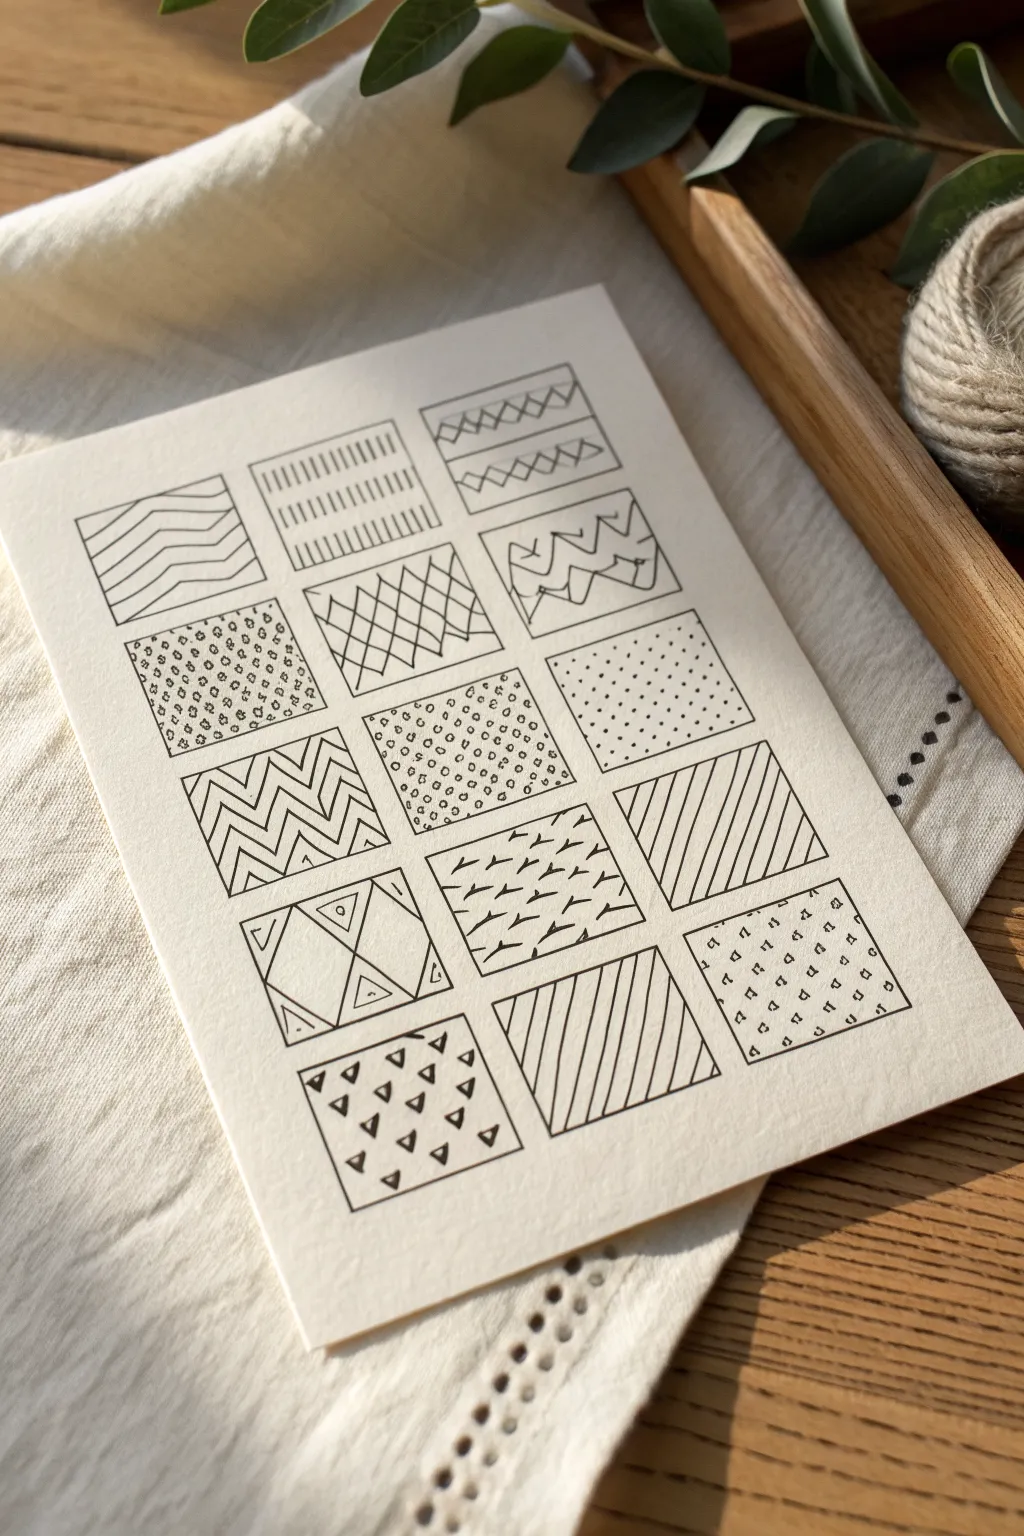
This minimalist pattern study is the perfect exercise for relaxing and sharpening your steady hand. You will create a neat grid of fifteen distinct texture squares, exploring variations of zigzags, hatching, and geometric shapes in striking black ink.
Step-by-Step
Materials
- High-quality cream or off-white cardstock (A5 or 5×7 inch)
- Fine-point black drawing pen (0.3mm or 0.5mm)
- Pencil (HB or 2H)
- Ruler
- Eraser
Step 1: Setting the Grid
-
Measure margins:
Begin by lightly marking a uniform margin around the edges of your cardstock using your pencil. A 1-inch border usually frames the artwork nicely. -
Calculate square sizes:
Divide the interior space to accommodate a grid of 3 columns and 5 rows. Aim for squares that are roughly 1 to 1.5 inches in size, leaving a small gap (about 1/4 inch) between each one for breathing room. -
Draw the grid:
Use your ruler to lightly sketch the fifteen square outlines in pencil. Keep these lines very faint, as they serve only as boundaries for your ink patterns and will be erased later.
Ink Smearing?
If you erase too soon, ink will streak gray across your cream paper. Test dryness by lightly tapping the densest patterns with a clean finger before erasing.
Step 2: Linear Patterns
-
Draw simple zigzags:
In the top-left square, draw a series of horizontal zigzag lines. Try to keep the angles consistent, but allow natural hand-drawn variations to soften the look. -
Create vertical hatching:
Move to the next square. Fill it with vertical lines, but break them into horizontal bands. Draw a band of short vertical strokes, then another band below it, repeating until the square is full. -
Double cross-hatching:
For the third square, draw a series of X shapes stacked in horizontal rows. Add horizontal lines above and below each row of Xs to create a banded geometric effect. -
Sketch jagged waves:
In the second row, far right, draw irregular, jagged zigzag lines that intersect slightly or vary in height, creating a more chaotic, electric wave pattern. -
Form diagonal stripes:
Jump to the third row, far right. Fill this box with simple, evenly spaced diagonal lines running from bottom-left to top-right. Keep your pressure even.
Steady Hands
Don’t lock your wrist. For straighter long lines (like the diagonals), move your entire arm from the elbow rather than just flicking your wrist.
Step 3: Geometric & Shape Fills
-
Stipple texture:
In the second row, far left, fill the square with tiny, irregular circles or ‘pebbles’. Vary their sizes slightly and cluster them densely for a rich texture. -
Intersecting diamond grid:
For the second square in the second row, draw diagonal lines in one direction, then cross them in the other direction to form a diamond lattice work. -
Regular dot grid:
Beside the jagged waves, fill the square with a orderly grid of small dots. I find it helps to do one horizontal row at a time to keep the spacing consistent. -
Small circles:
In the center square of the grid, draw rows of small, open circles. Let them touch slightly or float near each other, creating a bubbly texture. -
Chevron stacks:
In the third row, far left, draw bold chevron lines (inverted Vs). Create a nested effect by drawing lines parallel to the main chevrons.
Step 4: Detailed Motifs
-
Y-shaped sprigs:
In the center square of the fourth row, draw rows of small ‘Y’ shapes or flying bird silhouettes. Alternate the direction or spacing slightly for visual interest. -
Large triangles:
To the left of the sprigs, draw two large X shapes to divide the box into triangles. Add smaller triangles inside these spaces to create a geometric, almost structural stained-glass look. -
Opposing diagonals:
In the center square of the bottom row, fill the box with diagonal lines running top-left to bottom-right (opposite to your earlier diagonal square) to create contrast on the page. -
Tiny geometric confetti:
For the square to the right of the opposing diagonals, sprinkle tiny geometric shapes like diamonds, triangles, and angled lines loosely throughout the space. -
Solid triangles:
Finally, in the bottom-left corner, draw a grid of small triangles. Darken every other triangle or selected ones to add visual weight and anchor the bottom of the composition.
Step 5: Finishing Touches
-
Clean borders:
Once all patterns are inked, re-trace the square outlines with your pen if you want a crisp box, or leave them open for a lighter look. The example uses crisp black borders. -
Erase guidelines:
Wait at least 10-15 minutes to ensure the ink is completely dry. Gently erase all pencil grid lines and margin marks to reveal your clean, high-contrast sampler.
Display your pattern sampler on a desk easel or frame it as a testament to your patience and precision
Stippling Gradients as Pattern Fill
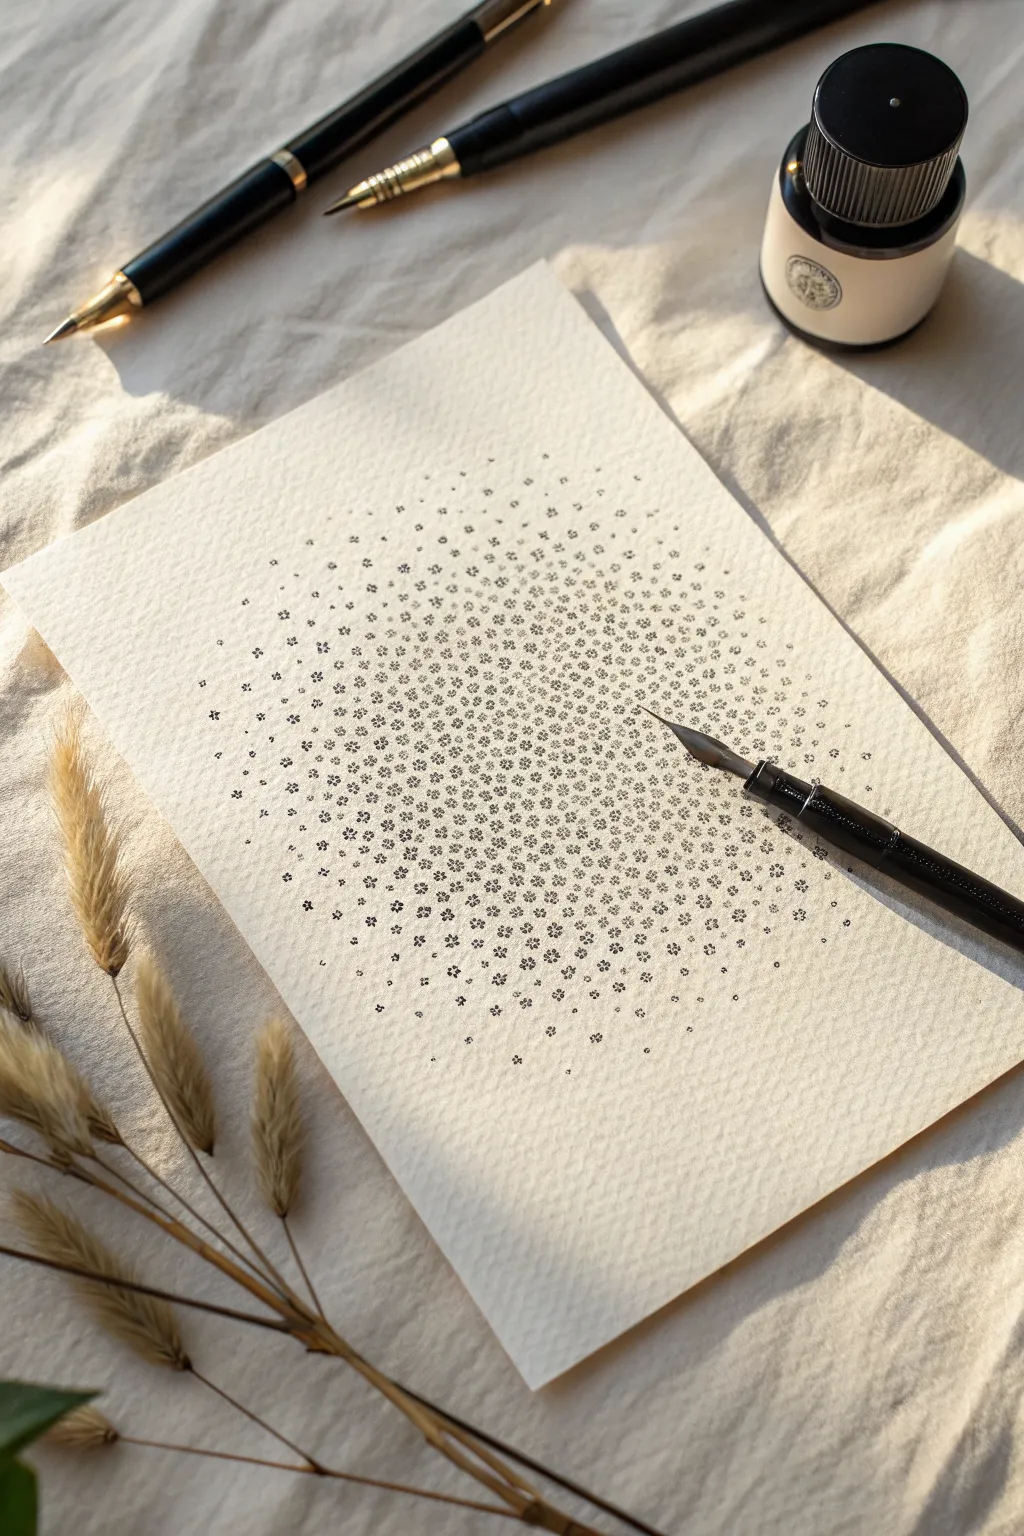
This meditative ink project creates a soft, radiating sphere using thousands of tiny, repetitive marks. By varying the density of delicate flower-like dots, you can build a captivating gradient that feels organic and airy.
Detailed Instructions
Materials
- High-quality textured watercolor paper or bristol board
- Dip pen holder
- Fine nib (mapping nib or hawk quill)
- Black drawing ink (waterproof, India ink, or acrylic ink)
- Pencil (H or HB)
- Compass or circular object for tracing
- Kneaded eraser
- Paper towel or cloth
Step 1: Preparation and Mapping
-
Prepare your workspace:
Clear a flat, stable surface with good lighting. Place your paper, ink, and pen within easy reach. Keep a scratch sheet of paper nearby to test your ink flow periodically. -
Define the boundary:
Use a compass or trace around a circular object to lightly draw a perfect circle in the center of your paper. This will serve as the outer limit for your gradient. -
Mark the center:
Lightly mark the absolute center of your circle with a small dot. This reference point helps you maintain the density gradient later. -
Soften the guidelines:
Take your kneaded eraser and gently roll it over the pencil circle. You want the line to be barely visible—just a faint guide that won’t show through the finished ink work.
Step 2: Establishing the Core
-
Load your nib:
Dip your pen nib into the ink bottle, submerging it just enough to cover the breather hole. Tap the excess ink gently against the bottle’s inner rim. -
Practice your motif:
On your scratch paper, practice making tiny five-point clusters. These aren’t perfect flowers, just five or six quick dots arranged closely together to suggest a floral shape. -
Begin at the center:
Start placing your dot ‘flowers’ right at the center mark. Cluster them tightly together, allowing very little white space between the motifs. -
Build the core density:
Work outward from the center in a small radius, maintaining a very high density. The ink marks should almost touch, creating a dark, solid-looking focal point. -
Rotate the paper:
To keep the circle even, rotate your paper frequently as you work. This prevents the pattern from skewing to one side due to your hand’s natural arc.
Ink blotting?
If the pen drops a blob of ink, don’t wipe it! Let it dry completely, then turn it into a larger flower cluster or a dark focal point in the pattern.
Step 3: Creating the Gradient
-
Expand the radius:
Begin to move further out from the dense core. As you do, slightly increase the space between each flower motif. -
Vary the motif size:
Occasionally mix in smaller single dots or three-dot clusters among the five-dot flowers. This irregularity makes the dispersion look more natural and organic. -
Manage ink flow:
Dip your pen frequently. A dry nib produces faint, scratching lines, while a freshly dipped nib makes bold, dark marks. Try to distribute these variations evenly so no section looks accidentally faded. -
Review the transition:
Pause and step back or squint at the drawing. You should see a smooth transition from the dark center to a medium-density middle ring. Fill in any obvious bald spots. -
Feather the edges:
As you approach the outer pencil guideline, spacing should become sparse. Place one flower here, another there, leaving significant white space.
Add some sparkle
Mix a small amount of metallic gold mica powder into your black ink, or accent the center dots with a gold gel pen for a hidden shimmer.
Step 4: Finishing Touches
-
Break the boundary:
Don’t stop rigidly at the pencil line. Place a few stray dots or tiny flowers just outside the circle’s edge to create a drifting, ethereal effect. -
Dry thoroughly:
Let the ink dry completely. Ink can pool in the tiny divots of textured paper, so I usually wait at least 30 minutes to be safe. -
Erase guidelines:
Once the ink is bone dry, gently erase any remaining pencil marks with the kneaded eraser. Be careful not to scrub too hard over the inked areas. -
Assess contrast:
One final check: if the center doesn’t look dark enough compared to the edges, add a second layer of dots right in the middle to deepen the gradient.
Now you have a serene, detailed piece of art that celebrates the beauty of patience and simple repetition
Negative Space Pop-In Shapes
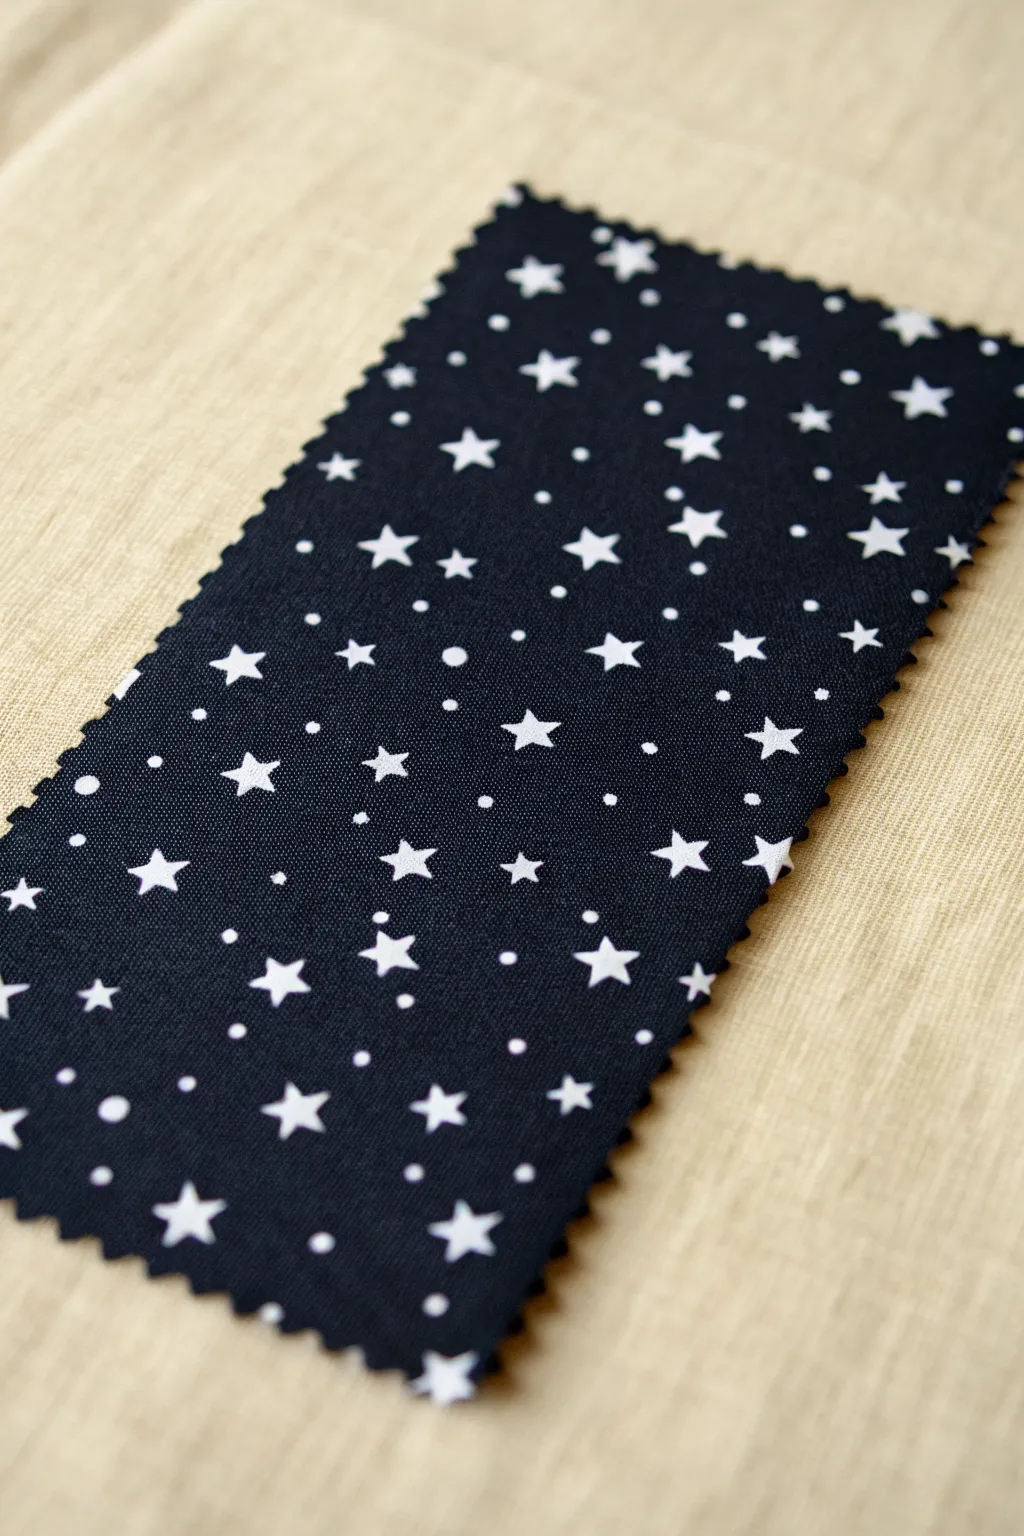
Create your own celestial textile design using simple block printing or screen printing techniques to achieve crisp white stars against a deep midnight background. This project focuses on utilizing negative space to make the starry pattern pop against the dark fabric.
How-To Guide
Materials
- Cotton fabric (white or natural)
- Fabric paint or ink (Midnight Blue or Black)
- Screen printing kit OR linoleum block & carving tools
- Brayer (rubber roller)
- Pinking shears
- Iron (for heat setting)
- Scrap paper or cardboard
- Masking tape
Step 1: Design Preparation
-
Sketch the pattern:
Start by sketching a repeating star pattern on paper. Include a mix of traditional five-point stars in varying sizes and small dots to represent distant stars. -
Plan the negative space:
Since we want the stars to remain the color of the fabric (white/natural), you will be carving away the background if using linocut, or masking out the stars if using screen printing. The ink will cover the ‘sky,’ leaving the stars unpainted. -
Transfer the design:
Transfer your star cluster design onto your linoleum block or trace it onto your screen printing mesh using a pencil or marker suitable for the surface.
Ink Blotching?
If ink bleeds into your star shapes, you are likely using too much ink on the brayer. Roll it out longer on the palette until it sounds like hook-and-loop fastener separating.
Step 2: Creating the Tool
-
Carve the relief (Block Print Method):
If using a linoleum block, carefully carve away the star shapes and the small dots. Remember, whatever you carve away will remain white. Leave the background raised and intact to catch the ink. -
Prepare the screen (Screen Print Method):
If screen printing, use drawing fluid to paint over the stars and dots on the screen. Once dry, coat the screen with screen filler. Wash out the drawing fluid to reveal the open mesh where the stars are, then reverse the thinking: you actually want the background open and stars blocked for a negative print, or simply print dark ink on light fabric. -
Refine the edges:
Check your block or screen for stray bits. In a negative space design, clean edges on the stars are crucial for that sharp ‘pop-in’ look.
Sharper Zigzags
When using pinking shears, cut near the back of the blades (closest to the handle) rather than the tips. This gives more leverage and prevents the fabric from chewing.
Step 3: Printing Process
-
Prepare the fabric:
Lay your white or natural cotton fabric on a flat, protected surface. Tape down the corners to prevent shifting. I find placing a piece of cardboard underneath helps achieve a crisper print. -
Ink the tool:
Squeeze a line of midnight blue or black fabric ink onto a palette or glass pane. Roll your brayer back and forth until the ink sounds ‘sticky’ and has an even texture. -
Test print:
Always do a test print on a scrap piece of similar fabric. This helps you gauge how much pressure is needed and if your negative spaces (the stars) are staying clean. -
Apply the print:
Press your inked block firmly onto the fabric, or pull your squeegee across the screen. Ensure even pressure to get a solid, dark background color. -
Repeat the pattern:
Re-ink and align your tool to repeat the pattern across the fabric. Don’t worry about perfect alignment; a little irregularity adds to the hand-printed charm.
Step 4: Finishing Touches
-
Dry completely:
Allow the fabric paint to air dry completely. This usually takes 24 hours, depending on the thickness of the ink application. -
Heat set the ink:
Once dry, iron the reverse side of the fabric on a cotton setting (no steam) for 3-5 minutes. This locks the pigment into the fibers so it becomes washable. -
Cut the swatch:
Measure out the final rectangle size you want for your project or swatch. -
Create zigzag edges:
Use pinking shears to cut along your measured lines. Line up the V-shape of the shears with the previous cut as you move forward to keep a continuous zigzag pattern. -
Clean up threads:
Trim any loose threads that may have frayed during the cutting process to give it that professional sample look.
Now you have a custom celestial fabric swatch ready to be sewn into a larger project or displayed as a design sample
Mandala Rings as Pattern Swatches
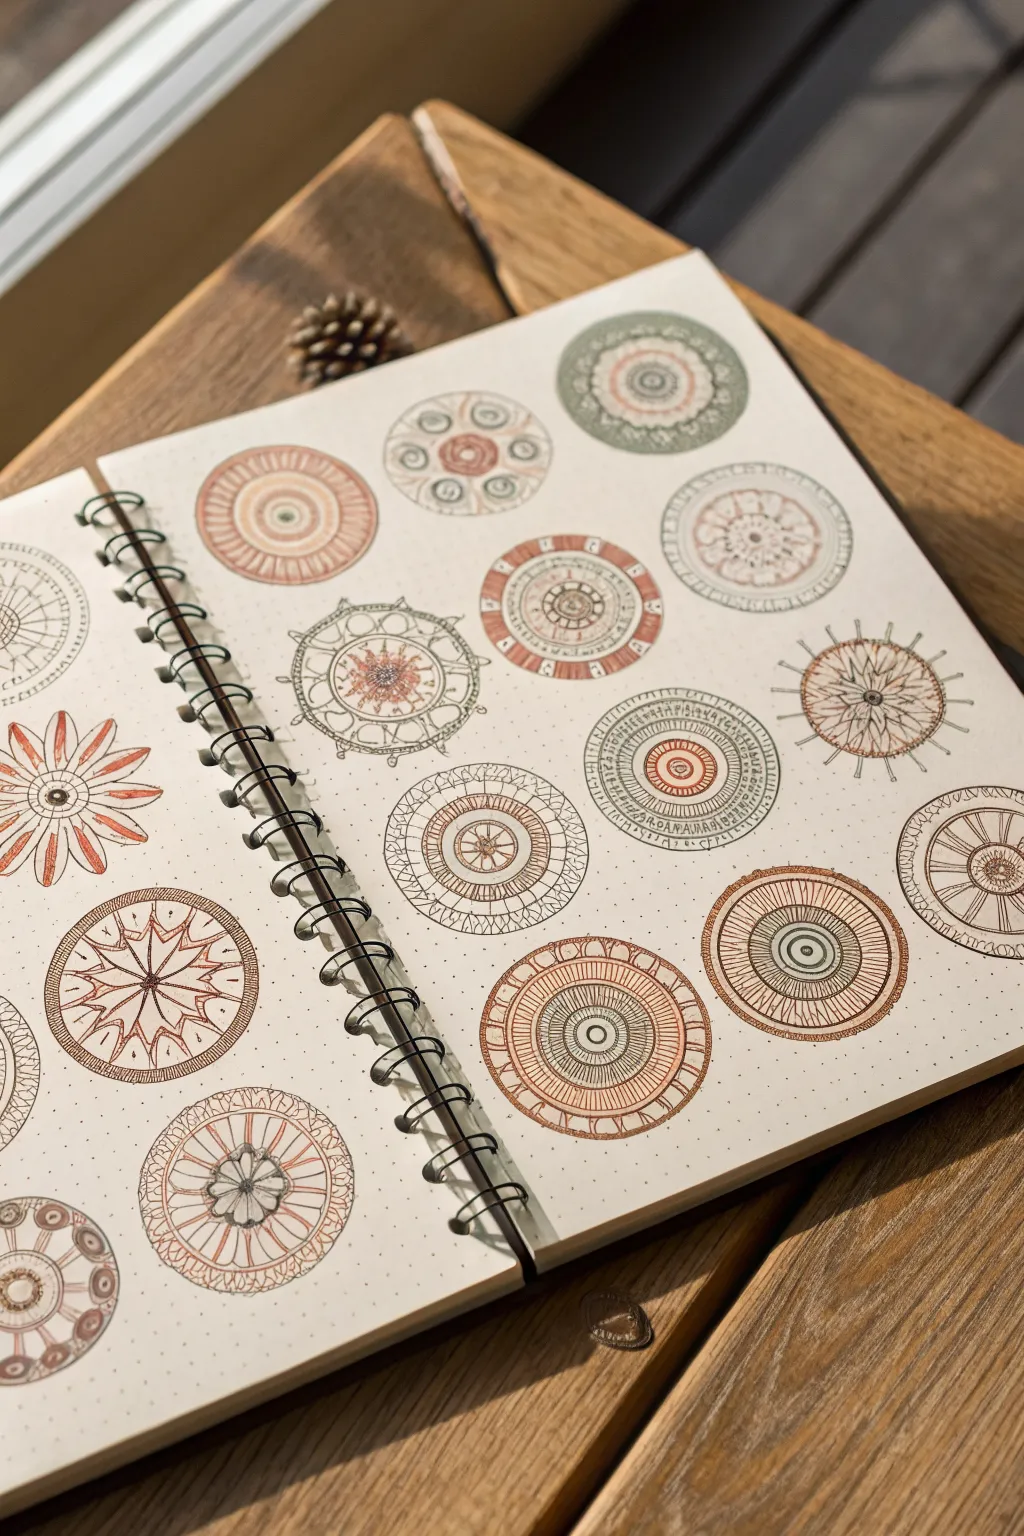
This project transforms a simple sketchbook page into a stunning library of circular motifs, mixing the structure of mandalas with the freedom of organic doodling. Using a warm, earthy color palette, you’ll create a series of unique, disconnected round designs that look like ancient coins or ceramic tiles.
Step-by-Step Tutorial
Materials
- Dot grid journal or sketchbook (spiral bound preferred)
- Fine liner pens (sizes 0.1, 0.3, and 0.5)
- Circle stencil or compass
- Pencil (HB or 2H)
- Eraser
- Colored pencils or fine tip markers (Terracotta, Sage Green, Warm Grey, Black)
- Ruler
Step 1: Planning the Layout
-
Establish the Grid:
Begin by deciding on the placement of your circles. To achieve the balanced look in the photo, aim for a staggered grid layout rather than perfect rows. Use your dot grid paper as a guide to space them evenly. -
Draft the Skeletons:
Using a pencil and your compass or circle stencil, lightly draw the outer boundaries of about 12-15 circles across the double-page spread. Vary the sizes slightly, but keep them generally uniform, around 1.5 to 2 inches in diameter. -
Mark Center Points:
For each circle, lightly mark the center point. This is crucial for symmetry. If you want concentric rings, lightly sketch those internal circles now as well so you don’t struggle with spacing later.
Wobbly Circles?
If your concentric circles aren’t perfect, embrace it. Go over the line again loosely to create a ‘sketched’ look. A shaky line looks like a mistake; a double shaky line looks like artistic intent.
Step 2: Drawing the Motifs
-
Start with Structure:
Pick your first circle and choose a structured design. Using a 0.3 fine liner, ink the concentric rings. I find it helpful to rotate the sketchbook physically as I draw the curves to keep my hand comfortable and steady. -
Add Geometric Details:
Fill the rings with simple geometric patterns. Try zig-zags, small triangles, straight radiating lines (like spokes on a wheel), or tiny repeated squares. The goal is repetition. -
Incorporate Organic Elements:
Move to the next circle and try a floral theme. Draw a central flower with rounded petals, then surround it with a ring of leaves or vine-like squiggles. This contrasts nicely with the geometric ones. -
The Sunburst Style:
Create a ‘sunburst’ motif by drawing a small central circle and extending long, thin rays outward to the edge. Intersect these rays with shorter lines or dots to add complexity without clutter. -
Play with Text:
For a mystical look, fill one ring with tiny, unreadable scribbles or faux-runes that mimic ancient scripts. Keep these marks small and tightly packed between two concentric ink lines. -
Vary Line Weight:
Switch to a 0.5 pen to darken major boundaries or central focal points, and use the 0.1 pen for delicate internal hatching. This line variety makes the drawings pop.
Step 3: Adding Color
-
Select a Palette:
Choose a limited color palette to maintain cohesion. The example uses earthy tones: terracotta red, muted sage green, and warm grey. -
Color Blocking:
Gently shade specific rings or sections within your mandalas. Don’t color the entire circle; leave plenty of white space to let the ink work breathe. A colored ring creates a nice frame. -
Accentuate Centers:
Add a pop of color to the very center of selected mandalas. This draws the eye inward and anchors the design. -
Layering Tone:
If using colored pencils, layer the color slightly heavier at the edges of a section and lighter in the middle to create a subtle 3D rounded effect.
Gold Leaf Accents
Make your patterns feel regal by adding tiny dabs of metallic gold watercolor or gold leaf pen to the center of the flowers or the outermost rings for a subtle shimmer.
Step 4: Refining and Finish
-
Erase Basics:
Once the ink is completely dry (give it a few minutes to avoid smudging), gently erase all visible pencil guidelines and compass marks. -
Check Balance:
Step back and look at the spread. If a certain circle feels too light or empty, go back in with your finest pen and add stippling (tiny dots) to add texture and shading. -
Spiral Connection:
Since you are working across a spiral binding, ensure the designs near the center don’t get ‘eaten’ by the holes. Leave a small buffer zone near the wire.
Now you have a beautiful reference sheet of patterns that serves as both a relaxing exercise and a library for future artwork ideas
Optical Illusion Warp Grids
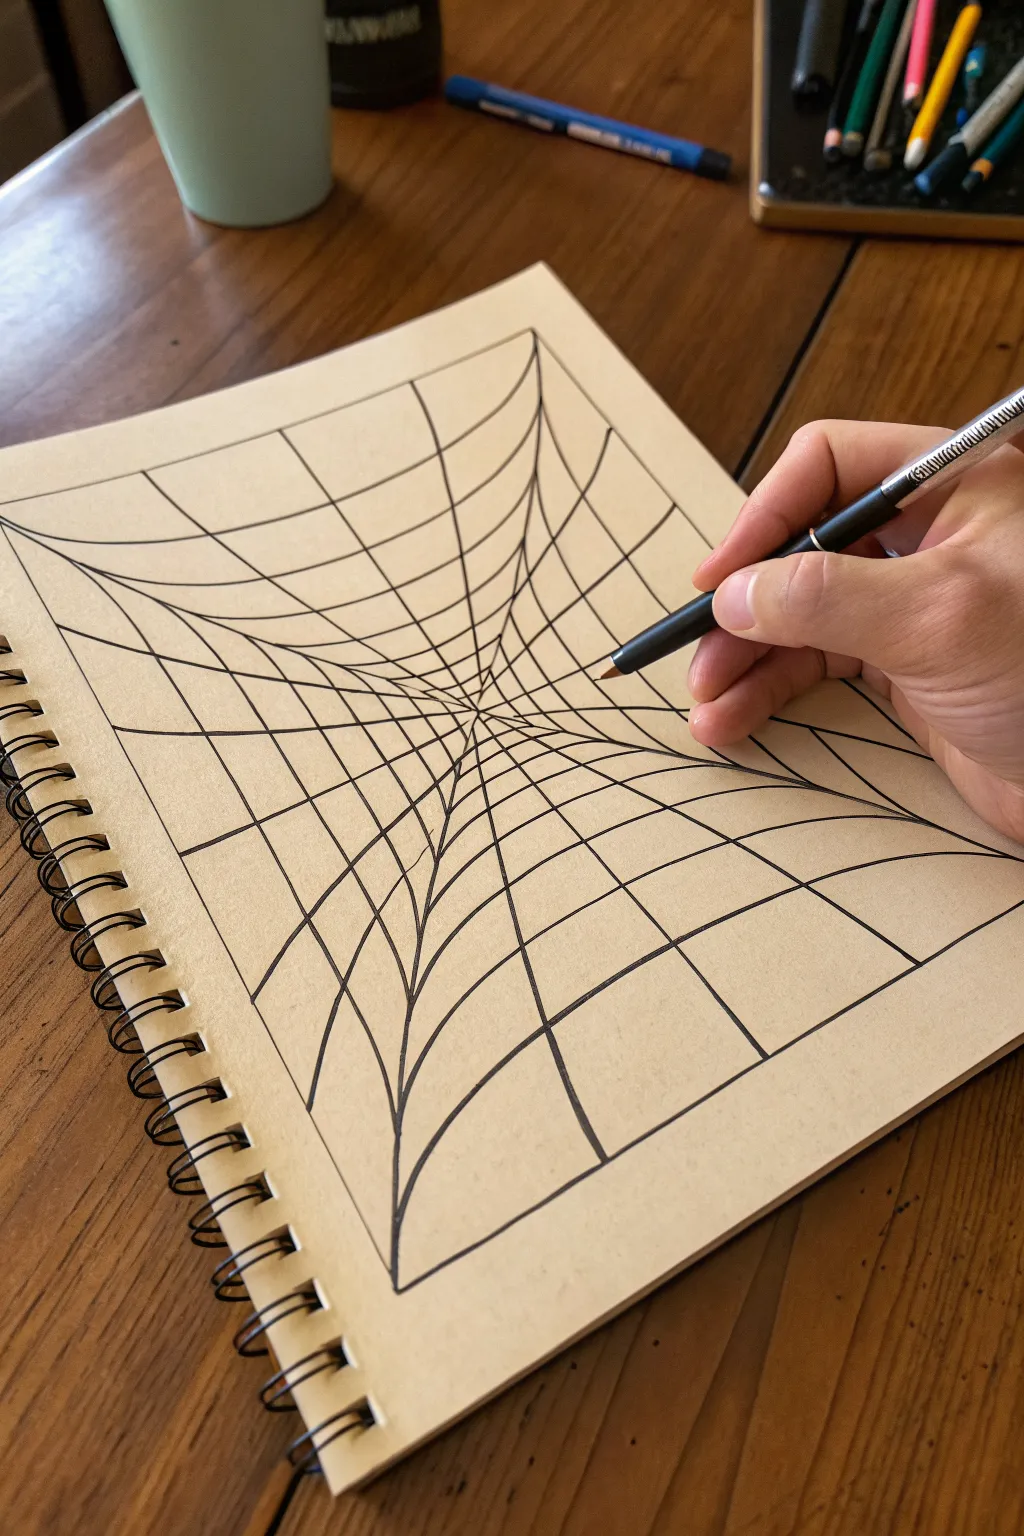
This mesmerizing optical illusion turns a flat piece of paper into a deep, warping tunnel using nothing but simple lines. By manipulating the spacing and curvature of intersecting grids, you can create a striking 3D effect that feels like it’s pulling you into the page.
Detailed Instructions
Materials
- Tan or kraft paper sketchbook (square or rectangular)
- Black fine-liner pen (0.5mm or 0.8mm)
- Ruler or straight edge
- Pencil (HB or 2B)
- Eraser
Step 1: Setting the Framework
-
Define the boundary:
Start by drawing a large square or rectangle in pencil on your tan paper. This will act as the outer frame for your illusion. Leave a comfortable margin of empty space around the edges of the page. -
Locate the center point:
Find the approximate center of your frame. It doesn’t need to be mathematically perfect, but aiming for the middle will give the most symmetrical funnel effect. Mark this spot lightly with a dot. -
Draw the main cross:
Using your ruler and pencil, draw a vertical line straight through the center dot, from top to bottom edge. Then, draw a horizontal line through the dot, connecting the left and right edges. You now have four quadrants. -
Add diagonal guides:
Draw diagonal lines from each corner of the outer frame directly to the center point. These X-lines are crucial as they define the deepest corners of your funnel.
Curve Control
If your curves look shaky, don’t draw from your wrist. Lock your wrist and move your entire arm from the elbow or shoulder for smoother, longer arcs.
Step 2: Drafting the Curved Grid
-
Mark spacing intervals:
Along the main vertical and horizontal axes you drew earlier, make small tick marks. Place them closer together near the center point and space them further apart as you move toward the outer edges. This increasing gap is the secret to the depth illusion. -
Sketch the inner curves (horizontal):
Start connecting the tick marks. Draw curved lines that swoop from the diagonals towards the vertical axis. Imagine a spiderweb: the lines should bow toward the center. Sketch these lightly in pencil first. -
Sketch the inner curves (vertical):
Repeat the process for the vertical grid lines. Connect the tick marks on the horizontal axis by drawing curves that bow inward towards the horizontal centerline. The grid should now look like a stretched net. -
Review the flow:
Take a moment to step back and look at your pencil sketch. The squares formed by the crossing lines should get progressively smaller as they approach the center. Adjust any curves that look too flat or disjointed.
Depth Trick
Add light shading with a pencil or grey marker inside the smallest squares near the center. This vignette effect dramatically increases the perceived depth.
Step 3: Inking and Refining
-
Trace axis lines:
Switch to your black fine-liner pen. I find it easiest to start by inking the straight diagonal lines (the X) first, as these anchor the drawing. -
Ink the outer frame:
Carefully trace the outer square boundary with a steady hand. Using a ruler here creates a sharp contrast against the organic curves inside, but a freehand line adds character. -
Ink the horizontal curves:
Begin tracing your pencil curves. Rotate your sketchbook if needed to find a comfortable angle for your hand. Focus on making smooth, continuous strokes rather than short, scratchy ones. -
Ink the vertical curves:
Complete the grid by inking the vertical curves. Pay close attention to where the lines intersect; crisp, clean intersections make the illusion much more convincing. -
Deepen the center:
If the very center point looks a bit messy or congested, you can carefully darken the tiny triangle shapes right at the convergence point with your pen to emphasize the ‘black hole’ depth. -
Erase guidelines:
Wait for the ink to dry completely—give it an extra minute just to be safe. Then, gently erase all visible pencil marks to reveal the clean, suspended grid. -
Add line weight (optional):
To enhance the 3D effect, you can thicken the lines slightly as they get closer to the outer edges of the paper, keeping the lines near the center very thin. This subtle variation mimics atmospheric perspective.
Now you have a mind-bending piece of geometric art that looks like it’s defying the flatness of the page
3D Cube and Isometric Tiles
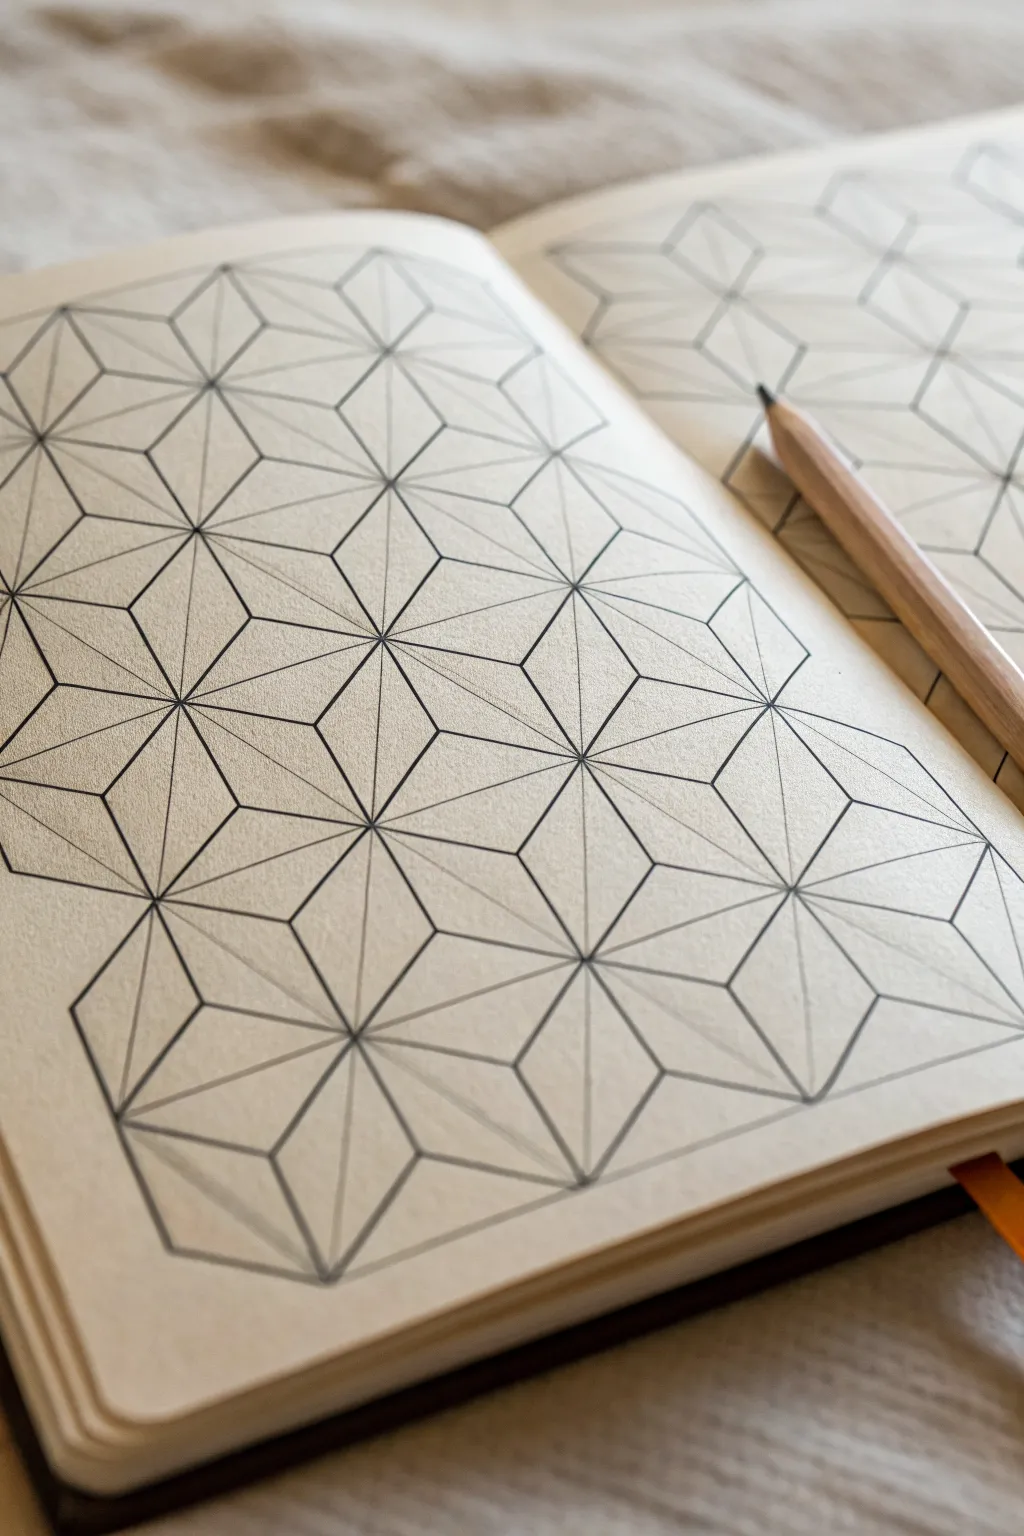
This precise geometric sketch creates a stunning optical illusion of interconnected cubes and six-pointed stars. Using nothing but straight lines and an isometric grid, you can build a sharp, minimalist 3D pattern that pops off the page.
Step-by-Step
Materials
- Sketchbook with smooth, cream paper
- Pencil (HB for grid, 2B or mechanical for lines)
- Ruler or straightedge
- Eraser
- Optional: Printed isometric grid paper (for underlay)
Step 1: Setting the Foundation
-
Create the isometric grid:
Begin by lightly drawing a grid of equilateral triangles across your page using a hard pencil like an HB. These triangles should all point up and down in alternating rows. If you don’t want to measure every line, slipping a printed isometric grid sheet under your page is a lifesaver. -
Establish the centers:
Identify the intersection points where six triangles meet. These will become the centers of your ‘stars’ or the corners of your cubes. Mark these gently so you don’t lose your place in the sea of lines.
Grid Mastery
Can’t draw a perfect grid? Print an isometric dot or line template, slip it under your page, and use a lightbox (or a bright window) to trace the base points perfectly.
Step 2: Drawing the Primary Structure
-
Draw the vertical axes:
Using your darker pencil and ruler, draw vertical lines connecting the top and bottom points of the diamonds formed by your grid. These verticals will act as the spine for your cubes. -
Connect the hexagon shapes:
Around each vertical center line, draw the six outer edges to form a perfect hexagon. This is the silhouette of your cube. -
Form the internal ‘Y’:
From the center point of each hexagon, draw three lines radiating outward to the alternating corners (top left, top right, and bottom). This creates the classic 3D cube look.
Level Up: Metallic Pop
Use a gold or silver gel pen for the internal star lines while keeping the outer cube outlines black. The metallic ink will catch the light as you turn the page.
Step 3: Adding the Star Detail
-
Locate the midpoints:
On every edge of your drawn cubes, find the exact center point. You can eyeball this if you feel confident, but measuring ensures perfect symmetry. -
Draw the star points:
Connect these midpoints back to the center of the cube’s faces. This subdivides the larger diamond faces of the cube into smaller geometric shapes. -
Deepen the lines:
Go over your final pattern lines with a 2B pencil or a fine liner pen. Press firmly to create crisp, dark lines that contrast sharply with the paper. -
Connect adjacent shapes:
Ensure the lines flow seamlessly from one cube to the next. The magic of this pattern is in the continuity where the cubes touch.
Step 4: Refining and Shading
-
Erase guidelines:
Once your main lines are set and the ink (if used) is dry, carefully erase the initial light grid construction lines to clean up the drawing. -
Add subtle depth:
To enhance the 3D effect shown in the image, lightly shade one side of the internal triangles. I like to shade the bottom-right facets consistently to simulate a single light source. -
Clean the edges:
Use a straightedge to check the perimeter of your drawing. The drawing looks best when the pattern fades out naturally or ends on a clean geometric boundary, rather than abrupt stops. -
Final inspection:
Look for any intersecting lines that overshoot their corners and gently tidy them up with a precision eraser.
Now you have a mesmerizing page of geometric illusions ready to be shaded or left as crisp line art
Micro Motifs: One Mark, Infinite Patterns
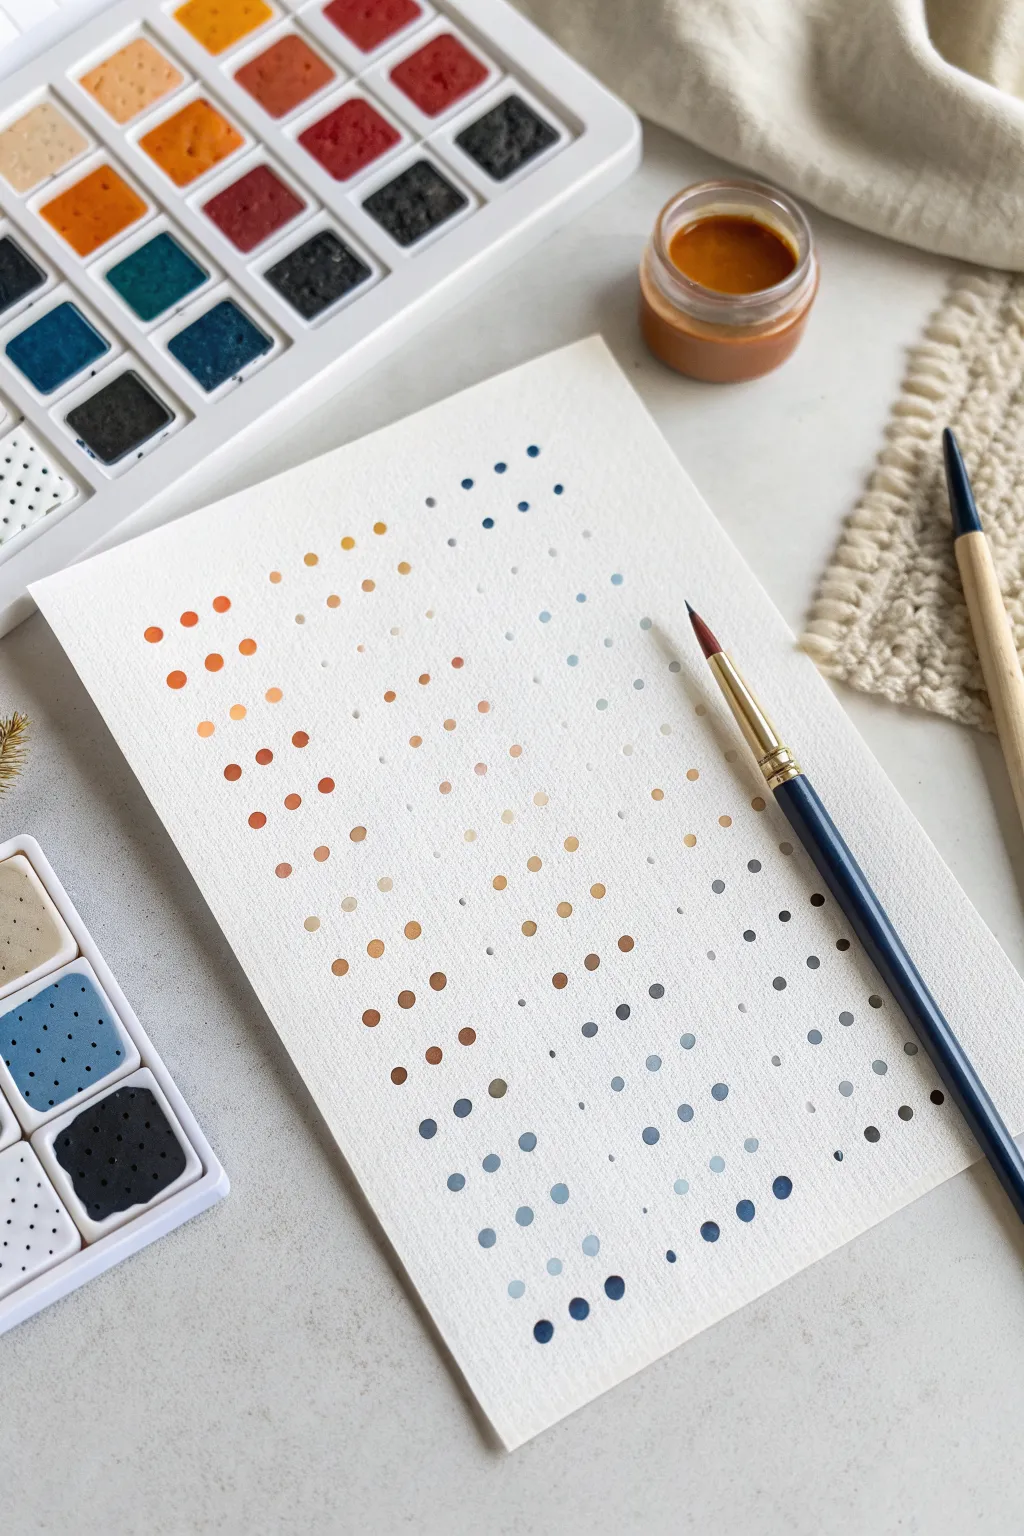
This meditative project explores the beauty of repetition and color theory through a simple yet striking grid of watercolor dots. By carefully controlling water-to-pigment ratios, you’ll create a seamless transition from warm, earthy terracottas to cool, steel blues on textured paper.
Detailed Instructions
Materials
- Cold press watercolor paper (300 gsm)
- Watercolor pan set (featuring rust/ochre and indigo/grey tones)
- Round watercolor brush (size 2 or 4)
- Pencil (HB or H)
- Ruler
- Clean water jar
- Paper towel or rag
- Mixing palette
Step 1: Preparation & Grid Layout
-
Paper selection:
Begin with a rectangle of high-quality cold press watercolor paper. The texture is crucial here, as it adds character to the simple dot shapes and allows the pigment to settle beautifully. -
Marking the intervals:
Using a ruler, lightly mark small ticks along the left and top edges of your paper to define your spacing. A 1/2 inch or 1.5cm spacing works well for this scale. -
Creating the guide:
Very faintly draw a grid of small dots or tiny ‘x’ marks in pencil where your painted dots will go. Keep these guide marks extremely light so they disappear under the paint or can be easily erased later.
Water Control Pro Tip
For that perfect ‘hard edge’ look, let the puddle of water sit on the paper and evaporate slowly. Don’t touch it once placed! This concentrates pigment at the rim as it dries.
Step 2: Painting the Warm Tones
-
Mixing the starting color:
Activate a warm rust orange or burnt sienna on your palette. Add a fair amount of water to create a medium-transparency wash. -
Test the consistency:
Before hitting the main paper, dab a test dot on a scrap piece. You want the bead of water to sit slightly on the surface before soaking in. -
First column application:
Load your round brush and carefully paint the first column of dots. Hold the brush perpendicular to the paper and use just the tip to press down into a circular shape. -
Adding vibration:
As you move to the second and third columns, slightly vary the amount of pigment on your brush. Dip into water briefly without reloading paint to create lighter, more translucent dots interspersed with saturated ones. -
Introducing neutrals:
Gradually mix a small amount of warm brown or light ochre into your orange mix. Continue painting the next few columns, allowing the color to shift naturally towards a neutral beige.
Step 3: Transitioning the Gradient
-
The middle ground:
Clean your brush thoroughly. Create a very watery wash of a neutral grey or diluted brown. This middle section serves as a breathing space between the warm and cool zones. -
Dot sizing:
Pay attention to the size of your dots in this transition zone. I personally like keeping them consistent, but allowing the natural wicking of the paper to make edges slightly soft. -
Painting the center:
Fill the central columns with this pale neutral mix. If a dot has too much water, touch the tip of a dry paper towel to it to lift the excess. -
Mixing part two:
Prepare your cool tone palette. Mix a steel blue or Payne’s grey with a touch of the neutral brown you used earlier to bridge the colors harmoniously.
Creative Level Up
Try a double-loaded brush: dip the brush in water, then just the very tip in pigment. When you press the dot, the color will naturally bleed out from the center for a stunning gradient.
Step 4: Completing with Cool Tones
-
The cool shift:
Begin painting the next set of columns using your grey-blue mix. Start very pale, adding more water than pigment. -
Deepening the value:
As you move to the final right-hand columns, increase the pigment load. Add pure indigo or Prussian blue to your mix for a stronger, darker finale. -
Checking alignment:
Periodically pause and step back to ensure your rows are remaining relatively straight, though slight organic wobble adds charm. -
Refining the pattern:
For the last column, use your darkest, most saturated blue. Ensure these dots are crisp and distinct to frame the edge of the composition. -
Drying time:
Let the paper sit flat until completely dry. Avoid using a heat tool if possible, as air drying preserves the unique ‘coffee ring’ effect on the edges of watercolor dots. -
Clean up:
Once fully dry, gently erase any visible pencil guide marks between the dots.
Now you have a serene color study that highlights the delicate nature of watercolor pigments


Have a question or want to share your own experience? I'd love to hear from you in the comments below!