A good school wall painting can turn a plain hallway into a place that quietly teaches, encourages, and makes kids feel like they belong. Here are my favorite creative school wall painting ideas—from classic, tried-and-true murals to a few unexpected ones that always get a big reaction.
Front Entrance Welcome Wall

Transform a plain school entrance into an inviting landmark with this bold typographic mural. Featuring classic scholastic motifs like a pencil, basketball, and stars alongside a friendly greeting, this large-scale project sets a positive tone for every student walking through the doors.
Step-by-Step
Materials
- Exterior latex primer
- Exterior acrylic latex paint (Cream/Off-white for base)
- Exterior acrylic latex paint (Brick Red, Navy Blue, Grey)
- Set of angled sash brushes (2-inch and 1-inch)
- Small artist brushes for details (round and flat)
- Painter’s tape
- Pencil and eraser
- Laser level or chalk snap line
- Projector (overhead or digital)
- Computer with design software (optional)
- Drop cloths
- Ladder or scaffolding
Step 1: Preparation and Base Coat
-
Clean the surface:
Begin by thoroughly washing the exterior wall with a pressure washer or a stiff brush and soapy water to remove dirt and cobwebs. Let the surface dry completely before proceeding. -
Protect the area:
Lay down heavy-duty drop cloths on the entryway steps and surrounding pavement. Use painter’s tape to mask off the door frame, light fixtures, and the underside of the overhang. -
Apply the background:
Roll on two coats of high-quality exterior latex paint in a warm cream or off-white shade. This creates a clean, neutral canvas that makes the lettering pop.
Step 2: Layout and Lettering
-
Establish guidelines:
Use a laser level or snap a chalk line to mark the baseline for ‘SCHOOL’ and the straight line for ‘TO’. Since ‘WELCOME’ is arched, you’ll need to find the center point of the wall above the door to ensure symmetry. -
Project the design:
Wait until dusk or evening, then set up a projector to cast your digital design onto the wall. This is the most accurate way to transfer the specific serif font and the arched text. -
Trace the outlines:
Using a soft pencil, carefully trace the outline of every letter and graphic element (the basketball, pencil, stars, and clock). I like to step back occasionally during this phase to ensure the proportions look right from a distance. -
Paint the red text:
Load a 1-inch angled sash brush with brick red exterior paint. Carefully fill in the letters for ‘WELCOME’, using the brush’s sharp edge to cut neat lines against your pencil marks. -
Paint the blue text:
Switch to navy blue paint for the words ‘TO’ and ‘SCHOOL’. Apply two thin coats rather than one thick one to prevent drips, especially on the vertical strokes.
Mural Pro Tip
Mix a clear glazing medium into your acrylics for the final layer. It improves flow for sharp edges and adds durability against weather.
Step 3: Graphics and Details
-
Fill in the stars:
Using a mix of the red and blue paints, fill in the star shapes scattered around the text. Use a smaller flat brush to keep the points of the stars sharp. -
Paint the basketball:
Paint the circle of the basketball with the brick red paint. Once dry, use a fine liner brush and navy blue paint to add the curved seam lines. -
Detail the pencil:
Paint the pencil body in red and white stripes. Use grey for the ferrule (the metal part) and navy blue for the eraser tip and the graphite point. -
Add the clock and snowflakes:
For the clock at the top, paint a grey circle and add fine blue tick marks and hands. Use your smallest round brush to add the delicate snowflake detail near the ‘W’. -
Create the sunburst:
To the right of ‘SCHOOL’, paint the small sunburst lines and the ‘188’ text (or your school’s founding year) in red using a steady hand or a stencil. -
Paint secondary motifs:
Moving to the lower sections beside the door, paint the abstract shapes, feather, and book stack using the same color palette to maintain visual consistency. -
Touch up edges:
Walk around the mural with a small brush and your background cream paint. ‘Cut in’ backwards to fix any spots where the colored paint may have bled or wobbled outside the lines.
Make It Yours
Swap the basketball for a soccer ball or musical note to reflect your specific school’s specialty, or change the year to the graduation class.
Enjoy the pride on the students’ faces as they walk beneath their new, vibrant school banner


Tree of Knowledge Library Feature
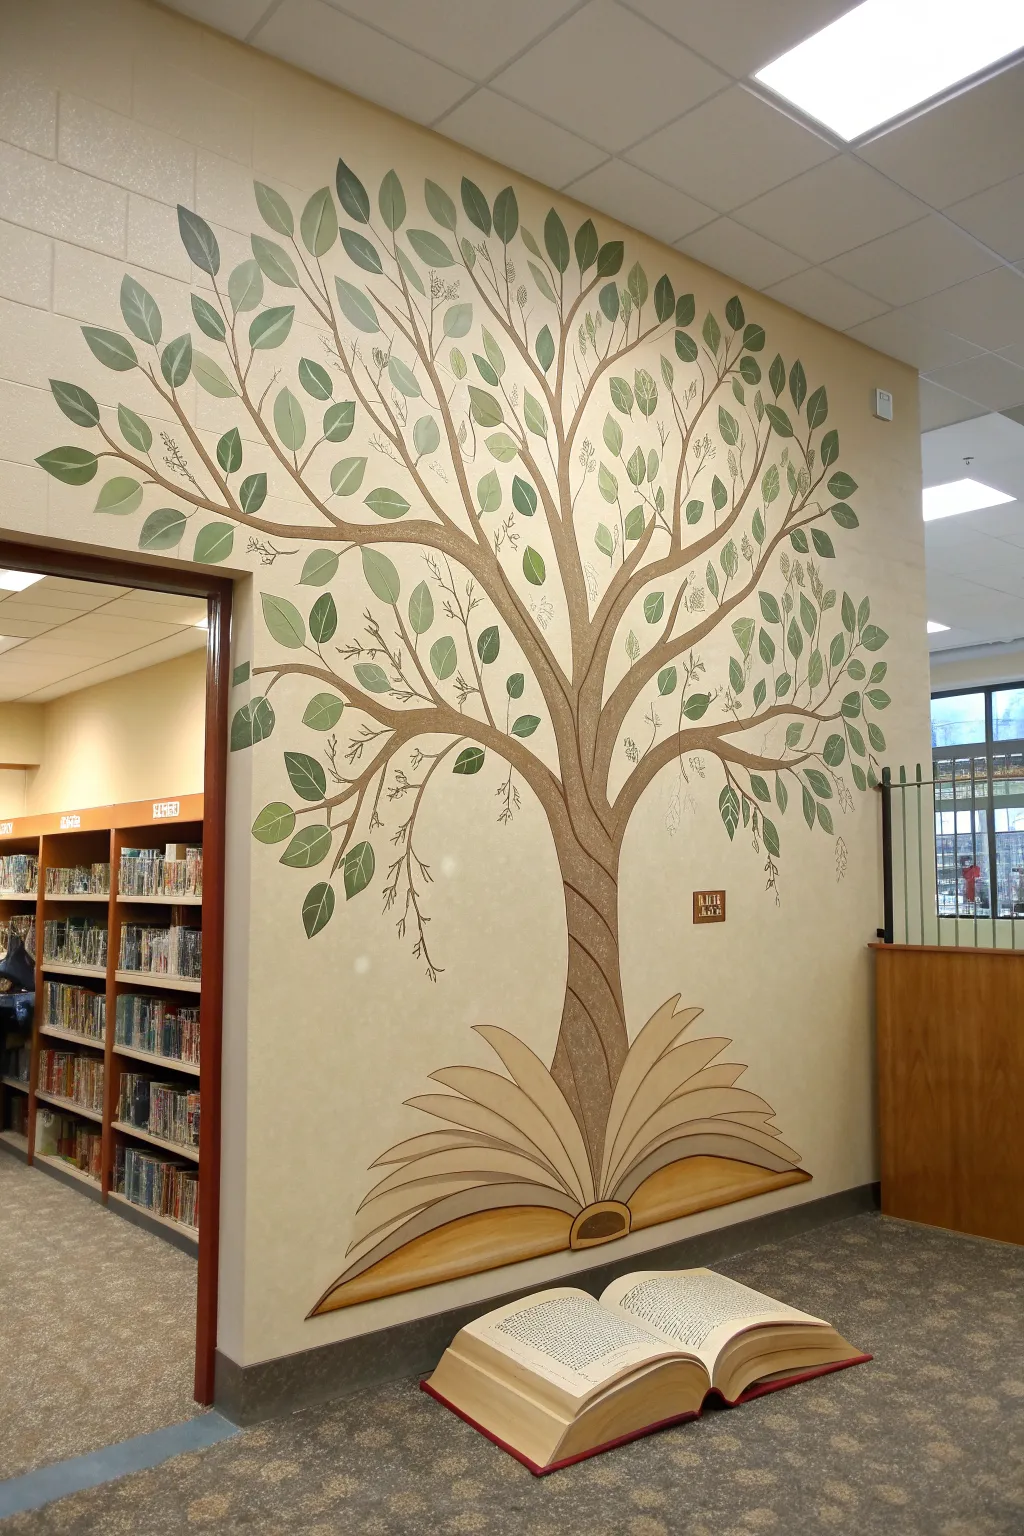
Transform a plain library corner into a whimsical literary haven with this dimensional mural. This project combines wall painting with a trompe-l’œil effect where a painted tree appears to sprout directly from an open book, seamlessly blending illustration with reality.
How-To Guide
Materials
- Interior latex wall paint (cream base)
- Acrylic paints (browns: raw umber, burnt sienna; greens: sap green, olive green, celadon)
- Wide painter’s tape
- Chalk or pastel pencil (light gray)
- Assorted brushes: 2-inch angled sash brush, #6 round brush, #2 liner brush
- Large sponge or rag for texture
- Pencil and eraser
- Drop cloths
- Ladder or step stool
- Varnish or clear topcoat (matte finish)
Step 1: Preparation and Base Outline
-
Prepare the surface:
Begin by cleaning the wall surface thoroughly to remove dust and oils. If the existing wall color isn’t a warm cream or beige, roll on two coats of a neutral base color to provide a soft, parchment-like background for your tree. -
Protect the area:
Lay down drop cloths to protect the carpet or flooring. While masking tape isn’t strictly necessary for the organic shapes, you may want to tape off adjacent door frames or baseboards to keep lines crisp. -
Sketch the anchor:
Using a light pencil or chalk, sketch the large open book at the bottom center of the wall. The book should look like it’s lying flat on the floor, with pages fanned open to form the ‘roots’ of the tree. -
Map the trunk:
Draw the main trunk lines rising from the center of the book. Twist the trunk slightly as it moves upwards to suggest movement and growth, branching out into main limbs that reach toward the ceiling.
Step 2: Painting the Book and Trunk
-
Block in the book pages:
Mix a warm beige-white and fill in the pages of the open book at the base. Use a slightly darker tan to paint the edges of the pages, creating a fanned-out, dimensional look. -
Detail the book cover:
Paint the cover and binding of the book in a rich ochre or gold tone. Add shadows underneath the pages where they meet the ‘floor’ to ground the object. -
Paint the base trunk color:
Fill in the tree trunk with a medium brown acrylic paint. I like to use a 2-inch angled brush here to get good coverage while maintaining a sharp edge against the wall color. -
Add texture to the bark:
While the brown is still tacky, stipple in darker raw umber and lighter tan shades. Use a twisting motion with your brush to mimic the spiral growth pattern seen in the reference photo. -
Define the branches:
Extend the brown paint into the sketched branches. Allow the branches to taper naturally as they get further from the trunk, ensuring they curve elegantly.
Fixing Flat Foliage
If leaves look too flat, don’t repaint them entirely. Mix a glaze (50% water, 50% light yellow paint) and brush it purely on the upper half of leaf tips to instantly add sun-kissed dimension.
Step 3: Leaf Work and Details
-
Mix leaf variations:
Prepare three shades of green: a deep olive for shadow, a standard sap green, and a pale celadon. Having variety creates depth so the tree doesn’t look flat. -
Stencil or freehand leaves:
Start painting leaves on the outer branches. You can cut a simple stencil from cardstock if you’re nervous, but freehanding them gives a more organic, distinct variety to the shapes. -
Layer the foliage:
Paint the darker leaves first to establish the background layers. Once dry, layer medium and lighter green leaves over them, overlapping slightly to create density. -
Add delicate stems:
Switch to a #2 liner brush and thinned brown paint. Connect floating leaves to the main branches with very fine, wispy lines. -
Create botanical illustrations:
Using a fine liner brush and dark grey or black paint, sketch faint, scientific-style botanical drawings of seeds or pods near some leaf clusters for an intellectual touch.
Level Up: Real Pages
Decoupage actual book pages onto the painted ‘book’ base before sealing. The real text adds incredible texture and reinforces the literary theme.
Step 4: Finishing Touches
-
Highlight the book:
Return to the book base and add crisp white highlights to the tops of the curved pages to simulate light hitting the paper. Deepen the crease in the center binding with dark brown. -
Add a spine spiral:
Paint a subtle spiral or wrapping line up the trunk using a lighter tan shade to emphasize the magical, twisting nature of the wood. -
Clean up edges:
Step back and check your work from a distance. Use your wall base color to cut in and clean up any stray paint marks around the leaves or trunk. -
Protective coat:
Once fully dry (wait at least 24 hours), apply a matte clear varnish over the painted areas, especially near the bottom where curious hands might touch the ‘book’. -
Check the perspective:
Finally, ensure the shadow under the painted book aligns with the room’s lighting to really sell the 3D illusion.
Enjoy your new corner of inspiration where stories literally spring to life


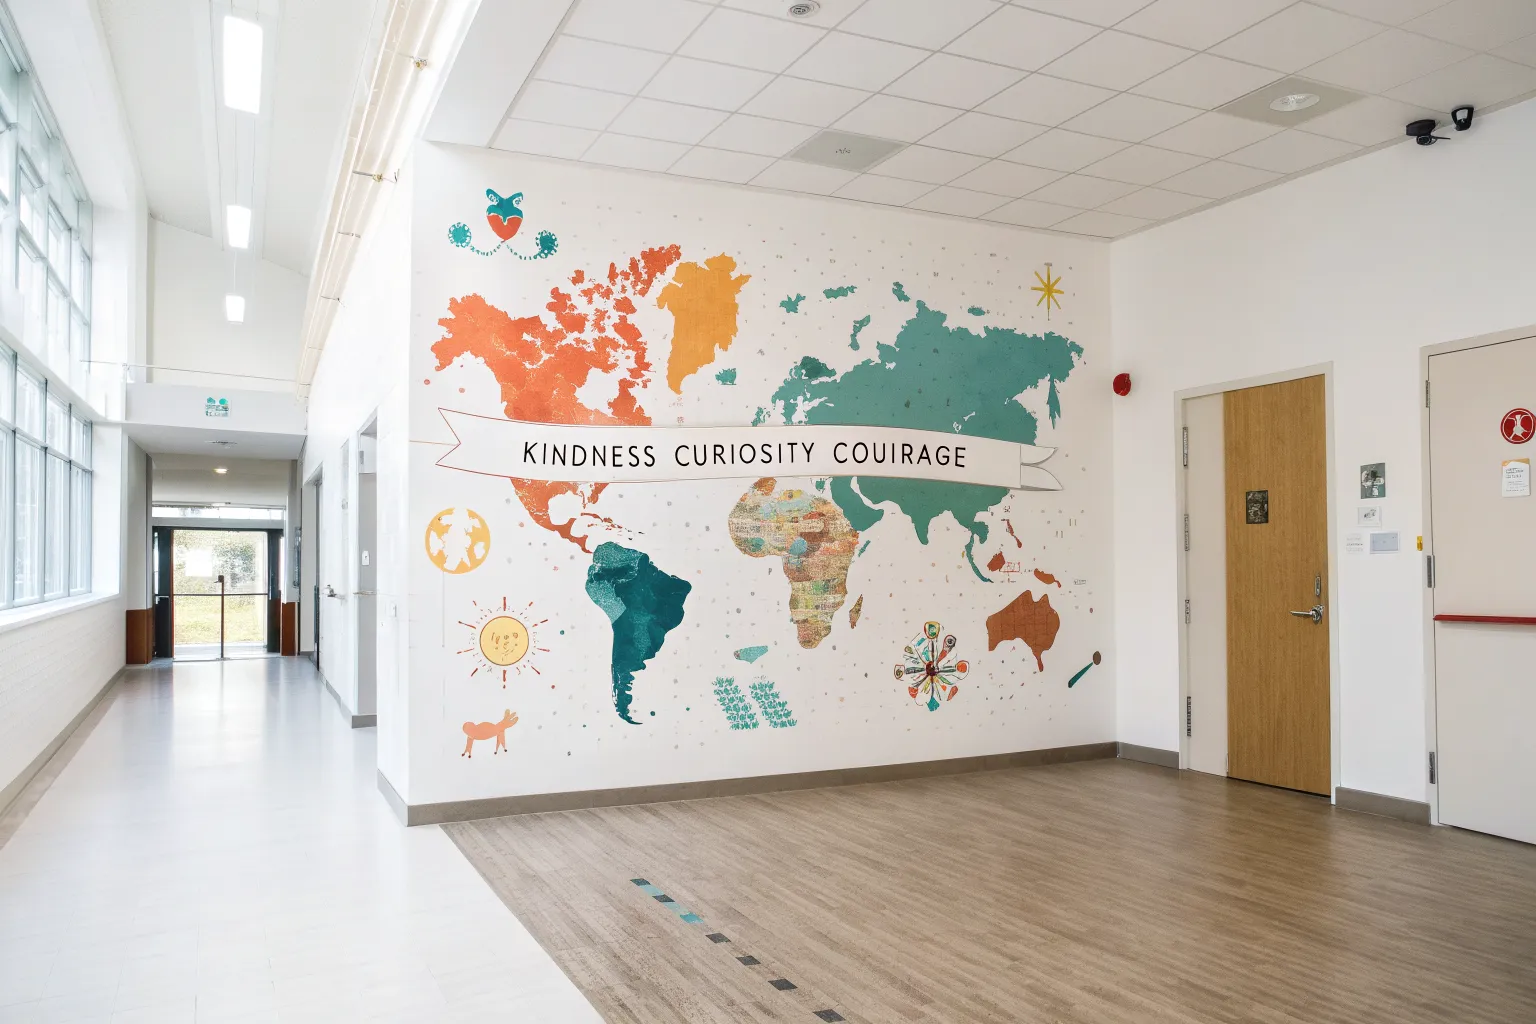
World Map Learning Hallway

Transform a plain hallway into an educational centerpiece with this stunning two-tone world map mural. The deep teal background makes the cream-colored continents pop, while charming animal silhouettes along the baseboard add a playful element for younger students.
Step-by-Step Guide
Materials
- Deep teal semi-gloss interior paint (2 gallons)
- Cream/off-white semi-gloss interior paint (1 gallon)
- Orange and brown acrylic paints (for animals/logos)
- overhead projector or digital projector
- Digital file of a world map (vector preferred)
- Painter’s tape (2-inch width)
- Chalk or pastel pencils (white and yellow)
- Paint rollers (standard nap)
- Assorted paintbrushes (angled sash brush, small detail brushes)
- Drop cloths
- Ladder or step stool
- Cleaning supplies (TSP or degreaser)
Step 1: Preparation & Base Coat
-
Clean the surface:
Begin by thoroughly cleaning the brick wall with a degreaser or TSP solution. School hallways see a lot of traffic, so removing handprints and dust is crucial for paint adhesion. -
Protect the area:
Lay down drop cloths along the entire length of the hallway floor. Use painter’s tape to mask off the ceiling line, the floor trim, and adjacent walls or door frames. -
Roll the background color:
Using a standard roller, apply the deep teal paint to the entire wall section. Brick often absorbs the first coat, so be prepared to apply a second coat once the first is dry to ensure solid, opaque coverage. -
Cut in the edges:
While the roller work dries, use an angled sash brush to paint the teal color into the corners, along the ceiling line, and around any permanent fixtures like fire alarms or outlets. -
Inspect and touch up:
Check for any deep crevices in the mortar that the roller missed. Use a cheap brush to jab paint into these deep pores so no original wall color shows through.
Step 2: Mapping the World
-
Set up the projector:
Once the teal base is fully dry (wait at least 24 hours), set up your projector. Position it far enough back to cast the map image across the desired width of the wall. -
Align the image:
Adjust the keystone settings on the projector to minimize distortion. Ensure the continents are level and placed at a comfortable viewing height, leaving room at the bottom for the Antarctica animal details. -
Trace the outlines:
Using a white chalk or pastel pencil, carefully trace the outline of every continent and island. The chalk shows up well on the dark teal and can be wiped away easily if you make a mistake. -
Outline the extras:
Don’t forget to trace the circular logo graphic on the right and the animal silhouettes along the bottom edge (Antarctica) while the projector is still running.
Mortar Mastery
Painting straight lines over bumpy mortar is tricky. Use a stiff, angled brush and press firmly into the groove first, then feather the paint out to the brick surface for a cleaner edge.
Step 3: Painting the Continents
-
Outline with cream paint:
Using a small, round artist’s brush, paint over your chalk lines with the cream paint. This creates a seal and defines the complex coastlines before you fill them in. -
Fill in the landmasses:
Switch to a slightly larger flat brush to fill in the centers of the continents. I find that working in small sections prevents the paint from drying too quickly on the brush. -
Navigate the mortar lines:
When painting over the horizontal and vertical mortar grooves, dab the paint in rather than brushing across. This ensures the line remains crisp and doesn’t skip over the texture. -
Apply a second coat:
The cream color will likely need a second pass to look solid against the dark teal. Let the first layer dry completely, then apply the second coat for a bright, opaque finish. -
Add texture (optional):
If you want the distressed look seen in the reference, lightly dry-brush a tiny amount of darker beige or gold paint over the center of the larger landmasses to simulate terrain.
Wobbly Coastlines?
If your hand shakes while painting detailed coastlines, brace your pinky finger against the dry wall for stability, or use a ‘mahl stick’ (or a yardstick) to rest your hand on while working.
Step 4: Details & Final Touches
-
Paint the logo:
Using bright orange acrylic paint and a fine liner brush, fill in the traced logo grid and text on the right side of the map. -
Create the animal parade:
Paint the animal silhouettes along the bottom snow/ice shelf using solid brown and orange paints. Keep shapes simple and graphic for better readability from a distance. -
Add the geometric sphere:
Use a white paint pen or a very fine brush to create the delicate geometric wireframe sphere located in the ocean area below Asia. -
Clean up chalk lines:
Once all paint is perfectly dry, use a damp microfiber cloth to gently wipe away any remaining visible chalk outlines. -
Remove tape:
Carefully peel off the painter’s tape while pulling at a 45-degree angle. Do this slowly to ensure a crisp edge along the ceiling and floor.
Step back and admire how this large-scale art piece instantly makes the hallway feel more worldly and sophisticated


Number Line and Pattern Wall
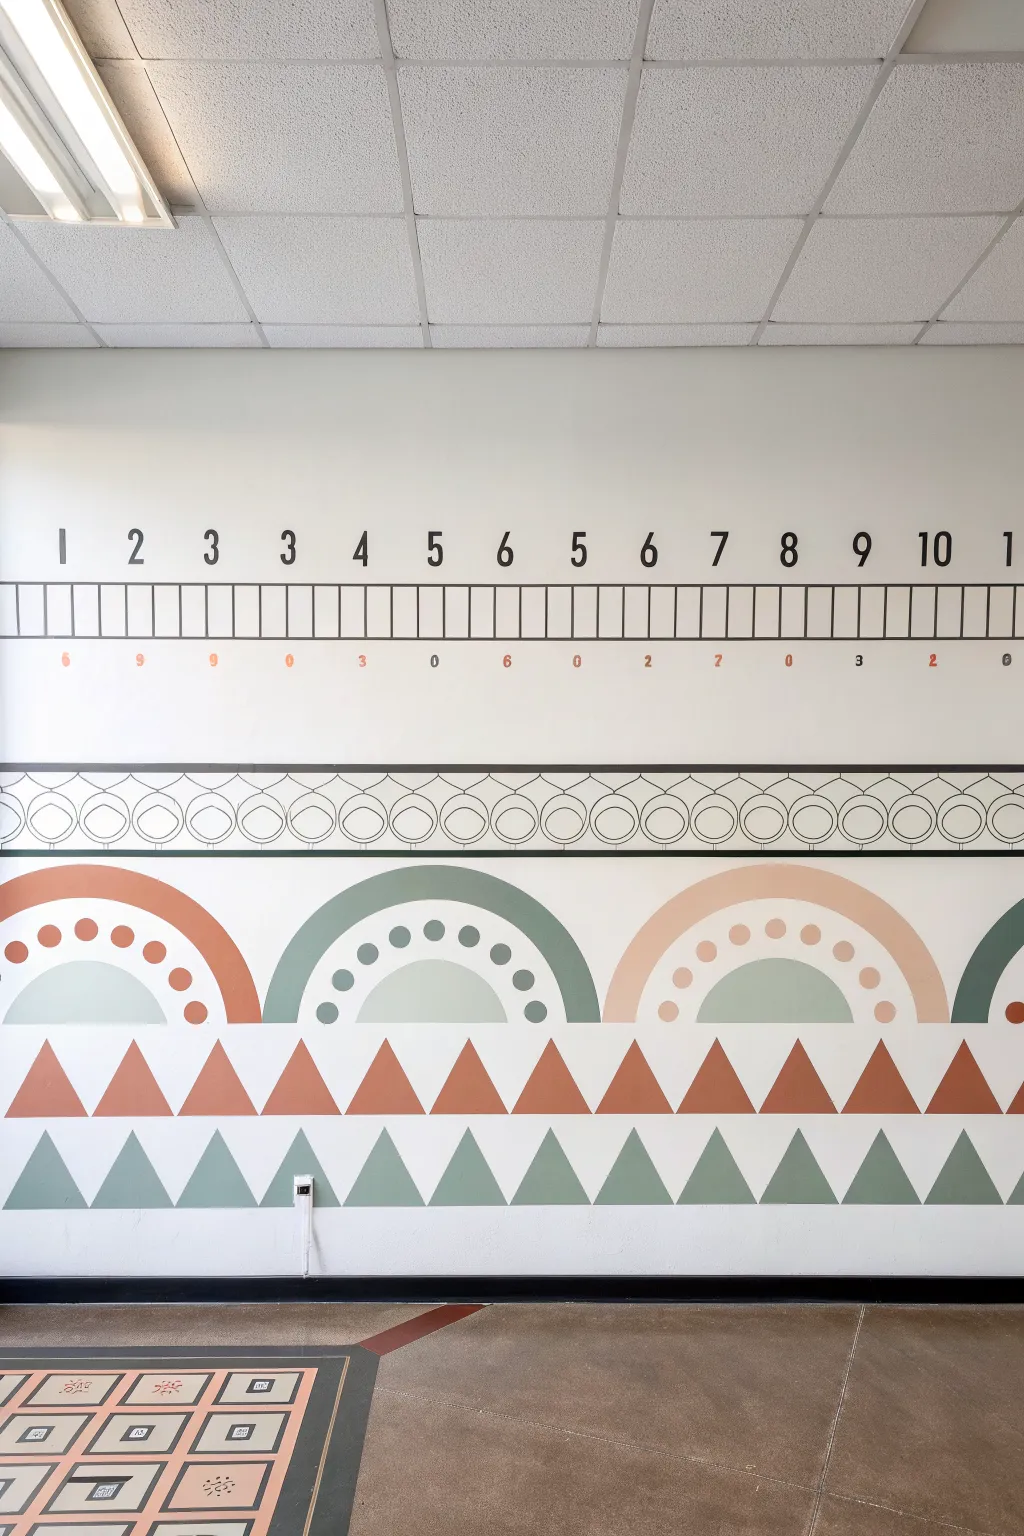
Transform a blank classroom or hallway wall into an educational masterpiece with this muted, boho-inspired mural. Combining functional learning elements like a number line with calming geometric patterns, this design creates an engaging environment without visual clutter.
Step-by-Step Tutorial
Materials
- Interior emulsion paint (White base, Rust/Terracotta, Sage Green, Muted Peach/Blush)
- Black acrylic paint or paint markers (medium and broad tips)
- Painter’s tape (various widths, including 1 inch and delicate surface)
- Laser level or long spirit level
- Pencil and large eraser
- Measuring tape
- Large compass or string and tack method for circles
- Stencils (optional for numbers)
- Paint rollers and tray
- assorted paintbrushes (angled sash brush, small detail brushes)
- Drop cloth
Step 1: Preparation and Base Layer
-
Prep the Surface:
Begin by cleaning the wall thoroughly to remove dust and grime. If the existing color isn’t a clean, crisp white, apply two coats of a high-quality white interior primer-and-paint in one. Let this cure completely, ideally overnight, as you’ll be applying a lot of tape. -
Map Out the Zones:
Use a laser level to lightly pencil horizontal lines that will divide your distinct sections: the number line at the top, the small decorative border, the main arch pattern, and the bottom triangles. This ensures everything stays perfectly straight across the long span of the wall.
Bleed-Through Blues?
If paint bleeds under tape, let it dry, then paint over the bleed with the base wall color (white) to ‘erase’ it before reapplying the correct color.
Step 2: Painting the Geometric Patterns
-
Draft the Bottom Triangles:
Starting at the bottom section (just above the floorboard), use your measuring tape to mark equal intervals for the triangle bases. Connect these points to a center peak point for each triangle to create a zigzag pattern. -
Tape the Triangles:
Apply painter’s tape along the pencil lines of your triangles. Press the edges of the tape down firmly with a credit card to prevent bleed-under. -
Paint the Lower Triangles:
Fill in the bottom row of triangles with sage green paint. For the row immediately above it, use the rust/terracotta shade. Remove the tape while the paint is still slightly tacky to get the sharpest lines. -
Create the Arches:
Move up to the central band. Mark the center point for each arch on your guide line. I find using a string tied to a pencil and tacked to the center point works best to draw the large semi-circles, followed by smaller concentric semi-circles inside them. -
Paint the Arches:
Carefully paint the distinct bands of the arches. Alternate colors: create a rust arch, a sage arch, and a peach arch. Use an angled sash brush for the curved edges to keep them smooth without needing to tape every curve. -
Add Polka Dot Details:
Once the arches are dry, use a small round sponge dabber or a stencil to add the decorative dots inside the white spaces of the arches. Use colors that contrast with the neighboring arch (like rust dots near a sage arch). -
Paint the Inner Semi-Circles:
Fill the smallest, innermost semi-circle of each arch with a solid color, alternating between sage green and light blue-grey.
Make It Interactive
Paint the lowest section of the wall with clear dry-erase height paint or chalkboard paint so students can practice writing their own numbers or patterns.
Step 3: Detailed Line Work & Numbers
-
Draw the Decorative Border:
Between the number line and the arches, pencil in the intricate repeating border. This design features intersecting semi-circles and small circles. Use your compass to keep the curves consistent. -
Outline in Black:
Using a steady hand and a small liner brush with black paint (or a broad black paint marker), outline the decorative border design. Keep the line weight consistent. -
Create the Number Line Grid:
For the top section, use your level to draw the long horizontal baseline and top line for the ruler grid. Mark vertical dashes at even intervals—every 2 to 3 inches depending on your wall width. -
Inking the Grid:
Go over your pencil grid with black paint or a thick black marker. Ensure the vertical lines are perfectly perpendicular to the horizontal base. -
Stencil the Numbers:
Position stencils for the large numbers (1-10) directly above the grid. Use a dry-brush stencil technique with black paint to prevent smudging, or carefully trace and fill them in. -
Add Secondary Numbers:
below the black grid line, stamp or stencil smaller numbers in orange or rust to represent the lower count, aligning them with specific tick marks. -
Final Touches:
Inspect the entire wall for any smudges or uneven lines. Use a small artist’s brush with your white wall paint to touch up any errors or clean up the edges of your shapes.
Step back and admire how this blend of math and art transforms the learning space into something truly special.
BRUSH GUIDE
The Right Brush for Every Stroke
From clean lines to bold texture — master brush choice, stroke control, and essential techniques.
Explore the Full Guide
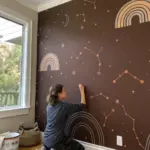
Staircase Solar System Mural
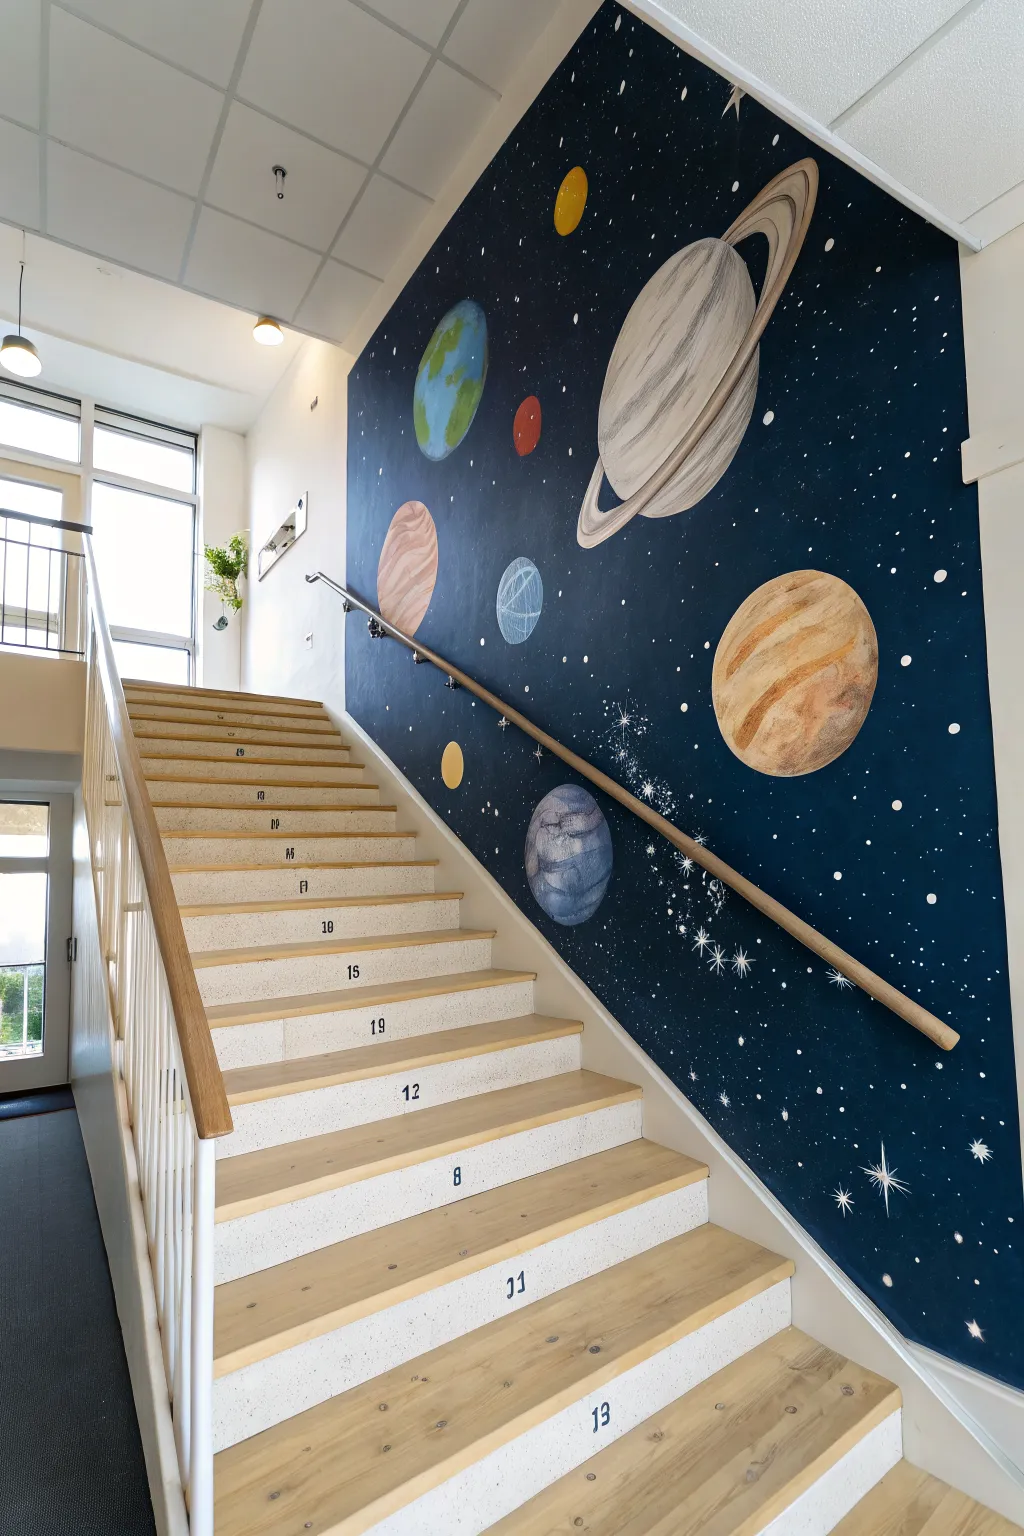
Transform an ordinary stairwell into an educational journey through the cosmos with this stunning solar system mural. The deep navy backdrop contrasts beautifully with vibrant, hand-painted planets, creating a sense of depth and wonder as students ascend the steps.
Step-by-Step Guide
Materials
- Navy blue interior semi-gloss latex paint (base)
- Acrylic craft paints (titanium white, ochre, terra cotta, burnt sienna, cerulean blue, hooker’s green, yellows, purple)
- Wide wall paint roller and tray
- Assorted synthetic brushes (1-inch flat, #4 round, #0 detail liner)
- Painter’s tape
- Chalk or pastel pencil (white)
- Circle templates (various sizes like mixing bowls or lids)
- Sponge (sea sponge or synthetic)
- Wooden handrail (if not already installed)
- Polyurethane clear coat (water-based)
Step 1: Setting the Stage
-
Prep the Area:
Begin by masking off the ceiling line, the adjacent wall, and the stringer (the trim right next to the stairs) with painter’s tape. Lay down drop cloths on the stairs to protect the treads. -
Apply the Base Coat:
Roll on the deep navy blue latex paint. This large expanse may need two coats for a solid, opaque finish that looks like deep space. Allow it to dry fully, ideally overnight. -
Plan the Composition:
Stand back and visualize where the planets will flow. I like to sketch the layout lightly directly on the dry blue wall using white chalk. This makes it easy to wipe away mistakes. -
Outline the Orbs:
Use household items like mixing bowls, lids, or plates as stencils to trace perfect circles for your planets using your chalk.
Galaxy Glazing
Mix glazing medium with your acrylics. This makes the paint translucent, allowing you to layer cloud bands on gas giants without hiding the colors underneath.
Step 2: Painting the Planets
-
Block in Base Colors:
Using a 1-inch flat brush, fill in the circles with their dominant base colors—terra cotta for Mars, pale yellow-white for Saturn, and light blue for Uranus. -
Detailing Jupiter:
For the largest gas giant, mix ochre, white, and burnt sienna. Paint horizontal bands while the paint is slightly wet to blend them softly, mimicking Jupiter’s iconic storms. -
Painting Earth:
Start with a blue circle, then dab on green continents using a smaller round brush. Add swirls of white cloud cover on top to give the planet a realistic atmosphere. -
Creating Texture:
For rocky planets like Mars or Mercury, use a sea sponge. Dip it in a slightly lighter shade than your base color and dab it gently to create crater-like textures. -
Saturn’s Rings:
Draw the rings with your chalk first to get the ellipse angle right. Paint the rings using long, confident strokes of pale beige and grey, ensuring the planet appears to sit ‘inside’ the rings. -
Adding Depth:
Determine a light source direction (usually from the top). Glaze a thin shadow of diluted black or dark purple on the bottom-left of every planet to make them look spherical.
Step 3: Galactic Details
-
The Milky Way:
Mix a very watery white or silver paint. Using an old toothbrush or a stiff bristle brush, flick tiny speckles across the diagonal center of the wall to create a dense cluster of distant stars. -
Major Stars:
With your smallest liner brush and pure white paint, add specific larger stars. Paint a small dot, then pull four quick, thin lines outward to create a twinkling starburst effect. -
Constellation Lines:
If desired, connect specific star dots with very thin, faint white lines to represent constellations relevant to your science curriculum. -
Sealing the Artwork:
Since this is a high-traffic stairway, apply a coat of water-based clear polyurethane over the painted planets once they are fully cured to protect them from scuffs.
Glow Up
Trace over the white starbursts and constellation lines with invisible glow-in-the-dark paint. The mural will reveal a secret hidden galaxy when the lights go out.
Step 4: Finishing the Stairs
-
Numbering the Risers:
Using stencils or vinyl decals, apply numbers to the center of each stair riser. This is great for younger students practicing counting. -
Install the Handrail:
Reattach your wooden handrail. Ensure the brackets are securely screwed into studs, positioning the rail so it cuts across the mural without obscuring the main planetary features.
Now you have an inspiring ascent that combines art and science in every step
Human Body Systems Wall
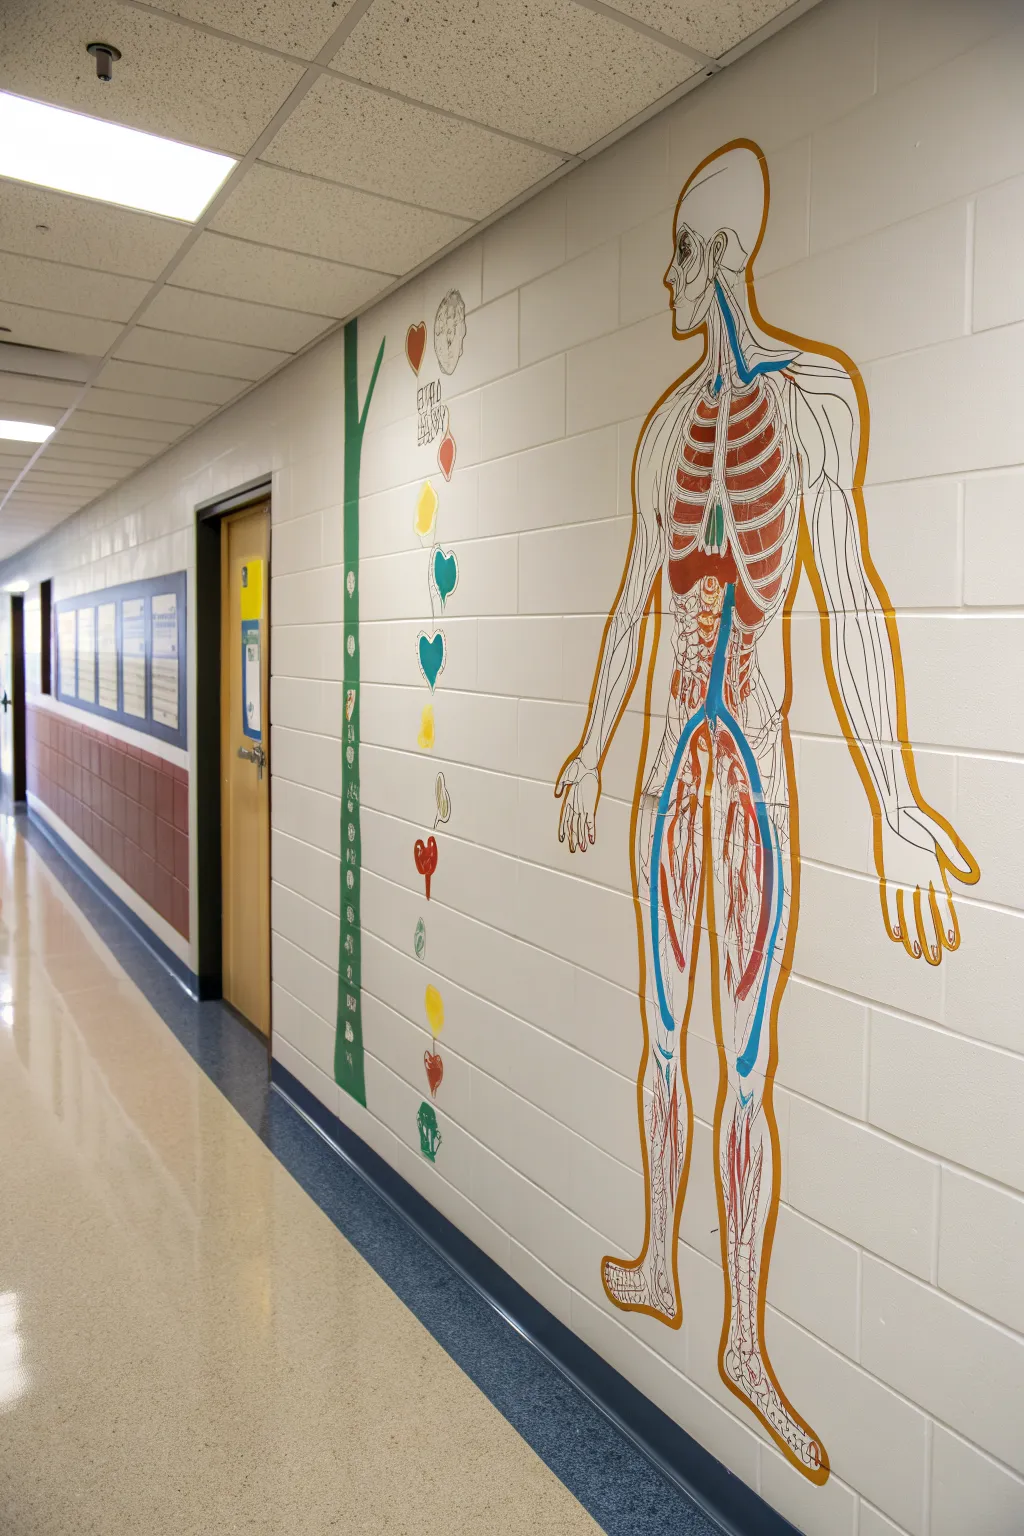
Transform a plain corridor into an interactive biology lesson with this striking, large-scale anatomical mural. Featuring a stylized human body system and a whimsical vertical growth chart, this wall art combines educational value with clean, graphic lines.
Detailed Instructions
Materials
- Interior acrylic latex paint (white, tan/gold, red, blue, green, yellow)
- Wide painter’s tape
- Pencil and eraser
- Overhead projector (optional but recommended)
- Transparency film with anatomy diagram (if using projector)
- Assorted paintbrushes (1-inch flat, medium round, fine liner)
- Small roller and tray
- Drop cloth
- Ladder or step stool
- Yardstick or long level
Step 1: Preparation and Mapping
-
Clean the surface:
Begin by wiping down the cinder block wall with a damp cloth to remove dust and grime. Let it dry completely to ensure the paint adheres properly. -
Project the outline:
Set up your overhead projector to cast the image of the human body onto the wall. Adjust the distance until the figure is approximately life-size or slightly larger, fitting vertically between the floor and ceiling tiles. -
Trace the main figure:
Using a pencil, lightly trace the entire outline of the body, including the internal details like the ribcage, spine, and major arteries. Don’t worry about perfection; pencil marks can be painted over. -
Map the vertical elements:
To the left of the body, use a yardstick or long level to draw a straight vertical line for the vine element. Sketch small leaf shapes and heart/organ icons at regular intervals going up this line.
Step 2: Painting the Anatomy
-
Outline the body silhouette:
Load a medium round brush with the tan or gold paint. Carefully paint the thick outer contour of the human figure. This creates the container for your anatomical details. -
Fill the ribcage:
Switch to red paint. Inside the chest cavity area, paint the horizontal curves of the ribs. Use a steady hand to keep the lines relatively consistent in thickness. -
Add the spine:
Using white or light grey paint, fill in the spinal column structure running down the center back. It doesn’t need to be photo-realistic; a stylized blocky representation works well on cinder block. -
Paint the major organs:
Block in the shapes of the lungs and liver with red and darker red-brown tones. I find it helps to do two thin coats here rather than one thick one to cover the texture of the blocks. -
Detail the circulatory system:
Using a fine liner brush and blue paint, draw the veins running from the heart area down towards the legs. Repeat this process with red paint for the arteries. -
Add the arm and leg muscles:
With a thin brush and black or dark grey paint, add the striation lines in the arms and legs to suggest muscle fibers. Keep these lines thin and directional. -
Define the hands and feet:
Complete the extremities by outlining the finger and toe bones within the tan silhouette. Simple lines are effective here.
Fixing “Bleeding” Lines
Cinder blocks are porous. If paint bleeds into the pores, let it dry, then use the wall’s base color to “cut in” and sharpen the edges again.
Step 3: The Growth Vine & Details
-
Paint the main stem:
Using green paint and a 1-inch flat brush, paint the long vertical stem you traced earlier. Make it solid and bold. -
Add the tiered icons:
Moving up the vine, paint the small icons you sketched. Alternate colors like yellow, teal, and red for the hearts and abstract organic shapes. -
Add detail to the icons:
Once the base colors for the icons are dry, use a fine liner brush to add tiny outlines or internal details to the hearts and leaves to make them pop. -
Incorporate text:
If your design includes labels or names near the vine (like the faint text seen in the reference), carefully hand-letter them now using a very small brush or paint marker. -
Clean up edges:
Step back and inspect your work. Use a small brush with the wall’s original base color (likely white or off-white) to touch up any drips or wobbly lines on the exterior. -
Seal the mural (optional):
In a high-traffic hallway, consider applying a coat of clear, matte geometric varnish over the painted areas once fully cured to protect against scuffs.
Level Up: Interactive Labels
Paint the organ sections with magnetic primer before the color coat. This lets teachers stick magnetic labels on the body for quizzes.
Now you have an educational masterpiece that brightens the hall and sparks curiosity about the human body

PENCIL GUIDE
Understanding Pencil Grades from H to B
From first sketch to finished drawing — learn pencil grades, line control, and shading techniques.
Explore the Full Guide
History Timeline Band Mural
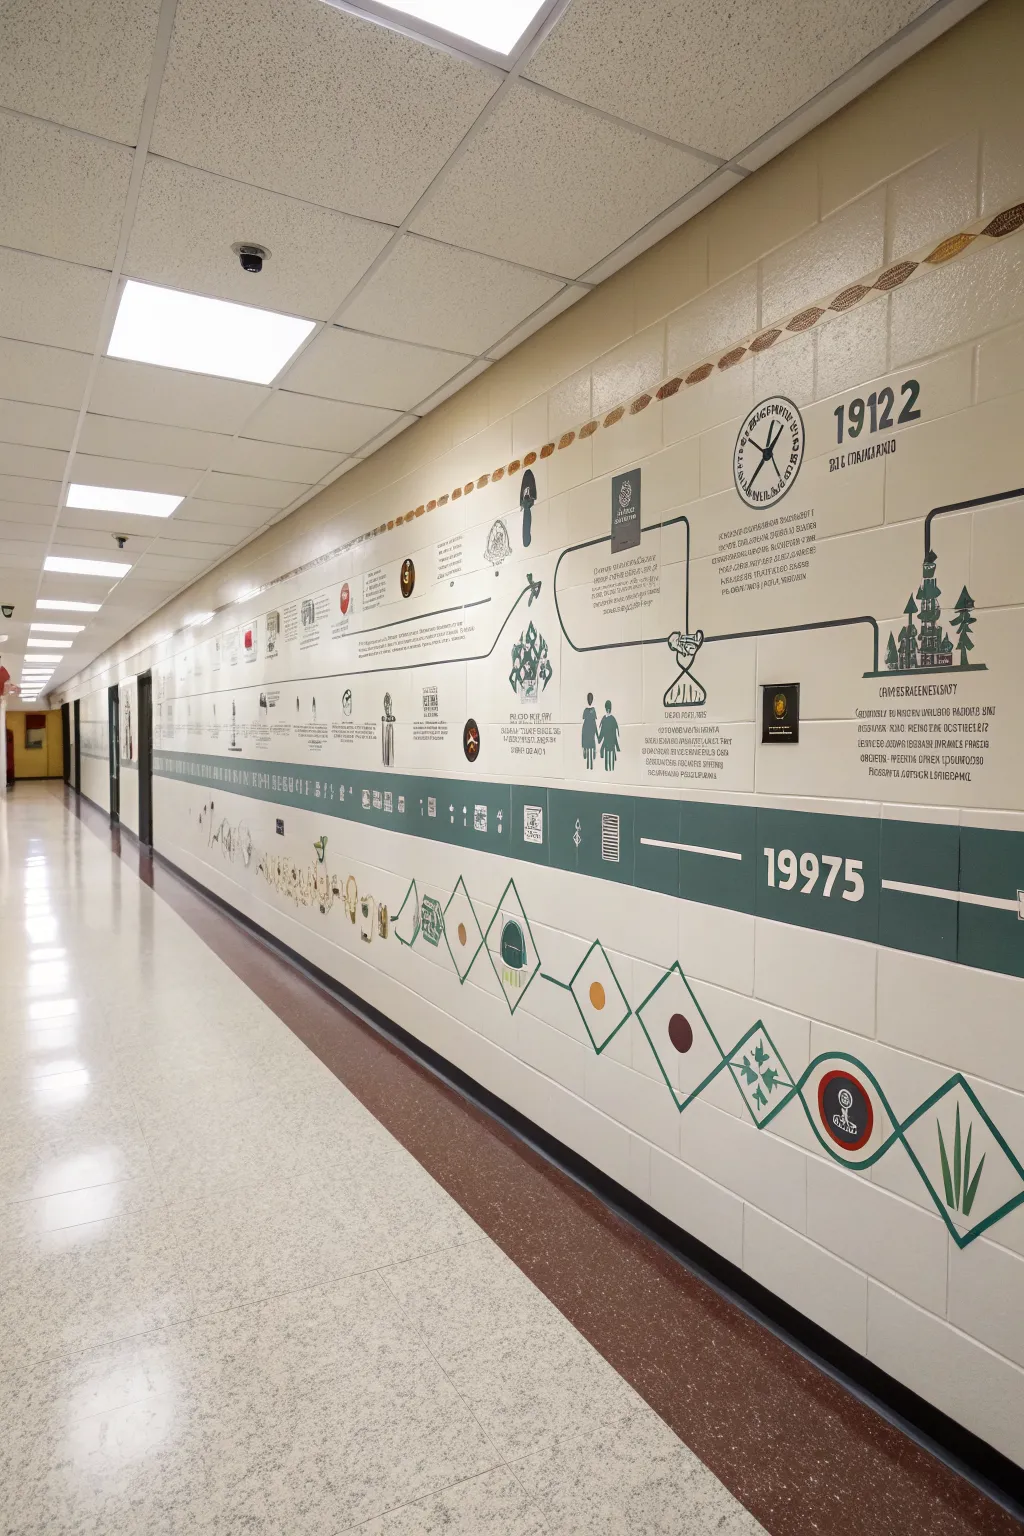
Transform a long, plain hallway into an engaging educational journey with this structured history timeline mural. Featuring clean lines, silhouette iconography, and a cohesive color palette, this project turns cinder block walls into a storybook of events.
Detailed Instructions
Materials
- Latex interior wall paint (Beige/Cream base)
- Acrylic mural paints (Dark Green, Red, Black, Gold)
- Painter’s tape (various widths including 1-inch and 2-inch)
- Laser level (highly recommended for long halls)
- Chalk line or graphite transfer paper
- Stencils for lettering and numbers
- Assorted synthetic brushes (sizes 0 to 12)
- Ruler and yardstick
- Projector (optional but helpful for icons)
- Clear matte varnish (for high-traffic protection)
Step 1: Preparation & Base Layout
-
Clean and prime:
Begin by thoroughly cleaning the wall surface to remove dust and handprints. If the current paint is glossy or dark, apply a coat of primer to ensure your beige base coat adheres well. -
Apply base color:
Roll on two coats of a warm beige or cream latex paint across the entire mural area. Let this cure for at least 24 hours so your tape won’t peel it off later. -
Establish the horizon line:
Using a laser level, mark a continuous horizontal line about waist-height down the hallway; this will become the top edge of your main green band. Use a chalk line to snap this guide if a laser isn’t available. -
Tape the main band:
Run painter’s tape along your guide line. Measure down approximately 12 inches (or one cinder block height) and tape a parallel line to define the thick bottom band.
Step 2: Blocking Colors & Structure
-
Paint the foundation band:
Fill in the taped area with a deep forest green acrylic or latex paint. I usually apply two thin coats rather than one thick one to prevent drips in the grout lines. -
Map out the timeline flow:
Once the green band is dry, remove the tape. Lightly sketch a flowing, connecting black line above the green band that dips and rises to connect different ‘events.’ Use a yardstick for the straight sections. -
Draw the diamond grid:
Below the green band, measure equal intervals to draw a series of connecting diamond shapes. Use the cinder block mortar lines as a grid guide to keep them symmetrical. -
Paint the geometric accents:
Outline the diamonds in green. Fill selected diamonds with accent icons or solid colors (red, gold, green) to create a rhythm along the base of the wall.
Pro Tip: Cinder Block Success
When painting on textured block, use a stiff-bristled brush to ‘jab’ paint into the tiny pits and pores before smoothing it out, ensuring solid coverage without white spots.
Step 3: Typography & Iconography
-
Position the dates:
Place your large year stencils (e.g., ‘1975’) directly onto the green band or floating just above it. Use a level to ensure the numbers are perfectly upright. -
Stipple the numbers:
Using a stencil brush and white or cream paint, use a dry-brush stippling motion to fill in the dates. This prevents paint from bleeding under the stencil edges. -
Project the detailed icons:
For the intricate illustrations (like the castle, figures, or logos), project the images onto the wall at the desired timeline points. Trace the outlines lightly with a pencil. -
Fill in silhouettes:
Using a small number 2 or 4 round brush and black paint, carefully fill in the traced icons. Keep the edges sharp. For the text blocks, I prefer using a black permanent paint marker for legibility. -
Add connecting elements:
Paint the black ‘path’ line connecting your icons to the main timeline. Add small arrows or nodes where specific events branch off.
Troubleshooting: Bleeding Tape
If paint bleeds under your tape on the uneven surface, paint over the tape edge with your BASE wall color first to seal it, then apply your green stripe.
Step 4: Finishing Touches
-
Create the top border:
Near the ceiling, stencil or freehand a simple repeating pattern (like a rope or dashed line) in gold or brown to frame the top of the mural. -
Detail the ‘white noise’:
Add the faint, smaller text blocks or ‘secondary history’ notes in a lighter grey or smaller font size for curious readers who get close to the wall. -
Clean up lines:
Walk the length of the hall with a small brush and your original wall color. Touch up any spots where the green bled or where pencil lines are still visible. -
Seal the work:
Once fully cured (wait 48 hours), apply a clear matte water-based varnish over the painted areas, especially the lower sections that might get scuffed by backpacks.
Step back and admire how your hallway now tells a story with every step you take
Diverse Students Playing Silhouettes

Transform a plain school courtyard wall into a celebration of diversity and play with this striking high-contrast mural. Using a limited palette of blues and creams, you’ll create dynamic silhouettes of children engaging in various activities against a stylized sky.
Step-by-Step Guide
Materials
- Exterior masonry primer
- Exterior acrylic latex paint (Cream/Off-white for the middle sky)
- Exterior acrylic latex paint (Light Blue for the upper sky)
- Exterior acrylic latex paint (Navy Blue for shadows and deep ground)
- Exterior acrylic latex paint (Medium Blue/Slate for silhouettes)
- Projector (optional but recommended)
- Chalk or watercolor pencils for sketching
- Painter’s tape (various widths)
- Large rollers and extension poles
- Angled sash brushes (2-inch and 3-inch)
- Small artist brushes for details
- Drop cloths
- Ladder or scaffolding
Step 1: Preparation and Base Layer
-
Clean the surface:
Begin by thoroughly cleaning the exterior wall to remove dirt, dust, and loose debris. A pressure washer works best for large masonry surfaces like this. -
Prime the wall:
Once the wall is completely dry, apply a generous coat of exterior masonry primer. This ensures your colors will be vibrant and long-lasting against the elements. -
Map out the horizon:
Using chalk, draw a rough, wavy line about one-third of the way up the wall to designate the separation between the dark foreground and the lighter sky area. -
Paint the upper sky:
Roll the Light Blue paint onto the top section of the wall. Bring this color down past where your cloud line will eventually be to ensure full coverage. -
Apply the middle band:
Paint the large middle section with your Cream/Off-white color. You don’t need a hard edge where it meets the blue; a soft blend or overlapping strokes work fine here since clouds will cover the transition.
Pro Tip: Grid Method
No projector? Draw a grid on your reference image and a matching chalk grid on the wall. Transfer the design square by square for perfect scale without electronics.
Step 2: Creating the Background Scene
-
Draft the clouds:
With the base colors dry, sketch the large, billowing cloud shapes that separate the blue sky from the cream band. Use large, rounded organic curves. -
Refine the sky edge:
Use an angled brush to carefully cut in the Light Blue paint along the top edge of your cream cloud shapes, creating a crisp, defined boundary between the two sky zones. -
Paint the foreground:
Fill the bottom third of the wall with the Deep Navy Blue. Create a rolling hill effect for the top edge of this section, providing a ground for your figures to stand on. -
Add vegetation accents:
While the navy paint is fresh, or after it dries, hand-paint simple grass sprigs and small plants along the bottom edge using a lighter green or the cream color for contrast.
Troubleshooting: Drips
If paint drips down the wall, don’t wipe it while wet! Let it dry completely, sand the bump gently, then touch it up with the background color for an invisible fix.
Step 3: Painting the Silhouettes
-
Project the design:
Set up a digital projector in the evening to cast the image of the children and trees onto the wall. This is the easiest way to get accurate proportions for the figures. -
Trace the outlines:
Trace the projected silhouettes with chalk or a pencil. Pay close attention to the details of the cricket bat, the ball, and the tree branches. -
Outline in paint:
Using a smaller brush and the Medium Blue/Slate paint, carefully outline the figures of the children and the trees. Step back occasionally to check your lines. -
Fill the figures:
Fill in the bodies of the children and the trees with the Slate Blue paint. Use a small roller for the larger body areas and a brush for limbs and edges. -
Detail the tree:
For the tree on the left, ensure the branches taper naturally. I like to twist the brush slightly at the ends of branches to get a more organic look. -
Add the palm tree:
Paint the palm tree silhouette on the right side. Use quick, outward strokes to mimic the feathery texture of palm fronds.
Step 4: Final Touches
-
Add the playful elements:
Paint the ball mid-air and the small bird silhouette near the top using the Navy Blue or Slate color. Ensure the bird’s wings look like they are in motion. -
Create the horizon line:
Run a thin, meandering line of Navy Blue horizontally behind the figures to suggest a distant landscape or fence line, connecting the figures visually. -
Touch up edges:
Walk along the wall with a small brush and your background colors (Cream and Blue) to clean up any drips or messy edges on the silhouettes. -
Seal the mural:
Apply a clear, non-yellowing UV-resistant topcoat over the entire mural to protect it from sun fading and weather damage.
Now your school yard has a permanent reminder of the joy of inclusive play


Gym Movement and Teamwork Wall
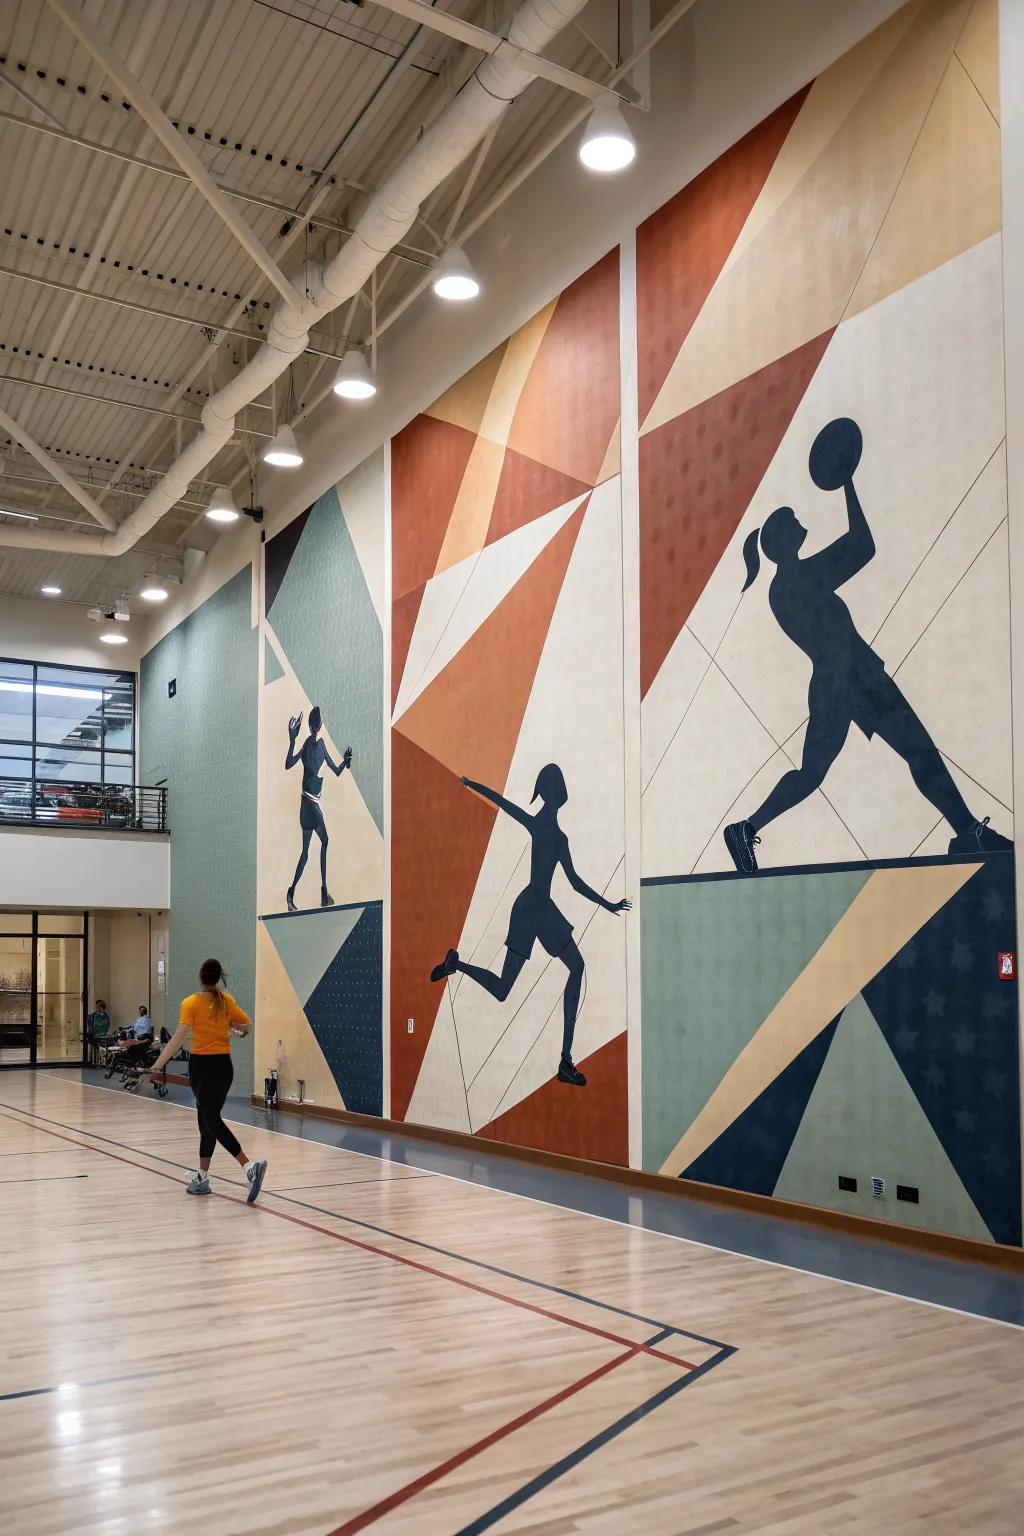
Transform a large gymnasium wall into a dynamic celebration of movement with this geometric mural. The design features bold athlete silhouettes set against a backdrop of intersecting triangles and angular shapes in a sophisticated, earthy palette.
How-To Guide
Materials
- Interior latex paint (various earth tones: terracotta, sage green, beige, navy, off-white)
- Painter’s tape (high-quality edging tape)
- Laser level or chalk snap line
- Extension ladder or scaffolding
- Paint rollers (9-inch and 4-inch sizes)
- Extension poles for rollers
- Angled sash brushes (2-inch)
- Projector
- Computer or tablet with athlete silhouette images
- Pencil or white chalk
- Drop cloths
Step 1: Planning and Surface Prep
-
Assess the space:
Begin by measuring the full dimensions of your wall. This design works best on tall, wide surfaces like a gym, divided into three or more vertical panels or sections. -
Mock up the design:
Create a digital or paper sketch. Divide your space into large geometric zones using diagonal lines. Plan for where your athlete silhouettes will ‘live’ within these shapes to ensure they aren’t cut off awkwardly. -
Prepare the wall:
Clean the wall thoroughly to remove dust and gym grime. Patch any holes and apply a primer if painting over a dark color or bare drywall. -
Protect the area:
Lay down heavy-duty drop cloths along the entire base of the wall to protect the gym floor from drips and splatters.
Step 2: Geometric Background
-
Mark the major lines:
Use a laser level or a chalk snap line to mark the large vertical divisions and the primary diagonal lines that form the background triangles. -
Tape the first color zones:
Apply painter’s tape along the *outside* specific shape lines you want to paint first. Remember, you can’t paint adjacent shapes simultaneously because the tape needs to overlap dry paint. -
Seal the tape edges:
Press the tape down firmly. I like to paint a very thin layer of the *base wall color* (or clear matte medium) over the tape edge first; this prevents the new color from bleeding under. -
Paint the first shapes:
Using a roller, fill in the first set of non-touching geometric shapes. Use your earthy palette—terracotta, sage, and beige. Apply two coats for solid coverage. -
Remove tape and dry:
Pull the tape off while the second coat is still slightly tacky to get the sharpest line. Let these sections dry completely—usually at least 24 hours—before taping over them. -
Tape and paint remaining shapes:
Once the first shapes are cured, tape off the remaining adjacent triangles. Repeat the painting process with your contrasting colors like navy blue or off-white.
Clean Lines Secret
When painting geometric shapes, always peel the tape away at a 45-degree angle while the paint is still wet. This prevents the dried paint ‘skin’ from ripping.
Step 3: Adding the Silhouettes
-
Set up the projector:
Position your digital projector so it casts the image of the first athlete (e.g., the basketball player) onto the desired section of the wall. -
Trace the outline:
Standing on your ladder or lift, carefully trace the outline of the projected silhouette using a pencil or white chalk. Ensure the scale feels heroic and fills the panel nicely. -
Repeat for all figures:
Move the projector to the next section and trace your runner, volleyball player, or other athletes. Turn off the projector periodically to check your composition. -
Outline with a brush:
Using a small, angled sash brush and your darkest paint color (navy or black), carefully cut in the edges of the silhouette. Keep a steady hand for these curves. -
Fill the silhouettes:
Once the edges are defined, use a small 4-inch roller to fill in the body of the silhouette. This ensures a consistent texture that matches the rest of the wall. -
Add subtle details:
If your design includes subtle stars or patterns within the dark geometric sections (like in the lower right of the example), use a stencil and a slightly lighter sheen or shade of the same color to add them now. -
Final touches:
Inspect the wall for any paint bleeds or uneven spots. Use a small artist’s brush to touch up lines where shapes intersect or where the silhouette meets the background.
School Spirit Level-Up
Instead of generic silhouettes, take photos of actual student athletes from the school in action poses and use those as the source material for the projections.
Step back and admire how the intersecting lines and active figures bring a powerful energy to the entire gymnasium
Music Hall Rhythm and Notes
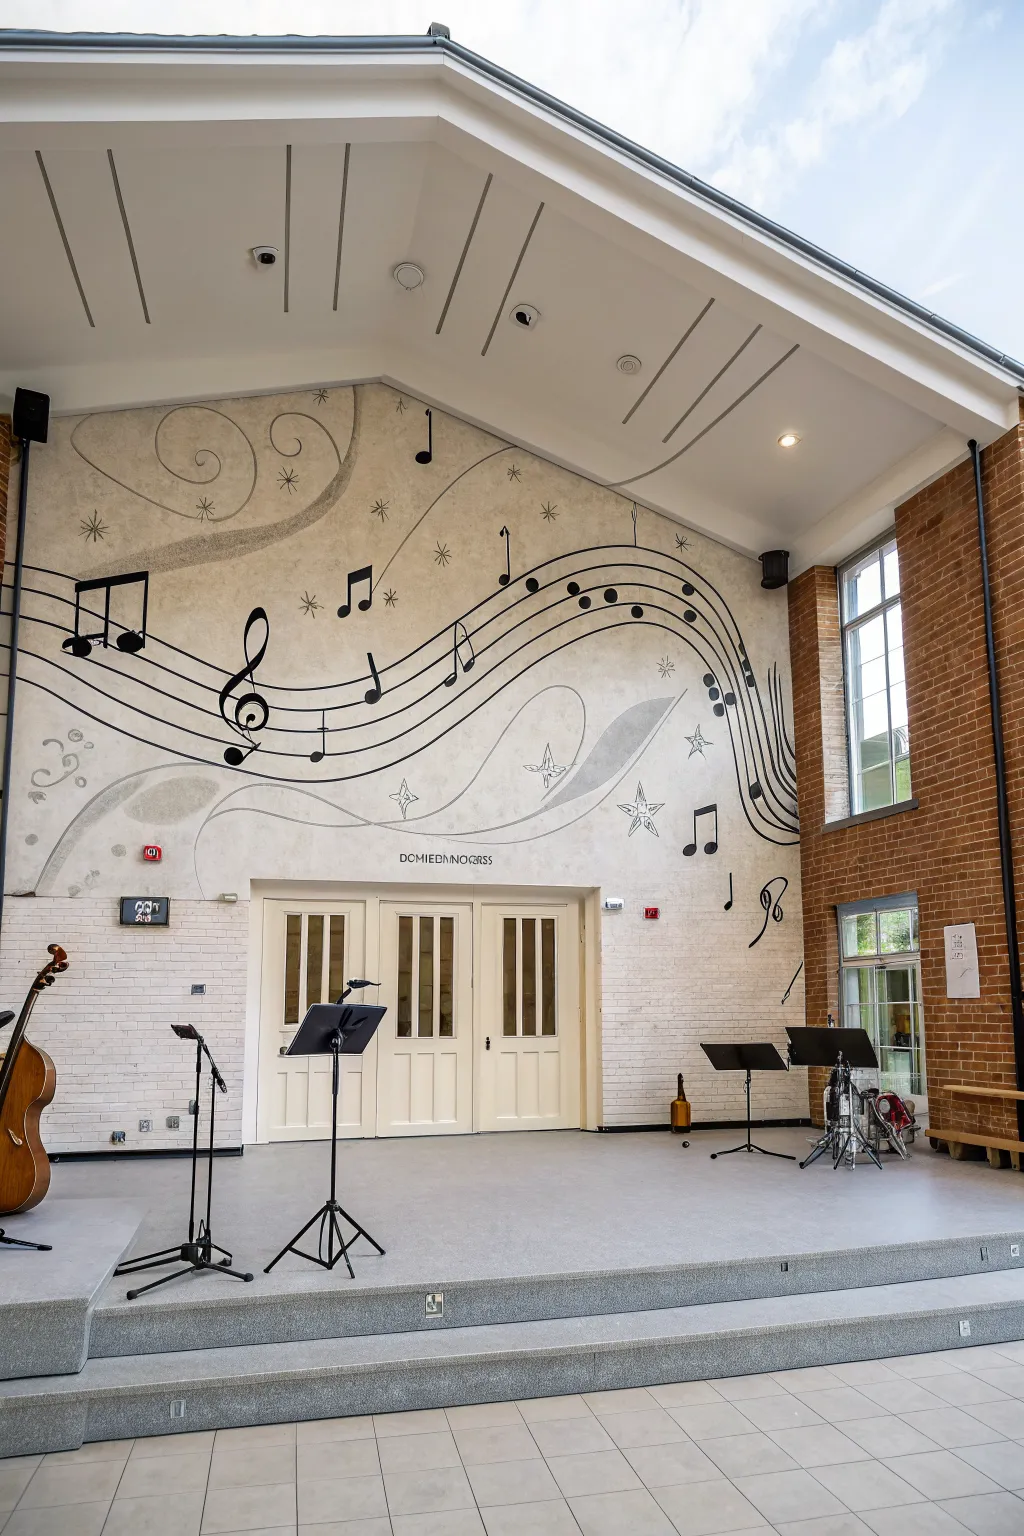
Transform a plain performance space into a visual melody with this dynamic, large-scale mural that captures the flow of music. Using a monochromatic palette and bold line work, you’ll create sweeping staves and dancing notes that seem to echo the sounds of the room.
Detailed Instructions
Materials
- Interior latex shimmering/pearlescent base paint (cream or off-white)
- Black high-gloss acrylic paint
- Pencil and large erasers
- Digital projector
- Laptop or tablet with mural design file
- Painter’s tape and drop cloths
- Ladder or scaffolding
- Assorted round brushes (sizes 4, 8, and 12)
- Small roller (4-inch) with foam cover
- Wide flat brush (2-inch) for sweeping effects
- Silver or grey metallic paint for accents
- Level and chalk line
Step 1: Preparation and Base Coat
-
Prep the Surface:
Begin by cleaning the wall thoroughly to remove dust and grease, patching any holes or imperfections to ensure a smooth canvas. -
Protect the Area:
Apply painter’s tape along the ceiling line, floor trim, and around the door frames. Lay down drop cloths to protect the stage flooring. -
Apply the Shimmer Base:
Roll on two coats of the pearlescent cream base paint. This subtle shimmer gives the background depth and mimics the feeling of sound waves. -
Let it Cure:
Allow the base coat to dry completely for at least 24 hours. A fully cured surface is crucial so your pencil sketching doesn’t gouge the paint later.
Clean Curves Secret
For long curved staff lines, don’t rely just on your wrist. Use a flexible strip of trim or PVC molding as a physical guide while you paint the curve.
Step 2: Drafting the Design
-
Set Up Projection:
Given the scale and height of this wall, use a digital projector to cast your musical staff design onto the surface. Adjust the projector angle until the image fits perfectly across the wall’s peak. -
Trace the Outlines:
Standing on your ladder or scaffold, lightly trace the projected lines with a pencil. Focus on the main five lines of the staff effectively first. -
Mark Note Locations:
Outline the positions of the treble clef, music notes, and the decorative stars. Don’t fill them in yet; just capture the perimeter shapes. -
Check Without Projection:
Turn off the projector and step back to view the pencil lines. I like to check at this stage to ensure the flow looks natural and make minor hand-adjustments if the projection was slightly distorted.
Level Up: 3D Elements
Mount painted wooden quarter notes or stars on small stand-off blocks over the mural to cast real shadows and add physical depth to the artwork.
Step 3: Painting the Staff and Notes
-
Paint the Staff Lines:
Using a size 8 round brush and high-gloss black paint, carefully paint the long, sweeping lines of the musical staff. Keep your hand steady and break the lines only where notes will overlap. -
Define the Treble Clef:
Paint the large treble clef on the left side. Use a thicker brush for the main downward stroke to give it weight, tapering to a thinner line for the swirled top. -
Fill the Note Heads:
Switch to a small round brush to fill in the oval heads of the music notes. Ensure the edges are crisp and the black is opaque. -
Add Stems and Flags:
Connect the note heads to the staff lines with vertical stems. For the eighth and sixteenth notes, paint the flags with a fluid, slightly curved stroke to suggest movement. -
Refine Edges:
Go back over any shaky lines with a small detail brush to sharpen the artwork. The contrast between the black paint and the shimmer wall needs to be very sharp.
Step 4: Adding Motion and Detail
-
Create Grey Swirls:
Mix a small amount of black into your metallic silver paint to create a soft grey. Paint the large, swooping ribbon-like shapes behind and around the staff to visually connect the elements. -
Add Starbursts:
Using a thin liner brush and the original black paint, draw the delicate eight-pointed stars and asterisks scattered throughout the composition. -
Paint Translucent Effects:
For the shadowy, ribbon-like swirls near the bottom left, dilute your grey paint with a glazing medium. Apply this in broad, sweeping strokes to create a sense of transparency. -
Placement of Text:
If adding the dedication text above the door like in the example, use stencils and a pouncer brush with black paint to ensure uniform lettering. -
Final Inspection:
Remove the painter’s tape carefully. Inspect the wall from the furthest point in the room to ensure the ‘melody’ reads clearly from a distance.
Step back and enjoy the visual music you have created on what was once a silent wall
Art Room Color Wheel Feature
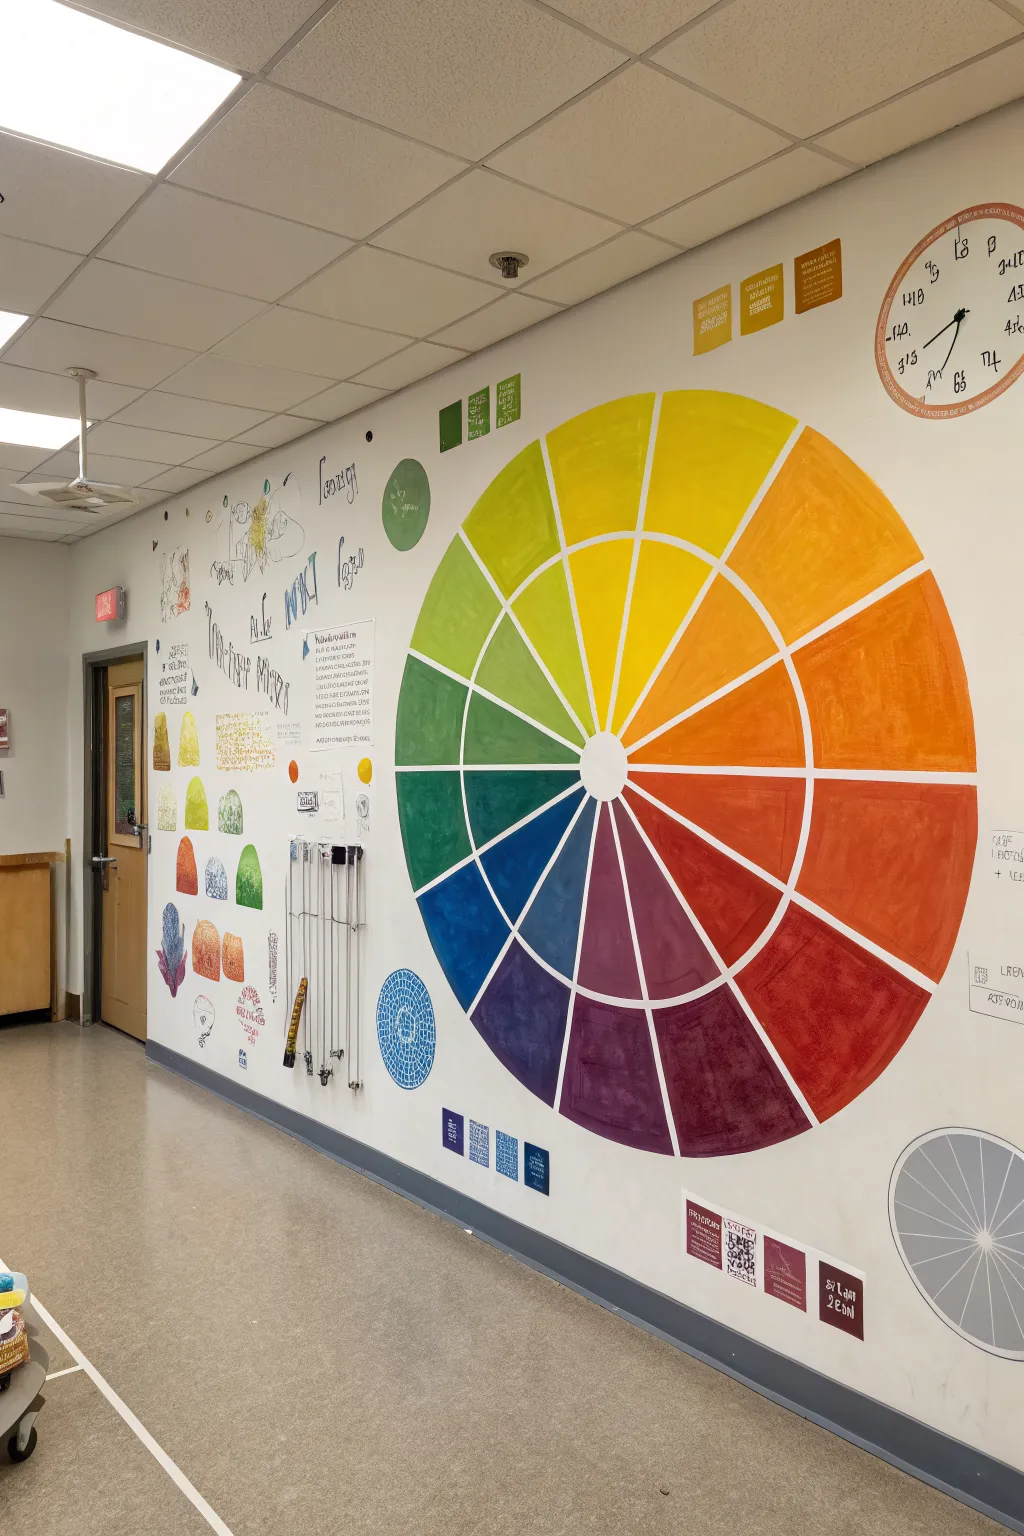
Transform a blank classroom wall into a functional and vibrant learning tool with this massive color wheel mural. This project combines geometric precision with loose, painterly texture to create an eye-catching reference point that helps students understand color theory at a glance.
Step-by-Step
Materials
- Interior semi-gloss or satin wall paint (white base)
- Acrylic mural paints or heavy body acrylics (Primary Red, Primary Yellow, Primary Blue)
- Painter’s tape (various widths, 1-inch and 0.5-inch)
- Pencil
- String and pushpin (for makeshift compass)
- Yardstick or long straight edge
- Assorted flat brushes (1-inch to 3-inch)
- Mixing containers or palatte paper
- Ladder or step stool
- Eraser
- Drop cloth
Step 1: Preparation & Grid
-
Prepare the surface:
Begin by ensuring the wall is clean and free of dust. If the wall isn’t already white, apply a fresh coat of white interior primer or paint to ensure your colors pop vividly. -
Mark the center:
Determine the desired height and center point for your wheel. Mark this spot clearly with a pencil; this will be the anchor for your compass. -
Draw the circles:
Tie a string to a pencil. Pin the other end to your center mark. Adjust the string length to draw three concentric circles: a small inner circle for the core, a middle ring, and a large outer ring defining the wheel’s edge. -
Divide into wedges:
Using a yardstick and a protractor (or careful estimation), divide your circle into 12 equal wedges (30 degrees each). Draw straight lines radiating from the center point to the outer edge. -
Tape the structure:
Thoroughly tape off all your pencil lines. For the cleanest look, tape outside the lines for the wedges so the white negative space remains consistent. Use narrower tape for the concentric circle divides if you want thinner separation lines.
Seal the Deal
Before applying color, paint a thin layer of your base wall color (white) over the tape edges. This seals the tape and ensures perfectly crisp lines.
Step 2: Mixing & Painting
-
Mix primary colors:
Pour out your pure Primary Red, Yellow, and Blue. These will go into the three equidistant wedges on your wheel (12 o’clock, 4 o’clock, 8 o’clock positions relative to standard color theory placement). -
Mix secondary colors:
Combine equal parts of your primaries to create Orange, Green, and Violet. Place these directly between the primary wedges. -
Create tertiary colors:
Mix your remaining intermediaries (Red-Orange, Yellow-Green, etc.) by combining a primary with its neighboring secondary color. -
Paint the outer ring:
Start painting the outermost ring wedges first. Use a broad, flat brush and apply the paint somewhat loosely to create visible brushstrokes and texture, rather than a perfectly flat coat. -
Paint the middle ring:
Move to the middle ring. Here, add a tiny touch of white (tint) or the complementary color (tone) if you wish to show variation, or simply continue the pure hue. Maintain that textured, painterly application. -
Paint the inner ring:
Finish with the innermost wedges. I prefer to use a slightly smaller brush here to ensure I don’t accidentally bridge the taped gap near the center circle. -
Seal the tape edges:
Before walking away, do a quick check for thick globs of paint on the tape and smooth them out to prevent peeling issues later.
Step 3: Finishing Touches
-
Let it dry:
Allow the paint to dry until it is dry to the touch, usually about an hour depending on humidity and paint thickness. -
Remove tape:
Carefully peel back the painter’s tape at a 45-degree angle. Do this slowly to ensure crisp, clean white lines between your colorful wedges. -
Touch up:
Use a small detail brush and white paint to tidy up any spots where color might have bled under the tape. -
Add surrounding elements:
Use stencils or freehand painting to add supplementary diagrams like the greyscale wheel (bottom right) or color mixing charts (left side) as seen in the inspiration image.
Interactive Element
Paint the wedges with dry-erase clear coat or chalkboard paint (tinted to match). This lets you write notes directly on the color wheel during lessons.
Step back and admire how this massive splash of color instantly energizes the entire room
Wayfinding Color Zones in Hallways
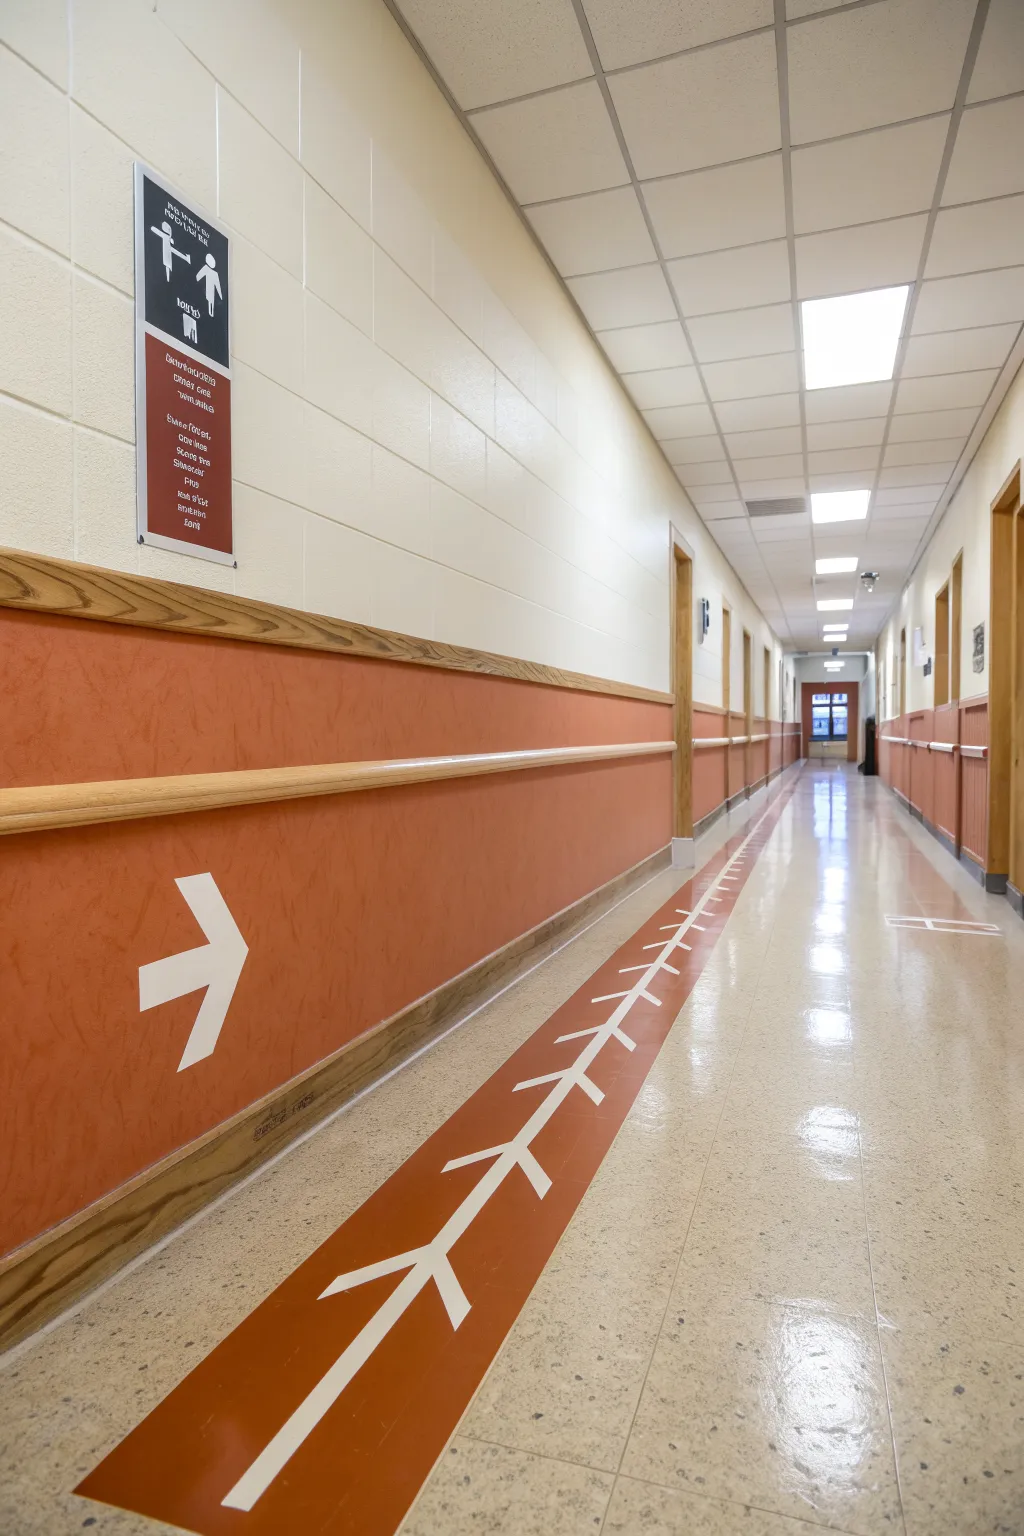
Transform a standard corridor into an intuitive navigation tool with this bold two-tone wall treatment featuring directional floor graphics. This project combines warm terracotta tones with crisp cream upper walls to create a visual anchor that guides students and visitors effortlessly through the space.
Step-by-Step Tutorial
Materials
- Cream/off-white interior semi-gloss latex paint
- Terracotta/burnt orange interior semi-gloss latex paint
- Heavy-duty floor marking tape (burnt orange/terracotta)
- Heavy-duty floor marking tape (white)
- Painter’s tape (multi-surface)
- Drop cloths
- Paint rollers and extension poles
- Angled sash brush (2.5 inch)
- Wooden chair rail molding
- Wooden handrail kit (rounded profile)
- Mounting brackets for handrail
- Level (4-foot or laser level)
- Measuring tape
- Pencil
- White vinyl wall decal (large arrow) or stenciling supplies
- Finish nails/nail gun
- Wood stain and polyurethane (optional, for molding)
Step 1: Wall Preparation and Base Coat
-
Prepare the workspace:
Clear the hallway of any movable furniture or obstacles. Lay down drop cloths to protect the entire floor span, securing edges with painter’s tape. -
Establish the horizon line:
Using a measuring tape, determine the height for your color transitions. A standard chair rail height is usually between 32 to 36 inches from the floor. Mark this height at intervals along the wall. -
Paint the upper wall:
Apply the cream-colored paint to the upper portion of the wall. Extend the paint slightly below your measured line to ensure full coverage behind the future chair rail. Allow this coat to dry completely.
Sticky Situation?
If floor tape lifts at the edges after a few days, the floor likely had wax residue. Clean the area with isopropyl alcohol before reapplying a fresh strip.
Step 2: Installing the Color Block
-
Define the separation:
Once the top coat is dry, snap a chalk line or use a laser level to mark the exact horizontal line for the color split. -
Apply the lower color:
Roll the terracotta/burnt orange paint onto the lower section of the wall. Use an angled sash brush to cut in carefully along the baseboards and corners. Two coats are usually necessary for this depth of color. -
Install the chair rail:
Measure and cut your wooden chair rail molding to fit the length of the hallway. Secure it directly over the transition line using a nail gun and finish nails, covering the seam between the two paint colors. -
Mount the handrail:
Locate studs in the wall using a stud finder. Mark positions for the handrail brackets at a comfortable height (typically 34-38 inches). Mount the brackets securely into the studs. -
Attach the rail:
Secure the rounded wooden handrail to the mounted brackets. Ensure the wood is sanded smooth and sealed with polyurethane or stain before installation to prevent splinters.
Step 3: Applying Directional Graphics
-
Position the wall arrow:
Clean the surface of the orange paint with a damp cloth to remove dust. If using a vinyl decal, peel the backing and apply the large white arrow pointing in the direction of traffic flow, smoothing out bubbles with a squeegee. -
Stencil alternative:
If painting the arrow, tape a stencil securely to the wall. Dab white paint lightly with a stencil brush or foam roller to prevent bleed-through underneath the edges. -
Clean the floor surface:
Sweep and mop the hallway floor thoroughly. The floor must be completely dry and free of wax or grease for the heavy-duty tape to adhere properly. -
Lay the main floor strip:
Unroll the wide terracotta floor marking tape down the center of the hallway. Do not stretch the tape as you lay it; let it rest naturally and press it down firmly. -
Create the floor arrow shaft:
Apply a strip of white floor tape roughly 2-3 inches wide down the exact center of the terracotta strip to create the arrow’s shaft. -
Cut the chevron details:
Cut several shorter strips of white floor tape. Using a protractor or 45-degree angle guide, trim the ends of these strips to form sharp chevron ‘feathers’ for the arrow. -
Assemble the floor graphic:
Space the white chevrons evenly along the terracotta strip, ensuring they point in the same direction as the wall arrow. Press all tape edges down firmly, or use a floor roller to bond the adhesive.
Pro Tip: Seamless Corners
When applying the terracotta paint, use a “W” motion with the roller to distribute paint evenly and avoid vertical streaks in the darker pigment.
Step back and admire how clear visual cues can make a hallway both beautiful and functional
Interactive Chalk-and-Write Strip
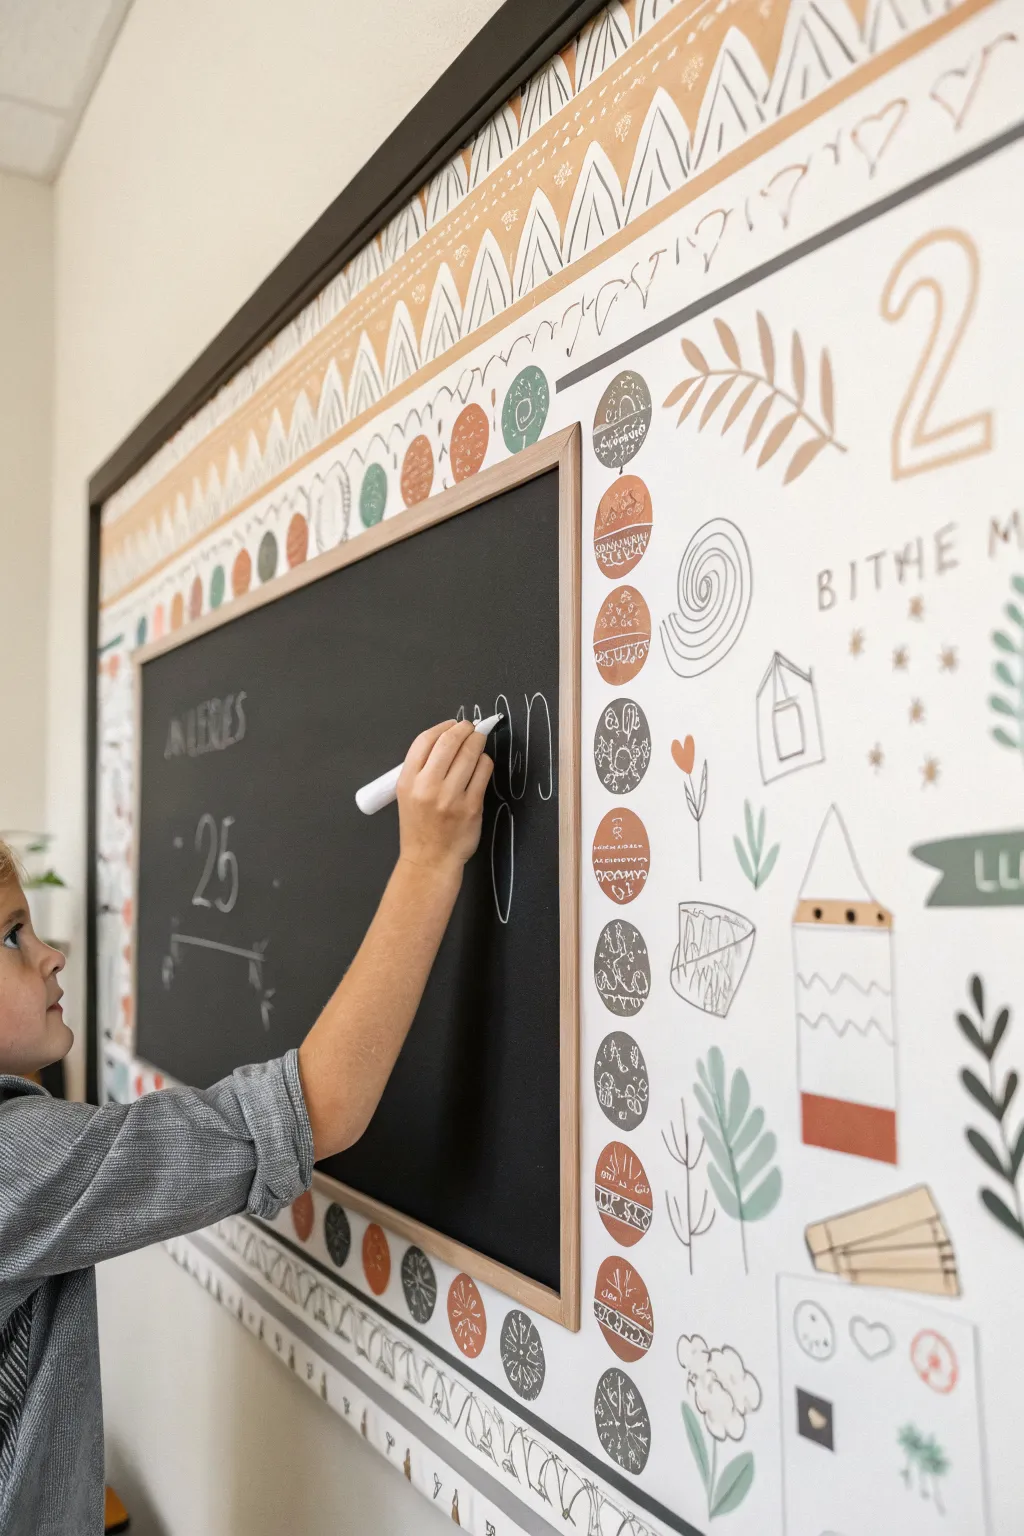
Transform a plain classroom wall into an engaging learning station with this integrated chalkboard mural. Featuring earthy terracotta and sage tones alongside whimsical line art, this project combines functionality with a trendy bohemian aesthetic.
Detailed Instructions
Materials
- Large framed chalkboard (approx. 24″ x 36″)
- Self-adhesive chalkboard paper (alternative)
- Painter’s tape
- Interior wall paint (white or off-white base)
- Acrylic craft paints (terracotta, sage green, gray, beige)
- Assorted paintbrushes (medium flat brush, small round brush for details)
- Black paint marker or permanent oil-based marker (fine tip)
- Pencil and eraser
- Ruler or level
- Liquid nails or mounting hardware
- White paint pen (for chalkboard writing)
Step 1: Setting the Stage
-
Prep the surface:
Start with a clean, dry wall surface. If the existing wall color is too dark or vibrant, apply a coat of white or off-white primer-paint to create a neutral canvas for your artwork. -
Mount the chalkboard:
Determine the ideal height for your students. Measure and mark the placement for the chalkboard. Mount the framed board securely using appropriate wall anchors or heavy-duty mounting adhesive. -
Create the outer border:
Using a ruler and level, lightly draw a large rectangular border around the chalkboard, extending several feet outwards to define the mural space. Outline this border with painter’s tape to keep your edges crisp.
Pro Tip: Stencil Hack
Make a cardboard cutout for the circles around the chalkboard frame. Tracing a template guarantees consistent sizing without measuring every single shape.
Step 2: Painting the Geometric Patterns
-
Sketch the top motif:
Along the top section of your taped-off area, lightly sketch a repeating pattern of tall triangles or stylized mountains. Vary the heights slightly for a hand-drawn feel. -
Apply the first color wash:
Mix a warm beige paint with a tiny bit of water to make it translucent. Paint alternating triangles with this wash to create a soft, textured background layer. -
Add terracotta accents:
Using your terracotta paint, fill in select geometric shapes within the top border. I like to leave some white space between shapes to keep the look airy. -
Outline the geometry:
Once the paint is dry, use a gray or black paint marker to loosely outline the triangles and add zig-zag decorative lines inside them. -
Create the repeating circle border:
Draw two parallel lines directly surrounding the chalkboard frame. Inside this ‘track,’ sketch a series of circles evenly spaced apart. -
Paint the circles:
Fill the circles using an alternating pattern of terracotta, sage green, and dark gray paint. Don’t worry about perfect circles; a slightly organic shape adds character. -
Detail the circles:
After the base colors dry completely, use a fine white paint pen or a thin brush with white paint to doodle small symbols–suns, flowers, or abstract lines–inside each colored circle.
Step 3: Adding Whimsical Illustrations
-
Sketch distinct icons:
In the open white space to the right of the chalkboard, pencil in large, simple illustrations. Think botanical leaves, numbers, hanging lanterns, and simple houses. -
Line work first:
Go over your pencil sketches with a black paint marker or a thin round brush dipped in black paint. Keep the lines consistent in thickness. -
Color blocking:
Identify key areas in your illustrations to fill with color, such as the bottom of a lantern or a single leaf. Use the terracotta and sage green paints to fill these spots, staying within the lines. -
Add floating elements:
Scatter small decorative elements like stars, dots, or tiny hearts around the larger illustrations to fill negative space without overcrowding it. -
Add text elements:
If desired, stencil or freehand simple words or numbers (like the large ‘2’ seen in the reference) using an outline style in beige or light brown.
Level Up: Magnetic Paint
Before painting the mural background, apply 2-3 coats of magnetic primer. This lets you attach notes or student artwork directly to the painted wall sections.
Step 4: Final Touches
-
Simulate the bottom border:
Repeat the circle pattern or a simple geometric design along the bottom edge of the mural area to balance the visual weight of the top border. -
Clean up lines:
Check for any pencil marks that are still visible and gently erase them. Touch up any smeared paint with your base wall color. -
Remove tape:
Carefully peel away the painter’s tape on the outer edges to reveal your clean, sharp border. -
Season the chalkboard:
Before writing, rub the side of a piece of chalk over the entire board surface and wipe it off. This prevents ‘ghosting’ from the first message you write.
Step back and admire how this interactive art piece brightens the room and invites creativity
Collaborative Student Patchwork Mural
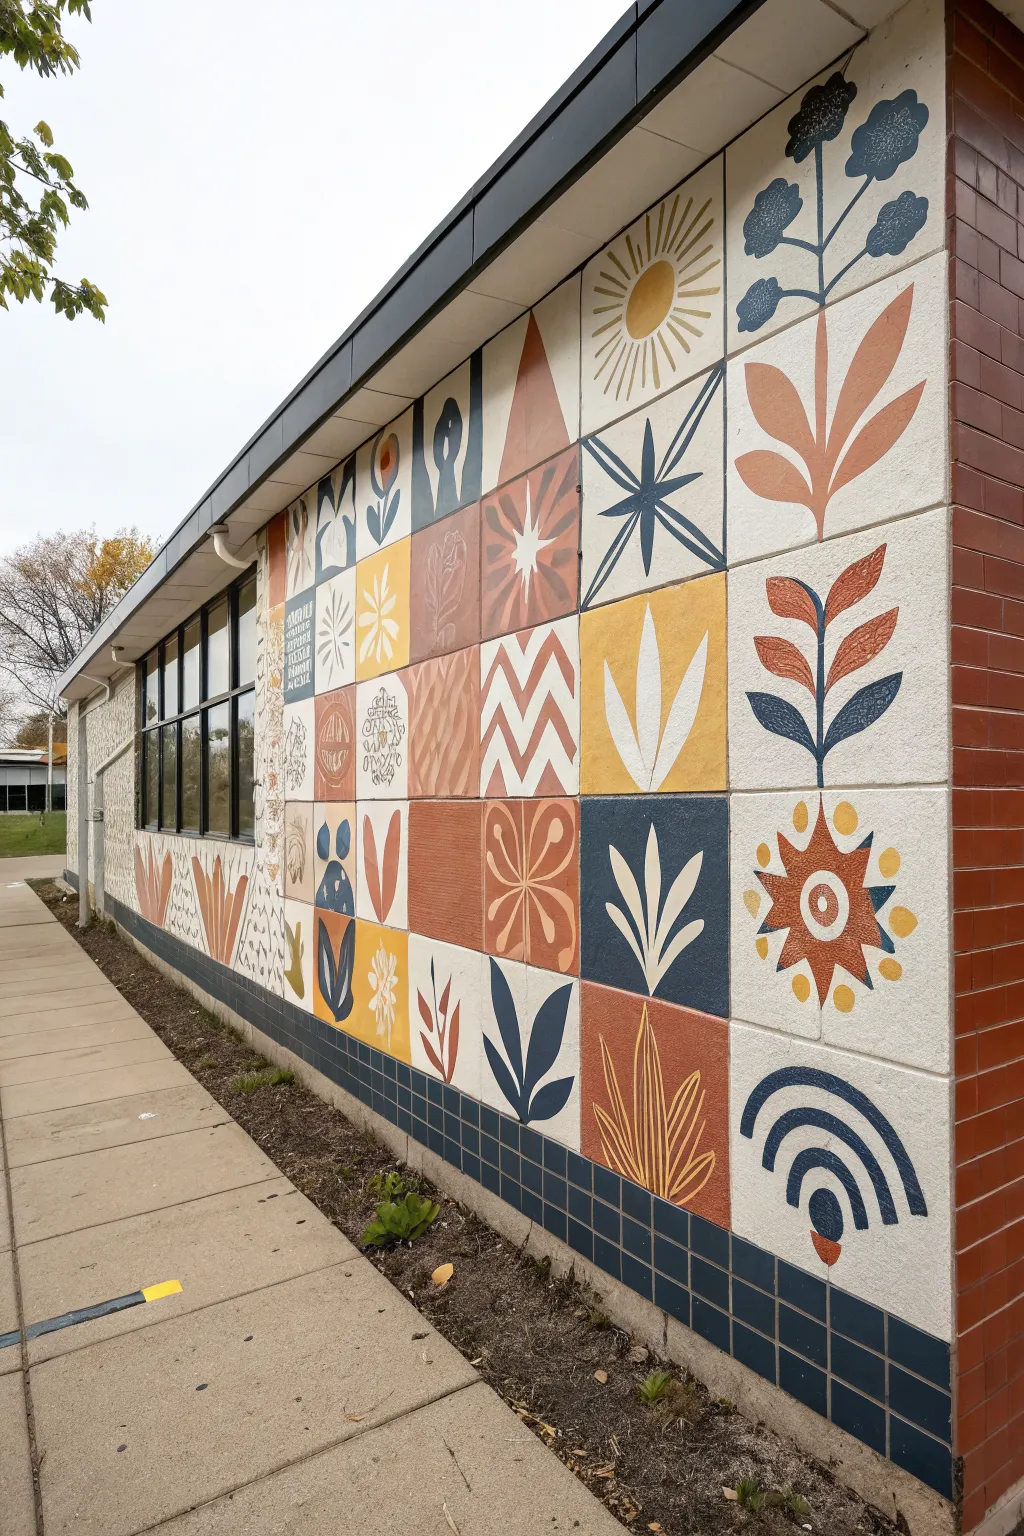
Transform a plain exterior wall into a stunning patchwork of nature-inspired art with this collaborative mural project. Using a cohesive color palette of terracotta, mustard, and navy, this grid-style design allows multiple students to contribute individual squares that come together for a unified, modern look.
How-To Guide
Materials
- Exterior masonry primer
- Exterior latex paint (white base)
- Exterior latex paint (terracotta orange, mustard yellow, navy blue)
- Painter’s tape (1-inch and 2-inch widths)
- Chalk line tool or long straight edge
- Measuring tape
- Assorted paintbrushes (2-inch sash brushes, 1-inch flat brushes, and detail rounds)
- Grid paper for planning
- Chalk or pastel pencils for sketching
- Drop cloths
- Paint rollers and trays
Step 1: Planning and Surface Prep
-
Analyze the wall:
Begin by measuring the total area of the wall you intend to paint. If the wall is made of concrete blocks or bricks, use the existing grout lines as a natural guide for your grid; otherwise, calculate a square size that fits evenly across the space. -
Design the grid layout:
Have students draft their designs on square grid paper first. Stick to simple, bold organic shapes like leaves, sun rays, floral motifs, and abstract waves, limiting the palette to three main colors plus white to ensure the final patchwork looks cohesive. -
Clean and prime:
Power wash or scrub the wall to remove dirt and mildew, letting it dry completely. Apply a coat of high-quality exterior masonry primer to seal the surface and ensure the topcoat adheres well. -
Establish the grid:
Once the primer is dry, use a measuring tape and a chalk line tool to snap a grid over the wall. If you are working on a flat stucco wall without natural block lines, use blue painter’s tape to mask off the squares, creating crisp borders between each design block.
Step 2: Base Coating
-
Assign the background colors:
Refer to your paper plan and mark each square on the wall with a small dot of its intended background color. This helps prevent confusion when multiple people are painting at once. -
Paint the background squares:
Using roller brushes for larger areas and sash brushes for edges, fill in the background color of each square. Some squares should remain white, while others get filled with solid blocks of terracotta, yellow, or blue. -
Apply a second coat:
Exterior masonry often soaks up paint unevenly. I usually find that a second coat is essential here to get that rich, opaque saturation seen in the reference photo. Let this dry fully for at least 4-6 hours.
Uneven Texture?
If the wall is very rough (stucco/brick), ‘stipple’ the paint by dabbing the brush tip vertically into the recesses rather than brushing across, which can leave gaps.
Step 3: Adding the Motifs
-
Sketch the designs:
Using light-colored chalk for dark backgrounds and pencil for light backgrounds, freehand sketch the organic shapes onto the dry base coats. Focus on symmetry for the sun and starburst patterns, and fluid curves for the plant stems. -
Paint the leaves and stems:
For the botanical squares, use a 1-inch flat brush to create the broad stems. Switch to a smaller brush to taper the leaves. Use contrasting colors—painting navy leaves on a white background, or white leaves on a yellow background. -
Create the sunbursts:
For the sun motifs, paint the central circle first. Then, carefully pull the brush outward to create the rays. This ensures the energy of the shape radiates effectively from the center. -
Paint geometric fills:
Some blocks feature zig-zags or star patterns. Use smaller angled brushes for these to keep the points sharp. Painting ‘negative space’ squares—where you paint the background around a shape rather than the shape itself—adds great visual variety. -
Detailing the arches:
For the rainbow arch shapes at the bottom, cultivate a steady hand or use a string-compass (a string tied to chalk) to guide your brush for perfectly concentric curves.
Unified Palette Tip
Pre-mix large batches of your 3-4 specific colors before starting. Don’t let students mix their own shades, or the grid won’t look consistent across the whole wall.
Step 4: Refinement and Finish
-
Touch up edges:
Step back and look for any shaky lines or spots where the textured wall surface caused skips in the paint. Use a small detail brush to sharpen the edges of leaves and geometric forms. -
Remove tape (if used):
If you used painter’s tape to define the grid lines, peel it off slowly at a 45-degree angle while the final touch-ups are still slightly tacky to prevent peeling dry paint. -
Seal (Optional):
In high-traffic areas or harsh climates, applying a clear, UV-resistant exterior sealer can help protect the vibrancy of the colors for years to come.
Step back and admire how individual squares have come together to create a vibrant, cohesive tapestry for the whole school to enjoy


Have a question or want to share your own experience? I'd love to hear from you in the comments below!