Whenever I want a quick creative win, I reach for a plain pair of shoes and treat them like a tiny wearable canvas. Here are my favorite decorate shoes ideas—from classic painted patterns to more surprising mixed-media twists you can totally pull off at your kitchen table.
Hand-Painted Floral Vines
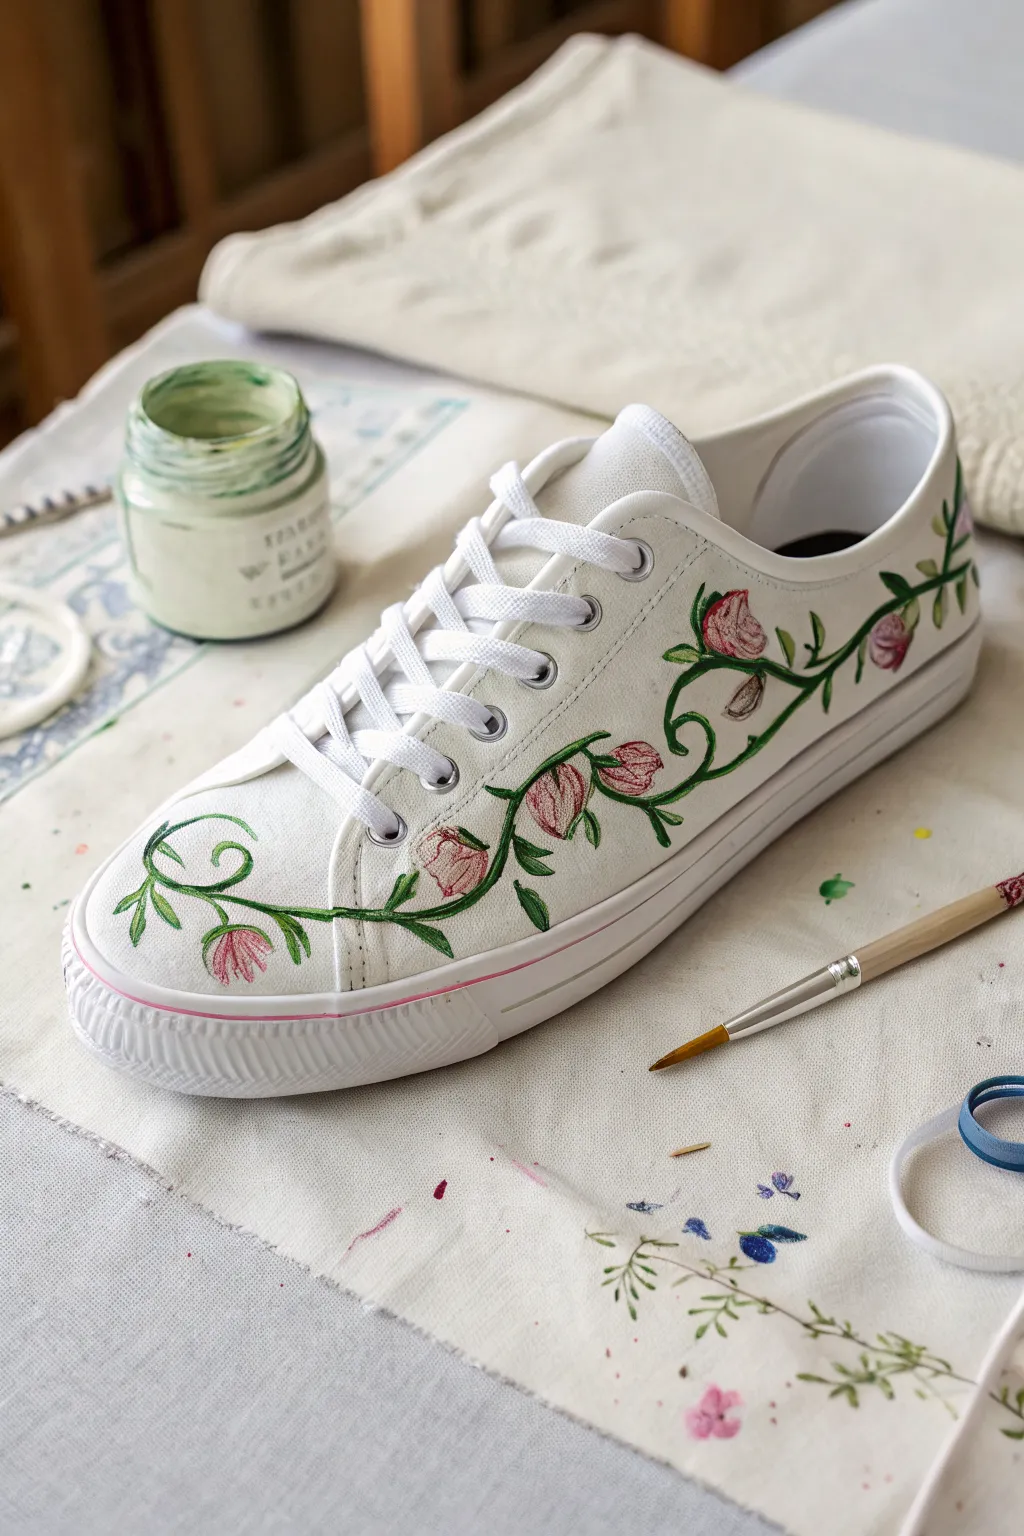
Transform a plain pair of white canvas shoes into a wearable garden with this delicate hand-painted design. Featuring trailing dark green vines and soft pink buds, this project adds a touch of romantic elegance to everyday footwear.
Step-by-Step Guide
Materials
- White canvas sneakers (clean and dry)
- Fabric medium
- Acrylic paints (Dark hunter green, bright leafy green, dusty pink, titanium white)
- Fine liner brush (size 00 or 0)
- Small flat shader brush or round brush (size 2)
- Air-erasable fabric marker or light pencil
- Water jar
- Palette or small mixing plate
- Paper towels
- Clear acrylic sealer (spray or matte varnish)
Step 1: Preparation & Sketching
-
Clean surface:
Ensure your sneakers are completely free of dust or dirt. If they are brand new, you might want to wipe them down with a damp cloth to remove any factory sizing, then let them dry fully. -
Mix fabric medium:
On your palette, mix your acrylic paints with fabric medium according to the bottle’s instructions (usually a 1:1 or 2:1 ratio). This crucial step ensures the paint remains flexible and doesn’t crack as you walk. -
Plan the vine path:
Using an air-erasable marker or a very light pencil touch, lightly sketch the main S-curve of the vine. Start near the toe cap, curving gently upwards along the side panel towards the heel collar. -
Sketch branches:
Add small offshoot lines where you want your leaves and flower buds to sit. Keep the spacing organic; nature rarely follows a perfect pattern.
Smooth Lines Pro-Tip
If your paint feels too thick or drags on the canvas, add a tiny drop of water to your brush. The consistency should be like ink so it flows smoothly.
Step 2: Painting the Greenery
-
Paint the main stem:
Load your fine liner brush with the dark hunter green mixture. With a steady hand, trace over your main vine line. Apply slightly more pressure on curves to thicken the line, and lift off for thinner sections. -
Add secondary stems:
Extend shorter lines from the main vine for your leaf stems and flower stalks. Keep these lines quite thin and delicate. -
Create leaf shapes:
Using the same dark green, paint the outlines of small, pointed leaves. I like to vary the sizes slightly to keep it looking natural. -
Fill the leaves:
Mix a little of the bright leafy green with a touch of white to create a highlight color. Carefully fill in the center of the leaves, blending slightly with the darker outline while it’s still tacky for a dimensional look. -
Add curling tendrils:
Use the very tip of your liner brush to add fine, curly embellishments coming off the main vine. These should be whimsical spirals, particularly near the toe and around the floral buds.
Level Up: Bee Details
Paint tiny bumblebees hovering near the flowers using yellow and black dots to add even more garden life to your custom kicks.
Step 3: Adding the Blooms
-
Base coat the buds:
Mix dusty pink with a tiny bit of white. Paint oval or teardrop shapes at the ends of your flower stalks to form the base of the buds. -
Define petals:
Once the base pink is touch-dry, use a slightly darker shade of pink (or mix in a dot of red) to paint thin lines indicating the separation of petals on the buds. -
Add sepals:
Clean your brush and switch back to the dark green. Paint tiny, cup-like shapes at the base of each pink bud where it connects to the stem. -
Highlighting:
Add tiny dashes of pure white on the top curves of the petals and the highest points of the vines to simulate light hitting the artwork. -
Refine outlines:
Go back with your dark green liner brush and sharpen any leaf edges or vine connections that look a bit fuzzy.
Step 4: Finishing Touches
-
Cure time:
Let the shoes dry completely for at least 24 hours. Don’t rush this, as thicker areas of paint need time to set fully on the canvas fibers. -
Heat set:
Once dry, use a hairdryer on high heat (or an iron without steam if you can safely reach the fabric) to heat-set the design. This bonds the fabric medium permanently to the shoe. -
Seal (optional):
For extra durability against puddles and dirt, apply a thin coat of matte acrylic sealer spray over the painted areas.
Step out in style knowing you’re wearing a one-of-a-kind piece of art.


Crisp Color-Block Panels
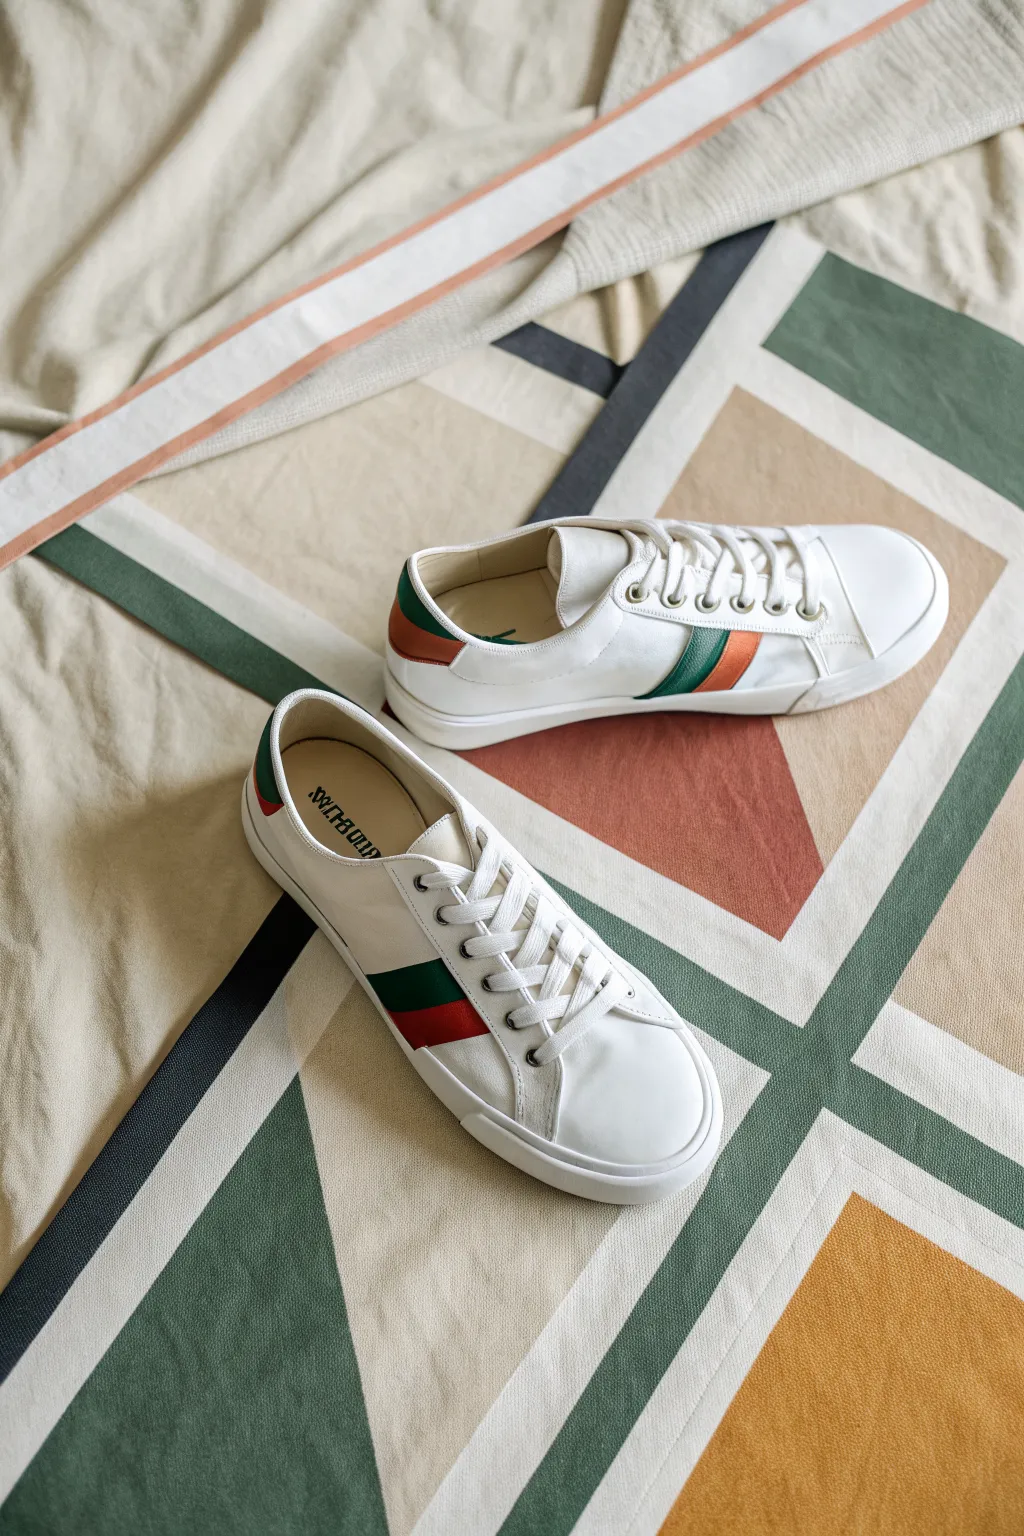
Transform plain white sneakers into high-end fashion statements with these crisp, sporty color-block panels. This simple painting project adds a touch of retro court style using bold green and terracotta stripes for a clean, custom look.
Detailed Instructions
Materials
- White canvas or leather sneakers
- Angelus leather paint (Dark Green)
- Angelus leather paint (Terracotta or Dark Orange)
- Leather preparer and deglazer (or acetone)
- Painter’s tape or masking tape
- Cotton pads or balls
- Fine detail paintbrush
- Medium flat paintbrush
- Heat gun or hair dryer (optional)
- Acrylic finisher (matte or satin)
- Ruler or flexible measuring tape
- Pencil
Step 1: Preparation & Mapping
-
Clean surface:
Before painting, you must remove the factory finish. Dampen a cotton pad with leather preparer or acetone and rigorously scrub the areas where you plan to paint. This ensures the paint bonds permanently. -
Dry thoroughly:
Allow the shoes to dry completely for at least 15 minutes after cleaning so the surface isn’t tacky. -
Remove laces:
Take the laces out entirely to give yourself unobstructed access to the side panels and tongue area. -
Mark the stripe:
Use a flexible ruler and a pencil to lightly sketch the angle of your side stripe. Aim for a diagonal line that starts near the sole and angles upward toward the laces. -
Apply tape borders:
Apply painter’s tape firm along your pencil lines. Press the edges of the tape down firmly with your thumbnail to prevent paint bleeding underneath. -
Create the center divide:
Place a third strip of tape directly down the middle of your taped-off area to separate the green section from the orange section.
Step 2: Painting the Panels
-
Paint the green stripe:
Using the medium flat brush, apply a thin layer of Dark Green paint to the rear section of the stripe. Keep the layer thin to avoid cracking later. -
Paint the orange stripe:
Clean your brush and apply the Terracotta color to the front section of the stripe. Again, focus on smooth, even coverage rather than opacity on the first pass. -
Paint the heel tab:
Tape off the heel tab area if needed. I find it easiest to paint the top half green and the bottom half orange to mirror the side design, using the detail brush for the edges. -
Dry and repeat:
Let the first coat dry for 15-20 minutes. You can speed this up with a hair dryer on a low setting. -
Apply subsequent coats:
Apply 2-3 more thin coats of each color until the finish is solid and opaque. Thin layers are key for durability. -
Remove tape carefully:
While the final coat is still slightly tacky (not fully cured), slowly peel back the painter’s tape at a 45-degree angle. This helps keep the lines crisp. -
Touch up edges:
Inspect your lines. If any paint bled under the tape, use a toothpick or a tiny brush with a bit of white paint to clean up the edges.
Uneven Lines?
If paint bleeds under the tape, wait for it to dry completely. Then, gently scratch the excess away with a toothpick or cover it with white paint.
Step 3: Finishing Touches
-
Apply finisher:
Once the paint has dried for 24 hours, apply a thin layer of acrylic finisher over the painted areas using a clean brush to seal the work and protect against scuffs. -
Re-lace:
Once the finisher is dry to the touch, lace your sneakers back up. For a fresh look, you can swap in crisp new white laces.
Paint Flexibility
Mix the paint with a fabric medium or 2-Soft additive if painting on canvas shoes. This keeps the paint flexible so it won’t crack when you walk.
Step out in your newly customized court classics and enjoy the clean, geometric pop of color


Easy Polka Dots and Confetti Speckles
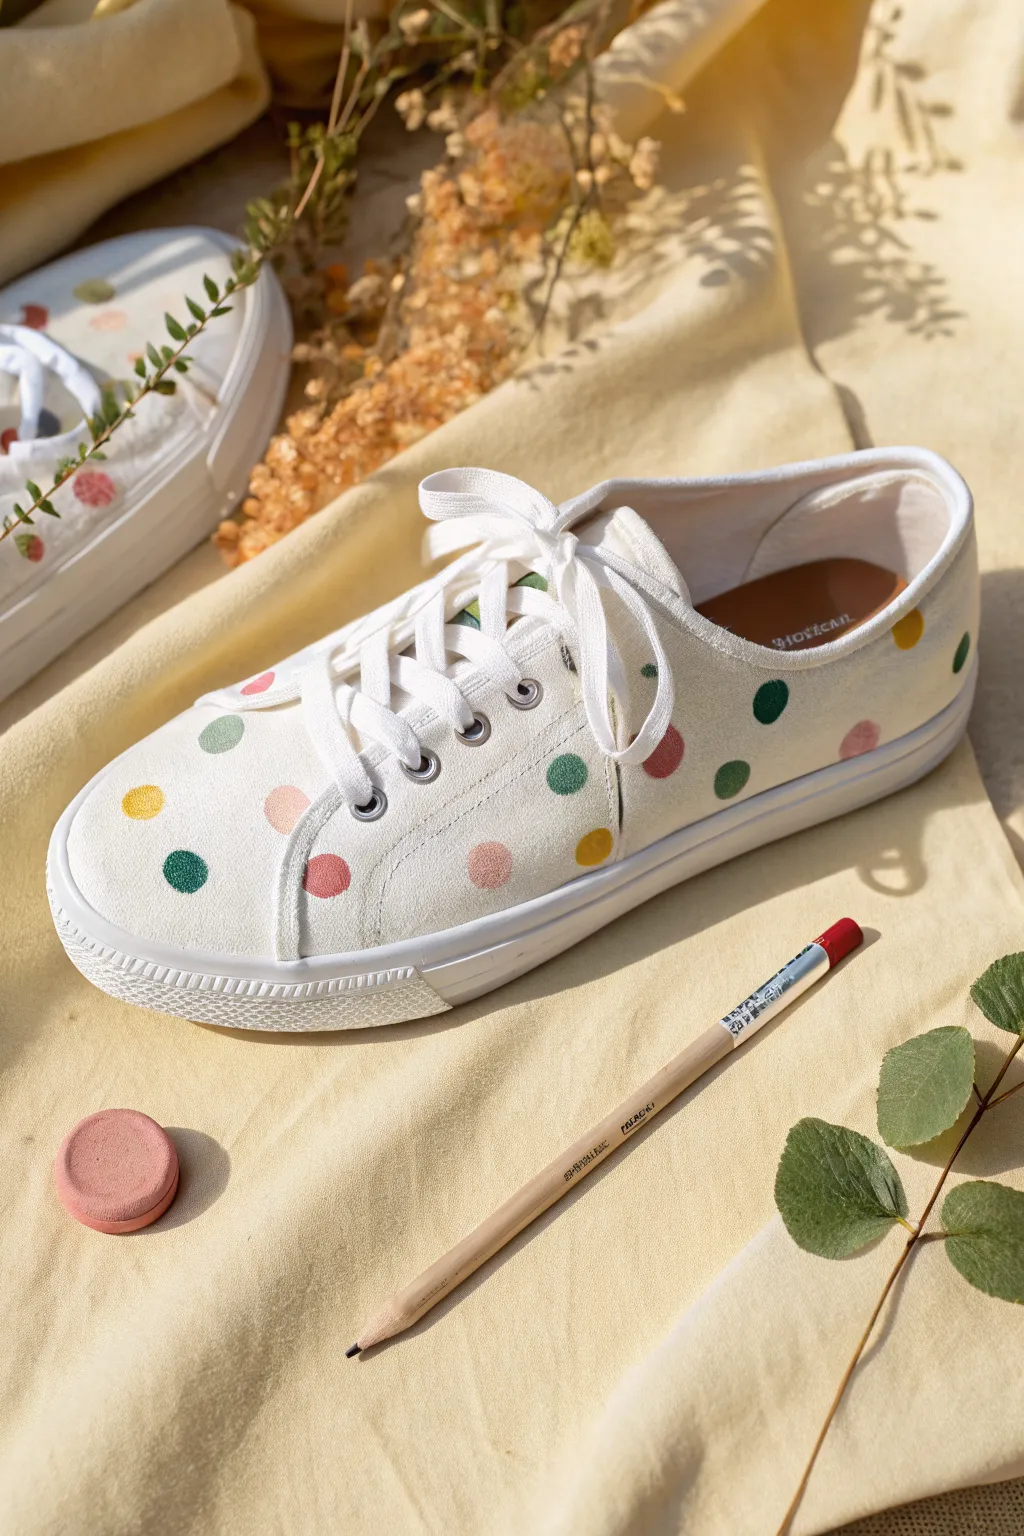
Transform a plain pair of white canvas shoes into a playful statement piece with this easy polka dot design. Using soft, muted tones creates a vintage confetti look that feels both classic and fresh for sunny days.
How-To Guide
Materials
- White canvas sneakers
- Fabric paint or soft body acrylics (mustard yellow, forest green, sage green, rose pink)
- Textile medium (if using acrylics)
- Round foam pouncers (small size, approx. 1/4 inch)
- Small round paintbrush (size 2 or 4)
- Painter’s tape
- Pencil with a flat eraser
- Paper plate or palette
- Water cup and paper towels
Step 1: Preparation
-
Clean the canvas:
Before starting, ensure your sneakers are clean and free of dust. If they are brand new, you can skip washing, but a quick wipe with a damp cloth helps remove any factory sizing that might repel paint. -
Remove laces:
Take the laces off completely. This prevents accidental paint splatters on them and gives you full access to the tongue and eyelet areas where you’ll want the pattern to continue seamlessly. -
Shape the shoes:
Stuff the inside of the shoes with newspaper or plastic bags. This firms up the canvas surface, making it easier to stamp and paint without the fabric collapsing under pressure. -
Protect the soles:
Apply painter’s tape carefully along the rubber sidewall (foxing) where it meets the canvas. Take your time here to ensure a clean line, as this separates your colorful dots from the bright white sole.
Bleeding Dots?
If paint bleeds into the canvas weave, your paint is too watery. Use less water or let the paint sit for 5 minutes on the palette to thicken slightly before stamping again.
Step 2: Creating the Palette
-
Mix your medium:
If you are using standard acrylics, mix them with a textile medium according to the bottle instructions (usually 1:1 or 2:1). This ensures the paint remains flexible and won’t crack when you walk. -
Prepare colors:
Pour small dollops of your four key colors onto your palette: mustard yellow, forest green, sage green, and rose pink. Space them out nicely so you don’t accidentally mix the pouncers. -
Test the tones:
I like to do a quick test stamp on a scrap piece of fabric or paper towel first. This confirms opacity and lets you see if the color combination feels balanced before touching the shoe.
Step 3: Applying the Design
-
Start with primary dots:
Dip your foam pouncer or the flat eraser end of a pencil into your first color (let’s start with the rose pink). Dab off excess paint on the palette to prevent globs. -
Random placement:
Press the tool firmly onto the canvas to create your first set of dots. Space them widely apart—about 1.5 to 2 inches—scattered randomly across the toe box and side panels. -
Add the second color:
Clean your tool or switch to a fresh one, then move to the mustard yellow. Place these dots in the empty spaces between the pink ones, trying to avoid creating obvious straight lines or grids. -
Incorporate greens:
Repeat the process with the forest green and sage green paints. As the canvas fills up, look for larger gaps to fill, ensuring no two dots of the same color are right next to each other. -
Touch up edges:
Use your small paintbrush to carefully add half-dots along the seams, near the sole tape, and close to the eyelets. This creates the illusion that the fabric was printed with the pattern before the shoe was made. -
Refine the shapes:
If any of your stamped dots look patchy or uneven, use the small brush to gently fill them in or smooth out the circumference while the paint is still damp.
Eraser Trick
Don’t have foam pouncers? The flat eraser on the end of a brand new pencil makes perfectly uniform, small polka dots. Just wipe it clean between color changes.
Step 4: Finishing Touches
-
Drying time:
Allow the paint to dry completely. Since fabric paint can be thick, give it at least 24 hours to cure fully before handling excessively. -
Remove tape:
Once dry, slowly peel off the painter’s tape from the soles. Pulling at a 45-degree angle usually gives the crispest line. -
Heat set:
To make the design permanent and washable, blast the shoes with a hair dryer on high heat for a few minutes, or toss them in a dryer (in a pillowcase) on high cycle for 20 minutes. -
Re-lace:
Thread your clean white laces back through the eyelets to finish the look.
Enjoy styling your custom kicks with your favorite summer outfits
Soft Ombre Fade
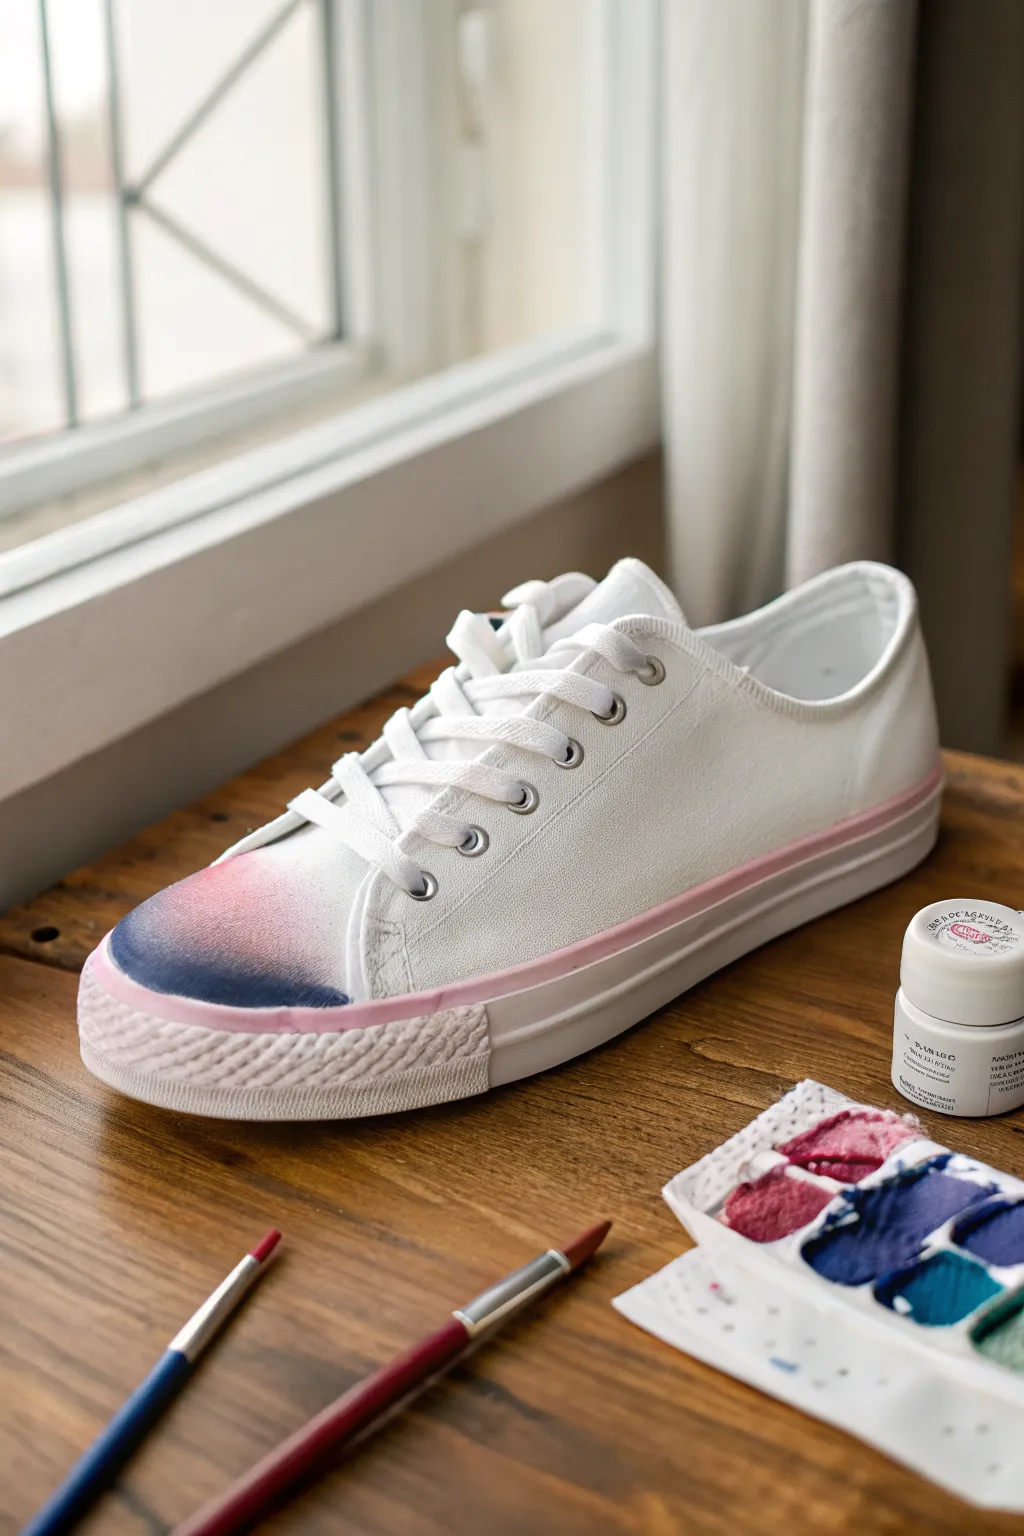
Transform plain white canvas sneakers into a wearable sunset with this delicate ombré technique. By blending soft pinks into deep blues right on the toe cap and adding a crisp accent stripe, you’ll create a custom pair that looks professionally designed.
Step-by-Step Guide
Materials
- White canvas sneakers
- Fabric paint (magenta/pink, dark blue, teal)
- Textile medium (optional, for thinning)
- Small flat brush
- Medium round brush
- Masking tape or painter’s tape
- Water cup
- Paper towels
- Palette or mixing tray
Step 1: Preparation and Masking
-
Clean surface:
Ensure your sneakers are clean and dry. If they are brand new, give them a quick wipe to remove any factory dust that might interfere with paint adhesion. -
Remove laces:
Unlace the shoes completely to prevent accidental drips on the laces and to give yourself more room to work comfortably around the tongue area. -
Protect the sole:
Apply masking tape carefully along the bottom edge of the rubber sole where it meets the ground. We will be painting the upper rubber strip, so only tape off the very bottom tread if you’re worried about mess.
Uneven Blending?
If the colors aren’t merging smoothly, your canvas might be too dry. specific dampen the brush with a tiny bit more water (or extender medium) to re-awaken the paint and facilitate the blend.
Step 2: The Pink Sidewall Accent
-
Mix the pink shade:
On your palette, mix a small amount of magenta fabric paint with a touch of white if needed to get a soft, bubblegum pink. The goal is a pastel but opaque hue. -
Load the flat brush:
Dip a small flat brush into the pink paint. Wipe off excess so the paint doesn’t glob or drip, ensuring a smooth application. -
Paint the foxing stripe:
Carefully paint the rubber strip (the foxing) that runs around the side of the shoe, just below the canvas. Start from the heel and move forward. -
Detail the toe bumper:
Continue painting this pink line over the textured toe bumper. Push the paint into the textured grooves of the rubber gently so no white spots show through. -
Refine the edge:
Use the edge of your flat brush to clean up the line where the rubber meets the canvas. A steady hand is key here to keep the line sharp without bleeding onto the fabric yet.
Galaxy Sparkle
Make the ombré look like a galaxy by flicking tiny specks of white fabric paint onto the dark blue section using an old stiff toothbrush for a starry effect.
Step 3: Creating the Ombré Toe
-
Dampen the canvas:
Take a clean brush with just a little water and lightly dampen the toe cap area of the canvas. This helps the fabric paint bleed and blend softer rather than sitting as a hard blob. -
Apply the base pink:
Using the same pink mix, paint the lower section of the canvas toe cap, right where it meets the rubber. Feather the color upward lightly. -
Add the transition shade:
While the pink is still wet, introduce a small amount of purple or mix your pink with a tiny drop of blue. Apply this to the middle of the toe area, slightly overlapping the pink. -
Blend the colors:
Use a damp (not soaking) brush to blur the line between the pink and purple. I tend to use a gentle dabbing motion here to push the pigments together seamlessly. -
Apply the dark tip:
Pick up your dark blue or teal paint. Apply this to the very tip of the toe area and the upper edge of the fade. -
Final gradient blend:
Work the blue downwards into the purple/pink transition. Keep blending until you have a smooth gradient from the dark blue tip fading into the soft pink base. -
Check symmetry:
Repeat the process on the second shoe, constantly comparing it to the first to ensure the color zones match in size and intensity.
Step 4: Finishing Touches
-
Clean rubber edges:
If any paint from the canvas accidentally smudged onto your freshly painted pink rubber strip, wipe it away immediately with a damp paper towel or Q-tip. -
Allow to dry:
Let the shoes sit in a well-ventilated area for at least 24 hours. Don’t rush this, or the paint might tackiness might attract dust. -
Heat set:
Once fully dry, use a hair dryer on a high heat setting for a few minutes over the painted areas to set the fabric paint, making it more durable and water-resistant. -
Re-lace:
Remove any masking tape and lace your sneakers back up, ready to wear.
Now you can step out with a unique splash of color on your feet
BRUSH GUIDE
The Right Brush for Every Stroke
From clean lines to bold texture — master brush choice, stroke control, and essential techniques.
Explore the Full Guide
Dot-Painted Mandala Medallions
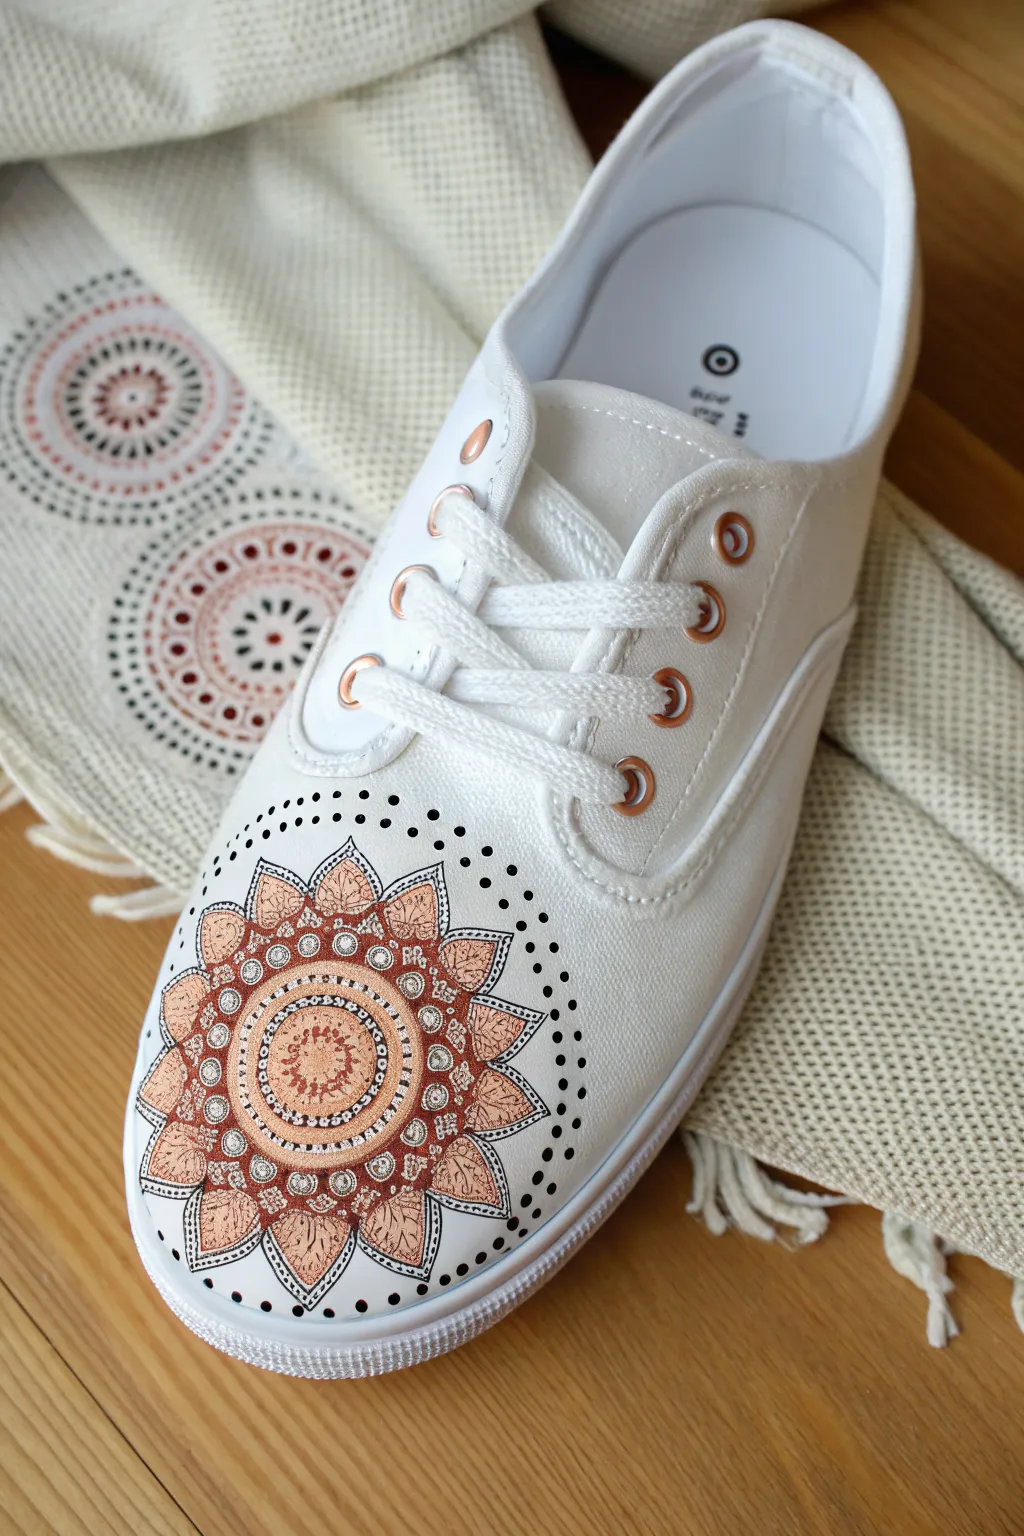
Transform plain white canvas sneakers into a boho-chic statement piece with this intricate mandala design. Featuring a warm palette of copper, peach, and crisp black ink, the circular pattern radiates from the center toe for a stunning, symmetrical focal point.
Detailed Instructions
Materials
- White canvas sneakers
- Fabric medium (optional, but recommended for durability)
- Acrylic paints (colors: metallic copper, peach/flesh tone, white)
- Black fine-point fabric marker or waterproof archival ink pen (0.5mm and 0.8mm)
- Pencil and eraser
- Compass or circle stencil tool
- Small round paintbrushes (sizes 0 and 2/0)
- Dotting tools or toothpicks
Step 1: Preparation & Mapping
-
Prep the surface:
Remove the laces from your sneakers to create an unobstructed workspace. If these are not brand new, give the toe area a quick clean with a damp cloth and let it dry completely. -
Mix your medium:
If you are using regular acrylic paint instead of specific fabric paint, mix it with fabric medium according to the bottle instructions. This ensures the design won’t crack when you walk. -
Mark the center:
Using a pencil, very lightly mark the exact center of the toe box. This will be the anchor point for your entire mandala. -
Draft the guide circles:
Use a compass or circle stencils to lightly draw concentric circles radiating from your center point. You’ll need about four or five rings to guide the different layers of petals and patterns.
Stuff the Shoes
Before painting, stuff the toe of the shoe tightly with old newspaper or rags. This creates a hard, stable surface to draw on and prevents the canvas from collapsing under your pen pressure.
Step 2: Painting the Base Mandala
-
Paint the central core:
Start by painting a small solid circle in the very center with your peach or flesh-toned paint. -
Create the first ring:
Paint a ring of metallic copper outside your center circle. Don’t worry about perfect edges yet, as the black outlining will clean that up later. -
Add the petal base:
Roughly sketch the pointed petal shapes in the outer rings using your pencil guide. Fill the larger outer petals with the peach tone. -
Overlay copper accents:
Add copper accents inside those peach petals or create a secondary ring of copper petals. The metallic paint catches the light beautifully, so apply it liberally. -
Let it dry completely:
This is crucial. Before moving to ink work, the paint must be bone dry to prevent the pen tip from clogging or the ink from bleeding.
Go Metallic
Switch the peach base color for a metallic rose gold. When combined with the copper, the entire mandala will shimmer in the sunlight, making the design look like actual jewelry.
Step 3: Inking & Detail Work
-
Outline the center:
Using your fine-point black fabric marker, carefully trace the central circles. Keep your hand steady and use the shoe’s surface to brace your pinky finger. -
Outline the petals:
Trace the outer petal shapes. Add a second, thinner line inside each petal to create a double-bordered look, which adds depth to the design. -
Fill the negative space:
For the areas between the circles and petals, use tiny repetitive patterns like scalloped edges or small loops to connect the layers. -
Add inner details:
Draw tiny veins or geometric lines inside the larger peach petals. I find that varying the line weight here makes the drawing look more organic.
Step 4: Dotting the Finishing Touches
-
White dot accents:
Dip a small dotting tool or toothpick into white paint. Add tiny dots on top of the copper rings to create contrast and brightness. -
Black dot border:
Using the black marker or a very fine dotting tool with black paint, create the signature dotted halo. Start closely packed near the design edge. -
Fade the dots out:
Continue dotting outward onto the empty white canvas, spacing the dots further apart as you move away from the mandala to create a dispersing effect. -
Seal the deal:
Once fully dry (give it 24 hours to be safe), you can apply a clear matte acrylic sealer spray to protect your artwork from dirt and moisture. -
Re-lace:
Rethread your laces, perhaps opting for a fresh white pair or matching copper aglets to tie the look together.
Step out in style knowing your footwear is now a one-of-a-kind masterpiece
Fine-Line Doodles and Patterns
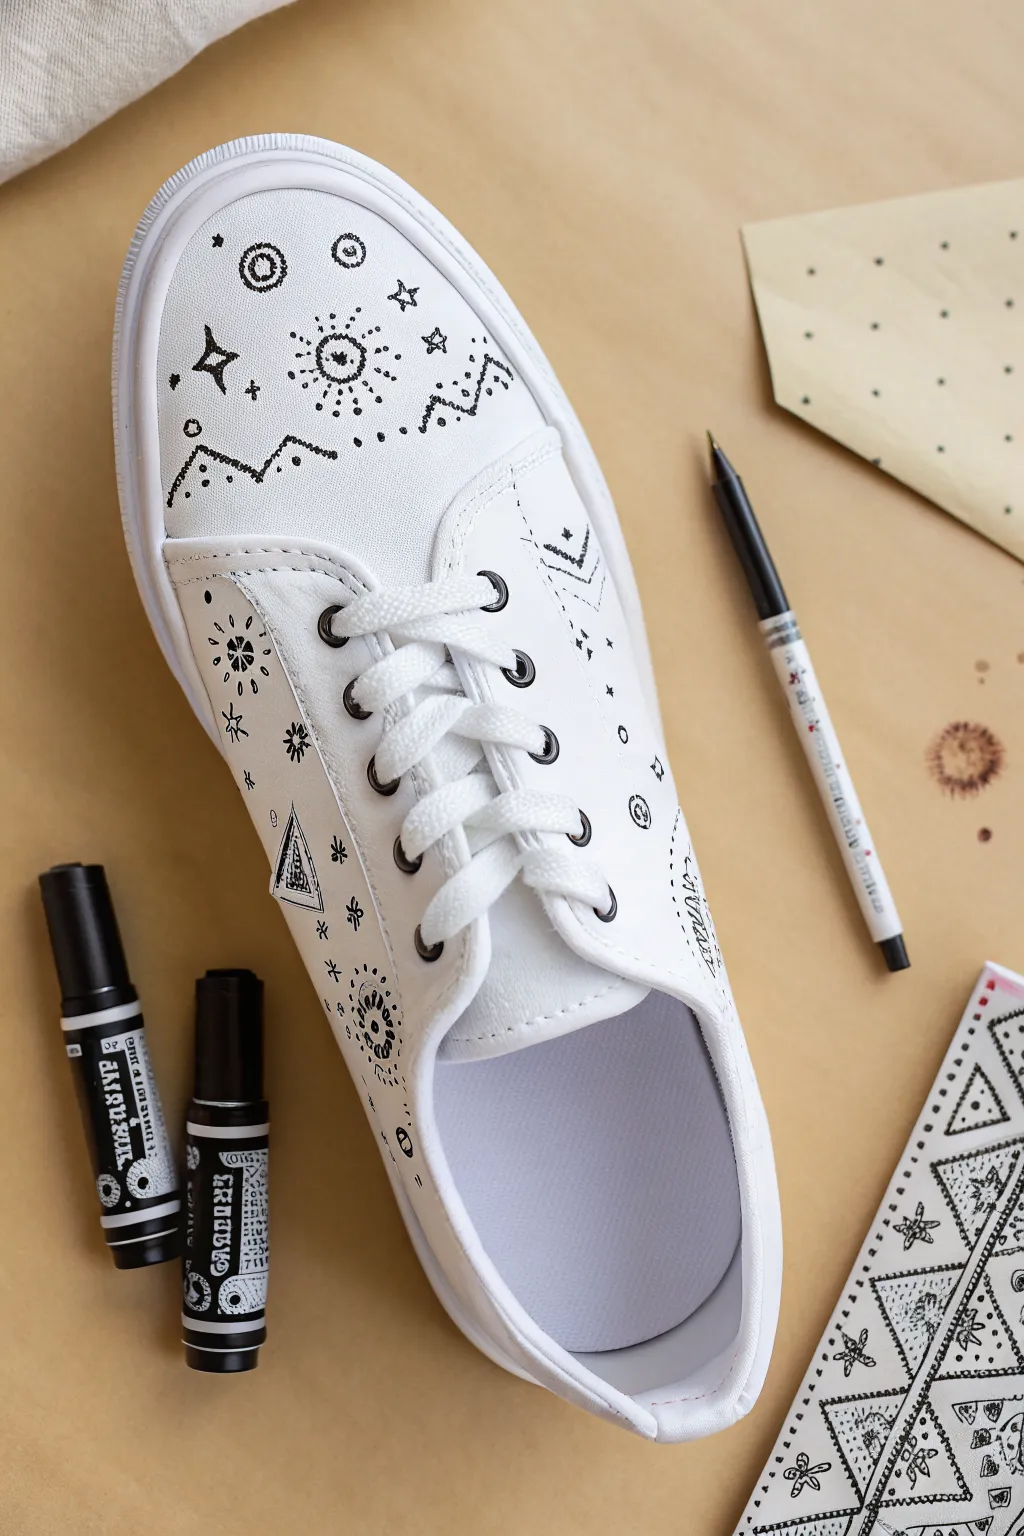
Transform a plain pair of white canvas sneakers into a personalized galaxy of doodles with nothing but a pen and some creativity. This project combines geometric mountain ranges with whimsical celestial motifs for a clean, monochrome look that feels both bespoke and effortlessly cool.
Step-by-Step Tutorial
Materials
- A pair of white canvas sneakers (clean and dry)
- Fine-point black fabric marker or permanent pigment liner (0.5mm or 0.8mm)
- Thicker tip black fabric marker (for filling in)
- Pencil (HB or lighter)
- Eraser (kneaded eraser works best to avoid smudges)
- Paper for practice sketching
Step 1: Planning and Preparation
-
Prepping the surface:
Ensure your sneakers are completely free of dirt or dust. If they are brand new, give them a quick wipe with a clean cloth to remove any sizing residue that might repel ink. -
Practicing your motifs:
Before touching the shoe, grab a spare sheet of paper to practice the specific doodles seen on the shoe: radiant suns, jagged mountain peaks, scattered stars, and geometric triangles. Get comfortable with the scale you want to use. -
Mapping the toe box:
Using a light hand and your pencil, sketch the main focal point on the toe box. Draw a jagged horizon line of mountains about two-thirds of the way down the toe area. -
Adding celestial elements:
Lightly pencil in a central sunburst above the mountains, flanked by a few larger stars or planets. Sketching these main anchors first ensures your design stays balanced.
Ink Bleeding Issues?
If ink feathers on the canvas, your pen might be too wet or the nib too thick. Switch to a finer technical pen (0.3mm) and move your hand faster to prevent ink soaking.
Step 2: Inking the Toe Box
-
Outlining the mountains:
Take your fine-point black marker and trace over your pencil lines for the mountain range. Use a slightly shaky or stippled motion to give the lines an organic, textured feeling rather than a perfect geometric ruler line. -
Adding texture:
Inside the mountain triangles, add stippling (tiny dots) along the bottom edges and peaks to create shading and depth. This mimics the look of snow-capped peaks or rocky terrain. -
Drawing the sun:
Ink the central sun motif. Start with a small circle, then add a ring of dots around it. Create the rays using short, radiating lines of varying lengths for a bursting effect. -
Filling the sky:
Populate the empty space around the sun with small four-point stars, tiny circles, and dots. I like to vary the density here—clustering more dots near the horizon line adds nice visual weight.
Step 3: Detailing the Sides
-
Creating the side pattern:
Move to the side panel of the shoe. Here, the design becomes more abstract. Pencil in a vertical arrangement of geometric shapes: triangles, diamonds, and more sunbursts. -
Inking geometric shapes:
Trace your side designs with the fine liner. For the triangles, try creating a ‘nested’ look by drawing smaller triangles inside the larger ones. -
Adding bold accents:
Switch to your thicker marker to fill in specific small areas, like the center of an eye motif or alternating stripes within a triangle. These dark spots help anchor the delicate lines. -
Incorporating doodle filler:
Between your main geometric shapes on the side, add ‘filler doodles’ like small asterisks, tiny plus signs, and singular dots to keep the design cohesive without looking cluttered.
Level Up: Cosmic Color
Use diluted fabric paint or watercolor markers to add faint washes of purple and blue behind the doodles for a subtle ‘galaxy’ watercolor background effect.
Step 4: Finishing Touches
-
Reviewing the heel:
Don’t forget the back! Carry a small amount of the pattern—perhaps just a few stars or a small mountain peak—onto the heel strip for continuity. -
Checking balance:
Step back and look at the shoe as a whole. If any area looks too empty, add a few stray stippling dots to balance the negative space. -
Letting the ink cure:
Allow the ink to dry completely. Fabric markers usually dry fast, but giving it 24 hours ensures it won’t smear during the final step. -
Erasing guidelines:
Gently erase any visible pencil marks. Be very careful rubbing over the inked areas; verify the ink is totally bone-dry before you do this. -
Heat setting (optional):
If your specific fabric markers require heat setting, blast the shoes with a hair dryer on high heat for a few minutes to lock the design into the fibers.
Now lace up your custom kicks and enjoy walking in your own wearable sketchbook art

PENCIL GUIDE
Understanding Pencil Grades from H to B
From first sketch to finished drawing — learn pencil grades, line control, and shading techniques.
Explore the Full Guide
Bold Stripes With Masking Tape
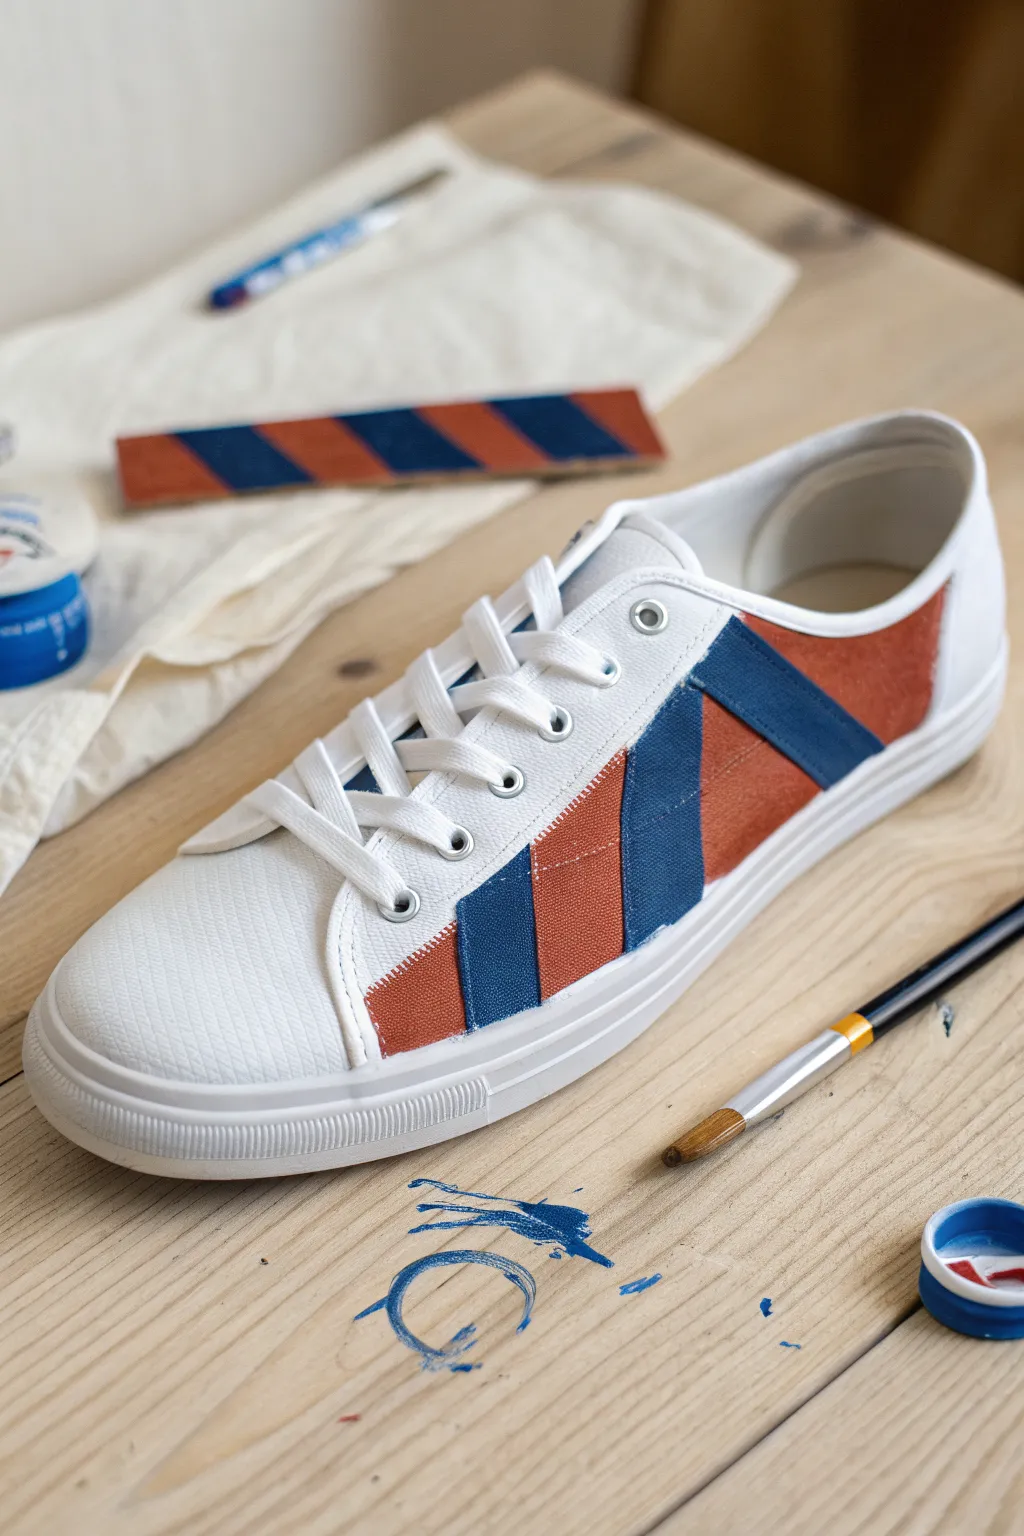
Transform a basic pair of white canvas sneakers into a bold statement piece with nothing more than masking tape and paint. This geometric design uses crisp, clean lines and a classic rust-and-navy color palette to give your shoes a high-end designer look.
Step-by-Step
Materials
- White canvas sneakers
- Painter’s tape or masking tape (medium width)
- Fabric medium
- Acrylic paint (Rust/Terracotta color)
- Acrylic paint (Navy Blue color)
- Flat shader brush (size 6 or 8)
- Small round detail brush
- Palette or small mixing dish
- Paper towels
- Craft knife (optional)
Step 1: Preparation & Mapping
-
Clean the canvas:
Before you begin, ensure your sneakers are clean and free of dust. If they are new, giving them a quick wipe with a damp cloth prevents any factory sizing from interfering with the paint adhesion. -
Remove laces:
Take the laces completely off both shoes. This gives you unobstructed access to the canvas sides and prevents accidental paint splatter on your laces. -
Plan your angles:
Visualize the diagonal stripes. Notice how the design in the photo features three thick stripes on the side panel—two rust, one navy in the middle, and another navy segment near the back. The angle is fairly steep, leaning forward. -
Apply the first tape strip:
Lay down your first strip of masking tape diagonally across the side of the shoe. This strip will protect the white space between two painted stripes. Press the edges down firmly with your thumbnail to prevent bleeding. -
Create the parallel spacing:
Place subsequent strips of tape to define the width of your painted stripes. I find it helpful to use the width of the tape itself as a spacer if you want consistent white gaps, or eyeball it for wider painted sections. -
Tape off the sole:
Carefully run a strip of tape along the rubber sole where it meets the canvas. This is crucial for a clean finish; you don’t want paint dripping onto the rubber sidewall.
Step 2: Mixing & Painting
-
Prepare the fabric paint:
Mix your acrylic paints with fabric medium according to the bottle instructions (usually 1:1 or 2 parts paint to 1 part medium). This ensures the paint stays flexible and doesn’t crack as you walk. -
Mix the colors:
Create your custom shades. For the rust color, you might need to mix orange with a touch of brown and red. For the navy, a standard dark blue works well, perhaps deepened with a touch of black. -
Seal the tape edges:
Here is a secret trick: paint a very thin layer of white paint (or the base color of the shoe) along the edge of the tape first. This seals the tape so if any paint bleeds under, it’s just white. -
Paint the first rust stripe:
Using your flat brush, fill in the first diagonal section closest to the toe with the rust/terracotta mixture. Apply thin, even strokes, working away from the tape edge to minimize bleeding. -
Paint the navy stripe:
Skip the next section (or tape it off if your layout allows) and paint the central stripe in navy blue. Ensure the paint saturates the canvas texture but isn’t glooped on too thick. -
Continue the pattern:
Alternating colors based on your masked sections, fill in the remaining diagonal stripes. The pattern shown uses Rust – Navy – Rust (partial) – Navy (at the heel). -
Touch up edges:
Use the small round brush to carefully paint right up to the eyelets or seams where the tape couldn’t quite reach perfectly. A steady hand is key here.
Seal the Deal
Before applying color, paint a thin layer of white paint (or clear medium) over the tape edges. This fills any tiny gaps and prevents colored paint from bleeding under.
Step 3: Finishing Touches
-
Let the paint set:
Allow the paint to become tacky but not fully cured. Waiting too long can cause the paint to peel up with the tape, while removing it too wet can cause smudges. -
The reveal:
Slowly peel the tape back at a 45-degree angle alongside the shoe. This is the most satisfying part, revealing those crisp white lines between your bold colors. -
Clean up imperfections:
If there is a tiny bit of bleed, don’t panic. Dip a small brush in white paint and carefully touch up the line, or use a damp Q-tip if the paint is still wet. -
Heat set:
Once completely dry (usually 24 hours), heat set the paint by blowing a hair dryer on high heat over the painted areas for a few minutes. This improves durability. -
Re-lace:
Thread your clean white laces back through the eyelets to complete the fresh, geometric look.
Uneven Lines?
If your peeled lines look jagged, you likely pulled the tape too fast or too late. Try using a white paint marker to gently trace and straighten the edges.
Now you have a custom pair of kicks ready for a sunny day out
Galaxy Sky With Splatter Stars
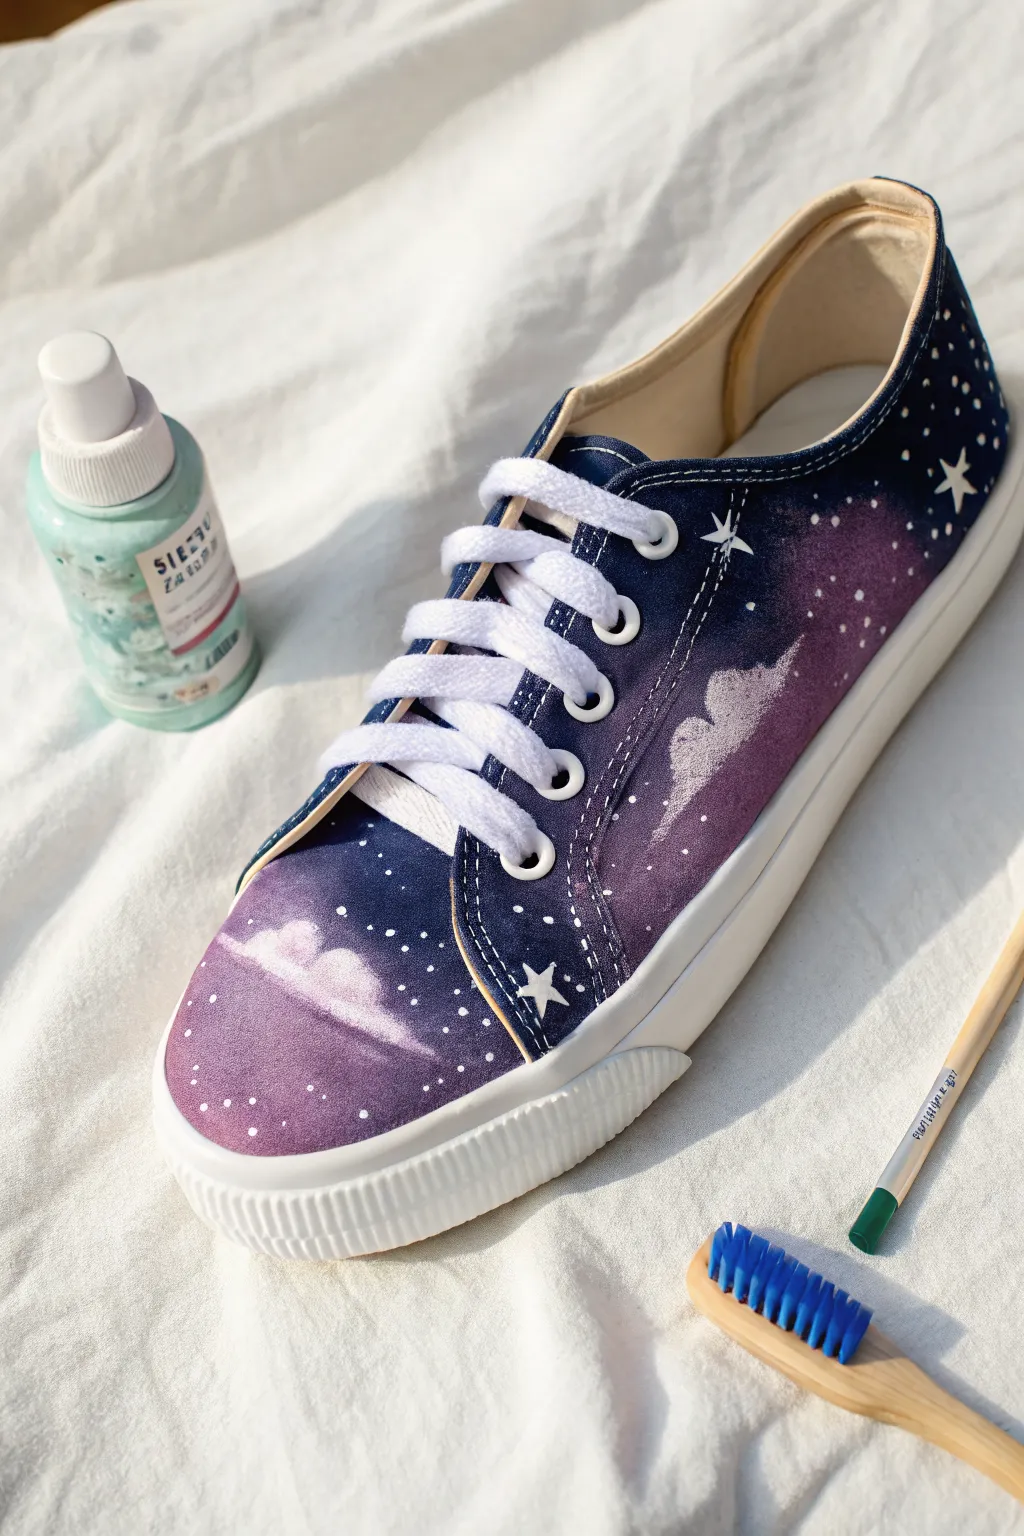
Transform a simple pair of white canvas shoes into a stunning celestial masterpiece featuring dreamy purple nebulae and soft clouds. This galaxy sky design captures the magic of a starry night with delicate gradients and crisp white stars.
Detailed Instructions
Materials
- White or light-colored canvas sneakers
- Fabric medium
- Acrylic paints (Dark Navy Blue, deep Purple/Violet, Titanium White, Teal/Light Blue)
- Small sponges or makeup sponges
- Masking tape or painter’s tape
- Fine detail paintbrush (size 0 or 00)
- Flat brush (size 4 or 6)
- Cup of water and paper towels
- Toothbrush (for splatter stars)
- Palette or small cups for mixing
Step 1: Preparation & Base Gradient
-
Prep the canvas:
Remove the shoelaces completely from the shoes. Clean the surface with a damp cloth if they aren’t brand new to ensure no dust interferes with the paint adhesion. -
Tape off edges:
Use painter’s tape to carefully mask off the rubber soles, including the toe cap bumper, to keep them crisp white. Press the tape edges down firmly to prevent paint bleed. -
Mix your medium:
Mix your acrylic paints with fabric medium according to the bottle’s instructions (usually 1:1 or 2:1 paint to medium). This is crucial for making the paint flexible so it won’t crack when you walk. -
Apply the dark base:
Start by applying the Dark Navy Blue to the upper areas (near the ankle and eyelets) and the very bottom edges using a sponge. Dab the paint on rather than brushing for a better texture. -
Create the nebula gradient:
While the blue is still slightly wet, sponge your Deep Purple into the middle sections. Blend the edges where it meets the blue by dabbing lightly to create a seamless transition.
Step 2: Painting the Clouds
-
Draft the cloud shapes:
Mix a tiny bit of white into your violet to make a lavender shade. Using a sponge or rough brush, lightly map out where your clouds will float, focusing on the toe box and side panels. -
Building cloud volume:
Switch to pure Titanium White. Use a small, dry brush or the corner of a clean sponge to dab the tops of your cloud shapes, keeping the bottom edges soft and blended into the purple background. -
Adding depth:
If the clouds look too flat, I find adding a very faint wash of light blue or teal to the shadowed bottom of the cloud helps them pop against the purple sky. -
Refining the edges:
Go back with your dark purple on a detail brush to clean up the sky around the clouds if you accidentally made them too big or fuzzy. -
Let it dry:
Allow these base layers to dry completely to the touch before moving on to the stars. This prevents the splatter from muddying your beautiful clouds.
Muddy colors?
If colors turn grey while blending, stop! Let the first layer dry completely before adding the next color. Acrylics blend best when wet, but overworking them creates mud.
Step 3: Stars & Finishing Touches
-
Create the splatter mixture:
Water down a small amount of white acrylic paint until it has the consistency of heavy cream. It needs to be fluid enough to fly off bristles but opaque enough to show up. -
The flicker technique:
Dip an old toothbrush into this mixture. Test it on a piece of paper first, then use your thumb to flick the bristles, spraying a fine mist of white dots across the dark blue and purple sections. -
Adding major stars:
Use your finest detail brush to hand-paint larger, individual stars. Create random dots in varying sizes to add depth to your galaxy. -
Painting the hero stars:
Paint a few large, five-pointed stars or four-point ‘twinkle’ stars in key spots. Painting a tiny dot in the center first helps you center the points. -
Detailing the eyelets:
Carefully paint around the metal eyelets with your dark blue or navy to ensure no white canvas is peeking through the lace holes. -
Remove tape:
Once the paint is tacky but almost dry, slowly peel off the masking tape. Cleaning up any bleeds on the rubber immediately with a wet Q-tip or fingernail is much easier than waiting until it cures. -
Heat setting:
Once fully dry (give it 24 hours), heat set the paint by blowing a hair dryer on high heat over the shoes for a few minutes to seal the bond. -
Re-lace:
Thread your clean white laces back through. The bright white laces against the dark galaxy print create a really striking contrast.
Cloud texture secret
Tear a small piece off a makeup sponge to create a jagged, uneven surface. Use this torn edge to dab on your clouds—it creates a much more organic, fluffy shape than a brush.
Step out in style knowing you are wearing a unique piece of wearable art that is truly out of this world.


Tie-Dye Swirls on Canvas Shoes
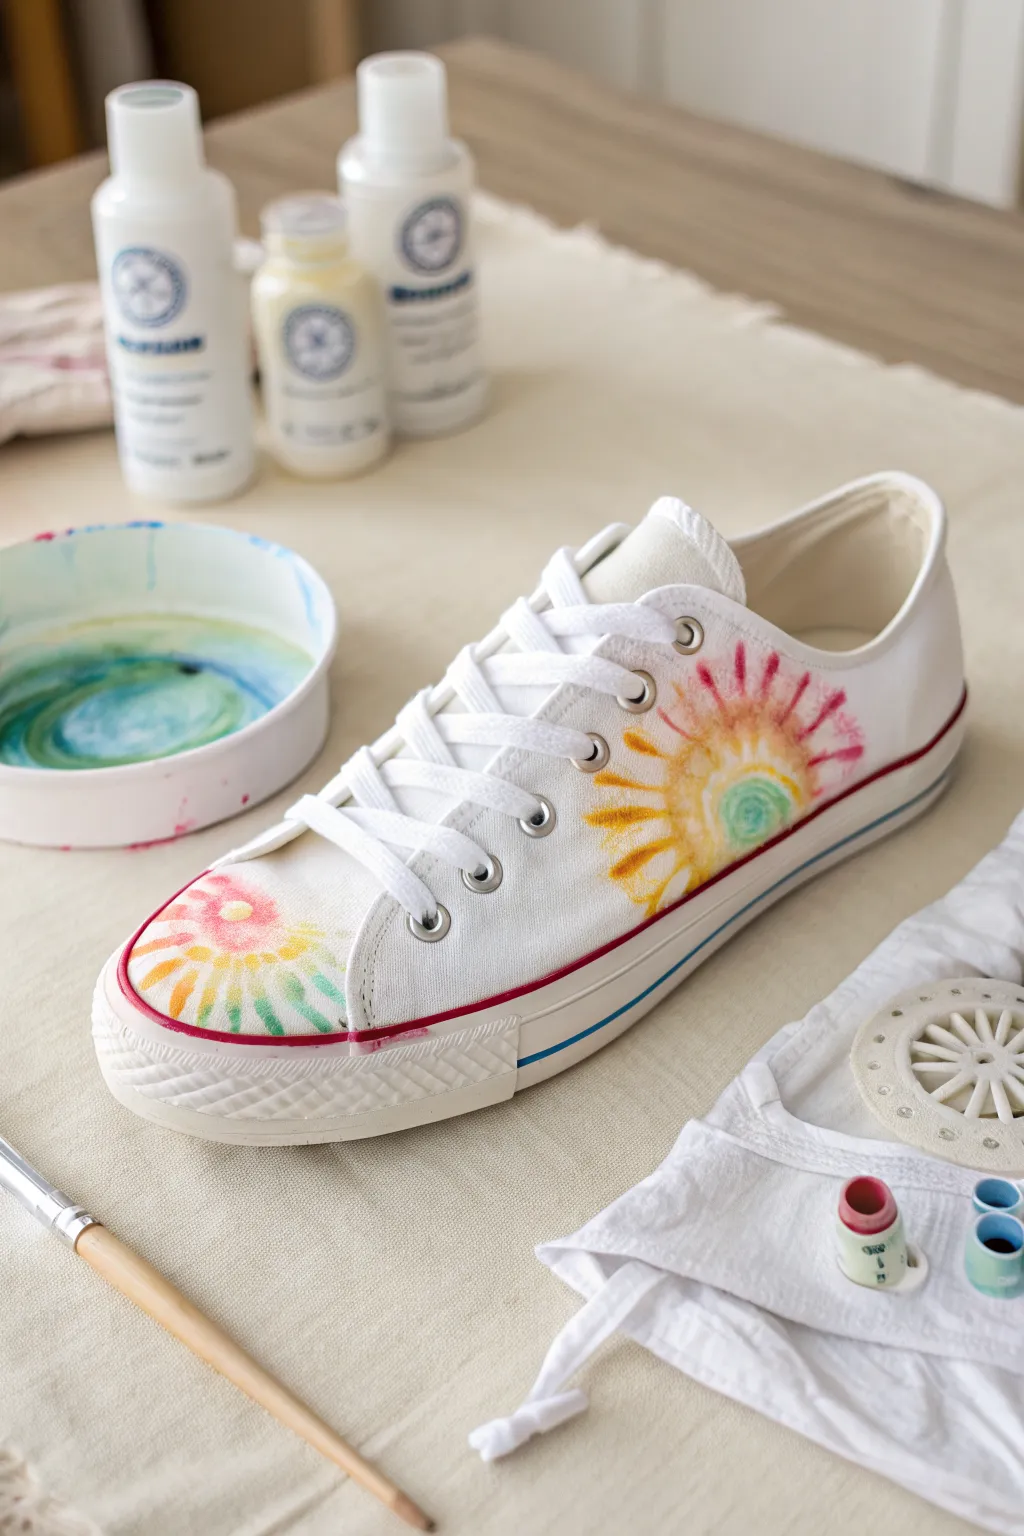
Transform plain white canvas sneakers into a burst of summer energy with this faux tie-dye painting technique. Using diluted fabric paints, you’ll create soft, bleeding sunburst patterns that mimic the classic tie-dye look without the messy dipping process.
How-To Guide
Materials
- White canvas sneakers (clean and dry)
- Fabric paint (Yellow, Orange, Pink, Teal/Green)
- Fabric medium or water (for diluting)
- Small mixing cups or palette
- Round watercolor brushes (sizes 4 and 6)
- Clean water for rinsing
- Paper towels
- Painter’s tape (optional)
Step 1: Preparation and Mixing
-
Prep the workspace:
Lay down a drop cloth or old newspaper to protect your table. Remove the shoelaces from the sneakers to keep them clean and provide unobstructed access to the tongue and eyelet areas. -
Stuff the shoes:
Pack the inside of the shoes tightly with paper towels or rags. This creates a firm surface to paint on and absorbs any excess liquid that might soak through the canvas. -
Create the watercolor wash:
In your mixing cups, dilute the fabric paints. I like to mix about one part paint to two parts water or fabric medium. You want a consistency that is fluid like watercolor but still holds vibrant pigment. -
Test the consistency:
Before touching the shoe, test your diluted paint on a scrap of fabric or paper towel. It should spread slightly when applied but not run uncontrollably.
Control the Bleed
Slightly dampen the canvas with clean water before painting. This helps the paint travel and bleed naturally for an authentic tie-dye look without hard edges.
Step 2: Painting the Sunbursts
-
Start the side center:
Dip your smaller brush into the teal/green mixture. Locate the center point for the side sunburst (near the sole, midway back). -
Paint the core:
Paint a small, semi-circle or bullseye shape as the nucleus of the burst. Use a light touch to let the paint soak into the weave. -
Add the yellow ring:
Switch to yellow paint. Paint a ring surrounding the green center. Allow the wet edges to touch slightly so the colors blend naturally without becoming muddy. -
Create the rays:
Using the orange paint, start flicking small brushstrokes outward from the yellow ring. Think of these as the inner rays of a sun. -
Extend with pink:
Complete the side burst by adding longer, radiating strokes of pink paint at the unexpected outer edges. Vary the length of these lines to create a dynamic, organic ‘explosion’ effect. -
Begin the toe box:
Move to the toe of the shoe. You’ll create a similar burst here but positioned off-center for visual interest. -
Paint the toe center:
Start with a pink center this time to vary the look. Paint a small, soft circle on the upper part of the toe cap. -
Layer the middle colors:
Surround the pink with a ring of yellow, blending the edges gently with a damp (not soaking) brush. -
Finish the toe rays:
Use the teal/green mixture to paint outward rays extending toward the rubber toe cap and the sole. Let the paint fade out naturally at the ends.
Add Some Sparkle
Once the paint is dry, use a fine-tip brush to add tiny dots of metallic gold or silver fabric paint along the rays for a sun-kissed shimmer effect.
Step 3: Refining and Setting
-
Soften harsh lines:
If any brushstrokes look too sharp, dampen a clean brush with water and gently dab the edges to encourage that fuzzy, tie-dye bleed effect. -
Check for saturation:
Look closely at the canvas. If the colors look too pale as they soak in, go back over the centers of the bursts with a slightly less diluted paint mixture to deepen the saturation. -
Clean the rubber:
Take a damp paper towel or a cotton swab and immediately wipe away any paint that accidentally got onto the rubber soles or toe cap before it dries. -
Dry completely:
Allow the shoes to air dry for at least 24 hours. The colors may lighten slightly as the moisture evaporates. -
Set the paint:
Follow the instructions on your specific fabric paint bottle. Most require heat setting with a hair dryer or by tossing them in a hot dryer for 20 minutes to make the design permanent. -
Re-lace appropriately:
Once fully cured and cooled, lace the clean white shoelaces back up to crisp contrast against your colorful new design.
Step out into the sunshine showing off your custom, vibrantly dyed footwear
Geometric Triangle Mosaic
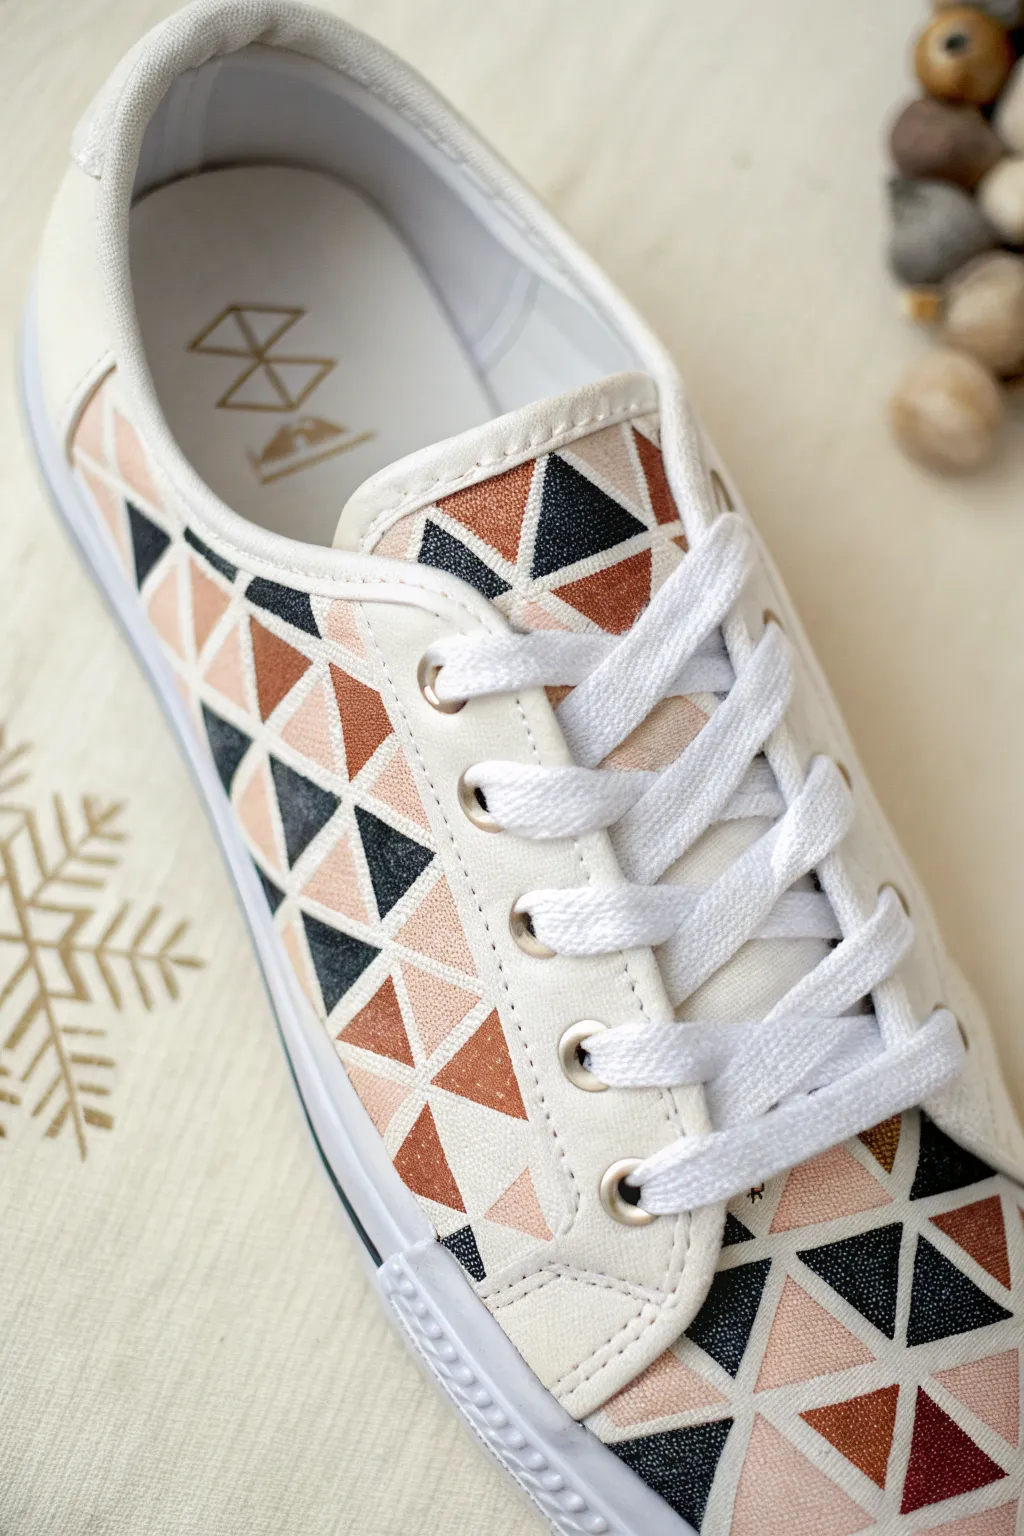
Transform a plain pair of white canvas shoes into a statement piece with this chic geometric design. By using a simple triangle stencil technique and an earthy color palette of black, bronze, and blush, you’ll create a mosaic effect that looks professionally printed.
Step-by-Step
Materials
- White canvas sneakers
- Fabric paint (Black, Metallic Copper/Bronze, Blush Pink)
- Painter’s tape or masking tape (thin width creates better spacing)
- Small flat paintbrush
- Fine-point detail brush
- Ruler
- Pencil
- Fabric sealer or fixative spray
Step 1: Preparation and Planning
-
Prepare the canvas:
Before you begin, remove the shoelaces from your sneakers to ensure you have full access to the tongue and eyelet areas. Clean the shoes if they aren’t brand new, and stuff the toes with paper towels or newspaper to create a firm surface for painting. -
Plan the grid:
Using a ruler and a pencil, lightly mark a grid of squares across the front toe box and side panels of the shoe. Aim for squares approximately 1 inch wide, though you can adjust the scale based on your shoe size. -
Create the triangle guides:
Draw diagonal lines through your squares. Alternate the direction of the diagonal line for each adjacent square to create a variety of triangle orientations, forming a random, mosaic-like appearance rather than a strict uniform pattern.
Clean Lines Hack
Use thin striping tape or ‘fineline’ tape to mask off the grid before painting. Peel it off while paint is slightly wet for perfect white gaps.
Step 2: Painting the Pattern
-
Start with the darkest value:
Dip your small flat brush into the black fabric paint. Select random triangles throughout your grid to fill in with black. Aim to fill about one-third of the total triangles, ensuring no two black triangles touch directly. -
Define the edges:
When painting near the white negative space lines (the gaps between triangles), use the fine-point detail brush to get crisp, sharp edges. The white ‘grout’ lines are crucial for this mosaic effect. -
Add the metallic accents:
Clean your brush thoroughly and switch to the metallic copper or bronze paint. Fill in another random selection of triangles. The metallic sheen adds a lovely dimension that catches the light. -
Apply the soft tone:
Using the blush pink paint, fill in the remaining designated triangles. I find that stepping back occasionally helps ensure the color distribution feels balanced across the shoe. -
Refine the tongue:
Don’t forget the tongue of the shoe underneath where the laces will go. Continue the geometric pattern onto this area so the design looks seamless when the shoes are laced up. -
Clean up the lines:
If any paint has bled into the white separation lines, use a clean detail brush with a tiny amount of white fabric paint (or white gesso) to tidy up the grid and re-establish the separation.
Level Up: Texture
Mix fabric medium with fine glitter into just the metallic triangles for extra sparkle, or use puff paint for a tactile 3D effect.
Step 3: Finishing Touches
-
Let it cure:
Allow the paint to dry completely. Fabric paint often requires 24 hours to fully cure, so be patient before handling them too much. -
Set the paint:
Depending on your specific fabric paint instructions, you may need to heat set the design with an iron (using a barrier cloth) or simply blow dry it on high heat for a few minutes. -
Apply protection:
Spray the entire shoe with a fabric sealer or waterproofing spray. This will protect your meticulous paint job from dirt and water damage. -
Re-lace via fresh style:
Once fully dry and sealed, lace your sneakers back up. Crisp white laces look best to complement the white grid lines in the design.
Enjoy walking in your custom-designed geometric art pieces
Playful Animal Prints
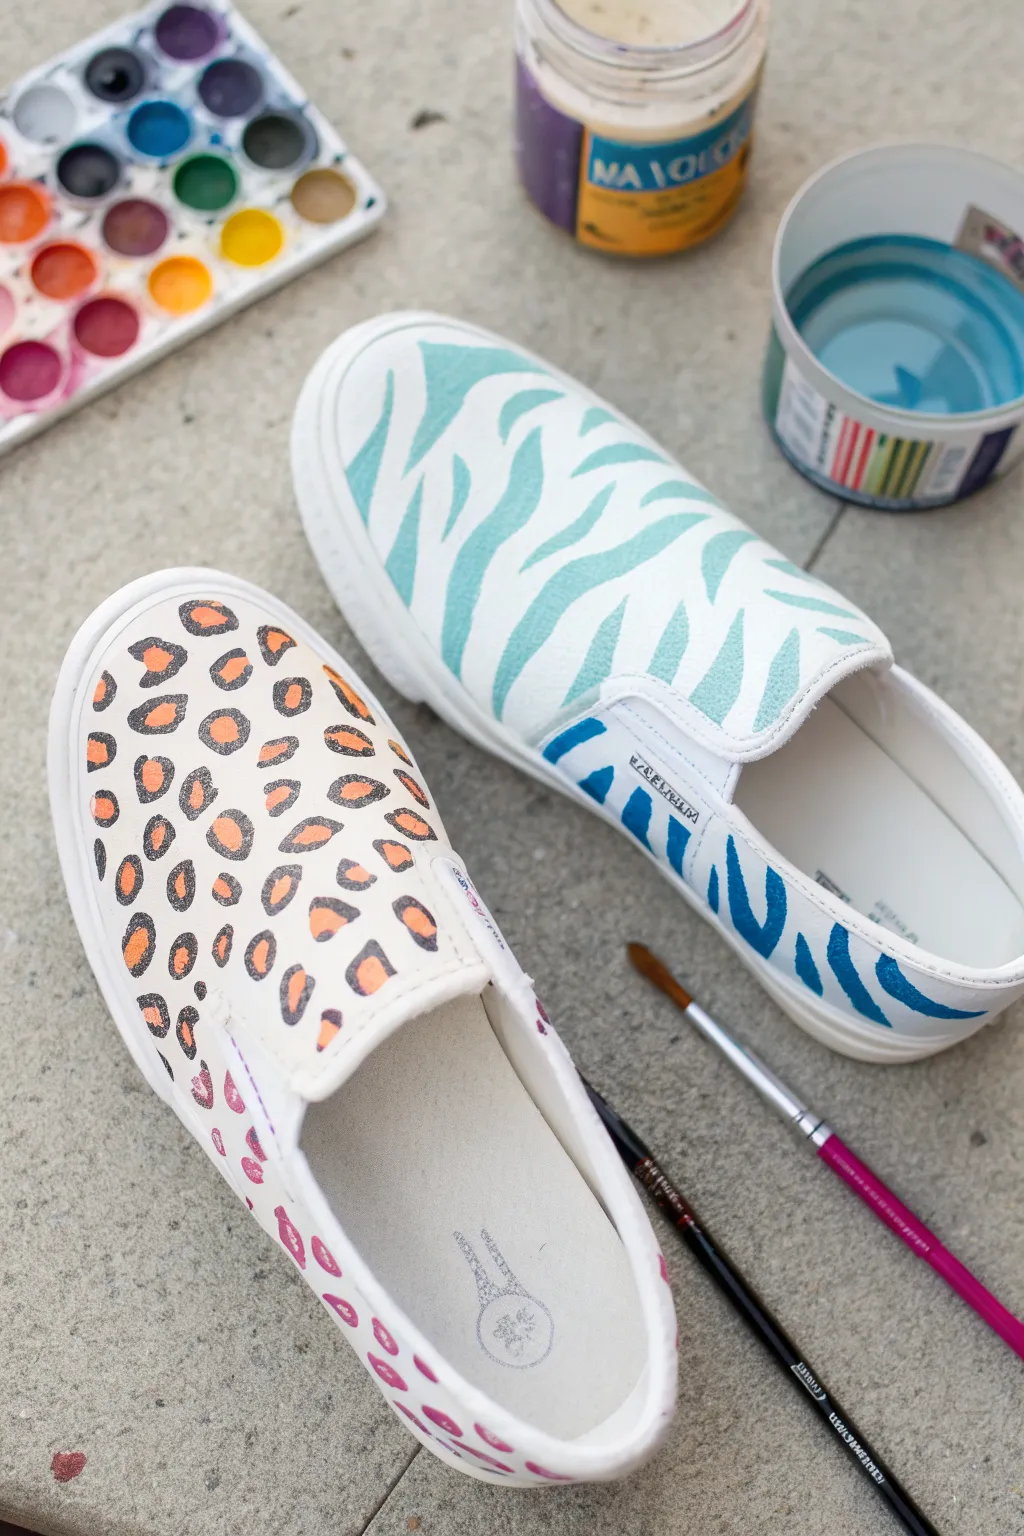
Transform plain white canvas slip-ons into a wild fashion statement with these vibrant animal print designs. Using a fun watercolor-style technique, you’ll create a soft zebra stripe and a bold, colorful leopard pattern that really pops.
How-To Guide
Materials
- White canvas slip-on shoes
- Fabric medium or textile painting medium
- Watercolor paints or fluid acrylics
- Small round paintbrush (size 2 or 4)
- Fine liner brush
- Water cup
- Masking tape (optional)
Step 1: Preparation
-
Prep the Surface:
Start by removing any tags or stickers from your new shoes. If the canvas feels stiff or has a coating, you can wipe it down with a slightly damp cloth to help the paint absorb better later. -
Stuff the Shoes:
Stuff the toes of the shoes tightly with paper towels or newspaper. This provides a firm surface to paint against and prevents the canvas from denting while you work. -
Mix Your Medium:
If you are using watercolors, mix a small amount of fabric medium into your water cup. This helps the pigment bond permanently to the fabric rather than washing out.
Prevent Bleeding
Canvas is thirsty! Don’t overload your brush with water. Use just enough moisture to move the pigment, otherwise, your crisp stripes will blur into blobs.
Step 2: Painting the Zebra Shoe
-
Mix Teal Paint:
Load your round brush with a watered-down teal or turquoise pigment. The consistency should be fluid but not dripping. -
Start the Stripes:
Begin at the toe of the left shoe. Paint wavy, uneven lines that taper at the ends. Think of them as elongated triangles that wiggle slightly. -
Vary the Direction:
As you move up the shoe, curve the stripes slightly to follow the contour of the foot. Leave white space between each stripe—about the same width as the painted line itself. -
Transition Colors:
As you reach the side panels near the heel, switch to a darker blue shade. Blend the teal into the blue slightly where the sections meet for an ombre effect. -
Fill the Sides:
Continue the stripe pattern down the sides of the shoe, ensuring the darker blue stripes angle backwards relative to the heel.
Step 3: Painting the Leopard Shoe
-
Mix Orange Base:
Clean your brush and pick up a bright orange color. Make sure your brush is damp enough to let the paint bleed slightly into the canvas fibers. -
Create the Spots:
Paint random, irregular blobs of orange all over the toe and front section of the right shoe. Keep them roughly pea-sized but don’t make them perfect circles. -
Add Variation:
Vary the spacing. Some spots can be close together, others further apart. I often add tiny dots of orange in the empty spaces to add texture. -
Let it Dry:
Allow the orange spots to dry completely before adding the black details. If the orange is wet, the black will bleed and turn muddy. -
Outline the Rosettes:
Using a finer brush and black or dark grey paint, create ‘C’ or ‘U’ shapes around the orange spots. Don’t close the circle completely; leave breaks in the black outline. -
Add Solid Spots:
In the white spaces between your rosettes, paint small solid black spots or irregular dashes to fill out the pattern and make it look dense. -
Fade the Heel:
Continue this pattern towards the heel, optionally lightening the colors or spacing the spots out more as you reach the back for a lighter look.
Paint looks faded?
Watercolors dry much lighter on fabric than paper. Go over your stripes or spots a second time once dry to pump up the saturation and contrast.
Step 4: Finishing Up
-
Final Dry:
Let both shoes sit in a well-ventilated area for at least 24 hours to ensure all layers of paint are fully dry. -
Heat Set:
To make the design wash-resistant, blast the shoes with a hairdryer on high heat for a few minutes, or follow the specific heat-setting instructions on your fabric medium bottle.
Step out in style with your completely unique, custom-designed footwear
Celestial Sun and Moon Motifs
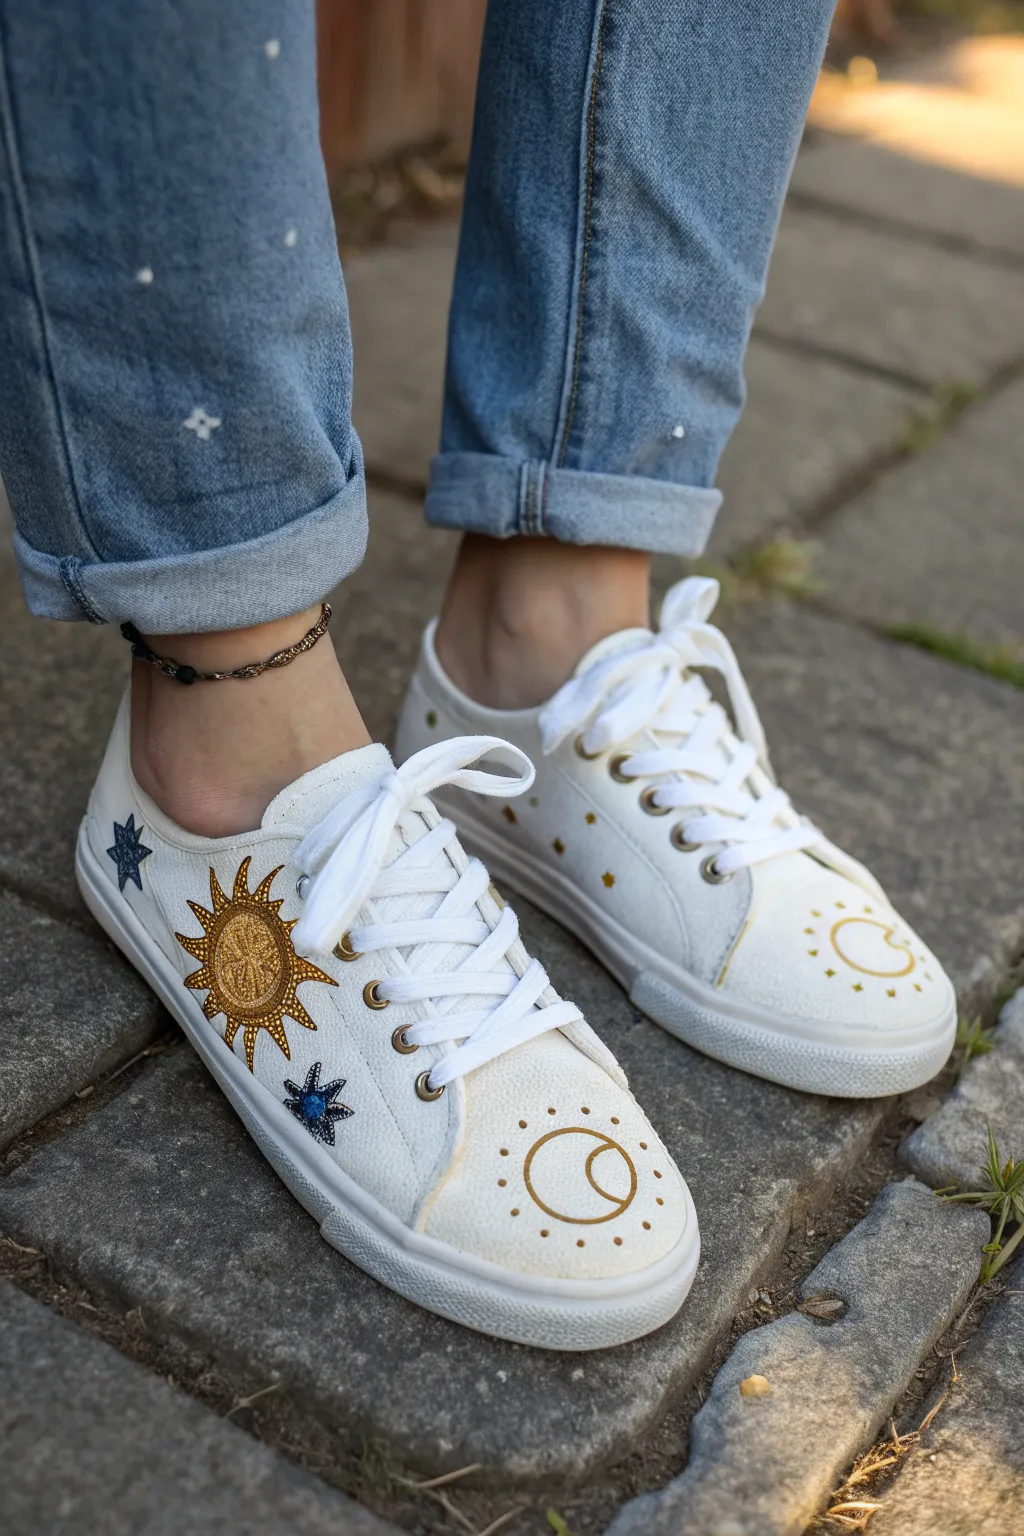
Transform plain white canvas sneakers into a celestial statement piece with elegant golden suns, crescent moons, and twinkling stars. This project blends delicate line work with bold, shimmering embroidery-style painting to create a magical, bohemian look.
Detailed Instructions
Materials
- White canvas sneakers
- Fabric medium
- Gold fabric paint or metallic acrylic paint
- Navy blue fabric paint or acrylic paint
- Fine detail paintbrushes (size 00 or 0)
- Pencil or chalk fabric marker
- Gold glitter paint or fine gold glitter
- Masking tape
- Small rhinestones (optional)
- Fabric glue (if using rhinestones)
Step 1: Preparation and Sketching
-
Prep the shoes:
Remove the laces from your sneakers to ensure you have a completely clear canvas and don’t accidentally get paint on them. -
Clean the surface:
If the shoes aren’t brand new, give them a quick wipe with a damp cloth and let them dry completely. Even new shoes benefit from a lint roller to remove loose fuzz. -
Sketch the toe cap design:
On the rubber or canvas toe cap of each shoe, lightly pencil a circle in the center. Inside that circle, draw a crescent moon shape. -
Add toe cap details:
Around the main circle on the toe, sketch small dots or tiny rays radiating outward to mimic a sunburst pattern. -
Map out the side motifs:
On the outer side of the left shoe, sketch a large, prominent sun with wavy and sharp rays. On the right shoe, sketch a few scattered stars and small dots.
Uneven Lines?
If your hand shakes while painting lines, rest your pinky finger on the shoe surface to stabilize your grip while you paint.
Step 2: Painting the Gold Elements
-
Mix your gold:
Mix your metallic gold acrylic paint with a fabric medium according to the bottle’s instructions. This prevents the paint from cracking when you walk. -
Line the toe cap:
Using your finest brush, carefully trace the circle and crescent moon on the toe caps with the gold mixture. Keep your hand steady for clean, thin lines. -
Paint the toe rays:
Dip the tip of your brush or a dotting tool into the gold paint and create the radiating dots or small dashes around the toe cap circle. -
Fill the large sun:
Moving to the side of the shoe, paint the central face of the large sun gold. I like to stipple the paint here to give it a textured, almost embroidered look. -
Define the sun rays:
Paint the triangular and wavy rays extending from the sun. Outline them first, then fill them in solidly with gold. -
Add glitter accents:
While the gold paint on the large sun is still tacky, lightly brush over it with gold glitter paint to enhance the sparkle.
Pro Tip: Long-Lasting Gold
Apply two thin coats of gold rather than one thick one. This maintains the metallic shine without getting gloppy or peeling later.
Step 3: Adding the Stars and Finishing Touches
-
Paint blue stars:
Using navy blue paint mixed with fabric medium, fill in the star shapes you sketched on the sides. Use a variety of sizes—some 5-pointed, some 8-pointed bursts. -
Add texture to stars:
Once the blue base is dry, use a lighter blue or silver to add a tiny dot in the center of the stars, or stipple them slightly for texture. -
Scatter small gold details:
Look for empty white spaces on the sides and heel. Add tiny gold dots, small crosses, or miniature diamonds to create a ‘starry sky’ effect. -
Create center embellishments:
For the center of the large sun and the larger stars, use a dot of gold paint or glue on a small rhinestone for extra dimension. -
Seal the design:
Once all paint is completely dry (usually 24 hours), cure it with heat if your fabric medium requires it (often a hair dryer works well), or spray with a fabric sealer. -
Re-lace:
Put your shoelaces back in. Crisp white laces keep the look fresh, but gold-tipped laces would also look amazing.
Let the shoes cure fully before wearing them out to enjoy your personalized cosmic artwork
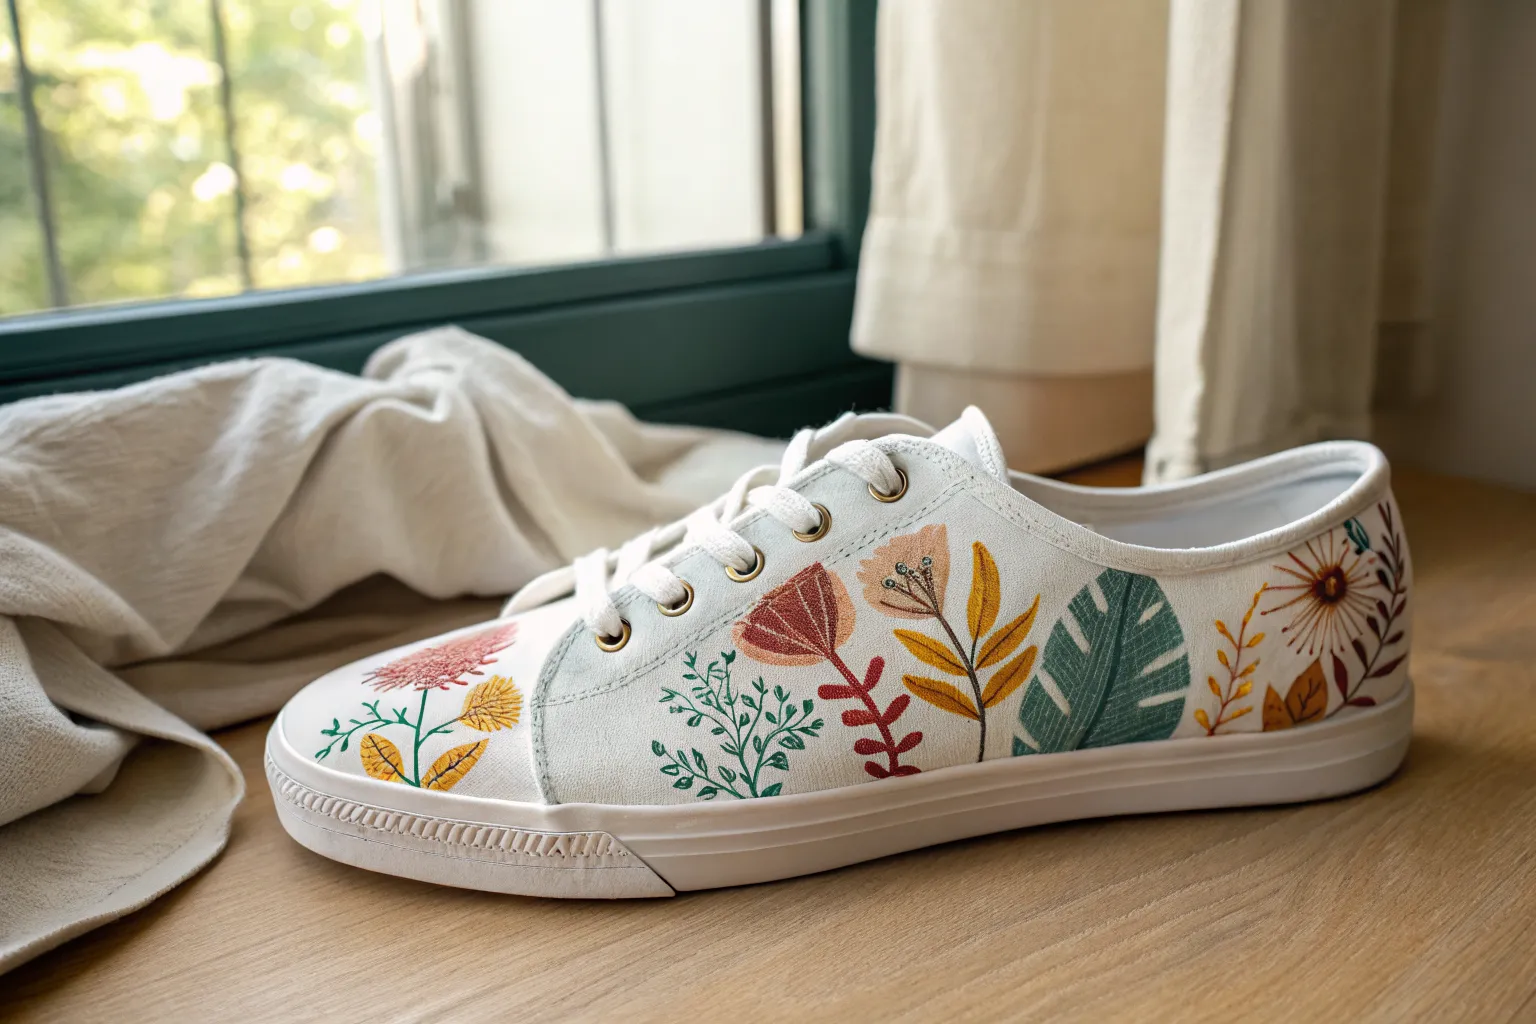
Cottagecore Garden Collage
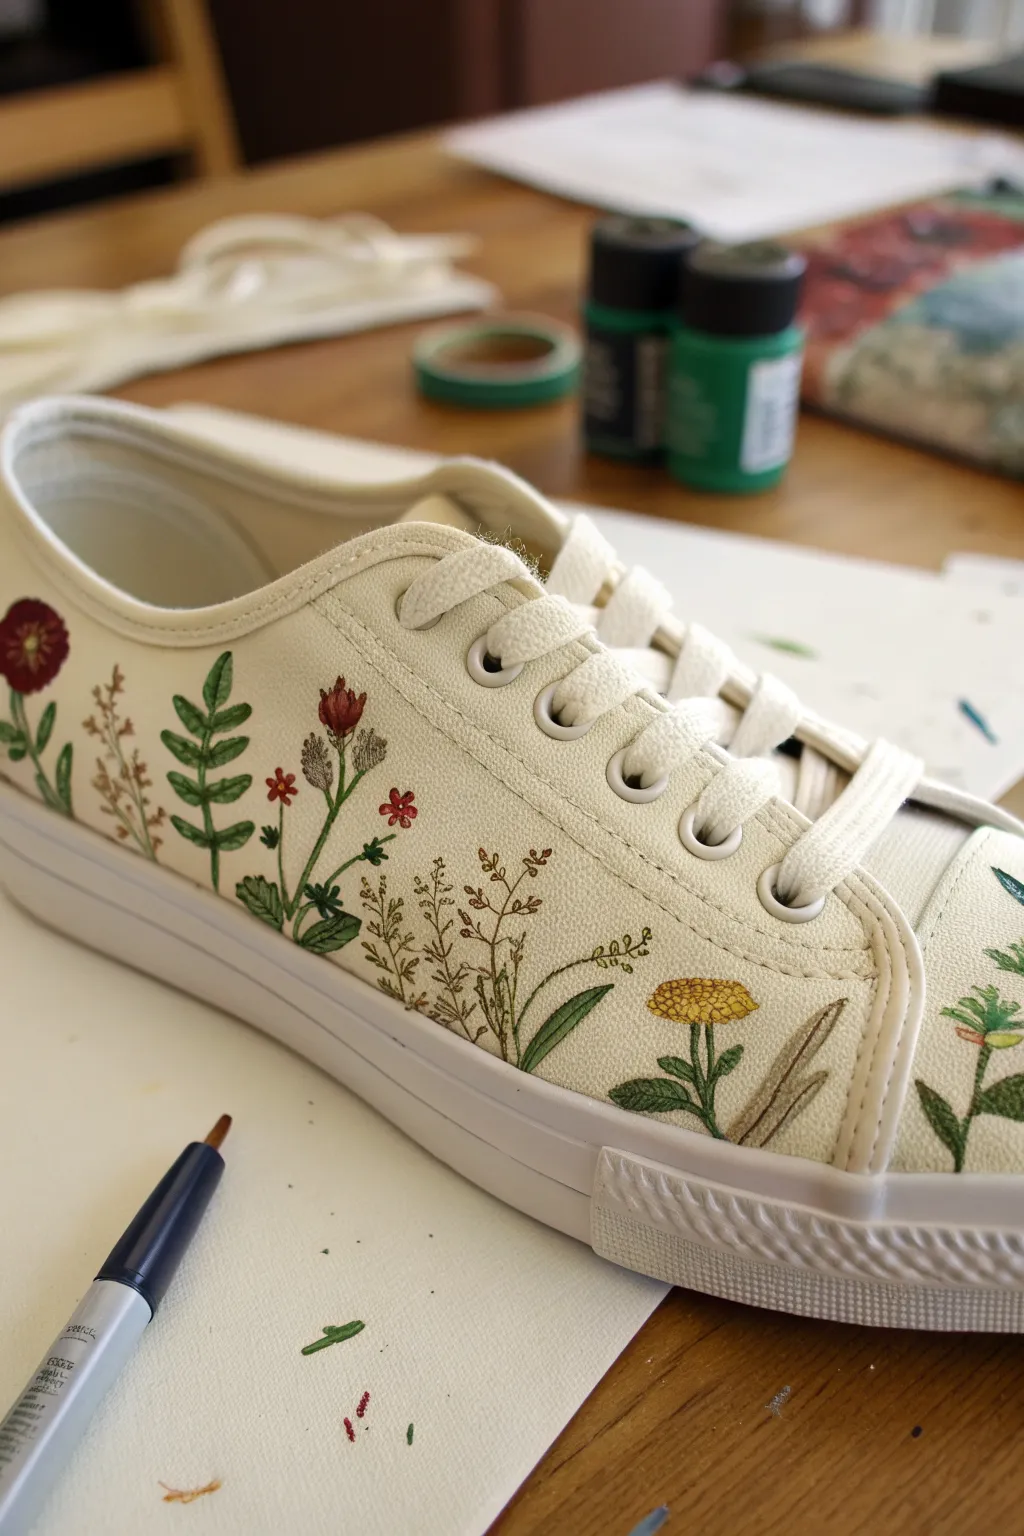
Transform a plain pair of white canvas sneakers into a walking wildflower meadow with this delicate Cottagecore-inspired project. Using fine lines and muted earth tones, you’ll create a vintage botanical illustration right on your shoes.
Step-by-Step
Materials
- White or cream canvas sneakers
- Fabric medium
- Acrylic paints (olive green, forest green, deep red, mustard yellow, brown, white)
- Fine liner brushes (sizes 00, 0, and 1)
- Pencil or disappearing ink fabric pen
- Small paint palette
- Washi tape or masking tape
- Water cup and paper towels
- Clear acrylic sealant spray (matte finish)
Step 1: Preparation & Planning
-
Prepare the canvas:
Start by removing the shoelaces to give yourself an unobstructed canvas to work with. If the shoes are new, you might want to give them a quick wipe with a damp cloth to remove any sizing chemicals. -
Protect the soles:
Use washi tape or painter’s tape to carefully mask off the rubber soles along the bottom edge. This ensures your paint lines stay crisp and don’t smudge onto the rubber. -
Sketch the layout:
With a pencil or disappearing ink pen, lightly sketch the stems of your larger plants first. Focus on creating vertical flow from the sole upward, varying the heights to mimic a wild garden.
Pro Tip: Steady Hand
For ultra-fine lines on uneven canvas, anchor your pinky finger against the rubber sole of the shoe while painting. This stabilizes your hand for precise detailing.
Step 2: Painting the Greenery
-
Mix your base medium:
Mix your acrylic paints with fabric medium according to the bottle instructions (usually 1:1 or 2:1). This makes the paint flexible so it won’t crack when you walk. -
Paint main stems:
Using your size 1 brush and an olive green mix, trace over your main stem lines. Keep the pressure light to maintain thin, elegant stalks. -
Add leafy details:
Switch to a forest green for variety. Paint small, alternating leaves on the tallest fern-like plant. Use a ‘press and lift’ motion: press down for the leaf base and lift up to create a sharp point. -
Create fine grasses:
I like to use my finest 00 brush here to add very thin, wispy grass blades in a brownish-green tone. Fill the gaps between larger plants with these delicate lines. -
Detail the base:
Add slightly denser greenery near the sole of the shoe to ground the composition, making it look like the plants are growing out from the bottom edge.
Level Up: Embroidered Details
After the paint dries, use embroidery floss for the flower centers or thick stems. French knots in yellow make amazing 3D pollen centers for the red flowers.
Step 3: Adding Florals & Accents
-
Paint crimson flowers:
Mix a deep red acrylic. Locate your planned spots for the poppy-like flowers and dab small, irregular circles. Don’t make them perfect spheres; uneven edges look more organic. -
Add yellow blooms:
Using mustard yellow, paint the small, tight flower head of the tansy plant. Use a stippling technique (tiny dots) to build up texture rather than flat strokes. -
Create seed heads:
With a diluted light brown, paint wispy, branched structures for dried seed pods. These add that essential airy, autumn texture to the design. -
Add tiny fillers:
Using a reddish-orange, paint tiny five-petal flowers floating on thin stems between the larger focal plants. These little pops of color tie the garden together. -
Highlight the leaves:
Mix a little white into your olive green. Carefully add a thin highlight line to the upper edge of the larger leaves to give them dimension and catch the ‘light’.
Step 4: Finishing Touches
-
Define the centers:
Once the red flowers are dry, use a dark brown or black on the tip of a toothpick or 00 brush to add tiny dots in their centers. -
Clean up edges:
Inspect your work for any stray paint marks. If you spot mistakes on the unpainted canvas, a clean, damp brush can often gently scrub them away before they cure. -
Dry completely:
Let the shoes sit for at least 24 hours to ensure the paint is fully deeply dried. Patience here prevents smudging later. -
Heat set the paint:
Use a hairdryer on high heat or an iron (on the cotton setting, with a cloth between the iron and shoe) to heat set the fabric paint, making it permanent. -
Seal the artwork:
Take the shoes outside and apply two light coats of matte acrylic sealant spray. This protects your garden from dirt and water. -
Re-lace:
Remove the masking tape from the soles and lace your sneakers back up. They are now ready for a stroll.
Enjoy walking through your day with a tiny personal meadow on your feet
Embroidered Stitch-Outlines on Canvas
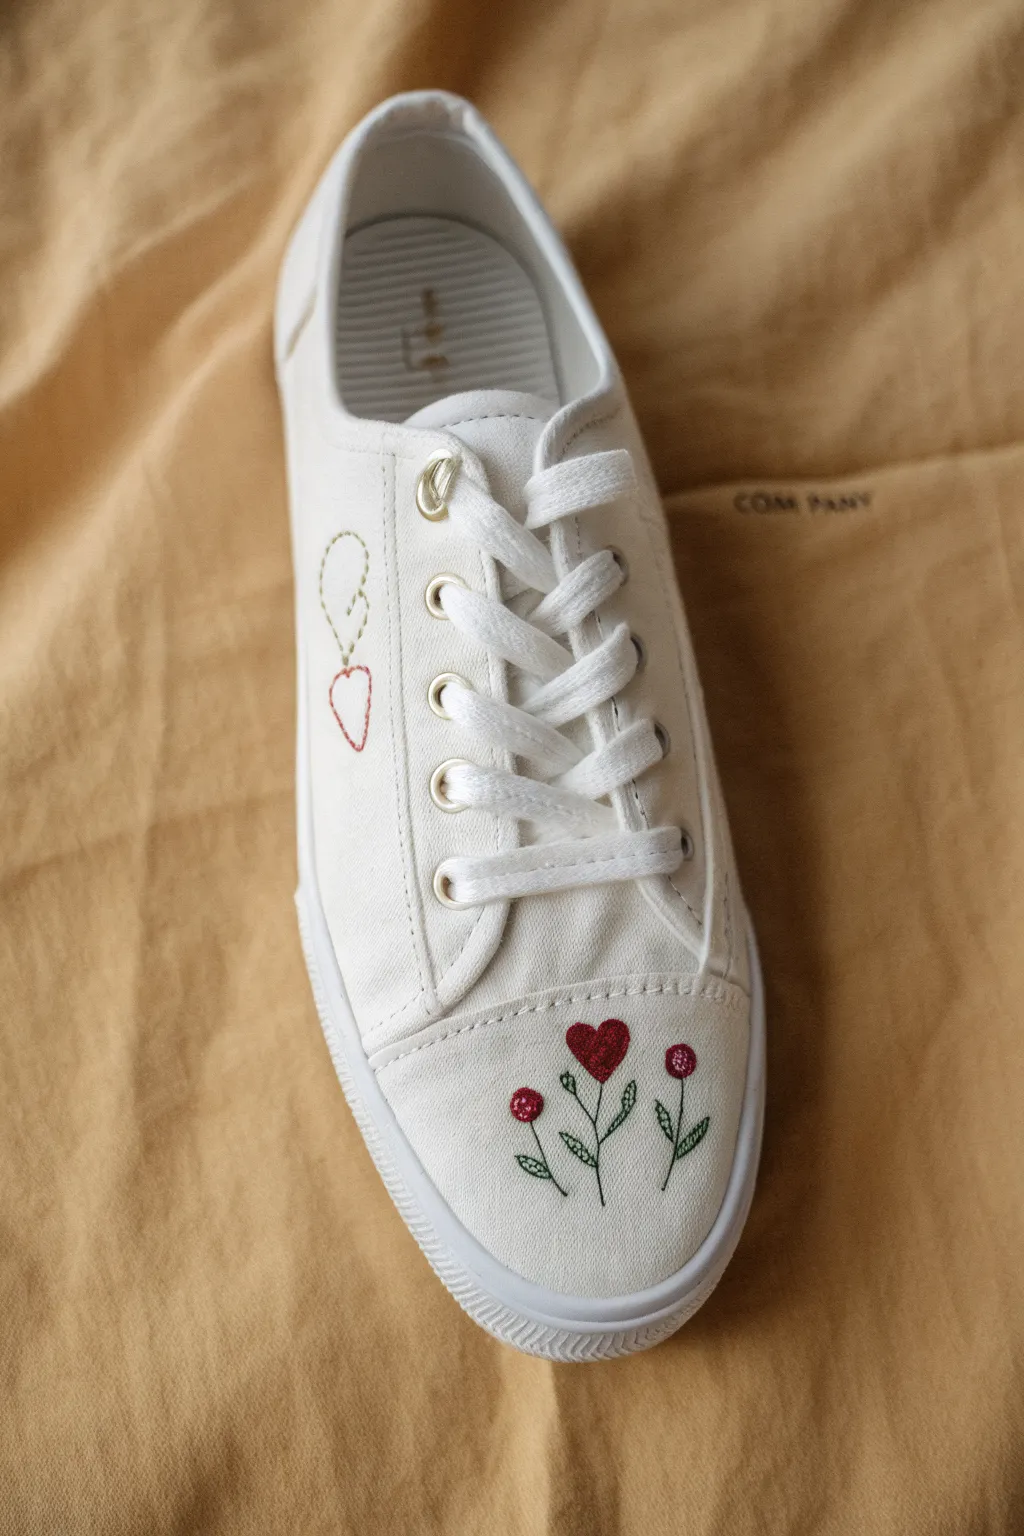
Transform plain white canvas sneakers into a charming statement piece with delicate hand embroidery. This project features sweet floral stems topped with hearts and buds on the toe, plus minimalist outline designs on the side, giving your footwear a personalized, boutique feel.
Step-by-Step
Materials
- White canvas sneakers (clean and dry)
- Embroidery floss in deep red and forest green
- Embroidery floss in light olive green (for the side detail)
- Sharp embroidery needle (size 3-9)
- Water-soluble fabric marker or disappearing ink pen
- Thimble (highly recommended for canvas)
- Small scissors
- Needle threader (optional but helpful)
Step 1: Preparation and Sketching
-
Remove Laces:
Begin by unlacing the sneakers completely. This gives you unrestricted access to the tongue and side panels and prevents your thread from getting tangled in the laces while you work. -
Plan the Toe Design:
On the rubber toe cap area (Wait, looking closely, this is a canvas toe cap, not rubber). On the canvas toe cap, use your water-soluble marker to draw three vertical stems. Make the center stem slightly taller than the two side ones. -
Add Flower Heads:
Draw a small heart shape at the top of the center stem. For the two side stems, draw a small circle or bud shape at the very tips. -
Detail the Leaves:
Sketch small, simple leaves branching off the stems. Keep the lines thin and delicate to match the aesthetic of the finished shoe. -
Mark the Side Design:
Move to the outer side panel of the shoe, near the eyelets. Draw a small heart outline near the stitching line. Above it, draw a second, slightly irregular round shape (like a balloon or fruit) connected by a tiny line.
Needle Won’t Push Through?
Canvas is tough! If the needle gets stuck, use a rubber grip or pliers to pull it through. A thimble is essential to push the needle without hurting your finger.
Step 2: Stitching the Toe Cap
-
Prepare the Green Thread:
Cut a length of forest green embroidery floss—about 18 inches is manageable. Separate the strands and use 2-3 strands for a sleek look. Thread your needle and knot the end. -
Stitch the Center Stems:
Starting from the inside of the shoe, push the needle up at the base of the center stem. Use a backstitch to create a continuous line up to the base of the heart. -
Add the Side Stems:
Continue using the backstitch technique for the two shorter side stems. Keep your stitches small (about 3-4mm) so they handle the curve of the shoe fabric smoothly. -
Embroider the Leaves:
For the leaves, you can use a lazy daisy stitch for an open look, or simply straight stitches to create the vein and outline. The example shows simple straight stitches forming a ‘V’ shape for leaves. -
Switch to Red Thread:
Tie off your green thread securely inside the shoe. Switch to the deep red floss, using 3-4 strands to make the flowers pop. -
Fill the Center Heart:
For the heart on the center stem, use a satin stitch. Bring the needle up on one side of the heart outline and down on the other, placing stitches closely side-by-side until the shape is filled with rich color. -
Stitch the Side Buds:
Move to the side stems. Use a satin stitch again to fill in the small circular buds. Alternatively, a large French knot could work here for texture, though satin stitch is flatter and more durable.
Step 3: Stitching the Side Panel
-
Outline the Side Heart:
Rethread with the red floss (2 strands is sufficient here for a finer look). Use a neat backstitch to trace the outline of the heart shape you drew on the side panel. -
Switch to Light Olive:
Tie off the red thread. Thread your needle with the lighter olive green floss. -
Stitch the Upper Shape:
Use a backstitch to outline the top shape above the red heart. This creates a subtle visual contrast with the darker green used on the toe. -
Connect the shapes:
If there is a connecting line or string between the shapes, stitch that now with a single straight stitch or tiny backstitch.
Pro Tip: Iron-On Backing
Iron a small piece of interfacing inside the shoe over your finished knots. This protects the embroidery effectively and stops threads from rubbing your toes.
Step 4: Finishing Touches
-
Secure all Knots:
Double-check the inside of the shoe. Ensure all knots are tight and trim any long tails of thread so they don’t rub against your foot or sock. -
Remove Markings:
Dab the embroidered areas gently with a damp cloth or sponge to dissolve the water-soluble marker lines, revealing your clean stitch work. -
Re-lace:
Once the canvas is dry from removing the marker, lace the shoes back up. Your custom kicks are ready to wear.
Enjoy walking around in your one-of-a-kind art that adds a handcrafted touch to every step.


Have a question or want to share your own experience? I'd love to hear from you in the comments below!