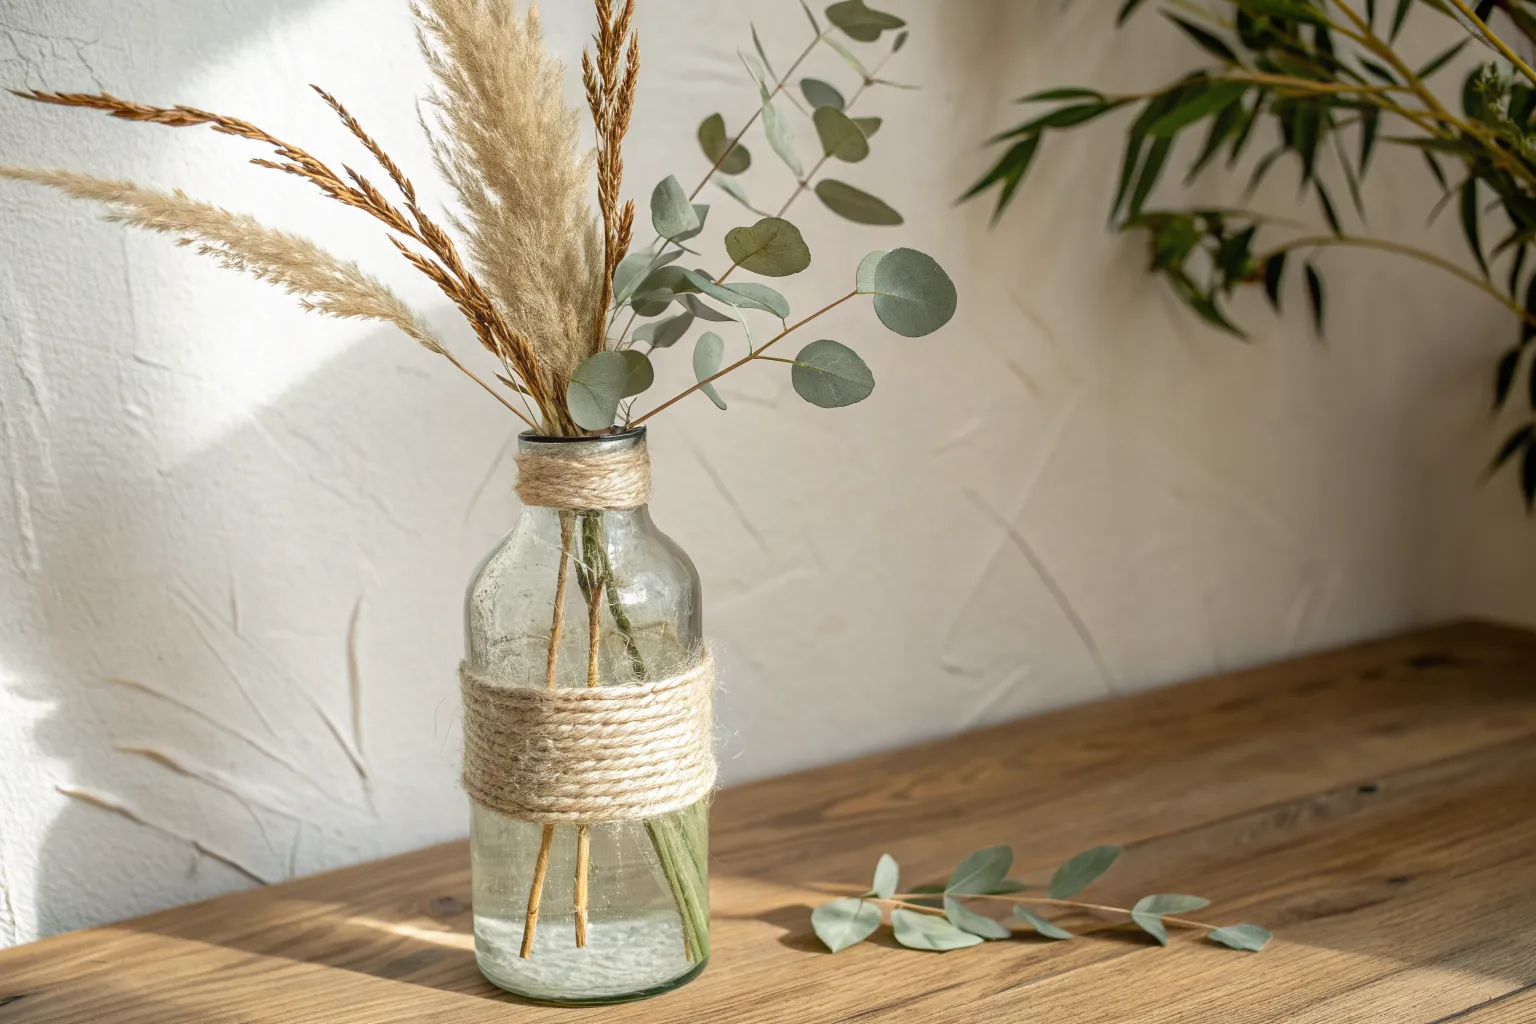
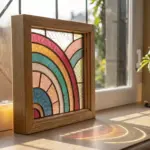
I love how glass bottle crafts can turn yesterday’s “empty” into something you actually want to display (or use) today. Here are my favorite DIY glass bottle crafts ideas, starting with the classics and drifting into the delightfully unexpected.
Painted Bottle Vase Trio
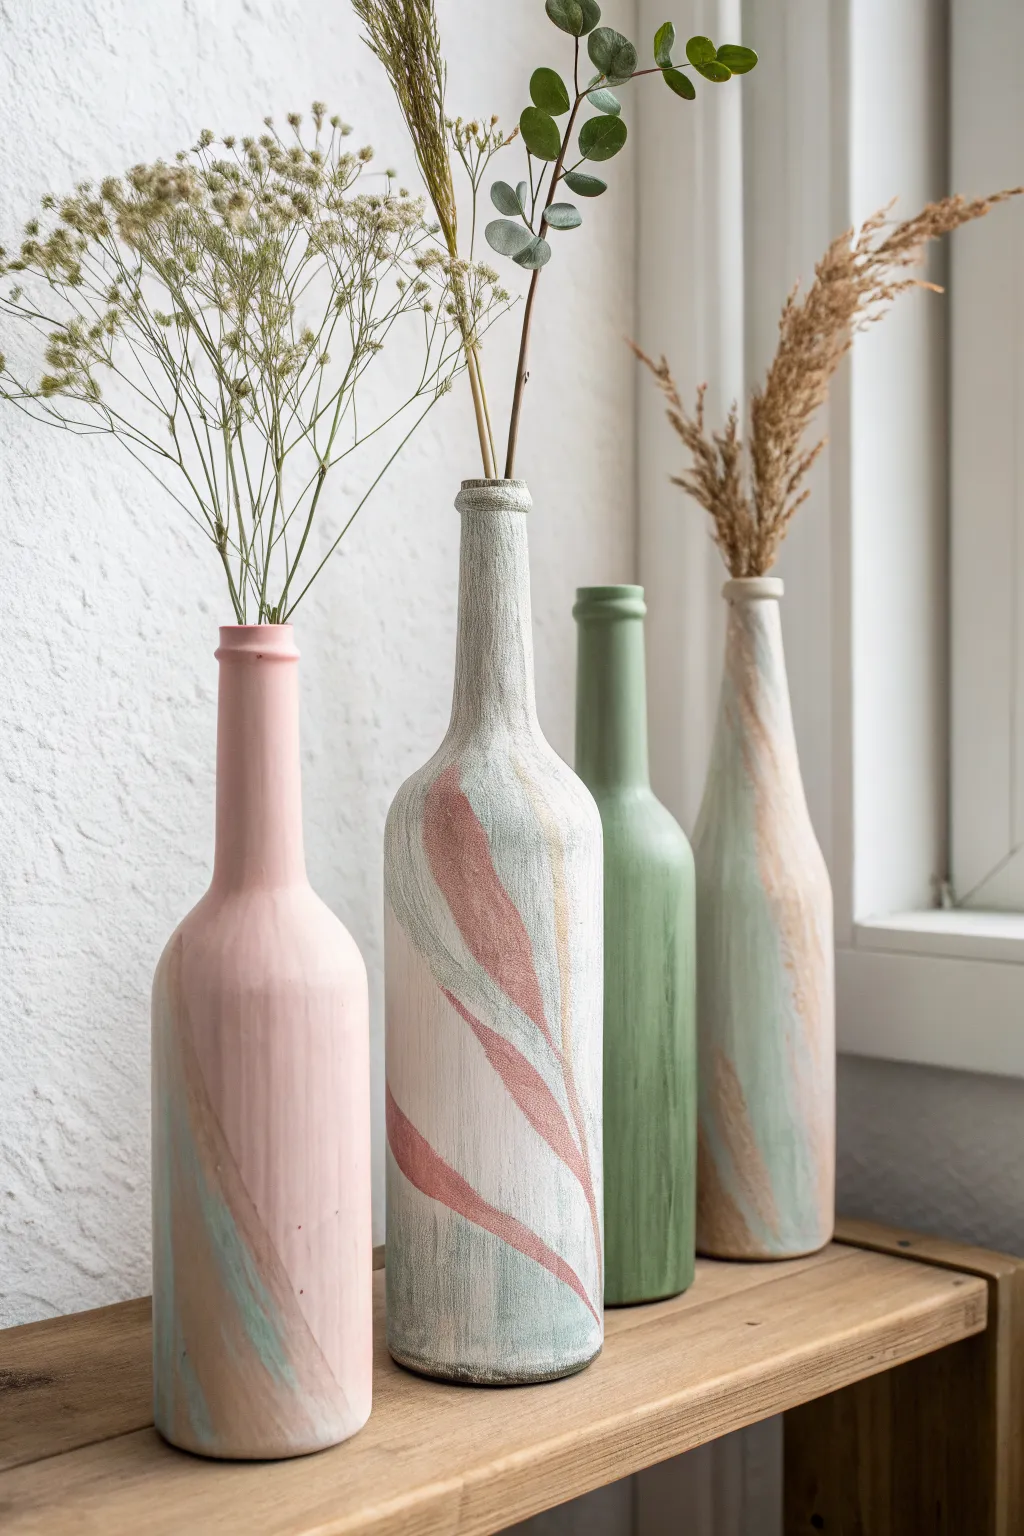
Transform ordinary glass recyclables into stylish, high-end decor with a soft, chalky finish. This project uses a clever textural paint technique to give bottles a beautiful, stoneware-like appearance perfect for displaying dried botanicals.
Step-by-Step
Materials
- Clean glass bottles (wine or soda bottles work best)
- White acrylic gesso or primer
- Acrylic paints (pale pink, sage green, cream/off-white, terracotta)
- Baking soda (bicarbonate of soda)
- Mixing cups or small bowls
- Flat synthetic paintbrushes (medium and large)
- Clear matte sealer spray (optional)
- Sandpaper (fine grit, optional for prep)
- Dried flowers or grasses for display
Step 1: Preparing the Base
-
Clean the surface:
Start by thoroughly washing your glass bottles with warm, soapy water to remove all labels and sticky residue. If stubborn glue remains, a bit of oil or Goo Gone works wonders. Dry them completely before painting. -
Prime the glass:
Apply a coat of white acrylic gesso or a glass primer to the entire exterior of each bottle. This step is crucial because acrylic paint can sometimes peel off slick glass; the primer gives your textured paint something to grip onto. -
Let the primer set:
Allow the primer layer to dry fully. Depending on your primer brand, this usually takes about an hour. Don’t rush this foundation.
Fixing Clumps
If your paint mix gets too lumpy, the baking soda hasn’t dissolved enough. Add a tiny drop of water and mix vigorously to smooth out big chunks.
Step 2: Mixing the Textured Paint
-
Create the texture mix:
In separate mixing cups, pour out your chosen acrylic paint colors: a pale pink base, a sage green, and a cream color. I like to add about one part baking soda to every three parts paint. -
Stir for consistency:
Mix the baking soda and paint thoroughly. You are looking for a fluffy, mousse-like consistency. If it’s too thick to spread, add a drop of water; if it’s too runny, add a pinch more baking soda. -
Test the grit:
Swipe a small amount on a scrap piece of paper. The baking soda should create a subtle, grainy texture similar to ceramic or terracotta.
Pro Tip: Ombre Effect
For a subtle gradient, mix a little white into your base color for the top half of the bottle while blending wet-on-wet for a seamless fade.
Step 3: Painting the Base Colors
-
Apply the first base coat:
Using a flat brush, paint each bottle with its designated base color (e.g., one pink, one green, one cream). Use vertical strokes from the neck down to the base to minimize chaotic brush marks. -
Dry and repeat:
Let the first coat dry until it feels chalky to the touch. The baking soda mix dries faster than regular paint. Apply a second coat to ensure opaque, solid coverage where no glass shows through. -
Smooth the rim:
Don’t forget the very top rim of the bottle. Dab your brush carefully around the opening to ensure the color transitions seamlessly into the neck.
Step 4: Adding Artistic Accents
-
Plan the abstract strokes:
For the patterned bottles, visualize where you want your sweeping accents. The goal isn’t a precise drawing, but rather organic, free-flowing curves that mimic leaves or abstract waves. -
Paint the contrasting curves:
Dip a clean brush into a contrasting color mixture (like terracotta on the cream bottle, or sage on the pink bottle). Paint long, sweeping curves starting from the bottom and twisting upward. -
Feather the edges:
While the accent paint is still wet, you can slightly feather the edges with a dry brush if you want a softer look, though sharp lines also look very modern. -
Layering colors:
On the central cream bottle, create depth by adding a second accent color—perhaps a hint of pale pink—overlapping or running parallel to your terracotta strokes. -
Final dry time:
Allow the painted bottles to cure completely overnight. The baking soda paint hardens significantly as it cures. -
Seal the finish (optional):
If you plan to handle the bottles frequently, lightly mist them with a clear matte spray sealer. This protects the textured surface from chipping without adding unwanted shine. -
Arranging the florals:
Once dry, fill your new faux-ceramic vases with dried elements. Baby’s breath looks lovely in the pink vase, while tall pampas grass or eucalyptus branches complement the taller cream and green bottles.
Enjoy styling your shelf with these custom, artisanal-looking vases that add a touch of softness to any room


Firefly Bottle Light Lanterns
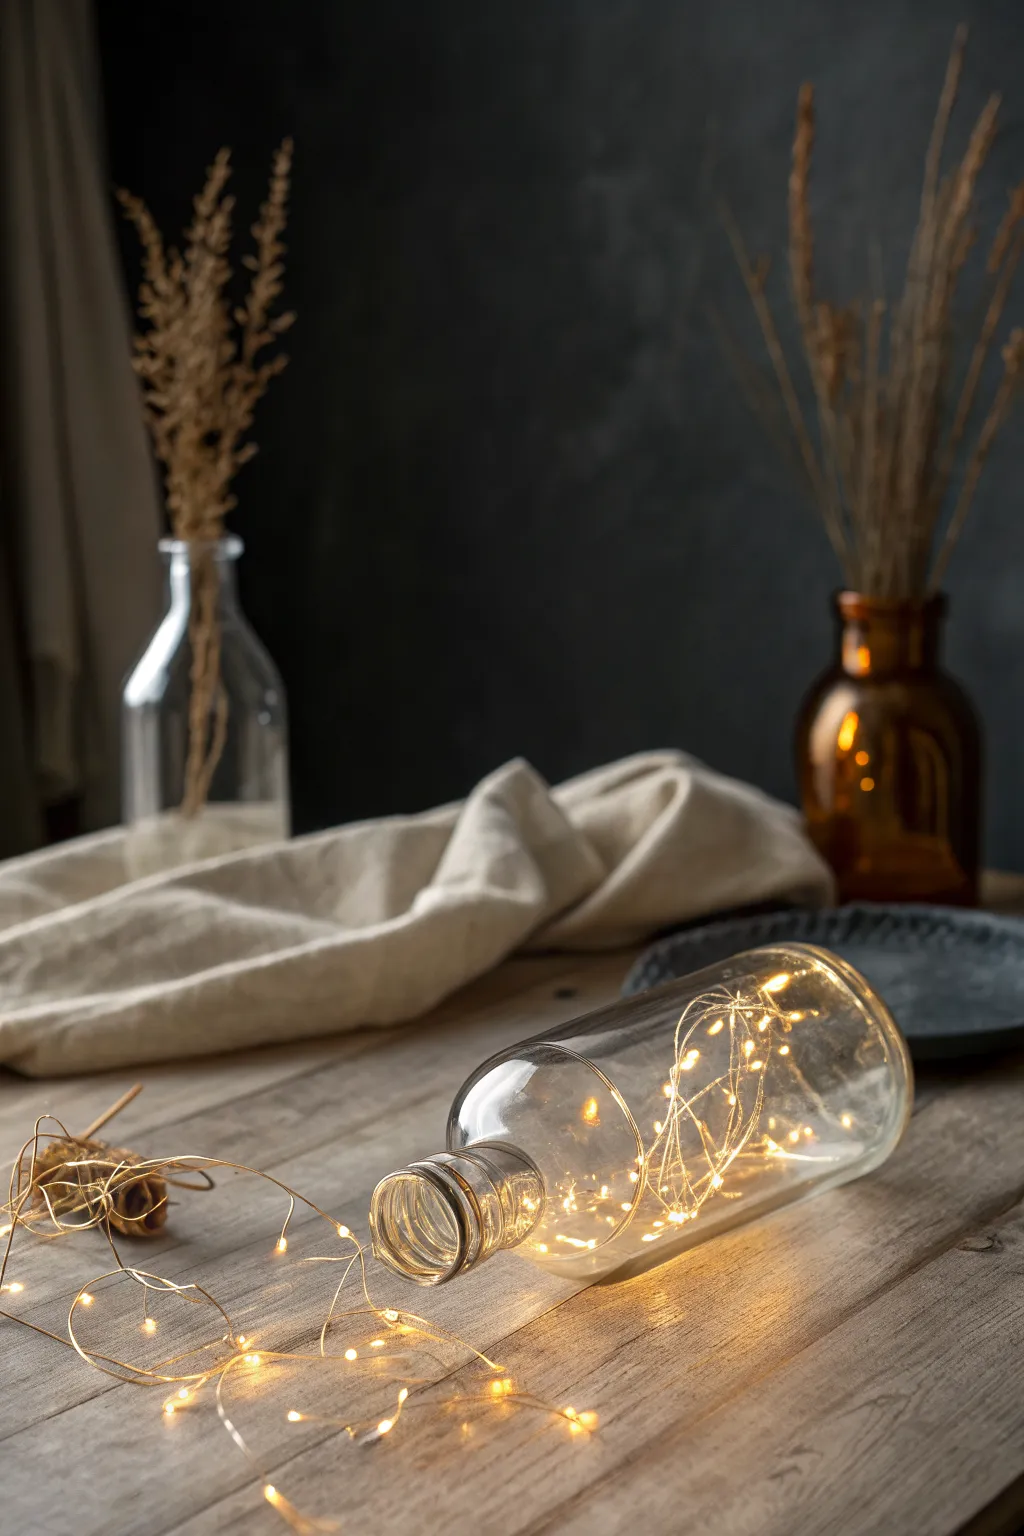
Transform a simple clear glass bottle into a magical lantern that captures the essence of fireflies on a warm summer evening. This project uses delicate fairy lights to create a warm, inviting glow that spills effortlessly across your tabletop.
Detailed Instructions
Materials
- Clear glass bottle (wine or juice bottle size)
- Battery-operated LED fairy light string (copper or silver wire)
- Batteries for the light pack
- Glass cleaner
- Lint-free cloth
- Chopstick or long knitting needle (optional, for positioning)
Step 1: Bottle Preparation
-
Clean the glass:
Start by thoroughly cleaning your chosen glass bottle both inside and out. Remove any old labels by soaking the bottle in warm soapy water, then scrubbing away the residue. -
Dry completely:
Ensure the inside of the bottle is absolutely dry before proceeding. Any moisture trapped inside can fog up the glass later or damage the delicate electronics of your lights. -
Polish for clarity:
Give the exterior a final polish with glass cleaner and a lint-free cloth. I always do this last step to remove any fingerprints from handling, ensuring the clearest possible view of the lights inside.
Wire Wisdom
Use copper wire lights for a vintage warmth, or silver wire for a cooler, modern look. The wire color is visible inside the glass, so choose one that matches your room’s decor.
Step 2: Light Installation
-
Prepare the lights:
Uncoil your strand of fairy lights gently to remove any kinks from packaging. Insert fresh batteries into the battery pack and test the switch to make sure all bulbs are functioning correctly. -
Create the first loop:
Take the end of the light strand (the end furthest from the battery pack) and fold it back on itself loosely to create a small cluster of lights about the size of a golf ball. -
Insert the first cluster:
Gently push this first cluster through the neck of the bottle. Let it slide down to the bottom (which will be the back of the bottle when it’s lying down). -
Feed the wire:
Continue feeding the wire into the bottle, occasionally twisting your wrist or the wire itself. This random twisting helps the wire coil naturally inside rather than just piling up in a straight line. -
Create volume:
As you feed more wire in, try to nudge the coils so they expand and fill the circumference of the bottle. You don’t want them all resting on the bottom glass wall. -
Use a tool for adjustment:
If the lights are clumping too much in one spot, insert a chopstick or knitting needle through the neck to gently poke and redistribute the wire coils. -
Fill the space:
Continue until about three-quarters of your light strand is inside the bottle. Aim for a loose, airy arrangement that looks distinct and separated rather than a tight ball of wire.
Tangled Troubles?
If the wire gets stuck or tangled inside the narrow neck, don’t pull hard. Gently shake the bottle upside down to loosen the mass, then use a pencil to guide it back in.
Step 3: Final Styling
-
Arrangement check:
Lay the bottle on its side on your work surface to check the distribution. The lights should look like they are floating throughout the cylinder, not just resting on the wood. -
Adjust the flow:
If a large empty spot appears when you lay it down, use your tool again to shift a few coils into that void. -
The spillover effect:
Take the remaining length of wire that is still outside the bottle and arrange it casually on the surface in front of the bottle mouth. -
Hide the battery pack:
Tuck the bulky battery pack behind a prop, like a folded cloth, a stack of books, or a small vase, so it remains unseen but accessible. -
Loosen the exterior wire:
Gently pull the exterior wire loops apart to create wider, more relaxed curves on the table, mimicking the path of fireflies escaping the jar. -
Final polish:
Do one last quick wipe of the bottle’s exterior to remove any new smudges from the assembly process.
Now dim the overhead lights and enjoy the cozy, magical atmosphere your new lantern creates


Simple Bottle Candle Holders

Transform everyday glass bottles into an elegant, farmhouse-style centerpiece with barely any effort. This project combines the rustic charm of amber and clear glass with the industrial edge of a metal tray for a cozy, flickering display.
Step-by-Step Guide
Materials
- Tall clear glass bottle (cleaned, label removed)
- Small amber glass bottle (cleaned, label removed)
- Round black metal tray with wire rim
- Standard cream taper candle
- Sharp knife or craft blade
- Warm water and dish soap
- Adhesive remover (optional)
- Lighter or matches
Step 1: Preparation & Cleaning
-
Select your bottles:
Choose two contrasting bottles for your tray. Aim for one tall, clear glass bottle with a narrow neck to hold the taper, and a shorter, stout amber glass bottle to add visual weight and color variation. -
Soak the glass:
Submerge both bottles in a basin of warm, soapy water. Let them soak for at least 30 minutes to soften the paper labels and dissolve the glue. -
Remove the labels:
Gently peel away the paper labels. If any stubborn adhesive remains, use a bit of adhesive remover or a paste of baking soda and oil to scrub the glass completely clean. -
Dry thoroughly:
Rinse the bottles inside and out to remove soap residue. Dry them completely with a lint-free cloth to ensure they sparkle without streaks. -
Clean the tray:
Wipe down your black metal tray to remove any dust or fingerprints. The matte black finish provides a perfect grounding contrast to the shiny glass.
Wax Grip Trick
If you shaved off too much wax and the candle is loose, wrap a small strip of masking tape around the candle base or drop a bit of melted wax into the neck before inserting.
Step 2: Fitting the Candle
-
Test the fit:
Insert the base of your cream taper candle into the neck of the clear bottle. Often, standard tapers are slightly too wide for bottle openings. -
Shave the base:
If the fit is too tight, very carefully use a sharp knife or craft blade to shave thin layers of wax off the bottom inch of the candle. Rotate the candle as you work to keep it cylindrical. -
Check stability:
Re-insert the candle frequently during the shaving process. You want a snug friction fit so the candle stands perfectly straight without wobbling. -
Secure with flexibility:
I prefer to leave the fit just tight enough that I have to twist it slightly to get it in; this ensures it won’t tip over once lit.
Seasonal Fill
Fill the clear bottle with water and a sprig of greenery, or dry elements like peppercorns or baby’s breath, before inserting the candle for a customized look.
Step 3: Arrangement & Styling
-
Position the tray:
Place your black wire-rimmed tray in the center of your table or on a linen runner. -
Place the main bottle:
Set the tall clear bottle with the secured taper candle slightly off-center on the tray. This creates a dynamic, asymmetrical look rather than a rigid one. -
Add the accent bottle:
Nestle the smaller amber bottle next to the clear one. The height difference creates a pleasing visual hierarchy. -
Manage negative space:
Leave the rest of the tray relatively empty. The beauty of this arrangement relies on the openness and the stark lines of the metal rim. -
Light and adjust:
Light the taper candle. Step back and ensure the flame is upright and safe. If the candle leans, extinguish it and adjust the base shaving slightly until perfect. -
Optional: Add background elements:
To echo the theme, you can place extra amber bottles or small votive candles nearby on the table, outside the tray, to expand the scene.
Enjoy the calm atmosphere created by this streamlined and modern candle display

Refillable Soap Dispenser Bottle
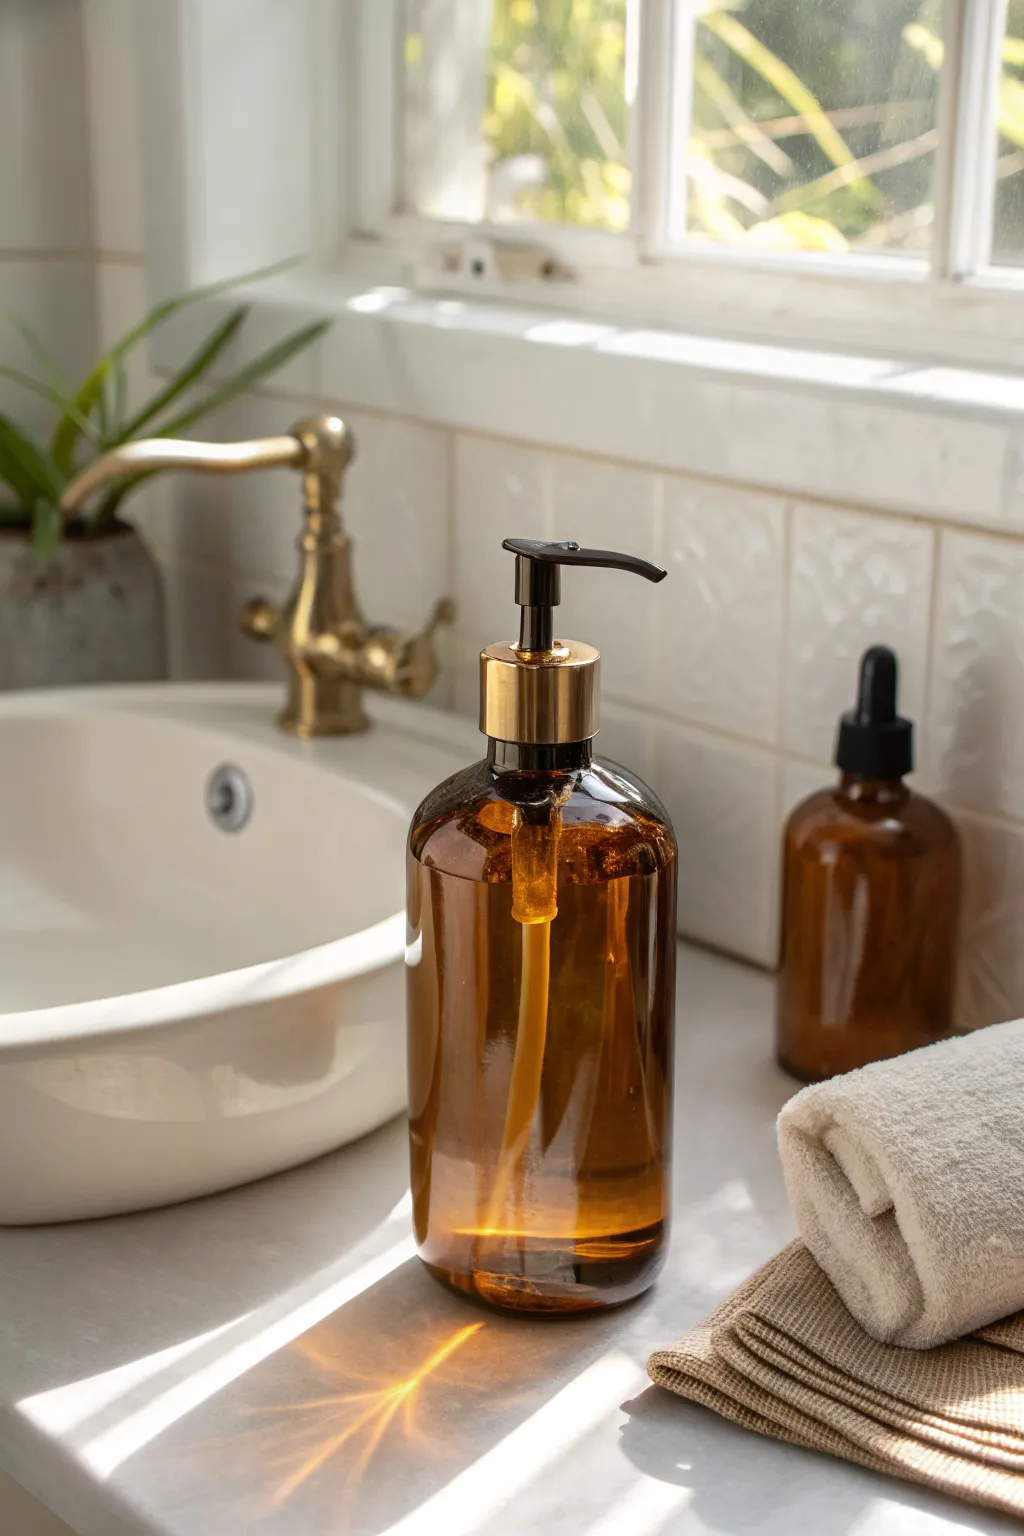
Transform a plain glass bottle into an elegant, spa-worthy accessory for your bathroom sink. This simple upgrade combines the warmth of amber glass with the sleek finish of metallic hardware, creating a functional piece that looks expensive but costs surprisingly little.
Detailed Instructions
Materials
- Clean amber glass bottle (16 oz or 500ml works best)
- Black and gold soap pump dispenser replacement
- Measuring tape or ruler
- Scissors
- Liquid soap of your choice
- Warm soapy water
- Isopropoyl alcohol
- Microfiber cloth
Step 1: Preparation & Cleaning
-
Select your vessel:
Begin by sourcing a sturdy amber glass bottle. While you can purchase these new, repurposing a kombucha bottle or large essential oil bottle is a sustainable option. Ensure the neck size is standard, typically 28/400, to fit most pump mechanisms. -
Remove old labels:
If you are upcycling a bottle, soak it in hot, soapy water for 30 minutes to loosen the adhesive. Peel away the paper label gently. -
Clean adhesive residue:
Use a microfiber cloth dampened with isopropyl alcohol or a dedicated adhesive remover to scrub away any sticky residue left on the glass. The surface needs to be pristine. -
Internal cleaning:
Wash the inside of the bottle thoroughly with warm water and dish soap. Rinse repeatedly until no suds remain. -
Dry completely:
Invert the bottle on a drying rack or clean towel. I like to let this air dry for several hours or overnight to ensure absolutely no moisture is trapped inside, which could dilute your soap.
Tube Trimming Tip
Cut the dip tube slightly longer than you think you need. You can always trim more off, but a tube that’s too short won’t reach the last inch of soap.
Step 2: Fitting the Mechanism
-
Check pump fit:
Take your new black and gold pump mechanism and screw it onto the empty bottle to ensure the threads match perfectly. It should twist on smoothly without force. -
Measure the dip tube:
Remove the pump and hold it alongside the bottle, aligning the top of the cap with the bottle’s rim. Observe where the plastic dip tube reaches the bottom. -
Mark the cut line:
If the tube is too long, it will bend awkwardly or prevent the cap from closing. Mark the tube where it hits the bottom corner of the bottle. You want a slight angle for better suction. -
Trim the tube:
Use sharp scissors to cut the plastic tube at a 45-degree angle. This angled cut prevents the tube from suctioning flat against the glass bottom and blocking flow. -
Test the length:
Insert the pump back into the empty bottle. The tube should just barely touch the bottom, bending ever so slightly to reach the corner.
Add a waterproof label
Elevate the look by applying a minimal, waterproof vinyl label (like ‘HAND SOAP’ in a serif font) to the front center of the bottle.
Step 3: Assembly & Finishing
-
Select your soap:
Choose a liquid hand soap. Clear or light golden soaps look best in amber glass as they catch the light beautifully, whereas milky soaps can look opaque and heavy. -
Fill the bottle:
Pour your soap slowly into the bottle. Stop filling when the liquid reaches the shoulder of the bottle—leaving ‘headroom’ prevents overflow when the pump displacement occurs. -
Wipe the rim:
Before closing, wipe the threaded rim of the bottle with a damp cloth to remove any drips. This ensures a tight seal and prevents crusted soap build-up. -
Secure the pump:
Insert the pump tube and screw the gold collar down firmly. Ensure it is tight enough to prevent leaking but avoid overtightening which could crack the plastic collar. -
Unlock the mechanism:
Most new pumps come in a locked ‘down’ position. Twist the spout counter-clockwise (follow the arrow on top if present) until it pops up, ready for use. -
Prime the pump:
Pump the dispenser 3-5 times over a sink or towel until the soap begins to flow steadily through the spout. -
Final polish:
Give the exterior one last buff with a clean microfiber cloth to remove fingerprints and make the amber glass shine.
Set your stunning new dispenser by the sink and enjoy a touch of everyday elegance
BRUSH GUIDE
The Right Brush for Every Stroke
From clean lines to bold texture — master brush choice, stroke control, and essential techniques.
Explore the Full Guide
Ombre Painted Bottle Set
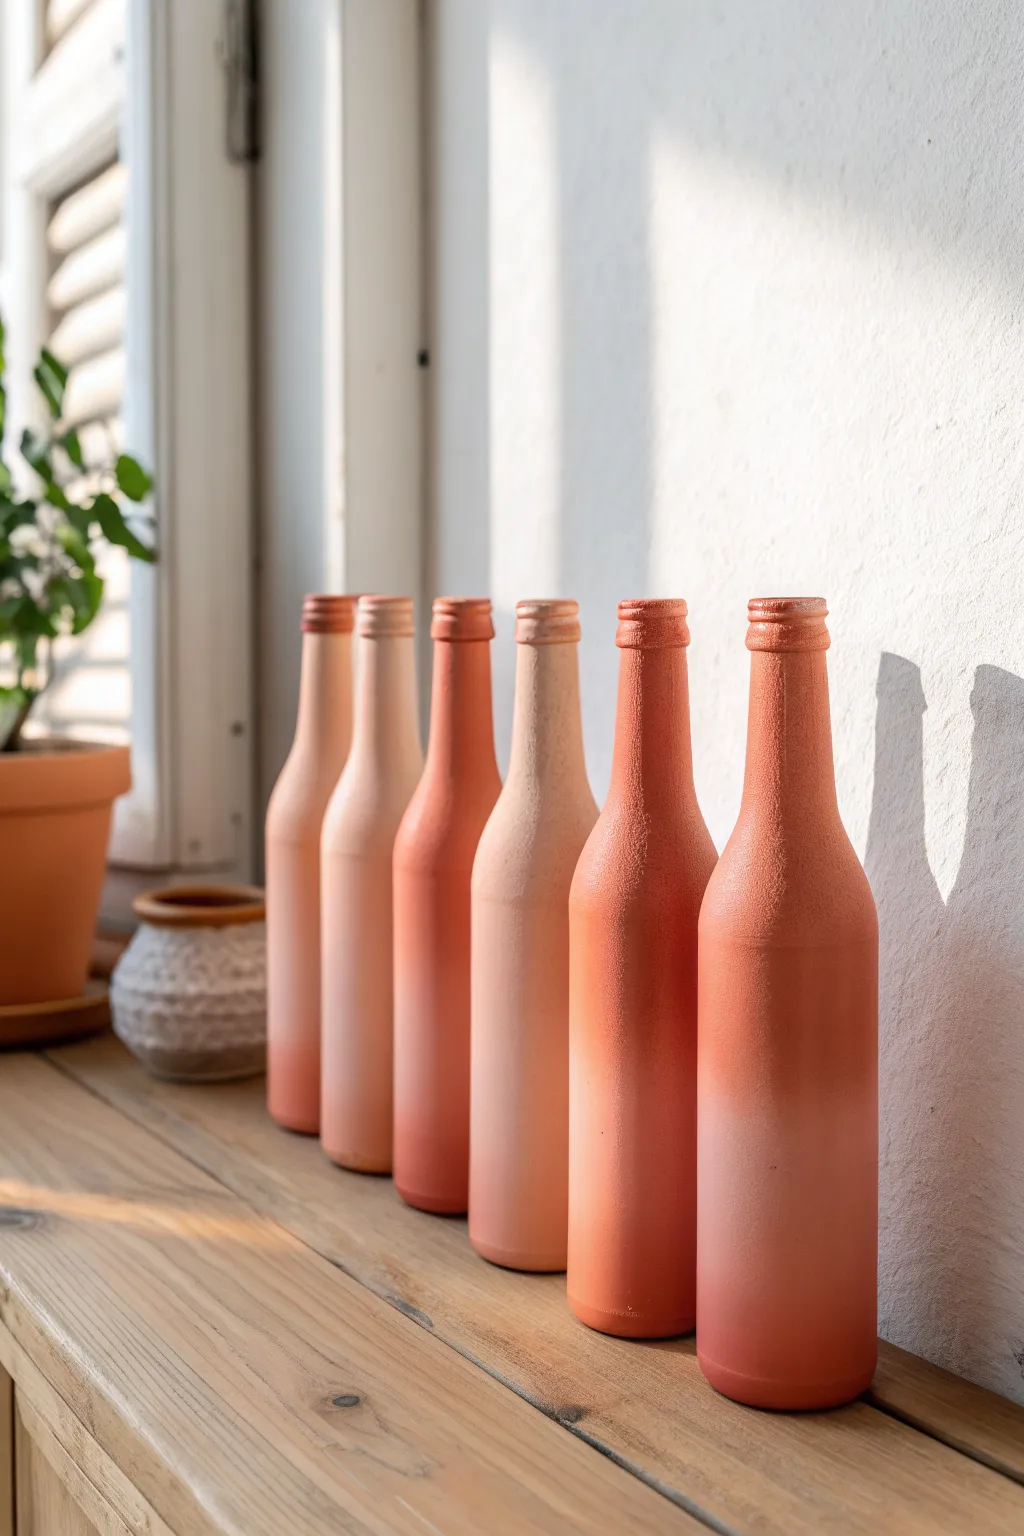
Transform plain glass recycling into a stunning set of faux ceramic vases using paint and baking powder. These bottles feature a warm, sun-baked gradient of coral, peach, and terracotta tones with a gorgeous matte texture that feels just like real pottery.
Step-by-Step
Materials
- 6 empty glass bottles (wine or beer bottles, labels removed)
- Acrylic paint (burnt orange, coral, cream, and white)
- Baking powder
- Mixing cups or palette
- Flat paintbrushes (medium and large)
- Makeup sponges or foam brushes
- Paper towels
- Disposable mixing sticks
- Cardboard or drop cloth
Step 1: Preparing the Faux Ceramic Paint
-
Clean the glass:
Begin by thoroughly washing your bottles with warm soapy water to remove any label residue or oils. Dry them completely with a lint-free towel to ensure the paint adheres properly. -
Mix the base colors:
Squeeze out your acrylic paints into separate cups. You want a gradient, so keep your burnt orange pure in one cup, mix orange with coral in another, coral with cream in a third, and a very light cream/white mix in the last. -
Add the secret ingredient:
To achieve that gritty, stone-like texture, add 1 teaspoon of baking powder to every 2 tablespoons of paint. Mix thoroughly until the paint fluffs up slightly and has a mousse-like consistency. -
Test the texture:
Brush a small amount of the mixture onto a scrap piece of cardboard. If it is too chunky, add a drop of water; if it’s too runny to hold texture, add a pinch more baking powder.
Baking Powder vs. Soda
Make sure to use baking POWDER, not baking soda. Baking powder creates a fluffier, mousse-like texture that mimics clay better than the gritty sand-like finish of baking soda.
Step 2: Applying the Base Coat
-
Apply the first layer:
Using a flat brush, paint a solid base coat on each bottle. To mimic the image, paint two bottles in the darkest terracotta shade, two in the medium coral, and two in the lightest cream-peach tone. -
Create texture while wet:
Immediately after brushing on the paint, use a dabbing motion with your brush tip or a sponge to break up the brushstrokes. This stippling effect enhances the faux-ceramic look. -
Let it dry completely:
Allow this first coat to dry for at least an hour. The baking powder paint dries faster than regular acrylics but needs to be fully set before you can blend over it. -
Assess opacity:
If the glass still shows through after drying, apply a second coat using the same colors and stippling technique. A solid, opaque base is crucial for the ombre effect.
Step 3: Creating the Ombre Gradient
-
Select your gradient pairs:
For the ombre look, pair a lighter shade with a darker bottle, or vice versa. I like to take a bottle painted in the medium coral tone and prepare a lighter peach color for the bottom half. -
Paint the bottom section:
Apply the contrasting color to the bottom third of the bottle using a foam brush or sponge. Don’t worry about a perfect line yet; just get the color on the glass. -
Blend the transition line:
While the paint is still wet, use a clean makeup sponge to dab softly where the two colors meet. Tap rapidly up and down along the seam to blur the line. -
Refine the fade:
If the transition looks too harsh, dip your sponge lightly into the base color and dab it back down into the new color. Keep working back and forth until the gradient looks soft and misty. -
Repeat for all bottles:
Continue this process for the remaining bottles, varying the height of the ombre effect. Make some gradients start lower and others higher to create visual interest when they are displayed together. -
Texture check:
Ensure your blended areas still have that gritty texture. If the sponging smoothed it out too much, tap a tiny bit of baking-powder-paint mix over the area to restore the roughness.
Rustic Speckle Effect
Load an old toothbrush with thinned brown paint and flick droplets onto the dry bottles. This creates tiny speckles that resemble natural pottery clay imperfections.
Step 4: Finishing Touches
-
Clean the rims:
Check the very top rim of the bottles. If paint has globed unevenly effectively inside the mouth, carefully wipe the inner edge or paint it neatly for a professional finish. -
Final dry time:
Let the bottles cure for at least 24 hours. The baking powder mixture hardens significantly over time, becoming more durable. -
Optional sealing:
Since these are intended to look like matte clay, avoid glossy sealers. If you want protection, use an ultra-matte spray fixative to lock in the texture without adding shine.
Arrange your beautiful new vases on a sunny windowsill where the light can highlight their rich, earthy textures
Decoupage Pattern Bottle Decor
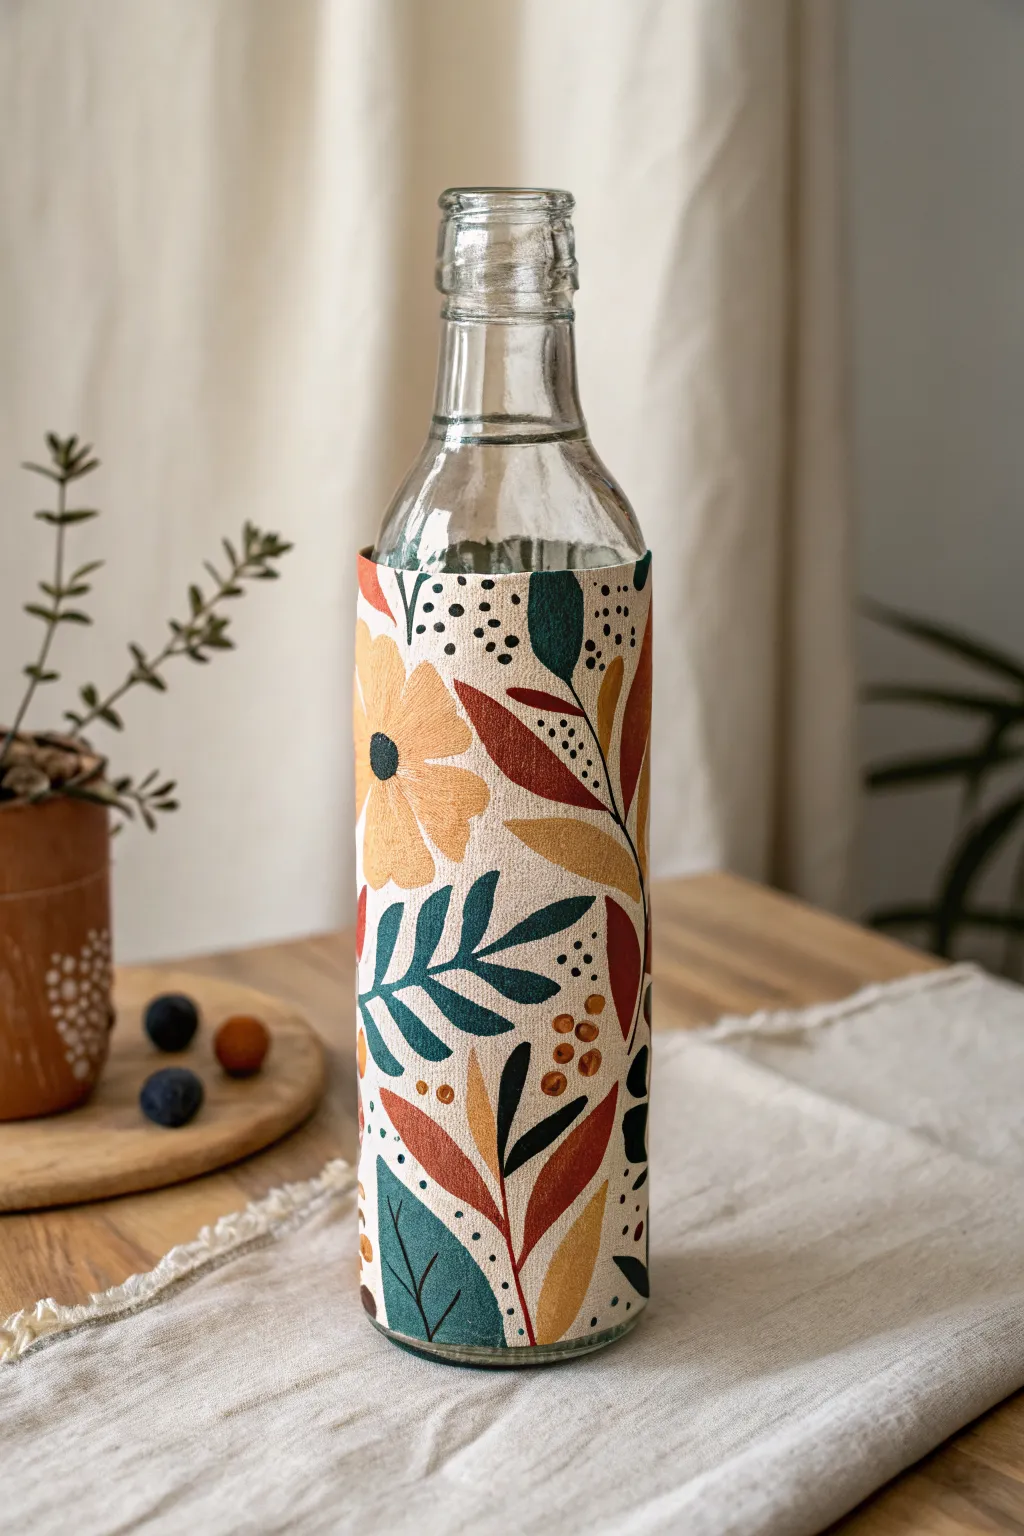
Transform a plain glass bottle into a chic vase or decorative piece using a fabric-textured decoupage technique. This project features a warm, botanical pattern with autumnal hues that wraps seamlessly around the glass, giving it a high-end, hand-painted ceramic look.
How-To Guide
Materials
- Clean glass bottle (label removed)
- Patterned napkin, decoupage paper, or thin printed fabric (botanical/floral design)
- Mod Podge (Matte or Satin finish)
- White acrylic paint or gesso
- Sponge brush or flat paint brush
- Soft bristle brush
- Scissors or craft knife
- Ruler
- Pencil
- Rubbing alcohol
- Clear acrylic sealer spray (optional)
Step 1: Preparation
-
Clean the Surface:
Begin by thoroughly washing your glass bottle with warm soapy water to remove any grease or residue. Dry it completely. -
Final Degrease:
Wipe the exterior surface of the bottle with rubbing alcohol on a lint-free cloth. This removes invisible oils and ensures maximum adhesion for your base coat. -
Prime the Glass:
Using a sponge brush, dab a coat of white acrylic paint or gesso onto the middle section of the bottle where the design will go. Don’t cover the very top neck unless you want the full bottle covered. -
Dry and Repeat:
Let the first coat dry fully. If the glass still shows through, add a second thin coat of white paint. This white background makes the colors of your paper or fabric pop vividly.
Step 2: Sizing the material
-
Measure the Circumference:
Wrap a flexible measuring tape or a strip of paper around the bottle to determine the exact circumference needed to cover it. -
Determine Height:
Decide how tall you want your decorative band to be. In this design, it stops just below the bottle’s shoulder curve and ends slightly above the bottom edge. -
Cut the Material:
Cut your decorative paper or thin fabric to size, adding about a half-inch of overlap for the seam. If using a paper napkin, gently peel away the back white layers so you are left with only the single printed ply.
Wrinkle Rescue
If stubborn wrinkles appear while smoothing paper, wet your finger slightly with water (not glue) and gently massage the wrinkle flat before the glue sets.
Step 3: Application
-
Apply Glue Base:
Apply a thin, even layer of Mod Podge directly over the dry white painted section of the bottle using a flat brush. -
Position the Sheet:
Carefully align one edge of your cut material vertically on the bottle. Press it down gently to anchor it. -
Smooth the Wrap:
Slowly wrap the material around the bottle, smoothing it outward from the center with your fingers to release trapped air bubbles. I find working in small sections prevents wrinkles better than rushing. -
Seal the Seam:
When you reach the overlap, apply a tiny bit more Mod Podge under the edge to secure the seam tightly. It should look almost invisible if lined up well. -
Initial Top Coat:
Once the wrap is secure, apply a layer of Mod Podge over the entire surface of the paper or fabric. Use long, smooth vertical strokes. -
Dry Time:
Allow this layer to dry for at least 20 minutes until it is clear and dry to the touch.
Pro Tip: Textured Look
For that authentic fabric feel shown in the photo, use a tightly woven cotton fabric instead of paper. It absorbs the glue well and adds a rich, tactile dimension.
Step 4: Finishing and Sealing
-
Clean Edges:
If there is any excess material hanging off the top or bottom edges, use a fine-grit sandpaper or a sharp craft knife to trim it cleanly against the glass. -
Second Coat:
Apply a second coat of Mod Podge to ensure durability. This seals the texture and protects the design from moisture. -
Emphasize Texture (Optional):
To mimic the fabric look in the image, you can lightly stipple the wet Mod Podge with a sponge rather than brushing it smooth. This creates a tiny bit of tactile surface grain. -
Final Cure:
Let the project cure for 24 hours before using. If you want extra protection against water splashes, finish with a clear acrylic sealer spray.
Now your custom botanical bottle is ready to hold fresh stems or simply brighten up your shelf

PENCIL GUIDE
Understanding Pencil Grades from H to B
From first sketch to finished drawing — learn pencil grades, line control, and shading techniques.
Explore the Full Guide
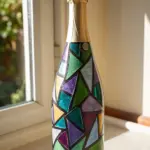
Faux Stained Glass Painted Bottles
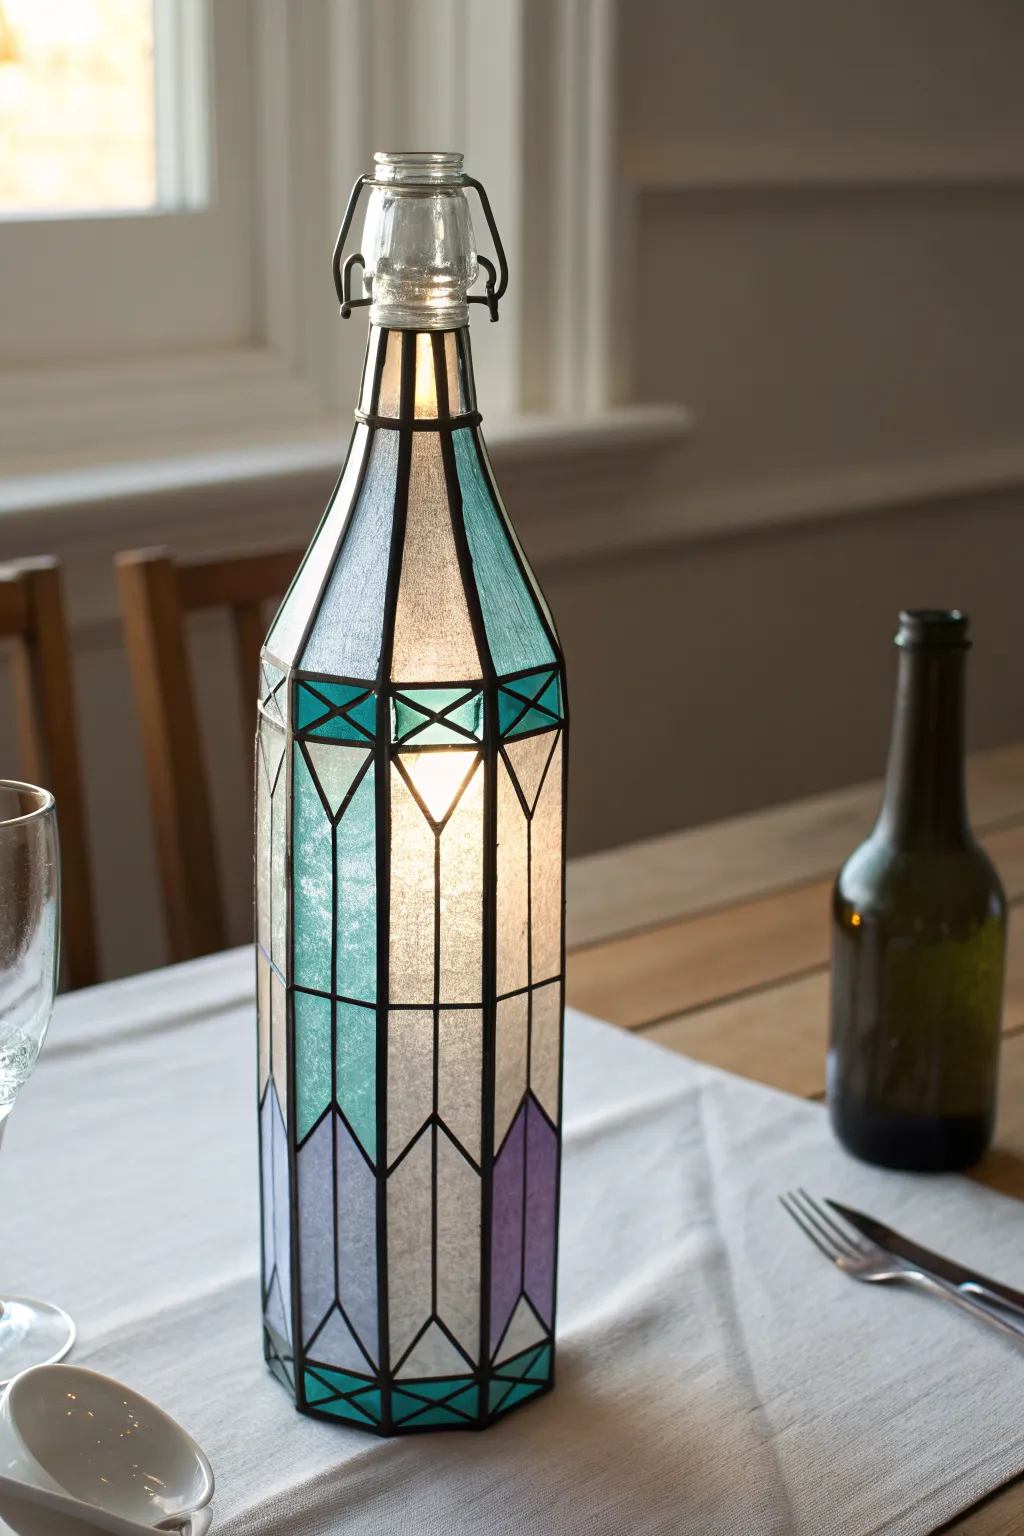
Transform a standard glass bottle into a glowing Art Deco masterpiece using faux stained glass techniques. This project combines crisp geometric lines with soft, alternating panels of white, teal, and lavender to create a sophisticated table lamp.
Detailed Instructions
Materials
- Large clear glass bottle (swing-top style works best)
- Glass cleaner and lint-free cloth
- Adhesive lead strip (1/8 inch or 3mm width)
- Gallery Glass or similar faux stained glass paint (Crystal Clear, Turquoise, Lavender)
- Liquid leading (black)
- Bone folder or specialized lead flattening tool
- Scissors / craft knife
- Ruler and flexible measuring tape
- Fine-tip dry erase marker
- Toothpicks or needle tool
- LED fairy light string (battery or cork style)
Step 1: Preparation and Design
-
Clean surface:
Thoroughly wash the bottle with warm soapy water to remove all labels and residue. Finish with a wipe-down using glass cleaner or rubbing alcohol to ensure a completely grease-free surface. -
Mark vertical divisions:
Using a flexible measuring tape, measure the circumference of the bottle’s widest part. Divide this number by 8 (or your desired number of panels). Mark these intervals around the bottom and top of the main body with a fine-tip dry erase marker. -
Draw guide lines:
Connect your top and bottom marks using a ruler and the dry erase marker to create long vertical lines running the length of the bottle. Extend these lines up the neck as they naturally converge.
Drip Prevention
If paint is too runny, let it sit on a palette for 20 mins to thicken before applying. This stops gravity from sagging your design.
Step 2: Applying the Lead Framework
-
Apply vertical leading:
Peel the backing off your adhesive lead strip. Carefully apply strips over your drawn vertical lines, starting from the base and working up to the neck rim. Keep the line taut to ensure straightness. -
Secure the lead:
Once a strip is placed, use a bone folder or the plastic tool included with the lead to press it firmly onto the glass. This seal prevents paint from bleeding underneath later. -
create horizontal bands:
Add horizontal lead strips to create distinct sections. Place one band near the bottom (about 2 inches up) and another where the bottle shoulder begins to curve inward. -
Add chevron details:
Cut smaller pieces of lead strip to create the ‘V’ or chevron shapes within the panels. Measure carefully so the points of the V’s align perfectly around the bottle’s circumference. -
Seal intersections:
Wherever two strips of lead meet, apply a tiny dot of liquid leading. This bridges the gap and creates a seamless ‘soldered’ look while reinforcing the joints.
Level Up: Antique Patina
Rub a tiny amount of black acrylic paint or specialized patina over the lead strips, then wipe off. It creates an aged, authentic iron look.
Step 3: Painting the Panels
-
Prep the paint:
Bottle painting creates vertical surfaces, so let your gallery glass paint sit open for about 30 minutes to thicken slightly, or work in thin layers to prevent running. -
Apply the frosty base:
Start with the ‘Crystal Clear’ or ‘Frost’ panels. Apply the paint directly from the nozzle, starting at the edges against the lead and working inward. This creates the primary white glow seen in the photo. -
Texture the paint:
Immediately tap the wet paint gently with a stiff brush or use a toothpick to swirl it. This creates the textured, seeded glass look that diffuses the light beautifully. -
Paint color accents:
Fill the top geometric sections with turquoise and the bottom chevron sections with lavender (or your chosen palette). Use the same edge-to-center technique. -
Pop bubbles:
Inspect your wet paint closely. I always keep a needle tool handy to pop any tiny air bubbles immediately, as these will be very visible once the lamp is lit. -
Dry horizontally:
To prevent drips on the vertical surface, cradle the bottle horizontally in a box or towel nest. Paint one side, let it dry to the touchscreen, rotate, and paint the next section. -
Second coat:
Once the first layer is fully dry (usually 8-24 hours), apply a second thin coat if you want deeper color saturation, particularly on the teal and purple sections.
Step 4: Finishing Assembly
-
Clean up details:
Once fully cured, use a craft knife to carefully trim away any paint that might have smeared onto the lead strips. -
Insert lighting:
Uncoil your LED fairy light string. Feed the wire carefully into the bottle, using a chopstick to help distribute the lights evenly from bottom to top so the glow is uniform. -
Secure the top:
If using a cork-shaped battery pack, insert it into the neck. If using an external battery pack, tape the wire discreetly to the back of the neck and reattach the swing-top mechanism over it.
Flip the switch and enjoy the warm, colorful ambiance of your handcrafted geometric lamp
Etched Frosted Glass Bottles
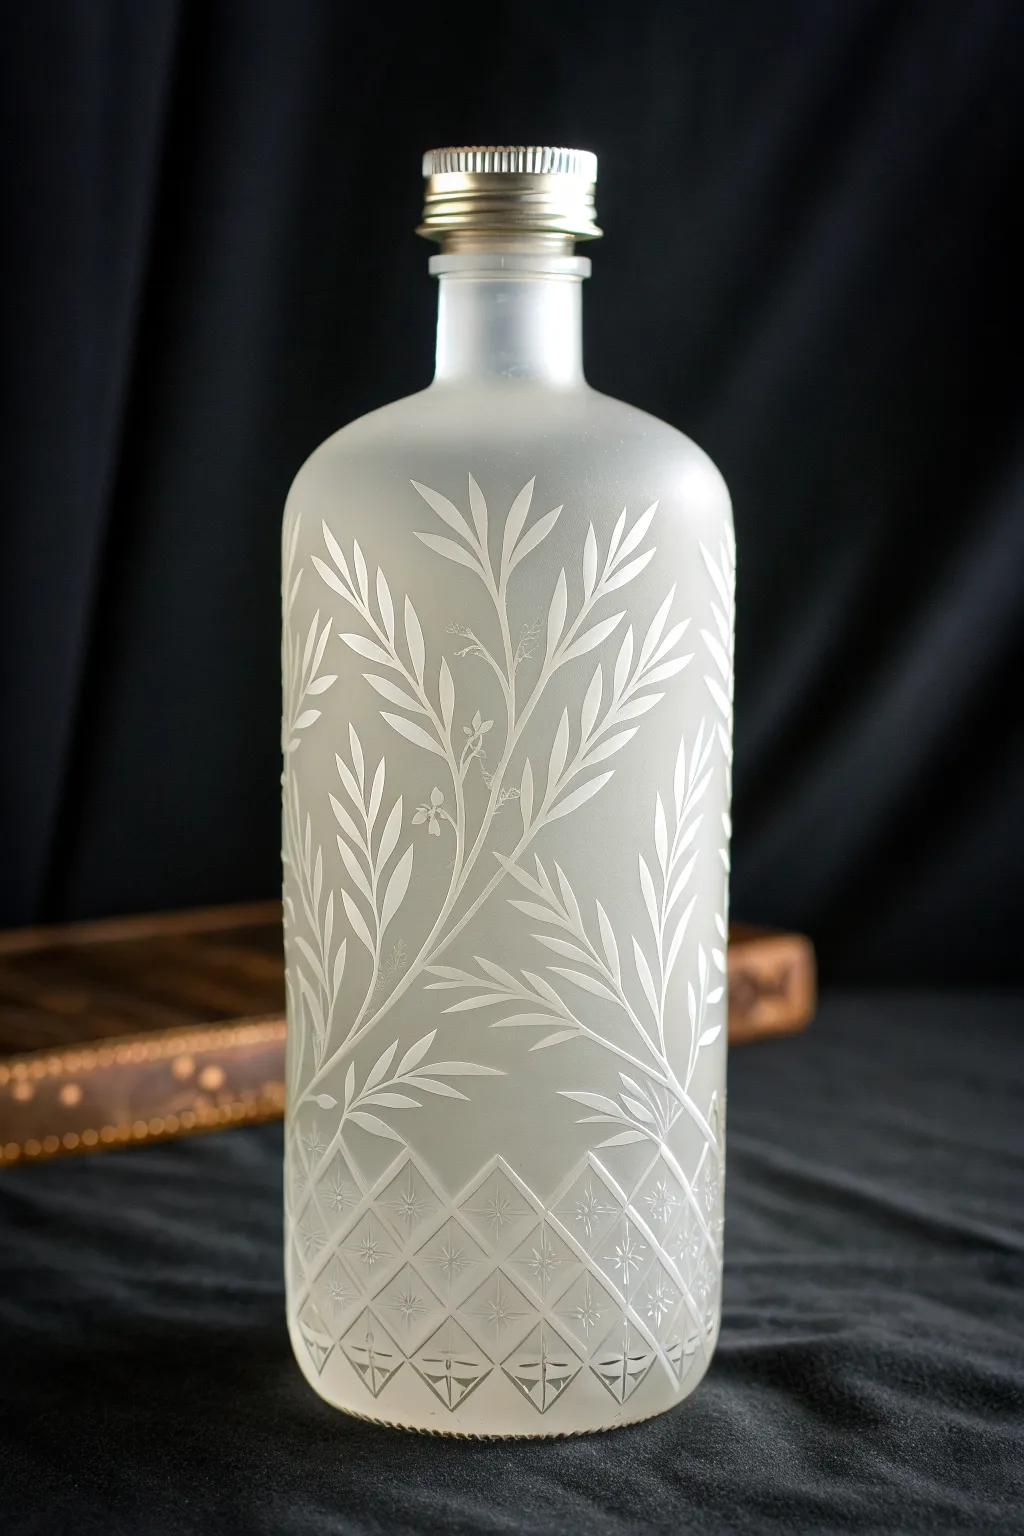
Transform a plain glass bottle into a sophisticated decor piece with this frosted etching technique. The delicate leaf patterns and geometric base create a vintage-inspired look that captures light beautifully and adds a touch of class to any shelf.
Step-by-Step
Materials
- Clear glass bottle with screw cap (cleaned and dried)
- Glass etching cream (e.g., Armour Etch)
- Frosted glass spray paint
- Adhesive vinyl sheets or stencil film
- Cricut machine or craft knife
- Transfer tape
- Paintbrush (small, synthetic)
- Masking tape or painter’s tape
- Rubbing alcohol
- Lint-free cloth
- Protective gloves and eyewear
- Weeding tool
- Scraper tool or old credit card
Step 1: Preparation & Design
-
Clean surface:
Begin by thoroughly cleaning your glass bottle with warm soapy water to remove any labels or glue residue. Once dry, wipe the entire exterior with rubbing alcohol on a lint-free cloth to remove oils and fingerprints, ensuring a perfect surface for adhesion. -
Create the design:
Design or download a botanical pattern featuring long, slender leaves and stems. Additionally, create a geometric diaper pattern (diamonds with small stars/crosses inside) for the bottom quarter of the bottle. If you don’t have a cutting machine, draw your design directly onto stencil film. -
Cut the stencil:
Cut your design out of adhesive vinyl or stencil film. If using a machine, use a standard grip mat. If cutting by hand, use a sharp craft knife on a healing mat, taking your time with the intricate curves of the leaves. -
Weed the design:
Carefully remove the positive space of your design—this means peeling away the leaf shapes and the geometric lines where you want the frost or etch to appear. You are creating a negative stencil.
Uneven Frosting?
If your etching looks blotchy, it likely wasn’t applied thick enough or sat too long. Redistribute cream halfway through the wait time to pop hidden air bubbles.
Step 2: Applying the Stencil
-
Apply transfer tape:
Cut a piece of transfer tape slightly larger than your vinyl design. Press it firmly onto the vinyl using a scraper tool to ensure the vinyl lifts off its backing sheet cleanly. -
Position the geometric base:
Start with the diamond pattern at the bottom. Wrap the stencil around the base of the bottle, ensuring the seam aligns neatly at the back. Press down firmly to adhere. -
Position the botanical elements:
Apply the leaf stencils to the main body of the bottle. I tend to place the larger stems first, allowing them to curve naturally up the bottle’s neck, and then fill in gaps with smaller sprigs. -
Burnish the edges:
Using your scraper tool or fingernail, burnish the edges of every cutout very firmly. This step is crucial to prevent the etching cream or spray from bleeding under the stencil. -
Mask exposed areas:
Use painter’s tape to cover any exposed glass areas that you do not want frosted, specifically focusing on the bottle’s neck threads or the very bottom if you want those clear.
Step 3: Creating the Frosted Effect
-
Choose your method:
You can achieve this look two ways: chemical etching or frosted spray. For a permanent, dishwasher-safe texture like the photo, chemical etching is best. For a quicker, purely decorative finish, frosted spray works well. -
Apply etching cream (Option A):
Put on your protective gloves and eyewear. Apply a thick layer of etching cream over the stencil openings using a brush. Dab it on rather than brushing it to ensure a thick, even coat. -
Wait and redistribute:
Let the cream sit according to the manufacturer’s instructions (usually 5-15 minutes). Halfway through, lightly swirling the brush over the cream helps break up air bubbles and encourages an even etch. -
Rinse off cream:
Under running lukewarm water, rinse off all the etching cream. Do not remove the vinyl stencil yet; ensure all residue is gone first. -
Apply frosted spray (Option B):
If spraying, shake the can vigorously. Hold the can 10-12 inches away and apply light, overlapping coats over the stencil. Let it dry for 10 minutes between coats until you reach the desired opacity.
Level Up: Dual Texture
Apply a gloss sealer over just the leaf parts of your frosted design for a subtle ‘wet’ look on the matte white glass, adding extra dimension.
Step 4: Finishing Touches
-
Remove stencil:
Once the glass is dry (or the spray paint is tacky-dry), carefully peel away the vinyl stencil. Use a weeding tool to lift the small diamond shapes or delicate leaf tips. -
Clean and polish:
Wipe the bottle down gently with a damp cloth to remove any adhesive residue or stray bits of etching cream. Dry it with a microfiber cloth to make the frosted design pop against the clear glass. -
Optional neck detail:
For an exact match to the inspiration, ensure the threaded neck remains clear. If you accidentally frosted it, you can sometimes scrape away spray paint with a razor blade, but etched glass is permanent. -
Add the cap:
Screw on the metallic cap to complete the look. The contrast between the industrial metal and the delicate organic frost is what creates that high-end aesthetic.
Place your bottle near a window where the light can filter through the delicate frosted leaves


Glitter-Dipped Celebration Bottles
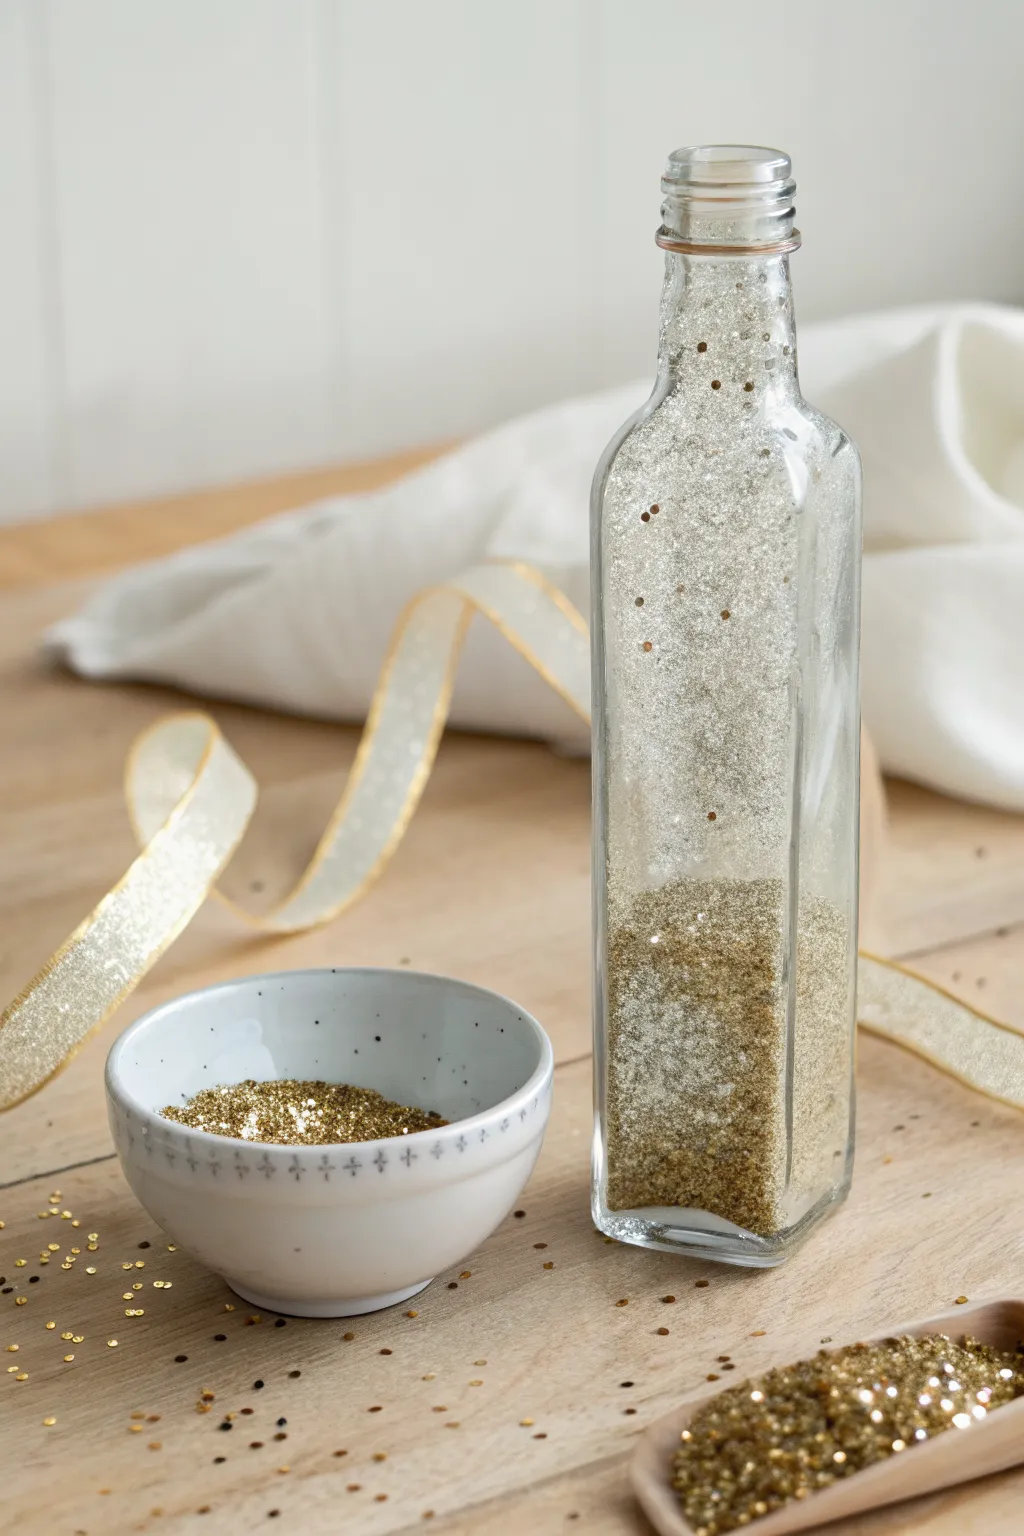
Transform a plain glass bottle into a dazzling centerpiece that sparkles from the inside out using a simple coating technique. This project captures the festive spirit with fine gold glitter adhering to the interior walls, creating a sleek, mess-free finish that looks like liquid gold.
How-To Guide
Materials
- Clear glass bottle (square or round, narrow neck)
- Fine gold glitter
- Chunky gold sequins or glitter mix
- Mod Podge or white craft glue
- Water (for thinning glue)
- Small mixing bowl
- Funnel (or stiff paper cone)
- Paper plate or tray (to catch spillover)
- Decorative ribbon (gold or cream)
Step 1: Bottle Preparation
-
Clean the glass:
Begin by thoroughly washing your glass bottle with warm soapy water to remove any grease or residue. -
Remove labels:
Soak the bottle if necessary to peel off any old labels, scrubbing away remaining adhesive with a rough sponge or solvent. -
Dry completely:
Ensure the bottle is absolutely bone dry inside and out before starting; any moisture will repel the adhesive and ruin the finish.
Sticky Situation?
If the glitter slips off the glass leaving bald spots, your glue mixture was likely too watery. Let it tack up for 60 seconds before adding glitter.
Step 2: Creating the Adhesive Layer
-
Mix the solution:
In a small container, mix a solution of roughly equal parts Mod Podge (or white glue) and water. -
Check consistency:
Stir until smooth; you want a consistency resembling heavy cream or whole milk—pourable, but sticky enough to coat the glass. -
Pour into bottle:
Using a funnel, pour a generous amount of your glue mixture into the bottle. -
Swirl to coat:
Slowly rotate and tilt the bottle in all directions, allowing the liquid to coat every inch of the interior walls up to the neck. -
Drain excess:
Turn the bottle upside down over your mixing bowl or some waste paper and let the excess glue drain out for a minute or two.
Step 3: Adding the Sparkle
-
Prepare your workspace:
Place a paper plate or a sheet of paper underneath your work area to catch stray glitter for reuse. -
Pour fine glitter:
I prefer to use a dry funnel here to pour a substantial amount of fine gold glitter into the bottle while the glue remains wet. -
Swirl the glitter:
Rotate the bottle just like you did with the glue, shaking it gently to ensure the glitter sticks to every wet surface. -
Add texture:
For the look in the image, toss in a pinch of chunky sequins or larger glitter flakes now; shake again to distribute them randomly among the fine dust. -
inspect coverage:
Hold the bottle up to the light to check for bare spots; add more glitter and shake again if needed. -
Empty excess:
Turn the bottle upside down over the paper plate and tap strictly to dislodge any loose glitter that hasn’t adhered.
Ombré Effect
Use silver glitter for the top half and gold for the bottom half, shaking carefully to blend them in the middle for a trendy two-tone look.
Step 4: Finishing Touches
-
Initial dry time:
Leave the bottle uncapped and upright in a warm, dry area for at least 24 hours to allow the glue to cure completely. -
Clean the exterior:
Once dry, wipe down the outside of the glass with a damp cloth to remove any stray glue fingerprints or glitter specs. -
Style with ribbon:
Unspool a length of gold-edged ribbon and arrange it loosely around the base or tie a bow at the neck for an elegant touch. -
Display:
Place your shimmering bottle on a table or mantel, perhaps alongside a small bowl of extra sequins as part of the vignette.
Enjoy the warm glow your new sparkling centerpiece brings to the room
Sand-and-Shell Memory Bottles
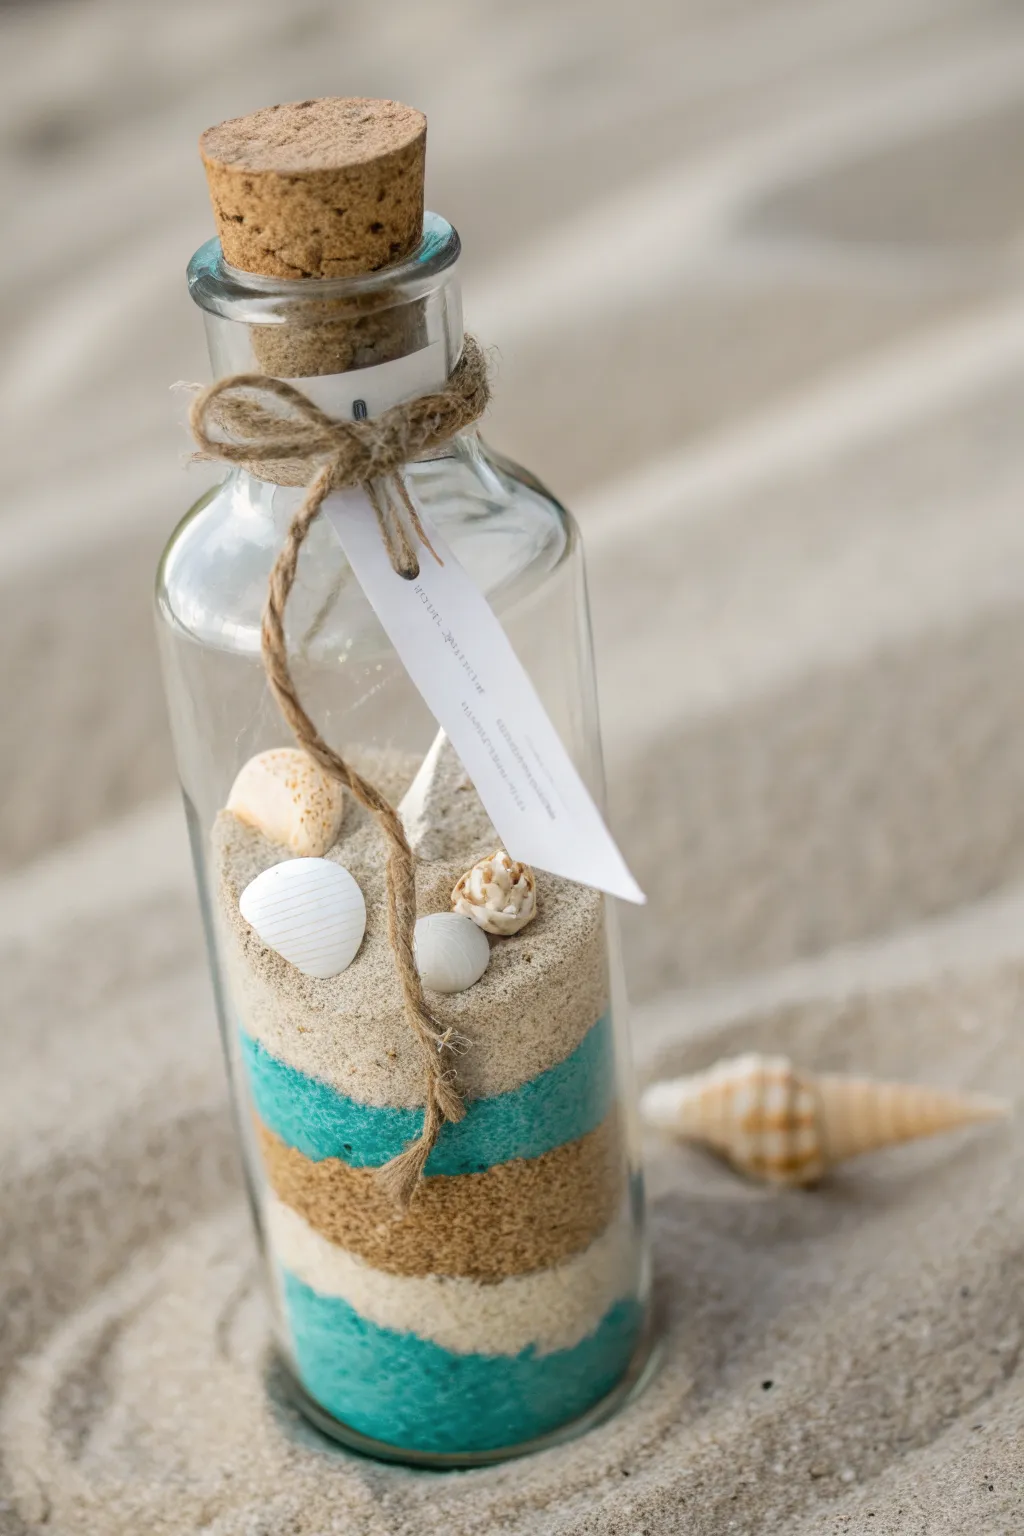
Capture the breezy essence of the seaside with this elegant keepsake bottle, featuring alternating layers of textured sand and ocean-hued pigments. It’s a perfect way to preserve beachcombing treasures or simply add a touch of nautical charm to your shelf.
Step-by-Step
Materials
- Clear glass bottle with a cork stopper (approx. 250ml)
- Fine grain craft sand (natural light beige)
- Colored craft sand (teal or turquoise)
- Colored craft sand (darker brown or tan)
- Small assorted seashells (white cockles, mini conchs)
- Jute twine
- Small rectangular cardstock tag (white)
- Funnel (paper or plastic)
- Long, thin skewer or chopstick
- Scissors
- Hole punch
Step 1: Preparing the Base Layers
-
Dry the bottle:
Ensure your glass bottle is completely clean and bone-dry inside. Even a tiny drop of moisture will cause the sand to clump and ruin the crisp layers. -
First teal layer:
Using a funnel, pour a layer of teal sand into the bottom of the bottle. Aim for a depth of about 1 to 1.5 inches. -
Leveling:
Gently tap the bottom of the bottle on your table to settle the sand flat. If it’s uneven, use your long skewer to gently push the grains into a level surface. -
Beige intermediate layer:
Slowly pour in a lawyer of natural light beige sand. Make this layer slightly thinner than the bottom teal one for visual variety. -
Brown accent layer:
Add a layer of the darker brown or tan sand. Adding this darker tone creates a nice contrast that mimics wet sand on a shoreline.
Layering Pro-Tip
For a ‘dune’ effect, tilt the bottle 45 degrees while pouring a layer, then straighten it before pouring the next. This creates beautiful, rolling waves instead of straight lines.
Step 2: Building the Middle Section
-
The second teal stripe:
Pour another layer of teal sand. I find that making this one slightly irregular or wavy by tilting the bottle slightly while pouring adds a more organic, dune-like feel. -
Thick beige foundation:
Add a significant layer of the natural light beige sand on top of the teal. This needs to be the thickest layer yet, as it will serve as the ‘bed’ for your shells. -
Creating a slope:
Instead of leveling this beige layer perfectly flat, use the skewer to create a slight slope or a small depression in the center where the shells can nestle.
Stuck Shells?
If a shell lands upside down and the skewer won’t flip it, attach a tiny piece of double-sided tape or sticky tack to the end of the skewer to grab the shell and reposition it.
Step 3: Adding Treasures and Finishing
-
Placing the first shell:
Drop a white clam-style shell into the bottle. Use the skewer to flip it so the concave side faces outward or however you prefer it to sit. -
Adding variety:
Drop in a second shell, perhaps a small spiral or conch shape, placing it adjacent to the first one. -
Fine-tuning placement:
Use the skewer to nudge the shells into the sand so they look partially buried and natural, rather than just floating on top. -
Partial burial:
If needed, sprinkle just a tiny pinch more of beige sand over the edges of the shells to anchor them visually. -
Sealing the bottle:
Insert the cork stopper firmly into the neck of the bottle. -
Prepare the tag:
Cut a strip of white cardstock to create a tag. Punch a small hole at one end. -
Wrapping the neck:
Cut a length of jute twine. Wrap it around the neck of the bottle two or three times to create a rustic band. -
Attaching the tag:
Thread the tag onto one of the loose twine ends. -
Tying the bow:
Tie the ends of the twine into a simple shoelace bow, securing the tag in place against the glass. -
Trimming:
Trim the ends of the twine bow to your desired length to finish the presentation.
Place your finished bottle near a window where the light can catch the sand texture and remind you of the sea
Mini Terrarium Bottle Planter
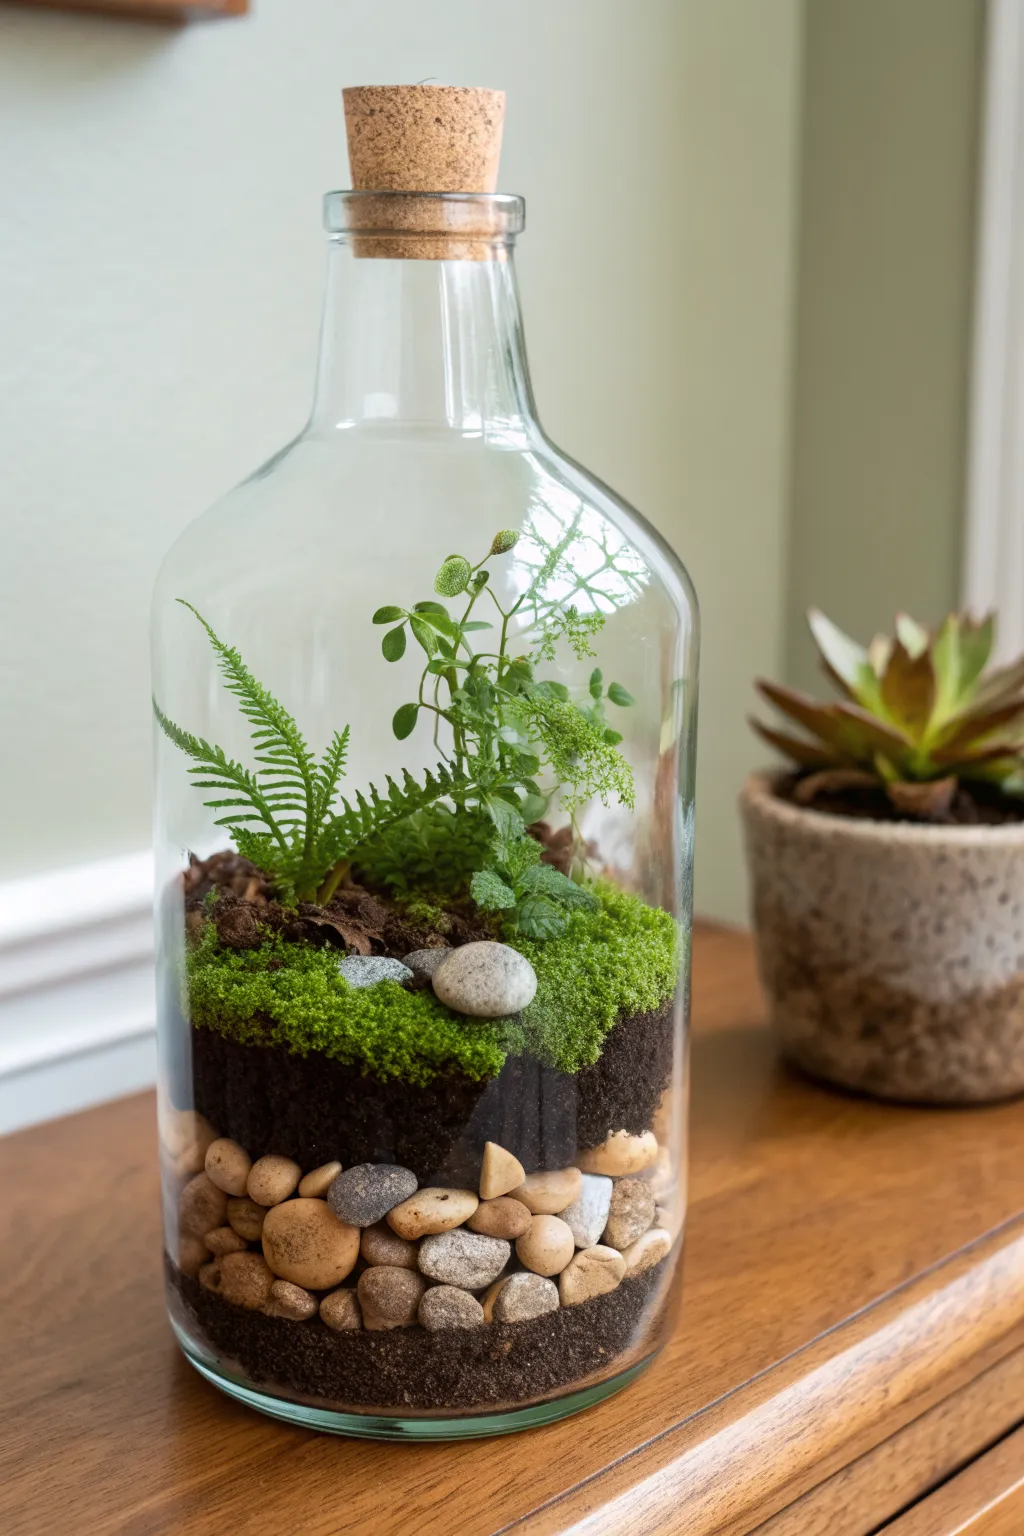
Transform a simple glass bottle into a self-sustaining miniature world with this layered terrarium project. This enclosed ecosystem features distinct strata of river rocks, rich soil, and vibrant greenery, all sealed beneath a rustic cork for a clean, scientific aesthetic.
Step-by-Step Tutorial
Materials
- Large clear glass bottle with a wide neck (repurposed liquor or syrup bottle)
- Natural cork stopper to fit the bottle opening
- Small river rocks or pea gravel (tan and grey mix)
- Activated charcoal
- Potting soil mixed with sand
- Sheet moss or cushion moss
- Small ferns (like Button Fern or Asparagus Fern)
- Small foliage plants (like Fittonia or Pilea)
- Decorative grey stones (2-3 pieces)
- Long tweezers or chopsticks
- Funnel (or stiff paper rolled into a cone)
- Spray bottle with water
Step 1: Preparation & Drainage Layer
-
Clean the vessel:
Begin by thoroughly washing your glass bottle with hot, soapy water. Rinse it several times to remove any residue and dry the outside completely to prevent water spots. -
Dry the interior:
Ensure the inside is completely dry before starting; moisture on the glass walls makes adding soil messy. I like to use a twisted paper towel held by long tweezers to wipe the bottom. -
Add first soil dusting:
Using your funnel, pour a very thin, dark layer of soil—just a dusting—at the absolute bottom. This helps settle the stones and creates a visual base. -
Pour the pebble foundation:
Carefully drop in your mixed river rocks or pea gravel. Aim for a layer about 1.5 to 2 inches deep. This is crucial for drainage so plant roots don’t sit in stagnant water. -
Level the stones:
Use a long stick or the handle of a wooden spoon to gently flatten the rock layer so it looks even from the outside.
Foggy Walls?
Condensation is normal, but if large water droplets obscure the view constantly, open the cork for a few hours to let excess moisture evaporate, then reseal.
Step 2: Filtration & Soil Layers
-
Add activated charcoal:
Sprinkle a thin layer of activated charcoal over the rocks. This acts as a filter to keep the water fresh and prevents mold and odors in the closed system. -
Install the soil barrier:
Pour your main potting soil mix into the bottle using the funnel. You want a substantial layer, roughly 2 to 3 inches thick, to give roots room to grow. -
Create terrain:
Don’t just flatten the soil; use your tool to push the soil slightly higher towards the back of the bottle. This creates a slope that improves the display of the plants.
Step 3: Planting & Scaping
-
Prepare the plants:
Remove your small plants from their nursery pots. Gently massage the root balls to remove excess soil, making them narrow enough to fit through the bottle neck. -
Insert the fern:
Using long tweezers, lower the fern into the bottle first. Place it slightly to the left or rear. -
Secure the fern:
Use the end of your tweezers or a chopstick to dig a small depression, nestle the roots in, and cover them with surrounding soil. -
Add secondary foliage:
Place your second plant (a Pilea or similar) near the center or right side. Position it so the taller stems reach upward into the headspace of the bottle. -
Carpet with moss:
Tear small chunks of sheet moss and lower them in one by one. Arrange them around the base of the plants to cover the bare soil completely. -
Press down moss:
Gently tamp down the moss pieces with your tool to ensure good contact with the soil beneath. -
Place decorative stones:
Select two or three distinct grey pebbles. Drop them carefully onto the moss bed to add a sense of scale and natural contrast.
Make It Magical
Add tiny figurines like a miniature bench or a small plastic animal among the ferns to turn your ecosystem into a hidden secret garden scene.
Step 4: Final Touches
-
Clean the glass:
If any soil stuck to the sides during planting, use a small piece of sponge attached to a stick or tweezers to wipe the inside glass clean. -
Water carefully:
Mist the inside of the bottle with a spray bottle. You want the soil moist but not soggy—you should see the soil darken, but water shouldn’t pool in the bottom gravel. -
Seal the ecosystem:
Place the cork stopper firmly into the neck of the bottle to seal in the humidity.
Place your new terrarium in bright, indirect light and watch your miniature world thrive
Self-Watering Herb Bottle Planter
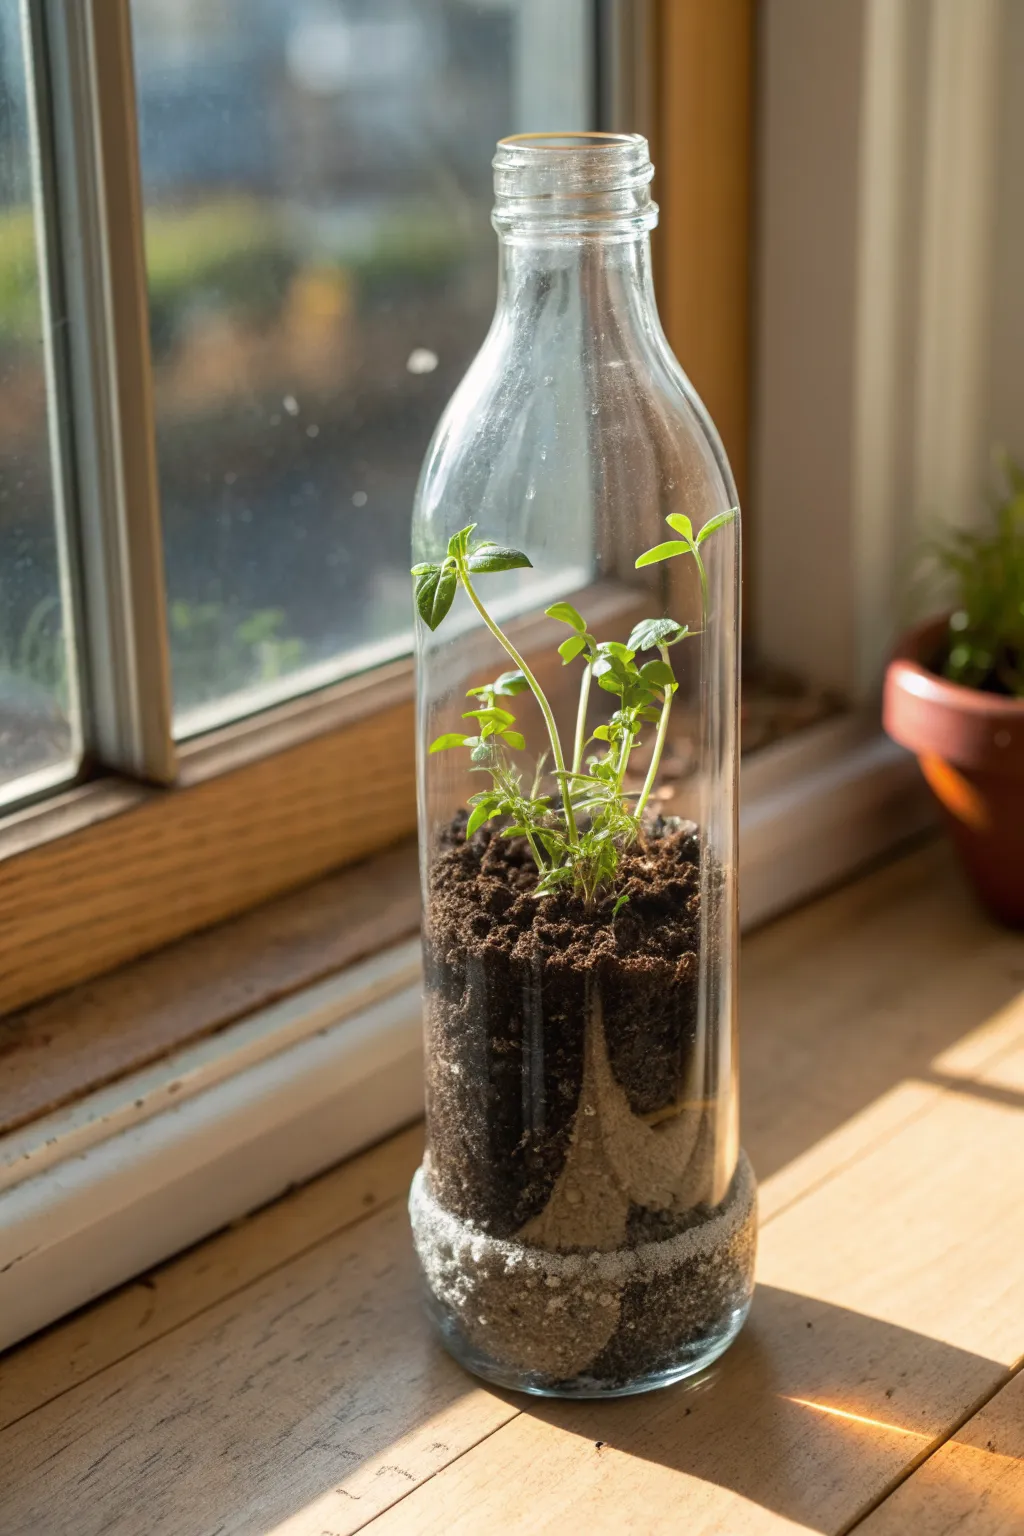
Turn a simple glass bottle into a self-sustaining home for your favorite herbs with this clever upcycling project. By cutting and inverting the top half of a bottle into its own base, you create a sleek, low-maintenance planter that let’s you see the roots and soil in beautiful layers.
Detailed Instructions
Materials
- Clear glass bottle (straight sides work best)
- Glass bottle cutter tool (or scoring knife and boiling/ice water)
- Sandpaper (medium and fine grit)
- Small herb seedlings (basil or mint work well)
- Potting soil
- Cotton wick or thick cotton string
- Small piece of mesh screen (optional)
- Water
Step 1: Preparing the Vessel
-
Clean and remove labels:
Start by thoroughly cleaning your chosen glass bottle. Soak it in warm soapy water to peel off any paper labels. If any sticky residue remains, a bit of oil or adhesive remover will take care of it. -
Score the bottle:
Determine where you want your planter to sit. You’ll need to cut the bottle roughly in half, but aim for a spot where the top section, when inverted, won’t touch the bottom of the base. Use your glass cutter to firmly score a continuous line around the circumference. -
Separate the glass:
Use the hot/cold method to separate the bottle. Pour boiling water over the score line while rotating the bottle, then immediately run it under cold water. Repeat this thermal shock process until the bottle snaps cleanly along the score. -
Sand the edges:
The cut edges will be extremely sharp. Wet your sandpaper to reduce glass dust and gently sand both cut rims—the bottom of the top piece and the top of the bottom piece. Start with medium grit to dull the edge and finish with fine grit for a safe, smooth feel.
Step 2: Creating the Wick System
-
Measure the wick:
Cut a length of cotton string or wick long enough to reach from the bottom of the water reservoir (the base) up into the middle of the soil chamber. -
Insert the wick:
Thread the wick through the neck of the inverted top section. Let a good portion dangle down—this will sit in the water—while holding the other end inside the bottle. -
Secure the drainage:
To prevent soil from falling through the neck and clouding your water reservoir, I sometimes cut a small circle of mesh screen, poke a hole for the wick, and place it inside the neck of the bottle.
Clean Cuts Only
Apply constant, even pressure when scoring the glass. You should hear a distinct ripping sound. Do not go over the line twice, or the glass will splinter.
Step 3: Planting and Assembly
-
Add first soil layer:
Holding the wick upright in the center, gently scoop a small amount of potting soil into the inverted bottle top. Pack it lightly around the wick to keep it central. -
Position the plant:
Take your herb seedling and gently loosen its root ball. Place it into the bottle top, arranging the roots around the wick so they can easily draw moisture. -
Fill with soil:
Carefully add the rest of your soil around the plant, filling the bottle until the roots are covered but leaving some headspace below the rim. I like to tap the glass gently to settle the dirt without compacting it too much. -
Prepare the reservoir:
Fill the bottom half of the glass bottle (the base) with fresh water. You want enough water to submerge the wick but not so much that it touches the bottle cap area directly. -
Assemble the planter:
Ideally, nest the planted top section into the water-filled base. The neck should hang suspended in the water. Ensure the wick is submerged. -
Clean the glass:
Wipe down the exterior of the glass with a microfiber cloth to remove any soil smudges or fingerprints for that crystal-clear look. -
Final watering:
Give the top soil a light initial watering from above to settle the soil and start the capillary action of the wick.
Wick Won’t Work?
If the soil stays dry, your wick might be synthetic. Ensure you use 100% cotton material, as synthetic fibers don’t wick water effectively.
Now you have a stylish, functional planter that practically takes care of itself and looks great on any windowsill.
Hanging Bottle Wind Chime
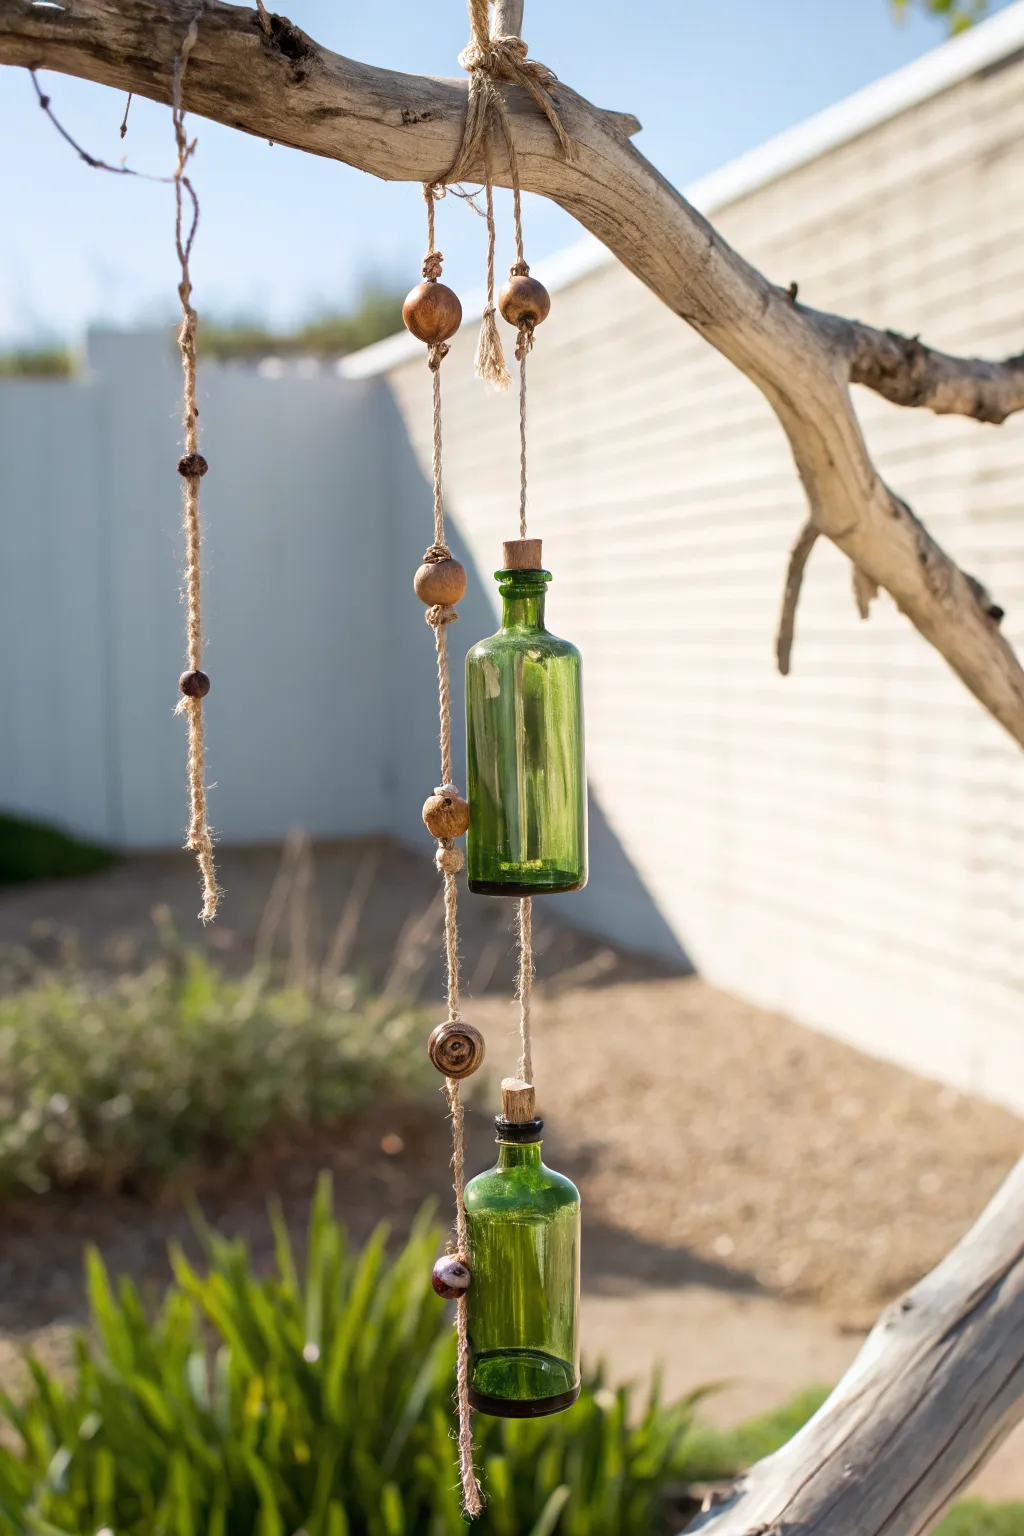
Transform empty glass bottles and natural elements into a serene outdoor accent that catches the light beautifully. This rustic wind chime pairs the organic texture of driftwood and jute with the smooth, vibrant green of recycled glass for a perfectly balanced garden decoration.
Step-by-Step Guide
Materials
- 2 Small green glass bottles (approx. 4-6 oz)
- Natural jute twine (medium thickness)
- Large, sturdy driftwood branch (approx. 2-3 feet long)
- Assorted wooden beads (varying sizes, dark and light natural tones)
- 2 Cork stoppers sized for the bottles
- Small screw eye hooks (2)
- Strong craft glue or epoxy (optional)
- Scissors
- Measuring tape
Step 1: Preparing the Bottles
-
Clean and dry:
Start by thoroughly washing your green glass bottles to remove any labels or sticky residue. Let them air dry completely, ensuring the inside is moisture-free before corking. -
Prepare the corks:
Take your two cork stoppers. If they are slightly too large for the bottle necks, gently shave them down with a craft knife until they fit snugly but don’t force them in just yet. -
Insert hanging hardware:
Screw a small eye hook into the center of the top of each cork. Ensure it goes in straight and feels secure. If the cork feels crumbly, a tiny dab of super glue on the screw threads can add extra grip. -
Secure the corks:
Place the corks firmly into the bottle necks. For a permanent hold, I like to apply a thin rim of adhesive around the cork before pushing it in to prevent the bottle from slipping off over time.
Knot Slipping?
If twine slides on smooth driftwood, wrap a small rubber band around the branch first, then tie your twine directly over it for invisible grip.
Step 2: Creating the Jute Hangers
-
Cut the main lines:
Cut two long lengths of jute twine. One piece should be significantly longer (about 25-30 inches) to hang the lower bottle, and the other shorter (about 15-18 inches) for the upper bottle. -
Attach to bottles:
Thread the end of your twine through the eye hook on the cork. Tie a secure double knot or a fisherman’s knot to ensure it won’t come undone under the weight of the glass. -
Add bead details:
On the longer string (for the lower bottle), thread a large wooden bead just above the knot at the cork. Tie a simple overhand knot above the bead to keep it in place if you want it stationary, or let it rest naturally. -
Space the decorations:
Move about 6 inches up the string and tie a knot. Thread on a decorative bead or a small natural element like a snail shell (if available), then tie another knot immediately above it to lock it in position.
Step 3: Assembling the Branch
-
Select the hanging point:
Find the center of gravity on your driftwood branch. This is where you will attach the main suspension loop so the branch hangs evenly. -
Create the branch suspension:
Wrap a length of jute twine around the branch multiple times at the balance point. Leave a large loop at the top for hanging, and knot the ends securely underneath. -
Attach the bottle strings:
Take the string attached to the shorter (upper) bottle. Tie it to the driftwood branch a few inches to the right of your center suspension wrap. Wrap the twine around the wood 3-4 times for a rustic look before knotting. -
Attach the lower bottle:
Take the string with the lower bottle. Tie this one directly next to the first bottle’s attachment point, perhaps slightly overlapping. The goal is to have them hang in a tiered formation, one below the other. -
Create a decorative strand:
Cut a third piece of twine, roughly 20 inches long. Tie one end to the driftwood branch to the left of the center suspension. -
Bead the decorative strand:
Thread 3-4 wooden beads onto this new strand, spacing them out by tying knots between them. Leave the bottom of this strand loose and frayed for a boho texture. -
Secure all knots:
Check every knot on the driftwood. If the wood is smooth and slippery, put a drop of glue on the knots to prevent them from sliding along the branch. -
Final adjustments:
Hang the chime temporarily to check the balance. If the bottles are clanking too hard or the branch is tipping, slide the knotted wraps left or right until everything hangs perfectly vertical.
Sun Catcher Tip
Use colored translucent beads instead of wood near the bottles. When the sun hits them, they’ll cast colorful reflections alongside the green glass.
Hang your new creation on a porch hook or a sturdy tree limb and enjoy the gentle clink of glass in the breeze
Mosaic Bottle Statement Piece
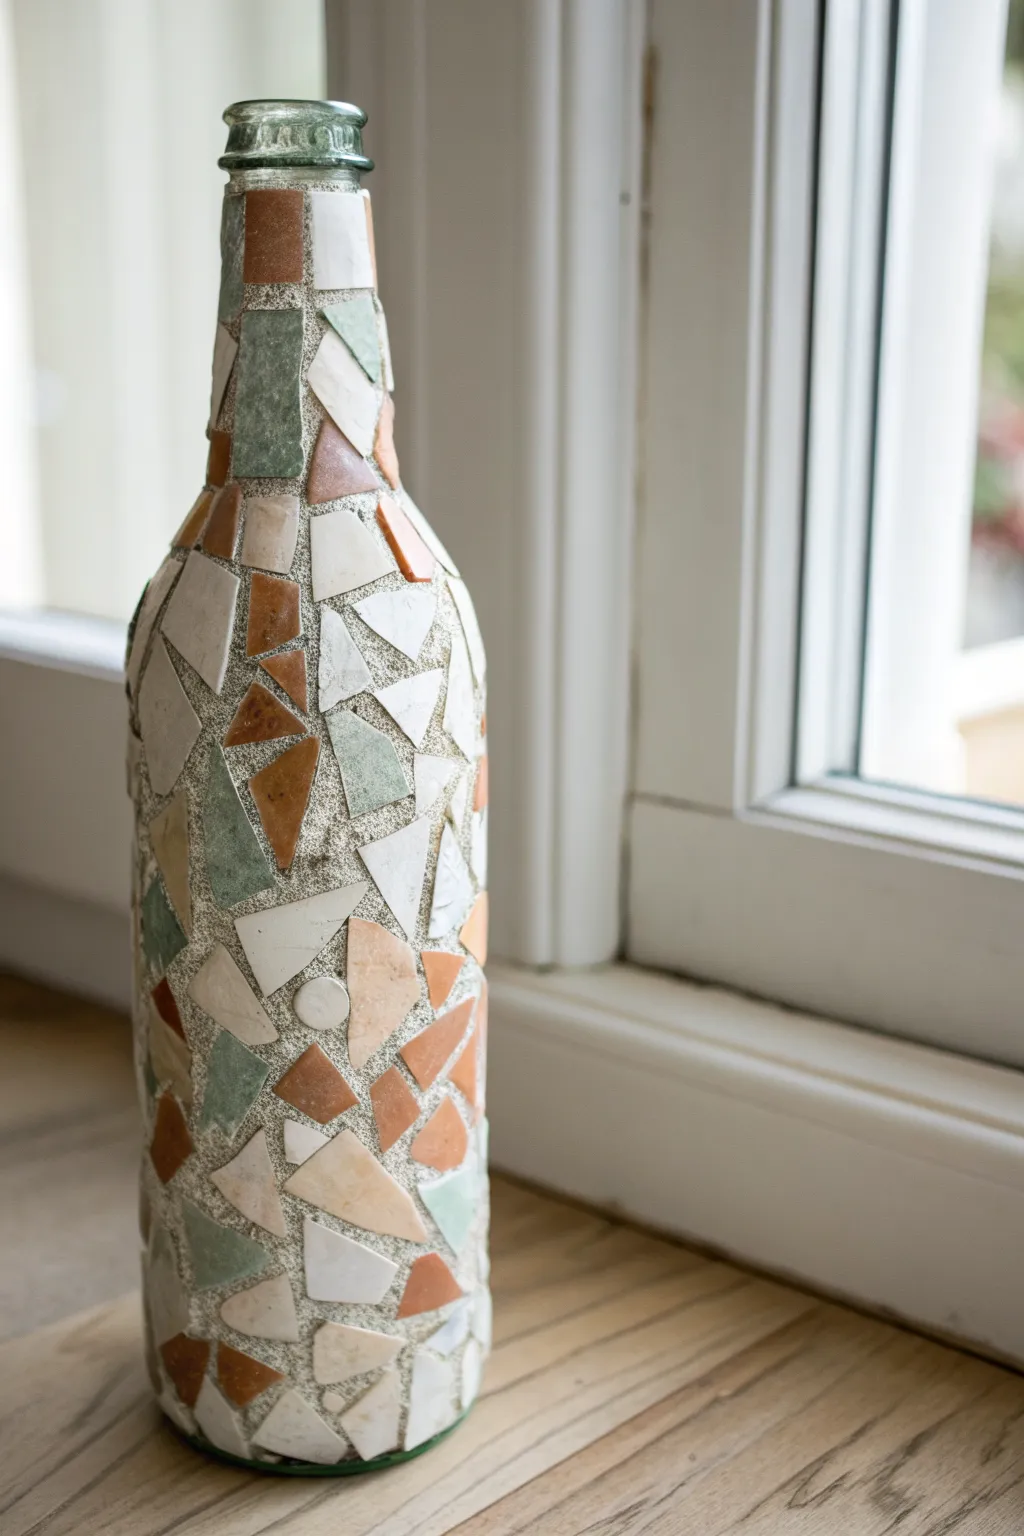
Transform a plain glass bottle into a rustic statement piece using the timeless art of mosaic. This project combines geometric ceramic shards with rough grout to create a textured, earth-toned vase that catches the light beautifully.
Step-by-Step
Materials
- Empty glass bottle (standard wine bottle size)
- Ceramic tiles or broken crockery (terracotta, cream, sage green, white)
- Tile nippers or wheeled glass cutters
- Sanded grout (grey or concrete color)
- White craft glue or clear silicone adhesive
- Palette knife or craft stick
- Sponge and soft cloth
- Protective eyewear
- Rubber gloves
- Bowl for mixing grout
Step 1: Preparation & Breaking
-
Prepare the Base:
Begin by thoroughly washing your glass bottle to remove any labels and adhesive residue. Dry it completely with a clean cloth to ensure the glue will bond properly to the glass surface. -
Safety First:
Before breaking any ceramic material, put on your protective eyewear. This is crucial as small shards can fly unexpectedly when nipping tiles. -
Create Tesserae:
Use your tile nippers to cut your ceramic tiles or crockery into small, irregular geometric shapes. Aim for triangles, trapezoids, and jagged polygons ranging from 1/2 inch to 1 inch in size. -
Sort the Pieces:
Separate your broken pieces by color groups—terracotta, sage, white, and cream. Having them sorted beforehand makes the design process much smoother and allows you to balance colors evenly.
Step 2: Adhering the Design
-
Establish the Rim:
Start applying glue near the neck of the bottle, but leave the very top threaded rim exposed (about 1 inch) to show the original glass color. Place your first few pieces here to create a distinct upper border. -
Apply Adhesive:
Work in small sections at a time. Apply a generous dab of craft glue or silicone adhesive directly to the back of a shard, rather than the bottle, to prevent messy drips. -
Build the Pattern:
Press the shard firmly onto the glass. Pick a contrasting color for the next piece and place it near the first, leaving a gap of about 1/8 to 1/4 inch between them. This gap represents where your grout will eventually go. -
Navigate Curves:
As you work down the shoulder of the bottle where it widens, use slightly smaller pieces. Smaller triangles work best here to lie flat against the curve without popping up at the edges. -
Fill the Body:
Continue gluing pieces down the main body of the bottle. Rotate the bottle often to ensure you aren’t favoring one side. I usually like to stand back occasionally to check that the colors are distributed randomly and organically. -
Check the Spacing:
Keep an eye on your ‘interstices’ (the spaces between tiles). Try to keep the grout lines relatively consistent in width, though a little variation adds to the rustic charm. -
Finish the Base:
Glue the final row of tiles along the bottom edge. Ensure these pieces don’t extend past the glass bottom, or the bottle will sit unevenly. -
Dry Completely:
Let the bottle sit undisturbed for at least 24 hours. The glue must be fully cured so the tiles don’t shift during the vigorous grouting process.
Grout Won’t Stick?
If grout crumbles out of gaps after drying, the mix was likely too dry. Mist the finished bottle lightly with water daily for 2-3 days to help it cure harder and stronger
Step 3: Grouting & Finishing
-
Mix the Grout:
In your mixing bowl, combine the sanded grout powder with water according to the package instructions. You are aiming for a consistency similar to peanut butter or thick oatmeal. -
Apply Grout:
Wearing rubber gloves, scoop up a handful of grout and smear it over the entire surface of the bottle. Press it firmly into the gaps between the tiles to ensure no air pockets remain. -
Reveal the Tiles:
Once the bottle is covered, use your gloved hand to wipe away excess grout, revealing the tops of the ceramic pieces. Wait about 15-20 minutes for the grout to set slightly. -
Sponge Clean:
Dampen a sponge (wring it out well so it’s barely wet) and gently wipe across the surface. Rinse the sponge frequently. The goal is to smooth the grout lines and clean the tile faces without washing the grout out of the gaps. -
Final Polish:
After the grout has dried for another hour and a light haze appears on the tiles, take a dry, soft cloth and buff the tiles vigorously to make them shine.
Sea Glass Twist
Swap ceramic shards for tumbled sea glass in blues and aquas. Use a white non-sanded grout to reflect light through the translucent glass pieces for a coastal look
Place your new textured vase on a windowsill where sunlight can highlight the contrast between the smooth ceramic and rough stone finish
Whimsical Fairy House Bottle Lamp
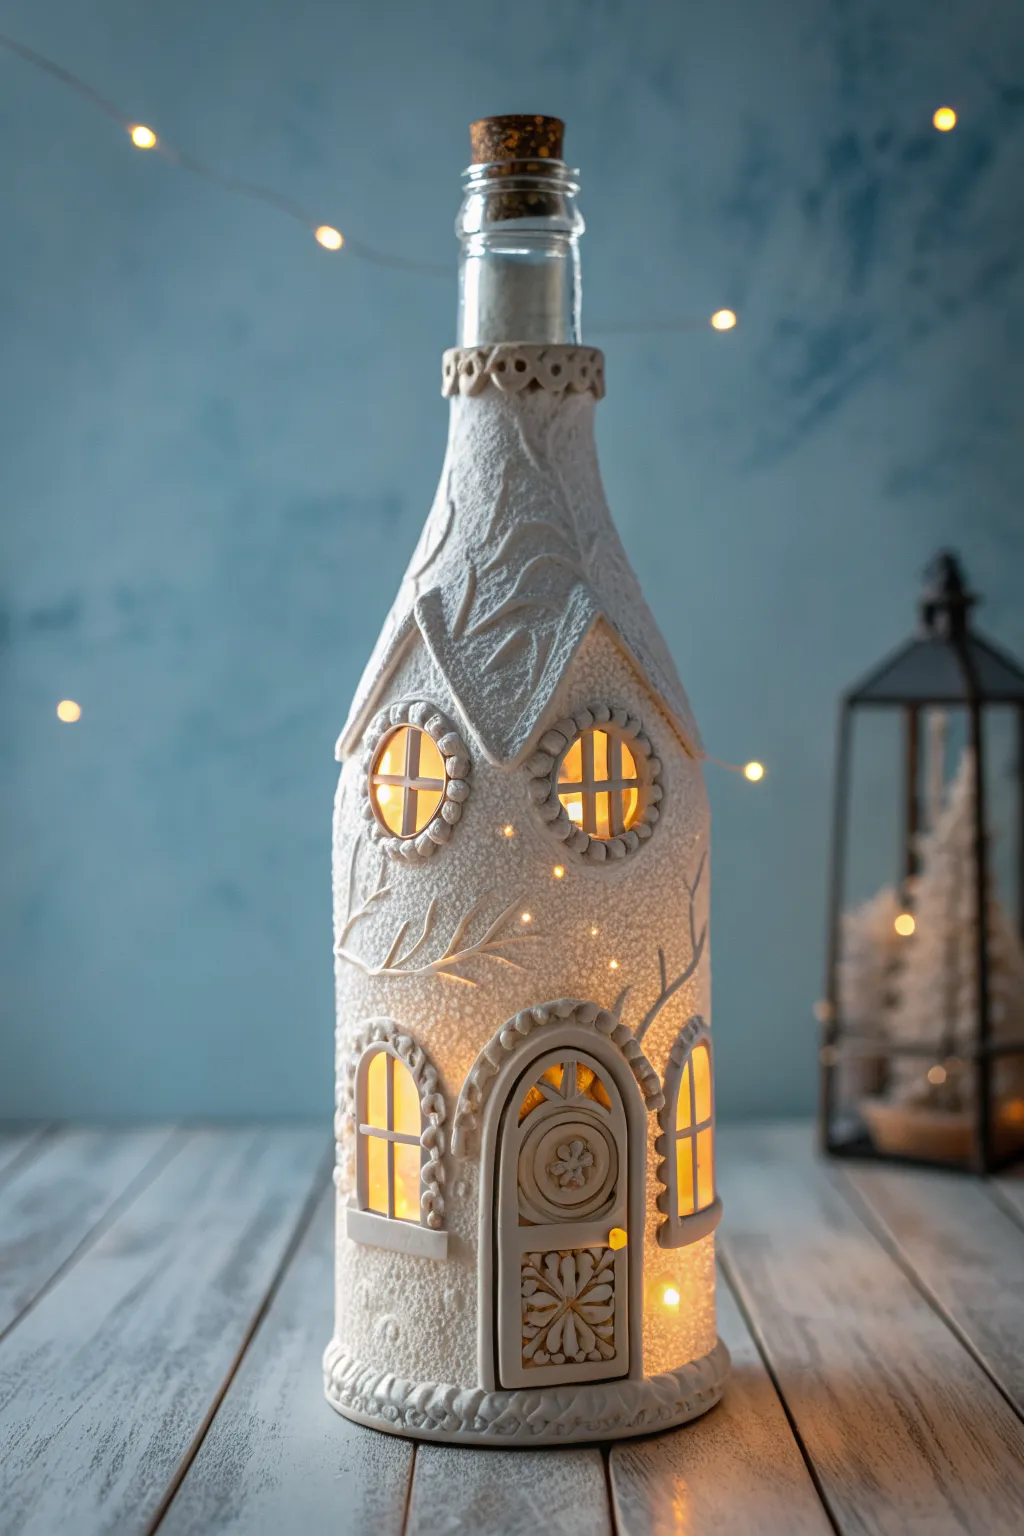
Transform a plain glass bottle into an enchanting winter dwelling that glows from within. This project uses texture paste and clay to sculpt whimsical details like arched windows and a cozy door, finished with a snowy, frosted effect.
Detailed Instructions
Materials
- Clean glass wine bottle with cork
- Air-dry modeling clay (white or terracotta)
- Texture paste (or white acrylic paint mixed with baking soda)
- White acrylic paint
- PVA glue (white craft glue)
- Sculpting tools (or toothpick, plastic knife)
- Small craft sponge
- Fine grit sandpaper
- LED string lights (battery operated with cork switch is ideal)
- Rolling pin
- Parchment paper
Step 1: Preparing the Base Structure
-
Clean the surface:
Begin by thoroughly washing your glass bottle to remove any labels and adhesive residue. Wipe it down with rubbing alcohol to ensure a completely grease-free surface for the clay to adhere to. -
Roll out the clay:
Roll out a portion of your air-dry clay on parchment paper to a thickness of about 3-4mm. You want it thin enough to conform to the bottle’s curve but thick enough to hold detail. -
Cut the main features:
Using a craft knife, cut out the basic shapes for your door and the peaked roof sections. The door should be a tall arch, and the roof pieces should correspond to where the bottle neck begins to taper. -
Attach the clay pieces:
Apply a layer of PVA glue to the back of your clay cutouts and press them firmly onto the bottle. Smooth the edges down significantly so they blend seamlessly into the glass surface.
Step 2: Sculpting Architectural Details
-
Create the windows:
Roll small balls of clay and flatten them into circles for the upper windows and arches for the lower ones. Glue these onto the bottle, cutting out the centers to reveal the glass where the light will shine through. -
Add window panes:
Roll extremely thin ‘snakes’ or coils of clay. Carefully lay these across the open window spaces to form the cross-pane details, securing them to the window frames with a dab of water or glue. -
Sculpt the door frame:
Create an arched frame around your door panel using a thicker coil of clay. Use a sculpting tool or toothpick to press indentations into it, creating a stone or brick texture. -
Detail the door:
Add a small circular medallion and decorative carvings to the door itself. I find using the tip of a small paintbrush handle works perfectly for stamping flower patterns or geometric shapes. -
Form the roof line:
Add triangular peaks of clay above the upper circular windows to simulate dormers. Blend the bottom edges into the bottle but leave the top edges sharp and defined. -
Add tree branch relief:
Slightly wet your fingers to roll very fine, tapering branches from clay. Arrange these organically up the sides of the bottle, pressing them gently so they adhere but remain raised.
Clay Sliding Down?
If clay pieces slip on the smooth glass, wrap a rubber band gently around the bottle to hold them in place while the glue sets initially.
Step 3: Texturing and Finishing
-
Let it dry:
Allow the clay work to dry completely. This usually takes 24-48 hours depending on humidity. Any shrinkage cracks can be filled with a little fresh clay or paste. -
Apply the snow texture:
Mix texture paste (or make your own by mixing baking soda into white acrylic paint until thick). Using a small sponge, dab this mixture all over the glass areas and over the flat parts of the clay. -
Refine the details:
While the texture paste is still wet, use a clean, small brush to wipe away any excess paste that accidentally covered the window panes or the intricate door carvings. -
Creating the frosted look:
Once the first coat is dry, sponge a second, lighter layer of the texture paste specifically on the ‘roof’ peaks and the tops of the window frames to mimic accumulated snow. -
Painting the details:
If your clay wasn’t white, paint the entire bottle with white acrylic paint now. For a dimensional look, you can dry-brush a very pale grey into the crevices of the door and windows before adding the final white topcoat. -
Clean the glass:
Use a damp cotton swab to clean any paint or paste off the actual glass panes inside the windows so the light will shine through clearly. -
Adding the lights:
Feed the string of LED fairy lights down through the neck of the bottle. If using a cork-stopper battery pack, insert it securely into the top.
Add Some Magic
Sprinkle fine iridescent glitter over the wet texture paste on the roof and branches to make the snow sparkle under the surrounding lights.
Place your glowing bottle on a mantel or bedside table to enjoy the cozy atmosphere of this miniature winter home


Have a question or want to share your own experience? I'd love to hear from you in the comments below!