If you’re craving that satisfying “I made this!” moment, DIY paint projects are the quickest way I know to turn plain surfaces into something that looks polished and intentional. I pulled together my favorite paint project ideas that feel beginner-friendly but still give you that bold, display-worthy finish.
Tape-Resist Geometric Canvas
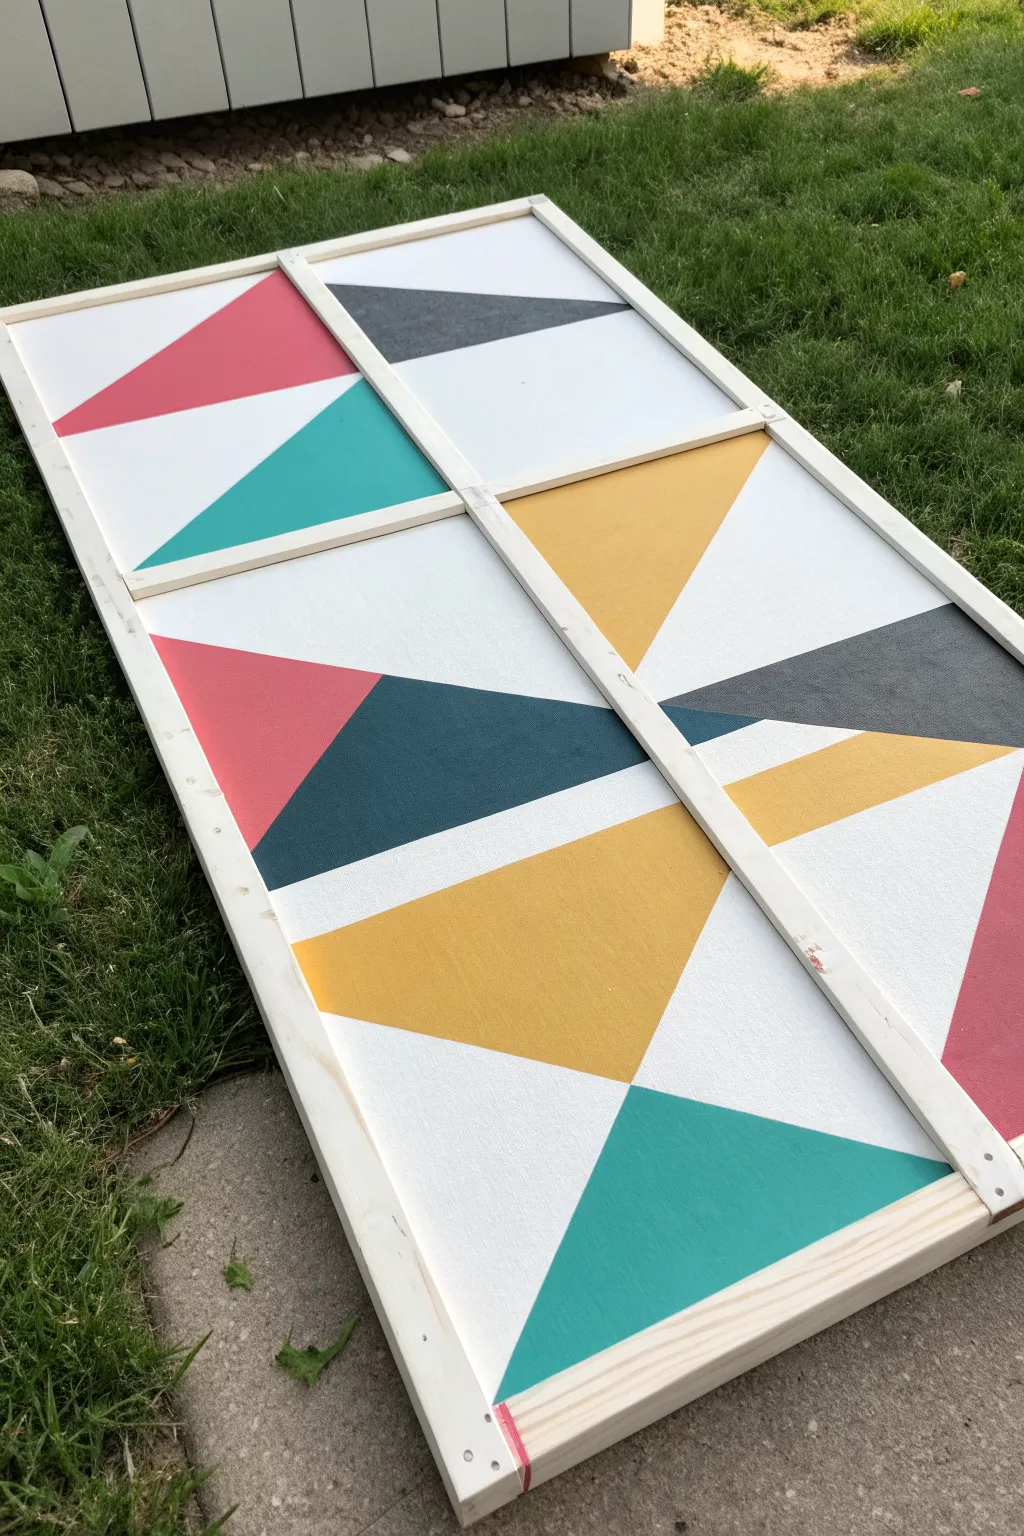
Transform a plain drop cloth or canvas into a stunning, budget-friendly piece of modern art perfect for large empty walls. This bold geometric design uses simple tape-resist techniques to create crisp, clean lines and vibrant triangles that pop against a white background.
Step-by-Step
Materials
- Large wooden frame (1×2 lumber)
- Medium-weight canvas or heavy drop cloth
- Staple gun and staples
- Gesso or white acrylic primer
- Painter’s tape (1-inch width works best)
- Acrylic paints (Teal, Mustard Yellow, Coral Red, Dark Grey, Navy Blue)
- Wide flat paintbrush
- Small touch-up brush
- Drop cloth for the workspace
- Yardstick or long ruler
- Pencil
Step 1: Building the Canvas
-
Construct the frame:
Cut your 1×2 lumber to your desired dimensions. For a large statement piece like this, creating a reinforced frame is key. Assemble the outer rectangle using wood screws or nails, ensuring the corners are square. -
Add support beams:
Since this is a large piece, measure and attach a central vertical brace and a horizontal cross brace. This creates a window-pane structure that prevents the frame from warping and gives you a solid grid to work with. -
Stretch the fabric:
Lay your canvas or drop cloth flat on the ground. Place the frame face down on top of it. Pull the fabric up and over one side of the frame, pulling it taut, and secure it with a staple gun in the center of that side. -
Secure remaining sides:
Move to the opposite side, pulling the fabric extremely tight before stapling. Repeat this for the remaining two sides. Work your way out from the center staples to the corners, keeping tension high to avoid sagging. -
Fold the corners:
Neatly fold the fabric at the corners—think hospital bed corners—to keep the bulk minimal. Staple these securely and trim away any excess fabric with sharp scissors.
Tape Sealing Trick
To guarantee zero paint bleed, paint a layer of matte medium or clear varnish over the tape edges before applying color. It creates a completely invisible barrier.
Step 2: Prepping and Taping
-
Prime the surface:
Flip your new canvas over. Apply a generous coat of Gesso or white primer over the entire surface. This seals the fabric so it won’t soak up too much paint and provides a pure white base for your colors. -
Let it dry completely:
Allow the primer to dry fully. If the surface feels too rough, I sometimes run a fine-grit sanding block over it quickly, though a little texture adds character to this project. -
Plan the grid:
Using your yardstick and a light pencil, lightly mark out where your wooden cross-braces are underneath the canvas. You want your design lines to interact intentionally with the physical structure of the frame. -
Apply the tape design:
Start applying painter’s tape to create your geometric shapes. Begin with long lines that span the full height or width, often originating from a central focal point or intersecting diagonally. -
Create triangles:
Add more tape strips intersecting your main lines to form distinct triangles of various sizes. Don’t be afraid of asymmetry; the goal is a dynamic, shattered-glass effect rather than a perfect repeating pattern. -
Seal the tape edges:
Once your design is taped, run your finger or a credit card firmly along all tape edges. For ultra-crisp lines, paint a thin layer of your white base coat over the tape edges first—this blocks paint bleed.
Sagging Canvas?
If your canvas loosens after priming, mist the back of the unpainted fabric with water. As it dries, the cotton fibers will shrink and tighten the drum again.
Step 3: Painting the Colors
-
Select your palette:
Pour your acrylic paints onto a palette or paper plate. For this look, you want a mix of warm tones (yellow, coral) and cool tones (teal, blue, grey) to create visual balance. -
Paint the first color:
Choose a color like the mustard yellow and paint 2-3 specific triangles. Try to space them out so two yellow shapes aren’t touching directly. Use a wide flat brush and stroke away from the tape edge to prevent peeling. -
Continue with remaining colors:
Wash your brush thoroughly and move to the coral red, then the teal, and so on. Be mindful of the overall composition; distribute the heavy dark colors (like the charcoal grey) so the painting doesn’t feel ‘heavy’ on one side. -
Apply a second coat:
Lighter colors like yellow often need a second coat for opacity. Let the first layer dry to the touch before adding another to ensure a rich, solid finish. -
Remove the tape:
This is the most satisfying part. While the final coat of paint is still slightly tacky (not fully cured), carefully peel back the tape at a 45-degree angle. Pulling slowly ensures you don’t rip up any dried paint films. -
Touch up edges:
Inspect your white lines. If any paint bled through, use a small detail brush specifically with white paint to clean up those edges and make them razor-sharp again.
Hang your massive masterpiece with pride and enjoy how it completely transforms the feel of your room


Easy Stenciled Silhouette Art
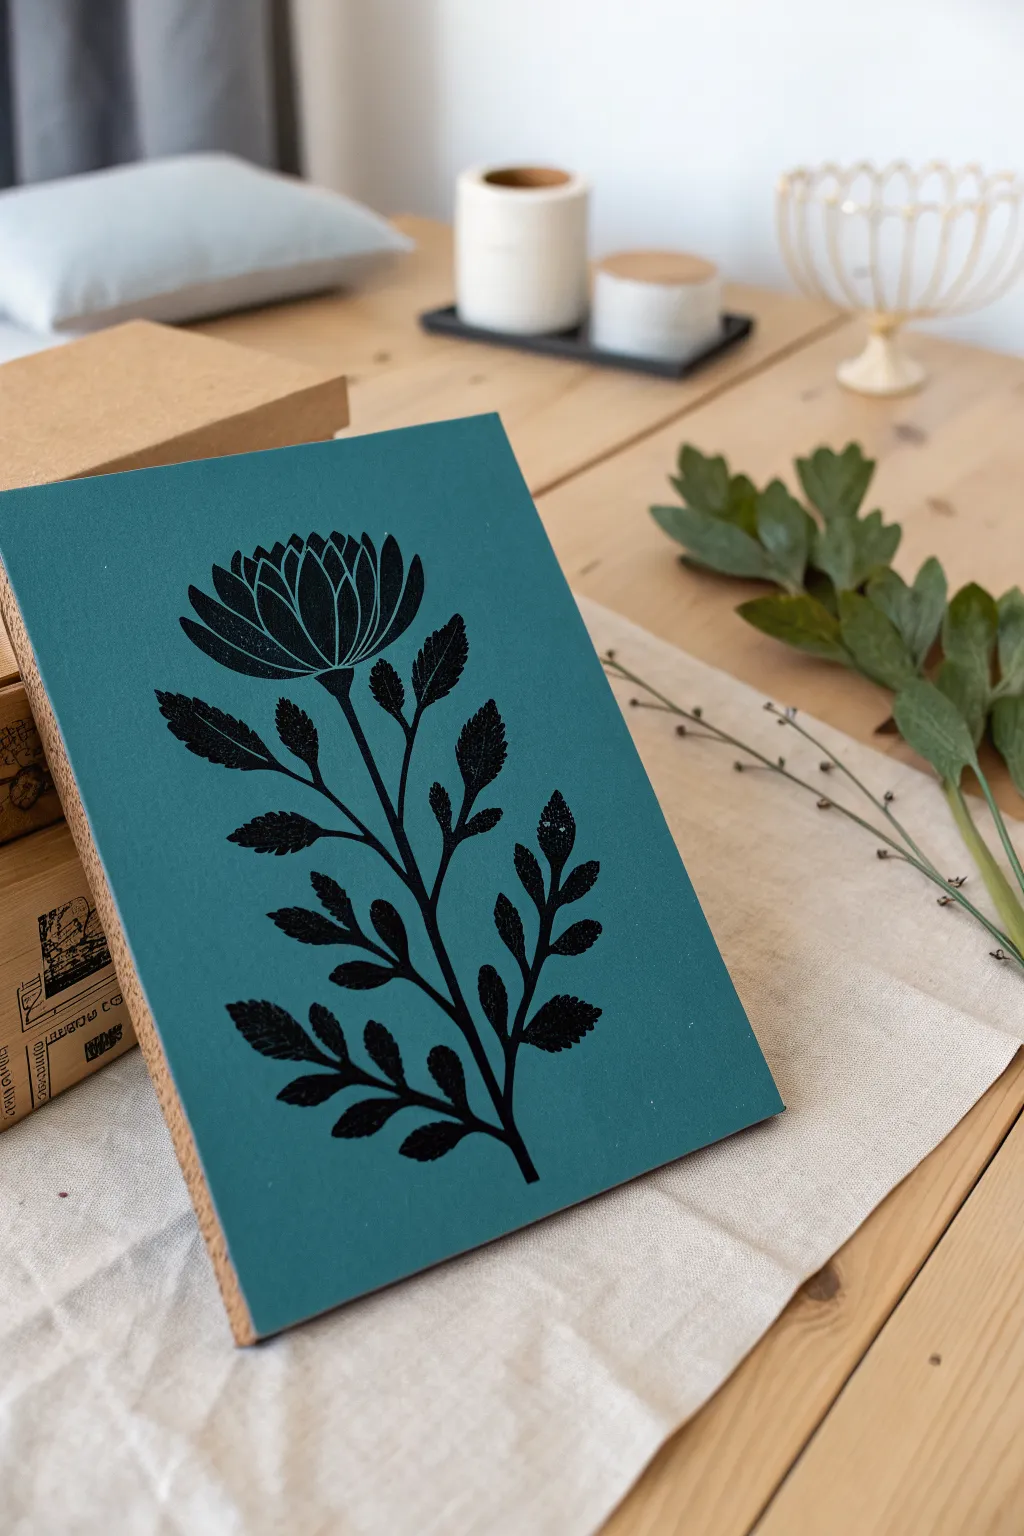
Capture the elegance of nature with this striking silhouette project featuring a bold floral design against a rich teal background. This piece combines the crisp lines of stenciling with a modern, moody color palette to create a sophisticated accent for any room.
Step-by-Step
Materials
- Rectangular wooden block or canvas panel (approx. 8×12 inches)
- Matte acrylic paint (Teal/Deep Turquoise)
- Matte acrylic paint (Black)
- Large flat paintbrush or foam brush
- Floral stencil (chrysanthemum or wildflower design)
- Stencil brush or high-density foam pouncer
- Repositionable stencil adhesive spray
- Painter’s tape
- Fine grit sandpaper (optional)
- Matte clear coat sealer (spray or brush-on)
Step 1: Preparation & Base Coat
-
Prepare the surface:
Begin by ensuring your wooden block or canvas panel is clean and free of dust. If you are using raw wood, give it a quick sanding with fine-grit sandpaper to create a smooth surface for painting. -
Apply the first coat:
Using your large flat brush or foam brush, apply an even layer of the teal acrylic paint across the entire front surface. I like to brush in one consistent direction to minimize texture. -
Paint the edges:
Don’t forget the sides. Carefully paint the edges of the block or canvas to ensure the piece looks finished from every angle. -
Let it dry completely:
Allow the first coat to dry fully. This usually takes about 20-30 minutes depending on the thickness of the paint and humidity. -
Apply a second coat:
For a truly opaque and rich background color, apply a second coat of teal paint. This ensures no wood grain or white canvas shows through. -
Dry overnight:
Let the base color cure completely. It is crucial that the base is bone-dry before applying any adhesive, or you risk peeling up the paint.
Step 2: Stenciling the Design
-
Prep the stencil:
Take your floral stencil and flip it over. Lightly spray the back with repositionable stencil adhesive. Let it sit for a minute until it becomes tacky, not wet. -
Position the design:
Center the stencil on your painted background. The adhesive will help hold intricate details—like the thin stems and leaves—flat against the surface to prevent paint bleed. -
Secure the edges:
Use small pieces of painter’s tape on the outer edges of the stencil plastic to ensure it doesn’t shift while you work. -
Load the brush correctly:
Dip your stencil brush or foam pouncer into the black acrylic paint. Tap it onto a paper towel repeatedly until almost all the paint is gone. The brush should feel almost dry. -
Begin stenciling:
Start applying the black paint using a straight up-and-down tapping motion. Do not sweep or brush side-to-side, as this pushes paint under the stencil edges. -
Build color gradually:
Apply a light first layer. It might look grey or patchy at first, but this is normal. Just keep tapping lightly. -
Add a second layer:
Once the first pass is dry to the touch (which happens quickly), go over the design again with the black paint to build up to a solid, opaque silhouette. -
Check density:
Inspect the flower petals and leaf tips to ensure the black is consistent throughout the design.
Clean Lines Secret
Before applying the black paint, seal the stencil edges by tapping a very light layer of the TEAL base color over the stencil first. This blocks leaks.
Step 3: Finishing Touches
-
Remove the stencil:
Immediately after finishing the last layer of black, carefully peel the stencil away from the surface. Pull it straight up to avoid smearing any wet edges. -
Fix imperfections:
If there was any tiny bleed-under, use a very fine detail brush and a touch of the original teal paint to clean up the edges once the black is dry. -
Seal the artwork:
Protect your work by applying a matte clear coat. A spray sealer works best here to avoid dragging the black paint across the teal background.
Texture Twist
Mix a small amount of texture paste or baking soda into the black paint before stenciling to give the floral silhouette a raised, embossed 3D effect.
Place your new botanical artwork on a shelf or side table to add a touch of handmade serenity to your space


Dot Painting With Cotton Swabs
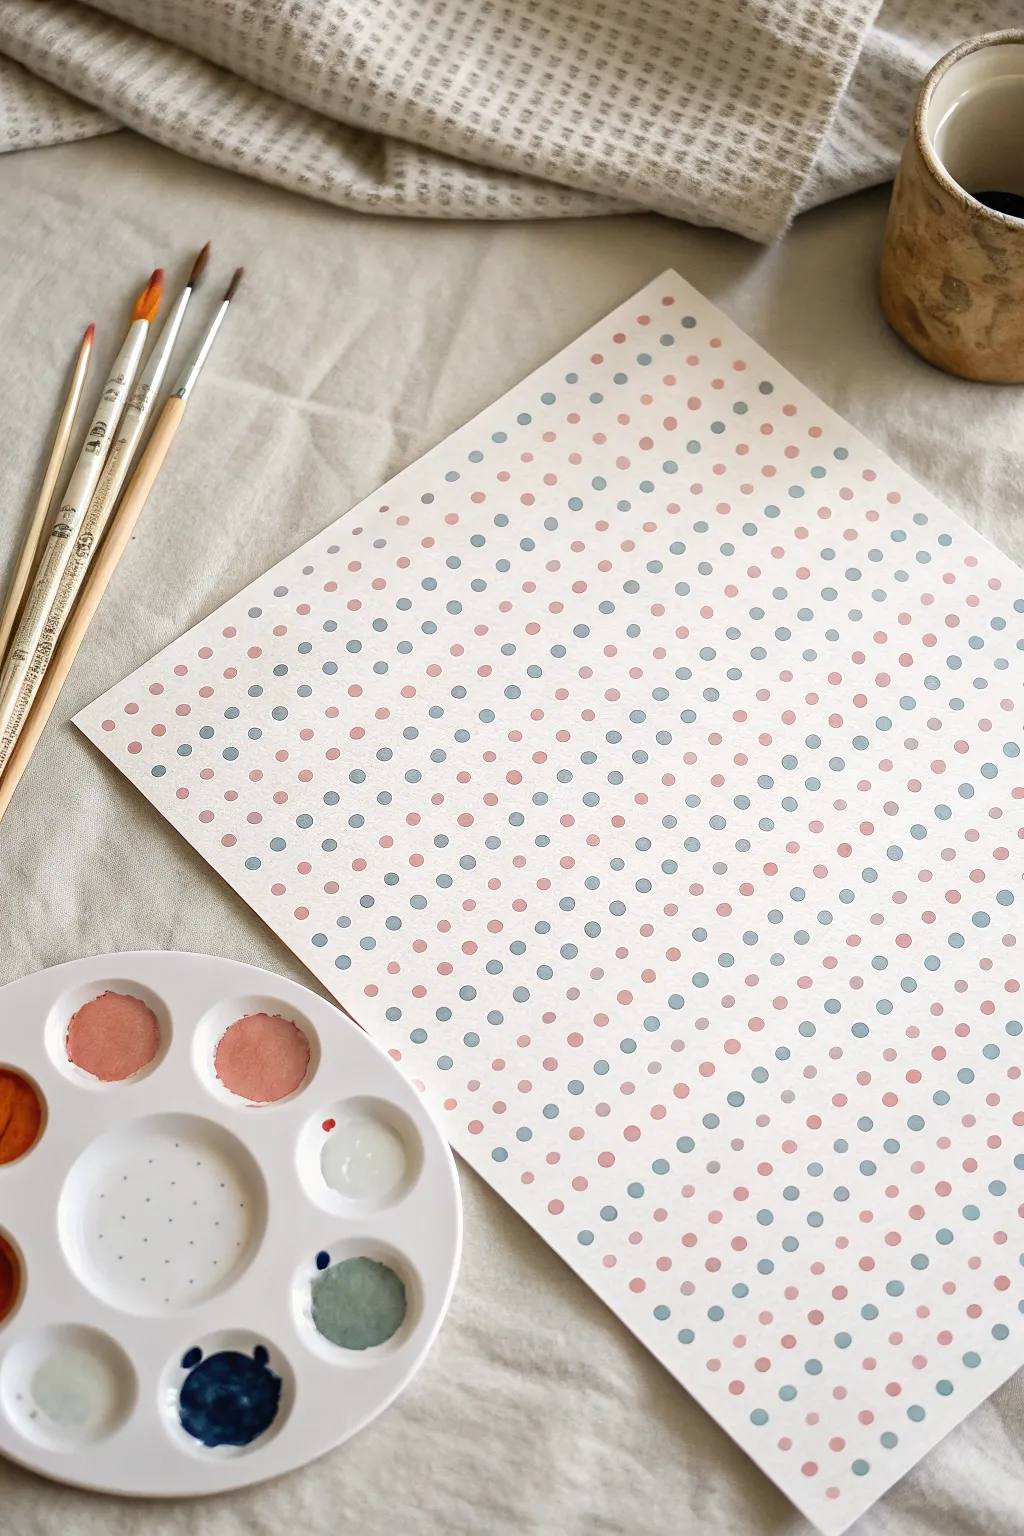
Bring a sense of calm order to your space with this meditative dot painting project. Using soft pastel tones and a rhythmic grid, you’ll create a mesmerizing pattern that feels both modern and hand-touched.
How-To Guide
Materials
- Heavyweight watercolor or mixed media paper (white)
- Acrylic or gouache paints (soft pink, light blue/grey-blue)
- Round paint palette
- Pointed round paintbrushes (size 4 or 6)
- Cotton swabs (Q-tips)
- Ruler
- Light pencil (HB or 2H)
- Paper towels
- Water cup
Step 1: Setting the Grid
-
Prepare your workspace:
Lay down your heavyweight paper on a flat, clean surface. Ensure you have good lighting to see your pencil marks clearly. -
Measure the horizontal axis:
Along the top edge of your paper, make very light tick marks with your pencil every 1.5 to 2 centimeters apart, depending on how dense you want your dots. -
Measure the vertical axis:
Repeat the measuring process along the left side of the paper, using the same spacing measurement to ensure a uniform look. -
Create the grid:
Use your ruler to very lightly connect the marks, creating a faint grid across the entire page. These intersections will be your guides. Keep the lines barely visible so they are easy to erase later.
Step 2: Preparing the Palette
-
Mix the pink shade:
In your palette, mix a small amount of red or magenta with plenty of white to create a soft, dusty pink. Add a tiny touch of yellow oxide if you want it warmer like the example. -
Mix the blue shade:
Create a muted blue by mixing primary blue with white. To get that sophisticated grey-blue tone seen in the image, mix in a comprehensive tiny dot of orange or black to desaturate it. -
Check consistency:
Add drops of water to your acrylics or gouache until the paint is the consistency of heavy cream. It needs to flow off the tool without being runny.
Uneven Dot Troubles?
If your cotton swabs are getting fuzzy and making messy circles, dip your fingers in water and smooth the cotton tip before dipping it in paint.
Step 3: Applying the Dots
-
Start the first color:
Dip a cotton swab or the end of a round paintbrush into your pink mixture. Start at the top left corner. -
Establish the pattern:
Place a pink dot on every *other* grid intersection. Press straight down and lift straight up to keep the circle clean. -
Continue the pink rows:
Move row by row. On the second row, shift your position so the pink dot sits diagonally beneath the first row’s dots (checkerboard style). -
Refill paint regularly:
I like to re-dip my tool after every 2-3 dots to ensure the size remains consistent across the page. -
Let the first color dry:
Allow the pink dots to dry completely before starting the blue. This prevents any accidental smudging while your hand moves across the paper. -
Begin the blue dots:
Using a fresh cotton swab or brush, dip into your blue mixture. Place these dots on the empty grid intersections remaining between the pink ones. -
Maintain pressure:
Try to apply the exact same amount of pressure you used for the pink dots so the blue circles match in size. -
Fill the page:
Work your way down the sheet, filling in the gaps until the entire grid is populated with alternating pastel dots.
Pro Tip: Tool Variance
Use the back end of different sized paintbrushes to create dots of varying sizes. A larger handle end makes perfect, uniform larger dots.
Step 4: Finishing Touches
-
Check for consistency:
Scan the page for any dots that look too transparent. You can carefully dab a second layer of paint on top if needed. -
Erase the grid:
Wait until the paint is 100% bone dry—humid paint will smear. Gently run a kneaded eraser over the pencil lines to remove the grid, leaving only the floating dots.
Step back and admire the satisfying rhythm of your new geometric artwork


Abstract Acrylic Pour on a Panel
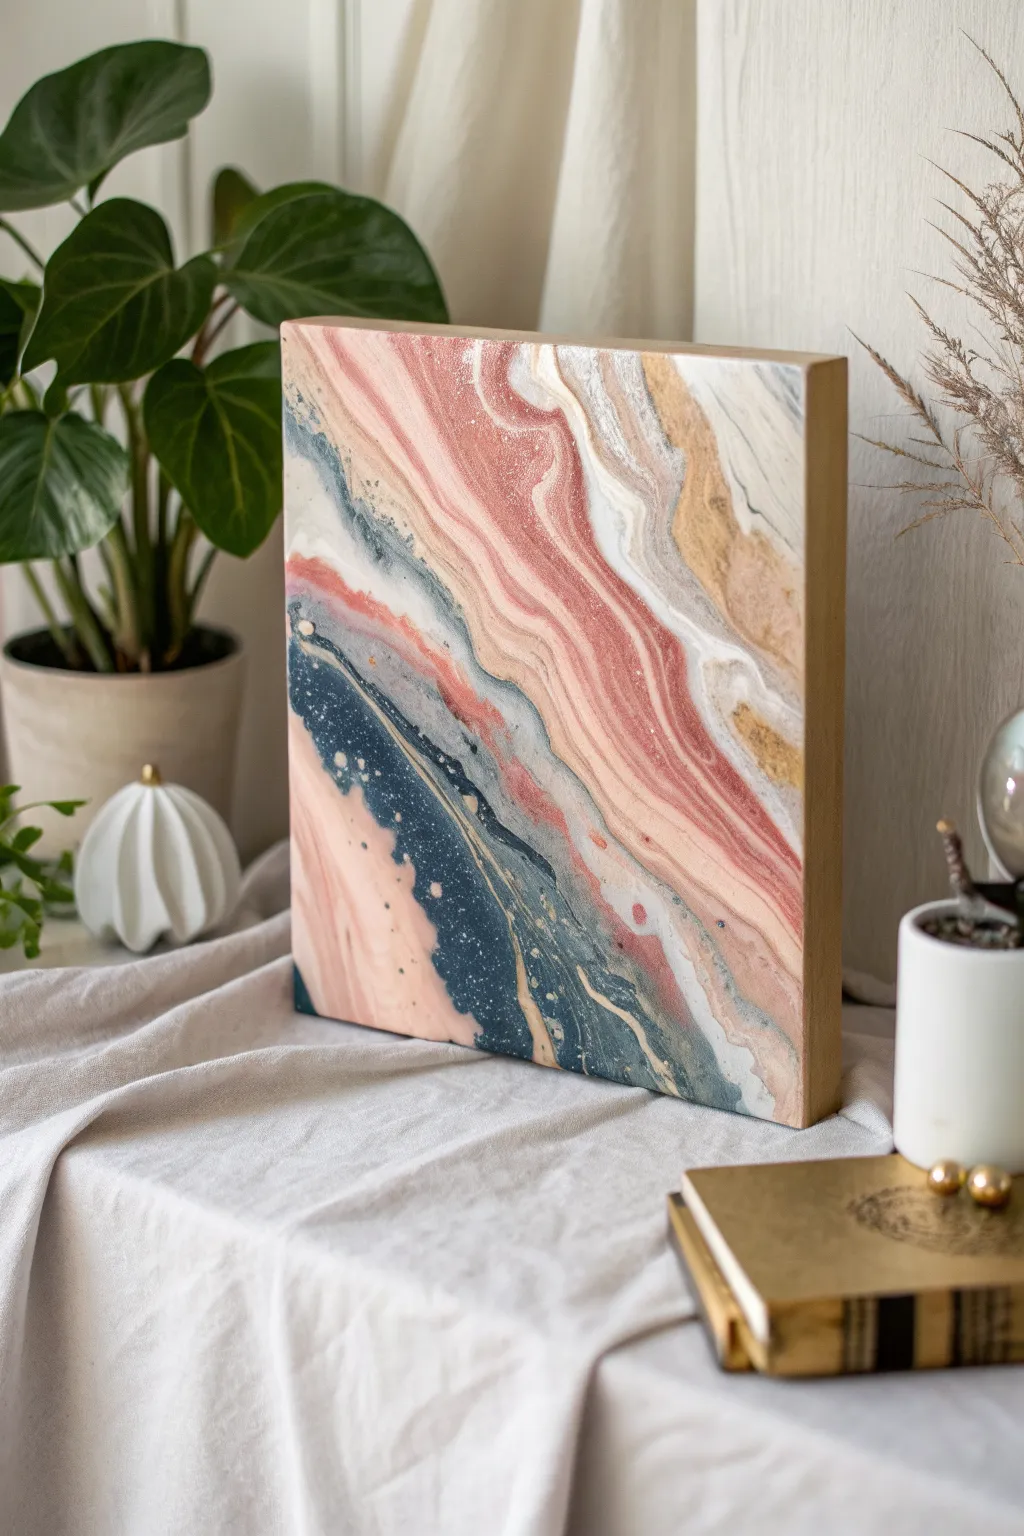
This elegant acrylic pour captures the serene beauty of natural stone, blending dusty pinks, moody blues, and shimmers of gold on a sturdy wood panel. The result is a piece of art that looks high-end but is created through a relaxing, fluid process.
Detailed Instructions
Materials
- Deep cradled wood panel (10×10 or 12×12 inch)
- Acrylic paints (dusty pink, salmon, navy blue, cream, white)
- Metallic gold or copper acrylic paint
- Pouring medium (Floetrol or specialized medium)
- Silicone oil (optional, for cells)
- Fine glitter (optional)
- Plastic cups (one per color + one for pouring)
- Craft sticks for stirring
- Masking tape
- Drop cloth or plastic sheet
- Heat gun or lighter
Step 1: Preparation
-
Protect the workspace:
Fluid art gets messy, so cover your entire working surface with a heavy drop cloth or plastic sheet. -
Prep the panel edges:
Since we want a clean wood grain look on the sides, vigorously apply masking tape around the entire outer edge of your wood panel. Press down firmly to prevent paint from sneaking underneath. -
Mix your paints:
In individual cups, mix each acrylic color with your pouring medium. A standard ratio is often 1 part paint to 2 parts medium, but check your medium’s bottle. You want a consistency similar to warm honey. -
Add metallic sheen:
When mixing your gold or copper shade, I like to add just a tiny pinch of fine glitter directly into the cup for extra sparkle that catches the light later. -
Check consistency:
Lift your stir stick. The paint should flow off in a continuous stream without breaking. If it’s too thick, add a few drops of water; if too thin, add a bit more paint.
Step 2: The Pour
-
Layer the dirty cup:
Take your empty pouring cup and start layering your colors. Don’t stir them together. Instead, pour small amounts of white, then pink, then navy, then gold, repeating until the cup is full. -
Perform the flip cup (or straight pour):
Place the canvas face down on top of the cup, hold them together tightly, and flip. Alternatively, just slowly pour the contents of the cup into the center of the panel in a tight zigzag motion. -
Tilt the panel:
Gently lift the panel and tilt it slowly from side to side. Encourage the paint to flow toward the corners, stretching the bands of color into long, geological-looking striations. -
Cover the surface:
Continue tilting until the entire face of the panel is covered. Don’t worry if some paint drips over the taped sides; that’s part of the process. -
Pop bubbles:
Quickly pass a heat gun or lighter over the wet surface. This pops trapped air bubbles and can bring up small ‘cells’ of color if you added silicone.
Muddy colors?
If your colors are turning ‘muddy’ or gray, you may have over-tilted or stirred the paint too much. Try layering contrasting colors (like blue and orange) with a white buffer layer in the cup.
Step 3: Refining and Drying
-
Check composition:
If a certain area looks too heavy in one color, you can manually add a ribbon of a different color directly onto the canvas and tilt again to integrate it. -
Clean the underside:
Run a craft stick or your gloved finger along the bottom edge of the tape to remove dripping paint, which prevents it from pulling the top design as it dries. -
Let it cure:
Place the panel on raised cups (like overturned yogurt cups) in a dust-free area. Allow it to dry undisturbed for at least 24 to 48 hours. -
Remove the tape:
Once the paint is fully dry to the touch, carefully peel away the masking tape to reveal the crisp, natural wood edges. -
Wait for full cure:
Acrylic pours can take a few weeks to fully cure underneath the surface. Avoid stacking anything on top of the art for about 3 weeks. -
Seal the artwork:
To enhance the colors and protect the surface, apply a coat of high-gloss varnish or a layer of art resin once the piece is fully cured.
Try a resin finish
For a glass-like, professional gallery finish that makes the metallic gold truly pop, pour a clear coat of epoxy resin over the fully dried painting instead of using standard varnish.
Now you have a stunning, geology-inspired statement piece ready to display on your shelf or wall
BRUSH GUIDE
The Right Brush for Every Stroke
From clean lines to bold texture — master brush choice, stroke control, and essential techniques.
Explore the Full Guide
Spin Art Using a Turntable
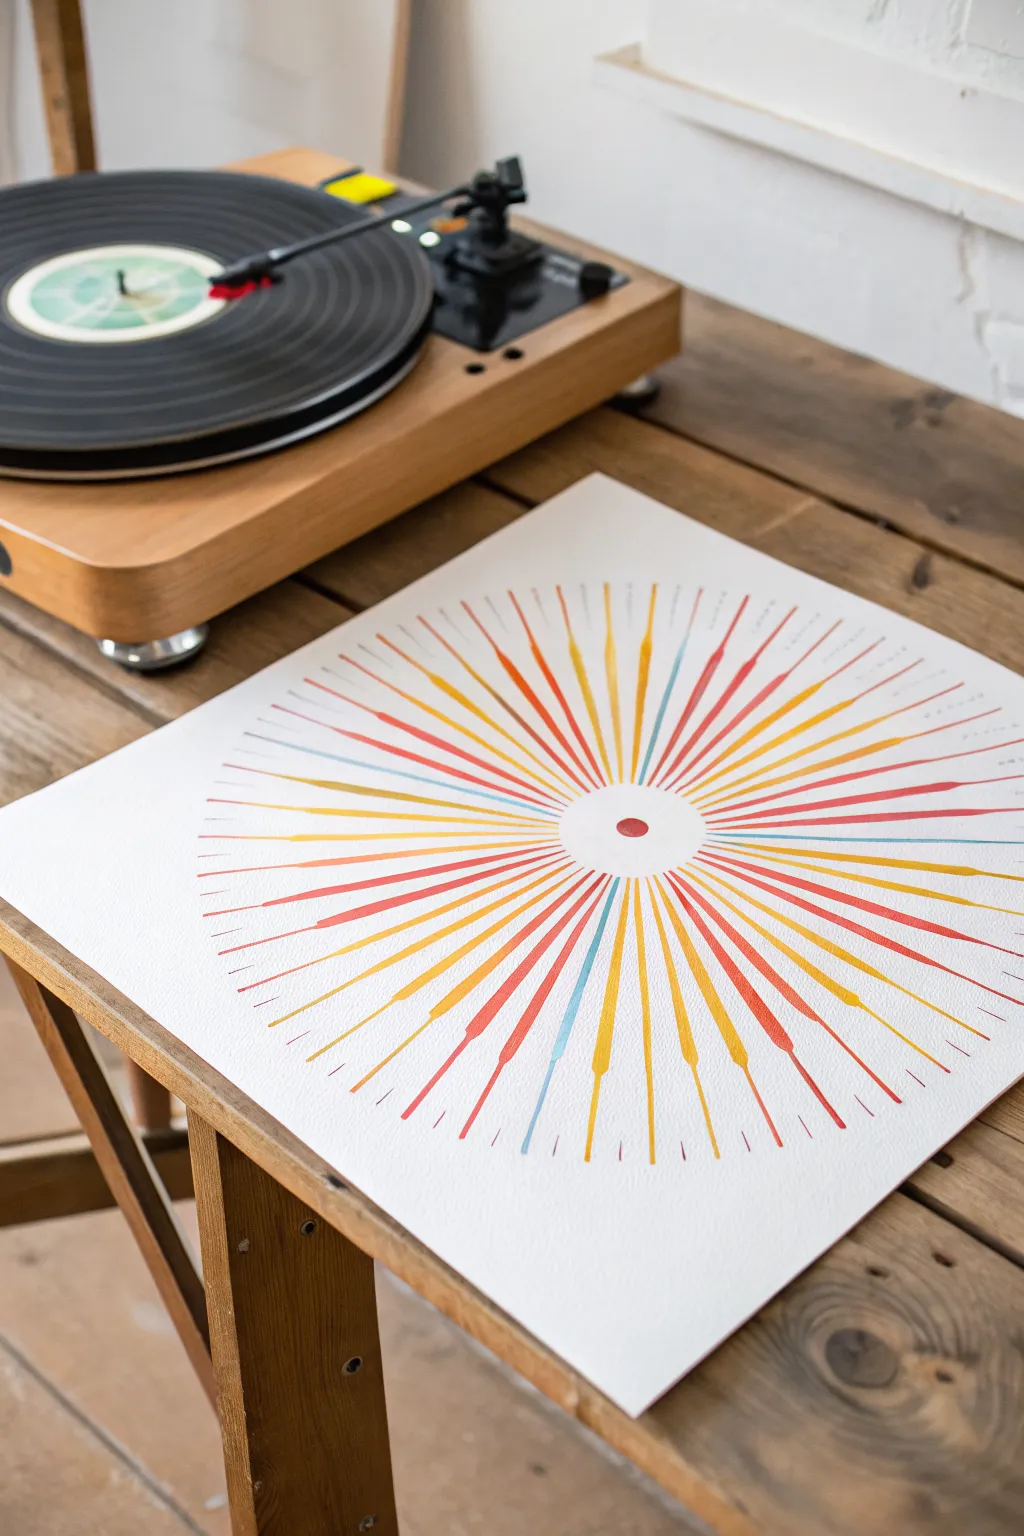
This project transforms the kinetic energy of a record player into precise, geometric art with a distinct mid-century modern vibe. Unlike messy splatter spin art, this technique uses controlled application to create clean, radiating lines in a warm, retro color palette.
Detailed Instructions
Materials
- High-quality watercolor paper or heavy cardstock (cut to 12″x12″ or preferred size)
- Turntable (functioning, adjustable speed preferred)
- Old vinyl record (as a sacrificial base)
- Painter’s tape or double-sided tape
- Liquid acrylic inks or fluid acrylic paints (Teal, Mustard Yellow, Coral, bright Red)
- Fine-tip dropper bottles or syringes (essential for control)
- Ruler
- Pencil
- Red circular sticker or red paint marker (for the center)
Step 1: Preparation and Setup
-
Prepare the workspace:
Since this involves spinning liquid, cover your table and the surrounding area of your turntable with newspaper or a plastic drop cloth to catch any potential flying droplets. -
Ready the paints:
Dilute your acrylic paints with a flowing medium until they have the consistency of heavy cream, or use liquid acrylic inks directly. Transfer each color into its own fine-tip dropper bottle or syringe to ensure precise flow. -
Prepare the paper base:
Cut your watercolor paper into a perfect square. Locate the exact center of the paper by lightly marking intersecting diagonal lines with a pencil and ruler. -
Mount the paper:
Place an old, sacrificial vinyl record on the turntable platter. Use loops of painter’s tape or strong double-sided tape on the back of your paper to secure it firmly to the record, ensuring your pencil center mark aligns perfectly with the record’s spindle hole. -
Check the alignment:
Turn on the turntable to a low speed (33 RPM) to test the rotation. If the paper wobbles significantly, stop and adjust the positioning until it spins true.
Speed Control
Use 78 RPM for longer, thinner lines that reach the edge. Use 33 RPM for shorter, thicker lines that fade out before the paper’s border.
Step 2: Creating the Radiating Lines
-
Start the rotation:
Set the turntable to a higher speed, such as 45 or 78 RPM, to generate enough centrifugal force to pull the ink outward in straight lines. -
Apply the first color (Coral):
Starting near the center (but not touching it), gently squeeze a drop of Coral ink onto the paper. The spinning motion will immediately fling the pigment outward, creating a streak. -
Build the pattern:
Continue adding drops of Coral, spacing them out rotationally. Try to vary the starting distance from the center slightly to create lines of different lengths. -
Introduce the second color (Mustard Yellow):
Switch to your Mustard Yellow applicator. Apply drops in the gaps between the Coral radial lines, again varying the starting point to add visual interest. -
Add the accent color (Teal):
Use the Teal ink sparingly as an accent. I find that applying these lines slightly further out from the center helps keep the design feeling open and airy. -
Refine the composition:
Observe the spinning pattern. Look for large gaps in the radial symmetry and fill them with smaller, shorter dashes of color to balance the visual weight. -
Address consistency:
If a line looks too thin or faint, you can carefully re-apply a drop at the exact same starting point while it spins to darken the streak.
Step 3: Finishing Touches
-
Stop the spin:
Turn off the turntable and let it come to a complete stop naturally. Do not try to stop it with your hand, as a sudden jerk might cause wet ink to run sideways. -
Assess the wetness:
The ink will likely be pooled slightly at the start of each line. Allow the artwork to sit on the turntable for a few minutes to let the initial wetness set. -
Remove the artwork:
Carefully peel the tape from the back of the paper or lift the paper off the record. Lay it flat in a safe, dust-free area to dry completely. -
Add the center point:
Once the paint is fully dry, cover the central empty space (where the spindle was) by placing a small red circular sticker or painting a perfect red circle. This anchors the radial design. -
Initial the work:
For a gallery-style finish like the image, use a fine pencil to faintly number or initial the outer lines, giving it a technical diagram aesthetic.
Curved Lines?
If you get spirals instead of straight rays, your paint is too thick or the spin is too slow. Thin the paint with water or flow medium.
Now you have a striking piece of modern art ready to frame and hang
String-Pull Flower Prints
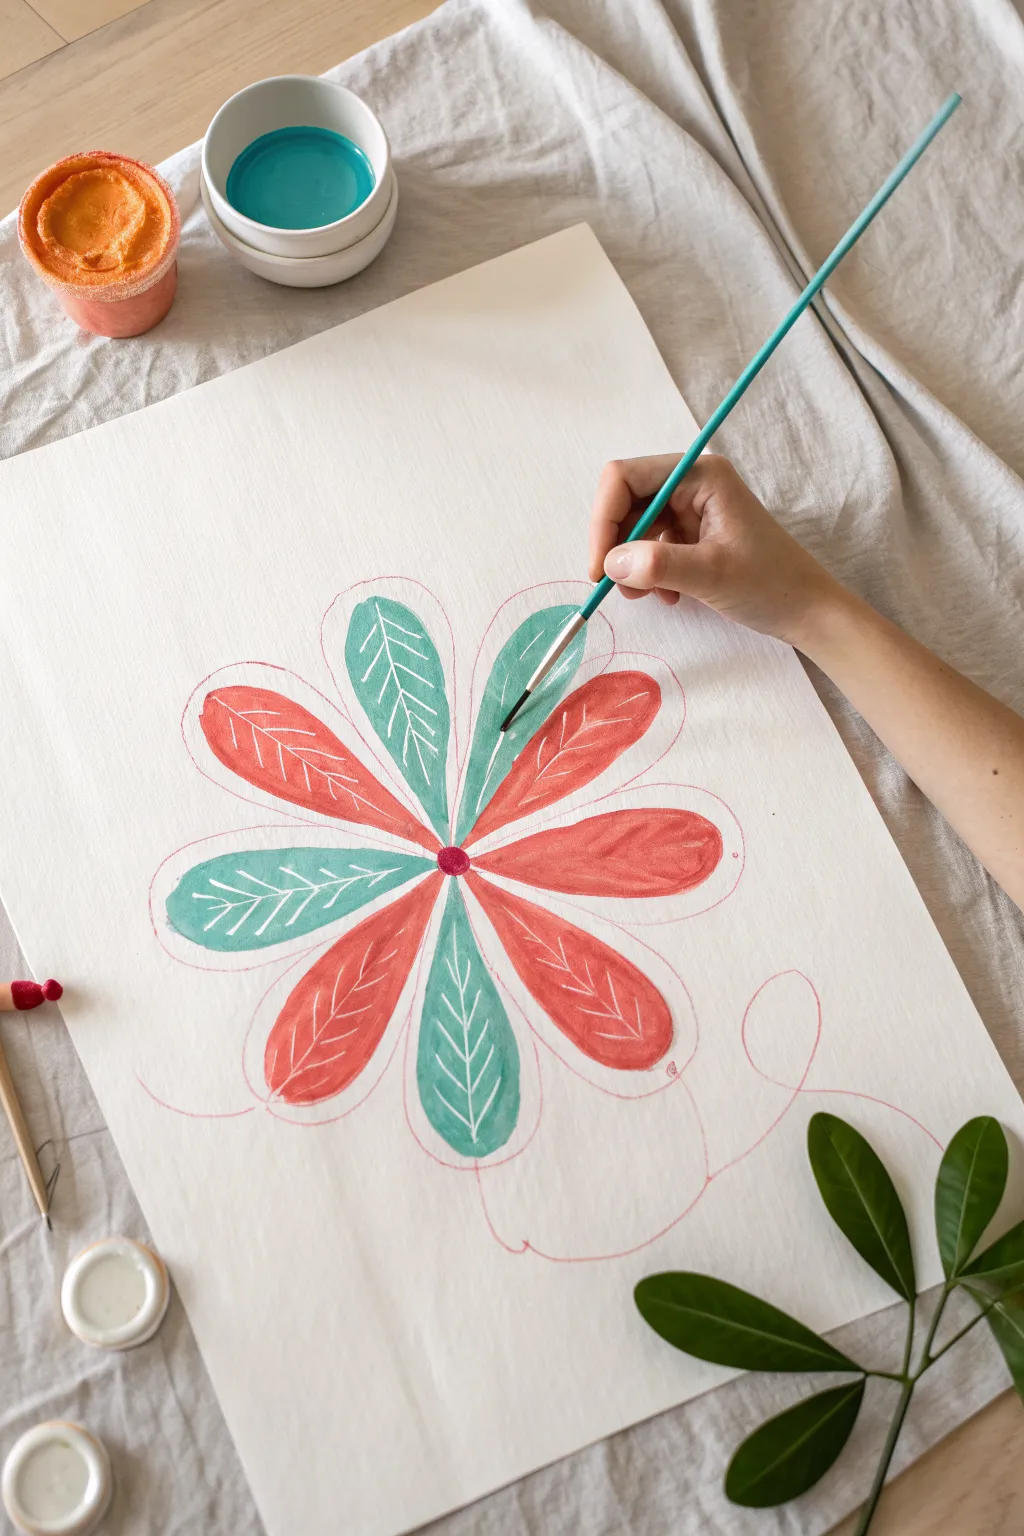
This charming painting project combines simple geometric shapes with delicate line work to create a folk-art-inspired bloom. The alternating coral and teal palette feels fresh and modern, while the visible guide lines add a lovely hand-drawn character to the finished piece.
Step-by-Step Guide
Materials
- Heavyweight cold press watercolor paper or mixed media paper
- Coral pink acrylic or gouache paint
- Teal or turquoise acrylic or gouache paint
- Small round paintbrush (size 2 or 4)
- Very fine detail brush (size 0 or 00) or white gel pen
- Pencil (HB or 2B)
- Eraser
- Palette or small dishes for mixing
- Water cup
- Paper towels
Step 1: Sketching the Layout
-
Find the center:
Begin by lightly marking a small dot in the center of your paper to act as the anchor for your flower petals. -
Draw the main axis lines:
Using a pencil, draw a light vertical line and a horizontal line crossing through your center dot to create a cross shape. This helps keep your petals symmetrical. -
Mark diagonal guides:
Add two diagonal lines crossing through the center, dividing your space into eight equal pie-shaped sections. -
Sketch the petal outlines:
Draw eight long, teardrop-shaped petals radiating from the center. I like to keep the tips slightly rounded rather than sharp for a softer look. -
Add decorative swirls:
Loosely sketch a flowing, curly line extending from the bottom petals, creating a decorative stem or ribbon effect that loops outward. -
Create the outer aura:
Draw a faint outline around the entire flower shape, leaving about a half-inch gap from the petals. This acts as a guide for placement but won’t be painted.
Clean Edges Fix
If your paint bleeds outside the pencil line, wait for it to dry completely, then use a tiny bit of white gouache to paint over the mistake and reshape the petal.
Step 2: Painting the Base Colors
-
Prepare the coral paint:
Mix your coral paint with a tiny drop of water to improve its flow. It should be creamy, not watery. -
Paint alternating petals:
Choose one petal to start with (perhaps the top left) and fill it in with the coral paint. Skip the next petal, then paint the third one coral. Continue until you have four coral petals. -
Refine the edges:
While the paint is wet, use the tip of your round brush to smooth out the edges of the coral petals so they look clean and intentional. -
Prepare the teal paint:
Clean your brush thoroughly and mix up your teal shade. Ensure it has the same consistency as your coral mix. -
Fill the remaining petals:
Paint the four remaining empty petals with the teal color. Be careful near the center where the petals meet to keep the colors distinct. -
Paint the center:
Once the petals are mostly dry, dip a small brush into a darker pink or red and paint a small, solid circle right in the center of the flower.
Step 3: Adding Details
-
Let it dry completely:
Wait for all paint layers to be fully dry to the touch. This is crucial so your fine lines don’t bleed into the base color. -
Paint the central veins:
Using your finest brush and white paint (or a white gel pen), draw a straight line down the center of each petal, starting near the center and stopping before the tip. -
Add side veins:
Paint short, diagonal dashes branching off the central white line on every petal. Three or four pairs of lines per petal usually looks best. -
Trace the decorative line:
Go back to your pencil swirl at the bottom. Use a very fine brush with a diluted pink or red paint to trace over this pencil line lightly. -
Final assessment:
Step back and look at your composition. You can choose to erase the remaining pencil marks or leave them visible for that authentic sketchbook aesthetic shown in the example.
Consistent Flow
When painting the white veins, test your stroke on a scrap paper first. The paint needs to be inky enough to flow off the brush without dragging.
Display your cheerful print in a frame or use the design on greeting cards to share a bit of joy

PENCIL GUIDE
Understanding Pencil Grades from H to B
From first sketch to finished drawing — learn pencil grades, line control, and shading techniques.
Explore the Full Guide
Marbled Paper With Foam Swirls
Create sophisticated, high-end looking abstract art using a surprisingly simple household item: shaving foam. This project produces delicate swirls of sage green and coral pink that look like expensive stationery or hand-dipped marbling.
Step-by-Step
Materials
- Heavyweight watercolor paper or cardstock (white)
- Shaving foam (traditional white foam, not gel)
- Acrylic paints (Sage Green, Coral/Muted Pink, White)
- Baking sheet or shallow tray (larger than your paper)
- Spatula or straight edge ruler (for scraping)
- Toothpicks, skewers, or the end of a paintbrush
- Paper towels
- Light wood picture frame (A4 or 8×10)
Step 1: Preparing the Foam Base
-
Set up your station:
Prepare a workspace covered with newspaper or a plastic tablecloth, as this can get a bit messy. Have your paper towels and spatula within easy reach before you start spraying foam. -
Fill the tray:
Shake your can of shaving foam vigorously. Spray a generous layer into your baking sheet or shallow tray, ensuring the bottom is completely covered. -
Smooth the surface:
Use your spatula or straight edge to spread the foam out evenly. You want a flat, smooth surface like a frosted cake, about one inch deep.
Step 2: Creating the Color Swirls
-
Apply the first color:
Take your Sage Green acrylic paint. Gently squeeze small drops or drizzle thin lines randomly across the surface of the foam. Leave plenty of white space. -
Add the accent color:
Repeat the process with the Coral/Muted Pink paint. Try to place some drops near the green ones but avoid mixing them directly on top of each other yet. -
Incorporate white space:
If your foam is very dense, you can add a few drops of white acrylic paint to ensure there are opaque bright spots, though the foam itself often acts as the white negative space. -
Begin the marbling:
Take your skewer or toothpick. Gently drag the tip through the dots of paint. I like to start with vertical lines up and down the tray. -
Create the swirls:
Now, drag the skewer horizontally through the vertical lines you just made. This creates a classic ‘comb’ pattern. For the look in the photo, add some circular, freehand swirls to disrupt the grid and create organic flow. -
Check the density:
Examine your pattern. If the colors look too sparse, add a tiny drop of paint and swirl it in. Be careful not to over-mix, or the colors will turn muddy.
Clean Swipes Only
Wipe your scraping tool completely clean after every single pass. If you drag dirty foam back over the paper, you’ll smear the crisp lines.
Step 3: Transferring and Finishing
-
Press the paper:
Ideally cut your paper slightly smaller than the frame now. Gently place the paper face down onto the foam pattern. Do not push it deep into the foam; just let it rest on the surface. -
Ensure contact:
Lightly pat the back of the paper to ensure the entire surface has made contact with the paint and foam mixture. Wait about 10-15 seconds. -
Lift and reveal:
Peel the paper off the foam by lifting one corner and pulling slowly. It will look like a mess of foam at this stage—don’t panic. -
Scrape the excess:
Place the paper face up on a clean surface. Immediately take your straight edge ruler or spatula and firmly scrape the foam off the paper in one smooth motion. The pattern remains printed on the paper. -
Dry the print:
Wipe off any remaining foam residue gently with a clean paper towel if needed, then let the paper dry completely. This usually takes about 20 minutes since acrylic dries fast. -
Flatten the paper:
If the paper curled from the moisture, place it under a heavy book overnight once it is completely dry. -
Frame your art:
Place your dried marbled masterpiece into the light wood frame. Secure the backing and display your custom art.
Go Metallic
Add a few drops of liquid gold leaf or metallic gold acrylic paint into your foam swirls for a luxe, shimmering finish that catches the light.
Hang your new marbled print in a bright spot where the natural greens and pinks can really shine


Have a question or want to share your own experience? I'd love to hear from you in the comments below!