
If you’re itching to make an easy love painting for him, you don’t need fancy skills—just a simple plan and a little heart. These ideas are the kind you can actually finish in an afternoon and still have them feel personal and swoony.
Sunset Couple Silhouette
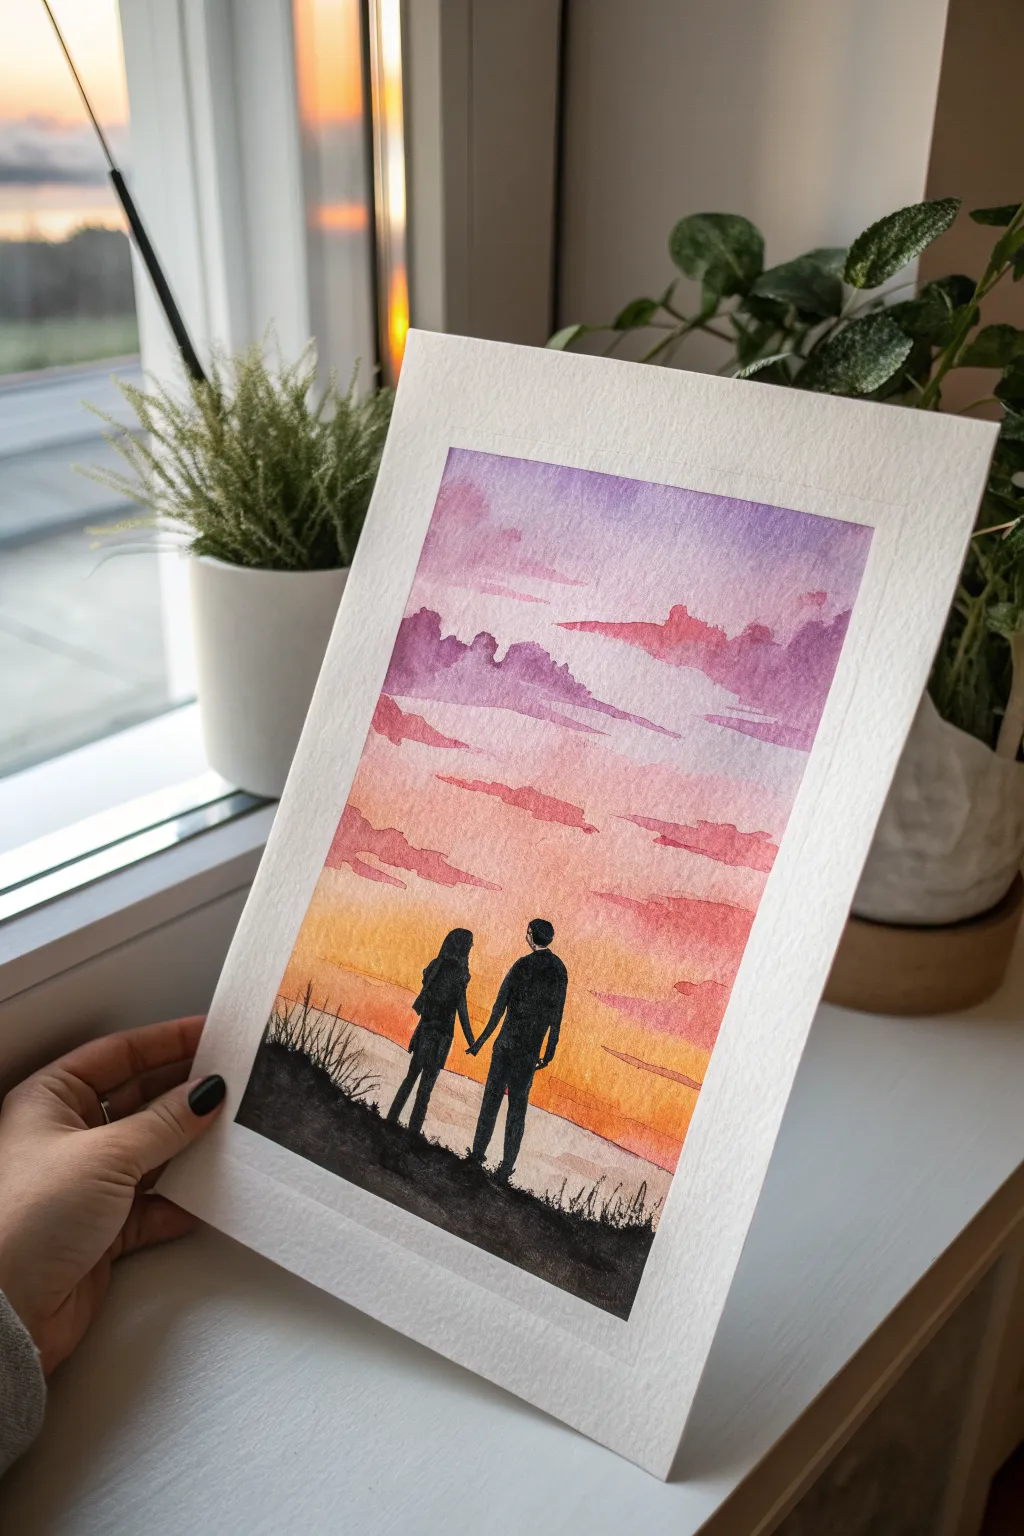
Capture the warmth of a romantic sunset with this vibrant watercolor piece. By blending rich purples into glowing oranges, you’ll create a stunning backdrop for two simple yet evocative silhouettes.
Detailed Instructions
Materials
- Cold press watercolor paper (300 gsm)
- Painter’s tape or masking tape
- Watercolor paints (purple, pink/magenta, warm orange, yellow ochre)
- Black gouache or concentrated black watercolor
- Large flat wash brush
- Medium round brush (size 6 or 8)
- Small detail brush (size 0 or 1)
- Two jars of water
- Paper towels
- Hardboard or table for taping down paper
Step 1: Preparing the Sky Gradient
-
Tape the borders:
Secure your watercolor paper to a hardboard or table using painter’s tape. Create a wide border to achieve the crisp white frame seen in the original image. Press the edges down firmly to prevent paint seepage. -
Pre-wet the paper:
Using a clean flat wash brush and fresh water, gently wet the entire area inside the tape. The paper should be glisten with a satin sheen, but pools of water shouldn’t form. -
Start with purple:
Load a round brush with a watered-down purple. Apply this to the top third of the paper using horizontal strokes, letting the color bloom softly into the wet fibers. -
Introduce pink tones:
Rinse your brush slightly and pick up a vibrant pink or magenta. Paint directly below the purple, allowing the two colors to touch and merge naturally on the page. -
Transition to warmth:
While the paper is still damp, mix a warm orange. Apply this in the middle-lower section, blending it upwards into the pink. Keep your strokes loose and horizontal. -
Add the golden horizon:
Finish the gradient by painting a diluted yellow or yellow-ochre at the very bottom, leaving the bottom-most area very pale or even white to simulate bright horizon light.
Step 2: Creating Texture and Clouds
-
Lift pigment for clouds:
While the sky wash is still wet but settling, use a clean, thirsty brush (damp but mostly dry) to lift out small horizontal streaks in the purple and pink areas. This creates soft, white cloud shapes. -
Add defined cloud layers:
Mix a slightly more concentrated purple-pink. Paint wispy, jagged cloud lines over the initial wash. Because the paper is drying, these strokes will hold their shape better but still have soft edges. -
Deepen the upper sky:
Add a few darker strokes of purple near the very top edge to create a vignette effect, drawing the eye downward. -
First drying phase:
Let this sky layer dry completely. The paper must be bone-dry before you add the silhouette, or the black ink will bleed into the sky.
Uneven Gradients?
If your sky colors aren’t blending smoothly, tilt your board slightly. Gravity helps the wet paint flow downward, naturally merging the bands of color without overworking the paper.
Step 3: Painting the Silhouette
-
Sketch the outline:
Lightly sketch the couple and the grassy hill using a hard pencil (like an H or HB) to keep lines faint. Outline two figures holding hands, with one slightly taller than the other. -
Paint the ground first:
Using black gouache or very concentrated black watercolor, paint the uneven hillside at the bottom. Tapping the brush tip creates the look of grass texture along the ridge. -
Outline the figures:
Switch to your smallest detail brush. Carefully outline the heads and shoulders of the figures first to ensure the proportions look right against the sunset. -
Fill the shapes:
Fill in the bodies with solid black. I find that gouache works best here for a matte, opaque finish that doesn’t show brushstrokes. -
Refine the connection:
Pay special attention to the clasped hands. You only need a tiny bridge of black paint to show they are holding hands; don’t make the wrist area too thick. -
Add grassy details:
Use the very tip of your detail brush to flick quick, upward strokes from the black ground hill. These fine lines mimic tall blades of grass backlit by the sun. -
Final drying:
Allow the black paint to dry fully. Gouache can smudge easily if touched while damp. -
The reveal:
Slowly peel away the painter’s tape at a 45-degree angle, pulling away from the painting to ensure a crisp, clean edge.
Make it Personal
Customize the silhouette to match you and your partner. Add details like a baseball cap, a ponytail, or even a small pet silhouette sitting beside the couple.
Frame this piece behind glass to protect those delicate transitions and surprise him with a personalized sunset.


Moon-and-Stars Kiss Scene
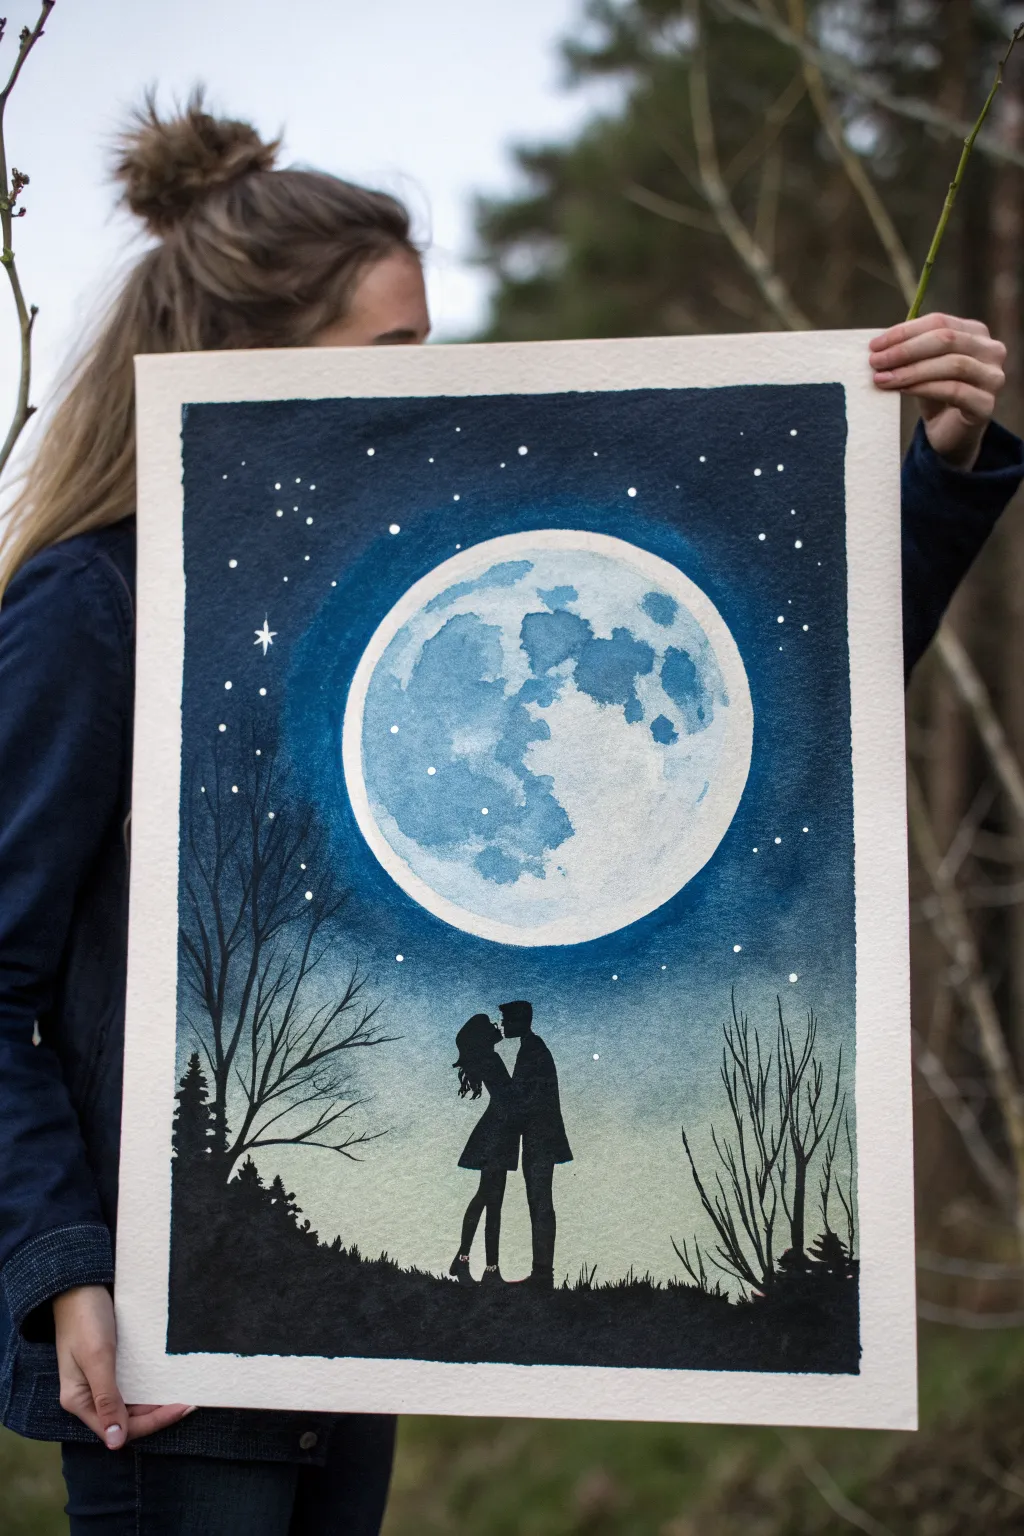
Capture the magic of a midnight kiss with this stunning watercolor project that balances a luminous, detailed moon against a stark, romantic silhouette. The contrast between the bright lunar surface and the deep navy sky creates a dramatic focal point that is surprisingly simple to achieve.
Step-by-Step Guide
Materials
- Cold press watercolor paper (A3 or 11×14 inches recommended)
- Watercolor paints (Indigo, Prussian Blue, Black, White Gouache or Acrylic)
- Round watercolor brushes (sizes 4, 8, and 12)
- Detailed liner brush (size 0 or 00)
- Masking tape or painter’s tape
- Compass or a large circular bowl for tracing
- Liquid masking fluid (in a bottle or pen)
- Old/cheap brush for masking fluid
- Graphite pencil and eraser
- Palette for mixing
- Paper towels and water cup
Step 1: Preparation and Masking
-
Secure the paper:
Tape your watercolor paper down to a board or table on all four sides. This creates that crisp white border seen in the photo and prevents the paper from buckling when you add water. -
Sketch the moon:
Using a compass or by tracing a large bowl, draw a large circle in the upper center of the page. It should take up a significant portion of the sky, leaving room at the bottom for the ground. -
Protect the moon:
Fill the entire interior of your pencil circle with masking fluid. Use an old, cheap brush for this, as masking fluid ruins bristles. Let this dry completely until it is tacky and firm to the touch. -
Sketch the silhouette outline:
Lightly sketch the outline of the ground and the couple at the bottom. You don’t need details, just the outer shape of where the black ink will go later so you know where to stop your sky wash.
Soap Savior
Before dipping your brush into masking fluid, coat the bristles in bar soap. The soap acts as a barrier, making it much easier to wash the sticky fluid out afterward.
Step 2: Painting the Night Sky
-
Wet-on-wet technique:
Using your largest brush, wet the paper around the masked moon with clean water. Be careful not to get water inside the couple’s silhouette if you can help it, though painting over them is fine since black will cover it. -
Apply the base blue:
Load your brush with a rich Prussian Blue. Start painting at the top of the paper, letting the color flow into the wet paper. Work your way down, maneuvering carefully around the masked moon. -
Deepen the cosmos:
While the paper is still damp, mix Indigo or a touch of Black into your blue to create a darker shade. Drop this color into the upper corners and edges of the sky to create a vignette effect. -
Create the halo:
Lift a little pigment away from the immediate edge of the masking fluid with a thirsty (clean, slightly damp) brush, or use a lighter blue wash there. This creates a glowing halo effect around the moon. -
Fade to horizon:
As you reach the bottom near the silhouette, dilute your paint slightly so the sky becomes a paler blue-grey near the horizon line. Let the background dry completely.
Bleeding Lines?
If paint bleeds under the tape, use a slightly damp stiff brush to scrub the unwanted paint away, or cover the error with thick white gouache to restore the border.
Step 3: The Moon and Stars
-
Reveal the moon:
Gently rub your finger or a rubber cement pickup eraser over the dried masking fluid to peel it off the paper, revealing the stark white circle underneath. -
Paint lunar craters:
Mix a very watery, pale blue-grey. Using a size 4 brush, dab irregular shapes onto the moon’s surface to mimic craters and seas. Leave plenty of white paper showing for high brightness. -
Adding stars:
Dip a liner brush into white gouache or acrylic. Dot tiny stars throughout the dark blue sky. Add one or two slightly larger stars with cross-shapes for a twinkling effect.
Step 4: Silhouettes and Details
-
Paint the couple:
Using pure black watercolor or ink, carefully fill in the sketched silhouette of the couple. Use your smallest brush for the profiles of their faces to ensure sharp noses and chins. -
Ground the scene:
Fill in the ground area with solid black. Use the tip of your brush to flick tiny grass blades upward along the top edge of the hill for texture. -
Add foliage:
With the liner brush or a size 4 round brush, paint spindly trees rising from the sides. Keep the lines organic and jagged. Paint a pine tree shape on the left for variety. -
Final touches:
Check your edges. If the silhouette looks patchy, add a second coat of black once the first is dry. Ensure the stars pop against the dark sky. -
Peel the tape:
Slowly peel the painter’s tape away at a 45-degree angle to reveal your crisp white border.
Frame this celestial masterpiece and gift it to someone special to remind them that your love goes to the moon and back.


Love Birds on a Branch
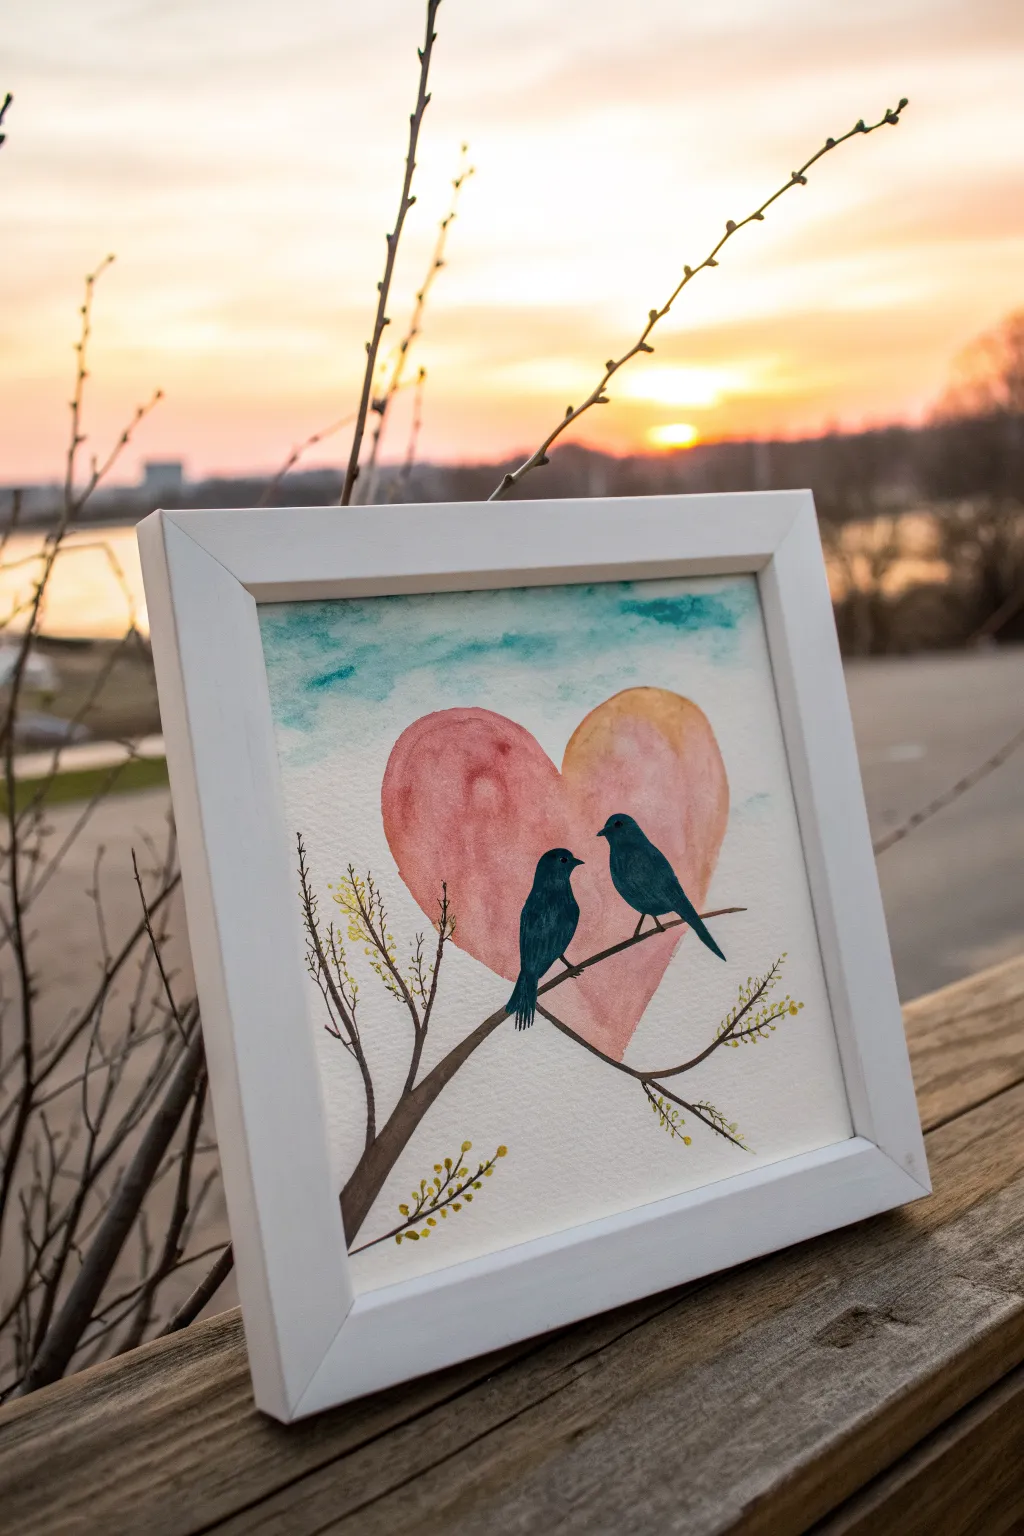
Capture the romance of a quiet evening with this watercolor painting featuring two silhouetted birds perched before a soft, glowing, heart-shaped moon. The blend of warm pinks and cool blues creates a sentimental atmosphere perfect for a heartfelt gift.
How-To Guide
Materials
- Cold press watercolor paper (approx. 8×8 inches)
- Watercolor paints (Alizarin Crimson, Cadmium Yellow, Ultramarine Blue, Burnt Umber, Payne’s Grey or Lamp Black)
- Round watercolor brushes (size 8 for washes, size 2 for details)
- Pencil (HB or H)
- Masking fluid (optional)
- Palette
- Water cups and paper towels
- White picture frame (square)
Step 1: Sketching the Composition
-
Outline the Heart:
Begin by lightly sketching a large heart shape in the center of your paper. Keep the pencil lines very faint so they won’t show through the translucent watercolor later. The heart should take up about half the vertical space. -
Draft the Branch:
Draw a diagonal line rising from the bottom left corner across the bottom of the heart. Add a few smaller twigs branching off, but keep the main branch thick enough to support your birds. -
Position the Birds:
Sketch the outline of two small birds sitting on the main branch, overlapping the bottom of the heart shape. Have them facing each other slightly to create a connection between the figures.
Step 2: Painting the Heart and Sky
-
Wet the Heart:
Dip your size 8 brush in clean water and carefully wet the inside of the heart shape. Only apply water where you want the paint to flow. -
Apply Warm Tones:
Load your brush with a watery mix of Alizarin Crimson and a touch of Cadmium Yellow. Touch the wet paper inside the heart, letting the pinkish-orange color bloom naturally. Keep the color stronger on the left side and lighter on the right for dimension. -
Create the Sky:
While the heart dries completely, wet the top area of the paper above the heart. Add a loose, horizontal wash of diluted Ultramarine Blue mixed with a tiny bit of teal or green to create a soft sky effect. -
Dry Completely:
This step is crucial; wait until both the heart and the sky sections are bone dry before proceeding. If the paper is damp, the crisp lines of the branch will bleed.
Fixing Bleeds
If paint bleeds outside the heart line, don’t panic. Dampen a clean brush with nothing but water, gently scrub the mistake, and dab it up with a paper towel immediately.
Step 3: Adding the Silhouettes
-
Paint the Branch:
Using your size 2 brush and a mix of Burnt Umber, carefully paint the main branch. I like to vary the pressure on the brush to make the branch look organic—thick in some spots, thinner in others. -
Extend the Twigs:
Pull fine lines outward from the main branch to create the smaller twigs sketched earlier. Use the very tip of your brush for these delicate strokes. -
Fill the Birds:
Mix a dark, rich color using Payne’s Grey or a mix of Ultramarine Blue and Burnt Umber. Carefully fill in the bird outlines. Ensure the edges are crisp against the background heart. -
Refine the Shapes:
Once the first layer on the birds is dry, you can add a second coat if needed to make them truly opaque and shadow-like.
Salt Texture
While the pink paint inside the heart is still wet, sprinkle a few grains of table salt on it. Brush it off when dry for a starry, textured effect inside the love heart.
Step 4: Final Details
-
Add Greenery:
Mix a muted green using your yellow and blue. With the tip of your small brush, dab tiny leaves or buds onto the ends of the smaller twigs. -
Highlights:
If you want to add a tiny glint of life, leave a microscopic speck of white paper for the birds’ eyes, or use a tiny dot of white gouache or gel pen after the black paint is dry. -
Review and Correct:
Check the painting for any unwanted smudge marks. You can lift small mistakes with a damp clean brush if caught quickly. -
Frame the Work:
Once the artwork is completely dry (give it at least an hour), place it into the white frame to make the colors pop.
Hang this lovely piece in a spot that catches the morning light to enjoy the translucency of the watercolors


Simple “I Love You” Lettering

This sweet, minimalist card combines modern calligraphy with scattered watercolor hearts for a romantic touch. The soft color palette and hand-lettered charm make it perfect for anniversaries, Valentine’s Day, or just because.
Step-by-Step
Materials
- Cold press watercolor paper (cut to 5×7 inches)
- Brown Kraft envelope (A7 size)
- Pencil (HB or H)
- Kneaded eraser
- Watercolor paints (Payne’s Gray or Indigo, Alizarin Crimson, Burnt Sienna)
- Small round watercolor brush (size 2 or 4)
- Water cup and paper towel
Step 1: Planning and Layout
-
Prepare your paper:
Cut your watercolor paper to size. If you want a folded card, cut a larger piece and score it down the middle, but for a flat card like the example, a single 5×7 inch panel works beautifully. -
Sketch the baseline:
Using a ruler and a very light pencil touch, draw three horizontal baselines where your text will sit. Space them evenly, leaving more room at the very top and bottom margins than in between the lines. -
Lightly draft the text:
Sketch the words ‘I’, ‘love’, and ‘you’ in a cursive style. Focus on the spacing; the ‘I’ should be centered at the top. Don’t worry about thickness yet, just get the skeleton of the letters down. -
Refine the letterforms:
Go back over your sketch to add weight to the downstrokes. I like to visualize where the pen would press down to create those thicker lines, mimicking calligraphy. -
Erase guidelines:
Once you are happy with the lettering placement, gently roll a kneaded eraser over the pencil lines until they are barely visible. This prevents the graphite from muddying your paint later.
Uneven Strokes?
If your lettering edges look shaky, wait for the paint to dry fully. Then, use a very fine-tip dark grey pen to outline and smooth out the roughest edges of the letters.
Step 2: Painting the Lettering
-
Mix your dark color:
Create a watery mixture of Payne’s Gray or a deep Indigo. You want a color that looks like faded denim—dark but transparent enough to show the paper texture. -
Paint the letter ‘I’:
Load your round brush. Start with the Roman numeral style ‘I’. Use the tip of the brush for the thin horizontal serifs and apply more pressure for the thick vertical stroke. -
Paint ‘love’:
Move to the second line. Paint the word ‘love’ using the same pressure technique: light pressure for upstrokes, heavy pressure for downstrokes. If the paint pools slightly at the bottom of a letter, that’s okay—it adds character. -
Paint ‘you’:
Finish the text with ‘you’ on the bottom line. Ensure the tail of the ‘y’ loops gracefully. Let the lettering dry completely before moving on.
Step 3: Adding the Hearts
-
Mix the pinks:
Prepare a few puddles of color for the hearts. Mix Alizarin Crimson with plenty of water for a soft pink, and add a tiny touch of Burnt Sienna to another puddle for a warmer, dusty rose tone. -
Paint the main heart:
Paint a medium-sized heart to the right of the letter ‘I’. Use the warmer, dusty rose color here. Place it slightly angled for a playful look. -
Scatter small hearts:
Using the tip of your brush, paint tiny hearts randomly around the text. Vary the sizes—some should be mere specks, others slightly larger. -
Vary the opacity:
For some hearts, dilute your paint significantly so they appear very faint and translucent. For others, use more pigment so they stand out darker. -
Add floating dots:
To fill empty negative space, dab small, circular dots using a mix of the dusty rose and a hint of brown. These act like confetti and tie the composition together. -
Final drying time:
Let the card sit undisturbed until the watercolor is bone dry. If the paper has buckled slightly, you can place it under a heavy book overnight once it is completely dry. -
Pair with envelope:
Slide the finished artwork into a brown Kraft envelope to complete the rustic, handmade aesthetic shown in the photo.
Level Up: Metallic Pop
Mix a small amount of metallic gold watercolor or gouache and paint two or three of the smallest hearts with it for a subtle shimmer that catches the light.
Now you have a heartfelt, hand-painted card ready to share with someone special
BRUSH GUIDE
The Right Brush for Every Stroke
From clean lines to bold texture — master brush choice, stroke control, and essential techniques.
Explore the Full Guide
Envelope-and-Note Collage Heart
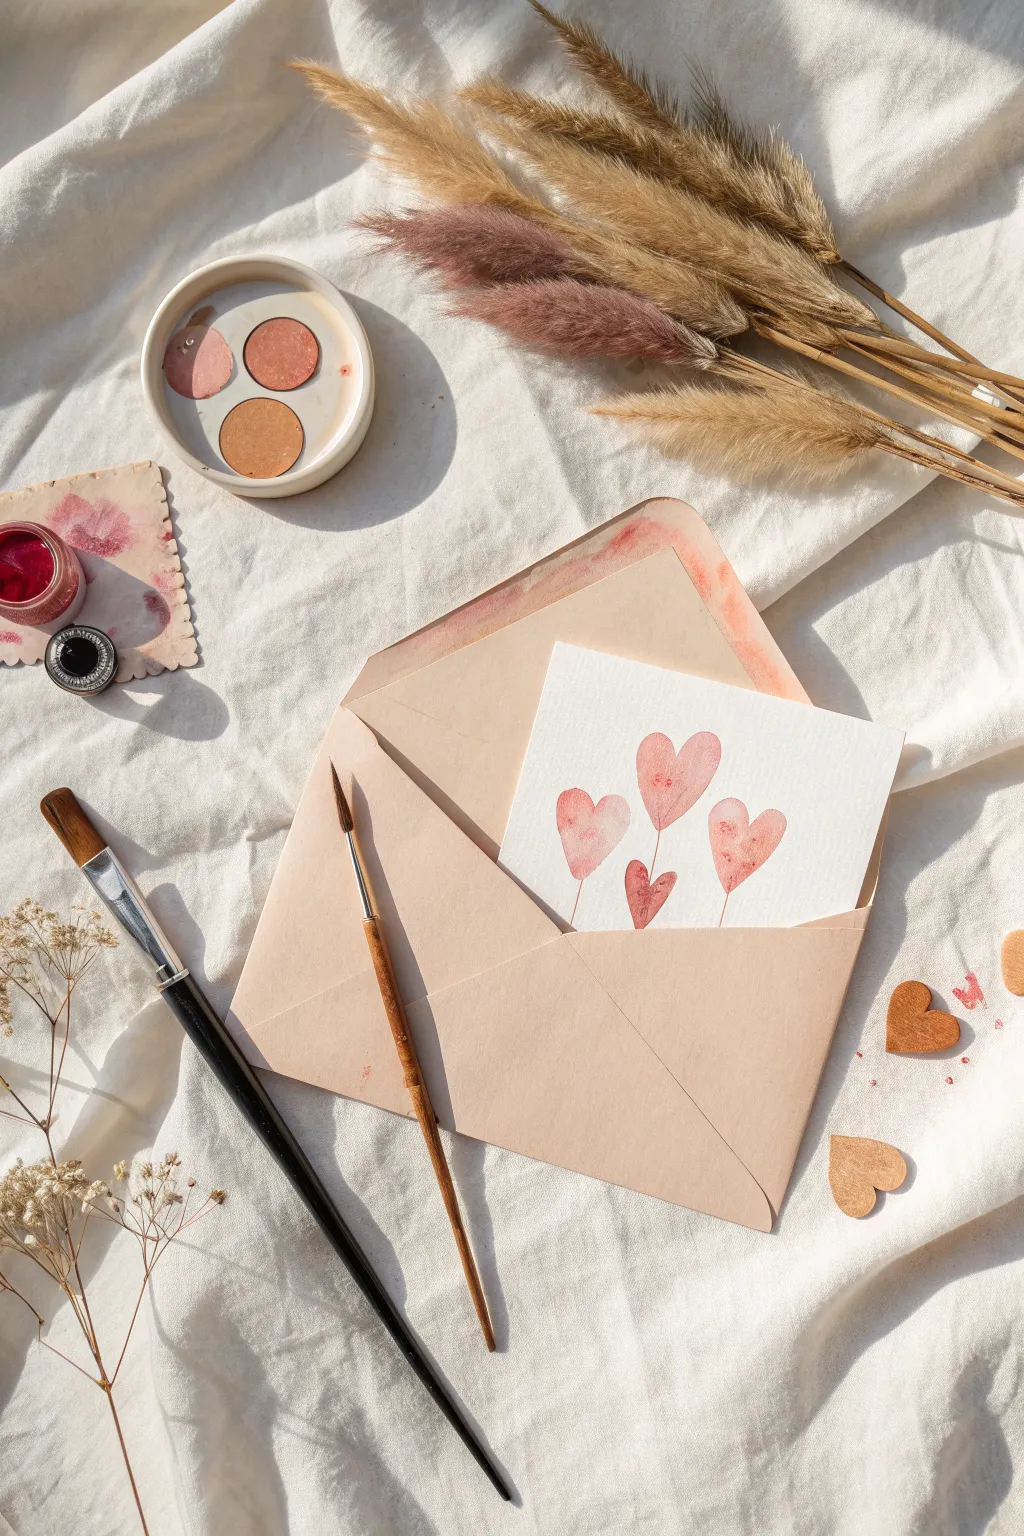
This charming project combines a loose, airy watercolor painting of floating hearts with existing stationery for a multimedia feel. It captures a whimsical sense of love being unleashed from an envelope, perfect for a surprise note tucked into a larger gift.
How-To Guide
Materials
- Cold-pressed watercolor paper (small square size)
- Watercolor paints (shades of pink, blush, and red)
- Small round watercolor brushes (size 2 and 4)
- A beige or kraft paper envelope
- Pencil and eraser
- Clean water jar
- Paper towels
- Small palette for mixing
Step 1: Preparation
-
Cut the paper:
Measure your envelope’s inner width and cut your watercolor paper slightly smaller so it will slide in easily but still look substantial. -
Test the fit:
Before painting, slip the paper into the envelope to ensure the sizing is correct, leaving enough room at the top for the design to be seen. -
Prepare your palette:
Mix a few different puddles of watery pink paint. I like to have a pale blush, a medium rose, and a slightly darker terracotta pink ready to go.
Natural Texture
Don’t overwork the paint. Let the water pool and dry naturally to create those beautiful hard edges and ‘cauliflower’ blooms distinctive to watercolor.
Step 2: Painting the Hearts
-
Sketch placement:
Very lightly sketch the positions of four hearts with a pencil. Make the central heart the highest, with the others floating at different levels. -
Start the first heart:
Using your medium brush loaded with the pale blush color, paint the shape of the top-left heart. -
Create a watercolor bloom:
While that heart is still wet, touch just the tip of your brush loaded with the darker red paint into the center of the wet shape and let it bleed naturally. -
Paint the central heart:
Moving to the highest middle heart, paint it using a slightly more saturated rose color. -
Add texture:
Dab a tiny bit of water into the center of the wet central heart to push the pigment to the edges, creating a lovely outline effect. -
Paint the right-side heart:
Paint the third heart on the right. Keep this one slightly smaller and angled outward as if it’s drifting away. -
Add the bottom heart:
Paint the final, smallest heart near the bottom center. For this one, I often use a mix of the leftover pinks for a deeper tone to ground the composition. -
Let it dry completely:
Step away and let the hearts dry fully. This is crucial before adding the stems.
Step 3: Adding Details
-
Mix a stem color:
Mix a very thin, watery version of your darkest red or brown paint. -
Switch brushes:
Change to your smallest detail brush (size 0 or 2) for fine line work. -
Draw the stems:
Paint very thin, delicate lines extending downward from the bottom point of each heart. -
Vary the lengths:
Ensure the stems aren’t all perfectly straight or the same length; letting them wobble slightly adds charm. -
Add speckles (optional):
Load a brush with watery red paint and gently tap it over the paper to create tiny splatters for an artistic, messy look.
Make it Sparkle
Once the paint is dry, use a metallic gold pen to trace part of the heart outlines or add tiny dots along the stems for a luxurious touch.
Step 4: Assembly
-
Final dry:
Ensure all paint, including the stems, is bone dry to avoid smudging the envelope. -
Insert into envelope:
Slide the finished painting into the envelope. -
Add envelope detail:
For a cohesive look, brush a little watered-down pink paint onto the inside flap of the envelope for a matching artistic stain.
Now you have a sweet, handmade expression of love ready to be discovered inside its envelope
Umbrella Couple in the Rain
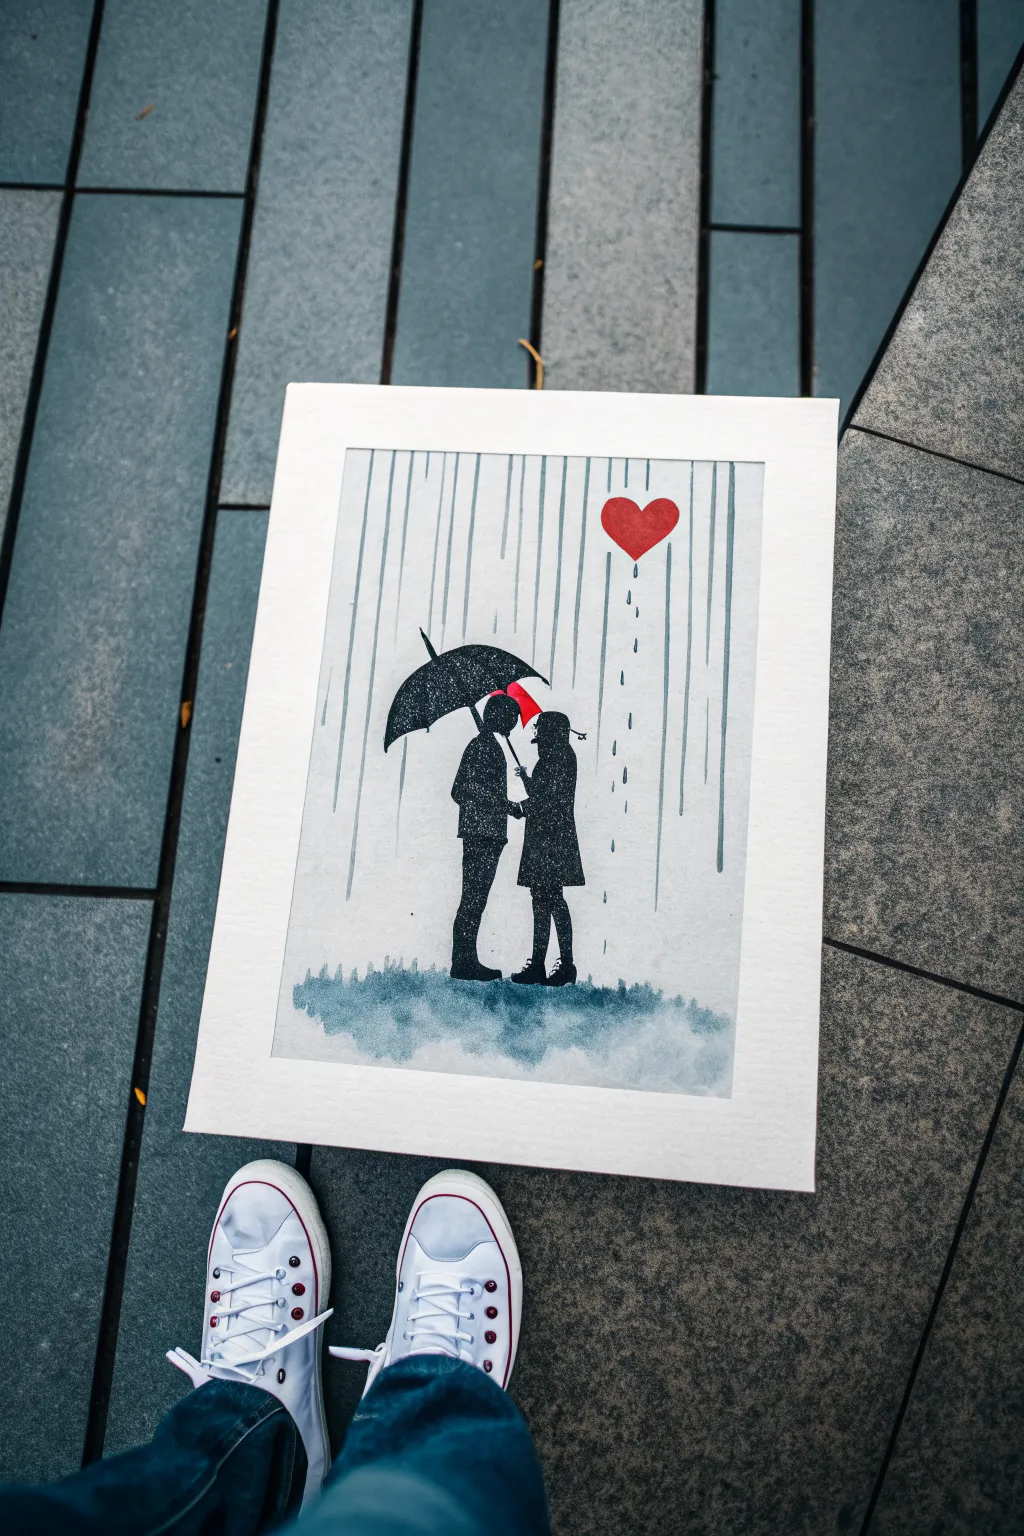
Capture a sweet moment of connection with this striking contrast between dark silhouettes and a splash of color. This mixed-media piece combines soft watercolor washes with crisp ink details to depict a couple sheltered under an umbrella.
Detailed Instructions
Materials
- High-quality watercolor paper (cold press recommended)
- Black waterproof fine liner pens (0.3mm and 0.5mm)
- Black India ink or black gouache
- Small round brush (size 2 or 4)
- Medium flat brush
- Watercolor paints (Payne’s Grey or Indigo, Red)
- Ruler
- Pencil and eraser
- Masking tape
Step 1: Preparation and Sketching
-
Secure the paper:
Tape down all four edges of your watercolor paper to a drawing board or hard surface. This prevents buckling when we add the water later. -
Sketch the umbrella:
Using a light pencil, draw the dome of the umbrella first, placing it slightly to the left of the center. Add the center stick handle coming down. -
Outline the figures:
Lightly sketch the silhouette outlines of the couple standing underneath the umbrella. Don’t worry about facial features; focus on the overall shape of their coats and legs. -
Add the focal point:
Draw the small heart shape floating above and to the right of the couple. This will be our only pop of red, so place it thoughtfully.
Step 2: Inking the Silhouettes
-
Fill the umbrella:
Using your black India ink or gouache and a small round brush, carefully fill in the umbrella shape. Leave a tiny sliver of white space between the umbrella ribs if you want extra dimension, or fill it solid for a classic look. -
Define the figures:
Switch to your waterproof fine liner (0.5mm) to outline the couple’s bodies. This gives you a crisp edge before filling. -
Fill the figures:
Use the brush and black ink to fill in the bodies. Be careful around the legs and feet to keep the shapes distinct. -
Detail the edges:
For fine details like the umbrella tip or the couple’s hair and coat textures, I prefer switching back to the fine liner pen to scratch in tiny texture lines at the silhouette edges.
Ink Bleeding into Paper
If your black ink feathers into the paper grain, outline the shape first with a waterproof pen, then fill the center with liquid ink. Cold press paper texture can sometimes cause fuzzy edges.
Step 3: Watercolor Washes
-
Paint the ground:
Dilute your Payne’s Grey or Indigo watercolor with plenty of water. Using the flat brush, dab a loose, cloudy wash at the feet of the couple to simulate a wet pavement reflection. -
Let it bleed:
While the ground wash is still damp, touch the very tips of the feet with a little more concentrated paint so it bleeds slightly downward, anchoring the figures. -
Paint the heart:
Clean your brush thoroughly. Use a vibrant red watercolor or red ink to fill in the floating heart. Keep limits crisp. -
Dry thoroughly:
Wait until both the black ink and the watercolor ground are completely dry before moving to the next step to avoid smudging.
Perfectly Straight Rain
Instead of drawing one long continuous line for rain, lift your pen slightly as you slide it down the ruler. This creates a broken, shimmering line that looks more like falling water than a solid bar.
Step 4: Creating the Rain
-
Draw rain lines:
Using a ruler and your finest pen (0.3mm), draw vertical lines from the top of the paper down towards the ground. Stop the lines abruptly when they hit the umbrella or the figures. -
Vary the lengths:
Don’t make every line the same length. Let some stop higher and others go lower to create a natural, staggered rain effect. -
Add bouncing droplets:
Draw tiny, short dashes or dots bouncing off the top of the umbrella to show the heavy rain hitting the fabric. -
Add heart drips:
Draw a few small, teardrop-shaped drips falling directly underneath the red heart to visually connect it to the rainy scene. -
Final touches:
Erase any visible pencil marks carefully, ensuring no ink smears. Remove the masking tape slowly at a 45-degree angle.
Frame this charming piece in a simple white mat to emphasize the minimalist beauty of the scene

PENCIL GUIDE
Understanding Pencil Grades from H to B
From first sketch to finished drawing — learn pencil grades, line control, and shading techniques.
Explore the Full Guide
Heart-Shaped Balloon Floating Away
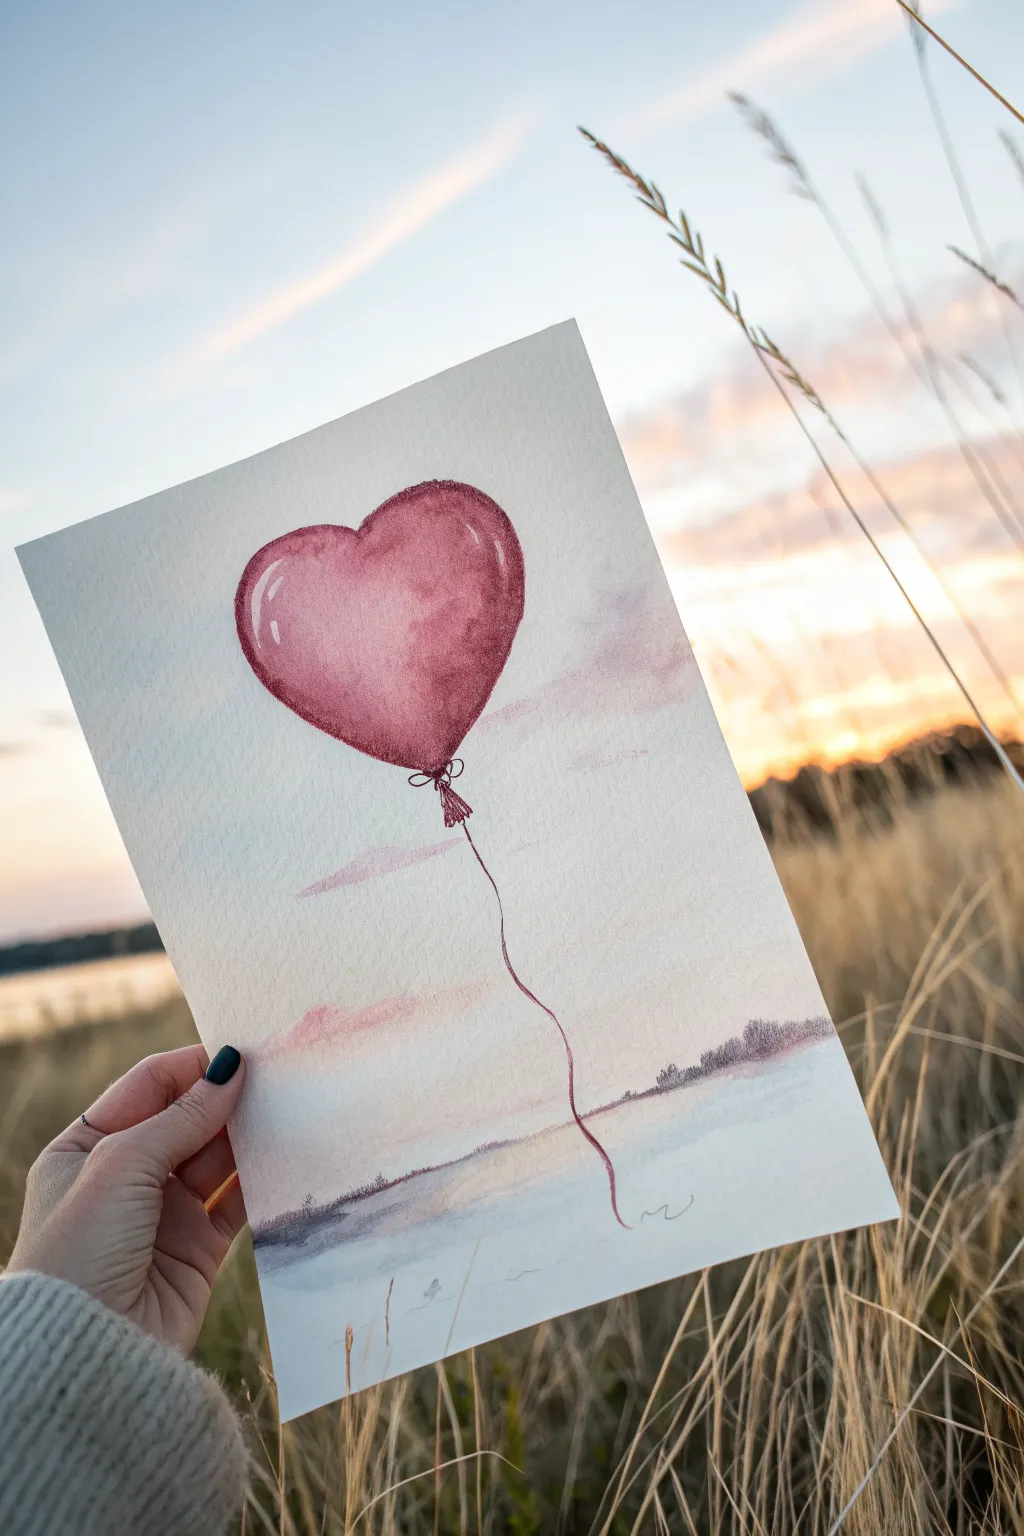
Capture the feeling of love taking flight with this gentle watercolor painting of a heart-shaped balloon drifting over a serene landscape. The soft gradients and simple composition make this an ideal project for beginners wanting to paint something sentimental.
Step-by-Step
Materials
- Cold press watercolor paper (A5 size or greeting card)
- Watercolor paints (Alizarin Crimson, Burnt Umber, Payne’s Grey, a touch of Blue)
- Round watercolor brushes (Size 4 and Size 0/1 for details)
- Pencil (HB) and eraser
- Jar of clean water
- Paper towels
- Mixing palette
Step 1: Sketching the Composition
-
Outline the balloon:
Lightly sketch a large, tilted heart shape in the upper third of your paper. Keep the lines very faint so they won’t show through the translucent paint later. -
Add the balloon details:
Draw the small tied knot at the bottom point of the heart and a gentle, wavy line trailing downward for the string. -
Map the horizon:
Sketch a very low horizon line near the bottom quarter of the page. Indicate a faint line for distant trees or land across the perceived water.
Uneven Wash?
If your balloon color looks blotchy, you likely used too little water. Rewet the whole shape gently and drop in more pigment while wet for a smoother gradient.
Step 2: Painting the Heart Balloon
-
Mix your red tone:
Prepare a watery mix of Alizarin Crimson on your palette. You want a soft, romantic red rather than a bright, jarring solid color. -
Apply the first wash:
Using your size 4 brush, fill the heart shape with clean water first (wet-on-wet technique), then drop in your red paint, letting it bloom and spread naturally. -
Create volume with shading:
While still wet, drop a slightly more concentrated red mix into the bottom right curve of the heart to suggest shadow and roundness. -
Lift out highlights:
Quickly rinse and dry your brush, then use it to lift away paint on the upper left curve to create a ‘shiny’ highlight effect. -
Paint the knot:
With a smaller brush and a slightly darker red mix, carefully paint the little gathered knot at the base of the balloon. -
Draw the string:
Mix a thin, brownish-red color. Using the very tip of your smallest brush (size 0), paint over your pencil line for the string with a shaky, organic hand.
Step 3: Creating the Background Atmosphere
-
Wash the sky:
Mix a very dilute wash of pale blue and pink. Paint horizontal strokes across the sky area, leaving plenty of white paper showing to create a cloudy, airy feel. -
Add soft clouds:
While the sky is damp, dab in a few soft patches of diluted purple or pink near the horizon line to mirror the sunset colors. -
Paint the distant land:
Mix a greyish-purple using Payne’s Grey and a touch of your red. Paint a jagged, uneven strip along the horizon line to represent distant trees or land. -
Soften the land edges:
Before the land strip dries completely, run a clean, damp brush along the bottom edge to blur it slightly into the water area below.
Make it Personal
Once dry, use a fine-liner pen to write a tiny hidden message or date along the curve of the balloon string for a romantic secret detail.
Step 4: Final Touches
-
Define the water:
Add a few very faint horizontal streaks of pale blue or grey in the bottom section to suggest water reflection. -
Deepen the balloon shadow:
Once the balloon is bone dry, I like to add a second glazing of red on the shadow side to make the form really pop three-dimensionally. -
Refine highlights:
If your lifted highlights faded, use a tiny amount of white gouache or a white gel pen to add sharp little reflection lines on the balloon’s curve.
Let your painting dry completely before framing this delicate token of affection
Constellation Heart of Your Anniversary Night
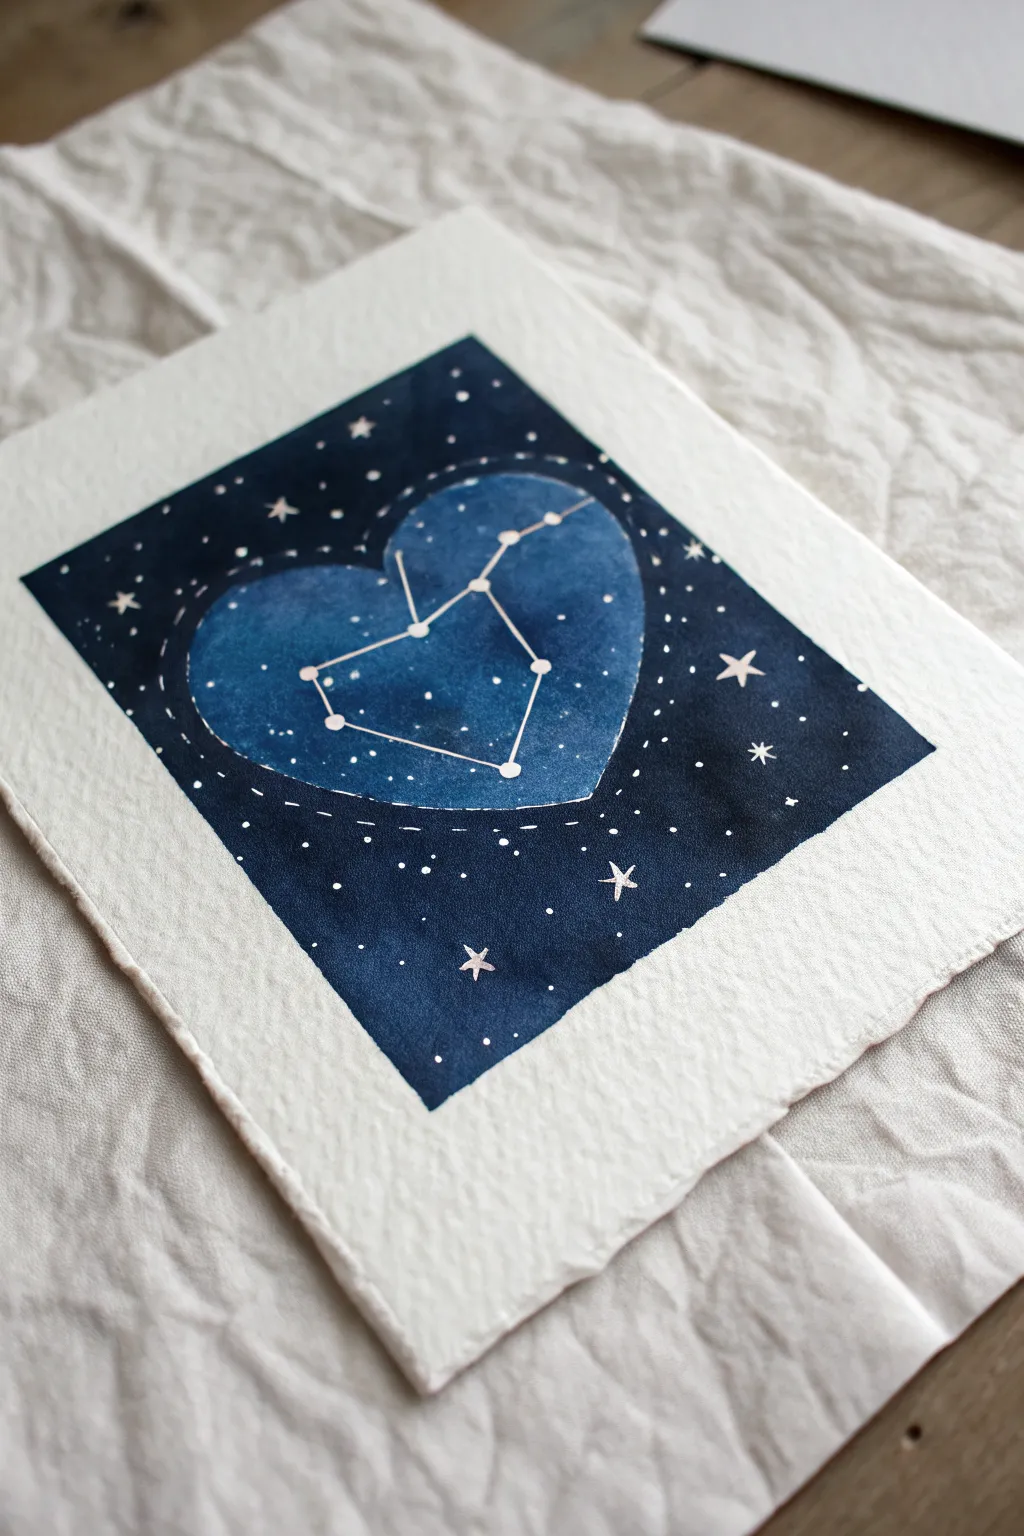
Create a celestial keepsake that captures the stars from a special date. This project uses masking and wet-on-wet watercolor techniques to create a dreamy, deep blue galaxy contained within a heart.
Detailed Instructions
Materials
- Cold press watercolor paper (300 gsm)
- Masking fluid or drawing gum
- Pencil and eraser
- Watercolor paints (Indigo, Prussian Blue, Payne’s Gray)
- White gouache or white gel pen
- Washi tape or masking tape
- Round watercolor brushes (size 6 and size 2)
- Old brush or ruling pen for masking fluid
- Ruler
- Palette and water jars
Step 1: Preparation and Masking
-
Tape the edges:
Center your paper on your workspace. Use painter’s tape or washi tape to mask off a clean rectangular border around the edges of the paper. Press the edges of the tape down firmly to prevent paint bleeding. -
Sketch the heart:
Lightly sketch a large heart in the center of your taped area using a pencil. Keep the lines faint so they can be easily erased later. -
Map the constellation:
Inside the heart, lightly mark the dots for your chosen constellation. Connect them with faint lines to ensure the placement looks balanced. -
Apply masking fluid:
Using an old brush or a ruling pen, apply masking fluid over the constellation stars and the connecting lines. Also, dab small dots of masking fluid randomly inside and outside the heart to create distant stars. -
Let it dry completely:
Allow the masking fluid to dry fully. It should feel gummy and not tacky to the touch. Patience here is key to clean lines.
Protect Your Brush
Masking fluid ruins nice brushes instantly. Coat your brush bristles in dish soap before dipping into the fluid to make cleanup easier, or just use a cheap disposable applicator.
Step 2: Painting the Galaxy
-
Pre-wet the background:
Dip your larger brush in clean water and wet the entire rectangular area inside the tape, going right over your pencil lines and masking fluid. -
Apply the first wash:
Load your brush with a watered-down mix of Prussian Blue. Wash this color over the entire wet area to establish a base tone. -
Darken the outer background:
While the paper is still damp, mix a concentrated Indigo or Payne’s Gray. Carefully paint the area *outside* the heart shape, letting the pigment bleed slightly but trying to keep the heart interior lighter. -
Define the heart edge:
Use a smaller brush with the dark Indigo mix to carefully cut in around the edge of your heart outline. This contrast is what makes the shape pop. -
Add depth to the heart:
Add a slightly darker blue to the edges inside the heart, blending it inward, but leave the center of the heart lighter to create a glowing effect. -
Let the paint dry:
Allow the painting to dry partially. It should lose its glossy sheen but feel cool to the touch. -
Intensify the background:
If the background dried too light, apply a second layer of Indigo to the area surrounding the heart to achieve that deep, midnight sky look. -
Full drying time:
Let the painting dry completely. Use a hairdryer on a low setting if you need to speed up the process.
Metallic Magic
Mix a tiny amount of metallic silver or gold watercolor into your white gouache for the constellation lines. It adds a subtle shimmer when the light hits the artwork.
Step 3: Finishing Touches
-
Remove masking fluid:
Gently rub your finger or a rubber cement pick-up tool over the dried masking fluid to peel it away, revealing the crisp white paper underneath. -
Enhance the stars:
If any stars aren’t bright enough, touch them up with a tiny dot of white gouache or a white gel pen. -
Add larger stars:
Paint a few larger, four-pointed ‘flare’ stars in the dark background area using the white gouache to add variety to the night sky. -
Connect the constellation:
Retrace the lines connecting your constellation stars with the white gel pen or a fine brush and white gouache to make them stand out clearly. -
Remove the tape:
Slowly peel away the border tape at a 45-degree angle, pulling away from the artwork to ensure a clean, crisp edge.
Frame this celestial tribute to capture a specific moment in time forever


“You + Me” Split Canvas Diptych
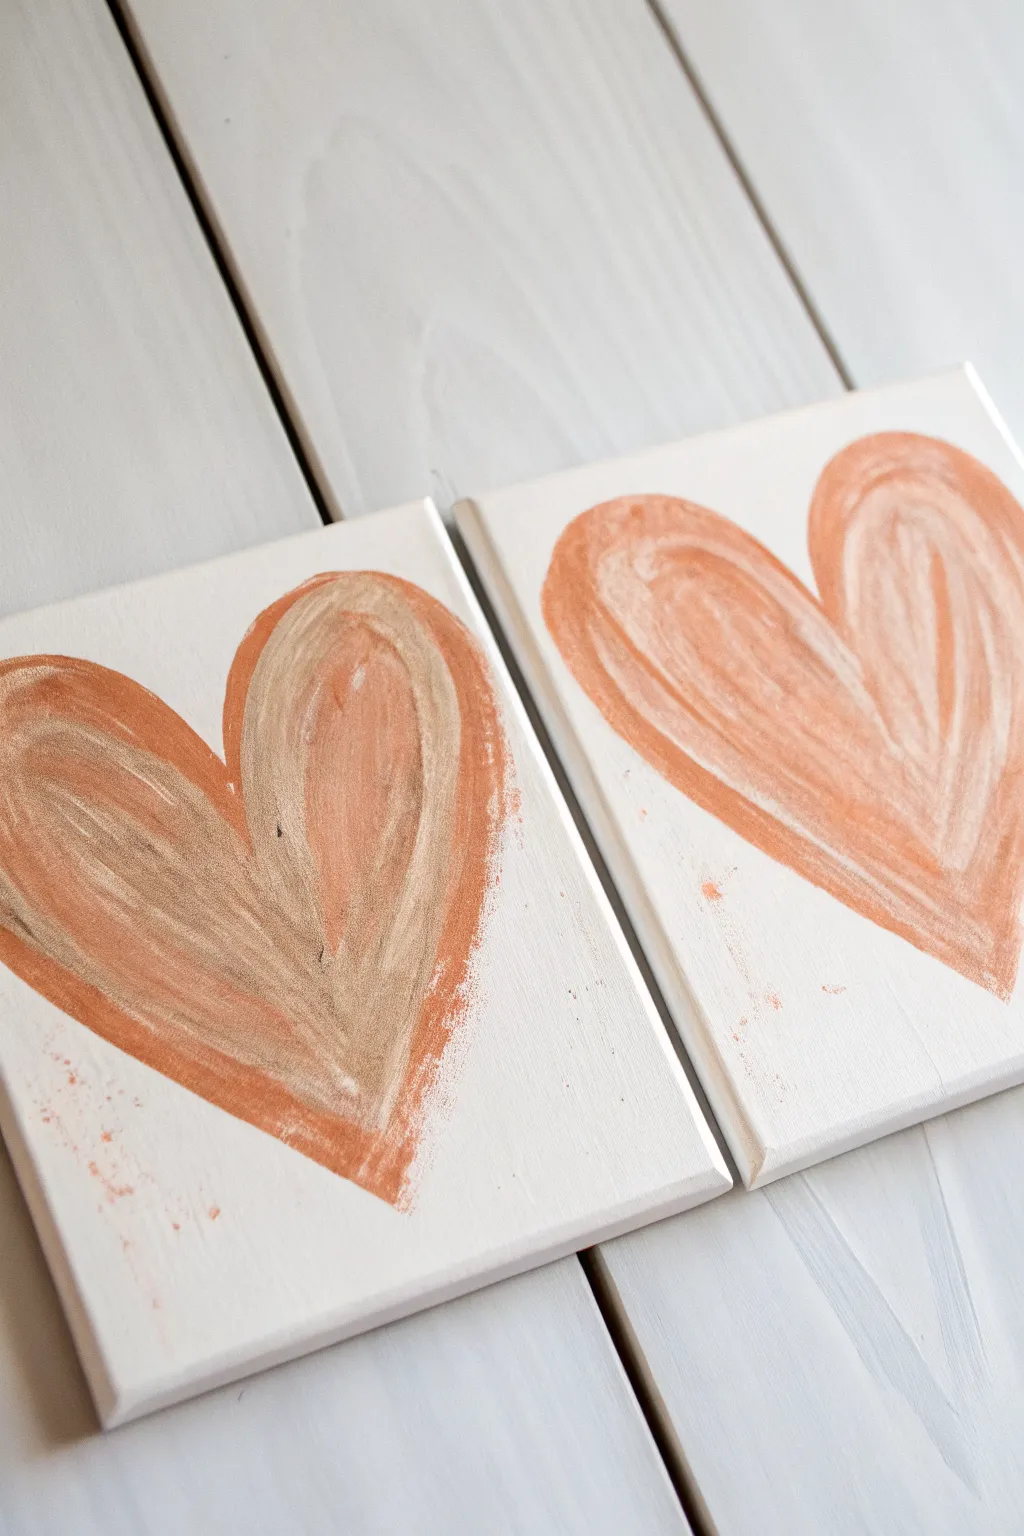
This charming project creates a unified statement piece using two separate canvases, symbolizing connection and togetherness. The loose, painterly strokes blend warm copper and coral tones against a stark white background for a modern, minimalist look.
Step-by-Step
Materials
- Two small square canvases (e.g., 6×6 or 8×8 inches)
- White acrylic gesso or white acrylic paint
- Metallic copper or bronze acrylic paint
- Coral or soft orange acrylic paint
- Flat paintbrush (approx. 1 inch width)
- Small round paintbrush (optional for touch-ups)
- Pencil
- Paper plate or palette
- Painter’s tape or scrap paper (for table protection)
Step 1: Preparation & Base Coat
-
Prime the Surface:
Even if your canvases came pre-primed, apply a fresh coat of white gesso or white acrylic paint to both. This ensures a clean, bright background and helps the metallic paint glide smoothly. -
Position the Diptych:
Once the base coat is fully dry, lay the two canvases side-by-side on a flat surface. Push them together so they are touching; treat them as if they are one single long canvas for the sketching phase. -
Sketch the Flow:
Lightly sketch the vague outline of two hearts using a pencil. Don’t worry about perfection. Draw one heart on the left canvas and one on the right, angling them slightly toward each other as if they are interacting.
Step 2: Painting the Underlayer
-
Mix Your Coral Tone:
Squeeze a small amount of coral or soft orange paint onto your palette. If the color feels too vibrant, calm it down by mixing in a tiny drop of white or tan. -
First Broad Strokes:
Using your flat brush, paint the initial shape of the hearts. Use wide, sweeping motions that follow the curve of the heart lobes. -
Keep Edges Rough:
Don’t try to make the edges crisp. The charm of this piece lies in the visible brush texture, so allow the bristles to leave a slightly ragged or dry-brush effect at the borders. -
Create Depth:
While the paint is still wet, add a little extra pressure in the center of the heart shapes to push the paint outward, creating lighter, more transparent areas in the middle. -
Dry Time:
Let this coral layer dry completely. Metallic paints sit better on top of dry matte layers rather than mixing into wet ones.
Dry Brush Technique
Wipe most of the paint off your brush before applying the final metallic layer. This ‘dry brush’ method lets the texture of the canvas and the coral color peek through beautifully.
Step 3: Adding the Metallic Sheen
-
Prepare the Copper:
Load your flat brush with the metallic copper paint. You don’t need to dilute it; usually, the thicker consistency works well for texture. -
Layering Over Coral:
Apply the metallic paint directly over your coral shapes, but don’t cover them entirely. Leave peeks of the orange color showing through at the edges or in the swirls. -
Directional Strokes:
Follow the same sweeping curves you used for the base layer. Start from the top curve of the heart and swoop down toward the point. -
Adding Contrast:
I like to add a second, heavier layer of copper on just one side of each heart lobe. This creates a subtle shadow effect and adds dimension. -
The Center Swirl:
Use the edge of your brush to define the inner cleft of the heart, pulling streaks of white (or lighter metallic) through the wet copper to create highlights.
Date Night Twist
Make this a collaborative date night activity. You paint the left canvas while your partner paints the right, trying to match the style and join the hearts in the middle.
Step 4: Finishing Polish
-
Spatter Effect:
Water down a tiny bit of the coral or copper paint on your palette until it is inky. Dip a brush in it. -
Flicking the Paint:
Gently tap the handle of the brush over the canvases to create tiny, random splatters around the hearts. This adds energy and breaks up the white space. -
Paint the Sides:
Decide if you want a gallery look. If so, paint the sides of the canvas white to match the front, or wrap the heart design around the edges. -
Final Cure:
Allow the canvases to dry undisturbed overnight. Metallic acrylics often take a little longer to cure fully than standard matte colors.
Hang these canvases with a small gap between them to emphasize the connection between the two halves
Minimal Heartbeat Line With a Tiny Heart

Capture the rhythm of your love with this elegant and understated heartbeat line drawing. Using textured paper and a fine liner, this project creates a sophisticated piece that speaks volumes through simplicity.
Step-by-Step
Materials
- Heavyweight watercolor or cotton rag paper (deckle edge preferred)
- Black fine liner pen (size 0.5 or 0.8)
- Pencil (HB or 2H)
- Eraser
- Ruler
Step 1: Preparation and Sketching
-
Prepare the paper:
Start with a piece of high-quality watercolor or cotton rag paper. If your paper doesn’t have a deckle edge and you want that torn look, gently fold and tear the edges against a ruler rather than cutting them. -
Mark the baseline:
Lay your ruler horizontally across the center of the paper. Lightly mark a very faint horizontal guideline with your pencil to ensure your heartbeat rhythm stays level. -
Outline the center heart:
Find the approximate center of your horizontal line. Lightly sketch a small, simple heart shape here. Making the heart slightly tilted or asymmetric can add charm, but keep it centered on your guideline. -
Sketch the left rhythm:
To the left of the heart, lightly sketch the beginning of the EKG line. Start flat, then add a small upward bump, followed by a sharp, tall spike upward and a deep spike downward. -
Connect to the heart:
Draw a connecting line from the bottom of your last downward spike directly into the left side of your heart sketch. This makes the heart look like part of the continuous electrical signal. -
Sketch the right rhythm:
On the right side of the heart, sketch the continuing line. Start with a line coming out of the heart’s right side, leading into a tall upward spike and a sharp downward return. -
Finish the sequence:
Add a few smaller, diminishing bumps after the main spike to simulate the rhythm fading out, ending with a straight horizontal tail. -
Review proportionality:
Step back and look at your pencil sketch. Ensure the spikes on the left and right differ slightly in height to look organic, rather than perfectly mirrored.
Jittery Lines?
If your hand shakes, don’t worry. Slight wobbles make the heartbeat look more organic and real. Just keep your speed moderate—too slow causes more shakes.
Step 2: Inking and Finalizing
-
Test your pen:
Before touching the final paper, test your black fine liner on a scrap piece of the same paper type to ensure the ink flows smoothly and doesn’t bleed excessively into the paper fibers. -
Trace the heart first:
Begin inking by carefully tracing your central heart shape. Use a confident, steady hand, as hesitations can create shaky lines. -
Ink the left side:
Start from the far left edge of your line. Trace over your pencil marks, maintaining consistent pressure. When you reach the spikes, try to keep the corners relatively sharp rather than rounded. -
Connect the left section:
Draw the line straight into the contour of the heart you already inked. Stop cleanly where the line meets the heart. -
Ink the right side:
Resume the line from the opposite side of the heart. Draw the tall spike and the subsequent smaller waves with a fluid motion. -
Refine the line weight:
If your initial line feels too thin, go over it a second time very carefully to thicken it slightly, or switch to a slightly thicker pen nib (like an 0.8) to give the heartbeat more presence. -
Let the ink cure:
Allow the ink to dry completely. Since textured paper can hold ink in its grooves, I usually wait at least 15 minutes to be safe. -
Erase guidelines:
Gently erase your pencil sketch and the horizontal guideline. Hold the paper taut with one hand while erasing to prevent crinkling the textured sheet.
Red Tint Option
Instead of black, outline the central heart with a deep red fine liner or fill it in with watercolor for a subtle pop of romantic color.
Now you have a timeless symbol of affection ready to be framed or gifted


Have a question or want to share your own experience? I'd love to hear from you in the comments below!