
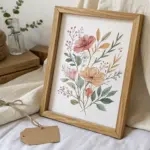
When I need a quick, feel-good sketch that also makes an adorable handmade present, I almost always reach for cute gift drawings. Here are my favorite kawaii gift ideas you can draw fast, personalize easily, and turn into something someone will actually want to keep.
Kawaii Gift Box With a Face
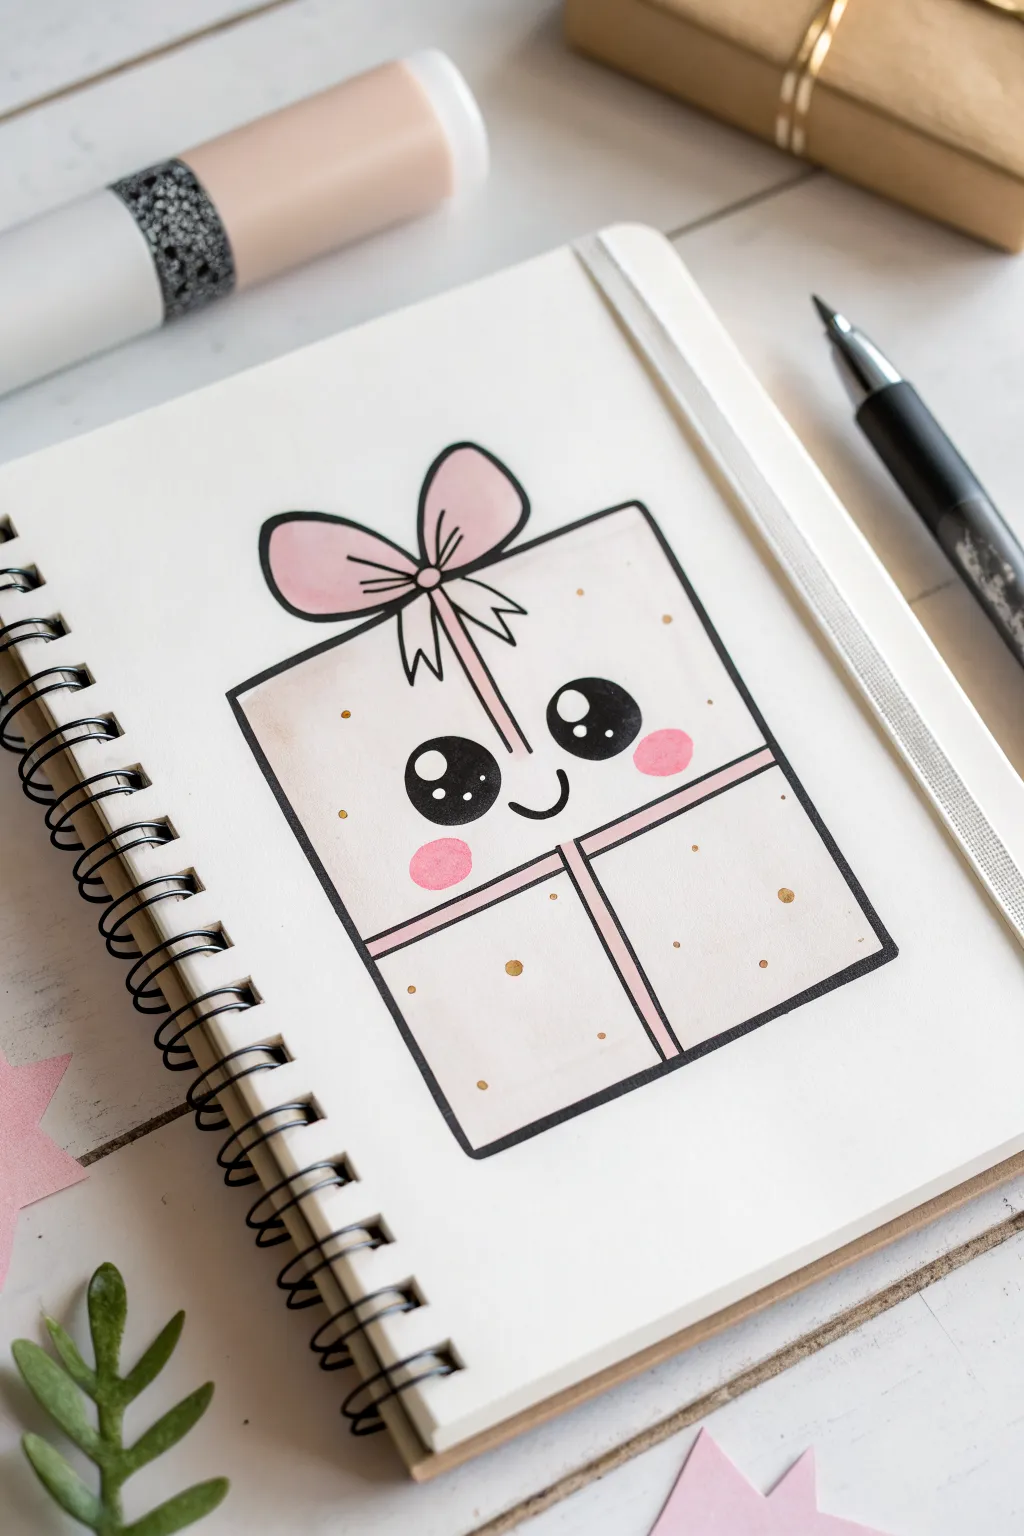
Brighten up your sketchbook or holiday cards with this adorable gift box character. Featuring big, sparkling eyes and soft pink accents, this simple illustration is the perfect way to practice cute, kawaii-style art.
How-To Guide
Materials
- Sketchbook or drawing paper
- Pencil and eraser
- Black fine liner pen (0.5mm or 0.8mm)
- Thick black marker (or brush pen)
- Light pink marker (alcohol or water-based)
- Salmon or blush pink marker
- Gold or metallic gel pen (optional for dots)
- White gel pen
Step 1: Basic Shape & Outline
-
Map out the box:
Start by lightly sketching a large square or slightly vertical rectangle in the center of your page with a pencil. This will be the main body of your gift box. -
Add the bow guides:
At the top center of the square, sketch a small circle for the knot. extend two large, rounded loops outward for the bow, like butterfly wings. -
Draw the ribbon lines:
From the center knot, draw two vertical lines going straight down the middle of the box to the bottom edge. Then, draw two horizontal lines across the middle to create the cross-tie look. -
Sketch the face:
In the upper half of the box, lightly pencil in two large circles for eyes. Place a small, curved ‘U’ shape exactly between them for the smile. Ensure the face sits comfortably above the horizontal ribbon line.
Highlight Hack
If you accidentally color over the eye highlights, don’t worry! Use a white gel pen or a dot of white acrylic paint to add the sparkles back on top of the black ink.
Step 2: Inking the Drawing
-
Outline the box:
Using your medium-thickness black fine liner, trace over the outer square of the box. Create clean, straight lines, but keep the corners slightly soft or rounded for a cuter look. -
Define the bow:
Ink the bow loops carefully. Add a few small creases near the center knot to give the fabric some volume. Don’t forget the loose ribbon ends hanging down from the knot. -
Ink the ribbon stripes:
Trace the vertical and horizontal ribbon lines. These lines should stop when they hit the outer edge of the box or intersected with the bow. -
Draw the heavy outlines:
For a bolder look, you can re-trace the very outer perimeter of the box with a thicker black marker to make it pop off the page.
Drawing Straight Lines
Shaky hand? Rotate your sketchbook so your hand pulls the pen naturally toward your body rather than pushing away. It creates much straighter lines without a ruler.
Step 3: Adding the Kawaii Face
-
Fill the eyes:
Before filling the eyes with black, draw two small circles inside each eye—one larger at the top and a smaller one at the bottom. These are the highlights. -
Darken the pupils:
Carefully color the rest of the eye with your black marker, avoiding those two highlight circles so they stay pure white. -
Ink the mouth:
Trace the small smile with a steady hand. Keep the line weight fairly thin to maintain a delicate expression.
Step 4: Color & Details
-
Color the ribbons:
Take your light pink marker and fill in the vertical and horizontal ribbon stripes. Use long, even strokes to minimize streakiness. -
Color the bow:
Using the same light pink marker, color in the large bow loops on top. If you want depth, add a second layer of ink right near the knot for shading. -
Add rosy cheeks:
Switch to your salmon or blush pink marker. Draw small ovals or circles just underneath and slightly outside each eye to give the box rosy cheeks. -
Base shadow:
I like to add a very subtle shadow to the white box itself. Use a very pale grey or beige marker to add a thin line of shadow along the left and bottom edges inside the box outline. -
Polka dot pattern:
scatter small dots irregularly across the white parts of the box. Use a gold metalic pen or a beige marker for a festive, wrapping-paper texture. -
Final Cleanup:
Once the ink is completely dry, erase any visible pencil sketch lines to leave your drawing crisp and clean.
Now you have a charming little gift box character ready to decorate your journal pages
Cute Gift Tag Doodle Set
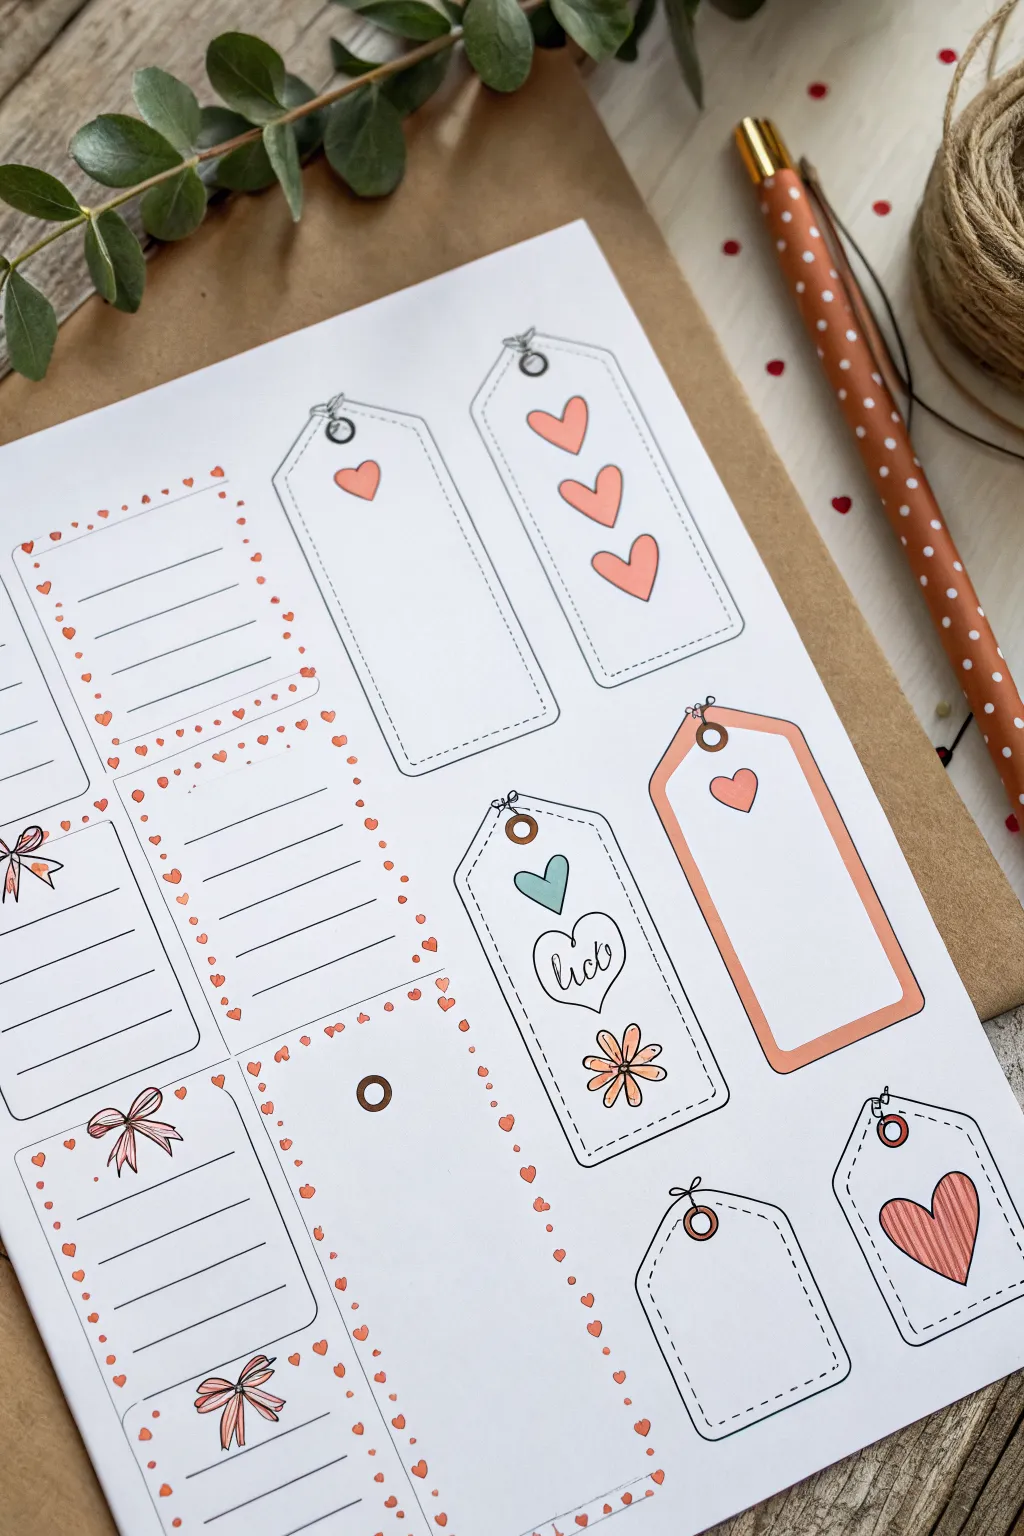
These charming gift tag illustrations add a personal, handmade touch to your presents without needing scissors or string just yet. By drawing the tags directly onto paper, you create a customizable sticker sheet aesthetic that is perfect for bullet journals or planning out real tag designs.
Detailed Instructions
Materials
- White smooth cardstock or thick printer paper
- Fine-liner pen (black, 0.3mm or 0.5mm)
- Pencil and eraser
- Ruler
- Colored markers or brush pens (peach/coral, teal/mint, pink)
- Optional: White gel pen for highlights
Step 1: Drafting the Layout
-
Plan your composition:
Start by lightly sketching the layout of your tags with a pencil. Aim for a mix of rectangular shapes for lists and classic luggage-tag shapes with angled top corners. -
Draw the rectangular frames:
Use a ruler to pencil in the straight-edged rectangular boxes on the left side of your page. These will serve as ‘to-do’ list style tags or larger message areas. -
Sketch the luggage tags:
Sketch the classic tag shapes on the right. Draw a rectangle first, then create a triangle at the top center to guide your angled cuts, ensuring the top point is centered. -
Add reinforcement circles:
Near the top of each luggage tag shape, sketch a small circle to represent the hole reinforcement. For the rectangular doodle frames, you can skip this step.
Smudge Prevention
Patience is key. If your fine-liner smudges when you color over it, switch the order: color your shapes first, let them dry, and then draw your black outlines on top.
Step 2: Inking the Outlines
-
Ink the main shapes:
Using your black fine-liner, trace over your pencil lines. For a cute, illustrative look, you don’t need to use a ruler here; a slightly wobbly hand-drawn line adds character. -
Create detailed dashed lines:
Inside several of the tags, draw a second border using a dashed line. Keep this line about 3mm inside the main outline to look like stitching. -
Draw the punch holes:
Go over the small circles at the top of the tags. Draw a tinier circle inside to represent the actual hole, and darken the space between the two circles to create depth. -
Add simple strings:
At the very top of each tag hole, doodle a tiny loop of string or a small knot to make the tags look like they are ready to be tied.
Step 3: Adding Decorative Elements
-
Draw list lines:
On the rectangular tags, use your ruler or freehand to draw horizontal lines for writing messages. Leave space at the top for a header or decorative border. -
Add border details:
I love adding tiny hearts around the perimeter of the rectangular boxes. Simply draw small, evenly spaced hearts all along the outer edge to create a sweet frame. -
Sketch central motifs:
inside the luggage tags, draw your main icons. Try a stack of three hearts on one, a single large heart on another, and a ‘love’ lettering piece surrounded by a flower on a third. -
Add bows:
On the lined rectangular tags, draw a cute ribbon bow at the top center or bottom to break up the lines.
Make it a Sticker
Draw these directly onto full-sheet sticker paper. Once you’re done, you can cut them out individually and use them as peel-and-stick labels for actual gifts.
Step 4: Coloring and Finishing
-
Erase pencil guides:
Once the black ink is completely dry—give it a minute to be safe—gently erase all your underlying pencil sketches. -
Color the hearts:
Take your coral or peach marker and fill in the hearts. For the stack of three hearts, you can graduate the color or keep them uniform. -
Add accent colors:
Use a teal or mint marker for variety, coloring in specific details like a single heart in a cluster or the center of a flower. -
Fill the tag borders:
For the boldest tag, fill the entire border area (between the outer line and the inner shape) with your coral marker to make the white drawing pop. -
Stripe details:
On the large heart at the bottom right, use your fine-liner to add vertical hatching lines inside the heart for a textured look before or after coloring. -
Final touches:
Check for any empty spots. You can add tiny scattered hearts/dots falling around the tags on the white background to fill the negative space.
You now have a beautiful sheet of hand-drawn tags ready to adorn your next gift or journal spread


Patterned Wrapping Paper Swatches
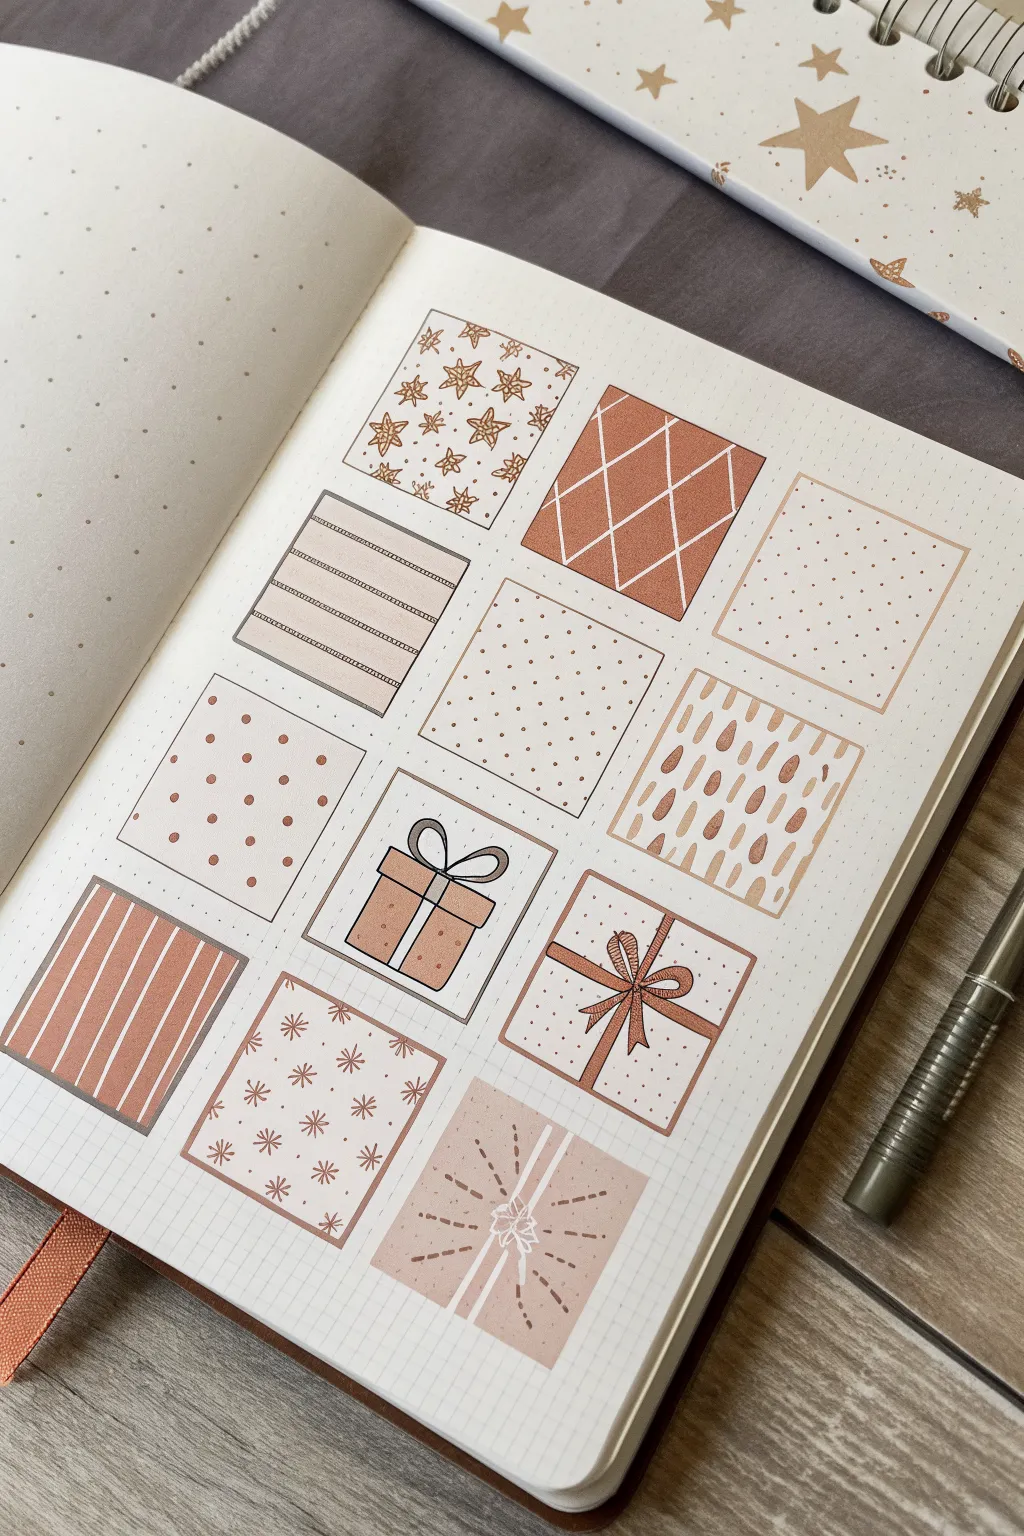
Create a cozy, minimalist compilation of wrapping paper designs and gift boxes in your bullet journal. This satisfying grid layout uses a harmonious palette of warm browns and crisp lines to explore different festive textures.
Step-by-Step Guide
Materials
- Dot-grid notebook or journal
- Pencil and eraser
- Ruler
- Fine-point black drawing pen (0.3mm or 0.5mm)
- Light brown or tan brush pen/marker
- Metallic copper or bronze gel pen (optional for accents)
Step 1: Setting up the Grid
-
Draft the layout:
Begin by using a pencil and ruler to map out a 3×4 grid of squares on your dot-grid page. Leave a uniform gap (about two dot spaces) between each square to keep the layout breathable. -
Ink the frames:
Once you are happy with the spacing, trace over your pencil squares with a fine-point black pen. Use your ruler to ensure crisp, clean edges for each box.
Ink Smearing?
If your white gel pen drags the marker color underneath, wait longer for the base layer to cure, or scribble the gel pen on scrap paper to clear the nib.
Step 2: Row 1: Stars, Plaid, and Dots
-
Draw the star pattern:
In the top left square, draw scattered five-pointed stars using a brown fine-liner. Fill the negative space with tiny dots to create density. -
Create the diamond lattice:
For the middle square, color the entire background with your tan marker. Once dry, use a white gel pen to draw diagonal intersecting lines, forming a large diamond grid. -
Stipple the minimalist dots:
In the top right square, keep the background white. Use a brown pen to place very small, evenly spaced dots across the entire area for a classic Swiss-dot look.
Step 3: Row 2: Stripes, Speckles, and Dashes
-
Stripe the block:
In the first square of the second row, draw horizontal bands. Alternate between thin outlines and thicker bands filled with tan marker. -
Add confetti dots:
Move to the middle square. Use your tan marker to make small dots, but keep them slightly larger than the previous stippling pattern to create a confetti effect. -
Paint organic dashes:
In the right-hand square, use the brush tip of your marker to create vertical, organic dashes. Vary the pressure slightly so they look like hand-painted brushstrokes.
Pattern Variations
Try swapping the tan marker for metallic gold or silver paint pens. The shimmer adds a festive dimension that catches the light beautifully.
Step 4: Row 3: Bold Dots, Ribbon Box, and Brushstrokes
-
Create polka dots:
In the left square, draw larger circles using the tan marker. Arrange them in a staggered offset pattern rather than a straight grid for visual interest. -
Outline the first gift:
For the middle square, draw a smaller internal square to represent a gift box. Add a vertical stripe down the center for the ribbon and sketch a two-loop bow on top with black ink. -
Color the gift:
Fill the gift box with the tan marker, carefully avoiding the ribbon stripe if you want it white, or coloring it all in to add details later. -
Draw the vertical stripes:
On the third square, fill the background solid tan. Use your black pen or white gel pen to add vertical pinstripes over the color.
Step 5: Row 4: Snowflakes and Finishing Gifts
-
Draw the asterisks:
In the bottom-left square, use your brown fine-liner to draw eight-pointed asterisks or simple snowflake shapes evenly across the white space. -
Sketch the detailed bow:
In the middle square, draw a large cross shape for ribbon. At the intersection, sketch a fluffy, multi-looped bow with black ink, adding shading lines inside the loops for depth. -
Add the final flat lay gift:
For the final square, color a tan background. Use a white gel pen to draw a cross-ribbon and a delicate, thin bow in the center. -
Embellish patterns:
I like to add tiny white accents to the tan gift box in the final square, creating a starburst pattern radiating from the bow. -
Erase guidelines:
Wait for all ink to be completely dry—especially the heavy marker areas—before gently erasing any remaining pencil marks to keep the page smudge-free.
Now you have a charming reference page for all your future holiday doodle needs


Stack of Cute Presents
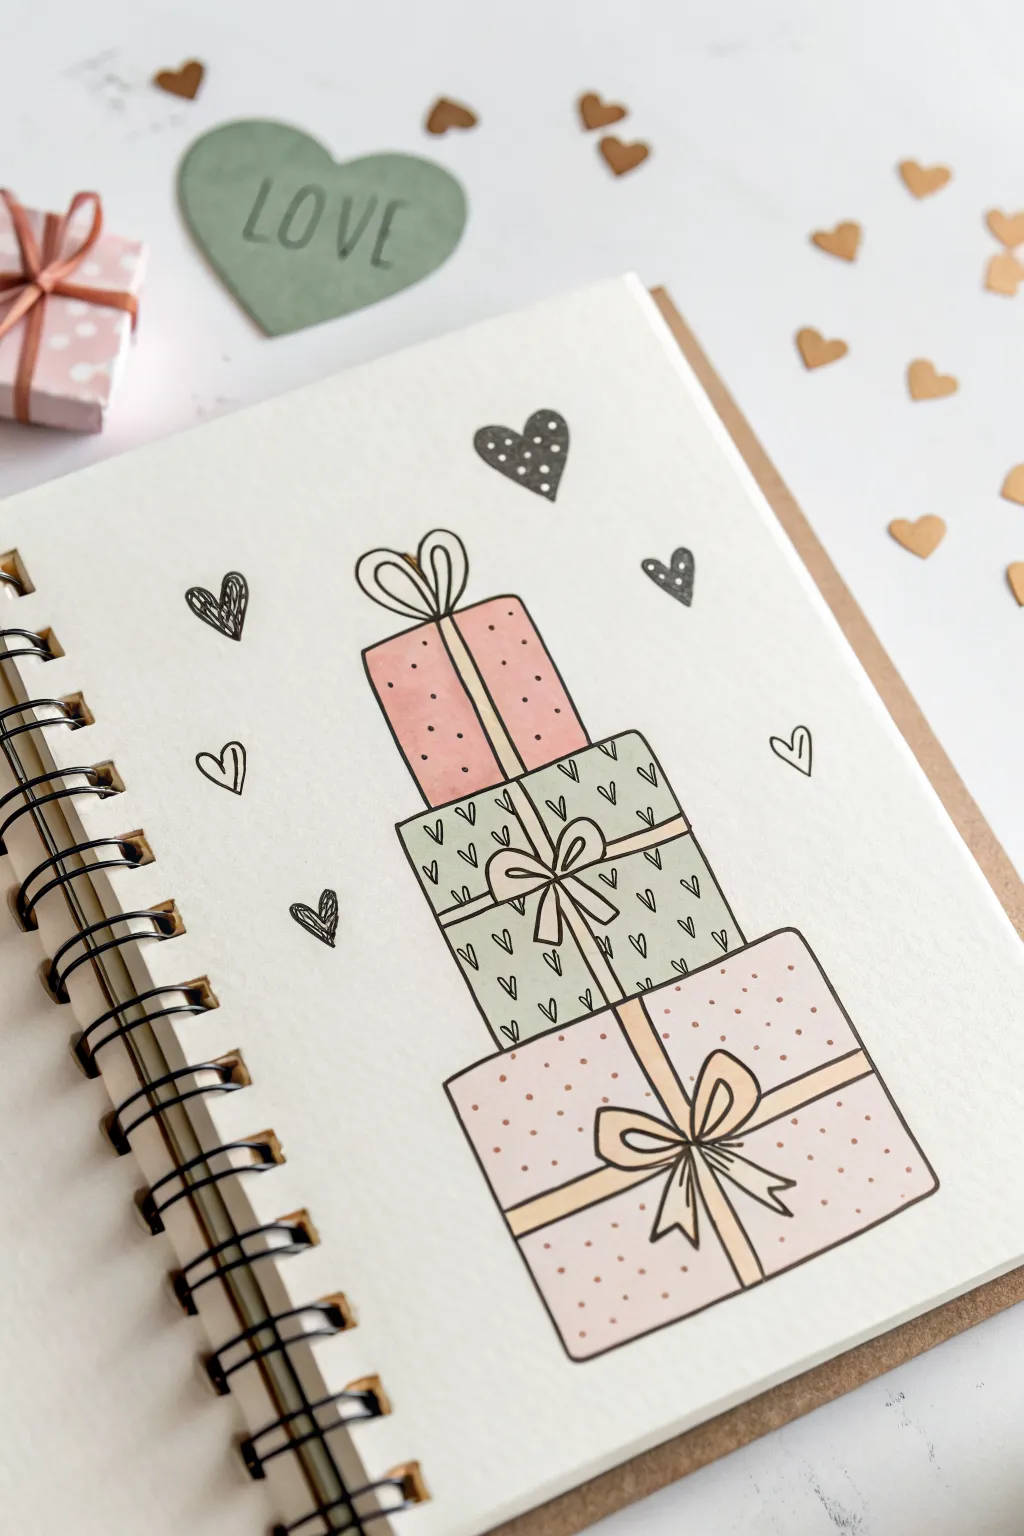
Learn to draw this charming tower of presents, perfect for adding a festive touch to your bullet journal or greeting cards. This tutorial guides you through sketching a perfectly balanced stack of boxes adorned with sweet patterns and simple bows.
Step-by-Step Tutorial
Materials
- Sketchbook or high-quality drawing paper
- Pencil (HB or H)
- Eraser
- Fine liner pen (0.3mm or 0.5mm, black)
- Colored markers or brush pens (pink, sage green, beige/warm grey)
- Ruler (optional)
Step 1: Sketching the Structure
-
Define the base box:
Begin near the bottom of your page by lightly sketching a large, slightly wide rectangle. This will be the foundation for your stack, so make sure it’s centered. -
Add the middle box:
directly on top of the first rectangle, sketch a second box. Make this one slightly narrower and shorter than the base box to create a tapered look. -
Top the stack:
Sketch the final, smallest rectangle on the very top. It should be taller and narrower than the others, resembling a jewelry box shape. -
Sketch the ribbon paths:
Draw vertical lines down the center of each box to mark where the ribbons will sit. For the bottom and middle boxes, add horizontal lines crossing the vertical ones to create the classic gift-wrap cross shape.
Uneven Stack?
If your boxes look lopsided, lightly draw a vertical centerline before starting. Build your rectangles outward from this line to ensure perfect symmetry.
Step 2: Inking the Outlines
-
Outline the boxes:
Using your fine liner pen, carefully trace over the outer edges of your penciled rectangles. Try to keep your hand steady for crisp, clean lines. -
Draw the bows:
At the intersection of your ribbon lines on the bottom two boxes, draw a big, looped bow. Start with the center knot, then add the two loops and the tails hanging down. For the top box, place the bow right on the upper edge. -
Define the ribbon strips:
Ink the lines for the ribbons. Instead of single lines, draw double parallel lines to give the ribbon some width. Make sure the lines stop when they hit the bow loops so they look like they are tucked underneath. -
Erase pencil marks:
Once the ink is completely dry—I usually give it a full minute just to be safe—gently erase all your underlying pencil sketches for a tidy look.
Step 3: Adding Color & Pattern
-
Color the bottom box:
Take a soft pink marker and fill in the bottom box. Work carefully around the ribbon strips and the bow so those areas remain white for now. -
Color the middle box:
Switch to a sage green marker for the middle tier. Use smooth strokes in one direction to avoid streakiness. -
Color the top box:
Use a slightly darker pink or a coral shade for the top box to add a bit of contrast while keeping the color palette cohesive. -
Fill in the ribbons:
Use a beige or warm cream color to fill in all the ribbon strips and the bows. This neutral tone helps ground the pastel colors of the wrapping paper.
Add Dimension
Use a light grey marker to add a faint shadow on one side of the stack and underneath the bows. This makes the drawing pop off the page.
Step 4: Final Details
-
Add polka dots:
On the bottom and top pink boxes, use your fine liner or a slightly darker pink pen to add small, scattered polka dots. -
Draw heart patterns:
On the green middle box, draw tiny, simple heart shapes in rows or scattered randomly. Keep them delicate to match the scale of the drawing. -
Embellish the background:
Draw floating hearts around the stack—some solid black, some with scribbled interiors, and some just outlines—to fill the white space. -
Highlight the bows:
Add tiny detail lines inside the bow loops and on the knot with your thin black pen to show creases and give the fabric some dimension.
Now you have a delightful stack of gifts ready to brighten up your notebook page
BRUSH GUIDE
The Right Brush for Every Stroke
From clean lines to bold texture — master brush choice, stroke control, and essential techniques.
Explore the Full Guide
Mini Gift Doodles for Card Borders
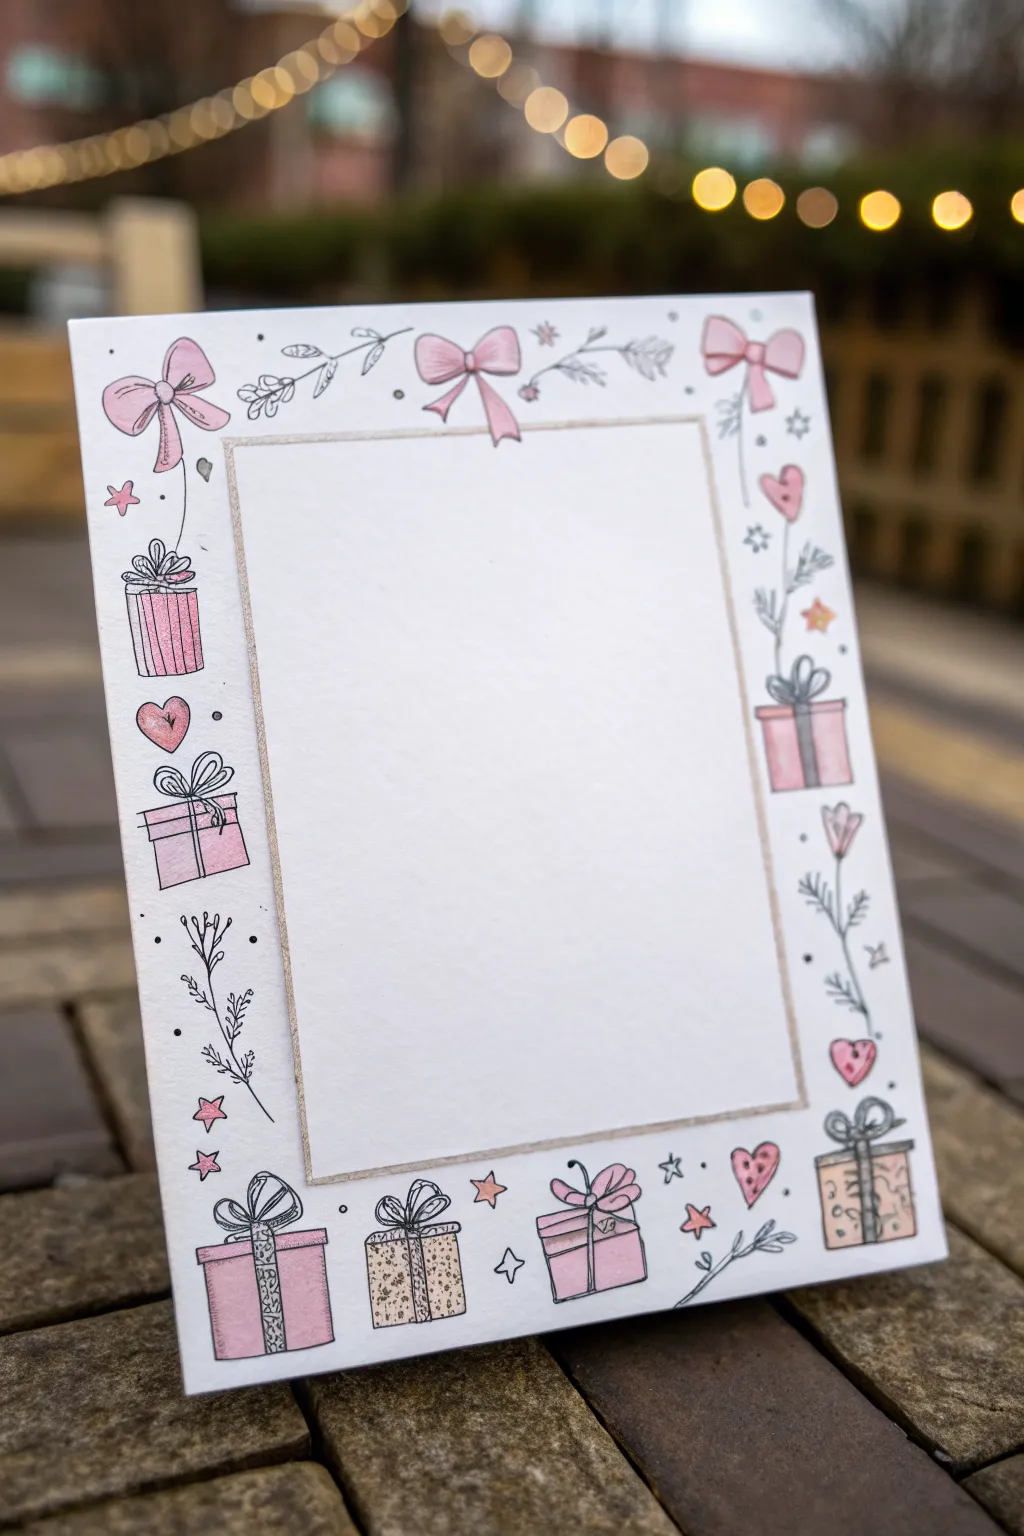
Transform a plain card into a charming keepsake with this hand-drawn border filled with sweet packages, bows, and festive doodles. The delicate pink palette and simple line work create a clean, elegant look perfect for any celebration.
Step-by-Step
Materials
- A5 or A6 heavy cardstock (white or cream)
- Pencil (HB or H for light sketching)
- Fine liner pen (black, 0.1mm and 0.3mm)
- Ruler
- Eraser
- Colored pencils or light markers (shades of dusty pink and gold/beige)
- Gold or metallic gel pen
Step 1: Setting the Structure
-
Define the drawing area:
Begin by lightly tracing a rectangular frame in the center of your cardstock using a pencil and ruler. Leave a generous margin of about 1.5 inches around the edge for your doodle border. -
Mark the corners:
Sketch light placement circles or squares in the four corners and the midpoint of each side. This helps ensure your gift boxes are evenly distributed before you start detailing.
Smudge Control
If your ink smears when coloring, ensure you are using waterproof pens. Alternatively, color the pencil sections first and add the black outlines last.
Step 2: Sketching the Elements
-
Draw the top center:
Start at the top center with a large sketched bow. Give it soft, looping ribbons that trail slightly to the left and right, acting as a connector for the other elements. -
Sketch the bottom row:
Along the bottom edge, lightly sketch four distinct gift boxes. vary their shapes—make some tall, some square, and give one a round lid to add visual interest. -
Fill the side columns:
Draw three to four vertical elements on the left and right sides. Mix standard square gift boxes with floating elements like hearts or botanical sprigs to keep the border feeling airy. -
Add connecting filler:
In the gaps between your main boxes, lightly sketch small stars, dots, and simple leafy vines. These tiny details prevent the border from looking too rigid. -
Detail the ribbons:
Go back to each gift box and sketch unique ribbon styles. Try cross-hatching patterns, simple stripes, or oversized fluffy bows on top of the packages.
Level Up: 3D Pop
Use foam squares to adhere cut-out paper bows over the drawn ones. This adds a tangible, 3D element that makes the card feel extra special.
Step 3: Inking the Design
-
Outline the boxes:
Using your 0.3mm fine liner, carefully trace the main outlines of the gift boxes. Keep your hand relaxed to achieve that charming, slightly imperfect hand-drawn look. -
Ink the bows and ribbons:
Switch to a 0.1mm pen to trace the delicate ribbons and bows. The thinner line weight will make these elements look lighter and more fabric-like. -
draw the botanical details:
Use the finer pen to ink the sprigs, vines, and leaves. Add tiny veins to the leaves and small distinct petals to any floral doodles. -
Add decorative patterns:
Ink the patterns inside the ribbons or boxes, such as vertical stripes or speckles. I like to add tiny stitching lines on some hearts for a crafty texture. -
Ink the confetti:
Go over the small stars, dots, and confetti shapes scattered in the background. Ensure these are distributed randomly to fill empty white space. -
Erase pencil marks:
Wait until the ink is completely dry to avoid smudging, then gently erase all your underlying pencil sketches until the paper is clean.
Step 4: Adding Color and Finish
-
Color the pink elements:
Take a dusty pink colored pencil and fill in selected boxes, bows, and hearts. Use a light hand for a soft, pastel wash rather than a heavy, saturated block of color. -
Add texture with shading:
Deepen the pink shade slightly on the sides of the boxes and under the bow loops to create a sense of dimension and shadow. -
Introduce gold accents:
Use a beige or metallic gold pencil to color specific boxes or ribbon strips. This breaks up the pink and adds a touch of elegance to the layout. -
Highlight the inner frame:
Trace over your initial central rectangle with a metallic gel pen or gold pencil to create a defined border for your future text or photo. -
Final decorative touches:
Add tiny finishing dots using the metallic pen near the star clusters to make the border sparkle slightly when it catches the light.
Now you have a beautifully framed space ready for a heartfelt message or a favorite photograph
Tiny Gift in a Jar Drawing
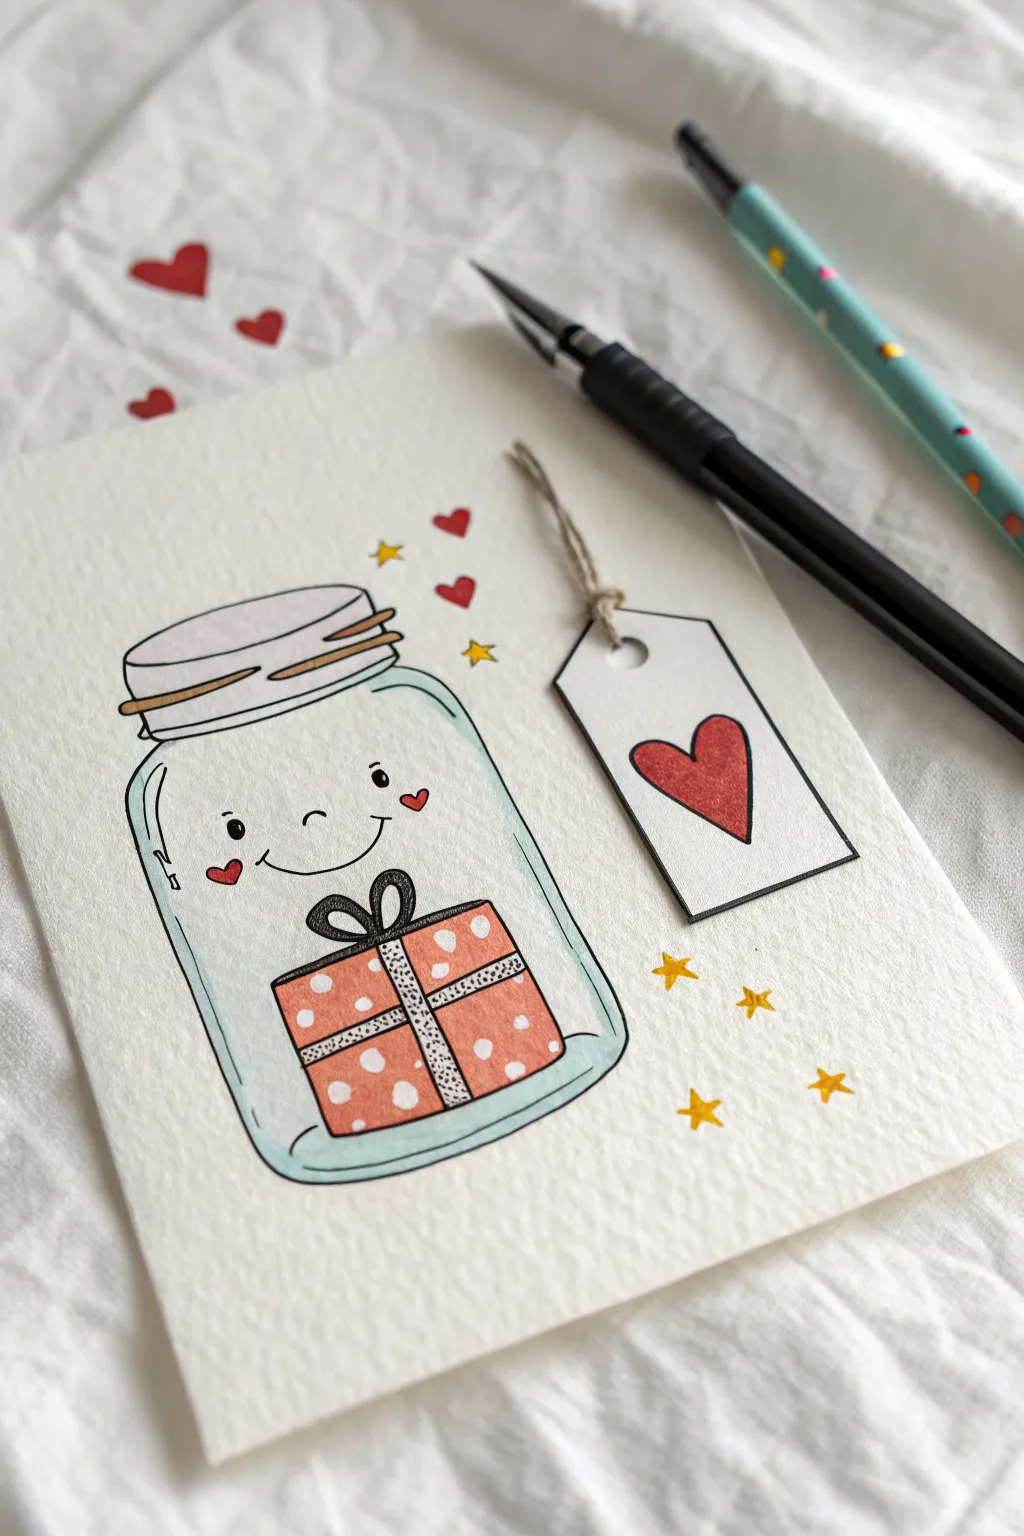
Capture the sweetness of giving with this adorable illustrated card featuring a smiling mason jar holding a tiny present. The clean lines and soft watercolors create a charming, handcrafted look perfect for birthdays or just because.
How-To Guide
Materials
- Cold press watercolor paper (A5 size or greeting card blank)
- Black waterproof fine liner pen (01 and 03 sizes)
- Watercolors (light blue, coral/red, yellow, grey)
- Small round watercolor brush (size 2 or 4)
- Pencil (HB or 2H)
- Eraser
- Ruler
- White gel pen (optional for highlights)
Step 1: Planning and Sketching
-
Outline the jar shape:
Begin by lightly sketching the main jar shape with your pencil. Draw two vertical lines that curve slightly inward at the bottom, connecting them with a gentle curve for the base. Leave the top open for the lid. -
Add the jar lid:
Sketch a flattened oval at the top of your vertical lines to form the opening. Draw a slightly larger, rounded rectangle directly above it for the lid, adding horizontal lines inside to suggest the screw threads. -
Sketch the gift inside:
Inside the lower third of the jar, draw a square cube shape. Angle the top slightly to show dimension. Add a cross shape for the ribbon and two loops on top for the bow. -
Draw the tag and string:
To the right of the jar, sketch a rectangle with the top corners clipped off to look like a gift tag. Draw a small circle near the top for the hole and sketch a wavy line connecting the tag to the jar’s neck. -
Add the face and details:
Give the jar personality by sketching two small, wide-set eyes and a simple curved smile right in the middle. Add small hearts for cheeks and scatter a few tiny stars and hearts around the outside of the jar.
Smudged Ink?
If your fineliner ignores the watercolor and bleeds anyway, stop immediately. Let it dry, then only use colored pencils or crayons to fill the rest of the drawing.
Step 2: Inking the Design
-
Trace the main lines:
Using your waterproof fine liner (size 03), carefully trace over your pencil lines. Keep your hand steady but allow for slight organic wobbles to maintain that hand-drawn charm. -
Detail the ribbon:
Switch to a finer pen (size 01) to ink the ribbon on the gift. Instead of solid lines, use stippling (lots of tiny dots) to give the ribbon a textured, fabric-like appearance. -
Refine the tag handle:
Ink the string connecting the tag. Make the line look slightly frayed or twisted by doubling back on it loosely to mimic twine. -
Erase guidelines:
Wait until the ink is completely dry—I usually give it a full five minutes to be safe—then gently erase all visible pencil marks to leave a clean black-and-white drawing.
Step 3: Adding Color
-
Paint the jar glass:
Dilute a very small amount of light blue paint with plenty of water. Paint a thin strip along the left and bottom interior edges of the jar, fading it out toward the center to create a glass reflection effect. -
Color the gift box:
Use a coral or soft red watercolor for the gift box. Carefully paint around the stippled ribbon sections. While the paint is still wet, you can lift out tiny circles with a dry brush or wait until dry to add white dots later. -
Fill the heart tag:
Paint the large heart on the gift tag with a bold red. Try to keep the color even and saturated so it pops against the white tag background. -
Detail the lid:
Wash a very pale grey over the lid area. Once that dries slightly, add a thin line of darker grey or brown between the thread lines to enhance the dimension. -
Add golden accents:
Use yellow paint to fill in the scattered stars. If you have metallic watercolor or a gold gel pen, this is a perfect spot to add a little shimmer. -
Paint the cheeks:
Add tiny dabs of pink or light red to the heart-shaped cheeks on the jar’s face to make it look flushed and happy. -
Final highlights:
Once everything is bone dry, use a white gel pen to add small dots on the gift box if you didn’t lift them out earlier, and a tiny catchlight in the eyes.
Level Up: Real Twine
Instead of drawing the string, punch a tiny hole in the card and thread actual jute twine through it, gluing a real paper tag onto the card surface for 3D texture.
Now you have a sweet, personalized card ready to brighten someone’s day

PENCIL GUIDE
Understanding Pencil Grades from H to B
From first sketch to finished drawing — learn pencil grades, line control, and shading techniques.
Explore the Full Guide
Gift Box With Surprise Confetti Burst
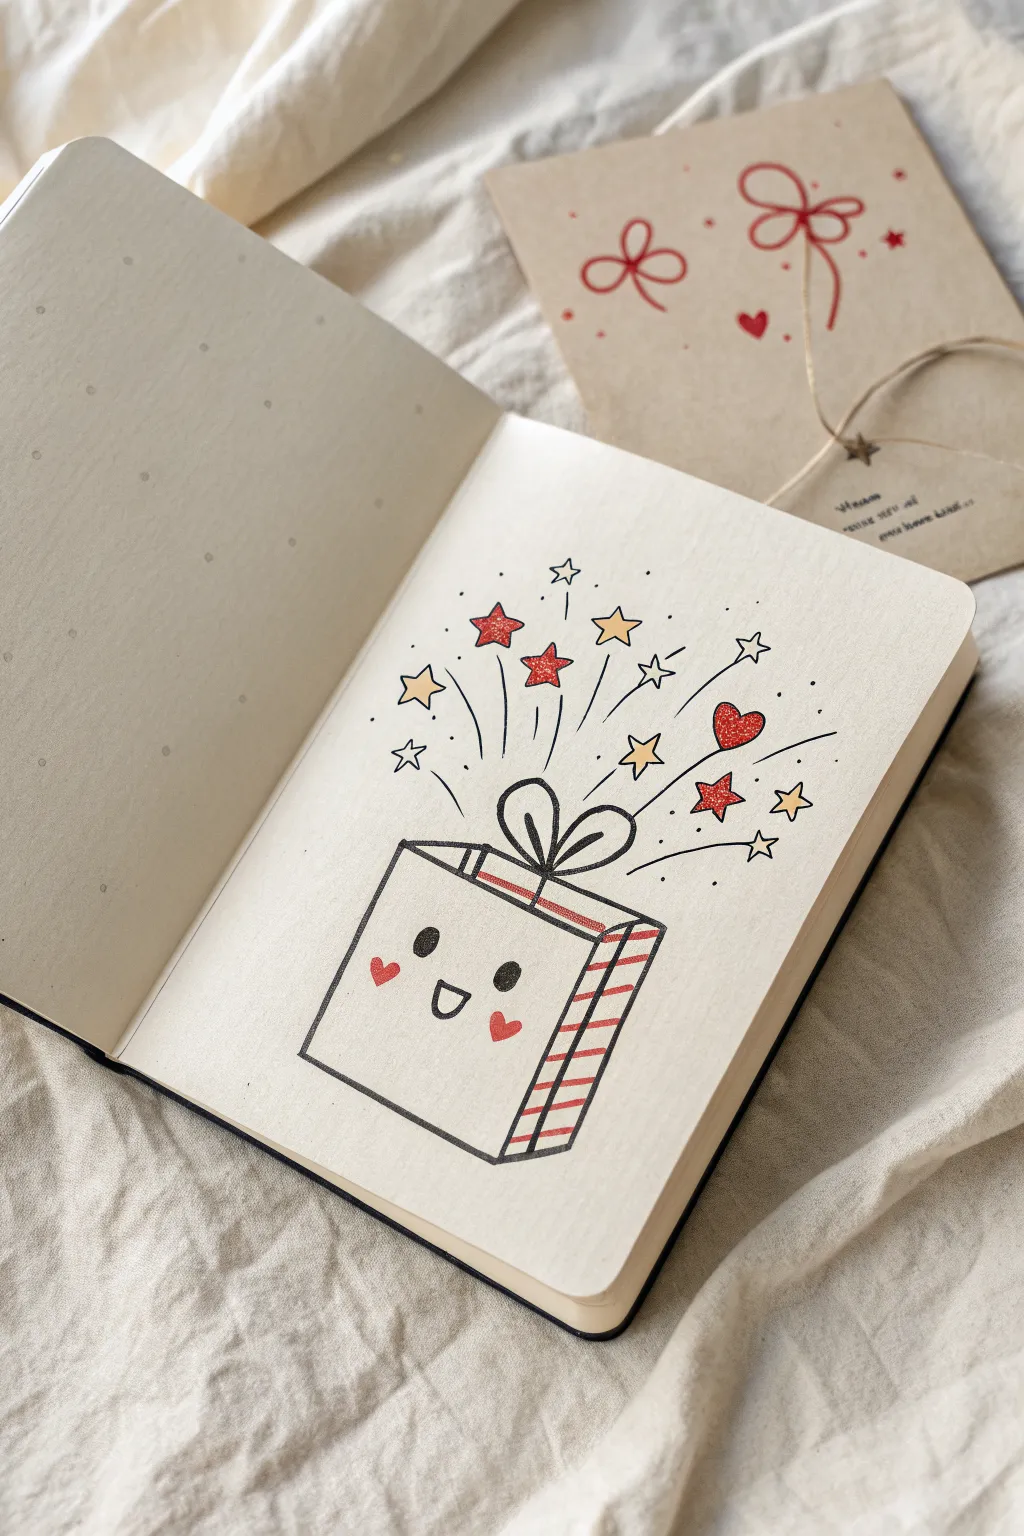
Capture the excitement of giving with this adorable illustrated gift box that literally bursts with joy. This simple yet charming doodle features a smiling present box releasing a flurry of stars and hearts, perfect for adding a festive touch to your bullet journal or greeting cards.
Step-by-Step Tutorial
Materials
- Dotted or blank notebook paper
- Fine liner pen (black, approx. 0.3mm to 0.5mm)
- Red marker or felt-tip pen
- Yellow or gold marker
- Pencil and eraser for sketching
Step 1: Drawing the Box Structure
-
Outline the front face:
Start near the bottom third of your page. Draw a square shape for the front of the box, slightly tilting the lines to give it a hand-drawn, relaxed feel rather than a rigid geometric look. -
Add dimension:
To make the box 3D, draw two short diagonal lines extending upward and to the right from the top-left and top-right corners of your square. Connect the tips of these lines with a horizontal line to form the top lid. -
Complete the side:
Draw another vertical line down from the top-right corner of the lid, parallel to the right side of your initial square. Connect the bottom corners to close off the side panel. -
Draw the ribbon loop:
Right in the center of the lid, sketch two large, teardrop-shaped loops for the bow. They should look like bunny ears flopping slightly to the sides. -
Add ribbon details:
Draw a small curve under the loops for the knot. Then, draw a line extending from the knot down the center of the lid and down the front of the box. Add a second line on the side panel to show the ribbon wrapping around.
Wonky Lines?
Don’t stress about perfect straight lines! If your box looks a bit wobbly, just retrace the outline slightly thicker. This emphasized ‘sketched’ look usually adds to the cute aesthetic.
Step 2: Adding Personality & Details
-
Face the front:
On the front panel of the box, draw two solid black ovals for eyes, spacing them comfortably apart. Between and slightly below them, draw a small ‘D’ shape on its side for a happy, open mouth. -
Rosy cheeks:
Sketch tiny heart shapes directly under each eye using your red marker to give the box cute, blushing cheeks. -
Pattern the ribbon:
If you want a candy-cane effect, draw small diagonal stripes across the ribbon section on the side of the box. I find this adds a nice textural contrast to the plain front. -
Color accents:
Fill in the diagonal stripes on the ribbon with your red marker. Leave every other stripe white for a classic pattern.
Make it Sparkle
Use a glitter gel pen for the yellow stars or add tiny dots of white gel pen inside the black eyes to create a ‘highlight’ reflection, making the character look even more alive.
Step 3: Creating the Burst
-
Draft the explosion lines:
Using your black fine liner, draw swift, curved lines radiating upward and outward from the bow. These action lines create the sense of movement and energy. -
Scatter the stars:
Draw several five-pointed stars floating at the ends of the action lines. Vary the sizes, making some larger and central, and others tiny and further out. -
Add hearty love:
In the mix with the stars, draw a few heart shapes. Place at least one prominent heart floating upwards on the right side. -
Color the confetti:
Select a few main stars and hearts to color in. Use red for the hearts and a few stars to balance the composition, and use yellow or gold for the remaining stars. -
Final touches:
Add tiny dots and small unfilled circles around the burst area to act as extra confetti dust, filling in any empty gaps.
Now you have a cheerful little character ready to celebrate any occasion on your page
Heart-Shaped Gift With Ribbon

This adorable illustration transforms a simple heart shape into a charming character gift box, complete with a dotted ribbon and a sweet, blushing face. It’s a quick and delightful project perfect for greeting cards or adding a touch of whimsy to your sketchbook pages.
Step-by-Step Guide
Materials
- Sketchbook or watercolor paper
- Pencil (HB or lighter)
- Eraser
- Black fine liner pen (0.3mm or 0.5mm)
- Black brush pen or thick marker
- Pale pink alcohol marker or watercolor
- Beige or light gold alcohol marker or watercolour
- White gel pen (optional for highlights)
Step 1: Basic Sketching
-
Outline the Heart:
Start by lightly sketching a large heart shape in the center of your page with a pencil. Aim for a plump, rounded shape rather than a sharp, elongated one to keep it looking cute. -
Draw the Vertical Ribbon:
Pencil in a diagonal band running from the top left dip of the heart down to the bottom right point. Keep the width consistent as you draw. -
Add the Horizontal Ribbon:
Draw a second band crossing the first one, curving slightly to follow the volume of the heart. This creates the ‘cross’ where the bow will sit. -
Sketch the Bow Center:
Right where the two ribbons intersect, draw a small, rounded rectangle or square to act as the knot of the bow. -
Form the Bow Loops:
Extending from the knot, sketch two large, teardrop-shaped loops. Make the loops fairly big to enhance the cartoonish look. -
Add Ribbon Tails:
Draw two tails hanging down from behind the knot. Give the ends a ‘V’ cut for a classic ribbon finish. I find usually placing them slightly asymmetrically looks more natural. -
Face Placement:
In the upper right section of the heart (the larger open space), lightly pencil in two small U-shapes for closed eyes and a tiny curve for a smile.
Step 2: Inking and Coloring
-
Outline Everything:
Using your fine liner pen, carefully trace over all your pencil lines. Don’t worry if the lines aren’t perfectly smooth; a little wobble adds character. -
Thicken the Outer Edge:
Take a thicker marker or a brush pen and trace *only* the very outside perimeter of the heart. This heavy outline makes the drawing pop off the page. -
Erase Sketches:
Wait a moment for the ink to dry completely, then gently erase all visible pencil marks to clean up your canvas. -
Draw the Face Details:
Ink the eyes and mouth with the fine liner. Add tiny eyelashes to the closed eyes for extra cuteness. -
Color the Box:
Fill in the heart shape (excluding the ribbon areas) with a pale pink marker. Use long, even strokes to minimize streakiness. -
Color the Ribbon:
Color the ribbon bands, bow loops, and tails with a beige or light gold marker. This contrast separates the gift wrap from the box itself. -
Add Rosy Cheeks:
Using a slightly darker or more saturated pink, draw small oval circles right under the eyes to give the character blushing cheeks. -
Pattern the Ribbon:
With your fine black pen, add small, random dots all over the beige ribbon areas. Keep the spacing loose to maintain the delicate look. -
Final Detail:
Use the fine liner to add two small vertical lines inside the center knot of the bow to imply fabric folds.
Uneven Color?
If your marker is leaving streaks, try coloring in small circular motions rather than straight lines, or switch to a thicker paper that absorbs ink more slowly.
Level Up
Add a white gel pen highlight to the top of the heart and on the bow knot to make the gift box look shiny and three-dimensional.
Now you have a sweet little character ready to share the love


Animal Hugging a Gift Box
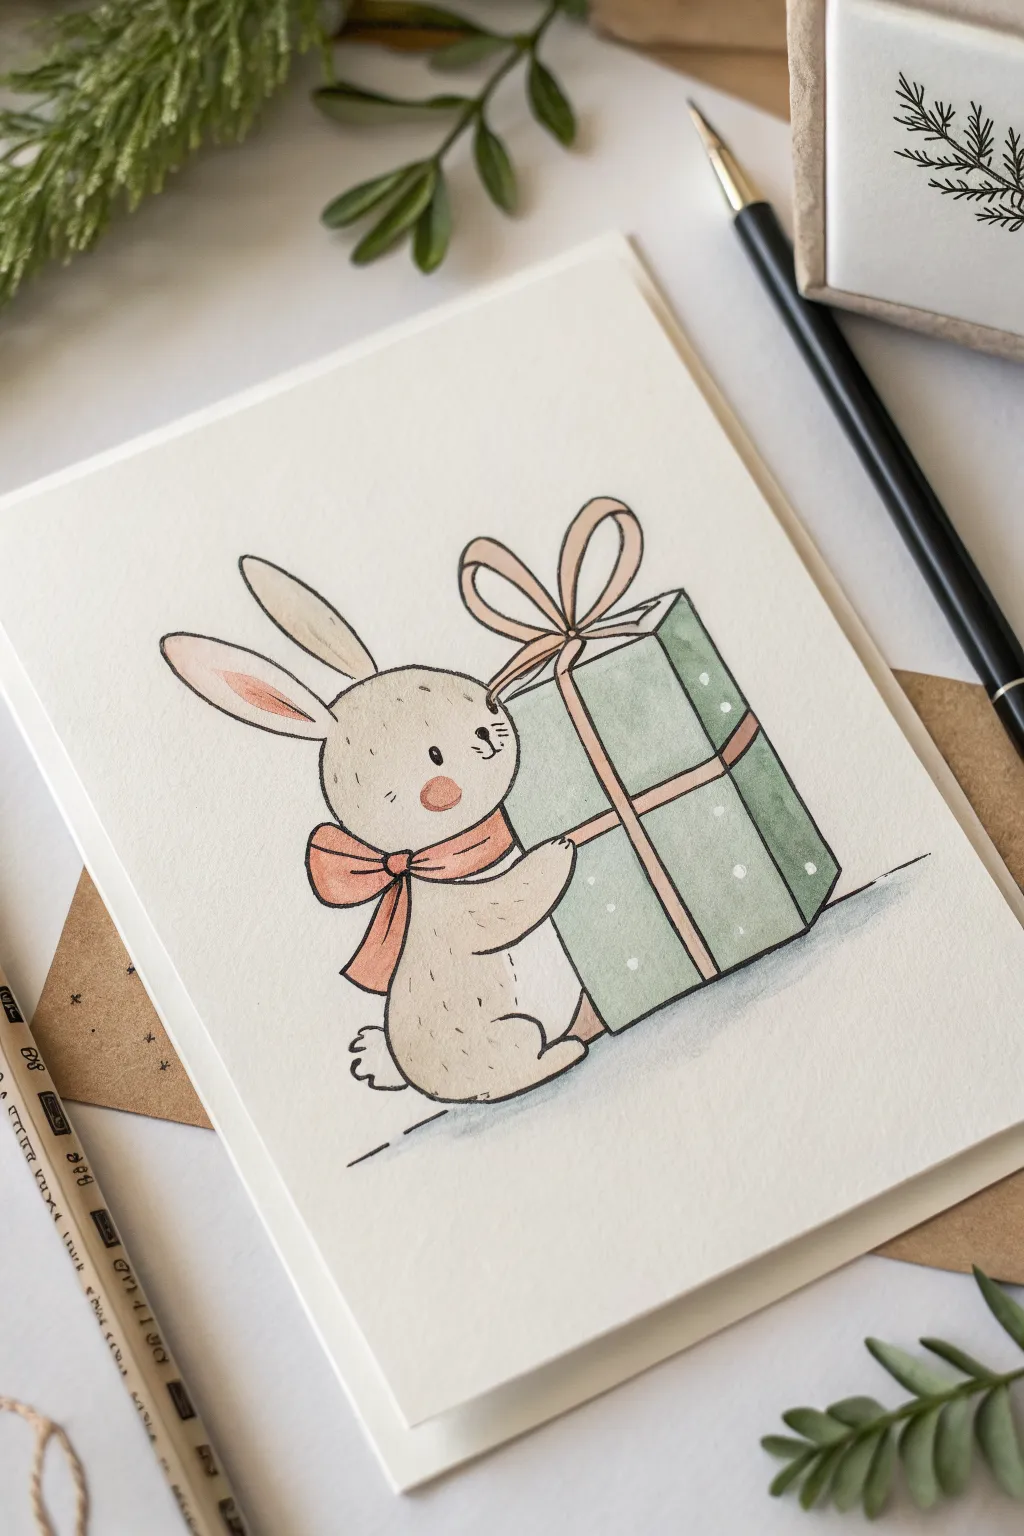
This heartwarming illustration features a gentle little rabbit embracing a gift box nearly as big as itself. Using soft watercolor washes and fine ink lines, you’ll create a charming, handcrafted card perfect for birthdays or holidays.
How-To Guide
Materials
- Cold press watercolor paper (A5 or folded card stock)
- Pencil (HB or H)
- Kneaded eraser
- Waterproof fine liner pen (black or sepia, 0.1mm – 0.3mm)
- Watercolor paints (warm grey, sage green, blush pink, coral)
- Round watercolor brushes (size 2 and 4)
- Two jars of water
- Paper towels
Step 1: Sketching the Composition
-
Outline the head:
Begin lightly with your pencil. Draw a rounded, slightly flattened circle for the bunny’s head. Imagine a soft marshmallow shape rather than a perfect sphere to keep it looking cuddly. -
Add the ears:
Extending from the top left of the head, sketch two long, oval ears. Make them slightly tapered at the tips and position them at a gentle backward angle to imply movement. -
Draw the body:
Sketch a pear-shaped body directly below the head. It should be slightly smaller than the gift box you’re about to draw, curving at the bottom for the seated posture. -
Sketch the gift box:
To the right of the bunny, draw a large cube using simple perspective. The front face should be a square, with a narrow side panel visible on the right to give it 3D depth. The box should be roughly the same height as the bunny’s head and body combined. -
Connect the hug:
Draw the bunny’s arm reaching out and overlapping the left side of the box. Add a small, rounded paw resting on the box’s surface to show it’s holding on tight. -
Add festive details:
Sketch a large bow on top of the gift box with loops that flop slightly. Draw a smaller ribbon bow around the bunny’s neck. Add the little fluffy tail at the base of the bunny.
Muddy colors?
Wait for each section (like the bunny) to dry completely before painting a touching neighbor (like the box). This prevents wet colors from bleeding into each other.
Step 2: Inking the Lines
-
Trace the main shapes:
Using your waterproof fine liner, carefully trace over your pencil lines. Keep your hand relaxed; slightly wavering lines add to the organic, illustrative charm. -
Define the fur:
When inking the outline of the bunny, use broken lines or tiny dashes in certain spots—like the cheeks or the back—to suggest soft fur texture rather than a solid, hard outline. -
Add facial features:
Draw a small, solid black eye, a tiny nose, and a simple curve for the mouth. Add three short whiskers on the cheek. Make sure the expression looks towards the gift. -
Clean up:
Wait for the ink to dry completely to avoid smudging, then gently erase all underlying pencil marks with your kneaded eraser.
Make it Personal
Instead of polka dots, paint tiny stars or hearts on the wrapping paper. You can also write a recipient’s name on a small gift tag attached to the ribbon.
Step 3: Adding Watercolor Washes
-
Paint the bunny:
Mix a very watery warm grey or beige. Apply a light wash over the bunny’s body and head. While the paint is wet, drop in a slightly pigment-richer grey near the bottom and under the arm to create roundness. -
Color the gift box:
Load your brush with a soft sage green. Paint the front and side panels of the box. I usually try to leave tiny, random circular spots unpainted to create the white polka-dot pattern simply by using the white of the paper. -
Paint the details:
Use a coral or soft pink for the inner ears, the cheek blush, the neck bow, and the ribbon on the gift. This consistent color palette ties the whole image together nicely. -
Add shadows:
Once the first layers are dry, mix a diluted grey-blue. Paint a simple cast shadow on the ground underneath the bunny and the box to ground them so they aren’t floating in space. -
Final touches:
If the polka dots got covered by green paint, you can use a white gel pen or opaque white gouache to add them back in once the green is fully dry.
Now you have an adorable, hand-painted greeting ready to share
Cupcake Gift Box Character
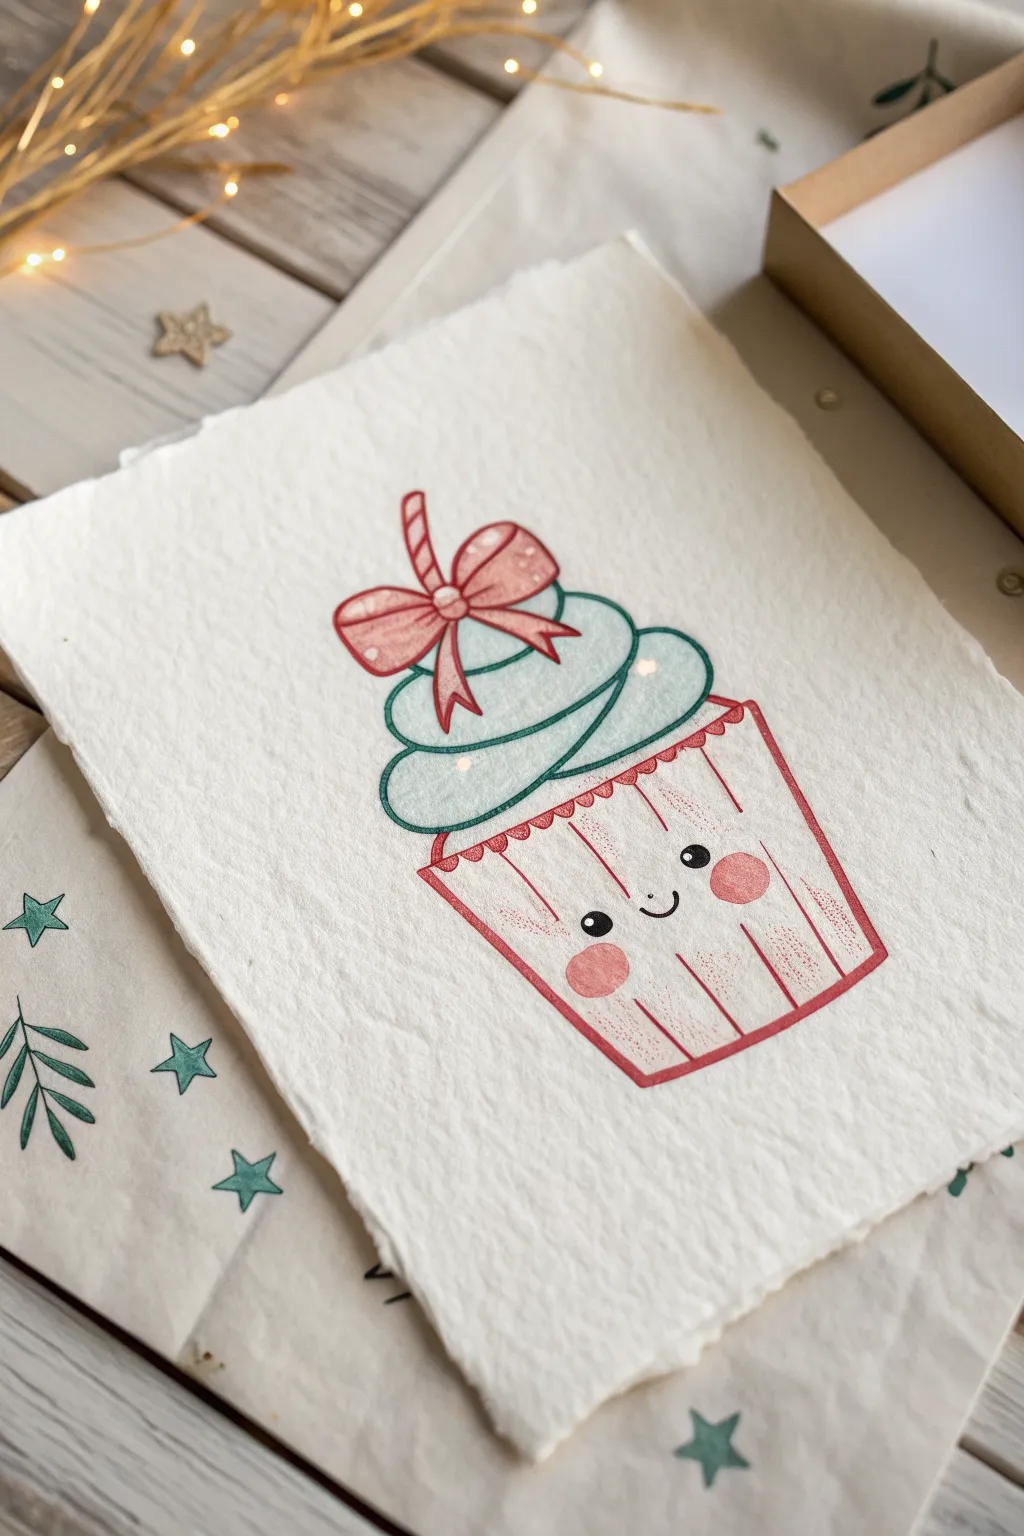
This charming project features a kawaii-inspired cupcake character drawn on gorgeous handmade paper with deckled edges. The texture of the paper adds a rustic, artisanal feel to the clean lines and sweet expression of the drawing.
Detailed Instructions
Materials
- Thick handmade cotton paper with deckle edges (approximately 5×7 inches)
- Pencil (HB or H for light sketching)
- Kneaded eraser
- Fine liner pens (Black, 0.3mm and 0.5mm)
- Colored pencils or alcohol markers (Soft Teal, Warm Red, Pink)
- Ruler
Step 1: Sketching the Structure
-
Establish the base:
Begin by lightly sketching a trapezoid shape for the cupcake wrapper. The top line should be wider than the bottom line. Keep your pencil strokes very faint so they don’t groove the soft handmade paper. -
Add the frosting mounds:
Above the wrapper, draw two main cloud-like shapes for the frosting. First, draw a wide, squashed oval shape resting on the wrapper, then add a slightly smaller, rounded swirl sitting on top of that one. -
Draft the topper:
At the very top of the frosting swirl, sketch a small loop for the candy cane stick and a basic bow shape. Don’t worry about the knot details yet; just get the placement centered. -
Mark the face:
On the wrapper section, lightly mark the placement for the eyes and mouth. The eyes should be wide-set, about halfway down the wrapper, with a small smile right in the middle.
Ink Bleeding?
Handmade paper is very absorbent. Test your markers on a scrap piece first. If they bleed, stick to colored pencils or very fine micron pens for cleaner lines.
Step 2: Inking the Details
-
Outline the wrapper:
Using a red fine liner or colored pencil, trace the outer lines of the wrapper. Add the scalloped edge along the top rim where the paper meets the frosting. -
Draw the stripes:
With your ruler and the red liner, carefully draw vertical stripes down the wrapper. Angle the outer stripes slightly inward to match the trapezoid shape, creating a 3D effect. -
Define the frosting:
Switch to a teal or dark green fine liner used for the frosting outlines. Trace your pencil sketches, giving the frosting swirls a smooth, continuous curve. I like to keep the line weight consistent here for a cartoon look. -
Detail the bow:
Using the red liner again, outline the bow. Create the center knot first, then the loops, and finally the ribbon tails draping down over the frosting. Add the small candy cane stick poking out behind the bow.
Step 3: Adding Color and Character
-
Color the frosting:
Gently fill in the frosting swirls with a soft teal colored pencil. Use small circular motions to get into the texture of the drawing paper without pressing too hard. -
Fill the bow:
Color in the bow loops and tails with a warm red shade. Leave tiny white spots or use a white gel pen later to add highlights which make the ribbon look shiny. -
Bring the face to life:
Using a black 0.5mm pen, carefully draw two solid black circles for the eyes, leaving a tiny dot of white paper in each for a sparkle. Draw a simple U-shape for the smile. -
Apply blush spots:
Take a pink pencil or marker and draw soft, round circles on the ‘cheeks’ right next to the eyes. This gives the character that signature cute look. -
Erase and refine:
Once the ink is completely dry, gently roll a kneaded eraser over the entire drawing to lift any visible graphite lines. Be careful not to smudge the colored pencil areas. -
Final shading touches:
Add just a hint of darker shading under the frosting rim and beneath the bow using slightly more pressure with your colored pencils to give the drawing depth.
Add Sparkle
Use a clear glitter pen or metallic gel pen to trace over the bow or add sprinkles to the frosting for a festive, shimmering finish.
Now you have an adorable, handcrafted card ready to brighten someone’s day
Gift Box With Tiny Speech Bubble Message
Learn to sketch this adorable, multi-faced present that speaks for itself with a sweet speech bubble message. This simple ink-and-color pencil drawing is perfect for bullet journals, handmade cards, or adding a touch of cuteness to your notes.
How-To Guide
Materials
- Blank sketchbook or thick drawing paper
- Fine liner pen (black, 0.3mm or 0.5mm)
- Pink colored pencil or pastel highlighter
- Pencil (HB for sketching)
- Eraser
Step 1: Constructing the Box
-
Draft the central corner:
Start by drawing a vertical line in the lower center of your page. This will be the front corner of your gift box. -
Form the top diamond:
From the top of your vertical line, draw two angled lines moving upward and outward to create a ‘V’ shape. Connect the ends of these lines to form a squashed diamond shape at the top. This is the lid of your box. -
Complete the cube shape:
Draw two vertical lines downward from the left and right corners of your top diamond. They should be parallel to your first central line. Connect the bottom points with angled lines that mirror the top ‘V’ shape to finish the basic 3D cube. -
Outline the ribbon path:
Sketch a cross shape directly over the top diamond to show where the ribbon sits. Extend these lines vertically down the front two faces of the box to show the ribbon wrapping around the sides. -
Add the bow center:
Right where the ribbon lines cross on top of the box, draw a small, slightly messy knot. It doesn’t need to be perfect; a few overlapping loops look more natural. -
Draw the bow loops:
Add four distinct loops radiating from the knot—two extending toward the back corners and two toward the front. Keep the lines thin and simple.
Wonky Box?
If your cube looks distorted, ensure the vertical lines are perfectly straight up and down, parallel to the sides of your paper, not slanted.
Step 2: Bringing it to Life
-
Ink the structural lines:
Switch to your black fine liner. Carefully trace over the outer edges of your box and the ribbon lines, giving them a clean, confident stroke. -
Add the faces:
On the left face of the box, draw two tiny dots for eyes. Repeat this on the right face. For the central face (the corner closest to you), draw the eyes slightly wider apart. -
Create the speech bubble:
Hovering above the box, draw a large oval speech bubble. Add a small triangular tail pointing down toward the center of the gift box. -
Fill the speech bubble:
Inside the bubble, draw a simple kawaii face using a small ‘v’ for the mouth and two dots for eyes. Surround this face with three small floating hearts. -
Add the floating heart:
In the empty space to the right of the speech bubble, draw a rogue heart tilding slightly to the right for balance. -
Erase pencil guides:
Wait a moment for the ink to fully dry, then gently erase all your underlying pencil sketches so only the crisp ink remains.
Customize It
Change the face expressions on each side of the box! Try a winking eye, a sleeping face, or a surprised ‘o’ mouth to tell a story.
Step 3: Adding Color & Details
-
Color the ribbon:
Using your pink colored pencil, lightly shade in the ribbon stripes running down the sides and across the top. I like to keep the texture a bit grainy here for a softer look. -
Tint the hearts:
Fill in the three hearts inside the speech bubble and the single floating heart with the same pink shade. -
Apply blush:
Give each of the three faces on the box a sweet personality by scribbling small, oval pink patches directly under their eyes. -
Add bubble blush:
Don’t forget the face inside the speech bubble—give it two tiny pink cheeks as well. -
Final touches:
Review your drawing. If you want the ribbon to pop more, go over the pink areas a second time to deepen the color.
Now you have a charming little messenger ready to brighten up your sketchbook page
Gift Box “Family” Portrait Lineup
Capture the spirit of generic holiday cheer with this adorable lineup of smiling gift boxes. This minimalist black-ink drawing style is perfect for customizing personalized stationery or creating a sweet greeting card cover that feels hand-crafted and warm.
Step-by-Step Tutorial
Materials
- Spiral-bound sketchbook (creamy or off-white paper recommended)
- Fine liner pen (black, 0.3mm or 0.5mm)
- Pink colored pencil or pastel chalk marker
- Pencil (HB for sketching)
- A soft eraser
- Ruler (optional)
Step 1: Planning and Sketching
-
Establish the baseline:
Start by lightly penciling a faint horizontal line near the bottom third of your page to ensure your boxes stand straight. This line acts as the ground so your characters don’t look like they are floating. -
Block in the shapes:
Sketch four rectangles of varying heights and widths. Think of them as family members—perhaps a tall, wide one for a ‘parent’ figure, and smaller squares for the ‘kids.’ Varying the sizes makes the composition more dynamic. -
Add the lids:
Draw slightly wider, shallow rectangles on top of each main box shape to represent the gift lids. These should overhang the main box slightly on the left and right sides, giving them a bit of dimension. -
Detail the ribbons:
Sketch a vertical stripe down the center of each box shape if you want a classic ribbon look, though for this specific style, we will focus mostly on the bows and lid patterns first. -
Draft the bows:
Draw loops on top of each lid. To keep them looking whimsical, make the loops slightly uneven, like teardrops meeting at a center point. Adding a small curved line inside the loop helps imply the ribbon’s fold.
Step 2: Inking the Outline
-
Trace the main bodies:
Using your fine liner pen, carefully trace over your pencil lines for the main box bodies. I like to keep my hand loose here; slightly imperfect lines add to the charming, hand-drawn aesthetic. -
Ink the lids:
Go over the lid shapes, ensuring the edges extend just past the box body below. Close off the shapes cleanly. -
Define the bows:
Ink the ribbon loops on top. Where the loops meet the lid, add a small knot or a converging point. Don’t worry about perfect symmetry; -
Create distinct patterns:
Give each box personality by decorating the lids or ribbons differently. Use vertical hatching lines for one, polka dots for the tall box, and simple stripes for the others. This variation visually separates the characters. -
Erase the pencil:
Wait until the ink is completely dry to the touch to avoid smudging. Gently erase all the underlying pencil structure, leaving just the crisp black ink.
Keep it Clean
When erasing sketch lines, hold the paper taut with one hand to prevent the page from crinkling. Always rub the eraser in one direction rather than back and forth.
Step 3: Adding Personality
-
Position the faces:
Visualize where the eyes and mouth should go. Aim for the lower half of each box to create that cute ‘chibi’ proportion. Mark faint dots with a pencil if you need a guide. -
Draw the eyes:
Using the fine liner, make small solid black circles for eyes. Place them relatively wide apart to enhance the cute factor. -
Add the smiles:
Draw a tiny, shallow ‘U’ shape directly between the eyes. Keep the stroke thin and delicate. -
Apply the blush:
Take your pink colored pencil or pastel marker. Draw small, soft ovals underneath the eyes on the ‘cheeks’ of each box. If using pencil, press lightly and build up color slowly for a soft, powdery look. -
Final check:
Look over the drawing for any gaps in your lines or places where the pattern needs a touch-up. Strengthen the outer lines slightly if you want them to pop more against the page.
Creative Twist
Make it a real portrait! Adjust the heights of the boxes to match the actual heights of your family members or friend group for a personalized holiday card.
Let your little family of gift boxes brighten up your notebook or next holiday card project


Have a question or want to share your own experience? I'd love to hear from you in the comments below!