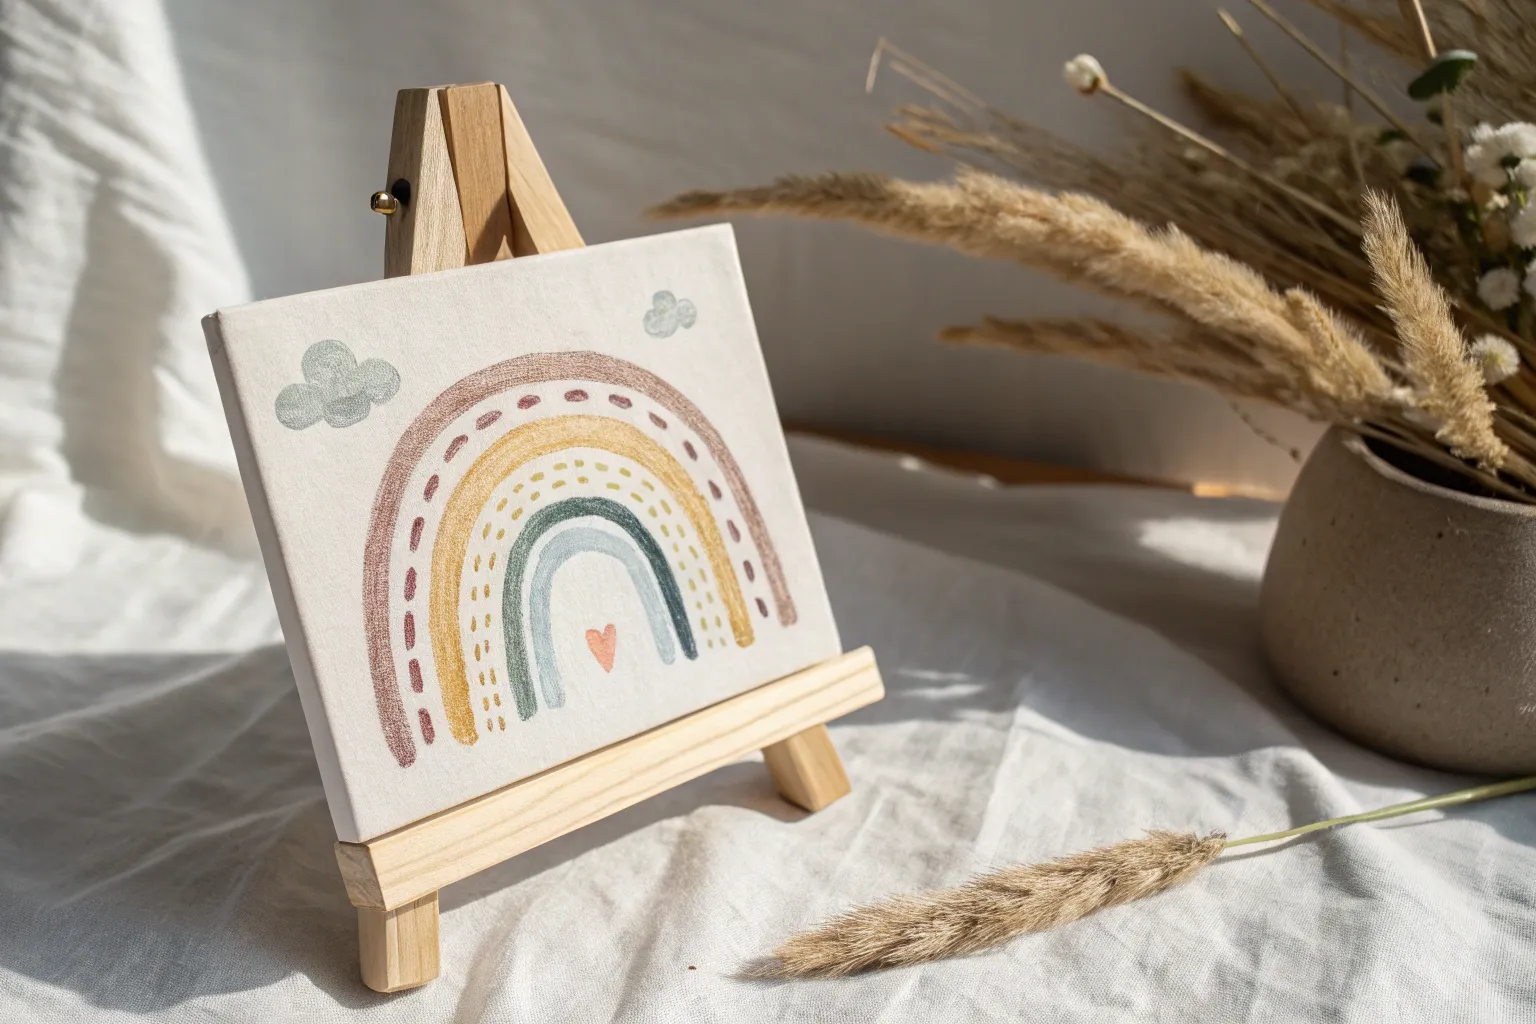
Whenever I need a quick mood boost, I reach for rainbow colors—they make even the simplest painting feel magical. These easy rainbow painting ideas are beginner-friendly, super forgiving, and perfect for loosening up your hand while still ending with something you’ll want to hang up.
Classic Rainbow With Fluffy Clouds

Capture the simple joy of a sunny day with this classic rainbow study, featuring soft, billowy clouds and gentle watercolor textures. The finished piece uses a lovely deckle-edged paper to give it a vintage, handcrafted feel.
Step-by-Step
Materials
- Square sheet of cold-pressed watercolor paper (deckle edge optional)
- Watercolor paints (pan or tube)
- Round watercolor brush (size 6 or 8)
- Fine liner brush (size 0 or 1)
- White gouache or white gel pen
- Pencil and eraser
- Jar of clean water
- Paper towel
Step 1: Planning the Composition
-
Prepare your paper:
Start with a square piece of watercolor paper. If yours doesn’t have raw edges, you can manually tear the edges against a ruler to create that charming deckled look. -
Sketch the cloud placement:
Using a pencil very lightly, draw two fluffy cloud shapes near the bottom third of the paper. Keep them slightly apart to anchor the rainbow. -
Add floating clouds:
Sketch two smaller, drifting clouds in the upper sky area to balance the composition. -
Outline the arc:
Draw the main arc of the rainbow connecting the two bottom clouds. Sketch four to five concentric bands inside this arc. Don’t worry about mathematical perfection; a hand-drawn look adds character.
Clean Edges Trick
To keep bands distinct without leaving gaps perfectly dry each color stripe with a hairdryer or heat gun before painting the neighboring color.
Step 2: Painting the Sky
-
Mix a sky blue wash:
Dilute a cerulean or sky blue paint with plenty of water to create a very pale, transparent wash. -
Paint around the shapes:
Carefully paint the background sky, working around your pencil sketches of the rainbow and the clouds. The goal is to leave the paper white in those specific areas. -
Soften edges:
While the blue paint is still damp, you can lift a little pigment here and there with a clean, thirsty brush to create subtle variations in the atmosphere. -
Let the background dry:
Allow the blue sky layer to dry completely before touching the rainbow area to prevent colors from bleeding outward.
Sparkle Upgrade
Mix a tiny amount of iridescent medium into your cloud shadows or use metallic gold paint for the dashed lines on the red stripe.
Step 3: Adding the Rainbow
-
Start with red:
Load your medium round brush with a vibrant red. Carefully paint the outermost band of the rainbow, keeping the edges crisp against the blue sky. -
Add the orange band:
Rinse your brush and paint the next band orange. I like to leave a tiny, almost invisible hairline characteristic of dry paper between bands to keep colors from muddying. -
Continue the spectrum:
Proceed with yellow, then a soft teal-green, and a light blue. Work your way inward, ensuring each stripe follows the curve of the previous one. -
Finish with purple:
Paint the innermost arch with a soft violet or purple hue. -
Add texture details:
Once the red band is dry, switch to your fine liner brush. Using white gouache or a gel pen, add tiny dashed stitches along the center of the red stripe for a cute, embroidered effect.
Step 4: Defining the Clouds
-
Outline the clouds:
Mix a slightly darker, cooler blue-grey shade. Using your fine liner brush, outline the scalloped edges of all your cloud shapes. -
Create volume:
Add a few curved lines inside the bottom edge of the clouds using that same blue-grey mix. This suggests shadow and gives the clouds a fluffy, 3D volume. -
Blend the shadows:
With a clean, damp brush, gently soften the inner side of your shadow lines so they fade into the white of the cloud, rather than remaining strict outlines. -
Final touches:
Erase any visible pencil marks carefully once the entire painting is bone dry.
Display your delightful sky scene in a floating frame to show off those beautiful deckled edges


Simple Sky Gradient Behind a Rainbow

This tutorial guides you through creating a charming watercolor rainbow set against a soft, dreamy blue sky with fluffy clouds. By painting the sky first and then layering the vibrant arches on top, you achieve a lovely depth that makes the artwork pop.
Step-by-Step Guide
Materials
- Cold press watercolor paper (preferably 300 gsm)
- Watercolor paints (Indigo, Cerulean Blue, Deep Red, Orange, Yellow Ochre, Sage Green)
- Round watercolor brush (size 6 or 8)
- Small round detail brush (size 2 or 4)
- Clean water jar
- Paper towels
- Painter’s tape or masking tape
- Pencil and eraser
- Drawing board or hard surface
Step 1: Preparation & Drawing
-
Secure the paper:
Tape your watercolor paper down to a hard board on all four sides. This helps keep the paper flat when it gets wet and creates a clean white border around your finished piece. -
Sketch the rainbow:
Using a pencil, very lightly sketch the arches of your rainbow. Start with the smallest inner arch and work your way out, leaving a small gap between each band. Keep your lines incredibly faint so they won’t show through the translucent paint later. -
Sketch the clouds:
Lightly draw a few fluffy cloud shapes near the top corners of the paper, overlapping slightly with where the sky will be.
Clean Edges Trick
To get super crisp white lines between rainbow bands, let every other color band dry completely before painting the ones in between them.
Step 2: Painting the Sky
-
Mix a sky wash:
Dilute some Cerulean Blue with plenty of water to create a very pale, transparent wash for the sky. -
Apply the sky background:
Paint the background area around your rainbow sketch using the large round brush. Carefully paint around your cloud shapes—leaving the paper white inside them creates the fluffiest clouds. -
Soften cloud edges:
While the blue paint around the clouds is still damp, rinse your brush and use just clean water to slightly soften the hard edges of the clouds, letting a tiny bit of blue bleed inward for a soft, dreamy look. -
Add cloud shadows:
Mix a tiny amount of indigo into your watery blue mix. Dab this subtle grey-blue into the bottom curves of the white clouds to give them volume and dimension. -
Let it dry completely:
Wait for the background sky layer to be 100% dry. If you paint the rainbow too soon, the colors will bleed into the sky.
Step 3: Painting the Rainbow Arcs
-
Paint the inner arch:
Start with the smallest, innermost arch. Mix a soft Sage Green and carefully paint the curve using your medium brush. Try to do this in one continuous stroke if possible for a smooth look. -
Paint the yellow band:
Skip a small white gap and paint the next band using Yellow Ochre. Leaving a sliver of white paper between colors prevents them from bleeding into each other. -
Add the orange layer:
Continue outward with the orange band. Keep your hand steady and follow the curve of the previous line. -
Apply the red band:
Paint the next arch in a deep, rich red. I often vary the pressure on the brush slightly here to give the band an organic, hand-painted texture. -
Paint the blue bands:
Move on to the blue layers. Paint the second-to-last band with a medium blue tone, similar to the sky but more saturated. -
Finish the outer arch:
Complete the rainbow with the largest, outermost arch using a deep Indigo blue to frame the whole design boldly.
Make It Sparkle
Once the painting is totally dry, add tiny dots of metallic gold watercolor or gel pen inside the white gaps for a magical, shimmering effect.
Step 4: Finishing Touches
-
Check for gaps:
Assess your white gaps. If any look too wide or uneven, you can carefully broaden a colored band to tidy it up, but imperfection adds charm. -
Add subtle texture:
Once the rainbow creates are dry, you can use a fairly dry brush to add tiny concentrated drops of color at the bottom edges of the arches to simulate pooling watercolor pigment. -
Sign and remove tape:
Sign your name small in the bottom corner with a fine liner or pencil. Finally, slowly peel off the masking tape at a 45-degree angle to reveal those crisp white edges.
Hang your cheerful sky painting in a sunny spot to brighten your day

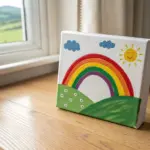
Rainbow Over Rolling Green Hills
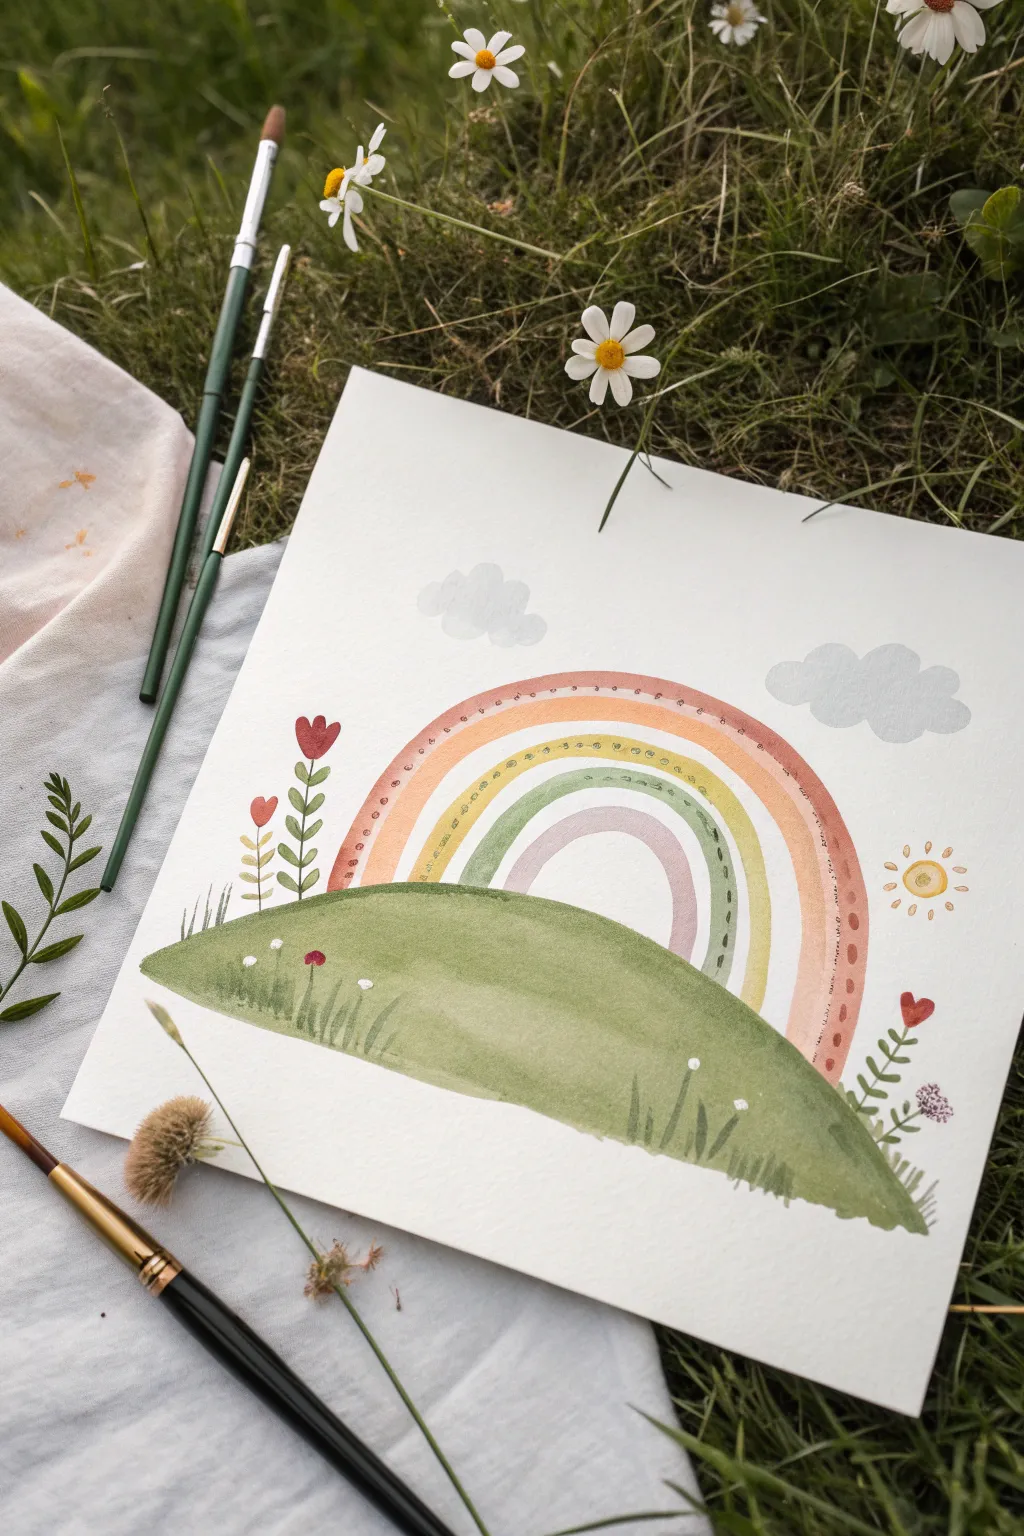
Capture the sweetness of a sunny day with this charming watercolor scene featuring a muted rainbow arching over a soft green hill. The folk-art style flowers and delicate clouds make this a relaxing project perfect for a quiet afternoon in the garden.
Step-by-Step
Materials
- Watercolor paper (cold press, 300gsm suggested)
- Watercolor paints (muted red/rust, orange, yellow, sage green, gray)
- Round watercolor brushes (sizes 2, 4, and 6)
- Pencil for sketching
- Eraser
- Jar of clean water
- Paper towel
Step 1: Planning and Sketching
-
Outline the hill:
Begin by lightly sketching a large, gentle mound at the bottom third of your paper. Make the curve smooth, sloping down on the left and right edges to create the ground. -
The rainbow arch:
Sketch four concentric arches rising from behind the hill. Don’t worry about making them perfect geometric semi-circles; a slightly organic, hand-drawn look adds to the charm. -
Adding elements:
Lightly pencil in two fluffy cloud shapes above the rainbow. Mark small circles for the sun on the right and tiny stems for the flowers on both sides of the hill.
Steady Arcs
Turn your paper as you paint the rainbow curves. Pulling the brush toward your hand usually results in a smoother line than pushing it away.
Step 2: Painting the Hill
-
Base wash:
Load a size 6 brush with a watered-down sage green mix. Paint the entire hill shape, keeping the wash fairly even but allowing some natural pooling for texture. -
Deepening the color:
While the green is still slightly damp, drop a more concentrated olive green along the bottom edge and the very top ridge of the hill to create volume. -
Grassy texture:
Using the tip of a smaller brush, flick tiny upward strokes along the bottom edge and sporadically across the hill to represent blades of grass. Let this section dry completely.
Make it Sparkle
Once the painting is totally dry, add tiny touches of gold metallic watercolor to the sun’s rays or the center of the flowers for a magical finish.
Step 3: Painting the Rainbow
-
The outer band:
Mix a muted rust or terracotta red. With a steady hand and a size 4 brush, paint the outermost arch. Keep the color somewhat translucent. -
The middle bands:
Paint the second band with a soft orange and the third with a pale yellow-ochre. Leave a tiny sliver of white paper between the bands so the colors don’t bleed into each other. -
The inner arch:
Fill the smallest, innermost arch with a very pale, watered-down purple or mauve tone. -
Rainbow details:
Once the bands are dry, use a fine detail brush to add patterns. I like to add tiny dots inside the orange band and small dashes inside the yellow band for that folk-art feel.
Step 4: Sky and Florals
-
Fluffy clouds:
Dilute a gray or blue-gray paint heavily with water. Paint the cloud shapes, keeping the edges soft. -
Sunny details:
Paint a small sun with yellow ochre to the right of the rainbow. Add small dots or dashes radiating outward for rays. -
Flower stems:
Using a size 2 brush and dark green paint, draw vertical stems rising from the left and right sides of the hill. Add small, leaf-shaped strokes along the stems. -
Blooms and buds:
Paint tulip-shaped blooms on top of the stems using the rust red. Add smaller heart-shaped buds lower down on the stems. -
Final foreground touches:
Add a few tiny white gouache dots or lift small spots of color on the hill to suggest tiny wildflowers or dew drops in the grass.
Let your peaceful landscape dry completely before erasing any visible pencil lines


Rainbow Ending in a Pot of Gold
This charming watercolor painting captures the magic of St. Patrick’s Day with a classic rainbow arcing right into a waiting black cauldron. Using textured paper and simple strokes, you’ll create a vibrant, lucky piece of art complete with sparkling gold star accents.
Step-by-Step Guide
Materials
- Cold-press watercolor paper (300gsm or 140lb)
- Watercolor paints (rainbow spectrum + black + Payne’s gray)
- Round watercolor brush (size 6 or 8)
- Small detail brush (size 0 or 2)
- Gold metallic paint, gold metallic marker, or gold star sequins
- Pencil and eraser
- Cup of water and paper towels
Step 1: Planning and Sketching
-
Lightly sketch the rainbow:
Begin by using a pencil to very faintly sketch the curvature of your rainbow. You don’t need to draw every single stripe line, but mark the top and bottom boundaries of the arc to ensure you have enough room for all the colors. -
Sketch the pot:
At the bottom right end of your rainbow arc, sketch a simple cauldron shape. It should look like a rounded bowl with a slightly flared rim, positioned so the rainbow appears to fall directly into it. -
Mark the cloud placement:
Draw a loose, fluffy cloud shape in the upper left corner, balancing the composition against the pot in the lower right.
White Space Magic
Make sure to leave a hairline gap of white paper between your rainbow stripes. This keeps the colors distinct and prevents them from turning into a muddy brown mess.
Step 2: Painting the Rainbow
-
Load your brush with red:
Start with a size 6 or 8 round brush loaded with a saturated red watercolor. Test the consistency on scrap paper; you want it vibrant but fluid. -
Paint the red arc:
Carefully paint the outermost stripe of the rainbow in a single, confident stroke if possible. If you need to stop and reload, lift your brush gently to avoid hard lines. -
Add the orange stripe:
Rinse your brush well. Pick up orange paint and paint the next stripe directly beneath the red. Leave a tiny sliver of white paper between the colors to prevent them from bleeding into each other immediately. -
Continue with yellow:
Paint the yellow stripe next. Keep your wrist loose to follow the curve naturally. -
Paint the green stripe:
Add the green band. As you move inward to the tighter curve, be careful to keep the width of the stripe consistent with the others. -
Add the blue stripe:
Lay down the blue stripe. The blue used here is a nice sky blue, not too dark. -
Paint the final indigo/violet stripes:
Finish the rainbow arc with a stripe of indigo or violet. Make sure the ends of all stripes terminate roughly at the rim of your sketched pot. -
Let it dry completely:
Before moving on to the cloud or pot, ensure the rainbow stripes are dry so you don’t smudge the colors.
Shaky Hands?
If you struggle with painting distinct stars, use small gold star sequins or stickers instead! Just dab a tiny dot of glue and press them onto the dry paper.
Step 3: Cloud and Cauldron Details
-
Paint a soft cloud:
Using very diluted blue paint, fill in your cloud sketch. Use a ‘wet-on-dry’ technique to get those slightly crisp edges that define the fluffy shape. -
Base layer for the pot:
Mix a dark grey or black. Paint the main body of the cauldron. You can leave the paint slightly uneven or watery in the center to suggest roundness and volume. -
Paint the pot rim:
Add a distinct rim to the top of the pot. Ensure this dark shape slightly overlaps the bottom ends of your rainbow stripes, so the rainbow looks like it is going *inside* the pot. -
Dry again:
Allow the black paint to dry completely. Black watercolor can be tricky and easily bleeds into yellow or gold if it’s still damp.
Step 4: Golden Touches
-
Add falling gold stars:
Using a small detail brush and metallic gold paint (or a gold marker), draw tiny stars clustering around the base of the rainbow and spilling out of the pot. -
Vary star sizes:
Paint some stars as simple five-point shapes and others as tiny dots or diamonds to create a scattering effect. I find that grouping them in clusters of three looks most natural. -
Erase pencil lines:
Once the entire painting is bone-dry, gently erase any visible pencil marks, especially around the cloud and pot edges.
Display your colorful creation near a window to catch the light on those golden details
BRUSH GUIDE
The Right Brush for Every Stroke
From clean lines to bold texture — master brush choice, stroke control, and essential techniques.
Explore the Full Guide
Pastel Glow Wet-on-Wet Rainbow
Capture the ethereal beauty of a rain-washed sky with this soft, glowing watercolor project. By using the wet-on-wet technique, you’ll create seamless transitions between pastel hues for a dreamy, calming effect.
Step-by-Step Guide
Materials
- Cold press watercolor paper (140lb/300gsm)
- Watercolor paints (tube or pan set)
- Wide flat wash brush (1 inch)
- Round brush (size 8 or 10)
- Masking tape or artist’s tape
- Water jar
- Paper towels
- Wooden board or hard surface
Step 1: Preparation and Setup
-
Secure the paper:
Begin by taping your watercolor paper down to a sturdy board or your work surface. Use masking tape along all four edges, overlapping the paper about a quarter-inch to create a crisp white border later. -
Prepare your palette:
Pre-mix your rainbow colors in a palette. Since we want a pastel look, dilute your pigments with plenty of water. You’ll need a soft purple, sky blue, minty green, buttery yellow, pale orange, and a gentle rose pink. -
Test the opacity:
Before touching the final paper, test your mixed colors on a scrap piece. They should appear light and translucent; if they are too vibrant, add more water now.
Step 2: Painting the Gradient
-
Wet the paper:
Using your large flat wash brush and clean water, apply an even coat of water across the entire surface of the paper. You want an even sheen, not puddles. -
Begin with purple:
Load your round brush with the diluted purple mix. Starting at the bottom left diagonal (or straight vertical depending on your preference), lay down a broad stripe of color. Let the pigment spread naturally on the wet surface. -
Add the blue:
Without cleaning your brush thoroughly—a little mixing is good—pick up the blue paint. Apply it right next to the wet purple edge, allowing them to touch and bleed together slightly. -
Transition to green:
Rinse your brush and load it with the minty green. Apply this band next to the blue, gently encouraging the colors to merge at the border for that soft, fuzzy transition. -
Introduce light:
This is crucial for the glowing effect: apply the yellow band next. Be careful not to let the green overpower the yellow; keep your brush clean for this step to maintain luminosity. -
Warm up the tones:
Move into your orange paint. Lay this strip down adjacent to the yellow. I like to let this dry briefly—just a few seconds—so the orange doesn’t turn muddy against the yellow. -
Finish with pink:
Complete the gradient by filling the remaining corner or edge with your soft rose pink. Ensure it blends seamlessly into the orange band.
Stay Thirsty
Keep paper consistently damp. If it dries mid-painting, stop, let it dry fully, then re-wet with a fine mist sprayer to continue blending without hard edges.
Step 3: Refining and Drying
-
Check moisture levels:
Look at the painting from an angle. If certain areas are drying too fast and creating hard lines, you can very gently add a tiny drop of water or pigment to re-wet the edge. -
Tilt for blends:
If your stripes look too separate, gently pick up your board and tilt it slightly back and forth. This encourages gravity to pull the wet paint together for a smoother gradient. -
Soak up excess:
If you notice pools of water collecting at the tape edges (creating ‘blooms’), use the corner of a clean paper towel to wick the excess liquid away. -
Let it dry completely:
Allow the painting to dry naturally on a flat surface. Avoid using a hair dryer if possible, as the airflow can push the pigment around and disturb the soft blend. -
The reveal:
Once the paper is bone dry and cool to the touch, slowly peel away the masking tape. Pull the tape away from the paper at a 45-degree angle to prevent tearing.
Avoid Muddy Colors
If your colors turn brown where they meet, you’re over-mixing on the paper. Let the wet edges touch and mingle on their own; don’t scrub them together.
Display your radiant gradient in a spot with natural light to highlight the transparency of the watercolors
Crisp Striped Rainbow Band Practice
Achieve satisfyingly neat edges and a vibrant gradient with this simple yet striking watercolor exercise. The result is a clean, modern rainbow study that looks beautiful framed or as a meditative practice page.
Detailed Instructions
Materials
- Cold press watercolor paper (300gsm recommended)
- Masking tape or painter’s tape (low tack)
- Watercolor paints (tube or pan set)
- Flat shader brush (approx. 1/2 inch or 3/4 inch)
- Ruler
- Pencil (HB or lighter)
- Cup of clean water
- Paper towel or rag
- Eraser
Step 1: Preparation and Masking
-
Secure the paper:
Start by taping down all four edges of your watercolor paper to a sturdy board or table. This prevents buckling when the paper gets wet and creates a clean border. -
Measure the layout:
Using your ruler, lightly mark the top and bottom of the paper to divide the space. You will need six equal sections for the colors, plus narrow gaps in between each one. -
Draw guide lines:
Connect your top and bottom marks with very faint pencil lines. You don’t need to press hard; you just need a guide for where the tape will go. -
Mask the gaps:
Apply strips of masking tape over the areas that will remain white. This includes the gaps between the color bars. -
Seal the edges:
Run your fingernail or a bone folder firmly along the edges of every piece of tape. This is crucial to prevent paint from seeping underneath and ruining those crisp lines.
Bleed-Proof Lines
For ultra-crisp edges, paint a thin layer of clear water or white gouache over the tape edges first. This seals the gap so color won’t seep under.
Step 2: Painting the Spectrum
-
Prepare the red:
Load your flat brush with clean water and pick up a vibrant red pigment. Aim for a tea-like consistency—fluid but rich in color. -
Paint the first stripe:
Fill the first exposed vertical channel on the left. Use long, confident strokes from top to bottom to minimize streakiness. -
Mix the orange:
Rinse your brush thoroughly. Mix a bright orange, or combine your red with a bit of yellow, ensuring the saturation matches the red stripe. -
Apply the orange stripe:
Paint the second channel. I like to keep the paper flat during this stage so the pigments settle evenly into the paper’s texture. -
Paint the yellow:
Clean your brush well. Pick up a pure, sunny yellow and fill the third channel. Be careful not to let your hand drag through the wet orange paint. -
Continue with cool tones:
Proceed to the green stripe. A sap green or hooker’s green works well here for a natural look. -
Add the blue:
Mix a clear sky blue or cyan hue. Paint the fifth channel, keeping your edges right up against the tape for maximum crispness. -
Finish with purple:
For the final stripe, use a violet or purple shade. Apply it evenly in the last channel on the right.
Add Subtle Texture
While the paint is still wet, sprinkle a tiny pinch of salt onto the blue or purple stripes. It creates a beautiful starburst texture as it dries.
Step 3: Finishing Touches
-
Allow to dry completely:
Let the painting sit undisturbed until the paper is bone dry to the touch. If the paper feels cool, it is still damp. -
Remove the tape:
Slowly peel back the masking tape at a 45-degree angle away from the painted area. This helps prevent the paper from tearing. -
Erase markings:
If any pencil lines are visible in the white gaps, gently erase them now that the paint is dry and the tape is gone. -
Flatten if needed:
If the paper has curled slightly after removing the tape, place it under a heavy book overnight to flatten it out.
Now you have a flawless spectrum ready to brighten up any wall or notebook cover.

PENCIL GUIDE
Understanding Pencil Grades from H to B
From first sketch to finished drawing — learn pencil grades, line control, and shading techniques.
Explore the Full Guide
Rainbow Reflection in Calm Water

Capture the magic of a fleeting storm with this charming watercolor sketch that mirrors nature’s own palette. This project focuses on blending vibrant arches into a soft, cloudy sky above a tranquil strip of water.
How-To Guide
Materials
- Cold press watercolor paper (approx. 5×5 inches, torn edges)
- Watercolor paints (pan or tube set)
- Round watercolor brush (size 6 or 8)
- Small flat brush (optional)
- Jar of clean water
- Paper towels
- Masking tape (optional, if you want flat paper while painting)
- Pencil (HB or lighter)
Step 1: Preparation and Sketching
-
Prepare the paper:
Start by tearing your watercolor paper to size rather than cutting it. This creates that lovely, rustic deckled edge seen in the photo. -
Sketch the horizon:
Lightly draw a horizontal line across the bottom third of the paper to separate the sky from the water. -
Outline the land:
Sketch a very faint, uneven line just above the water line to represent the distant treeline or hills. -
Mark the rainbow’s path:
Very lightly sketch the arch of the rainbow. Don’t press hard; you just want a guide for where the colors will flow.
Step 2: Painting the Rainbow
-
Start with red:
Load your round brush with a vibrant red. Paint the outermost curve of the rainbow, keeping the pigment fairly concentrated but wet. -
Blend into orange:
While the red is still slightly damp, rinse your brush and pick up orange. Paint a stripe right next to the red, letting them touch slightly so they bleed together naturally. -
Add the yellow:
Continue immediately with a bright yellow stripe. I find that working quickly here prevents hard lines from forming between the colors. -
Continue the spectrum:
Add your green, blue, and finally a touch of purple or indigo on the innermost curve. Ensure each new color barely kisses the previous one for a soft gradient. -
Soften the edges:
If the rainbow looks too stiff, take a clean, slightly damp brush and run it along the inner edge of the purple to fade it softly into the white paper.
Natural Deckled Edge
To get a perfect torn edge, fold the paper deeply along the line you want, wet the fold with a damp brush, wait 30 seconds, and pull apart gently.
Step 3: Sky and Clouds
-
Create a cloud wash:
Mix a very watery, pale blue-grey. Paint loosely around the rainbow being careful not to touch the wet colors yet. -
Lift out clouds:
while the blue-grey wash is wet, use a crumpled paper towel to blot lifting up pigment to create fluffy white cloud shapes. -
Define shadows:
Once the first layer is dry, add slight shadows to the bottom of your clouds using a slightly darker grey-blue mix for volume.
Add Metallic Shimmer
Once dry, lightly glaze a metallic pearl watercolor over the rainbow’s arch or the water ripples to make the painting glow in sunlight.
Step 4: Land and Water
-
Paint the distant land:
Mix a deep forest green. detailed small, vertical strokes to suggest trees along the horizon line you sketched earlier. -
Fill the water:
For the lake, use a cool blue tone. Paint horizontal strokes across the bottom section, leaving small slivers of white paper showing through to mimic sparkling ripples. -
Add reflected color:
While the water area is wet, drop in a tiny amount of the rainbow colors near the shoreline if you want a subtle reflection, or keep it simple blue as shown in the reference. -
Final touches:
Let the entire piece dry completely. If the paper has buckled, you can press it under a heavy book overnight to flatten it out.
Now you have a serene keepsake that captures the calm after the storm
Rainbow With a Black Tree Silhouette
Combine the soft, bleeding colors of watercolor with the stark contrast of black ink in this mixed-media piece. This project features a vibrant rainbow arching over a detailed, silhouetted tree, creating a scene that feels both hopeful and grounded.
Step-by-Step Tutorial
Materials
- Cold press watercolor paper (A4 or slightly smaller)
- Watercolor paint set
- Round watercolor brush (size 6 or 8)
- Small round watercolor brush (size 2 or 3)
- Black fine liner pen (0.3mm or 0.5mm)
- Jar of clean water
- Paper towels
- Pencil and eraser
Step 1: Painting the Rainbow Base
-
Sketch lightly:
Begin by using a pencil to very lightly sketch the arch of the rainbow. You don’t need perfect lines, just a general guide for where the colors will flow. Mark a small area at the bottom left for the cloud. -
Prepare your colors:
Activate your watercolor paints with a drop of water each. You will need red, orange, yellow, green, blue, and purple. -
Paint the red band:
Using your larger round brush, load it with red paint and create the outermost arch. Start from the left side and sweep up and over to the right. Let the end fade out naturally. -
Blend in orange:
While the red is still slightly damp, rinse your brush and pick up orange paint. Paint the band directly underneath the red, allowing the edges to touch and bleed together slightly for a soft transition. -
Continue the spectrum:
Repeat this process for yellow, green, blue, and purple, working your way inward. Try to keep the bands roughly the same width, but don’t worry about perfection; the handmade look adds charm. -
Add the cloud:
At the bottom left end of the rainbow, where the colors start, paint a loose, fluffy cloud shape using diluted blue paint. Let the rainbow colors bleed slightly into the top of the cloud to connect them. -
Create rain:
With the small brush and the same diluted blue, make small vertical dashes falling from the cloud to simulate gentle rain. Vary the pressure to make them look like droplets. -
Let it dry completely:
This is crucial. The paper must be bone dry before you add the ink drawing, or the pen lines will bleed and ruin the crisp effect. Wait at least 20-30 minutes.
Clean Edges
For a smoother look, erase your pencil guides gently after the paint is fully dry but before you start inking the tree.
Step 2: Drawing the Tree Silhouette
-
Outline the trunk:
Using the black fine liner, start drawing the tree trunk on the right side of the paper. Make the base wider and narrow it as it reaches upward toward the rainbow. -
Fill the trunk:
Color in the trunk solid black with your pen. I find using small, overlapping strokes helps create a nice, dense texture that resembles bark. -
Draw primary branches:
Extend thick branches outward from the top of the trunk. Let some reach towards the rainbow and others stretch out to the side. -
Add secondary branches:
From each main branch, draw smaller, thinner branches splitting off. Keep your wrist loose to create natural, slightly jagged lines rather than straight sticks. -
Detail the twigs:
Continue splitting the branches until you have very fine twigs at the ends. This creates the intricate, lacy look of a winter tree. -
Add leaf textures:
On the tips of the smallest twigs, draw tiny scribbles, loops, or small leaf shapes. These don’t need to be realistic; they just add texture and volume to the canopy. -
Ground the tree:
At the base of the trunk, drawn short, spiky lines to represent grass. Create a small hill shape to show the ground so the tree doesn’t look like it’s floating. -
Add final details:
Draw a few small wildflowers or distinct blades of grass on the far right edge near the trunk to balance the composition.
Sparkle & Shine
Once the watercolor is dry, add details with a metallic gold or silver gel pen on the rain droplets or tree leaves for magical flair.
Display your finished piece in a simple frame to highlight the beautiful contrast between the colorful sky and the dark earth


Rainbow Heart With Cloud Edges
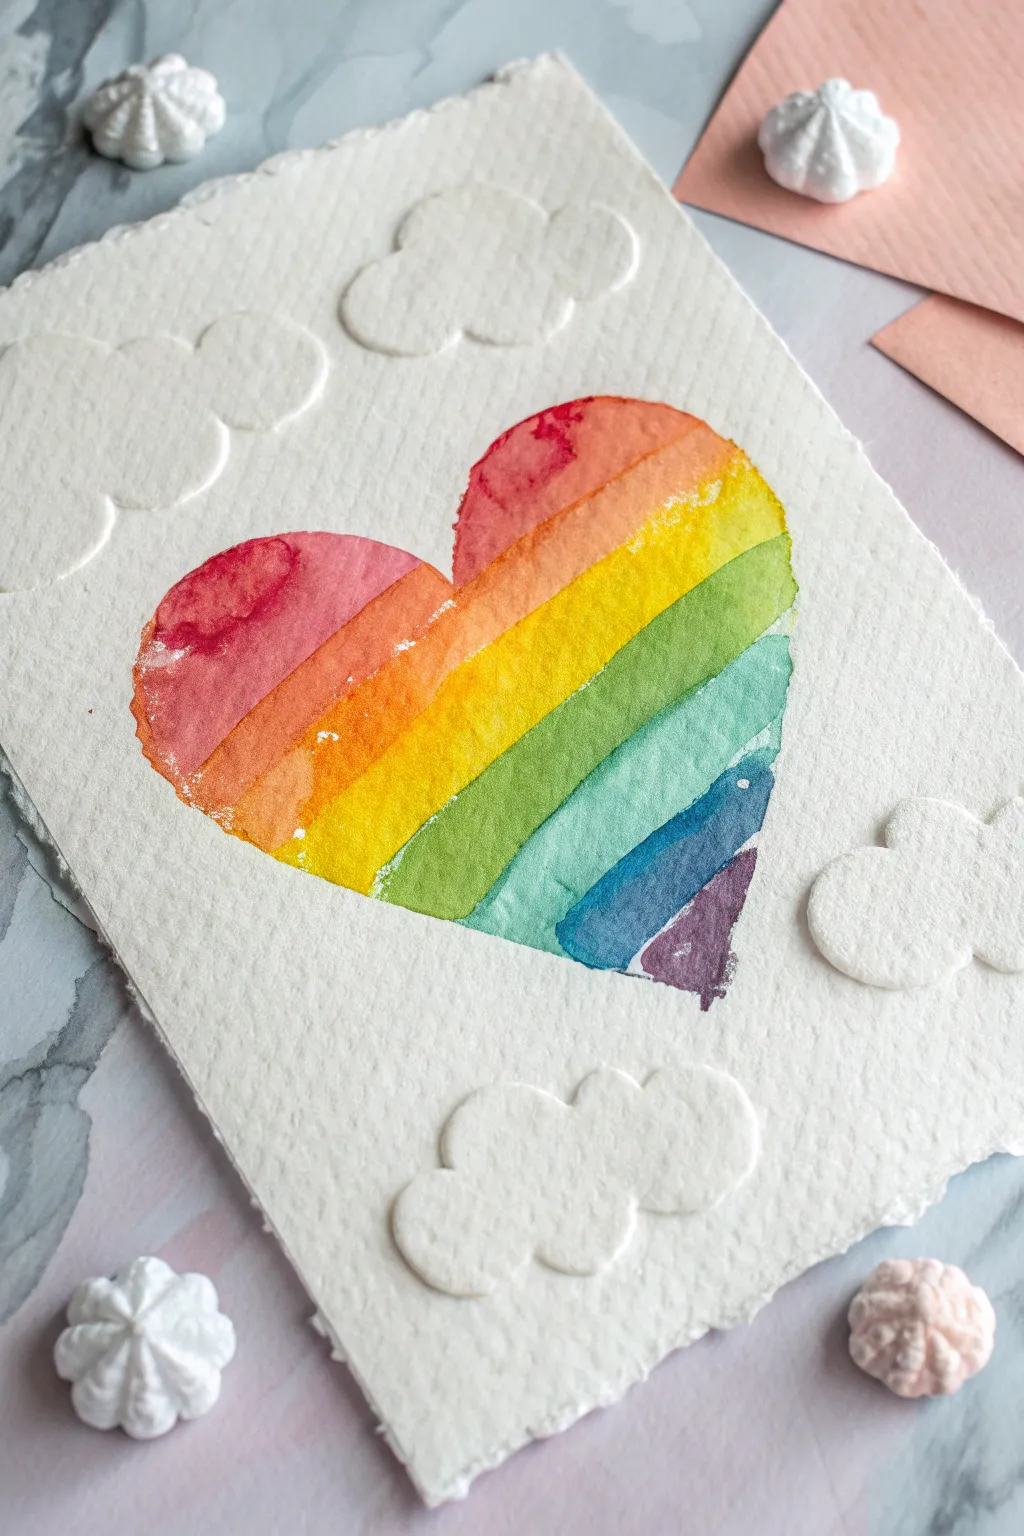
Combine the vibrant flow of watercolors with the tactile elegance of dry embossing in this charming textured artwork. The result is a piece that feels as lovely as it looks, featuring a crisp rainbow heart floating among soft, raised clouds.
Step-by-Step Guide
Materials
- Heavyweight cold-press watercolor paper (300 gsm or higher)
- Watercolor paints (rainbow palette: red, orange, yellow, green, blue, indigo, violet)
- Flat shader brush (size 6 or 8)
- Round detail brush
- Pencil and eraser
- Paper towels
- Masking fluid (optional but recommended)
- Embossing stylus or empty ballpoint pen
- Cloud stencil or thick cardstock to make one
- Ruler
- Water jar
- Painter’s tape
Step 1: Preparation & Sketching
-
Prepare the paper:
Start by tearing your watercolor paper to size if you want those lovely deckled edges shown in the example. Score and fold it back and forth along a ruler edge, then wet the fold line slightly before carefully tearing to get that soft, fibrous look. -
Sketch the heart:
Lightly draw a large heart shape in the center of your paper using a pencil. Keep your lines faint so they won’t show through the translucent watercolor later. -
Section the stripes:
Using a ruler, lightly mark diagonal lines across the heart to divide it into seven equal sections for your rainbow stripes. These lines will guide your painting.
Light Box Hack
No light box for embossing? Tape your template and paper to a sunny window. The daylight acts as a perfect backlight to see exactly where to press your stylus.
Step 2: Painting the Rainbow
-
Mix your palette:
Prepare your watercolor paints in a palette, ensuring you have watery but vibrant puddles of red, orange, yellow, green, blue, indigo, and violet ready to go. -
Paint the first stripe:
Starting at the top left with red, use your flat brush to fill in the first diagonal section. Carefully edge the brush along the heart’s curve to keep a crisp outline. -
Add the orange layer:
Rinse your brush and pick up the orange paint. Apply it to the second stripe. I like to let the wet edge of the orange just barely touch the wet red paint so they bleed together slightly for a blended look. -
Continue the spectrum:
Proceed down the heart, painting the yellow, green, and blue stripes. If you notice a puddle forming, dab your brush on a paper towel and lift the excess water to prevent blooms. -
Finish the bottom tip:
Complete the heart by painting the indigo and violet sections at the bottom tip. Be very careful with the point of the heart to keep it sharp. -
Allow to dry completely:
Let the painting dry fully. This is crucial because the next step involves pressing down on the paper, and damp paper will tear.
Fixing Warped Paper
If the water caused buckling, place the finished, completely dry artwork under a heavy stack of books overnight to flatten it out perfectly.
Step 3: Dry Embossing the Clouds
-
Create cloud templates:
While the paint dries, cut small cloud shapes out of thick cardstock or use a plastic cloud stencil. You’ll need shapes that are smaller than the open spaces around your heart. -
Position the template:
Once the paint is bone dry, place your paper face down on a light pad or a bright window. Tape your cloud template to the *front* side of the paper where you want the cloud to appear. -
Trace to emboss:
Working from the back of the paper (which is facing you), use your embossing stylus to firmly trace the outline of the cloud template you can see through the paper. Press hard to stretch the paper fibers. -
Fill the shape:
After outlining, coloring in the entire shape with the stylus from the back. This pushes the whole cloud area forward on the front side, creating that raised, puffy effect. -
Repeat the process:
Move your template to a new spot and repeat the embossing process until you have a pleasing arrangement of raised clouds surrounding your rainbow heart. -
Clean up:
Gently erase any remaining visible pencil marks from your initial sketch, being careful not to rub squarely over the painted area.
Now you have a piece of art that invites touch as much as it delights the eye
Rainbow Burst From a Paintbrush
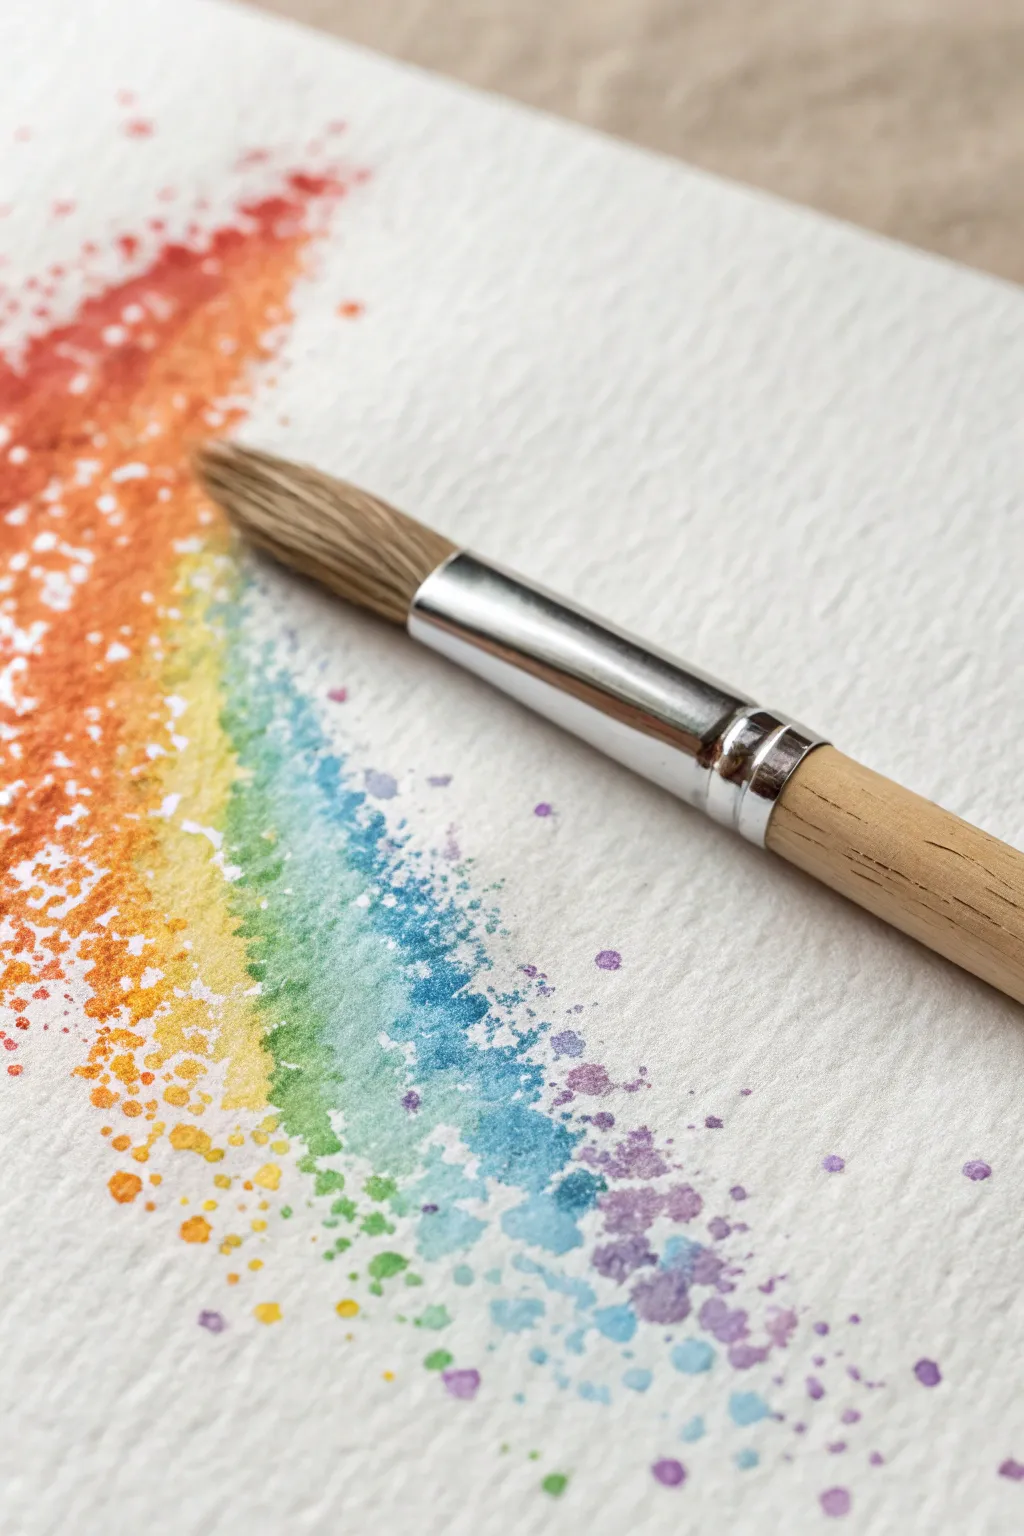
Capture the magic of color exploding right from your brush with this vibrant, speckled rainbow swoosh. This technique relies on the unique texture of cold press paper to break up the paint, creating a loose, energetic effect that looks like stardust.
Step-by-Step Tutorial
Materials
- Cold spray watercolor paper (very textured)
- Round watercolor brush (size 8 or 10)
- Watercolor paints (tube or pan)
- Jar of clean water
- Paper towel
- Palette for mixing
- Masking tape (optional)
Step 1: Preparation & Setup
-
Paper Selection:
Choose a high-texture ‘cold press’ or ‘rough’ watercolor paper. The success of this effect relies heavily on the ‘tooth’ of the paper to grab pigment while leaving white valleys. -
Secure the Page:
If you are using a loose sheet, tape the edges down to a board to prevent buckling. If you are using a block, you are ready to go. -
Palette Prep:
Pre-wet your watercolor pans or squeeze out fresh dots of red, orange, yellow, green, blue, and purple onto your palette. -
Moisten the Brush:
Dip your round brush in water, then pat it on a paper towel until it is damp but not dripping wet. This is crucial for the ‘dry brush’ look.
Too Much Water?
If the paint fills perfectly into the paper grooves instead of skipping over them, your brush is too wet. Blot it thoroughly on a towel before reloading pigment.
Step 2: Painting the Rainbow Arc
-
Load Red Pigment:
Pick up a generous amount of red paint with your damp brush. Ideally, the paint consistency should feel creamy, not watery. -
The First Swoosh:
Starting at the top left, drag the brush swiftly in a diagonal curve toward the bottom right. Use light pressure so the brush skips across the paper’s texture. -
Transitioning to Orange:
Quickly rinse your brush, blot it damp again, and pick up orange paint. Paint alongside the red strip, slightly overlapping while the red is still workable. -
Blending the Edge:
Where the red and orange meet, let the bristles dance lightly to encourage soft mixing without creating a muddy puddle. -
Yellow and Green:
Repeat the process for yellow and green. As you move down the arc, maintain that swift, skimming motion to keep the white speckles visible. -
Add Cool Tones:
Continue blending in blue and then purple at the end of the tail. The arc should naturally taper off or fade out as the paint runs low on the brush.
Step 3: Splatter and Texture
-
Prepare for Splatter:
Once the main arc is laid down, load your brush with a watery mix of red paint. -
Controlled Tapping:
Hold the brush over the red section of the painting and tap the handle against your finger or another brush to dislodge small droplets. -
Color-Coordination:
Clean the brush and repeat the splatter process for each color section (orange over orange, blue over blue) to extend the ‘burst’ effect outward into the white space. -
Micro-Details:
For tiny, precise dots near the edges, I utilize a smaller detail brush to manually place specks of intense pigment, filling in any gaps that look too empty. -
Softening Edges:
If any splatter dots look too harsh, touch them lightly with a clean, damp brush to diffuse them into the paper.
Pro Tip: Texture
Practice the ‘dry brush’ sweep on a scrap piece of paper first. Speed matters—moving the brush faster often creates better texture separation than slow strokes.
Step 4: Finishing Touches
-
Prop the Brush:
For the artful photo finish shown in the example, clean your main painting brush thoroughly and dry the handle. -
Placement:
Lay the clean brush diagonally across the painted arc, aligning it so the ferrule (the metal part) sits near the transition from warm to cool colors. -
Final Drying:
Allow the effortlessly blended colors and splatters to dry completely before moving the paper or removing any tape.
Now you have a dynamic splash of color that brings energy to your sketchbook
Sponge-Swipe Rainbow Texture
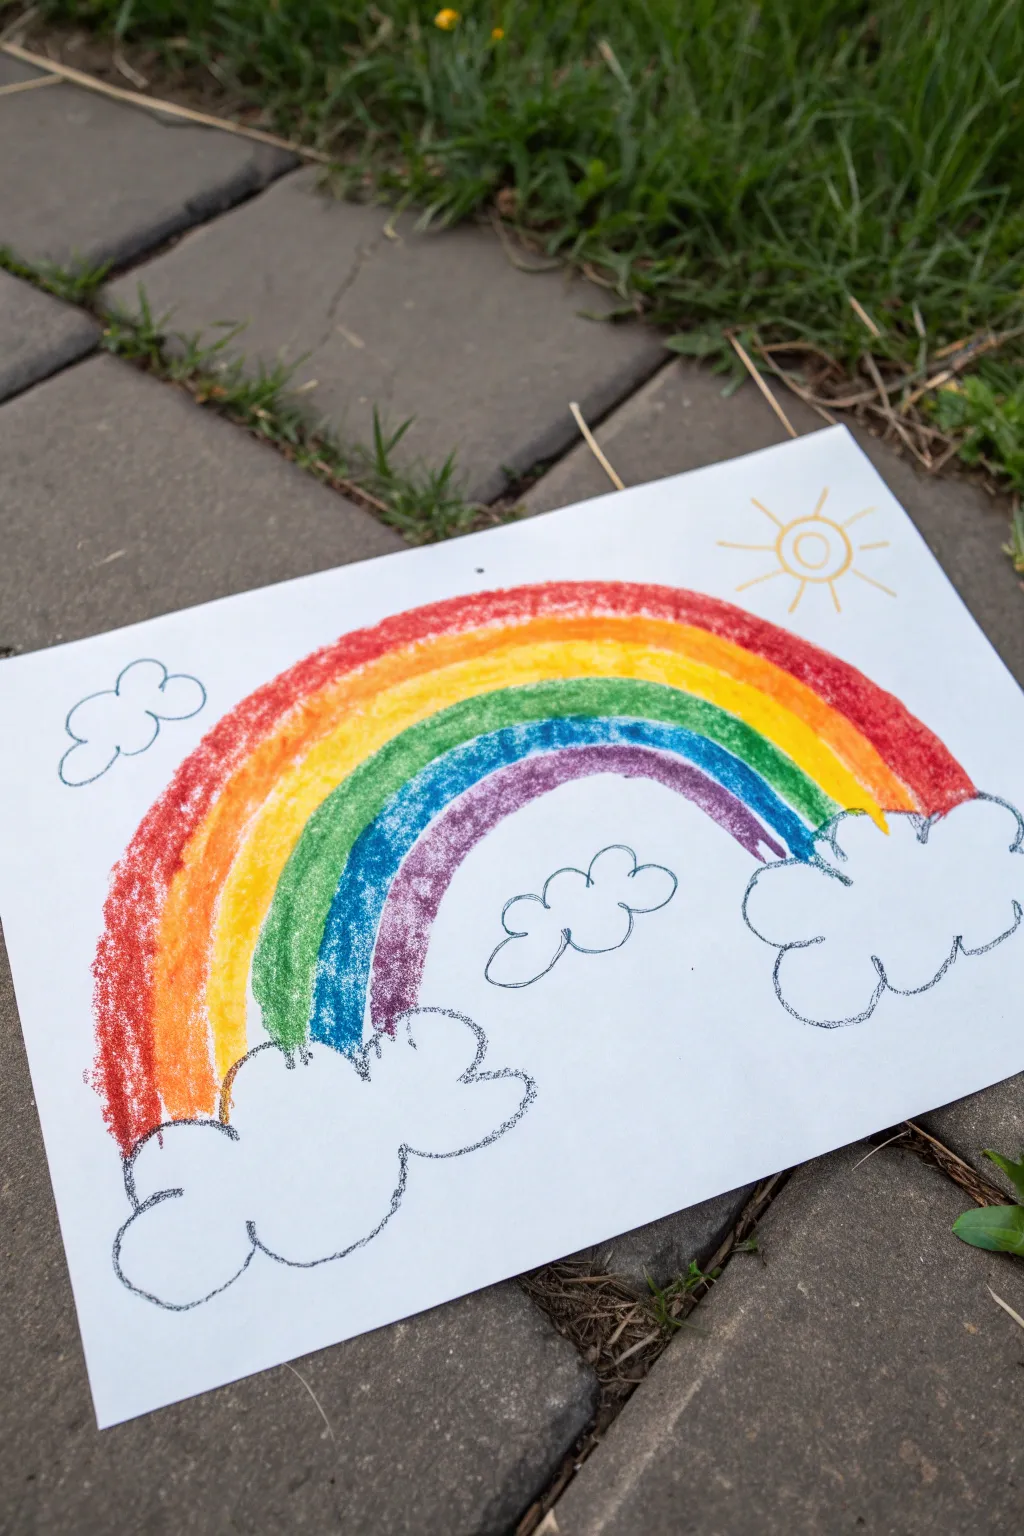
This joyful project captures the charm of a child’s drawing with vibrant, textured strokes that bring a classic rainbow to life. Using oil pastels or wax crayons provides a wonderful, grainy coverage that pops beautifully against crisp white paper.
Step-by-Step
Materials
- White drawing paper or cardstock (A4 size)
- Oil pastels or soft wax crayons (Red, Orange, Yellow, Green, Blue, Indigo/Purple)
- Black wax crayon or oil pastel
- Yellow wax crayon or oil pastel (for the sunlight)
- A clean, flat surface to work on
Step 1: Creating the Clouds
-
Map out the base:
Start by deciding where your rainbow will ‘land.’ You’ll need two large cloud clusters at the bottom corners of your paper. -
Draw the left cloud:
Using a black pastel or crayon, draw a fluffy cloud shape in the bottom left corner. Use bumpy, curved lines—think of drawing the number ‘3’ over and over again. -
Draw the right cloud:
Repeat this process on the bottom right side. Make this cloud slightly wider to anchor the other end of your rainbow. -
Add floating clouds:
Sketch two smaller, simpler clouds floating in the sky area. Place one near the top left and another hovering just under where the purple arch will go.
Smooth Blends
For a softer look, use your finger or a paper towel to gently rub the boundaries where two colors meet. This blends them slightly.
Step 2: Building the Rainbow
-
Start with Red:
Pick up your red pastel. Start from the top of the left base cloud and draw a large, high arch that lands on the right base cloud. This defines the outer boundary. -
Thicken the Red band:
Go back over your red line. Press firmly to create a thick, solid band of color. Allow the texture of the paper to show through slightly for that lovely grainy look. -
Add the Orange layer:
Directly underneath the red arch, draw your orange band. Let the colors touch or slightly overlap to avoid white gaps between the stripes. -
Fill in with Yellow:
Follow the curve with a bright yellow pastel. I find that pressing a bit harder here helps the yellow stand out against the white paper. -
Create the Green arch:
Draw the green stripe next. Try to keep the width consistent with the previous bands, following the established curve. -
Draw the Blue band:
Add a stripe of distinct blue. If your curve is getting smaller/tighter, that’s perfectly fine; it creates depth. -
Finish with Purple:
Complete the rainbow with the innermost purple or indigo arch. This should create a cozy tunnel shape in the center.
Sparkle Upgrade
Once finished, lightly brush a thin layer of liquid glue over the clouds and sprinkle silver glitter for a magical, shimmering 3D effect.
Step 3: Finishing Touches
-
Draw the Sun:
In the upper right corner, use a yellow pastel to draw a simple circle. -
Add sun rays:
Draw straight lines radiating outward from the sun’s center. Keep them loose and sketchy for a playful feel. -
Clean up edges:
Check your clouds. If the rainbow coloring went over the black outlines, gently re-trace the black cloud loops to make them pop again.
Step back and admire your cheerful, colorful masterpiece that brightens up any day
Rainbow Geometric Mountains
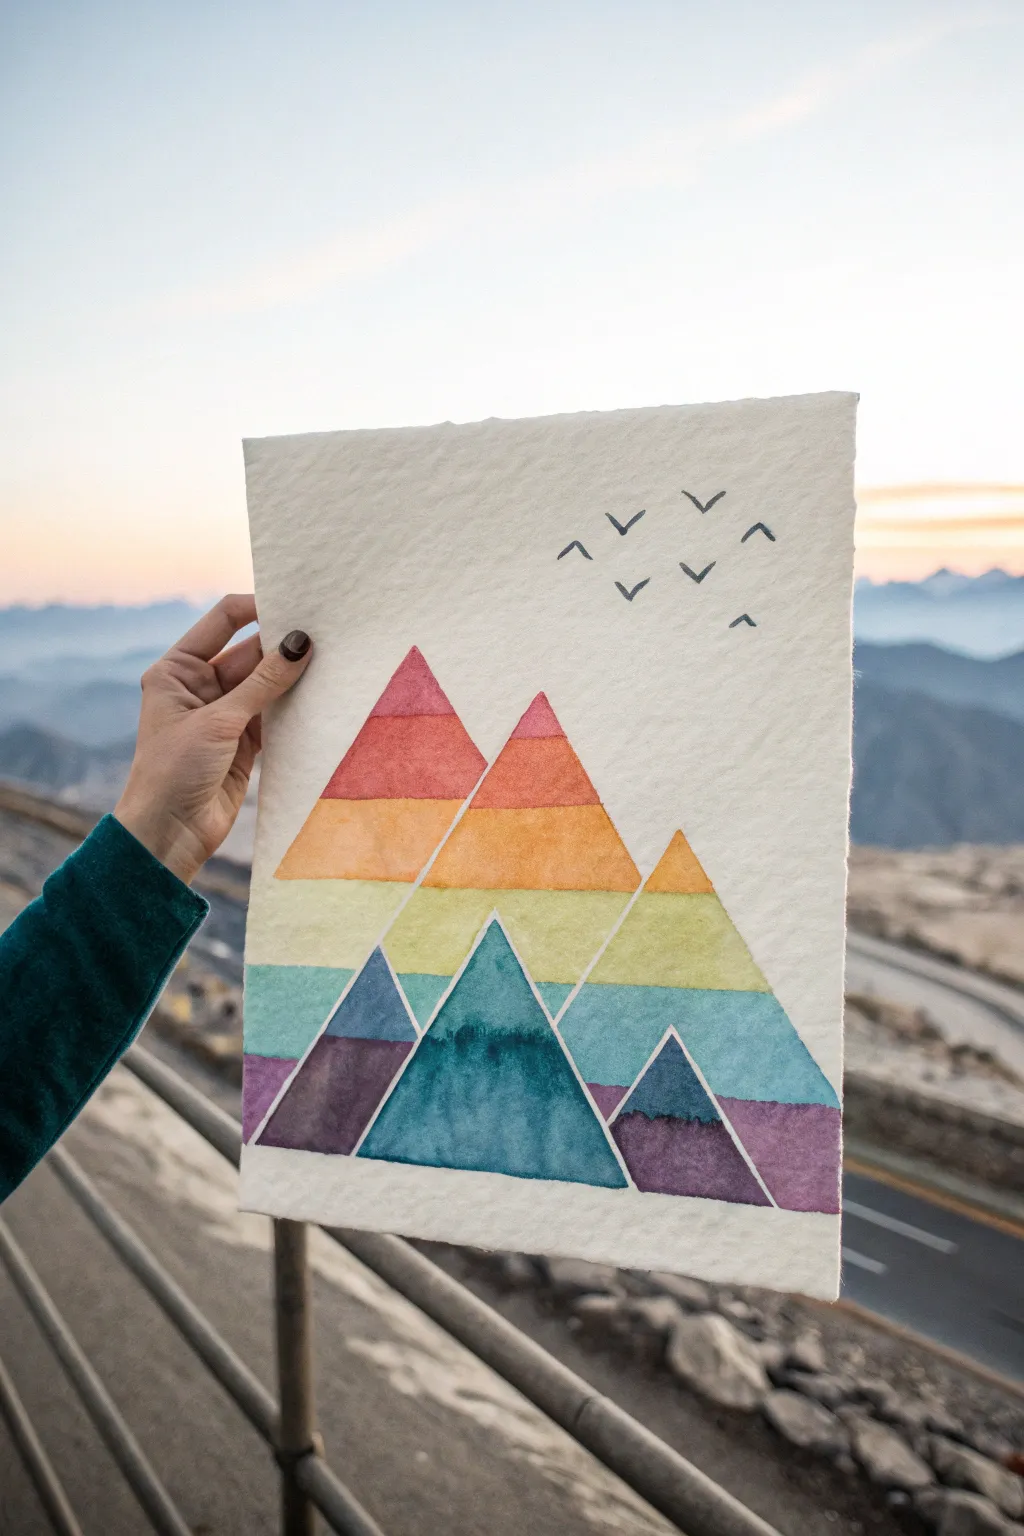
Capture the magic of a mountain sunrise with this crisp, geometric watercolor study. Using distinct color blocks and sharp lines, you’ll build a vibrant range of peaks that transition beautifully from cool valleys to warm summits.
Step-by-Step Guide
Materials
- Cold press watercolor paper (heavyweight, textured)
- Watercolor paint set
- Flat shader brush (size 6 or 8)
- Small round brush (size 2)
- Pencil (HB or lighter)
- Ruler
- Black fine liner pen
- Painter’s tape or masking tape
- Jar of water & paper towels
Step 1: Drafting the Design
-
Secure Your Paper:
Begin by taping down all four edges of your watercolor paper to a hard board or table. This prevents buckling when the paper gets wet and creates a clean white border. -
Mark Horizon Lines:
Using your ruler and pencil, lightly draw six horizontal lines across the paper. Space them evenly to create seven distinct bands of color, but leave plenty of white space at the top for the sky. -
Sketch the Base Mountains:
Draw three large triangles for your primary mountain shapes. Their points should reach up into what will be the red and orange bands, and their bases should sit in the green or blue bands. -
Add Foreground Peaks:
Sketch smaller, overlapping triangles in the foreground. These should sit lower on the page, primarily occupying the purple and blue sections of your grid. -
Refine the Grid:
Now, go back over your pencil lines. You need to verify that the horizontal lines only exist *inside* the mountain triangles. Erase the horizontal lines in the background ‘sky’ area so the mountains stand alone against white paper.
Bleeding Lines?
If colors bleed into each other too much, your paint is too wet. Paint one band, skip the next one down, and paint the third. Then go back and fill the gaps once dry.
Step 2: Painting the Gradient
-
Start with Red:
Load your flat brush with a bold red watercolor. Paint the very tips of the tallest mountains, carefully staying within the triangle lines. The flat edge of the brush is perfect for getting those sharp angles. -
Transition to Orange:
Clean your brush and pick up a vibrant orange. Paint the band immediately below the red tips. If the red is still wet, a tiny bit of bleed is okay, but for this geometric look, I prefer letting each color dry just a touch to keep the lines fairly crisp. -
Yellow Layer:
Move down to the next section with a bright, sunny yellow. Ensure the paint fully touches the orange line above it without leaving white gaps. -
Green Band:
Mix a fresh grassy green. Paint the next horizontal strip. Notice how the mountain shapes are getting wider as you move down; keep your edges sharp against the white background. -
Light Blue Section:
Apply a sky blue or cyan tone to the next band. This is often where the secondary, smaller mountains might start to appear, so pay attention to which triangle belongs to which layer. -
Deep Blue Tones:
Switch to a darker royal blue or indigo for the lower sections. For the foreground mountains that are entirely in the lower bands, you can use a solid wash of blue-green or teal to set them apart. -
Purple Base:
Finish the bottom-most sections and the lowest peaks with a deep purple or violet. This grounds the image and completes the full spectrum gradient. -
Let it Dry Completely:
Step away and let the artwork dry fully. If the paper feels cool to the touch, it is still damp.
Step 3: Final Details
-
Erase Guidelines:
Once the paint is bone-dry, gently erase any visible pencil marks around the exterior of the mountains to clean up the silhouette. -
Outline the Shapes:
Use a white gel pen or very thin white gouache to re-draw the outlines of the triangles if you lost definition, or leave them soft. If you want a graphical look, define the edges. -
Add the Flock:
With a fine black pen or very small round brush and black paint, add the silhouette of birds flying. Draw simple ‘V’ shapes in the upper right white space. -
Vary the Birds:
Make sure the birds aren’t all identical. Make some ‘V’ shapes wider and some narrower to simulate different wing positions in flight. -
Peel the Tape:
Slowly peel your masking tape away from the paper at a 45-degree angle to reveal your crisp, clean edges.
Add Texture
While the paint is still wet in the darker blue and purple sections, sprinkle a pinch of table salt on it. Brush it off when dry for a chilly, frosty texture.
Frame your geometric landscape to bring a permanent splash of color to any room
Rainbow Night Sky With Simple Stars
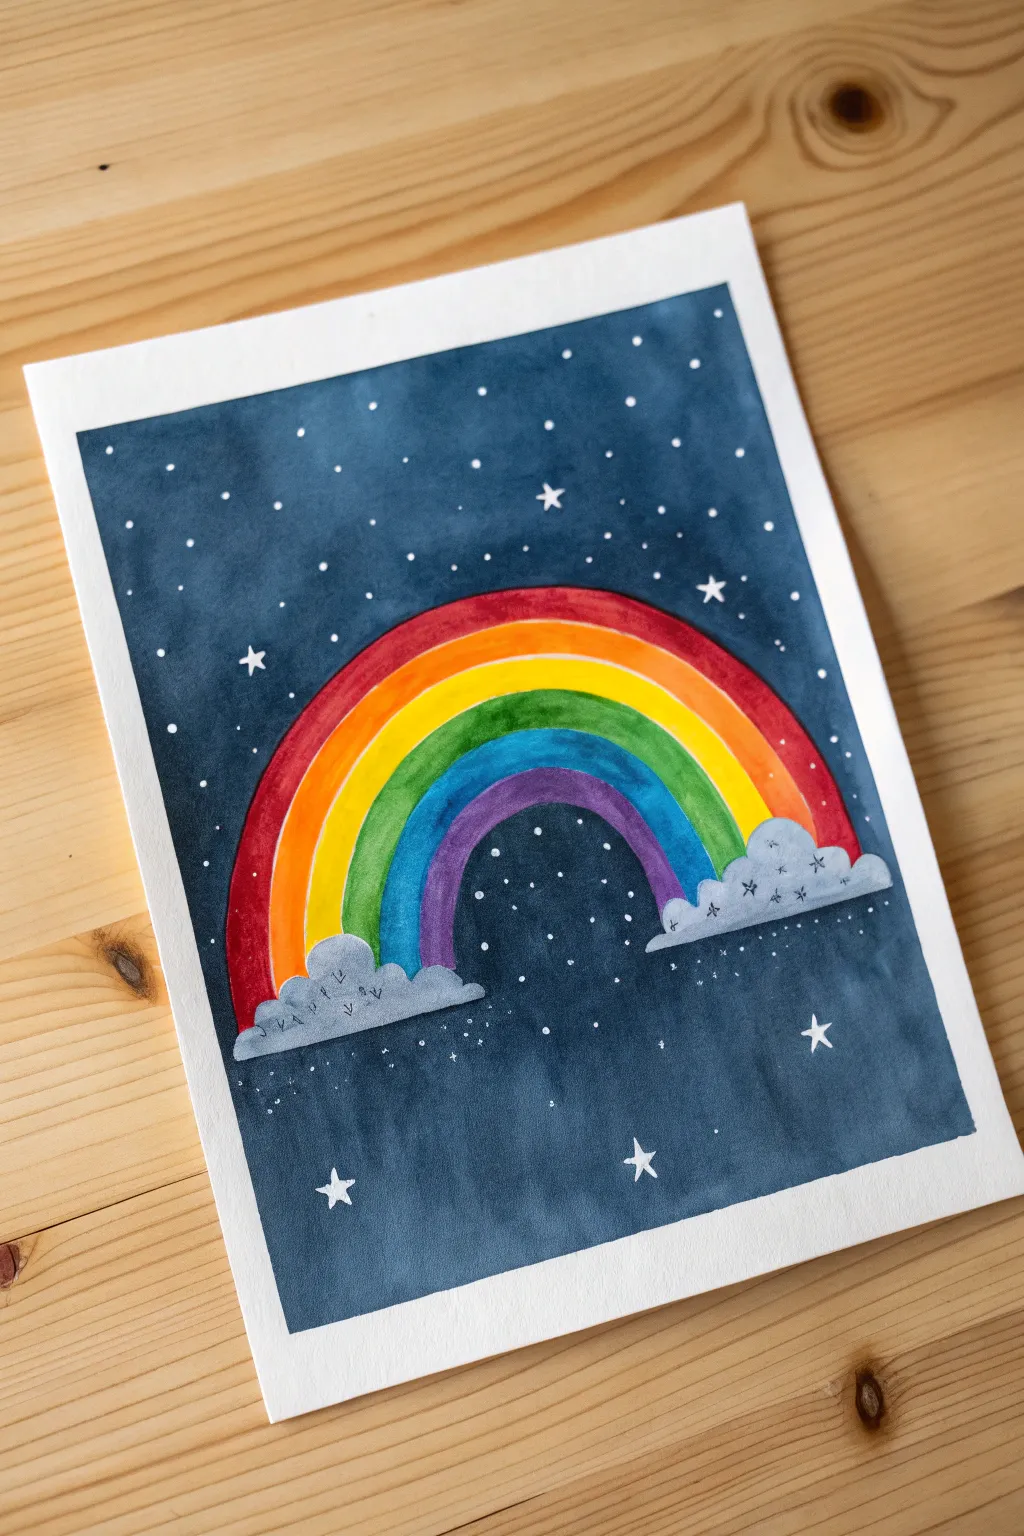
Transform a classic rainbow motif by setting it against a deep, moody night sky instead of daytime blue. This striking contrast makes the vibrant colors pop beautifully, creating a whimsical scene perfect for beginners.
Detailed Instructions
Materials
- Watercolor paper (140lb/300gsm recommended)
- Watercolor paints (rainbow spectrum + indigo/Payne’s grey)
- Round brushes (size 6 for washes, size 2 for details)
- Masking tape or washi tape
- White gel pen or opaque white gouache
- Pencil and eraser
- Two jars of water
- Paper towels
Step 1: Preparation & Sketching
-
Secure your paper:
Tape down all four edges of your watercolor paper to a flat surface or board. This creates a crisp white border and prevents the paper from buckling when wet. -
Sketch the rainbow:
Lightly draw a large arch in the center of the paper. Add six evenly spaced bands inside the arch. Keep your pencil pressure very light so the lines don’t show through the lighter colors later. -
Add the clouds:
At the base of each rainbow leg, sketch a fluffy, flat-bottomed cloud shape. Let them overlap the bottom edge of the rainbow slightly.
Step 2: Painting the Rainbow
-
Start with red:
Load your brush with vibrant red watercolor. Carefully paint the outermost band of the rainbow, following the curve smoothly. -
Paint the warm tones:
Moving inward, paint the orange band next. If the red is still wet, be careful not to let them touch unless you want a blended look; for crisp stripes, wait a moment for the red to dry or leave a hairline gap. -
Add yellow and green:
Continue with a bright yellow band, followed by a grassy green. I find that rinsing the brush thoroughly between these lighter colors keeps them from looking muddy. -
Finish the cool tones:
Paint the blue band, and finally, fill the innermost arch with a deep violet or purple. Let the entire rainbow section dry completely before moving on.
Bleeding Colors?
If your sky paint bleeds into the rainbow, stop immediately. Let it dry completely, then gently lift the mistake with a damp, clean brush or cover it with opaque paint later.
Step 3: Creating the Night Sky
-
Mix the sky color:
Create a large puddle of dark night-sky color. Indigo is perfect, or mix dark blue with a touch of black or burnt umber to deepen it. -
Paint around the rainbow:
Using your larger brush, carefully paint the negative space around the rainbow and clouds. Outline the shapes first with the tip of your brush to get a clean edge, then fill in the rest of the background. -
Fill the center:
Don’t forget to paint the small arch of sky underneath the purple band of the rainbow. -
Smooth the wash:
Work somewhat quickly to cover the sky area so the paint dries evenly without hard streaks. Let the background dry completely—it must be bone dry for the next steps.
Add Dimension
Make the stars glow by painting a very faint, washed-out circle of water around the bigger stars, lifting a tiny bit of the blue pigment.
Step 4: Clouds & Details
-
Paint the clouds:
Mix a very watery, pale grey. Fill in the cloud shapes you sketched earlier. While wet, you can drop in a tiny bit of darker grey at the bottom for shadow. -
Outline the clouds:
Once the clouds are dry, use a fine-tip black pen or very dry brush with dark paint to loosely outline the cloud bumps and add a few little ‘u’ shapes inside for texture. -
Add major stars:
Using a white gel pen or a fine brush with white gouache, draw several five-pointed stars scattered across the dark sky. -
Create distant stars:
Fill the empty spaces in the sky with small white dots. clustering some together and leaving other areas sparse creates a more natural galaxy effect. -
Add sparkle:
You can add tiny little crosses or four-pointed sparkles near the clouds or rainbow for extra magic. -
The reveal:
Once everything is absolutely dry, slowly peel away the masking tape at a 45-degree angle to reveal your clean white border.
Hang your finished piece in a spot that needs a little starry wonder


Have a question or want to share your own experience? I'd love to hear from you in the comments below!