If you’re craving that cozy autumn vibe, fall pallet painting ideas are my go-to for big impact with simple supplies. I love how reclaimed wood adds instant rustic charm, so even beginner brushwork looks warm and intentional.
Oversized Pumpkin Across the Slats
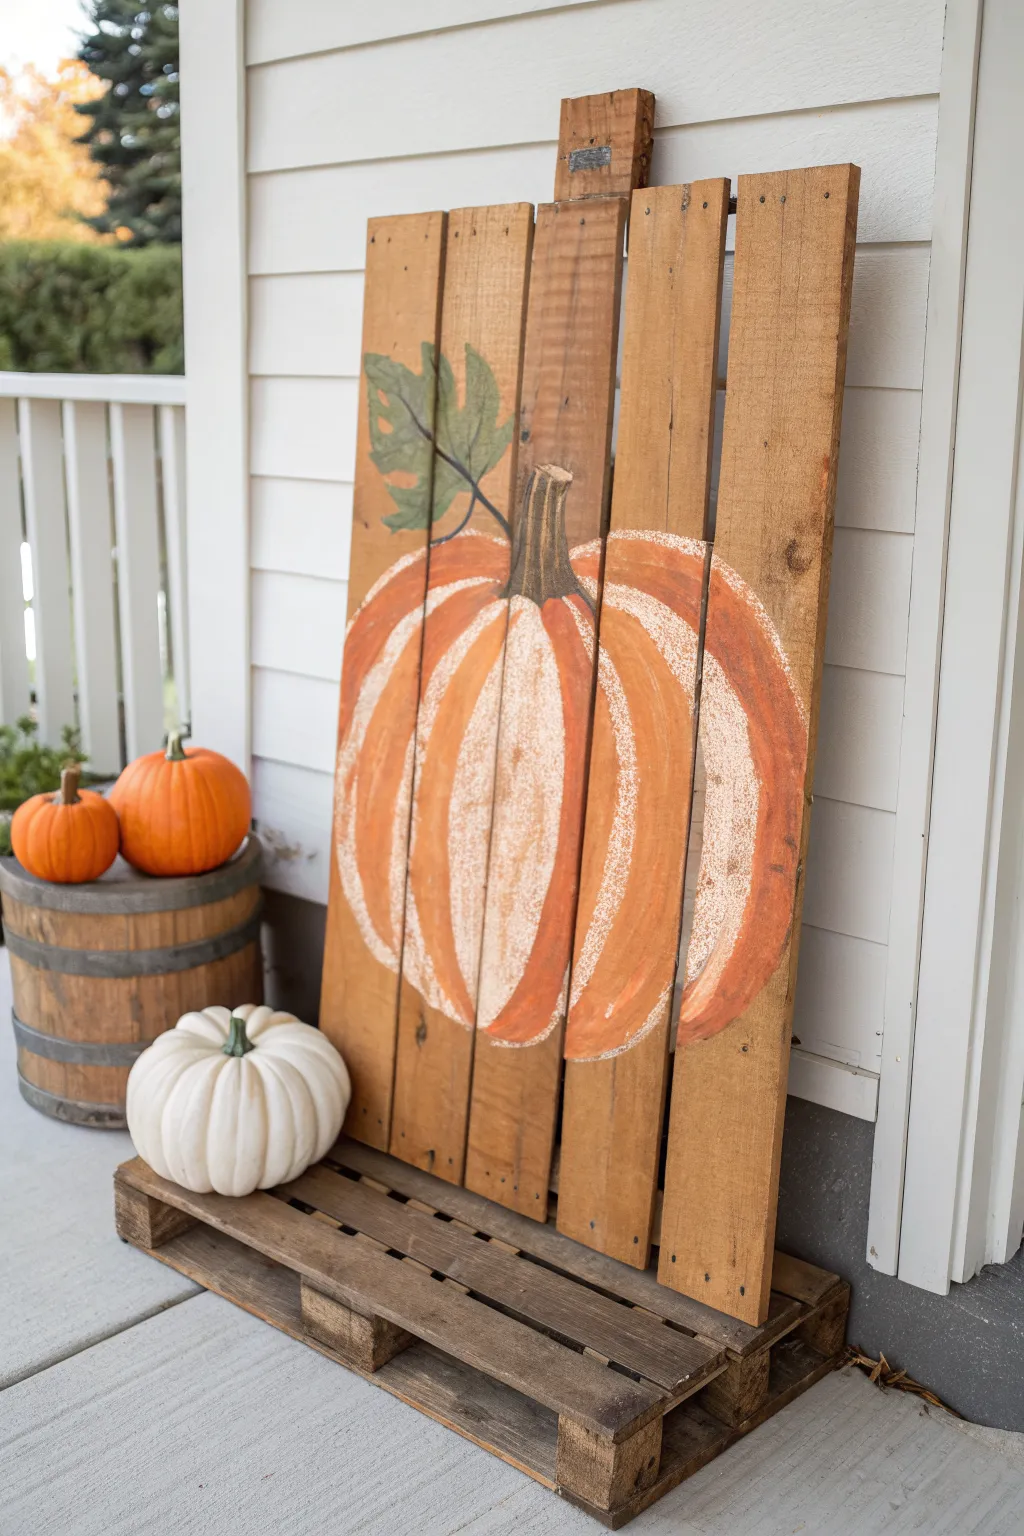
Transform a series of reclaimed wood slats into a charming oversized pumpkin that spans the entire surface. This project embraces the natural texture of the wood, using dry brushing techniques to create a warm, weathered look perfect for your front porch.
Detailed Instructions
Materials
- 4-5 wide wooden pallet slats (approx. 40″ tall)
- 2 horizontal wood braces for the back
- Wood screws or nails
- Sandpaper (80 and 120 grit)
- Acrylic craft paint (Burnt Orange, Pumpkin Orange, Titanium White, Dark Brown, Sage Green)
- 3-inch wide flat paintbrush
- Medium round brush
- Linear detail brush
- Chalk or pencil for sketching
- Matte clear sealer spray
Step 1: Build the Canvas
-
Arranging the Slats:
Lay your vertical pallet slats side-by-side on a flat surface. Leave a purposefully jagged top edge by positioning the center board slightly higher than the rest to create an uneven, rustic silhouette. -
Securing the Back:
Place your two horizontal brace pieces across the back of the arrangement—one near the top and one near the bottom. Screw or nail each vertical slat into these braces to lock the structure together. -
Surface Prep:
Give the front surface a quick sanding with 80-grit sandpaper to remove deeper splinters, followed by 120-grit for a smoother painting surface. Wipe away all sawdust with a tacked cloth or damp rag.
Dry Brush Success
Wipe almost all paint off onto a paper towel before touching the wood. You want a whisper of color, not a glob, to get that scratchy texture.
Step 2: Sketch and Base Coat
-
Outline the Pumpkin:
Using a piece of chalk, sketch a large, squat oval shape that fills the bottom two-thirds of the wood canvas. Keep the lines loose; it doesn’t need to be perfectly symmetrical. -
Define the Ribs:
Draw curved lines radiating from the top center point down to the bottom edge to create the pumpkin’s distinct sections or ribs. The center rib should be the widest. -
Initial Coloring:
Load your wide flat brush with Pumpkin Orange. Paint the main body of the pumpkin, but keep the paint layer somewhat thin so the wood grain still peeks through in places. -
Skipping the Gaps:
When painting near the gaps between the slats, avoid flooding the cracks with paint. Keeping the edges of the boards clean maintains that distinct pallet-style aesthetic.
Step 3: Adding Dimension
-
Creating Highlights:
While the orange is dry to the touch, mix a little white with your orange paint. Use a dry-brush technique to stroke this lighter color down the center of each rib section, creating a rounded appearance. -
Defining Shadows:
Dip the edge of your brush into a tiny bit of brown mixed with orange. Run this darker shade strictly along the curved chalk lines you drew earlier to separate the ribs visually. -
Adding Texture:
Take pure Titanium White on a specialized texture brush or a dry chip brush. Lightly scuff vertical streaks over the highlighted areas to enhance the weathered, farmhouse look.
Fixing “Flat” Pumpkins
If your pumpkin looks 2D, darken the grooves between ribs with more brown and brighten the center of each rib with pure white. Contrast creates the curve.
Step 4: Details and Finish
-
Painting the Stem:
At the top center where the ribs meet, paint a thick, slightly curved stem using Dark Brown. Use your round brush to pull the color downward slightly into the orange to anchor it. -
Leaf Accents:
Sketch a jagged leaf shape extending from the left side of the stem. Fill it in with Sage Green, keeping the coverage semi-opaque. -
Leaf Veins:
Once the green is dry, use a liner brush with watered-down dark brown or black paint to draw the central vein and smaller branching veins on the leaf. -
Stem Texture:
Add a few thin vertical lines of light tan or white to the brown stem to simulate ridges and bark texture. -
Reference Check:
Step back and look at your work from a distance. If the pumpkin looks too flat, I prefer to go back in with a bit more white dry-brushing on the highest points of the pumpkin belly for extra pop. -
Sealing:
Finish the project by spraying the entire front surface with a matte clear sealer. This protects the acrylic paint from moisture if you plan to display it outdoors.
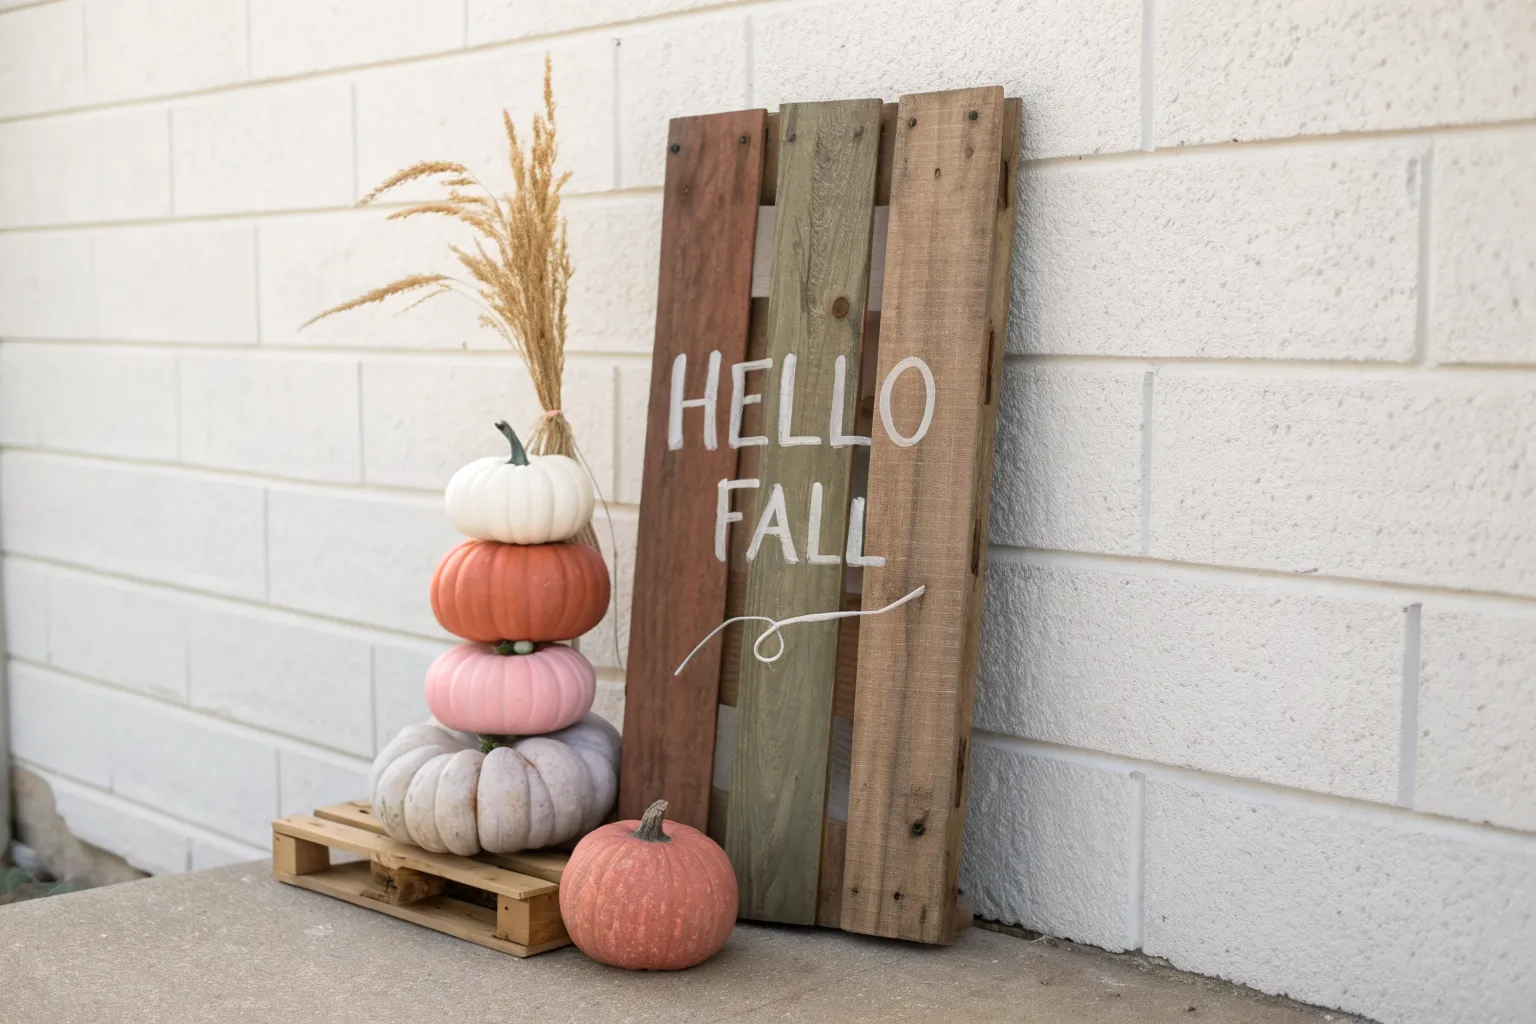
Lean your finished masterpiece against the wall and enjoy the instant harvest vibes it brings to your space


Trio of Plump Pumpkins in Warm Neutrals
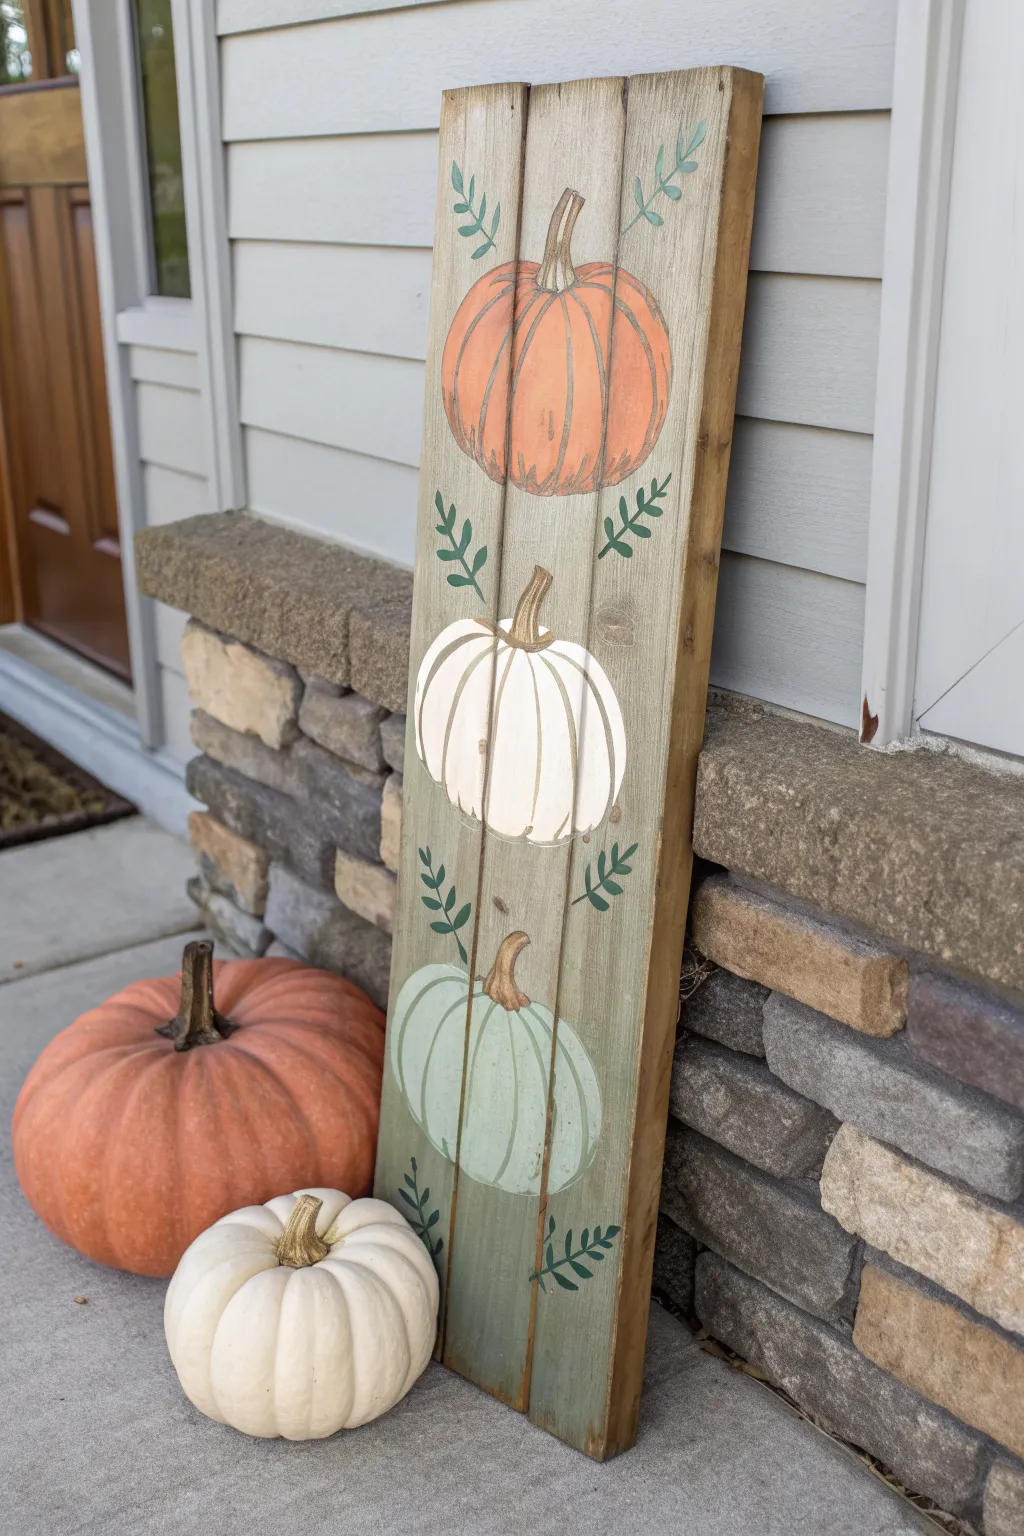
Bring the harvest season to your front porch with this charming vertical sign featuring a trio of stacked pumpkins in soft, earthy tones. The weathered wood background combined with muted orange, cream, and sage hues creates a cozy, rustic aesthetic perfect for autumn.
Step-by-Step
Materials
- Reclaimed pallet wood or 1×4 boards (approx. 3-4 feet long)
- Wood glue and nails/screws
- Sandpaper (medium and fine grit)
- Acrylic craft paints: Burnt Orange, Cream/Warm White, Sage Green, Dark Brown, White
- Assorted paintbrushes (flat 1-inch brush, medium round brush, fine liner brush)
- Pencil for sketching
- Paper plate or palette
- Water cup and paper towels
- Matte clear sealer spray (optional)
Step 1: Preparing the Canvas
-
Construct the base:
Begin by joining three lengths of wood together side-by-side to create your vertical plank. You can secure these by attaching two horizontal bracing strips across the back with wood glue and screws or nails. The finished width should be roughly 10-12 inches. -
Sand the surface:
Using medium-grit sandpaper, smooth down the face of the boards to remove major splinters, but don’t over-sand; preserving the saw marks and wood grain adds to the rustic charm. -
Apply a wash:
Create a watery mix of gray or diluted brown paint to stain the wood if it looks too new. Wipe it on and immediately wipe off the excess with a rag to give the wood a weathered, aged appearance. Let this dry completely.
Don’t Forget the Cracks
When painting over the seams where boards meet, push your brush bristles into the crack to ensure the pumpkin color continues into the gap, rather than leaving a jarring raw wood line.
Step 2: Blocking in the Shapes
-
Sketch the pumpkins:
Lightly draw three pumpkin outlines stacked vertically using a pencil. Make the top one slightly oval, the middle one rounder and squat, and the bottom one similar to the top. Ensure they are evenly spaced. -
Paint the top pumpkin:
Using a flat brush, fill in the top pumpkin silhouette with a muted burnt orange. Applying a thin first coat is fine; we want the wood texture to peek through slightly. -
Paint the middle pumpkin:
Clean your brush and fill in the center pumpkin with a warm cream or off-white paint. This central pumpkin acts as a visual break between the colors. -
Paint the bottom pumpkin:
Fill the lowest pumpkin shape with a soft sage green. If your green is too bright, mix in a tiny drop of brown or gray to mute it down to a farmhouse tone. -
Let the base coats dry:
Allow all three shapes to dry firmly to the touch. This prevents the detail work from muddying into the base colors later.
Make it 3D
Instead of painting the stems, glue on real dried pumpkin stems, driftwood pieces, or thick cinnamon sticks for extra texture and a tactile element.
Step 3: Adding Detail and Dimension
-
Create the segments:
For each pumpkin, use a slightly darker shade of its base color (or a watery brown) to paint curved vertical lines. These lines define the ribbed segments of the pumpkin. -
Add highlights:
Dip a dry brush into white paint and wipe most of it off. Lightly dry-brush the center of each pumpkin segment to simulate roundness and volume. -
Define the shadows:
Mix a small amount of dark brown with water to create a glaze. Run this along the bottom edge of each pumpkin and in the deep crevices between segments to add depth. -
Paint the stems:
Using a small round brush and dark brown paint, add a stem to the top of each pumpkin. Give them a twisted, organic look, rather than painting perfect rectangles. -
Highlight the stems:
Once the brown stems are dry, add thin streaks of tan or light gray to signify the wood grain and dried texture of the pumpkin stem.
Step 4: Vines and Finishing Touches
-
Sketch the foliage:
Plan out where your leaves will go. Pencil in simple vine distinct shapes curving outwards from the stems into the negative space on either side of the stacked pumpkins. -
Paint the vines:
Using a dark green paint and a fine liner brush, trace over your pencil lines to create the main vine stems. -
Add the leaves:
paint simple, small almond-shapes along the vines. Keep these loose and painterly rather than trying to make them botanically perfect. -
Distress the edges:
Once the paint is fully cured, take a piece of fine-grit sandpaper and lightly scuff the edges of the pumpkins and the sides of the board. This reveals a bit of wood and unifies the vintage look. -
Seal the artwork:
If this sign will live outdoors, protect your hard work with a coat or two of matte clear sealer spray to prevent fading and weather damage.
Place your beautiful new sign by the front door or lean it against the fireplace for an instant seasonal upgrade


Distressed Whitewashed Background With Leaf Spray
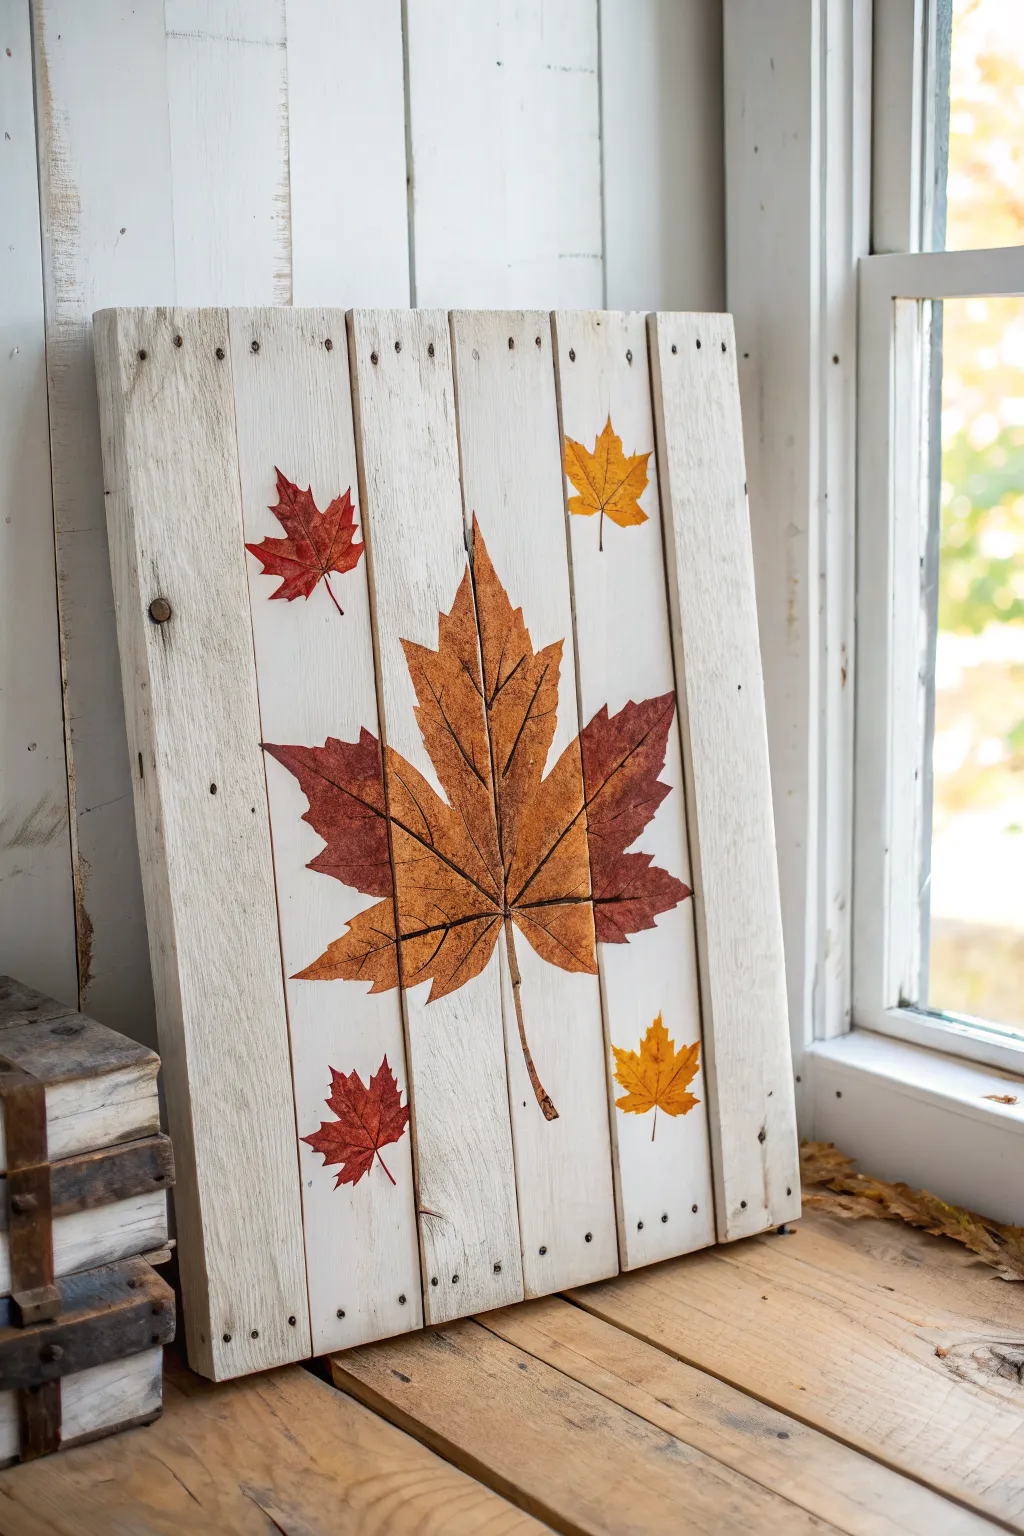
Bring the warmth of autumn indoors with this charming rustic sign featuring a large central maple leaf surrounded by drift of smaller foliage. The distressed whitewashed background perfectly contrasts with the rich ambers and rusts of the leaves, creating a cozy farmhouse aesthetic.
Detailed Instructions
Materials
- 5-6 wooden pallet slats (approx. 20-24 inches long)
- Two support wood strips (for the back)
- Wood glue and nails/screws
- Sandpaper (medium and fine grit)
- White chalk paint or flat acrylic paint
- Paintbrushes (large flat brush and small detail brushes)
- Small rag or paper towels
- Pencil
- Maple leaf templates or stencils (one large, one small)
- Acrylic paints (burnt sienna, yellow ochre, raw umber, orange)
- Acrylic sealer (matte finish)
Step 1: Building the Canvas
-
Prep the pallet wood:
Select 5 or 6 pallet slats that are roughly the same width. Sand them down thoroughly to remove splinters and rough patches, but don’t worry about making them perfectly smooth—the texture adds character. -
Assemble the sign:
Lay the slats side-by-side on your work surface, leaving a tiny gap (about 1/8 inch) between each board to emphasize the plank look. Place your two support strips perpendicular across the back and secure them with wood glue and short nails or screws. -
Distress the edges:
Once assembled, run sandpaper along the edges of the individual boards again to round them slightly, which helps the plank definition stand out after painting.
Natural Texture
Use a real stiff leaf from your yard as a stamp! Paint the backside of the leaf and press it firmly onto the wood for a perfect, organic imprint.
Step 2: Creating the Background
-
Apply the whitewash base:
Mix a small amount of water into your white chalk paint to thin it slightly. Brush this mixture over the entire front surface of the wood. You want coverage, but not total opacity. -
Distress the paint:
While the paint is still tacky, use a rag to wipe away random patches of paint, especially near the edges and nail holes, to let the raw wood peek through. I like to focus on the corners for a naturally worn look. -
Let it dry:
Allow the whitewash layer to dry completely. If the grain feels too rough after painting, give it a very light pass with fine-grit sandpaper. -
Add faux nail heads:
If your pallet wood doesn’t have visible nail heads, use the back of a paintbrush dipped in dark brown or grey paint to dot small ‘nail’ marks near the top and bottom of each slat for authentic detailing.
Step 3: Painting the Leaves
-
Trace the main leaf:
Position your large maple leaf template in the absolute center of the sign. Lightly trace the outline with a pencil, ensuring the design flows right over the gaps between the boards. -
Trace the accent leaves:
Position the smaller leaf templates in the corners—two diagonally opposite in red/rust tones, and two in yellow/gold tones. Trace these lightly as well. -
Block in base colors:
For the large center leaf, paint the base layer using a mix of yellow ochre and light orange. Don’t worry about shading yet; just get the shape filled in. Use burnt sienna for the red corner leaves and yellow ochre for the yellow ones. -
Add dimension to the big leaf:
While the base is still slightly wet, blend in burnt sienna around the edges and tips of the large leaf. Use a dry brush to drag the darker color toward the center veins to create a gradient effect. -
Paint the veins:
Using a very fine liner brush and thinned raw umber paint, carefully draw the central stem and the branching veins. Make the lines slightly broken or thinner at the ends for realism. -
Gap detailing:
Take a moment to carefully paint the edges of the wood slats where the leaf design crosses over. Painting inside the gap ensures the image looks continuous even when viewed from an angle. -
Highlight and shadow:
Add tiny touches of watered-down black or dark brown to the very tips of the leaf lobes to simulate dried, crunchy edges. Add a faint shadow under the stem to lift it off the board. -
Detail the small leaves:
Repeat the veining process on the four corner leaves. Keep these simpler than the main leaf, using just a few strokes to suggest the structure.
Go 3D
Glue a real twig or small stick over the painted stem of the central leaf to add tactile texture and a pop of realism to your sign.
Step 4: Finishing Touches
-
Final distressing:
Once the leaves are bone dry, lightly scuff a few spots on the painted leaves with fine sandpaper. This makes the design look like it has weathered along with the wood. -
Seal the artwork:
Apply a coat of matte acrylic sealer over the entire piece. This protects the paint and unifies the sheen of the whitewash and the leaf motifs.
Hang your new rustic masterpiece near a window to let the natural light highlight the wood grain texture


Simple Grateful Typography With Wheat Stalks

Embrace the warmth of the season with this minimalist wooden sign that combines rich terracotta tones with natural textures. The bold white serif typography against the slatted wood background creates a striking focal point, perfectly accented by delicate dried wheat stalks for an authentic harvest feel.
How-To Guide
Materials
- 5 small wooden slats (approx. 2-3 inches wide each)
- 2 thin wood backing strips (for assembly)
- Wood glue or heavy-duty construction adhesive
- Orange/Terracotta acrylic craft paint
- White acrylic craft paint
- Wide foam brush or flat paintbrush
- Small detail paintbrush
- Fine-grit sandpaper (220 grit)
- Access to a printer and paper (for stencil)
- Graphite transfer paper or chalk
- Painter’s tape or pencil
- Dried wheat stalks or bunny tails
- Hot glue gun and glue sticks
Step 1: Assembling the Base
-
Prepare the slats:
Cut five equal pieces of wood slat to your desired height, ensuring they are cut straight. Sand any rough edges or splinters with fine-grit sandpaper for a smoother surface. -
Align the wood:
Lay the five slats side-by-side on a flat surface, face down. Make sure the tops and bottoms are perfectly aligned to create a rectangle. -
Secure the backing:
Apply wood glue to your two thin backing strips. Place them horizontally across the back of the slats—one near the top and one near the bottom—to hold the five pieces together firmly. -
Weight and dry:
Place heavy books or weights on top of the backing strips while the glue cures. Let this sit for several hours or overnight to ensure a sturdy bond before flipping it over.
Clean Lines Hack
Use a white paint pen instead of a brush for the lettering outlines. It provides much more control on uneven wood surfaces.
Step 2: Applying Color
-
Mix the base color:
If you don’t have the perfect terracotta shade, mix standard orange acrylic paint with a small drop of brown and a touch of red to achieve that warm, earthy fall hue. -
Paint the first coat:
Using a wide foam brush, apply your orange paint across the entire front surface. Brush in the direction of the wood grain for the best finish. -
Paint the edges and grooves:
Don’t forget to push the bristles into the small grooves between the slats so no raw wood shows through the cracks. Cover the outer side edges as well. -
Let it dry completely:
Allow the first coat to dry fully. If the wood absorbs too much pigment and looks patchy, apply a second coat for opacity.
Step 3: Adding Typography
-
Design the text layout:
On your computer, select a tall, serif font (like Times New Roman or Bodoni) and type the word ‘GRATEFUL’. Scale it so it will span across all five slats. -
Print the template:
Print your word out. If the sign is wider than a standard sheet of paper, print it in sections and tape the pages together. -
Transfer the design:
Place a sheet of graphite transfer paper (or rub chalk on the back of your printout) between the paper and the dry wood. Tape the template down securely. -
Trace the outline:
Trace the outline of each letter firmly with a pencil or ballpoint pen. Press hard enough to transfer the lines onto the painted wood. -
Fill in the letters:
Remove the template. Using a small detail brush and white acrylic paint, carefully fill inside the transferred lines. I like to keep a damp cloth nearby to quickly wipe away any slips. -
Handle the gaps:
When painting over the gaps between slats, dab the brush gently rather than dragging it, to prevent paint from dripping down into the cracks. -
Apply a second white coat:
White paint often looks translucent on darker colors. Once the first letter coat is dry, add a second layer to make the word pop brilliantly.
Make It Dimensional
Instead of painting the letters, buy wooden craft letters, paint them white, and glue them onto the slats for a 3D relief effect.
Step 4: Detailing & Decorating
-
Distress (Optional):
If you prefer a more weathered look, lightly sand the edges and corners of the sign once the paint is bone dry to reveal a bit of wood underneath. -
Select the wheat:
Curate a small bundle of dried wheat stalks, choosing pieces that still have fluffy heads. -
Attach the accents:
Using a dab of hot glue, attach one or two loose stalks near the top right corner and bottom left corner for an artistic, asymmetrical touch. -
Create the main bouquet:
Tie a larger bundle of wheat together at the stems. Lay this loosely at the base of your display when styling, or glue it to the bottom edge if you want it permanently attached.
Place your finished sign on a mantel or lean it against a wall surrounded by soft textiles for a cozy autumn vibe
BRUSH GUIDE
The Right Brush for Every Stroke
From clean lines to bold texture — master brush choice, stroke control, and essential techniques.
Explore the Full Guide
Ombre Harvest Sunset Gradient

Capture the warmth of autumn evenings with this stunning wooden pallet project that transitions from soft, natural wood tones to deep, rich burgundy. This rustic decor piece brings an elegant harvest gradient to your porch or garden, perfectly mimicking the colors of turning leaves.
Step-by-Step Guide
Materials
- Standard wooden shipping pallet (in good condition)
- Sandpaper (80-grit and 120-grit)
- Electric sander (optional but recommended)
- Clean rags or tack cloth
- Acrylic or latex exterior paints: Cream/Light Yellow, Bright Orange, Burnt Orange, Deep Burgundy/Maroon
- Water for thinning paint
- Wide foam brushes or synthetic bristle brushes (2-3 inch)
- Painter’s tape (optional)
- Clear matte or satin exterior sealant
- Drop cloth
Step 1: Preparation and Cleaning
-
Select your canvas:
Choose a pallet that is structurally sound with relatively even slat spacing. Look for one with heat-treated markings (HT) rather than chemically treated ones for safer handling. -
Rough sanding:
Using 80-grit sandpaper, forcefully sand down the entire front surface of the pallet. Focus on removing splinters, rough patches, and any grime from the wood. -
Fine tuning:
Switch to 120-grit sandpaper to smooth out the grain. This step is crucial because a smoother surface will accept the sheer washes of paint more evenly than rough, raw wood. -
Clean the surface:
Wipe the entire pallet down thoroughly with a tack cloth or a slightly damp rag to remove all sawdust. Let the wood dry completely if moisture was introduced.
Wet-on-Wet Blending
For a seamless ombre, don’t let the slats dry fully between colors. Overlap the wet edges of the orange and yellow washes slightly right on the wood for a natural fade.
Step 2: Creating the Paint Washes
-
Prepare the containers:
Set out four separate containers for your paint mixing. We aren’t using the paint straight from the tube; we want a stained, transparent look. -
Mix the lightest shade:
In the first container, mix your cream or light yellow paint with water in a 1:1 ratio. You want a milky consistency that tints the wood without opaque coverage. -
Mix the mid-tones:
Prepare the bright orange and burnt orange paints in their respective containers, also thinning them with water (approx 1:1 ratio). Test the consistency on a scrap piece of wood to ensure the grain shows through. -
Mix the darkest shade:
Dilute the deep burgundy paint. I usually make this one slightly thicker (maybe 2 parts paint to 1 part water) to ensure the bottom slats feel grounded and heavy.
Step 3: Painting the Gradient
-
The top tier:
Dip your wide brush into the watered-down light yellow mix. Apply it to the top two or three slats. Brush with the grain, ensuring full coverage but wiping away excess with a rag if it pools. -
Transitioning to orange:
Move to the bright orange wash for the next two slats. As you apply it, gently feather the wet brush upward slightly into the bottom edge of the yellow section above for a soft blend. -
Deepening the color:
Apply the burnt orange wash to the middle-lower slats. This color bridges the gap between the bright pumpkin orange and the dark base. -
Anchoring the base:
Paint the bottom two slats with the deep burgundy wash. This dark color hides dirt effectively since this part often touches the ground. -
Blending check:
Step back and look at the gradient. If the lines between colors are too harsh, dip a clean, damp rag into water and gently rub the transition lines to blur them while the paint is still tacky. -
Dry time:
Allow the pallet to dry completely in a well-ventilated area. Because these are water-based washes, it should feel dry to the touch in about an hour.
Paint Soaking In Too Fast?
If the dry wood sucks up moisture instantly, lightly mist the wood with water from a spray bottle before painting. This keeps the wash workable longer.
Step 4: Finishing Touches
-
Second coat (optional):
If any colors look too washed out, apply a second layer of the specific wash to deepen the saturation. The bottom burgundy often benefits from a second pass. -
Protect your work:
Once fully dry, apply a clear exterior sealant over the entire front surface. Use long, even strokes to avoid bubbles. -
Seal the feet:
Pay extra attention to sealing the very bottom edges of the pallet vertical supports, as these will wick up moisture from the ground. -
Final cure:
Let the sealant cure according to the manufacturer’s instructions before placing the pallet outside.
Place your finished ombre pallet on your porch alongside a bright pumpkin to complete the autumn vignette
Sunflower and Vine Corner Bouquet
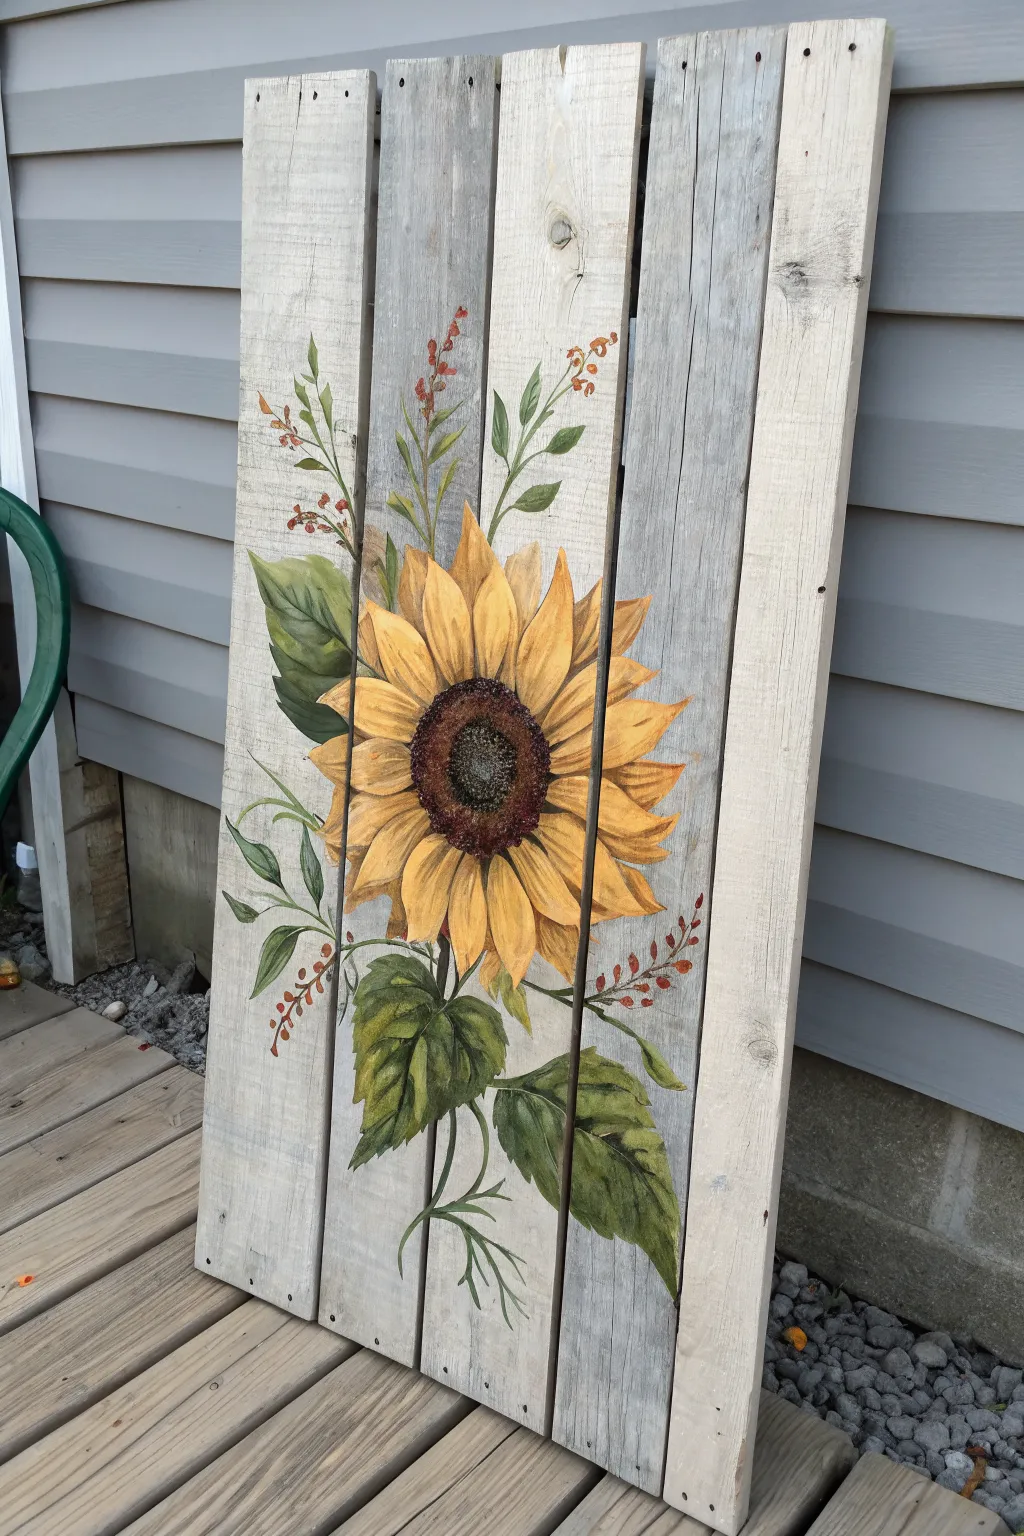
Transform a simple set of wooden slats into a stunning piece of farmhouse decor with this detailed sunflower painting. Using the natural orientation of the wood to lend a rustic feel, this project features a large, vibrant bloom surrounded by delicate greenery and budding vines.
Step-by-Step
Materials
- Reclaimed wood pallet or 4 wood slats joined together (approx. 24-30 inches tall)
- Sandpaper (medium and fine grit)
- White or cream chalk paint (for the base)
- Acrylic paints: Cadmium Yellow, Yellow Ochre, Burnt Sienna, Raw Umber, Sap Green, Olive Green, Burnt Umber, White
- Paintbrushes: 1-inch flat brush, No. 6 or 8 round brush, No. 0 liner brush
- Pencil for sketching
- Palette for mixing
- Water cup and paper towels
- Clear matte sealer (spray or brush-on)
Step 1: Preparation and Base Coat
-
Prepare the wood surface:
Start by lightly sanding your wooden slats to remove splinters and rough patches. You don’t need it perfectly smooth—some texture adds character—but it should be safe to handle. -
Whitewash the background:
Using your 1-inch flat brush, apply a whitewash layer. Mix water with a bit of white or cream paint and brush it vertically along the grain. You want the natural wood grain to show through, so wipe away excess paint with a rag if it gets too opaque. -
Sketch the sunflower placement:
Once the background is dry, use a pencil to lightly sketch the center of the sunflower. Position it slightly off-center, covering the middle two boards mostly, but extending onto the outer boards. -
Outline the petals and leaves:
Sketch the radiating petals around your center. They should be long and slightly pointed. Then, draw the large leaves at the bottom and the taller stems and buds reaching upward.
Step 2: Painting the Sunflower
-
Block in the petals:
Load a round brush with Yellow Ochre and fill in the shape of all the petals. Do not worry about shading yet; just get the base color down solid. -
Create the flower center:
Mix Burnt Umber with a touch of black or deep purple. Stipple this color into the center circle using a tapping motion with an old or stiff brush to create a textured, seed-like look. -
Add petal highlights:
Mix Cadmium Yellow with a little White. Paint streaks along the center and tips of each petal, leaving the Ochre visible near the base and edges. -
Add petal shadows:
Using a thin wash of Burnt Sienna or light brown, paint lines between the petals to separate them. Add a little shadow at the base of the petals where they meet the dark center. -
Refine the center details:
Go back to the center and stipple a lighter brown (Raw Umber) in a ring around the very middle to give the seed head dimension. Add tiny dots of light yellow in the very center for pollen texture.
Pro Tip: Rustic Texture
Don’t fight the gaps in the wood! If your brush skips over a crack or knot, leave it. These imperfections enhance the vintage farmhouse aesthetic.
Step 3: Leaves and Vines
-
Base coat the greenery:
Mix Olive Green and Sap Green. Fill in the large leaves at the bottom and the smaller leaves on the upper stems. -
Add leaf veins and structure:
With the liner brush and a darker green (green mixed with a tiny bit of brown), paint the central veins and branching veins on the large leaves. -
Highlight the foliage:
Mix a little yellow or white into your green. Brush this lighter shade onto the tops and edges of the leaves where the light would hit. -
Paint the stems:
Use the liner brush to connect the leaves and flower to the main stems. Keep your hand loose to create slightly curved, organic lines rather than stiff, straight ones.
Level Up: 3D Elements
Glue actual dried moss or small segments of twine near the base of the stem to add a mixed-media element that pops off the wood surface.
Step 4: Final Details
-
Add the delicate buds:
For the tall, thin sprigs, use the liner brush to paint fine stems. Dot small specks of Burnt Sienna or orange along these stems to create the look of dried fall berries or buds. -
Enhance contrast:
Look at the painting from a distance. If the petals need more pop, add a final highlight of nearly pure white to the very tips. Deepen the shadows under the leaves if they look too flat. -
Seal the artwork:
Allow the paint to cure for at least 24 hours. Protect your work by applying a clear matte sealer, which will keep the rustic look while preventing fading.
Hang your beautiful new artwork on a porch or entryway to welcome the autumn season.

PENCIL GUIDE
Understanding Pencil Grades from H to B
From first sketch to finished drawing — learn pencil grades, line control, and shading techniques.
Explore the Full Guide
Spooky Jack-O’-Lantern Silhouette Pallet
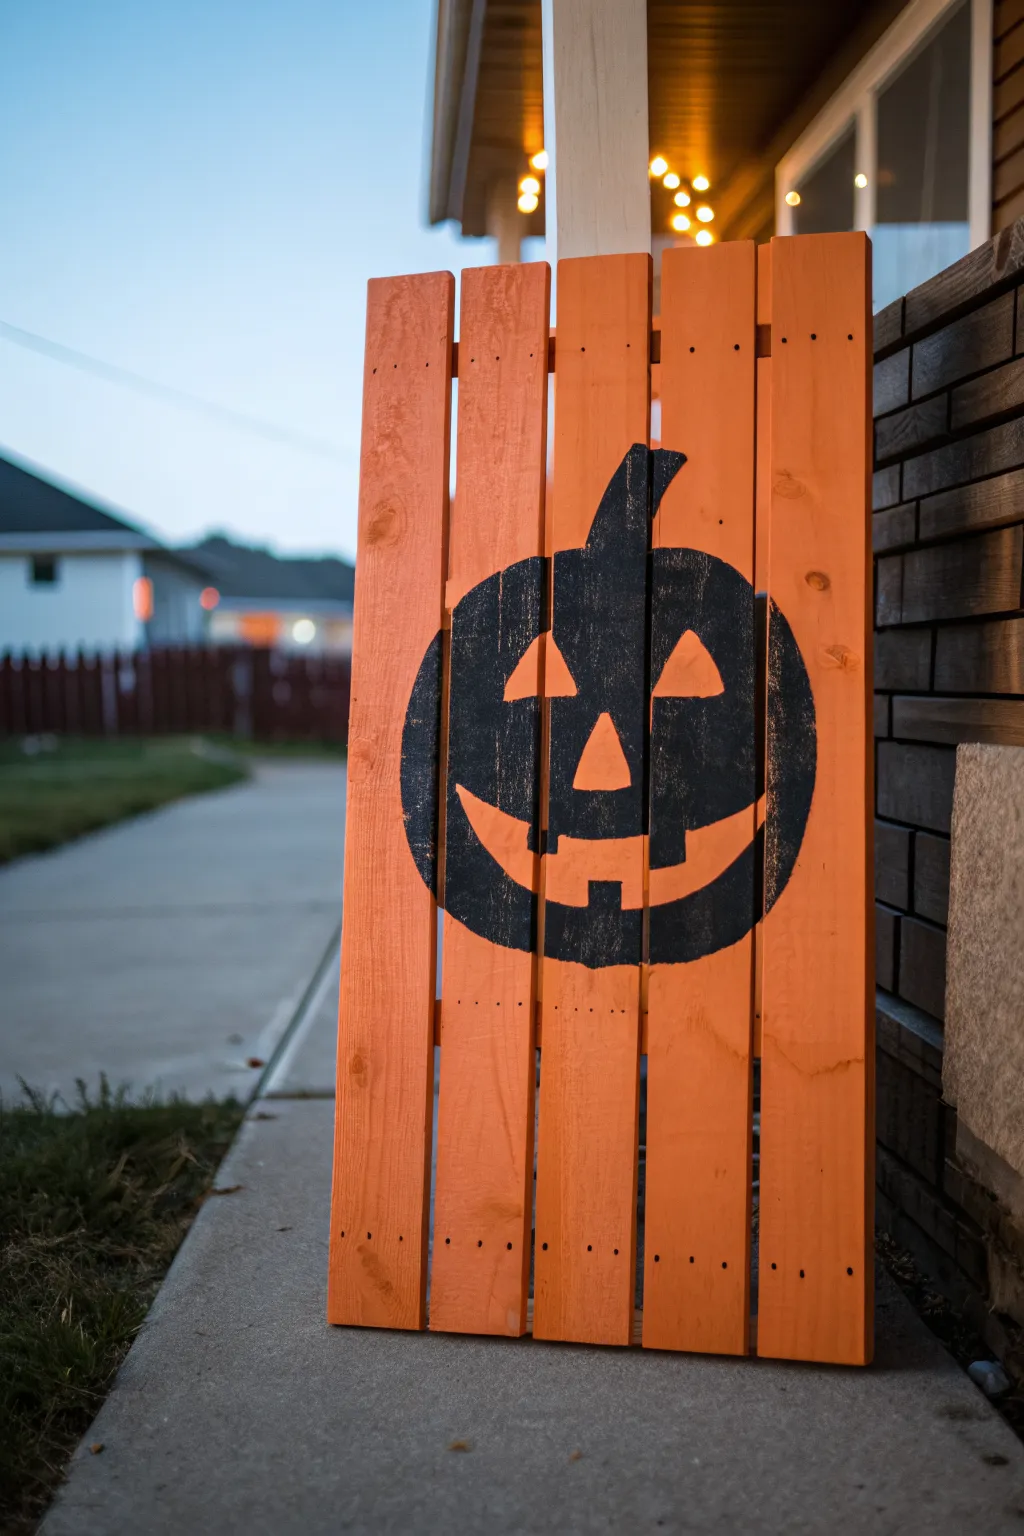
Capture the classic spirit of Hallow’s Eve with this bold, vertical porch sign. The vibrant orange slats create a rustically modern canvas for a stark, spooky silhouette that stands out perfectly against brick or siding.
Detailed Instructions
Materials
- 5 wooden slats (1×4 inch boards, ~3-4 feet long)
- 2 backing strips (1×2 inch boards, cut to width of assembled sign)
- Wood screws or brad nails
- Sandpaper (medium grit)
- Exterior wood primer (white or grey)
- Bright orange exterior acrylic or latex paint
- Black acrylic paint
- Wide paintbrush (2-3 inch)
- Small flat brush or stencil brush
- Painter’s tape or stencil film
- Pencil
- Printed pumpkin template (optional)
Step 1: Building the Canvas
-
Prep the boards:
Begin by sanding your five uniform wooden slats to remove any rough splinters or stamped markings. The surface doesn’t need to be furniture-smooth, but it should be clean enough to take paint evenly. -
Arrange the layout:
Lay the five boards side-by-side on a flat surface. Leave a consistent, narrow gap (about 1/4 to 1/2 inch) between each board to create that signature slatted look. -
Secure the back:
Place your two backing strips horizontally across the boards—one near the top and one near the bottom. I usually position them about 6 inches in from the ends so they remain hidden from the front. -
Fasten together:
Using wood screws or a brad nailer, attach the backing strips to each vertical slat. Ensure each board is square and the gaps remain even as you work your way across.
Bleed Prevention
If using a stencil, paint a thin layer of the ORANGE base color over the stencil edges first. This seals the gap, so any bleed-under matches the background.
Step 2: The Orange Base
-
Prime the wood:
Apply a coat of exterior primer over the front and sides of the slats. This step is crucial for making the orange pop later, especially if you used dark or knotted wood. -
First coat of orange:
Once the primer is dry, load up a wide brush with your bright orange exterior paint. Apply broadly with the grain of the wood. -
Get into the gaps:
Make sure to dab the brush slightly into the crevices between the slats. You don’t need full coverage deep inside, but the visible edges of the wood should be orange. -
Second coat:
Let the first layer dry completely, then apply a second coat for a rich, opaque finish. This ensures the background is vibrant enough to contrast sharply with the black.
Distress for Effect
Once the paint is fully dry, lightly sand the edges and the black silhouette with fine-grit sandpaper to give the sign a weathered, vintage farmhouse vibe.
Step 3: Creating the Spooky Face
-
Design the silhouette:
You can either sketch a classic pumpkin shape freehand or tape together printed sheets of paper to make a large template. The design should span across the middle three or four slats. -
Transfer the outline:
Center your design vertically on the board. Lightly trace the outline of the pumpkin body, the stem, and the facial features onto the orange wood with a pencil. -
Define the edges:
For the crispest lines, use painter’s tape to mask off the outside edges of the pumpkin shape if the design allows, or simply rely on a steady hand for the curves. -
Paint the stem:
Start at the top with the stem. Using a smaller flat brush and black paint, fill in the slightly curved, organic shape. -
Outline the body:
Carefully paint the outer perimeter of the pumpkin shape first. This establishes your boundaries before you fill in the larger areas. -
Fill the silhouette:
Switch to a slightly larger brush to fill in the main body of the pumpkin with solid black, working carefully around the eyes, nose, and mouth areas so they remain orange. -
Manage the gaps:
When painting over the gaps between boards, use a ‘dry brush’ technique—very little paint on the brush—so darker paint doesn’t drip down the sides of the slats. -
Refine the face:
Go back with a small detail brush to sharpen the corners of the triangle eyes and the toothy grin. Clean lines here make the difference between messy and professional. -
Final touch-ups:
Check for any orange spots showing through the black silhouette and add a second coat of black if needed for a solid, matte look.
Allow your sign to cure for 24 hours before leaning it on your porch to greet trick-or-treaters
Pumpkin Patch Farm Sign Look

Embrace the charm of autumn with this weathered wooden sign featuring a classic orange pumpkin and forest green lettering. Its distressed white background and prominent vertical slats give it a convincing antique farmhouse feel perfect for a front porch display.
Step-by-Step
Materials
- Unfinished pallet wood sign blank (approx. 12×18 inches)
- White chalk paint or matte acrylic paint
- Forest green acrylic paint
- Burnt orange acrylic paint
- Dark grey/brown acrylic paint (for stem)
- Painter’s tape or stencil film
- Sandpaper (80 and 120 grit)
- Stencil brushes or sponges
- Small liner brush
- Large flat brush
- Pencil
- Carbon transfer paper (optional)
Step 1: Preparing the Distressed Base
-
Prepare the surface:
Begin by giving your wooden sign blank a light sanding with 120-grit sandpaper to remove any large splinters while keeping the rough texture intact. -
Apply the base coat:
Load a large flat brush with white chalk paint and cover the entire front face of the sign. -
Create coverage variation:
Don’t aim for perfection here; leave the paint slightly thinner in some areas so the wood grain can peek through later. -
Let it dry completely:
Allow the white base coat to dry fully for at least one hour so subsequent layers don’t lift the paint. -
Sand for distress:
Take your 80-grit sandpaper and sand heavily along the edges and corners of the board to reveal raw wood. -
Highlight the slats:
Fold the sandpaper and run it specifically down the vertical grooves between the wood slats. This emphasizes the separate planks, which is crucial for the pallet look.
Step 2: Painting the Pumpkin Centerpiece
-
Outline the shape:
Lightly sketch a wide, squat pumpkin shape in the center of the board with a pencil. You can freestyle this or use a reference image. -
Block in the color:
Fill in the pumpkin shape using burnt orange paint and a medium round brush. Keep your strokes vertical to mimic the roundness of the gourd. -
Add the stem:
Paint a thick, slightly angled stem at the top center using the dark grey-brown paint. -
Detail the tendrils:
Using a fine liner brush and the stem color, swirl two delicate, curly tendrils coming off the base of the stem. -
Define the ribs:
Dip a nearly dry brush into white paint and lightly drag curved vertical lines down the orange body to suggest the pumpkin’s ribs and add a weathered sheen. -
Scuff the design:
Once the pumpkin is bone dry, lightly scuff it with fine-grit sandpaper to make it look worn and integrated into the background.
Paint Bleeding?
If paint bleeds under your stencil, wait for it to dry completely. Then, use a small stiff brush and white base paint to carefully touch up and ‘erase’ the messy edges.
Step 3: Adding the Typography
-
Plan the text layout:
Position your stencils or trace your lettering. Place ‘PUMPKIN’ in an arch at the top, ‘PATCH’ centered below the artwork, and ‘FARM’ at the bottom. -
Establish the arch:
Ensure the word ‘PUMPKIN’ follows a gentle downward curve to frame the top of the artwork nicely. -
Start stenciling:
Dip a stencil brush into forest green paint and offload most of the paint onto a paper towel until the brush is almost dry. -
Apply paint to letters:
Dab the green paint vertically onto the stencils using an up-and-down pouncing motion to prevent bleed-under. -
Remove stencils:
Carefully peel away the stencils while the paint is still slightly tacky to keep crisp edges. -
Bridge the gaps:
Use a small brush to fill in the ‘bridges’ left by the stencil letters if you prefer a solid, hand-painted look. -
Final distressing pass:
Give the entire sign, including the new lettering, one final quick pass with fine sandpaper to unify the aging across the whole piece.
Real Weathering
Mix a tiny drop of brown paint with water to create a thin wash. Lightly brush this over the dried white background, especially near edges, for a truly aged, grimy antique look.
Prop your new sign on a hay bale or display it on your mantel for instant harvest charm


Mixed-Media Wreath on a Painted Backdrop
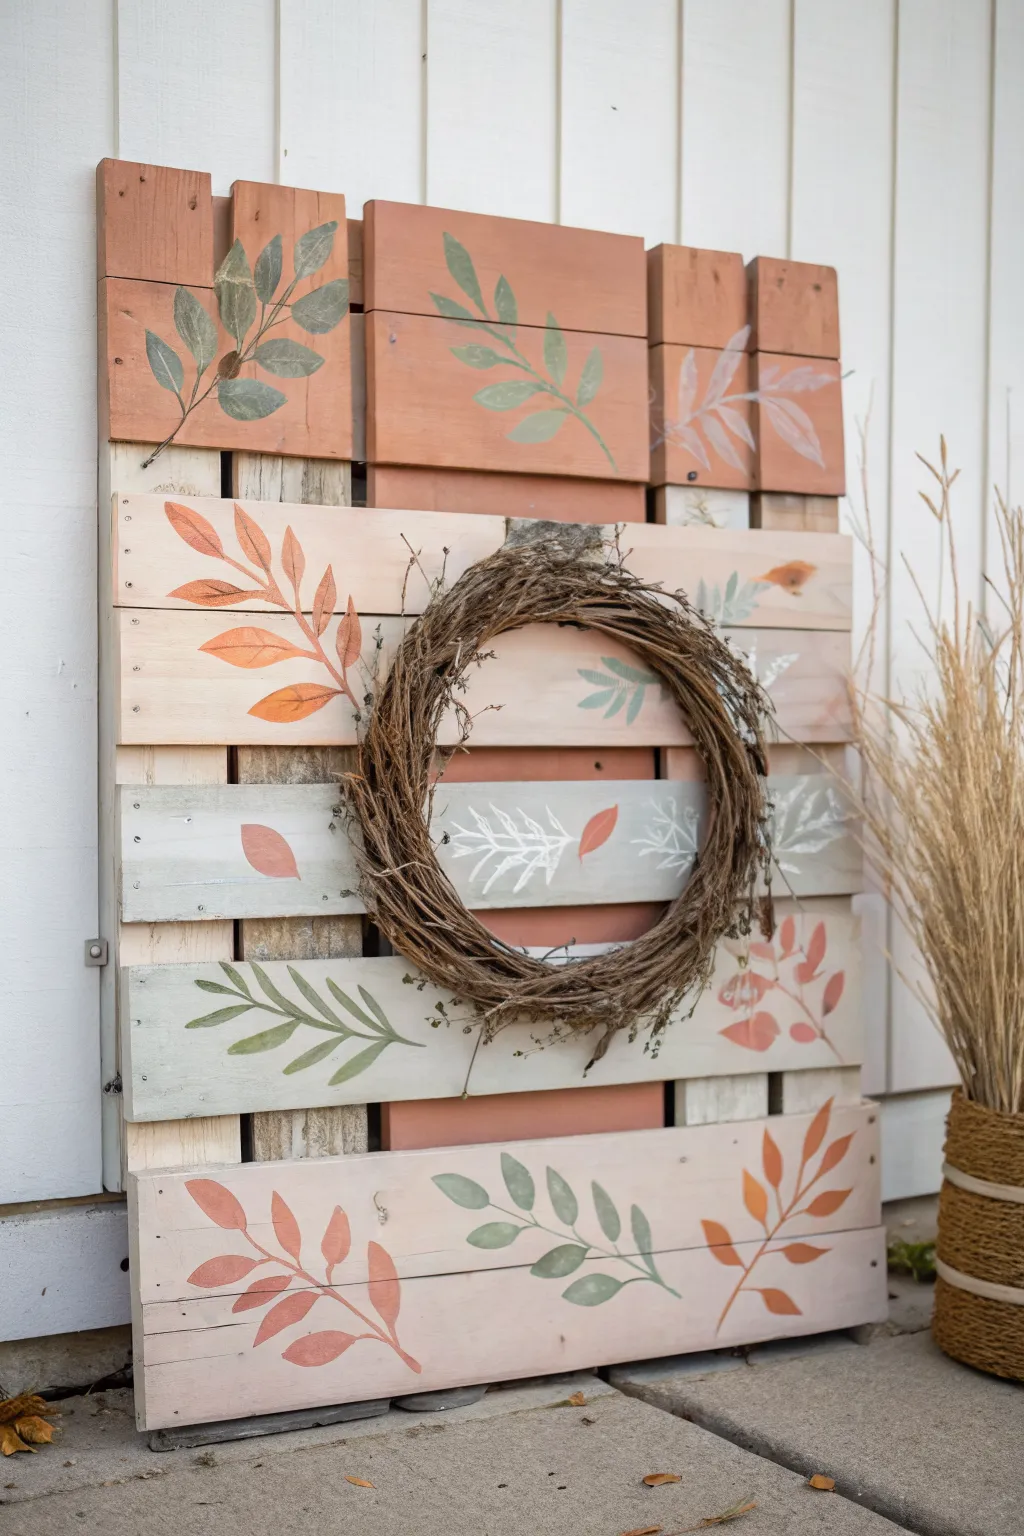
Celebrate the changing seasons with this charming mixed-media display that combines painted woodwork with natural textures. By layering leaf motifs over a pieced-together pallet backdrop and centering a simple grapevine wreath, you can create a cozy statement piece perfect for a porch or entryway.
Detailed Instructions
Materials
- Reclaimed pallet wood or 1×4 lumber slats
- Plywood backing board (cut to size)
- Wood glue and brad nails
- Sanding block or electric sander
- Acrylic craft paints (terra cotta, sage green, cream, gray)
- Leaf stencils (various sizes and shapes)
- Stencil brushes or sponges
- Small fine-liner brush
- Grapevine wreath (12-14 inch diameter)
- Floral wire or heavy-duty twist tie
- Picture hanging hardware
Step 1: Prepping and Assembling the Canvas
-
Assess your wood:
Start by selecting your pallet slats. You’ll need pieces of varying lengths to create a staggered, rustic look. If you don’t have a pallet, distressing new 1×4 lumber with a hammer and chain works just as well. -
Cut and arrange:
Cut your slats so they fit somewhat uniformly horizontally, but allow for gaps and uneven edges to maintain character. Lay them out on a flat surface to plan the composition. -
Sand the surfaces:
Give each slat a quick sand. You don’t want it perfectly smooth—the texture is part of the charm—but you do need to remove any dangerous splinters before painting. -
Create the base:
Attach your arranged slats to a plywood backing board or two vertical support struts using wood glue and brad nails. Leave small, intentional gaps between rows to emphasize the slat construction.
Step 2: Painting the Background
-
Apply base colors:
Paint specific slats in alternating base tones. Looking at the reference, keep the top section a warm terra cotta and the lower sections a mix of whitewash or pale gray. Leave some wood raw for contrast. -
Distress the paint:
Once the base coats are tacky but not fully dry, use a dry sanding block to scuff the edges and reveal the wood grain underneath. This instantly ages the piece. -
Let it cure:
Allow the base layer to dry completely for at least an hour. If the wood is damp, your stencils might bleed in the next phase.
Clean Stencils
To prevent paint bleed, lightly spray the back of your stencil with a temporary spray adhesive. It keeps the plastic flush against the rough wood grain.
Step 3: Adding the Foliage
-
Plan stencil placement:
Lay out your leaf stencils. Aim for a scattering effect, ensuring some leaves stretch across multiple slats to unify the piece visually. -
Stenciling technique:
Load a stencil brush with paint, then offload most of it onto a paper towel until the brush feels dry. Dab vertically over the stencil. Use sage green leaves on the terra cotta slats and terra cotta leaves on the pale slats. -
Layering colors:
For the white/grey leaves, I find that doing a very faint first pass, letting it dry, and then doing a second pass creates a lovely, ghost-like vintage effect. -
Freehand details:
Using a fine-liner brush, extend the stems of the leaves slightly beyond the stencil shape. This makes them look hand-painted rather than mass-produced. -
Seal the work:
Once all paint is dry, apply a coat of matte clear sealer if this piece will live outdoors to protect it from moisture.
Add Dimensions
Tuck a few sprigs of dried wheat, faux berries, or real preserved leaves into the grapevine wreath to add pop and coordinate with your painted colors.
Step 4: Attaching the Wreath
-
Position the wreath:
Center your grapevine wreath on the board. It should cover the middle section, creating a focal point amidst the scattered leaves. -
Secure with wire:
Feed a piece of floral wire through the back of the wreath and poke the ends through the gap between two pallet slats. -
Twist and tighten:
Twist the wire tightly at the back of the artwork to secure the wreath firmly in place. Trim any excess wire with snips. -
Final touches:
Add a sturdy picture hanger to the back of the wood structure, ensuring it’s robust enough to handle the weight of the wood.
Hang your new rustic masterpiece and enjoy the warm autumn vibes it brings to your space
Abstract Fall Color Blocks With Drips
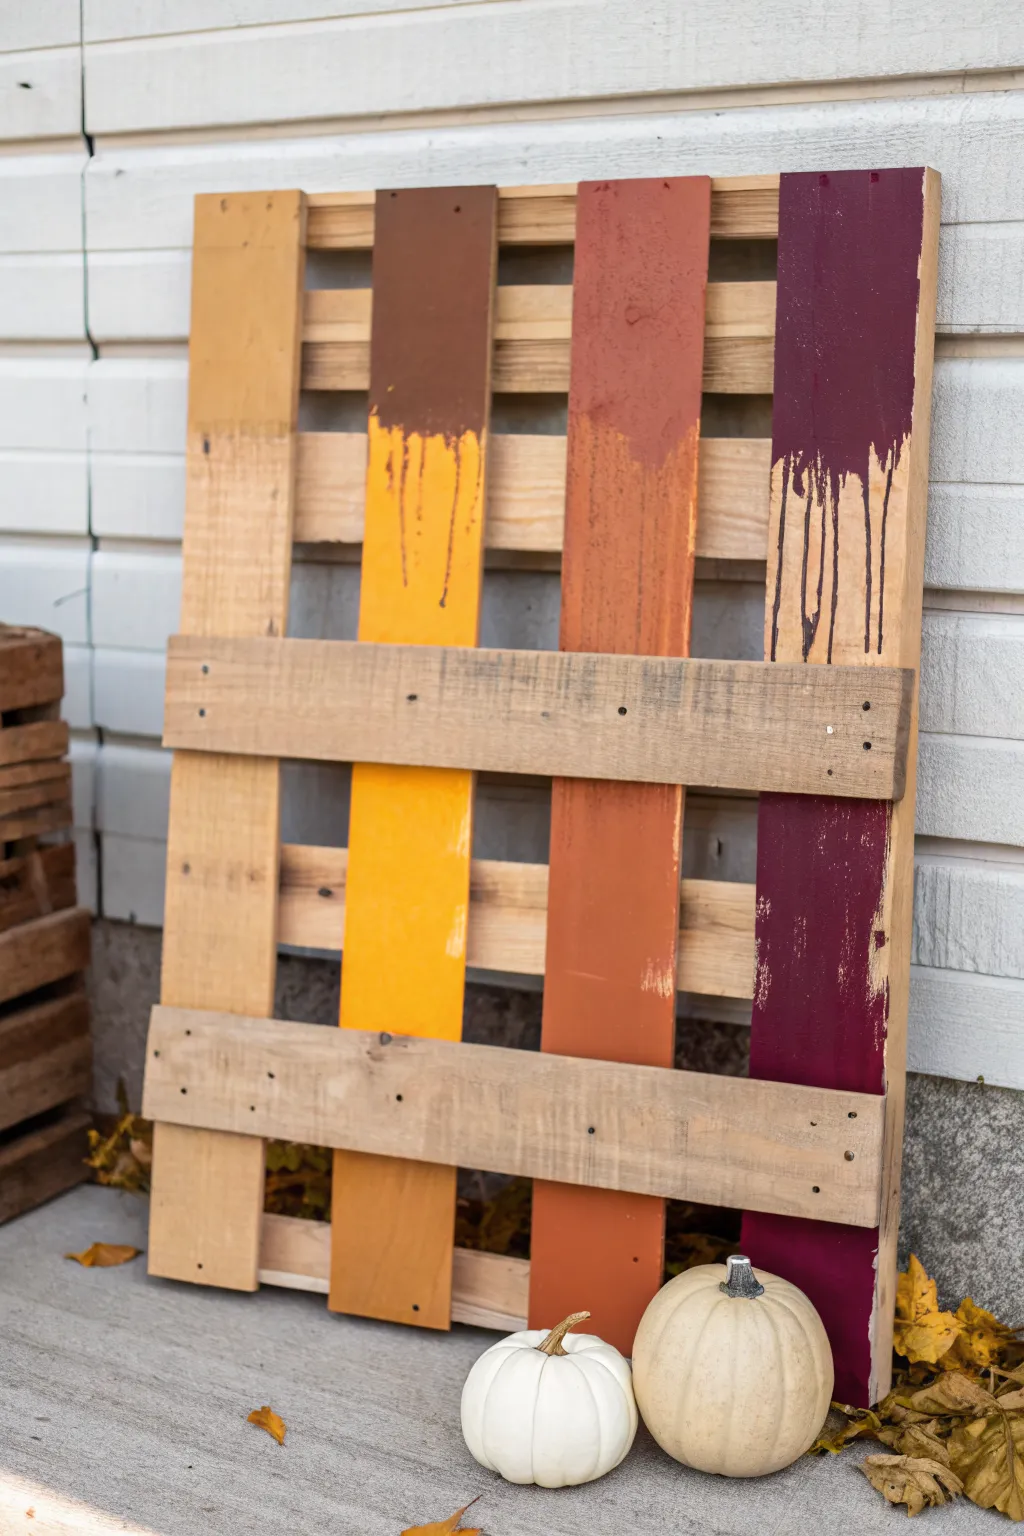
Embrace the imperfect beauty of fall with this rustic pallet project that celebrates warm, cozy hues. Using color blocking and intentional paint drips, you’ll transform plain wood into a striking seasonal statement piece perfect for your porch.
Step-by-Step Tutorial
Materials
- Small wooden pallet (approx. 24″ x 36″ or similar)
- Sandpaper (80 and 120 grit)
- Acrylic craft paints in four fall colors: Mustard Yellow, Burnt Orange, Terracotta, and Deep Plum
- 2-inch foam brushes or synthetic bristle brushes
- Painters tape (optional)
- Drop cloth or old newspapers
- Water cup
- Paper towels
- Clear matte sealer spray (optional)
Step 1: Pallet Prep
-
Clean the surface:
Start by giving your pallet a good scrub with a stiff brush to remove dirt, cobwebs, and loose debris. If it’s old wood, make sure it’s completely dry before you begin. -
Sand rough edges:
Use 80-grit sandpaper to knock down major splinters on the vertical slats where you’ll be painting. It doesn’t need to be baby-smooth—rustic is the goal—but you want a surface that won’t shred your paintbrush. -
Smooth the slats:
Follow up with a quick pass of 120-grit sandpaper just on the faces of the four vertical slats to help the paint adhere more evenly.
Paint Won’t Drip?
thick craft acrylics can be stubborn. Mix a thimble-full of paint with a few drops of water in a separate cup to create a runnier consistency perfect for dripping.
Step 2: Color Blocking
-
Select your palette:
Arrange your four paint colors in the order you want them to appear on the pallet. From left to right in our example, we used: Mustard Yellow, Deep Brown/Orange, Terracotta, and Plum. -
Paint the bottom sections:
Starting with the leftmost slat, paint the bottom half (below the lower horizontal crossbar) with your first color (Mustard Yellow). Apply a solid, opaque coat. -
Paint the middle sections:
Continue with the same color on the middle section of that slat, positioned between the two horizontal crossbars. Leave the crossbars themselves unpainted natural wood. -
Paint the remaining slats:
Repeat this blocking process for the other three slats, using a different color for each vertical board. Ensure the paint coverage is solid, applying a second coat if the wood soaks up too much pigment. -
Top section base coat:
For the top section of each slat (above the upper crossbar), paint a solid block of color that covers about the top two-thirds of that exposed wood area.
Add Dimension
Use a stencil to add a white fall word like ‘Harvest’ or ‘Gather’ across the horizontal unpainted crossbars for a layered, professional finish.
Step 3: Creating the Drips
-
Load the brush heavily:
Now for the fun, messy part. Dip your brush generously into the first color so it is saturated with paint. -
Apply the drip line:
Press the loaded brush against the wood where your painted top block ends and the unpainted gap begins. Push harder to release a pool of paint. -
Encourage the run:
If the paint is thick, you might need to add a tiny splash of water to your brush. Tap the wet paint gently so gravity pulls drips down the unpainted wood surface. -
Vary the lengths:
Try to make some drips long and others short for a natural look. I like to let some run almost all the way to the crossbar while others stop short. -
Repeat for all colors:
Work your way across the remaining three slats, creating similar drip effects with their respective colors. Be careful not to smudge the wet drips on the neighboring boards. -
Distress the edges (Optional):
While the main blocks are drying, you can take a dry brush with very little paint and lightly drag it along the edges of the painted blocks to create a worn, vintage feel.
Step 4: Finishing Touches
-
Dry completely:
Let the pallet sit flat if possible while drying so the drips settle nicely and don’t run sideways. Allow at least 2-3 hours for the thickest drips to harden. -
Seal the deal:
If you plan to display this outdoors, spray the entire front of the pallet with a matte clear sealer to protect the colors from moisture and fading. -
Style it:
Once dry, lean your masterpiece against a wall and arrange pumpkins or gourds at the base to complete the autumnal vignette.
Now you have a bold, colorful backdrop ready to welcome the crisp autumn air at your doorstep


Have a question or want to share your own experience? I'd love to hear from you in the comments below!