A flower pot drawing is one of those feel-good subjects that’s simple to start and surprisingly fun to personalize. I love it because you can keep it super beginner-friendly or push it into bold color, pattern, and even little storytelling details.
Classic Daisy Pot Sketch

Capture the delicate beauty of garden daisies with this crisp, black-and-white graphite sketch. The drawing focuses on clean linework and subtle shading to bring out the natural symmetry of the petals and leaves.
Detailed Instructions
Materials
- Spiral-bound sketchbook (medium weight paper)
- Graphite drawing pencil (HB or 2B)
- Pencil sharpener
- Kneaded eraser
- Reference photo or potted daisy plant
Step 1: Laying the Framework
-
Establish the composition:
Start by lightly marking the general placement of your flower heads. Draw loose circles or ovals to represent where the main blooms will sit, ensuring they are spaced nicely across the page. -
Draw flower centers:
Inside your initial circles, sketch small, slightly flattened ovals for the yellow centers of the daisies. Keep these centered but tilted slightly depending on the angle of the flower. -
Sketch the pot rim:
Lightly curve a line underneath the flower grouping to suggest the rim of the pot. This grounds your drawing so the flowers aren’t floating in space. -
Add stem guidelines:
Draw faint, single lines connecting the flower heads down toward the pot rim. These will act as the spine for your stems later.
Step 2: Defining the Petals
-
Start the main petals:
Begin adding petals to the largest, central flower first. Draw long, oblong shapes radiating from the center disk. The tips should be slightly rounded or softly pointed. -
Create overlapping layers:
Daisies often have multiple layers of petals. Draw a second row of petals peeking out from behind the first set to create fullness and dimension. -
Vary the angles:
For the side-facing flowers, shorten the petals on the far side and lengthen the ones closest to you. This foreshortening trick gives the flower 3D volume. -
Refine the edges:
Go over your petal outlines with a slightly firmer pressure. Add tiny indentations at the tips of some petals to mimic the natural texture of a real daisy.
Keep it Sharp
A freshly sharpened pencil is crucial for the center details. A dull point will make the stippling look muddy rather than crisp.
Step 3: Adding Foliage and Detail
-
Draw the leaves:
Sketch broadly shaped leaves emerging from the stems. Daisy leaves are somewhat spoon-shaped with slightly serrated or uneven edges, so keep your line work organic rather than perfectly smooth. -
Include bud details:
If your composition allows, draw small, tight buds on shorter stems. These look like small balls with tiny leafy bracts clasping the bottom. -
Thicken the stems:
Transform your single guide lines into proper stems by adding a parallel line. Make sure they connect naturally to the base of the flower heads. -
Detail the center disks:
Add texture to the flower centers. Instead of coloring them solid, use tiny stippling dots or small ‘c’ curves to suggest the fuzzy, pollen-filled texture.
Lost Your Perspective?
If a flower looks ‘flat,’ check your petal lengths. Petals pointing away from the viewer should always act shorter than those pointing toward you.
Step 4: Shading and Finishing
-
Shade the leaves:
Using the side of your pencil lead, gently shade the leaves. I like to use linear hatching strokes that follow the direction of the leaf veins for a stylized look. -
Darken the depths:
Identify the areas where petals overlap or where leaves sit behind the flowers. Press harder with your pencil here to create deep shadows that make the white petals pop forward. -
Add petal veins:
Draw very faint, short lines extending from the center of the flower partially up the length of a few petals. This adds a delicate fragility to the bloom. -
Final clean up:
Take your kneaded eraser and lift away any remaining construction lines or stray smudges, leaving a clean, high-contrast graphite drawing.
Now you have a charming botanical study captured forever in your sketchbook

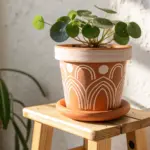
Tulips in a Simple Clay Pot

Capture the delicate beauty of spring indoors with this gentle illustration of tulips reaching out from a textured pot. The sketch balances clean ink lines with soft, blended color for a look that feels both organic and refined.
Step-by-Step
Materials
- Spiral-bound sketchbook (medium textured paper)
- H or HB graphite pencil
- Eraser
- Black fineliner pens (0.1mm and 0.3mm)
- Colored pencils (Sage Green, Forest Green, Salmon Pink, Deep Red, Warm Grey)
- Optional: White gel pen for highlights
Step 1: Sketching the Composition
-
Establish the base:
Begin by lightly sketching the pot’s structure near the bottom right of your page. Draw an ellipse for the rim, then taper the sides down to a narrower base to form a classic planter shape. -
Map the stems:
From the center of the pot’s opening, draw three gentle, curving lines extending upward and to the left. These will become your tulip stems. Vary their heights so the composition feels natural. -
Outline the blooms:
At the top of the two taller stems, sketch elongated egg shapes. These placeholders will guide the petals of your tulip flowers. -
Add the leaves:
Draw long, lance-shaped leaves emerging from the base of the stems. Let them curve and fold over each other gracefully, ensuring some droop slightly while others point upward.
Gradient Secrets
To get that smooth fade on the petals, color in small circular motions rather than back-and-forth strokes. It blends the pencil wax much better.
Step 2: Inking the Lines
-
Refine the petals:
Using the 0.1mm fineliner, trace over your flower sketches. Define distinct petals, allowing them to cup together at the base and separate slightly at the tips. -
Define the foliage:
Ink the stems and leaves with confident strokes. Add a central vein line to the larger leaves to give them dimension and a sense of direction. -
Structure the pot:
Ink the outline of the pot. Instead of a plain terracotta look, draw a decorative geometric pattern on the pot’s surface—diagonal lines creating a diamond grid work well here. -
Erase guidelines:
Once the ink is completely dry—I usually wait at least five minutes to avoid smudging—gently erase all the underlying graphite sketch marks.
Step 3: Adding Color and Texture
-
Base layer for leaves:
Take your Sage Green pencil and apply a light, even layer of color to all the stems and leaves. Keep your pressure light to let the paper texture show through. -
Deepen the greens:
Using the Forest Green pencil, shade the areas where shadows would naturally fall—underneath folded leaves and near the base where the stems meet the soil. -
Color the blooms:
Start with Salmon Pink on the tulip petals. Apply color from the bottom of the flower upward, lifting your pencil pressure as you reach the tips to create a fade. -
Add floral depth:
Layer Deep Red into the base of the petals and along the creases where petals overlap. This gradient makes the flowers look rounded and dimensional. -
Shade the pot:
Lightly shade the pot with Warm Grey or a very faint brown. Keep the coloring loose and sketchy, focusing on the right side to suggest a light source coming from the left. -
Suggest soil:
Use a dark brown or black pencil to add small, scribbled textures just inside the rim of the pot to represent the potting soil.
Level Up: Texture
Try using watercolor pencils for the initial color layer. A slightly damp brush can turn your sketch into a soft wash before you add final ink details.
Step 4: Final Details
-
Reinforce shadows:
Go back in with your 0.3mm pen to thicken the lines on the shadowed side of the leaves and pot. This line weight variation adds instant visual weight. -
Add highlights:
If you have a white gel pen or a very sharp eraser, add tiny touches of light on the most curved parts of the leaves and the shiny texture of the tulip petals. -
Ground the object:
Sketch a few minimal, dashed lines to the right of the pot using your fineliner. This abstract shadow helps anchor the drawing so it doesn’t look like it’s floating in space.
Now you have a timeless botanical sketch that captures the elegance of simple garden flowers


Sunflower Pot With Big Shapes
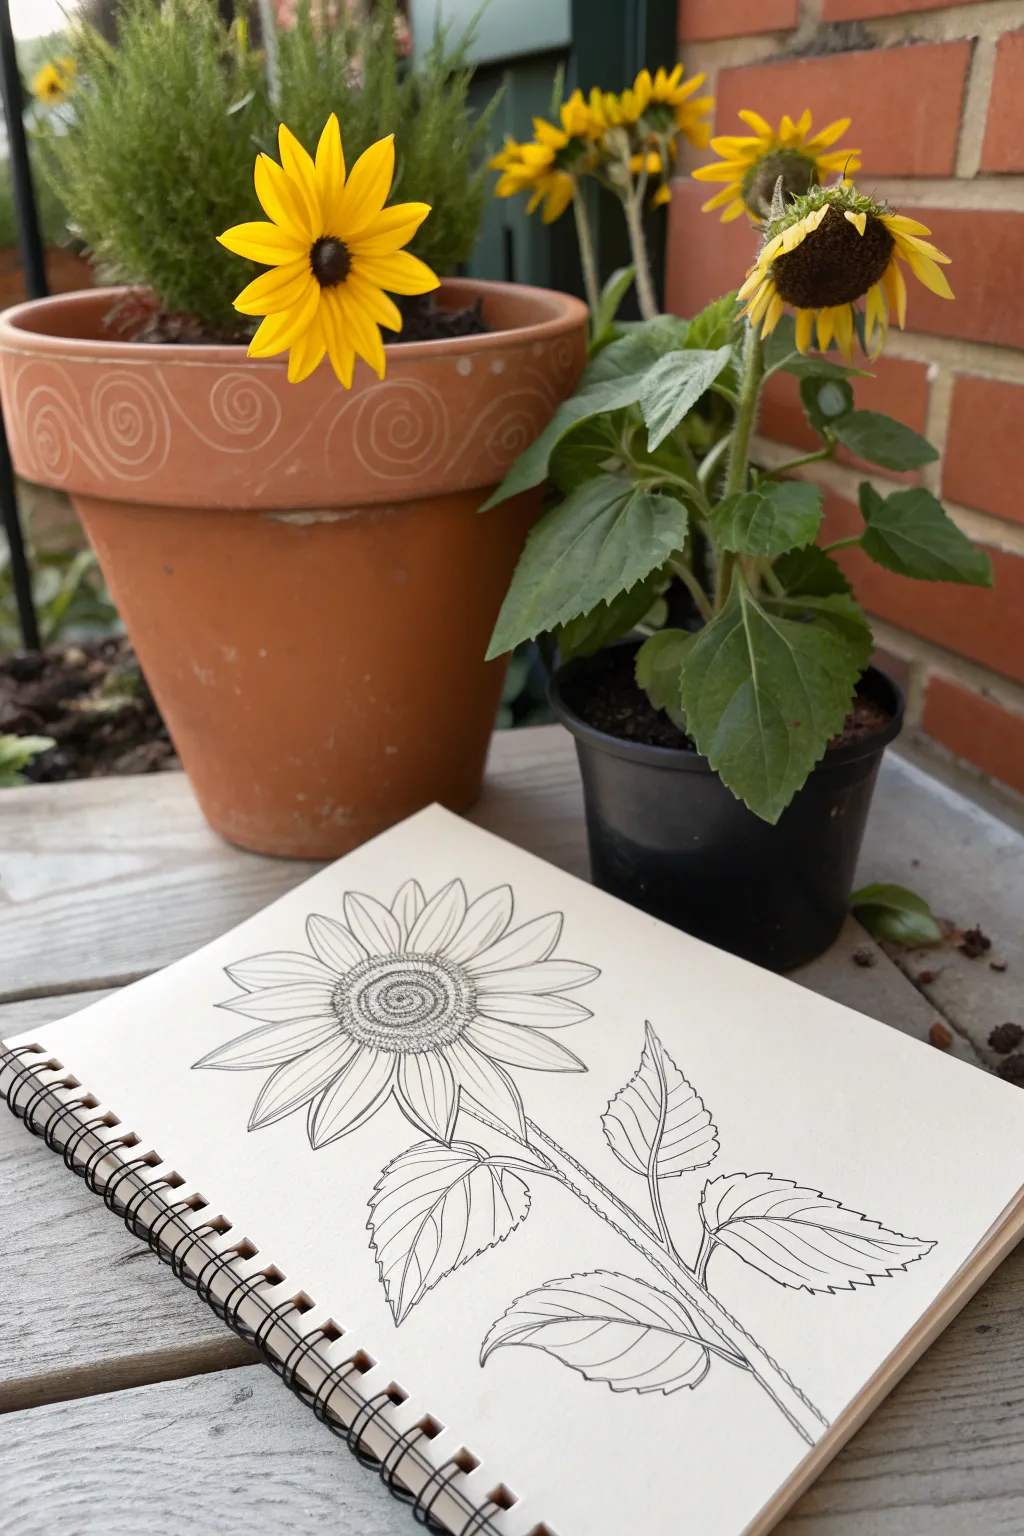
Capture the delicate details of a garden sunflower with this elegant line drawing tutorial. Using simple shapes and precise ink work, this project creates a botanical illustration style that looks beautiful in any sketchbook.
How-To Guide
Materials
- Spiral-bound sketchbook with smooth paper
- Pencil (HB or H)
- Eraser
- Fine liner pen (0.3mm or 0.5mm, black)
- Thinner fine liner pen (0.1mm, black)
- Ruler (optional)
Step 1: Drafting the Shapes
-
Map the flower head:
Start by drawing a medium-sized circle in the upper left quadrant of your page. This will represent the center of the sunflower. Around this, sketch a larger, faint circle to define the outer boundary where the petals will end. -
Establish the stem:
Draw a long, slightly curved line extending from the bottom of your center circle down toward the bottom right corner of the page. Add a second parallel line close to the first to give the stem thickness. -
Place the leaves:
Sketch the central veins for four leaves. Place two lower down on the stem (one left, one right) and two higher up closer to the flower head. Draw the rough almond shapes of the leaves around these veins, making them large and prominent.
Uneven Ink Lines?
Don’t worry if your hand shakes slightly. In botanical art, a ‘nervous line’ often looks more natural and organic than a perfectly straight, mechanical one.
Step 2: Drawing the Petals
-
Draft the front petals:
Using your pencil, draw the first layer of petals radiating from the center circle. These should be teardrop-shaped but with somewhat squared-off or pointy tips. Leave small gaps between them. -
Add back petals:
Fill in the gaps between the front petals with the tips of a second layer of petals peeking through from behind. This adds depth and makes the flower look full. -
Ink the petal outlines:
Switch to your 0.3mm or 0.5mm pen. Carefully trace over your pencil lines for the petals. I like to make the lines slightly imperfect and organic rather than perfectly rigid. -
Add petal details:
Using the thinner 0.1mm pen, draw two or three very fine lines inside each petal, starting from the center and fading out toward the tip. This suggests the texture and curve of the petal surface.
Step 3: Detailing the Center and Stem
-
Texture the center:
In the very middle of the flower center, draw a tight spiral. As you move outward from that spiral, start making small ‘U’ shapes or tiny circles packed closely together to create the seed pattern. -
Outline the outer ring:
Define the outer edge of the flower’s center with a slightly thicker line, separating the seeded area from the petal base. -
Ink the stem:
Trace the stem lines with your thicker pen. Where leaves attach to the stem, slightly widen the connection point to show where the leaf stalk joins the main stem. -
Add stem texture:
Draw short, vertical hatching lines along the shadowed side of the stem (usually the bottom or right side) to give it a cylindrical volume.
Level Up: Stippling
Add depth to the flower center by using stippling (tiny dots). Densely pack dots on one side of the center circle to create a strong shadow effect.
Step 4: Leaf Structure
-
Outline the leaves:
Go over the leaf outlines with your main pen. Instead of a smooth line, use a slightly jagged or serrated motion to mimic the toothed edge of a sunflower leaf. -
Draw the veins:
Ink the central vein of each leaf first. Then, draw secondary veins branching out diagonally toward the leaf edges. Make sure the veins curve with the shape of the leaf. -
Refine leaf texture:
With the 0.1mm pen, add fine hatching marks near the central vein and the base of the secondary veins. This shading helps the leaves envision a concave shape.
Step 5: Finishing Touches
-
Erase pencil lines:
Wait at least 15 minutes to ensure the ink is totally dry. Gently erase all underlying pencil sketches to reveal the clean ink work. -
Check line weight:
Look over the drawing. If any main outlines feel too thin, go over them one last time to thicken them, especially on the underside of petals and leaves to suggest shadow.
Now you have a timeless botanical study ready to be framed or kept as a beautiful page in your journal

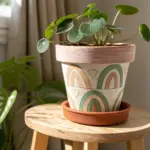
Balanced Bouquet in a Rounded Pot
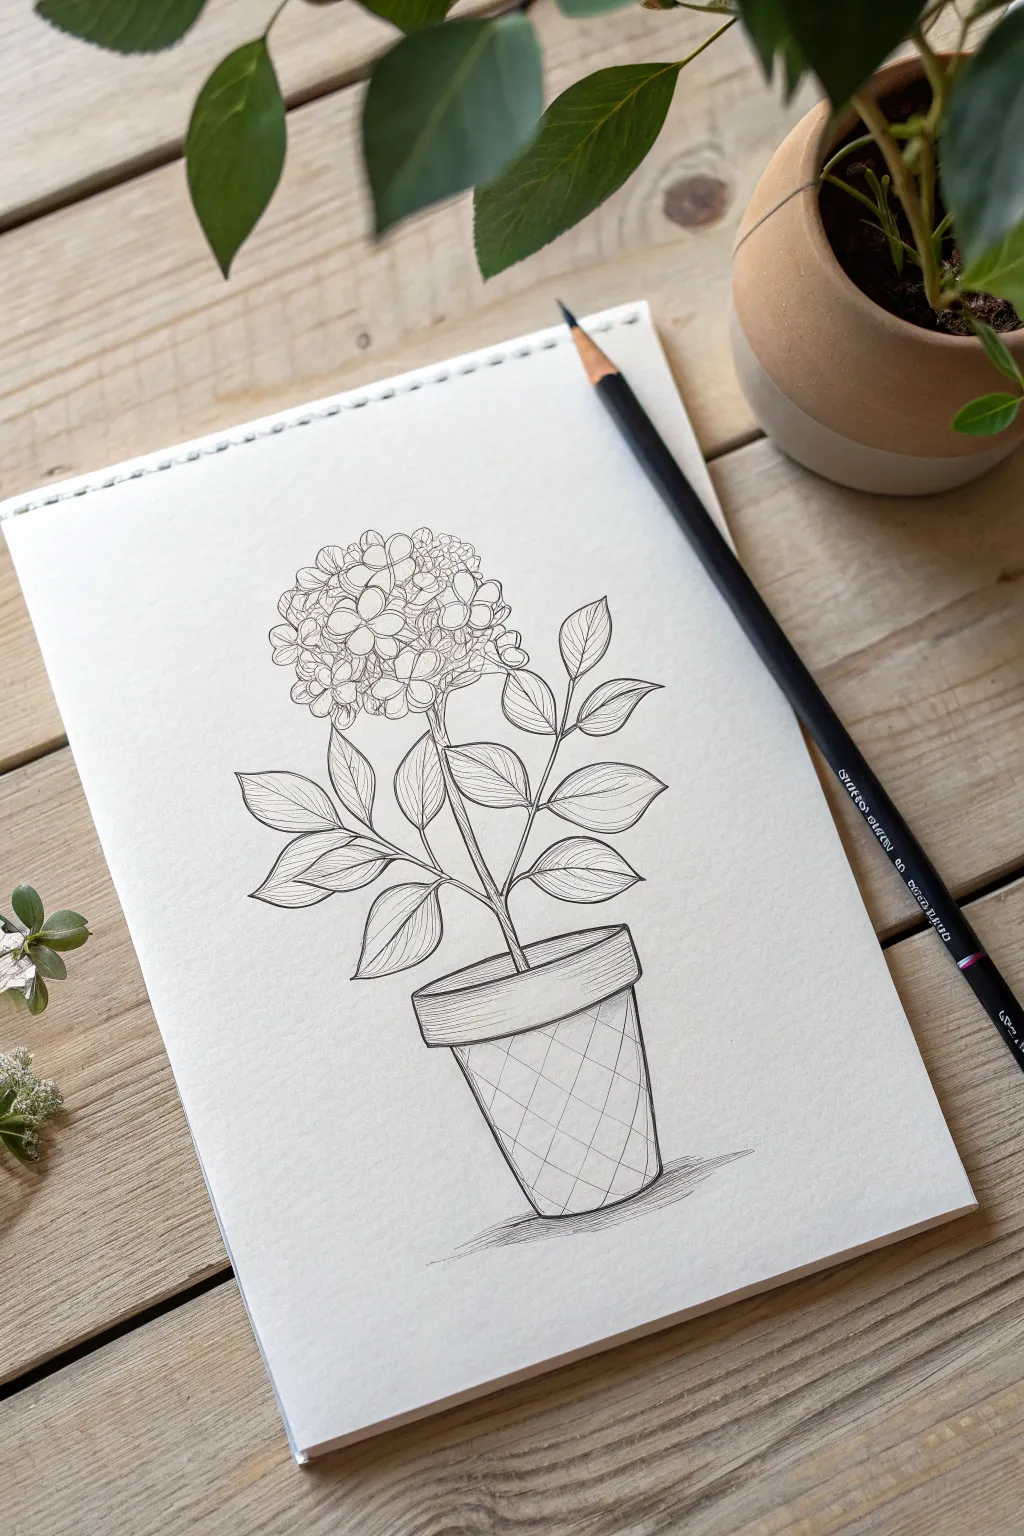
Capture the delicate complexity of a hydrangea bloom sitting atop a sturdy, patterned pot in this clean line drawing. This project focuses on botanical precision and balanced leaves, creating a peaceful, monochromatic study perfect for a sketchbook page.
Step-by-Step Tutorial
Materials
- Heavyweight drawing paper or sketchbook (smooth texture)
- H pencil for sketching
- HB or B pencil for defined lines
- Fine liner pen (0.3mm or 0.5mm, black)
- Soft eraser
- Ruler (optional)
Step 1: Structuring the Foundation
-
Establish the pot shape:
Start near the bottom third of your page. Draw a slightly tapered cylinder shape for the pot. Keep the bottom narrower than the top rim. -
Add the rim:
Draw a thick, prominent rim at the top of your cylinder shape. This should look like a flattened oval or ellipse sitting on top of the base. -
Map the stem:
From the center of the pot’s soil area, draw a main stem rising straight up, leaning ever so slightly to the left for a natural look. -
Outline the flower head:
At the top of the stem, lightly sketch a rough circle or cloud shape to define the boundaries of the hydrangea bloom. -
Place leaf guidelines:
Draw single lines branching out from the main stem to indicate where the leaf stalks (petioles) will go. Aim for symmetry, placing them in opposite pairs climbing the stem.
Step 2: Developing the Details
-
Draw individual florets:
Inside your cloud shape, start drawing the individual four-petal flowers (florets). Start with the ones in the front center, making them the largest and most detailed. -
Fill the cluster:
Continue adding florets behind the front ones. Make these slightly smaller and tucked away to create a sense of depth and spherical volume. -
Refine the leaf shapes:
Flesh out the leaves around your guidelines. Give them an ovate shape with pointed tips, ensuring the edges are smooth but slightly serrated. -
Add leaf veins:
Draw a central vein down each leaf, then add curved secondary veins branching out towards the edges. Keep these lines lighter than the outline. -
Detail the pot pattern:
On the main body of the pot below the rim, draw diagonal lines crisscrossing to create a diamond or quilt-like grid pattern. I find keeping these lines slightly curved helps show the roundness of the pot.
Uneven Grid?
If your pot’s diamond pattern looks flat, try curving the diagonal lines slightly outward. This simple trick mimics the cylindrical volume of the pot.
Step 3: Inking and Finishing
-
Ink the outlines:
Using your fine liner, go over the main contours of the flower, leaves, and pot. Use a confident, steady hand for a crisp look. -
Thicken key lines:
Go back and slightly thicken the lines where shadows would fall, such as under the overlapping lives or the underside of the pot rim. -
Draw inner pot texture:
Ink the diamond grid on the pot. You can double up the lines faintly to give the impression that the texture is etched or embossed. -
Add the soil line:
inside the pot rim, draw a few short, horizontal dashes to suggest the soil surface where the stem emerges. -
Ground the drawing:
Sketch a small patch of shadow at the base of the pot using quick horizontal hatching strokes. This stops the pot from looking like it is floating. -
Erase pencil marks:
Once the ink is completely dry, gently erase all the underlying pencil sketches to reveal the clean line work.
Level Up: Texture
Add stippling (tiny dots) to the center of each floret and under the leaves. This adds shading/texture without needed heavy pencil shading.
Now you have a beautifully structured botanical illustration ready to be framed or colored
BRUSH GUIDE
The Right Brush for Every Stroke
From clean lines to bold texture — master brush choice, stroke control, and essential techniques.
Explore the Full Guide
Pot Rim and Soil Ellipse Practice
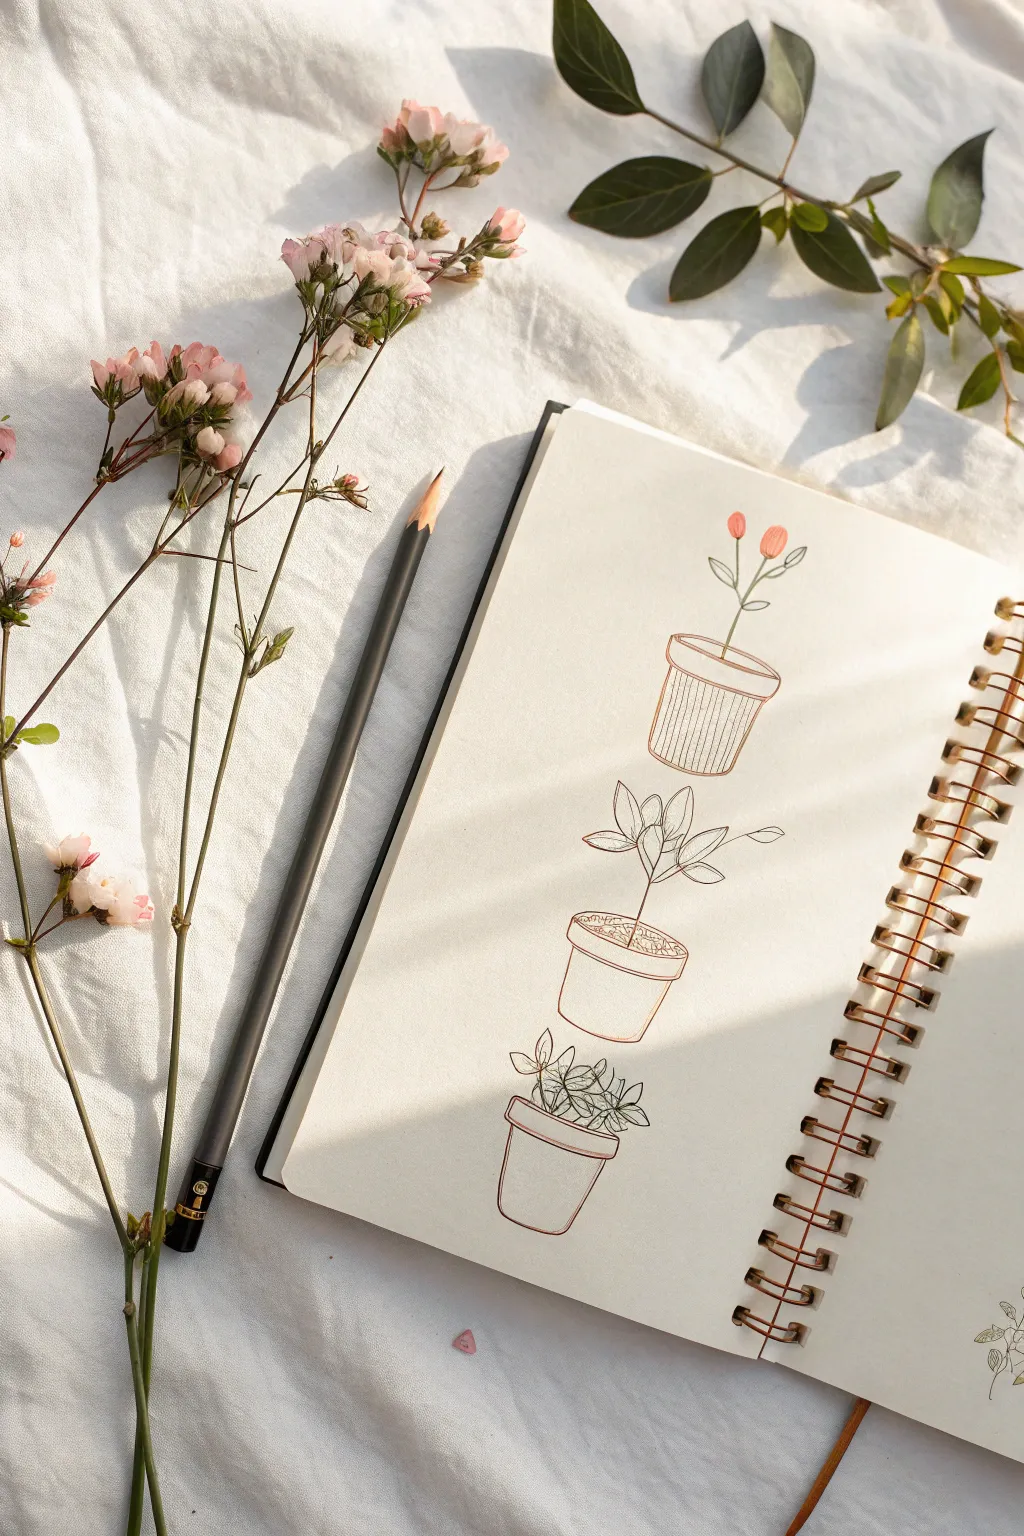
This minimalist practice exercise focuses on mastering the perspective of cylinder rims and simple botanical forms. By stacking three distinct pot designs vertically, you create a pleasing composition while refining your ability to draw ellipses.
Step-by-Step Guide
Materials
- Acid-free sketchbook or drawing paper
- Graphite pencil (HB or 2B)
- Fine liner pen (0.3mm or 0.5mm, brown/sepia tone)
- Soft kneading eraser
- Colored pencils, art markers or watercolors (muted orange/green)
Step 1: Drafting the Structure
-
Mark placement guidelines:
Begin by lightly drawing a vertical centerline down the middle of your page to align the pots. Make three small horizontal marks along this line to indicate where the bottom of each pot will sit, ensuring equal spacing between them. -
Sketch the top ellipses:
For each pot, draw a narrow horizontal oval (ellipse) centered on your line. Keep these ellipses relatively flat to convey a slightly elevated viewing angle. Draw the top pot’s ellipse slightly wider than the bottom one to suggest perspective variation. -
Define the pot bodies:
From the widest points of each ellipse, drop two lines downward to form the sides of the pots. For the top pot, taper the lines inward. For the middle pot, keep them straighter. For the bottom pot, curve them gently inward toward the base. -
Add rim thickness:
Draw a second, slightly larger curve wrapping around the bottom half of the original ellipses. This creates the illusion of a thick rim on each pot. Connect this outer rim to the main body of the pot.
Wobbly Ellipses?
Draw through the shape! Instead of sketching just the visible curve, draw the full oval several times lightly with your whole arm before committing to the final line.
Step 2: Drawing the Plants
-
Sketch the top stem:
For the highest pot, draw a single, slender stem rising from the center of the soil area. Branch it slightly near the top and sketch two small oval bud shapes. -
Draft the middle foliage:
In the center pot, sketch a central stem that splits into several leaf clusters. Draw these leaves as simple pointed ovals radiating outward, keeping the lines loose. -
Create the bottom succulent:
For the lowest pot, fill the rim opening with a cluster of small, tear-drop shaped leaves to resemble a succulent or leafy herb. Let some leaves overlap others to create depth. -
Refine distinct pot details:
Go back to the top pot and add vertical stripes along the body. For the middle pot, draw a ‘soil line’ inside the rim ellipse and add stippling texture. On the bottom pot, simply clean up the outer silhouette.
Make It Grow
Try varying the ‘growth stage’ of the plants. Draw a seed in the bottom pot, a sprout in the middle, and a full bloom in the top pot to tell a story.
Step 3: Inking and Finishing
-
Outline the top pot:
Switch to your fine liner pen. I prefer a sepia or warm brown ink for a softer look. Trace the rim and body of the top pot, carefully inking the vertical stripes freehand for a natural finish. -
Ink the top plant:
Trace the stem and buds of the top plant. Add two small leaves near the middle of the stem. -
Outline the middle pot:
Ink the rim and sides of the middle pot. When drawing the soil texture, use small, random dots or tiny jagged lines to suggest dirt or gravel. -
Ink the middle plant:
Go over the leaf outlines. Add a central vein line to a few of the leaves, but leave others blank to keep the style minimal. -
Outline the bottom pot:
Ink the final pot’s rim and body. Ensure the lines connecting the rim to the curved sides are smooth and continuous. -
Ink the bottom plant:
Trace the cluster of small leaves. Allow the ink lines to overlap slightly where leaves sit in front of one another. -
Erase pencil marks:
Wait until the ink is completely dry to prevent smudging. Gently rub your kneaded eraser over the entire drawing to lift all graphite guidelines. -
Add soft color accents:
Using a colored pencil or marker, add a touch of muted coral or pink to the buds on the top plant. You can also add very faint shading to the sides of the pots if desired.
Now you have a charming vertical study that shows off your control of simple forms and delicate lines
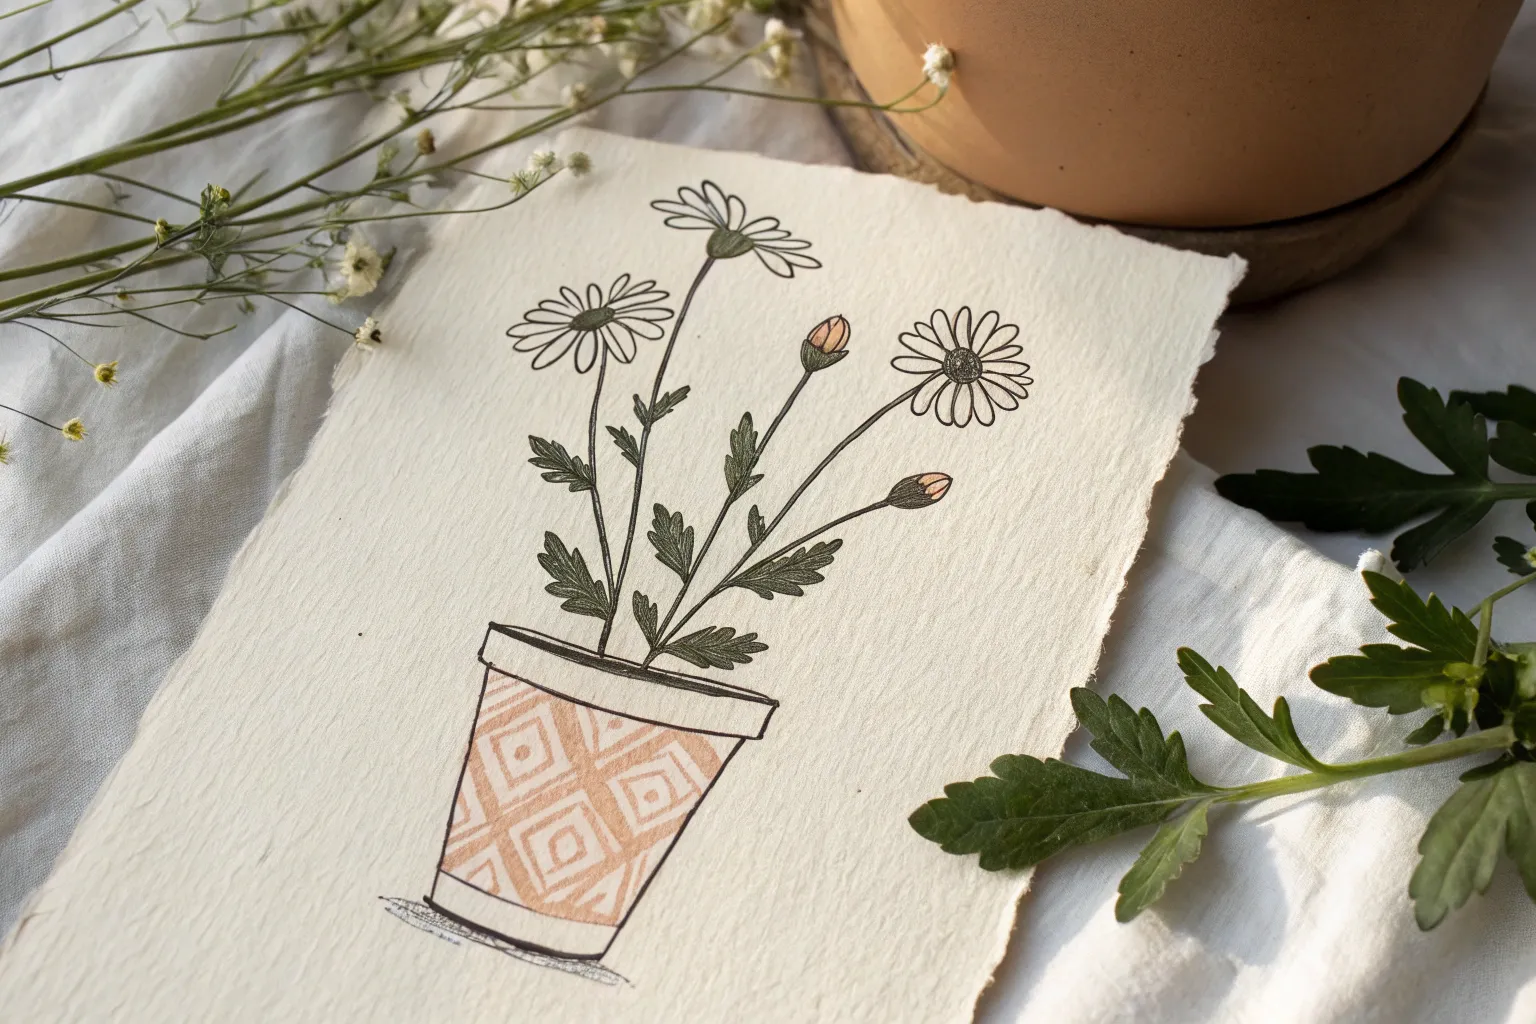
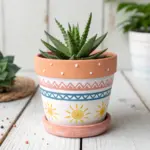
Polka-Dot Pot With Cute Daisies
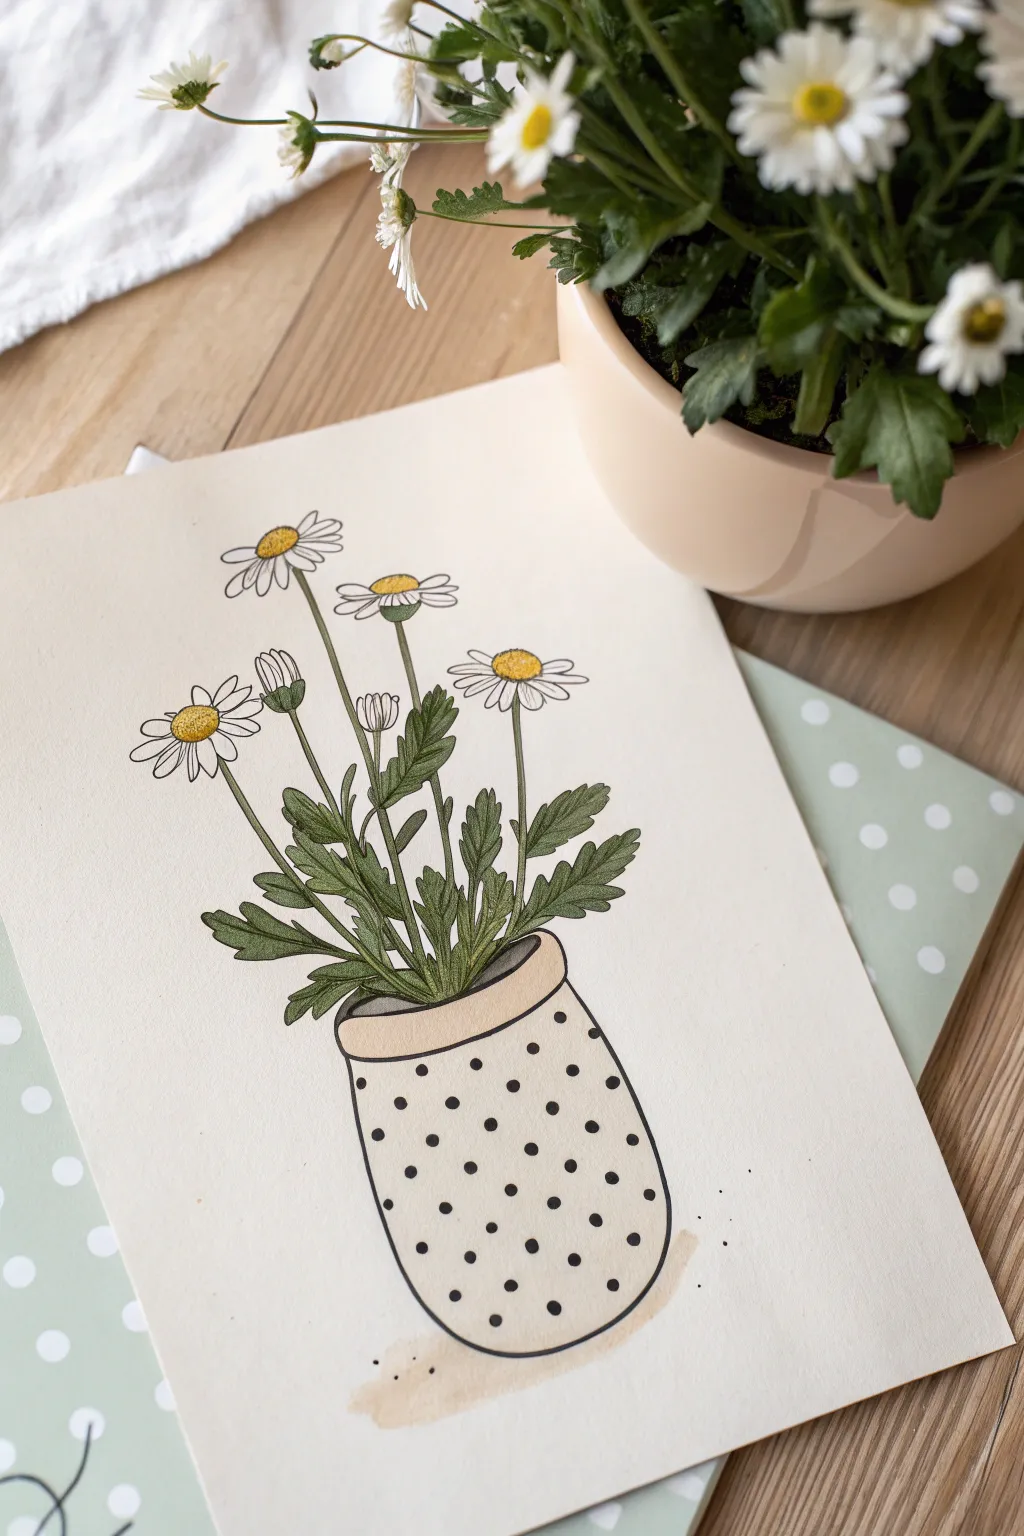
This charming illustration brings the simple beauty of a daisy bouquet to life, nestled in a playful polka-dot planter. With its clean lines and soft shading, this project is perfect for practicing botanical forms and adding character to everyday objects.
Step-by-Step Tutorial
Materials
- Heavyweight drawing paper or mixed media paper
- Fine liner pens (black, sizes 0.1, 0.3, and 0.5)
- Pencil (HB or 2B)
- Eraser
- Alcohol-based markers (yellow, green, dark green, beige/warm grey)
- White gel pen (optional)
- Ruler (optional)
Step 1: Drafting the Foundations
-
Sketch the pot shape:
Start near the bottom center of your page. Draw a gentle U-shape for the base of the pot, slightly flattening the very bottom so it sits stable. Close the top with a subtle downward curve to indicate the rim. -
Add the rim detail:
just below the top curve of the pot, draw a parallel curved line to create a thick, rolled rim effect. This gives the pot some dimension. -
Establish the stems:
Lightly sketch five thin lines rising from the center of the pot’s opening. Fan them out naturally—some taller, some shorter. These will be the spines for your daisies. -
Outline flower centers:
At the top of each stem line, draw oval shapes. Since the flowers are facing different directions, vary the ovals: flat ovals for side-facing blooms and rounder ones for front-facing flowers. -
Block in the petals:
Sketch the long, slender petals radiating from each center. Don’t worry about perfection; natural daisies have petals that overlap and vary in length.
Natural Petal Tip
Don’t draw every petal straight! Add a few bent or slightly drooping petals on the lower flowers to make the bouquet feel real and less rigid.
Step 2: Inking the Details
-
Ink the pot outline:
Using a 0.5 fine liner, trace the main outline of the pot. Keep your hand steady for a clean look, but allow for slight organic wobbles to maintain a hand-drawn charm. -
Define the flowers:
Switch to a finer 0.1 or 0.3 pen for the delicate petals. Outline each petal carefully, letting some lines break near the center to suggest lightness. -
Texture the centers:
Stipple (dot) the yellow centers of the daisies with your fine liner. Pack the dots denser at the bottom of the center for shadow and looser at the top for highlights. -
Add leaves and stems:
Draw the leaves along the stems using jagged, saw-tooth edges typical of daisy foliage. Ink the stems, making them slightly thicker at the base where they emerge from the pot. -
Draw the polka dots:
On the body of the pot, penciling in small, evenly spaced circles first is wise. Once happy with the pattern, ink the circles carefully. -
Erase pencil lines:
Wait until the ink is completely dry to prevent smudging, then gently erase all underlying pencil sketches.
Level Up: Texture
Use colored pencils over your dried marker base. A few strokes of dark green pencil on the leaves adds fantastic texture and grit.
Step 3: Adding Color and Depth
-
Color the pot base:
Use a very light beige or cream marker to fill in the body of the pot. If you want a textured look, color in vertical strokes. -
Shade the rim:
Use a slightly darker warm grey or brown marker to color the rolled rim. Add a second coat of ink on the left side to suggest a shadow. -
Fill the dots:
Carefully color in the polka dots with black ink or a dark warm grey marker. Ensure the edges remain crisp. -
Brighten the blooms:
Color the stippled flower centers with a bright yellow marker. I usually add a touch of orange or brown to the bottom edge of the yellow center to enhance the 3D effect. -
Green up the foliage:
Use a mid-tone green for the stems and leaves. For depth, layer a darker green on the undersides of the leaves and where the stems bunch together near the pot’s rim. -
Create a shadow base:
Underneath the pot, add a wash of light grey or diluted beige marker. Keep the shape irregular and mostly to one side to ground the object. -
Add final highlights:
If you have a white gel pen, add tiny reflection dots to the yellow flower centers or a small shine line on the pot’s rim to make it pop.
Now you have a cheerful floral illustration ready to frame or turn into a greeting card

PENCIL GUIDE
Understanding Pencil Grades from H to B
From first sketch to finished drawing — learn pencil grades, line control, and shading techniques.
Explore the Full Guide
Color-Pop Complementary Palette
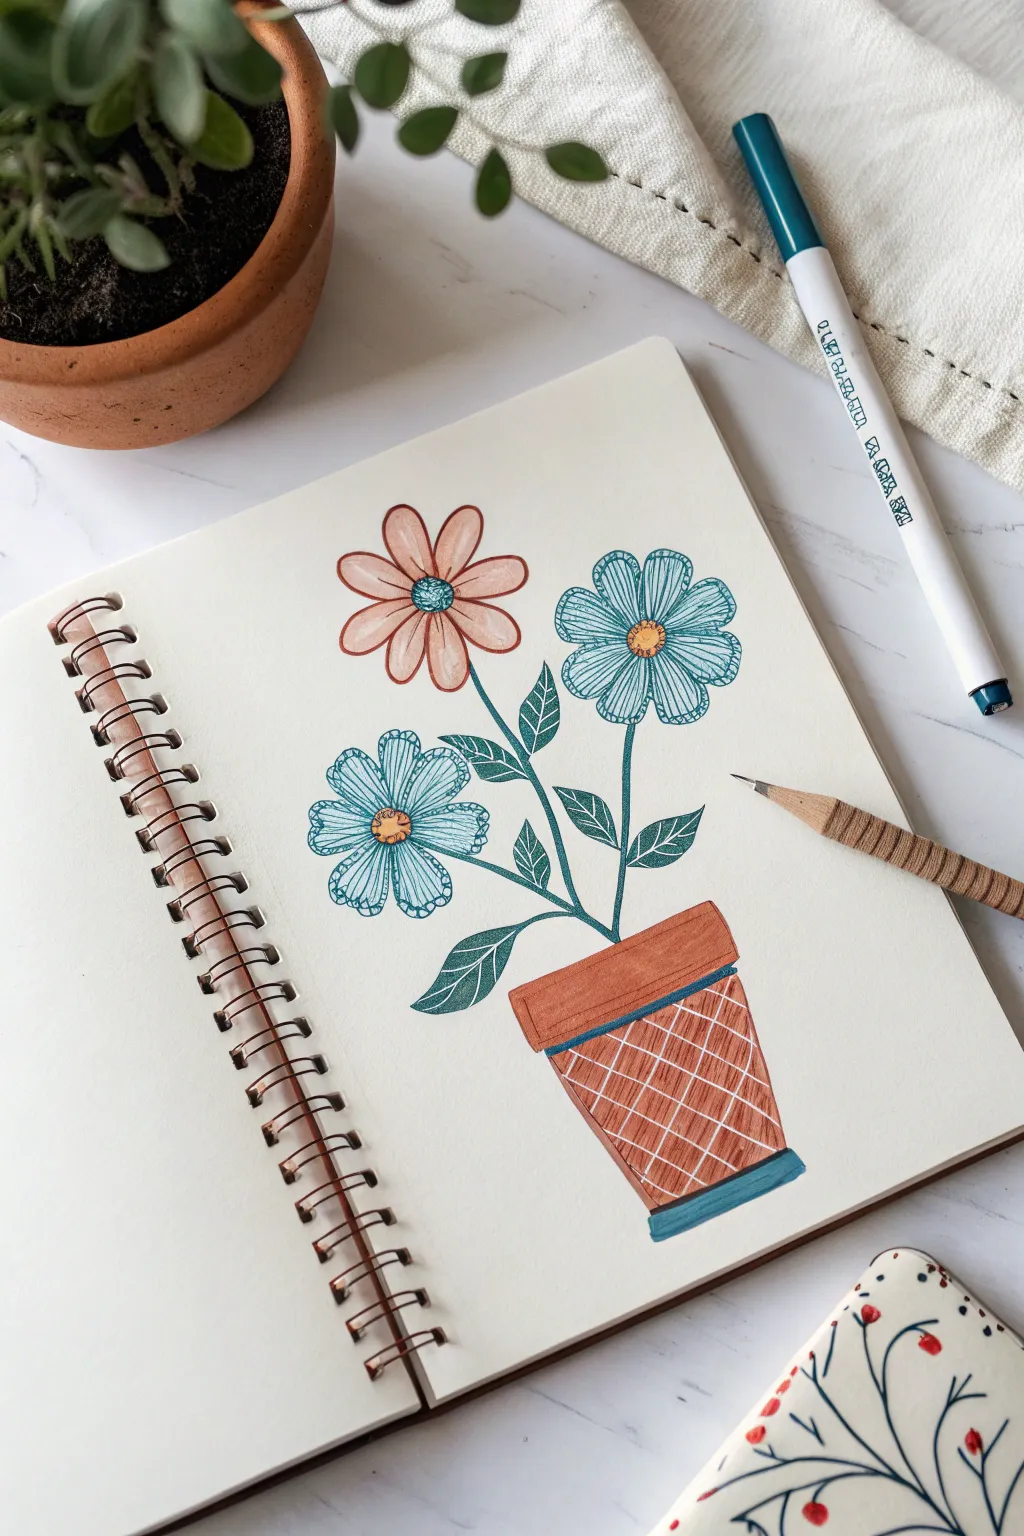
This cheerful drawing combines warm terracotta tones with cool blues and teals for a striking complementary contrast. The stylized flowers and patterned pot create a modern folk-art feel that pops right off the page.
Detailed Instructions
Materials
- Spiral-bound mixed media or sketch paper
- Peach/Light Orange marker or colored pencil
- Teal/Aqua Blue fineliner or gel pen (0.5mm or 0.8mm)
- Dark Teal brush pen or broad marker
- Terracotta/Rust colored marker
- White gel pen (opaque)
- Pencil (HB) for sketching
- Eraser
Step 1: Base Sketch & Pot Structure
-
Outline the pot shape:
Start near the bottom of your page. Draw a trapezoid shape (wider at the top, narrower at the bottom) for the main body of the pot. -
Add the rim:
Draw a rectangular band sitting directly on top of your trapezoid for the pot’s rim. Let it overhang slightly on the left and right sides. -
Sketch the flower placement:
Lightly sketch three long stems rising from the pot. Place one central stem slightly lower, and two taller stems branching to the left and right to fill the space. -
Define the flower heads:
Draw a simple circle at the top of the left and right stems. For the central (highest) flower, draw a slightly larger circle.
Don’t Smudge the Grid!
Terracotta markers can take a moment to dry. Test dryness with a spare paper scrap before applying the white gel pen to keep your lines crisp white.
Step 2: Bringing the Pot to Life
-
Color the pot body:
Fill in the main trapezoid body of the pot using your terracotta or rust-colored marker. Apply even strokes to avoid streaks. -
Color the rim:
Color the rectangular rim with the same terracotta shade. I create a slightly darker line right under the rim to suggest a shadow. -
Add the saucer base:
At the very bottom of the pot, draw a narrow, flat oval base using your dark teal marker. This grounds the pot and introduces the cool color palette early on. -
Create the white grid:
Once the terracotta ink is completely dry, use your white gel pen to draw diagonal lines across the pot body. Cross them with diagonal lines the opposite way to form a diamond grid pattern.
Add Dimension
Use a darker brown or orange colored pencil to shade the left side of the terracotta pot and under the rim to make it look 3D and rounded.
Step 3: Flowering Details
-
Color the petals base:
For the top flower, color the petals with a solid peach/light orange marker. For the two lower flowers, leave the petals uncolored for now. -
Outline the center petals:
Using your teal fineliner, carefully outline the petals of the top peach flower. Draw a simple center line down each petal for texture. -
Draw the blue flowers:
For the two lower flowers, use the teal fineliner to draw the petal outlines directly. Fill the interior of these petals with fine lines or scribbles to give them a colored appearance without solid ink. -
Add flower centers:
Draw small circles in the center of the blue flowers using the peach marker. For the top peach flower, use the dark teal marker for the center to reverse the contrast.
Step 4: Leafy Greens & Final Touches
-
Draw the stems:
Trace over your initial pencil stems with the dark teal marker or brush pen, making them thick and sturdy. -
Add the leaves:
Draw pointed, oval-shaped leaves branching off the stems. Aim for about two to three leaves per stem. -
Fill the leaves:
Color the leaves solidly with the dark teal marker. Leave a tiny sliver of white down the center of each leaf to represent the vein, or draw it in with white gel pen later. -
Intensify outlines:
Go back over your main outlines with the teal fineliner if any lines got lost during coloring, especially around the flower centers. -
Clean up:
Wait for all ink to be fully dry to the touch, then gently erase any remaining visible pencil sketch lines.
Now you have a vibrant botanical illustration that perfectly balances warm earth tones with cool floral blues
Marker Outline With Flat Color Fill
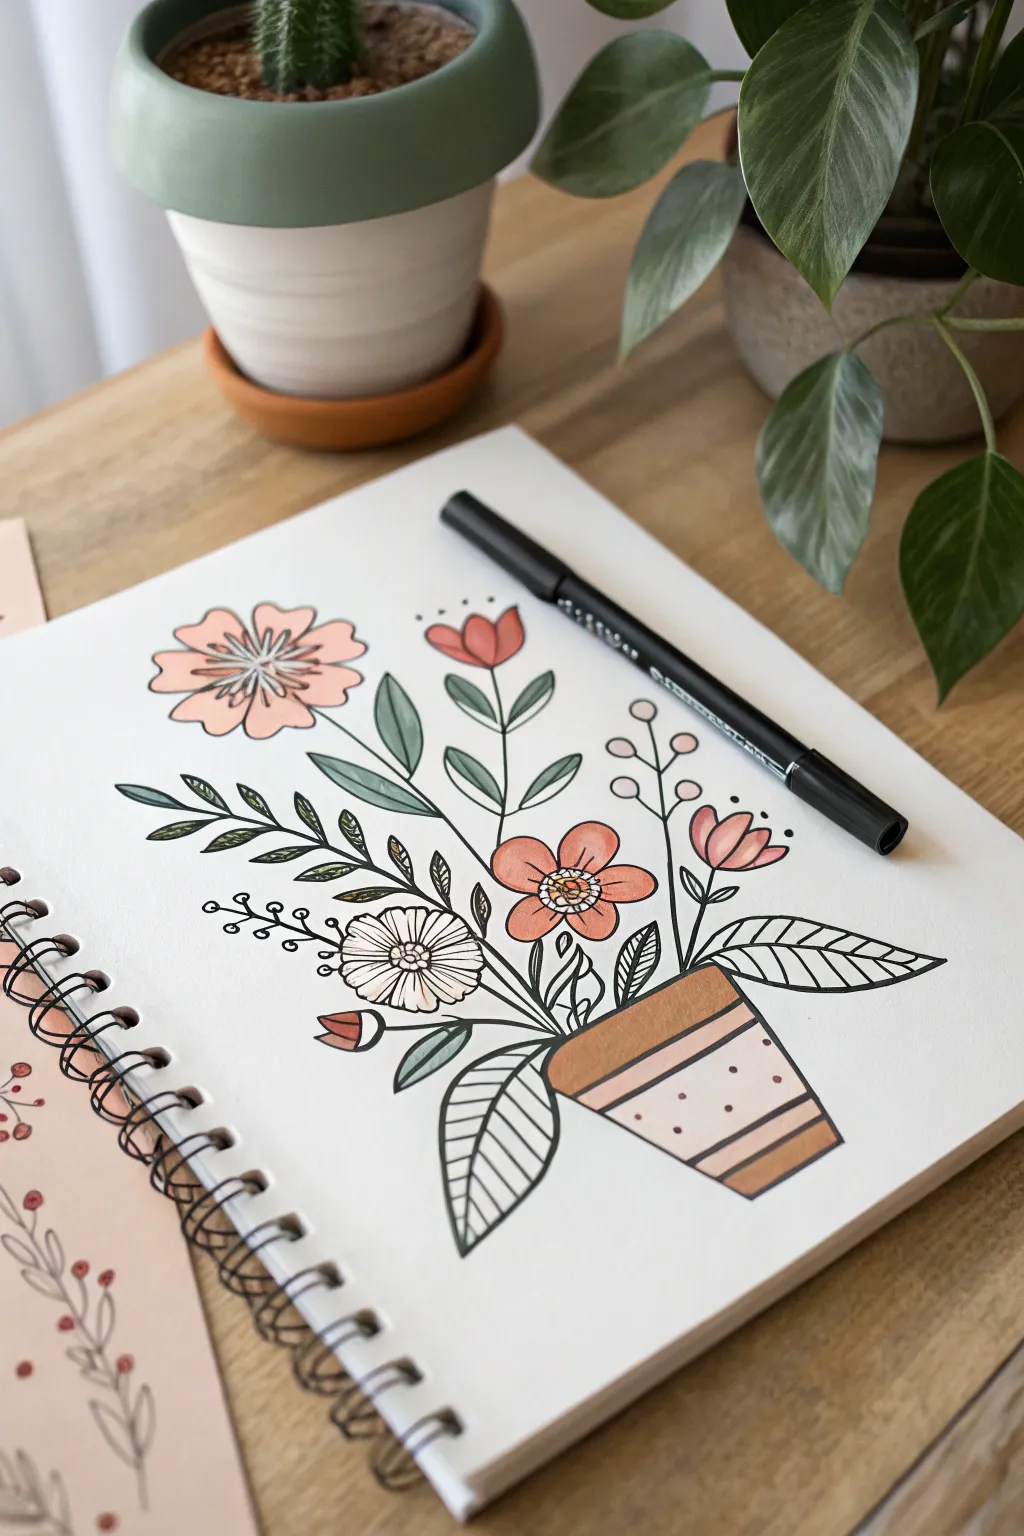
This charming illustration combines bold linework with soft, flat coloring for a clean, graphic look. Perfect for your sketchbook, this project focuses on simplified botanical shapes and a harmonious, limited color palette.
Step-by-Step Tutorial
Materials
- Sketchbook or mixed media paper
- Pencil (HB or H)
- Eraser
- Black fine liner pen (0.3mm to 0.5mm)
- Thicker black marker (0.8mm or small brush pen)
- Alcohol markers or brush pens (peach/pink, sage green, terracotta/brown, warm beige)
Step 1: Pencil Sketching
-
Establish the pot shape:
Start near the bottom center of your page. Lightly sketch a trapezoid shape for the pot, wider at the top and narrower at the bottom base. -
Draw the pot rim:
Add a horizontal band across the top of the trapezoid to create the rim of the pot. Draw a few faint horizontal lines across the pot’s body to mark where the decorative stripes will go later. -
Map out the stems:
From the center of the pot rim, draw several radiating lines upward and outward. These don’t need to be perfect; they just act as the skeleton for your floral arrangement. -
Sketch the main blooms:
Draw loose circles or ovals at the ends of your stem lines to place the flowers. Make one large circle on the left for the daisy, smaller ovals for the tulips, and a medium circle for the center flower. -
Refine the flower shapes:
Inside the large circle, sketch petal shapes radiating from a center point. For the tulips, draw a ‘U’ shape with a zig-zag top. Add simple leaf shapes along the stems.
Ink Confidence
Don’t worry if your lines wobble. In botanical illustration, slightly organic, shaky lines often look more natural than ruler-straight ones
Step 2: Inking the Outline
-
Outline the pot:
Using your thicker black marker or pen, trace over the main outline of the pot. Keep the lines confident and smooth. -
Ink the main stems:
Switch to your standard fine liner. Trace the stem lines, stopping where they meet leaves or flowers so the lines don’t run through your shapes. -
Detail the large daisy:
Ink the center of the large daisy first, adding small lines for texture. Then, draw the petals, allowing them to be slightly imperfect and organic. -
Ink the leaves:
Outline the leaves carefully. For the fern-like leaves on the left, draw a central vein and small, paired leaves coming off it. For the broad leaves on the right, draw the outline and a simple central vein. -
Add decorative elements:
Draw the floating elements, like the small berries on stems or the little dots near the top tulip, which add a whimsical touch to the composition. -
Erase pencil lines:
Wait a moment for the ink to fully set, then gently erase all your pencil sketches to reveal a clean black and white drawing.
Pattern Play
Try filling the uncolored leaves with different patterns like polka dots or checkerboards instead of stripes for a unique twist
Step 3: Adding Color
-
Color the pot:
Take a terracotta or warm brown marker and fill in the rim of the pot and the bottom stripe. Leave the middle section uncolored for now. -
Color the pot details:
Use a lighter beige or pale pink marker to fill the middle stripe of the pot. Once dry, use your brown marker to add small dots over this lighter section for texture. -
Fill the large flower:
Color the petals of the large left flower with a soft peach or pink marker. I usually leave a tiny bit of white space near the detailed center to keep it looking airy. -
Color the tulips and center bloom:
Use a varied shade of coral or darker pink for the tulip shapes and the small center flower to create some contrast against the lighter daisy. -
Greenery tones:
Use a sage green marker for the broad leaves. For visual interest, leave some leaves—like the fern on the left and the striped leaf on bottom right—uncolored (white) with just their black ink details showing.
Step 4: Final Details
-
Leaf patterns:
Go back in with your fine liner. On the uncolored striped leaf at the bottom right, draw parallel diagonal lines. -
Define the flower centers:
Add small dots or tiny circles inside the flower centers using the fine liner to increase contrast. -
Final assessment:
Check for any areas that need a thicker outline to stand out, like the outer edge of the pot, and bold them up if necessary.
Enjoy your lovely new botanical illustration, which looks beautiful tucked into a journal or framed on a desk


Watercolor Wash Behind the Pot
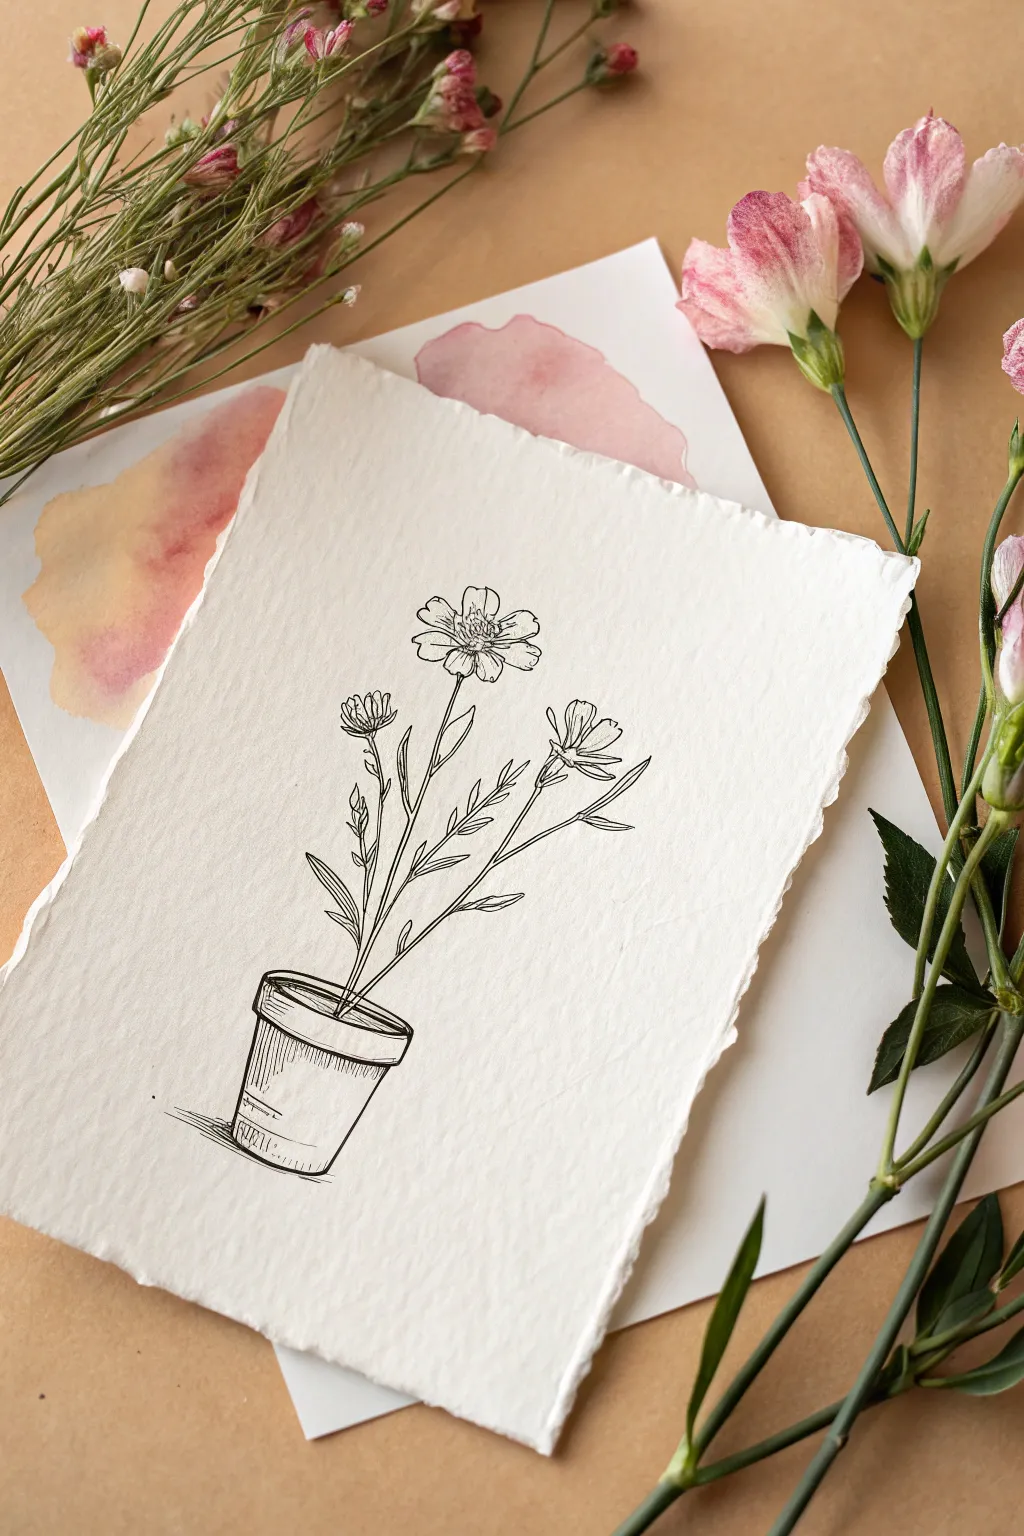
This elegant artwork combines the crisp simplicity of a fine-line botanical drawing with a soft, ethereal background. By layering a textured ink sketch over a loose watercolor wash, you create a beautiful sense of depth without needing complex painting skills.
How-To Guide
Materials
- Heavyweight textured paper (cold press watercolor or handmade paper)
- Second sheet of mixed media paper (for the background)
- Fine liner or archival ink pen (0.3mm or 0.5mm, black)
- Watercolor paints (shades of muted pink, peach, and soft orange)
- Watercolor brush (round, size 6 or 8)
- Pencil (HB) and eraser for sketching
- Paper tearing ruler or straight edge (optional)
- Masking tape
Step 1: Creating the Soft Watercolor Background
-
Prepare the background paper:
Start with your secondary sheet of paper, which will sit behind your main drawing. Tape down the corners lightly if the paper is thin to prevent buckling. -
Mix your colors:
On your palette, dilute a soft pink and a warm peach-orange with plenty of water. You want these colors to remain very transparent and fluid. -
Apply the wash:
Using a wet brush, paint two large, loose organic blob shapes on the paper. Let the pink and peach bleed into each other slightly in the middle. -
Soften edges:
While the paint is still wet, rinse your brush and run clear water along the outer edges of your painted shapes to help them feather out softly. -
Let it dry completely:
Set this sheet aside to dry fully. The colors should look like soft, undefined clouds once dry.
Step 2: Preparing the Drawing Surface
-
Select your top paper:
Choose a thick, high-quality paper for the foreground drawing. Handmade cotton paper works beautifully here because of its rich texture. -
Create the decked edge:
To mimic the torn look in the reference, carefully tear the edges of your paper manually or use a tearing ruler. This adds a rustic, vintage charm. -
Sketch the pot layout:
Lightly sketch the flower pot near the bottom third of the paper. Use simple geometric forms: a slightly wider oval for the rim and a tapered cylinder for the base. -
Sketch the stems:
Draw three main vertical lines rising from the pot for the stems. I like to curve them slightly outward to make the arrangement feel natural rather than stiff.
Natural Deckle Edges
To get a soft, fuzzy torn edge, paint a line of water where you want to tear the paper. Wait 30 seconds, then pull the paper apart gently along the wet line.
Step 3: Inking the Botanical Design
-
Outline the pot rim:
Using your fine liner pen, trace the heavy oval rim of the pot. Double the line slightly on the top edge to indicate thickness. -
Draw the pot body:
lnk the sides and bottom of the pot. Add a few quick, vertical hatch marks on the left side and under the rim to suggest shadow and roundness. -
Add a ground shadow:
Scribble a few horizontal lines just underneath the pot, slightly to the left, to ground the object so it doesn’t look like it’s floating. -
Ink the main stems:
Go over your pencil lines for the stems. Keep your hand loose; wobble the line just a tiny bit to replicate the organic texture of a plant stem. -
Draw the central flower:
For the main bloom, start with a textured center, then draw five or six petals radiating outward. Add small lines inside the petals near the center to show dimension. -
Add side buds:
Draw the smaller flowers on the left and right stems. These can be simpler—just jagged cup shapes to represent opening buds. -
Add leaves:
Draw narrow, lance-shaped leaves growing upward along the stems. Use quick, confident strokes. -
Detail the leaves:
Add a single central vein line to each leaf, but don’t connect it all the way to the tip for a lighter, more illustrative feel. -
Erase pencil marks:
Wait at least 5-10 minutes to ensure the ink is totally dry, then gently erase all visible pencil guidelines.
Level Up: Pressed Flowers
Glue a tiny, real pressed flower petal onto one of the drawn blooms for a mixed-media 3D effect that blends reality with sketch.
Step 4: Final Assembly
-
Layer the artwork:
Place your torn-edge drawing on top of the dry watercolor background sheet. Adjust the position so the pink and peach wash peeks out nicely from behind the drawing. -
Secure the layers:
Use a small piece of double-sided tape or a glue dot in the center to hold the top sheet in place.
Display your layered botanical art in a floating frame to show off those beautiful torn edges.
Surreal Flower Pot Mini World
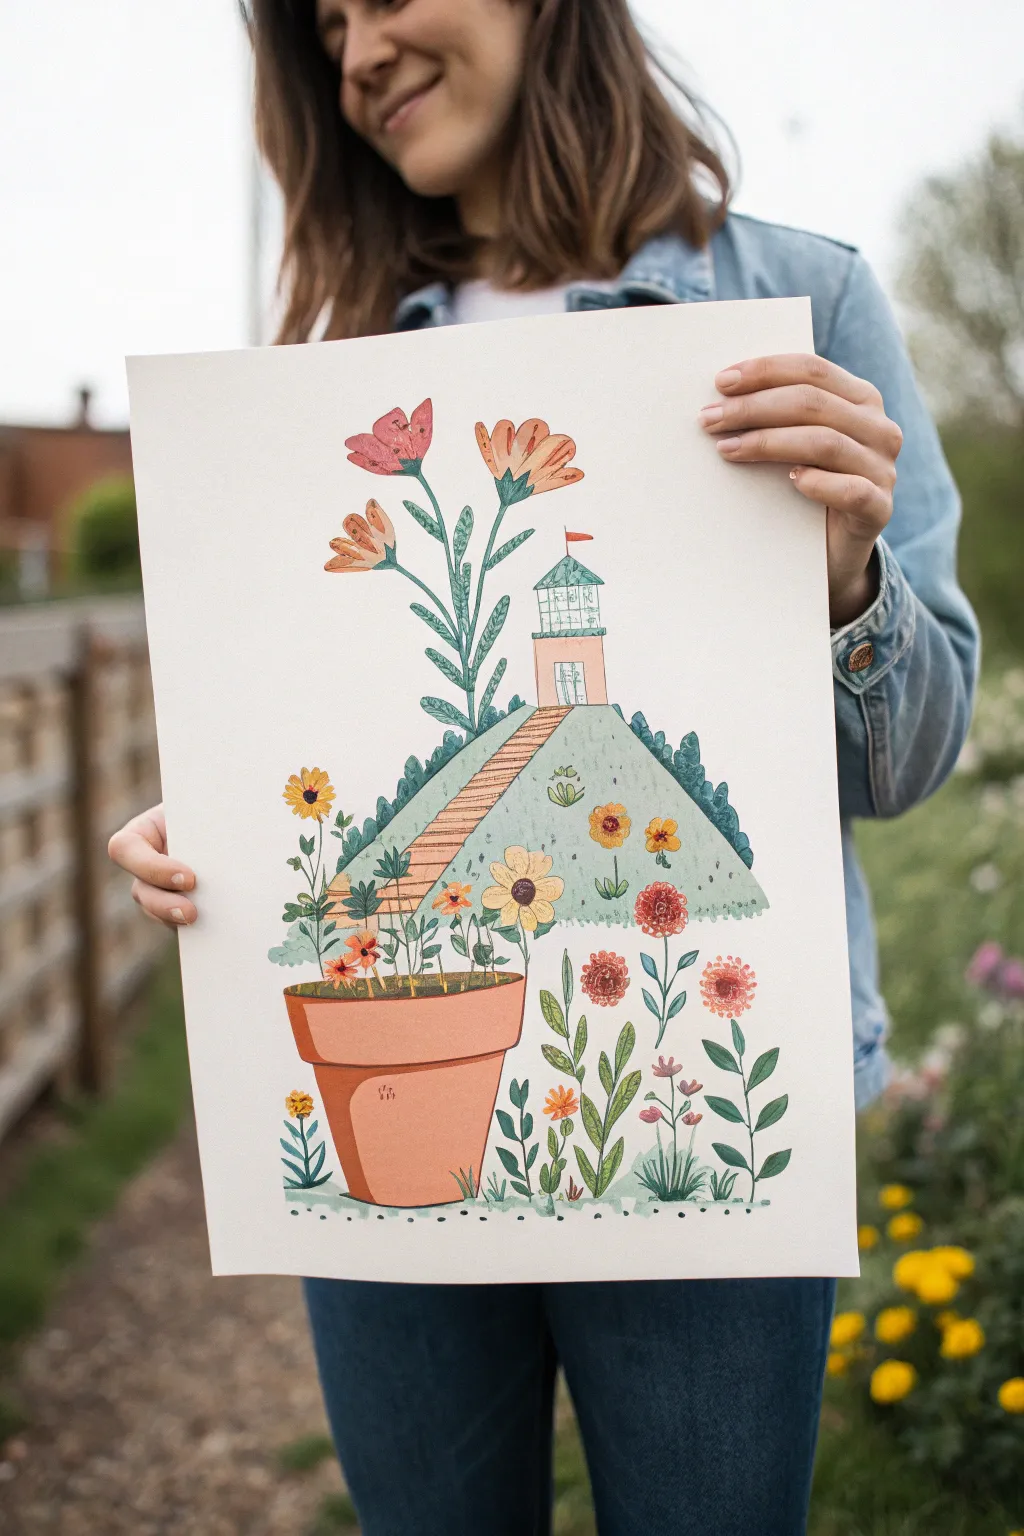
This imaginative project blends traditional botanical illustration with a playful surrealist twist, transforming a simple flower pot into a tiny, flourishing landscape. The soft textures and muted palette create a dreamy, storybook quality perfect for wall art.
Step-by-Step Guide
Materials
- High-quality watercolor paper (hot press for smoothness or cold press for texture)
- Pencil (HB) and eraser
- Gouache or acrylic paints (Terracotta, Sage Green, Cream, Deep Green, Coral, Yellow Ochre)
- Fine liner pens or a very thin detail brush
- Flat shader brush (medium)
- Small round brush (size 2 or 4)
- Palette and water cup
- Ruler (optional)
Step 1: Planning and Sketching
-
Establish the Composition:
Start by lightly sketching the large terracotta pot near the bottom third of your paper. Draw a wide oval for the rim to give it a 3D perspective. -
Draw the Hillside:
Instead of a flat soil line inside the pot, draw a large, rounded hill rising steeply from the rim. I like to make the hill slightly asymmetrical to keep things interesting. -
Add the Structure:
At the very peak of your hill, sketch a small, whimsical house or lighthouse. Include a simple triangular roof and a tiny flag. -
Sketch the Giant Flora:
Draw three large, dominant flower stems rising from behind the hill, looming over the house. These should feel exaggerated in scale compared to the building. -
Detail the Foreground:
Fill the space around the base of the pot with smaller, simpler wildflowers and leaves to ground the composition.
Gouache Consistency Tip
Gouache dries lighter! Keep your paint consistency like heavy cream. If it’s too watery, you’ll lose that lovely matte opacity that makes this style pop.
Step 2: Painting the Base Layers
-
Block in the Pot:
Using a terracotta or burnt orange gouache, paint the body of the pot. Mix a slightly darker shade for the shadow side to create volume. -
Paint the Hillside:
Fill in the hill shape with a muted sage or mint green. Keep this layer relatively flat and opaque to serve as a backdrop for later details. -
Color the House:
Use a soft cream or pale pink for the house walls and a contrasting teal or blue for the roof. Precision is key here, so switch to your smallest round brush. -
Lay Down Flower Colors:
Paint the petals of the giant flowers using coral and soft orange tones. Don’t worry about outlining yet; just focus on getting solid shapes.
Seasonal Switch
Change the vibe by altering the hill’s season. Paint the hill white with blue shadows for snow, or use warm oranges and reds for an autumn harvest scene.
Step 3: Adding Texture and Detail
-
Create the Staircase:
Using a light brown or tan, paint a winding staircase leading from the pot’s rim up to the house door. Add tiny horizontal lines for the steps once the base strip dries. -
Texture the Hill:
Stipple small dots and tiny V-shapes in a darker green across the hill to simulate grass texture without drawing every blade. -
Define the Giant Leaves:
Paint the stems and leaves of the large flowers in a deep forest green. Add vein details with a lighter green mix or a white gel pen once dry. -
Populate the Pot:
Paint smaller flowers ‘growing’ directly out of the soil inside the pot rim. Sunflowers and daisies in yellow and white work well here for contrast. -
Ground Level Foliage:
Paint the eclectic mix of plants at the very bottom of the paper surrounding the pot base. Vary your greens here to distinguish them from the hill.
Step 4: Final Touches
-
Add Shadows and Highlights:
Mix a watery dark brown to add a cast shadow under the lip of the pot and beneath the pot itself to anchor it to the ground. -
Line Work:
Using a very fine brush or a fine liner pen, add delicate outlines to the house windows, the flag, and the flower centers. -
Stipple the Background:
Add a few scattered dots or small marks in the background around the main image to give the piece a cohesive, illustrated feel. -
Clean Up:
Erase any visible pencil sketch lines that haven’t been covered by paint, ensuring the paint is bone dry first to avoid smearing.
Frame your mini-world drawing in a simple wood frame to let the colors truly shine


Have a question or want to share your own experience? I'd love to hear from you in the comments below!