Game day face paint is the quickest way to turn your outfit into full-on football spirit—and it can be as simple or as extra as you feel like being. Here are some of my favorite football game face painting ideas, starting with the classics and moving into the fun, artsy twists.
Two-Tone Color Block Half Face
Achieve a bold, minimalist look that screams team spirit without overpowering your natural features. This modern take on football face paint uses two thick vertical stripes in contrasting colors to create a striking architectural effect.
Step-by-Step Tutorial
Materials
- Red face paint (water-activated or cream)
- White face paint (water-activated or cream)
- Medium flat brush (approx. 1/2 inch to 3/4 inch width)
- Small flat or filbert brush for edges
- Clean water cup
- Setting spray (optional)
- Makeup sponge
- Makeup remover wipes
Step 1: Preparation and Mapping
-
Cleanse and dry:
Begin with a completely clean face. Any oils or moisturizer can cause the paint to slide, so ensure your skin is fresh and dry. -
Select your brush:
Choose a medium-sized flat brush. The width of the brush will dictate the natural width of your stripes, making the process much smoother. -
Visualize the placement:
Look in the mirror and align the design with your eye. The goal is to have the stripes run vertically down, passing over the inner corner or center of the eye and down the cheekbone.
Clean Lines Hack
Use a piece of paper or cardstock as a shield. Hold it against your skin and paint right up to the edge to get perfectly straight vertical lines effortlessly.
Step 2: Painting the Red Stripe
-
Load the red paint:
Dip your flat brush into water and work it into the red cake paint until you have a creamy, opaque consistency. -
Start at the forehead:
Place the brush flat against your forehead, slightly off-center to the left (or right, depending on preference). Pull a straight line down towards the eyebrow. -
Bridge the eye gap:
Continue the line below the eyebrow, passing over the eyelid if desired or skipping it, and reconnecting at the top of the cheekbone. -
Extend down the cheek:
Pull the stroke downwards along the cheek, tapering off naturally near the jawline. -
Create the outer edge:
Using the same red paint, create a second vertical stroke right next to the first one on the outer side. This widens the red section significantly. -
Fill in gaps:
Use the flat of the brush to fill the area between your strokes so the red block is solid and opaque. -
Clean the lines:
Use the edge of a clean, damp brush or a makeup wipe wrapped around a finger to straighten the vertical edges if they got a bit wobbly.
Level Up: Texture
Instead of solid paint, press loose cosmetic glitter over the stripes while the paint is still tacky for a sparkling version that catches the stadium lights.
Step 3: Adding the White Stripe
-
Clean your brush thoroughly:
Wash your brush completely to remove all red pigment. I prefer to use a fresh water cup here to avoid turning the white paint pink. -
Load the white paint:
Like before, work the brush into the white paint until it is creamy and solid, not watery. -
Align the center:
Position your brush directly next to the inner edge of the red stripe on the forehead. The goal is for them to touch without blending. -
Paint the forehead section:
Pull the white stripe down the forehead to the eyebrow, keeping it parallel to the red block. -
Navigate the nose bridge:
Carefully bring the white stripe down past the inner corner of the eye and along the side of the nose bridge. -
Finish the cheek section:
Extend the white line down the cheek, mirroring the length of the red stripe. -
Sharpen the seam:
If there is a gap between colors, carefully use a small brush to fill it. If they overlapped and muddied, wait for them to dry and dab pure color on top. -
Texturize the top (optional):
For a raw look like the photo, allow the very top of the forehead strokes to be slightly uneven or ‘brush-stroked’ rather than a perfect geometric square. -
Set the look:
Once dry, a light mist of setting spray will keep the colors distinct and prevent them from sweating off during the game.
Now you are ready to head to the stadium with a graphic, high-fashion take on team spirit


Game-Day Star Bursts Around the Eyes
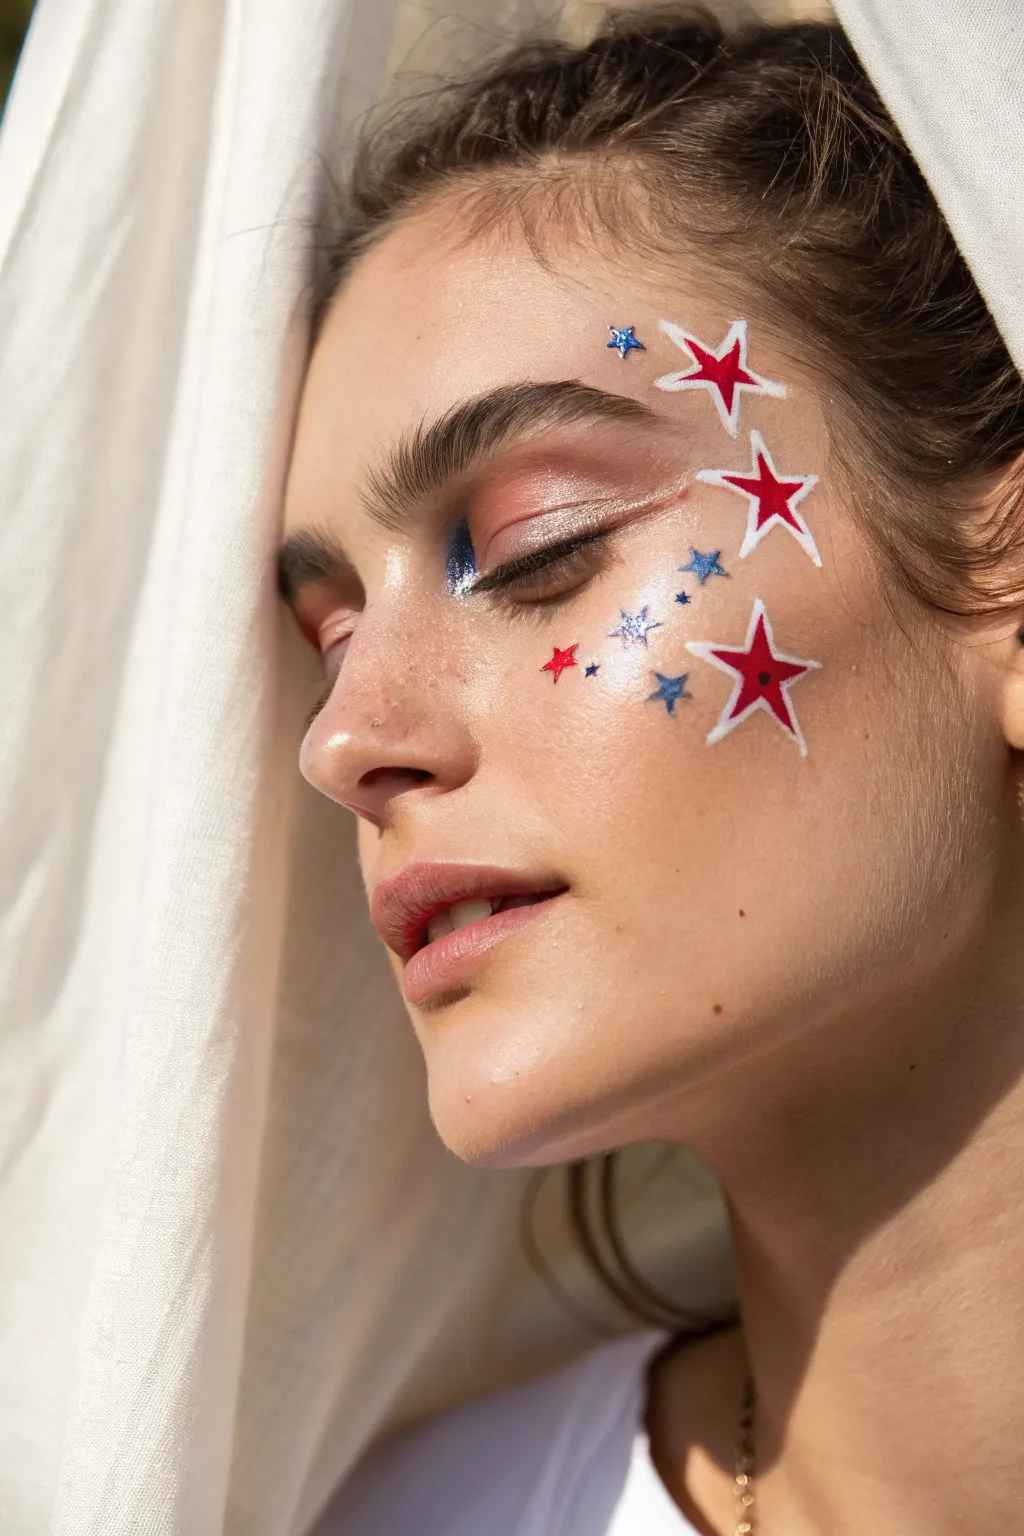
Capture the spirit of the game with this dazzling face paint design that sweeps across the temple and cheekbone. Combining classic red, white, and blue hues with metallic accents, this star-studded look is perfect for cheering on your favorite team in style.
Detailed Instructions
Materials
- White face paint (water-activated or cream)
- Red face paint
- Blue face paint (metallic or shimmer finish)
- Fine detail brush (size 0 or 00)
- Small flat brush or angled eyeliner brush
- Blue glitter gel or cosmetic adhesive with loose blue glitter
- Red glitter (optional)
- Pink or reddish-brown eyeshadow
- Fluffy eyeshadow blending brush
- Makeup setting spray
- Small star stencils (optional)
Step 1: Base and Eyeshadow
-
Prep the canvas:
Start with clean, moisturized skin. Apply a light layer of foundation or concealer if desired to even out the skin tone, ensuring the area around the temple and cheekbone is dry and not oily. -
Apply eyelid color:
Using a fluffy blending brush, sweep a soft pink or reddish-brown eyeshadow across the entire eyelid. Blend it upwards slightly past the crease for a diffused, romantic flush that complements the red stars. -
Add inner corner pop:
Take a small angled brush or detail brush loaded with metallic blue face paint. Carefully apply a sharp triangle or wing shape to the inner corner of the eye, extending just slightly onto the nose bridge for a striking, modern accent.
Use Stencils for Speed
Can’t freehand a star? Use small adhesive stencils. Place them on the skin, sponge the paint over, and peel off immediately for crisp lines.
Step 2: Painting the Major Stars
-
Outline the first star:
Locate the highest point of the checkbone, near the hairline. Using a fine detail brush and white face paint, carefully outline a five-pointed star shape. Keep the lines thin and crisp. -
Fill the star outline:
Gently fill in the white outline you created. You don’t need it to be perfectly opaque yet, but ensure the shape is solid. -
Add the red center:
Clean your brush or switch to a new fine brush dipped in red face paint. Carefully paint a smaller red star inside the white one, leaving a distinct white border around the edges. This creates a sticker-like effect. -
Repeat the pattern:
Paint a second, slightly smaller red-and-white star lower down on the cheek, roughly in line with the bottom of the nose. Follow the same process: white outline first, then the red fill. -
Create the third star:
Place a third star between the first two but slightly further back toward the ear. I find varying the size slightly adds dynamic movement to the design.
Add Crystal Bling
Enhance the sparkle by adhering small rhinestones to the center of the blue stars or at the tips of the large red stars using eyelash glue.
Step 3: Adding Galaxy Details
-
Place blue stars:
Using your metallic blue paint or a blue glitter gel, paint several small, solid blue stars scattered between the larger red-and-white ones. Aim for size variety—some medium, some tiny. -
Add red micro-stars:
Switch back to your red paint and a very fine brush. Dot a few extremely small, solid red stars into the empty spaces to fill out the ‘constellation’ look. -
Incorporate glitter accents:
For extra dimension, dab a tiny amount of cosmetic glitter glue over the small blue stars and press loose blue glitter on top. This catches the light beautifully. -
Highlight with white dots:
Dip the very tip of a brush handle or a dotting tool into white paint. Add tiny clusters of white dots around the stars to mimic distant stardust or sparkles. -
Paint a shooting star tail:
If you are feeling steady-handed, drag a very faint, thin line of white or silver shimmer from the corner of the eye outward to connect the design visually.
Step 4: Refining and Setting
-
Sharpen edges:
Check the points of your large stars. If any red paint bled into the white border, use a clean brush with a tiny bit of concealer to clean up the edges and make them pop. -
Set the look:
Close your eyes and mist the design lightly with a setting spray. This helps prevent the water-activated paints from smudging if you sweat during the game.
You are now ready to sparkle from the sidelines with a festive look that shows off your team spirit


Ombre Team-Color Cheek Fade
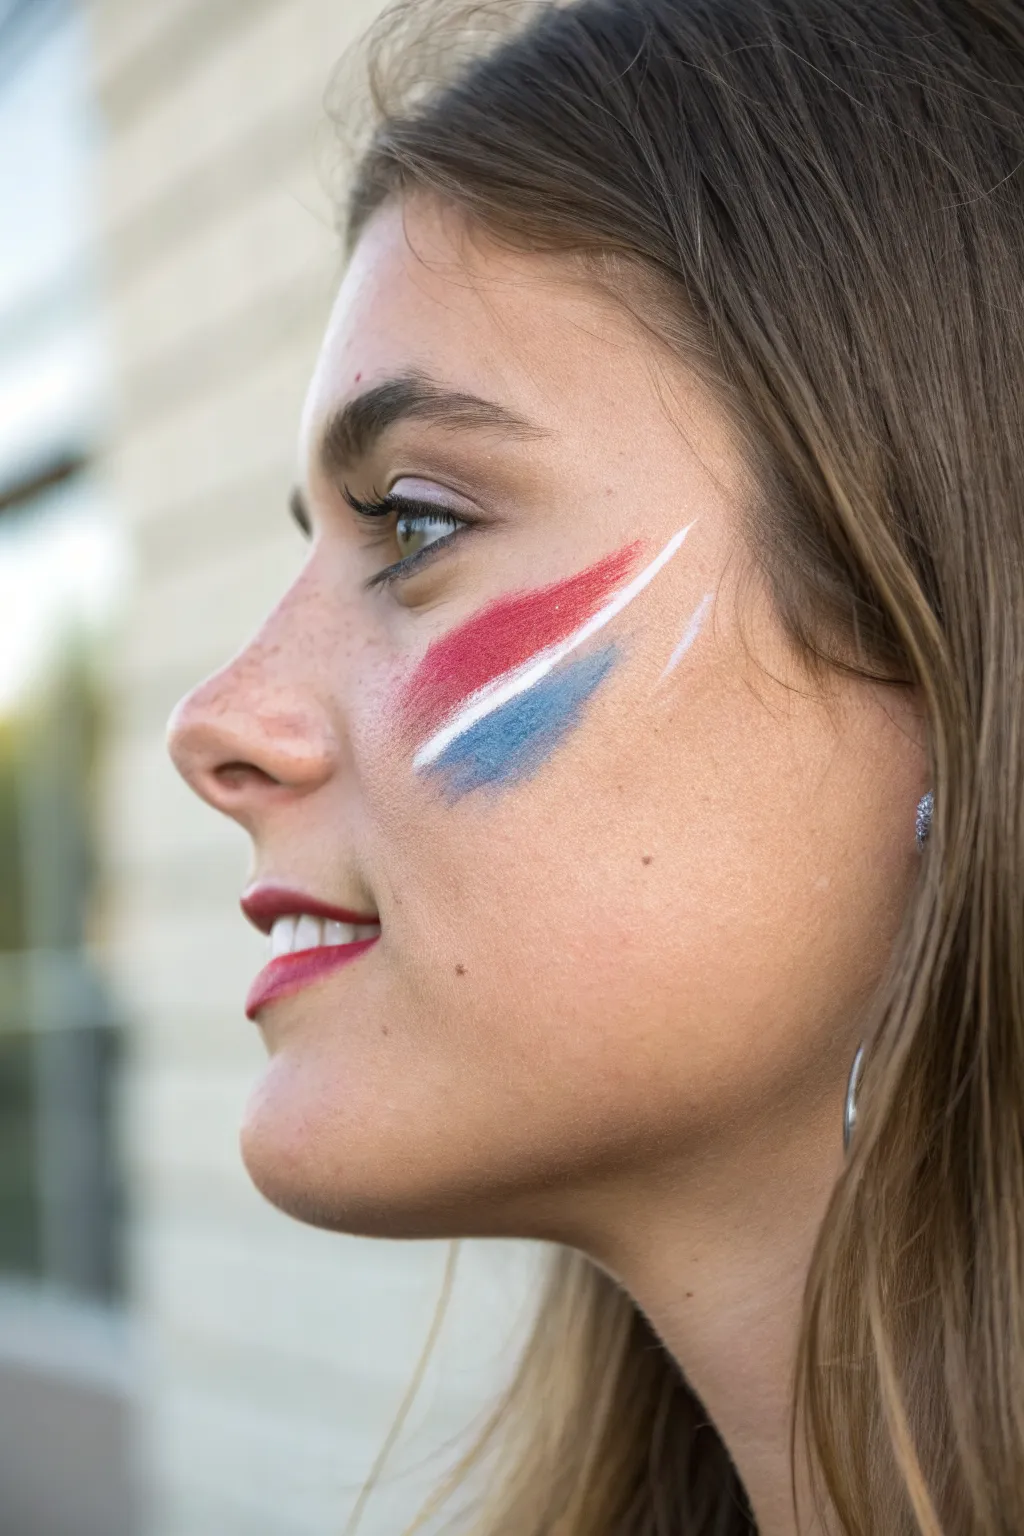
Achieve a spirited and artistic look for game day with this dynamic three-tone swoosh design. Unlike solid blocks of color, this technique uses dry brushing to create a textured, motion-filled effect that contours perfectly with the cheekbone.
Step-by-Step Guide
Materials
- Red face paint (water-activated or cream)
- Blue face paint (water-activated or cream)
- White face paint (optional for highlights)
- Flat synthetic brush (medium width, approx. 1/2 inch)
- Small round detail brush
- Cup of water
- Paper towels
- Setting spray (optional)
Step 1: Preparation and Base
-
Clean the Canvas:
Start with a clean, dry face free of heavy oils or moisturizers, as these can cause the paint to slide rather than grip the skin. -
Visualize the Placement:
Look in the mirror and locate the highest point of your cheekbone. The design will flow upwards from the apple of the cheek towards the temple. -
Load the Red Paint:
Dip your flat brush into water and activate your red face paint. You want a creamy, not watery, consistency for opaque coverage. -
Test Consistency:
Swipe the brush on your hand or a paper towel first. If it drips, it’s too wet; if it drags too hard, add a tiny drop of water.
Step 2: Applying the Strata
-
The Red Swoosh:
Starting near the apple of the cheek, place the flat edge of the brush against the skin. -
Create the Stroke:
In one confident motion, sweep the brush upward and outward toward the hairline, letting the pressure lighten at the end to create a tapered, feathery tail. -
Clean the Brush:
Thoroughly rinse your flat brush in the water cup and dry it completely on a paper towel. Residual red will turn your next color purple. -
Load the Blue Paint:
Activate the blue face paint, aiming for that same creamy, rich consistency. -
Position the Blue Stroke:
Place your brush below the red stroke, leaving a gap of about a quarter-inch of bare skin between where the blue will go and the red line. -
The Blue Swoosh:
Mirroring the motion of the first stroke, sweep the blue paint upward and outward. I like to let the bristles drag slightly at the tail end to mimic the texture of the red stripe.
Smudged Edges?
If the lines bleed together, your brush was likely too wet. Let it dry completely, then use a slightly damp Q-tip to ‘erase’ the blurry area before reapplying.
Step 3: Refining the Details
-
Dry Brushing Texture:
If your strokes look too solid or glossy, wipe most of the paint off your brush until it’s nearly dry. -
Adding Texture:
Gently flick the dry brush over the tails of your swooshes to enhance that streaky, energetic look shown in the photo. -
The White Divider:
Using a small round detail brush, load up a stark white face paint. -
Creating Separation:
Draw a thin, crisp line right in the center of the gap between the red and blue sections. -
Feathering the White:
Instead of a solid white block, let the white line trail off and break up slightly as it moves toward the temple, matching the fade of the colored sections. -
Adding Highlights:
For extra dimension, add a tiny, faint white stroke just above the blue section’s tail to suggest movement. -
Final Clean Up:
Use a cotton swab dipped in a little water or makeup remover to sharpen the bottom edge of the blue swoosh if any paint went astray. -
Set the Look:
Close your eyes and mist the design lightly with a makeup setting spray to ensure it lasts through all the cheering.
Add Sparkle
While the paint is still tacky, tap a finger dipped in cosmetic-grade glitter over the very center of the white stripe for a festive, light-catching finish.
You are now ready to cheer on your team with a personalized touch of spirit


Helmet-Inspired Face Mask Lines
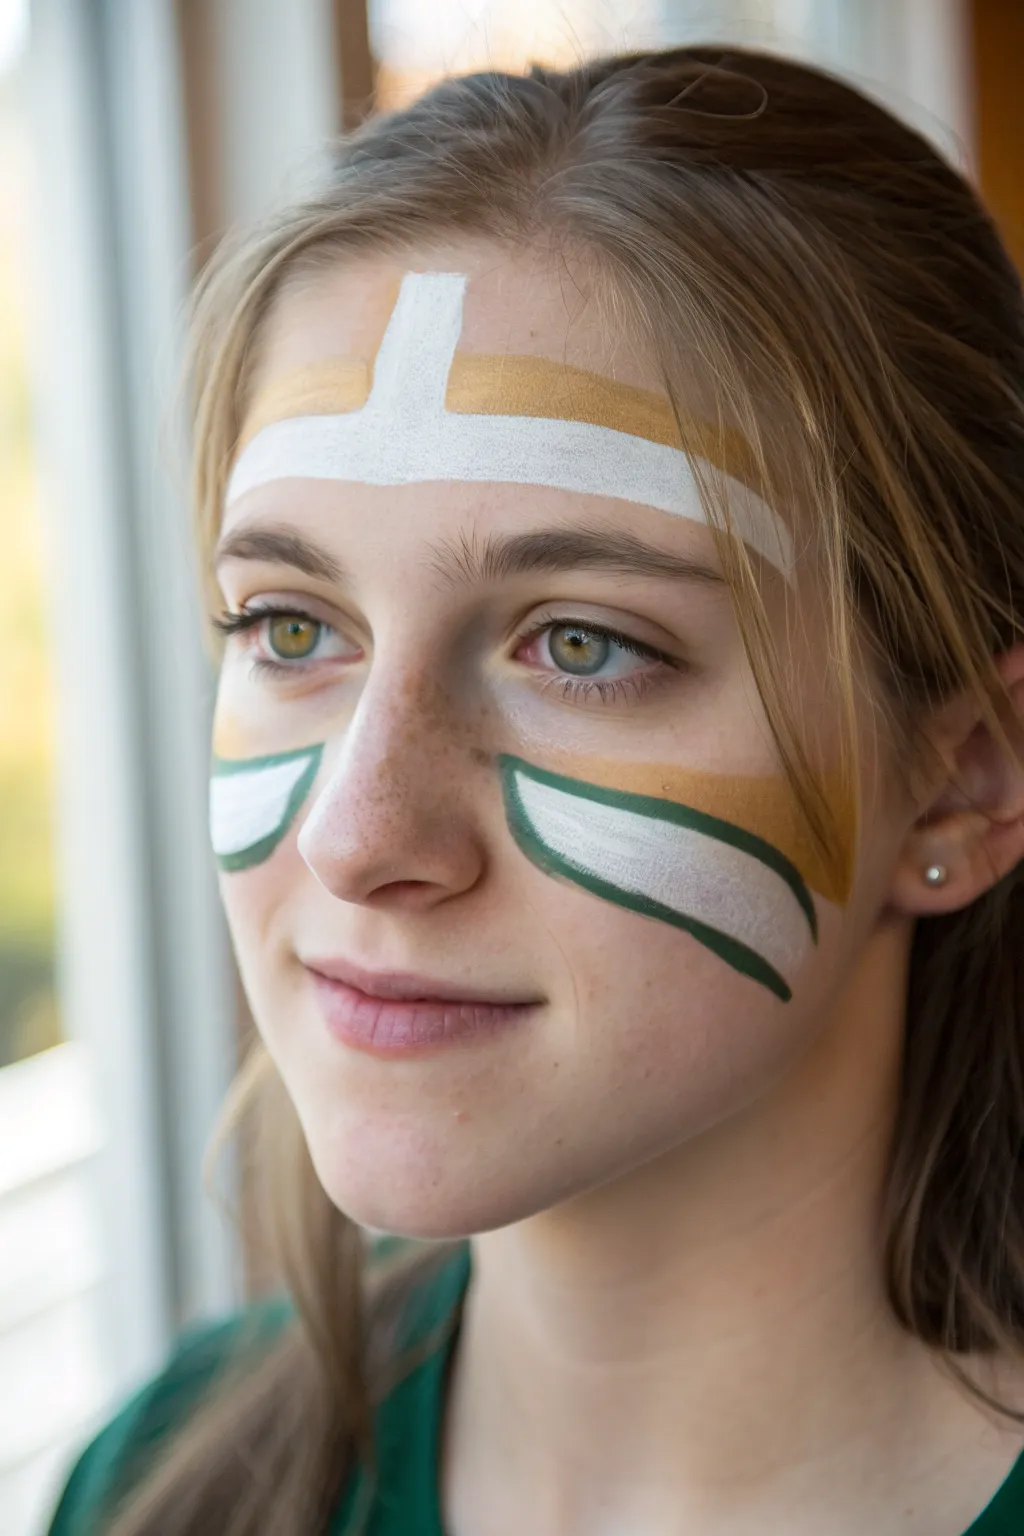
Channel a fierce team spirit with this structured, helmet-inspired face paint design that combines bold geometric lines with soft metallic accents. The look features a distinctive white forehead crest and cheek sweeps highlighted in gold and deep green, perfect for game day intensity.
Step-by-Step
Materials
- White face paint (water-activated or cream)
- Metallic gold face paint
- Dark forest green face paint
- Flat brush (medium width, approx 3/4 inch)
- Small round detail brush
- Small angled brush
- Cup of water
- Paper towels
- Makeup setting spray (optional)
- Makeup remover wipes (for cleanup)
Step 1: Forehead Crest Foundation
-
Map the center line:
Load your flat brush with white paint. Start perfectly in the center of the forehead, near the hairline, and draw a straight, vertical line down toward the bridge of the nose, stopping just above the eyebrows. -
Create the crossbar:
Using the same brush, draw a horizontal line that intersects the bottom of your vertical strip. Extend this line outward towards the temples on both sides, creating a T-shape that curves slightly with the forehead’s natural contour. -
Sharpen the edges:
Go back over the white lines to ensure they are fully opaque. Use the edge of the brush to square off the ends of the lines for a crisp, geometric look rather than a soft fade.
Step 2: Golden Accents
-
Add upper gold wings:
Clean your flat brush thoroughly and load it with metallic gold paint. Place the brush directly above the horizontal white line you just painted on the forehead. -
Sweep the forehead gold:
Paint a parallel gold stripe that sits right on top of the white crossbar, extending out toward the hairline. Repeat this on the other side so the white T is capped in gold. -
Start the cheek foundation:
Still using the gold paint, move to the cheeks. Start high on the cheekbone, near the outer corner of the eye, and sweep a broad stroke downward and inward toward the nose. -
Taper the gold stroke:
As you pull the brush inward, twist it slightly or lift pressure to create a tapered point that ends midway across the cheek, below the pupil.
Fixing Smudges
If your green outline is shaky or distinct lines bleed, wait for it to fully dry. Then, use a damp Q-tip to erase the mistake before re-painting the straight edge.
Step 3: Cheek Detail & Geometry
-
Paint the white cheek swoops:
Switch back to white paint on a clean flat brush or the angled brush. Paint a curved shape directly underneath the gold cheek stripe. -
Shape the swoosh:
Unlike the gold which is a straight fade, make this white section look like a curved blade or a Nike-style swoosh. The thickest part should be under the outer eye, tapering to a sharp point near the nose. -
Check symmetry:
Step back and look in the mirror. Ensure the white swooshes on both cheeks end at roughly the same distance from the nose; I usually use the nostrils as a visual anchor point.
Add Some Sparkle
While the gold paint is still tacky, press cosmetic-grade gold glitter onto the forehead stripes or the tops of the cheekbones for extra stadium visibility.
Step 4: Defining Lines
-
Prepare the green liner:
Switch to a small round detail brush and load it with dark forest green paint. Ensure the paint consistency is creamy, almost like ink, for smooth lines. -
Outline the under-eye:
Trace a thin line along the bottom edge of the white cheek shape. Start from the inner point near the nose and sweep outward. -
Create the outer curve:
Continue that green line, wrapping it around the outer edge of the white shape and pulling it slightly underneath. This creates a shadow effect that makes the white pop. -
Sharpen the points:
Use the very tip of your round brush to refine the inner points of the cheek designs, making sure the green, white, and gold all meet at a clean, sharp terminus. -
Final touches:
If any white has become translucent, dab a little extra distinct white paint in the center of the forehead cross or the fattest part of the cheek swoosh to maximize brightness.
Your game face is now crisp, professional, and ready for kickoff
BRUSH GUIDE
The Right Brush for Every Stroke
From clean lines to bold texture — master brush choice, stroke control, and essential techniques.
Explore the Full Guide
Sweat-Resistant Minimal Stripe Set
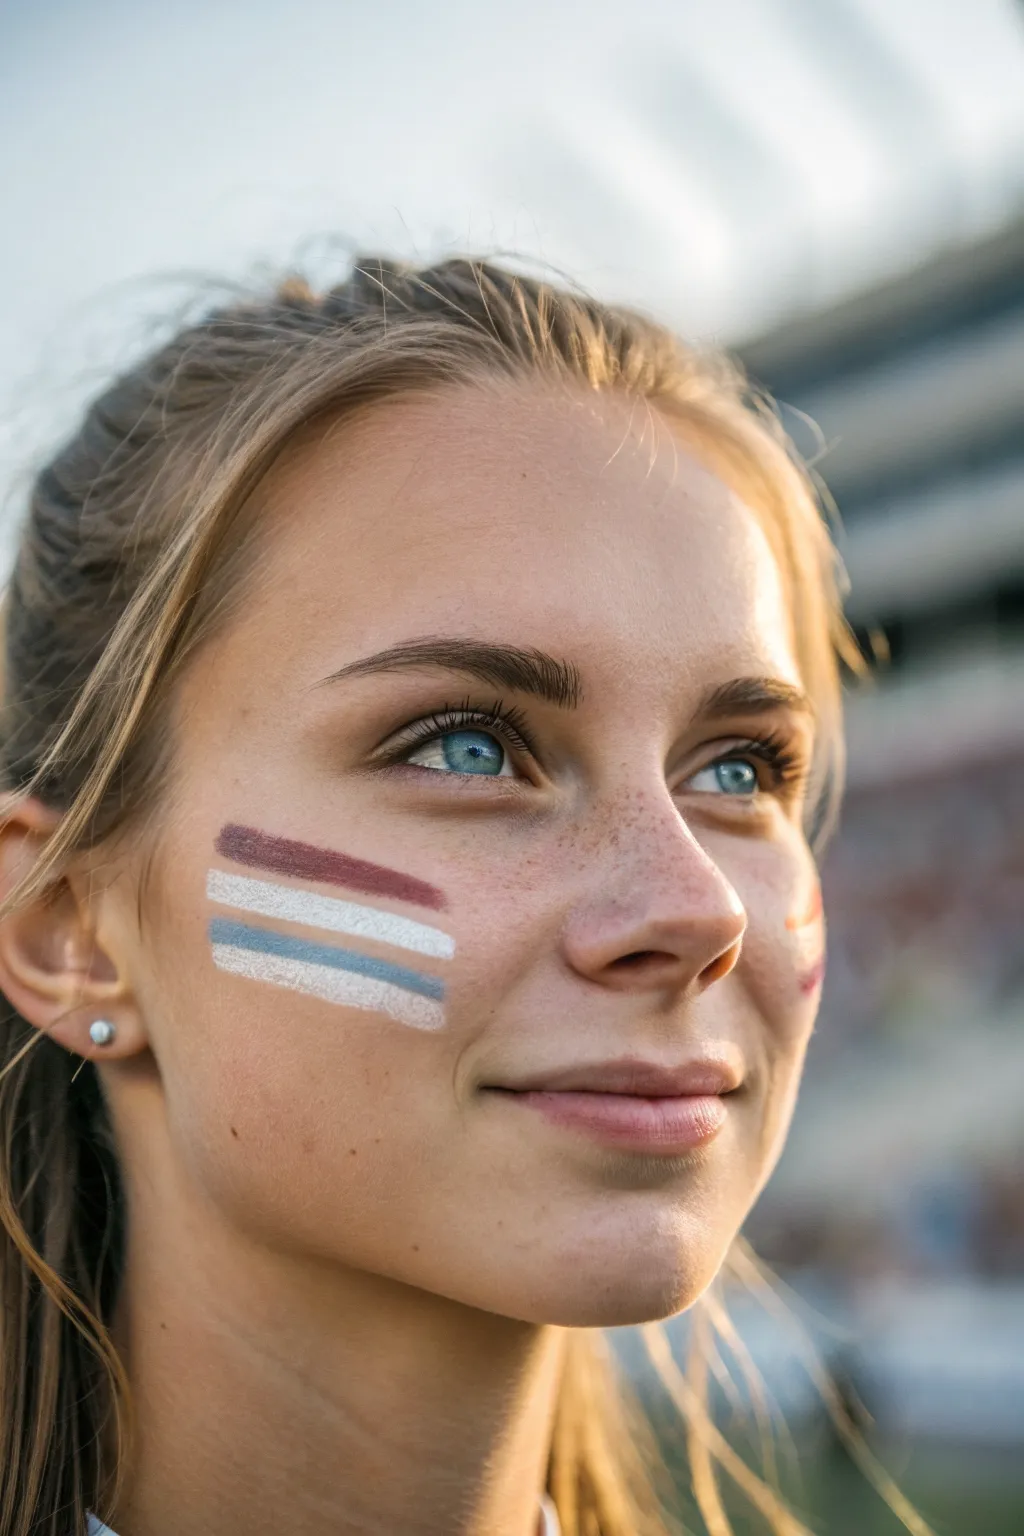
For a refined game-day look that won’t melt away by halftime, this minimal striped design is perfect. It features soft, muted tones of maroon, white, and slate blue applied directly to the cheekbone for a spirited yet understated appearance.
Detailed Instructions
Materials
- Cream-based face paint palette (maroon, white, slate blue)
- Flat synthetic brush (approx. 1/4 inch width)
- Micellar water or makeup remover
- Cotton rounds
- Translucent setting powder
- Small fluffy setting brush
- Setting spray (sweat-resistant formula)
Step 1: Preparation & Mapping
-
Clean the canvas:
Start with a clean, dry face. Use a cotton round with a bit of micellar water to remove any oils or moisturizer from the specific cheek area where the stripes will go. This ensures the paint adheres directly to the skin for better longevity. -
Visualize placement:
Identify the high point of the cheekbone. You want the stripes to sit right on this ridge, running slightly diagonal towards the hairline, mirroring the natural bone structure rather than sitting perfectly horizontal.
Smear Rescue
If colors bleed together, wait for them to dry slightly. Instead of wiping, use a small concealer brush with skin-tone foundation to ‘cut’ the line back into shape.
Step 2: Applying the Colors
-
Load the brush for the top stripe:
Take your flat synthetic brush and load it with the maroon or deep burgundy cream paint. Wipe off any excess on the back of your hand so the brush isn’t overloading with product; you want a controlled application. -
Paint the top line:
Starting closer to the nose and moving outward towards the ear, press the flat edge of the brush against the skin and pull a single confident stroke about 2-3 inches long. Taper pressure at the end for a natural fade. -
Clean the brush:
Thoroughly wipe your brush clean on a dry paper towel or tissue to remove all maroon pigment before switching colors. -
Apply the middle white stripe:
Load the clean brush with white face paint. Position this stroke immediately below the maroon one, leaving a tiny hairline gap or just barely touching the previous line. I find keeping them slightly separated prevents muddying colors. -
Execute the middle stroke:
Drag the white paint parallel to the first line, matching its length and angle. If the coverage looks patchy, wait a few seconds and gently pat more white over the top, but try to keep it one fluid motion. -
Prepare the bottom hue:
Clean your brush again. For the bottom stripe, mix a touch of slate blue with a little white if you need to soften the color, or use a pre-mixed light denim blue shade. -
Paint the final blue line:
Apply this third stripe directly underneath the white one. Follow the same angle and length. This completes the tri-color flag effect on the cheek. -
Let it set:
Allow the cream paints to sit for about a minute. The warmth of the skin will help them meld slightly, looking less like a sticker and more like painted skin.
Step 3: Finishing Touches
-
Soften edges (optional):
If the ends of your stripes look too blunt or blocky, use a clean fingertip to very gently tap the outer edge near the hairline to diffuse it slightly. -
Set with powder:
Dip a small fluffy brush into translucent setting powder. Tap off the excess brilliantly, then lightly press and roll the brush over the painted area. Do not swipe, or you will smear the lines. -
Dust off excess:
After pressing the powder in, verify that the paint feels dry to the touch. Gently flick away any visible loose powder sitting on top of the paint or surrounding skin. -
Seal with spray:
Close your eyes and mist the face with a sweat-resistant setting spray from arm’s length. This locks the moisture out and keeps the pigment vibrant.
Level Up: Glitter Gradient
Tap a tiny amount of cosmetic glitter onto the wet paint of just the center white stripe before setting it. It adds a festive sparkle that catches the stadium lights.
Now you are ready to cheer comfortably knowing your team colors will stay crisp all game long
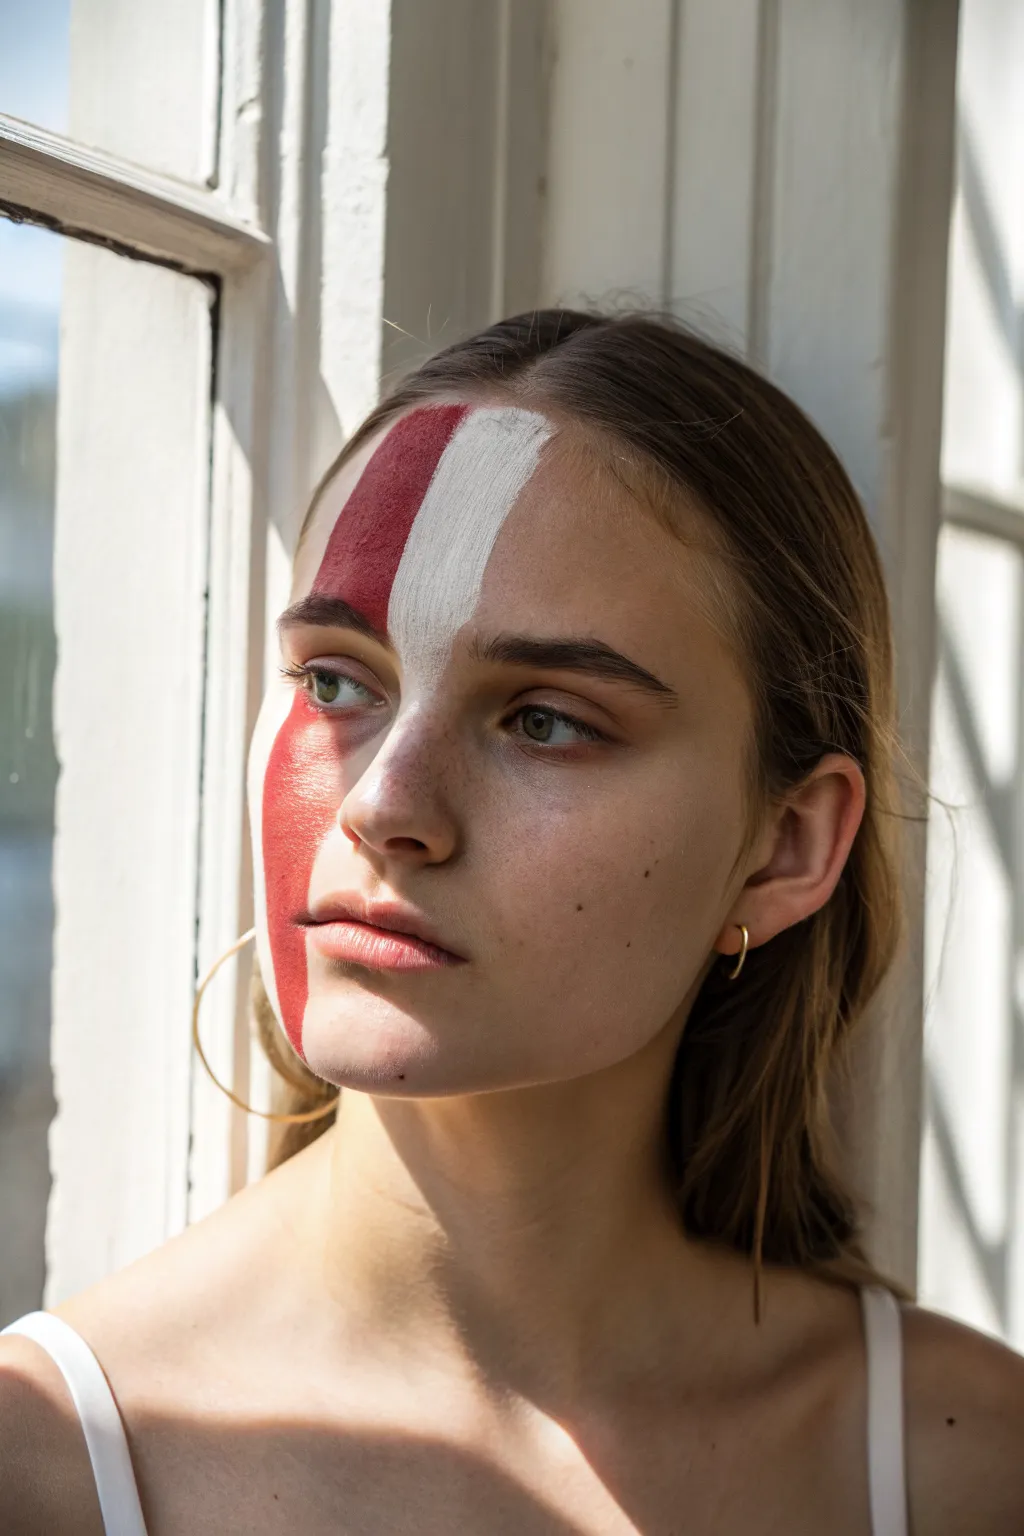
Matching Friends: Mirror-Image Designs
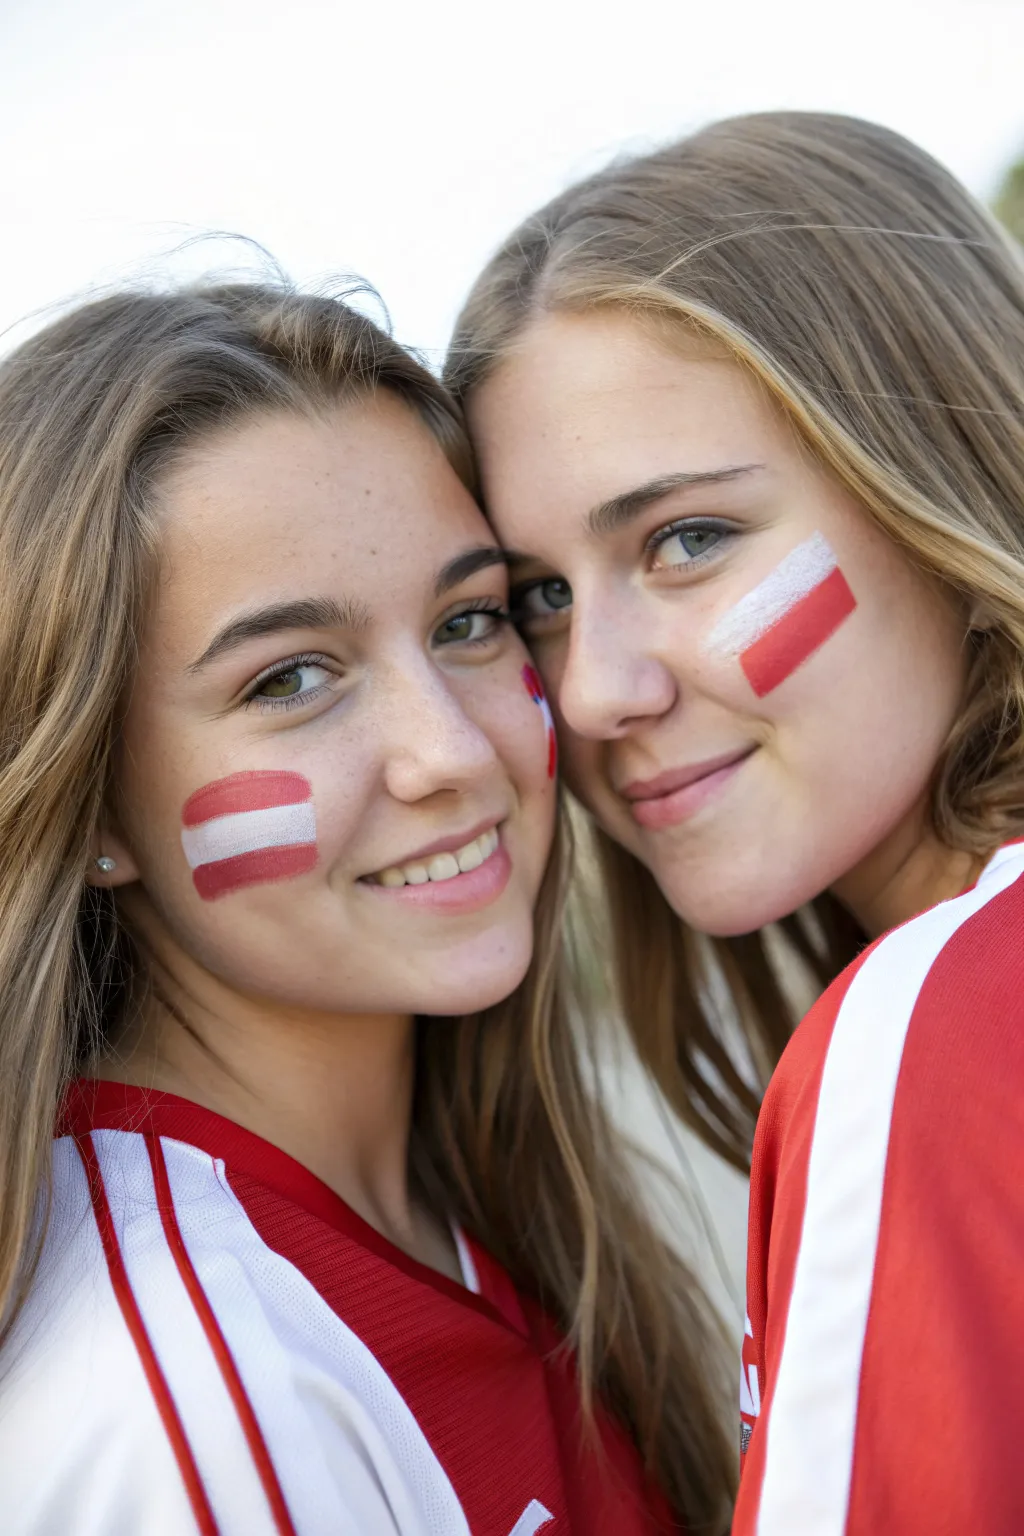
Show off your team unity with these crisp, clean flag designs painted onto cheeks for a symmetrical, mirror-image effect. This design utilizes simple geometric blocks of red and white to represent national colors, perfect for supporting teams like Austria or Poland at the next match.
Step-by-Step Guide
Materials
- High-quality water-based face paint or grease paint (Red)
- High-quality water-based face paint or grease paint (White)
- Flat shader brush (medium size, approx. 1/2 inch)
- Small angled brush or flat brush for clean up
- Cup of water and paper towels
- Makeup remover wipes or cotton swabs
- Setting spray (optional)
Step 1: Preparation and Base Layout
-
Clean the canvas:
Begin with a clean, dry face. Use a makeup wipe to remove any oils or heavy moisturizer from the cheek area, as this ensures the paint adheres smoothly and lasts through the game. -
Position the friends:
Have the two friends stand next to each other to visualize the symmetry. Decide who gets which flag placement so that when they lean in together, the flags are on the outer visible cheeks. -
Load the white paint:
Dip your medium flat shader brush into water and work it into the white face paint until you have a creamy consistency similar to soft butter. Avoid making it too watery, or it will drip.
Step 2: Painting the Austrian Flag (Left Friend)
-
Mark the center strip:
On the left friend’s cheek, press the flat edge of your white-loaded brush horizontally across the middle of the cheekbone. Create a distinct rectangular stripe about 2 inches long. -
Clean the brush:
Thoroughly rinse your brush in the water cup and dry it completely on a paper towel. Since we are switching to red, any leftover white will turn the next layer pink. -
Load the red paint:
Load the clean brush with red face paint, aiming for that same creamy, opaque consistency. -
Paint the top stripe:
Carefully paint a red rectangular stripe directly above the white one. Use the flat edge of the brush to create a sharp line where the red meets the white. -
Paint the bottom stripe:
Reload the brush if necessary and paint the final red stripe directly below the white one. Ensure the ends of all three stripes align vertically for a neat rectangle shape.
Straight Edge Secret
For ultra-crisp lines between colors, hold a piece of cardstock or a business card against the cheek as a stencil while you paint the edge of the rectangle.
Step 3: Painting the Polish Flag (Right Friend)
-
Switch back to white:
Rinse your brush perfectly clean again. Load it with white paint. -
Create the top block:
On the right friend’s cheek, paint a thicker horizontal white rectangle. This should be roughly twice the height of the individual stripes on the first friend, occupying the upper half of the flag area. -
Switch to red:
Clean and dry your brush, then load up the red paint once more. -
Create the bottom block:
Paint a matching red rectangle directly beneath the white one. Press the brush down firmly to get a solid fill in one stroke if possible.
Fixing Pink Smudges
If red bleeds into white, let it dry completely. Don’t wipe it wet! Once dry, dab opaque white paint over the mistake to cover it cleanly.
Step 4: Refining and Setting
-
Check the edges:
Look closely at the borders of your flags. If any lines are wobbly, take a slightly damp cotton swab or the edge of a makeup wipe and gently tidy up the perimeter. -
Sharpen the corners:
I find that using a small angled brush lightly dipped in the background skin tone or concealer can help square off the corners if the swab took off too much paint. -
Fill in gaps:
If the skin is showing through anywhere, gently pat a little extra paint over those spots. Do not drag the brush, as this might lift the first layer. -
Apply setting spray:
Close eyes and mist a light layer of barrier spray or makeup setting spray over the cheeks to prevent smudging during cheering or sweating. -
Let it dry:
Allow the paint to set completely for about 2-3 minutes before touching the face or pulling jerseys on or off.
Now you are ready to head to the stadium with a fast, professional-looking fan look that celebrates your team colors

PENCIL GUIDE
Understanding Pencil Grades from H to B
From first sketch to finished drawing — learn pencil grades, line control, and shading techniques.
Explore the Full Guide
Family Set: Big Motif, Mini Motifs
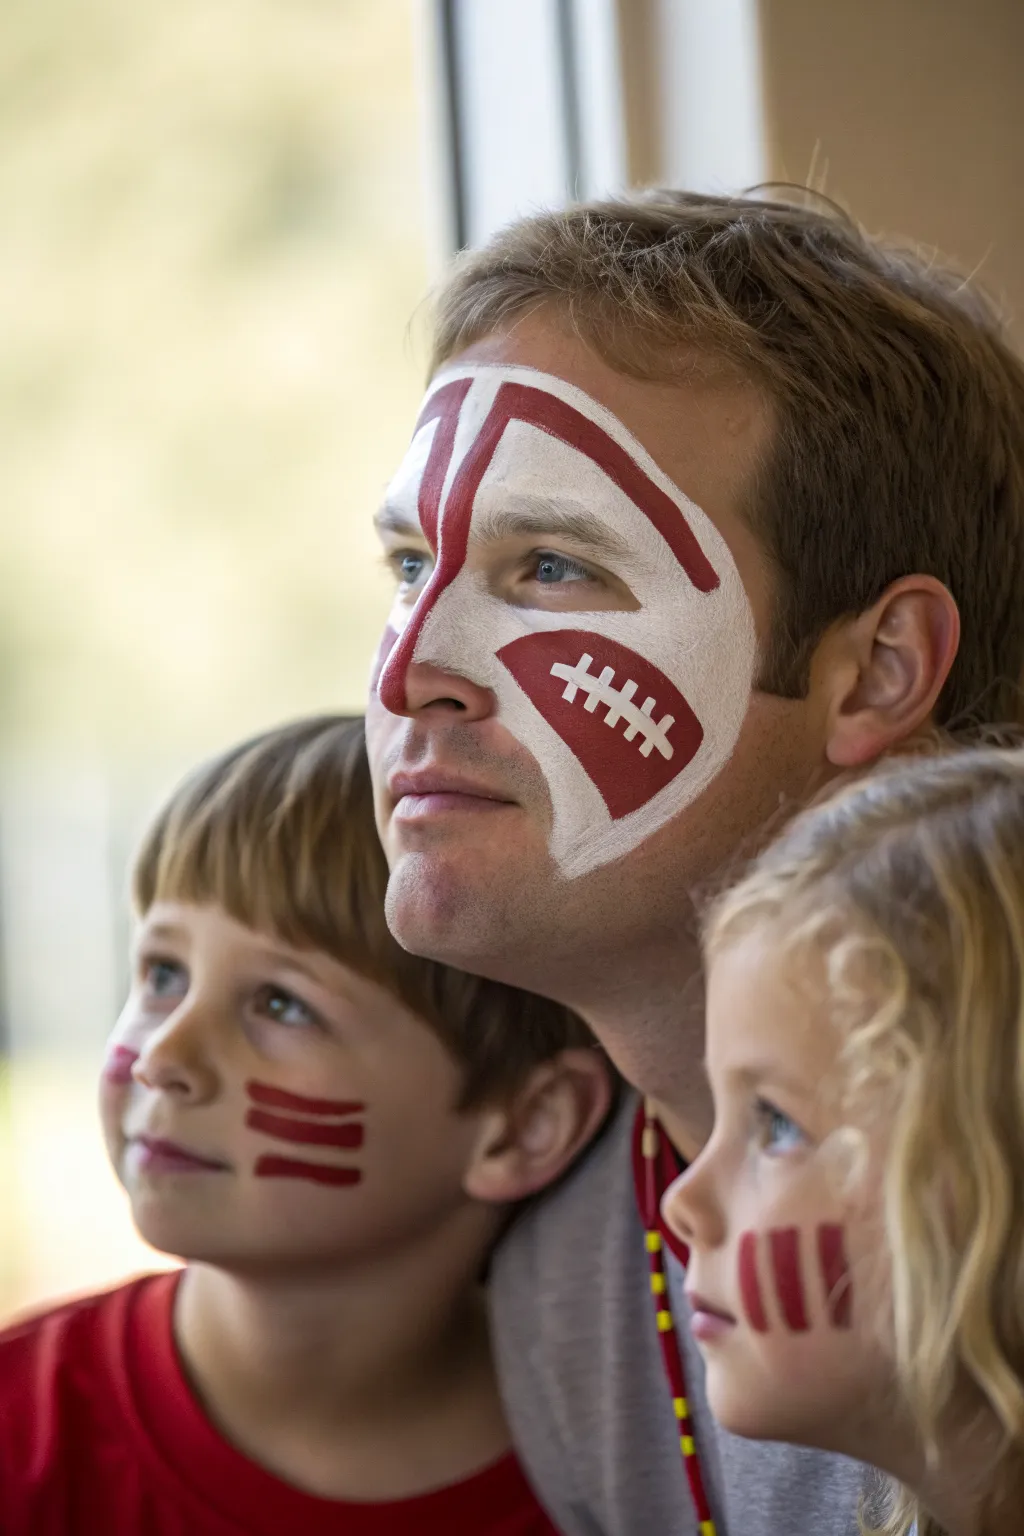
Get the whole family game-day ready with this coordinated set that pairs an elaborate football-themed mask for adults with quick, spirited stripes for the little ones. The detailed ‘quarterback’ design features bold white coverage with sharp crimson accents, perfectly complemented by the simple sideline stripes on the kids.
Step-by-Step
Materials
- High-quality white face paint (water-based cake or cream)
- Red face paint (water-based cake or cream)
- High-density face painting sponge (petal or half-moon shape)
- Medium round brush (size 4 or 6)
- Fine detail brush (size 1 or 2)
- Cup of clean water
- Paper towels
- Baby wipes (for cleanup mistakes)
Step 1: The Quarterback Mask (Dad’s Design)
-
Load the sponge:
Start by activating your white face paint with a little water. Rub a high-density sponge into the paint until you have a creamy consistency, not too drippy. -
Create the nose bridge:
Press the sponge onto the bridge of the nose and sweep upwards onto the forehead, creating a central vertical column of white. -
Fan out the forehead:
From that central column, sponge the white paint outwards across the forehead on both sides, tapering it slightly as you reach the temples to create the top of the ‘helmet’ shape. -
Shape the cheek sections:
Continue sponging white down from the temples, going under the eyes and sweeping back across the cheekbones. Leave the area immediately around the eyes unpainted for comfort. -
Define the jawline curve:
Extend the white paint down the cheeks towards the jawline, curving it inward toward the mouth but stopping before you reach the lips. The goal is a sharp, angular mask shape. -
Clean the edges:
Use the edge of a clean wipe wrapped around your finger to tidy up the perimeter of the white shape so the lines are distinct against the skin. -
Paint the central stripe:
Switch to your medium round brush loaded with red paint. Draw a bold vertical line starting from the top center of the forehead down the nose bridge, stopping just above the tip of the nose. -
Add the ‘helmet’ accents:
Paint a thick red stripe curving from the top center of the forehead down towards the left temple. Repeat this curved line on the right side to mirror it. -
Create the football shape:
On the left cheek, paint a solid red football shape—an oval with pointed ends. Imagine the ball is angled diagonally across the cheekbone. -
Detail the laces:
Once the red football shape is dry to the touch, use a fine detail brush with white paint. Paint a single line down the center of the football, then cross it with 4-5 shorter perpendicular lines for the laces.
Step 2: The Sideline Fans (Kids’ Design)
-
Load the brush for stripes:
Clean your medium round brush thoroughly or grab a fresh one. Load it generously with red paint so the bristles are smooth and shaped to a point. -
Position the first stripe:
On the child’s cheek, place the brush tip near the nose and press down firmly to flare the bristles. Drag the brush outward toward the ear to create a tapered line. -
Add parallel lines:
Paint two vertical stripes on the cheek if you want a classic variety, or stack three horizontal stripes like the boy in the photo. Keep the spacing consistent. -
Vary the placement:
For a different look on a second child, paint three short vertical stripes low on the jawline. I find mixing up the direction keeps each kid feeling unique while still part of the team.
Fixing Smudges
If the red bleeds into the white, let it dry completely. Then, use a slightly damp brush with white paint to ‘erase’ over the mistake like correction fluid.
Sponge Technique
Don’t drag the sponge! Use a patting or stippling motion to build opaque white coverage without streaks. This ensures the mask looks solid.
Now your team is painted up and ready to cheer for a victory
Dotted Lines Like Yard Markers
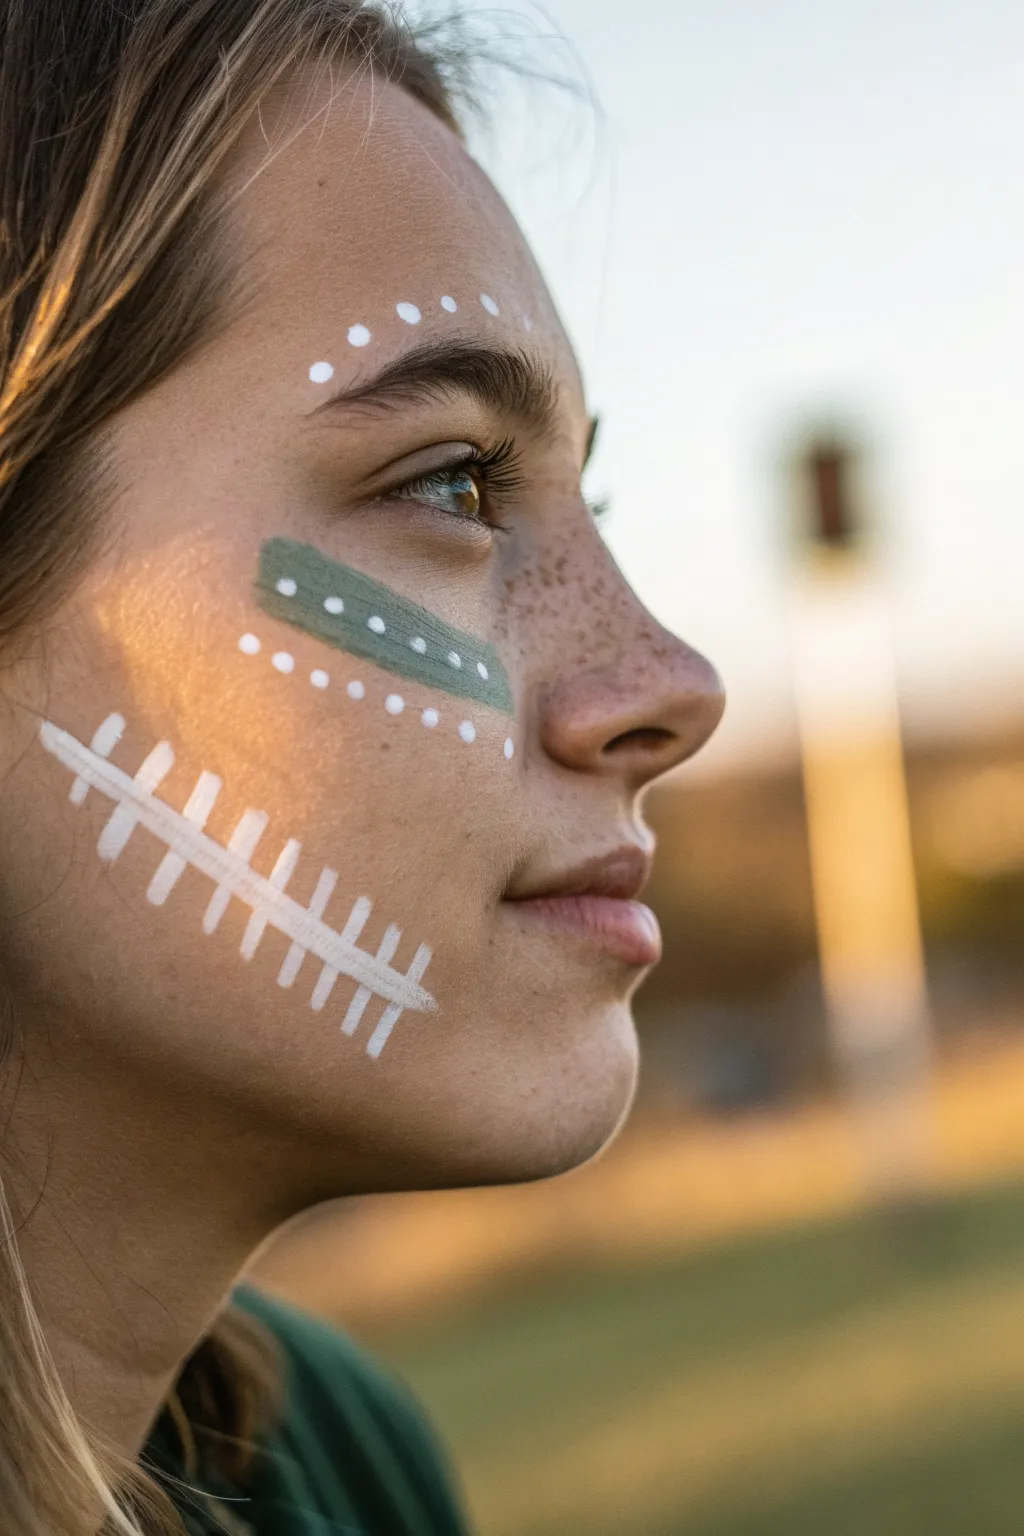
Bring the spirit of the field to your face with this crisp, athletic look that combines classic team colors with football iconography. By mixing bold stripes, clean yard lines, and delicate dots, you’ll create a spirited profile that’s perfect for cheering on the sidelines.
How-To Guide
Materials
- White face paint (water-activated or cream)
- Sage green face paint (or your team’s color)
- Flat shader brush (medium size)
- Fine liner brush (size 0 or 1)
- Dotting tool or the end of a paintbrush handle
- Cotton swabs
- Water cup
- Setting spray (optional)
Step 1: Prepping the Canvas
-
Cleanse and Dry:
Start with a freshly washed and thoroughly dried face to ensure the paint adheres smoothly without sliding. -
Apply Primer (Optional):
If you’re expecting a long day in the sun, lightly dab a thin layer of barrier cream or primer on the cheekbone and temple area where the design will sit.
Paint sliding off?
If your skin is naturally oily or sweaty, the paint may slip. Blot the area with an oil-absorbing sheet or tissue before starting, and avoid applying moisturizer right before painting.
Step 2: Painting the Eye Black Stripe
-
Load the Flat Brush:
Dip your medium flat shader brush into water and activate your green paint until it reaches a creamy, opaque consistency. -
Position the Stripe:
Find the highest point of the cheekbone, just under the outer corner of the eye. This is where your main stripe will live. -
Swipe the Color:
With a confident hand, pull the brush from the center of the cheekbone outwards toward the hairline in one short, blocked stroke. -
Refine the Shape:
If the edges look a bit ragged, use the clean edge of the brush to square off the ends of the rectangle, ensuring it’s about 2 inches long and half an inch wide. -
Let it Set:
Allow this green base layer to dry completely for a minute or two; painting white over wet green will result in muddy gray.
Make it Sparkle
While the white paint on the dots is still tacky, gently press a tiny amount of cosmetic-grade glitter onto them. It adds a festive shimmer that catches the stadium lights.
Step 3: Adding the Football Stitches
-
Mix the White Paint:
Clean your brush thoroughly and load up your white paint. You want this mixture slightly thicker than ink for maximum opacity. -
Draw the Spine:
Using a fine liner brush, paint a diagonal line starting low on the jaw near the corner of the mouth, angling upward toward the earlobe. It should be long, roughly 3-4 inches. -
Paint the Upper Cross-Stitches:
Starting at the top end of your diagonal spine, paint short, perpendicular hash marks across the line. Keep these lines thick and bold. -
Paint the Lower Cross-Stitches:
Continue painting the hash marks down the spine. As you move lower on the cheek, slightly taper the thickness of the marks so they fade out naturally. -
Space Evenly:
Aim for about 8 to 10 cross-stitches total, keeping the spacing consistent to mimic the laces of a football.
Step 4: Detailing with Dots
-
Load the Dotting Tool:
Dip a dedicated dotting tool or the round handle end of a small paintbrush into creamy white paint. -
Dot the Brow Arch:
Follow the natural curve above the eyebrow. Place three to five dots in an arc, spacing them widely for an open, airy look. -
Decorate the Green Stripe:
Moving back to the dried green cheek stripe, gently press a row of small white dots directly down the center of the green rectangle. -
Add the Lower Accent Line:
Using the liner brush again, paint a row of tiny white dots just beneath and parallel to the green stripe to frame it. -
Clean Up Edges:
Dip a cotton swab in a little water or makeup remover to sharpen any smudged edges on the white laces or the green block. -
Set the Look:
Close your eyes and mist a lightweight setting spray over the design to lock the pigment in place for the whole game.
Now you have a distinctive, fan-ready face design that captures the excitement of every yard gained


Face Gems in Team-Color Clusters
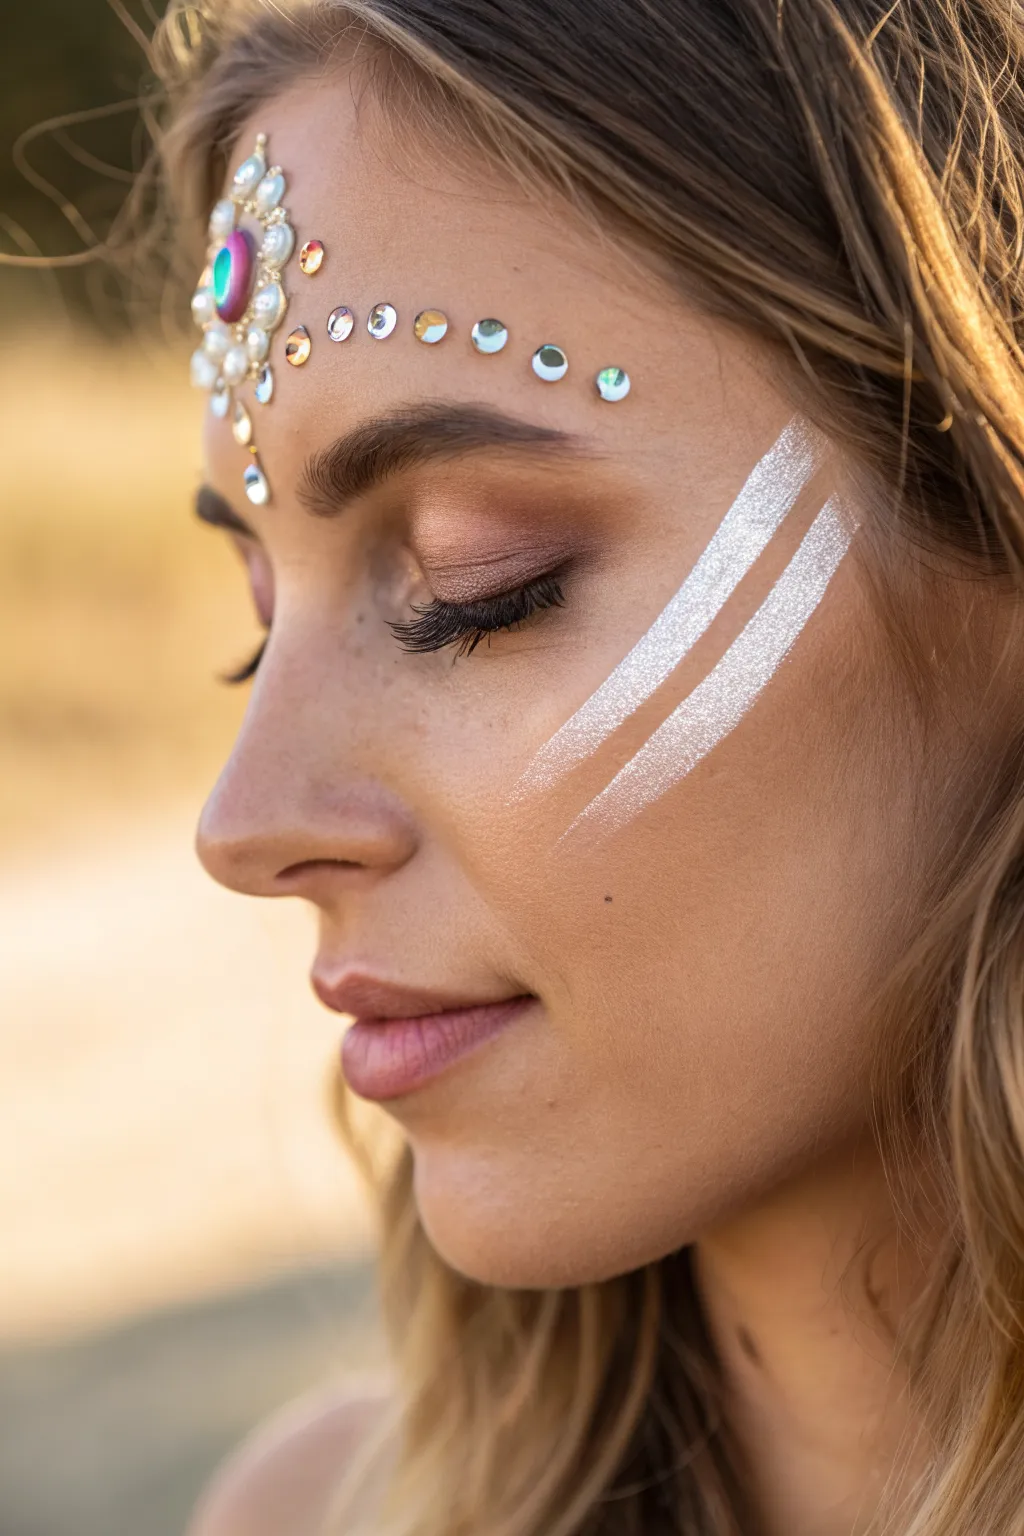
Elevate your game day spirit with this chic, festival-inspired look that combines metallic shimmer with sparkling jewels. This design pairs striking silver cheek stripes with a delicate forehead diadem for a sophisticated take on team spirit.
Step-by-Step Guide
Materials
- Silver or white metallic face paint (water-activated or cream)
- Flat shader brush (medium size)
- Self-adhesive face gems (mixed sizes: large focal piece, small rounds, teardrops)
- Small rhinestones (clear or iridescent)
- Eyelash glue (clear drying) for extra hold
- Eyeshadow primer (optional)
- Setting spray
- Tweezers
Step 1: Forehead Jewel Placement
-
Clean the canvas:
Start with clean, dry skin on the forehead area. If you are wearing foundation, dab a little setting powder where the gems will go to help them adhere better. -
Apply the focal piece:
Select your largest, most intricate gem cluster. This acts as the centerpiece. Peel it from the backing and place it directly in the center of your forehead, just above the brow line. -
Secure the center:
Press the centerpiece firmly against the skin for ten seconds. If you expect a long day of cheering, I usually dab a tiny bit of eyelash glue on the back for extra security. -
Start the arch:
Using tweezers for precision, pick up a medium-sized round gem. Place it above the right eyebrow, spacing it about half an inch away from your central cluster. -
Mirror the placement:
Repeat the previous step on the left side, ensuring symmetry with the gem above the left eyebrow. -
Continue the curve:
Add a second, slightly smaller gem further out along the natural curve of the brow bone on the right side. -
Finish the arch:
Place the matching second gem on the left side. You should now have a gentle arc of gems framing the top of the brows. -
Add floating accents:
Place two or three tiny, scattered rhinestones vertically down the bridge of the nose or just below the central cluster to soften the transition.
Use a Guide
For perfectly straight cheek lines, hold a piece of cardstock or tape against your cheek as a stencil while you paint the stripes.
Step 2: Metallic Cheek Stripes
-
Prep the paint:
Activate your silver or white metallic face paint with a small amount of water until it reaches a creamy, opaque consistency. -
Load the brush:
Fully load a flat shader brush, ensuring the bristles are smooth and chisel-edged for sharp lines. -
Map the first line:
Visualize a line running from the top of your ear down towards the corner of your mouth. This follows the natural hollow of the cheekbone. -
Paint the upper stripe:
Starting near the hairline, pull the brush downward in one confident, smooth stroke to create the top stripe. Lift pressure as you reach the middle of the cheek to taper the end slightly. -
Position the second stripe:
Align your brush parallel to the first stripe, leaving a small gap of skin (about a quarter-inch) visible between them. -
Paint the lower stripe:
Execute the second stroke just below the first, matching its length and angle perfectly. Keep your hand steady to maintain crisp edges. -
Check density:
If the metallic paint looks streaky, wait for it to dry completely, then carefully layer a second coat over the existing lines. -
Set the look:
Close your eyes and mist the entire face with a setting spray to lock the paint and jewels in place for the whole game.
Team Spirit Swap
Swap the silver paint for your team’s secondary color in a metallic finish, or use team-colored gems for the forehead design.
You are now ready to sparkle in the stands with a look that is both sporty and stylish
Stenciled Lightning or Flame Swooshes
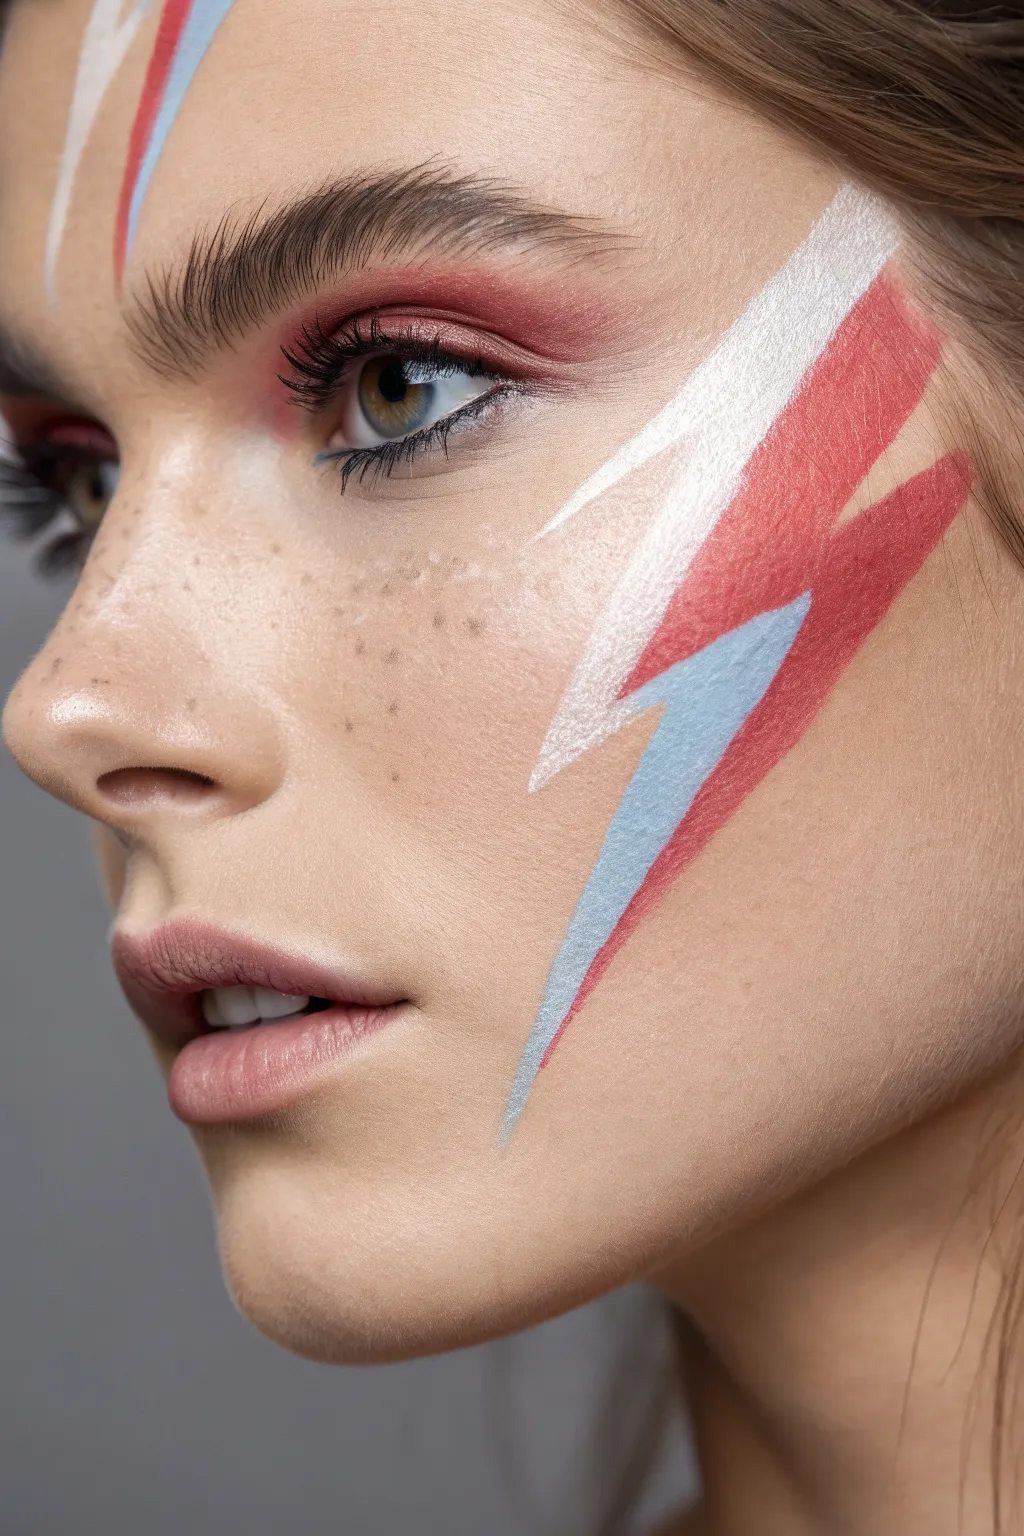
Channel a bit of glam rock energy at your next football game with this striking lightning bolt design. The crisp angles of red and blue, highlighted by stark white, create a bold statement piece that is surprisingly easy to execute with steady hands.
How-To Guide
Materials
- White face paint (water-activated or cream)
- Red face paint
- Light blue face paint
- Angled brush (medium)
- Small detail brush or liner brush
- Setting powder
- Eyeshadow (rust red/terracotta)
- Brown eyeliner pencil (for freckles)
- Makeup sponge
Step 1: Base and Prep
-
Clean canvas:
Start with clean, dry skin. If the subject has oily skin, a light dusting of translucent powder can help the paint adhere better. -
Draft the shape:
Using a very light touch and a brow pencil or a pale eyeshadow, faintly sketch the outline of the lightning bolt. It should start high on the forehead, cut through the eye area, and zigzag down the cheek. -
Apply eye color:
Before painting the bolt, apply a wash of rust-red eyeshadow over the eyelid and up toward the brow bone. Since the paint will go over this, blend it outward for a soft, diffused look.
Step 2: Painting the Bolt
-
Load the red paint:
Load your angled brush with bright red face paint. Ensure the consistency is creamy but not dripping. -
Paint the red section:
Fill in the main body of the lightning bolt on the temple and the cheek. Keep your edges sharp. Leave a gap specifically for the blue section that cuts through the middle. -
Establish the blue wedge:
Clean your brush thoroughly or switch to a fresh one. Load it with light blue paint. -
Fill the blue line:
Paint the thin blue strip that runs parallel to the bottom edge of the red bolt. It should feel like a shadow or a secondary strike following the main red shape. -
Refine the edges:
Go back with your small liner brush to sharpen any wobbly lines on the red and blue sections. Clean lines are crucial for this graphic look. -
Add the white highlight:
Load a clean detail brush with opaque white paint. Creating a crisp border is key here. -
Outline the top edge:
Paint a thick, tapering white line along the upper edge of the red bolt. Start thick near the hairline and let it taper off as it moves down the face. -
Separate the colors:
Use the white paint to create a thin separation line between the red and blue sections if you want extra definition, though letting them touch works too.
Clean Lines Hack
Use surgical tape or clear scotch tape on the skin to act as a stencil for the straight edges of the lightning bolt. This guarantees razor-sharp lines.
Step 3: Finishing Touches
-
Enhance the lashes:
Apply mascara to the upper and lower lashes. Since the paint covers the eye area, defined lashes help the eye pop against the graphic background. -
Create faux freckles:
Take a brown eyeliner pencil or a fine brush with diluted brown paint. Gently dot faux freckles across the nose and cheeks. -
Soften the spots:
Immediately after dotting, tap them lightly with your fingertip to soften the edges so they look natural rather than like polka dots. -
Lip color:
Apply a natural, pinkish nude lipstick. You want the focus to remain on the lightning bolt, so avoid competing bold lip colors. -
Highlighting points:
Add a tiny dab of white paint or highlighter to the inner corner of the eye to open up the gaze. -
Set the design:
If using cream paints, lightly dust the painted area with translucent setting powder to prevent smudging during the game.
Fixing Smudges
Don’t wipe a mistake while it’s wet. Let the smudge dry completely, then use a damp Q-tip to flake it off before repainting.
Now you are ready to stand out in the crowd with this electric design
Graphic Laces Across the Nose Bridge
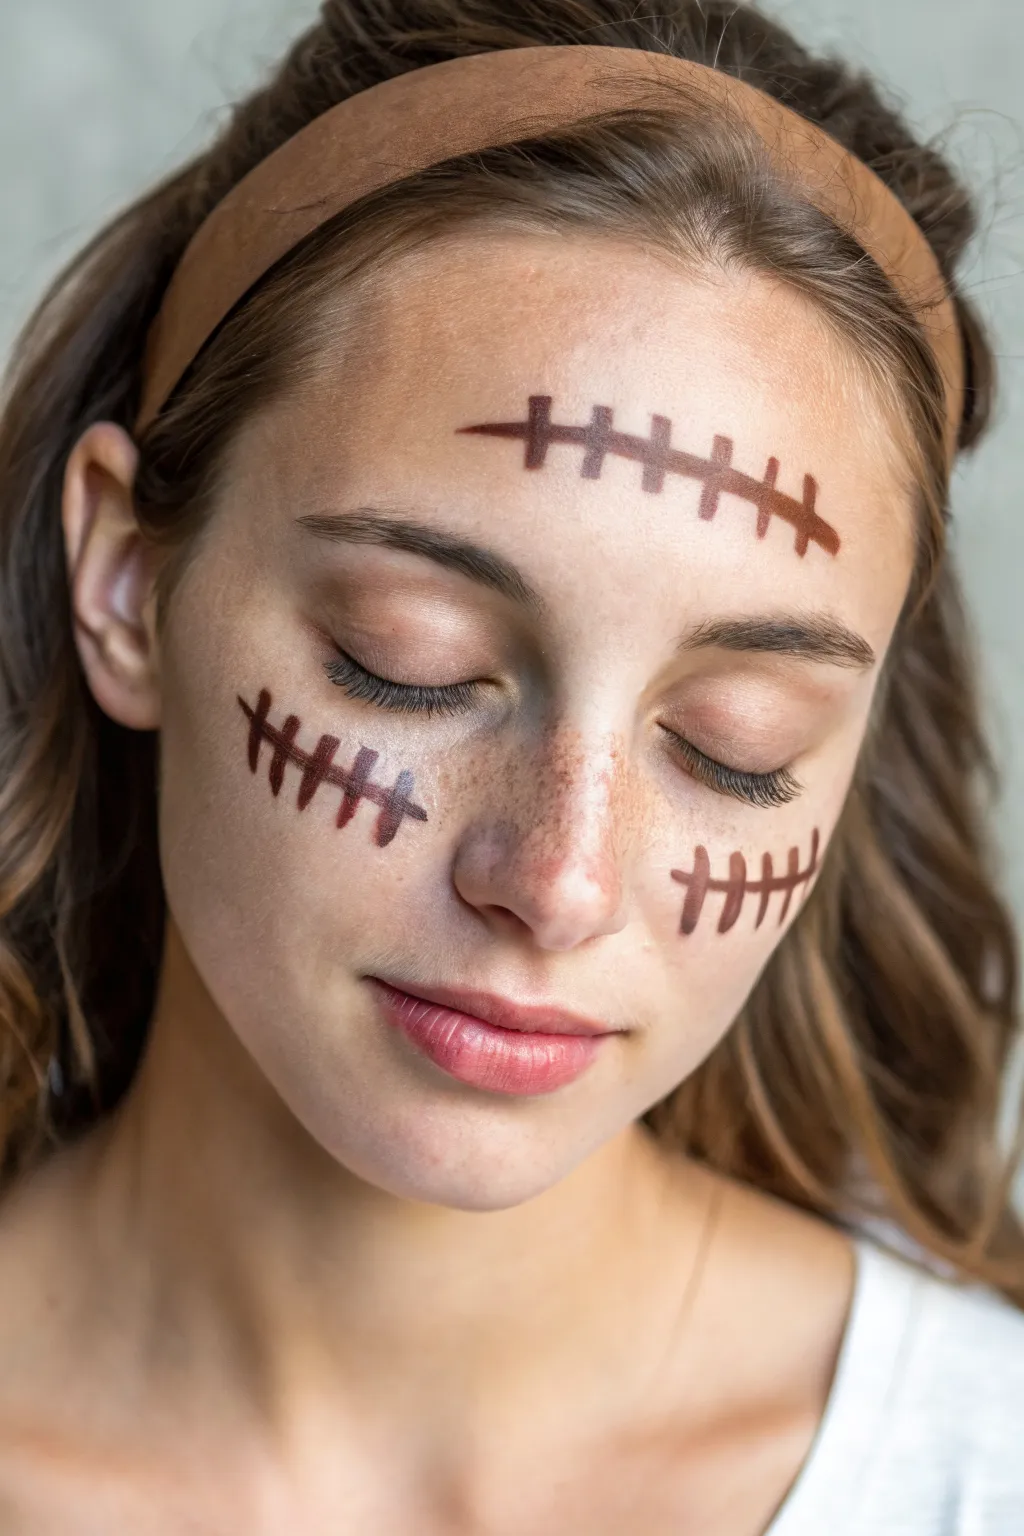
For a minimalist yet spirited game day look, try this clean design featuring three distinct sets of football laces. This style frames the face beautifully, with oversized graphic stitching placed on the forehead and both cheeks for maximum impact.
Detailed Instructions
Materials
- Brown face paint (water-activated or cream)
- Small flat brush or angled shader brush
- Fine detail brush or liner brush
- Setting spray (optional)
- Makeup sponge
- Translucent setting powder
Step 1: Planning the Placement
-
Prepare the skin:
Start with a clean, dry face free of heavy moisturizers or oils, which can make face paint slide around. -
Visualize the lines:
Before dipping your brush, look in the mirror to map out where your three football lace designs will go: one centered on the forehead and one on each cheek bone. -
Check the angle:
The cheek designs should follow the natural angle of your cheekbones, sloping slightly upwards toward the ears, while the forehead design works best slightly arched or straight across.
Step 2: Painting the Forehead Laces
-
Load your brush:
Dampen your flat brush slightly and load it with a rich brown face paint until you have a creamy consistency, not too watery or drippy. -
Draw the main line:
Starting in the center of your forehead, paint a single, bold horizontal line about 3 to 4 inches long. I like to taper the ends slightly so they don’t look too blocky. -
Add vertical stitches:
Switch to your finer detail brush or turn your flat brush on its side to create the vertical cross-stitches. -
Space them out:
Paint 5 to 6 vertical lines across the main horizontal stripe, trying to keep the spacing even between each stitch. -
Refine the edges:
Go back over any transparent spots with a second layer of brown to ensuring the paint looks solid and opaque.
Smudge Control
If you have oily skin or will be sweating, skip cream paints. Use water-activated cake makeup instead, as it dries quickly to a smudge-resistant matte finish.
Step 3: Creating the Cheek Accents
-
Position the right cheek:
Moving to your right cheek, paint the main horizontal line starting near the apple of your cheek and extending back toward your hairline. -
Add the stitching:
Just like the forehead, add your vertical cross-lines. Because cheek space is smaller, you might only fit 4 or 5 stitches here. -
Mirror the design:
Repeat this process on the left cheek, trying to match the angle and length of the line on the right side for symmetry. -
Sharpen the lines:
If any lines look fuzzy, use a clean, slightly damp brush or a cotton swab to tidy up the edges for a crisp, graphic finish.
Add Some Glam
Trace one side of the brown stitches with a thin line of gold or silver glitter gel. This adds sparkle and makes the standard football design pop under stadium lights.
Step 4: Finishing Touches
-
Let it dry:
Allow the paint to dry completely for a few minutes; it should change from shiny to a matte finish when ready. -
Set the design:
Lightly dust a translucent setting powder over the design to prevent smudging, or close your eyes tight and mist with a setting spray. -
Add definition (optional):
If you want extra dimension, you can add tiny highlights of white paint on the upper corners of the stitches to make them look 3D.
Now you have a bold, symmetrical look ready for kickoff
Neon Pop Outline Over Dark Base
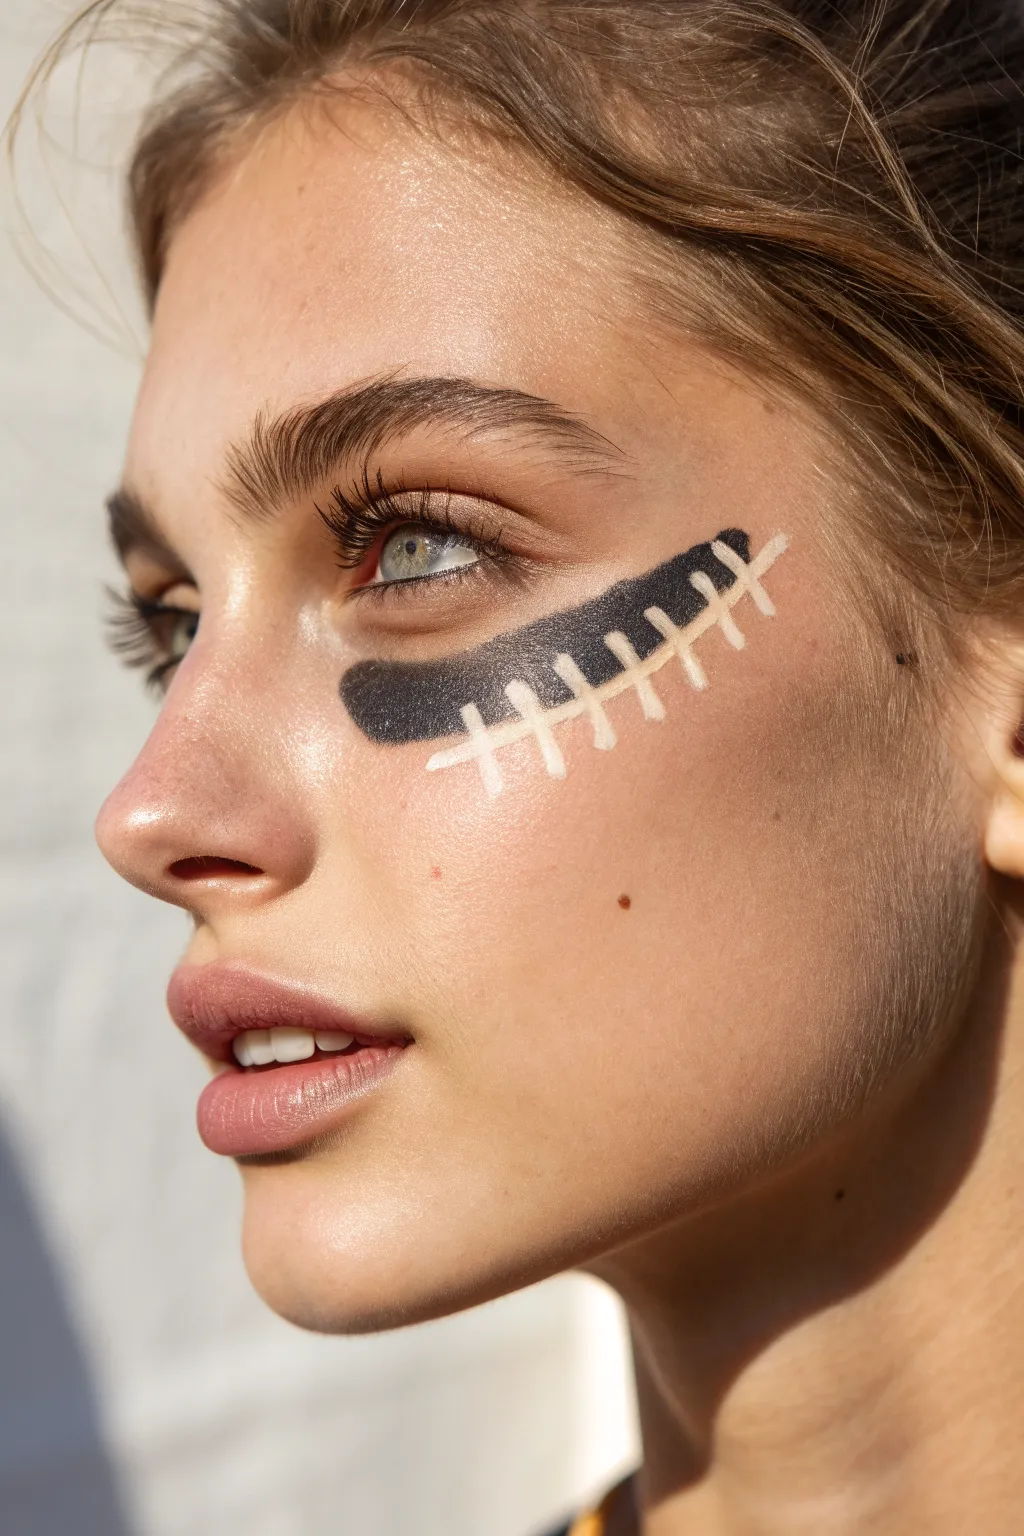
Elevate standard game day eye black by transforming it into a stylized football shape right on your cheek. This look combines the classic grit of athletic grease with a sharp, graphic pop of white that stands out beautifully in photos.
Step-by-Step
Materials
- Matte black cream makeup (stick or pot)
- White liquid eyeliner or opaque face paint
- Small angled brush or flat shader brush
- Fine detail liner brush
- Translucent setting powder
- Makeup setting spray
- Micellar water and cotton swabs (for cleanup)
Step 1: Preparation
-
Start fresh:
Begin with clean, moisturized skin. If you are wearing foundation or tinted moisturizer, ensure it has set completely so the face paint grips well. -
Map the placement:
Visualize where the strip will go. It should sit high on the cheekbone, just under the eye, angling slightly upward toward the temple to lift the face.
Layering Tip
Wait for the black layer to be 100% dry and matte before applying white. If the black is still creamy, it will mix with the white and turn gray.
Step 2: The Black Base
-
Outline the shape:
Using your black cream makeup and an angled brush, sketch the outline of the eye black strip. Aim for a rounded rectangle shape—slightly curved to hug the facial structure. -
Fill it in:
Load a flat shader brush with the black pigment and fill in your outline. Press the product into the skin rather than dragging it to get the most opaque coverage. -
Clean the edges:
Dip a cotton swab in a little micellar water to sharpen the edges. The bottom edge should be crisp, while the top can follow the natural curve of your lower lash line. -
Set the black:
Lightly dust translucent setting powder over the black strip. This is crucial—it prevents the black from smudging and creates a dry surface for the white lines to sit on top of clearly.
Step 3: The White Laces
-
Choose your white tool:
For the crispest lines, I prefer using a white liquid eyeliner with a felt tip, but a high-quality white face paint on a fine liner brush works well too. -
Draw the center line:
Starting near the nose, draw a single, long horizontal line all the way through the center of the black strip. Use a steady hand and try to do this in one continuous stroke. -
Plan the stitches:
Before painting, mentally space out your vertical stitches. You want about 6 to 8 evenly spaced lines depending on the length of your strip. -
Paint the first stitch:
Start with the center-most vertical stitch. Draw a short line perpendicular to your main horizontal line, extending just slightly past the black edges onto the skin for a ‘stitched’ effect. -
Work outward:
Continue adding vertical stitches moving outward toward the temple. Keep the spacing consistent and vary the angle slightly so they remain perpendicular to the curve of the black strip. -
Work inward:
Go back to the center and add the remaining stitches moving toward the nose. These lines might need to be slightly shorter as the black strip tapers. -
Brighten the white:
If the black is showing through the white, let the first layer dry completely, then carefully trace over the white lines a second time for maximum opacity.
Team Spirit Level Up
Swap the white laces for your team’s colors! Use a bright yellow, red, or metallic silver liner for the stitching to customize the vibe.
Step 4: Finishing Touches
-
Check symmetry:
Step back and look in the mirror. If any stitch lines look too thin, gently thicken them to match the others. -
Final seal:
Close your eyes and mist the area with a makeup setting spray. This locks the design in place and prevents sweat or humidity from melting your game day look.
You’re now ready to cheer from the stands with a sporty, custom look that lasts through overtime
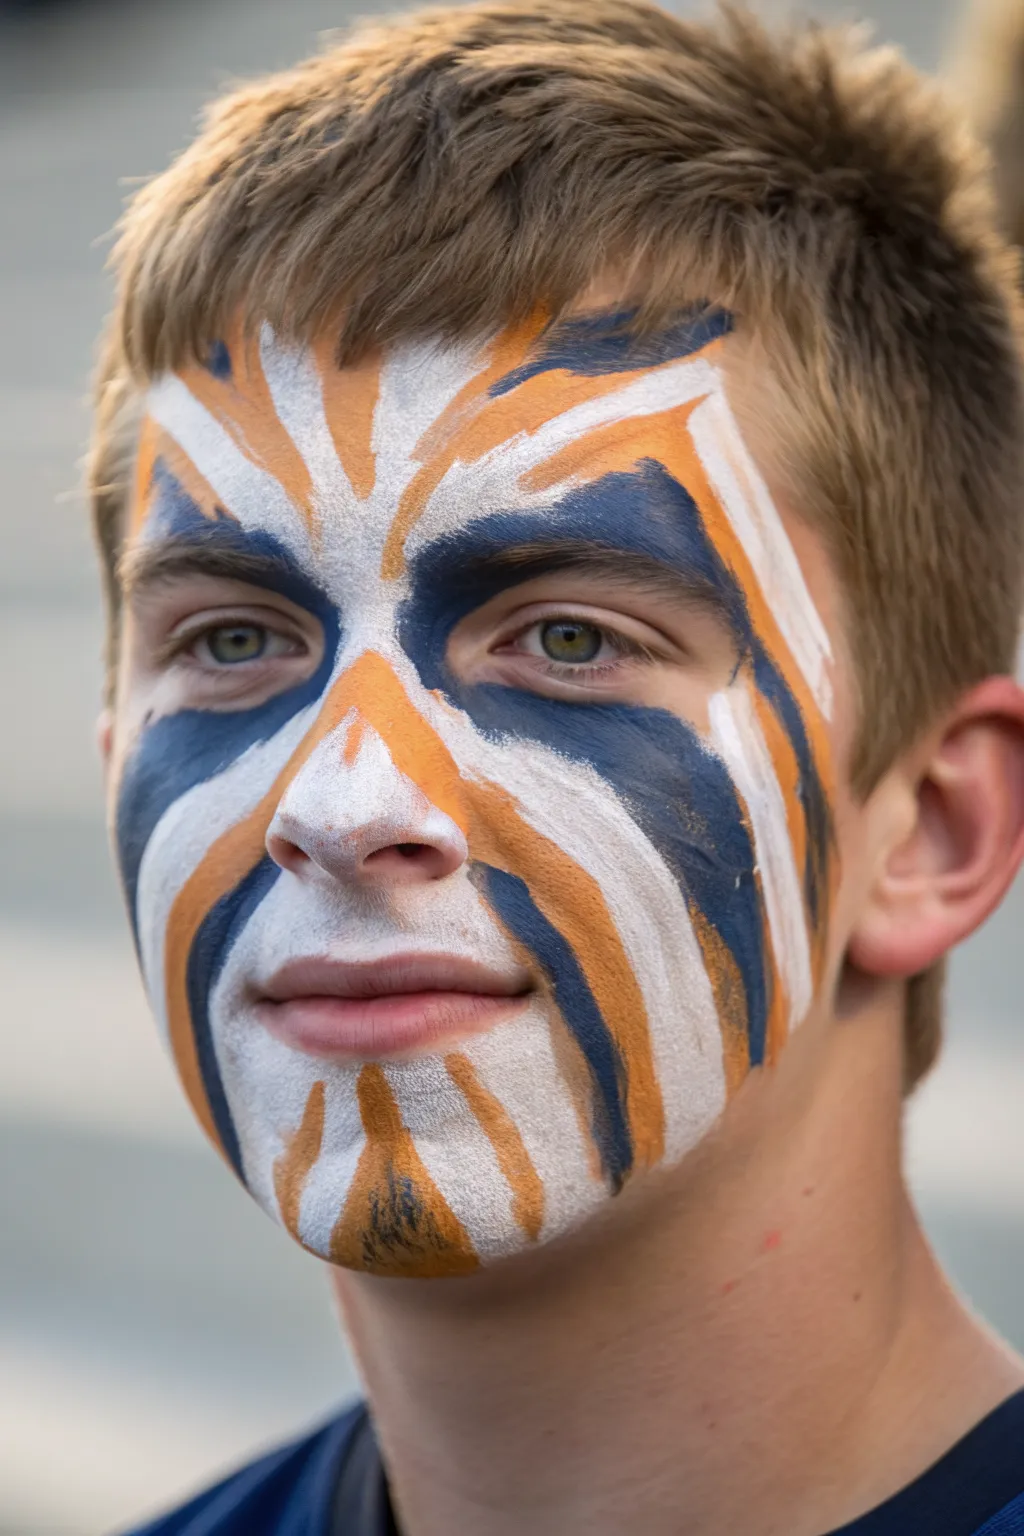
Full Face Abstract “Crowd Energy” Paint

Channel the intense energy of the crowd with this striking, symmetrical face paint design that mimics the fierce markings of a tiger in team colors. Using bold strokes of white, orange, and navy, this abstract style transforms the face into a canvas of pure team spirit.
Step-by-Step Tutorial
Materials
- White face paint (water-activated or cream)
- Orange or gold face paint
- Navy blue or black face paint
- High-density face painting sponge
- Medium round brush (size 4 or 6)
- Small detail brush (size 2)
- Cup of water
- Paper towels or cloth
Step 1: Setting the White Base
-
Prepare the center:
Load a clean sponge or a large brush with white face paint. Start directly on the bridge of the nose, dabbing specifically on the tip and extending slightly upward to create a central anchor point. -
Map the forehead rays:
Using a medium round brush, pull thick white strokes upward and outward from the bridge of the nose towards the hairline. Imagine a sunburst pattern; create a central V-shape and two angled strokes on either side. -
Define the cheekbones:
Continue with the white paint, sweeping broad, curved lines from the nose, under the eyes, and down across the cheekbones. These strokes should widen as they move away from the center of the face. -
Create the muzzle area:
Paint the area above the upper lip and the chin with a solid white base. On the chin, pull the paint downwards in short, vertical strokes to mimic fur texture.
Smudge Control
If paints bleed into each other, don’t wipe. Wait for it to dry completely, then paint the correct color directly over the mistake. Wiping wet paint creates a gray smear.
Step 2: Applying the Orange Accents
-
Add forehead definition:
Load your medium brush with orange paint. Carefully paint stripes in the negative spaces between your white forehead rays. Let the orange strokes follow the same radiating angle as the white ones. -
Stripe the nose bridge:
Paint an orange V-shape or diamond on the upper bridge of the nose, right where your white base began. This connects the forehead design to the lower face. -
Contour the cheeks:
Sweep a bold orange stripe underneath the white cheekbone line. Start near the nose and flare it out towards the jawline, keeping the edges crisp. -
Detail the chin:
Add two distinct vertical orange stripes on the chin, overlaying the white base. I find it helpful to taper these strokes so they look sharp at the bottom.
Glitter Finish
While the paint is still slightly tacky, dab cosmetic-grade glitter in matching team colors onto the white sections for a sparkling finish that catches stadium lights.
Step 3: Adding Depth with Navy
-
Define the brow line:
Switch to navy blue paint on a round brush. Paint a strong, thick line starting from the inner corner of the eyebrow, swooping up and over the brow bone, acting as a shadow to the white markings. -
Under-eye intensity:
Paint a dark stripe starting near the tear duct, swooping down along the cheekbone, sandwiched between the white and orange layers. This adds intense contrast to the eyes. -
Create the jawline shadow:
Add a sweeping navy curve starting from the side of the mouth (the nasolabial fold) and pulling down towards the jaw. This frames the mouth area effectively. -
Chin detailing:
Place small, precise navy strokes or dots at the very bottom center of the chin to anchor the vertical design.
Step 4: Refining and blending
-
Sharpen the edges:
Use a small detail brush with a tiny amount of water to clean up any messy edges where the colors meet. You want distinct separation, not a muddy blend. -
Add texture:
If the paint looks too flat, use a dry brush to lightly drag the edges of the colors into one another just barely—this creates a fur-like, energetic texture. -
Highlight the center:
go back in with fresh white paint on the tip of the nose to make it the brightest point of the face, ensuring the design pops in photos.
You are now ready to head to the stands and support your team with a fierce look that demands attention


Have a question or want to share your own experience? I'd love to hear from you in the comments below!