A gazebo birdhouse is basically a tiny architectural canvas—those multiple panels and that tiered roof are just begging for paint. Here are my favorite painting ideas to help you make the shape pop, from classic garden looks to the kind of designs that make people lean in for a closer look.
Classic White Trim and Soft Cottage Body
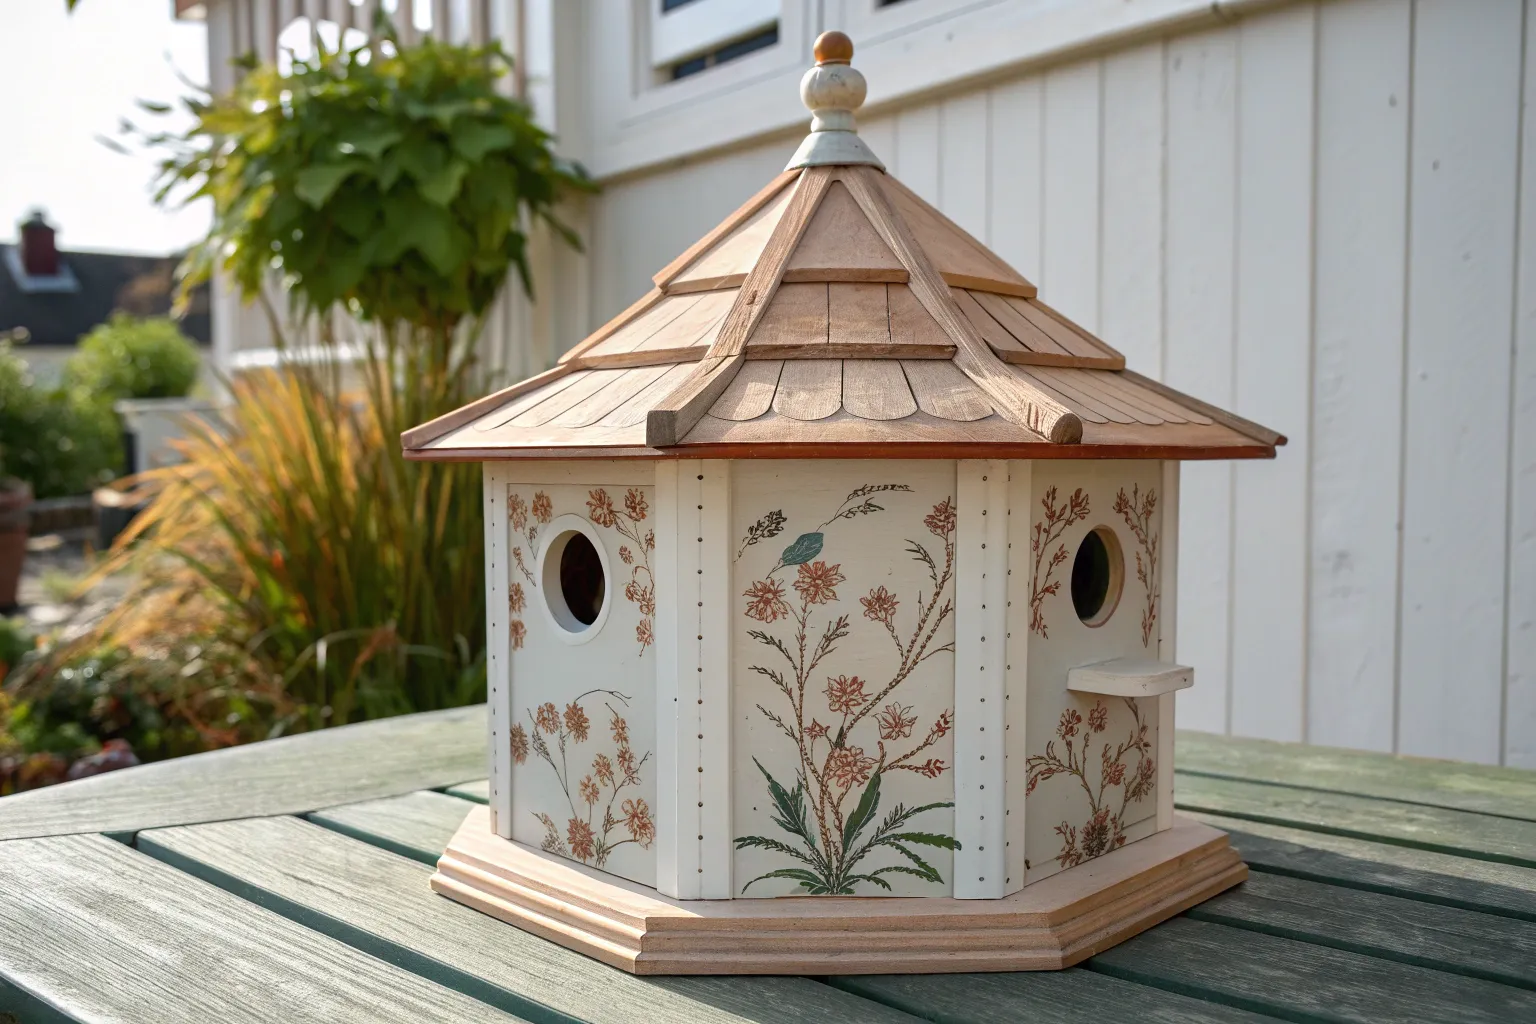
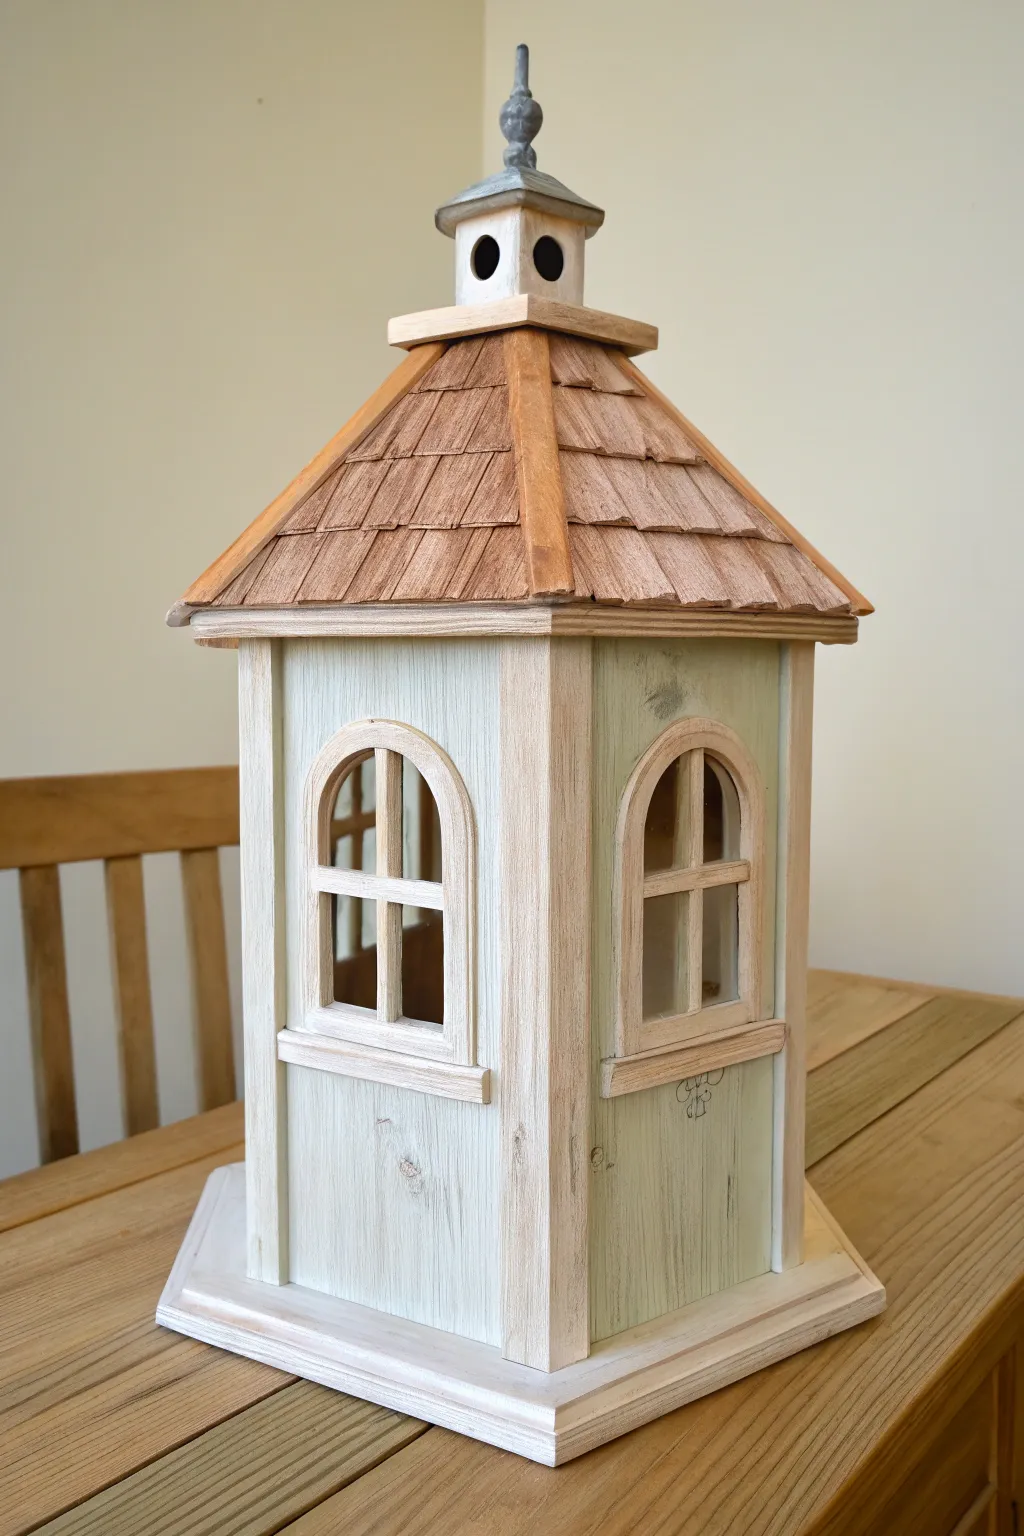
Recreate the charm of a grand estate with this elegant gazebo birdhouse, featuring soft buttery cream walls and contrasting slate grey roof shingles. This project relies on subtle color variation to highlight the architectural woodwork without overwhelming the delicate design.
How-To Guide
Materials
- Unfinished wood gazebo birdhouse
- Medium-grit sandpaper (150-180 grit)
- Tack cloth
- Exterior acrylic paint: Soft Cream / Antique White
- Exterior acrylic paint: Slate Grey / Weathered Stone
- Exterior acrylic paint: Bright White (for trim)
- Wide flat brush (1 inch)
- Small angled shader brush (1/4 inch)
- Fine detail brush (Size 0 or 1 round)
- Painter’s tape (optional)
- Outdoor matte or satin sealer spray
Step 1: Preparation & Base Coat
-
Sand the surfaces:
Begin by gently sanding the entire birdhouse, paying special attention to any rough laser-cut edges on railings or window frames. This ensures your paint glides on smoothly and doesn’t snag. -
Clean the dust:
Wipe down every nook and cranny with a tack cloth to remove sawdust. Even a tiny amount of dust can create a bumpy finish, so be thorough. -
Prime the structure:
Apply a thin layer of primer or a white base coat to the entire house. This seals the wood and ensures your cream color will look rich rather than soaking into the grain. -
Let it cure:
Allow the primer to dry completely according to the manufacturer’s instructions before starting with your colors.
Clean Lines Hack
If you struggle with steady hands on the lattice railing, paint the railing pieces first before efficient assembly, or use a white paint marker for more control than a brush.
Step 2: Painting the Body
-
Apply the cream body color:
Load your medium flat brush with the Soft Cream paint. Cover the main interior walls of the gazebo and the exterior siding, avoiding the roof and the base platform. -
Getting into corners:
Use the small angled brush to push the cream paint into the corners where walls meet the floor or ceiling. I like to work from the inside out to avoid smudging wet paint with my hand. -
Paint the pillars:
Carefully paint the turned columns and vertical pillars in the same cream shade. Turn the birdhouse frequently to ensure you haven’t missed the ‘back’ side of a round pillar. -
Second coat:
Once the first coat is dry to the touch, apply a second layer of cream for full opacity and a rich, solid finish.
Aged Patina
For a vintage look, mix a tiny drop of brown paint with water to make a thin wash. Brush it casually over the cream siding and wipe away immediately with a rag.
Step 3: Roof & Platform Detailing
-
Base coat the roof:
Switch to your Slate Grey paint. Using the angled brush, carefully paint the faceted roof panels and the tiny cupola roof at the top. -
Paint the foundation:
Apply the same Slate Grey to the bottom base platform of the feeder. This grounds the design and hides dirt better than a light color would. -
Dry brushing texture:
To mimic the shingle texture seen in the photo, wipe most of the grey paint off your brush until it’s nearly dry. Lightly drag it over the roof ridges to create a weathered, textured look. -
Define the roof ribs:
Use the fine detail brush and a touch of the lighter Cream color to carefully paint the raised ribs (the strips separating the roof panels). This creates the defining ‘skeleton’ look of the roof.
Step 4: Fine Trim Work
-
Highlighting the railings:
With a steady hand and your smallest brush, paint the lattice railings and the X-bracing in Bright White or a very light version of your cream. This subtle contrast makes the woodwork pop. -
Window details:
Paint the arched window frames and muntins (the grid bars) in the cream color. If you got any grey on them earlier, touch them up now for crisp lines. -
Cupola accents:
Don’t forget the tiny bird entry holes on the cupola. Use a small dab of dark grey or black well inside the hole to create depth, simulating a shadowy interior. -
Final inspection:
Rotate the birdhouse and check for any drips or missed spots, especially under the eaves. -
Seal for protection:
Finish with two light coats of outdoor clear sealer spray. This protects your hard work from sun and rain without visible brushstrokes.
Hang this sophisticated little shelter in a quiet corner of the garden and wait for your feathered guests to arrive


Two-Tone Color Blocking by Panel
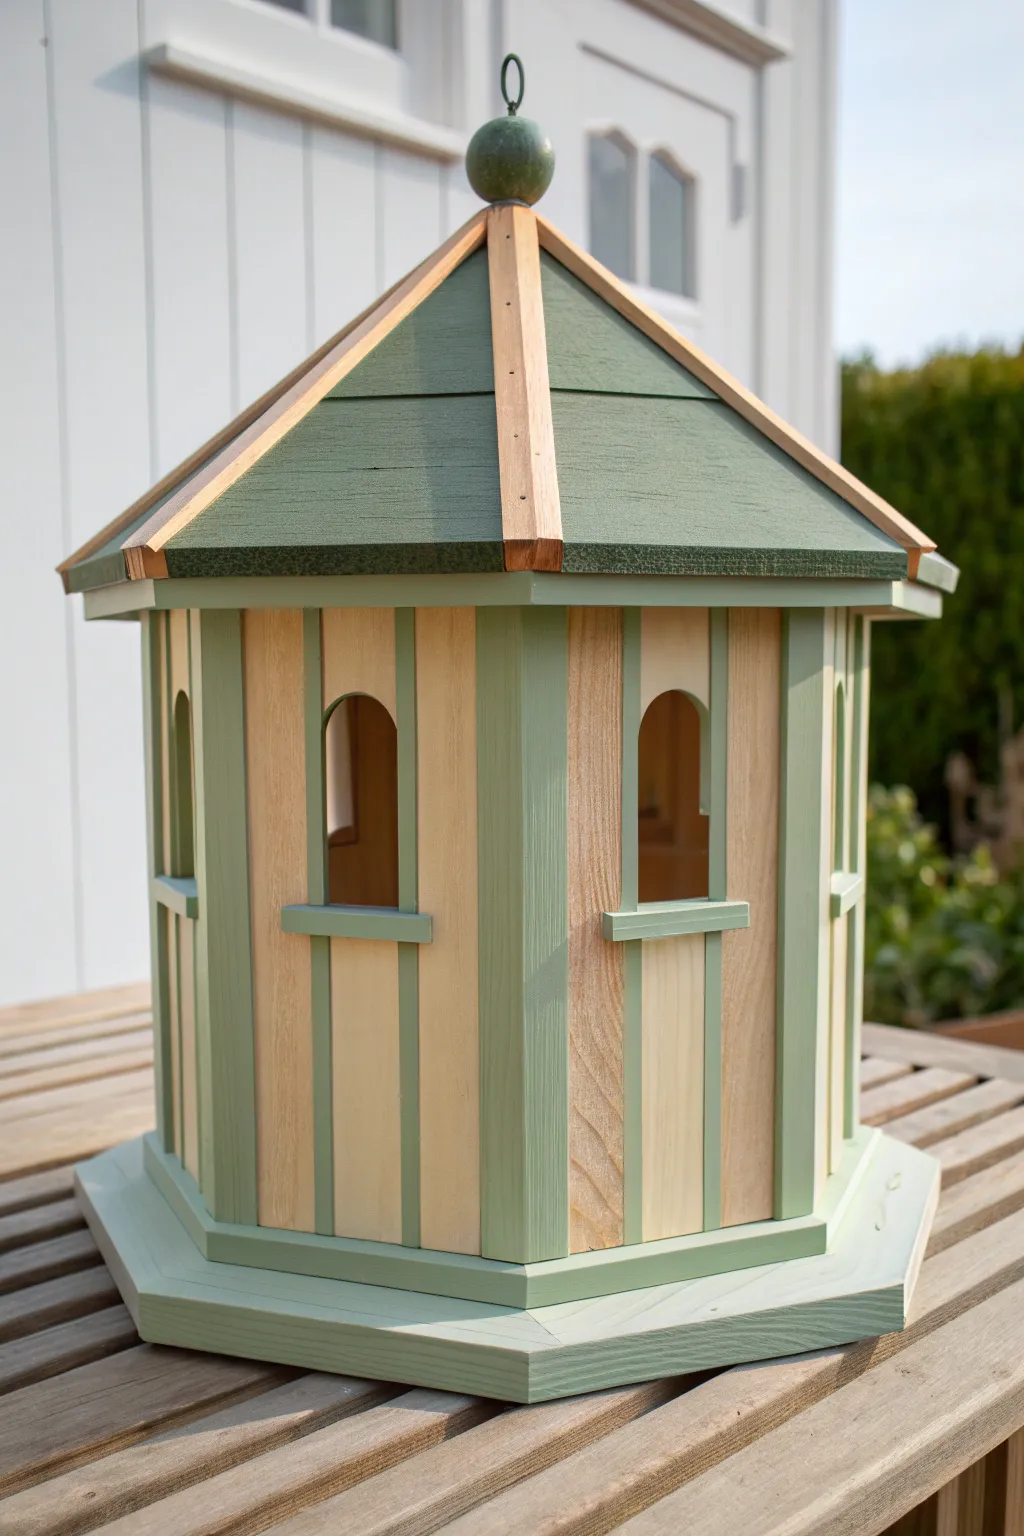
This elegant finish highlights the natural beauty of wood grain against a soft, matte sage green, giving your gazebo birdhouse a sophisticated, garden-ready look. By meticulously blocking out specific panels, you create a structured, architectural feel that mimics a real Victorian garden folly.
Detailed Instructions
Materials
- Unfinished hexagonal wood birdhouse
- Sage green exterior acrylic latex paint (matte or satin)
- Clear outdoor spar urethane (satin finish)
- Painter’s tape (high-quality, varied widths)
- Small angled sash brush (1 inch)
- Fine detail brush (size 2 or 4 round)
- 220-grit sandpaper
- Tack cloth
- Small flat artist brush
Step 1: Preparation & Masking
-
Sand the surface:
Begin by lightly sanding the entire birdhouse with 220-grit sandpaper. This smooths out any rough grain on the panels that will remain clear and helps the paint adhere better to the trim areas. -
Clean the dust:
Wipe down every nook and cranny with a tack cloth to ensure absolutely no sawdust remains, as this can mar the finish. -
Protect the natural panels:
The key to this look is precision. Apply painter’s tape to the vertical wood panels that flank the windows. Press the edges down firmly with a fingernail or credit card to prevent paint bleed. -
Mask the roof spines:
Carefully tape over the wooden spines (hips) of the roof. You want these to remain natural wood to contrast with the green roof panels.
Bleeding Lines?
If paint seeps under the tape onto the wood grain, don’t wipe it while wet! Let it dry fully, then gently scrape the excess off with an X-Acto knife or sharp razor blade.
Step 2: Painting the Structure
-
Paint the roof panels:
Using your small flat artist brush, paint the triangular roof sections between the taped spines. Paint carefully along the masked edges. Two thin coats are better than one thick one here. -
Paint the base:
Tackle the hexagonal base next. Use the angled sash brush for the broader flat areas and edges. Ensure you get into the bevels without pooling paint. -
Detail the vertical trim:
Moving to the body, paint the vertical columns and corner posts with the sage green. I find it easiest to work from top to bottom to catch any drips immediately. -
Paint window accents:
Use the fine detail brush to carefully paint the small ledges beneath the arched windows. Do not paint the inside edges of the arch itself; leave those natural for depth. -
Paint the decorative finial:
Paint the round ball finial on top of the roof green. Leave the tiny metal ring at the very top unpainted if it is metal, or paint it green if it’s wood. -
Let it cure:
Allow the green paint to dry completely, preferably overnight. It needs to be fully cured so it doesn’t peel up when you remove the tape.
Step 3: Finishing Touches
-
Remove the tape:
Slowly peel back the painter’s tape at a 45-degree angle. This reveals the crisp lines between your sage green and the natural wood. -
Check for touch-ups:
Inspect your lines. If any paint bled under the tape onto the natural wood, gently scrape it away with a craft knife or lightly sand it off. -
Apply clear coat to wood:
Dip a clean brush into the spar urethane. Carefully apply a thin coat over the exposed natural wood panels, the roof spines, and inside the window arches. -
Seal the painted areas:
Continue applying the urethane over the painted green sections. This seals the whole unit against moisture. The spar urethane will slightly warm the tone of the green. -
Apply a second coat:
Once the first coat is dry (check the can for re-coat times), lightly sand with fine paper, wipe clean, and apply a second coat of urethane for maximum outdoor durability. -
Final finial check:
Ensure the finial is securely attached and sealed, as this is the highest point and takes the most weather abuse. -
Install the hanger:
If your birdhouse uses a screw-eye hook, twist it into the pilot hole on top of the finial now that the finish is hard and dry.
Add a Copper Top
For a luxe upgrade, paint the finial with metallic copper paint instead of green. As it weathers, it will develop a patina that complements the sage hue perfectly.
Your birdhouse is now a charming, weather-resistant focal point ready to welcome its first residents


Painted Shingle Roof Illusion
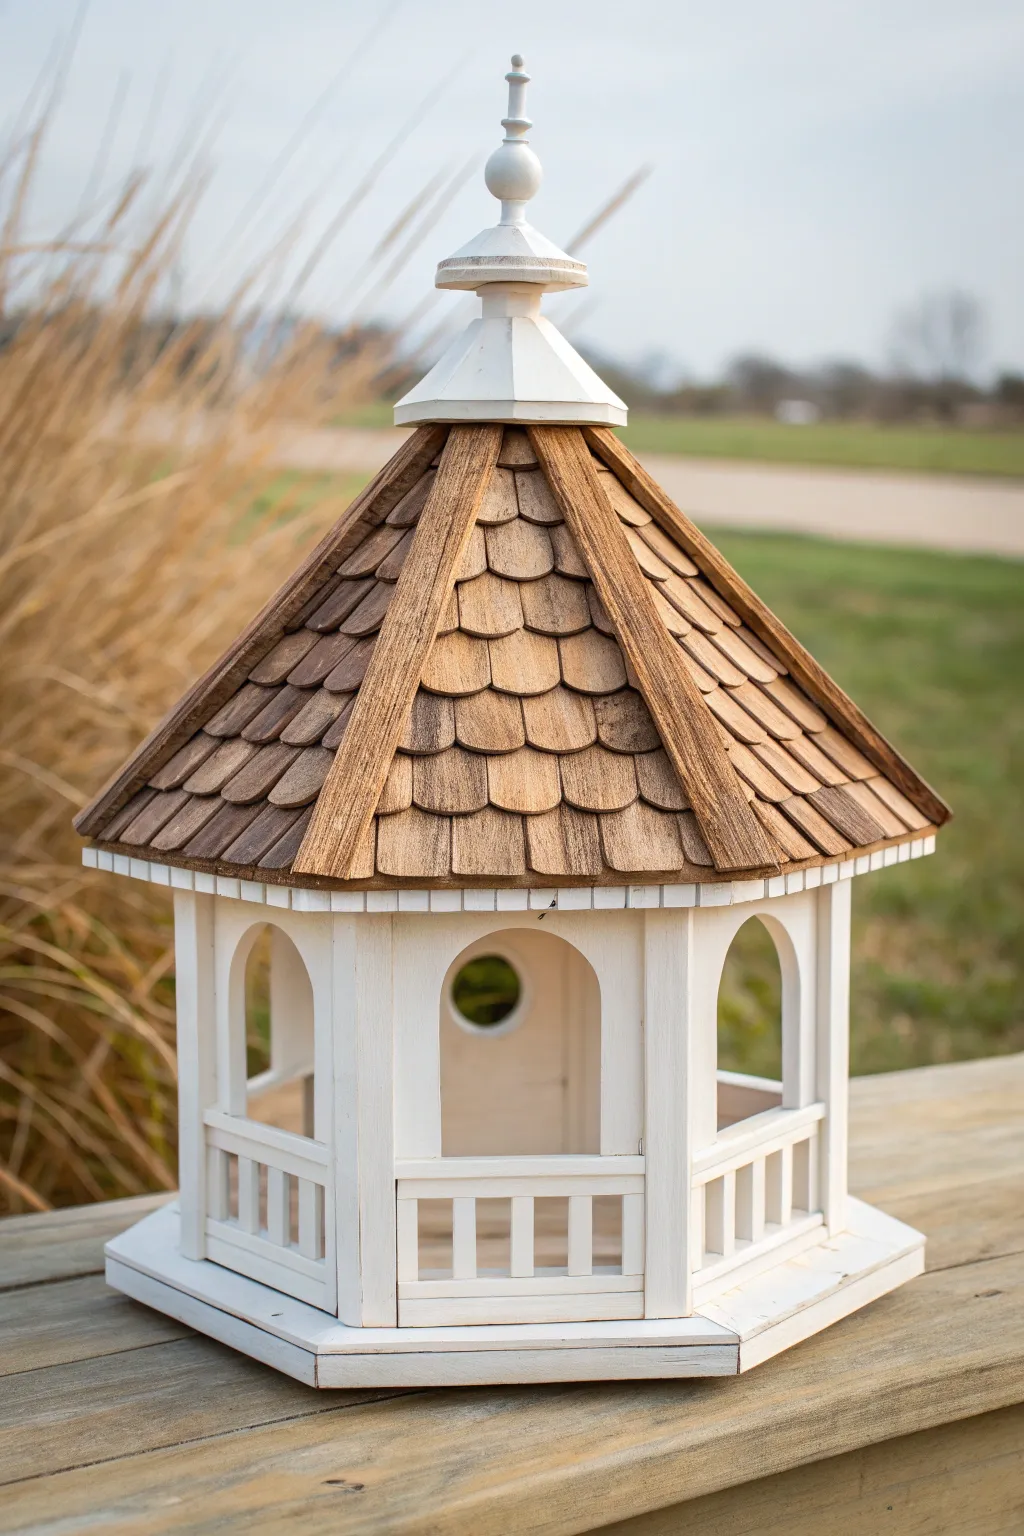
Give your standard birdhouse a sophisticated upgrade by turning a plain wooden roof into a realistic shingled masterpiece using paint and stain techniques. This method transforms simple pine into the look of aged cedar shakes, contrasting beautifully with a crisp white base.
Step-by-Step Guide
Materials
- Unfinished wooden gazebo birdhouse
- Medium grit sandpaper (120-150 grit)
- Tack cloth
- White exterior acrylic latex paint or chalk paint
- Dark walnut or espresso gel stain
- Warm honey or pecan wood stain (water-based)
- Small flat artist brush (1/4 inch)
- Detail liner brush
- Clean lint-free rags
- Matte spray sealer (outdoor rated)
- Painter’s tape
Step 1: Preparation and Base Coat
-
Sand the surfaces:
Begin by smoothing out any rough edges on the birdhouse, paying special attention to the roof ridges and the window cutouts. This ensures your paint and stain absorb evenly without snagging your brush. -
Clean the dust:
Wipe down the entire structure with a tack cloth to remove every bit of sawdust. Any leftover dust will create a gritty texture that ruins the smooth painted look. -
Tape off the roof:
Carefully apply painter’s tape along the underside of the roof eaves where they meet the walls. You want to protect the roof area while you paint the body of the house. -
Paint the body white:
Apply a coat of crisp white exterior paint to the main body, railings, and finial base. I like to use a flat brush for the wider sections and switch to a smaller brush to get inside the arched windows and railing slats. -
Apply a second coat:
Once the first coat is dry to the touch, apply a second coat of white to ensure full opacity, especially on the end grain where the wood soaks up more paint.
Natural Variation Tip
Don’t make every shingle identical. Leaving some lighter and making others darker with extra stain adds essential realism to the aged wood look.
Step 2: Creating the Shingle Effect
-
Stain the roof ridges:
Remove the tape. Using a small brush, carefully apply the lighter honey-toned stain to the raised wooden ridges that separate the roof sections. Wipe away excess immediately with a rag so only a tint remains. -
Base stain the shingles:
Working in small sections, apply the honey stain to the individual ‘shingles’ or the flat roof panels. Keep this layer light; it’s just the background glow for the wood. -
Add depth with dark stain:
Dip just the tip of your flat brush into the dark walnut gel stain. Lightly drag it from the bottom edge of a shingle upward, feathering the stroke so it fades out halfway up the shingle. -
Create shadow lines:
To make the shingles pop, take a detail liner brush with dark stain and paint a thin line underneath the bottom edge of each shingle row. This creates a drop-shadow effect. -
Simulate wood grain:
Using a relatively dry brush with a tiny amount of dark stain, lightly streak vertical lines onto the shingles to mimic wood grain texture. Vary the pressure so some lines are darker than others. -
Define the vertical dividers:
Run a very thin line of dark stain along the crevices where the roof panels meet the raised ridges. This separates the structural elements visually. -
Blend harsh edges:
If any grain lines look too stark, gently dab them with a clean, dry cloth while the stain is still tacky to soften the look.
Blotchy Stain?
If the soft wood is absorbing stain unevenly, apply a pre-stain wood conditioner first. This helps the pine accept the color more consistently.
Step 3: Finishing Details
-
Paint the finial:
Paint the turned finial at the very top pure white to match the base. This acts as a visual capstone that ties the whole color scheme together. -
Clean up borders:
Inspect the point where the roof meets the white trim. If any stain bled onto the white paint, touch it up with a small brush and fresh white paint. -
Paint the entryway hole:
Don’t forget the inside edge of the circular entry hole. Painting this white keeps the look clean and finished. -
Seal for protection:
Since this will likely live outdoors, apply two to three light coats of matte exterior spray sealer. Let the sealer cure fully according to the can’s instructions before hanging.
Hang your new birdhouse in the garden and enjoy the charming, custom-crafted look it brings to your outdoor space.


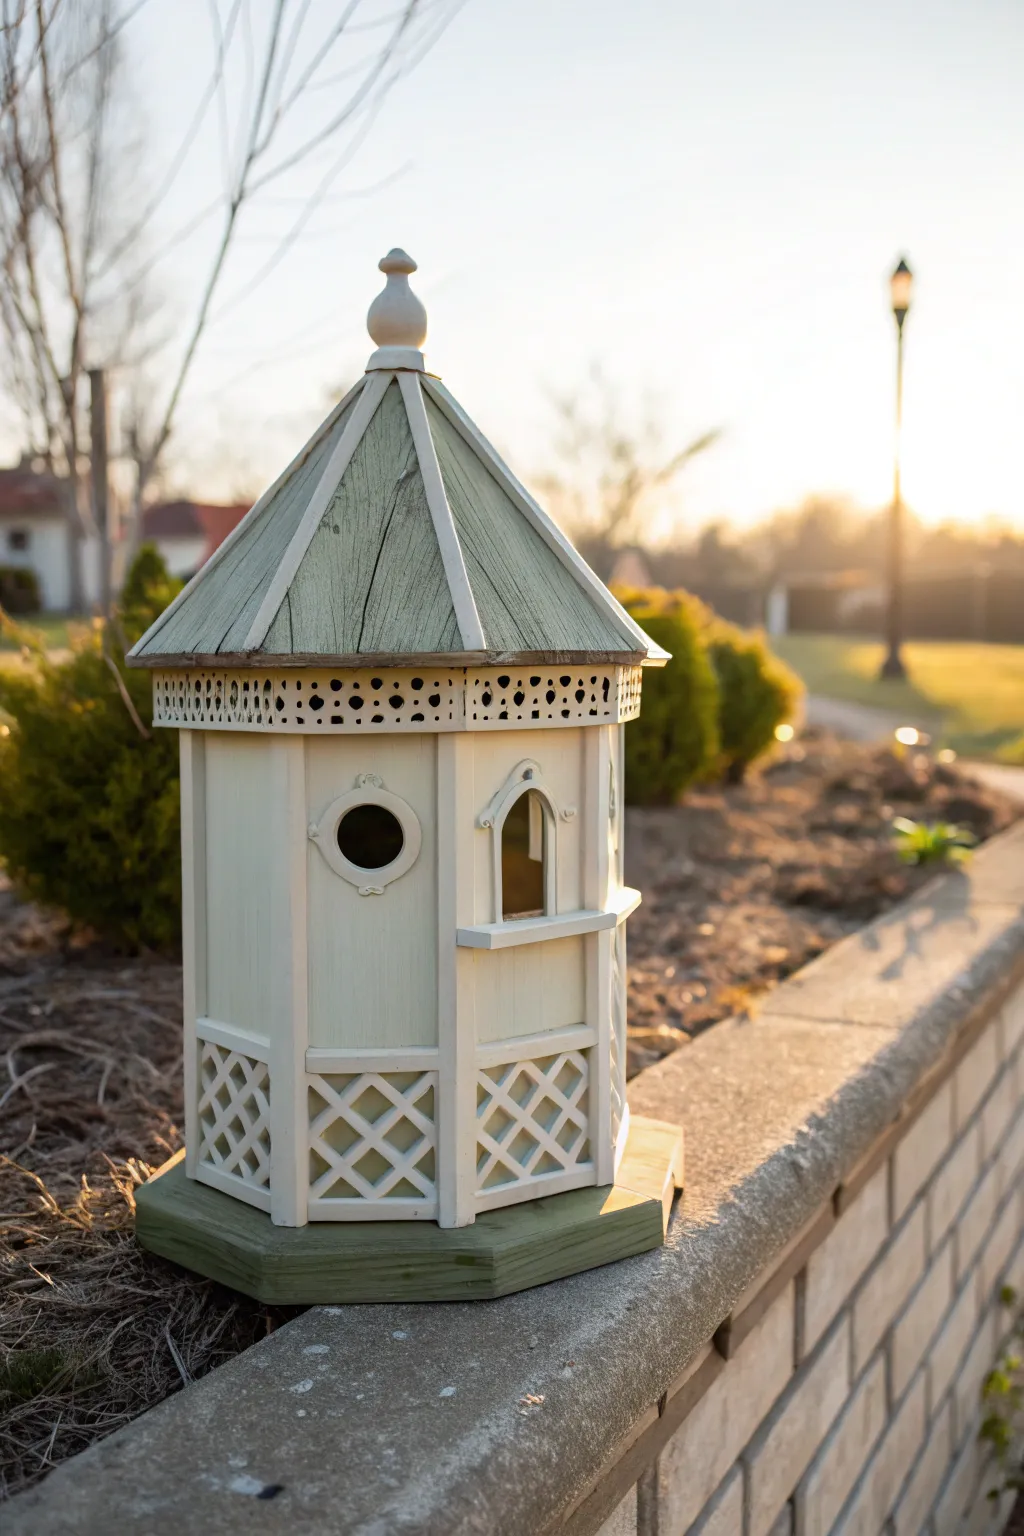
Faux Windows on Every Other Panel
Transform a basic hexagonal birdhouse into an elegant garden folly with this distressed, architectural finish. By adding arched trim and using a clever whitewash technique, you can create the illusion of depth and antiquity.
How-To Guide
Materials
- Unfinished wood gazebo birdhouse (hexagonal base)
- Laser-cut arched window frames (wood or sturdy cardstock)
- Wood glue or heavy-duty craft glue
- Chalk paint in Soft Sage Green
- Chalk paint in Antique White or Cream
- Dark wax or antiquing glaze
- Small cedar shingles or balsa wood strips
- Wooden finial
- Sandpaper (120 and 220 grit)
- Painter’s tape
- Small flat brushes and detail brushes
- Clean lint-free rag
Step 1: Structural Preparation
-
Prep the surface:
Begin by lightly sanding the entire birdhouse with 220-grit sandpaper to remove any rough splinters or manufacturing fuzz. Wipe away all dust with a tack cloth or slightly damp rag. -
Install the window frames:
Select alternating panels for your windows. Apply a thin bead of wood glue to the back of your laser-cut arched frames and press them firmly onto the center of the chosen panels. Wipe away excess glue immediately and let dry completely. -
Trim the base and corners:
If your birdhouse lacks corner molding, add thin strips of balsa wood to the vertical seams between panels to define the hexagonal shape. Clean up any rough edges. -
Prepare the roof:
If the roof is plain plywood, glue rows of small cedar shingles or cut balsa strips in overlapping layers to create a shake roof texture. Start from the bottom edge and work your way up to the peak. -
Attach the cupola detail:
If you are adding a top cupola, assemble and glue it to the roof peak now. Drill a small hole at the very top to insert and glue the decorative finial.
Step 2: Layered Painting Technique
-
Apply the base color:
Paint the main body panels (including the window areas) with the Soft Sage Green chalk paint. Don’t worry about perfect coverage; a little wood showing through adds character. Let this dry for about an hour. -
Paint the trim:
Using a smaller brush, carefully paint the faux window frames, the corner posts, and the base molding with the Antique White paint. You may need two coats here for a cleaner contrast against the green. -
Whitewash the panels:
Water down your Antique White paint until it’s the consistency of skim milk. Brush this wash over the green panels, then immediately wipe it back gently with a rag. This leaves a hazy, sun-bleached effect over the color. -
Create depth in windows:
To make the windows look real, mix a tiny drop of black or dark brown into your green paint. Carefully paint only the ‘glass’ areas inside the frame with this darker shade to simulate interior shadow. -
Stain the roof:
Create a watery wash using brown paint or a light wood stain. Apply this liberally to the roof shingles, ensuring the color gets into the crevices between the shakes. Wipe off the high points to highlight the texture.
Glue Control
When gluing the delicate window frames, use a toothpick to apply the glue. This prevents squeeze-out which can repel your stain or paint later.
Step 3: Distressing and Finishing
-
Sanding for age:
Once all paint is bone dry, take 120-grit sandpaper and distress the edges. Focus on the corner molding, the raised window frames, and the roof ridges where natural wear would occur. -
Paint the finial:
Paint the finial and the very top of the cupola with a dark grey or metallic pewter paint to mimic lead or ironwork. -
Apply antiquing wax:
Dip a rounded brush into clear or lightly tinted dark wax. Work it into the corners of the window frames and under the roof overhangs. -
Buff the finish:
Let the wax sit for 15 minutes, then buff the entire piece vigorously with a clean, lint-free cloth. This creates a soft sheen and seals the paint. -
Add detail sketching:
For a whimsical touch, use a fine-tip permanent marker or detail brush to draw a tiny monogram or decorative swirl on the panel below the window, just like in the reference photo.
Copper Roof Accents
Paint the finial with copper metallic paint. Once dry, dab on patina-green accents to mimic oxidized metal for an aged garden look.
Place your finished birdhouse on a mantel or protected porch shelf to enjoy the timeless architectural vibes
BRUSH GUIDE
The Right Brush for Every Stroke
From clean lines to bold texture — master brush choice, stroke control, and essential techniques.
Explore the Full Guide
Tiny Door and Wrapped Baseboard Detail
Elevate a standard wooden birdhouse by focusing on the charming details of its entryway and foundation. This section guides you through creating a soft, two-toned aesthetic with a diminutive faux door and classic wrapped baseboard trim that adds architectural depth.
Step-by-Step Tutorial
Materials
- Unfinished wooden gazebo birdhouse
- Sandpaper (220 grit)
- White exterior acrylic paint or chalk paint
- Sage green exterior acrylic paint (matte finish)
- Small flat brush (1/4 inch)
- Fine detail brush (00 or 0)
- Painter’s tape
- Small decorative metal hook or stiff wire
- Wood glue or super glue
- Small scrap of wood (for door header/trim)
- Clean rag or tack cloth
Step 1: Preparation & Base Coat
-
Smooth the Surface:
Begin by lightly sanding the entire birdhouse, paying special attention to the area around the entryway and the base where the trim will go. Wipe away dust with a tack cloth. -
Prime the Structure:
Apply a base coat of white exterior paint to the main body of the house, including the porch rails and columns. Don’t worry about perfect coverage yet; a second coat will follow. -
Define the Door Shape:
Once the white base is dry to the touch, use a pencil to lightly sketch the outline of the tiny door on the front panel, directly below the entrance hole.
Clean Lines Secret
If you don’t have a steady hand for the window arches, use liquid masking fluid. Paint it over the white areas you want to protect, paint the green trim freely, then rub the mask off.
Step 2: Painting the Tiny Door
-
Tape for Precision:
Apply strips of painter’s tape around the outside of your pencil lines to ensure the door edges remain crisp against the white siding. -
Apply the Sage Tone:
Using a small flat brush, fill in the door area with your sage green paint. I find that applying thin, even strokes vertically mimics wood grain nicely. -
Second Coat:
Let the first coat dry completely, usually about 20-30 minutes, then apply a second coat of sage green for full opacity. -
Create the Groove:
To give the illusion of double doors or planks, use your fine detail brush and a slightly darker mix of green (or a tiny drop of black mixed into the sage) to paint a single thin vertical line down the center. -
Remove Tape:
Carefully peel away the painter’s tape while the second coat is still slightly tacky to prevent peeling the paint film.
Step 3: Adding Architectural Details
-
Paint the Door Header:
Take a small, thin rectangular scrap of wood to serve as the door header. Paint this piece the same sage green color on all sides. -
Install the Header:
Once dry, glue the header piece directly above the painted door area. This small overhang adds immediate 3D realism to the painted flat surface. -
Paint the Entry Hole Trim:
Using the fine detail brush, carefully paint the decorative ring around the circular bird entrance hole in the same sage green, keeping your hand steady to avoid smudging the white walls. -
Paint Window Accents:
Move to the side windows. Use the detail brush to paint the arched window frames in sage green, leaving the muntins (the grid bars) sage as well to match.
Rustic Roof Variation
Instead of leaving the roof slats raw, try a dry-brush technique with a pale gray paint. It mimics the look of weathered cedar shakes without covering the wood grain completely.
Step 4: The Wrapped Baseboard
-
Define the Base:
The baseboard is the bottom lip of the house structure itself. If your birdhouse rests on a larger platform, focus on the bottom edge of the house walls. -
Apply White Finish:
Ensure the baseboard area is painted with a fresh, thick coat of white. This helps it stand out as a distinct architectural feature against the raw wood platform below. -
Clean Up Edges:
Use a small brush to touch up any white paint that may have strayed onto the raw wood platform. A clean line here is crucial for the polished look. -
Optional Weathering:
If you want the baseboard to look slightly aged, dilute a tiny bit of gray paint with water and run a wash along the very bottom edge where it meets the platform.
Step 5: Hardware & Finishing
-
Prepare the ‘Handle’:
Take a very small metal hook or bend a piece of dark wire into a ‘J’ shape to mimic a door handle. -
Install Hardware:
Drill a tiny pilot hole or simply press the wire/hook into the wood on the right side of the painted door. Use a dot of super glue to secure it. -
Roof Trim Touch-up:
Paint the fascia board (the trim just under the roof line) in the matching sage green. Use the small flat brush and turn the house upside down if needed for better access. -
Final Inspection:
Check all sage green areas—door, window frames, hole trim, and roof fascia—for consistency. Touch up any white spots with a small brush.
With these precise painted details, your birdhouse will look like a custom miniature home ready for its first feathered resident
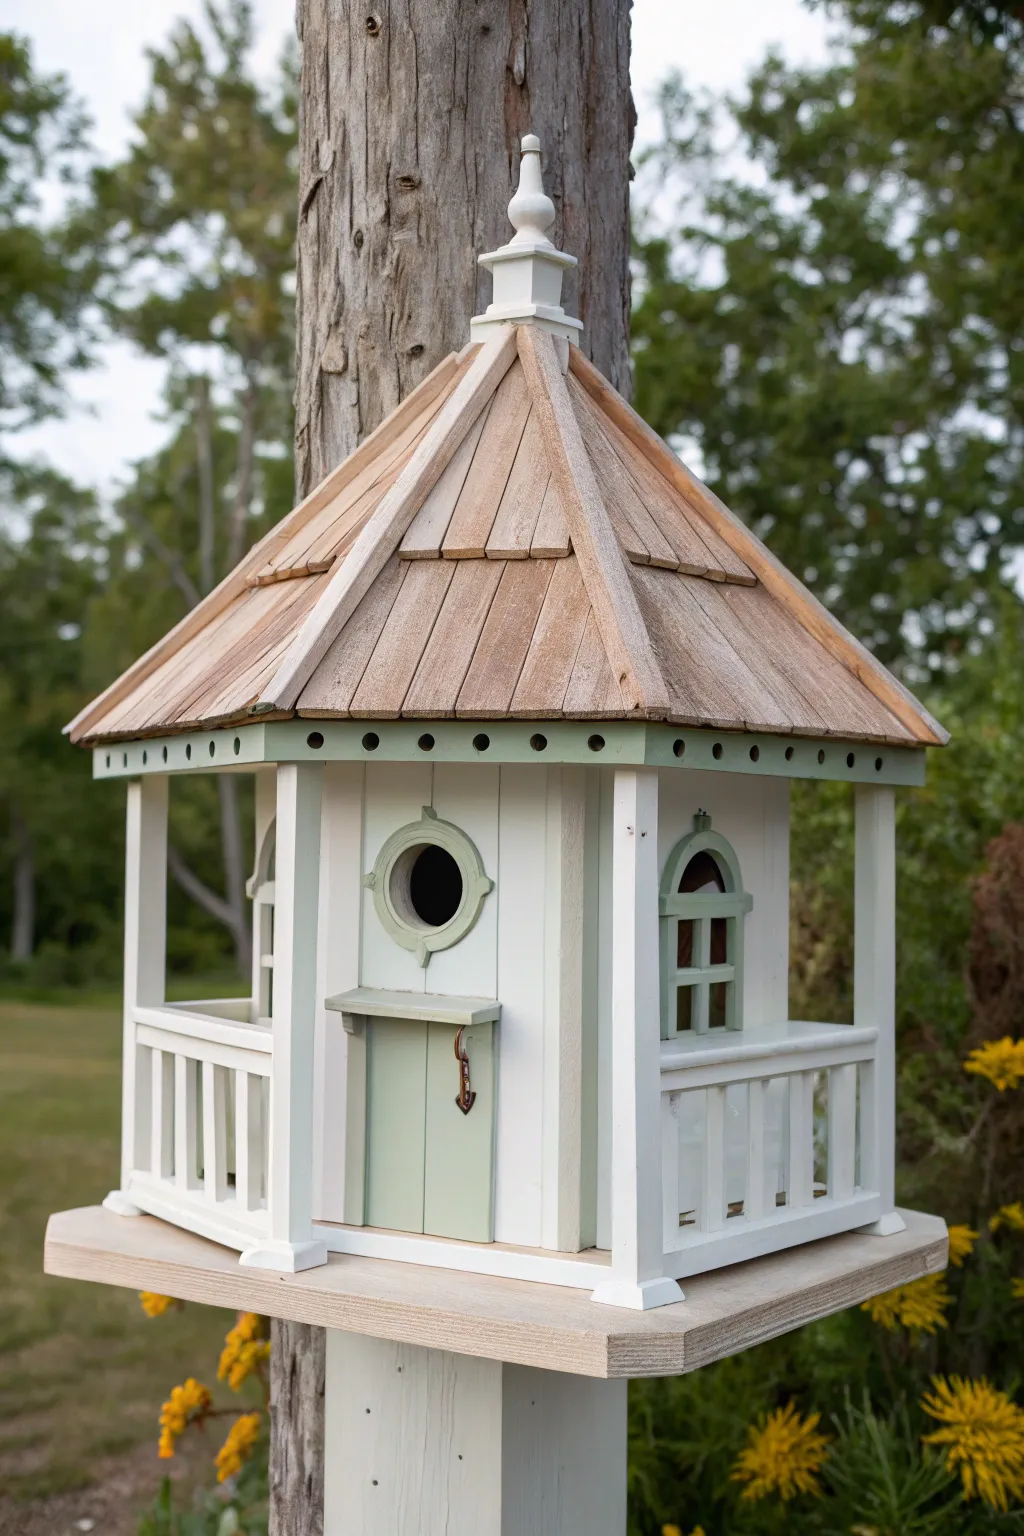
Lattice Railing Gazebo Look
Transform a standard wooden birdhouse into a charming garden feature with this sophisticated two-tone color palette. The combination of weathered sage green and rich buttercream creates a classic gazebo look that mimics real outdoor architecture.
How-To Guide
Materials
- Unfinished wooden gazebo-style birdhouse
- Sandpaper (medium and fine grit)
- Tack cloth
- Exterior acrylic craft paint (Soft Sage/Green-Grey)
- Exterior acrylic craft paint (Warm Cream/Buttercream)
- Small flat brush (1/2 inch)
- Small round brush (size 2 or 4) for details
- Painter’s tape (optional)
- Exterior matte or satin varnish spray
Step 1: Preparation
-
Sand the surfaces:
Begin by inspecting the raw wood for any splinters or rough patches. Use medium-grit sandpaper to smooth down the main walls and roof, paying special attention to the decorative lattice work at the base. -
Clean the dust:
Once sanded, wipe the entire structure down thoroughly with a tack cloth or slightly damp rag. Removing all sawdust is crucial for a smooth paint finish, especially in the tight corners of the window openings. -
Evaluate the base:
If your birdhouse has a separate base piece, mask off the bottom edge if you plan to keep the bottom raw or paint it a different color later.
Paint Clogging?
If paint globs up inside the tiny lattice holes, use a toothpick or a dry brush to clear the excess immediately before it dries to keep the shapes sharp.
Step 2: Painting the Body
-
Apply the first coat of cream:
Using your flat brush, apply the Warm Cream paint to the main hexagonal walls. Work in smooth, vertical strokes following the wood grain. -
Tackle the lattice details:
Switch to your smaller round brush to get inside the lattice railing at the bottom. Painting the inside edges of these diamond shapes first ensures you don’t miss spots later. -
Paint the decorative trim:
Carefully paint the vertical support beams and the circular window frames with the cream color. I find it easier to do this while the walls are wet to blend any accidental overlaps. -
Let it dry completely:
Allow the first coat to dry for at least 30 minutes. The raw wood will soak up a lot of paint, so don’t worry if it looks patchy initially. -
Apply the second coat:
Paint a second layer of cream over the walls and lattice. This will provide that solid, opaque finish that looks like real siding.
Step 3: Roof and Accents
-
Paint the roof panels:
Switch to your Soft Sage paint. Carefully paint each triangular section of the roof, being mindful not to drag green paint onto your fresh cream walls. -
Paint the finial:
Using the small brush, coat the decorative finial at the very top of the roof in the same cream color used for the body to tie the look together. -
Detail the eaves:
Locate the decorative strip or holes just under the roofline. Paint this band in cream to create a distinct separation between the roof and the walls. -
Paint the base platform:
Apply the Soft Sage color to the geometric base of the birdhouse. This grounds the structure and mirrors the roof color for balance. -
Create a weathered roof effect (Optional):
If you want visual texture, dry brush a tiny amount of a lighter grey-green over the raised grain of the roof panels.
Try a Wash
Water down your sage paint by 50% for the roof. This creates a semi-transparent stain that lets the natural wood grain show through for a rustic look.
Step 4: Finishing Touches
-
Clean up edges:
Inspect the spots where the cream walls meet the green roof or base. Use a small detail brush to touch up any wandering brushstrokes for a crisp line. -
Paint the window interiors:
Carefully paint the inside depth of the window ledges and circular openings. A solid cream color here makes the wood look thicker and more substantial. -
Seal the project:
Since this will likely live outdoors, apply two light coats of exterior varnish spray. Let it dry completely between sprays to prevent drips.
Place your new gazebo on a garden wall or post and watch your feathered neighbors inspect the real estate

PENCIL GUIDE
Understanding Pencil Grades from H to B
From first sketch to finished drawing — learn pencil grades, line control, and shading techniques.
Explore the Full Guide
Daisy Panels for a Bright Garden Theme
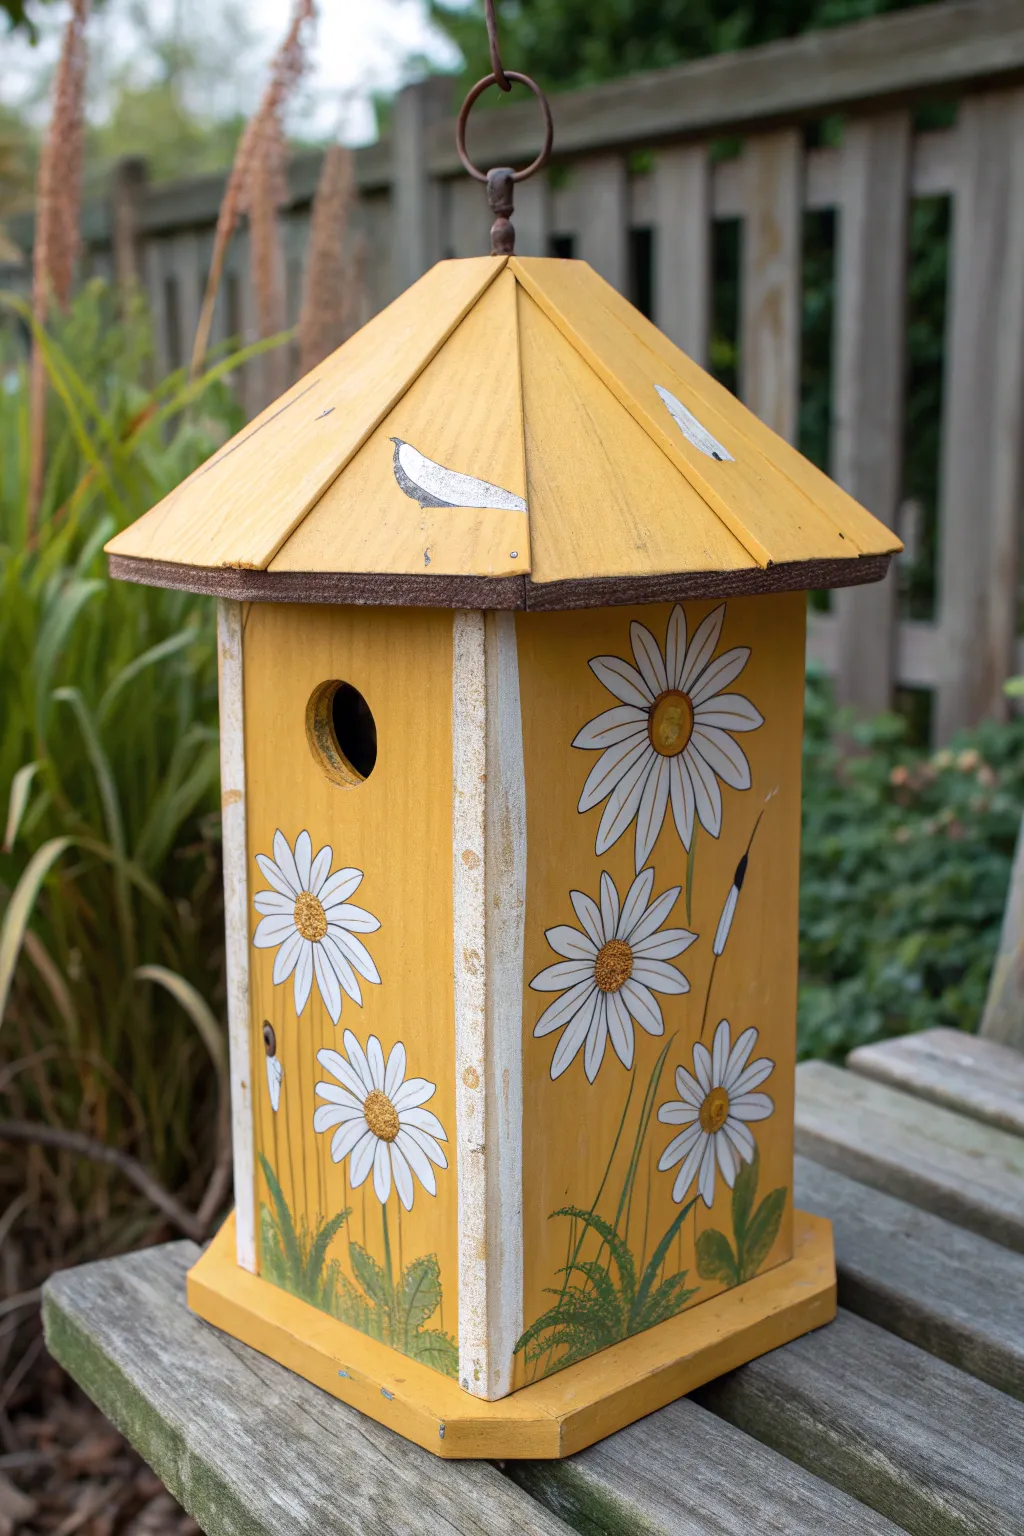
Brighten up your garden with this cheerful hexagonal birdhouse, featuring climbing white daisies on a warm yellow background. The classic floral motif adds a whimsical cottage-core feel, while the distressed edges give it the charm of a well-loved antique.
Step-by-Step Tutorial
Materials
- Unfinished wooden hexagon birdhouse
- Sandpaper (medium and fine grit)
- Acrylic craft paints: Goldenrod Yellow, Bright White, Deep Green, light brown, metallic gold
- Paintbrushes: 1-inch flat brush, small round detail brush (#2 or #4), liner brush
- Pencil
- Exterior satin sealer or varnish
- White paint pen (optional)
Step 1: Preparation and Base Coat
-
Sand the Wood:
Begin by sanding the entire birdhouse, paying special attention to the edges and the roof segments. Wipe away all dust with a damp cloth or tack cloth to ensure a smooth painting surface. -
Paint the Vertical Panels:
Using your 1-inch flat brush, paint the vertical body panels of the birdhouse with Goldenrod Yellow. You’ll likely need two coats for opaque coverage; let the first coat dry completely before applying the second. -
Paint the Roof:
Apply the same Goldenrod Yellow to the main roof sections. If you want a slight variation like the photo, you can mix a tiny drop of white into the yellow for the roof to make it subtly lighter than the body. -
Define the Corners:
Paint the vertical corner strips (the trim between the panels) with white paint. Don’t worry about perfect lines yet, as we will distress this later. -
Add Roof Edge Detail:
Paint the horizontal trim directly under the roof overhang with a dark brown paint to create a distinct separation between the roof and the body.
Step 2: Painting the Daisies
-
Sketch the Flowers:
Lightly sketch the placement of your daisies using a pencil. Arrange large blooms on the wider panels and smaller ones generally lower down. Vary the heights to simulate a natural garden growth habit. -
Paint the Petals:
Using a small round brush and Bright White paint, fill in the petals. Start from the center of the flower and pull your stroke outward to get that tapered daisy petal shape. -
Second Coat on Petals:
White over yellow can be transparent, so once the first layer fits dry, dab a second coat of white onto the petals to make them pop. I find this extra step is crucial for that bright, fresh look. -
Add Flower Centers:
Dip a small brush into metallic gold or textured yellow-brown paint. Stipple (dab repeatedly) the paint into the center of each flower to create a pollen-like texture. -
Paint the Stems:
With a liner brush and Deep Green paint, draw thin, slightly curving lines extending downwards from the flower heads to the base of the birdhouse. -
Add Leaves:
Paint long, slender leaves attaching to the stems, as well as some grassy tufts at the very bottom edge of the panels to ground the design. -
Detail the Roof:
If desired, paint simple white shapes on the roof panels to mimic fallen petals or abstract bird shapes using your small detail brush.
Petal Pro Tip
For sharper daisies, rotate the birdhouse as you paint so your hand is always pulling the brush stroke toward your body, rather than twisting your wrist at awkward angles.
Step 3: Inking and Finishing
-
Outline the Petals:
To make the flowers stand out against the yellow background, use a very fine liner brush with thinned black or dark grey paint (or a paint pen) to outline each petal and the yellow centers. -
Detail the Leaves:
Add center veins to the green leaves using a lighter green mix or your detail liner brush to add depth. -
Distress the Edges:
Once everything is fully dry, take fine-grit sandpaper and lightly sand the white vertical trim and the edges of the roof. This reveals a bit of raw wood and creates the rustic, weathered aesthetic seen in the photo. -
Paint the Entry Hole:
Carefully paint the inside rim of the bird entry hole with dark brown or black to give it a finished, shadowed appearance. -
Seal for Outdoors:
Apply two coats of exterior satin sealer over the entire project, allowing proper drying time between coats, to protect your artwork from rain and UV rays.
Level Up: Bee Friends
Add tiny painted bumblebees near the flowers. Use a yellow oval, add black stripes, and paint translucent white wings for a buzzing 3D garden effect.
Hang this cheerful creation on a sturdy branch or hook and enjoy the pop of color it brings to your outdoor space
Climbing Vine Around the Gazebo Sides
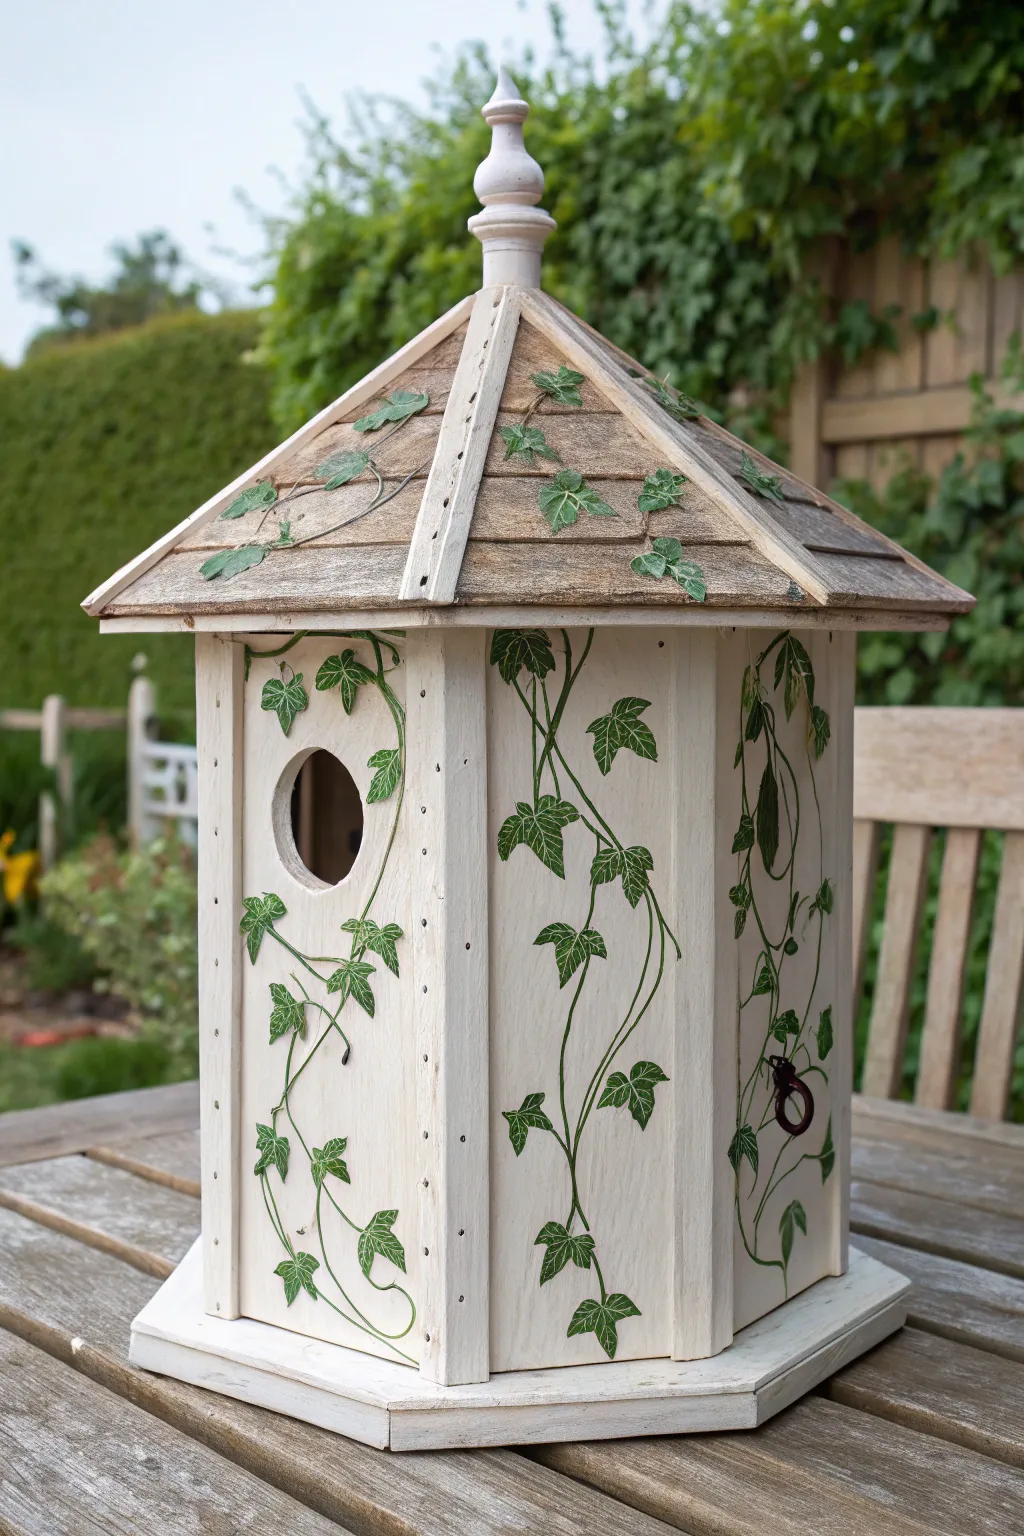
Transform a plain wooden birdhouse into an enchanting garden cottage featuring realistic climbing ivy vines. This project focuses on delicate brushwork and natural tones to create the illusion of vibrant growth overtaking a weathered structure.
Detailed Instructions
Materials
- Unfinished hexagonal wood birdhouse
- Sandpaper (medium and fine grit)
- White or cream outdoor acrylic paint
- Brown acrylic paint (light tan and darker espresso)
- Green acrylic paint (olive, hunter green, and sage)
- Small round paintbrushes (sizes 0, 2, and 4)
- Flat shader brush (1/2 inch)
- Pencil
- Outdoor matte varnish or polyurethane sealer
- Clean rag or sponge
Step 1: Preparation and Base Coats
-
Sand the Wood:
Begin by sanding the entire birdhouse, paying special attention to any rough edges around the entry hole or roofline. Start with medium grit to knock down splinters and finish with fine grit for a smooth painting surface. -
Clean the Surface:
Wipe away all sawdust with a damp rag or tack cloth to ensure your paint adheres properly. -
Paint the Structure:
Using the flat shader brush, apply a coat of white or cream paint to the main body of the birdhouse, carefully avoiding the roof shingles. Allow this to dry fully. -
Apply a Second Coat:
If the wood grain is still showing through too much, apply a second coat of the cream paint for opaque coverage. -
Paint a Weathered Roof:
Mix a light tan paint and apply it to the roof shingles. While the paint is still wet, I like to lightly streak in a tiny bit of darker brown to simulate aged wood grain. -
Distress the Edges:
Once the base coats are bone dry, use a piece of sandpaper to gently distress the edges of the walls and roof lines, revealing a hint of raw wood for a rustic look.
Uneven Vines?
If your vine lines look too thick or shaky, don’t restart. Thicken the leaves over the ‘mistake’ areas to hide the stem completely.
Step 2: Creating the Climbing Vines
-
Sketch the Vine Path:
With a pencil, lightly draw curving lines that meander up the sides of the gazebo. Start from the bottom edge and weave them upwards, letting some trails cross over the corners onto adjacent panels. -
Paint the Stems:
Load a size 2 round brush with dark brown or olive-brown paint. Trace over your pencil lines using a shaky, organic motion rather than a straight line to mimic natural vine growth. -
Add Vine Tendrils:
Using the smallest size 0 brush, paint tiny, hair-like offshoots curving off the main stems to act as gripping tendrils. -
Block in Leaf Shapes:
Switch to your medium green shade (hunter green). Using the size 4 brush, paint distinctive three-point ivy leaf shapes along the vines. Vary the spacing—some clustered together, some solitary. -
Add Roof Foliage:
Don’t stop at the eaves; paint a few vines creeping up onto the roof shingles to integrate the design. -
Highlight the Leaves:
Mix a lighter sage green or add a touch of white to your green paint. Use the size 0 brush to add fine veins inside the leaves and highlights on the upper edges where the sun would hit. -
Add Shadow Depth:
For extra realism, create a watery wash of dark brown or black paint. Apply a tiny, translucent shadow under select leaves to make them appear lifted off the surface.
Step 3: Finishing Touches
-
Inspect the Details:
Step back and look at the overall balance. If a spot looks too bare, add a small sprig of leaves or a curling vine. -
Seal the Project:
Since this birdhouse may live outdoors, apply two thin coats of outdoor matte varnish over the entire piece, allowing proper drying time between applications.
Pro Tip: Texture
Mix a pinch of baking soda into the roof paint before applying. This creates a grainy, weather-beaten texture that looks like real shingles.
Now you have a charming garden accent ready to welcome its first feathered visitors


Pastel Spring Fade With Soft Ombré Panels
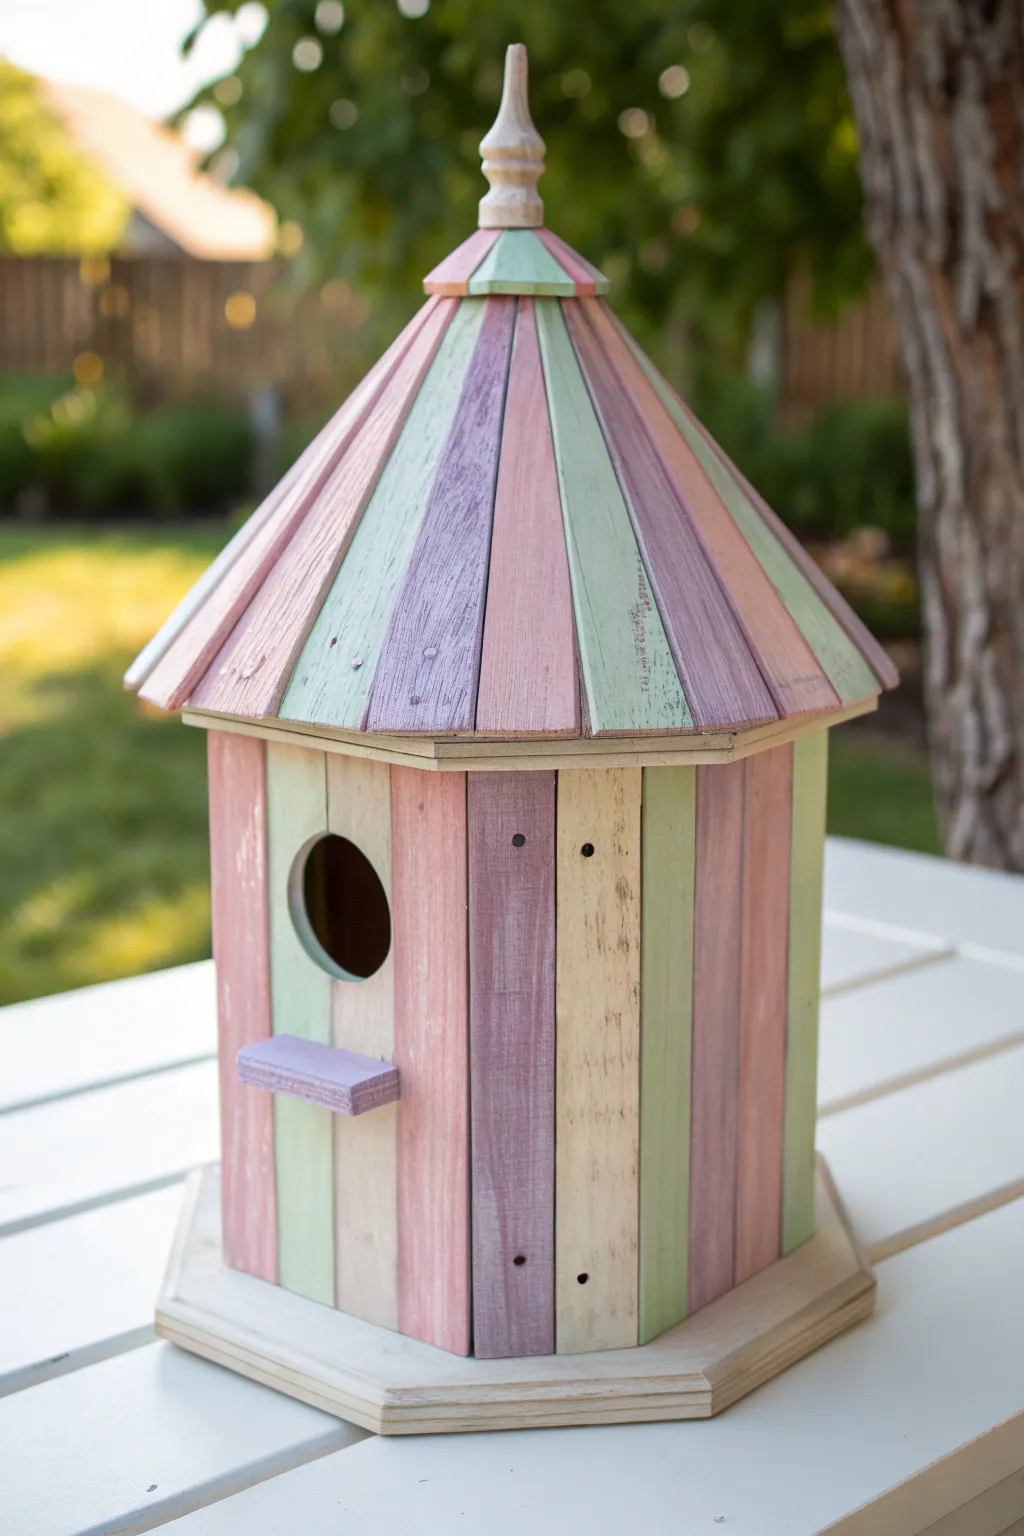
Bring the soft, whimsical colors of early spring to your garden with this charming hexagonal birdhouse featuring alternating pastel slats. The muted pinks, greens, and purples create a gentle, weathered look that feels instantly timeless and welcoming to feathered friends.
Step-by-Step Guide
Materials
- Unfinished hexagon wooden birdhouse with slat roof
- Acrylic craft paints (pastel pink, sage green, lavender, cream)
- Medium flat synthetic brush
- Small angled detail brush
- Fine-grit sandpaper (220-grit)
- Clean cotton rag or paper towels
- Water cup for rinsing
- Painter’s tape (optional)
- Outdoor matte varnish or clear sealant
Step 1: Preparation & Base Tones
-
Sand the surface:
Begin by lightly sanding the entire unfinished wood birdhouse with 220-grit sandpaper. You want to smooth out any rough splinters on the roof slats and the vertical body panels to ensure the paint glides on evenly. -
Clean the dust:
Wipe down the entire structure with a slightly damp cloth or tack cloth to remove all sanding dust. Let the wood dry completely for about 10 minutes before applying any paint. -
Plan your pattern:
Observe the repeating pattern of your birdhouse slats. Deciding on a repeating sequence—like pink, green, cream, purple—before dipping your brush helps prevent mistakes. I like to mark the bottom of each slat lightly with a pencil code to stay organized.
Water it Down
If your acrylics are too thick and opaque, mix them with water (1 part water to 2 parts paint) before applying. This creates a semi-transparent stain that looks more natural on wood.
Step 2: Painting the Body Panels
-
Apply the first color:
Load your flat brush with the pastel pink paint. Carefully paint every fourth vertical slat on the main body of the birdhouse. Use long, smooth strokes from top to bottom. -
Create a wash effect:
Immediately after painting a slat, while the paint is still wet, gently wipe it back with a dry cotton rag. This pushes the pigment into the wood grain and creates that soft, stained look rather than a heavy, opaque coat. -
Add the green panels:
Rinse your brush thoroughly. Move to the next slat in your sequence using the sage green paint. Apply carefully right up to the edge of the previous color, using the slat’s natural groove as your guide. -
Continue the sequence:
Repeat the painting and wiping process for the lavender and cream panels. If you get a little overlap, simply wipe it away quickly with a damp edge of your rag. -
Paint the perch:
Don’t forget the small perch below the entrance hole. Paint this matching lavender (or your preferred accent color) to tie the design together.
Metallic Accent
For a magical twist, lightly dry-brush a sheer shimmering gold or copper over just the raised edges of the roof slats to catch the sunlight without overpowering the pastels.
Step 3: Roof & Detail Work
-
Align the roof colors:
For the most cohesive look, align the roof slat colors with the body panel colors directly beneath them. Start painting the roof slats using the small angled brush to get into the tight point at the top. -
Feather the edges:
As you paint the roof, use a very light touch near the center finial. You want the colors to meet cleanly without glooping up at the narrowest point. -
Paint the finial:
Leave the decorative finial at the very top natural wood or paint it a soft cream. This acts as a neutral capstone that balances the colorful stripes below. -
Detail the entrance:
Use your smallest brush to carefully paint the inside edge of the circular entry hole. Darkening this slightly or ensuring the color wraps inward gives the project a professional finish.
Step 4: Finishing Touches
-
Distress the edges:
Once all paint is dry to the touch (usually about 30 minutes for acrylics), take your sandpaper again. Gently scuff the edges of the slats and the corners of the hexagon base to reveal a bit of raw wood. -
Enhance the texture:
Focus your sanding vertically along the center of a few painted panels to mimic weathering. This adds to the rustic charm shown in the reference image. -
Seal for protection:
Since this will likely live outdoors, apply two thin coats of outdoor matte varnish. Ensure the first coat is fully dry before adding the second to protect your pastel pigments from UV fading. -
Dry completely:
Allow the birdhouse to cure for at least 24 hours in a dry, ventilated area before hanging it outside to ensure the sealant hardens fully.
Now you have a delightful garden centerpiece ready to welcome the first birds of the season
Crisp Stripes That Emphasize the Angles
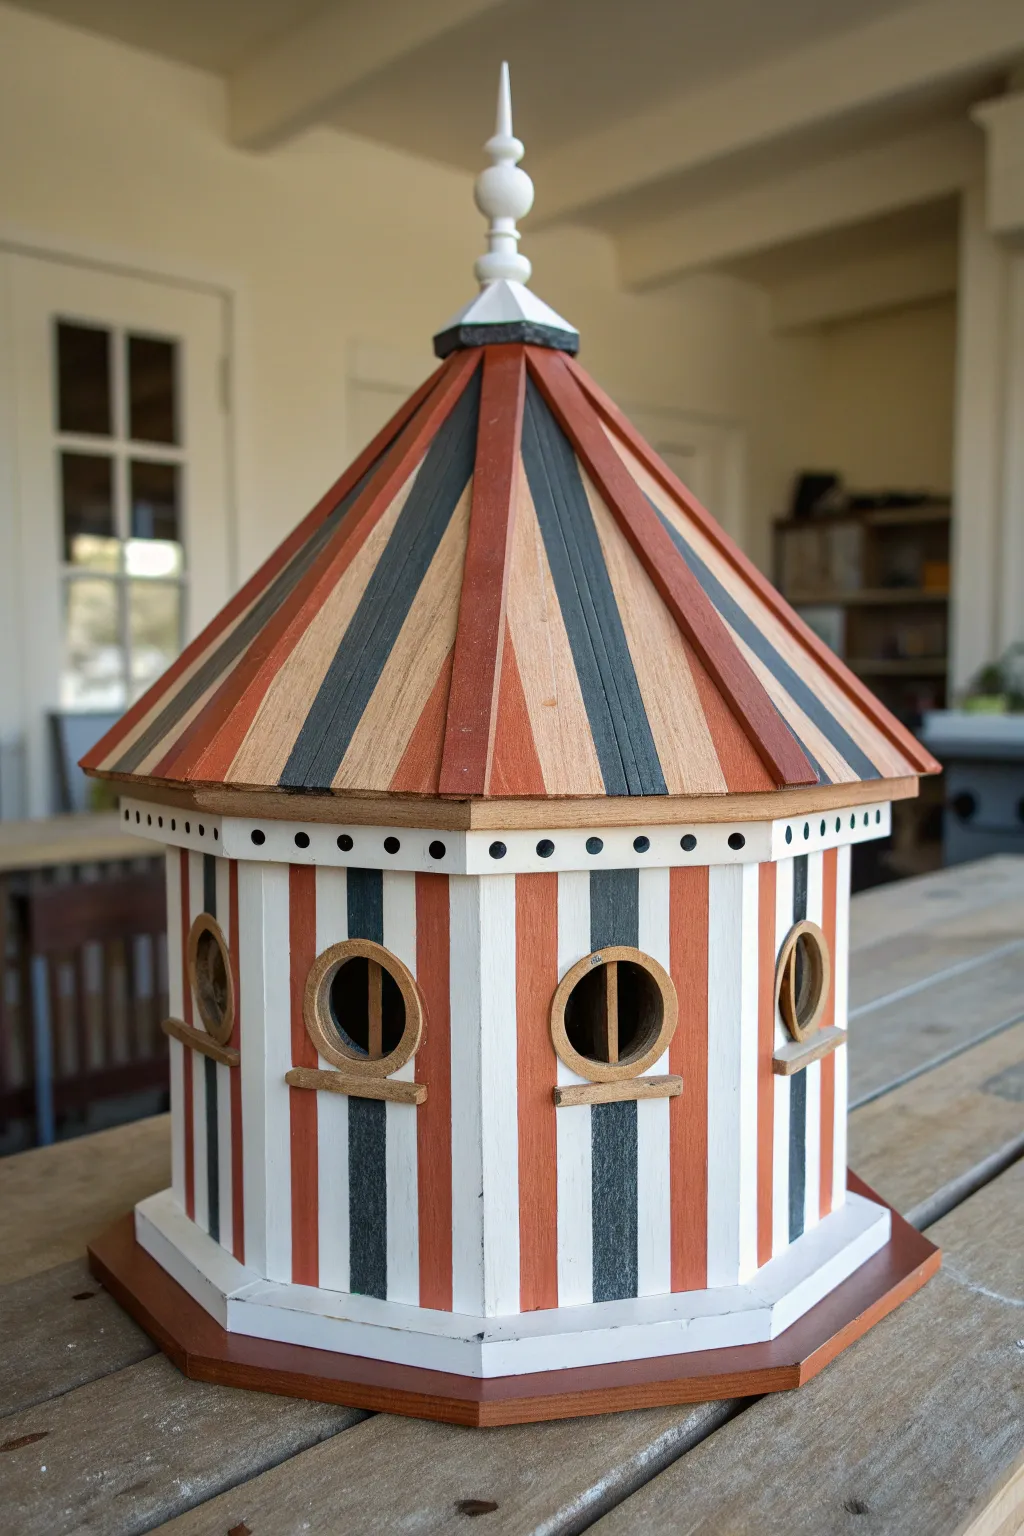
Transform a standard wooden birdhouse into a whimsical, vintage-style pavilion with these precise, high-contrast stripes. The clever use of alternating terra cotta, slate black, and white emphasizes the hexagonal geometry for a striking architectural effect.
Step-by-Step Tutorial
Materials
- Unfinished hexagonal wood birdhouse
- Sandpaper (120 and 220 grit)
- Painter’s tape (various widths, ideally 0.5-inch and 1-inch)
- Acrylic craft paints: Warm White, Slate Black (or Dark Charcoal), and Terra Cotta Red
- Flat shader brushes (medium and small)
- Fine detail linear brush
- Pencil
- Ruler or straight edge
- Clear outdoor sealer (spray or brush-on)
- Tack cloth
Step 1: Preparation and Base Coating
-
Sand the surface:
Begin by sanding the entire birdhouse. Start with 120-grit to smooth any rough mill marks on the wood, especially on the roof edges, then finish with 220-grit for a paint-ready surface. -
Clean dust:
Wipe the entire structure down thoroughly with a tack cloth to remove all sawdust, ensuring your paint adheres perfectly. -
Prime the main body:
Paint the entire exterior body of the birdhouse (excluding the roof) with your Warm White acrylic. This acts as both a primer and your base color. -
Apply second coat:
Once the first coat is dry to the touch, apply a second coat of the Warm White to ensure solid, opaque coverage without wood grain showing through. -
Paint the finial:
Carefully paint the decorative finial at the very top of the roof white as well. You may need a smaller brush to get into the curves.
Bleeding Lines?
If paint bleeds under the tape, accept it! Once dry, re-tape exactly over the line and paint over the mistake with the original base color to ‘erase’ it perfectly.
Step 2: Mapping the Stripes
-
Measure the roof panels:
The roof consists of alternating triangular panels. Use your ruler to find the center line of each triangular roof section. -
Mark vertical wall stripes:
On the white body, lightly pencil vertical lines. You want to align your stripes with the roof angles above. Aim for a pattern that alternates wide and narrow stripes if your birdhouse features windows. -
Tape the roof:
Apply painter’s tape to mask off sections of the roof. Tape off every other triangular section first so you can paint them cleanly without bleeding into neighbors. -
Tape the body:
Tape vertical stripes on the body walls. Press the edges of the tape down firmly with your thumbnail or a credit card to prevent paint seepage.
Step 3: Painting the Colors
-
Paint Terra Cotta sections:
Paint the specific roof triangles and corresponding wall stripes with the Terra Cotta Red. Apply thin, even layers. -
Paint Slate Black sections:
Paint the alternating roof triangles and wall stripes with Slate Black. Be careful near the finial base. -
Remove tape and dry:
While the paint is still slightly wet, carefully peel back the tape at a 45-degree angle. Let these sections dry completely before taping the remaining empty spots. -
Tape and paint remaining sections:
Once dry, re-tape to protect your fresh paint, and fill in the remaining alternating stripes on the roof and body. Leave the ‘white’ stripes unpainted since the base coat serves that color. -
Detail the eaves:
Paint the flat horizontal trim directly under the roof overhang with a warm, natural wood tone or a light beige to separate the roof from the body.
Age It Up
For a rustic look, lightly sand the edges of the roof and the raised window trims after the paint dries to reveal raw wood, then apply an antique glazing medium.
Step 4: Detaling and Finishing
-
Add black dots:
Using the back end of a small paintbrush dipped in Slate Black, stamp perfectly round rivets/dots along the white trim piece just under the roofline. -
Paint window trims:
Using a small brush and a steady hand, paint the circular window frames and the small ledges beneath them in a natural wood tone or light brown. -
Accent the finial:
Paint the very base of the finial (where it meets the roof) in black to create a sharp visual cap. -
Touch up:
Inspect your lines. If any paint bled, use a small linear brush and the base white paint to tidy up the edges. -
Seal:
Once fully cured (wait at least 24 hours), apply two coats of clear outdoor sealer to protect the wood from moisture and UV fading.
Now you have a stunning, circus-style centerpiece for your garden that looks professionally tailored.
Polka Dots With Contrasting Roof Trim
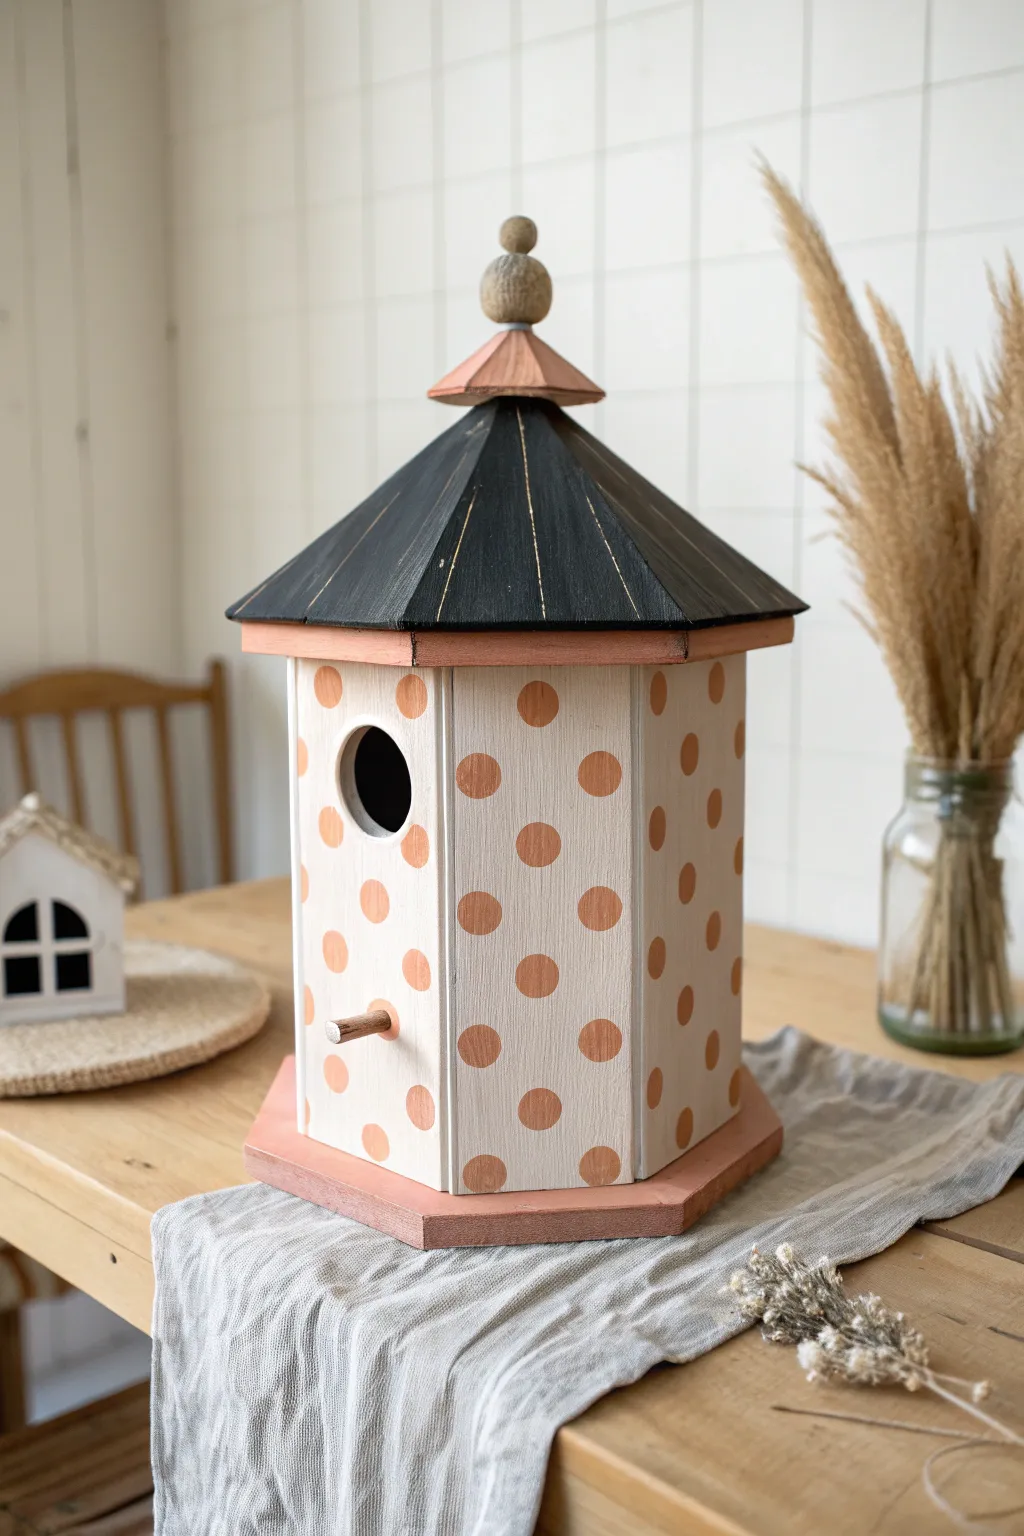
Transform a plain wooden birdhouse into a charming garden focal point with this sweet polka dot and contrasting trim design. The combination of a moody black roof, soft cream walls, and playful terracotta dots creates a modern cottage aesthetic perfect for any shelf or patio.
Step-by-Step Guide
Materials
- Unfinished wooden gazebo-style birdhouse (hexagonal)
- Sandpaper (150 and 220 grit)
- Tack cloth or dry rag
- Painter’s tape (narrow width is best)
- Acrylic craft paint: Soft Cream / Off-White
- Acrylic craft paint: Terracotta / Muted Coral
- Acrylic craft paint: Matte Black or Charcoal
- Flat paintbrushes (1-inch and small angle brush)
- Round foam pouncer (approx. 3/4 inch diameter)
- Small round detail brush
- Clear matte or satin sealant spray
Step 1: Preparation and Base Coat
-
Sand the surface:
Begin by smoothing out any rough patches on your wooden birdhouse using 150-grit sandpaper, paying special attention to the roof edges and the entrance hole. -
Refine the finish:
Follow up with 220-grit sandpaper for a silky smooth feel, then wipe away all the sawdust thoroughly with a tack cloth or clean rag so your paint adheres perfectly. -
Paint the walls:
load a wide flat brush with your Soft Cream paint and cover the hexagonal body of the birdhouse. Apply smooth, even vertical strokes. -
Apply a second coat:
Once the first layer is dry to the touch, apply a second coat of cream to ensure the wood grain is fully concealed and the color is solid.
Step 2: Painting the Roof and Trim
-
Mask the roofline:
Use painter’s tape to carefuly mask off the top of the cream walls right where they meet the roof overhang. This ensures a crisp line. -
Paint the roof:
Using the Matte Black paint, coat the entire main roof section. Don’t worry about perfect coverage yet; a slightly rustic look actually adds character here. -
Paint the finial base:
Paint the small cone-shaped piece at the very top of the roof (the base of the finial) in the Terracotta color. -
Paint the finial ball:
Carefully paint the round ball finial at the very peak. I like to leave this natural or use a very diluted grey wash to make it look like weathered stone, contrasting with the black roof. -
Paint the base trim:
Paint the hexagonal base platform in the Terracotta shade. Use an angled brush to get cleanly into the corners where the floor meets the walls. -
Paint the roof trim:
Using a steady hand or more tape, paint the vertical edge of the roof overhang in Terracotta to match the base. This sandwiching of color ties the whole piece together.
Bleeding Tape Lines?
If paint bleeds under your tape, wait for it to dry completely. Then, use a small angled brush and the base cream color to ‘erase’ the bleed for a sharp line.
Step 3: Adding the Polka Dots
-
Prepare the pouncer:
Pour a small amount of Terracotta paint onto a flat palette or paper plate. Dip your round foam pouncer in, then dab it on a scrap paper to remove excess paint and prevent globs. -
Start the pattern:
Press the pouncer gently onto the center of one wall panel to create your first dot. Maintain consistent pressure to get a clean circle. -
Fill the pattern:
work your way around the birdhouse, placing dots in a staggered pattern (like the five side of a die). Aim for roughly three vertical rows per panel. -
Handle edges:
For dots that land on the corner seams of the hexagon, simply stamp right over the edge. It creates a seamless wallpaper effect. -
Touch up dots:
If any circles look uneven or faint, use a small detail brush with a tiny bit of paint to carefully fill them in or round out the edges.
Make It Functional
If this will live outside, skip the finial painting and coat the entire roof with an exterior-grade sparing varnish to waterproof it against rain.
Step 4: Distressing and Finishing
-
Distress the roof:
Once the black roof is bone dry, take your sandpaper and very lightly scuff the raised ridges and edges. This reveals a bit of the light wood underneath for a vintage feel. -
Paint the perch:
If your birdhouse has a peg perch, paint it Terracotta or leave it natural wood, depending on your preference. -
Seal the project:
Ideally outdoors or in a ventilated area, spray the entire birdhouse with a clear matte sealant. This protects your hard work from moisture and dust.
Now you have a delightful architectural accent ready to brighten a corner of your home
Painted Flower Boxes on the Window Panels
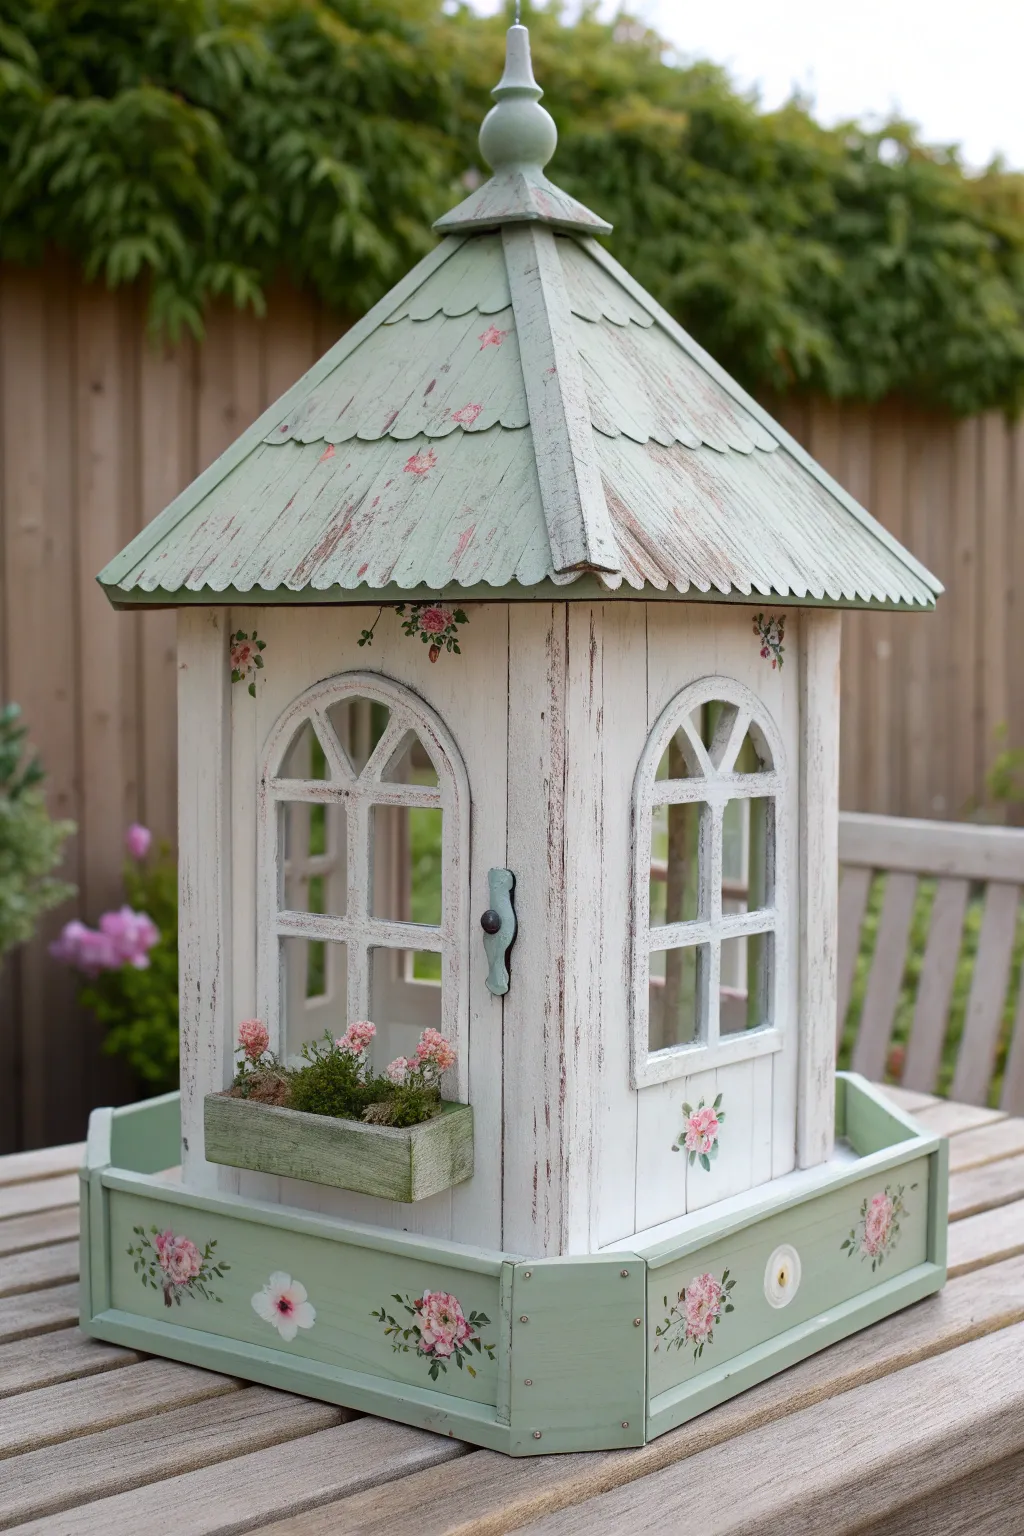
Transform a plain wooden birdhouse into a charming, distressed garden centerpiece with soft green accents and delicate floral motifs. This project combines faux-aging techniques with miniature gardening to create a whimsical avian retreat that looks like it’s been weathering gracefully for years.
Step-by-Step Tutorial
Materials
- Unfinished wooden gazebo birdhouse (hexagonal or octagonal base)
- White chalk paint or flat acrylic paint
- Sage green acrylic paint
- Dark grey or brown acrylic paint (for distressing)
- Sandpaper (120 and 220 grit)
- Small floral decoupage paper or floral napkins
- Decoupage glue (Mod Podge)
- Small paintbrushes (flat and detail)
- Miniature plastic window box or small wood scrap
- Miniature faux flowers and dried moss
- Hot glue gun and glue sticks
- Antique wax or dark glazing medium (optional)
- Matte spray sealer
Step 1: Base Painting & Distressing
-
Prep the surface:
Begin by lightly sanding the entire birdhouse to remove any rough splinters. Wipe away the dust with a damp cloth or tack cloth to ensure a clean painting surface. -
Apply the base coat:
Paint the main body of the gazebo (the walls) with a coat of white chalk paint. Don’t worry about perfect coverage; a slightly streaky look adds to the vintage appeal. -
Paint the roof and base:
Using the sage green paint, carefully coat the roof shingles, the finial on top, and the bottom tray/base of the birdhouse. You might need two coats here for richer color. -
Distress the walls:
Once the white paint is fully dry, stick a piece of coarse sandpaper to a block and rub the flat surfaces and corners of the walls. Expose the wood grain underneath, focusing on the vertical lines to mimic weathered siding. -
Weather the roof:
Take a dry brush with a tiny amount of white or grey paint and lightly drag it down the green roof panels. This simulates sun-bleached shingles and oxidation. -
Add deep weathering details:
Use a very fine brush and watery dark grey paint to create faux cracks or emphasize the grooves between the vertical wood planks on the walls.
Step 2: Floral Details & Assembly
-
Paint the flower box:
Paint your miniature window box component in the same sage green as the roof. Once dry, distress the edges slightly with sandpaper. -
Prepare floral decals:
Ideally, cut out small individual flowers from decoupage paper or a decorative napkin. If using a napkin, peel away the bottom white layers so you are left with just the thin printed top sheet. -
Apply floral accents:
Using a small brush and decoupage glue, adhere the flower cutouts to the base tray, the area under the windows, and randomly near the roofline. Smooth them gently from the center outward to prevent wrinkles. -
Paint the window frames:
Carefully paint the arched window grilles white. I find a small angled shader brush works best to get into the corners without smudging the glass area. -
Install the door handle:
Paint a small wooden or metal embellishment in a contrasting teal or dark green color to serve as a door handle. Glue this to the center of one of the solid wall panels. -
Fill the flower box:
Fill the miniature window box with hot glue and press in a bed of dried moss. While the glue is still warm, tuck in tiny stems of pink miniature faux flowers. -
Attach the window box:
Secure the filled flower box underneath one of the window openings using strong wood glue or hot glue. Ensure it is level. -
Seal the project:
Spray the entire birdhouse with a matte UV-resistant sealer. This protects the decoupage and paint from moisture if you plan to keep it outdoors.
Wrinkled Decoupage?
If your paper bubbles up, lay a piece of plastic wrap over the wet image and smooth it out with your finger. The plastic prevents tearing the delicate wet paper.
Pro Tip: Instant Age
Mix a drop of dark brown paint into continuous water in a cup. Wash this ‘dirty water’ over the white walls and wipe off immediately for an instant antique patina.
Now you have a stunning, romantic focal point ready to bring old-world charm to your garden patio
Distressed Vintage Gazebo Finish
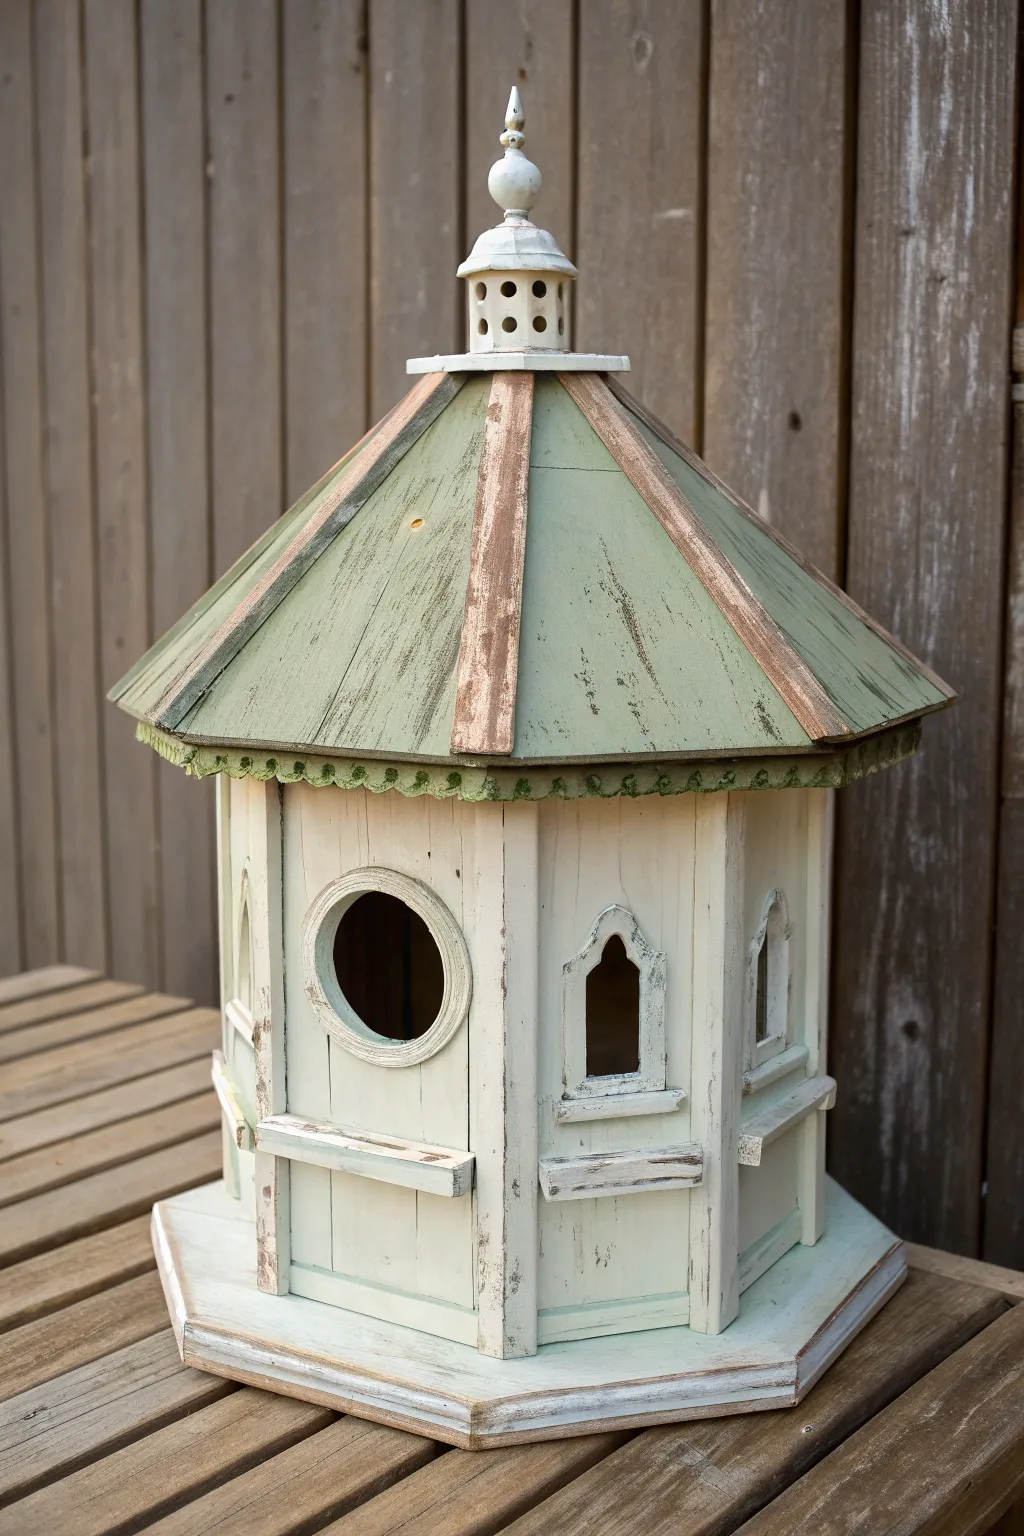
Transform a standard wooden birdhouse into a vintage garden treasure with this distressed finish tutorial. By layering paint and strategically sanding, you’ll achieve an authentic, time-worn look that mimics years of exposure to the elements.
How-To Guide
Materials
- Unfinished wooden gazebo birdhouse
- Sandpaper (150 and 220 grit)
- Cream or off-white chalk paint
- Muted sage green chalk paint
- Dark brown antiquing wax or glaze
- Clean lint-free rags
- Small flat brush (1-inch)
- Small detail brush
- Tac cloth or damp rag
- Clear matte sealer (spray or brush-on)
- Candle wax or petroleum jelly (optional)
Step 1: Preparation and Base Coat
-
Surface Prep:
Begin by lightly sanding the entire birdhouse with 150-grit sandpaper to remove any rough splinters or factory gloss. Wipe away all sawdust with a tac cloth or damp rag to ensure the paint adheres properly. -
Identify Wear Points:
Visualize where natural wear would occur—corners, roof ribs, window sills, and the base edges. Rub a small amount of candle wax or petroleum jelly on these specific high spots; this resist technique will make the distressing step much easier later. -
Painting the Body:
Using the 1-inch flat brush, apply a coat of cream chalk paint to the main hexagonal body of the birdhouse, including the window frames and base. Don’t worry about perfect coverage; a slightly streakier application adds to the aged effect. -
Painting the Details:
Switch to a smaller brush to get inside the arched windows and around the round entrance. I prefer to leave the deep interior unpainted or stained dark to create depth, but ensure the visible edges are coated in cream. -
Roof Base Coat:
Apply the sage green chalk paint to the roof sections. Paint with the grain of the wood, moving from the peak down to the eaves. Avoid painting the raised vertical ribs between the roof panels for now. -
Painting the Ribs:
Carefully paint the raised wooden ribs on the roof using a detail brush. You can either use the same cream as the body for contrast or sticking with the sage green depending on your preference; the reference piece uses a washed-out timber look here. -
Dry Time:
Let the entire birdhouse dry completely for at least 2-3 hours. Chalk paint dries quickly, but it needs to be fully set before we start the aggressive sanding phase.
Step 2: Distressing and Finishing
-
Heavy Distressing:
Take your 150-grit sandpaper and sand the areas where you applied the wax resist. The paint should flake off easily, revealing the raw wood underneath. Focus heavily on the roof ribs and the transition edge between the roof and the walls. -
General Wear:
Switch to 220-grit sandpaper and lightly scuff the flat panels of the roof and walls. You want to expose just a hint of wood grain through the paint, creating a sun-bleached appearance. -
Roof Texture:
Sand the sage green roof panels in vertical strokes. This emphasizes the direction of the wood grain and mimics water run-off marks that appear on old structures. -
Accentuate the Finial:
If your birdhouse has a decorative finial or cupola, distress the high points thoroughly. The intricate turnings collect dirt naturally, so we want the recesses to remain painted while the edges show raw wood. -
Applying Antiquing Wax:
Dip a clean rag into a very small amount of dark brown antiquing wax. Offload most of it onto a paper towel until the rag is almost dry to the touch. -
Grunging the Edges:
Lightly smudge the wax into the corners, under the eaves, and around the window sills. This creates the illusion of accumulated grime and shadows. Feather it out so there are no harsh lines. -
Roof Patina:
Run the dirty wax rag vertically down the green roof panels. This deepens the sage color and settles into the sanding scratches you made earlier, giving the roof a realistic, weathered texture. -
Final Cleanup:
Use a clean cloth to buff away any excess wax. If an area became too dark, use a bit of clear wax or a damp cloth to lift the color before it cures. -
Sealing:
Once you are happy with the level of distress, seal the entire birdhouse with a clear matte sealer. This is crucial if the birdhouse will be used outdoors, as it protects the raw wood areas from rotting.
Wax Resist Trick
If you don’t have candle wax, a clear lip balm works perfectly as a resist medium to stop paint from sticking to the wood edges.
Add a Copper Touch
For a luxe twist, rub a tiny amount of metallic copper gilding wax onto the finial tip or the roof ribs to mimic old flashing.
Place your new vintage-style birdhouse in the garden and watch it blend perfectly with nature
Watercolor-Style Wash on the Gazebo Walls
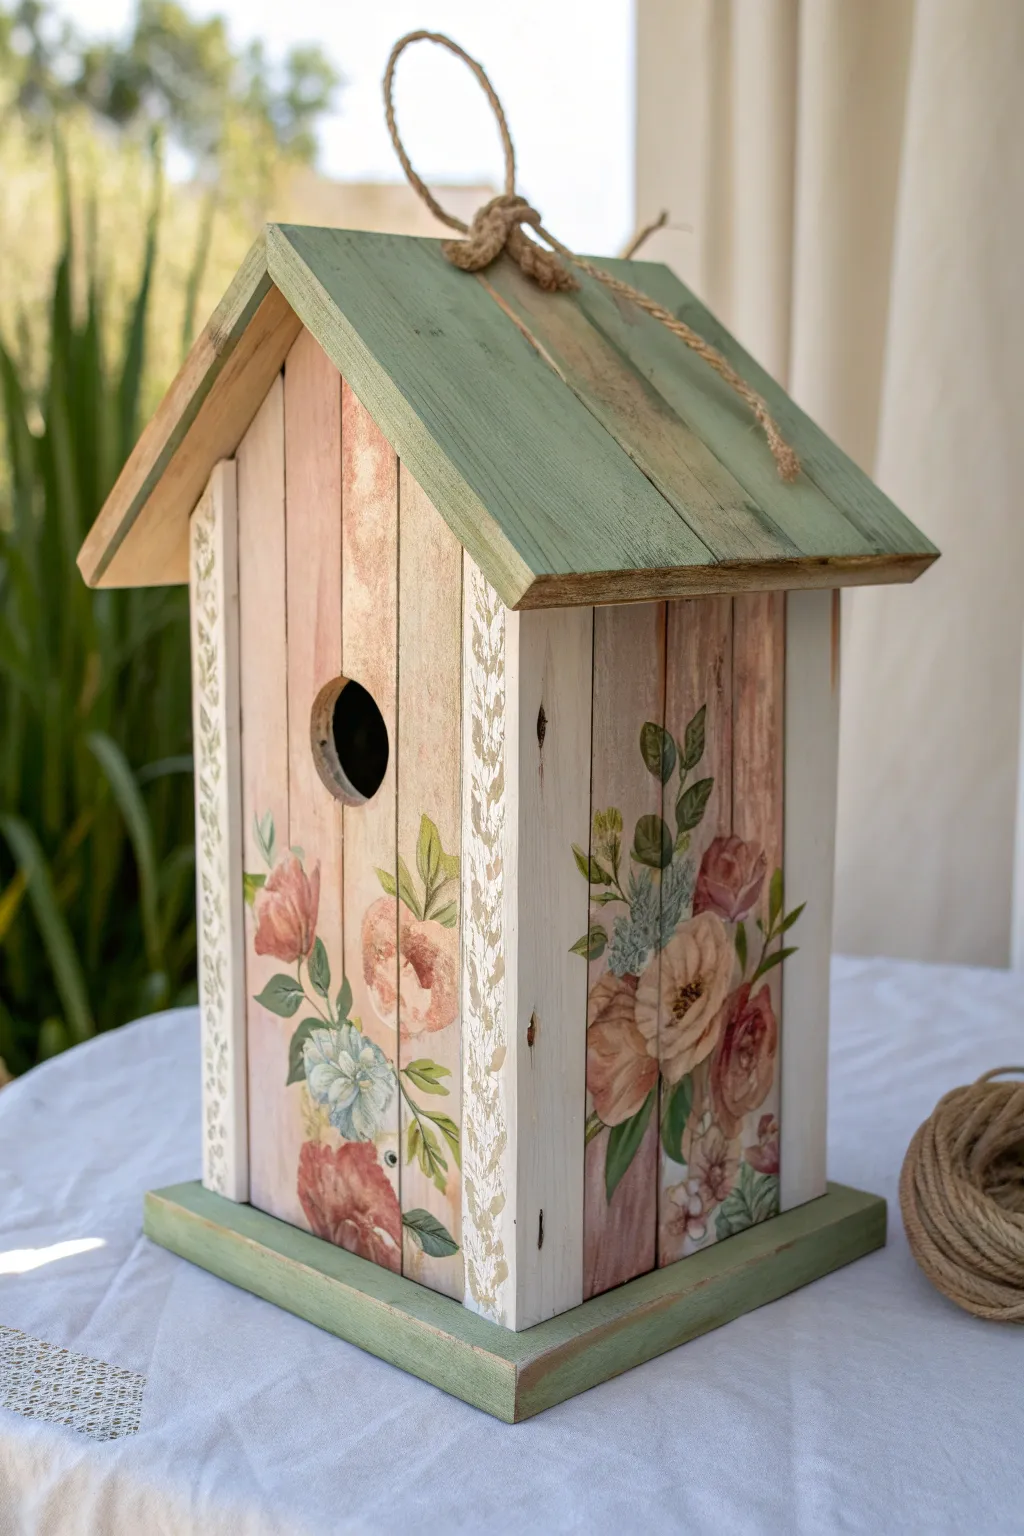
Transform a simple wooden birdhouse into a garden centerpiece with a soft, romantic aesthetic. Using a combination of whitewashing and delicate floral transfers or painting, you’ll achieve a vintage, weathered look that mimics hand-painted watercolor art.
Detailed Instructions
Materials
- Unfinished wooden birdhouse with vertical slats (gazebo style)
- White chalk paint or acrylic paint
- Sage or mint green acrylic paint (for roof/base)
- Water-soluble decal paper or floral rub-on transfers
- Medium-grit sandpaper (120-150 grit)
- Fine-grit sandpaper (220 grit)
- Matte finish decorative varnish or Mod Podge
- Flat paintbrush (1-inch width)
- Small round detail brush
- Water container and paper towels
- Jute twine for hanging
Step 1: Preparing the Base
-
Sand the Wood:
Begin by lightly sanding the entire birdhouse with medium-grit sandpaper to remove any rough splinters or factory imperfections. Wipe away the dust with a damp cloth or tack cloth. -
Mix the Whitewash:
Create a watery whitewash by mixing white acrylic paint with water in a 1:1 ratio. You want the consistency of heavy cream or milk, not thick paint. -
Apply the Base Coat:
Brush the whitewash mixture onto the vertical walls of the birdhouse. Work in the direction of the wood grain, allowing some of the natural wood tone to peek through for a rustic effect. -
Highlight the Corners:
Paint the solid corner beams and the decorative trim strips in a solid, opaque white. This frames the ‘slat’ sections and adds dimension to the structure. -
Distress the Trim:
Once the corner trim is dry, lightly sand the edges with fine-grit sandpaper to reveal just a hint of wood underneath, enhancing the shabby-chic vibe.
Decoupage Secret
If using paper napkins for the florals, separate the plies until you have only the single printed layer. It will melt seamlessly into the wood texture.
Step 2: Adding the Color Accents
-
Paint the Roof:
Apply your sage green paint to the roof slats. Depending on the coverage of your paint, you may need a second coat, but keeping it slightly translucent maintains the weathered charm. -
Paint the Base:
Apply the same sage green color to the bottom platform of the birdhouse to create visual balance with the roof. -
Dry Brushing:
I like to take an almost dry brush with a tiny amount of brown or tan paint and whisk it very lightly over the green roof slats to simulate dirt and age.
Fixing Peeling Edges
If decal edges lift after drying, dab a tiny amount of white glue under the lifted area with a toothpick and press down firmly for 30 seconds.
Step 3: Applying the Floral Designs
-
Choose Your Method:
Decide between hand-painting or using transfers. For the look in the image, water-slide decals or rub-on transfers featuring roses and greenery are easiest and most consistent. -
Cut and Arrange:
Cut out your floral designs, visualizing how they will climb up the sides of the house. Don’t cover every inch; negative space is crucial for the watercolor look. -
Apply Main Florals:
Apply the larger rose clusters near the bottom corners or wrapping around the side. If using decals, soak them briefly, slide them off the backing, and smooth them gently onto the wood slats. -
Add Decorative Vines:
Paint or apply a vertical vine pattern along the white corner trim. If painting, use a fine liner brush and sage green paint to create simple repeating leaf shapes. -
Blend the Edges:
If using decals, take a barely damp brush with a tiny bit of the whitewash mixture and feather the edges of the plastic film so they disappear into the wood grain. -
Create Depth:
Use a small brush to add tiny dots of darker green or brown near the base of the leaves to ground the design and make it look less like a sticker. -
Detail the Entrance:
Use a darker brown paint inside the birdhouse hole and lightly around the rim to give the entrance definition and shadow.
Step 4: Finishing Touches
-
Seal the Project:
Once all paint and decals are fully dry, apply a coat of matte decorative varnish or outdoor Mod Podge over the entire house. This seals the wood and protects the artwork from moisture. -
Add the Hanger:
Thread a length of thick jute twine through the loop or hook at the top of the roof. Secure it with a sturdy knot. -
Decorative Knot:
For extra flair, tie a second piece of twine around the base of the hanging loop into a purely decorative bow or knot.
Now you have a stunning garden accessory that looks like a piece of art.
Decoupage Panels With Painted Trim Frame
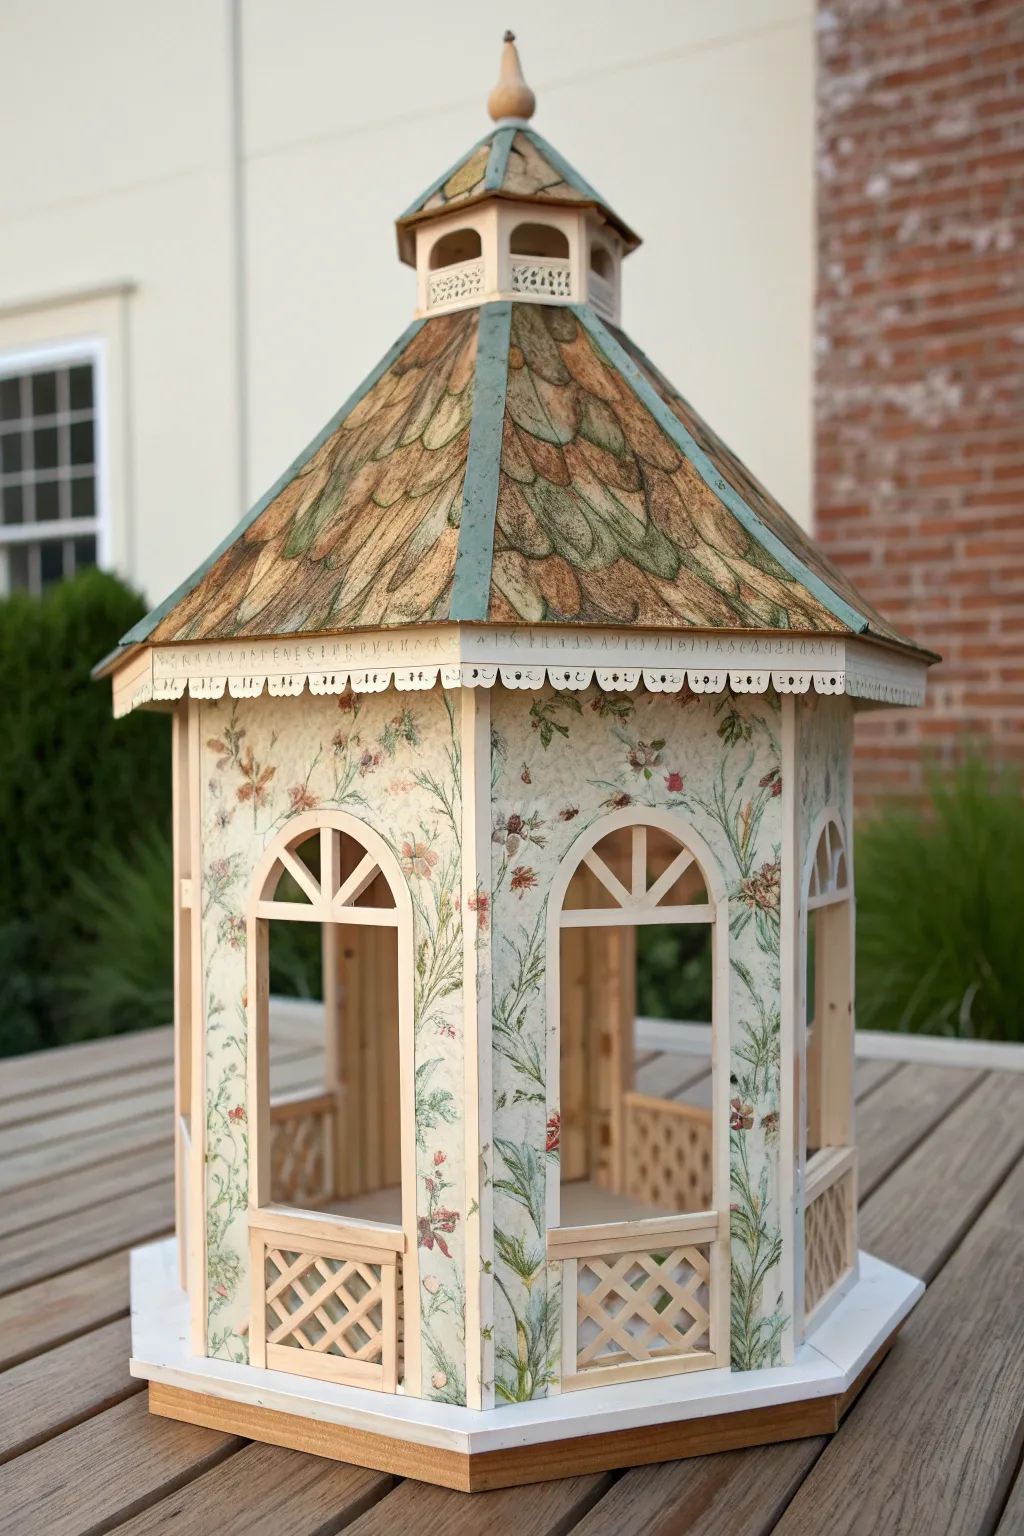
Transform a plain wooden birdhouse into a vintage-inspired garden centerpiece using floral paper and clever painting techniques. This project combines delicate botanical patterns with a faux-finish roof for a whimsical, aged aesthetic.
How-To Guide
Materials
- Unfinished wooden gazebo birdhouse (hexagonal)
- Botanical print wrapping paper or decoupage tissue
- Mod Podge (Matte or Outdoor formula)
- Acrylic craft paints: Cream, Sage Green, burnt umber, tan, metallic gold
- Flat paintbrushes (various sizes)
- Fine detail brush
- Craft knife or scalpel
- Sandpaper (220 grit)
- Ruler and pencil
- Clear outdoor sealer spray (matte finish)
Step 1: Preparation and Base Coat
-
Prep the surface:
Begin by lightly sanding the entire wooden birdhouse with 220-grit sandpaper to remove any rough splinters or factory imperfections. Wipe away the dust with a barely damp cloth. -
Prime the structure:
Paint the entire birdhouse, including the roof and inside the open arches, with a base coat of cream acrylic paint. This ensures the wood grain won’t show through your paper later. -
Paint the latticework:
Using a smaller flat brush, carefully paint the latticework railings and the vertical support beams a clean, solid cream color. Two thin coats are better than one thick coat here to avoid globs in the lattice holes.
Clean Cuts Every Time
Change your craft knife blade frequently when trimming wet decoupage paper. A dull blade will tear the damp fibers rather than slicing them cleanly.
Step 2: Decoupling the Walls
-
Measure the panels:
Measure the dimensions of the flat wall sections between the arched windows. Don’t worry about the arch shape yet; just measure the full rectangular area. -
Cut the paper:
Cut rectangles of your botanical paper slightly larger than your measurements. I find it helpful to hold the paper up to the birdhouse to visualize exactly where large floral elements will land. -
Apply the first panel:
Apply a thin, even layer of Mod Podge to one wall section. Press the paper rectangle onto the wood, smoothing it from the center outward to eliminate air bubbles. -
Trim the arches:
Once the paper is semi-dry but not fully hard, use a sharp craft knife to carefully trace the inside of the window arch and the bottom lattice line, removing the excess paper. -
Repeat the process:
Continue this process for all six sides of the gazebo, ensuring your pattern alignment looks pleasing as you move around the structure.
Antique Glaze Effect
Mix a tiny drop of brown paint into your final sealer or Mod Podge layer. This instantly ages the bright paper, giving it a tea-stained, vintage look.
Step 3: Creating the Faux-Shingle Roof
-
Sketch the shingles:
On the roof panels, use a pencil to lightly sketch overlapping scale or feather shapes to mimic slate or wooden shingles. -
Base color the scales:
Paint inside your sketched scales using a mix of tan, sage green, and burnt umber. Vary the shades slightly for each scale to create depth and a natural, weathered look. -
Add definition:
Use a fine detail brush and watered-down brown paint to outline the scales. Feather the paint slightly with a dry brush to soften the edges so they don’t look too cartoonish. -
Paint the roof ridges:
Paint the wooden ridges where the roof angles meet in a solid sage green or teal color to simulate oxidized copper flashing. -
Detail the cupola:
If your birdhouse has a top cupola, paint the roof to match the main roof shingles and accent the tiny vents with cream paint.
Step 4: Finishing Details
-
Decorative trim:
Use a very fine brush or a paint pen to add small decorative ‘drill holes’ or dots along the scalloped edge of the roofline for a lace-like effect. -
Seal the paper:
Apply a top coat of Mod Podge over all the decoupage paper panels to protect them. Let this dry completely clear. -
Weatherproofing:
Finally, spray the entire birdhouse with two coats of clear outdoor sealer. This is crucial if you plan to keep the birdhouse outside.
Now you have a charming, custom-designed gazebo that looks right at home in a fairytale garden
Night Sky Gazebo With Starry Roof
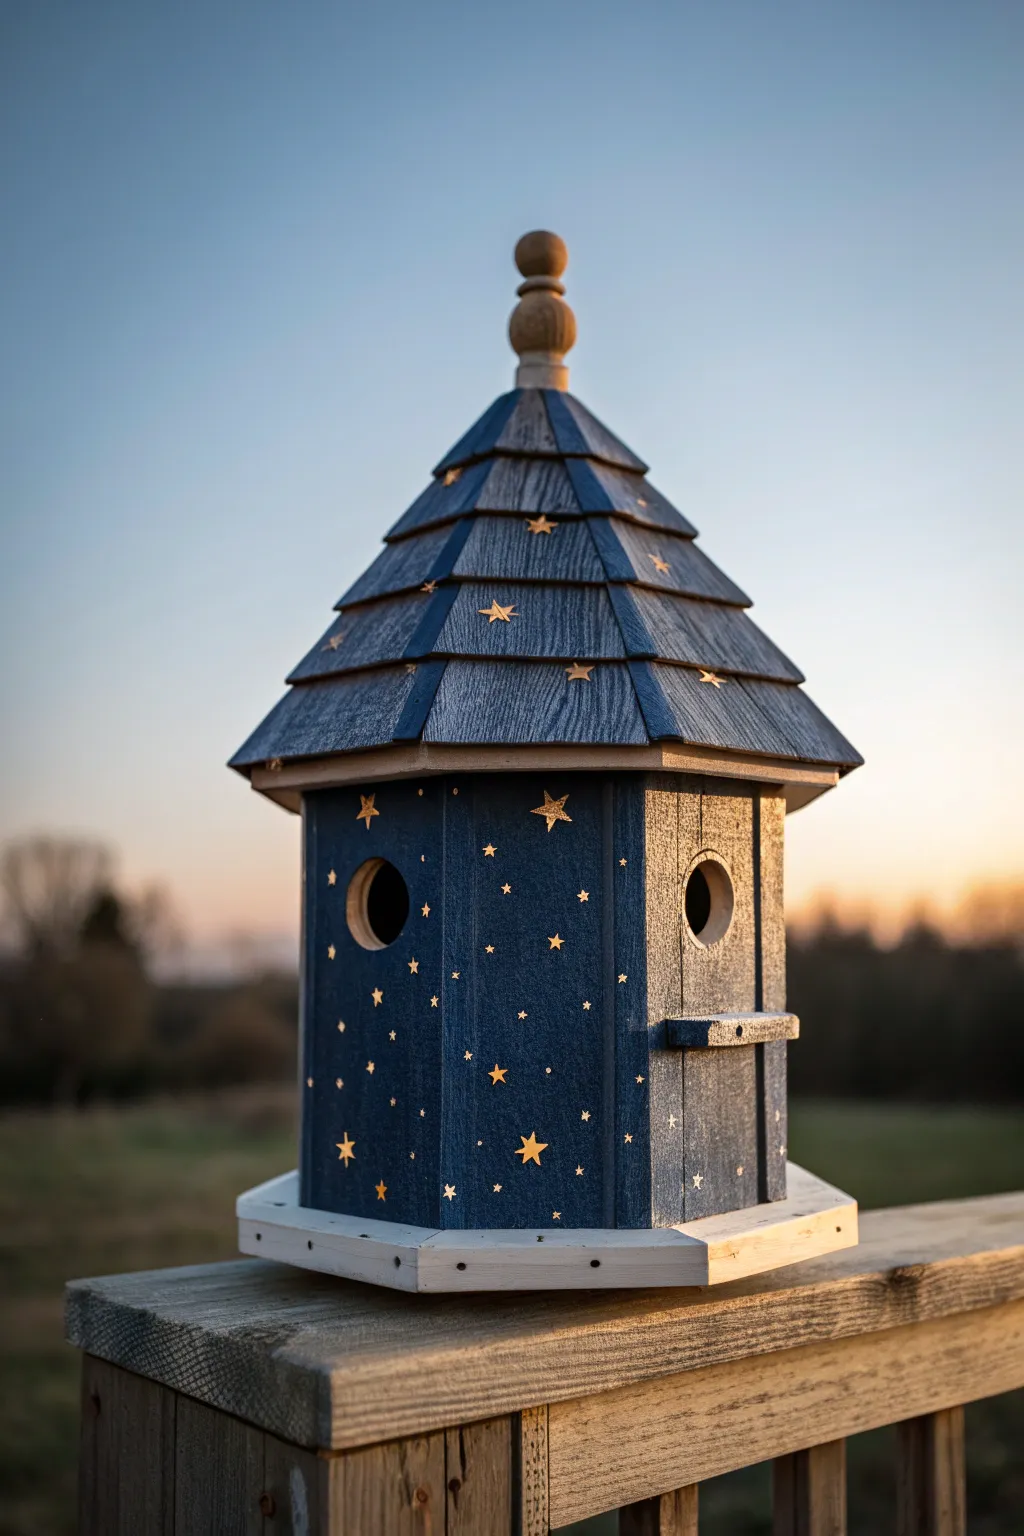
Transform a plain wooden birdhouse into a magical midnight sanctuary with this deep blue and gold star design. The multi-tiered roof and scattered constellations create a whimsical look that mimics a clear night sky.
Step-by-Step Tutorial
Materials
- Unfinished wooden gazebo birdhouse
- Sandpaper (medium and fine grit)
- Deep navy blue outdoor acrylic paint
- Metallic gold craft paint
- Exterior-grade wood primer (white or grey)
- Wide flat paintbrush
- Small angled shader brush
- Fine detail liner brush
- Star stencils (optional)
- Drill with small bit (optional for vent holes)
- Outdoor weather-resistant varnish (matte or satin)
- Painter’s tape
- Wood glue (for repairs if needed)
Step 1: 1. Preparation and Priming
-
Sand the surface:
Begin by smoothing the entire birdhouse with medium-grit sandpaper to remove any rough splinters, paying special attention to the roof edges and the entrance hole. -
Clean the dust:
Wipe the wood down thoroughly with a tack cloth or a slightly damp rag to ensure no sawdust remains, as this will ruin your paint finish. -
Prime the wood:
Apply a coat of exterior-grade primer over the entire house. This seals the wood and ensures your dark blue paint will look rich and opaque. -
Let it cure:
Allow the primer to dry completely according to the manufacturer’s instructions before moving on to the color coats.
Bleeding Stars?
If your gold stars look messy or blobby, your paint is likely too thin. Use undiluted metallic acrylics and a very dry brush so the shape holds sharp edges.
Step 2: 2. Painting the Midnight Base
-
Paint the walls:
Using a wide flat brush, apply your deep navy blue paint to the vertical walls of the gazebo. Use long, vertical strokes to mimic the grain of the wood. -
Tackle the roof:
Paint the roof tiers with the same navy blue. For the edges of the shingles, turn your brush sideways or use a smaller brush to get into the crevices. -
Add a second coat:
Once dry, apply a second coat of navy blue to deepen the color and ensure full coverage without streaks. -
Highlight the finial:
Paint the decorative finial on top. You can keep it natural wood for contrast, or paint it a lighter shade of blue or gold. -
Paint the base:
Paint the hexagonal base platform white or a very pale grey to ground the design and create a crisp contrast against the dark house.
Dry-Brush Effect
For a rustic, weathered look on the roof shingles, lightly dry-brush a pale grey or slate blue over the navy base before adding the gold stars.
Step 3: 3. Creating the Constellations
-
Plan your stars:
Visualize where you want your larger stars to go. I find it helpful to place the biggest stars first to anchor the composition. -
Paint large hero stars:
Using the metallic gold paint and a small detail brush (or a stencil), paint a few prominent five-pointed stars on the main wall panels and the roof. -
Add medium stars:
Scatter medium-sized stars around the larger ones. Don’t worry about perfect symmetry; a random pattern looks more like a natural sky. -
Fill with micro-stars:
Use the tip of your finest liner brush to dot tiny specks of gold paint in the empty spaces. These represent distant stars and add depth. -
Highlight the perch:
Lightly dry-brush a small amount of gold or lighter blue onto the perch to make it stand out for the birds.
Step 4: 4. Weatherproofing and Finishing
-
Protect the base:
Ensure the white base is fully coated and touches up any navy drips that might have fallen during the painting process. -
Seal the artwork:
Apply two coats of outdoor weather-resistant varnish over the entire birdhouse. This protects your hard work from rain and UV fading. -
Check drainage:
Inspect the bottom of the birdhouse to ensure drainage holes haven’t been clogged by paint or varnish; clear them with a drill bit if necessary. -
Final cure:
Let the birdhouse cure in a dry, ventilated area for at least 24-48 hours before placing it outside.
Now your garden has a stunning focal point that brings the beauty of the night sky into the daylight
Koi Pond Wraparound Scene on the Panels
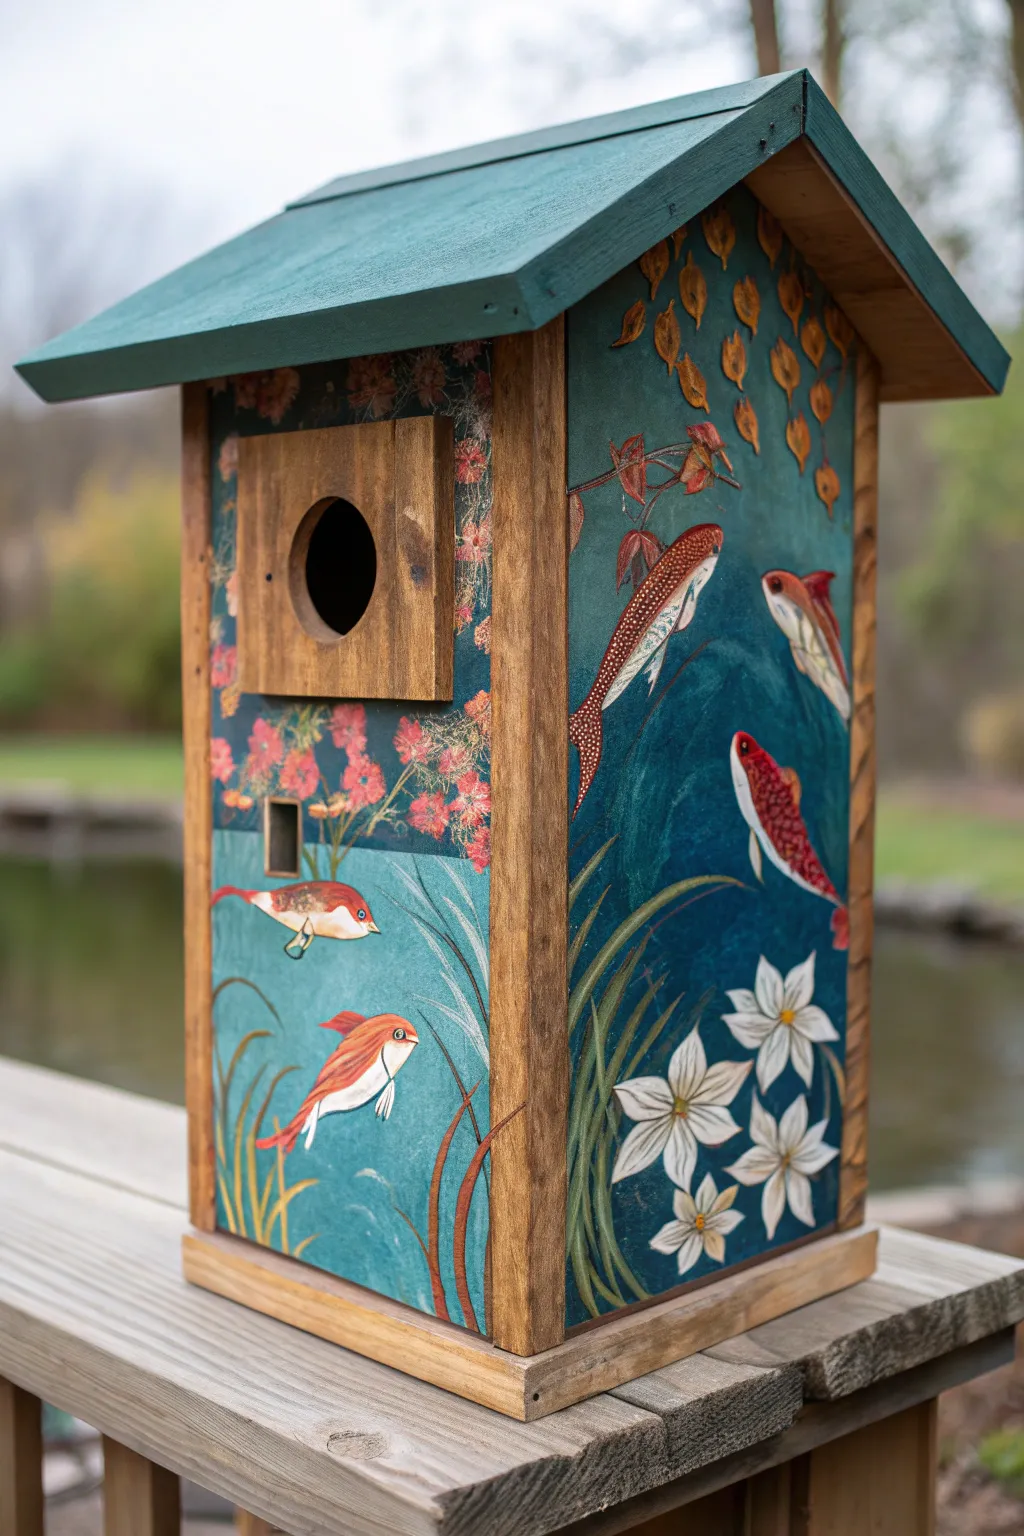
Transform a plain wooden birdhouse into a serene aquatic escape with this wraparound painting project. Featuring vibrant swimming fish, delicate white blooms, and cascading pink florals, this design utilizes gradient backgrounds to create depth and movement.
Detailed Instructions
Materials
- Unfinished wooden birdhouse
- Sandpaper (220-grit)
- Acrylic paints (teal, deep blue, white, crimson red, orange, brown, metallic gold)
- Medium flat brush
- Small round detail brush
- Fine liner brush
- Outdoor matte varnish or polyurethane
- Pencil
- Palette for mixing
- Clean cloth
Step 1: Preparation and Background
-
Prep surfaces:
Begin by lightly sanding the entire birdhouse, paying special attention to the edges and the roof, to remove any splinters. If the wood has a rough grain, sanding it smooth will make painting fine details much easier. -
Wipe down:
Use a tack cloth or a slightly damp rag to remove all sawdust. A clean surface ensures your paint adheres properly and doesn’t clump. -
Paint the roof:
Mix a teal shade by combining your blue, green, and a touch of white. Apply two even coats to the roof panels, letting each coat dry completely. I like to paint the underside of the roof overhang as well for a finished look. -
Create the heavy stains:
To retain the rustic charm, leave the vertical corner trims and the base unpainted. Instead, apply a watered-down brown paint or a wood stain to these areas to frame the artwork. -
Basecoat the panels:
On the main body panels, apply a gradient background. Start with a deep blue at the top and blend it down into a lighter teal/aqua towards the bottom. Use a damp flat brush to smooth the transition between colors while the paint is still wet.
Step 2: Sketching and Blocking
-
Sketch the layout:
Once the background is fully dry, lightly sketch your composition with a pencil. Plan for fish swimming upwards on the side panels and smaller fish near the bottom on the front. Add outlines for the white flowers at the bottom right and hanging branches at the top. -
Block in the fish:
Using a mixture of orange and white, paint the base silhouette of the fish. Don’t worry about scales yet; just get the solid shapes of the bodies and fins opaque. -
Block in foliage:
Paint the long, grass-like leaves rising from the bottom using a mix of green and brown. Make your brushstrokes long and sweeping to mimic the movement of underwater plants.
Smooth Blends
To get a seamless ombre water effect, keep a misting bottle handy. A light spritz keeps acrylics wet longer, allowing colors to meld without hard lines.
Step 3: Adding Details
-
Detail the fish:
Mix a crimson red. Using your small round brush, add the scales to the fish bodies. Small, overlapping ‘U’ shapes work best. Add definition to the fins with thin red lines. -
Fish highlights:
Add white accents to the bellies of the fish and small black dots for eyes. A tiny dot of white in the eye brings life to the character. -
Paint the white flowers:
On the side panel, paint the star-shaped flowers with pure white paint. You may need two coats to make them pop against the dark blue background. Add shading to the petal centers with a very light grey. -
Add the upper branches:
Using a thin liner brush and brown paint, create delicate branches hanging from the top edge. Dapple them with pink and red spots to represent small blossoms or berries. -
Falling leaves:
Paint small teardrop shapes in gold or brownish-orange near the top right corner, simulating falling autumn leaves drifting into the water. -
Final enhancements:
Use a liner brush with watered-down white paint to add subtle motion lines around the fish fins and tails, suggesting movement through the water.
Correcting Smudges
If you accidentally paint over a line, don’t wipe it! Let the mistake dry completely, then paint over it with the background color before trying again.
Step 4: Protection
-
Seal the work:
Allow the birdhouse to dry for at least 24 hours. Once cured, apply two to three coats of outdoor-rated clear varnish to protect your artwork from the elements.
Hang your finished masterpiece in the garden and enjoy the splash of color it adds to your outdoor space
Surreal Color Pop Gazebo With Mixed Patterns
Transform a plain wooden birdhouse into a vibrant architectural masterpiece featuring a captivating mix of stripes, checks, and botanical motifs. This project combines bold reds and greens with intricate detailing to create a surreal, storybook-style focal point for your garden.
Step-by-Step
Materials
- Unfinished wooden gazebo birdhouse
- Sandpaper (220 grit)
- Acrylic craft paints (Deep crimson red, hunter green, cream/off-white, black, metallic gold)
- Painter’s tape (various widths, including 1/8 inch)
- Small round brushes (sizes 0, 1, and 3)
- Flat shader brushes (1/4 inch and 1/2 inch)
- Wood sealant or primer
- Exterior polyurethane varnish (satin or gloss)
- Ruler and pencil
- Gold braid trim (optional)
Step 1: Preparation and Base Coats
-
Prepare the surface:
Begin by lightly sanding the entire birdhouse with 220-grit sandpaper to smooth out any rough patches or splinters. Wipe away the dust with a tack cloth or slightly damp rag to ensure a clean painting surface. -
Prime the wood:
Apply a coat of quality wood primer or sealant to the entire structure. This prevents the raw wood from soaking up your paint and ensures the colors pop vibrantly. -
Establish the cream base:
Paint the main hexagon panels (the walls) and the bottom latticework areas with a warm cream or off-white acrylic paint. You will likely need two coats for opaque coverage. -
Paint structural accents:
Using a flat brush, paint the vertical columns and the bottom base rim in a deep crimson red. Use a steady hand to keep lines clean where the red meets the cream panels.
Clean Lines Secret
For the crispest lines on the roof stripes and checkerboard trim, burnish the edge of your painter’s tape with a fingernail or credit card to prevent paint bleed.
Step 2: Roof and Trim Details
-
Block in the roof colors:
The roof is divided into triangular sections. Paint alternating sections in solid crimson red and hunter green. Let this dry completely before moving to the stripes. -
Stripe the roof panels:
On the green roof sections, add thin vertical stripes using cream and black paint. I find using narrow painter’s tape helps keep these lines perfectly straight, though a steady hand and a liner brush work too. -
Detail the finial:
Paint the finial topper in hunter green to match the roof sections. Add subtle highlights with a lighter green or gold to give it dimension. -
Create the checkerboard trim:
Along the flat fascia board directly under the roof overhang, paint a black-and-white vertical stripe pattern to mimic a piano key or checkerboard effect. -
Add the diamond base border:
On the white angled rim at the very bottom, paint a pattern of black diamonds. Using a pencil to lightly mark the spacing first ensures the pattern wraps around evenly.
Go 3D
Instead of painting the lower lattice, cut actual balsa wood strips to create a real 3D grid, gluing them over a painted dark red background for true depth.
Step 3: Intricate Panel Designs
-
Paint the leaf motif:
On the upper half of the cream wall panels, paint curved, flowing fern-like leaves using hunter green. Start from the sides and curve inward toward the bird entry hole. -
Add red botanical accents:
Intersperse small red dots or tiny diamond shapes among the green leaves to simulate berries or buds, tying the wall design back to the red columns. -
Define the faux curtains:
On the lower half of the wall panels, clearly define the triangular ‘curtain’ shape. Use a ruler to draw the diagonal lines, then paint the area inside the triangle a solid cream if it needs refreshing. -
Decorate the triangles:
Inside the lower cream triangles, paint a series of small black or navy blue dots arranged in a pyramid pattern. Top the triangle’s peak with a single red dot. -
Highlight the lattice:
Carefully paint the raised grid of the bottom lattice sections in red. This can be tedious, so use a very small flat brush and just touch the top surface of the wood lattice.
Step 4: Finishing Touches
-
Paint the perches:
Paint the small geometric ledges beneath the entry holes green. Add a darker green shade on the underside to create a shadow effect and faux depth. -
Apply gold accents:
Using metallic gold paint, add subtle outlines to the leaves or small decorative dots along the red columns for a bit of sparkle. -
Attach decorative trim:
Glue a strip of decorative gold or woven trim just under the roof overhang, covering the transition between the roof and the checkerboard fascia. -
Seal for protection:
Once all paint is fully cured (give it 24 hours), apply two to three coats of exterior-grade clear polyurethane to protect your artwork from the elements.
Place your finished masterpiece on a sturdy post to invite your feather friends into their new luxury home
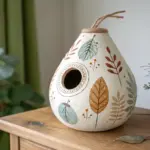

Have a question or want to share your own experience? I'd love to hear from you in the comments below!