Painting on wood is one of those feel-good crafts where the wood grain does half the beauty work for you. Here are my favorite wood craft painting ideas—from classic, beginner-friendly designs to a few quirky “I can’t believe I made that” projects.
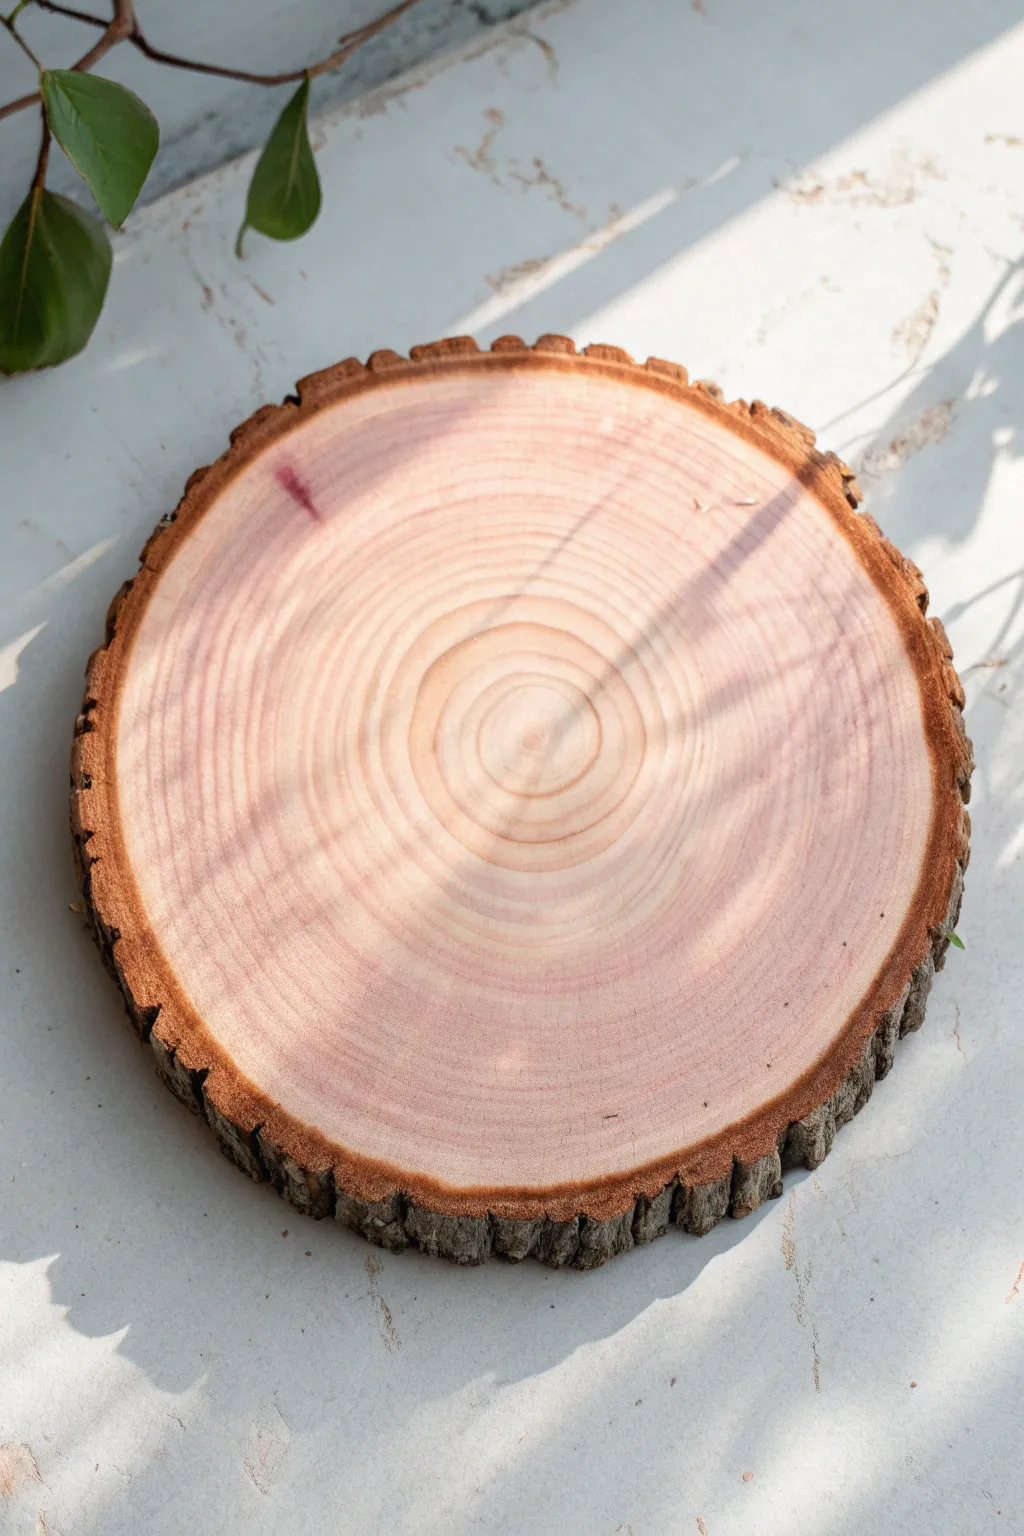
Classic Wood Slice Coasters
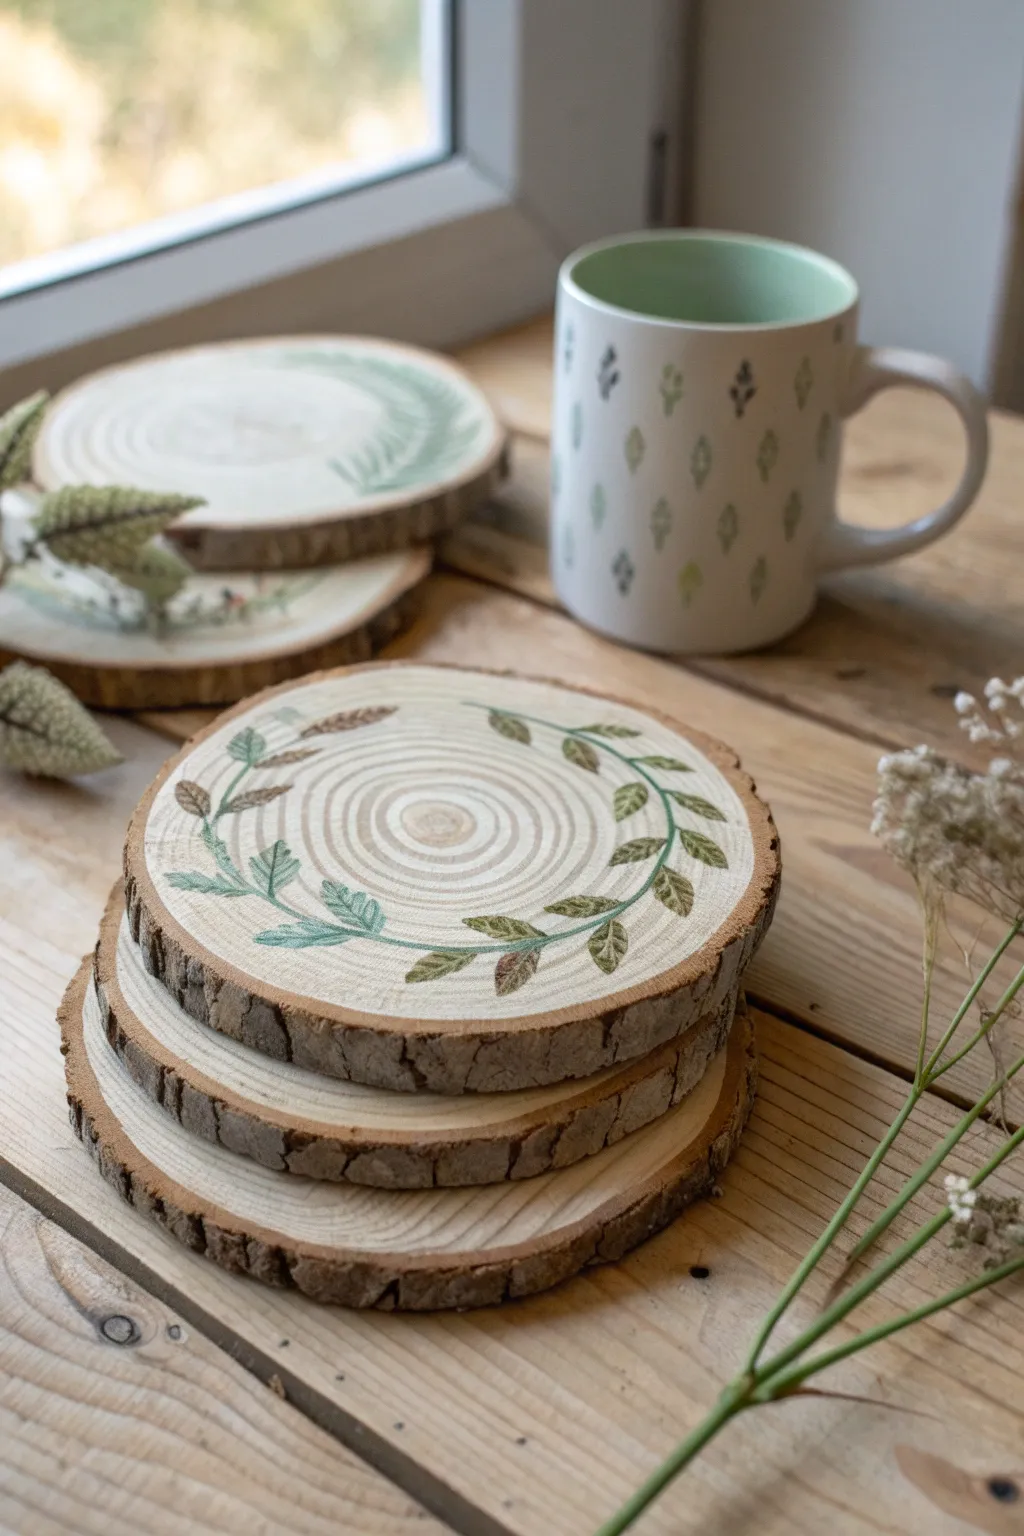
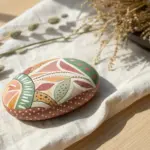
Bring a touch of the forest indoors with these charming, rustic coasters featuring a delicate hand-painted leaf wreath. The natural wood grain shines through the center, perfectly complementing the soft greens and earthy browns of the botanical design.
Step-by-Step
Materials
- Unfinished wood slices (approx. 3.5-4 inches diameter) with bark edge
- Fine-grit sandpaper (220-320 grit)
- Acrylic craft paints (sage green, forest green, muted brown)
- Small round paintbrushes (size 0, 1, and 2)
- Pency or chalk pencil
- Clear matte or satin varnish/sealer (polyurethane or spray sealant)
- Paper plate or palette
- Water cup and paper towels
Step 1: Preparation
-
Surface Smoothing:
Begin by lightly sanding the top surface of each wood slice. You want it smooth enough for a brush to glide without catching on splinters, but retain enough texture to look natural. Wipe away every speck of dust with a damp cloth or tack cloth before proceeding. -
Design Planning:
Using a very light touch with a pencil, sketch a faint circle about half an inch inside the bark edge. This will serve as the guide for your wreath stem.
Bleeding Paint?
If paint bleeds into the wood grain, your paint is too watery. Use undiluted soft-body acrylics or prime just the painting area with clear matte medium first to seal the thirsty pores.
Step 2: Painting the Foliage
-
Mixing Greens:
Squeeze out your sage green and forest green paints. I like to mix a tiny drop of brown into the sage green to make it look more organic and less synthetic. -
Main Stem:
Use your size 1 liner brush and the darker forest green or brown to trace over your pencil guide. Paint a thin, winding line that encircles the center wood rings, varying the pressure slightly so the line isn’t perfectly uniform. -
Leaf Placement:
Switch to the size 2 round brush. Load it with the lighter sage green mixture. Visualize where the leaves will go—aim for pairs of leaves branching off the main stem, spacing them out rhythmically. -
Painting First Leaves:
To create a leaf shape, touch the tip of the brush to the wood near the stem, press down gently to widen the stroke for the leaf belly, and lift up as you pull away to create a point. -
Adding Variety:
While the first set of leaves is wet, dip just the very tip of your dirty brush into the darker green. Paint a few leaves with this two-tone load to create natural shading and depth. -
Brown Accents:
Clean your brush and switch to the muted brown paint. Add smaller, filler leaves or tiny buds in the gaps between your green foliage. This adds that dried-floral look seen in the inspiration image. -
Vein Details:
Once the green leaves are fully dry to the touch, use your smallest size 0 brush with a watered-down dark green or brown to paint a single, hair-thin vein down the center of the larger leaves.
Use Nature’s Template
For realistic leaf shapes, gather actual leaves from your yard. Trace a real leaf onto cardstock to make a tiny stencil, or just keep one on your table as a visual reference while painting.
Step 3: Finishing Touches
-
Drying Time:
Allow the paint to cure completely. Acrylics dry fast, but giving them an hour ensures you won’t smudge anything during the sealing process. -
Sealing the Top:
Apply a thin, even coat of matte or satin varnish over the entire top surface, extending slightly over the bark rim to bind it. -
Second Coat:
After the first coat is dry, lightly sand with a high-grit paper if it feels rough, wipe clean, and apply a second coat of sealer. This is crucial for protecting the wood from condensation and coffee stains. -
Backside Check:
Flip the coaster over. If you plan to stick felt pads on the bottom to protect your table, now is the time to apply them.
Stack your finished coasters on the coffee table and enjoy the cozy woodland vibe they add to your decor
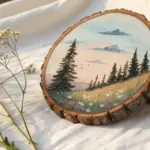


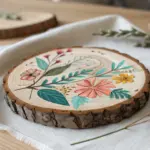
Easy Floral Wood Rounds
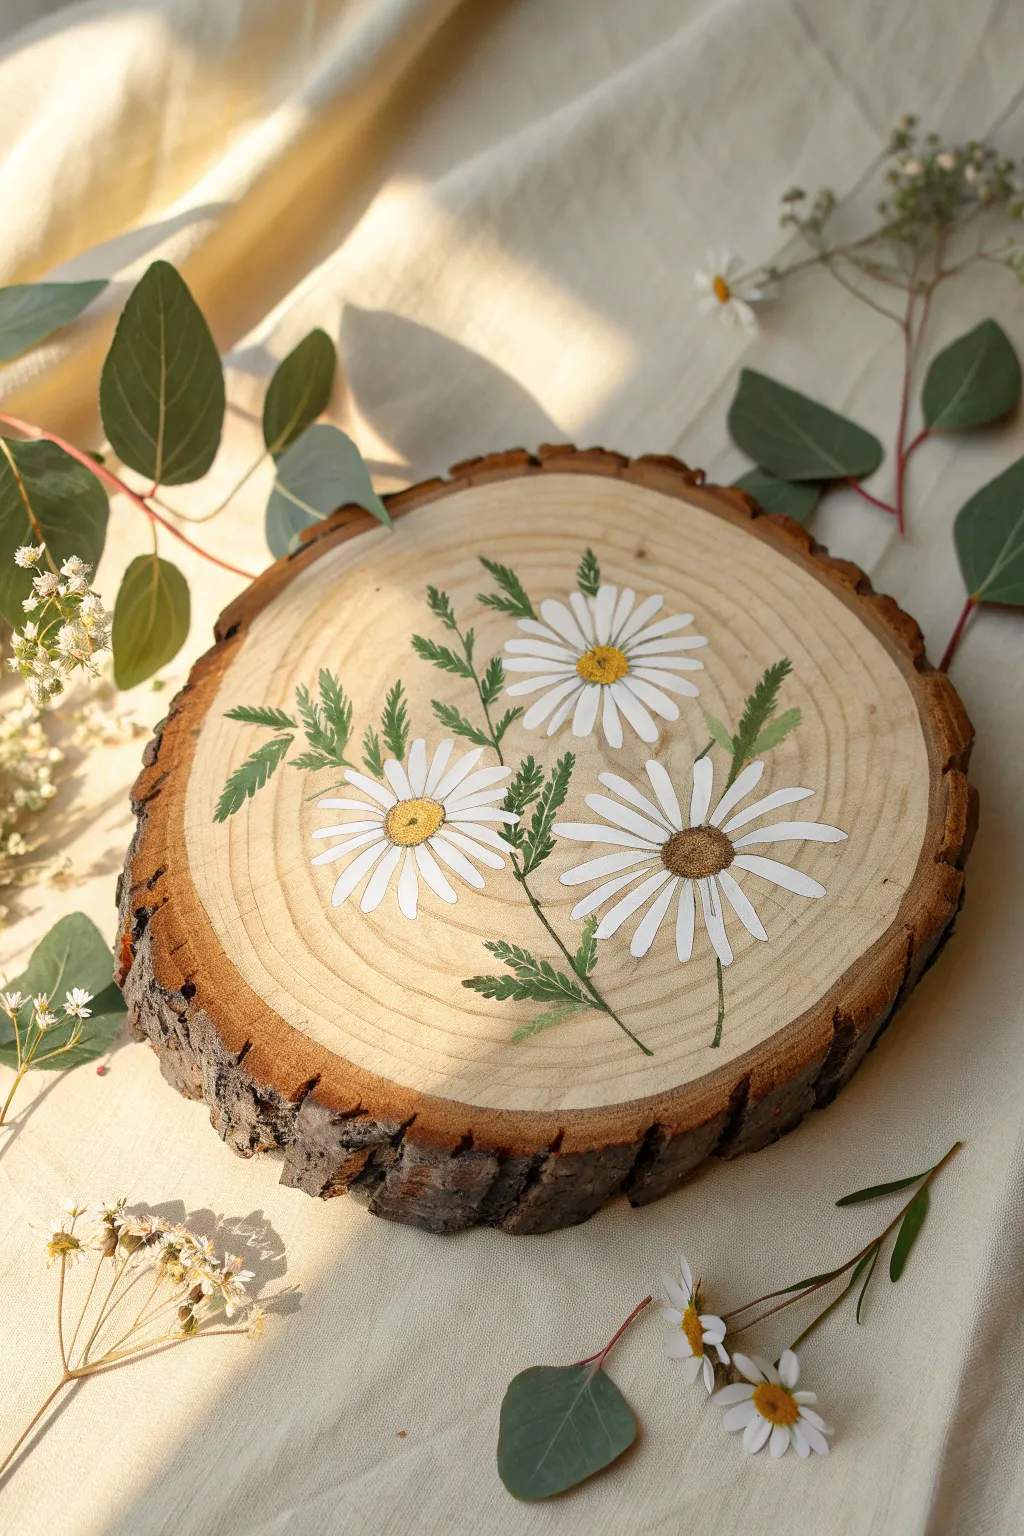
Bring a touch of everlasting spring indoors with this charmingly rustic wood slice project. The design mimics the delicate look of pressed flowers, featuring crisp white daisies and feathery greenery against the natural wood grain.
Step-by-Step Guide
Materials
- Large wood slice with bark edge (approx. 8-10 inches)
- Fine-grit sandpaper (220 grit)
- White acrylic paint (high opacity)
- Golden yellow acrylic paint
- Dark brown or ochre acrylic paint
- Sap green and olive green acrylic paint
- Small round brush (size 2 or 4)
- Fine liner brush (size 0 or 00)
- Pencil for sketching
- Matte finish artist varnish or sealant
- Paper towels and water cup
Step 1: Preparation and Layout
-
Sand the surface:
Before you begin painting, ensure your canvas is ready. Use fine-grit sandpaper to gently smooth the face of the wood slice. You want to remove any splinters or rough patches that might catch your brush bristles, but don’t sand the bark edges. -
Wipe it clean:
Thoroughly wipe away all sanding dust with a slightly damp cloth or tack cloth. A clean surface is crucial for crisp paint lines. -
Sketch the composition:
Using a pencil very lightly, sketch the placement of three main flower heads. Imagine a triangle shape to keep the composition balanced. Draw a simple center circle for each flower to mark their positions. -
Map the stems:
Lightly draw thin, curving stems connecting your flower heads, leading them toward a central point near the bottom. Add a few branching lines where leaves will go.
Smooth Moves
To get super fine lines for the fern leaves, thin your green acrylic paint with a few drops of water until it has an ink-like consistency.
Step 2: Painting the Greenery
-
Mix your greens:
On your palette, mix sap green with a tiny touch of brown to create a natural, earthy stem color. Keep pure olive green ready for the leaves. -
Paint the stems:
Using your fine liner brush, carefully trace over your pencil stem lines. Keep the pressure light to create thin, delicate lines rather than thick branches. -
Create fern-like leaves:
Switch to your small round brush. Dip it in the olive green. To create the feathery leaves seen in the project, use short, flicking strokes branching off the main stems. Start at the stem and flick outward, tapering the paint to a point. -
Layer the foliage:
Once the first layer of leaves is dry, I sometimes add a few darker strokes (green mixed with a little brown) underneath to add depth and shadow to the foliage.
Step 3: Creating the Daisies
-
Base coat the petals:
Using the high-opacity white paint and the round brush, begin painting the daisy petals. Start at the outer tip of the petal and pull the stroke inward toward the flower center. This naturally creates a rounded tip and a tapered base. -
Complete the petal ring:
Continue painting petals around each center circle. Don’t worry if they overlap slightly or have small gaps; minor imperfections make them look more organic. -
Evaluate opacity:
Wood absorbs paint, so your white might look streaks at first. Let the first coat dry completely, then apply a second coat of white to the petals for a bright, solid finish. -
Add petal details (optional):
For extra realism, mix a tiny drop of grey into your white. Paint very thin, subtle lines near the base of the petals to show where they curl toward the center.
Make it Bloom
Instead of painting the centers, try gluing actual dried mustard seeds or small yellow beads into the middle for a fun 3D mixed nedia texture.
Step 4: Details and Finishing
-
Paint the flower centers:
Fill the center circles with golden yellow paint. Dab the paint on rather than stroking it to create a slightly textured surface. -
Add texture to the centers:
While the yellow is still tacky, take your smallest brush or a toothpick and dot tiny specks of dark brown or ochre along the bottom edge of the yellow center. This creates a shadow and mimics the seeds of a daisy. -
Clean up:
Step back and look at your composition. If any pencil marks are still visible, wait until the paint is 100% bone dry and gently erase them. -
Seal the wood:
protect your artwork by applying a coat of clear matte varnish over the entire flat surface. Sealants prevent the wood from absorbing moisture and warping over time.
Hang this lovely piece on your wall or use it as a centerpiece to keep a little bit of nature nearby all year round
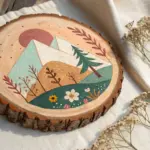
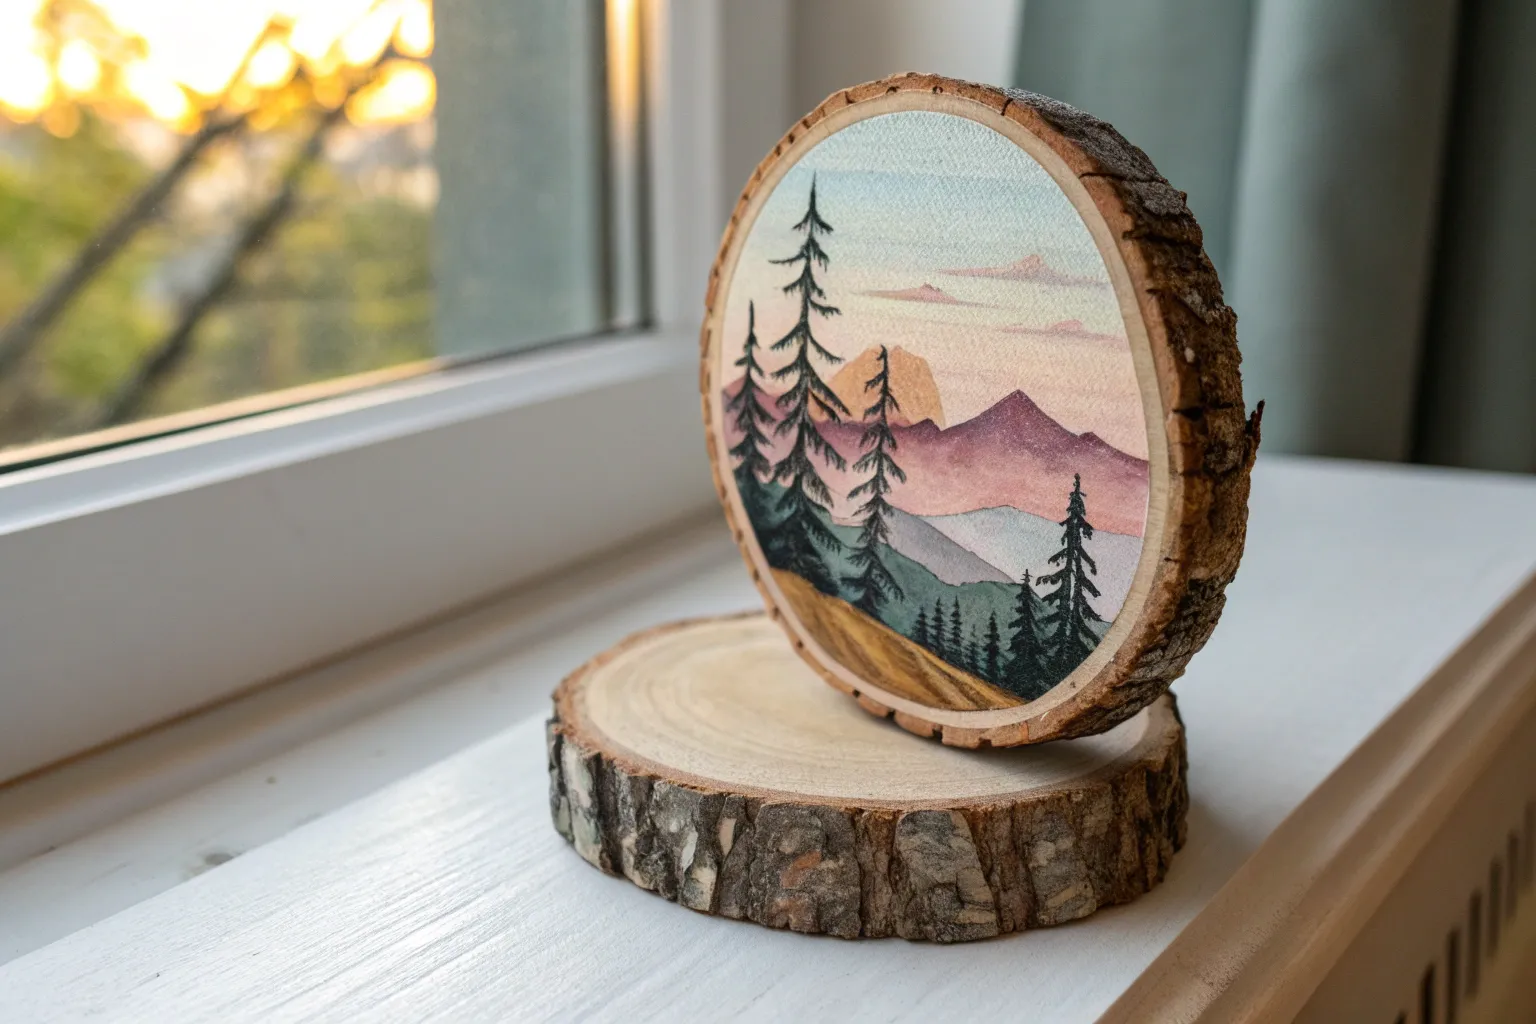
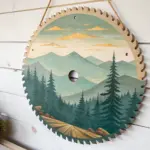
Mini Mountain Landscapes on Slices
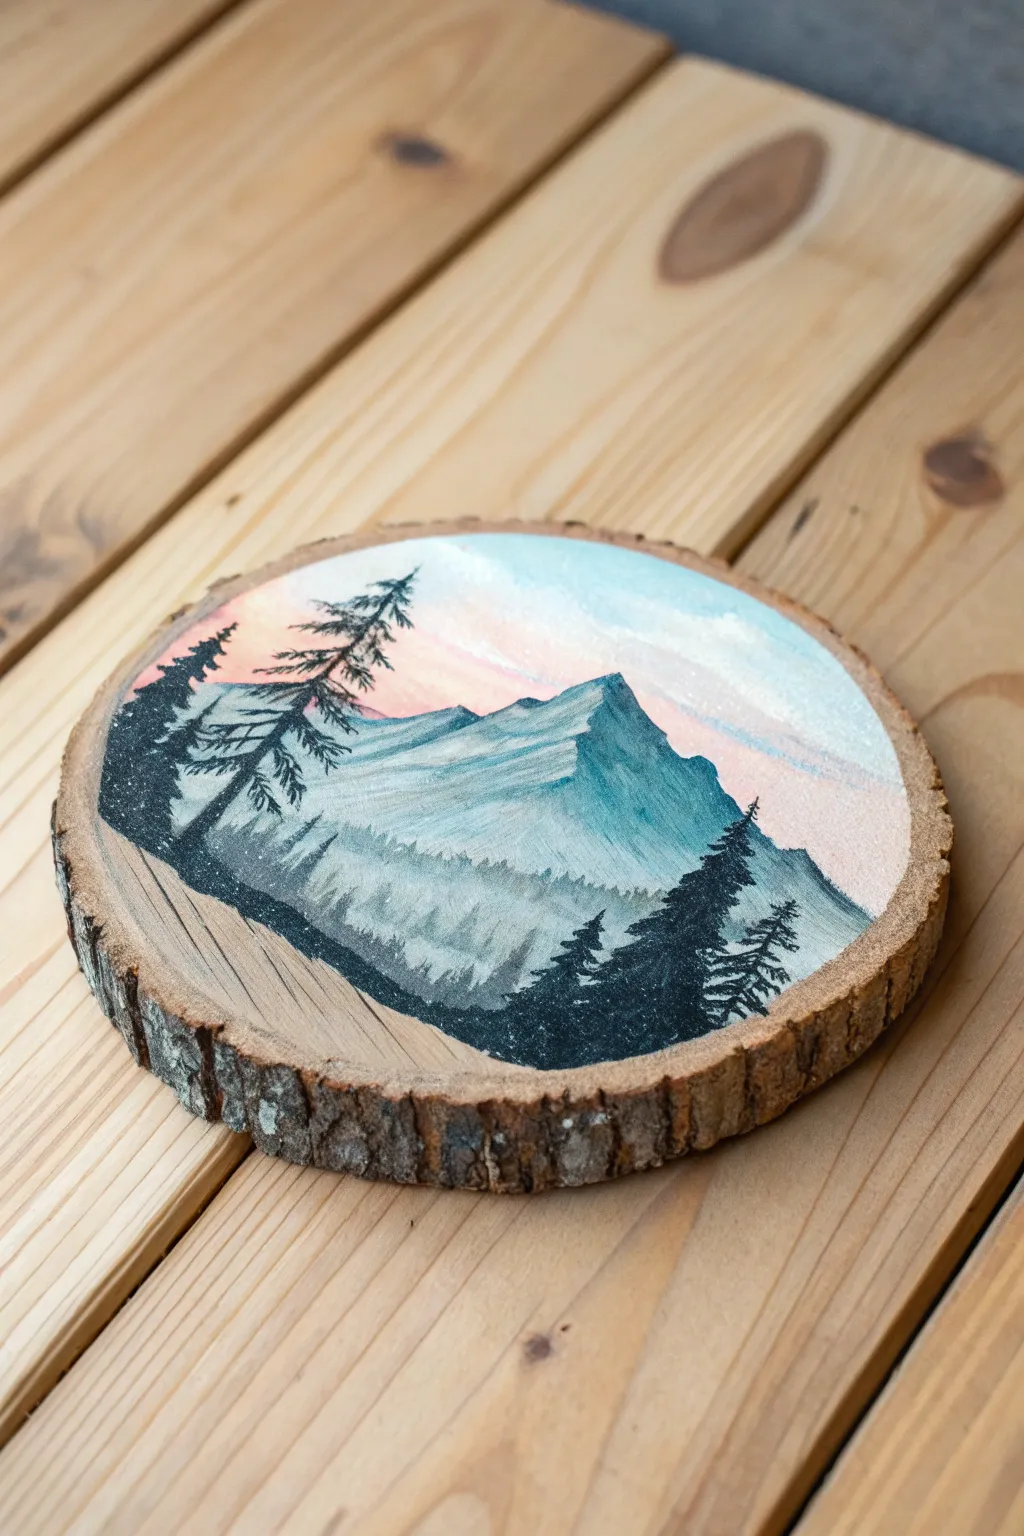
Capture the serene beauty of a mountain dusk on a rustic canvas with this wood slice painting project. The natural bark edge frames a cool-toned landscape featuring jagged peaks and silhouetted pines relative to a soft pastel sky.
Step-by-Step
Materials
- Wood slice with bark edge (approx. 4-6 inches diameter)
- Acrylic paints: Titanium White, Ultramarine Blue, Phthalo Blue, touches of Burnt Umber, and a soft Pink or Magenta
- Gesso or white primer (optional but recommended)
- Flat synthetic brush (approx. 1/2 inch) for the sky
- Small round detail brush (size 0 or 1) for trees
- Medium filbert or shader brush for mountains
- Palette or paper plate
- Cup of water and paper towels
- Fine-grit sandpaper
Step 1: Preparation and Sky Layer
-
Surface Prep:
Before painting, lightly sand the face of your wood slice to create a smooth surface, wiping away any dust with a slightly damp cloth. If the wood feels very absorbent, apply a thin layer of clear gesso or white primer to the center area, leaving a small margin of raw wood near the bark if you prefer that rustic border look. -
Mixing the Sky Colors:
On your palette, prepare two main sky colors: a very pale blue (mostly white with a tiny dot of Phthalo Blue) and a soft sunset pink (white with a very small amount of magenta or pink). You want these colors to be pastel and airy. -
Painting the Gradient:
Using your flat brush, paint the upper third of the wood slice with the pale blue mix. While this paint is still wet, rinse your brush quickly and pick up the pastel pink mix. Apply the pink just below the blue, gently blending where they meet to create a soft, seamless transition from cool sky to warm sunset. -
Soft Clouds:
While everything is still slightly damp, take a clean brush with a tiny amount of pure white. Lightly scumble in some wispy cloud shapes near the top right, softening edges so they feel distant and dreamy.
Natural Border Tip
Leave a small rim of unpainted wood between your art and the bark. This negative space acts like a built-in frame and highlights the rustic texture.
Step 2: Painting the Mountain Range
-
Mountain Underpainting:
Mix a mid-tone mountain blue using Ultramarine Blue, a touch of white, and a speck of Burnt Umber to desaturate it slightly. With your filbert brush, block in the main triangular shape of the mountain in the center of the slice. The peak should reach up into the blue section of your sky. -
Creating Form:
Decide on a light source—in this painting, the light seems to hit from the right. Mix a lighter version of your mountain blue (add more white) and paint the right-side slopes of the peaks. Use choppy, downward strokes to mimic rugged rock faces. -
Deepening Shadows:
Mix a darker version of the blue (less white, a bit more blue) and apply it to the left-side slopes. This contrast creates the 3D dimension of the ridges. -
Mist and Foothills:
As you move toward the bottom of the mountain shape, start adding more white into your brush without rinsing it fully. Paint horizontal, hazy strokes at the base of the mountains to create the illusion of mist or distant snowy foothills. This should fade out near the bottom edge.
Step 3: Detailed Foreground
-
Mixing the Silhouette Color:
Create a very dark, near-black color for the trees. I prefer mixing Ultramarine Blue and Burnt Umber rather than using straight black from a tube, as it gives a richer, more natural deep tone. -
Left Side Pines:
Using your smallest detail brush, load it with the dark mixture. Start on the far left edge. Draw a thin vertical line for a tree trunk that extends up past the mountain horizon. Use tiny ‘tapping’ motions to create pine branches that angle slightly downward, getting wider as you go down the trunk. -
Right Side Pines:
Repeat the process on the bottom right side. Create a cluster of two or three trees here, varying their heights. Ensure the tallest tree on the right doesn’t perfectly match the height of the left one to keep the composition dynamic. -
Connecting the Ground:
Fill in the very bottom curve of the wood slice with your dark tree color, connecting the left and right tree clusters with a dark, shadowy foreground. You can stipple the top edge of this dark mass to suggest treetops or bushes looking up from below. -
Snowy Highlights:
Once the dark trees are completely dry, take a liner brush with watered-down white paint. Extremely lightly, add a few subtle highlights to the tips of the pine branches, suggesting snow resting on the needles.
Paint Soaking In?
If the wood drinks up your paint too fast, making colors dull, let the first coat dry fully and apply a second layer. The first coat acts as a sealer.
Seal your miniature landscape with a satin varnish to protect those delicate mountain hues for years to come
Hand-Lettered Quote Plaques

Earthy tones meet whimsical lettering in this hand-painted wooden sign featuring a playful, looping script. The warm terracotta background contrasts beautifully with crisp white lines, making it a trendy addition to any shelf or wall display.
Detailed Instructions
Materials
- Rectangular wood board (approx. 4″ x 12″)
- Terracotta or burnt orange acrylic paint
- White paint marker (fine point)
- White paint marker (medium point) or small round brush
- Pencil
- Ruler
- Fine-grit sandpaper
- Matte clear sealer spray
Step 1: Preparation & Base Coat
-
Sand the surface:
Begin by lightly sanding your wooden board with fine-grit sandpaper to remove any splinters or rough patches. Wipe away the dust with a clean, dry cloth or a tack cloth to ensure a smooth canvas. -
Apply the base color:
Paint the entire face and sides of the board with your terracotta acrylic paint. Use long, even strokes in the direction of the wood grain for the best finish. -
Let it dry:
Allow the first coat to dry completely to the touch. This usually takes about 20-30 minutes depending on your paint thickness. -
Add a second coat:
Apply a second coat of terracotta paint to ensure full, opaque coverage. I find this depth of color really makes the white lettering pop later on. Let this dry fully, preferably for an hour.
Paint Pen Pro Tip
Store your paint pens horizontally when not in use. If the ink seems watery, press the nib onto a scrap piece of paper several times to re-saturate it with pigment.
Step 2: Sketching the Layout
-
Mark guidelnes:
Using a ruler and a pencil with a very light touch, mark the vertical center of the board. You can also lightly mark horizontal lines to space out your three recurring words evenly. -
Draft the text:
Lightly sketch the phrase ‘a perfect perfect is a perfect’ in a loose script style. Start with the top ‘a’, then the first ‘perfect’, followed by the second ‘perfect’, then ‘is a’, and finally the bottom ‘perfect’. -
Check spacing:
Step back and look at your pencil sketch. Ensure the words are centered and that there is enough room at the top and bottom for the decorative curved flourishes. -
Sketch flourishes:
Draw an upward-curving line above the top text and a downward-curving line below the bottom text to frame the quote. Add small dots above the top curve and below the bottom curve.
Step 3: Lettering & Details
-
Trace the downstrokes:
Shake your white paint marker well to get the ink flowing. Begin tracing over your pencil lines, applying slightly more pressure on the downward strokes of the letters to mimic calligraphy. -
Thicken the lines:
Go back over the downstrokes (the parts of the letters where your pen moved downward) to thicken them. This creates a faux-calligraphy look without needing a specialty nib. -
Refine the upstrokes:
Use a fine-point white marker to clean up the hairline upstrokes, keeping them delicate and thin for contrast against the thicker downstrokes. -
Draw the curves:
Trace the curved framing lines at the top and bottom of the board. Keep your hand steady and move the marker in one smooth motion if possible. -
Add the dots:
carefully place the decorative dots along the outside of the curved lines. Try to keep the spacing between them consistent. -
Erase pencil marks:
Wait until the paint marker ink is strictly dry—give it a good 15 minutes to be safe. Then, gently erase any visible pencil guidelines with a clean eraser.
Level Up: Distress It
For a rustic farmhouse vibe, lightly sand the edges and corners of the board after the paint dries to reveal a bit of the raw wood underneath.
Step 4: Finishing Touches
-
Inspect the work:
Check for any uneven lines or spots where the terracotta background shows through the white ink. Touch up these areas carefully with your marker. -
Seal the project:
Take the board to a well-ventilated area and spray it with a matte clear sealer. This protects the paint from scratching and gives the piece a professional, finished look. -
Dry and display:
Let the sealer cure according to the can’s instructions before handling or leaning the plaque against a wall.
You have now created a charming piece of hand-lettered decor ready to warm up any corner of your home
BRUSH GUIDE
The Right Brush for Every Stroke
From clean lines to bold texture — master brush choice, stroke control, and essential techniques.
Explore the Full Guide
Monogram Initials on Wood Tags
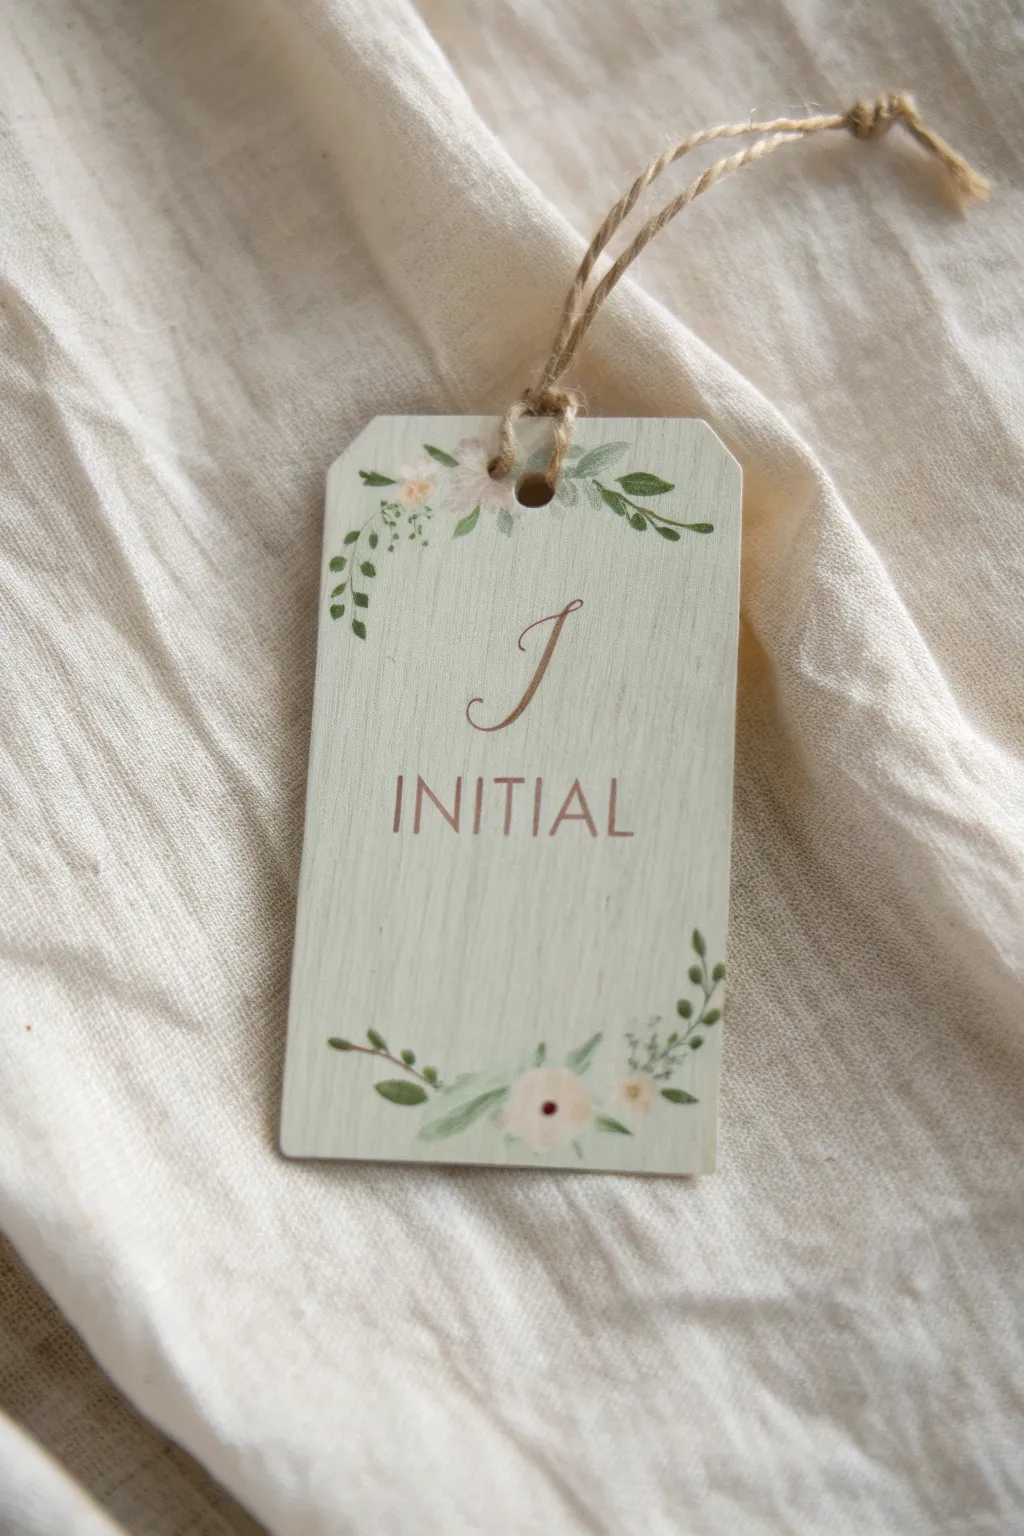
Create a sophisticated and personalized gift tag or ornament using a simple wooden blank. This project features a soft, whitewashed background adorned with delicate watercolor-style florals and elegant typography.
How-To Guide
Materials
- Rectangular wooden tag with hole (approx. 2×4 inches)
- White or pale cream acrylic paint (matte)
- Sage green acrylic paint
- Soft pink/blush acrylic paint
- Burnt umber or dark brown acrylic paint
- Rose gold or copper metallic paint pen (fine tip)
- Wide flat brush
- Fine detail brush (size 00 or 0)
- Small round brush (size 1 or 2)
- Jute twine
- Sandpaper (fine grit)
- Pencil (optional)
- Water cup and palette
Step 1: Preparation & Base Coat
-
Prepare the surface:
Begin by lightly sanding your wooden tag to ensure a smooth painting surface. Wipe away any dust with a damp cloth or tack cloth. -
Mix the wash:
Create a whitewash mixture by combining 2 parts white (or pale cream) paint with 1 part water. You want it opaque enough to cover the raw wood color but sheer enough to let the grain texture peek through. -
Apply base color:
Using the wide flat brush, apply the wash evenly over the entire front surface of the tag. Use long, vertical strokes to mimic the wood grain direction. -
Dry and assess:
Let this layer dry completely. If the wood color is still too prominent for your taste, add a second thin coat of the wash.
Pro Tip: Watercolor Look
To get that soft, painted look on acrylics, mix a tiny drop of glazing medium into your paints. This increases transparency without breaking down the binder like water does.
Step 2: Painting the Florals
-
Plan placement:
Visualize two floral clusters: one draping from the top hole area and a smaller curve at the bottom edge. You can lightly sketch the main vine lines with a pencil if helpful. -
Paint main vines:
Load your fine detail brush with thinned sage green paint. Paint delicate, curving lines for the stems, keeping your hand loose to create natural-looking vines. -
Add leaves:
Using same green, press the belly of the brush down and lift up to create teardrop-shaped leaves along the vines. Vary the sizes, making some tiny leaves near the vine tips. -
Paint blossoms:
Switch to your small round brush and the soft pink paint. Dab gently to create small, cloud-like shapes for the flowers near the center of your vine clusters. Keep the paint slightly translucent for a watercolor effect. -
Detail the centers:
Once the pink flowers are dry, use the very tip of your detail brush with a tiny dot of brown or dark maroon to add the flower centers. -
Add highlights:
Mix a tiny bit of white into your pink and add a few highlights to the petals to give them dimension.
Level Up: Double-Sided
Paint the back of the tag with a solid color that matches your floral vines, or add a ‘To/From’ dedication on the reverse side for gift-giving.
Step 3: Lettering & Finishing
-
Draft the text:
Lightly sketch your chosen initial in a large script font in the center. Below it, print the word ‘INITIAL’ (or a name) in sans-serif capital letters. -
Inking the calligraphy:
Using the metallic rose gold paint pen, carefully trace over your sketched initial. Apply slightly more pressure on the downstrokes to thicken them, mimicking calligraphy. -
Adding the subtext:
Use the same pen to write the block letters below. Keep these lines thin and uniform for a clean, modern look. -
Clean up:
Allow the ink to dry fully. If any pencil marks are still visible, gently erase them. -
Add twine:
Cut a length of jute twine (about 8 inches). Fold it in half, push the loop through the tag hole, and pull the tails through the loop to secure it with a lark’s head knot.
Attach this charming tag to a wedding favor or gift bag for an instantly elevated presentation
Rustic Welcome Sign on Planks
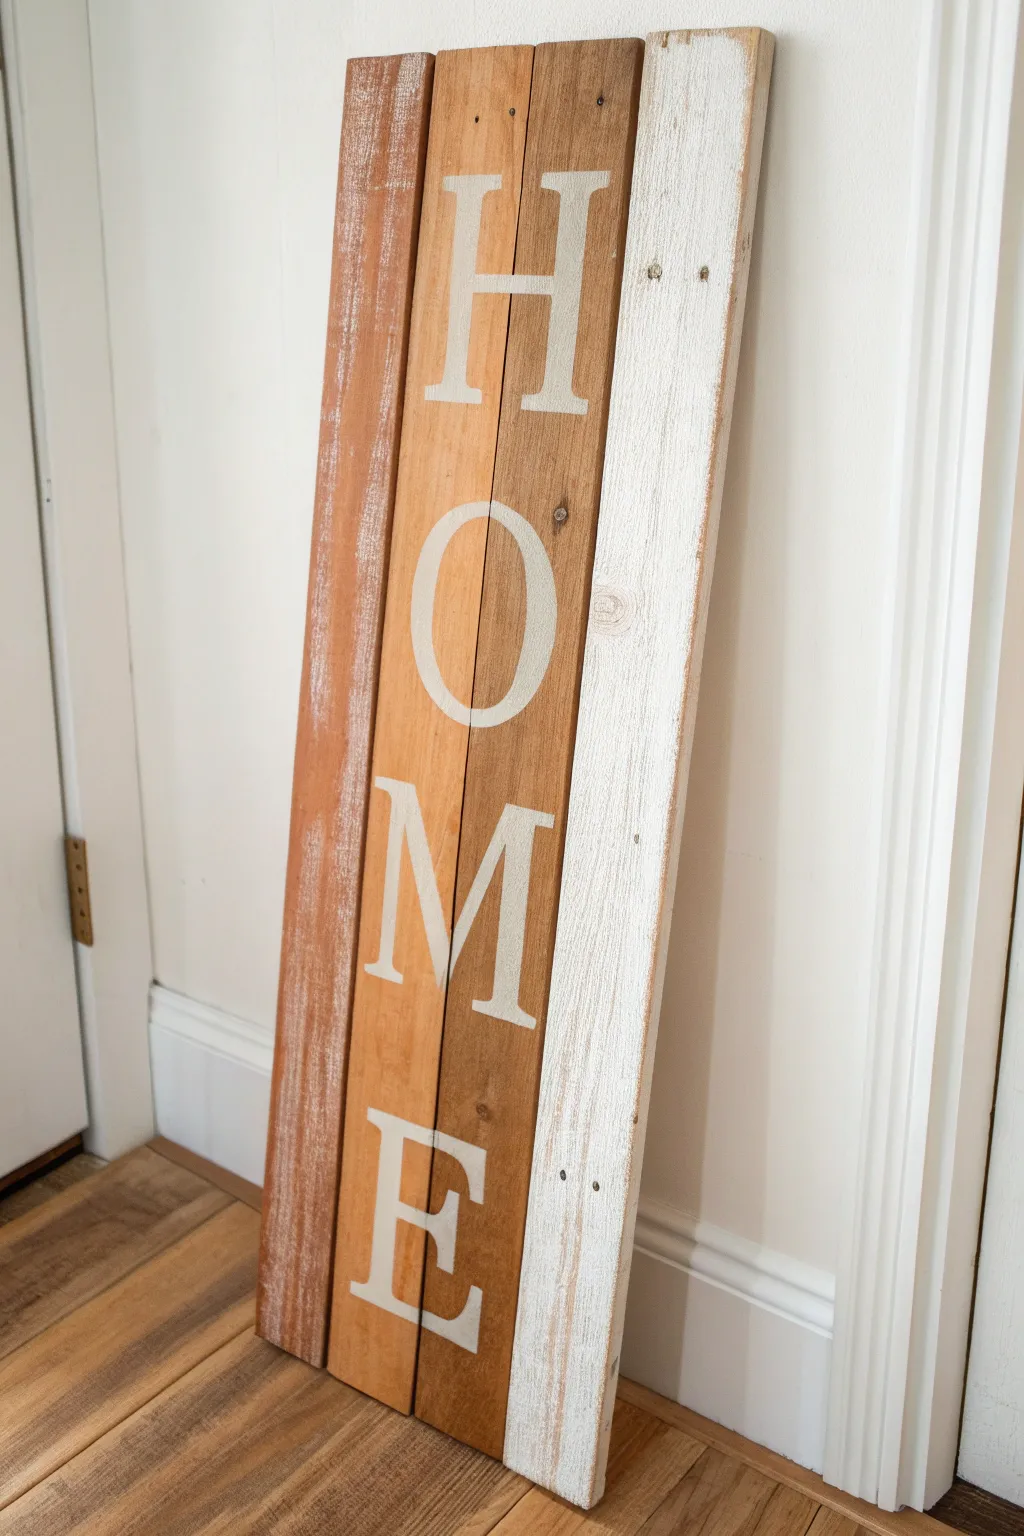
Add vertical interest to your entryway or corner nook with this charmingly rustic, multi-toned wooden sign. By combining different wood stains and distressed paint techniques across four connected planks, you create a cozy, reclaimed barn wood effect that feels instantly welcoming.
Step-by-Step
Materials
- 4 pine boards (1×4 or similar, cut to equal length)
- 2 thin wood strips or mending plates (for backing)
- Wood glue
- 1.25-inch wood screws
- Sandpaper (80 and 120 grit)
- White or cream chalk paint
- Wood stains (Early American, Dark Walnut, and a reddish stain like Sedona Red)
- Dry brush or chip brush
- 1-inch flat paintbrush
- Stencil (optional, letters H-O-M-E)
- Pencil and ruler
- Painter’s tape
Step 1: Preparing the Wood Base
-
Select and cut boards:
Cut your four pine boards to identical lengths, typically around 36 to 48 inches depending on how tall you want your sign. If the wood is very raw, give the edges a quick sanding with 80-grit paper to remove splinters, but don’t smooth them out too much—we want that rustic texture. -
Distress the surface:
Before assembling, beat up the wood a little. I like to use a hammer, a heavy chain, or the side of a screwdriver to create random dents and scratches that will catch the stain later. -
Arrange the pattern:
Lay your four boards out side-by-side on a flat surface. Decide on the order; mixing the grain patterns adds character. This arrangement determines which board gets which finish. -
Apply the stains:
Stain the two middle boards first. Use a lighter stain (like Early American) on the second board from the left, and a slightly darker stain (like Dark Walnut) on the third board. Wipe off excess stain with a rag. -
Create the weathered red look:
On the far-left board, apply a reddish wood stain. Once dry, lightly dry-brush a very small amount of white chalk paint over the top, focusing on the edges, then sand it back heavily so the red shows through predominantly. -
Create the whitewashed look:
Paint the far-right plank solid white. Once it’s fully dry, sand it aggressively with 80-grit sandpaper, exposing the raw wood underneath, especially along the edges and corners. -
Assemble the sign:
Flip all four dry boards over, ensuring they are aligned perfectly at the top and bottom. Place two thin wood strips or mending plates horizontally across the back—one near the top, one near the bottom. -
Secure the planks:
Apply wood glue between the backing strips and the planks, then screw them into place using wood screws. Make sure the screws pierce the backing but aren’t long enough to poke through the front of your sign.
Dry Brushing Secret
When doing the ‘dry brush’ on the red plank, your brush should have almost zero paint on it. Practice on scrap wood first!
Step 2: Adding the Lettering
-
Map out the letters:
Flip the sign face up. Measure the total width of the assembled planks and find the center line. Using a ruler, lightly mark the horizontal placement for your four letters so they are spaced evenly from top to bottom. -
Align the H and E:
Start by marking the top letter ‘H’ and the bottom letter ‘E’. This ensures you don’t run out of room at the bottom. The letters should span across the two middle boards primarily, but extending slightly onto the outer boards is fine. -
Stencil placement:
Position your stencils (or printouts if tracing) over your pencil marks. Tape them down securely with painter’s tape to prevent shifting. -
Prepare the paint:
Dip a stencil brush or a small sponge into white chalk paint. Offload almost all the paint onto a paper towel until the brush feels dry. Too much wet paint leads to bleeding under the stencil. -
Stenciling technique:
Using a vertical dabbing motion, apply the paint over the stencil. Build up coverage slowly with multiple thin coats rather than one thick gloppy coat. -
Hand-painting option:
If you are hand-painting without a stencil, use a flat 1-inch brush and your pencil guidelines. Keep your vertical strokes straight, following the grain of the wood. -
Remove stencils:
Peel off the tape and stencils while the paint is still slightly tacky to avoid pulling up dried flakes. -
Age the letters:
Once the white lettering is completely dry, take your 120-grit sandpaper and lightly sand over the letters. You want them to look worn and faded, matching the distressed background. -
Final dusting:
Wipe the entire piece down with a tack cloth or slightly damp rag to remove all sanding dust.
Seasonal Swap
Mount a small hook or nail in place of the letter ‘O’. You can then hang a mini wreath that you swap out for different seasons.
Lean your new sign against a wall near your doorway to greet guests with a warm, handmade touch

PENCIL GUIDE
Understanding Pencil Grades from H to B
From first sketch to finished drawing — learn pencil grades, line control, and shading techniques.
Explore the Full Guide
Seasonal Pumpkin Wood Blocks
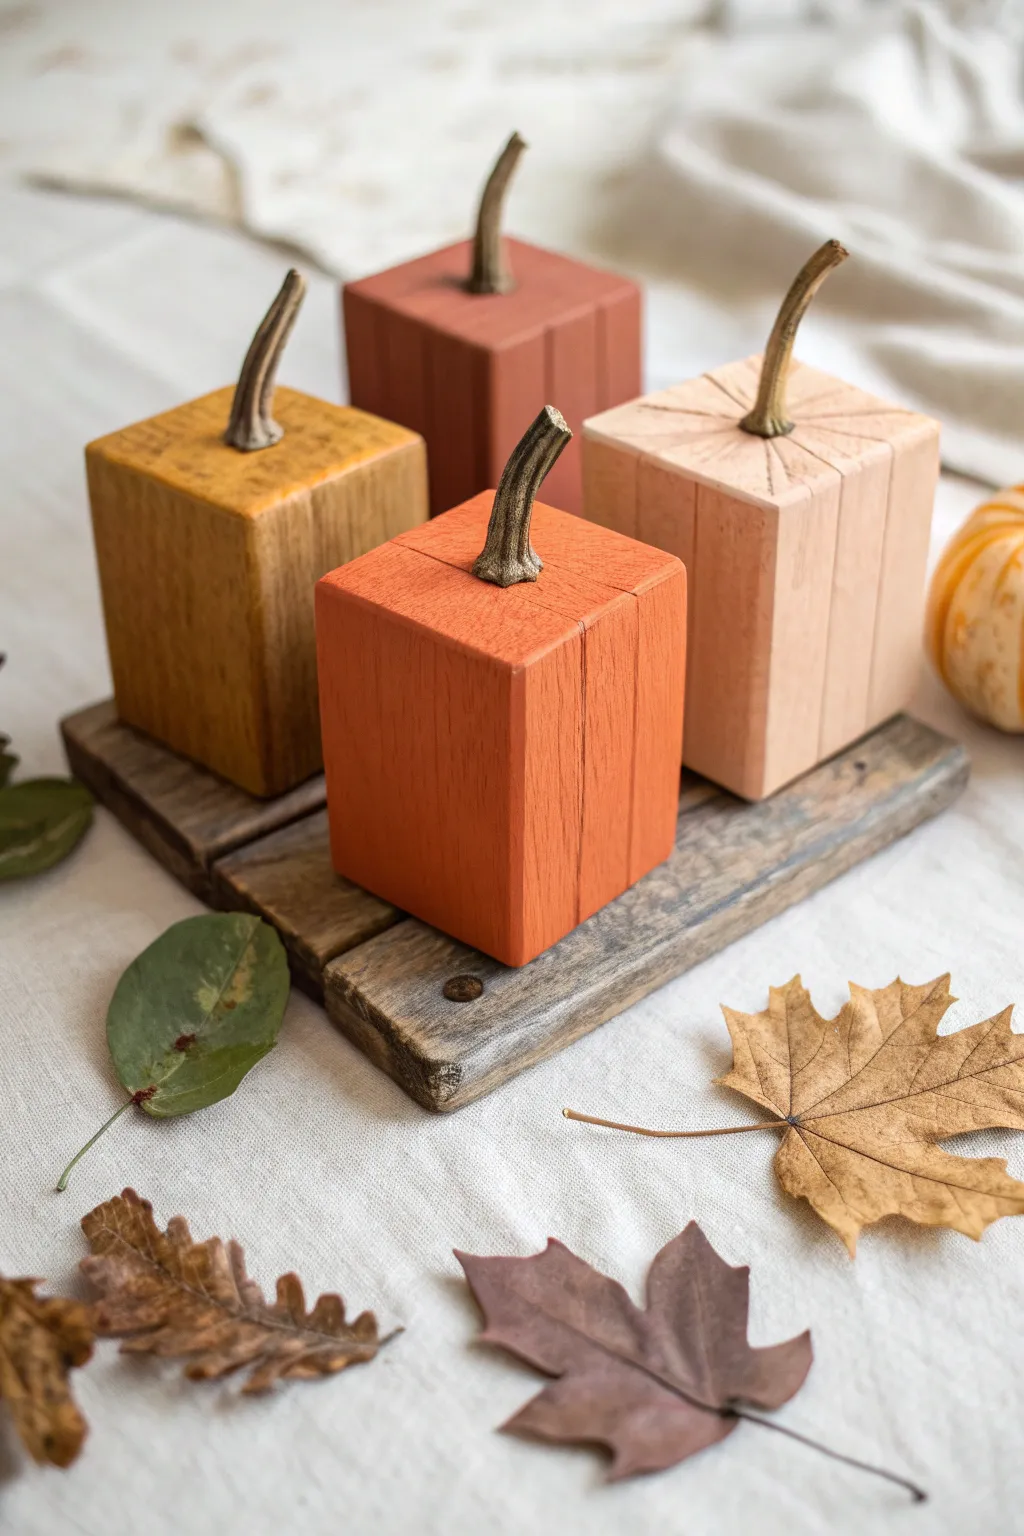
Transform simple 4×4 lumber scraps into a charming patch of modern fall decor. These geometric pumpkin blocks feature muted, earthy tones and realistic stems for a sophisticated take on seasonal crafting.
Detailed Instructions
Materials
- 4×4 wood post (enough for 4 blocks)
- Miter saw or hand saw
- Sandpaper (80, 120, and 220 grit)
- Acrylic craft paints (burnt orange, mustard yellow, terra cotta red, pale peach)
- Matte finish clear coat spray
- Drill with appropriate drill bit
- Real dried pumpkin stems or thick twigs
- Hot glue gun and glue sticks
- Foam brushes or soft bristle brushes
- Ruler
- Pencil
Step 1: Preparing the Wood Base
-
Measure and mark:
Begin by marking your 4×4 lumber into four sections. Create variety in height to add visual interest; aim for roughly 4-inch, 5-inch, and 6-inch lengths, keeping one perhaps square. -
Cut the blocks:
Using a miter saw or hand saw, cut the wood along your marked lines. Ensure the cuts are straight so the blocks will sit flat. -
Sand the edges:
Use 80-grit sandpaper to aggressively soften the sharp corners and edges of each block. You want a worn, slightly rounded look rather than crisp factory edges. -
Smooth the surfaces:
Progress to 120-grit and finally 220-grit sandpaper over the flat surfaces to prepare the wood for painting. Wipe away all sawdust with a tack cloth or damp rag. -
Create the stem hole:
Mark the center of the top face of each block. Select a drill bit slightly largest than the base of your chosen stems and drill a hole about 1/2 inch deep.
Step 2: Painting and Distressing
-
Apply base colors:
Paint each block a solid color using foam brushes. For the orange pumpkin, use a bright burnt orange. For the others, use mustard yellow, deep terra cotta, and pale peach respectively. -
Let dry and recoat:
Allow the first coat to dry completely. If the wood grain is showing through too much for your liking, apply a second coat for opacity. -
Add vertical ribs:
To mimic pumpkin ridges, lightly drag a dry brush with a tiny amount of a darker shade (or watered-down brown paint) vertically down the sides of the blocks. Keep this subtle. -
Detail the top:
Don’t forget to extend these faint vertical lines across the top surface, radiating from the center hole towards the edges. -
Light sanding:
Once the paint is fully cured, take your 220-grit sandpaper and very lightly scuff the edges and corners again. This reveals a bit of raw wood for that rustic appeal. -
Seal the wood:
Spray all sides of the blocks with a matte clear coat. This protects the paint and gives the pumpkins a finished, professional look without adding unwanted gloss.
Stem Stability Issues?
If your stems wobble despite the glue, fill the extra space in the hole with wood filler or craft putty. Insert the stem while wet and let it harden overnight for a rock-solid hold.
Step 3: Stem Assembly
-
Prepare the stems:
If using found twigs or real dried pumpkin stems, clean them of any dirt. Trim the bottoms so they sit relatively flat. -
Test fit:
Insert the stems into the pre-drilled holes to check the fit. If a stem is too loose, wrap the base with a little masking tape; if too tight, whittle it down slightly. -
Secure with glue:
Apply a generous dab of hot glue into the drilled hole and immediately insert the stem. Hold it in place for 30 seconds until the glue sets firmly. -
Clean up glue:
If any glue squeezed out onto the top of the pumpkin, peel it away carefully once it has cooled. -
Arrangement:
Group your finished blocks on a wooden tray or shelf to see how the heights and colors complement each other.
Add a Jack-O-Lantern Vibe
Use black vinyl cutouts or stencils to add minimalist geometric faces to one side of the blocks. This makes them reversible—decor for Halloween on one side and Thanksgiving on the other.
Group your new wooden pumpkin patch on a mantle or tablescape for an instant touch of autumn warmth
Winter Scene Wood Round Ornaments
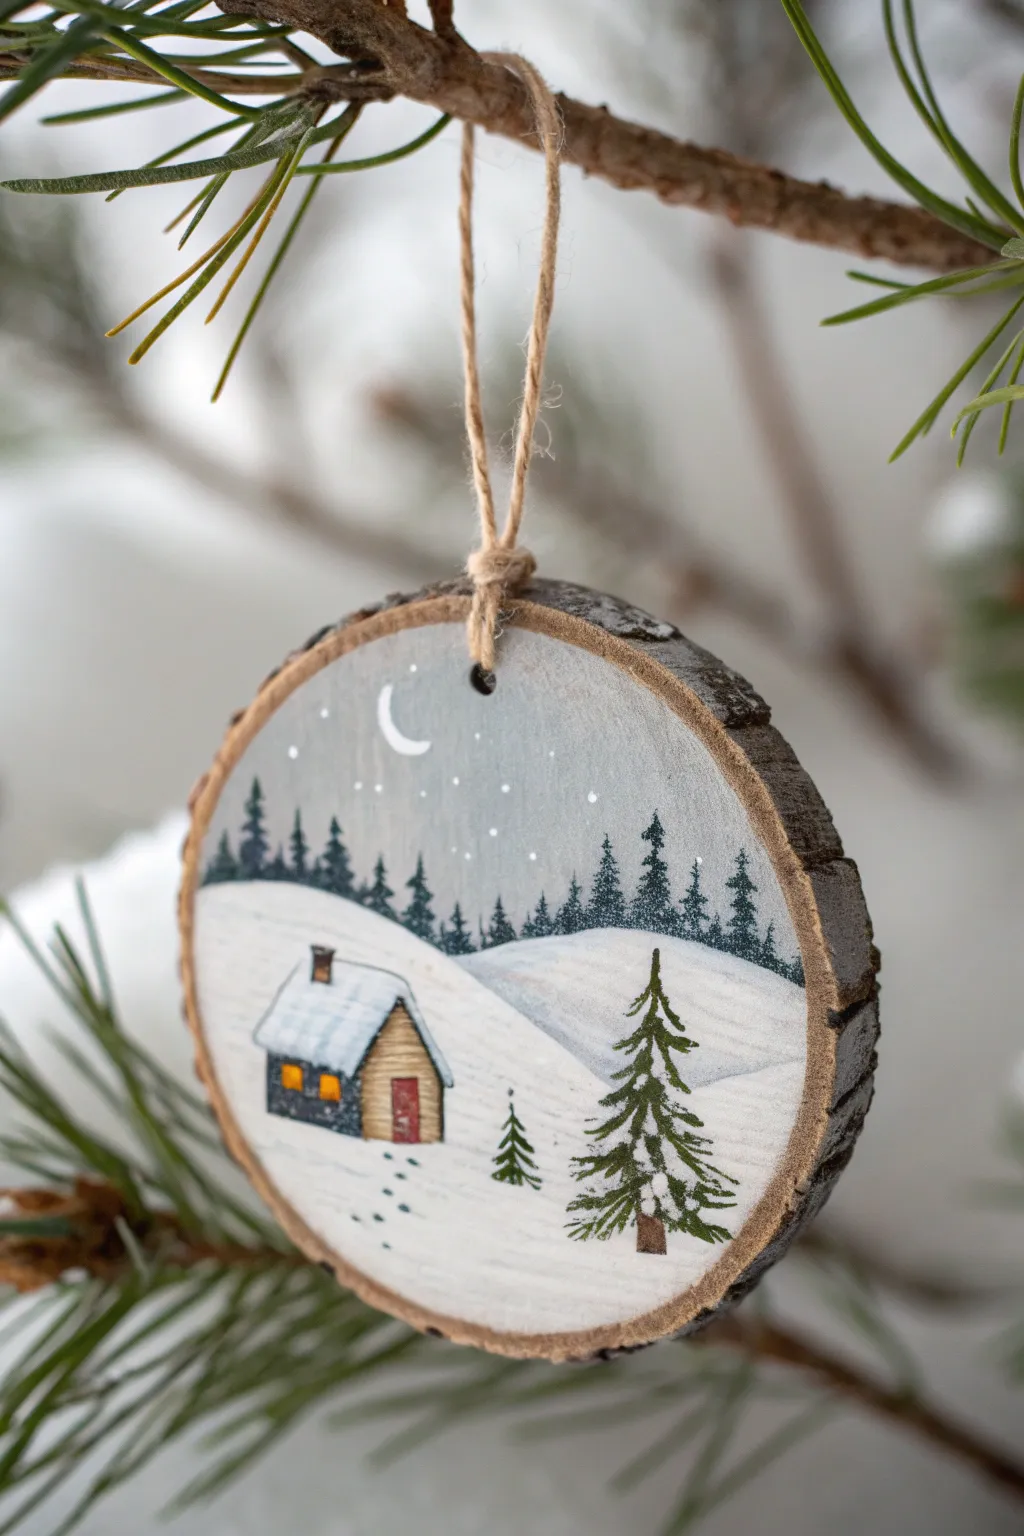
Capture the stillness of a winter evening with this charming hand-painted wood slice ornament. Featuring a tiny cabin nestled in snowdrifts under a moonlit sky, this rustic project brings warmth to your tree with its delicate details and natural bark frame.
Step-by-Step
Materials
- Small wood slice with bark edge (approx. 3-4 inches diameter)
- Acrylic paints: Titanium White, Paynes Grey or Midnight Blue, Burnt Sienna, Yellow Ochre, Deep Green, Black
- Fine grit sandpaper (optional)
- Flat shader brush (size 4 or 6)
- Fine liner brush (size 00 or 000)
- Small round brush (size 1)
- Jute twine
- Drill with small bit (if wood slice is pre-drilled, skip)
- Mod Podge or satin varnish
Step 1: Preparing the Base
-
Smooth the Surface:
Before picking up a brush, run your fingers over the wood slice. If it feels rough, lightly sand the face with fine-grit sandpaper to ensure your tiny details don’t get lost in the wood grain. Wipe away any dust with a damp cloth. -
Drill the Hole:
If your wood slice doesn’t already have one, drill a small hole near the top edge, centered. Make sure to do this before painting so you don’t accidentally chip your finished artwork later. -
Paint the Sky:
Mix a soft, muted grey-blue using Titanium White and a very small touch of Paynes Grey. Using your flat brush, paint the upper two-thirds of the wood slice. I like to keep this layer slightly sheer so a hint of wood grain shows through. -
Establish the Snow Line:
While the sky is drying, clean your flat brush. Load it with pure Titanium White and paint the bottom third of the slice, creating a gentle, rolling curve where it meets the sky to represent a snowy hill. -
Add the Background Hills:
Once the sky layer is dry to the touch, mix a lighter version of your white paint (maybe with a tiny drop of grey) to paint a second, distant snow hill slightly higher up, overlapping the bottom of the sky area.
Paint Soaking In?
Raw wood slices are thirsty! If your first layer of paint vanishes into the grain, apply a clear coat of matte craft sealer or gesso first. This creates a barrier so your colors stay bright on top.
Step 2: Painting the Landscape
-
Paint the Distant Forest:
Mix Deep Green with a little Black to create a very dark forest green. Using the tip of a small round brush or the flat brush turned on its side, stipple a jagged tree line along the top of the distant snow hill. -
Define the Tree Shapes:
Refine the distant trees by pulling small, vertical strokes downward from the jagged line. Keep these shapes loose and indistinct; they are far away and in the shadows. -
Draft the Cabin Shape:
Switch to your fine liner brush. Using thinned Burnt Sienna, lightly outline the basic shape of the cabin on the left side of the foreground hill—a simple rectangle for the wall and a slanted triangle for the roof. -
Fill the Cabin Walls:
Fill in the cabin wall rectangle with Burnt Sienna. Let it dry, then add tiny horizontal lines with a slightly darker brown mix to suggest log siding. -
Add the Snowy Roof:
Paint the roof area with pure Titanium White. Make the paint thick here to mimic the texture of heavy snow sitting on top of the house. -
Windows and Door:
Paint a small rectangle for the door in reddish-brown. For the windows, use Yellow Ochre to create a warm, glowing light effect. Frame the windows with tiny black outlines once the yellow is dry. -
Chimney Detail:
Add a tiny rectangle on the roof for the chimney using a dark brown or grey mix.
Pro Tip: Glowing Windows
To make the cabin windows really pop, paint a tiny dot of pure white in the center of the yellow squares while the yellow is still wet. It creates a convincing ‘lit from within’ look.
Step 3: Foreground Details
-
Paint the Foreground Tree:
Using your Deep Green paint and the liner brush, paint a vertical line for the trunk of the large foreground pine tree on the right side. Add branches starting short at the top and getting wider toward the bottom. -
Add Snow to the Tree:
Once the green is dry, take a tiny amount of white paint on your finest brush and gently dab ‘snow’ onto the tops of the pine branches. Don’t cover all the green; let the shadows show through. -
Paint the Tiny Sapling:
Repeat the previous tree steps to create a much smaller tree between the cabin and the large pine. This helps balance the composition. -
Create Footprints:
Dip the very tip of your liner brush into a watery grey mix. Dot a tiny path of footprints leading from the bottom edge of the ornament toward the cabin door. -
Starry Night:
Using the tip of a toothpick or the handle end of a brush dipped in white, dot tiny stars into the grey sky. Don’t overdo it—less is more effectively moody here. -
The Crescent Moon:
Paint a very thin, delicate crescent moon shape in white on the upper left side of the sky. -
Sealing and Hanging:
Allow the paint to cure fully (at least an hour). Apply a coat of satin varnish or Mod Podge to seal the wood and protect the paint. Once dry, thread the jute twine through the hole and tie a knot.
Hang this serene little scene on a sturdy branch where the lights can catch the subtle details of your handiwork


Painted Birdhouse Makeover
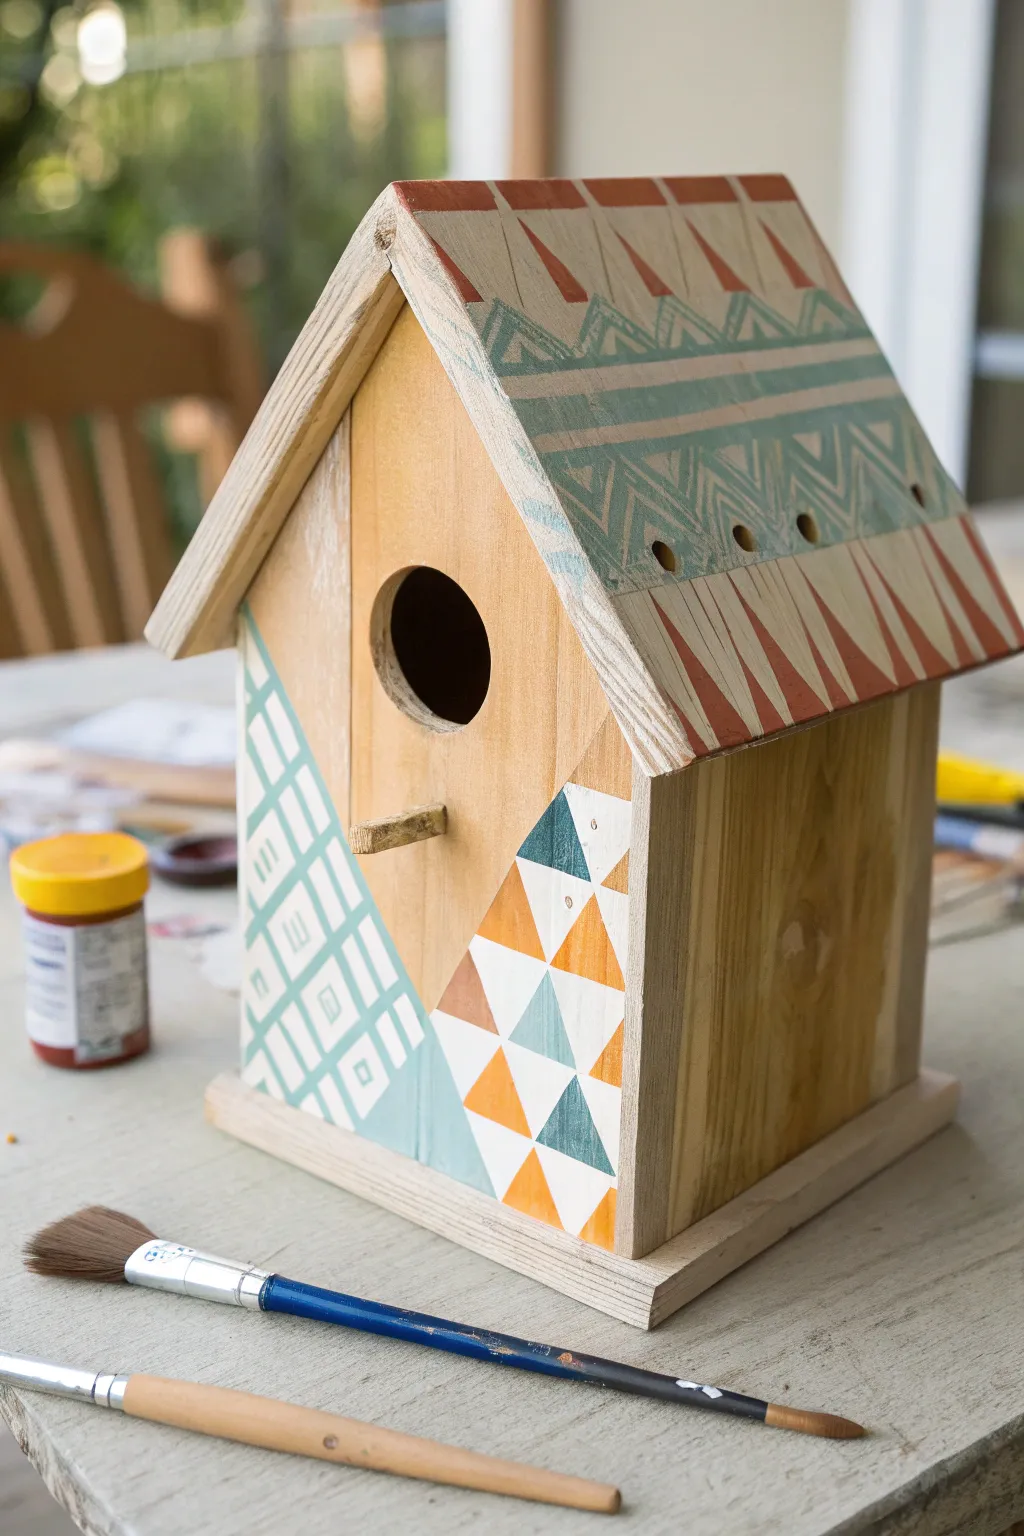
Transform a plain wooden birdhouse into a stylish garden accessory with a modern makeover featuring geometric patterns and soft, earthy colors. This project combines crisp lines with raw wood textures for a lovely bohemian look that fits perfectly on a patio or porch.
Step-by-Step Guide
Materials
- Unfinished wooden birdhouse
- Acrylic craft paints (teal, rust orange, white)
- Painter’s tape (various widths)
- Flat paintbrushes (medium & small)
- Fine-grit sandpaper (optional)
- Ruler
- Pencil
- Clear matte acrylic sealer (spray or brush-on)
Step 1: Preparation & Planning
-
Prep the surface:
Begin by ensuring your birdhouse is clean and free of dust. If the wood feels rough, give it a quick sanding with fine-grit sandpaper, wiping away any residue with a damp cloth. -
Remove hardware:
If your birdhouse has a hanger or any metal hardware, remove it temporarily or cover it completely with tape to keep it paint-free. -
Plan the front sections:
Using your pencil and ruler, lightly draw a diagonal line across the front of the birdhouse, separating the bottom left corner and the bottom right corner from the central wood area. This guides where your different patterns will go.
Tape Like a Pro
To prevent paint bleed, press the edge of your painter’s tape down firmly with a credit card or fingernail. Apply a tiny amount of the base color first to seal the tape’s edge.
Step 2: Painting the Roof
-
Tape the roof edge:
Apply a strip of painter’s tape along the bottom edge of the roof to create a clean border. You want a sharp line where the roof meets the walls. -
Base coat the pattern area:
For the roof’s main teal section, painting a light wash of white first can sometimes help the color pop, though painting directly on wood works for a more rustic look. Ensure you leave the very peak and the edges raw if desired. -
Create the teal bands:
Using a flat brush, paint two wide horizontal bands of teal across the roof. Let the first coat dry and apply a second for opacity. -
Add zigzag details:
Once the teal bands are fully dry, use a fine brush to hand-paint the zigzag or chevron patterns within the teal stripes. Using a lighter teal or white creates a nice contrast. -
Paint the rust triangles:
Along the top ridge and bottom edge of the roof, paint a series of elongated triangles using the rust-orange paint. I find that marking the center points of each triangle with a pencil first helps keep them uniform.
Fixing Wobbly Lines
If your hand-painted geometric lines aren’t perfectly straight, use a white or metallic paint pen to outline the shapes. The marker tip offers more control than a brush.
Step 3: Decorating the Front
-
Tape the geometric sections:
Use painter’s tape to mask off the central wood area, leaving only the bottom-left and bottom-right triangular sections exposed. -
Base coat the left section:
Paint the bottom-left triangular section with a solid coat of teal paint. Allow this to dry completely. -
Add grid details:
Using a small brush and white paint, create a grid pattern over the teal base. Add small squares or ticks inside the grid boxes for extra detail, mimicking a woven texture. -
Create the triangle pattern:
On the bottom-right section, paint a repeating pattern of small triangles. Alternate between rust, teal, white, and unpainted wood triangles to create a dynamic ‘quilt’ look. -
Clean up lines:
Carefully peel away the painter’s tape while the final paint is still slightly tacky to ensure crisp edges.
Step 4: Finishing Touches
-
Check the perch:
Decide if you want to paint the small perch peg or leave it natural. Leaving it natural often ties in nicely with the other raw wood elements. -
Touch ups:
Inspect your work for any paint bleeds or uneven lines. Use a small brush with the appropriate color or a bit of sandpaper to correct any mistakes. -
Seal the project:
Once all paint is thoroughly dry (give it at least 24 hours), apply a clear matte acrylic sealer. This protects the wood and paint from moisture if you plan to place the birdhouse outdoors.
Place your new birdhouse in a sheltered spot in the garden and enjoy the splash of pattern and color it brings to your outdoor space
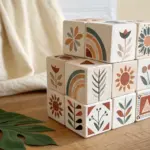
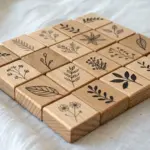
Geometric Color-Block Wood Tiles
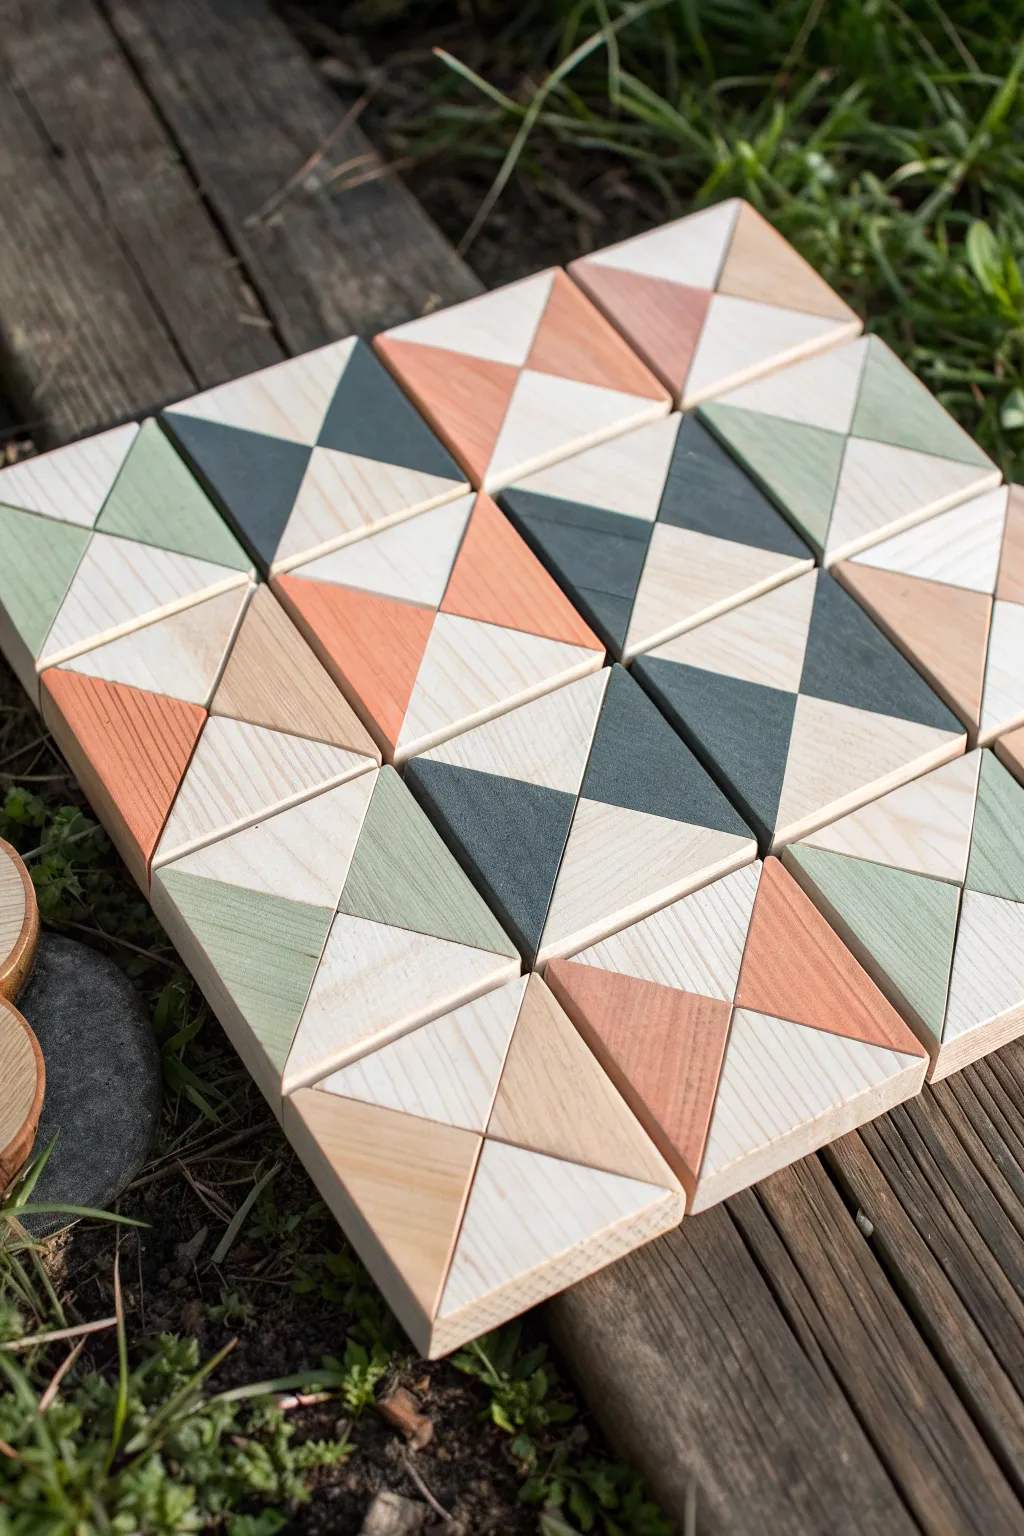
These striking geometric tiles combine the warmth of natural wood with muted, modern colors in a timeless quilt-like pattern. The clean lines and soothing palette of sage, charcoal, salmon, and beige make this a versatile project perfect for wall art, coasters, or even a custom tabletop design.
How-To Guide
Materials
- 16 square wooden tiles (approx 3×3 or 4×4 inches, unfinished pine or birch)
- Acrylic craft paints (Sage Green, Charcoal Grey, Salmon/Terracotta, Beige)
- Painter’s tape (high quality, low-tack)
- Ruler or straight edge
- Pencil
- Small flat synthetic paintbrush
- Fine-grit sandpaper (220 grit)
- Matte clear sealant spray or varnish
- Paper towels or rag
Step 1: Preparation & Layout
-
Sand the surface:
Begin by lightly sanding the face and edges of each wooden tile. You want a smooth surface free of splinters, but don’t over-sand to the point where the wood loses its texture. -
Wipe clean:
Remove all sanding dust thoroughly with a tack cloth or a slightly damp paper towel. Allow the wood to dry completely if it got wet. -
Mark the center:
Using your ruler and pencil, lightly find the exact center of one square tile by measuring. Place a tiny dot to mark this spot. -
Draw the diagonals:
Draw straight lines from corner to corner, crossing through your center dot. This ‘X’ creates the four triangular sections that form the basis of the classic geometric design. -
Repeat for all tiles:
Continue marking the centers and drawing the diagonal lines on all 16 of your wooden squares until your full grid is prepped.
Burnish for Crispy Lines
Before painting, seal the tape edge by painting a tiny bit of clear matte medium or white base coat first. This blocks voids so your colored paint won’t bleed underneath.
Step 2: Masking & Painting
-
Plan your palette:
Before painting, visualize or sketch out your pattern. The beauty of this design lies in balancing the painted sections with the raw wood triangles. I find it helpful to physically group the colors to see how they play off each other. -
Tape the first triangles layer:
Apply painter’s tape along the pencil lines to mask off the areas you want to keep as raw wood or paint a different color later. Press the tape edges down firmly with your fingernail to prevent bleed-under. -
Paint the dark accents:
Start with your boldest color, the charcoal grey. Paint selected triangles, applying thin, even coats. Brush from the tape inward toward the center of the triangle to minimize seepage under the tape edge. -
Add warmth with salmon:
While the grey dries, move to other tiles and tape off sections for the salmon/terracotta color. Apply this warm hue to create contrast against the cooler tones. -
Apply the sage green:
Tape and paint the sage green triangles. This earth tone bridges the gap between the natural wood and the darker grey. -
Add neutral beige tones:
Finally, paint the beige sections. This subtle color adds depth without overwhelming the natural grain of the nearby raw wood sections. -
Remove tape carefully:
Peel off the tape while the paint is still slightly tacky or completely dry—avoid pulling when it’s half-dry and gummy. Pull at a 45-degree angle away from the painted area for the cleanest line.
Step 3: Refining & Finishing
-
Let it cure:
Allow all the painted sections to dry fully. If the wood grain raised slightly after painting, you can very gently pass over it with fine sandpaper, but be careful not to distress the paint. -
Tape and paint opposing sections:
If your design calls for two painted triangles touching (like an hourglass shape), mask over the now-dry painted areas to protect them, then paint the remaining triangles according to your pattern. -
Touch up lines:
Inspect your geometric lines. If any paint bled, use a small craft knife to gently scrape it away or use a tiny brush with the appropriate color to fix the edge. -
Clean up raw wood:
If the unpainted wood sections got smudged, a quick targeted sanding will bring them back to a pristine natural look. -
Seal the tiles:
To protect the raw wood from yellowing and the paint from chipping, apply a thin coat of matte clear spray sealant. This unifies the sheen without making it look plastic. -
Arrange your mosaic:
Lay out your finished tiles to find the most pleasing arrangement. Rotate them to see how different triangles connect to form larger shapes like diamonds or pinwheels.
Make it Magnetic
Attach strong adhesive magnets to the back of each tile. Now you can use them on a fridge or magnetic board as an interactive, rearrangeable piece of art.
Now you have a stunning set of geometric tiles ready to display individually or as a cohesive modern art installation
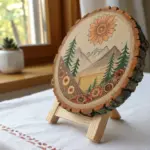
Dot Mandala Art on Wood Slices
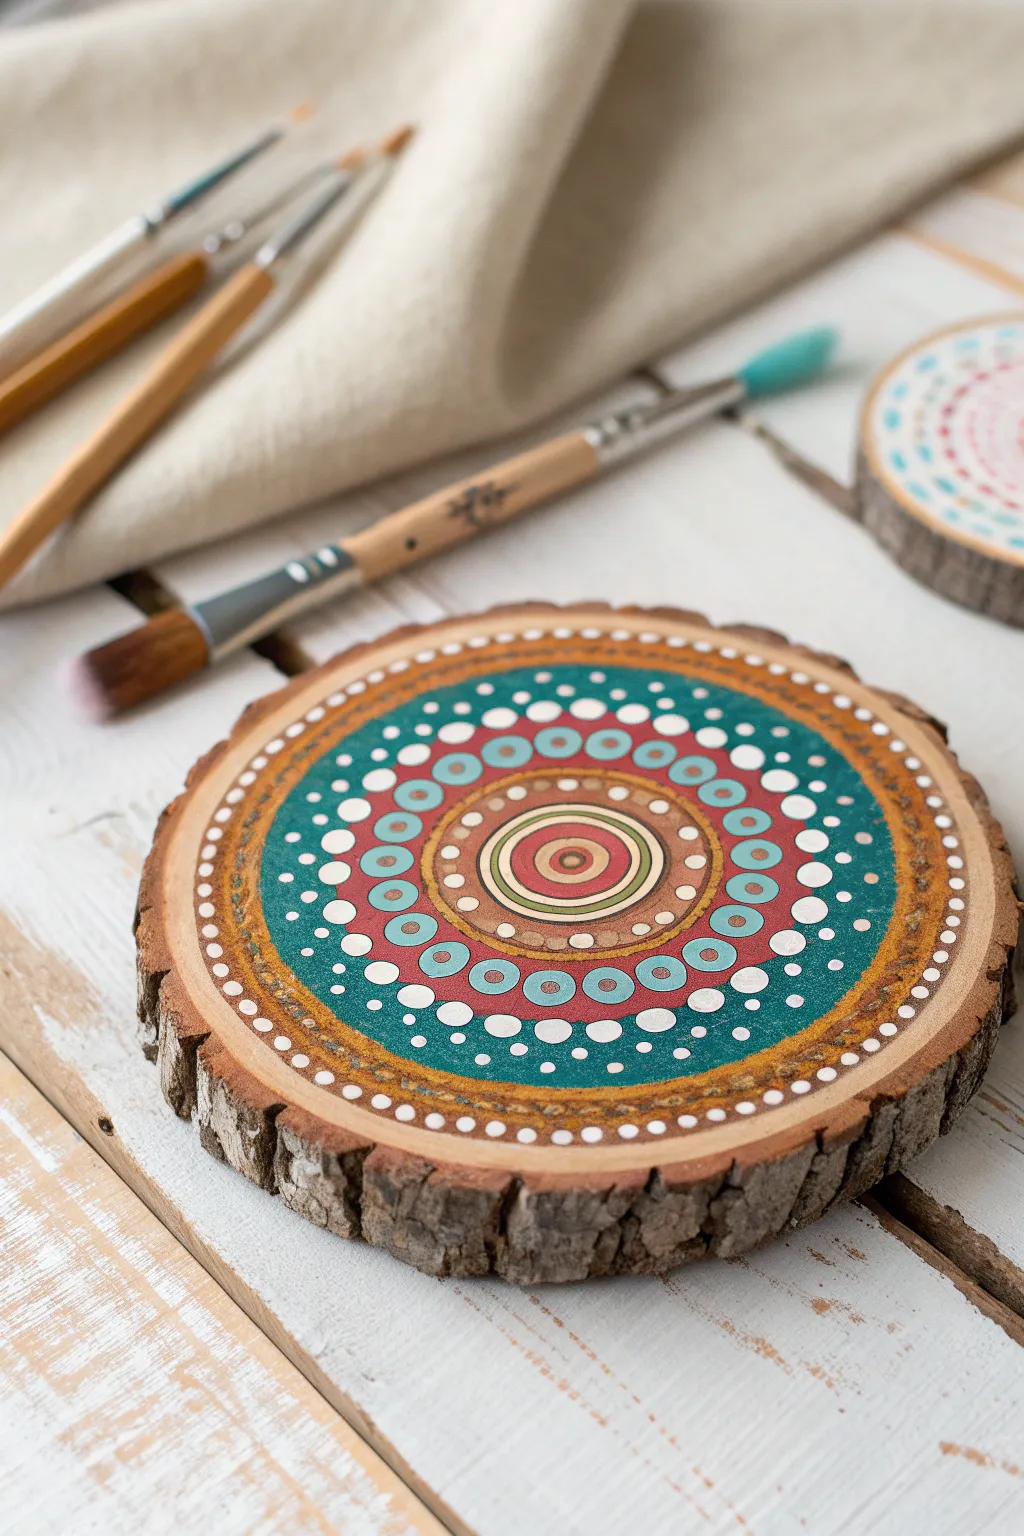
Transform a simple slice of nature into a vibrating work of art with this intricate dot mandala design. Featuring bands of teal, burnt umber, and coral, this project combines rustic charm with meditative precision for a stunning coaster or wall hanging.
Step-by-Step
Materials
- Wood slice (approx. 4-6 inches diameter) with bark edge
- Sandpaper (fine grit)
- Acrylic paints: Teal/Turquoise, Burnt Umber/Sienna, Coral/Red-Orange, White, Cream/Beige, Mustard Yellow
- Dotting tools (various sizes)
- Small flat paintbrush
- Ruler and pencil
- Compass (optional)
- Clear varnish or sealant (matte or gloss)
Step 1: Preparation & Base Layers
-
Prepare the surface:
Start by ensuring your wood slice is clean and smooth. Lightly sand the top surface to remove any roughness that might deflect your paintbrush, then wipe away the dust with a damp cloth. -
Mark the center:
Find the approximate center of your wood slice. Use a pencil and ruler to mark this spot lightly. If you want perfect symmetry, use a compass to draw faint concentric guide circles radiating outward from this center point. -
Paint the central circle:
Using a small brush or a large dotting tool, paint a solid circle in the very center using a light cream or beige color. Allow this to dry completely. -
Add the inner rings:
Carefully paint concentric rings inside your cream circle. Start with a small red-orange dot in the absolute center, followed by a thin ring of teal, and then a thin ring of red-orange. Let each ring dry before adding the next to keep lines crisp. -
Create the first outer band:
Paint a band of burnt umber around your central cream circle. This band should be about half an inch wide. While the paint is wet, you can feather the edges slightly for a softer look, but a solid block of color works perfectly too.
Step 2: Building the Mandala
-
Dot the umber band:
Dip a medium-sized dotting tool into cream paint. Place a ring of evenly spaced dots around the burnt umber band. Then, use a smaller tool to place tiny white dots in between the larger cream ones. -
Paint the main teal band:
Paint a wide band of teal or turquoise around the burnt umber section. This is your largest color field, so apply two coats if necessary to get rich, opaque coverage. -
Add large coral dots:
Using a larger dotting tool, load it with coral/red-orange paint. Create a ring of large dots sitting on the inner painted edge of the teal band, closest to the center. -
Layer dots-on-dots:
Once the large coral dots are dry, take a smaller tool with light blue or teal paint and place a smaller dot in the center of each coral dot. I prefer to wait until the base dot is fully hard to touch so they don’t blend. -
Create the outer teal pattern:
move to the outer edge of the teal band. Using a medium tool and white paint, create a ring of dots. Below this ring (closer to the center), add a second ring of slightly smaller white dots for a cascading effect. -
Fill the negative space:
Use your smallest dotting tool or even a toothpick to fill the empty teal space with tiny white micro-dots. This adds that magical ‘starry night’ texture to the background.
Fixing Smudged Dots
Did a dot smudge while wet? Don’t wipe it! Let it dry completely, then paint over the mistake with the background color. Re-dot once the fix is dry.
Step 3: Border & Finishing Touches
-
Paint the outer rim:
Paint the final outer ring of the design (before the bark) in a mustard yellow or golden ochre shade. This frames the teal section beautifully. -
Add border details:
On this yellow band, add a simple pattern. Use a small tool to place white dots spaced about a centimeter apart all the way around the ring. -
Create the final boundary:
For a sharp finish, add a very thin line of burnt umber right at the edge where the paint meets the raw bark. You can embellish this dark line with tiny white dots if you have space. -
Clean up guidelines:
If any pencil marks are still visible between your paint layers, gently erase them now that the paint is fully dry. -
Seal the artwork:
protect your hard work by applying a clear varnish or sealant over the entire painted surface. A glossy finish tends to make the dot colors pop and look like enamel.
Level Up: 3D Effect
Mix a tiny amount of thickening medium or heavy gel into your white paint for the top dots. This creates a raised, tactile texture you can feel.
Display your beautiful mandala on a coffee table or hang it up to bring a splash of color to your room
Soft Ombre Wash That Shows Grain
Embrace the natural beauty of wood grain by enhancing it rather than covering it up with this delicate wash technique. The result is a soft, warm, rose-tinted surface that glows in the sunlight, perfect for a coaster, trivet, or wall hanging.
Step-by-Step Guide
Materials
- Unfinished wood slice (round, with bark)
- Fine-grit sandpaper (220 grit)
- Tack cloth or slightly damp rag
- Acrylic paint (Deep Rose or Magenta)
- Acrylic paint (Titanium White)
- Water
- Small mixing cups or palette
- Wide flat synthetic brush (1-inch)
- Paper towels
- Matte or satin spray sealant
Step 1: Preparation & Sanding
-
Inspect the surface:
Begin by examining your wood slice. Run your hand over the top surface to check for any rough patches or splinters that might snag your brush later. -
Smooth the grain:
Using 220-grit sandpaper, gently sand the face of the wood slice in circular motions. The goal isn’t to remove material, but to create a velvety smooth surface that accepts moisture evenly. -
Clean the dust:
Wipe the entire surface vigorously with a tack cloth or a barely damp rag. It is crucial to remove all sawdust, as trapped dust will create muddy spots in your delicate paint wash. -
Protect the bark:
If you want to keep the bark completely natural, you can apply a strip of painter’s tape around the rim, though a steady hand usually works just fine since we are using a watery mix.
Step 2: Mixing the Wash
-
Create the base tint:
In a mixing cup, place a dime-sized amount of Deep Rose or Magenta acrylic paint. Add a tiny dot of White designed to soften the harshness of the pigment without making it opaque. -
Add water gradually:
Add water to your paint drop by drop. You are looking for a consistency much thinner than heavy cream—think more like skim milk or watercolor tea. -
Test the opacity:
Brush a tiny amount of your wash onto a scrap piece of wood or the very back of your slice. You should see the wood grain clearly through the color; if it’s too solid, add more water.
Too Blotchy?
If the wash looks uneven, your wood was likely too dry. Sand the discoloration back lightly and re-wet the entire surface with plain water before reapplying the color wash.
Step 3: Applying the Wash
-
Dampen the wood:
Before applying paint, take a clean brush with plain water and lightly dampen the entire wood surface. This technique helps the colored wash flow smoothly and prevents blotchy absorption. -
Begin the application:
Dip your wide flat brush into the diluted rose wash. Start painting in the center of the wood slice, following the direction of the tree rings where possible. -
Feather outwards:
Work the color quickly toward the edges. Because the wood is pre-dampened, the color should spread beautifully without leaving hard brush strokes. -
Wipe back excess:
Immediately after covering the surface, take a lint-free paper towel and gently wipe across the wood. This removes excess moisture and pushes the pigment into the grain lines. -
Assess the color:
Look at the result. If the pink is too faint, I sometimes let it dry for five minutes and apply a second very thin wash to build depth. -
Create a subtle gradient:
To mimic the ‘ombre’ look mentioned in the inspiration, dip a clean part of your towel in water and dab the very center of the slice to lift a little more pigment, leaving the edges slightly darker.
Add Metallic Sparkle
Mix a tiny pinch of mica powder or metallic gold pigment into your final clear sealant coat to give the wood slice a subtle, magical shimmer in the sunlight.
Step 4: Finishing Touches
-
Dry completely:
Let the wood slice dry fully. This may take only 20 minutes since the layers were thin, but ensure it is cool to the touch before sealing. -
Check for raised grain:
Sometimes water causes wood fibers to stand up. If the surface feels rough after drying, pass your 220-grit sandpaper over it very lightly one last time. -
Seal the surface:
Spray the face with a matte or satin clear coat. Use quick, even sweeping motions to avoid puddling. -
Seal the back:
Once the top is dry, flip it over and seal the back as well to prevent the wood from warping due to humidity changes over time.
Now you have a beautifully tinted piece of nature ready for display or practical use.
Layered Ocean Waves on Driftwood
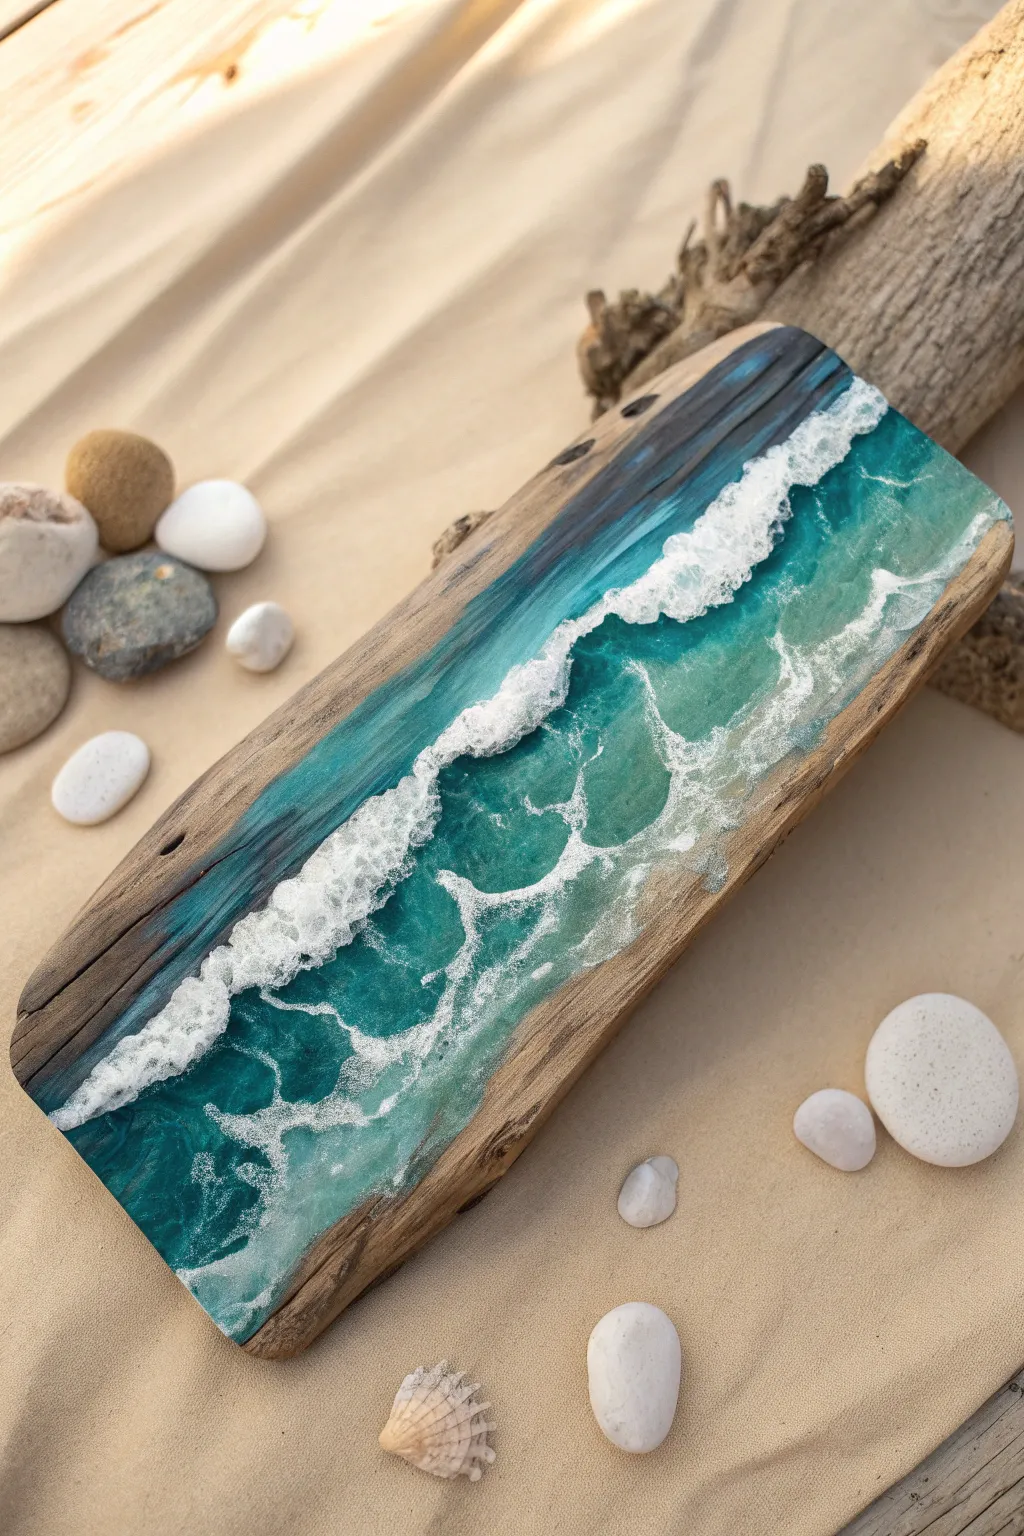
Transform a weathered piece of driftwood into a stunning seascape using layers of tinted resin to create depth and movement. This project captures the beauty of crashing waves against a rustic wooden canvas, perfect for bringing a touch of the coast into your home.
Step-by-Step
Materials
- Flat, clean piece of driftwood (approx. 12-18 inches)
- Epoxy resin (2-part art resin)
- Resin pigments: Navy Blue, Turquoise/Teal, White
- Heat gun or torch
- Plastic cups and stir sticks
- Nitrile gloves
- Painter’s tape or masking tape
- Sandpaper 220 grit
- Dust sheet or silicone mat
- Straw (optional but helpful)
Step 1: Preparation
-
Clean the Wood:
Begin by thoroughly cleaning your driftwood piece. Use a stiff brush to remove any loose sand, dirt, or bark splinters that might flake off later. Wipe it down with a slightly damp cloth and let it dry completely. -
Sand the Top Surface:
Identifying the flattest face of the driftwood, lightly sand the area where you intend to pour the resin. You don’t need it perfectly smooth, but knocking down high ridges helps the resin flow evenly. Wipe away the dust. -
Tape the Underside:
Apply painter’s tape to the underside of the wood and along the rugged edges where you don’t want resin to drip. Press the tape down firmly to create a seal, acting as a dam for any runaway drips during the pour.
Step 2: Mixing the Resin
-
Mix the Base Batch:
In a large cup, mix your epoxy resin and hardener according to the manufacturer’s ratio (usually 1:1). Stir slowly for at least 3 minutes, scraping the sides and bottom to ensure a perfect chemical blend. -
Divide and Tint:
Pour the mixed resin into four smaller cups. Leave one cup clear. Tint the others: a deep navy blue for the deep water, a bright turquoise or teal for the shallows, and an opaque white for the sea foam.
Pro Tip: Lacing Magic
For better sea foam cells, use a specialized ‘casting white’ pigment paste rather than liquid dye or acrylic paint. Being heavier, it sinks slightly and separates beautifully when heated.
Step 3: Pouring the Ocean Layer
-
Apply the Deep Blue:
Start by pouring a strip of the navy blue resin along the top third of your driftwood canvas. This represents the deepest part of the ocean furthest from the shore. -
Pour the Turquoise:
Next to the navy blue, pour a strip of the turquoise resin. Overlap the colors slightly so they touch. This transition zone creates the natural gradient seen in ocean water. -
Add Clear Resin:
Pour clear resin on the remaining bottom section of the wood where the ‘sand’ or bare wood would adhere. Use a stick to blend the turquoise into the clear section for a faded, watery look. I like to keep this layer thin near the bottom edge. -
Blend the Gradient:
Using a heat gun on a low setting or your gloved finger, gently blur the line between the navy and turquoise resin until the transition creates a smooth, ombré effect.
Level Up: Sandy Texture
Before pouring the clear resin at the bottom, mix a small amount of real sand into a bit of resin and apply it to the lowest edge of the wood for a genuine textured shoreline.
Step 4: Creating Waves
-
Lay the White Lines:
Take your cup of white resin and pour a thin, distinct line right at the transition point where the turquoise meets the clear resin. Add a second, thinner line further back in the deep blue section for a secondary wave. -
Heat and Push:
Using your heat gun, warm the white line slightly to make it fluid. Then, swiftly push the white resin back towards the blue area using the air from the heat gun. Angle the gun low and parallel to the surface to glide the white pigment over the colors. -
Create Cells:
As you push the white resin, you’ll see lacing or ‘cells’ begin to form, mimicking sea foam. If you need more control, blow through a drinking straw to maneuver specific sections of the wave crests for natural irregularities. -
Refine the Shoreline:
Use a toothpick or small stick to drag tiny wisps of the white foam down into the clear section, creating the look of receding water or bubbles on the ‘beach’.
Step 5: Finishing Touches
-
Pop Bubbles:
quickly pass a torch or heat gun over the entire surface one last time to pop any micro-bubbles that have risen to the top. Be careful not to scorch the resin or wood. -
First Cure:
Cover the piece with a box to protect it from dust and let it cure for 24 hours. Check the manufacturer’s suggested cure time for your specific brand. -
Optional Second Layer:
For added depth, you can lightly sand the cured surface and pour a second clear coat with another layer of white waves on top. This 3D effect makes the water look incredibly realistic. -
Cleanup:
Once fully hard, remove the tape from the back. If any resin drips hardened on the underside, you can sand them away or carefully remove them with a utility knife.
Display your ocean masterpiece on a shelf or mount it to the wall to enjoy that seaside calm every day
Galaxy Night Sky Bark-Edge Rounds

Transform rustic wood slices into enchanting portals to the cosmos with this simple yet striking acrylic painting project. The natural bark edge provides a beautiful, earthy frame for these deep blue and purple galaxy scenes, perfect for coasters or decorative magnets.
Step-by-Step Tutorial
Materials
- Small wood slices with bark edges (3-4 inches diameter)
- Acrylic paints (Dark Blue, Phthalo Blue, Purple, Magenta, Black, White)
- Flat shader brush (size 6 or 8)
- Small round detail brush (size 0 or 00)
- Old toothbrush (optional for splatter stars)
- Palette for mixing
- Cup of water and paper towels
- Matte or satin varnish (optional)
Step 1: Preparing the Base
-
Surface Prep:
Ensure your wood slices are clean and free of loose dust. If the surface feels rough, give it a quick sanding with fine-grit sandpaper, but be careful not to damage the bark rim. -
Initial Base Coat:
Load your flat brush with a dark navy or midnight blue. Paint a circle in the center of the wood slice, leaving a small margin of natural wood showing just inside the bark edge. This border makes the design pop. -
Deepening the Edges:
While the blue is still wet, mix a tiny bit of black into your blue. Paint along the outer perimeter of your blue circle, blending inwards slightly to create a vignette effect that mimics the vastness of space.
Paint Soaking In?
If the raw wood absorbs the first layer of paint and looks dull, let it dry and apply a second coat. A clear gesso primer layer first also helps keep colors bright.
Step 2: Creating the Galaxy
-
Adding the Nebula:
Rinse your brush and pick up some purple paint. While the base is tacky but not fully dry, swipe a curved, swooping motion across the center. For the moon piece, sweep from the bottom right towards the top left. -
Brightening the Core:
Mix a little magenta with white to create a soft pink-purple. Apply this sparingly into the center of your purple streak to create a glowing core. Blend the edges softly with a clean, damp brush. -
Layering Blues:
Add touches of a brighter Phthalo blue around the purple areas to create depth. Blend these colors using a gentle stippling or soft sweeping motion so there are no harsh lines between the colors. -
Drying Time:
Let this background layer dry completely before moving on to the stars. The paint should be matte and cool to the touch.
Step 3: The Moon and Stars
-
Painting the Moon:
If you are recreating the moon design, switch to your fine detail brush and white paint. Outline a crescent moon shape on the left side of the galaxy swirl. -
Filling the Moon:
Fill in the crescent shape with solid white. You may need two thin coats to ensure it covers the dark background vividly. -
Texturing the Moon:
Once dry, use a nearly dry brush with a whisper of grey to dab faint craters or shadows onto the inner curve of the crescent for dimension. -
Painting Major Stars:
Using the very tip of your detail brush, paint several four-pointed or five-pointed stars scattered across the sky. Concentrate a few larger ones near the galaxy swirl. -
Adding Distant Stars:
Dip the back end of your paintbrush handle into white paint and dot it onto the wood. This creates perfect round dots for medium-sized planets or stars. -
The Starfield Splatter:
For the tiniest stars, dilute a small amount of white paint with water. Dip an old toothbrush in it, hold it over the wood, and flick the bristles with your thumb. Test on paper first to control the splatter size. -
Finishing Touches:
Add tiny white highlights to the center of your largest painted stars to make them twinkle. -
Sealing:
Once the artwork is thoroughly dry, apply a layer of matte or satin varnish to protect the paint and make the colors richer without adding too much artificial gloss.
Make It Sparkle
Mix a tiny amount of iridescent mixing medium or fine holographic glitter into your varnish coat for a subtle shimmer that only appears when the light hits it.
Enjoy displaying your miniature slice of the universe on your coffee table or fridge
Faux Inlay Patterns with Paint Pens
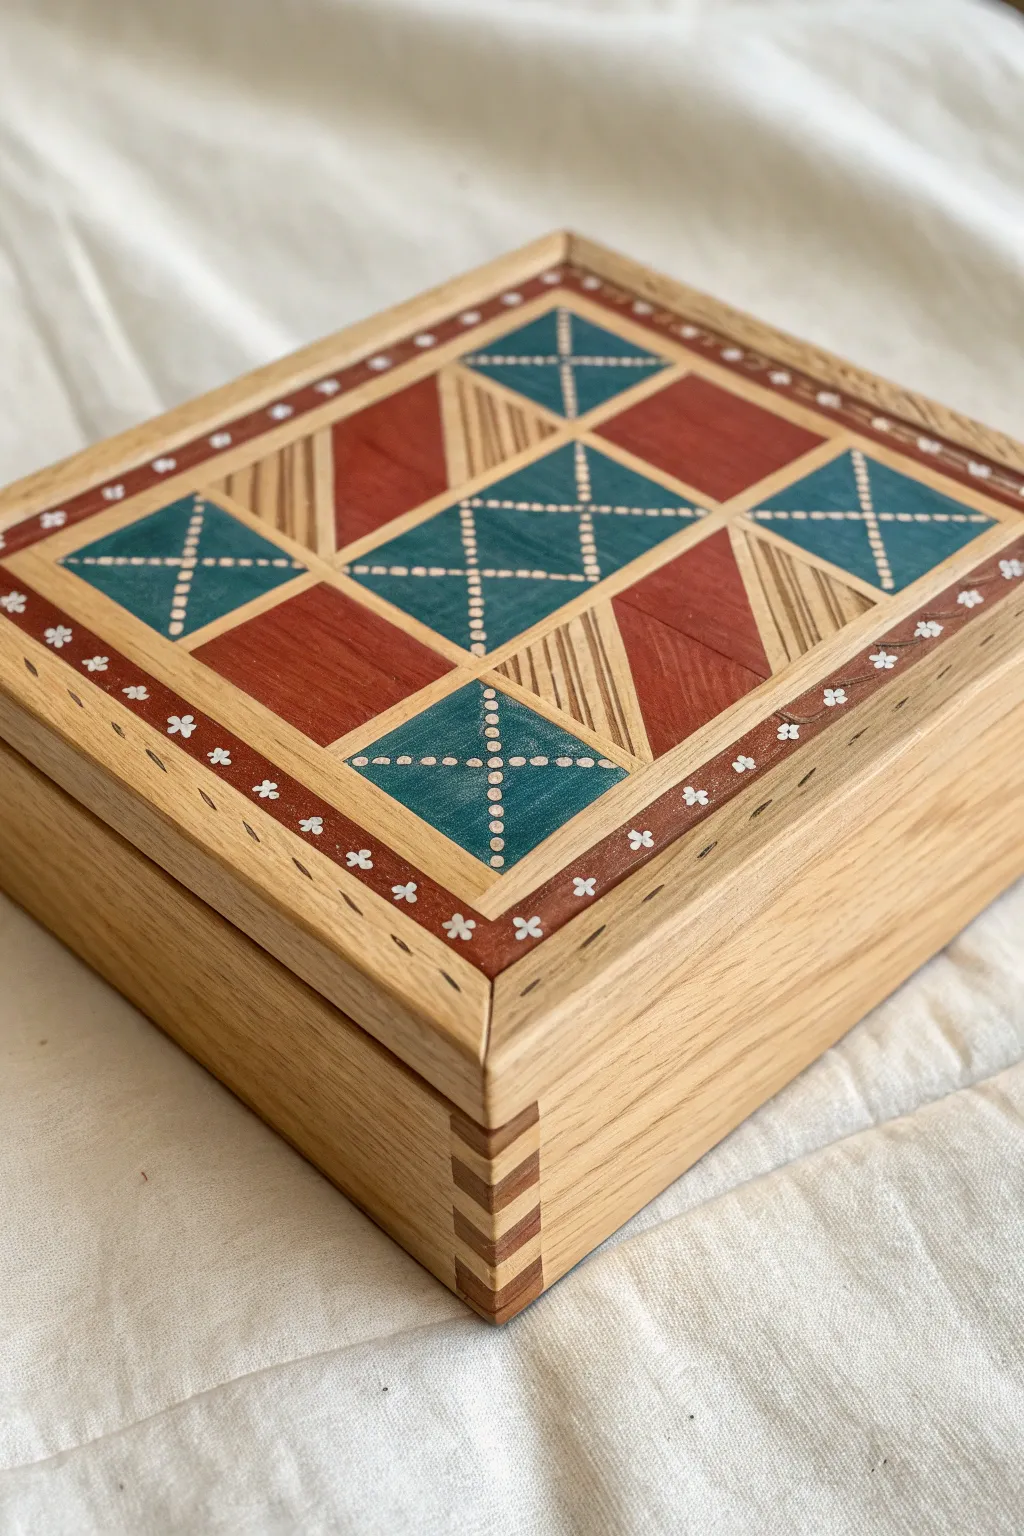
Achieve the sophisticated look of traditional marquetry without cutting a single piece of veneer by using paint pens on a raw wood box. This geometric design combines deep reds, teals, and natural wood tones with delicate dotted details for a stunning faux inlay effect.
Detailed Instructions
Materials
- Unfinished wooden box (with finger joints preferred)
- Fine-grit sandpaper (220 grit)
- Pencil and ruler
- Painter’s tape or masking tape
- Paint pens (Deep Red/Burgundy, Teal/Turquoise, White)
- Matte or Satin clear coat sealant spray
- Clean cloth
Step 1: Preparation & Grid
-
Prepare the surface:
Start by lightly sanding the entire box, focusing on the lid, to ensure a smooth canvas for your paint. Wipe away all dust with a clean, dry cloth. -
Mark the center:
Using your ruler, find the exact center of the box lid. Draw a light cross to divide the lid into four equal quadrants. -
Create the border:
Measure a consistent border width (about 3/4 inch) from the edge of the lid and draw a square frame inside. This will be your border area. -
Draw the main grid:
Inside the border, draw a 3×3 grid. The squares should be equal in size, sitting diagonally like diamonds if you prefer, or straight as shown in the example which uses a standard grid orientation rotated or bisected design elements. -
Sketch the triangles:
Within specific grid squares, draw diagonal lines to create triangles. Following the pattern shown, alternate the direction of these diagonals to create dynamic movement.
Step 2: Painting the Faux Inlay
-
Tape off the red sections:
To get crisp lines, tape off the boundaries of the triangular sections designated for the deep red color. Press the tape edges down firmly. -
Apply red paint:
Fill in the exposed triangular sections with the burgundy paint pen. Use long, even strokes to simulate the grain of wood. Let this dry completely before peeling the tape. -
Tape and paint the teal sections:
Once the red is dry, repeat the taping process for the teal squares and triangles. Fill these in carefully with your teal paint pen. -
Create the faux wood grain:
For the “natural” colored triangles, leave the wood bare but draw fine vertical or diagonal lines using a light brown or tan fine-tip pen to exaggerate a striped wood grain effect, mimicking inlaid strips. -
Paint the border:
Carefully color in the border frame with the burgundy paint pen. I find it helpful to outline the edges first before filling in the center.
Bleeding Lines?
If paint bleeds under the tape, let it dry completely. Then, gently scrape the excess away with an X-Acto knife or touch it up with a distinct black outline to hide the error.
Step 3: Detailing & Finishing
-
Add the border flowers:
Using a fine-tip white paint pen, add small four-dot clusters (representing flowers) spaced evenly along the center of the red border. -
Detail the teal squares:
On the teal shapes, draw a white “X” or cross using a series of small, closely spaced dots. This mimics functional stitching or decorative pinning often found in leather or fabric crafts. -
Add subtle black accents:
Using a very fine black pen, add tiny tick marks or dashes along the wood grain sections and the border edges to simulate the shadow lines where different pieces of wood would join in real inlay. -
Decorate the side edges:
Don’t forget the rim of the lid. Add small dashes or simple geometric marks around the side profile to carry the design over the edge. -
Seal the project:
Once all ink is fully cured (give it at least an hour), finish the box with a light coat of matte or satin spray sealant to protect the design from handling.
Contrast Boost
Use a gold metallic pen instead of white for the dots to give the box a more antique, luxurious feel that catches the light beautifully.
Now you have a charming keepsake box that looks like a master woodworking piece without the sawdust


Have a question or want to share your own experience? I'd love to hear from you in the comments below!