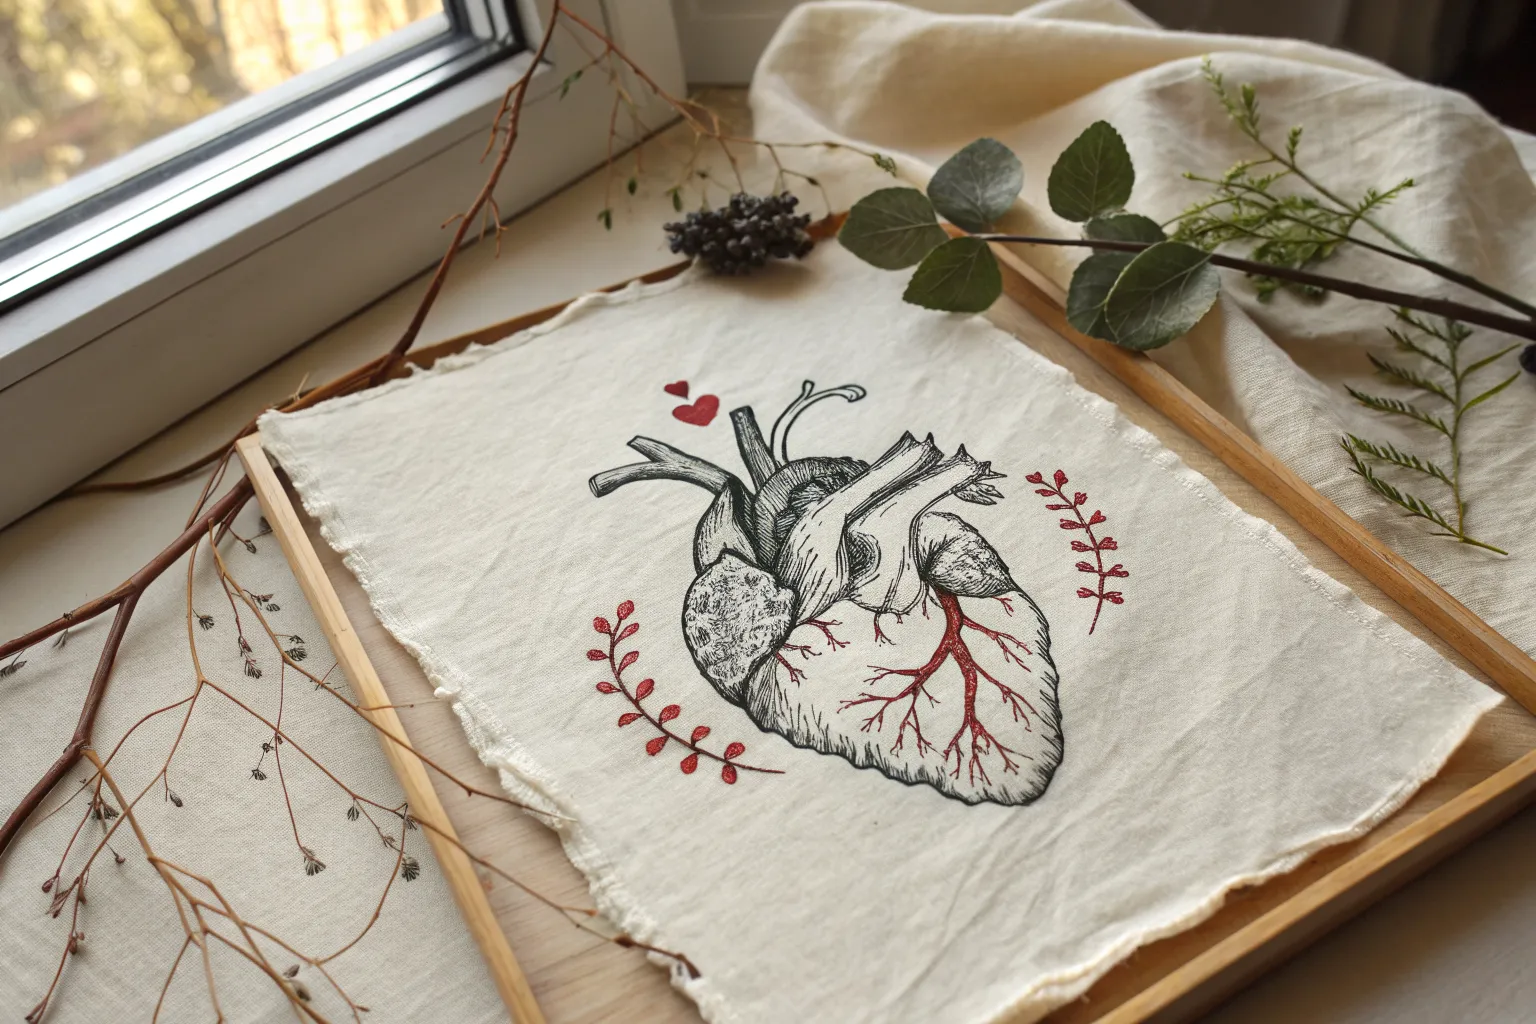
If you’re craving gory drawing ideas that feel bold, creepy, and weirdly beautiful, you’re in the right headspace. I love mixing anatomy horror with playful art choices—because the more intentional your textures and lighting are, the more believable the gore gets.
Skull With Blood Smear Accents
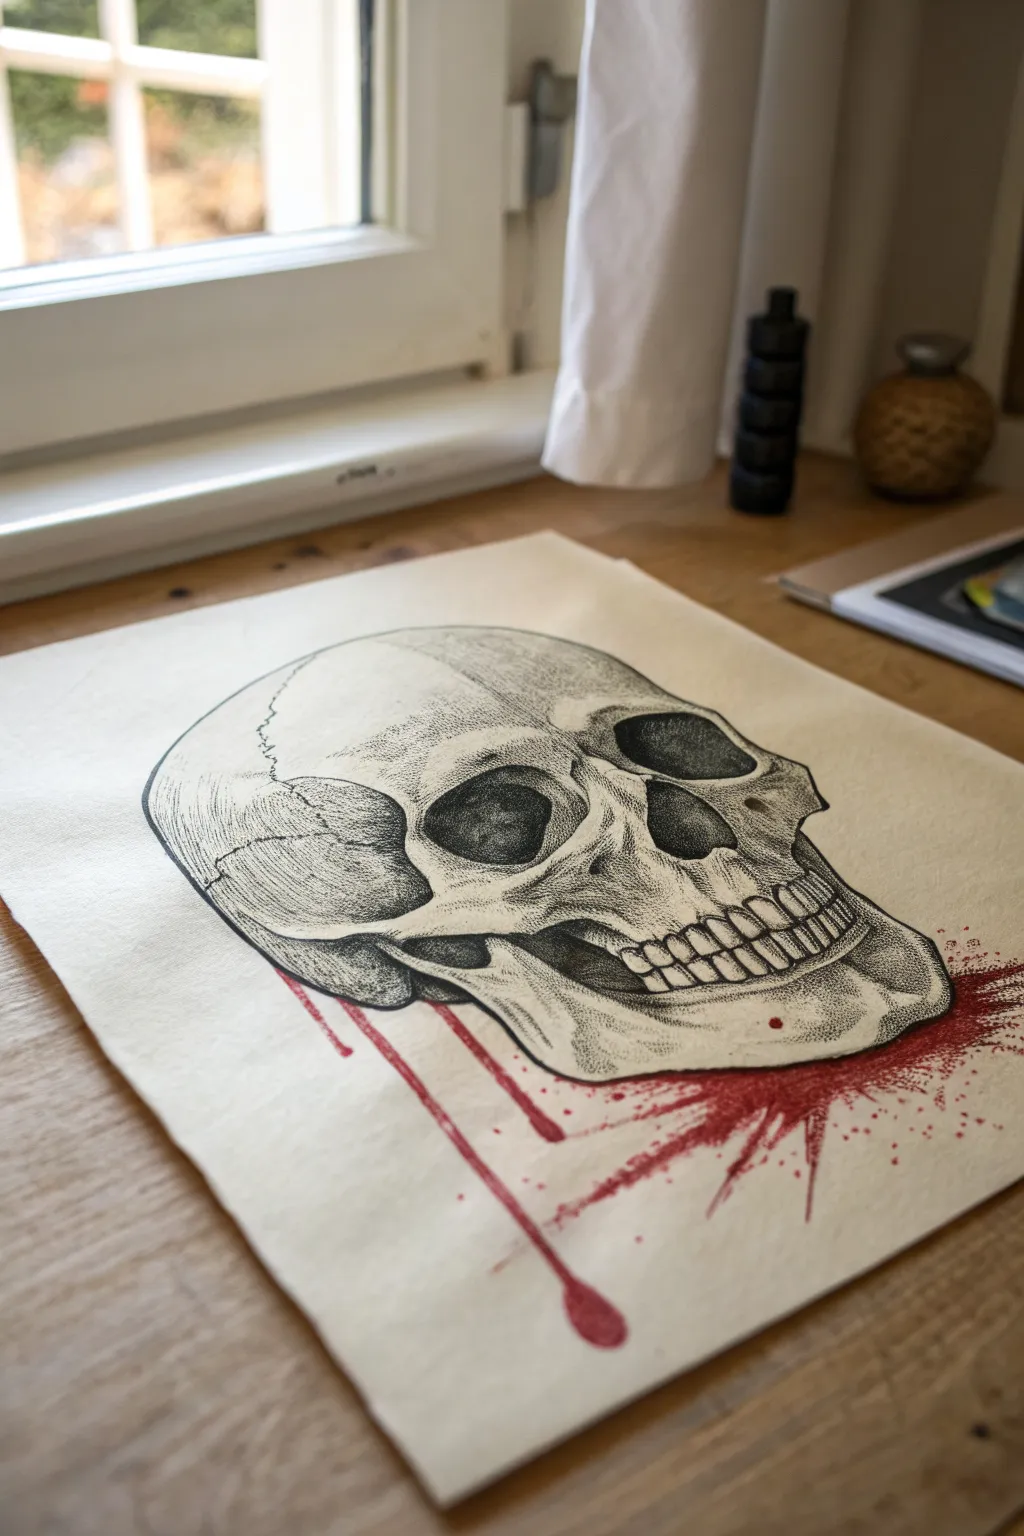
This striking illustration combines the meticulous precision of stippling with raw, expressive energy. You’ll create a detailed skull study using dotwork shading, finished with shocking streaks of crimson ink for a beautifully macabre effect.
Detailed Instructions
Materials
- High-quality heavyweight drawing paper (off-white or cream)
- HB pencil
- Kneaded eraser
- Fine liner pens (sizes 0.05, 0.1, and 0.5 mm)
- Red ink or diluted red acrylic paint
- Small round paintbrush
- Reference image of a human skull
Step 1: Structural Sketching
-
Lay the Foundation:
Begin by lightly sketching the basic Cranium shape using an HB pencil. Focus on getting the proportions right—a large oval for the brain case and a smaller, boxier section for the jaw and face. -
Define Key Features:
Map out the large, dark eye sockets (orbits) and the inverted heart shape of the nasal cavity. These are your anchors for the face so take your time placing them. -
Refine the Contours:
Add the zygomatic arches (cheekbones) and the brow ridge. Keep your lines faint so they can be easily erased later, but accurate enough to guide your pen. -
Sketch the Teeth:
Draw the upper and lower teeth lightly. Don’t worry about individual separation yet; just establish the curved gum line and the general bite alignment.
Dot Control
Hold your pen vertically when stippling. Slanted angles create tiny dashes instead of clean round dots, which ruins the texture effect.
Step 2: Inking outlines
-
Initial Outline:
Switch to a 0.1mm fine liner. Trace your pencil lines, but avoid a single continuous line; use broken or varied line weights to suggest bone texture rather than a smooth cartoon outline. -
Detailing Fractures:
Draw the sutures (the squiggly cracks where bone plates meet) on the side of the skull. These jagged lines add immense realism and age to the piece. -
Deepening Shadows:
Use a 0.5mm pen to fill in the deepest black areas, specifically inside the eye sockets and the nasal cavity. Leave small, irregular white speckles in these dark voids to suggest rough bone texture catching the light.
Fixing Ink Blobs
If you accidentally drop too much red ink, don’t wipe it! Let it dry completely, then stipple over the edges with white ink or gel pen to refine the shape.
Step 3: Stippling and Texture
-
Start the Stippling:
Using your 0.05mm pen, begin the stippling process. Place dots closer together in areas where shadows naturally fall—under the cheekbones, around the temples, and beneath the jaw. -
Build Mid-Tones:
Move to the 0.1mm pen to expand your gradients. Spread dots further apart as you move toward the highlighted areas of the forehead and rounded cheek surfaces. -
Adding Bone Texture:
Create clusters of dots along the cranium and jawline to simulate the porous surface of old bone. This shouldn’t be uniform; randomness creates the organic look. -
Shadowing the Teeth:
Carefully stipple the spaces between the teeth and the gum line. Keep the teeth themselves mostly white, using only faint dots near the roots to show curvature. -
Final Contrast Check:
Step back and look at your contrast. Use the 0.1mm pen to go over the darkest shadow transitions again, densifying the dotwork to make the skull pop off the page. -
Clean Up:
Once the ink is completely dry—give it a few minutes—gently erase all underlying pencil marks with your kneaded eraser.
Step 4: The Bloody Accent
-
Prepare the Red Medium:
Your red ink or diluted paint should be fluid but pigment-rich. Test the consistency on a scrap piece of paper to ensure it flows easily. -
The Main splatter:
Load a small round brush with red ink. Position it under the jaw and flick the bristles or tap the handle to create the explosive splatter effect at the base. -
Adding the Streaks:
For the defined lines dripping down, brush two or three deliberate strokes downward from the splatter zone. I prefer to let the brush run dry towards the end of the stroke for a trailing effect. -
Controlled Drops:
Add a few intentional droplets separate from the main splash, perhaps one on the jaw bone itself, to connect the gory element to the object.
Allow the red ink to dry completely before framing your chilling masterpiece


Half Flesh, Half Bone Portrait

This striking large-scale drawing explores the duality of mortality by juxtaposing a lively, realistic portrait with its skeletal structure. The piece features a distinct vertical division, rendering half the face in warm flesh tones and the other in stark, anatomical bone detail.
Step-by-Step Guide
Materials
- Large roll of heavy cartridge paper or white banner paper (approx. A1 or larger)
- Graphite pencils (H, HB, 2B)
- Colored pencils (flesh tones: ochre, burnt sienna, pinks, creams)
- Colored pencils (bone tones: cool grays, warm grays, raw umber, white)
- Pencil sharpener
- Eraser (kneaded and plastic)
- Long ruler or straight edge
- Red colored pencil (for the dividing line)
- Workable fixative spray (optional)
Step 1: Planning and Underdrawing
-
Paper Preparation:
Cut a large sheet of white banner paper or heavy cartridge paper to your desired size (roughly 24×36 inches offers great impact). Tape the corners down to a flat surface or drawing board to prevent slipping. -
The Dividing Line:
Using your long ruler, draw a faint vertical line straight down the center of the paper. This will be the boundary between life and death. -
Basic Head Shape:
Lightly sketch a large oval shape that spans both sides of the line. Focus solely on the outer silhouette of the head and neck first, ensuring it feels symmetrical in weight. -
Horizontal Guides:
Sketch light horizontal guidelines to align the features. You’ll need lines for the eyes, the base of the nose, the mouth, and the chin. These must be perfectly level so the skull and face match up anatomically. -
Sketching the Living Side:
On the left side, sketch the outline of the eye, eyebrow, half-nose, and lips. Keep your pencil pressure very light, as you want these graphite lines to disappear under the color later. -
Sketching the Skeleton Side:
On the right side, draft the corresponding skeletal features. The eye socket should be larger than the living eye, sitting slightly lower. The nasal cavity is a triangular void, and the teeth should align roughly where the lips are on the other side.
Reference Is Key
Don’t guess on anatomy. Print a photo of a face and a skull, cut them in half, and tape them together side-by-side to use as a direct reference while drawing.
Step 2: Rendering the Flesh (Left Side)
-
Initial Eye Detail:
Start detail work with the eye on the left. Use blues, greens, or browns for the iris, and add a dark pupil. Remember to leave a small white highlight to give the eye life. -
Base Skin Tones:
Lay down a base layer of cream or lightest flesh tone over the entire face area. Use broad, soft strokes to avoid harsh lines. I prefer to work in small circular motions to build up a smooth texture. -
Building Shadows:
Layer darker ochres and pinks around the eye socket, the side of the nose, and under the lip. This establishes the three-dimensional form of the face. -
Refining Features:
Sharpen your pencils and refine the eyebrow hairs and eyelashes. Add darker browns to the nostril and the line between the lips to create depth. -
Neck and Shoulders:
Extend the flesh tones down the neck. Use vertical strokes here to suggest muscle structure and tendons, fading them out at the bottom for a sketch-like aesthetic.
Make It Raw
Instead of a clean cut, make the dividing line jagged or torn. Add dripping blood effects along the seam where skin meets bone for a grittier result.
Step 3: Rendering the Bone (Right Side)
-
Socket Depths:
Switch to your cool grays and browns. Fill in the eye socket and nasal cavity with dark, heavy layering to make them look like hollow voids. Keep the edges of these voids relatively soft. -
Bone Texture Base:
Lightly shade the skull using a pale warm gray or dirty cream color. Leave areas white where the light would hit the forehead and cheekbone. -
Cracks and Sutures:
Use a sharp dark grey or raw umber pencil to draw the cranial sutures (the squiggly lines on the skull) and small surface cracks. This texture is crucial for separating bone from skin. -
Teeth alignment:
Carefully draw the teeth. They shouldn’t be perfect chiclets; add slight gaps and roots. Shade heavily between the top and bottom rows to show they are separate. -
Jaw and Neck Shadowing:
Shade under the cheekbone and the jawline heavily to create volume. Follow the anatomy of the vertebrae in the neck area, using red/brown lines to hint at the raw muscle connecting to the bone.
Step 4: Final Touches
-
The Red Divider:
Take your red colored pencil and trace over your initial center line. Make it bold and deliberate to emphasize the split. -
Cross-Hatching Texture:
Go back over both sides with light cross-hatching strokes. Using similar directional strokes on both the skin and bone helps unify the two disparate halves into one piece. -
Reinforcing Contrast:
Check your values. If the skull looks too flat, deepen the darkest shadows. If the skin looks washed out, add a touch more burnt sienna to the shadowed areas. -
Grommets (Optional):
If you plan to hang this like the example, reinforce the top corners with tape on the back and punch holes or install metal grommets for easy display.
Hang your finished piece high and step back to appreciate the powerful contrast you have created


Ripped Skin Reveal Underlayer
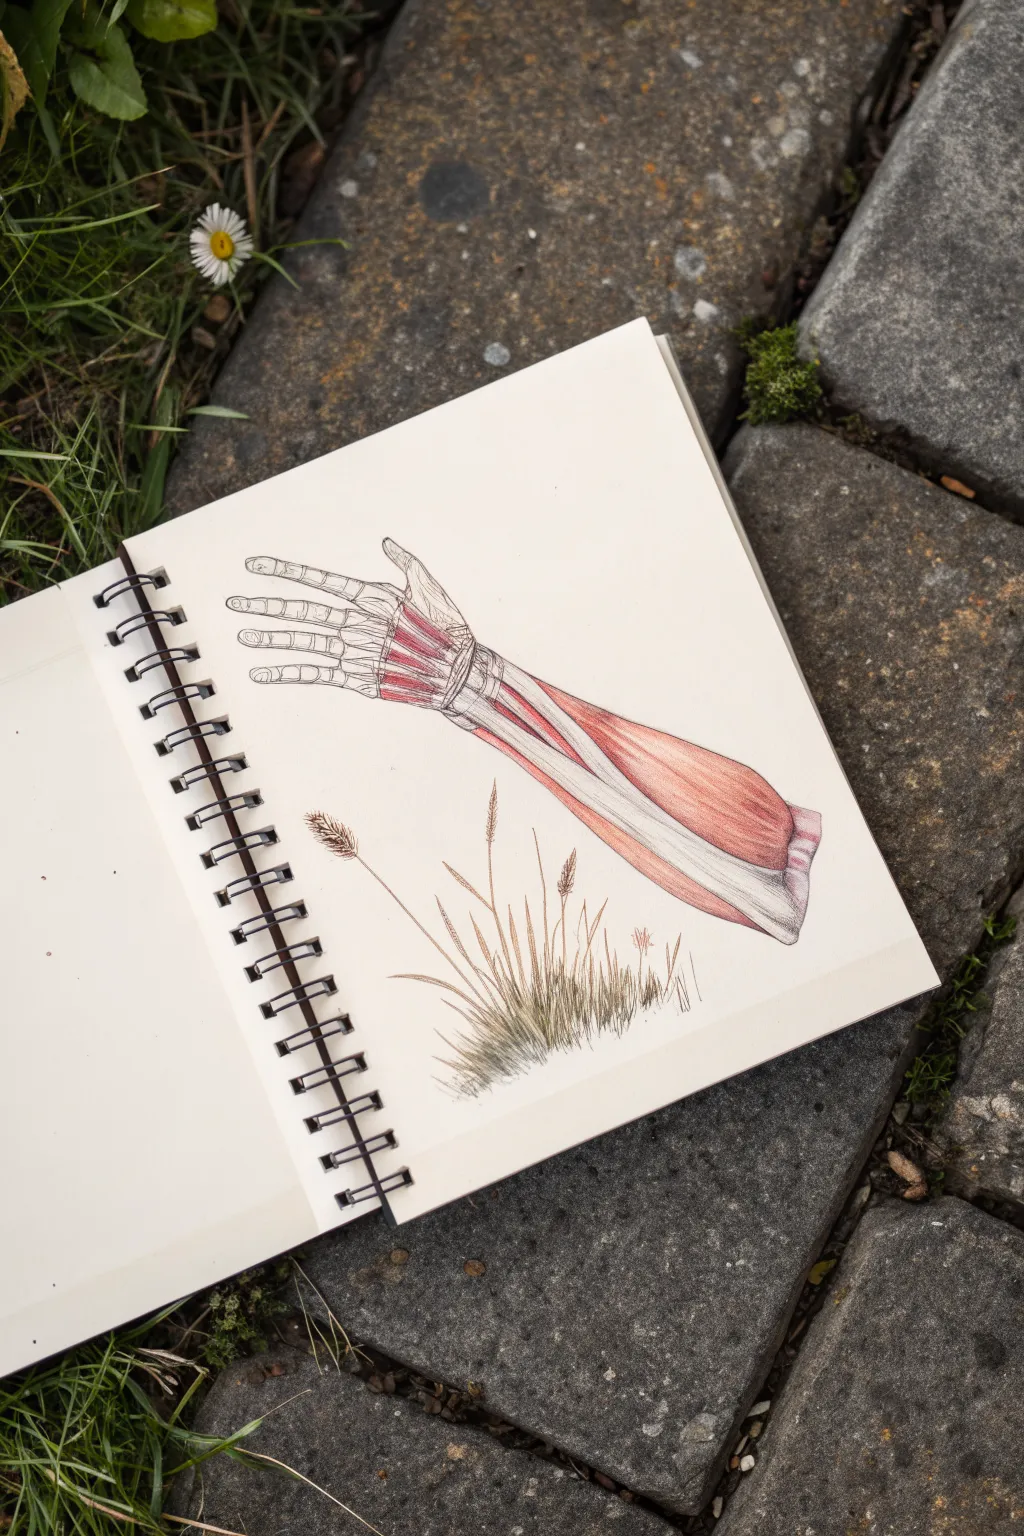
This striking drawing juxtaposes scientific anatomical precision with delicate organic plant life. By revealing the musculature of the arm alongside swaying grasses, you create a thoughtful piece that explores the biological connection between human structure and nature.
Detailed Instructions
Materials
- Sketchbook with smooth heavyweight paper
- HB or 2B graphite pencil
- Kneaded eraser
- Fine liner pens (0.1mm and 0.3mm, black)
- Colored pencils (various reds, pinks, terracottas, and browns)
- White gel pen (optional for highlights)
Step 1: Planning and Sketching
-
Establish the pose:
Begin with a faint pencil sketch to map out the arm’s position. Draw a diagonal line starting from the bottom right corner extending toward the upper left to guide the angle of the arm. -
Block in the shapes:
Lightly sketch the basic cylinders for the forearm and the blocky shapes for the hand and fingers. Don’t worry about muscles yet; just focus on getting the proportions and perspective of the hand correct. -
Map the anatomy:
Using a reference diagram, lightly draw the outlines of the major muscle groups inside your arm shape. Sketch the long tendons extending from the wrist into the fingers and mark the finger bones (phalanges). -
Position the flora:
Below the arm, lightly sketch the placement of the grass clumps. Draw sweeping, curved lines to indicate the direction of the blades and the seed heads.
Smudge Alert
Red colored pencil pigment loves to smear onto the white areas. Place a scrap piece of paper under your drawing hand to protect the stark white bones and background.
Step 2: Inking the Structure
-
Outline the bones:
Switch to your 0.1mm fine liner. carefully trace the finger bones. Use broken or slightly jittery lines to suggest the texture of bone segments rather than perfectly smooth tubes. -
Detail the joints:
At the knuckles and wrist, add small curved hatch marks to indicate the rounded joint surfaces and ligaments. -
Define muscle groups:
Ink the boundaries of the long forearm muscles. Keep these lines relatively thin. You want to separate the muscles without making them look like solid objects just yet. -
Add tendon strings:
Draw the tendons connecting the wrist to the fingers as taut, straight lines. I find it helpful to pull the pen quickly for these to keep the lines straight and confident. -
Ink the grass:
Use the 0.1mm pen to ink the grass blades. Use quick, upward flicking motions to keep the tips sharp and tapered. Add small stippling dots to the seed heads for texture. -
Erase guidelines:
Once the ink is completely dry, gently remove all underlying graphite sketches with your kneaded eraser.
Level Up: Torn Paper
Draw jagged, ripping skin edges at the shoulder or wrist to make it look like the skin has been peeled back to reveal the anatomy, adding a layer of gruesome realism.
Step 3: Coloring and Texturing
-
Base layer for muscles:
Take a light pink or salmon colored pencil and gently shade the entire muscle area. Keep the pressure light to create an even, soft base tone. -
Deepen the reds:
Switch to a darker red or terracotta pencil. Shade the centers of the muscle bellies and the areas where muscles overlap to create depth and roundness. -
Add fiber texture:
Sharpen a dark red or brown pencil to a fine point. Draw very fine, closely spaced lines following the length of the muscles to simulate muscle fibers. This directional shading is crucial for realism. -
Define the wrist area:
Use a darker brown to shade deeply around the white tendons at the wrist. This high contrast makes the white tendons appear to pop forward. -
Color the grass:
Use muted olive greens and ochre pencils for the grass. Keep the coloring loose and sketchy, focusing the pigment at the base of the clump and fading out toward the tips. -
Highlighting:
Leave the bones the color of the paper, but add very faint grey shading to their sides to give them cylindrical form. -
Final touches:
If you have a white gel pen, add tiny highlights to the wettest-looking parts of the muscle tissue or the tops of the tendons for a little extra shine.
Enjoy the process of exploring what lies beneath the surface in this scientific study


Melting Flesh Drip Effect
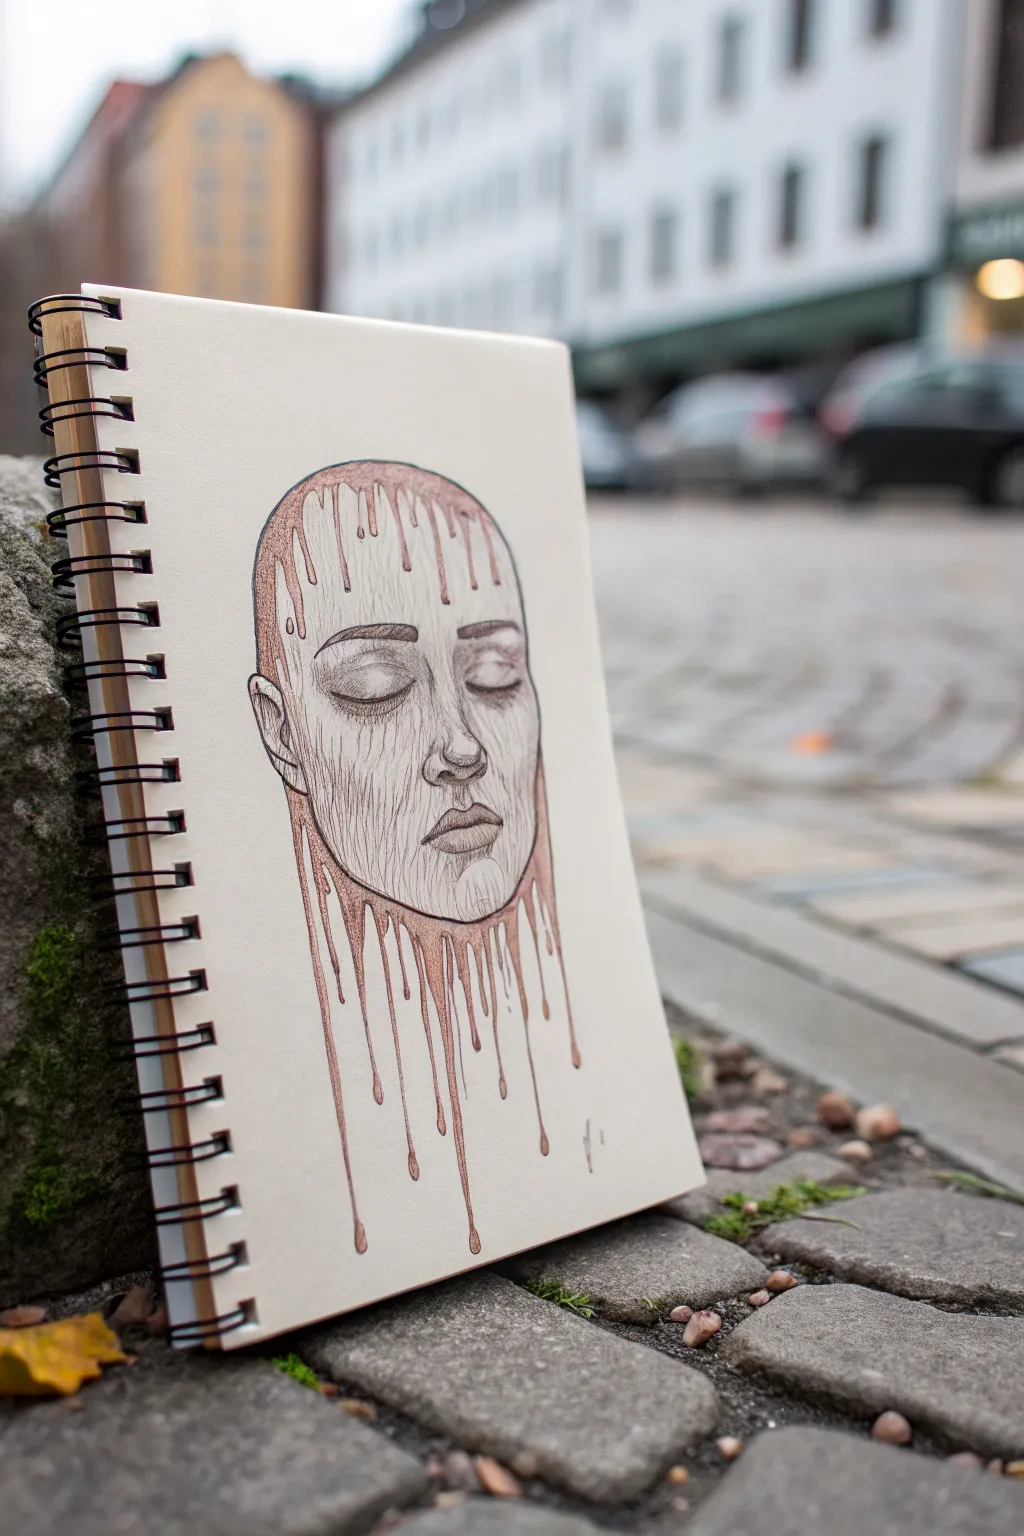
This evocative drawing combines delicate facial features with a surreal, melting effect to create a striking balance between serenity and decay. By blending fine liner work with controlled watercolor splashes, you’ll achieve a hauntingly beautiful piece that looks like it’s slowly dissolving on the page.
Step-by-Step
Materials
- Heavyweight mixed media sketchbook or watercolor paper
- HB graphite pencil
- Fine liner pens (0.1mm, 0.3mm, 0.5mm, black waterproof ink)
- Reddish-brown watercolor paint or ink (burnt sienna/rust)
- Small round paintbrush (size 2 or 4)
- Kneaded eraser
- Paper towel
Step 1: Sketching the Foundation
-
Outline the head shape:
Begin with an HB pencil to lightly draw a simple oval for the face. Don’t worry about drawing the top of the skull or the chin perfectly, as these areas will be replaced by the melting effect later. -
Map facial features:
Mark the center line of the face and the eye line. Sketch the eyebrows, closed eyelids, nose, and lips. The expression should be peaceful and neutral, with the eyes gently shut. -
Refine the features:
Tighten up your pencil sketch on the nose, lips, and eyelids. Add subtle creases under the eyes and around the mouth to give the face character. -
Draft the drips:
Instead of drawing a hairline or a jawline, sketch long, varying drips extending upward from the forehead and downward from the chin. Make them irregular—some long and thin, others shorter and thicker with bulbous ends.
Step 2: Inking the Details
-
Outline the features:
Switch to a 0.3mm fine liner. carefully go over your pencil lines for the eyes, nose, mouth, and eyebrows. Keep your hand steady but allow for slight organic variations. -
Texture the skin:
Using a 0.1mm pen, add vertical hatching lines across the face. These lines should curve slightly with the contours of the face—curving around the cheeks and nose—to create a wood-grain or weathered texture. -
Detail the forehead and chin:
Where the face transitions into the drips, break up the solid lines. Let the vertical texture lines flow seamlessly into the start of the liquid drips. -
Ink the drip outlines:
Use the 0.5mm pen to outline the drips themselves. The slightly thicker line weight here will help separate the liquid element from the delicate facial features. -
Erase pencil guides:
Once the ink is completely dry, gently run a kneaded eraser over the entire drawing to lift the original graphite sketch, leaving just the crisp ink work.
Gravity Guide
Make the bottom of every drip slightly darker and wider than the top. This simple trick mimics how liquid naturally pools due to gravity.
Step 3: Adding the Gore
-
Prepare the wash:
Mix a rusty, reddish-brown watercolor or dilute an ink of the same color. You want a consistency that flows easily but holds its color—not too watery. -
Fill the top drips:
Start painting the drips at the top of the head. Carefully fill inside your inked outlines. I usually gather a bit more pigment at the bottom of each drip to simulate gravity pulling the heavy liquid down. -
Paint a connecting wash:
Bring the color down slightly onto the forehead to create a transition zone where the melting begins. This shouldn’t be a solid block of color but rather a soft fade. -
Fill the bottom drips:
Repeat the painting process for the chin area. Ensure the teardrop shapes at the end of the drips are saturated with color to make them look full and heavy. -
Add stray droplets:
Paint a few small, unattached droplets falling below the main chin drips. This adds movement and realism to the liquid effect. -
Deepen the shadows:
Once the first layer of paint is dry, go back in with a slightly darker mix of the same color. Add shadows to one side of the drips to give them three-dimensional volume.
Color Shift
Mix a tiny drop of dark blue or purple into your red-brown paint for the shadowed areas. It creates a bruised, more realistic gory tone.
Now you have a surreal portrait that captures a fascinating moment of transformation

PENCIL GUIDE
Understanding Pencil Grades from H to B
From first sketch to finished drawing — learn pencil grades, line control, and shading techniques.
Explore the Full Guide
Scream Mouth With Too Many Teeth
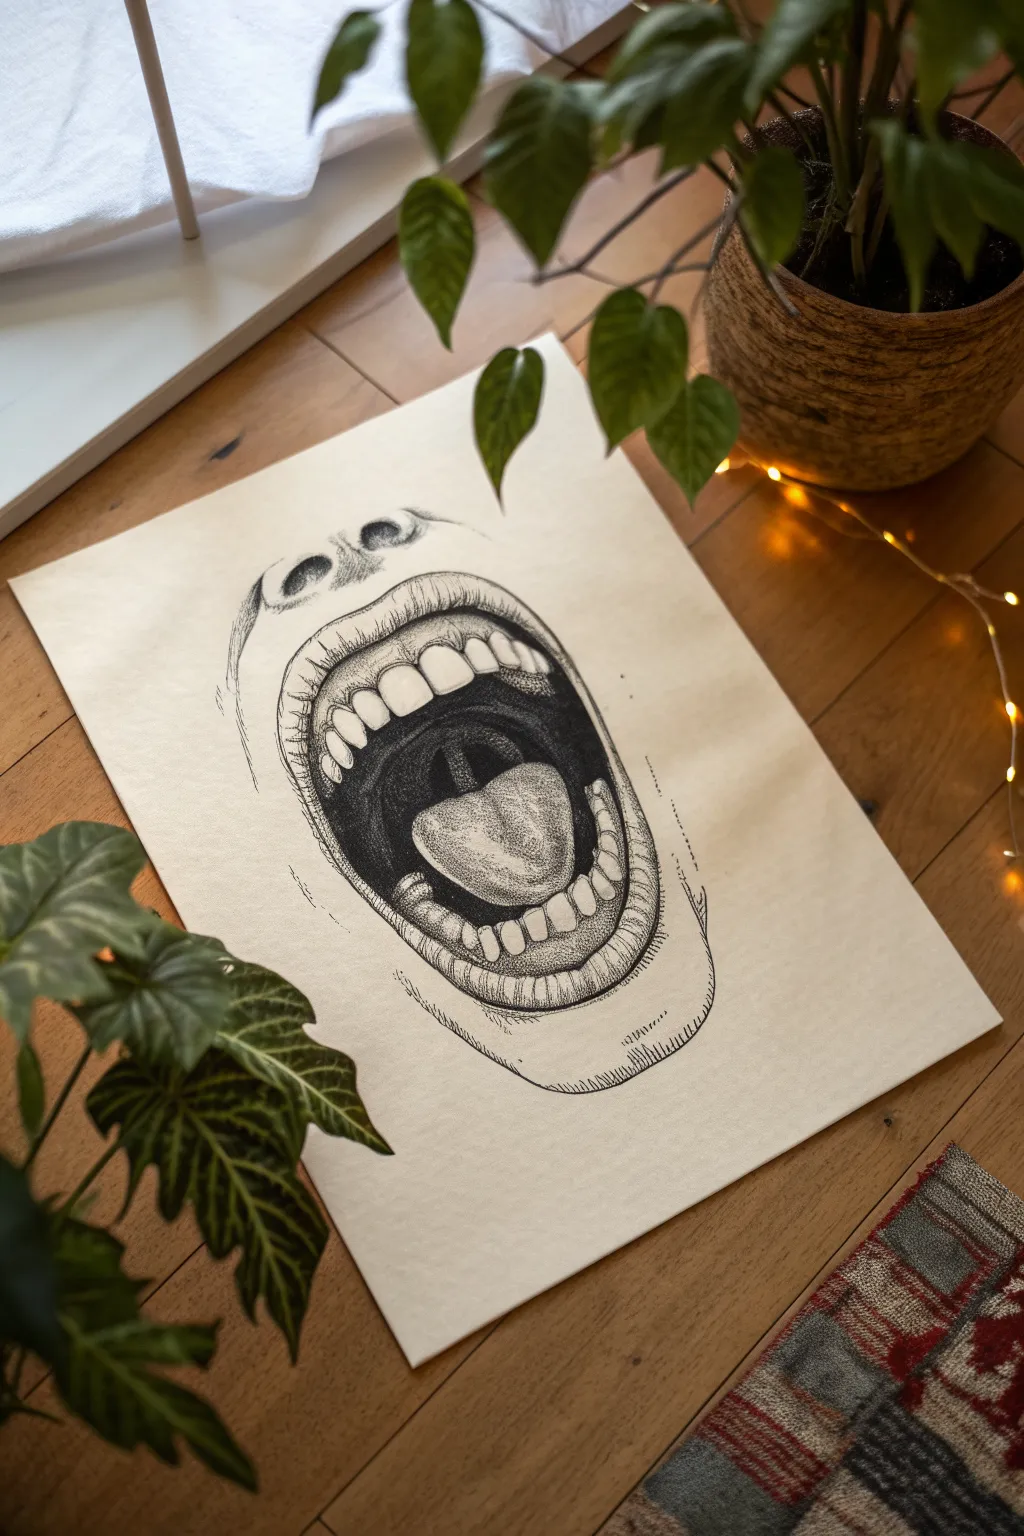
This striking black-and-white illustration captures the raw emotion of a scream through intricate stippling and line work. By focusing on high contrast and texture, you’ll create a piece that feels both anatomical and unsettlingly surreal.
Step-by-Step Tutorial
Materials
- Smooth bristol board or heavyweight illustration paper (A3 or 11×17 inch)
- Graphite pencil (HB or 2H)
- Kneaded eraser
- Fine liner pens (sizes 0.05, 0.1, 0.3, and 0.5mm)
- Black brush pen or large marker for deepest shadows
Step 1: Foundational Sketching
-
Establish the oval:
Begin by lightly sketching a large, vertical oval shape in the center of your paper. This will serve as the boundary for the open mouth. Keep your pencil pressure very light so these lines can be erased later. -
Draft the lip contours:
Around the central oval, draw the outer shape of the lips. The upper lip should have a distinct cupid’s bow shape, while the lower lip creates a U-shaped curve. Add the surrounding skin folds, including the philtrum (the groove under the nose) and the chin line. -
Place the nose:
Sketch the nostrils just above the upper lip. You don’t need to draw the entire nose bridge—just the two nostril openings and the bottom curve of the nose tip. -
Outline the teeth and gums:
Inside the mouth cavity, sketch the upper and lower rows of teeth. For that unsettling effect, make the teeth prominent and clearly defined. Include the gum line above the top teeth and below the bottom ones. -
Position the tongue and uvula:
Draw the tongue resting at the bottom of the mouth, curving upward slightly. In the dark space behind the tongue, sketch the uvula hanging down from the soft palate.
Step 2: Inking the Outlines
-
clean up the sketch:
Use your kneaded eraser to lift off excess graphite, leaving only faint guidelines to follow. This prevents graphite from smearing under the ink. -
Line the primary shapes:
With a 0.3mm fine liner, carefully trace the main outlines of the lips, teeth, and tongue. Use a confident, continuous stroke for the teeth to keep them looking sharp and enamel-like. -
Add lip texture:
Switch to a 0.1mm pen to draw the vertical cracks and texture lines on the lips. These lines should follow the curve of the lips to suggest roundness, rather than being perfectly straight vertical marks.
Ink Bleed fix
If you accidentally smear ink or a line goes rogue, use a white gel pen or opaque white gouache to paint over the mistake. Once dry, you can stipple right over the fix.
Step 3: Shading and Stippling
-
Fill the void:
Using your brush pen or 0.5mm marker, fill in the deep space inside the mouth (the throat area). Be careful to cleanly outline the teeth, tongue, and uvula before filling the large black areas to ensure crisp edges. -
Stipple the tongue:
I find stippling works best here to mimic the texture of taste buds. With a 0.1mm pen, apply thousands of tiny dots to the tongue. Concentrate the dots heavily on the sides and bottom to create shadow, fading to fewer dots on the top center for a highlight. -
Shade the gums:
Use fine hatching lines (short, parallel strokes) on the gums. Make the area directly touching clearly defined teeth darker to make the teeth pop forward. -
Detail the teeth:
Keep the center of the teeth mostly white. Add very subtle stippling or tiny lines near the gum line and the biting edge to give them volume. Do not overwork them, or they will look gray. -
Shadow the nostrils:
Stipple densely inside the nostrils, making them almost solid black but fading slightly at the edges. Add lighter stippling on the skin around the nose highlight the form. -
Contour the face:
Use directional hatching on the skin surrounding the mouth. Follow the curves of the philtrum and chin. Keep these lines sparse compared to the inside of the mouth to differentiate skin texture from mucous membranes. -
Deepen contrast:
Go back with a 0.05mm pen and add a second layer of very fine stippling to the darkest areas of the tongue and the corners of the mouth. This enhances the 3D effect. -
Final clean up:
Wait at least 15 minutes for the ink to fully cure. Gently erase any remaining pencil marks with the kneaded eraser to leave a crisp, high-contrast finish.
Hatching Pro Tip
When hatching the lips, curve your lines like parentheses ( ) rather than straight lines | |. This simple trick instantly makes the lips look full and round rather than flat.
Now you have a dramatically detailed ink drawing that turns a simple expression into a captivating piece of art
Exposed Ribcage With Floral Growth
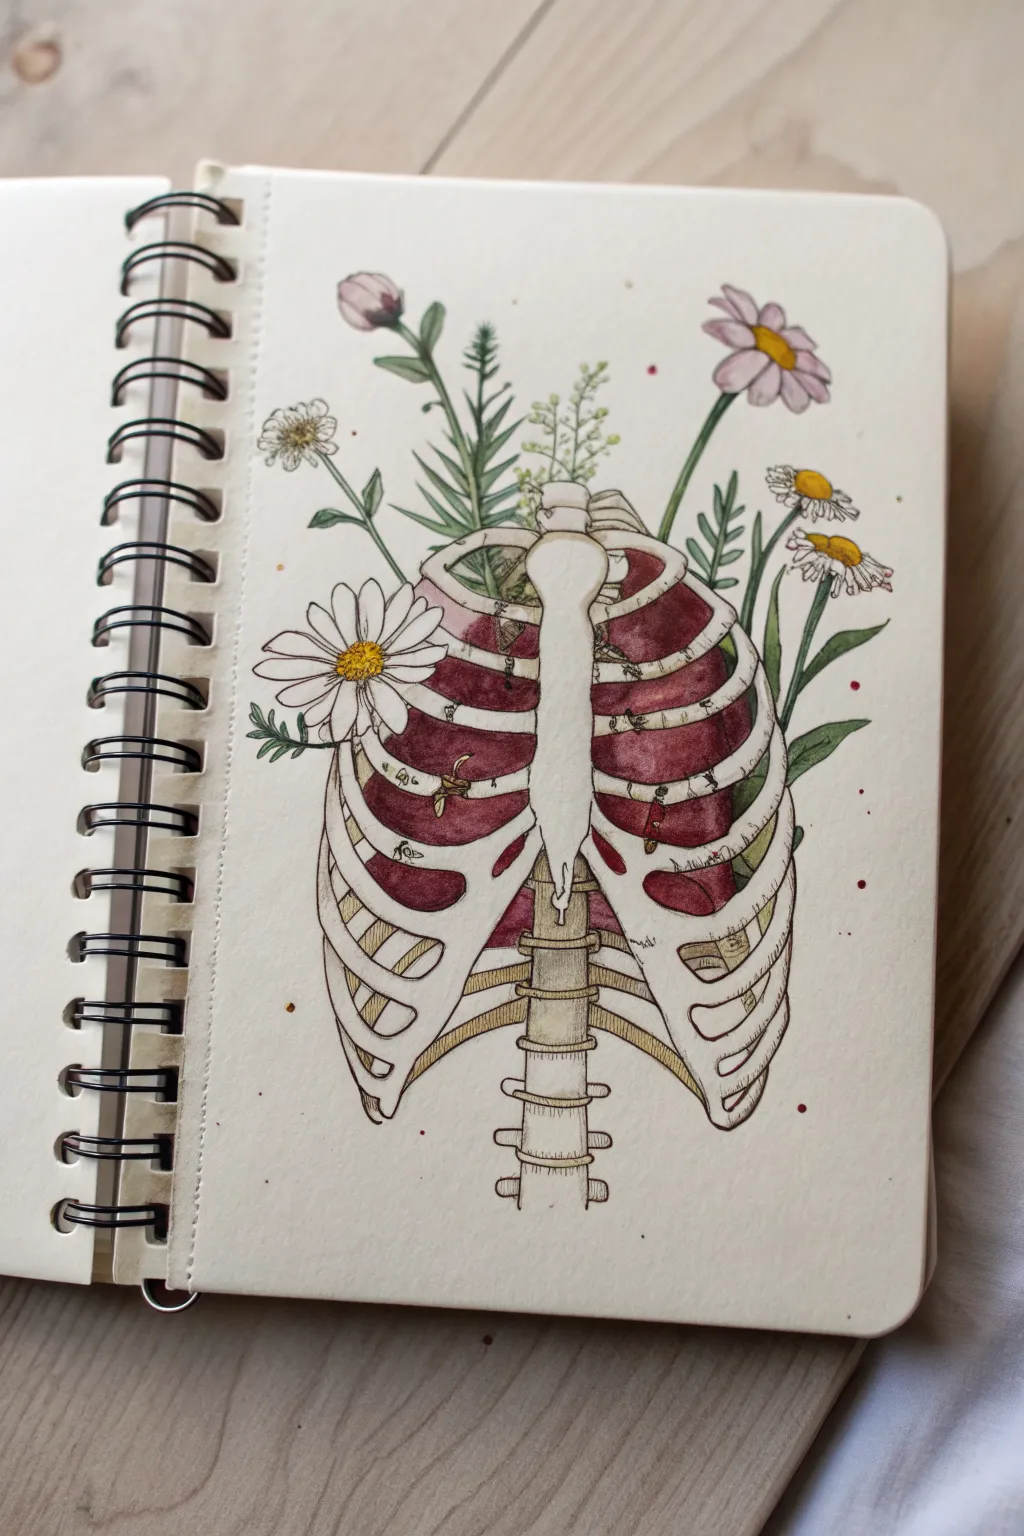
This striking illustration blends anatomical precision with soft botanical beauty, featuring a stylized ribcage enclosing a deep red interior from which wildflowers sprout. It creates a hauntingly beautiful juxtaposition between life and structure, rendered in ink and watercolor.
Step-by-Step Guide
Materials
- Spiral-bound sketchbook (mixed media or watercolor paper)
- Pencil (HB or 2B)
- Kneaded eraser
- Fine liner pens (0.1mm, 0.3mm, 0.5mm, black ink)
- Watercolor paints (Deep Maroon, Crimson, Sap Green, Olive Green, Yellow Ochre, Burnt Umber)
- Small round watercolor brushes (sizes 2 and 4)
- White gel pen (optional for highlights)
Step 1: Anatomical Foundation
-
Spinal Column:
Begin by lightly sketching a vertical line for the spine. Near the bottom center of the page, draw the stacked vertebrae, ensuring they have a blocky, interlocking structure. -
Sternum Shape:
Above the spine, sketch the sternum (breastbone). It resembles a tie or a dagger shape—wider at the top (manubrium) and tapering down to a point (xiphoid process). -
Rib Curvature:
Draw the ribs curving meant to attach to the sternum. Start from the top ribs near the collarbone area and work down. Remember that ribs are not flat; give them a slight 3D thickness by drawing the top and bottom edges of each bone. -
Open Structure:
Sketch the lower ‘floating’ ribs curving outward without attaching to the sternum, leaving the central cavity exposed.
Bone Texture Tip
Don’t make your bones purely white. Use a ‘dirty water’ wash of very diluted brown/grey on the ribs. It makes them look aged and realistic rather than like polished plastic.
Step 2: Botanical Sketching
-
Placing the Stems:
Sketch long, slender stems growing upwards from behind and within the ribcage. Let them weave through the open spaces between the ribs for a natural, entangled look. -
Adding Blooms:
Draw the main flowers. Place a large daisy on the left side, resting partially on the ribs. Add smaller chamomile-style flowers on the right and top, varying their angles so some face forward and others droop. -
Leaf Details:
Fill in the gaps with leafy stems. Use jagged, dandelion-like leaves for some greenery and smaller, rounded leaves for others to create texture variety.
Bleeding Lines?
If your black ink lines bleed when you add watercolor, your pen isn’t waterproof. Let it dry for at least 30 minutes, or do the painting first and the inking last.
Step 3: Inking the Outlines
-
Boney Textures:
Using a 0.3mm fine liner, trace over your ribcage pencil lines. I prefer to keep the lines slightly broken or shaky in areas to mimic the organic texture of bone, rather than perfect geometric curves. -
Floral Delicacy:
Switch to a 0.1mm pen for the flowers and leaves. Use very light, quick strokes for the petals to keep them looking soft. -
Clean Up:
Once the ink is completely dry, gently erase all underlying pencil marks with the kneaded eraser.
Step 4: Watercolor Application
-
The Inner Cavity:
Mix a deep, rich red using Crimson and a touch of Burnt Umber. Carefully paint the space *inside* the ribcage, behind the bones. Keep the edges neat against the white ribs to make the bones pop. -
Bone Shading:
Dilute a tiny amount of Burnt Umber or Yellow Ochre with lots of water to create a pale beige wash. Apply this narrowly along the edges of the ribs and spine to create depth and shadow. -
Greenery:
Paint the stems and leaves using Sap Green. For variety, mix in a little Olive Green for the shadows and yellow for the lighter tips of the leaves. -
Flower Centers:
Dab a concentrated Yellow Ochre or deep yellow into the centers of the daisies. Leave the petals paper-white, or add the faintest touch of gray near the center for shadow.
Step 5: Final Details
-
Deepening Shadows:
Once the red layer is dry, go back in with a slightly darker mix (add a tiny bit of black or purple to your red) and paint right next to the ribs and stems to create contrast. -
Hatching:
Using the 0.1mm pen, add fine hatching lines to the shadowed areas of the bones and the undersides of the ribs to enhance the 3D effect. -
Splatter Effect:
Load a brush with watered-down red paint and lightly tap it over the page to create tiny, scattered droplets around the drawing for an artistic, raw finish.
Now you have a beautifully macabre piece of botanical anatomy ready to display in your sketchbook
BRUSH GUIDE
The Right Brush for Every Stroke
From clean lines to bold texture — master brush choice, stroke control, and essential techniques.
Explore the Full Guide
Intestines Texture Study Sheet
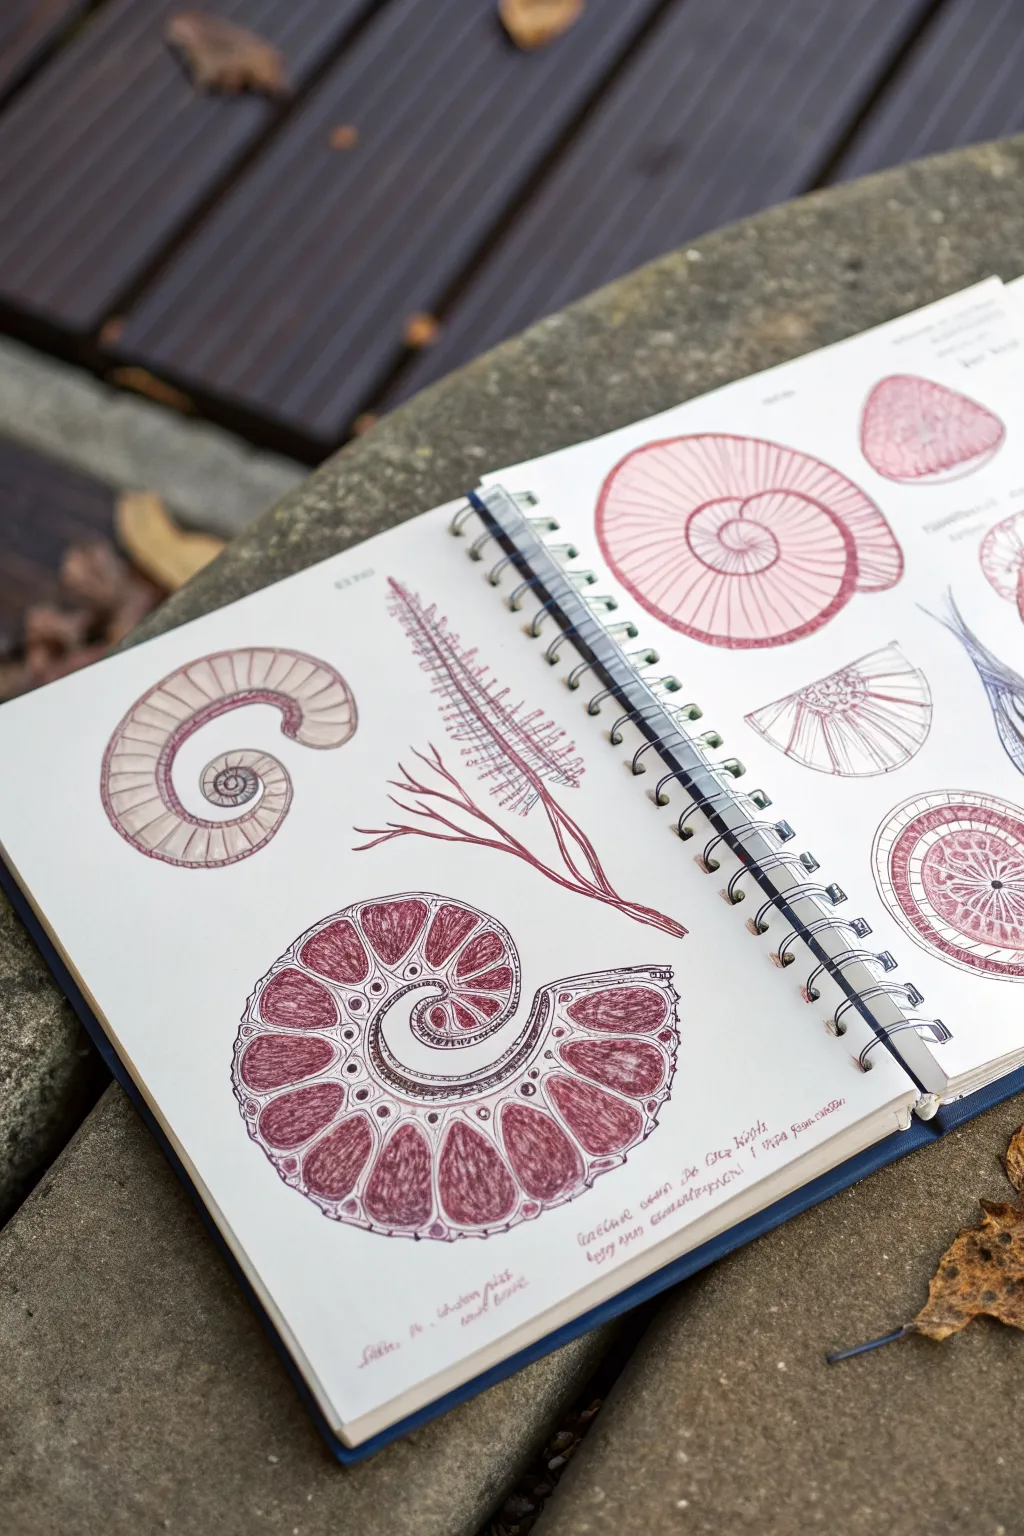
This sketchbook spread focuses on the delicate, segmented structures often found in both marine biology and internal anatomy. Using fine liners and stippling techniques, you’ll create detailed cross-sections that balance scientific precision with organic fluidity.
Detailed Instructions
Materials
- Sketchbook with smooth, heavy-weight paper (min 120gsm)
- HB or 2H graphite pencil
- Kneaded eraser
- Fine liner pens (Sepia or Dark Red, sizes 0.1, 0.3, 0.5)
- Fine liner pen (Black or Dark Grey, size 0.05 or 0.1)
- Ruler (optional, for layout)
Step 1: Conceptual Layout
-
Light Sketching:
Begin by lightly sketching the large, primary spiral shape at the bottom left using your HB pencil. Focus on the nautilus-like curve, ensuring the chambers gradually increase in size as they spiral outward. -
Adding Secondary Elements:
Above the main spiral, sketch a smaller, C-shaped segmented curve. To the right of that, draw a long, feathery spine structure that acts as a central divider for the page layout. -
Right Page Mapping:
On the opposite page, pencil in rough circles and fan shapes to represent the cross-sections of smaller specimens. Keep your pencil pressure very light so these lines can be erased later without leaving indentations. -
Refining Contours:
Go back over your pencil sketches to define the ‘chambers’ within your spirals. For an intestine study interact, think of these as distinct segments or pouches rather than hard shell walls, giving them slightly softer, rounded edges.
Ink Smearing?
Place a scrap piece of paper under your drawing hand. This acts as a shield, preventing oils from your skin from hitting the paper and stopping your hand from dragging wet ink.
Step 2: Inking the Structures
-
Main Outline:
Switch to your 0.3 sepia or dark red pen. carefully trace the outer boundary of the large bottom spiral. Use a broken or slightly jittery line to suggest organic tissue rather than a perfect manufactured edge. -
Inner Separation:
Draw the internal walls separating the chambers. I like to double these lines slightly to give the walls thickness, creating a cellular look. -
Detailing the Spine:
Ink the central feathery structure. Use quick, confident strokes that flick outward from the center stem to capture the delicate, hair-like texture of the appendages. -
Upper Spiral Inking:
Ink the smaller upper-left C-shape. For this one, employ strict, parallel lines across the width of the tube to emphasize a ribbed, muscular texture similar to an esophagus or trachea.
Level Up: Aged Paper
Before drawing, lightly wash the paper with diluted tea or coffee and let it dry flat. This creates a vintage parchment look perfect for old-school anatomical diagrams.
Step 3: Texturing and Shading
-
Base Stippling:
Using the 0.1 red pen, begin stippling (dotting) inside the chambers of the large spiral. Concentrate the dots heavily near the bottom edges of each chamber to create a sense of depth and curvature. -
Hatching the Flesh:
In the large spiral, layer fine hatching lines over the stippling. Follow the curve of the chamber with your strokes. This combination of dots and lines mimics the fibrous texture of muscle tissue. -
Darkening the Core:
Switch to your 0.5 red pen to darken the tightest part of the inner spiral. This high contrast draws the eye into the center of the form. -
Contrast Work:
Take your very fine 0.05 black or grey pen. Add extremely subtle shadows just under the thickest dividing walls. This tiny addition of a cool tone makes the warm red tones pop. -
Right Page Textures:
For the circular cross-sections on the right page, use radial lines expanding from the center outward. Vary the density to show different tissue densities.
Step 4: Final Touches
-
Clean Up:
Once you are certain the ink is completely dry, gently erase all underlying pencil marks with the kneaded eraser. Rolling the eraser over the page is safer than scrubbing. -
Annotation:
Add handwritten notes in a cursive or small print style near the bottom or margins. You can use nonsense text or actual anatomical terms to enhance the ‘scientific field study’ aesthetic. -
Review and Refine:
Step back and look at the overall balance. If any area looks too flat, go back in with the 0.1 pen and add more stippling to deepen the shadows.
Now you have a beautifully detailed study that merges the fascinating patterns of nature with artistic precision
Zombie Rot Patchwork Close-Up
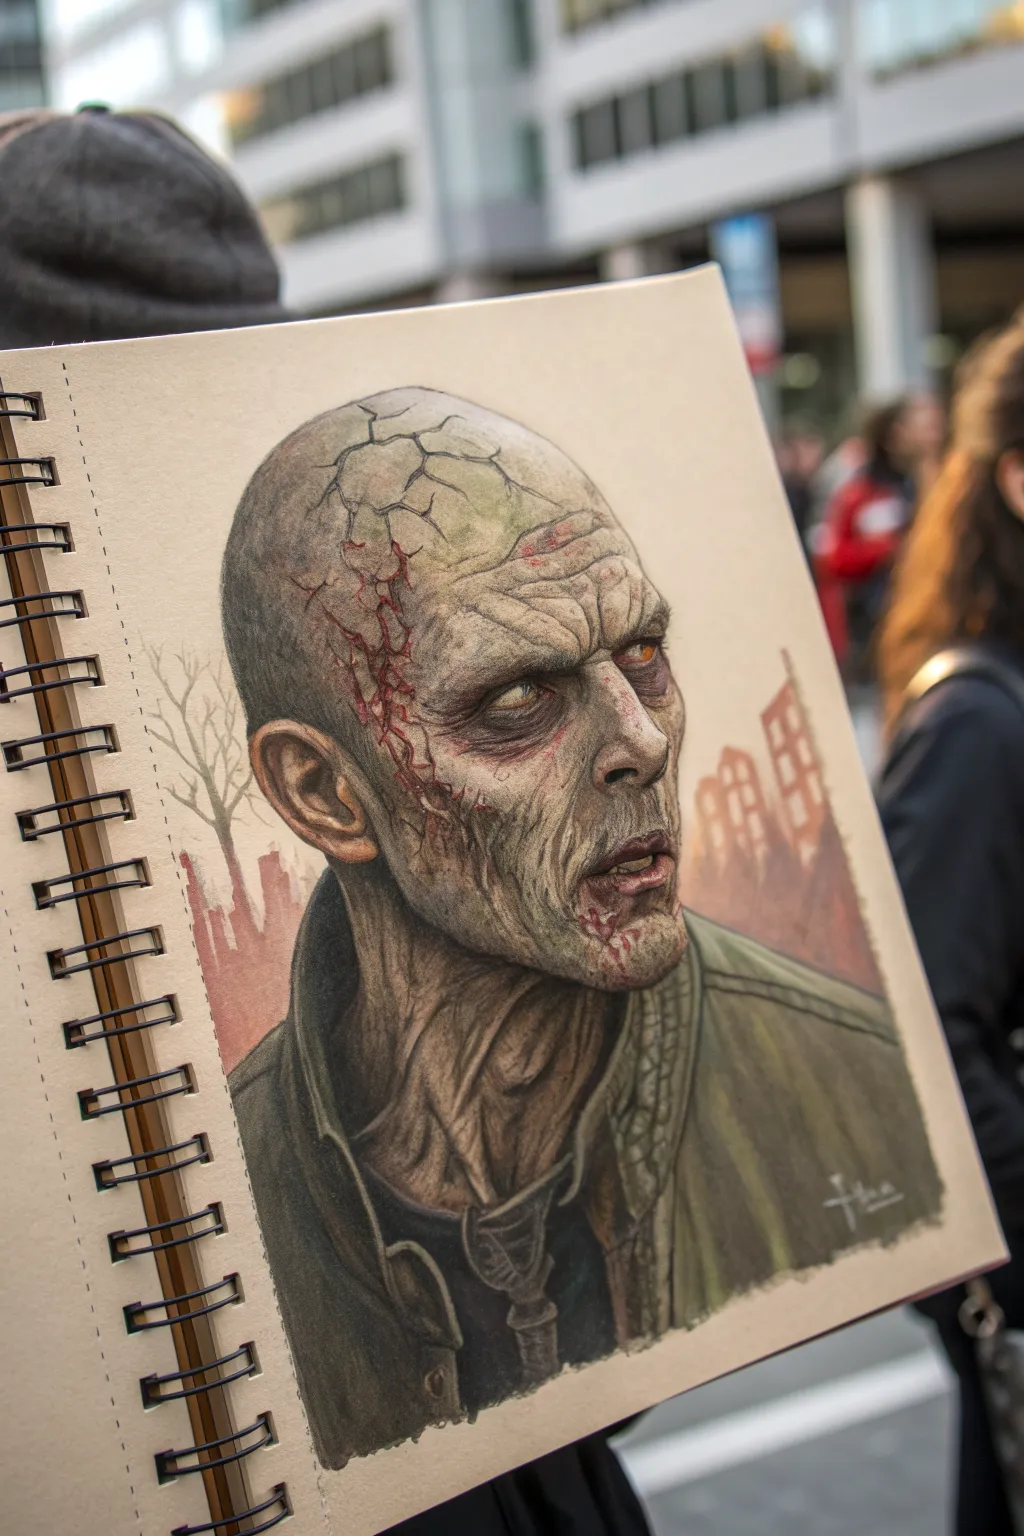
Capture the gruesome details of the undead with this intricate colored pencil study on toned paper. You will learn to render cracked, mottled skin texture and piercing yellow eyes that seem to stare right through the page.
Step-by-Step Guide
Materials
- Tone tan or light brown sketchbook paper (spiral bound)
- Graphite pencil (HB or 2H)
- Kneaded eraser
- Wax or oil-based colored pencils (Complete set focusing on olive greens, greys, browns, and dark reds)
- White gel pen or white gouache (for highlights)
- Fine liner pens (sepia and black)
- Blending stump or colorless blender
Step 1: Structuring the Undead
-
Initial sketch:
Begin with a light graphite outline of the head shape. Since this is a close-up, focus on the elongated jaw and hollow cheekbones characteristic of a starved zombie. -
Mapping the features:
Lightly place the deep-set eye sockets, the nose bridge, and the slack mouth. Instead of hair, you will be drawing the cracked scalp, so keep the skull shape prominent and smooth. -
Defining the cracks:
Sketch the primary fissures running across the scalp and down the left temple. Make these lines jagged and erratic, branching out like lightning bolts. -
Background silhouette:
Faintly outline the ruined cityscape in the background. Keep trees leafless and buildings crumbling to match the apocalyptic mood.
Too waxy?
If pencil layers stop sticking, spray a workable fixative lightly over the drawing. Let it dry completely to regain tooth.
Step 2: Flesh and Decay
-
Base tone application:
Using a pale olive green and a sickly beige, gently shade the entire face, leaving the cracks and eyes empty for now. Use light, circular strokes to avoid harsh lines. -
Building shadows:
Switch to a cool grey and darker brown to deepen the eye sockets, under hollow cheeks, and beneath the chin. The neck needs heavy shadowing to emphasize the ropy, strained muscles. -
Coloring the eyes:
Fill the irises with a dull yellow or amber pencil. Add a tiny dot of rusty orange near the pupil for depth, but keep the gaze cloudy and unfocused. -
Creating the mottled texture:
I like to stipple small dots of grey and green over the skin to mimic pores and decay. Vary the pressure to create uneven patches of discoloration. -
Defining the facial structure:
Use a dark sepia pencil to re-outline the nose and lips. The lips should be pale and cracked, with just a hint of dried blood color in the corners.
Pro Tip: Veins
Use a very sharp blue or purple pencil to draw faint, squiggly veins under the thin skin of the temple and neck.
Step 3: Gore and Grit
-
Deepening the cracks:
Go back to the scalp fissures. Fill the deepest parts with a dark red or maroon pencil, then outline the edges with a sharp dark grey to make the skin look split open. -
Adding fresh wounds:
Layer bright crimson along the temple cracks to suggest wetter, fresher wounds. Blend the edges slightly into the surrounding green skin for an inflamed look. -
Clothing textures:
Color the jacket with a muted army green. Use heavy, vertical strokes to suggest a rough, fabric texture, and darken the folds with black to create volume. -
Neck details:
Refine the tendons in the neck. Use sharp lines to make the skin look tight and dehydrated, stretching over the anatomy underneath.
Step 4: Final Atmosphere
-
Background fade:
Color the cityscape with very light washes of reddish-brown and grey. Keep this area soft and out of focus so it doesn’t compete with the detailed portrait. -
Enhancing contrast:
Take a black colored pencil or fine liner and deepen the darkest shadows under the collar and inside the ear to make the image pop. -
Highlighting:
Using a white gel pen or a very sharp white pencil, add tiny highlights to the edges of the cracked skin and the bridge of the nose to simulate a sheen of sweat or grease. -
Eye reflection:
Place a single, tiny white dot in the eyes. This ‘catchlight’ brings the zombie to life, making the stare piercing. -
Final blending check:
Look over the skin tones one last time. If the transitions are too rough, use a colorless blender or a light cream pencil to smooth out the patchy areas. -
Signature:
Sign your work discreetly in the corner, perhaps using a jagged font style to match the theme.
Step back and admire the wonderfully horrifying creature you have summoned onto the page


Eye-in-Mouth Surreal Creature
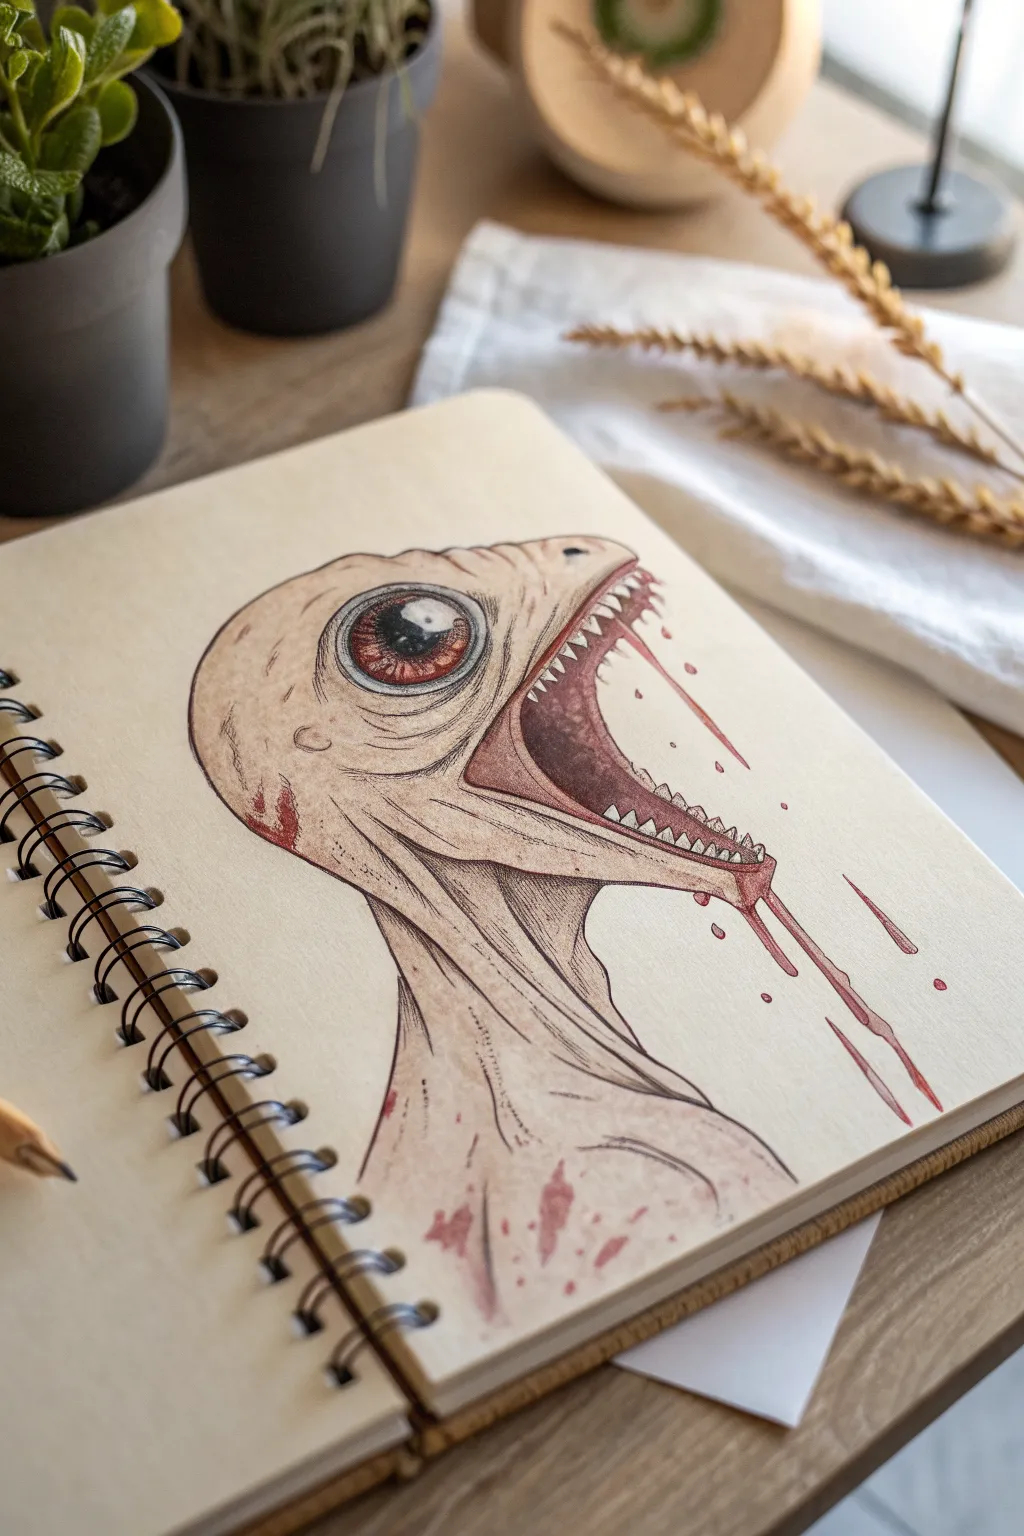
Capture the unsettling beauty of body horror with this sketch of a pale, screaming entity. This project combines delicate shading with jarring splashes of crimson to create a stark, gore-filled contrast.
Step-by-Step Guide
Materials
- Spiral-bound sketchbook (cream paper)
- Graphite pencils (HB, 2B, 4B)
- Fine liner pens (black, 0.1mm and 0.3mm)
- Red watercolor paint or red ink
- Small round paintbrush (size 2 or 4)
- White gel pen
- Kneaded eraser
- Blending stump (tortillon)
Step 1: Structural Sketching
-
Head Shape:
Start by lightly sketching a large, bulbous cranial shape using your HB pencil. Imagine an elongated egg that tapers down towards where the neck will be. -
Jaw Placement:
Draw the open jaw hanging low. The mouth should look unhinged, so sketch the bottom jaw extending further down and back than a human jaw naturally would. -
Eye Positioning:
Place a large circle high on the side of the head. This eye is the focal point, so make it significantly larger than normal proportions dictate. -
Neck Connection:
Connect the head to the body with a thin, strained neck. Sketch vertical lines to indicate tendons stretching under tension.
Bloody Realism
For realistic blood, wait for the first red layer to dry, then add a second darker layer (mix a tiny bit of blue or brown into the red) at the center of the drips.
Step 2: Detailed Line Work
-
Refining Contours:
Switch to your 0.1mm fine liner. Go over your pencil lines with a scratchy, organic stroke. Don’t make the lines too perfect; a little wavering adds to the grotesque texture. -
Teeth and Gums:
Draw rows of small, sharp triangular teeth along the top and bottom gums. They shouldn’t look dental-perfect—vary their sizes slightly for a feral look. -
Eyelid Detail:
Add heavy folds around the large eye. Use multiple concentric lines to suggest baggy, tired skin surrounding the eyeball. -
Iris and Pupil:
Draw the iris and pupil. Unlike the rest of the sketch, try to keep the circle of the cornea relatively smooth to make the eye look wet and glassy.
Level Up: 3D Pop
Use a light grey marker to add drop shadows underneath the floating blood droplets and the main figure to make the creature look like it’s hovering off the page.
Step 3: Shading and Texture
-
Base Shading:
Using a 2B pencil, lightly shade the underside of the jaw, the neck tendons, and the back of the head. I find using a blending stump here helps create a smooth, skin-like transition. -
Skin Textures:
Add small stippling dots and faint veins with the 0.1mm pen around the temples and neck. These imperfections make the creature feel more biological and less like a cartoon. -
Deepening Shadows:
Take a 4B pencil or the 0.3mm pen to darken the inside of the mouth. The back of the throat should be almost solid black to create depth. -
Iris Detailing:
Fill in the iris with radiating lines from the pupil. Add red ink or pencil lightly over the iris to give it an inflamed, bloodshot appearance.
Step 4: The Gore Factor
-
Mouth Blood:
Dip your small brush into red watercolor or ink. Carefully paint the gum line, letting the color pool slightly at the corners of the mouth. -
Drips and Splatter:
Draw distinct drip lines falling from the bottom lip and teeth. Let the lines taper off into droplets. Add a few disconnected droplets floating in the air for kinetic energy. -
Neck Staining:
Dilute your red paint slightly and apply patchy washes on the neck and chest area to look like smeared or dried blood. -
Highlights:
Once the red ink is fully dry, use a white gel pen to add a sharp highlight to the eye and on the wettest-looking blood drips to make them glisten.
Now you have a terrifyingly realistic creature leaping right off the page of your notebook
Abstract Blood Splatter Forms a Face

This striking mixed-media piece combines precise anatomical illustration with chaotic, expressive watercolor effects to create a moody gothic statement. The sharp black lines of the skull contrast beautifully against the unpredictable burst of crimson, making for art that feels both calculated and wild.
Step-by-Step Guide
Materials
- Hot press watercolor paper (A4 or A3 size)
- Pencil (HB or 2B) and eraser
- Waterproof fine liner pens (sizes 0.1, 0.3, and 0.5)
- Red watercolor paint (Alizarin Crimson or Cadmium Red Deep)
- Round watercolor brushes (size 6 and 12)
- Small spray bottle with water
- Paper towels
- White or light wood frame (to finish)
Step 1: Sketching the Anatomy
-
Establish the Basic Shape:
Begin by lightly sketching the general contour of the cranium in the center of your paper. Look for the large, rounded brain case and the distinct cheekbones. -
Define the Eye Sockets:
Draw the two orbital cavities. Notice how they aren’t perfect circles but rather irregular, slightly angular shapes that sit deep within the skull. -
Nasal Cavity & Jaw:
Sketch the upside-down heart shape for the nose hole. Drop down to sketch the open jawbone, ensuring the mandible looks unhinged or screaming to add emotion. -
Teeth Placement:
Lightly block in the rows of teeth. Don’t worry about individual details yet; just get the arch of the gum line correct on both the upper and lower jaw.
Step 2: Inking the Skull
-
Outline with Confidence:
Using your 0.3 waterproof pen, go over your pencil lines. Keep your hand steady but allow for some organic variation in line weight to simulate bone texture. -
Darken the Cavities:
Switch to a 0.5 or thicker pen/marker to fill in the eye sockets and nasal cavity. Leave tiny specks of white or use hatch marks near the edges to suggest depth rather than a flat black hole. -
Detail the Teeth:
Use your finest 0.1 pen to draw the individual teeth. Add small cracks or imperfections to make them look aged. -
Add Texture and Shading:
Using a stippling or cross-hatching technique with the 0.1 pen, add shadows under the cheekbones, around the temples, and where the jaw connects. This gives the skull volume. -
Clean Up:
Once the ink is completely dry—and I mean completely—erase all underlying pencil sketches to leave a crisp black and white illustration.
Paint Bleeding?
If paint bleeds into the skull where you want it white, blot instantly with a tissue. Once dry, use white gouache or a white gel pen to reclaim the bone highlights.
Step 3: Creating the Blood Splatter
-
Prepare the Paint:
Mix a generous amount of red watercolor. Aim for a consistency distinct from heavy cream—it needs to be fluid enough to splash but pigmented enough to dry dark red. -
Apply the Base Wash:
Using the large round brush, paint a loose, irregular pool of red directly behind and ‘under’ the skull, treating it like a shadow. Let it bleed slightly into the white space. -
The Splatter Technique:
Load your brush with heavy pigment. Hold it over the paper and tap the handle sharply against your other hand to send droplets flying outward from the center. -
Directional Blasts:
To create the ‘speed lines’ effect seen on the left, flick your wrist sharply while painting outwards, dragging the brush quickly off the paper’s edge. -
Adding Blooms:
While the main red wash is still wet, drop in concentrated pigment or a tiny bit of clear water. This creates ‘cauliflower’ blooms that add organic texture to the blood. -
Controlled Drips:
Use your smaller brush to pull thin lines of paint away from the main pool, simulating rivulets of liquid running across a surface.
Level Up: Metallic Touch
Mix a tiny amount of gold ink or watercolor into your final red splatters. It adds a subtle, eerie shimmer that catches the light beautifully when framed.
Step 4: Final Touches
-
Wait and Assess:
Let the paint dry partially. If the red looks too light, glaze over the central areas with a second layer of darker crimson to intensify the ‘fresh’ look. -
Re-establish Contrasts:
Sometimes the watercolor might dull your black lines if you painted over them heavily. Once dry, go back with your pen and re-darken any essential outlines on the skull. -
Final Cleanup:
Check for any unwanted paint speckles in the far corners of the white space. If found, you can often lift them gently with a damp clean brush/tissue. -
Framing:
Place your finished piece in a simple white frame without a mount (mat board) to let the negative space breathe and keep the focus on the central subject.
Hang this macabre masterpiece in a well-lit spot to let the stark contrast really capture attention


Have a question or want to share your own experience? I'd love to hear from you in the comments below!