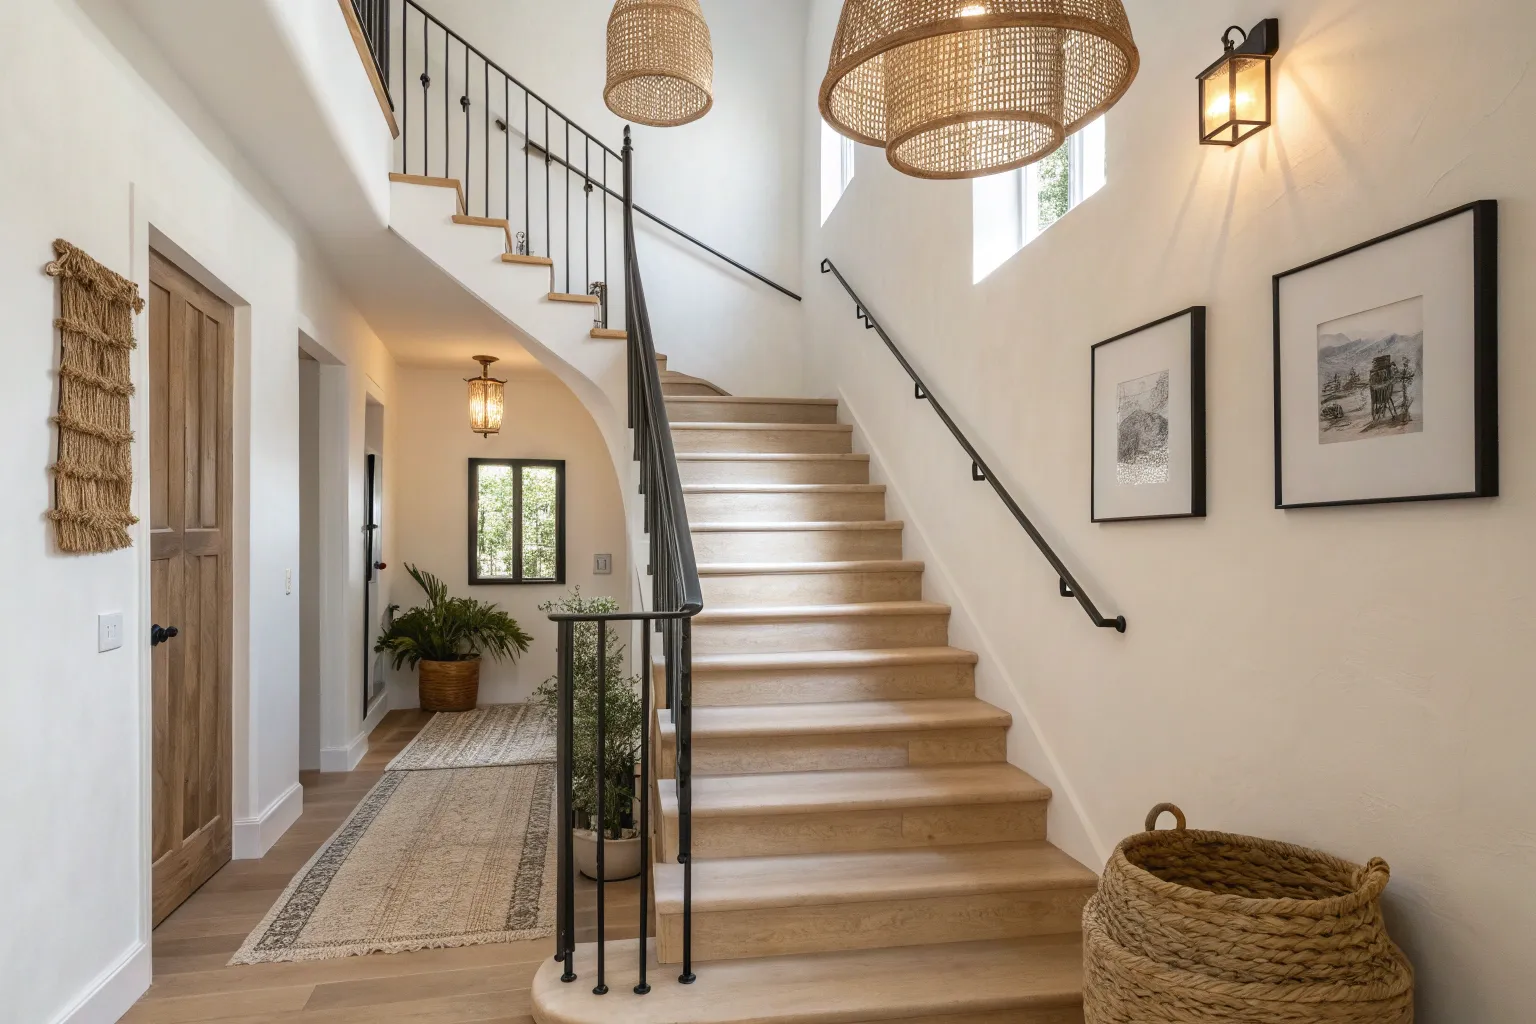
Stairwells are such an underrated canvas—one minute you’re just passing through, and the next you’re standing there admiring the vibe. With a few thoughtful choices in color, art placement, and light, you can turn that in-between space into a real focal point.
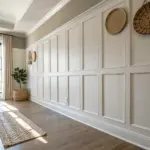
Classic Stairwell Gallery Wall
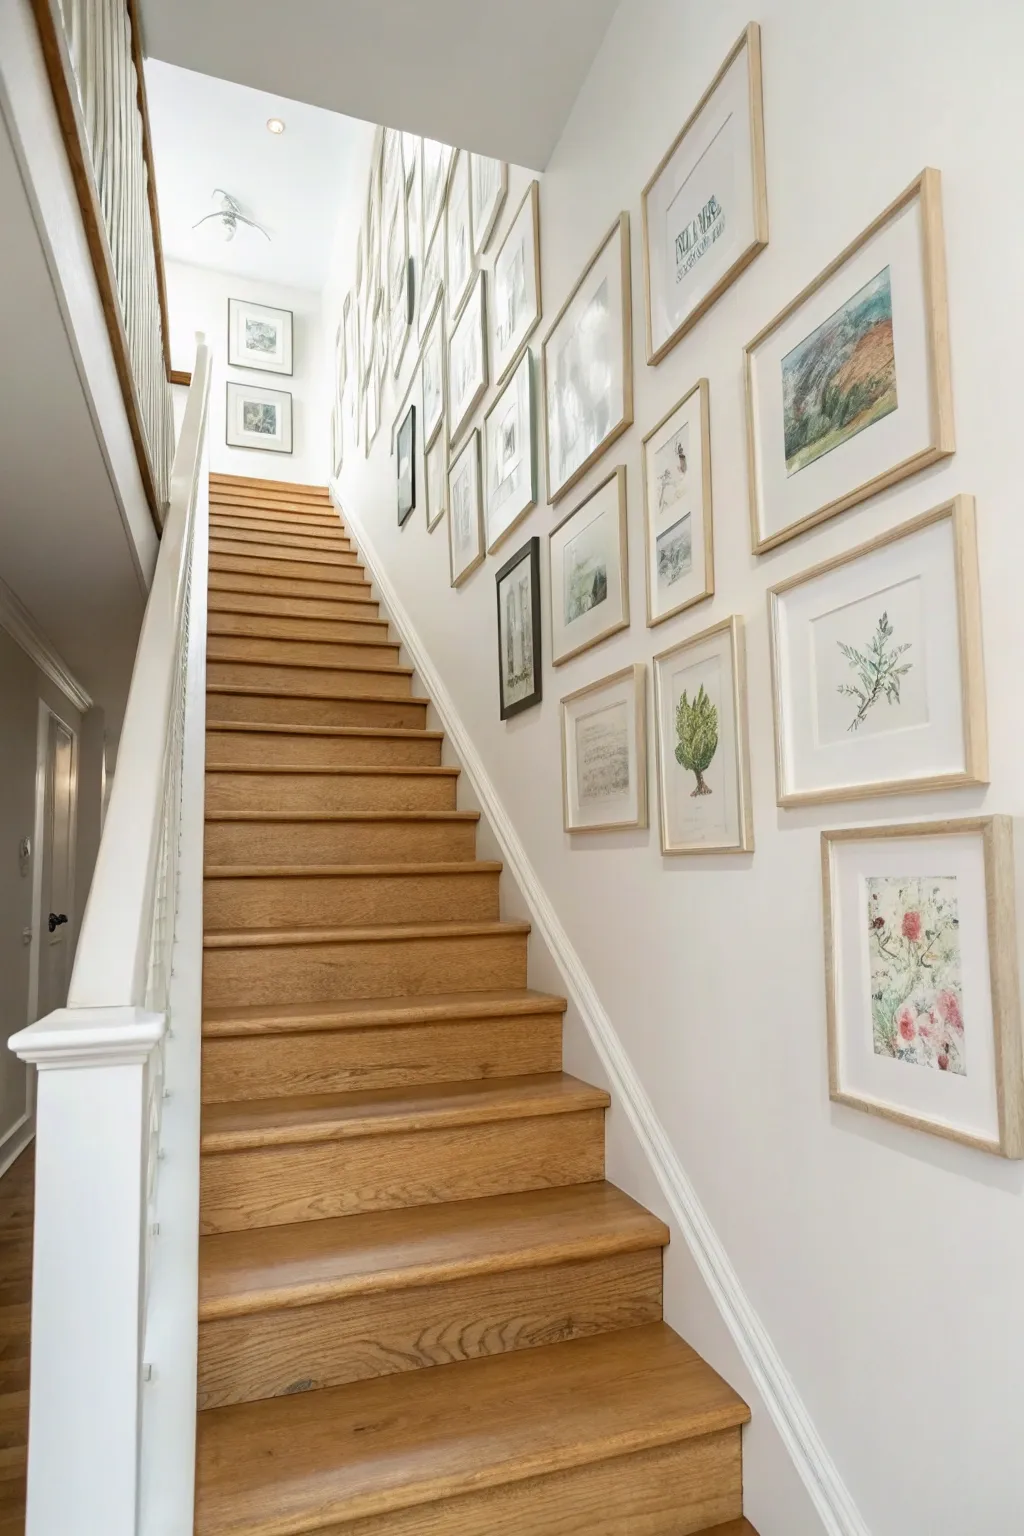
Transform a plain stairwell into a curated journey with this classic gallery wall layout. Featuring a cohesive collection of soft botanical and landscape prints in light wood frames, this project brings an airy, sophisticated charm to vertical spaces.
Step-by-Step Tutorial
Materials
- 15-20 matching light wood frames (various sizes like 8×10, 11×14, 16×20)
- White mat boards cut to fit frames
- Kraft paper (large roll)
- Painter’s tape
- Pencil & Eraser
- Level (2-foot or laser level recommended)
- Hammer
- Picture hanging hooks (or Command strips)
- Tape measure
- Assorted botanical and landscape art prints (digital downloads or vintage book pages)
- Scissors
Step 1: Planning the Layout
-
Trace your frames:
Begin by laying your roll of kraft paper on the floor. Place each frame on the paper and trace the outer edge with a pencil. Don’t forget to mark where the hanging hardware is located on the back of the frame onto the paper template. -
Cut the templates:
Cut out each paper shape you just traced. Write a quick descriptor on each one (e.g., ‘Large Landscape’ or ‘Fern Print’) so you don’t lose track of which frame matches which template. -
Define the slope:
On your stairwell wall, measure a consistent height from the tread of the bottom step (like 60 inches) and mark it lightly with pencil. Do the same at the top step. Using painter’s tape, create a diagonal guide line connecting these points to visualize the slope. -
Test the arrangement:
Using painter’s tape, stick your kraft paper templates to the wall. Start with the largest pieces in the middle and work outward. Aim for a mix of sizes to keep the eye moving. -
Refine the spacing:
Adjust the templates until you have a balanced look. Keep the gap between frames consistent—about 2 to 3 inches usually works best for a tight, curated gallery feel.
crooked frames?
Stair vibrations often knock frames askew. Place a small piece of double-sided foam tape or a bumper pad on the bottom corners of each frame to keep them permanently level.
Step 2: Preparing the Art
-
Clean the glass:
Before assembly, clean both sides of the frame glass with glass cleaner and a lint-free cloth. I always double-check for streaks in bright light before closing the frame. -
Mount the artwork:
Center your chosen prints behind the white mats. Use a small piece of acid-free artist tape on the back of the print to secure it to the mat board, ensuring it doesn’t slip over time. -
Assemble the frames:
Place the matted art into the frames, add the backing board, and secure the clips. Check the front again for any trapped dust specks before moving on.
Step 3: Installation
-
Mark hole locations:
Go back to your paper templates on the wall. Since you marked the hanger location on the paper in step one, you can nail your hook right through the paper at that exact spot. -
Install hardware:
Hammer in your picture hooks at the marked spots. If the frames are heavy, double-check that you are using hooks rated for the correct weight. -
Remove templates:
Gently tear away the kraft paper templates from behind the hooks and peel off the painter’s tape references. -
Hang the frames:
Place your framed art onto the corresponding hooks. Start from the center of the collection and work your way out to the edges. -
Level and secure:
Place a small level on top of each frame to ensure it is perfectly straight. To keep frames from shifting heavily on a staircase, you can place a small ball of museum putty on the bottom corners of the frame back.
Make it cohesive
Edit your art sources digitally to have the same color saturation or apply a subtle sepia filter before printing. This unifies disparate images into a single collection.
Step back and admire how your new gallery wall guides the eye upward with effortless style


Oversized Statement Art on the Landing

Enhance your entryway with this oversized, textural abstract painting that captures the serene warmth of a coastal sunset. Using layers of acrylics and modeling paste, you’ll create a piece that feels both organic and modern, perfectly anchoring a high-ceilinged space.
Step-by-Step Guide
Materials
- Large gallery-wrapped canvas (36″ x 60″ or similar)
- Acrylic modeling paste or heavy gel medium
- Floater frame kit (natural wood)
- Acrylic paints: Titanium White, Unbleached Titanium, Raw Sienna, Burnt Sienna, Payne’s Grey, Sky Blue
- Wide palette knives (3-4 inches)
- Wide flat paintbrush (2-3 inches)
- Spray bottle with water
- Drop cloth
- Sandpaper (fine grit)
Step 1: Preparation & Texture
-
Prepare your workspace:
Lay down a drop cloth in a well-ventilated area. Because of the canvas size, working flat on a table or the floor is often easier than using an easel to maintain control over the heavy texture mediums. -
Apply the base texture:
Scoop out a generous amount of modeling paste onto the canvas. Using a wide palette knife, spread it across the surface but focus heavily on the middle third where the ‘horizon’ line will be. -
Create horizontal movement:
Drag your palette knife strictly horizontally through the wet paste. Don’t aim for smoothness; let ridges and gaps form naturally to mimic rock or sediment layers. -
Texturize the ‘sky’ and ‘foreground’:
For the top and bottom thirds, apply a thinner layer of paste mixed with a little Titanium White paint. Use broad, sweeping strokes to keep this area calmer than the center. -
Let it cure:
Allow the texture to dry completely. For heavy paste applications, this might take 24 hours. It must be hard to the touch before painting.
Tip: Texture Control
If the modeling paste peaks are too sharp after drying, lightly sand them down with fine-grit sandpaper before painting to prevent snagging your brush.
Step 2: Painting the Horizon
-
Mix your warm tones:
On your palette, mix Raw Sienna with a touch of Burnt Sienna for a rusty gold, and create a lighter version by adding Unbleached Titanium. -
Paint the central band:
Using the wide brush, apply the darker rust color across the heavily textured middle section. Work the paint into the deep crevices of the modeling paste. -
Add highlights:
While the rust color is still tacky, use a clean palette knife to scrape the lighter gold mixture over the top of the ridges immediately. This emphasizes the texture without muddying the colors. -
Create a transition zone:
Mix white with a tiny dot of Payne’s Grey for a soft, cloudy grey. Paint the area immediately below the rust band, blending slightly upward where they meet.
Level Up: Metallic Glaze
Mix a metallic gold medium with clear glazing liquid and drag it lightly over the rust-colored horizon line for a subtle shimmer that catches sunlight.
Step 3: Atmosphere & Framing
-
Establish the sky:
Mix a very pale wash of Sky Blue and Titanium White. Apply this to the top third of the canvas using long, horizontal brushstrokes. -
Blend the sky downwards:
While the blue is wet, mist it lightly with your spray bottle. Use a large dry brush to pull the color down toward the horizon line, fading it into white as you go. -
Paint the foreground:
For the bottom section, layer heavy amounts of Titanium White. I define the bottom area by dragging the paint downward, mimicking the reflection of light on water. -
Dry brushing details:
Once the main layers are dry, dip a dry brush into Unbleached Titanium. Lightly whisk it over the lowest section to catch the texture, adding depth without darkening the bright aesthetic. -
Review and refine:
Step back to view the composition from a distance. If the horizon line feels too sharp, mist it with water and soften the edge with a clean brush. -
Seal the artwork:
Apply a coat of satin varnish to protect the paint and unify the sheen of the different textured areas. -
Assemble the frame:
Place your dry canvas inside the floater frame. Center it so the reveal (the gap between canvas and frame) is even on all sides. -
Secure the frame:
flip the assembly over carefully. Screw the frame into the canvas stretcher bars using the hardware provided with your kit.
Hang your new masterpiece in the stairwell and enjoy how the shifting daylight plays across those textured ridges


High-Contrast Railings and Trim
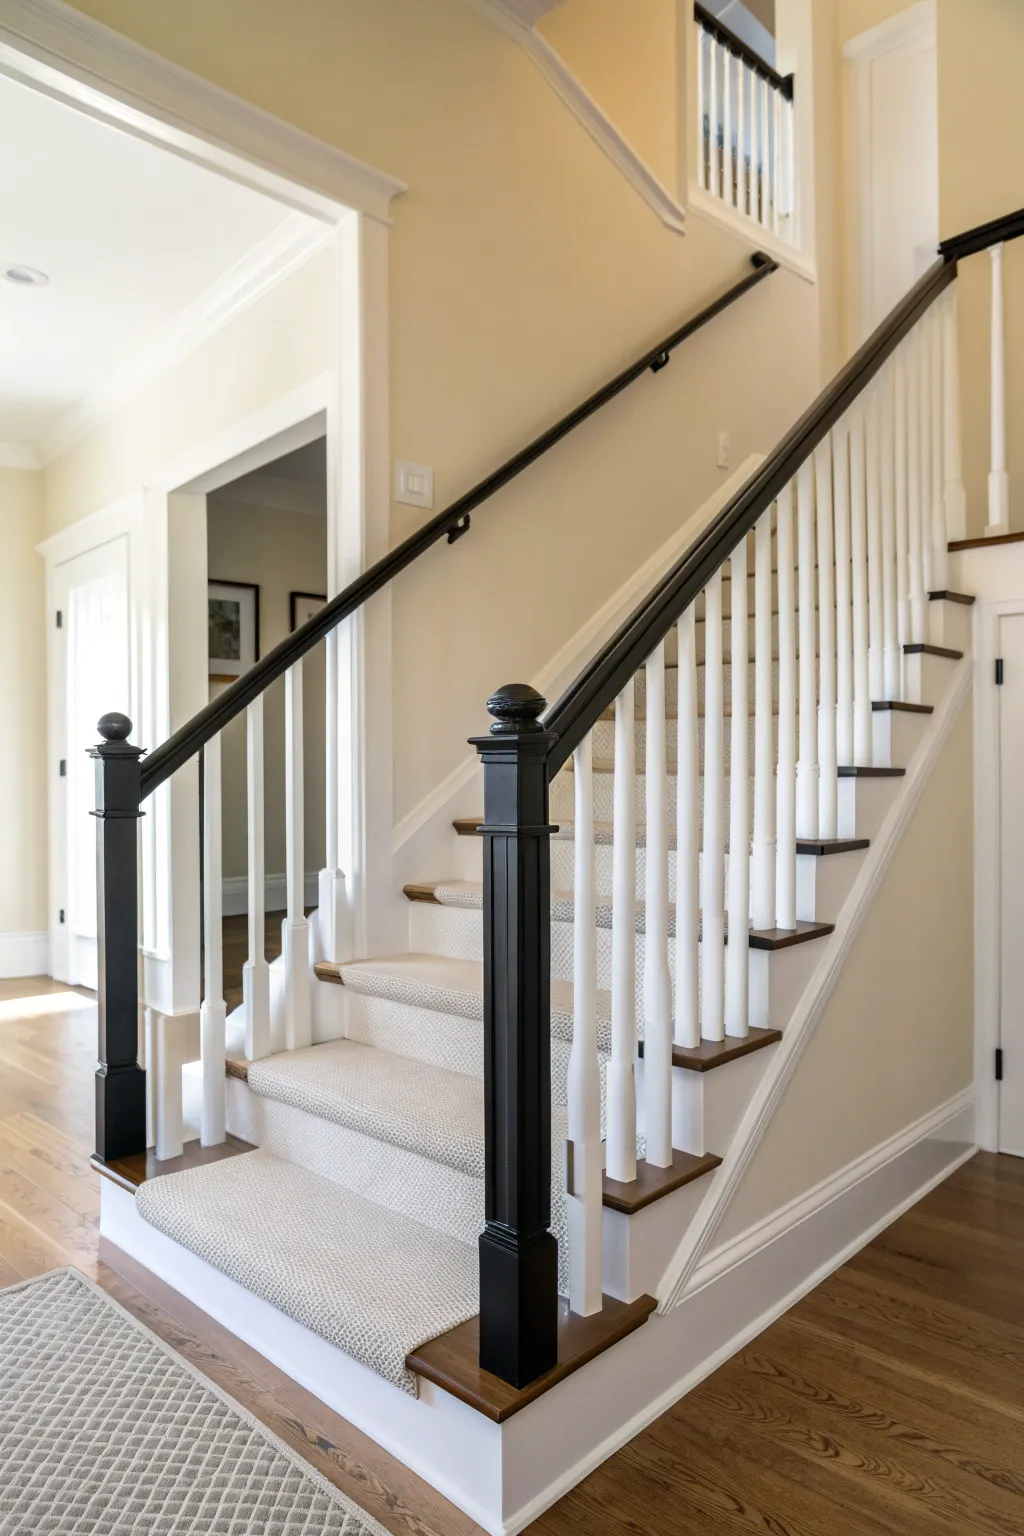
Transform a standard staircase into a stunning focal point with this high-contrast railing and trim project. By pairing crisp white balusters with jet-black posts and warm wood accents, you’ll create a sophisticated, timeless look.
Detailed Instructions
Materials
- Semi-gloss white interior paint
- Satin black paint
- Wood stain (walnut or dark oak)
- Painter’s tape (various widths)
- Drop cloths
- Sandpaper (120 and 220 grit)
- Tack cloth
- Angled sash brush (2-inch)
- Small foam roller
- Wood filler
- Primer (stain-blocking)
Step 1: Preparation
-
Clear and Clean:
Remove any existing carpet runner temporarily if possible, or tape it off meticulously with heavy plastic. Wipe down all wood surfaces with a degreaser to remove hand oils and dirt. -
Sand Surfaces:
Lightly sand all existing wood surfaces—balusters, newel posts, and handrails—using 120-grit sandpaper. This scuffs the finish to help the new paint adhere properly. -
Fill Imperfections:
Inspect the wood for dings or deep scratches. Fill these with wood filler, let it dry completely, and sand smooth with 220-grit paper. -
Dust Removal:
Vacuum the entire area thoroughly. Follow up by wiping everything down with a tack cloth to ensure absolutely no dust remains before priming.
Step 2: Painting the Balusters and Trim
-
Protect Key Areas:
Apply painter’s tape to the floor, stair treads, and the edges where the balusters meet the handrail and newel posts. -
Prime White Areas:
Apply a stain-blocking primer to all balusters, the riser trim, and the stringer (the side support). Let this dry according to the manufacturer’s instructions. -
First Coat of White:
Using an angled sash brush, paint the balusters and trim with semi-gloss white paint. I like to work from top to bottom to catch any drips immediately. -
Second Coat:
Once dry, lightly sand with fine grit if necessary, wipe clean, and apply a second coat of white for full, opaque coverage. Remove tape while the paint is slightly tacky to avoid peeling.
Clean Lines
For ultra-crisp lines between the black post and white balusters, use a utility knife to lightly score the painter’s tape edge before peeling it away.
Step 3: Staining and Painting High-Contrast Elements
-
Tape for Contrast:
After the white paint has cured for at least 24 hours, carefully tape off the white balusters where they meet the handrail and newel posts. -
Stain the Treads:
If your treads are being refinished, sand them down to bare wood carefully. Apply your chosen stain with a rag, wiping off excess. Seal with polyurethane once dry. -
Prime Newel Posts:
Prime the large newel posts at the base and top of the stairs. Use a dark-tinted primer if possible to help the black coat cover better. -
Paint Posts Black:
Apply the satin black paint to the newel posts. Use a high-quality brush to minimize stroke marks, ensuring the paint gets into the decorative grooves of the post cap. -
Paint the Handrail:
Paint the handrail black to match the posts. Take your time on the underside where it’s easy to miss spots. Two coats usually provide the richest finish. -
Detail Work:
Use a small artist’s brush for the tiny crevices where the black handrail meets the wall brackets or white balusters to ensure a razor-sharp line.
Go Matte
Swap satin black paint for a matte finish on the handrail and posts. It hides fingerprints better and gives the woodwork a velvety, modern feel.
Step 4: Finishing Touches
-
Install Runner:
If you are adding a runner like the one shown, measure and center it on the stairs. Secure it with a pneumatic stapler, tucking it tightly under the nose of each tread. -
Wall Bracket Installation:
Install any wall-mounted handrail brackets. Matte black brackets complement the dark railing beautifully and reinforce the modern aesthetic. -
Final Inspection:
Walk the stairs and look for any touch-ups needed—perhaps a spot of white on the black post or vice versa. Correct these with a small brush.
Step back and admire how the bold black accents instantly modernize your entryway


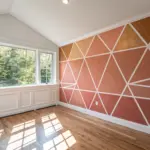
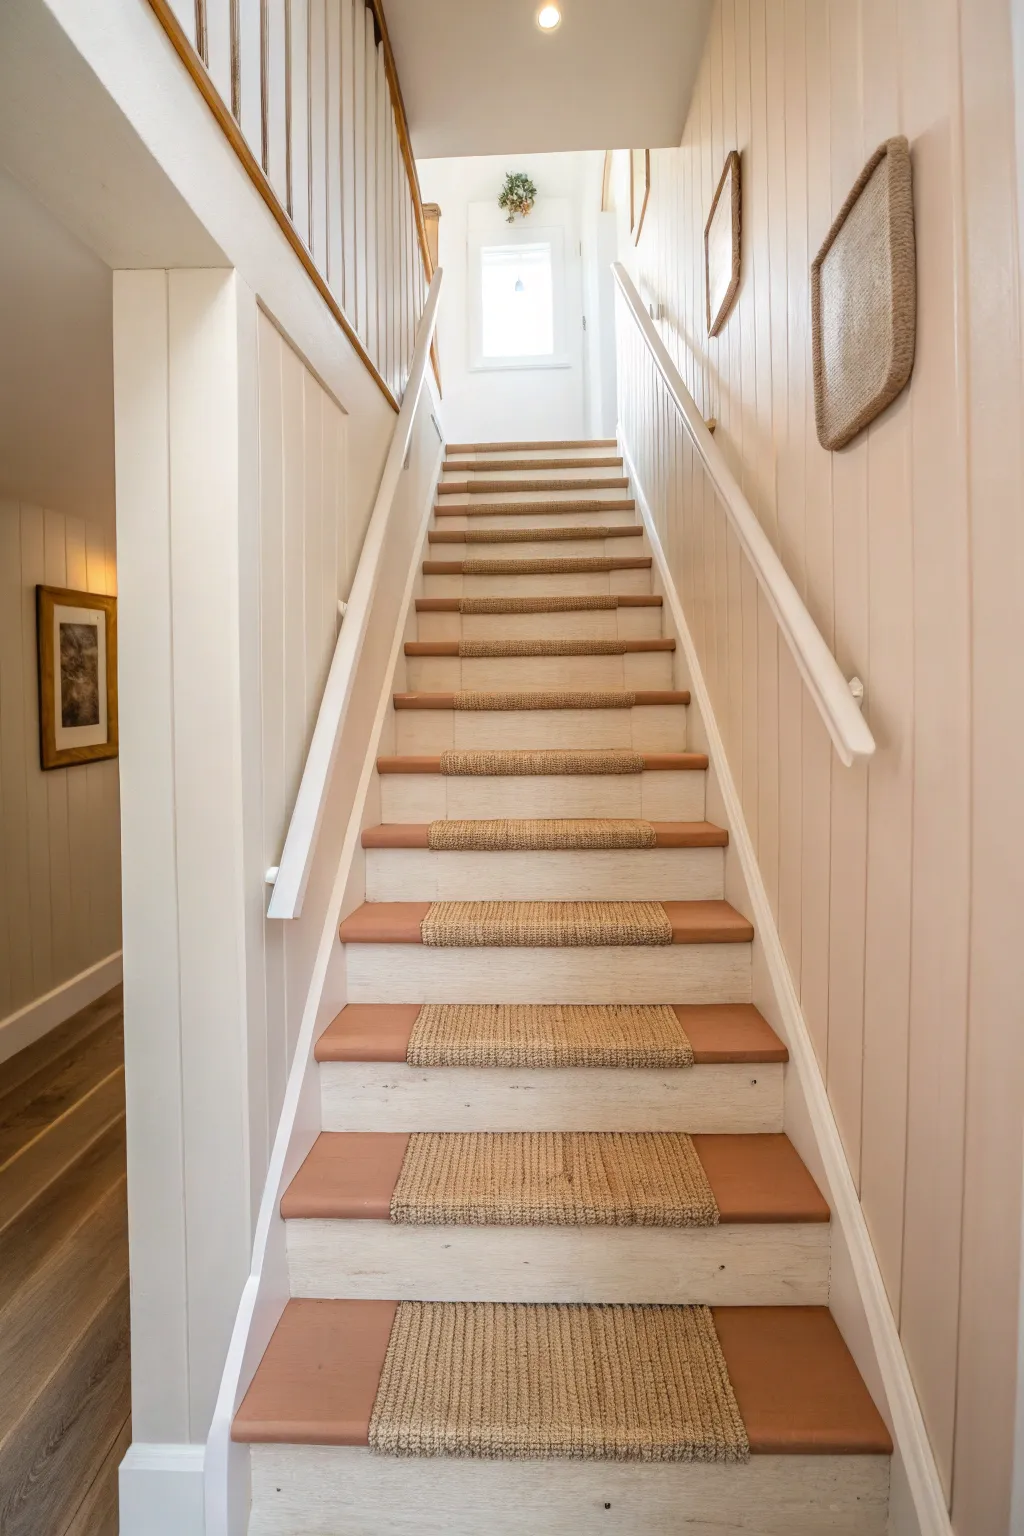
Painted Stair Risers With Pattern
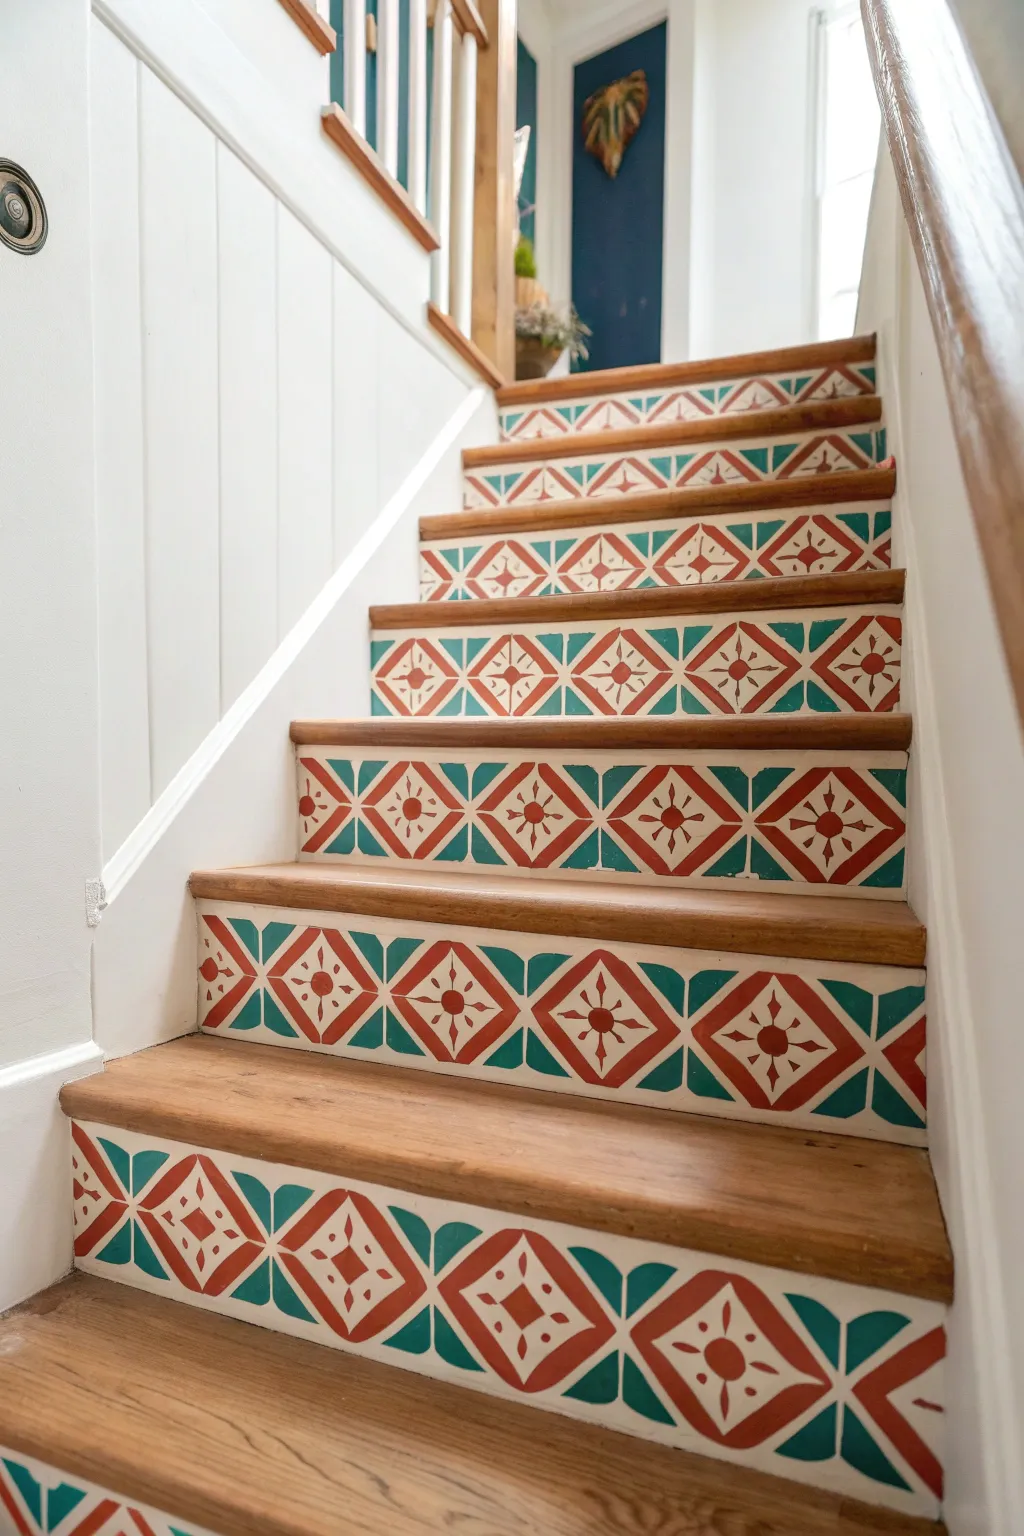
Transform a plain wooden staircase into a stunning architectural feature with this faux-tile painting project. Using a custom stencil and a warm, earthy color palette of terracotta and teal, you can mimic the look of expensive Spanish encaustic tiles directly on your risers.
How-To Guide
Materials
- Sander or sanding block (120-grit)
- Painter’s tape (1-inch width)
- Primer (high-adhesion bonding primer)
- Porch and floor enamel (White base)
- Acrylic latex paint (Terracotta/Rust Orange)
- Acrylic latex paint (Deep Teal/Turquoise)
- Custom stencil (diamond/star pattern to match riser height)
- Stencil adhesive spray
- Small high-density foam roller
- Stencil brushes (flat-bottomed)
- Small angled artist brush for touch-ups
- Polyurethane sealer (water-based, satin finish)
- Cleaning supplies (degreaser/TSP substitute)
- Measuring tape
Step 1: Prep and Prime
-
Clean surface thoroughly:
Before anything else, scrub the stair risers with a degreaser or TSP substitute to remove scuff marks, oils, and dirt. Let the wood dry completely. -
Sand for adhesion:
Lightly sand the riser surfaces using 120-grit sandpaper; you aren’t trying to strip them bare, just creating a ‘tooth’ so the paint sticks well. -
Protect the treads:
Apply painter’s tape carefully along the underside of the stair nosing and along the bottom edge where the riser meets the tread below. -
Apply primer:
Roll on a coat of high-adhesion bonding primer using a small foam roller. Allow this to dry according to the manufacturer’s instructions. -
Base coat application:
Apply two coats of white porch and floor enamel. This durable paint resists scuffs better than standard wall paint. Let it cure fully, ideally overnight, before stenciling.
Bleed-Through Fix
If paint bleeds under the stencil, lightly sand the dried bleeds with fine-grit paper, then dab white base paint over the error with a tiny sponge before restenciling the shape.
Step 2: Stenciling the Pattern
-
Prepare the stencil:
Measure the varying widths of your stair risers to find the absolute center point of each. Mark this center lightly with a pencil. -
Secure the stencil:
Spray the back of your stencil with a light mist of repositionable stencil adhesive. Press it firmly onto the center of the first riser, aligning it with your pencil mark. -
Draft the first color:
Load a stencil brush or small foam roller with the Terracotta paint. Offload most of the paint onto a paper towel until the brush feels almost dry—this ‘dry brush’ technique is critical to prevent bleeding. -
Paint the warm tones:
Stipple or roll the Terracotta paint into the diamond and central star sections of the design. Build up color intensity with multiple thin layers rather than one thick glob. -
Add the cool tones:
Using a fresh brush, apply the Deep Teal paint to the outer corner geometric shapes and triangular accents. Keep your hand steady near the edges of the orange sections. -
Repeat across the riser:
Peel the stencil off carefully and move it to the left or right, aligning the registration marks with the pattern you just painted. Continue until the full width of the riser is covered. -
Handle the edges:
When you reach the edges of the stairs, you may need to bend the flexible stencil into the corner to get the pattern flush against the wall stringer. -
Continue upward:
Repeat the stenciling process for every riser. I find it easiest to work from the bottom stair up so I’m not leaning on wet paint.
Step 3: Finishing Touches
-
Touch up mistakes:
Once the stencil work is dry, take a small artist’s brush and some of your white base paint to clean up any areas where color might have bled under the plastic. -
Remove tape:
Carefully score the edge of the painter’s tape with a utility knife before peeling it away to ensure you don’t pull up any dried paint. -
Seal the work:
Protect your hard work by applying two coats of water-based satin polyurethane. This makes the risers wipeable and resistant to shoe scuffs.
Add Dimension
After the main colors dry, use a fine liner brush and a diluted darker shade of grey to add tiny drop shadows to one side of the shapes, making the ’tiles’ look 3D.
Now you can enjoy the customized charm of your staircase every time you head to the second floor
BRUSH GUIDE
The Right Brush for Every Stroke
From clean lines to bold texture — master brush choice, stroke control, and essential techniques.
Explore the Full Guide
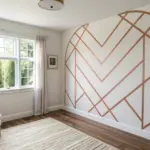
Accent Wall That Climbs the Steps
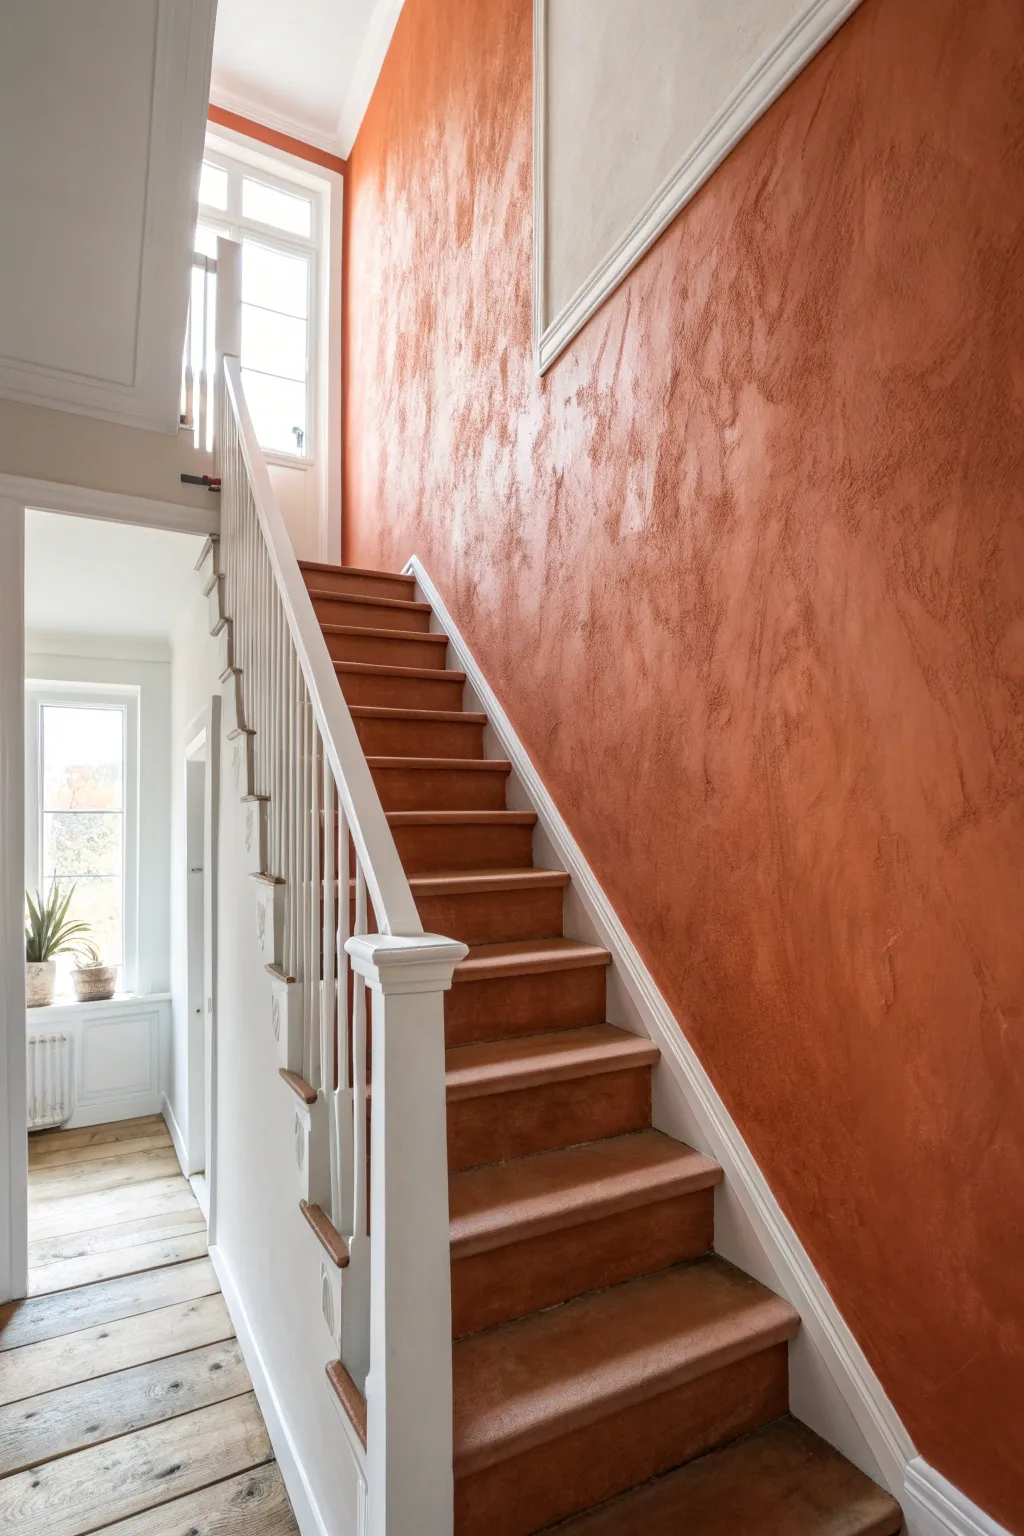
Transform a plain stairwell into a warm, Mediterranean-inspired feature with this textured wall finish. The deep terracotta hue combined with a subtle plaster effect adds depth and instant character to any ascending space.
Step-by-Step
Materials
- High-quality interior primer
- Terracotta or rust-colored textured paint (or Venetian plaster)
- Wide painter’s tape
- Drop cloths
- Medium-nap paint roller and tray
- Large trowel or plaster spatula
- Rectangle brush for cutting in
- Sanding block (fine grit)
- Sealer or wax (optional, dependent on paint type)
- Clean rags
- Ladder suitable for stairs
Step 1: Preparation & Priming
-
Protect the area:
Begin by thoroughly covering the stair treads and the floor below with drop cloths. Use wide painter’s tape to mask off the white trim, the skirt board running up the stairs, and the ceiling edge to ensure crisp lines. -
Clean the surface:
Wipe down the wall with a damp rag to remove dust or cobwebs. A clean surface is crucial for textured paints to adhere properly without dragging debris. -
Repair imperfections:
Fill any nail holes or significant dents with spackle. Once dry, sand these spots flush with the wall so they don’t disrupt the intentional texture you’ll be creating later. -
Apply primer:
Roll on a coat of high-quality interior primer. This provides a consistent base and helps the colored plaster or textured paint bond evenly. Allow this to dry completely according to the manufacturer’s instructions.
Keep It Random
Avoid repeating the same hand motion. Rotate your wrist and change directions frequently to prevent a visible pattern from forming.
Step 2: Base Application
-
Cut in the edges:
Using your rectangle brush, carefully paint a border of the terracotta color along the ceiling line, corners, and right against the taped trim. Feather the edges inward so you don’t have a harsh ridge. -
Apply the first coat:
Use the roller to apply the first layer of your textured paint or plaster. Work in small sections, roughly 3×3 feet. The goal here is coverage rather than perfect texture, but try to keep the distribution relatively even. -
Create initial texture:
While the paint is still wet, you can use a trowel to lightly knock down high spots or create broad, sweeping motions. This builds the foundation of that old-world look. -
Let it cure:
Allow this first coat to dry fully. Since textured paints are thicker, this might take longer than standard latex paint—often 4 to 6 hours or overnight.
Uneven Texture?
If one area looks too thick or lumpy, mist it lightly with water and rework it with a clean trowel to smooth out the excess material.
Step 3: Texturing & Detailing
-
Apply the second coat:
Apply the second coat using a trowel rather than a roller for better control. Scoop a small amount of product onto the trowel and apply it in random, cross-hatch or arcing motions. -
Build the pattern:
Vary your pressure. Pressing harder removes material to show the layer below, while lighter pressure leaves more product. I find that overlapping X-motions create the most natural, organic movement. -
Work the edges:
Pay special attention to the areas near the trim. Use a smaller putty knife or the very tip of your trowel to ensure the texture goes all the way to the tape line without building up too thick of a ledge. -
Check for balance:
Step back down the stairs frequently to view the wall from a distance. Look for areas that seem too flat or too heavy and adjust them while the material is still workable. -
Burnish (Optional):
If using Venetian plaster, wait until the surface is tacky but firm, then rub the clean trowel over the surface at a shallow angle. This compresses the material and creates a slight sheen or marble-like finish.
Step 4: Finishing Touches
-
Remove tape:
Carefully peel off the painter’s tape before the wall is 100% rock hard. Pulling the tape away at a 45-degree angle helps prevent chipping your new textured finish. -
Touch up lines:
If any paint bled through, use a small artist’s brush and your trim color to tidy up the edges where the rust wall meets the white molding and skirt board. -
Seal the surface:
For high-traffic stairwells, apply a clear matte sealer or wax with a rag or sponge. This protects the textured finish from scuffs and handprints as people walk up and down. -
Final inspection:
Do a final walk-through to ensure uniform coverage and texture. Wipe away any dust on the skirt boards and enjoy the dramatic new look.
Now step back and admire the rich, textural warmth you’ve brought to your hallway
Wallpaper Moment in the Stairwell
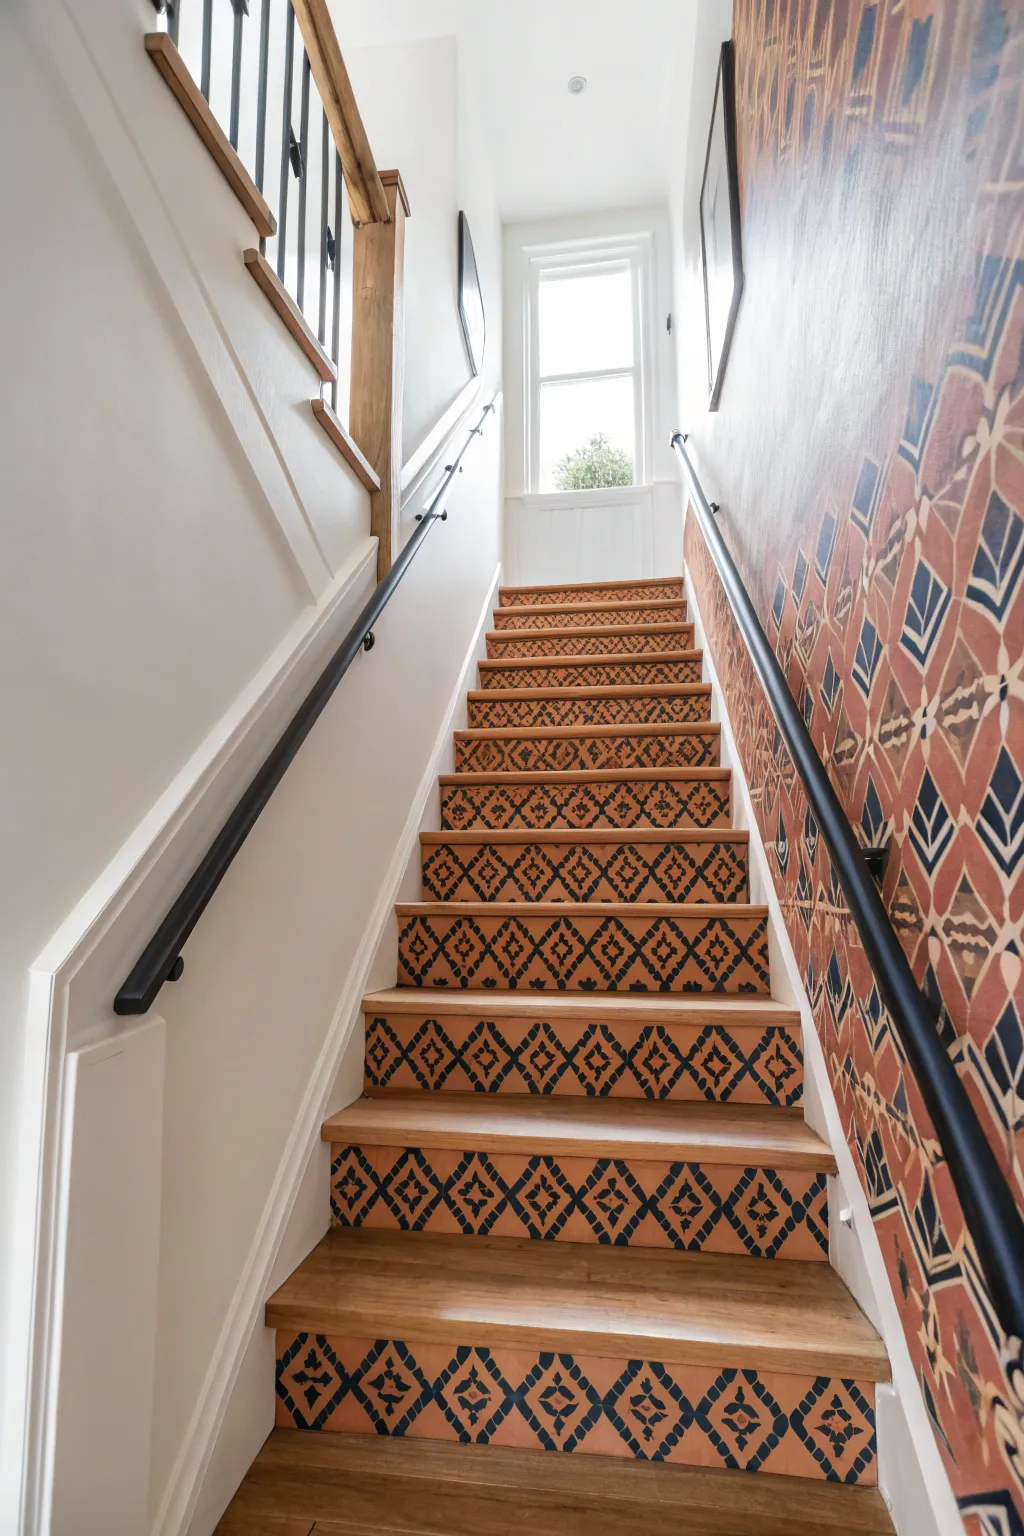
Transform a standard staircase into a stunning focal point by applying bold, patterned wallpaper to just the risers. This technique creates a visual surprise that draws the eye upward without overwhelming the space, balancing intricate design with crisp white architectural details.
How-To Guide
Materials
- Geometric or tribal patterned wallpaper (peel-and-stick or traditional)
- Wallpaper paste (if using traditional)
- Tape measure
- Metal straight edge or ruler
- Sharp utility knife or X-Acto knife with extra blades
- Cutting mat or scrap cardboard
- Smoother tool (plastic squeegee)
- Sponge and bucket of warm water
- Mild degreaser or TSP substitute
- Sandpaper (medium grit)
- Painter’s tape (optional)
- Clean microfiber cloths
Step 1: Cleaning & Preparation
-
Assess the surface:
Examine your stair risers closely. If they are painted with a high-gloss finish, the wallpaper might struggle to adhere. Give them a quick scuff-sand with medium-grit sandpaper to create a better bonding surface, then wipe away all dust. -
Deep clean the risers:
Stairs collect a surprising amount of scuffs and grime. Wash each riser thoroughly using a sponge and a mild degreaser or a TSP substitute. This removes oils and dirt that could cause peeling later. -
Dry completely:
Wipe the risers down with a clean, dry microfiber cloth and let them air dry for at least an hour. Trapped moisture is the enemy of a long-lasting wallpaper job. -
Measure precisely:
Measure the height and width of every single riser individually. Stairs in older homes often shift and settle, meaning the bottom step might be 1/8 inch different from the top step. Write these dimensions down in order.
Loose Corners?
If a corner keeps peeling up, use a tiny dab of seam glue or extra-strength adhesive spray on a Q-tip. Press and hold for 30 seconds to lock it in place permanently.
Step 2: Cutting the Paper
-
Plan the pattern repeat:
Unroll your wallpaper and identify the pattern match. For a geometric diamond pattern like this, you want the design to be centered on each step. Determine the center point of your riser width and align the center of the pattern to match. -
Cut the rough strips:
Using your measurements, cut strips of wallpaper for each riser, adding about 1 inch of excess to both the height and width. This safety margin allows you to trim for a perfect fit during installation. -
Mark the backings:
As you cut each piece, lightly number the back of the paper to correspond with the step it belongs to (e.g., ‘1’ for the bottom step). This prevents confusion once you start pasting.
Step 3: Installation
-
Start at the top:
I usually prefer starting from the top stair and working my way down so I’m not sitting on my freshly papered work. Peel back a few inches of the liner (if using peel-and-stick) or apply paste to the back of the first strip. -
Align the top edge:
Position the wallpaper against the riser, aligning the pattern so it is centered. Tuck the top edge of the paper tightly up against the underside of the stair tread nose (the part of the step that hangs over). -
Smooth the center:
Press the center of the paper against the riser. Using your plastic smoothing tool, work from the center outward to the left and right edges to push out air bubbles and ensure firm adhesion. -
Crease the edges:
Use the hard edge of your smoother to firmly crease the paper into the corners where the riser meets the wall (or stringer) and where it meets the tread below. -
Trim the excess:
Place your metal straight edge into the creased corner. Run your sharp utility knife along the straight edge to slice off the excess paper at the bottom and sides. Snap off your blade tip frequently to ensure clean cuts without tearing. -
Repeat the process:
Move down to the next step, ensuring visual continuity. If your pattern is large, step back occasionally to make sure the overall flow looks consistent from top to bottom. -
Seal the edges:
Once all risers are covered, run your finger along the perimeter of each piece to ensure the edges are fully sealed down. If using traditional paste, wipe away any excess glue from the wood treads immediately with a damp sponge.
Varnish Finish
For high-traffic households, apply a coat of clear, matte polycrylic over the wallpaper risers. This seals the paper and makes it easy to wipe away scuffs from shoes.
Now you have a staircase that makes a stylish statement every time you head upstairs

PENCIL GUIDE
Understanding Pencil Grades from H to B
From first sketch to finished drawing — learn pencil grades, line control, and shading techniques.
Explore the Full Guide
Mirror Placement to Bounce Light
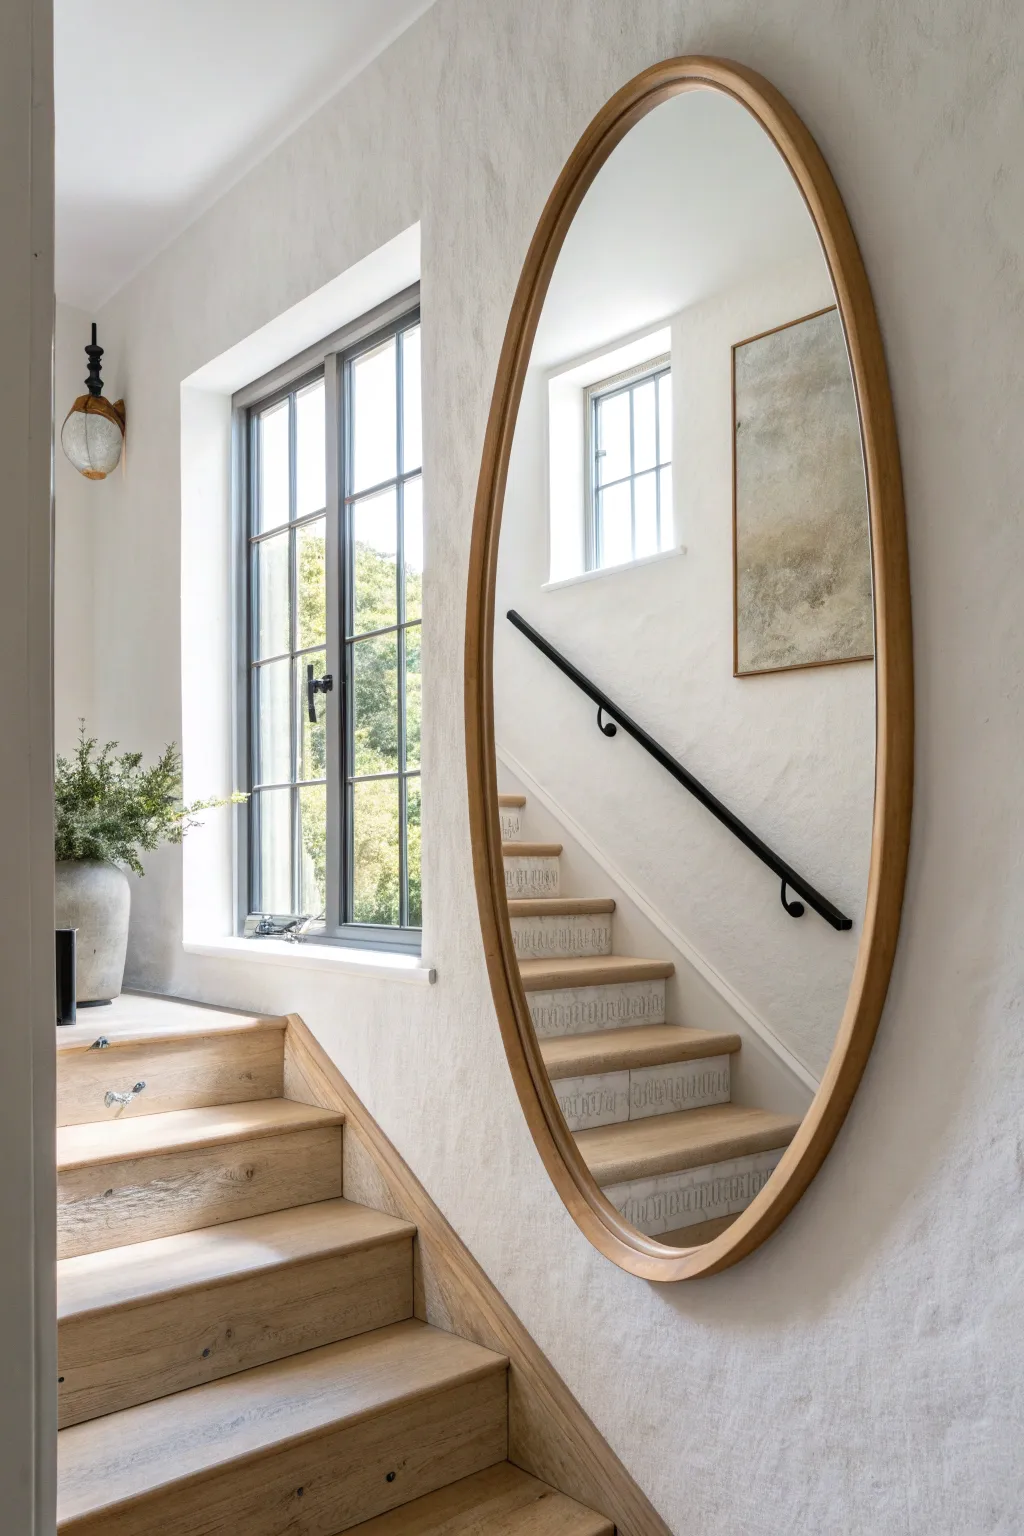
Transform a narrow or dim stairwell into a bright, airy passage by installing a large, statement mirror. This project focuses on securely mounting a heavy oval mirror to maximize natural light reflection while complementing the warm wood tones of the staircase.
Step-by-Step Guide
Materials
- Large oval mirror with light wood frame (approx. 60-70 inches tall)
- Heavy-duty wall anchors or toggle bolts
- Power drill with drill bits
- Stud finder
- Measuring tape
- Painter’s tape
- Pencil
- Level (24-inch or longer)
- Clean microfiber cloth
- Glass cleaner
Step 1: Planning the Placement
-
Identify the sweet spot:
Stand at the bottom of the stairs and look up. You want to place the mirror where it will catch light from the adjacent window but also reflect the architectural details of the staircase itself. -
Check for studs:
Use your stud finder to locate the wooden studs in the wall area you’ve chosen. Mark the center of the studs lightly with a pencil. -
Create a visual template:
Since holding a heavy mirror is tiring, I cut a piece of cardboard or kraft paper to the exact size of the mirror. Tape this template to the wall using painter’s tape to visualize the final position. -
Adjust the height:
Move the template up or down until the center of the oval sits roughly at eye level for someone standing on the landing or the specific step directly in front of it. -
Assess the reflection:
Stand back and imagine the reflection. Ensure the top of the oval isn’t so high that it only reflects the ceiling; you want it to capture the window frame and the handrail.
Alignment Trouble?
If the mirror isn’t hanging perfectly straight, wrap a small piece of painter’s tape around the screw on the lower side to lift that side slightly.
Step 2: Preparing the Hardware
-
Measure mounting points:
Flip your mirror over and carefully measure the distance between the hanging D-rings or the keyhole slots on the back. Accuracy here is critical. -
Transfer measurements to the wall:
Using the center point of your paper template, measure out and mark exactly where the screws should go. Remove the paper template once your marks are precise. -
double-check level:
Place your long level across the two marks you just made. Adjust them slightly if the bubble isn’t perfectly centered. -
Drill pilot holes:
Drill into your marked spots. If you hit a stud, that’s ideal. If you hit hollow drywall, you will need to enlarge the hole slightly to fit your anchors. -
Install anchors:
Insert your heavy-duty hollow wall anchors or toggle bolts into the drywall holes. Tap them flush with a hammer if necessary. -
Drive the screws:
Drive the screws into the anchors or studs, leaving the head protruding just enough (usually about 1/4 inch) to catch the hardware on the back of the mirror.
Make It Pop
Install a small, directed picture light above the mirror to add evening ambiance and highlight the texture of the wall behind the frame.
Step 3: Mounting and Finishing
-
Prepare for the lift:
Clean the back of the mirror to remove any dust that might rub onto your wall texture. -
Hang the mirror:
With a partner’s help, lift the mirror and guide the D-rings or keyholes onto the protruding screws. I prefer to guide one side on first while the partner stabilizes the other. -
Verify security:
Gently pull down on the mirror to ensure the hardware has fully seated into the slots or rings. -
Check the alignment:
Place your level on the side edge of the frame to ensure the oval is hanging straight vertically. -
Polish the glass:
Using a glass cleaner and a microfiber cloth, wipe away any fingerprints from the installation process. -
Style the surroundings:
Ensure the area reflected in the mirror—specifically the window sill or landing—is tidy, perhaps adding a textured pot or greenery to enhance the view.
Step back and enjoy how much larger and brighter your stairwell feels with this simple addition
Statement Pendant in the Stairwell Void
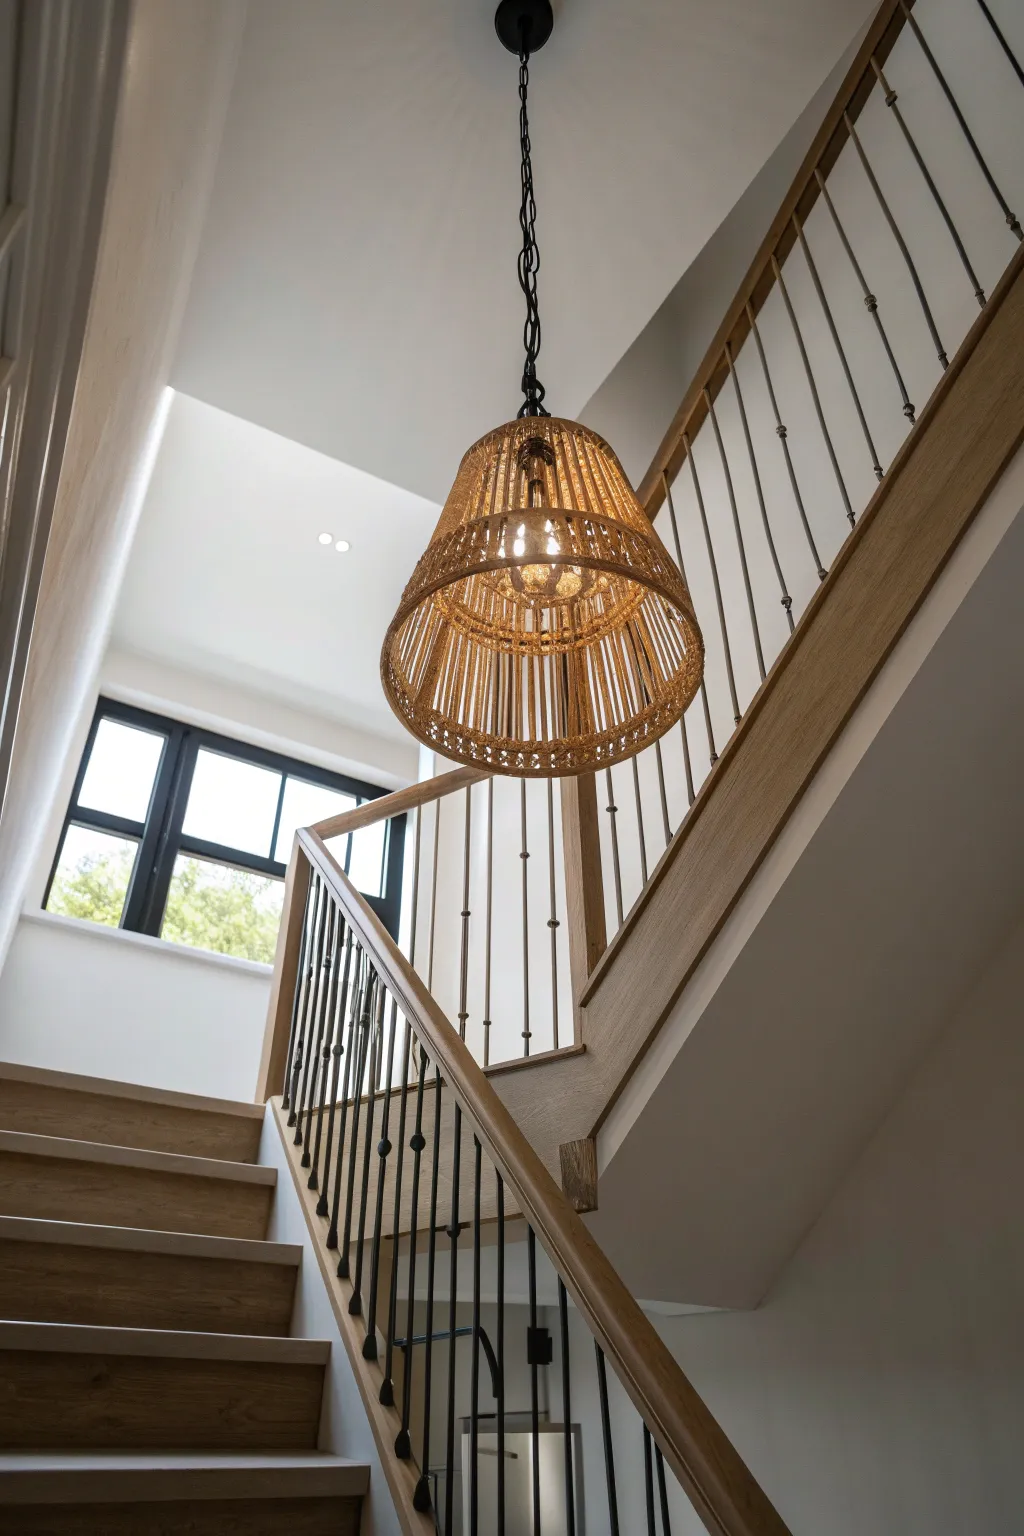
Transform a standard stairwell void with this impressive two-tier woven pendant light, mimicking the texture of natural rattan. This project guides you through constructing a structural wire frame and wrapping it with natural fibers to create a warm, filtered light effect.
How-To Guide
Materials
- Two wire lampshade frames (one large conical, one medium conical)
- Natural jute twine or sisal rope (thin to medium gauge)
- Thin crafting wire (24 gauge)
- Pendant light cord kit (black)
- Black spray paint (matte finish)
- Needle-nose pliers
- Wire cutters
- Hot glue gun and clear glue sticks
- Scissors
Step 1: Frame Preparation
-
Select your frames:
Choose two conical wire lampshade frames. The larger one will serve as the bottom tier and the smaller one as the top tier. Ideally, the bottom width of the smaller frame should roughly match the top width of the larger frame for a cohesive look. -
Remove existing fabric:
If you are upcycling old shades, carefully strip away all fabric and excess glue until you are left with just the bare metal skeletons. -
Join the tiers:
Position the smaller frame on top of the larger inverted frame. Use thin crafting wire to securely bind the bottom ring of the top frame to the top ring of the bottom frame at every vertical strut junction. Twist the wire tightly with pliers. -
Paint the structure:
Take the joined frames outdoors or to a well-ventilated area. Spray the entire metal structure with matte black paint to ensure any visible metal blends with the final aesthetic. Let it dry completely.
Loose Weave?
If your vertical strings feel too loose, add a tiny dot of clear glue on the backside where the horizontal and vertical lines cross to lock them in place.
Step 2: Vertical Weaving
-
Start the vertical wraps:
Begin at the very top ring of the upper tier. Tie a knot with your jute twine, securing it with a small dab of hot glue on the inside of the ring. -
Create the struts:
Run the twine vertically down to the bottom ring of the top tier. Loop it around the ring, keeping tension tight, and run it back up to the top ring. Repeat this every 1-2 inches around the circumference to create a base vertical pattern. -
Wrap the metal struts:
For a cleaner look, I prefer to wrap the actual metal vertical bars of the frame with twine first. Apply a dot of glue at the top, and wind the twine tightly down the length of each bar until the metal is fully concealed. -
Repeat for the lower tier:
Do the same for the bottom tier frame. Ensure your vertical lines align visibly with the ones above for a continuous flow, even though the angle of the slope might change.
Ombré Effect
Use a darker stain or diluted paint on the bottom third of the twine after weaving to create a subtle dipped or ombré gradient effect.
Step 3: Horizontal Texturing
-
Begin the horizontal weave:
Starting at the top of the upper tier, tie your twine to one of the vertical struts. Weave the twine in an over-under pattern through the vertical twine lines you created earlier. -
Build the top density:
Continue weaving in a tight spiral for the top 2-3 inches of the upper shade. This denser section hides the bulb socket and adds structural stability. -
Create the open section:
Transition to a more open design. Instead of weaving continuously, wrap the twine around the vertical struts only, spacing these horizontal lines about 1/2 inch apart to allow light to filter through. -
Define the middle junction:
When you reach the point where the two frames join, weave a dense band of about 1 inch height. This visually separates the tiers and hides the connecting wire mechanics. -
Weave the lower tier:
Continue the open wrapping pattern down the larger, lower tier. Keep the spacing consistent with the section above for visual harmony. -
Finish the bottom rim:
At the very bottom edge, switch back to the dense over-under weave for the final 2 inches. This weights the shade visually and provides a durable rim.
Step 4: Assembly and Hanging
-
Secure loose ends:
Trim any excess twine tails. Use a small amount of hot glue to tuck these ends on the inside of the shade so they aren’t visible from the exterior. -
Install the cord kit:
Thread your black pendant cord through the central washer of the top tier frame. Secure the socket ring tightly. -
Add the chain accent:
To mimic the look in the photo, loop the black chain through the top hanging loop of the pendant kit. Adjust the length to suit your stairwell drop. -
Final bulb check:
Screw in a warm-toned Edison bulb. The filament style looks fantastic through the open weave. Hang your masterpiece and admire the shadows it casts.
Enjoy the warm, organic glow of your new custom lighting feature


Step-by-Step Color Gradient
Transform a plain staircase into a stunning architectural feature using a soft, shifting color palette on the treads. This project combines painted wood with natural textured inserts throughout the rise, creating a warm, inviting pathway that draws the eye upward.
Step-by-Step Guide
Materials
- Sander (orbital or mouse)
- Sandpaper (80, 120, and 220 grit)
- Wood filler
- Painter’s tape (high quality)
- Primer (high-adhesion bonding primer)
- Porch and floor enamel paint (white/cream base)
- Porch and floor enamel paint (terracotta/peach base)
- Clear matte polyurethane (floor grade)
- Sisal or jute stair treads (pre-cut or roll)
- Heavy-duty double-sided carpet tape or carpet tacks
- Measuring tape
- Pencil
- Paint rollers (foam and nap)
- Angled sash brush
Step 1: Preparation and Priming
-
Clear and clean:
Remove any existing carpet, staples, or adhesive from the stairs. Vacuum thoroughly and wash the wood with a degreaser to ensure a clean surface. -
Sand the surfaces:
Using an orbital sander, sand the treads and risers starting with 80-grit paper to remove old finish. Progress to 120-grit for smoothing. -
Fill imperfections:
Inspect the wood for gouges or nail holes. Apply wood filler, let it dry, and hand-sand smooth with 220-grit paper. -
Masking off:
Apply painter’s tape carefully along the edges where the stairs meet the wall or skirting board to ensure crisp lines. -
Prime the wood:
Apply a coat of high-adhesion bonding primer to both risers and treads. Let this cure fully according to the manufacturer’s instructions, as stair traffic is heavy.
Step 2: Painting the Gradient
-
Paint the risers:
Start by painting the vertical risers white (or your chosen cream base color). Use a small roller for the main area and an angled brush for corners. Apply 2-3 coats for solid coverage. -
Plan your gradient:
For the subtle gradient effect shown, you will need to mix your terracotta paint with varying amounts of white. Separate your paint into small containers—one for every 3-4 steps. -
Mix the shades:
Keep the bottom few steps the darkest, pure terracotta. For the next batch of steps, mix in 10% white paint. Increase the white ration by 10-15% for each subsequent group of steps as you move up. -
Apply the tread color:
Paint the horizontal treads with your mixed colors. Start from the top and work your way down so you don’t trap yourself upstairs. Use an angled brush for the edges first. -
Roll the finish:
While the edges are wet, use a smooth foam roller to paint the flat surface of the tread. This eliminates brush strokes. I find two thin coats are always more durable than one thick one. -
Seal the work:
Once the paint has cured for at least 24-48 hours, apply two coats of clear matte polyurethane to the treads to protect against foot traffic.
Uneven Fade?
If the color jump between steps looks too drastic, create an intermediate mix of the two neighboring colors and apply a wash coat over the lighter step to blend them.
Step 3: Installing the Runners
-
Measure for center:
Find the exact center of your bottom stair tread and mark it lightly with a pencil. Do the same for the top stair to ensure alignment. -
Prepare the sisal:
If using a roll, cut your sisal or jute material into rectangular mats sized to leave about 3-4 inches of painted wood visible on either side. -
Apply adhesive:
Apply heavy-duty double-sided carpet tape to the back perimeter of each sisal mat. Alternatively, you can use small carpet tacks for a permanent hold. -
Position the mats:
Peel the backing off the tape and carefully place the mat on the tread, aligning it with your center marks. Press down firmly to secure the bond. -
Final securement:
Repeat the process for every step, ensuring the vertical alignment is straight when looking up the staircase.
Texture Twist
Instead of plain sisal, bind the edges of your mats with a colored cotton piping that matches the darkest shade of your gradient for a cohesive, custom look.
Now step back and admire how the colors gently guide you up to the next level of your home
Painted “Runner” With Tape Lines
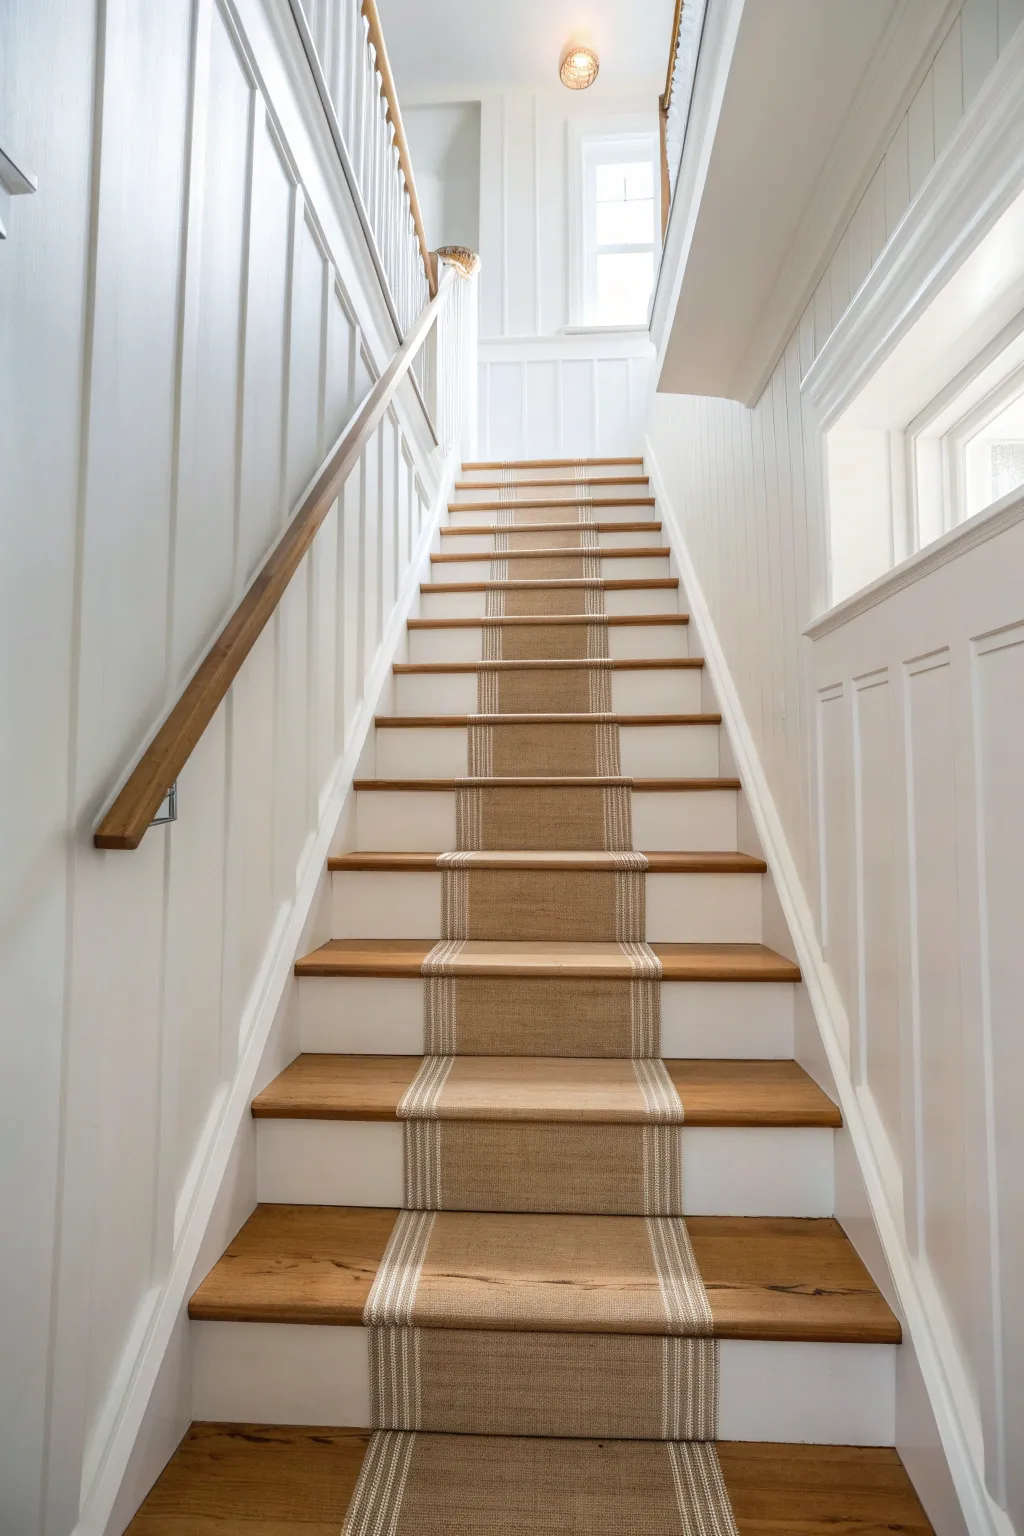
Transform a plain wooden staircase into a coastal-inspired feature with nothing but paint and tape. This clever trompe l’œil effect mimics the texture of a woven natural fiber runner, offering durability without the slip hazards of real rugs.
Step-by-Step
Materials
- Sander and sandpaper (120 and 220 grit)
- Painter’s tape (various widths: 1-inch, 1/4-inch, and delicate surface)
- Primer suitable for floors
- Floor enamel paint (White/Cream base)
- Floor enamel paint (Tan/Beige main color)
- Floor enamel paint (Darker Taupe for texture)
- Glaze medium
- Stiff bristle brush or dragging brush
- Foam rollers and tray
- Measuring tape
- Pencil
- Sea sponge or rag (optional for texture)
- Clear matte polyurethane (floor grade)
Step 1: Preparation & Base Coat
-
Clean and sand:
Begin by thoroughly cleaning the stairs to remove any wax or oils. Sand the center of the treads and risers where the runner will go to ensure proper adhesion, wiping away all dust with a damp tack cloth. -
Mark the center:
Find the exact center of your staircase at the top and bottom tread. Use a long straight edge or a chalk line to create a faint guide, ensuring your runner stays perfectly aligned all the way down. -
Define the width:
Decide on the width of your runner (standard is usually 24-27 inches). Measure out from your center line on both sides and mark these boundaries lightly with a pencil on every tread and riser. -
Tape the perimeter:
Run long strips of high-quality painter’s tape along your marked pencil lines to define the outside edges of the runner. Press the tape edges down firmly to prevent bleed-through. -
Apply base color:
Paint the entire area between the tape lines with your tan/beige base color. I prefer using a foam roller here for a smooth, even application. Apply two coats, letting them dry completely in between.
Pro Tip: The “Stitching” Trick
To mimic the selvage edge of a real rug, lightly dry-brush a tiny amount of dark grey paint along the very outer edges of the runner before sealing.
Step 2: Creating the Woven Texture
-
Mix the glaze:
Mix your darker taupe paint with a glaze medium (usually a 1:4 ratio of paint to glaze). This transparency is crucial for creating depth that mimics fiber. -
Apply vertical drag:
Working on one tread at a time, brush on a layer of the glaze mixture. Immediately drag a dry, stiff bristle brush vertically through the wet glaze to create fine warp lines. -
Add cross-hatching:
Once the vertical lines are dry to the touch, apply a second, very thin layer of glaze. Drag the brush horizontally this time to create the weft, forming a subtle cross-hatch pattern that looks like woven fabric. -
Soften the look:
If the lines look too harsh, lightly dab the wet glaze with a clean, dry rag or sponge to break up the pattern and induce a more organic, natural fiber appearance. -
Let texture cure:
Allow this textured layer to dry fully, ideally overnight, as you will be applying tape directly over this surface for the next step.
Step 3: Detailing the Borders
-
Tape the border layout:
To create the ticking stripe effect on the edges, you need precise taping. Apply a strip of 1-inch tape about 2 inches in from the outer edge on both sides. This creates the main broad band. -
Add pinstripe tape:
Inside that masked-off border area, apply thin 1/4-inch tape strips. These thin strips will preserve the tan color, creating the delicate pinstripes seen in the reference. -
Seal the tape:
Brush a very light coat of your base tan paint over the tape edges. This seals the tape and ensures that the next color creates crisp, razor-sharp lines. -
Paint the stripes:
Using a small brush, fill in the exposed areas within your border taping with the white or cream paint. You may need two light coats to get solid coverage over the darker texture. -
Remove tape:
While the final coat of white paint is still slightly tacky, carefully peel back all the tape strips at a 45-degree angle. This reveals your faux woven runner with its crisp ticking stripe border.
Troubleshooting: Bleeding Tape
If paint bleeds under the tape, wait for it to dry fully. Then, create a straight edge with the original base color and a tiny artist’s brush to tidy it up.
Step 4: Protection
-
Clear coat application:
Once the paint has cured for at least 24 hours, apply a clear, matte floor-grade polyurethane. -
Final finish:
Add a second and third coat of polyurethane, lightly sanding with high-grit paper between coats, to ensure the runner can withstand heavy foot traffic.
Step back and enjoy the classic elegance of your new runner that will never snag or slide
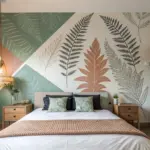
Hand-Painted Mural Along the Stairwell Wall
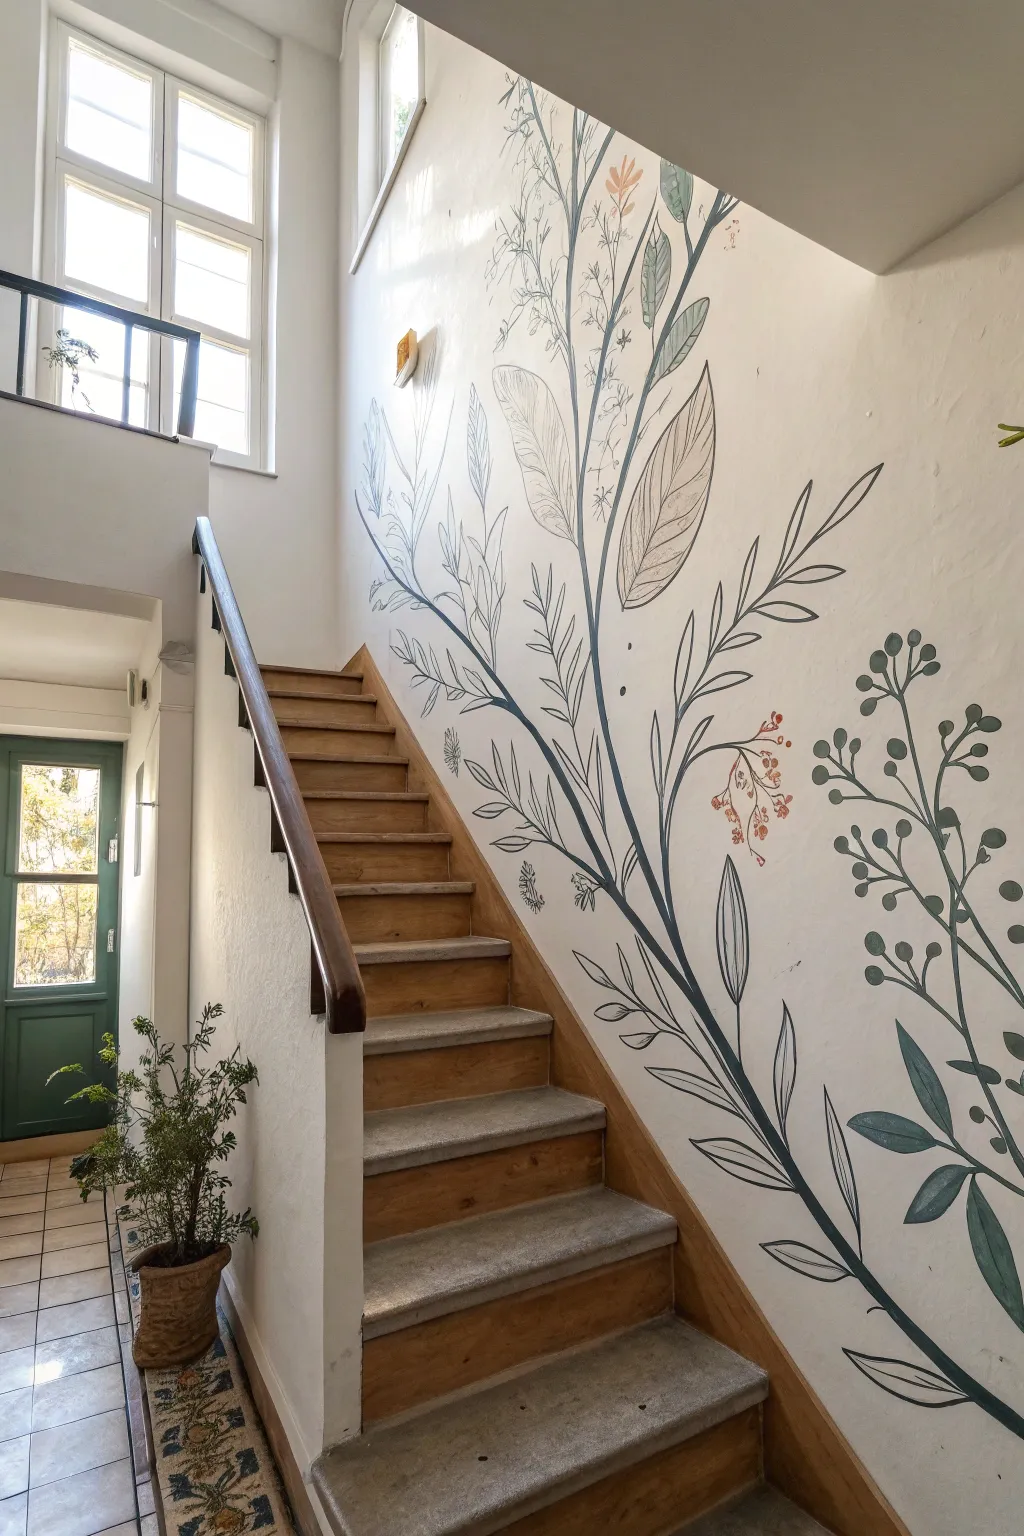
Transform a plain stairwell into an enchanting garden path with this large-scale botanical mural. Featuring sweeping vines, delicate leaves, and subtle pops of color, this illustrative design adds height and nature-inspired elegance to your home.
Detailed Instructions
Materials
- Interior latex paint (white or cream for base)
- Acrylic paints (dark blue-grey, sage green, olive green, rust orange, pale blue)
- Pencil and eraser
- Painter’s tape
- Ladder or sturdy step stool
- Drop cloths
- Round synthetic brushes (sizes 2, 6, and 10)
- Long liner brush (size 1)
- Palette or paper plates
- Chalk (optional, for drafting)
Step 1: Preparation and Sketching
-
Prepare the workspace:
Clear the stairs of any rugs or obstacles. Lay down drop cloths securely on the steps and landing to catch any drips, taping them down so they don’t slip while you work. -
Prime the wall:
If your wall isn’t already a fresh, clean shade, apply a coat of white or cream interior latex paint. Let this base coat cure for at least 24 hours before you start the artistic work. -
Plan the main stems:
Using a pencil or light chalk, sketch the primary swooping lines that will serve as the main stems. Start from the bottom skirting board and swoop upwards diagonally, following the ascent of the stairs. -
Draft the foliage:
Lightly sketch the shapes of the leaves and berry clusters. Keep the composition balanced by varying the size of the leaves—large, broad leaves near the bottom and smaller, delicate sprays near the top. -
Refine the composition:
Step back frequently to view the sketch from the bottom of the stairs. Adjust any lines that feel stiff or cluttered, ensuring the flow mimics the natural growth of wild plants.
Uneven Lines?
If your long stem lines are looking shaky, support your painting hand with your pinky finger against the wall, or use a mahl stick for leverage.
Step 2: Painting the Structure
-
Mix the stem color:
Create a dark blue-grey shade on your palette. Add a tiny drop of water to improve flow, which helps create long, smooth lines without the brush dragging. -
Paint the main vines:
Using a size 6 round brush, trace over your pencil lines for the main stems. Apply consistent pressure to keep the line width steady, tapering off slightly at the very tips. -
Branch out:
Switch to a size 2 brush to paint the thinner, secondary branches connecting the leaves to the main stems. I find that pulling the brush toward me gives me more control over these finer lines. -
Block in large leaves:
Mix a muted olive green. With your size 10 brush, fill in the shapes of the largest leaves. Don’t worry about outlines yet; focus on a smooth, solid fill of color. -
Add varied foliage:
Mix a sage green and a pale blue-grey. Paint the medium-sized leaves in sage and the smallest, fern-like sprays in the pale blue for visual depth and variety.
Add Dimension
Mix a slightly lighter version of your green leaf color and add a single swipe to one side of each leaf to create a simple highlight effect.
Step 3: Detailing and Outlining
-
Paint the berries:
Mix a warm rust or burnt orange color. Use the size 6 brush to dab small, round circles in clusters at the ends of the finer branches. -
Add veining detail:
Once the green leaves are fully dry, use the liner brush and your dark blue-grey stem mixture to paint delicate veins inside the large olive leaves. -
Outline the leaves:
Using the liner brush, carefully outline the leaves that you want to stand out. You don’t need to outline every single leaf; leaving some ‘open’ creates a lighter, illustrative look. -
Create botanical texture:
Add tiny dashes or dots along the stems using a very fine brush to simulate thorns or texture. This small detail adds a lot of realism to the illustration. -
Erase guidelines:
Review the entire mural for visible pencil or chalk marks. Wait until the paint is bone-dry—usually overnight—before gently erasing remains to avoid smudging. -
Protect the work (optional):
Because stairwells are high-traffic areas, you might choose to apply a clear, matte water-based varnish over the painted areas to protect them from scuffs.
Now you have a serene, nature-filled passage that brightens your daily climb up the stairs


Have a question or want to share your own experience? I'd love to hear from you in the comments below!