Marble has this magical way of looking both wild and polished at the same time, like nature decided to paint with lightning. If you’re craving marble design ideas you can actually visualize (and even recreate in your own art), here are my favorite directions to explore.
Classic White Marble Everywhere
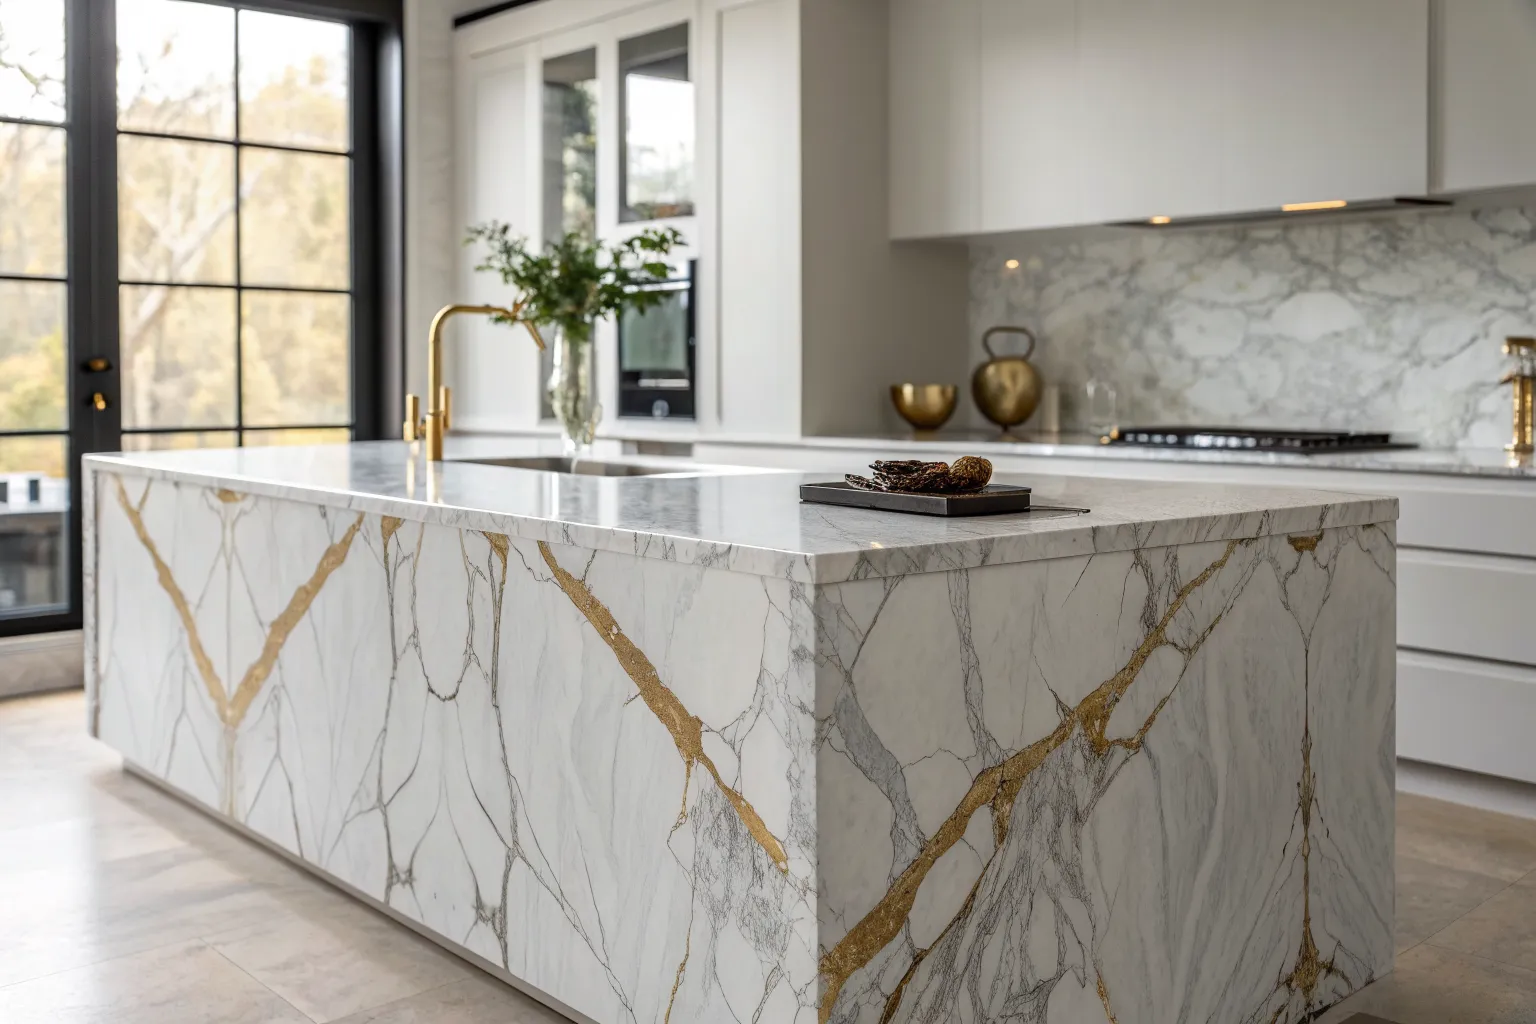
Achieve the high-end look of a classic white marble countertop without the hefty price tag using this detailed faux painting technique. You will create realistic grey veining and soft, diffused shadows atop a pristine white base, transforming any laminate or wooden surface into a sleek stone replica.
Detailed Instructions
Materials
- High-adhesion white primer
- High-gloss white epoxy resin kit (2-part)
- Grey acrylic paint (charcoal or cool dark grey)
- White acrylic paint
- Paint thinner or water (mister bottle helpful)
- Natural sea sponge
- Fine liner brush (size 0 or 00)
- Feather or soft blending brush
- Clean mixing cups and stir sticks
- Isotropic alcohol (for dispersing epoxy)
- Plastic drop cloths and painter’s tape
- Heat gun or propane torch
- Sandpaper (220 grit)
Step 1: Preparation & Base Coat
-
Surface Prep:
Begin by thoroughly cleaning your countertop surface to remove grease and debris. Scuff the entire area with 220-grit sandpaper to create a ‘tooth’ for the primer to grip, then wipe away all dust with a tack cloth. -
Masking Off:
Protect your cabinets, floors, and sink fixtures by taping off the edges carefully with painter’s tape and laying down plastic sheets. This epoxy process can get messy, so be thorough. -
Priming:
Apply two coats of high-adhesion white primer. Allow the first coat to dry completely before applying the second to ensure a solid, opaque white background that hides the old color completely.
Veins look too stiff?
If your lines look too straight or painted, spritz them with more water and blot heavily with a sponge. Real marble is chaotic and blurry, not perfect.
Step 2: Creating the Veins
-
Mixing Vein Colors:
Prepare a mixture of grey acrylic paint with a small amount of water or thinning medium. You want a consistency similar to ink—fluid enough to flow but pigmented enough to show up against the white. -
Mapping the Veins:
Lightly sketch the path of your major veins using a very faint pencil line or by envisioning the flow. Marble veins often fork like lightning; keep them random and avoid uniform patterns. -
Painting Major Veins:
Dip a fine artist’s brush or a feather into your grey mixture. Drag it shakily along your map to create the primary veins, twisting the brush slightly as you go to create natural, organic variations in thickness. -
Softening Edges:
While the paint is still wet, spritz it lightly with water from a mist bottle. Use a soft, dry blending brush or a sea sponge to gently blot and feather the edges of the veins, making them look submerged rather than painted on top. -
Adding Depth:
Mix a slightly darker shade of grey. Go back into just the very centers of your widest veins and add a thin, sharp line. This creates a 3D effect, suggesting density in the stone. -
Ghost Veining:
Create ‘ghost veins’ by mixing a very diluted, watery grey wash. Paint broad, faint areas around the main veins to simulate the translucent layers of real stone found deep beneath the surface. -
Highlighting:
I like to take a bit of pure white paint on a small sponge and dab it over areas where the veining got too heavy. This ‘push and pull’ technique adds realism by making some veins appear to dive under the white surface. -
Final Vein Check:
Step back and assess the overall pattern. Add tiny, spider-web connecting veins between the larger ones to tie the composition together. Let all paint dry for at least 24 hours.
Add some shimmer
Mix a tiny pinch of white pearl mica powder into your final epoxy pour. It gives the ‘stone’ a subtle, crystalline sparkle when the sun hits it.
Step 3: Epoxy Finish
-
Mixing Epoxy:
Combine your two-part epoxy resin according to the manufacturer’s instructions. Stir slowly for several minutes to minimize bubbles, ensuring the sides and bottom of the cup are scraped. -
Pouring:
Pour the clear epoxy directly onto the center of the countertop. Use a plastic spreader or trowel to guide the resin toward the edges, letting it self-level over the painted surface. -
Edge Work:
Allow the epoxy to flow over the edges naturally. Use a gloved finger or brush to smooth the drips underneath the countertop edge to prevent hardened bumps later. -
Removing Bubbles:
Pass a heat gun or propane torch quickly over the wet epoxy surface. Keep it moving constantly to pop trapped air bubbles without scorching the resin. This creates that glass-like finish. -
Curing:
Restrict access to the room to prevent dust from settling on the sticky surface. Allow the epoxy to cure for the time specified by the kit (usually 24-72 hours) before placing any objects on it.
Now you have a stunning, durable surface that anchors the room with elegant brightness


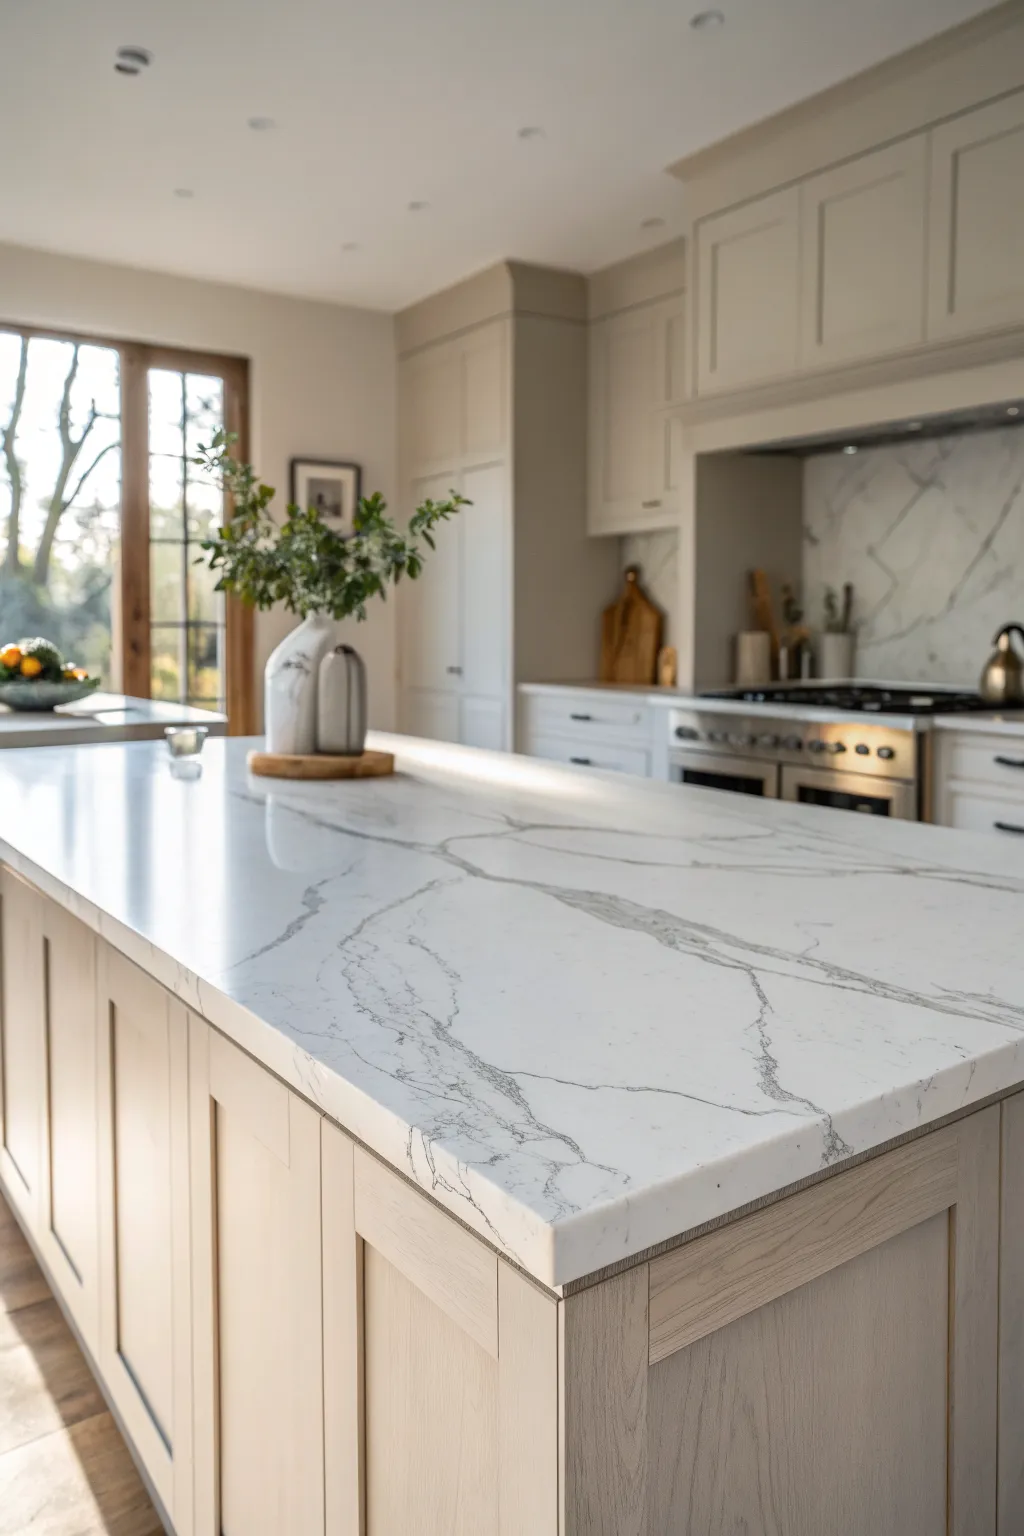
Marble Countertop and Full-Height Backsplash
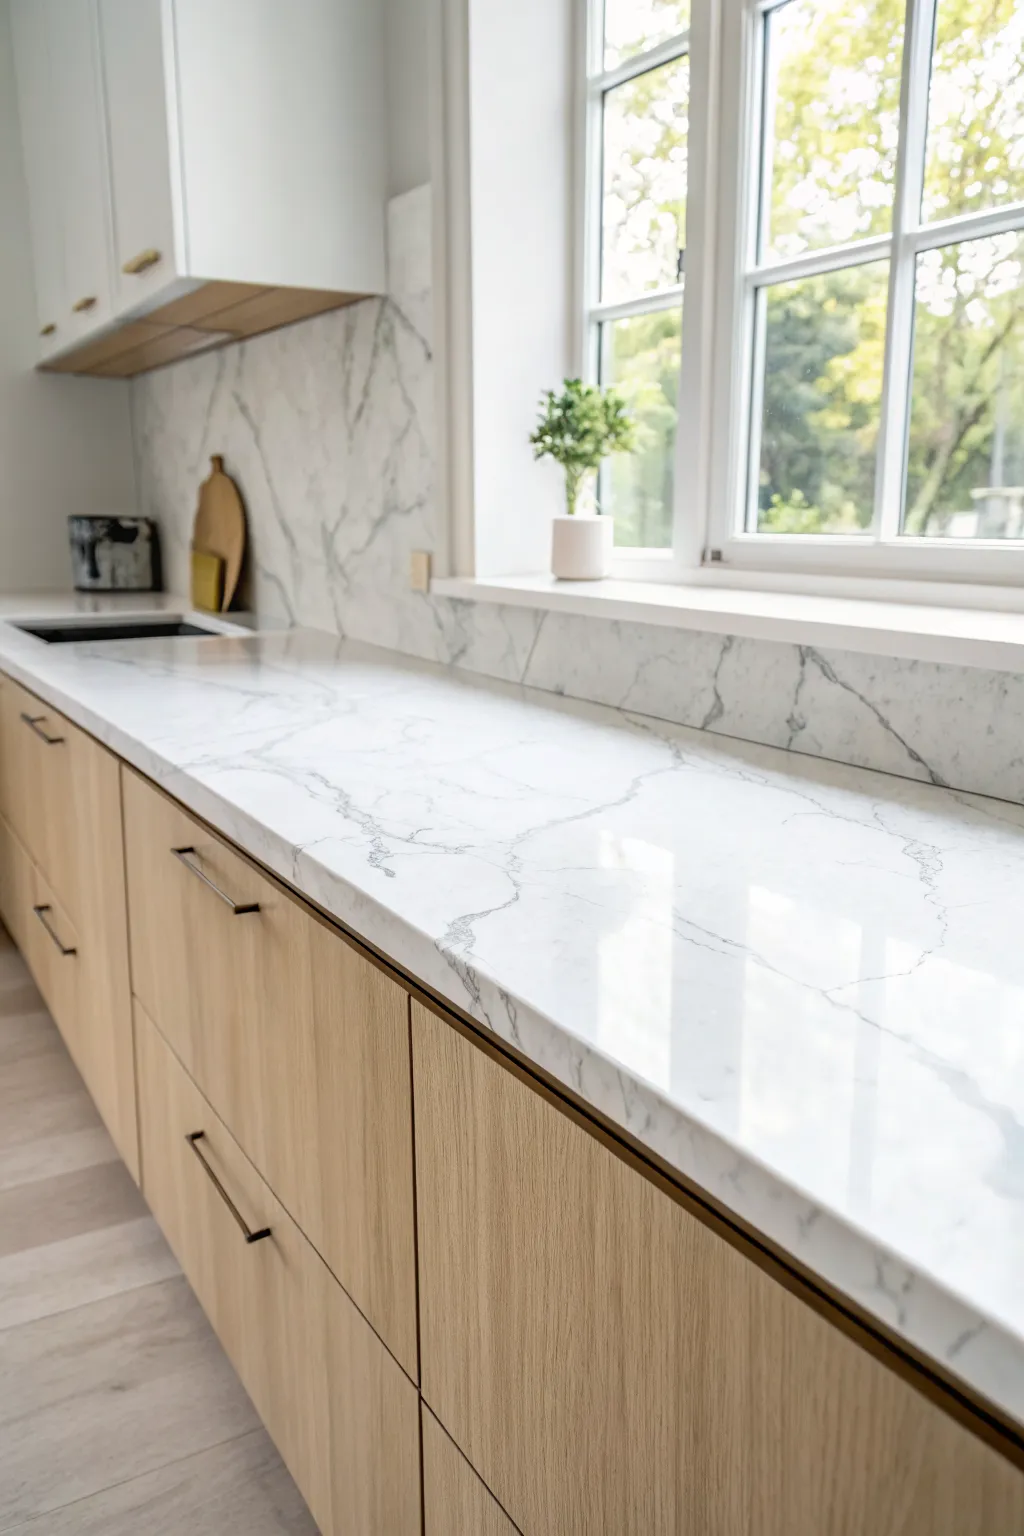
Achieve the luxurious look of a high-end kitchen remodel by installing a marble-effect quartz countertop with a matching full-height backsplash. This project brings brightness and sophisticated texture to your space using durable, engineered stone.
Step-by-Step
Materials
- Marble-effect quartz slabs (pre-cut)
- Plywood for subtop (if needed)
- Construction adhesive (heavy duty)
- Silicone sealant (white or clear)
- Color-matched epoxy adhesive
- Razor blades
- Measuring tape and laser level
- Suction cup seam setters
- Microfiber cloths
- Caulking gun
- Shims
- Isopropyl alcohol
Step 1: Preparation and Base
-
Check Cabinet Level:
Before anything heavy moves in, meticulous checking is key. Use a long level across all your lower cabinets to ensure they are perfectly flat and level. Any high points on the cabinet frames should be sanded down, and low points should be shimmied up. -
Install Subtop Support:
Depending on your cabinetry and the thickness of your quartz (usually 2cm or 3cm), you may need a plywood subtop. Secure 3/4-inch plywood sheets to the tops of your cabinets with screws, ensuring they are flush with the cabinet faces. -
Dry Fit the Countertop:
With help (these slabs are incredibly heavy!), carefully lift the main countertop slab into place. Check the overhang on the front edge—standard is about 1.5 inches—and ensure it fits snugly against the back wall. -
Verify Sink Cutout:
If you are installing an undermount sink, now is the time to check alignment. Ensure the pre-cut hole lines up perfectly with your sink basin below.
Uneven Seams?
If the two slab pieces aren’t perfectly flush after using the seam setter, you can carefully polish the higher side with a diamond polishing pad to level the transition.
Step 2: Countertop Installation
-
Apply Adhesive:
Lift the slab slightly or remove it temporarily. Apply varying dollops of heavy-duty construction adhesive along the tops of the cabinet frames or plywood subtop. I like to focus on the corners and cross-beams for maximum stability. -
Secure the Slab:
Lower the slab back into its final position. Press down firmly to seat it into the adhesive. Double-check your level again, both front-to-back and side-to-side. -
Seam the Joints:
If your counter consists of multiple pieces (like an L-shape), apply color-matched epoxy to the edges where they meet. Push the pieces together tightly. -
Tighten Seams:
Place suction cup seam setters across the joint. Tighten the mechanism to pull the two slabs together until the seam is nearly invisible and the surface is flush. Let the epoxy cure according to the manufacturer’s instructions. -
Clean Excess Epoxy:
Once the epoxy is semi-hard, scrape off the excess beading on the surface with a fresh razor blade held at a low angle.
Step 3: Backsplash Installation
-
Dry Fit Backsplash:
The full-height backsplash is the showstopper here. Carefully dry fit the vertical slab pieces against the wall to ensure they sit flat on the new countertop and tuck neatly under any upper obstacles or window sills. -
Apply Wall Adhesive:
Apply a generous amount of silicone or construction adhesive in a grid pattern directly onto the drywall behind where the stone will go. -
Set the Backsplash:
Press the marble slab firmly against the wall. You may need to use temporary wooden bracing or shims to hold the heavy slab tight against the wall while the adhesive grabs. -
Caulk the Transitions:
Run a thin bead of white or translucent silicone caulk along the joint where the backsplash meets the countertop. This prevents water from seeping behind the cabinets. -
Smooth the Caulk:
Dip your finger in a bit of soapy water or use a caulking tool to smooth the bead into a perfect, concave line.
Pro Seam Tip
Mix a tiny bit of the stone dust created during cutting into your epoxy resin. This helps the seam color match the stone’s base tone perfectly for an invisible join.
Step 4: Finishing Touches
-
Clean Surfaces:
Wipe down the entire installation with isopropyl alcohol and a microfiber cloth to remove any adhesive residue, dust, or fingerprints. -
Seal:
Since quartz is non-porous, sealing isn’t usually necessary, but if you used natural marble, now involves applying a penetrating sealer to protect that beautiful veining from stains.
Step back and admire clean lines and continuous flow of marble veining that now define your kitchen.


Spa-Style Marble Shower Wrap
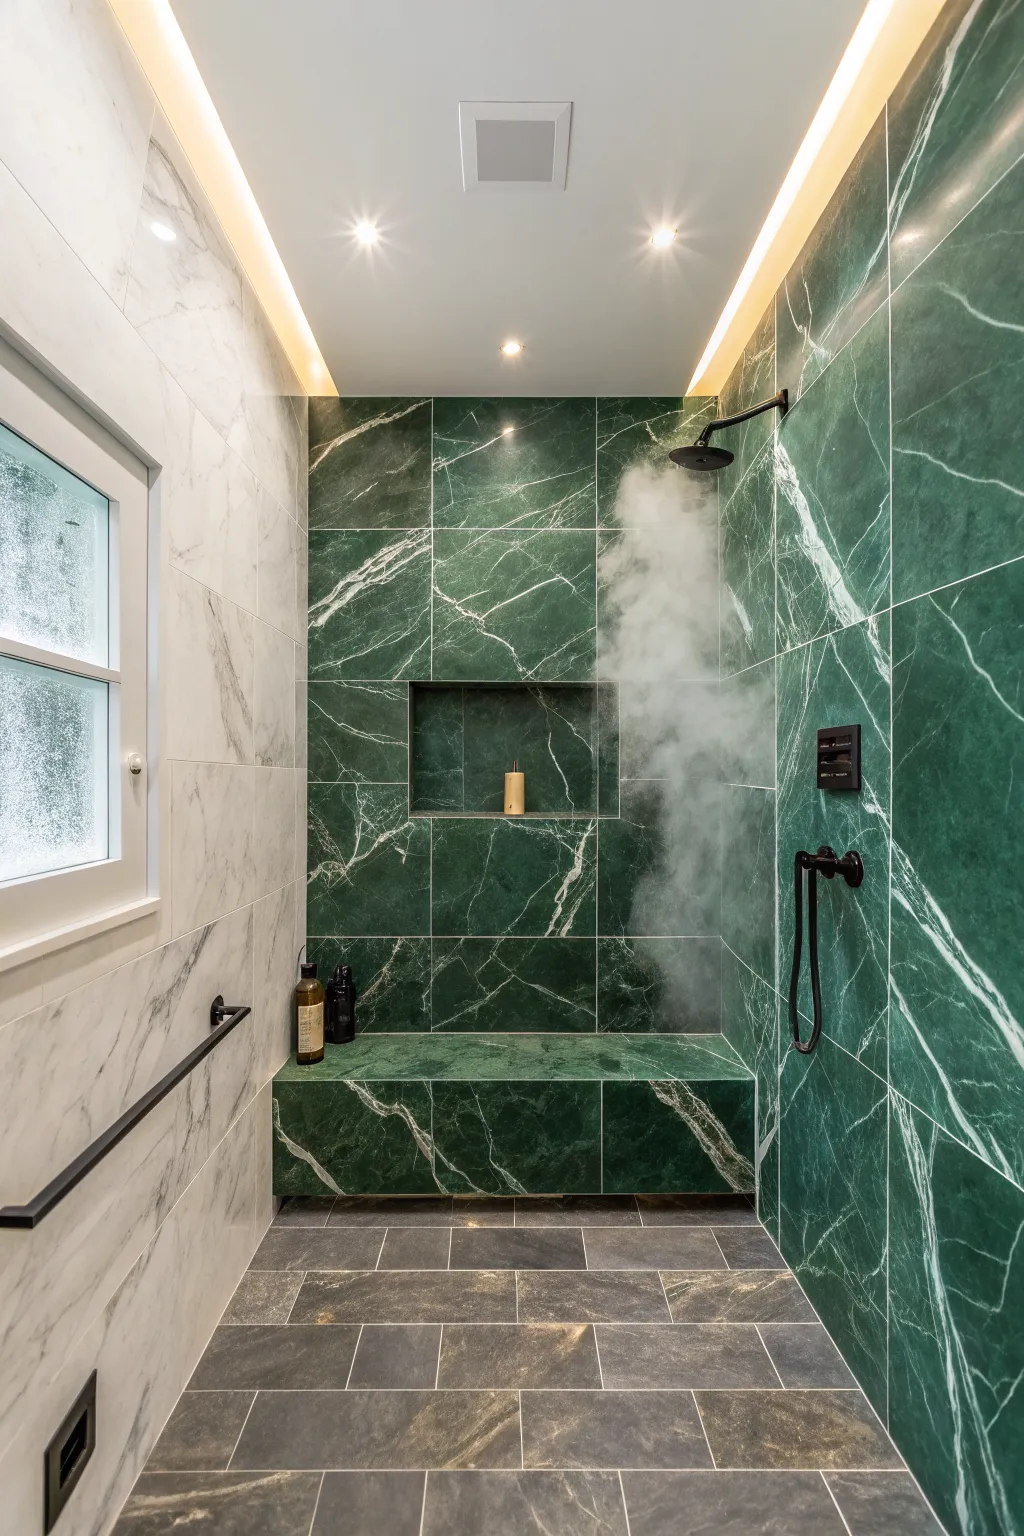
Transform a standard shower into a luxurious steam room experience with this bold, two-toned marble installation. The deep emerald green walls contrast beautifully with the crisp white marble, creating a serene, spa-like atmosphere right in your home.
Step-by-Step Guide
Materials
- Green marble large-format tiles (12×24 or similar)
- White Carrara marble large-format tiles
- Waterproofing membrane system (like Schluter-Kerdi)
- Engineered foam shower bench form
- Thinset mortar suitable for natural stone
- 1/2-inch notched trowel
- Tile spacers (1/16 inch)
- Diamond blade wet saw
- Power drill with mixing paddle
- Laser level
- Stone sealer
- Black shower fixtures (rain head, handheld sprayer)
- Charcoal or dark grey sanded grout
- Rubber grout float
- Sponge and bucket
Step 1: Preparation & Waterproofing
-
Assess the substrate:
Before laying a single tile, ensure your shower walls are perfectly plumb and the floor is sloped correctly toward the drain. Any imperfections here will be magnified by large-format marble. -
Install the bench form:
Secure your pre-formed foam bench into the shower corner. Using a pre-made form is much lighter and easier to waterproof than framing one out of wood. -
Apply waterproofing membrane:
Cover the entire shower area—floor, walls, and the new bench—with your waterproofing membrane. Pay special attention to the seams and corners, overlapping the membrane bands generously to ensure a watertight seal. -
Construct the niche:
Install a pre-fabricated niche box into the stud bay on the back wall. Waterproof it thoroughly, integrating it with the wall membrane to prevent any leaks behind the tile.
Vein Matching
Number the back of your tiles during the dry lay. This prevents confusion when mixing mortar and ensures your marble veins flow beautifully across critical areas like the bench front.
Step 2: Setting the Green Marble
-
Plan the layout:
Dry lay your green marble tiles to visualize the veining. I like to shuffle tiles from different boxes to ensure the natural variation looks organic rather than patchy. -
Set the back wall baseline:
Use a laser level to establish a straight line for your first row of green tiles on the back wall, starting directly above the bench level. -
Cut and tile the bench:
Measure and cut pieces for the bench face and top. It’s crucial to slightly slope the bench top toward the drain so water doesn’t pool. -
Tile the back wall:
Apply thinset using a 1/2-inch notched trowel and begin placing the green tiles on the back wall, working your way up to the ceiling. Back-butter each large tile to ensure full adhesion. -
detail the niche:
Carefully measure and cut mitered edges for the niche corners if you want a seamless look, or use a tile profile edge. This recessed area is a focal point, so take your time with these cuts. -
Tile the side wall:
Continue the green marble pattern onto the right-hand wall where the shower fixtures will be. Verify that your horizontal grout lines align perfectly with the back wall. -
Drill fixture holes:
Before setting the tiles for the fixture wall, carefully measure and drill holes for the shower mixer, rain head arm, and handheld mount using a diamond core bit.
Steam Ready?
If building a true steam shower, the ceiling must be sloped (2″ per foot) and tiled/waterproofed completely to prevent cold drips and moisture damage to drywall.
Step 3: Transition & Finishing
-
Switch to white marble:
On the left wall (the window wall), install the white Carrara marble tiles. The sudden shift from dark green to bright white creates the stunning visual ‘wrap’ effect. -
Tile around the window:
Takes precision measurements to cut around the window frame. Ensure you leave a small expansion gap between the tile and the window casing, to be filled with flexible caulk later. -
Address the ceiling:
With the walls complete, apply the same green marble tiles (or paint, depending on preference) to the ceiling if desired, though keeping it white maximizes light reflection. -
Seal the stone:
Once the thinset has cured (usually 24 hours), apply a high-quality penetrating sealer to all the marble. Natural stone is porous and needs protection before grouting to prevent staining. -
Grout the lines:
Mix your dark grey grout and force it into the joints with a rubber float. The dark color helps hide future discoloration and blends seamlessly with the green stone. -
Clean and caulk:
Wipe away haze with a damp sponge as the grout sets. Once dry, apply color-matched silicone caulk to all change-of-plane joints (corners, floor-to-wall, bench edges). -
Install black fixtures:
Finally, attach the matte black shower trim plates, the rain shower head, and the handheld wand to complete the modern, high-contrast look.
Step back and admire the serene sanctuary you have built with your own hands


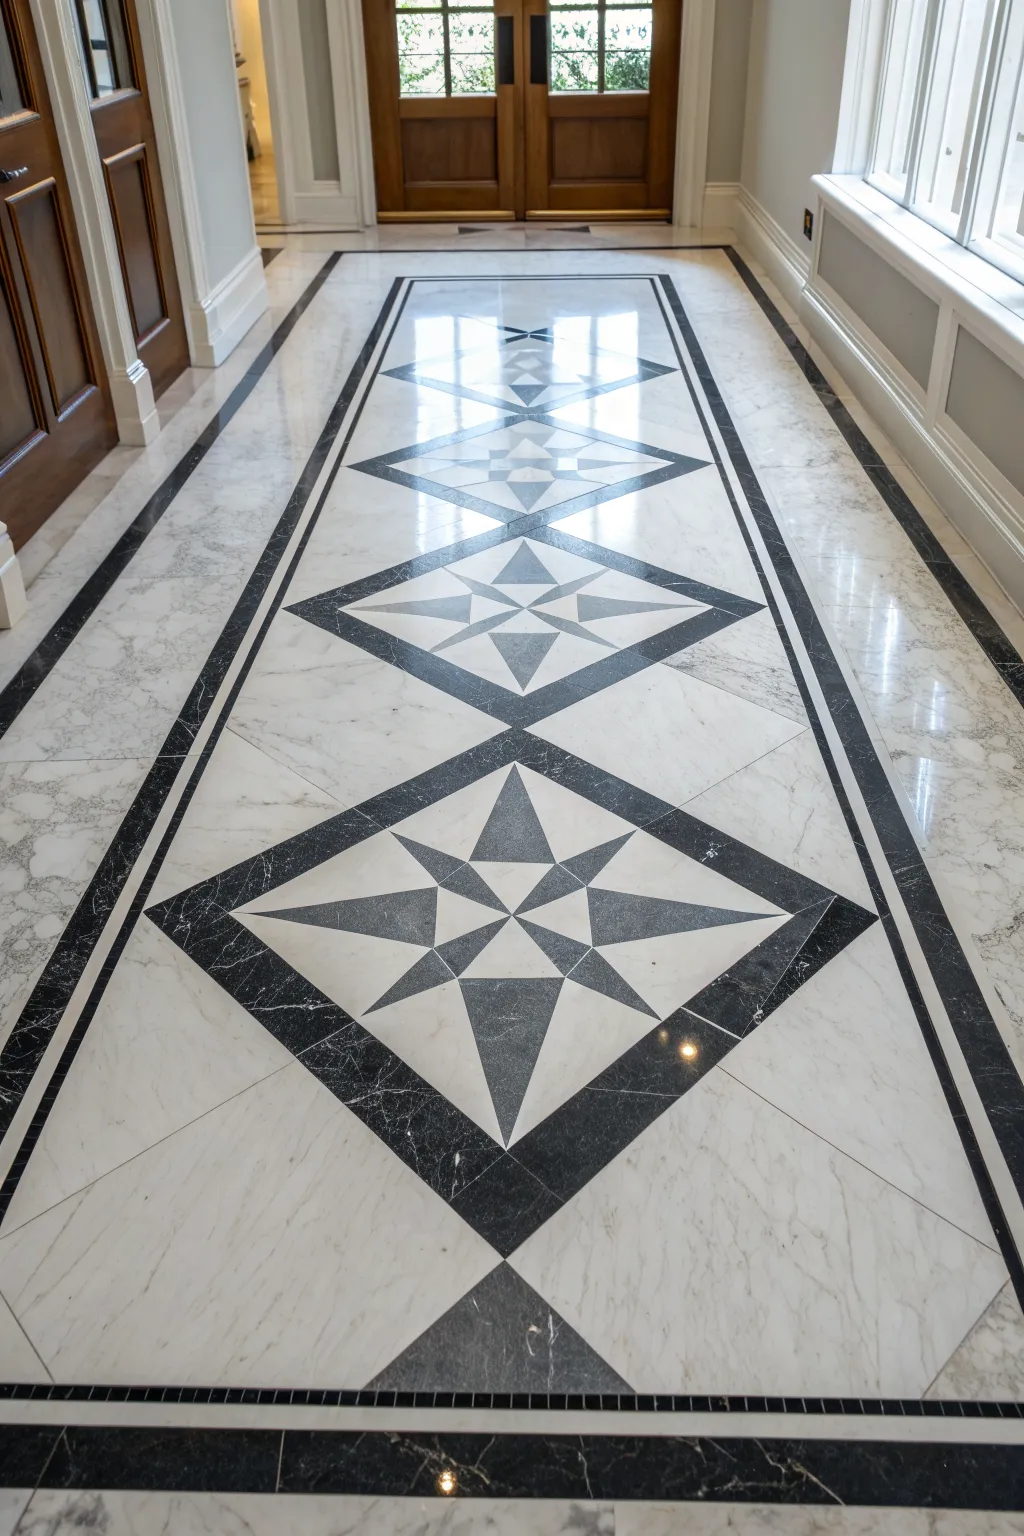
Black Border and Light Marble Field
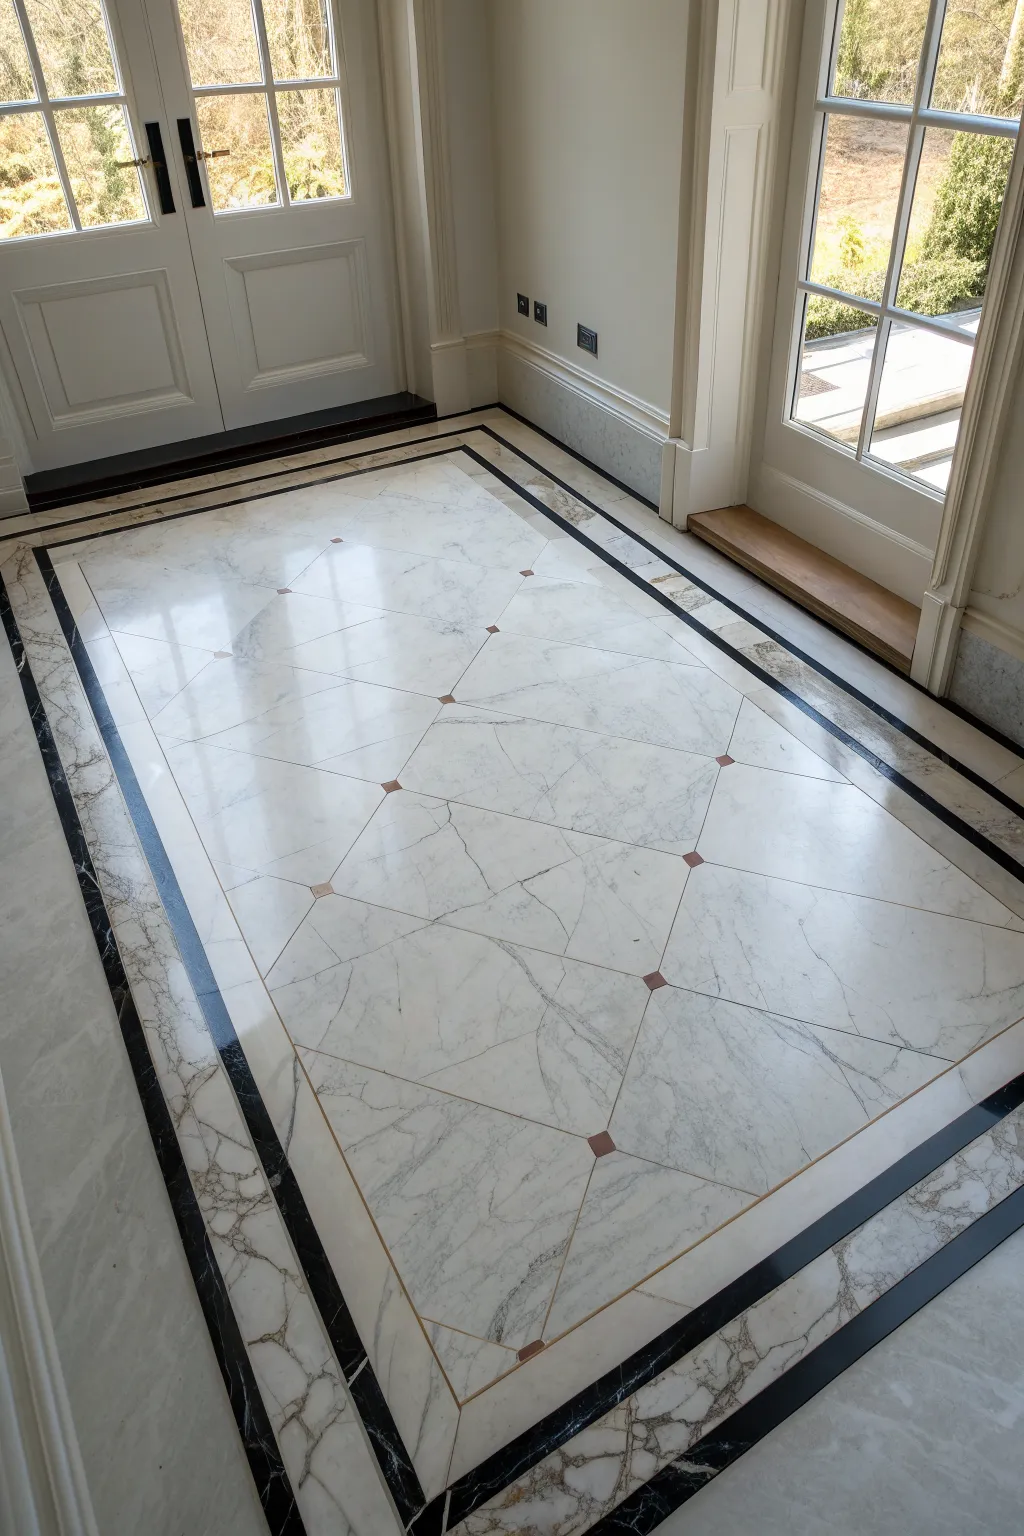
This project recreates the sophisticated look of a classic vestibule floor featuring a white marble field set in a geometric lattice with bronze accents and a striking black border. The result is a grand, high-contrast surface that brings architectural gravitas to any entryway or hall.
Detailed Instructions
Materials
- White Carrara or Calacatta marble tiles (large field tiles)
- Black Marquina marble (for borders)
- Small red-brown marble or granite squares (approx. 2×2 inch inserts)
- Brass or gold-tone metal inlay strips (1/4 inch wide)
- White thin-set mortar
- Grey thin-set mortar (optional, for dark borders)
- Tile spacers (1/16 inch)
- Wet saw with a diamond blade
- Notched trowel (1/2 inch)
- Laser level and chalk line
- Unsanded grout (color matched to the white marble)
- Stone sealer
Step 1: Preparation and Layout
-
Assess the Subfloor:
Ensure your subfloor is perfectly level and rigid. Large format stone tiles are unforgiving of uneven surfaces, so apply a self-leveling compound if you detect any dips or humps greater than 1/8 inch. -
Find the Center:
Measure the length and width of the room to find the absolute center point. Snap chalk lines to create a crosshair; this will guide the placement of the central diamond pattern. -
Dry Lay the Pattern:
Before mixing any mortar, lay out a section of your central field tiles and the black border pieces. This dry run is crucial to see how the geometric pattern terminates at the walls and ensures your borders remain symmetrical.
Uneven Tiles?
Lippage (uneven edges) ruins the look. Use a tile leveling system with clips and wedges during installation to force adjacent tiles into a perfectly flat plane.
Step 2: Installing the Central Field
-
Cut the Diamond Angles:
Using your wet saw, cut the large white marble tiles into the specific repeating geometric shapes required for the lattice. The pattern relies on large, elongated hexagons or clipped rectangles that meet at corners. -
Notch the Corners:
Carefully notch the corners of the main field tiles where the small square accents will sit. I find it helpful to create a jig for the wet saw to ensure every corner notch is identical in size. -
Spread the Mortar:
Apply white thin-set mortar to the floor using a 1/2 inch notched trowel. Comb the ridges in straight lines to support the heavy stone and prevent air pockets. -
Lay the Main Tiles:
Place the white field tiles, pressing them firmly into the mortar. Twist them slightly to collapse the ridges and ensure full coverage on the back of the stone. -
Insert the Accents:
Place the small red-brown square inserts into the spaces created by the notched corners. Verify they sit flush with the surrounding white marble; tap them gently with a rubber mallet if needed. -
Add Metal Inlays:
If using metal strips for the thin gold lines seen in the design, press them into the thin-set between specific tile joints now, ensuring they stand slightly proud or flush, depending on your sanding plan.
Level Up: Heated Floors
Install an electric radiant heating mat under the thin-set. Marble is naturally cool, so heating makes this entryway luxurious and comfortable in winter.
Step 3: Creating the Border System
-
Install the Inner Frame:
Once the central field is set, install the thin white marble strip that frames the main pattern. This acts as a visual breather between the busy lattice and the dark outer border. -
Lay the Black Border:
Cut and install the wide strips of Black Marquina marble. Use spacers to maintain consistent 1/16 inch joints. The contrast here is key, so select pieces with dramatic white veining if possible. -
Outer Perimeter:
Fill the remaining space between the black border and the wall with varying widths of white marble, mirroring the inner field to integrate the floor with the room’s skirting boards.
Step 4: Finishing Touches
-
Allow to Cure:
Let the entire installation cure undisturbed for at least 24 to 48 hours. Walking on it too soon can shift the heavy stones and ruin the geometric alignment. -
Grouting:
Mix unsanded grout consistent with your marble color. Force the grout diagonally into the joints with a rubber float, taking care not to scratch the metal inlays if you used them. -
Clean and Polish:
Wipe away haze with a damp sponge as the grout sets. Once fully dry, buff the floor with a soft cloth to remove remaining residue. -
Seal the Stone:
Apply a high-quality penetrating stone sealer. This is vital for white marble, which is porous and susceptible to staining. Apply coats until the stone stops absorbing the liquid.
With the final polish complete, your entryway now boasts a stunning architectural floor that will endure for generations
BRUSH GUIDE
The Right Brush for Every Stroke
From clean lines to bold texture — master brush choice, stroke control, and essential techniques.
Explore the Full Guide
Herringbone Marble for Subtle Movement
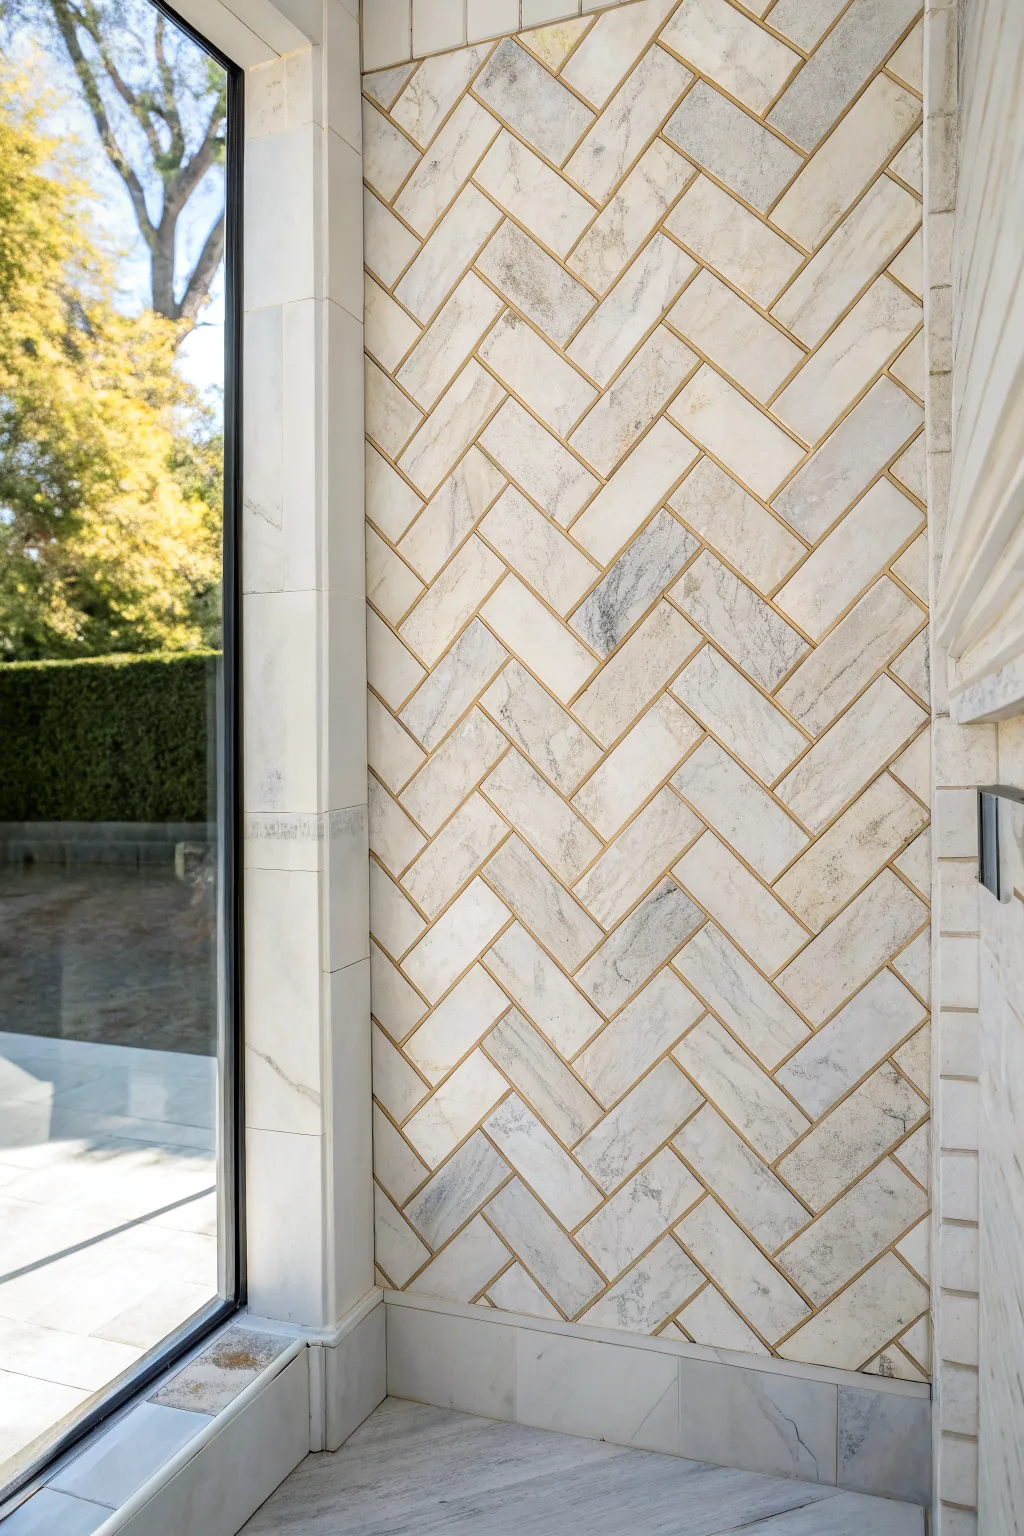
Transform a plain wall into a sophisticated focal point by installing marble subway tiles in a classic herringbone layout. The subtle gray veining of the marble pairs beautifully with metallic gold grout lines for a touch of modern luxury.
How-To Guide
Materials
- Marble subway tiles (approx. 3×12 inches)
- White thin-set mortar
- Notched trowel (1/4 inch v-notch)
- Tile spacers (1/16 inch)
- Wet saw or tile cutter
- Laser level
- Tape measure
- Metallic gold grout or epoxy grout with gold glitter additive
- Grout float
- Sponge and bucket
- Microfiber cloth
- Stone sealer
Step 1: Preparation and Layout
-
Surface Prep:
Ensure your wall surface is clean, dry, and flat. If you are tiling a wet area like a shower, ensure proper waterproofing membrane is installed first. -
Find the Center:
Measure the width of the wall to find the exact center point. Mark a vertical line from floor to ceiling using a laser level to guide your symmetry. -
Dry Run:
Before mixing mortar, I find it incredibly helpful to lay out a small section of the herringbone pattern on the floor. This helps visualize the 45-degree angles and ensures your cuts will fit nicely at the edges. -
Establish the Base:
Determine the starting height. Since floors can be uneven, measure up from the floor and mark a level horizontal line where your first full pattern V-shape will begin, leaving space for cuts at the bottom.
Drifting Pattern?
Herringbone patterns love to wander. Check plumb with a laser level every 3-4 rows. If tiles start drifting, slightly adjust spacing over the next few courses rather than fixing it all at once.
Step 2: Installing the Tiles
-
Mix Mortar:
Mix your white thin-set mortar according to the package instructions until it reaches a peanut butter consistency. Let it slake (rest) for about 10 minutes before using. -
Apply Thin-set:
Using the flat side of your trowel, key the mortar into the wall at the center line. Then, comb it out with the notched side at a 45-degree angle to create uniform ridges. -
Set the Center V:
Place your first two tiles at a 90-degree angle to each other, with the point of the ‘V’ aligned perfectly with your vertical center line. This first placement is critical for the rest of the wall. -
Check for 45 Degrees:
Use a speed square to verify that your starting tiles are exactly at 45 degrees relative to your level lines. -
Expand the Pattern:
Continue adding tiles, working outward from the center ‘V’ in a step-ladder fashion. Apply steady pressure to bed each tile into the mortar. -
Use Spacers:
Insert 1/16 inch spacers between all tiles to ensure consistent gaps for your metallic grout later. -
Cutting Edges:
As you reach the side walls, ceiling, and floor, measure the triangular gaps carefully. Cut the marble tiles to fit these spaces using a wet saw for clean, chip-free edges. -
Clean Joints:
While setting, keep a small tool handy to scrape any excess thin-set out of the grout lines immediately. Dried mortar will interfere with the gold grout finish.
Step 3: Grouting and Finishing
-
Sealing Before Grout:
Marble is porous, so apply a penetrating stone sealer to the face of the tiles before grouting. This prevents the dark or colored grout pigments from staining the stone. -
Mix Gold Grout:
Prepare your metallic gold grout. If using an additive, mix it thoroughly into the base to ensure even distribution of the shimmer. -
Apply Grout:
Using a rubber grout float, press the mixture firmly into the joints at a 45-degree angle to the tile lines, ensuring no air pockets remain. -
Wipe Clean:
Wait for the grout to haze over slightly, then wipe the surface gently with a damp sponge. rinse your sponge frequently to avoid spreading haze. -
Final Polish:
Once the grout is fully cured, use a clean microfiber cloth to buff off any remaining residue and make the gold lines sparkle. -
Final Seal:
Apply a final coat of stone sealer over the entire wall, including the grout if recommended by the manufacturer, to protect your beautiful work from moisture and stains.
Brass Inlay Option
For sharper lines than grout can provide, use real brass metal strips (Schluter strips) between tiles. Cut them to size and embed them in the thin-set for a permanent, high-end metallic grid.
Step back and admire how the classic pattern and modern gold details bring a refined movement to your space
Geometric Marble Inlays and Diamonds
Transform a plain hallway into a grand entrance with this sophisticated marble inlay project. By combining white Carrara and black Marquina marble in a precise geometric diamond pattern, you create the illusion of a luxurious, permanent rug that elongates the space.
Step-by-Step Guide
Materials
- White Carrara marble tiles (12×12 or custom slab)
- Black Nero Marquina marble tiles (for borders and inlays)
- Wet tile saw with diamond blade
- White thin-set mortar (specifically for light stone)
- Notched trowel (1/4 inch or 3/8 inch)
- Laser level / Chalk line
- Tile spacers (1/16 inch)
- Straight edge / Metal ruler
- Tile nippers or grinder
- Grout (light gray or white)
- Grout float
- Stone sealer
- Backer board (if installing over wood subfloor)
Step 1: Planning and Layout
-
Measure the hallway:
Begin by finding the exact center of your hallway’s width at both ends. Snap a chalk line down the entire length to establish your central axis, which is crucial for the diamond points to align perfectly. -
Determine the runner width:
Decide on the width of the central patterned area versus the plain border. A good rule of thumb is to leave at least 6-10 inches of plain field tile between the patterned runner and the wall baseboards. -
Dry lay the pattern:
Before cutting any stone, sketch the diamond and star pattern on graph paper. I highly recommend doing a partial dry lay of the central diamonds on the floor to verify the spacing ensures you don’t end up with awkward slivers at the ends of the hall.
Step 2: Cutting the Geometry
-
Cut the field triangles:
The background of the runner consists of white marble cut into large triangles. Set your wet saw fence to exact dimensions to cut 12×12 white tiles into triangles that will form the outer structure of the diamond sequence. -
Fabricate the black borders:
Cut the black Nero Marquina marble into consistent strips. You will need thinner strips (about 1.5 inches) for the inner framing of the diamonds and slightly wider strips (about 3-4 inches) for the long outer border that spans the hallway length. -
Cut the star components:
For the central 8-pointed stars, you need precise triangles. Cut four isosceles triangles from black marble and four from white marble for each star motif. A jig for your wet saw is essential here to keep the angles identical. -
Assemble the center stars:
I prefer to pre-assemble the central star motifs on a mesh backing sheet if possible. This ensures the points meet perfectly in the center without struggle during the actual installation.
Uneven Star Points?
If star points aren’t meeting perfectly, slightly sand the edges with a diamond sanding pad. Even a millimeter of adjustment can make the center convergence sharp and clean.
Step 3: Installation
-
Spread the mortar for the center:
Starting at the absolute center of the hallway, spread the white thin-set mortar. Using white mortar is critical with Carrara marble to prevent gray bleed-through. -
Set the central diamonds:
Install the central star units first, then surround them with the black diamond border strips. Use the laser level constantly to ensure the tips of the diamonds are forming a perfectly straight line down the hall. -
Fill the field:
Once the central diamonds are set, fill in the white triangular field tiles around the stars. Work outward from the center line to ensure symmetry. -
Install the long borders:
Place the long, linear black border strips that run parallel to the walls. These frame the geometric work. Ensure the spacing between this border and the central pattern is equal on both sides. -
Lay the perimeter tile:
Fill the remaining space between the black runner border and the walls with standard white field tile. These cuts may vary slightly if the walls aren’t perfectly square, which hides imperfections.
Add a Medalion
Instead of repeating the diamond star throughout, use this technique to create a single large medallion in a foyer, then switch to a simple running bond pattern for the rest of the hall.
Step 4: Finishing
-
Clean the joints:
Before the mortar fully hardens, use a utility knife or spacer to gently clean any excess ooze from the grout lines. This is especially important on the sharp points of the stars where definition is key. -
Apply sealer:
Apply a penetrating stone sealer to the marble tiles before grouting. This prevents the dark grout or the black marble dust from staining the porous white Carrara. -
Grout the floor:
Mix a light gray or white unsanded grout. Force it diagonally into the joints with a rubber float. Wipe away excess with a damp sponge, being careful not to pull grout out of the joints. -
Final buff:
Once the grout has cured according to package directions, buff the floor with a dry cheesecloth to remove any haze.
Step back and admire your sophisticated new floor that will endure for decades.

PENCIL GUIDE
Understanding Pencil Grades from H to B
From first sketch to finished drawing — learn pencil grades, line control, and shading techniques.
Explore the Full Guide
Warm Wood and Cool Marble Pairing
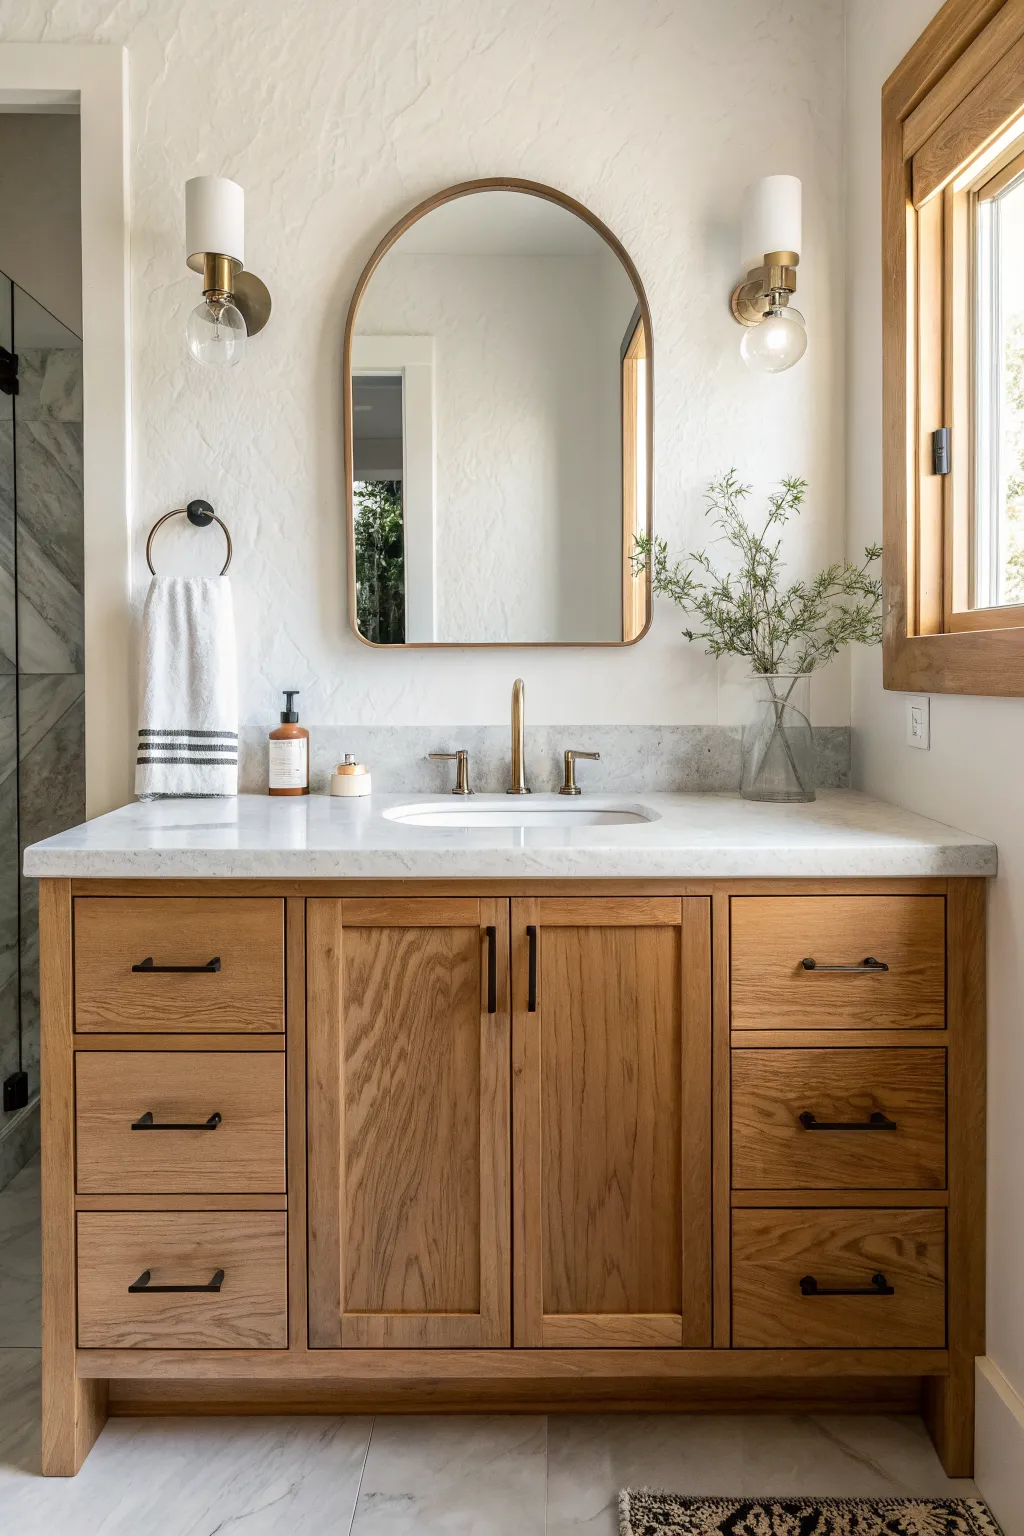
Transform a builder-grade bathroom vanity into a stunning focal point by combining the warmth of natural oak with the cool elegance of Carrara marble. This project balances rustic textures with polished finishes for a sophisticated, spa-like atmosphere.
Step-by-Step Tutorial
Materials
- Unfinished white oak vanity cabinet (double door, six drawer configuration)
- Carrara marble countertop with backsplash and undermount sink cutout
- Undermount white ceramic sink
- Gold finish faucet set (spigot and handles)
- Matte black cabinet pulls (4 inches)
- Matte black cabinet knobs (finger pulls)
- Clear matte polyurethane or wood sealer
- Sandpaper (120, 220, and 300 grit)
- Tack cloth
- Silicone caulk (clear and white)
- Plumber’s putty
- Drill with bits
- Caulk gun
- Screwdriver set
- Clean rags
- Paintbrush or foam applicator
Step 1: Preparing the Cabinet Base
-
Sand the wood surface:
Begin with 120-grit sandpaper to smooth out any rough patches on the unfinished oak vanity. Follow up with 220-grit for a finer finish, paying attention to the drawer fronts and door panels. -
Clean dust thoroughly:
Use a tack cloth to remove every speck of sawdust. This is crucial because any leftover dust will create a rough texture under the sealer. -
Apply the first coat of sealer:
Using a high-quality foam brush or synthetic bristle brush, apply a thin, even layer of clear matte polyurethane. I find that brushing with the grain prevents unsightly streaks. -
Sand between coats:
Once the first coat is completely dry (check the can for times), lightly scuff the surface with 300-grit sandpaper to knock down raised grain fibers. -
Final seal:
Apply a second and third coat of sealer, allowing ample drying time in between. This protects the wood from bathroom humidity while keeping that natural, raw look.
Sticky Situation
If excess silicone squeezes out from under the sink or backsplash, don’t wipe it while wet! Let it cure slightly until it’s rubbery, then peel it away cleanly with a razor blade.
Step 2: Installing the Marble Top
-
Dry fit the vanity:
Position the cabinet exactly where you want it against the wall to ensure it fits the plumbing rough-ins perfectly before attaching anything heavy. -
Attach the undermount sink:
Flip the marble countertop upside down on a soft surface. Apply a bead of silicone around the sink rim and secure it to the stone using mounting clips. -
Secure the counter:
Apply a generous zigzag of construction adhesive or silicone to the top edge of the wooden vanity cabinet. Carefully lower the heavy marble top onto the base. -
Install the backsplash:
Apply adhesive to the back of the marble backsplash piece and press it firmly against the wall, resting it on the countertop. I like to double-check the level here. -
Seal the joints:
Run a thin bead of white or clear silicone along the seam where the backsplash meets the countertop to prevent water damage.
Step 3: Fixtures and Hardware
-
Install the faucet:
Drop the gold faucet and handle valves into the pre-drilled holes in the marble. Secure them from underneath and connect the water lines. -
Mark hardware placement:
Use a template or measure carefully to mark the center points for your drawer pulls and door knobs. Masking tape helps prevent the wood from splintering when drilling. -
Drill pilot holes:
Drill through your marked spots on the drawer fronts and doors. Keep the drill level to ensure the screws go in straight. -
Attach matte black pulls:
Screw in the matte black handles on the drawers and the finger pulls on the cabinet doors. Tighten them by hand to avoid stripping the threads. -
Final cleanup:
Wipe down the marble with a stone-safe cleaner and polish the gold fixtures to remove any fingerprints from installation.
Level Up: Drawer Liners
Line the drawers with a cork or soft felt liner before filling them. It protects the wood interior from spills and adds a hidden layer of luxury every time you open a drawer.
Enjoy the serene, organic feel your new bathroom centerpiece brings to the space
Metal Accents That Make Marble Glow
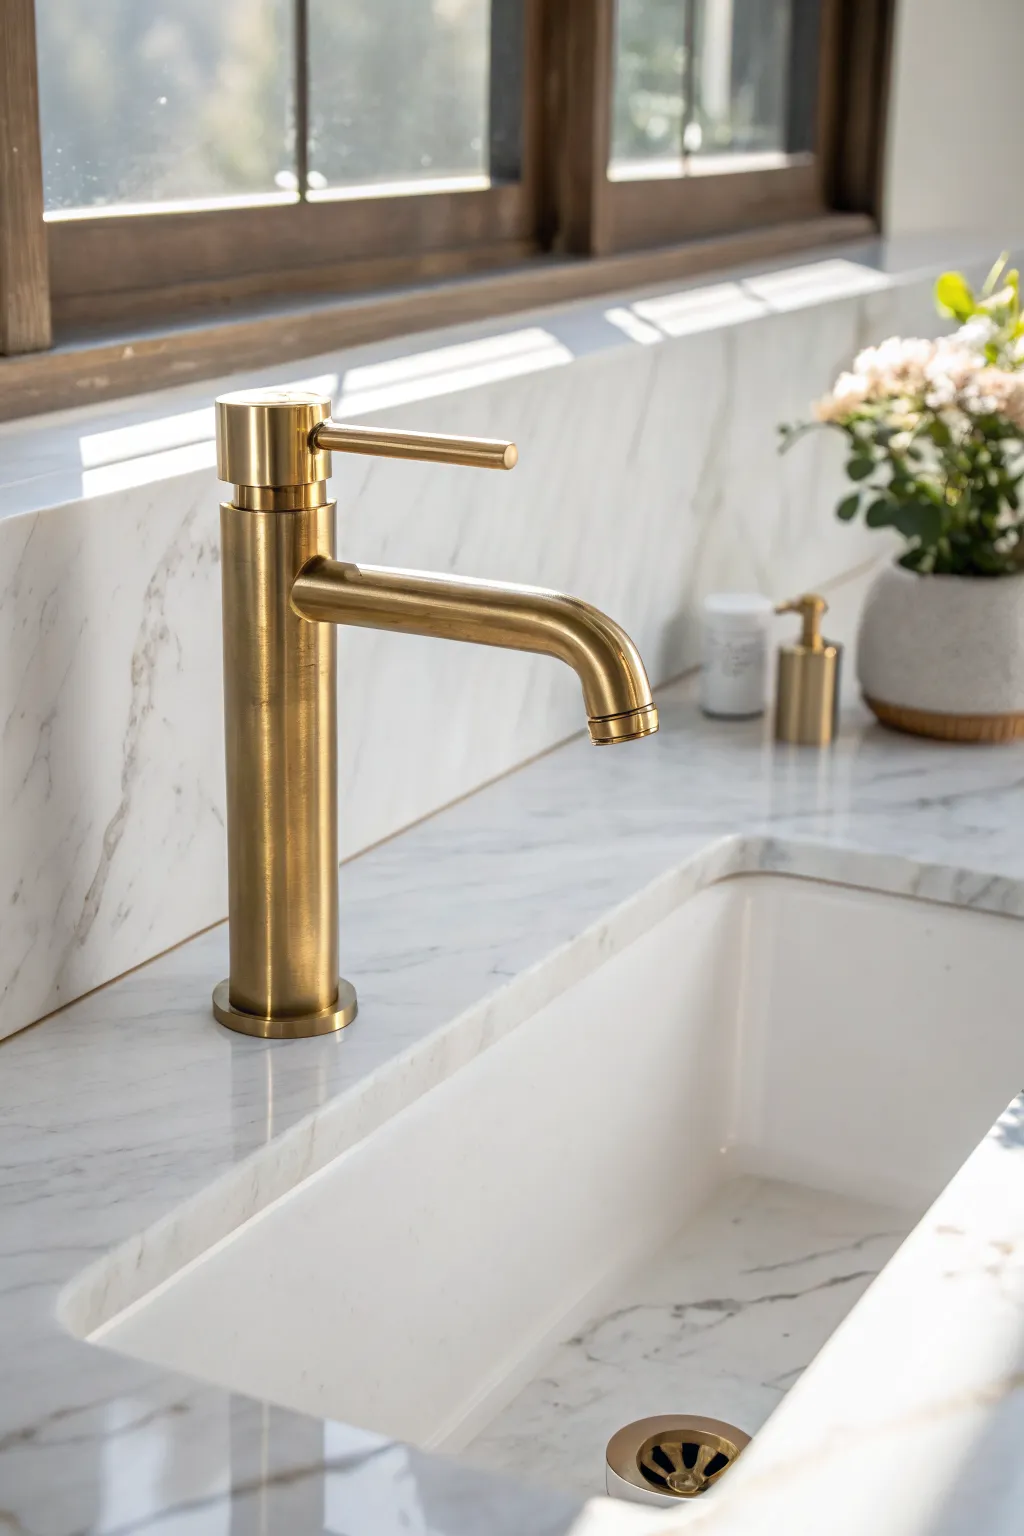
This tutorial guides you through creating a photorealistic 3D render of a luxurious bathroom vanity featuring stunning marble surfaces and warm brass accents. You will learn to model the scene, apply realistic textures, and set up lighting that makes the metal elements truly glow against the stone.
Step-by-Step Guide
Materials
- 3D Modeling Software (Blender, 3ds Max, or Maya)
- Render Engine (Cycles, V-Ray, or Corona)
- High-resolution PBR marble texture
- Reference image of brass faucet
- HDRI map (warm interior)
- 3D plant asset (optional)
Step 1: Modeling the Vanity
-
Block out the countertop:
Start by adding a simple cube and scaling it to dimensions representing a standard bathroom countertop depth and thickness. Add a boolean modifier or cut a hole where the sink basin will sit. -
Create the basin:
Model a deep, rectangular undermount sink shape. Use subdivision surfaces to smooth out the corners, ensuring the lip sits perfectly flush beneath the countertop cutout. -
Add the backsplash:
Extrude a plane or thin cube upwards from the back edge of the counter to form the backsplash area. Include a small ledge or window sill if you want to match the depth of the reference image. -
Model the faucet base:
For the faucet, cylinder primitives are your best friend. Create the main vertical cylinder for the body, slightly beveling the edges to catch light later. -
Extrude the spout:
From the cylinder, extrude the spout horizontally, bending it gently downwards at the end. Use proportional editing to maintain a smooth curve that mimics cast metal. -
Detail the handle:
Add a separate, thinner cylinder near the top for the handle lever. Ensure it has a pivot point mechanism visual, making it look functional rather than just stuck on. -
Accessorize:
Quickly model a small soap dispenser using similar cylindrical shapes and add a simple pot shape for the plant. If you have a pre-made plant asset, import it now to check scale.
Step 2: Texturing and Materials
-
Unwrap the marble:
Apply a UV map to your countertop and backsplash. This step is crucial for marble veins to flow naturally; avoid stretching particularly around the sink cutout edges. -
Configure the marble shader:
Load your PBR marble texture. Connect the albedo, roughness, and normal maps. Keep the roughness low (around 0.1-0.2) to achieve that polished, wet-look stone finish. -
Add subsurface scattering:
I find that adding a tiny amount of subsurface scattering to white marble makes it look less like plastic and more like dense stone. Keep the radius very small. -
Create the brushed brass:
Creating the metal is the highlight. Use a Principled BSDF shader with Metallic set to 1.0. For the color, pick a warm, desaturated yellow-orange. -
Add the brushed effect:
Plug a noise texture into the Anisotropic rotation or Roughness input, stretched heavily along the Z-axis. This simulates the vertical brushed finish seen on high-end faucets. -
Texture the ceramic sink:
Give the sink basin a simple glossy white ceramic material. It should be highly reflective but not metallic, distinguishing it from the stone and brass.
Imperfection is Key
Add a fingerprint or smudge overlay to the roughness map of the brass. Perfectly clean metal looks fake; subtle grime adds life.
Step 3: Lighting and Rendering
-
Set up the environment:
Load a warm interior HDRI map to provide general ambient light and realistic reflections on the metal and marble surfaces. -
Place sun lighting:
Position a strong, directional light source (sun lamp) coming from the left, simulating light streaming through a window. Angle it to cast distinct ‘god rays’ across the faucet. -
Add gobos for realism:
To create the dappled light effect on the counter, place a plane with a window frame pattern or foliage texture in front of your light source to break up the beam. -
Adjust depth of field:
Select your camera and set the focus object to the faucet. Lower the F-stop to blur the background plant slightly, drawing the viewer’s eye to the brass details. -
Final render settings:
Set your sample count high enough to clear noise from the glossy surfaces. Use a denoiser if needed, then hit render and wait for the magic to happen.
Caustics Boost
Enable caustics in your render settings to allow light to bounce realistically off the brass and illuminate the white marble nearby.
Now you have a stunning, photorealistic render that perfectly captures the elegance of marble and brass design.


Marble Mosaic Accent Strip
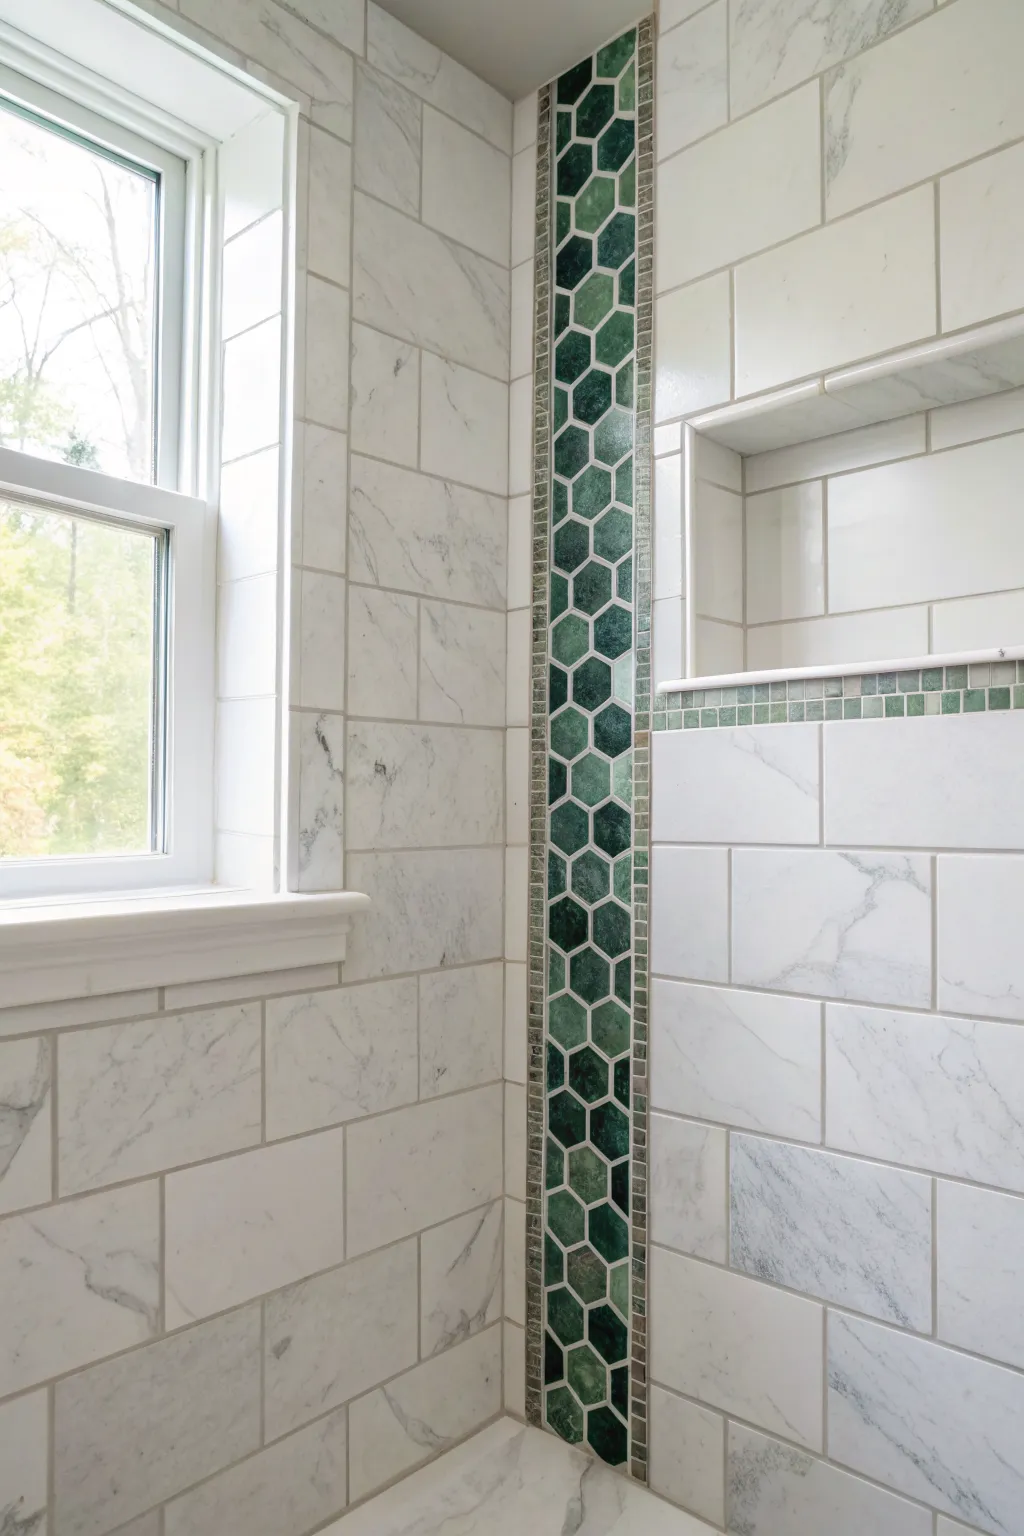
Elevate a classic marble subway tile shower with a stunning vertical floor-to-ceiling accent strip. This design combines the timeless elegance of Carrara marble with the bold, organic touch of dark green hexagonal mosaics to create a sophisticated focal point.
Step-by-Step
Materials
- White Carrara marble subway tiles (3×6 or 4×8 inch)
- Dark green hexagon mosaic tile sheets
- Small square marble/glass mosaic accent border strips
- Thinset mortar (white, polymer-modified)
- Notched trowel (1/4 inch or similar, check tile specs)
- Tile spacers (1/16 or 1/8 inch)
- Tile wet saw
- Laser level or chalk line
- Sanded or unsanded grout (light grey or white)
- Rubber grout float
- Grout sponge and bucket
- Tile sealer (penetrating)
- Measuring tape
- Pencil
Step 1: Planning and Layout
-
Establish the centerline:
Begin by determining the precise location of your vertical accent strip. Measure the wall width and mark the center or your desired focal point, using a laser level to project a perfectly straight plumbing line from floor to ceiling. -
Dry lay the design:
Before mixing any mortar, lay out your hexagon sheets, the thin border strips, and a few subway tiles on the floor. This lets you visualize the width of the accent strip and double-check that your spacing between the different tile types looks balanced. -
Mark vertical guidelines:
Transfer the total width of your accent strip (hexagons plus the two borders) onto the wall using the laser line as a guide. Mark vertical lines on the backer board to indicate exactly where the subway tiles should stop and the mosaic feature will begin.
Uneven Surfaces?
Mosaic tiles are often thinner than large field tiles. Apply a slightly thicker bed of mortar behind the mosaic strip so they sit flush with the adjacent subway tiles.
Step 2: Installing the Main Field Tile
-
Apply mortar for the first section:
Mix your white thinset mortar. Starting at the bottom corner away from the accent strip, spread mortar using the flat side of the trowel, then comb it with the notched side to create uniform ridges. -
Set the subway tiles:
Press the marble subway tiles into the mortar, twisting slightly to ensure good coverage. Use a running bond (brick) pattern as shown in the image. -
Cut tiles for the border:
As you approach your marked vertical guidelines for the accent strip, measure and cut the subway tiles to fit perfectly against that line. A clean, straight cut here is crucial for a professional look. -
Address the window and niche:
If your wall includes a window or niche like the example, tile up to these features carefully. I find it easiest to dry-fit pieces around corners before committing them to mortar to ensure the lines flow continuously. -
Continue upward:
Work your way up the wall with the field tiles, leaving the vertical channel for the accent strip completely empty for now. Ensure all subway tiles are level and evenly spaced with spacers.
Step 3: Creating the Accent Strip
-
Install the left border:
Apply a narrower band of thinset within your empty vertical channel. Carefully set the thin strip of small square mosaic tiles along the left edge of the subway tiles. -
Install the hexagon center:
Cut your green hexagon sheets into vertical strips to fit the remaining space. Press the hexagon sheets into the mortar, ensuring the flat edges of the hexagons align vertically. -
Install the right border:
Place the second strip of small square mosaics on the right side of the hexagons. This frames the green accent and acts as a transition if you are tiling the adjacent wall or continuing into a corner. -
Adjust and level:
Use a flat board or proper grout float to gently tap the mosaic section. This presses the thinner mosaic tiles in so they sit flush with the thicker subway tiles; otherwise, you’ll have an uneven lip.
Level Up Your Design
Carry the green mosaic theme horizontally into the shower niche shelf or back panel to tie the vertical strip into the rest of the shower’s design visually.
Step 4: Finishing Touches
-
Clean joints:
Before the mortar fully hardens, use a tool or toothbrush to clean any squeezed-out thinset from the grout lines, especially around the small mosaics where it can hide easily. -
Seal (First Pass):
Because marble is porous, apply a penetrating sealer to the marble tiles once the mortar is dry but before grouting. This prevents grout haze from staining the stone. -
Mix and apply grout:
Mix your chosen grout color. Using a rubber float held at a 45-degree angle, spread grout diagonally across the tiles, forcing it deep into all joints—pay special attention to the many small lines in the mosaic strip. -
Clean the haze:
Wait for the grout to set slightly (about 15-20 minutes). Wipe the surface with a damp (not soaking) sponge in circular motions to shape the joints and remove excess grout. -
Final polish and seal:
Once the grout is fully cured, buff off any remaining haze with a dry cloth or cheesecloth. Apply a final coat of sealer to the entire wall, including the grout lines, to protect your beautiful new shower surrounds.
Step back and admire how that vertical strip draws the eye upward and adds a custom designer touch to the room
Sculptural Marble Sink Moment
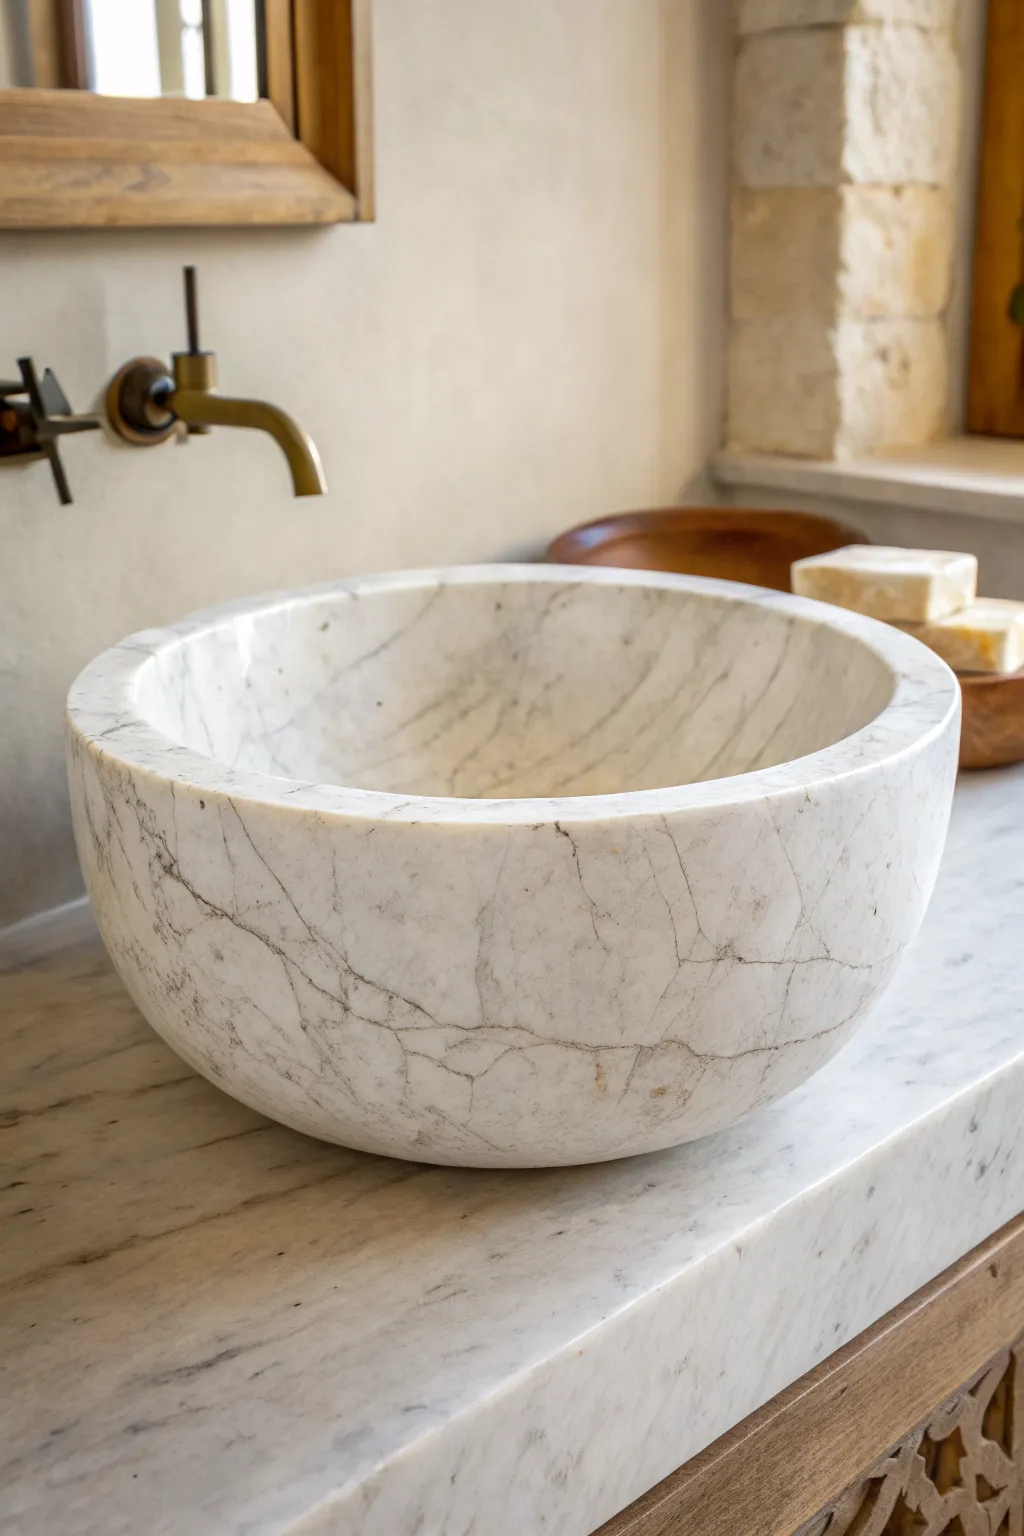
Transform a solid block of stone into a functional work of art with this guide to carving your own marble vessel sink. The result is a stunning, organic centerpiece that blends the raw beauty of natural stone with sophisticated craftsmanship.
How-To Guide
Materials
- Solid block of Carrara or Calacatta marble (approx. 18x18x8 inches)
- Angle grinder with diamond cutting blades
- Pneumatic hammer/chisel or hammer and cold chisels
- Variable speed polisher
- Diamond polishing pads (50 to 3000 grit)
- Contour gauge
- Personal protective equipment (respirator, goggles, ear protection)
- Wax pencil or heavy marker
- Water supply for wet grinding
- Template (cardboard circle)
- Epoxy stone sealer
Step 1: Roughing Out the Form
-
Mark the perimeter:
Begin with your squared marble block. Use a cardboard template to trace the outer circle of your sink onto the top surface using a wax pencil. Ensure you leave enough material for the rim thickness. -
Define the outer curve:
Using an angle grinder with a continuous rim diamond blade, carefully make vertical cuts down the corners of the block, stopping just shy of your drawn circle. This removes the bulk of the square corners. -
Establish the height:
Mark the desired depth on the side of the block. Use the grinder to trim the bottom excess if the block is too tall, ensuring the base remains perfectly flat for stability. -
Chisel the exterior:
Switch to your pneumatic chisel or hammer and cold chisel. Work around the exterior to knock off the remaining angular sections between your grinder cuts, aiming for a rough cylindrical shape. -
Refine the bowl profile:
Gently grind the exterior walls to curve inwards towards the base. Check your progress frequently with a contour gauge to ensure the curve is symmetrical all the way around.
Uneven Rim?
If the rim height varies, flip the sink upside down onto a flat piece of sandpaper-covered plywood. Rotate the sink in circles to grind the rim perfectly level.
Step 2: Hollowing the Core
-
Mark the rim:
On the top surface, draw a second, smaller circle inside the first one to define the inner wall. A thickness of about 1 inch is usually safe for structural integrity. -
Create depth cuts:
Make a series of cross-hatch cuts into the center of the cylinder with your angle grinder. Be extremely careful not to cut deeper than your intended interior bottom. -
Break out the material:
Using the hammer and chisel, strike the material segments defined by your cross-hatch cuts. Work from the center outward, stopping about an inch from your inner rim line. -
Shape the interior slope:
Continue chiseling and grinding to create a smooth, sloping bowl shape. I find it helpful to wet the stone occasionally to reveal the true depth and spot any uneven humps. -
Drill the drain hole:
Once the basic hollow is established but before final polishing, locate the exact center. Use a diamond core drill bit sized for a standard drain assembly to bore the hole completely through.
Textured Exterior
For a rustic contrast, leave the lower half of the exterior ‘chiseled’ or rough-hewn. Only polish the interior and the top rim for a tactile, dual-texture experience.
Step 3: Refining and Polishing
-
Smooth the surfaces:
Switch to a cup wheel on your grinder to smooth out all chisel marks on both the interior and exterior. The surface should feel consistent to the touch before moving to pads. -
Start the polishing sequence:
Attach a 50-grit diamond pad to your wet polisher. Work over the entire sink, moving slowly to remove deep scratches. Keep the stone wet to prevent overheating and dust. -
Progress through grits:
Move sequentially through 100, 200, and 400 grit pads. Thoroughly wash the sink between each grit change to prevent stray coarse particles from scratching your progress. -
Achieve the shine:
Continue directly with 800, 1500, and finally 3000 grit pads. By the time you reach 3000, the marble patterns and veining should pop with a distinct, glossy reflection. -
Create the matte finish (optional):
If you prefer the honed look shown in the inspiration image, stop polishing at 400 or 800 grit. This leaves a satiny, soft feel without the high gloss. -
Seal the stone:
Allow the sink to dry completely for 24 hours. Apply a high-quality penetrating stone sealer to protect against water spots and toothpaste stains.
Install your new masterpiece on a sturdy vanity and enjoy the timeless elegance of hand-carved stone.


Have a question or want to share your own experience? I'd love to hear from you in the comments below!