If you’ve ever wanted a tumbler that feels more rugged, more hobby-driven, and way less frilly, epoxy is where the magic happens. These men’s epoxy tumbler ideas lean into bold textures like wood, metal, stone, smoke, and fire—so your cup looks like it belongs in a workshop, on a boat, or by the grill.
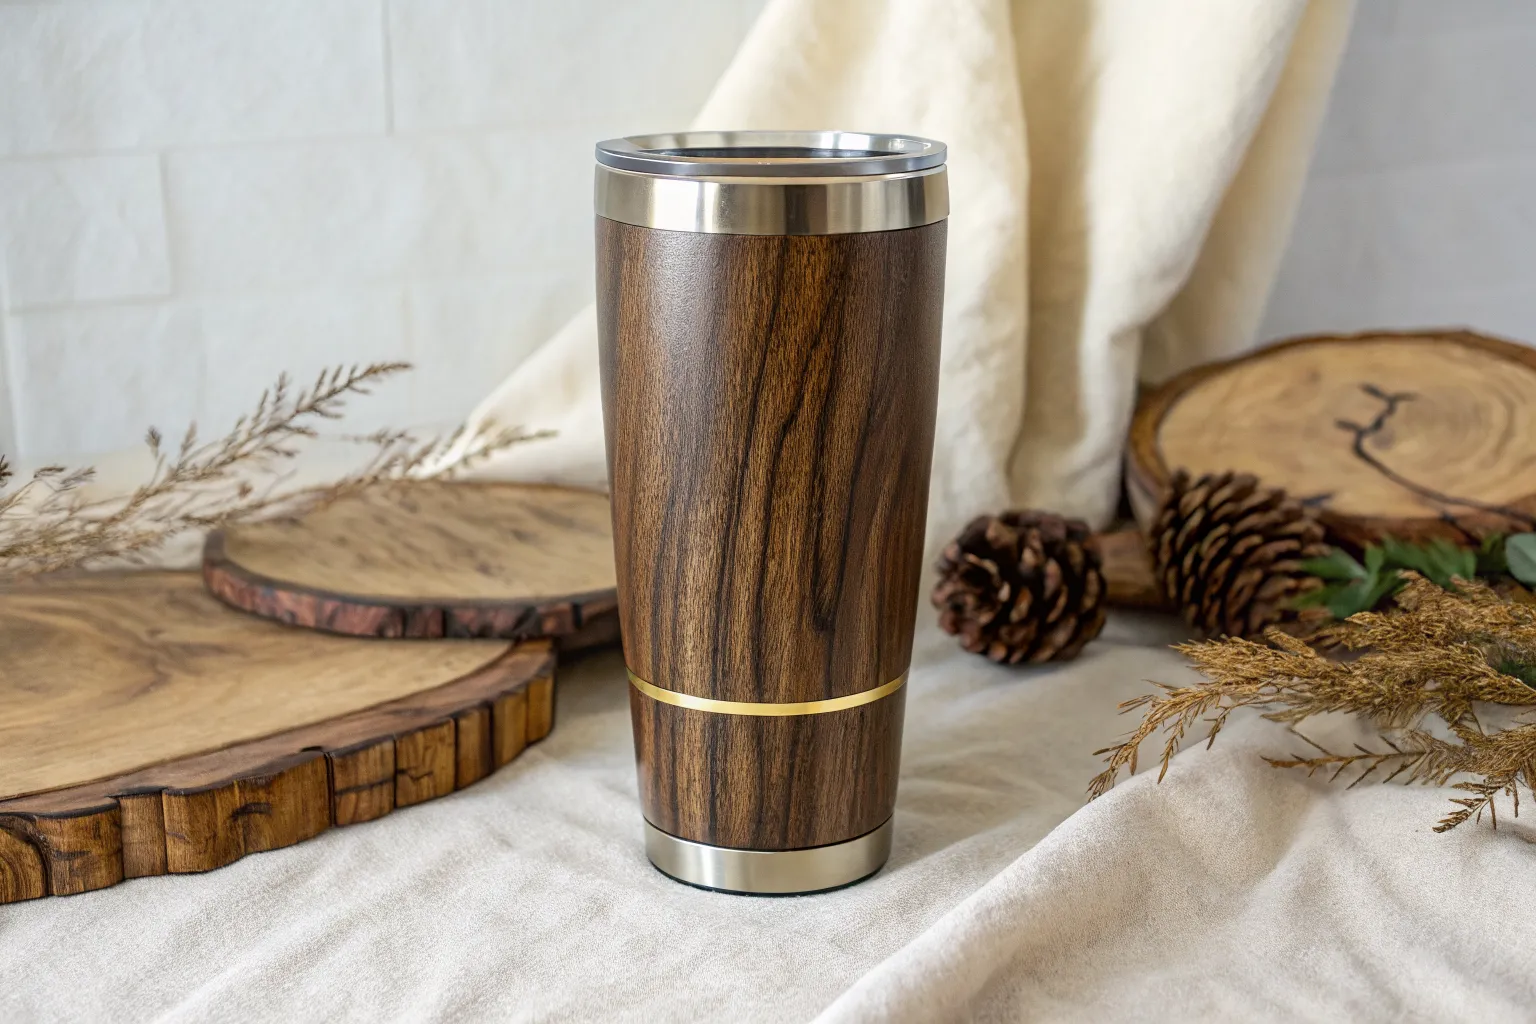
Faux Woodgrain Finish
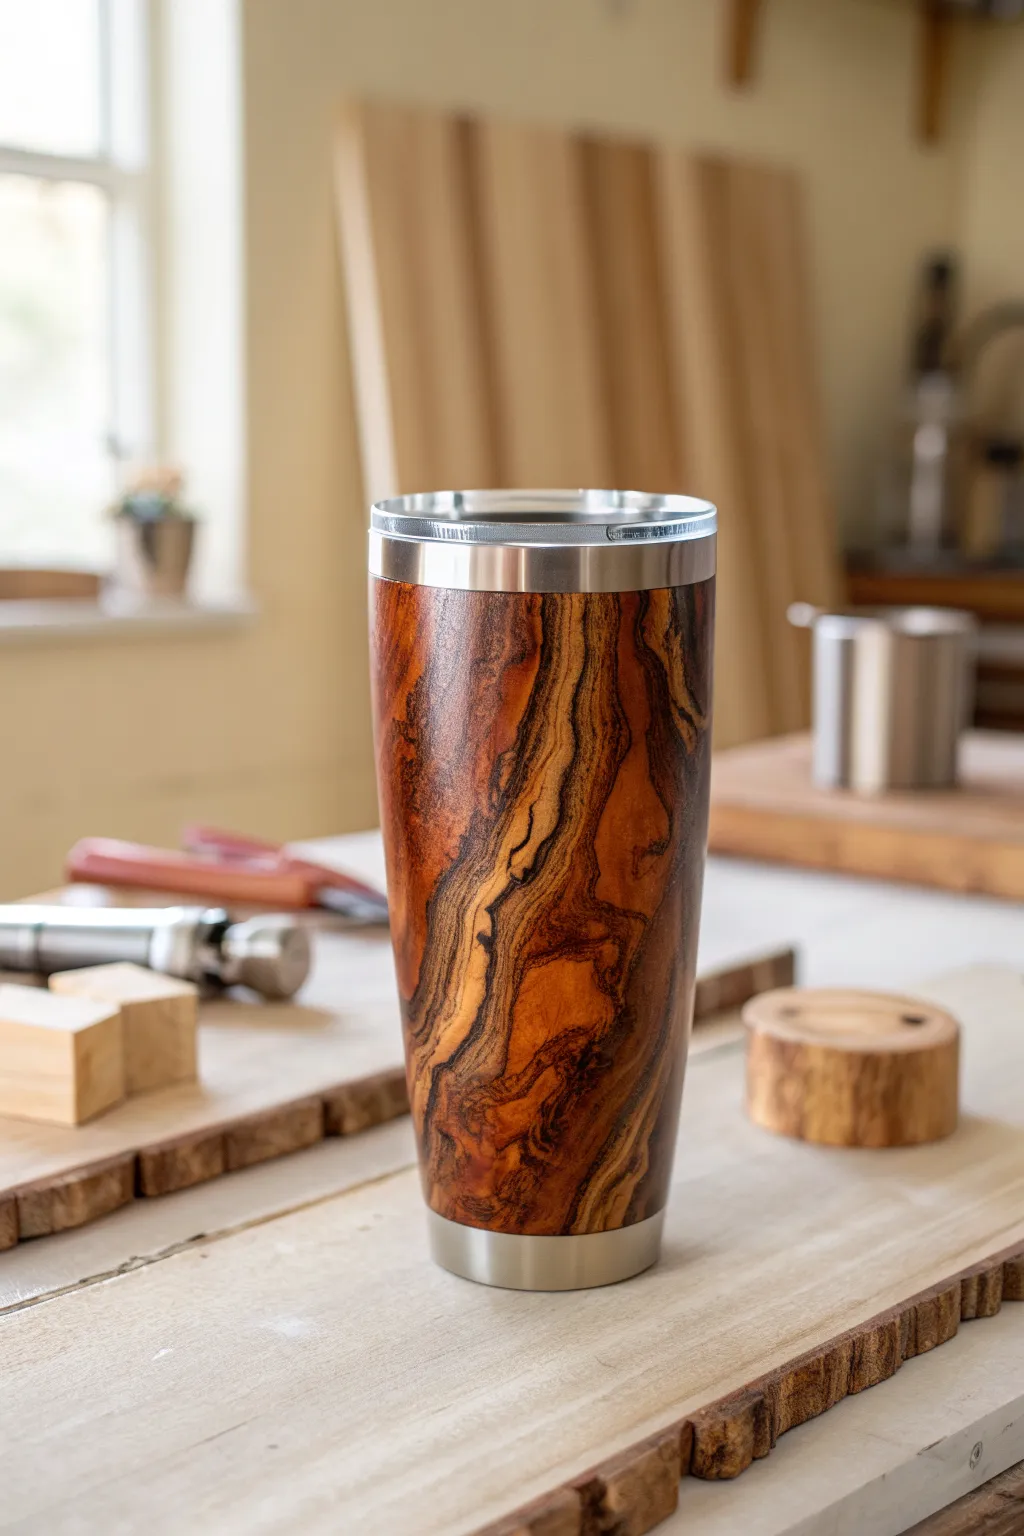
Transform a plain stainless steel cup into a rugged masterpiece with this realistic faux woodgrain technique. The rich swirls of amber, deep brown, and black create a convincing timber look that feels right at home in any workshop.
Step-by-Step
Materials
- Stainless steel tumbler (20oz or 30oz)
- White or light tan spray paint (matte)
- Alcohol inks (brown, caramel/latte, pitch black)
- Inexpensive chip brush (bristles cut short)
- Fine detail brush
- Rubbing alcohol (91% or higher)
- Painter’s tape or electrical tape
- 220-grit sandpaper
- Epoxy resin (two-part)
- Tumbler turner
- Gloves and respirator
- Clear acrylic sealer spray
Step 1: Preparation
-
Sand and Clean:
Begin by scuffing the entire surface of your stainless steel tumbler with 220-grit sandpaper. This gives the paint something to grip onto. Wipe it down thoroughly with rubbing alcohol to remove any oils or metal dust. -
Protect the Rims:
Since the example photo shows distinct steel rims, carefully tape off the top lip and the bottom edge of the cup using painter’s tape or electrical tape. Run your fingernail along the tape edge to ensure a tight seal so no paint bleeds under. -
Base Coat:
Apply a spray paint base coat. For this specific look, use a matte white or a very light tan. Apply a few light layers rather than one heavy one to avoid drips, letting it dry completely according to the can’s instructions.
Grain looking blobs?
If your ink is pooling into blobs instead of streaks, your brush is too wet. Wipe it on a paper towel and let the ink on the cup dry for 10 seconds before dragging it again.
Step 2: Painting the Grain
-
Prepare the Chip Brush:
Take a cheap chip brush and cut the bristles down until they are stiff and uneven. This modified brush is key to dragging the ink to create those natural-looking wood fibers. -
Apply Base Ink:
Drop a generous amount of the lighter brown or caramel alcohol ink directly onto the cup. Quickly brush it from top to bottom in long, continuous strokes. Don’t worry about perfect coverage yet; the streaky texture is exactly what we want. -
Layering Depth:
While the first layer is drying, add drops of darker brown ink sporadically. Use your stiff brush to drag these drops down, blending them slightly into the lighter background to simulate the natural variations in timber color. -
Creating the Knots:
Locate a few spots where you want a ‘knot’ to appear. Drop a small pool of black or dark brown ink in that spot. Instead of brushing normally, dab the brush or swirl it slightly, then gently pull wavy lines around this central dark spot to mimic grain flowing around a knot. -
Detailing the Flow:
Using a fine detail brush dipped in dark brown or black ink, manually paint in squiggly, organic grain lines. I find it helps to shake my hand slightly while pulling the brush to keep the lines from looking too straight or manufactured. -
Enhancing Contrast:
Go back in with your modified chip brush. Dip it lightly in alcohol to reactivate some of the dried ink, and drag it through the dark knots one more time. This softens rigid lines and creates that blurred, organic wood textures seen in the photo. -
Final Ink Check:
Rotate the cup and look for any unnatural white spaces. Fill them with a wash of your lightest ink color. Let the inks dry completely for at least an hour. -
Seal the Ink:
Before moving to epoxy, spray the tumbler with a clear acrylic sealer. This is crucial because raw epoxy can sometimes reactivate alcohol ink and cause your beautiful grain lines to smear or bleed.
Burnished Look
Before the final epoxy coat, lightly rub a tiny amount of metallic bronze mica powder over the raised ‘knots’ to give the wood a subtle, shimmering depth in sunlight.
Step 3: Epoxy Finish
-
Mix the Epoxy:
Don your gloves and respirator. Measure equal parts of resin and hardener into a mixing cup. Stir slowly and consistently for 3-5 minutes, scraping the sides and bottom to ensure a perfect chemical blend. -
Remove Tape:
Carefully peel off the tape from the top and bottom rims. Doing this before applying epoxy ensures a clean line, though some crafters prefer to epoxy over the tape and cut it later—I recommend removing it now for a flush steel transition. -
Apply Resin:
Place the tumbler on your turner and switch it on. Pour a line of mixed epoxy onto the cup and use a gloved finger to spread it evenly from the top rim to the bottom rim. Ensure the entire woodgrain surface is coated. -
Pop Bubbles:
After letting the cup spin for a few minutes, pass a heat gun or torch quickly over the surface to pop any micro-bubbles. Keep the heat source moving to avoid scorching the resin. -
Clean Rims:
While the cup is spinning, use a clean finger or a silicone tool to wipe any excess epoxy off the exposed stainless steel rims, keeping that sharp separation between the ‘wood’ and the metal. -
Cure:
Let the tumbler spin undisturbed for 6-8 hours (or until dry to the touch), then remove it from the turner and allow it to fully cure for another 24-48 hours before use.
Once fully cured, your tumbler will have a rugged, timeless appearance perfect for the morning commute or the workbench


Camo Pattern Wrap
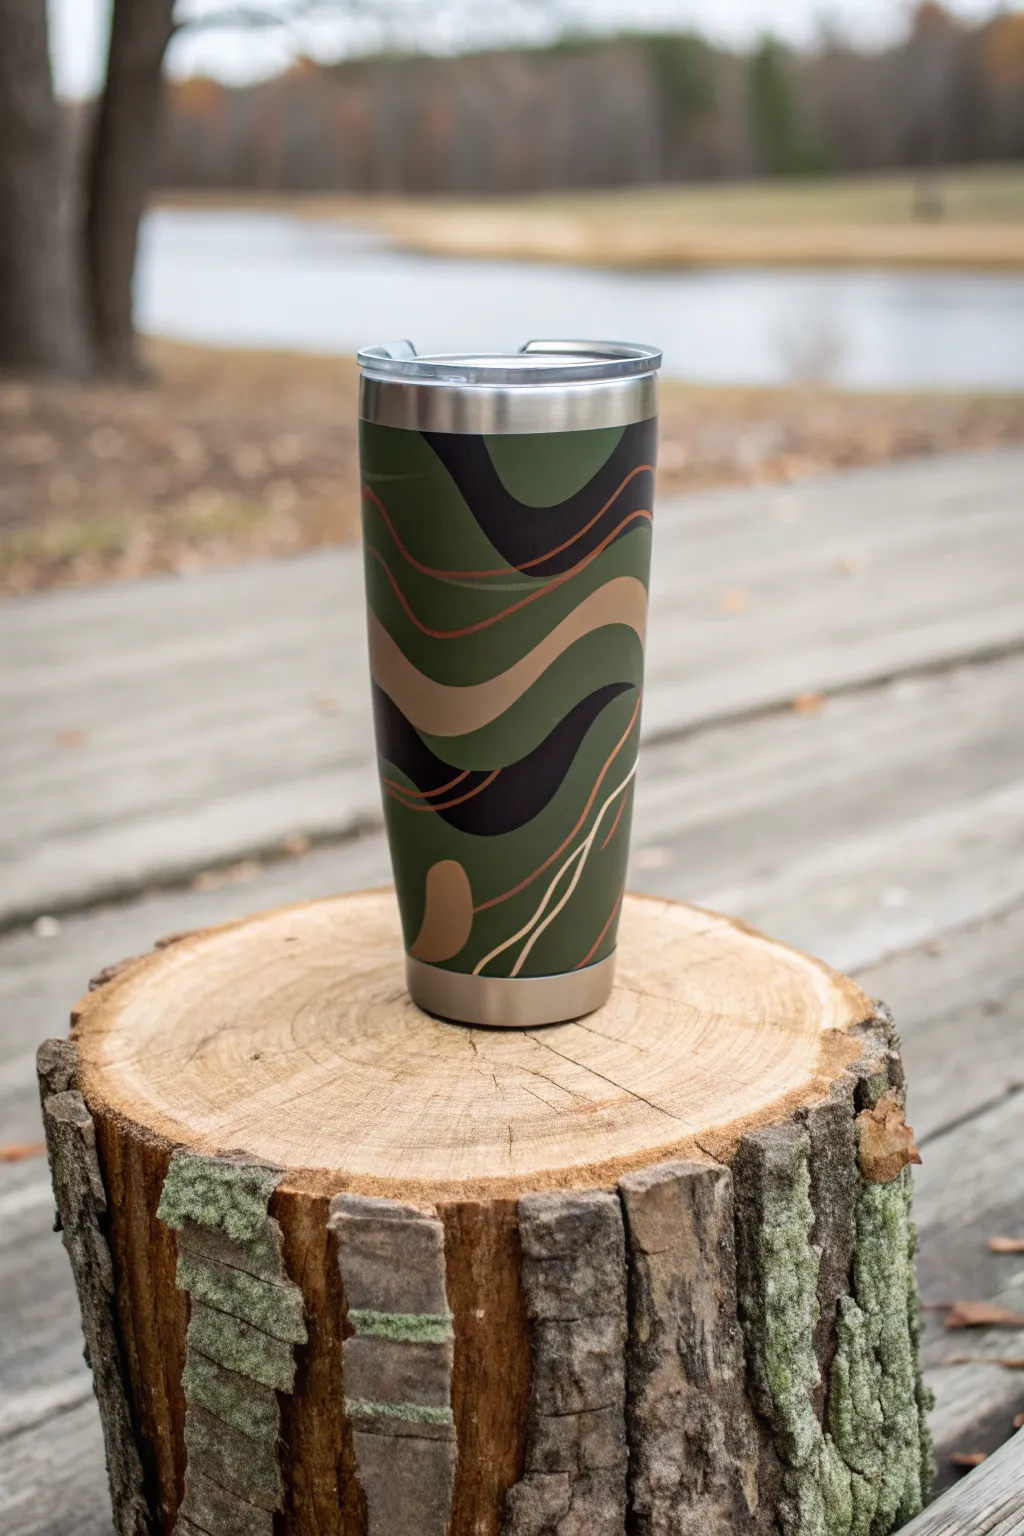
Give the classic camouflage look a sophisticated update with this flowing, topographic-style design. This project uses vinyl layers and precise cutting to create a seamless, matte-finish tumbler that looks equally great at the office or the campsite.
Step-by-Step Tutorial
Materials
- Stainless steel tumbler (20oz or 30oz)
- Permanent vinyl sheets (Olive Green, Dark Forest Green, Mocha Brown, Matte Black)
- Metallic vinyl (Gold or Copper for accent lines)
- Sandpaper (400 grit)
- Rubbing alcohol
- Lint-free cloth
- Cricut or Silhouette cutting machine
- Weeding tools
- Transfer tape
- Epoxy resin (optional for a glossy finish, though matte is pictured)
- Painter’s tape
Step 1: Preparation & Design
-
Prep the surface:
Begin by lightly sanding the entire surface of your stainless steel tumbler using 400-grit sandpaper. You just want to scuff the shine to help the vinyl adhere. -
Clean thoroughly:
Wipe the cup down with rubbing alcohol and a lint-free cloth to remove all metal dust and oils from your hands. -
Tape the rims:
Apply a strip of painter’s tape around the top rim and bottom edge of the tumbler to preserve clean steel lines where your lips will touch. -
Set up the design:
In your design software, look for a ‘seamless abstract wave’ or ‘topographic map’ SVG file. Size it to wrap fully around your specific tumbler dimensions. -
Assign colors:
Separate the design layers in your software. Assign large wavy sections to your olive and forest greens, smaller accent blobs to mocha brown and black, and the thin contoured lines to your metallic vinyl.
Bubble Trouble?
If you get air bubbles under the vinyl, poke a tiny hole with a sewing needle and press the air out with a finger.
Step 2: Cutting & Applying Vinyl
-
Cut the base layer:
Load your Olive Green vinyl first. This will likely serve as your background color. If you prefer to paint the base, spray paint the cup olive green now and let it dry for 24 hours. -
Cut remaining layers:
Proceed to cut the Dark Forest Green, Matte Black, and Mocha Brown shapes. Use a standard grip mat to ensure the vinyl doesn’t slip during these wavy cuts. -
Weed the vinyl:
Carefully weed out the negative space from all your vinyl sheets. Be extra gentle with the metallic layer, as those thin lines can be fragile. -
Apply the first layer:
Apply the large Forest Green waves first. Use transfer tape to lift the design and wrap it around the tumbler. Start from the center and smooth outwards to prevent bubbles. -
Layer the accents:
Apply the Matte Black and Mocha Brown shapes next. I find it helpful to overlap these slightly with the green layers to create depth and remove any gaps. -
Add metallic details:
Finally, apply the thin gold or copper topographic lines. These should flow along the edges of your darker color blocks to highlight the ‘camo’ shapes.
Step 3: Finishing Touches
-
Remove tape:
Carefully peel away the painter’s tape from the top and bottom rims. -
Seal edges:
If any vinyl overlaps the rim area, slice it cleanly with a craft knife for a sharp edge. -
Apply heat:
Use a heat gun or hair dryer on a low setting over the entire cup to help the vinyl adhesive bond permanently to the metal. -
Optional epoxy coat:
For a permanent seal, mix a small batch of epoxy resin. Apply a thin, even coat over the entire vinyl wrap while the cup spins on a turner. -
Cure:
Allow the epoxy to cure for at least 12 hours while spinning. If you skipped epoxy, just let the vinyl cure for 72 hours before wetting.
Layering Pro-Tip
Cut small ‘registration marks’ (like triangles) in the corners of your vinyl sheets to help line up multiple layers perfectly.
Now you have a rugged, custom tumbler ready for your next adventure

Concrete and Marble Industrial Look
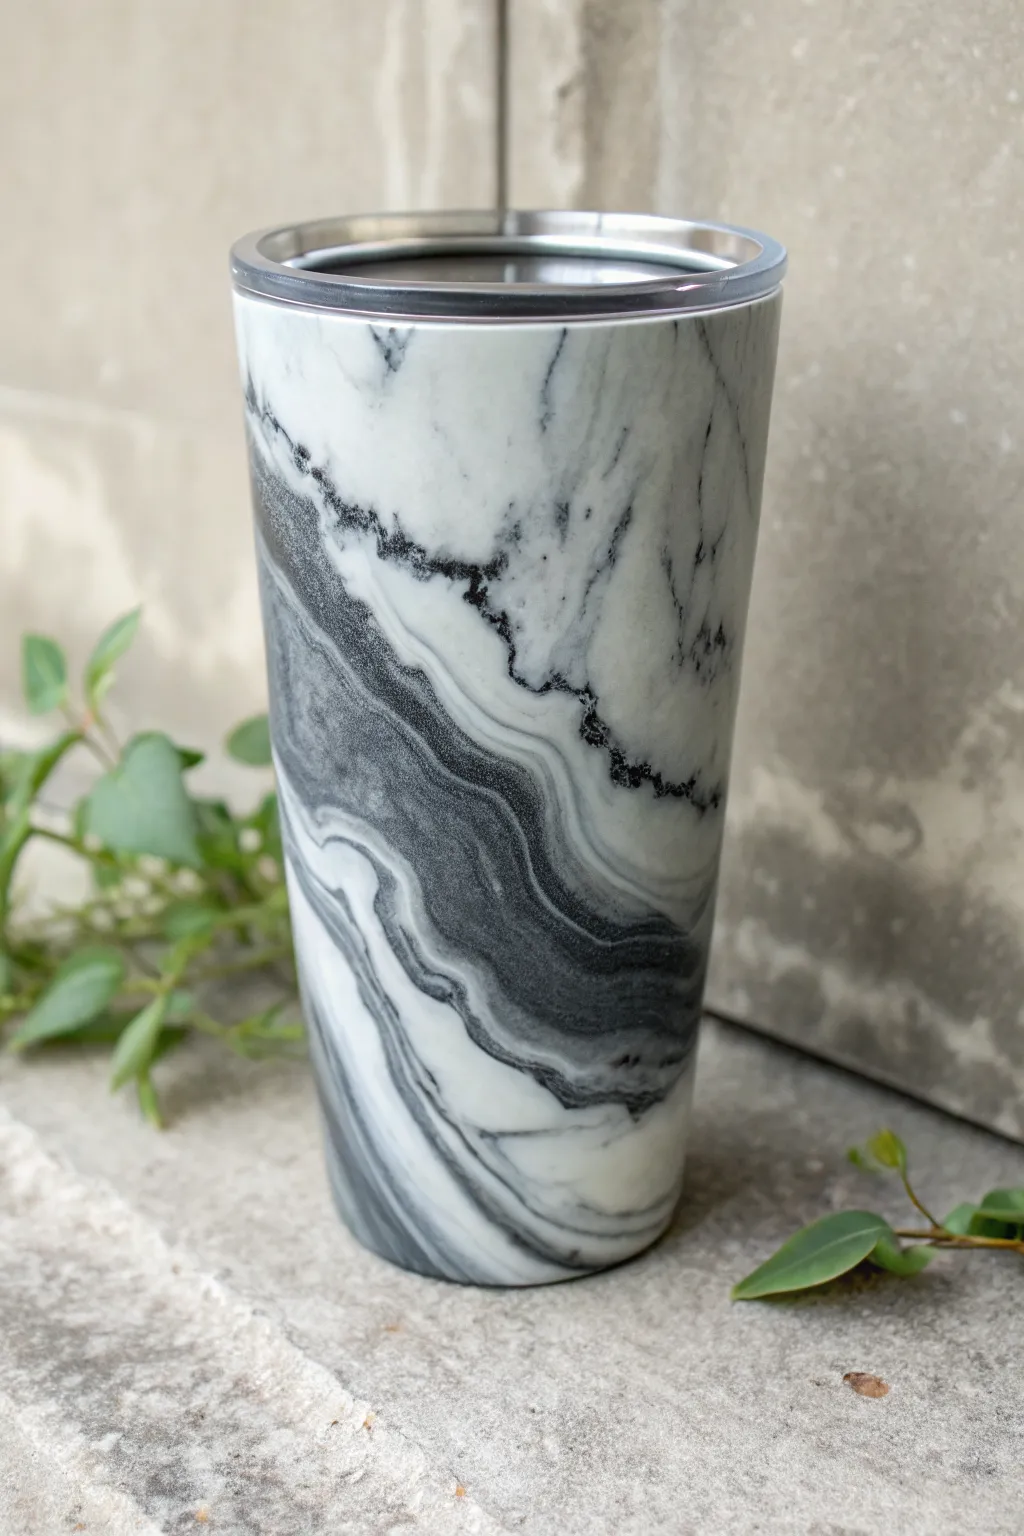
Capture the rugged elegance of natural stone with this high-contrast marble tumbler. Using a hydro-dipping technique with spray paints creates fluid, organic veins of black and grey against a stark white base, resulting in a masculine, industrial aesthetic that looks incredibly high-end.
Step-by-Step
Materials
- Stainless steel tumbler (20 oz or 30 oz)
- White spray paint (flat or satin finish)
- Black spray paint (gloss or matte)
- Metallic silver or charcoal grey spray paint
- 5-gallon bucket (filled with water)
- Painter’s tape
- Sandpaper (400 grit)
- Rubbing alcohol
- Epoxy resin (two-part molding, FDA compliant)
- Silicone brush or gloved finger
- Cup turner
- PVC pipe or pool noodle (to hold cup)
- Disposable gloves and respirator mask
Step 1: Preparation and Base Coat
-
Prep the Surface:
Begin by removing any existing lids or straws. Lightly sand the entire exterior of the stainless steel tumbler using 400-grit sandpaper to give the paint something to grip onto. -
Clean Thoroughly:
Wipe down the sanded surface with rubbing alcohol and a lint-free cloth. This removes manufacturing oils and dust, ensuring a flawless bond. -
Tape the Rim:
Carefully apply painter’s tape to the very top rim of the cup and the inside to keep the stainless steel clean where the mouth touches. -
Mount the Cup:
Secure the tumbler onto a PVC pipe, pool noodle, or a holder that allows you to handle it without touching the painted surface. -
Apply Base Color:
Spray the entire tumbler with an even coat of white spray paint. Hold the can about 8-10 inches away to avoid drips. -
Second Coat:
Allow the first coat to dry for about 15-20 minutes, then apply a second coat of white for full, solid coverage.
Water Temp Trick
Use lukewarm water (around 75°F-80°F). If the water is too cold, the paint clumps instantly; too hot, and it spreads too thin and separates.
Step 2: Hydro-Dipping
-
Prepare the Water Bath:
Fill a 5-gallon bucket about three-quarters full with lukewarm water. The temperature matters—if it’s too cold, the paint skins over too fast. -
Spray the Pattern:
Spray your black paint directly onto the center of the water surface for 2-3 seconds. Immediately follow with a quick burst of charcoal grey or metallic silver into the center of the black. -
Swirl the Colors:
Wait just a moment for the paint to expand, but don’t let it solidify. The natural dispersion usually creates enough pattern, but you can gently blow on it to move the veins. -
The Dip:
Holding your tumbler by the handle (PVC pipe), slowly dip it into the water at a 45-degree angle. Submerge it fully while rotating it slightly to wrap the pattern around the curves. -
Clear the Surface:
While the cup is fully submerged, blow away the remaining floating paint on the water’s surface or use a piece of cardboard to swipe it aside so you don’t double-dip the pattern on the way out. -
Remove and Dry:
Pull the tumbler out of the water. Inspect the marble effect; small water droplets are normal and will dry. Set the cup aside to dry completely for at least 4 hours, or overnight if possible.
Add Gold Veins
For a luxe touch, spray a tiny burst of metallic gold into the hydro dip water alongside the black and grey for subtle, expensive-looking detailing.
Step 3: Sealing with Epoxy
-
Mix the Resin:
Mix equal parts of your resin and hardener according to the manufacturer’s instructions. Stir slowly for 3-5 minutes to minimize bubbles. -
Apply the Epoxy:
Mount the dry, painted tumbler onto your cup turner. Turn the motor on. Pour a small stream of mixed epoxy onto the cup and use a gloved finger or silicone brush to spread it evenly from rim to bottom. -
Pop Bubbles:
I usually let the turner spin for a few minutes, then quickly pass a heat gun or torch over the surface to pop any micro-bubbles. -
Curing:
Allow the tumbler to spin for 8-12 hours until the epoxy is hard to the touch. -
Remove Tape:
Clean up the rim if necessary. If you taped over the rim, carefully score the edge of the epoxy with an X-Acto knife before removing the tape to get a crisp line.
Now you have a durable, custom piece of drinkware that combines artistic flair with rugged industrial vibes


Distressed Flag Wrap
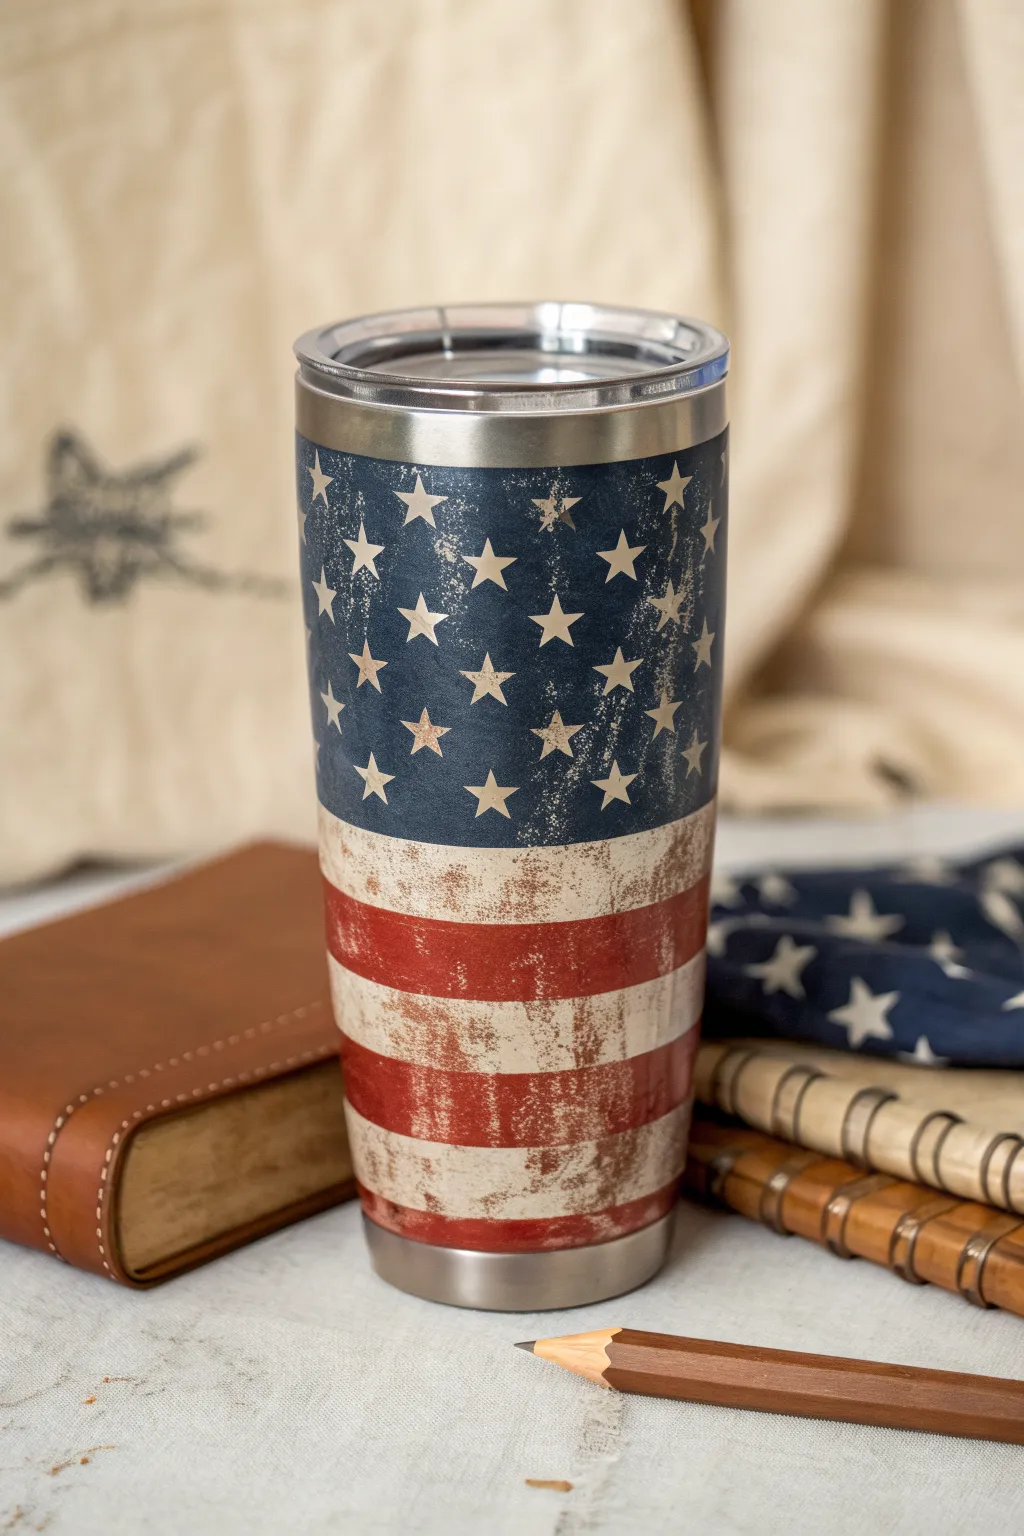
Capture a rugged, patriotic spirit with this distressed American flag tumbler design. The worn, vintage aesthetic gives the cup a timeless, hardworking feel that pairs perfectly with the sleek stainless steel trim.
Step-by-Step Tutorial
Materials
- 20oz or 30oz stainless steel tumbler (straight or tapered)
- Distressed flag design file (high-resolution)
- Waterslide paper (clear or white, depending on preference) OR Sublimation paper + printer
- Spray sealer (clear acrylic gloss)
- Epoxy resin (A and B parts)
- Tumbler turner
- Sanding block (fine grit, 400-600)
- Isopropyl alcohol and lint-free cloth
- Heat gun or torch
- Water basin (for waterslide method)
- Silicone brush or gloved finger
- Painter’s tape
Step 1: Preparation & Base
-
Prepare the Tumbler Surface:
Begin by lightly sanding the entire exterior of your stainless steel tumbler with fine-grit sandpaper. You aren’t trying to remove deep metal, just scuffing the surface to give the epoxy and adhesive something to grip. -
Clean Thoroughly:
Wipe down the tumbler with isopropyl alcohol and a lint-free cloth or paper towel. Ensure all sanding dust and oils from your fingers are completely removed. -
Masking Off:
Apply painter’s tape to the very top rim and the bottom rim if you want to keep the exposed steel look shown in the reference photo. Press the tape edges down firmly to prevent leakage. -
Apply White Base Coat (Optional):
If using a clear waterslide paper or if your sublimation design requires a white base to pop, spray paint the tumbler white. Let it dry completely for 24 hours. If using a full-wrap white waterslide or sublimation specific tumbler, you can skip this paint step.
Cloudy Spots?
If your waterslide looks cloudy after epoxy, trapped moisture is the culprit. Ensure you squeegee out ALL water and let the applied decal dry for 24 hours before resin.
Step 2: Applying the Distressed Design
-
Print and Seal the Design:
Print your distressed flag image. If using waterslide paper, spray the printed sheet with clear acrylic sealer (3 thin coats), letting it dry for 15 minutes between each. If doing sublimation, mirror your image before printing. -
Trim the Wrap:
Cut your design to size. Since this is a full wrap, measure your tumbler carefully. I prefer to leave a very slight overlap to ensure there isn’t a gap in the pattern. -
Soak the Waterslide (Method A):
If using waterslide: Submerge the decal in room-temperature water for about 30-60 seconds until the backing starts to slide. Don’t let it float off entirely. -
Apply the Waterslide:
Moisten the tumbler surface slightly. Slide the decal onto the cup, positioning it carefully between your taped rims. Use a silicone squeegee or damp cloth to smooth out water and air bubbles from the center outward. -
Sublimation (Method B):
If sublimating: Tape your print tightly to the tumbler with heat-resistant tape. Bake in a tumbler press or convection oven according to your paper/blank manufacturer’s settings (usually around 360°F for 6 minutes, turning halfway). -
Dry Time:
Let the applied decal dry completely. For waterslides, this is crucial—wait at least 4-6 hours (or overnight) to ensure no moisture is trapped underneath, which causes cloudiness.
Add Real Texture
Before the final epoxy coat, lightly dab a tiny bit of metallic bronze or copper mica powder onto the ‘rusted’ areas of the graphic to make the distress effect shimmer.
Step 3: Epoxy Sealing
-
Mix the Epoxy:
Measure equal parts of Epoxy Resin Part A and Part B. Stir slowly and consistently for 3-5 minutes until the mixture is clear and free of streaks. -
Mount on Turner:
Place your dry tumbler on the turner and switch it on to a slow rotation. -
First Coat Application:
Pour a small amount of resin onto the center of the spinning tumbler. Use a gloved finger or silicone brush to spread it evenly towards the top and bottom tape lines. -
Smooth and Pop Bubbles:
Ensure the coat is thin and even. Pass a heat gun or torch quickly over the surface to pop any micro-bubbles. Don’t linger in one spot to avoid scorching the design. -
Remove Tape:
Approximately 45-60 minutes after applying the epoxy (when it’s tacky but not runny), carefully peel off the painter’s tape at the rims to get a clean line. -
Cure and Evaluate:
Let the tumbler spin for 6-8 hours, then turn off the spinner and let it cure for another 12 hours. Check for any rough spots. -
Final Coat:
Lightly sand the first coat if necessary, wipe clean, re-tape the rims (optional, for protection), and apply a second, final layer of epoxy for a glass-like finish. Remove tape at the tacky stage again.
Allow the final layer to cure fully for 72 hours before using it, and enjoy your stunning custom patriotic tumbler
BRUSH GUIDE
The Right Brush for Every Stroke
From clean lines to bold texture — master brush choice, stroke control, and essential techniques.
Explore the Full Guide
First Responder Tribute Line Design
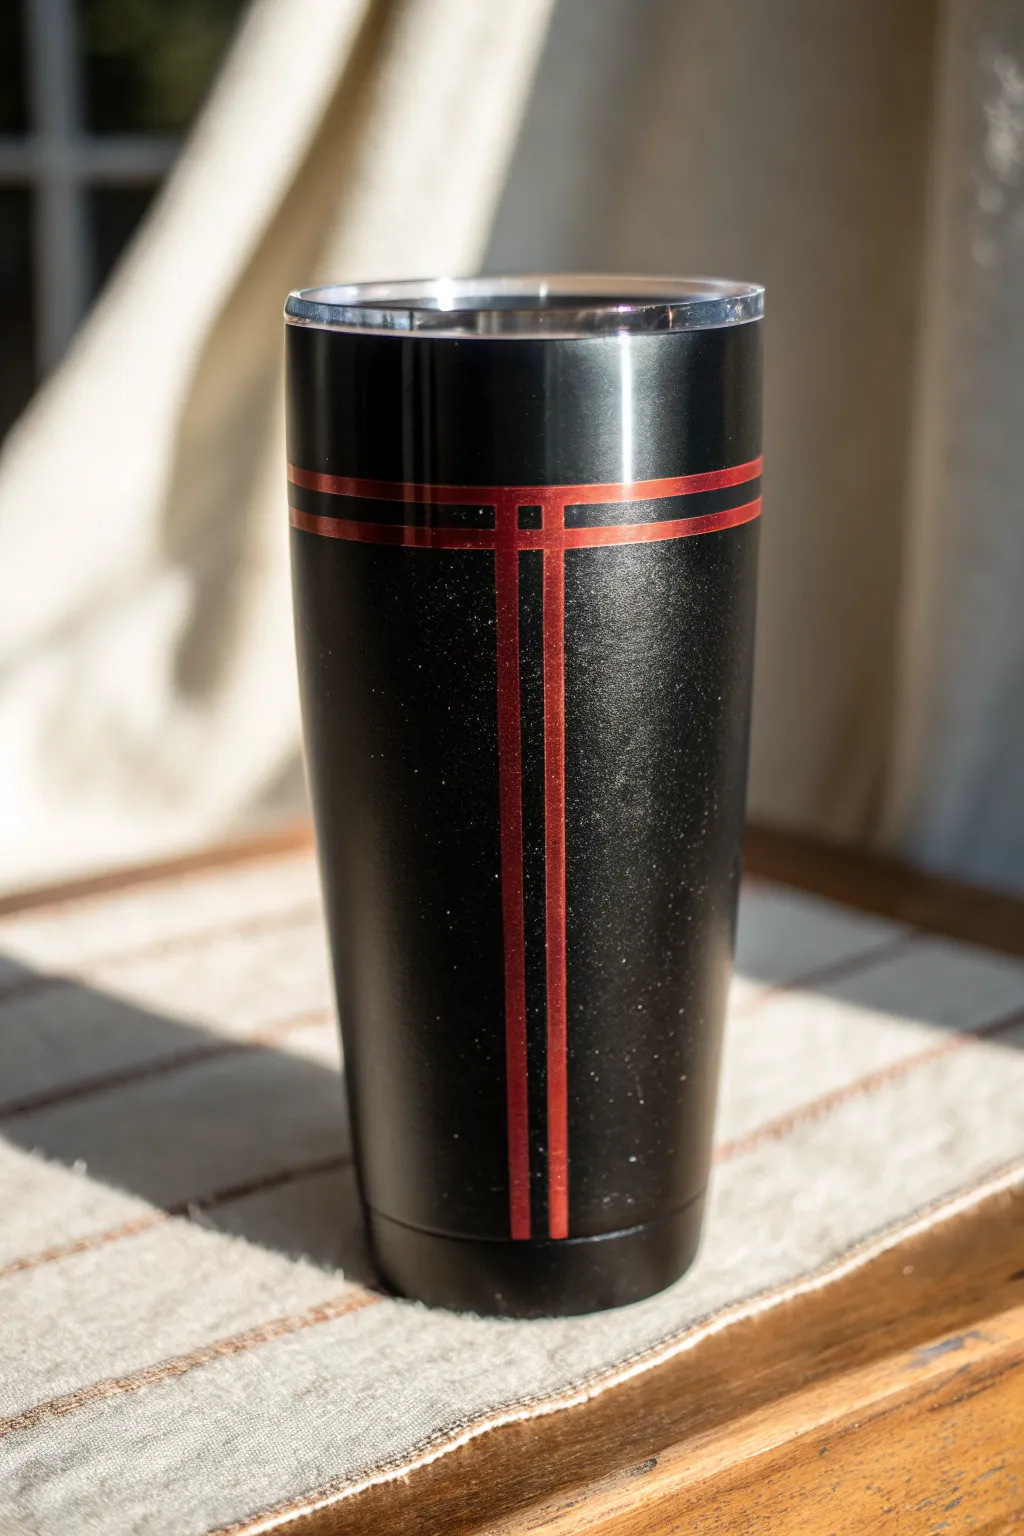
Create a sleek and respectful tribute with this distinctive ‘Thin Line’ tumbler design. This project features a deep, shimmery black base crossed by precise metallic red lines generally associated with firefighters, resulting in a professional and polished finish.
Step-by-Step Guide
Materials
- Stainless steel tumbler (20oz or 30oz)
- Black spray paint (gloss or satin)
- Createx Wicked Red paint (or similar metallic red acrylic)
- Fine black glitter (optional, for subtle shimmer)
- 1/8 inch or 1/4 inch vinyl striping tape (or painter’s tape cut to size)
- Epoxy resin (Part A and Part B)
- Tumbler turner
- Sandpaper (400 grit)
- Rubbing alcohol
- Lint-free cloth
- Silicone brush or gloved finger
- Heat gun or torch
- X-Acto knife
Step 1: Preparation and Base Coat
-
Prep the surface:
Begin by sanding your stainless steel tumbler with 400-grit sandpaper to scuff the surface. This mechanical bond is crucial for paint adhesion. Wash thoroughly with dish soap and water, then wipe down with rubbing alcohol. -
Apply base color:
Spray paint the tumbler with a solid coat of black. Hold the can 8-10 inches away and use sweeping motions to avoid drips. Apply 2-3 light coats rather than one heavy one, letting it dry between layers. -
Add subtle shimmer (optional):
If you want the speckled look seen in the photo, lightly dust a very fine black or dark grey glitter over the final wet coat of spray paint (the ‘tacky’ phase), or mix a tiny amount into your first epoxy layer later. -
Allow to cure:
Let the base paint gas off and dry completely for at least 24 hours. If it smells like paint, it’s not ready for the next step.
Straight Line Secret
Rest your hand on a stack of books or a stable object at the correct height while applying tape. Rotate the cup against the tape rather than moving your hand around the cup.
Step 2: Masking the Design
-
Plan the grid:
This design relies on negative space masking. You will be painting the red lines, so you need to mask off everything *except* where the red lines will go. Alternatively, for a sharper and easier line, we will use the ‘reverse peel’ method or simply apply vinyl stripes directly if preferred, but painting offers a more embedded look. -
Apply horizontal tape:
Using your dedicated striping tape, place two parallel horizontal lines near the top rim of the cup. Ensure they are level by measuring the distance from the rim at multiple points. -
Apply vertical tape:
Run two vertical strips of tape from the top horizontal line down to the bottom of the cup. These should intersect the horizontal lines perpendicularly. -
Create the spacing:
The gap between your tape lines is where the black base will show (if using vinyl as the color) or where the red paint will go (if painting). For the look in the image which appears to be metallic foil or vinyl sealed under epoxy, apply two strips of metallic red vinyl tape directly onto the black base. -
Trim intersections:
Use an X-Acto knife to carefully trim the overlapping tape sections. If you want the lines to look woven or continuous, cut out the small squares where the vertical and horizontal tapes meet so they lie flat.
Step 3: Sealing with Epoxy
-
Clean the surface:
Once your red vinyl striping is perfectly placed and adhered, gently wipe the tumbler with a lint-free cloth to remove any finger oils or dust. -
Mix the epoxy:
Mix your epoxy resin according to the manufacturer’s instructions, usually a 1:1 ratio. Stir slowly for 3-5 minutes to minimize bubbles. -
Apply the first coat:
Mount the cup on your turner. With the turner spinning, stick your gloved finger or brush into the epoxy and spread it evenly from the rim to the bottom edge. Use long, even strokes. -
Address bubbles:
After letting the cup spin for a few minutes, carefully pass a heat gun or torch over the surface. Keep the heat moving constantly to pop micro-bubbles without scorching the resin. -
Rim care:
While spinning, use your finger to gently wipe the very top rim of the stainless steel to ensure a clean break where the epoxy stops. This prevents a rough edge where your mouth touches. -
Check for coverage:
Look at the tumbler under a bright light. Typically, the vinyl stripes create a small ridge. Ensure the epoxy is thick enough to start leveling that out. -
Cure and recoat:
Let the tumbler spin for 12-24 hours until cured. If you can still feel the texture of the vinyl tape lines, lightly sand everything with used 400 grit sandpaper, wipe clean, and apply a second coat of epoxy.
Tape Looking Peely?
If vinyl lifting occurs under epoxy, it wasn’t pressed down enough. Use a squeegee or credit card to burnish the vinyl firmly before sealing, ensuring no air gaps exist.
Now you have a durable, honorable tribute piece ready for daily use or gifting
Hunting Cabin Badge Style
Channel the cozy vibes of a weekend getaway with this rugged yet refined tumbler design. Featuring a distinct split base of deep forest green and warm leather brown, accented with metallic copper vinyl, it captures the essence of the great outdoors.
How-To Guide
Materials
- 30oz Stainless steel tumbler
- Spray paint: Matte Forest Green
- Spray paint: Matte Terracotta or Leather Brown
- Painter’s tape or electrical tape
- Cricut or silhouette cutting machine
- Adhesive vinyl: Metallic Copper or Rose Gold
- Transfer tape
- Clear epoxy resin (Part A and B)
- Epoxy mixing cups and stir sticks
- Tumbler turner
- Silicone brush or gloved finger
- Isopropyl alcohol
Step 1: Base Preparation
-
Prep the Surface:
Begin by removing any existing lids or stickers from your stainless steel tumbler. Give the entire exterior a light sanding with fine-grit sandpaper to help the paint adhere, then wipe it down thoroughly with isopropyl alcohol to remove oils and dust. -
Base Coat Application:
Spray the entire tumbler with your matte forest green paint. Hold the can about 8-10 inches away and use steady, sweeping motions to avoid drips. Apply 2-3 light coats rather than one heavy one, letting it dry to the touch between layers. -
Tape the Delineation:
Once the green base is completely dry (give it at least 24 hours to be safe), mask off the top section of the tumbler. Measure about one-third up from the bottom and apply a straight line of painter’s tape around the circumference. Press the tape edge down firmly to prevent bleed-through. -
Protect the Top:
Cover the rest of the green section with paper or a plastic bag, taping it securely to your masking line. You want to ensure absolutely no brown overspray hits your perfect green finish. -
Paint the Bottom:
Spray the exposed bottom section with the terracotta or leather brown paint. Again, use light coats to build up opaque coverage. Remove the tape while the final coat is still slightly tacky to get a crisp, clean line.
Step 2: Vinyl Decal and Details
-
Design the Graphics:
In your design software, search for or create a ‘deer head silhouette’ and a ‘hexagonal tent badge’. You’ll also need a row of simple pine tree silhouettes. Size the main logo to fit comfortably on the green section and the trees to wrap around the brown section. -
Cut and Weed:
Load your metallic copper vinyl into your cutting machine. Cut the designs, then carefully weed out the excess vinyl, leaving only your deer, badge, and trees on the carrier sheet. I like to use a bright crafting light here to see the cut lines clearly. -
Apply the Trees:
Using transfer tape, pick up your row of pine trees. Align them carefully around the brown bottom section of the tumbler. Apply them gently from the center outwards to avoid bubbles, spacing them evenly. -
Place the Main Emblem:
Position the deer head and tent badge decal on the center of the green upper section. Ensure it’s vertically aligned with the trees below for a cohesive look. Burnish firmly with a scraper tool before peeling away the transfer tape.
Tape Line Bleed?
If paint bled under your tape, use a q-tip dipped in acetone to carefully clean the line. Alternatively, cover the seam with a thin strip of copper vinyl tape.
Step 3: Sealing with Epoxy
-
Setup the Environment:
Set up your tumbler turner in a dust-free, well-ventilated area. Mount your tumbler onto the arm, ensuring it’s level so the epoxy doesn’t pool at one end. -
Mix the Resin:
Measure equal parts of epoxy resin (Part A) and hardener (Part B) into a mixing cup. Stir slowly but thoroughly for 3-5 minutes, scraping the sides and bottom. Let it sit for a minute or two so bubbles can rise to the surface. -
Apply the Coat:
Turn on the rotator. Pour a small stream of mixed resin onto the spinning tumbler. Use a silicone brush or a gloved finger to spread the epoxy evenly from rim to bottom edge in long, smooth strokes. -
Pop the Bubbles:
Once the tumbler is fully coated, pass a heat gun or torch quickly over the surface to pop any remaining micro-bubbles. Keep the heat source moving constantly to avoid scorching the resin. -
Cure:
Let the tumbler spin for at least 6-8 hours (or as per your resin’s instructions) until it is tack-free. Then, turn off the spinner and let it cure fully for another 24 hours before use.
Rustic Touch
Before the epoxy step, lightly scuff the edges of the vinyl with sandpaper for a worn, vintage look that matches the camping aesthetic.
Now you have a durable, custom tumbler ready for your next adventure into the wild

PENCIL GUIDE
Understanding Pencil Grades from H to B
From first sketch to finished drawing — learn pencil grades, line control, and shading techniques.
Explore the Full Guide
Fishing Lake Swirl With Tackle Details
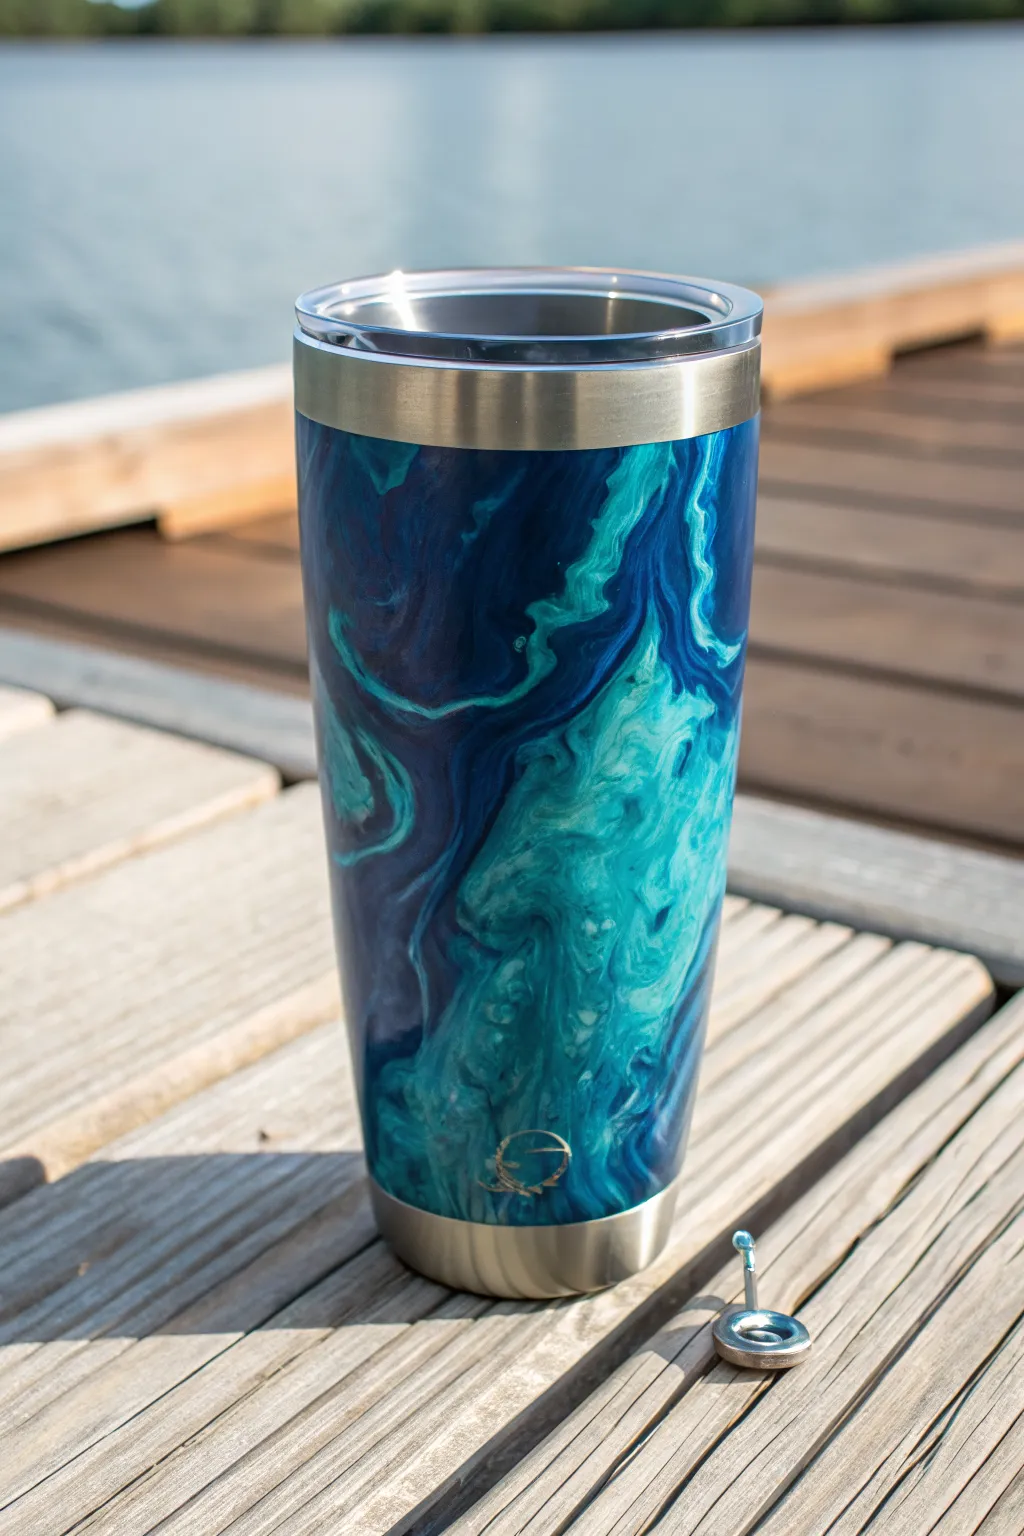
Capture the essence of a serene fishing lake with this swirling resin design that mimics deep currents and shallow teals. The result is a rugged yet artistic tumbler that feels perfectly at home on the dock or in the boat.
Step-by-Step Tutorial
Materials
- Stainless steel tumbler (30oz or 20oz)
- Painter’s tape
- 2-part epoxy resin
- Alcohol inks (Navy Blue, Royal Blue, Teal, White)
- Mica powder (Pearl Blue or Iridescent Green)
- Heat gun or torch
- Cup turner
- Mixing cups and stir sticks
- Nitrile gloves
- Sandpaper (220 grit)
- Rubbing alcohol
- Gold or Silver metallic vinyl (for the fishing hook decal)
- Cricut machine (or pre-purchased vinyl decal)
- Silicone brush
Step 1: Preparation and Base Coat
-
Prep the Surface:
Begin by removing any existing lids or stickers. Lightly sand the entire outer body of the stainless steel tumbler with 220 grit sandpaper to give the resin something to grip. -
Clean Thoroughly:
Wipe the sanded surface down with a paper towel soaked in rubbing alcohol. This removes oils and metal dust that could repel your coating. -
Tape It Off:
Apply painter’s tape carefully around the inner rim and the very bottom edge of the cup if you want to keep the steel exposed there. Press the edges down firmly to prevent leakage. -
Mount the Cup:
Place the tumbler securely onto the arm of your cup turner. Ensure it’s level, but don’t turn it on just yet.
Go With the Flow
Don’t overwork the inks with the heat gun. Apply heat in short bursts and let gravity and the spinning motion create the natural water patterns for you.
Step 2: The Ink Swirl
-
Mix First Batch:
Mix a small batch of epoxy resin (about 20-30ml) according to the manufacturer’s instructions. Stir slowly to minimize bubbles. -
Apply Clear Coat:
Turn on the cup turner. Using a gloved finger or silicone brush, apply a thin, even layer of the clear epoxy over the entire working surface of the cup. -
Drop the Colors:
While the cup is spinning, drop generous amounts of your alcohol inks onto the wet epoxy. Alternate between the Navy Blue and Teal, covering most of the surface but leaving small gaps. -
Create Movement:
Add a few drops of white alcohol ink to break up the colors and create depth. I prefer to add these near the transition areas between the dark blue and teal. -
Heat and Swirl:
Use your heat gun on a low setting to warm the epoxy. As it thins, the centrifugal force and the heat will cause the inks to marble and swirl together like water currents. -
Add Some Shimmer:
Sprinkle a tiny pinch of Pearl Blue mica powder into the wet resin in select spots. This adds that sun-hitting-water effect without overwhelming the deep colors. -
Let it Cure:
Allow the cup to spin undisturbed for 6-8 hours, or until the epoxy is tack-free.
Sticky Situation
If your epoxy feels tacky even after the recommended cure time, the room might be too cold or humid. Move the turner to a warmer area (75°F+) to help it finish hardening.
Step 3: Decal and Final Seal
-
Prepare the Decal:
While the first layer cures, cut your fishing hook or logo design out of metallic vinyl. Weed out the excess material carefully. -
Apply the Decal:
Once the cup is dry to the touch, apply the vinyl decal near the bottom center. Rub it down firmly to ensure no air bubbles are trapped underneath. -
Mix Final Epoxy:
Mix a second batch of clear epoxy resin. This layer needs to be enough to fully cover the decal and create a smooth, glass-like finish. -
Apply Final Coat:
With the turner spinning, pour the clear epoxy over the cup. Use your finger to spread it evenly from the top tape line to the bottom tape line. -
Remove Bubbles:
Wait 5-10 minutes for any micro-bubbles to rise, then quickly pass a torch or heat gun over the surface to pop them. -
Remove Tape:
After about 45 minutes to an hour (when the resin is gel-like but not hard), carefully peel off the painter’s tape. Pulling it now ensures a clean, crisp line. -
Final Cure:
Let the tumbler spin for another 8-12 hours until fully hardened.
Once fully cured, wash thoroughly by hand before filling it up for your next trip to the lake
Mechanic Humor Typography
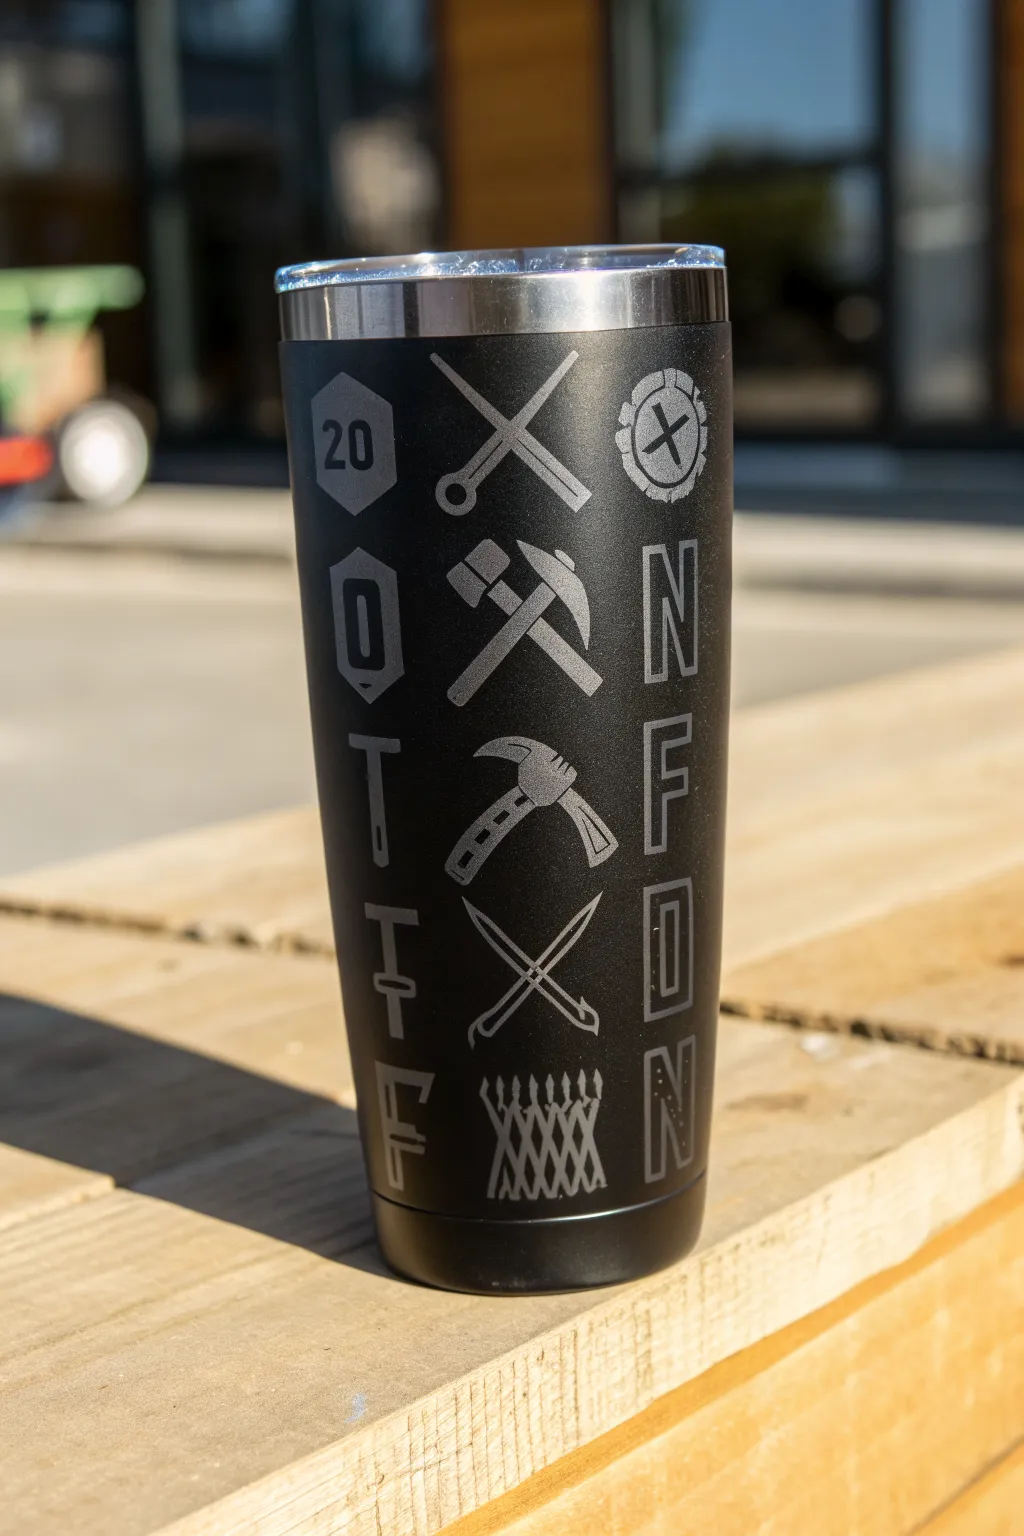
For the gamer who tinkers, this sleek matte black tumbler combines rugged aesthetics with a nod to tabletop RPGs. The design eliminates the need for messy decals by using a laser engraver to permanently etch the graphics directly through the powder coat to the stainless steel below.
How-To Guide
Materials
- 30oz stainless steel tumbler (powder coated black)
- Laser engraving machine (Diode or CO2 laser)
- Lightburn software (or similar design software)
- Rotary roller attachment for laser
- Isopropyl alcohol
- Lint-free microfiber cloth
- Digital calipers
- Magic Eraser or stiff bristle brush
- LA’s Totally Awesome cleaner (or similar degreaser)
Step 1: Design Preparation
-
Measure the canvas:
Before opening your software, use digital calipers to measure the exact height and circumference of your tumbler’s engravable area. Remember that the circumference is diameter multiplied by pi (3.14). -
Set up the workspace:
Open Lightburn (or your preferred laser software) and create a workspace matching your measurements. If your rotary attachment requires a specific diameter input, enter that now to prevent image stretching. -
Create the central column:
Import or draw your central icons vertically. For this theme, start with a D20 die at the top, followed by crossed swords, a hammer and pickaxe, a combat axe, another set of crossed blades, and finally a grid or gate pattern at the bottom. -
Add vertical text:
On the left side of the icons, type ’20’, ‘O’, ‘T’, ‘H’, ‘E’. On the right side, type the corresponding letters to spell ‘MANA’ vertically alongside ‘N’, ‘F’, ‘O’, ‘N’. The goal is to spell ’20 OUT OF MANA’ (adjusting shortening like ‘OTHE’ vs ‘OF THE’ to fit your aesthetic). -
Adjust settings:
Set your layer to ‘Fill’. For powder coated tumblers, you typically want a speed around 100-300 mm/s and power around 30-50% depending on your specific laser’s wattage (e.g., a 10W diode vs a 60W CO2).
Ghosting Issues?
If the image looks double-exposed or stretched, your rotary steps-per-rotation settings are wrong, or the cup slipped. Tighten the chuck or add weight inside the cup for traction.
Step 2: Laser Engraving
-
Clean the surface:
Wipe the tumbler down thoroughly with isopropyl alcohol and a microfiber cloth. Any oils from your hands can cause uneven engraving results. -
Level the rotary:
Place the tumbler on your rotary attachment. Use a small level to ensure the top surface of the cup is perfectly parallel to the laser head. This is crucial for keeping the laser in focus from top to bottom. -
Focus the laser:
Lower the laser head to the correct focal distance using the focus kickstand or measuring block provided with your machine. -
Frame the job:
Run the ‘Frame’ function in your software. Watch the red light or laser head movement to ensure the design sits centered on the cup and doesn’t run off the top or bottom edges. -
Engrave:
Put on your laser safety glasses, turn on your air assist (if available) to clear smoke, and start the job. Stay near the machine for safety during the entire process.
Add an Epoxy Seal
For a glossy finish, apply a thin layer of food-safe epoxy resin over the entire cup after cleaning. This protects the steel from tarnishing and gives it a premium glass-like feel.
Step 3: Post-Processing
-
Initial inspection:
Once the machine stops, carefully remove the tumbler. Don’t worry if the design looks dark or sooty; that is just carbon residue. -
Apply cleaner:
Spray the engraved areas liberally with a strong degreaser like LA’s Totally Awesome. I find letting it sit for about 30 seconds helps loosen the stubborn soot. -
Scrub the design:
Take a Magic Eraser or a stiff nylon brush and scrub the design vigorously under running water. You want to remove all the black char to reveal the bright stainless steel underneath. -
Final polish:
Dry the tumbler completely with a clean cloth. If you see any remaining haze, give it one final wipe with isopropyl alcohol to make the contrast pop.
Fill up your new custom vessel and enjoy your next campaign session in style


Smoke Swirl in Steel Blues
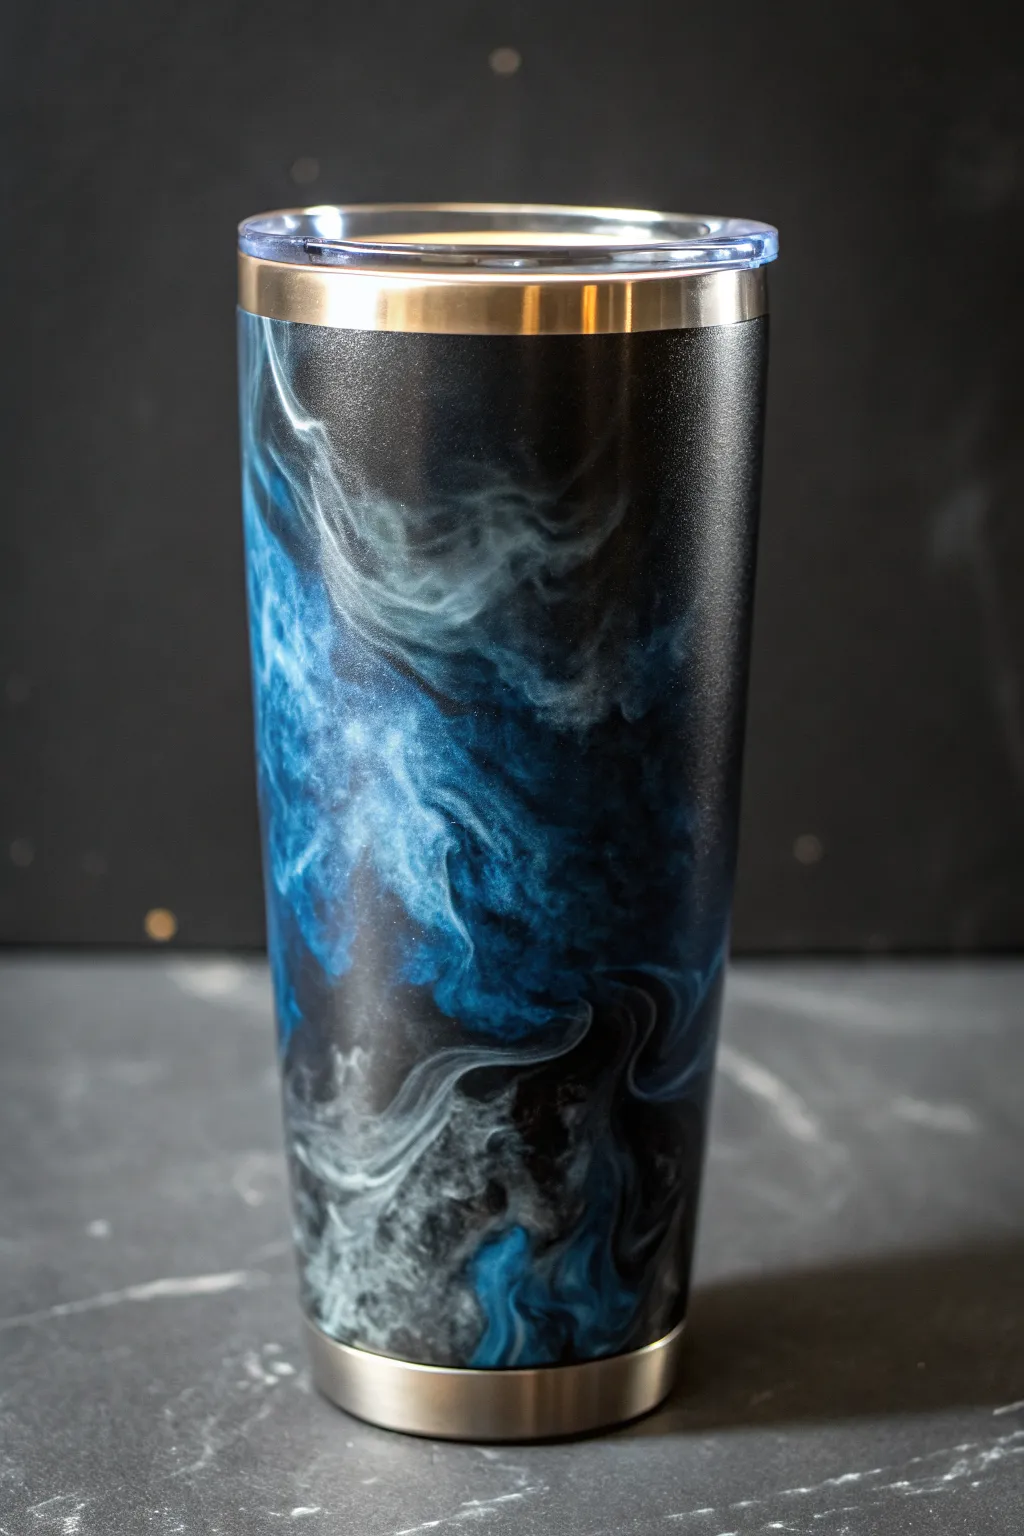
Achieve a mysterious and masculine look with this smoke swirl design, capturing the essence of wispy vapors drifting against a dark void. The interplay of deep matte black and shimmering steel blue mica creates depth and movement that looks different from every angle.
Detailed Instructions
Materials
- Stainless steel tumbler (20oz or 30oz)
- Spray paint (Matte Black)
- Epoxy resin (tumbler grade)
- Mica powder (Steel Blue, Gunmetal Grey, Pearl White)
- Small mixing cups and stir sticks
- Heat gun or embossing tool
- Tumbler turner
- Gloves and respirator mask
- Sanding block (fine grit)
- Rubbing alcohol and lint-free cloth
Step 1: Base Preparation
-
Prep the surface:
Begin by lightly sanding the entire stainless steel tumbler with a fine-grit sanding block. This scuffing helps the spray paint adhere better for a long-lasting finish. -
Clean thoroughly:
Wipe down the sanded cup with rubbing alcohol on a lint-free cloth to remove all dust, oils, and fingerprints. -
Apply base coat:
Take the tumbler to a ventilated area and apply an even coat of matte black spray paint. Rotate the cup as you spray to avoid drips. Let it dry completely, usually for about 30-60 minutes.
Don’t Overwork It
Stop manipulating the resin sooner than you think. As the tumbler spins, the epoxy will continue to move and soften the lines on its own.
Step 2: Epoxy & Mica Application
-
Mix the resin:
While the paint dries, mix a batch of epoxy resin according to the manufacturer’s instructions. A total of 20-30ml is usually sufficient for the base layer of a standard tumbler. -
Separate colors:
Pour small amounts of the mixed clear epoxy into three separate small cups. You’ll want to keep about half of your mixed epoxy clear. -
Create mica pastes:
Mix your mica powders into the small cups. Create a Steel Blue cup, a Gunmetal Grey cup, and a Pearl White cup. Stir until the pigment is fully incorporated and smooth. -
Coat the tumbler:
Mount the dried, painted tumbler onto your turner and switch it on. Apply a thin, even layer of the clear epoxy over the entire black surface. -
Apply the blue:
Using a stir stick, drizzle the Steel Blue epoxy in random, jagged lines vertically up and down the cup. Don’t cover the whole thing; you want that black base to peek through. -
Add grey accents:
Repeat the drizzle process with the Gunmetal Grey, placing it near the blue lines to create shadow and transition zones. -
Add white highlights:
Sparingly drizzle fine lines of the Pearl White epoxy. This will become the brightest part of the smoke, so use less of this than the other colors.
Muddy Colors?
If your colors turn into a grey blob, you likely used too much heat or stirred too aggressively. Use short bursts of heat and let the white sit on top.
Step 3: Creating the Smoke Effect
-
Apply heat:
Turn on your heat gun. pass it quickly over the cup to pop bubbles and slightly warm the resin, making it more fluid. -
Manipulate the resin:
Use the heat gun to blow the colored resin lines. Aim the air to push the white into the blue and blue into the black, creating wispy, smoke-like tendrils. -
Swirl manually:
If the air isn’t giving you enough detail, I sometimes use a gloved finger or a silicone brush to physically swirl the colors together. Use a light touch to avoid muddying the pigments. -
Check for movement:
Monitor the cup as it spins. Gravity and the spinning motion will continue to blend the colors. If it looks too separated, add a little more heat to encourage flow. -
Let it cure:
Once you are happy with the swirl pattern, leave the tumbler on the turner for 6-8 hours (or until dry to the touch) to set the design.
Step 4: Finishing Touches
-
Inspect and sand:
Remove the cup from the turner once cured. If there are any rough spots or raised mica bumps, lightly sand them down and wipe with alcohol. -
Final clear coat:
Mix a final batch of clear epoxy (about 15-20ml). Apply a smooth, final flood coat over the entire tumbler to seal the design and give it a glass-like shine. -
Pop bubbles:
Pass a heat gun or torch quickly over the clear coat to pop any remaining micro-bubbles. -
Final cure:
Let the tumbler spin for a final 8-12 hours until fully cured and hard.
This sleek, stormy design is perfect for gifting or keeping, offering a sophisticated twist on the classic swirl technique.
Fire Fade From Charcoal to Ember
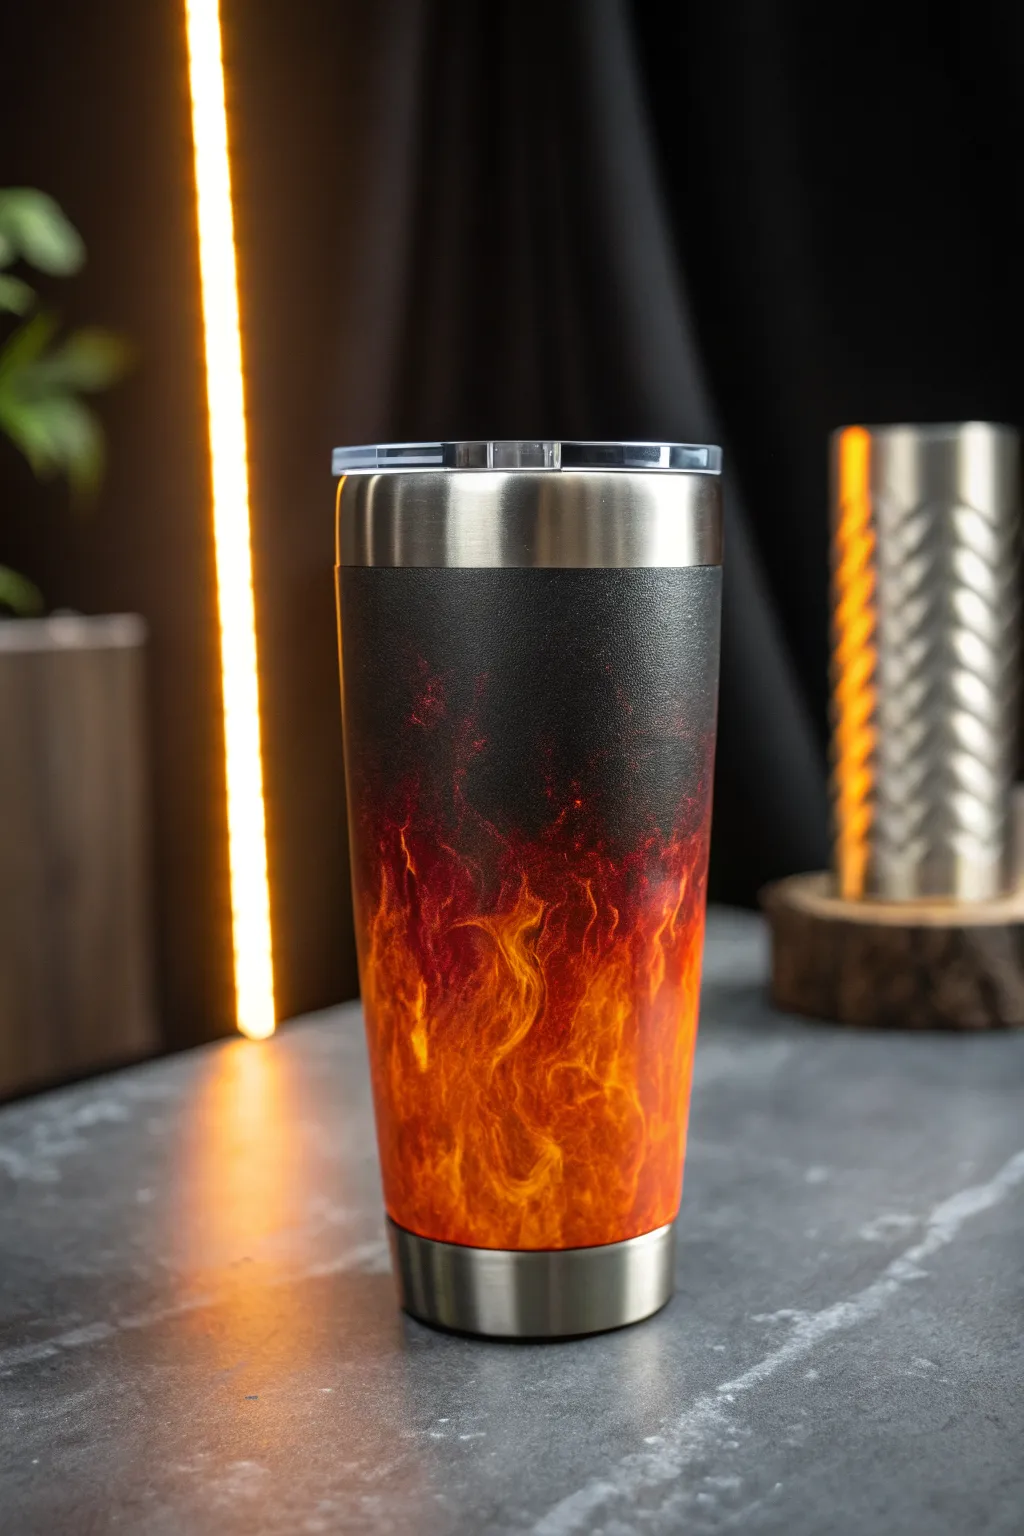
Create a striking illusion of smoldering embers rising into charred darkness with this masculine tumbler design. By blending realistic flame decals or paint with a textured dark top, you capture the heat of a dying fire in a functional piece of art.
Step-by-Step
Materials
- Stainless steel tumbler (20oz or 30oz)
- Black spray paint (matte or satin)
- White spray paint
- Epoxy resin (tumbler grade)
- Alcohol inks (Intense orange, yellow, crimson red)
- Black glitter or fine charcoal powder (optional for texture)
- Heat gun or torch
- Sandpaper (400 grit)
- Painter’s tape
- Nitrile gloves
- Cup turner
- Silicone mixing cups and stir sticks
- Clear waterslide paper or printable vinyl (if using digital flame assets)
Step 1: Preparation & Base Coat
-
Prep the Surface:
Begin by removing any lids or stickers from your stainless steel tumbler. Lightly sand the entire exterior surface with 400-grit sandpaper to give the paint something to grip. -
Clean Thoroughly:
Wipe the sanded tumbler down with isopropyl alcohol and a lint-free cloth to remove all dust and oils. Avoid touching the surface with bare hands after this step. -
Tape the Rim:
Apply painter’s tape carefully around the top rim of the cup and the bottom steel ring if you want to keep those areas exposed stainless steel. Press the tape down firmly to prevent leaks. -
Apply White Base:
Spray the bottom two-thirds of the tumbler with white spray paint. This bright undercoat is crucial for making your fire colors pop later. -
Apply Black Top:
While the white is drying or after a brief pause, spray the top third of the tumbler with matte black paint, allowing a soft, misty transition where it meets the white area.
Muddy Flames?
If your fire colors turn brown where they meet the black, let the black paint dry completely before adding inks, or use a barrier of clear resin first.
Step 2: Creating the Fire Effect
-
Start the Engines (Turners):
Place your tumbler on the cup turner and get it spinning slowly. Ensure it is level so your resin doesn’t pool unevenly. -
Resin Mixing:
Mix a small batch of epoxy resin according to the manufacturer’s instructions. You’ll need enough for a thin, even coat over the whole cup. -
Apply Base Resin:
With gloved hands, smooth the clear resin over the entire painted surface of the tumbler while it spins. -
Drop the Inks:
Starting at the very bottom over the white base, drop yellow alcohol ink. Move up slightly and drop orange ink, blending it into the yellow. Finally, add red/crimson ink just below the black line. -
Heat and Move:
Use your heat gun on a low setting to gently push the inks around. Aim the air upwards to drag tongues of ‘flame’ from the yellow/orange zone up into the darkness. -
Intensify the Black:
If the transition looks too muddy, you can carefully dab a tiny amount of black mica powder or black ink mixed with resin at the very top to re-establish the deep charcoal look.
Level Up: Smoke Signal
Use a wisp of white alcohol ink or pearl mica powder in the transition zone to create a realistic, ghostly smoke effect rising from the flames.
Step 3: Adding Texture & Realism
-
The Charred Look:
For that realistic ‘burnt wood’ texture seen in the top half, wait until the resin is tacky but not fully cured. Gently tap a textured sponge or sprinkle very fine black glitter onto the black section only. -
Enhancing Flame Detail:
If inks alone didn’t give you the sharp flame shapes you wanted, let this layer cure completely. Then, apply a clear waterslide decal of realistic fire over the orange section. -
Seal the Decal:
If you added a decal, seal it with a quick spray of clear acrylic sealer to prevent the ink from bleeding in the next resin coat.
Step 4: Final Coat & Finish
-
Final Resin Layer:
Mix a final batch of high-gloss epoxy. Apply a generous, flood coat over the entire tumbler to encase the texture and flames in a glass-like finish. -
Pop Bubbles:
Pass a torch quickly over the surface to pop any micro-bubbles. Don’t linger in one spot to avoid scorching your artwork. -
Clear the Rim:
About 30-45 minutes after applying the final coat (when resin is no longer dripping but still pliable), carefully remove the tape from the rim and bottom. -
Clean Up:
If any resin seeped under the tape, use an Exacto knife to clean up the edges while the resin is still soft. -
Full Cure:
Leave the tumbler on the turner for at least 6-8 hours, then move to a drying rack for the remainder of the 24-48 hour cure time.
Your finished tumbler now holds the captivating power of a contained inferno, ready for your morning brew


Have a question or want to share your own experience? I'd love to hear from you in the comments below!