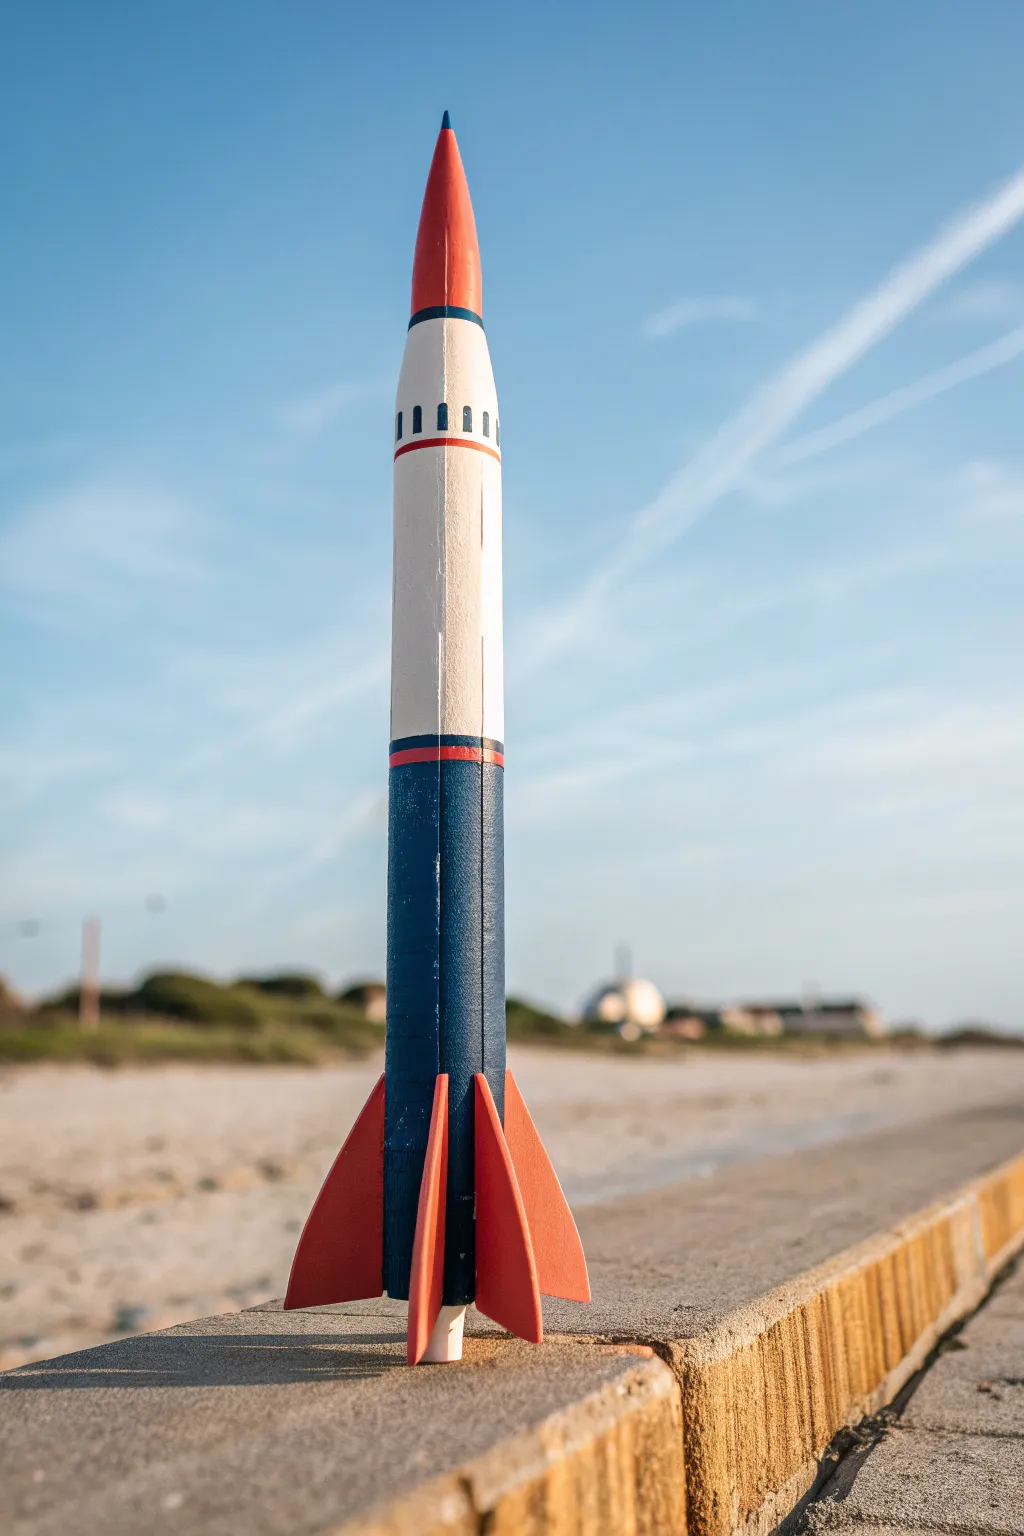
A model rocket is basically a long, skinny canvas—so a smart paint scheme can make it look faster, cleaner, and way easier to spot in the sky. Here are my favorite model rocket paint ideas that play nicely with tubes, fins, and nose cones, from classic and crisp to totally artsy.
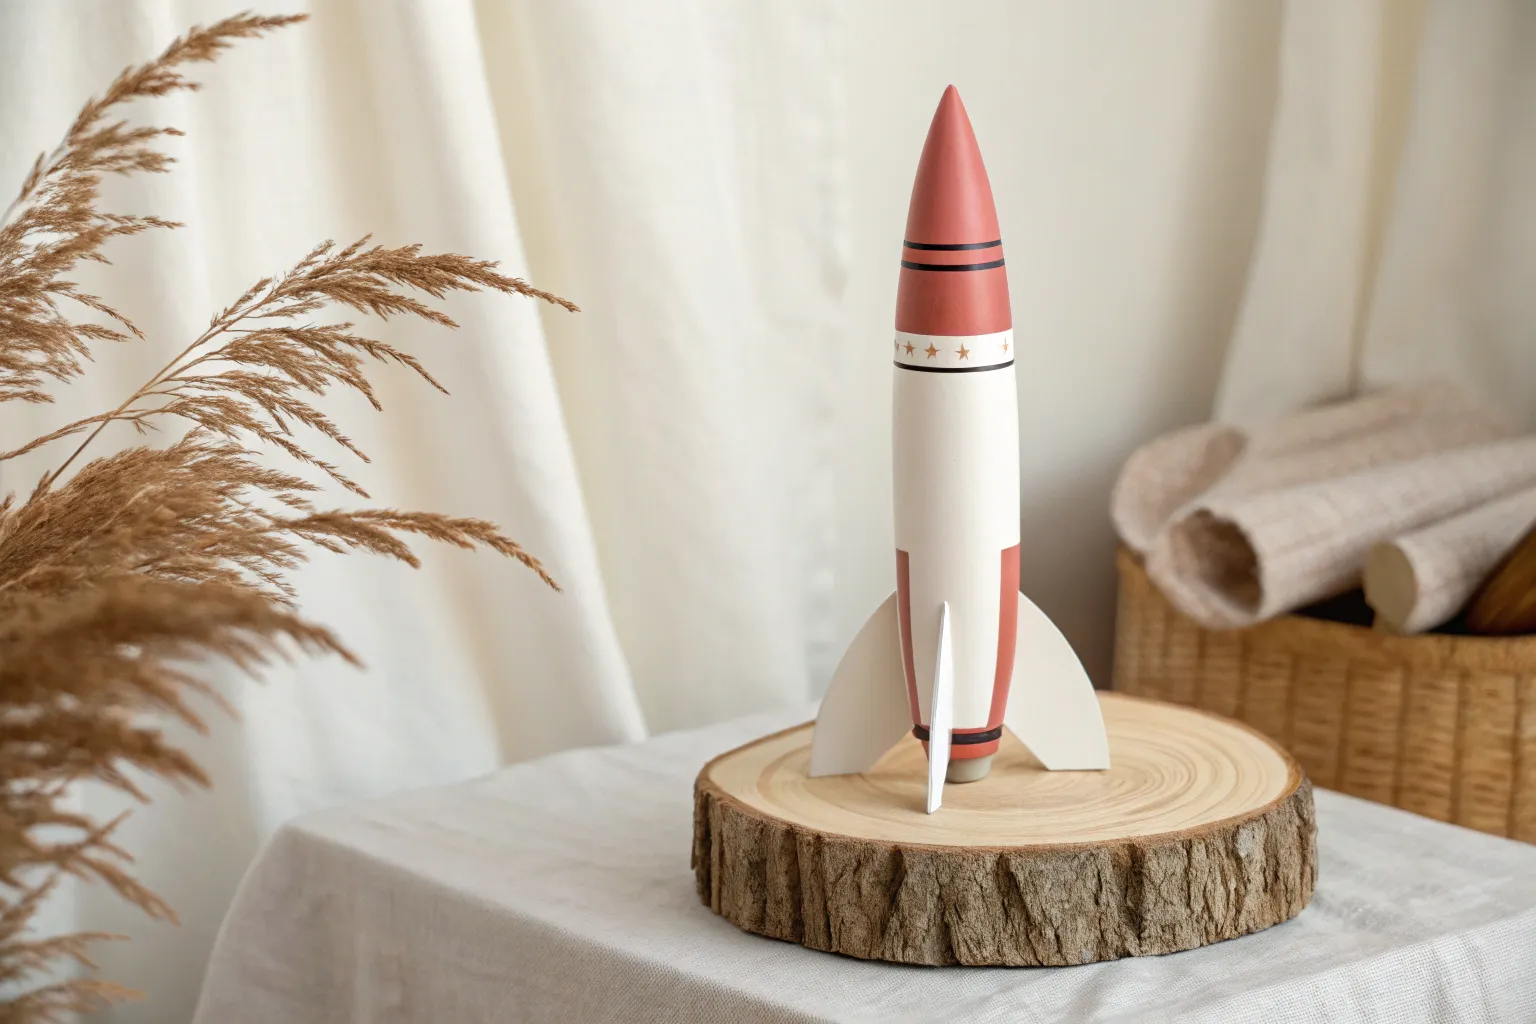
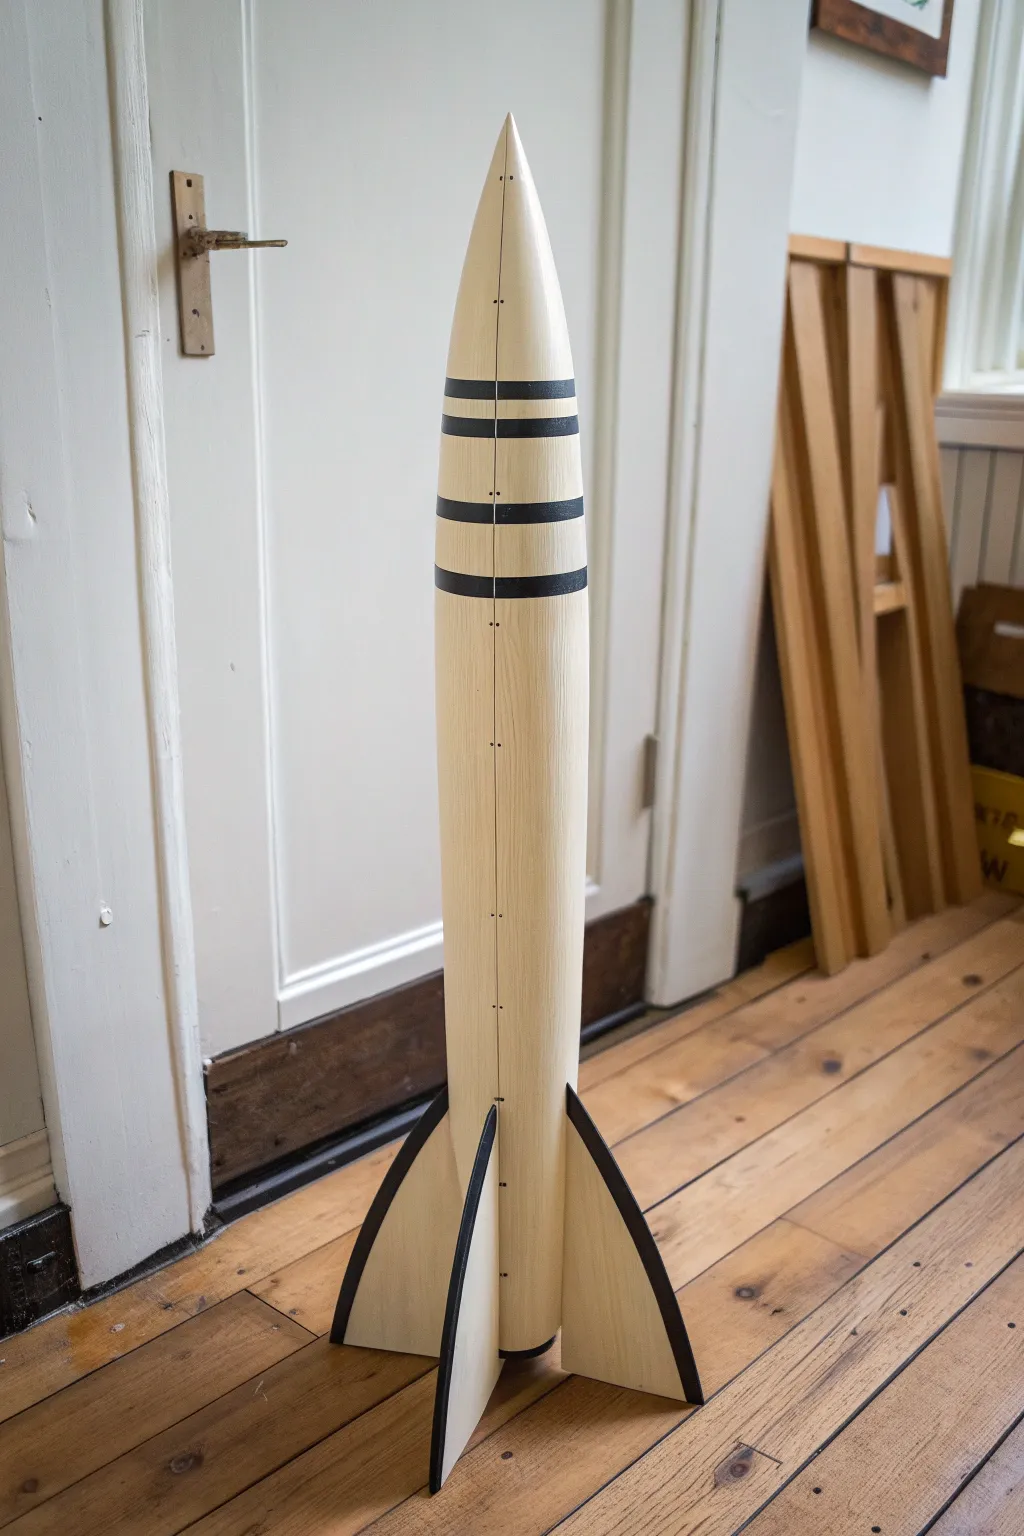
Classic Space-Age Stripes
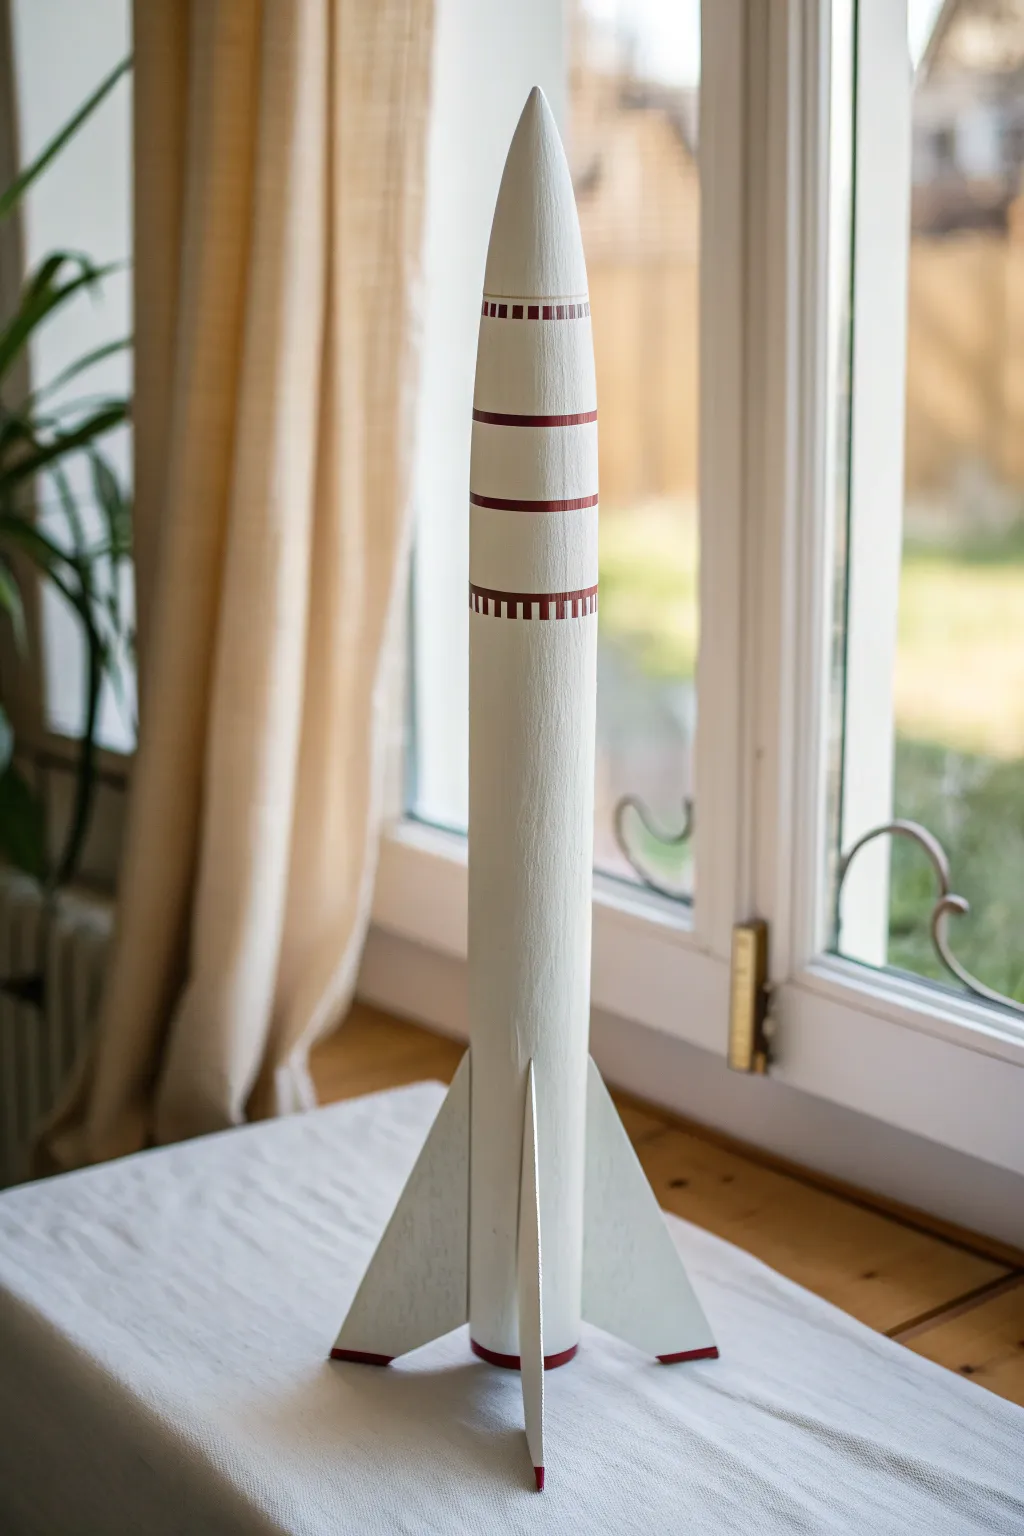
Capture the spirit of early space exploration with this minimalist yet striking design. The crisp white body contrasted with deep red geometric bands creates a timeless look that feels like it belongs on a vintage sci-fi book cover.
Step-by-Step Guide
Materials
- Model rocket kit (or body tube, nose cone, and balsa fins)
- White primer spray paint
- Matte white spray paint or acrylic paint
- Deep red acrylic paint (burgundy or crimson)
- Painter’s tape (various widths, including fine line tape)
- Small flat brush
- Ruler or measuring tape
- Pencil
- Fine-grit sandpaper (400-600 grit)
- Wood filler (if using balsa fins)
- Clear matte sealer spray
Step 1: Preparation and Base Coat
-
Sand the surfaces:
Begin by smoothing out the rocket body tube and the wooden nose cone. Since the fins are likely balsa wood, give them a gentle sanding to remove any fuzz. If the grain is deep, apply a thin layer of wood filler, let it dry, and sand it flush for a perfectly smooth surface. -
Assemble the major components:
Glue your fins to the base of the rocket body according to your kit’s instructions. Ensure they are perfectly perpendicular to the tube and evenly spaced. Let the glue cure completely before moving to painting. -
Apply primer:
Spray a light, even coat of white primer over the entire rocket. I usually do this in two thin passes to avoid drips. This unifies the texture of the different materials (plastic nose cone versus cardboard tube and wood fins). -
Sand the primer:
Once the primer is bone dry, lightly sand it with fine-grit sandpaper. This knocks down any rough spots and creates the ideal surface for your topcoat. -
Apply the white base coat:
Spray or brush on your matte white finish. This rocket relies on a very clean, solid white background, so apply multiple thin layers until you have full, opaque coverage without any underlying gray showing through. -
Dry thoroughly:
Let the white paint cure for at least 24 hours. This is crucial—if the base isn’t fully cured, the painter’s tape in the next steps might peel it off.
Bleeding Lines?
If paint bleeds under tape, seal the tape edge first with a tiny bit of clear matte medium or part of your base color before applying the red.
Step 2: Drafting the Design
-
Mark ring locations:
Lightly mark the vertical positions of the rings on the nose cone section. You’ll need four distinct bands: a segmented ring at the top (near the nose shoulder), two solid rings slightly lower, and another segmented ring below those. -
Create the horizontal guides:
Wrap a strip of paper around the tube at your pencil marks to create a perfect circle guide, then trace lightly around it with a pencil. Do this for the top and bottom edge of every red band. -
Mark the vertical segments:
For the top and bottom ‘dashed’ rings, measure equal increments around the circumference. These vertical marks indicate where the red paint stops and starts to create the blocky pattern.
Step 3: Painting the Details
-
Tape the solid rings:
Using masking tape, mask off the area *outside* the two middle rings. Press the tape edges down firmly with your fingernail or a burnishing tool to prevent paint bleed. -
Tape the segmented rings:
For the top and bottom bands, mask off the horizontal borders first. Then, place small vertical pieces of tape to block out the white ‘gaps’ in the pattern, leaving only the squares exposed that will be painted red. -
Paint the red bands:
Using your small flat brush and deep red acrylic paint, carefully fill in the exposed areas. Use a ‘dry brush’ technique—wiping most paint off the brush first—to minimize bleeding under the tape edges. -
Paint the fin tips:
Don’t forget the fins. Mark a straight line across the very bottom edge of each fin and paint this small strip red to match the body detail. -
Peel the tape:
Remove the tape while the red paint is still slightly tacky. Pulling the tape slowly at a 45-degree angle away from the painted edge usually gives the crispest line. -
Touch up edges:
If a little red paint crept under the tape, wait for it to dry, then use a tiny brush with white paint to clean up the line. I find a steady hand here makes all the difference. -
Seal the project:
Finish by spraying the entire model with a clear matte sealer. This protects those crisp red lines and gives the rocket a professional, uniform sheen.
Clean Curves
Cut thin strips of masking tape (1/8 inch) to handle the curves of the nose cone without wrinkling, or buy flexible automotive pinstriping tape.
Now you have a stunning, museum-quality display piece ready for the launch pad or the shelf


Black-and-White Roll Pattern Blocks
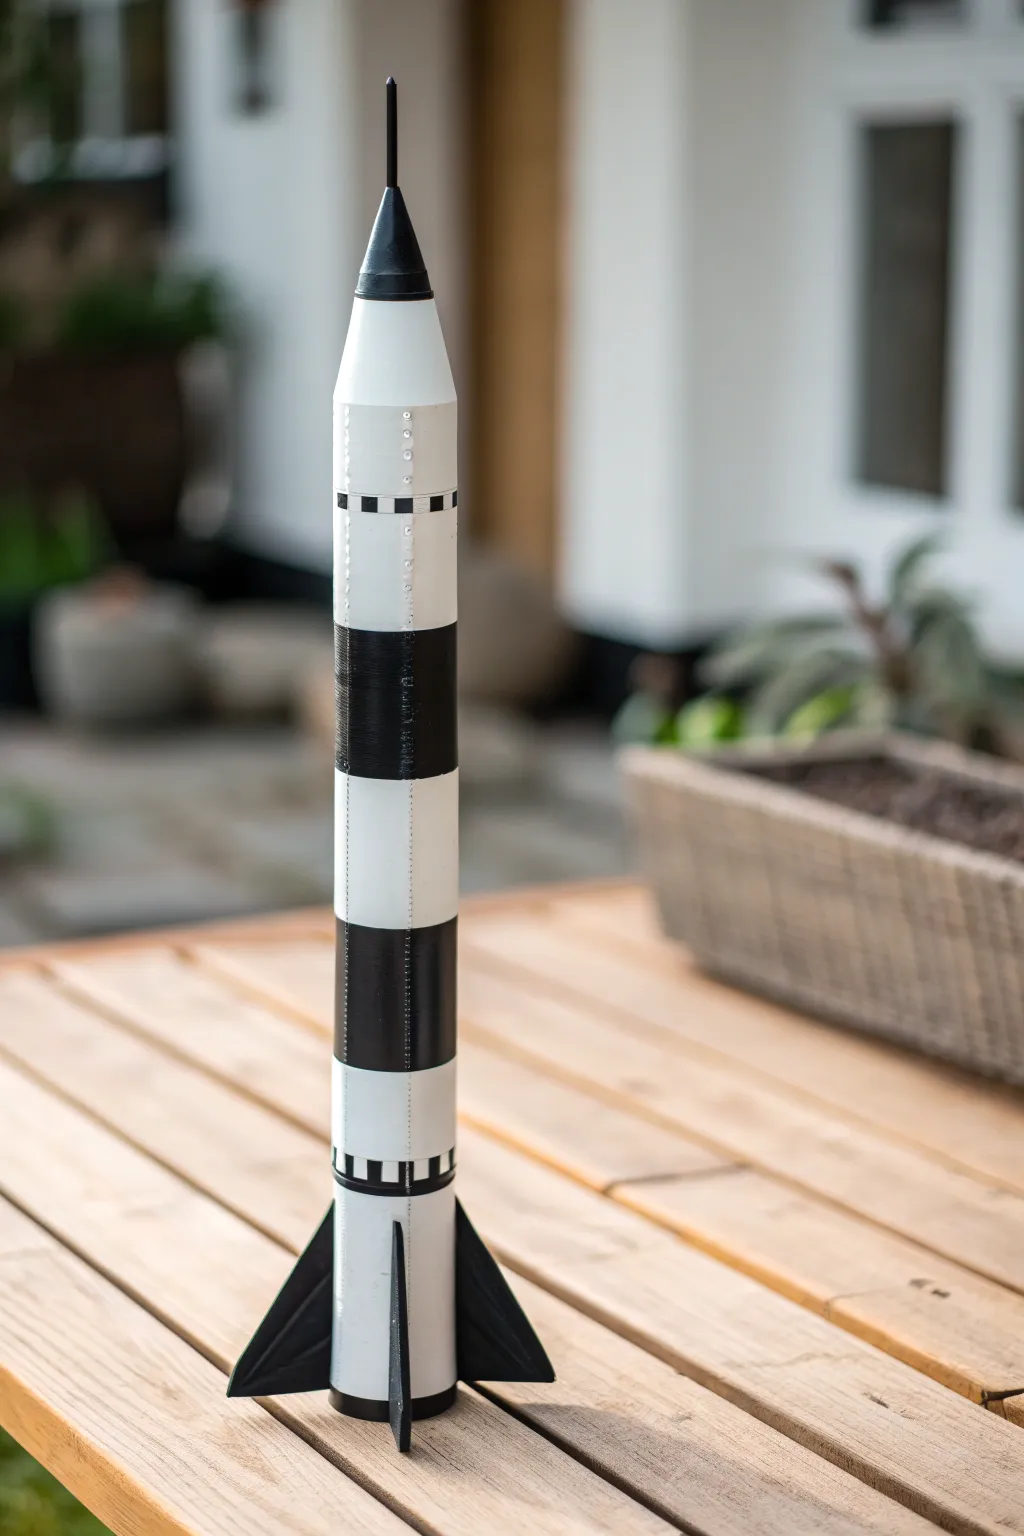
Achieve a professional, aerospace-inspired look with this striking black-and-white roll pattern design. The high-contrast bands and checkerboard details not only look incredible on the launch pad but also help visual tracking during flight.
Step-by-Step
Materials
- Model rocket kit (unfinished body tube, nose cone, and fins)
- White sandable primer spray paint
- Gloss white spray paint (enamel or lacquer)
- Gloss black spray paint
- Painter’s tape (high quality, various widths)
- Fine-line graphical tape (1/16 or 1/8 inch width)
- Ruler or flexible measuring tape
- Pencil
- X-acto knife or hobby blade with fresh blades
- Clear coat spray (gloss)
Step 1: Preparation and Base Coat
-
Surface Prep:
Begin by sanding the entire rocket body, nose cone, and fins with fine-grit sandpaper to remove any manufacturing ridges or glossiness. Wipe it down with a tack cloth to ensure it’s dust-free. -
Priming:
Apply a coat of sandable white primer to the entire rocket. Let it dry completely, then lightly sand it again. Repeat this process until you have a perfectly smooth surface without wood grain showing on the fins. -
White Base Layer:
Spray the entire rocket with your gloss white paint. Apply two to three thin, even coats rather than one thick one to avoid drips. Allow this base layer to cure fully—I recommend waiting at least 24 hours to prevent the tape from pulling it up later.
Bleed Prevention
If you struggle with paint bleeding under tape, spray a light coat of clear matte sealer over your masking tape edges before spraying the black. This seals the gap.
Step 2: Masking the Stripes
-
Measuring Zones:
Using a pencil and a flexible ruler, mark the locations for the two large black bands. Lightly tick mark the circumference of the tube so your tape lines stay level. -
Primary Masking:
Apply painter’s tape to cover the areas that will remain white. Burnish the edges of the tape down firmly with your fingernail or a plastic card to prevent paint bleed. -
Creating the Roll Pattern:
For the checkerboard-style roll pattern strips near the top and bottom, lay down a strip of tape horizontally around the tube. -
Cutting the Checks:
Use a fresh hobby blade to carefully cut small vertical slits into that tape strip at even intervals. Then, peel away every other square to expose the white paint underneath.
Step 3: Painting the Black Sections
-
Masking the Rest:
Use paper or plastic bagging to cover the rest of the white rocket body that isn’t being painted black to protect it from overspray. -
Applying Black Paint:
Spray the exposed sections (the two bands, the nose cone, fins, and the checkerboard areas) with gloss black paint. Use light mist coats initially to seal the tape edges. -
Tip for Clean Lines:
Avoid flooding the surface with paint, as this encourages bleeding under the tape. Several light coats serve better than a heavy wet one. -
Finishing the Nose Cone:
Ensure the nose cone is fully coated in black, including the tip. If your nose cone is separate, painting it off the rocket is often easier.
Add Weathering
For a flown look, lightly dry-brush some silver paint on the leading edges of the black fins and nose cone to simulate heat friction and atmospheric reentry wear.
Step 4: Revealing and Sealing
-
Removing Masking:
This is the crucial part: carefully peel off the masking tape before the black paint is 100% hard but after it’s dry to the touch. Pull the tape back upon itself at a sharp 45-degree angle. -
Removing Checkers:
Use the tip of your hobby knife to gently lift the corners of the small checkerboard squares and peel them away to reveal the white underneath. -
Simulated Rivets:
For the rivet detail visible on the white sections, use a fine-tip silver marker or a very small dot of silver paint on a toothpick. Apply them in vertical lines along the body tube seams. -
Protective Coat:
Once all paint is cured (give it another 24 hours if possible), spray the entire rocket with a gloss clear coat. This unifies the sheen of the black and white paints and protects your hard work during landing.
Now your rocket is ready to stand out on the launch pad with a crisp, historical aesthetic


High-Visibility Two-Tone Contrast
Achieve a timeless and professional look with this classic red, white, and blue design that emphasizes clean lines and high contrast for maximum visibility during flight. This scheme uses blocking techniques to create distinct sections, making your rocket look sharp on the launch pad and easy to track in the sky.
Detailed Instructions
Materials
- Model rocket kit (standard tube and plastic/balsa nose cone)
- Sandpaper (400 and 600 grit)
- White primer spray paint
- Gloss White spray paint
- Gloss Navy Blue spray paint
- Gloss Red spray paint (or acrylic paint for small details)
- Painter’s tape (high quality, low tack)
- Fine-tip black permanent marker or black acrylic paint
- Small flat brush
- Clear coat spray (gloss)
Step 1: Preparation and Base Coat
-
Sand the surfaces:
Before painting, ensure the rocket body tube, nose cone, and fins are smooth. Gently sand the entire surface with 400-grit sandpaper to remove any manufacturing ridges or wood grain fuzz. Wipe away all the dust with a tack cloth or slightly damp rag. -
Apply primer:
Spray a light, even coat of white primer over the entire rocket. Keep the can moving to avoid drips. Let this dry completely, usually for about 30 minutes to an hour. -
Fine sanding:
Once the primer is bone dry, lightly scuff it with 600-grit sandpaper. This creates a perfectly smooth canvas for your top coats and helps the next layer adhere better. -
Spray the white base:
Since the upper body is white, spray the entire rocket with Gloss White. It is much easier to paint darker colors over white than vice versa. Apply two or three thin coats rather than one heavy one, allowing dry time between each.
Step 2: Color Blocking
-
Mask the upper body:
Once the white paint has cured for at least 24 hours (don’t rush this!), mask off the top section of the rocket. Determine where the blue section begins—roughly halfway down the tube—and wrap painter’s tape around the circumference. -
Protect the top:
Use paper or plastic shading to cover the entire upper white section and the nose cone (if attached) to protect them from overspray. -
Paint the lower body:
Spray the exposed lower half of the body tube with Gloss Navy Blue. I prefer to hold the can slightly further away to build the color gradually. Ensure you get coverage down to the root of the fins. -
Remove tape:
carefully peel back the tape while the paint is tacky but not wet. Pull the tape away at a 45-degree angle to keep the line sharp. Let the blue paint cure completely.
Tape Sealing Trick
After applying masking tape, brush a tiny amount of the *base* color (white) along the tape edge. This seals gaps so the next color (blue) won’t bleed underneath.
Step 3: Detailing the Fins and Nose
-
Mask for the fins:
Now, tape off the blue body tube right at the root of the fins. You want to isolate the fins so they can be painted red without ruining the blue body. -
Paint the fins red:
Apply Gloss Red paint to the fins. If spraying, use light bursts. If you find masking difficult here, you can hand-paint them with red acrylic and a flat brush, but spraying gives a smoother finish. -
Paint the nose cone:
If the nose cone is detachable, paint it separately with Gloss Red. If it’s glued on, mask the white body tube carefully just below the shoulder of the nose cone before painting. -
Add the pinstripe:
To create the red stripe separating the white and blue sections, you can use a steady hand with a striping brush and red paint, or apply a thin strip of red vinyl automotive pinstriping tape for a perfect line.
Level Up: Weathering
Dry brush a tiny amount of silver paint on the leading edges of the fins and nose cone to cultivate a ‘flown’ look, simulating friction burns from reentry.
Step 4: Final Touches
-
Mark window positions:
Near the top of the white section, lightly mark positions for the small vertical windows using a pencil. Space them evenly around the circumference. -
Paint the windows:
Using a fine-tip black marker or a very small brush with black acrylic paint, fill in the small vertical rectangles. Keep edges crisp to simulate cockpit ports. -
Add upper detailing:
The image shows a thin horizontal red stripe just below the windows. Carefully paint this line or use another piece of red pinstriping tape. -
Clear coat application:
Once all paint and detailed work is fully dry, finish the rocket with a clear gloss coat. This seals the tape edges, protects the paint from landing scratches, and gives the rocket a unified sheen.
Now your rocket is dressed for success and ready for the launchpad


Pop-Color Nose Cone Accent
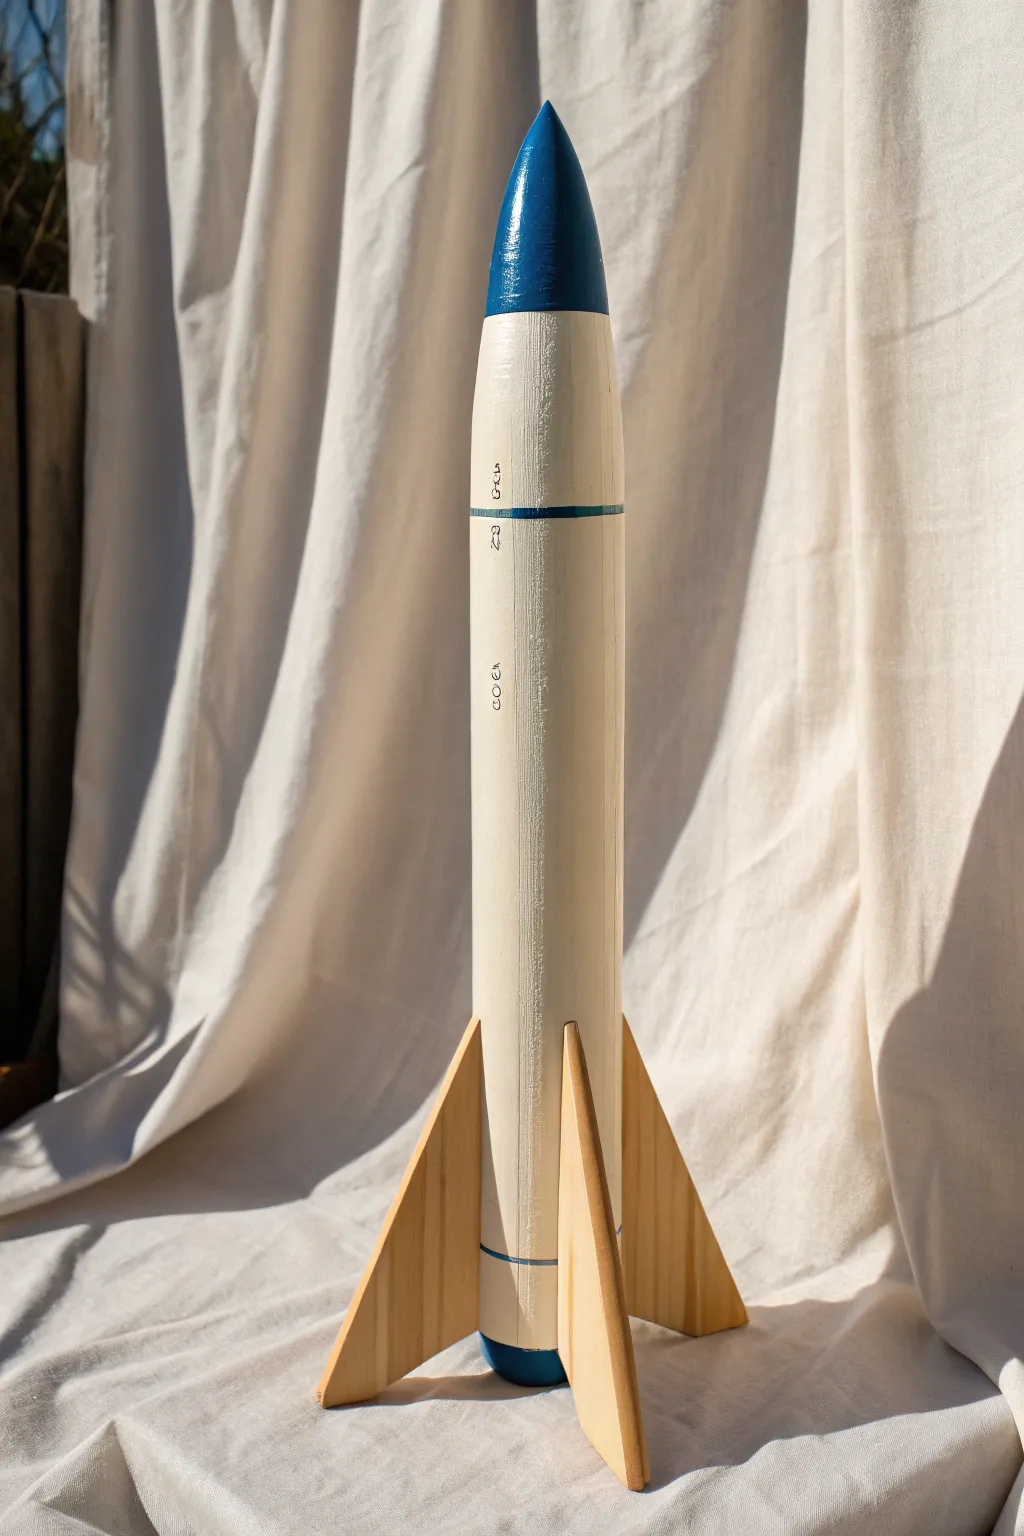
This project showcases a clean, classic aesthetic by pairing a creamy white body with natural wood fins and a bold pop of blue on the nose cone. The finish has a slight texture to it, giving the rocket a charming, handcrafted vintage feel.
Step-by-Step Guide
Materials
- Unfinished wooden model rocket kit (body tube, nose cone, balsa sheet)
- Sandpaper (medium and fine grit)
- Wood glue
- Cream or off-white acrylic paint
- Deep cobalt blue high-gloss enamel or acrylic paint
- Painter’s tape (automotive grade is best)
- Small flat paintbrush
- Fine-point black permanent marker or technical pen
- Cardboard stand or dowel for painting support
- Clear matte sealer (optional)
Step 1: Preparation & Construction
-
Prepare the Body Tube:
Begin by lightly sanding the main cardboard body tube to remove the glossy manufacturing sheen, which helps the primer and paint adhere better. -
Shape the Fins:
Cut your fins from the balsa wood sheet according to your kit’s template. For this specific look, sand the edges round but leave the flat surfaces largely untouched to preserve the wood grain. -
Attach the Fins:
Glue the fins onto the base of the rocket body. Use a jig or alignment guide to ensure they are perfectly straight. Wipe away any excess glue immediately with a damp finger to keep the wood clean for the clear finish later. -
Prepare the Nose Cone:
Sand the wooden nose cone until it feels completely smooth. If it fits loosely in the tube, wrap a small strip of masking tape around the shoulder base now so it stays snug during painting steps.
Bleed Prevention
Paint bleeding under tape? Before applying the blue stripe, paint over the tape edge with your base white color first. This seals the gap, so the blue line stays crisp.
Step 2: Painting the Body
-
Mask the Fins:
Since we want to keep the fins natural wood, carefully wrap them in painter’s tape. Ensure the tape goes right up to the root edge where the fin meets the body tube. -
Mount the Rocket:
Place the rocket body on a dowel or painting stand. This allows you to rotate the piece freely without touching the wet paint. -
Apply the Base Coat:
Paint the entire body tube with the cream or off-white acrylic. Don’t worry about perfect smoothness; slight brush strokes add to the texture seen in the reference image. -
Second Coat:
Allow the first layer to dry completely, then apply a second coat for solid opacity. Let this cure fully—ideally overnight—before attempting any masking.
Step 3: The Blue Details
-
Paint the Nose Cone:
While the body dries, paint the nose cone separately with your deep cobalt blue. Use a high-gloss paint here to create a distinct separation in texture from the matte body. -
Sanding the Cone:
Once the blue paint is dry, lightly sand it with fine grit paper if you want to knock back the shine slightly or reveal tiny hints of wood underneath for a distressed look. -
Masking the Body Stripe:
Back on the white body tube, measure about 2 inches down from the top shoulder. Wrap a strip of painter’s tape around the tube, pressing the edges down firmly. -
Painting the Stripe:
Using a very small brush, paint a thin blue line right along the edge of your tape. This creates the crisp accent stripe seen in the upper quarter of the rocket. -
Lower Stripe Detail:
Repeat this process near the bottom of the tube, just above the fins, to add the secondary blue ring. -
Remove Tape:
Peel off the tape while the blue paint is still slightly tacky to avoid pulling up chips of dry paint. Now, remove the tape protecting the wooden fins.
Vintage Varnish
To age the rocket further, mix a tiny drop of brown paint into clear matte varnish and brush it over the white body. It gathers in the texture for an antique look.
Step 4: Finishing Touches
-
Assembly:
Insert the painted nose cone into the body tube. The blue tip should now starkly contrast with the creamy white body. -
Adding Text Details:
Use a fine-point technical pen to write small text details vertically along the body tube. In the image, these look like technical specs or serial numbers (e.g., ’28 cm’). Keep your hand steady and the font simple. -
Emphasizing Texture:
I like to take a very fine grit sandpaper and give the white body one last extremely light pass. This enhances the vertical grain texture visible in the photo. -
Seal (Optional):
To protect that raw wood on the fins without changing the color, brush on a very thin layer of matte sealer, or leave it bare if the rocket is just for display.
Now you have a striking display piece that balances colorful flair with natural materials
BRUSH GUIDE
The Right Brush for Every Stroke
From clean lines to bold texture — master brush choice, stroke control, and essential techniques.
Explore the Full Guide
Contrasting Fin Color Blocking
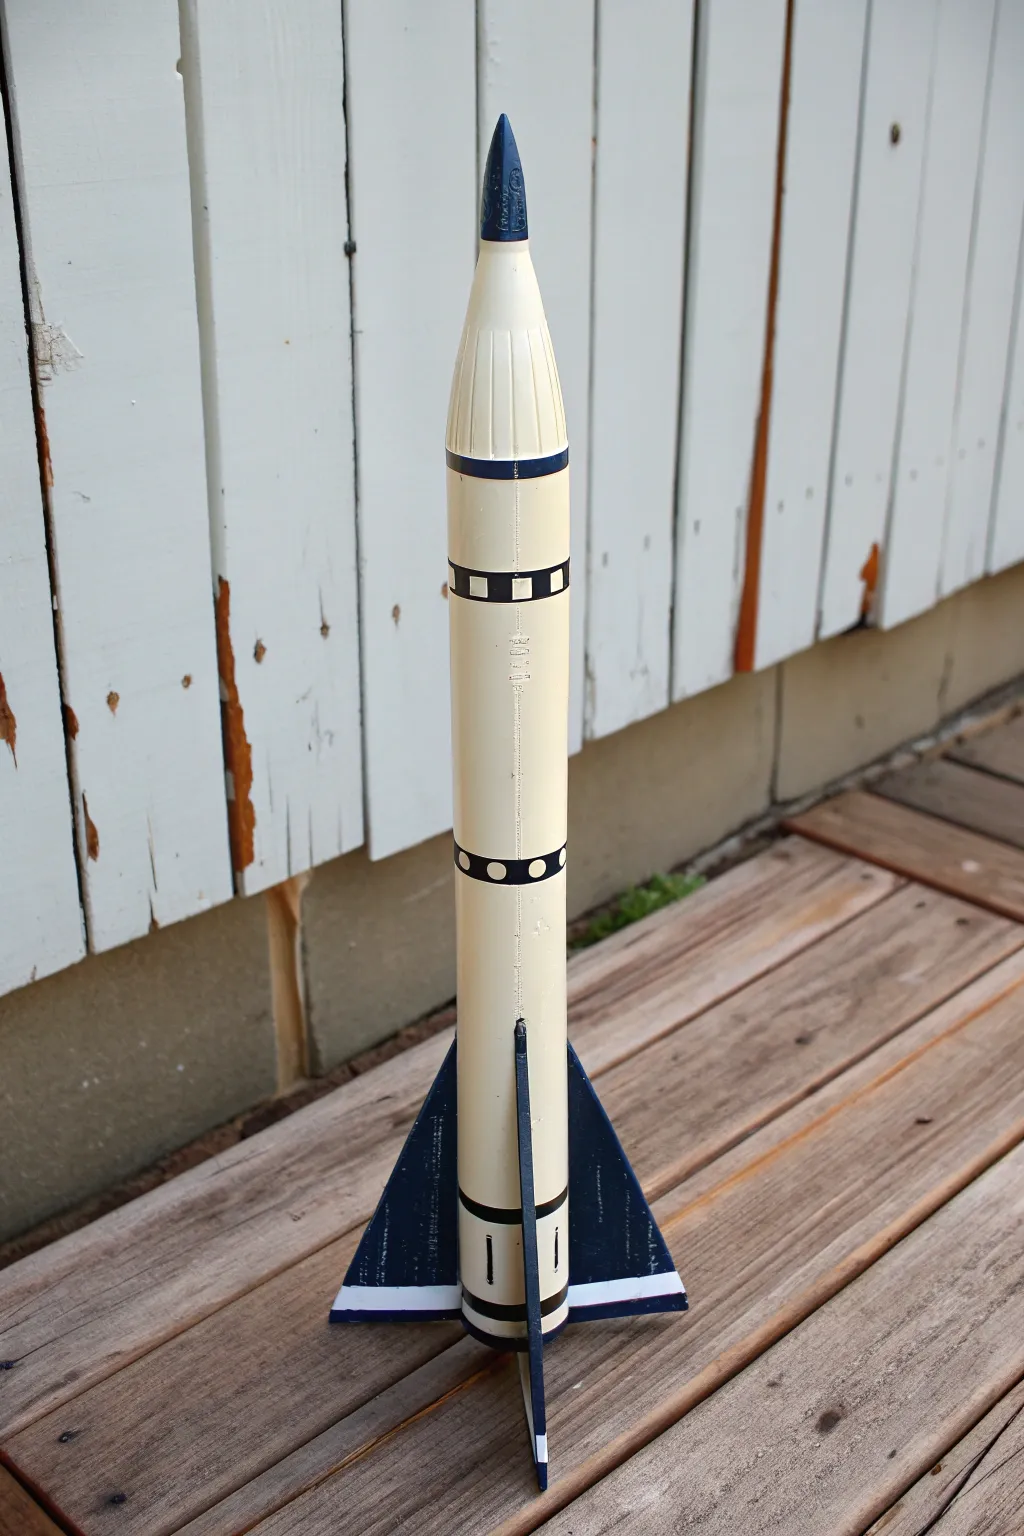
This classic military-style paint scheme combines a vintage cream body with sharp navy blue accents for a timeless aerospace look. The design features distinctive roll pattern bands and color-blocked fins that give the model an authentic, test-flight aesthetic.
How-To Guide
Materials
- Model rocket kit (fully assembled, sanded, and primed)
- Cream or off-white spray paint (gloss or satin)
- Dark navy blue spray paint
- High-quality masking tape (various widths: 1/4 inch, 1/2 inch, and 1 inch)
- Hobby knife with fresh #11 blades
- Black decal sheet or black striping tape
- Ruler
- Pencil
- White pinstriping tape (1/8 inch)
- Small burnishing tool or spoon back
- Clear coat spray (gloss)
Step 1: Base Coat Application
-
Prime the surface:
Ensure your assembled rocket is perfectly smooth. Apply a final coat of grey or white primer and sand with fine 400-grit paper to remove any fuzz or imperfections. -
Apply the cream color:
Spray the entire rocket with the cream or off-white paint. Hold the can 10-12 inches away and apply light, even coats to prevent drips. Rotate the rocket as you spray. -
Let it cure:
Allow the base coat to dry completely. I strongly recommend waiting at least 24-48 hours before applying any tape, as rushing this step is the number one cause of peeled paint later.
Step 2: Masking the Fins and Nose
-
Mask the body tube:
Using masking tape and paper, completely cover the cream body tube right up to the root edge where the fins meet the body. You want to protect the cream paint from the upcoming blue spray. -
Add fin stripes:
To create the white stripe seen at the bottom of the fins, apply a thin strip of 1/8 inch masking tape horizontally across the bottom section of each fin. Press down firmly. -
Mask the fin tips (optional):
If you want the very tips to remain white or cream, mask them off now. Otherwise, leave the rest of the fin exposed. -
Prepare the nose cone:
If your nose cone is removable, take it off to paint separately. If it is glued on, carefully mask the body tube right at the shoulder of the nose cone.
Seal Tape Edges
Before spraying the navy blue, lightly spray a bit of cream over the masking tape edges first. This seals the tape and ensures any bleed-under is the base color, keeping your lines razor sharp.
Step 3: Painting the Navy Accents
-
Spray the navy blue:
Apply the dark navy blue spray paint to the exposed fins and the nose cone. Multiple light coats are better than one heavy wet coat. -
Remove masking:
Once the paint is dry to the touch (usually about 30-60 minutes), carefully peel away the masking tape. Pull the tape back at a sharp 45-degree angle to ensure a crisp line. -
Reveal the fin stripe:
Remove the thin strip of tape on the fins. This should reveal the underlying cream color, creating a sharp contrasting stripe against the fresh navy blue.
Fixing Paint Bleed
If paint bleeds under the tape on the fins, don’t panic. Wait for it to dry fully, then lightly scrape the excess away with the tip of a fresh X-Acto blade or touch up with a small brush.
Step 4: Detailing the Body Tube
-
Measure the bands:
Using a ruler and pencil, lightly mark the locations for the black roll pattern bands. Place one band near the top thirds of the body and another lower down near the fins. -
Apply main band tape:
Wrap black striping tape (or cut strips from a black decal sheet) around the circumference of the rocket at your marked locations. Ensure the ends meet perfectly without a large overlap. -
Create the checkered effect:
Cut small squares or rectangles of cream-colored decal paper or use small bits of masking tape painted cream. Place them at regular intervals over the black bands to create the dashed or ‘roll pattern’ look. -
Add the upper ring:
Apply a final, thinner ring of solid navy blue or black tape just below the nose cone shoulder to frame the upper section. -
Add vertical lettering:
If your kit included decals or if you have rub-on lettering, apply vertical text or numbers between the two roll pattern bands for added realism.
Step 5: Final Protective Coat
-
Seal the decals:
If you used water-slide decals, let them dry overnight. Gently wipe away any adhesive residue with a damp cloth. -
Apply clear coat:
Finish the model with a light coat of high-gloss clear acrylic spray. This seals the tape edges, protects the decals, and gives the rocket a unified, professional sheen.
Now you have a striking, retro-inspired rocket ready for the launch pad.
Fin-Edge Border Trim
Give your large-scale model rocket a vintage, test-vehicle aesthetic with this clean two-tone design. By utilizing smart masking techniques, you can achieve crisp white racing stripes and distinctive fin trim that pops against a warm terra cotta primer base.
Step-by-Step
Materials
- Large scale model rocket (assembled and sanded)
- White primer spray paint
- Terra Cotta or Red Oxide primer spray paint (or similar matte finish)
- High-quality masking tape (1-inch width)
- Fine-line masking tape (1/4 inch width)
- Tack cloth
- Sandpaper (400 and 600 grit)
- Clear coat (matte or satin)
- Drop cloth or cardboard workspace
Step 1: Preparation and Base Coat
-
Surface Prep:
Begin by sanding the entire rocket body and fins with 400-grit sandpaper to ensure a smooth surface. Pay special attention to the fillets where the fins meet the body tube. -
Clean Up:
Wipe the entire model down with a tack cloth to remove every speck of dust. Any debris left now will show up in the final paint job. -
White Base Layer:
Spray the entire rocket with the white primer. Apply 2-3 light coats rather than one heavy one to avoid drips. This will serve as the color for your stripes and fin edges. -
Drying Time:
Allow the white base coat to cure fully for at least 24 hours. If it’s not perfectly dry, the masking tape in the next step might peel it off. -
Sanding the White:
Lightly wet-sand the white layer with 600-grit paper to knock down any fuzz, then wipe clean again.
Seal the Tape
Before spraying redness, spray one final light layer of WHITE over your masking tape. This seals the edge so any bleeding is white-on-white and invisible.
Step 2: Masking the Design
-
Vertical Stripe Layout:
Run a strip of 1-inch masking tape vertically from the nose cone tip all the way down the body tube. Ensure it is perfectly centered between two fins. -
Horizontal Band:
Apply a horizontal ring of tape around the shoulder of the rocket (where the nose cone meets the body) or slightly lower to create the cross pattern shown in the reference. -
Masking the Fin Edges:
To create the white border effect, apply tape to the trailing edge of each fin. The tape should cover the area you want to remain white. -
Refining the Fin Angle:
For that dynamic sweep, angle the tape on the fins so the white section is wider at the tip and narrows as it moves toward the body tube. I like to use a ruler here to ensure all fins match. -
Burnishing Edges:
Firmly press down the edges of all masking tape with your fingernail or a plastic burnishing tool. This prevents the top coat from bleeding underneath.
Step 3: Top Coat and Reveal
-
Applying Color:
Spray the Terra Cotta or Red Oxide paint over the entire model, covering the white base and the masking tape. -
Build Up:
Apply in thin, even passes. You may need 3-4 light coats to get full opacity over the white without creating a ridge at the tape line. -
Simulated Rivets (Optional):
If you want the rivet detail seen in the image, you can use a fine point tool to create small divots along the trim lines while the paint is still slightly soft, or apply vinyl rivet decals later. -
The Reveal:
Wait until the paint is dry to the touch but not fully cured (about 30-60 minutes). Carefully peel the tape back at a sharp 45-degree angle. -
Dealing with Ridges:
If there is a high ridge of paint where the tape was, very gently sand it down with high-grit paper after the paint has cured for a few days. -
Clear Coat:
Seal the entire rocket with a matte or satin clear coat to protect the finish and unify the sheen of the two colors.
Weathered Look
For a used look, lightly dry-brush silver paint on the leading edges of the fins and nose cone to simulate atmospheric re-entry friction burns.
Now you have a striking model that looks ready for the launchpad or the display shelf

PENCIL GUIDE
Understanding Pencil Grades from H to B
From first sketch to finished drawing — learn pencil grades, line control, and shading techniques.
Explore the Full Guide
Wide Bands With Simple Stencil Markings
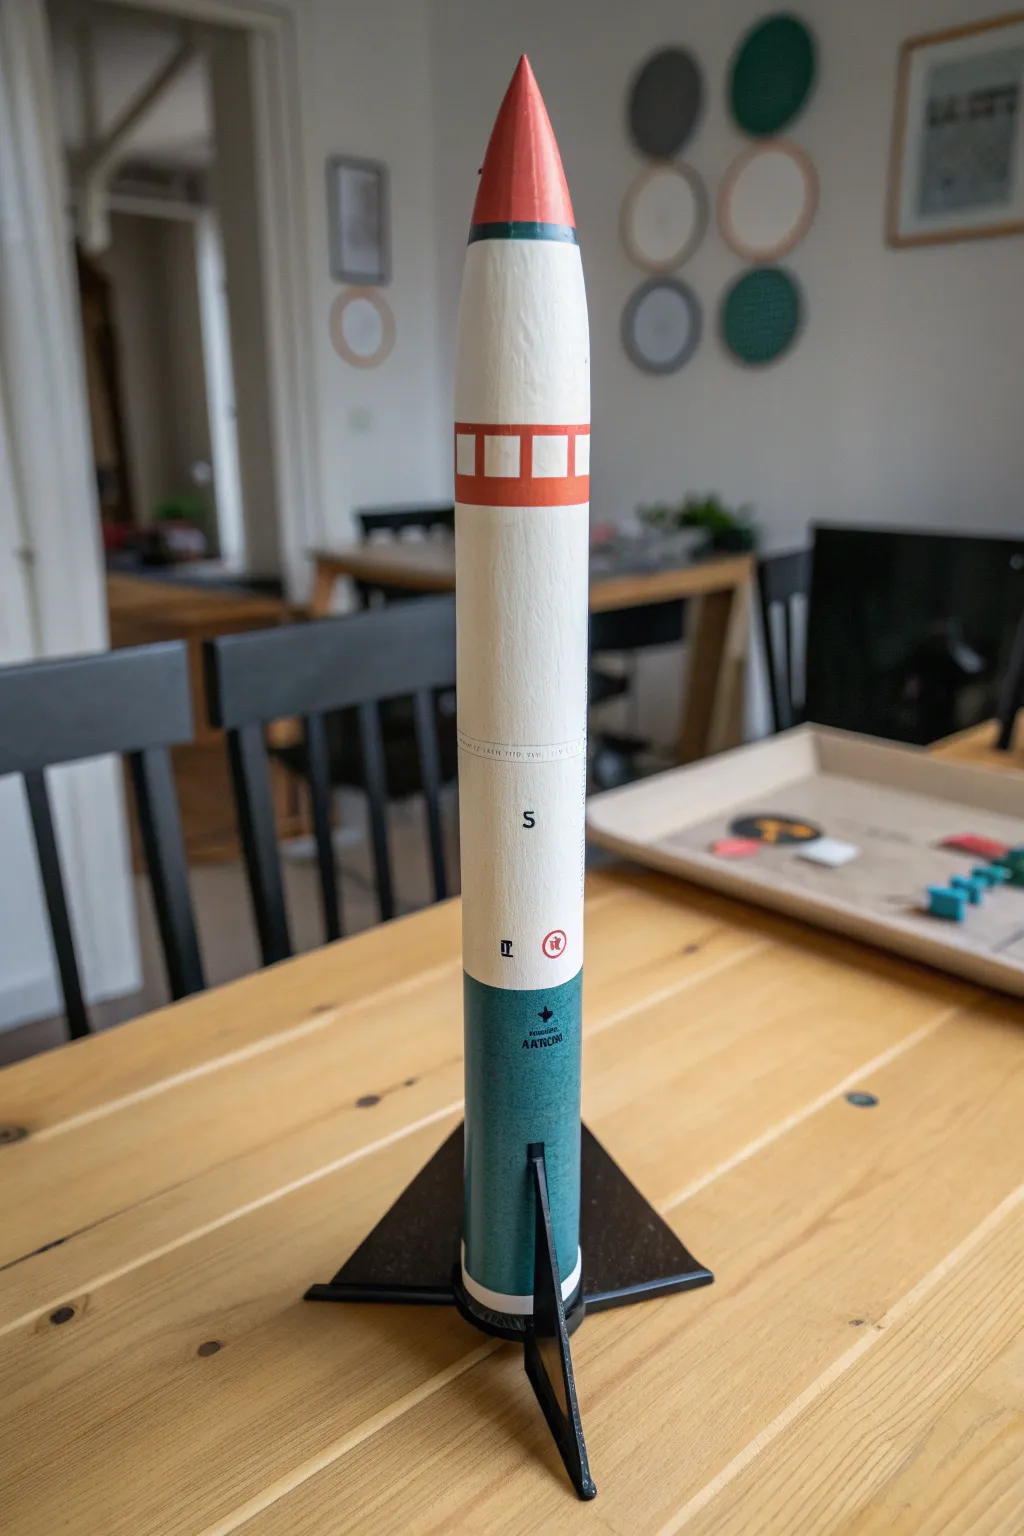
This project captures the sturdy, functional aesthetic of mid-century aerospace design with bold color blocking and crisp geometric details. The combination of a classic white body with deep teal and signal red accents creates a striking look that stands out on the launch pad.
How-To Guide
Materials
- Model rocket kit (assembled and primed)
- White spray paint (matte or satin)
- Signal red spray paint (or heavy body acrylic)
- Deep teal/blue-green spray paint
- Black spray paint
- Painter’s tape (various widths)
- Masking paper or plastic
- Dry transfer letters (black)
- Small waterslide decals (optional icons)
- Matte clear coat
- Fine-grit sandpaper (400-600 grit)
- X-Acto knife with fresh blade
Step 1: Base Coat and Preparation
-
Prepare the surface:
Ensure your assembled rocket is completely smooth. If you haven’t already, sand down any wood grain on the fins and spiral seams on the body tube using fine-grit sandpaper until they are flush. -
Apply the white base:
Spray the entire rocket with a high-quality white primer followed by a few thin coats of matte white. This will serve as the primary color for the upper body tube, so ensure solid, opaque coverage. -
Let it cure:
Allow the white base coat to dry completely for at least 24 hours. This is crucial because you will be applying tape directly over this layer, and fresh paint pulls up easily.
Bleed Prevention
Paint bleeding under tape? Before applying your second color, spray a light coat of the *base* color (white) over the tape edge first to seal it.
Step 2: Color Blocking the Body
-
Mask the upper section:
Measure about one-third of the way up from the bottom of the body tube. Wrap a strip of painter’s tape around the tube here to define the line between the white upper section and the teal lower section. -
Protect the white area:
Cover the entire upper white section and the nose cone (if attached) with paper and tape to protect it from overspray. -
Paint the lower section:
Spray the exposed lower third of the body tube with the deep teal or blue-green paint. Apply light coats to avoid runs. -
Paint the fins:
If your fins are attached, you can paint them teal now and accent them later, or mask the root edge and paint the fins black differently. For the look in the image, paint the fins black separately or mask the teal tube and spray the fins black. -
Paint a black separation band:
Once the teal is dry, you can add a very thin strip of black tape or paint a thin black line right at the transition between the white and teal sections for a sharp divider.
Step 3: Details and Markings
-
Paint the nose cone:
Remove the nose cone if possible. Paint the tip a bright signal red. You can mask a small ring at the base of the nose cone to leave it teal or black, creating a collar effect. -
Create the window stencil:
To recreate the red square ‘windows’ on the upper white section, take a strip of painter’s tape and place it on a cutting mat. Use an X-Acto knife to cut out four or five small, evenly spaced squares. -
Apply the window mask:
Apply this custom stencil tape to the upper white section of the rocket body. Burnish the edges of the cutouts firmly with your fingernail. -
Paint the windows:
Lightly dab signal red paint (the same shade as the nose cone) into the square openings. I prefer using a dry sponge or a brush with very little paint to prevent it from bleeding under the tape. -
Remove masking:
Carefully peel away the window stencil tape while the red paint is still slightly tacky to get crisp edges.
Pro Tip: Weathering
For a flown look, lightly brush powdered graphite or charcoal on the fin edges and nose cone tip before the final clear coat.
Step 4: Typography and Final Polish
-
Add dry transfer lettering:
Position a large black letter ‘S’ (or your preferred initial) in the center of the white section. Rub the transfer sheet gently with a dull pencil or burnishing tool to apply it. -
Apply technical markings:
Add smaller details like technical text, warnings, or small logos near the transition line and on the teal section. Waterslide decals work best for these tiny details. -
Seal the work:
Once all paint and decals are fully dry, spray the entire rocket with a matte clear coat. This unifies the sheen of the different paints and protects the delicate transfer letters. -
Install the stand:
If you have a display stand like the triangular base shown, slot the rocket fins into place to complete the presentation.
Now you have a stunning, professional-looking model that captures the spirit of classic rocketry ready for display or flight
Clean Diagonal Color Split
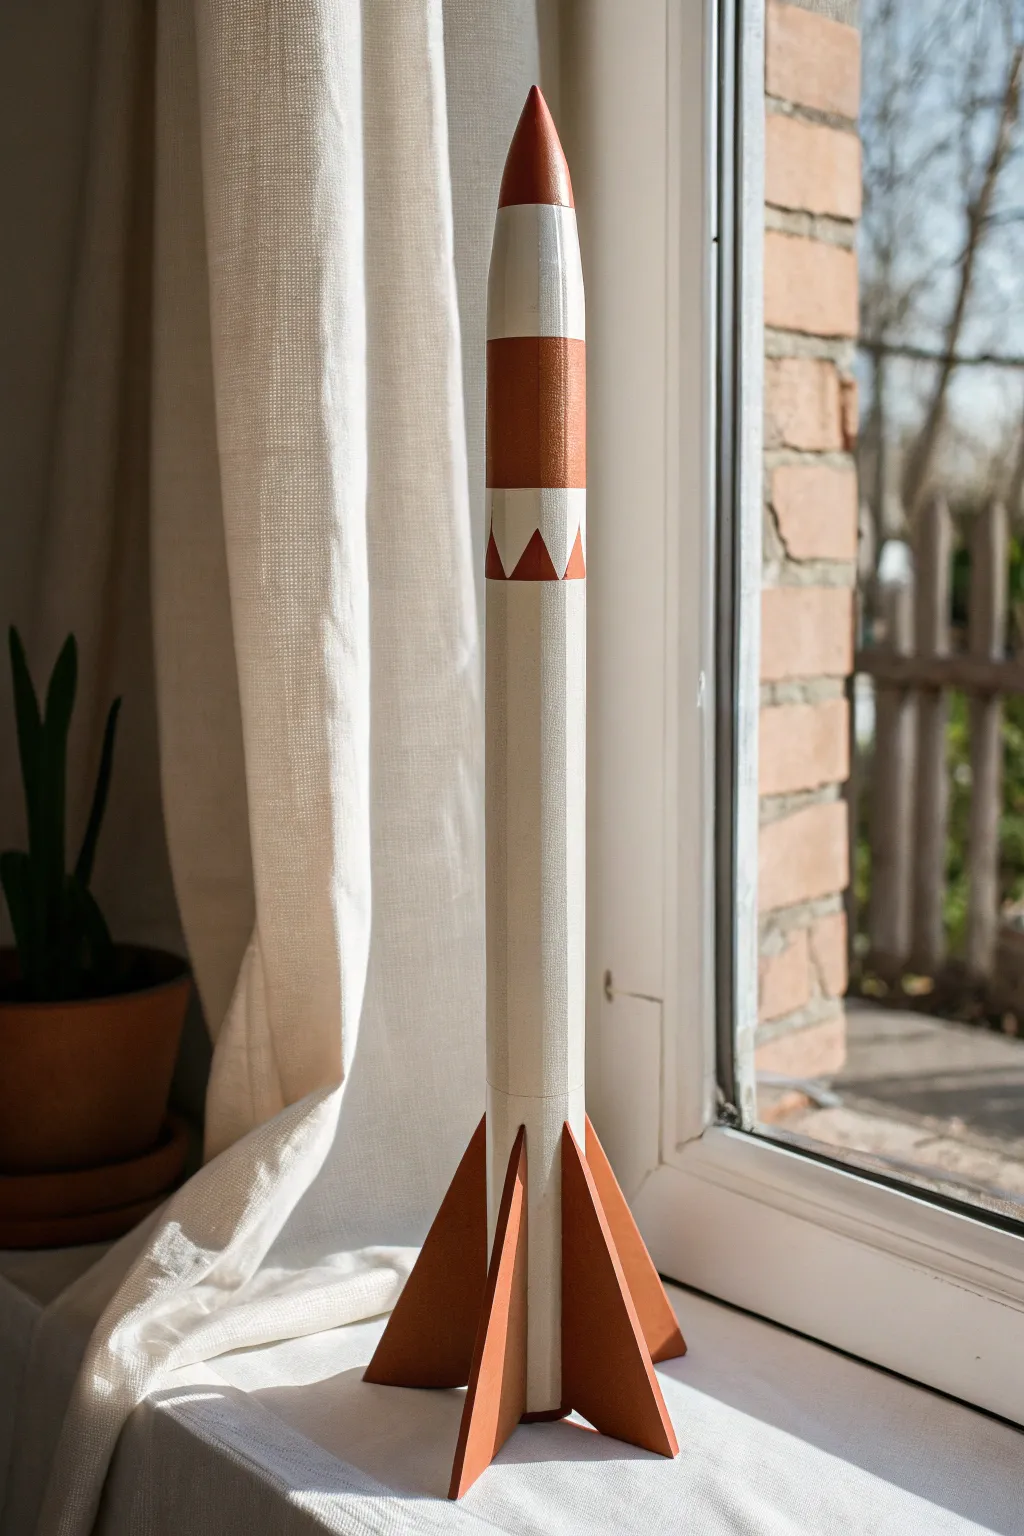
This model rocket design channels a classic mid-century aesthetic with its crisp geometric lines and warm, earthy color palette. The combination of matte white and rusty terra cotta creates a sophisticated look that stands out on the launch pad or the display shelf.
Detailed Instructions
Materials
- Model rocket kit (body tube, nose cone, 4 fins)
- White primer spray paint covers
- Matte white spray paint
- Terra cotta or rust-colored acrylic paint
- High-quality painter’s tape (low tack)
- Ruler and pencil
- Hobby knife with fresh blade
- Flat shader brush (medium size)
- Small detail brush
- Clear matte sealer spray
Step 1: Preparation and Base Coat
-
Assemble the airframe:
Begin by assembling your model rocket kit according to the manufacturer’s instructions. Ensure the fins are glued on straight and any seams on the body tube are sanded smooth for a seamless finish. -
Prime the surface:
Apply a light, even coat of white primer to the entire rocket. This is crucial for hiding the spiral seams in the cardboard tube and ensuring the topcoats adhere properly. -
Sand for smoothness:
Once the primer is fully dry, lightly sand the entire surface with fine-grit sandpaper (400 grit or higher) to knock down any fuzz or dust nibs. -
Apply the white base:
Spray the entire rocket with matte white paint. Apply two to three thin coats rather than one heavy one to prevent drips. Let this dry completely—I usually wait overnight to be safe before applying tape.
Bleeding Lines?
If paint seeps under mask, next time apply a thin layer of the *base* color (white) over the tape edge first. This seals the gap before the color goes on.
Step 2: Masking the Geometric Pattern
-
Mark the band location:
Measure about 2-3 inches down from the nose cone shoulder. Use a pencil to lightly mark where the top and bottom of the colored band will sit on the body tube. -
Tape the upper band:
Wrap a strip of painter’s tape around the tube to define the top edge of the terra cotta band. Ensure the tape creates a perfect circle and seal the edge firmly with your fingernail. -
Create the triangle stencil:
To create the sawtooth pattern, apply a strip of painter’s tape to a cutting mat or glass surface. Use a ruler and hobby knife to cut a zig-zag line down the center of the tape strip. -
Apply the triangle mask:
Carefully peel up your zig-zag tape strip and apply it to the rocket body, positioning the points of the ‘teeth’ facing upward, just below the solid band area you defined earlier. -
Protect the white areas:
Use additional tape and scrap paper to completely cover the middle and lower sections of the white body tube that shouldn’t receive any colored paint.
Texture Twist
For a true clay-like terra cotta look, mix a tiny pinch of baking soda into your acrylic paint before applying it to the nose cone and fins.
Step 3: Painting the Accents
-
Paint the nose cone:
Using your flat shader brush and terra cotta acrylic paint, apply smooth, even strokes to the nose cone. You may need two coats for full opacity. -
Fill the body band:
Paint the exposed area between your upper tape masking and the lower triangle masking. Paint slightly over the tape edges to ensure sharp lines, but avoid pushing paint under the tape. -
Paint the fins:
Move to the bottom of the rocket and carefully paint each fin with the terra cotta color. Use the small detail brush to get close to the fuselage without accidentally marking the white body tube. -
Remove the masking:
While the paint is touch-dry but not fully cured, carefully peel away the painter’s tape. Pull the tape back at a steep angle away from the painted edge to ensure a sharp, crisp line. -
Touch up edges:
Inspect your lines for any bleed-through. If necessary, use a tiny brush with a bit of white paint to clean up any errant spots. -
Seal the work:
Once all paint is completely bone dry, lightly mist the entire rocket with a clear matte sealer. This unifies the sheen of the glossier spray paint and the matte acrylics.
Your finished rocket now has a timeless, clean look ready for the launch pad


Three-Color Geometric Panels
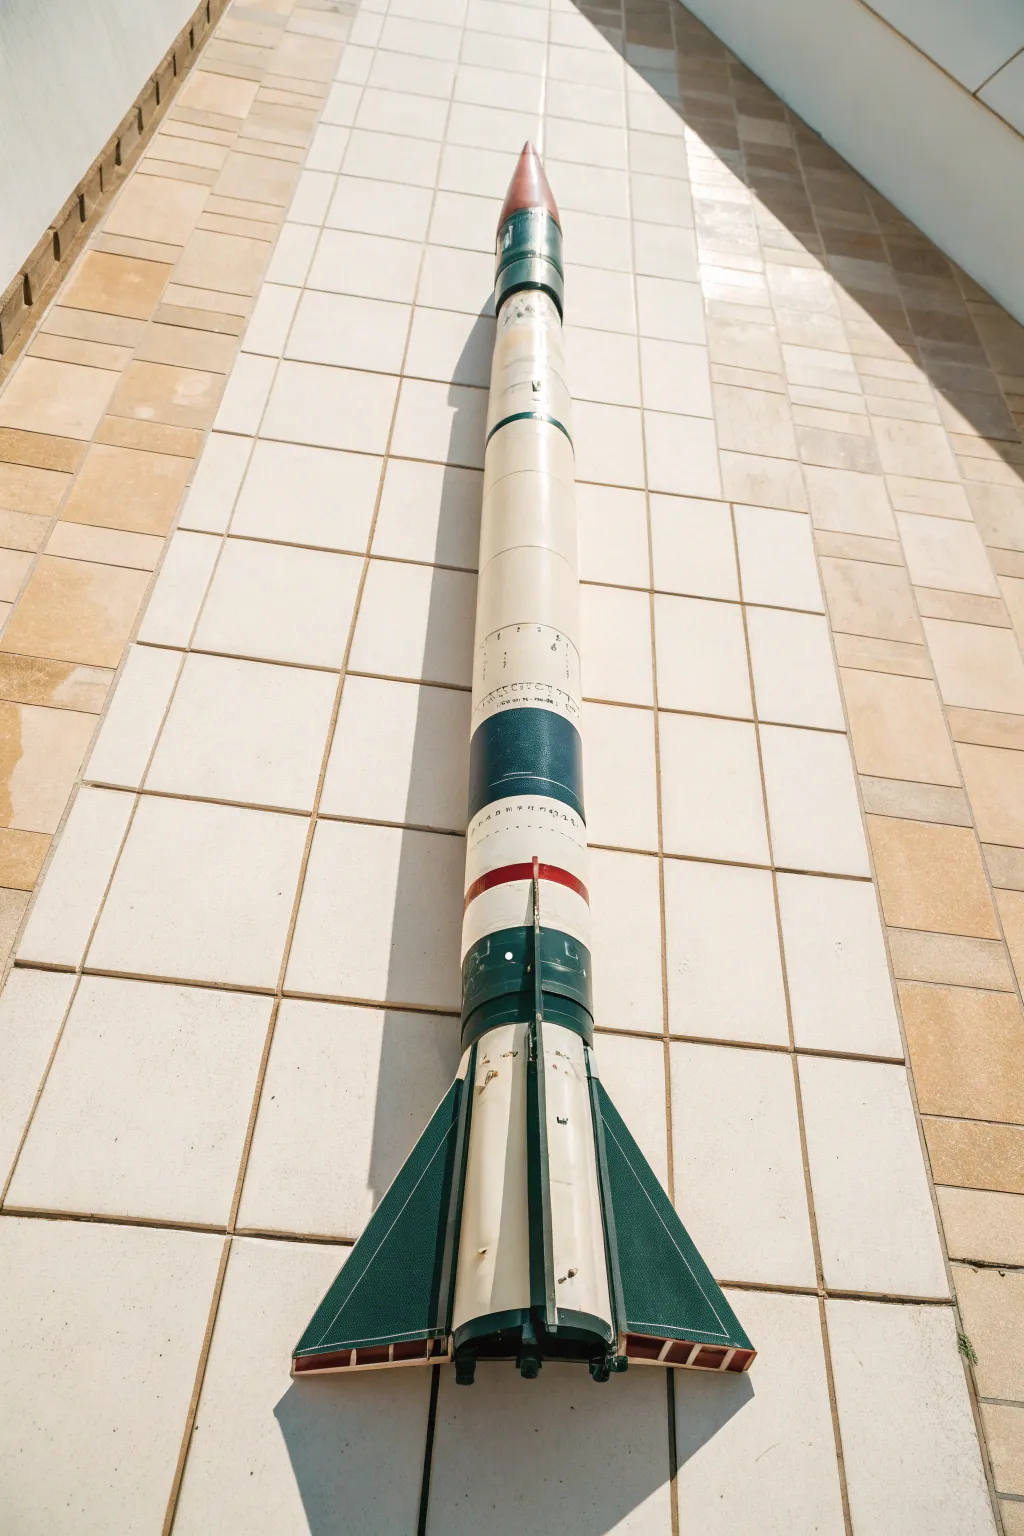
This project captures the utilitarian aesthetic of a vintage sounding rocket with a crisp, geometric paint scheme. By combining deep forest green, navy blue, and stark white sections, you’ll create a model that looks like it rolled straight out of a Cold War-era hangar.
Step-by-Step Guide
Materials
- Model rocket kit (completed assembly, sanded)
- White primer spray paint
- Gloss white spray paint
- Deep forest green spray paint
- Navy blue spray paint
- Crimson red spray paint
- High-quality painter’s tape (various widths)
- Masking paper or plastic sheets
- Fine-grit sandpaper (400-600 grit)
- Clear matte or satin topcoat
- Ruler and pencil
- Compass or circle template (optional)
- Waterslide transfer paper (optional for dial details)
Step 1: Preparation and Base Coat
-
Surface Prep:
Begin by ensuring your assembled rocket is perfectly smooth. Sand down any glue fillets on the fins and body tube seams using fine-grit sandpaper until you can run your finger across without feeling a ridge. -
Priming:
Apply a light, even coat of white primer to the entire rocket, including the nose cone and fins. Let this dry completely, then lightly sand any imperfections. Repeat with a second coat if the body tube spirals are still visible. -
The Foundation Color:
Spray the entire rocket with gloss white paint. This is your base color, so ensure solid coverage. It’s better to do three thin coats than one heavy, dripping coat. Allow this base to cure for a full 24-48 hours before applying any tape.
Step 2: Masking and Blocking
-
Measuring the Bands:
Using a ruler, lightly mark the positions for the colored bands. Based on the reference, you’ll need markings for the nose cone section, a band near the top, a thick middle band, and the lower fin section. -
Masking the White:
Wrap painter’s tape precisely around the body tube to cover the areas that should remain white. Burnish the edges of the tape down firmly with your fingernail or a plastic card to prevent paint bleed. -
Painting the Green Fins:
Mask off the entire body tube above the fin can. Apply the deep forest green paint to the fins and the lower section of the body tube. Spray at varying angles to coat the leading and trailing edges of the fins evenly. -
The Upper Green Band:
Locate the upper band mark near the nose cone. Mask off everything else and spray this section with the same forest green. -
Painting the Blue Band:
Once the green is dry to the touch, mask off a new section in the middle of the body for the navy blue band. Cover the rest of the rocket carefully with masking paper to protect against overspray, then apply the blue. -
The Red Stripe:
Create a thin gap with your tape just below the blue band area or further down the body. Spray this narrow section crimson red to create a striking accent ring. -
Nose Cone Detail:
Remove the nose cone if it’s detachable. Spray the very tip crimson red. If you want the two-tone look from the image, mask the tip once dry, then spray the base of the nose cone green to match the upper body band.
Bleed-Through Blues
Paint bled under the tape? Don’t panic. Wait for it to fully dry, then lightly scrape the excess away with a hobby knife or touch it up with a small brush and some white paint.
Step 3: Detailing and Weathering
-
Unmasking:
Wait until the paint is tacky but not fully cured to carefully peel away the masking tape. Pull the tape back slowly at a 45-degree angle to leave a sharp, clean line. -
Adding Markings:
The reference image shows small technical markings and dial numbers on the white sections. You can replicate these using fine-tip permanent markers for a hand-drawn look, or print custom waterslide decals for precision. -
Simulated Paneling:
To mimic the panel lines seen on the fins, use a very sharp pencil or a thin strip of graphic tape to gently draw or create lines following the fin geometry. -
Light Weathering:
For that authentic ‘used’ look, I like to take a smudge of charcoal or gray pastel powder on a cotton swab and lightly brush it around the panel lines and band edges to simulate grime and aerodynamic wear. -
Sealing:
Finish the project by spraying the entire model with a matte or satin clear coat. This seals the decals, protects the paint, and unifies the surface sheen for a professional scale appearance.
Add Structural Depth
Before painting, glue thin strips of cardstock or styrene onto the fins to create actual raised panel details instead of just drawing them on later.
Now you have a striking, realistic missile ready for the launchpad or display shelf
Smooth Heat-Gradient Fade
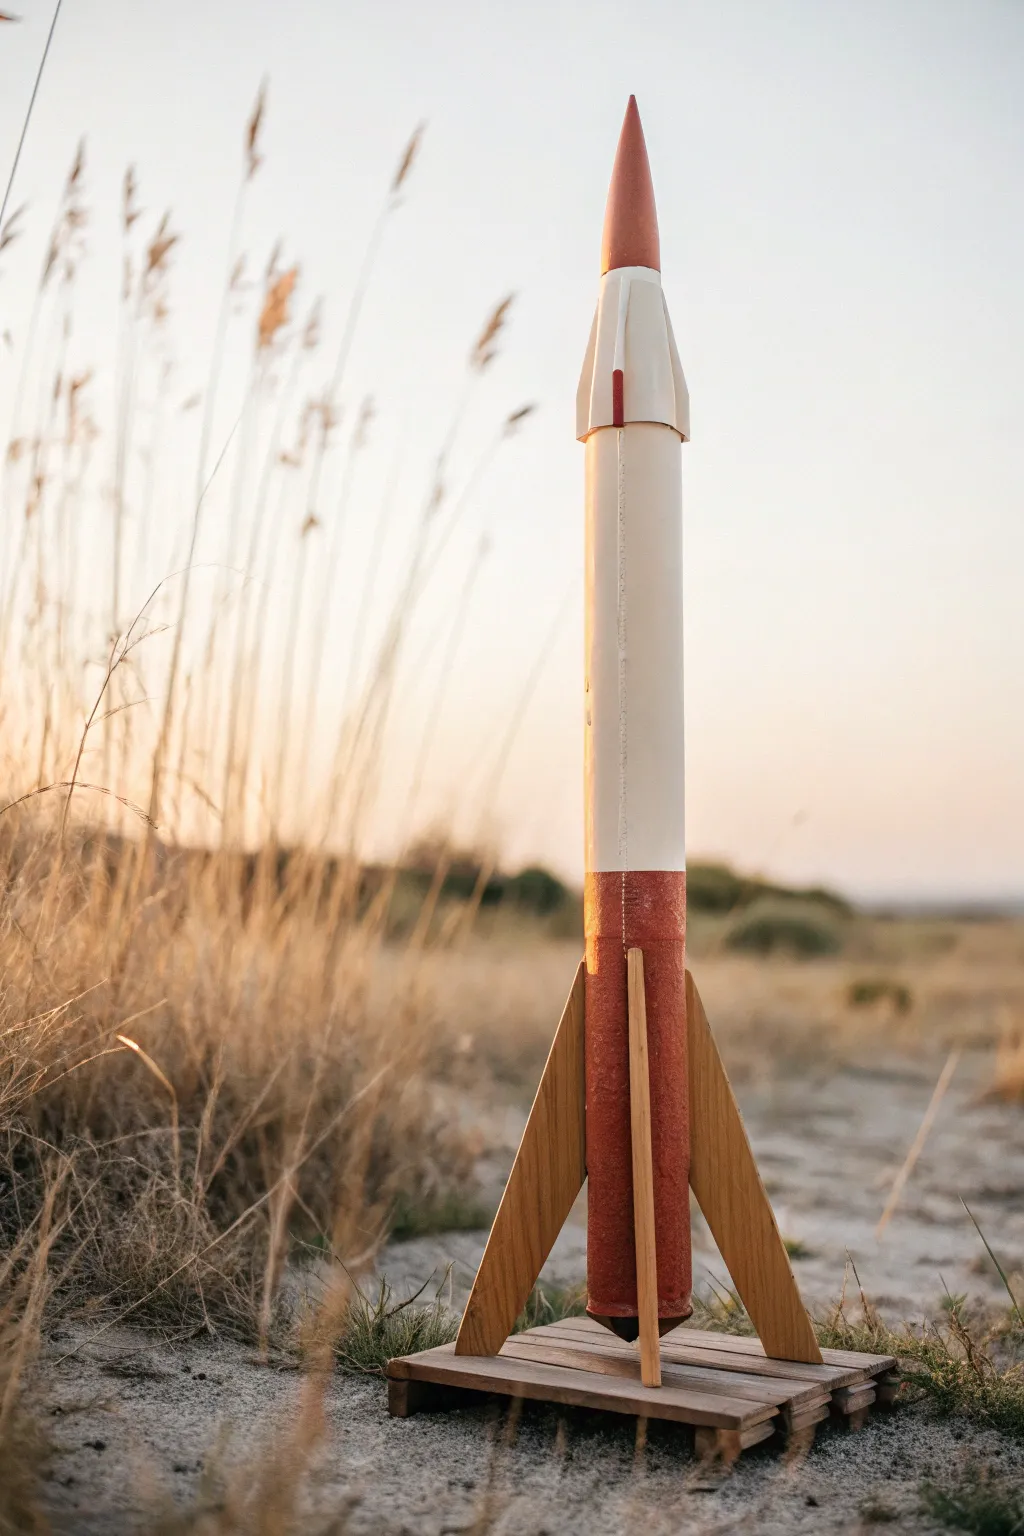
This classic model rocket design combines a clean white fuselage with a rugged, textured rust tone on the nose and base, evoking the look of heat shielding or oxidized metal. The result is a striking contrast between smooth modern lines and gritty industrial realism.
How-To Guide
Materials
- Model rocket body tube and nose cone
- Balsa or plywood sheet (for fins)
- Wood glue
- Sanding sealer
- Fine-grit sandpaper (400-600 grit)
- White primer spray paint
- Gloss white spray paint
- Rust or terracotta textured spray paint
- Matte clear coat
- Painter’s tape
- Small wooden launch stand (optional)
Step 1: Preparation and Body Construction
-
Prep the surfaces:
Begin by lightly sanding the entire body tube and plastic nose cone with fine-grit sandpaper to remove any manufacturing gloss and help the primer stick. -
Cut the fins:
Cut three or four trapezoidal fins from your balsa or plywood sheet. Sand the edges carefully to create a slight airfoil shape which reduces drag. -
Seal the wood:
Apply a coat of sanding sealer to the wooden fins. Once dry, sand them smooth again. I like to repeat this process twice to ensure the wood grain doesn’t show through the final paint. -
Attach the fins:
Mark the bottom of the tube for fin placement. Use wood glue to attach the fins securely to the base section, ensuring they are perfectly vertical, and let the glue cure completely.
Step 2: Base Painting
-
Prime the model:
Spray the entire rocket, including fins and nose cone, with a light coat of white primer. Do this in smooth, sweeping motions to avoid drips. -
Apply the white base:
Once the primer is fully dry, apply several thin coats of gloss white spray paint over the entire main body tube and nose cone. -
Let it cure:
Allow the white paint to dry for at least 24 hours. This is crucial because you will be applying tape over it, and you don’t want to peel the paint up later.
Bleeding Lines?
If paint bleeds under the tape, wait for it to dry fully, then lightly scrape the excess away with a sharp hobby knife or touch it up with a small brush and the base white color.
Step 3: Creating the Two-Tone Effect
-
Mask the center section:
Use high-quality painter’s tape to mask off the middle section of the rocket body that will remain white. Ensure the edges of the tape are pressed down firmly to prevent bleed-under. -
Protect the upper fins:
If you want the natural wood look for the fins as shown in the inspiration, carefully mask the fins completely with paper and tape. -
Apply rust texture:
Spray the exposed nose cone and the very bottom section of the body tube with the rust or terracotta textured paint. Hold the can slightly further away than usual to encourage a ‘dusty’ texture. -
Detail the transition:
For the specific look in the image, ensure the rust color covers the nose cone tip and the base area between the fins, creating a ‘heat shield’ aesthetic. -
Remove masking:
Carefully peel away the painter’s tape while the rust paint is still slightly tacky to get a clean, crisp line between the white and rust sections.
Pro Tip: Burnishing
After applying your masking tape, run the back of your fingernail or a plastic spoon firmly along the tape edge to create a perfect seal that paint cannot penetrate.
Step 4: Finishing Touches
-
Clear coat protection:
Once all paint layers are fully dry, spray the entire model with a matte clear coat. This unifies the sheen and protects the textured paint from chipping during potential landings. -
Build the display stand:
To match the image, construct a simple slatted wooden base using small craft wood strips glued to a square frame. -
Install the launch rod:
Drill a hole in the center of the wooden base and insert a dowel or rod to hold the rocket upright for display.
Your rocket now has a professional, flight-ready appearance that looks great on the shelf or the launch pad
Metallic Lower Section With Solid Upper

This elegant model rocket design combines the retro-futurism of metallic hues, featuring a striking split between a shimmering pale blue upper body and a rich gold base. The result is a sleek, trophy-like finish that looks just as good on display as it does on the launch pad.
Detailed Instructions
Materials
- Unpainted model rocket kit (assembled and sanded)
- White primer spray paint
- Metallic Gold spray paint
- Metallic Ice Blue or Silver-Blue spray paint
- Metallic Silver spray paint (for fins)
- Painter’s tape (high quality)
- Fine-grit sandpaper (400-600 grit)
- Thin pinstriping tape (blue or black, 1/8 inch)
- Clear coat spray (gloss)
- Tack cloth
- Cardboard or scrap paper for masking
Step 1: Preparation and Priming
-
Smooth the Surface:
Begin with your assembled rocket. Ensure all glue joints, especially around the fins and launch lugs, are smooth. Sand the entire body tube and nose cone lightly with high-grit sandpaper to remove any spiral tube lines or burrs. -
Clean Before Painting:
Wipe the entire model down with a tack cloth. This step is crucial because metallic paints show every speck of dust. -
Apply Primer:
Spray a light, even coat of white primer over the entire rocket. Keep the can moving to avoid drips. -
Let it Cure:
Allow the primer to dry completely according to the manufacturer’s instructions. If any fuzz or roughness appears, do a very light sanding and wipe clean again.
Tape Line Tip
Burnish down the edge of your painter’s tape with a fingernail or plastic spoon before spraying. This prevents paint from bleeding under the tape and ensures a razor-sharp line.
Step 2: Applying the Base Colors
-
Paint the Lower Section Gold:
We will start with the gold since it covers the lower body tube. Spray the bottom third of the rocket body tube in metallic gold. Don’t worry about a crisp line at the top yet; just ensure good coverage where the gold section will be. -
Paint the Nose Cone:
While you have the gold paint out, spray the nose cone separately. Support it on a dowel or stick to paint all sides evenly. -
Gold Drying Time:
Let the gold paint cure fully. Since metallic paints can be soft, I usually give this a bit longer than standard colors—overnight is best. -
Masking the Lower Body:
Once the gold is rock-hard dry, measure where you want the color break to happen—usually just above the fins. Wrap painter’s tape carefully around the circumference of the tube at this mark. -
Protect the Gold:
Use paper and more tape to completely cover the lower gold section and the fins below your tape line. You want to protect it from the blue overspray.
Step 3: The Upper Body and Fins
-
Apply the Metallic Blue:
Spray the exposed upper body tube with the metallic ice blue (or silver-blue) paint. Apply several thin coats rather than one heavy one to maintain that metallic grain. -
Unmasking:
Once the blue paint is dry to the touch, carefully peel away the masking tape and paper. Pull the tape back slowly at a 45-degree angle to keep a clean line. -
Masking for Fins:
Now, mask off the gold body tube around the root of the fins. You only want the fin surfaces exposed. -
Painting the Fins:
Spray the fins with metallic silver. This creates a nice contrast against the warm gold body. -
Final Unmasking:
Remove all masking materials from the fins and body. You should now have distinctly colored sections.
Heavy Metal Upgrade
Use ‘Hammered’ finish spray paint for the fins instead of standard metallic. It adds a rugged, industrial texture that contrasts beautifully with the smooth body tube.
Step 4: Detailing and Sealing
-
Adding the Separation Stripe:
To define the transition between the nose cone and the body tube (or just below the nose cone shoulder), apply a thin strip of blue pinstriping tape. This mimics the detail ring seen in the project image. -
Reattach Nose Cone:
Place the painted gold nose cone back onto the body tube. Ensure the fit is snug but doesn’t scrape your new paint job. -
Apply Decals (Optional):
If you have small text decals like the gold vertical lettering shown on the body tube, apply them now using tweezers for precision. -
Clear Coat:
Finish the entire rocket with a gloss clear coat. This unifies the sheen of the different metallic paints and protects the finish from fingerprints and scratches. -
Final Polish:
Once fully cured, give it a very gentle wipe with a microfiber cloth to bring out the maximum shine before display.
Now you have a stunning, metallic display piece ready for the shelf or the sky
Matte-and-Gloss Contrast Details
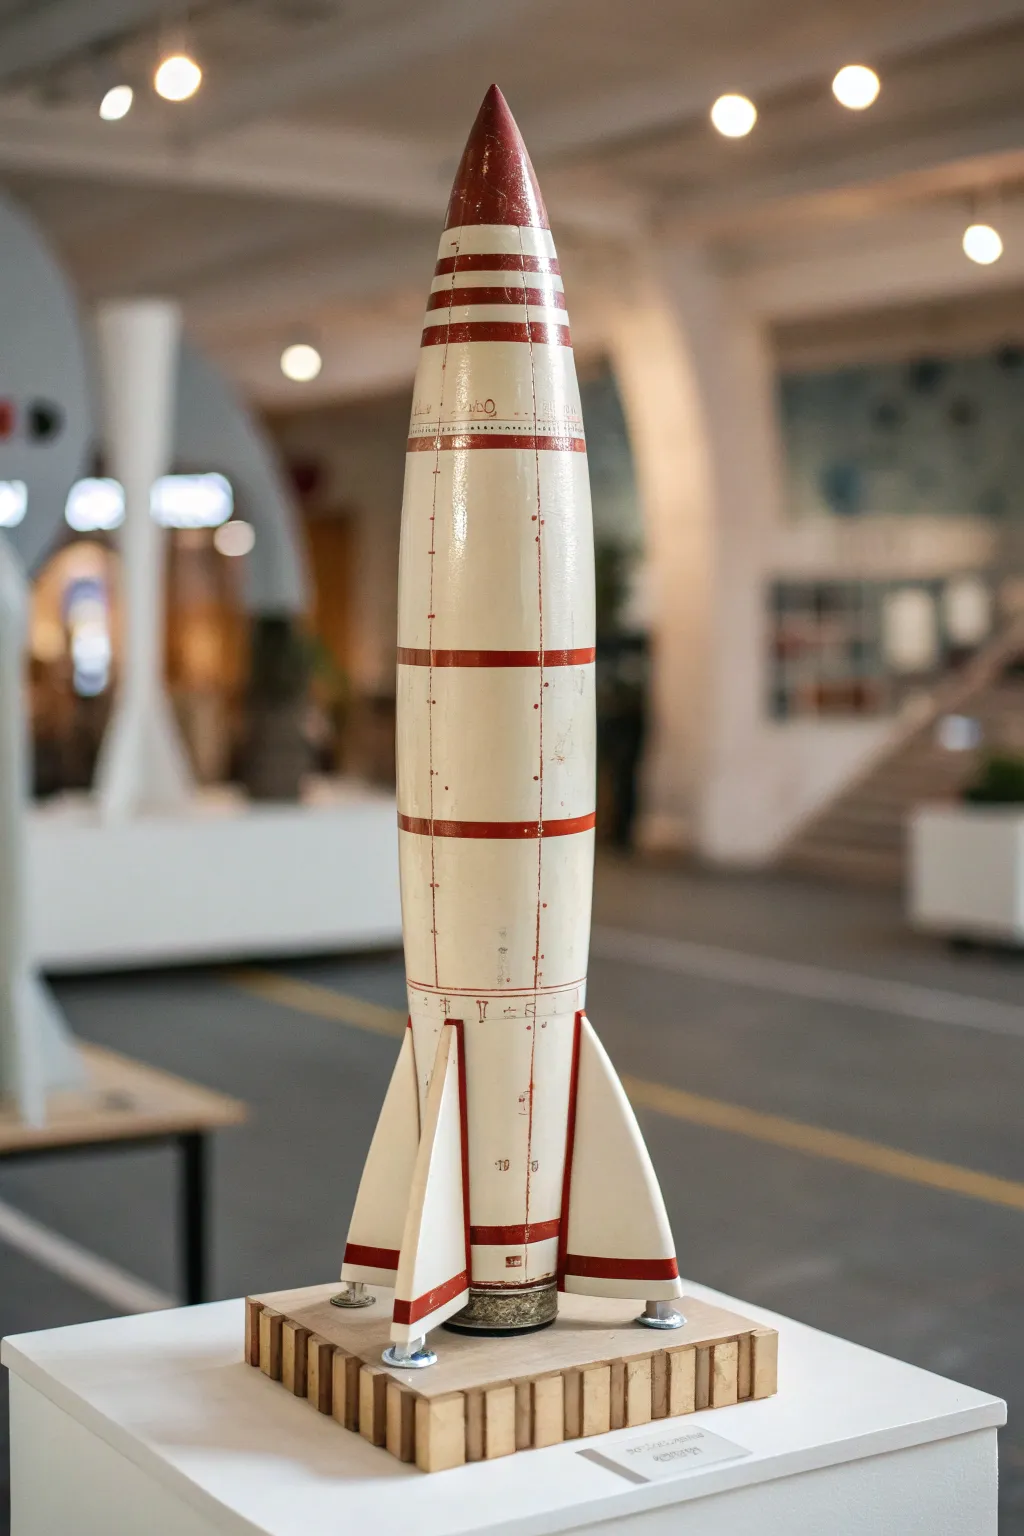
Recreate the iconic look of early rocketry with this tutorial, focusing on a striking interplay between high-gloss body paint and weathered matte red accents. The result is a display-worthy piece that feels like it was plucked straight from a museum archive.
Step-by-Step Tutorial
Materials
- Model rocket kit (V-2 or similar ogive shape)
- High-build primer spray
- Gloss white enamel spray paint
- Red acrylic paint (matte finish)
- Fine-grit sandpaper (400-800 grit)
- Masking tape (various widths, including fine line)
- Fine detail brush (size 0 or 00)
- Pencil and flexible ruler
- Brown/black weathering wash or oil paint
- Clear matte varnish (optional for fins)
- Wooden display base and metallic stand-offs
Step 1: Preparation and Base Coat
-
Sand and Prime:
Begin by assembling your rocket body and fins according to the kit instructions. Sand all seams flush. Apply a coat of high-build primer to fill any wood grain in the fins or spiral grooves in the body tube, sanding smooth between coats until the surface is glass-like. -
Apply Gloss White:
Spray the entire model with gloss white enamel. Apply several thin, even coats rather than one heavy one to avoid drips. Let this cure fully—ideally for 24 to 48 hours—to ensure a hard shell for the masking tape later. -
Inspect the Finish:
Check for any imperfections. Since we are aiming for a high-gloss versus matte contrast, the white base needs to be flawless. Polish with a very fine polishing cloth if necessary.
Step 2: Adding the Red Bands
-
Measure the Bands:
Using a pencil and a flexible ruler or a strip of paper, lightly mark the positions for the horizontal red bands. You’ll need markings for the nose cone tip, the upper stripes, the mid-body stripes, and the lower fin area. -
Masking Off:
Apply masking tape around the rocket body. For the crispest lines, I recommend using high-quality fine-line tape for the edges and filling the rest with standard painter’s tape. Ensure the tape is pressed down firmly to prevent bleed-under. -
Painting the Nose Cone:
Hand-paint or airbrush the tip of the nose cone with matte red acrylic. The contrast between the matte red and the gloss white is the key feature here, so avoid using gloss red. -
Painting Body Stripes:
Fill in the masked areas on the body tube with the same matte red. You may need two coats for full opacity. Remove the masking tape carefully while the paint is still slightly tacky to avoid pulling up jagged edges. -
Detailing the Fins:
Paint the bottom edge and the leading edge of the fins with the red accent color. Use a steady hand and a flat brush to keep these lines sharp against the white fin surface.
Pro Tip: Tape Removal
Pull masking tape away at a sharp 45-degree angle back over itself. This cuts the paint film cleanly, leaving a razor-sharp line without jagged edges.
Step 3: Panel Lines and Weathering
-
Pencil Paneling:
To simulate panel lines without carving, lightly draw vertical lines down the body tube using a mechanical pencil and a straight edge. Add small horizontal tick marks along these lines to simulate rivets or fasteners. -
Adding Technical Markings:
Use a very fine detail brush (size 00) or a red fine-tip archival ink pen to draw small technical markings, numbers, and ‘rivets’ along the red bands and vertical pencil lines. These mimic the schematic markings seen on test rockets. -
Create a Wash:
Dilute a small amount of brown or black paint with water (for acrylics) or thinner (for oils) to create a transparent wash. It should be very runny, like dirty water. -
Apply Weathering:
Brush the wash over the red bands and the panel lines. Let it sit for a moment, then wipe most of it away with a paper towel. This leaves grime in the recesses and dulls the red slightly for a vintage look. -
Finishing the Base:
If displaying the model, mount it on a wooden block. You can achieve the ‘floating’ look from the image by using small metallic stand-offs or screws inserted into the base of the fins.
Level Up: Texture Variation
After painting, lightly scuff the red bands with 2000-grit sandpaper. This enhances the matte texture and makes the gloss white body pop even more by comparison.
Place your finished rocket on its stand and admire the professional, museum-quality aesthetic you have achieved
Pinstripes Made With Tape Pull Lines
This project combines the natural beauty of light wood grain with bold, geometric black accents for a mid-century modern aesthetic. It focuses on precision masking and negative space to create a sophisticated model that looks at home on a display shelf.
Step-by-Step
Materials
- Model rocket body tube (balsa or cardboard wrapped in wood veneer)
- Balsa wood sheet (for fins) and nose cone
- Light wood veneer sheeting (if covering a cardboard tube)
- High-quality masking tape (pinstriping width)
- Matte black spray paint or acrylic paint
- Clear matte varnish or sealant
- Fine-grit sandpaper (220-400 grit)
- Ruler and pencil
- Black fine-point permanent marker or paint pen
- Wood glue
- Hobby knife
Step 1: Body Construction & Prep
-
Prepare the Body Tube:
If you are using a standard cardboard rocket tube, carefully wrap it in a light-colored wood veneer sheet. Use wood glue sparingly to avoid bubbling, and ensure the seam is clean and straight. -
Shape the Fins:
Cut three identical fin shapes from your balsa wood sheet. Sand the edges smooth, rounding the leading edges slightly for better aerodynamics and a softer look. -
Sand Everything:
Lightly sand the entire body tube (now veneered), the nose cone, and the fins. You want a uniform, smooth surface that feels like natural timber. -
Initial Sealing:
Apply a light coat of clear matte varnish to seal the wood grain. This is crucial because it prevents bleed-through when you apply the black paint later. -
Assemble the Rocket:
Attach the fins to the base of the rocket body using wood glue. Ensure they are spaced perfectly evenly (120 degrees apart) and stand perpendicular to the tube.
Bleeding Lines?
If paint seeps under the tape, let it dry fully, then gently scrape the excess away with the tip of a hobby knife. You can also touch it up with a wood-colored pencil.
Step 2: Creating the Pinstripes
-
Mark the Ring Locations:
Using a ruler, lightly mark the positions for the four black rings on the upper section of the fuselage. These should be near the transition to the nose cone. -
Masking the Rings:
Apply strips of high-quality masking tape around the circumference of the rocket. You are masking off the areas that will remain *wood*. The gaps between the tape strips will become the black rings. -
Varying the Widths:
Notice the design uses variation: create two thinner gaps at the top and bottom of the cluster, and a slightly wider gap for the middle stripe to add visual weight. -
Seal the Tape Edges:
I always press the tape edges down firmly with a fingernail or burnishing tool. Apply a tiny amount of clear matte varnish over the tape edges to lock them down and prevent paint creep. -
Painting the Rings:
Using matte black paint (either brushing carefully or masking the rest of the rocket for spraying), fill in the exposed gaps between your tape lines.
Retro Engine Upgrade
Drill small holes in the bottom center of the rocket and glue in different lengths of dowel painted metallic silver to simulate engine nozzles.
Step 3: Fin Detailing & Finishing
-
Mask the Fins:
Now, tackle the fins. Apply masking tape to the flat faces of the fins, leaving about 1/8th inch (3mm) of the outer edge exposed. -
Paint the Fin Edges:
Paint the exposed edges of the fins black. This creates a sharp outline that defines the rocket’s silhouette against the floor. -
Remove Tape:
Once the paint is tacky but not fully hard, carefully peel away all masking tape from the body and fins. Pull at a 45-degree angle away from the painted edge. -
Adding the Rivet Detail:
Using a fine ruler, lightly pencil a vertical guideline down the center of the fuselage between the fins and the nose cone stripes. -
Dotting the Line:
Take a black fine-point marker or paint pen. Carefully place pairs of small dots along your guideline. Space them evenly, perhaps every inch or so. -
Add Upper Dots:
Continue a similar dot pattern on the nose cone itself, aligning them with the vertical line on the body. -
Final Clear Coat:
Once all ink and paint are completely dry, finish with a final coat of clear matte varnish over the entire rocket to protect the finish and unify the sheen.
Place your finished rocket on the floor or a low shelf to best show off those sleek vertical lines.
Speckled “Meteor Dust” Splatter
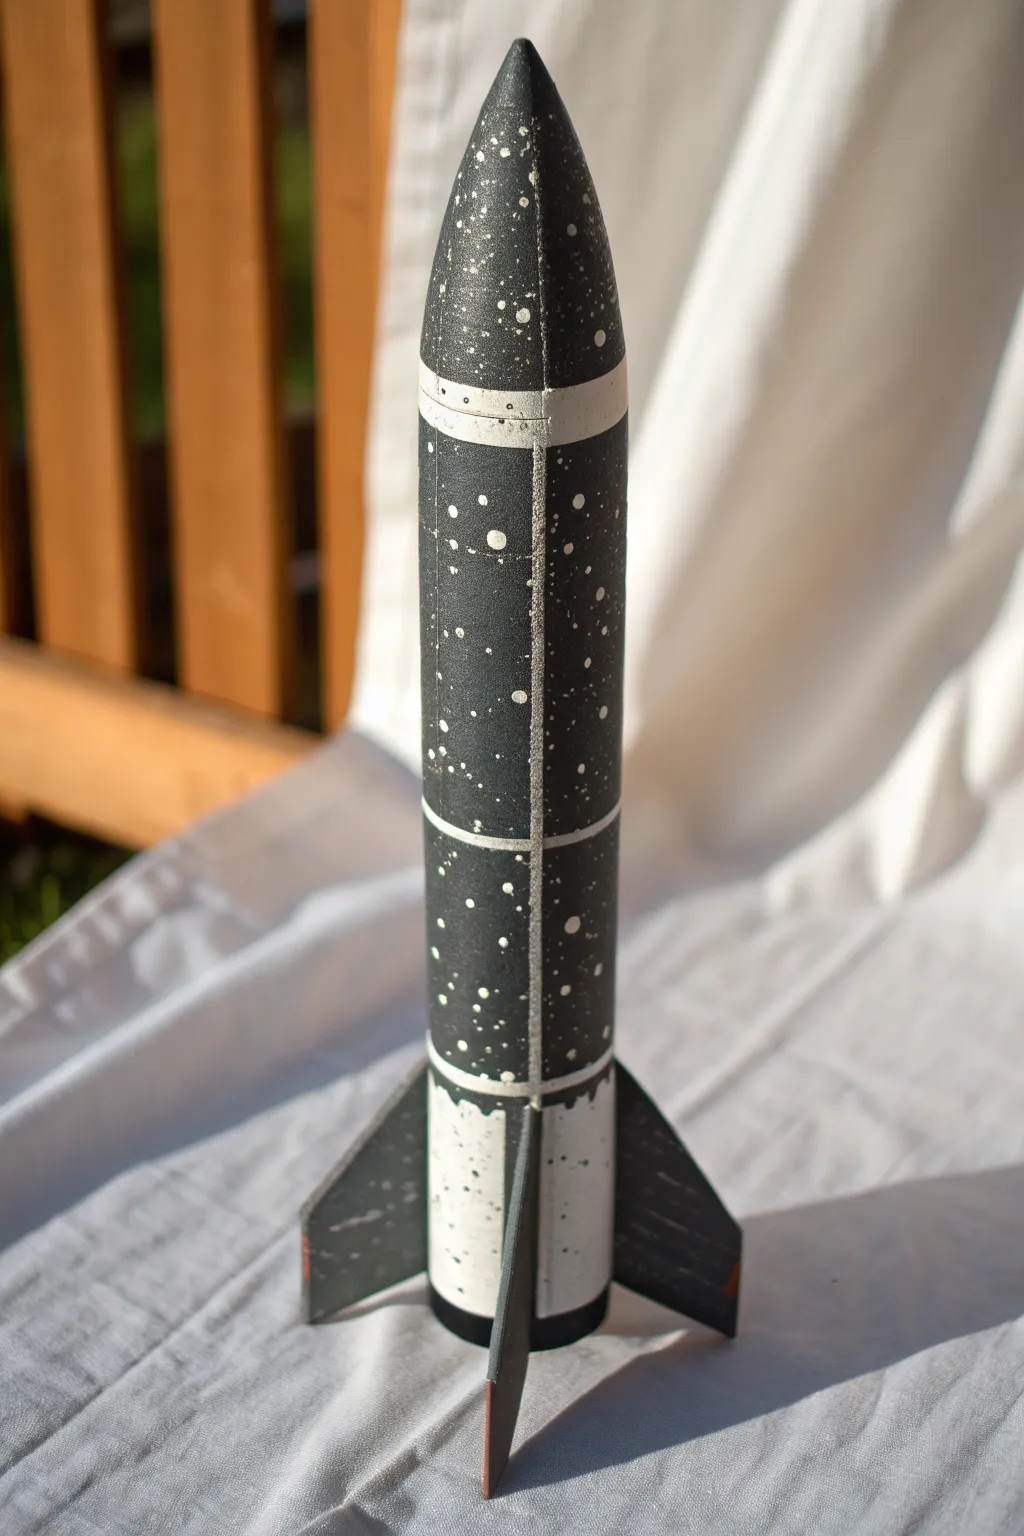
Capture the chaotic beauty of deep space with this striking monochromatic rocket design. By flipping the color scheme on the lower body and using controlled splatter techniques, you’ll create a finish that looks like it’s been dusted by a passing comet.
Step-by-Step Tutorial
Materials
- Model rocket kit (fully assembled, sanded, and primed)
- Flat black spray paint
- Flat white spray paint
- Painter’s tape (various widths, including 1/8 inch striping tape)
- Old toothbrush or stiff bristle brush
- A scrap piece of cardboard or box
- Paper towels
- Matte clear coat sealant
- Latex or nitrile gloves
Step 1: Base Coat & Masking
-
Prime the surface:
Ensure your assembled rocket is smooth. Apply a high-quality white primer to the entire rocket, as this will help your subsequent white layers pop. -
Apply the white base:
Spray the entire rocket with flat white paint. This is crucial because the white stripes and the white bottom section rely on this layer. Let it dry completely for at least 24 hours to prevent tape peeling later. -
Mask the bottom section:
Using painter’s tape and paper, completely mask off the bottom section of the body tube (where the fins attach) to keep it white. Cover the fins as well if you want them to remain a dark contrasting color later. -
Create the vertical stripe:
Run a single strip of thin 1/8 inch striping tape vertically down the side of the upper body tube. Press the edges down firmly with your fingernail to prevent paint bleed. -
add horizontal bands:
Apply horizontal bands of tape around the body tube. Typically, one near the nose cone transition and one further down creates a balanced look. These will become your crisp white lines.
Blob Control
Prepare to troubleshoot big globs. If a large drop lands on your rocket, dab it gently with a corner of a paper towel immediately, or let it dry and turn it into a ‘larger planet’ with a second color dot.
Step 2: The Dark Void
-
Spray the black coat:
With all your masking tape secure, spray the exposed upper body tube and nose cone with flat black paint. Apply light, even coats to avoid drips. -
Dry and peel:
Allow the black paint to dry until it’s safe to touch, then carefully peel away the striping tape to reveal the white grid lines underneath. Don’t remove the masking from the bottom section yet. -
Mask the upper body:
Now, reverse the masking. Cover the black painted upper body with paper and tape to protect it. Remove the masking from the bottom white section. -
Paint the fins:
If your fins aren’t already the desired dark shade, carefully paint them black or dark charcoal now, protecting the white body tube section.
Level Up: Nebula Effect
Before speckling, mist some very faint patches of dark blue or purple spray paint over the black base. The white stars on top will make the deep colors look like a distant nebula.
Step 3: Creating the Meteor Dust
-
Prepare the splatter station:
Set up a box or drop cloth area. This gets messy. Spray a small puddle of white spray paint onto a piece of scrap cardboard. -
Load the brush:
Dip the bristles of strictly the tip of an old toothbrush into the wet white paint puddle. Do not overload it or you’ll get globs instead of stars. -
Test the flicker:
Hold the toothbrush near your scrap cardboard. Run your thumb across the bristles to flick paint forward. Adjust your distance and pressure until you get fine, mist-like dots. -
Splatter the black section:
Unmask the upper black body (but protect the bottom white section). Flick white paint specks over the black areas. Rotate the rocket constantly for even coverage. -
Switch colors:
Now, mask the upper body to protect your new stars. Spray a puddle of black paint onto cardboard. -
Splatter the white section:
Using a clean toothbrush, flick black speckles onto the white bottom section of the rocket body. This inverted effect adds visual weight to the base. -
Optional fin weathering:
I sometimes like to lightly distress the edges of the fins with sandpaper or add a few unintentional specks for a flown look, but this is up to you. -
Final reveal:
Remove all remaining masking tape carefully. Check for any bleed-through and touch up with a small hand brush if needed. -
Seal the deal:
Once all paint is bone dry, spray the entire rocket with a matte clear coat. This unifies the sheen and protects your galaxy effect from handling.
Your rocket now looks like it has traveled through the asteroid belt and back, ready for the launch pad
Galaxy Swirl Body Tube
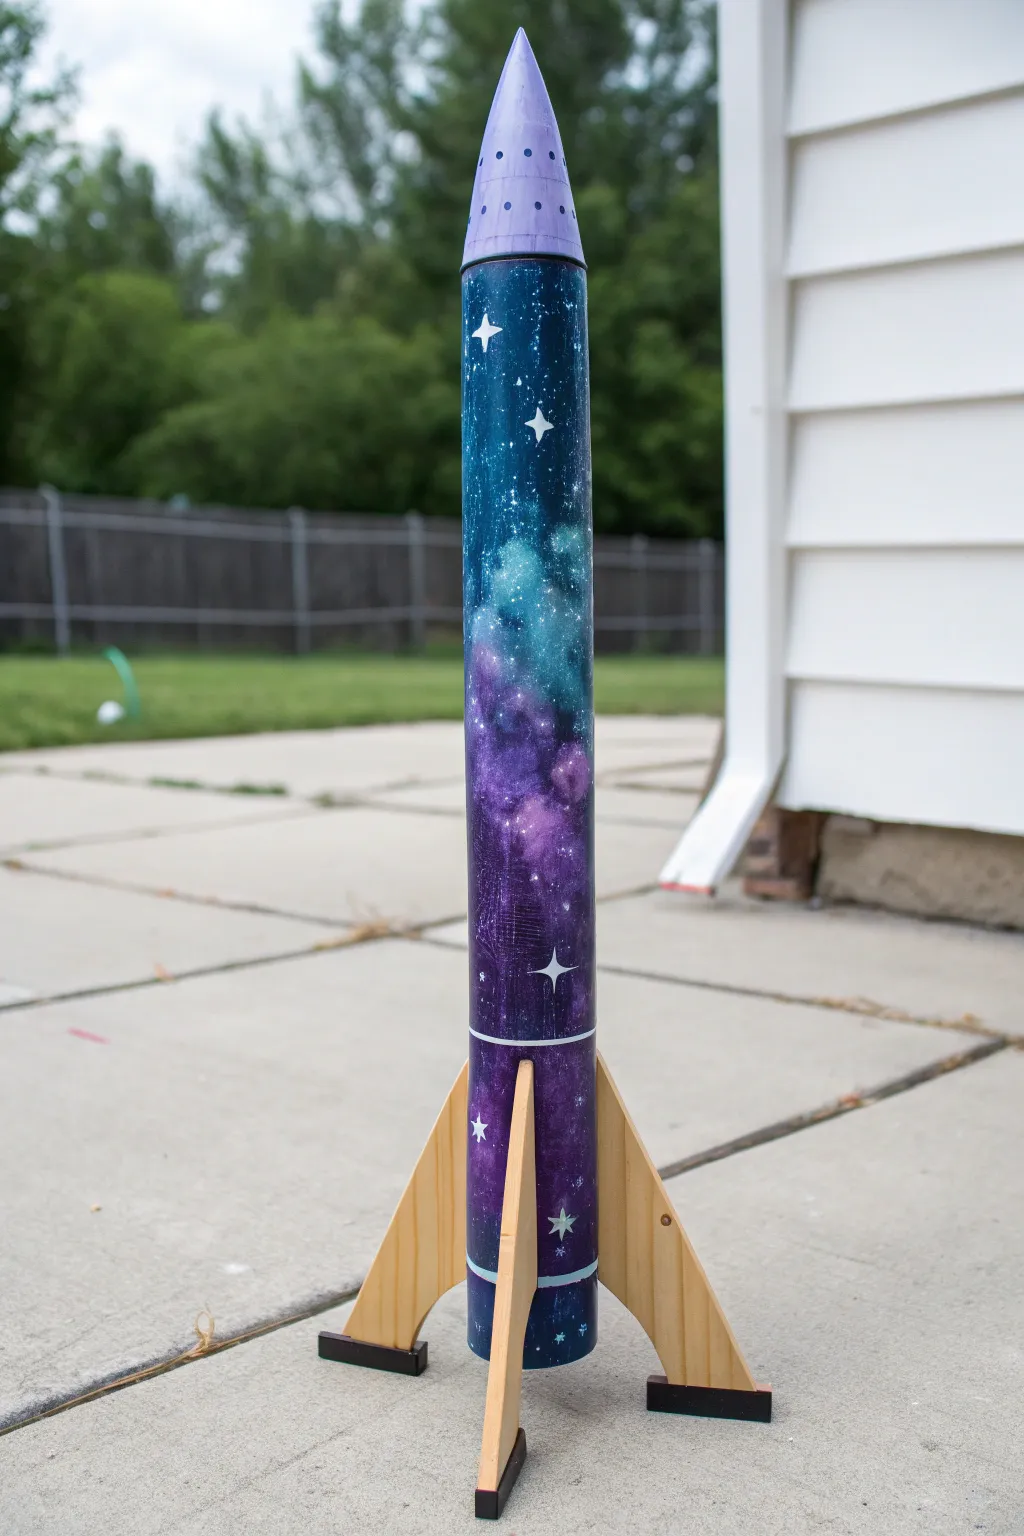
Transform a standard cardboard rocket tube into a stunning piece of deep-space art using a blend of sponge painting and careful detailing. This galaxy swirl effect creates a vibrant, professional-looking nebula that makes your rocket stand out on the launch pad.
Detailed Instructions
Materials
- Assembled model rocket (body tube, nose cone, and balsa fins attached)
- White spray primer
- Navy blue spray paint (matte or satin)
- Acrylic craft paints: Violet, Teal/Turquoise, White, Black
- Small sea sponge or cosmetic wedge sponges
- Fine liner brush (size 00 or 0)
- Painter’s tape (0.25 inch and 1 inch widths)
- Gloss clear coat spray
- Sandpaper (fine grit)
- Palette or paper plate
Step 1: Preparation & Base Coat
-
Prepare the surface:
Before painting, ensure your rocket is fully assembled and smoothed. Lightly sand the body tube and wooden fins to remove any burrs or rough patches, then wipe away the dust with a tack cloth or slightly damp rag. -
Prime the rocket:
Apply a coat of white primer to the entire rocket. This is crucial for making the subsequent colors pop, especially the nebula effects. Let the primer dry completely according to the can’s instructions. -
Apply the galaxy background:
Spray the entire body tube and fins with a deep navy blue spray paint. You want solid, even coverage here, as this represents the depths of space. Allow this base layer to dry for several hours or overnight to ensure it’s fully cured.
Sponge Technique
Always offload your sponge on paper first. You want a dry-brush texture, not a wet stamp. You can always add more layers, but it’s hard to remove too much paint.
Step 2: Creating the Nebula
-
Sponge on the first nebula color:
Pour a small amount of teal or turquoise acrylic paint onto your palette. Dampen a small piece of sponge, dab it into the paint, and offload most of the excess onto a paper towel. Gently dab irregular cloud shapes onto the middle section of the body tube, keeping the edges soft and faded. -
Add depth with purple:
Using a fresh piece of sponge and violet acrylic paint, repeat the sponging process. Apply the purple near the teal sections, letting them overlap slightly to create a blended, bruised-sky look. I like to concentrate the purple lower down on the tube for a nice gradient effect. -
Highlighting with white:
To create bright centers within your nebula clouds, take a tiny amount of white paint on a sponge and very lightly dab it into the center of your teal and purple patches. This adds dimension and makes the gases look illuminated. -
Blending the edges:
If any edges look too harsh, take a clean sponge with a tiny bit of the original navy blue (or black) acrylic paint and lightly dab over the perimeter of your nebula clouds to push them back into the background.
Glow in the Dark
Mix glow-in-the-dark medium into your white star paint. The nebula won’t show at night, but your stars will glow brightly during dusk launches.
Step 3: Nose Cone & Details
-
Masking the nose cone:
Once the body tube is fully dry, cover the top of the body tube with painter’s tape to protect your galaxy work. Spray or brush paint the nose cone a solid light lavender or purple to match the nebula tones. -
Adding nose cone details:
Dip the handle end of a paintbrush into dark purple or black paint. Dot a ring of circles around the base of the nose cone. Above that, add a second ring using a smaller tool, like a toothpick, to create size variation. -
Painting the stars:
Using your fine liner brush and thinned white acrylic paint, hand-paint four-pointed stars (cross shapes) scattered across the galaxy background. Vary their sizes, placing larger stars in the darker negative spaces. -
Splattering distant stars:
Load an old toothbrush or stiff bristle brush with thinned white paint. Run your thumb across the bristles to flick tiny specks of paint onto the rocket body. This creates the effect of thousands of distant stars. -
Adding the separation ring:
Use a thin strip of white vinyl tape or simply paint a thin white line around the circumference of the tube, separating the main fin section from the upper body for a technical look.
Step 4: Finishing Touches
-
Detailing the fins:
The wooden fins on this project are left mostly natural wood or painted a light tan to contrast the dark space scene. If you painted over them, sand the faces back to wood or paint them a solid beige. -
Adding fin shoes:
Paint the very bottom edge (the ‘foot’) of each wooden fin black. You can use painter’s tape to get a crisp straight line here. -
Clear coating:
Once all paint is completely dry (give it 24 hours to be safe), spray the entire rocket with a gloss clear coat. This protects your artwork during launches and gives the galaxy a deep, wet look.
Now your rocket is ready to blend in with the cosmos on its next flight
Constellation Line Art Accents
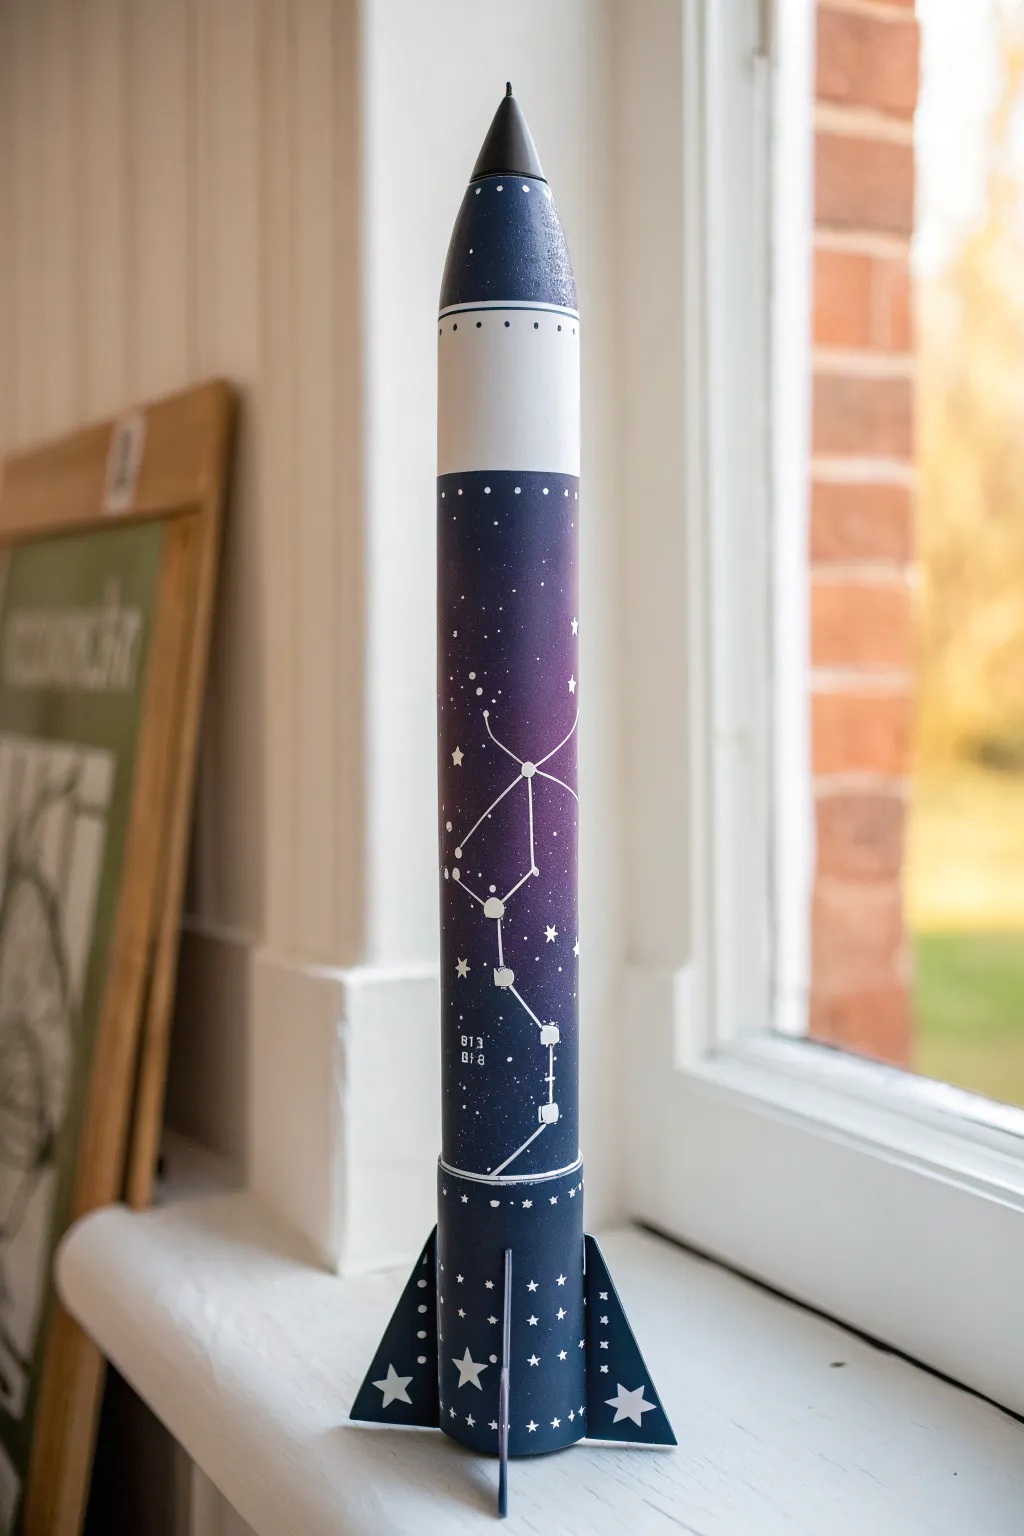
Transform a standard model rocket kit into a piece of celestial art with this elegant star-map design. The deep violet-to-navy fade provides the perfect backdrop for delicate white constellation lines that turn your rocket into a soaring night sky.
Step-by-Step
Materials
- Standard model rocket kit (assembled and primed)
- Painter’s tape (various widths)
- Navy blue spray paint (matte or satin)
- Deep violet spray paint (matte or satin)
- White acrylic paint or paint pen (fine tip)
- Small stiff-bristle brush (for splattering)
- Ruler and pencil
- Gloss or matte clear coat sealant
- Black spray paint (for nose cone)
- White spray paint (for upper accent band)
- Paper towels or newspaper
Step 1: Base Coat and Gradient
-
Prime and prep:
Ensure your assembled rocket is sanded smooth and has a solid coat of primer. A smooth surface is crucial for the gradient to look professional. -
Paint the white band:
Spray the upper third of the body tube with bright white paint. Don’t worry about overspray lower down; we just need a solid white base where the accent band will be. -
Mask the accent stripe:
Once the white paint is fully cured (give it at least 24 hours to be safe), mask off a two-inch section near the top of the body tube with painter’s tape to preserve the white band. -
Apply the nose cone color:
Remove the nose cone if it isn’t glued, or mask the body heavily. Spray the nose cone a solid matte black to create a sharp contrast point at the tip. -
create the galaxy gradient:
Spray the remaining body tube and fins with the deep violet paint as a base. While it’s still slightly tacky, lightly mist the bottom half and fins with navy blue, feathering the spray upward to create a seamless transition from dark blue to violet.
Tape Trick
Burnish down the edges of your painter’s tape with a fingernail or credit card before spraying to prevent paint from bleeding under the mask.
Step 2: The Starfield
-
Prepare for stars:
Lay the rocket horizontally on a protected surface. Pour a small amount of white acrylic paint onto a palette or paper plate and water it down slightly until it has the consistency of heavy cream. -
Splatter texture:
Dip your stiff-bristle brush or an old toothbrush into the thinned white paint. Using your thumb, flick the bristles to spray tiny droplets across the blue and purple sections to create a distant starfield. -
Vary the density:
I find it looks best if you concentrate the splatter slightly more near the bottom fin area, simulating the density of the Milky Way. -
Hand-paint larger stars:
Using a fine detail brush or a white paint pen, add a few specifically placed larger stars. Draw small 5-point stars on the fins and scattered randomly on the body tube for variety.
Step 3: Detailing the Constellations
-
Plan the constellation:
Using a reference image of the Big Dipper or your favorite constellation, lightly sketch the position of the main stars onto the body tube with a pencil. -
Connect the dots:
Use a white fine-tip paint pen to draw straight lines connecting your pencil marks. A ruler can help here, but a steady hand often looks more organic and artistic. -
Add star nodes:
At each point where lines intersect, paint a small, solid white circle or a tiny star to represent the primary stars of the constellation. -
Detail the white band:
Remove the painter’s tape from the upper white band. Using a very fine black pen or paint brush, add a row of tiny dots along the top and bottom edge of the white stripe for a vintage technical look. -
Finishing touches:
Check the fins for any bald spots in your star pattern. Add large, bold white stars on the flat surfaces of the fins to ground the design. -
Seal the work:
Once all paint and ink are completely dry, spray the entire rocket with a clear coat sealant to protect your galaxy from handling and launch exhaust.
Glow Up
Mix glow-in-the-dark powder into your white acrylic paint for the stars. The constellation will reveal itself when the lights go out.
Your rocket is now ready to take its rightful place among the stars it depicts
Topographic Map Wrap Lines
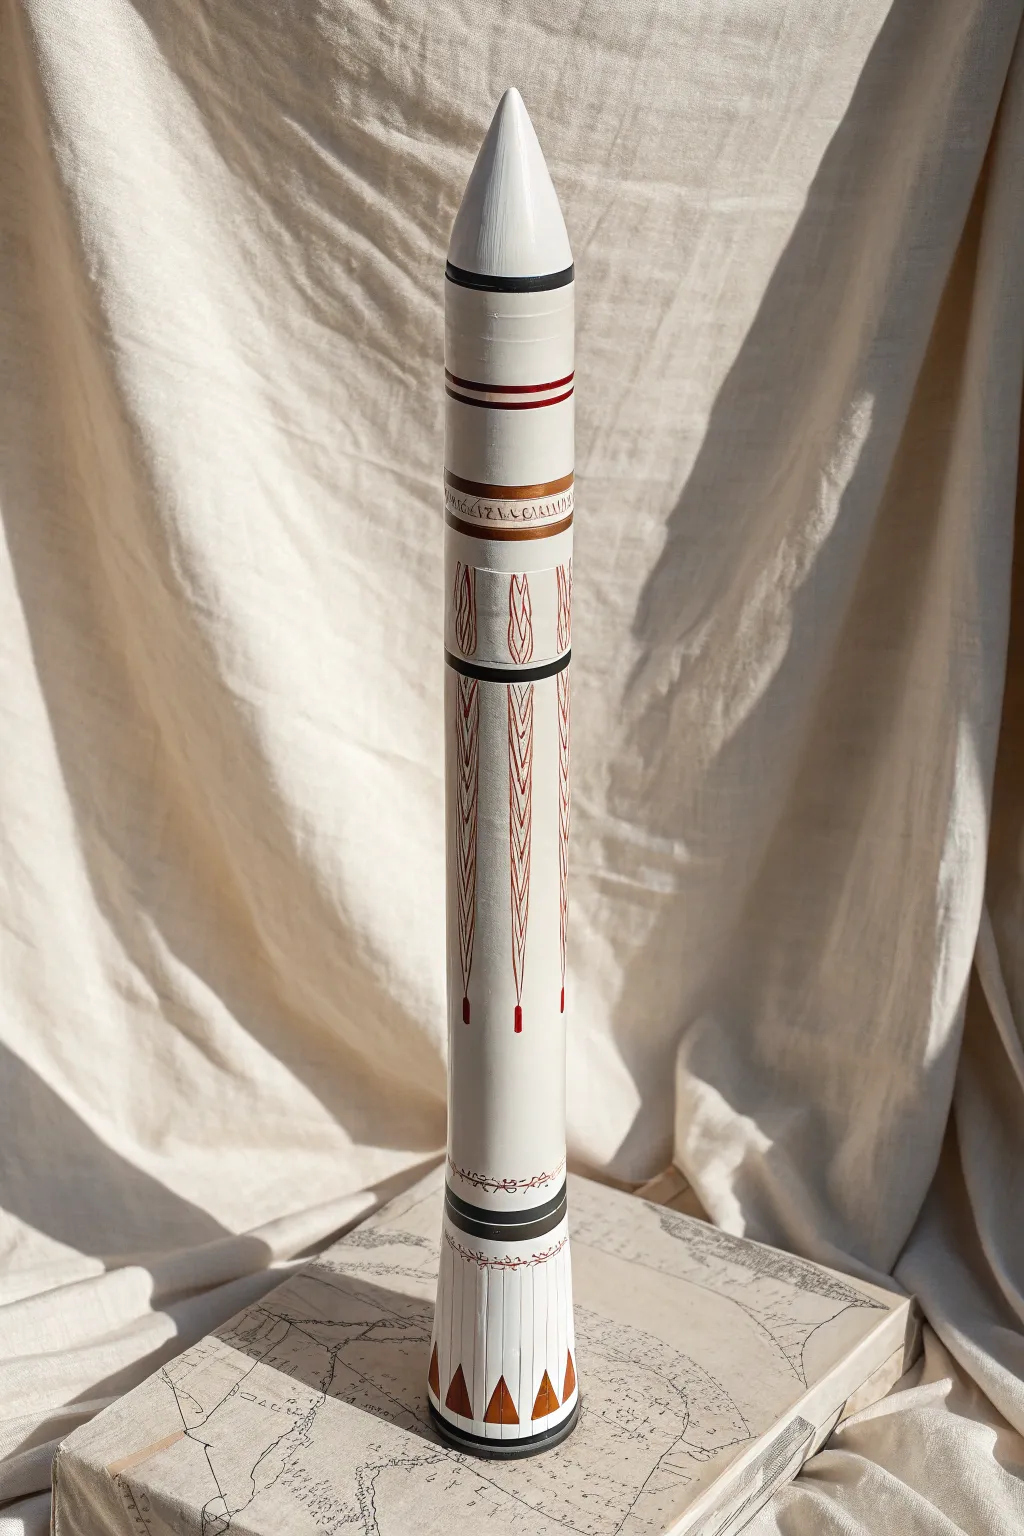
Transform a standard model rocket body into an artifact of exploration with this refined, map-inspired design. The look combines crisp geometric bands with stylized organic flourishes, evoking the aesthetic of vintage topographic charts and compass roses.
How-To Guide
Materials
- Model rocket body tube and nose cone (primed white)
- High-quality white spray paint (satin or matte)
- Acrylic paints: Crimson Red, Metallic Copper/Bronze, Black
- Fine liner brushes (00 and 0 sizes)
- Painter’s tape measures (various widths, including 1/8 inch)
- Pencil
- Ruler or flexible measuring tape
- Matte clear coat sealant
Step 1: Base Coat & Layout
-
Apply the Base:
Begin by spraying the entire rocket body and nose cone with your white paint. I prefer a satin finish for this project as it holds detailed brushwork better than high gloss. Apply two to three thin coats, allowing full drying time between each. -
Mark Sections:
Once the white is fully cured (at least 24 hours), use a pencil to lightly mark where your horizontal bands will go. You want a distinct section near the nose cone shoulder, a separation in the middle of the body, and a detailed section near the fins. -
Masking Horizontal Rings:
Use painter’s tape to mask off the areas for the solid horizontal rings. Apply tape firmly to prevent bleed-through. You’ll need stripes at the nose cone base, mid-body, and near the bottom.
Step 2: Structural Detailing
-
Paint the Primary Bands:
Load a brush with black acrylic and fill in the masked ring just below the nose cone and the ring separating the upper and lower body sections. Peel the tape while the paint is slightly tacky for a cleaner edge. -
Add Metallic Accents:
Using the copper or bronze metallic paint, carefully hand-paint a broad band below the upper black ring. This serves as the background for your script later. -
Paint the Red Accent Lines:
Above the metallic band, paint a thin, precise crimson red stripe. Use a steady hand or use a piece of cardstock as a guide if you aren’t using tape here. -
Drafting the Vertical Patterns:
With a pencil, lightly sketch the vertical repeating patterns on the main body tube. These look like stylized wheat or feathers. Divide the circumference evenly so the pattern repeats symmetrically.
Wobbly Lines?
If your hand shakes during fine line work, rest your pinky finger on the rocket body for stability, or use a crafting contour gauge to guide the brush.
Step 3: Fine Line Work
-
Painting the Script:
On the dry copper band, use your finest brush (size 00) and thinned black paint or a fine-tip permanent marker to add faux script or Elvish-style writing. Keep the characters small and consistent. -
Feather Details – Outline:
Using the crimson red paint, outline the long, vertical ‘feather’ shapes you sketched on the mid-section. Create an elongated oval shape that tapers at the bottom. -
Feather Details – Internal Lines:
Fill the interior of these shapes with delicate chevron patterns pointing upwards, mimicking the veins of a leaf or fletching visually. Keep the paint thin so it flows smoothly. -
Lower Body Connectors:
Extend thin red lines downward from the feather shapes. Terminate each line with a small, solid red bead or droplet shape just above the lower banding.
Level Up: Aged Paper
Before painting details, lightly sponge a very watered-down beige wash over the white body to give it an antique parchment appearance.
Step 4: The Base Design
-
Map-Style Squiggles:
Just above the bottom black ring, paint a very fine, zigzagging red line that connects horizontally. This mimics the look of a topographic elevation line or a decorative border on a map. -
Geometric Triangles:
At the very base of the rocket, paint a series of small triangles pointing upward. Alternate colors or make them solid copper/bronze to weight the design visually. -
Cleanup:
Check the surrounding white areas for any smudges. Use a tiny bit of white paint to touch up edges where lines may have wobbled. -
Top Clear Coat:
Seal your work with a matte clear coat. Apply in very light mists to avoid causing the red or black acrylics to run.
Your finished rocket now carries the elegance of an old-world explorer’s map anywhere it flies
Drip Effect “Re-Entry Melt” Look
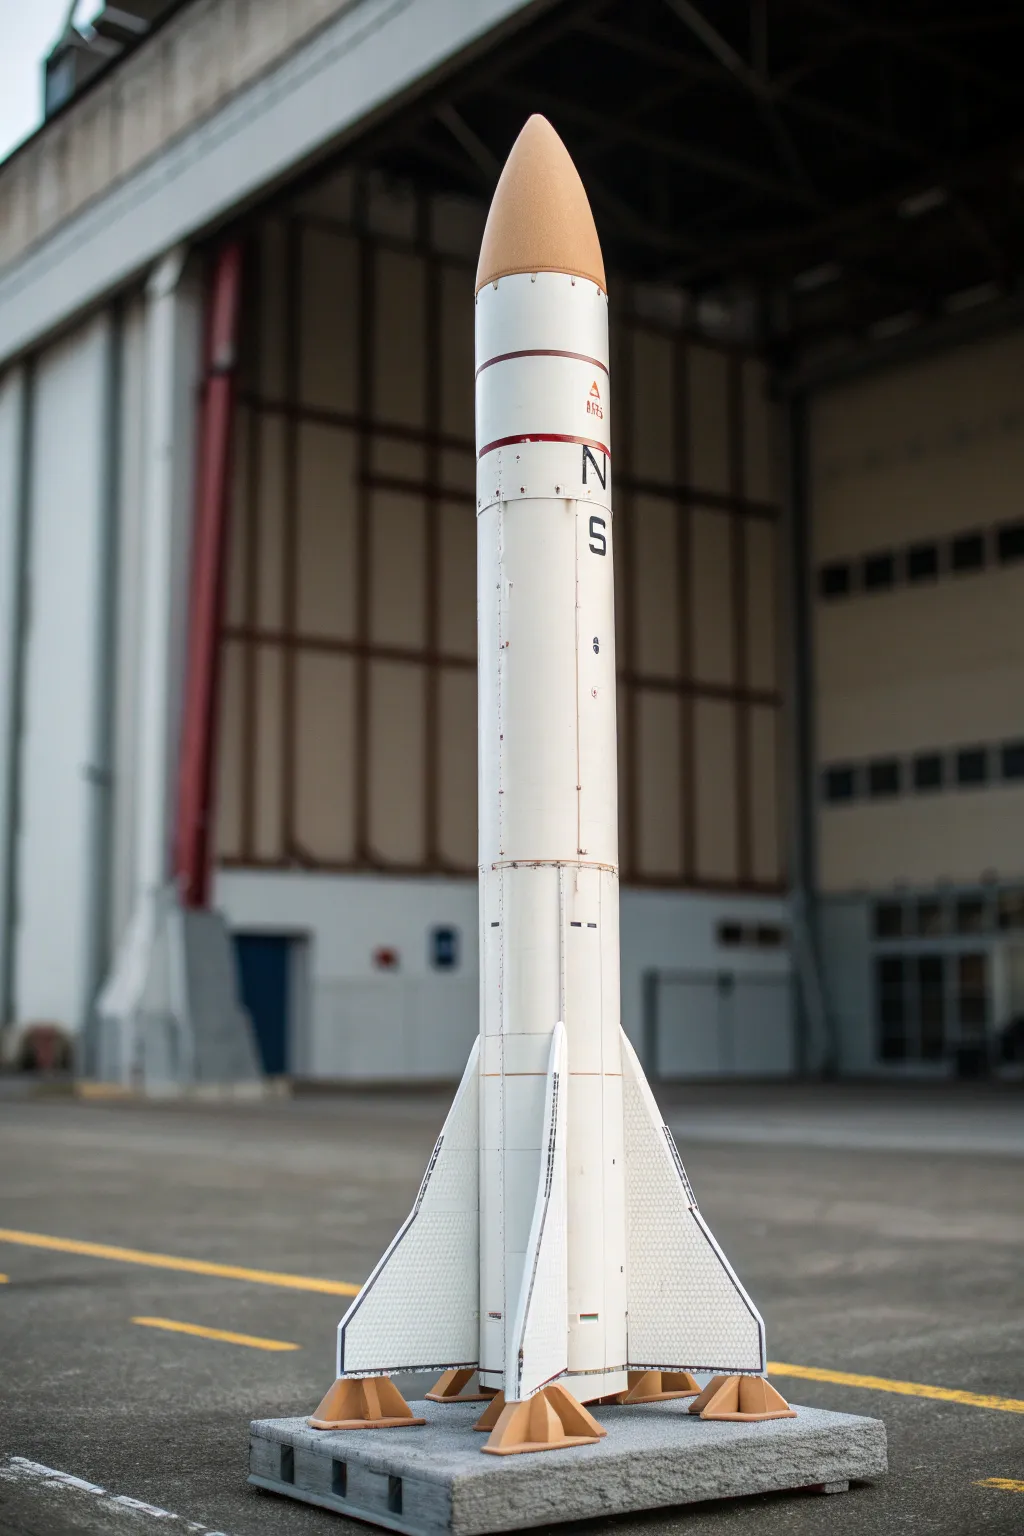
Transform a standard model rocket kit into a veteran of atmospheric flight with this rugged, weathered aesthetic. This project focuses on subtle detailing, texture building on the fins, and a distinct paint scheme that mimics heat shielding and ceramic materials.
Detailed Instructions
Materials
- Model rocket kit (or scratch-built body tube and nose cone)
- White primer spray paint
- Matte white spray paint
- Tan or light ochre acrylic paint
- Dark brown and rust-colored weathering powders or washes
- Fine mesh screen or drywall mesh tape (for texture)
- Super glue or strong craft adhesive
- Masking tape (various widths)
- Black decal letters/numbers or black permanent marker
- Fine-grit sandpaper (400-600 grit)
- Matte clear coat sealer
- Small detail brushes
Step 1: Structural Prep & Texture
-
Assemble the main body:
Construct the main body tube and nose cone according to your kit’s instructions, but leave the fins unattached for now to make detailing easier. -
Create the fin texture:
Cut pieces of drywall mesh tape or fine screen to match the shape of your fins. This mimics the heat-shielding tiles often seen on spacecraft. -
Adhere the mesh:
Carefully glue the mesh onto the flat surfaces of the fins. Ensure the edges are flush and don’t overhang the fin borders. -
Seal the texture:
Apply a thin layer of white primer over the mesh-covered fins to lock the texture in place and create a uniform surface for painting. -
Attach the fins:
Once the fins are dry, glue them securely to the base of the rocket body. Check alignment from above to ensure they are vividly straight.
Uneven Drips?
If your weathering washes run too fast or look messy, keep a damp Q-tip handy. You can quickly wipe away excess wash before it sets to control the scorch marks.
Step 2: Base Painting
-
Prime the full model:
Spray the entire rocket with a coat of white primer. Sand lightly with fine-grit sandpaper after it dries to smooth out any imperfections on the body tube. -
Apply the topcoat:
Spray several thin, even coats of matte white paint. I like to let this dry overnight to ensure the surface is hard enough for masking tape. -
Paint the nose cone:
Mask off the body tube just below the nose cone seam. Paint the nose cone with a flat tan or light ochre color to simulate a ceramic heat-resistant cap. -
Detail the base:
Paint the footpads or mounting stabilizers at the bottom in the same tan shade as the nose cone to tie the color scheme together.
Step 3: Markings & Weathering
-
Mask the stripes:
Use thin masking tape to designate two rings near the top of the body tube. Burnish the edges of the tape down firmly. -
Paint the stripes:
Paint the exposed rings with a dark red or maroon acrylic paint. Peel the tape away slowly while the paint is still slightly tacky for a crisp line. -
Add lettering:
Apply black decal letters (like the ‘N’ and ‘5’ shown) vertically along the upper body tube. If you don’t have decals, a steady hand and a fine-point permanent marker work well. -
Simulate panel lines:
Using a very sharp pencil or a light grey wash, carefully draw or paint faint horizontal and vertical lines to suggest panels on the main body tube. -
Create the ‘melt’ drip:
Mix a very watery wash of brown and rust paint. Dab small spots near panel lines specifically around the nose cone and let gravity pull faint streaks down the body. -
Dirty the fins:
Dry brush a little grey or soot-colored paint over the textured fins to highlight the high points of the mesh pattern. -
Final seal:
Finish the project by spraying the entire rocket with a matte clear coat. This protects the paint and reduces shiny reflections for a realistic scale look.
Scorched Earth
Use a sponge to dab black and brown paint near the rocket’s very bottom edge to mimic carbon buildup from engine ignition blast.
Your rocket now wears its faux battle scars proudly, ready for display as a seasoned traveler of the atmosphere
Glow Bands for Easy Tracking
This custom paint job combines classic white fuselage with striking neon accents to ensure your rocket is visible against any sky. The overlapping luminous bands not only look sleek but serve a practical purpose by making recovery much easier in tall grass.
Step-by-Step Guide
Materials
- Model rocket kit (body tube, nose cone, balsa fins)
- White primer spray paint
- Gloss white spray paint
- Neon green acrylic paint (high visibility)
- Neon orange acrylic paint (high visibility)
- Red acrylic paint (for pinstriping)
- Masking tape or painter’s tape (various widths)
- Fine detail paintbrush
- Medium flat paintbrush
- Sandpaper (fine grit)
- Clear coat sealant (gloss)
Step 1: Preparation and Base Coat
-
Surface Prep:
Begin by lightly sanding the entire body tube and balsa fins to remove any ridges or imperfections. Wipe the surface down with a tack cloth or slightly damp rag to ensure no dust remains. -
Prime the Body:
Apply a coat of white primer to the entire rocket, including the nose cone and fins. Hold the can about 10-12 inches away and use sweeping motions to avoid drips. -
Smooth the Primer:
Once the primer is fully dry, inspect for rough spots. Give it another very light sanding if necessary to create a glass-smooth surface for the topcoat. -
Apply White Base:
Spray the entire rocket with gloss white paint. I prefer doing two light coats rather than one heavy one to prevent running. Let this cure completely, ideally overnight, as the tape in the next steps can pull up soft paint.
Bleeding Lines?
If paint bleeds under your tape, let it dry completely. Then, use a small brush with your glossy white base color to ‘erase’ the mistake and sharpen the edge.
Step 2: Adding the Neon Accents
-
Masking the Body Band:
Decide on the placement of the horizontal band, typically about 2/3rds down the body tube. Use masking tape to mark off a crisp horizontal stripe, ensuring the tape is pressed down firmly at the edges. -
Painting the Horizontal Band:
Using your medium flat brush, fill in the masked area with neon green acrylic paint. You will likely need 3-4 thin coats to get that solid, opaque neon look. -
Remove Horizontal Tape:
Carefully peel back the masking tape while the last coat is tacky but not wet. This helps create a sharp line without chipping the dried acrylic. -
Vertical Stripe Guide:
For the long vertical green stripe, you can either freehand it for a rustic look or use two long strips of tape to create a guide running from the nose cone base down to the fin can. -
Painting the Vertical Line:
Paint the vertical stripe with the same neon green. Notice how it overlaps the horizontal band; allow the paint to build up slightly at the intersection for texture. -
Nose Cone Detail:
Paint the tip of the nose cone with neon orange acrylic. You can mask this if you want a perfect circle, or careful brushwork can achieve a nice organic transition.
Step 3: Fin Detailing and Pinstriping
-
Base Color for Fins:
Paint the lower section of the body tube (the area between the fins) in neon green to match the stripes. -
Painting the Fin Faces:
Paint the flat sides of the balsa fins with neon orange. The contrast between the green body tube and orange fins creates maximum visual vibration. -
Fin Edges:
carefully paint the leading and trailing edges of the fins. Check for any missed spots near the glue joints where the fins meet the body. -
Red Border Detail:
Using a very fine detail brush, add thin red pinstripes directly above and below the horizontal neon green band. This frames the color and adds a professional touch. -
Clean Up Lines:
Inspect all your neon lines. If the white base shows through patchily, dab a little extra neon paint to solidify the color saturation.
Make It Glow
Mix a small amount of glow-in-the-dark powder or medium into your neon green acrylic. It won’t change the day color but adds a fun luminescence for twilight launches.
Step 4: Final Assembly
-
Dry Time:
Allow all acrylic details to dry for at least 4 hours. Neon pigments can sometimes stay gummy longer than standard colors. -
Protective Seal:
Spray the entire finished rocket with a clear gloss sealant. This locks in the acrylics, protects the white from grass stains, and gives the neon a unified sheen.
Your rocket is now ready for the launchpad, sporting a vibrant look that is impossible to miss in the sky
Layered Decal Collage Under Clear Coat
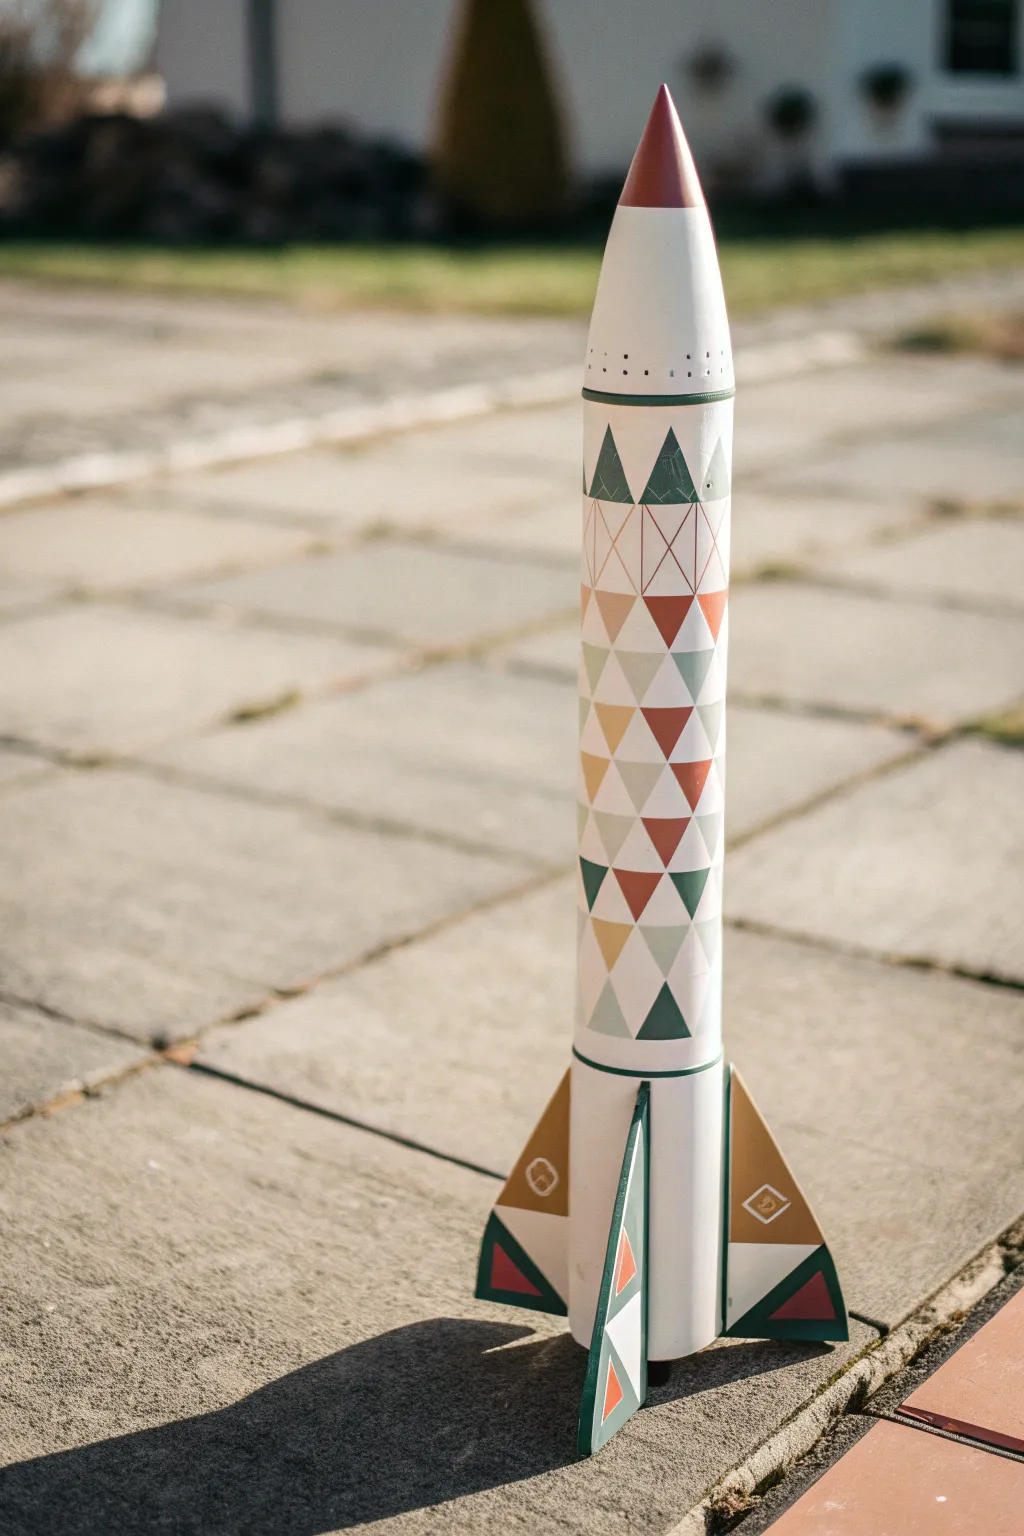
Transform a standard model rocket into a piece of modern art with this intricate geometric design. By layering cut vinyl or decals under a protective clear coat, you achieve a seamless, high-end finish that looks professionally printed rather than handmade.
How-To Guide
Materials
- Model rocket kit (standard tube size)
- White primer spray paint
- Matte white spray paint (base coat)
- Copper or rust metallic spray paint (nose cone)
- Adhesive vinyl sheets or uncut decal paper (forest green, terracotta, mustard gold)
- Craft knife or Cricut machine
- Self-healing cutting mat
- Metal ruler
- Fine-grit sandpaper (400 and 800 grit)
- Clear matte acrylic sealer spray
- Pencil and masking tape
- Transfer tape (optional)
Step 1: Preparation and Base Coating
-
Smooth the surfaces:
Before assembling, sand the rocket body tube and balsa fins lightly with 400-grit sandpaper to remove any spiral grooves or roughness. Wipe away dust with a tack cloth. -
Assemble the rocket:
Glue the fins to the body tube according to your kit’s instructions. Ensure the fillets (glue joints) are smooth and fully dry before painting. -
Apply primer:
Spray a light coat of white primer over the entire rocket body and the separate nose cone. Let it dry, then sand very lightly with 800-grit paper for a glass-smooth surface. -
Paint the base color:
Spray the rocket body with matte white paint. Apply two to three thin coats rather than one heavy one to avoid drips. Allow at least 24 hours of curing time so the adhesive applied later won’t lift the paint. -
Paint the nose cone:
While the body dries, spray the nose cone with the metallic copper or rust paint. Set it aside to cure completely.
Step 2: Creating the Geometric Pattern
-
Cutting the triangles:
This is the most time-consuming part. You need many small equilateral triangles. If using a craft knife and ruler, cut strips of vinyl 0.5 inches wide, then cut diagonally to create triangles. Alternatively, use a digital cutter for precision. -
Plan the layout:
Lightly mark a horizontal ring around the rocket body where you want the pattern to start and stop. I like to measure about 1/3 down from the top and leave the bottom 1/4 white. -
Apply the first row:
Peel and stick your first row of triangles (pointing up) along your bottom guideline. Use alternating colors like terracotta, gold, and green to establish your palette. -
Build the mosaic:
Place the next row of triangles pointing down into the gaps of the first row. Continue building upward, row by row. -
Vary the density:
As you move up the rocket body, start spacing the triangles out slightly or skip some spots entirely to create a ‘fading’ effect near the top, rather than a solid block of color. -
Detailing the fins:
Apply larger triangle cutouts to the corners of the fins. Use the straight edges of the fins as guides for your vinyl placement to keep things sharp. -
Adding fine lines:
Cut extremely thin strips of contrasting vinyl (or use a fine-tip paint pen) to add the delicate ‘X’ patterns and dividers seen in the upper section of the design.
Sticky Situation
If vinyl keeps lifting at the sharp points of the triangles, use a hairdryer on low heat to warm the decal for 5 seconds, then press down firmly.
Step 3: Sealing and Finishing
-
Smooth the edges:
Once all decals are placed, firmly rub them down with a burnishing tool or the back of a spoon to ensure edges are fully adhered. -
Initial clear coat:
Spray a very light ‘mist coat’ of clear matte sealer over the decal area. Do not wet the surface yet; this initial mist locks the edges without dissolving the adhesive. -
Full sealing:
After the mist coat dries (15 minutes), apply a heavier wet coat of clear sealer over the entire rocket body. This unifies the sheen of the vinyl and the paint. -
Reattach nose cone:
Once the body remains tacky-free, slide the painted nose cone back into place. You can add a thin strip of green vinyl at the seam where the nose cone meets the body for a clean transition.
Pro Seam Hiding
Align the ‘seam’ of your pattern application (where the start and end of the row meet) with the launch lug so the disruption is hidden on the back.
Now you have a stunning, gallery-worthy rocket ready for the launch pad or the display shelf


Have a question or want to share your own experience? I'd love to hear from you in the comments below!