
Monsters are my favorite excuse to ditch perfection and just play with shape, color, and personality. If you’re craving ideas that feel whimsical, kid-friendly, and wildly creative, let’s build some lovable little beasts together.
Googly-Eyed Monster Faces
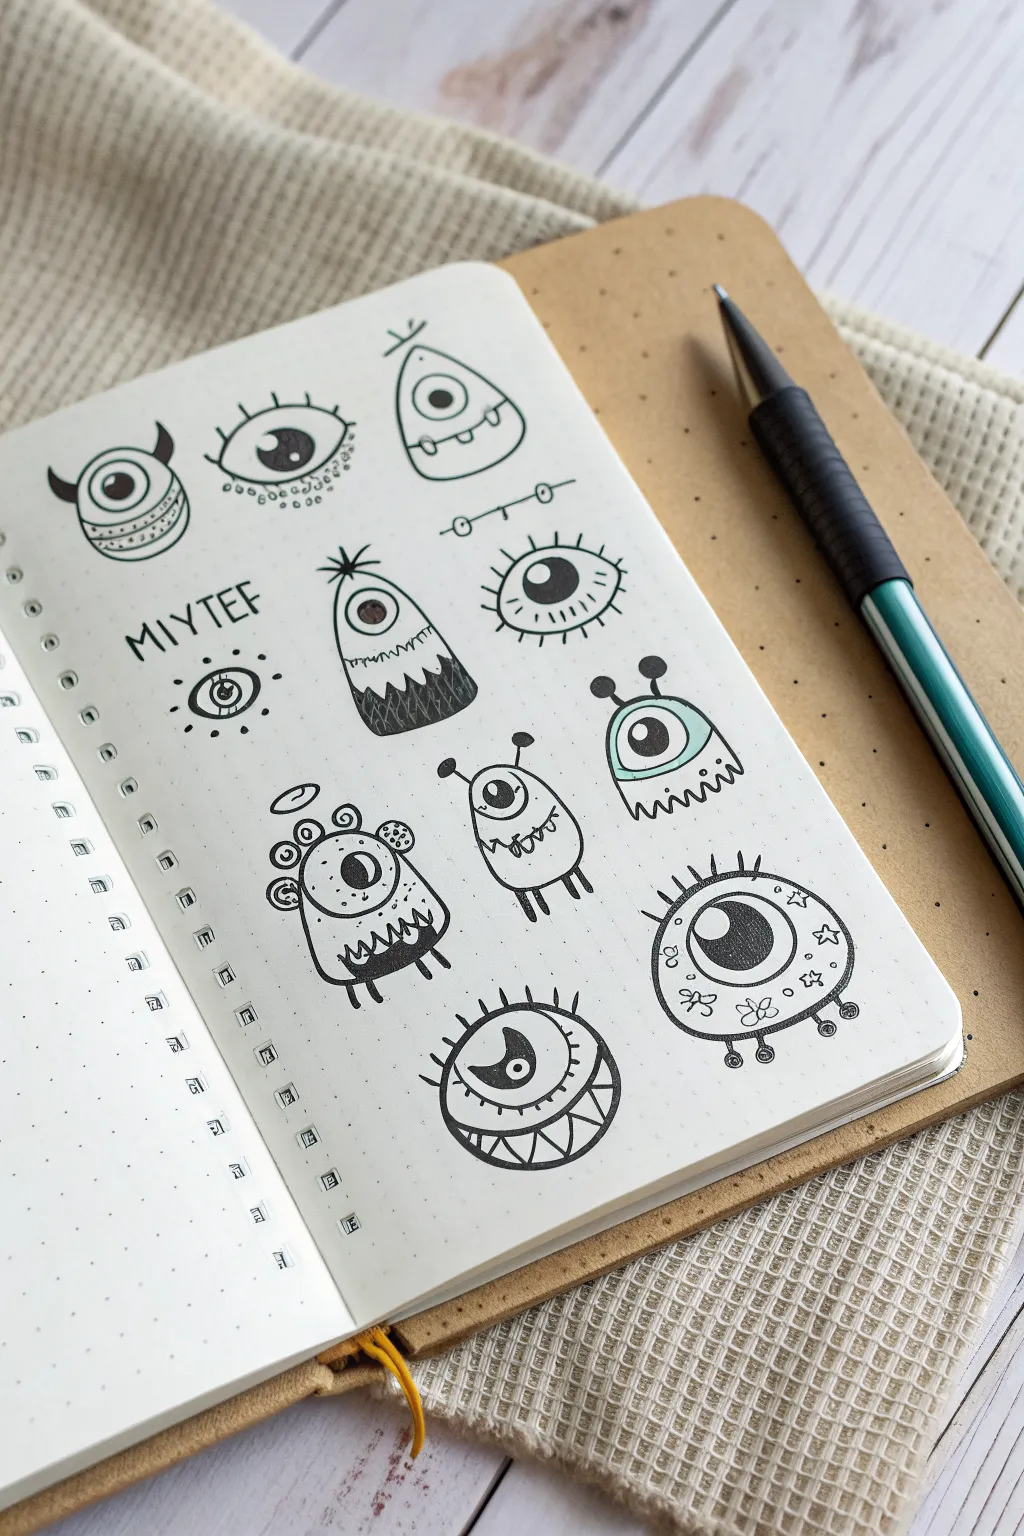
Fill your sketchbook with a playful page of quirky, one-eyed creatures that bring personality to scribbles. These minimal black-ink monsters use simple shapes and bold eye designs to create expressive, slightly spooky characters.
How-To Guide
Materials
- Dotted grid journal or sketchbook paper
- Fine liner pen (01 or 03 size, black)
- Thicker felt tip pen or marker (05 or 08 size, black)
- Pencil (HB or 2B)
- Eraser
- Optional: Cyan or light blue marker for accents
Step 1: Conceptualizing the Shapes
-
Grid Layout:
Start by lightly visualizing a grid on your dotted paper. Aim to fit three columns and about four rows of doodles, leaving comfortable negative space between each imagined square. -
Light Sketching:
Using a pencil with very light pressure, sketch basic geometric shapes for the monster bodies. Draw a mix of ovals, gumdrop shapes, and flattened circles. Don’t worry about details yet; just place the ‘blobs’ on the page. -
Eye Placement:
The defining feature of these monsters is the single, prominent eye. Sketch a large circle within or on top of each body shape. Vary the placement—some eyes can float above the body, while others take up the entire face.
Eye Expression Trick
Change the direction of the monster’s gaze by moving the black pupil. Pupils looking up, down, or sideways create vastly different personalities.
Step 2: Inking the First Row
-
The Horned Cyclops:
Starting at the top left, ink a round body shape. Draw a large central eye with a heavy pupil. Add two small, curved horns on top and three curved lines across the bottom of the body for texture. -
The Floating Eye:
To the right, draw a standalone eye. Ink a wobbly, nervous sclera (the white part) and a dark pupil with a small white highlight. Add sketched lashes on top and small stippling dots underneath for a shadowy effect. -
The Tall Gumdrop:
For the third monster in the row, ink a tall, tapered oval shape. Draw the eye near the top. Add a small mouth with two teeth sticking up from the bottom lip, and finish with a single hair sprig on top.
Step 3: Adding Text & Mid-Page Monsters
-
Hand Lettering:
Below the first monster, write a playful nonsense word or title like ‘MIYTEF’ in casual, all-caps block letters to fill the gap. -
The Hairy Cone:
In the center, ink a cone-shaped monster. Draw the eye roughly in the middle. At the base of the cone, use jagged zigzag lines to simulate fur or a skirt, filling the bottom section with solid black ink. -
Radiating Lashes:
Create an eye that looks like a sunburst. Draw the central pupil and iris, then surround it with short, outward-facing dashed lines instead of a solid outline, creating a ‘shocked’ expression. -
Antennae Alien:
Move lower and draw a small, round creature. Give it a distinct rectangular mouth with zigzag teeth. Add two antennae on top with small black circles at the tips.
Ink Smearing?
If your hand drags ink across the paper, place a scrap piece of paper under your drawing hand to act as a shield while you work.
Step 4: Complex Characters & Details
-
The Multi-Horned Beast:
For the large monster on the lower left, draw a rounded-square body. Add a halo floating above it. Draw three distinct bulbous shapes on the left side of the head and three stick legs at the bottom. -
Detailing the Beast:
Fill in the mouth of the multi-horned beast with sharp, triangular teeth. Shade the pupil darkly, leaving a white crescent for reflection. -
The Little Walker:
Near the center, draw a small oval body with two stick legs. Add long, straight arms ending in simple circles for hands. Give this one a bewildered expression with a small pupil. -
The Spiky Flower Eye:
In the bottom right corner, draw a large circle. Instead of normal contouring, decorate the iris area with small flower doodles and stars. Add spikes or thick lashes around the outer edge. -
The Bottom Crawler:
At the bottom center, draw a flattened sphere. Place the eye low, looking upward with a crescent pupil. Add a zig-zag pattern across the belly area.
Step 5: Finishing Touches
-
Solid Blacks:
Switch to your thicker marker or pen. Go back and fill in all the pupils, making them bold and dark. I find this creates the strongest contrast and brings them to life. -
Texture Accents:
Use your fine liner to add tiny dots, dashes, or small circles around the monsters to fill empty space and add grunge texture. -
Optional Color Pop:
If you have a cyan or light blue marker, gently trace the outline of just one or two monsters (like the antenna alien) to make them stand out without overwhelming the monochrome look. -
Erase Sketches:
Wait at least 10 minutes for the ink to fully cure. Gently erase all remaining pencil guidelines to leave a crisp, clean finish.
Close your sketchbook knowing you have created a lively crowd of unique characters

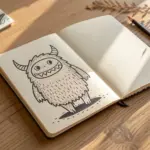
One-Eyed Cyclops Cuties
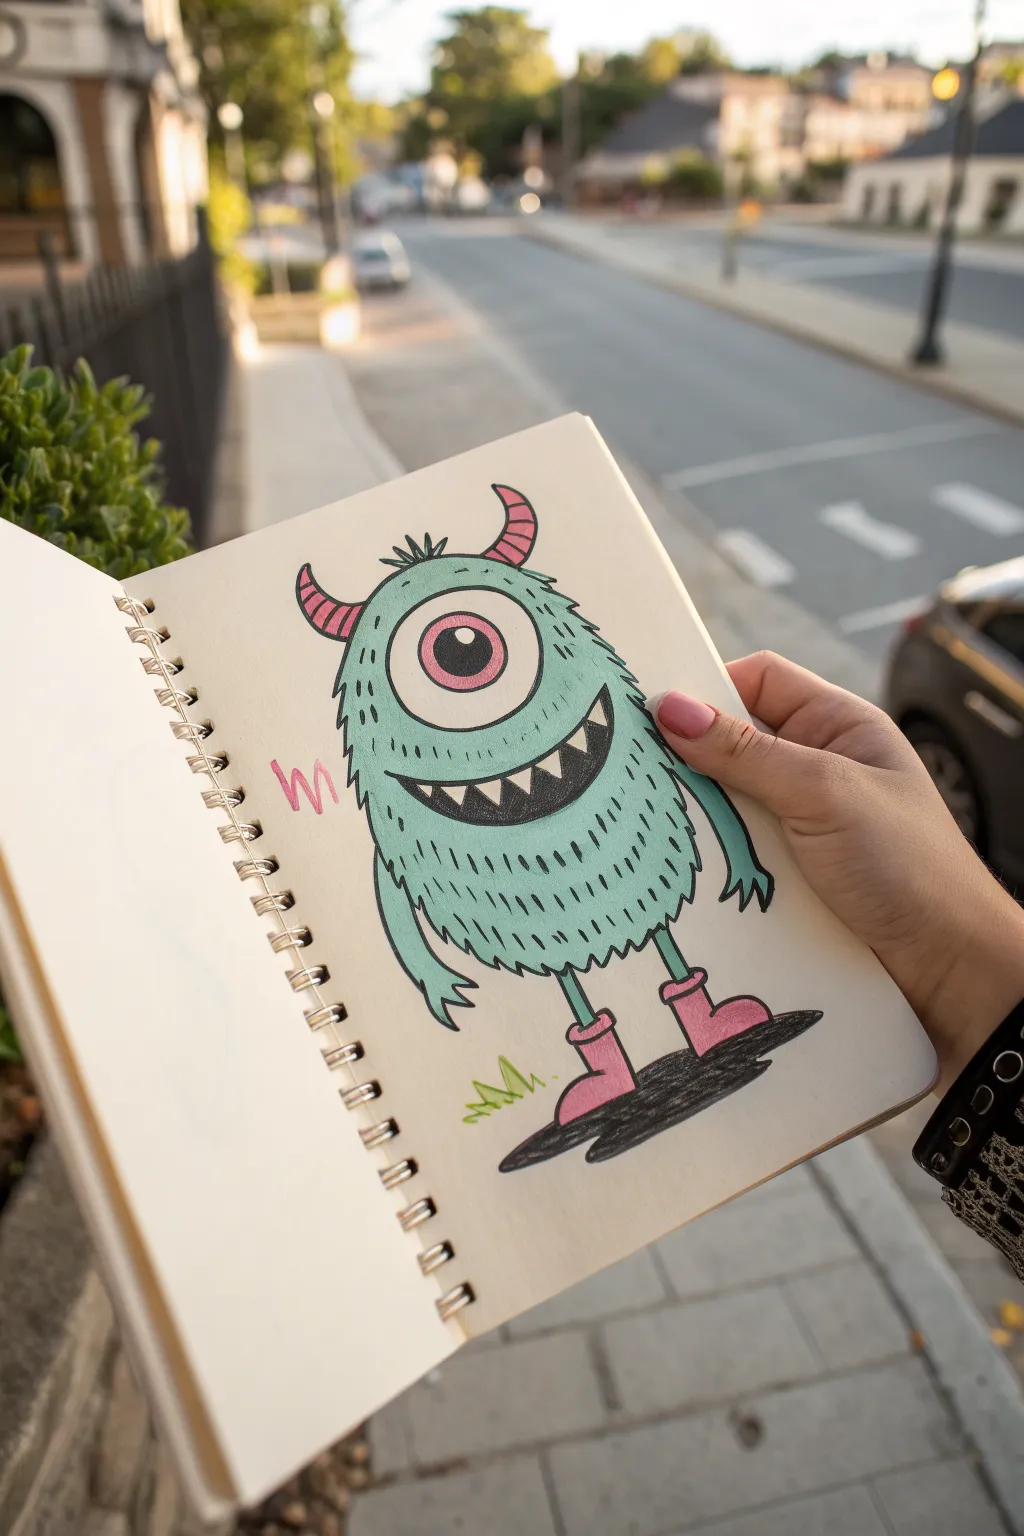
This charming, fuzzy friend proves that monsters don’t have to be scary—they can be downright adorable in teal fur and pink rain boots. The drawing features bold outlines and soft pastel coloring for a style that pops right off the sketchbook page.
Step-by-Step Guide
Materials
- Sketchbook or drawing paper (heavyweight marker paper preferred)
- Pencil and eraser
- Fine liner pen (black, waterproof)
- Teal/mint colored alcohol markers or colored pencils
- Pink/magenta colored alcohol markers or colored pencils
- Dark grey or black marker for shading
- Light green marker for grass
Step 1: Sketching the Base
-
Body outline:
Begin by sketching a large, rounded egg shape for the monster’s body. Keep the bottom slightly flatter than the top to give it some weight. -
Central eye:
Draw a large circle in the upper middle of the body for the single eye. Inside this, add two smaller concentric circles: one for the iris and a smaller one for the pupil. -
Smile shape:
Below the eye, sketch a wide, curved ‘U’ shape for the mouth. Add a straight line across the top of the curve to close the shape. -
Adding teeth:
Inside the mouth, draw a zigzag line across the top and bottom to create sharp, triangular teeth. -
Arms and horns:
Sketch two curved horns protruding from the top of the head. Then, draw two skinny arms hanging down the sides, ending in simple, three-fingered hands.
Bleeding Lines?
If your black outline bleeds when you add marker color, switch to a pigment liner or archive-quality pen. Alternatively, color first and outline last.
Step 2: Refining Details
-
Fur texture:
Go around the outer edge of your body shape and add small, jagged tufts to make the monster look fuzzy instead of smooth. -
Legs and boots:
Draw two thin sticks for legs at the bottom. At the end of each, sketch a simple rain boot shape with a thick cuff at the top. -
Ground details:
Add a small patch of jagged grass near the left foot and a flat oval shadow beneath both boots to ground the character. -
Inking lines:
Trace over your pencil lines with a black fine liner. I like to use a slightly thicker line for the outer body and boots to make them stand out. -
Cleanup:
Wait a moment for the ink to dry completely, then gently erase all visible pencil marks so your coloring surface is clean.
Make it fuzzy
Instead of marker dashes on the belly, use a colored pencil in a slightly darker teal shade to draw thousands of tiny hair strokes for realistic fur.
Step 3: Adding Color
-
Body color:
Fill in the main body and arms with a mint or light teal marker. Use long, consistent strokes to avoid streakiness. -
Inner details:
Color the horns and the iris of the eye with a vibrant pink. Use the same pink for both rain boots. -
Mouth depth:
Color the inside of the mouth dark grey or black, being very careful to paint around the white triangular teeth so they stay bright. -
Pupil fill:
Fill in the smallest circle of the eye (the pupil) with solid black, leaving a tiny white dot as a highlight if desired. -
Texture dashes:
Using a thin black pen or darker teal pencil, draw small, vertical dash marks scatterered across the tummy area to suggest fur texture. -
Detailing horns:
Add small curved horizontal lines across the pink horns to give them a ribbed texture. -
Grounding it:
Color the shadow oval beneath the feet with a dark grey or black, using horizontal scribble strokes for a sketchier look. -
Final touches:
Add a zigzag ‘M’ shape in pink to the left of the monster for a playful decorative element and color the grass patch light green.
Now you have a friendly monster ready to jump off the page and into an adventure


Three-Eyed Color Pop Monsters
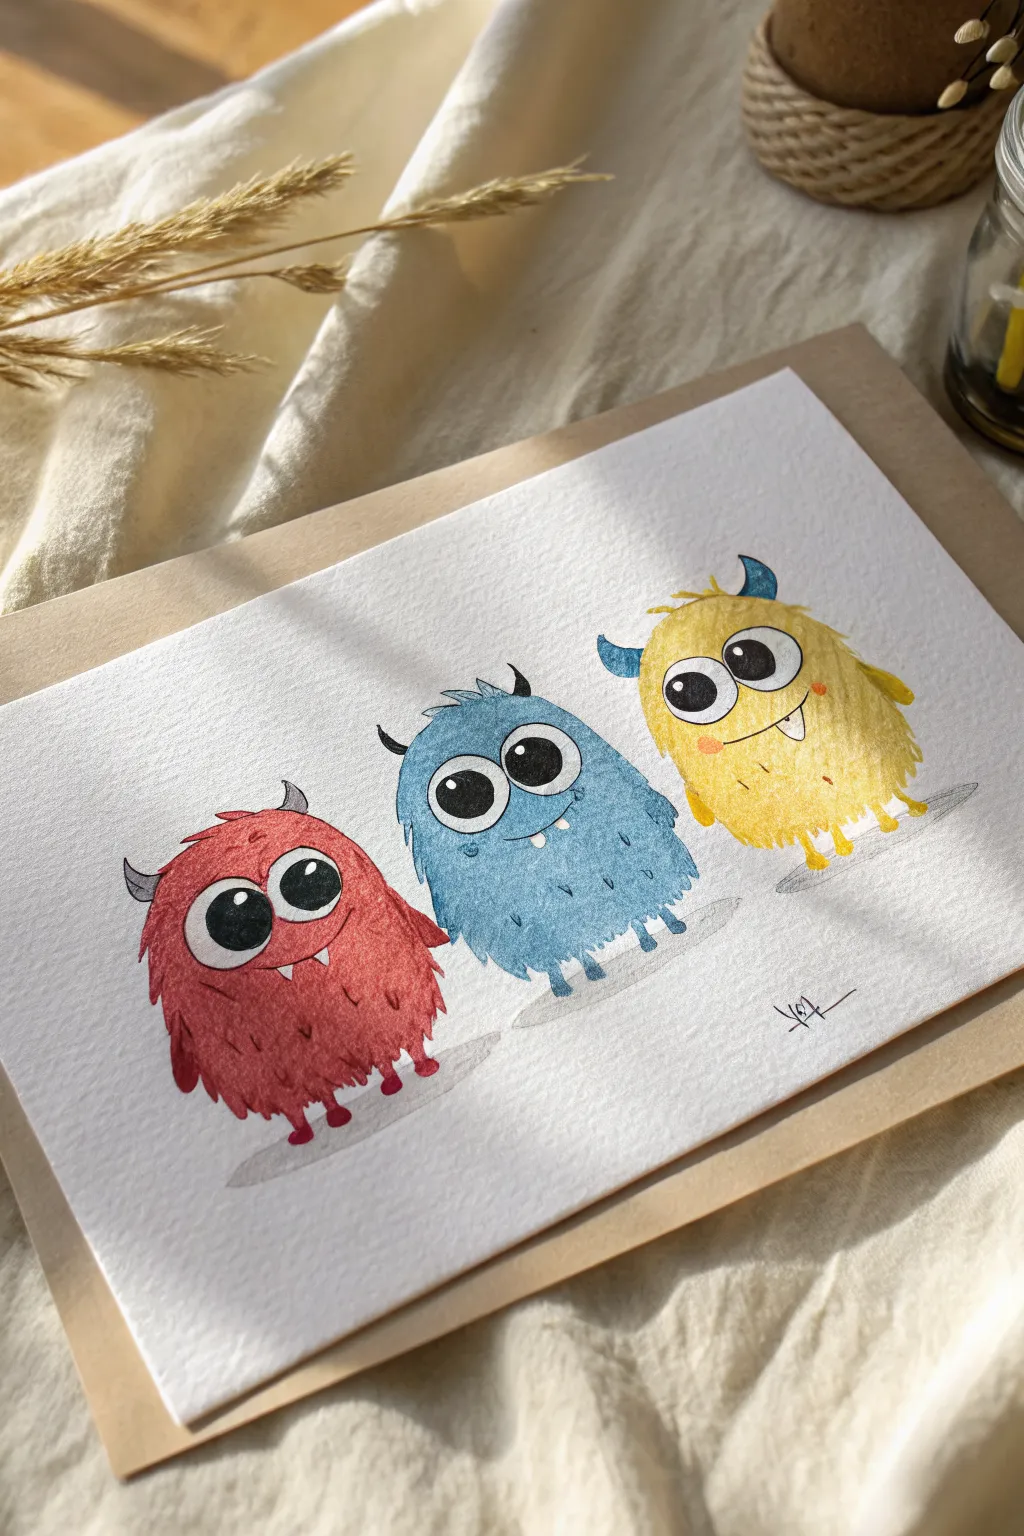
These adorable, fuzzy monsters bring a splash of color and personality to any greeting card or wall art. Using simple watercolor techniques and ink outlining, you can create character-filled creatures with charmingly imperfect textures.
Detailed Instructions
Materials
- Cold press watercolor paper (300gsm)
- Black waterproof fine liner pen (0.3mm or 0.5mm)
- Watercolor paints (Red, Cerulean Blue, sunny Yellow)
- Small round brushes (size 2 and 4)
- White gel pen (optional)
- Pencil and eraser
- Kraft paper cardstock (for mounting)
Step 1: Sketching the Shapes
-
Plan the composition:
Begin by lightly marking the center of your watercolor paper to ensure your three monsters will fit evenly. You want them standing shoulder-to-shoulder but not overlapping. -
Draw the main bodies:
Sketch three soft, egg-like oval shapes. Vary the heights slightly to give them personality; make the middle blue one a bit rounder and the outer ones slightly taller. -
Add facial features:
Draw two large, touching circles for eyes on each monster. Place them roughly in the upper third of the body shapes to make them look cute and attentive. -
Detail the limbs and horns:
Sketch tiny stick legs with rounded feet at the bottom. Add small, curved horns on their heads—vary the direction (some pointing in, some out) for variety.
Fuzzy Texture Trick
Use a nearly dry brush with concentrated pigment to flick color outward from the body edges. This makes the fur look fluffier than just painting a solid shape.
Step 2: Inking the Outlines
-
Ink the eyes and horns:
Using your waterproof fine liner, trace the eyes and horns with a steady hand. Fill in the pupils solid black, leaving a small white highlight circle in each for a sparkle. -
Create the fur texture:
Instead of tracing the body outline with a solid line, use short, quick flicks of the pen to simulate fur. Follow the curve of your pencil sketch, keeping the flicks loose and somewhat irregular. -
Add mouths and teeth:
Draw simple, curved smiles. For extra charm, add one or two small, triangular teeth protruding from the smile line on the blue and yellow monsters. -
Erase pencil marks:
Wait until the ink is completely dry to prevent smudging, then gently erase all your initial pencil guidelines.
Step 3: Watercolor Application
-
Paint the red monster:
Load your brush with red watercolor. Start painting the body of the left monster, staying mostly within the ‘fur’ lines but letting the color bleed slightly to the edge for softness. -
Add texture while wet:
While the red paint is still damp, dab in slightly more concentrated red pigment near the bottom and sides to create a shadowed, rounded 3D effect. -
Paint the blue monster:
Rinse your brush thoroughly. Paint the middle monster with cerulean blue. Use the tip of the brush to dab small dots or texture marks into the wet paint to enhance the fuzzy look. -
Paint the yellow monster:
Paint the final monster on the right with a bright, sunny yellow. Keep the wash relatively even, but darken the bottom edge slightly for weight. -
Color the horns:
Use a contrasting color for the horns if desired, or stick to grey. For the blue monster, black horns work well; for the yellow one, try blue horns for a fun contrast. -
Shadows and grounding:
Dilute a tiny bit of grey or watered-down black paint. Add a very faint, horizontal oval shadow underneath each monster’s feet so they don’t look like they are floating.
Customize Their Moods
Change the eyebrow angles! Slanting them inward makes them look angry (but cute), while lifting them high makes them look surprised or excited.
Step 4: Final Touches
-
Dry completely:
Allow the paint to dry fully. If the paper feels cool to the touch, it is still damp. -
Detail enhancement:
If painting covered up any ink lines, re-trace them gently with your pen. Add tiny dots or ‘freckles’ on their cheeks for extra cuteness. -
Mounting:
Trim the watercolor paper down to size and glue it centered onto a piece of kraft cardstock to frame the artwork nicely.
Now you have a trio of friendly monsters ready to brighten someone’s day


Horns, Antennae, and Odd Ears
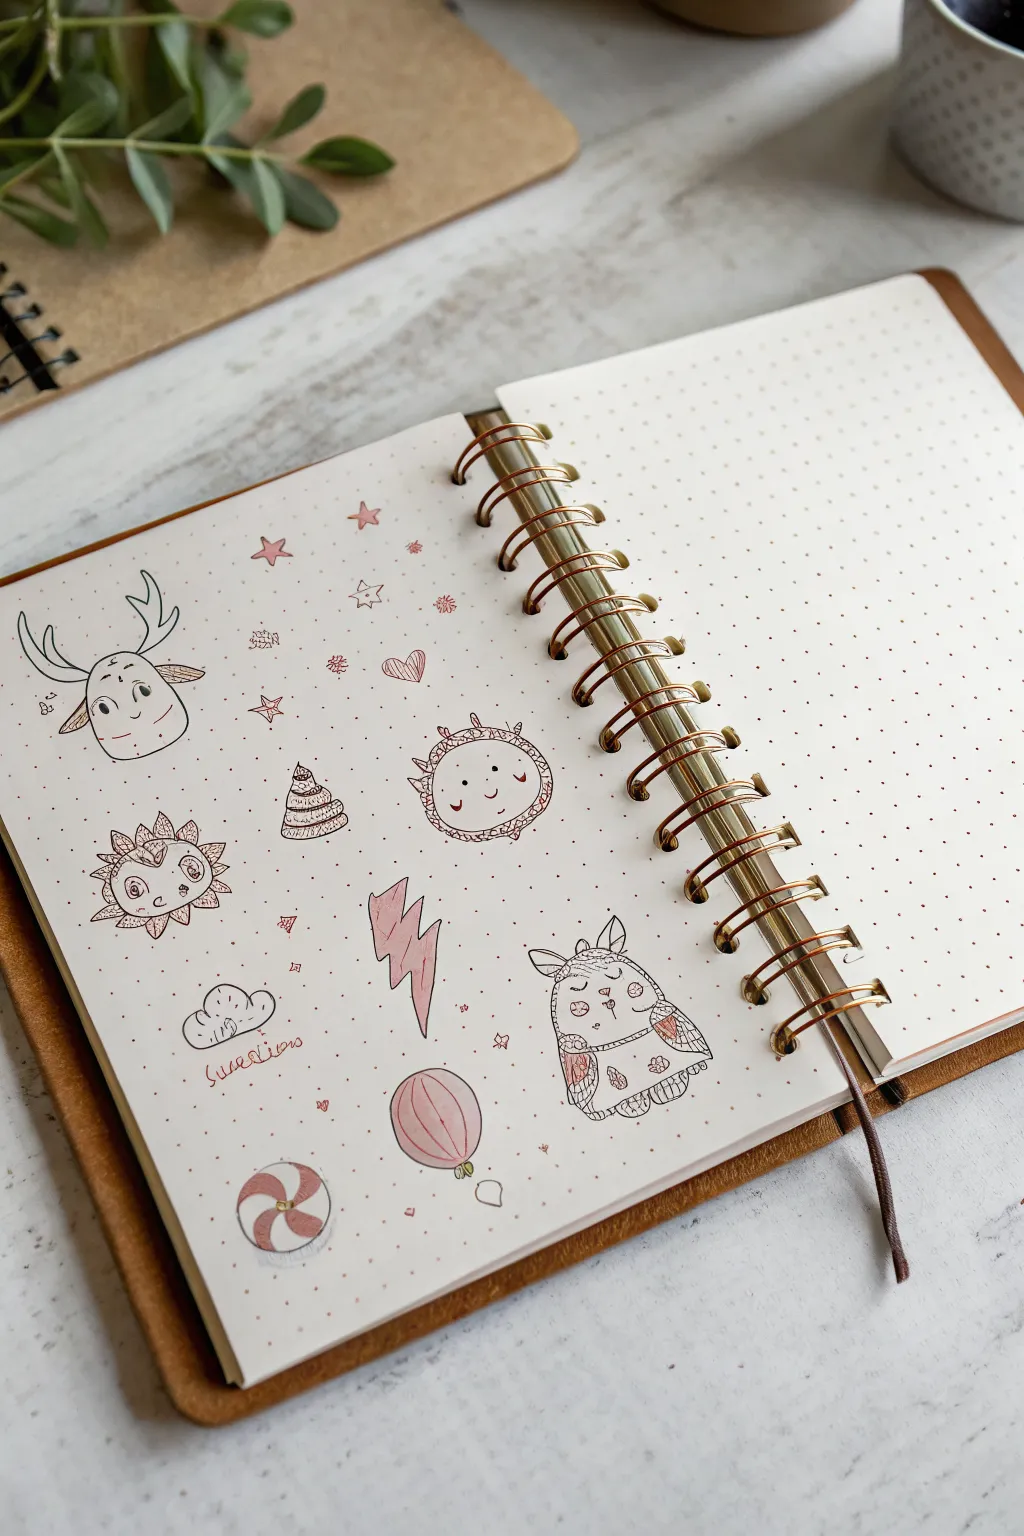
Fill a journal page with this charming collection of simple, folk-art-inspired doodles featuring cute monsters, celestial shapes, and sweet treats. The minimal color palette of black ink and soft rose turns random sketches into a cohesive and delightful layout.
How-To Guide
Materials
- Dotted grid journal or sketchbook
- Fine liner pen (black, size 0.3 or 0.5)
- Thinner fine liner pen (black, size 0.1 for details)
- Rose or dusty pink marker (felt tip or brush pen)
- Pencil and eraser (for preliminary sketched outlines)
Step 1: Planning the Layout
-
Establish the spacing:
Visualize the page as a grid. You want to scatter the larger focal drawings (the deer-monster, the sun, the owl-creature) evenly across the page so it doesn’t look cluttered. -
Lightly sketch placements:
Using a pencil, lightly draw circles or basic shapes where each main doodle will go. This helps ensure you have room for the horns, rays, and antennae without overlapping.
Consistent Ink Flow
Keep your pen upright when drawing the tiny details. This prevents the line weight from changing too much and keeps the delicate ‘doodle’ look consistent across the page.
Step 2: Drawing the Main Characters
-
Start with the horned creature:
In the top left, draw a rounded U-shape for the head. Add two large, curving antlers branching out from the top and small leaf-like ears on the sides. Give it a simple smiling face with wide-set eyes. -
Draw the sun monster:
Towards the center, sketch a messy, textured circle. Add triangular rays all around the perimeter. Inside, draw a simple happy face with small cheeks. -
Create the owl-rabbit hybrid:
In the bottom right, draw an oval shape with pointed ears at the top. Divide the body with a horizontal line for a sweater or outfit. Add wings on the sides and big, sleepy closed eyes with lashes. -
Add the lightning bolt:
Draw a jagged lightning bolt shape near the center bottom. Keep the lines slightly loose for a hand-drawn feel rather than using a ruler. -
Sketch the sweets and balloon:
Add a round peppermint candy shape at the bottom left and a simple balloon with a string near the bottom center. Sketch a small cupcake or poop-emoji shape near the sun.
Metallic Accent
Go over the small stars or the lightning bolt with a gold gel pen instead of pink. The metallic shine adds a magical touch when the journal catches the light.
Step 3: Inking and Details
-
Outline with the main pen:
Take your 0.3 or 0.5 black fine liner and carefully trace over your pencil lines. Don’t worry about perfect smoothness; a slightly shaky line adds to the doodle aesthetic. -
Add texture to the owl:
Use the thinner 0.1 pen to add small scallops or feathers to the owl’s body and wings. Draw tiny circles on its ‘sweater’ for pattern. -
Create facial details:
Inking the faces brings them to life. Make the eyes solid black dots or curved lines. Add tiny dots for cheeks on the sun and the horned monster. -
Pattern the sun creature:
Add small hatch marks or dots inside the triangular rays of the sun monster to give them depth. -
Erase pencil marks:
Wait for the ink to become completely dry to the touch, then gently erase all visible pencil guidelines to clean up the page.
Step 4: Adding Color
-
Color the lightning bolt:
Use your rose or pink marker to fill in the lightning bolt fully. The color should be soft, not neon. -
Accent the main characters:
Apply the pink color selectively. Color the owl’s wings, the sun’s cheeks, and the inside of the horned creature’s ears. -
Fill the smaller elements:
Color every other stripe on the peppermint candy and fill in the balloon with the pink marker. -
Add background stars:
Using the pink marker (or a fine colored pen), draw small five-pointed stars scattered in the empty white spaces between the larger drawings.
Step 5: Finishing Touches
-
Micro-doodling:
Switch back to your finest black pen (0.1). In the remaining empty spaces, draw tiny dots, miniature stars, or small circles to fill the gaps and make the page feel complete. -
Text accents:
If you have space, write a tiny word like ‘Super’ or ‘Stars’ in a loose script near the clouds or doodles. -
Final review:
Check for any large white gaps that feel unbalanced and add a final pink star or black dot to even out the composition.
Now you have a charming page of practice doodles that explores different creature features in a unified style
BRUSH GUIDE
The Right Brush for Every Stroke
From clean lines to bold texture — master brush choice, stroke control, and essential techniques.
Explore the Full Guide
Shape-Based Monster Bodies
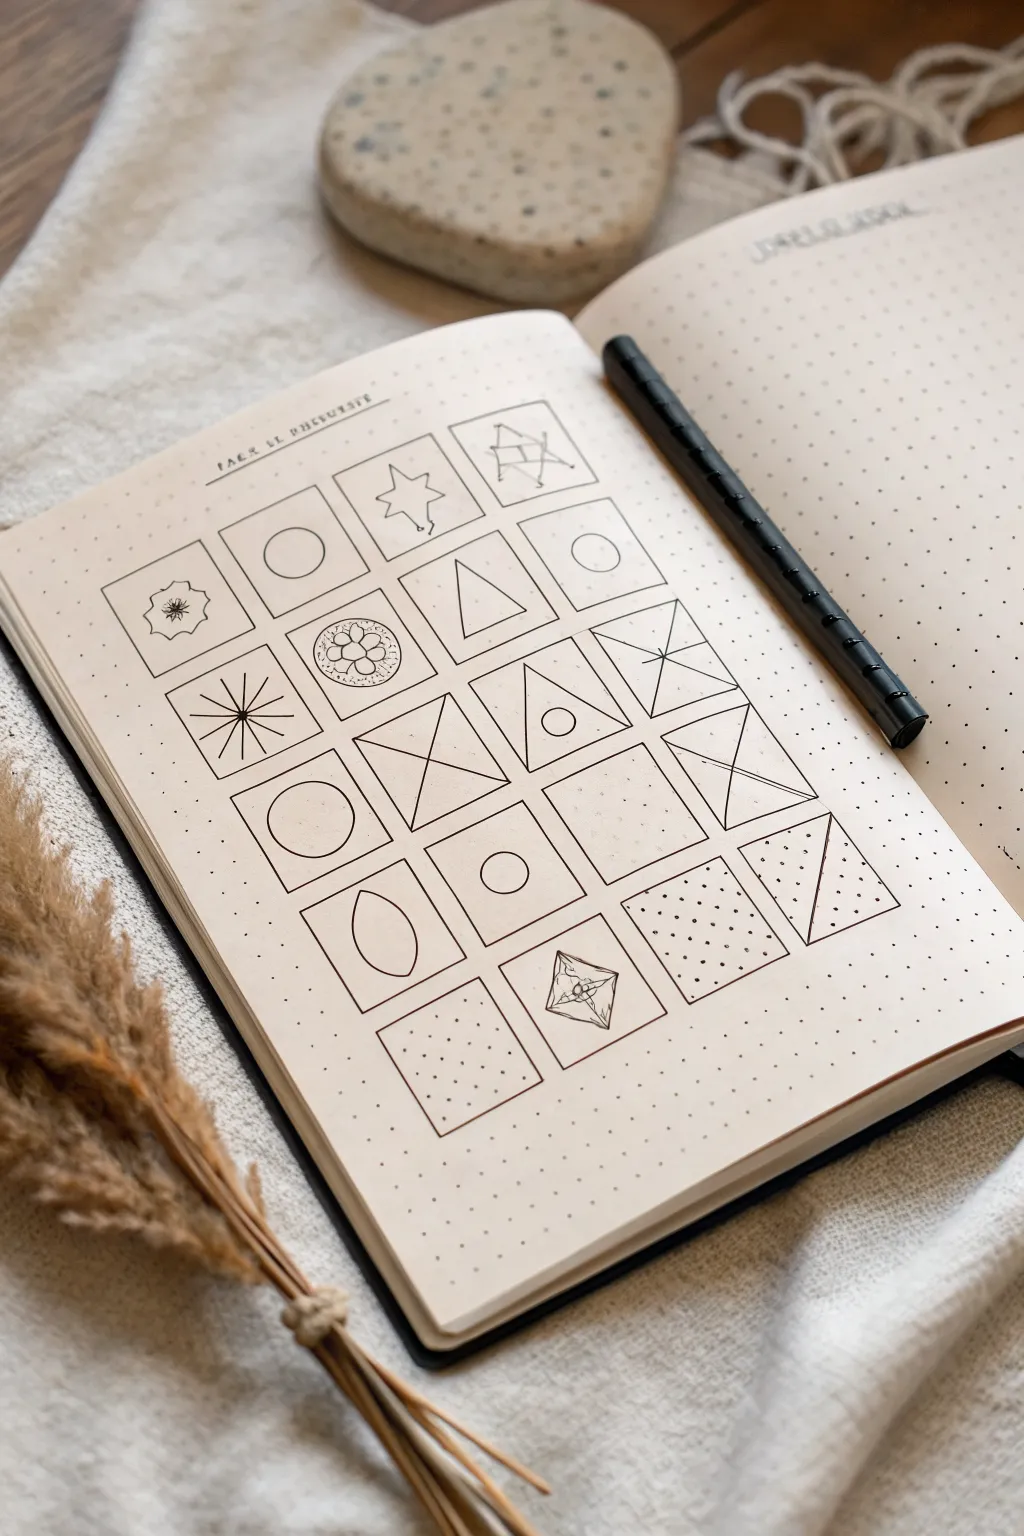
This creative exercise uses a simple grid of squares filled with various geometric shapes as a brainstorming tool for character design. It’s a clean, minimalist spread that invites you to transform basic forms into unique monster bodies.
Step-by-Step
Materials
- Dot grid notebook or journal (A5 size recommended)
- Fine liner pen (black, 0.3mm or 0.5mm)
- Ruler or straight edge
- Pencil (optional, for sketching)
- Eraser
Step 1: Setting Up the Grid
-
Assess your page:
Begin by opening your dot grid notebook to a fresh spread. Count the dots horizontally and vertically to determine the center and spacing for your squares. You’ll need space for a 4×5 grid. -
Draft the title:
At the very top of the page, neatly hand-letter a small title like ‘Body Shapes’ or ‘Monster Base’ using your fine liner. Keep it centered and understated. -
Mark the corners:
Using a pencil to start, mark the four corners of each square you plan to draw. Aim for squares that are roughly 4-5 grid units wide and tall, leaving a 1-unit gap between them for breathing room. -
Draw the grid lines:
With your fine liner and a ruler, connect your markings to create the 20 distinct boxes. Draw four horizontal rows of five boxes each, ensuring the lines are crisp and straight. -
Let the ink set:
Give the ink a moment to dry completely before carefully erasing any pencil guidelines to keep the page looking sharp.
Uneven Squares?
If your hand-drawn squares look wonky, cut a template from cardstock the exact size you want your boxes to be and trace around it for perfect uniformity.
Step 2: Adding the Shapes
-
Simple circles:
Start with the basics. In the second square of the top row (and a few others randomly scattered), draw a perfect circle centered within the box. -
Triangular forms:
In several other boxes, draw triangles. Experiment with orientation; have some pointing up, some down, and vary their width. -
Draw an asterisk:
In the first box of the second row, draw a large asterisk shape with lines radiating from a central point to the corners and sides. This creates a spiky body base. -
Create a star:
In the third box of the top row, sketch a somewhat loose, asymmetric star shape. It doesn’t need to be perfect; the irregularity adds character. -
Add intersecting lines:
For the bottom right squares, draw an ‘X’ from corner to corner. In the square next to it, draw a standard cross (‘+’) to divide the box into quadrants. -
Combine shapes:
Try mixing forms. In the center row, draw a triangle with a small circle floating in the middle of it. This suggests a cyclops-style eye or a hollow body. -
Texture squares:
Fill two or three squares with patterns instead of outlines. Use small dots for a stippled texture in one, and perhaps a small grid pattern in another. -
Floral motif:
In the second box of the second row, draw a flower-like shape inside a circle. Use small loops for petals to create a softer, more organic monster body option. -
Diamond shape:
Near the bottom, draw a diamond or kite shape. Inside it, sketch a smaller geometric form to suggest depth or a crystal-like structure. -
Connect points:
In the top right box, draw random dots and connect them with straight lines, creating a constellation-like, jagged form. -
Final varied shapes:
Fill the remaining empty boxes with variations: a wide oval (like a seed), a square-within-a-square, or a triangle with a line striking through it. -
Review and refine:
I usually scan the whole page once finished to see if any lines need thickening. Reinforce any weak lines with your pen to ensure every box has equal visual weight.
Use A Compass
For the circular elements inside the boxes, use a drawing compass or a circle stencil ruler to keep the curves smooth and professional-looking.
You now have a complete catalog of body shapes ready to inspire your next set of monster doodles
Monochromatic Monster Mood Study
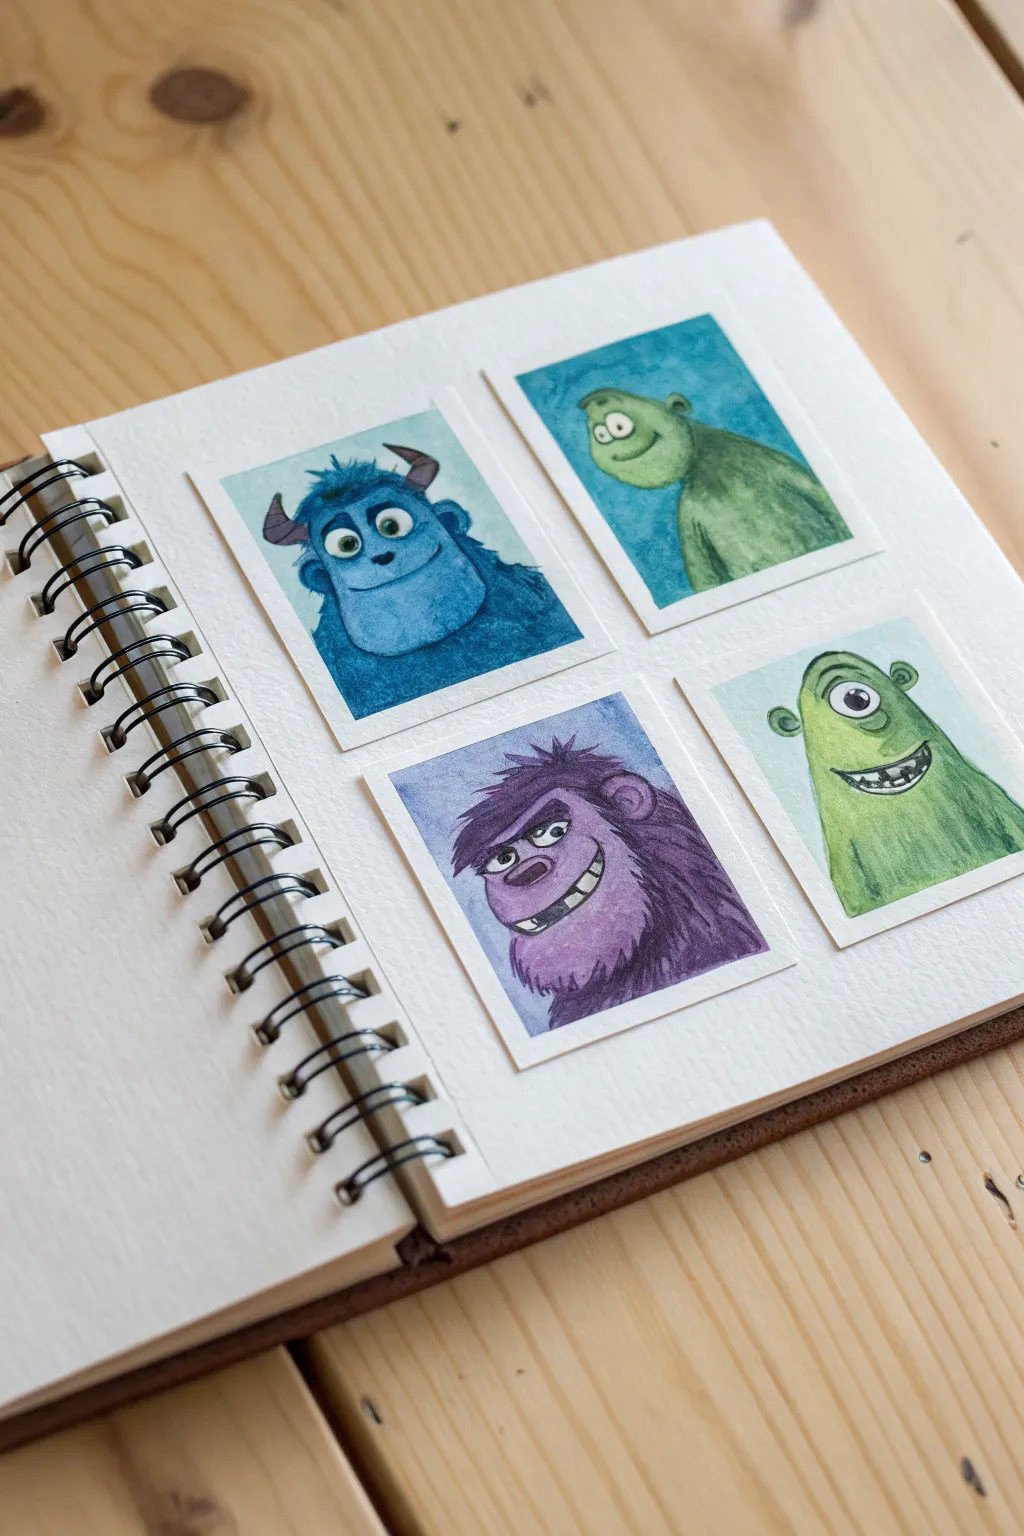
Create a charming grid of four distinct monster personalities using a monochromatic color palette for each. This project focuses on capturing texture—from shaggy fur to smooth scales—within small, manageable square formats using watercolor techniques.
Detailed Instructions
Materials
- Sizable sketchbook with watercolor paper (at least 140lb/300gsm)
- Painter’s tape or low-tack masking tape
- Watercolor paint set (focus on Phthalo Blue, Sap Green, Dioxazine Purple, and Yellow Green)
- Ceramic palette for mixing
- Round brushes (sizes 2, 4, and 0 for details)
- HB Pencil and kneaded eraser
- Jars of clean water
- Paper towels
Step 1: Drafting the Grid
-
Structure the page:
Begin by taping off four equal squares on your sketchbook page. Leave about a half-inch of space between them to create clean, crisp white borders later. Press the tape edges down firmly so paint won’t seep underneath. -
Blue monster sketch:
In the top-left square, lightly sketch a rounded, broad-shouldered monster. Give him two small horns, tufty ears, and a large friendly grin. Keep his fur lines soft and jagged. -
Green monster sketch:
For the top-right square, draw a smoother, pear-shaped monster character. Give this one a simple, wide-eyed expression and a distinct lack of fur to contrast with the first one. -
Purple monster sketch:
In the bottom-left, sketch a shaggy monster with messy hair covering its forehead. Draw a lopsided grin with visible teeth to give him a goofy, mischievous personality. -
Cyclops sketch:
Finally, in the bottom-right square, draw a tall, cone-headed monster. Feature a single large eye in the center and a wide, toothy mouth that spans the width of his face.
Bleeding Edges?
If paint bled under the tape, wait for it to dry fully, then use white gouache or a white gel pen to touch up the borders and reclaim that crisp edge.
Step 2: Base Washes
-
Blue foundation:
Mix a watery wash of Phthalo Blue. Apply this to the top-left monster, working wet-on-dry. While the paint is still wet, drop in slightly more concentrated blue around the edges and chin to start building 3D form. -
First green layer:
For the top-right monster, use a diluted Sap Green. Paint the entire body smoothly. I find that lifting a little pigment from the center of the face with a damp thirsty brush helps create a highlight on his smooth skin. -
Purple base tone:
Using a light wash of Dioxazine Purple, fill in the bottom-left shaggy monster. Don’t worry about fur texture yet; just establish the overall silhouette color. -
Light green wash:
Mix a Yellow Green tone for the bottom-right cyclops. Apply an even wash, avoiding the single eye and the teeth, which should remain white for now.
Step 3: Developing Texture & Depth
-
Fur texturing (Blue):
Once the blue base is dry, use a size 2 brush with less water and more pigment. Use short, flicking strokes to mimic fur texture, layering darker blues around the neck and under the chin. -
Smooth shading (Green):
Return to the top-right green monster. Glaze a darker Sap Green along the right side and bottom edge to make him look round. Keep the transitions soft by blurring edges with a clean, damp brush. -
Shaggy details (Purple):
For the purple monster, load your brush with concentrated purple paint. Paint jagged, messy hair clumps, focusing on the shadow areas under the hair fringe and the jawline. -
Skin mottling (Light Green):
On the cyclops, dab small spots of darker green while the surface is slightly damp to create a bumpy, reptilian skin texture. Darken the area under the chin significantly.
Pro Tip: Fur Effect
For realistic fur, let the brush run almost dry (dry-brush technique) and drag it lightly over the paper’s tooth. This creates broken lines that look naturally fuzzy.
Step 4: Refining Faces
-
Eye details:
Paint the irises of the eyes. Use bright greens or hazels for contrast against the blue and purple skins. Leave tiny white specks of paper unpainted for the catchlights. -
Facial features:
Using a size 0 brush and a very dark mix (like Indigo or Payne’s Gray), carefully outline the smiles, define individual teeth, and add pupils to the eyes. -
Horns and ears:
Paint the horns on the blue monster with a dusty grey or brown. Add shadow to the inner ears of the green monster to give them depth. -
Background wash:
Mix very diluted versions of each monster’s main color. Carefully paint the negative space behind each monster to make the figures pop, keeping the color strongest near the monster and fading out toward the tape.
Step 5: Final Touches
-
Deepen shadows:
Mix your darkest value for each hue. Add final tiny shadows under eyelids, behind teeth, and under the chins to maximize contrast. -
The reveal:
Wait until the paper is completely bone-dry. Slowly peel away the masking tape at a 45-degree angle to reveal your crisp white borders.
Enjoy your collection of colorful creatures and consider trying a warm-toned page next time.

PENCIL GUIDE
Understanding Pencil Grades from H to B
From first sketch to finished drawing — learn pencil grades, line control, and shading techniques.
Explore the Full Guide
Neon Slime Monster Splashes
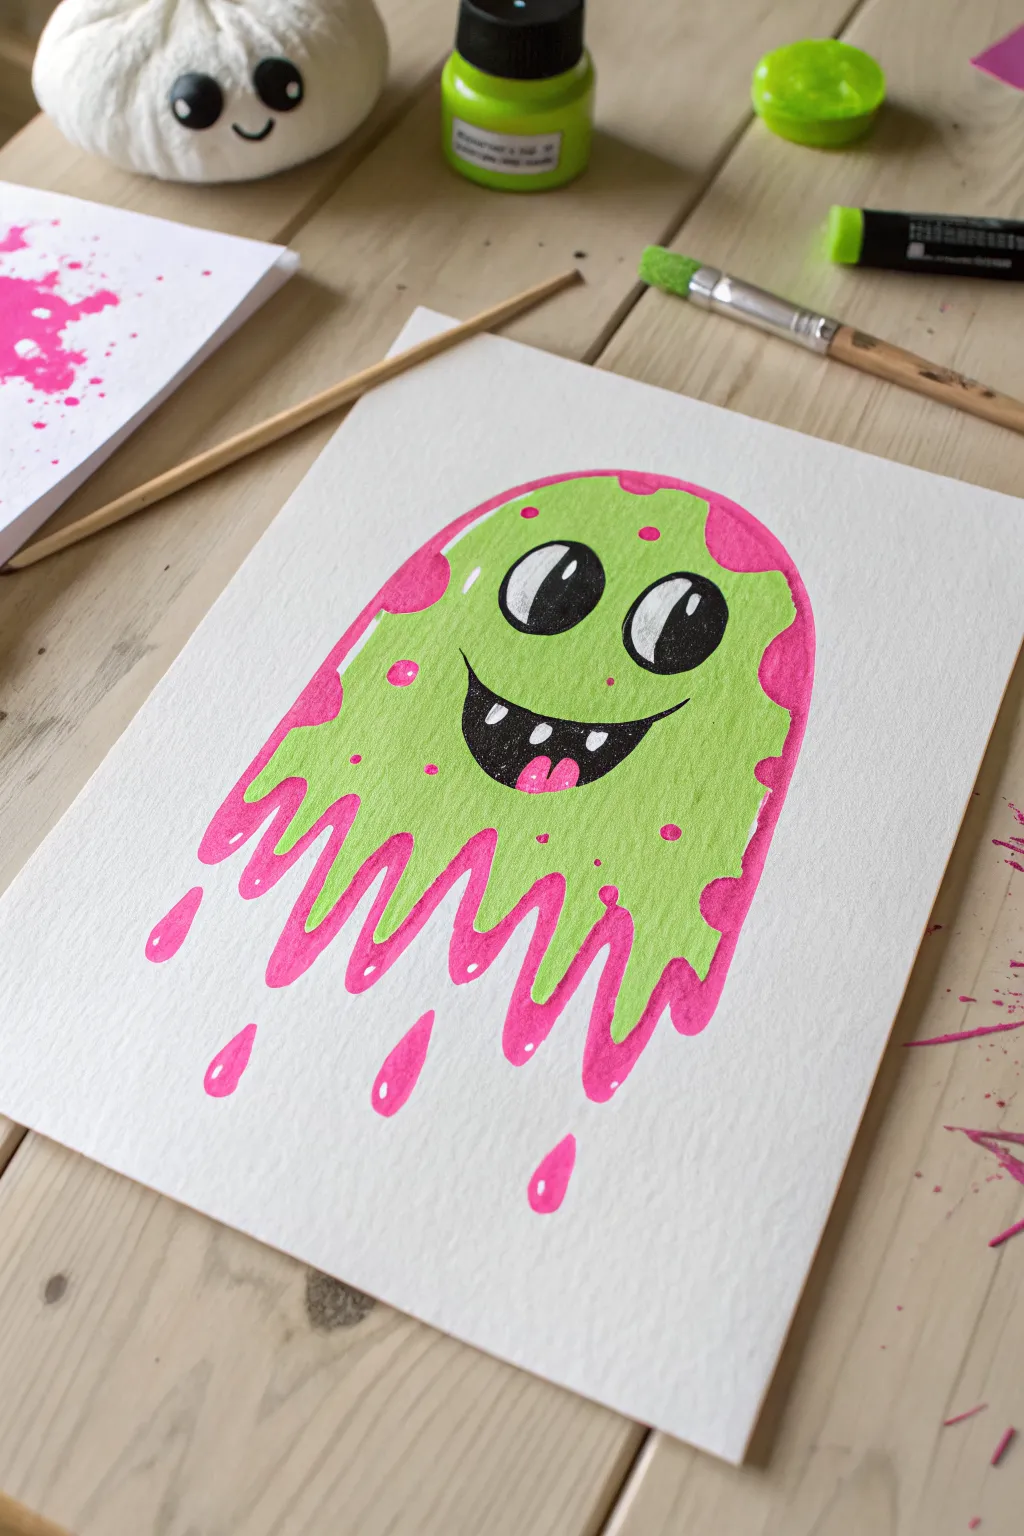
This vibrant project features a drippy, cheerful slime monster that pops off the page with electric lime green and hot pink hues. Using high-contrast colors and bold cartoon outlines creates a sticker-like effect that is both fun and easy to achieve.
Step-by-Step Guide
Materials
- Heavyweight mixed media or watercolor paper (cold press creates nice texture)
- Pencil and eraser
- Lime green acrylic paint or gouache
- neon pink acrylic paint or gouache
- Black waterproof fine liner or marker
- Small round paintbrush
- Paint palette or mixing surface
- White gel pen or white acrylic paint for highlights
Step 1: Sketching the Outline
-
Map the shape:
Begin by lightly sketching a simple rounded arch shape for the monster’s body. It should look a bit like a tall gumdrop or a classic ghost silhouette. -
Add the drips:
Along the bottom edge, draw long, wavy drips instead of a straight line. Vary the length of the drips to make it look like oozing slime. -
Create floating droplets:
Sketch three or four detached teardrop shapes falling below the main body to enhance the drippy effect. -
Draw the face:
Place two large oval eyes near the top center. Draw a wide, curved smile slightly below the eyes to give your monster a happy expression. -
Add facial details:
Inside the mouth, sketch a small tongue and a couple of simple teeth. Inside the eyes, mark out the pupils, leaving room for white highlights.
Uneven Coverage?
If your neon paint looks transparent or streaky, don’t overload the brush. Instead, let the first layer dry completely and apply a second thin coat for opacity.
Step 2: Painting the Base Colors
-
Paint the green body:
Using your lime green paint, fill in the main body of the monster. Be careful to paint around the eyes, mouth, and the specific spots where you want pink slime to show through. -
Leave gaps for pink:
While painting the green, leave irregular gaps along the edges and random spots in the middle. These empty white spaces will become the pink ‘under-slime’ later. -
Dry completely:
Let the green layer dry fully. If the paint looks streaky, apply a second coat for a solid, opaque matte finish. -
Fill the pink accents:
Take your neon pink paint and fill in the gaps you left in the previous steps. This includes the ‘shadow’ layer behind the green drips and the spots on the body. -
Paint the falling drops:
Paint the detached teardrop shapes at the bottom in neon pink. -
Color the tongue:
Use the same pink shade to fill in the tongue inside the mouth.
Paper Choice Matters
Use cold-press watercolor paper (~300gsm). The slight texture grabs the paint better and prevents the paper from buckling under wide areas of wet acrylic.
Step 3: Adding Definition and Detail
-
Fill the eyes and mouth:
Using black paint or a thick black marker, fill in the pupils and the inside of the mouth (around the teeth and tongue). This high contrast brings the face to life. -
Add color spots:
Dip the handle end of a paintbrush into your pink paint and dot small circles onto the dried green sections to add texture. -
Outline the features:
With a fine black marker or liner, carefully outline the eyes and the mouth to sharpen the expression. -
Refine the edges:
I like to go back over the outer edges where the green meets the pink to make sure the transition is crisp, although you don’t need a heavy black outline here. -
Add white highlights:
Using a white gel pen or a small dot of white paint, add a catchlight reflex to the black pupils. -
Highlight the slime:
Add small white curved lines or dots to the green body and pink drips to make the slime look wet and glossy.
Once the final highlights are dry, your neon slime monster is ready to brighten up your wall or sketchbook
Fuzzy Fur With Texture Tricks
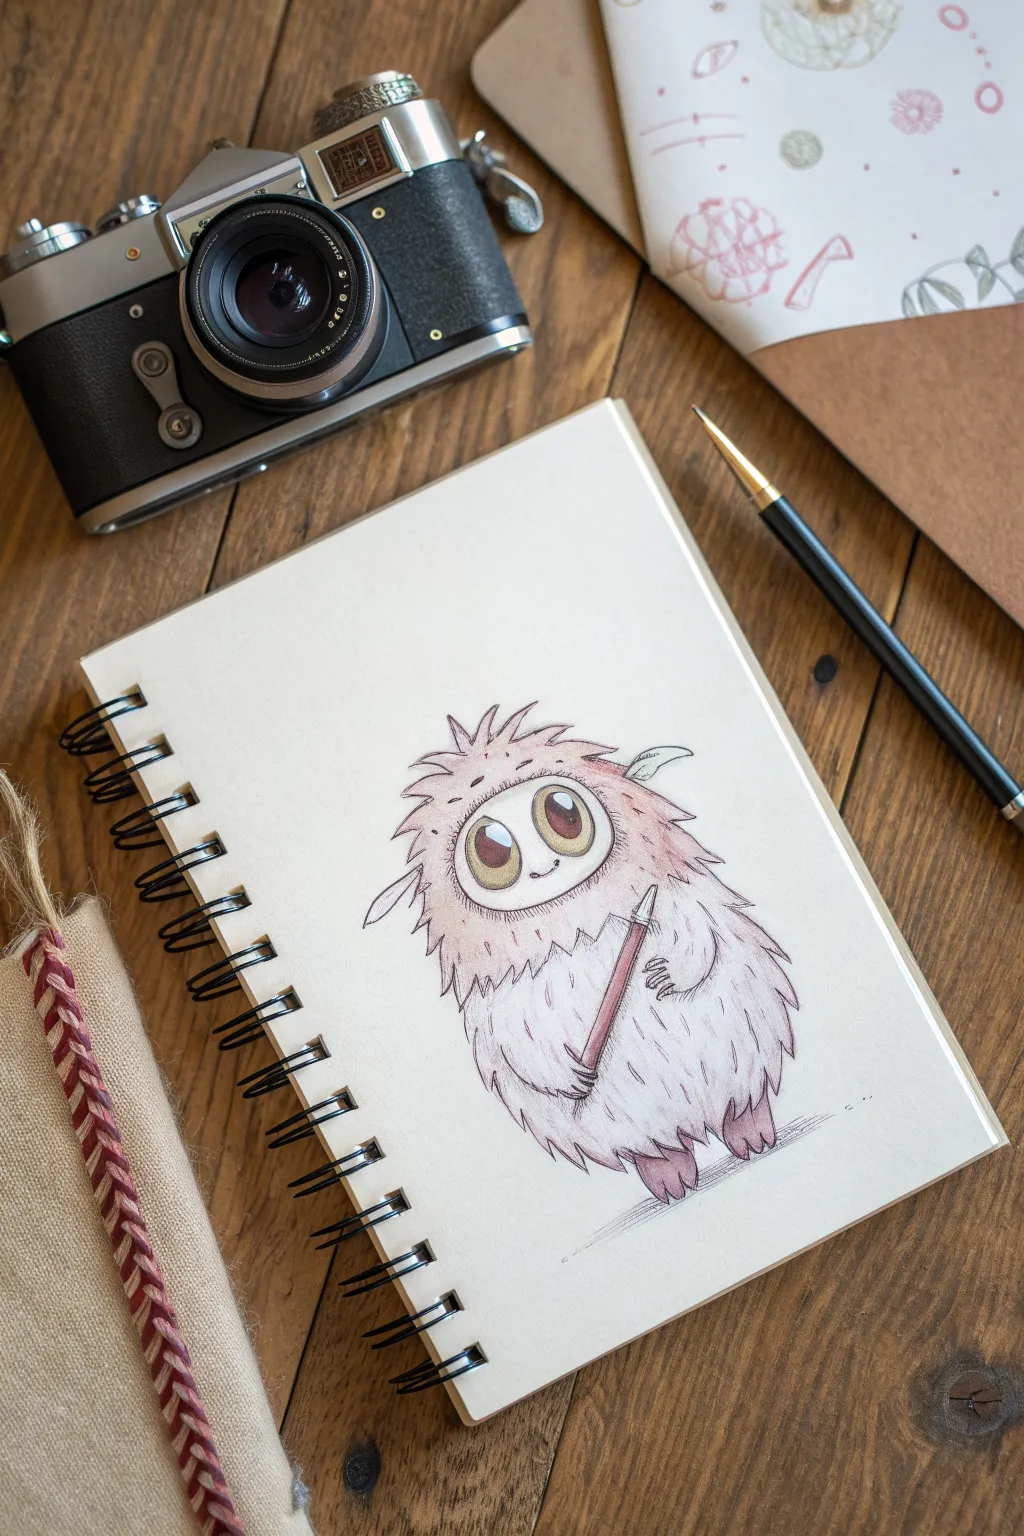
Learn to draw this adorable, round monster character holding its own tiny pencil. The focus here is on creating soft, fuzzy textures using simple pen strokes and gentle colored pencil shading to bring the critter to life on the page.
Step-by-Step Tutorial
Materials
- Spiral-bound sketch pad (smooth or light grain paper)
- Graphite pencil (HB or 2B for initial sketch)
- Fine liner pen (black, 0.1mm or 0.3mm)
- Colored pencils (pink, dusty rose, beige, brown)
- Eraser
Step 1: Basic Shapes & Outline
-
Draw the main body:
Start lightly with your graphite pencil. Draw a large, slightly squashed oval shape for the monster’s body. It should feel weighty at the bottom, like a teardrop with a rounded top. -
Add the face zone:
Within the upper half of the body, sketch a smaller horizontal oval. This will become the area for the eyes and face, separating the facial features from the surrounding fur. -
Sketch the eyes:
Inside the face oval, draw two large, vertical ovals for eyes. Make them touch in the middle. Add pupils inside, leaving small circular highlights near the top right of each pupil for a shiny look. -
Place the limbs:
Add tiny, triangular shapes for the ears sticking out near the top. Sketch short, stubby arms coming from the mid-body, and two small feet at the very bottom. -
Add the prop:
Draw a diagonal cylinder shape in the monster’s right hand (viewer’s right) to represent the pencil it’s holding. Keep it simple for now.
Step 2: Inking & Fur Texture
-
Outline the eyes:
Switch to your fine liner pen. Carefully trace the large eyes and pupils. Fill in the pupils solid black, ensuring you leave those white glossy highlights untouched. -
Start the fur silhouette:
This is where the texture magic happens. Instead of tracing your pencil line directly, use short, quick flicks of the pen moving outward. Go all around the body outline to create a jagged, fluffy edge. -
Refine the face border:
Does the face oval look too smooth? Break up that line with tiny, inward-facing strokes. This makes it look like the fur is growing over the edge of the face. -
Detail the limbs:
Ink the small claws on the fingers and toes. Keep the lines sketchy and loose rather than rigid. Add a little tuft of fur on top of the ears. -
Ink the pencil prop:
Go over the pencil shape with your pen. Add a little line near the tip to separate the wood from the lead, and a band at the end for the eraser. -
Inner fur details:
Add scattered, short strokes inside the main body shape. I like to focus these near the bottom and sides to suggest volume and shadow without cluttering the center. -
Erase guidelines:
Wait a moment for the ink to fully dry to avoid smudges, then gently erase all your underlying graphite pencil marks.
Flick of the Wrist
For the best fur texture, lift your pen quickly at the end of each stroke. This makes the line taper off naturally, resembling a real hair strand.
Step 3: Color & Shading
-
Base layer for fur:
Take a very pale pink or dusty rose colored pencil. Lightly shade the body, using the side of the pencil lead for a soft, grainy texture. Leave the center of the tummy almost white for a highlight. -
Deepen the shadows:
With a slightly darker pink or light brown pencil, add shading to the bottom of the monster, under the arms, and around the edges of the face oval. This gives the body a spherical, 3D look. -
Color the eyes:
Use a golden brown or ochre pencil for the irises. Press harder at the top of the iris and lighter at the bottom to create a gradient effect. -
Rosy cheeks and feet:
Add a touch of darker pink to the feet and just under the eyes to give the monster a sweet, flushed appearance. -
Color the prop:
Color the monster’s pencil with a classic reddish-brown or cedar color. Don’t forget a grey tone for the metal ferrule and pink for the eraser. -
Ground the figure:
Use a grey colored pencil or your fine liner to add a few horizontal hatching lines directly underneath the feet. This cast shadow anchors the monster so it doesn’t look like it’s floating.
Make it a Series
Draw this monster in different poses: jumping, sleeping, or holding different art supplies like a paintbrush or a tiny palette.
Now you have a charming little creative companion to decorate your sketchbook pages


Blow-Paint Monster Hair
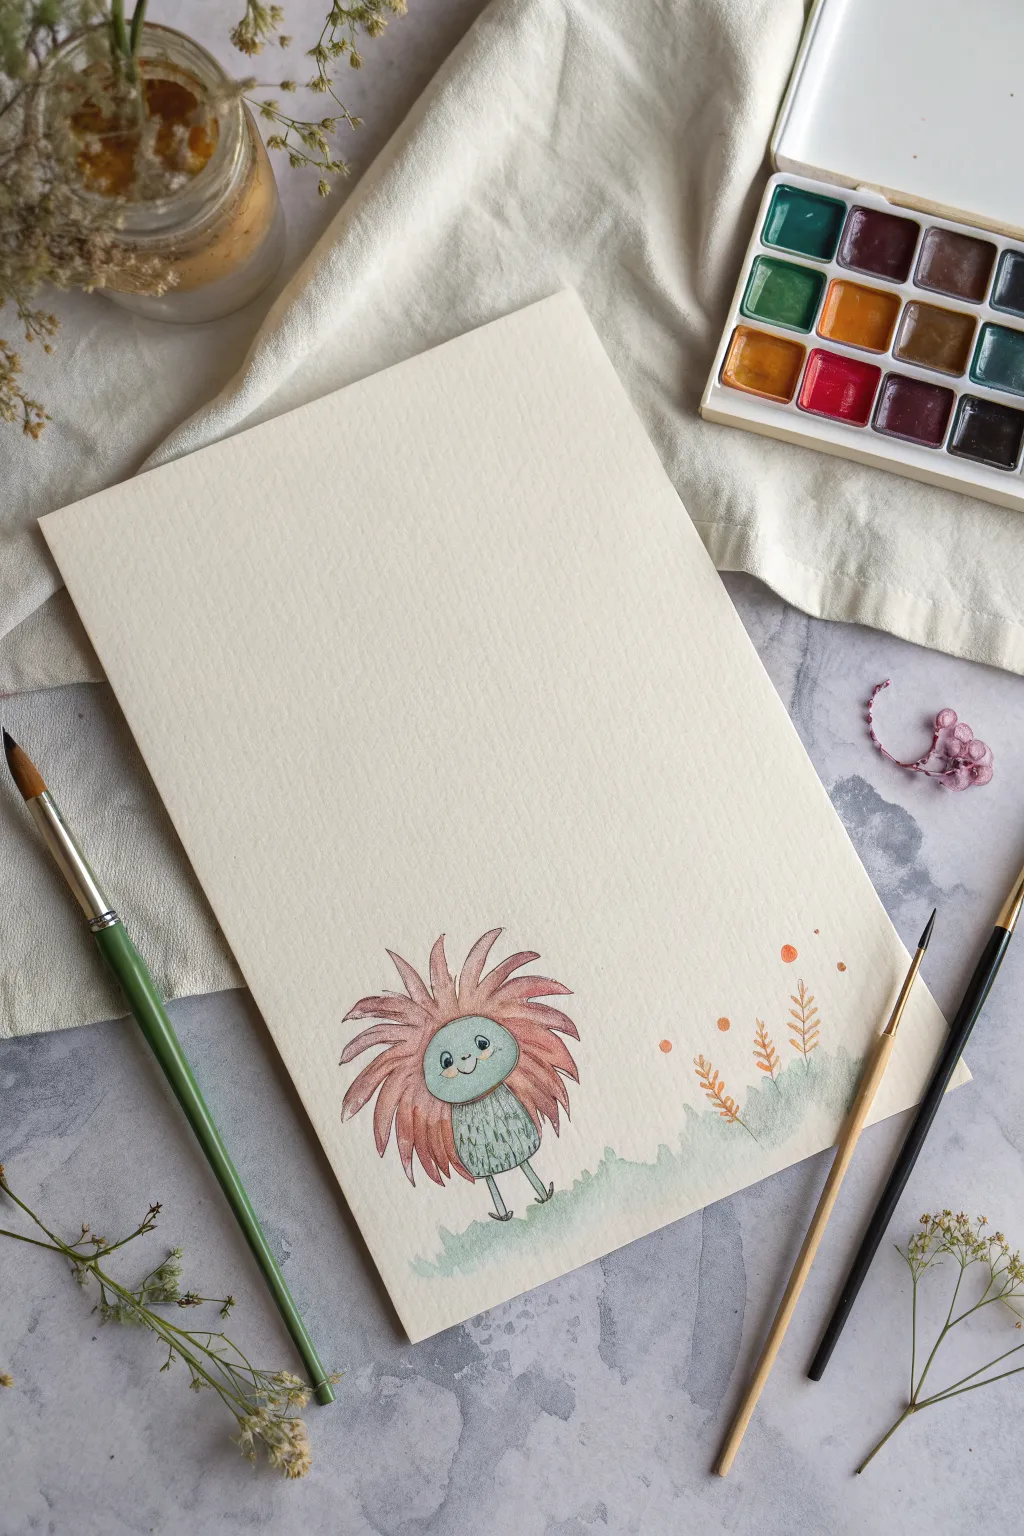
Create an adorable little creature with wild, expressive hair using watercolor techniques on textured paper. This project combines simple character illustration with loose, organic brushwork for a charming and gentle result.
How-To Guide
Materials
- Cold press watercolor paper (A4 or A5)
- Watercolor paint set (essential colors: teal/green, reddish-pink, orange)
- Round watercolor brush (size 4 or 6 for body/hair)
- Fine detail brush (size 0 or 00 for outlines)
- Water jar
- Paper towel
- Pencil (optional for sketching)
- Black waterproof fine liner pen (optional alternative to painting outlines)
Step 1: Sketching the Character
-
Position the monster:
Visualize where your monster will stand. Aim for the bottom left third of the paper to leave plenty of negative space above, which creates a nice artistic balance. -
Draw the head shape:
Lightly sketch a small circle or oval for the face. It doesn’t need to be perfect; a slightly wobbly shape adds character. -
Add the body:
Draw an oval or pear shape directly beneath the head for the body. The body should be roughly the same height as the head but perhaps a bit wider at the bottom. -
Sketch the limbs:
Add two thin lines for legs and tiny feet at the bottom. Since the monster’s arms are hidden by the hair in this style, you only need to worry about the legs.
Fixing Blotches
If you use too much water and a puddle forms, dry your brush on a paper towel and touch it to the puddle. The thirsty brush will lift the excess water right up.
Step 2: Painting the Body
-
Mix the body color:
Prepare a watery mix of teal or light green on your palette. You want a soft, pastel look, so ensure there is plenty of water in the mix. -
Paint the face base:
Gently fill in the face circle with your teal mix. Work quickly so the paint doesn’t dry with hard edges. -
Paint the body texture:
While the paint is still wet, fill in the body shape. I like to dab a slightly darker version of the green into the wet body area to create a little fuzzy texture. -
Let it dry:
Allow this initial layer to dry completely before moving on to the detailed features.
Step 3: Creating the Wild Hair
-
Mix the hair color:
Create a warm, reddish-pink hue. Just like the body, keep this fairly transparent and watery rather than thick and opaque. -
Start the hair strokes:
Starting from the outer edge of the face circle, pull your brush outward in long, sweeping strokes. These should look like flower petals or sun rays. -
Vary the lengths:
Make some hair strands longer and some shorter. Ensure the hair goes all the way around the head, overlapping slightly with the top of the body. -
Add depth:
While the first hair layer is still damp, drop a tiny bit of darker red or purple paint at the roots (near the face) to create shadow and dimension.
Add Some Sparkle
Once the painting is 100% dry, use a metallic gold or silver gel pen to add tiny highlights to the monster’s eyes or trace the veins of the orange plants.
Step 4: Adding Details & Background
-
Paint the face details:
Using your smallest detail brush and very little water (or a fine liner pen), carefully paint two small eyes, eyebrows, and a curved smile on the dry face. -
Define the body:
Use the fine brush to add tiny vertical hatch marks on the body to simulate fur. Paint the stick-thin legs and feet now as well. -
Create the ground:
Dilute your green paint significantly until it is very pale. Paint a loose, jagged wash across the bottom of the page to represent grass or moss. -
Add simple flora:
Dip your fine brush into orange paint. Draw simple vertical lines rising from the grass with small ‘V’ shapes coming off them to create abstract plants. -
Finishing touches:
Add a few random orange dots floating near the plants for visual interest or ‘spores’.
You now have a charming little monster friend ready to frame or give as a card
Monster Under the Bed Pop-Up
Capture the charm of a misunderstood monster with this simple, clean line drawing. This project uses basic shapes and minimalist coloring to create a character that looks like it hopped right out of a storybook.
Step-by-Step
Materials
- Spiral-bound sketchbook (heavyweight paper preferred)
- Pencil (HB or 2B)
- Eraser
- Black fineliner pens (0.5mm and 0.8mm)
- Grey marker or colored pencil (light shade)
- Yellow marker or colored pencil
- Texture tool (stippling brush or fine point pen)
Step 1: Drafting the Shape
-
Establish the centerline:
Begin by lightly sketching a vertical line down the center of your page to help maintain symmetry for your creature’s body. -
Outline the body:
Draw a large, elongated oval shape that is slightly wider at the bottom than the top. This will serve as the main body of your monster. -
Add the ears:
At the top of the oval, sketch two triangular shapes pointing upwards. Space them out slightly so they sit like tall cat ears. -
Position the arms:
Sketch two long, slender curves hanging down from the sides of the body. These simple arms should end in small points rather than detailed fingers.
Step 2: Adding Facial Features
-
Draw the eyes:
Place two large circles near the top third of the body. Make them touch in the middle for a wide-eyed, innocent look. -
Detail the pupils:
Inside the large eye circles, draw smaller concentric circles for the pupils. Keep them centered to give the monster a direct gaze. -
Create the nose:
Just below where the eyes meet, add a very small, inverted triangle or diamond shape for a nose or beak. -
Define the belly:
Lightly sketch a large U-shape on the lower torso to mark out the belly area, which we will texture later. -
Add feet:
At the bottom of the body, draw small, claw-like feet with three toes each, anchoring your creature to the page.
Smudge Alert
If your ink smears when erasing, switch to a kneaded eraser. Dab gently rather than rubbing to lift graphite without disturbing the ink.
Step 3: Inking the Lines
-
Outline the main form:
Using your thicker 0.8mm fineliner, carefully trace over your pencil lines for the outer body shape and the ears. I find pulling the pen towards me helps keep the line steady. -
Ink the features:
Switch to the 0.5mm pen for the eyes, nose, and arms. The thinner line weight will make the facial features pop without looking heavy. -
Color the pupils:
With the grey marker, color in the pupils. Leave the rest of the eye white for contrast. -
Brighten the ears:
Fill in the triangular ears with your yellow marker or colored pencil. This small pop of color brings a playful energy to the drawing.
Make It Pop
Cut out the finished drawing leaving a white border and mount it on black cardstock with foam tape for a pseudo 3D sticker effect.
Step 4: Texturing and Finishing
-
Start the belly texture:
For the belly patch, use a fine point pen to create a speckled texture. Start loosely in the center. -
Build up density:
Add more dots and tiny squiggles towards the bottom of the belly patch to create a slight gradient effect, making the fur look fluffy. -
Add gentle shading:
Use the grey marker to add a very subtle shadow under the arms and along the bottom edge of the body to give it volume. -
Erase guidelines:
Once the ink is completely dry—give it a few minutes—gently erase all remaining pencil marks for a clean, professional finish. -
Lettering touch:
Optionally, add a small, scribbled name or nonsensical monster language text near the feet using a light pencil or thin pen.
Your sketchbook now houses a delightful new friend ready to keep you company
Emotion Monsters With Color Language
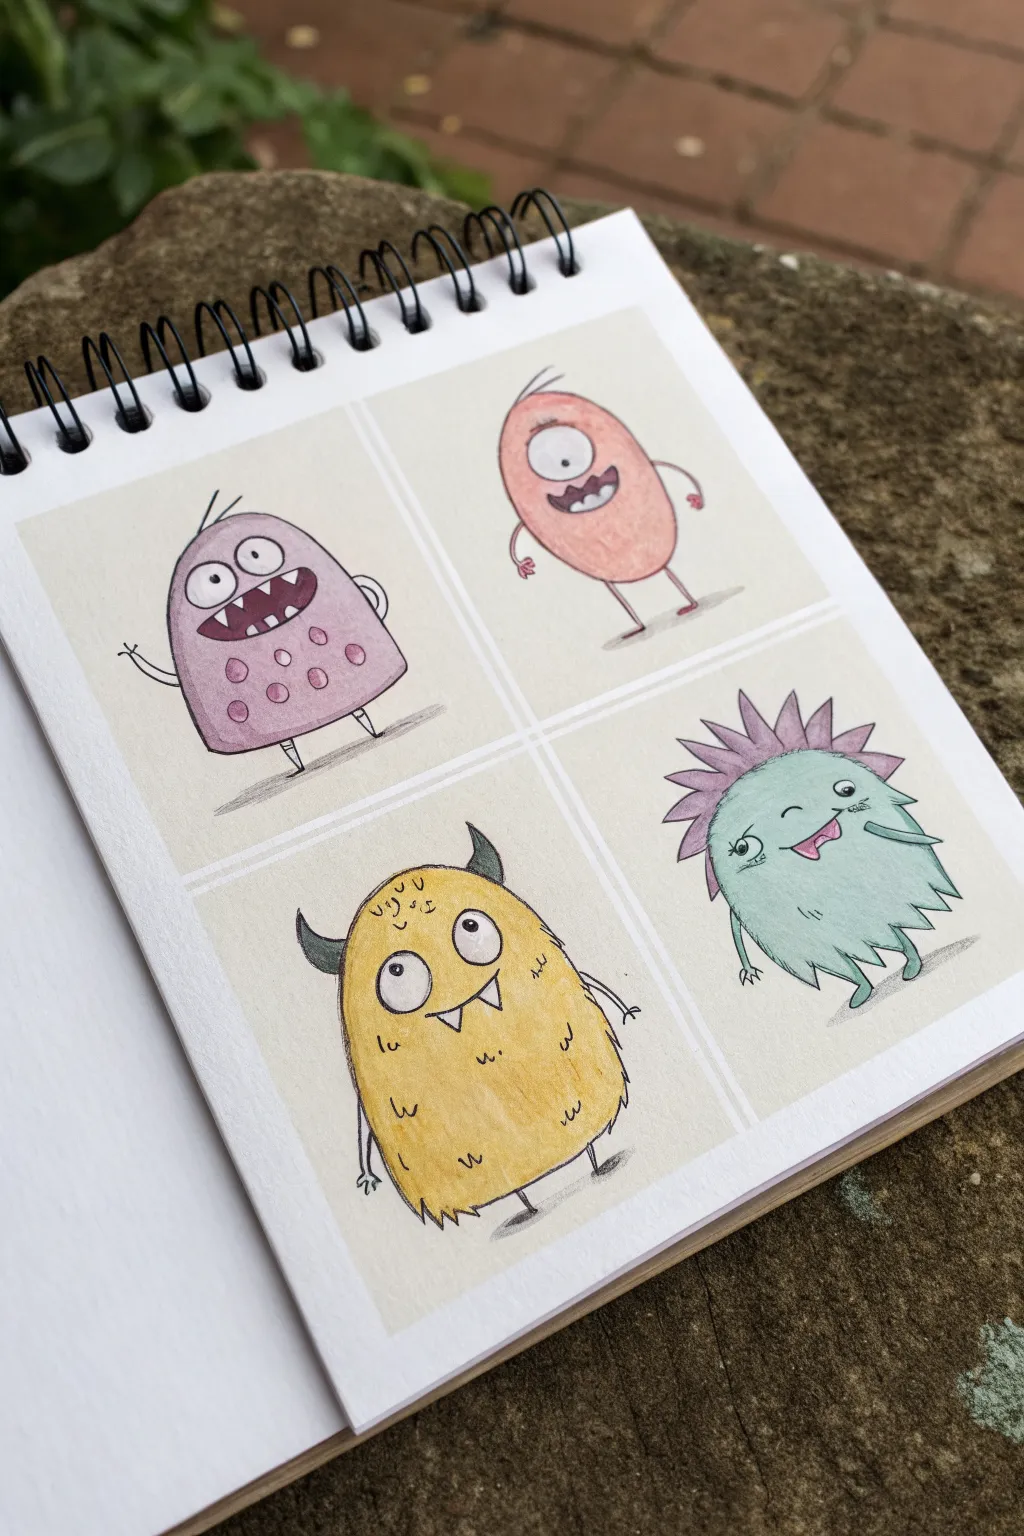
Explore feelings through shape and color with this charming grid of four expressive little monsters. Using mixed media techniques, you will layer soft colors under crisp ink lines to give each character a distinct personality and texture.
Detailed Instructions
Materials
- Spiral-bound sketchbook or heavy mixed-media paper
- Pencil and eraser
- Fine liner pen (black, waterproof, 0.3mm or 0.5mm)
- Colored pencils (purple, pink, yellow/ochre, teal/mint)
- White gel pen (optional)
- Ruler
Step 1: Planning the Grid
-
Outline the layout:
Use a ruler and pencil to lightly draw a 2×2 grid on your paper. Leave a small gap between the four squares to create clean separation, which frames each monster like a little portrait. -
Define the background tint:
Before drawing the monsters, lightly shade the inside of each square with a very pale, warm beige or cream colored pencil. This unifies the illustrations and gives them a vintage, warm tone.
Step 2: Sketching the Characters
-
Monster 1: The Shy Bean:
In the top-left square, sketch a bean-shaped body that leans slightly to the left. Add two big round eyes, a wide mouth with triangular teeth, and simple stick arms and legs. -
Monster 2: The Cyclops Egg:
In the top-right box, draw an upright oval shape. Place one large eye directly in the center and a small smiling mouth beneath it. Give him long, spindly legs and tiny arms. -
Monster 3: The Yellow Fuzzball:
For the bottom-left, sketch a squat, pill-shaped body. Add two small horns on top and indicate a furry texture with jagged lines along the bottom edge. -
Monster 4: The Spiky Friend:
In the bottom-right, draw a round body with spiky hair on top and jagged fur at the bottom. Sketch a winking face with a tongue sticking out for a playful expression.
Slippery pencil?
If your colored pencils are waxy and resisting the ink pen, try inking your outlines first, let them dry completely, and then color inside the lines.
Step 3: Adding Color
-
Shade the purple monster:
Take a muted purple pencil and fill in the first monster. Apply slightly more pressure around the edges to create a sense of roundness, leaving the center a bit lighter. -
Color the pink monster:
Use a salmon-pink pencil for the one-eyed monster. Color smoothly, ensuring the coverage is even, but keep the saturation soft rather than neon. -
Fill in the yellow monster:
Color the fuzziest monster with a golden-yellow or ochre pencil. I like to use small circular strokes here to suggest a matting texture in the fur. -
Complete with teal:
For the final monster, use a mint or teal pencil. Shade the body and color the hair spikes purple to connect it visually to the first monster. -
Add details:
Go back and add darker spots to the purple monster’s belly and scribble texture to the yellow monster’s forehead using the same pencils but with harder pressure.
Make it yours
Give each monster a name related to an emotion (like ‘Grumpy’ or ‘Glee’) and write it in cursive below their feet using the fine liner.
Step 4: Inking and Definition
-
Outline the contours:
Trace over your pencil lines with a black fine liner. Don’t worry about being perfectly smooth; a slightly jittery line adds to the hand-drawn charm. -
Define features:
Ink the eyes, teeth, and mouths. Fill in the pupils solid black, leaving a tiny speck of white paper for a highlight if possible. -
Enhance texture:
Add small ‘u’ shapes for fur on the yellow monster’s body and tiny hatches on the teal monster. Draw the spots on the purple monster clearly. -
Create shadows:
Using a gray pencil or a very light wash of gray watercolor, add cast shadows underneath each monster’s feet to ground them so they aren’t floating in space. -
Final highlights:
If you lost any eye highlights during inking, use a white gel pen to add a tiny dot to each pupil for life and sparkle.
Now you have a completed grid of colorful personalities ready to brighten your sketchbook page


Have a question or want to share your own experience? I'd love to hear from you in the comments below!