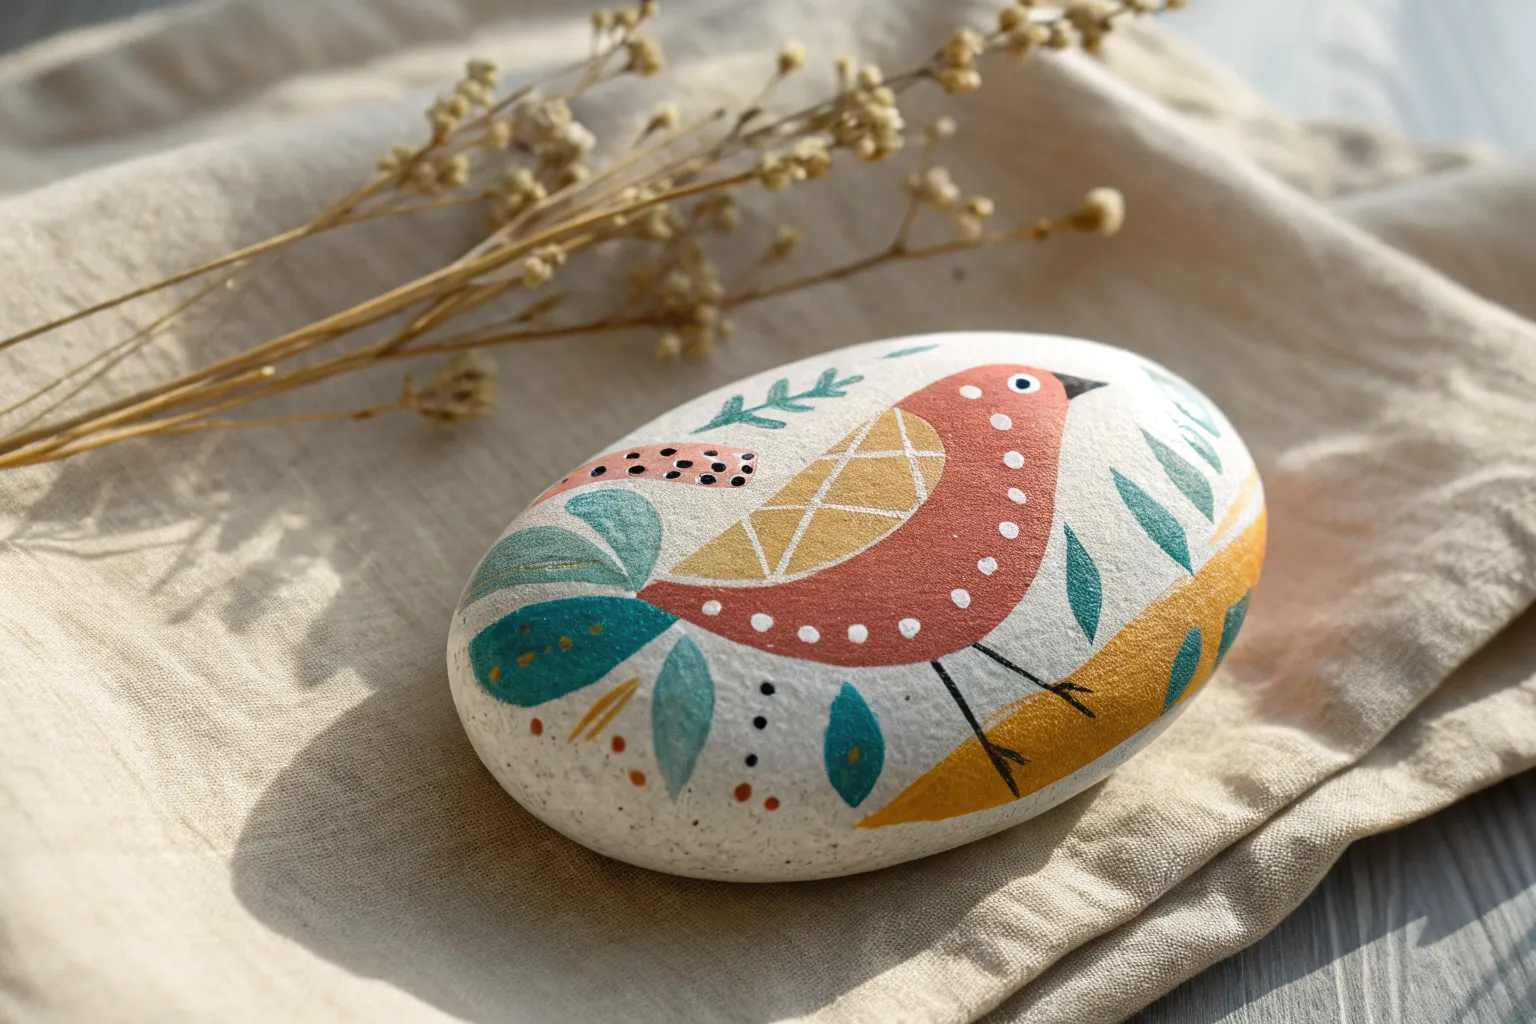
Oval rocks are basically nature’s little canvases—already composed for you with that smooth curve and satisfying taper. I love how the oval shape can instantly suggest a subject, so your design feels like it belongs on the stone instead of just sitting on top of it.
Classic Ladybug Oval Rock
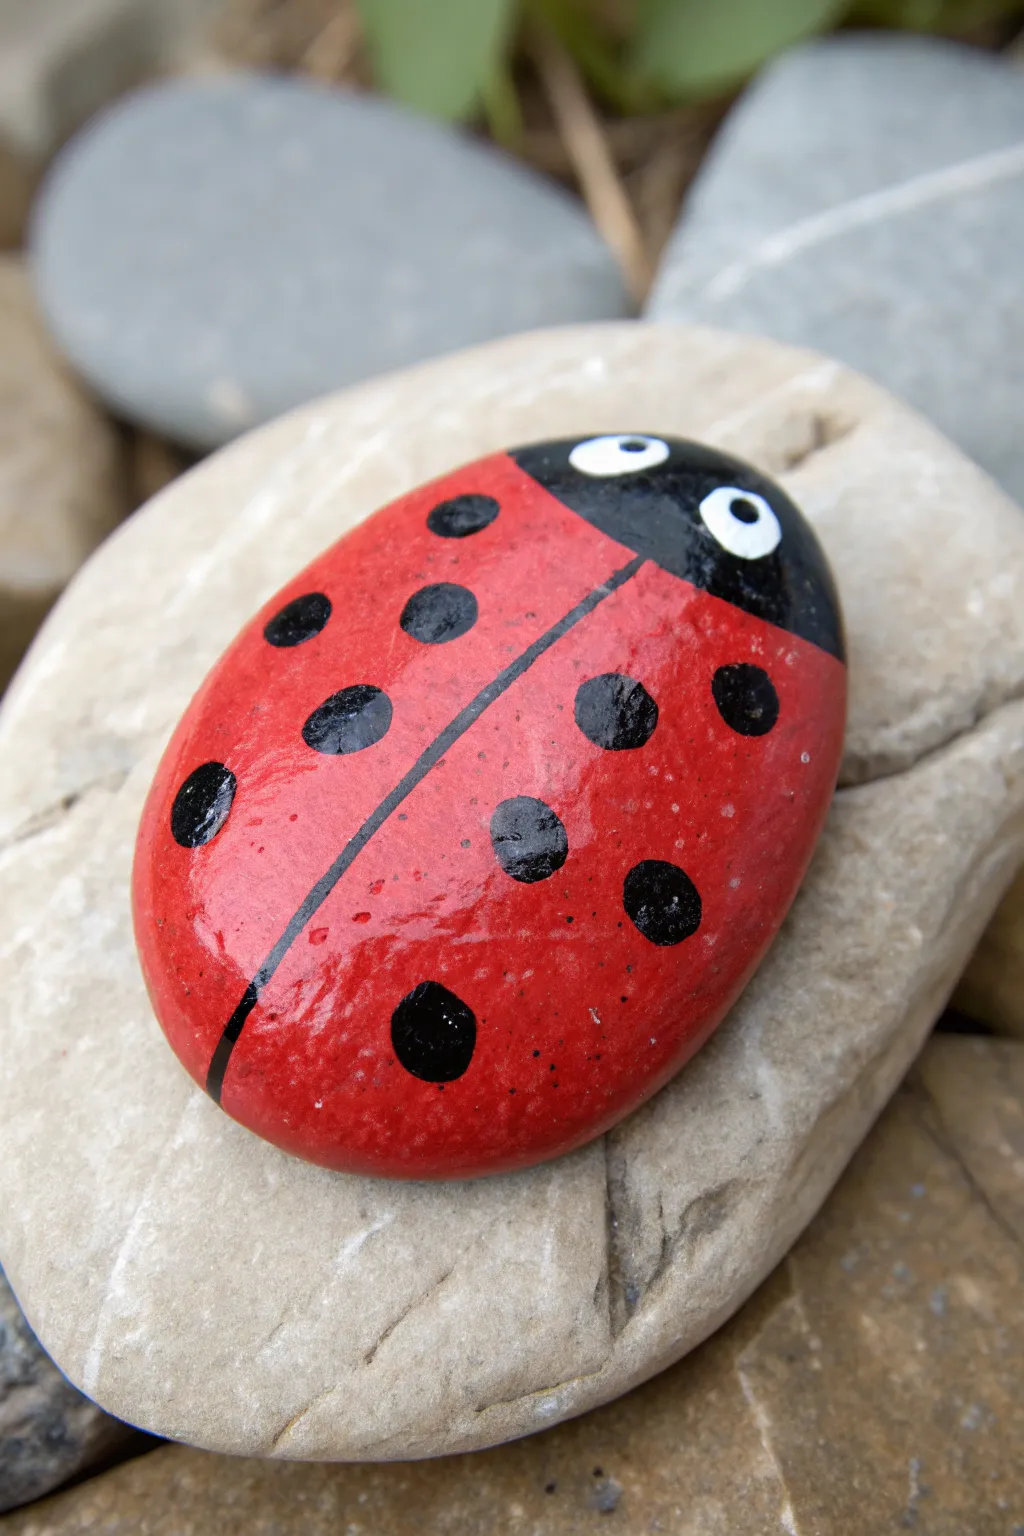
Transform a simple oval stone into this cheerful garden classic with vibrant red paint and bold black details. The smooth, shiny finish makes it look almost like a giant beetle resting on the path, perfect for hiding in flower pots.
Step-by-Step Tutorial
Materials
- Smooth oval river rock (palm-sized)
- Red acrylic paint (bright cherry or cardinal red)
- Black acrylic paint
- White acrylic paint
- Flat paintbrush (medium)
- Small round detail brush
- Dotting tool or toothpick
- Gloss varnish or clear sealant spray
- Pencil (optional)
Step 1: Preparation and Base Coat
-
Surface Prep:
Begin by washing your stone thoroughly with soap and water to remove any dirt or oils. Let it dry completely in the sun or with a hairdryer to ensure the paint adheres properly. -
Outline the Head:
Visualize the top one-quarter of the oval as the head. You can sketch a faint curved line with a pencil to separate this area, but try to keep it light so graphite doesn’t smudge into the paint. -
Paint the Head:
Using your black acrylic paint and a flat brush, fill in that top quarter section. Create a smooth, curved boundary line where the head meets the body. -
Base Body Layer:
Paint the remaining three-quarters of the rock with your bright red acrylic paint. Carefully meet the black edge without overlapping too much to keep the line crisp. -
Build Opacity:
Acrylic red can sometimes be translucent. Allow the first coat to dry, then apply a second or even third coat until the red is rich, solid, and opaque.
Step 2: Adding the Details
-
The Center Line:
Once the red base is fully dry, take a fine detail brush loaded with black paint. Start from the center of the black head section and draw a thin line straight down the middle of the red body to the bottom tip. -
Line Corrections:
If your center line isn’t perfectly straight, I find it helps to thicken it slightly to even it out rather than trying to erase it. -
Large Spots Placement:
Load a small round brush with black paint. Paint two or three large, distinct circles on each side of the wing division. Stagger them slightly so they look natural. -
Medium Spots:
Add a few medium-sized black dots in the gaps between the larger ones. Keep the circular shape consistent. -
Tiny Spots:
Using a dotting tool or the tip of a brush handle, dab tiny black specks near the edges of the rock to simulate depth and roundness. -
Eye Base:
Dip the handle end of a larger paintbrush into white paint. Press two large white dots onto the black head area for the eyes. Let these dry completely. -
Pupils:
Using a smaller dotting tool or toothpick, add a small black dot inside each white eye circle. Place them slightly off-center or looking upward for a cute expression.
Smooth Surface Secret
If your rock has tiny pits, mix a little white glue with baby powder to make a paste. Fill the holes, let dry, and sand smooth before painting.
Step 3: Finishing Touches
-
Highlights (Optional):
For extra realism, you can add a microscopic dot of white on the black pupils to make the eyes sparkle. -
Cleanup:
Check the underside of the rock. If any paint dripped over the edge, clean it up or paint the bottom solid black for a finished look. -
Drying Time:
Allow the entire painted ladybug to cure for at least 24 hours. The thick layers of paint need to be fully set before sealing. -
Sealing:
Apply a coat of high-gloss outdoor varnish. This step is crucial—it gives that ‘wet’ beetle look and protects the color from sun and rain.
Make a Colony
Paint rocks of different sizes to create a whole family. Use slightly different shades of red or orange for variety.
Place your shiny new friend among the green leaves of your garden for a delightful pop of color


Bumblebee Stripes on an Oval Stone
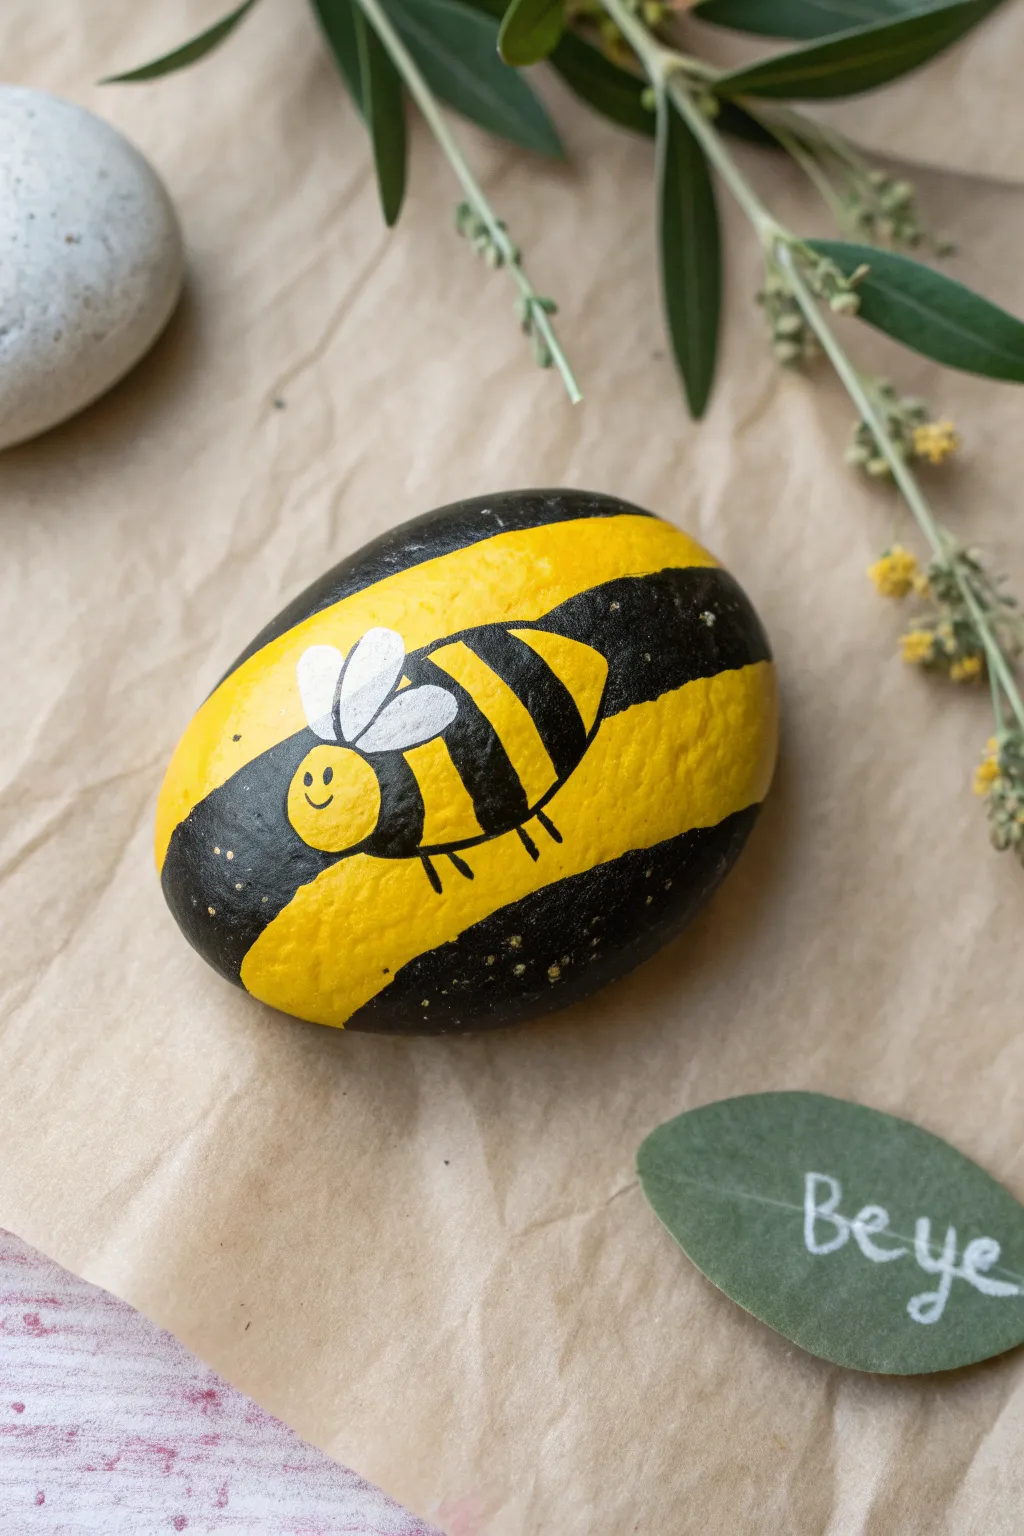
Transform a smooth oval rock into a cheerful garden friend with this bold striped design. The project layers a tiny, detailed bee illustration over chunky graphic stripes, creating a striking contrast that is both modern and whimsical.
Step-by-Step Guide
Materials
- Smooth oval river rock (about palm-sized)
- Acrylic paint (bright yellow, black, white)
- Flat paintbrush (medium size)
- Fine detail paintbrush (liner or size 0)
- Pencil
- Posca paint pens (optional, for finer details)
- Clear acrylic sealer (matte or gloss)
Step 1: Base Stripes
-
Clean surface:
Begin by washing your stone with warm soapy water to remove any dirt or oils, then let it dry fast and completely so the paint adheres properly. -
Plan the stripes:
Using a light pencil grip, sketch four broad, diagonal bands across the face of the stone. These don’t need to be perfectly straight; a slight curve follows the rock’s natural shape nicely. -
First yellow coat:
Load your medium flat brush with bright yellow acrylic paint. Fill in the second and fourth bands (counting from the top). You might need two coats to get a solid, opaque yellow. -
Painting the black:
Once the yellow is dry to the touch, fill in the remaining bands with black acrylic. Paint carefully along the edges where the black meets the yellow to keep the lines crisp. -
Clean up edges:
If your lines got a little wobbly, go back with the appropriate color and tidy up the seams. Let the entire base coat dry completely before moving on.
Tape it Off
For ultra-crisp lines between your yellow and black background stripes, use strips of washing tape or painter’s tape. Press edges down firmly to prevent bleed-under.
Step 2: Adding the Bee Character
-
Position the bee:
Decide where your little bee will sit. In the example, it rests primarily on a black stripe but overlaps into the yellow. Lightly sketch a small oval for the body and a smaller circle for the head. -
Paint the bee body:
Using a small round brush and yellow paint, fill in the bee’s body shape. Since you are painting yellow over a black background, apply a thin coat of white first as a primer, let it dry, then paint the yellow on top for vibrancy. -
Add bee stripes:
Switch to your fine detail brush and black paint. Carefully add two curved stripes across the bee’s yellow body, mimicking the larger pattern of the rock. -
Draw the stinger:
At the very rear of the bee, use the tip of your detail brush to pull out a tiny black triangular point for the stinger. -
Legs and face:
Paint delicate, thin black lines for the legs underneath the body. Two tiny dots for eyes and a small curved smile bring the face to life.
Step 3: Wings and Details
-
Draft the wings:
Sketch two tear-drop shapes on the bee’s back using the fine brush and white paint. I like to overlap them slightly to create depth. -
Second wing coat:
White paint can be translucent, so apply a second layer to the wings to make them stand out brightly against the dark rock. -
Wing definition:
Once dry, use an ultra-fine brush or a fine-tip black paint pen to outline the wings and add a tiny line in the center of each for texture. -
Gold speckles:
For a magical touch, dip an old toothbrush or stiff brush into diluted yellow or gold paint. Flick the bristles to spatter tiny speckles over the black stripes. -
Sealing:
Finish the project by applying a coat of clear acrylic sealer to protect your artwork from the elements.
Glitter Wings
Mix a tiny pinch of iridescent glitter into the white paint before painting the wings. It creates a subtle shimmer that catches the sunlight beautifully.
Place your finished bee stone in a flower pot or give it to a friend as a small token of happiness


Paddle Cactus Oval Rock
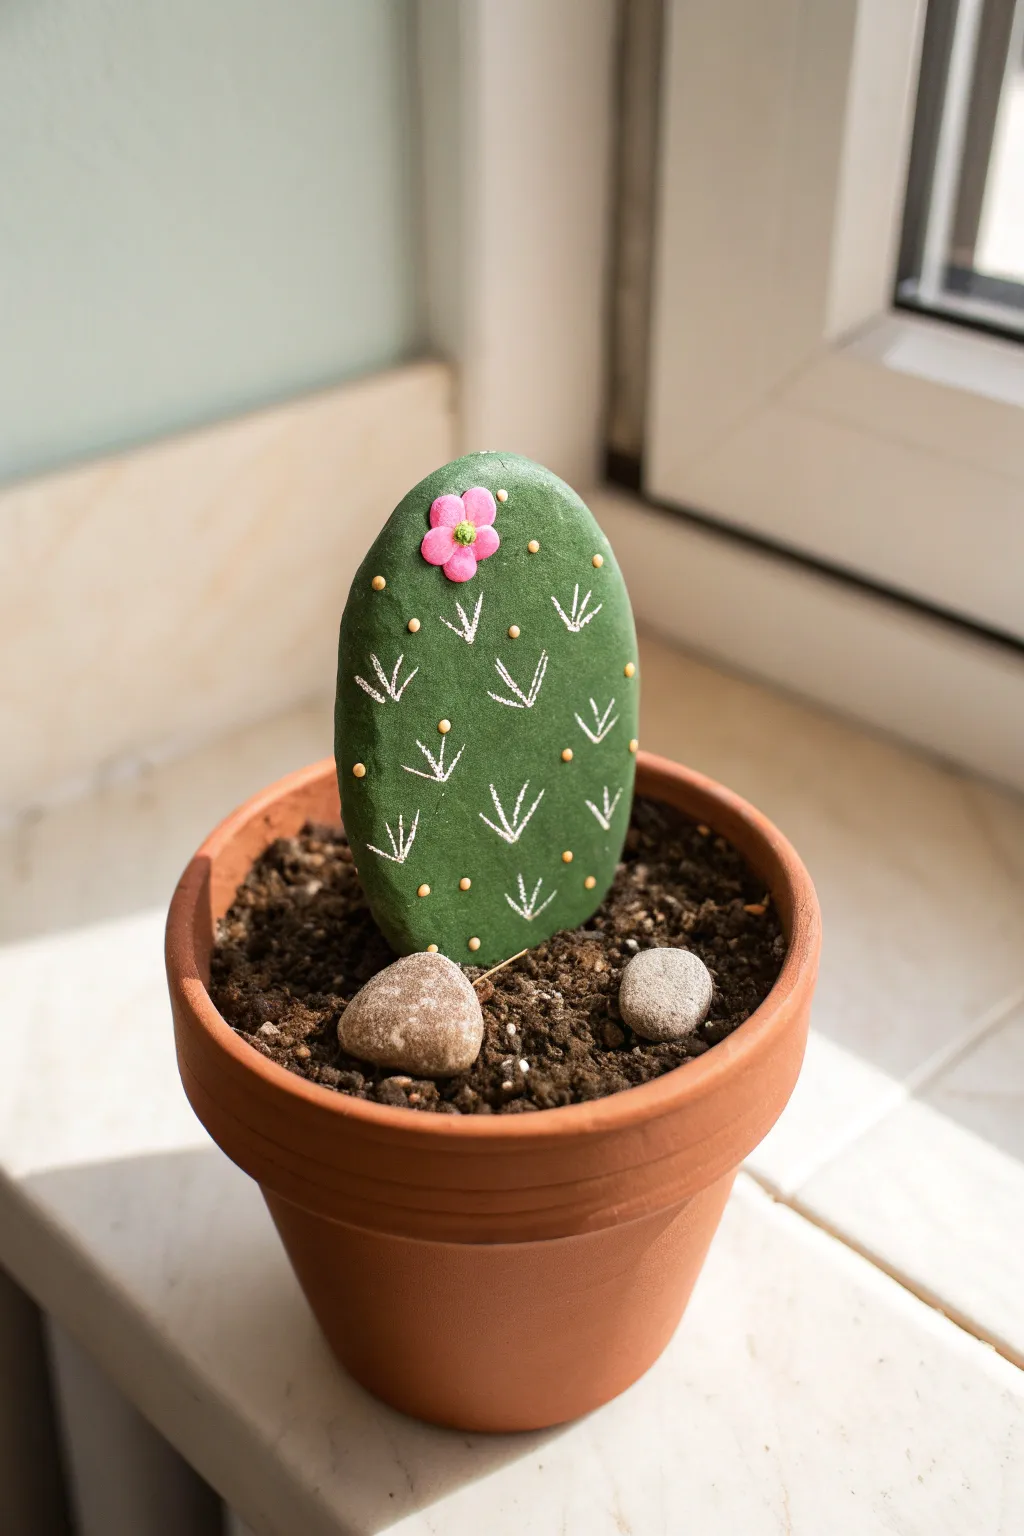
Transform a simple stone into a potted plant that needs zero watering. This charming faux cactus features bright green paint, delicate white spines, and a cute pink flower, making it a perfect bit of decor for even the blackest of thumbs.
Detailed Instructions
Materials
- Smooth, flat oval river rock (palm-sized)
- Small terracotta pot (approx. 3-4 inches)
- Potting soil or dry dirt
- Two smaller, unpainted pebbles (for decoration)
- Acrylic paint (Emerald/Cactus Green)
- Acrylic paint (White)
- Acrylic paint (Pink)
- Acrylic paint (Yellow/Gold)
- Medium flat paintbrush
- Fine liner paintbrush or white paint pen
- Dotting tool or toothpick
- Clear acrylic sealer (matte or satin spray)
Step 1: Base Painting
-
Prepare the Rock:
Wash your large oval rock with warm soapy water to remove any dust or oils. Let it dry completely before starting, as moisture can trap bubbles under the paint. -
First Coat of Green:
Using your medium flat brush, apply a generous coat of emerald green acrylic paint to the front and sides of the rock. Don’t worry about the back if it won’t be seen, but full coverage looks more professional. -
Dry and Repeat:
Allow the first coat to dry for about 15-20 minutes. If the stone’s original color is showing through, apply a second coat for a solid, opaque green finish. -
Smooth the Texture:
Check for any brush strokes while the paint is still wet. Lightly feather out any ridges to ensure the ‘skin’ of your cactus looks smooth.
Step 2: Adding Details
-
Start the Spines:
Once the green is fully dry, switch to a fine liner brush or a white paint pen. Start near the top center and paint a small ‘V’ shape. -
Create a Pattern:
Continue painting small ‘V’ shapes in a loose, staggered pattern down the face of the rock. Vary the size slightly to make it look organic, and add a small third line to some clusters to make them look like little tufts. -
Add Dot Accents:
Using the handle end of a paintbrush, a dotting tool, or a toothpick, dip into a yellow or gold paint. Place small dots sparsely between the spine clusters to represent areoles or buds. -
Paint the Flower Petals:
Near the top left curve of the rock, paint five small pink tear-drop shapes meeting in a center point. You might need two coats of pink to ensure it pops against the dark green background. -
Detail the Flower Center:
Once the pink petals are dry, add a tiny dot of yellow or lime green in the very center of the flower for contrast.
Natural Texture Hack
Mix a tiny pinch of baking soda into your green paint before applying. This gives the cactus a slightly gritty, realistic plant texture.
Step 3: Assembly
-
Seal the Rock:
I prefer to take the rock outside and spray it with a matte or satin clear acrylic sealer. This protects the paint from scratching and gives it a finished look without being overly glossy. -
Prepare the Pot:
Fill your small terracotta pot with real potting soil or dirt. Fill it almost to the rim, leaving about half an inch of space. -
Plant the Cactus:
Push the bottom (unpainted or less detailed) edge of your painted rock firmly into the center of the soil so it stands upright securely. -
Add Decorative Stones:
Place your two smaller, unpainted pebbles on top of the soil near the base of the cactus. This adds realism and helps prop up the main rock if it feels wobbly. -
Final Adjustments:
Gently pat down the soil around the base of the rock to secure everything in place. Display your new forever-plant on a sunny windowsill.
Running Paint?
If your white paint pen lines are bleeding into the green, the base coat wasn’t fully dry. Let it sit for another hour, or use a hair dryer on cool.
Enjoy your maintenance-free greenery that brightens up any corner without ever drooping


Succulent Rosette Framed by the Oval
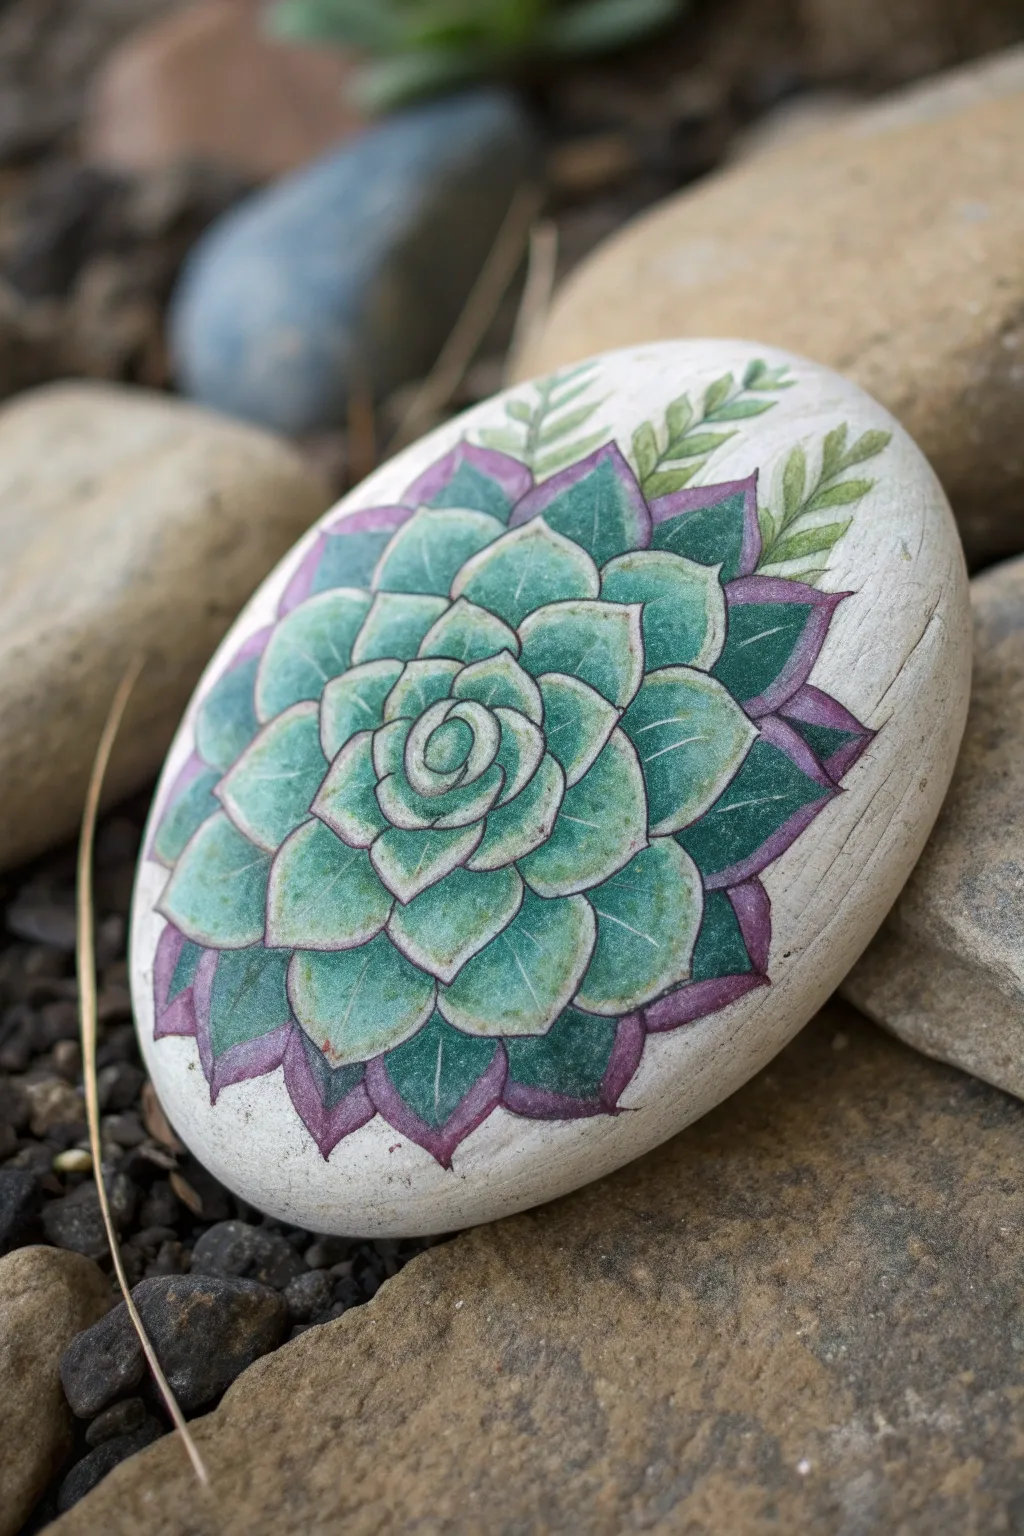
Transform a simple stone into a botanical beauty with this detailed succulent design. The natural oval shape of the rock perfectly frames the spreading rosette, creating a harmonious piece of garden art that looks almost three-dimensional.
Step-by-Step Guide
Materials
- Smooth, oval river rock (palm-sized)
- White acrylic paint or gesso
- Pencil (HB or similar)
- Fine-point permanent black marker or liner pen
- Acrylic paints (teal, leaf green, purple/magenta, white)
- Small round paintbrushes (sizes 0, 1, and 2)
- Water cup and palette
- Spray sealer or varnish (matte or satin finish)
Step 1: Base Preparation
-
Clean the surface:
Begin by scrubbing your rock with warm, soapy water to remove any dirt or oils. Let it dry completely in the sun or with a hair dryer. -
Apply the base coat:
Paint the top surface of the rock with white acrylic paint. You may need two or three thin coats to get a solid, opaque background that masks the natural stone color. -
Check for smoothness:
Ensure the white base is perfectly smooth. Sand lightly with fine-grit sandpaper if brushstrokes are too visible, then wipe away the dust.
Uneven Petals?
Don’t stress about perfect symmetry. Real succulents have natural irregularities. If one leaf looks weird, just make the neighbor slightly bigger to balance it out.
Step 2: Sketching the Design
-
Find the center point:
Mark a tiny dot in the center of the white oval. This will be the heart of your succulent rosette. -
Draw the center bud:
Sketch a tight spiral or small, overlapping C-curves around your center dot to form the unbloomed bud of the plant. -
Add inner petals:
Continue drawing slightly larger, pointed oval shapes radiating outward from the center. Keep them tightly packed. -
Expand the rosette:
Draw the next layer of leaves, making them larger and wider. Imagine them nestled in the gaps between the previous layer’s leaves. -
Complete the outer ring:
Sketch the final, largest ring of leaves. These should have slightly sharper tips and extend almost to the edge of the stone. -
Add accent foliage:
Draw a few sprigs of greenery extending from the top right or top left side of the succulent to break the symmetry.
Step 3: Painting the Succulent
-
Base green color:
Mix a vibrant teal-green using your leaf green, a touch of teal, and white. Paint the body of each leaf, leaving a very thin white gap between them to keep the shapes distinct. -
Create a gradient:
While the paint is still slightly wet, blend a lighter, paler green (mixed with more white) into the center of each leaf to create a plump, 3D effect. -
Paint the outer tips:
Mix a purple-magenta shade. Carefully paint the pointed tips of the outermost leaves, blending the purple slightly down into the green for a natural transition. -
Detail the sprigs:
Paint the small greenery sprigs using a fresh, yellowish-green to differentiate them from the main succulent. -
Refine the edges:
Using your finest brush or a liner pen, carefully outline each leaf. I prefer using a very dark green or thin black ink for this to really make the details pop.
Use a Transfer
If you aren’t confident drawing freehand, print a succulent image, rub pencil on the back, and trace the outline onto your white rock surface.
Step 4: Finishing Touches
-
Clean up the background:
If any paint went outside the lines, touch up the surrounding white background with a small brush to keep the edges crisp. -
Dry thoroughly:
Allow the painted rock to cure for at least 24 hours to ensure all layers are hardened. -
Seal the artwork:
In a well-ventilated area, spray the rock with a clear acrylic sealer. A matte finish looks very natural, while satin gives a slight sheen.
Place your finished stone in a planter or on a desk for a touch of greenery that never needs watering
BRUSH GUIDE
The Right Brush for Every Stroke
From clean lines to bold texture — master brush choice, stroke control, and essential techniques.
Explore the Full Guide
Sleepy Cat Curled to Fit the Oval

Capture the peaceful slumber of this curled-up ginger cat, perfectly fitted to the natural contours of an oval river rock. This project combines illustrative brushwork with fine line details to create a cozy, decorative piece that celebrates the simple shape of the stone.
Detailed Instructions
Materials
- Smooth, oval river rock (approx. 3-4 inches wide)
- Acrylic craft paints (burnt sienna, ochre/yellow oxide, dark brown, white, cream, soft pink)
- Fine detail brushes (sizes 00 and 1)
- Small flat shader brush (size 4)
- Graphite transfer paper and pencil (or a white charcoal pencil)
- Fine-point black paint marker or micron pen (waterproof)
- Palette for mixing
- Water cup and paper towels
- Matte or satin varnish sealer
Step 1: Preparation and Sketching
-
Clean the canvas:
Wash your rock thoroughly with soap and water to remove any dirt or oils. Let it dry completely, perhaps in the sun, to ensure the paint adheres properly. -
Plan the composition:
Visualize the cat’s circular shape filling the main body of the rock. Use a white charcoal pencil to lightly sketch the large circle of the body, the triangular ears, and the sweeping curve of the tail wrapping around. -
Refine the outline:
Draw the details of the face, situating the closed eyes low on the head. Sketch the branches and leaves in the negative space to the left of the cat’s head to frame the composition.
Natural Texture
Don’t paint the background! Leaving the raw gray stone visible around the edges gives the piece an organic, rustic look that complements earth tones.
Step 2: Base Coloring
-
Mix the ginger base:
Create a warm, light ginger color by mixing ochre with a touch of white and a tiny dot of burnt sienna. This should be a soft, creamy orange. -
Fill the body shape:
Using the flat shader brush, paint the entire body and head of the cat with your ginger mixture. Avoid the tip of the tail and the muzzle area for now. You may need two thin coats for opacity. -
Add white accents:
While the ginger dries, use a smaller brush to paint the tip of the tail and the muzzle area (where the whiskers will go) with pure white paint. Blend slightly where the white meets the ginger for a soft transition. -
Paint the inner ears:
Mix a small amount of soft pink with white. Carefully fill in the triangular shapes of the inner ears.
Step 3: Fur Texture and Markings
-
Create the stripes:
Mix a darker orange-brown using burnt sienna and a little dark brown. Using the size 1 brush, paint short, tapered strokes to create the tabby stripes on the back, top of the head, and along the tail. -
Layer fur texture:
I find that dry-brushing a little cream color over the lighter parts of the body helps create depth. Use a nearly dry brush to flick tiny hairs over the back and the curve of the leg. -
Define the shape:
Use a thinned brown paint to deepen the shadows where the limbs overlap—specifically under the chin, where the tail tucks in, and the curve of the hip. -
Paint the foliage:
Mix a muted brown-gold color for the branches. Paint the stems and leaf shapes delicately around the cat. Add small dabs of pink to a few of the lower leaves for a pop of color.
Make it Yours
Adapt the markings to match a real-life pet. Swap the ginger stripes for black and white patches, or use greys for a Russian Blue style sleeper.
Step 4: Details and Outline
-
Outline the cat:
Once all paint is totally dry, use your black paint pen or a 00 brush with thinned black paint to outline the entire cat. Use broken, sketchy lines to simulate fur rather than a solid, heavy wire. -
Draw facial features:
Carefully draw the two curved lines for the sleeping eyes and the small nose and mouth. Add tiny dots on the white muzzle area. -
Whiskers and highlights:
Using your finest brush or pen, flick quick, confident lines for the whiskers. Add tiny white highlight strokes on the ears and the top of the curve of the back to make the kitty look round. -
Leaf details:
Outline the leaves and branches with the black pen to match the illustrative style of the cat. -
Seal the rock:
Allow the rock to cure for at least 24 hours. Apply a coat of varnish to protect your artwork from scratches and dust.
Place your finished stone on a shelf or use it as a heartwarming paperweight to keep you company while you work
Simple Dog Face on a Horizontal Oval
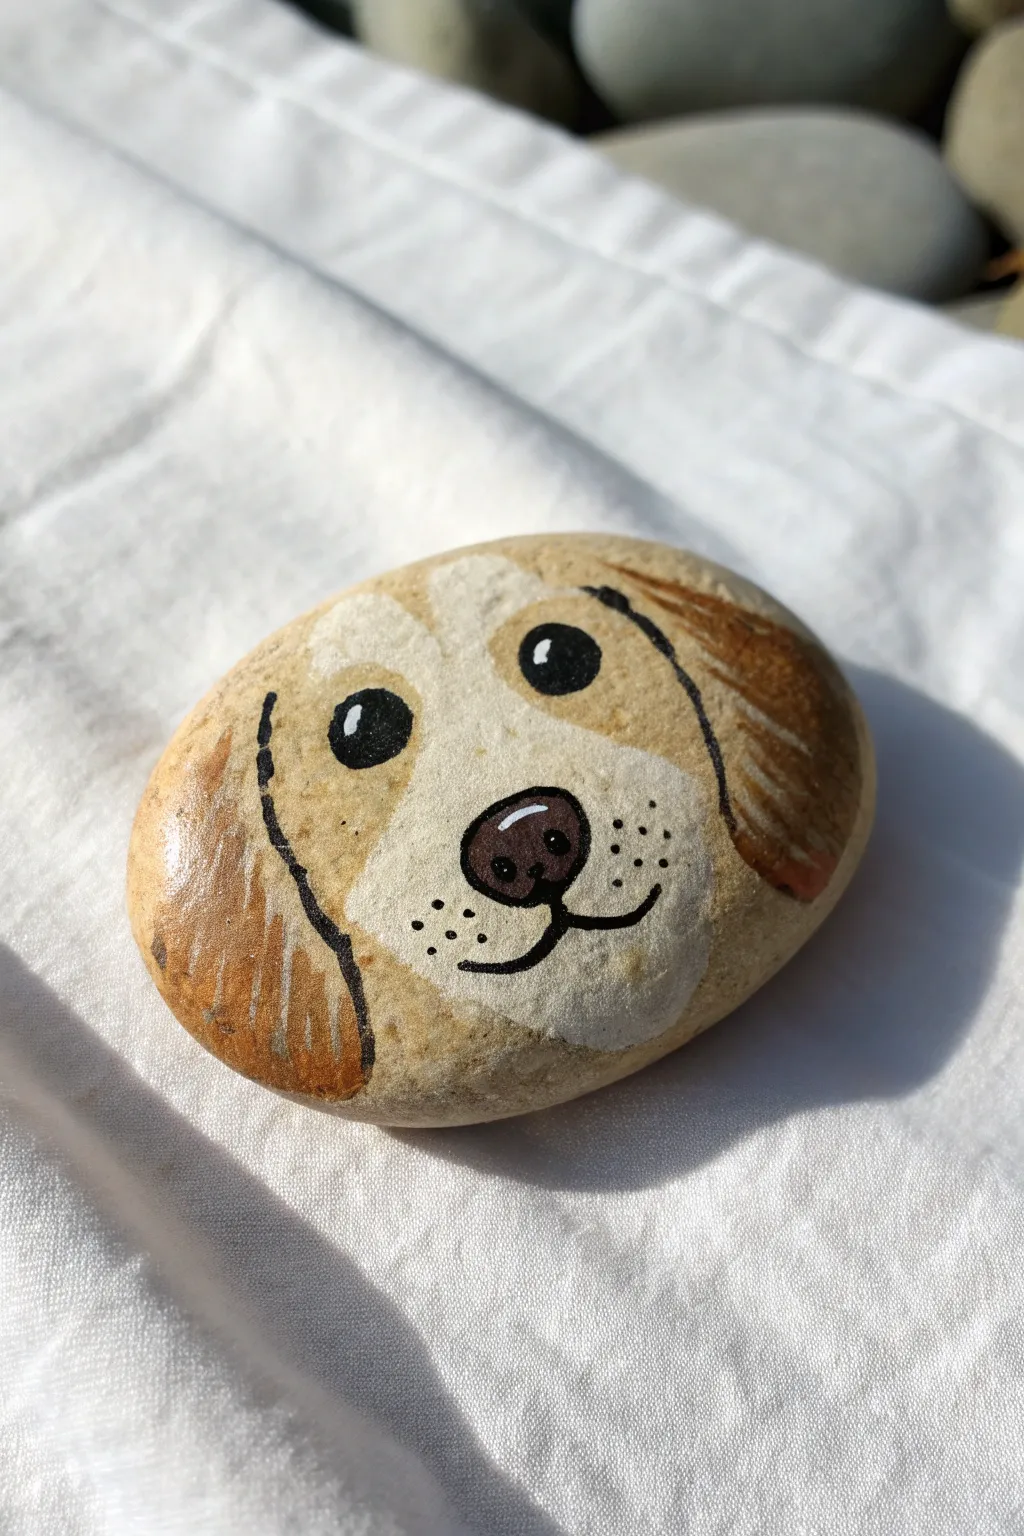
Transform a smooth river rock into an adorable puppy companion with this straightforward painting project. The natural shape of horizontal oval stones lends itself perfectly to a wide, friendly dog face with floppy ears.
Step-by-Step Tutorial
Materials
- Smooth, horizontal oval rock (approximately palm-sized)
- Acrylic paints: white, tan/beige (light brown), dark brown, black
- Pencil (for sketching)
- Flat paintbrush (medium size)
- Small round paintbrush (size 0 or 1)
- Detail liner brush (optional, for whiskers)
- Clear acrylic sealer (matte or gloss)
Step 1: Base and Sketch
-
Clean the canvas:
Before starting, scrub your rock with soap and water to remove any dirt or oils. Let it dry completely in the sun or with a hairdryer. -
Base coat (optional):
If your rock is very dark, you might want to paint a solid layer of white or cream over the whole surface first. If your rock is naturally light grey or beige like the one shown, you can skip this to use the natural stone texture. -
Map out the face:
Using a pencil, lightly sketch the outline of the dog’s face. Draw a large mushroom shape in the center for the snout and forehead, leaving space on the sides for ears. -
Sketch the ears:
On the left and right sides of your center ‘mushroom’ shape, sketch long, floppy ears that curve down toward the bottom of the rock.
Natural Texture
Don’t over-paint the background! Leaving some original rock surface visible around the edges makes the painting feel like it’s emerging from the stone.
Step 2: Blocking Colors
-
Paint the muzzle and blaze:
Load your medium flat brush with white paint. Fill in the center muzzle area and extend a stripe up the forehead between the eyes. You may need two coats for opaque coverage. -
Create the main fur color:
Mix a soft tan color using beige and a tiny dot of brown. Paint the areas around the eyes, blending slightly into the white muzzle edges while the paint is still wet for a soft transition. -
Fill in the ears:
Use a darker brown (or add more brown to your tan mix) to paint the ears. The darker color helps frame the face and adds depth. -
Feather the edges:
While painting the ears, use quick, short strokes near the bottom to mimic the texture of fur rather than a solid smooth line.
Custom Collars
Paint a bright red or blue collar along the bottom edge of the rock. You can even add a tiny painted metal tag with a name on it.
Step 3: Facial Features
-
Paint the nose:
Mix a dark chocolate brown shade. Using your small round brush, paint a rounded triangular shape for the nose in the center of the white muzzle area. -
Add the eyes:
Switch to black acrylic paint. Carefully paint two solid black circles for eyes on either side of the white forehead stripe. -
Outline the mouth:
With a thin liner brush and black paint, draw a small vertical line down from the nose, splitting into two curves for the mouth. Adding a tiny tick mark at the ends of the smile gives extra personality. -
Outline the head:
Use diluted black paint or a black paint pen to loosely outline the ears and top of the head. I find keeping the lines slightly broken looks more organic than a solid heavy border.
Step 4: Details & Highlights
-
Add nose highlights:
Dip the back of your paintbrush or a dotting tool into white paint. Add a curved highlight line on the top of the nose and two tiny dots for nostrils. -
Sparkle in the eyes:
Place a single small white dot in the upper corner of each black eye. This ‘catchlight’ instantly brings the dog to life. -
Paint whisker spots:
Using the very tip of your smallest brush or a toothpick, add several tiny black dots on the white muzzle area on both sides of the nose. -
Add fur texture:
Using a dry brush with a tiny amount of white or light tan, gently whisk over the dark ear sections to suggest individual hairs catching the light. -
Seal the artwork:
Once absolutely dry (give it at least an hour), apply a layer of clear acrylic sealer to protect your puppy from chipping and weather.
Now you have a loyal, low-maintenance pet that creates a warm welcome on any doorstep or window sill

PENCIL GUIDE
Understanding Pencil Grades from H to B
From first sketch to finished drawing — learn pencil grades, line control, and shading techniques.
Explore the Full Guide
Tiny Penguin Body Using the Oval Shape

Transform a simple oval stone into an adorable, chilly friend with this easy painting project. The natural grey of the rock serves as the perfect backdrop for a classic black and white penguin design.
Step-by-Step Guide
Materials
- Smooth oval river rock (medium grey)
- Acrylic paints: Black, White, Orange
- Paintbrushes: Medium flat brush, fine detail liner brush
- Dotting tool or toothpick
- Pencil (optional)
- Spray sealer or varnish
Step 1: Planning the Shape
-
Clean your canvas:
Begin by washing your rock with soapy water and letting it dry completely to ensure the paint adheres properly. -
Sketch the outline:
Using a pencil, lightly sketch a large oval shape for the white belly in the center of the rock, leaving enough space at the top for the head and on the sides for flippers. -
Mark the features:
Lightly draw two circles for eyes above the belly area and a small triangle for the beak.
Smooth Operator
If your white paint looks streaky, sand the first coat lightly with fine-grit sandpaper after it dries, then apply a second coat for a porcelain finish.
Step 2: Painting the Base Layer
-
Fill the belly:
Use your white acrylic paint and a medium brush to fill in the large oval belly shape. You may need two coats for solid coverage. -
Create the eyes:
Paint the two circular eye shapes with white paint, making sure they are opaque and bright. -
Outline the body:
With black paint, carefully outline the white belly. Extend this black area outwards to the edges of the rock to form the penguin’s main body. -
Paint the head:
Fill in the top area around the eyes with black paint, creating a smooth curve over the forehead. -
Add the flippers:
Extend the black paint down the sides of the rock in a curved, pointed shape to create wings resting against the body.
Winter Wonderland
Create a whole colony by painting rocks of different sizes, or paint a second rock white to serve as an ‘iceberg’ for your penguin to stand on.
Step 3: Adding Personality
-
Paint the beak:
Using orange paint and a small brush, fill in the triangular beak. I like to let the orange overlap the black outline slightly for a cleaner look. -
Add the feet:
Paint two small, webbed foot shapes at the very bottom of the rock using the same orange paint. -
Detail the eyes:
Once the white eye paint is fully dry, stick the handle end of a paintbrush into black paint to add pupils. Place them slightly cross-eyed or looking up for a cuter expression. -
Highlight the eyes:
Dip a toothpick in white paint and add a tiny speck of light reflection inside each black pupil to bring the character to life.
Step 4: Texture and Finishing
-
Mix a grey wash:
Dilute a tiny drop of black paint with water or mix it with plenty of white to create a very pale, watery grey. -
Add belly speckles:
Dip a stiff brush or an old toothbrush into your grey mixture and gently flick or tap tiny specks onto the white belly area for texture. Alternatively, use a fine tip brush to dab small dots. -
Refine lines:
Go back with your finest brush and touch up any black edges that might have gotten messy during the speckling process. -
Seal the artwork:
Allow the rock to dry overnight, then spray with a clear acrylic sealer to protect your penguin from scratches and weather.
Now you have a charming little desk companion that wont ever need a sweater
Koi Fish Swimming Along the Oval Curve
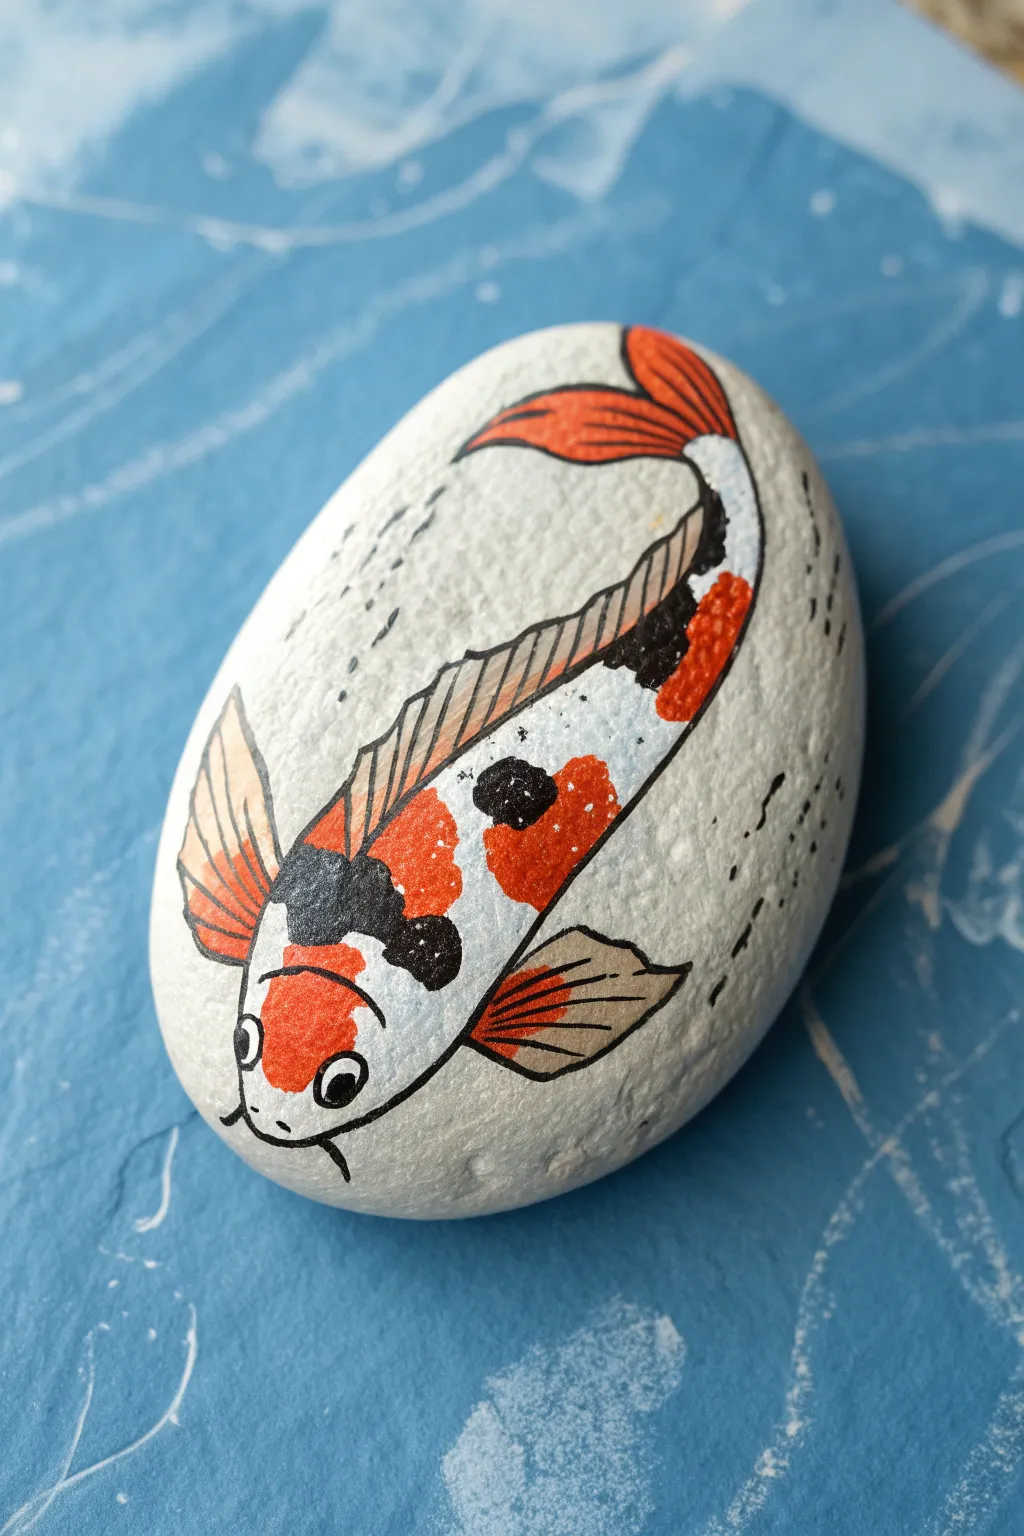
Transform a simple oval rock into a tranquil pond scene with this vibrant koi fish painting. Using the natural curve of the stone to emphasize the fish’s movement creates a beautifully fluid and dynamic piece of art.
How-To Guide
Materials
- Smooth, oval-shaped river rock
- Acrylic paints (orange, red, black, white, and a diluted beige/grey)
- Fine liner brushes (size 00 or 0)
- Small flat brush
- pencil and eraser
- Matte or glossy spray varnish
Step 1: Preparation and Sketching
-
Clean the canvas:
Before starting, scrub your rock with soap and water to remove any dirt or oils, then let it dry fast and completely. -
Draft the curve:
Using a pencil, lightly sketch the spine of the koi first. Follow the natural oval shape of the rock to make the fish look like it’s turning. -
Outline the body:
Flesh out the fish’s body around that spine line, tapering the tail towards the top right and widening the head near the bottom left. -
Add fins and details:
Sketch the large pectoral fins fanning out near the head, the dorsal fin along the back, and the tail fin. Don’t worry about scales yet; just get the main shapes in.
Step 2: Base Colors and Blocking
-
Apply the white base:
Paint the entire body of the fish with white acrylic. You may need two thin coats to ensure the grey rock doesn’t show through. -
Map the orange spots:
Once the white is dry, paint organic patches of bright orange. key areas are the nose, the left pectoral fin, and blotches along the spine. -
Add deep red accents:
While the orange is still slightly tacky or just dry, blend a darker red-orange into the rear tail section and the dorsal fin for depth. -
Paint the black markings:
Using a smaller brush, carefully paint the black patches. Place a prominent one on the back shoulder and another near the tail to balance the design.
Ink Alternative
If you struggle with brush control for the thin black outlines, use a waterproof archival black ink pen (like a Micron) over the dried paint instead.
Step 3: Details and Definition
-
Outline the body:
Use your finest liner brush and black paint (thinned slightly with water flow easier) to outline the entire fish. -
Draw the dorsal fin spines:
Inside the dorsal fin, draw thin, parallel lines that curve slightly backward to show the fin’s structure. -
Detail the pectoral fins:
Outline the side fins and add interior lines. Note that the left fin is orange-tipped while the right one is mostly transparent/grey. -
Create the face:
Outline the head curve. Paint two small black circles for eyes, leaving a tiny white dot in each for a reflection, and draw two thin whiskers (barbels). -
Add transparency:
Mix a very watery beige or light grey. Glaze this over the dorsal fin and the right pectoral fin to make them look semi-transparent compared to the solid body.
Add Some Sparkle
Mix a tiny amount of metallic gold or iridescent medium into the white paint for the body scales to make the fish shimmer in the sunlight.
Step 4: Finishing Touches
-
Add movement lines:
Around the fish, use diluted black or grey paint to add tiny dashes and curved strokes on the raw stone. This mimics water ripples. -
Clean up edges:
If any paint went outside the lines, use a damp brush or a tiny bit of rock-colored paint to tidy the perimeter. -
Seal the artwork:
Allow the rock to cure overnight, then spray with a clear varnish to protect the paint and give the fish a ‘wet’ look.
Place your finished stone in a garden pot or on a desk to bring a little underwater serenity to your day


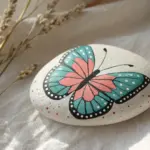
Monarch-Style Butterfly on an Oval Rock
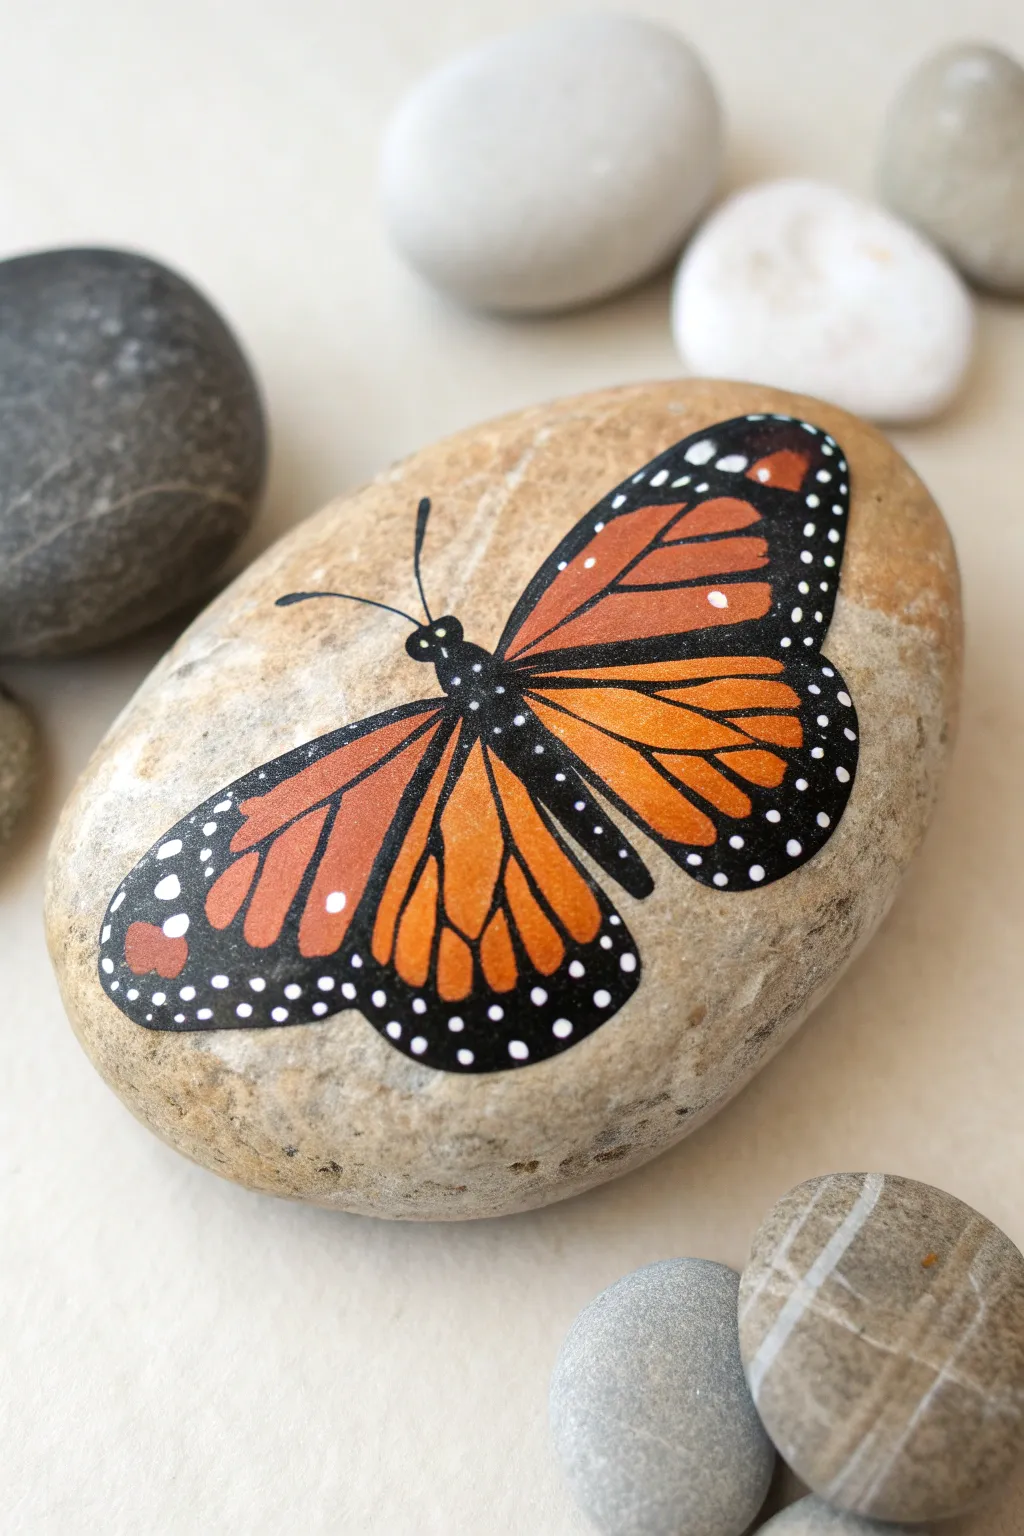
Transform a smooth river stone into a lifelike nature scene with this stunning Monarch butterfly study. The natural beige tones of the rock serve as the perfect neutral background, letting the vibrant oranges and deep blacks of the wings truly pop.
Step-by-Step Guide
Materials
- Smooth, oval-shaped river rock (cleaned and dried)
- Acrylic paints: Bright Orange, Red-Orange, Deep Black, Titanium White
- Fine liner brush (size 0 or 00)
- Small flat brush or round brush
- Pencil and eraser
- Palette or small plate
- Paper towels and water cup
- Varnish or clear sealant (matte or satin finish)
Step 1: Planning and Base Colors
-
Prepare the canvas:
Ensure your rock is thoroughly scrubbed with soap and water to remove any dirt or oils, then let it dry completely. A smooth surface is crucial for the fine details of the butterfly wings. -
Sketch the outline:
Using a light pencil, sketch the butterfly shape. Start with a central vertical line for the body, then draw the upper and lower wing shapes symmetrically. Angle the upper wings slightly upwards and the lower wings downwards for a lifelike pose. -
Lay out the orange base:
Load your small round brush with bright orange paint. Fill in the main sections of the wings, purposefully leaving a thin gap around the edges and between the wing veins where the black lines will go later. This prevents the orange from mixing with your black outline. -
Add depth:
While the orange is still slightly wet, blend a tiny amount of red-orange near the body of the butterfly and the upper tips of the wings. This soft gradient gives the wings a warm, sunlit appearance. -
Paint the body:
Using the black paint, fill in the central body shape. It should be a slender oval for the thorax and a longer, thinner section for the abdomen. Let all base layers dry completely before moving to the next phase.
Steady Hands
Rest your painting wrist on the table or stabilize it with your other hand while painting the thin black veins to minimize shaking.
Step 2: Defining the Details
-
Outline the wings:
Switch to your fine liner brush and thin your black paint slightly with a drop of water for better flow. Carefully paint the thick outer border of all four wings. -
Create the veins:
With the same liner brush, paint the delicate black veins running through the orange sections. I find it easiest to start from the body and pull the brush outward toward the wing edges to get a tapered line. -
Refine the upper wings:
The veins on the upper wings should fan out broadly. Make sure the lines are crisp; if you wobble, you can touch up with orange later. -
Detail the lower wings:
Draw the webbing on the lower wings. These cells are slightly smaller and more intricate, resembling a stained-glass pattern. -
Add the antennae:
Paint two very fine, curved lines extending from the head for antennae. Keep a light hand here so they don’t look too heavy.
Shadow Effect
After sealing, paint a faint gray shadow on the rock just under the lower wings to make the butterfly look like it’s resting on top.
Step 3: Highlights and Finish
-
Dot the borders:
Dip the very tip of your smallest brush or a toothpick into white paint. Add a series of small dots along the thick black outer margin of the wings. Vary the sizes slightly—some tiny, some slightly larger. -
Add body details:
Place a few tiny white specks on the black body (thorax) and the head to suggest light reflection and texture. -
Highlight the wings:
Add a few elongated white dashes or larger spots near the tips of the upper forewings, just inside the black border. This is a signature trait of Monarchs. -
Clean up edges:
If any paint went outside the lines onto the raw stone, use a damp Q-tip to gently wipe it away before it cures, or cover it with a paint color that matches your rock. -
Seal the artwork:
Allow the rock to dry for at least 24 hours. Apply a coat of matte or satin varnish to protect the paint from chipping without making the stone look unnaturally glossy.
Place your finished butterfly rock in a garden pot or on a sunny windowsill to enjoy a touch of nature indoors
Vertical Sunset Landscape in an Oval Frame
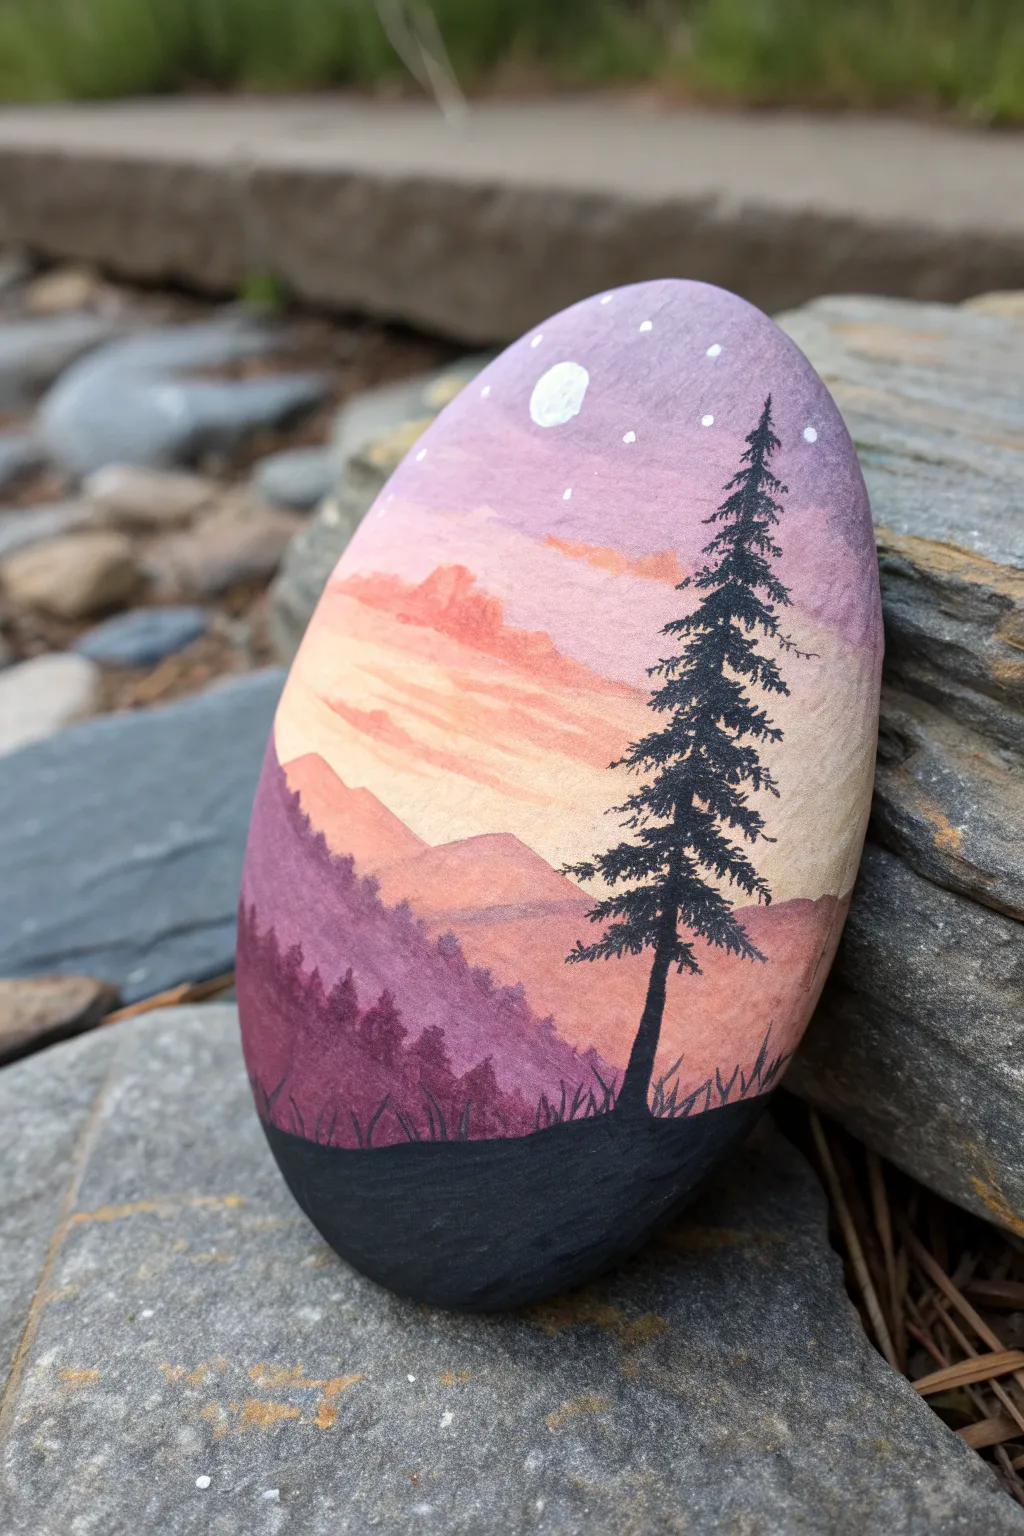
Capture the serene transition from sunset to nightfall with this vertically oriented landscape on a smooth, oval stone. The design features a glowing gradient sky, soft mountain layers, and a stark black pine tree silhouette that frames the scene beautifully.
Step-by-Step Tutorial
Materials
- Smooth, oval river rock (cleaned and dried)
- Acrylic paints: Titanium White, Primary Yellow, Orange, Magenta, Violet, Ultramarine Blue, Black
- Gesso or white primer
- Clear acrylic sealer (matte or gloss)
- Flat shader brushes (medium and small)
- Fine liner brush (0 or 00 size)
- Palette for mixing paint
- Cup of water and paper towels
Step 1: Preparation & Sky Gradient
-
Prime the Surface:
Begin by applying a base coat of white gesso or acrylic paint to the top surface of your rock. This ensures your sunset colors will pop and not be absorbed by the stone’s natural color. Let this dry completely. -
Mix Sky Colors:
Prepare three puddles of paint on your palette: a pale violet (violet + white), a soft orange (orange + tiny bit of yellow + white), and a deeper purple-blue for the top edge. -
Paint the Upper Sky:
Using a flat brush, paint the top third of the rock with your violet mixture. While the paint is still wet, blend in the deeper purple-blue right at the very top edge to create a night-sky transition. -
Blend the Horizon:
Clean your brush and pick up the soft orange mixture. Paint the middle section of the rock, brushing upward into the wet violet paint to create a seamless, hazy gradient where the sun is setting. -
Brighten the Glow:
Mix a very pale yellow-white. While the orange layer is still slightly damp, dry-brush horizontal streaks across the center area to mimic illuminated clouds catching the last light. Allow the entire sky to dry fully before moving on.
Chalky Blends?
If your gradient looks rough or chalky, your paint might be drying too fast. Mix a drop of glazing medium or water into your sky colors to keep them wet longer for smoother blending.
Step 2: Mountains & Foreground
-
Paint Distant Peaks:
Mix a hazy purple-grey color using violet, a touch of white, and a speck of black. About halfway down the rock, paint the outline of the furthest mountain range with soft, rolling peaks. Fill in the shape down to the bottom and let dry. -
Add Mid-Ground Mountains:
Create a slightly darker, more saturated purple mixture. Paint a second range of mountains slightly lower than the first, partially overlapping them. This layering creates atmospheric perspective. -
Create the Tree Line:
Using a deep plum color (violet + magenta + black), use the tip of a small brush to stipple a jagged tree line along the base of the purple mountains. This texture suggests a dense forest in the distance. -
Paint the Immediate Foreground:
Load a medium flat brush with pure black paint. At the very bottom of the rock, paint a solid, curvaceous hill shape. This serves as the ground for your main silhouette. -
Block in the Main Tree:
Switch to your fine liner brush with slightly thinned black paint. Draw a vertical line starting from the foreground hill, extending almost to the top right of the rock. This is your trunk. Taper it so it’s thinner at the top.
Step 3: Details & Finishing
-
Detail the Pine Silhouette:
Using the very tip of your liner brush, tap small, irregular horizontal branches extending from the trunk. Keep the branches shorter near the top and wider near the bottom. Leave small gaps between branches so the sky peeks through. -
Add Grass Texture:
On the black foreground hill, use quick, upward flicking motions with your liner brush to create tall blades of grass along the ridge line. -
Paint the Moon:
Dip the back end of a paintbrush handle or a dotting tool into white paint. Place a clean white circle in the upper left violet section of the sky. -
Add Stars:
Using the smallest liner brush or a toothpick, add tiny white dots randomly scattered in the upper purple section of the sky to represent the first stars of the evening. -
Seal the Artwork:
Once the paint is absolutely bone dry (wait at least an hour), apply a coat of clear acrylic sealer. I prefer a matte finish for landscapes to reduce glare, but gloss works well too.
Pro Detail Tip
For the finest pine needles, thin your black paint to an ink-like consistency with water. This helps the paint flow off the liner brush effortlessly without clumping.
Place your finished stone on a desk or tiered shelf where it can serve as a peaceful window into nature
Single Tree Silhouette That Follows the Taper
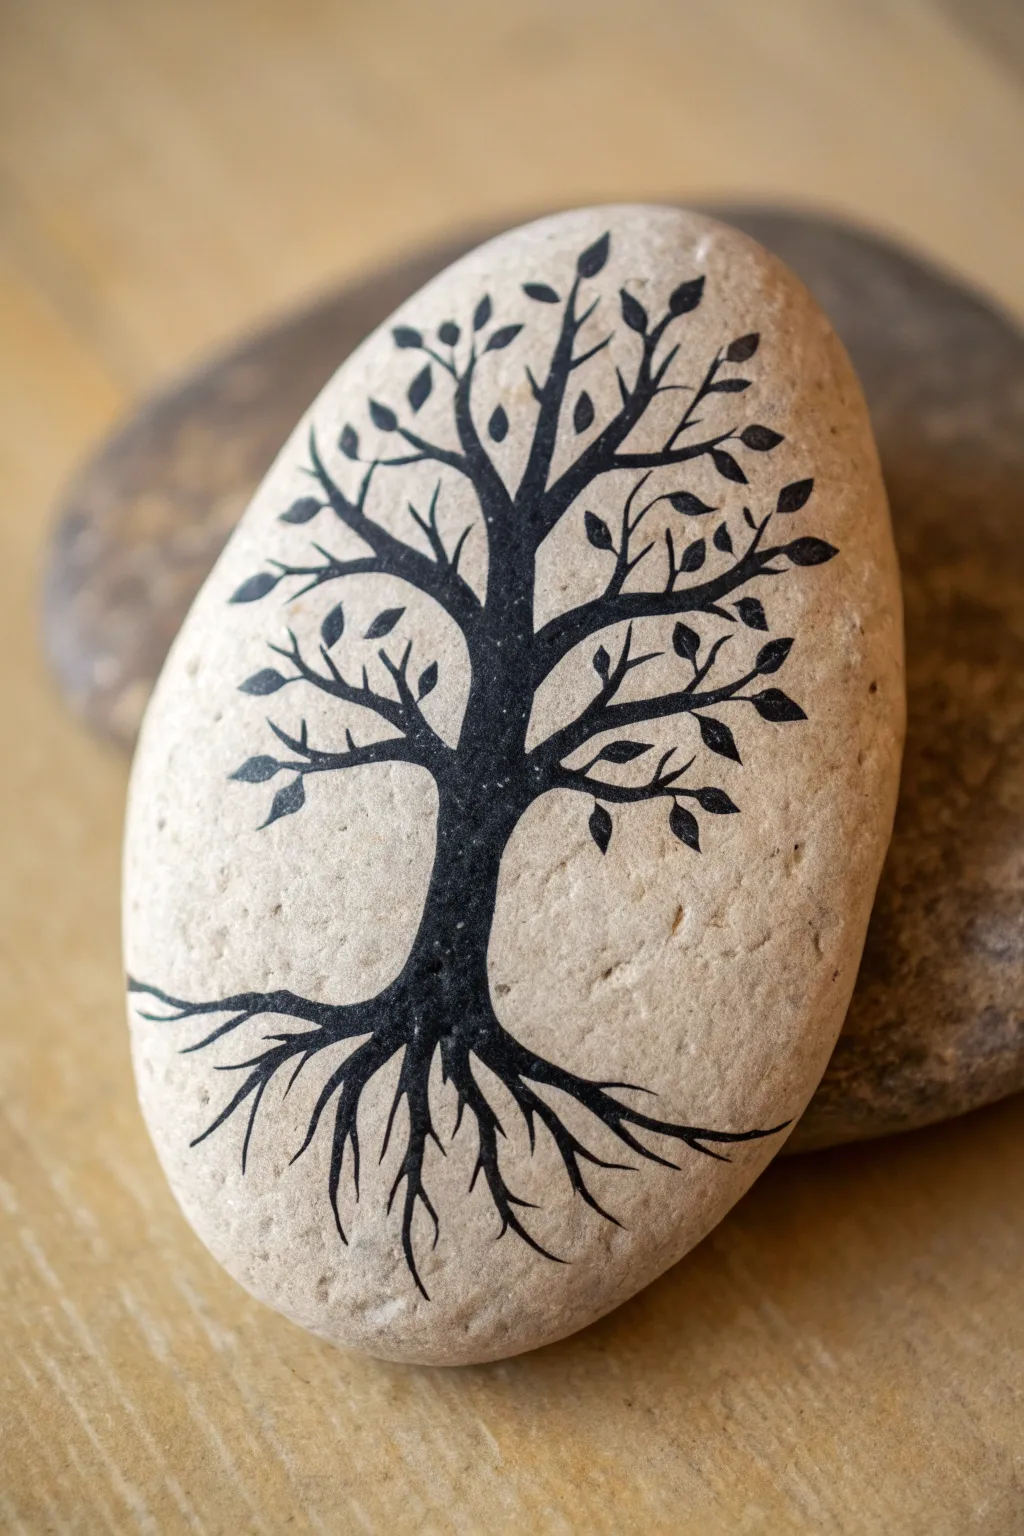
Embrace the natural shape of your stone with this elegant tree silhouette that perfectly mirrors the oval canvas. The stark black ink against the raw, beige stone creates a timeless organic look that feels both grounded and reaching.
How-To Guide
Materials
- Smooth oval river rock (light beige/tan)
- Black acrylic paint pen (fine tip/0.7mm)
- Black acrylic paint pen (extra-fine tip/0.5mm)
- Pencil (HB or lighter)
- Kneaded eraser
- Sealant (spray matte finish)
Step 1: Preparation and Mapping
-
Clean the canvas:
Begin by thoroughly washing your rock with warm soapy water to remove any dirt or oils. Let it dry completely before starting, as moisture can cause the ink to bleed. -
Find the center:
Visualize a vertical line running down the center of the oval. This will guide your trunk placement to ensure the tree feels balanced within the stone’s boundaries. -
Sketch the trunk:
Using a light pencil, sketch a central trunk that starts slightly thicker at the bottom third and tapers gently as it moves upward. Don’t press too hard; you want these lines to be barely visible. -
Mark the major branches:
Lightly sketch three to four main branches extending upward and outward, following the upper curve of the rock. -
Outline the root system:
At the base of the trunk, sketch roughly five to six main root lines spreading downward and outward, utilizing the wider bottom curve of the stone.
Step 2: Inking the Foundation
-
Fill the trunk:
Take your fine tip (0.7mm) black paint pen and carefully fill in the trunk. I like to start in the middle and work outward to the edges to keep the lines crisp. -
Extend the main branches:
Draw the main branches you sketched, tapering them naturally—thicker near the trunk and thinner as they reach the rock’s edge. -
Create the root anchor:
Switch to drawing the roots. Make the connection point between the trunk and roots seamless and thick, creating a solid base for your tree. -
Taper the roots:
Draw the tips of the roots with a flicking motion to make them sharp and delicate as they extend toward the bottom edge of the stone.
Natural Flow Tip
When painting branches, roll the customized rock in your hand as you turn corners. Following the curve physically helps your hand create smoother, more organic lines.
Step 3: Detailing Branches and Leaves
-
Add secondary branches:
From your main branches, add smaller V-shaped offshoots. Aim for an organic, slightly asymmetrical arrangement rather than perfect symmetry. -
Switch to extra-fine tip:
Change to your extra-fine (0.5mm) pen for the most delicate work. This is crucial for the tiny twigs and leaves. -
Draw the leaves:
Add small, simple almond or tear-drop shapes along the outer twigs. Keep them small so they don’t overwhelm the delicate branch structure. -
Vary leaf direction:
Ensure the leaves point in different directions to simulate natural growth and wind movement. -
Refine the roots:
Add tiny hair-roots splitting off from the main root lines using the extra-fine pen. This adds incredible realism and depth to the bottom half.
Fixing a Blob
If you accidentally make a branch too thick or drip ink, turn it into a leaf or a knot in the wood. Silhouette art is forgiving; imperfections create character.
Step 4: Finishing Touches
-
Check for gaps:
Inspect the solid black areas of the trunk for any light spots or stone texture showing through. Apply a second coat of black ink if necessary for an opaque finish. -
Clean up sketch lines:
Once the ink is 100% dry (give it at least 20 minutes), gently dab the kneaded eraser over the design to lift any remaining visible pencil marks. -
Seal the artwork:
Take the rock outside and apply a light coat of matte spray sealant. A gloss finish can reflect too much light and obscure the silhouette, so matte is best.
Place your finished stone on a desk or shelf as a serene reminder of nature’s resilience and beauty
Botanical Garland Border Around the Oval
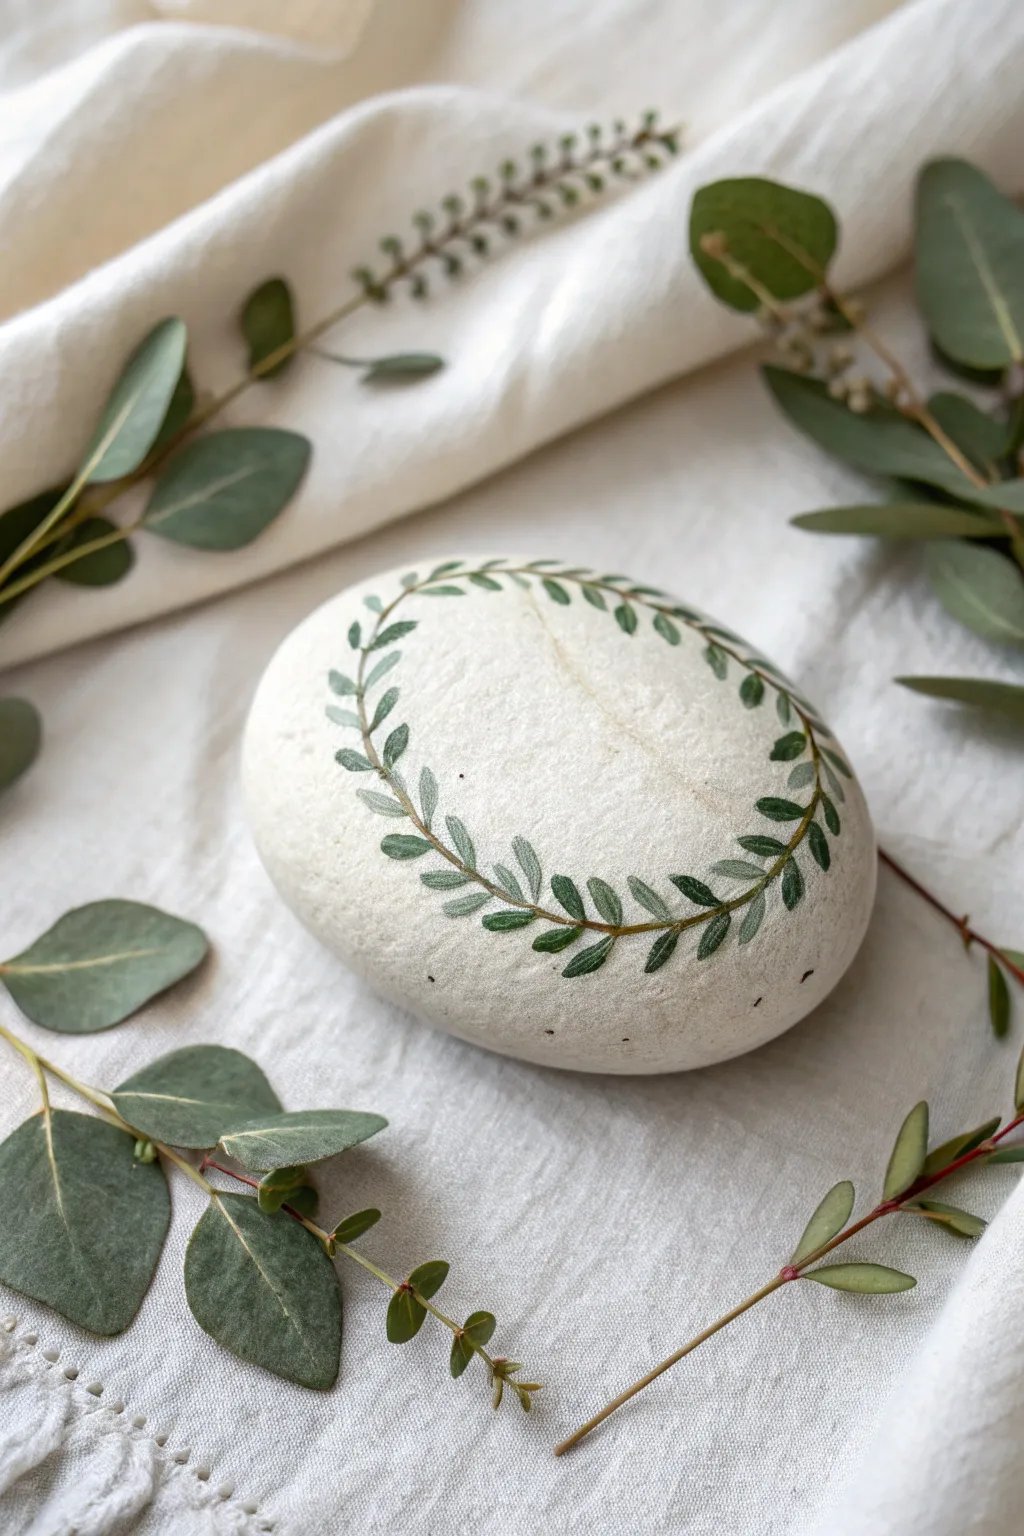
Transform a smooth river rock into a piece of minimalist botanical art with this elegant leaf garland design. The soft white background and crisp green foliage create a serene, nature-inspired decorative accent perfect for a desk or shelf.
How-To Guide
Materials
- Smooth, oval river rock (medium size)
- White acrylic paint (matte finish)
- Wide flat brush
- Fine liner brush (size 0 or 00)
- Acrylic paints in olive green, dark hunter green, and brown
- Pencil (optional)
- Matte spray varnish or sealer
- Palette or small plate for mixing
- Cup of water and paper towels
Step 1: Preparation & Base Coat
-
Clean the Stone:
Begin by washing your stone thoroughly with soap and warm water to remove any dirt or oils. Scrub well with an old toothbrush if needed to get into porous areas. -
Dry Completely:
Let the stone air dry completely before applying any paint, as trapped moisture can cause the paint to bubble or peel later. -
Apply First Base Layer:
Using the wide flat brush, apply a smooth, even coat of white acrylic paint over the top surface. Don’t worry about full opacity yet; thin layers are key. -
Layer for Opacity:
Once the first coat is dry to the touch, apply a second coat. Cross the direction of your brushstrokes to minimize texture. I prefer adding a third coat if the stone’s natural color is still peeking through. -
Sketch the Stem (Optional):
If you are nervous about freehand painting, use a pencil to very lightly sketch a single curved line that loops around the stone’s surface to guide your vine placement.
Brush Control Tip
For the finest lines on the stem, roll the wet liner brush on your palette to create a needle-sharp point, then hold the brush vertically while painting.
Step 2: Painting the Vine
-
Mix the Stem Color:
On your palette, mix a small amount of brown paint with a tiny dot of olive green to create a natural, earthy twig color. Thin the paint slightly with a drop of water for better flow. -
Paint the Central Stem:
Load your fine liner brush with the thinned brown mix. Paint a thin, continuous line following the curve of the stone, creating the main spine of your garland. -
Add Branch Offshoots:
While the brown is on your brush, add very short, thin lines branching off the main stem in alternating directions. These will be the anchor points for your leaves. -
Mix Leaf Greens:
Create two shades of green on your palette: a lighter olive green for highlights and a darker hunter green for shadow and depth. -
Paint the Leaf Shape:
Starting at one of the branch tips, use the liner brush and olive green paint to press down slightly and pull away, creating a small, tapered oval leaf shape. -
Populate the Vine:
Continue adding leaves along the vine. Try to angle them naturally, mirroring the flow of real eucalyptus or fern leaves.
Step 3: Details & Finishing
-
Add Depth:
Once the base green leaves are dry, use the darker hunter green to paint over the bottom half or center vein of select leaves. This adds dimension and prevents the garland from looking flat. -
Refine the Edges:
Go back in with your liner brush to sharpen any leaf tips or connect any ‘floating’ leaves back to the main brown stem. -
Clean Up Mistakes:
If any green paint strayed too far, wait for it to dry completely, then use a tiny dot of your white base paint to cover the error like correction fluid. -
Cure the Paint:
Allow the finished design to dry for at least 24 hours to ensure the paint has fully bonded to the stone surface. -
Seal the Design:
Finish by applying a light coat of matte spray varnish. This protects the delicate leaves from scratches without adding an unnatural glossy shine.
Make It Glossy
Instead of matte varnish, use a high-gloss resin or thick clear glaze finisher to make the rock look like fine porcelain or ceramic tile.
Place your finished botanical stone on a stack of books or use it as a calming paperweight
Mini Galaxy Painted on a Smooth Oval Rock
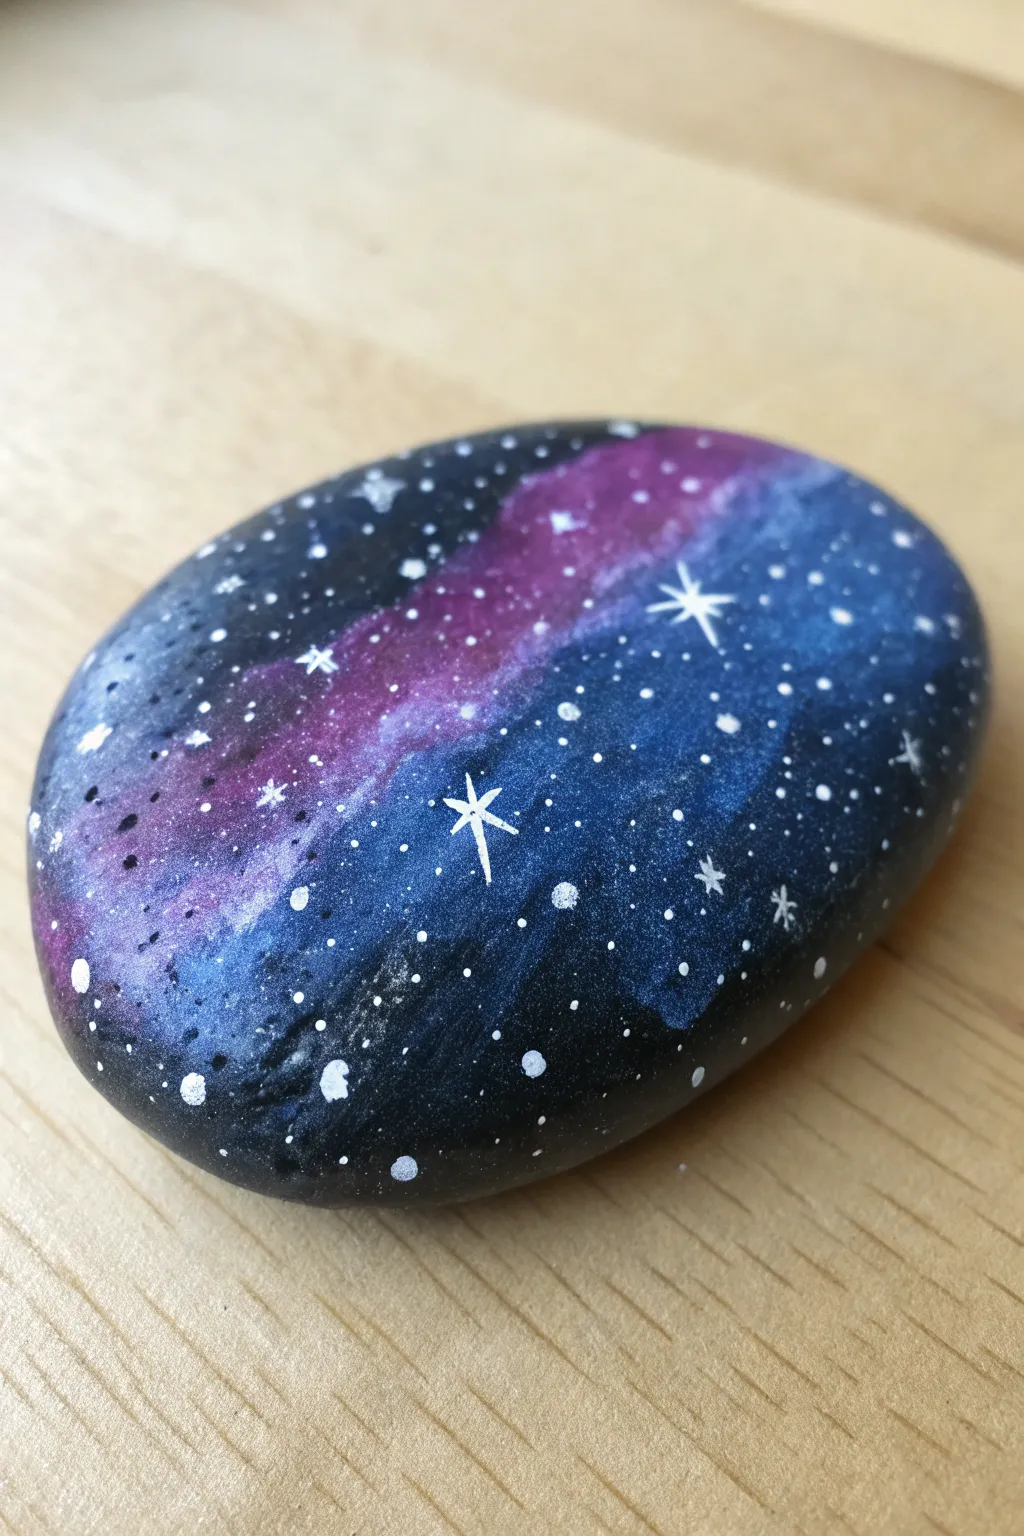
Capture the vastness of the cosmos right in the palm of your hand with this mesmerizing rock art project. Using simple blending techniques and splatter effects, you’ll transform an ordinary stone into a swirling nebula of blues, purples, and starry constellations.
Detailed Instructions
Materials
- Smooth oval rock (river rock works best)
- Black acrylic paint (or black gesso)
- Violet or deep purple acrylic paint
- Ultramarine or deep blue acrylic paint
- Light blue or teal acrylic paint
- White acrylic paint
- Small kitchen sponge or makeup sponge
- Medium flat brush
- Fine detail brush (liner brush)
- Old toothbrush (optional for splattering)
- Gloss varnish or clear sealer
Step 1: Preparing the Void
-
Clean the surface:
Begin by scrubbing your rock with warm water and a little soap to remove any dirt or grease. Let it dry completely. -
Base coat application:
Using your medium flat brush, paint the entire rock with a solid coat of black acrylic paint. -
Wait or expedite:
Allow the base coat to dry fully. If the rock is porous and you see grey spots, apply a second coat for a deep, opaque black.
Step 2: Creating the Nebula
-
Start the nebula swirl:
Squeeze a small amount of violet or deep purple paint onto your palette. Dip a small piece of sponge into the paint, then dab off the excess on a paper towel until the texture is almost dry. -
Sponge the purple layer:
Gently dab the sponge diagonally across the center of the rock to create a cloudy, irregular band of purple. Don’t cover the whole rock; keep the edges soft and faded into the black. -
Add deep blue depth:
Using a clean section of the sponge (or a new piece), pick up some ultramarine blue. Dab this color along the edges of your purple streak and into some areas of the remaining black space. -
Blend the transition:
While the paint is slightly tacky, lightly tap over the boundary where the blue and purple meet to soften the transition between the two colors. -
Highlighting:
Mix a tiny bit of white into your light blue or teal paint. Very sparingly sponge this brighter color into the center of the nebula band to create a glowing core effect. -
Soften the edges:
Wait for the lighter colors to dry for a moment. If any edges look too harsh, you can lightly glaze over them with a very watery layer of black to push them back into the shadows.
Nebula Nuance
Keep the sponge very dry! Too much paint creates blobs. You want a dusty, transparent texture so the black shows through slightly.
Step 3: Adding the Stars
-
Prepare splatter paint:
Mix white acrylic paint with a few drops of water until it reaches the consistency of thin cream or ink. -
Splatter stars:
Dip an old toothbrush or a stiff bristled brush into the thinned white paint. Holding it over the rock, run your thumb across the bristles to flick tiny specks of ‘stardust’ across the surface. -
Adjust density:
Concentrate slightly more splatter near the nebula band to mimic the density of the Milky Way, but be careful not to overdo it. -
Adding distinct stars:
Switch to your finest detail brush. Dip the tip into un-thinned white paint and carefully dot individual larger stars around the rock. -
Painting the main stars:
Choose two or three spots for ‘hero’ stars. Paint a small cross shape consisting of a vertical line and a horizontal line intersecting at a central dot. -
Adding flair:
For the largest stars, I like to pull two smaller diagonal lines from the center of the cross to create an eight-point glimmer effect. -
Final dry:
Let the rock sit undisturbed until the white paint is touch-dry. The thicker dots will take longer than the background.
Cosmic Sparkle
Mix a tiny pinch of silver glitter or metallic shimmer medium into your final varnish coat for a galaxy that truly sparkles in the sun.
Step 4: Protecting the Universe
-
Sealing the work:
Apply a coat of gloss varnish or clear sealer. A glossy finish is ideal here as it deepens the black background and makes the colors pop. -
Curing:
Let the sealer cure according to the bottle instructions before handling or displaying your rock.
Place your finished galaxy rock on a desk or shelf to add a little piece of the infinite universe to your room
School Supply Set Made from Oval Rocks
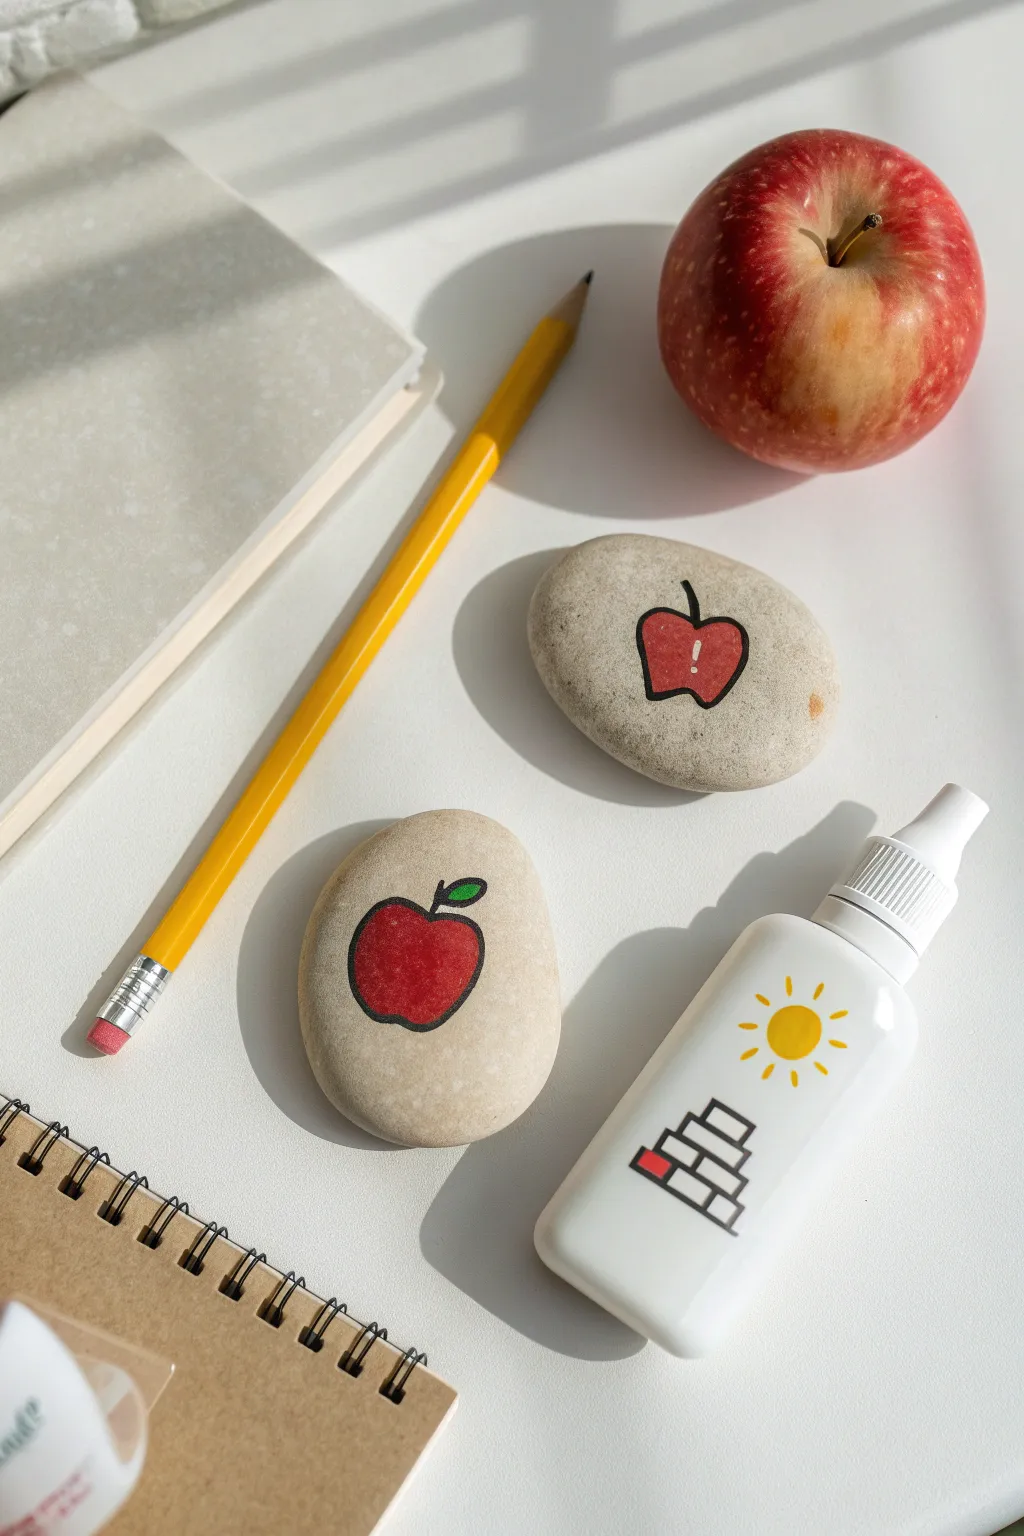
These charming, smooth stones are transformed into adorable school-themed tokens perfect for a teacher’s desk or a student’s study space. The clean, graphic apple designs pop beautifully against the natural beige of the river rocks, creating a modern yet playful aesthetic.
Step-by-Step
Materials
- Two smooth oval river rocks (beige/grey tone)
- Acrylic paint pens (Red, Black, Green)
- Pencil for sketching
- Eraser
- Matte spray sealant or Mod Podge
- Mild soap and water
- Paper towel
Step 1: Preparation
-
Cleaning:
Begin by washing your oval rocks thoroughly with mild soap and warm water. Scrub away any dirt or grit that might interfere with the paint adhesion. -
Drying:
Pat the rocks dry with a paper towel and let them sit for about 15-20 minutes to ensure all moisture has evaporated from the porous surface. -
Sketching the Whole Apple:
On the first rock, use a pencil to lightly sketch a classic apple shape. Draw a rounded heart-like shape for the fruit and add a small stem and single leaf at the top. -
Sketching the Apple Logo:
On the second rock, sketch a stylized apple logo. This one looks like the famous tech logo but slightly more hand-drawn. Instead of a stem, float a small exclamation mark inside the center of the apple shape.
Smooth Surface Strategy
Choose rocks that are as smooth as possible. Pitted surfaces make clean black outlines difficult and can fray the felt tips of your paint pens.
Step 2: Painting the Designs
-
Outlining the Whole Apple:
Take your black fine-tip acrylic paint pen. Carefully trace over your pencil sketch for the first apple, outlining the fruit, the stem, and the leaf. -
Filling the Red:
Shake your red paint pen well to mix the pigment. Color in the main body of the apple. You might need to do this in two thin layers to get that solid, opaque look without streaks. -
Painting the Leaf:
Using a bright green paint pen, fill in the small leaf shape at the top of the first apple. -
Outlining the Logo Apple:
Switch to the second rock. Use the black paint pen to outline the exterior shape of the stylized apple and the exclamation mark inside it. -
Filling the Logo:
Fill the interior of this apple shape with red paint, being very careful to work around the exclamation mark so it remains unpainted (showing the stone underneath). -
Adding the Stem:
For the logo apple, draw a simple, curved black line for the stem floating just above the fruit.
Step 3: Finishing Touches
-
Cleanup:
Once the paint is fully dry to the touch, check for any visible pencil lines. Gently erase them, being careful not to rub the paint. -
Refining Lines:
If the red paint covered any of your black outlines, re-trace the black border now to make the image crisp and bold. -
Shading (Optional):
I sometimes like to add a tiny curved white line or a lighter red tone on the upper left of the apple to create a subtle highlight, though flat color looks great too. -
Sealing:
To protect your artwork effectively, spray the rocks with a matte sealant in a well-ventilated area. This keeps the stone looking natural while locking in the paint.
Paint Pen Troubleshooting
If the paint comes out too watery or transparent, press the nib on a scrap piece of paper a few times to re-saturate it with thicker pigment before applying to the rock.
Place these delightful stone apples next to your notebooks to add a touch of whimsy to your study session


Have a question or want to share your own experience? I'd love to hear from you in the comments below!