If you’re staring at a tired countertop and dreaming of something fresh, paint can seriously pull off a makeover that looks way more expensive than it is. I’m sharing my favorite painted countertop looks—from classic faux marble to artsy statement finishes—so you can pick a vibe and run with it.
Classic White Faux Marble

Transform dated laminate into sophisticated Carrara marble using nothing but paint and feathers. This technique creates delicate, realistic veining that mimics high-end stone without the renovation price tag.
Step-by-Step
Materials
- High-quality bonding primer
- White satin or semi-gloss latex enamel (base color)
- Grey acrylic paint (cool and warm tones)
- Small turkey feather or pheasant feather
- Sea sponge
- Soft blending brush (makeup brush works well)
- Water spray bottle
- Polyacrylic topcoat (satin or gloss finish)
- Fine grit sandpaper (220 grit)
- Lint-free tack cloth
Step 1: Preparation & Base Coat
-
Clean and Scuff:
Begin by thoroughly cleaning your existing countertop with a degreaser to remove any cooking oils or residue. Once dry, lightly sand the entire surface with 220-grit sandpaper to give the primer something to grip. -
Tape Off Edges:
Use painter’s tape to protect your sink, backsplash, and walls. Press the edges down firmly with a credit card to prevent paint from bleeding underneath. -
Apply Bonding Primer:
Roll on a coat of high-quality bonding primer designed for laminate surfaces. This is crucial for durability. Let this layer dry completely according to the manufacturer’s instructions. -
Painting the Base White:
Apply your white latex enamel using a dense foam roller for the smoothest finish. You want a solid, opaque white background, so this will likely require two to three thin coats. Allow full drying time between each coat.
Step 2: Creating the Veins
-
Mix the glaze:
Create a glaze mixture by combining 1 part grey paint with 4 parts water. It needs to be very fluid, almost like ink. I like to keep a separate cup of plain water nearby for diluting on the fly. -
Map your veins:
Dip the tip of a turkey feather into your grey glaze. hold the feather loosely and drag it across the surface with a trembling hand motion. Don’t make straight lines; marble veins vary in thickness and direction. -
Soften the lines:
Immediately following your feather, use a dry sea sponge to lightly dab over the wet vein. This breaks up the hard edges and makes the paint look like it’s part of the stone rather than sitting on top. -
Mist and blur:
From a distance, spritz the wet vein with a fine mist of water. Take your soft blending brush and gently sweep over the veins to create a ‘ghosting’ effect where the lines fade into the white background. -
Add major arterial veins:
Go back in with a slightly less diluted grey paint and the feather to create the ‘backbone’ veins. These should be sharper and darker than your background shading but retrace the same general paths. -
Creating fissures:
Use a very fine liner brush to add tiny, sharp cracks branching off your main veins. These intricate details add realism and depth to the faux finish. -
Review and repeat:
Step back often to look at the overall pattern. Marble is random, so ensure you have some areas with heavy veining and some negative white space to let the eye rest.
Veins look too harsh?
If a line looks too painted, spray it heavily with water immediately and blot with a paper towel. This erases the mistake or turns it into subtle background shading.
Step 3: Sealing and Protecting
-
Let the art cure:
Allow your painted veining to dry for at least 24 hours. The paint must be fully cured so the topcoat doesn’t smear your delicate lines. -
First seal coat:
Apply a clear polyacrylic topcoat using a high-quality synthetic brush. Use long, even strokes in one direction to avoid bubbles. Do not overwork the clear coat. -
Sand between coats:
Once the first coat is dry, very lightly sand with fine-grit sandpaper to knock down any dust nibs. Wipe clean with a tack cloth. -
Final layers:
Apply at least two more coats of polyacrylic, sanding lightly between each. This thick barrier is what gives the countertop that deep, glassy shine typical of polished stone. -
Full cure time:
While it may feel dry to the touch quickly, avoid placing heavy appliances or scrubbing the surface for roughly a week to allow the finish to harden completely.
Add Metallic Depth
For a luxe Calacatta gold look, mix a tiny amount of metallic gold paint into your grey glaze for specific accent veins. Use sparingly for a high-end sparkle.
Enjoy the timeless beauty of your custom stone surfaces without the heavy lifting


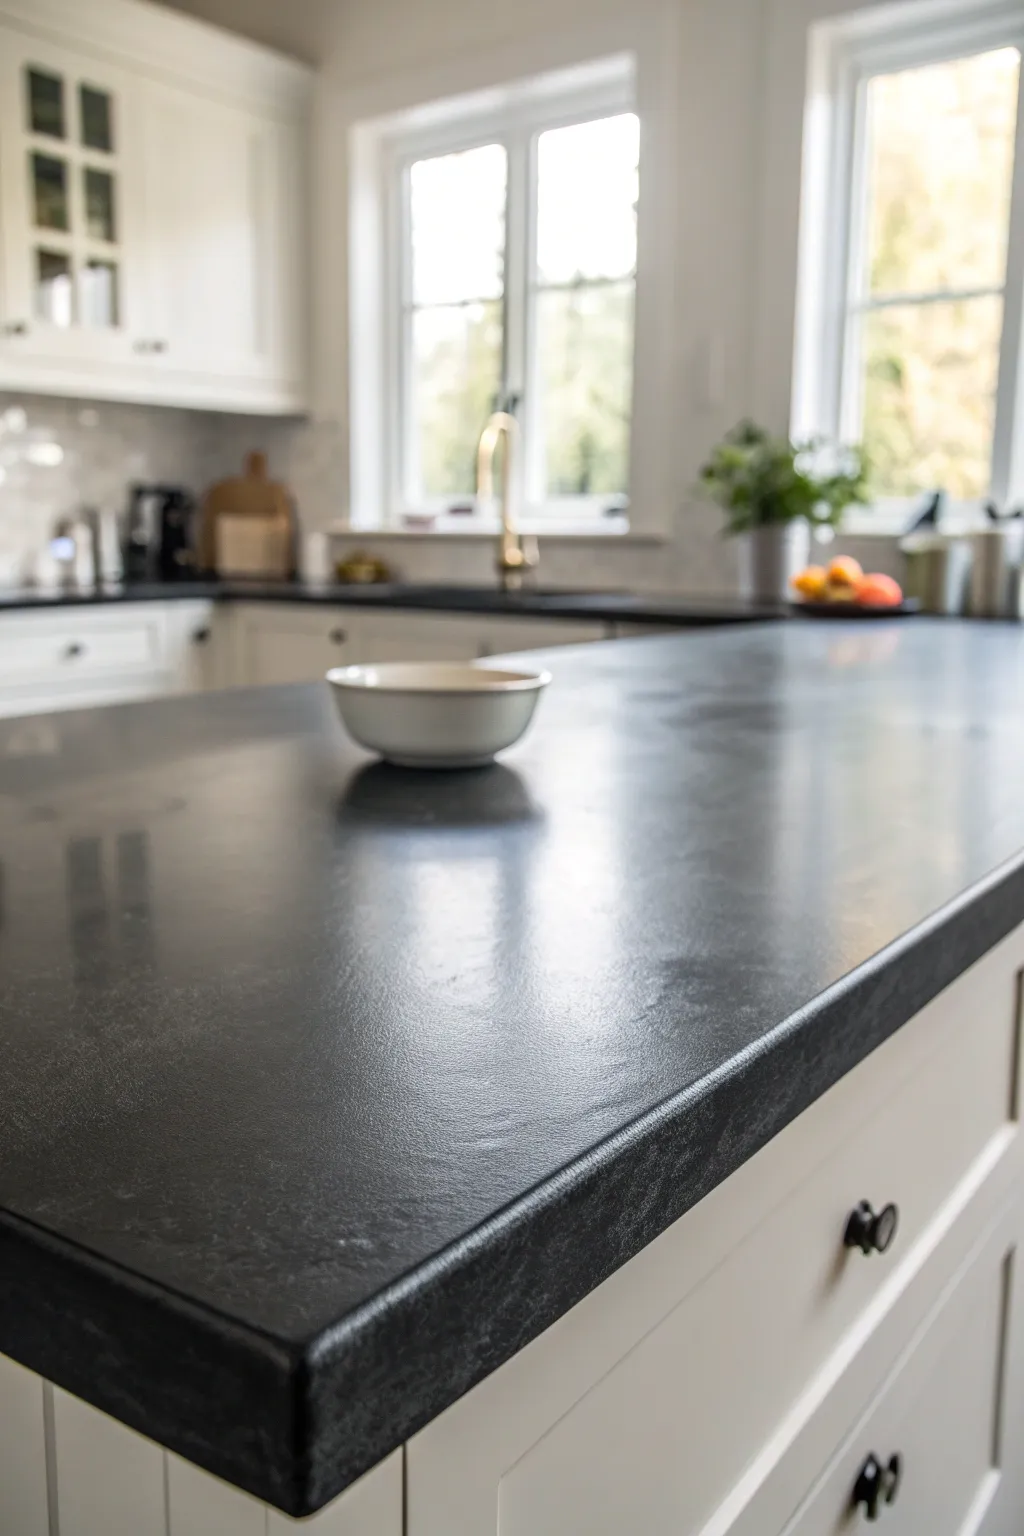
Deep Charcoal Soapstone Look
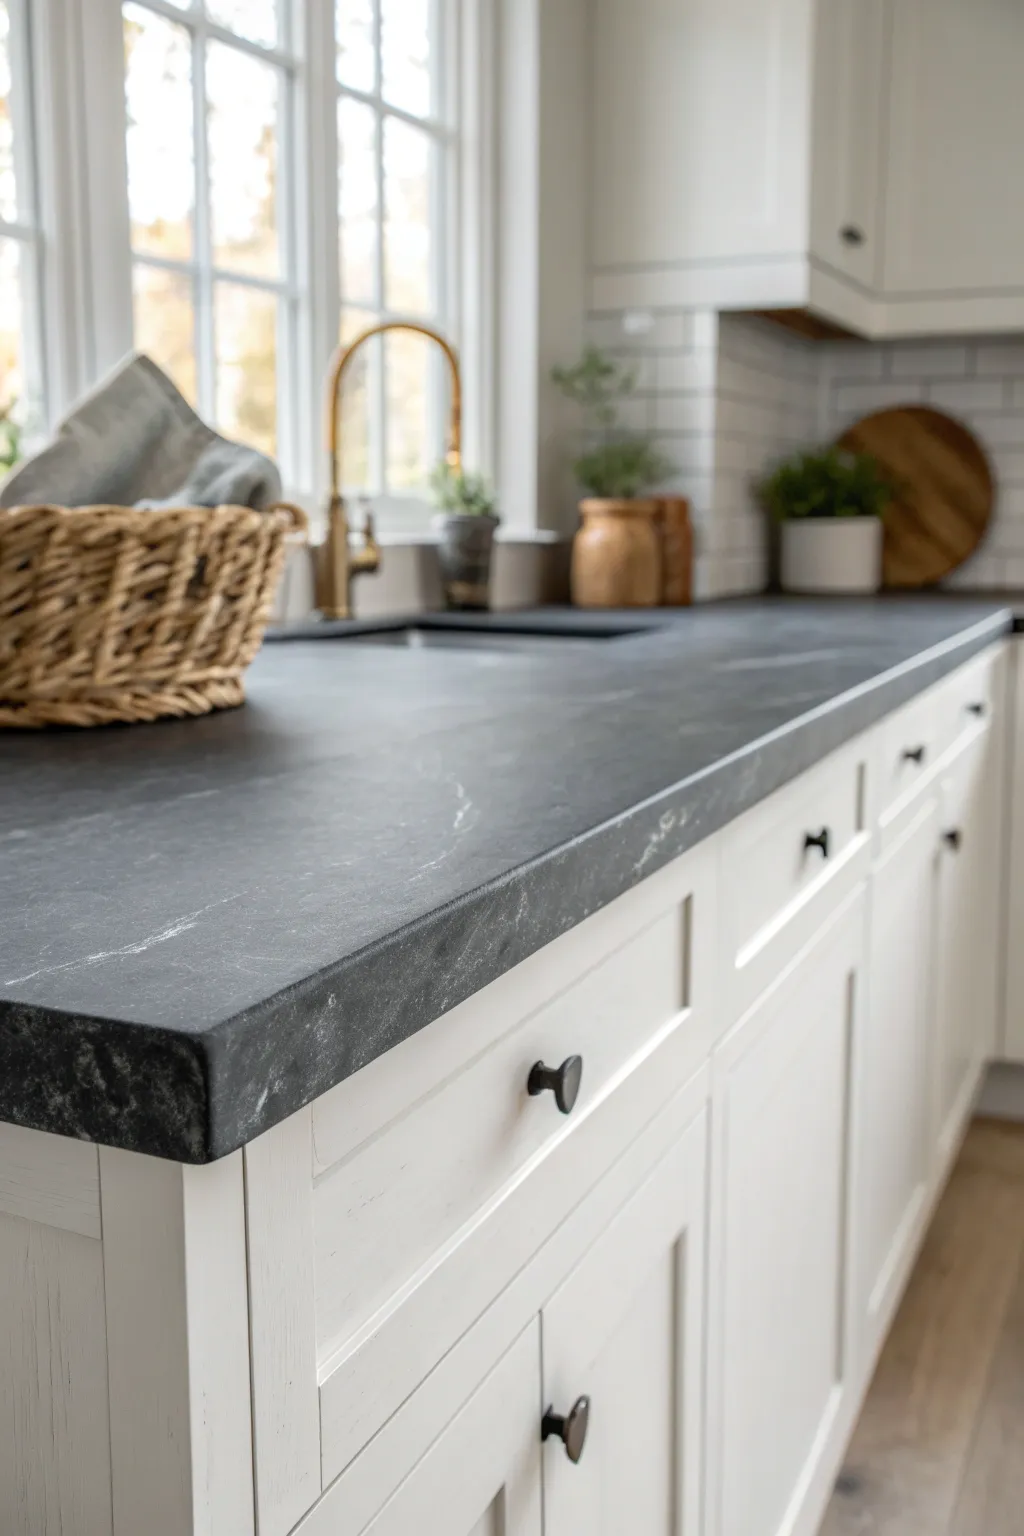
Achieve the sophisticated, velvety look of natural soapstone without the hefty price tag using specialized countertop paint. This tutorial guides you through creating a deep charcoal finish complete with subtle, authentic-looking veining that mimics the real stone’s soft elegance.
Step-by-Step
Materials
- TSP substitute degreaser
- Medium and fine grit sandpaper (120 and 440 grit)
- Bonding primer designed for laminates
- Charcoal gray chalk-style paint or countertop paint
- Metallic glaze or white acrylic paint (for veining)
- Water-based matte polyurethane sealer
- High-density foam roller
- Assorted small artist brushes (fine tip and fan brush)
- Sea sponge
- Feather
- Lint-free rags
Step 1: Preparation & Base Coat
-
Clean Thoroughly:
Start by scrubbing your existing countertop with a TSP substitute degreaser. It is crucial to remove every bit of kitchen grease, oil, and residue, or the paint will not adhere properly. -
Sand the Surface:
Scuff sand the entire surface using 120-grit sandpaper. You aren’t trying to strip the old finish, just creating ‘teeth’ for the primer to grip. Wipe away all dust with a damp cloth followed by a tack cloth. -
Mask Off Areas:
Apply painter’s tape to the backsplash, sink edges, and any walls adjoining the countertop to protect them from stray roller marks. -
Prime the Surface:
Roll on a thin, even coat of high-quality bonding primer. Use a foam roller to keep the texture smooth. Let this dry completely according to the manufacturer’s instructions, usually overnight for the best bond. -
Apply First Charcoal Coat:
Using a fresh foam roller, apply your deep charcoal base color. Work in small sections to maintain a wet edge and avoid roller marks. Allow this coat to dry fully. -
Apply Second Coat:
Roll on a second coat of charcoal paint for full opacity. The deep, dark color is the foundation of the soapstone look, so ensure coverage is solid and even.
Fixing heavy veins
If a vein looks too stark or thick, don’t panic. Simply sponge a tiny bit of your original charcoal base color over the mistake to push it into the background.
Step 2: Creating the Soapstone Effect
-
Prepare Veining Mix:
Mix a small amount of white acrylic paint with water (about 50/50) or use a pearlescent glaze. You want a translucent mixture that isn’t too stark against the dark background. -
Draw Major Veins:
Dip a fine-tipped artist brush or the tip of a feather into your white mixture. Drag it loosely across the surface with a shaky hand to create long, diagonal primary veins. Generally, veins should flow in one direction. -
Soften the Lines:
Immediately after painting a vein, blot it gently with a damp sea sponge or a dry rag. This blurs the sharp edges and pushes the vein ‘into’ the stone look rather than letting it sit on top. -
Add Secondary Veining:
Use a fan brush or feather to create fainter, whisper-thin veins that branch off the main ones. I like to keep these very subtle, almost barely there, to mimic the natural imperfections of soapstone. -
Create Texture:
Dip a sea sponge lightly into a slightly lighter grey paint (mix your charcoal with a drop of white) and blot off almost all the paint. Gently tap random areas to create tonal depth and cloudiness, breaking up the solid color. -
Mist and Soften:
If any veins look too distinct, mist them lightly with water from a spray bottle and dab with a dry rag. This watercolor effect enhances the realism of the stone pattern. -
Final Veining Check:
Step back and look at the countertop as a whole. Add small details where the pattern feels too empty, but remember that less is often more with soapstone.
Step 3: Sealing & Protection
-
Dry Time:
Allow your painted and veined surface to cure for at least 24 hours. The paint needs to be completely hard before sealing. -
First Coat of Sealer:
Apply a water-based matte polyurethane using a high-quality synthetic brush or foam applicator. Avoid shaking the can, as bubbles will ruin the smooth finish. -
Sand for Smoothness:
Once the first coat is dry, lightly sand with very fine 440-grit sandpaper. This knocks down any dust nibs and ensures a buttery smooth feel similar to honed stone. -
Apply Final Topcoats:
Apply 2-3 more thin coats of sealer, allowing proper dry time between each. The multiple thin layers provide the durability needed for a kitchen surface. -
Final Cure:
Remove the painter’s tape carefully. Let the countertops cure for several days before placing heavy appliances back on them to prevent denting the fresh finish.
Level Up: Honed texture
For an ultra-realistic honed feel, buff the final dried sealer coat with a brown paper bag. It acts like ultra-fine sandpaper to polish without scratching.
Now you have a stunning, durable surface that brings dramatic moodiness to your kitchen without the extensive renovation costs.


Industrial Concrete Gray
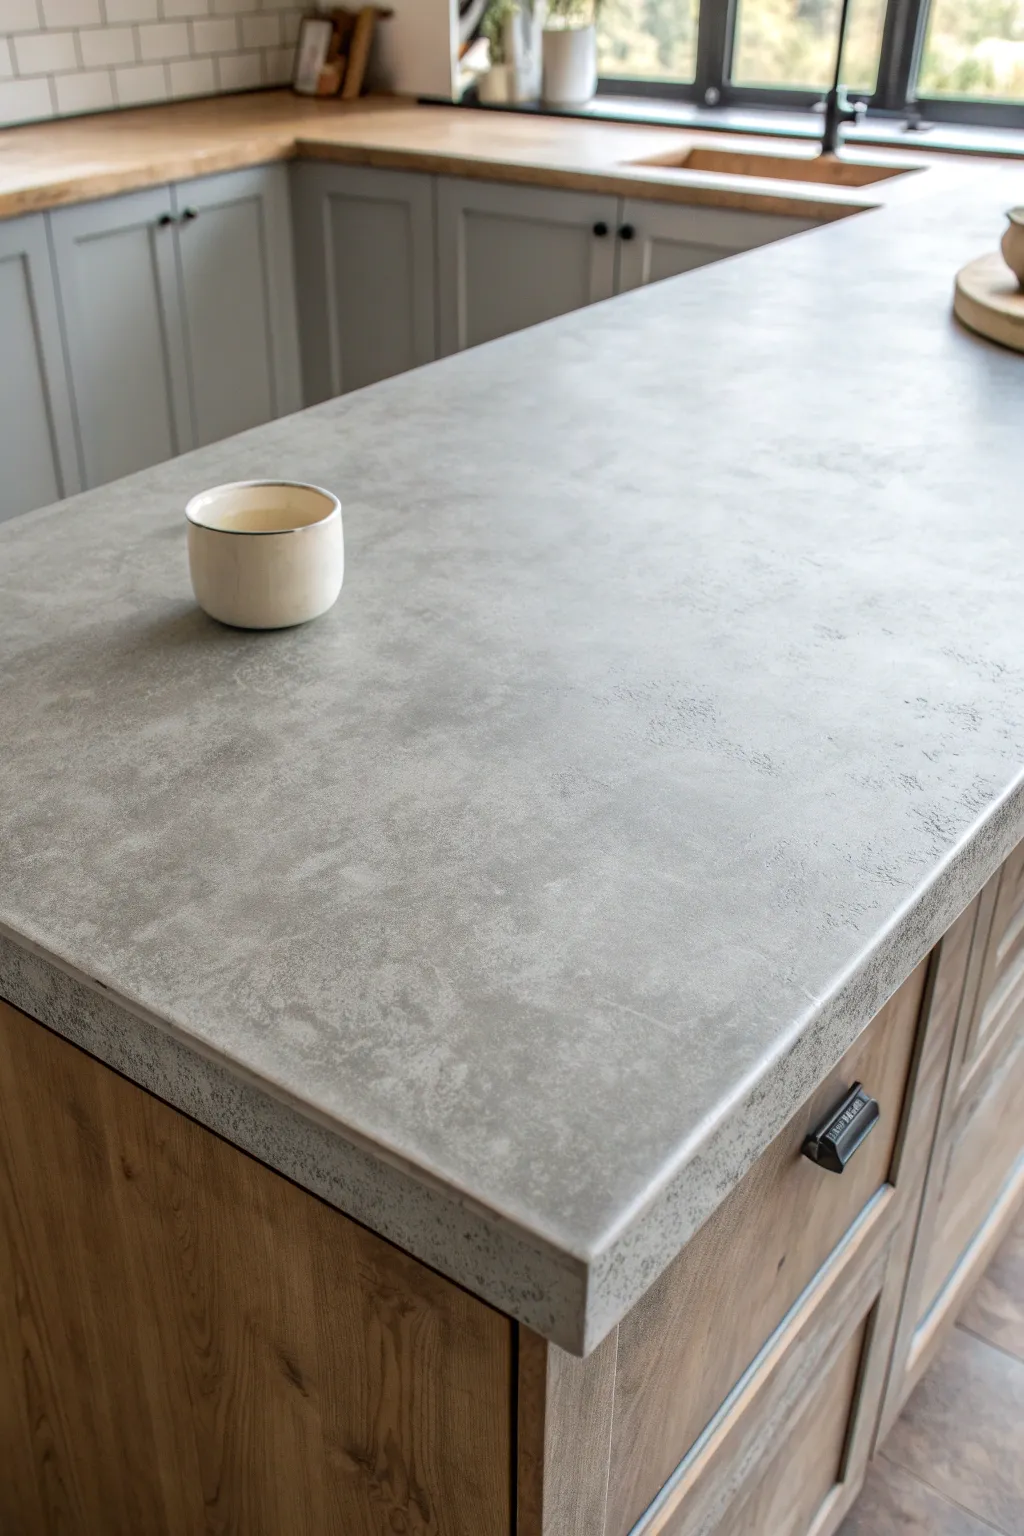
Transform standard laminate or wood countertops into a sleek, modern feature with this stone-effect painting technique. The result creates a convincing matte gray surface with subtle variations that mimics poured concrete perfectly.
Step-by-Step
Materials
- Bonding primer (high adhesion)
- Base coat paint (medium gray)
- Secondary paint (lighter gray)
- Accent paint (dark charcoal or soft black)
- Water-based polyurethane (matte finish)
- Sea sponge or specialized texturing sponge
- Painter’s tape
- Sandpaper (220-grit)
- Microfiber rollers and tray
- Clean, lint-free rags
- Foam brush
Step 1: Preparation
-
Clean surface:
Scrub the entire countertop thoroughly using a degreaser or TSP substitute to remove all oils, food residue, and wax. This is crucial for adhesion. -
Sand for grip:
Lightly scuff sand the existing surface with 220-grit sandpaper. You aren’t trying to remove the old finish, just creating tiny scratches for the primer to grab onto. -
Mask edges:
Apply painter’s tape carefully along the walls, sink edges, and cabinetry below the counter to protect them from splatters. -
Prime:
Roll on a bonding primer designed for shiny surfaces. Use a smooth strokes to minimize texture, and let this layer cure completely according to the can’s instructions.
Pro Tip: Edge Work
When sponging the edges, wrap the sponge around the corner rather than stopping at the top. This makes the stone effect look solid rather than like a veneer.
Step 2: Base Color Application
-
Apply base gray:
Using a microfiber roller, apply your medium gray base coat. This will be the dominant color of your concrete. -
Smooth the edges:
Use a foam brush to ensure the paint gets into corners and along the edges without leaving heavy brush marks. -
Wait and repeat:
Allow the first coat to dry, then apply a second coat if the original countertop color is peeking through. A solid, opaque base is essential.
Troubleshooting: Visible Lines
If you see roller marks in your clear coat, switch to a high-quality synthetic brush or add a flow extender additive to help the polyurethane self-level.
Step 3: Creating the Concrete Texture
-
Prepare the glaze mix:
Mix your lighter gray paint with a small amount of water or glaze medium to make it translucent (about a 1:1 ratio). -
Sponge application:
Dip a sea sponge into the lighter mix and blot the excess onto a paper towel until almost dry. -
Dab the surface:
Lightly dab the sponge across the countertop in random clusters. I find twisting my wrist slightly as I work prevents recognizable patterns from forming. -
Soften the look:
While the paint is still wet, gently pat the sponged areas with a dry, lint-free rag to blur the edges and blend the colors into the base. -
Add depth:
Repeat the sponging process using the dark charcoal paint, but use this color much more sparingly to create the illusion of pitting and depth found in real concrete. -
Blend layers:
If any dark spots look too harsh, go back over them with a very light touch of the original base gray sponge to knock them back.
Step 4: Sealing and Protection
-
Dry thoroughly:
Allow your textured paint layers to dry for at least 24 hours to ensure they are fully set and hard. -
First seal coat:
Apply a thin layer of matte water-based polyurethane using a high-density foam roller. Do not overwork the clear coat as it can create bubbles. -
Light sanding:
Once the sealer is dry to the touch, very lightly hand-sand with 220-grit sandpaper to knock down any dust nibs. -
Final coats:
Wipe away dust and apply 2-3 more thin coats of polyurethane, allowing proper drying time between each, to build a durable, water-resistant rock-hard finish. -
Cure time:
Remove the painter’s tape while the final coat is still slightly tacky to avoid peeling, then let the counters cure for several days before heavy use.
Now you have a stunning, durable surface that looks just like expensive poured concrete for a fraction of the cost

Crisp Solid Color Modern Counter
Transform outdated laminate into a chic, modern surface with this deep graphite finish that mimics the look of honed slate. This project delivers a sophisticated, velvety matte texture that feels as premium as it looks, instantly modernizing your kitchen space.
Step-by-Step Guide
Materials
- High-adhesion countertop primer (e.g., bonding primer)
- Black slate or charcoal chalk-style paint
- Sanding sponges (120 and 220 grit)
- Foam roller covers (high density)
- Small angled sash brush
- Degreaser cleaner (TSP or similar)
- Painter’s tape
- Polyacrylic protective topcoat (matte or satin finish)
- Clean lint-free rags
- Tack cloth
Step 1: Preparation
-
Deep clean the surface:
Begin by scrubbing the entire countertop thoroughly with a heavy-duty degreaser or TSP substitute. Pay extra attention to areas near the stove where grease collects, as any residue will cause the paint to peel later. -
Sand for adhesion:
Scuff the existing laminate surface using a 120-grit sanding sponge. You aren’t trying to remove the old finish, just creating ‘teeth’ for the new paint to grab onto. -
Wipe away dust:
Vacuum up the bulk of the sanding dust, then wipe the entire surface down with a damp rag followed by a tack cloth to ensure it is completely debris-free. -
Tape off edges:
Apply painter’s tape carefully along the backsplash, walls, and sink edges. Press the tape edges down firmly with your fingernail or a putty knife to prevent paint bleed.
Smooth Surface Secret
Between every single coat of paint and sealer, run a brown paper bag over the dried surface. It acts like ultra-fine sandpaper to polish the finish without scratching.
Step 2: Priming and Painting
-
Cut in the primer:
Use your angled brush to apply a bonding primer to the corners, edges, and tight spots around the sink first. -
Roll on the primer:
Immediately follow up with a high-density foam roller to coat the flat surfaces. Apply a thin, even coat of primer and let it dry according to the can’s instructions, usually overnight for countertops. -
Light sanding:
Once the primer is fully cured, give it a very light pass with 220-grit sandpaper to smooth out any texture bumps, then wipe away the dust. -
First coat of color:
Stir your chalk-style charcoal paint thoroughly. Apply the first coat using the foam roller, working in small sections to keep a wet edge. I find it helpful to roll in a ‘W’ pattern and then backroll to smooth it out. -
detail check:
Check the edges and backsplash for coverage, using the small brush to fill in any missed spots while the paint is still workable. -
Apply second coat:
Allow the first coat to dry completely (usually 2-4 hours). Apply a second coat in the same manner to achieve that deep, opaque solid color. -
Inspect and touch up:
Look at the surface from different angles under good lighting. If you see any holidays (missed spots) or unevenness, apply a partial third coat where needed.
Sticky Situation?
If your roller starts lifting partially dried paint (creating a texture mess), stop immediately. Let that section dry fully, sand it smooth, and recoat. Don’t force wet paint.
Step 3: Sealing and Finishing
-
Prepare the sealer:
Gently stir your polyacrylic topcoat; never shake it, as shaking introduces air bubbles that can ruin the smooth finish. -
Apply first seal coat:
Using a fresh foam roller, apply a thin layer of the matte polyacrylic. Move efficiently and avoid overworking the product, as it can get tacky quickly. -
Wait and sand:
Let this layer dry for at least 2 hours. Very gently sand with high-grit sandpaper (400 grit is ideal here) to knock down any raised grain or dust nibs. -
Apply final seal coats:
Wipe off dust and apply two more thin coats of polyacrylic, allowing proper drying time between each. Three coats are essential for kitchen durability. -
Remove tape:
While the final coat is still slightly tacky (not fully dry), carefully score the edge of the painter’s tape with a utility knife and peel it away at a 45-degree angle. -
Cure time:
Let the countertops cure for at least 48 hours before placing light objects on them, and a full 7-21 days before heavy use or scrubbing.
Enjoy the sleek, modern feel of your newly transformed kitchen workspace
BRUSH GUIDE
The Right Brush for Every Stroke
From clean lines to bold texture — master brush choice, stroke control, and essential techniques.
Explore the Full Guide
Two-Tone Edge Or Waterfall Detail
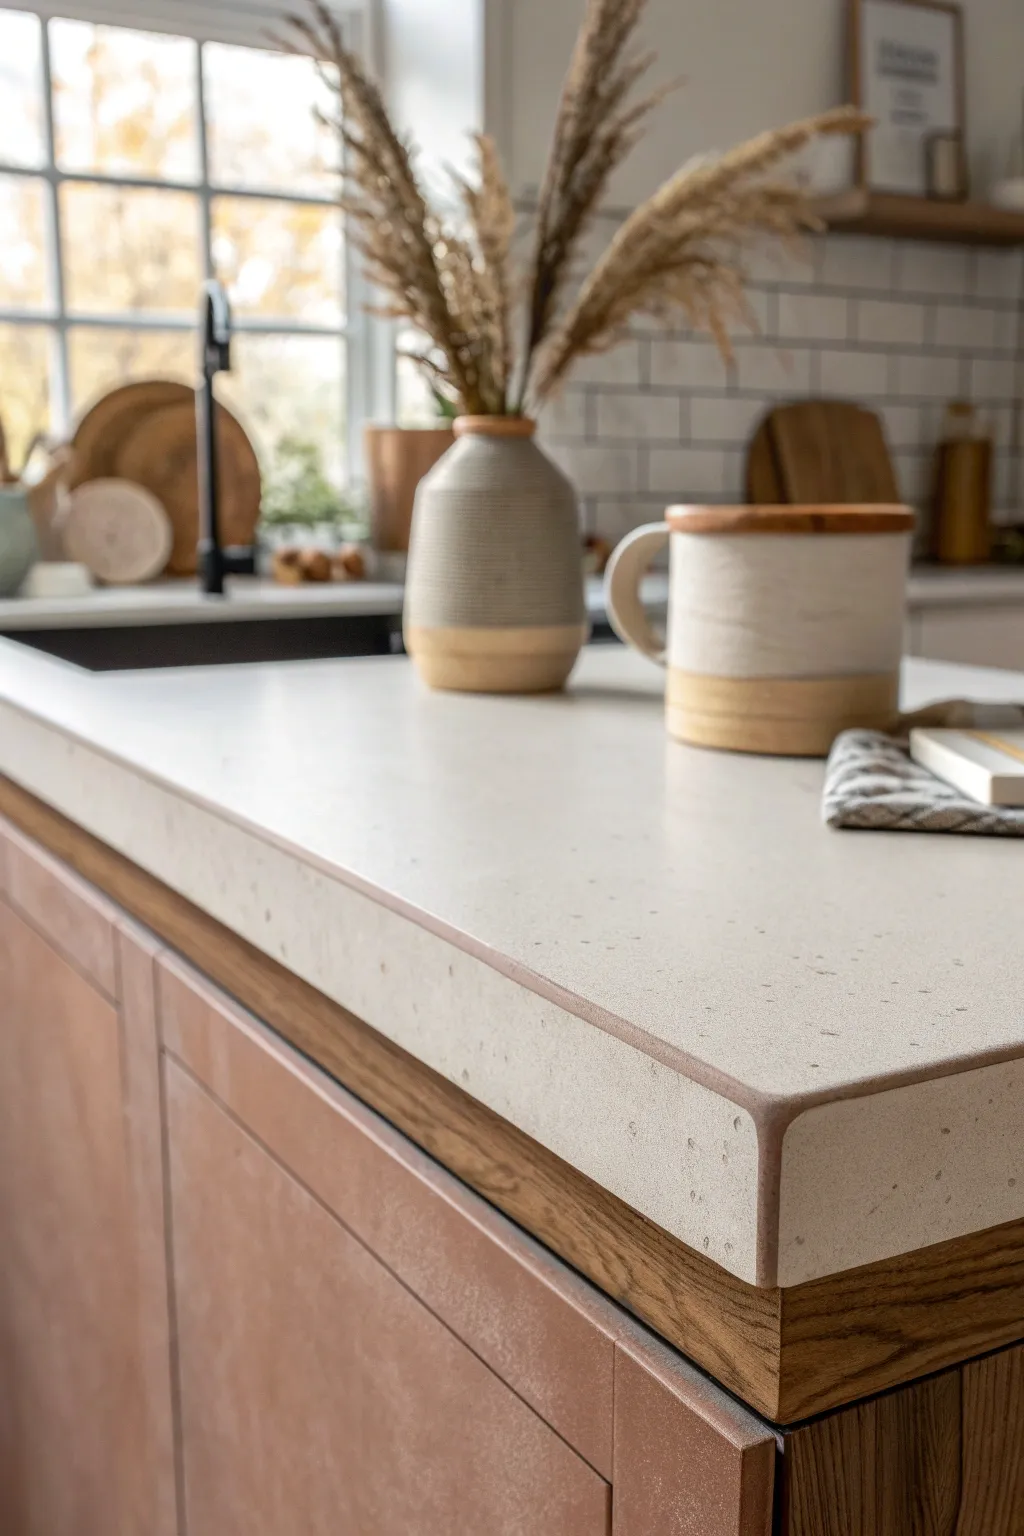
Transform a plain laminate or wood countertop into a sophisticated faux-stone surface featuring a distinct two-tone edge detail. This project mimics the look of high-end quartz with a speckled finish and adds a warm, copper-toned painted rim for a custom design element.
Step-by-Step
Materials
- High-adhesion primer (suited for laminate)
- Stone-fleck spray paint or texture kit (white/cream base)
- Clear epoxy resin or polyurethane topcoat
- Copper or bronze metallic acrylic paint
- Painter’s tape (high quality)
- Small foam roller
- Small fine-detail brush
- Fine-grit sandpaper (220 and 400 grit)
- Cleaning degreaser
- Drop cloths
- Sanding block
Step 1: Preparation & Base Coat
-
Clean and scuff:
Start by thoroughly degreasing your countertop surface to remove kitchen oils. Once dry, scuff the entire surface, including the edges, with 220-grit sandpaper to give the paint something to grip. -
Protect surrounding areas:
Apply drop cloths on the floor and tape off any appliances, sinks, or cabinets below the countertop line to protect them from spray and drips. -
Prime the surface:
Roll on a thin, even layer of high-adhesion primer over the entire countertop, including the edges. Let this dry completely according to manufacturer instructions. -
Sand the primer:
Lightly hand-sand the primed surface with 400-grit sandpaper to knock down any bumps, ensuring a silky smooth base. -
Apply base color:
Roll on a base coat of cream or off-white paint. Two thin coats are better than one thick one; this provides the background color for your stone effect.
Clean Line Pro Tip
Before painting your edge color, brush a tiny amount of your clear sealer over the tape edge first. This seals the tape and prevents the color from bleeding under for a razor-sharp line.
Step 2: Creating the Stone Effect
-
Spray the stone texture:
Using a stone-effect spray paint or a texture kit, spray the top surface and the vertical edges. Move in sweeping motions to avoid puddling. -
Build the density:
Apply a second or third light misting of the texture spray until you achieve the desired density of speckles. I like to step back occasionally to check for even coverage. -
Initial seal:
Once the texture is fully dry (often 24 hours), apply a clear sealant or a thin layer of polyurethane to lock down the texture particles before you start the edge detail.
Step 3: The Two-Toned Edge Detail
-
Tape the separation line:
This is the critical design step. Carefully run a line of painter’s tape along the top edge of the countertop, just slightly in from the rounded corner, to define where the ‘stone’ top ends and the painted edge begins. -
Tape the underside:
Apply another line of tape underneath the countertop overhang if you need a sharp line there, though often just painting the vertical thickness is enough. -
Paint the edge base:
Using a small brush, apply your metallic copper or bronze paint to the exposed edge strip. Use long, horizontal strokes to minimize brush marks. -
Add dimension:
While the paint is wet, you can lightly dab a slightly darker brown on the very bottom of the edge to create a subtle shadow effect, enhancing the rounded look. -
Remove tape:
Carefully peel back the painter’s tape while the paint is still slightly tacky to ensure a crisp, clean line without chipping. -
Touch up:
inspect the line between the stone top and the copper edge. use a tiny detail brush to fix any bleed-through or uneven spots.
Level Up: Faux Veining
Before the final seal, use a feather or fine liner brush with diluted gray paint to draw faint, wandering veins across the top surface to mimic natural marble or quartz.
Step 4: Final Sealing
-
Prep the resin:
Mix a clear epoxy resin or prepare a high-quality water-based polyurethane for the final finish. Ensure the room is dust-free. -
Pour and spread:
Pour the resin or brushing sealer over the center of the countertop. Spread it outwards towards the edges with a spreader or foam brush. -
Seal the edge:
Allow the sealer to flow over the painted edge, or brush it carefully onto the vertical surface to protect your metallic paint work without creating drips. -
Remove bubbles:
If using resin, use a heat gun or torch lightly over the surface to pop any air bubbles. For polyurethane, watch for bubbles and brush them out immediately. -
Cure time:
Allow the countertop to cure fully for at least 3-7 days before placing any heavy objects or appliances back on it.
Enjoy your durable, custom-designed countertop that looks like a high-end installation for a fraction of the price
Stenciled Tile Pattern Illusion
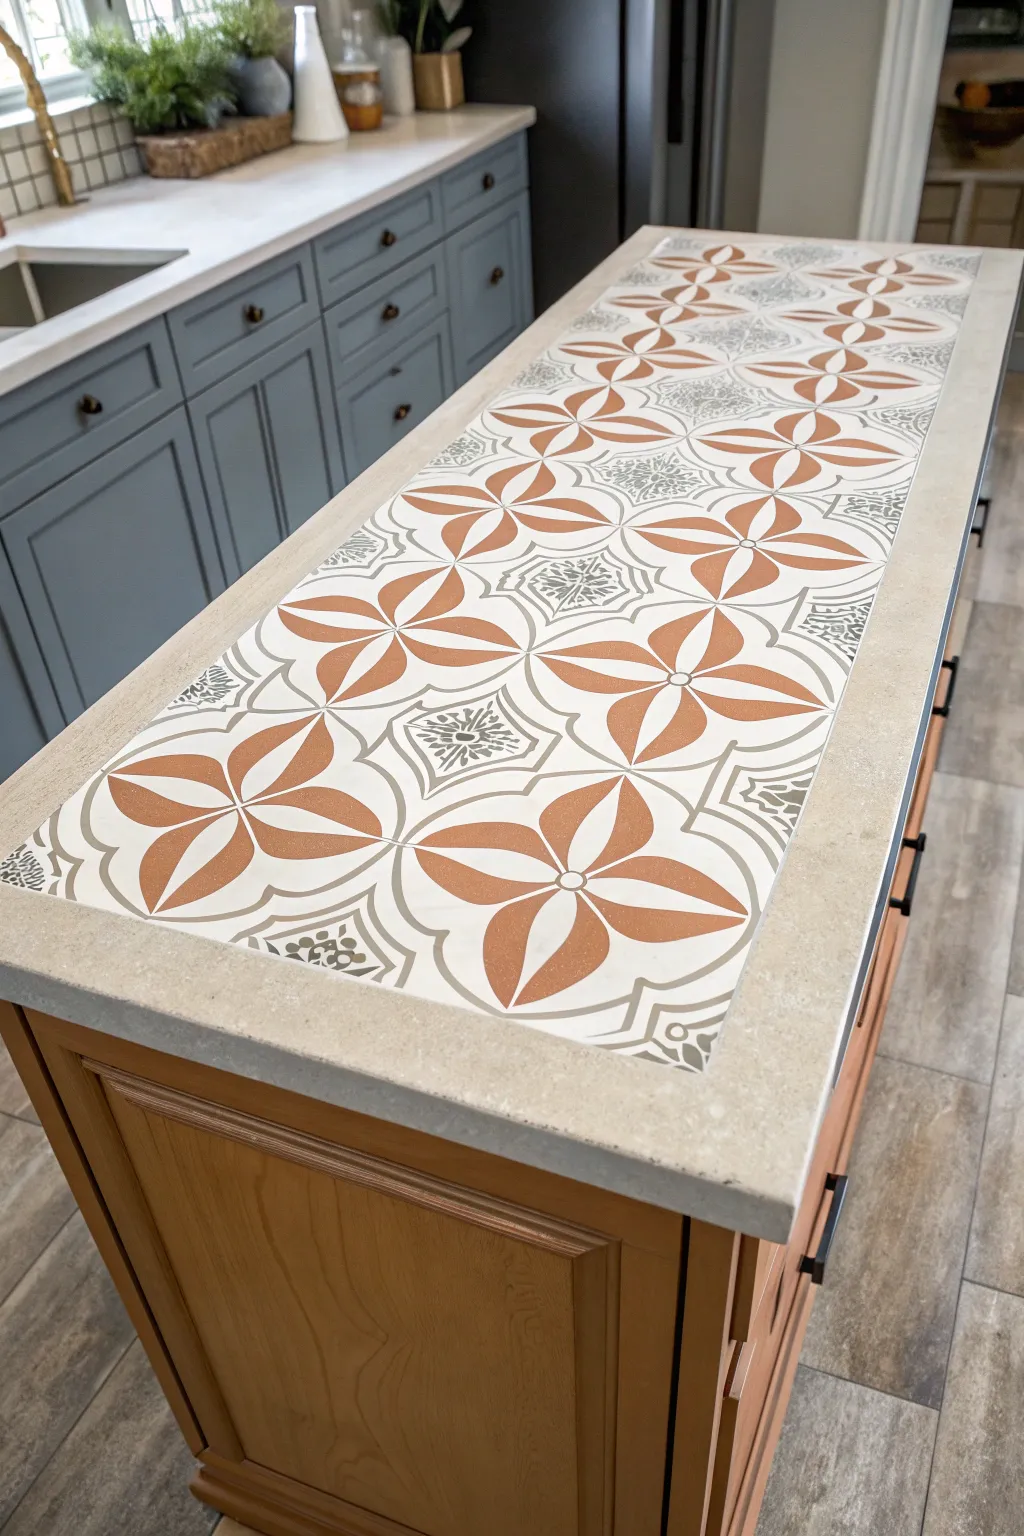
Transform a plain laminate or wood countertop into a stunning focal point with this faux concrete and tile runner effect. This project achieves the high-end look of inlaid cement tiles using just paint, stencils, and patience.
How-To Guide
Materials
- Appropriate primer (bonding primer for laminate)
- Stone-effect base coat paint (light beige/greige)
- Acrylic craft paints (terra cotta, white, charcoal grey)
- Large geometric tile stencil (roughly 8×8 or 12×12 inch pattern)
- Stencil brushes (dense foam or bristle)
- Painter’s tape (low tack)
- Small artist brushes for touch-ups
- Water-based polyurethane sealer (matte or satin)
- Fine grit sandpaper (220 grit)
- Measuring tape
- pencil
- Paper towels
Step 1: Preparation & Base Coat
-
Clean and sand:
Begin by thoroughly cleaning your existing countertop to remove any grease or oils. Lightly scuff sand the surface with 220-grit sandpaper to give the primer something to grip onto, then wipe away all dust with a damp cloth. -
Apply primer:
Roll on a coat of high-quality bonding primer designed for shiny surfaces. Ensure even coverage and let it dry completely according to the manufacturer’s instructions, usually overnight. -
Apply stone-effect base:
Apply your base color, which mimics the look of natural stone or concrete. I prefer a ‘greige’ (grey-beige) tone for a realistic limestone look. Apply two to three thin coats using a foam roller for a smooth finish, letting each coat dry fully in between. -
Measure the runner:
Decide how wide you want your ’tile’ runner to be. Measure the center of your island and mark two parallel lines down the length of the countertop with a pencil to guide your stencil placement. The border on the sides should remain the solid stone color.
Clean Lines Secret
Spray the back of your stencil with a temporary repositionable adhesive spray. This keeps the intricate middle parts flat against the surface.
Step 2: Stenciling the Pattern
-
Position the first stencil:
Place your stencil at the center of one end of your marked runner area. Secure it firmly with painter’s tape on all four sides to prevent it from shifting. -
Load the brush:
Dip your stencil brush into the white paint first. Offload most of the paint onto a paper towel until the brush feels almost dry. This ‘dry brush’ technique is critical to prevent paint bleeding under the plastic. -
Apply the background color:
Stipple or swirl the white paint over the stencil openings that correspond to the background of the tile pattern. Build up opacity slowly with multiple light passes rather than one heavy one. -
Add the terra cotta accents:
Switch to a clean brush and the terra cotta paint. Carefully fill in the flower petal shapes of the design. Use a smaller brush near the edges where colors meet to keep lines crisp. -
Detail with grey:
Use the charcoal grey paint for the intricate center details and corner flourishes. Dab gently straight up and down to capture the fine lines without smudging. -
Lift and repeat:
Peel the stencil up straight to avoid smearing. Align the stencil for the next tile by matching the registration marks or the edge of the previous design, and repeat the painting process down the entire length of the marked runner.
Paint Bleeding?
If paint seeps under the stencil, you are using too much paint. Your brush should be frustratingly dry to the touch before it hits the surface.
Step 3: Finishing Touches
-
Fill the gaps:
Once the main runner is stenciled, you may have partial tile spaces at the very ends. Tape off the edge of the counter and only stencil the portion of the design that fits naturally. -
Touch up imperfections:
Inspect your work closely. Use a small artist’s liner brush and your base color to paint over any bleed-through or mistakes. This step sharpens the ‘grout lines’ and makes the tile illusion convincing. -
Add faux grout lines:
To enhance realism, you can lightly paint a very thin line of the base color between each ’tile’ square using a straight edge, simulating the grout joint where real tiles would meet. -
Apply first sealer coat:
Once the paint has cured for at least 24 hours, apply a clearer water-based polyurethane sealer. Use a high-quality synthetic brush or foam roller, applying a thin, even coat. -
Sand and recoat:
After the first coat of sealer dries, very lightly hand-sand with fine sandpaper to knock down any bumps. Wipe clean and apply 3-4 more coats of sealer for a durable, food-safe finish.
Your kitchen island now boasts a custom, Mediterranean-inspired look that costs a fraction of real tile installation

PENCIL GUIDE
Understanding Pencil Grades from H to B
From first sketch to finished drawing — learn pencil grades, line control, and shading techniques.
Explore the Full Guide
Subtle Linen Texture With Sponging
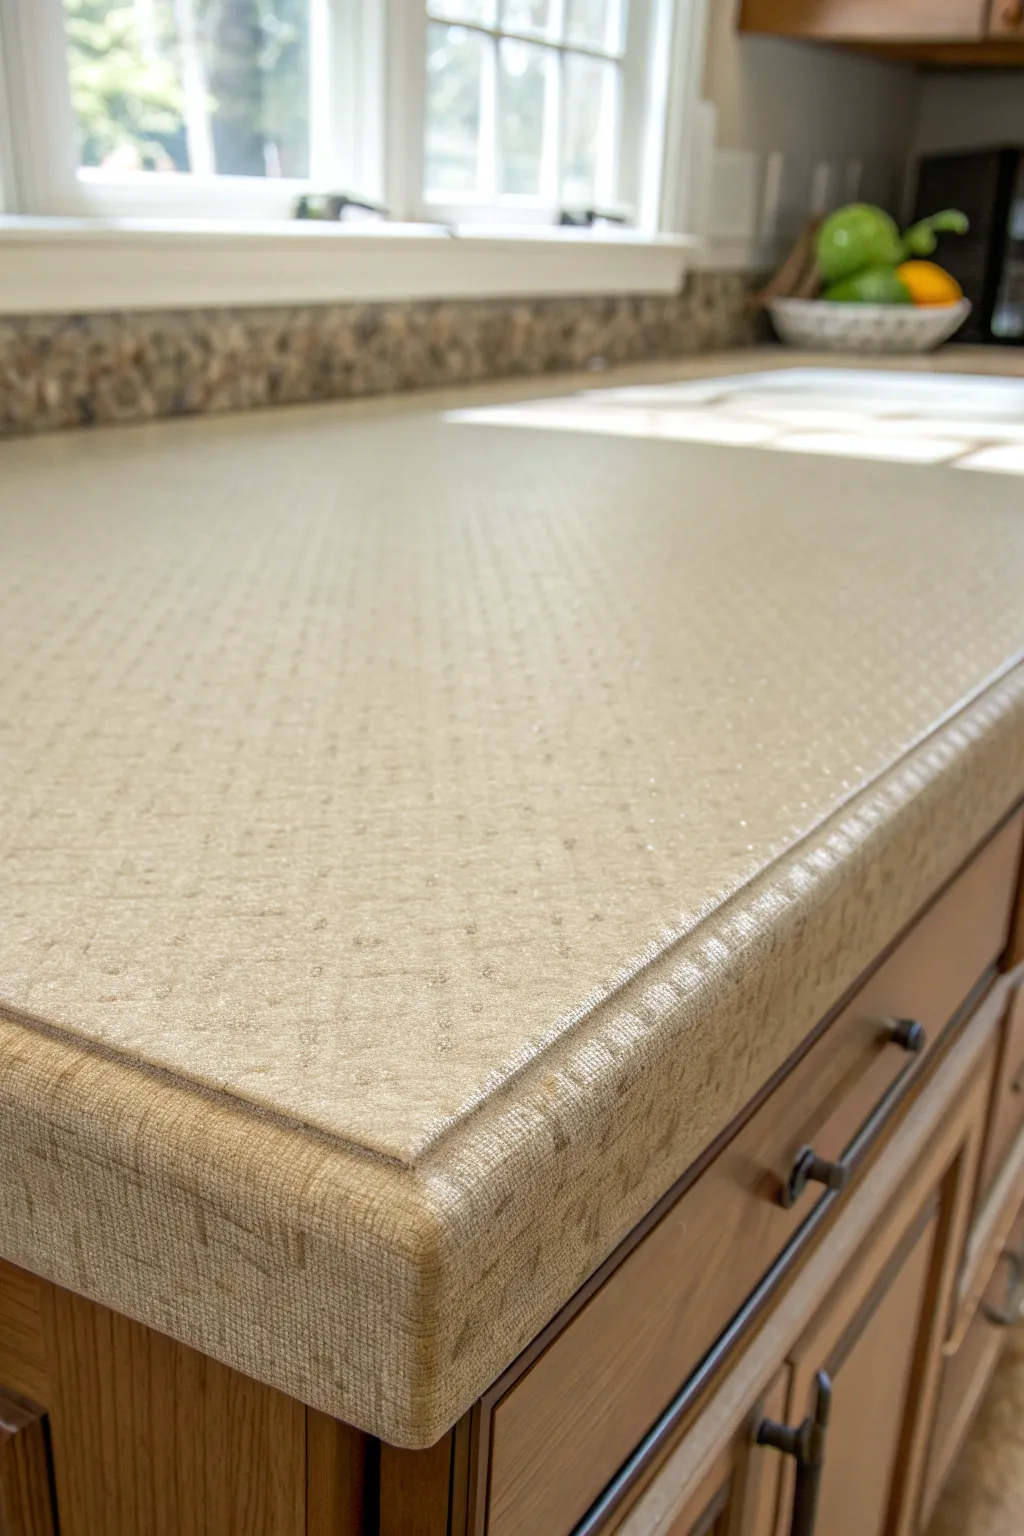
Achieve the sophisticated look of woven linen on your kitchen surfaces with a clever faux finish technique. This project layers subtle neutral tones to create depth and a tactile fabric appearance that adds warmth to any space.
Step-by-Step
Materials
- High-quality bonding primer (like STIX or similar)
- Beige or light tan satin latex paint (Base coat)
- Medium brown or taupe latex glaze (Top coat)
- Clear acrylic glazing liquid
- High-density foam roller and tray
- Natural sea sponge
- Weaver’s brush or stiff-bristled dragging brush
- Painter’s tape
- Sandpaper (220-grit)
- Water-based polyurethane topcoat (satin or matte finish)
- Lint-free rags
Step 1: Preparation and Priming
-
Clean the Surface:
Begin by thoroughly cleaning the existing countertop with a degreaser to remove all oils, dirt, and residue. -
Scuff Sanding:
Lightly sand the entire surface with 220-grit sandpaper to rough up the previous finish, which helps the primer adhere better. -
Masking Off:
Apply painter’s tape carefully around sinks, walls, and cabinets to protect them from stray paint marks. -
Prime the Surface:
Roll on a coat of high-quality bonding primer using a foam roller for a smooth finish. Allow this to dry completely according to the manufacturer’s instructions.
Step 2: Base Coat Application
-
Apply Base Color:
Using a fresh foam roller, apply your chosen beige or light tan base coat. Aim for full, opaque coverage. -
Check for Smoothness:
Inspect the wet paint for any bubbles or roller marks and smooth them out immediately. A texture-free base is crucial for the faux finish. -
Second Coat (Optional):
If the first coat looks streaky or transparent after drying, apply a second thin coat of the base color. -
Let it Cure:
Allow the base coat to dry fully, preferably overnight, to ensure it is hard enough to withstand the glazing process.
Clean Lines
Keep a dry rag handy to constantly wipe off excess glaze build-up from your dragging brush. This prevents globs and keeps the linen lines crisp.
Step 3: Creating the Linen Texture
-
Mix the Glaze:
Mix one part medium brown paint with four parts clear acrylic glazing liquid. The mixture should be translucent and workable. -
Apply Glaze in Sections:
Work in small, manageable sections (about 2×2 feet). Roll or brush a thin layer of the glaze mixture over the base coat. -
Vertical Dragging:
Immediately take your weaver’s brush or dragging brush and pull it vertically through the wet glaze in straight, continuous lines to create the warp of the fabric. -
Horizontal Dragging:
While the glaze is still wet, lightly drag the brush horizontally across the vertical lines. This cross-hatching creates the woven linen effect. -
Soften with Sponge:
Dampen a natural sea sponge and wring it out almost completely. Gently dab over areas where the brush marks look too harsh or manufactured to organicize the texture. -
Blend Sections:
Move to the next section, overlapping slightly with the wet edge of the previous area to avoid visible seam lines. -
Repeat Process:
Continue the glazing, dragging, and sponging process across the entire countertop.
Metallic sheen
Mix a small amount of pearl or metallic gold paint into your glaze mixture. It adds a subtle shimmer that catches the light like high-end fabric.
Step 4: Sealing and Protection
-
Dry Time:
Let the faux finish dry for at least 24 hours. The glaze needs to be completely set before sealing. -
First Coat of Sealer:
Apply a thin layer of water-based polyurethane using a high-quality synthetic brush or foam applicator. Avoid overworking it to prevent bubbles. -
Light Sanding:
Once dry, very lightly sand the surface with high-grit sandpaper to knock down any dust nibs. -
Final Coats:
Apply 2-3 additional coats of polyurethane, allowing proper drying time between each, to build a durable, water-resistant surface.
Enjoy the elegant upgrade you’ve given your kitchen with just a bit of paint and creativity
Geometric Color-Block Statement
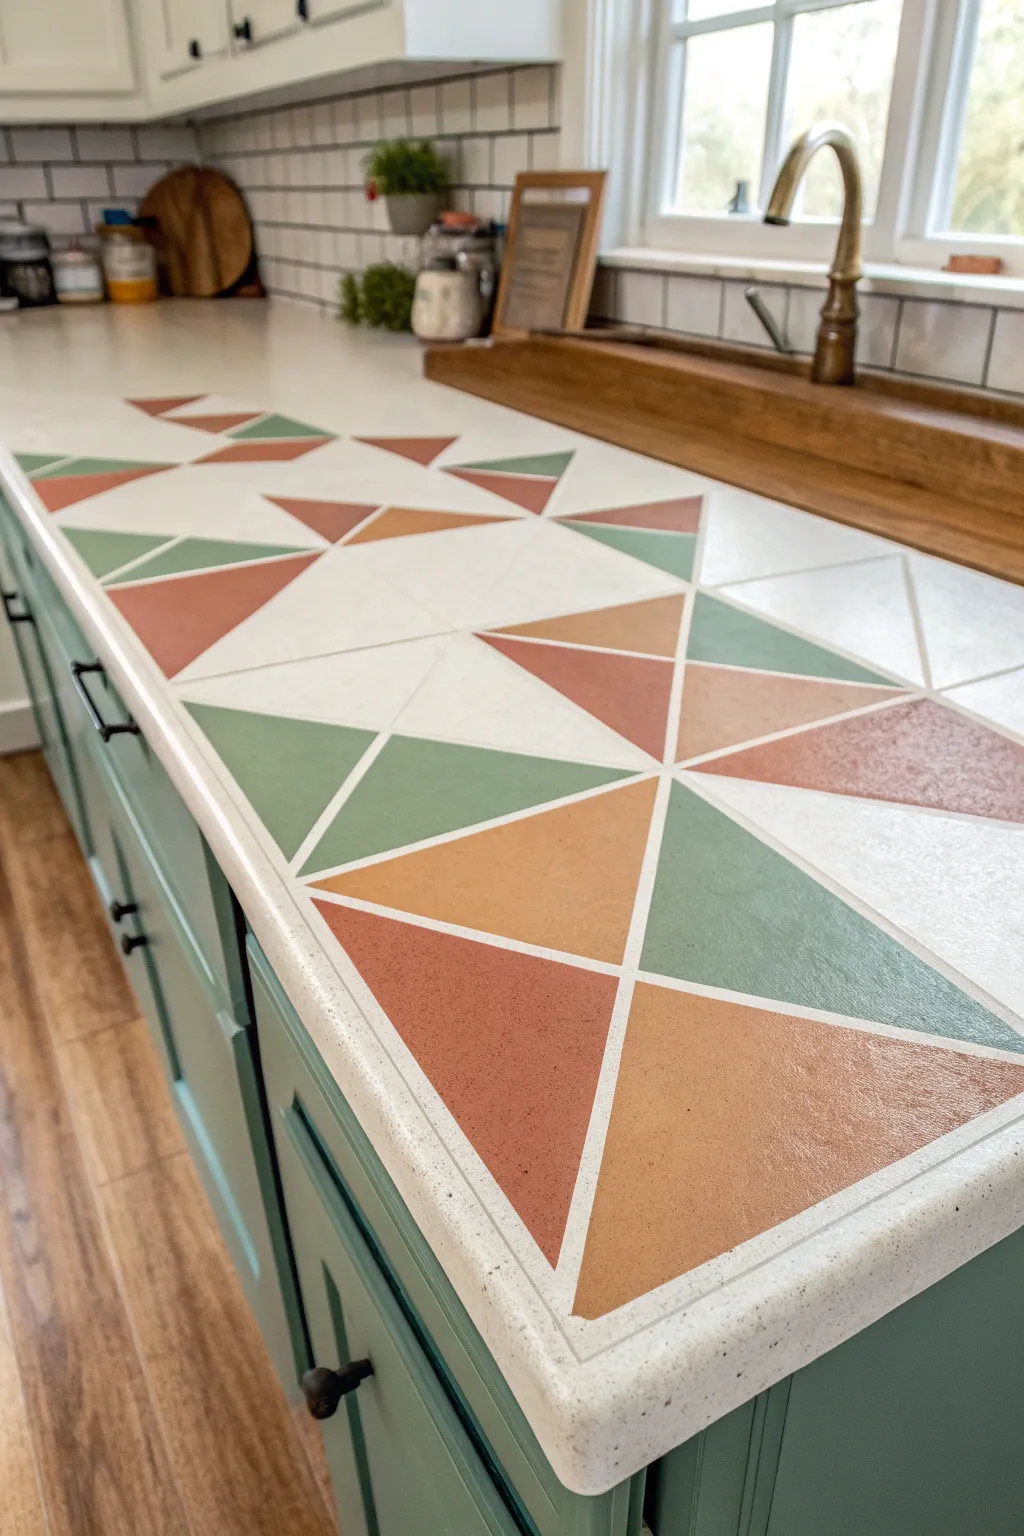
Transform a plain laminate countertop into a stunning focal point featuring a modern geometric pattern. This project combines earthy terracotta, sage green, and warm beige tones in a triangular tessellation that mimics the look of high-end custom tile.
Detailed Instructions
Materials
- High-quality bonding primer (e.g., Zinsser BIN)
- White or cream latex countertop paint (base coat)
- Acrylic paints (terracotta/rust, sage green, warm tan, mustard yellow)
- Water-based polyurethane sealer (satin or matte)
- 1/4-inch painter’s tape or fineline tape
- High-density foam roller and handle
- Small angled artist brush (for touch-ups)
- Small foam pouncers or stencil brushes
- Sandpaper (220-grit)
- Degreaser cleaner (TSP or similar)
- Ruler or straight edge
- X-Acto knife
- Pencil
Step 1: Preparation & Base Coat
-
Initial Cleaning:
Thoroughly scrub your existing countertop with a heavy-duty degreaser or TSP substitute to remove all oils, grease, and residue. This is the most crucial step for adhesion. -
Sanding the Surface:
Lightly sand the entire countertop surface with 220-grit sandpaper to rough it up slightly, creating ‘tooth’ for the primer to grab onto. Wipe away all dust with a damp tack cloth. -
Priming:
Apply a coat of high-quality bonding primer using a high-density foam roller for a smooth finish. Let this cure according to the manufacturer’s instructions before moving on. -
Base Color Application:
Roll on your base color—an off-white or cream works best to replicate ‘grout’ lines later. Apply two thin coats rather than one thick one, allowing full drying time in between. -
Curing Time:
Allow the base coat to cure for at least 24 hours. The paint needs to be hard enough to withstand tape removal without peeling.
Tape Trick
Use 1/4-inch tape specifically for the ‘grout’ lines. Standard blue tape is too wide and will distort the scale of your triangles, making the pattern look chunky rather than delicate.
Step 2: Mapping the Geometry
-
Creating the Grid:
Using a pencil and a long straight edge, lightly mark out a grid of large squares across the countertop. Aim for squares approximately 6-8 inches wide. -
Adding Diagonals:
Draw diagonal lines through your squares to create triangles. Vary the direction of the diagonals (some creating an ‘X’, some just a single slash) to build the randomized geometric look. -
Taping the Lines:
Apply 1/4-inch painter’s tape directly over your pencil lines. Press the edges of the tape down firmly with your fingertip or a credit card to prevent paint bleed. -
Sealing the Tape:
I like to enhance crisp lines by brushing a tiny amount of the *base color* over the tape edges first. This seals any gaps so the colored paint won’t seep underneath.
Step 3: Painting the Design
-
Planning the Palette:
Assign your colors to the triangles randomly before painting. Try to avoid having two of the same color touching; alternation between terracotta, sage, tan, and the white negative space is key. -
Applying the Terracotta:
Start with your darkest color (terracotta or rust). Use a small foam pouncer to dab the paint into the designated triangles. Dabbing creates a texture closer to stone than brushing does. -
Applying the Greens:
Move on to the sage green triangles. Apply two light coats to ensure opacity, letting the first dry to the touch before adding the second. -
Applying the Accents:
Fill in the remaining shapes with your warm tan and mustard accents. Leave roughly 25-30% of the triangles as the white base color to keep the design airy. -
Adding Texture (Optional):
While the customized colors are still slightly wet, you can lightly stipple them with a dry sponge to simulate a slight stone or ceramic texture.
Stone Effect
Mix a tiny pinch of fine sand or baking soda into your colored paints. This adds subtle grit, making the painted triangles feel and look more like real unglazed ceramic tile.
Step 4: Finishing & Sealing
-
Removing Tact:
Carefully peel off the painter’s tape while the colored paint is still slightly tacky—don’t wait for it to be bone dry, or it might chip the edges. -
Touch Ups:
Inspect your ‘grout’ lines. Use a tiny angled artist brush and your base color to fix any areas where the color might have bled. -
Sealing Coat 1:
Once the artwork is fully cured (give it overnight), apply a thin layer of water-based polyurethane sealer. Use long, smooth strokes with a high-quality synthetic brush or foam roller. -
Sealing Coat 2 & 3:
Lightly sand with very fine grit paper between coats if any dust settled. Apply at least 2-3 more coats of sealer to ensure the surface is durable enough for kitchen use. -
Final Cure:
Observe the full cure time of your sealer (usually 3-7 days) before placing heavy appliances or scrubbing the surface.
Enjoy your customized, budget-friendly kitchen upgrade that looks anything but ordinary


Metallic Veins On Stone Base
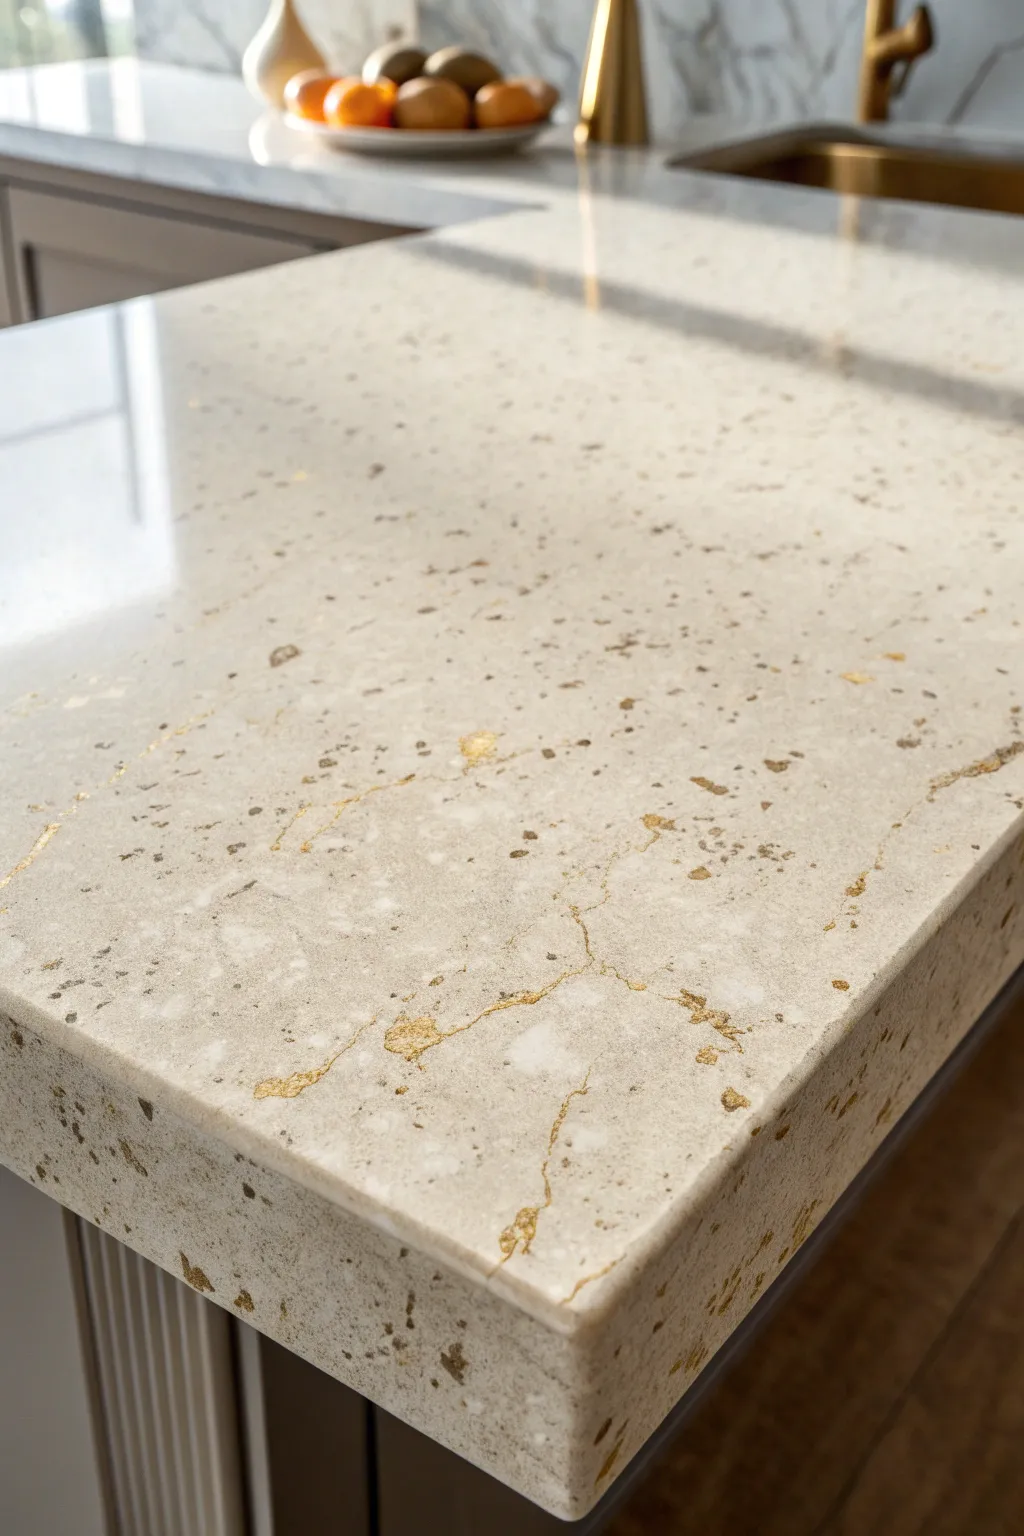
Transform a plain laminate or wood surface into a stunning piece of faux stone that rivals high-end quartz. This technique combines a speckled limestone base with delicate, hand-painted gold veining for a sophisticated finish that catches the light beautifully.
Step-by-Step Guide
Materials
- High-adhesion primer (specifically for laminate/countertops)
- Cream or warm off-white latex base paint (semi-gloss)
- Sponge kit (natural sea sponge and dense foam sponge)
- Acrylic craft paints for speckling (warm gray, beige, white)
- Metallic gold leafing paint or liquid gold leaf
- Fine liner brush (size 0 or 00)
- Feather (turkey or pheasant quill, for veining)
- Food-safe, heat-resistant epoxy resin kit
- Sandpaper (220 and 400 grit)
- Lint-free tack cloths
- Plastic drop cloths and painter’s tape
Step 1: Preparation & Base Coat
-
Clean and prep:
Begin by scrubbing the countertop thoroughly with a heavy-duty degreaser to remove all kitchen oils. Once dry, scuff-sand the entire surface with 220-grit sandpaper to create a ‘tooth’ for the primer, then wipe away every speck of dust with a tack cloth. -
Protect the area:
Tape off your sink, faucet, backsplash, and cabinets with precision. Cover the floor immediately below the counter with a drop cloth to catch any drips. -
Prime the surface:
Apply a bonding primer specifically designed for difficult surfaces like laminate. Use a small foam roller for an ultra-smooth finish, ensuring no roller marks remain. Let this cure according to the manufacturer’s maximum waiting time. -
Apply the base color:
Roll on your cream or off-white base coat. You’ll likely need two or three thin, even coats to achieve full opacity, sanding very lightly with 400-grit paper between coats for perfect smoothness.
Step 2: Creating the Stone Texture
-
Mix speckle glazes:
Dilute your beige, warm gray, and white acrylic paints with a small amount of water or glazing medium. The consistency should be fluid but not dripping wet. -
First sponge layer:
Dampen a natural sea sponge, dip it into the beige mixture, and blot excess onto a paper towel. Lightly pounce the sponge over the counter in random patterns, rotating your wrist constantly to avoid repetitive shapes. -
Add depth:
Repeat the sponging process with the warm gray paint, filling in gaps left by the beige. Keep this layer sparse; you want the cream base to remain the dominant color. -
Flick for fine grit:
For that realistic sandy stone look, dip a stiff toothbrush into the dark gray paint and flick the bristles with your thumb to spray tiny speckles across the surface. Repeat this with white paint for highlights.
Natural Veining Tip
For truly organic veins, hold your brush by the very end of the handle. This reduces your control slightly, creating the shaky, jagged lines found in real stone.
Step 3: Painting the Gold Veins
-
Plan the vein path:
Visualize where your veins will flow. In the reference image, the veins meander naturally—some long, some short. You can lightly sketch the main arteries with a very pencil, but keep lines faint. -
Apply main liquid gold lines:
Dip a fine liner brush into the metallic gold paint. Paint thin, trembling lines. I like to twist the brush slightly as I pull it to create irregular, organic widths rather than distinct stripes. -
Feather out the details:
While the gold is still wet, use the tip of a feather or a dry brush to drag edges of the vein outward, creating ‘fractures’ where the gold seeps into the stone texture. -
Add metallic flecks:
To mimic the image’s scattered gold deposits, dab tiny, isolated spots of gold near the main veins. These shouldn’t connect to the line but suggest mineral deposits within the rock. -
Soften the look:
If a gold line looks too stark, mix a tiny drop of your base cream paint with water and lightly glaze over sections of the vein to make it look like it’s submerged slightly under the stone surface.
Fixing Heavy Splatter
If your ‘toothbrush flicking’ creates blobs that are too large, don’t wipe them. Let them dry, then dab a bit of the base cream color over them with a small sponge.
Step 4: Sealing & Protecting
-
Clean and inspect:
Allow the paint to cure for at least 24 hours. Gently wipe the surface with a tack cloth one last time to ensure absolutely no dust or hair is resting on the paint. -
Mix the epoxy:
Combine your two-part countertop epoxy resin accurately according to the package instructions. Stir slowly and steadily to avoid whipping air bubbles into the mixture. -
Pour and spread:
Pour the resin onto the center of the countertop. Use a plastic spreader or a clean foam roller to guide the liquid to the edges. It will naturally self-level. -
Pop bubbles:
Use a heat gun or a specialized torch passed quickly over the surface to pop any rising air bubbles. Don’t linger in one spot to avoid scorching the resin. -
Final cure:
Let the resin cure undisturbed for 48 to 72 hours before placing any objects on the counter. Keep the room dust-free during this critical drying time.
Enjoy the luxurious new look of your kitchen without the heavy renovation price tag
Hand-Drawn Doodle Countertop Under Clear Coat
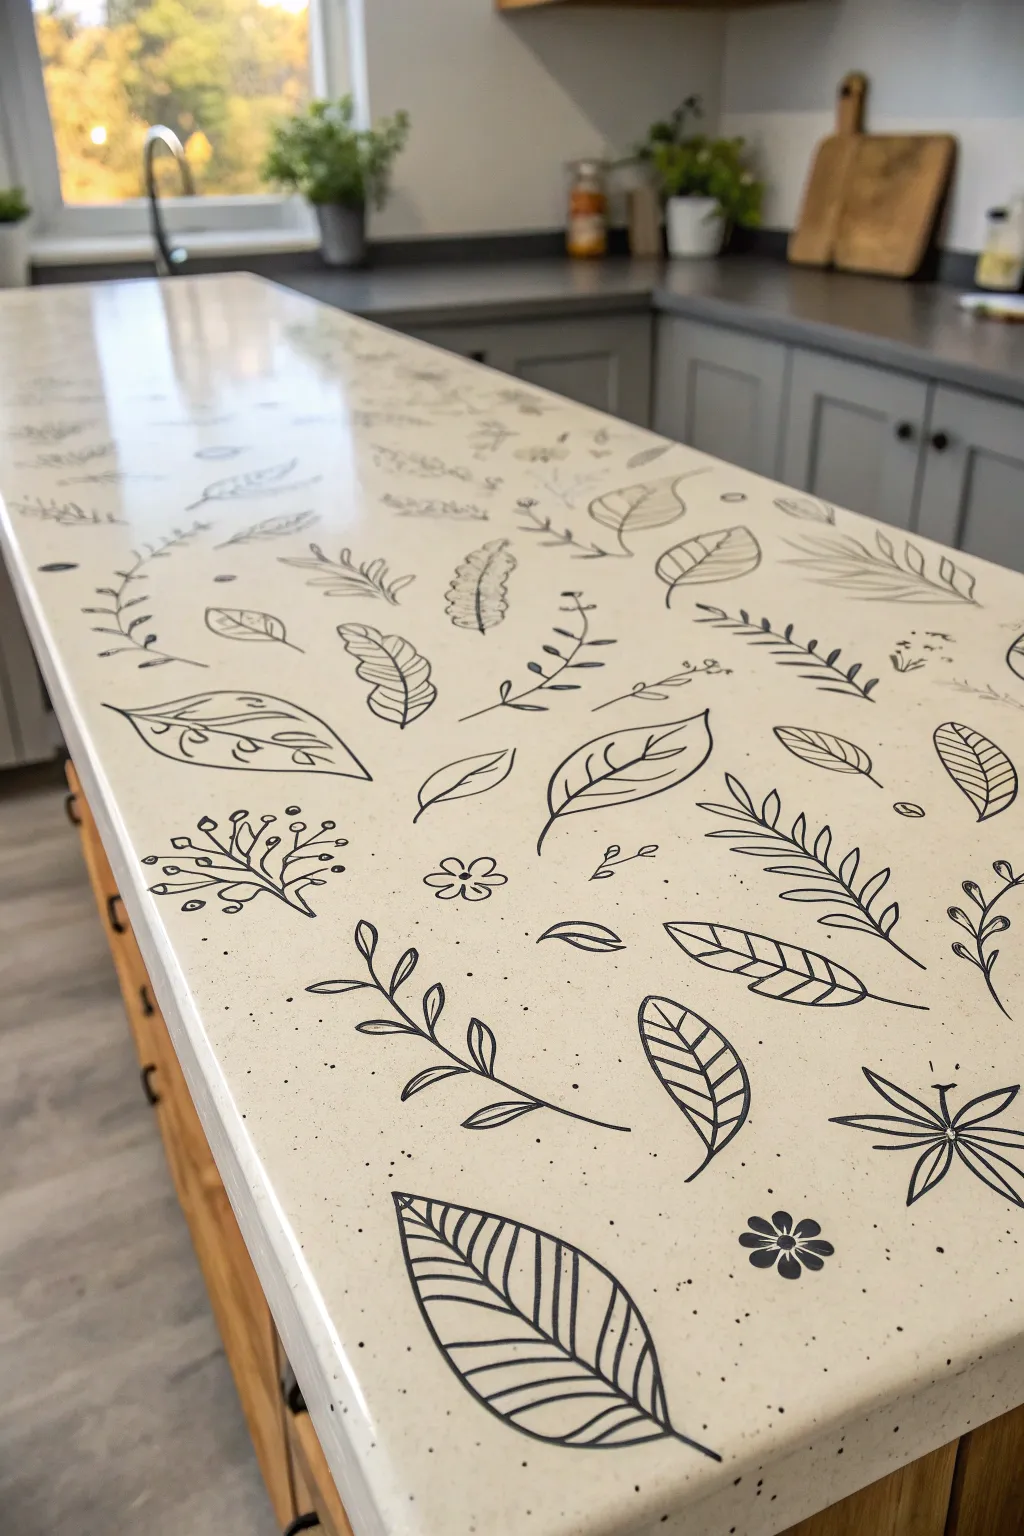
Transform a plain laminate or wood countertop into a personalized piece of art with this charming hand-drawn botanical design. The result is a light, airy surface scattered with black ink leaves and florals, all protected under a durable, glassy finish.
Step-by-Step Tutorial
Materials
- Existing countertop (laminate or wood)
- Sandpaper (120 and 220 grit)
- Bonding primer (specifically for laminate if applicable)
- Cream or off-white acrylic latex paint (eggshell or satin finish)
- Black fine-tip paint pens (oil-based recommended for durability)
- Black medium-tip paint pens
- Paper for sketching practice
- Pencil and eraser
- High-quality clear countertop epoxy resin kit
- Painter’s tape and plastic drop cloths
- Lint-free tack cloth
- Heat gun or torch (for resin bubbles)
Step 1: Preparation and Base Coat
-
Clean and Degrease:
Begin by thoroughly cleaning the entire countertop surface to remove any grease, cooking oils, or residues. A TSP substitute works well for this, creating a pristine canvas for your artwork. -
Protect the Area:
Use painter’s tape to meticulously mask off any sinks, faucets, backsplashes, or cabinets you don’t want to get messy. Lay down plastic drop cloths on the floor to catch drips. -
Scuff Sanding:
Lightly sand the existing surface with 120-grit sandpaper. You aren’t looking to remove the old finish entirely, just to scuff it up enough so the primer has something to grip onto. -
Remove Dust:
Wipe away all sanding dust using a tack cloth. Any leftover particles will create annoying bumps in your smooth finish later. -
Apply Primer:
Roll on a coat of high-quality bonding primer. If you are painting over laminate, ensure the can specifically states it bonds to slick surfaces. -
Apply Base Color:
Once the primer is dry, apply your cream or off-white base color using a high-density foam roller for the smoothest finish. Apply at least two coats, letting each dry fully. -
Smooth the Canvas:
I like to do a very light sanding with 220-grit paper after the final paint coat is perfectly dry, just to knock down any roller texture before drawing.
Smear Prevention
Before pouring epoxy, test your pen ink! Draw on a scrap piece, let it dry, and dab a little epoxy on it. If it smears, spray a light coat of clear acrylic sealer over the detailed counter first.
Step 2: Drawing the Design
-
Practice Your Doodles:
On a spare sheet of paper, practice drawing various leaf shapes, ferns, and simple flowers. Experiment with different hatching and line shading techniques to see what you prefer. -
Plan Composition:
Look at the counter as a whole. You want a scattered, random pattern that isn’t too crowded. You might lightly mark a few spots with a pencil to keep spacing even. -
Draw Large Elements First:
Using the medium-tip black paint pen, draw the largest leaves and ferns first. Distribute them widely across the surface to anchor the design. -
Add Detail and Shading:
Switch to your fine-tip pen to add veins inside the leaves or stripes. This contrast in line weight makes the doodles look more professional. -
Fill with Medium Elements:
Draw medium-sized sprigs and branches in the empty spaces between the large leaves. Rotate your wrist frequently so the leaves point in different directions for a natural flow. -
Add Small Accents:
Use the fine-tip pen to draw tiny flowers, dots, or small petals in the remaining gaps. These small details act as filler to balance the white space. -
The Speckle Effect:
To mimic the look of stone or terrazzo and hide future specks of dust, add tiny random dots of black ink throughout the empty cream areas. -
Let Ink Cure:
Allow the paint pens to dry completely for at least 24 hours. Oil-based pens need this time to off-gas so they don’t smear when sealed.
Go Metallic
For a luxe upgrade, mix in a few copper or gold leaf doodles alongside the black ink. The metallic sheen will catch the light beautifully under the thick layer of glossy epoxy resin.
Step 3: Sealing
-
Mix the Epoxy:
Following the manufacturer’s exact instructions, mix your two-part countertop epoxy responsibly. Mix slowly to minimize air bubbles. -
Pour and Spread:
Pour the epoxy onto the center of the counter and spread it outward toward the edges using a plastic spreader or a foam brush. -
Pop Bubbles:
Pass a heat gun or small torch rapidly over the wet surface to pop any rising air bubbles. Keep the heat moving constantly to avoid scorching the resin. -
Final Cure:
Protect the surface from dust and pets for at least 48 to 72 hours while the epoxy hardens into a rock-solid, glossy shell.
Now you have a durable, custom surface that brings artistic flair into the heart of your kitchen


Have a question or want to share your own experience? I'd love to hear from you in the comments below!