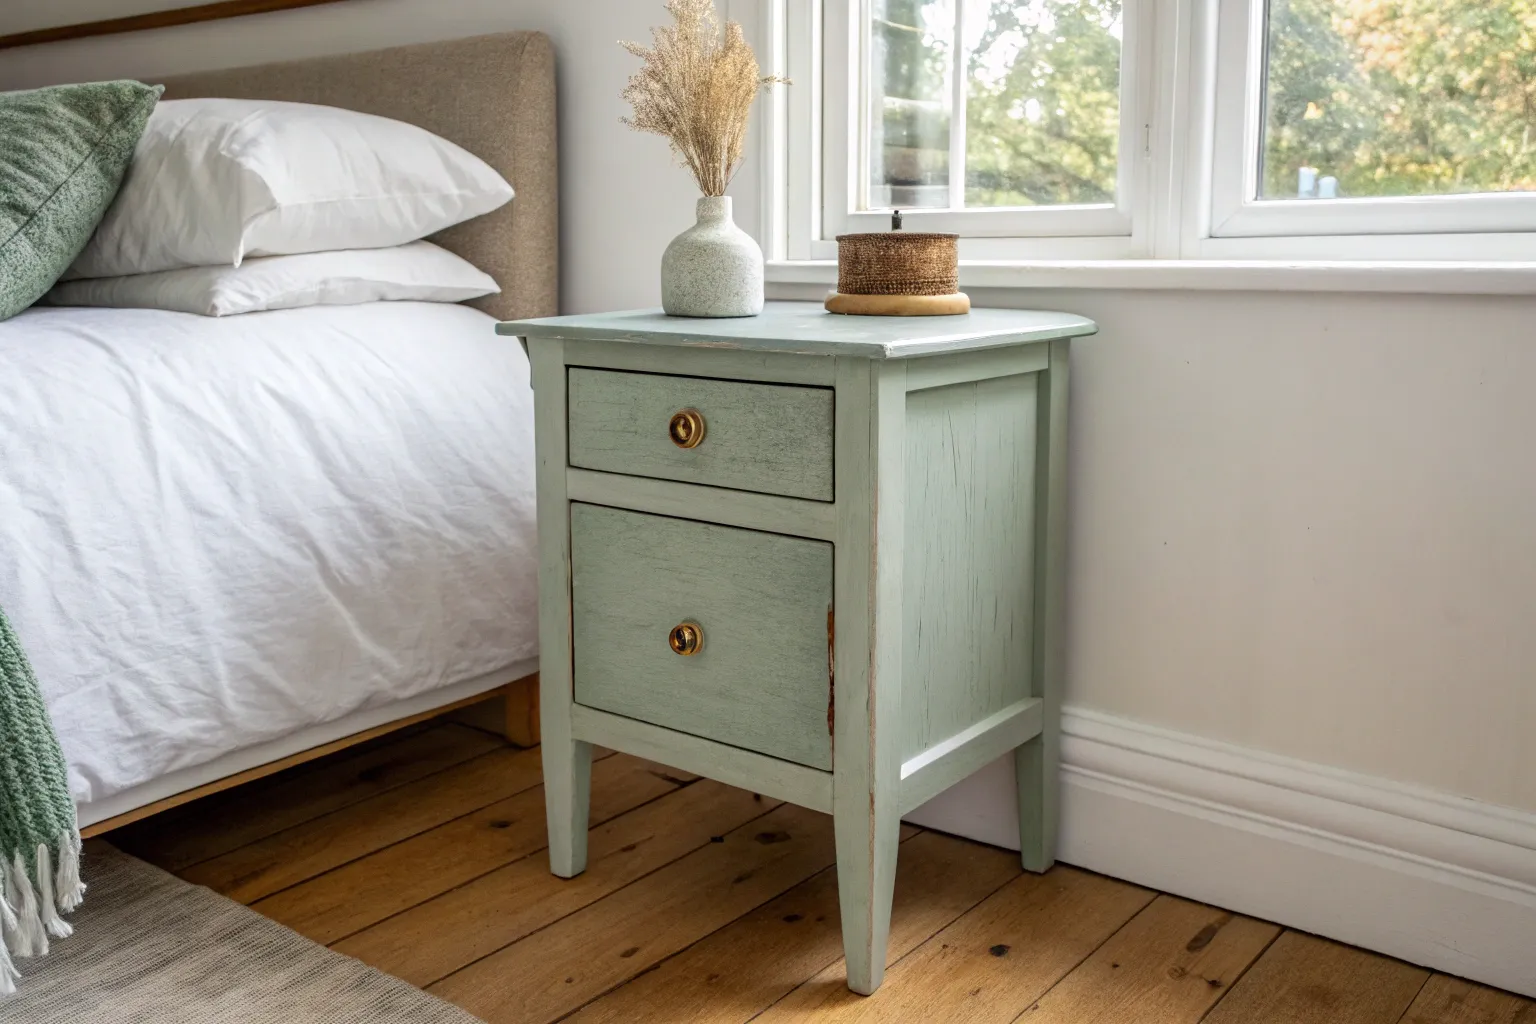
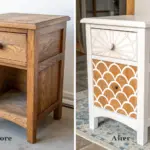
A painted nightstand is one of my favorite small furniture projects because you get that big “new room” feeling without committing to a full makeover. Here are painted nightstand ideas that range from classic, bedroom-friendly finishes to artsy statements that turn your bedside table into a mini canvas.
Classic Matte White Refresh
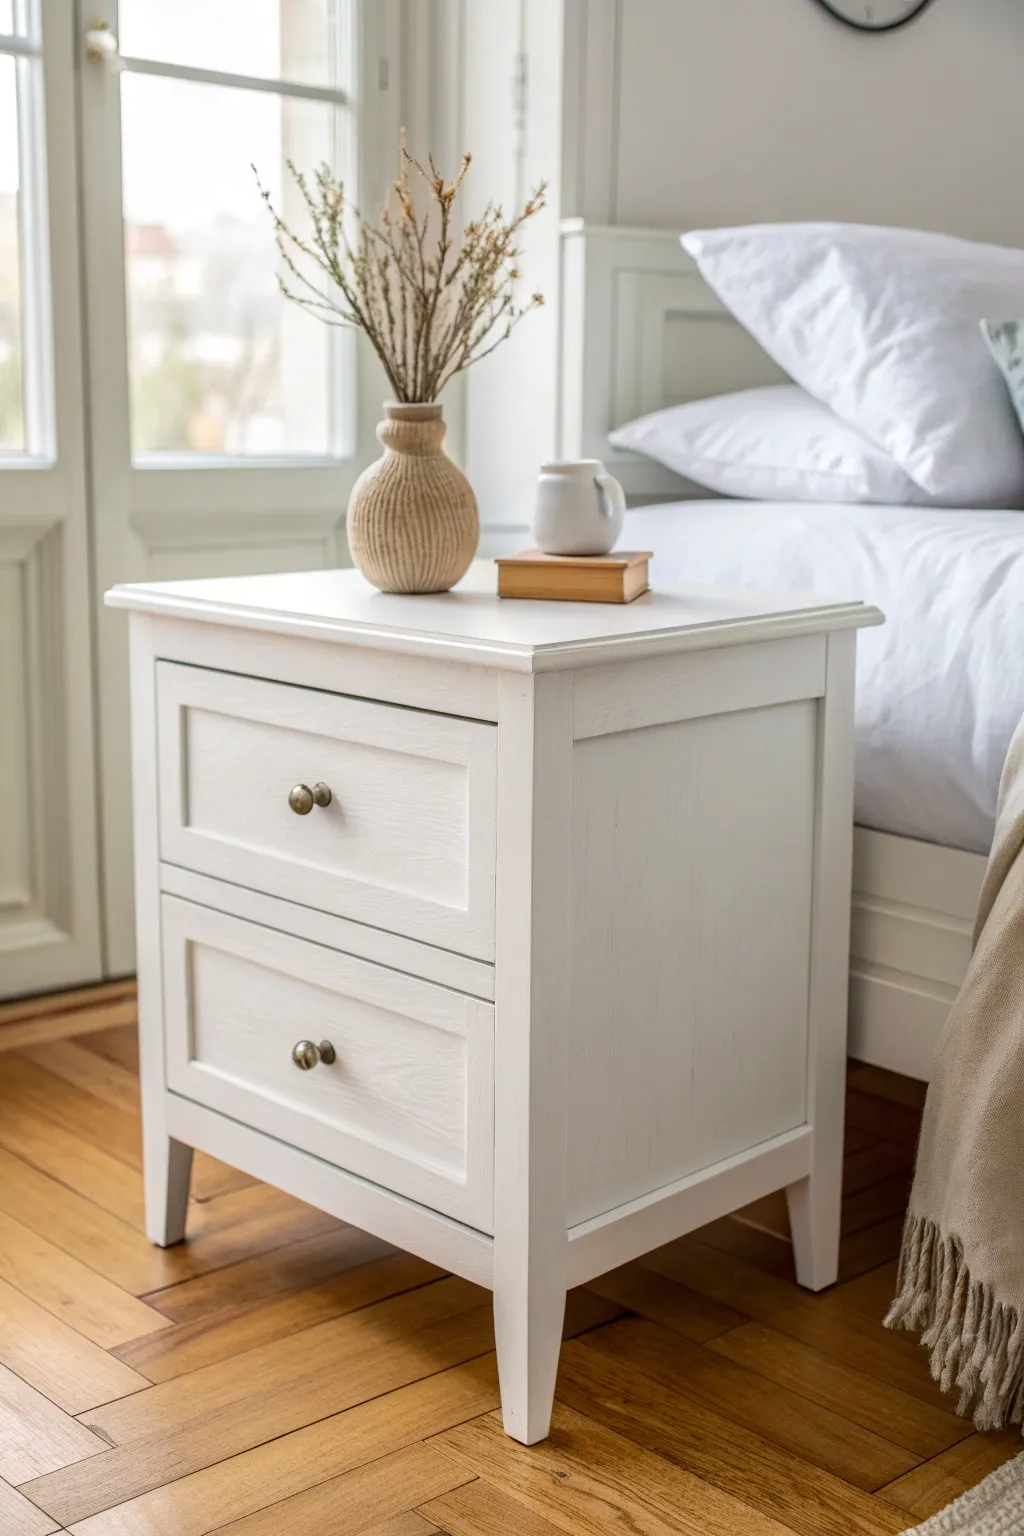
Transform a tired wooden nightstand into a bright, contemporary piece with a crisp matte white finish. This refreshing update emphasizes clean lines and simple elegance, perfect for brightening up any bedroom corner.
Step-by-Step Guide
Materials
- Wooden nightstand (vintage or thrifted)
- Screwdriver (for hardware removal)
- Sandpaper assortment (100, 150, and 220-grit)
- Electric orbital sander (optional but recommended)
- Tack cloth or lint-free rags
- Wood filler (if repairing dents)
- Painter’s tape
- High-quality stain-blocking primer (white)
- Matte white furniture paint (chalk or mineral paint works well)
- Small foam roller
- Angled synthetic bristle brush (2-inch)
- Matte polyurethane topcoat (water-based)
- Brass or gold mushroom knobs
Step 1: Preparation & Cleaning
-
Remove Hardware:
Begin by removing the drawers from the frame. Use a screwdriver to carefully detach the old knobs or handles and set them aside, or discard them if you plan to upgrade to new hardware. -
Clean Thoroughly:
Wipe down the entire piece with a degreasing cleaner to remove years of furniture polish, oil, and dust. This ensures your paint adheres properly later on. -
Fill Imperfections:
Inspect the wood for deep scratches or old hardware holes you want to hide. Overfill these slightly with wood filler and let it dry completely according to the package instructions.
Sticky Drawers?
If drawers stick after painting, rub a plain candle or a bar of beeswax along the wooden runners and the sides of the drawer box to help them glide smoothly again.
Step 2: Sanding & Priming
-
Initial Sanding:
Using 100 or 150-grit sandpaper, scuff sand the entire surface to remove the old glossy finish. You don’t need to strip it to bare wood, just create a ‘tooth’ for the primer to grip. -
Smoothing:
Follow up with a quick pass of 220-grit sandpaper to smooth out the wood filler and create a uniform surface. -
Dust Removal:
Vacuum up the sanding dust, then wipe every nook and cranny with a tack cloth. Any leftover dust will create bumps in your finish. -
Apply Primer:
Using a foam roller for flat areas and a brush for corners, apply a coat of stain-blocking primer. This is crucial to prevent wood tannins from bleeding through your white paint. -
Spot Check:
Once the primer is dry, looking for any bleed-through. If you see yellow or pink spots, apply a second coat of primer to those specific areas.
Add Drawer Details
Line the interior drawer bottoms with a patterned wallpaper or contact paper. A floral or geometric print adds a fun, hidden pop of personality when you open them.
Step 3: Painting
-
First Coat:
Stir your matte white paint thoroughly. Apply the first coat using a foam roller on the top and sides for a smooth, brush-free finish. Use the angled brush to get into the recessed panels and around the legs. -
Watch for Drips:
I always keep a close eye on the corners of the drawers and the legs during this stage; catch any drips immediately with your brush before they tack up. -
Light Sanding:
After the first coat is fully dry, very lightly run a fine-grit sanding sponge over the surface. This knocks down any raised grain and ensures a buttery smooth final texture. -
Second Coat:
Apply the second coat of white paint exactly like the first. Two coats are usually sufficient, but light colors sometimes require a third thin coat for full opacity. -
Dry Time:
Allow the paint to cure for at least 24 hours before moving on to the protective finish. This patience prevents the paint from pulling up when you apply the topcoat.
Step 4: Finishing Touches
-
Sealing:
Apply a water-based matte polyurethane using a specialized topcoat brush or a fresh foam roller. Apply in long, single strokes to avoid creating bubbles or milky haze. -
Reassembly:
Once the topcoat is cured (refer to the manufacturer’s curing time), slide the drawers back into the rails. -
Hardware Installation:
Attach your new brass mushroom knobs. If the new screws are too long, you may need to add a washer on the inside of the drawer front for a snug fit. -
Final Polish:
Give the piece a final wipe with a soft cloth to remove fingerprints from the installation process, position it by your bed, and style with simple decor.
Enjoy the calm and clean atmosphere this newly refreshed piece brings to your bedroom


Moody Navy Statement Nightstand
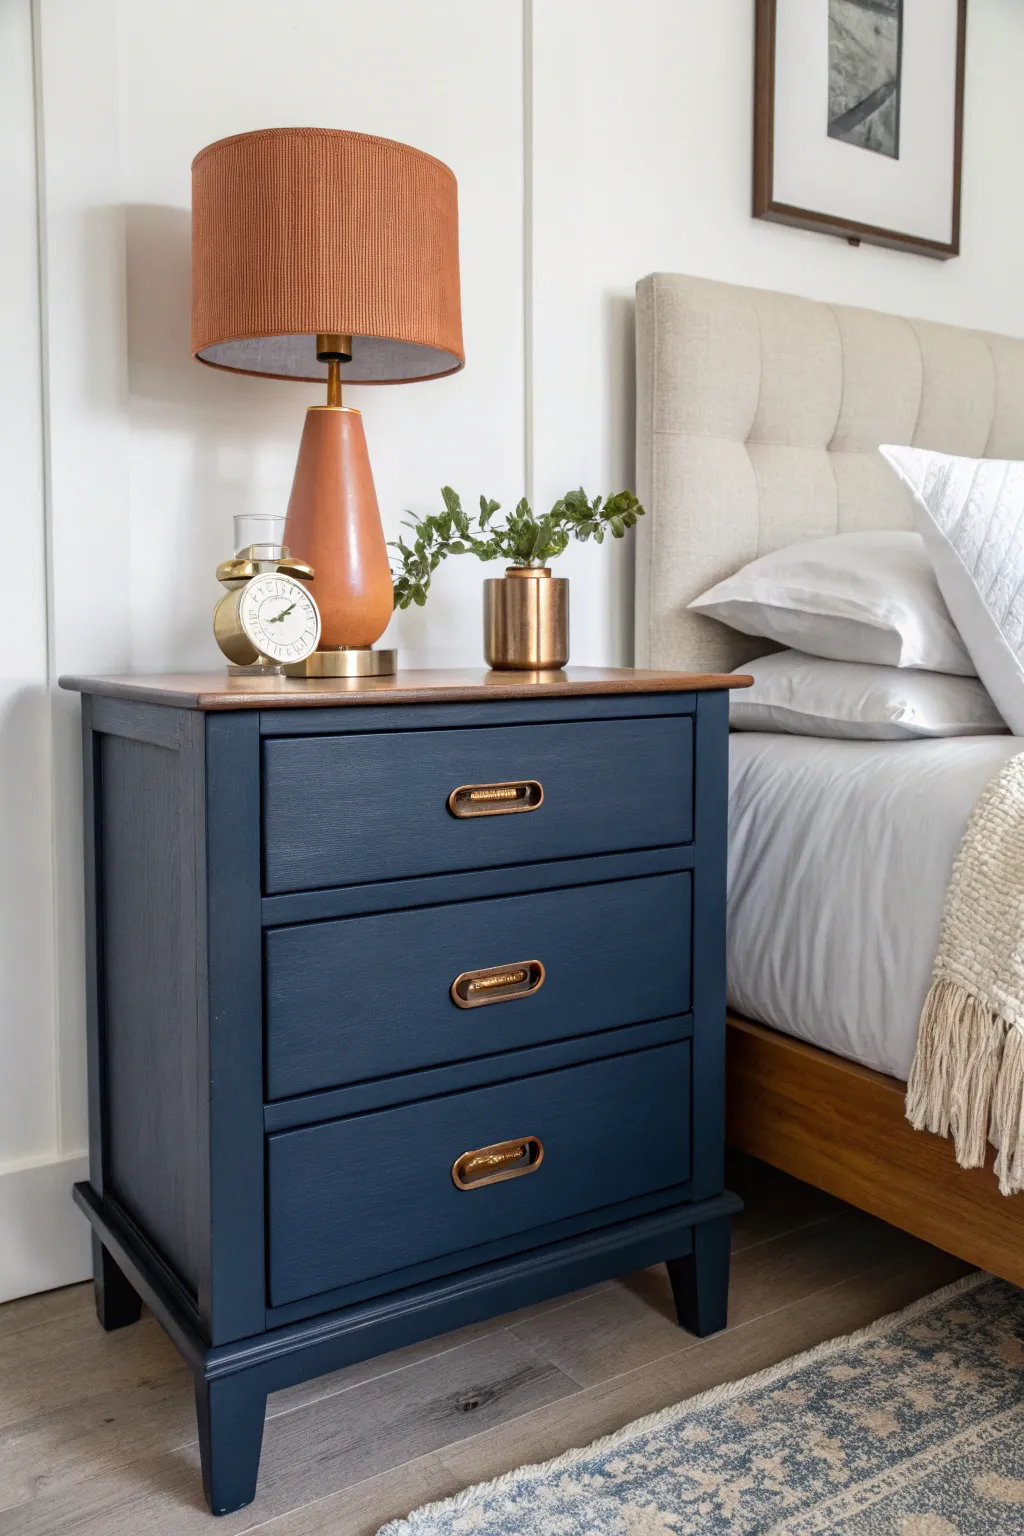
Transform a dated wooden nightstand into a sophisticated bedroom staple with a coat of rich navy paint and a preserved wood top. This project balances the warmth of natural wood grain with the modern, moody appeal of a deep blue finish, accented perfectly by recessed brass hardware.
Step-by-Step Guide
Materials
- Solid wood nightstand
- Medium-grit sandpaper (120-grit)
- Fine-grit sandpaper (220-grit)
- Chemical stripper (optional, for the top)
- Wood stain (Warm Walnut or similar)
- Polyurethane topcoat (Satin finish)
- Primer (oil-based or stain-blocking)
- Navy blue furniture paint (e.g., Hale Navy or similar)
- Gold or brass recessed drawer pulls
- High-quality synthetic paintbrush
- Foam roller
- Painter’s tape
- Tack cloth
- Drill and bits (if hardware holes change)
Step 1: Prep and Sanding
-
Remove hardware and drawers:
Begin by taking all the drawers out of the nightstand. Unscrew the existing hardware from the drawer fronts and set everything aside in a labeled bag so you don’t lose any pieces. -
Clean surface thoroughly:
Wipe down the entire piece with a degreaser or a mix of mild soap and water to remove oils, dust, and old furniture wax. This ensures your paint and stain will adhere properly. -
Sand the top down to raw wood:
Since we are keeping the top wood-toned, use an orbital sander with 120-grit paper to remove the old finish completely. You want to see the bare, raw wood grain. Finish with a hand-sand using 220-grit for a smooth surface. -
Scuff sand the body:
For the parts being painted (the body and drawer fronts), you don’t need to strip to bare wood. Just give them a scuff sand with 120-grit paper to roughen up the old shiny finish. This gives the primer something to ‘bite’ onto.
Insider Edge
For that ultra-smooth factory finish, dampen your paintbrush slightly before dipping it into the navy paint. This helps the paint level out better and reduces visible brush strokes as it dries.
Step 2: Staining the Top
-
Apply masking tape:
Protect the body of the nightstand by running a line of painter’s tape right underneath the lip of the top surface. This prevents stain from dripping onto areas you plan to paint navy. -
Stain the raw wood:
Using a lint-free cloth or foam brush, apply your chosen wood stain to the top. Wipe it on in the direction of the grain, let it sit for a few minutes to absorb, and then wipe off the excess. I prefer to work in long, continuous strokes to avoid lap marks. -
Seal the top:
Once the stain is completely dry (check the can instructions, usually 24 hours), apply 2-3 coats of satin polyurethane. Lightly sand with 220-grit paper between coats for a professional, smooth finish.
Sticker Shock
Drawers sticking? Rub a plain candle or a bar of soap along the wooden runners and the sides of the drawer box. This provides lubrication and helps them glide smoothly without scraping your new paint.
Step 3: Priming and Painting
-
Tape off the finished top:
Now that the top is done and dry, protect it. Apply painter’s tape along the edge of the wood top where it meets the nightstand body. -
Apply primer:
Roll or brush on a coat of high-quality stain-blocking primer. This is crucial for dark wood pieces to prevent tannins from bleeding through your navy paint later. Let it dry completely. -
Sand the primer:
Run your hand over the primed surface. If it feels rough, lightly knock down the bumps with 220-grit sandpaper and wipe away the dust with a tack cloth. -
First coat of navy paint:
Using a high-quality angled brush for corners and a foam roller for flat surfaces, apply the first coat of navy blue paint. Don’t worry if it looks streaky; thin, even coats are key. -
Second coat of navy paint:
After the first coat dries, apply a second coat for full opacity and depth of color. The deep luxury look comes from solid coverage, so a third coat might be necessary depending on your paint brand. -
Paint the drawer fronts:
Don’t forget the drawers! Paint the fronts using the same method, ensuring you don’t paint the sides of the drawers (which can make them stick).
Step 4: Assembly and Details
-
Seal the painted areas:
If your furniture paint doesn’t have a built-in topcoat, apply a clear protective finish (wax or polycrylic) to the navy sections to protect against scuffs. -
Install recessed hardware:
The recessed pulls shown here give a custom look. If your previous holes align, screw them in. If not, measure carefully, drill new pilot holes, and secure the brass pulls tightly so they sit flush. -
Reinsert drawers:
Wait for the paint to fully cure (this can take a few days to harden properly) before sliding the drawers back in to prevent the paint from sticking or peeling. -
Final wipe down:
Remove all tape and give the piece a final wipe with a clean microfiber cloth to remove any stray dust or fingerprints before styling.
Now step back and admire how this elegant two-tone piece anchors your bedroom with style


Matte Black With Bright Hardware Contrast
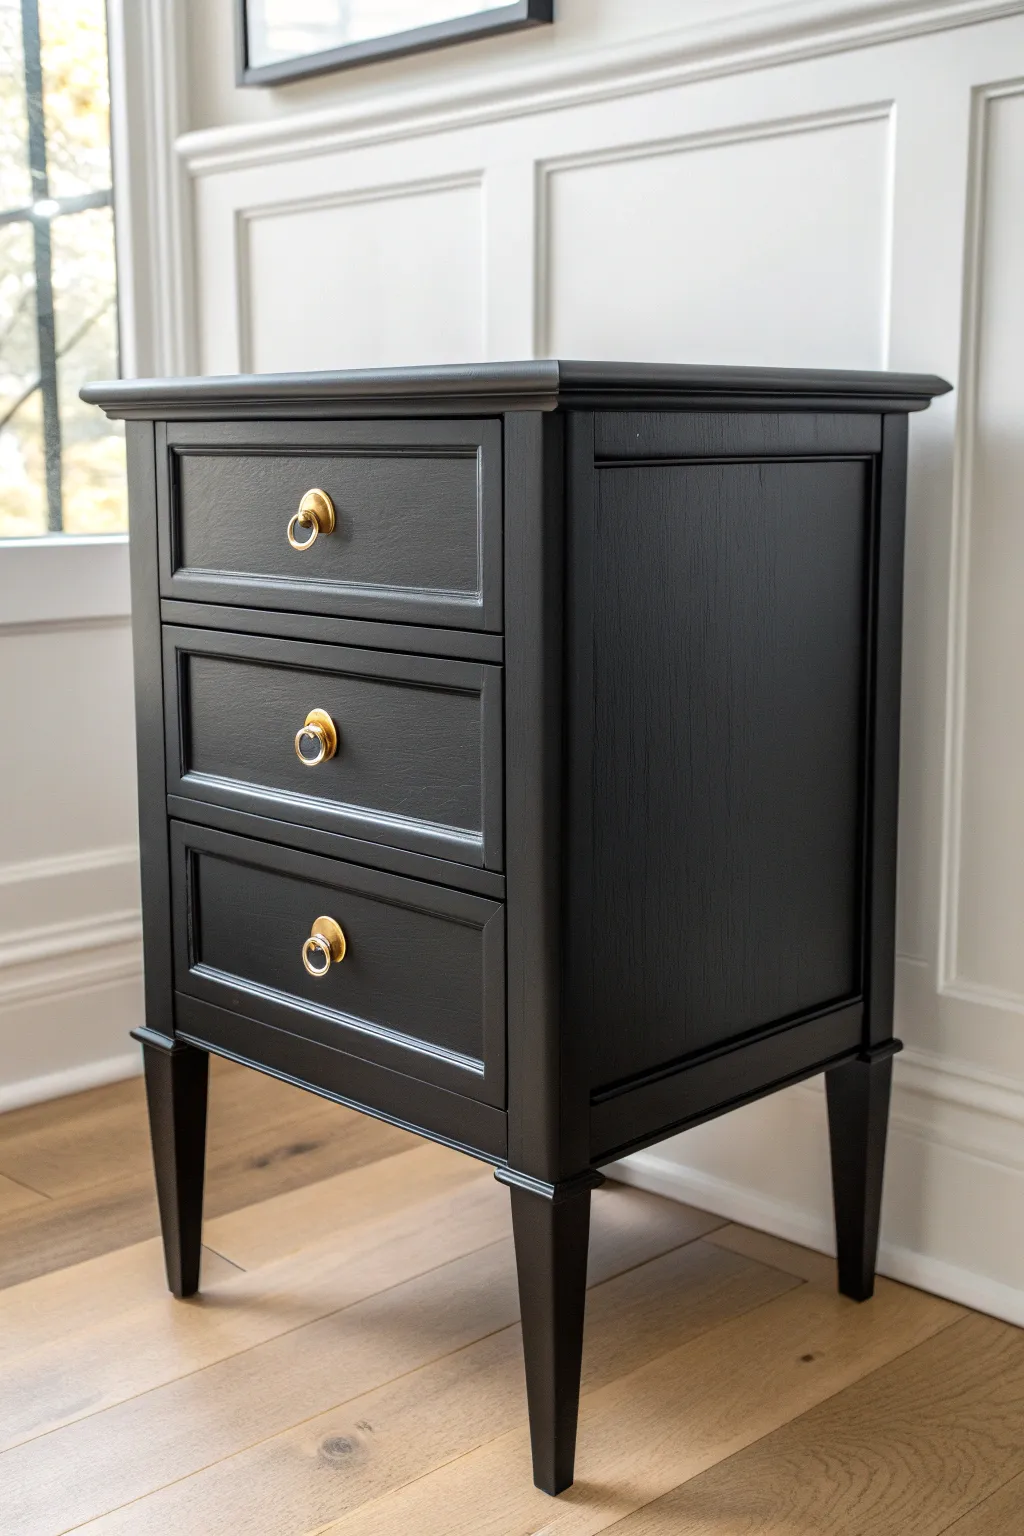
Transform a tired wooden nightstand into a stunning statement piece with this high-contrast makeover. The velvety matte black finish paired with brilliant gold hardware creates a look that is both modern and timelessly elegant.
Detailed Instructions
Materials
- Used/vintage wooden nightstand (3-drawer style)
- Medium and fine grit sandpaper (120 and 220)
- Wood filler
- Degreasing cleaner (like TSP or a mild degreaser)
- Tack cloth
- High-adhesion primer (grey or dark tinted preferred)
- Matte black furniture paint (chalk or mineral type)
- Polyurethane topcoat (matte finish)
- Gold ring pull hardware (3 pieces)
- Synthetic oval brush
- Foam roller
- Screwdriver
- Painter’s tape
Step 1: Preparation & Repairs
-
Strip the hardware:
Begin by removing all the old knobs or pulls with your screwdriver. Set these aside if you plan to clean and reuse them, but for this specific look, we will be replacing them later. -
Remove drawers:
Pull out all the drawers completely. It is always easier to paint the frame and the drawer fronts separately to avoid sticking or missed spots. -
Clean thoroughly:
Wipe down the entire piece with a degreasing cleaner. Old furniture often has years of wax or polish buildup that will repel paint, so don’t skip this scrub. -
Fill imperfections:
Inspect the surfaces for deep scratches or dents. Apply wood filler to these areas with a putty knife, overfilling slightly to account for shrinkage. -
Initial sanding:
Once the filler is dry, sand the entire piece with 120-grit sandpaper. You aren’t trying to strip it to bare wood, just scuffing the shiny finish to give the new paint ‘tooth’ to grab onto. -
Clean up dust:
Vacuum up the bulk of the sanding dust, then wipe every surface with a tack cloth to catch the remaining fine particles.
Achieving Ultra-Smooth Finishes
For a factory-like finish without a sprayer, use a high-quality paint extender (like Floetrol) mixed into your paint. It slows drying time, allowing brush strokes to level out flat.
Step 2: Priming & Painting
-
Tape edges:
If you aren’t painting the interior of the drawers, apply painter’s tape along the sides of the drawer boxes to keep your lines crisp. -
Apply primer:
Roll or brush on a coat of high-adhesion primer. Since our final color is black, I prefer using a grey-tinted primer here so the dark topcoat covers easier. -
Sand the primer:
After the primer cures, give it a very light hand-sand with 220-grit paper. This knocks down any brush strokes or texture, which is crucial for a smooth matte finish. -
First coat of black:
Stir your matte black paint thoroughly. Use a synthetic oval brush to cut in corners and detailed moldings, then follow immediately with a foam roller on flat surfaces to smooth it out. -
Let it dry:
Allow the first coat to dry completely according to the manufacturer’s instructions. Matte paints can look dry quickly but still be soft, so patience is key. -
Second coat:
Apply the second coat of black paint. Watch for drips around the recessed panels on the drawer fronts and smooth them out gently with your brush. -
Inspect coverage:
Check for any uneven spots in harsh light. If necessary, a thin third coat may be needed for absolute opacity.
Step 3: Finishing Touches
-
Protective topcoat:
To seal the paint without adding shine, apply a water-based polyurethane with a matte or ‘dead flat’ finish. Use long, even strokes to avoid cloudiness. -
Drill new holes (if needed):
If your new gold ring pulls have different spacing than the original hardware, fill the old holes earlier in the process and drill new ones now, using a template for accuracy. -
Install hardware:
Attach the gold ring pulls to each drawer center. Tighten them by hand to avoid cracking the new paint finish. -
Reassemble:
Slide the drawers back into the frame carefully. Check clearanceto ensure the extra paint thickness doesn’t cause rubbing.
Fixing Shiny Spots
If you accidentally rub the matte finish and create a shiny burnish mark, lightly sand the spot with 300+ grit paper and recoat just that area with a small amount of topcoat.
Step back and admire the chic contrast of deep black and bright gold that now brings energy to your room


Two-Tone Paint and Natural Wood Top

This project transforms a standard wooden nightstand into a sophisticated, modern farmhouse piece by combining crisp white paint with warm, natural oak tones. The result is a balanced, airy design where the natural wood grain takes center stage against a clean, painted frame.
Step-by-Step
Materials
- Unfinished wood nightstand (oak veneer preferred)
- Orbital sander with 120, 180, and 220-grit sandpaper
- High-quality painter’s tape (frog tape recommended)
- Sanding sealer
- White primer (stain-blocking)
- White satin or semi-gloss furniture paint
- Clear matte polyurethane or polycrylic
- Foam roller and synthetic straight-cut brush
- Tack cloth
- Brass or gold drawer knobs
- Screwdriver and measuring tape
Step 1: Preparation & Disassembly
-
Remove hardware and drawers:
Start by taking the drawers out of the nightstand entirely. Unscrew any existing knobs or handles and set them aside if you plan to reuse them, though new hardware really updates the look. -
Initial coarse sanding:
Using your orbital sander with 120-grit sandpaper, remove any existing finish from the entire piece. You want to get down to the raw wood, especially on the top surface, side panels, and drawer fronts, as these will remain exposed wood. -
Smooth the surfaces:
Switch to 180-grit sandpaper to smooth out the scratches from the coarser pass. Finish with a quick hand-sand using 220-grit paper to ensure the wood is buttery smooth and ready for finishing. -
Clean dust thoroughly:
Vacuum up all the sanding dust from crevices and corners. Wipe the entire piece down with a tack cloth to capture any remaining fine particles.
Step 2: Protecting the Wood Accents
-
Apply sanding sealer:
Brush a coat of sanding sealer onto the areas that will remain natural wood: the top surface, the inset side panels, and the drawer fronts. This prevents the wood from absorbing stain unevenly or looking blotchy. -
Tape off natural areas:
Once the sealer is dry, carefully apply painter’s tape to protect the wood sections you want to keep unpainted. Be extremely precise with your lines, especially around the inset side panels and the edge of the top surface. -
Seal the tape edges:
I always press the edge of the tape down firmly with a credit card or fingernail to prevent bleed-under. You can even apply a tiny amount of clear sealer over the tape edge for a perfect seal.
Tape Sealing Trick
To get razor-sharp lines between the wood and paint, brush a tiny bit of clear matte medium over the edge of your tape before painting. This seals the gap so no white paint bleeds onto the wood.
Step 3: Painting the Frame
-
Prime the frame:
Apply a coat of stain-blocking primer to the legs, the main structural frame, and the outer border of the side panels. Use a small roller for flat areas and a brush for corners. -
Sand the primer:
After the primer has dried completely, lightly scuff it with 220-grit sandpaper to knock down any raised grain or brush strokes, then wipe away the dust. -
First coat of paint:
Apply your white satin furniture paint to the primed areas. Use long, smooth strokes with your synthetic brush to minimize texture, and don’t overload the brush. -
Second coat of paint:
Checking coating times on your can, apply a second coat for full opacity. Two thin coats are always better than one thick one to avoid drips. -
Paint the drawer boxes:
Since the drawer fronts (the main face) remain wood, you only need to paint the front face of the drawer *box* itself if the design requires it. In this specific styles, the drawer fronts are painted white, but the top/bottom lips are wood. Wait—looking closely at the reference, the drawer fronts are actually painted white entirely *except* for a wood trim or the frame surrounding them. Actually, reverse that: The reference shows white drawer fronts with a wood accent strip maybe? No, let’s look closer. It’s a wood frame with white drawers. Okay, paint the drawer fronts fully white. -
Correction on drawer fronts:
Paint the main face of the drawer fronts white. Leave the thin trim detail or bottom edge unpainted if your specific nightstand has a wooden lip detail like the inspiration image.
Grain Showing Through?
If the wood grain texture is still visible through your white paint after two coats, sand lightly and apply a third coat. Oak has a deep grain that often needs extra paint to level out fully.
Step 4: Finishing & Assembly
-
Remove tape carefully:
The most satisfying part: Peel off the painter’s tape while the final coat of paint is still slightly tacky (not fully cured) to get the cleanest lines without chipping. -
Protect the natural wood:
Apply a clear, water-based matte polycrylic over the exposed natural wood sections (top and sides). This keeps the wood looking raw but protects it from water rings. -
Protect the painted/wood mix:
You can also apply a final clear coat over the painted sections for extra durability against scuffs. -
Install drawers and hardware:
Once everything has cured for at least 24 hours, slide the drawers back in. Install your new brass knobs in the center of the drawer fronts.
Enjoy the fresh, clean look your new two-tone nightstand brings to the room
BRUSH GUIDE
The Right Brush for Every Stroke
From clean lines to bold texture — master brush choice, stroke control, and essential techniques.
Explore the Full Guide
Antique Glaze for Aged Depth
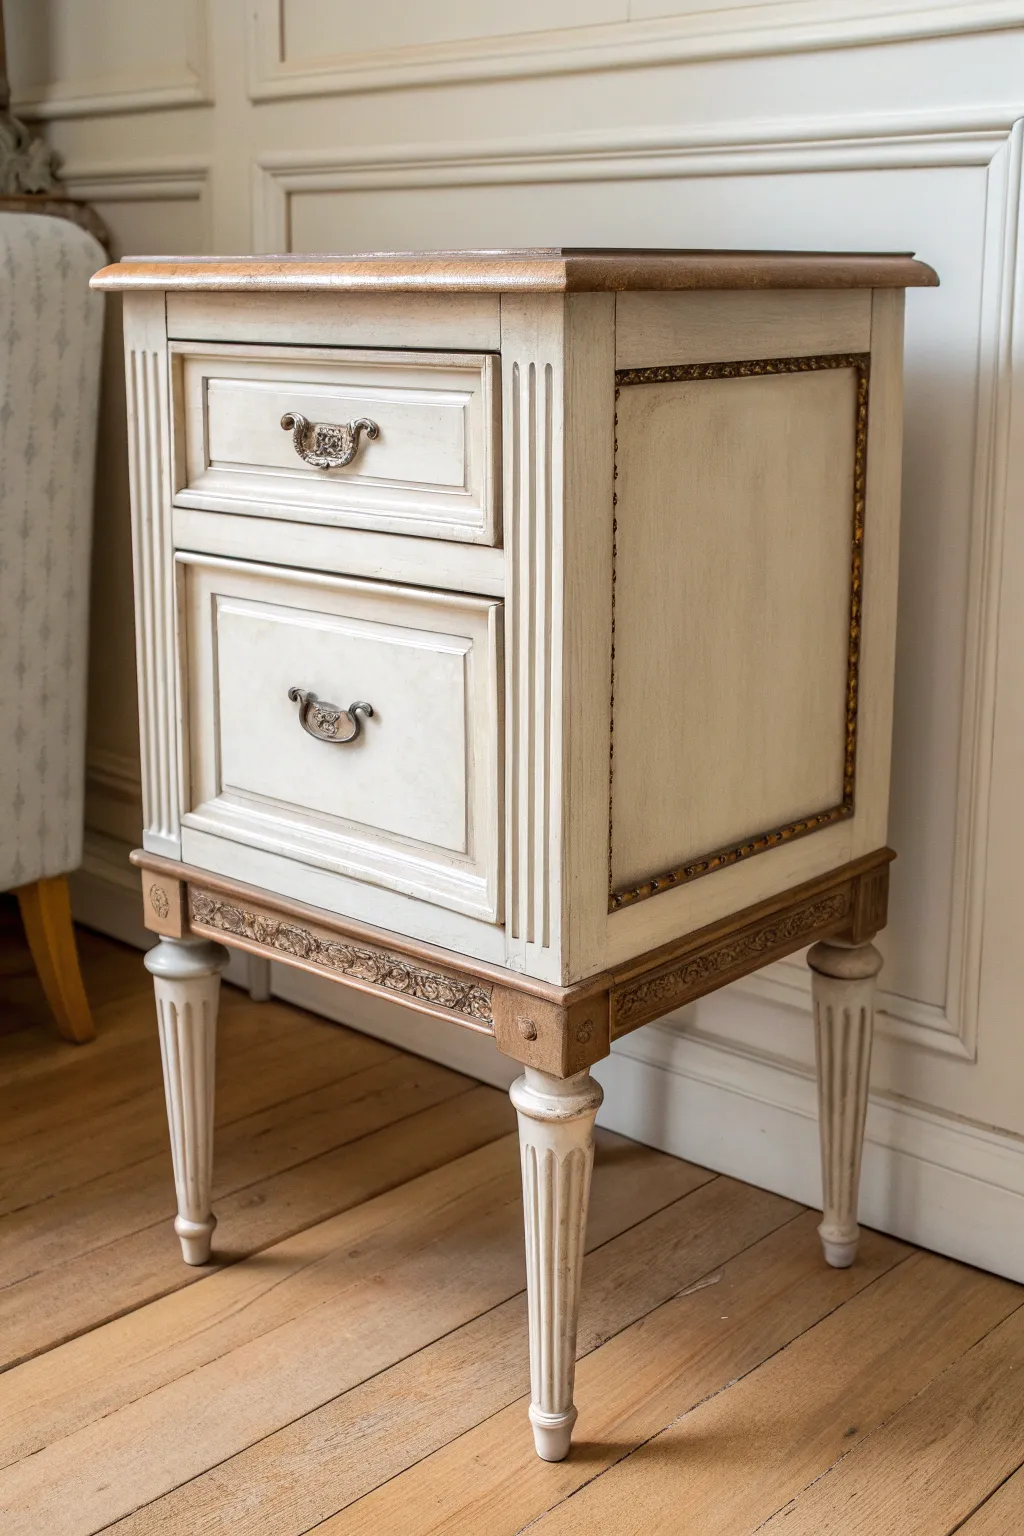
Transform a standard nightstand into a stunning French provincial heirloom using strategic paint layering and glazing techniques. This project focuses on achieving a creamy, time-worn patina that highlights intricate carvings and provides a sophisticated contrast against natural wood tones.
Detailed Instructions
Materials
- Wooden nightstand (preferably with carved details)
- Painter’s tape
- Sandpaper (120, 220, and 320 grit)
- Clean rags or tack cloth
- Chalk-style paint (Warm Cream or Antique White)
- Dark antique wax or glaze (dark brown/umber)
- Gold gilding wax or metallic gold acrylic paint
- Clear wax or matte polycrylic sealer
- Paintbrushes (one medium round, one small detail)
- Lint-free cloth for glazing
- Screwdriver (for hardware removal)
Step 1: Preparation and Base
-
Clear the decks:
Begin by removing all drawers from the nightstand. Use your screwdriver to take off the old hardware handles and set them aside safely in a labelled bag so pieces don’t get lost. -
Surface cleaning:
Wipe down the entire piece with a mild degreaser or soapy water to remove years of dust, oils, or furniture polish. A clean surface is crucial for paint adhesion. -
Strategic sanding:
Scuff sand the areas you intend to paint using the 220-grit sandpaper. You don’t need to strip it bare, just create a ‘tooth’ for the paint to grab onto. -
Expose the wood accents:
If you want to replicate the natural wood top and bottom trim shown in the photo, sand those specific areas completely down to the bare wood using 120-grit, followed by 220-grit for smoothness. -
Protect the wood:
Use high-quality painter’s tape to meticulously mask off the freshly sanded wood top and the bottom skirt trim to protect them while you paint the body.
Step 2: Painting and Glazing
-
First coat application:
Apply your first coat of Warm Cream chalk paint. Use a round brush to get into the grooves of the side panels and drawer fronts. Don’t worry if it looks streaky; chalk paint often needs two coats. -
Second coat coverage:
Once dry, apply a second coat for solid, opaque coverage. Let this dry completely—usually about 24 hours just to be safe before glazing. -
Mixing the glaze:
If using a liquid glaze, mix it according to instructions. If using dark wax, ensure it is pliable. I like to keep a damp rag nearby to erase mistakes quickly during this step. -
Apply the antique effect:
Working in sections, brush the dark glaze or wax generously over the painted surface. Focus heavily on corners, crevices, and the vertical fluting on the legs. -
The wipe-back technique:
Immediately use a clean, lint-free cloth to wipe away the excess glaze from the flat, raised surfaces. You want the dark color to remain trapped in the recessed lines and corners, creating that shadowed, aged look. -
Feathering the sides:
On the large side panels, wipe firmly in the center and leave slightly more glaze accumulated near the edges to create a vignette effect, mimicking years of dirt accumulation.
Glaze too dark?
If the glaze dries too dark or heavy, don’t panic. Apply a small amount of clear wax over the dark glaze; it acts as an eraser, lifting the pigment so you can wipe it back further.
Step 3: Detailing and Sealing
-
Remove tape:
Carefully peel away the painter’s tape from the wood top and bottom trim while the glaze is drying. -
Enhance the trim:
Using a small detail brush or your fingertip, apply gold gilding wax to the decorative beading on the side panels and the lower apron. This subtle metallic highlight adds instant luxury. -
Stain or oil wood parts:
Apply a clear hemp oil or a light stain to the exposed wood top and bottom to rehydrate the grain and match the richness of the painted body. -
Hardware refresh:
Clean the original hardware. If it’s too shiny, dab a little dark wax on it to dull the sheen, matching the antique vibe of the nightstand. -
Final clear coat:
Seal the entire painted area with a coat of clear wax or matte polycrylic. This locks in your glaze work and protects the finish from daily wear. -
Buff and assemble:
After the wax hardens (cure time varies by brand), buff it with a soft cloth to a gentle sheen. Reattach your hardware and slide the drawers back in.
Add Texture
Before painting, use a heavy-grit sandpaper to scratch up the corners or create wormholes with a nail. The dark glaze will settle into these physical defects for authentic aging.
Enjoy the rich, historical charm this newly finished piece brings to your bedroom decor
Crisp Striped Nightstand
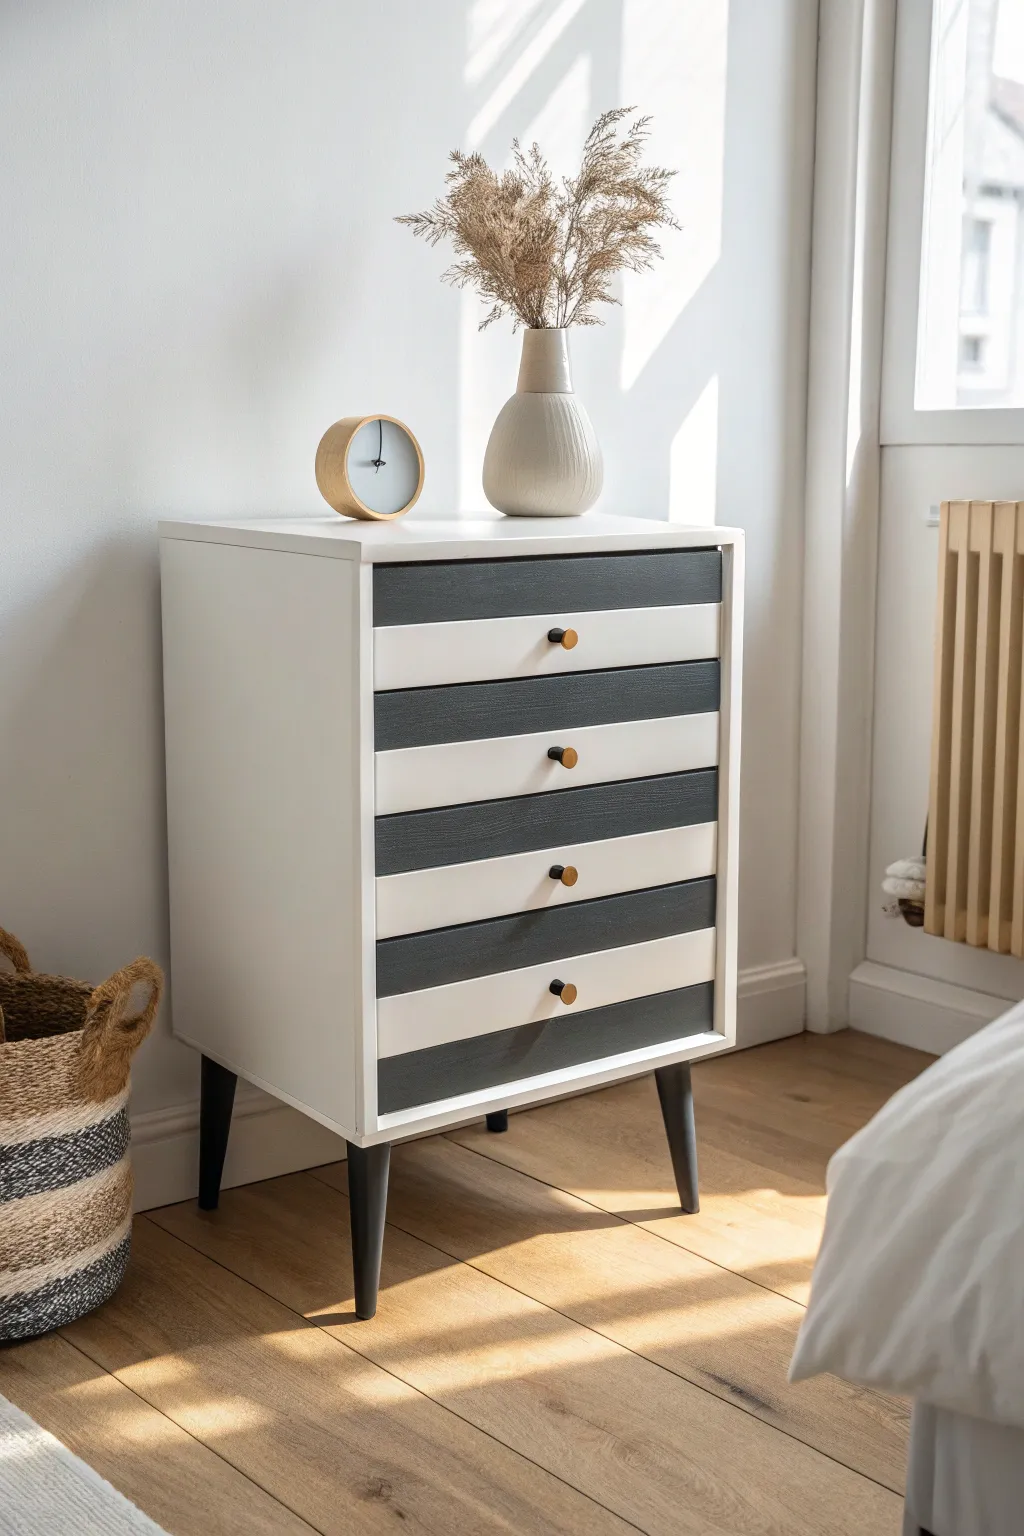
Transform a plain nightstand into a bold statement piece with this high-contrast striped design. The crisp black and white bands create a playful optical rhythm that instantly modernizes any bedroom corner.
Step-by-Step
Materials
- Wooden nightstand (IKEA Rast or similar)
- Sandpaper (120 and 220 grit)
- Primer (oil-based or stain-blocking)
- White satin furniture paint
- Charcoal or soft black satin furniture paint
- Painter’s tape (high quality)
- Foam roller and tray
- Synthetic bristle brush (2-inch)
- Small artist brush
- Ruler or measuring tape
- Pencil
- Modern furniture legs (black tapered)
- Drill and mounting plates
- Gold and wood drawer knobs
Step 1: Preparation and Base Coat
-
Disassemble the unit:
Begin by removing all drawers from the nightstand carcass. If there is existing hardware, unscrew and remove it. Keep the hardware in a baggie if you plan to reuse it, though we will be upgrading ours. -
Sand surfaces down:
Scuff sand the entire piece—both the main body and the drawer fronts—using 120-grit sandpaper. You don’t need to strip it to bare wood, just remove the shine to give the primer something to grip. -
Clean thoroughly:
Wipe away all sanding dust with a damp tack cloth or a rag soaked in a little degreaser. A clean surface is crucial for a smooth finish. -
Apply primer:
Roll on a coat of stain-blocking primer using a foam roller for the flat surfaces and a brush for corners. Let this dry completely according to the can’s instructions. -
Sand the primer:
Once dry, lightly glide over the primed surfaces with 220-grit sandpaper to knock down any raised grain or fuzz. Wipe clean again. -
Paint the foundation:
Apply two coats of your white satin paint to the entire nightstand body and the drawer fronts. Allow ample drying time between coats to ensure a hard, durable finish.
Seal the Edge
Always paint over your tape edge with the *base color* first. This locks the seal and ensures absolutely zero bleed-through for crisp lines.
Step 2: Creating the Stripes
-
Measure the drawers:
Reinsert the drawers into the frame temporarily. Determine the height of your drawer fronts. For this look, we want equal-width bands. -
Mark the lines:
Using a pencil and ruler, lightly mark the horizontal lines where your black stripes will go. Make sure the pattern flows continuously from the top drawer to the bottom one. -
Apply painter’s tape:
Tape off the sections that will remain white. Run your fingernail or a credit card firmly along the edge of the tape to seal it perfectly against the wood. -
Seal the tape edge:
Here is a trick I always use: brush a tiny amount of your *white* base paint over the tape edge first. This fills any microscopic gaps with white paint so the black paint won’t bleed under. -
Paint the dark stripes:
Using a small roller or brush, apply your charcoal or black paint to the exposed areas. Use thin coats to avoid ridges. -
Remove tape while damp:
Carefully peel off the painter’s tape while the final coat of black paint is still wet to slightly tacky. Pulling it off at a 45-degree angle helps ensure a crisp line. -
Touch up:
Once fully dry, inspect your lines. Use a tiny artist brush to fix any small imperfections or bleeds.
Try a Soft Gray
For a softer contrast that still feels modern, swap the charcoal paint for a pale sage green or a warm ‘greige’ tone.
Step 3: Final Assembly
-
Install new legs:
Flip the nightstand upside down. Position the mounting plates for your tapered legs near the corners. Drill pilot holes and screw the plates in place, then screw in the black modern legs. -
Drill hardware holes:
Measure to find the exact center of each drawer front—specifically centered within the white stripe area for visual balance. Mark with a pencil and drill holes for your knobs. -
Attach knobs:
Screw in your mixed-material gold and wood knobs. Tighten them securely from the inside of the drawer. -
Reassemble:
Slide your drawers back into the casing to complete the transformation.
Enjoy styling your new graphic nightstand with simple decor to let those stripes really shine

PENCIL GUIDE
Understanding Pencil Grades from H to B
From first sketch to finished drawing — learn pencil grades, line control, and shading techniques.
Explore the Full Guide
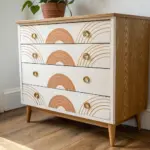
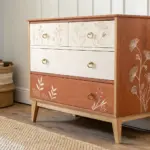
Geometric Color-Blocked Drawers
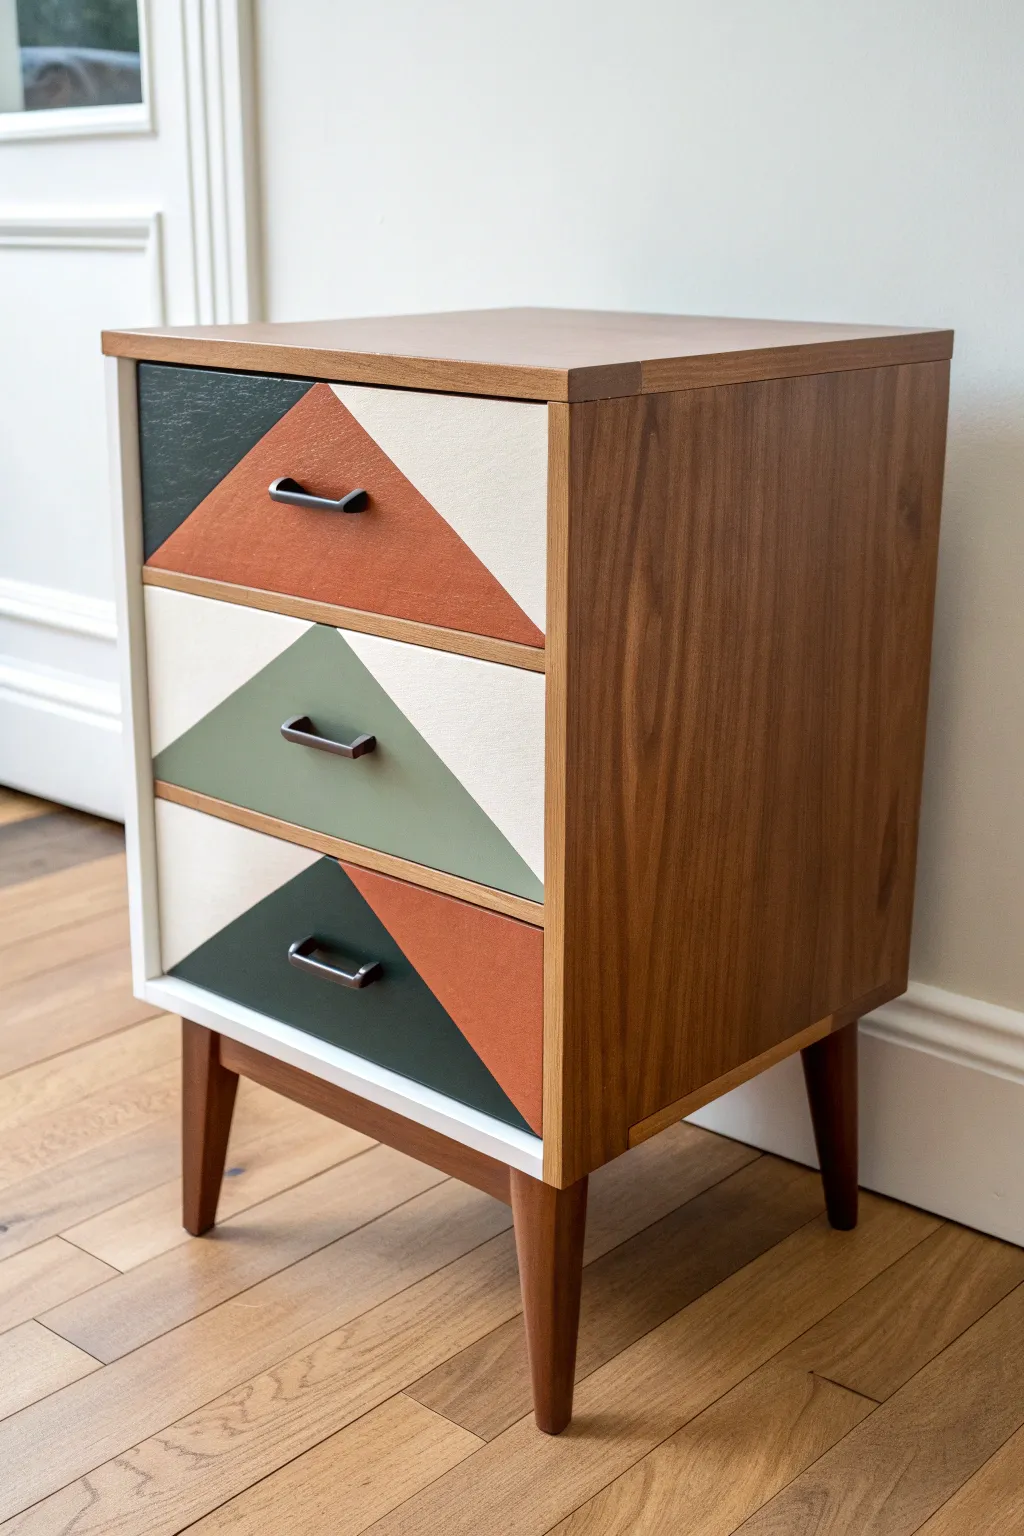
Give a simple wooden nightstand a bold, retro-inspired update with this geometric paint technique. By combining warm terracotta and cool greens with crisp white angles, you can transform plain drawer fronts into a striking focal point.
How-To Guide
Materials
- Wooden nightstand (raw or stripped)
- Sandpaper (120 and 220 grit)
- Painter’s tape (high quality)
- Primer suitable for wood
- Chalk paint or satin furniture paint (White, Terracotta, Forest Green, Sage Green)
- Small foam rollers
- Angled sash brush
- Ruler or speed square
- Pencil
- Clear matte polycrylic topcoat
- Drawer pulls (matte black)
Step 1: Preparation
-
Disassemble the hardware:
Begin by removing all the drawers from the nightstand body. Unscrew the existing handles or pulls and set them aside in a baggie so you don’t lose the screws. -
Sand the surfaces:
Scuff sand the drawer fronts using 120-grit sandpaper to remove any old glossy finish and create a ‘tooth’ for the paint to grab. Wipe away the dust thoroughly with a tack cloth or damp rag. -
Prime the drawers:
Apply a coat of high-quality primer to just the drawer fronts. This ensures your light colors won’t become discolored by wood tannins bleeding through later. -
Base coat application:
Roll on two coats of your base white or cream color over the entire face of all three drawers depending on the coverage. Let this dry completely—I usually wait overnight to ensure the tape won’t peel it up.
Bleed-Proof Lines
Always burnish the edge of your painter’s tape with a credit card or spoon back before painting. This extra pressure prevents fuzzy paint lines.
Step 2: Drafting the Design
-
Mark center points:
Using your ruler, find the exact center of each drawer front and make a small tick mark with a pencil on the top and bottom edges. -
Draw the diagonal lines:
For the top drawer, draw a line from the bottom-left corner and bottom-right corner up to the top-center mark to form a large central triangle. For the middle drawer, do the same but aiming for a wide chevron look. For the bottom drawer, you can invert the pattern or mimic the top style. -
Double-check symmetry:
Step back and look at your pencil lines. Ensure the angles look consistent across all three drawers so the pattern flows visually when they are stacked.
Step 3: Painting the Colors
-
Tape the first borders:
Apply painter’s tape along the OUTSIDE of the areas you want to paint first. For the top drawer, tape off the white sections so only the central triangle is exposed. -
Seal the tape edge:
Brush a very thin layer of your base white paint over the edge of the tape. This seals the gap and prevents the colored paint from bleeding under, guaranteeing a razor-sharp line. -
Apply the terracotta:
Paint the central triangle of the top drawer and the right-side triangle of the bottom drawer with the terracotta rust color. Use a small foam roller for a smooth, brush-stroke-free finish. -
Apply the greens:
While the rust dries, tape off and paint the middle drawer’s central triangle with sage green. Then, paint the top-left corner of the top drawer and the left-side triangle of the bottom drawer in forest green. -
Remove tape while damp:
Carefully peel back the painter’s tape while the paint is still slightly tacky. Pulling it away at a 45-degree angle helps prevent chipping. -
Touch up lines:
Inspect your geometric lines once dry. If there are any minor bleeds, use a tiny artist’s brush and the background white color to tidy them up.
Uneven Coverage?
If the dark forest green looks streaky, don’t overload the brush. Instead, apply multiple thin coats, sandpapering lightly with 220-grit between coats.
Step 4: Finishing Touches
-
Clean up the frame:
If you are keeping the main body of the nightstand as natural wood, give it a quick refresh with wood oil or conditioner to make the grain pop against the new painted drawers. -
Seal the work:
Apply two to three thin costs of matte polycrylic over the painted drawer fronts. This protects the design from scratches without adding unwanted shine. -
Reinstall hardware:
Once the topcoat is fully cured, screw the new matte black handles into place. You may need to drill new pilot holes if the spacing differs from original hardware.
Enjoy the sleek, modern look of your newly customized furniture piece
Stencil Pattern Like Tile or Lace

Transform a plain bedside table into a piece of bohemian elegance using textured stencils and a soft neutral palette. This project mimics the look of vintage lace or ceramic tile, creating a sophisticated focal point for any bedroom.
Detailed Instructions
Materials
- Wooden 3-drawer nightstand
- Sander and sandpaper (120 and 220 grit)
- Primer (bonding primer recommended)
- White or cream chalk paint (for body and base coat)
- Beige or taupe chalk paint (for stencil designs)
- 3 distinct geometric or lace stencils
- Stencil brush or small foam roller
- Painter’s tape
- Clear matte polyurethane or wax
- Gold round knobs
- Wood stain (optional, for top)
- Clean rags and tack cloth
Step 1: Preparation & Base Painting
-
Remove Hardware:
Begin by unscrewing and removing all existing knobs and handles. Pull the drawers out completely and set them aside on a drop cloth. -
Clean and Sand:
Wipe down the entire nightstand to remove dust and grime. Give the whole piece, including drawer fronts, a scuff sand with 120-grit sandpaper to help the paint adhere. -
Sand the Top:
If you want to keep the natural wood top shown in the inspiration photo, sand the top surface down to bare wood using an orbital sander, starting with 120-grit and finishing with 220-grit. -
Prime the Surface:
Apply a coat of high-quality bonding primer to the body of the nightstand and the drawer fronts. Let this dry completely according to the manufacturer’s instructions. -
Paint the Body:
Using your white or cream chalk paint, apply two even coats to the main frame and legs of the nightstand. I find that light sanding between coats with a fine-grit sponge gives the smoothest finish. -
Base Coat the Drawers:
Paint the drawer fronts with the same white base color. Ensure you get full coverage, as this will be the background color for your stenciled designs. -
Seal the Top:
While the paint dries, stain the wood top if desired, or simply seal the raw wood with a clear matte varnish to protect it while maintaining that natural look.
Clean Lines
Use spray adhesive on the back of your stencil instead of just tape. It holds the intricate lattice details flat against the wood, preventing paint bleed.
Step 2: Stenciling the Details
-
Plan Your Patterns:
Select three different stencils that share a similar geometric or floral vibe. Assign one pattern to each drawer—using a heavier or darker pattern on the bottom drawer visually anchors the piece. -
Position the First Stencil:
Lay the nightstand drawer flat on its back. Center your stencil on the drawer front and secure it firmly with painter’s tape to prevent shifting. -
Load the Brush:
Dip your stencil brush into the beige/taupe paint, then offload almost all the paint onto a paper towel until the brush feels nearly dry. This is crucial for crisp lines. -
Apply the Pattern:
Using a vertical dabbing or swirling motion, apply the paint over the stencil. Build up the color slowly rather than trying to get opaque coverage in one heavy pass. -
Check and Repeat:
Carefully lift a corner to check your progress. If the look is consistent, remove the stencil and move on to the next drawer, using a different stencil pattern for each one. -
Vary the Intensity:
For the bottom drawer, you might apply the paint slightly heavier or use a darker taupe shade to replicate the graduated look in the inspiration photo. -
Touch Ups:
Once the stencil paint is dry, use a small artist’s brush and your white base paint to tidy up any areas where paint might have bled under the stencil.
Step 3: Assembly & Finishing
-
Seal the Drawers:
Once the stenciled designs have cured for at least 24 hours, apply a clear matte topcoat or wax to seal the work and protect the finish from daily wear. -
Install Hardware:
Attach the gold round knobs to the center of each drawer. If the old holes don’t match your new pattern alignment, you may need to fill them and drill new ones before painting. -
Reassemble:
Slide the drawers back into the nightstand frame. Step back and ensure the patterns look balanced and the drawers slide smoothly.
Bleeding Paint?
If paint bleeds, don’t wipe it while wet. Let it dry completely, then gently scrape the excess away with a craft knife or touch up with the base color.
Enjoy the sophisticated, custom look of your newly refinished nightstand that brings a touch of texture to your room


Decoupage Drawer Fronts With Painted Frame
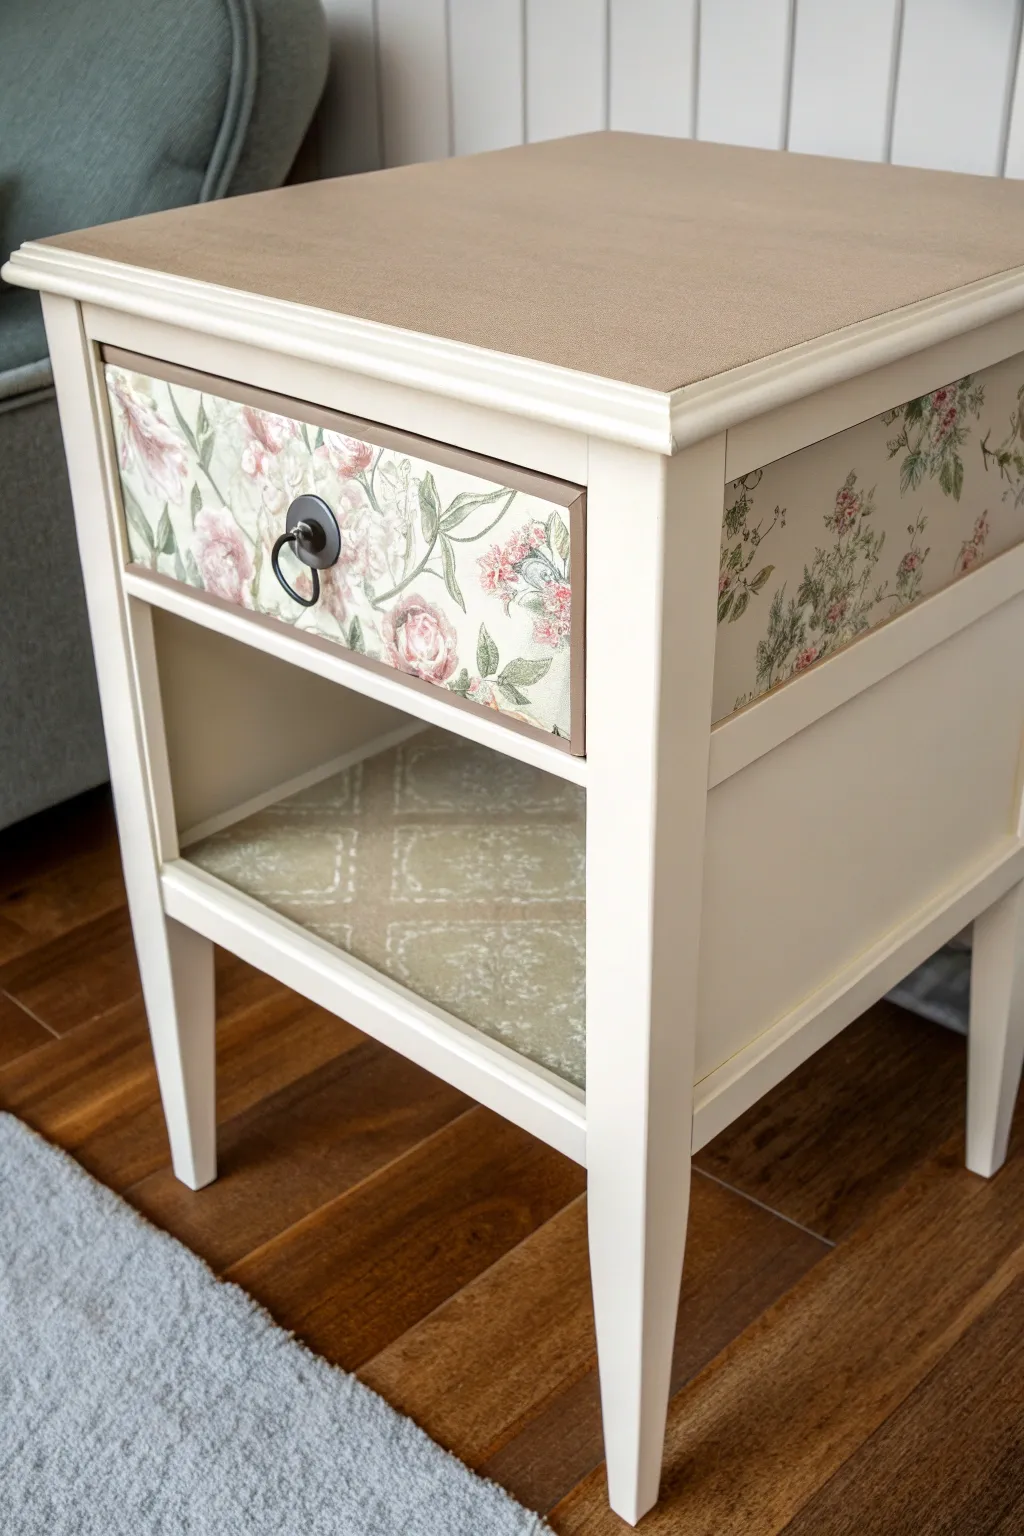
Transform a plain nightstand into a romantic, vintage-inspired piece by combining crisp paint with delicate floral patterns. This project uses the art of decoupage to add visual interest to the drawer face and side panels, perfectly complemented by a soft, creamy white frame.
Step-by-Step Tutorial
Materials
- Wooden nightstand (vintage or basic structure)
- Sandpaper (120 and 220 grit)
- Creamy white chalk paint or furniture paint
- Floral pattern decoupage paper or wallpaper scraps
- Geometric/tile pattern paper (for the shelf)
- Mod Podge or decoupage medium (matte finish)
- Paintbrushes (synthetic bristle)
- Foam brush or decoupage smoothing tool
- X-acto knife or craft razor blade
- Clear protective topcoat (polycrylic or wax)
- Screwdriver
- Clean tack cloth
Step 1: Preparation
-
Disassemble the hardware:
Begin by removing the drawer from the nightstand. Locate the screws holding the drawer pull or knob in place and unscrew them, setting the hardware aside in a safe baggie. -
Clean and scuff sand:
Wipe down the entire piece to remove dust and grime. Using medium-grit sandpaper (120-grit), scuff the surfaces you intend to paint to help the new finish adhere better. -
Smooth the surfaces:
Follow up with a finer grit sandpaper (220-grit) on the drawer front and side panels where the paper will go, ensuring these areas are perfectly flat and smooth. -
Remove sanding dust:
Use a tack cloth or a damp rag to completely remove all sanding residue. Any leftover dust can create bumps under your decoupage paper later.
Wrinkle-Free Pro Tip
Iron your paper! Apply Mod Podge to the wood and let it dry completely. Place the paper on top, cover with parchment paper, and iron on medium heat to reactivate the glue for a flawlessly smooth bond.
Step 2: Painting the Frame
-
Apply the first coat:
Using a quality synthetic brush, apply your creamy white furniture paint to the main body of the nightstand, the legs, and the outer edges of the drawer front. -
Let it dry and assess:
Allow the first coat to dry completely according to the manufacturer’s instructions. If you see brush strokes or wood grain showing through, light sanding between coats helps create a professional finish. -
Add the second coat:
Apply a second coat of paint for full, opaque coverage. I prefer to use long, smooth strokes in the direction of the wood grain here to minimize texture. -
Paint the drawer edges:
Don’t forget to paint the top and side edges of the drawer box that aren’t covered by the face, so it looks finished when opened.
Troubleshooting Bubbles
If a stubborn bubble appears after the paper dries, don’t peel it up. Prick it with a tiny sewing needle to release the air, then press it down firmly with your finger to re-adhere the spot.
Step 3: Applying the Decoupage
-
Measure and cut the paper:
Measure the inset area of the drawer front creating a template if needed. Cut your floral paper slightly larger than the measured space to allow for trimming. -
Apply adhesive:
Brush a thin, even layer of Mod Podge or decoupage medium directly onto the wood surface of the drawer front. -
Position the paper:
Carefully lay your floral paper onto the wet medium. Start from one edge and slowly smooth it down to prevent air pockets. -
Smooth out bubbles:
Using a brayer, an old credit card, or a smoothing tool, gently press from the center outward to work out any wrinkles or bubbles. -
Detail the side panels:
Repeat this process for the side panels of the nightstand if yours has inset panels suitable for papering. -
Apply the shelf paper:
Measure and cut the geometric pattern paper for the bottom shelf. Apply using the same technique—adhesive on the wood, smooth the paper down, and press out bubbles.
Step 4: Finishing Touches
-
Trim excess paper:
Once the adhesive is dry and the paper is crisp, use a sharp X-acto knife to trim the excess paper flush against the edges or molding. -
Seal the decoupage:
Apply a top coat of decoupage medium over the paper to seal it. Use light strokes to avoid tearing the damp paper. -
Apply final protection:
Once the sealer is dry, coat the entire piece—painted areas and papered sections—with a water-based polycrylic for durability. -
Reinstall hardware:
Poke a hole through the paper where the original hardware hole is located. Screw the drawer pull back into place. -
Reassemble:
Slide the drawer back into the nightstand to complete your elegant transformation.
Step back and admire how a simple paper application has completely elevated the character of your furniture
Hand-Painted Floral Accent Panels
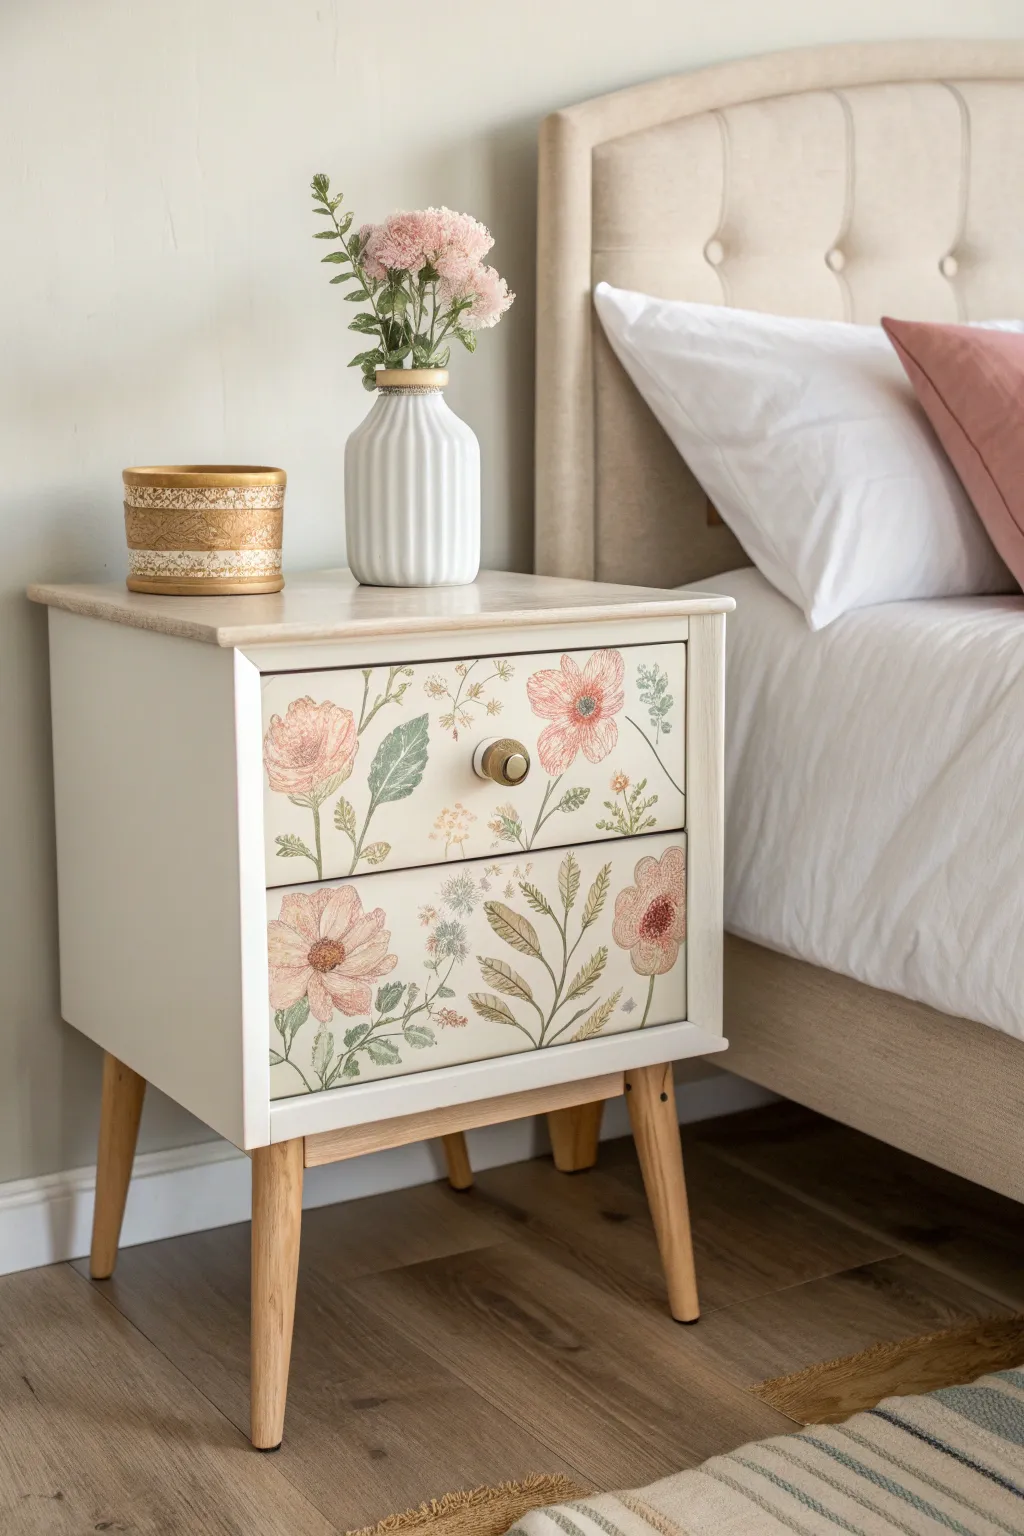
Transform a plain nightstand into a romantic bedroom centerpiece with these hand-painted floral drawer fronts. The soft pink blooms and sage greenery against a cream background create a timeless, cottage-core aesthetic that feels both bespoke and cozy.
Detailed Instructions
Materials
- Wooden nightstand with flat drawer fronts
- Sandpaper (120 and 220 grit)
- Primer (bonding type recommended)
- Cream or off-white chalk paint
- Acrylic craft paints (dusty pink, coral, sage green, olive green, brown, deep red)
- Set of detail brushes (round sizes 0, 2, and 4)
- Small flat shader brush
- Gold drawer knob (antique brass finish)
- Pencil and eraser
- Matte clear topcoat (polycrylic)
- Painter’s tape
- Palette or paper plate for mixing
Step 1: Preparation and Base Coat
-
Remove hardware:
Begin by unscrewing and removing any existing knobs or handles from the drawers. Store them safely if you plan to reuse them, though a gold knob works best for this specific look. -
Clean and sand:
Wipe down the drawer fronts to remove dust and oils. Lightly scuff the surface with 120-grit sandpaper to give the paint some grip, then wipe away the sanding dust with a tacky cloth or damp rag. -
Prime the surface:
Apply a thin, even coat of bonding primer to the drawer fronts. This ensures your beautiful artwork won’t chip off later. Let this layer dry completely according to the can’s instructions. -
Apply base color:
Paint the drawer fronts with your cream or off-white chalk paint. Use a high-quality synthetic brush to minimize brushstrokes. Two thin coats usually provide the best coverage, allowing dry time in between. -
Optional whitewashing:
If your nightstand has a wooden body like the one shown, consider whitewashing the top surface to match the light tones of the artwork while keeping the natural wood grain visible.
Tip: Faux Watercolor Effect
To get that vintage botanical look with acrylics, mix in a glazing medium. It makes the paint translucent, allowing layers to overlap beautifully like watercolor.
Step 2: Sketching the Florals
-
Plan the composition:
Visualize where your main flowers will go. The reference image uses an asymmetrical layout: a large bloom on the left of the top drawer, and another on the right of the bottom drawer to create balance. -
Lightly sketch outlines:
Using a pencil with a very light hand, draw the basic shapes of the flowers. Don’t worry about petals yet; just mark circles for the blooms and sweeping lines for the stems. -
Add leaf details:
Sketch in the leaves along the stem lines. Vary the sizes, drawing some large, broad leaves near the base and delicate sprigs near the top. Keep the pencil lines faint so they are easier to cover with paint.
Step 3: Painting the Botanicals
-
Block in flower shapes:
Mix a dusty pink with a touch of cream. Using a size 4 round brush, fill in the main flower shapes. I find that applying the paint somewhat thinly here mimics a vintage watercolor look. -
Paint the greenery:
Mix sage green with a little water to improve flow. Use a size 2 brush to paint the stems and leaves. For the larger leaves, utilize the flat shader brush to get a smooth, broad stroke. -
Add floral depth:
Once the pink base is dry, take a coral or deep red shade and dry-brush the centers of the flowers, flicking outward to define individual petals. -
Detail the leaves:
Using olive green and a size 0 brush, paint thin veins onto the larger leaves. Add small texture lines to mimic the serrated edges often found in botanical illustrations. -
Add accent flora:
In the negative space, paint delicate sprigs of ‘filler’ flowers or ferns using a muted grey-green or pale blue. These should look like background elements, so keep them less detailed. -
Highlight the blooms:
Mix a tiny amount of white into your original pink. Add highlights to the tips of the petals where the light would naturally hit, giving the flowers a 3D effect. -
Create flower centers:
For the center of the open blooms, stipple small dots of brown and yellow-ochre to create the pollen area. This small detail brings the flower to life.
Fix: Shaky Hand Lines
If your stems look wobbly, don’t paint over them immediately. Let them dry, then use the background cream color to ‘cut in’ and reshape the line perfectly.
Step 4: Finishing Touches
-
Erase guidelines:
Once the paint is 100% dry (give it a few hours just to be safe), gently erase any visible pencil marks that weren’t covered by paint. -
Seal the artwork:
Protect your handiwork with two coats of matte polycrylic. Use a soft brush and light pressure to ensure you don’t smear the artwork, although acrylics are quite stable once dry. -
Install hardware:
Reattach your drawer knob. An antique brass or gold knob complements the warm tones of the pink florals perfectly.
Step back and admire how a simple paint job has given your furniture a fresh, artistic personality
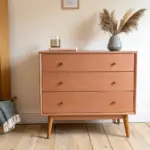
Ombre Fade From Light to Deep
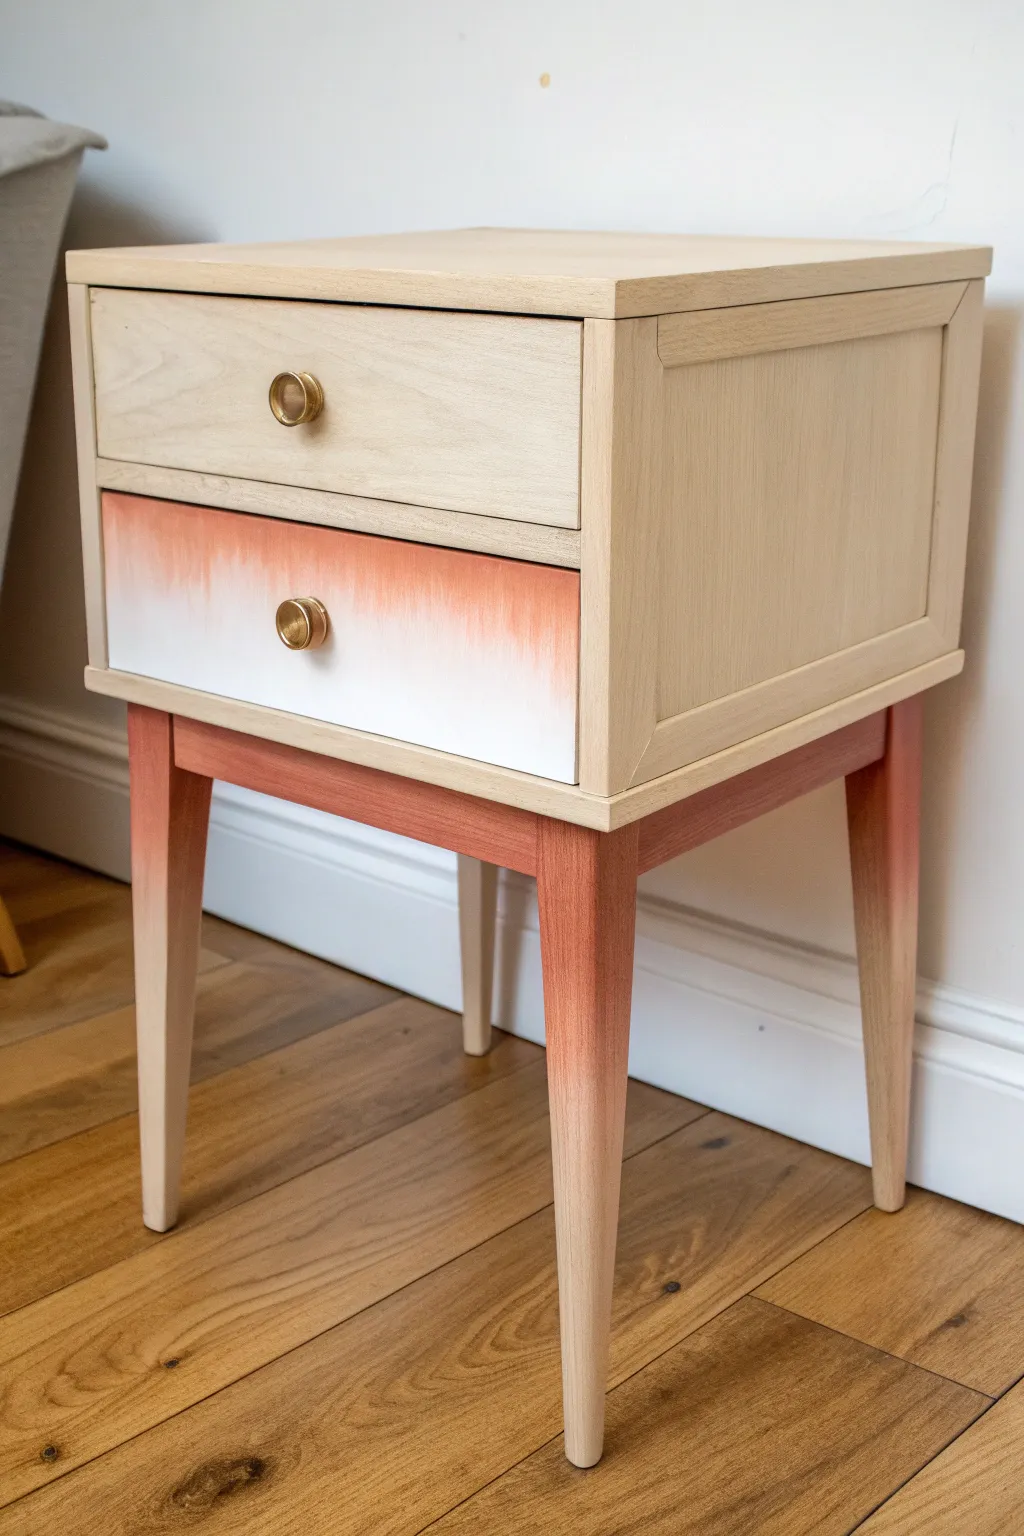
This project transforms a simple wooden nightstand into a statement piece with a dreamy, sunset-inspired gradient. By using a blending technique on the drawer front and legs, you can achieve a soft, modern fade that beautifully complements the natural wood grain.
How-To Guide
Materials
- Unfinished wooden nightstand (with removable legs)
- Sandpaper (120, 220, and 320 grit)
- Tack cloth
- Painter’s tape
- Primer spray
- White matte furniture paint
- Peach or coral furniture paint
- Clear matte varnish or polyurethane
- Small foam roller
- High-quality synthetic bristle brush
- Blending brush or soft sponge
- Gold drawer knobs
- Screwdriver
- Drop cloth
Step 1: Preparation
-
Remove Hardware:
Begin by unscrewing the existing knobs from the drawers and removing the legs from the body of the nightstand if possible. This makes painting much easier and cleaner. -
Clean and Sand:
Give the entire piece a light sanding with 120-grit sandpaper to remove any existing finish or rough spots. Follow up with 220-grit for smoothness. Wipe everything down thoroughly with a tack cloth to remove dust. -
Tape Off Areas:
Since we are keeping the top drawer and the main cabinet body natural wood, use painter’s tape to carefully mask off the edges of the box where the legs attach. You don’t want paint seeping onto the main carcass.
Uneven Fade?
If your gradient looks choppy, mist the area lightly with water while the paint is wet. This extends the drying time, giving you a few extra minutes to smooth out brush strokes.
Step 2: Painting the Drawer Front
-
Prime the Drawer:
Remove the bottom drawer completely. Apply a coat of primer to the drawer front to ensure the white paint adheres well and the colors pop true to tone. Let it dry completely. -
Apply White Base:
Using a small foam roller, apply a solid coat of white paint to the bottom two-thirds of the drawer front. You want solid coverage here, so apply a second coat if needed after the first dries. -
Apply Peach Tone:
While the white is dry, paint the top third of the drawer front with your peach or coral color. Bring this color down slightly to meet the white section. -
Create the Gradient:
This is the crucial step. While the paint is still wet (or by re-wetting slightly with a mist of water), use a clean, dry blending brush to lightly feather the peach paint downwards into the white. Use quick, horizontal strokes to blur the line where the colors meet. -
Refine the Blend:
Start with very little paint on your brush—you can always add more peach, but it’s hard to take away. Keep blending horizontally until the transition looks soft and foggy like the photo.
Step 3: Creating the Ombre Legs
-
Tape the Feet:
Decide where you want the fade to end on the legs. For this look, tape off the bottom third of each leg if you want a sharp line, or leave it untaped for a fade into raw wood. -
Apply Base Color:
Paint the top portion of the legs (where they attach to the table) with the solid peach color. Extend this color down past the ‘knee’ of the leg. -
Feather Out:
Dip your brush in a tiny amount of water or thinning medium. From the solid peach section, drag your brush downward toward the raw wood foot. The goal is to let the brush run out of paint as you go down, creating a misty fade. -
Sand for Distress (Optional):
If the transition looks too harsh once dry, take a piece of 320-grit sandpaper and very gently sand the fade area. This physically removes some pigment and softens the gradient perfectly.
Dry Brushing
For the softest fade on the legs, wipe most of the paint off your brush onto a paper towel before dragging it down the leg. This ‘dry brush’ technique creates a misty texture.
Step 4: Assembly and Finish
-
Seal the Wood:
Once all paint is bone dry, apply a clear matte varnish to the entire piece—painted areas and raw wood alike. This protects the ombre and seals the raw pine or oak from yellowing drastically. -
Reattach Legs:
Screw the legs back onto the base of the nightstand. Ensure they are tight and the painted gradient faces the correct direction relative to the front. -
Install Hardware:
Attach the new gold knobs to the drawer fronts. The gold tone adds a lovely warmth that picks up on the peach tones. -
Final Polish:
Give the whole piece a final wipe with a clean cloth to remove any stray dust or fingerprints from assembly.
Step back and admire how a simple touch of color has completely customized your furniture piece
Artsier Spray-Painted Scribble Layers
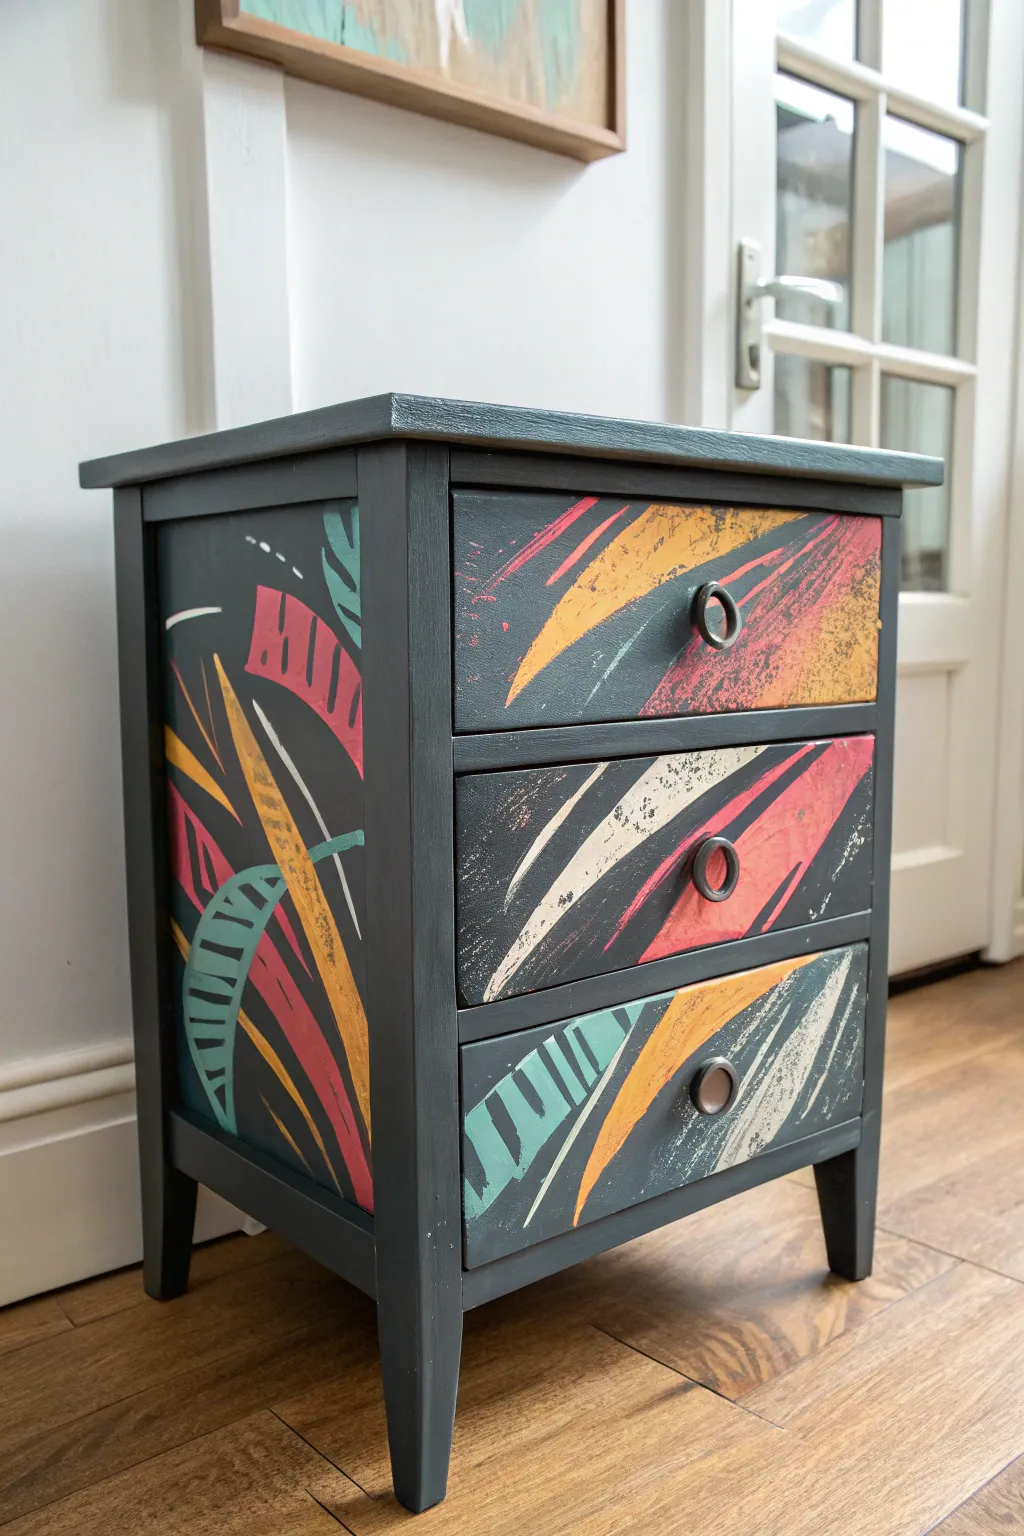
Transform a plain wooden nightstand into a vibrant statement piece with this spirited, modern technique. By layering energetic abstract shapes over a moody charcoal base, you’ll create a finish that feels like chic street art brought indoors.
Step-by-Step Tutorial
Materials
- Wooden 3-drawer nightstand
- Sandpaper (120 and 220 grit)
- Painter’s tape
- Primer spray paint (grey)
- Chalk or mineral paint (Charcoal/Dark Grey)
- Acrylic craft paints (Teal, Coral Red, Mustard Yellow, Cream/White)
- Small round ring pulls (oil-rubbed bronze)
- Assorted flat artist brushes (various widths)
- Cardboard or stencil sheets (for masking)
- Matte clear topcoat (polycrylic or wax)
- Screwdriver
- Clean lint-free rags
Step 1: Preparation & Base Coat
-
Remove Hardware:
Begin by removing all drawers from the nightstand. Unscrew the original knobs or pulls and set them aside in a labelled bag so you don’t lose the screws. -
Clean and Sand:
Wipe down the entire piece to remove dust and grime. Give the existing finish a scuff sand with 120-grit sandpaper to help the new paint adhere, then follow up with 220-grit for a smooth touch. -
Prime the Surface:
Apply a coat of grey spray primer to the nightstand body and the drawer fronts. This ensures your dark base coat will have solid, even coverage without needing five layers. -
Apply the Base Color:
Once the primer is dry, paint the entire nightstand (body and drawer fronts) with your charcoal or dark grey chalk paint. Use long, smooth strokes for a professional finish. -
Second Coat:
Let the first coat dry completely according to the can’s instructions. Apply a second coat of the dark grey to ensure rich, opaque coverage with no wood showing through.
Uneven Lines?
If your freehand strokes look wobblier than energetic, use painter’s tape to mark off the shapes first. This gives you crisp, cleaner lines that mimic the sharp edges.
Step 2: Creating the Abstract Art
-
Plan Your Flow:
Place the drawers back into the nightstand temporarily. Visualize how the swipes of color will travel across the front and onto the side panels. Lightly sketch a few directional lines with white chalk if you need a guide. -
Mix Your Palette:
Pour small amounts of your accent colors (teal, coral, mustard, cream) onto a paper plate. Do not water them down; you want the paint slightly thick for texture. -
First Layer: The Bold Swipes:
Using a wide flat brush, paint large, sweeping curves of Mustard Yellow. Start your stroke with pressure and lift off quickly at the end to create a tapered, ‘scribble’ effect. -
Adding Contrast:
Switch to a clean brush and add strokes of Coral Red. Let some intersect with the yellow, but keep them distinct. I find that quick, confident wrist movements work best here to avoid shaky lines. -
Detailing with Stencils:
To get the sharp, ‘cut-out’ look seen in the teal and cream shapes, cut simple curved shapes or jagged edges out of a piece of cardboard to use as a makeshift shield. -
Apply Masked Shapes:
Hold your cardboard mask against the drawer surface and brush paint away from the edge. This creates the crisp, geometric boundaries seen in the fan-like teal shapes. -
Dry Brushing Effects:
Dip a dry brush lightly into the cream paint and wipe most of it off on a rag. Drag this lightly over some of the darker areas to add that textured, distressed ‘spray paint’ vibe. -
Side Panel Continuity:
Don’t forget the sides of the nightstand. extend your patterns around the corner, ensuring the lines imply movement that flows from the front to the side. -
Refining Edges:
If any lines look too messy, use a small detail brush with the original charcoal base color to ‘erase’ or sharpen the edges of your colorful shapes.
Step 3: Finishing Touches
-
Seal the Work:
Once the artwork is fully dry (give it overnight to be safe), apply two thin coats of matte polycrylic. This protects your hand-painted design from scratches without adding too much shine. -
Install Hardware:
Attach the new oil-rubbed bronze ring pulls. The dark metal complements the charcoal base and doesn’t distract from the colorful artwork. -
Final Inspection:
Check the drawers to ensure they slide smoothly. If paint has gummed up the tracks, sand those edges down lightly and add a bit of drawer wax.
Creating Texture
For that gritty, street-art texture, dab the wet paint with a crumpled paper towel or a dry sponge before it dries. This lifts pigment and creates visual noise.
Step back and admire how a few bold colors have turned a simple piece of furniture into a functional work of art

Have a question or want to share your own experience? I'd love to hear from you in the comments below!