Painted stairs plus a runner is one of my favorite design combos because you get the best of both worlds: color and character, with a soft path underfoot. If you’re dreaming up a staircase makeover, these ideas will help you pair stair paint and a runner rug in ways that feel intentional (and seriously good-looking).
Crisp White Risers With a Neutral Stripe Runner
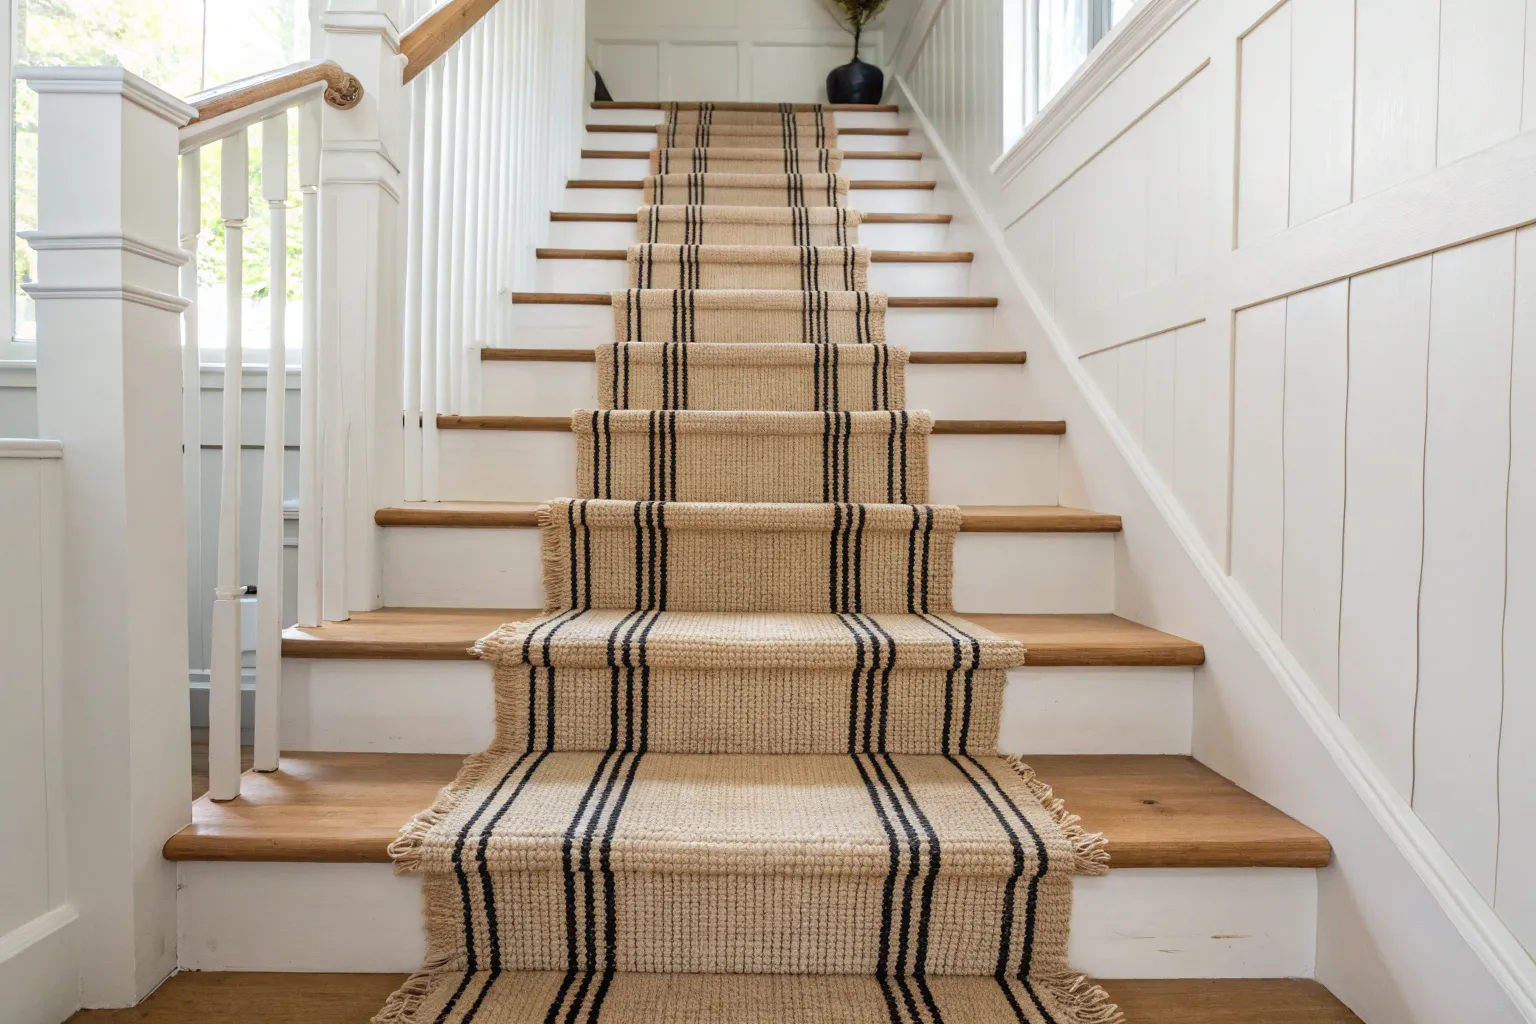
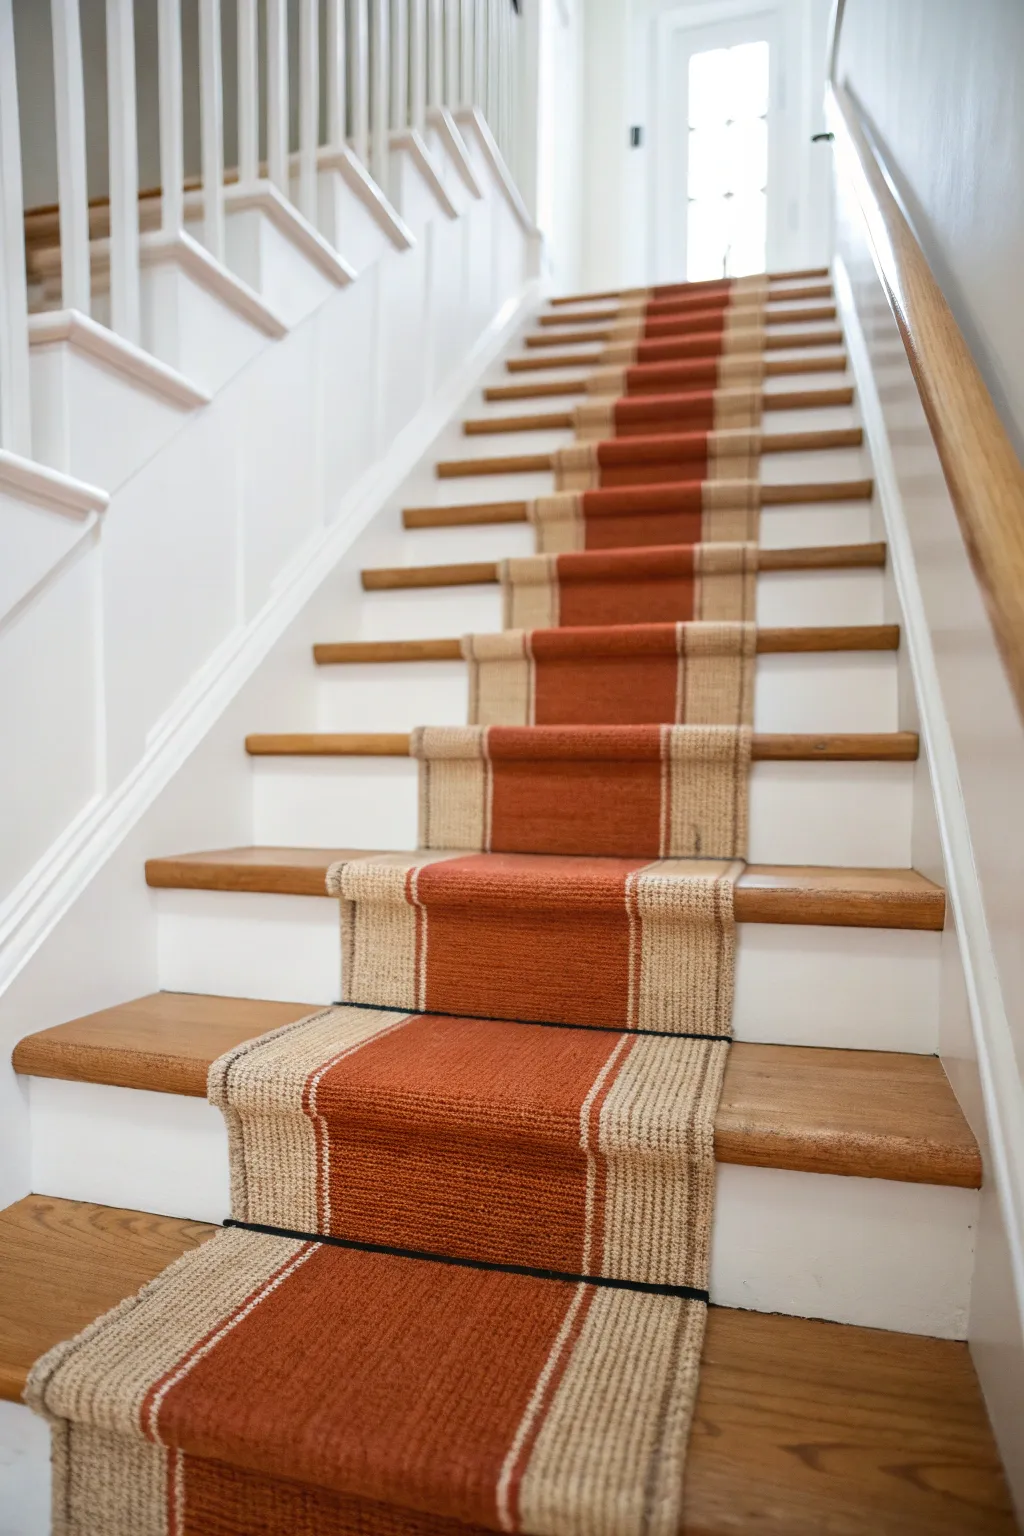
Transform a standard staircase into a breezy, sophisticated focal point by pairing crisp white paint with a textural, striped runner. This classic combination highlights the architectural details of your home while providing durability and softness underfoot.
Step-by-Step Guide
Materials
- High-quality semi-gloss white paint (for trim/risers)
- Painter’s tape (multi-surface)
- Sanding sponge (medium grit)
- Wood cleaner/degreaser
- Stair runner (neutral stripe pattern, woven sisal or wool blend)
- Carpet pad/underlay (specifically for stairs)
- Pneumatic staple gun or electric stapler
- 9/16-inch staples
- Decorative stair rods (optional)
- Fabric scissors or carpet cutter
- Measuring tape
- Straight edge or carpenter’s square
- Awl or tucking tool
- Hammer and carpet tacks (optional)
Step 1: Preparation & Painting
-
Clean surfaces thoroughly:
Begin by removing any old carpet or runners. Clean the treads and risers meticulously with a wood cleaner or degreaser to remove dirt, oils, and old adhesive, ensuring a pristine surface for paint adhesion. -
Sand for adhesion:
Lightly scuff the risers and stringers (the sides of the stairs) with a medium-grit sanding sponge. You aren’t trying to strip the wood bare, just creating enough ‘tooth’ for the new paint to stick. -
Mask off the treads:
Apply painter’s tape carefully along the edges where the riser meets the wood tread. Press the edges down firmly with a credit card or putty knife to prevent bleed-through. -
Paint the first coat:
Apply a coat of high-quality semi-gloss white paint to the risers and stringers. Use an angled sash brush for corners and a small foam roller for flat areas to get a smooth, brush-stroke-free finish. -
Apply the second coat:
Once dry, lightly sand any imperfections and apply a second coat of white paint. I find this second coat is crucial for that deep, crisp professional look. Let the paint cure fully—usually 24 to 48 hours—before installing the runner.
Step 2: Installing the Needled Rug Pad
-
Measure the path:
Measure the width of your runner and mark the center of each stair tread with a pencil. This centerline will be your guide to keep everything straight during installation. -
Cut the padding:
Cut pieces of carpet pad for each tread. The pad should be slightly narrower than your runner (about 1 inch less on each side) so it doesn’t peek out, and it should wrap over the nose of the tread but stop just short of the riser intersection. -
Secure the padding:
Staple the pad to the tread, placing staples near the edges and along the nose. Ensure it sits flat and doesn’t bunch up, as lumps will be visible through the runner.
Stray Staple Syndrome
If a staple doesn’t go all the way in or bends, don’t hammer it flat—it will look messy. Pull it out completely with pliers and shoot a new one. The rug fibers hide the extraction holes well.
Step 3: Installing the Runner
-
Position the start:
Start at the very top of the staircase. Attach the runner directly under the nosing of the landing or the first riser, stapling it securely every 2-3 inches. Make sure it aligns perfectly with your pencil center marks. -
Secure under the nose:
Pull the runner taut over the first tread nose. Use your staple gun to secure the runner directly underneath the nose of the tread. I like to shoot staples into the crease where the nose meets the riser to hide them effectively. -
Anchor at the riser base:
Smooth the runner down the riser and pull it tight. Staple along the bottom of the riser, right where it meets the next tread. This ‘waterfall’ style lets the carpet flow smoothly, but anchoring at the bottom corner keeps it crisp. -
Tighten and tuck:
Use a tucking tool or a broad chisel to crease the carpet firmly into the angle between the tread and riser before stapling. This ensures a sharp 90-degree angle rather than a loose, floating carpet. -
Repeat down the stairs:
Continue this pattern: pull tight over the nose, staple under the nose, pull down the riser, staple at the bottom corner. Check your alignment with a tape measure on every single step to ensure the stripes remain straight. -
Handle corners and landings:
If you have a landing, you generally cut the runner and restart perpendicular to the new direction. For a straight run like this image, simply continue the process consistently down to the floor. -
Finish at the bottom:
When you reach the floor, cut the runner with about 2 inches of excess length. Fold this excess under to create a clean hem, and staple it securely to the base of the final riser. -
Trim loose fibers:
Inspect the edges for any loose threads or fibers created during installation, especially near staples. Snip these carefully with sharp scissors, being careful not to pull them.
Keep Stripes Straight
Striped runners can skew easily. Instead of just eyeing it, measure the distance from the wall to the runner’s edge on every single tread before stapling to guarantee perfection.
Your staircase is now a perfect blend of modern lines and classic comfort, ready to welcome guests into your home with style.

Dark Treads, Light Risers, and a Low-Contrast Runner
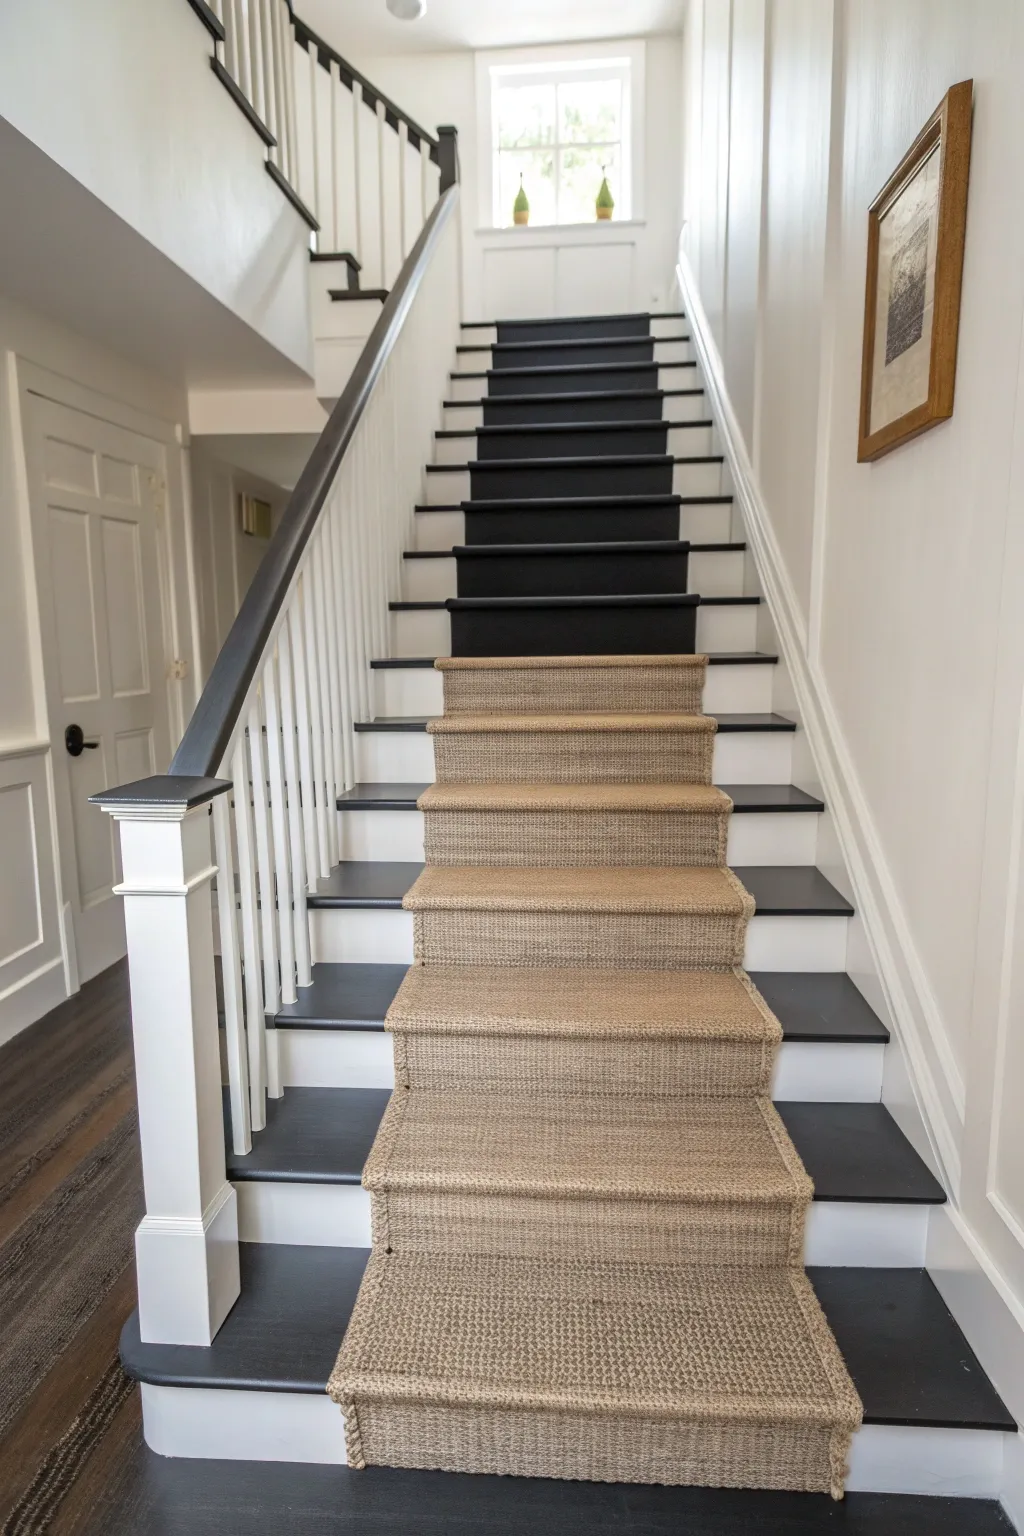
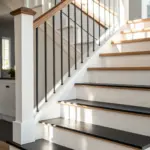
Transform a basic staircase into a classic architectural feature with high-contrast paint and texture. This project combines crisp white risers and deep charcoal-black treads with a natural fiber runner for a look that feels both modern and timeless.
How-To Guide
Materials
- Sander (orbital or mouse)
- Sandpaper (80, 120, and 220 grit)
- Wood filler
- Painter’s tape (high quality)
- Primer (high-adhesion bonding primer)
- Porch and floor enamel (Black/Charcoal)
- Semi-gloss trim paint (White)
- Natural fiber runner (Sisal or seagrass)
- Rug pad (specifically for stairs)
- Pneumatic stapler or heavy-duty staple gun
- Measuring tape
- Utility knife with fresh blades
- Metal straight edge
Step 1: Preparation & Repairs
-
Remove old coverings:
Begin by pulling up any existing carpet, tacks, or staples. Use pliers to remove stubborn staples and a scraper to get up any old carpet pad glue. -
Fill imperfections:
Inspect the wood for nail holes, gouges, or deep scratches. Fill these spots with wood filler, slightly overfilling the holes to account for shrinkage as it dries. -
Rough sanding:
Using 80-grit sandpaper, sand down the treads and risers to remove old varnish or rough spots. This is crucial for adhesion. Wear a mask during this dusty phase. -
Smooth sanding:
Switch to 120-grit and then 220-grit sandpaper to create a smooth, paint-ready surface. Wipe everything down essentially twice—first with a vacuum, then with a tack cloth to remove every speck of dust.
Step 2: Painting the Foundation
-
Prime the wood:
Apply a high-quality bonding primer to both treads and risers. If your wood is dark or knotty, a stain-blocking primer is best to prevent bleed-through. -
Paint the risers and trim:
Apply two coats of white semi-gloss paint to the risers (the vertical parts), the stringers (the sides), and the balusters. Let the paint cure fully between coats. -
Tape off the treads:
Once the white paint is completely dry (I like to wait at least 24 hours), use high-quality painter’s tape to protect the bottom edge of your freshly painted risers where they meet the treads. -
Paint the treads:
Apply your dark floor enamel to the treads. Start from the top stair and work your way down so you don’t paint yourself into a corner. Use a high-quality angled brush for edges and a small foam roller for the flat surfaces. -
Second coat:
Apply a second coat of the dark enamel for durability. Remove the painter’s tape slowly while the paint is still slightly tacky to ensure a crisp line.
Loose Weave Worries
If staples are visible in your sisal runner, use a black permanent marker to color the crown of the staple before firing. This helps them blend seamlessly into dark or textured natural fibers.
Step 3: Installing the Runner
-
Measure and mark:
Determine the center point of your stairs. Measure the width of your runner and mark the placement on each tread with blue tape to ensure it stays perfectly centered as you install. -
Attach the rug pad:
Cut pieces of rug pad slightly narrower than the runner (about 1 inch less on each side). Staple a piece of pad to each tread, but do not wrap it over the nose of the stair. -
Start at the top:
Secure the top edge of the runner under the nose of the landing or top riser. Staple firmly every few inches, keeping the staples hidden in the weave of the fibers. -
Secure the riser:
Pull the runner taut down the first riser. Staple it securely into the crease where the riser meets the tread below. Use a bolster chisel or dull putty knife to crease the rug tightly into the corner before stapling. -
Secure the tread:
Pull the runner across the tread and over the nose. Staple it snugly under the nose of the tread. This ‘waterfall’ style looks clean, but stapling under the nose keeps it tighter. -
Repeat the process:
Continue down the staircase, checking your blue tape guides on every single step to ensure you aren’t drifting off-center. -
Trim the bottom:
When you reach the floor, cut the runner with a sharp utility knife using a metal straight edge. Leave about an inch of excess fabric. -
Finish the edge:
Fold the excess fabric under for a clean hem and staple it securely to the bottom riser or floor molding.
Binding for Beauty
For a more tailored, high-end look, have a professional bind the edges of your runner with a wide cotton or linen tape in a contrasting color (like black) before installation.
Enjoy the dramatic transformation of your entryway every time you walk up the stairs

Soft Greige Stair Paint With a Natural Texture Runner

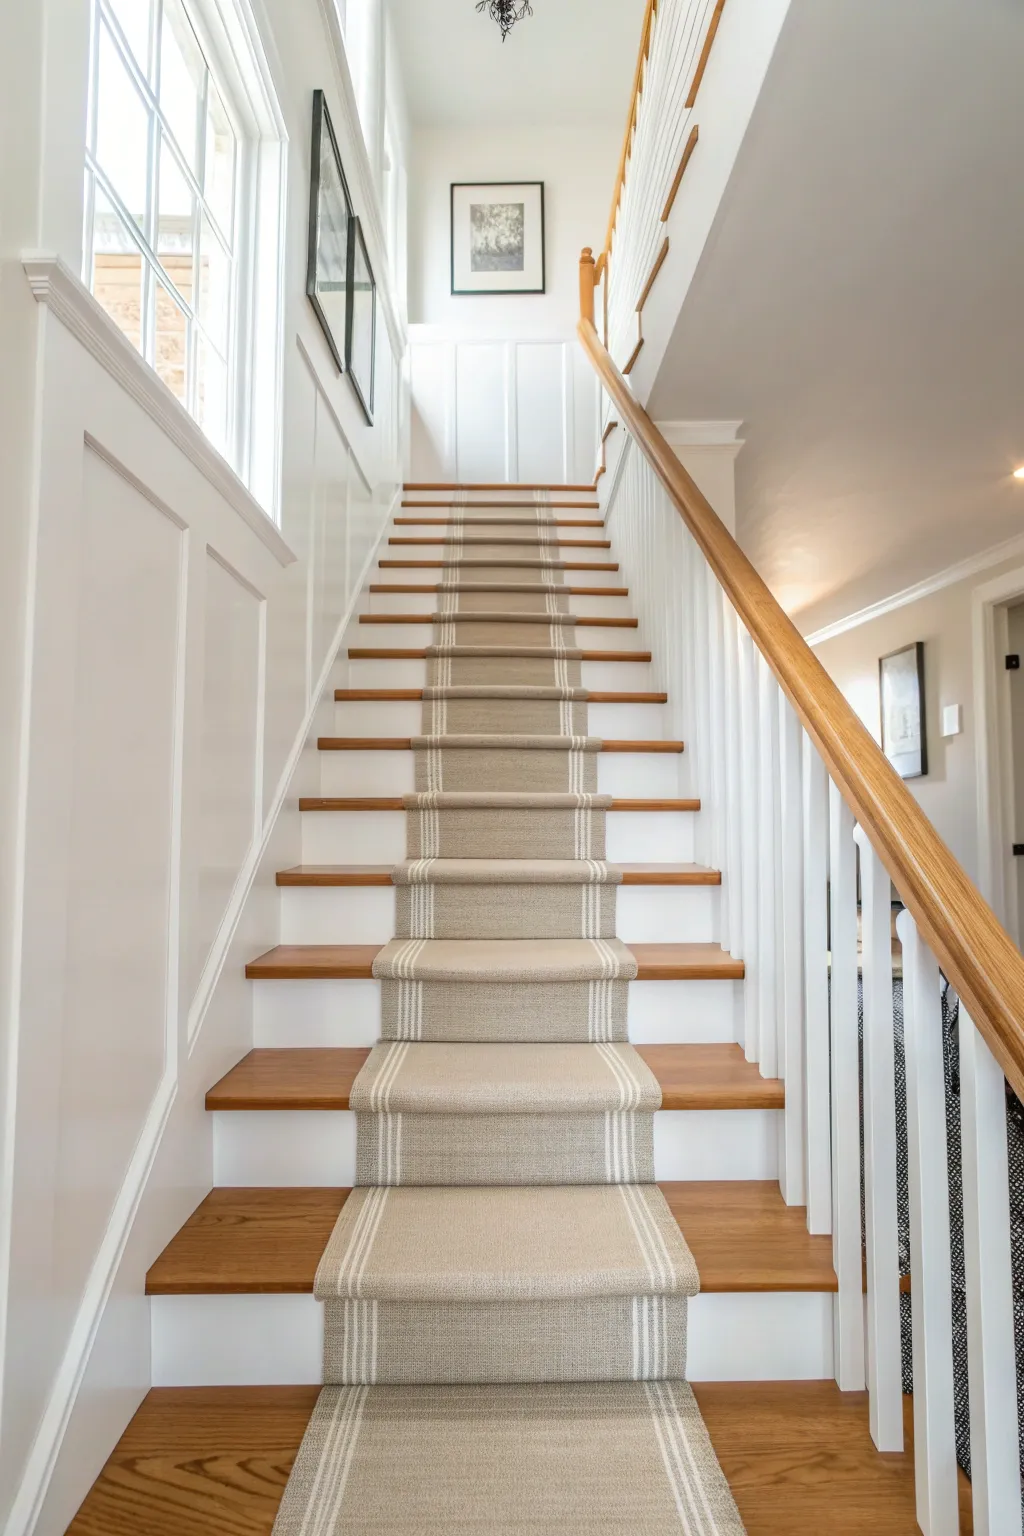
Update your staircase with a look that balances fresh, airy design with grounded natural textures. This project couples a soft greige paint finish on the treads and risers with a durable woven runner, creating a timeless coastal cottage aesthetic.
Step-by-Step Guide
Materials
- High-quality floor/porch paint (Soft Greige/Off-White)
- Sandpaper (120 and 220 grit)
- Wood filler
- Painter’s tape
- Tack cloth
- Primer (stain-blocking)
- Sisal or jute runner rug
- Rug pad (cut slightly narrower than runner)
- Staple gun with 9/16″ staples
- Carpet knee kicker tool
- Utility knife with extra blades
- Bolster chisel or wide putty knife
- Measuring tape
- Pencil
Step 1: Preparation & Painting
-
Clear and clean:
Remove any existing carpet, padding, tack strips, and staples from the stairs. Vacuum thoroughly and wipe down the surfaces with a mild degreaser to remove dirt and oils. -
Fill imperfections:
Inspect the treads and risers for nail holes or deep scratches. Fill these with wood filler, slightly overfilling to account for shrinkage, and let it dry completely. -
Sand the surface:
Using 120-grit sandpaper, sand down the wood filler and scuff the entire surface of the stairs to help the paint adhere. Follow up with 220-grit for a smooth finish. -
Remove dust:
Vacuum up the sanding dust. I find it essential to wipe everything down with a tack cloth afterwards to ensure absolutely no debris gets trapped in your paint. -
Apply primer:
Coat the treads and risers with a high-quality stain-blocking primer. This is crucial if you are painting over old wood to prevent tannin bleed-through. -
Paint the first coat:
Apply your chosen soft greige porch and floor paint. Start at the top of the stairs and work your way down so you don’t paint yourself into a corner. -
Apply the second coat:
Once the first coat is fully dry (check manufacturer times), apply a second coat for full opacity and durability. Let this cure for at least 24-48 hours before walking on it.
Paint Choice Matter
Use ‘Porch & Floor’ enamel specifically. Standard wall paint won’t withstand foot traffic and will chip quickly under the friction of the runner.
Step 2: Installing the Runner
-
Measure and mark:
Measure the width of your stair tread and subtract the width of your runner. Divide by two to find the margin size. Mark this distance with painter’s tape or a pencil on each tread to keep the runner centered. -
Secure the rug pad:
Cut pieces of rug pad for each tread. They should be slightly narrower than the runner and stop just short of the riser nose. Staple these securely to the treads. -
Start at the top:
Align the top edge of your runner directly under the nose of the top landing. Staple it securely into the riser, spaced about 2-3 inches apart. -
Anchor the first riser:
Let the runner drape down the first riser. Pull it taut and staple it into the bottom of the riser, right where it meets the tread below. -
Tuck the crease:
Use a bolster chisel or wide putty knife to push the runner firmly into the corner where the riser meets the tread. This creates a crisp, professional 90-degree angle. -
Staple the corner:
While holding the runner tight into the crease with your tool, staple directly into the crease. Place staples every 3 inches across the width. -
Kick and smooth:
Pull the runner over the next tread. Use a knee kicker to stretch the rug tight across the tread toward the next riser, eliminating any bubbles or slack. -
Waterfall edge:
For a ‘waterfall’ look as seen in the photo, allow the carpet to flow directly over the nose of the tread without stapling underneath the nosing. Keep tension high. -
Repeat the process:
Continue the process—pull tight, tuck into the crease, staple, and move to the next step—checking your alignment marks on every single step. -
Finish at the bottom:
When you reach the floor, cut the runner with a sharp utility knife leaving about 2 inches of excess. Fold this excess under for a neat hem and staple it securely to the bottom riser.
Add a Border
For a designer touch, choose a sisal runner with a contrasting fabric tape binding on the edges, like black or navy, to frame the stairs more boldly.
Step back and admire how the natural texture warms up your freshly painted space


Moody Blue Painted Stairs With a Cream Runner
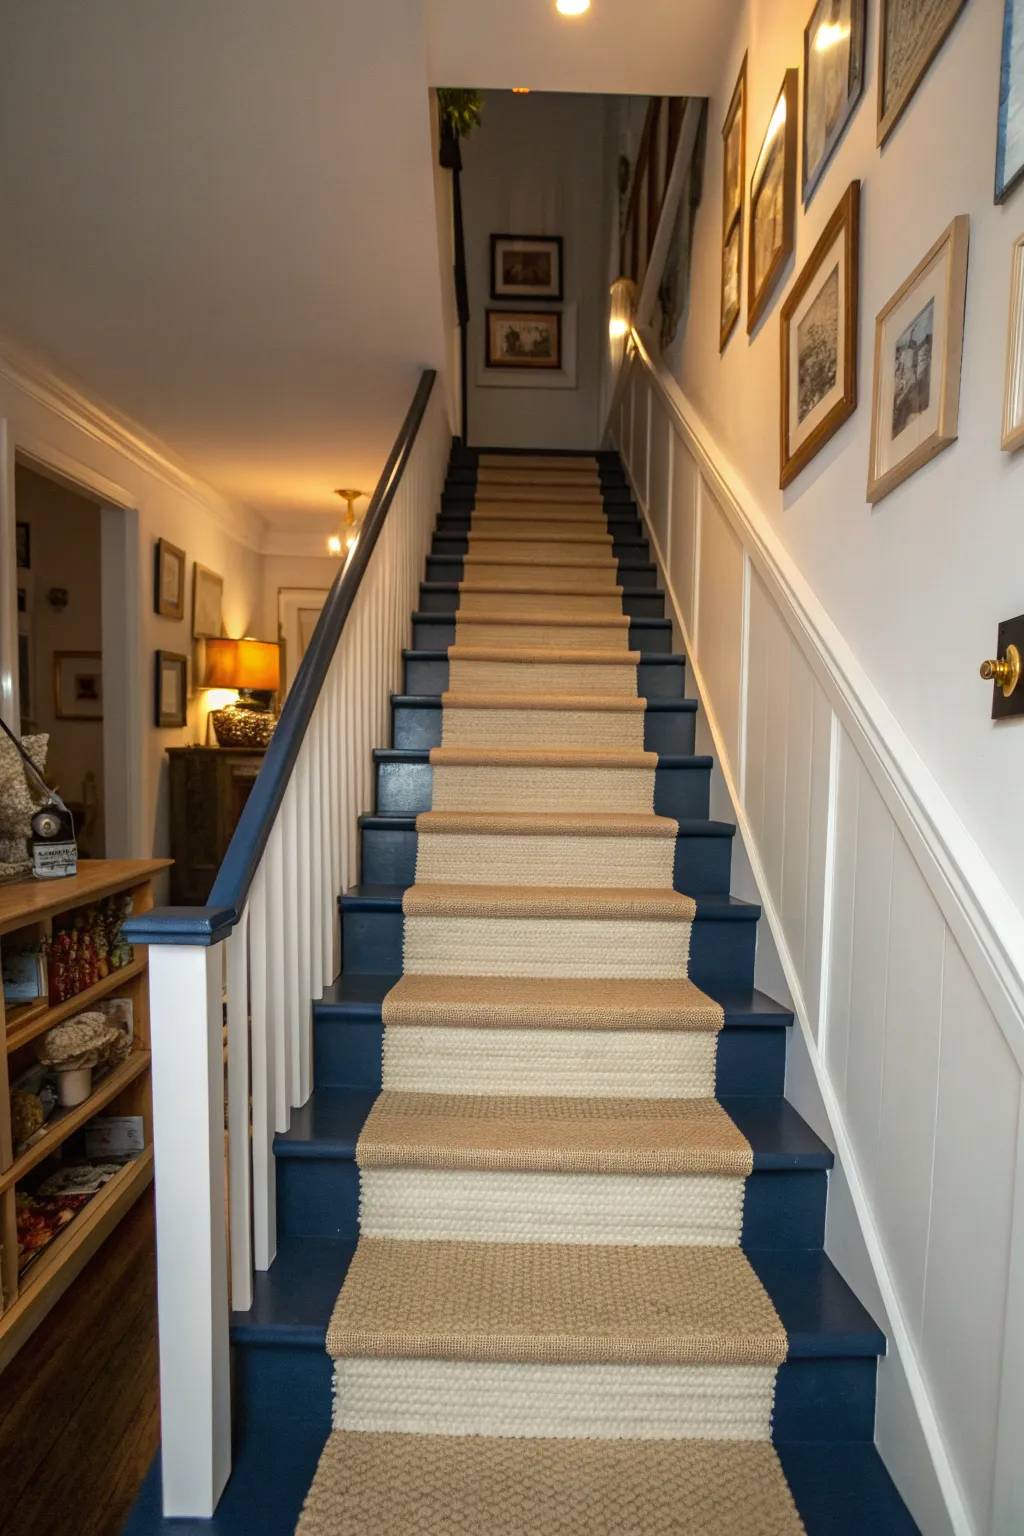
Transform a standard staircase into a striking focal point by pairing a rich, moody blue paint with a textured cream runner. This project balances bold color with classic warmth, creating an entryway that feels both modern and timeless.
Detailed Instructions
Materials
- High-quality floor/porch paint (Navy/Deep Blue)
- Primer suitable for wood floors
- Sanding block or orbital sander (medium grit)
- Painter’s tape (delicate surface and standard)
- Tack cloth
- Angled sash brush (2-inch)
- Small foam roller
- Cream/Beige stair runner (sisal or wool look)
- Carpet padding/underlayment
- Pneumatic stapler or heavy-duty staple gun
- Staples (9/16 inch or appropriate for runner thickness)
- Carpet knife or sharp utility shears
- Measuring tape
- Bolster chisel or wide flathead screwdriver
Step 1: Preparation and Painting
-
Remove old materials:
Begin by pulling up any existing carpet, removing tack strips, and pulling out all old staples with pliers. Fill any deep gouges or nail holes with wood filler and let dry. -
Sand the surfaces:
Scuff sand the treads (the part you step on) and risers (the vertical part) thoroughly to remove the old finish’s gloss. This ensures the new paint adheres properly. Wipe everything down with a tack cloth to remove every speck of dust. -
Prime the wood:
Apply a coat of high-quality primer to any bare wood or previously stained areas. Since we are using a dark blue, you might consider having your primer tinted gray to help with coverage later on. -
Tape off edges:
Once the primer is fully cured, carefully apply painter’s tape along the wall edges, wainscoting, and around the base of the white spindles to protect them from the blue paint. -
Cut in the edges:
Using an angled sash brush, ‘cut in’ the corners and edges of the stairs where the roller won’t reach. I like to work on every other step first so I can still walk up and down if needed during the process. -
Roll the main surfaces:
Use a small foam roller to paint the flat surfaces of the treads and risers. The foam roller helps achieve a smooth finish without brush strokes. Apply two to three thin, even coats of the deep blue floor paint, allowing full drying time between each as per the can’s instructions. -
Seal (Optional):
If your floor paint doesn’t have a built-in sealer, apply a localized clear coat purely on the treads for extra durability against foot traffic.
Step 2: Installing the Runner
-
Measure and mark:
Measure the width of your stairs and the width of your runner. Subtract the runner width from the stair width and divide by two. This number is your reveal space. Use a pencil to mark this distance lightly on each tread to keep your runner perfectly centered. -
Install the padding:
Cut your carpet padding into rectangles slightly narrower than the runner (about 1 inch less on each side). Staple a piece of padding onto each tread only—do not wrap it over the nose or onto the riser. -
Secure the start:
Start at the very top of the staircase. Staple the end of the runner securely under the nose of the top landing. Ensure the staples are hidden in the fibers. -
Anchor under the nose:
Pull the runner straight down over the first riser. Use your bolster chisel or wide screwdriver to crease the rug tightly into the corner where the riser meets the tread below. Staple firmly across this crease about every 3 inches. -
Secure the tread:
Smooth the runner over the tread and padding. Pull it taut toward the next nose. Staple it securely along the edge just under the nose of the tread. -
Repeat the process:
Continue this ‘waterfall’ installation method (or ‘Hollywood’ style if you are wrapping tighter) down the stairs. Check your pencil marks frequently to ensure the runner hasn’t drifted left or right. -
Finish at the bottom:
When you reach the floor, cut the runner with a sharp utility knife, leaving about 2 inches of excess. Fold this excess under to create a neat hem and staple it securely to the bottom riser, right at the floor line.
Paint Choice Matter
Use ‘Porch & Floor’ enamel rather than standard wall latex. It cures much harder and resists scuffing, which is critical for the exposed edges of the stairs.
Add some bling
Install metallic stair rods at the base of each riser. Brass rods against that moody blue would look incredible and add a high-end vintage feel.
Enjoy the dramatic and cozy new look of your stairway every time you walk through the door
BRUSH GUIDE
The Right Brush for Every Stroke
From clean lines to bold texture — master brush choice, stroke control, and essential techniques.
Explore the Full Guide
Wide Painted Reveal Border Framing the Runner
Achieve a timeless, upscale aesthetic by installing a natural sisal runner with a distinct wide reveal on your staircase. This project highlights the contrast between gleaming wood treads and the textured warmth of the woven runner, framed by crisp cotton binding.
Step-by-Step Guide
Materials
- Custom-cut sisal or seagrass runner material
- Cotton binding tape (wide width, off-white)
- Heavy-duty pneumatic stapler (electric or air)
- 9/16-inch staples
- Carpet padding (narrower than the runner)
- Double-sided carpet tape
- Fabric shears or sharp carpet knife
- Bolster chisel or wide flathead screwdriver
- Hot glue gun and heavy-duty glue sticks
- Measuring tape
- Painter’s tape
- Hammer
- Carpet tacks (optional)
Step 1: Preparation and Padding
-
Measure the Reveal:
Begin by determining your desired ‘reveal’—the amount of exposed wood on either side of the runner. For this wide-reveal look, measure the total width of your stair tread, subtract the runner width, and divide by two. This gives you the precise distance from the wall to start the runner. -
Mark the Guidelines:
Using your calculated reveal measurement, place small pieces of blue painter’s tape on the tread and nosing of every other step to act as alignment guides. This ensures your runner doesn’t drift left or right as you work your way down. -
Cut the Padding:
Cut strips of carpet padding for each tread. The padding should be roughly 1 inch narrower than your runner width (1/2 inch shorter on each side) so it remains invisible once installed. It should cover the tread depth but stop short of the nosing curve. -
Secure the Padding:
Apply strips of double-sided carpet tape or use a few staples to secure the padding to the center of each tread, aligning it with your measured guidelines. Do not pad the risers.
Loose Staples?
Sisal is thick. If staples aren’t sinking flush, tap them gently with a hammer. If they bend, switch to shorter staples or increase your compressor PSI.
Step 2: Runner Installation
-
Anchor the Top:
Start at the very top riser, directly under the landing nose. Staple the top edge of the runner securely to the top of the riser, tucking the raw edge under if it isn’t bound, or abutting it cleanly if it has a finished edge. Ensure five to six staples are used across the width for a strong hold. -
Smooth Over the First Tread:
Unroll the runner over the first tread and padding. Pull it taut—sisal is stiff, so you need firm tension. Double-check your alignment against the painter’s tape markers on the side. -
Staple the Crotch:
Push the runner deep into the ‘crotch’ where the tread meets the riser below it. Using your bolster chisel, crease the carpet firmly into this 90-degree angle. Staple directly into the crease, spacing staples about 2 inches apart across the entire width. -
Waterfall vs. Hollywood:
Decide on your style. The image shows a ‘Hollywood’ or upholstered installation where the runner hugs the nose. To do this, staple underneath the nosing of the tread before letting the carpet fall down the riser. -
Secure the Riser:
Pull the carpet down the face of the riser. Staple it at the very bottom of the riser, just above the next tread. Keep the tension high to prevent bubbling. -
Repeat the Process:
Continue this rhythm: pull over tread, align, crease into the back corner with the chisel, staple securely, and move to the next step. Ideally, check your measurements every 3-4 steps to ensure the reveal remains perfectly consistent. -
Handle the Bottom:
When you reach the floor, cut the runner with about 2 inches of excess. Fold this raw edge under for a clean hem and staple it directly to the bottom of the final riser or the floor molding.
Step 3: Binding and Finishing
-
Apply Binding Tape (if DIY binding):
If your runner wasn’t pre-bound, you will apply the cotton binding now. Wrap the wide cotton tape around the raw edges of the sisal. I find hot glue works best here for an immediate bond: apply a bead of glue along the edge, press the binding into place, and smooth it down. -
Miter the Corners:
Where the binding turns a corner (like at the top or bottom landing), fold the tape into a neat 45-degree miter. A dab of hot glue will hold the fold flat and crisp. -
Stitch or Glue:
For extra durability on the binding, you can run a blind stitch with a heavy needle and upholstery thread, or simply rely on high-temp heavy-duty hot glue, pressing firmly as it cools. -
Final Inspection:
Walk the stairs and wiggle the runner to check for loose sections. If you find any slack areas, use a carpet tack or an extra staple hidden in the weave to tighten it up. -
Hide the Staples:
Using the tip of your chisel or a flathead screwdriver, gently fluff the sisal fibers over the staple heads to conceal them. The texture of sisal is excellent for hiding fasteners.
Level Up: Brass Rods
For a truly high-end finish, install brass stair rods along the back crease of each step. They add a jewelry-like shine and help hold the runner tight.
Step back and admire how the crisp lines of your new runner transform the entire staircase with texture and elegance
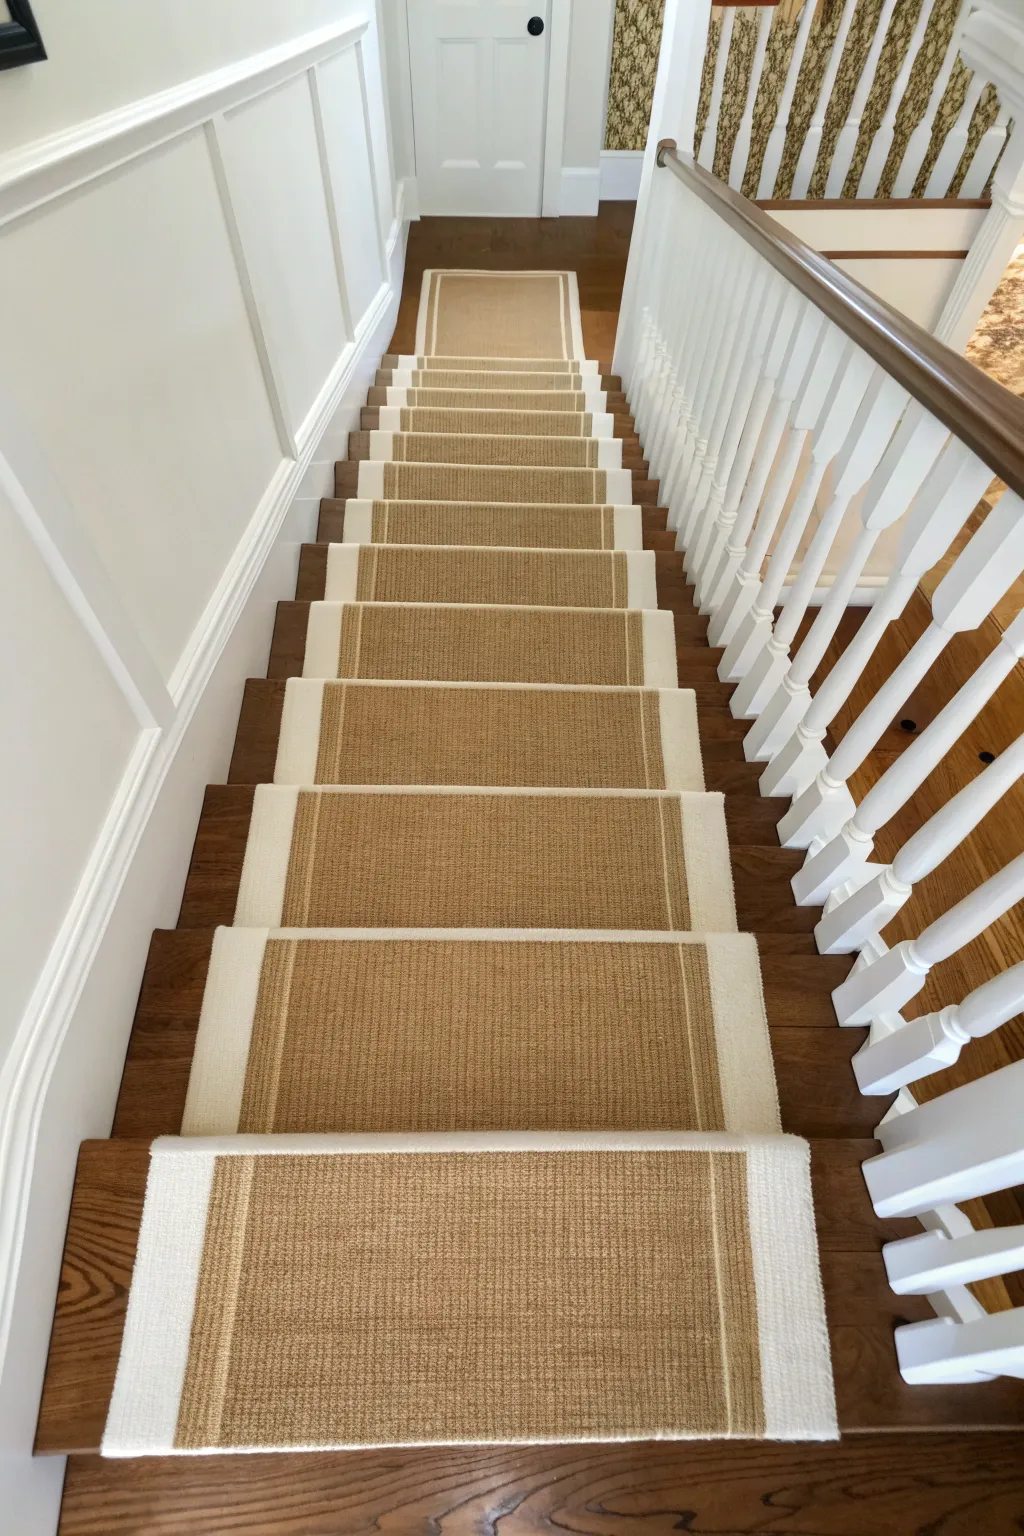
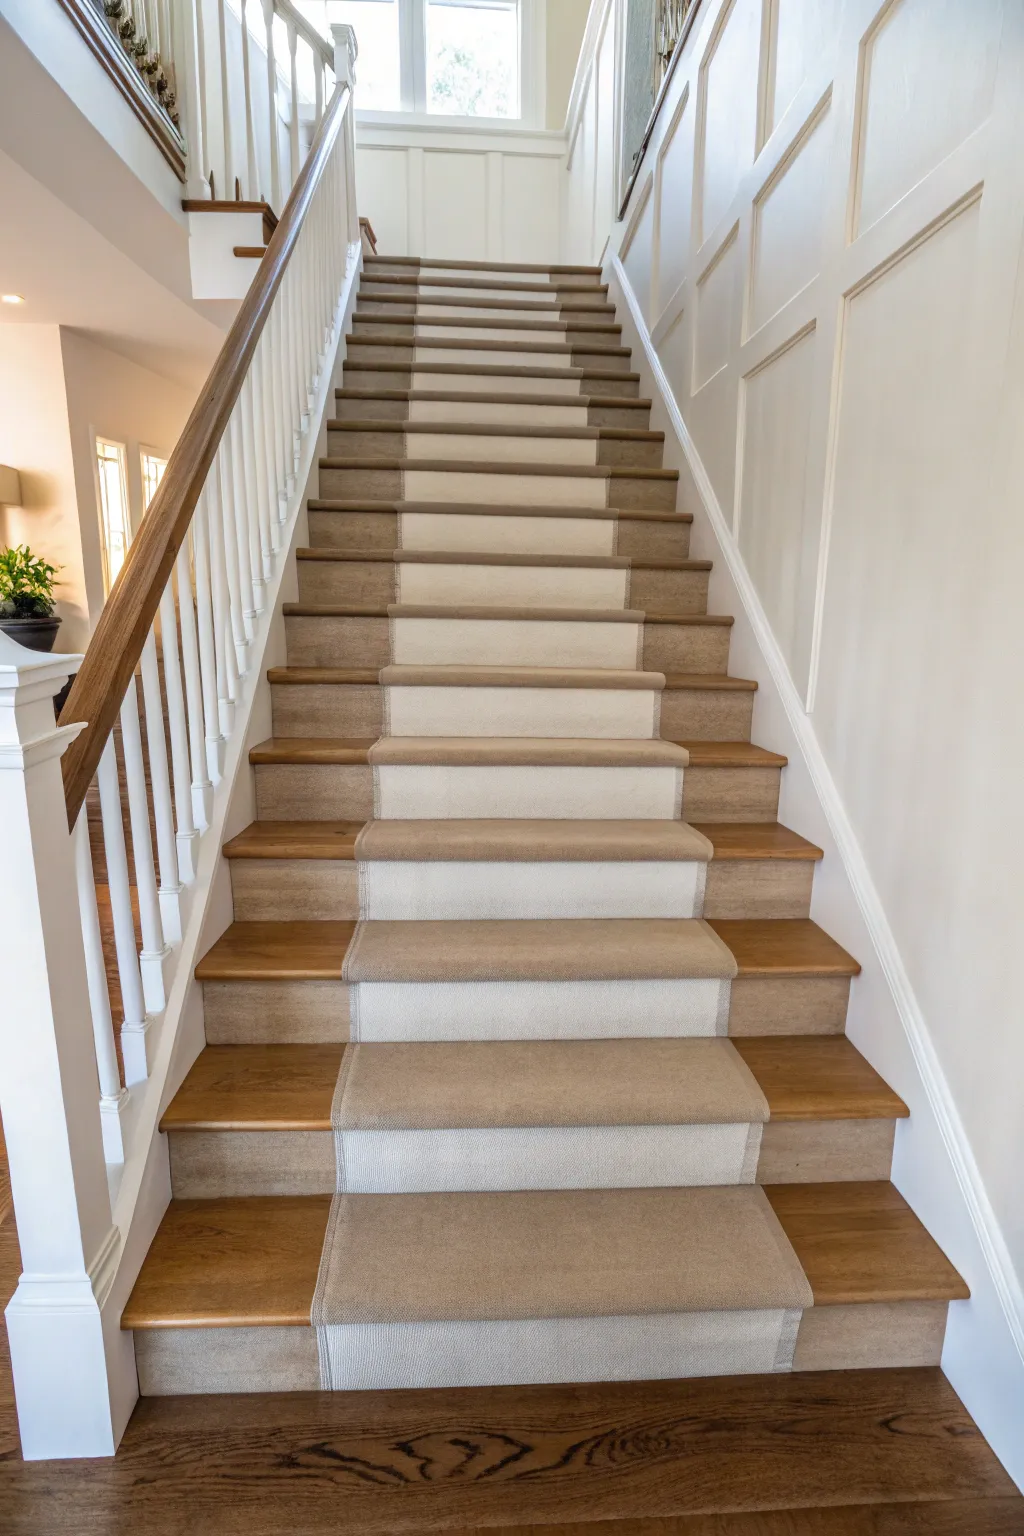
Runner That Matches the Stair Paint Undertone
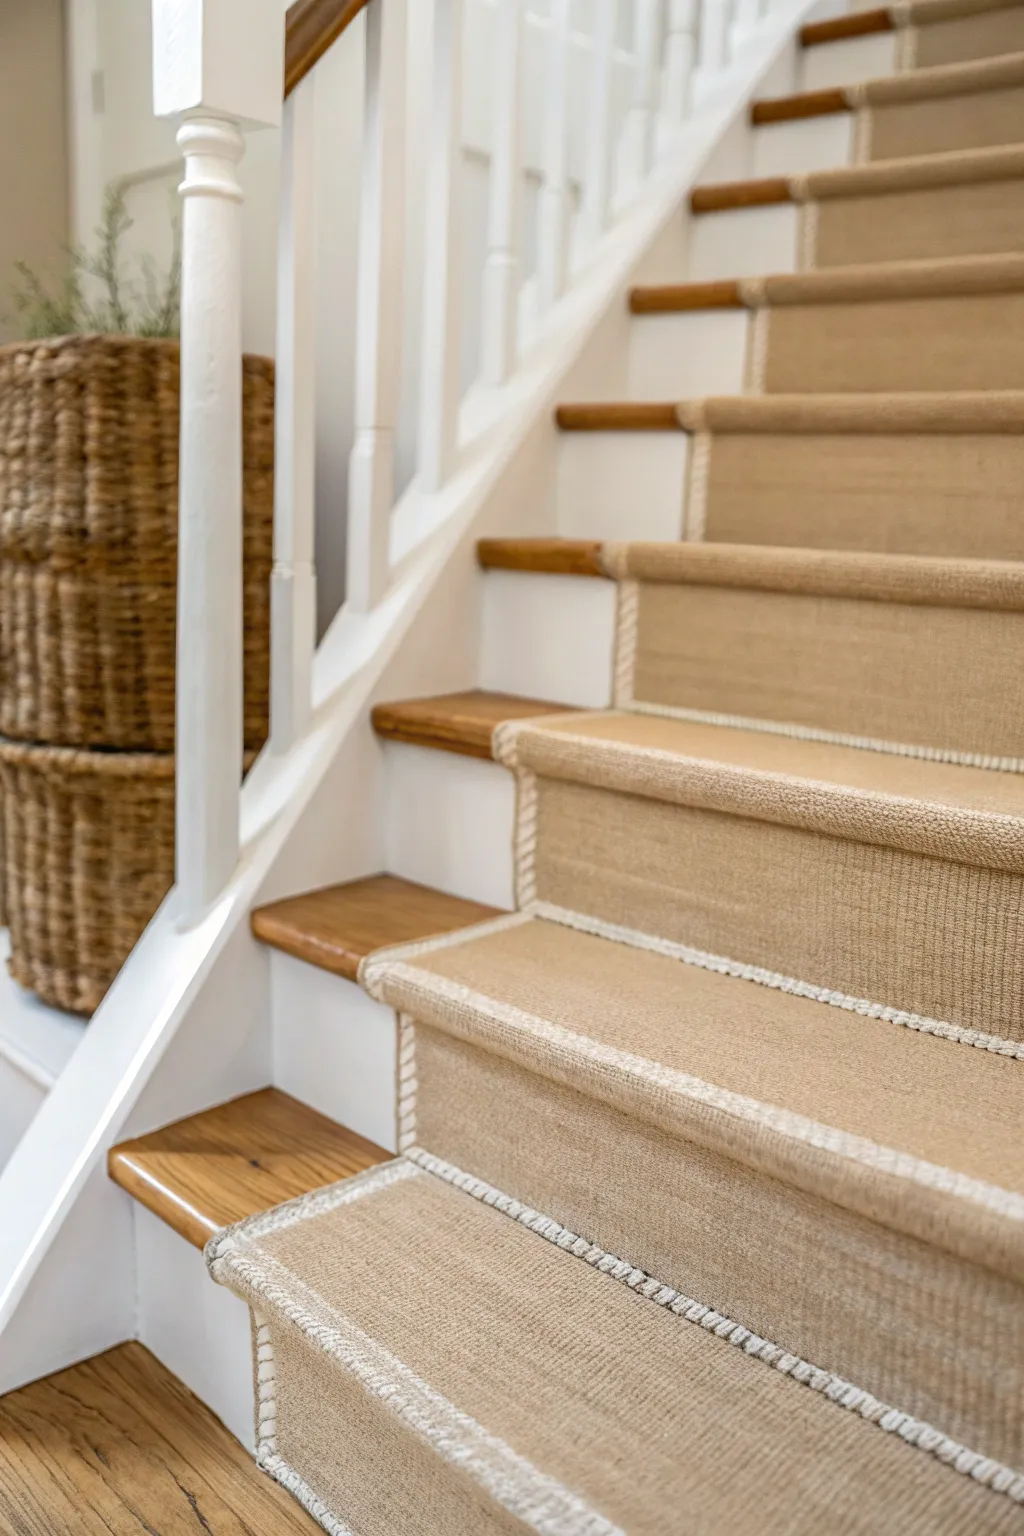
Achieve a timeless, tailored look for your staircase with this project that pairs gleaming white risers with a textural sisal runner. The neutral beige fibers introduce warmth, while the crisp white binding ties the runner seamlessly into the painted woodwork.
Detailed Instructions
Materials
- Sisal or natural fiber runner (custom width)
- White fabric binding tape or serging service
- Carpet padding (narrower than the runner)
- Pneumatic staple gun
- 9/16-inch staples
- Carpet shears or heavy-duty utility knife
- Measuring tape
- Double-sided carpet tape
- Bolster chisel or wide putty knife
- Knee kicker (optional but helpful)
- Painter’s tape
Step 1: Preparation & Measuring
-
Measure the Stairs:
Begin by calculating the total length of runner material needed. Measure the depth of the tread and the height of the riser, add them together, and multiply by the number of steps. Add at least 10% extra for waste and adjustments. -
Determine Width:
Decide how wide you want the runner to be. A classic look, as seen here, leaves about 3 to 4 inches of exposed wood on either side of the runner for balance. -
Prep the Surface:
Ensure all treads and risers are clean, dry, and free of dust. If you have recently painted the risers white to match the binding, I like to let the paint cure for full hardness before starting installation to avoid scuffing. -
Mark Guidelines:
Using painter’s tape or a pencil, lightly mark the center of each tread and riser. This visual guide is crucial for keeping the runner perfectly straight during installation.
Step 2: Padding Installation
-
Cut the Padding:
Cut individual pieces of carpet padding for each tread. The padding should be about 1 inch narrower than your runner width so it doesn’t peek out the sides. -
Position the Pad:
Place the padding on the tread, butting it up against the back of the tread (where it meets the riser). Do not wrap the padding over the nose of the stair. -
Secure the Pad:
Staple the padding down securely. Place staples roughly every 3 inches along the edges to prevent shifting.
Use a Knee Kicker
For tough sisal, a knee kicker helps stretch the material tight. It saves your hands and ensures a snug fit over the stair nose.
Step 3: Installing the Runner
-
Start at the Top:
Begin installation at the very top riser, directly under the nosing of the landing. Staple the end of the runner securely to the top of the first riser. -
Waterfall Method Basics:
This look uses a ‘waterfall’ style, where the carpet flows over the nose without being tacked underneath it. Pull the runner down tight over the first tread. -
Secure at the Crotch:
Push the runner firmly into the deeper corner where the tread meets the riser below it. Use a bolster chisel or putty knife to crease the carpet tightly into this angle. -
Staple the Corner:
While holding the tension with your chisel, fire staples into the crease. Aim the staple gun into the corner, capturing the carpet securely. Space staples about 2-3 inches apart across the width. -
Check Alignment:
Before moving to the next step, measure the distance from the runner edge to the wall or balusters. Adjust gently if necessary to ensure it remains centered. -
Continue Downward:
Drape the carpet over the next nose and pull straight down. For stiff sisal, gravity helps, but you need to maintain consistent tension. -
Handling the Nosing:
Ensure the carpet is pulled tight enough that it doesn’t billow away from the nose, but not so tight that it warps the weave. -
Repeat the Process:
Repeat the tuck-and-staple process for each subsequent step. Work methodically, always checking your center marks.
Loose Weave?
If staples sink too deep or pull through loose weaves, color the top of the staple with a marker matching the fiber before firing.
Step 4: Finishing Touches
-
Trim the Bottom:
When you reach the final floor level, cut the runner with sharp shears, leaving about an inch of excess material. -
Final Securement:
Fold the raw excess edge under to create a neat hem. Staple this folded edge securely to the bottom riser or the floor, depending on your transition preference. -
Conceal Staples:
If any staples are visible or flattened the fibers, use a small flathead screwdriver to gently fluff the sisal weave over the staple crowns. -
Add Binding (If DIY):
If your runner wasn’t pre-bound, apply white heavy-duty fabric tape to the sides using a strong fabric adhesive or by hand-stitching for that tailored white edge.
Step back and admire how the natural texture and white binding completely transform the character of your staircase

PENCIL GUIDE
Understanding Pencil Grades from H to B
From first sketch to finished drawing — learn pencil grades, line control, and shading techniques.
Explore the Full Guide
Colored Risers With a Simple Solid Runner
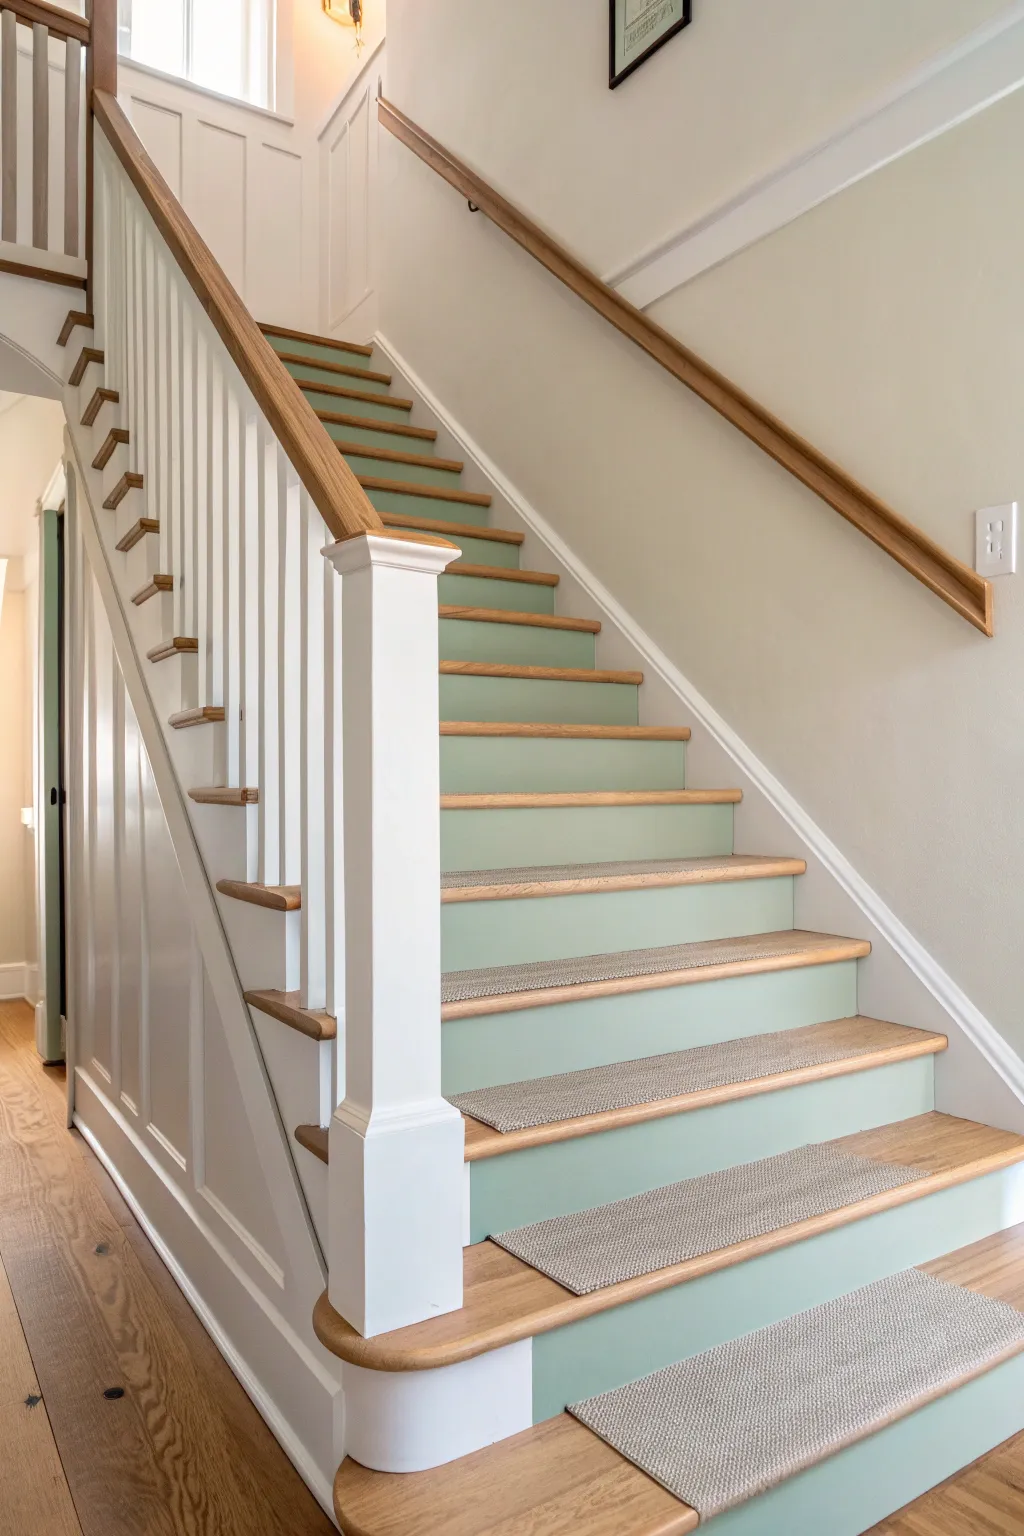
Transform a standard wooden staircase into a fresh, modern focal point by combining soft sage green risers with natural wood treads. This project balances the warmth of oak with a cool, matte paint finish and adds practical, non-slip runner pads for a completed look.
Step-by-Step Guide
Materials
- Sander (orbital or mouse detail sander)
- Sandpaper grits (80, 120, and 220)
- Wood stain (light oak or natural finish)
- Polyurethane (satin or matte finish)
- Sage green interior paint (satin or semi-gloss for durability)
- White trim paint (for the skirting)
- High-quality angled sash brush (2-inch)
- Mini foam roller and tray
- Painter’s tape (delicate surface)
- Separate stair tread runners (sisal or synthetic blend)
- Carpet tape or non-slip rug grippers
- Tack cloth
- Wood filler (stainable)
Step 1: Preparation & Sanding
-
Assess the surface:
Begin by removing any existing carpet, nails, or staples from the stairs. If your stairs are pre-finished, you will need to break the seal of the old varnish. -
Clean and fill:
Scrub the stairs down with a degreaser to remove oils or dirt. Fill any deep gouges or nail holes with stainable wood filler and let it dry completely according to the package instructions. -
Heavy sanding:
Using an orbital sander with 80-grit paper, sand the treads (the part you step on) to strip away old finish and expose the raw wood. I find a mouse sander works best for getting deep into the corners where the tread meets the riser. -
Refine the surface:
Switch to 120-grit and then 220-grit sandpaper on the treads to smoothen the grain. Lightly sand the risers (the vertical parts) and the side skirting just enough to scuff the surface for paint adhesion. -
Dust removal:
Vacuum the entire staircase thoroughly, starting from the top. Wipe everything down with a tack cloth to catch the remaining fine dust particles.
Bleeding Paint?
If paint bleeds under the tape onto the wood tread, don’t wipe it while wet. Let it dry completely, then gently scrape it off with a plastic razor blade or credit card edge.
Step 2: Staining & Painting
-
Stain the treads:
Apply your chosen wood stain to the treads using a clean rag or foam brush. Work with the grain, wiping off excess stain after a few minutes to ensure an even, non-blotchy finish. Allow this to dry fully, usually overnight. -
Seal the wood:
Apply a coat of polyurethane to the treads. Once dry, lightly sand with very fine paper, wipe clean, and apply a second coat for durability. -
Protect the treads:
Once the polyurethane has cured for at least 24 hours, carefully apply painter’s tape to the fresh wood treads where they meet the risers and skirting to protect your hard work. -
Paint the trim:
Paint the side skirting board (the stringer) white. Use an angled sash brush for the edges and a small foam roller for flat sections to avoid brush marks. -
Cut in the risers:
Using your angled brush and the sage green paint, carefully ‘cut in’ the edges of the risers. Focus on the corners and the line where the riser meets the tread. -
Roll the risers:
Use a mini foam roller to fill in the rest of the riser. This ensures a smooth, sprayed-on look. Apply 2-3 coats as needed for full opacity, allowing proper drying time between each.
Step 3: Finishing Touches
-
Remove tape:
Peel off the painter’s tape while the final coat of paint is slightly tacky. Pulling slowly at a 45-degree angle helps prevent the paint film from ripping. -
Prepare the runners:
Lay out your individual stair tread runners. Measure the width of your stair tread and the width of the runner to calculate exactly where to center them. -
Mark placement:
Place small, removable pieces of tape on the left and right measurements of each tread to act as guides for where the runner edges should sit. -
Apply adhesive:
Attach heavy-duty double-sided carpet tape to the back of your runner pads. Some runners come with a non-slip backing, but tape provides extra security. -
Install runners:
Align the runner with your tape guides and press down firmly, smoothing from the center outward to eliminate any bumps.
Level Up: Rounded Nosing
If your treads have a rounded front lip (nosing), stain that section to match the top tread rather than painting it green. It creates a seamless visual flow.
Enjoy the calm, cohesive look of your newly refreshed staircase every time you walk up and down
Alternating Riser Colors With a Centered Runner
Transform a plain wooden staircase into a sophisticated focal point with this classic runner installation. This project combines the warmth of natural oak with the tailored look of a striped herringbone runner, accented by chic stair rods for a polished finish.
Step-by-Step Guide
Materials
- Heavy-duty striped runner rug (approx. 27-30 inches wide)
- Rug padding (felt or rubber)
- Staple gun (electric or pneumatic is best)
- 9/16-inch staples
- Carpet tucking tool or broad putty knife
- Utility knife with fresh blades
- Measuring tape
- Pencil or painter’s tape
- Fabric shears
- Decorative stair rods (optional but recommended for this look)
- Hammer or rubber mallet
- Bolster chisel
Step 1: Preparation & Layout
-
Clean surface:
Begin by thoroughly cleaning your staircase. Vacuum dust from corners and wipe down the treads and risers with a wood-safe cleaner to ensure the pad and rug adhere properly. -
Measure the center:
Measure the total width of your stair tread. Subtract the width of your runner, then divide that number by two. This gives you the distance from the wall (or banister) where the runner should start. -
Mark guidelines:
Using your calculation, mark the rug’s placement on each tread with a pencil or strips of painter’s tape. I find tape is safer so you don’t accidentally leave permanent graphite marks on the wood. -
Cut padding:
Cut strips of rug padding for each tread. The padding should be about 1 inch narrower than the runner (0.5 inches on each side) and deep enough to cover the tread but stop just short of the riser. -
Install padding:
Staple the padding securely to the treads. Place staples in the corners and center, ensuring it sits flat and doesn’t curl up at the edges.
Staple Hiding Trick
Use a black or brown sharpie to color the crowns of your staples before loading the gun. This helps them blend seamlessly into the darker fibers of the runner pattern.
Step 2: Runner Installation
-
Start at the top:
Unroll your runner. Begin at the very top riser, underneath the nosing of the landing. Staple the top edge of the runner directly under the nose, ensuring it is perfectly centered between your tape guides. -
Secure under the nose:
Pull the rug down the face of the first riser. Smooth it tightly. Staple underneath the nose of the first tread, spacing staples about every 3 inches. -
Tuck the corner:
Use your carpet tucking tool or bolster chisel to wedge the rug tightly into the crotch where the riser meets the tread. Getting this corner crisp is crucial for a professional look. -
Staple the crease:
Staple directly into the crease you just created. Try to nestle the staples into the weave or between the fibers of the herringbone pattern so they disapper. -
Pull and smooth:
Pull the rug forward across the tread. It needs to be taut but not stretched so tight that it warps the pattern. Check your alignment with your tape markers on every single step. -
Wrap the nose:
Wrap the runner over the edge (nose) of the tread and pull it tight against the top of the next riser. Staple neatly under the nose. -
Repeat the process:
Continue this waterfall method—down the riser, tuck into the crease, staple, over the tread, staple under the nose—down the entire flight. -
Handle bulky seams:
If you need to join two runner pieces, do it at the bottom of a riser where the staples can be hidden in the crease. Overlap slightly, cut through both for a clean seam, and staple heavily.
Level Up: Wall Art
Elevate the look by hanging a simple, black-framed typographic print at the top of the landing to draw the eye upward, mimicking the styling in the photo.
Step 3: Finishing Touches
-
Terminate at the bottom:
When you reach the floor, cut the runner leaving about 2 inches of excess. Fold this excess under to create a clean hem and staple it directly to the bottom riser for a tidy finish. -
Install stair rods:
If you are adding the decorative rods shown in the image, position the brackets in the corner where the tread meets the riser. -
Secure brackets:
Screw the brackets into the wood on either side of the runner. Slide the rod through and lock the finials in place. These are largely decorative but add that high-end ‘hotel’ aesthetic. -
Draft check:
Run your hand over the edges and seams to check for any loose staples or sharp edges. Tap down any protruding staples gently with a hammer.
Now you have a safer, quieter, and beautifully styled staircase ready for daily use


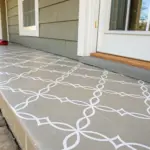
Painted Stair Trim That Echoes the Runner Pattern
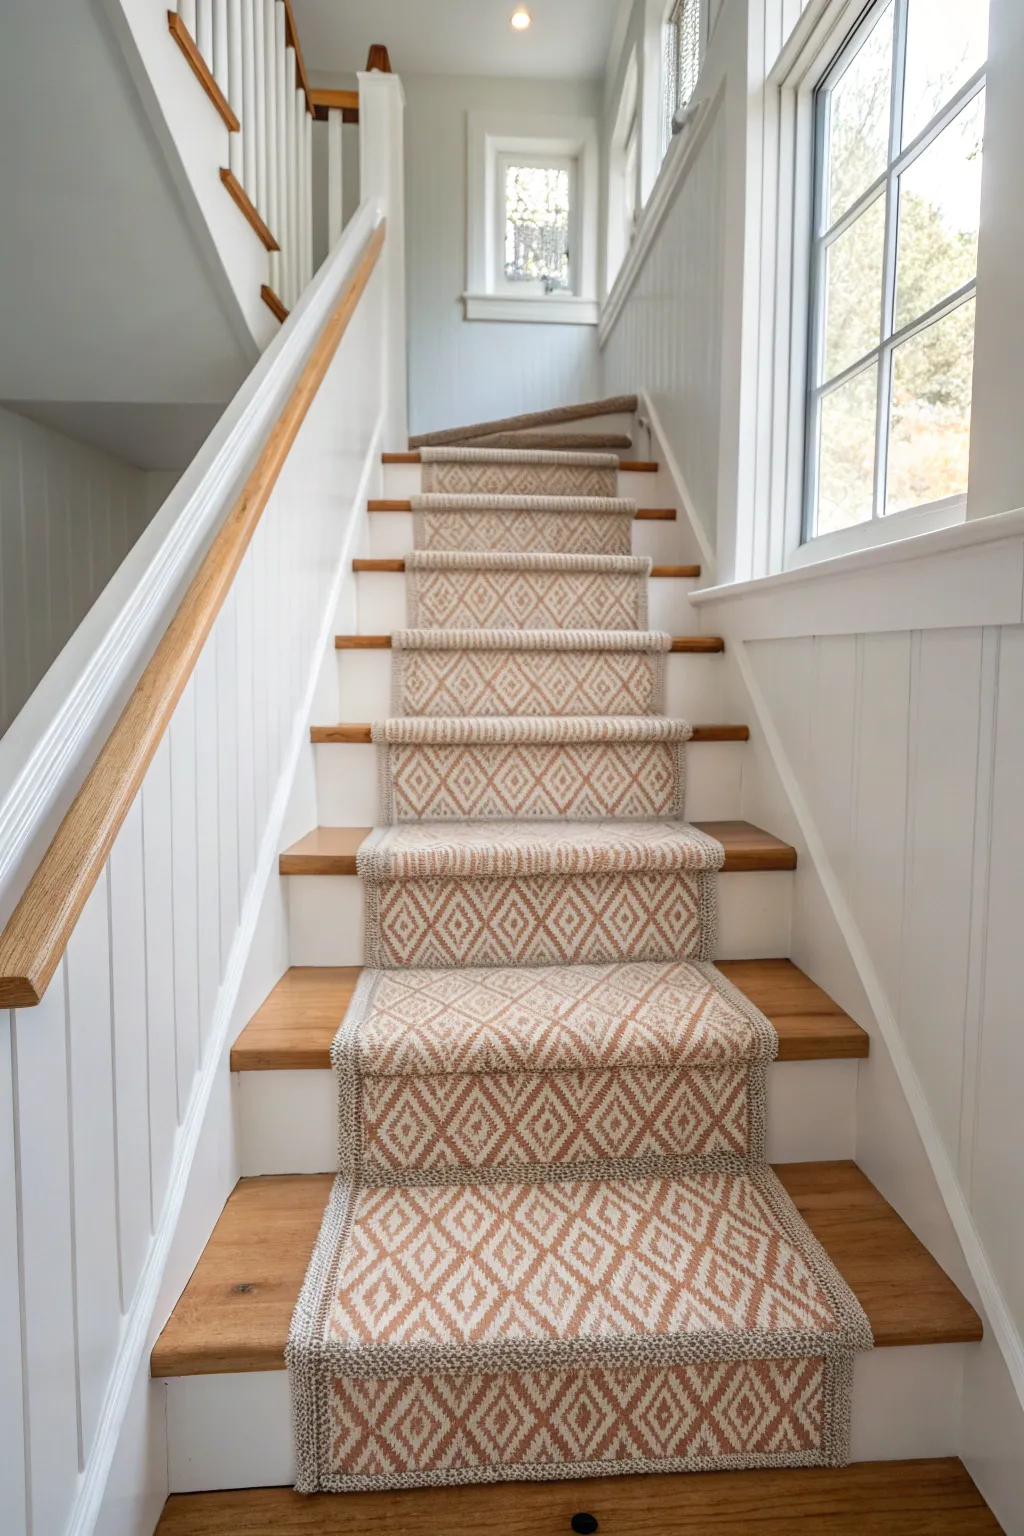
Transform a standard staircase into a breezy, coastal-inspired focal point with this combination of crisp white paint, warm wood tones, and a geometric runner. The pattern adds visual interest without overwhelming the space, creating a welcoming ascent to your upper floors.
Step-by-Step Tutorial
Materials
- Geometric pattern stair runner (woven sisal or wool blend)
- White semi-gloss trim paint
- High-quality wood stain (warm oak or honey tone)
- Polyurethane clear coat (satin finish)
- Painter’s tape
- Sanding block and sandpaper (120 and 220 grit)
- Pneumatic staple gun with 1/2-inch staples
- Carpet tucker tool or wide chisel
- Fabric shears or sharp utility knife
- Measuring tape
- Pencil
- Double-sided carpet tape (heavy duty)
- Bolster chisel
Step 1: Preparation and Painting
-
Prepare the surface:
Begin by removing any old carpet, tacks, or staples from the stairs. Fill any holes with wood filler and sand the treads and risers smooth, starting with 120-grit and finishing with 220-grit sandpaper. -
Clean thoroughly:
Vacuum the stairs meticulously to remove all dust and debris. Wipe down the wood with a tack cloth to ensure a perfectly clean surface for the finish. -
Stain the treads:
Apply your chosen warm wood stain to the stair treads. Use a rag or brush to apply it evenly, wiping away excess after a few minutes to reveal the grain. Let this dry completely according to the manufacturer’s instructions. -
Seal the wood:
Protect the stained treads with two to three coats of satin polyurethane. Lightly sand between coats for the smoothest finish, and allow sufficient curing time before walking on them. -
Paint the risers and trim:
Tape off the finished treads to protect them. Apply two coats of crisp white semi-gloss paint to the risers, the stringers (the sides), and any adjacent wall trim or wainscoting.
Step 2: Installing the Runner
-
Measure and mark:
Measure the width of your stair tread and the width of the runner. Calculate the difference and divide by two to find your margin size. Mark this distance lightly with a pencil on each tread to ensure the runner stays perfectly centered. -
Apply carpet tape:
Stick strips of heavy-duty double-sided carpet tape on the riser and the back of the tread for the first few steps. This helps hold the runner in place while you staple, acting as an extra pair of hands. -
Secure the start:
Start at the very top of the stairs, under the nosing of the landing. Staple the top edge of the runner securely into the underside of the landing nose, spacing staples about 2 inches apart. -
Install the first riser:
Smooth the runner down the first riser. Pull it taut and staple it into the bottom of the riser, just where it meets the tread below. I find placing staples into the crease helps hide them within the weave. -
Tuck and tighten:
Use your bolster chisel or carpet tool to crease the runner tightly into the corner where the riser meets the tread. This ‘waterfall’ style needs a sharp crease to look professional. -
Secure the tread:
Pull the runner across the tread. Staple it securely into the corner where the back of the tread meets the next riser. Keep checking your pencil marks to ensure the runner hasn’t drifted left or right. -
Install the nose staples:
For extra security, you can actuate staples directly under the nose of each tread. This hugs the runner tight against the wood profile and prevents ‘tenting’ when weight is applied. -
Repeat the process:
Continue working your way down the stairs: pull tight, tuck into the crease, staple, and check alignment. Consistency in tension is key to avoiding wrinkles later. -
Handle the landing:
If your stairs have a turn or landing, you may need to cut the runner. Measure carefully, cut with sharp shears, and start a new piece, matching the pattern as closely as possible to minimize the visual break. -
Finish at the bottom:
When you reach the bottom floor, trim the runner so it extends slightly past the last riser. Fold the raw edge under for a clean hem, and staple it firmly into the base of the final riser or tack it to the floor if preferred.
Floating Staples?
If staples aren’t sinking fully into hard oak treads, tap them gently with a hammer afterward. Coloring the staple heads with a permanent marker that matches the rug can make them invisible.
Pattern Perfection
For geometric patterns like diamonds, buy 10-15% extra length. This gives you ‘wiggle room’ to cut and align the pattern precisely at the top or on landings so the design flows seamlessly.
Now step back and admire how the crisp lines and soft textures perfectly complement your home’s architecture
Painted Spindles and Handrail to Coordinate With the Runner
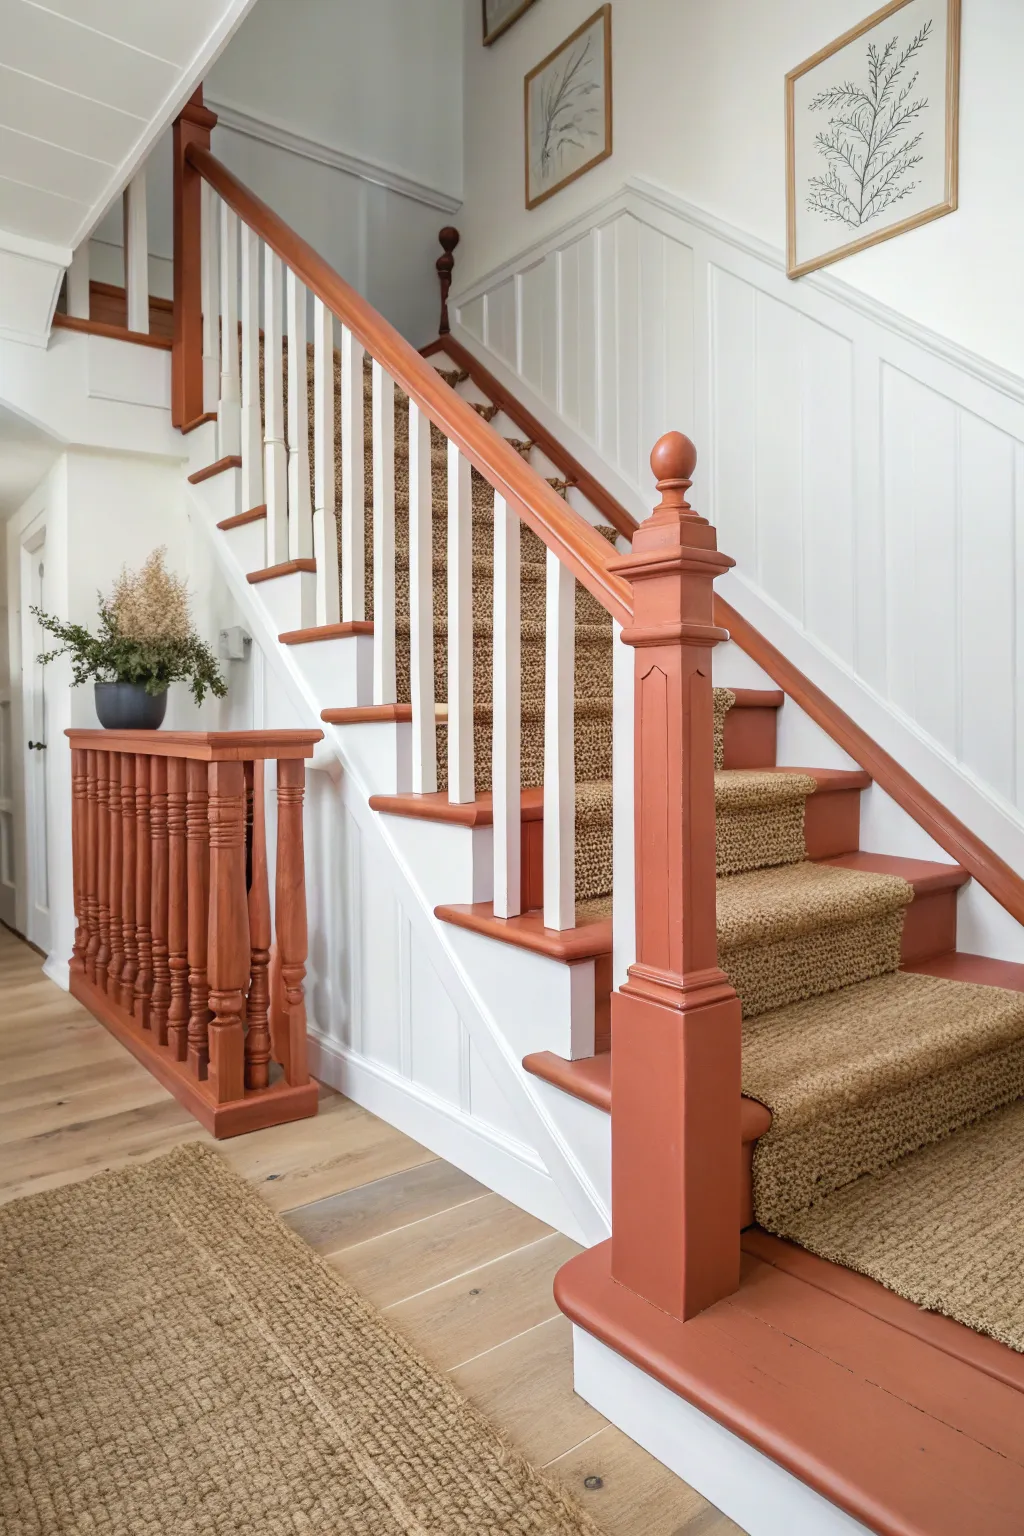
Transform a standard staircase into a cozy architectural feature by combining earthy terracotta tones with crisp white woodwork. This project creates a stunning balance between warmth and clean lines, finished perfectly with a natural fiber runner.
Step-by-Step
Materials
- High-quality wood primer
- Satin or semi-gloss paint (Terracotta/Rust color)
- Satin or semi-gloss paint (Bright White)
- Sandpaper (120 and 220 grit)
- Painter’s tape and plastic drop cloths
- Sisal or jute stair runner
- Carpet padding/underlay
- Pneumatic stapler and staples
- Carpet knee kicker
- Fabric shears
- Sash brush (angled)
- Mini foam roller
- Tack clothes
- Wood filler
Step 1: Preparation and Priming
-
Clear and clean:
Remove any existing carpet, staples, or tack strips. Clean the entire staircase thoroughly with a degreaser to remove oils and dirt, which is critical for paint adhesion. -
Fill imperfections:
Inspect the treads, risers, and woodwork for holes or deep scratches. Fill these with wood filler, letting it dry completely before proceeding. -
Sand everything:
Scuff sand all surfaces—treads, risers, spindles, and handrails—using 120-grit sandpaper. This removes the old finish’s gloss and gives the primer something to grip. -
Remove dust:
Vacuum away the sanding dust carefully. I like to follow up with a tack cloth to pick up those fine particles that a vacuum might miss. -
Apply primer:
Apply a high-quality stain-blocking primer to all surfaces. Use an angled sash brush for corners and spindles, and a mini roller for flat areas like treads and risers.
Step 2: Painting the Woodwork
-
Paint the white elements:
Once the primer is dry and lightly sanded with 220-grit paper, start painting the risers, stringers (the sides), and spindles in bright white. Two coats are usually necessary for full coverage. -
Protect the white:
Allow the white paint to cure for at least 24 hours. Then, carefully tape off the base of the spindles and the edges where white meets the areas you’ll paint terracotta. -
Paint the treads and railing:
Apply your terracotta or rust-colored paint to the treads, newel posts, and handrails. Work from the top of the stairs down so you don’t paint yourself into a corner. -
Sand between coats:
Lightly sand the first coat of terracotta with 220-grit paper once dry. This creates an ultra-smooth professional finish. -
Second coat application:
Apply the second coat of terracotta paint. Focus on smooth, long brush strokes on the handrail and rails to minimize texture. -
Remove tape:
Carefully peel away the painter’s tape while the paint is still slightly tacky to ensure a crisp, clean line without peeling.
Clean Lines Pro-Tip
When painting two colors, paint the lighter color (white) slightly onto the dark area first. Then tape over it. This seals the tape edge so the darker paint creates a razor-sharp line.
Step 3: Installing the Runner
-
Measure and mask:
Determine the width of your runner and mark the center of your treads. Use painter’s tape to mark the outer edges of where the runner will sit to guide your installation. -
Install padding:
Cut carpet padding slightly narrower than your runner width. Staple it securely to the treads, ensuring it wraps slightly over the nose of the step but doesn’t show from the sides. -
Start at the top:
Staple the top edge of the runner under the nosing of the landing or top riser. Ensure it is perfectly centered and straight. -
Secure the riser:
Smoothing the runner down the first riser, staple it firmly at the bottom of the riser where it meets the tread. -
Kick and secure:
Use a carpet knee kicker to stretch the runner taut over the tread. Staple it securely into the corner where the tread meets the next riser. -
Repeat the process:
Continue down the staircase, checking for alignment at every single step. Tension is key to preventing loose carpet. -
Finish at the bottom:
At the bottom step, trim the excess runner neatly and staple the end securely to the bottom riser, possibly hiding the edge with a small quarter-round molding if needed.
Runner shifting?
If the runner pattern looks crooked, don’t just pull it. Check that your padding is even. Small lumps in the underlay cause visible shifts in woven sisal patterns.
Step back and admire how the warm paint tones and natural texture completely reinvent your entryway vibe
Add Stair Rods for a Finished, Jewelry-Like Look
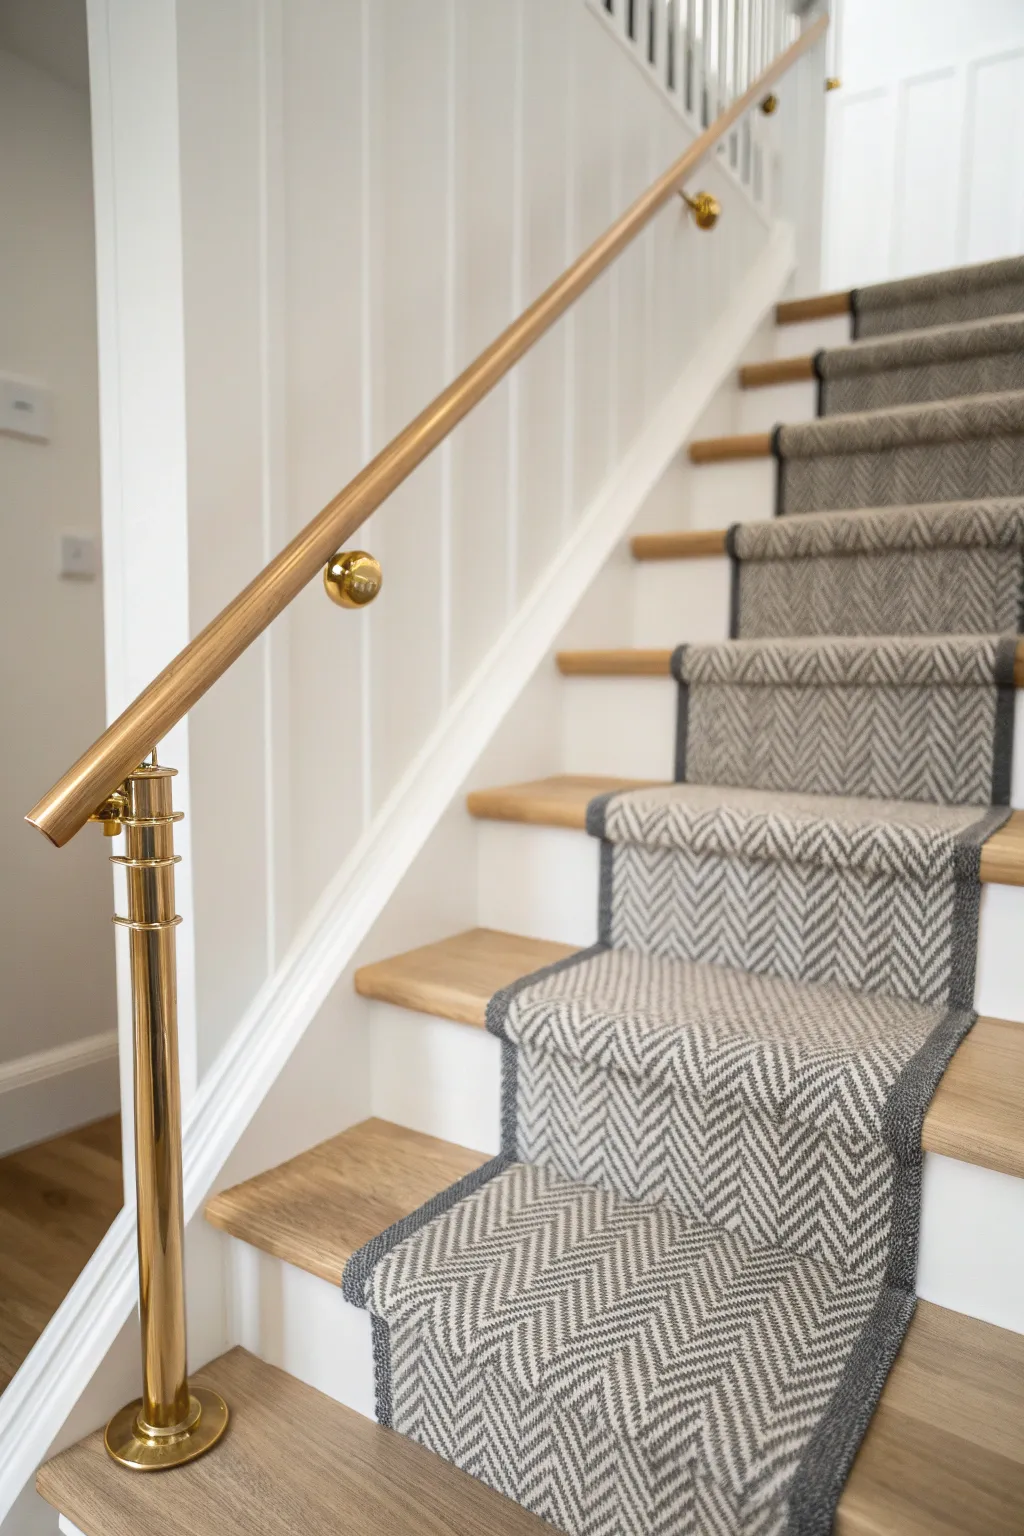
Elevate a standard staircase into a grand entrance by combining the timeless texture of a herringbone runner with the warm gleam of brass hardware. This project balances modern geometric patterns with classic finishes for a sophisticated, high-end look.
Step-by-Step Guide
Materials
- Herringbone pattern carpet runner (grey/white tones)
- Contrasting fabric binding tape (dark grey/charcoal)
- carpet padding/underlay
- Carpet tacks or staples
- Staple gun (electric or pneumatic recommended)
- Knee kicker
- Utility knife or carpet shears
- Brass stair rods (optional, per section theme)
- Brass finish handrail brackets
- Brass newel post cap or finial
- Painter’s tape
- White semi-gloss trim paint
- Sander and sandpaper (120 and 220 grit)
- Wood stain (matching existing treads)
- Measuring tape
- Hammer
- Awl or punch tool
Step 1: Preparation & Painting
-
Clear and clean:
Remove any existing carpet, padding, all staples, and tack strips from the stairs. Vacuum thoroughly to ensure a clean surface. -
Sand the surfaces:
Lightly sand the treads and risers. If you are refinishing the wood treads, sand them down to raw wood using 120-grit paper followed by 220-grit. -
Apply stain and finish:
If the treads need refreshing, apply your chosen wood stain carefully with a rag or brush. Follow with a durable polyurethane topcoat and allow it to cure fully. -
Paint the risers and stringers:
Tape off the stained treads to protect them. Apply two coats of high-quality white semi-gloss trim paint to the risers and the side stringers for that crisp, clean contrast.
Waterfall vs. Hollywood
This look uses ‘Hollywood’ style installation (tacked under the nose) for a tailored look. For a looser, flowing look, skip stapling under the nose (Waterfall style).
Step 2: Installing the Runner
-
Measure and mark:
Measure the width of your tread and subtract the runner width to find your center. Mark this distance lightly with a pencil on each tread to ensure the runner stays perfectly straight. -
Prepare the padding:
Cut your carpet padding into strips slightly narrower than the runner (about 1 inch less on each side). Staple a piece to each tread, but do not wrap it over the nose. -
Anchor the runner:
Start at the very top riser, directly under the landing nose. Staple the end of the runner securely into the top of the riser. -
Secure the first tread:
Pull the runner taut over the first tread. Using a knee kicker if necessary to remove slack, staple the runner into the crease where the tread meets the next riser. -
Work your way down:
Continue this process—smooth over tread, pull tight, staple into the crease—for every step. I often check my pencil marks every few steps to ensure I haven’t drifted off-center. -
Finish the bottom:
When you reach the bottom floor, trim the excess runner leaving about an inch. Fold this raw edge under for a clean hem and staple it securely to the bottom riser.
Loose Carpet?
If the runner ripples, use a knee kicker to stretch it aggressively before stapling. Always staple from the center moving outward to push out air pockets.
Step 3: Adding the Brass Details
-
Install handrail brackets:
Remove old hardware if present. Screw the new brass brackets into the wall at stud locations, ensuring they are level and spaced evenly. -
Attach the handrail:
Secure the wooden handrail to the new brass brackets. Ensure the wood is smooth and finished to match the stair treads. -
Add the newel post accent:
For the finishing touch seen in the project image, install a brass cap or finial to the base newel post. This often slides over the post or screws directly into vertical supports. -
Install stair rods (optional):
If following the specific ‘stair rod’ prompt, place the brass rod into the corner where the tread meets the riser. Mark the screw holes for the brackets on either side of the runner. -
Final polish:
Wipe down all brass elements with a soft cloth to remove fingerprints and vacuum the new runner to lift the pile.
Step back and admire how the crisp white paint and warm brass transform your staircase into a sophisticated focal point.
Paint the Landing to Connect Runner and Stair Color
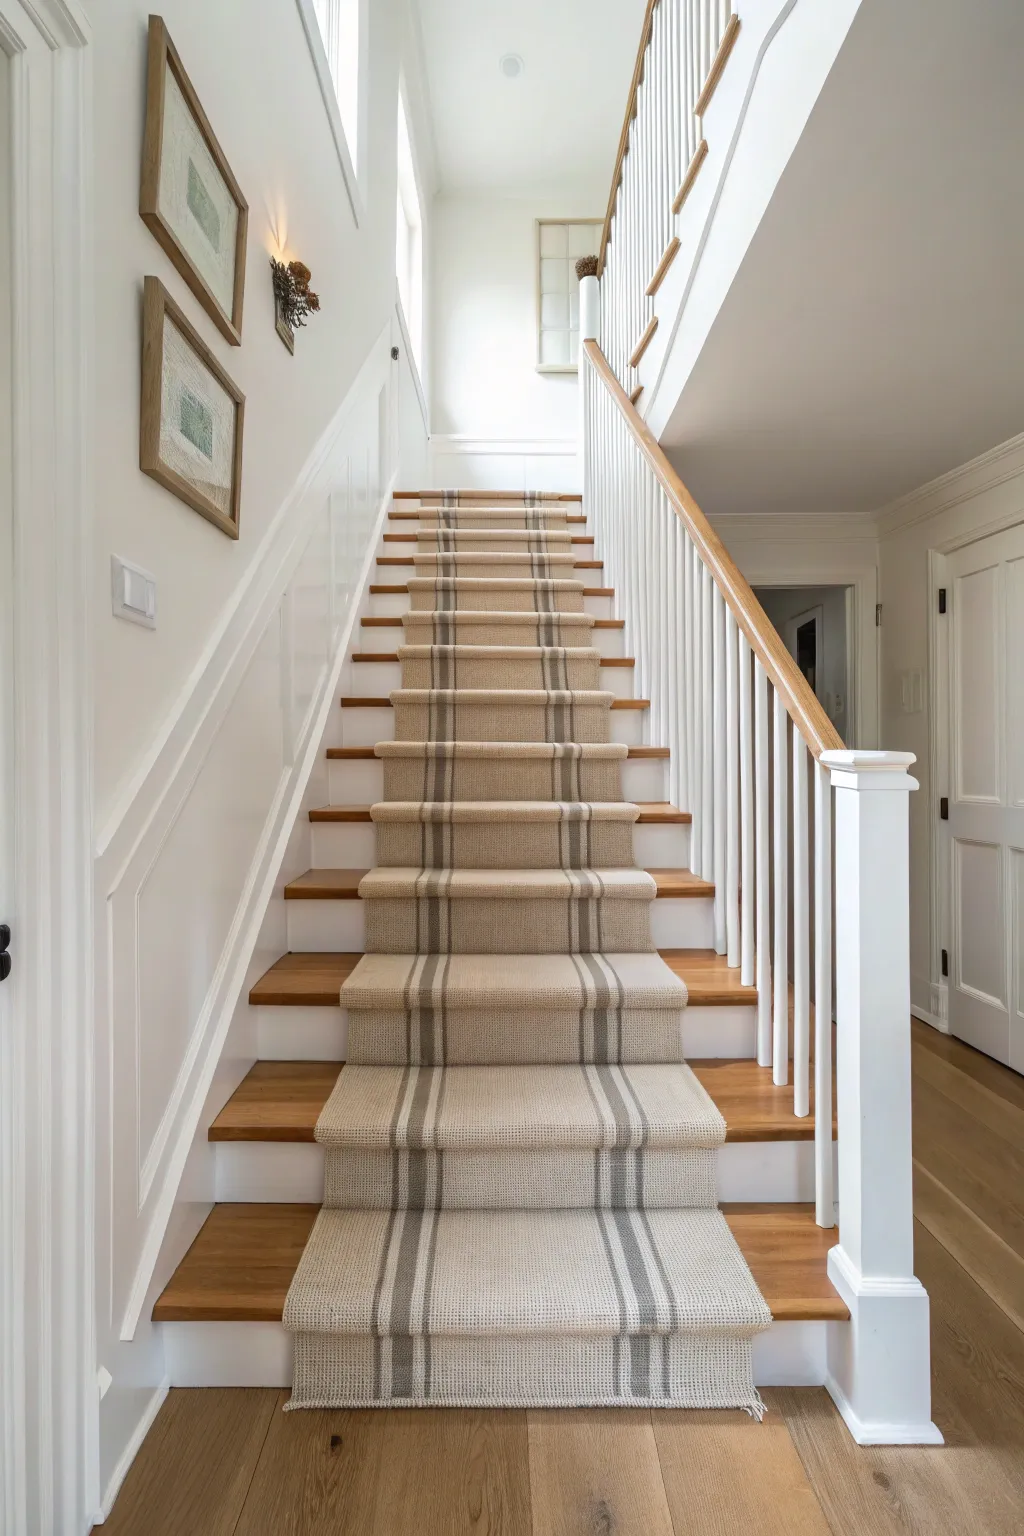
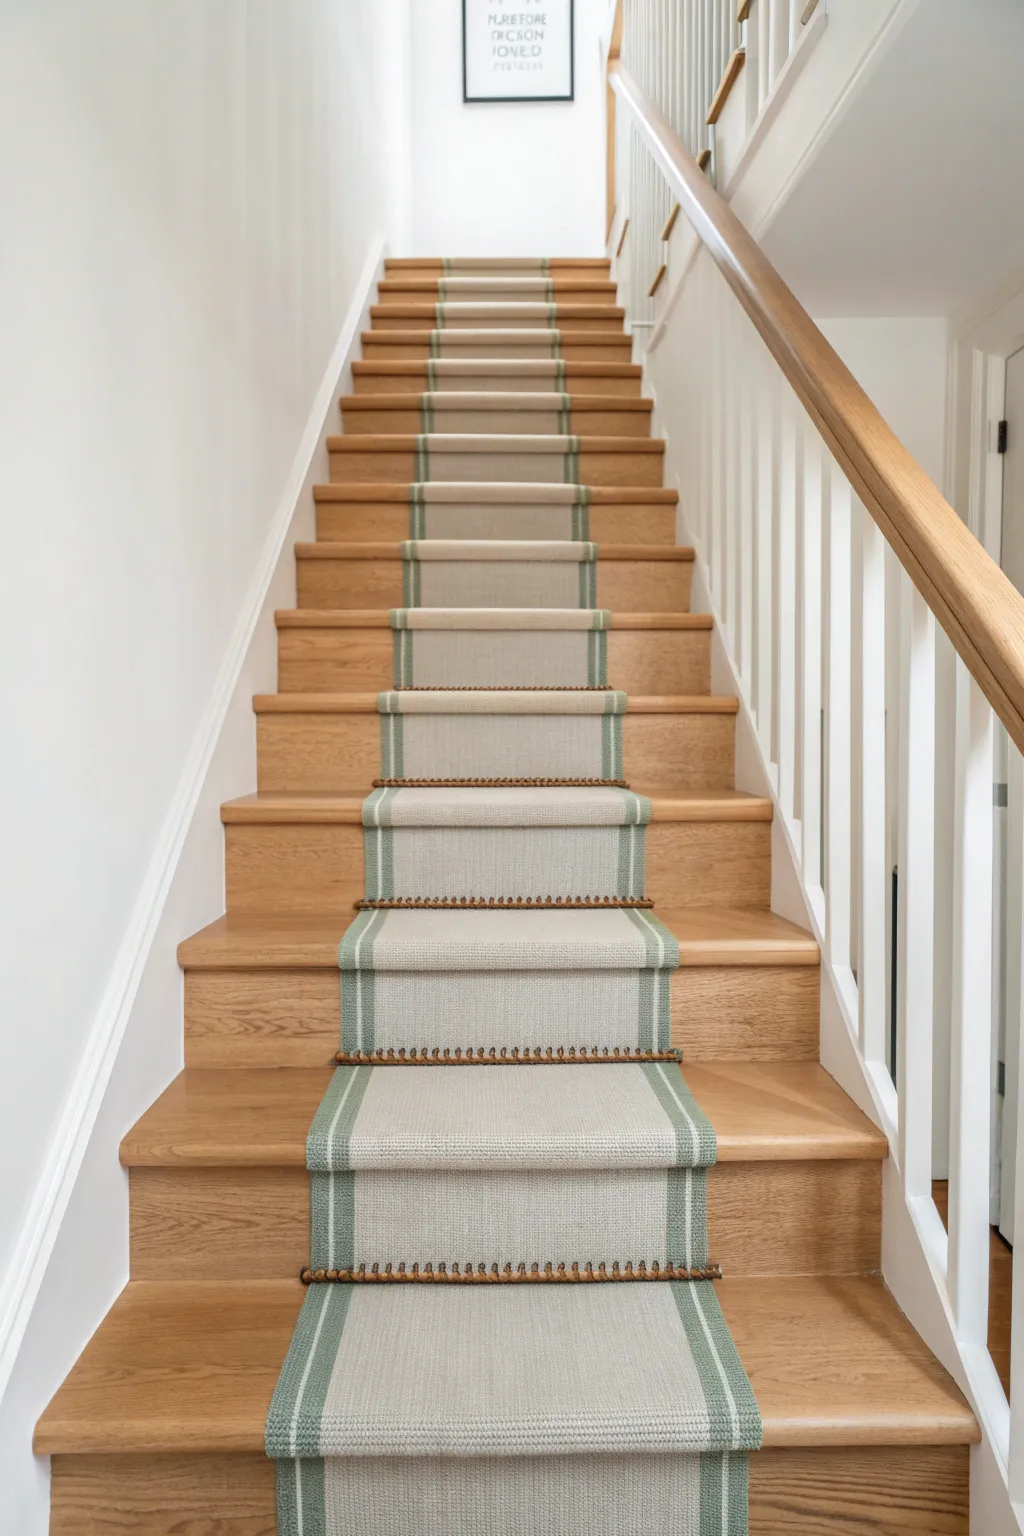
Transform a plain staircase into a coastal-inspired centerpiece with this combination of crisp white detailed paneling and a durable, striped runner. The look balances the warmth of natural wood treads with the architectural elegance of wainscoting for a welcoming entryway.
Step-by-Step
Materials
- Primed pine boards (1×4 for rails/stiles, base cap molding)
- Construction adhesive & finishing nails
- Wood filler
- Sanding block (120 and 220 grit)
- Painter’s tape (delicate surface)
- High-quality interior paint (semi-gloss white)
- Stair runner roll (striped sisal or wool blend)
- Carpet padding (cut to size)
- Pneumatic staple gun with carpet staples
- Fabric shears or carpet knife
- Bolster chisel or wide putty knife
- Measuring tape & pencil
Step 1: Preparation & Wall Treatments
-
Clean and clear:
Begin by removing any existing carpet or staples from your staircase. Thoroughly clean the treads and risers, sanding down the wood treads if they need refinishing before you start the installation. -
Measure the paneling layout:
Decide on the height of your wainscoting. A common height follows the angle of the stairs, usually around 36 inches from the nose of the tread vertically. Snap a chalk line to mark the top rail angle. -
Install the framework:
Cut your 1×4 lower rails and upper rails to match the angle of the stairs. Attach them to the wall using construction adhesive and finish nails, ensuring you hit studs where possible for security. -
Add the verticals:
Measure and cut shorter vertical battens to fit between your top and bottom rails. Space them evenly—I usually aim for about 16-20 inches apart—and secure them to create the grid pattern. -
Detail with molding:
To achieve the recessed panel look, install base cap molding or smaller trim pieces inside the rectangles you’ve created. Picture frame the inner edges of each box for that custom joinery appearance. -
Fill and sand:
Fill all nail holes and seams with wood filler. Once dry, sand everything smooth with 120-grit sandpaper, followed by 220-grit for a flawless finish. -
Paint the woodwork:
Prime the fresh wood, then apply two coats of semi-gloss white paint to the wainscoting, stair risers, and stringers. Let this cure fully—usually 24 hours—before installing the runner.
Drifting Stripes?
If your stripes start to look crooked, don’t just pull harder. Release the last few staples and gently nudge the runner back to center before restapling. Small corrections are key.
Step 2: Runner Installation
-
Measure the runner path:
Find the exact center of your stair treads and mark it lightly with a pencil. Measure out from the center to ensure your runner will be perfectly centered, leaving an even reveal of wood on both sides. -
Install carpet padding:
Cut individual rectangles of carpet padding for each tread. The pad should be slightly narrower than the runner (about 1 inch less on each side) and wrap just over the nose. Staple these securely in place. -
Anchor the runner start:
Start at the very top riser, underneath the landing nosing. Staple the top edge of the runner securely, hiding the staples up under the lip of the landing. -
Secure the first tread:
Pull the runner taut over the first tread. Use your bolster chisel to crease the rug tightly into the corner where the tread meets the riser. Staple firmly into this crease, spacing staples about 3 inches apart. -
Waterfall vs. Hollywood:
Decide on your style. This project uses the ‘Waterfall’ method, where the carpet flows directly from the edge of one tread down to the back of the next without being tacked under the nosing. Keep tension high as you pull it down. -
Continue the descent:
Move down step by step. Pull tight, center against your pencil marks, crease with the tool, and staple. I like to check my measurements every two steps to ensure the stripes aren’t drifting sideways. -
Handle the landing:
If you have a landing, you may need to cut the runner and restart it to handle the turn. If it’s a straight shot, just keep the tension continuous. -
Finish at the bottom:
When you reach the bottom floor, cut the runner leaving about 2 inches of excess. Fold this excess under to create a clean hem and staple it neatly to the bottom of the last riser. -
Trim loose fibers:
Inspect the edges for any loose threads or fibers and snip them carefully with sharp shears. DO NOT pull them, as this can unravel the weave.
Brass Appeal
Elevate the look by adding decorative stair rods in brass or brushed nickel. They fit into the crease of each step and add a sophisticated, vintage hardware element to the design.
Step back and admire how the crisp white lines of the woodwork frame your new runner perfectly
Ombre Risers With a Neutral Runner Down the Middle
Transform a standard staircase into a stunning architectural feature by blending soft, gradient risers with a classic beige runner. This project combines the warmth of exposed wood treads with a subtle, artistic paint effect that draws the eye upward.
Detailed Instructions
Materials
- Sanding block or orbital sander (medium and fine grit)
- Wood stain (matching handrail)
- Polyurethane floor finish
- Painter’s tape (high quality)
- Primer (high adhesion)
- Latex or enamel paint in 3-5 gradient shades (from dark taupe to cream)
- Paint brushes (angled sash brush)
- Small foam roller
- Stair runner carpet (beige/taupe weave)
- Carpet padding (cut slightly narrower than runner)
- Pneumatic staple gun with 1/2-inch staples
- Carpet tuck tool or wide chisel
- Utility knife
- Measuring tape
Step 1: Preparation & Foundation
-
Remove old coverings:
Begin by pulling up any existing carpet, padding, tack strips, and staples. Use pliers to ensure every staple is removed to prevent injury or lumps under your new runner. -
Sand the treads:
Since the sides of the treads will be visible, sand the wooden steps down to bare wood. Start with a medium grit to remove old varnish and finish with a fine grit for a smooth surface. -
Stain the exposed wood:
Apply your chosen wood stain to the treads, focusing on the outer edges that won’t be covered by the runner. Wipe away excess stain and let it dry completely according to the manufacturer’s instructions. -
Seal the treads:
Apply two to three coats of durable polyurethane floor finish to the stained areas. This protects the wood from foot traffic and makes cleaning easier later on.
Clean Corner Hack
When stapling under the nose, angle the staple gun slightly upward. This hides the staples deep in the pile so they vanish visually.
Step 2: Painting the Ombre Risers
-
Tape off the edges:
Once the tread finish is fully cured, carefully apply painter’s tape to the underside of the stair nosing and the top of the treads where they meet the risers. -
Prime the risers:
Apply a coat of high-quality primer to all the risers. This blocks any bleed-through from knots and gives your gradient paint a solid base to adhere to. -
Plan your gradient:
Organize your paint cans from darkest to lightest. Count your stairs and divide them into groups so you know exactly which shade goes on which set of risers to create a smooth transition. -
Apply the darkest shade:
Start at the bottom stairs (or top, depending on your preference) with your darkest color. Use an angled brush to cut in the edges and a small foam roller for the flat center to ensure a smooth finish. -
Blend upward:
Move to the next group of stairs and apply the next lighter shade. If you want a seamless blend, you can mix a little of the previous color into the new one for the transition step. -
Finish with the lightest shade:
Complete the upper section of the staircase with your lightest cream or white shade, ensuring the final result looks like a gentle fade rather than abrupt stripes. -
Remove tape:
Carefully peel off the painter’s tape while the final coat is still slightly tacky to achieve crisp, clean lines without peeling the paint.
Binding the Edges
For a truly custom look, take your runner to a carpet shop to have a contrasting fabric tape binding sewn onto the edges before installation.
Step 3: Installing the Runner
-
Measure and mark:
Find the precise center of your staircase. Measure exactly where the edges of the runner should sit and mark these spots on each tread with a piece of painter’s tape as a guide. -
Install padding:
Cut your carpet padding into individual rectangles for each tread. Staple them down, ensuring they are roughly 1 inch narrower than the runner width so they stay hidden. -
Anchor the runner start:
Secure the top edge of the runner under the nosing of the very top landing or first step using your staple gun. I like to place staples every 3 inches for a secure hold. -
Create the waterfall effect:
Pull the runner taut over the nose of the step and straight down the riser. Staple it securely into the crease where the riser meets the tread below. -
Tighten into the crease:
Use a carpet tuck tool or a wide chisel to jam the runner tightly into the corner of the step before stapling. This ensures a sharp, professional-looking 90-degree angle. -
Secure the tread:
Pull the carpet forward across the tread, smooth it out from the center, and staple it just under the nose of the next step. -
Repeat and finish:
Continue this process down the stairs. When you reach the bottom, cut the excess runner cleanly and staple the final edge securely to the bottom riser or floor.
Now you have a sophisticated, custom staircase that perfectly bridges traditional warmth with modern design flair
Faux Painted Runner With a Real Runner Layered Over It
Achieve the high-end look of a custom stair runner by combining a painted faux base with a textile overlay for texture and depth. This clever layering technique creates a crisp border effect while adding the warmth and grip of a traditional fiber runner.
How-To Guide
Materials
- Sandpaper 120 and 220 grit
- Painter’s tape (multiple widths: 1-inch and 2-inch)
- Primer suitable for wood floors
- Porch and floor paint (white or off-white)
- Clear matte or satin polyurethane (floor grade)
- Sisal, jute, or synthetic stair runner (slightly narrower than your painted stripe)
- Measuring tape and pencil
- Staple gun and 1/2-inch staples
- Carpet cutter or sharp utility knife
- Paint rollers and angled sash brushes
- Bolster chisel (optional, for tucking)
Step 1: Painting the Faux Underrunner
-
Prep the surface:
Begin by removing any old carpet, staples, or tack strips. Fill holes with wood filler and sand the treads and risers smooth using 120-grit paper, finishing with 220-grit for a polished feel. -
Clean thoroughly:
Vacuum every corner and crevice to remove dust, then wipe down the stairs with a damp tack cloth or liquid deglosser. -
Measure the center:
Find the exact center of your staircase. Decide on the total width of your painted runner—usually about 4 inches wider than your textile runner will be—and mark the outer edges lightly with a pencil on every tread and riser. -
Tape the borders:
Apply painter’s tape along your pencil lines. Ensure you press the tape down firmly, especially at the nose of the tread, to prevent paint bleed. -
Prime the area:
Apply a high-quality primer to the area inside the tape. I find that using a mini roller speeds up the treads, while a brush helps get into the corners where the tread meets the riser. -
Paint the risers and borders:
Once the primer is dry, paint the risers and the taped-off ‘faux runner’ section with your chosen white floor paint. You will likely need 2-3 coats for full opacity, allowing proper drying time between each. -
Seal the paint:
After the final coat of paint has cured for at least 24 hours, apply two thin coats of clear polyurethane to protect the painted finish from foot traffic. -
Remove the tape:
Carefully peel up the painter’s tape while the final clear coat is tacky or completely dry, revealing crisp wood edges flanking your white painted center.
Step 2: Installing the Textile Layer
-
Align the fiber runner:
Unroll your sisal or jute runner. Position it so it sits perfectly centered on top of your white painted section. You should see an even reveal of white paint on both sides (about 1.5 to 2 inches). -
Secure the top:
Start at the very top riser, directly under the nose of the landing. Staple the end of the runner securely, placing staples roughly every 2 inches. -
Staple under the nose:
Pull the runner taut over the first tread nose. Use your staple gun to secure the runner to the underside of the nosing. This keeps the rug tight and prevents tripping hazards. -
Anchor firmly:
Push the runner firmly into the corner where the riser meets the next tread. I like using a bolster chisel here to crease the rug tightly into that angle before stapling. -
Staple the crease:
Place a row of staples into the crease, securing the rug to the riser just above the tread. -
Repeat down the stairs:
Continue this process—pulling tight, stapling under the nose, and stapling into the crease—all the way down the staircase. -
Maintain alignment:
Check your measurements frequently as you work downwards to ensure the runner hasn’t drifted left or right and that the white painted reveal remains consistent. -
Finish at the bottom:
When you reach the floor, cut the runner with a sharp utility knife, leaving about an inch of excess. Fold this excess under for a clean hem and staple it securely to the bottom riser.
Seal That Tape Edge
Before painting white, brush a little clear matte medium or the base wood color over the tape edge. This seals gaps and ensures razor-sharp lines.
Loose Rug Middle?
If the rug creates a bubble in the middle of a tread, verify you are stapling tightly under the nosing. Double-sided carpet tape on the tread adds extra grip.
Step back and admire how the dual layers add both sophisticated architecture and cozy texture to your home’s entryway
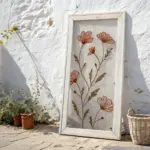
Hand-Painted Riser Mini Murals Beside a Simple Runner
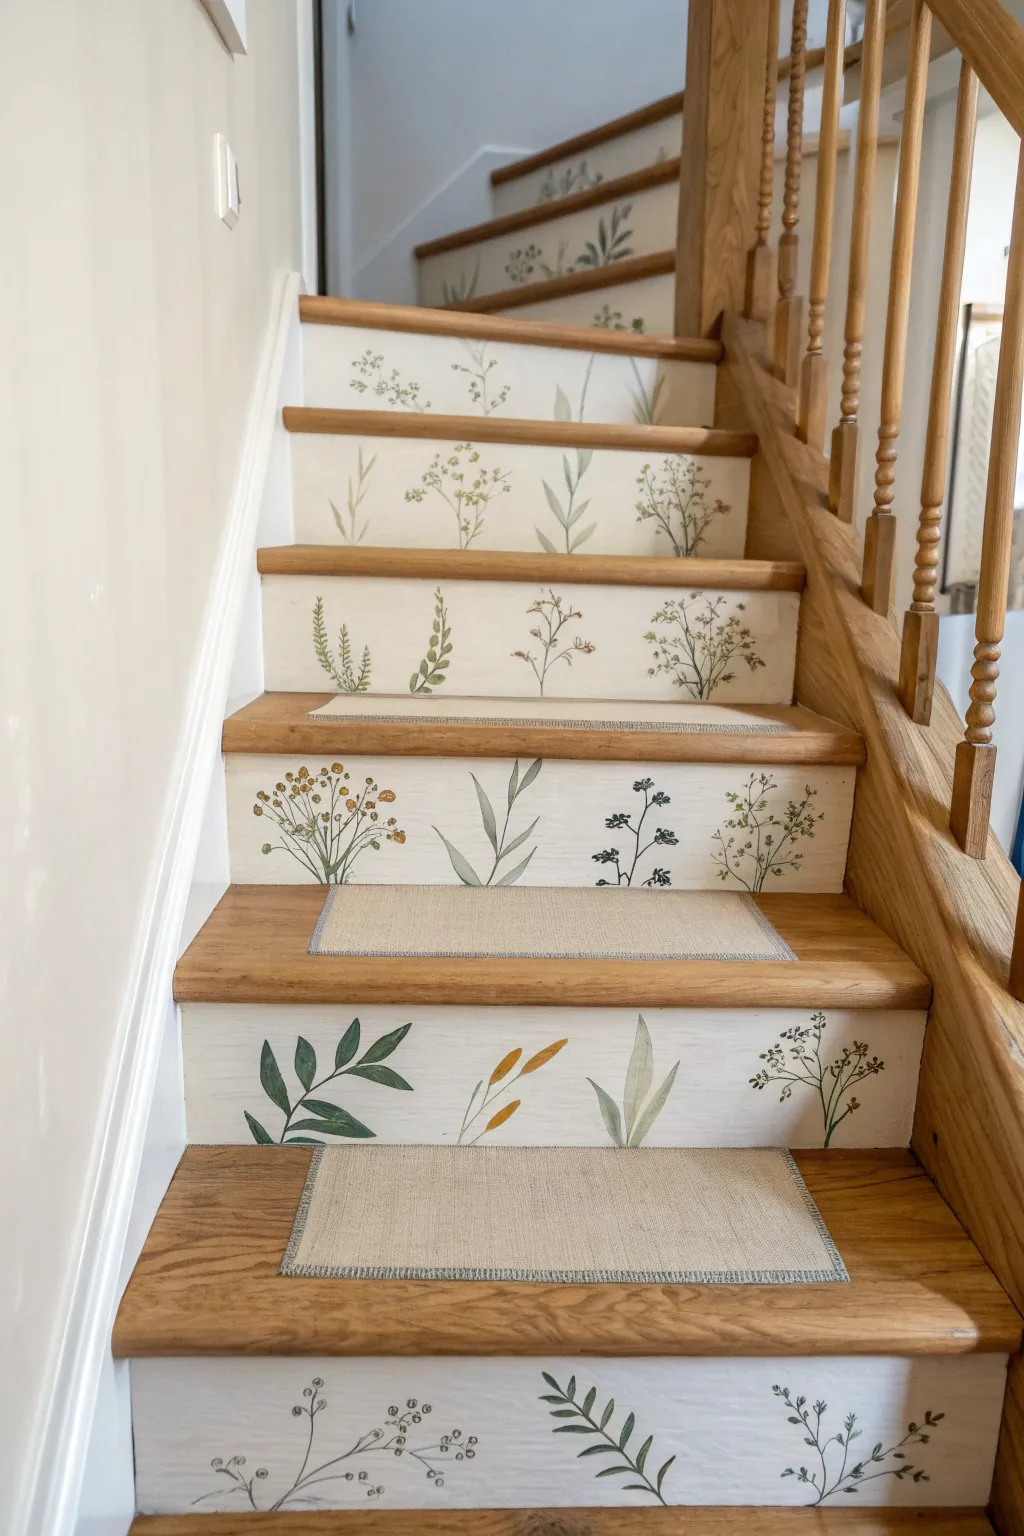
Elevate your staircase from purely functional to an enchanting meadow walk with these delicate, hand-painted botanical risers. This project combines the clean look of a neutral runner with custom floral artistry that peeks out from the sides, adding organic charm to every step.
Detailed Instructions
Materials
- Sanding block (medium and fine grit)
- Painter’s tape
- Primer (high-quality gripping primer)
- White or cream latex paint (satin finish)
- Acrylic craft paints (olive green, muted sage, golden yellow, brown, white)
- Assorted detail paintbrushes (round sizes 0, 2, and 4)
- Pencil and eraser
- Clear protective topcoat (water-based polyurethane)
- Carpet runner (sisal or wool blend)
- Stair runner installation tools (staple gun, carpet tucker)
Step 1: Preparation & Base Coat
-
Clean the surface:
Begin by thoroughly cleaning your stair risers with a degreaser or TSP substitute to remove any dirt, scuff marks, or oils that could prevent paint adhesion. -
Sand for grip:
Lightly sand the existing finish of the risers using a medium-grit block. You don’t need to strip it bare, just scuff the surface enough to give the new paint some ‘tooth’ to grab onto. -
Protect the edges:
Apply painter’s tape carefully along the underside of the stair nosing (the lip) and the tread below the riser to ensure crisp, clean lines. -
Prime the risers:
Apply a coat of high-quality bonding primer to the risers. Let this dry completely according to the manufacturer’s instructions before assessing if a second coat is needed for full coverage. -
Apply the background color:
Paint the risers with your chosen background shade—a warm creamy white works beautifully here to mimic watercolor paper. Apply two thin, even coats rather than one thick one to avoid drips.
Loose Hand Technique
Don’t rest your palm heavily on the riser while painting. Instead, extend your pinky finger to balance your hand against the wood, keeping your brush strokes fluid and loose.
Step 2: Planning the Design
-
Define the runner space:
Before sketching, measure and lightly mark pencil guidelines where your carpet runner will sit. You want your artwork to extend slightly behind where the runner will be, so no blank gaps show. -
Sketch the stems:
Using a light pencil touch, sketch varied botanical stems on the exposed sides of the risers. Draw single, sweeping lines for the main stalks, ensuring they curve naturally rather than standing perfectly straight. -
Vary the composition:
Alternate your designs on each step. I like to mix tall grasses, leafy fern shapes, and small flower clusters so no two adjacent steps look identical.
Fixing Paint Smudges
Did a leaf go rogue? Keep a damp Q-tip handy. While acrylic is wet, you can quickly wipe away small mistakes without ruining the base coat. If dry, just touch up with base color.
Step 3: Painting the Botanicals
-
Mix your palette:
Squeeze out your acrylics onto a plate. Mix a few shades of green—add a touch of brown to green for stems, and yellow to green for fresh leaves—so your plants have depth and aren’t monotone. -
Paint main stems:
Using a size 2 round brush and thinned brownish-green paint, carefully trace over your pencil lines for the main stems. Keep the pressure light at the tips for a tapered effect. -
Add broad leaves:
Switch to a slightly larger size 4 brush for broader leaves. Press the belly of the brush down and lift as you pull away to create a natural leaf shape that is wider in the middle and pointy at the end. -
Detail delicate fronds:
For fern-like designs, use a size 0 detail brush. Use short, quick strokes extending from the center vein outward. A muted sage green works well here for a soft, vintage look. -
Dab in florals:
For the seed heads or small flowers, dip the tip of a small brush into golden yellow or brown. Use a stippling motion (gentle dots) to create clusters at the ends of stems. -
Layer for depth:
Once the first layer of leaves is dry, go back in with a slightly lighter or darker mixture to add veins or shadows where leaves overlap. -
Review and refine:
Step back and look at the stairs as a whole. If any area looks too sparse, add a small sprig or a few falling leaves to balance the visual weight.
Step 4: Finishing Touches
-
Erase guidelines:
Ensure the paint is bone dry (wait at least 24 hours to be safe), then gently erase any visible pencil marks that weren’t covered by paint. -
Seal the artwork:
Apply two coats of water-based clear polyurethane in a satin or matte finish. This protects your hand-painted work from scuffs without yellowing the white background. -
Install the runner:
Finally, install your sisal or wool runner down the center over your pencil guides. The runner will cover the inner edges of your paintings, creating the illusion that the garden continues underneath.
Enjoy the gentle, garden-inspired atmosphere every time you ascend your new artistic staircase


Have a question or want to share your own experience? I'd love to hear from you in the comments below!