
If you’ve ever popped a fresh plaster mask off the form and thought, “Okay… now what?” you’re in the right place. I pulled together my favorite plaster mask ideas—starting with the classics and sliding into the delightfully weird—so you can turn that plain white shell into something unforgettable.
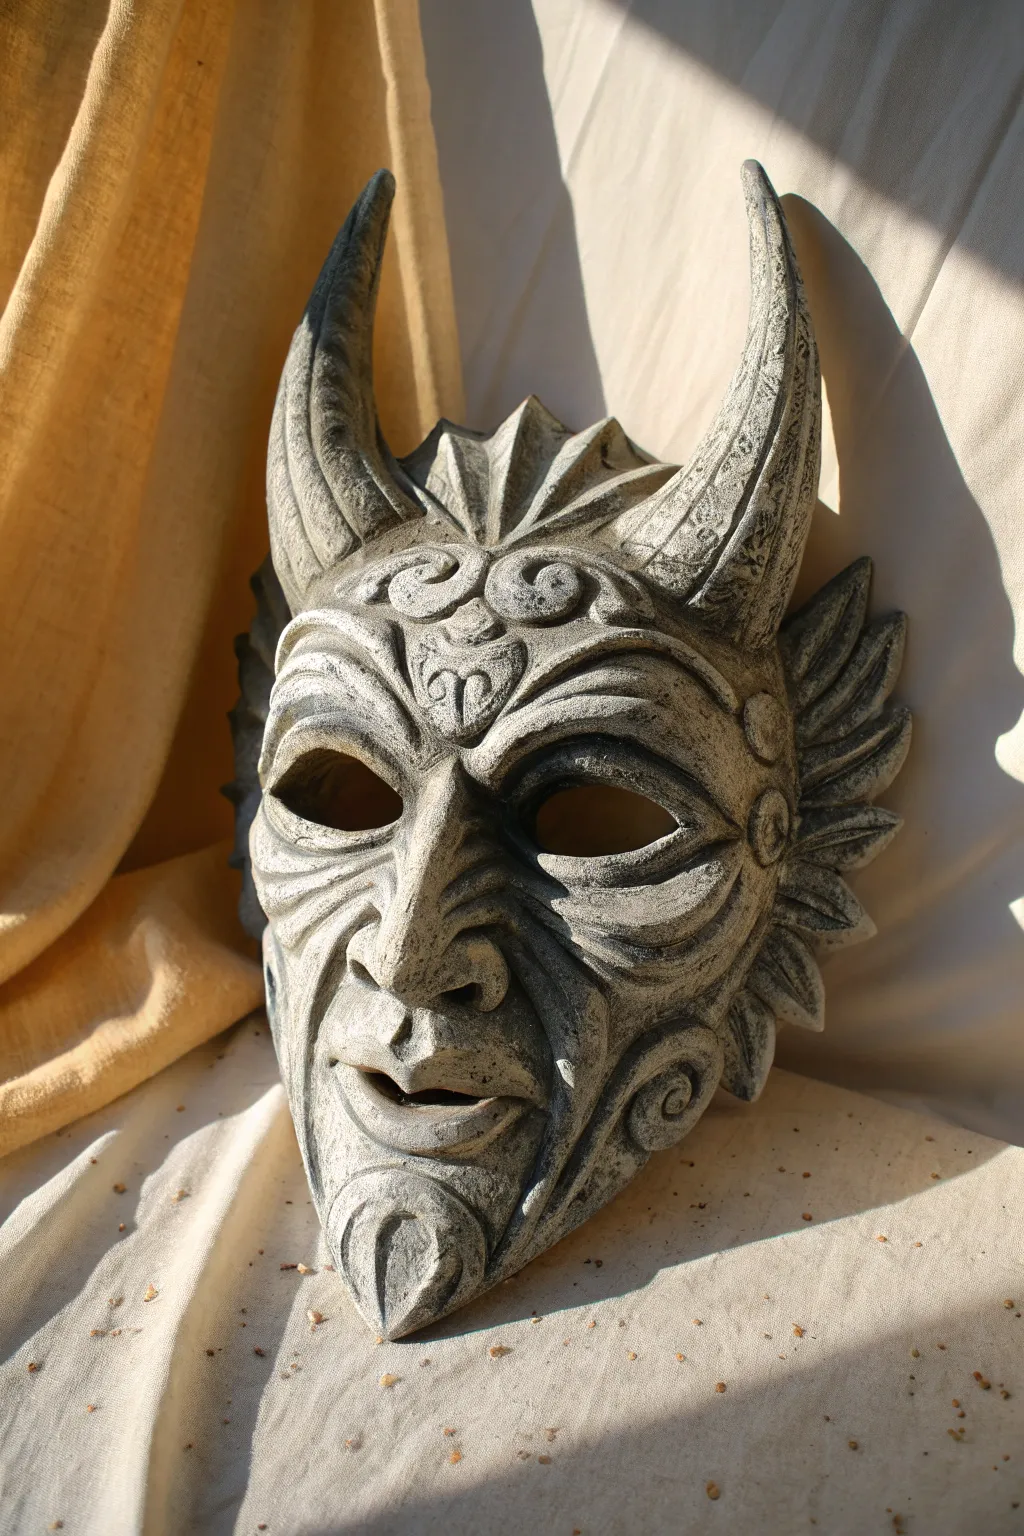
Classic Painted Character Mask
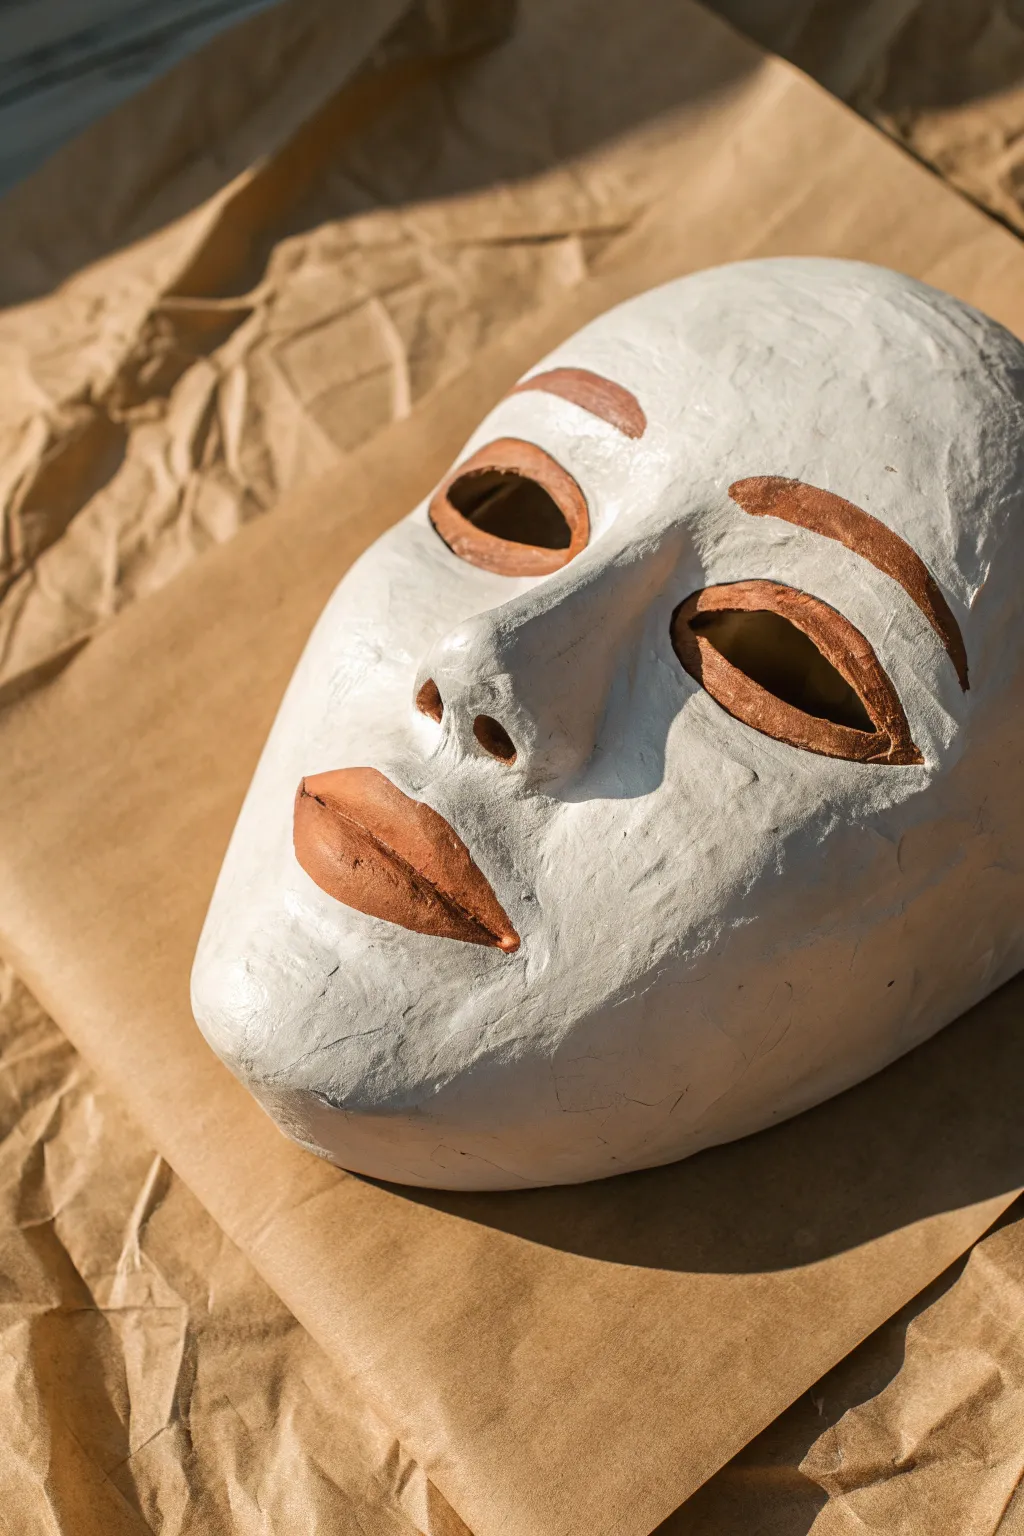
This project captures the serene beauty of a classic theatrical mask, blending a stark, textured white base with warm, terracotta accents. The result is a striking, ancient-inspired visage that looks wonderful displayed on a shelf or wall.
Step-by-Step
Materials
- Plastic face mold or volunteer model
- Petroleum jelly (Vaseline)
- Plaster gauze bandages (plaster strips)
- Bowl of warm water
- Fine grit sandpaper (220 grit)
- White acrylic gesso or matte white acrylic paint
- Terracotta or rust-colored acrylic paint
- Medium flat brush
- Small round detail brush
- Matte sealant spray (optional)
Step 1: Forming the Base
-
Prepare your workstation:
Cover your table with newspaper or a plastic drop cloth, as plaster work can get messy. Set out your bowl of warm water and cut your plaster gauze into manageable strips of varying lengths (2-4 inches). -
Prepare the mold:
If using a plastic face mold, apply a thin, even layer of petroleum jelly over the entire surface to ensure the mask releases easily later. If you are casting on a person’s face, protect their hairline and eyebrows thoroughly with jelly. -
Apply the first layer:
Dip a plaster strip into the warm water, run it between two fingers to squeegee off excess water, and lay it across the forehead of the mold. Smooth it down gently to remove air bubbles. -
Build the structure:
Continue adding wet strips, overlapping them slightly. Work your way down the nose, cheeks, and chin. I like to reinforce the edges by folding the strips over the rim slightly for a cleaner look. -
Detail the features:
Use smaller, thinner strips around the nose and eye openings. Press the gauze firmly into the crevices of the nostrils and lips to capture the definition of the mold. -
Add strength:
Apply a second and preferably a third layer of plaster strips, changing the direction of the strips (criss-cross pattern) to maximize structural integrity. -
Let it cure:
Allow the plaster to set completely. This usually takes about 20-30 minutes on the mold until it feels cool and hard to the touch. -
Demold the mask:
Gently wiggle the mask loose from the mold. Lift it carefully away and let it dry thoroughly in a warm, dry spot for at least 24 hours to ensure all moisture has evaporated.
Rough Edges?
If the edges of your mask are fraying or sharp after drying, add a thin strip of wet plaster gauze folded over the rim, or sand it down heavily before painting.
Step 2: Refining and Painting
-
Smooth the surface:
Once fully dry, take your fine-grit sandpaper and lightly sand the surface. You don’t want it perfectly smooth—retain some of that bandage texture for character—but knock down any sharp ridges or loose threads. -
Clean the dust:
Wipe the mask down with a slightly damp cloth or a tack cloth to remove all plaster dust before painting. -
Apply the base coat:
Using a medium flat brush, paint the entire mask, including the edges, with white gesso or matte white acrylic. This creates that clean, stone-like finish seen in the photo. -
Dry and assess:
Let the white layer dry. If the plaster texture is still too visible for your taste, apply a second coat of white. -
Outline the eyes:
Load a small round brush with terracotta paint. Carefully paint a thick, stylized outline around the eye sockets, mimicking a theatrical makeup style. The shape should be almond-like and bold. -
Paint the eyebrows:
Above the eye sockets, paint arched eyebrows in the same terracotta shade. Keep the stroke relatively flat and uniform, starting thicker near the nose and tapering slightly toward the temples. -
Define the lips:
Fill in the lip area with the terracotta paint. Follow the natural sculpture of the mouth, ensuring the cupid’s bow is distinct but soft. -
Refine the edges:
Go back with your small brush and touch up any terracotta lines that look shaky. The beauty of this mask is in the contrast between the rough white texture and the precise painted features. -
Final seal:
Once all paint is completely dry, you can lightly mist the mask with a matte sealant to protect the finish from dust and handling.
Antiquing Trick
To make the white look aged, mix a tiny drop of brown paint into your white base coat, or dilute brown paint with water and do a light wash, wiping it off quickly.
Hang your finished piece in a spot with dramatic lighting to emphasize the sculpted shadows of the face


Simple Animal Mask With Added Ears
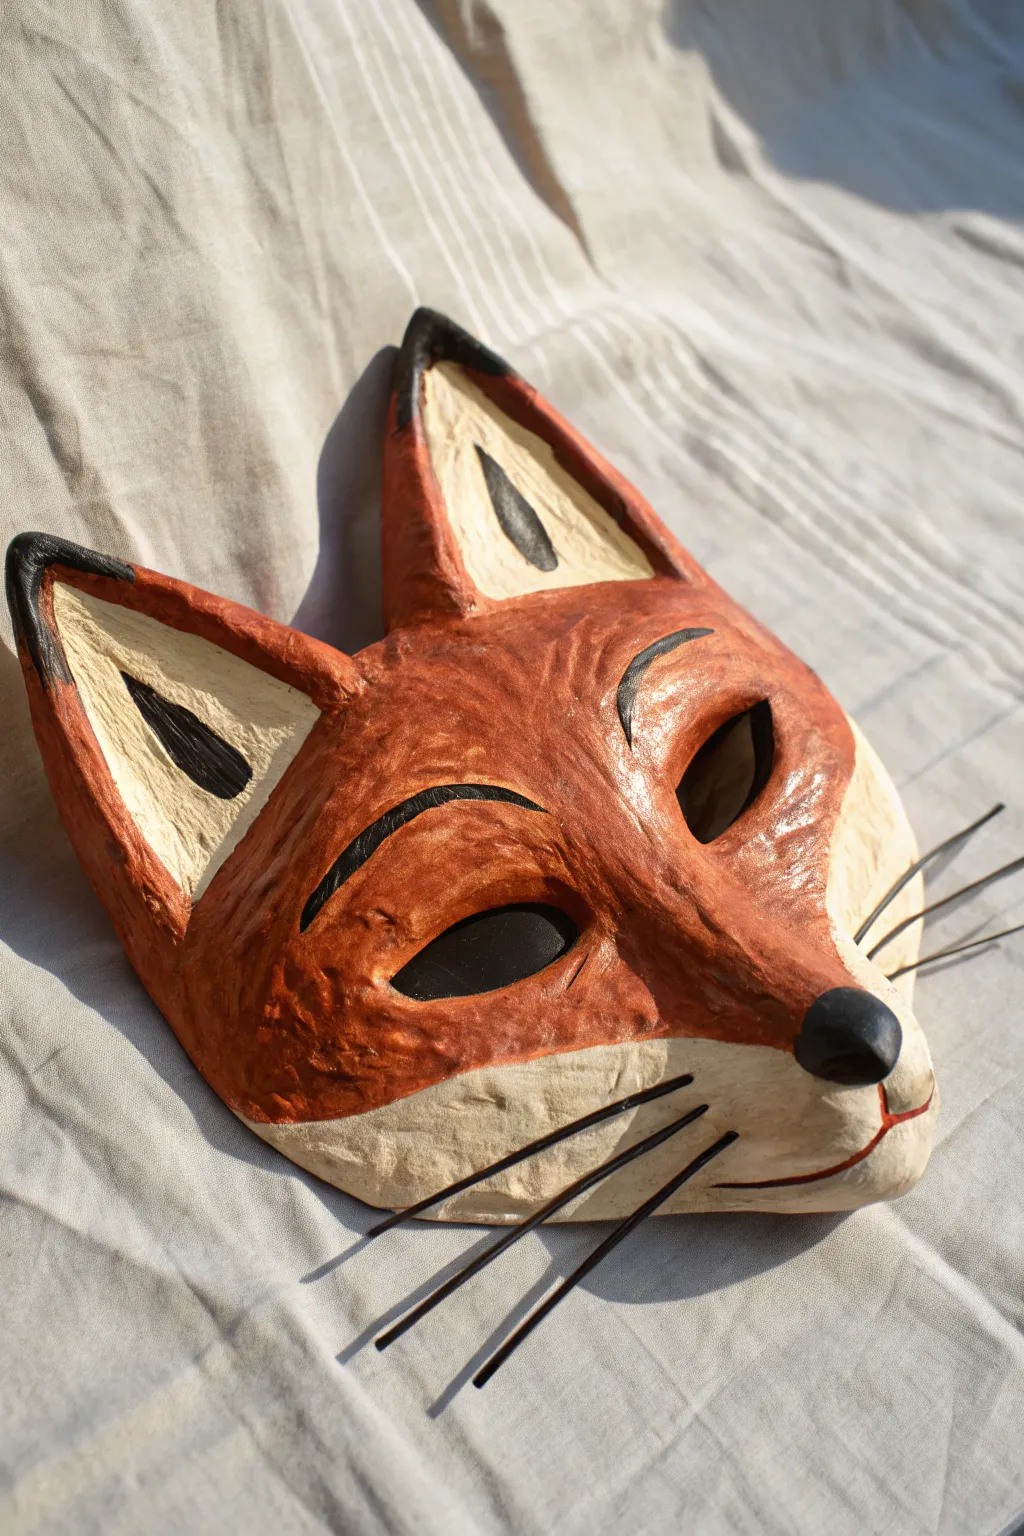
This charming fox mask uses a basic face form as a foundation, building up distinct ears and a snout for a classic woodland creature look. The finished piece features a warm, rusty red finish with striking black whiskers, perfect for display or costume use.
Step-by-Step Tutorial
Materials
- Plastic face mask form (as a base)
- Plaster cloth rolls (or plaster of Paris strips)
- Cardboard (for ears)
- Masking tape
- Lightweight clay or paper mache pulp (for nose/snout volume)
- Acrylic paints: rust red/orange, cream/off-white, black
- Matte or satin varnish
- Black craft wire (medium gauge for whiskers)
- Small drill bit or awl
- Hot glue gun
- Scissors
Step 1: Building the Structure
-
Prepare the ear templates:
Cut two large, pointed triangular shapes from stiff cardboard. They should look a bit oversized compared to the mask base, as foxes have prominent ears. -
Attach the ears:
Position the cardboard ears at the top corners of your plastic mask form. Use generous amounts of masking tape to secure them, angling them slightly forward for a curious expression. -
Build the snout volume:
Since standard mask forms have human noses, you need to extend this forward. I like to bunch up masking tape or use a small foil ball to build a protruding snout tip, taping it securely over the nose area. -
Apply the first plaster layer:
Cut your plaster cloth into short strips. Dip them in water and begin laying them over the entire mask, overlapping edges to create a strong shell. Smooth the plaster with your wet fingers as you go to remove the fabric weave texture. -
Refine the shape:
Pay special attention to the transition points where the cardboard ears meet the forehead. Add extra strips here to create a seamless curve rather than a sharp angle. -
Create the nose tip:
While the plaster is still damp, you can add a small ball of paper mache pulp or air-dry clay to the very tip of the snout to create the distinct black button nose shape.
Wrinkled Plaster?
If your plaster strips bubble up, use your wet finger to smooth them in circular motions immediately after applying. This pushes air out and seals the layers.
Step 2: Adding Texture and Paint
-
Dry completely:
Allow the mask to dry for at least 24 hours. It should feel hard and room temperature to the touch, not cool. -
Add surface texture:
To get that slightly fur-like, hand-molded look seen in the photo, apply a very thin layer of plaster or gesso with a stiff brush, leaving subtle brushstrokes visible. -
Base coat the lighter areas:
Using cream or off-white acrylic paint, cover the muzzle area (mouth and cheeks) and the inside triangles of the ears. Don’t worry about perfect edges yet. -
Apply the fox red:
Paint the rest of the face and the outer ears with a rusty red-orange. Use a dry-brush technique near the cream areas to create a soft, feathery transition rather than a hard line. -
Paint the details:
Using a fine brush and black paint, carefully fill in the nose tip. Paint the elongated tear-drop shapes inside the ears and outline the cream muzzle with a thin line for the mouth. -
Define the eyes:
Paint black sweeping arches above the eye holes to simulate eyebrows, and line the inner corners of the eyes to emphasize the fox’s slant.
Custom Ear Fluff
Glue small tufts of faux fur or torn cotton balls inside the ears before the final varnish for a realistic, fuzzy texture.
Step 3: Whiskers and Finishing
-
Drill whisker holes:
Once the paint is dry, carefully use a small hand drill or an awl to poke three small holes on each side of the muzzle. -
Prepare the wire:
Cut six lengths of black craft wire, roughly 4-5 inches long each. Gently curve them with your fingers so they aren’t perfectly straight. -
Insert whiskers:
dip one end of a wire into a tiny dab of super glue or hot glue, then insert it into a hole. Repeat for all whiskers. -
Seal the work:
Apply a coat of matte or satin varnish over the entire mask. This protects the paint and gives the ‘fur’ texture a nice, unified sheen.
Hang your clever fox on the wall and enjoy the crafty woodland vibe it brings to the room


Tiger Or Zebra Stripe Paint Job
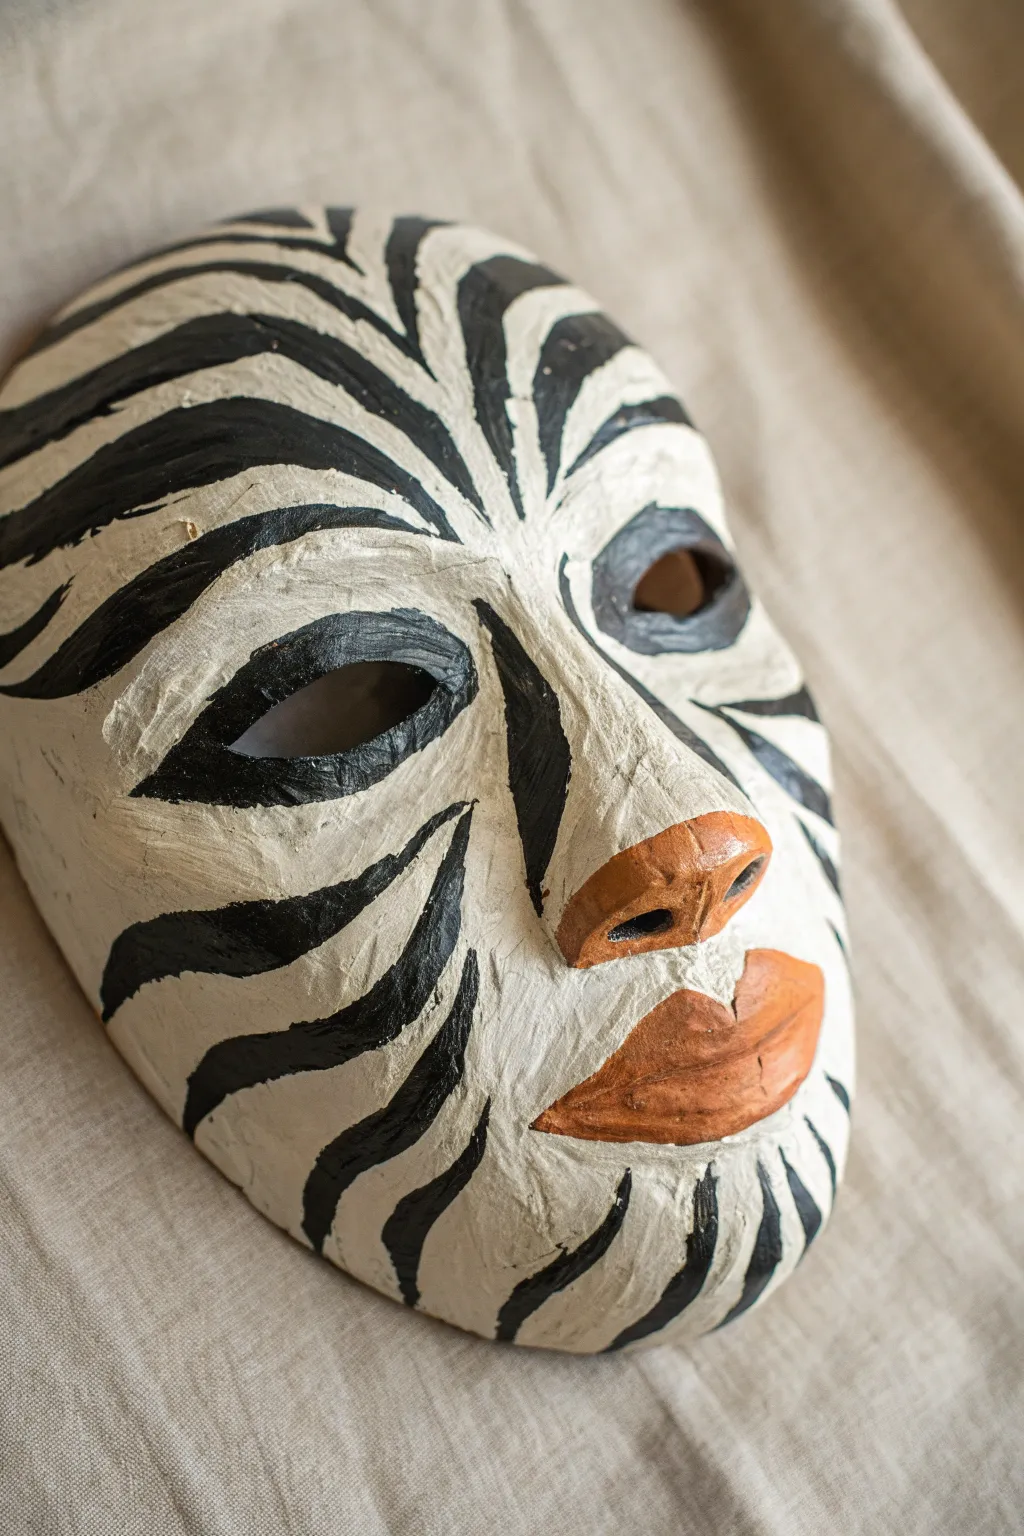
Transform a plain plaster cast into a wild, nature-inspired piece with this bold zebra stripe design. The striking contrast of black stripes against white textured plaster creates a dramatic effect, softened by warm terracotta accents.
Detailed Instructions
Materials
- Rigid plastic face mold or volunteer model
- Plaster gauze strips
- Bowl of warm water
- Petroleum jelly (Vaseline)
- Scissors
- Fine grit sandpaper (optional)
- White acrylic gesso or primer
- Black acrylic paint
- Terracotta or burnt orange acrylic paint
- Medium flat brush
- Small round detail brush
- Matte or satin clear sealant spray
Step 1: Creating the Base Mask
-
Prep the Mold:
If you are using a plastic mold, coat it lightly with petroleum jelly to ensure easy release. If you are casting on a person’s face, protect their hairline with a headband and apply a generous layer of petroleum jelly to their skin, especially eyebrows. -
Cut Gauze Strips:
Pre-cut your plaster gauze into manageable strips. You’ll want a mix of lengths: longer strips for the forehead and cheeks, and smaller 1-2 inch pieces for the nose and chin areas. -
Dip and Apply:
Dip a strip into warm water, squeegeeing off the excess water between your fingers as you pull it out. Lay the strip across the mold, smoothing it down gently to remove air bubbles and mesh texture. -
Build Layers:
Continue applying strips in overlapping patterns. Aim for at least 2-3 sturdy layers to ensure the mask holds its shape. Pay special attention to reinforcing the bridge of the nose and the edges. -
Smooth the Surface:
Before the plaster sets completely, run your wet fingers over the entire mask to smooth out the mesh weave of the gauze as much as possible. -
Dry and Remove:
Allow the mask to set until it feels hard and cool to the touch (usually 20-30 minutes). Gently wiggle it loose from the mold. Let it cure fully in a dry spot for 24 hours before painting.
Uneven Lines?
If your hand shakes while painting stripes, try slightly watering down the black paint (inky consistency). This helps the brush glide over the textured plaster without skipping.
Step 2: Painting the Design
-
Refine Edges:
Once fully dry, use scissors to trim any jagged edges around the eyes or perimeter. You can lightly sand rough spots, but I personally keep some texture to enhance the organic look. -
Prime the Surface:
Paint the entire front of the mask with a coat of white acrylic gesso or primer. This seals the porous plaster and provides a bright, opaque base for your stripes. -
Paint Feature Accents:
Using a medium brush, paint the nose tip and the lips with terracotta or burnt orange paint. Apply two coats if necessary for solid coverage. -
Map the Stripes:
Visualize a center line down the forehead and nose. Zebra stripes generally radiate outward from this center line. You can lightly sketch the pattern with a pencil if you’re nervous about freehanding. -
Start the Forehead Stripes:
Using black acrylic paint and a round brush, paint curved stripes starting from the center of the forehead and sweeping outward and upward toward the temples. -
Define the Eyes:
Carefully outline the eye holes with black paint. Extend thick, sweeping stripes from the outer corners of the eyes toward the ears. -
Cheek Contours:
Paint stripes on the cheeks that curve downwards, following the natural shape of the face. Vary the thickness—start thick near the nose/eyes and taper to a point near the mask edge. -
Chin Details:
Add vertical or slightly curved stripes along the chin and jawline. These should flow upwards toward the lips, filling the negative space naturally. -
Refine and Dry:
Check for any uneven edges on your black lines and touch them up. Let the paint dry completely. -
Seal the Work:
Finish by spraying the mask with a clear matte or satin sealant. This protects the paint from chipping and gives the mask a professional, unified sheen.
Add Dimension
Mix a tiny drop of brown into your black paint for the edges of the stripes, or dry-brush a little gold on the terracotta nose to make the features pop.
Now you have a striking display piece that brings a wild, artistic touch to any wall

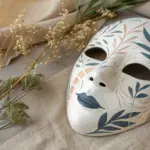

Sugar Skull-Inspired Floral Mask
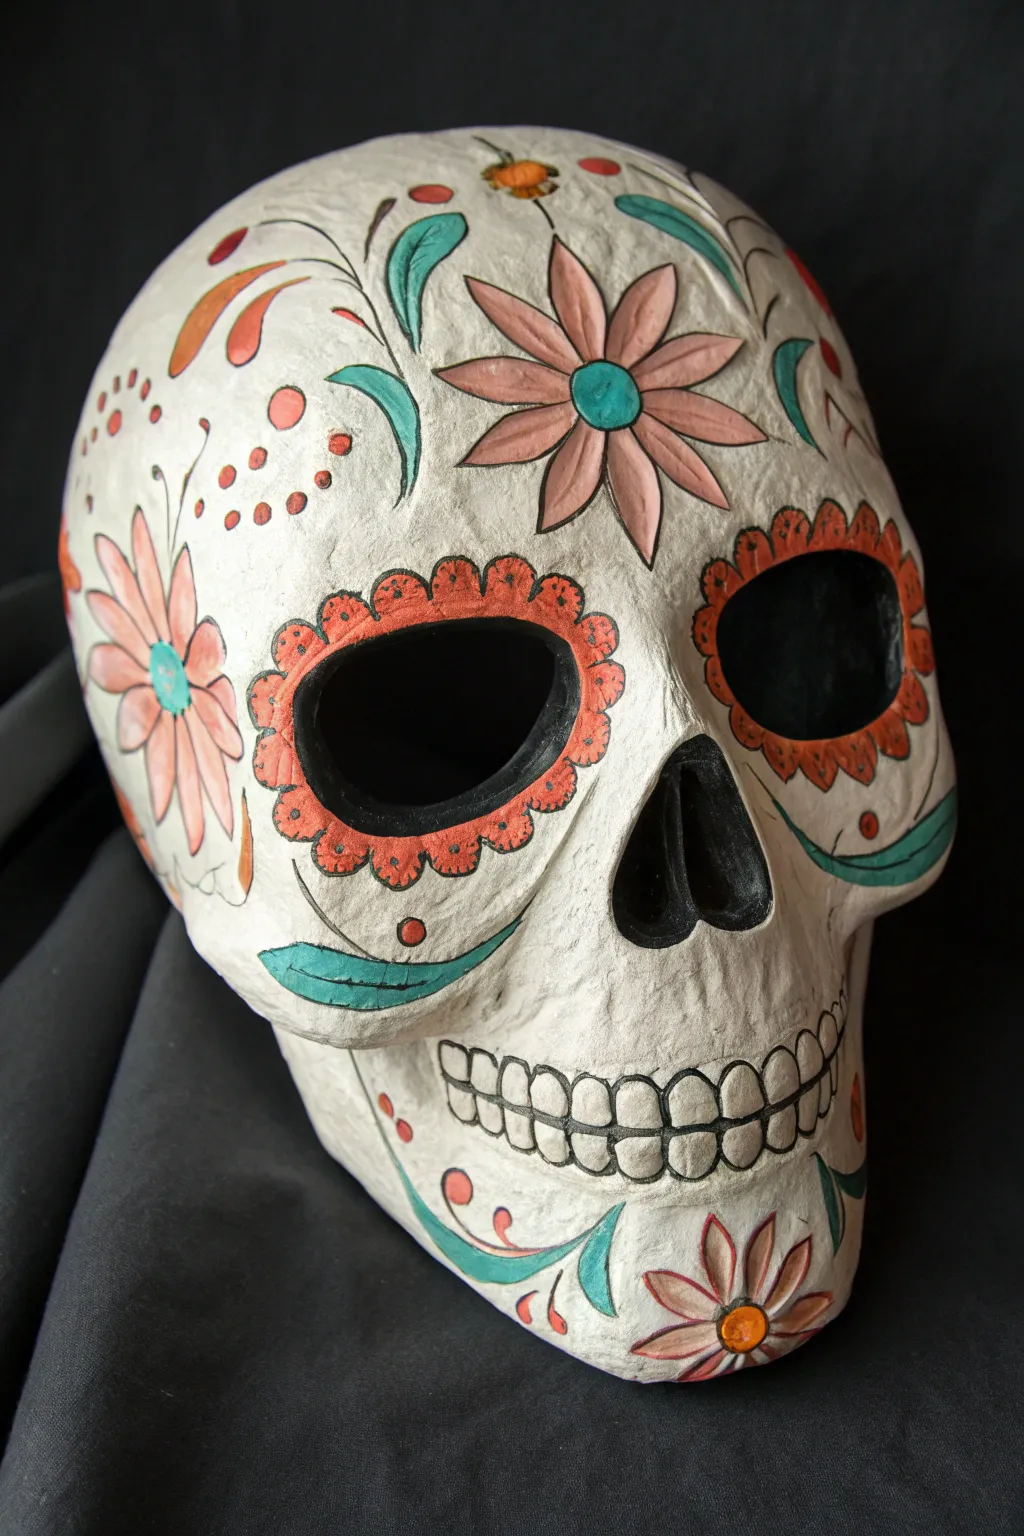
Embrace the vibrant spirit of Dia de los Muertos with this papier-mâché sugar skull, featuring bold floral motifs and traditional scalloped eye designs. The textured white base provides the perfect canvas for hand-painted details in soft coral, teal, and black.
Step-by-Step
Materials
- Plastic skull form (for molding) or pre-made paper mâché skull
- Newspaper strips
- Paper clay or paper pulp
- White flour and water (or PVA glue)
- White acrylic gesso or primer
- Acrylic paints: Black, Coral/Peach, Teal/Turquoise, Orange-Gold
- Fine grit sandpaper
- Pencil
- Round synthetic brushes (sizes 2, 4, and 6)
- Fine liner brush (size 0 or 00)
- Matte or satin varnish
Step 1: Building the Base
-
Prepare the form:
If you are starting from scratch, grease a plastic skull prop with petroleum jelly to act as a release agent. Alternatively, you can use a balloon combined with cardboard structures for a more rustic shape. -
Apply base layers:
Dip torn strips of newspaper into a mixture of flour and water (or diluted PVA glue). Apply 3-4 layers over your form, smoothing out air bubbles as you go. Let this dry completely, usually overnight. -
Add surface texture:
To achieve the specific matte, slightly organic texture seen in the photo, apply a thin layer of paper clay or thick paper pulp over the dried newspaper shell. Smooth it with wet fingers, but don’t aim for perfection—little bumps add character. -
Define features:
While the pulp is damp, ensure the eye sockets are deep and the nose cavity is clearly defined. Build up the brow bone slightly for structural depth. -
Prime the surface:
Once the skull is bone-dry (this may take 24-48 hours), coat the entire piece with white acrylic gesso. You may need two coats to get that solid, opaque white finish that makes the colors pop.
Step 2: Sketching the Design
-
Grid the face:
Lightly sketch a vertical centerline down the skull with a pencil to help with symmetry. It doesn’t have to be mathematically perfect, as the charm lies in the hand-drawn look. -
Outline the eyes:
Draw large circles around the eye sockets. Sketch scalloped ‘flower petal’ edges around these circles, similar to a marigold flower. -
Add floral elements:
Sketch a large, six-petaled flower on the forehead, slightly off-center if you prefer the organic look. Add sweeping vines and leaves curving down the cheeks and along the jawline. -
Detail the mouth:
Draw a horizontal line for the mouth, extending almost to the jaw hinge. Sketch vertical oval shapes for the teeth, ensuring they follow the curve of the maxilla.
Smooth Operator
Sand your dried paper pulp layer lightly before gessoing. It removes stray pulp fibers and makes painting fine lines much easier.
Step 3: Painting the Artwork
-
Darken the cavities:
Using black acrylic paint and a size 6 brush, fill in the deep eye sockets and the nose cavity. I like to do this first because it immediately anchors the face visually. -
Paint the eye rings:
Mix a coral/orange shade. Carefully paint the scalloped petals surrounding the black eye sockets. Let the paint be opaque but not too thick. -
Fill the forehead flower:
Paint the petals of the forehead flower with a soft pink or light coral. Use a teal color for the center circle. Once dry, outline the petals with a very fine black line. -
Color the leaves:
Use the teal or turquoise paint for the leaves on the forehead and jaw. Use a sweeping motion with your brush to taper the ends of the leaves nicely. -
Add side flowers:
Paint the larger flower shapes on the temples or sides of the head in a light peach or coral tone. Add a small teal center to tie the color palette together. -
Detail the jaw:
Paint the sweeping vine design along the jawline in teal, adding small red or orange dots as berries or buds for contrast.
Add Dimension
Glue small flat-back gems or sequins into the center of the painted flowers for a touch of light-catching texture.
Step 4: Fine Lining & Finishing
-
Outline the features:
Switch to your fine liner brush (size 00) and thin your black paint slightly with water. Outline the eye scallops, the forehead flower, and the leaves. Keep the lines delicate. -
Define the teeth:
Outline the teeth shapes with the fine liner brush. Add a horizontal line through the center of the teeth to separate the top and bottom sets. -
Add decorative dots:
Dip the non-brush end of a paintbrush into red or orange paint to stamp small, perfect dots around the cheeks and forehead area for extra texture. -
Final touches:
Review your work for any patchy areas. Add small black accents or veins inside the leaves if they look too plain. -
Seal the project:
Once all paint is thoroughly dry, apply a matte or satin spray varnish to protect the artwork without making it overly shiny.
Display your finished skull on a mantelpiece or shelf to add a touch of artistic flair to your space
BRUSH GUIDE
The Right Brush for Every Stroke
From clean lines to bold texture — master brush choice, stroke control, and essential techniques.
Explore the Full Guide
Venetian-Style Masquerade Look
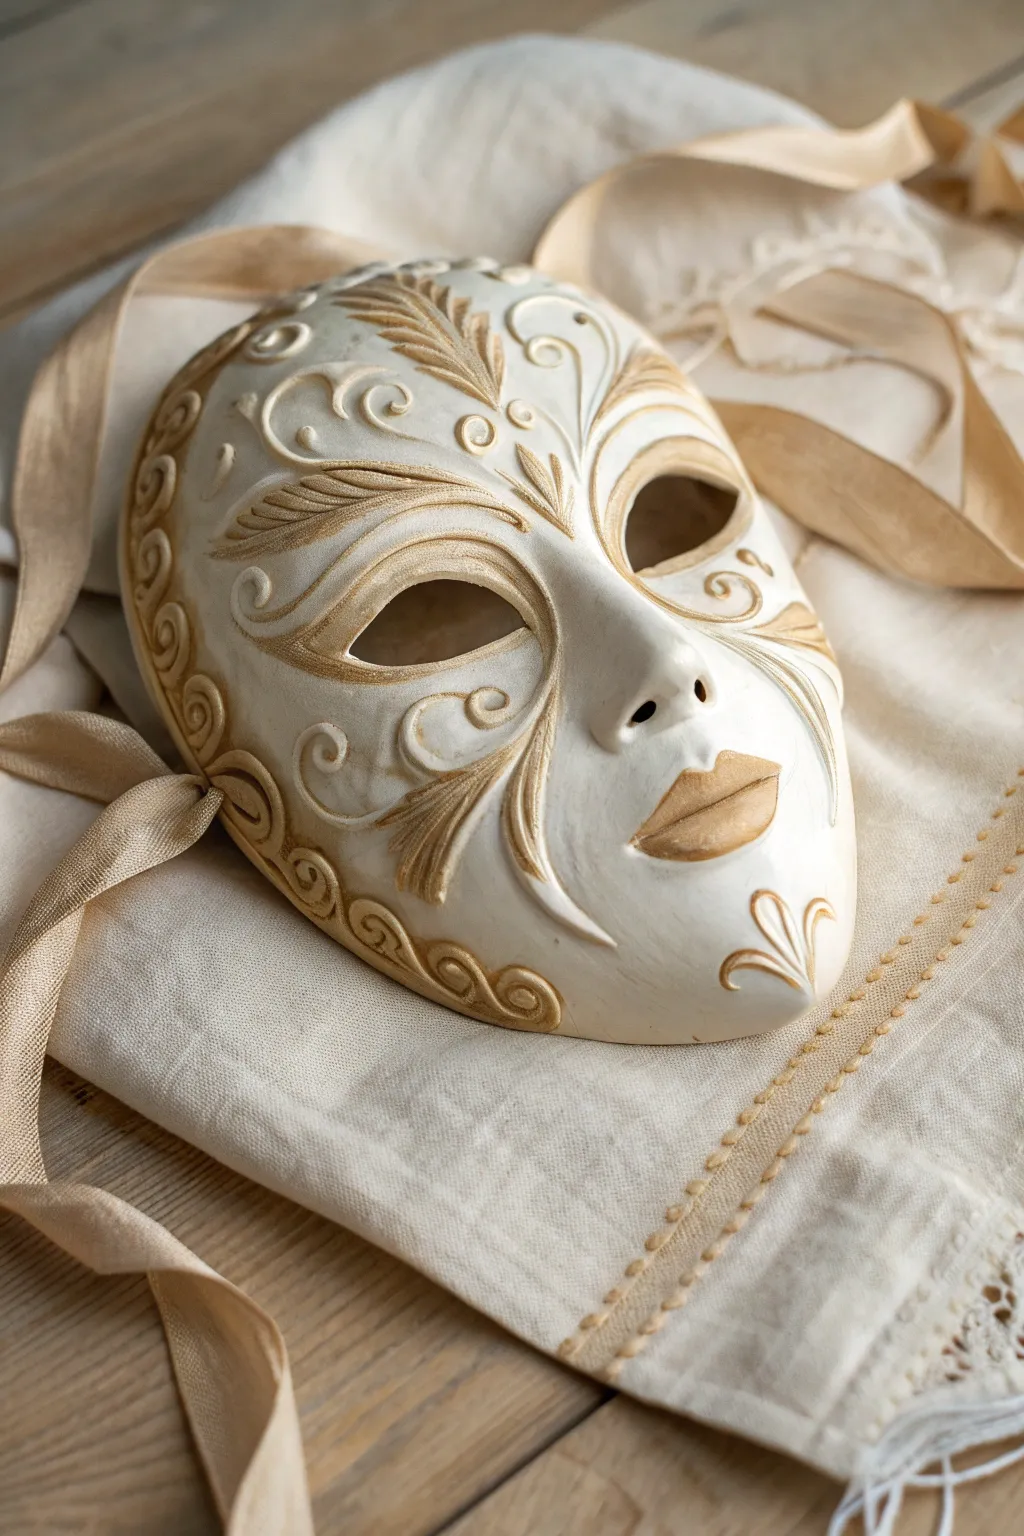
This project transforms a simple plaster or papier-mâché mask form into a stunning Venetian-style masterpiece featuring elegant raised scrollwork and subtle gold accents. The finished piece has a timeless, antique ivory look perfect for masquerades or wall decor.
Step-by-Step Guide
Materials
- Blank full-face mask form (paper pulp, plaster, or plastic)
- Gesso or white acrylic primer
- Dimensional fabric paint (Puffy Paint) or relief paste in a fine-tip bottle
- Acrylic paints: Antique White/Cream, Metallic Gold, Raw Umber
- Matte finish spray sealant
- Soft synthetic brushes (flat shader and fine liner)
- Pencil
- Gold satin ribbon (1 inch wide)
- Hot glue gun and glue sticks
- Sandpaper (fine grit)
- Damp cloth
Step 1: Preparation and Base Coat
-
Prepare the surface:
Begin by lightly sanding your mask blank if there are any rough seams or ridges. Wipe it down with a damp cloth to remove dust, ensuring a smooth canvas for your detailing. -
Prime the mask:
Apply a uniform coat of gesso or white acrylic primer over the entire front of the mask. This seals the material and provides a bit of tooth for the subsequent layers. -
Apply base color:
Once the primer is dry, paint the entire mask with an Antique White or heavy Cream acrylic paint. You want a solid, opaque coverage, so apply a second coat if the first looks streaky.
Fixing Wobbly Lines
If your relief paste lines smear or wobble, don’t wipe them immediately. Let them dry slightly, then use a toothpick to lift the mistake off the surface cleanly before re-piping.
Step 2: Sketching and Relief Work
-
Draft the design:
Using a pencil very lightly, sketch the swirling patterns onto the dry mask. Focus on symmetry around the eyes and a central motif on the forehead. -
Outline the eyes:
Draw the sweeping curves that frame the eye holes, extending them outwards towards the temples to create that dramatic cat-eye shape seen in Venetian styles. -
Add nature motifs:
Sketch the leaf-like shapes on the cheeks and forehead. Use the reference image to guide the flow of the fern-like fronds and scrolling vines. -
Apply dimensional relief:
Take your bottle of dimensional paint or relief paste. Carefully trace over your pencil lines, applying steady pressure to create raised, 3D lines. I find resting my wrist on a steady object helps keep shaky hands at bay. -
Build up leaf texture:
For the wider leaf sections, fill in the sketched area with the dimensional medium, using the nozzle tip to drag through the wet paste to create internal vein textures. -
Create the border:
Pipe a continuous scroll or wave pattern along the outer edge of the mask, particularly focusing on the jawline and chin area to frame the face. -
Let it cure:
Allow the relief work to dry completely. This is crucial; dimensional paint can take several hours or even overnight to harden fully.
Make it Crackle
Apply a crackle glaze medium between the base coat and the top cream coat. As it dries, fine fissures will appear, giving the mask an authentic, centuries-old antique porcelain effect.
Step 3: Painting and Antiquing
-
Unify the color:
Once the raised designs are rock hard, paint over the *entire* mask again—including the raised relief—with your Cream base color. This integrates the relief so it looks like carved plaster rather than applied paint. -
Highlight with gold:
Dip a flat brush into Metallic Gold paint and wipe most of it off on a paper towel (dry brushing). Gently sweep the brush over the raised relief patterns to catch only the high points. -
Detail the lips:
Paint the lips entirely in Metallic Gold using a smaller brush for precision. Ensure the edges are crisp and clean. -
Fill the eyes:
Similarly, paint the inner rim of the eye holes with gold to create a finished, professional look. -
Add antique depth:
Mix a tiny amount of Raw Umber with water to create a thin wash. Paint this into the deep crevices of the relief work and immediately wipe away the excess from the high points with a rag. This shadows the recesses.
Step 4: Finishing Touches
-
Seal the work:
Spray the mask with a matte finish sealant. This protects the paint job and knocks back any unnatural glossiness from the acrylics, giving it a soft, porcelain-like sheen. -
Prepare ribbons:
Cut two lengths of gold satin ribbon, each about 18-24 inches long. Cut the ends at an angle to prevent fraying. -
Attach ribbons:
Use a hot glue gun to securely attach one end of a ribbon to the inside temple area of the mask on both sides. You can glue a small square of felt over the ribbon attachment point for extra comfort against the skin.
Enjoy displaying your sophisticated Venetian creation or wearing it to your next elegant event
Wearable Half Mask With Clean Edges
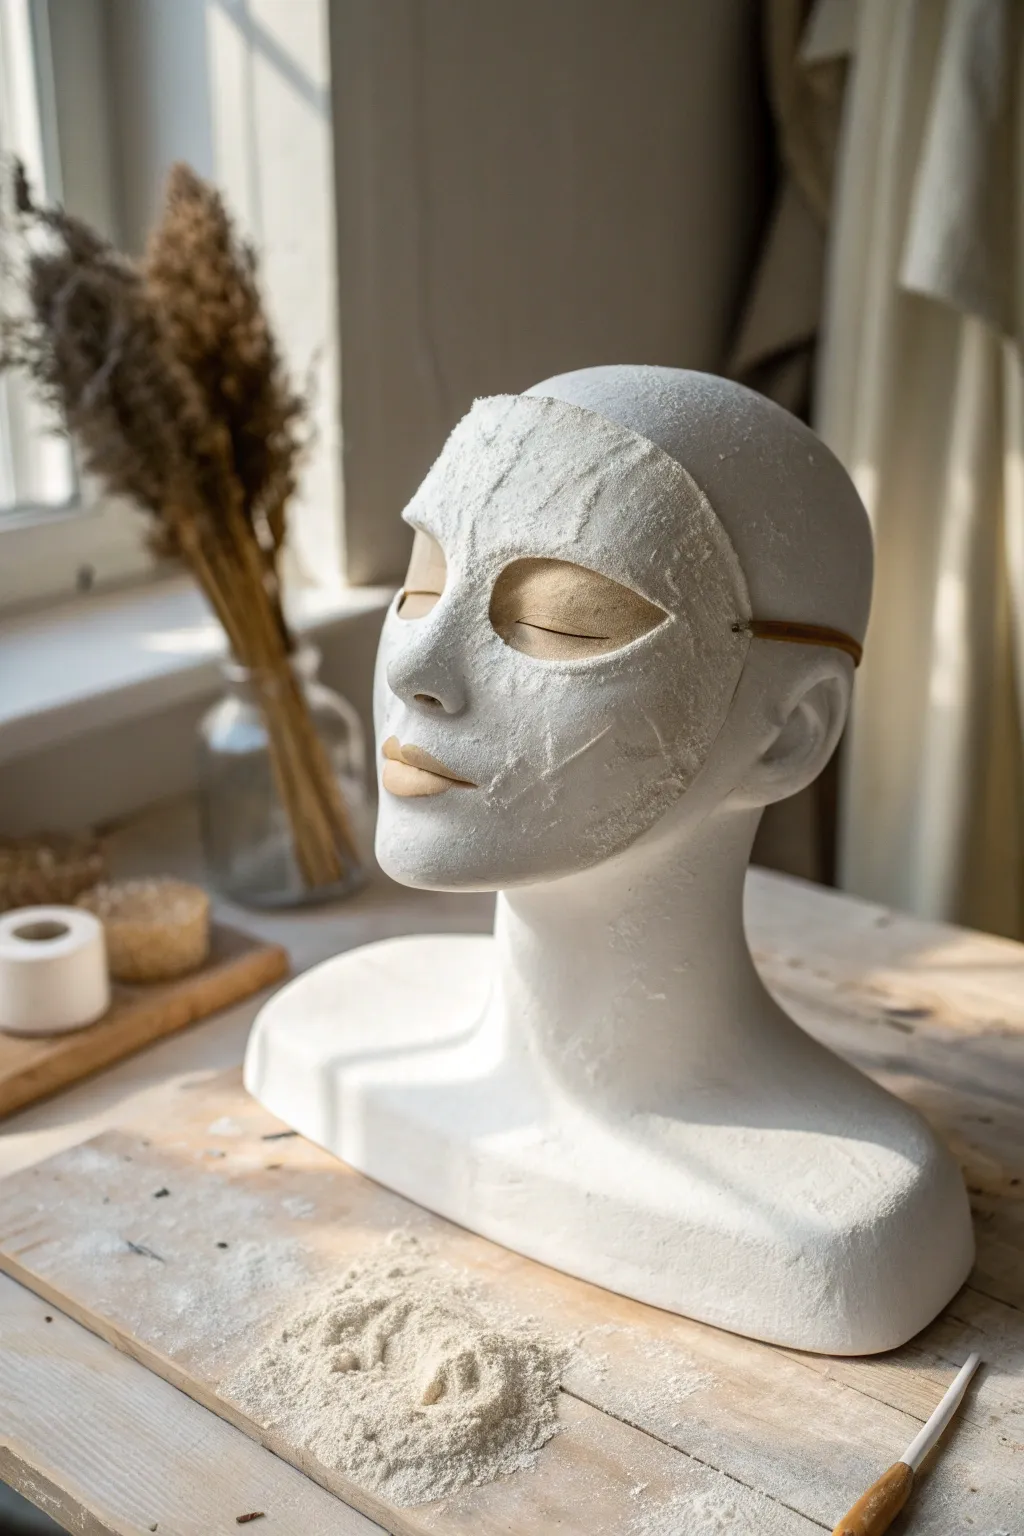
This project captures the serene beauty of a classic plaster mask, focusing on clean lines and subtle textures. The result is a striking, museum-quality piece with defined eye openings and raw, dusty edges that evoke an ancient aesthetic.
Detailed Instructions
Materials
- Plastic or foam head form (armature)
- Plaster gauze strips (modroc)
- Petroleum jelly or plastic wrap (release agent)
- Bowl of warm water
- Fine grit sandpaper (220-400 grit)
- X-acto knife or craft scalpel
- Elastic cord or leather strap
- Scissors
Step 1: Preparation and Base Layer
-
Prepare the workspace:
Cover your work area with plastic sheeting or newspaper, as plaster dust and drips can be messy. Set up your head form in a stable position. -
Apply a release barrier:
Coat the facial area of your head form generously with petroleum jelly. Alternatively, wrap the area tightly with plastic wrap to ensure the mask doesn’t stick permanently to the form. -
Cut the gauze:
Pre-cut your plaster gauze into manageable strips of varying sizes—some long rectangular strips for spanning the forehead and shorter, thinner pieces for around the nose. -
Wet the first strips:
Dip a strip of plaster gauze into the warm water for just a second or two, then run it between two fingers to squeegee off excess water. -
Form the perimeter:
Lay the damp strips across the forehead and down the cheeks to establish the outer shape of the mask. For this half-mask style, define a boundary that stops just below the nose or covers the upper lip, keeping the chin free. -
Build the base layer:
Continue layering wet strips over the bridge of the nose and cheekbones. Overlap each strip by about half its width to ensure structural integrity.
Creamy Finish Tip
To hide the gauze texture completely, apply a final thin layer of ‘joint compound’ or purely plaster paste (no gauze) with your finger over the dried mask.
Step 2: Building Structure and Shape
-
Define the eye sockets:
Carefully place smaller strips around the eye area, but leave the actual eye holes mostly open. It is easier to refine these shapes later than to build them perfectly wet. -
Smooth the surface:
As you add layers, use wet fingers to gently rub the plaster. This smooths the gauze weave and creates a creamier, more stone-like texture. -
Build thickness:
Apply a second and third layer of gauze. I like to switch the direction of the strips (vertical vs. horizontal) to make the final mask stronger. -
Create the raw edge texture:
Instead of folding the edges under for a neat seam, leave the raw gauze edges slightly visible or uneven. Add a little extra plaster paste from the bottom of the bowl along these edges to enhance that crusty, imperfect look shown in the photo. -
Initial drying phase:
Allow the mask to set on the form until it is cool to the touch and hard, usually about 20-30 minutes.
Step 3: Refining and Finishing
-
Remove from form:
Gently pry the edges of the mask away from the head form. It should pop off easily thanks to the petroleum jelly. Let it dry completely off the form for another 1-2 hours. -
Carve the eyes:
Using a sharp X-acto knife, carefully carve out the almond-shaped eye openings. Clean up any ragged bits of gauze from the cut. -
Refine the perimeter:
Trim any excessively long loose threads from the outer edge, but maintain the slightly rough border that gives character to the piece. -
Sand for texture:
Lightly sand the surface with fine-grit sandpaper. Focus on high points like the nose bridge and cheekbones to create a smooth contrast against the rougher recessed areas. -
Dust and detail:
Rub a small amount of dry plaster powder over the surface to enhance the matte, dusty finish seen in the reference image. -
Attach the strap:
Poke small holes on either side of the temple area using a drill bit or awl. Thread your leather cord or elastic through and knot it securely on the inside.
Make it Ancient
Mix a tiny drop of tea or coffee into your water bowl before dipping the gauze. This tints the plaster slightly, giving it an aged, bone-like parchment color.
Once dried and strapped, your mask is ready to be displayed as a sculptural object or worn for a dramatic effect

PENCIL GUIDE
Understanding Pencil Grades from H to B
From first sketch to finished drawing — learn pencil grades, line control, and shading techniques.
Explore the Full Guide
Closed-Eye Display Mask With Painted Lids

Transform a plain plaster base into a striking piece of decor with this elegant closed-eye design. Featuring a textured white finish accented by bold royal blue and shimmering gold leaf paint, this mask evokes a serene, theatrical beauty ideal for shelf display.
Step-by-Step Guide
Materials
- blank plaster or papier-mâché full-face mask
- white gesso or textured primer
- white matte acrylic paint
- royal blue acrylic paint
- gold metallic acrylic paint or liquid gold leaf
- fine detail paintbrush (size 0 or 1)
- medium flat paintbrush
- pencil with a soft lead
- matte sealant spray
- metal display stand with a vertical rod
- fine-grit sandpaper
- small dotting tool or toothpick
Step 1: Base Preparation
-
Clean and sand:
Begin by lightly sanding your blank mask to remove any manufacturing seams or rough spots that feel unintentional. Wipe it down with a damp cloth to ensure it’s dust-free. -
Build texture:
To achieve that stone-like, ancient look, apply a layer of thick gesso or textured primer. Instead of brushing it on smoothly, stipple it with your brush to create deliberate imperfections and a tactile surface. -
Apply base color:
Once the texture layer is completely dry, coat the entire mask with matte white acrylic paint. This unifies the surface and ensures the texture stands out without looking messy. Let this dry fully for at least an hour.
Step 2: Mapping the Features
-
Sketch the eyelids:
Using a soft pencil, lightly draw the shape of the large, closed eyelids. Aim for a wide, almond shape that covers the actual eye socket area of the mask. -
Outline the lashes:
Lightly sketch the sweeping, downward-curved lashes under the eye area. Just marking the direction and length is enough, as you’ll define the thickness with paint later. -
Mark decorative details:
Plan the arch of dots above the eyebrows. A faint guideline helps ensure symmetry on both the left and right sides.
Trembling Hand Trouble?
If you struggle with straight lines on curved surfaces, rest your pinky finger on a dry part of the mask to anchor your hand while painting the blue outlines.
Step 3: Painting the Gold Elements
-
Paint the eyelids:
Using your gold metallic paint and a medium brush, fill in the sketched eyelid shape. I find that applying two thin coats gives a much richer luster than one thick glob. -
Gild the lips:
Paint the lips with the same gold. Follow the natural contours of the mask’s mouth, emphasizing the cupid’s bow for a distinct look. -
Create the lashes:
Switch to your fine detail brush. With a steady hand, paint the individual lashes below the eye in gold, starting thick at the base and lifting the brush as you stroke outward to create a tapered point. -
Add the brow dots:
Dip a dotting tool or the non-brush end of your paintbrush into the gold. gently press dots along your guideline above the brow, spacing them evenly.
Pro Tip: Ancient Texture
For an even more aged, stone-like appearance, try lightly dabbing a slightly grey-tinted glaze over the white base before painting the features, then wipe most of it off.
Step 4: Defining with Blue
-
Outline the upper lid:
Load a small round brush with royal blue paint. Carefully trace the upper arch of the gold eyelid. Keep this line smooth and consistent in width. -
Outline the lower lid:
Paint the bottom curve of the eyelid in blue, connecting it to the top line at the corners to fully enclose the gold shape in a sharp blue almond outline. -
Refine edges:
If the blue paint wobbled slightly, wait for it to dry and then use a tiny bit of gold to touch up the inner edge for a crisp boundary.
Step 5: Assembly and Finish
-
Seal the artwork:
Once all paint is perfectly dry (give it a few hours to be safe), mist the mask with a matte sealant spray. This protects the porous plaster and prevents the metallic paint from tarnishing. -
Mount on stand:
Carefully slide the opening at the base of the mask (or under the chin) onto the metal rod of your display stand. If the fit is loose, you can add a bit of putty inside the mask to stabilize it.
Place your finished piece in a spot with good lighting to let that metallic gold truly catch the eye
Metallic Patina Finish
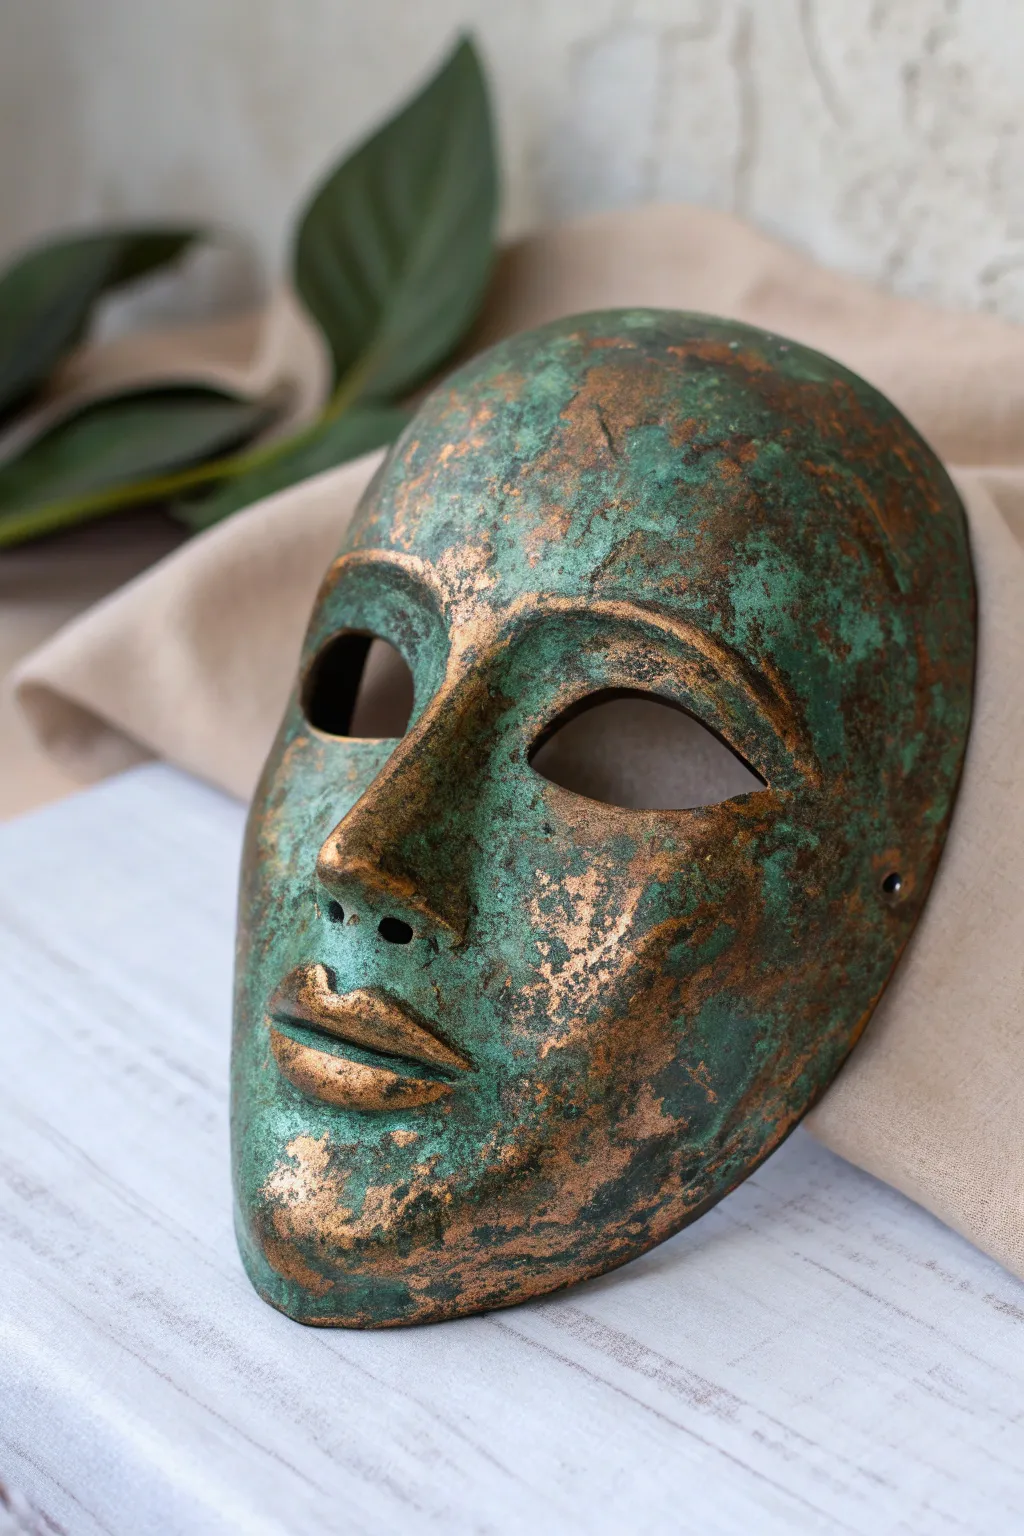
Transform a plain white plaster mask into a relic of antiquity with this faux bronze technique. By layering metallic coppers with textural teal washes, you will simulate the beautiful oxidation known as verdigris found on ancient statues.
Step-by-Step Tutorial
Materials
- White paper mache or plaster craft mask
- Acrylic primer (gesso)
- Black acrylic paint
- Dark metallic bronze or copper acrylic paint
- Bright copper or gold acrylic paint (optional highlight)
- Teal or turquoise acrylic paint
- Sea sponge or coarse textured sponge
- Soft synthetic paintbrushes (medium flat and small round)
- Paper towels
- Matte finish spray sealer
- Medium-grit sandpaper
Step 1: Preparation & Base Coat
-
Smooth the surface:
Begin by inspecting your plaster or paper mache mask for any rough peaks or casting seams. Lightly sand these areas down with medium-grit sandpaper to create a unified surface, then wipe away any dust with a damp cloth. -
Prime the mask:
Apply a coat of gesso or white acrylic primer over the entire front of the mask. This seals the porous plaster so it doesn’t soak up too much of your expensive metallic paint later. -
Apply the shadow layer:
Once the primer is dry, paint the entire mask solid black. While this seems counterintuitive for a bronze mask, the black base adds depth and ensures that any recessed areas underneath the metallic layer look shadowed and heavy. -
Dry thoroughly:
Let the black coat dry completely. If you can see white showing through, add a quick second coat to ensure total coverage.
Too much green?
If the teal wash overwhelmed your copper, don’t panic. Once dry, just dry-brush pure metallic copper lightly over the high spots to push the oxidation back into the shadows.
Step 2: The Metallic Effect
-
Stipple the bronze:
Dip a sea sponge into your dark metallic bronze or copper paint. Dab off the excess on a paper towel until the sponge is almost dry. -
Build the texture:
Gently stipple the sponge over the mask. You want to leave tiny specks of the black background showing through, which creates the look of pitted, aged metal rather than a brand new shiny sheet. -
Focus on high points:
Apply a slightly heavier amount of the metallic paint to the highest points of the face—the nose bridge, brow bone, lips, and cheekbones. -
Add warm highlights:
If you want extra dimension, mix a little bright copper or gold with your bronze. Lightly sponge this brighter mix just on the very tips of the nose and lips to catch the light.
Add 3D texture
Mix sand or baking soda into your teal paint before applying it. This creates a gritty, crusty buildup that looks like centuries of heavy corrosion on the metal surface.
Step 3: Creating the Verdigris Patina
-
Prepare the wash:
Dilute your teal or turquoise acrylic paint with water. You want a consistency similar to thin ink or watercolor, not heavy paint. -
Apply the oxidation:
Brush this watery teal mix generously over the entire mask, letting it pool into the eye sockets, around the nose, and in the crevices of the lips. -
Wipe back immediately:
Before the wash dries, take a crumpled paper towel and blot the surface. I prefer to dab rather than wipe, which lifts the teal off the high points (nose, cheeks) but leaves it settled in the texture and recesses. -
Assess the effect:
Look at your mask. If it looks too green, lightly sponge a little more copper over the most prominent areas to bring the metal back. If it’s not aged enough, repeat the teal wash step. -
Add texture variation:
For a crustier look, take a nearly dry brush with undiluted teal paint and stipple it randomly in a few patches on the cheeks or forehead, simulating heavier corrosion. -
Check the profile:
Don’t forget the sides of the mask. Ensure the patina wraps around the edges so the illusion holds up from all angles.
Step 4: Final Touches
-
Dry overnight:
Allow the mask to dry fully, ideally overnight. Moisture trapped in the plaster needs to evaporate before sealing. -
Seal the work:
Take the mask to a well-ventilated area and apply a light coat of matte spray sealer. A matte finish looks much more authentic for ancient metal than a glossy one.
Display your finished mask on a shelf or wall to add a touch of historical mystery to your decor


Galaxy And Starfield Mask
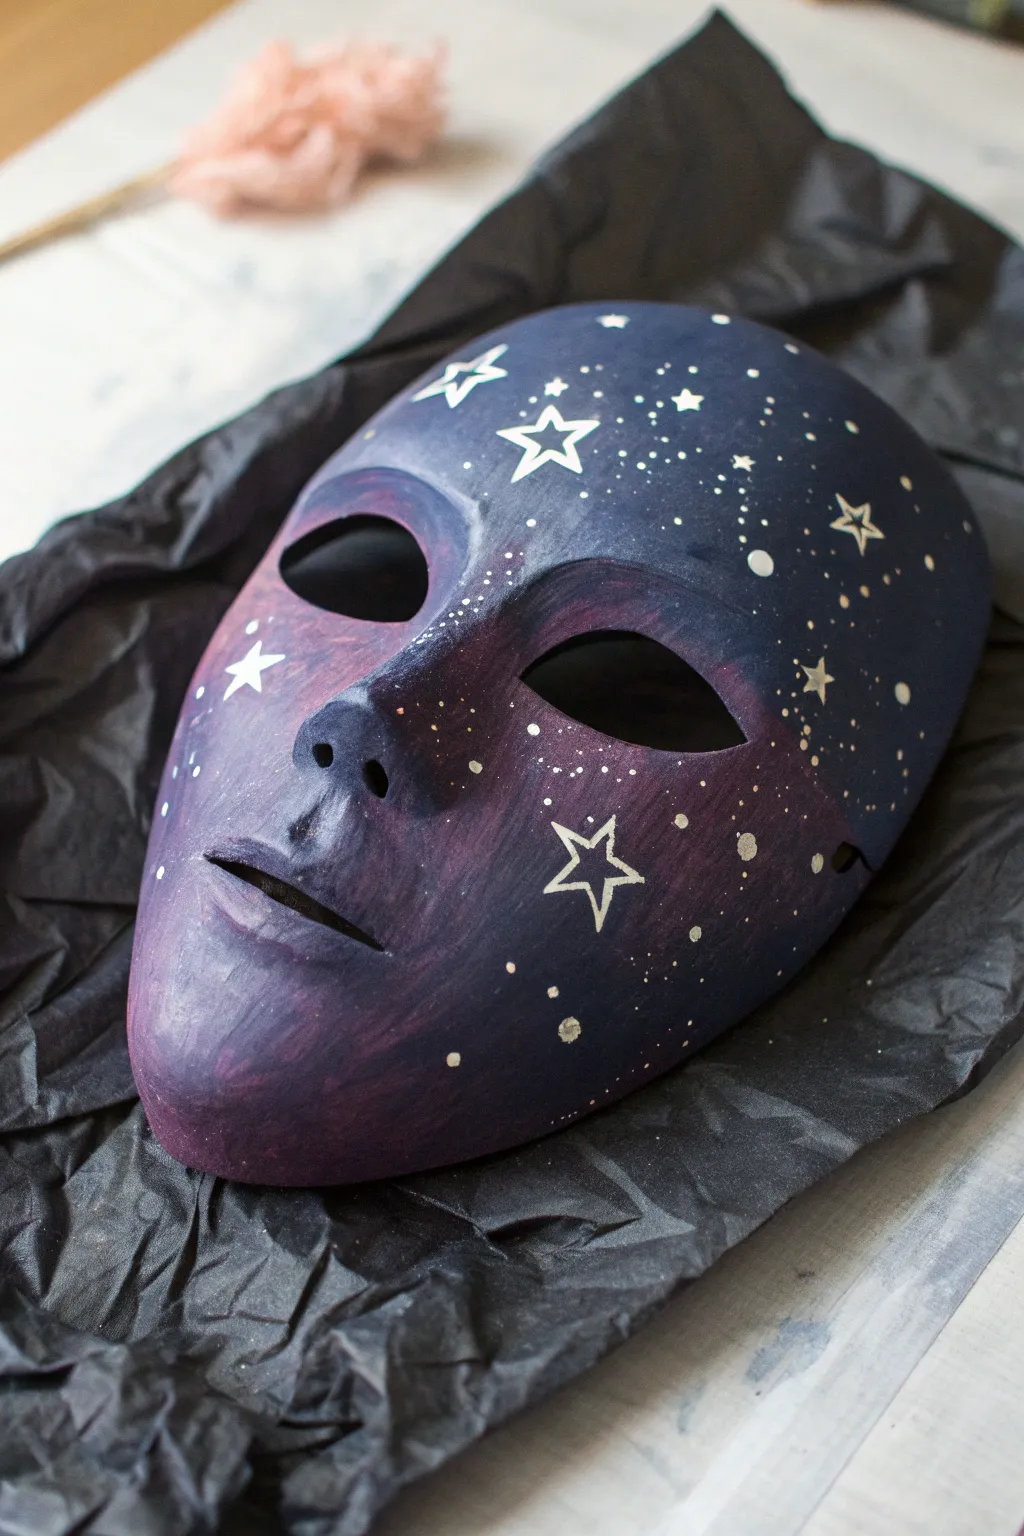
Capture the mysteries of the cosmos with this stunning hand-painted galaxy mask. Using smooth blending techniques and careful detailing, you’ll transform a plain plaster face into a deep blue and purple nebula filled with shining stars.
Step-by-Step
Materials
- Plain plaster or papier-mâché face mask
- Gesso or white acrylic primer
- Acrylic paints: Navy Blue, Deep Purple, Magenta, Black, and Titanium White
- Medium flat synthetic brush
- Small round detail brush (size 0 or 1)
- Old toothbrush (optional for splattering)
- Water cup and paper towels
- Palette or paper plate
- Matte or satin spray varnish
Step 1: Preparation and Base Coat
-
Prime the Surface:
Before adding color, coat the entire front of your mask with a layer of gesso or white acrylic primer. This seals the porous plaster and ensures your galaxy colors will appear vibrant rather than soaking in. -
Establish the Darkest Values:
Squeeze out navy blue and a touch of black onto your palette. Using your medium flat brush, paint the upper forehead area and the outer edges of the mask with this deep, dark blue mix to create the illusion of deep space. -
Transition to Purple:
While the blue paint is still slightly wet, mix deep purple with a tiny amount of the navy blue. Apply this to the mid-section of the mask—around the eyes and cheekbones—blending it gently into the wet edge of the dark blue forehead. -
Add Brighter Nebulas:
Clean your brush and pick up pure magenta or a reddish-purple. Paint the lower cheek area, nose, and chin with this lighter hue. Use light, sweeping strokes to feather this color into the darker purple above it, avoiding harsh lines. -
Deepen the Shadows:
To add dimension, take a very small amount of black mixed with purple and glaze the insides of the eye sockets and the nostrils. This helps the features pop against the colorful skin. -
Smooth the Gradient:
If your transitions look choppy, use a slightly damp brush (with almost no paint on it) to gently rub the border areas between the blue, purple, and magenta sections. This creates that soft, gaseous nebula effect. -
Let It Cure:
Set the mask aside until the base layer is completely dry to the touch. If the colors feel sticky, waiting a bit longer will prevent your star details from smudging the background.
Nebula Cloud Tip
Sponge on tiny amounts of metallic silver or pearl white over the purple sections before adding stars. It creates a shimmering, dimensional gas cloud effect.
Step 2: Starfield Detailing
-
Mix Your Star White:
On your palette, thin down a small amount of titanium white acrylic with a few drops of water. You want a consistency like heavy cream or ink—opaque but fluid enough to flow easily off a small brush. -
Paint Major Stars:
Switch to your smallest round detail brush. Choose 3 to 5 spots on the mask (like the forehead or cheek) to paint larger, five-pointed stars. Draw the outline carefully first, then fill them in solid white. -
Add Secondary Stars:
Paint smaller, simpler four-pointed stars or tiny cross shapes scattered randomly across the darker blue sections. Varying the size of your stars gives the galaxy depth. -
Create Distant Clusters:
Dip the tip of your brush in the white paint and gently dot groups of tiny specks in specific areas. Grouping these dots closely together mimics distant star clusters or the Milky Way arm. -
The Splatter Technique:
For the finest background stars, dip an old toothbrush (or a stiff brush) into the thinned white paint. Test it on a paper towel first, then gently flick the bristles with your thumb to spray a fine mist of white dots over the entire mask. -
Clean Up Features:
If any star splatter landed inside the eye holes or looked too heavy on the nose, quickly dab it away with a damp paper towel or paint over it with a bit of your background color. -
Seal the Artwork:
Once the white stars are fully dry, take the mask to a well-ventilated area. Apply a light coat of matte or satin spray varnish to protect the paint and unify the finish without making it too glossy.
Make It Wearable
Punch small holes near the temples before painting. Later, thread shimmering silver ribbon or black velvet elastic through for a comfortable, secure fit.
Now you have a piece of the night sky ready to hang on your wall or wear to your next event
Bold Geometric Color-Block Mask
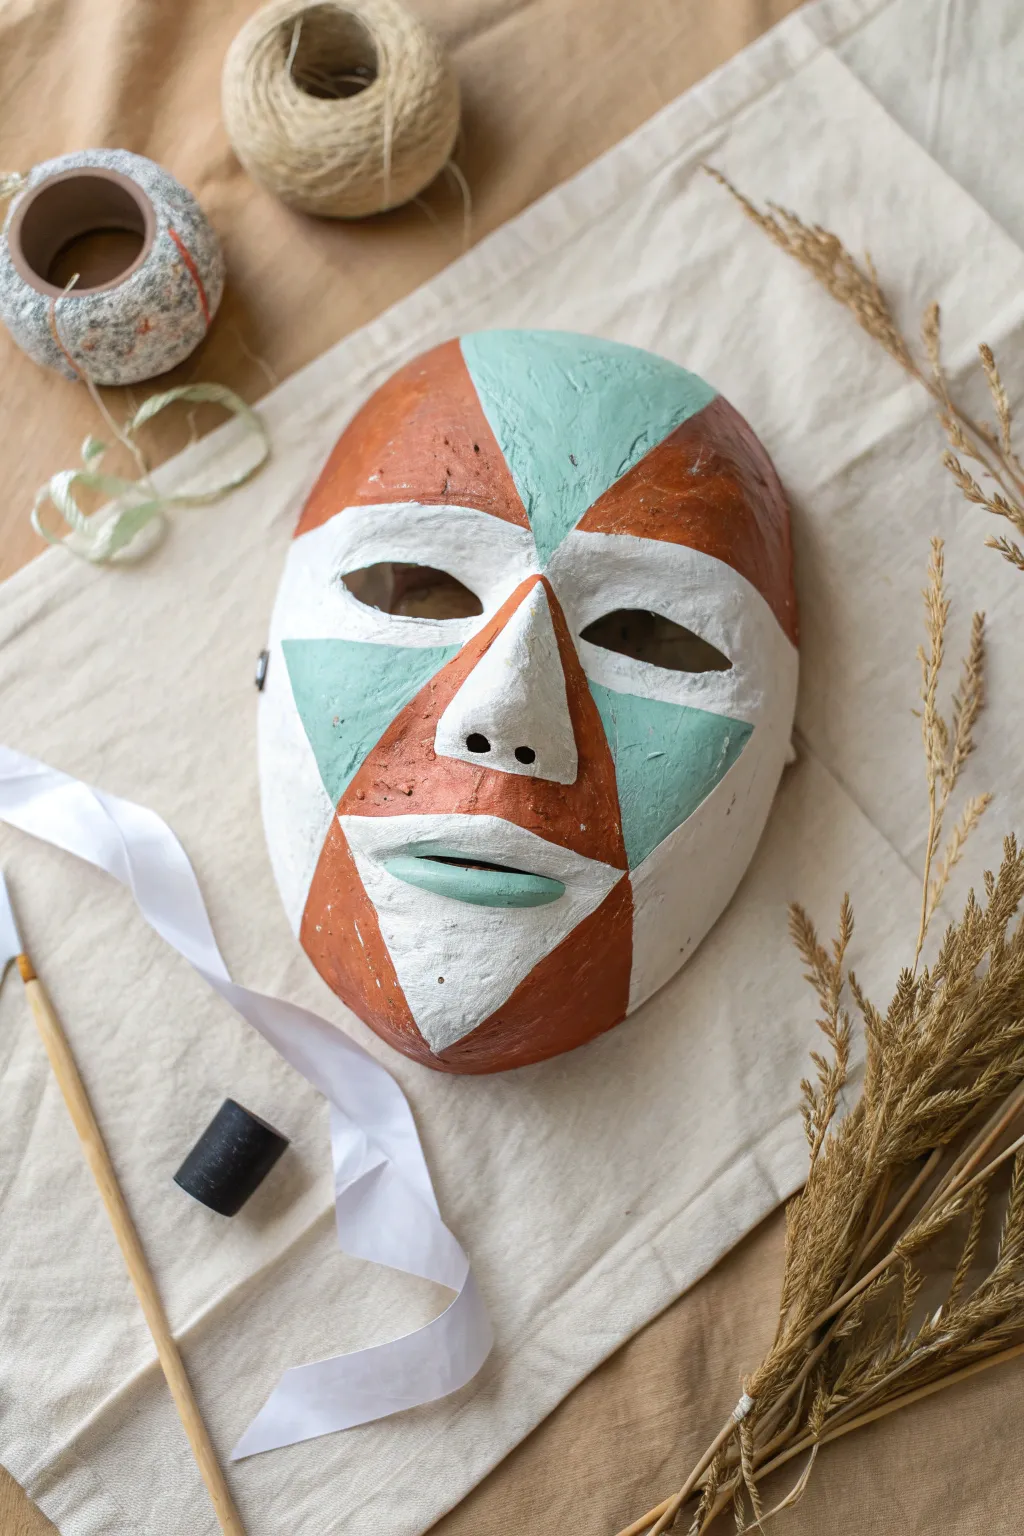
This striking mask combines the raw texture of papier-mâché or plaster with bold, modern geometry. The interplay of terracotta, teal, and bright white creates an earthy yet vibrant look that feels like a contemporary twist on ancient theater masks.
Step-by-Step Tutorial
Materials
- Plastic or paper mask base (plain face shape)
- Papier-mâché pulp or plaster gauze strips
- Sandpaper (fine and medium grit)
- Acrylic paints: Terracotta/Rust, Teal/Mint, and White
- Paintbrushes: Flat square brush and a detail round brush
- Pencil for sketching
- Matte sealant or varnish
- Water container and mixing palette
Step 1: Building the Foundation
-
Prepare the base:
Start with a clean plastic or paper mask form. If using a plastic base, lightly sand it first to help the plaster or papier-mâché adhere better. -
Apply the texture layer:
Cover the entire mask with a layer of plaster gauze or smooth papier-mâché pulp. Aim for a slightly uneven, organic texture rather than a perfectly smooth factory finish, as this adds character. -
Sculpt the nose:
Build up the nose area slightly to make it more prominent and triangular. Ensure the nostrils are defined holes rather than just painted on. -
Create the lips:
Mold a distinct, slightly parted lip shape. Keep the edges soft but clearly raised from the surrounding face area. -
Thorough drying:
Let the mask dry completely. This is crucial—I usually leave mine overnight near a radiator or in a sunny spot to ensure there is absolutely no moisture left inside. -
Refine the surface:
Once dry, use fine-grit sandpaper to knock back any extremely rough peaks or sharp edges, but preserve the overall hand-modeled look.
Step 2: Mapping the Design
-
Sketch the center line:
Using a pencil, lightly draw a vertical line down the center of the mask to help keep your geometric shapes symmetrical. -
Define the eyes and nose:
Draw triangles around the eye sockets and the nose bridge. This design relies on triangular zones, so think in sharp angles. -
Map the cheeks and forehead:
Sketch large angular sections on the cheeks and forehead. Look closely at the reference image: a large teal triangle sits on the forehead, flanked by terracotta. -
Outline the mouth area:
Mark out the area surrounding the mouth. In this design, the mouth sits inside a white zone, while the chin is split into a white triangle.
Crisp Lines Made Easy
For perfectly straight geometric lines between colors, use narrow automotive detailing tape or flexible masking tape to block off sections before painting.
Step 3: Painting the Colors
-
Start with white:
Using a flat brush, paint the white sections first (around the eyes and the chin/mouth area). Apply two coats to ensure opaque coverage over the raw material. -
Apply the teal:
Mix a soft teal or mint green paint. Carefully fill in the upper forehead triangle and the cheek triangles. Use the edge of your flat brush to transform your pencil lines into crisp paint edges. -
Paint the lips:
Use the same teal shade to paint the lips. Using a smaller detail brush here helps you stay neatly within the sculpted lip lines. -
Fill in the terracotta:
Paint the remaining sections—the nose, the side of the forehead, and the outer jaw sections—with the terracotta or rust-colored paint. This warm tone anchors the design. -
Clean up the edges:
Once the main blocks are dry, go back with a small brush and touch up any lines where colors meet to ensure the geometric shapes look sharp. -
Final protection:
Finish by applying a coat of matte varnish. This seals the paint and unifies the sheen without making it look glossy or plastic.
Add Metallic Flair
Swap the terracotta paint for a copper metallic acrylic. This adds a subtle shimmer that catches the light and contrasts beautifully with the matte white.
Now you have a striking piece of wall art that balances modern design with handcrafted charm
Botanical Wreath And Vines Mask
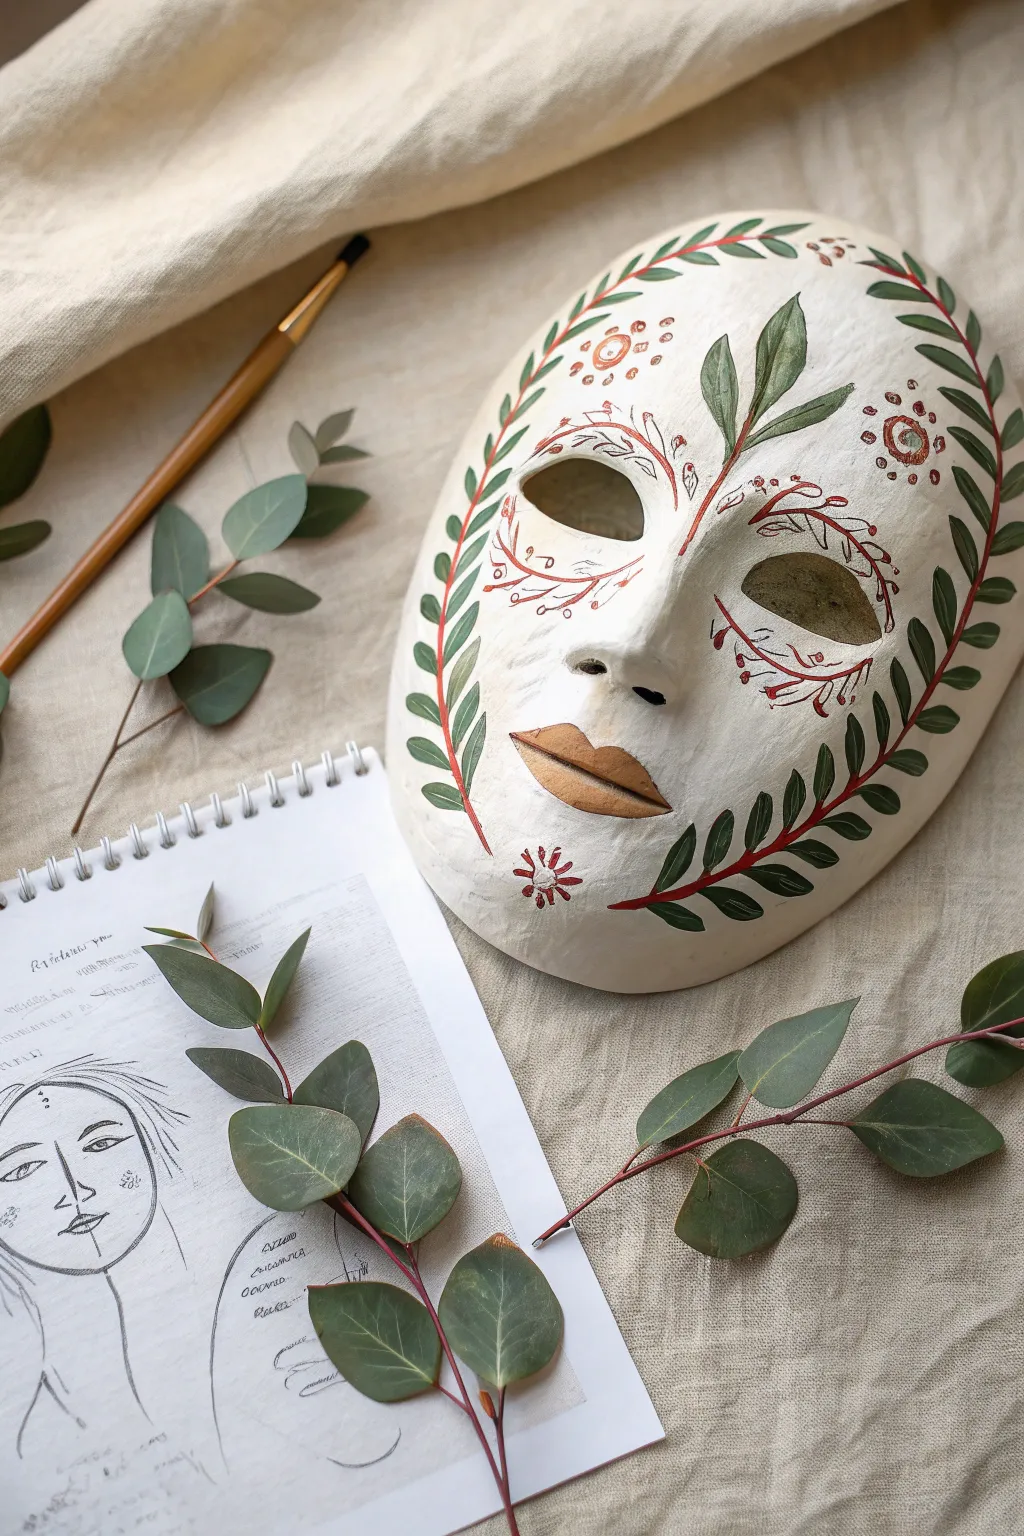
This elegant plaster mask project brings nature indoors with a serene, symmetrical design of climbing vines and delicate folk-art details. The combination of earthy greens, burnt sienna, and creamy white plaster creates a timeless, organic aesthetic that looks beautiful on any wall.
How-To Guide
Materials
- White plaster craft mask (smooth finish)
- Fine-grit sandpaper (400 grit)
- Acrylic paints: Olive Green, Forest Green, Burnt Sienna/Terracotta, Gold (optional)
- Round synthetic brushes: size 2 and size 0 for fine details
- Pencil (HB or lighter)
- Kneaded eraser
- Matte or satin spray varnish
- Palette for mixing
Step 1: Preparation & Sketching
-
Surface Prep:
Begin by inspecting your plaster mask for any rough bumps or casting seams. Gently smooth these areas with fine-grit sandpaper, wiping away the dust with a barely damp cloth so the paint adheres perfectly. -
Planning the Flow:
Using a very light touch with your pencil, sketch a central vertical line down the nose bridge to establish symmetry. This will be your anchor for the botanical growth. -
Drafting the Vines:
Lightly draw the main curving vines that frame the face. Start from the chin, curve up along the cheeks, and arch over the eyebrows to meet at the forehead. Keep the lines fluid and organic rather than rigid. -
Adding Leaf Placement:
Sketch the leaf shapes along your vine lines. I find it helpful to vary the angles slightly so they don’t look stamped on. Add a prominent central sprig rising from the bridge of the nose up the forehead. -
Detailing the Eyes:
Draw delicate curved lines around the eye sockets, mimicking eyelashes or smaller vines. Add small circles and dots in the open spaces on the forehead and cheeks to create the folk-art ‘flower’ motifs.
Steady Hand Trick
Rest your pinky finger on a dry part of the mask while painting fine lines. This anchors your hand and gives you much better control for delicate details.
Step 2: Painting the Botanical Elements
-
Mixing Greens:
On your palette, mix a touch of Olive Green with Forest Green to create a natural leaf tone. You want a color that isn’t too bright but has depth. -
Painting the Leaves:
Using your size 2 round brush, carefully fill in the larger leaf shapes. Use a ‘press and lift’ stroke: press down at the base of the leaf to widen the stroke, then lift as you pull towards the tip to create a sharp point. -
Adding Variation:
While the green is still wet on the brush, you might dip the very tip into a slightly darker green or brown for the central forehead leaves, giving them a bit more dimension. -
Refining Edges:
Once the main green layer is dry, use your size 0 brush to tidy up any edges. The crispness of the leaf shapes is key to this design’s elegance.
Antique Finish
Dilute brown paint with water to make a thin wash. Brush it over the dry mask and wipe it off immediately with a rag to leave ‘age’ in the crevices.
Step 3: Adding Folk Art Details
-
Drawing the Stems:
Switch to the Burnt Sienna paint. With the size 0 liner brush, trace over your pencil lines for the central vine stems that connect the leaves. Keep the pressure light for thin, graceful lines. -
Eye Decoration:
Using the same Burnt Sienna, paint the delicate scrolled lines around the eyes. Add small, leaf-like dashes branching off these lines, creating a feathery effect. -
Geometric Accents:
Paint the small circular motifs on the forehead and temples. Create the ‘flower’ centers with a dot of Sienna, and surround them with tiny dots. You can add a touch of Gold here for subtle shimmer if you like. -
Defining the Lips:
Paint the lips in a solid coat of Burnt Sienna or Gold. Follow the natural sculpt of the mask, keeping the edges very clean. -
Chin Detail:
Add the small sunburst or flower motif on the chin directly below the lips using the Sienna paint. This balances the visual weight of the forehead design.
Step 4: Finishing Touches
-
Cleanup:
Once the paint is thoroughly dry (give it at least an hour), use a kneaded eraser to gently lift any visible pencil marks. Be careful not to rub the paint itself. -
Sealing:
To protect your work from dust and fading, spray the mask with a light coat of matte or satin varnish. Hold the can about 12 inches away and apply in short bursts to avoid drips.
Hang your finished masterpiece on a gallery wall or display it on a shelf to enjoy its tranquil beauty.
Aged Stone Gargoyle Mask
Transform a standard plaster starter mask into an ancient architectural relic that looks like it was chipped from a gothic cathedral. By using modeling clay for sculptural details and clever painting techniques, you’ll achieve a weathered stone finish that is surprisingly lightweight.
Detailed Instructions
Materials
- Basic white plastic mask form
- Air-dry clay (e.g., Das or creative paperclay)
- Water and small spray bottle
- Sculpting tools (needle tool, loop tool, clay shapers)
- Gesso or white primer
- Acrylic paints: Black, dark grey, light cool grey, white, unbleached titanium
- Sea sponge or coarse texture sponge
- Matte varnish spray
- Sandpaper (medium grit)
Step 1: Sculpting the Form
-
Base preparation:
Begin by scuffing your plastic mask form with medium grit sandpaper. This creates ‘tooth’ for the clay to grip onto. Wipe away any plastic dust with a damp cloth before starting. -
Building the bulk:
Apply a thin, even layer of air-dry clay over the entire face surface, roughly 3mm thick. Use a little water on your fingertips to smooth it down, ensuring there are no air pockets between the mask and the clay. -
Adding the horns:
Roll two tapered cones of clay for the horns. Score the attachment points on the forehead and the base of the horns with a needle tool, add a dab of water (slip), and press them firmly into place. Blend the clay downwards onto the mask so they become one seamless unit. -
Sculpting the brow:
Add thick snakes of clay above the eye sockets to create a heavy overhanging brow. Use a modeling tool to carve deep furrows and frown lines, giving the gargoyle a stern or menacing expression. -
Nose and cheeks:
Build up the nose bridge and cheekbones with additional lumps of clay. I find it helpful to exaggerate these features slightly, as the ‘stone’ texture we add later tends to soften the details. Press deep hollows under the cheekbones to simulate a gaunt look. -
Leafy ears and side details:
Attaching wing-like or leaf-shaped slabs of clay to the temples creates the gargoyle’s ears. Carve veins or feather textures into these shapes using a knife tool. -
Chin and mouth:
Sculpt a pointed goatee on the chin and refine the mouth area. Slightly part the lips and angle the corners downwards. Use a small ball tool to create spiral motifs on the cheeks or chin for that classic decorative architectural look. -
Refining texture:
Before the clay dries, take a rough stone or a crumpled ball of aluminum foil and press it gently all over the surface. This imparts a natural, pitted stone texture that is crucial for the final effect.
Cracks happen
If you see hairline cracks as the clay dries, don’t panic. Mix a slurry of clay and water (slip) and paint it into the cracks, then smooth over.
Step 2: Painting the Stone Effect
-
Drying and priming:
Allow the mask to dry completely—this usually takes 24 to 48 hours depending on thickness. Once bone dry, coat the entire piece with white gesso to seal the clay and prepare it for paint. -
Base coat:
Paint the entire mask with a solid coat of dark grey acrylic paint mixed with a little black. You want a very deep, almost charcoal color as your foundation. Ensure you get the brush into every deep crevice and texture pit. -
Heavy dry brushing:
Load a large, dry bristle brush with a medium grey tone. Wipe most of the paint off on a paper towel until barely any remains. Sweep this across the raised surfaces of the mask, highlighting the textures while leaving the dark base coat visible in the recesses. -
Detailed dry brushing:
Switch to a lighter cool grey. Continue dry brushing, but focus more on the highest points: the brow ridge, nose tip, horn curves, and cheekbones. This builds depth and simulates illuminated stone. -
Stippling texture:
Dip a damp natural sea sponge into a mix of light grey and unbleached titanium white. Lightly stipple random patches over the mask to create uneven weathering and varied stone coloration. -
Final highlights:
For the sharpest details, use a tiny amount of pure white or very pale grey on your smallest brush. lightly touch the very edges of the eyelids, the tip of the goatee, and the ridges of the horns to make them pop. -
Sealing the work:
Once you are happy with the paint job, finish with a coat of matte varnish spray. This protects the clay and unifies the sheen, making it look truly like dry, aged stone.
Weight Saver
Keep the horns lightweight by bulking them out with tinfoil cores first, then covering them with a thin layer of clay rather than using solid clay.
Now you have a striking gothic artifact ready to guard your wall or complete a costume
Carved Woodgrain Illusion Mask
Transform a simple plaster base into a striking artifact that looks like hand-carved, seasoned timber. This project combines careful texturing with a layered painting technique to create a convincing illusion of aged wood and tribal-inspired carving.
Step-by-Step
Materials
- Plain full-face plaster mask base (store-bought or hand-cast)
- Acrylic paints: Burnt Umber, Raw Sienna, Gold Ochre, White, Black
- Matte medium or matte varnish
- Carving tools or lino cutters (optional, see text)
- Fine-grit sandpaper (220 grit)
- Wide, stiff bristle brush
- Fine detail brush (size 0 or 1)
- Pencil
- Water container and palette
- Paper towels or soft rag
Step 1: Preparation & Base Coating
-
Sand the Plaster:
Begin by lightly sanding your plaster mask to remove any casting seams or rough bumps. You want a smooth canvas, but don’t worry about perfection; slight imperfections add to the organic wood look. -
Sketch the Design:
Using a pencil, lightly map out the main geometric zones shown in the image. Mark the V-shape on the forehead, the bands across the cheeks, and the triangular border patterns. Keep lines faint so they don’t show through later. -
Base Color Application:
Mix Raw Sienna with a touch of Gold Ochre. Apply this base coat over the entire mask. It doesn’t need to be opaque; a semi-transparent wash allows the white plaster to peek through slightly, mimicking lighter wood grain. -
Create the Grain Texture:
While the base coat is still slightly tacky, use a stiff, dry bristle brush dipped in a tiny amount of Burnt Umber. Drag the brush vertically down the mask to stimulate wood grain lines. I find it helps to wiggle the brush very slightly to create organic, non-linear patterns.
Step 2: Creating the Illusion of Carving
-
Define the Dark Wood Areas:
Identify the areas that will remain dark wood in the final design—specifically the nose, mouth area, and chin. Paint these sections with a solid coat of Burnt Umber, blending the edges softly into the lighter areas. -
Simulate Cuts:
For a truly authentic look, you can physically carve into the plaster with lino cutters along your pencil lines. If you prefer not to carve, simulate depth by painting thin, dark brown lines along the edges of your design sections. -
Whitewash Application:
Mix white acrylic with a small amount of water to create a milky consistency. Paint this inside the specific geometric zones on the forehead and cheeks, leaving your dark wood lines and the nose/chin area untouched. -
Distress the White:
Before the white paint dries completely, gently wipe some of it away with a rag or dry brush. This reveals the ‘wood’ color underneath and makes the white paint look like it has been worn down over time.
Grain Master Tip
For deeper wood texture, apply a layer of thick heavy body gel or modeling paste before painting. Drag a comb through it while wet to create physical ridges.
Step 3: Detailing & Patterns
-
Painting the Bands:
Using a steady hand and your fine detail brush, paint the brown geometric bands over the whitewashed sections. Use the Burnt Umber paint to create the sweeping curves across the forehead and cheeks. -
Adding the Pips:
Dip the non-brush end of your paintbrush into a mix of White and Gold Ochre paint. Dot this color along the brown bands you just painted to create the raised ‘pip’ or bead effect seen in the reference. -
Border Geometrics:
Along the outer rim of the mask, paint a zigzag pattern using Burnt Umber. Inside the resulting triangles, add smaller, lighter triangles to simulate carved relief. -
Hatching Details:
On the lower cheek sections, paint series of small diagonal hatch marks inside the brown bands. These should look like small chisel marks. -
Deepening Shadows:
To make the nose and mouth really pop, use a watered-down Black or very dark brown to glaze the deepest recesses around the nostrils, eye sockets, and the lip line.
Level Up: Crackle
Use a crackle medium between the brown base coat and the whitewash layer. As it dries, the white paint will split, revealing the dark ‘wood’ beneath for instant age.
Step 4: Final Touches
-
Highlighting the Grain:
Dry brush a tiny amount of a light tan color strictly on the highest points of the ‘wood’ texture (like the nose bridge and chin) to catch the light. -
Sand for Age:
Once fully dry, take your fine-grit sandpaper and very gently scuff the high points of the painted mask. This removes microscopic bits of paint, enhancing the weathered, antique aesthetic. -
Seal to Finish:
Apply a coat of matte medium or matte varnish. Avoid glossy finishes, as real seasoned wood has a dull, satin sheen.
Now you have a stunning, culturally inspired piece that carries the weight and history of carved wood, all from a light plaster base
Mosaic Tile Painted Pattern
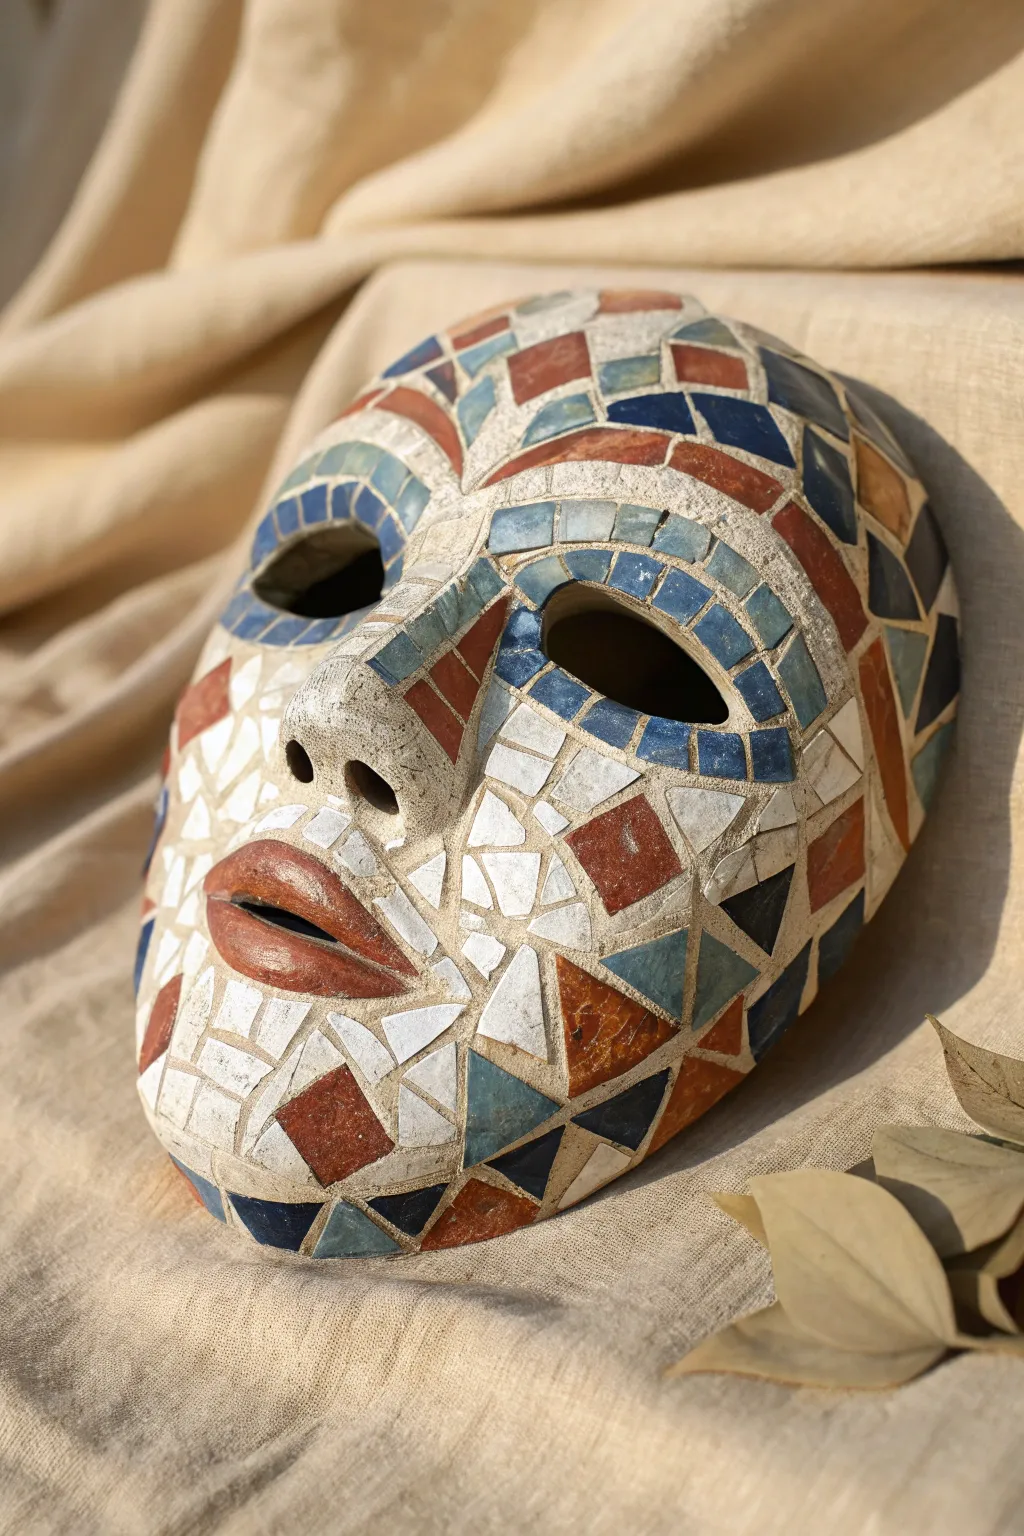
Bring the timeless beauty of Mediterranean tilework to your home decor with this striking faux mosaic mask. This project combines the sculptural depth of plaster with geometric painting techniques to create an illusion of shattered ceramic shards and aged grout.
Step-by-Step Tutorial
Materials
- Plaster face mask blank (store-bought or cast yourself)
- Pencil
- Carving tool or linoleum cutter (V-gouge)
- Acrylic paints (terracotta, brick red, navy blue, teal, white, cream)
- Fine-grit sandpaper
- Small flat paintbrushes
- Detail liner brush
- Matte or satin clear sealant spray
- Damp sponge
Step 1: Planning and Carving
-
Surface preparation:
Begin by lightly sanding your plaster mask to remove any casting seams or rough bumps. Wipe it down with a damp cloth to remove the dust, ensuring a smooth canvas for your work. -
Sketch the major zones:
Using a pencil, lightly map out the main design features. Outline the eyes, the lips, and define the ‘eyebrows’ as arched sections above the eye sockets. -
Draft the mosaic grid:
Fill in the rest of the face with various geometric shapes—triangles, distorted squares, and trapezoids. Keep the shapes irregular to mimic broken tiles rather than a perfect grid. -
Refine the eye area:
Around the eye sockets, draw concentric rows of small, brick-like rectangles. This radiant pattern helps frame the eyes and adds structural realism to the mosaic design. -
Carve the grout lines:
Carefully trace over your pencil lines with a V-gouge or carving tool. You want to etch grooves directly into the plaster; these recesses will serve as your ‘grout’ lines, creating physical separation between the painted ’tiles.’ -
Clean the grooves:
Use a stiff, dry brush or a burst of air to clear all plaster dust from the carved grooves. We need these channels clean so the paint edges stay sharp.
Step 2: Painting the Tiles
-
Base color selection:
Prepare your palette with earthy, Mediterranean tones. You’ll need a mix of warm terracotta reds, deep rusts, cool teals, and navy blues, alongside plain white and cream. -
Painting the white tiles:
Start by painting the cheek and chin ‘shards’ with white and cream acrylics. I find that doing the lightest colors first prevents accidental muddying from darker pigments later. -
Adding warm tones:
Select random geometric shapes on the forehead and cheeks to fill with your terracotta and rust colors. Paint the lips solid rust-red, leaving a thin carved line between the upper and lower lip. -
Adding cool tones:
Fill in the remaining shapes with your teal and navy paints. Focus the blue tones around the eyes and scattered near the edges of the mask for contrast. -
Creating the distressed look:
Once the base coats are dry, dry-brush a tiny amount of lighter paint over the darker tiles (e.g., light blue over navy) to simulate surface wear and age. -
Detailing the lips:
Add a subtle highlight to the center of the lower lip using a lighter version of your rust color to give the ‘ceramic’ some volume.
Grout Grooves
If you don’t have carving tools, you can use a dull pencil or a nail to scratch the lines into fresh, slightly damp plaster for easier etching.
Step 3: Finishing Touches
-
Grout wash:
Mix a very watery wash of grey or beige paint. Brush this over the entire mask, ensuring it settles deep into the carved grooves. -
Wipe back:
immediately wipe the surface with a damp sponge. This removes the wash from the raised ’tiles’ but leaves the pigment in the carved lines, enhancing the grout effect. -
Final dry brushing:
If surface paint was removed during the wipe-back, touch up the tiles. You can also lightly sand the surface again with very fine grit to expose bits of raw plaster for an antique look. -
Sealing the work:
Finish with a coat of matte or satin spray sealant. This protects the plaster and unifies the sheen of the different paint colors without making it look like plastic.
Antique Glaze
Apply a coat of gloss varnish only to the colored ’tile’ sections while keeping the grout matte. This mimics the shine of real glazed ceramic pieces.
Display your finished mask on a stand or hang it on a gallery wall to add a touch of artistic history to your room
Feathers And Fur Creature Mask
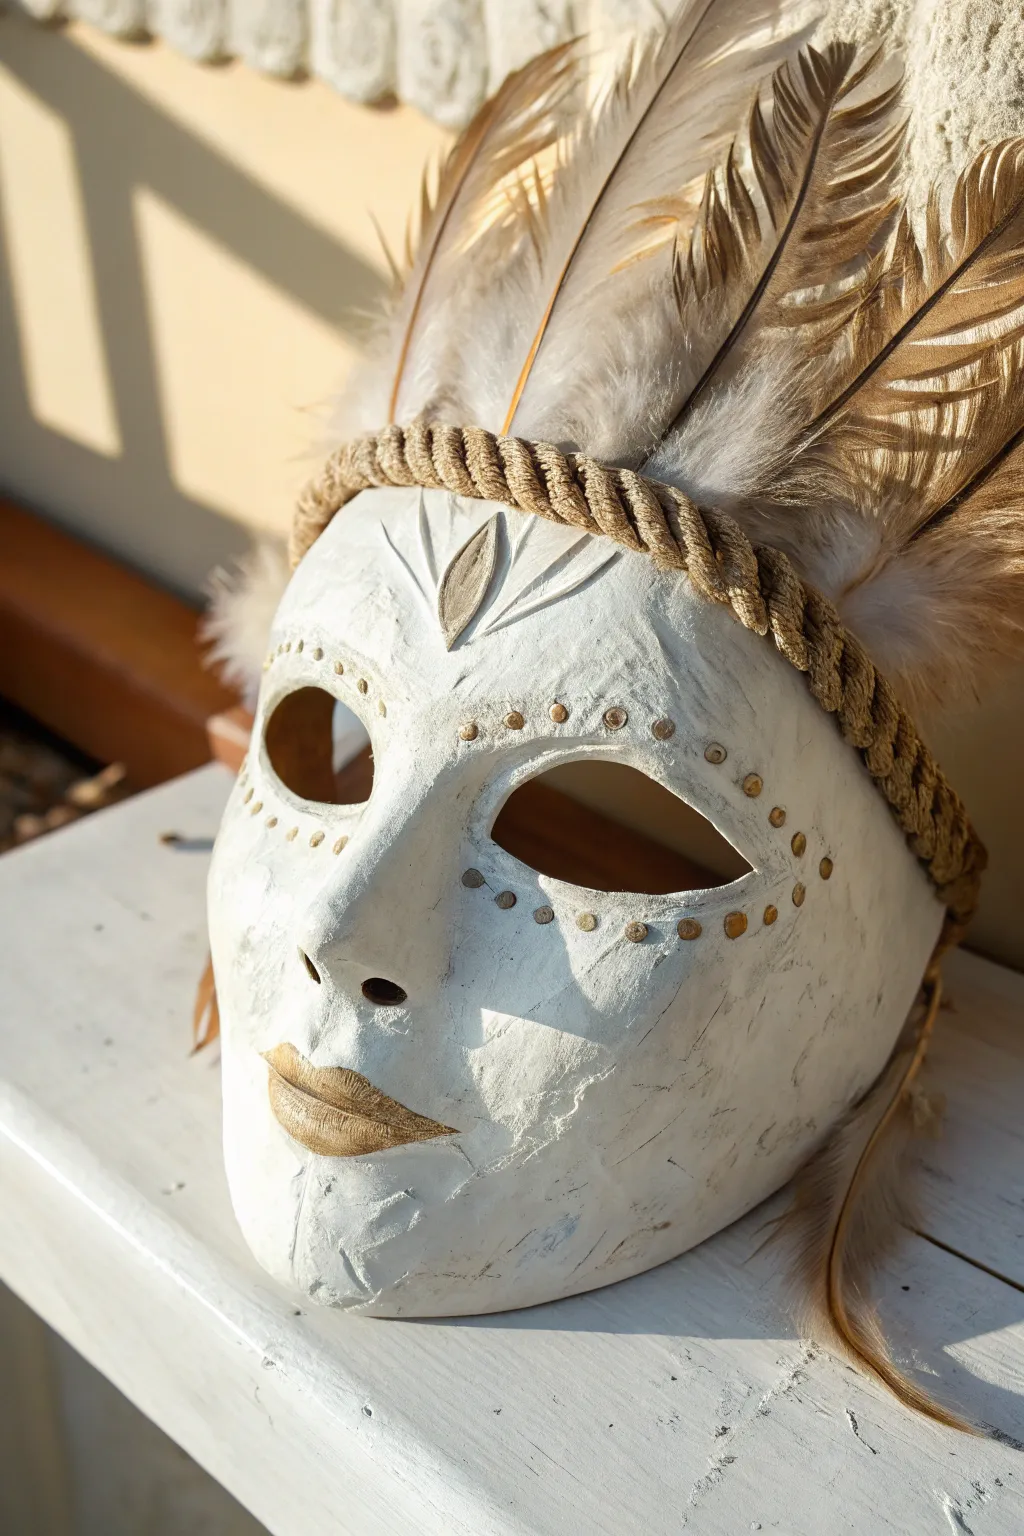
This striking creature mask combines organic textures with regal gold accents to create a piece that feels both ancient and mythical. The interplay of soft feathers, rough rope, and smooth plaster makes for a stunning display piece or costume accessory.
Detailed Instructions
Materials
- White plastic face mask form (as a base)
- Plaster cloth strips
- Air-dry clay or Paperclay
- Gesso or white acrylic primer
- Acrylic paints (White, Metallic Gold, Raw Umber)
- Thick jute rope or twisted cord (approx. 1/2 inch thick)
- Natural feathers (tan, brown, and white mix)
- Hot glue gun and glue sticks
- Sandpaper (fine grit)
- Small sculpting tools
- Small rhinestones or gold studs
- Paintbrushes (flat shader and fine detail)
- Bowl of water
Step 1: Sculpting the Base
-
Prepare the form:
Start with a basic plastic mask form. If you want to customize the fit, you can apply petroleum jelly to the form and layer plaster cloth strips over it first, but working directly on a sturdy base works well for display pieces. -
Apply the clay layer:
Cover the entire mask surface with a thin, even layer of air-dry clay or Paperclay. Aim for about 1/8 to 1/4 inch thickness. This gives you a sculptable surface unlike bare plastic. -
Refine the features:
While the clay is wet, smooth out the eye sockets and build up the nose bridge slightly. Use your fingertips and a bit of water to blend the clay around the lips to create a distinct, pouty shape. -
Carve the forehead emblem:
Using a sculpting tool or a dull knife, carve the leaf-like design in the center of the forehead. Create a central teardrop shape and flank it with two curved lines radiating outward. -
Add texture:
Don’t smooth the clay perfectly. Use a stiff brush or a crumpled piece of foil to gently press subtle rock-like textures into the cheeks and chin. This gives it that ancient, weathered look. -
Let it cure:
Allow the clay to dry completely. This usually takes 24-48 hours depending on humidity. The clay will turn a chalky white when fully dry.
Natural Texture
For a stone-like finish, mix a teaspoon of baking soda into your white base paint. It creates a gritty, matte surface that grabs the antiquing wash perfectly.
Step 2: Painting and Detailing
-
Apply the base coat:
Paint the entire mask with white acrylic paint or gesso. You don’t need opaque coverage; a slightly streaky application adds to the organic feel. -
Create the weathered wash:
Mix a tiny amount of Raw Umber with plenty of water. Brush this wash over the mask and immediately wipe it back with a rag. The dark pigment will settle into your texture marks and the carved forehead design, revealing the details. -
Paint the lips:
Using your metallic gold paint and a fine brush, carefully fill in the lips. Two thin coats are often better than one thick glob for a smooth metallic finish. -
Outline the emblem:
Take a very small amount of gold paint on your finger or a dry brush and lightly graze the raised edges of your forehead carving to make it pop. -
Add the studded details:
Using a strong craft glue or super glue, attach small gold studs or flat-back rhinestones around the eyes. Follow the curve of the eye socket in a dotted line pattern.
Step 3: Assembly and Adornment
-
Prepare the crown:
Measure a length of thick jute rope that fits across the top forehead of the mask, extending down towards the ears. Wrap the ends with tape or thread to prevent fraying before cutting. -
Attach the rope:
Apply a generous bead of hot glue along the hairline of the mask. Press the rope firmly into the glue, holding it in place until it sets. I find holding it for an extra 30 seconds prevents it from popping up. -
Gild the rope:
Dry brush metallic gold paint over the ridges of the rope. This ties the rustic material into the elegant gold theme of the face. -
Select your feathers:
Sort through your feathers. You want longer, stiffer feathers for the back layer to provide height, and softer, fluffier down feathers for the front to hide the quills. -
Construct the crest:
Gluing from the back of the mask (behind the rope), attach the tall feathers first, fanning them out symmetrically. Then, layer smaller feathers in front of them to create volume. -
Final touches:
Attach a few long, wispy feathers hanging down from the side near the jawline to frame the face softly.
Eye Variations
Make the mask wearable by gluing sheer black fabric behind the eye holes. It hides your eyes completely while still allowing you to see out.
Once the final feather is in place, you have a mystical artifact ready to hang or wear.
Horns, Antlers, Or Snout Add-Ons
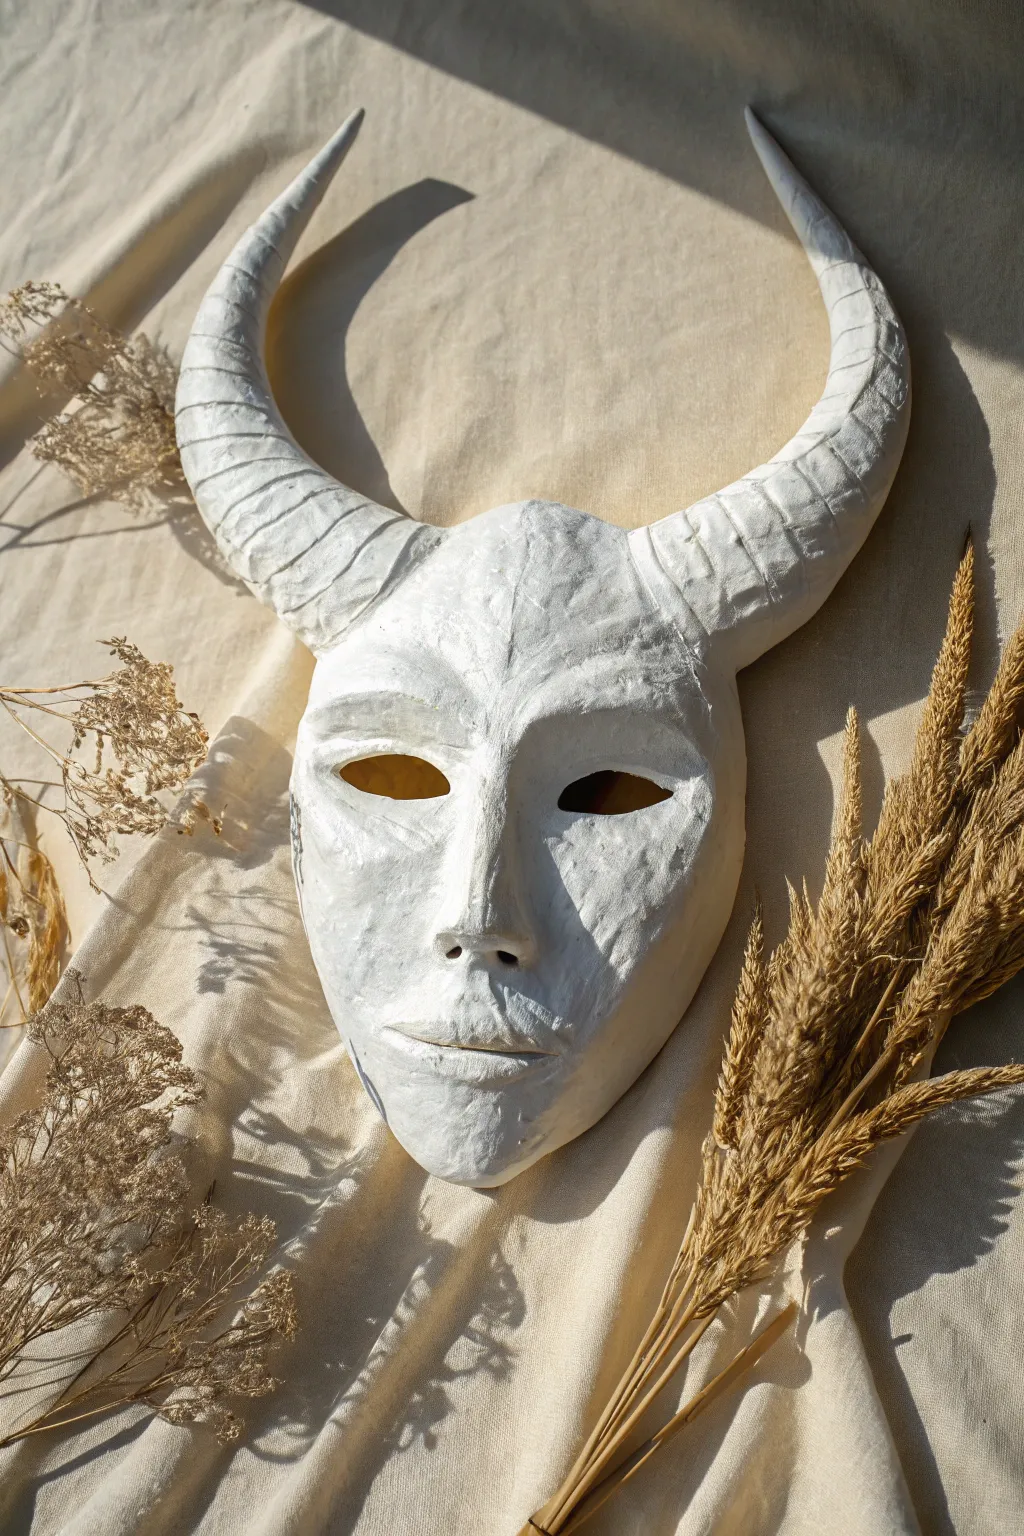
Transform a basic face shape into a mythic creature with the addition of impressive, textured horns. This project uses paper clay and plaster techniques to create a unified, stone-like finish that looks ancient and mysterious.
Step-by-Step
Materials
- Plastic face mask base
- Aluminum foil
- Masking tape
- Air-dry paper clay or paper mache pulp
- Sculpting tools (or a butter knife)
- White gesso or acrylic primer
- Fine-grit sandpaper
- Water in a spray bottle
- Matte white acrylic paint
- Matte varnish (optional)
Step 1: Building the Horn Structure
-
Form the armature:
Begin by crumpling aluminum foil into two long, tapered cone shapes. These will be the core of your horns, so ensure they are thick at the base and curve gently toward a point. -
Shape the curve:
Bend the foil cones into a ‘C’ or ‘S’ shape depending on your preference. For this look, aim for a classic ram-horn curl that sweeps upward and slightly inward. -
Compress the foil:
Squeeze the foil tightly to remove air pockets. The tighter the foil, the sturdier your final horns will be and the less clay you will need to cover them. -
Attach to the mask:
Position the horns on the upper forehead of your plastic mask base. Secure them firmly using plenty of masking tape, wrapping it around the horn base and onto the mask surface in a star pattern. -
Check symmetry:
Before moving on, look at the mask from the front and top to ensure the horns are symmetrical in angle and height. Adjust the tape or bend the foil now if needed.
Structural Integrity
For extra-large horns, run a piece of craft wire through the center of your foil armature and poke it through the mask base, twisting inside to anchor it.
Step 2: Sculpting the Surface
-
Prepare the clay:
Knead your paper clay until it is soft and pliable. If it feels too dry, spritz it lightly with water to make it easier to smooth. -
Apply the base layer:
Cover the entire mask and the foil horns with a thin, even layer of clay. I find it helpful to start at the connection point between the horns and mask to strengthen that joint first. -
Build the ridges:
Roll small snakes or coils of clay and wrap them around the horns at regular intervals. These will become the segmented ridges typical of animal horns. -
Blend the segments:
Using a sculpting tool or your thumb, blend the edges of your clay coils downward into the horn surface, leaving the top edge of the coil distinct to create a stepped texture. -
Refine facial features:
Add small bits of clay to build up the brow bone, nose bridge, and lips. This helps integrate the dramatic horns so they don’t look like they were just stuck on a plain face. -
Create texture:
Instead of smoothing everything perfectly, dab the wet clay with a crumpled ball of foil or a stiff brush. This stone-like texture gives the mask its ancient artifact appearance.
Ancient Relic
Mix sand or baking soda into your final white paint layer to create a gritty, calcified texture that feels like real excavated stone.
Step 3: Finishing Touches
-
Allow to dry:
Let the mask dry completely. This can take 24-48 hours depending on the thickness of your clay. Flip it over halfway through to let the inside dry as well. -
Sand imperfections:
Once bone dry, use fine-grit sandpaper to gently knock down any sharp spikes or awkward lumps, but be careful not to sand away your intentional texture. -
Prime the surface:
Coat the entire mask with white gesso. This seals the paper clay and provides a uniform, bright white base. -
Apply the final coat:
Paint the mask with matte white acrylic paint. You want a flat, chalky finish rather than a glossy one to mimic plaster or bone. -
Optional wash:
If the white feels too stark, mix a tiny drop of grey or beige paint with plenty of water and brush it into the crevices, then wipe the high points clean with a rag.
Display your horned creation among dried botanicals for a striking, organic centerpiece
Split Design: Two Moods, One Mask
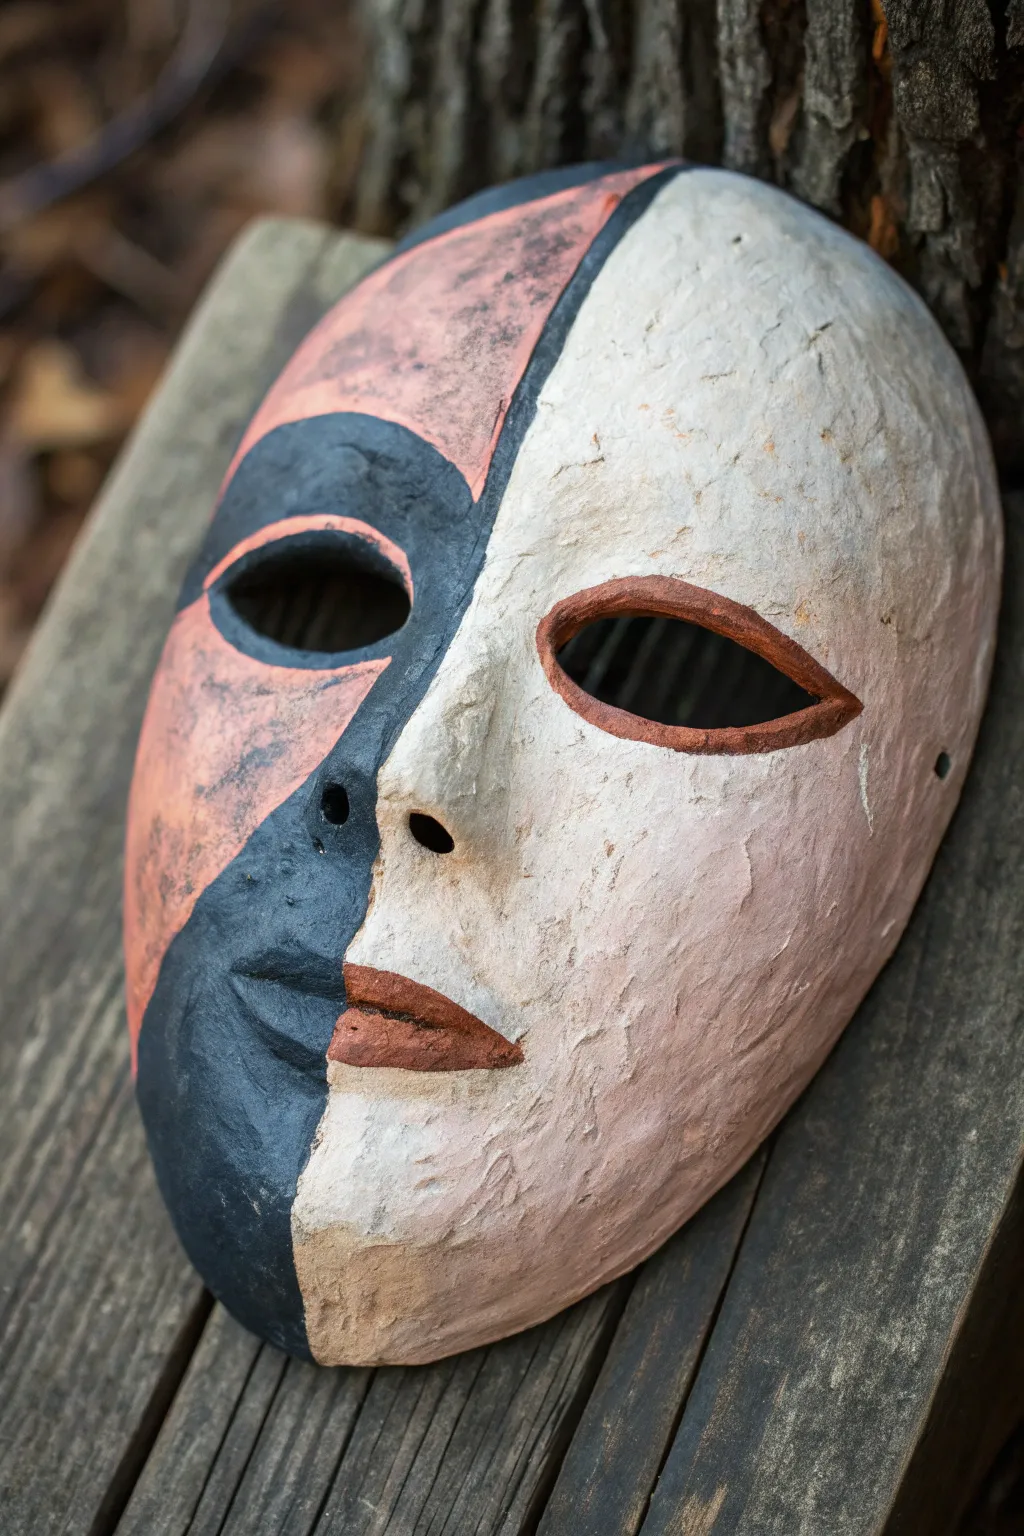
This striking plaster mask project explores duality through texture and color, combining a raw, organic cream finish on one side with a bold, abstract geometric pattern in clay orange and charcoal black on the other. The result is a piece that feels both ancient and modern, perfect for wall decor or a theatrical prop.
Step-by-Step Tutorial
Materials
- Plastic face mold or form
- Plaster gauze bandages (rolls)
- Bowl of warm water
- Petroleum jelly (Vaseline)
- Paper clay or air-dry clay (optional for smoothing)
- Fine-grit sandpaper (220 grit)
- Gesso primer
- Acrylic paints: Cream/Off-white, Charcoal Black/Dark Grey, Terracotta/Clay Orange, Burnt Umber
- Medium flat paintbrush
- Small fine-liner brush
- Matte acrylic sealant spray
Step 1: Base Construction
-
Prepare the workspace and mold:
Set up a clean area covered with newspaper or a drop cloth. If you are using a plastic face mold, coat the surface lightly with petroleum jelly to ensure the dried plaster releases easily later. -
Cut the gauze strips:
Cut your plaster gauze rolls into manageable strips. You will need different sizes: larger strips (about 3-4 inches) for the forehead and cheeks, and smaller strips (1-2 inches) for tight areas like the nose and around the eyes. -
Apply the first layer:
Dip a strip of gauze into the warm water, run two fingers down it to squeegee off excess water, and lay it across the mold. Smooth the plaster with your fingers to fill the mesh holes. -
Build up thickness:
Repeat the dipping and layering process until the entire mask is covered. Aim for at least 3 layers of gauze, crisscrossing the direction of the strips to maximize structural strength. Pay special attention to reinforcing the edges. -
Initial drying phase:
Allow the plaster to set on the mold. This usually takes about 20–30 minutes until it feels cool and hard to the touch. Carefully pop the mask off the mold. -
Refine the surface:
While the mask is off the mold but still slightly damp, you can smooth rough edges with your fingers. If you want a smoother texture than raw gauze provides, apply a thin layer of paper clay over the surface, or simply add another layer of creamy plaster paste (plaster of Paris mixed with water). -
Full cure:
Let the mask dry completely creating a bone-dry surface. This usually takes 24 hours depending on humidity. Once dry, lightly sand any sharp spikes or overly rough patches, though some texture is desirable for this look.
Uneven Texture?
If the plaster gauze texture is too grid-like, apply a thin ‘skim coat’ of drywall joint compound or gesso over the dry mask, then sand it down for a stone-like finish.
Step 2: Drafting and Painting
-
Prime the surface:
Coat the entire front of the mask with a layer of white Gesso. This seals the porous plaster and provides a good tooth for the acrylic paint. -
Create the dividing line:
Using a pencil, lightly draw a vertical line down the center of the face, following the curve of the nose and chin. This will separate your two distinct design halves. -
Sketch the geometric side:
On the left side of the mask (viewer’s left), sketch the abstract pattern. Draw a large curve starting from the forehead, swooping down towards the cheek to create the large terracotta section, leaving a charcoal section around the eye and jaw. -
Base coat the right side:
Paint the entire right side of the mask (viewer’s right) with the Cream/Off-white paint. I like to use a dabbing motion with a stiff brush here to enhance the organic, slightly pitted texture of the plaster. -
Paint the geometric charcoal sections:
On the left side, fill in the area around the eye and the lower jaw section with Charcoal Black. Use a medium flat brush for coverage and a smaller brush for clean edges against the pencil lines. -
Apply the terracotta tones:
Fill in the remaining curved section on the left side with your Terracotta/Clay Orange paint. You may need two coats to get a solid, opaque finish that contrasts well with the black. -
Detail the lips:
Paint the lips. On the ‘organic’ right side, use the Terracotta color but mix it with a tiny bit of brown for a more earthy tone. On the geometric left side, ensure the lip color ends precisely where the charcoal jaw section begins. -
Outline the right eye:
Using a fine detail brush and Burnt Umber (or dark Terracotta), carefully paint a rim around the right eye socket. This mimics the look of a traditional ceramic glaze finish. -
Distress the surface (optional):
To make the mask look weathered like the reference, dry-brush a tiny amount of grey or brown paint randomly over the cream section to catch the high points of the plaster texture. -
Seal the artwork:
Once all paint is completely dry, spray the mask with a matte acrylic sealant. This protects the finish and unifies the sheen of the different paint colors.
Level Up: Antiquing
Mix watery heavy body brown paint and wash it over the entire dry mask, then immediately wipe it off with a rag. The dark paint will stay in the crevices for an aged look.
Hang your finished dual-design mask in a spot with good lighting to highlight the interesting textural contrast you have achieved
Textured Imprints With Lace Or Leaves
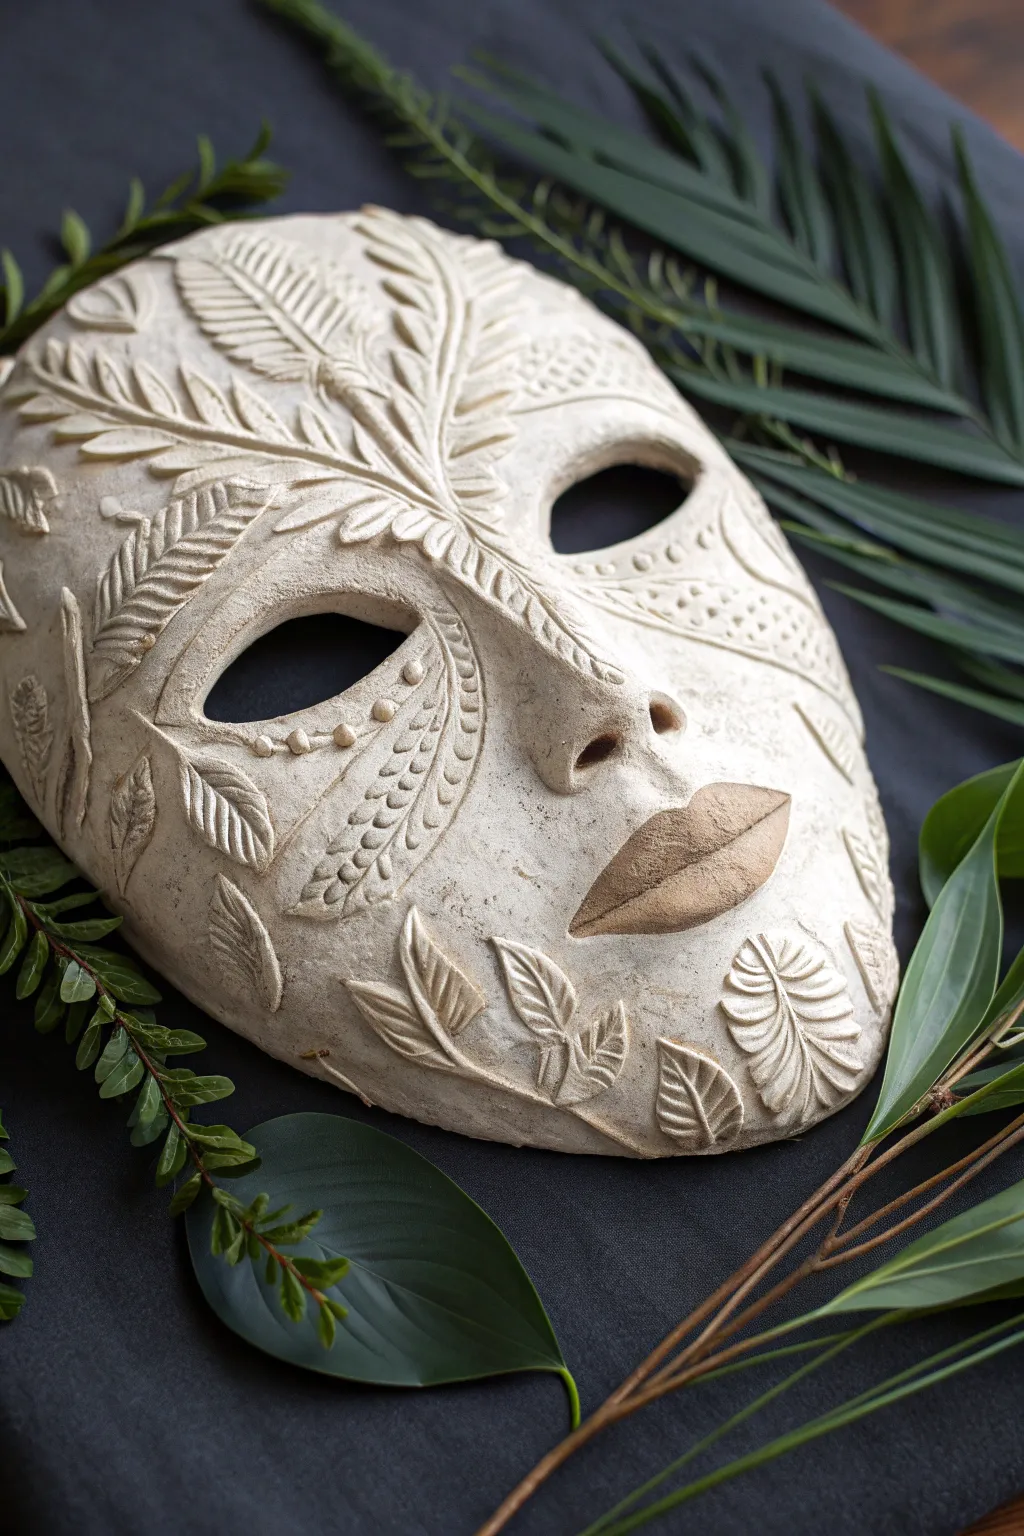
Transform a plain mask form into an organic masterpiece using the intricate textures of nature. This project combines raised relief techniques with botanical motifs for a stunning, fossil-like finish.
How-To Guide
Materials
- Plastic or paper maché face mask form (base)
- Air-dry clay or Paperclay (white or cream)
- Rolling pin
- Assorted artificial or distinctively veined fresh leaves (fern, palm, ficus)
- Sculpting tools (needle tool, smooth modeling tool)
- Water and small sponge
- Slip (clay mixed with water to a paste consistency)
- Sanding sponge (fine grit)
- Acrylic paints (antique white, beige, soft metallic gold)
- Paintbrushes (soft bristle)
- Clear matte sealant spray
Step 1: Preparing the Base
-
Clean the form:
Begin by wiping down your plastic or paper maché mask form to ensure it is free from dust and oils. This helps the clay adhere properly. -
Condition the clay:
Take a large portion of your air-dry clay and knead it in your hands until it becomes warm, pliable, and smooth. If it feels too dry, mist it lightly with water. -
Roll out a sheet:
Roll the clay out on a non-stick surface to a uniform thickness of about 1/4 inch. You want enough coverage to drape over the entire mask face. -
Apply the clay skin:
Carefully lift your clay sheet and drape it over the mask form. Use your thumbs to gently press the clay into the contours of the nose, eyes, and mouth, smoothing out any trapped air bubbles. -
Trim the excess:
Using a needle tool or craft knife, trim away the excess clay around the outer edge of the mask and carefully cut out the eye holes. Smooth these cut edges with a damp finger for a clean finish.
Vein Definition
If your leaf impressions look faint, gently re-trace the main veins with a needle tool while the clay is still wet to deepen the relief.
Step 2: Creating Leaf Impressions
-
Select your botanicals:
Choose leaves with thick, prominent veins. Ferns and palm leaves work wonderfully for this design. -
Roll separate clay pieces:
Instead of pressing leaves directly into the face, we will create appliqué pieces. Roll out small, thin scraps of clay. -
Press for texture:
Place a leaf vein-side down onto a clay scrap. Roll over it firmly with your rolling pin to transfer the texture deep into the clay. -
Cut the shapes:
Carefully cut around the outline of the leaf impression using a needle tool to create a clay replica of the leaf. -
Detail the nose bridge:
Mold a specialized, long fern-like shape for the bridge of the nose. This central piece anchors the design, fanning upwards toward the forehead.
Step 3: Sculpting the Relief
-
Score and slip:
Before attaching a clay leaf to the mask, scratch the back of the leaf and the target spot on the mask (scoring), then apply a little clay paste (slip). This acts as glue. -
Arrange the forehead:
Place your central fern piece on the forehead and nose bridge. Curve the fronds slightly to follow the roundness of the brow. -
Add cheek details:
Create larger, broader leaf shapes for the cheeks. Attach them so they angle upwards towards the ears, mimicking cheekbones. -
Define the eyes:
Use smaller, petal-like clay pieces or tiny rolled coils to frame the eye sockets, adding dotted textures with a needle tool for extra detail. -
Refine the mouth:
Ensure the lips are well-defined. I like to smooth a tiny bit of extra clay over the lips to make them fuller before painting. -
Blend the edges:
Use a modeling tool to verify that all attached leaves are fully adhered at the edges, so they don’t curl up while drying.
Antique Wash
For an aged look, apply a watered-down brown paint wash over the dried mask and wipe it off immediately, leaving dark pigment only in the deeper crevices.
Step 4: Finishing and Painting
-
Dry thoroughly:
Allow the mask to dry completely. This usually takes 24-48 hours depending on humidity. Inspect for cracks and patch with slip if needed. -
Sand gently:
Once bone dry, use a fine-grit sanding sponge to smooth any rough burrs or sharp edges on the leaf cutouts. -
Base coat:
Paint the entire mask with a varied coat of antique white or cream acrylic paint. -
Highlighting:
Using a dry-brush technique, lightly brush a soft metallic gold or beige over the raised veins of the leaves to catch the texture and create depth. -
Paint the lips:
Paint the lips a slightly darker beige or bronze tone to separate them visually from the botanical textures. -
Seal the work:
Spray the finished mask with a matte clear sealant to protect the clay and paint from moisture.
Hang your finished botanical mask as a serene, nature-inspired wall relief
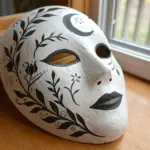
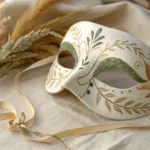

Have a question or want to share your own experience? I'd love to hear from you in the comments below!