A plain serving platter is one of my favorite “canvases” because the shape practically begs for a bold border and a clean center. Grab a platter you don’t mind experimenting on, and I’ll share platter painting ideas you can customize for your own table and style.
Classic Floral Rim Wreath
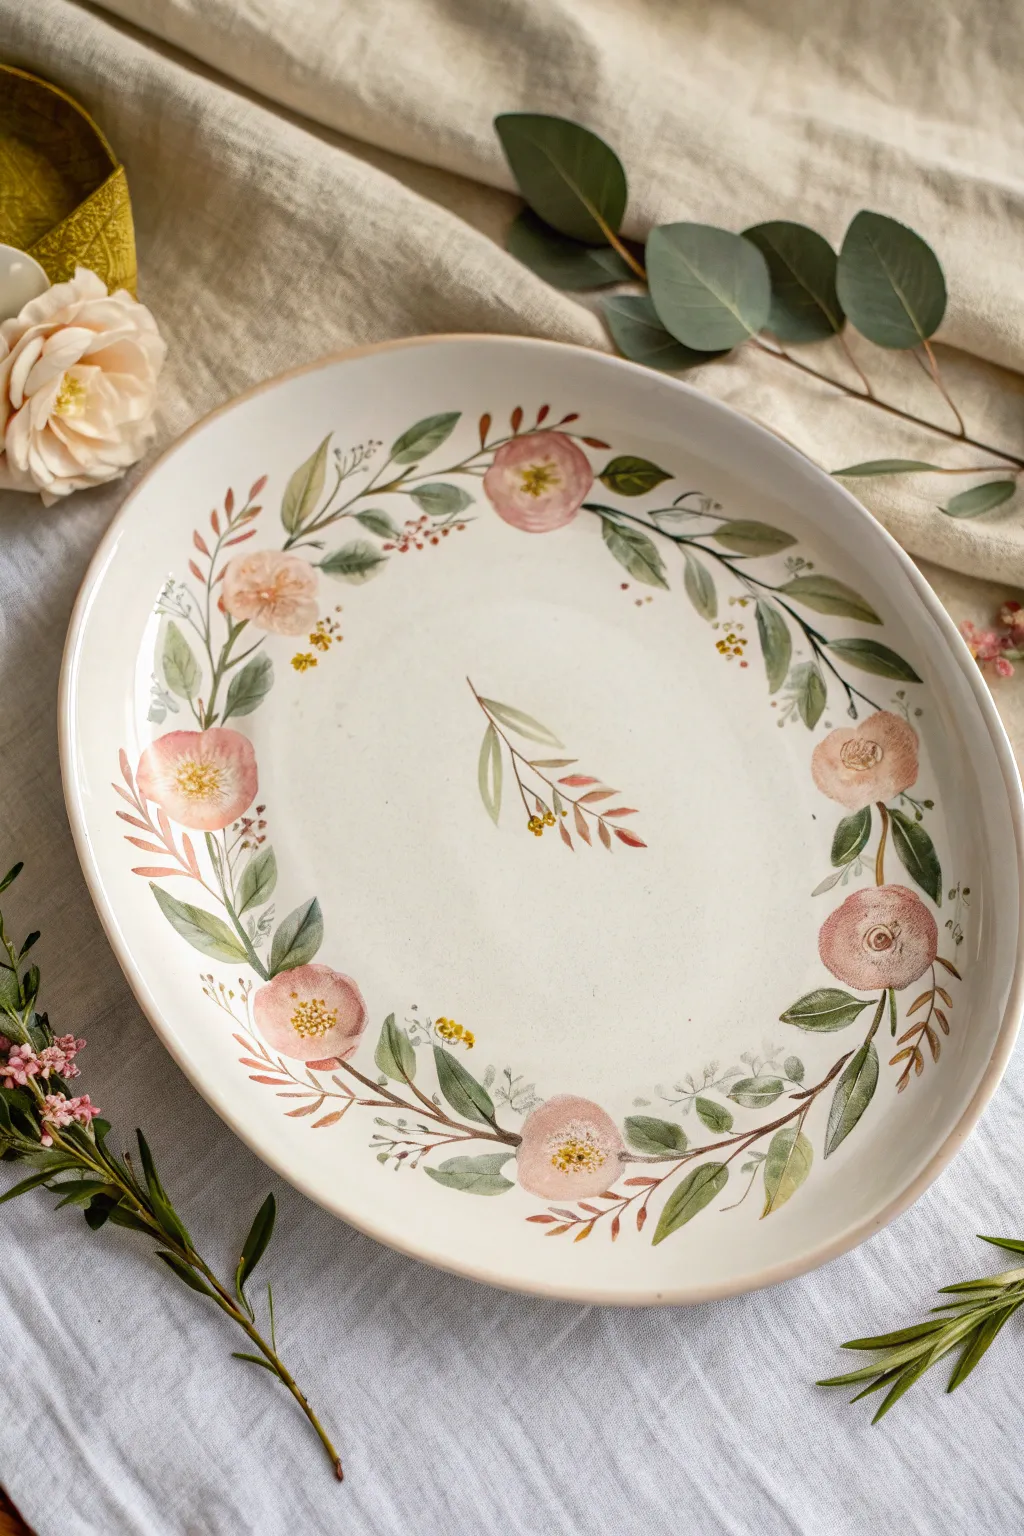
Recreate the delicate charm of vintage botanical illustrations with this soft and romantic platter design. Using ceramic paints to mimic the transparency of watercolors, you will layer dusty pinks and sage greens to create a timeless rim wreath.
How-To Guide
Materials
- White oval or round ceramic platter (glazed)
- Pebeo Porcelaine 150 paints (or similar baking ceramic paints)
- Colors: Rose Pink, Sage Green, Olive Green, Yellow Ochre, Brown, White
- Glazing medium or thinner for ceramic paints
- Fine round synthetic brushes (size 0 and 2)
- Small flat brush (size 4)
- Pencil (for sketching on ceramic)
- Isopropyl alcohol and paper towels
- Palette or small dish for mixing
- Jar of water
Step 1: Preparation & Planning
-
Clean the Surface:
Before painting, wipe the entire surface of the platter with isopropyl alcohol to remove any oils or fingerprints. This ensures the paint adheres properly. -
Sketch the Composition:
Using a soft pencil, lightly sketch a meandering oval line around the rim of the platter to serve as the ‘vine’ for your wreath. Mark 6-8 spots evenly spaced along this line where the main blooms will sit.
Step 2: Painting the Blooms
-
Mix the Pink:
On your palette, mix Rose Pink with a touch of White and a drop of thinner. You want a translucent, milky consistency that mimics watercolor. -
Paint the Base Circles:
Using the flat brush, paint soft, irregular circles at your marked flower spots. Keep the edges organic and slightly uneven; perfect circles look too rigid. -
Add Depth:
While the base pink is still tacky, mix a slightly darker version by adding a tiny speck of Brown to your pink mix. Dab this into the center of each flower to create a shadow. -
Define the Petals:
Switch to your size 2 round brush. With the darker pink mix, paint fine, curved C-shaped strokes inside the flower circles to suggest swirling petals. I like to keep these strokes loose and not too precise.
Watercolor Effect
Use a specialized ‘thinner’ rather than water to dilute ceramic paints. Water breaks down the binder, causing paint to flake off after baking.
Step 3: Adding Foliage
-
Connect the Vines:
Mix Brown with plenty of thinner to get an inky consistency. Use the size 0 liner brush to paint the thin, twiggy stems connecting the flowers, following your initial pencil guide. -
Paint Large Leaves:
Mix a soft Sage Green. Using the size 2 brush, press and lift to create almond-shaped leaves branching off the main vine. Vary the direction of the leaves to create movement. -
Layer in Darker Leaves:
Mix Olive Green. Paint smaller, narrower leaves tucked behind or between the sage ones. This variation in green tones adds the depth seen in botanical illustrations. -
Create Feathery Sprigs:
Using the size 0 brush and a reddish-brown mix, paint delicate fern-like or feathery sprigs emerging from the vine, filling in empty gaps between the larger leaves.
Gilded Edge
Once the floral design is baked and cooled, apply a thin rim of gold ceramic paint or gold leaf pen to the very edge of the platter for an elegant finish.
Step 4: Details & Centers
-
Add Flower Centers:
Mix Yellow Ochre with a tiny bit of White. Use the tip of your smallest brush to stipple small dots in the very center of the open flowers. -
Tiny Bud Details:
Dip the tip of your brush in the pink mix and add tiny clusters of dots near the feathery sprigs to represent unopened buds or berries. -
The Center Motif:
In the direct center of the platter, duplicate a small fragment of the rim design: paint a single stem with three leaves and a small reddish sprig. This ties the design together beautifully. -
Clean Up:
Check for any stray paint marks. If you make a mistake, you can scrape it off gently with a toothpick or wipe it with a damp Q-tip before it dries. Wipe away visible pencil lines carefully.
Step 5: Curing
-
Dry Time:
Allow the platter to air dry for at least 24 hours. The paint must be completely moisture-free before baking. -
Bake the Piece:
Place the platter in a cool oven. Set the temperature to 300°F (150°C). Once the oven reaches temperature, bake for 35 minutes. Turn the oven off and let the platter cool completely inside before removing.
Now you have a stunning, food-safe serving piece that captures the elegance of an English garden


Simple Geometric Blocks with Tape
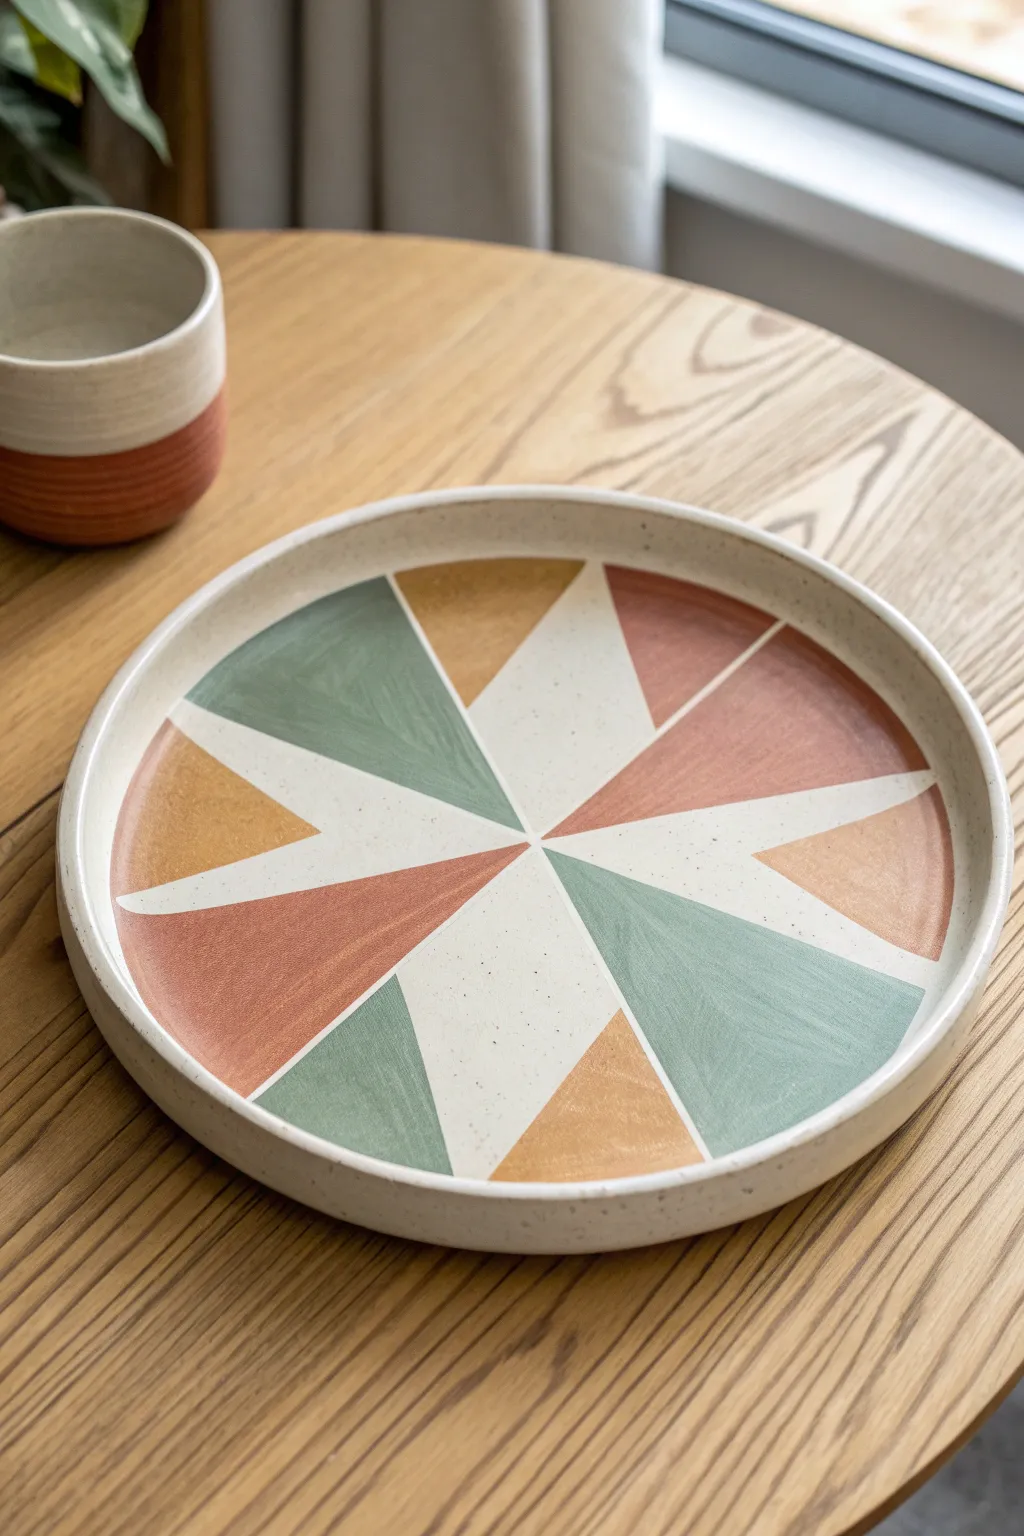
Bring a touch of modern bohemian style to your table with this geometric starburst platter. Using simple masking techniques, you’ll create crisp triangles in an earthy palette of sage, terracotta, and ochre against a speckled cream background.
Step-by-Step
Materials
- Round ceramic bisque platter (unglazed)
- Glaze paints (speckled cream/white, sage green, terracotta, mustard yellow)
- Painter’s tape or dedicated masking tape (various widths)
- Flat shader brushes (medium size)
- Round brush (small for touch-ups)
- Ruler or straight edge
- Pencil
- Damp sponge
- Clear dipping glaze (if using underglazes)
Step 1: Preparation and Base Coat
-
Clean the bisque:
Begin by wiping down your ceramic bisque platter with a damp sponge. This removes any dust or oils from handling that might prevent the glaze from adhering properly. -
Apply the base color:
Using a wide flat brush, apply your base color to the entire top surface of the platter. I recommend a speckled cream or oatmeal glaze to replicate the natural look in the photo. -
Let it dry completely:
Allow the first coat to dry until it is no longer cool to the touch. Apply a second and third coat if needed for full opacity, drying thoroughly between each layer. -
Inspect surface:
Ensure the base coat is bone dry before moving on to taping. If the paint is even slightly damp, the tape will peel it off.
Bleeding Lines?
If paint seeps under the tape, wait for it to fully dry. Then, gently scratch away the excess color with a wooden toothpick or a precision refreshing tool before firing.
Step 2: Mapping the Design
-
Find the center:
Use a ruler to lightly mark the exact center of the platter with a pencil. This small dot will be the convergence point for all your geometric triangles. -
Mark the rim:
Measure the circumference of the rim and divide it into equal sections. For this design, you’ll need 8 main sections, but you can adjust based on how many rays you want. -
Tape the primary lines:
Place long strips of painter’s tape starting from the center point extending out to your marks on the rim. Press the edges of the tape down firmly to prevent paint bleed. -
Create the secondary angles:
To create the ‘star’ effect where triangles don’t just touch side-by-side but overlap or shift, add additional tape lines connecting the midpoints of your pie slices back to the center or rim as shown in the reference.
Step 3: Painting the Geometry
-
Seal the tape edges:
For super crisp lines, I like to brush a tiny amount of the base cream color over the tape edges first. This seals the tape so any bleed is invisible. -
Apply the sage green:
Identify the sections for the green triangles. Use a flat shader brush to fill these shapes, stroking from the tape inward to avoid pushing paint under the adhesive. -
Paint the terracotta sections:
Wash your brush thoroughly and switch to the rust/terracotta glaze. Fill in the corresponding triangles to balance the cool green tones. -
Add the mustard accents:
Fill the remaining designated triangles with the mustard yellow glaze. This third color adds that crucial mid-century modern warmth. -
Second coat:
Once the colored sections are dry to the touch, apply a second coat to ensure the colors are rich and opaque.
Pro Tip: Tape Removal
Don’t rip the tape off quickly! Pull it slowly back against itself (flat), rather than pulling it straight up into the air, to keep your glaze lines razor sharp.
Step 4: Finishing Touches
-
Remove tape critically:
Carefully peel back the tape while the paint is still slightly tacky, or wait until fully dry if your specific glaze recommends it. Pull slowly at a 45-degree angle. -
Clean up edges:
If any paint bled through, use a clean, stiff brush slightly dampened with water or a craft knife to gently scrape or wipe away the error. -
Paint the rim:
Using a steady hand or a banding wheel if you have one, paint the outer vertical rim of the platter in the terracotta color to frame the design. -
Final inspection:
Check for any pinholes or missed spots in the glaze. Touch these up with a small round brush. -
Fire the piece:
If using traditional ceramic glazes, dip in clear glaze if required (consult your glaze label) and fire in a kiln according to the clay and glaze specifications.
Once fired, this platter becomes a functional piece of art ready to host your favorite appetizers


Blue-and-White Border Motifs
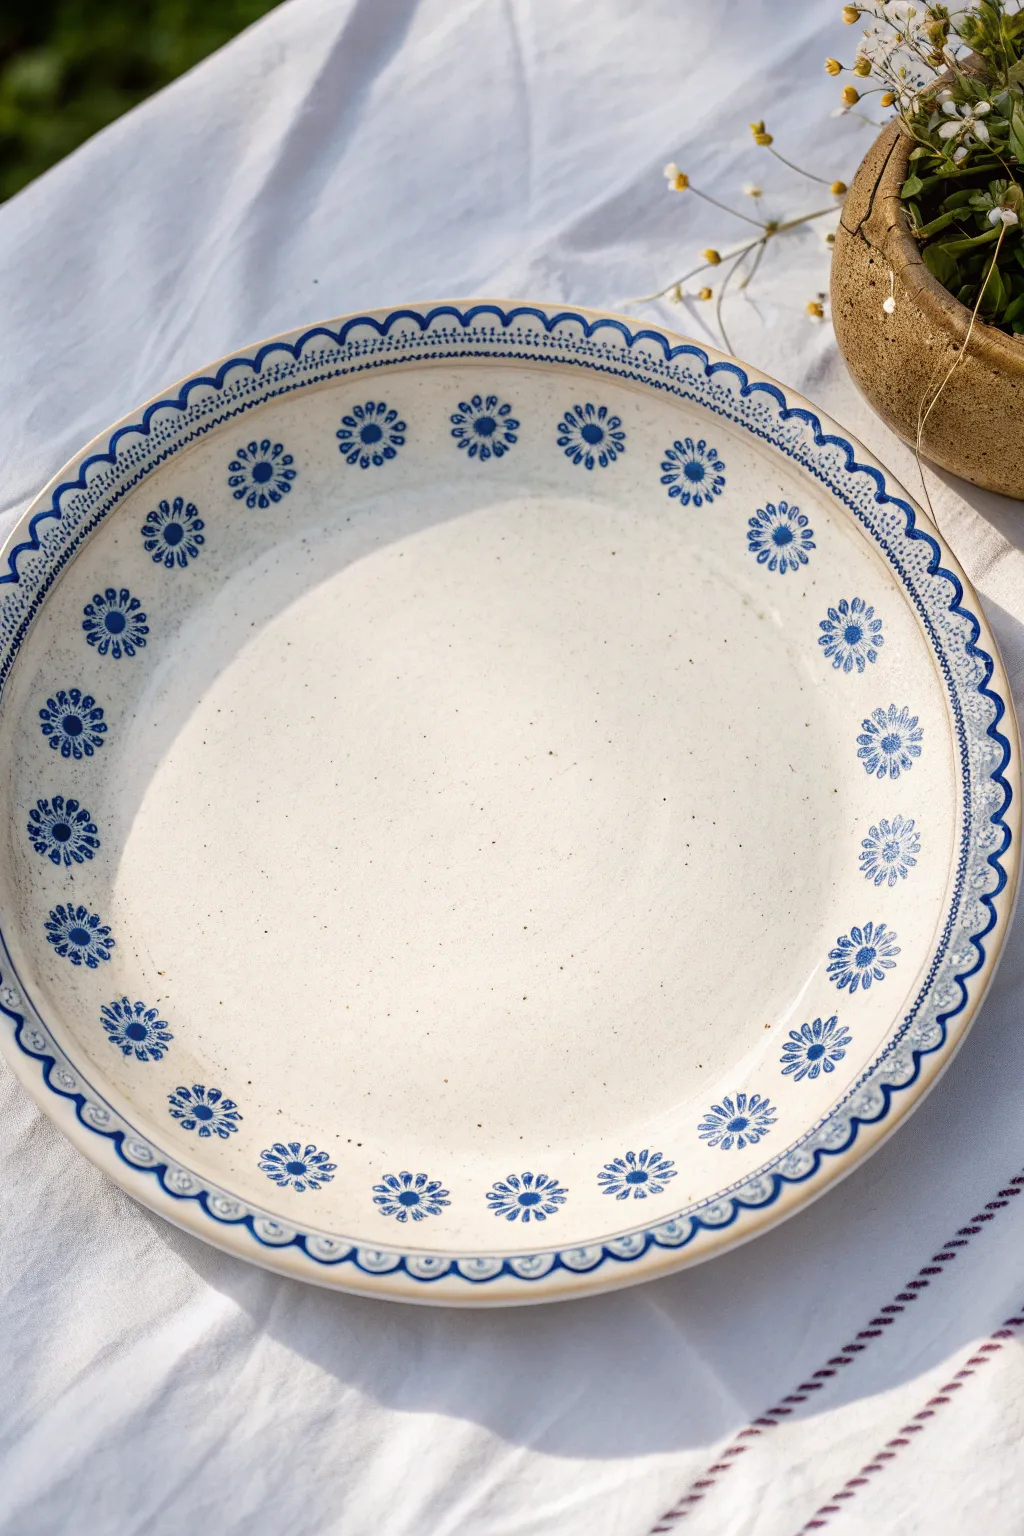
This charming design brings a classic folk-art feel to your table with its deceptively simple, repeated floral motifs and scalloped edges. While it looks like fired ceramic detail, you can easily achieve this crisp blue-on-cream look on a plain platter using porcelain paints.
Detailed Instructions
Materials
- Large, plain ceramic platter (cream or off-white glaze)
- Porcelain paint (Deep Blue or Cobalt)
- Small round detail brush (size 1 or 2)
- Cotton swabs
- Pencil (for sketching)
- Ruler or tape measure
- Paper towels
- Rubbing alcohol
- Oven (for curing, if using bake-on paints)
Step 1: Preparation & Mapping
-
Clean and degrease:
Before you begin, wipe the entire surface of your platter with rubbing alcohol on a paper towel. This removes any finger oils or dust that might prevent the paint from adhering properly. -
Mark the center:
Find the rough center of your platter. While this design is focused on the rim, understanding the center helps you gauge the spacing of your outer ring. -
Create guidelines:
Using a pencil, lightly draw a circle about 2 inches inward from the outer edge. This will serve as the baseline for your floral motifs to ensure they sit at the same height. -
Mark floral spacing:
Along your pencil guideline, make small tick marks spaced evenly apart—roughly every 1.5 to 2 inches depending on the size of your platter. These marks will be the centers of your flowers.
Step 2: Painting the Floral Ring
-
Paint the centers:
Dip the handle end of your paintbrush or a cotton swab into the blue paint. Press it firmly onto each tick mark to create a solid, round center dot for every flower. -
Start the petals:
Switch to your fine detail brush. Load it with a moderate amount of blue paint—you want flow, but not drips. -
Paint the radial strokes:
Around the first center dot, paint 10 to 12 small lines radiating outward like sun rays. Keep them short and slightly teardrop-shaped, thicker near the flower center and tapering out. -
Complete the ring:
Move to the next dot and repeat the process. I find it helpful to rotate the platter securely on the table rather than twisting my wrist, which keeps the stroke angle consistent. -
Check consistency:
Step back and look at your ring of flowers. If any petals look too thin, gently go over them again to add visual weight.
Brush Loading Secret
Load only the bottom third of your brush bristles with paint. Overloading causes blobs at the start of your stroke, ruining the delicate petal shape.
Step 3: Creating the Scalloped Border
-
Sketch the scallops:
Lightly pencil a scalloped (wavy) line about 1/4 inch inward from the very edge of the platter. The ‘dips’ of the wave should point toward the center of the plate. -
Paint the main wave:
Using your detail brush, trace over your pencil wave with a steady hand. Ensure the line thickness remains fairly uniform. -
Position the outer dots:
In the crest of each wave (the part closest to the rim), place a small dot of blue paint. Use the brush tip or a toothpick for precision here. -
Add the inner detail:
Paint a second, thinner line right next to your main scalloped wave, following the exact same curve. This double-line effect adds depth to the border. -
Create the hatch marks:
Connect the two parallel wave lines with tiny, perpendicular hatch marks (little dashes). Space them very close together to create a ‘stitched’ or ladder look.
Vintage Texture Level-Up
For an aged pottery look, lightly scuff the painted designs with fine-grit sandpaper after baking, or dilute the blue paint slightly with medium for a translucent, watercolor effect.
Step 4: Finishing Touches
-
Clean up errors:
If you smudged any paint, dampen a cotton swab with a tiny bit of water or alcohol and gently wipe away the mistake before it dries. -
Remove guidelines:
Once the paint is absolutely touch-dry (usually nearly an hour), use a soft eraser to gently remove any visible pencil marks. -
Cure the paint:
Follow the manufacturer’s instructions for your specific porcelain paint. This usually involves letting it air cure for 24 hours, then baking it in a home oven to make it dishwasher safe.
Now you have a stunning, hand-painted serving piece that echoes the timeless beauty of traditional blue pottery


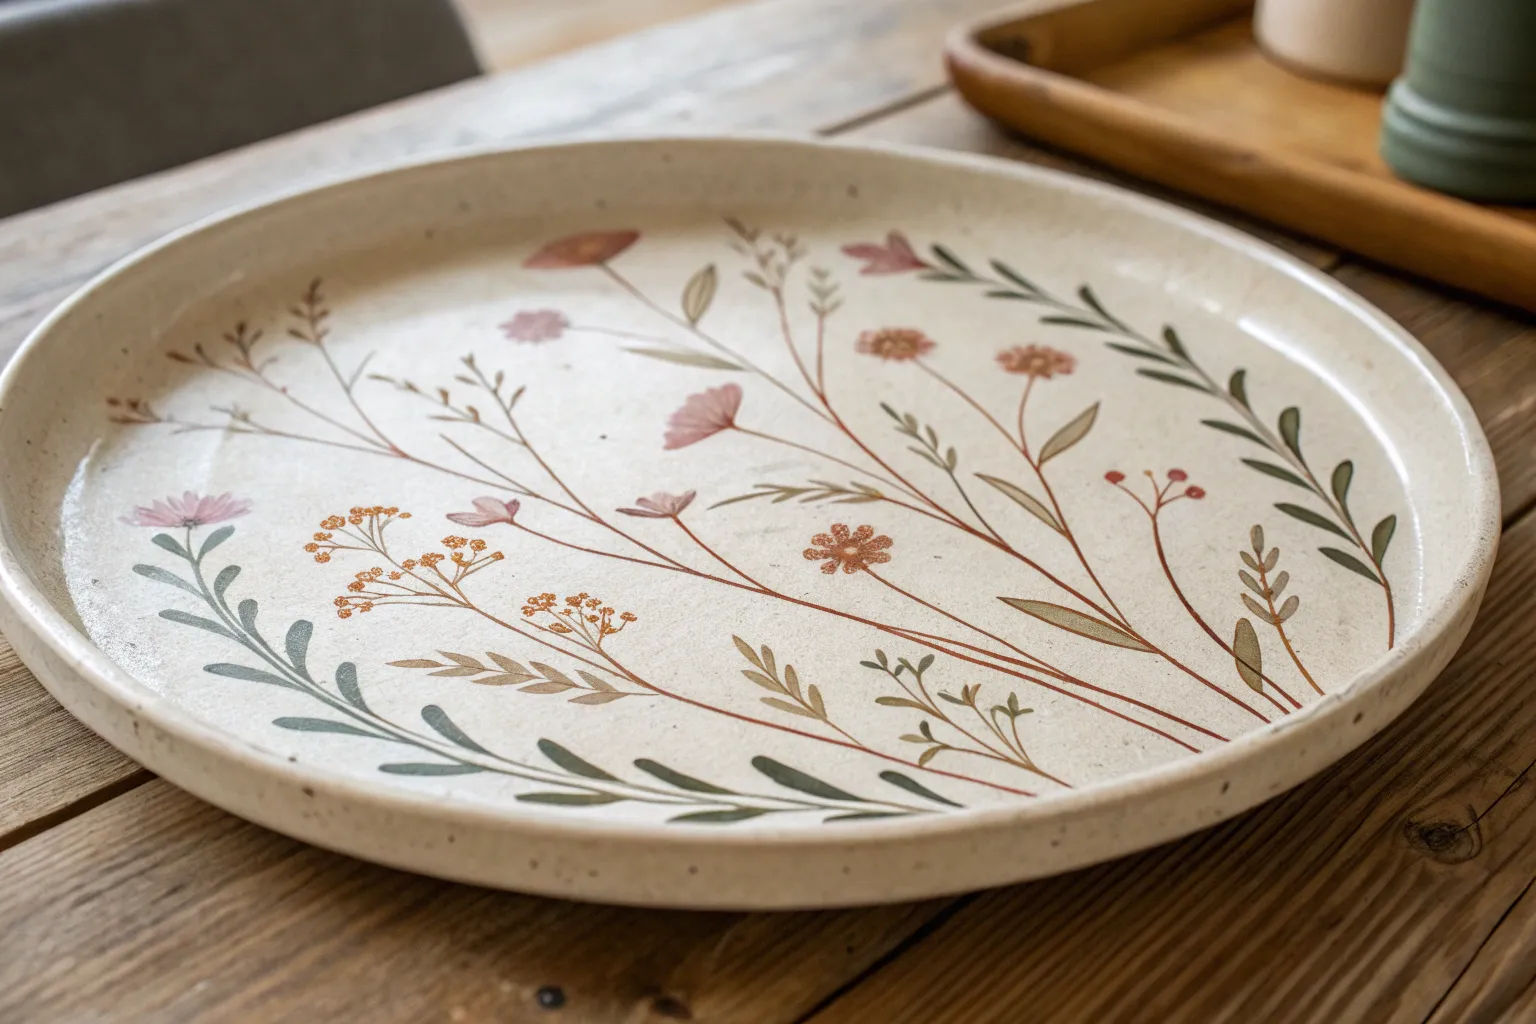
Citrus Slice Rim Pattern
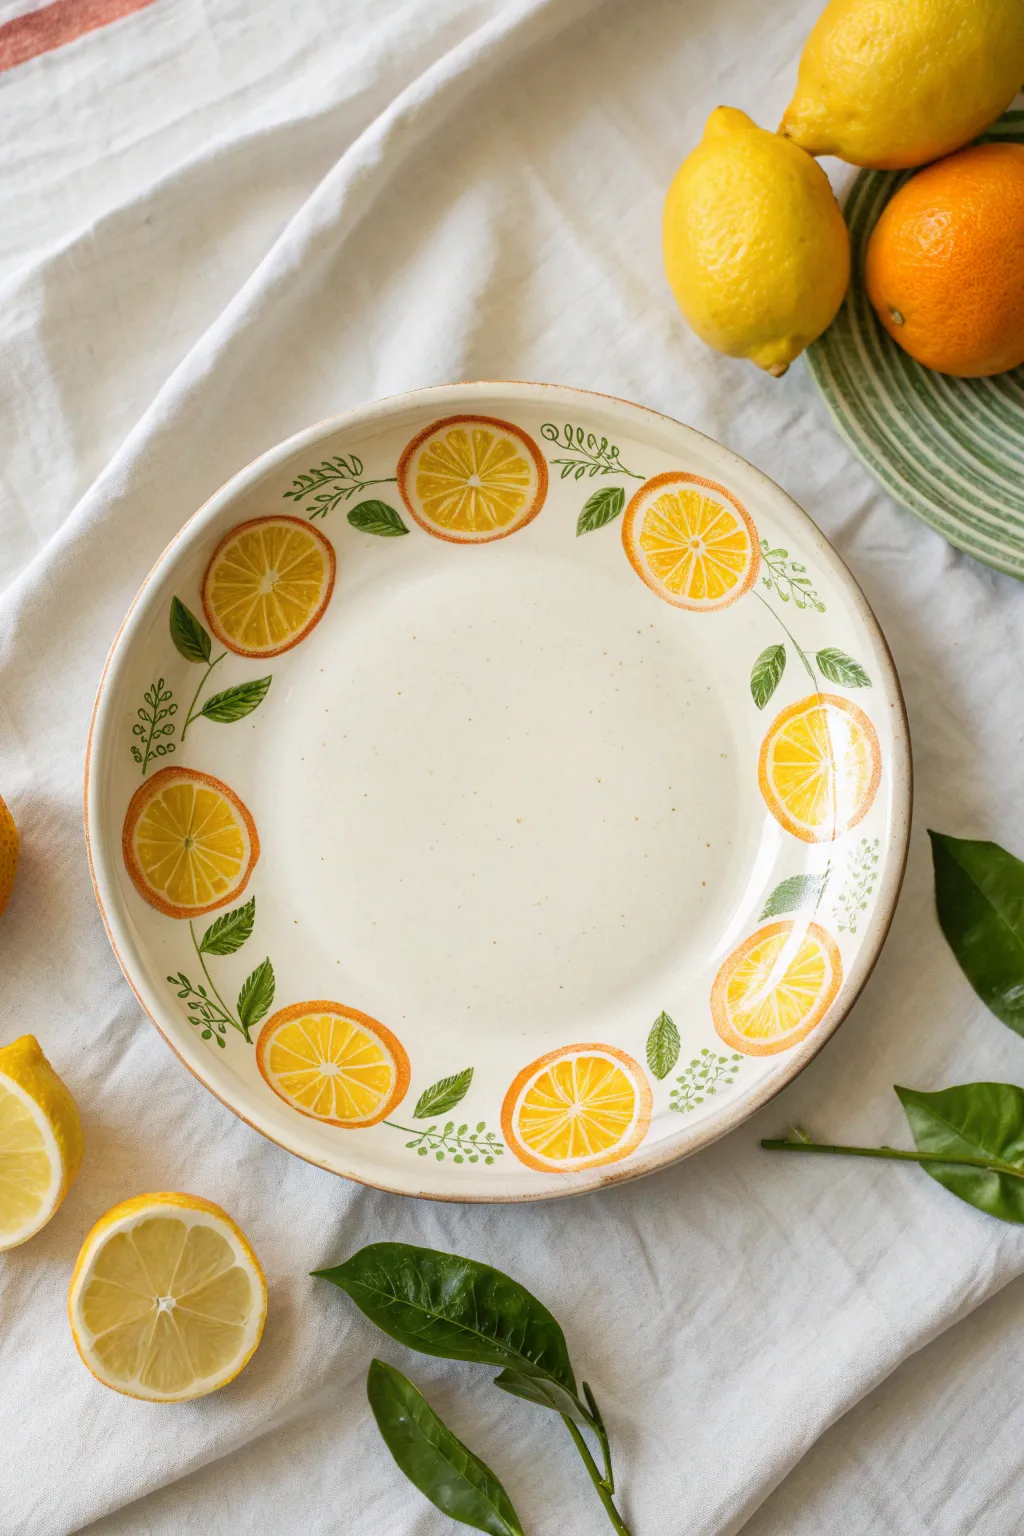
Bring the brightness of a Mediterranean orchard to your table with this cheerful ceramic painting project. Featuring sun-ripened orange slices and delicate green foliage encircling the rim, this design is both rustic and refreshingly modern.
Step-by-Step
Materials
- White or cream circular ceramic platter (bisque or glazed, depending on paint choice)
- Ceramic paints or underglazes: Bright Orange, Lemon Yellow, Deep Green, Light Green, Brown
- Round brushes (sizes 2, 4, and 6)
- Fine liner brush (size 0 or 00)
- Pencil (HB or lighter) or carbon paper
- Water cup and paper towels
- Compass or round object (optional, for spacing)
- Glaze and kiln access (if using underglazes) or oven (if using bake-on paints)
Step 1: Planning and Spacing
-
Clean surface:
Begin by wiping down your platter with a damp sponge or cloth to remove any dust or oils, ensuring a clean canvas for your paint. -
Mark placement:
Using a light pencil, gently mark eight evenly spaced points around the broad rim of the platter. Imagine a clock face to help you visualize opposite points first. -
Sketch circles:
At each mark, lightly sketch a circle about 2 inches in diameter. These don’t need to be perfectly round; a little irregularity adds to the hand-painted charm.
Uneven Spacing?
Don’t panic if your gaps aren’t equal. Add an extra leaf cluster or a floating citrus blossom in wider spaces to balance the visual weight without repainting.
Step 2: Painting the Citrus
-
Base orange tone:
Load a size 6 round brush with your Bright Orange paint. Fill in the circles you sketched, leaving the very center slightly lighter or unpainted if you want a highlight effect. -
Define the rind:
While the base is still slightly wet, carefully re-outline the outer edge of each circle with a slightly heavier concentration of orange to create the appearance of a rind. -
Inner details:
Clean your brush and switch to a Lemon Yellow. Paint a small circle in the direct center of each orange slice. -
Segment lines:
Using a size 2 brush and the Lemon Yellow (or a mix of yellow and white), paint thin, radiating lines from the center hub to the rind, dividing the orange into triangular segments. -
Texture highlights:
Inside each triangular segment, dab tiny flecks of yellow or a lighter orange mix. This stippling technique mimics the juicy texture of the fruit pulp. -
Second coat:
Allow the first layer to dry to the touch. Go back and strengthen the rind color with a second coat of Bright Orange if the ceramic looks too sheer.
Step 3: Adding Foliage and Vines
-
Sketch stems:
With your pencil, lightly draw a connecting line or ‘vine’ that runs between the fruit slices. It doesn’t need to be a continuous unbroken line; think of it as sprigs tucking behind the fruit. -
Paint main leaves:
Using Deep Green and a size 4 brush, paint singular, almond-shaped leaves near the fruit slices. Press down on the belly of the brush and lift to create a tapered point. -
Leaf variation:
Mix a little Light Green into your Deep Green. Paint a few smaller leaves interspersed with the dark ones to create depth and variety in the foliage. -
Detailing veins:
Switch to your fine liner brush (size 0). With a very diluted dark green or brown, paint a central vein down the middle of the larger leaves. -
Adding delicate sprigs:
Using the liner brush and Light Green, paint tiny, branching stems extending into the empty white spaces between the oranges. -
Tiny leaf clusters:
At the ends of these delicate stems, dab tiny dots or teardrop shapes to represent small buds or new growth. -
Connecting the vine:
Use a thin line of brown or dark green to visually connect the leaves and fruit, ensuring the flow moves naturally around the circle.
Add Depth
Mix a tiny drop of red into your orange paint and add it to just the bottom curve of each slice. This creates a shadow effect that makes the fruit look 3D.
Step 4: Finishing Touches
-
Clean up:
Check for any stray paint marks or smudges on the white center of the plate. Gently scrape them away with a craft knife or wipe with a damp Q-tip. -
Rim edge:
I find that painting a very thin, diluted wash of brown or orange along the very outer lip of the plate frames the design beautifully. -
Dry and fire:
Allow the paint to dry completely according to manufacturer instructions. If using underglaze, dip in clear glaze and fire; if using bake-on paints, cure in your home oven.
Once fired or cured, this vibrant platter is ready to serve up summer salads or decorate your kitchen wall
BRUSH GUIDE
The Right Brush for Every Stroke
From clean lines to bold texture — master brush choice, stroke control, and essential techniques.
Explore the Full Guide
Olive Branch Garland
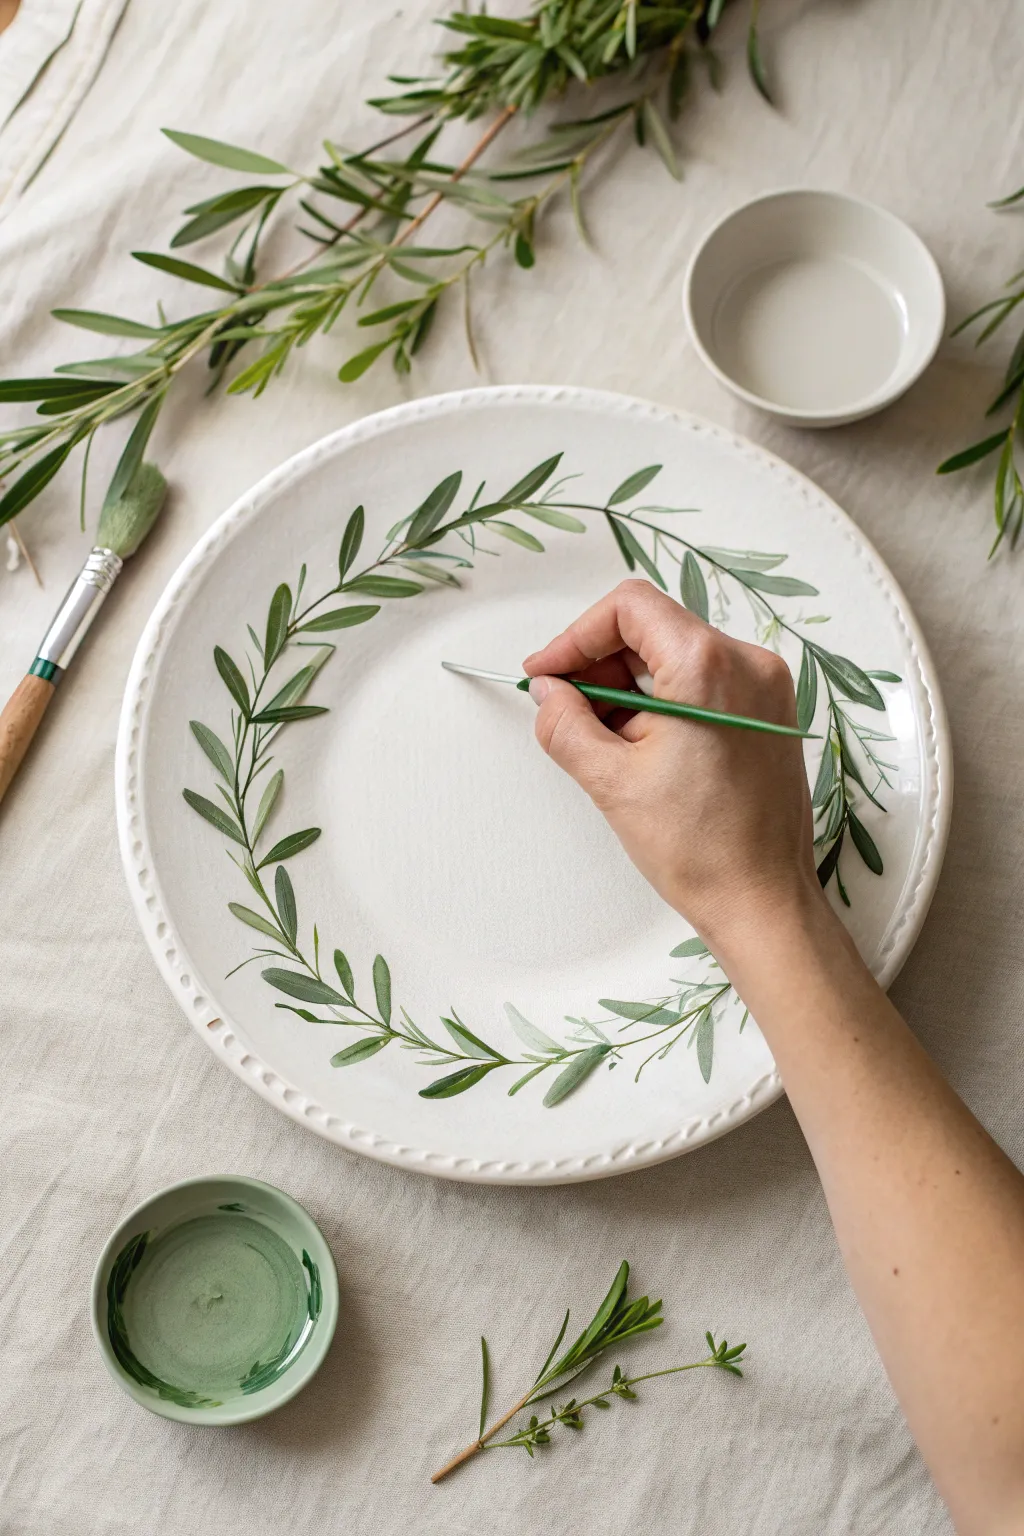
Transform a simple ceramic plate into a piece of Mediterranean-inspired art with this delicate olive branch garland design. Using subtle shades of sage and hunter green, you’ll create a flowing, organic wreath that frames food beautifully or stands alone as decor.
Step-by-Step Tutorial
Materials
- White ceramic platter (unglazed bisque or matte glaze recommended for adhesion)
- Ceramic paint or underglaze (Sage Green, Hunter Green, touch of White)
- Small round detail brush (size 0 or 1)
- Medium round brush (size 4 or 6)
- Palette or small mixing dish
- Paper towels
- Pencil (optional for sketching)
- Water cup
- Clear glaze (if using kiln-fire method) or sealant (for air-dry paints)
Step 1: Planning and Preparation
-
Clean surface:
Begin by wiping down your ceramic platter with a damp sponge or cloth to remove any dust or oils that might repel the paint. -
Mix your greens:
Squeeze a dollop of sage green and a smaller amount of hunter green onto your palette. I like to keep a small puddle of white nearby to mix lighter variations as I work. -
Create a guide (optional):
If you’re nervous about freehanding, very lightly trace a circle about 1.5 inches inward from the rim using a pencil. This line will burn off in a kiln or can be erased later.
Step 2: Painting the Stems
-
Load the fine brush:
Dip your smallest detail brush into a mix of the sage and hunter green to get a medium olive tone. Thin the paint slightly with a drop of water for smoother flow. -
Mark the quadrants:
Paint four small guiding stems at the top, bottom, left, and right points of your imaginary circle to ensure your garland stays balanced. -
Connect the garland:
Using a sweeping, broken stroke, connect these points with a thin, vine-like line. It doesn’t need to be perfectly continuous; natural vines have breaks and overlaps.
Fixing Wobbly Lines
Line too thick or shaky? Wait for it to dry completely, then gently scratch the excess paint away with a wooden toothpick to refine the edge.
Step 3: Adding the Leaves
-
Practice the stroke:
On a scrap paper, practice the leaf shape: press down to widen the brush, then lift while dragging to create a tapered point. -
Start with the main leaves:
Using the medium round brush loaded with sage green, begin adding leaves along your stem line. Angle them mostly in one direction to signify growth, usually clockwise. -
Vary the spacing:
Paint leaves in pairs or alternating patterns, leaving some small gaps for smaller new growth or olives later. -
Add darker depth:
While the first leaves are drying, mix a darker shade using more hunter green. Paint smaller leaves tucked behind or near the main sage ones to create shadow and volume. -
Layer lighter tones:
Mix a tiny bit of white into your sage green. Add a few highlights on the tips of the larger leaves to make them look sun-kissed.
Pro Tip: Color Variation
Don’t rinse your brush fully between color shifts. Letting the dark and light greens blend naturally on the bristles creates realistic, organic variegation.
Step 4: Fine Details and Finishing
-
Connect the leaves:
Switch back to your smallest detail brush. Carefully paint tiny stems connecting floating leaves back to the main vine. -
Refine the edges:
Use the fine brush to sharpen the tips of any leaves that look too rounded or blunt. -
Add minimal texture:
Use a nearly dry fine brush with the darkest green to add a delicate vein line down the center of only the largest 2-3 leaves for subtle realism. -
Check balance:
Step back and look at the platter from above. Fill in any sparse areas with a tiny leaf or an extra twig extension. -
Dry partially:
Let the paint sit until it loses its wet sheen, which usually takes about 15–20 minutes depending on your environment. -
Clean up imperfections:
If you smudged any paint, use a damp Q-tip or a toothpick to gently scrape or wipe away the mistake before the paint fully cures. -
Seal or fire:
Once fully dry (24 hours is best), create a protective finish. Apply a coat of clear glaze and kiln-fire, or use a food-safe sealant if this is a decorative piece.
Once fired or sealed, your platter will be ready to bring a touch of timeless greenery to your table setting
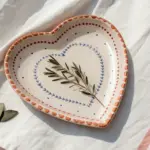
Cherry and Berry Scatter
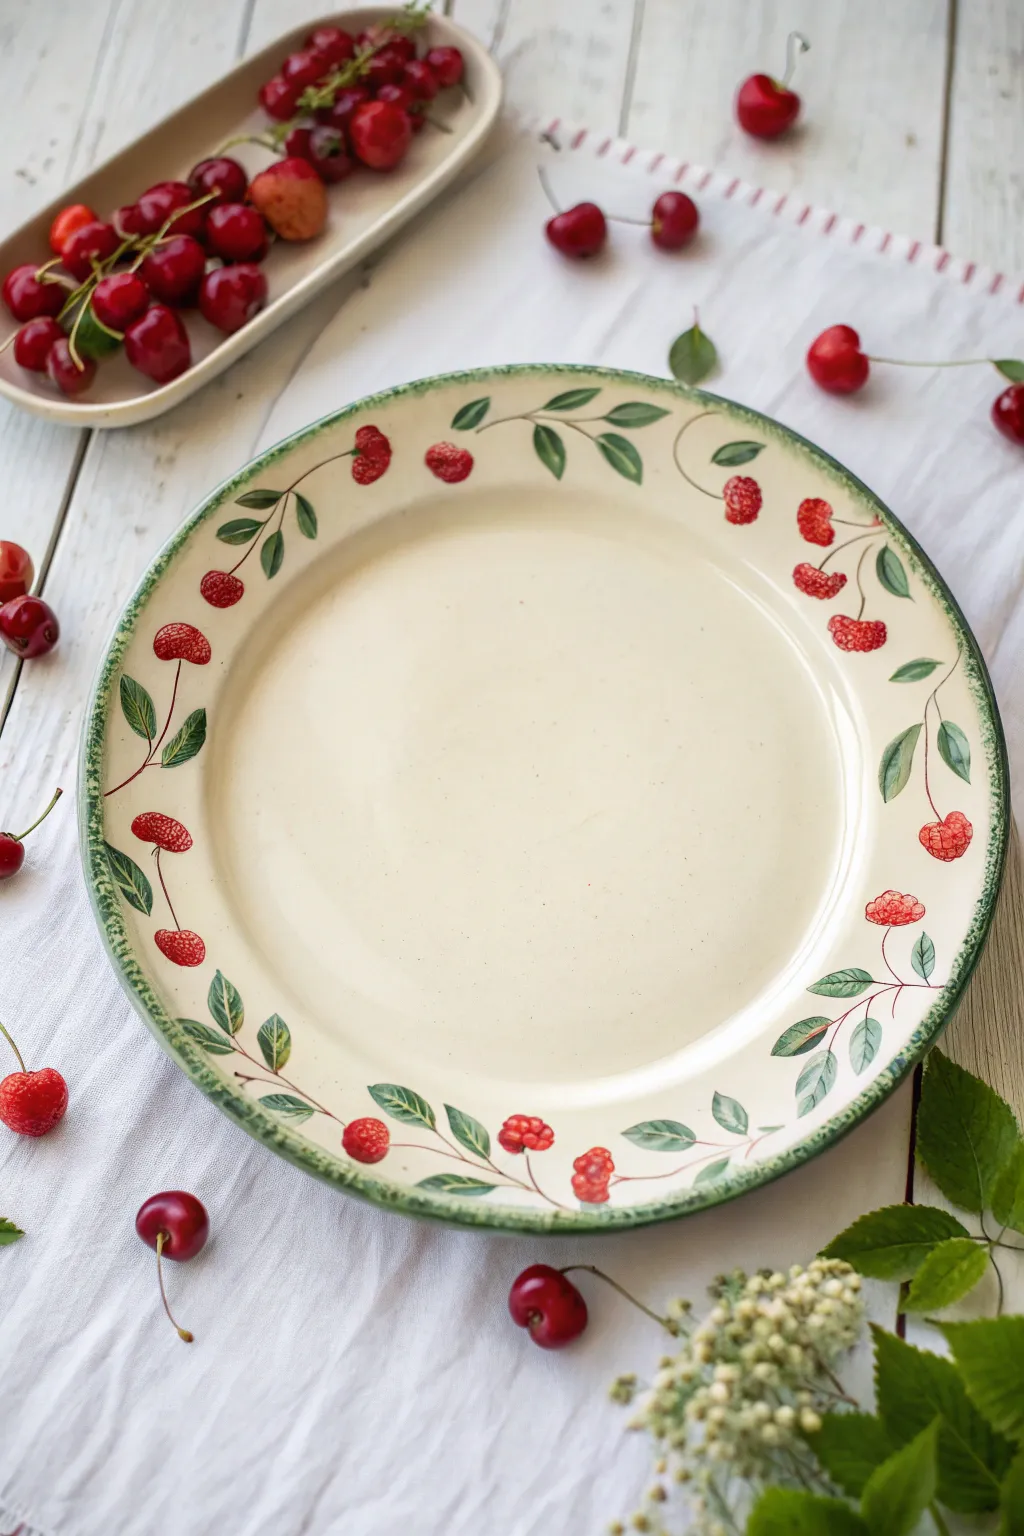
Transform a plain ceramic platter into a countryside treasure with this charming berry and leaf motif. The design focuses on the rim, creating a delicate, rhythmic frame of scattered red fruit and greenery against a creamy background.
Step-by-Step
Materials
- Large ceramic platter (bisque or glazed, depending on method)
- Small round brushes (sizes 2 and 4)
- Fine liner brush (size 00 or 0)
- Underglaze or ceramic paint (Deep Red, Bright Red, Forest Green, Sage Green)
- Clear glazing medium (if using ceramic paints)
- Sponge or large brush for background application
- Palette for mixing
- Small natural sea sponge (optional for texturing)
Step 1: Preparation & Background
-
Surface Prep:
Begin by cleaning your ceramic platter thoroughly to remove any dust or oils. If you are working with bisque ware, wipe it down with a slightly damp sponge. -
Base Tone:
Mix a very warm, creamy off-white color. Using a large brush or sponge, apply this base coat over the entire platter, focusing especially on getting a smooth, even finish on the wide rim where the design will sit. -
Rim Definition:
To give the platter an aged, rustic look, sponge or lightly brush a thin band of diluted Forest Green along the very edge of the rim. This shouldn’t be a perfect line; let it be slightly organic and uneven.
Step 2: Painting the Foliage
-
Mapping the Flow:
Visualise a gentle, waving line moving around the rim. You don’t need to draw it, but use this imaginary path to guide where you’ll place your leaves. -
Leaf Shapes:
Load a size 4 round brush with Sage Green. Using a press-and-lift motion, paint pairs of leaves. Press down to create the belly of the leaf, then lift gradually to form a sharp point. -
Stem Connections:
Switch to your fine liner brush and Forest Green paint. Connect the leaf pairs with very thin, delicate stems. These stems should curve gracefully, suggesting a vine-like movement around the plate. -
Leaf Detailing:
While the Sage Green leaves are still slightly tacky or just dry, use the liner brush with a darker green to add a central vein to each leaf. Keep the line incredibly thin for a refined look. -
Adding Variety:
I like to mix a tiny bit of brown into the green for a few random leaves to make the foliage look more natural and less uniform.
Natural Imperfection
Don’t aim for identical berries. Varying the size and shape slightly makes the pattern feel organic and hand-painted rather than stamped.
Step 3: Adding the Berries
-
Berry Placement:
Identify the empty spaces between your leaf groupings. These gaps are perfect for your berries. Aim for a mix of single berries and pairs to keep the eye moving. -
Base Berry Shape:
Using a small round brush and Bright Red, dab small, somewhat rough circles or ovals. Don’t make them perfect spheres; a slightly textured, bumpy edge mimics real berries like raspberries or wild strawberries. -
Building Texture:
Once the bright red base is dry, dip the very tip of your brush into Deep Red. Stipple tiny dots onto the lower half of each berry to create shadow and the appearance of seeded texture. -
Berry Highlights:
Clean your brush and pick up a tiny amount of pale pink or white. Add a micro-dot or small curve near the top of each berry to make them look juicy and dimensional. -
Connecting Fruit:
Return to your liner brush and thin green paint. Draw fine stems connecting the berries back to the main vine or leaf stems, ensuring they don’t look like they are floating in space.
Paint Lifting?
If the second layer of red lifts the first, ensure the base coat is 100% dry. Use a gentle stippling motion rather than dragging the brush.
Step 4: Finishing Touches
-
Outer Edge Texture:
Go back to the outer rim edge. Using a nearly dry brush with dark green paint, create a ‘spattering’ effect or small tick marks perpendicular to the edge to enhance the rustic pottery feel. -
Review and Refine:
Step back and look at the platter from a distance. If any area looks too sparse, add a small floating leaf or a stray berry to balance the composition. -
Sealing:
Allow the paint to dry completely (usually 24 hours for acrylics or until bone dry for underglaze). Apply a food-safe clear glaze and fire according to your clay’s instructions, or seal with a food-safe varnish if using decorative paints.
Now you have a stunning, cottage-core platter ready for your next summer gathering

PENCIL GUIDE
Understanding Pencil Grades from H to B
From first sketch to finished drawing — learn pencil grades, line control, and shading techniques.
Explore the Full Guide
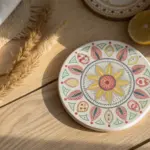
Point-to-Point Dot Mandala
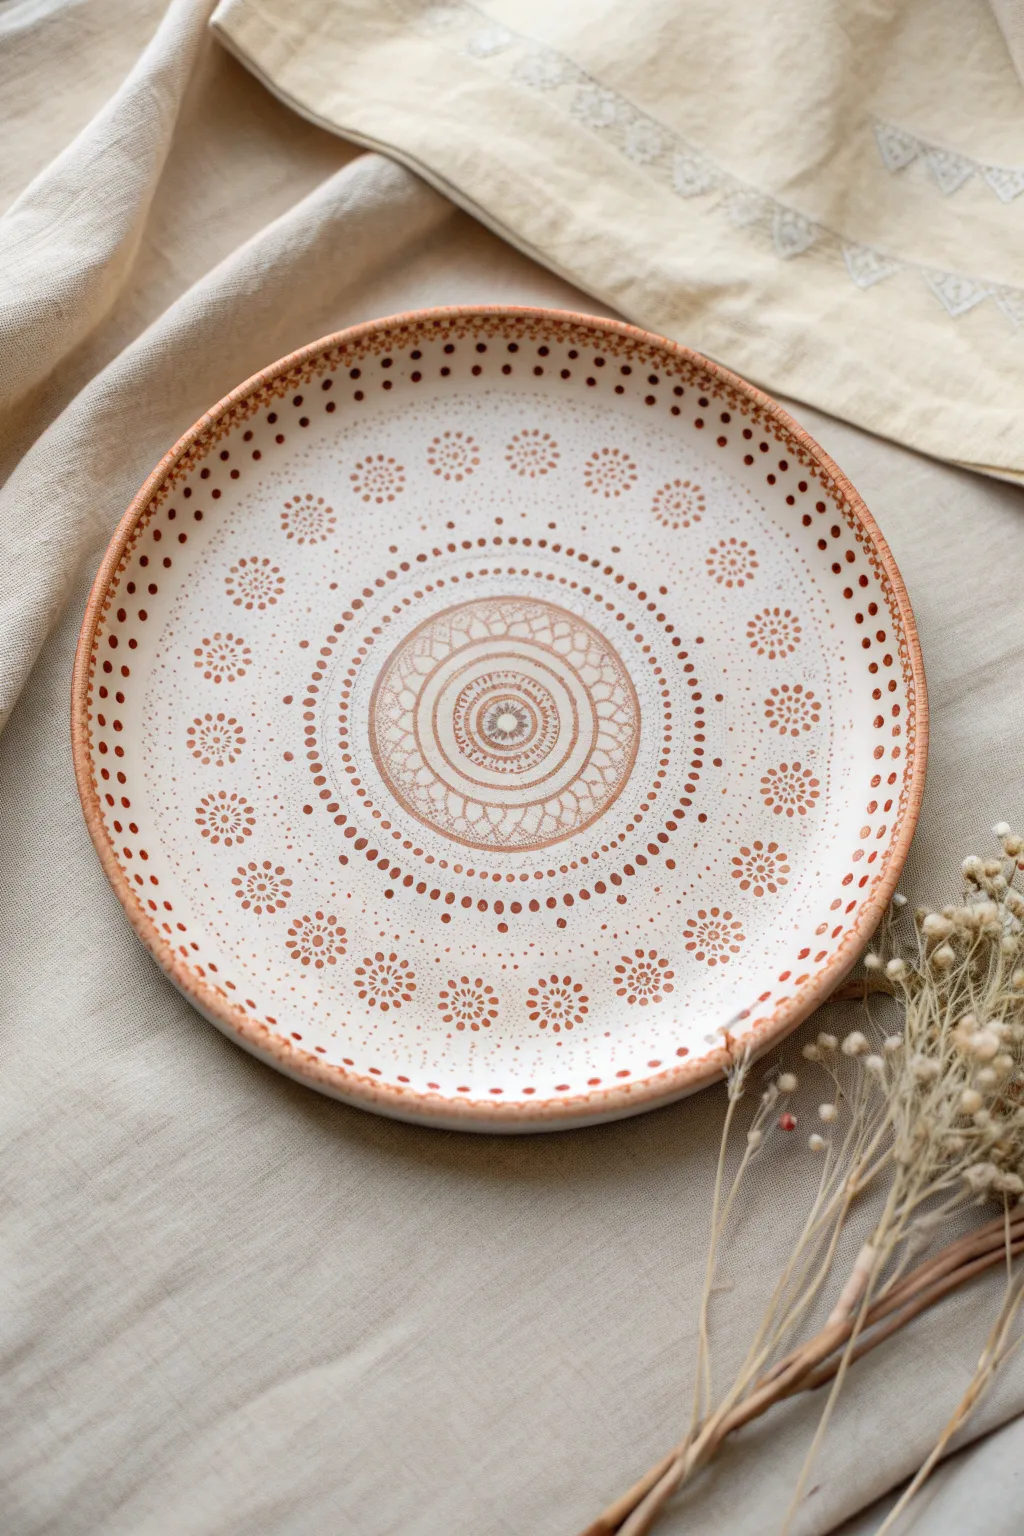
Capture the warmth of earthy tones with this delicate mandala design that mimics the look of stamped pottery using simple dotting techniques. The interplay between the creamy ceramic base and the rich copper-toned paint creates a sophisticated, bohemian centerpiece perfect for any table.
Step-by-Step Guide
Materials
- Round ceramic plate or charger (cream or off-white)
- Acrylic enamel paints (Burnt Sienna or Copper, and White)
- Rubbing alcohol
- Cotton pads
- Dotting tool set (various ball stylus sizes)
- Compass or round objects for tracing
- Pencil (light sketching)
- Palette or small plate
- Oven (if curing is required for your paint type)
Step 1: Preparation & Foundation
-
Clean surface:
Before starting, wipe the entire surface of your ceramic plate with rubbing alcohol and a cotton pad. This removes oils and dust, ensuring your paint adheres perfectly. -
Mark the center:
Find the exact center of your plate. You can do this by measuring the diameter or simply eyeing it if you feel confident. Mark a tiny, faint dot with your pencil. -
Sketch guidelines:
Using a compass gently, draw a series of concentric circles radiating from the center. These don’t need to be heavy lines; they are just guides to keep your mandala symmetrical. Draw circles at roughly 1-inch intervals towards the rim.
Uneven Dots?
If your dots are looking more like blobs, your paint might be too thick. Mix in a singular drop of flow medium or water. Wipe your stylus after every 2-3 dots to keep the tool clean and spherical
Step 2: The Central Medallion
-
Paint the first ring:
Start in the very center. Mix a tiny bit of white into your copper paint to soften it slightly if desired. Using a medium-sized dotting tool, place a single central dot, then surround it with a ring of very small, tight dots. -
Create the inner halo:
Moving outward, draw a solid thin circle with a fine brush or a fine-tip paint pen around your dot cluster. Add a second thin ring about 3-4mm away from the first. -
Fill the band:
Between those two thin rings, use a very small stylus to add tiny vertical tick marks or small dots, creating a textured band effect similar to embroidery. -
Expand the medallion:
Draw another, larger circle guideline. Inside this space, paint petal-like scallops or ‘U’ shapes touching the previous ring. Fill the inside of these petals with a mesh pattern or fine cross-hatching to mimic the texture seen in the reference. -
Close the center:
Finish the central medallion by painting a final solid thick lineage around the petal layer. Let this central section dry for about 10 minutes so you don’t smudge it while expanding.
Step 3: Radiating Dot Patterns
-
Start the dot rays:
Move to your next pencil guideline. Using a medium dotting tool dipped in pure copper paint, place dots evenly spaced along this line. Imagine the face of a clock to help with spacing—start at 12, 6, 3, and 9, then fill in betweens. -
Layer sizes:
Just outside that ring of dots, switch to a slightly smaller tool. Place a smaller dot in the ‘valley’ between each of the previous large dots. This nesting technique creates a tight, cohesive pattern. -
Create the negative space ring:
Leave a gap of about half an inch of plain ceramic. This negative space is crucial; it lets the design breathe. At the edge of this gap, paint a ring of tiny, high-density dots to create a border. -
Paint the floral motifs:
In the wide open space between your center design and the plate rim, you will paint the floating flower clusters. Visualize roughly 12-16 spots evenly spaced around the pattern. -
Form the flower centers:
At each spot, place a medium-sized central dot. I prefer to do all the centers first to ensure the spacing looks correct before committing to the petals. -
Add petals:
Surround each center dot with a ring of smaller dots to form the ‘petals.’ Following that, add a second ring of even smaller, fainter dots to make the flower look like it’s fading outward.
Vintage Patina Effect
To make the plate look like aged pottery, lightly sponge a diluted wash of light brown paint over the dried white surface before you start dotting. This adds an antique, textured depth
Step 4: Rim & Finishing Touches
-
Define the outer edge:
Move to the very rim of the plate. Using your largest dotting tool, place bold copper dots all along the inner edge of the rim. -
Walk the dots:
Use the ‘walking the dots’ technique here: reload your tool for the main rim dot, then use the leftover paint on the tool to make smaller and smaller dots cascading down from the rim toward the center. -
Fill empty spaces:
Look at the overall composition. If there are large empty gaps between the central medallion and the floral ring, add tiny, sparse individual dots as ‘stardust’ to connect the elements. -
Cure the paint:
Once fully painted, let the platter dry for at least 24 hours. If you used bake-on ceramic paint, place the plate in a cool oven, heat to the manufacturer’s specified temperature (usually 300-350°F), bake for 30 minutes, and let it cool in the oven.
Display your beautiful new platter on a stand or use it as a stunning charger for special dinners
Coastal Wave Band
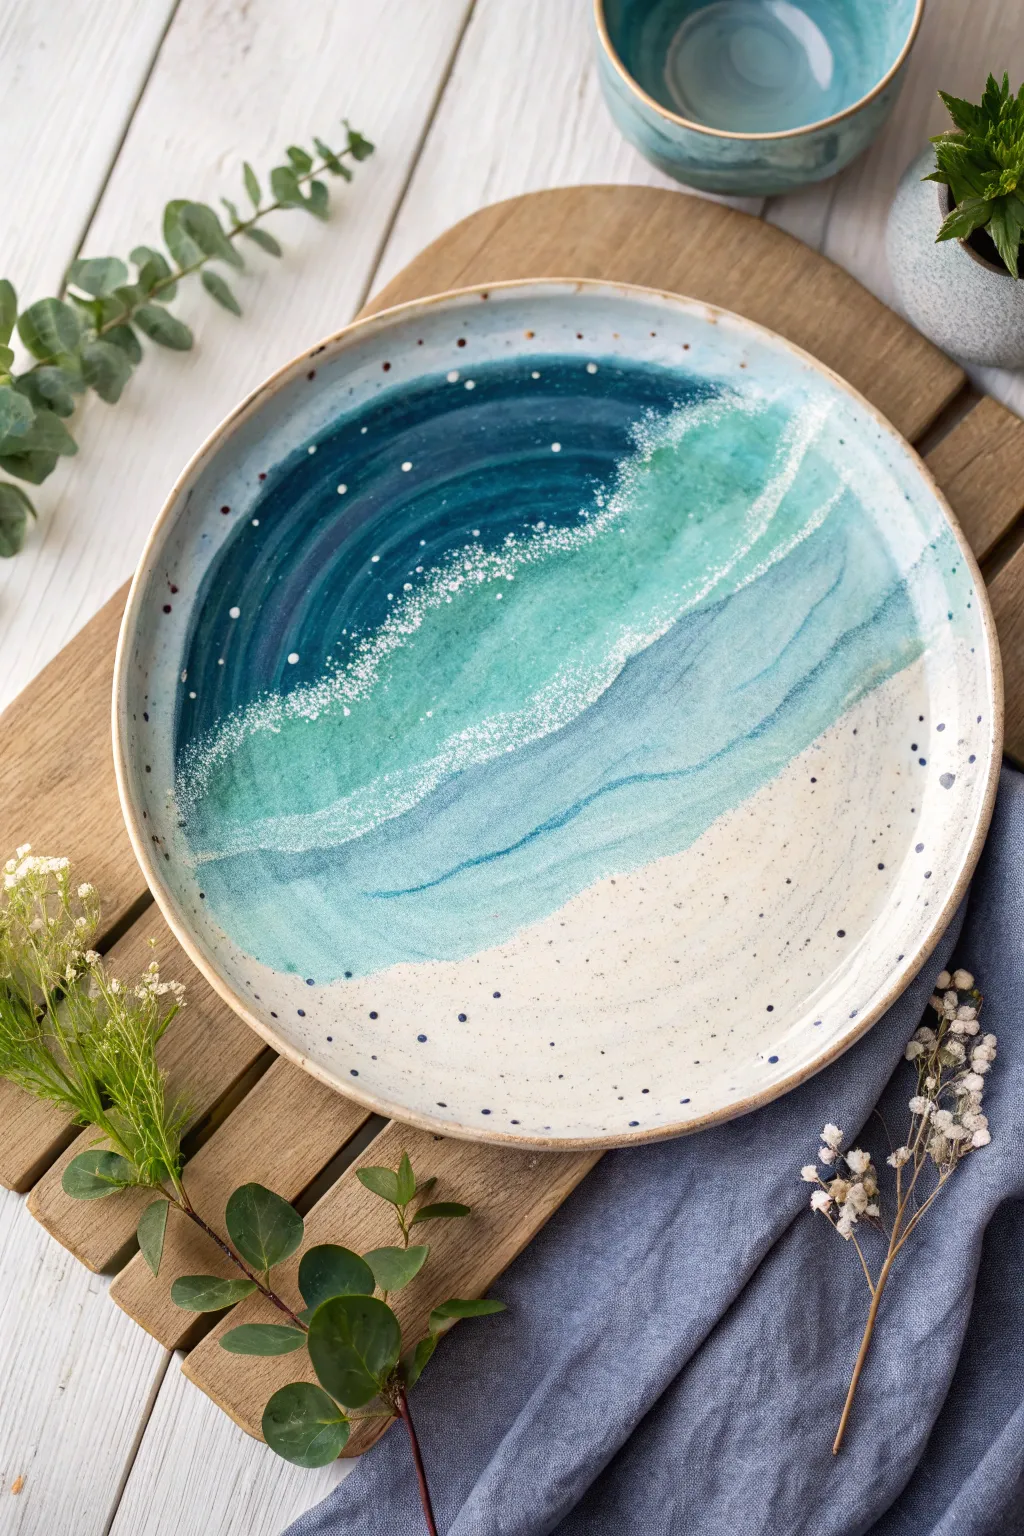
Capture the tranquil beauty of a shoreline with this stunning coastal wave design. Using layered bands of ocean hues and textured foam effects, you’ll transform a plain ceramic platter into a functional piece of art that brings the beach to your table.
Detailed Instructions
Materials
- Large round ceramic platter (bisque or glazed white)
- Ceramic paints or underglazes (Deep Navy, Teal, Aqua, Sandy Beige, Bright White)
- Wide flat brush
- Medium round brush
- Old toothbrush or stiff bristle brush
- Sponge (natural sea sponge preferred)
- Palette for mixing
- Water cup
- Paper towels
- Clear food-safe glaze (if using bisque)
Step 1: Setting the scene
-
Clean the surface:
Wipe down your platter thoroughly with a damp sponge to remove any dust or oils that might repel the paint. Let it dry completely. -
Visualizing the zones:
Mentally divide your platter into curved bands. The top left will be the deep ocean, transitioning down to the sandy shore on the bottom right.
Foam too heavy?
If your sponge application looks too solid, quickly dab it with a clean, damp paper towel to lift some paint and restore transparency.
Step 2: Painting the ocean depths
-
Deep water base:
Load your wide flat brush with Deep Navy. Start at the top left edge of the platter, painting a curved band that follows the rim. -
Feathering the edge:
As you move inward from the rim, lighten your touch so the navy paint feathers out slightly, preparing it for blending. -
Adding texture:
While the navy is still wet, dab a few spots of darker pigment or purple near the rim to create depth and variation in the deep water.
Level up with texture
Mix a small amount of fine sand or specialty textured medium into the beige paint for a tactile, gritty finish on the beach section.
Step 3: Transitioning the waves
-
Applying the teal:
Pick up your Teal paint with a clean brush. Paint the next curved band, slightly overlapping the wet edge of the navy area. -
Blending the seam:
Use a damp, clean brush to gently work the seam between the navy and teal, creating a soft, blurred transition rather than a hard line. -
The shallow water:
Continue the gradient by applying your Aqua or light turquoise paint. Curve this band smoothly below the teal section. -
Creating wave movement:
With the Aqua paint, make your brushstrokes wavy and irregular near the bottom edge to mimic water rushing toward the sand.
Step 4: The sandy shore
-
Painting the sand:
Fill the remaining bottom right section of the platter with Sandy Beige. I like to leave this layer slightly translucent to mimic the wet sand look. -
Sand speckles:
Dip a stiff brush into a slightly darker brown or grey. Flick the bristles with your thumb to create tiny speckles across the beige area, resembling grains of sand.
Step 5: Creating sea foam
-
Sponge technique:
Dampen a natural sea sponge and dip it lightly into Bright White paint. Dab off the excess onto a paper towel until it’s almost dry. -
Forming the crests:
Gently sponge the white paint along the transition line where the teal meets the aqua. This creates the frothy look of a breaking wave. -
Splatter effect:
Load an old toothbrush with watered-down white paint. Hold it over the blue sections and flick the bristles to create a fine mist of geometric ‘bubbles.’ -
Detailed foam lines:
Using a very fine liner brush and thinned white paint, drag delicate, wiggly lines from the foam area back into the deeper water to show movement. -
Adding bold accents:
Add a few larger, deliberate dots of white and dark blue near the wave crests and on the sand for high-contrast details.
Step 6: Finishing touches
-
Refining the rim:
Wipe the very edge of the rim with a damp sponge to expose the raw clay or base color, creating a rustic frame for your painting. -
Final drying:
Allow the paint to dry completely according to the manufacturer’s instructions. If using underglazes, apply a clear food-safe glaze over the entire piece. -
Firing or baking:
Fire the piece in a kiln (if ceramic) or bake in a home oven (if using oven-bake porcelain paints) to set the design permanently.
Your finished platter will be a beautiful reminder of the ocean every time you serve a meal


Soft Sunset Horizon
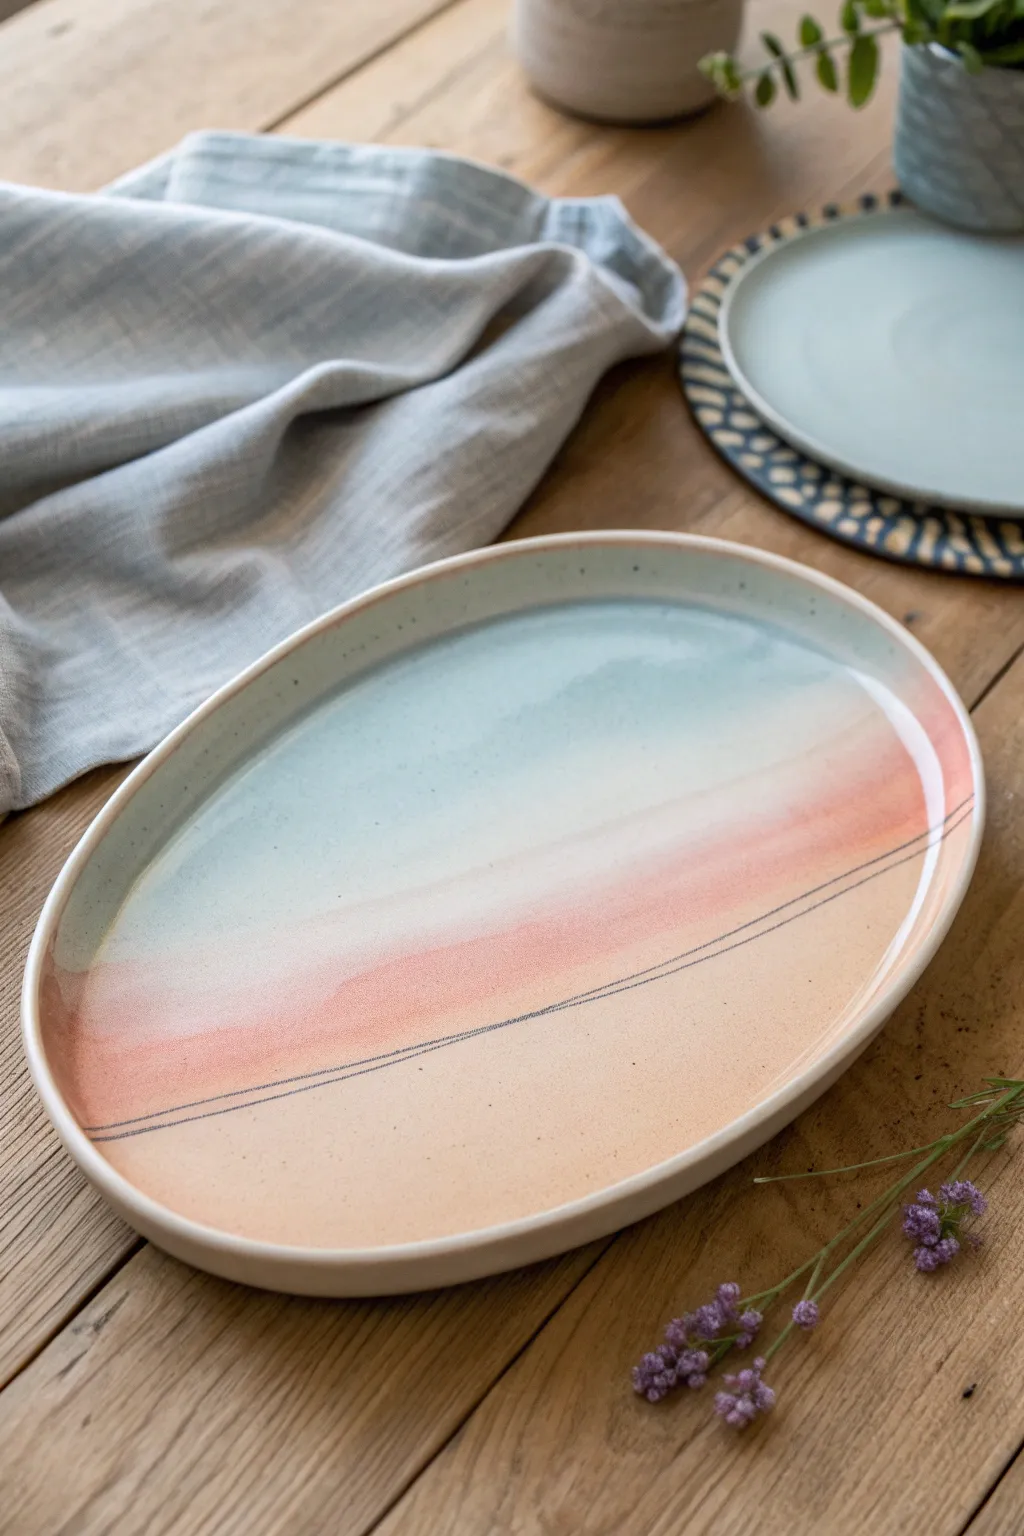
Capture the serene beauty of a fading day with this minimalist sunset design. By blending soft peaches, blues, and sandy creams, you will create a dreamy, atmospheric piece perfect for serving appetizers or styling a coffee table.
Step-by-Step
Materials
- Oval ceramic platter (bisque or glazed)
- Ceramic glazes or acrylic paints (Light Blue, White, Peach/Coral, Sand/Beige)
- Soft, wide flat paintbrush (for blending)
- Fine liner brush (size 0 or 00)
- Dark grey or black paint/glaze
- Water cup and paper towels
- Sponge
- Palette or mixing plate
- Clear sealant (if using acrylics)
Step 1: Preparation and Base
-
Clean surface:
Begin by wiping down your ceramic platter with a clean, damp sponge to remove any dust or oils that might interfere with paint adhesion. -
Mix colors:
Prepare your palette with four main puddles of color: light blue, white, peach, and sandy beige. You may want a fifth puddle blending peach and beige for smoother transitions. -
Dampen brush:
Dip your wide flat brush in water and blot it slightly; a damp brush helps create that soft, watercolor-like gradient effect we are aiming for.
Step 2: Creating the Ombré Sky
-
Apply the top blue:
Start at the very top edge of the platter. Using long, horizontal strokes, apply the light blue paint, covering roughly the top one-third of the oval. -
Fade to white:
While the blue is still wet, rinse your brush quickly and pick up white paint. Blend this into the bottom edge of the blue section, pulling downward to create a soft, milky transition. -
Introduce the peach:
Clean your brush thoroughly. Pick up the peach/coral color and start painting a horizontal band below the white middle section, overlapping slightly with the damp white paint. -
Blend the horizon:
Use gentle back-and-forth strokes where the white and peach meet to blur the line. I like to keep a clean, dry brush handy to feather out any harsh edges here. -
Paint the sandy bottom:
Load your brush with the sandy beige color. specific to the bottom third of the platter, blending it upward into the peach tone. -
Check transitions:
Stand back and look at your gradient. If the bands look too distinct, lightly sweep a slightly damp brush across the color meetings to soften them further. -
Let it dry:
Allow the base layer to dry completely. This is crucial before adding the fine lines, as wet paint will cause the lines to bleed.
Clean Lines?
If you struggle to paint straight freehand lines, lightly pencil the line onto the dry surface first, or use the edge of a flexible piece of cardstock as a guide.
Step 3: Adding the Horizon Lines
-
Prepare the liner brush:
Thin your dark grey or black paint with a tiny drop of water until it has an ink-like consistency. Load your fine liner brush, twirling it to a sharp point. -
Practice stroke:
Test the consistency on a piece of paper first. You need the paint to flow smoothly for a long line without needing to reload frequently. -
Paint the first line:
Starting from the left side, paint a very sweeping, thin line across the bottom third of the platter, letting it curve naturally with the shape of the dish. -
Add the second line:
Create a second line parallel to the first, keeping them very close together. It’s okay if the lines vary slightly in thickness; it adds organic character. -
Refine details:
Check for any breaks in the lines and carefully connect them if needed, keeping the touch extremely light.
Smoother Blending
Keep a misting spray bottle nearby. A very fine mist over the paint while blending keeps acrylics open longer, allowing you to work that soft gradient without it drying too fast.
Step 4: Finishing Touches
-
Clean the rim:
If any paint smudged onto the rim or outer edge where you didn’t intend it, wipe it away cleanly with a damp cloth. -
Rim color (optional):
For a finished look, you can paint the very top edge of the rim with the beige or peach tone to frame the artwork. -
Final dry:
Allow the entire piece to dry for at least 24 hours to ensure all layers are set. -
Seal or fire:
If using ceramic glazes, fire according to manufacturer instructions. If using acrylics for display, apply a clear gloss or matte sealant over the surface.
Once fired or sealed, your platter will bring a permanent touch of sunset warmth to your home
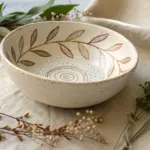
Modern Botanical Line Art
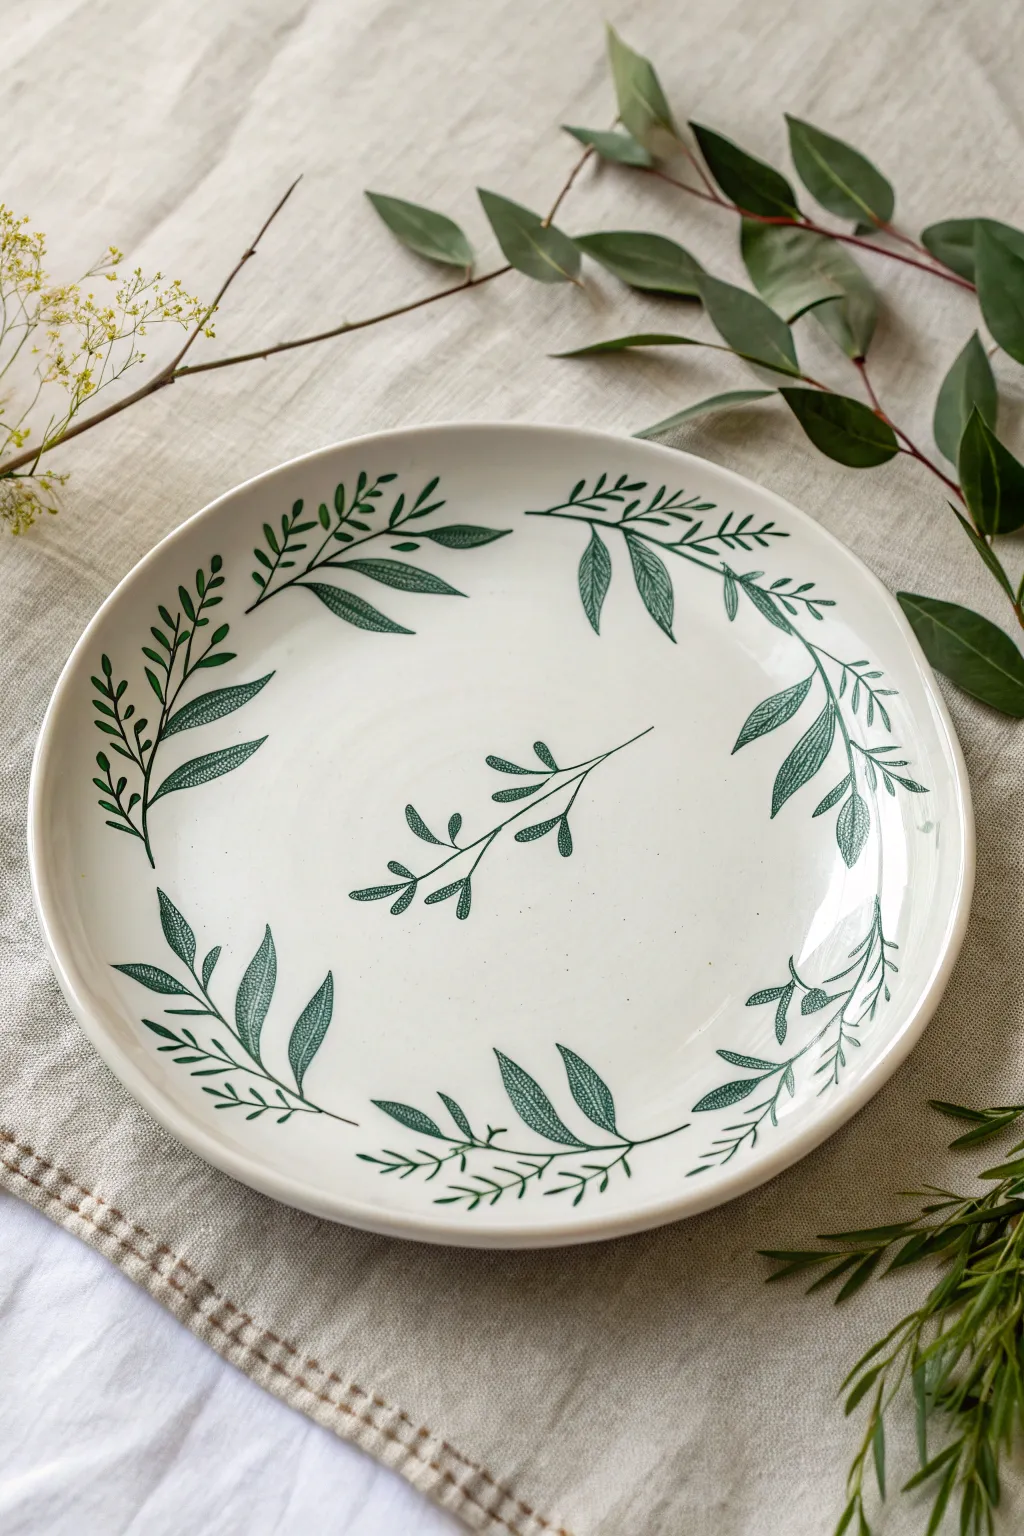
Bring a touch of minimalist nature to your table with this clean and elegant ceramic design, featuring a repeating wreath of botanical illustrations. The delicate deep green line art contrasts beautifully with a creamy white background, making it a perfect centerpiece or wall hanging.
Step-by-Step Tutorial
Materials
- White ceramic platter or large shallow bowl (smooth finish)
- Pebeo Porcelaine 150 paint (in Deep Green or Emerald)
- Fine liner brush (size 0 or 00)
- Small round brush (size 2)
- Rubbing alcohol and cotton pads
- Paper towels
- Pencil (HB)
- Palette or small dish
- Water container
- Oven (for curing)
Step 1: Preparation & Planning
-
Clean surface:
Begin by thoroughly cleaning your ceramic platter with soap and water to remove any dust or grease. Dry it completely with a lint-free cloth. -
Degrease with alcohol:
Wipe the entire surface down with rubbing alcohol on a cotton pad. This is a crucial step I never skip, as it ensures the paint adheres properly to the glaze. -
Plan the layout:
With a pencil, lightly mark four equidistant points around the rim of the plate (at 12, 3, 6, and 9 o’clock) to guide your wreath placement. Don’t worry, pencil marks will burn off in the oven. -
Sketch the center:
Lightly sketch the central sprig in the middle of the plate. It should be a simple curved stem with small leaves branching off, oriented diagonally.
Step 2: Painting the Wreath
-
Mix paint consistency:
Squeeze a small amount of green porcelain paint onto your palette. If it feels too thick, add a tiny drop of water or paint thinner specifically made for porcelain paint to get an ink-like consistency. -
Paint main stems:
Dip your fine liner brush (size 0) into the paint. Starting near the rim, paint the main curved stems that form the circle of the wreath. Keep your hand steady and use light pressure for thin lines. -
Connect the flow:
Ensure the stems flow in a singular direction around the plate (clockwise or counter-clockwise), leaving small gaps between sections so it looks organic rather than a perfect circle. -
Outline the leaves:
Using the same fine liner brush, draw the outlines of the leaves attached to the stems. Vary the shapes slightly—some elongated, some broader—to mimic nature. -
Add veining details:
Inside the larger leaf outlines, carefully paint fine lines for veins. A central vein with smaller diagonal lines branching out adds lovely detail. -
Fill selected leaves:
Switch to the size 2 round brush if needed, or stick with the liner. Instead of solid filling, use a stippling or hatching technique on some leaves to create texture. The image shows a ‘mesh’ or cross-hatch pattern inside larger leaves. -
Paint the smaller sprigs:
In between the larger leaf clusters, paint smaller, delicate sprigs with tiny solid leaves to fill the negative space and balance the composition.
Steady Hand Trick
To keep your lines smooth, rest your pinky finger on a dry section of the plate while painting. This anchors your hand and gives you much better control over fine details.
Step 3: Center Motif & Finishing
-
Paint center sprig:
Move to the center of the plate. Paint over your pencil sketch for the central sprig using the fine liner brush, matching the style of the outer wreath. -
Review and refine:
Take a step back and look at the overall balance. If any areas look too sparse, add a small extra leaf or stem extension. -
Clean up mistakes:
If you made a slip, dampen a cotton swab with water or alcohol and gently wipe away the wet paint. Do this quickly before it sets. -
Dry time:
Allow the platter to dry for at least 24 hours. The paint needs to be fully dry to the touch before baking. -
Bake to cure:
Place the platter in a cold oven. Set the temperature to 300°F (150°C) or the specific temperature recommended on your paint bottle. Bake for 35 minutes once the temperature is reached. -
Cool down:
Turn off the oven and leave the door closed. Let the platter cool down completely inside the oven to prevent thermal shock and cracking.
Mix & Match Leaves
Vary the leaf patterns for a richer look. Try filling some leaves solid deep green, keep others pure outline, and cross-hatch the rest to add visual depth.
Once baked, your botanical platter is food-safe and ready to serve your favorite appetizers
Abstract Color-Block Arches
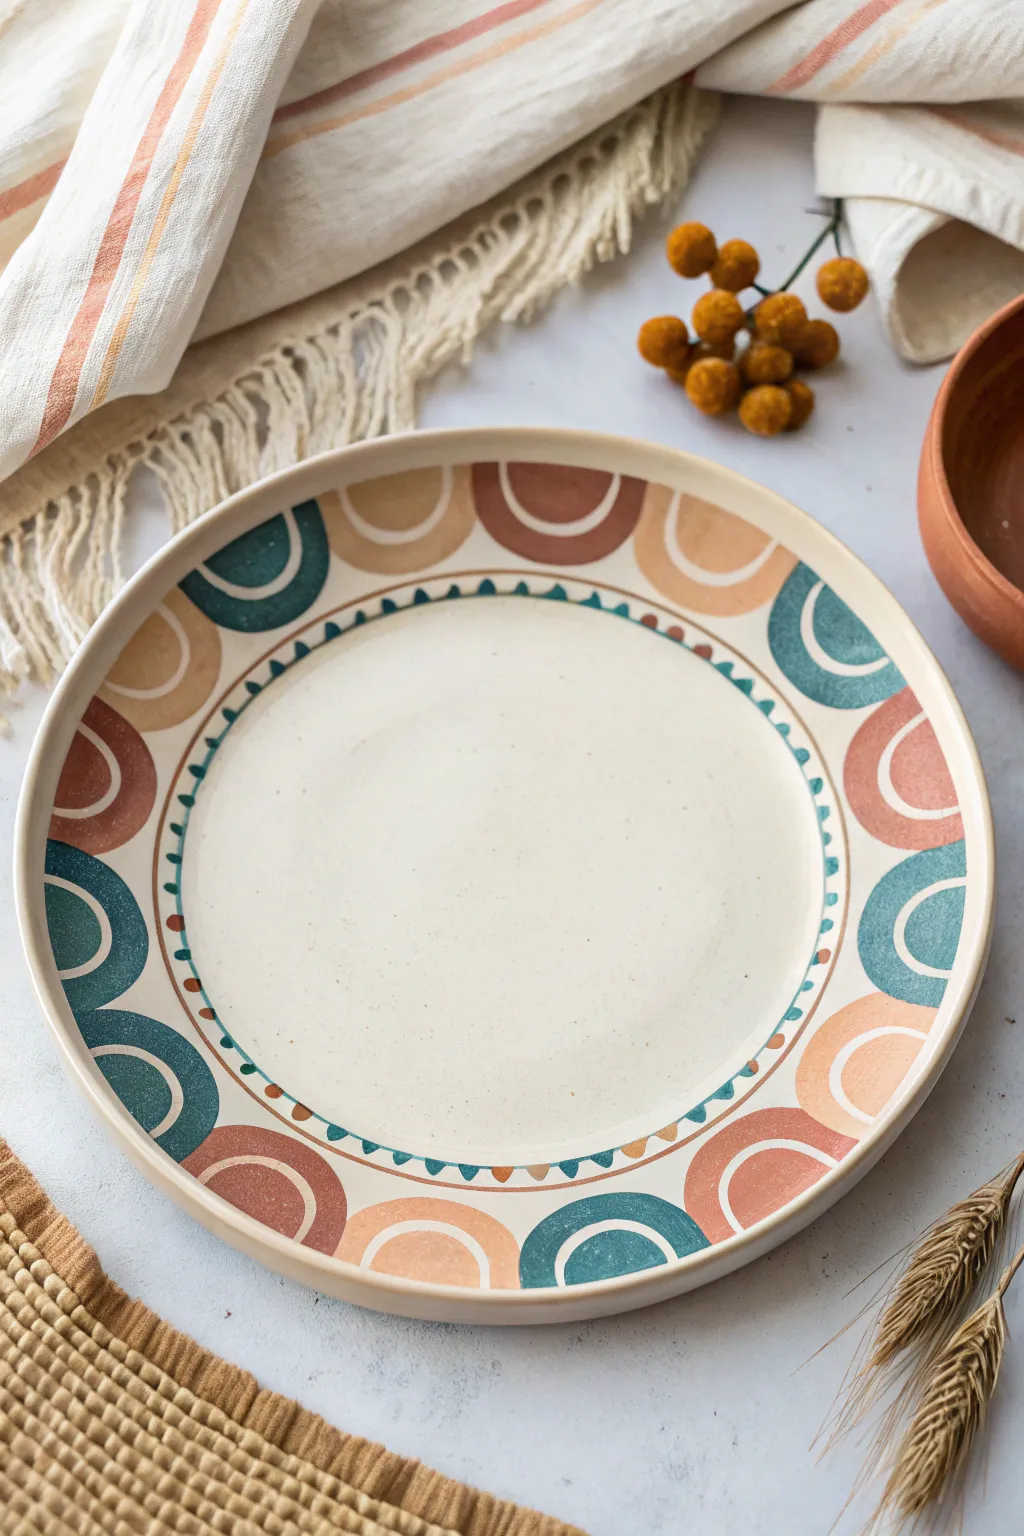
Transform a plain ceramic plate into a piece of modern art with this rhythmic design featuring repeating arches in earthy terracotta, teal, and ochre tones. This tutorial guides you through creating crisp, color-blocked semi-circles that form a cohesive border, perfect for adding a touch of geometric warmth to your table setting or wall display.
Step-by-Step
Materials
- Plain white ceramic platter or large plate (bisque or glazed)
- Ceramic paints or multi-surface acrylics (Terracotta, Teal/Deep Green, Ochre/Mustard, Red-Brown)
- Medium flat synthetic brush (size 6 or 8)
- Small round detail brush (size 0 or 1)
- Pencil for sketching
- Circle template or compass
- Ruler
- Paper towels and water cup
- Protective sealant or clear glaze (food-safe if intended for dining)
Step 1: Preparation & Sketching
-
Clean surface:
Begin by washing your ceramic plate thoroughly with soap and water to remove any dust or oils. Dry it completely with a lint-free towel. -
Mark the center:
Using your ruler, lightly find and mark the absolute center of the plate with a pencil to help guide your concentric circles. -
Draft the rim border:
Sketch a circle about 2 inches inward from the outer edge. This space between the edge and your pencil line will be the home for your large arch pattern. -
Draft the inner detail line:
Draw a second, smaller circle about half an inch inside your previous line. This narrow band is where the delicate triangle and dot pattern will go. -
Spacing the arches:
Lightly mark intervals around the outer rim. You want an even number of spaces if you plan to alternate colors strictly, though a random flow works too. Aim for each arch section to be roughly 2-3 inches wide.
Clean Lines Hack
Use a round sponge dauber or a bottle cap dipped in paint to stamp perfect circles, then just paint over the bottom half to create uniform arches.
Step 2: Painting the Main Arches
-
Base coat the first arch:
Load your flat brush with terracotta paint. Starting at one of your interval marks, paint a semi-circle shape that touches the outer rim and curves down to your first pencil line. -
Rotate and repeat:
Skip the space next to your first arch and paint the next one. I find it easiest to paint all the shapes of one color first before switching to the next hue to keep the brush clean. -
Apply the second color:
Switch to your teal or deep green paint. Fill in some of the empty spaces with the same semi-circle shape, ensuring the edges touch the neighboring arches without bleeding into them. -
Complete the color rotation:
Continue filling the remaining gaps with your ochre and red-brown paints until the entire rim is filled with solid, colorful semi-circles. -
Add the inner white arches:
Once the base colors are dry to the touch, use a clean brush to paint a smaller, nested white (or cream) semi-circle inside each colored arch. This creates the rainbow-like effect. -
Paint the solid centers:
Inside that white arch you just painted, fill the remaining small center semi-circle with the original base color. For example, a terracotta arch gets a terracotta center.
Step 3: Adding Fine Details
-
Create the boundary line:
Using your small round brush and the red-brown paint, carefully paint a thin, continuous line over your pencil guide that separates the big arches from the center of the plate. -
Paint the triangle border:
along the inner side of that boundary line, use the tip of your small brush to paint tiny, solid triangles pointing inward. Use the teal color for these to create contrast. -
Add decorative dots:
Between the triangles or resting on the line itself, add tiny dots using the burnt orange or rust color. -
Clean up edges:
Dip a stiff, damp brush or a cotton swab in water to tidy up any wobbly lines or paint smudges on the white center of the plate.
Fixing Wobbly Arches
If an arch looks lopsided, wait for it to dry completely. Then, use the cream/background color to ‘cut in’ and reshape the curve from the outside.
Step 4: Finishing
-
Dry thoroughly:
Allow the paint to dry completely. For most ceramic paints, this takes at least 24 hours. -
Bake or seal:
Follow the instructions on your specific paint bottle. Many require baking in a home oven to cure the paint, while others utilize a clear topcoat sealant.
Now you have a stunning, handcrafted platter ready to serve appetizers or hang as a statement piece in your kitchen
Loose Marbled Swirl Platter
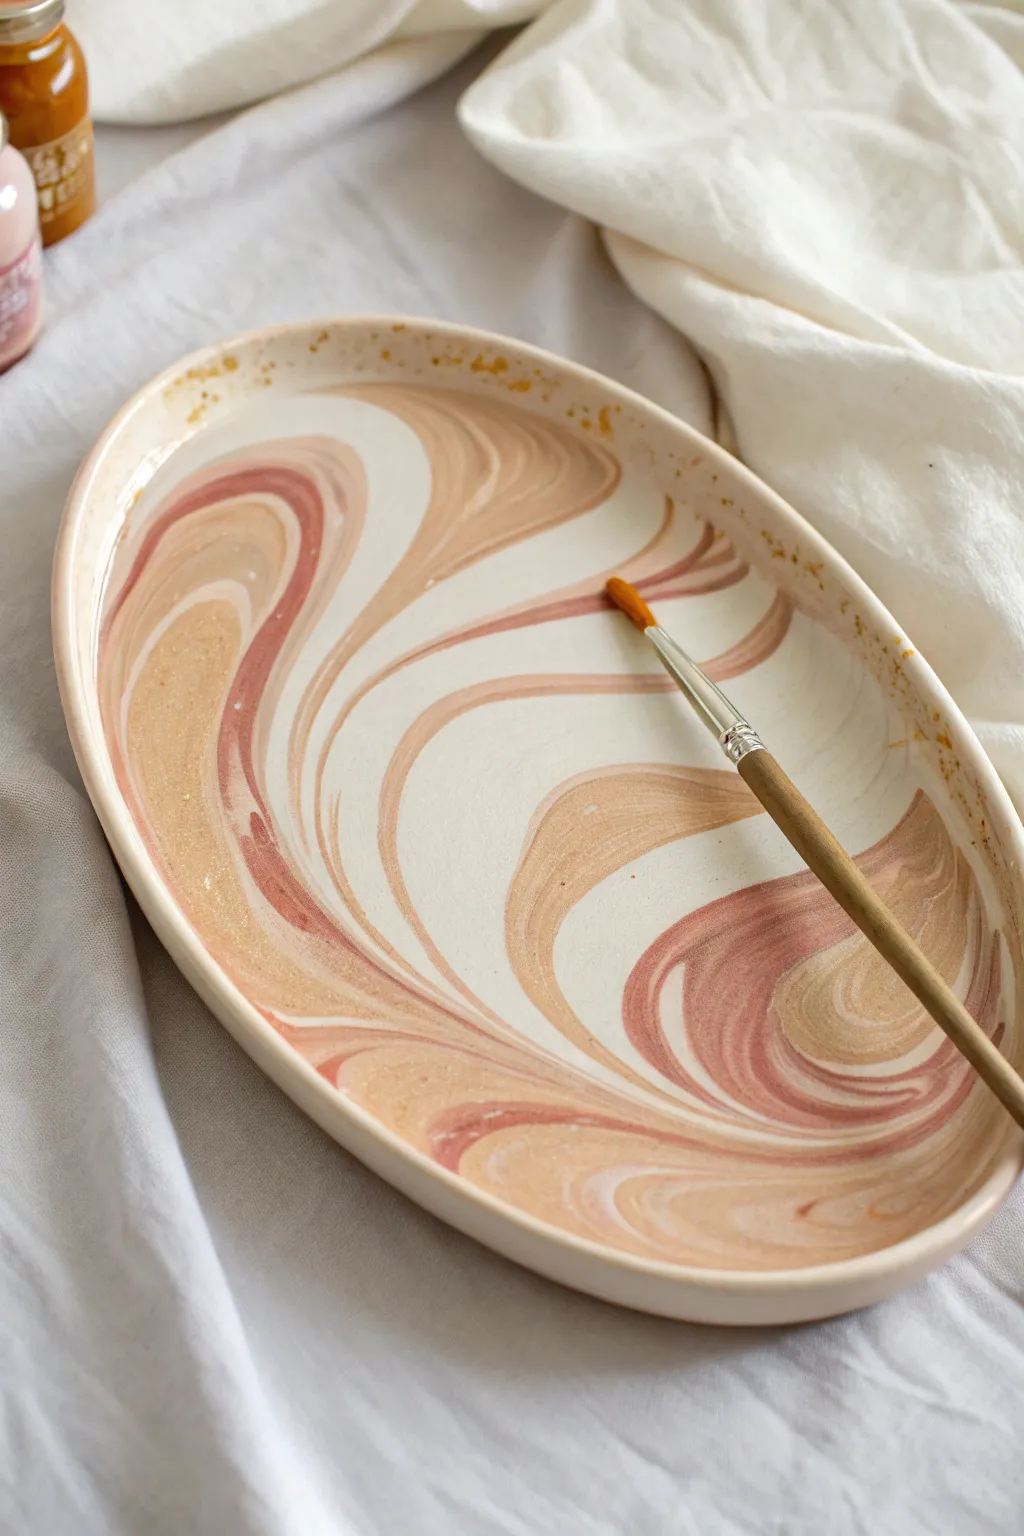
Embrace the fluid beauty of liquid clay with this stunning marbled platter, featuring organic swirls of peach, soft terracotta, and cream. The mesmerizing patterns created by layering and tilting liquid slip make every piece uniquely one-of-a-kind.
Detailed Instructions
Materials
- Bisque-fired ceramic oval platter (unglazed)
- Liquid ceramic slip or heavily watered-down underglazes (colors: White, Terracotta/Burnt Sienna, Peach/Light Pink, Metallic Gold for accents)
- Small cups or squeeze bottles for mixing slip
- Soft round paintbrush
- Clear dipping glaze or brush-on clear glaze
- Kiln access (or oven-bake ceramic paints if adapting for non-fired pottery)
- Damp sponge
- Water container
Step 1: Preparation & Base Mixing
-
Clean the Surface:
Begin by wiping the entire bisque platter with a clean, damp sponge. This removes any dust that could prevent the colors from adhering properly and ensures a smooth canvas. -
Prepare Your Slips:
In separate cups, pour out your colored slips or underglazes. If they are thick like yogurt, add small amounts of water until they reach a pouring consistency similar to heavy cream or melted ice cream. -
Test Consistency:
Dip a brush into your peach color and let it drip back into the cup. It should flow smoothly without breaking, but not be so watery that it loses opacity.
Step 2: Creating the Marble Effect
-
Pour the White Base:
Pour a generous amount of the cream or white slip into the center of the platter. You want enough to cover the bottom when tilted, but not so much that it spills over the rim immediately. -
Add Accent Colors:
While the white base is still wet and fluid, quickly add ribbons of the terracotta and peach slip. You can pour these directly from the cup or use a squeeze bottle for more control over the lines. -
Tilt and Swirl:
Lift the platter and gently tilt it in a circular motion. Let the gravity pull the colors into one another. The goal is to stretch those ribbons of color into elongated, organic swirls without mixing them into a muddy brown. -
Control the Flow:
I like to tilt the platter steeply to one side to create dramatic, sweeping curves, then quickly level it out to freeze the pattern in place once I see a shape I love. -
Add Gold Accents:
If you are using a kiln-safe metallic glaze or lustrous slip, dip the handle of your paintbrush into it and let small droplets fall into the wet swirl, or gently drag a thin line through the existing colors. -
Refine the Rim:
Often, the tilting process leaves the rim messy. Use a damp sponge or your finger to wipe the very edge of the rim clean, creating a sharp frame around your artwork. -
Add Rim Detail:
Using a small brush loaded with the gold or terracotta slip, lightly tap or brush imperfections along the inner rim to create a speckled, rustic border that complements the main design.
Muddy Colors?
If your swirls are turning brown or grey, you are over-tilting. Stop moving the platter sooner; the colors will continue to settle slightly even after you set it down.
Step 3: Drying & Finishing
-
Initial Drying:
Set the platter on a completely flat surface. Because the slip application is thick, this needs to dry slowly and evenly to prevent cracking. Avoid direct sunlight or drafts. -
Check for Pinholes:
Once the slip is leather-hard, inspect the surface. If any tiny air bubbles (pinholes) appeared, gently smooth them over with a clean, dry fingertip. -
Apply Clear Glaze:
Once the marbled design is bone dry, carefully apply a clear glaze over the top. If brushing, use a fluffy fan brush and float the glaze on to avoid smearing the underlying pattern. -
Clean the Foot:
Wipe the bottom (foot) of the platter with a damp sponge to remove any stray glaze, ensuring it won’t stick to the kiln shelf during firing. -
Final Fire:
Fire the piece in the kiln according to the manufacturer’s instructions for your specific glaze and clay body (typically Cone 06 or Cone 6).
Pro Tip: Surface Tension
Add a drop of water to your slip right before pouring. It breaks the surface tension and helps the colors glide over each other more smoothly for cleaner lines.
Now you have a stunning centerpiece ready to display fruit or serve appetizers with effortless artistic flair
Celestial Night Sky Border
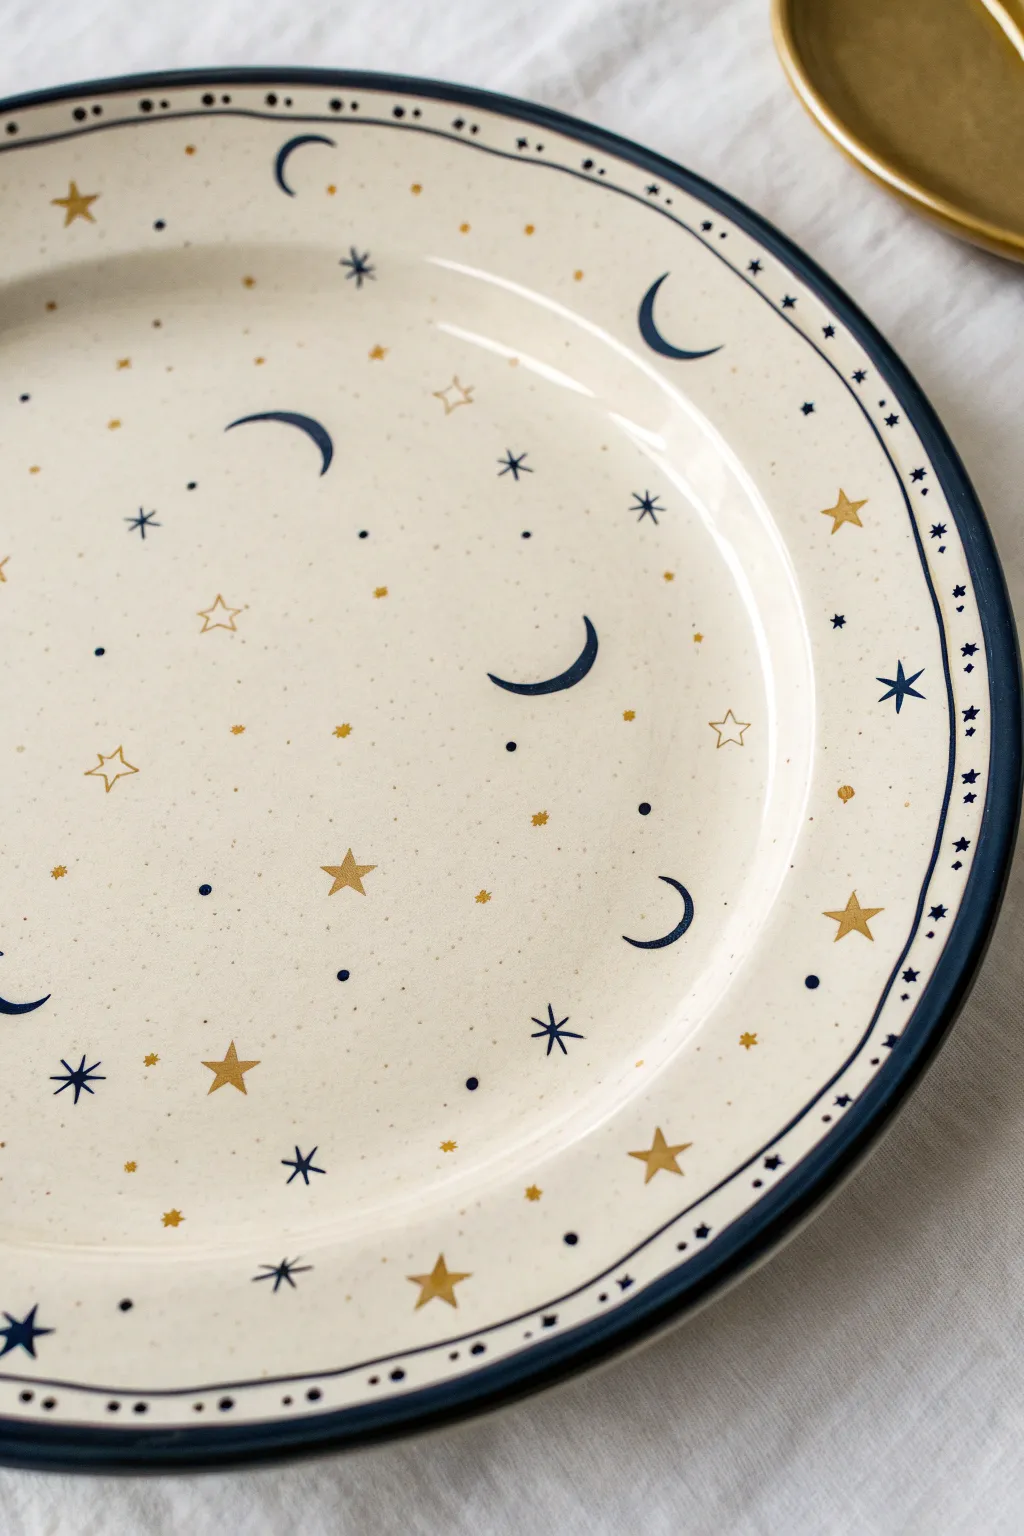
Bring the magic of a clear night sky to your table with this celestial-themed ceramic platter design. Featuring delicate crescent moons and twinkling stars against a creamy speckled background, this project uses simple motifs to create an elegant, dreamy effect.
Step-by-Step Guide
Materials
- Bisque-fired ceramic platter (large round)
- Underglaze pencil or soft graphite pencil
- Ceramic underglazes: Navy Blue, Metallic Gold, Cream/Off-White
- Clear dipping glaze or brushing glaze
- Round brushes (sizes 0, 2, and 4)
- Liner brush (size 00 or 000)
- Toothbrush (for speckling)
- Sponge and water bowl
- Palette or ceramic tile
Step 1: Preparing the Canvas
-
Clean surface:
Begin by wiping down your bisque platter with a damp sponge to remove any kiln dust or oils from your hands, ensuring a clean surface for the glaze to adhere. -
Apply base coat:
Using a soft wide brush, apply three even coats of Cream or Off-White underglaze to the entire face of the platter. Allow each coat to dry until it’s chalky to the touch before applying the next. -
Create the speckle:
Mix a tiny amount of water with a brownish-grey or diluted navy underglaze. Dip an old toothbrush into this mixture, hold it over the platter, and run your thumb across the bristles to create a very fine, subtle mist of speckles across the surface.
Step 2: Mapping the Design
-
Define the rim:
Using a pencil, lightly trace the inner indentation of the platter rim if it isn’t clearly defined. This will help separate the border pattern from the central design. -
Sketch placement:
Lightly sketch the positions of the larger crescent moons and main stars using a pencil. Don’t worry about precision yet; the pencil marks will burn off in the kiln. -
Balance the layout:
Ensure you have a mix of large stars and moons scattered randomly but evenly. I like to step back and look at the composition from a distance to make sure no area looks too empty or too cluttered.
Use a Banding Wheel
For the crisp blue lines on the rim, place your platter on a banding wheel. Hold your brush steady in one spot and slowly spin the wheel for a perfect circle.
Step 3: Painting the Celestial Motifs
-
Paint the moons:
Load your size 2 or 4 round brush with Navy Blue underglaze. Carefully paint the crescent moon shapes, ensuring the curves are smooth and the points taper sharply. -
Add large gold stars:
Switch to Metallic Gold underglaze and a clean brush. Paint the five-pointed stars you sketched earlier. Allow the first coat to dry and apply a second coat for opacity. -
Paint outline stars:
Using the Metallic Gold again, paint smaller, open five-pointed stars (just the outline) interspersed among the solid ones. -
Create starbursts:
With the Navy Blue and a liner brush, paint delicate eight-pointed starbursts (a cross with an ‘X’ over it) and simple four-pointed crosses in empty spaces. -
Add the tinies:
Fill the smallest gaps with tiny dots using the tip of your brush handle dipped in Navy Blue or Gold, and add very small four-pointed stars.
Add Real Gold Luster
For extra shine, apply real gold overglaze luster to the yellow stars after the main glaze firing, then fire the piece again at cone 018 for a true metallic finish.
Step 4: Defining the Border
-
Paint the inner ring:
Using a liner brush loaded with Navy Blue, paint a steady, thin line along the inner ridge where the rim meets the center of the plate. -
Paint the outer rim:
Paint the very edge of the platter rim with a solid Navy Blue line to frame the entire piece. -
Decorate the band:
Within the space between the two navy rings (on the rim itself), paint a repeating pattern of small dots and tiny stars. Alternate between Navy Blue and Gold for visual rhythm. -
Refine and Clean:
Check for any smudges or uneven lines. You can gently scratch away mistakes with a wooden skewer or clean them up with a damp stiff brush.
Step 5: Finishing
-
Clear glaze application:
Once the design is bone dry, carefully dip the platter into a clear dipping glaze, or brush on three coats of clear brushing glaze. -
Stilt and fire:
Wipe the foot of the platter clean with a sponge to prevent it from sticking to the kiln shelf. It is now ready for the final glaze firing according to your clay’s temperature specifications.
Now you have a stunning handmade centerpiece perfect for serving dinner under the stars
Topographic Lines and Tiny Labels
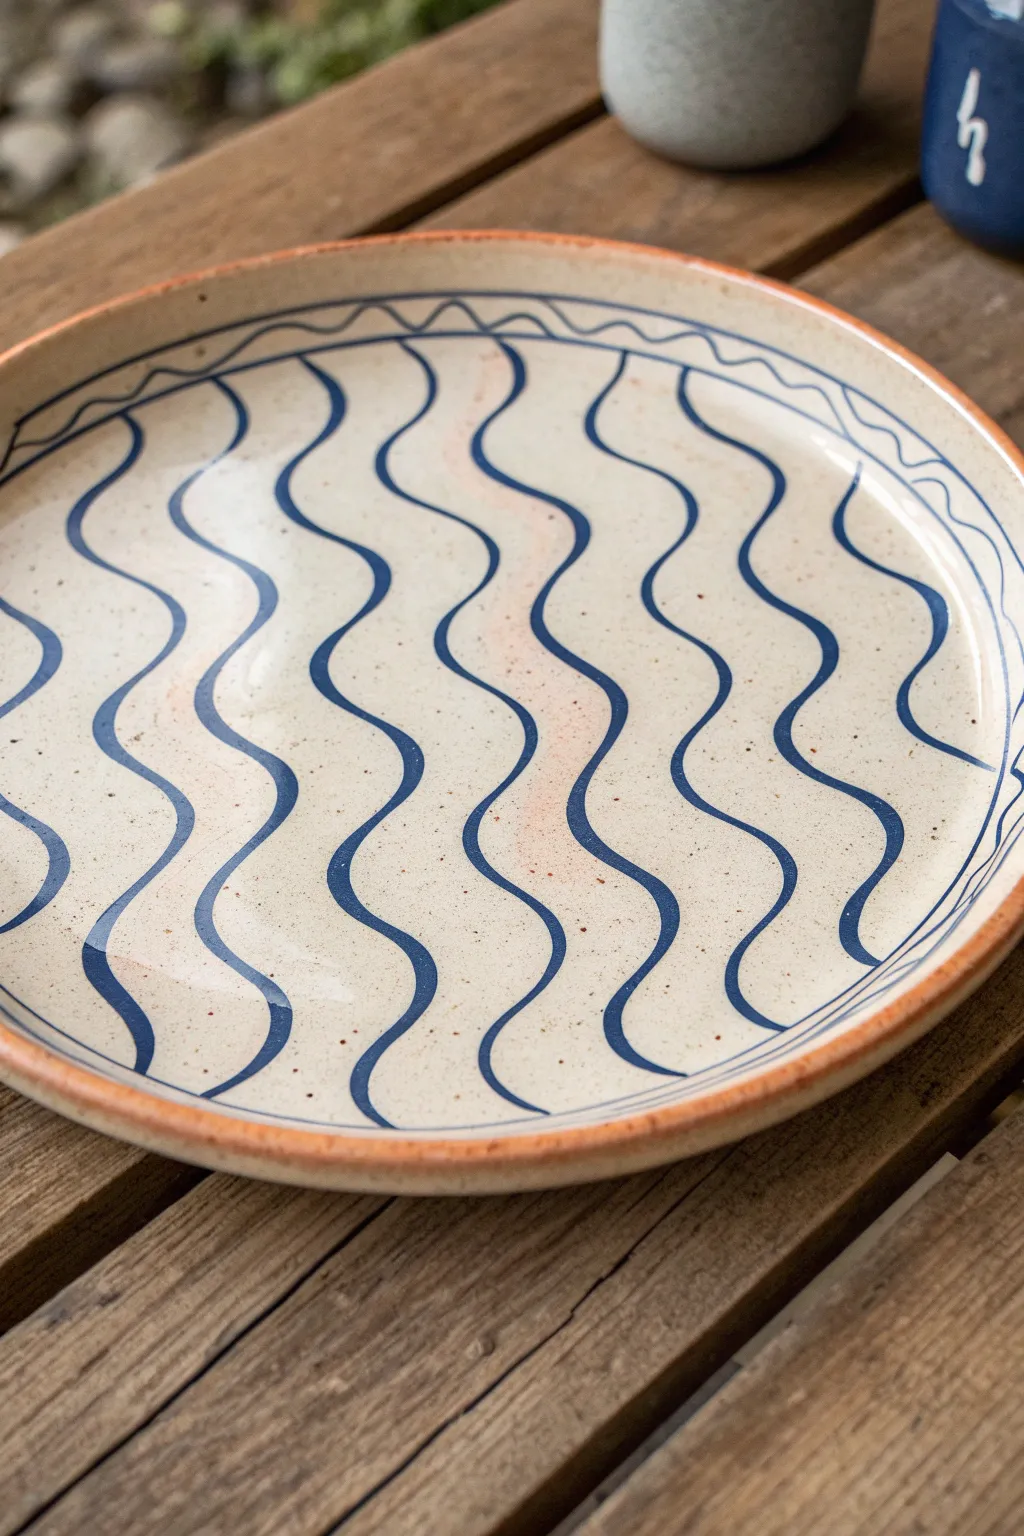
Capture the soothing rhythm of ocean currents or rolling hills with this minimalist line-work platter. The design features evenly spaced, undulating blue waves on a speckled cream background, creating a hypnotic effect that feels both modern and organic.
Step-by-Step Guide
Materials
- Bisque-fired ceramic platter (large, rimmed)
- Speckled cream or oatmeal glaze (underglaze or dipping glaze)
- Cobalt blue underglaze
- Terra cotta or rust orange underglaze (for the rim)
- Fine liner brush (size 0 or 00)
- Medium flat brush (for base coat)
- Pencil (optional)
- Clear transparent glaze (if using underglazes)
- Pottery wheel or banding wheel (highly recommended)
Step 1: Setting the Stage
-
Clean the bisque:
Start by wiping your bisque platter down with a slightly damp sponge. This removes any kiln dust or oils from your hands that might resist the glaze application. -
Apply the base glaze:
Using your medium flat brush, apply 2-3 coats of the speckled cream glaze to the entire interior surface. If you want that authentic stoneware look, ensure the glaze has suspended speckles in the formula. Allow each coat to dry until it’s chalky to the touch before adding the next. -
Optional sketching:
If you are nervous about freehand painting, lightly sketch your guidelines with a pencil directly onto the dry base glaze. Don’t worry about the graphite marks; they will burn away completely in the kiln.
Steady Hand Trick
Rest your pinky finger on a dry part of the plate while painting lines. This anchors your hand and acts as a pivot point, giving you much smoother curves than hovering your hand.
Step 2: Painting the Currents
-
Prepare the blue:
Pour a small amount of cobalt blue underglaze onto your palette. If it feels too thick, thin it slightly with water until it has an ink-like consistency. This ensures smooth, unbroken lines. -
Start the center wave:
Load your fine liner brush and identify the visual center of the plate. Paint your first vertical wavy line from the top edge down to the bottom rim. I like to focus on keeping the curves gentle and elongated rather than tight zig-zags. -
Work outward:
Paint the next wave to the right of your center line. Try to mimic the curves of the first line, keeping the spacing consistent—about an inch apart. It’s okay if they aren’t mathematically perfect; the slight variations add to the handmade charm. -
Complete the pattern:
Continue adding vertical waves across the entire surface of the platter until the interior is filled. Reload your brush frequently to avoid dry, scratchy lines.
Uneven Lines?
If a line gets too thick or wobbly, don’t wipe it! Let it dry completely, then gently scratch away the excess paint with a needle tool or a stiff toothpick to correct the shape.
Step 3: Border Details
-
Add the squiggle border:
Just inside the rim, paint a continuous horizontal wavy line that runs perpendicular to your vertical waves. This acts as a frame for the internal pattern. -
Enclose the design:
Paint a solid, thin blue circle right above the squiggle border line to neatly enclose your wavy field. Use a banding wheel here if you have one to keep the circle steady. -
Accent the rim:
Switch to your terra cotta or rust orange underglaze. Using a clean brush, carefully paint the very top edge of the rim. This warm tone contrasts beautifully with the cool blue and mimics the look of exposed raw clay.
Step 4: Finishing Up
-
Final drying:
Let all your detailed line work dry completely. The underglaze should look matte and powdery. -
Clear glaze application:
Dip the entire platter into a clear transparent glaze, or brush on a clear coat if dipping isn’t an option. This will seal your design and make the platter food-safe and glossy. -
Fire it:
Load the piece into the kiln for the final glaze firing according to the clay and glaze manufacturer’s temperature guidelines (usually Cone 5 or 6 for this stoneware look).
Once fired, your platter will be ready to serve as a stunning centerpiece that brings a touch of artistic flair to your table

Have a question or want to share your own experience? I'd love to hear from you in the comments below!