When you want scary face paint that actually looks spooky but doesn’t eat up your whole night, strong shapes and high-contrast colors are your best friends. These ideas are my go-to “quick wins” in the studio—simple to copy, forgiving if your lines wobble, and still seriously creepy.
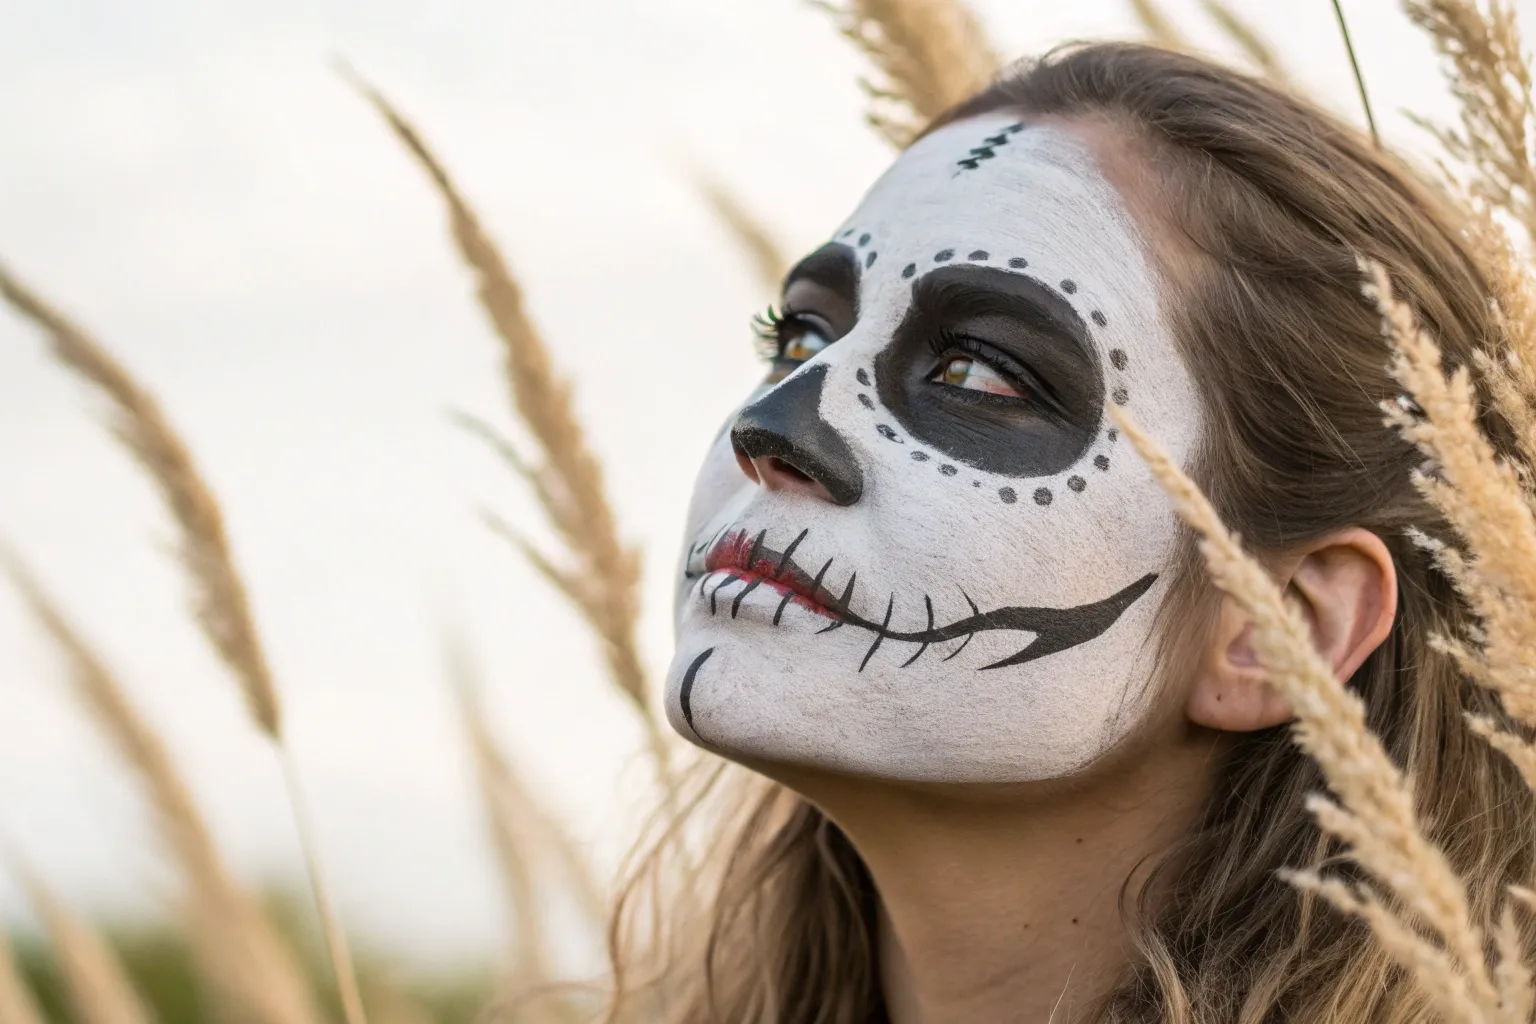
Classic Black-and-White Skull
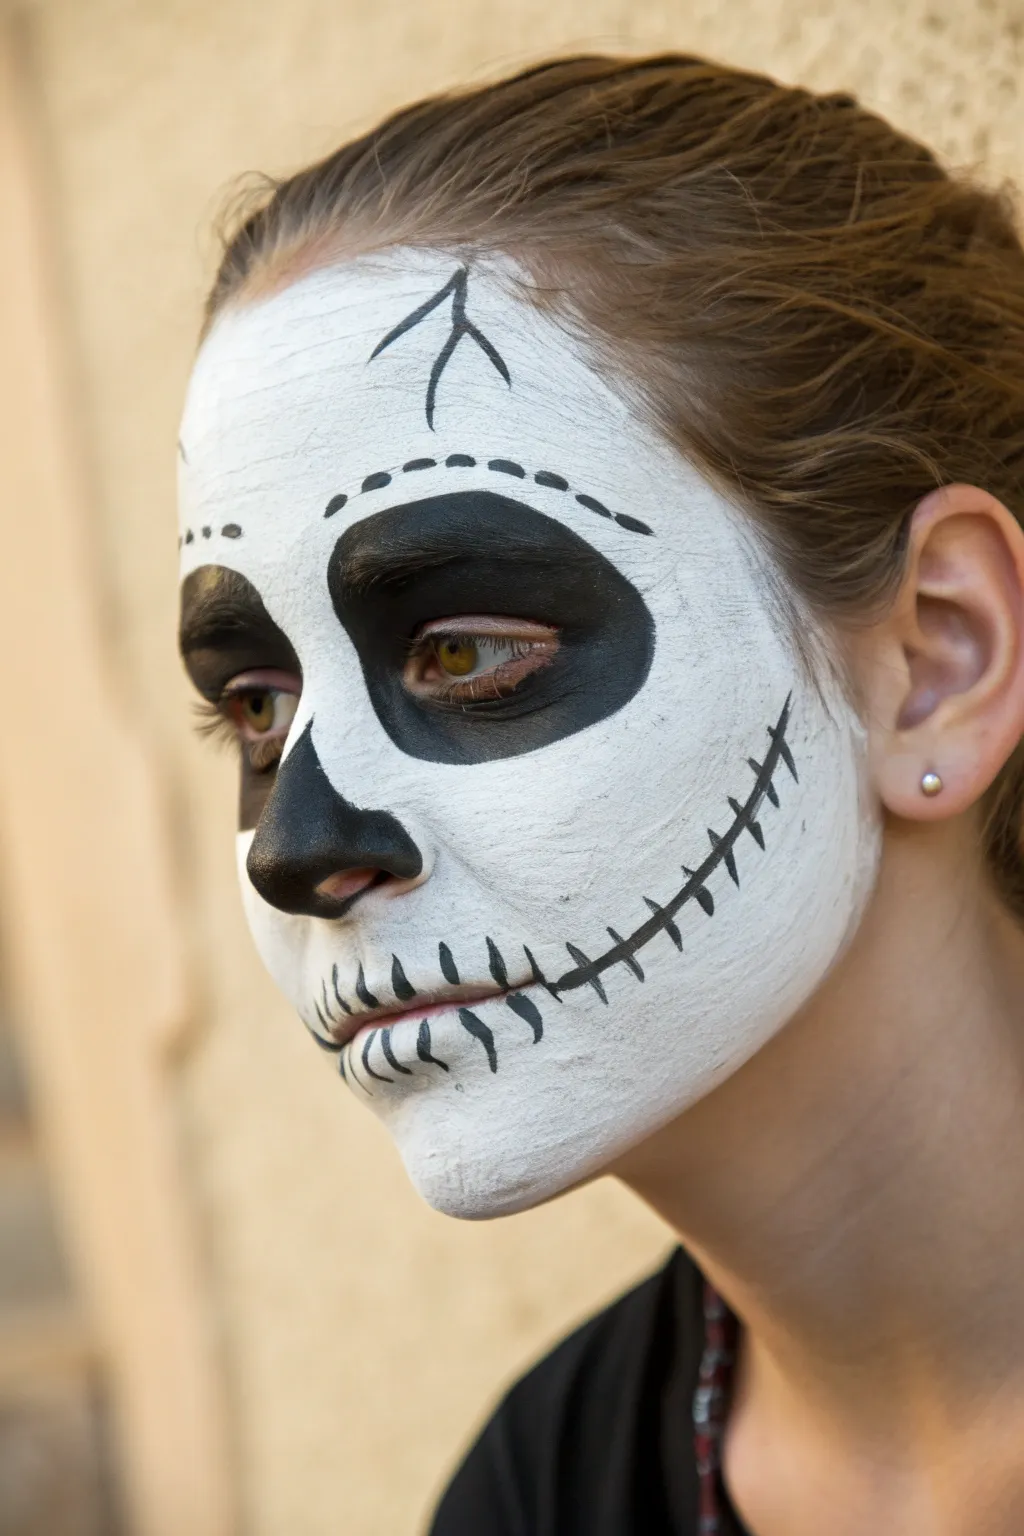
Achieve a hauntingly classic look with this Tim Burton-esque skeleton design featuring stitched detailing and deep, hollow eyes. The stark contrast between the bright white base and the matte black features creates a striking, slightly cartoonish undead effect perfect for Halloween night.
Step-by-Step
Materials
- White water-activated face paint or cream makeup
- Black water-activated face paint or cream makeup
- Flat foundation brush or makeup sponge
- Medium round brush
- Fine liner brush
- Translucent setting powder (optional)
- Small eyeshadow brush (optional)
Step 1: Creating the Pallid Base
-
Clean canvas:
Start with a clean, dry face. Tie back any loose hair to keep it away from the paint. -
Apply the white base:
Load a damp sponge or flat foundation brush with white face paint. Begin dabbing it over the entire face, covering the forehead, cheeks, chin, and nose. -
Build coverage:
Apply a second layer if the skin tone is still showing through, aiming for an opaque, solid white finish. Don’t worry about perfect smoothness; a little texture adds character. -
Avoid the eye area:
Leave the immediate area around the eyes bare or lightly covered, as you will be filling this in with black later. -
Set the base:
If using cream makeup, lightly dust the white areas with translucent powder to prevent smudging while you work on the details.
Stay Matte
For the blackest eye sockets, top your face paint with a layer of matte black eyeshadow. This sets the paint and prevents creasing on your eyelids throughout the night.
Step 2: Painting the Hollows
-
Outline the eye sockets:
Using a medium round brush and black paint, draw a large circle around each eye. Follow the orbital bone but extend slightly above the eyebrow to create a larger, more exaggerated socket. -
Fill in the darkness:
Fill the entire circle with black paint. Be gentle around the delicate eyelid skin and ensure the eyebrows are completely covered. -
Define the nose cavity:
Paint the tip of the nose black. Instead of a simple triangle, create two distinct teardrop shapes on the nostrils that join in the middle, resembling an upside-down heart or skeletal nasal cavity. -
Refine edges:
Go back over the edges of your black shapes to make them crisp and opaque.
Step 3: Stitching the Smile
-
Draw the mouth line:
With a fine liner brush, paint a thin black line extending from the corners of the mouth outwards across the cheeks, curving slightly upward toward the ears. -
Paint the lips:
Continue that thin black line across the center of lines where the lips meet. Keep this line quite thin rather than painting the full lips black. -
Start the stitches:
Using the same fine brush, paint short vertical lines intersecting the main mouth line. Space them somewhat evenly, creating a ‘stitched’ appearance. -
Detail the stitches:
I like to make the stitches slightly longer in the center of the lips and gradually shorter as the line extends out onto the cheeks. -
Add forehead cracks:
On the forehead, paint a few disconnected, curved dashed lines to suggest a skull fracture or suture lines. -
Detailed fractures:
Create a distinct Y-shaped craft or symbol near the hairline using sharp, jagged strokes for an aged bone look. -
Final touches:
Check for any patchy areas in the black paint and touch them up for a solid, matte finish.
Add Dimension
Use a grey eyeshadow to lightly shade under the cheekbones and around the temples. This adds subtle depth and makes the skull shape appear more 3D and realistic.
This iconic stitched grin is sure to be recognizable and spooky all night long


Half-Skull, Half-Real Face
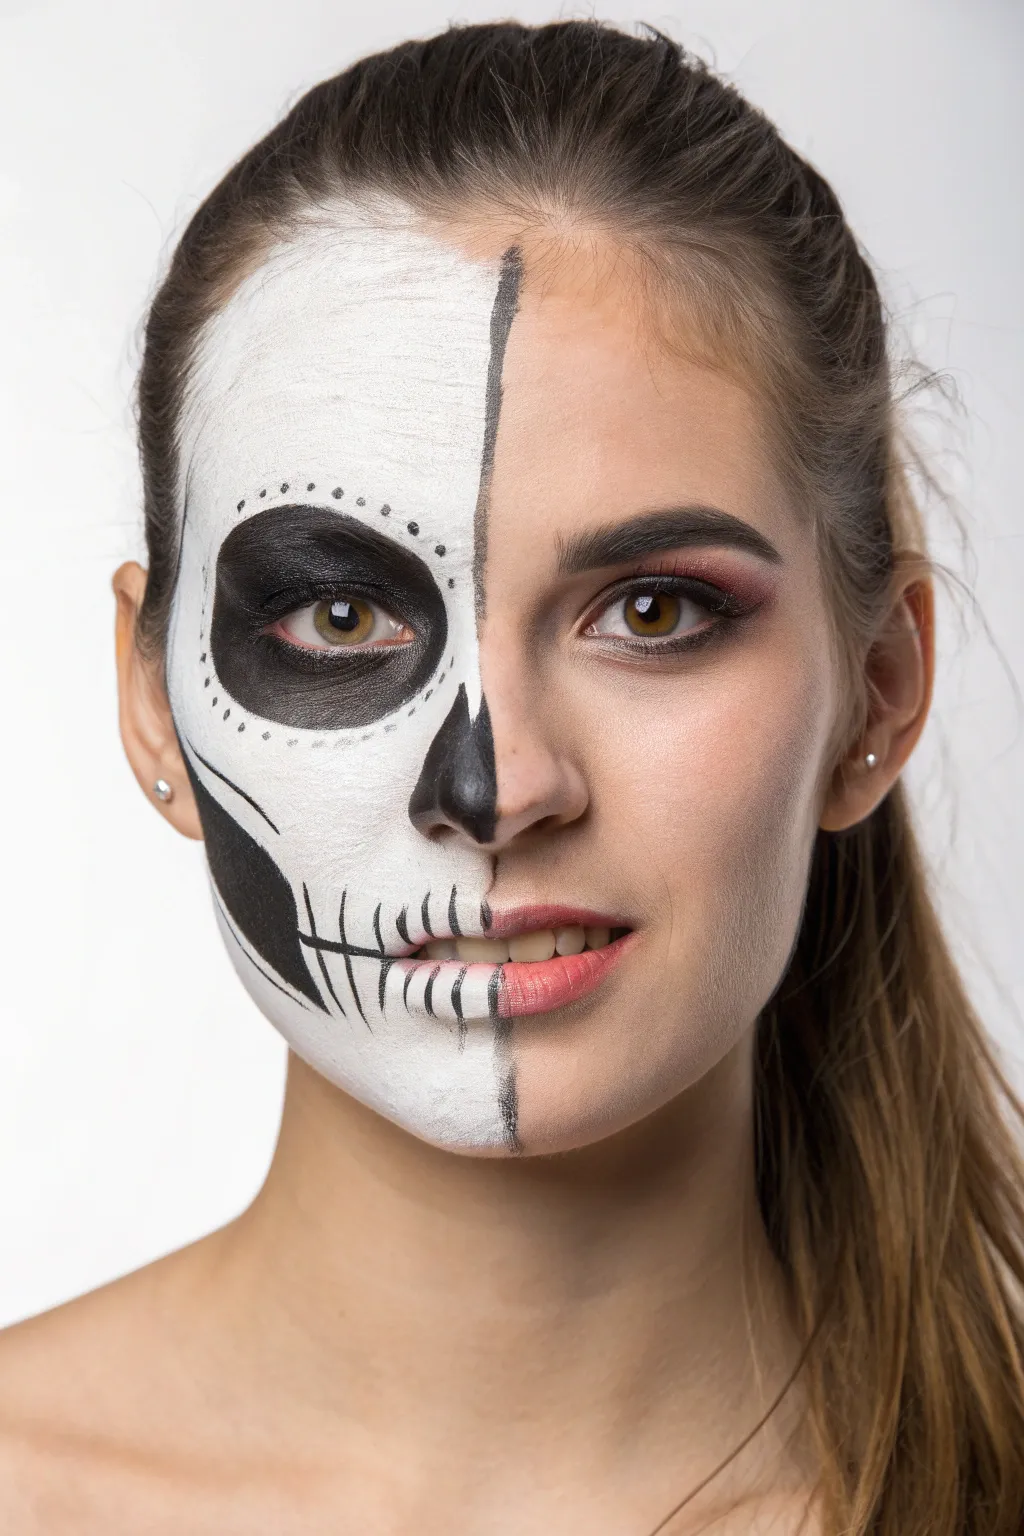
Split your visage right down the middle with this striking look that juxtaposes a stark white skull against a soft, natural beauty look. It’s perfect for those who want a taste of the macabre without sacrificing their favorite glam makeup routine.
Step-by-Step Guide
Materials
- White face paint (water-activated or cream)
- Black face paint or gel liner
- Translucent setting powder
- Eyeshadow palette (neutrals and soft berries)
- Flat foundation brush
- Small angled brush
- Fine detail liner brush
- Mascara
- Lip gloss or lipstick (soft pink)
Step 1: The Glam Half
-
Establish the canvas:
Begin by applying your regular foundation and concealer to the entire face, or just the right side if you want to save product. Ensure your eyebrows are groomed and filled in naturally. -
Eye definition:
On the right eye (the ‘living’ side), apply a soft brown eyeshadow into the crease to add depth. -
Soft berry accents:
Blend a muted berry or reddish-pink shadow onto the outer corner and slightly under the lower lash line to warm up the look. -
Lash enhancement:
Apply a coat or two of mascara to the right eye’s lashes to open them up. -
Natural lip:
Apply a soft pink lipstick or tinted gloss to the right side of the lips only, keeping the left side bare for now.
Step 2: The Skull Base
-
Map the divide:
Using a fine brush and a tiny bit of black paint or a brow pencil, lightly trace a vertical line down the exact center of your face, from hairline to chin. This guide ensures your symmetry stays sharp. -
Apply white base:
Using a flat foundation brush, apply white face paint to the entire left side of your face. Be careful near the hairline and the dividing line. -
Build opacity:
If the white looks streaky, let the first layer dry for a moment and pat on a second layer. I find a stippling motion helps get solid coverage without lifting the paint underneath. -
Set the paint:
Lightly dust translucent setting powder over the white paint to prevent creasing and create a smooth surface for the detailed black work.
Stay Smooth
Apply a thin layer of primer before the white paint. It stops the pigment from settling into fine lines and makes removal much easier later.
Step 3: Skeletal Details
-
The eye socket:
Outline a large circle around the left eye using black face paint. It should cover the eyebrow and extend down to the top of the cheekbone. -
Fill the void:
Fill in the entire eye socket circle with solid black paint. Use a flat brush for the center and an angled brush to keep the edges crisp. -
Inner rim:
Safely line your left watterline with black eyeliner so no skin color shows through the skull eye. -
Decorative dots:
With a fine liner brush or a dotting tool, place small black dots around the perimeter of the black eye socket for a traditional touch. -
Nose cavity:
Paint the left half of your nose black. Use an angled brush to create a sharp, tear-drop shape that ends in a point as it moves up the bridge of the nose. -
Hollow cheek:
Draw a thick, curvaceous shape starting from the ear and sweeping toward the mouth to simulate the hollow of the cheekbone. Fill this in with black. -
Defining the divide:
Go back over your center dividing line with black paint. Instead of a straight line, scribble it slightly to create a rough, cracked texture.
Add Dimension
Use a grey eyeshadow to lightly shade the white areas around the teeth and temples. It adds 3D depth and makes the skull look more realistic.
Step 4: Teeth and Finishing Touches
-
Mouth line extension:
Draw a thin horizontal black line extending from the corner of your mouth on the skull side, moving toward your ear. -
Vertical teeth:
Using your finest brush, paint vertical lines across the lips and the extended mouth line to create the appearance of teeth. -
Root details:
At the ends of these vertical tooth lines (above and below the lips), flick the brush slightly outward to simulate the roots of the teeth fading into the skull. -
Lip fade:
Blend the lipstick on the right side slightly into the white paint at the center of the lips to create a soft transition where the two worlds meet.
Now you have a stunning duality that is ready to turn heads at any costume party


Quick Zombie With Smudged Eyes
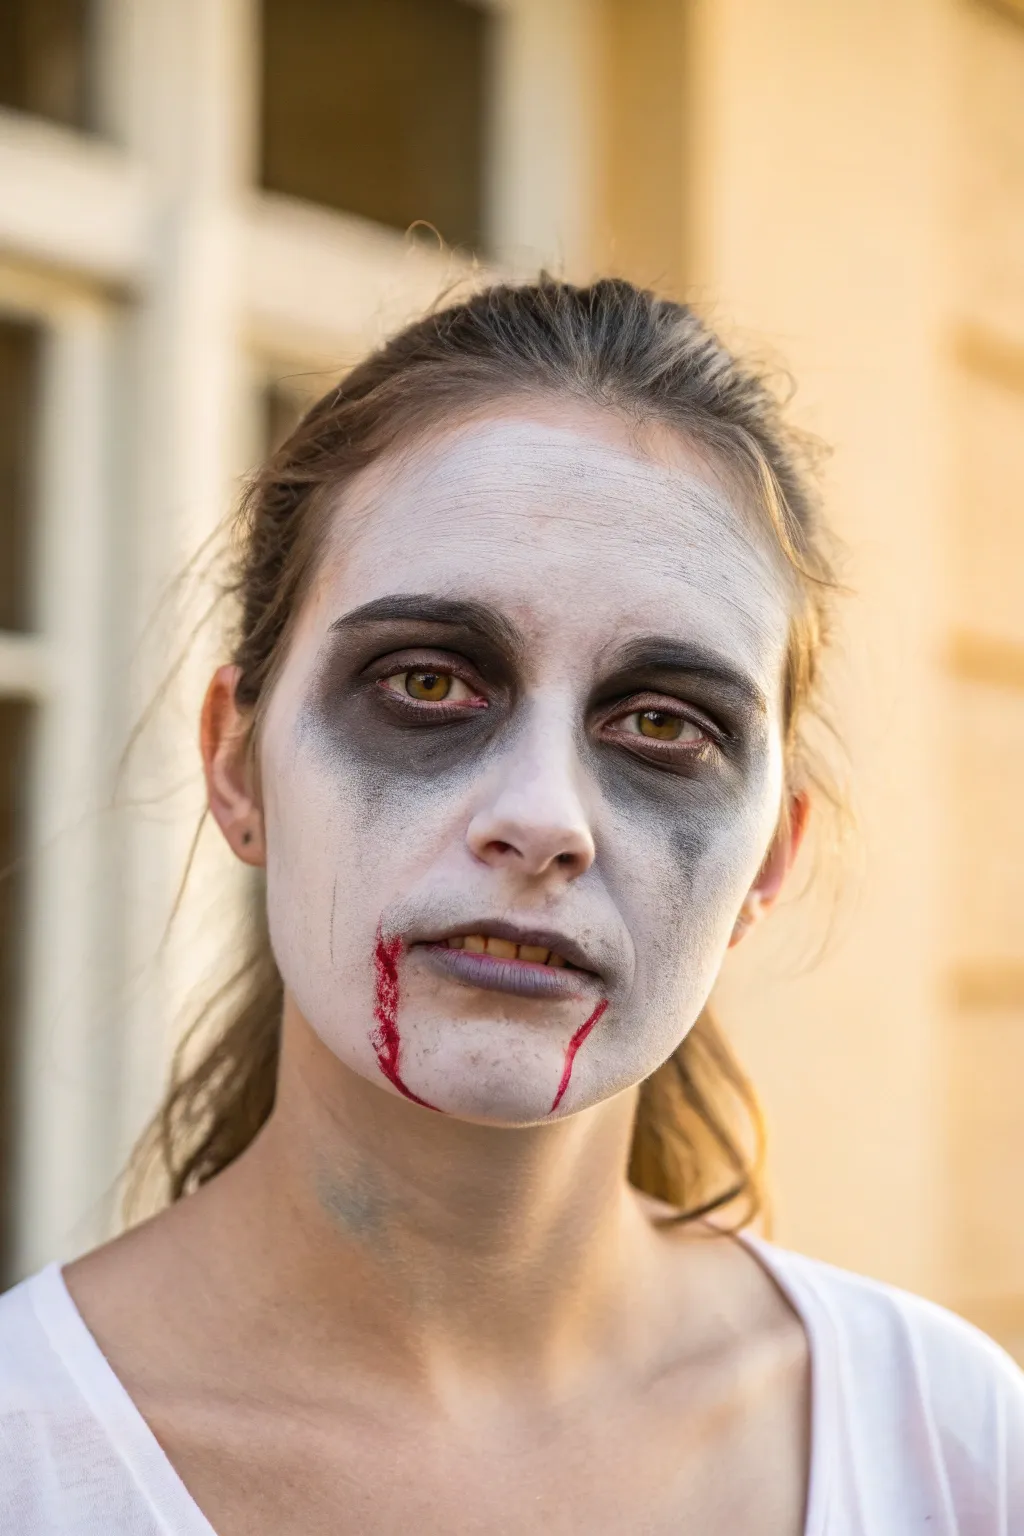
Transform into a convincing zombie in minutes with this straightforward tutorial that focuses on ghostly pale skin and hollowed-out features. The look relies on strategic smudging and minimal blood for an eerie, freshly-turned appearance perfect for quick halloween costumes.
Step-by-Step
Materials
- White cream face paint
- Grey matte eyeshadow or face powder
- Black matte eyeshadow
- Fake blood (gel or liquid)
- Makeup sponge (wedge or beauty blender)
- Fluffy blending brush
- Small detail brush
- Setting powder (translucent)
Step 1: Creating the Deathly Pallor
-
Prep the canvas:
Begin with a clean, dry face. Tie back hair to ensure full coverage of the forehead and hairline. -
Apply the white base:
Load a damp makeup sponge with white cream face paint. Instead of painting it on thick, stipple it across the entire face in thin layers. -
Blend the neck:
Drag the white paint down past the jawline onto the neck. You want this area to look faded and patchy, not fully opaque, to mimic decaying skin. -
Set the base:
Dust a light layer of translucent setting powder over the white paint. This stops it from creasing and creates a smooth surface for the shadow work.
Too Streaky?
If your white base looks uneven, switch from wiping motions to a dab-and-press motion with your sponge. Use thin layers, letting each dry slightly before adding more.
Step 2: Hollows and Shadows
-
Deepen the sockets:
Using a fluffy brush and black eyeshadow, pack color directly onto the eyelids. Extend the color up to the brow bone. -
Create the under-eye circles:
Sweep the same black shadow generously under the lower lash line. Don’t worry about being neat; messiness adds to the undead effect. -
Blend out the black:
Take a clean blending brush or a bit of grey shadow and buff the edges of the black circles so they fade gradually into the white skin rather than stopping abruptly. -
Contour the cheeks:
Suck in your cheeks to find the hollows. Using grey shadow, shade heavily in this area to create a gaunt, skeletal structure. -
Define the nose:
Run the grey shadow down the sides of the nose bridge and blend outwards. This sharpens the nose and makes the face look more wasted away. -
Add temple shading:
Lightly dust grey shadow on the temples and around the hairline to enhance the sunken skull look. -
Pale the lips:
Dab a small amount of the white cream paint over the lips with your finger to neutralize their natural pink color, making them look cold and dead. -
Darken the inner lip:
Apply a tiny amount of black or dark grey shadow just to the inner center of the lips for depth.
Step 3: The Bloody Finish
-
Position the drip:
Using a small detail brush or the applicator tip, place a drop of fake blood at the corner of the mouth. -
Guide the flow:
Allow the blood to drip naturally, or gently guide it straight down the chin with your brush. Keeps the lines thin for a realistic effect. -
Repeat on the other side:
Add a second thin stream of blood on the opposite corner of the mouth. Symmetry isn’t necessary here; slightly uneven lengths look more organic. -
Add final texture:
If you want a grittier look, flick the bristles of a toothbrush dipped in grey paint lightly over the face for subtle speckling.
Pro Tip: Eye Depth
Mix a tiny bit of red or purple eyeshadow into the black around the eyes. It adds a bruised, sickly dimension that flat greys just can’t achieve alone.
Now go stagger around and spook your friends with your effortlessly eerie new look


Creepy Clown With Simple Eye Streaks
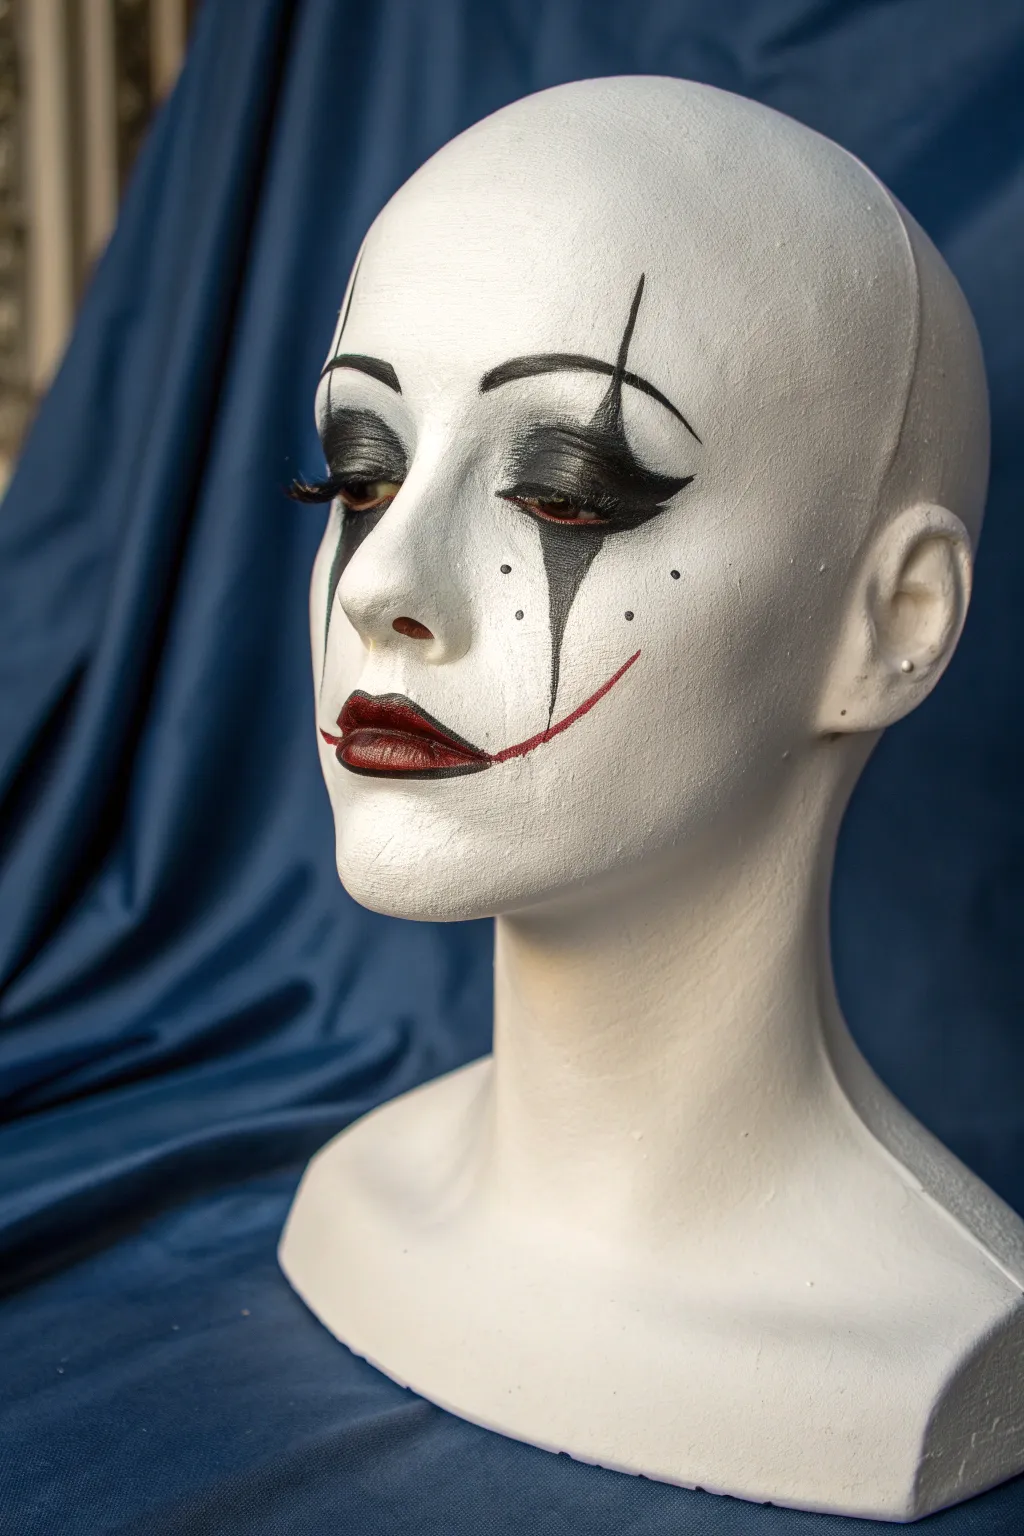
This striking black-and-white clown design combines classic harlequin elements with a touch of melancholy horror. The stark white base and sharp, geometric black accents create a look that is both sophisticated and unsettling.
How-To Guide
Materials
- White cream-based face paint or Clown White
- Translucent setting powder
- Black gel eyeliner or water-activated face paint
- Deep red lipstick or lip liner
- Fine detail paintbrush (size 0 or 00)
- Flat angled brush
- Makeup sponge
- Setting spray
- False eyelashes (optional)
- Black eyeshadow
Step 1: Creating the Ghostly Base
-
Prep the canvas:
Begin with a clean, dry face. If you have eyebrows you want to hide completely, glue them down flat with a glue stick before proceeding, though this design can work around natural brows too. -
Apply the white base:
Using a slightly damp makeup sponge, pick up your white cream paint. Stipple the paint onto the skin using a patting motion rather than dragging it to ensure solid, opaque coverage. -
Build coverage:
Apply a second layer of white if necessary, paying special attention to the nose, chin, and forehead to eliminate any patchiness. -
Set the foundation:
Once the white is even, immediately press a generous amount of translucent setting powder over the entire face with a powder puff. This prevents greasiness and locks the white in place. -
Dust off excess:
Gently sweep away any loose powder with a fluffy brush, leaving a dry, matte white surface ready for the detail work.
Sharp Line Pro Tip
Clean up any wobbly edges on your spikes by using a flat brush with a tiny bit of white paint or foundation on it like an eraser to carve out the perfect shape.
Step 2: The Dark Eyes
-
Map the eye shape:
With an angled brush and black eyeshadow, faintly sketch the shape of the eye design. Draw a line extending from the outer corner upwards, and outline the vertical spikes above and below the eye. -
Fill the eyelid:
Using black gel eyeliner or face paint, fill in the entire eyelid, bringing the black all the way up to the brow bone. -
Create the upper spike:
Extend the black paint vertically above the eyebrow. Taper this line into a sharp, needle-like point that reaches toward the forehead. -
Draw the lower tear:
Mirror the upper shape by drawing a long, sharp triangle extending down from the lower lash line onto the cheek. -
Wing it out:
Connect the upper and lower designs by pulling the black paint outwards from the outer corner of the eye into a sharp, flicked wing. -
Set with shadow:
Pack black eyeshadow over the wet paint to set it and intensify the darkness. This helps prevent creasing in the eyelid folds.
Step 3: Details and Lips
-
Drawing the thin line:
Using your finest detail brush, draw a very thin, straight vertical line starting from the tip of the upper spike, going further up the forehead. -
Add floating dots:
Dip the back end of a paintbrush into black paint and gently stamp three small dots on each cheek, arranging them in a slight variance of height. -
Outline the lips:
Use a deep red lip liner to outline the natural lip shape. Extend the corners slightly outward into a very subtle smile line. -
Fill the lips:
Fill in the lips with a dark blood-red lipstick. For dimension, I sometimes dab a little black eyeshadow in the very center of the lips to create an ombre effect. -
Extend the smile:
Using the red liner or fine brush, draw thin, curved lines extending from the corners of the mouth up toward the cheeks, tapering them to nothing. -
Final touches:
If desired, apply false eyelashes to the upper lid to add drama against the heavy black makeup. -
Seal the look:
Close your eyes and mist the entire face with a setting spray to keep the sharp lines from smudging throughout the night.
Level It Up
Add small black rhinestones to the ends of the spikes or over the cheek dots using eyelash glue for a touch of glamorous texture.
Now you have a hauntingly beautiful visage ready for any spooky occasion
BRUSH GUIDE
The Right Brush for Every Stroke
From clean lines to bold texture — master brush choice, stroke control, and essential techniques.
Explore the Full Guide
Vampire Fangs and Drip Lip
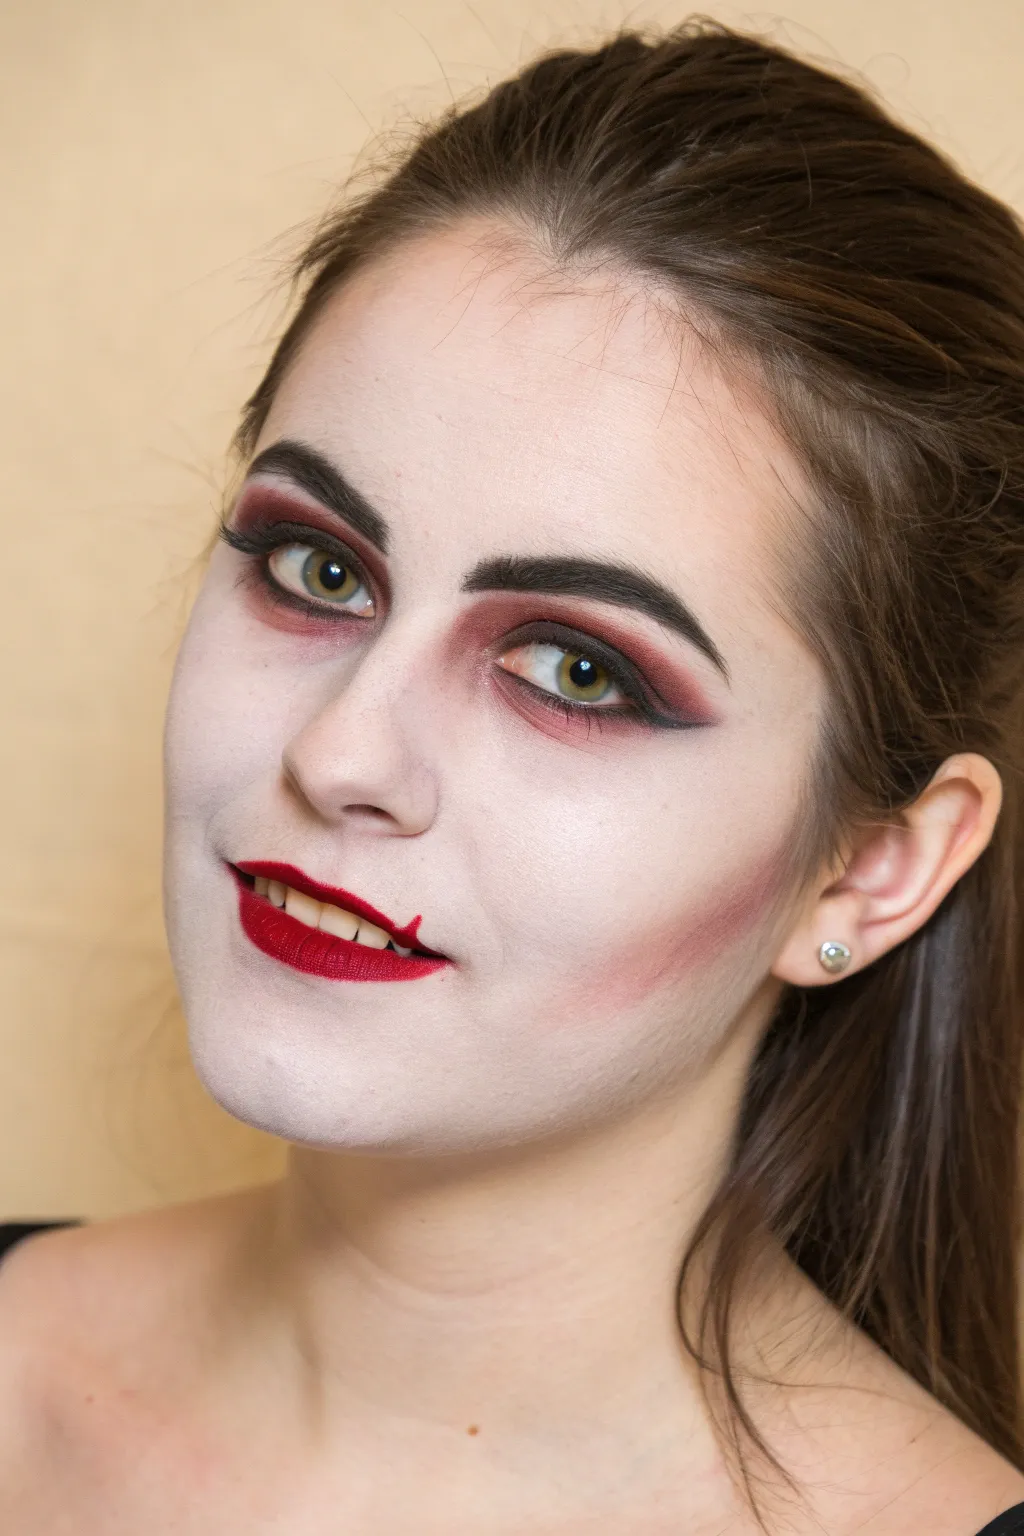
This classic vampire look combines a ghostly pale complexion with sultry, blood-red accents for a style that is both eerie and elegant. The focus is on the smoky, bruised eye makeup and the clever addition of painted fangs directly onto the lip for a biting finish.
Step-by-Step
Materials
- White cream face paint or very pale foundation
- Makeup sponge
- Translucent setting powder
- Black eyeliner pencil or gel liner
- Matte red eyeshadow (burgundy/crimson)
- Black matte eyeshadow
- Fluffy blending brush
- Angled brow brush
- Deep red lipstick (matte finish preferred)
- Lip liner (matching red or darker)
- Mascara
- False eyelashes (optional)
Step 1: The Undead Base
-
Prep the canvas:
Start with a clean, moisturized face to ensure the heavy makeup sits comfortably without cracking. -
Apply the ghost-white base:
Using a slightly damp makeup sponge, stipple white cream paint or the palest foundation you can find all over your face. -
Build coverage:
Don’t just drag the sponge; press the product into the skin, focusing on the center of the face and blending outward to the neck and ears. -
Set the base:
Dust a generous amount of translucent setting powder over the entire face to lock the white base in place and remove any shine.
Stay Matte
Cream paints can get oily. Keep a powder puff handy to blot your T-zone throughout the night, ensuring your undead pallor stays ghostly rather than sweaty.
Step 2: Haunted Eyes & Brows
-
Define the brows:
Use a black eyeliner pencil or shadows to fill in your eyebrows heavily. Create a darker, thicker arch than usual for a more intense stare. -
Lay the red base:
Pack a deep matte red or burgundy eyeshadow onto the entire mobile eyelid using a flat shader brush. -
Smoke it out:
Take a fluffy blending brush and sweep that same red shadow underneath the lower lash line, connecting it to the outer corner. -
Add depth:
Dip a smaller brush into black eyeshadow and apply it exclusively to the outer ‘V’ of the eye and tight along the upper lash line. -
Line the eyes:
Apply black eyeliner to the upper lash line. I like to wing it out slightly to lift the eye shape. -
Lower definition:
Run the black pencil along the outer half of the lower waterline to intensify the gaze. -
Lashes:
Apply two coats of mascara to top and bottom lashes. If you’re feeling extra dramatic, pop on a pair of wispy false lashes now.
Vein Detail
Use a very thin brush with blue or purple shadow to faintly draw veins under the eyes or on the neck for a translucent, thin-skinned vampire effect.
Step 3: Contour & The Bite
-
Hollow the cheeks:
Instead of bronzer, use the matte red or burgundy eyeshadow to contour. Sweep it under the cheekbones, blending diagonally upward toward the ears. -
Blend the contour:
Ensure there are no harsh lines on the cheeks; the red should look like a bruised shadow against the pale skin. -
Line the lips:
Outline your natural lip shape with a dark red or burgundy lip liner for a crisp edge. -
Fill with blood red:
Apply a coat of deep red lipstick, carefully filling in the lines you just created. -
Draw the fangs:
Using a fine detail brush and your red lipstick (or red face paint), draw two small, sharp triangles extending downward from your upper lip onto your lower lip. -
Highlight the tips:
If you want them to pop, add a tiny dot of white paint to the very tip of each red fang to make them look sharp and wet.
You are now ready to step into the night with a terrifyingly chic vampire visage
Witchy Web Around One Eye
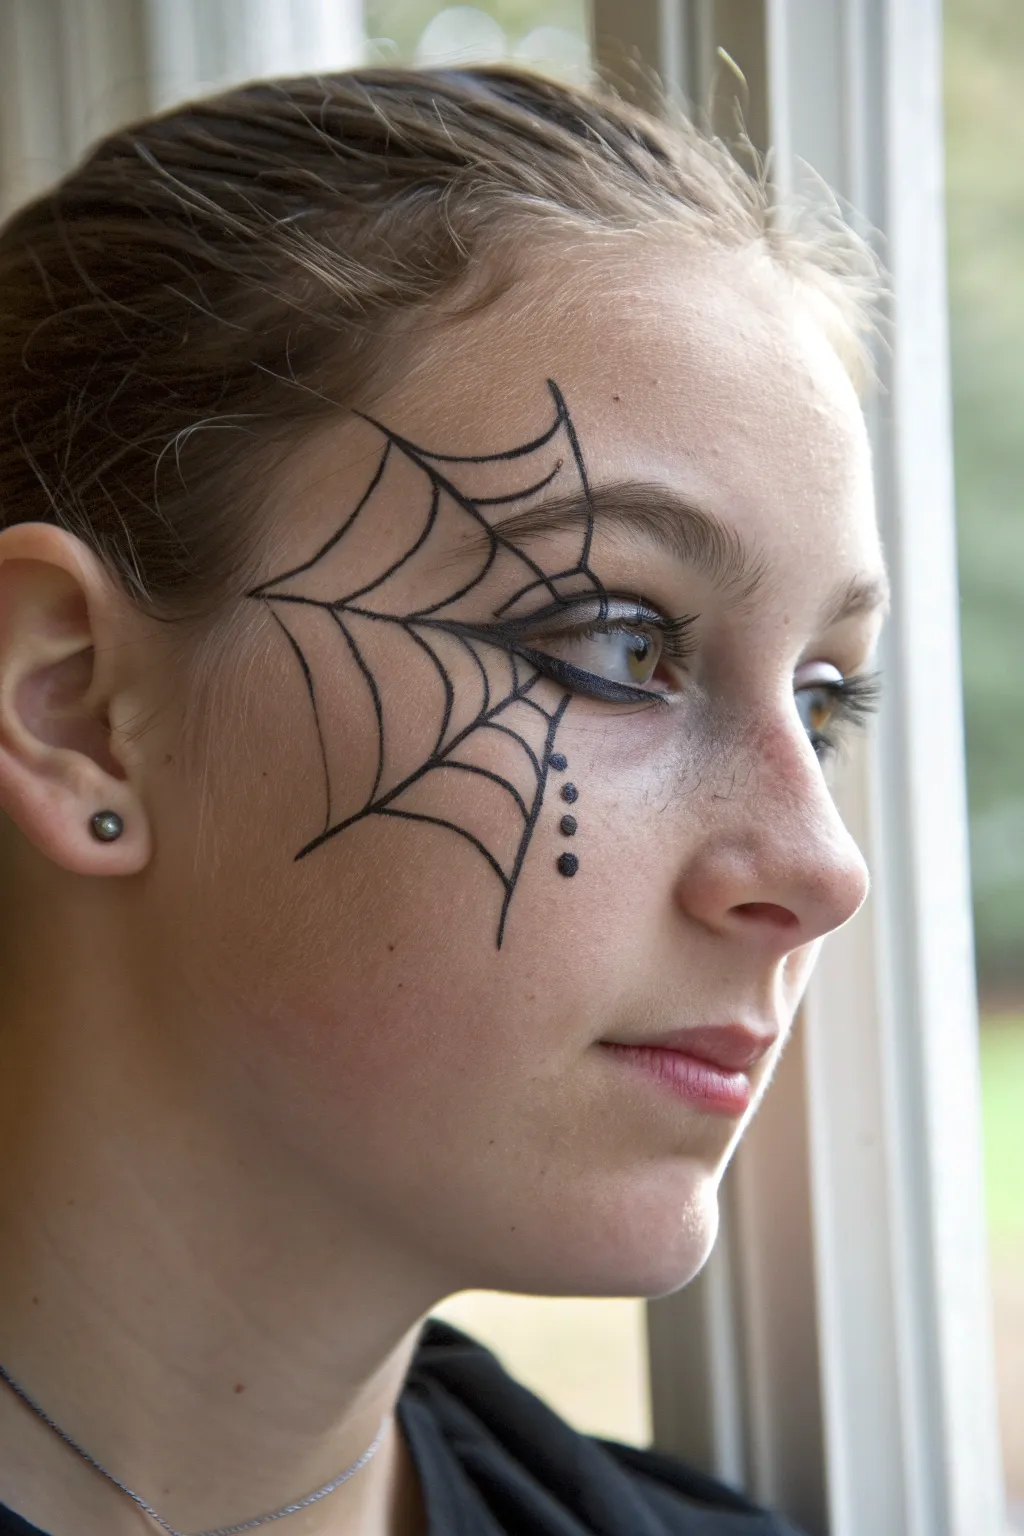
For a sleek and mysterious look that isn’t overly complicated, this asymmetrical spiderweb design is a perfect choice. It uses the natural contours of the eye to anchor the web, creating a dramatic effect that works beautifully for Halloween or cosplay events.
How-To Guide
Materials
- Black liquid eyeliner (fine tip)
- Black face paint or gel liner
- Fine detail brush (size 0 or 00)
- Micellar water and cotton swabs (for cleanup)
- Setting spray (optional)
- Black pencil liner (for the waterline)
Step 1: The Foundation Wing
-
Prep the eyelid:
Begin with a clean, dry eyelid. If the skin is oily, a light dusting of translucent powder will help your eyeliner grip better and last longer without smudging. -
Draw the upper lash line:
Using your black liquid eyeliner, draw a clean line along the upper lashes, starting from the inner corner and thickening slightly as you move outward. -
Create the main wing:
Extend the eyeliner past the outer corner of the eye. Instead of a typical upward flick, pull this line straighter out toward the temple to serve as the central anchor for your web. -
Thicken slightly:
Build up the thickness of this wing just a bit so it feels substantial enough to support the web design coming next. -
Smudge the lower lash line:
Run a bit of black pencil liner or shadow softly under the lower lashes, connecting it to the main wing for a cohesive look.
Clean Lines Hack
If you struggle with shaky hands while drawing long lines, rest your pinky finger against your cheek as a stabilizer while you paint.
Step 2: Weaving the Web
-
Draft the radial lines:
Switch to your fine detail brush and black face paint or gel liner. Imagine your eye’s outer corner is the center point. Paint 4-5 long, straight lines radiating outward across the temple and cheekbone. -
Position the top radial:
Place the topmost line so it arches up and over the eyebrow, following the brow bone’s curve. -
Position the bottom radial:
Direct the lowest line downwards onto the cheek, angling it slightly back towards the ear. -
Ensure spacing:
Keep the spacing between these radial lines relatively even, as this will make drawing the connecting curves much easier. -
Connect the first inner curve:
Starting close to the eye, draw small, concave curves (scallops) connecting the radial lines. The curve should dip towards the eye, mimicking a real web structure. -
Continue the middle row:
Move about an inch outward and paint a second row of connecting curves between the radial lines. Keep your hand steady and use just the very tip of the brush. -
Finish the outer row:
Add a third, final row of curves near the ends of your radial lines. I find it helpful to vary the pressure here—lighter at the ends—so the web looks delicate. -
Check symmetry:
Step back and look in the mirror. If any line looks too thin compared to the others, carefully retrace it to match the line weight.
Step 3: Final Details
-
Extend the tails:
At the very end of each radial line, extend the tip slightly past the last connecting curve to give it a sharp, trailing finish. -
Add decorative dots:
Below the lowest part of the web on the cheek, gently press the tip of your brush to create three descending dots. Make the top dot the largest and the bottom one the smallest. -
Clean up edges:
Dip a cotton swab in micellar water to sharpen any blurry edges or clean up fallout under the eye. -
Set the look:
Close the eye and give the face a very light mist of setting spray to lock the design in place for the day.
Level Up: Gemstone Dew
Glue tiny clear rhinestones at the intersection points of the web to simulate morning dew drops caught in the spider’s silk.
Now you have a striking, elegant design that adds a touch of darkness to your look while keeping your face open and expressive

PENCIL GUIDE
Understanding Pencil Grades from H to B
From first sketch to finished drawing — learn pencil grades, line control, and shading techniques.
Explore the Full Guide
Spiderweb Corner Mask
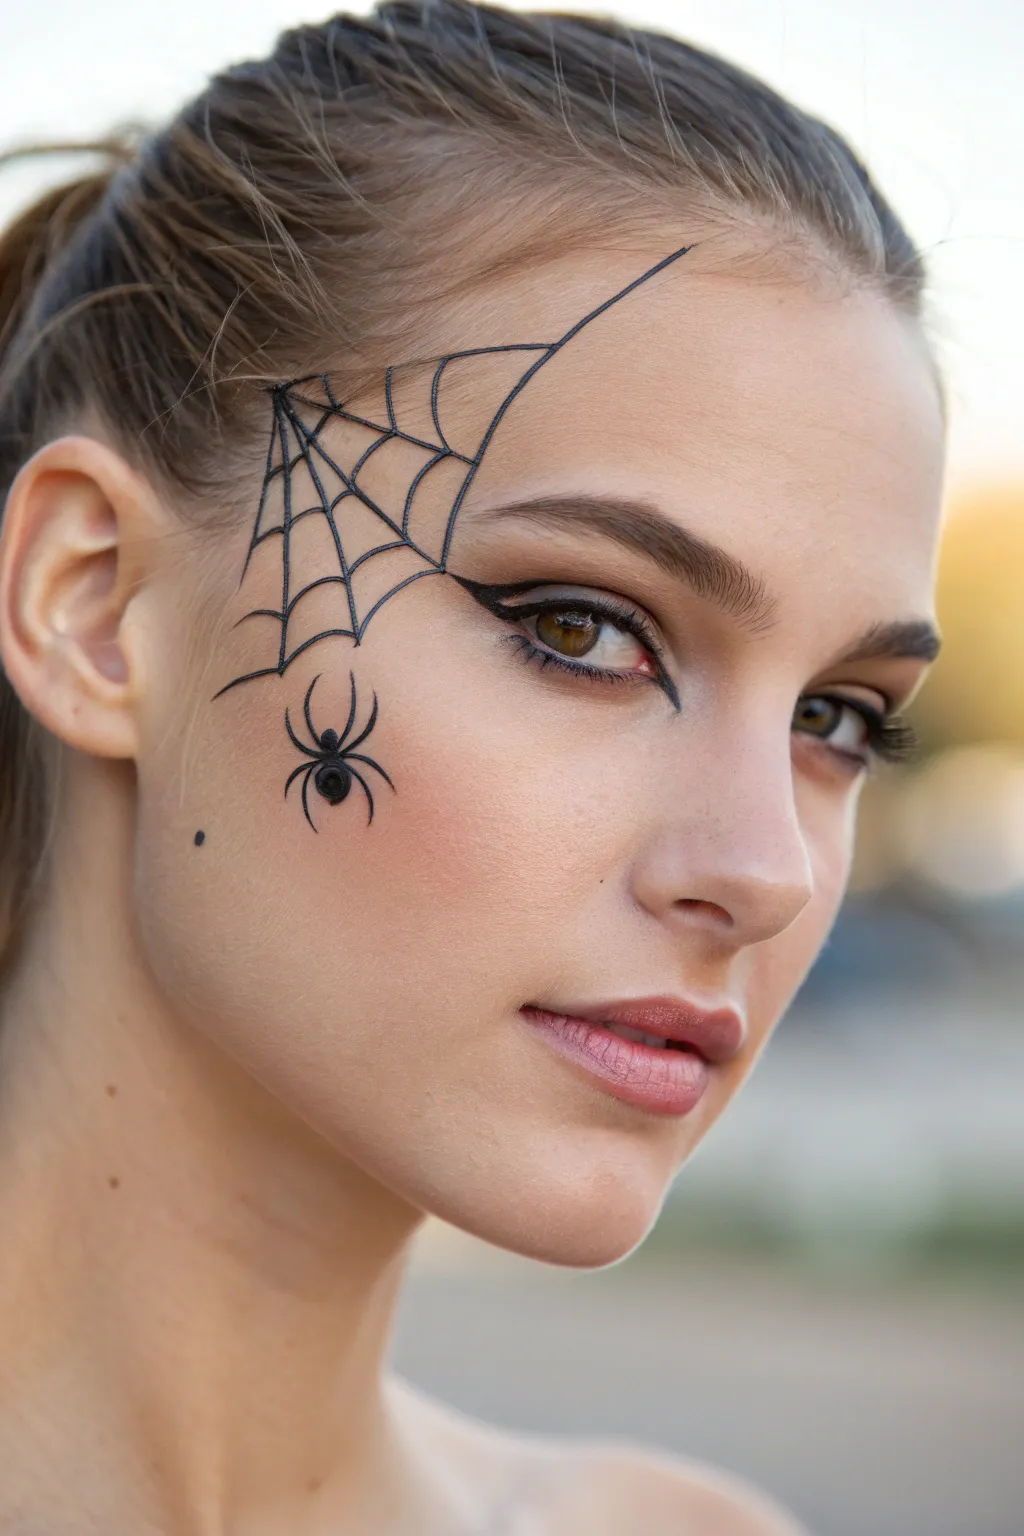
This sophisticated yet spooky design combines precise eyeliner techniques with classic Halloween imagery for a look that is both glamorous and haunting. The spiderweb seamlessly extends from a sharp winged liner, creating a mask-like effect on one side of the face.
Step-by-Step
Materials
- Black liquid eyeliner (fine felt tip)
- Black gel eyeliner or face paint
- Fine detail brush (size 0 or 00)
- Black eyeshadow
- Small angled brush
- Primer or foundation (as a base)
- Setting spray
- Makeup remover wipes (for cleanups)
Step 1: The Foundation and Wing
-
Prep the canvas:
Begin with a clean, moisturized face. Apply your usual foundation or a light primer to the temple and eye area to ensure the black lines stick well and don’t bleed. -
Draft the wing:
Using your black liquid liner, start at the inner corner of your eye and draw a standard eyeliner line across the upper lash line, thickening it slightly as you move outward. -
Extend the sharp classic wing:
Flick the liner outwards at the corner of your eye towards the end of your eyebrow to create a sharp, dramatic cat-eye wing. -
Connect the lower lash line:
Use a small angled brush with black eyeshadow or gel liner to softly line the outer third of the lower lash line, connecting it seamlessly to the wing you just created.
Line Stability Trick
Rest your pinky finger on your cheekbone while drawing. This anchors your hand and stops the shakes, giving you much crispier, straighter web lines
Step 2: Weaving the Web
-
Draw the main anchor lines:
Extend a long, thin line from the tip of your eyeliner wing diagonally upwards onto your forehead, reaching towards the hairline. This acts as the main spine of the web. -
Add secondary spines:
Draw three or four more long lines radiating outwards from the corner of the eye: one going straight up towards the temple, one diagonally down towards the cheekbone, and one more vertical. -
Create the inner webbing:
Starting close to the eye, connect the long spine lines with small, curved lines that dip inwards towards the eye center—these are scalloped shapes that mimic real silk strands. -
Expand the web outward:
Move further out along the spines and draw a second row of scalloped connecting lines. Keep the spacing relatively even, but natural variance makes it look better. -
Finish the outer web:
Complete the web structure with a third or fourth row of curved connecting lines, depending on how much space you have on your temple. -
Thicken intersection points:
Go back over the spots where the curved lines meet the straight spines. I like to add a tiny bit of extra thickness here to mimic the knots in a real spiderweb.
Fixing Smudges
Don’t wipe a mistake immediately! Let the liquid liner dry completely, then use a dry Q-tip to flake it off or a concealer brush to ‘erase’ the error cleanly
Step 3: The Spider Detail
-
Position the spider:
Choose a spot just below the lowest web section on your cheek for the spider to hang. -
Draw the silk drop:
Draw a single, straight vertical line dropping down from the web to where you want the spider’s body to sit. -
Paint the body:
Using the liquid liner or gel pot, draw a small oval for the abdomen and a smaller circle attached above it for the head/thorax. -
Add upper legs:
Draw four legs on each side. The top two pairs should curve sharply upwards and then hook down. -
Add lower legs:
Draw the bottom two pairs of legs extending downwards and slightly out, giving the impression the spider is descending. -
Create dimension:
Once the black ink is fully dry, take a minuscule amount of white face paint or a white gel pen and add a tiny dot on the spider’s back to make it look 3D. -
Seal the look:
Check for any uneven lines and smooth them out, then mist the area lightly with setting spray to prevent smudging throughout the night.
You now have a dangerously elegant look that works perfectly for any costume party without needing a full mask
Cracked Porcelain Doll Face
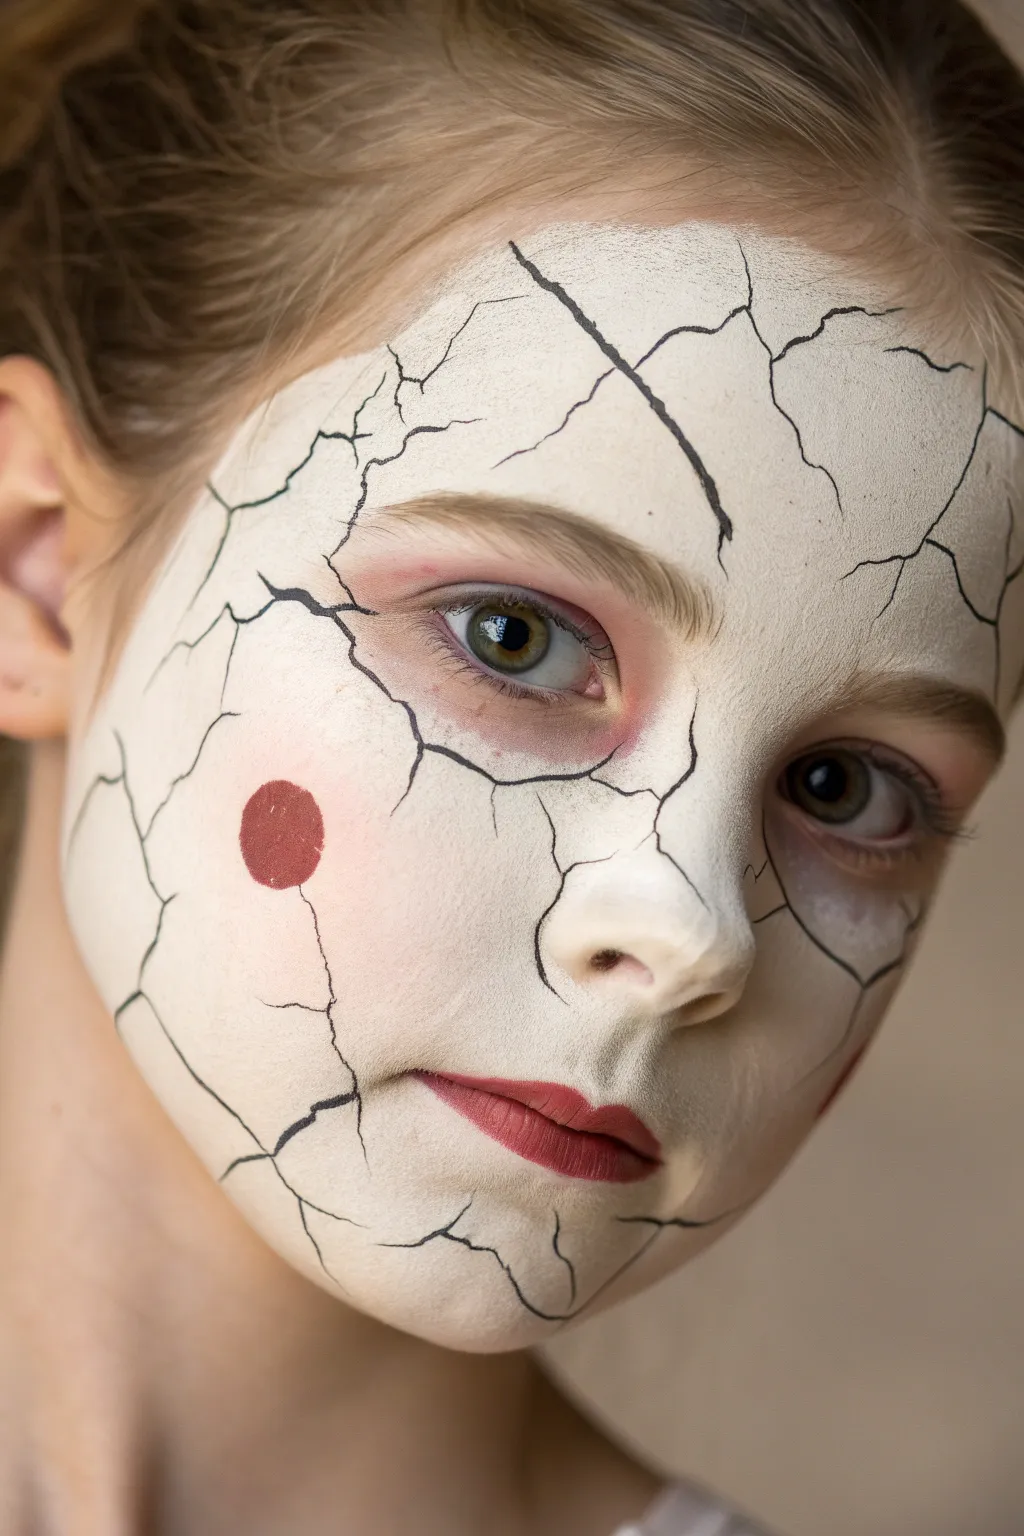
Transform yourself into a hauntingly beautiful broken toy with this cracked porcelain doll makeup. The look relies on a pale, matte base and careful linework to simulate the fissures and fractures of damaged ceramic.
Detailed Instructions
Materials
- White cream face paint or very pale full-coverage foundation
- Translucent setting powder (or white powder)
- Black liquid eyeliner or fine-detail face paint brush
- Black cream face paint
- Red lipstick or lip stain
- Red cream blush or face paint
- Makeup sponge
- Small blending brush
- Thin liner brush (size 0 or 00)
Step 1: Creating the Porcelain Base
-
Prepare the skin:
Start with a clean, dry face. Tie back hair to ensure full access to the forehead and temples, as the paint will extend into the hairline. -
Apply the white base:
Use a damp makeup sponge to stipple the white cream face paint over the entire face. Don’t drag the sponge, but rather press it into the skin for an opaque, even finish. -
Cover sensitive areas:
Work carefully around the eyes and over the eyebrows. You don’t need to block out the brows completely with glue, but muting their color with the white base helps the doll effect. -
Blend the edges:
Fade the white paint slightly down the neck so there isn’t a harsh line at the jaw, though the focus will be on the face itself. -
Set with powder:
Generously pat translucent or white setting powder over the entire face to lock the cream paint in place. This step is crucial to achieve that dry, matte texture of real porcelain.
Steady Hand Pro-Tip
Rest your pinky finger against your cheek while drawing the black cracks. It acts as an anchor, stabilizing your hand for sharper, less shaky lines.
Step 2: Adding Doll Features
-
Rosy cheeks:
Dip a rounded sponge or finger into red cream blush. Apply a distinct, circular classic doll spot on the apple of the cheeks. Keep the edges relatively soft but the shape definitely round. -
Eye definition:
Using a small brush and a tiny amount of red or pink eyeshadow/paint, lightly dust the area under the lower lash line to make the eyes look slightly sore or weary. -
Doll lips:
Apply red lipstick to the center of the lips. Maintain the natural cupid’s bow but keep the application slightly smaller than the natural mouth width for a pursed look.
Step 3: Fracturing the Surface
-
Map the main cracks:
Take your fine liner brush with black face paint (or a liquid liner pen). Start establishing large, jagged lines. Good placement ideas are coming down from the forehead and up from the chin. -
Vary line thickness:
When painting cracks, I prefer to press harder at the start of the crack and lift off as I move outward, creating a line that tapers into a fine point. -
Create intersections:
Draw smaller, secondary cracks branching off the main ones. Porcelain creates sharp angles when it shatters, so avoid smooth curves; stick to jagged, lightning-bolt shapes. -
Cross the features:
Don’t be afraid to draw lines directly over the lips or through the cheek circles. This interruption of the ‘perfect’ features sells the illusion that the surface is broken. -
Detailing the breaks:
Add tiny Y-shaped forks at the ends of some lines. This replicates how ceramic glazes craze and splinter under stress.
Level Up: Missing Pieces
Paint a small area entirely black inside a triangle of cracks to make it look like a shard of porcelain has completely fallen off your face.
Step 4: Depth and Dimension
-
Shadowing the cracks:
For a 3D effect, take a very small brush with grey or thinned black paint and lightly shade one side of the larger cracks. This simulates light hitting the raised edge of a shard. -
Enhance the nose:
Add a tiny bit of contour around the nostrils and tip of the nose to make it look slightly more sculpted and artificial. -
Final inspection:
Step back and look for empty spaces that feel too clean. Add very fine hairline fractures in these areas to balance the composition.
Now you have a fragile, eerie look that is perfect for haunting any party


Pumpkin Face With Triangle Features
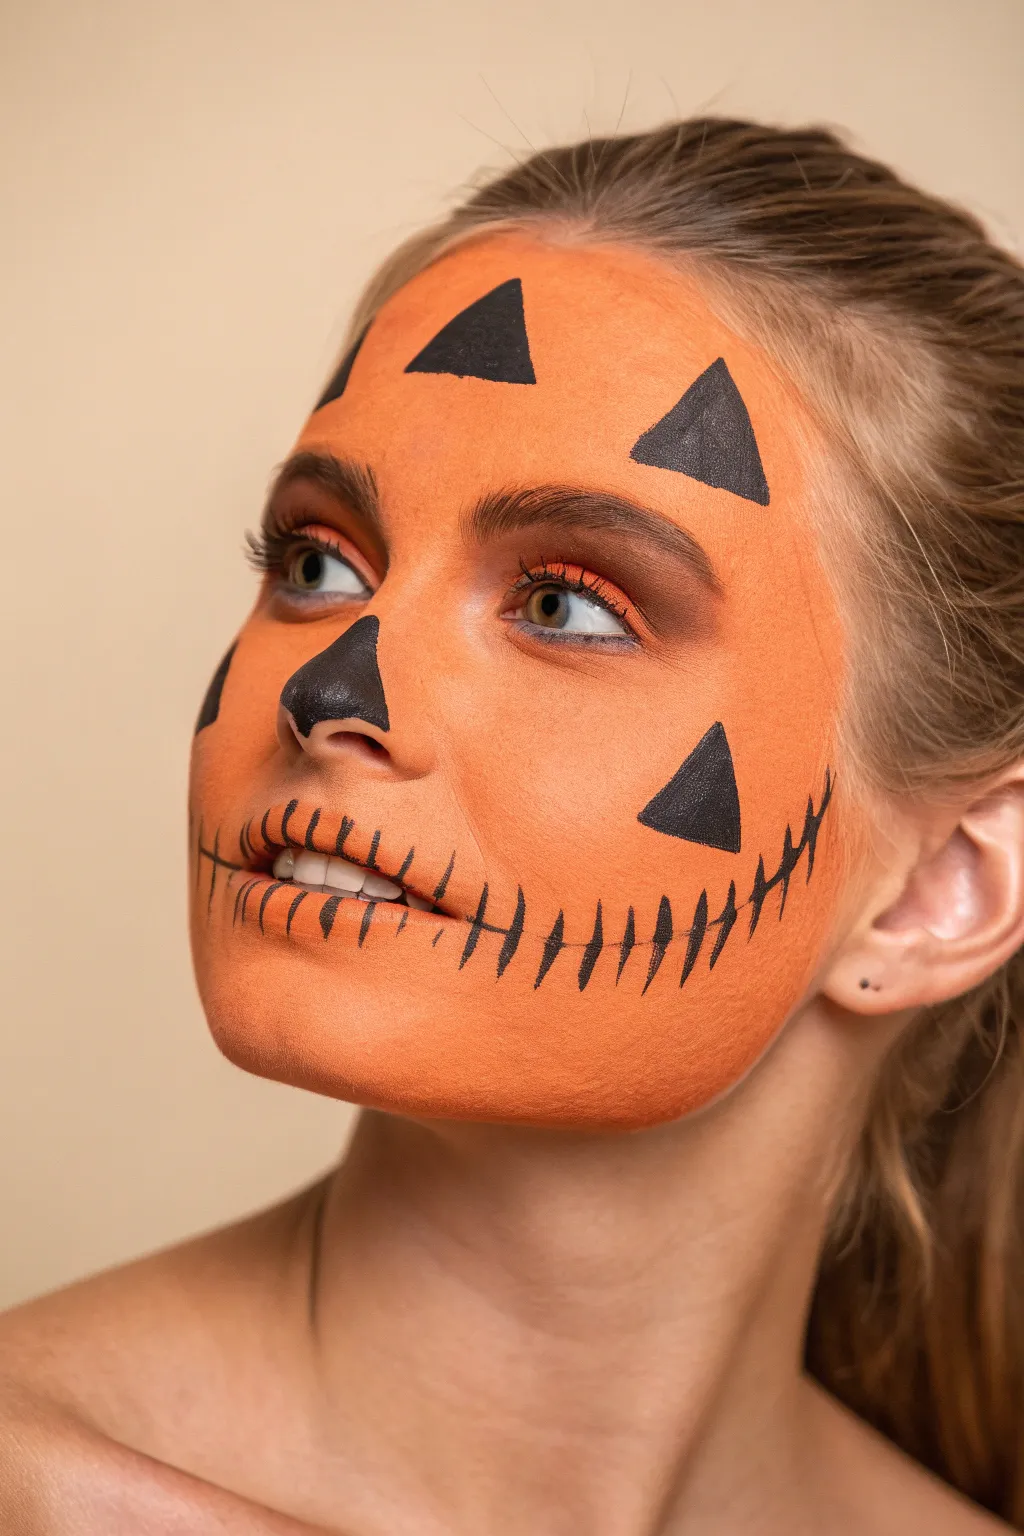
Transform yourself into the classic symbol of Halloween with this vibrant and surprisingly chic pumpkin face paint. By combining a bright orange base with geometric black details and a stitched smile, you achieve a look that is equal parts spooky and stylish.
Step-by-Step Tutorial
Materials
- High-quality orange face paint (water-activated or cream)
- Black face paint or gel liner
- Flat foundation brush or makeup sponge
- Small angled brush
- Fine detail liner brush
- Translucent setting powder
- Makeup setting spray
- Black mascara (optional)
Step 1: Creating the Orange Base
-
Clean and prep the skin:
Start with a freshly washed and dried face. Apply a very light layer of moisturizer, allowing it to absorb fully for a few minutes so the paint grips the skin better. -
Load your applicator:
Dampen your makeup sponge or flat foundation brush slightly with water (if using water-activated paint) and swirl it into the orange pigment until you have a creamy consistency. -
Apply the first layer:
Begin stippling the orange paint onto the center of the face, working outwards towards the hairline and jawline. Keep the layer thin to avoid cracking. -
Build up coverage:
Once the first layer is tacky but not fully dry, apply a second coat to ensure opacity. Make sure to cover the eyebrows, eyelids, and lips lightly, as these will be painted over later. -
Buff the edges:
For a softer look near the hairline and neck, use a clean sponge to buff out the edges of the orange paint so it fades naturally rather than ending in a harsh line. -
Set the base:
Lightly dust translucent setting powder over the orange paint to lock it in place and prevent it from smearing while you work on the details.
Crisp Lines Only
Rest your pinky finger gently on the chin or cheek (use a powder puff if the base is sticky) to stabilize your hand while painting the fine black details.
Step 2: Mapping the Geometric Features
-
Outline the nose triangle:
Using a small angled brush loaded with black paint, draw a small triangle on the tip of the nose. I like to round the corners very slightly to soften the look. -
Fill the nose shape:
Fill in the nose triangle completely with black paint, ensuring it is opaque and solid. -
Position the forehead triangles:
Visualize two triangles above the eyebrows. Using the angled brush, outline two medium-sized triangles on the forehead, keeping them relatively symmetrical. -
Paint the cheeks:
Locate the hollows of your cheeks or just below the cheekbone. Draw another triangle on each side, pointing inward towards the nose. -
Fill all triangles:
Carefully fill in the forehead and cheek triangles with the black paint, maintaining sharp, crisp edges.
Patchy Orange Paint?
If the orange looks streaky, switch to a stippling motion (dabbing up and down) rather than dragging the brush. This builds pigment without lifting the layer underneath.
Step 3: The Stitched Smile
-
Draw the main mouth line:
Switch to your fine detail liner brush. Extend a thin black line from the corners of your mouth outwards toward the cheekbones, curving slightly upward like a wide grin. -
Create the vertical stitches:
Starting at the center of the lips, paint short vertical lines that cross over the main mouth line. Space them about a centimeter apart. -
Vary the stitch size:
As you move outward along the extended smile line, make the vertical stitches slightly longer and angled to follow the curve of the cheek. -
Taper the lines:
Ensure the ends of each vertical stitch are tapered to fine points, giving them a sharp, sketched appearance rather than blunt blocks. -
Define the eyes (optional):
To finish framing the face, add a coat of black mascara to your lashes, which helps the eyes pop against the orange background. -
Final set:
Hold a setting spray at arm’s length and mist the face lightly to ensure your pumpkin design lasts all night.
Now you are ready to light up the room with your brilliant pumpkin glow
Devil Eyes and Sharp Cheek Flicks
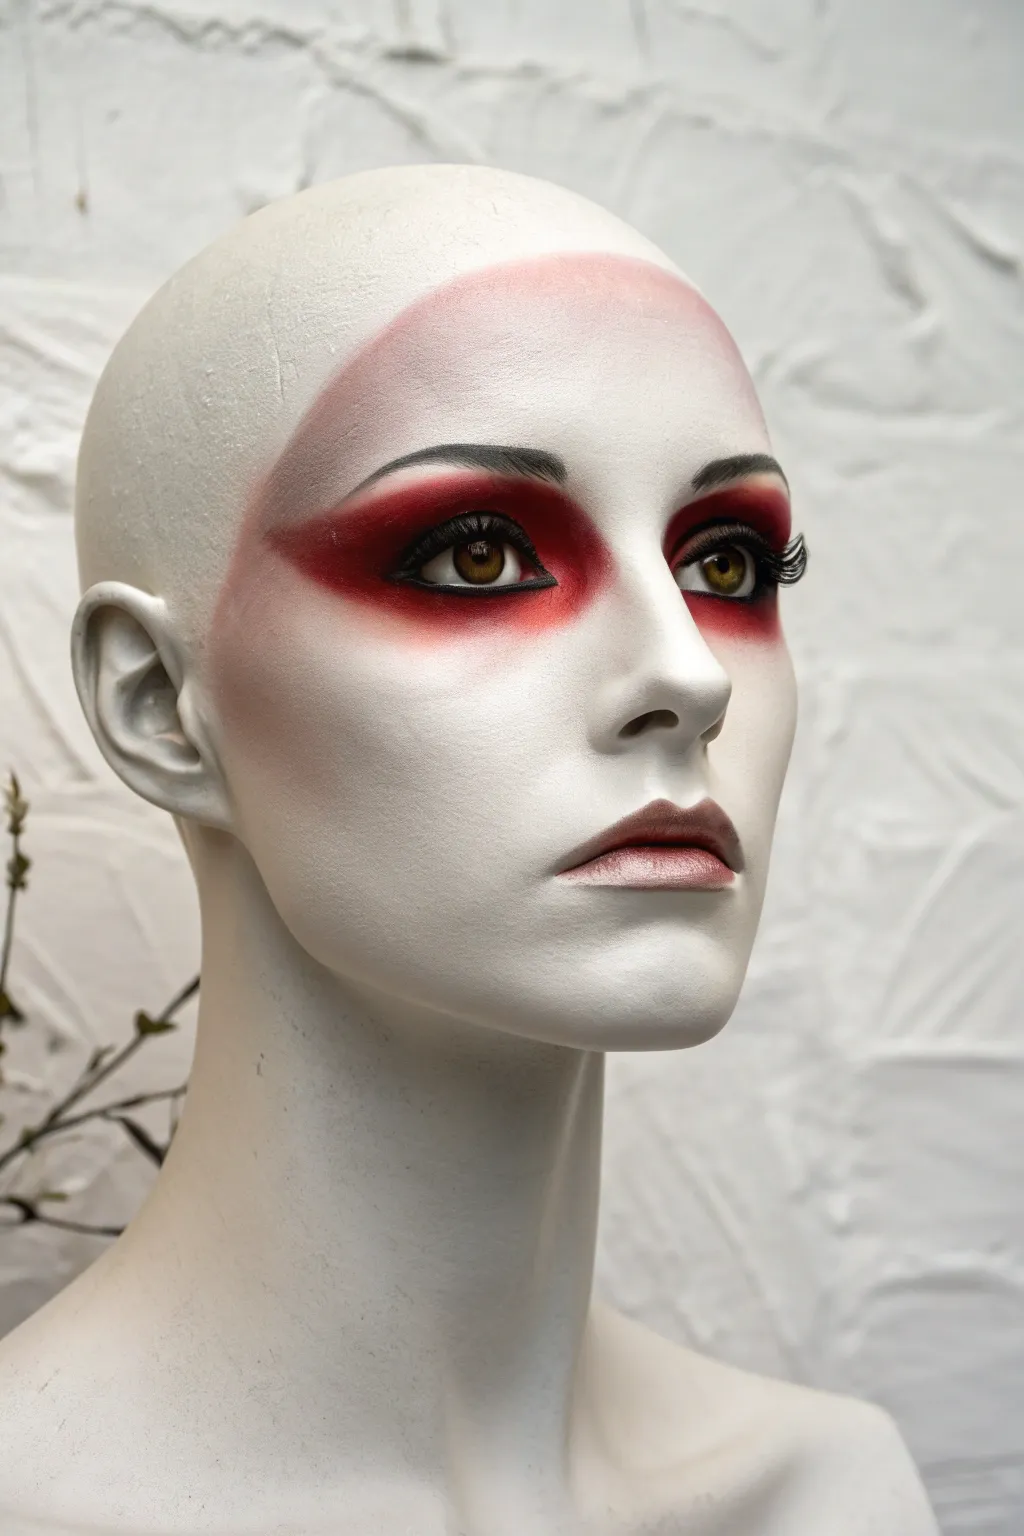
This tutorial guides you through creating a hauntingly elegant look featuring dramatic red eye masking and sharp contouring. It uses a pale white base to make the crimson hues pop, resulting in a face paint design that is both striking and eerie.
Detailed Instructions
Materials
- High-coverage white cream foundation or face paint
- Translucent setting powder (white or colorless)
- Black gel or liquid eyeliner
- Matte red eyeshadow (highly pigmented)
- Deep maroon or burgundy eyeshadow
- Fluffy blending brush
- Angled eyeliner brush
- Flat shader brush
- False eyelashes (optional)
- Lip brush
- Red lipstick or liner
Step 1: Base Preparation
-
Prime the canvas:
Begin with a clean, dry face. Tie back hair completely to expose the forehead and temples, as the design extends high up the face. -
Apply the white base:
Using a sponge or foundation brush, apply an even, opaque layer of white cream makeup over the entire face, neck, and ears. -
Ensure opacity:
Stipple a second layer of white over the eyes, nose, and cheeks if your skin tone is showing through. The goal is a porcelain, doll-like finish. -
Set the foundation:
Liberally pat translucent setting powder over the entire white base. This step creates a smooth surface for blending the colored powders later.
Use Powder over Paint
For the softest gradient on the forehead, use powder eyeshadow over the cream base. Cream paints are harder to blend into that airy ‘fade’ shown in the image.
Step 2: The Crimson Mask
-
Draft the red shape:
Dip a fluffy blending brush into bright matte red eyeshadow. Start applying color at the inner corners of the eyes, sweeping up towards the forehead. -
Extend the color:
Sweep the red pigment outward past the temples and up onto the forehead’s center, creating a soft, curved V-shape that frames the brow bone. -
Deepen the socket:
Pack more pure red pigment directly onto the eyelid and crease using a flat shader brush to build intensity. -
Add dimension:
Create depth by blending a deeper maroon or burgundy shade strictly into the crease and the very outer corner of the eye. -
Smoke out the bottom:
Run the red eyeshadow heavily under the lower lash line using a small smudge brush, connecting it to the outer corner color. -
Soften the edges:
With a clean fluffy brush, buff the outer edges of the red paint on the forehead and cheeks so it fades seamlessly into the white base.
Step 3: Defining the Eyes
-
Line the upper lid:
Using black gel liner and an angled brush, draw a thick line across the upper lash line. -
Create the inner point:
Extend the liner slightly past the inner tear duct to create a sharp, cat-like point. -
Line the waterline:
Fill in the lower waterline with black pencil or gel liner for maximum intensity. -
Smudge the lower line:
Apply a thin line of black below the lower lashes and gently smudge it into the red shadow to avoid a harsh separation. -
Apply mascara/lashes:
Coat your lashes with black mascara. If desired, apply dramatic false lashes to the outer corners for a flared look. -
Defined brows:
Draw on thin, arched eyebrows using a dark grey or black pencil. Keep the arch extremely precise and sharp to match the stern expression.
Patchy White Base?
If the white looks streaky, use a damp beauty sponge to press the product into the skin rather than wiping. Set immediately with plenty of powder.
Step 4: Finishing Touches
-
Contour the cheeks:
Lightly dust a mix of grey and red shadow under the cheekbones to create a hollow, gaunt appearance. -
Paint the lips:
Apply red lipstick, focusing most of the color in the center of the lips. -
Fade the lip edges:
I prefer to use a fingertip or small brush to blend the lip color outwards, letting it fade into the white skin rather than having a crisp lip line.
Enjoy the dramatic transformation of this stark and captivating look
Ghostly Dripping Mouth
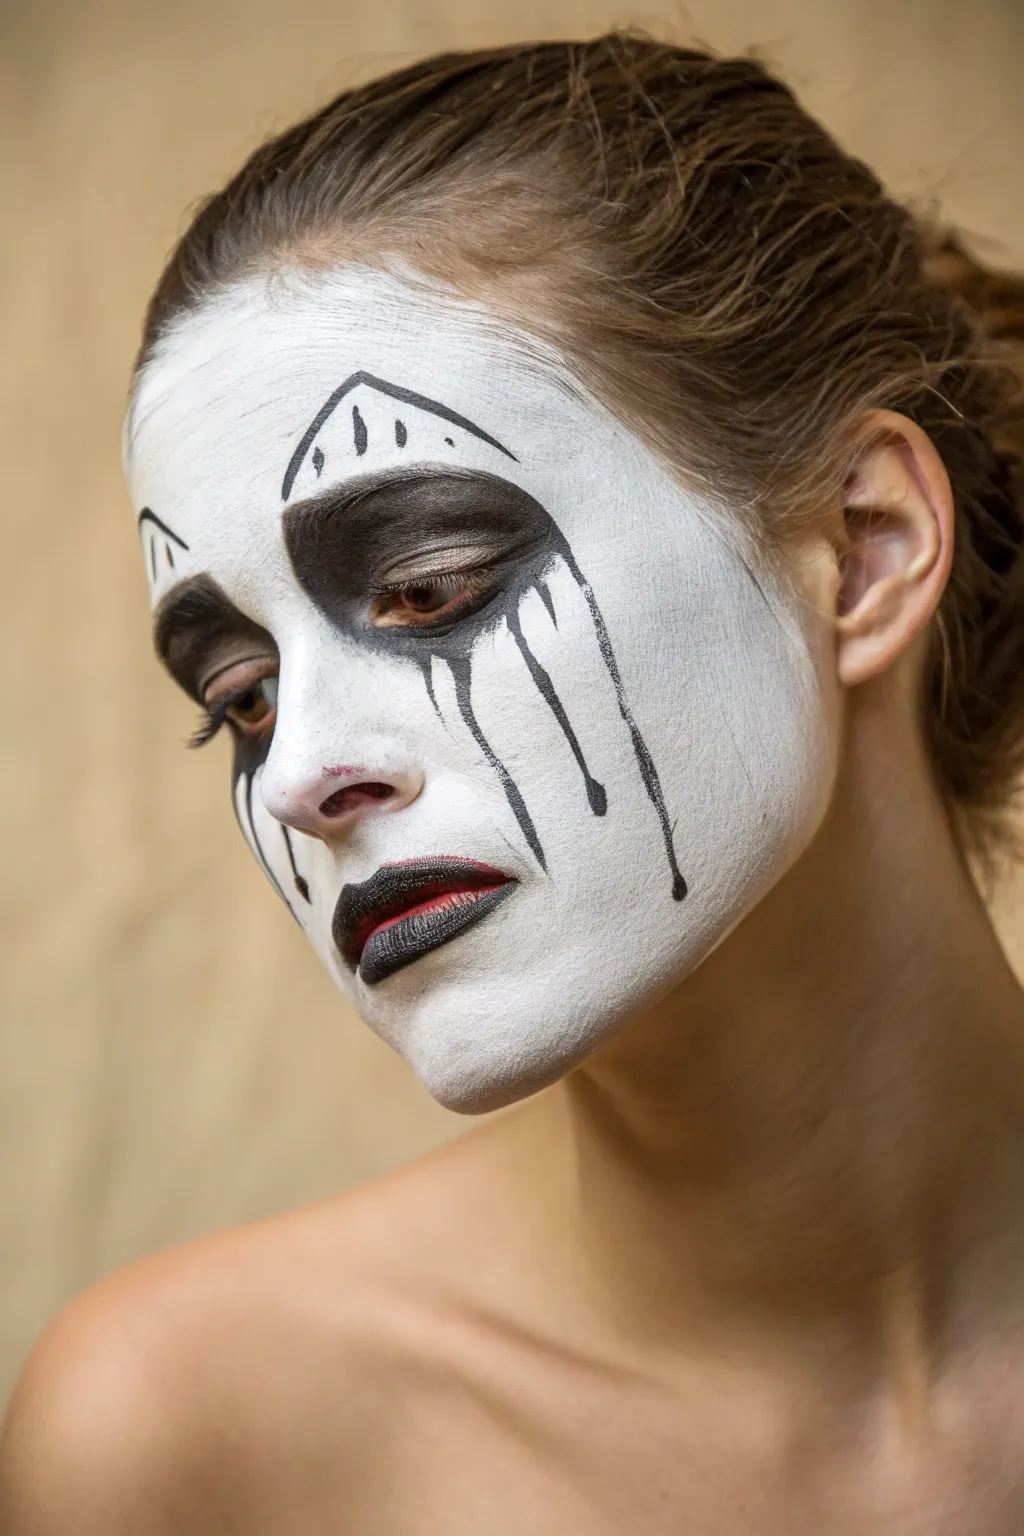
This hauntingly beautiful design combines elements of a sad pierrot clown with a ghostly specter. The stark white base contrasts with heavy black drips to create a melancholic, eerie visage perfect for Halloween.
How-To Guide
Materials
- High-quality white crème face paint or water-activated cake
- Black face paint (water-activated preferred for precision)
- Red lipstick or face paint
- Translucent setting powder
- Make-up sponge or beauty blender
- Medium flat brush
- Fine liner brush
- Black eyeliner pencil (optional)
- Small bowl of water
Step 1: Creating the Pale Canvas
-
Clean and Prep:
Start with a freshly washed and dried face. If you have sensitive skin, apply a very light layer of barrier cream or moisturizer and let it absorb completely. -
Load the Sponge:
Dampen your makeup sponge slightly and load it with opaque white face paint. You want a creamy consistency, not too watery. -
Stipple the Base:
Begin stippling the white paint onto the center of the face, focusing on the forehead, nose, cheeks, and chin. Use a patting motion rather than dragging to get even coverage. -
Fade the Edges:
As you move toward the hairline and jawline, use less product on the sponge to create a soft, faded edge where the white meets your natural skin tone. Avoid painting the neck. -
Set the Base:
Once the white layer is dry to the touch, lightly dust translucent setting powder over the entire face to prevent smearing during the next steps.
Step 2: The Sorrows of the Eyes
-
Block Out the Brows:
Using a medium flat brush loaded with black paint, cover your eyebrows completely. Paint a thick, rounded arch that extends slightly above your natural brow line. -
Darken the Lids:
Fill in the entire eyelid area with black, connecting it seamlessly to the brow block you just created. -
Under-Eye Shadow:
Bring the black pigment underneath the lower lash line. Be generous here; create a rounded, heavy look that makes the eyes appear sunken. -
Connect the Shape:
Ensure the upper and lower black areas meet at the corners of the eyes, forming a large, dark oval around each eye socket. -
Add the Triangles:
Above the center of each eyebrow block, use a finer brush to paint a small, empty triangle. The base of the triangle should rest on the top edge of the black brow. -
Detailing the Triangles:
Inside each triangle, draw three tiny vertical dashes using the very tip of your fine liner brush.
Stay Symmetrical
Work on both eyes simultaneously rather than finishing one side completely. Do the left brow, then the right brow. This makes it much easier to keep the spooky features balanced.
Step 3: Tears and Lips
-
Start the Drips:
Switch to your fine liner brush and black paint. I find that thinning the paint slightly with a bit more water helps the flow for this step. -
Draw the Tears:
Starting from the bottom edge of the black eye makeup, paint uneven, wavy lines dragging down the cheeks. Vary the lengths—some ending at the cheekbone, others reaching the jaw. -
Teardrop Ends:
At the bottom of each drip line, press the brush down slightly to create a rounded ‘drop’ shape, making it look like liquid pooling. -
Outline the Lips:
Outline your natural lip shape with black paint or a black eyeliner pencil. -
Fill the Corners:
Fill in the outer corners of the lips with solid black, tapering inward so only the very center remains unpainted. -
Add the Red Center:
Apply red lipstick or paint to the very center of the lips, then gently press your lips together to blend the red into the black for a gradient effect. -
Final Touches:
Check for any uneven patches in the white base and touch up if necessary, being careful not to disturb the black detailed lines.
Add Glosss
For a ‘wet’ look that makes the crying effect more realistic, dab a small amount of clear lip gloss over the black tear tracks appearing on the cheeks.
Now you are ready to haunt the night with this wonderfully tragic expression
Werewolf Scratches and Dark Nose
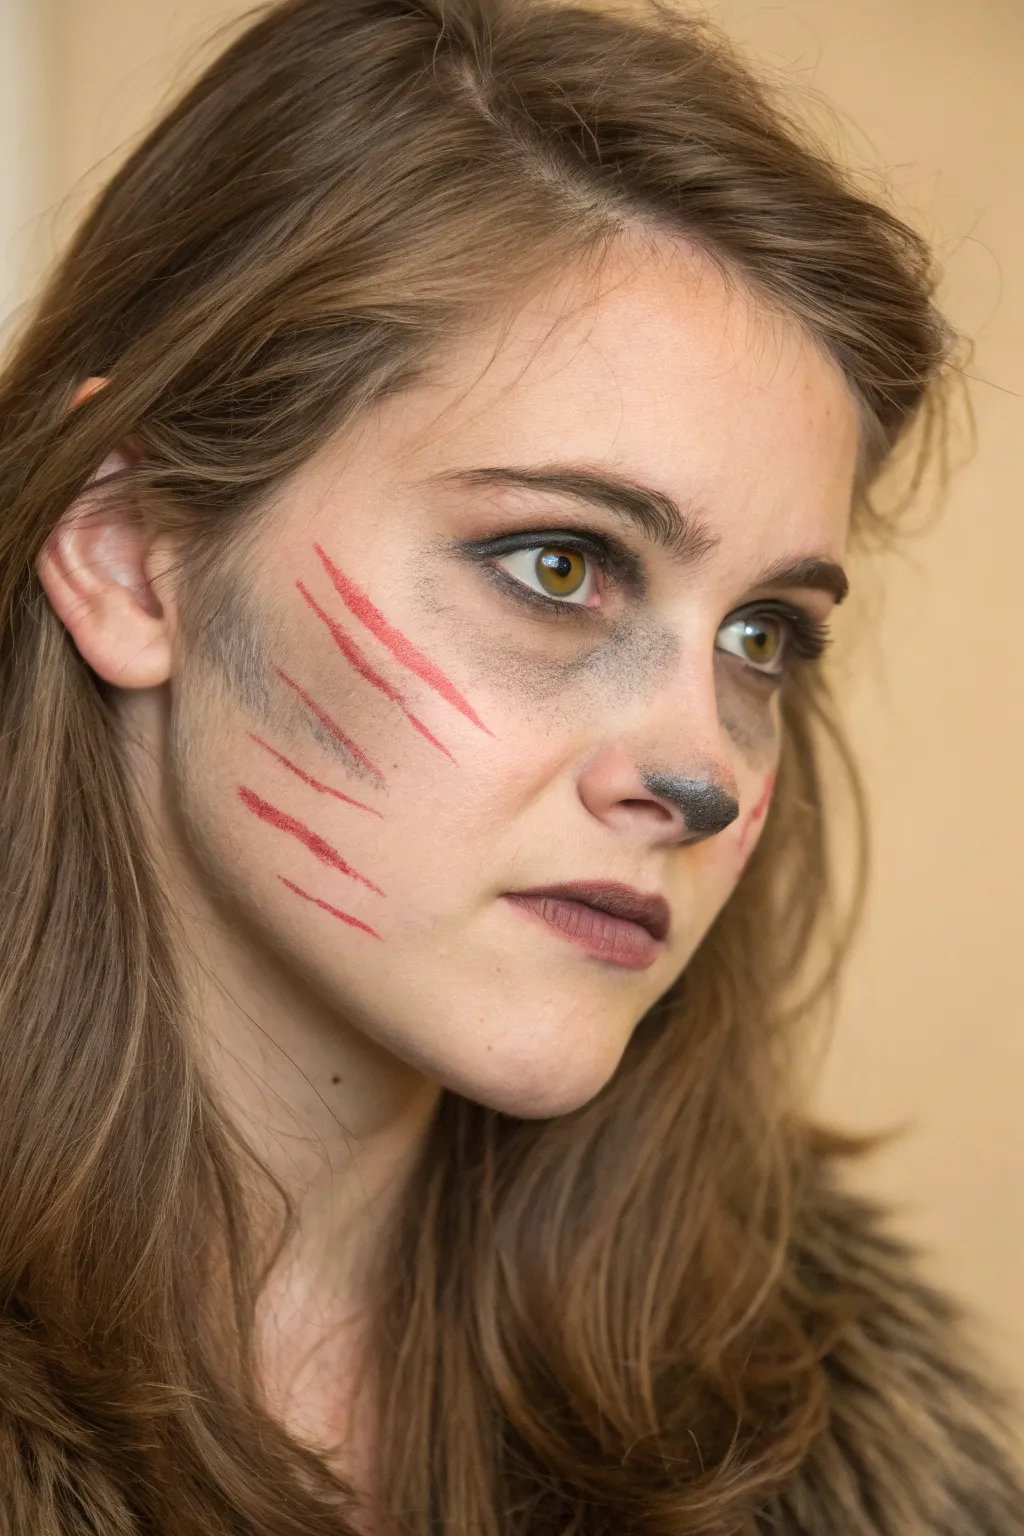
Transform into a creature of the night with this achievable werewolf look that balances grit with glam. Focusing on darkened, smoky features and distinct scratch marks creates a wild, primal appearance without needing prosthetics.
Step-by-Step Guide
Materials
- Matte foundation (skin tone matching)
- Black eyeshadow or cream face paint
- Grey or charcoal eyeshadow
- Dark brown matte eyeshadow
- Red lip liner pencil (bright crimson)
- Deep plum or maroon lipstick
- Fluffy blending brush
- Small angled brush
- Sponge applicator
Step 1: Base and Contour
-
Even out the complexion:
Start with a clean, moisturized face. Apply a matte foundation that matches your natural skin tone to create an even canvas, but don’t worry about perfection—this look benefits from a little texture. -
Create the dirty contour:
Load a fluffy blending brush with a mix of grey and charcoal eyeshadow. Sweep this aggressively along the hollows of your cheeks, extending from the ear towards the corner of the mouth to simulate dirt and shadow. -
Shadow the temples:
continue using the grey shadow to darken the temples and the hairline, creating a sunken, wild effect. -
Deepen the cheekbones:
Take a slightly smaller brush with black eyeshadow and deepen the very center of the cheek contour you just created to add dimension.
Step 2: Eyes and Nose
-
Smoke out the eyes:
Pack black eyeshadow onto your entire eyelid. Don’t worry about clean lines; we want a messy, slept-in look. -
Blend the under-eye:
Drag the black shadow heavily underneath the lower lash line using a smudger brush or sponge applicator. Pull the color down quite far to create a tired, animalistic eye socket. -
Diffuse the edges:
Use a clean fluffy brush to buff out the edges of the black shadow with a bit of grey, blending it seamlessly into your skin so there are no harsh lines. -
Create the nose tip:
Using black cream face paint or a wet black eyeshadow, color the very tip of your nose. Keep the shape somewhat rounded but rough at the edges to mimic an animal nose. -
Texture the nose area:
Dab a little grey shadow around the black nose tip to soften the transition between the dark paint and your skin.
Smudge Factor
For the grey dirt patches, use a coarse stipple sponge instead of a brush. It creates a speckled, uneven texture that looks much more like actual grime.
Step 3: Scratches and Lips
-
Draft the scratches:
Take a sharp red lip liner pencil. On one cheek, draw three to four diagonal lines moving from the cheekbone downward towards the jaw. -
Vary the line thickness:
Go back over the lines, pressing harder at the start and lifting pressure at the end to create a tapered ‘claw mark’ effect. I like to make the middle scratches slightly longer than the outer ones. -
Add texture to the wounds:
Lightly feather the edges of the red lines with a tiny bit of brown eyeshadow to make the scratches look irritated and less like perfect drawings. -
Apply the lip color:
Fill in your lips with a deep plum or matte maroon lipstick. Avoid glossy finishes to keep the gritty aesthetic. -
Darken the lip corners:
Use a touch of black eyeshadow on your finger to dab the outer corners of your mouth, blending it inward to ombre the lips.
Fresh Wounds
Add a coat of clear lip gloss or fake blood gel strictly over the red scratch marks. This makes them look wet and fresh against the matte skin.
You have successfully unleashed your inner wolf with a look that is both spooky and stylish
Creepy Scarecrow Stitched Smile
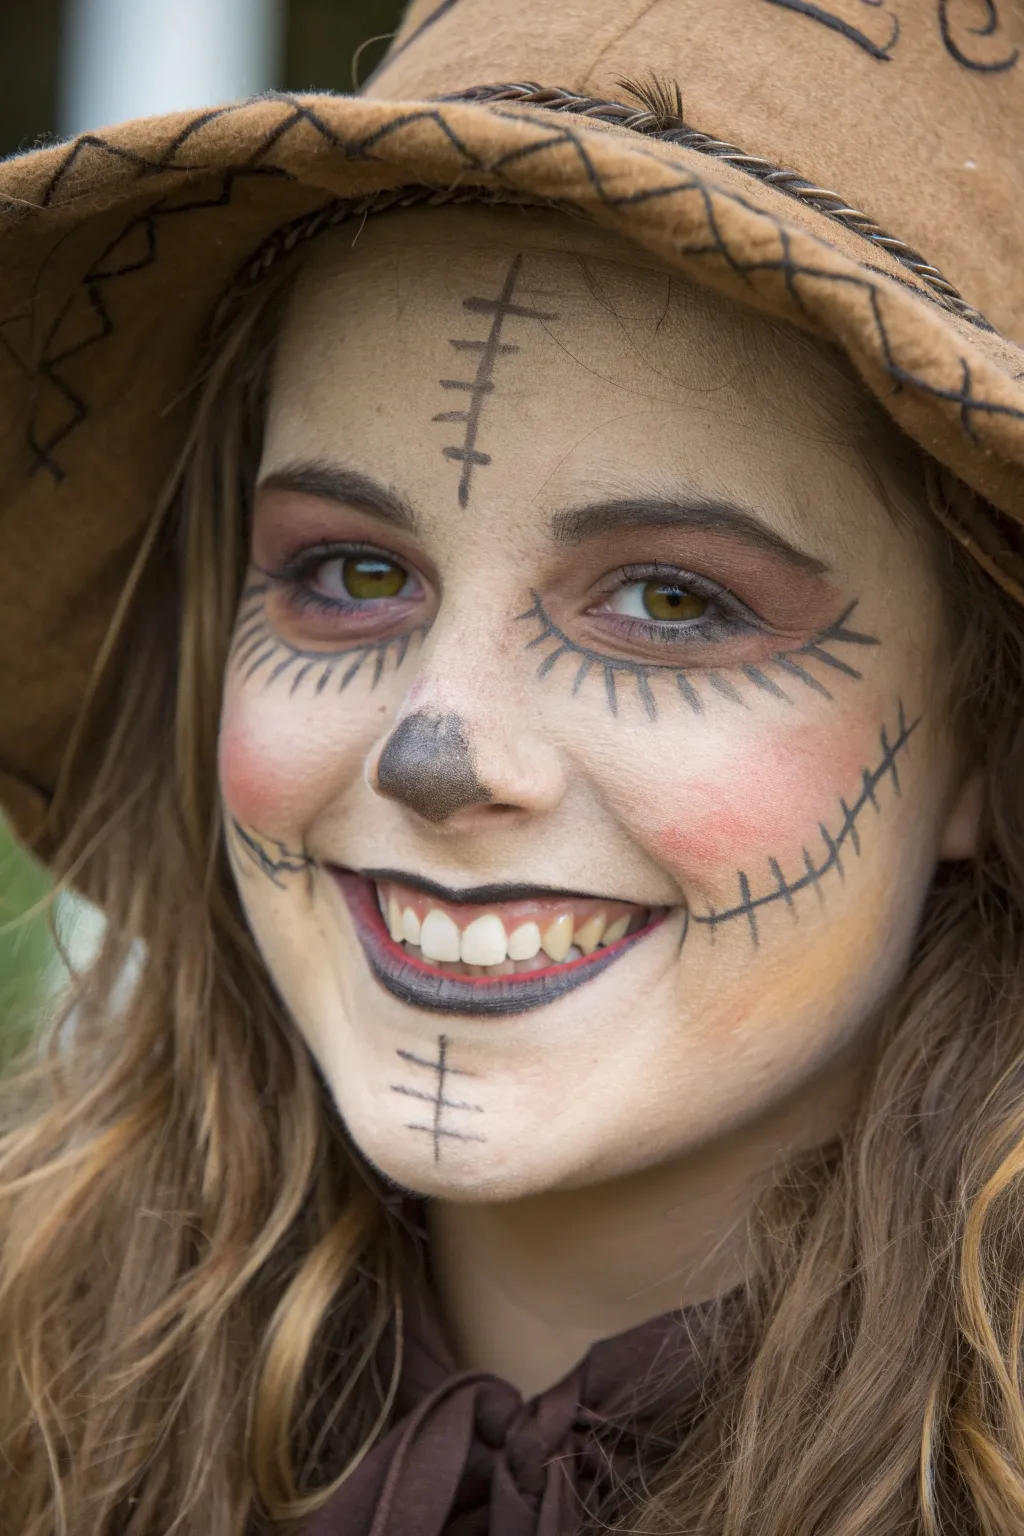
Transform into a charmingly spooky scarecrow with this classic stitched smile look. This design combines warm autumn tones with stark black details to create a character that feels both rustic and eerie.
Step-by-Step Tutorial
Materials
- Light foundation or pale face paint
- Translucent setting powder
- Matte brown eyeshadow
- Coral or peach blush
- Black liquid eyeliner or fine tip face paint brush
- Black face paint or cream makeup
- Mauve or dark pink lip liner
- Medium round eyeshadow brush
- Small detail brush
- Makeup sponge
Step 1: Base and Contour
-
Prep the canvas:
Start with a clean, moisturized face. Apply a foundation that is one or two shades lighter than your natural skin tone to give yourself a slightly stylized, doll-like base. -
Set with powder:
Dust the entire face with a translucent setting powder. This ensures the creamy paints you apply later won’t slide around or smudge into the base. -
Apply eye shadow wash:
Using a fluffy eyeshadow brush, sweep a matte brown shadow across your eyelids, extending slightly past the outer corners for a weary, shadowed look.
Don’t Smudge the Ink
Use waterproof liquid eyeliner for the stitching details. It creates sharper lines than face paint and resists smudging if you sweat or talk.
Step 2: Cheeks and Nose
-
Add rosy cheeks:
Take a coral or peach blush and apply it generously in circles on the apples of your cheeks. Don’t worry about blending it out perfectly; scarecrows often have distinct, painted-on cheeks. -
Shape the nose patch:
With a fine brush and black face paint or dark brown cream makeup, draw a soft triangular shape on the tip of your nose. -
Fill the nose:
Fill in the triangle shape. I like to stipple the color slightly in the center rather than painting it solid black to give it a worn, fabric-like texture.
Add Fabric Texture
Before the nose paint dries, press a piece of coarse burlap or a textured sponge against it to imprint a realistic woven fabric pattern.
Step 3: The Stitched Grin
-
Line the lips:
Outline your natural lip shape with a mauve or dark pink lip liner, then fill the lips in lightly with the same color. -
Extend the smile:
Using black eyeliner or a detail brush with black paint, draw a thin line extending from the corners of your mouth outward across your cheeks, curving slightly upward. -
Line the lip edges:
Go back over the outer edges of your lips with thin black lines to clearly define the mouth shape. -
Add vertical stitches:
Draw small vertical hatch marks along the extended smile lines and vertically across your actual lips to effect the classic ‘sewn shut’ mouth. -
Detail the chin stitch:
Create a small cross-hatch design on the chin using three horizontal lines crossed by a single vertical line.
Step 4: Eye Details and Finishing Touches
-
Paint lower lashes:
Beneath each eye, paint exaggerated, long lashes. Draw 7-8 lines radiating downward from your lower lash line onto your cheekbone. -
Add lash definition:
Thicken the base of each painted lash slightly where it meets the eye to add depth and dimension. -
Forehead stitches:
Draw a long vertical line down the center of your forehead. Cross it with several horizontal hatch marks, varying the length to make them look hand-stitched. -
Create faux cracks:
On one cheek near the smile line, use a very fine brush to draw a tiny, branching jagged line to simulate cracked porcelain or worn fabric. -
Final blush touch-up:
If your contour faded during the detail work, lightly dab a bit more blush on the apples of the cheeks to ensure that contrast remains vibrant.
Pair this look with a floppy hat and a flannel shirt to complete your transformation into the pumpkin patch guardian
Bruised Undead Cheek Shadow
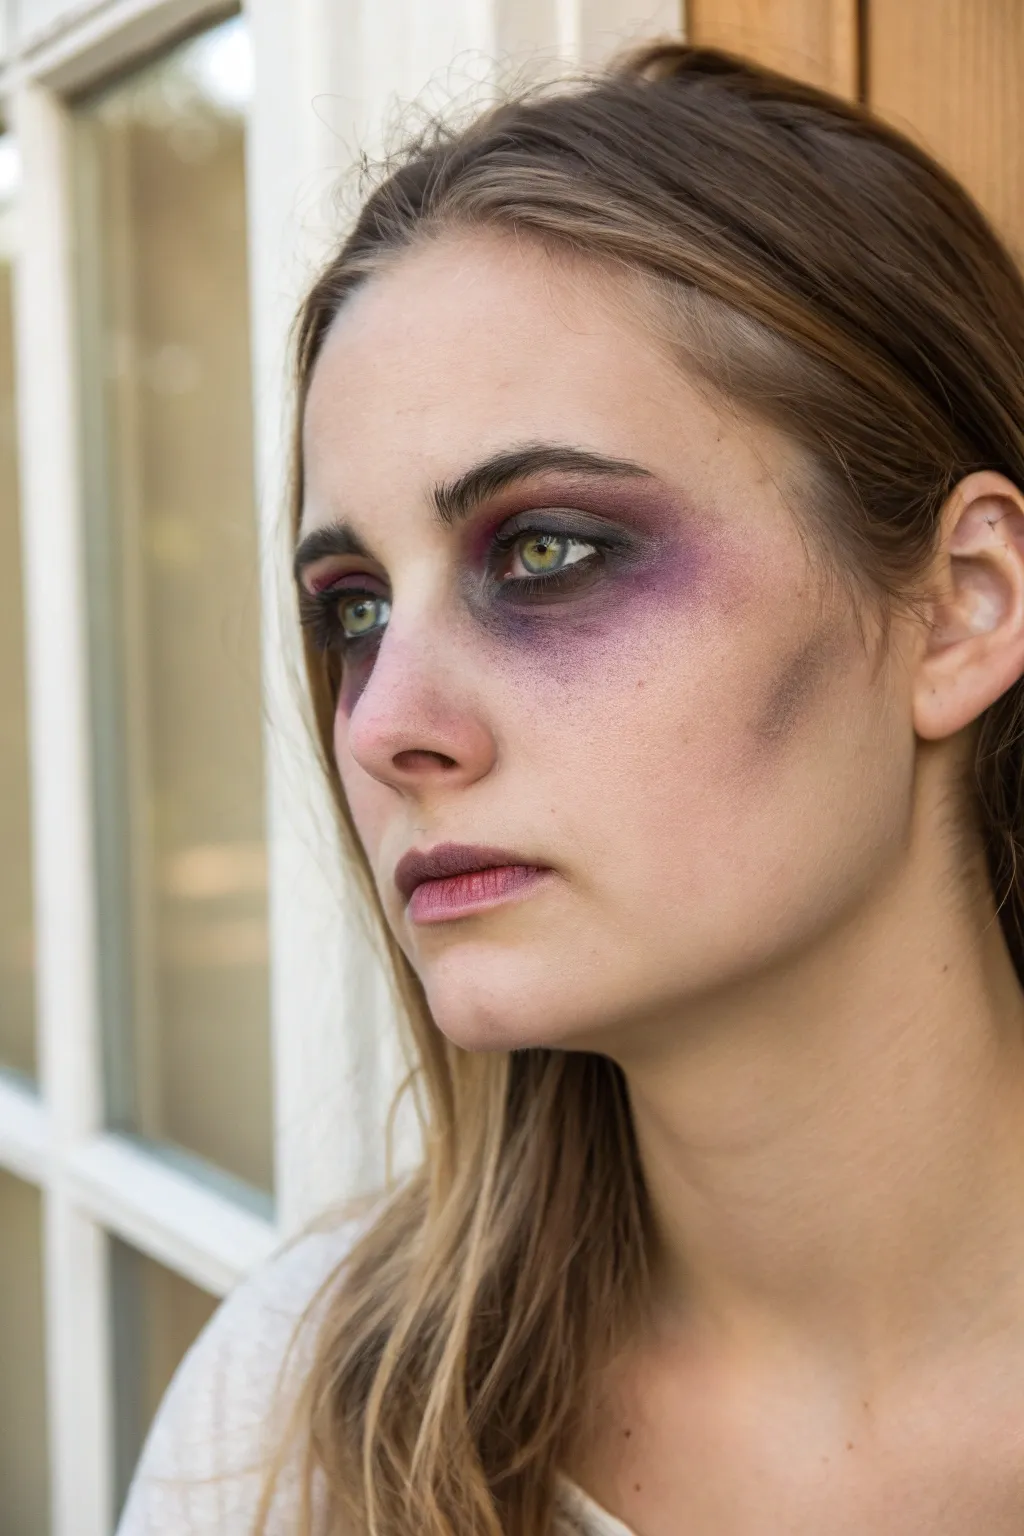
Transform into a weary member of the undead with this subtle yet striking makeup look that emphasizes exhaustion and decay. By focusing on bruised eye sockets and sunken cheekbones, you create a ghostly appearance without the need for heavy prosthetics.
Step-by-Step
Materials
- Matte pale foundation (2 shades lighter than skin tone)
- Translucent setting powder
- Purple cream makeup or eyeshadow
- Red-brown cream makeup or eyeshadow (bruise tone)
- Grey or taupe contour powder
- Black eyeliner pencil
- Small fluffy blending brush
- Angled contour brush
- Makeup sponge
- Lip balm
Step 1: Base Preparation
-
Pale Canvas:
Begin with a clean, moisturized face. Apply a matte foundation that is roughly two shades lighter than your natural skin tone all over your face and neck. Use a damp makeup sponge to bounce the product into the skin for a seamless, natural finish rather than a thick mask. -
Set the Base:
Dust a translucent setting powder lightly over the entire face. This step is crucial because it helps the subsequent powder shadows blend smoothly without grabbing onto wet foundation patches.
Patchy Shadows?
If your shadows are looking blotchy, dip your brush in setting powder before picking up color. This dilutes the pigment slightly and helps it glide over the skin more evenly.
Step 2: Creating the Bruised Eye
-
Initial Purple Wash:
Load a small fluffy blending brush with purple cream makeup or eyeshadow. Start applying it in the inner corner of the eye, sweeping excessive pigment under the lower lash line. -
Expanding the Shadow:
Blend the purple color outward past the outer corner of the eye, fading it gently into the temple area. Keep the edges soft and diffused to mimic the look of natural bruising under the skin. -
Adding Depth:
Take a deeper, red-brown shade (likened to dried blood) and apply it closer to the lash line, layering it over the purple. This adds a sickly dimension and makes the eye socket look deeper and more irritated. -
Upper Lid Detail:
Apply the same purple and red-brown mix to the eyelid, concentrating the darkest color in the crease. Blend upward toward the brow bone, leaving the space directly highlighting the brow bone relatively clean for contrast. -
Waterline Definition:
Using a black eyeliner pencil, tightline the upper waterline. For the lower waterline, lightly smudge a bit of the red-brown shadow instead of harsh black to give the eyes a raw, weeping appearance.
Step 3: Sunken Contours
-
Cheekbone Placement:
Find the hollow of your cheek by sucking in your cheeks slightly. Using an angled contour brush and a grey or taupe powder, draw a line following this hollow, starting near the ear and stopping midway down the cheek. -
Hollowing the Cheeks:
Buff this contour line downwards rather than upwards. By dragging the shadow down, you visually drag the face structure down, enhancing that gaunt, skeletal look. -
Detailing the Temple:
Add a touch of the grey contour powder to the temples and softly blend it into the hairline. This connects with the eye bruising and narrows the upper face. -
Nose Adjustments:
Lightly dust the red-brown shadow around the nostrils and the tip of the nose. This mimics cold, dead skin and simulates irritation from sickness.
Make It Glossy
For a fresh zombie look, dab clear lip gloss or petroleum jelly over the eye bruising. It creates a sweaty, feverish sheen that catches the light creepily.
Step 4: Final Touches
-
Pale Lips:
Pat a small amount of your pale foundation over your lips to neutralize their natural pink color. They should look dehydrated and faded. -
Inner Lip Tint:
Dab a tiny amount of the purple or red-brown shadow just in the very center of the lips. I like to press my lips together to transfer the pigment organically, creating a stained, bitten look. -
Distressing the Skin:
Optionally, take a coarse stipple sponge with a tiny bit of grey shadow and lightly dab random areas on the forehead or chin to create subtle mottling or texture. -
Final Blend Check:
Step back and look in the mirror. Use a clean fluffy brush to soften any harsh lines around the eye bruising or cheek contour, ensuring everything looks like it’s coming from under the skin.
Wear your haunted visage with a vacant stare to truly sell the character of the walking dead
Bloody Handprint Swipe
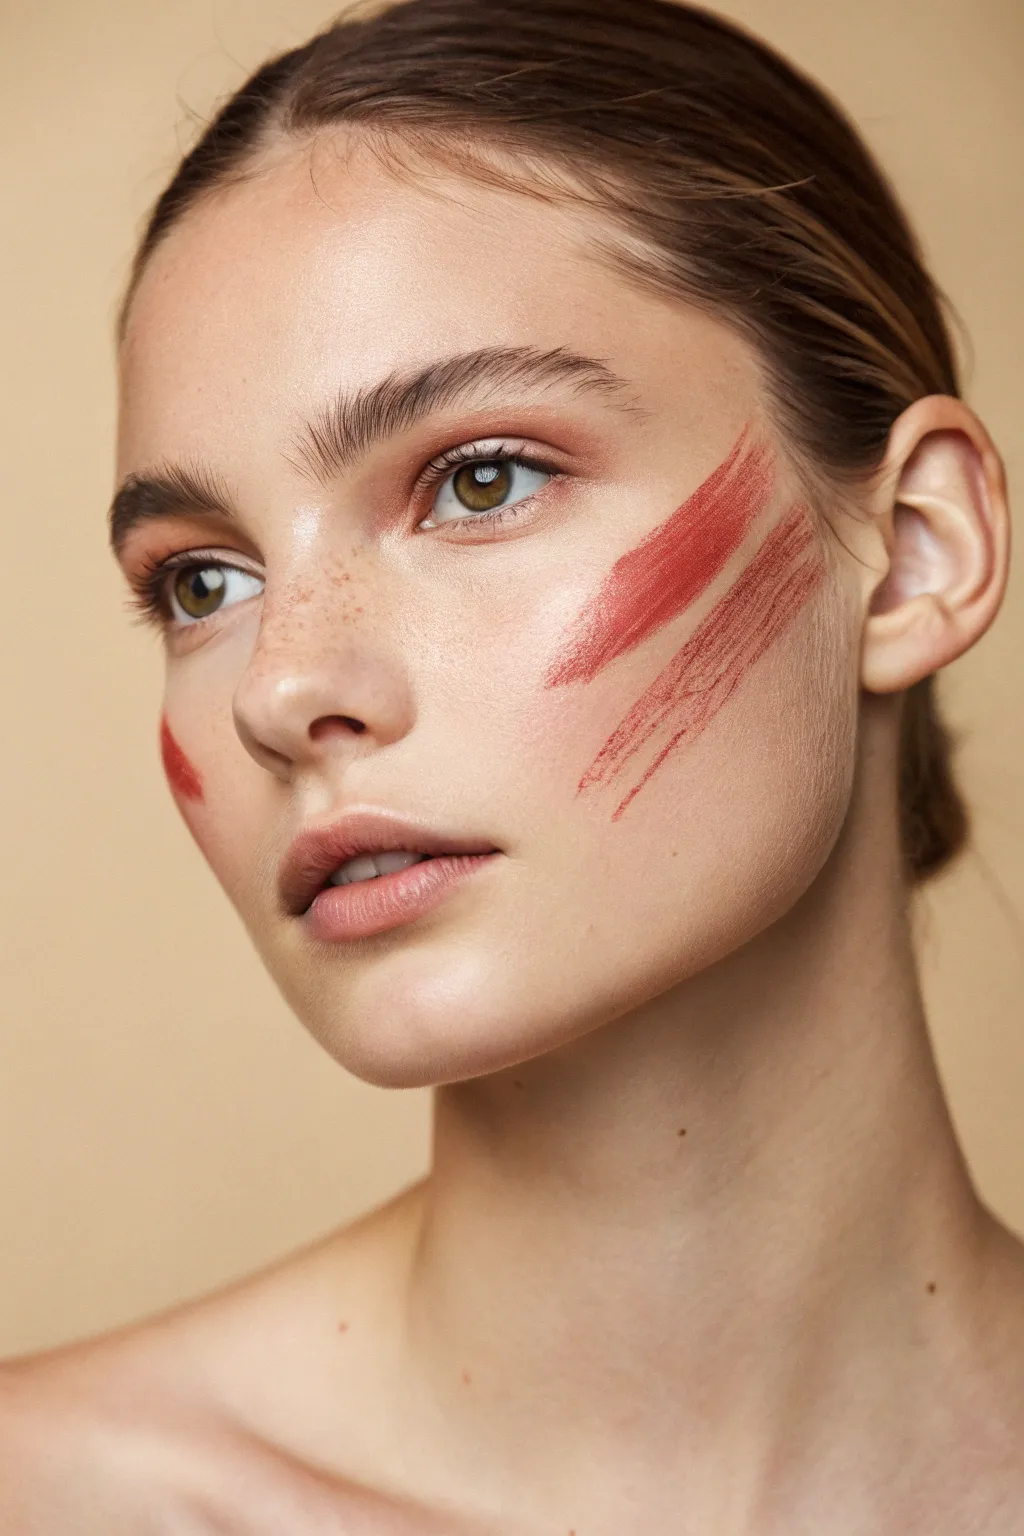
For a minimalist take on Halloween gore, create this look featuring stylized bloody swipes against a glowing, natural canvas. It combines the beauty of clean skin with an unsettling, raw artistic streak perfect for a last-minute costume.
Step-by-Step Tutorial
Materials
- Lightweight luminous foundation or skin tint
- Creamy concealer
- Eyebrow spoolie
- Clear brow gel or soap brow product
- Soft brown eyeliner
- Freckle pen or fine-tip brow pen
- Deep terracotta or brick-red cream lipstick
- Flat synthetic brush (medium width)
- Setting spray (dewy finish)
Step 1: Base Perfection
-
Skin Prep:
Begin with a well-moisturized face. Apply a luminous primer to ensure the skin looks hydrated rather than matte. -
Light Coverage:
Using a damp sponge or fingers, press a lightweight skin tint into the face. You want natural skin texture to show through, so avoid heavy foundations. -
Spot Conceal:
Dab a tiny amount of creamy concealer only where absolutely necessary—under the eyes or on redness—and blend out seamlessly.
Step 2: Brow & Freckle Detail
-
Brushing Up:
Take a clean spoolie loaded with clear brow gel. Brush the eyebrow hairs firmly upwards and outward to create a fluffy, unkempt texture. -
Filling Gaps:
If there are sparse areas, use a fine brow pen to flick in hair-like strokes, following the upward direction of the gel. -
Freckle Mapping:
Using a freckle pen or a brown eyeliner, dot random spots across the nose bridge and upper cheeks. -
Softening Marks:
Immediately after dotting, tap over the marks with your finger to fade them into the skin, making them look authentic rather than drawn-on. -
Eye Definition:
Sweep a wash of warm beige or soft peach eyeshadow across the lid for dimension, keeping it very subtle.
Dry Brush Technique
To get those visible streak lines, wipe excess product off your brush onto the back of your hand before touching your face. Too much paint smooths out the texture.
Step 3: The Bloody Swipes
-
Product Selection:
Choose a deep terracotta or muted brick-red lipstick. The texture needs to be creamy enough to drag but dry enough to show bristle marks. -
Loading the Tool:
Load a flat synthetic brush with the product. Don’t overload it; you want the streaks to look a bit dry and dragged. -
First Strike:
Position the brush high on the cheekbone near the ear. In one confident, swift motion, drag the brush diagonally down toward the corner of the mouth. -
Creating Texture:
Allow the brush to lift slightly at the end of the stroke to create a feathered, trailing-off effect. -
Second Parallel:
Reload the brush slightly less than before. Place it parallel to and slightly below the first stripe. -
The Lower Swipe:
Drag this second line downward, mirroring the angle of the first, letting the texture of the bristles show through the paint. -
Opposite Cheek Accent:
Add a small, singular smudge or partial swipe on the opposite cheek for asymmetry, placing it lower near the jawline. -
Lip Stain:
Pat the same brick-red color onto the center of your lips with a fingertip, blending outward for a blurred, bitten look. -
Final Set:
Mist the entire face with a dewy setting spray to lock the makeup in place while maintaining that fresh, skin-like finish.
Glossy Gory
For a fresher wound look, dab a tiny amount of clear lip gloss over the thickest part of the red swipe to make it look wet.
Step back and admire your beautifully unsettling creation, striking the perfect balance between high fashion and halloween horror
Extra Eyes Optical Illusion
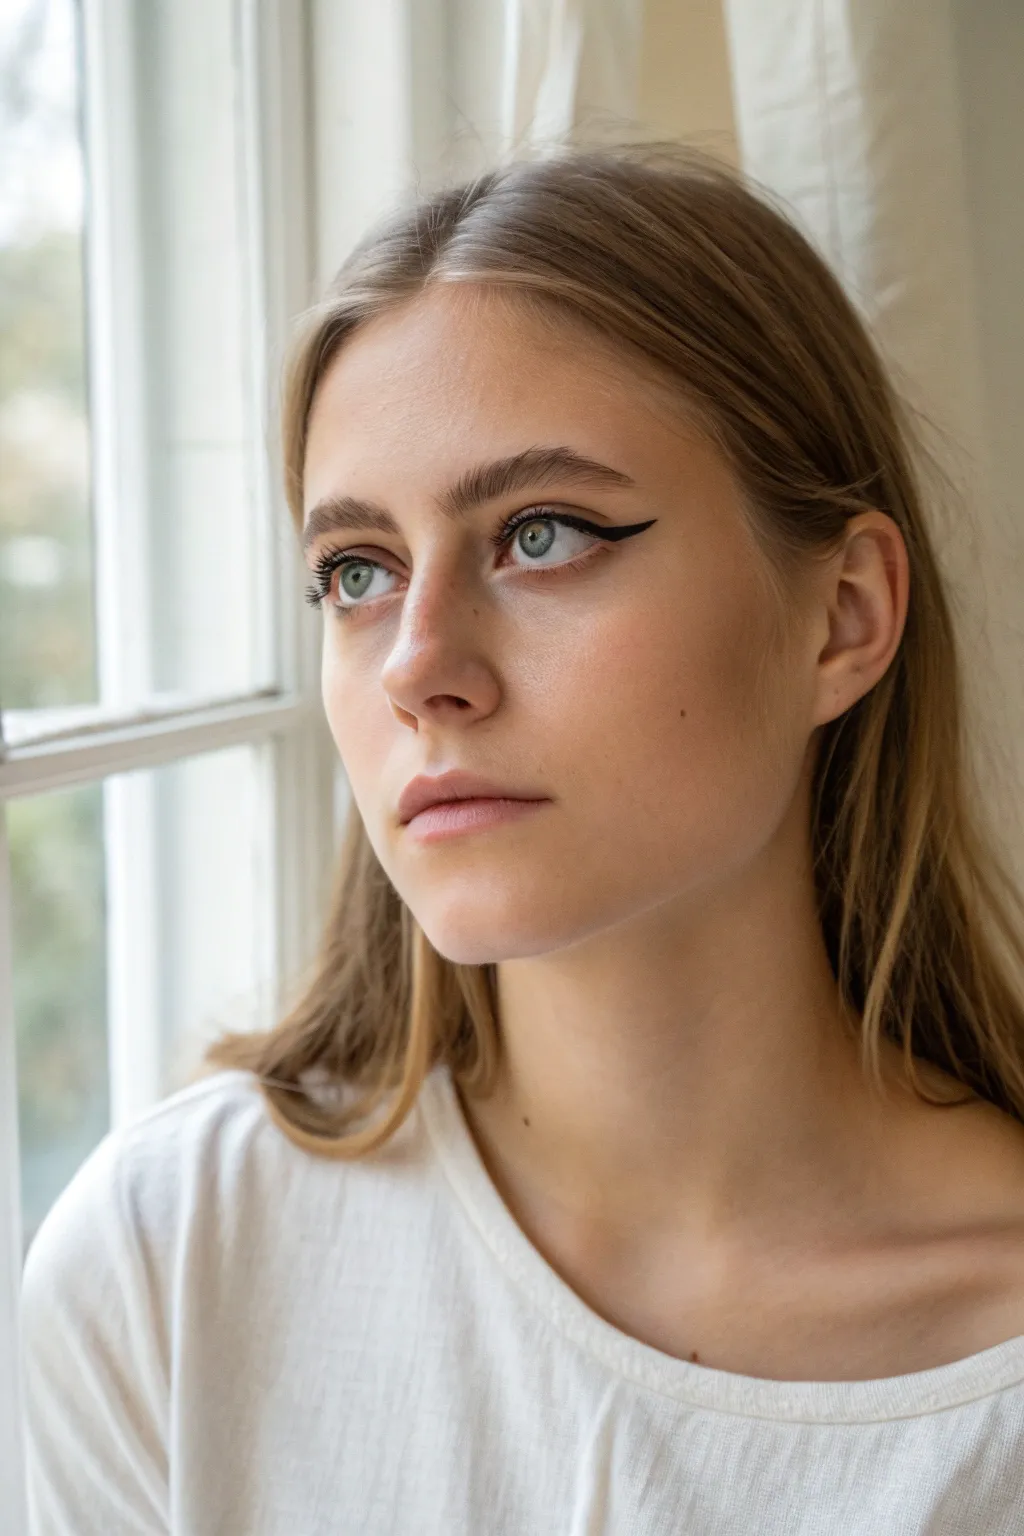
This classic, understated look focuses on enhancing natural beauty with a sharp, elongated cat-eye that lifts the gaze. It serves as a perfect, clean base before adding more complex elements, or stands alone as a striking, minimal feature.
Detailed Instructions
Materials
- Black liquid eyeliner
- Pointed cotton swabs
- Micellar water or makeup remover
- Eyelash curler
- Black mascara
- Concealer (optional)
- Small flat brush (optional)
Step 1: Creating the Base Line
-
Prepare the Lid:
Ensure your eyelid is clean and dry. If your lids tend to get oily, apply a thin layer of eyeshadow primer or translucent powder to help the liner grip better. -
Start at the Center:
Looking straight into a mirror, place the tip of your liquid liner pen at the center of your upper lash line. Draw short, thin dashes connected to the lash roots, moving toward the outer corner. -
Complete the Inner Line:
Go back to the inner corner of your eye. Use the very tip of the liner to draw an extremely fine line that connects to the center section you just created. -
Thicken the Outer Third:
Return to the outer half of the lash line and slightly thicken the line. The goal is to have the line gradually widen as it approaches the outer edge of the eye.
Stamp trick
Use the side of the felt tip pen like a stamp against your skin to create the initial wing angle instead of trying to freehand draw the line.
Step 2: Drafting the Wing
-
Find Your Angle:
Imagine a line extending from your lower lash line upward toward the tail of your eyebrow. This invisible guide is the angle your wing should follow for the most lifting effect. -
Mark the Wing Tip:
Place a tiny dot where you want the tip of your wing to end. Keeping it relatively short, about a centimeter past the eye, maintains a natural look. -
Connect the Tip:
Draw a straight, thin line from the outer corner of your eye up to the dot you just marked. This creates the bottom edge of your wing. -
Complete the Triangle:
From the tip of that line, draw a second line back inward, connecting it to the existing liner on your upper lid to form a small, elongated triangle. -
Fill in the Shape:
Carefully color inside the triangle shape you created. Ensure there are no gaps of skin visible between the liner and your lashes.
Step 3: Refining and Finishing
-
Check for Symmetry:
Step back from the mirror to compare both eyes. Don’t panic if they aren’t identical twins; aim for sisters. -
Clean Up Edges:
Dip a pointed cotton swab in a little micellar water. I like to use this to gently swipe firmly under the wing to sharpen the bottom edge and clean up any smudges. -
Sharpen with Concealer:
For an even crisper finish, take a small flat brush with a tiny amount of concealer and drag it just underneath the wing to highlight the contrast. -
Curl Lashes:
Once the liner is fully dry, firmly curl your lashes at the root, holding for a few seconds to open up the eye. -
Apply Mascara:
Finish with a coat or two of black mascara, focusing on the outer lashes to complement the elongated shape of the eyeliner.
Uneven wings?
If one wing is thicker, thicken the other to match, then use a Q-tip with makeup remover to trim them both down from the top edge until thin again.
With a bit of practice, this clean winged look becomes second nature and frames your eyes with effortless elegance
Negative-Space Skeleton Grin
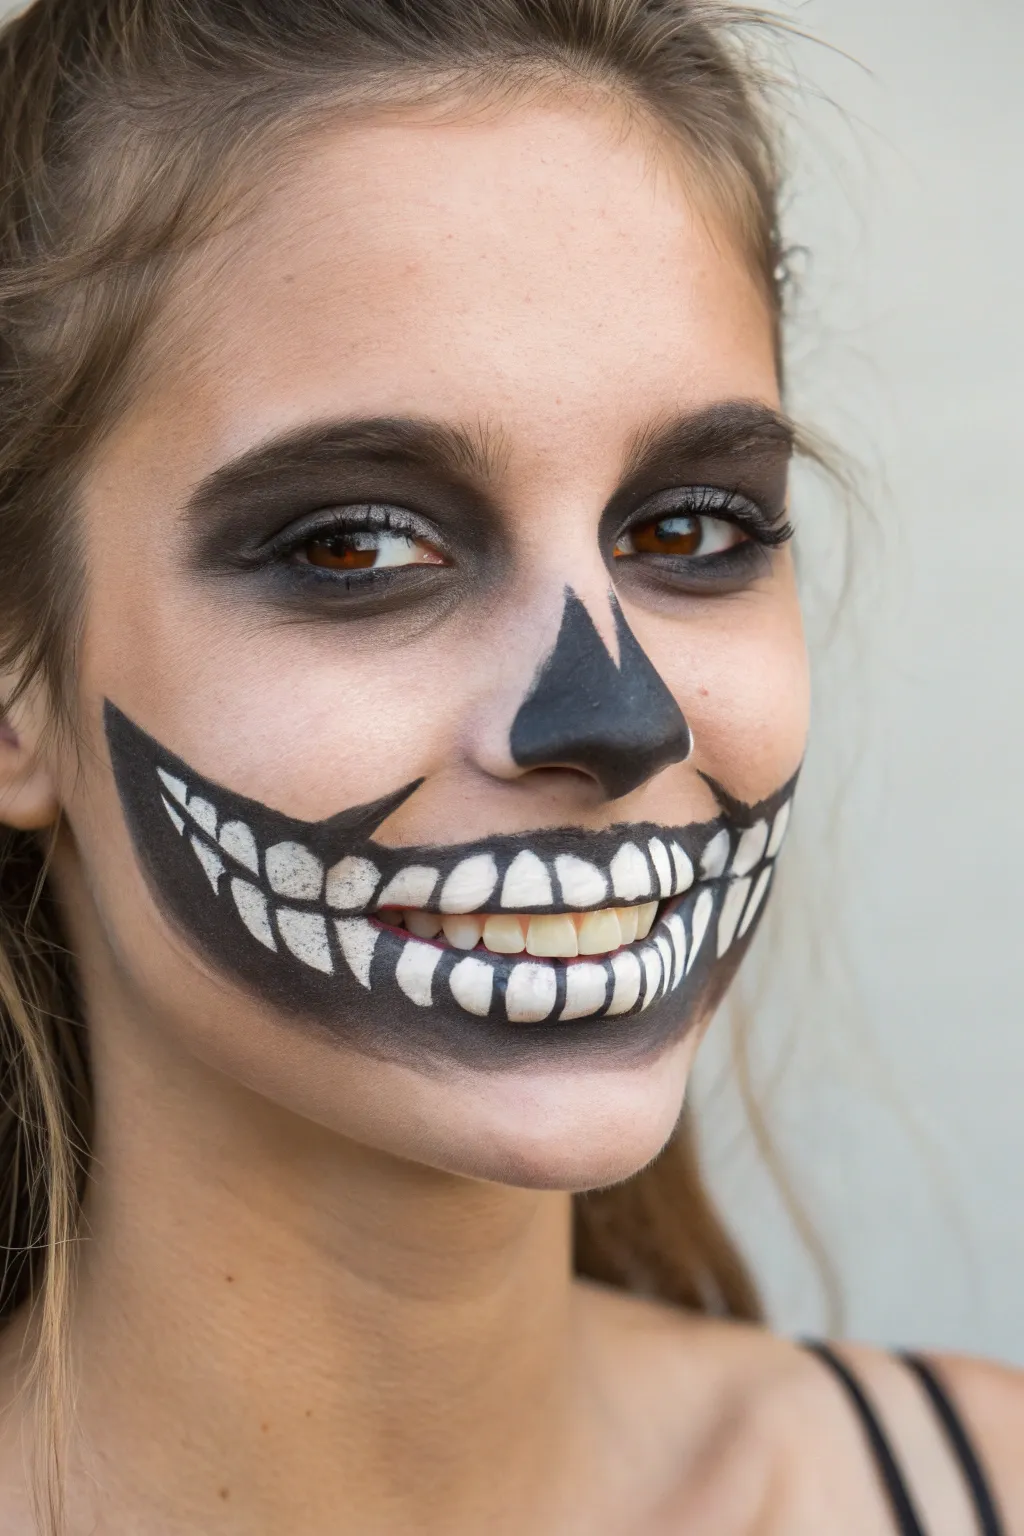
Transform a simple face paint look into something spooky with this skeletal design that plays with negative space to create an exaggerated, eerie smile. By focusing on high-contrast black and white details around the mouth and eyes, you achieve a striking skull effect without painting the entire face.
How-To Guide
Materials
- Face primer
- Matte foundation (skin tone)
- Translucent setting powder
- Black face paint (water-activated or cream)
- White face paint
- Fine detail brush (round size 1 or 2)
- Flat shader brush
- Small blending sponge
- Black eyeshadow
- Fluffy blending brush
Step 1: Base and Eyes
-
Prep the canvas:
Start with a clean, dry face. Apply a light layer of primer followed by a matte foundation that matches your skin tone to create an even surface for the paint to grip. -
Create the eye sockets:
Load a flat shader brush with black face paint. Map out large, roughly circular shapes around your eyes, extending slightly above the eyebrows and below the lower lash line. -
Fill the form:
Fill in these shapes completely with black paint. Don’t worry about making the edges perfectly sharp yet; we will soften them later. -
Soften the edges:
While the paint is still slightly tacky, use a small blending brush or sponge to smudge the outer edges of the black circles, creating a faded, sunken-eye appearance. -
Set the eyes:
Pat black eyeshadow over the cream paint using a fluffy brush. This intensifies the darkness and prevents creasing throughout the night.
Smudgy Teeth?
If the black outlines bleed into the white teeth, wait for the white layer to dry completely before lining. A felt-tip eyeliner pen offers more control than a brush for outlining.
Step 2: The Skeletal Nose
-
Draft the nose shape:
Using a fine detail brush and black paint, draw an ‘M’ shape across the bridge of your nose, creating two peaks. -
Complete the cavity:
Extend the outer lines down the sides of the nose, curving them inward around the nostrils to meet at the septum, leaving a small sliver of skin visible at the very bottom center if desired. -
Fill and darken:
Fill the shape in solid black. Ensure the coverage is opaque, as this is a focal point of the skull illusion.
Level Up
Add subtle cracks to the forehead or cheeks using a very fine liner brush and watered-down black paint for a weathered, ancient skeleton look.
Step 3: The Grinning Mouth
-
Outline the smile:
With your fine liner brush and black paint, draw a sweeping line from one ear toward the corner of your mouth, curving slightly upwards. Repeat on the other side. -
Define the lips:
Paint the inner part of your lips black, connecting this darkness to the cheek lines you just drew. This creates the illusion of an open, empty mouth cavity. -
Draft the teeth:
Switch to white face paint. Paint small, rectangular shapes along your upper and lower lips to represent teeth. I find it easiest to start from the center front teeth and work outward to keep them symmetrical. -
Extend the jaw:
Continue painting white ‘teeth’ extending out onto your cheeks, following the curve of that initial black smile line. Make the teeth smaller as they get further back. -
Outline the teeth:
Reload your fine brush with black paint. Carefully outline each white tooth box. Add distinct lines between each tooth to separate them. -
Add depth and roots:
At the top of the upper teeth and bottom of the lower teeth, create little ‘Y’ or ‘V’ shapes with black paint to simulate roots fading into the gum line. -
Shade the jawline:
Using a blending brush and black eyeshadow, lightly shade underneath the lower row of painted teeth on your cheeks to give the jaw bone dimension. -
Final touches:
Check for symmetry and crisp up any black lines that may have gotten smudged. A light dusting of translucent powder over the non-painted skin helps lock everything in place.
Now you have a chillingly precise skeletal grin that is sure to turn heads at your next event


Have a question or want to share your own experience? I'd love to hear from you in the comments below!