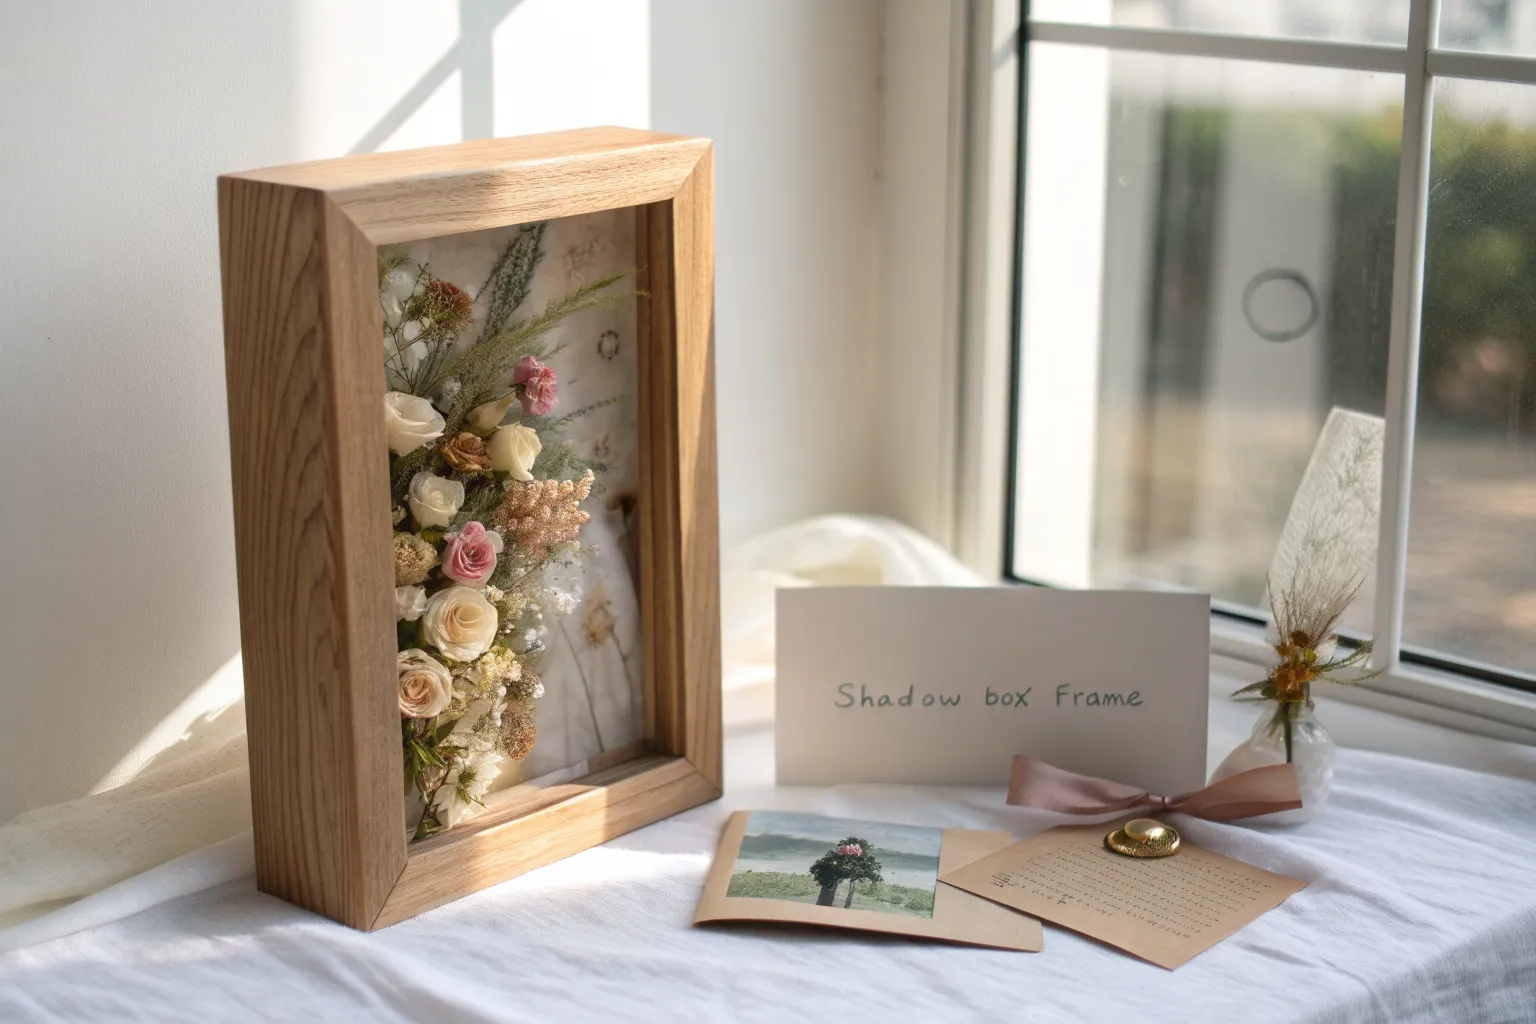
A shadow box is basically my favorite way to turn little bits of life into a mini 3D artwork you can hang up and smile at every day. If you’ve got keepsakes, collections, or even paper art you want to show off with real layering and dimension, these ideas will get you rolling.
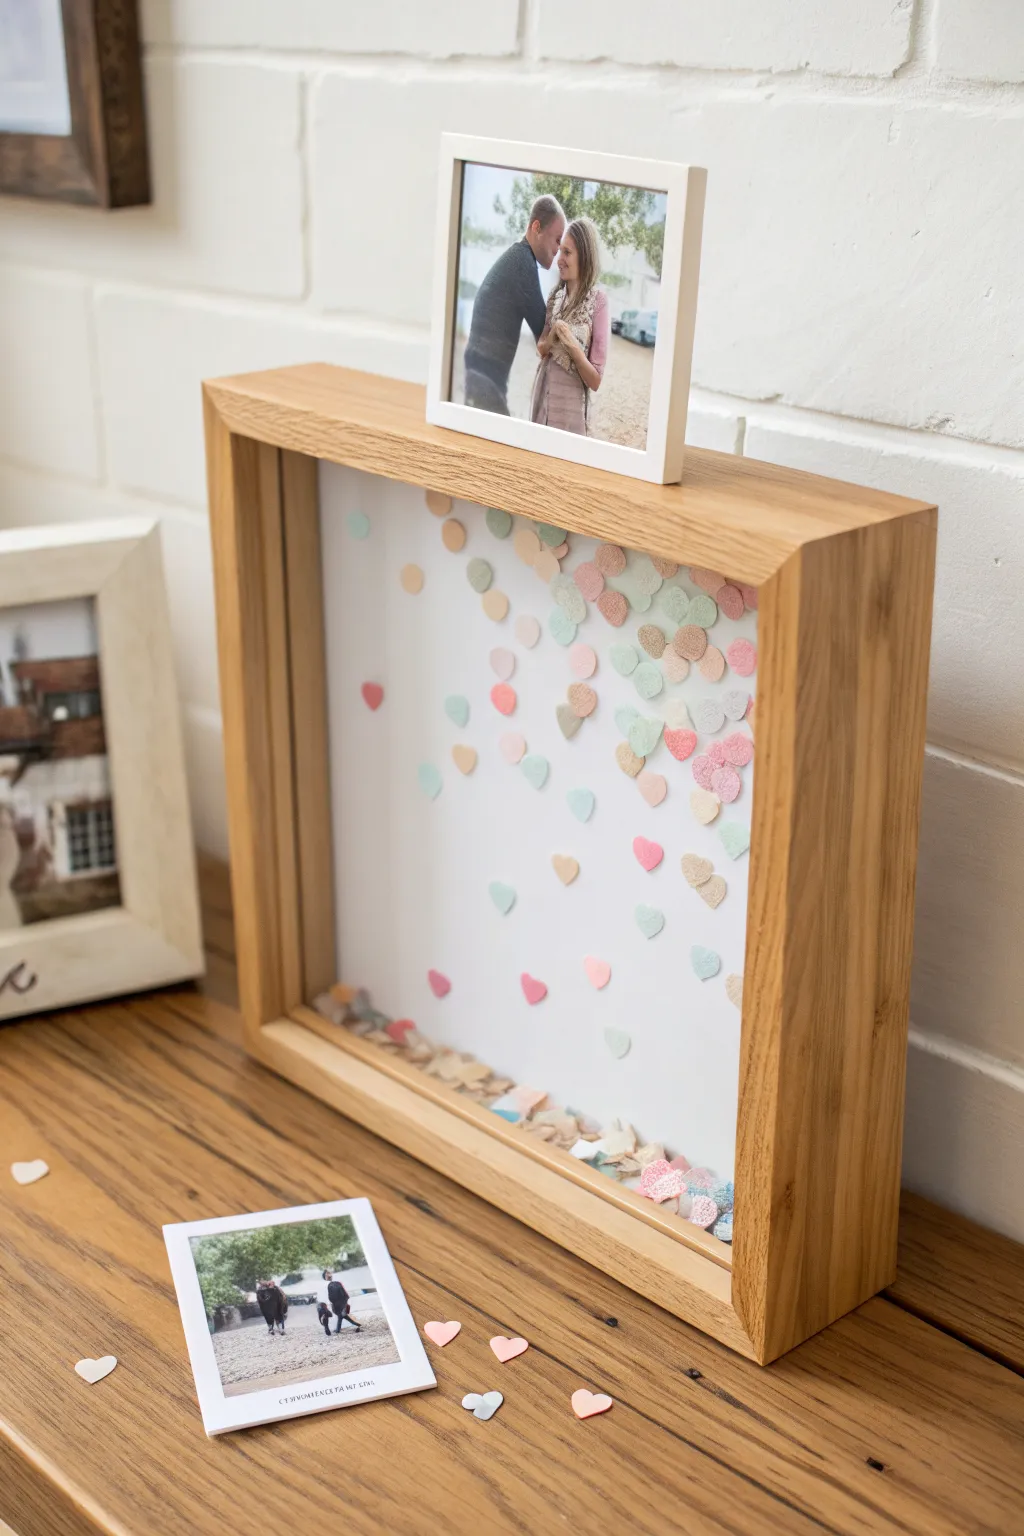
Wedding Guest Book Heart Drop Shadow Box
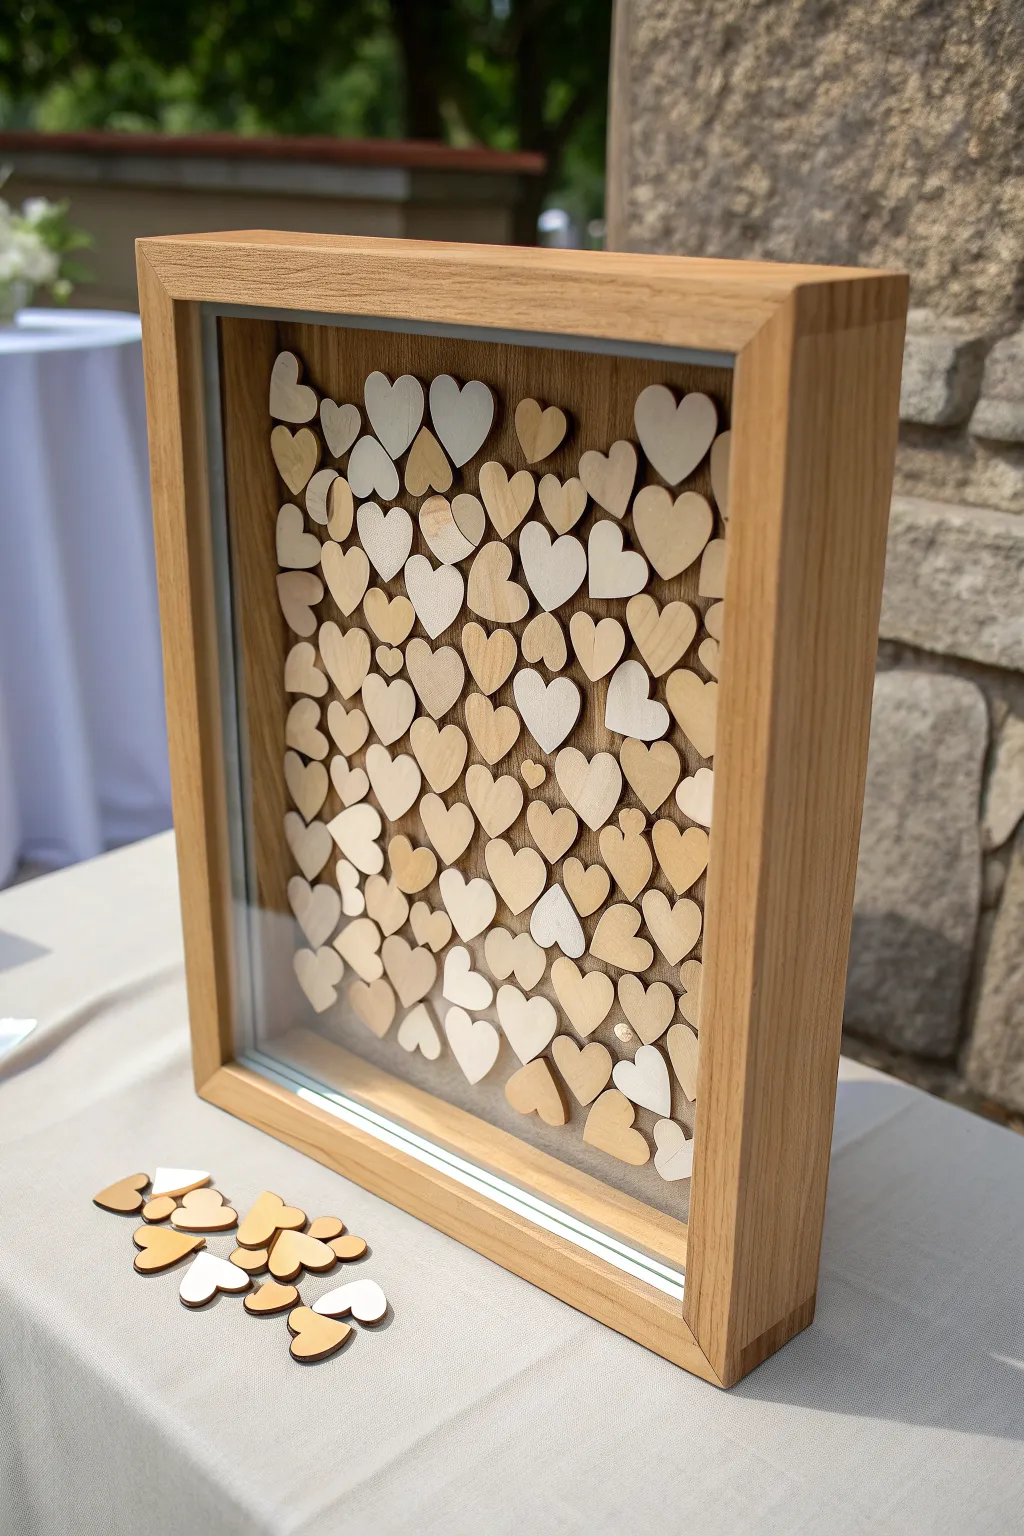
This interactive guest book serves as a beautiful alternative to traditional signature books, allowing guests to drop signed wooden hearts into a frame they can watch fill up with love. The finished piece creates a stunning, warm wooden display of memories that looks perfect on a mantel long after the wedding day.
How-To Guide
Materials
- Deep shadow box frame (approximately 12×16 inches, with glass front)
- Thin plywood sheet or birch veneer (1/8 inch thick)
- Laser cutter or purchasing pre-cut wooden hearts (approx. 1.5 inch width)
- Table saw or hand saw
- Wood glue
- Sandpaper (220 grit)
- Clear acrylic sealant spray
- Fine-point permanent markers (for testing)
- Small wooden spacers or scrap wood strips
- Hardware for hanging (optional)
Step 1: Preparing the Frame Structure
-
Disassemble the shadow box:
Begin by removing the backing board from your shadow box frame. Take out any existing glass, mats, or inserts so you are left with just the empty wooden frame. -
Create the drop slot:
Mark the center of the top frame rail. Using a router or a carefully controlled drill and jigsaw, create a slot approximately 2 inches wide and 1/4 inch thick—just enough for your hearts to slide through easily. -
Sand the slot edges:
Take a small piece of 220-grit sandpaper and smooth the inside edges of the new slot to prevent splinters from snagging the hearts as they drop. -
Measure the internal depth:
Measure the distance from the glass channel to the back of the frame. You need to ensure there is a gap of at least 3/16 inch to 1/4 inch between the glass and the backing board for the hearts to stack randomly. -
Install the glass:
Clean the glass thoroughly on both sides. Place it back into the front channel of the frame and secure it if necessary with a tiny dot of clear silicone in the corners.
Clean Slot Tip
Drill two pilot holes at the ends of your slot marks first, then connect them with a jigsaw for a cleaner, safer cut.
Step 2: Crafting the Hearts and Backing
-
Prepare the wooden hearts:
If you are cutting your own hearts, set your laser cutter to cut roughly 80-100 hearts from the thin birch veneer. If purchasing pre-cut hearts, ensure they are thin enough to not get stuck on top of each other. -
Sand the hearts:
Lightly sand both faces of the wooden hearts. This step is crucial because a smooth surface allows the ink from guest signatures to set without bleeding into the wood grain. -
Seal the hearts (Optional):
I usually like to give the hearts a very light mist of clear matte sealant. This further prevents ink bleeding, but test one first to make sure your pens write well on the sealed surface. -
Cut the backing board:
Cut a piece of high-quality plywood or veneer to fit the exact internal dimensions of the frame back. This will be the visible background behind the hearts. -
Sand and stain the backing:
Sand the backing board until smooth. You can leave it natural to match the hearts or apply a stain that contrasts slightly with the frame.
Centerpiece Heart
Glue a larger heart with your names and wedding date to the center of the backing board before closing it up.
Step 3: Assembly and Finishing
-
Create the spacer gap:
To ensure the hearts don’t sit flush against the back wood (which would look flat), glue thin strips of wood or spacers around the absolute perimeter of the backing board. -
Attach the backing to the frame:
Insert the backing board into the frame, pressing it against any internal stops so that the spacers create the necessary void for the hearts to fall into. -
Secure the back:
Use glazier points or small brad nails to permanently secure the backing board into the frame. Ensure it is tight so hearts cannot slip behind the backboard. -
Test the drop mechanism:
Before the big day, take a handful of blank hearts and drop them through the top slot to ensure they tumble freely and create that randomized, organic pile effect. -
Prepare the varying shades:
For added visual depth, consider lightly staining half of your hearts a slightly darker shade than the others, creating a lovely two-tone effect when mixed. -
Set up the display:
Place the frame on a stand or easel. Arrange the pile of blank hearts in a small bowl or tray nearby with testing pens.
Now you have a charming, interactive keepsake ready to capture the well-wishes of your guests

Baby’s First-Year Keepsake Shadow Box
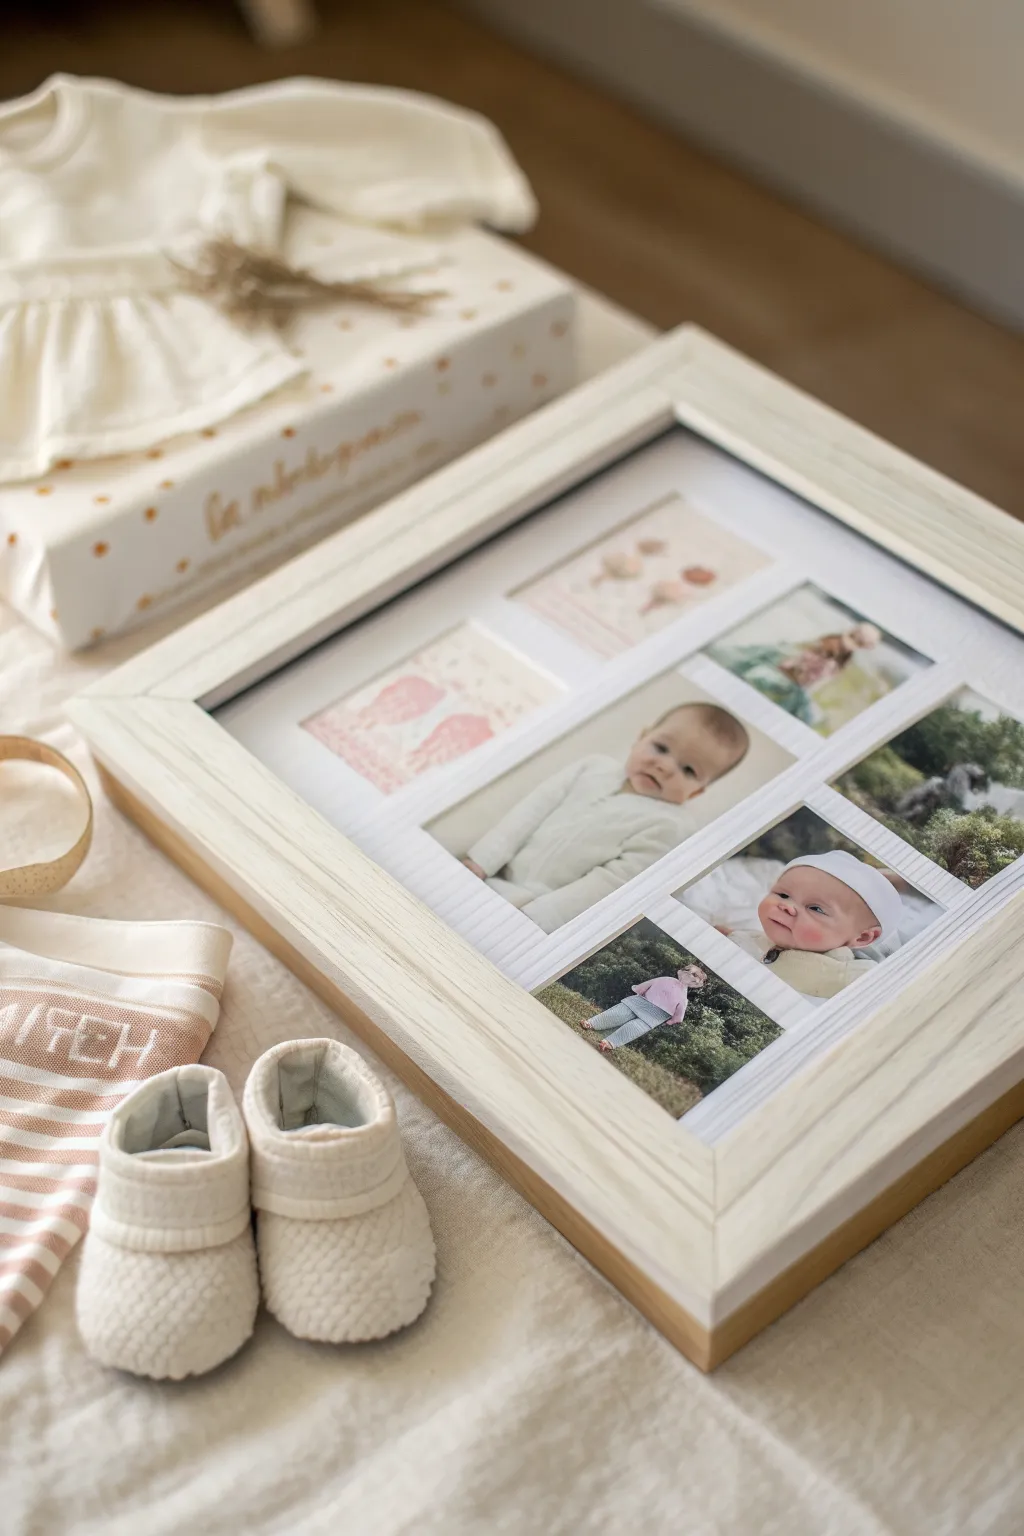
Capture the fleeting moments of early childhood with this clean and modern shadow box collage. Featuring a deep-set wooden frame and a custom-cut mat, this project beautifully organizes multiple milestones into a single, cohesive keepsake display.
Step-by-Step Tutorial
Materials
- Light wood shadow box or deep-set frame (approx. 11×14 or 12×16 inches)
- White or cream mat board (sized to fit frame)
- Craft knife or mat cutter
- Metal ruler
- Cutting mat
- Archival photo tape or acid-free mounting corners
- Pencil
- Selection of baby photos (printed to various sizes)
- Glass cleaner and microfiber cloth
- Double-sided foam tape (optional for depth)
Step 1: Planning and Layout
-
Select your photos:
Gather a collection of your favorite photos from the baby’s first year. Look for a mix of close-up portraits, full-body shots, and perhaps a detail shot like tiny feet or hands. -
Determine sizing:
Measure the inner dimensions of your frame. Decide on a grid layout. The example uses a mix of landscape and portrait orientations, so sketch a rough plan on paper first to balance the visual weight. -
Print photos:
Print your selected images. For this specific look, aim for slightly desaturated colors or soft filters to maintain a gentle, timeless aesthetic. Matte photo paper works best to avoid glare under glass.
Step 2: Creating the Custom Mat
-
Measure the openings:
Based on your printed photos, calculate the window sizes needed. The example features a unique layout with two smaller vertical shots on top, a large central horizontal shot, and three smaller square or vertical shots on the bottom. -
Mark the mat board:
On the back side of your mat board, carefully mark the window openings using your pencil and ruler. Leave equal spacing between the photos—about 0.5 to 0.75 inches works well to keep it looking uncluttered. -
Cut the windows:
Using a sharp craft knife or a specific mat cutter tool, cut out the window openings. Use a metal ruler as a guide to ensure straight, crisp lines. -
Check fit:
Flip the mat board over to the front. Place your photos loosely behind the openings to ensure everything lines up correctly before securing anything permanently.
Photo Choice Tip
Mix up the focal points. Use one photo where the baby looks at the camera and others where they are looking away for a candid feel.
Step 3: Assembly
-
Clean the glass:
Remove the back of the shadow box and take out the glass. Clean both sides thoroughly with glass cleaner and a microfiber cloth to remove any dust or fingerprints. Let it dry completely. -
Mount the photos:
Turn the mat board face down. Position your photos over the openings and secure them using archival photo tape. Tape across the top edge of the photo first to let it hang naturally, then secure the bottom corners. -
Add dimension (optional):
If you want the mat to float slightly off the backing board for a shadow effect, apply strips of double-sided foam tape to the back of the mat board, away from the photo edges. -
Prepare the backing:
If your frame backing is plain cardboard, you might want to cover it with a sheet of acid-free white paper or cardstock so any glimpses behind the mat look clean. -
Assemble the stack:
Place the glass back into the frame. Insert any spacer bars if your shadow box came with them to keep the glass away from the mat. -
Insert the artwork:
Place your matted photo assembly into the frame, face down against the glass or spacers. -
Secure the back:
Replace the frame backing board. Push down the flexible metal tabs or turn buttons to lock everything tightly in place. -
Final polish:
Wipe down the front of the glass one last time to ensure your beautiful keepsake is ready for display.
Add a Keepsake
Deep shadow boxes allow for objects. Try mounting a hospital bracelet or a tiny pair of socks in one of the mat openings instead of a photo.
Now you have a timeless gallery that perfectly preserves those precious early memories


Travel Souvenir Map Shadow Box
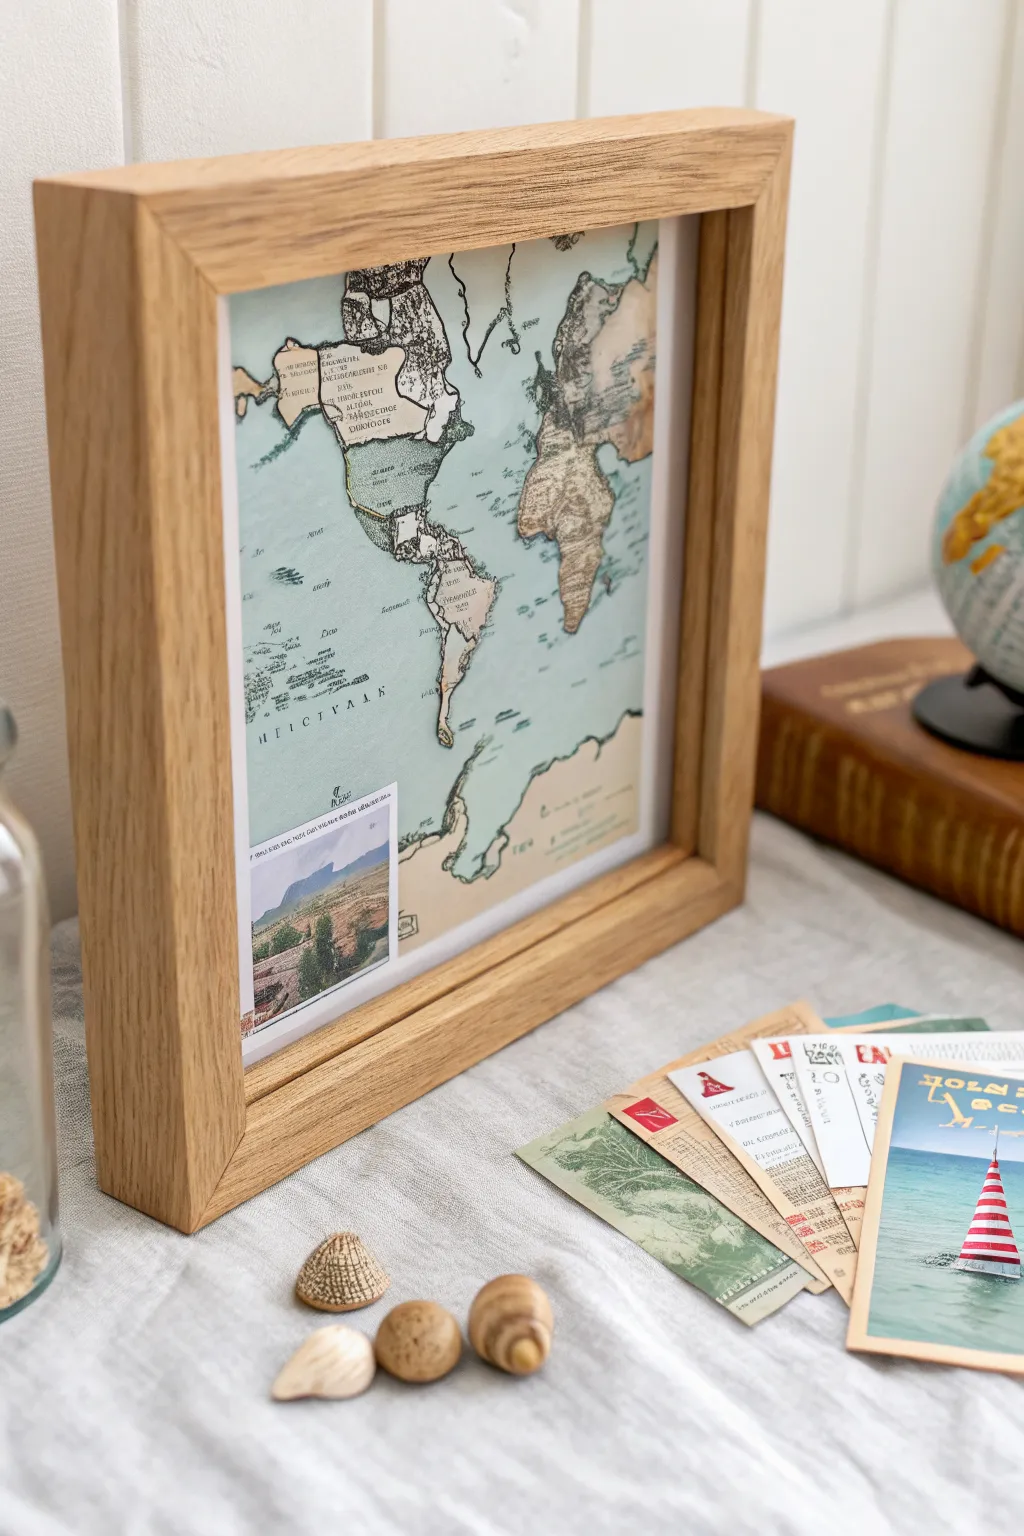
Capture your travel memories in a sophisticated, minimalist display that combines vintage aesthetics with personal touches. This shadow box features a textural world map backdrop and space to tuck in special photos or ticket stubs, making it a perfect evolving record of your adventures.
How-To Guide
Materials
- Deep oak or wood-finish shadow box frame (approx. 8×8 or 10×10 inches)
- Vintage-style world map paper or print
- Thick cork sheet or foam core board (sized to frame interior)
- Spray adhesive
- X-acto knife or craft knife
- Self-healing cutting mat
- Small printed travel photo (approx. 2×2.5 inches)
- Small map pins or flat-head thumbtacks (optional)
- Double-sided tape or photo corners
- Ruler
Step 1: Preparing the Base
-
Disassemble frame:
Begin by removing the backing board and glass from your shadow box frame. Set the glass aside safely, as you’ll need to clean it before final assembly. -
Measure backing:
Measure the inside dimensions of the frame carefully. You need your mounting surface to fit snugly without buckling. -
Cut the mounting board:
Cut your cork sheet or foam core board to these exact dimensions using a metal ruler and X-acto knife. This material provides depth and allows you to use pins if desired. -
Prep the map:
Lay out your vintage-style map paper. If the paper has creases, iron it on a low setting (no steam) beneath a protective cloth to flatten it perfectly.
Step 2: Mounting the Map
-
Apply adhesive:
In a well-ventilated area, spray an even coat of spray adhesive onto the surface of your cut cork or foam board. I find it helpful to spray past the edges onto scrap paper to ensure full corner-to-corner coverage. -
Position map:
Align one edge of your map paper with the edge of the board. Slowly smooth the paper down across the surface, using a clean, soft cloth to press out any air bubbles as you go. -
Trim excess:
Flip the board over so the cork/foam side is facing up. Use your craft knife to trim away the excess map paper, using the edge of the board as your guide for a crisp cut. -
Check fit:
Do a dry fit of the mounted map inside the frame (without the glass yet) to ensure it sits flat. Sand the edges slightly with a nail file if it’s too tight.
Vintage Vibe
To age a new map print, wipe it lightly with a damp tea bag before mounting. Let it dry completely for that authentic antique separation color.
Step 3: Personalizing and Assembly
-
Prepare the photo:
Select a meaningful travel photo. Resize and print it so it fits the scale of your map; the example uses a small Polaroid-style dimension, roughly 2 inches wide. -
Position the photo:
Place the photo in the lower corner of the map, overlapping the ocean area to avoid obscuring continents. Use a small piece of double-sided tape to secure it flat against the map. -
Clean the glass:
Clean the inside status of the glass thoroughly with glass cleaner and a microfiber cloth to remove dust or fingerprints. -
Reassemble:
Place the glass back into the frame. Insert the spacer (if your shadow box comes with one) or ensure there is depth between the glass and the back. -
Final closure:
Place your map-covered board into the frame, map side facing the glass. Secure the backing board with the frame’s flexible tabs.
Level Up: 3D Elements
Use foam mounting tape behind the photo to make it float slightly off the map, creating distinct shadow lines and adding more visual depth.
Now you have a timeless piece of decor that keeps your favorite journey close to heart


Ticket Stub and Playbill Shadow Box
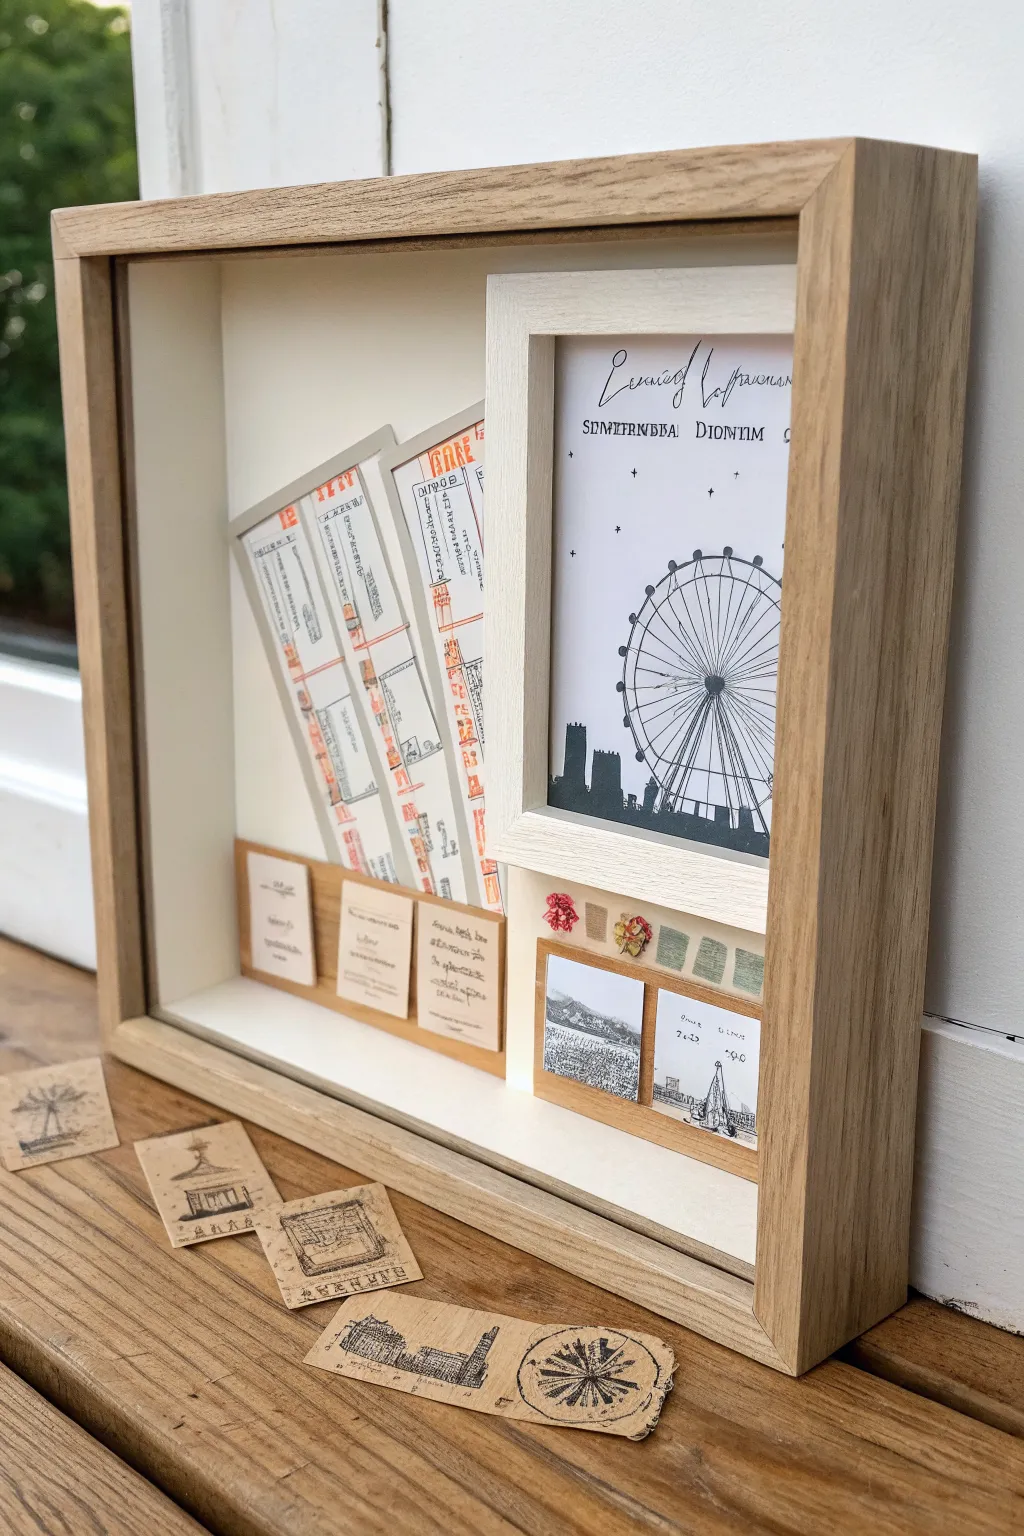
This elegant shadow box uses depth and layering to transform travel mementos into a structured piece of art. By incorporating a secondary internal frame and raised elements, it creates a sophisticated gallery feel that highlights special tickets and sketches.
Step-by-Step Tutorial
Materials
- Deep-set shadow box frame (natural wood finish)
- Smaller, flat wooden frame (white or light wood)
- White backing board or cardstock
- Ticket stubs or printed replicas
- Ferris wheel line art print (or personal travel photo)
- Small wooden craft rectangles or balsa wood strips
- Miniature photos or sketches
- Decorative washi tape or fabric scraps
- Double-sided foam tape
- Wood glue or strong craft adhesive
- Scissors and craft knife
- Ruler
Step 1: Preparing the Base and Layout
-
Disassemble frames:
Begin by removing the back and glass from your main shadow box frame. Clean the glass thoroughly on both sides to ensure no fingerprints remain inside later. -
Cut the backing:
Measure the inside of your shadow box and cut a piece of sturdy white cardstock or foam board to fit perfectly as your background canvas. -
Prepare the internal frame:
Take your smaller, secondary frame and remove any glass or backing it might have. This will act as a focal point for your main image. -
Dry run arrangement:
Place the empty small frame on the right side of your backing board. Arrange your ticket stubs on the left to gauge spacing before gluing anything down.
Depth Trick
Use double or triple layers of foam tape behind the smaller internal frame. This lifts it significantly off the background, creating dramatic shadows.
Step 2: Creating the Focal Point
-
Select the main image:
Cut your Ferris wheel print or travel photo to fit the exact dimensions of the smaller internal frame. -
Mount the image:
Attach the print directly to the backing board where the frame will sit. I find it easier to glue the print first, then place the frame over it, to ensure perfect alignment. -
Attach the internal frame:
Apply wood glue to the back of the small frame and press it firmly over your mounted image. Let this set completely. -
Add floating photos:
Below the internal frame, attach two small, square photos or sketches. Use foam tape here to give them a slight 3D pop. -
Decorate with textures:
Bridge the gap between the internal frame and the small photos with tiny swatches of fabric or patterned washi tape for a splash of texture.
Level Up: Vintage Vibe
Distress the edges of your tickets and the small wooden frame with light sandpaper or brown ink to give the entire piece an aged, old-world travel feel.
Step 3: Building the Ticket Display
-
Prepare the tickets:
Select two long ticket stubs or map strips. If your originals are fragile, consider scanning and printing them on high-quality cardstock. -
Mount the tickets:
Adhere the tickets to the left side of the backing board at a slight diagonal angle. This adds dynamic movement to the composition. -
Create wooden tags:
Cut three small rectangles from balsa wood or use pre-cut wooden craft shapes. These should be roughly 1 inch tall. -
Customize the tags:
Print out tiny text labels or hand-write locations and dates on small pieces of paper. Glue these onto the wooden rectangles. -
Attach the tag row:
Glue the three wooden tags in a horizontal row near the bottom left, slightly overlapping the bottoms of your diagonal tickets.
Step 4: Final Assembly
-
Check for debris:
Examine the artwork for any stray glue strings or dust particles. A soft brush works well to sweep the surface clean. -
Reassemble the shadow box:
Place the glass back into the main frame, followed by the frame spacer (if your box has one to keep the glass away from the art). -
Secure the artwork:
Insert your finished backing board face down into the frame. Press the retaining tabs or clips down firmly to lock everything in place. -
External accents (optional):
For a casual touch, you can scatter a few loose printed stamps or sketches on the table in front of the frame when displaying it, as seen in the inspiration photo.
Now you have a stunning, multi-dimensional tribute to your favorite adventures that captures the feeling of the journey
BRUSH GUIDE
The Right Brush for Every Stroke
From clean lines to bold texture — master brush choice, stroke control, and essential techniques.
Explore the Full Guide
Graduation Milestone Shadow Box

Celebrate a major academic achievement with this elegant shadow box display featuring a scaled-down mortarboard and diploma. The clean white background contrasts beautifully with the classic black cap and gold accents, creating a timeless keepsake to hang on the wall.
Step-by-Step Guide
Materials
- Deep shadow box frame (natural wood finish)
- White backing cardstock or foam board
- Black felt or stiff fabric
- Cardboard or mat board (for structure)
- White paper (standard or parchment style)
- Gold embroidery floss or thin cord
- Small bead (black or fabric-covered)
- Double-sided tape
- Hot glue gun and glue sticks
- Scissors
- Ruler
- Adhesive gold star confetti
Step 1: Preparing the Base
-
Prep the frame:
Disassemble your shadow box frame, removing the back panel. Clean the glass thoroughly on both sides to ensure no fingerprints remain inside your finished piece. -
Create the background:
Cut a piece of white cardstock or foam board to the exact internal dimensions of your frame. This needs to fit snugly against the back panel. -
Add sparkle:
Randomly adhere small gold star confetti stickers onto the white background. Scatter them naturally, keeping the density lower in the center where the main elements will sit.
Tassel Trick
To make the tassel hang naturally flat against the board, dampen the threads slightly with water and comb them straight, then let dry before framing.
Step 2: Crafting the Mortarboard
-
Cut the cap structure:
Cut a square piece of cardboard or mat board, roughly 3.5 to 4 inches per side, to serve as the stiff mortarboard top. -
Cover the board:
Cut a piece of black felt slightly larger than your cardboard square. Use hot glue specifically around the edges to wrap the fabric tautly over the cardboard, securing the excess on the underside. -
Make the skullcap:
Cut a strip of black felt about 1 inch wide and long enough to form a small circle (about 2 inches in diameter). Glue the ends together to form a ring. -
Attach the cap parts:
Glue the felt ring to the center of the underside of your wrapped square. This creates the dimension that lifts the cap off the background. -
Create the tassel:
Wrap gold embroidery floss multiple times around three fingers. Tie one end tightly with a separate piece of floss, then cut the loops at the opposite end. -
Finish the tassel:
Wrap another small piece of gold floss around the top of the bundle to create the tassel ‘head’. Trim the bottom ends so they are even. -
Secure the button:
Glue the tassel string to the exact center of the top of the mortarboard. Cover this connection point by gluing a small fabric-covered button or bead on top.
Step 3: Compiling the Diploma
-
Roll the paper:
Take a sheet of white paper about 5 inches wide. Tightly roll it into a cylinder shape to mimic a rolled diploma. -
Secure the roll:
Apply a tiny dot of glue or a piece of double-sided tape inside the edge of the roll to keep it from unraveling. -
Add the cord:
Wrap a length of gold cord around the center of the rolled diploma. I usually wrap it three or four times for a rich look before tying a simple bow. -
Trim the ends:
Let the tails of the gold cord hang down naturally, trimming them to a length that looks balanced with the capped ends of the diploma.
Wrinkled Fabric?
If your black felt looks lumpy on the cardboard square, pull it tighter and glue opposite sides first (like stretching a canvas) rather than going in a circle.
Step 4: Final Assembly
-
Position the cap:
Place the mortarboard in the upper center of your prepared background. Use hot glue on the rim of the skullcap (the ring underneath) to secure it to the white backing. -
Place the diploma:
Angle the diploma diagonally beneath the cap. Secure it with a line of hot glue along the back where it touches the paper. -
Check stability:
Gently tilt the backing to ensure both items are firmly attached and the tassel hangs nicely. You can add a tiny dot of glue to fix the tassel’s position if you prefer it static. -
Seal the box:
Place the background panel back into the frame behind the glass and secure the backing clips.
Now you have a sophisticated graduation memento that preserves the spirit of the big day elegantly
Seasonal Swap-In Shadow Box
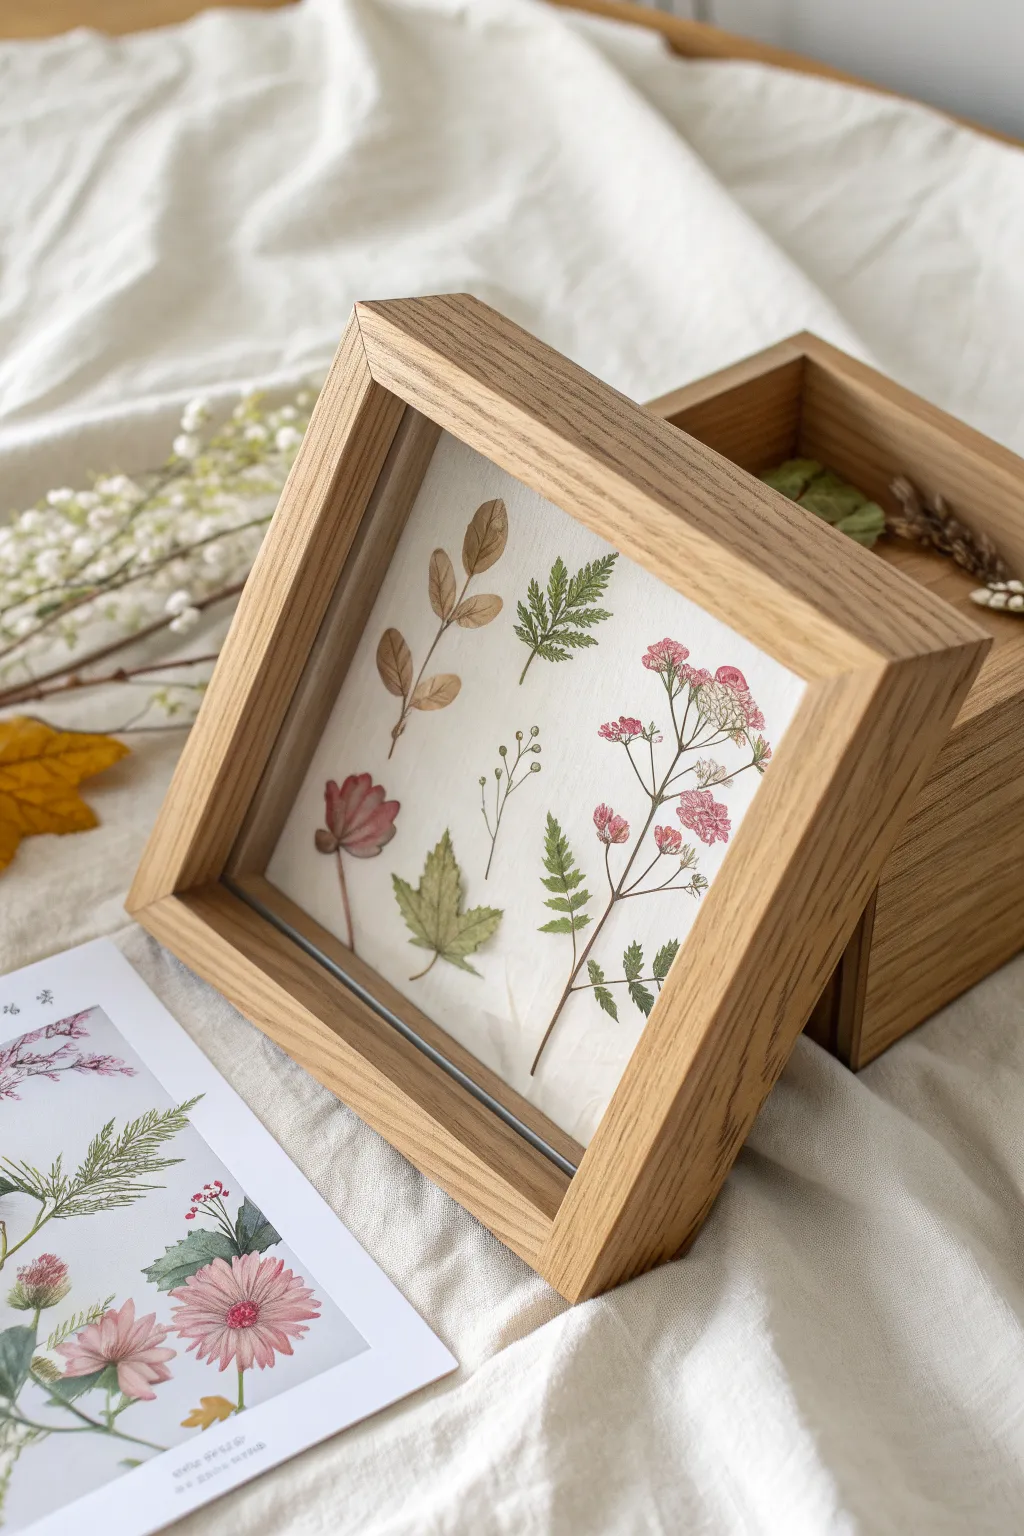
Capture the fleeting beauty of nature with this elegant pressed flower shadow box. By arranging dried botanical specimens on a clean white background, you create a timeless piece of art that brings a touch of the outdoors inside.
Step-by-Step Tutorial
Materials
- Deep wooden shadow box frame (oak or light wood finish)
- Assorted pressed flowers and leaves (ferns, baby’s breath, small blooms)
- Heavyweight white cardstock or watercolor paper (cut to frame size)
- Fine-point tweezers
- Acid-free craft glue or clear drying floral adhesive
- Small paintbrush or toothpick (for glue application)
- Clean, dry work surface
- Microfiber cloth
Step 1: Preparation & Selection
-
Prepare your botanicals:
Ensure your pressed flowers and leaves are completely dry and flat. If you are pressing them yourself, give them at least two weeks in a heavy book or flower press to ensure no moisture remains. -
Clean the glass:
Disassemble your shadow box frame. Take the glass pane and clean it thoroughly on both sides with a microfiber cloth to remove any dust or fingerprints, then set it aside safely. -
Cut the backing:
Measure the inside of your frame and cut your heavyweight white cardstock to fit perfectly. Check the fit by placing it inside the frame briefly before removing it for the layout phase.
Sticky Situation?
If you use too much glue and it seeps out, don’t wipe it! Let it dry completely clear, then gently flake off any excess with a craft knife tip.
Step 2: Designing the Composition
-
Draft the layout:
Place your cut cardstock on a flat surface. Using your tweezers, gently pick up your pressed specimens and experiment with their arrangement. Do not glue anything yet. -
Create balance:
Aim for an organic, ‘floating’ look. I like to start with the largest elements—like the pink wildflower stems or the larger fern frond—placing them slightly off-center. -
Fill the gaps:
Add smaller elements like individual leaves or tiny buds around the main stems. Keep some negative white space between the items so the composition doesn’t feel cluttered. -
Check spacing:
Step back and view your arrangement from a distance. Ensure the stems aren’t too close to the very edge of the cardstock, as the frame lip might cover them.
Step 3: Adhering & Assembly
-
Prepare the adhesive:
Squeeze a very small amount of acid-free craft glue onto a scrap piece of paper. You want to use the glue sparingly to prevent warping the delicate petals. -
Apply glue to stems:
Pick up your first botanical piece with tweezers. Using a toothpick or small brush, dab tiny dots of glue along the back of the stem and the center of the leaves. -
Secure the first piece:
Gently place the specimen back onto its designated spot on the cardstock. Press down very lightly on the stem (not the fragile petals) for a few seconds to bond. -
Repeat the process:
Continue gluing each piece one by one. Work from the center outward or from top to bottom to avoid accidentally brushing your hand against wet glue or loose flowers. -
Final drying time:
Once all pieces are glued, let the cardstock sit flat for at least an hour. This ensures the glue is fully cured and the paper won’t buckle once framed. -
Reassemble the frame:
Place the glass back into the frame face down. Carefully lower your artwork face down onto the glass. If your shadow box has a spacer needed to keep the glass away from the art, insert that first. -
Secure the backing:
Insert the frame backing board and secure the clips or glazier points. Double-check that the artwork hasn’t shifted during this process.
Pro Tip: Depth Check
Use a shadow box with an internal spacer. This keeps the glass from touching the petals, preventing potential moisture trapping and mold issues.
Hang your new botanical artwork in a well-lit spot, but out of direct sunlight to preserve the colors

PENCIL GUIDE
Understanding Pencil Grades from H to B
From first sketch to finished drawing — learn pencil grades, line control, and shading techniques.
Explore the Full Guide
Seashell Specimen Shadow Box
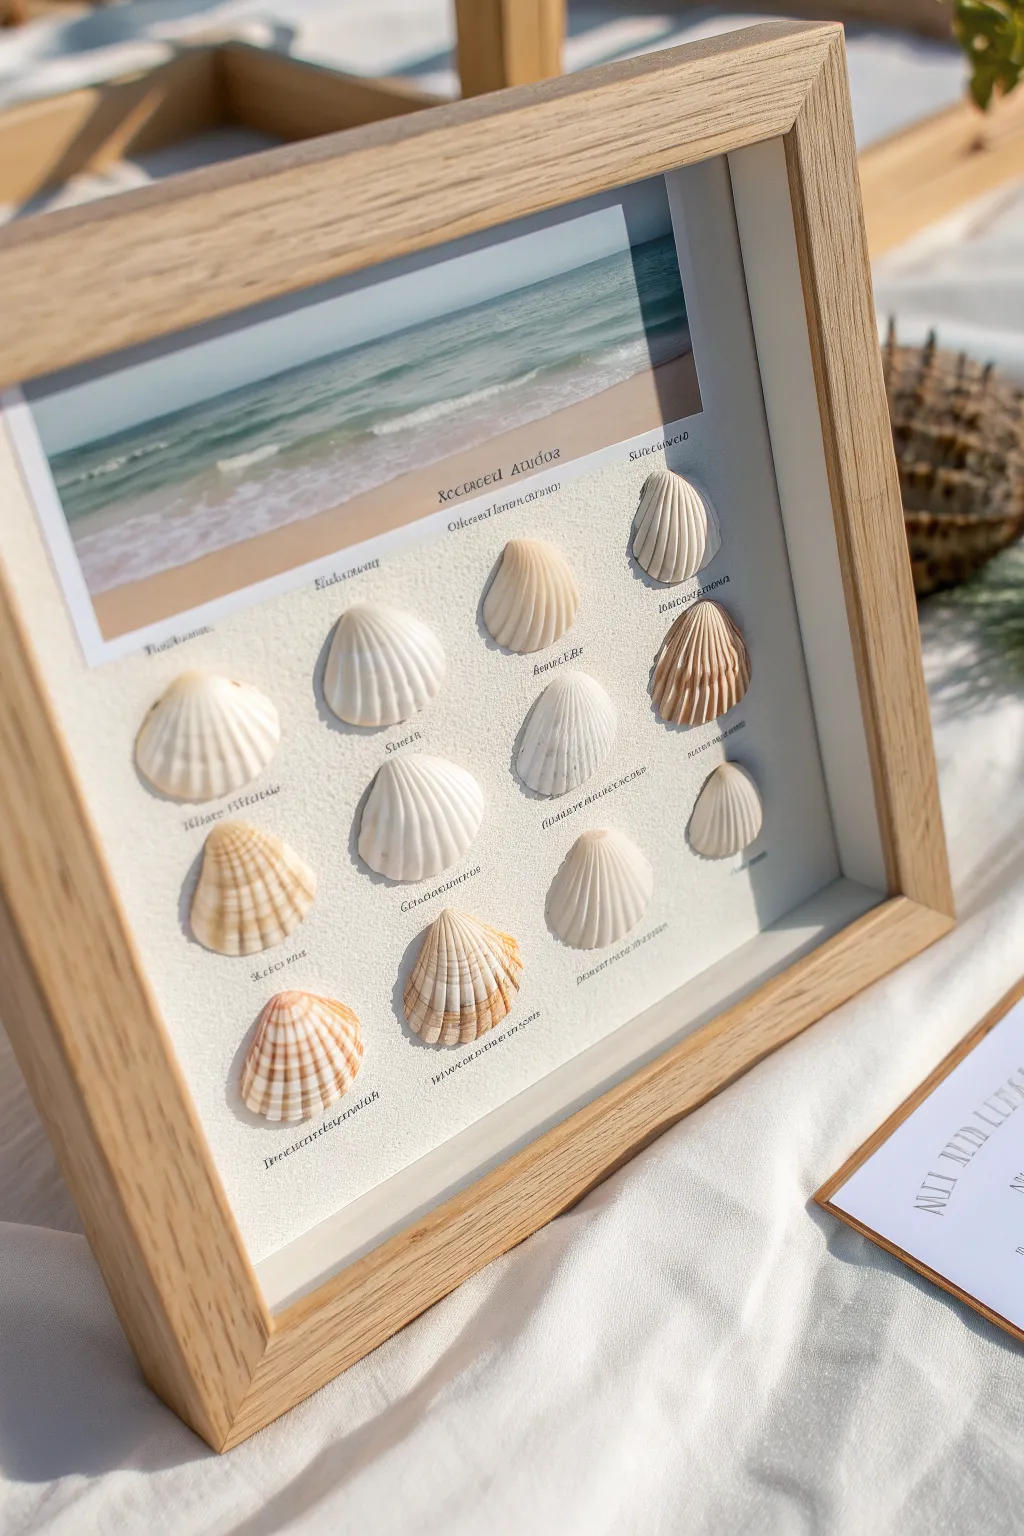
Transform your beachcombing treasures into a sophisticated scientific display with this elegant shadow box project. By combining a serene coastal photograph with labeled shell specimens, you bring the soothing essence of the seaside right onto your wall.
Detailed Instructions
Materials
- Light oak or natural wood deep shadow box frame (approx. 8×10 or 11×14 inches)
- White or cream textured cardstock (heavyweight)
- High-quality beach landscape photo (sized to fit the top third of your frame)
- Assorted small seashells (cockles or scallops work best for this uniform look)
- Hot glue gun and clear glue sticks
- Computer and printer (for labels)
- Ruler
- Pencil
- Craft knife or scissors
- Double-sided tape or spray adhesive
Step 1: Preparation & Layout
-
Select your specimens:
Gather a collection of seashells that are roughly similar in size but vary slightly in color and pattern. Clean them thoroughly with warm soapy water and let them dry completely before starting. -
Prepare the background:
Cut your textured cardstock to fit perfectly inside the back of your shadow box frame. Measure twice to ensure a snug fit that won’t shift. -
Print the photograph:
Print your beach landscape photo. It should be the same width as your background cardstock but only cover the top 1/4 to 1/3 of the height. A matte finish photo paper looks best here to match the organic feel. -
Mount the photo:
Apply double-sided tape or a light mist of spray adhesive to the back of the photo. Adhere it carefully to the top section of your cardstock background, ensuring the edges align perfectly.
Step 2: Labeling Design
-
Design the text:
Using a word processor, create small text labels for each shell. Use a classic serif font or a slightly italicized script to mimic vintage scientific taxonomy labels. -
Test the arrangement:
Before printing on your final cardstock, print a test sheet on plain paper. Lay your shells over the paper to check if the spacing between the text labels allows enough room for the shells themselves. -
Print the background grid:
Once satisfied with the spacing, print the text labels directly onto the bottom portion of your cardstock background. If your printer can’t handle the heavy stock, you can print on clear sticker paper or lighter paper and cut them into tiny strips later. -
Dry fit the grid:
Lay the background flat on your work surface. Place the shells onto their designated spots above or below the printed text to visualize the final grid one last time.
Uneven Shells?
If a shell won’t sit flat, build up a small ‘riser’ of hot glue on the back first, let it cool, then apply fresh hot glue to that riser to attach it to the paper.
Step 3: Assembly
-
Secure the shells:
Pick up the first shell. Apply a generous dab of hot glue to the rim or highest points of the back of the shell. I recommend testing one shell on scrap paper first to see how much glue is needed to make contact. -
Place with precision:
Quickly but carefully press the shell onto the cardstock in its designated spot. Hold it in place for about 10-15 seconds until the glue cools and sets. -
Repeat the process:
Continue gluing the remaining shells row by row, working from top to bottom to avoid accidentally bumping adhered shells with your hand. -
Add the main title:
If you want a title strip like the one in the photo (e.g., ‘Recueil Autour’), print this on a separate small strip of paper in a contrasting color or slightly darker shade, and glue it just below the landscape photo. -
Clean up:
Check for any wispy strands of hot glue (often called ‘angel hair’) and gently pull them away with tweezers. -
Final framing:
Clean the inside of the shadow box glass to ensure no dust is trapped. Place your mounted artwork into the frame. -
Close the box:
Secure the back of the frame. If the shells are heavy, you might want to add a little extra tape to the backboard’s clips to ensure it stays tight against the glass spacer.
Scientific Style
Use Latin names (or fake ones that sound Latin!) for your labels to give the piece an authentic museum specimen vibe.
Hang your finished specimen box in a well-lit area to let the shadows interplay with the delicate textures of the shells
Button, Pin, and Patch Display Shadow Box
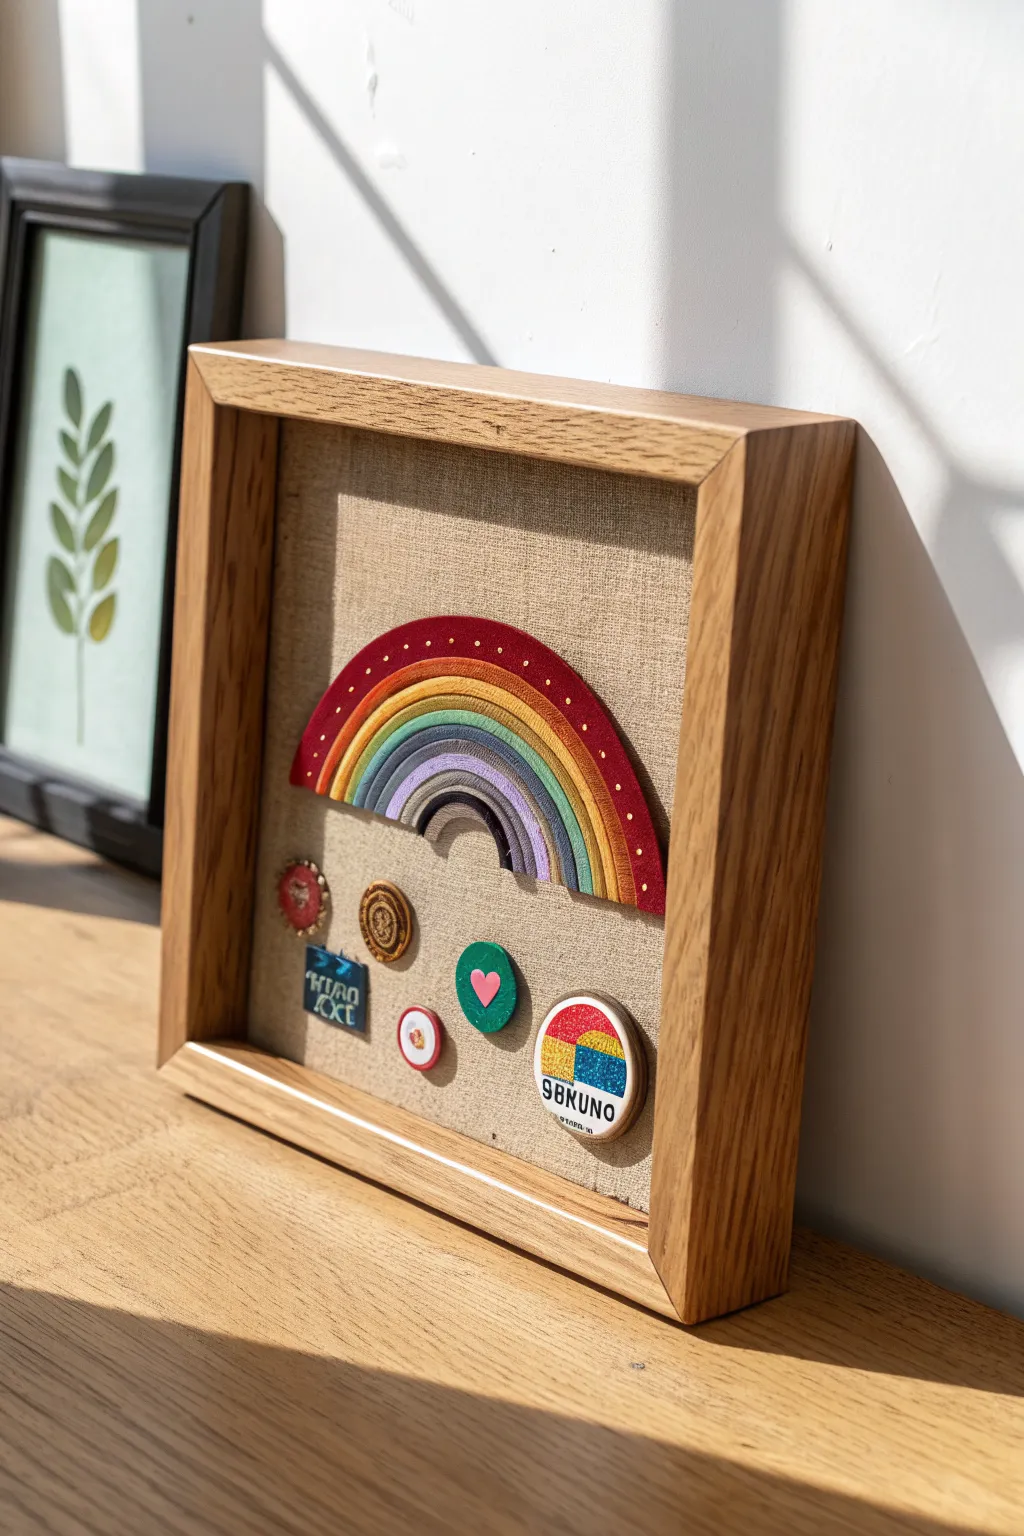
Bring a little textural sunshine into your home with this layered shadow box display. Combining the warmth of natural linen with a structured, dimensional rainbow design creates a piece that feels both handcrafted and modern.
Step-by-Step Tutorial
Materials
- Deep shadow box frame (oak or light wood finish)
- Natural linen fabric
- Foam core board or backing board
- Thick felt, leather, or suede scraps in rainbow colors
- Red velvet ribbon or fabric (for the top arch)
- Gold fabric paint or gold paint pen
- Assorted vintage-style pins, buttons, and embroidered patches
- Fabric glue or heavy-duty craft glue
- Scissors / rotary cutter
- Compass or round objects for tracing
- Double-sided tape or stapler
Step 1: Preparing the Backdrop
-
Disassemble the frame:
Begin by dismantling your shadow box. Remove the glass (optional for this project, or set aside to clean) and take out the backing board. -
Cut the backing:
If your frame backing is flimsy, cut a piece of foam core to fit snugly inside the frame. This provides a sturdier base for pinning and gluing heavier items. -
Wrap the linen:
Cut your natural linen fabric about two inches larger than your backing board on all sides. Iron out any creases thoroughly before attaching it. -
Secure the fabric:
Wrap the linen tightly around the board, securing it on the back with double-sided tape or a staple gun. Ensure the front surface is taut and smooth.
Sticky Situation
If fabric glue saturates the linen and leaves a mark, try dabbing it gently with a damp cloth immediately, or cover the spot with an extra pin or button.
Step 2: Constructing the Rainbow
-
Draft the arches:
On a stunning piece of paper or cardstock, use a compass to draw a series of concentric semi-circles. This will be your master template to ensure all rainbow layers fit together perfectly. -
Cut the top arch:
Use your template to cut the largest, outermost arch from red velvet or felt. This piece should be slightly wider than the others to act as a bold capstone. -
Add gold details:
Using a fine-tip gold paint pen or a small brush with gold fabric paint, carefully add small dots along the curve of the red arch. Let them dry completely so they don’t smear. -
Cut the inner layers:
Proceed to cut the remaining concentric arches from your various leather or felt scraps. Vary the textures—perhaps a suede for the teal and a smooth leather for the yellow—to create visual interest. -
Dry fit the rainbow:
Arrange the cut arches on your linen-covered board to check the spacing. I find it helpful to leave a tiny, almost invisible gap between strips to emphasize their individual thickness. -
Glue the rainbow:
Starting from the smallest inner arch, glue each strip onto the linen background. Apply glue sparingly to avoid seepage, pressing firmly but gently.
Go 3D
Elevate certain rainbow layers by gluing a strip of craft foam behind them before attaching to the linen for a tiered, sculptural effect.
Step 3: Personalizing the Display
-
Select your curios:
Gather your collection of pins, buttons, and patches. This design uses a mix of circular shapes to echo the curves of the rainbow. -
Arrange the layout:
Place your chosen items below the rainbow arch. Aim for a scattered but balanced look, avoiding rigid rows. -
Attach the pins:
For enamel pins, simply push the post through the fabric and foam core. If the post is loose, add a dab of super glue to the pin back. -
Secure buttons and patches:
Use fabric glue to attach any flat patches or buttons without shanks. If a button has a shank, you may need to make a small pilot hole in the board for it to sit flush. -
Final assembly:
Once all glue is dry, place the mounted artwork back into the wooden frame. You can choose to install the glass for protection or leave it open to appreciate the textures.
Hang your finished shadow box in a sunny spot to let the textures and gold accents catch the light


Medals, Ribbons, and Awards Shadow Box
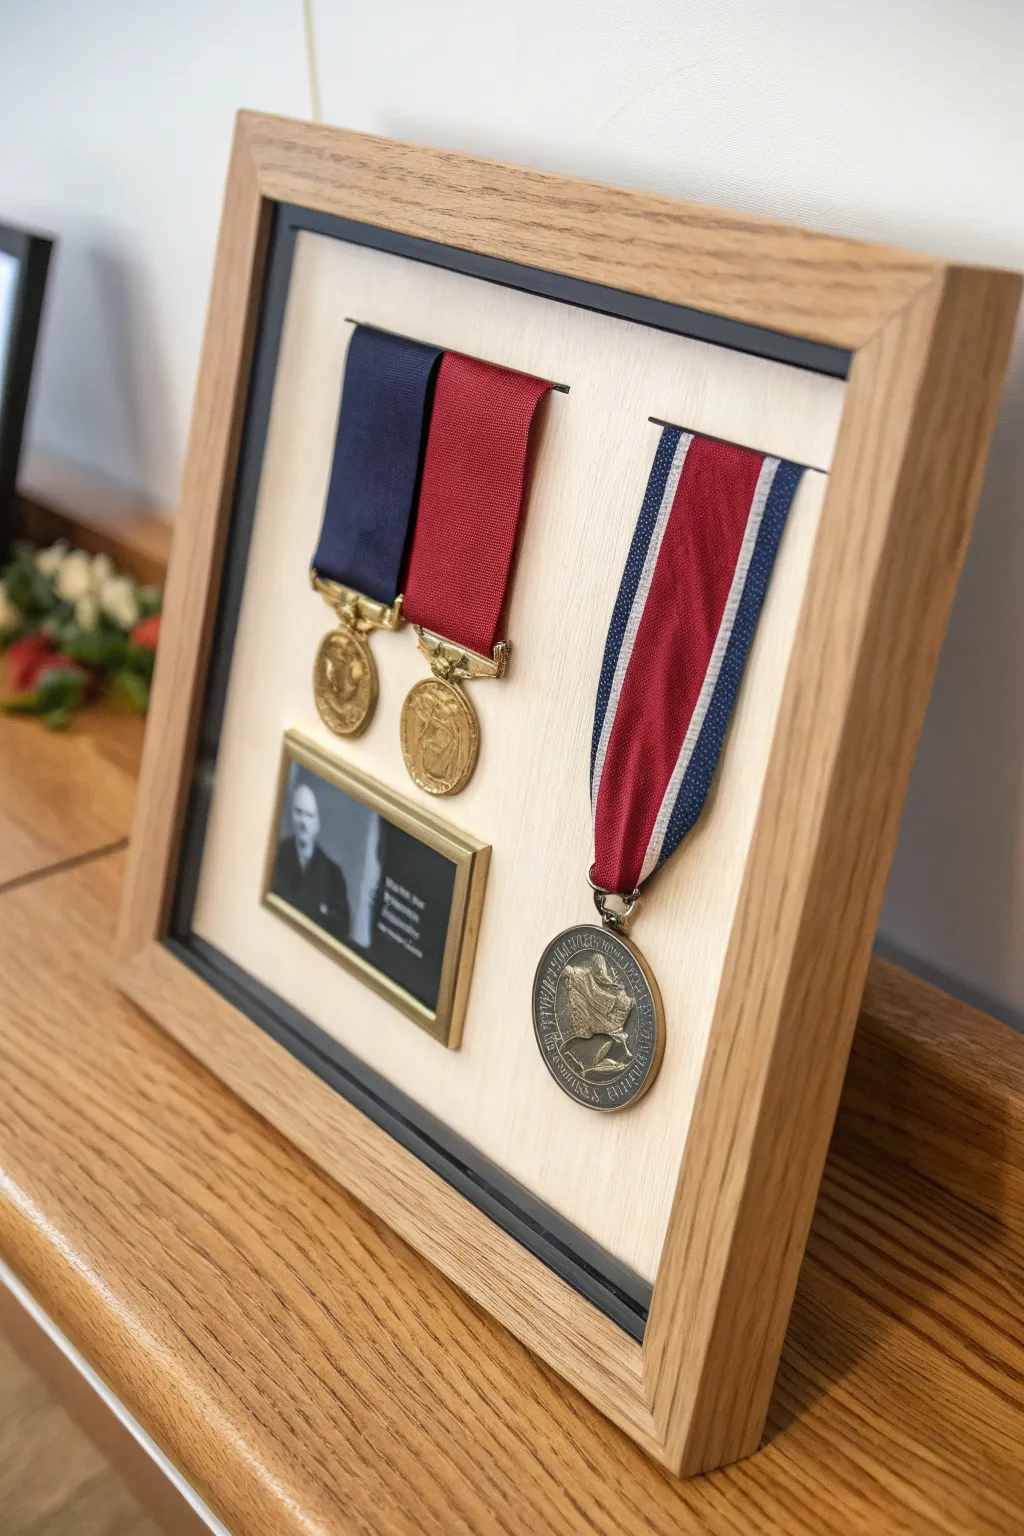
Preserve family history or military achievements with this dignified, minimalist shadow box display. The clean oak finish and precise mounting create a gallery-worthy presentation that gives heirloom medals the respect they deserve.
Detailed Instructions
Materials
- Oak finish shadow box frame (approx. 8×10 or 9×11 inches)
- Foam core board (white or off-white)
- Acid-free cardstock or mat board (cream/off-white)
- Small metal photo frame (brass/gold tone, miniature size)
- Printed photograph and caption block
- Double-sided archival tape or mounting squares
- Strong craft glue or hot glue gun (for structural elements)
- Needle and thread (color-matched to ribbons)
- Sharp craft knife or scalpel
- Metal ruler
- Pencil
- Awl or large needle
Step 1: Preparing the Backing
-
Measure the interior:
Begin by removing the back panel of your shadow box frame. Measure the internal dimensions precisely, as you’ll need to cut your mounting surface to fit snugly within the frame’s recess. -
Cut the foam core:
Using your metal ruler and a sharp craft knife, cut a piece of foam core board to match your measurements. Test the fit inside the frame—it should be tight enough not to rattle but loose enough to insert without bending. -
Apply the facing:
Cut your acid-free cardstock or mat board slightly larger than the foam core. Use archival double-sided tape or spray adhesive to mount the paper to the foam core, wrapping the edges around the back for a seamless finish on the front.
Fabric over Foam
Instead of cardstock, wrap your foam core in linen or velvet. It adds texture and is more forgiving when pushing pins or needles through for mounting.
Step 2: Mounting the Ribbons
-
Plan the layout:
Lay your medals and the small photo frame on the prepared board to determine spacing. For this look, group the two smaller medals on the left and the larger medal on the right, ensuring visual balance. -
Mark incision points:
Once satisfied with the placement, use a pencil to lightly mark where the top of each ribbon will sit. You will need to create slots for the ribbons to pass through for a professional ‘floating’ look. -
Create ribbon slots:
Carefully cut horizontal slits through the foam core board at your mark points. The width of the slit should match the width of the ribbon exactly. -
Thread the ribbons:
Pass the top excess length of each ribbon through the slots to the back of the board. Pull them taut so the medals hang straight and flat against the front surface. -
Secure the backs:
On the backside of the foam core, tape the ribbon ends down firmly with heavy-duty tape. I find that adding a dab of glue over the tape adds extra security for heavier medals. -
Stitch for stability:
To prevent the medals from swinging, take a needle and thread matching the ribbon color. Make one or two discrete stitches through the ribbon and into the board backing just above the medal suspension ring.
Step 3: Adding the Portrait Detail
-
Prepare the miniature:
Print your chosen black-and-white photo and a small text block to size. Trim them carefully to fit your miniature brass frame. -
Assemble the mini frame:
Insert the photo and text into the small frame. If the frame has a stand on the back, remove it with pliers so the frame can lay perfectly flat. -
Mount the portrait:
Apply strong craft glue or heavy-duty mounting tape to the back of the miniature frame. Position it beneath the two smaller medals on the left side, pressing firmly to secure.
Drooping Ribbons?
If ribbons refuse to lay flat, slide a small piece of clear acetate or stiff card inside the ribbon loop to act as a hidden stiffener before mounting.
Step 4: Final Assembly
-
Clean the glass:
Thoroughly clean the inside of the shadow box glass with a lint-free cloth to remove any dust or fingerprints before sealing. -
Insert the mounting board:
Place your completed mounting board with the medals into the frame. Ensure the orientation is correct and the board is seated fully against the spacer. -
Close the frame:
Replace the back panel of the shadow box. Secure the flexible tabs or pins to lock everything in place. -
Check for movement:
Give the frame a gentle shake. If anything shifts, open it back up and reinforce your mounting tape or stitches.
Now you have a timeless tribute ready to be displayed with pride on a mantel or wall
Paper Flower Monogram Shadow Box
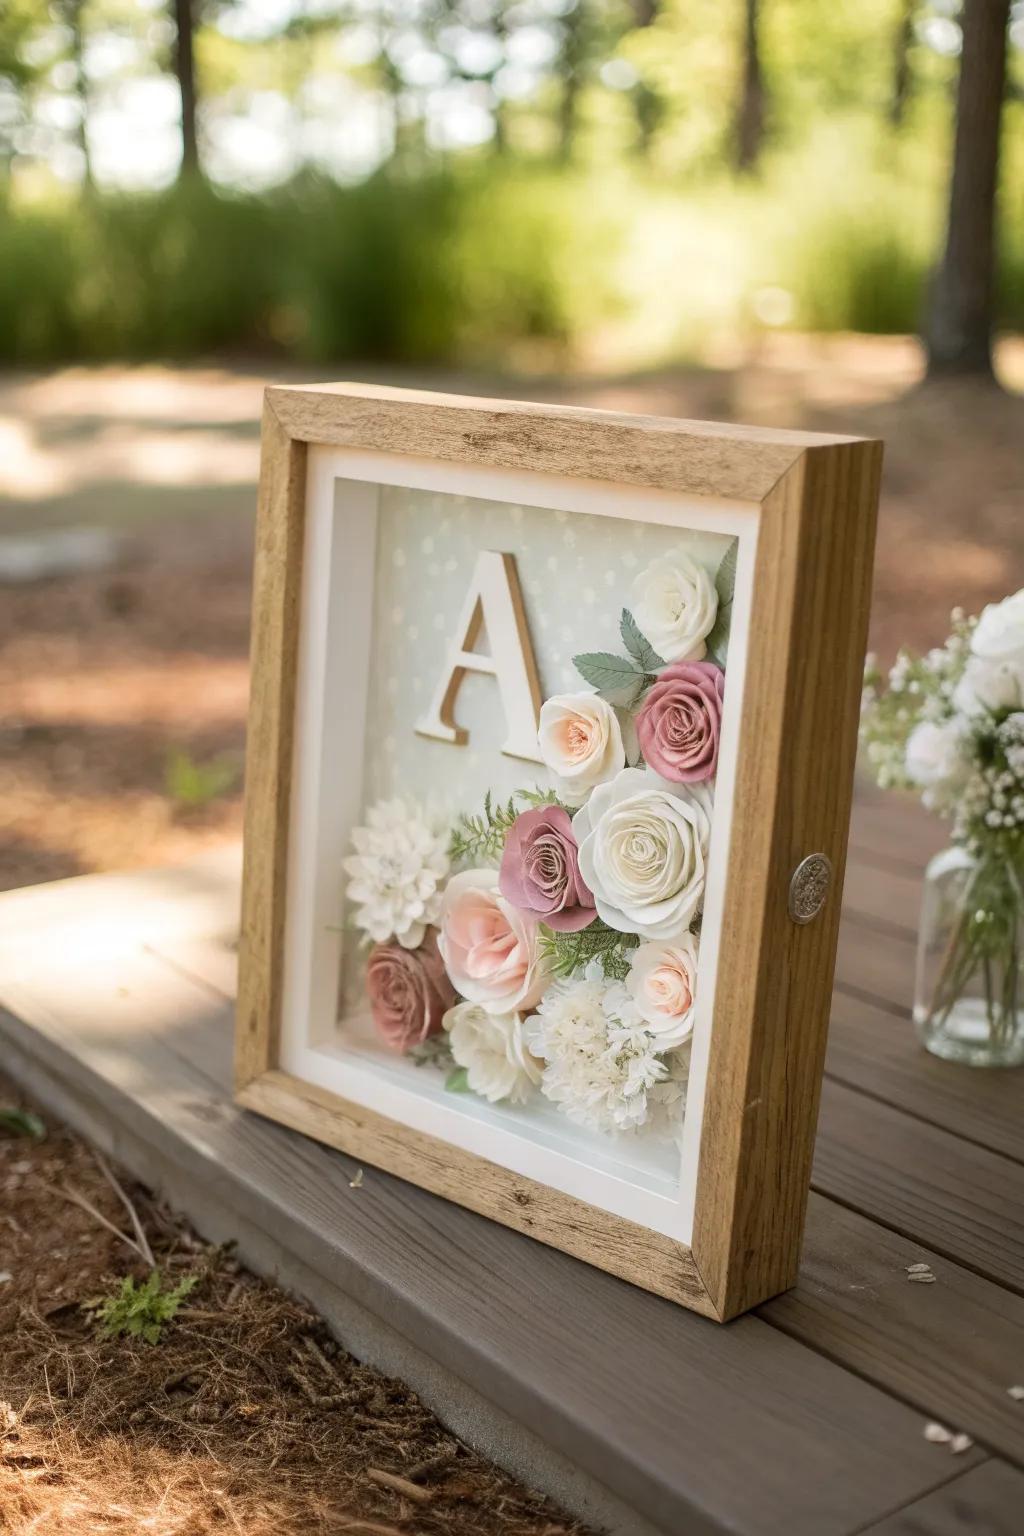
This elegant shadow box project combines rustic wood tones with delicate floral elements to create a personalized keepsake perfect for weddings or nurseries. By arranging an assortment of paper blooms around a central monogram, you’ll craft a dimensional piece of art that feels both modern and romantic.
Step-by-Step
Materials
- Deep wooden shadow box frame (8×10 or 9×12 inches)
- Wooden or chipboard letter (monogram)
- Scrapbook paper (soft sage green with white polka dots)
- Assorted paper flowers (white, cream, dusty rose, mauve)
- Faux greenery stems or paper leaves
- Hot glue gun and glue sticks
- Spray adhesive or craft glue
- Gold or metallic champagne acrylic paint
- Paintbrush
- Scissors
- Wire cutters (if using stemmed flowers)
- Pencil
Step 1: Preparing the Base
-
Disassemble the frame:
Begin by removing the back panel from your shadow box frame. Set the glass and the frame aside safely to avoid scratches or breakage while you work. -
Cut the background paper:
Place the back panel of the frame onto your chosen scrapbook paper. Trace around the panel with a pencil and carefully cut out the rectangle so it fits perfectly. -
Adhere the background:
Apply a thin, even coat of spray adhesive or craft glue to the front of the back panel. Press the cut scrapbook paper onto it, smoothing out any air bubbles from the center outward. -
Paint the monogram:
Take your wooden letter and paint the front and sides with gold or champagne acrylic paint. I usually do two thin coats rather than one thick one to ensure a smooth finish. Let this dry completely.
Step 2: Arranging the Layout
-
Dry fit the monogram:
Position the dry painted letter onto the background paper. For this specific look, align it slightly above the center and towards the left, leaving ample negative space on the bottom and right for the floral arrangement. -
Secure the letter:
Once you are happy with the placement, use hot glue to secure the letter to the backing. If your letter is thin, you might want to add small foam spacers behind it to give it extra lift off the paper. -
Prepare the flowers:
If your paper flowers came on wire stems, use wire cutters to snip the stems off completely so the flowers sit flat. Sort them by size and color to make the layout process easier. -
Plan the floral curve:
Before gluing, lay your flowers onto the backing without adhesive. Ideally, you want to create a ‘C’ or ‘L’ shape that hugs the bottom right corner of the letter, trailing down to the bottom edge.
Depth Perception
Use foam tape behind the monogram letter and the smaller flowers. Varying the height creates deeper shadows and makes the artwork look much more professional.
Step 3: Assembling the Florals
-
Anchor the large blooms:
Start by hot gluing the largest flowers first—specifically the large white rose and the dusty pink rose near the bottom right corner. These will serve as the focal points of your arrangement. -
Add medium blooms:
Place the medium-sized roses and dahlias around the anchor flowers. Try to alternate colors, placing a cream flower next to a pink one to create visual interest and balance. -
Fill gaps with small flowers:
Use the smallest buds and hydrangeas to fill in the empty spaces between the larger flowers. Tucking these tightly into the gaps hides the background paper and creates a lush, full look. -
Insert greenery:
Cut small sprigs of faux leaves or paper foliage. Tuck them under the edges of the flowers, particularly at the top and bottom of the arrangement, to soften the edges and add a natural touch. -
Check clearances:
Before the glue sets permanently, check the height of your tallest flower. Ensure it doesn’t stick up higher than the depth of the shadow box frame, or it will be crushed by the glass.
Flowers Falling?
If heavy paper flowers slide down before the glue sets, prop the frame flat on its back while you work. Hold each flower in place for 10-15 seconds as the hot glue cools.
Step 4: Final Assembly
-
Clean the glass:
Clean the inside of the shadow box glass thoroughly with glass cleaner to remove any fingerprints or dust specks. -
Reassemble the frame:
Carefully place the decorated back panel back into the frame. Secure the clips or tabs on the back to lock everything in place. -
Inspect and display:
Turn the frame over and check for any loose hot glue strings on the glass or flowers, removing them carefully with tweezers if necessary.
Now you have a stunning, personalized floral piece ready to gift or hang on your own wall
Quote on Glass Shadow Box
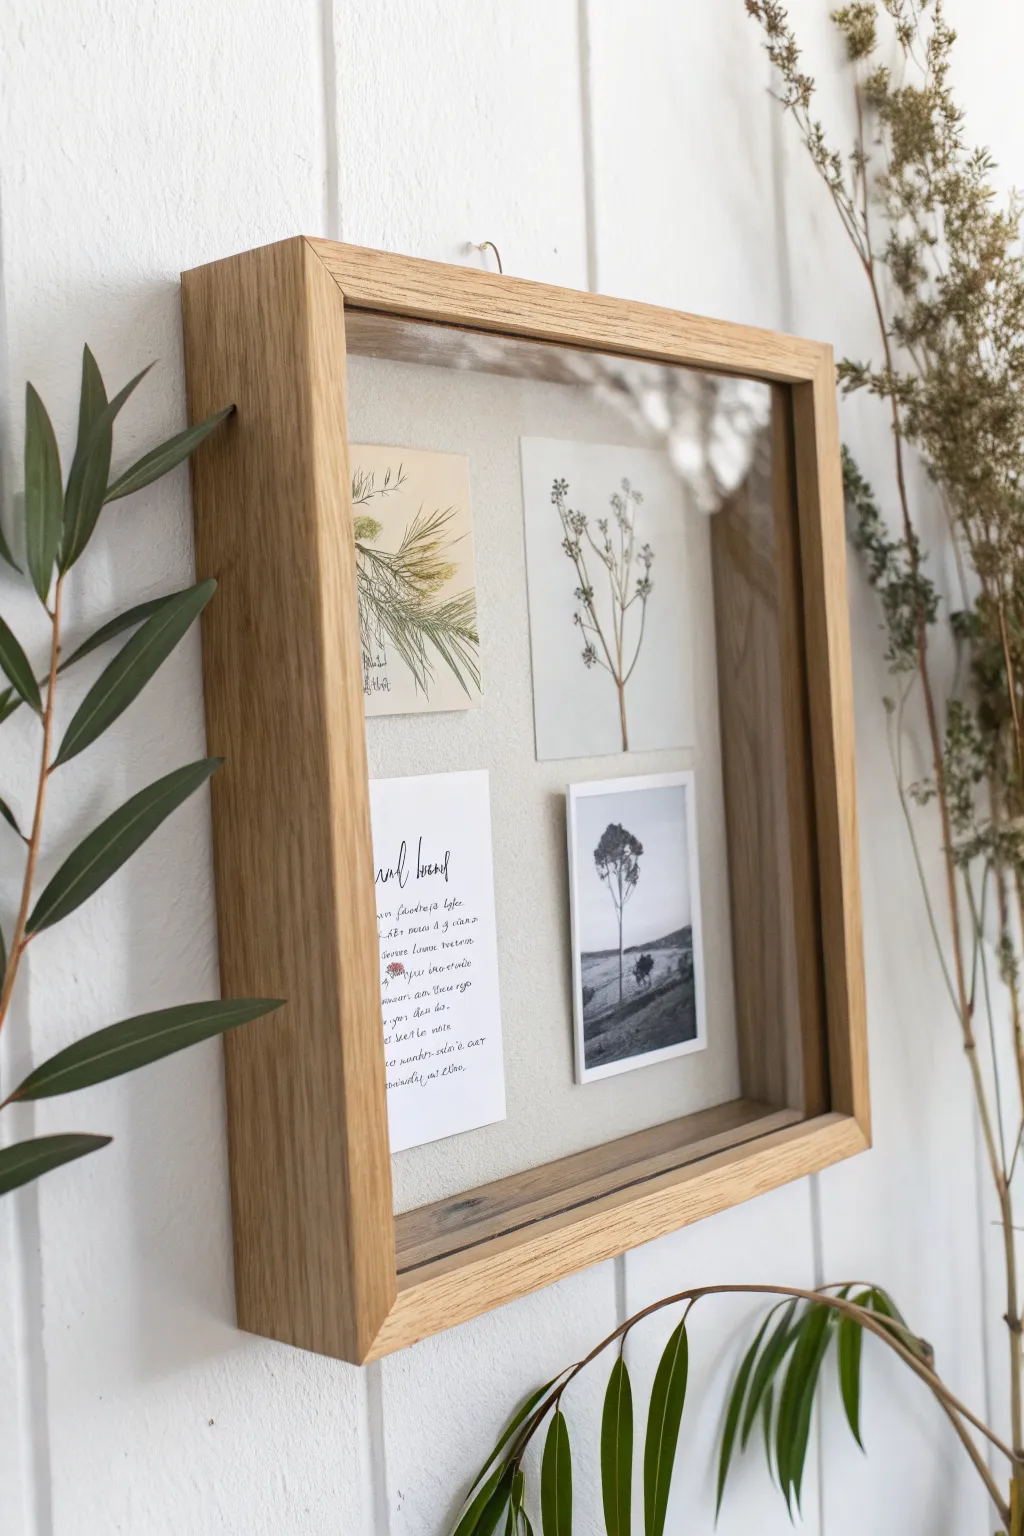
Bring the outdoors in with this serene, museum-quality shadow box display. Combining botanical sketches, preserved florals, and minimalist photography against a textured linen backdrop creates a tranquil focal point for any room.
Step-by-Step Guide
Materials
- Deep wooden shadow box frame (oak or unfinished pine)
- Textured linen or canvas fabric (oatmeal color)
- Rigid backing board or foam core
- Dried pressed wildflower or herb specimen
- Small black & white nature photograph
- Botanical illustration card or print
- Printed poem or quote on high-quality cardstock
- Spray adhesive
- Acid-free mounting tape or glue dots
- Scissors and rotary cutter
- Ruler or tape measure
Step 1: Preparing the Foundation
-
Disassemble the frame:
Begin by removing the backing board and glass from your shadow box frame. Set the glass and frame aside carefully to avoid scratches. -
Measure the backing:
Measure the interior dimensions of your shadow box’s backing board. You will need to cut your fabric slightly larger than this size to wrap the edges. -
Cut the linen fabric:
Lay your oatmeal-colored linen face down on a clean, flat surface. Place the backing board on top and cut the fabric, leaving about a 1-inch border on all sides. -
Adhere the fabric:
Apply an even coat of spray adhesive to the front of the backing board. Wait a few seconds until it feels tacky, then press it firmly onto the center of the fabric. -
Wrap the edges:
Fold the excess fabric over the edges of the board to the back. Use hot glue or strong tape to secure the fabric tension, ensuring the front surface is smooth and wrinkle-free.
Step 2: Curating and Arranging
-
Select your elements:
Gather your four focal pieces: a botanical drawing, a pressed dried flower, a typed poem, and a small black and white photo. Uniform sizing isn’t necessary, but they should feel balanced. -
Trim the paper elements:
Using a rotary cutter and ruler, trim your poem, photo, and botanical print to clean, sharp rectangles. I prefer leaving a small white border on the photo for a classic look. -
Mount the pressed flower:
Carefully mount your dried pressed flower onto a small piece of stiff, off-white cardstock using tiny dots of glue. This protects the delicate stem from the textured fabric background. -
Dry fit the layout:
Lay your fabric-covered board flat. Arrange the four items in a loose 2×2 grid. Adjust the spacing until the margins between items and the frame edge look visually equal.
Float Mount Trick
Use thin foam tape pieces stacked double-height behind your paper elements. This creates deeper shadows and emphasizes the 3D effect.
Step 3: Final Assembly
-
Attach the artwork:
Once you are happy with the positioning, secure each piece to the linen backing. Use acid-free mounting tape or glue dots for a clean hold that won’t damage the paper over time. -
Create a float effect (optional):
If you want extra depth, place a small square of foam tape behind the center of the paper items before sticking them down. This lifts them slightly off the fabric. -
Clean the glass:
Clean the inside of the shadow box glass thoroughly with glass cleaner and a microfiber cloth to remove fingerprints and dust. -
Reassemble the frame:
Place the glass back into the wooden frame, followed by the spacer (if your frame has one) to keep the glass away from the artwork. -
Secure the backing:
Insert your mounted artwork board into the frame. Secure the clips or flex points on the back of the frame to lock everything in place. -
Final check:
Turn the frame over and check for any trapped dust specks inside the glass. If clear, it’s ready to hang.
Level Up: Handwritten
Replace the printed font with your own handwriting on handmade paper for a deeply personal, vintage aesthetic.
Hang your new shadow box in a well-lit spot to let the natural textures shine
Shaker-Style Confetti Shadow Box
Capture the whimsical feeling of falling confetti with this charming shaker-style shadow box that doubles as a photo display. By securing some hearts mid-air while letting others tumble freely, you create a dynamic, frozen-in-time effect perfect for commemorating special moments.
Step-by-Step Tutorial
Materials
- Deep wooden shadow box frame (oak finish recommended)
- White backing cardstock (sized to frame interior)
- Cardstock in various pastel colors (pink, mint, peach, white)
- Glitter cardstock (silver or champagne)
- Small heart-shaped paper punch (approx. 0.5 – 0.75 inch)
- Double-sided foam tape or glue dots
- Standard photo print (4×6 or similar)
- Small printed photo (square or polaroid style) for the top
- Scissors
- Ruler
Step 1: Preparation & Punching
-
Disassemble frame:
Begin by opening your shadow box frame. Remove the back panel and any existing inserts. Clean the inside of the glass thoroughly with glass cleaner to ensure no dust is trapped later. -
Prepare the background:
Cut a piece of sturdy white cardstock to the exact dimensions of your frame’s internal backing board. This will serve as the clean, bright canvas for your confetti. -
Create confetti:
Using your heart-shaped punch, punch out a generous amount of hearts from your various pastel and glitter cardstocks. You’ll need about 50-70 hearts depending on the size of your frame. -
Sort your shapes:
Separate your punched hearts into two piles: one for the ‘floating’ effect and a larger pile for the loose shaker fill at the bottom.
Stuck Confetti?
If static cling makes loose hearts stick to the glass, wipe the glass interior with a dryer sheet before assembly to neutralize the charge.
Step 2: Creating the Floating Effect
-
Plan the layout:
Lay your white background paper flat on a table. Roughly arrange a scattering of hearts starting from the top right corner and cascading diagonally down toward the middle left. -
Secure the top hearts:
Starting with the hearts highest up on the paper, attach them using small pieces of double-sided foam tape. This slight elevation adds a lovely shadow, enhancing depth. -
Create the cascade:
Continue adhering hearts moving downward, spacing them out more as you go lower to mimic falling confetti. I like to rotate each heart slightly so they don’t look too uniform or rigid. -
Mix textures:
Intersperse the glitter hearts randomly among the matte pastel ones to catch the light. -
Check the spread:
Stop adhering hearts about two-thirds of the way down the page, leaving the bottom area clear for the loose hearts.
Sentimental Touch
Write dates, names, or tiny love notes on the backs of the loose hearts before sealing the frame for hidden messages.
Step 3: Assembly & Finishing
-
Attach background:
Secure the decorated white cardstock to the shadow box’s backing board using double-sided tape or gluestick. -
Fill the frame:
Place the frame face down (glass side down). Pour your remaining loose hearts directly onto the glass. -
Close the box:
Carefully place the backing board (with the attached hearts facing the glass) back into the frame. Secure the clips or tabs to lock it in place. -
Shake it up:
Turn the frame upright and give it a gentle shake to settle the loose hearts at the bottom, creating a natural pile beneath your floating ones. -
Add the top photo:
Take your small square photo print and place it on top of the wooden frame ledge. Since the frame is thick, it acts as a perfect shelf. -
Optional styling:
Scatter a few leftover hearts on the table or shelf surface around the frame to visually extend the theme outside the box.
Now you have a dynamic piece of decor that captures the joy of a celebration in a single snapshot
Layered Paper-Cut Scene Shadow Box

Capture the serene beauty of an alpine night with this stunning layered paper art piece. By stacking intricate cutouts of mountains, trees, and a starry sky, you’ll create a deep, dimensional scene that plays with light and shadow.
Step-by-Step Guide
Materials
- Square wooden shadow box frame (approx. 8×8 inches)
- Cardstock or high-quality art paper in various colors (navy blue, tan/kraft, white, forest green, light grey, metallic gold/yellow)
- Craft knife or precision blade (e.g., X-Acto)
- Self-healing cutting mat
- Foam adhesive squares or strips (varying thicknesses)
- Pencil and eraser
- Ruler
- White gel pen or opaque white paint (for stars)
- Bone folder (optional for crisp edges)
- Wood glue or strong craft glue
Step 1: Designing the Layers
-
Measure your frame:
Remove the back of your shadow box and measure the exact interior dimensions. Cut several pieces of cardstock to this size to serve as your base layers; navy blue will be the background layer. -
Sketch the composition:
On scrap paper, sketch out your four main layers: the background sky, the tall mountain range, the green foothills, and the foreground trees. Decide how high each element should rise to create depth. -
Draft the mountain layer:
Take a sheet of tan or kraft-colored paper. Lightly draw the outline of two or three large peaks. Make sure the peaks are tall enough to stand out against the sky but leave room for the moon. -
Draft the snow caps:
On white paper, draw the jagged shapes of snow that will sit atop your kraft mountains. These should match the angles of your drawn peaks perfectly. -
Draft the tree layers:
Sketch several pine trees of varying heights. You’ll need some for the middle ground (smaller) and some for the foreground (larger and more detailed). Use forest green paper for the ground and shades of yellow/gold for the trees to mimic moonlight or autumn colors.
Sticky Situation?
If foam tape is visible from the side, color the white edges with a marker that matches your background paper before sticking it down.
Step 2: Cutting and Assembling Components
-
Cut the background sky:
Prepare your navy blue square. Using a white gel pen or a fine brush with white paint, dot tiny stars across the upper half. Add a few larger, four-pointed stars for variety and let them dry completely. -
Create the moon:
Cut a clean circle from light yellow or cream cardstock. For a wood-grain effect like in the photo, you might lightly score vertical lines or use a textured paper. Adhere this flat against the navy background in the upper right quadrant. -
Cut the mountains:
Carefully cut out your tan mountain silhouette with your craft knife. Then, cut out the white snow caps. Glue the snow caps onto the tan peaks, ensuring the edges align seamlessly. -
Cut the tree shapes:
This is the most time-consuming part. Cut out your pine trees from yellow, ochre, and light wood-tone papers. I like to make small, downward v-shaped cuts along the branches to mimic pine needles and add texture. -
Detail the tree trunks:
If your trees need stability, cut thin strips of brown paper or thin balsa wood for trunks and glue them to the back of the foliage cutouts, leaving a bit visible at the bottom.
Make it Glow
Install a small battery-operated LED strip inside the frame rim behind the front-most layers to create a real backlit night effect.
Step 3: Building the Scene
-
Mount the mountains:
Apply a layer of foam adhesive squares to the back of your mountain cut-out. Adhere this layer directly onto the starry sky background, positioning it in the middle vertically. -
Add the middle ground:
Cut a rolling hill shape from forest green paper. Attach your smaller, background trees behind this hill so they peek out, then use thicker foam tape to mount this entire green section in front of the mountains. -
Install foreground trees:
Take your largest, most detailed yellow pine trees. Place foam tape on their backs—stack two squares if you need more height—and stick them onto the green hill or a separate foreground strip to make them pop forward. -
Create the bottom border:
Cut a final, low wavy strip from tan or cream paper to serve as the very bottom ground layer. Emboss or score it slightly for texture, and mount it at the very front using your thickest foam spacers. -
Final assembly:
Clean the inside of the shadow box glass to remove fingerprints. Gently place your stacked artwork into the frame, ensuring it fits snugly without bending corners. -
Secure the back:
Replace the frame backing and secure the clips. Check the front to ensure no paper scraps are trapped against the glass before hanging or displaying.
Now you have a tranquil mountain escape right on your shelf
Found-Object Story Shadow Box
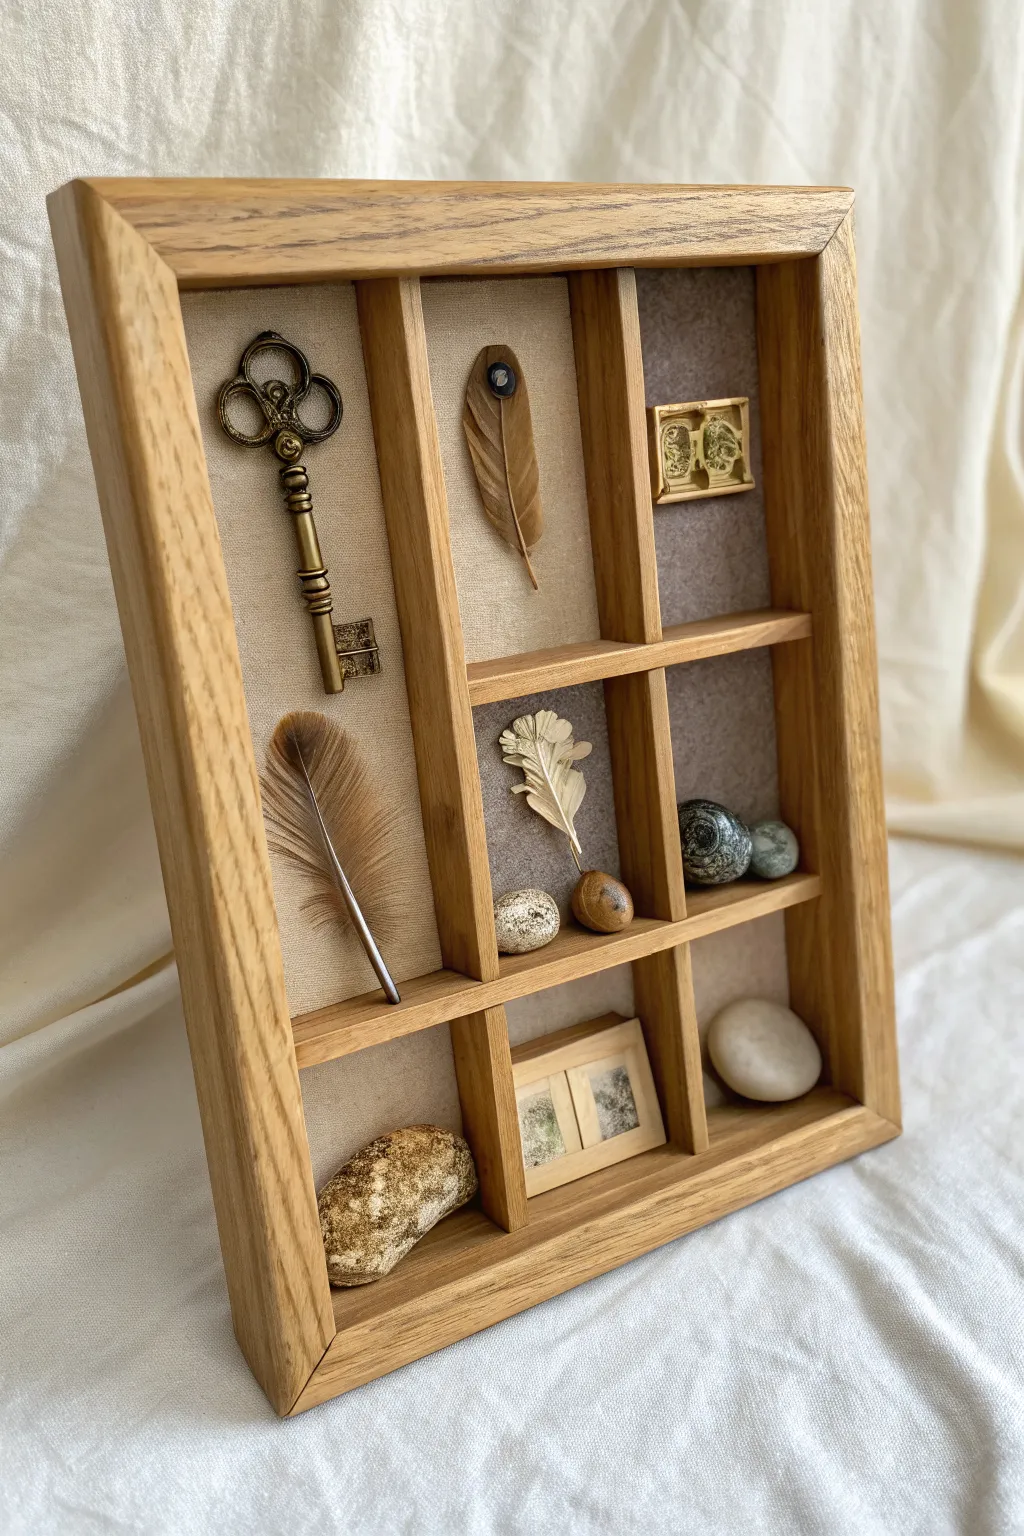
This project transforms a simple wooden divider box into an elegant display for tiny treasures, echoing the charm of a naturalist’s field kit. By combining warm oak tones with textured linen and carefully curated found objects, you’ll create a sophisticated piece of wall art that invites closer inspection.
Step-by-Step Tutorial
Materials
- Unfinished wooden shadow box with dividers (approx. 9×12 inches)
- Neutral linen or canvas fabric (oatmeal or ecru color)
- Cardstock or thin cardboard
- PVA glue or fabric glue
- Hot glue gun and glue sticks
- Matte spray varnish (optional)
- Small vintage-style brass key
- Assorted feathers (guineafowl, pheasant)
- Small river stones or polished pebbles
- Dried seed pods or acorns
- Metal leaf charm or small brass stamping
- Miniature wooden frame or molding scraps
- Gold or brass architectural finding (small)
- Scissors
- Ruler
- Double-sided tape (optional)
Step 1: Preparing the Shadow Box
-
Inspect and Clean:
Begin by inspecting your wooden shadow box. Sand down any rough edges or splinters with fine-grit sandpaper to ensure a smooth, professional finish. -
Seal the Wood:
If you want to protect the wood without changing its natural color, apply a light coat of matte spray varnish. I prefer this over staining because it keeps that raw, organic oak look seen in the example. -
Measure Compartments:
Measure the inside dimensions of each individual compartment precisely. Note that dividers are not always perfectly spaced, so measure every single box separately.
Step 2: Creating the Linen Backdrops
-
Cut Cardstock Inserts:
Cut pieces of cardstock or thin cardboard to match the measurements of each compartment. Test fit them to ensure they slide in snugly but lay flat against the back. -
Cut the Fabric:
Lay out your linen fabric. for each cardboard insert, cut a piece of fabric that is about 1/2 inch larger on all sides. -
Wrap the Inserts:
Place a cardboard piece in the center of a fabric square. Apply a thin line of PVA glue or double-sided tape to the back edges of the cardboard. -
Secure the Corners:
Fold the fabric corners in first to reduce bulk, then fold over the straight sides, pulling the linen taut so the front surface is smooth and wrinkle-free. -
Install the Backings:
Apply a dab of glue to the back of your fabric-wrapped inserts and press them firmly into their corresponding compartments in the wooden box.
Glue Ghosting?
If hot glue leaves visible blobs behind transparent or thin items, switch to a clear, drying jewelry glue (like E6000) applied with a toothpick for invisible hold.
Step 3: Curation and Composition
-
Dry Arrange Objects:
Before gluing anything, lay your box flat on a table. Play with the arrangement of your objects. Place heavier items like stones at the bottom to visually ground the piece. -
Balance Textures:
Aim for a mix of textures in each row. Notice how the example alternates between hard metals, soft feathers, and organic stones to keep the eye moving. -
Prepare the Vertical Feature:
The tall compartment on the left is perfect for an elongated object. Position your vintage key vertically here, ensuring it is centered.
Level Up: Scientific Labels
Add tiny, tea-stained slips of paper with handwritten Latin names or dates under each object to give your shadow box the authentic feel of a vintage biological specimen collection.
Step 4: Final Assembly
-
Mount the Key:
Use a small amount of hot glue or strong craft adhesive on the flattest points of the key’s back to secure it to the linen. -
Attach the Feathers:
For the feathers, apply a tiny dot of glue to the quill (the hard stem). Press gently. If using a delicate metal leaf, ensure the glue is hidden behind the central vein. -
Secure Heavy Objects:
Stones and seed pods need more support. Apply a generous dollop of hot glue to the back of the stone and hold it in place for 30 seconds until the glue sets completely. -
Add Miniature Frames:
If you have a tiny frame or architectural detail, glue it into a smaller compartment. I like to leave these empty inside to emphasize the object itself as a specimen. -
Clean Up:
Once all glue is dry, use tweezers to carefully pull away any wispy strings of hot glue that might be lingering in the corners.
Hang your finished shadow box in a place where the light can catch the different textures and enjoy your personal museum of curiosities

Have a question or want to share your own experience? I'd love to hear from you in the comments below!