
Silhouette paintings are my favorite way to get a dramatic, “wow” result without stressing over tiny details. You let a bold black foreground do the storytelling while the color-gradient sky brings all the mood.
Classic Sunset Tree Line
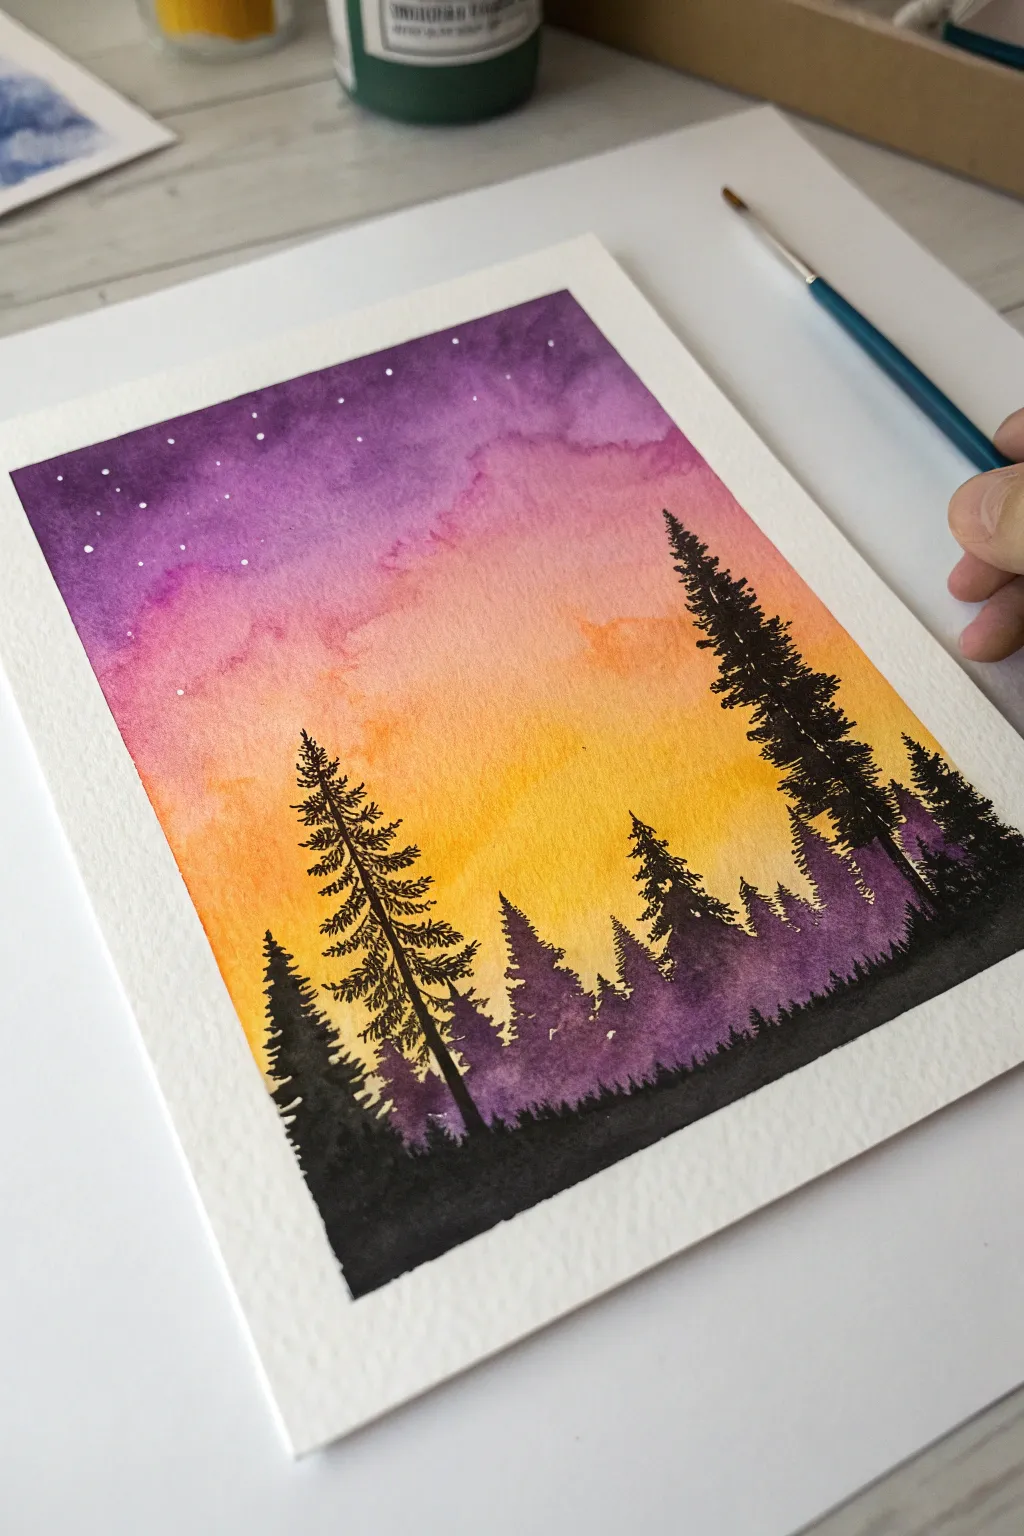
Capture the magic of dusk with this vibrant watercolor silhouette painting, where a glowing sunset meets a deep, shadowy forest. This project beautifully demonstrates how to blend warm and cool tones seamlessly before adding striking contrast with black ink.
How-To Guide
Materials
- Cold press watercolor paper (300gsm recommended)
- Painter’s tape or masking tape
- Watercolor paints (Purple, Magenta/Rose, Orange, Yellow)
- Black gouache or black waterproof ink
- White gouache or white gel pen
- Large round brush for washes
- Fine detail brush (size 0 or 00)
- Clean water jar
- Paper towels
- Palette for mixing
Step 1: Creating the Sunset Sky
-
Prepare your canvas:
Tape down all four edges of your watercolor paper to a flat surface or board using painter’s tape. This prevents the paper from buckling when wet and creates that crisp, clean white border at the end. -
Wet the paper:
Using a large, clean brush, apply a gentle coat of clean water across the entire sky area of your paper. You want the surface to be glistening but not forming puddles. -
Apply the purple:
Load your brush with a rich purple watercolor. Apply this to the top third of the paper, using horizontal strokes. Allow the color to be darkest at the very top edge. -
Transition to pink:
Clean your brush slightly and pick up a magenta or rose color. Paint this directly below the purple, letting the wet edges touch so they bleed together naturally. -
Shift to orange:
Rinse your brush again and load it with a bright orange. Apply this band below the pink, again allowing the wet paint to merge softly with the layer above it for a smooth gradient. -
Finish with yellow:
For the bottom section of the sky (before the ground starts), use a warm yellow. Blend this into the orange above. Paint this yellow area fairly low down, leaving just a small strip at the very bottom for the ground. -
Check the blend:
If lines between colors look too harsh, dry your brush on a paper towel and very gently sweep it across the transition area to soften the gradient. I like to tilt the board slightly to help gravity assist the blending. -
Add first stars:
While the purple section is still slightly damp, you can flick a tiny amount of clean water onto it to create subtle bloom effects that look like distant nebulae. -
Wait for complete dryness:
This is crucial: allow the paper to dry completely. It must be bone dry before you start the silhouette layer, or the black ink will bleed into your beautiful sunset.
Wet-on-Wet Magic
Work quickly while the paper is wet! If the paper dries while you are blending colors, you’ll get hard lines. Keep a spray bottle nearby to mist the paper if it dries too fast.
Step 2: Painting the Silhouette
-
Paint the ground:
Using black gouache or ink, paint a solid, undulating uneven line across the very bottom of the paper to represent the forest floor. Fill it in completely black. -
Start the hazy tree line:
Mix a small amount of purple into your black paint to create a slightly lighter, deep violet-black. Use this to paint a few distinct tree shapes in the mid-ground. These should be a bit translucent or lighter than the foreground trees. -
Define the main trees:
Switch back to pure, opaque black. Using your finest detail brush, draw a vertical line for the trunk of your first large pine tree on the right side. -
Add pine branches:
Starting from the top of the trunk, dab your brush in a zigzag pattern, getting wider as you move down. Keep the texture rough and organic to mimic pine needles. -
Balance the composition:
Add another large tree or two on the left side using the same technique. Vary the heights; make the one on the left slightly shorter or taller than the right one to keep it interesting. -
Fill the gaps:
Paint smaller, simpler triangular tree shapes between the large trees along the horizon line. This creates depth and makes the forest look dense. -
Add bright stars:
Once the sky serves as a dry background, use a white gel pen or a small brush with white gouache to dot tiny stars in the upper purple section. -
Refine silhouettes:
Look closer at your black trees. If any areas look patchy as they dry, add a second layer of black to ensure they remain a solid, stark silhouette against the bright sky. -
The reveal:
Once everything is absolutely dry, carefully peel away the painter’s tape at a 45-degree angle to reveal your clean edges.
Birds in Flight
Add tiny ‘V’ shapes in the orange or yellow section of the sky using your finest pen or brush to create a flock of distant birds returning home at sunset.
Frame your new landscape or gift it as a handmade card to impress a friend with your gradient skills


Palm Trees at Dusk
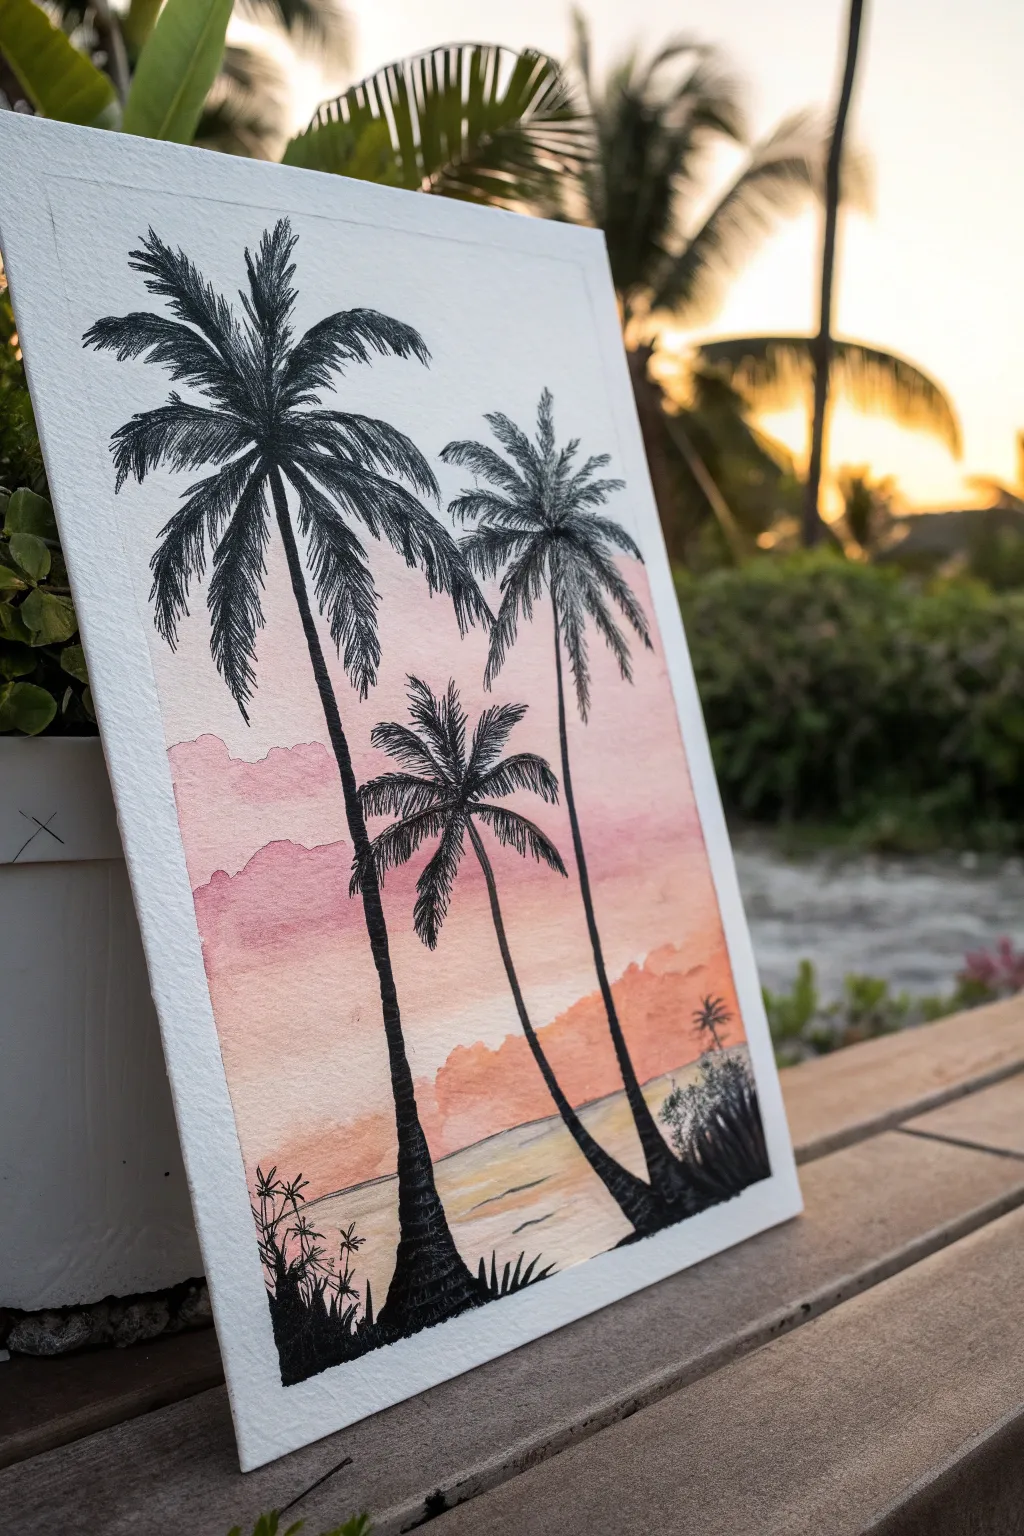
Capture the serenity of a sunset beach with this mixed-media project combining soft watercolor washes and bold ink details. The contrast between the dreamy pastel sky and the crisp black palm silhouettes creates a striking sense of depth.
Step-by-Step Tutorial
Materials
- Cold press watercolor paper (300 gsm)
- Painter’s tape or masking tape
- Watercolor paints (Pink, Orange, and soft Yellow)
- Large flat brush or wash brush
- Medium round watercolor brush
- Water container and paper towels
- Black fine liner pens (various sizes like 0.1, 0.3, and 0.5)
- Black brush pen or India ink with a small brush
- Pencil and eraser
Step 1: Setting the Scene
-
Prepare the canvas:
Tape your watercolor paper down firmly onto a hard board or table. Ensure the tape is straight, as this creates the crisp white border that frames the finished piece. -
Wet the paper:
Using your large wash brush and clean water, apply an even coat of water across the entire area inside the tape. Wait about 30 seconds for the sheen to become satin-like, not puddly. -
Paint the sky gradient:
Load your brush with a diluted soft pink. Paint horizontal strokes starting at about the halfway point of the paper, moving upwards. As you reach the top, the color can fade out slightly. -
Add warmth:
While the paper is still damp, introduce a soft orange hue below the pink section. Let the colors bleed naturally into each other where they meet to create a seamless gradient. -
Create the horizon:
Near the bottom quarter of the page, paint a stronger horizon line using a mix of orange and a tiny touch of yellow. This implies where the sky meets the distant water. -
Suggest clouds:
While the sky wash is drying but still slightly damp, drop in slightly more concentrated pink pigment in uneven, horizontal blotches. These blooms will dry with soft edges, mimicking distant clouds. -
Paint the water:
For the bottom section, use very pale yellow and diluted orange. Paint horizontal strokes, leaving small slivers of white paper showing through to represent light reflecting on the waves. -
Dry completely:
Let the background dry fully. If the paper feels cool to the touch, it’s still wet. Using a hair dryer on a low setting can speed this up, but keep it moving to avoid pushing the pigment.
Step 2: Inking the Silhouettes
-
Sketch the layout:
Lightly sketch the three main palm tree trunks with a pencil. Place the tallest one on the left, curving slightly inward, and stagger the heights of the other two for a balanced composition. -
Draw the trunks:
Using a thicker black pen or a brush pen, trace over your pencil lines. Make the base of the trunks wider and taper them as they go up. Add small horizontal texture lines to mimic the roughness of palm bark. -
Start the fronds:
Switch to a medium-sized fineliner. From the top center of each trunk, draw the main curved spines of the palm fronds, arching them outward in a starburst pattern. -
Add the leaves:
With a fine tip pen (like a 0.1 or 0.3), draw quick, flicking strokes coming off the main spines. These should point downwards and be slightly ragged to look realistic. -
Build density:
Go back over the center of the palm crowns with a brush pen to darken the area where the fronds meet the trunk. This adds weight and realism to the silhouette. -
Ground the scene:
At the very bottom, use your black marker or ink to create a solid black ground line. Use upward flicking strokes to create the suggestion of grass blades and small shrubs. -
Add foreground details:
On the far right and left corners, draw fuller bush shapes or smaller plants using a stippling or scribbling motion to differentiate the texture from the palm trees. -
Final touches:
Review the composition. I sometimes add a tiny distant palm tree on the horizon line or a few birds in the sky using the finest pen available to enhance the scale. -
Reveal the border:
Once the ink is 100% dry, carefully peel away the painter’s tape. Pull it away from the painting at a 45-degree angle to ensure a clean, sharp edge without ripping the paper.
Wet-on-Wet Magic
Don’t overwork the background gradient. Lay the colors down and let the water do the mixing for you. Too much brushing will make the colors muddy.
Go Darker
For truly opaque silhouettes, brush black India ink or gouache over your marker lines. It creates a deeper, darker void than standard markers.
Step back and enjoy the peaceful tropical vibe you’ve created with just a few colors and simple lines


Mountains Against a Glowing Sky
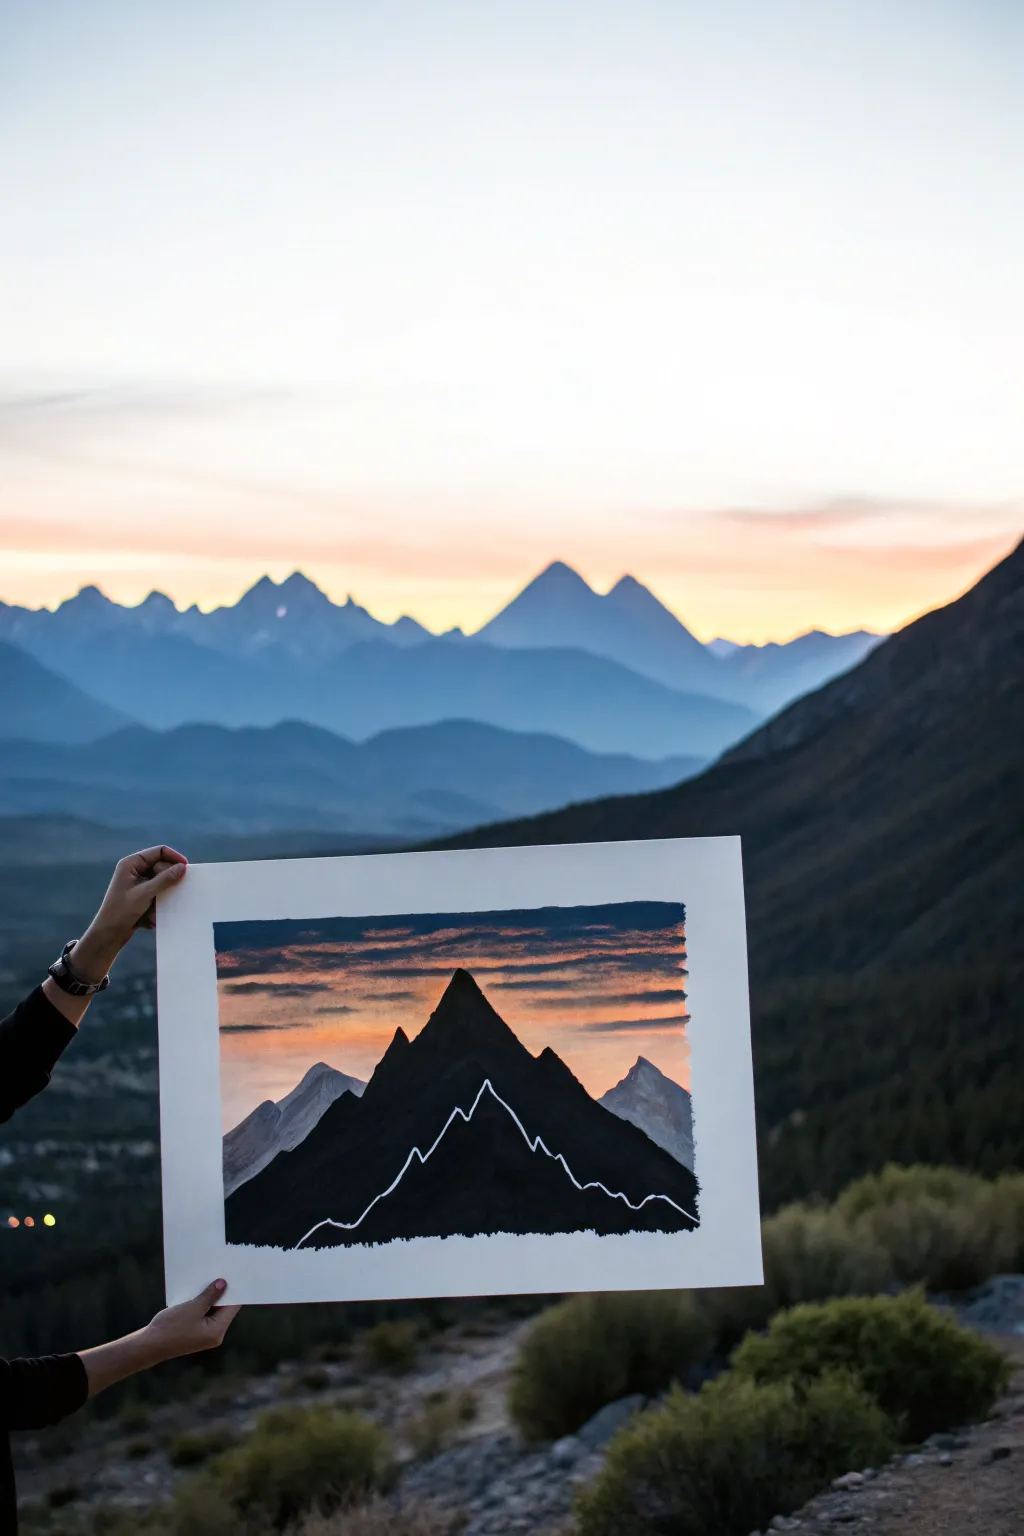
Capture the dramatic contrast of a mountain range at twilight with this striking acrylic painting. The project combines soft, blended skyscapes with bold, geometric silhouettes to create a sense of depth and majesty.
Step-by-Step
Materials
- Heavyweight watercolor paper or mixed media paper (approx. 11×14 inches)
- Acrylic paints: Titanium White, Payne’s Grey, Mars Black, Cadmium Orange, Burnt Sienna, Primary Blue
- Painter’s tape or masking tape
- Flat shader brushes (1 inch and 1/2 inch)
- Small round detail brush (size 1 or 2)
- White gel pen or fine white paint marker
- Palette or paper plate for mixing
- Water cup and paper towels
Step 1: Setting the Scene
-
Prepare your surface:
Begin by taping down the edges of your heavy paper to a flat board or table. This creates a clean, professional border visible in the final piece and prevents the paper from warping while you work. -
Mix the sky colors:
On your palette, prepare three main mixtures for the sky: a deep grey-blue (mix Primary Blue with a touch of Black and White), a vibrant orange (Cadmium Orange with a hint of White), and a muted peach tone (Orange mixed with White and a tiny dot of Burnt Sienna). -
Paint the upper sky:
Using the 1-inch flat brush, apply horizontal strokes of the deep grey-blue mixture across the very top of the page. Don’t worry about perfect smoothness; the texture adds to the cloud effect. -
Create the sunset glow:
While the top is still slightly tacky, switch to the orange mixture. Paint horizontal bands below the blue, allowing them to overlap slightly. Use a lighter hand to feather the edges where the blue and orange meet. -
Add cloud streaks:
With a smaller flat brush, use the dark grey-blue color to scumble in thin, horizontal cloud formations over the orange section. I like to keep these strokes rough and dry to mimic the textural clouds seen in a real sunset.
Step 2: Layering the Mountains
-
Block in background mountains:
Mix Titanium White with a small amount of Payne’s Grey to create a light, misty grey. Using the 1/2 inch brush, paint triangular mountain shapes on the left and right sides of the composition, leaving the center open. -
Add dimension to distant peaks:
While the grey paint is wet, add a slightly darker grey to the right side of these peaks to suggest shadow. This subtle shading creates a 3D effect without needing high detail. -
Outline the main silhouette:
Once the background layers are completely dry, take your black paint. Lightly sketch the outline of the large, central mountain peak with a small brush. It should be taller than the background mountains and dominate the center. -
Fill the silhouette:
Using the flat shader brush, fill in the entire central mountain shape with solid Mars Black. Ensure the paint is opaque; you may need a second coat after the first one dries to avoid streaking. -
Rough the bottom edge:
Instead of a straight line at the bottom, use the tip of your brush to dab black paint along the lower edge. This stippling technique simulates the texture of a forest line or rough terrain.
Fixing Wobbly Lines
If your white contour line gets shaky or too thick, let it dry completely. Then, use black paint and a detail brush to carefully ‘cut in’ and clean up the edges.
Step 3: The Final Details
-
Assess the composition:
Step back and look at your mountain. If the black shape feels too flat, you can mix a tiny bit of dark blue into the black and add very subtle vertical streaks near the peak to suggest ridges. -
Plan the geometric line:
The defining feature of this piece is the white contour line. Visualize a jagged line that sits roughly in the lower third of the black mountain, mimicking a smaller mountain range. -
Draw the contour line:
Using a white gel pen or a fine paint marker, draw a crisp, angular line across the black mountain. It should rise and fall like peaks and valleys. Move confidently to keep the line smooth. -
Refine the line weight:
Go over the white line a second time to brighten it. If you want a variation in thickness, you can make the ‘peaks’ of the line slightly sharper and the ‘valleys’ slightly thicker. -
Remove the tape:
Wait until absolutely everything is dry. Slowly peel the painter’s tape away at a 45-degree angle to reveal your crisp, white border.
Add Metallic Flair
Swap the white gel pen for a gold or silver leafing pen for the contour line. The metallic shine will catch the light and make the silhouette pop against the matte black.
Now you have a stunning mountain landscape that balances bold darkness with vibrant sunset warmth, ready to frame and display


Lake Reflection Silhouette
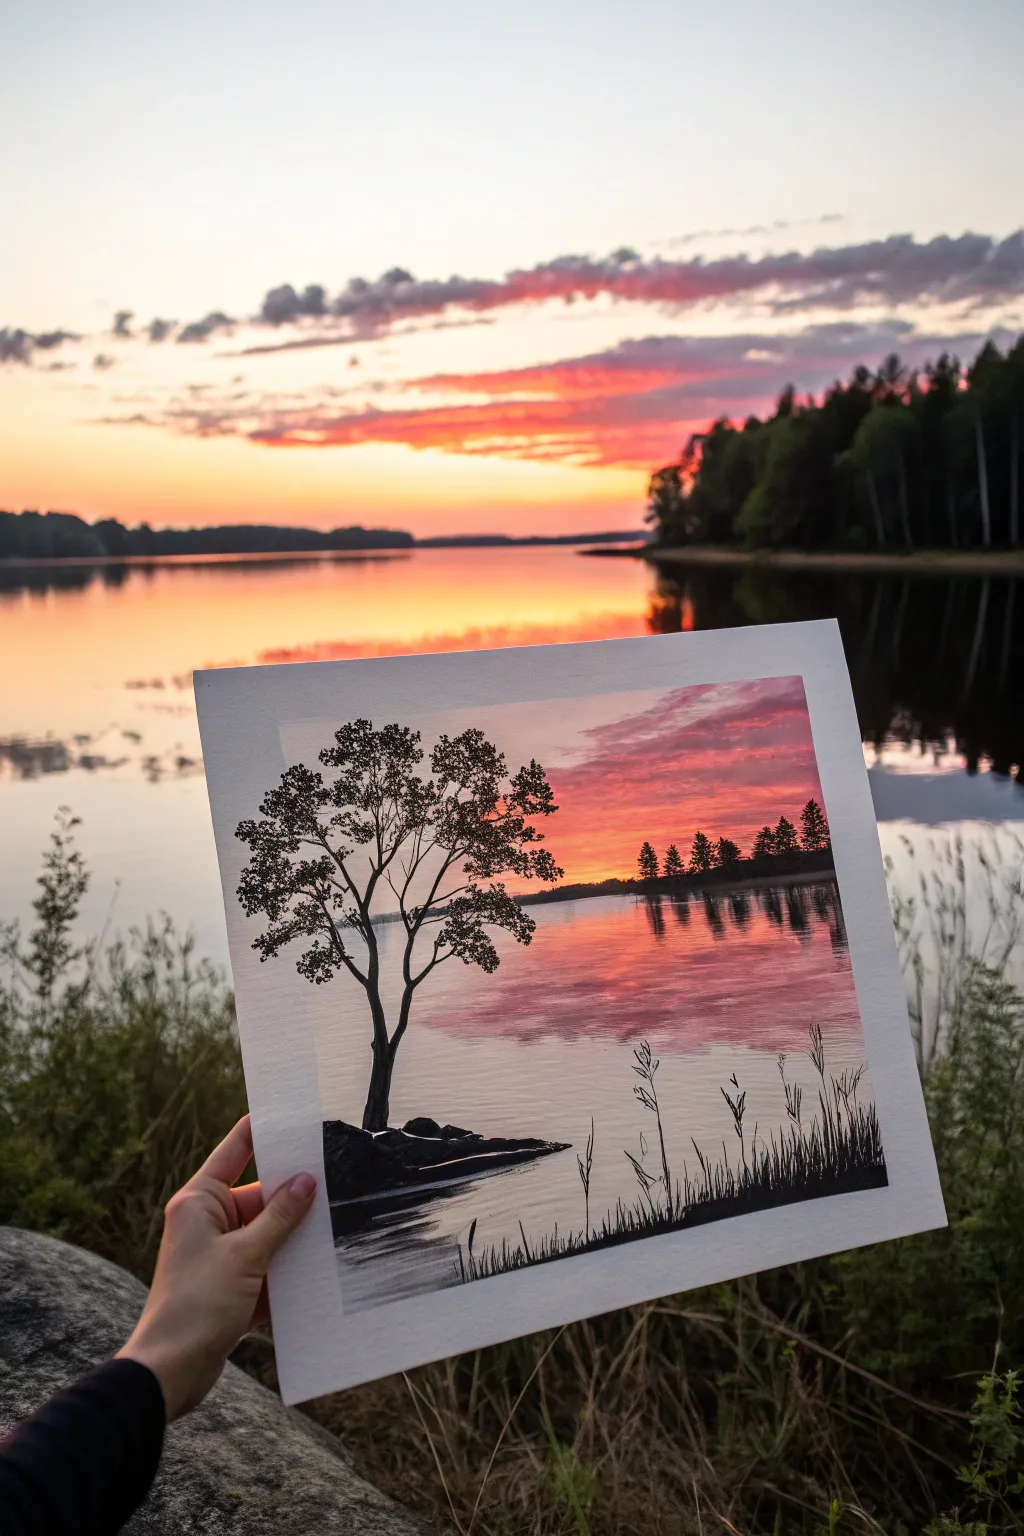
Capture the serene beauty of twilight with this mixed-media silhouette painting that contrasts natural black ink details against a vibrant watercolor sky. This project beautifully mimics the calm of a lakeside evening, perfect for practicing gradients and precision brushwork.
Step-by-Step Guide
Materials
- Square watercolor paper (300 gsm or heavier)
- Masking tape
- Watercolor paints (Pink, Orange, Purple, Red)
- Black India ink or waterproof acrylic ink
- Flat wash brush (1-inch)
- Round watercolor brushes (Size 4 and 8)
- Fine liner brush (Size 0 or 00)
- Clean water
Step 1: Setting the Scene
-
Tape the Edges:
Begin by taping down all four edges of your square watercolor paper to a rigid board. This creates the crisp white border seen in the final piece and prevents the paper from buckling when wet. -
Establish the Horizon:
Lightly sketch a straight horizontal line across the middle of the paper with a pencil to mark where the water meets the sky. Add faint outlines for the rocky outcrop on the left, but keep them very subtle.
Pro Tip: Leaf Texture
For realistic tree foliage, use a nearly dry brush or a small piece of natural sea sponge dipped in ink. Dabbing this lightly creates organic, airy leaf patterns.
Step 2: Painting the Sky and Water
-
Wet the Sky:
Using your large flat brush, apply clean water to the entire sky area above the horizon line. The paper should be glistening but not forming puddles. -
Start with Warmth:
Load a round brush with a vibrant orange and drop it near the horizon line, letting it bleed upwards. While it’s wet, I like to blend in pink tones effortlessly. -
Deepen the Clouds:
Mix a purple-red hue and dab it into the upper sky area to create cloud formations. Use horizontal strokes that are slightly jagged to mimic the cloud textures in the reference. -
Mirror the Water:
While the sky is drying, repeat the process for the water below the horizon line. Use the same colors—orange near the horizon, transitioning to pinks and purples—but keep your strokes strictly horizontal to suggest calm water reflection. -
Soften the Horizon:
Before everything is bone dry, run a slightly damp brush along the horizon line to slightly blur the transition. -
Add Water Ripples:
Using a slightly stronger concentration of pink-purple paint, add thin, wavy horizontal lines across the water surface to create the illusion of gentle ripples. -
Let it Dry Completely:
This is crucial: allow the entire background to dry completely. If the paper is cool to the touch, it’s still wet.
Step 3: Creating the Silhouettes
-
Paint the Distant Treeline:
Using black ink or very opaque black paint and a small round brush, paint the distant treeline on the right side of the horizon. These should be small, simple vertical shapes representing pine trees. -
Add Distant Reflections:
Immediately paint the reflection of those distant trees into the water. Use a slightly watered-down black for this and pull the strokes downward, keeping them somewhat broken and wavy. -
Define the Foreground Rocks:
Switch to opaque black ink. Paint the rocky outcrop on the bottom left corner. Ensure the edges are sharp against the water. -
Draft the Tree Structure:
Using your fine liner brush and black ink, start painting the main trunk of the large foreground tree. Start thicker at the base and taper as you move upward, branching out into a Y-shape. -
Branching Out:
Extend thinner branches from the main boughs. Keep your hand loose and allow the lines to be slightly irregular for a natural look. -
Stippling the Leaves:
To create the foliage, use an old, splayed brush or dab with the tip of a round brush. Apply clusters of black dots and small marks around the branch tips to simulate clumps of leaves. -
Foreground Grasses:
Using the fine liner brush again, flick upward strokes from the bottom right edge to create tall silhouette grasses. Vary the height and angle of the blades. -
Final Details:
Add small seed heads to a few of the grass blades and add a few horizontal ripples with black ink near the rock base to ground it in the water. -
The Reveal:
Once the black ink is fully dry, slowly peel away the masking tape at a 45-degree angle to reveal your clean white borders.
Level Up: Gloss Finish
Add a few touches of clear gloss medium over the water area after the painting is sealed. It creates a subtle shine that mimics real water reflection.
You now have a peaceful landscape that hangs beautifully on any wall
BRUSH GUIDE
The Right Brush for Every Stroke
From clean lines to bold texture — master brush choice, stroke control, and essential techniques.
Explore the Full Guide
Sailboat on the Horizon
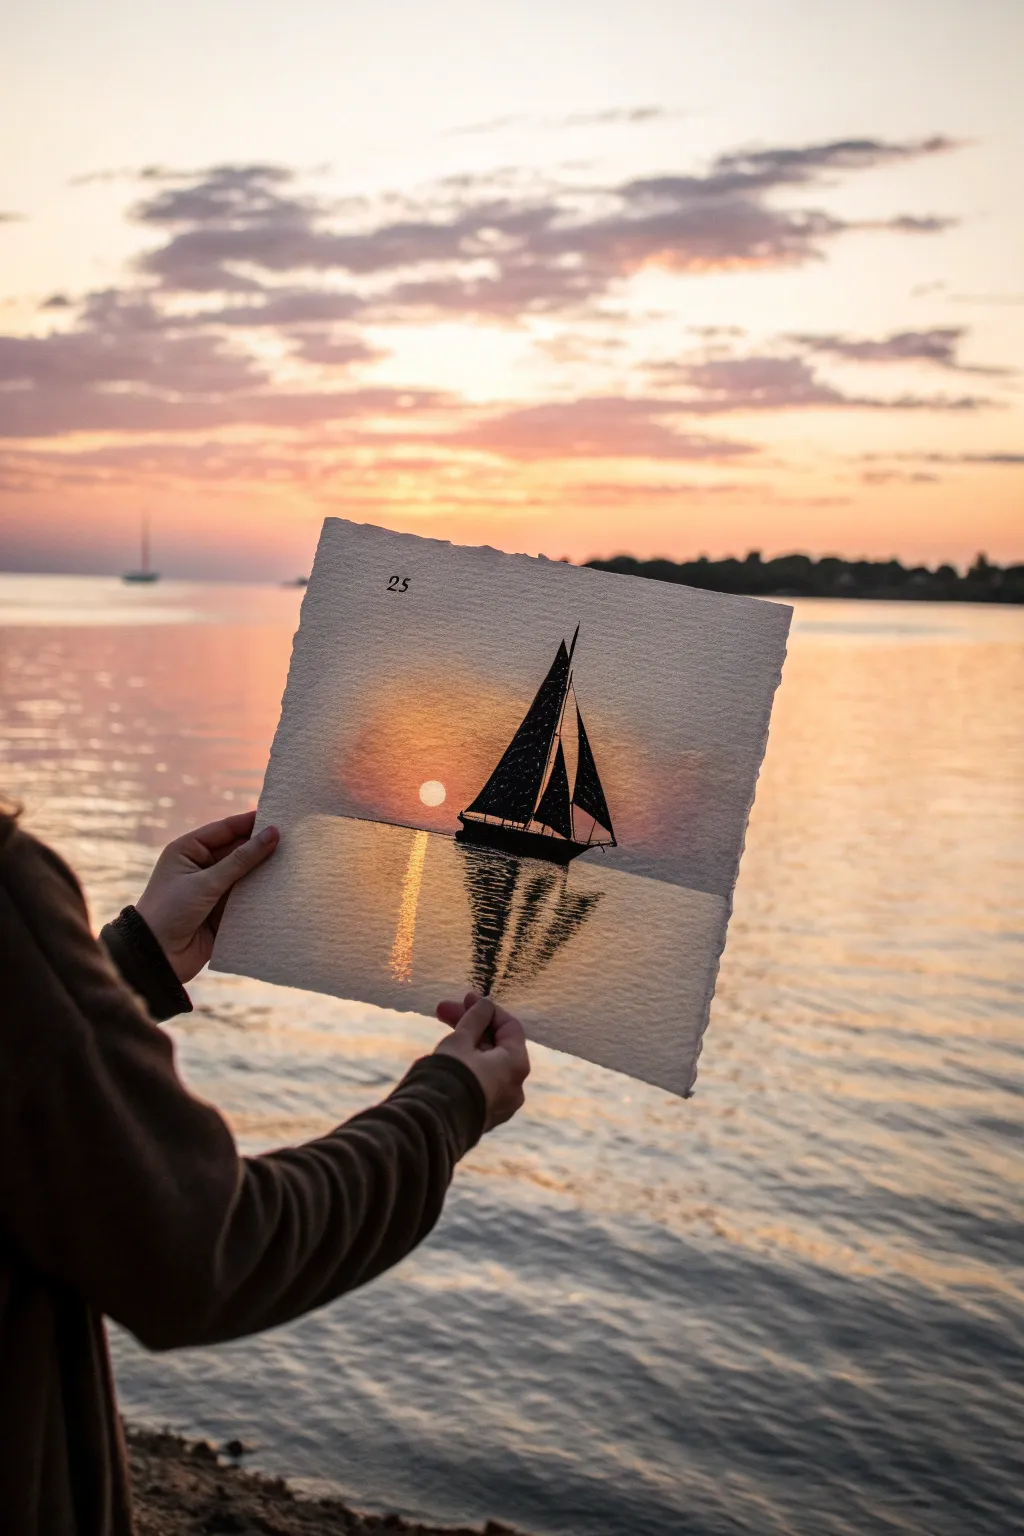
Capture the serene beauty of twilight on the water with this stunning mixed-media silhouette technique. By combining a soft watercolor wash background with stark black acrylic details, you’ll create a striking sailboat scene that perfectly mimics the high contrast of a setting sun.
How-To Guide
Materials
- Heavyweight cold-press watercolor paper (300 gsm)
- Black acrylic paint
- Watercolor paints (yellow, orange, red, warm grey/purple)
- Wide flat wash brush
- Small round detail brush (size 0 or 1)
- Masking tape
- Pencil and eraser
- Jar of clean water
- Paper towels
- White gel pen or white gouache
- Ruler
Step 1: Setting the Scene: The Background
-
Prep your paper:
Begin by taping down all four edges of your watercolor paper to a board or table. This prevents buckling when the paper gets wet and creates that crisp white border seen in the final piece. -
Establish the horizon:
Using your ruler and pencil, lightly draw a horizontal line about one-third of the way up from the bottom of the paper to separate the sky from the water. -
Wet the sky:
Use your large flat brush to apply clean water to the entire sky area above the horizon line. You want the paper glistening but not swimming in a puddle. -
Paint the sunset gradient:
While the paper is wet, load your brush with yellow and paint a semi-circle right above the center of the horizon for the sun’s glow. Work outwards with orange, then blend into a dusky red or purple near the top corners. -
Create the water reflection:
Paint the water section below the horizon using similar colors but in a horizontal, sweeping motion. Keep the area directly under the ‘sun’ lighter and warmer to mimic reflection. -
Let it dry completely:
This is crucial. The background must be bone-dry before you add the silhouette, or the black paint will bleed into the damp paper.
Uneven Gradients?
If your sunset sky looks streaky, re-wet the entire sky area (lightly!) and blend the colors again while damp. Don’t overwork it, or the paper might pill.
Step 2: Painting the Silhouette
-
Sketch the boat:
With a very light pencil touch, sketch the outline of the sailboat. Draw the hull resting on the horizon, two masts, and the triangular shapes of the sails. -
Outline the hull:
Switch to your small round detail brush and black acrylic paint. Carefully outline the hull of the boat first, ensuring the bottom edge sits flat on the horizon line. -
Fill the boat body:
Fill in the hull with solid black paint. Acrylic is perfect here because it’s opaque and won’t lift the underlying watercolor. -
Detail the rigging:
Using just the tip of your brush, draw the thin vertical lines for the masts and the diagonal lines for the booms. -
Paint the sails:
Fill in the sail shapes. I like to leave tiny, pin-prick gaps of unpainted space between the sails and the masts to suggest where the rigging connects, rather than blending them into one blob. -
Add texture to sails:
Once the main black layer is dry, you can use a slightly watered-down black or a very fine tool to add slight texture or ‘stars’ if you want a cosmic look, though solid black works perfectly for a pure silhouette.
Step 3: Final Reflections and Details
-
Start the water reflection:
Using the small brush and black paint again, paint horizontal zigzag lines directly under the boat hull. These should be widest near the boat and taper off as they go down. -
Break up the lines:
As you move lower in the water, break up the black lines more. Use a dry-brush technique (wipe most paint off the brush) to drag faint, broken shadows downwards to mimic ripples. -
Add the sun:
If your initial watercolor wash wasn’t light enough for the sun, use a small dab of white gouache or undiluted yellow acrylic to paint a crisp circle just to the left of the boat. -
Highlight the water:
Use a white gel pen or thin white paint to add a vertical column of shimmering light on the water directly beneath the sun circle, crossing over your horizon line. -
Number it (Optional):
For that catalogued artistic look shown in the inspiration photo, use a fine liner pen or stamp to add a small number (like ’25’) in the upper left sky. -
Reveal the border:
Once absolutely everything is dry, carefully peel away the masking tape at a 45-degree angle to reveal clear, crisp edges.
Reflection Perfection
Make the black water reflections jagged and horizontal. Don’t just paint a mirror image; breaks in the lines simulate the movement of waves distorting the shadow.
Frame this piece in a floating glass frame to enhance the illusion that your painted sunset is part of the real horizon
Birds on a Wire
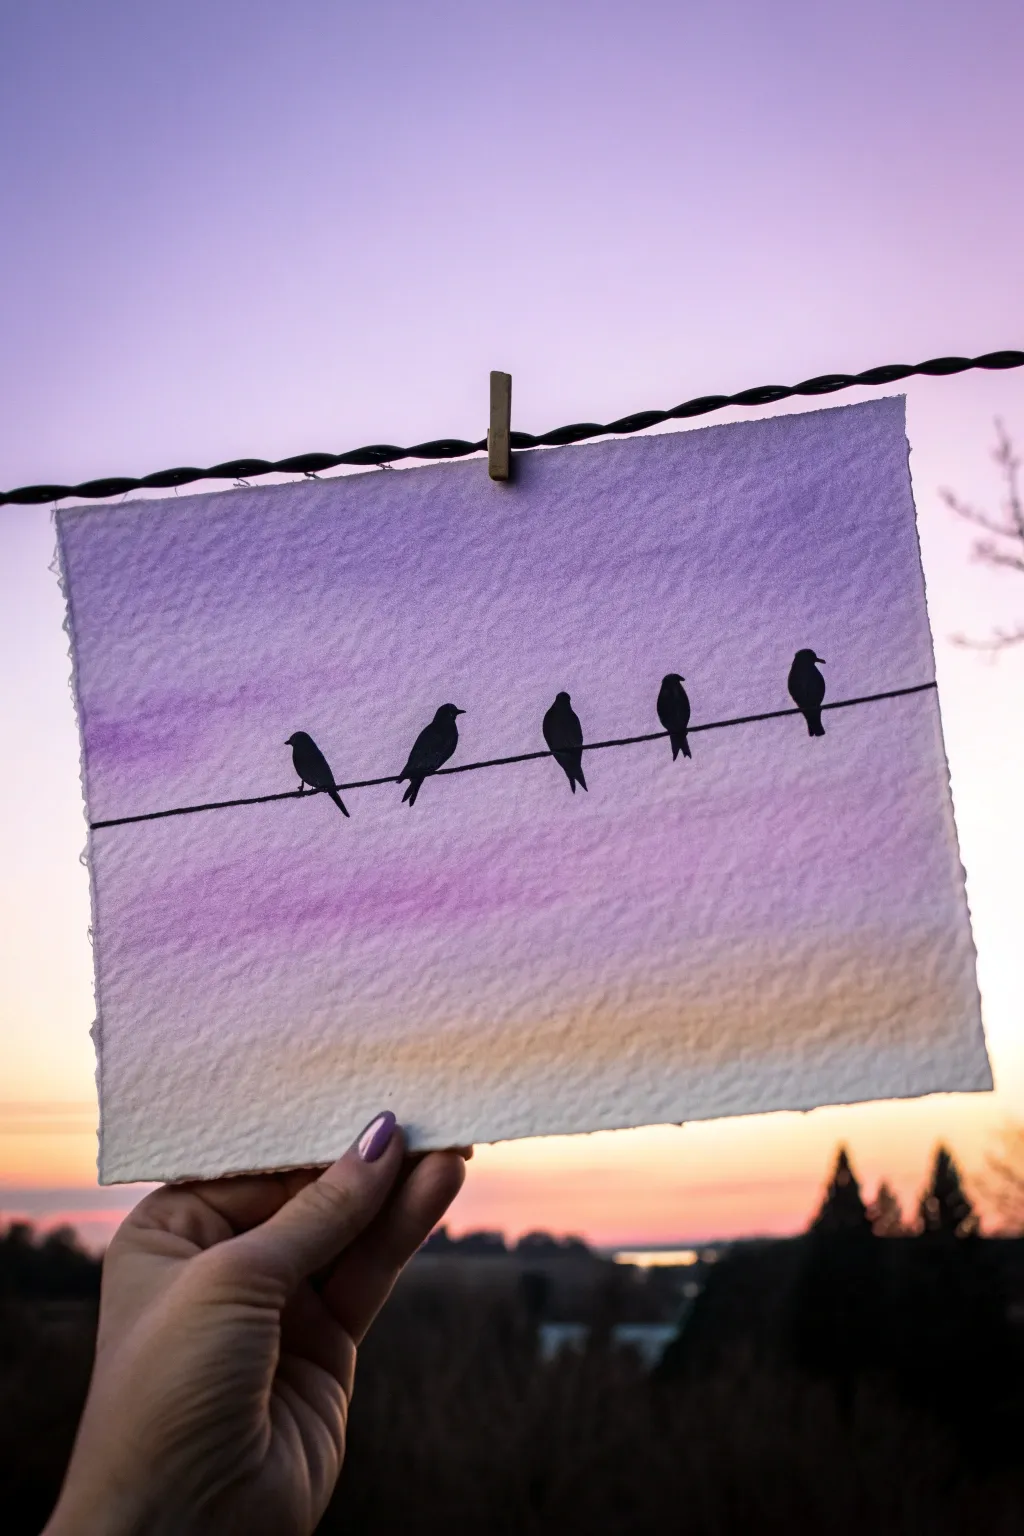
Capture the serene beauty of dusk with this elegant watercolor silhouette painting. Using a simple gradient wash and bold black details, you’ll create a striking contrast between a soft, colorful sky and crisp, perched figures.
Step-by-Step Guide
Materials
- Cold press watercolor paper (approx. 5×7 inches)
- Watercolor paints (Purple/Violet, Magenta, Yellow ochre or warm yellow)
- Fine tip black marker or black waterproof ink pen (0.5mm)
- Black acrylic paint or India ink (optional, for filling)
- Round watercolor brush (size 6 or 8)
- Small detail brush (size 0 or 1)
- Masking tape or painter’s tape
- Ruler
- Pencil
- Clean water
Step 1: Creating the Sky Gradient
-
Prepare the paper:
Begin by taping down your watercolor paper onto a flat board or table surface. This prevents warping and creates clean edges around your artwork. -
Wet the surface:
Load your large round brush with clean water and apply an even coat across the entire paper surface. The paper should be glisten but not have standing puddles. -
Apply the purple:
While the paper is wet, load your brush with a rich purple or violet hue. Apply this color horizontally across the top third of the paper, letting the pigment flow naturally. -
Blend downward:
Rinse your brush slightly and pull the purple color downwards into the middle section. As you move down, add a touch of magenta to the brush to warm up the transition. -
Add the horizon glow:
Rinse your brush thoroughly so it’s clean. Pick up your warm yellow or yellow ochre paint and apply it across the bottom third of the paper. -
Merge the colors:
Gently blend the yellow upward into the fading purple/magenta section. Be careful not to overwork this area, or the colors might turn muddy; just let the wet paper do the mixing for you. -
Dry completely:
Allow the paper to dry entirely before moving on. The surface must be bone-dry to prevent the black ink from bleeding into the sky later.
Wet-on-Wet Blending
To get that seamless sky fade, tilt your board slightly. Gravity pulls the wet paint down, helping the purple flow naturally into the yellow.
Step 2: Drawing the Silhouette
-
Position the wire:
Using a ruler and a light pencil touch, draw a straight line horizontally across the paper. Place it slightly below the vertical center to leave plenty of room above for the birds’ heads. -
Sketch basic shapes:
Lightly sketch five oval shapes sitting on the line to represent the bodies of the birds. Space them out somewhat unevenly to make it look natural. -
Refine the forms:
Add small circles for heads and define the tail feathers pointing downwards. Vary the poses slightly—have some looking left, some looking right, and vary the body sizes. -
Ink the wire:
Trace over your pencil line with a fine black marker or a detail brush loaded with black ink. Make the line solid and confident. -
Outline the birds:
Carefully outline the perimeter of your first bird using the fine marker. Pay attention to the beak shape and the slight curve where the feet would grip the wire. -
Fill in the bodies:
Fill in the bird shapes completely. You can use the marker for this, but I prefer switching to a small brush with black acrylic paint or India ink for a deeper, more opaque black coverage. -
Sharp details:
Once filled, use your finest pen to sharpen any tail feathers or beak tips that got lost during the painting process. -
Final touches:
Check for any white gaps in the silhouette and touch them up. Once the black ink is fully dry, gently erase any visible pencil marks. -
Deckled edge effect:
For that rustic torn-paper look shown in the example, place a ruler against the edge of the paper and carefully tear the excess strip off rather than cutting it with scissors.
Add Texture Details
Sprinkle coarse salt on the wet purple sky while it’s drying. Brush it off later to create starry textures or snowflake-like patterns.
Hang your finished piece near a window to see how your painted sunset complements the real evening sky

PENCIL GUIDE
Understanding Pencil Grades from H to B
From first sketch to finished drawing — learn pencil grades, line control, and shading techniques.
Explore the Full Guide
Cat Silhouette on a Rooftop

Capture the quiet magic of a cat gazing at the moon with this atmospheric watercolor piece. Through careful blending and stark contrast, you will create a glowing purple sky that perfectly frames a crisp, black silhouette.
Detailed Instructions
Materials
- Cold press watercolor paper (300 gsm)
- Masking tape
- Pencil and eraser
- Circular object or compass
- Watercolor paints (Violet, Magenta, Yellow Ochre, Indigo, Payne’s Grey)
- Black gouache or acrylic paint
- Round brushes (sizes 4, 8, and a fine liner)
- White gouache
- Jar of water
- Paper towels
Step 1: Planning and Preparation
-
Secure the edges:
Begin by taping down all four edges of your watercolor paper to a board. Press the tape firmly to ensure clean, white borders later. -
Sketch the moon:
In the upper right quadrant, use a compass or trace a small circular object to outline your moon. Keep your pencil lines very faint so they do not show through the paint later. -
Outline the roof and cat:
Lightly sketch the triangular peak of the roof at the bottom center. Draw the silhouette of the cat sitting on the peak, paying attention to the S-curve of the tail and the alert posture of the ears.
Tape Tactics
To prevent your paper from tearing when removing masking tape, heat the tape gently with a hair dryer on a low setting for a few seconds before peeling.
Step 2: Painting the Sky
-
Mask the moon:
Before wetting the paper, you need to protect the moon. Carefully paint around the circle with clean water first, or use masking fluid if you have it. For this tutorial, we will carefully paint around it. -
Wet-on-wet technique:
With a large clean brush, wet the entire sky area (avoiding the moon circle and the roof area). The paper should be glisten, but not hold puddles. -
Apply the purple base:
Load a size 8 brush with a vibrant Violet. Start at the top left corner and paint downwards. The colour should be darkest at the top and gradually fade as you move toward the horizon line. -
Blend the gradient:
As you reach the lower third of the sky, mix a touch of Magenta into your purple to warm it up. Let this blend naturally into the wet paper. -
Create the horizon glow:
Near the roofline, drop in a very faint wash of Yellow Ochre or a warm peach tone while the paper is still damp. This suggests the last light of sunset or a city glow. -
Scatter the stars:
While the sky is drying but not bone dry, you can flick a tiny amount of clean water or white gouache for larger stars, or wait until it is fully dry to paint them precisely. -
Detail the moon:
Once the sky is dry, wet the inside of the moon circle. Drop in very pale, diluted Violet or Grey to create craters and texture. Keep it subtle; the moon should remain mostly white.
Step 3: The Silhouette and Roof
-
Base layer for the roof:
Mix Indigo with a little Payne’s Grey. Using a flat or round brush, block in the shape of the roof. Use straight strokes to mimic the direction of the shingles or tiles. -
Define the rooftop texture:
Once the base roof layer is dry, use a darker mix of the same colors to paint thin, horizontal lines for the shingles. Add a shadow under the eave for dimension. -
Paint the cat silhouette:
Switch to black gouache or acrylic for maximum opacity. Carefully fill in the cat shape you sketched earlier. Start with the body to get the flow right. -
Refine the edges:
Use your smallest liner brush to sharpen the tips of the cat’s ears. I find that taking a deep breath and holding it steady helps make the tail curve smooth and elegant. -
Add fur texture:
With the very tip of your liner brush, pull out tiny, almost invisible hairs along the back of the cat’s neck and body to make the silhouette look fluffy rather than rigid.
Glow Up
Add a tiny, thin line of white gouache along the top edge of the cat’s silhouette and the roof ridge. This creates a ‘rim light’ effect from the moon.
Step 4: Finishing Touches
-
Starry highlights:
Dip a toothbrush or firm brush into white gouache. Tap it against a stick to splatter tiny stars across the purple sky. Add a few larger, manual dots for distinct constellations. -
Final inspection:
Check the opacity of your black silhouette. If the background sky shows through, apply a second coat of black paint. -
The reveal:
Wait until the painting is completely bone dry. peel the tape away slowly at a 45-degree angle to reveal your crisp, clean borders.
Now you have a serene rooftop moment captured forever on paper
Deer in a Moonlit Clearing
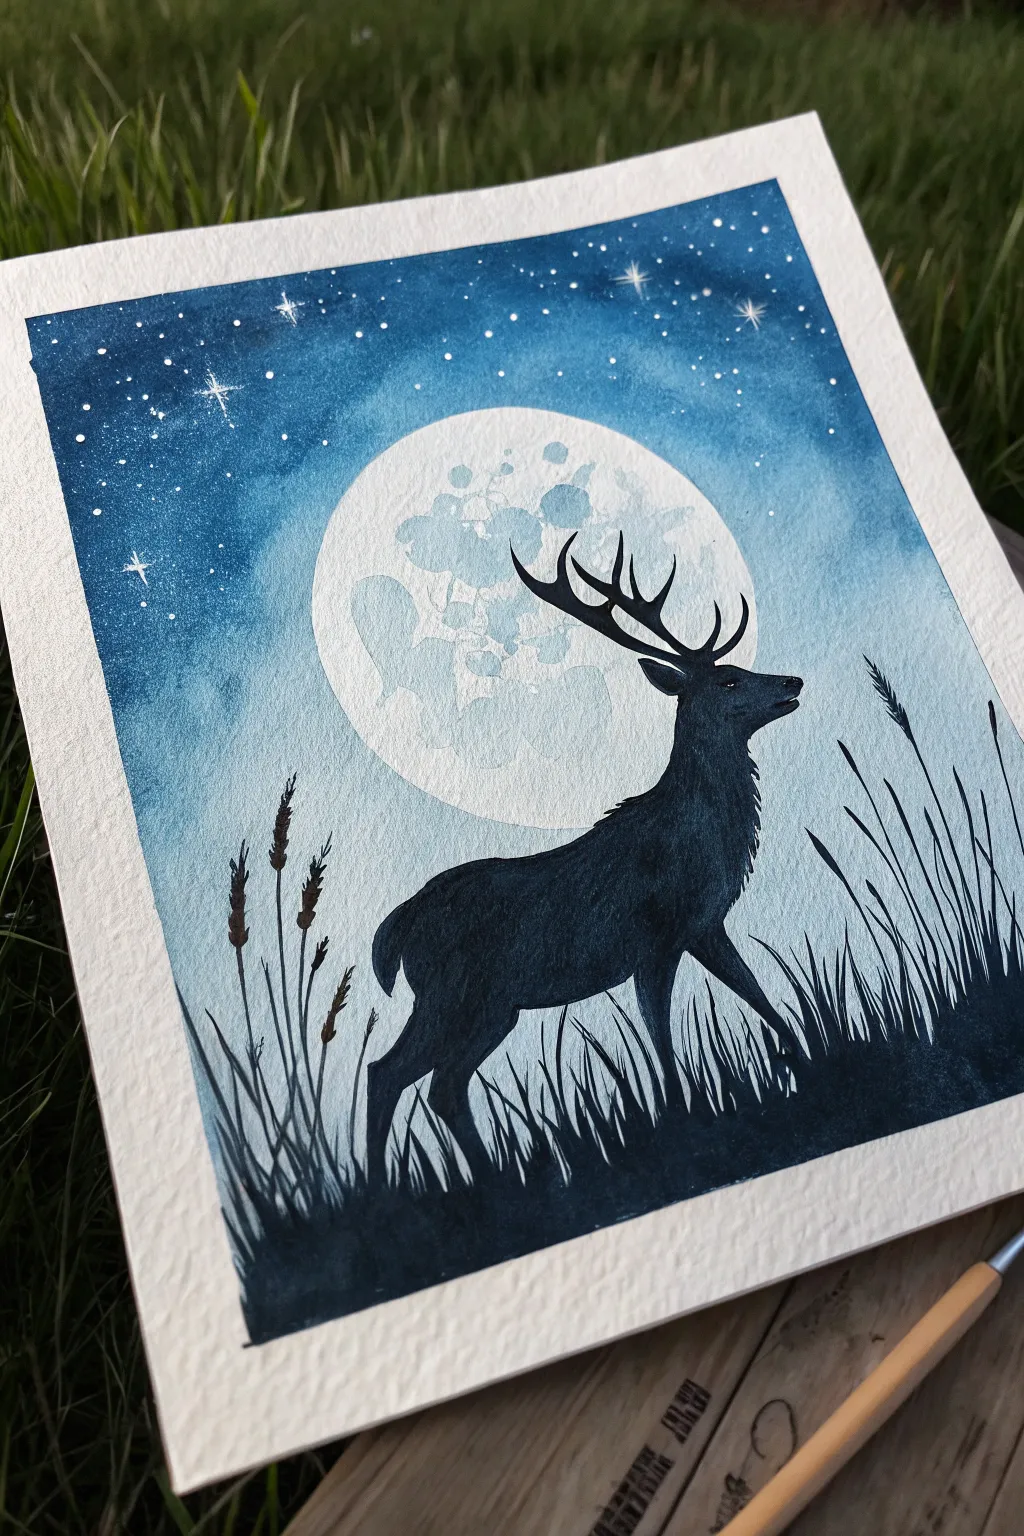
Capture the serene beauty of a stag standing beneath a giant, cratered moon in this monochromatic watercolor piece. The contrast between the soft, textured lunar surface and the crisp, dark silhouette creates a stunning focal point.
Step-by-Step
Materials
- Watercolor paper (cold press, 300gsm)
- Painter’s tape or masking tape
- Watercolor paints (Indigo, Prussian Blue, Payne’s Grey)
- White gouache or white ink
- Black gouache or waterproof black ink
- Round brushes (sizes 8, 4, and 0 for details)
- Circular object for tracing (like a roll of tape or a lid)
- Pencil
- Paper towels
- Two jars of water
Step 1: Setting the Scene
-
Secure the paper:
Begin by taping down all four edges of your watercolor paper to a board or table. Press the tape down firmly to ensure crisp, clean borders when you peel it off later. -
Trace the moon:
Place your circular object slightly above the center of the paper. Lightly trace around it with a pencil to define the moon’s shape. -
Sketch the silhouette:
Very lightly sketch the outline of the deer inside the lower right portion of the moon circle and extending downwards. Don’t worry about perfect details yet; just get the general pose and antler placement right.
Step 2: Painting the Sky and Moon
-
Masking the moon:
This is a crucial step: instead of using masking fluid, simply paint carefully *around* your pencil circle. Wet the entire sky area with clean water, avoiding the moon circle itself. -
First sky layer:
Drop in a dilute wash of Prussian Blue while the paper is wet so the color spreads softly. Keep the color lightest near the moon and darker toward the edges. -
Deepening the night:
While the paper is still damp, charge your brush with concentrated Indigo. Drop this dark pigment into the top corners and edges to create a vignette effect, guiding the eye toward the center. -
Adding stars:
Once the sky starts to lose its sheen but isn’t bone dry, use a small brush to flick tiny specks of white gouache over the blue areas. Add a few larger stars manually with the tip of a size 0 brush, painting tiny cross-shapes for sparkles. -
Painting the moon craters:
Let the sky dry completely. Wet the inside of the moon circle with clean water. Drop in very watery grey-blue paint in random splotches to mimic craters. -
Creating lunar texture:
While the moon is wet, dab at some of the grey spots with a thirsty brush or a corner of a paper towel to lift pigment, creating soft, cloud-like texture.
Bleeding Edges?
If blue paint bleeds into your moon, quickly dab it with a clean, dry paper towel. Once dry, you can clean up the edge with opaque white gouache.
Step 3: The Silhouette
-
Outline the stag:
Switch to your black gouache or ink. Ensure it is opaque and creamy. Carefully outline the deer’s head and neck, paying close attention to the antler shape. -
Fill the body:
Fill in the body of the deer with solid black. I find it helpful to use a slightly larger brush for the main body and switch back to a detail brush for the legs. -
Define the fur:
Use the very tip of your smallest brush to pull tiny, jagged strokes outward along the neck and chest to suggest fur texture, so the silhouette isn’t perfectly smooth. -
Ground the figure:
Paint a solid black uneven line at the bottom to represent the ground. Blend the deer’s hooves into this ground layer so the animal looks firmly planted. -
Add tall grasses:
Using quick, upward flicking motions with your liner or size 0 brush, paint tall blades of grass rising from the shadowy ground. Make them varying heights for realism. -
Seed heads:
Add small textured details to the tops of a few grass blades to look like wheat or reeds. These should overlap the bottom of the moon slightly to create depth. -
Final touches:
Check for any light patches in your black silhouette and apply a second coat if needed for total opacity.
Pro Tip: Better Stars
Cover the moon area with a scrap piece of paper before flicking your white paint to ensure you don’t get stars on the lunar surface.
Peel off the tape gently to reveal your crisp white border and admire your peaceful night scene


Wolf Howling at the Moon
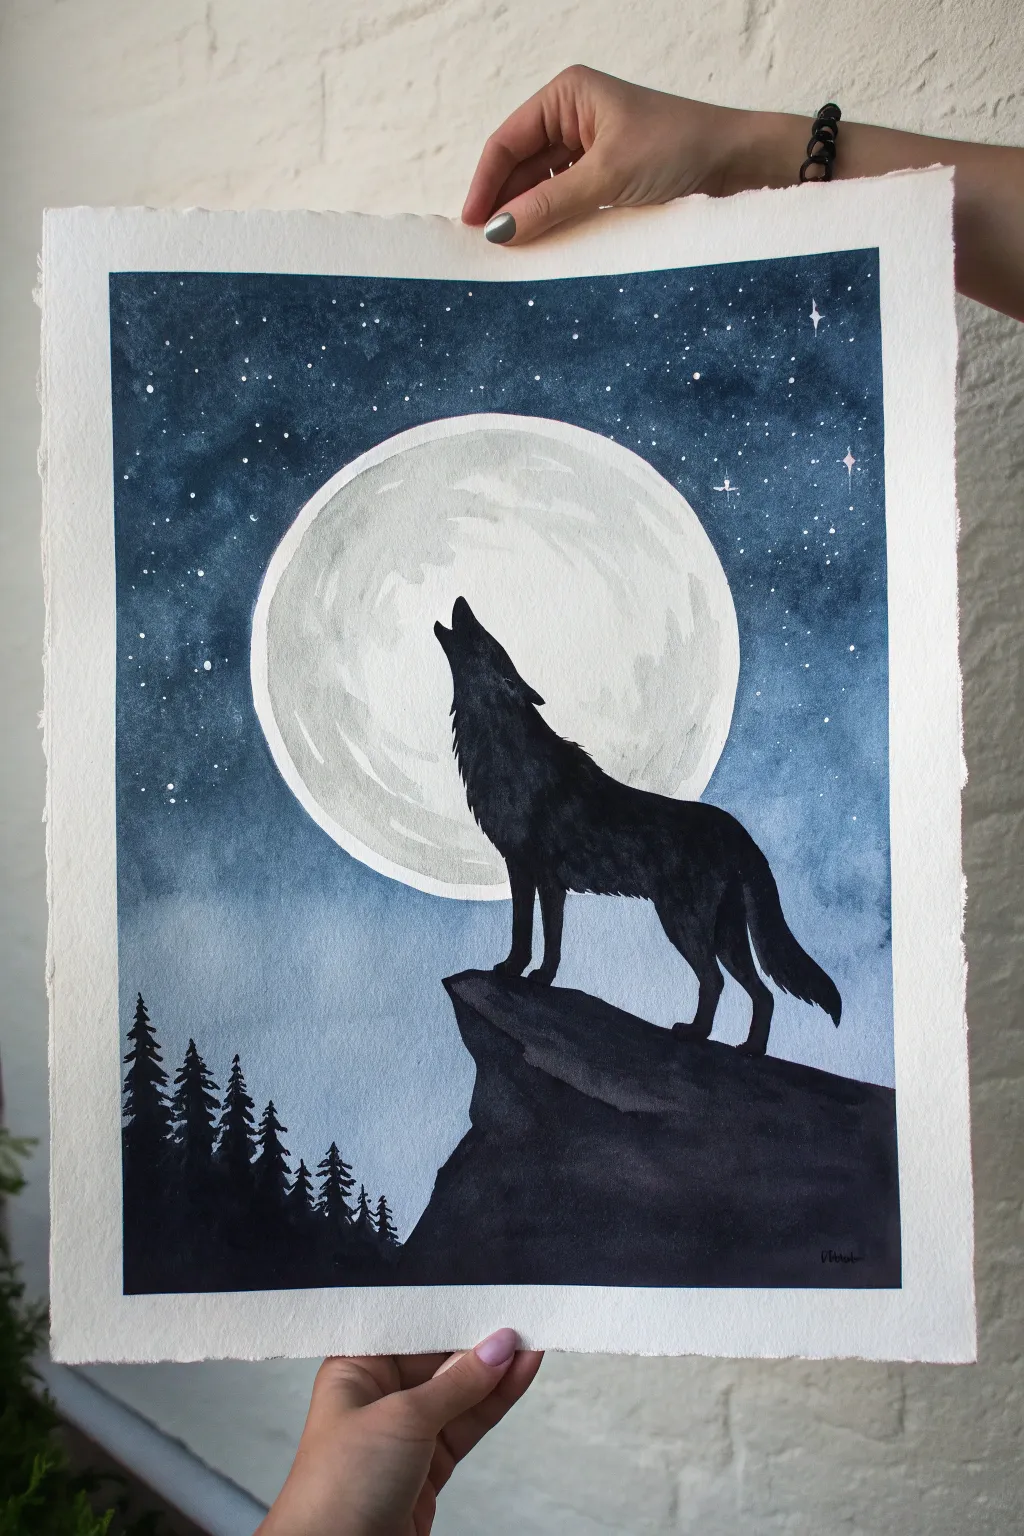
Capture the wild spirit of nature with this striking watercolor silhouette. Using a cool, monochromatic palette and masking techniques, you’ll create a glowing moon and a stark, beautiful contrast between the night sky and the howling wolf.
Step-by-Step Guide
Materials
- Cold press watercolor paper (140lb/300gsm)
- Painter’s tape or masking tape
- Pencil and eraser
- Watercolor paints (Indigo, Payne’s Grey, Black)
- White gouache or white gel pen
- Round brushes (sizes 4, 8, and a fine liner)
- Masking fluid (optional, but recommended)
- Jar of clean water
- Paper towels
- Circular object or compass for the moon
Step 1: Preparation and Sketching
-
Tape the edges:
Begin by taping down all four edges of your watercolor paper to a board or table. This creates that crisp, clean white border seen in the final piece and prevents the paper from buckling when wet. -
Outline the moon:
Using a roll of tape, a mug, or a compass, lightly trace a large circle in the upper center of the paper. This will be your glowing moon. -
Sketch the silhouette:
Lightly sketch the outline of the cliff jutting out from the right side. On top of the cliff, draw the silhouette of the wolf with its head threw back howling. Add the rough shapes of pine trees along the bottom left edge. -
Mask the moon:
Carefully apply masking fluid to the entire moon circle to protect the white paper. Alternatively, you can just paint very carefully around the circle later, but masking makes painting the sky much easier. Let it dry completely.
Uneven Sky Gradient?
If your sky dries with hard lines instead of a smooth fade, re-wet the entire sky area lightly with a clean damp brush to blend the transition, then let it dry flat.
Step 2: Painting the Night Sky
-
Prepare the sky wash:
Mix a large puddle of dark blue, such as Indigo or Prussian Blue. You want a gradient effect, so prepare a lighter, watery version of this color as well. -
Start from the top:
Using your largest brush, apply the darkest blue paint at the very top of the paper. Use broad, horizontal strokes. -
Create the gradient:
As you move down the paper, gradually add more water to your brush or dip into your lighter blue mix. The sky should transition from deep indigo at the top to a dusty, light blue near the horizon line. -
Paint around the landscape:
Bring the sky wash down to where your tree and cliff sketches begin. It’s okay to overlap the sketches slightly since the silhouettes will be black, but try to keep the general horizon area light. -
Add texture (optional):
While the paint is still damp near the top, you can drop in concentrated dots of dark blue to add depth to the night sky. Let the entire background dry completely.
Step 3: The Moon and Stars
-
Reveal the moon:
If you used masking fluid, gently rub it off with your finger or a rubber cement pickup to reveal the stark white circle. -
Texture the moon surface:
Mix a very watery, pale grey. Using a clean, damp brush, paint faint, patchy shapes inside the moon to represent craters. Soften any hard edges with clean water so the moon looks ghostly and dimensional, not flat. -
Splatter stars:
Load a brush with white gouache or slightly watered-down white acrylic. Tap the handle against another brush over the dark upper sky to create a field of stars. -
Add larger stars:
Use a white gel pen or a fine brush with white gouache to manually add a few larger, twinkling stars with cross shapes for extra sparkle.
Moon Texture Trick
Use a crumpled paper towel to blot the wet grey paint on the moon. This lifts pigment randomly and creates perfect, effortless crater textures.
Step 4: Creating the Silhouettes
-
Mix the darkest tone:
Combine black watercolor with a touch of indigo or violet to create a rich, deep black. Pure black can look flat, so mixing in color adds life. -
Paint the wolf:
Using a size 4 round brush, carefully fill in the wolf sketch. Use only the very tip of the brush to flick tiny strokes along the neck and back to simulate fur texture. -
Fill the cliff:
Switch to a slightly larger brush to fill in the large rock formation the wolf is standing on. Keep the edges sharp against the sky. -
Add rock texture:
While the black cliff is drying, lift a tiny bit of color or add a slightly lighter grey stroke near the top edge of the rock to suggest dimension and moonlight hitting the stone. -
Paint the trees:
For the pine trees on the left, draw a straight vertical line for the trunk first. Then, using a small brush, tap horizontal, jagged strokes getting wider as you go down to create the branches. -
Connect the foreground:
Ensure the bottom of the trees and the cliff merge into a solid dark mass at the bottom of the painting to ground the composition. -
Final touches:
Once everything is bone dry, carefully peel off the tape at a 45-degree angle to reveal your crisp border.
Enjoy the mysterious atmosphere of your new moonlit masterpiece
Cactus Desert Sunset
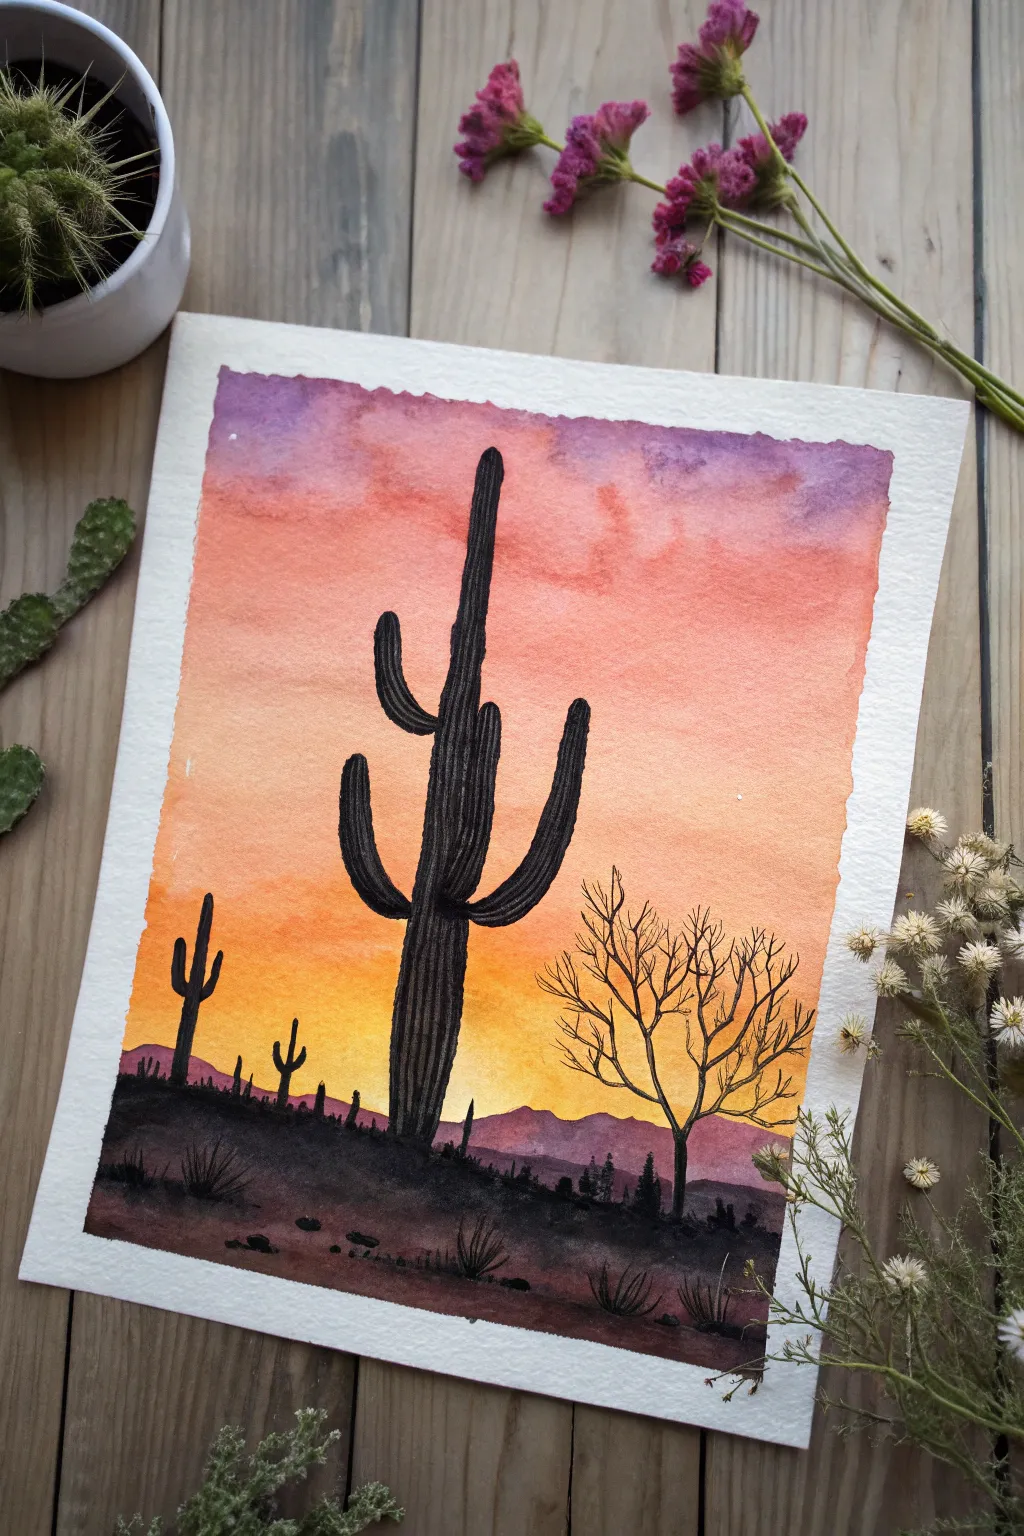
Capture the blazing warmth of a desert evening with this striking watercolor silhouette painting. You’ll create a seamless, glowing gradient sky as the perfect backdrop for stark black cacti and delicate dry brush details.
Step-by-Step
Materials
- Cold press watercolor paper (140lb/300gsm)
- Masking tape
- Watercolor paints: Purple (dioxazine), Pink (opera or quinacridone), Orange (cadmium), Yellow (lemon or cadmium)
- Black gouache or India ink
- Large flat wash brush
- Round brushes (sizes 6 and 2)
- Small detail brush (size 0 or 00)
- Clean water
- Paper towels
- Pencil and eraser
Step 1: Preparing the Sky
-
Secure the paper:
Begin by taping down all four edges of your watercolor paper to a board or table. This prevents buckling when the paper gets wet and creates a crisp white border. -
Wet the surface:
Using a clean, wide flat brush, apply an even coat of clean water over the entire paper surface. You want it shiny and damp, but not dripping with puddles. -
Apply the purple:
Load your brush with a watery mix of purple paint. Apply it horizontally across the very top of the paper, letting the pigment bleed downward slightly into the wet paper. -
Transition to pink:
Clean your brush and pick up your vibrant pink. Paint a horizontal band just below the purple, allowing the two colors to touch and merge softly. I like to tilt the board slightly to help them blend naturally. -
Add the orange glow:
Continue working downward with an orange hue. Blend it into the bottom edge of the pink, keeping your brush strokes long and horizontal. -
Finish with yellow:
Fill the remaining bottom section with a bright yellow. Blend it up into the orange, ensuring the brightest yellow stays near the bottom horizon line where the sun would be. -
Let it dry completely:
This is crucial: allow the paper to dry completely before moving on. The paper should be flat and warm to the touch. You can use a hair dryer on a low setting if you’re impatient.
Smooth Blends
To avoid ‘cauliflower’ blooms in your sky, work quickly while the paper is wet and don’t add water back into a drying section.
Step 2: Painting the Foreground
-
Sketch the outlines:
Lightly pencil in the horizon line, the main large cactus in the center, smaller cacti in the distance, and the skeletal tree structure on the right. -
Paint the distant mountains:
Mix a watery purple-grey color. Paint rough, low mountain shapes just above your pencil horizon line. Keep this layer semi-transparent so it looks far away. -
Establish the ground:
Using black gouache or very concentrated watercolor, paint the solid ground at the bottom. Make the top edge of the ground uneven to mimic rocky terrain. -
Outline the main cactus:
Switch to a round brush (size 6) loaded with solid black. Carefully fill in the main central cactus, starting with the thick trunk and extending up to the arms. -
Add vertical texture:
While the black paint is still wet, use a slightly dry brush to lift out tiny vertical lines on the cactus body, or wait until dry and use a white gel pen for subtle vertical highlights to suggest ribs. -
Paint secondary silhouettes:
Paint the smaller cacti on the left side of the scene. Vary their heights to create depth and perspective.
Starry Night
Once the sky is totally dry, flick a toothbrush loaded with white gouache over the purple section to add emerging stars.
Step 3: Detailed Silhouette Work
-
Create the tree structure:
Using your smallest detail brush (size 0 or 00) and black ink, paint the bare tree on the right. Start from the trunk and pull outward to create thin, tapering branches. -
Add fine twigs:
Add tiny, jagged twigs to the ends of the tree branches. A shaky hand actually helps here to make the branches look organic and gnarled. -
Add foreground shrubs:
Along the black ground line, use quick, upward flicking motions to paint small tufts of grass and spiky desert shrubs. -
Detail the ground:
Paint a few small rocks or pebbles on the ground using oval shapes. You can create shadows under them for a grounded look. -
Final touches:
Check your black values. If the watercolor dried too light, add a second coat of black to the main silhouettes to ensure they are stark and opaque against the sunset.
Peel off your tape slowly to reveal a crisp border and enjoy your stunning desert landscape
Pine Forest and Misty Moon
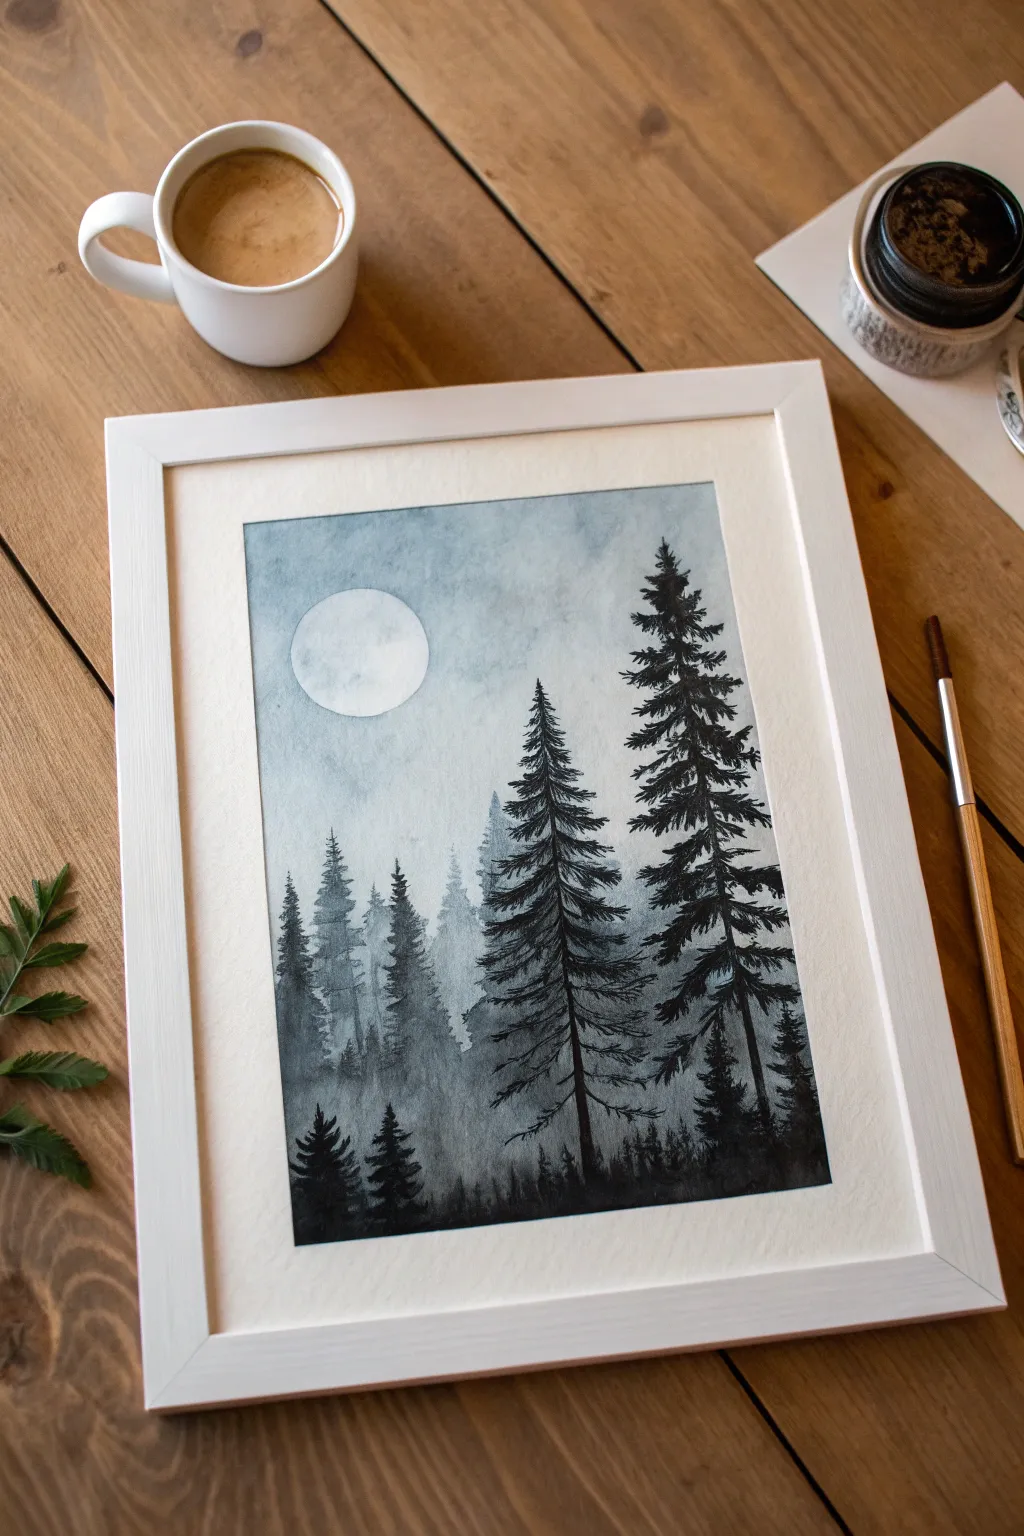
Capture the serene stillness of a midnight forest with this monochrome watercolor study. Using layers of wet-on-wet washes and precise dry-brush details, you’ll build depth from a glowing moon out to shadowy foreground pines.
How-To Guide
Materials
- Cold Press watercolor paper (300 gsm)
- Watercolor paints: Payne’s Grey, Indigo, and a touch of Lamp Black
- Winsor & Newton white gouache (optional, for corrections)
- Masking fluid or masking tape (circular)
- Round brushes: sizes 8 and 12 for washes
- Rigger or liner brush: size 0 or 2 for branches
- Flat brush: 1 inch for wetting paper
- Paper towels
- Two jars of water
- White wooden frame (optional)
Step 1: Setting the Sky
-
Prepare the Moon:
Begin by deciding the placement of your moon in the upper left quadrant. You can either carefully paint around a circular area or, for a crisp edge, apply a circle of masking fluid or a sticker. Let the masking fluid dry completely before proceeding. -
Wet the Paper:
Using your large flat brush, apply clean water across the entire sky area, stopping just short of the bottom third where the dense forest will be. The paper should be glisten with moisture but not hold puddles. -
Initial Wash:
Mix a very watery, pale wash of Payne’s Grey. Start dropping this color into the wet paper, concentrating slightly darker pigment around the edges and corners to create a vignette effect. Leave the area immediately around the moon lighter to suggest a glow. -
Creating Texture:
While the wash is still wet, dab in slightly more concentrated indigo in random cloud-like patches. Tilt the paper gently to let the colors blend naturally, creating that misty, atmospheric backdrop. -
Reveal the Moon:
Once the sky is bone dry, carefully rub away the masking fluid. If you painted around the circle, soften the edges slightly with a clean, damp brush to blend the moon into the sky just a touch. -
Moon texture:
With a very dilute grey, drop a few tiny, uneven patches inside the white moon circle to suggest craters and shadows. Keep this extremely subtle so the moon remains the brightest element.
Muddy Washes?
If your grey sky looks dirty, you might be overworking the paper. Lay the wash down confidently and stop touching it. Let gravity and the water do the blending work for you.
Step 2: The Background Forest
-
First Layer of Trees:
Mix a light-medium grey wash. On dry paper, paint the distant tree line about midway up the page. These shapes should be loose and faint, representing trees far in the distance obscured by fog. -
Softening Edges:
Before this layer dries, run a clean, damp brush along the bottom edge of these trees to blur them into the misty ground below. This prevents hard lines and creates a sense of depth. -
Second Layer:
Once dry, mix a slightly darker grey. Paint a second row of trees slightly lower and larger than the first. Add a bit more detail to the tops, implying pine shapes, but keep the bottoms hazy.
Step 3: The Foreground Silhouettes
-
Mixing the Darkest Tone:
Create a concentrated mix of Indigo and Lamp Black. You want a creamy consistency that is opaque and bold for the primary subjects. -
Main Trunks:
I prefer to tackle the two largest trees on the right first. Using a size 8 round brush, paint a straight vertical line for the trunk, tapering slightly as it goes up. Anchoring these first helps balance the composition. -
Adding Branches:
Switch to your smaller brush or rigger. Starting from the top of the tree, paint downward-sloping branches. Use short, flicking strokes to mimic pine needles. -
Building Volume:
As you move down the trunk, make the branches wider and denser. Leave small gaps between branches to let the background ‘mist’ peek through to prevent the tree from looking like a solid block. -
Left Side Trees:
Paint the smaller foreground trees on the left side using the same dark mix. Vary their heights so they don’t look perfectly uniform. -
The Forest Floor:
Connect the bases of all your dark trees with a dark, uneven wash at the very bottom of the paper. Use rough, upward dabbing motions to suggest tall grasses or low shrubs in the darkness. -
Final Details:
Assess the balance. Use your jagged liner brush to add a few ultra-fine, sharp twigs or dead branches sticking out from the main trunks for realism.
Winter Effect
Splatter opaque white gouache or slightly watered-down white acrylic over the dry painting using an old toothbrush to create a magical snowfall scene.
Once fully dry, place your artwork in a clean white frame to emphasize the cool tones of your misty night
Dock Into a Twilight Lake
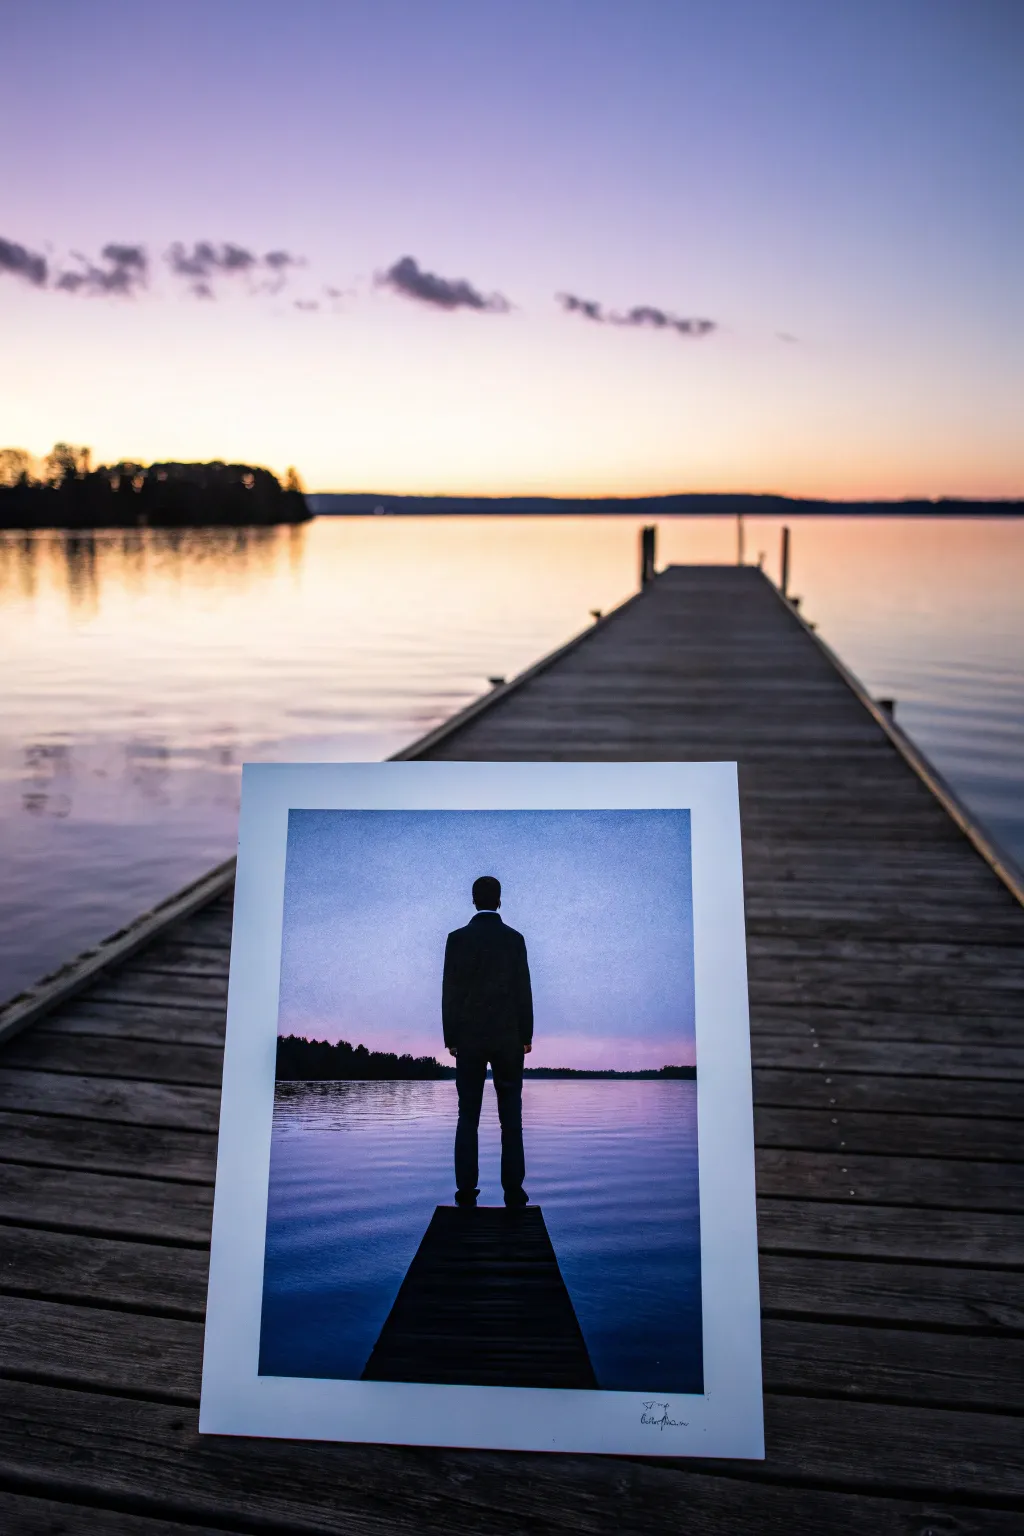
Capture the stillness of a fading day with this evocative acrylic painting featuring a solitary figure gazing out over a calm lake. Using simple blending techniques and crisp silhouette work, you’ll create a moody, atmospheric piece that perfectly mirrors the peaceful transition from dusk to night.
Step-by-Step Tutorial
Materials
- Canvas board or stretched canvas (11×14 or similar)
- Acrylic paints: Ultramarine Blue, Phthalo Blue, Dioxazine Purple, Titanium White, Mars Black, Crimson Red
- Large flat brush (1 inch)
- Medium flat brush (1/2 inch)
- Small round detail brush (size 1 or 2)
- Ruler or straight edge
- Painters tape (optional)
- Palette for mixing
- Cup of water and paper towels
Step 1: Sky and Water Gradient
-
Establish the horizon:
Decide where your waterline will be. For this composition, place it slightly below the center of the canvas to give emphasis to the vast sky. You can use a strip of painter’s tape or draw a very faint pencil line across the canvas to keep your horizon perfectly straight. -
Mix the twilight colors:
Prepare your sky colors on the palette. You’ll need a gradient ranging from a deep, rich indigo at the top to a soft, pale lavender at the horizon. Mix Ultramarine Blue with a touch of Black for the top, and White with touches of Purple and Crimson for the bottom. -
Paint the upper sky:
Using your large flat brush, apply the darkest blue mix to the very top edge of the canvas. Use long, horizontal strokes to ensure smooth coverage. -
Blend downward:
While the paint is still wet, gradually add your lighter purple mix as you move down the canvas. Blend the colors where they meet by brushing back and forth gently; acrylic drying retarder can be helpful here if your paint dries too fast. -
Create the horizon glow:
Right above your horizon line, use your lightest mix—mostly Titanium White with just a whisper of pink or purple. This creates that ‘last light of day’ effect. -
Paint the water base:
For the lake, you’ll mirror the sky but darker. Start just below the horizon with a medium purple-blue tone, darker than the sky above it. Drag your brush horizontally. -
Deepen the foreground water:
As you move toward the bottom of the canvas (the foreground), introduce more Phthalo Blue and deeper purples. Use horizontal strokes to mimic the surface of calm water.
Smooth Gradients
Keep a misting spray bottle handy. A light spritz of water on your canvas keeps the acrylics wet longer, allowing you to blend the sky colors seamlessly without harsh lines.
Step 2: Distant Trees and Horizon
-
Mix a near-black shade:
Avoid using pure black for natural elements. Instead, mix Mars Black with a little Dioxazine Purple or Dark Green. This creates a more organic silhouette color. -
Paint the tree line:
Using a smaller flat brush or round brush, tap in the distant tree line right on the horizon. Make the tops uneven and jagged to represent pine or deciduous trees, but keep the bottom edge perfectly straight against the water line. -
Add faint reflections:
Clean your brush and take a very small amount of the dark tree color. Glaze it directly underneath the tree line into the water, pulling straight down and then blurring it slightly for a soft reflection.
Fixing Silhouette Mistakes
If you smudge black paint into the sky, don’t wipe it! Let it dry completely, then paint over the mistake with your opaque sky color. Wet wiping often creates a muddy mess.
Step 3: The Dock and Figure
-
Draft the dock perspective:
I usually like to sketch this part lightly with chalk or pencil first. Draw a trapezoid shape starting from the bottom center of the canvas, narrowing as it goes upward toward the middle of the lake. This creates depth. -
Paint the dock base:
Fill in the dock shape with solid black paint. Ensure the edges are sharp and crisp against the blue water. Use your ruler again if needed to keep the sides straight. -
Add subtle wood texture:
Mix a dark grey (Black plus a tiny dot of White). Using a nearly dry brush, drag faint, horizontal lines across the black dock to suggest wooden planks. -
Outline the figure:
Draw the outline of the standing man in the center of the dock. Sketch a simple silhouette: a head, shoulders, a jacket shape, legs, and shoes. Keep the posture relaxed. -
Fill the silhouette:
Using your small round detail brush and pure black paint, carefully fill in the figure. Pay close attention to the shape of the head and the shoulders, as these define the human form most clearly. -
Refine the edges:
Go back over the edges of your figure and the dock. A crisp edge is crucial for a believable silhouette effect. Clean up any wobbles with the background water color if necessary. -
Add water ripples:
Take a fine brush with a mix of water and your lightest horizon color. Paint very thin, broken horizontal lines in the water around the dock and behind the figure to simulate ripples catching the twilight. -
Final touches:
Assess the contrast. If the figure doesn’t pop enough, add a second coat of black to make it truly opaque against the twilight background. Let the entire piece dry completely.
Place your finished painting in a simple frame or on a stand to enjoy the serene mood you’ve captured.
Hot Air Balloons in a Gradient Sky
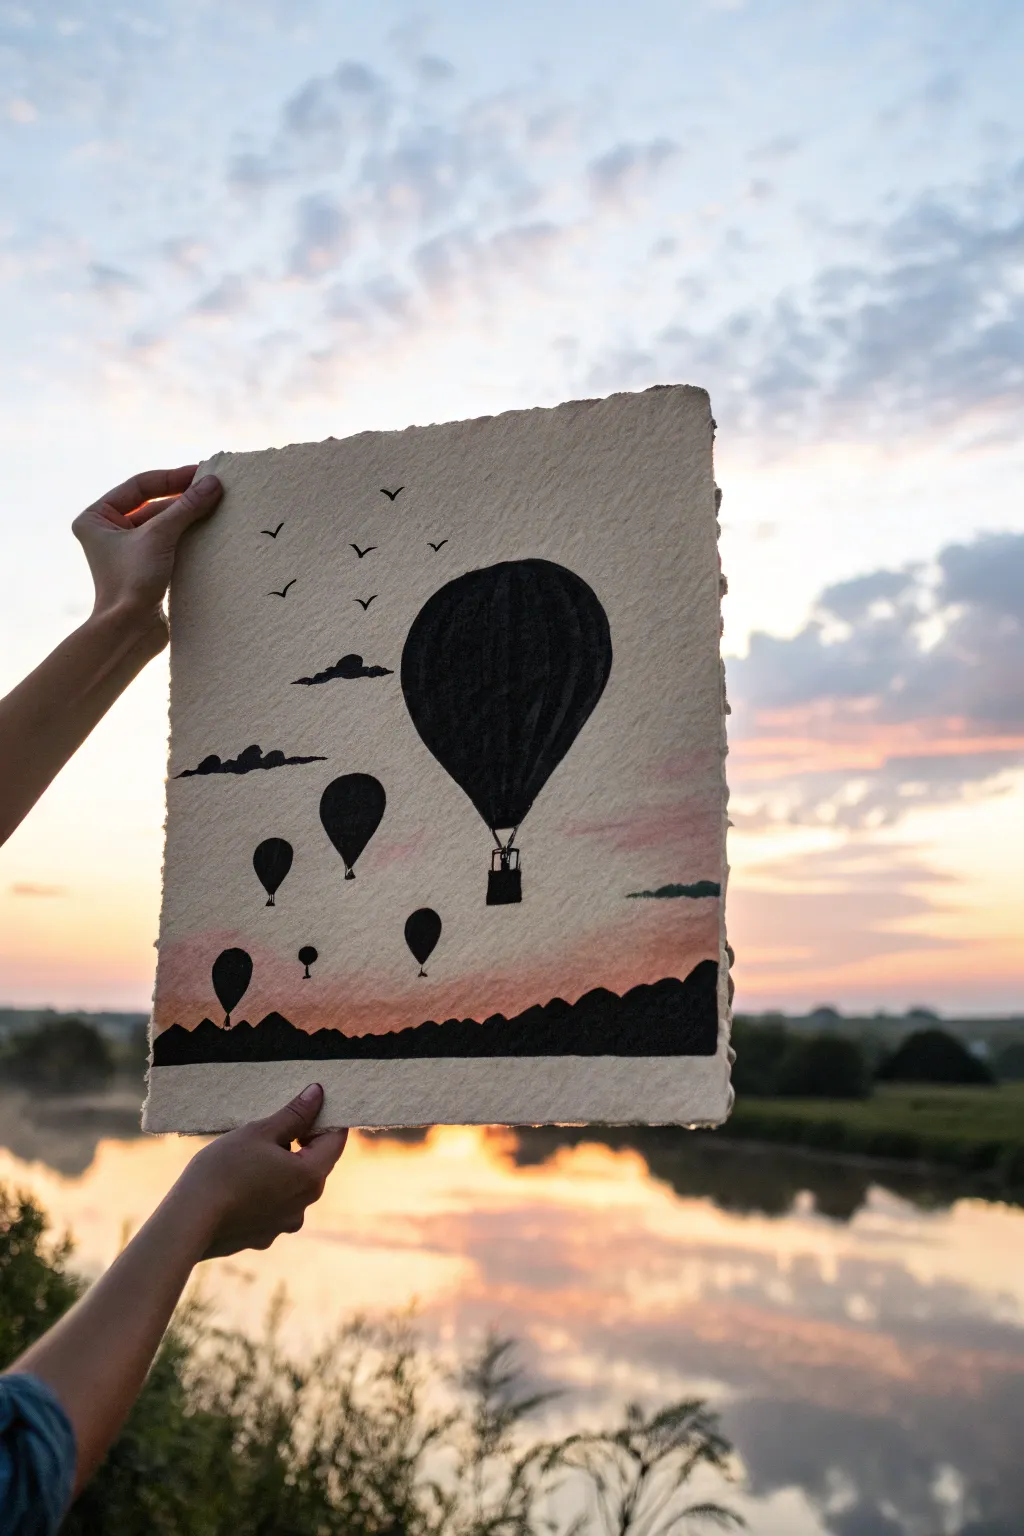
Capture the magic of an evening sky with this serene silhouette painting featuring drifting hot air balloons. The soft, blended gradient background contrasts beautifully with the crisp black ink, creating a dreamy sense of depth on textured paper.
Step-by-Step
Materials
- Heavyweight deckle-edge watercolor paper (300 gsm recommended)
- Watercolor paints (Payne’s Grey, Alizarin Crimson, Cadmium light orange)
- Black waterproof ink or black gouache
- Flat wash brush (1 inch)
- Round detail brushes (size 0 and 2)
- Pencil and eraser
- Palette
- Water cups
- Paper towels
Step 1: Painting the Gradient Sky
-
Prepare the paper:
Begin by lightly taping down your deckle-edge paper to a board if needed, though leaving the rough edges free adds to the rustic charm. Ensure the surface is clean and free of dust. -
Mix your colors:
On your palette, prepare watery washes of a soft warm grey or pale blue for the top, followed by a muted pink (mix a touch of crimson with plenty of water), and a warm orange for the horizon. -
Start the wash:
Using your large flat brush, wet the entire paper with clean water first—this ‘wet-on-wet’ technique helps create seamless blends. Start applying the grey/blue wash at the very top, moving horizontally. -
Blend the mid-tones:
While the paper is still damp, introduce the pinkish hue just below the grey section. Let the colors bleed slightly into each other naturally rather than overworking them with the brush. -
Add the horizon glow:
At the bottom third of the paper, paint the warm orange strip. Blend this upward into the pink to mimic the glowing light of a setting sun. Keep the strokes horizontal and smooth. -
Dry completely:
Allow the background wash to dry fully. The paper must be bone dry before you add the silhouettes, or the black ink will bleed into the sky.
Edge Control
To maintain the rustic deckled edge look while painting, place a scrap piece of paper under the painting’s edge so you can brush fully off the side without staining your table.
Step 2: Drafting the Layout
-
Sketch the horizon:
Using a pencil very lightly, draw an uneven, rolling line near the bottom edge to represent the distant hills or treeline. -
Outline the balloons:
Sketch the outline of the main, largest balloon on the right side. It should be a large teardrop shape. Then, add smaller teardrop shapes receding into the distance to the left to create perspective. -
Add detail sketches:
Lightly mark the position of the baskets below each balloon and sketch a few small ‘v’ shapes where you want your birds to be flying. -
Review the composition:
Step back and check the balance. I often like to erase and move the smallest balloons to ensure they look like they are drifting randomly rather than in a straight line.
Step 3: Inking the Silhouettes
-
Paint the landscape:
Load your medium round brush with black ink or opaque black gouache. Fill in the entire bottom section underneath your pencil line to create the solid black ground. -
Fill the large balloon:
Switch to a smaller brush for control. Outline the large balloon carefully, then fill it in with solid black. Ensure the edges are crisp and clean against the colorful sky. -
Detail the basket:
Using your size 0 detail brush, paint the ropes connecting the balloon to the basket and the basket itself. Keep these lines very fine to maintain the scale. -
Paint distant balloons:
Move on to the smaller balloons in the background. Because they are further away, their baskets can just be simple small rectangles or dots attached by single thin lines. -
Add the clouds:
Paint flat-bottomed cloud shapes drifting near the large balloon. These should be stylized and solid black to match the silhouette aesthetic, perhaps with slightly fluffy tops. -
Include the birds:
With the very tip of your smallest brush, paint the flock of birds. Vary the angle of the wings—some flat, some reaching up—to simulate movement in flight. -
Final touches:
Check for any uneven coverage in the black areas and apply a second coat if needed to make the silhouettes completely opaque. Let everything dry completely before displaying.
Add Metallic Magic
Once the black ink is dry, use a gold gel pen to add tiny highlights on the balloon ropes or edges of the clouds for a subtle sunset shimmer.
Enjoy the peaceful atmosphere your new silhouette artwork brings to the room
Northern Lights Silhouette Ridge
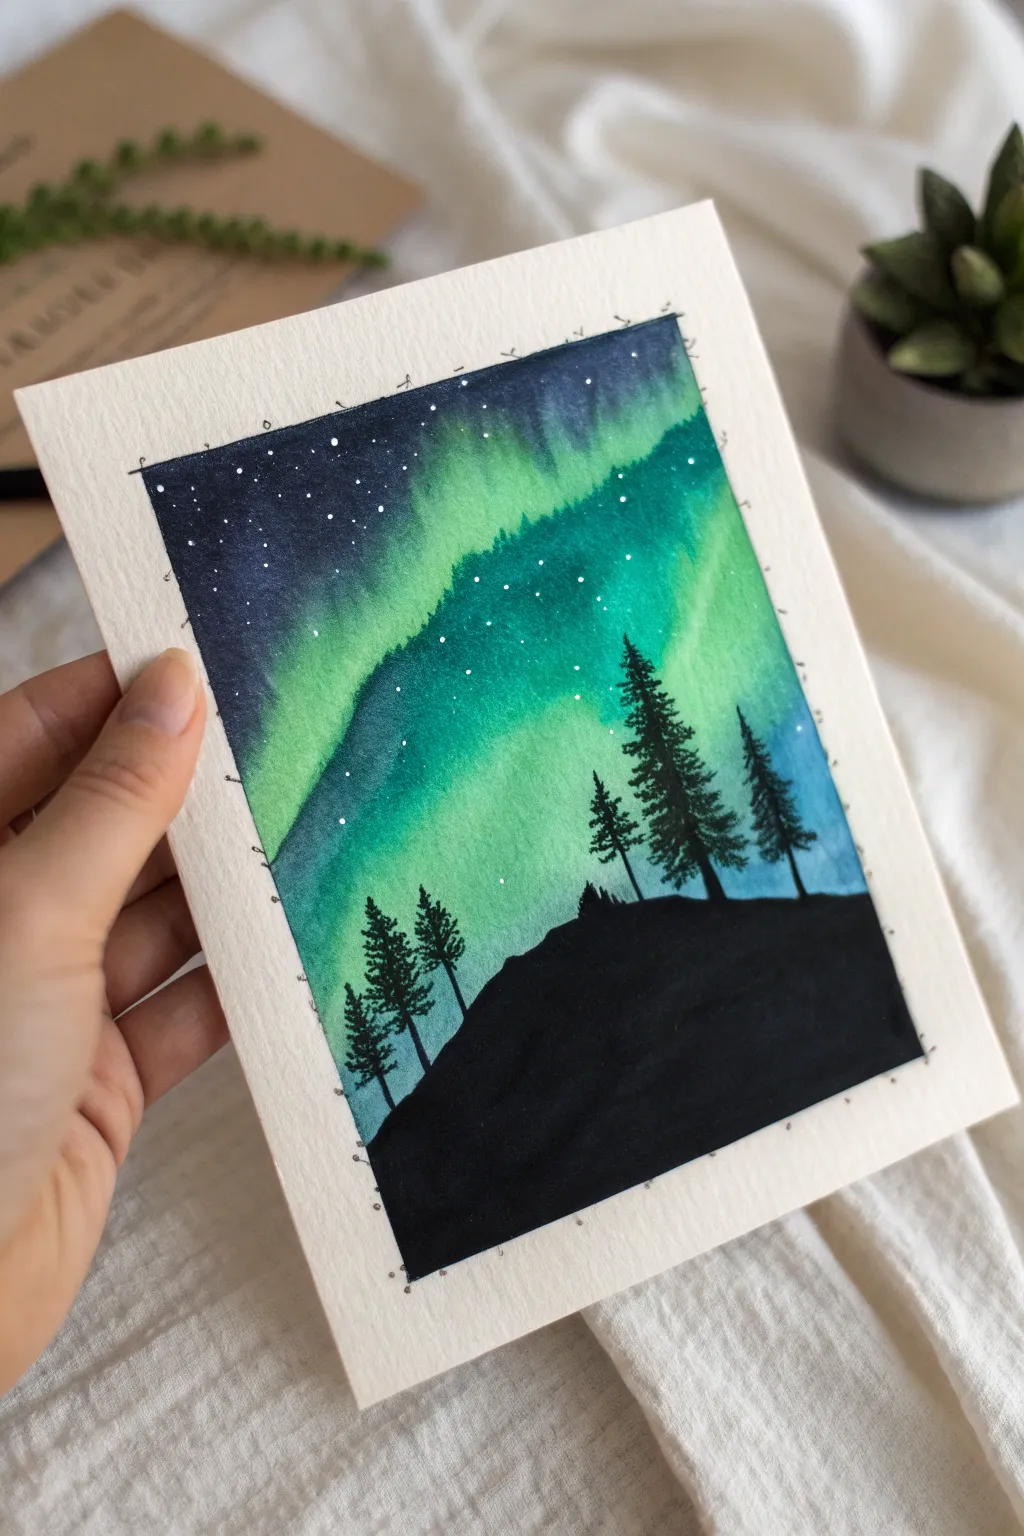
Capture the magic of the polar skies with this vibrant watercolor project. Swirling greens and deep indigos create a stunning background for a simple yet striking black silhouette of pine trees.
Detailed Instructions
Materials
- Cold press watercolor paper (300 gsm)
- Watercolor paints (Emerald Green, Phthalo Green, Indigo, Prussian Blue)
- Black ink or gouache
- Small round brush (size 2 or 4)
- Fine liner brush (size 0 or 00)
- White gel pen or white gouache
- Masking tape
- Paper towels
- Clean water jar
Step 1: Setting the Scene
-
Prep the paper:
Cut your watercolor paper to your desired size (postcard size works beautifully for this). Use masking tape to secure all four edges to your work surface. This creates a clean white border later and prevents buckling. -
Light pencil sketch (optional):
Very lightly sketch a low, hilly horizon line about one-third of the way up the paper. This marks where your snowy ground will eventually turn into a silhouette. -
Wet-on-wet base:
Using your larger round brush, wet the entire sky area with clean water. The paper should be glisten but not have puddles.
Uneven Blending?
If your sky dries with hard lines (blooms) instead of soft blends, you likely added water to paint that was already drying. Next time, work faster while the paper sheen is still wet.
Step 2: Painting the Aurora
-
First green sweep:
Load your brush with a bright Emerald Green. While the paper is still wet, paint a broad, sweeping diagonal streak across the middle of the sky. Let the edges bleed naturally. -
Deepening the green:
Add touches of Phthalo Green into the wet Emerald streak to create depth and variation within the light. -
Adding the night sky:
Clean your brush and pick up Indigo or Prussian Blue. Paint the top left and bottom right corners of the sky, carefully bringing the dark blue towards the green streak. -
Blending the transition:
Allow the blue and green to touch and blend slightly on the paper. If the transition looks too harsh, rinse your brush, dry it slightly, and gently coax the colors together. -
Identify vertical movement:
While the paint is still damp, use a nearly dry brush to lift out faint vertical lines within the green area, or add tiny vertical strokes of darker color to mimic the curtain-like effect of auroras. -
Let it dry completely:
This is crucial. The paper must be bone dry before moving to the next step, or the black silhouette will bleed into the sky.
Make it Sparkle
For a magical finish, mix a tiny pinch of iridescent watercolor medium or pearlescent eyeshadow into your green paint. The aurora will shimmer beautifully when caught in the light.
Step 3: creating the stars
-
Starry details:
Once the sky is dry, use a white gel pen or a fine brush with white gouache to dot small stars in the dark blue areas. Vary the spacing for a natural look. -
Cluster the stars:
You can add a few tiny dots within the green aurora itself, but keep them denser in the dark corners to frame the light.
Step 4: The Silhouette Ridge
-
Blocking the ground:
Switch to your black ink or gouache. Paint the solid black hill at the bottom, following your pencil line or creating a new organic curve. -
Tree trunks:
Using the fine liner brush, paint thin vertical lines rising from the hill. Make them varying heights—some tall and commanding, others shorter. -
Adding branches:
Start at the top of a trunk and tap your brush side-to-side, getting wider as you move down. Pine trees are rarely perfect triangles; keep the branches irregular and sparse in some areas. -
Refining the forest:
Add a few smaller trees in the background or right on the ridge line to create perspective. Ensure the black is opaque and solid.
Step 5: Finishing Touches
-
Decorative border (optional):
Referencing the image, you can use a fine black pen to draw small loop or stitch marks along the edge of the painted area once the tape is removed for a whimsical sketchbook feel. -
Remove tape:
Once the black ink is 100% dry, peel the masking tape away slowly at a 45-degree angle to reveal your crisp white border.
Step back and admire your personal view of the northern lights
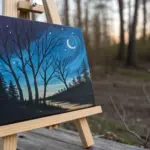
Galaxy Background With Simple Silhouette
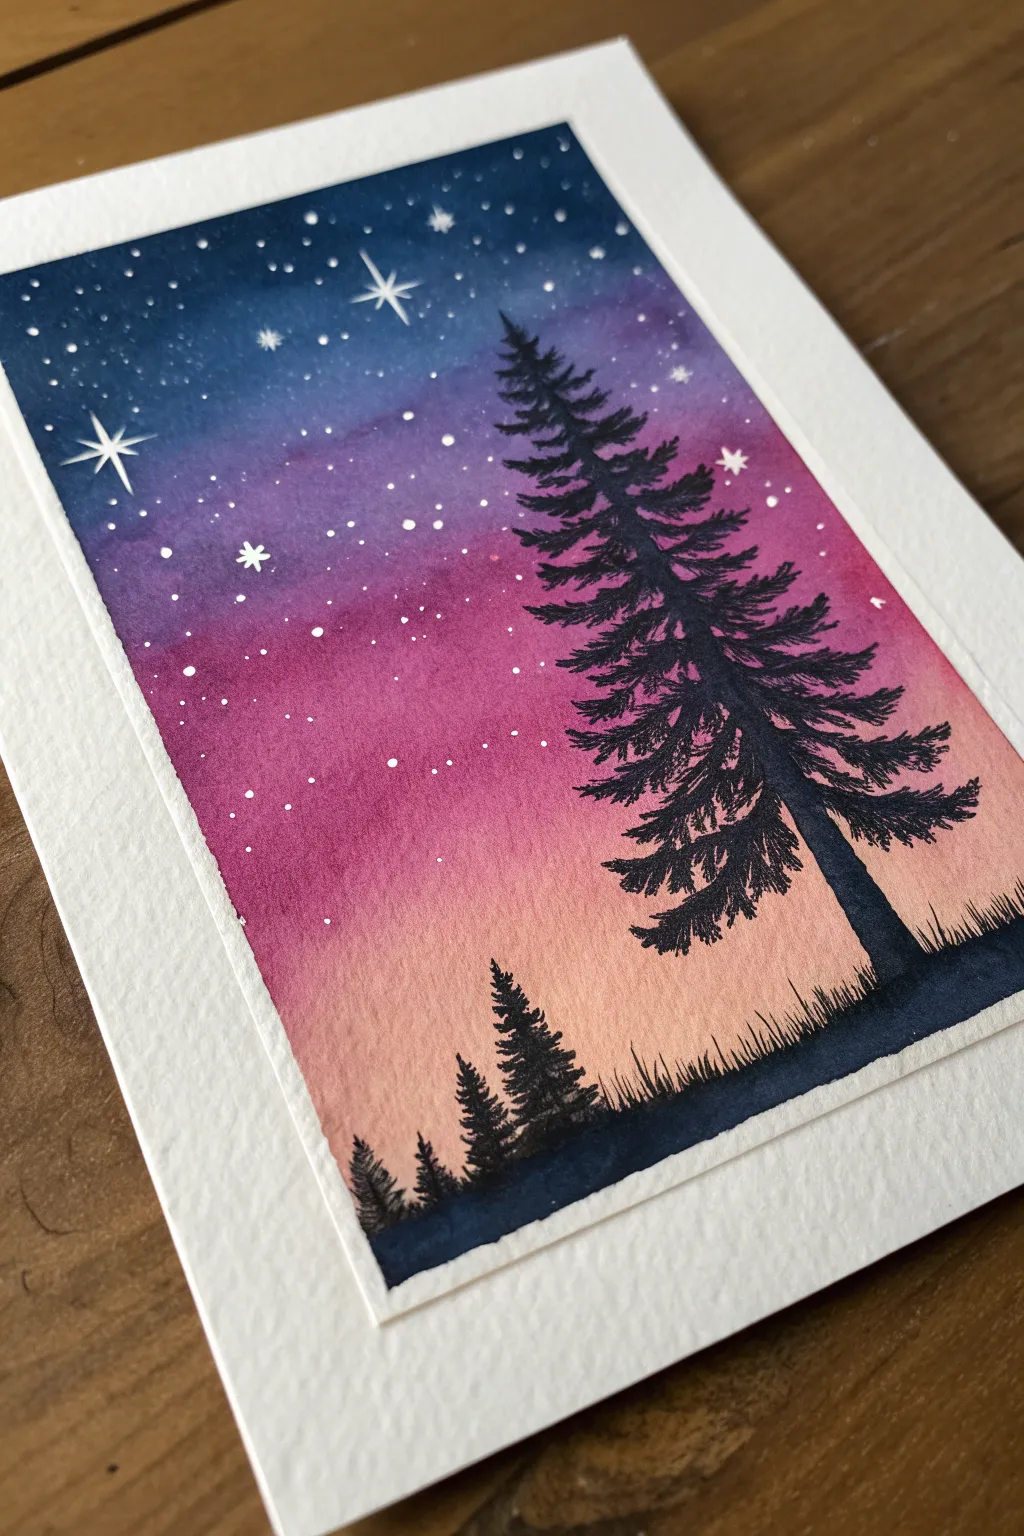
Capture the magic of twilight with this stunning watercolor galaxy study. This project combines a seamless gradient sky—transitioning from deep indigo to soft peach—with crisp, striking pine tree silhouettes.
Step-by-Step Tutorial
Materials
- Cold press watercolor paper (300 gsm)
- Painter’s tape or masking tape
- Watercolors: Indigo/Prussian Blue, Purple/Violet, Magenta/Rose, Peach/Light Orange
- Black gouache or archival black ink pen
- White opacity paint (gouache or white ink)
- Flat wash brush (large)
- Round brush (medium size 4 or 6)
- Fine liner brush (size 0 or 00) or a white gel pen
- Two jars of water
- Paper towels
Step 1: Setting the Stage
-
Tape the Edges:
Secure your watercolor paper to a hard board or your table using painter’s tape. Create a clean, crisp border by pressing the tape edges down firmly to prevent paint from bleeding underneath. -
Prepare Your Palette:
Pre-mix your gradient colors in your palette. You will need four distinct puddles: a deep midnight blue, a vibrant violet, a bright magenta rose, and a soft peach tone for the horizon. -
Wet the Surface:
Using your large flat brush and clean water, apply an even coat of water across the entire paper surface. The paper should glisten with a sheen but not have standing puddles.
Step 2: Creating the Galaxy Gradient
-
Apply the Peach:
Starting at the bottom third of the paper, paint a horizontal band of the peach color. Allow the wet paper to help the paint spread naturally. -
Add Magenta:
Immediately above the peach, brush on the magenta rose tone. Gently blend the meeting point between the rose and peach on the paper so there are no hard lines. -
Introduce Violet:
Work up the paper with your purple shade, blending it downward into the magenta. The colors should look like a sunset fading into night. -
Deepen the Night Sky:
Fill the top section of the paper with your darkest indigo blue. Bring it down to meet the purple, ensuring the transition is smooth and gradual. -
Intensify Corners:
While everything is still wet, drop a little more concentrated indigo into the very top corners to create a vignette effect. -
Let it Dry:
This is crucial: allow the background to dry completely. The paper must be bone-dry and flat before you add silhouettes, or the black paint will bleed into the sky.
Uneven Blends?
If your sky dries with hard lines or “cauliflowers,” your paper likely wasn’t wet enough. Keep the sheen consistent while blending, and don’t add water back into a drying area.
Step 3: Painting the Silhouettes
-
Establish the Ground:
Using black gouache or very concentrated black watercolor, paint an uneven, slightly bumpy horizon line across the peach section. -
Main Tree Trunk:
Identify where you want your large focal tree. Paint a thin vertical line for the trunk, making it slightly thicker at the base. -
Adding Branches:
Using a small round brush or fine liner, start painting branches from the top down. Use a dabbing motion to create the texture of pine needles rather than straight lines. -
Filling Out the Tree:
As you move lower on the trunk, make the branches wider and heavier. Leave some gaps between branches so the beautiful sunset colors peek through the foliage. -
Small Distance Trees:
Paint a few much smaller pine trees on the opposite side of the horizon line to create depth and balance. -
Add Grass Details:
Using the very tip of your brush or a fine black pen, flick tiny lines upward from the black ground to suggest grass blades.
Pro Tip: Depth of Field
Make the smaller, distant trees slightly lighter in color (mix a tiny bit of water into your black) to make them look further away than the bold, pure black foreground tree.
Step 4: Starry Details
-
Splatter Stars:
Cover the bottom silhouette area with a scrap piece of paper to protect it. Dip an old brush or toothbrush into white gouache and flick tiny droplets over the dried sky. -
Draw Large Stars:
Using a white gel pen or a fine brush with white gouache, manually draw a few larger, four-pointed or eight-pointed stars in the darker blue areas. -
Create Constellations:
Connect a few of your random dots with faint white lines if you want to suggest constellations. -
The Reveal:
Once all paint is 100% dry, carefully peel away the artist tape at a 45-degree angle to reveal your crisp white border.
Frame this piece or turn it into a beautiful greeting card to share that peaceful twilight feeling


Have a question or want to share your own experience? I'd love to hear from you in the comments below!