A split wall paint moment is one of my favorite ways to change a room fast without committing to a full-on mural. By simply dividing a wall into two colors, you can nudge the whole space to feel taller, cozier, calmer, or bolder—depending on where you place that line.
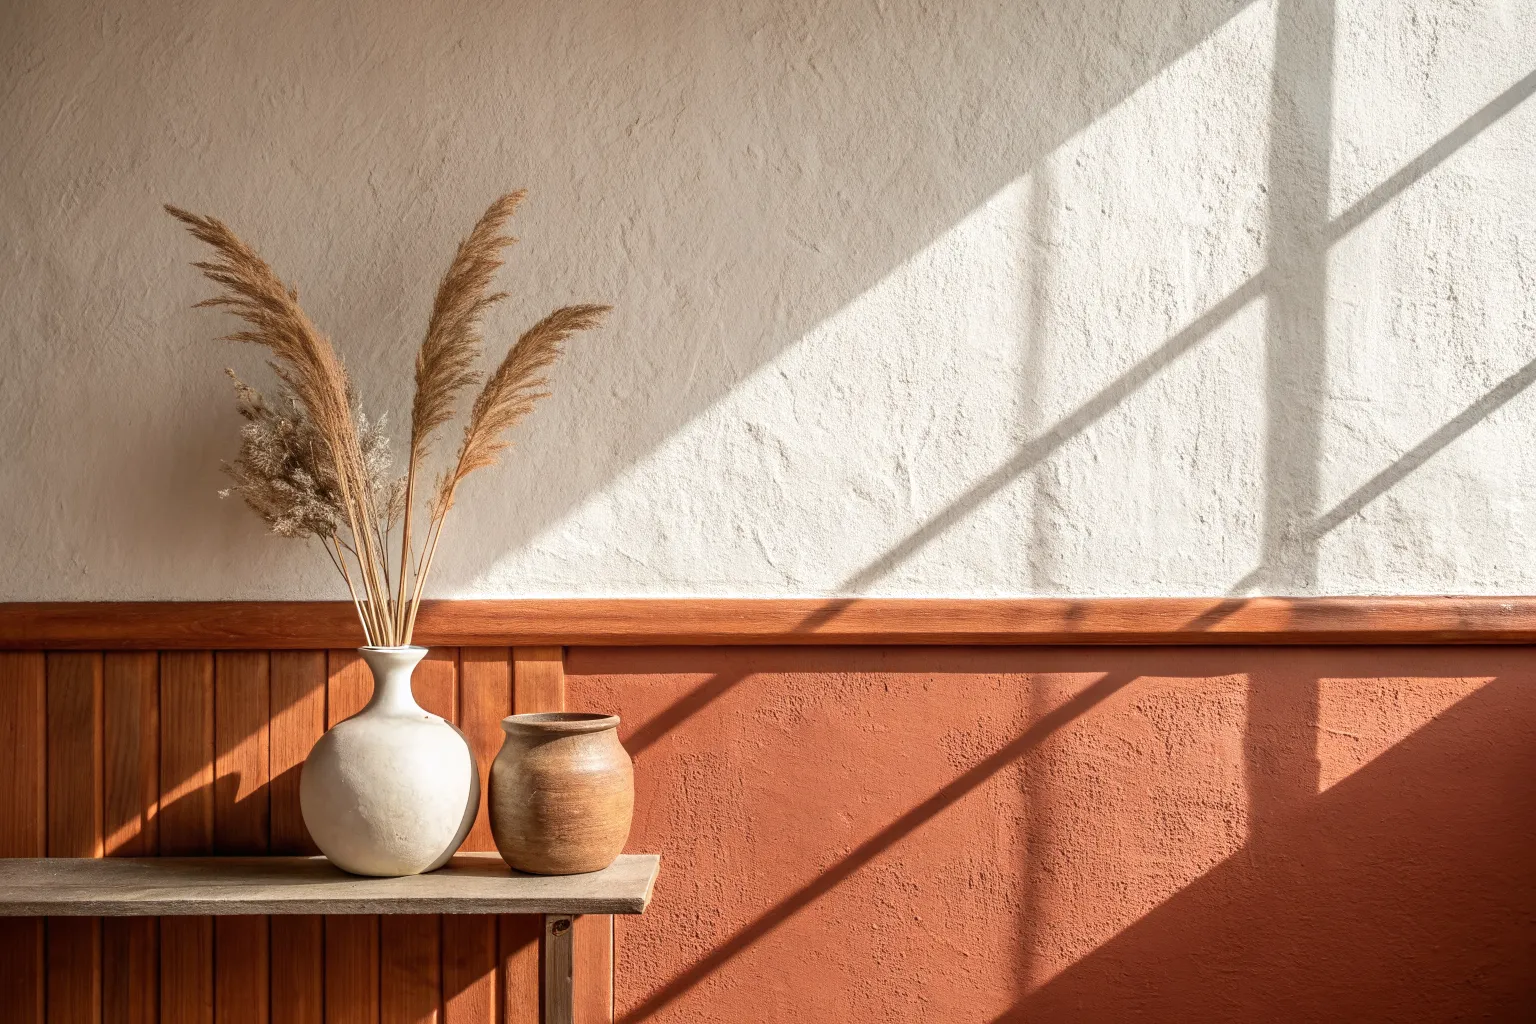
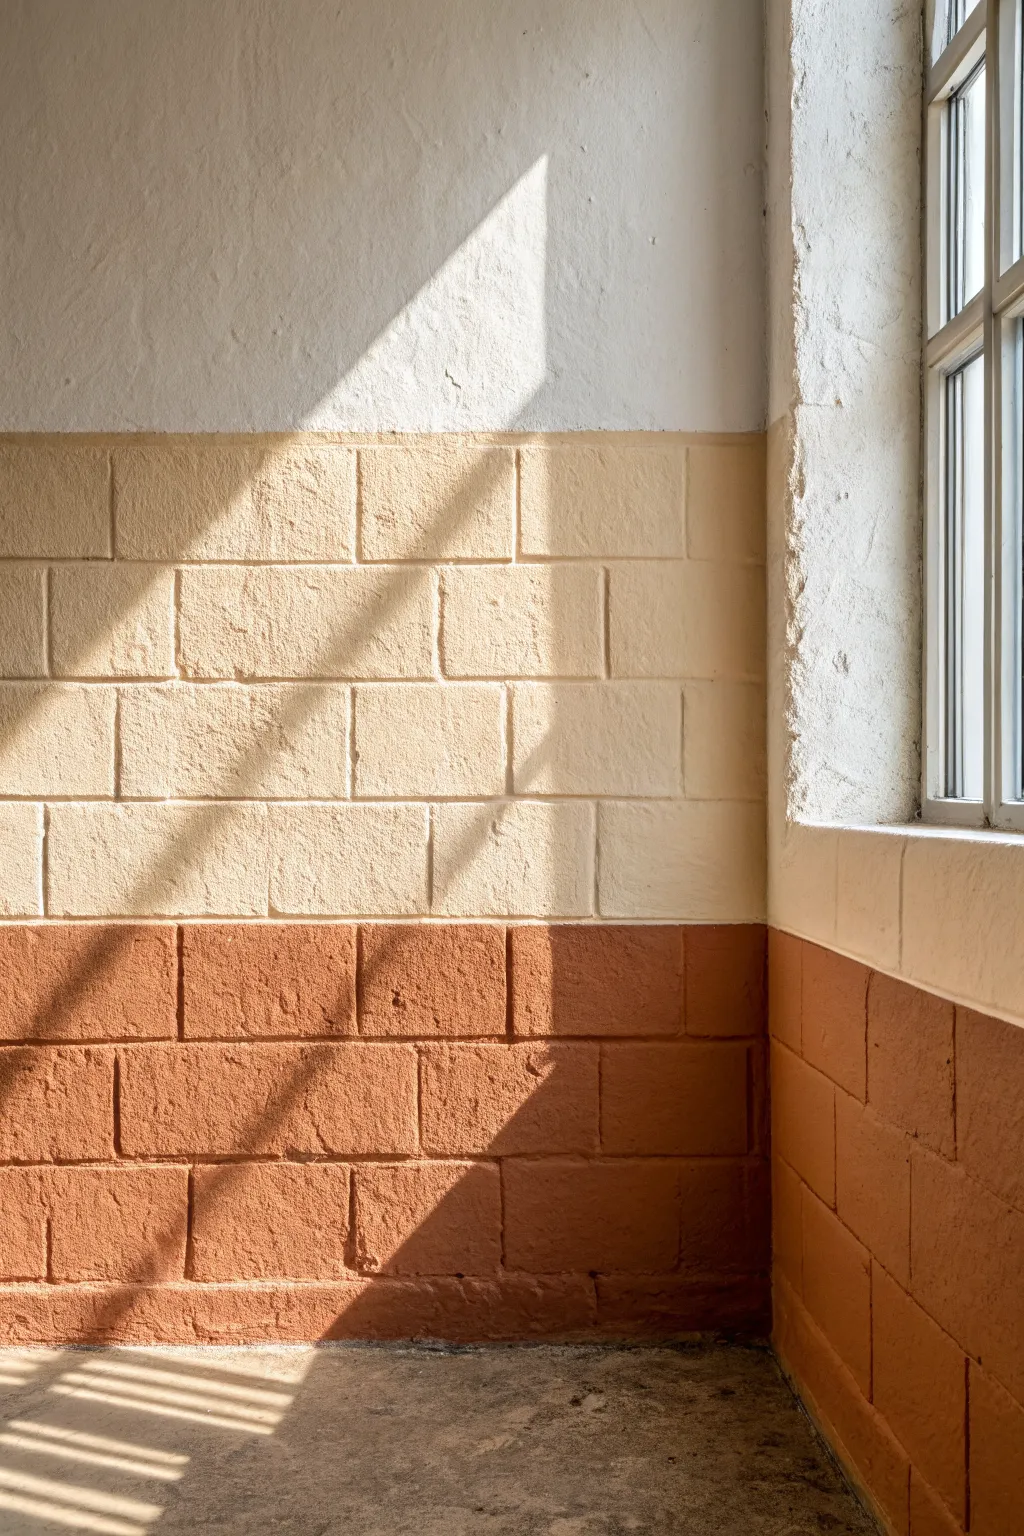
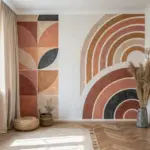
Classic Half-and-Half Horizontal Split
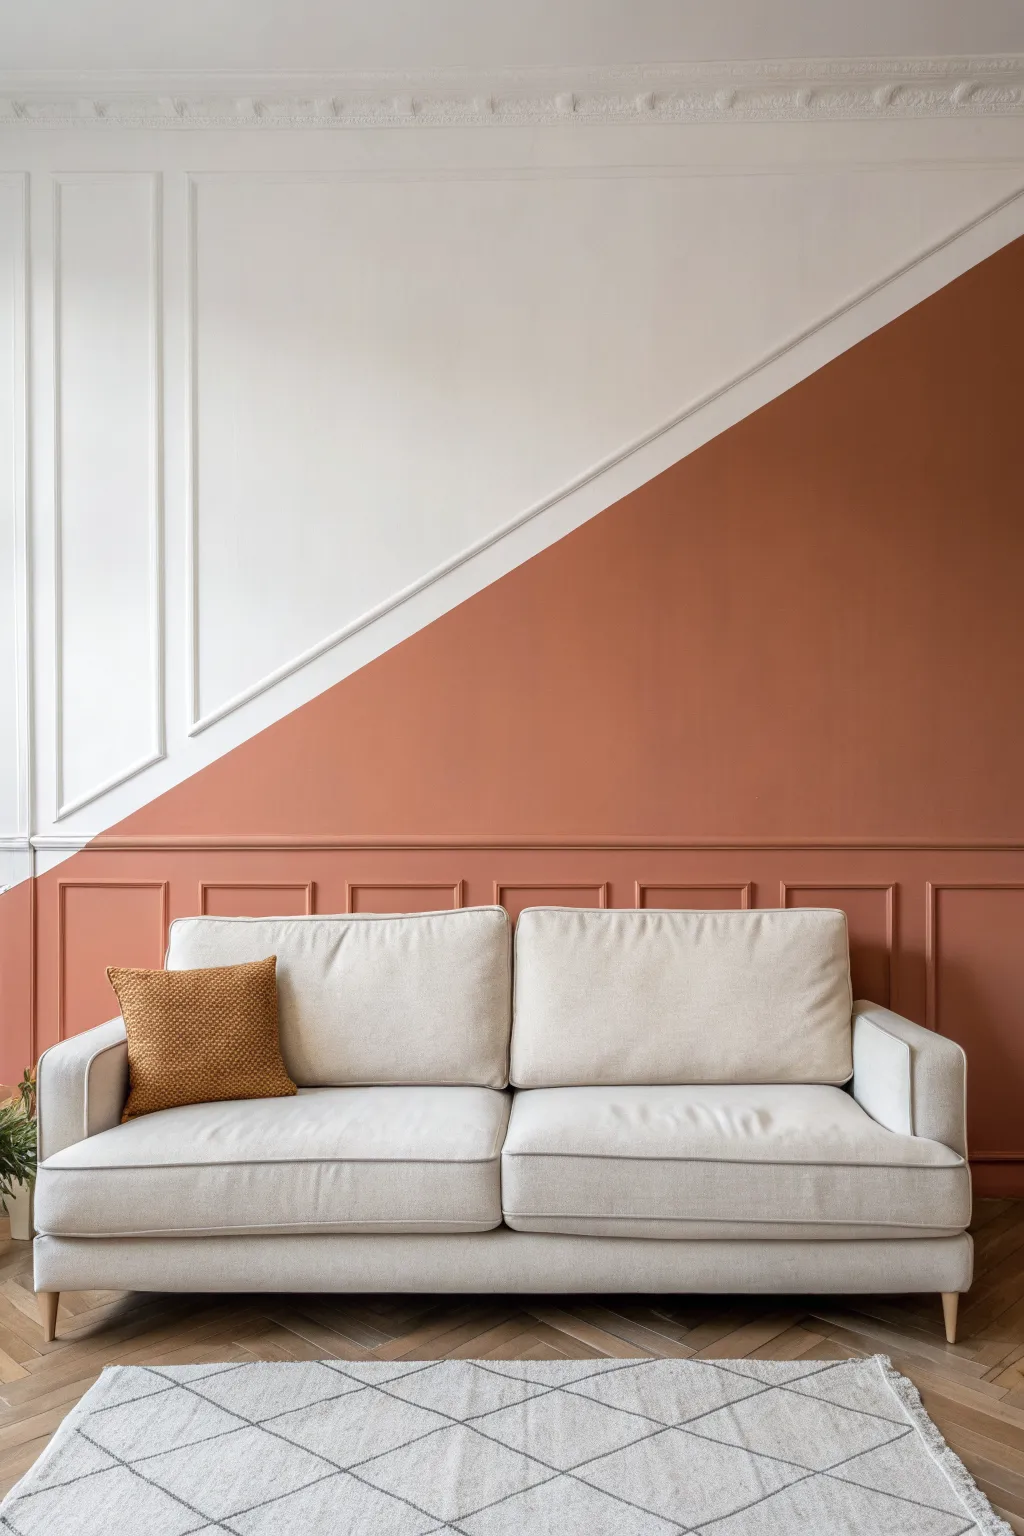
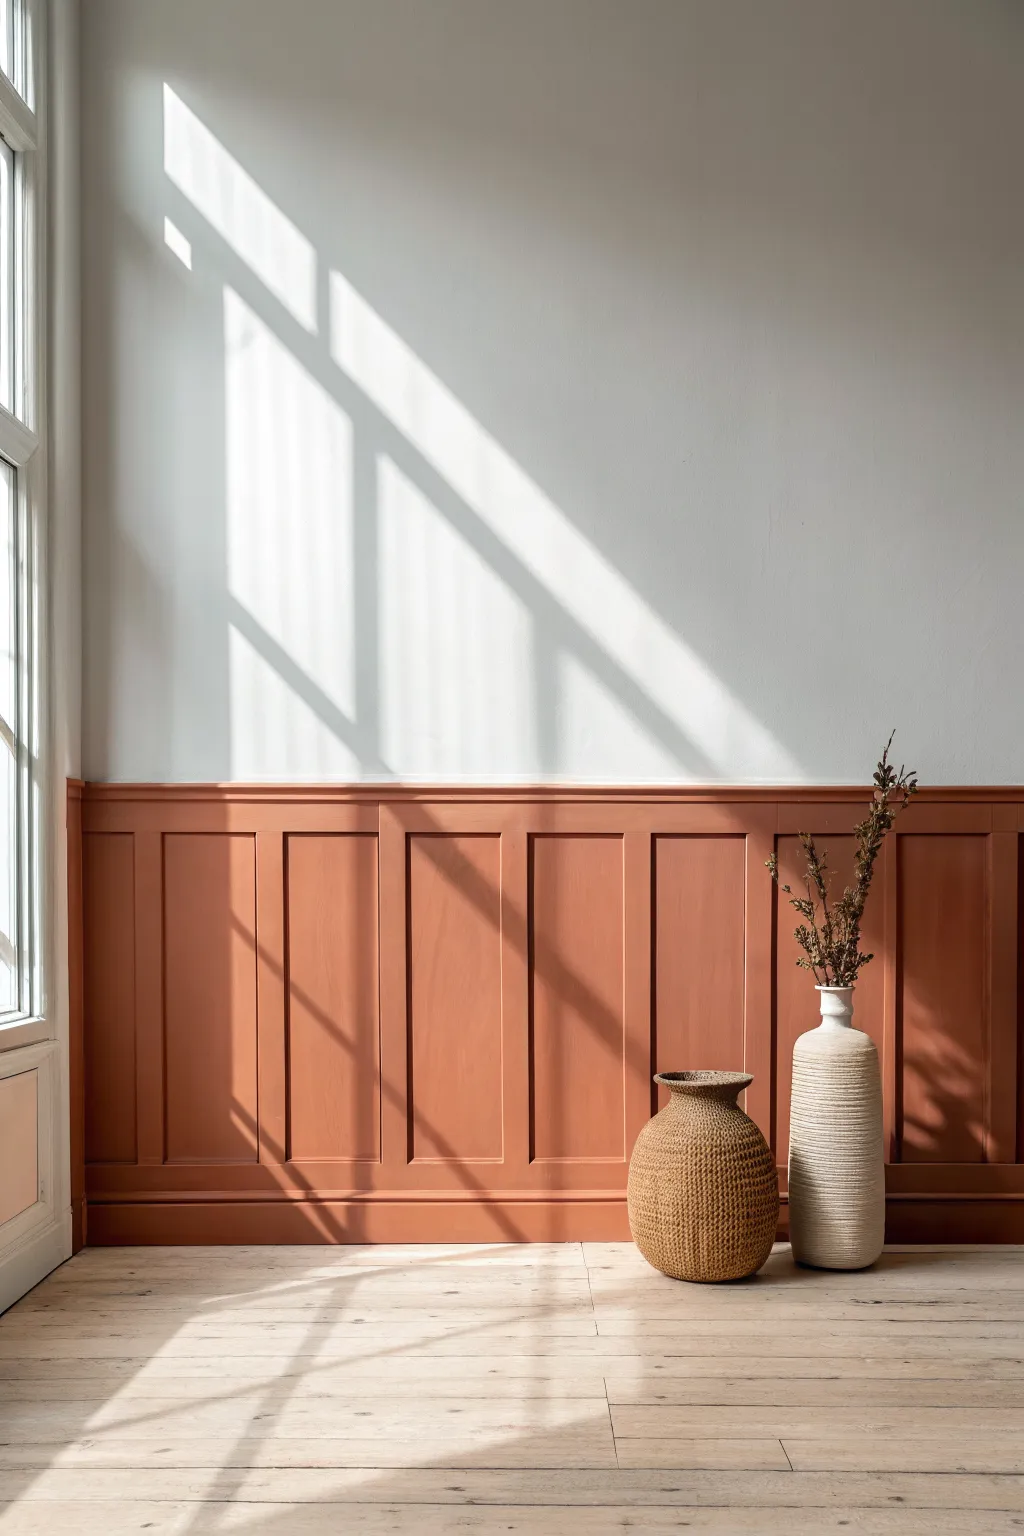
Transform a standard wall into a modern architectural statement by combining classic panel molding with a bold, diagonal color block. This project marries traditional wainscoting elements with a contemporary geometric split, creating a dynamic focal point for any living space.
Detailed Instructions
Materials
- White latex interior paint (eggshell or satin finish)
- Terracotta/burnt orange latex interior paint
- Pre-primed wood or PVC wall molding strips
- Miter saw or hand saw with miter box
- Construction adhesive (e.g., Liquid Nails)
- Brad nailer and 1.25-inch brad nails
- Level and tape measure
- Chalk line or laser level
- Painter’s tape (high quality for sharp lines)
- Wood filler and sandpaper (220 grit)
- Caulk and caulk gun
- Paint rollers (medium nap) and angled sash brushes
- Drop cloths
Step 1: Preparation and Base Coat
-
Clear and clean:
Begin by removing all furniture, outlet covers, and wall hangings from the target wall. Wipe down the surface with a damp cloth and mild detergent to remove dust or oils that might prevent paint adhesion. -
Patch imperfections:
Inspect the wall for any existing holes or dents. Fill these with spackle, let dry, and sand smooth so you are starting with a pristine canvas. -
Apply the white base:
Paint the entire wall with your chosen white paint. I prefer to do two coats here to ensure a solid, even background color, as the top left section will remain this color.
Step 2: Creating the Moldings
-
Plan the layout:
Sketch your molding design on paper first. Decide on the size of your rectangular boxes. Measure the wall and use a pencil to mark where the vertical and horizontal stiles will go. -
Cut vertical pieces:
Using your miter saw, cut the vertical molding strips to your desired height. For the rectangles shown, you’ll need uniform lengths for the sides. -
Cut horizontal pieces:
Cut the horizontal top and bottom pieces for each box. Use 45-degree miter cuts on the ends so they join together to form perfect 90-degree corners. -
Attach the molding:
Apply a bead of construction adhesive to the back of each molding piece. Press them onto your pencil marks, checking for level. -
Secure with nails:
While the glue sets, use a brad nailer to secure the molding to the studs or drywall. Place nails every 10-12 inches. -
Fill and sand:
Fill the nail holes and the mitered corner joints with wood filler. Once dry, sand the filler flush with the molding for a seamless look. -
Caulk the seams:
Run a thin bead of paintable caulk along the edges where the molding meets the wall. Smooth it with a wet finger to eliminate gaps.
Seal the Tape Gap
When taping over varied depths like molding, use a credit card or putty knife to push the tape deep into the crevices where the wood meets the wall to prevent leaks.
Step 3: The Diagonal Split
-
Mark the diagonal:
Determine the angle of your split. Use a chalk line to snap a straight diagonal line across the wall, cutting right through your installed molding. -
Tape the line:
Apply high-quality painter’s tape along the top edge of your chalk line. This is crucial for a crisp transition. Press the tape down firmly, especially over the molding humps. -
Seal the tape edge:
Here is a trick I always use: brush a very light layer of the *white* base paint over the edge of the tape. This seals the tape and prevents the orange paint from bleeding under. -
Cut in the color:
Using an angled brush, carefully paint the terracotta color along the taped line and into the corners/crevices of the molding below the tape. -
Roll the color:
Use a roller to fill in the rest of the bottom right section with the terracotta paint. Ensure you cover the molding sides thoroughly. -
Apply second coat:
Allow the first coat of terracotta to dry completely, then apply a second coat for rich, opaque coverage. -
The reveal:
While the final coat is still slightly tacky (not fully dry), slowly peel back the painter’s tape at a 45-degree angle to reveal your sharp line. -
Touch ups:
Inspect the diagonal line where it crosses the molding. Use a small artist’s brush to correct any tiny imperfections if the tape lifted slightly over the wood profiles.
Metallic Accent Line
After the paint cures, add a thin strip of gold washi tape or paint a slim metallic line directly over the split to highlight the diagonal divide.
Step back and admire how the bold geometry breathes new life into your classic architecture.
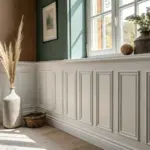

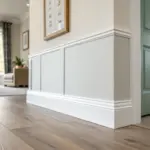
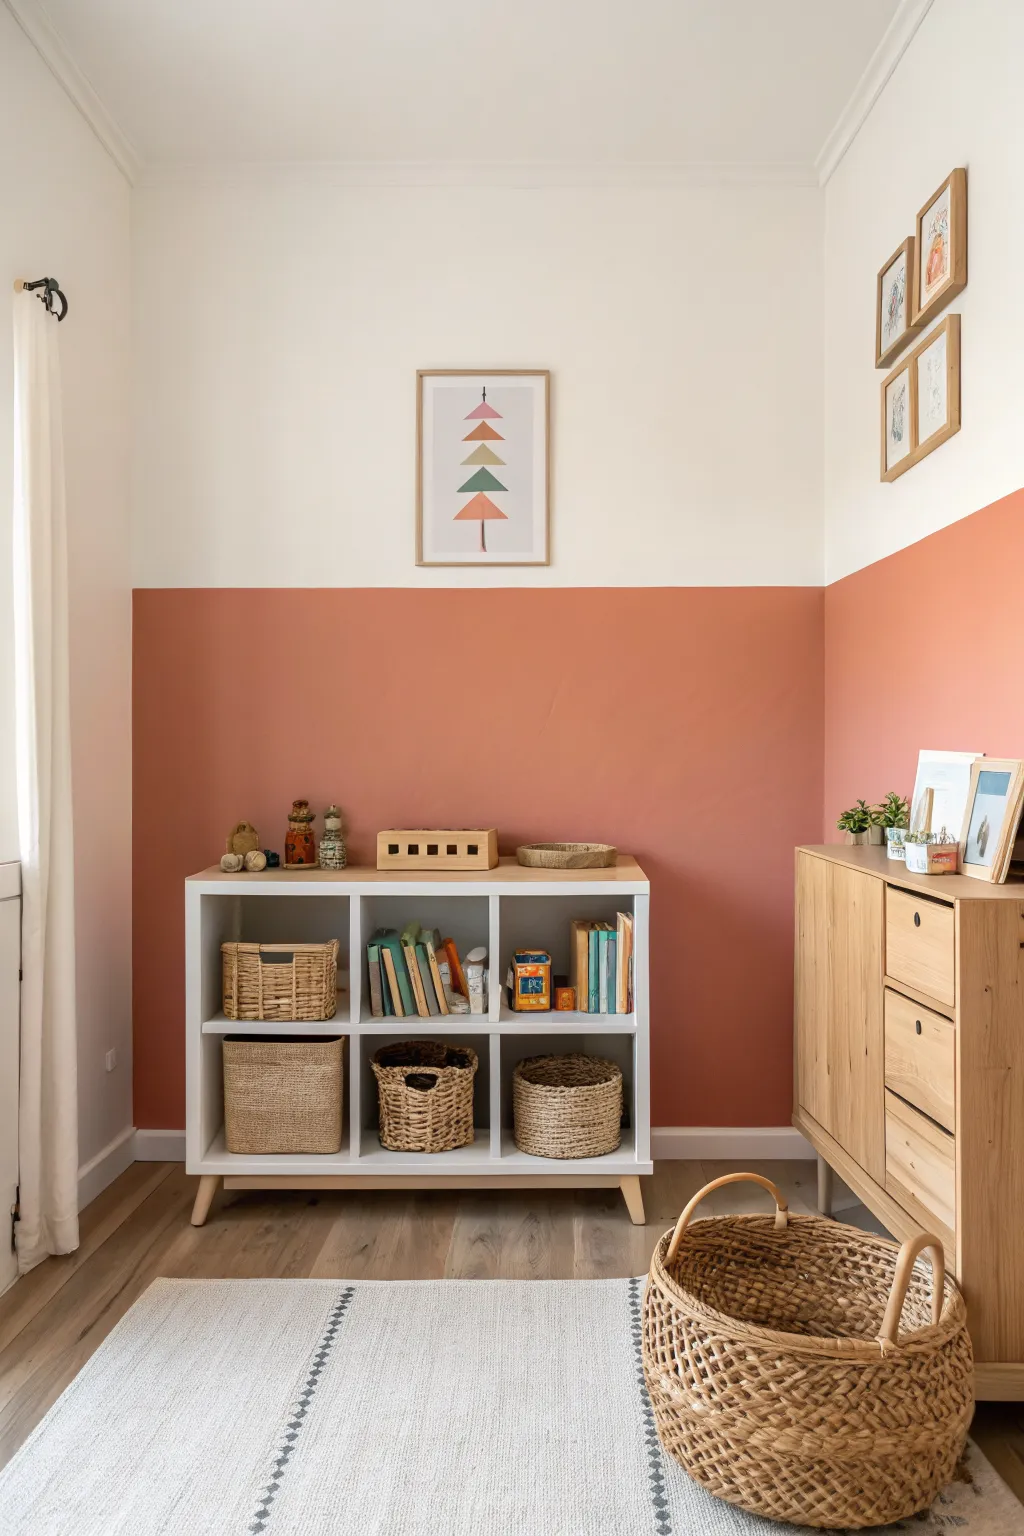
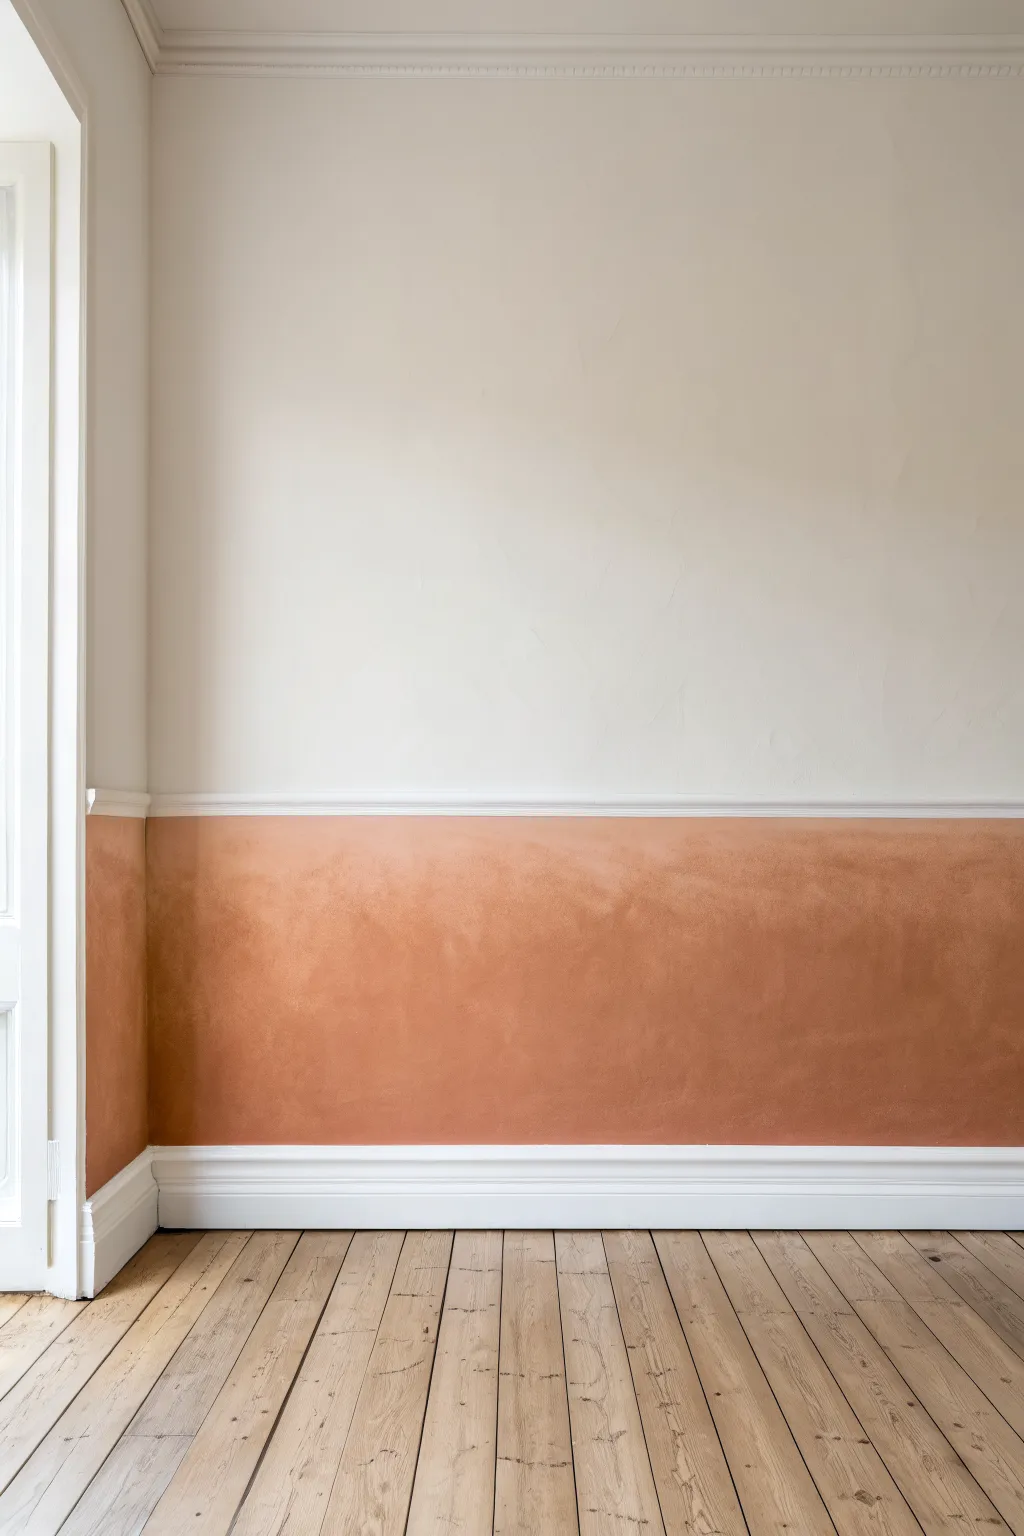
Bottom Third Pseudo-Wainscoting Split
Transform a plain white wall into a sophisticated architectural feature with this clever paint technique that mimics the look of traditional wood paneling. By using simple trim and a rich terracotta hue, you’ll create depth and character that grounds the room without the cost of full carpentry.
Step-by-Step Guide
Materials
- Terracotta or rust-colored interior satin paint
- White or light grey interior matte paint (for upper wall)
- Wooden molding stripes (1-2 inches wide)
- Chair rail molding
- Baseboard molding (if not already present)
- Construction adhesive or liquid nails
- Finishing nails and hammer (or nail gun)
- Wood filler
- Sandpaper (120 and 220 grit)
- Painter’s tape
- Level and measuring tape
- Caulk and caulk gun
- Paint rollers (medium nap)
- Angled sash brush
- Drop cloth
Step 1: Preparation and Layout
-
Clear and clean:
Remove all furniture from the area and lay down a drop cloth to protect your floors. Wipe down the walls with a damp cloth to remove dust and grease, ensuring a clean surface for adhesion. -
Measure the height:
Decide on the height of your wainscoting. A good rule of thumb is roughly one-third of the wall height. Mark this horizontal line across the entire wall using a level and a pencil. -
Plan the spacing:
Measure the total width of the wall and divide it to determine the spacing for your vertical battens. Aim for squares or vertical rectangles roughly 12-18 inches apart. Mark the center of each vertical strip on the wall.
Uneven Walls?
If your walls are wavy, flexible caulk is your best friend. Don’t force the wood flat against dips; bridge the gap with caulk to hide the shadow line effectively.
Step 2: Installing the Trim
-
Install the top rail:
Cut your chair rail molding to fit the length of the wall. Apply construction adhesive to the back and position it so the top edge aligns with your horizontal pencil line. Secure it with finishing nails into the studs. -
Cut vertical battens:
Measure the distance between the top of your baseboard and the bottom of your new chair rail. Cut your flat molding strips to this exact length for each vertical section. -
Attach vertical strips:
Apply adhesive to the back of each vertical strip. Place them over your marked center lines, using a level to ensure they are perfectly plumb before nailing them into place. -
Fill the gaps:
Use wood filler to cover all nail heads and any gaps where the wood strips meet the rail or baseboard. I like to overfill slightly as it shrinks when drying. -
Sand smooth:
Once the filler is completely dry, sand the filled areas flush with the wood using 120-grit paper, then finish with 220-grit for a seamless touch. -
Caulk the seams:
Apply a thin bead of printable caulk along every edge where the wood molding meets the drywall. This is crucial for making the trim look like built-in paneling rather than just wood glued to a wall. Smooth with a wet finger.
Texture Match
If your drywall has heavy texture, consider adding thin hardboard panels inside the boxes before painting to create a perfectly smooth, authentic wood look.
Step 3: Painting
-
Tape off the boundaries:
Apply painter’s tape along the floor and carefully along the top edge of the chair rail to protect the upper wall section. -
Cut in the edges:
Using an angled sash brush and your terracotta paint, carefully paint the corners, along the floor, and inside the recessed panel areas (the drywall between the moldings). -
Paint the trim:
Brush paint onto the chair rail, the vertical battens, and the baseboards. Brushing ensures the paint gets into the grain and grooves better than rolling. -
Roll the panels:
Use a medium nap roller to paint the flat wall sections between the battens. This evens out the brush marks from the cutting-in phase. -
Apply second coat:
Allow the first coat to dry according to the can’s instructions (usually 2-4 hours). Apply a second coat to the entire lower section for a rich, opaque finish. -
Remove tape:
Peel off the painter’s tape while the second coat is still slightly tacky. This prevents the dried paint from peeling up with the tape. -
Paint the upper wall:
If refreshing the top section, tape off the top of your newly painted chair rail (once fully cured). Roll the upper wall with your white or light grey matte paint to create high contrast.
Step back and admire how this simple division of space adds immediate warmth and structural elegance to your room


Chair-Rail Height Split for Instant Structure
Transform a plain wall with this blend of classic texture and warm, earthy color. This project combines vertical wood paneling with a chair-rail height split, creating a cozy dining nook that feels grounded and structured.
Detailed Instructions
Materials
- Tongue-and-groove paneling boards (MDF or pine)
- Top molding trim (dudo rail or slim trim)
- Baseboard molding
- Construction adhesive (e.g., Liquid Nails)
- Pin nailer or finishing nails
- Hammer and nail set
- Wood filler
- Fine-grit sandpaper (120 and 220 grit)
- Painter’s tape
- Level (long spirit level)
- Interior primer
- Low-sheen interior paint (Terracotta/Warm Clay color)
- Interior paint (Soft White for upper wall)
- Caulk and caulking gun
- Paint rollers and angled brushes
- Miter saw or hand saw
Step 1: Preparation & Planning
-
Determine the height:
Decide on the height of your split. Chair-rail height is typically around 32 to 36 inches from the floor. Use a measuring tape to mark this height at several points along the wall. -
Draw a level line:
Using a long spirit level or a laser level, connect your marks to create a perfectly horizontal guideline across the entire length of the wall. -
Prepare the wall surface:
Remove any existing baseboards carefully if you plan to reuse them, or pry them off to discard. Patch any large holes and lightly sand the wall area that will be covered to ensure adhesive bonds well.
Gaps in the Grove?
If your walls aren’t perfectly straight, boards might not click tight. Use a scrap block of wood and a hammer to tap the side of the board firmly to close stubborn gaps before nailing.
Step 2: Installing the Paneling
-
Cut boards to size:
Measure the vertical distance from the floor to your level line. Cut your tongue-and-groove boards to this exact length using a miter saw. -
Start the installation:
Begin at one corner of the room. Apply construction adhesive to the back of your first board in a zigzag pattern. -
Secure the first board:
Place the board against the wall, ensuring the grooved edge faces the corner. Check for plumb with your level before nailing it into place with a pin nailer at the top, bottom, and middle. -
Continue the row:
Slot the tongue of the next board into the groove of the previous one. Apply adhesive, tap it snugly into place to close the gap, and nail it secure. Repeat this process along the wall. -
Handle outlets and switches:
If you encounter outlets, measure carefully and use a jigsaw to cut out the necessary openings in the boards before installing them. -
Install the top trim:
Once the vertical boards are up, measure the total length of the wall for your top molding. Cut the molding to size and nail it directly on top of the paneling edge to create a clean, finished lip. -
Add baseboards:
Install your baseboard skirting at the bottom of the paneling. This grounds the structure and hides any uneven cuts near the floor.
Level Up: Picture Shelf
Instead of a slim trim cap, install a deeper piece of wood (2-3 inches) on top of the paneling to create a narrow ledge perfect for displaying framed art or small vases.
Step 3: Finishing Touches
-
Fill the holes:
Go over every nail hole with wood filler. I like to overfill slightly to account for shrinkage, then let it dry completely. -
Sand until smooth:
Sand the filled areas flush with the wood using fine-grit sandpaper. Also, give the entire paneling surface a light sanding to prep it for paint. -
Caulk the seams:
Run a bead of paintable caulk along the top of the trim where it meets the wall, inside corners, and where the baseboard meets the paneling. Smooth it with a wet finger for a seamless look. -
Prime the paneling:
Apply a coat of high-quality interior primer to the entire lower section—paneling, trim, and baseboards. This ensures the terracotta color will be rich and uniform.
Step 4: Painting
-
Paint the upper wall:
Before finishing the paneling, paint the upper wall section in a soft white. It’s easier to cut in the top line later than to protect the dark color from white splatter. -
Tape the top edge:
Once the white paint is fully dry, apply painter’s tape along the wall just above your top trim to protect the white section. -
Cut in the color:
Using an angled sash brush, carefully paint the grooves of the paneling and the edges near the floor and corners with your terracotta paint. -
Roll the flat surfaces:
Use a foam roller or a short-nap roller to apply paint to the flat faces of the boards. This provides a smooth, brush-mark-free finish. -
Apply a second coat:
Allow the first coat to dry according to the can’s instructions, then apply a second coat for full opacity and depth of color. -
Remove tape:
Peel off the painter’s tape while the final coat is still slightly tacky to ensure a crisp, sharp line.
Step back and enjoy the structured warmth your new paneled dining nook brings to the home.


Low Split Line to Cozy Up Tall Walls
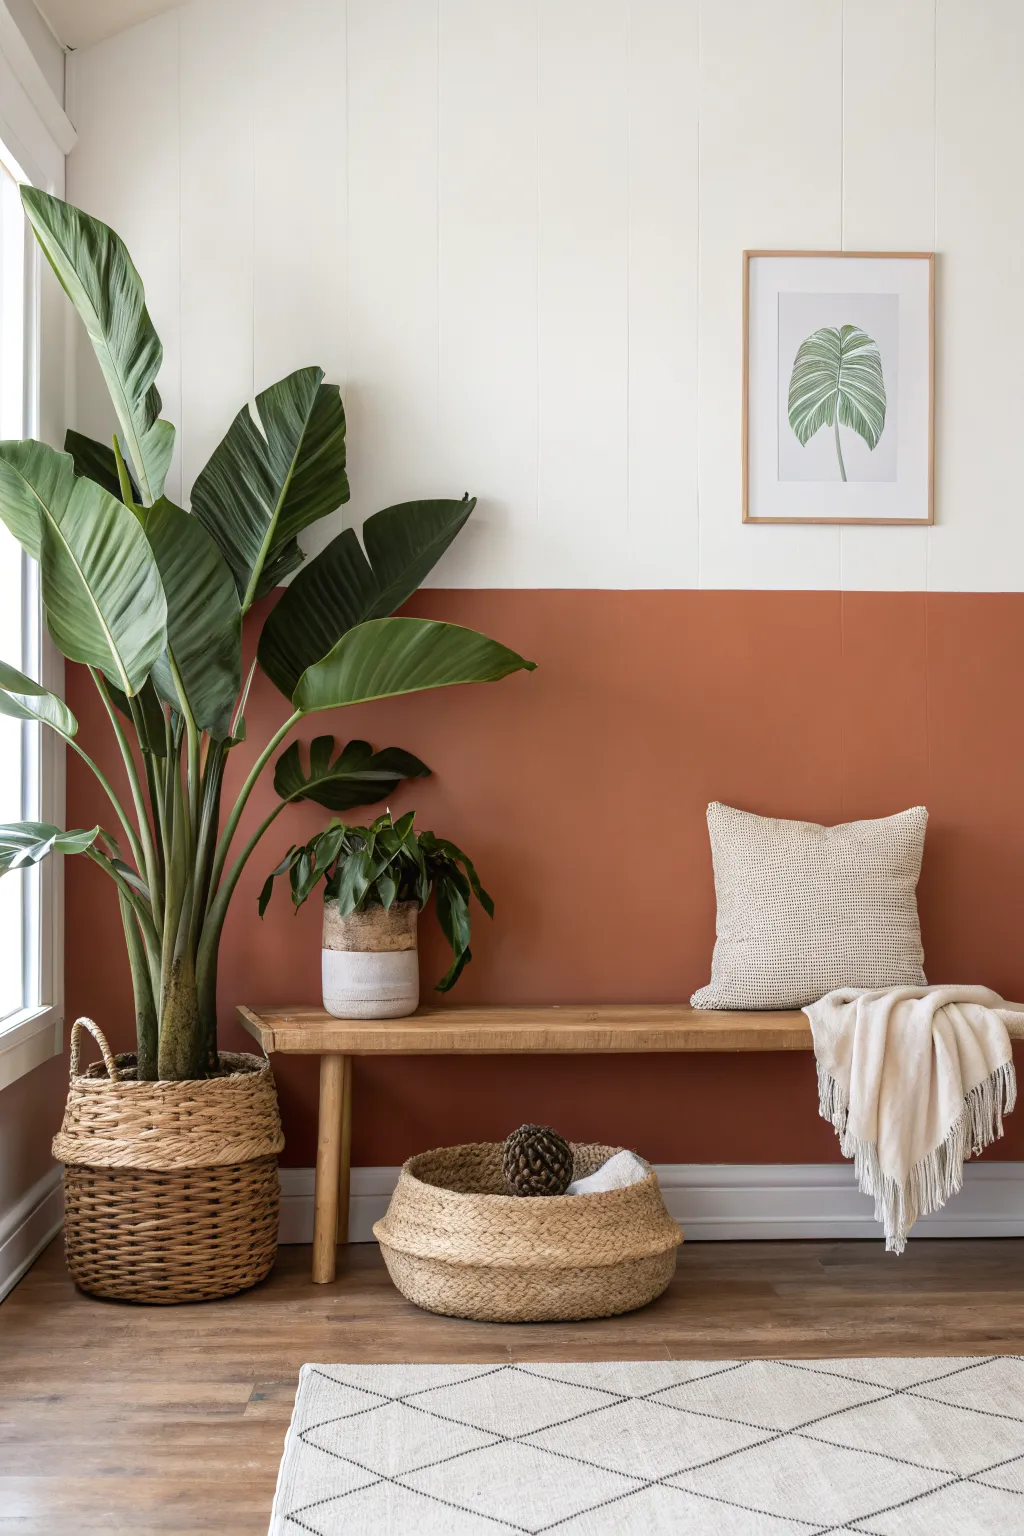
Transform a tall room into a cozy retreat with this striking two-tone wall treatment that grounds the space using warm, earthy tones. By placing the split line lower than usual, you create an intimate visual anchor perfect for showcasing furniture and greenery.
How-To Guide
Materials
- Painter’s tape (high quality)
- Laser level (optional but recommended)
- Measuring tape
- Pencil
- Spackle and putty knife
- Sandpaper (medium grit)
- Primer (if changing wall color drastically)
- Interior paint: Warm Terracotta/Rust (Satin or Eggshell)
- Interior paint: Crisp White (Satin or Eggshell)
- Paint roller and extension pole
- Paint tray and liners
- Angle sash brush (2-inch)
- Drop cloths
- Damp rag
Step 1: Preparation & Planning
-
Clear and clean:
Remove all furniture, including the bench and plants, from the wall area. Wipe the wall down with a damp cloth to remove dust and make sure the surface is clean for better paint adhesion. -
Patch imperfections:
Inspect the wall for any nail holes or dings. Fill them with spackle, let it dry completely, and then sand the spots flush with the wall surface so they disappear under the new paint. -
Determine the height:
I like to measure the height of the main furniture piece—in this case, the bench. Aim for the split line to sit just slightly above the bench back or midway up the wall, roughly 36 to 42 inches from the floor depending on your ceiling height. -
Mark the line:
Measure up from the floor at several points along the wall to your desired height. make small pencil marks at these intervals. -
Draw the guide:
Use a laser level to project a straight horizontal line across your pencil marks. If you don’t have a laser level, use a long level and faint pencil line to connect your marks, ensuring it is perfectly horizontal.
Step 2: Painting the Top Section
-
Cut in the top:
Start with your crisp white paint. Use the angle sash brush to cut in along the ceiling line, corners, and around any trim in the upper portion of the wall. -
Roll the upper wall:
Using a roller, paint the upper section of the wall white. It is okay to paint slightly past your pencil line into the bottom section; this ensures there is no unpainted gap later. -
Apply second coat:
Allow the first coat to dry according to the can’s instructions. Apply a second coat of white for a solid, opaque finish and let this cure fully—ideally overnight—before applying tape.
Seal the Deal
Always ‘seal’ your tape with the base wall color before applying the accent color. This blocks gaps and guarantees a crisp, professional line every time.
Step 3: Creating the Split
-
Apply the tape:
Once the white paint is fully cured, run a strip of painter’s tape across the wall. Align the top edge of the tape perfectly with your level pencil line or laser guide. -
Seal the tape edge:
To get that razor-sharp line, brush a very thin layer of the *white* paint (the top color) over the bottom edge of the tape. This seals the tape and prevents the terracotta color from bleeding underneath. -
Wait for seal to dry:
Let this sealing layer dry partially. It usually only takes about 20-30 minutes since it is a thin coat.
Vertical Interest
Create a wainscoting effect by gluing narrow vertical wood batten strips to the lower section before painting it, adding texture and depth.
Step 4: Painting the Bottom Section
-
Cut in the bottom:
Open your warm terracotta paint. Use a clean brush to cut in along the baseboards, corners, and carefully along the bottom edge of the tape. -
Roll the lower wall:
Use a roller to fill in the bottom section with the terracotta color. Work in ‘W’ shapes to distribute the paint evenly, blending into your cut-in edges while the paint is still wet. -
Second coat application:
Let the first coat dry to the touch. Apply a second coat of terracotta to ensure rich, deep color coverage that hides the wall texture underneath. -
Remove tape:
This is crucial: peel off the painter’s tape while the final coat is still slightly tacky, not fully dry. Pull the tape slowly at a 45-degree angle away from the line to slice through the paint film cleanly. -
Touch ups:
Inspect your line. If any tiny bleeds occurred despite sealing, use a small artist’s brush and the appropriate color to touch up the spots once everything is dry.
Step back and admire how this simple line transforms the room’s energy
BRUSH GUIDE
The Right Brush for Every Stroke
From clean lines to bold texture — master brush choice, stroke control, and essential techniques.
Explore the Full Guide
Golden Ratio Split for Easy Balance
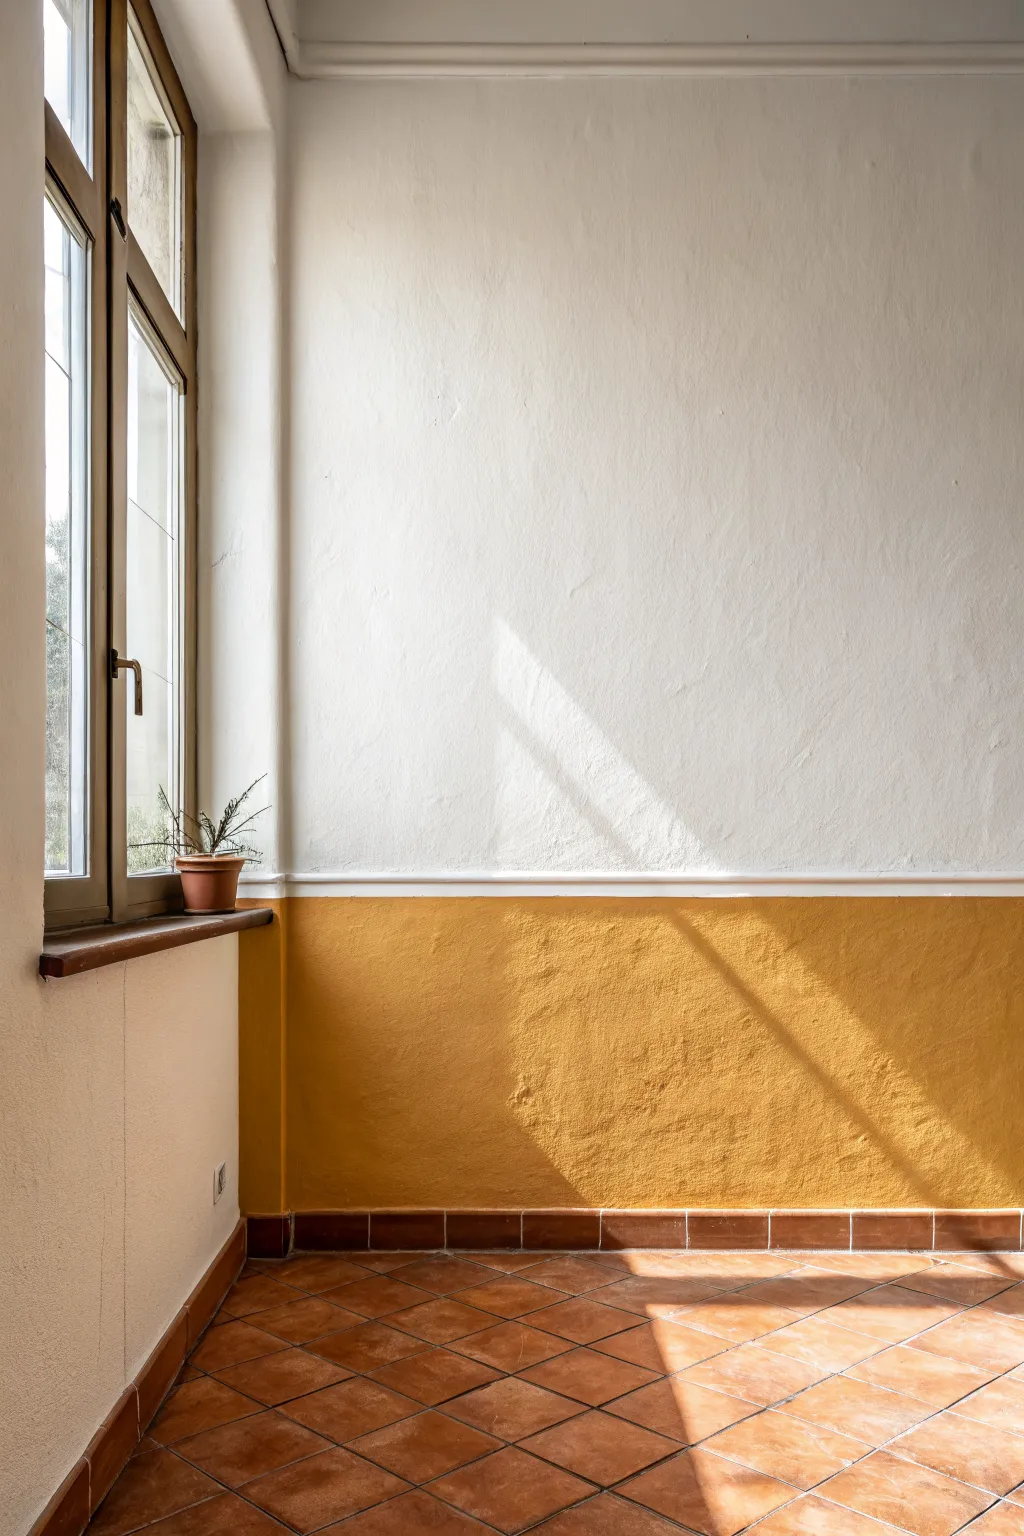
Bring the warmth of a Mediterranean afternoon into your space with this classic split-wall design. By balancing creamy white upper walls with a grounding ochre base and a crisp dado rail, you’ll create a room that feels both airy and cozy.
Detailed Instructions
Materials
- Interior wall primer
- Mustard yellow/ochre latex paint (matte or eggshell)
- Cream or off-white latex paint (matte or eggshell)
- Wooden dado rail (chair rail) molding
- Painter’s tape (high quality)
- Drop cloths
- Sanding block (medium grit)
- Filler or spackle
- Paint rollers and tray
- Angled sash brush
- Level (laser level preferred)
- Construction adhesive or finishing nails
- Caulk and caulk gun
- Measuring tape
- Pencil
Step 1: Preparation & Planning
-
Prepare the space:
Begin by clearing the room or moving furniture to the center. Lay down drop cloths to protect your flooring, especially if you have porous tiles like the ones in the example. -
Surface prep:
Inspect the walls for any holes or cracks. Fill these imperfections with spackle, let dry, and sand smooth. A clean, flat surface is crucial for that seamless look. -
Determine the height:
Decide on the height of your split. The Golden Ratio suggests dividing the wall into thirds. Measure about 30 to 36 inches up from the floor, which is a standard chair rail height, and mark this spot. -
Mark the level line:
Using a laser level or a long spirit level, draw a light pencil line around the entire room at your chosen height. This will guide your paint separation and molding placement.
Bleeding Lines?
If paint bleeds under the tape, wait for it to dry perfectly. Then, use a small artist’s brush and the original base color to carefully touch up the line for a razor-sharp finish.
Step 2: Painting the Upper Section
-
Cut in the top edges:
Starting with your cream or off-white paint, use an angled sash brush to ‘cut in’ along the ceiling line, corners, and around window frames. Don’t worry about the bottom edge yet. -
Roll the upper wall:
Using a roller, fill in the main upper wall section. Overlap slightly past your pencil line into the bottom section to ensure full coverage where the rail will sit. -
Second coat:
Allow the first coat to dry completely according to the can’s instructions. Apply a second coat for a rich, consistent finish that hides any previous color.
Step 3: Painting the Lower Section
-
Tape the line:
Once the cream paint is fully cured (give it at least 24 hours just to be safe), apply painter’s tape slightly *above* your pencil mark. This protects the fresh cream paint. -
Seal the tape:
I like to run a damp finger or a tiny bit of the cream paint over the tape edge first. This seals the tape and prevents the darker yellow from bleeding underneath. -
Cut in the base:
Brush the ochre paint along the baseboards, corners, and just below the tape line. Be careful near the floor tiles to avoid drips. -
Roll the color:
Apply the mustard yellow/ochre paint to the lower section using a roller. Use a ‘W’ motion to distribute the paint evenly for that earthy, textured look. -
Apply final coat:
After the specified drying time, add your second coat of ochre. Ensure the color is solid and opaque. -
Remove tape:
Carefully peel off the painter’s tape while the paint is still slightly tacky to keep a sharp edge. Don’t wait for it to dry completely.
Texture Play
For an authentic old-world feel, use a limewash or chalk paint for the bottom ochre section. This adds subtle texture and depth that mimics plaster walls perfectly.
Step 4: Installing the Chair Rail
-
Measure and cut:
Measure the length of each wall section. Cut your wooden dado rail to size, using miter cuts for the corners to ensure they fit together cleanly. -
Paint the rail:
Paint the molding strips before attaching them to the wall. This saves you from tedious cutting-in later. Use a semi-gloss matching your upper wall for a subtle transition, or bright white for contrast. -
Attach the rail:
Align the rail directly over the transition line between the two paint colors. Affix it using construction adhesive or finishing nails into the wall studs. -
Fill and touch up:
Use wood filler for the nail holes and caulk along the top edge of the rail to close any gaps. Once dry, dab a little paint over the filled spots to blend them in.
Step back and enjoy the structured warmth this dual-tone wall brings to your room
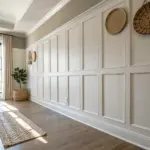
High-Contrast Split for Bold Drama
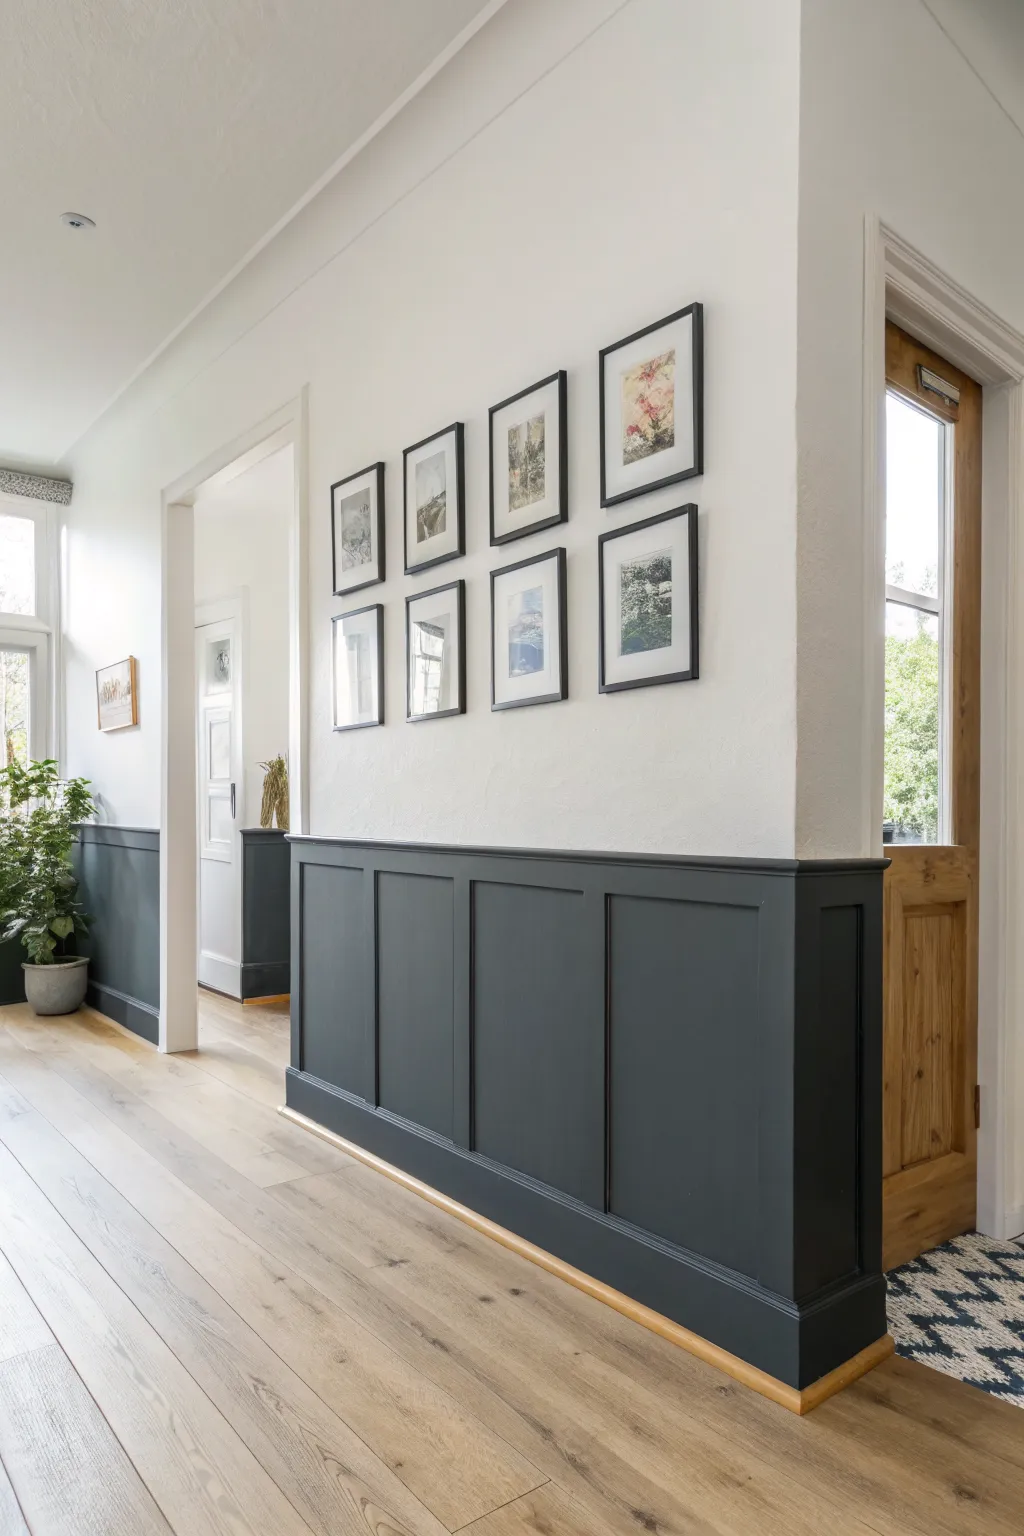
Transform a plain hallway into a sophisticated gallery space by combining crisp white walls with moody, dark architectural details. This high-contrast look grounds the space while letting your artwork shine against a clean backdrop.
Step-by-Step
Materials
- Interior latex paint (bright white)
- Interior semi-gloss or satin paint (charcoal or soft black)
- 1×3 MDF or pine boards (for battens and rails)
- 1×4 MDF or pine boards (for top ledge/cap rail)
- Construction adhesive (e.g., Liquid Nails)
- Finishing nails
- Hammer or nail gun
- Bubble level or laser level
- Wood filler
- Paintable caulk
- Sandpaper (120 and 220 grit)
- Painter’s tape
- Paint roller and tray
- Angled sash brush
- Drop cloths
Step 1: Preparation and Base Coat
-
Clear and clean:
Remove all outlet covers, existing baseboards (if replacing), and artwork. Wipe down the walls with a damp cloth to remove dust and grime, ensuring a clean surface for adhesion. -
Patch imperfections:
Fill any old nail holes or dents with spackling paste. Once dry, sand these spots smooth so your new paint job looks professional and seamless. -
Paint the upper wall:
Before installing any wood, roll two coats of your bright white paint on the upper portion of the wall. Paint slightly lower than where your wainscoting will sit so you don’t have to cut in later.
Uneven Walls?
If gaps appear between the battens and a wavy wall, don’t force the wood. Use extra caulk to fill the gaps. It disappears completely once painted.
Step 2: Installing the Wainscoting Grid
-
Determine height:
Decide on the height of your wainscoting. A good rule of thumb is about one-third of the wall height, or roughly 36-40 inches from the floor. -
Install the top rail:
Using a laser level for accuracy, mark a horizontal line at your chosen height. Apply construction adhesive to the back of a 1×3 board and nail it horizontally along this line. -
Add the baseboard:
Install a matching 1×3 or a slightly taller baseboard along the floor. Ensure it is level; if your floor slopes, you may need to scribe the bottom edge for a tight fit. -
Measure vertical spacing:
Measure the distance between the top rail and baseboard. Determine your vertical batten spacing; 16 to 24 inches usually looks balanced. Mark these positions lightly on the wall. -
Cut vertical battens:
Cut your 1×3 vertical boards to fit snugly between the top rail and baseboard. Measure each spot individually, as floors and ceilings are rarely perfectly parallel. -
Install vertical battens:
Apply adhesive to the back of each batten. Place them on your marks, check for plumb with a level, and nail them securely into place. -
Add the cap trim:
For a finished look, install the 1×4 board flat on top of the upper rail to create a small shelf or ledge. Nail it down into the top edge of the horizontal rail.
Step 3: Finishing and Painting
-
Fill nail holes:
Go over every nail hole with wood filler. Overfill slightly, as the filler shrinks when drying. Let it dry completely before moving on. -
Sand smooth:
Sand the wood filler flush with the surface using 120-grit sandpaper. Lightly sand all wood surfaces to remove any raised grain or rough spots. -
Caulk the seams:
Run a thin bead of finish caulk along every seam where wood meets wall and where boards meet each other. Smooth it with a wet finger for a seamless, built-in look. -
Tape off the top:
Once the caulk is cured, run a strip of high-quality painter’s tape along the wall just above your top ledge to protect the fresh white paint. -
Prime the wood:
If your wood is raw, apply a coat of primer. If it’s pre-primed, you can skip this, though I find a quick coat helps ensure an even finish for dark colors. -
Cut in the edges:
Using an angled sash brush, carefully paint the corners, edges, and detail areas of the wainscoting with your dark charcoal paint. -
Roll the flat surfaces:
Use a small foam or microfiber roller to paint the flat panels and board faces. This avoids brush strokes and provides a smooth, factory-like finish. -
Apply second coat:
Allow the first coat to dry according to the can’s instructions, then apply a second coat for full opacity and depth of color. -
Remove tape:
Peel off the painter’s tape while the paint is still slightly tacky to ensure a crisp, sharp line without peeling.
Level Up: Picture Shelf
Extend the top cap rail depth to 2-3 inches to create a functional picture ledge, allowing you to lean art instead of hanging it.
Enjoy the sophisticated contrast your new feature wall brings to the home.

PENCIL GUIDE
Understanding Pencil Grades from H to B
From first sketch to finished drawing — learn pencil grades, line control, and shading techniques.
Explore the Full Guide
Tone-on-Tone Split for Soft Dimension

Recreate the warmth of a Mediterranean villa with this textured, two-tone wall treatment that plays with light and shadow. By combining a creamy upper wall with a tactile, terracotta-pink lower section, you’ll add incredible depth and character to any plain room.
Step-by-Step Tutorial
Materials
- Creamy off-white interior latex paint (eggshell or matte)
- Terracotta pink interior latex paint (matte or flat)
- Texture additive (sand or silica) or pre-mixed textured paint
- Painter’s tape (high quality)
- Laser level or spirit level
- Measuring tape
- Pencil
- Drop cloths
- Sanding sponge (medium grit)
- Wide paint roller (9-inch) with medium nap
- Smaller trim roller or brush for edges
- Stir stick
- Paint tray and liners
Step 1: Preparation and Planning
-
Clear the area:
Begin by removing all furniture from the wall area. Lay down your drop cloths to protect those lovely wooden floors from any potential splatters. -
Clean the surface:
Wipe down the wall with a damp cloth or a mild sugar soap solution to remove dust and grease, ensuring a clean base for your new paint. -
Plan the split:
Decide on the height of your division line. A good rule of thumb is to place the split at about one-third or slightly below the halfway point of the wall height to visually ground the space. This image shows a split roughly at wainscoting height. -
Mark the line:
Using your measuring tape and pencil, make small marks at your chosen height across the wall. Use a laser level to ensure these guide marks are perfectly horizontal.
Bleed-Through Blues?
If paint bled under the tape, wait for it to dry completely. Re-tape carefully over the pink, then touch up the creamy white with a small artist’s brush for a perfect edge.
Step 2: Painting the Upper Wall
-
Cut in the edges:
Start with your creamy off-white paint. Use an angled brush to cut in around the ceiling line, corners, and window frames. -
Roll the top section:
Using a roller, apply the off-white paint to the upper portion of the wall. Extend the paint slightly below your pencil marks to ensure full coverage when you later tape over it. -
Second coat:
Let the first coat dry completely according to the manufacturer’s instructions. Apply a second coat for a rich, solid finish. I like to let this dry overnight to ensure the tape won’t peel it up later.
Step 3: Creating the Textured Lower Wall
-
Tape the line:
Once the top paint is fully cured, apply painter’s tape horizontally across the wall, aligning the bottom edge of the tape with your level pencil marks. Press the edge down firmly to seal it. -
Seal the tape (optional but recommended):
Lightly brush a tiny amount of the *top* color (off-white) over the bottom edge of the tape. This seals any gaps so that if paint bleeds, it matches the top wall, keeping your final line crisp. -
Prepare the texture:
Mix your texture additive into the terracotta pink paint. Stir thoroughly and frequently, as the sand tends to settle at the bottom of the tray. -
Test the texture:
Before hitting the wall, test your textured mix on a piece of cardboard. Adjust the amount of additive until you achieve that rough, stucco-like appearance shown in the photo. -
Cut in the bottom:
Carefully brush the terracotta paint along the baseboards, corners, and right up to the bottom edge of your painter’s tape. -
Roll only one direction:
Apply the textured paint to the lower wall using a roller. For a consistent texture, try finishing with all roller strokes moving in the same direction (usually down). -
Handling moldings:
If you have a chair rail or molding strip like the subtle one in the image, paint right over it with the terracotta mix to integrate it fully into the lower colour block. -
Apply second textured coat:
Allow the first coat to dry—textured paint often takes longer. Apply a second coat to build up that tactile, plaster-effect depth.
Fake Plaster Look
For even more depth, apply the bottom paint with a wide putty knife or trowel in random, crossing strokes instead of a roller to mimic authentic old-world plaster.
Step 4: Finishing Touches
-
Remove the tape:
While the second coat is still slightly tacky (not soaking wet, but not rock hard), carefully peel off the painter’s tape. Pull it at a 45-degree angle away from the painted edge for the sharpest line. -
Paint the baseboards:
To achieve the seamless “dipped” look, paint the baseboards and any bottom trim in the same terracotta pink. Use a brush for this to get into the crevices. -
Touch ups:
Inspect your work. If any texture clumped too heavily, you can lightly knock it down with a sanding sponge once fully dry, then touch up with a small amount of paint.
Step back and enjoy the calming, grounded atmosphere your new textured wall brings to the room
Monochrome Split Using Two Finishes
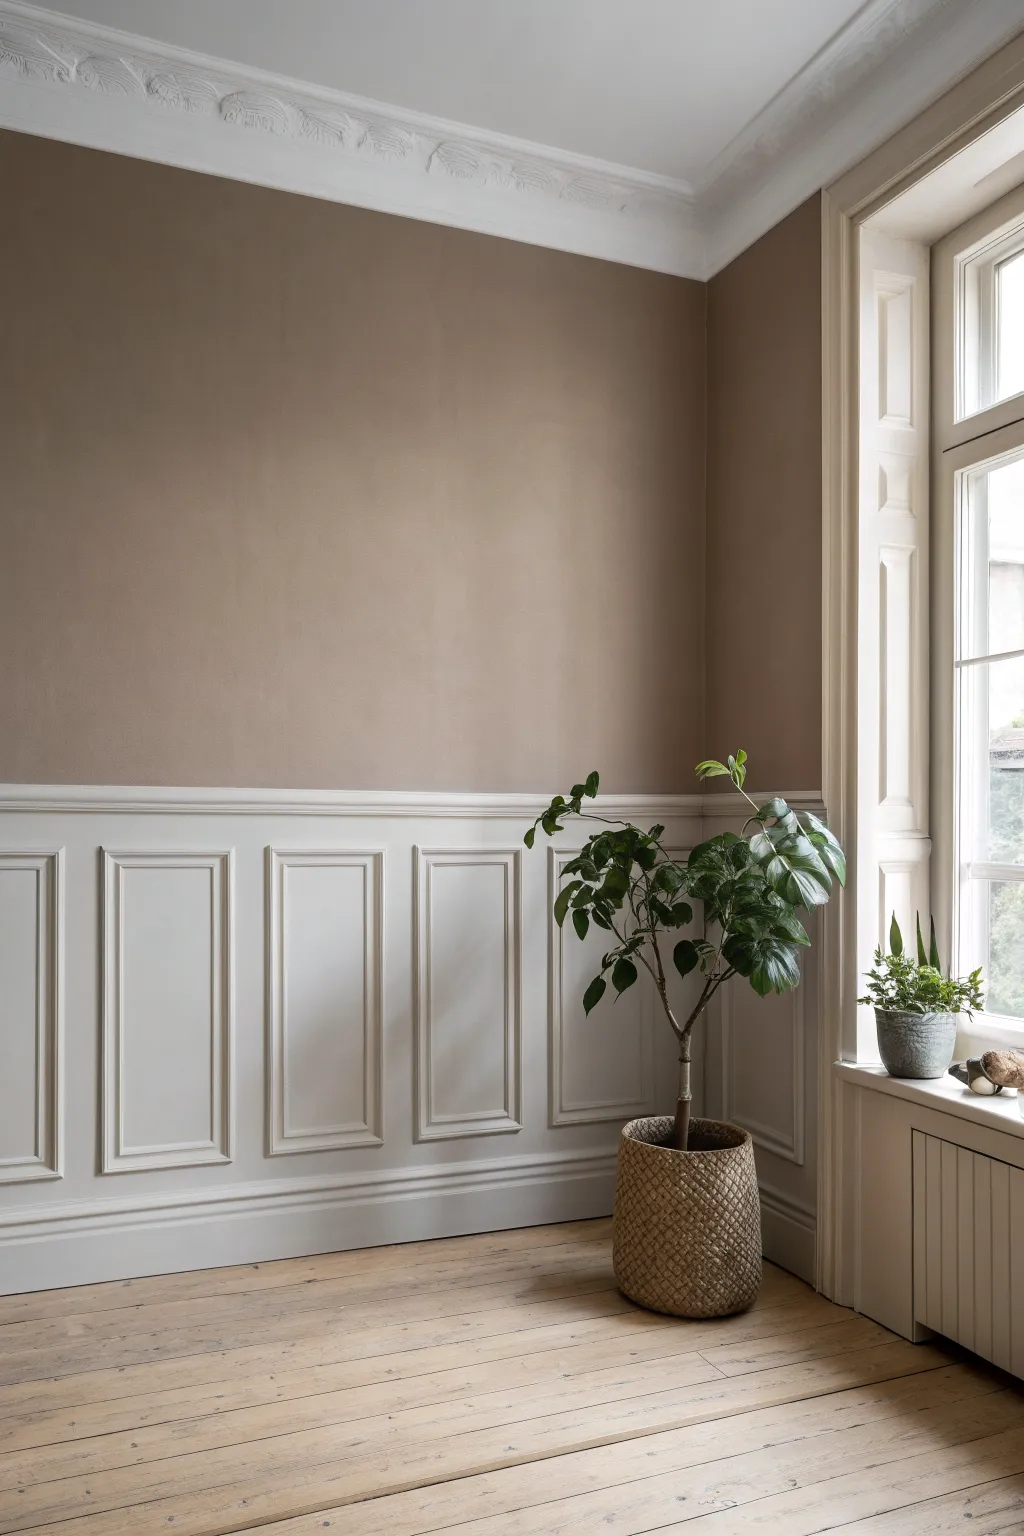
Transform a plain wall into a sophisticated feature by combining classic wainscoting with a warm, modern color palette. This project achieves a timeless monochrome-inspired look by contrasting crisp architectural woodwork against a soft, matte taupe upper wall.
Step-by-Step Guide
Materials
- Panel molding trim (rectangular profiles)
- Chair rail molding/dado rail
- Baseboard molding
- Miter saw or hand saw with miter box
- Construction adhesive (Liquid Nails)
- Finishing nails and nail gun (or hammer)
- Wood filler
- Sandpaper (120 and 220 grit)
- Caulk and caulking gun
- Painter’s tape
- Spirit level
- Tape measure
- Primer
- Interior paint (Satin or Semi-gloss White for panels)
- Interior paint (Matte Taupe/Brown for upper wall)
- Paint rollers and angled brushes
Step 1: Preparation and Planning
-
Measure and calculate:
Begin by measuring the total length of your wall. Decide on the height of your wainscoting; a standard height is around 32 to 36 inches from the floor, often roughly one-third of the wall’s total height. -
Design your boxes:
Sketch out the panel layout. Determine how many rectangular boxes will fit comfortably along the wall, ensuring equal spacing between them—typically 3 to 4 inches looks balanced. -
Mark the wall:
Using a level and pencil, draw a horizontal line across the entire wall at your chosen chair rail height. This will guide your top molding installation. -
Clean the surface:
Ensure the wall is clean, dry, and free of dust. If the current paint is glossy, give it a light sanding to help the new paint and adhesive bond effectively.
Step 2: Painting and Trim Installation
-
Paint the upper wall:
Before installing any wood, paint the upper section of the wall with your matte taupe color. Bring the paint down just slightly below your pencil line so you don’t have to cut in perfectly later. -
Install baseboards:
If you don’t have existing baseboards, install new ones along the floor. Secure them with construction adhesive and finishing nails into the studs. -
Install the chair rail:
Cut your chair rail molding to length. Apply construction adhesive to the back and nail it directly along your horizontal pencil line. Use your level constantly to ensure it remains perfectly straight. -
Paint the lower base color:
Roll your white satin or semi-gloss paint onto the wall area between the baseboard and the chair rail. I usually do two coats here to ensure a solid background before the trim goes on.
Spacer Block Trick
Cut a scrap piece of wood to the exact width needed between your panels. Use this as a physical guide to space every box perfectly without constantly using a tape measure.
Step 3: Creating the Panels
-
Cut the box molding:
Set your miter saw to a 45-degree angle. Cut the pieces for your rectangular boxes according to your layout measurements. Remember, the ‘short point’ of the miter cuts determines the inside dimension of your box. -
Dry fit the layout:
Place your cut pieces on the floor or tape them lightly to the wall to verify the spacing and fit. This is the moment to catch any measurement errors before gluing. -
Install vertical sides:
Starting with the vertical sides of your first box, apply a bead of adhesive and position them on the wall. Use a level on each piece before nailing it into place to ensure it is perfectly plumb. -
Install horizontal rails:
Fit the top and bottom horizontal pieces between the vertical sides. Apply adhesive, check for level, and nail them securely, completing the rectangular frame. -
Repeat the process:
Continue installing the remaining boxes along the wall, using a spacer block (a scrap piece of wood cut to your gap size) to keep the distance between panels consistent without measuring every time.
Level Up: Hidden Detail
For a richer look, add a second, smaller rectangle of molding inside the main panel box. Paint it the same color for added depth and shadow play.
Step 4: Finishing Touches
-
Fill nail holes:
Go over every piece of trim and fill the nail holes with wood filler. Let it dry completely, then sand it flush with 220-grit sandpaper. -
Caulk the seams:
Run a thin bead of printable caulk along all edges where the trim meets the wall, and at the mitered corners. Smooth it with a wet finger for a seamless, built-in look. -
Prime the trim:
Once the caulk is dry, apply a coat of primer to the raw wood molding and any filled spots to ensure an even final finish. -
Final painting:
Apply your final coats of white satin or semi-gloss paint over the entire lower section—baseboards, flat wall area, panel molding, and chair rail. Use a high-quality angled brush for the trim and a small roller for the flat centers. -
Touch up the line:
If any white paint strayed onto the taupe upper wall, use a small artist’s brush to carefully touch up the line right above the chair rail for a crisp finish.
Step back and admire how this architectural detail instantly adds height and character to your room


Split Wall That Wraps Trim and Baseboards
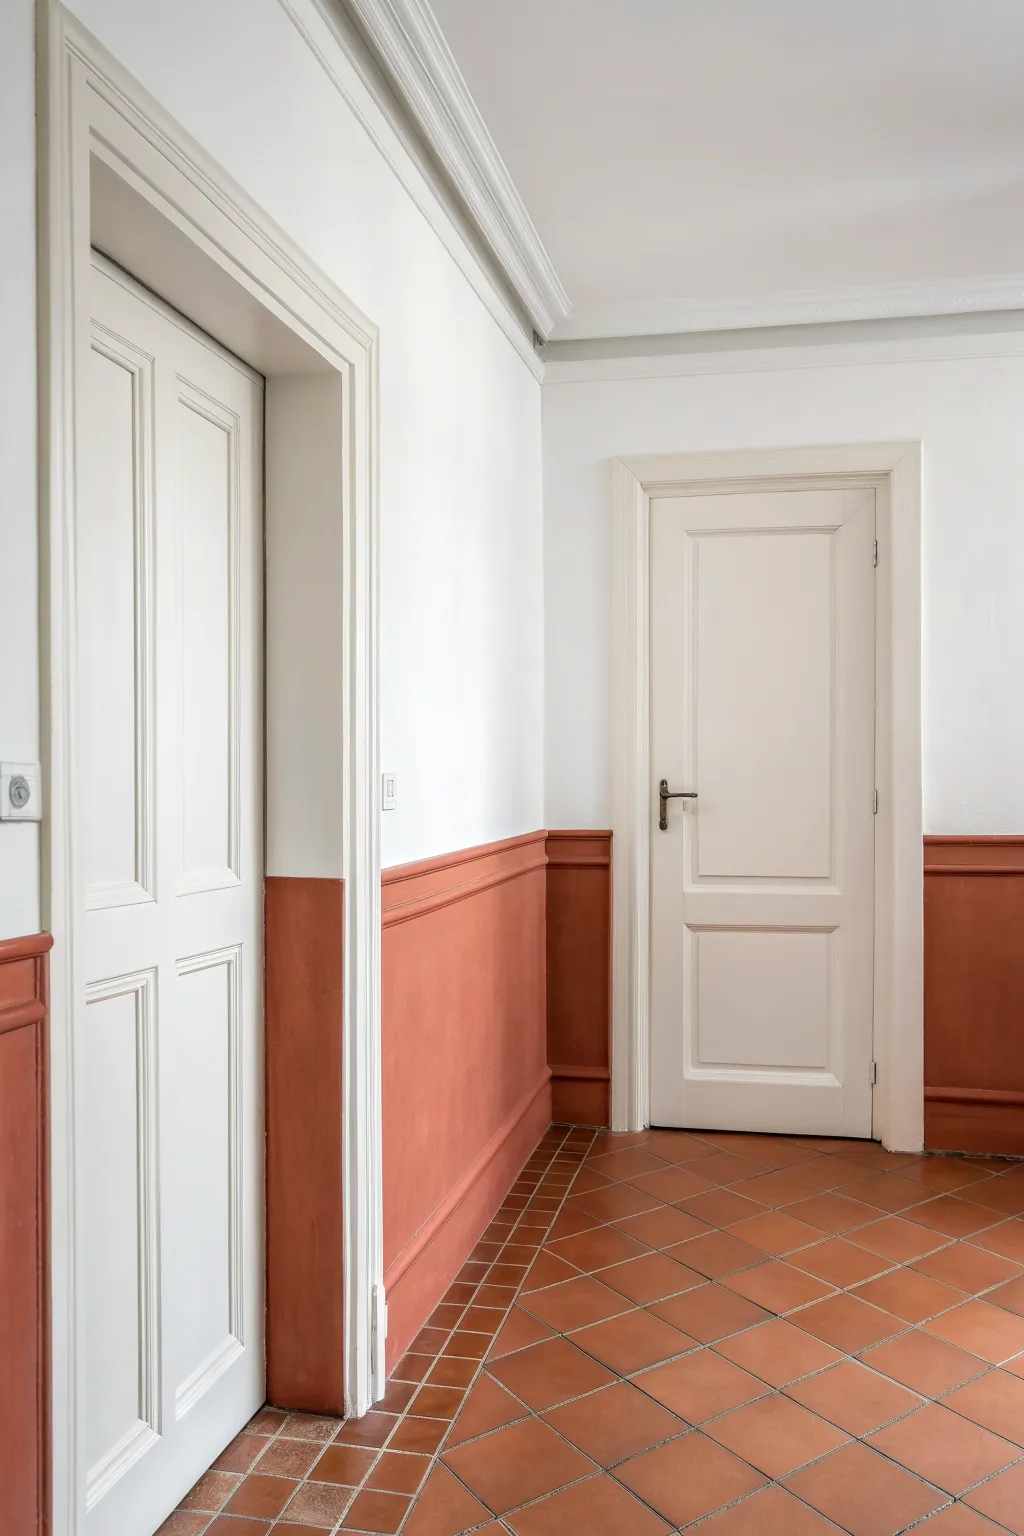
This project transforms a standard hallway into architectural art by carrying a warm terracotta hue across walls, baseboards, and door casings. The result is a unified, color-blocked effect that feels modern yet timeless, grounding the space without overwhelming it.
Step-by-Step
Materials
- High-quality painter’s tape (1.5-inch or wider)
- Laser level or spirit level
- Pencil
- Tape measure
- Sanding sponge (medium grit)
- Interior paint (Terracotta/Rust color) in satin or semi-gloss finish
- Interior paint (White) in eggshell or matte finish
- Angled sash brush (2-inch)
- Small microfiber roller and tray
- Primer (bonding primer if painting over glossy trim)
- Clean rags and mild detergent
Step 1: Preparation & Mapping
-
Clean surfaces thoroughly:
Since you will be painting over trim and baseboards, scrub them down with a mild detergent to remove grime, dust, or oils that could prevent adhesion. -
Sand the trim:
Lightly scuff the baseboards and door casings with a medium-grit sanding sponge. This is crucial for glossy trim surfaces to ensure the new paint bites. -
Determine the height:
Decide on your split height. A good rule of thumb is about one-third up the wall (wainscoting height) or slightly lower, around 32 to 36 inches from the floor. -
Mark the line:
Use a tape measure to mark your chosen height at several intervals along the wall. I find marking every 3-4 feet helps keep things accurate. -
Create the laser guide:
Set up your laser level to project a horizontal line connecting your marks. This eliminates the guesswork of uneven floors. -
Apply tape across walls and trim:
Run your painter’s tape along the laser line. Press the tape down firmly, especially where it crosses over the transition from flat wall to contoured molding. -
Seal the tape edge:
To prevent bleeeding, paint a very thin layer of the existing wall color (usually white) along the bottom edge of the tape. This seals the gap.
Use a Credit Card
When taping over uneven trim profiles, use the edge of an old credit card to press the tape deep into the grooves for a perfectly crisp seal.
Step 2: Painting the Detail Work
-
Prime glossy areas:
If your trim is currently high-gloss oil paint or deeply stained wood, apply a coat of bonding primer to the lower section of the trim and allow it to dry completely. -
Cut in the edges:
Using your 2-inch angled brush, dip into the terracotta paint and carefully ‘cut in’ along the floor, corners, and the intricate curves of the door casing. -
Paint the tape line:
Brush the terracotta paint over the sealed tape line. Don’t overload the brush here to avoid a ridge forming against the tape. -
Address the trim profiles:
Work the brush into the deep grooves of the baseboards and door casings. Watch for drips pooling in the corners of the molding. -
Feather the brush strokes:
Smooth out your brushwork on the flat parts of the trim to prepare for rolling.
Step 3: Rolling & Finishing
-
Roll the flat surfaces:
Switch to your microfiber roller. Roll the flat wall surfaces between the trim and the floor, getting as close to the brush work as possible without touching the floor. -
Apply the second coat:
Once the first coat is dry to the touch (check your paint can for times), apply a second coat for full opacity and depth of color. -
Remove tape while damp:
The moment the second coat is finished—while the paint is still slightly tacky—slowly peel off the painter’s tape at a 45-degree angle. -
Inspect the transition:
Check the line where the paint crosses the door casing. If any paint bled under, use a damp cloth wrapped around a putty knife to gently wipe it away immediately. -
Touch up the white:
If necessary, use a small artist’s brush and your upper wall color to fix any tiny imperfections along the line once the dark paint is fully cured.
Extend the Illusion
Paint the door itself in the same split-color fashion for a bold, immersive effect that makes the hardware pop.
Enjoy the satisfying visual weight and architectural interest this simple paint technique adds to your hallway
Split Wall With a Thin Accent Stripe Divider
This tutorial shows how to transform a simple block wall into a warm, architectural feature using three distinct bands of color. The result is a grounded, earthy look that plays beautifully with natural light and shadow.
Detailed Instructions
Materials
- High-quality painter’s tape (multi-surface)
- Measuring tape
- Pencil
- Laser level (optional but helpful)
- Angled sash brush (2.5 inch)
- Medium-nap roller (3/8 inch or 1/2 inch for textured walls)
- Roller frame and extension pole
- Paint tray and liners
- Drop cloths
- Primer (masonry specific if painting bare block)
- Interior latex paint: Terracotta/Rust color
- Interior latex paint: Creamy Beige color
- Interior latex paint: White
- Damp rag for clean up
Step 1: Preparation & Base Coat
-
Clear and clean:
Start by moving furniture away from the wall and laying down drop cloths. If the block wall is dusty or has loose mortar, brush it down with a stiff broom and vacuum the baseboards to ensure good adhesion. -
Prime the surface:
If your wall is unpainted masonry or concrete block, apply a dedicated masonry primer first to seal the porous surface. For previously painted walls, a standard primer or spot-priming repairs is sufficient. -
Apply the top color:
Since the top section is white, I suggest painting the upper third of the wall first. Don’t worry about a crisp bottom edge yet; just bring the white paint down a few inches lower than where you plan your first transition line to sit.
Pro Tip: The Seal
On bumpy block walls, seal your tape edge with a thin layer of paintable caulk. Wipe it almost completely away before painting over it for a razor-sharp line.
Step 2: Measuring & Marking
-
Determine heights:
Decide where you want your color breaks. In this design, the terracotta section anchors the bottom, covering roughly the lower third, while the beige section sits in the middle. Measure from the floor up to your desired height for the first line (top of the dark color). -
Mark the lines:
Use a pencil to make small tick marks at your measured height heavily across the wall. A laser level is fantastic here to project a straight line across irregular block textures, but a long spirit level and a steady hand work too. -
Tape the first transition:
Apply painter’s tape horizontally across the wall at your lower mark. Press the tape firmly into the grout lines and texture of the blocks to prevent bleed-under. This tape line will separate the bottom terracotta from the middle beige.
Level Up: Faux Mortar
For added dimension, use a small brush to paint the mortar lines a slightly darker shade than the block face within the same color band.
Step 3: Painting the Middle Section
-
Seal the tape edge:
To get a crisp line on textured block, lightly brush a tiny amount of the *existing base color* (or a clear matte medium) along the tape edge first. This seals any gaps so the next color won’t seep under. -
Cut in the beige:
Using your angled sash brush, cut in the creamy beige paint along corners, the window frame, and just above your tape line. -
Roll the middle band:
Use the roller to fill in the middle section with the beige paint. Roll vertically, ensuring you get paint into the mortar joints. Extend this beige color up past where your second (upper) transition line will be. -
Let it dry completely:
Allow the beige paint to dry fully—usually at least 4-6 hours. It must be dry to the touch so it can hold tape for the next step without peeling.
Step 4: Painting the Bottom Section
-
Tape the upper transition:
Once dry, measure and mark the line where the beige meets the white. Apply a fresh line of tape over the dry beige paint. Remember to press firmly into the texture. -
Cut in the top line:
If you need to touch up the white edge, do it now above the new tape line. Otherwise, prep to paint the bottom section. -
Tape for the bottom color:
Remove the first piece of tape (the one separating the bottom and middle) if you haven’t already. Now, mask off the *bottom edge* of the beige band you just painted so you can paint the dark terracotta below it. -
Cut in the terracotta:
Cut in the dark rust color along the floor (baseboards), corners, and along the tape edge that protects the beige section. -
Roll the bottom section:
Load your roller generously with the terracotta paint. The darker pigment and rough texture might require a thicker nap roller to ensure full coverage in the grooves. -
Check for holidays:
Inspect the deep mortar joints. If the roller missed spots, use a cheap chip brush to dab paint into the deep recesses, then lightly roll over it again to smooth the texture.
Step 5: Finishing Touches
-
Remove tape:
Peel off the tape while the paint is still slightly tacky, pulling it at a 45-degree angle away from the painted area. This helps prevent the dried paint skin from ripping. -
Touch ups:
On textured block walls, perfectly straight lines are rare on the first try. Use a small artist’s brush to hand-correct any bleed or wobble in the mortar joints. -
Clean up:
Wash your brushes and rollers immediately with warm soapy water and fold up your drop cloths.
Now step back and enjoy how the changing daylight interacts with your new color-blocked masterpiece.
Kids’ Room Split With a Playful Color Pair
Bring a touch of whimsical minimalism to your child’s room with this simple geometric tree print. This project uses basic triangular shapes and a muted, playful color palette to create an eye-catching focal point.
Detailed Instructions
Materials
- Heavyweight drawing paper or watercolor paper (11×14 inches)
- Ruler
- Pencil
- Eraser
- Acrylic craft paints (pink, mustard yellow, sage green, terra cotta)
- Small flat paintbrush
- Fine detail paintbrush
- Painter’s tape or masking tape
- Wooden picture frame (11×14 inches)
Step 1: Preparation and Sketching
-
Align the center:
Lay your paper on a flat surface. Using your ruler, measure the width of the paper to find the exact horizontal center. -
Draw a guide line:
Lightly draw a vertical pencil line straight down the center of the paper stopping about two inches from the bottom edge. This will serve as the trunk and alignment guide for your tree. -
Mark triangle heights:
Starting from the bottom of your guide line, mark four points spaced equally apart, approximately 2 inches between each mark, moving upward. -
Sketch the triangles:
Draw four triangles stacked on top of each other. The base of each triangle should become slightly narrower as you move up the tree, creating a tapered effect. -
Add the stem:
Draw a thin vertical rectangle at the very top for the tree topper, and extend the bottom line downward to create the main trunk.
Uneven Edges?
If paint bleeds under the tape, wait for it to dry fully. Then, paint over the mistake with white gouache or acrylic to clean up the line perfectly.
Step 2: Painting the Shapes
-
Tape the first shape:
For crisp lines, place strips of painter’s tape along the outside edges of the bottom triangle. Press the edges down firmly so paint won’t bleed underneath. -
Paint the base:
Using the terra cotta paint and a flat brush, fill in the bottom triangle using smooth, horizontal strokes. -
Remove tape carefully:
While the paint is still slightly tacky but drying, gently peel back the tape at a 45-degree angle to reveal a sharp edge. -
Transition to green:
Move to the second triangle up. I like to freehand this part if I’m feeling steady, but feel free to re-tape the edges if you prefer safety. Fill this shape with sage green paint. -
Add the yellow layer:
Clean your brush thoroughly. Paint the third triangle with the mustard yellow shade, ensuring you stay just inside your pencil lines. -
Top with pink:
Paint the smallest, top triangle with a soft pink color. -
Create the delicate topper:
Switch to your fine detail brush. Using the same pink or a slightly darker shade, paint the thin vertical stem at the very peak of the tree.
Step 3: Final Details and Framing
-
Paint the trunk:
Using a mix of the terra cotta and a tiny dot of black (or dark brown), paint the thin vertical trunk line at the bottom using the fine detail brush. -
Check for gaps:
Inspect the spaces between the triangles. Depending on your preference, you can leave a tiny white gap between them or carefully touch them up so the colors kiss typically. -
Erase guidelines:
Once the paint is completely bone dry, very gently erase any visible pencil marks around the exterior of the shapes. -
Let it cure:
Allow the entire artwork to dry flat for at least 2 hours to prevent the paper from buckling against the glass later. -
Place in frame:
Clean the glass of your wooden frame. Center your artwork on the backing board and secure it within the frame.
Use a Palette Knife
For a more textured, modern look, apply the paint with a small plastic palette knife instead of a brush to create slightly raised, dimensional shapes.
Now hang your custom artwork to perfectly complement the color-blocked walls of the room
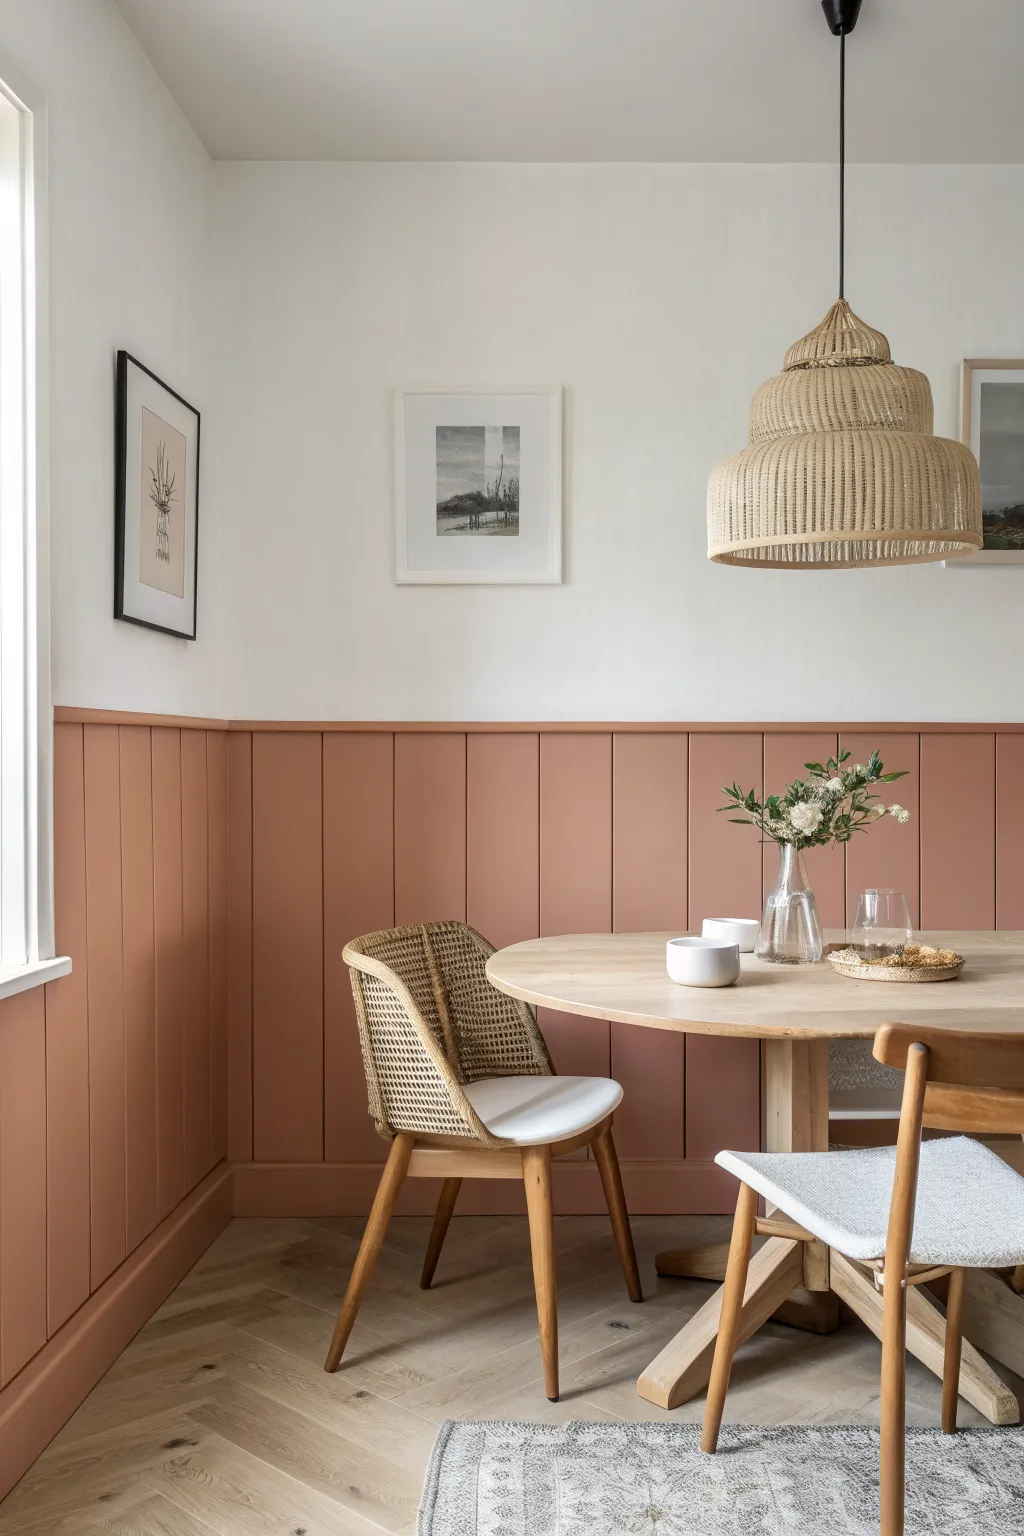
Dining Nook Split to Create a Room-Within-a-Room
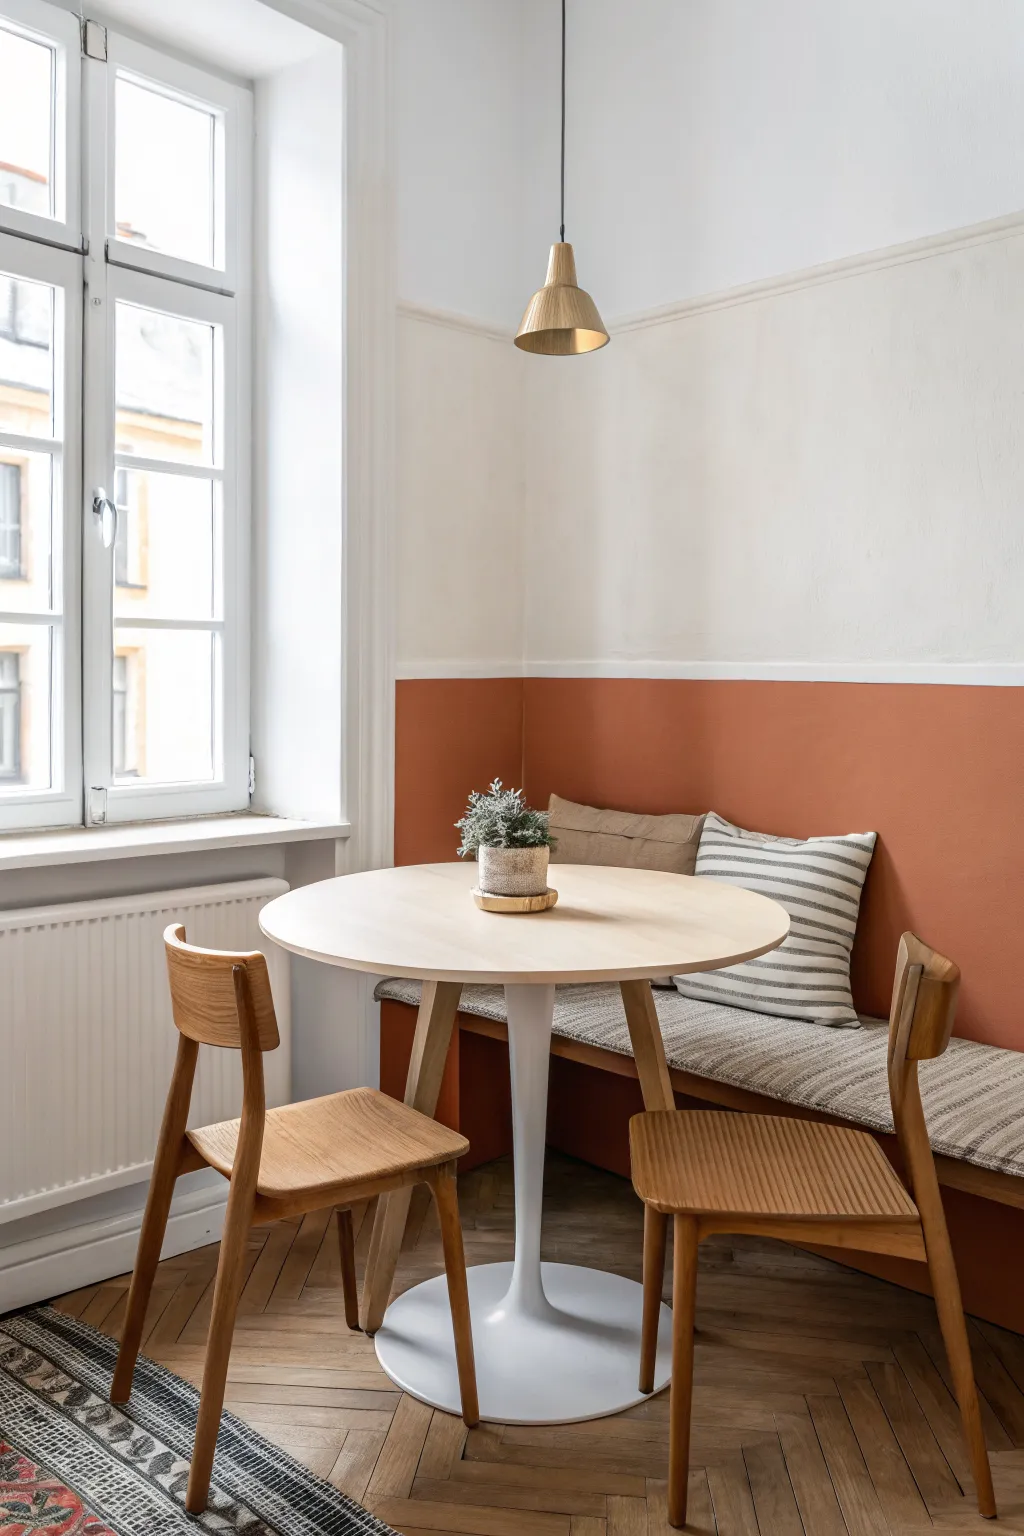
Transform a plain corner into a cozy, dedicated dining nook using a bold two-tone paint effect that grounds the space without overwhelming it. This technique, combining a warm terracotta base with a fresh cream upper, instantly creates architectural interest and the feeling of a ‘room-within-a-room.’
How-To Guide
Materials
- Warm terracotta semi-gloss or satin interior paint
- Cream or off-white eggshell interior paint
- Painter’s tape (high-quality, gentle release)
- Laser level or bubble level
- Pencil
- Measuring tape
- Paint rollers (microfiber covers)
- Angled sash brush (2-inch)
- Drop cloths
- Spackle and sandpaper (if wall repairs are needed)
- Paint tray and liners
Step 1: Preparation and Mapping
-
Clear and Clean:
Begin by removing all furniture, outlet covers, and wall hangings from the corner area. Wipe the walls down with a damp cloth and mild detergent to remove dust or grease, ensuring a clean surface for the paint to adhere to. -
Measure the Height:
Decide on the height of your split line. In this nook, the color block sits just above the back cushion line, approximately 36 to 40 inches from the floor, which helps anchor the seating area visually. -
Mark the Line:
Using your measuring tape, make small pencil marks at your chosen height every few feet along the walls. Precision here is key for a sharp, professional look. -
Establish the Horizon:
Set up a laser level to project a continuous straight line across your pencil marks. If you don’t have a laser level, use a long bubble level and connect the dots with a very light pencil line.
Step 2: Painting the Upper Section
-
Cut In the Edges:
Using your angled sash brush, cut in the cream paint along the ceiling line, corners, and around the window frame. I like to bring the paint down slightly past my pencil line to ensure full coverage where the colors will meet. -
Roll the Top Wall:
Fill the upper section with your cream or off-white paint using a roller. Apply in W-shaped patterns for even distribution. -
Second Coat:
Once the first coat is dry to the touch, apply a second coat for a rich, consistent finish. Let this upper section cure completely—ideally for 24 hours—before applying tape over it.
Tape Sealing Trick
Always ‘seal’ your tape edge with the base color first. It fills subtle gaps under the tape so the accent color can’t sneak through, guaranteeing a crisp line.
Step 3: Creating the Split Line
-
Apply the Tape:
Apply painter’s tape exactly along your marked or laser line. Press the tape firmly against the wall, ensuring the bottom edge of the tape aligns perfectly with your measurements. -
Seal the Edge:
To prevent dreaded paint bleed, brush a very thin layer of the *upper* wall color (the cream paint) along the bottom edge of the tape. This seals any tiny gaps so that if paint bleeds, it matches the top wall. -
Let it Dry:
Allow this sealing coat to dry completely. This step is the secret to that razor-sharp professional line you see in magazines.
Add Texture
For a luxe finish, install a thin wooden chair rail or picture ledge directly over the paint transition line to create a physical border, not just visual.
Step 4: Painting the Lower Section
-
Cut In the Terracotta:
Dip your angled brush into the terracotta paint and carefully cut in along the baseboards, corners, and right up to (and slightly over) the bottom edge of the tape. -
Roll the Bottom:
Use a fresh roller cover to apply the terracotta paint to the lower wall section. Work methodically to maintain a wet edge and avoid roller marks. -
Apply Full Coverage:
Let the first coat dry according to the can’s instructions, then apply a second coat. Darker earth tones often need two or even three coats for true depth and opacity. -
Remove Tape:
While the final coat of terracotta paint is still slightly tacky (but not wet), slowly peel off the painter’s tape at a 45-degree angle. Pulling while slightly damp helps prevent the paint film from ripping.
Step 5: Finishing Touches
-
Touch Ups:
Inspect your line and corners. Use a tiny artist’s brush to correct any minor imperfections along the split line or trim. -
Install Trim or Rail (Optional):
The image shows a subtle raised molding covering the transition line. If you want this look, cut a piece of small molding to size, paint it the upper wall color, and nail it directly over the paint seam. -
Reassemble the Space:
Once walls are fully cured, reinstall outlet covers and move your furniture back in. The contrast between the warm lower wall and light upper wall will immediately define the zone.
Enjoy your customized dining nook, where color creates a perfect backdrop for everyday moments
Window-Wall Split That Integrates the Frames
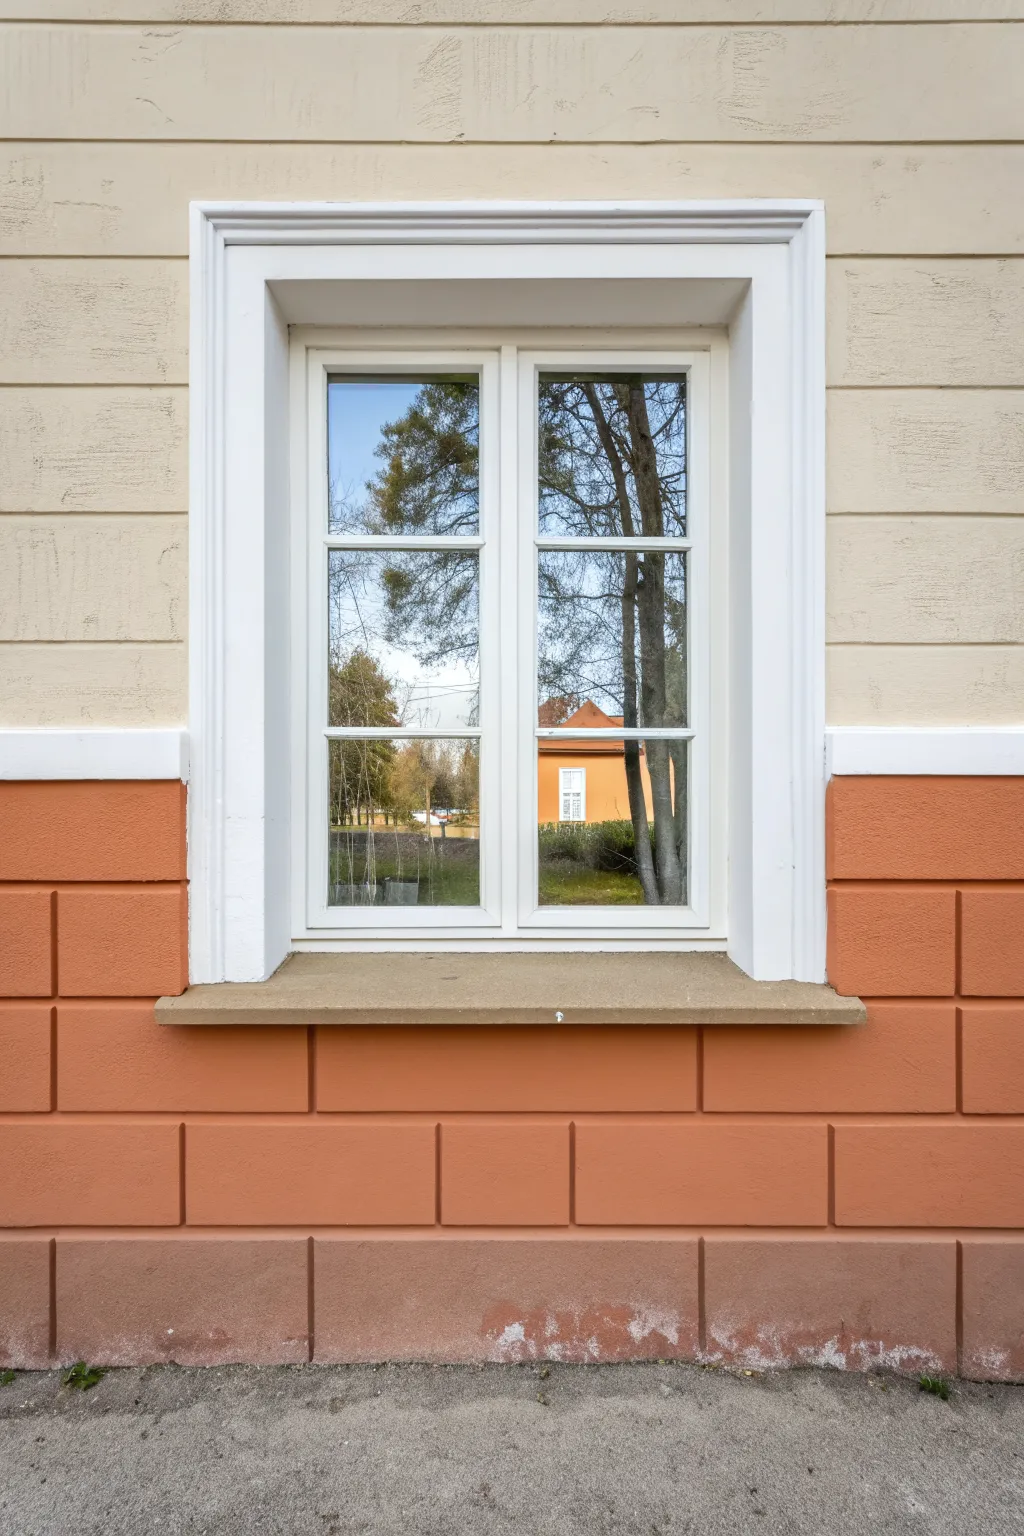
This exterior makeover creates a stunning visual break by pairing a textured cream stucco upper wall with a bold terracotta rustication below. The crisp white window molding acts as the perfect unifying element, bridging the two distinct zones for a polished, architectural finish.
Step-by-Step
Materials
- Exterior masonry primer
- Exterior masonry paint (Cream/Beige)
- Exterior masonry paint (Terracotta/Burnt Orange)
- Exterior trim paint (Bright White)
- Painters tape (exterior grade)
- Drop cloths
- Pressure washer (optional but recommended)
- Scrub brush and bucket
- Stucco repair patch (if needed)
- Medium-nap roller
- Extension pole
- Angled sash brush (2.5 inch)
- Level or laser level
- Chalk line
- Small detail brush
Step 1: Preparation & Cleaning
-
Inspect the surface:
Begin by thoroughly checking the stucco and rusticated brickwork for any cracks, loose mortar, or peeling old paint. -
Repair imperfections:
Fill any cracks or holes with appropriate exterior stucco patch or masonry filler. Allow these repairs to cure completely according to the manufacturer’s instructions. -
Clean everything:
Wash the entire wall surface. A pressure washer on a low setting is ideal for removing grime from the textured stucco, but a stiff scrub brush with soapy water works well too. Let the wall dry for at least 24 hours. -
Protect the area:
Lay down drop cloths at the base of the wall to protect the sidewalk or landscaping. Mask off the glass panes of the window carefully with painter’s tape.
Clean Groove Lines
When painting the lower rusticated blocks, double-check the recessed grooves for drips. Running a dry brush through them prevents paint accumulation.
Step 2: The Upper Section
-
Prime the surface:
Apply a coat of high-quality masonry primer to the entire wall if the surface is unpainted or porous. If previously painted, spot prime any repaired areas. -
Cut in the top color:
Using your angled sash brush, cut in the cream paint along the roofline, corners, and around the top half of the window frame. -
Roll the texture:
Load a medium-nap roller with the cream paint. Roll the upper section of the wall, ensuring you work the paint into the horizontal groove lines and stucco texture. Apply two coats for full coverage.
Step 3: The Lower Rustication
-
Establish the split line:
Locate the horizontal molding or groove that aligns with the window sill. This project relies on architectural features to define the split, so ensure this line is clean. -
Tape the divide:
Apply tape along the bottom edge of the white trim line that separates the upper and lower sections to ensure a razor-sharp transition. -
Paint the terracotta base:
Apply the terracotta orange paint to the lower blocked section. Use a brush to get deep into the recessed mortar joints between the ‘blocks’ first. -
Roll the flat surfaces:
Once the grooves are cut in, roll the face of the rusticated blocks with the terracotta paint. I find distinct horizontal strokes help maintain the structural look here. -
Darken the plinth:
If your wall has a bottom plinth (the lowest row of blocks near the ground), paint this a slightly darker, muddier shade of the terracotta to ground the building visually.
Paint Bleeding?
If paint bleeds under the tape on the textured stucco, wait for it to dry completely, then carefully touch up the line with a small artist’s brush.
Step 4: Trim & Finishing Touches
-
Paint the window sill:
Paint the stone window sill. A neutral tan or stone color works best here to separate the white frame from the orange wall. -
Detail the frame:
Using the bright white exterior trim paint, carefully paint the chunky window molding. Take your time here; this frame pops against both wall colors. -
Paint the sash:
Switch to a smaller brush to paint the actual window sashes and muntins (the grid bars) in the same bright white. -
Clean edges:
Remove the tape from the window glass and the dividing line while the paint is still slightly tacky to prevent peeling. -
Touch ups:
Inspect the transition points where the orange meets the sill and where the cream meets the white frame. Use a small detail brush to correct any bleeds.
Step back and admire how the crisp white frame now perfectly anchors the warm, two-toned facade design
Vertical Split for Zoning a Single Wall
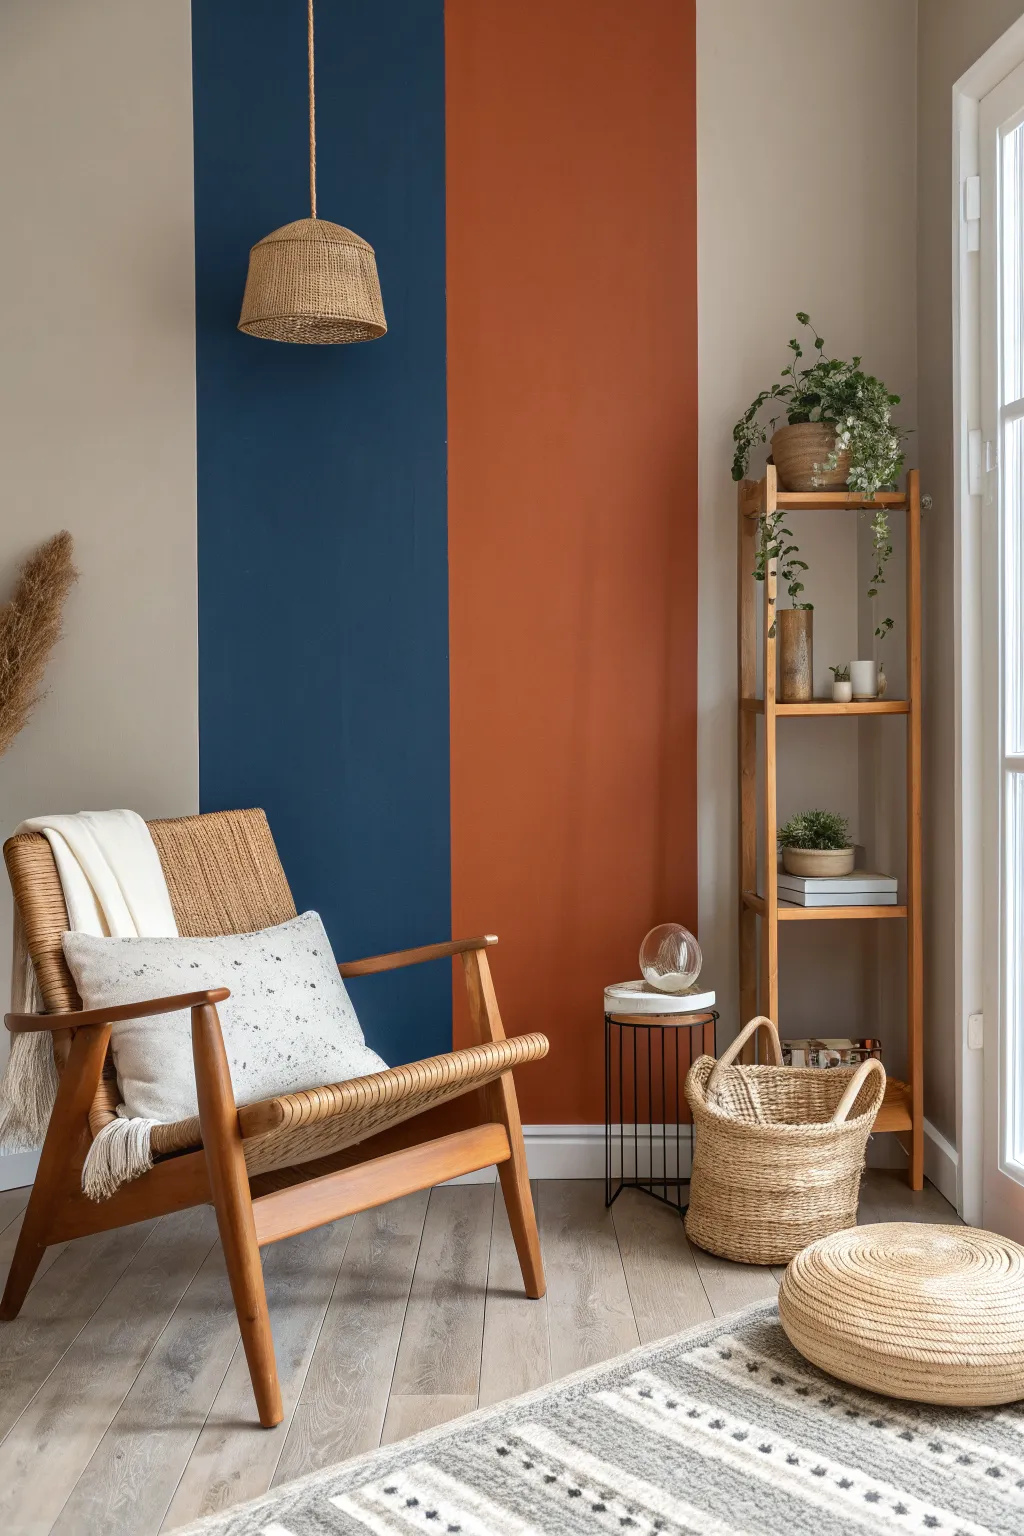
Transform a blank corner into a striking focal point with this tri-color vertical stripe technique. By pairing deep navy and burnt orange against a neutral backdrop, you create distinct visual zones that add height and drama to any room.
How-To Guide
Materials
- Interior latex paint (Beige/Off-white for base)
- Interior latex paint (Navy Blue)
- Interior latex paint (Burnt Orange/Terracotta)
- Painter’s tape (high-quality, multi-surface)
- Laser level or bubble level
- Measuring tape
- Pencil
- 9-inch paint roller and tray
- 4-inch mini roller for the stripes
- Angled sash brush
- Drop cloths
- Spackle and sandpaper (for wall prep)
- Damp cloth
Step 1: Preparation & Base Coat
-
Clear the area:
Move all furniture, including the armchair and shelving unit, away from the wall to give yourself ample working space. Lay down drop cloths to protect your flooring. -
Prep the surface:
Inspect the wall for nail holes or imperfections. Fill these with spackle, let dry, and sand smooth. Wipe the wall down with a damp cloth to remove dust and ensure good adhesion. -
Apply the base color:
Paint the entire wall with your chosen neutral beige or off-white shade using a 9-inch roller. This ensures a consistent background and means you won’t have to cut in perfectly on the outer edges of your stripes later. -
Cut in the edges:
While rolling the base, use your angled sash brush to cut in along the ceiling and baseboards. Let this base coat dry completely, preferably overnight, as you’ll be applying tape directly over it.
Bleed-Through Stopper
Paint over the tape edge with your *base* wall color first. This seals the tape so any seepage matches the background, keeping your color lines crisp.
Step 2: Mapping the Stripes
-
Measure the width:
Decide on the width of your bold stripes. In the inspiration image, the blue and orange sections appear roughly equal in width. Measure and mark distinct points along the wall where the color transitions will occur. -
Set the laser level:
Turn on your laser level and align it with your first pencil mark. A laser level is invaluable here for keeping lines perfectly plumb from floor to ceiling without constantly remeasuring. -
Tape the first line:
Apply painter’s tape along the laser line. Press the tape down firmly. Crucially, place the tape on the ‘outside’ of the area you intend to paint first (the Navy section) so the paint edge lands exactly on your mark. -
Tape the second line:
Repeat the process for the second vertical line that divides the Navy and Orange sections. Place the tape over the area that will eventually be Orange, protecting it while you paint the Navy. -
Seal the tape edges:
I always take a moment here to run a clean, dry finger or a credit card firmly along the edge of the tape to prevent bleed-through.
Peeling Paint?
If lifting the tape pulls up paint, the bottom layer wasn’t fully cured or the tape is too sticky. Carefully score the edge with a utility knife before pulling.
Step 3: Painting the Color Blocks
-
Paint the first stripe (Navy):
Using a 4-inch mini roller, apply the Navy paint between your first two tape lines. Use the angled brush for the ceiling and baseboard edges within this section. -
Apply a second coat:
Wait for the first Navy coat to dry to the touch, then apply a second coat for rich, opaque coverage. -
Remove the first tape:
While the second coat of Navy is still slightly tacky, carefully peel off the tape on the side connecting to the neutral wall. Pull it at a 45-degree angle away from the fresh paint. -
Let the Navy cure:
Allow the Navy section to dry thoroughly. This is critical because you will need to place fresh tape over perfectly dry Navy paint to create the crisp line for the Orange section. -
Tape for the Orange stripe:
Once the Navy paint is fully cured, apply a fresh line of tape directly over the edge of the blue paint. This protects the blue while you paint the orange right up against it. -
Tape the outer Orange edge:
Use your laser level again to mark and tape the final vertical line where the Orange section ends and the neutral wall begins. -
Seal the new tape:
To get a razor-sharp line between colors, lightly brush a tiny amount of the *Navy* paint over the tape edge covering the blue section. This seals any gaps with the existing color. -
Paint the second stripe (Orange):
Apply the Burnt Orange paint using a clean mini roller and brush. Two coats are usually best for these warm, earthy tones. -
Reveal the design:
Once the final coat is applied, slowly peel back all remaining tape. Do this steadily to reveal the sharp contrast between your three distinct zones.
Once the paint has fully cured, move your furniture back in to enjoy your modern, color-blocked masterpiece
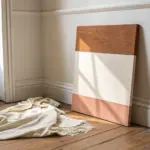
Diagonal Split for Instant Movement
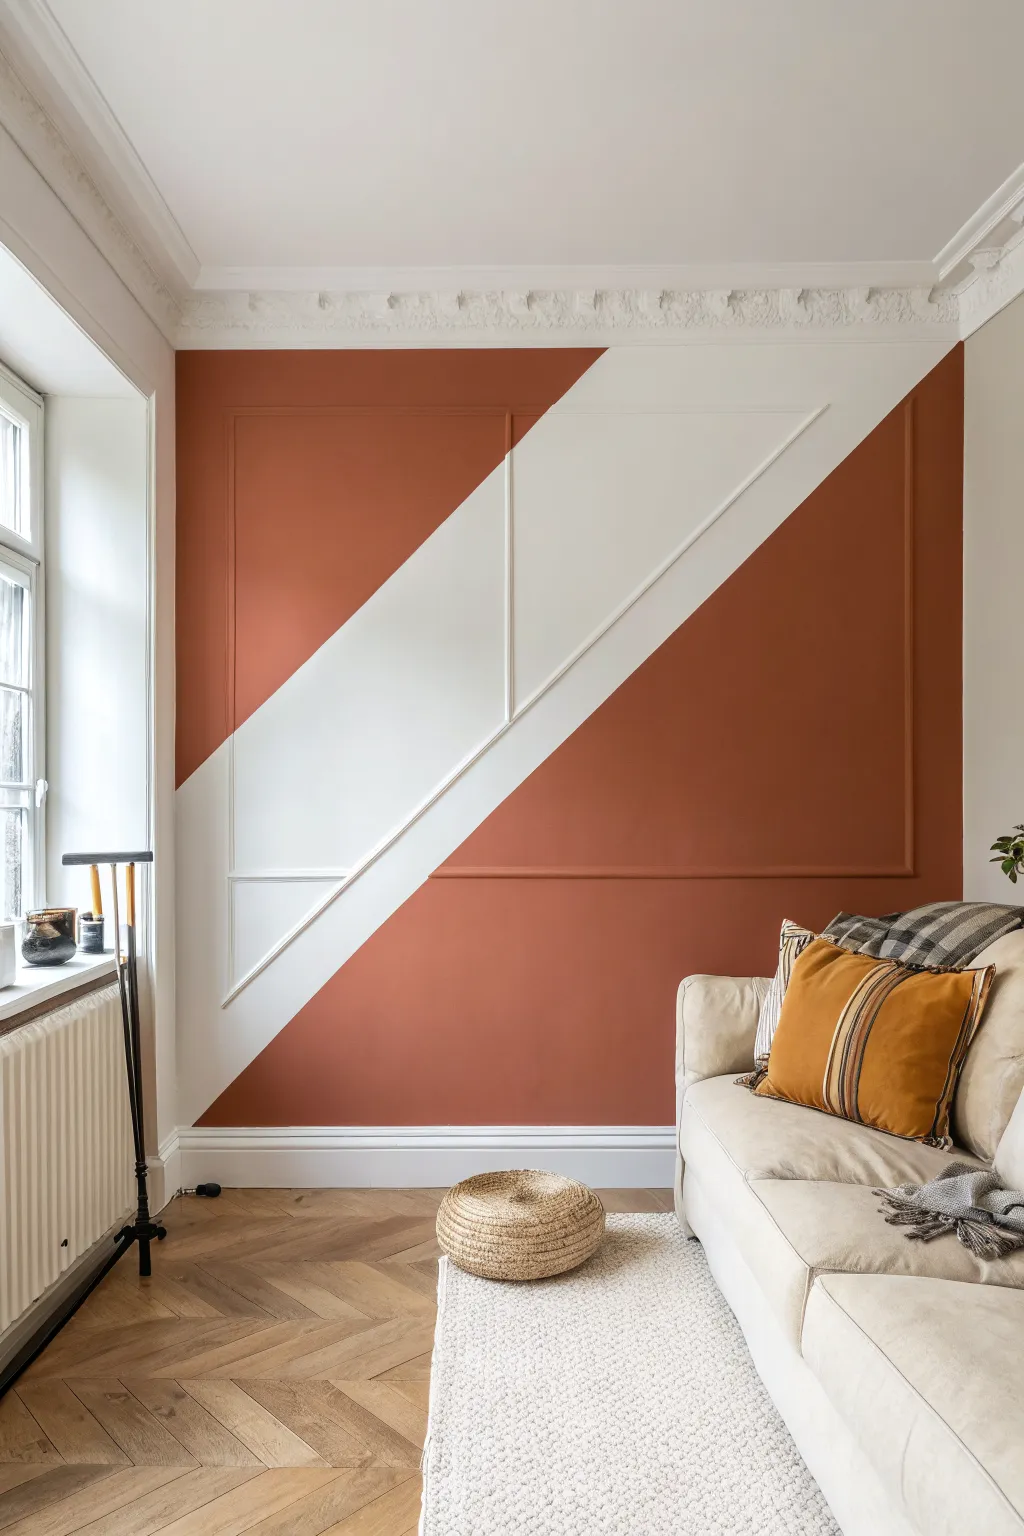
Transform a standard paneled wall into a dynamic focal point with this bold diagonal split finish. The sharp contrast between crisp white and warm terracotta creates instant movement while respecting the room’s traditional architecture.
Step-by-Step Tutorial
Materials
- Interior latex paint (White/Eggshell finish)
- Interior latex paint (Terracotta/Rust Orange/Eggshell finish)
- Painter’s tape (high-quality, delicate surface width)
- Laser level or chalk line
- Measuring tape
- Pencil
- Angle sash brush (2.5 inch)
- Roller frame and covers (3/8 inch nap)
- Drop cloths
- Spackle and sandpaper (for wall prep)
- Clean damp cloth
Step 1: Preparation & Base Coat
-
Assess and Prep the Wall:
Begin by removing any switch plates or outlet covers. Inspect the existing molding and wall surface for nail holes or cracks. Fill these imperfections with spackle, let dry, and sand smooth. -
Clean Surfaces:
Wipe down the entire wall, especially the tops of the molding strips where dust gathers, using a damp cloth to ensure the paint adheres properly. -
Protect the Area:
Lay down your drop cloths to protect the herringbone floor and tape off the baseboards and ceiling cornicing to ensure clean separation. -
Apply the Base Color:
If your wall isn’t already white, paint the entire wall with your white base color first. It is much easier to paint the darker color over the lighter one later. -
Cut In the Details:
Use your angled sash brush to get the white paint into all the crevices and corners of the panel molding. -
Roll the Flat Areas:
Follow up with a roller for the flat wall sections. Allow this base coat to dry completely, ideally overnight, so the tape won’t peel it off in the next phase.
Bleed-Through Blues?
Even with sealing, molding curves are tricky. If paint bleeds, let it fully dry, then re-tape the line slightly further out and use the artist brush to clean up the edge with the original base color.
Step 2: Creating the Diagonal
-
Determine the Angles:
Decide on the width of your center white stripe. Measure and mark two points on the left wall and two points on the right wall (or ceiling/floor) to establish where your diagonal lines will start and end. -
Mark the Lines:
Using a laser level is arguably the easiest method here to project a straight line across uneven molding. If you don’t have one, a chalk line works, but be careful not to stain the fresh white paint. -
Apply the Tape:
Apply painter’s tape along your marked lines. Press the tape down firmly. Crucially, tape roughly over the molding profiles first, then use your fingernail or a plastic putty knife to push the tape tight into the curves of the molding. -
Seal the Tape Edge:
Here is a trick I always use: paint a thin layer of the *base* color (white) along the edge of the tape that will receive the terracotta paint. This seals the tape and prevents the orange from bleeding under. -
Initial Terracotta Cut-In:
Once the seal coat is dry, open your terracotta paint. Use the brush to carefully paint the molding sections within the diagonal zones, ensuring full coverage in the detailed profiles. -
Painting the Edges:
Cut in along the ceiling and baseboards within the terracotta zones using your angled brush. -
Rolling the Color:
Use the roller to fill in the large flat triangular sections of the wall with the terracotta paint. -
Second Coat Application:
Allow the first coat of terracotta to dry to the touch. Apply a second coat to ensure a rich, opaque color, paying extra attention to the molding to avoid drips.
Metallic Accent Line
Add a thin pinstripe of gold leaf or metallic gold paint exactly on the diagonal line between the white and terracotta to highlight the separation and add a touch of luxury.
Step 3: The Reveal
-
Remove Tape While Damp:
Carefully peel off the painter’s tape while the second coat is still slightly tacky. Pull the tape away from the painted edge at a 45-degree angle to get the sharpest line. -
Touch Up Details:
Inspect the areas where the tape crossed the molding. Use a small artist’s brush to correct any tiny bleeds or jagged edges on the complex curves of the trim. -
Cleanup:
Remove the baseboard and ceiling tape, pick up your drop cloths, and reinstall any electrical plates once the paint is fully cured.
Step back and enjoy the vibrant energy your new feature wall brings to the space
Split-to-Ombre Blend for a Softer Horizon
Transform a plain wall into a sophisticated feature by combining crisp moulding with a textured, limewash-style finish. This project pairs a creamy upper wall with a warm terra-cotta lower section, separated by a classic chair rail for visual balance.
Step-by-Step
Materials
- Creamy off-white latex paint (eggshell or matte finish)
- Terra-cotta or rust-colored lime paint (or mineral paint)
- White semi-gloss trim paint
- Wooden chair rail moulding
- Block brush (large, natural bristle)
- Standard roller and tray
- 2-inch angled trim brush
- Painter’s tape
- Level
- Pencil
- Construction adhesive
- Finishing nails and hammer (or nail gun)
- Wood filler
- Sandpaper (120 and 220 grit)
- Caulk and caulk gun
- Drop cloths
Step 1: Preparation and Base
-
Clean and protect:
Begin by removing any existing nails or hooks and filling the holes. Wipe the walls down with a damp cloth to remove dust and lay drop cloths to protect your flooring. -
Establish the horizon line:
Decide on the height of your split. A common rule is about one-third up the wall (around 32-36 inches). Use a level and pencil to draw a faint, continuous horizontal line around the room at your chosen height. -
Paint the upper wall:
Using your roller, apply the creamy off-white latex paint to the top section of the wall. Extend the paint slightly below your pencil line so you won’t have gaps later. -
Apply a second coat:
Once the first coat is dry to the touch, apply a second coat for full opacity. I find it helpful to feather the bottom edge slightly so there isn’t a hard ridge of paint where the moulding will go.
Mastering the Clouds
Keep your wrist loose when applying lime paint. Rigid, uniform strokes look artificial; wildly varying directions create the best natural ‘bloom’.
Step 2: Installing the Chair Rail
-
Measure and cut:
Measure the length of your wall carefully. Cut your chair rail moulding to size, miter-cutting the corners at 45-degree angles if you are wrapping around corners. -
Attach the moulding:
Apply a zigzag of construction adhesive to the back of the moulding. Press it firmly against the wall, aligning the top edge with your pencil line. Secure it with finishing nails into the studs. -
Fill and sand:
Fill the nail holes with wood filler and let it dry. Sand the filler smooth with 220-grit paper. Caulk the top and bottom seams where the rail meets the wall for a seamless, professional look. -
Paint the trim:
Using the angled brush and semi-gloss white paint, coat the chair rail and the baseboards. You might need to mask off the floor and the upper wall if you don’t have a steady hand.
Visible Brushstrokes?
The texture is intentional, but if brush marks are too physically raised, your paint is too thick. Dilute slightly with water for a flatter finish.
Step 3: Creating the Textured Lower Wall
-
Pre-wet the surface (optional):
If you are using authentic lime paint, check the manufacturer instructions; some require you to lightly mist the wall with water first to help the paint bond and cure slowly. -
First coat: cloud technique:
Dip your large block brush into the terra-cotta lime paint. Apply it to the wall section below the chair rail using random, crisscross strokes (X-shapes). Do not paint in straight lines; the goal is visible brush texture. -
Work in sections:
Work in small, manageable patches (about 3×3 feet) to keep a wet edge. Blend the edges of each new section into the previous one while the paint is still damp to avoid rigid overlap marks. -
Let it cure:
Allow the first layer to dry completely. Lime paint often lightens significantly as it dries, so don’t be alarmed if it looks dark initially. -
Second coat: deeper texture:
Apply a second coat using the same random X-hatch motion. This layers the pigment, creating that beautiful suede-like blooming effect where some areas appear darker than others. -
Cut in carefully:
Use a smaller brush to carefully cut in the textured paint right under the chair rail and above the baseboard. Try to maintain the random strokes even in these tight spaces so the texture doesn’t look uniform.
Step 4: Final Touches
-
Seal (if necessary):
If this wall is in a high-traffic area, apply a clear matte sealer over the lime paint once it is fully cured (usually 24-48 hours). This protects the finish from water spots and scuffs. -
Remove tape:
If you used painter’s tape on the baseboards or trim, peel it off slowly at a 45-degree angle to ensure clean, crisp lines.
Step back and admire how the warmth of the textured lower wall anchors the room while the light upper wall keeps the space feeling airy and expansive


Have a question or want to share your own experience? I'd love to hear from you in the comments below!