Whale rock painting is one of those projects where the stone practically does the hard work for you—its smooth oval shape already feels like a little ocean giant. Here are my favorite whale rock ideas, starting with the classic crowd-pleasers and drifting into some more unexpected, artsy twists.
Classic Blue Whale Body Rock
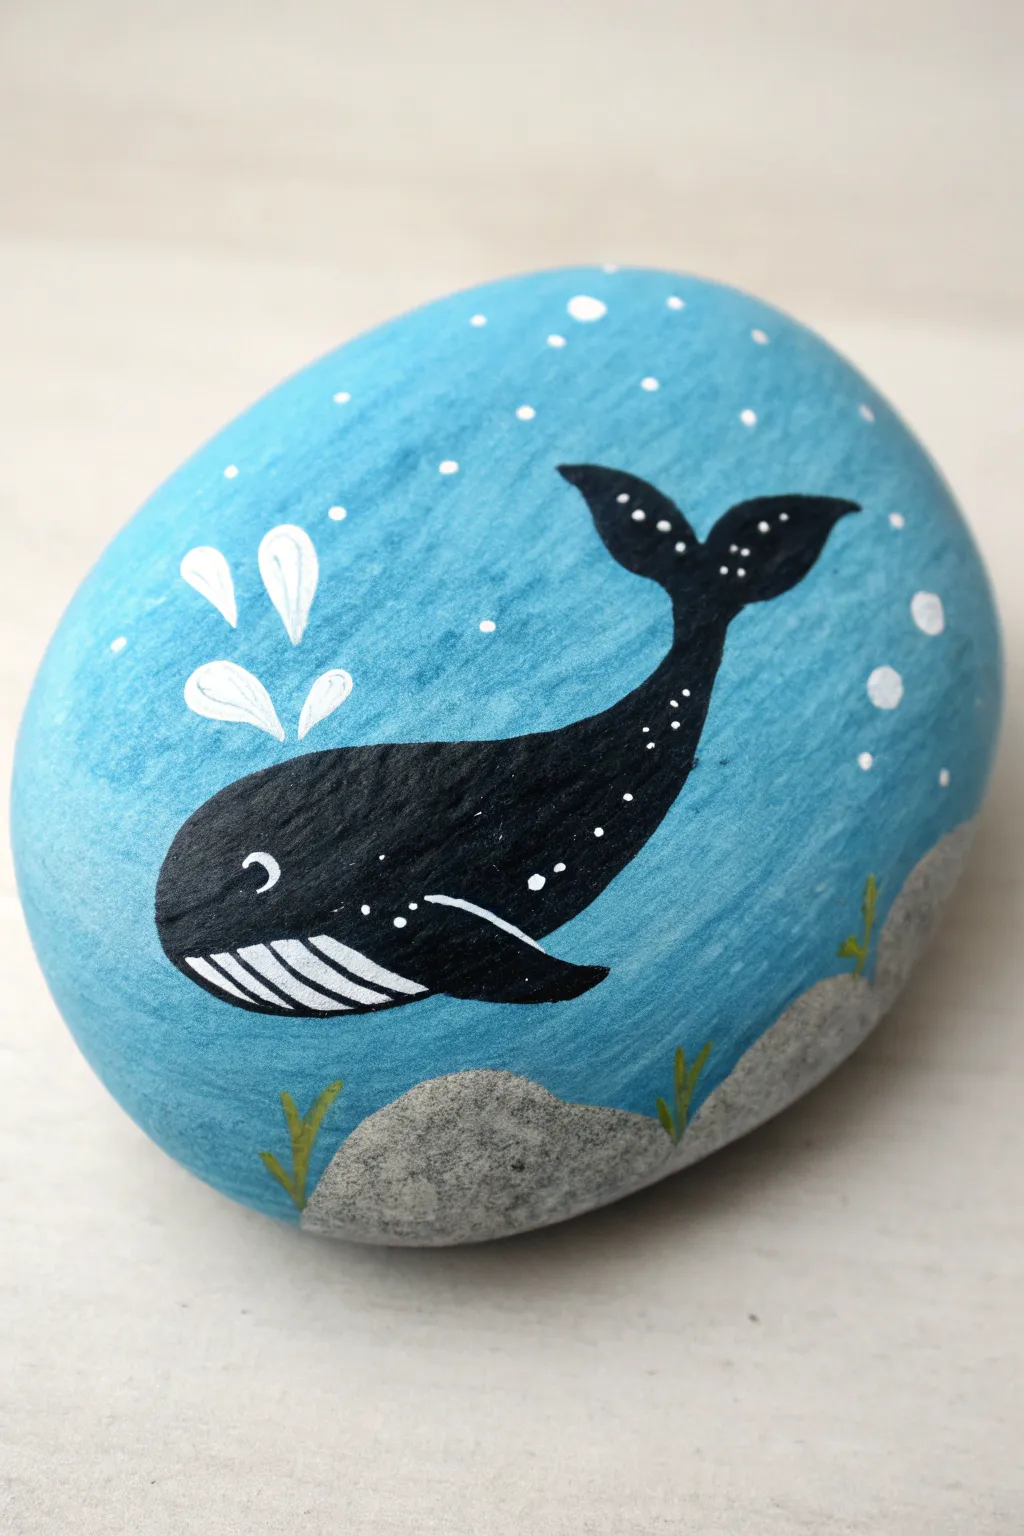
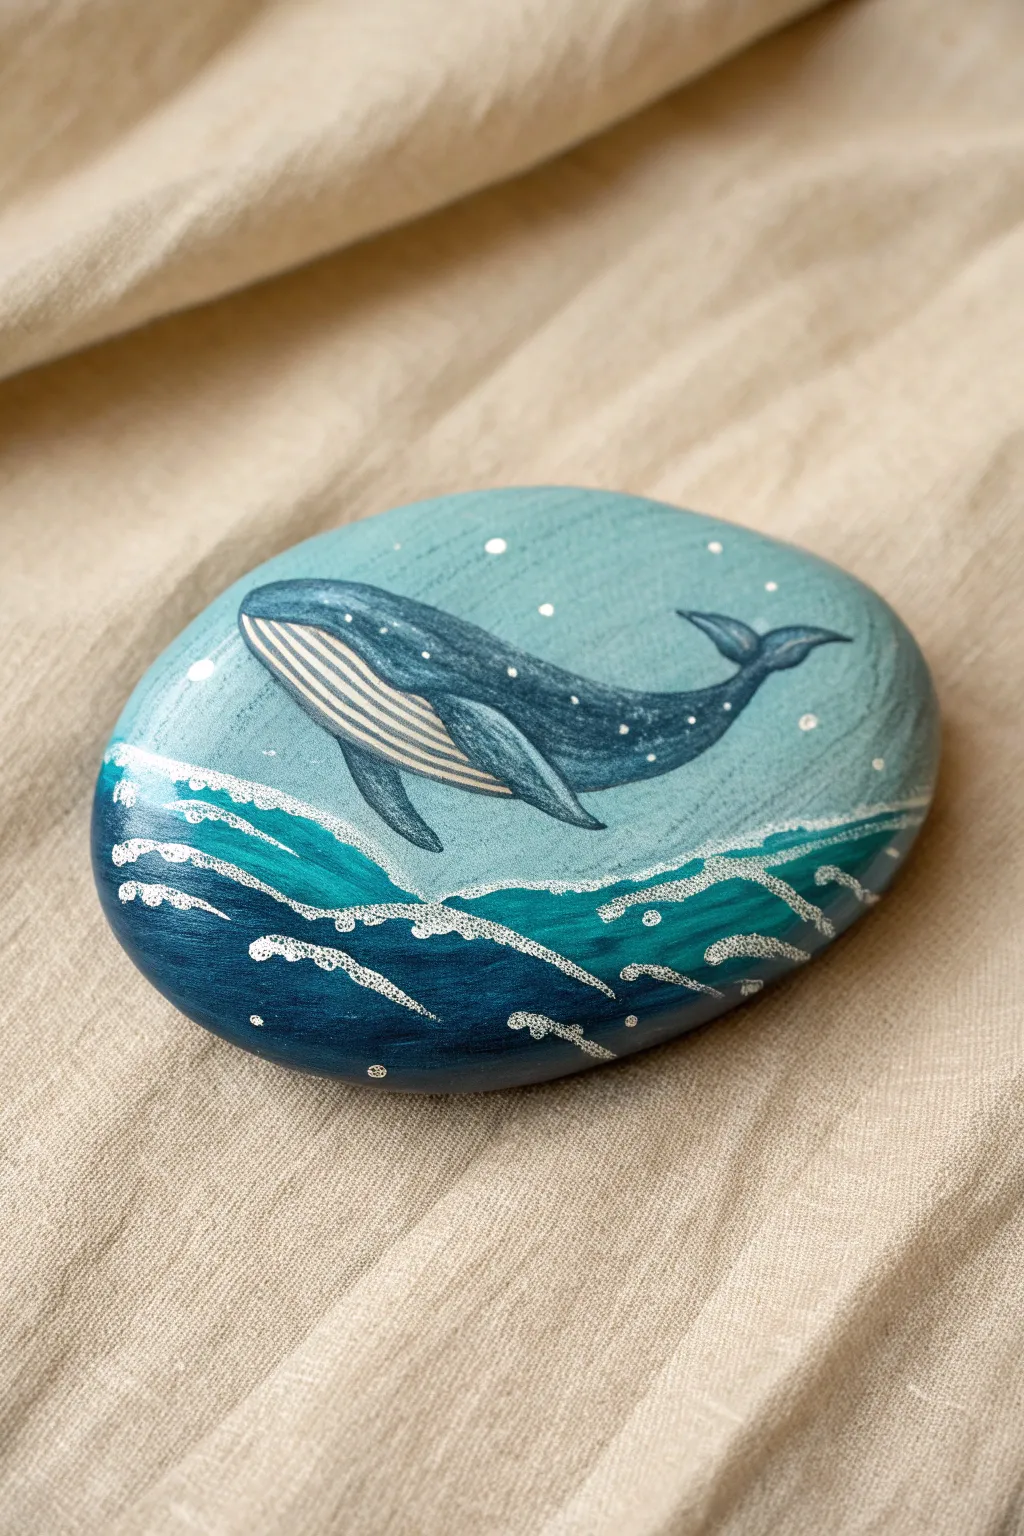
Transform a simple smooth stone into a charming oceanic keepsake with this classic blue whale design. The soft blue background and speckled details give this painted rock a friendly, whimsical character perfect for easy gifting.
Detailed Instructions
Materials
- Smooth, oval river rock (cleaned and dried)
- Acrylic paints: Light baby blue, medium oceanic blue, dark navy blue, white, black
- Flat brush (medium size)
- Detail round brush (size 0 or 00)
- Dotting tool or toothpick
- Graphite paper or light pencil (optional for sketching)
- Matte or satin sealant spray
Step 1: Setting the Scene
-
Preparing the Base:
Start with a clean, dry rock. Using your medium flat brush, coat the entire top surface with a light baby blue acrylic paint. You may need two coats for full opacity, allowing the first to handle-dry before applying the second. -
Adding Texture:
Once the base is completely dry, create a subtle texture. Dilute a tiny drop of darker blue paint with water on your palette and lightly flick it onto the rock using an old toothbrush or stiff brush. This creates the tiny speckles seen in the background.
Steady Hand Trick
Rest your pinky finger on a dry part of the rock while painting the thin outline. This anchors your hand and gives you much better control for those specialized long curves.
Step 2: The Whale’s Shape
-
Outlining the Form:
Using a very light pencil or a detail brush with diluted medium blue paint, sketch the basic whale shape. Draw a large curved teardrop for the body, swooping up into a tail on the right side. -
Filling the Body:
Fill in the upper body of the whale with your medium oceanic blue paint. Leave the bottom belly area unpainted for now. Use a smooth, confident stroke to get a clean edge along the top curve. -
Painting the Belly:
Now, paint the belly area using white mixed with a tiny drop of black or grey to create an off-white or very light grey tone. Make sure this section curves underneath the blue body, meeting at a distinct line. -
Tail and Fins:
Paint the tail flukes at the end of the upturned body using the same medium blue. Add a small, curved triangular fin on the side of the body, and a tiny fin peeking out from the bottom rear near the belly.
Make it a Set
Paint different sizes of rocks with whales in slightly different shades of blue (teal, indigo, turquoise) to create a whole family pod for your garden
Step 3: Defining Details
-
Crucial Outlining:
This step brings the cartoon look to life. Using your finest liner brush and dark navy (or black) paint, carefully outline the entire whale. Keep your hand steady and outline the separation between the blue body and white belly. -
Belly Ridges:
With the same dark liner color, paint thin, slightly curved lines running lengthwise across the white belly section. These lines mimic the throat grooves found on real whales. -
The Face:
Paint a solid black circle for the eye near the front of the head. Once dry, add a tiny white dot in the upper corner of the eye to create a ‘sparkle’ and bring the character to life.
Step 4: Finishing Touches
-
Speckled Skin:
Dip a dotting tool or the blunt end of a toothpick into white paint. Add tiny dots scattered across the blue part of the whale’s back, concentrating them slightly more near the top for a dappled light effect. -
The Spout:
Paint three small, teardrop-shaped splashes floating above the whale’s head using pure white paint to represent the water spout. Make the center drop slightly larger than the two side drops. -
Final Seal:
Allow the rock to cure for at least 24 hours. The thick layers of paint need to be fully hard. Once ready, apply a coat of spray sealant to protect your artwork from chipping and fading.
Now you have a serene little ocean friend that fits perfectly in the palm of your hand


Orca With Bold White Patches
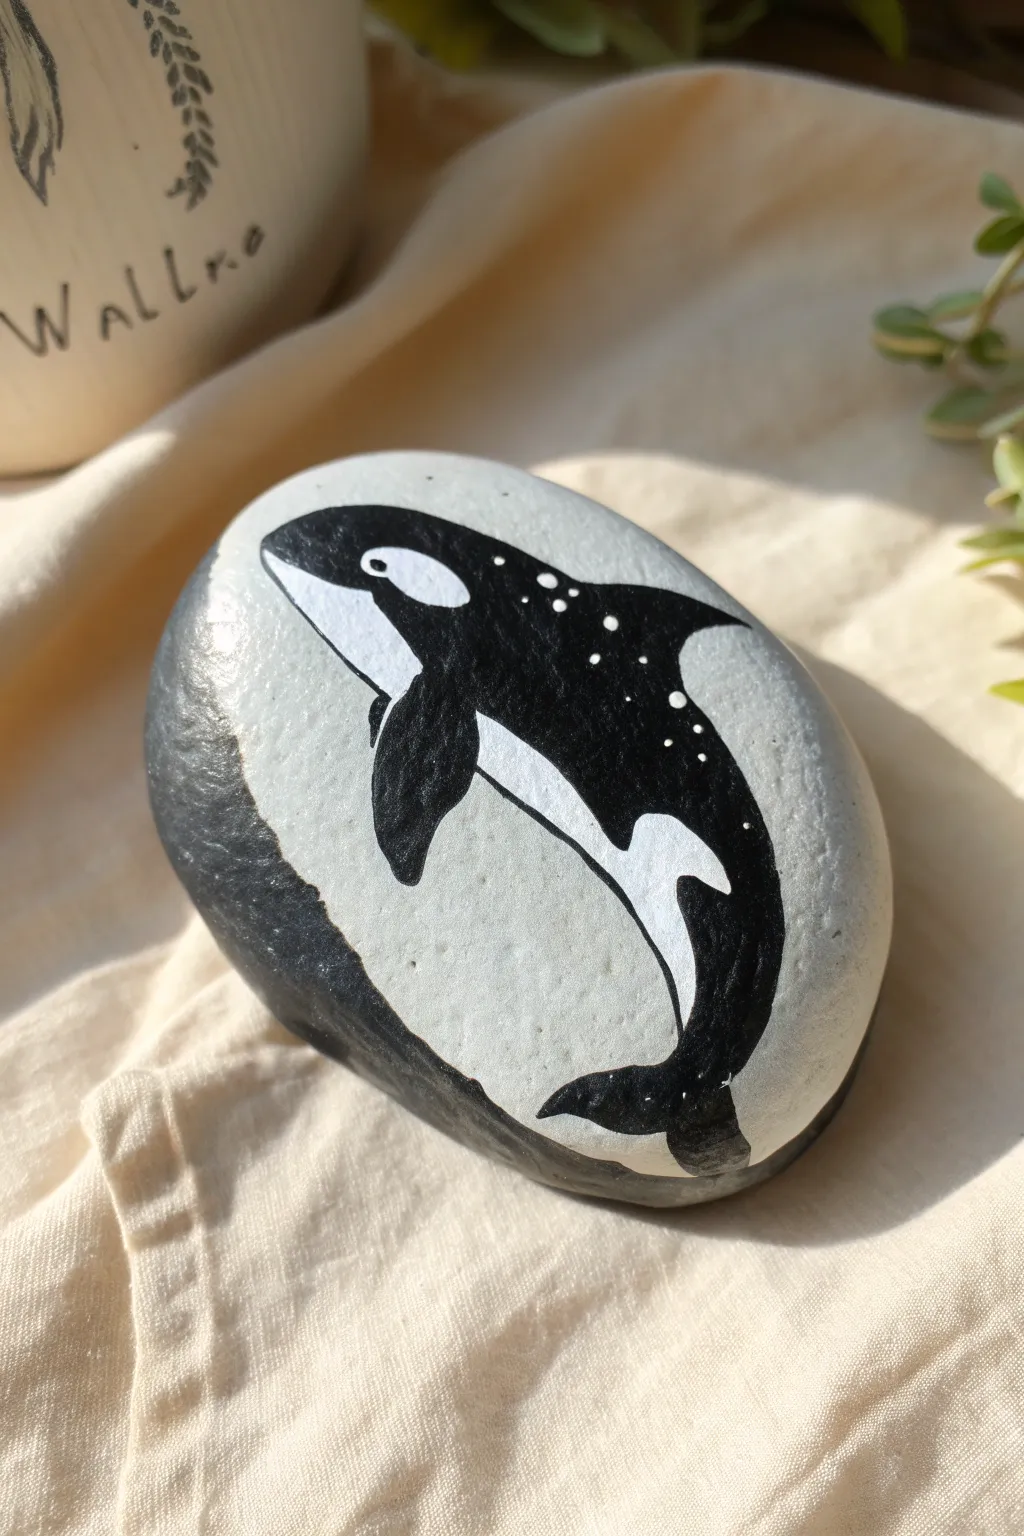
Transform a simple smooth stone into a stunning underwater scene featuring a majestic orca. This design uses bold contrasts and gentle stippling to create a piece that feels both fluid and magical.
How-To Guide
Materials
- Smooth, oval river rock (approx. 3-4 inches)
- Acrylic paints: Titanium White, Mars Black, Light Grey, Dark Grey
- Detail brushes: Fine liner (000), small round (2), and medium flat brush
- Pencil for sketching
- Spray varnish or sealant (satin or matte finish)
- Palette or paper plate
- Water cup and paper towels
Step 1: Base Preparation
-
Clean Your Canvas:
Begin by washing your stone thoroughly with warm soapy water to remove any dirt or grease. Dry it completely with a towel or let it air dry in the sun. -
Background Blocking:
Using a medium flat brush, mix a very light grey paint (or use straight white mixed with a tiny drop of black). Paint the large upper oval area of the rock where the whale will live. -
Adding Dimension:
While the light grey is still slightly workable, take a darker charcoal grey and paint the bottom left curve of the rock. Blend the edge where the dark and light greys meet to create a soft, shadowed transition. -
Second Coat:
Allow the first layer to dry completely. Apply a second coat of your background colors to ensure the natural rock color doesn’t peek through, keeping your surface opaque and smooth.
Step 2: Sketching the Giant
-
Outline the Shape:
Once the paint is bone dry, use a pencil to lightly sketch the outline of the orca. Start with a large teardrop shape for the body, curving it to fit the rock’s contour. -
Adding Fins:
Draw the dorsal fin on the top back, making it sharp and curved. Add the pectoral fin on the side, positioning it roughly in the middle of the body. -
Marking the Patches:
Outline the signature white patch behind the eye and the large white belly markings. This helps you map out where to preserve the light background or paint white later.
Uneven Coverage?
If your white paint looks streaky over the grey background, apply multiple thin layers rather than one thick glob. Let each layer dry fully before adding the next.
Step 3: Painting the Orca
-
Filling the Black Body:
Load a small round brush with black acrylic paint. carefully fill in the main body of the whale, painting around the areas you marked for the white patches. -
Refining Edges:
Switch to a fine liner brush to crisp up the edges of the dorsal fin and flukes. Clean lines are essential here to make the silhouette pop against the grey background. -
Painting White Patches:
Clean your brush thoroughly. Use pure Titanium White to fill in the eye patch, the chin, and the belly markings. You may need two thin layers to get a bright, solid white over the grey background. -
Defining the Eye:
Inside the white eye patch, towards the front, place a tiny black dot for the eye. It’s a small detail that gives the creature life.
Pro Tip: Paper Towel Rest
Rest your painting hand on a folded paper towel while working on details. This steadies your hand and prevents smudging wet areas on the curved rock surface.
Step 4: Details & Finish
-
Starry Details:
Dip the very tip of your finest brush or a toothpick into white paint. Add tiny, scattered dots along the top black back of the whale to mimic glistening water or a starry pattern. -
Enhancing Contrast:
Check your white belly markings. If the grey background makes them look dull, apply one final touch-up layer of white to make them stark and bright. -
Correcting Lines:
If any white paint strayed into the black areas, use your black liner brush to tidy up the boundaries. Sharp contrast is key for this design. -
Shadowing the Fin:
I like to add a barely-there grey line along the bottom edge of the pectoral fin to distinct it visually from the white belly area underneath. -
Sealing the Art:
Let the rock dry overnight. Finish by spraying a clear varnish over the top to protect your painting from scratches and give it a professional sheen.
Place your finished whale stone on a desk or in a garden nook for a peaceful reminder of the open ocean


Humpback With Throat Grooves
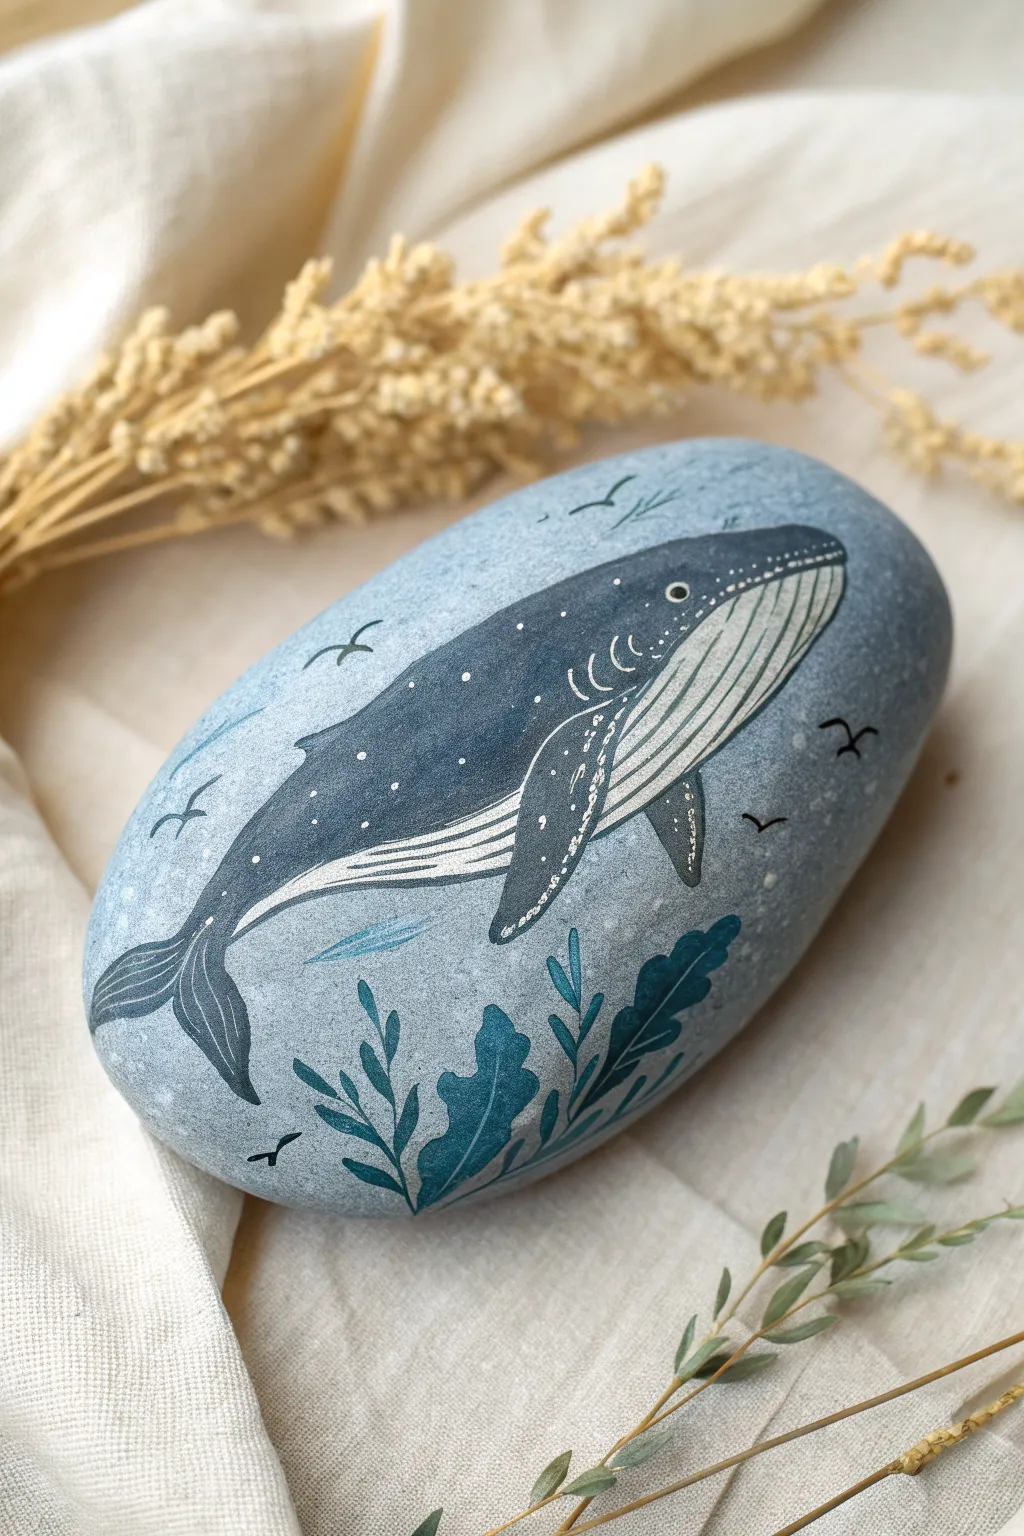
Capture the gentle majesty of a humpback whale on a smooth stone canvas, featuring distinct throat grooves and a speckled body. This project balances bold shapes with delicate line work for a serene, nautical piece of art.
Detailed Instructions
Materials
- Smooth, oval-shaped river rock
- Acrylic paints (light blue, dark navy/grey, white, teal, black)
- Flat brush (medium size)
- Fine liner brush (size 0 or 00)
- White or light grey paint pen (extra fine tip)
- Pencil and eraser
- Matte spray varnish
Step 1: Setting the Scene
-
Surface Prep:
Begin by washing your stone thoroughly with soap and water to remove any dirt or oils. Let it dry completely before starting. -
Base Coat:
Mix a light blue with a tiny drop of white to create a soft, airy sky-blue shade. Paint the entire top surface of the rock with your flat brush. -
Add Texture:
While the base coat is still slightly wet, dab a very dry brush with a slightly darker blue randomly across the surface. This creates a subtle, mottled water effect rather than a flat color. -
Dry Time:
Allow this background layer to dry fully. You can use a hairdryer on a cool setting to speed this up if you’re impatient like me.
Smooth Operator
If your rock has a rough texture, apply a coat of white gesso and sand it lightly once dry. This creates a perfectly smooth surface for detail work.
Step 2: Painting the Whale
-
Sketch the Outline:
Using a pencil, lightly sketch the shape of the humpback whale. Focus on the large curved back, the tapering tail, and the long pectoral fins. -
Block in the Body:
Fill in the upper body of the whale using a dark navy or charcoal grey paint. Leave the underside (belly area) unpainted for now. -
Paint the Belley:
Paint the belly area with a very light grey or off-white color. Let the contrasting colors touch but don’t blend them too much. -
Define the Fins:
Fill in the pectoral fins with the same dark navy color used for the body. Ensure the edges are crisp. -
Tail Details:
Paint the tail flukes in dark navy, ensuring the shape tapers elegantly at the connection point to the body.
Ocean Sparkle
Mix a tiny amount of metallic silver or iridescent medium into your blue water background paint to make the ocean shimmer in the light.
Step 3: Fine Details
-
Throat Grooves:
Using your fine liner brush or a paint pen, draw thin, curved lines along the white belly area. These should follow the contour of the whale’s jaw to the mid-body. -
The Eye:
Place a small white dot near the mouth line for the eye, and add a tiny black pupil in the center. -
Speckling:
Use a white paint pen or a toothpick dipped in paint to add tiny dots along the whale’s back and nose. This mimics barnacles typical of humpbacks. -
Fin Highlights:
Add a thin white line along the leading edge of the long pectoral fin to give it dimension and separate it visually from the body.
Step 4: Atmospheric Elements
-
Seaweed Base:
At the bottom curve of the rock, paint organic, waving shapes using a teal or deep green color to represent seaweed. -
Seaweed Detail:
Add a darker vein line down the center of each seaweed leaf for depth. -
Distant Birds:
Using a black fine liner or the very tip of your smallest brush, paint tiny ‘M’ or ‘V’ shapes in the background to represent distant seabirds. -
Final Varnish:
Once absolutely everything is dry, seal your artwork with a matte spray varnish to protect the paint from chipping.
Now you have a serene piece of the ocean to hold in the palm of your hand


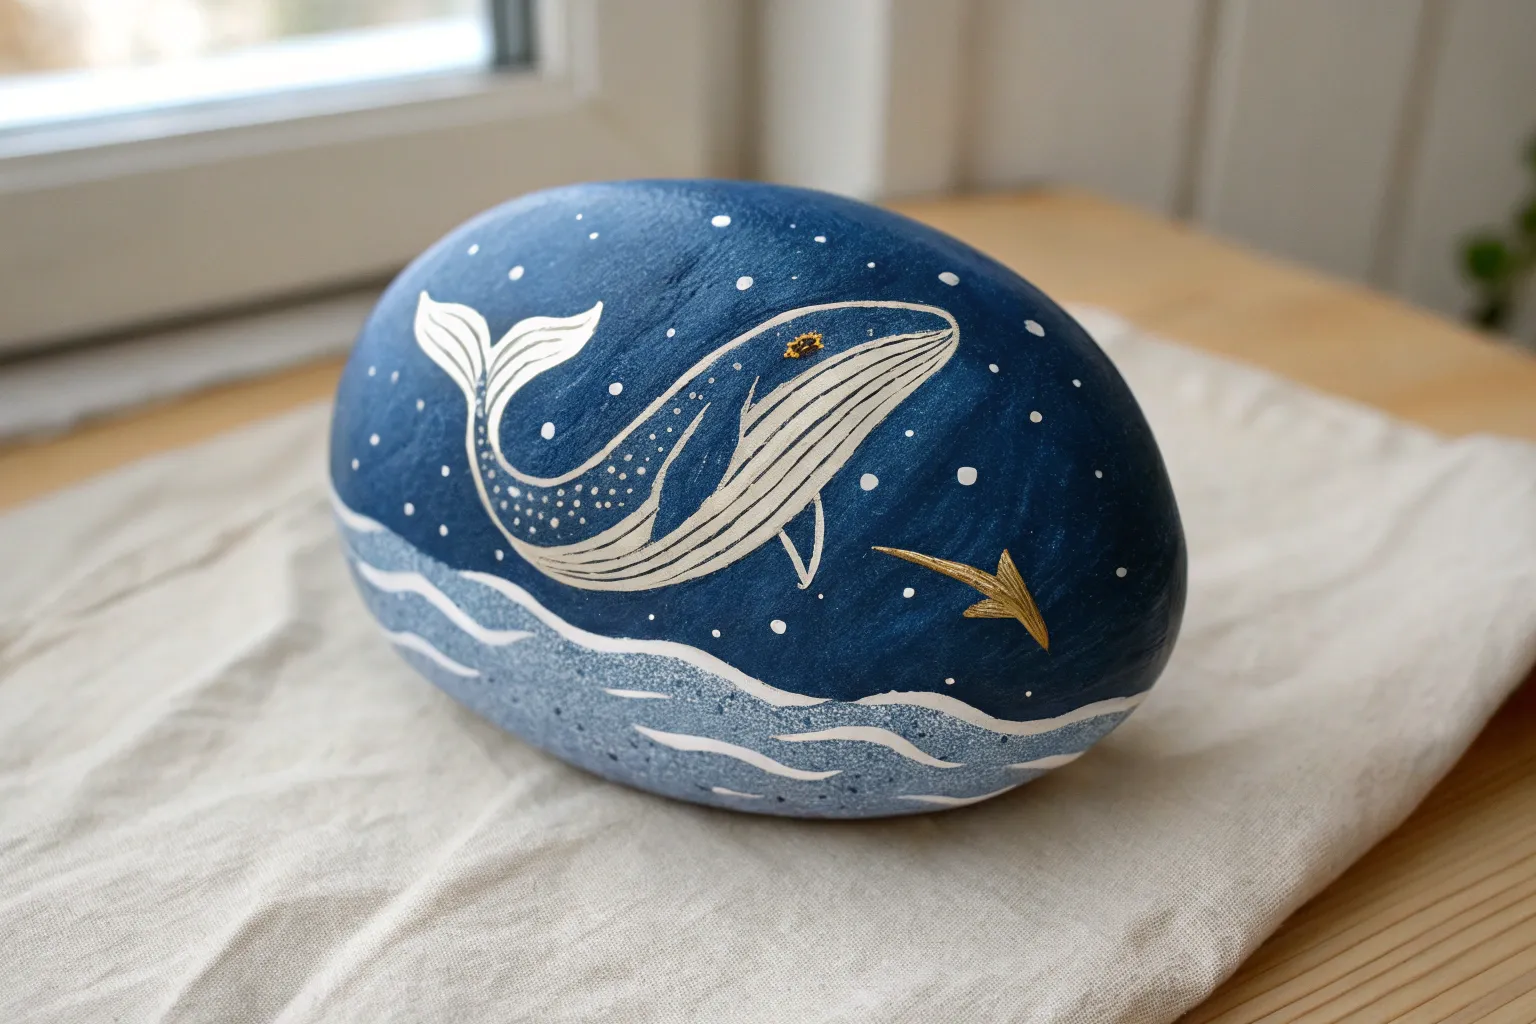
Whale Tail Splash Scene

Capture the magic of a midnight ocean encounter with this serene rock painting. This design features a majestic whale tail diving into choppy waves, set against a deep blue sky illuminated by distant stars and a falling comet.
How-To Guide
Materials
- Smooth, oval river rock (flat surface is best)
- Acrylic paints: Navy blue, slate grey, black, white, teal, muted purple/maroon
- Soft flat brush (medium size)
- Small round detail brush (size 0 or 00)
- Posca paint pens (optional, for fine lines)
- Old toothbrush (optional, for star spattering)
- Clear acrylic sealer (matte or gloss)
Step 1: Setting the Scene
-
Base coat:
Begin by cleaning your rock thoroughly to remove any dirt or oils. Once dry, paint the entire face of the stone with a solid coat of slate blue-grey paint. This acts as a mid-tone for both the water and the sky. -
Sky gradient:
While the base is still slightly tacky or freshly dried, apply a deep navy blue to the top third of the rock. Use a damp flat brush to blend the bottom edge of the navy down into the slate background, creating a soft transition for the night sky. -
Horizon hint:
Mix a very small amount of muted purple or maroon with your slate grey. Paint a faint, horizontal wash across the middle of the rock where the sky meets the water, suggesting a distant horizon line or sunset afterglow.
Uneven Rocks?
If your rock has pits or bumps, turn them into features! Let a bump become the crest of a wave or the curve of the tail to add natural 3D texture.
Step 2: Painting the Ocean
-
Defining the water:
Load your medium brush with a teal or blue-green shade. Focusing on the bottom two-thirds of the rock, paint horizontal, wavy strokes. Leave some of the underlying slate grey showing through to create depth in the waves. -
Deepening the waves:
Mix a little navy blue into your teal. Add darker shadows beneath the crests of your waves to give the water volume. Keep your strokes loose and flowing. -
Adding sea foam:
Using a smaller brush and white paint, create the whitecaps. Paint jagged, uneven lines along the tops of the teal waves. Don’t make these lines perfect; nature is chaotic. -
Highlighting the current:
Add thin, sweeping lines of lighter blue or diluted white within the body of the waves to suggest movement and current.
Level Up: Galaxy Sky
For a magical twist, sponge dabs of bright magenta and violet into the navy sky while wet before adding stars to create a nebula effect.
Step 3: The Whale Tail
-
Drafting the shape:
Using a very thin brush and black paint, lightly outline the shape of the whale tail rising from the center. Start with the narrow peduncle (the tail stock) and fan out into the two flukes. -
Filling the silhouette:
Fill in the tail shape completely with black paint. Ensure the paint is opaque; you may need a second coat after the first one dries. -
Adding texture:
Once the black is fully dry, mix a tiny bit of white into black to make a dark charcoal grey. Add subtle highlights along the top edge of the flukes and the center ridge of the tail to give it roundness. -
Sparkle details:
Dip the tip of a toothpick or your smallest brush into white paint. Dot tiny speckles onto the black tail to represent wet skin reflecting the starlight.
Step 4: Splash and Sky Details
-
Creating the splash:
At the base of the tail where it meets the water, stipple white paint vigorously. Use a pressing motion rather than a dragging one to create the look of foamy, aerated water splashing upward. -
Expanding the foam:
Extend this stippling effect outward slightly to show the ripples moving away from the entry point. Let the white paint fade out into the teal water. -
Starry sky:
For the stars, use your smallest detail brush to dot white paint into the navy area. Vary the pressure to create different sized stars. -
The shooting star:
Decide on a spot in the upper right quadrant. Paint a small white dot for the comet head, then quickly drag your brush tail-ward to create a fading streak. -
Final touches:
Review your contrast. If the white foam needs more pop, add a second layer of bright white to the thickest parts of the splash. -
Sealing:
Allow the rock to dry completely, preferably overnight. Finish with a spray acrylic sealer to protect your painting from chipping and UV light.
Place this peaceful stone on your desk or in a plant pot to remind you of the ocean’s vast beauty
BRUSH GUIDE
The Right Brush for Every Stroke
From clean lines to bold texture — master brush choice, stroke control, and essential techniques.
Explore the Full Guide
Minimalist Whale Silhouette
This charming painted rock captures the serene movement of a whale gliding through deep ocean waters. With its crisp black silhouette against a bright blue background, it’s a perfect beginner-friendly project that fits in the palm of your hand.
Step-by-Step Guide
Materials
- Smooth, oval river rock (medium size)
- Acrylic paint: Bright Cyan/Sky Blue, Black, White, Olive Green
- Paintbrushes: Flat brush (medium), round detail brush (fine)
- Posca paint pens (optional, for fine lines): White, Black
- Pencil (light sketching)
- Clear acrylic sealer (matte or gloss)
Step 1: Setting the Scene
-
Clean surface:
Begin by scrubbing your rock with warm soapy water to remove any dirt or oils. Let it dry completely before starting, as moisture can trap under the paint. -
Masking the seabed:
Decide on the rugged, uneven line at the bottom where the rock will remain unpainted to simulate the seabed. You can lightly sketch this boundary with a pencil or freehand it. -
Base coat application:
Using your medium flat brush, load up bright cyan or sky blue acrylic paint. Paint the entire upper portion of the rock, carefully following the uneven line you established at the bottom. -
Second coat:
Once the first layer is dry to the touch, apply a second coat of blue to ensure solid, opaque coverage without streaks. I usually wait about 10-15 minutes between coats.
Fixing Mistakes
Did the black paint smudge onto the blue? Let it dry fully, then paint a small patch of the original blue color over the mistake. Do not wipe it while wet.
Step 2: Painting the Whale
-
Sketch the shape:
With the blue background fully dry, lightly sketch the outline of the whale using a pencil. Start with a large teardrop shape for the body, curving upward toward the tail. -
Add the tail:
Draw the fluke (tail fin) at the top of the curve. Make sure the two tips of the tail flare out gracefully. -
Fill the silhouette:
Switch to a smaller round brush and black acrylic paint. Carefully fill in the entire whale shape you just sketched, keeping the edges as smooth as possible. -
Refine the edges:
If your edges are a bit shaky, use a very fine liner brush (or black paint pen) to clean up the outline of the tail and body. -
Belly details:
Once the black paint is completely dry, mix a tiny bit of water with white paint (or use a white paint pen). Paint a curved line near the chin and add vertical stripes to create the whale’s grooved belly. -
The eye:
Paint a small, white crescent shape near the front of the head for the eye. This simple closed-eye shape gives the whale a peaceful expression. -
Body speckles:
Using the tip of your smallest brush or a toothpick, dot tiny white specks along the whale’s back and tail to add texture and interest.
Step 3: Ocean Details
-
Water spout:
Paint three teardrop shapes coming from the top of the whale’s head using white paint. Position them so they fan out slightly, looking like a spray of water. -
Internal spout details:
If you wish, add very faint blue streaks inside the white water droplets to give them dimension. -
Bubbles and stars:
Dip the back end of a paintbrush handle into white paint and stamp various sized dots around the blue background to simulate bubbles rising to the surface. -
Seagrass stalks:
Using olive green paint and your finest brush, paint three or four simple, wavy lines sprouting from the unpainted bottom section up into the blue area. -
Seagrass leaves:
Add small, V-shaped strokes to the green stalks to create leaves. Keep these loose and organic. -
Sealing:
Allow the rock to dry overnight to ensure all thick paint layers are cured. Finish by applying a clear acrylic sealer to protect your artwork from chipping.
Make it Sparkle
Mix a tiny amount of silver glitter into your white paint for the bubbles, or apply a glitter topcoat just to the water spout for a magical shimmering effect.
Place this peaceful rock on your desk as a reminder to take a deep breath and keep swimming
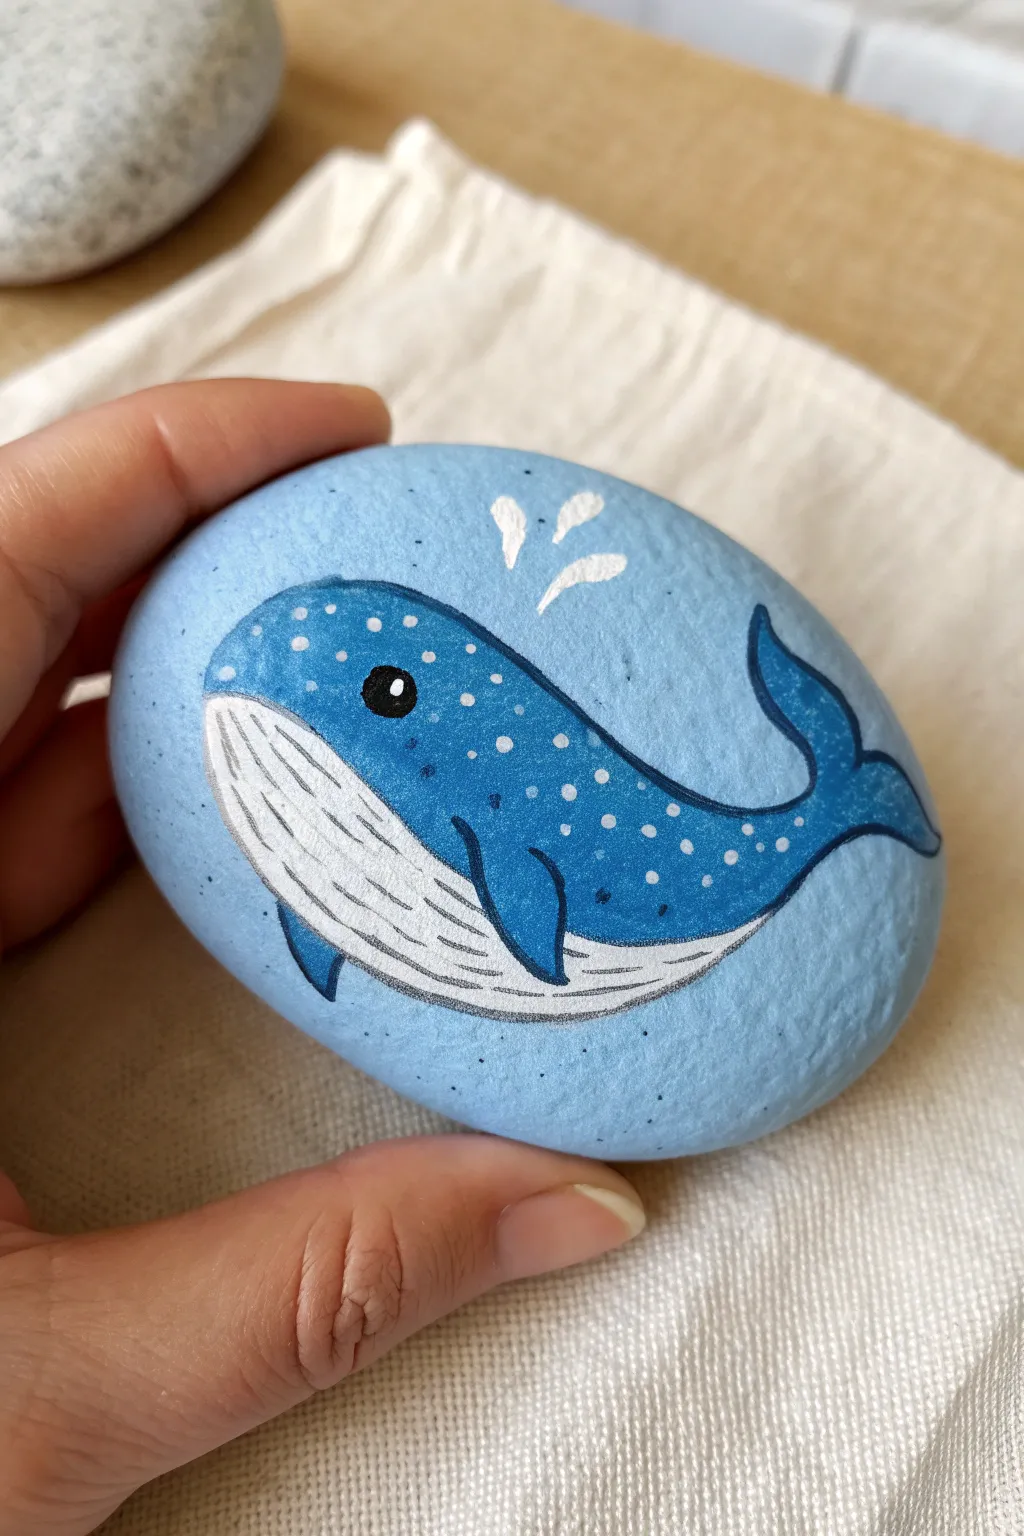
Baby Whale With Big Friendly Eye
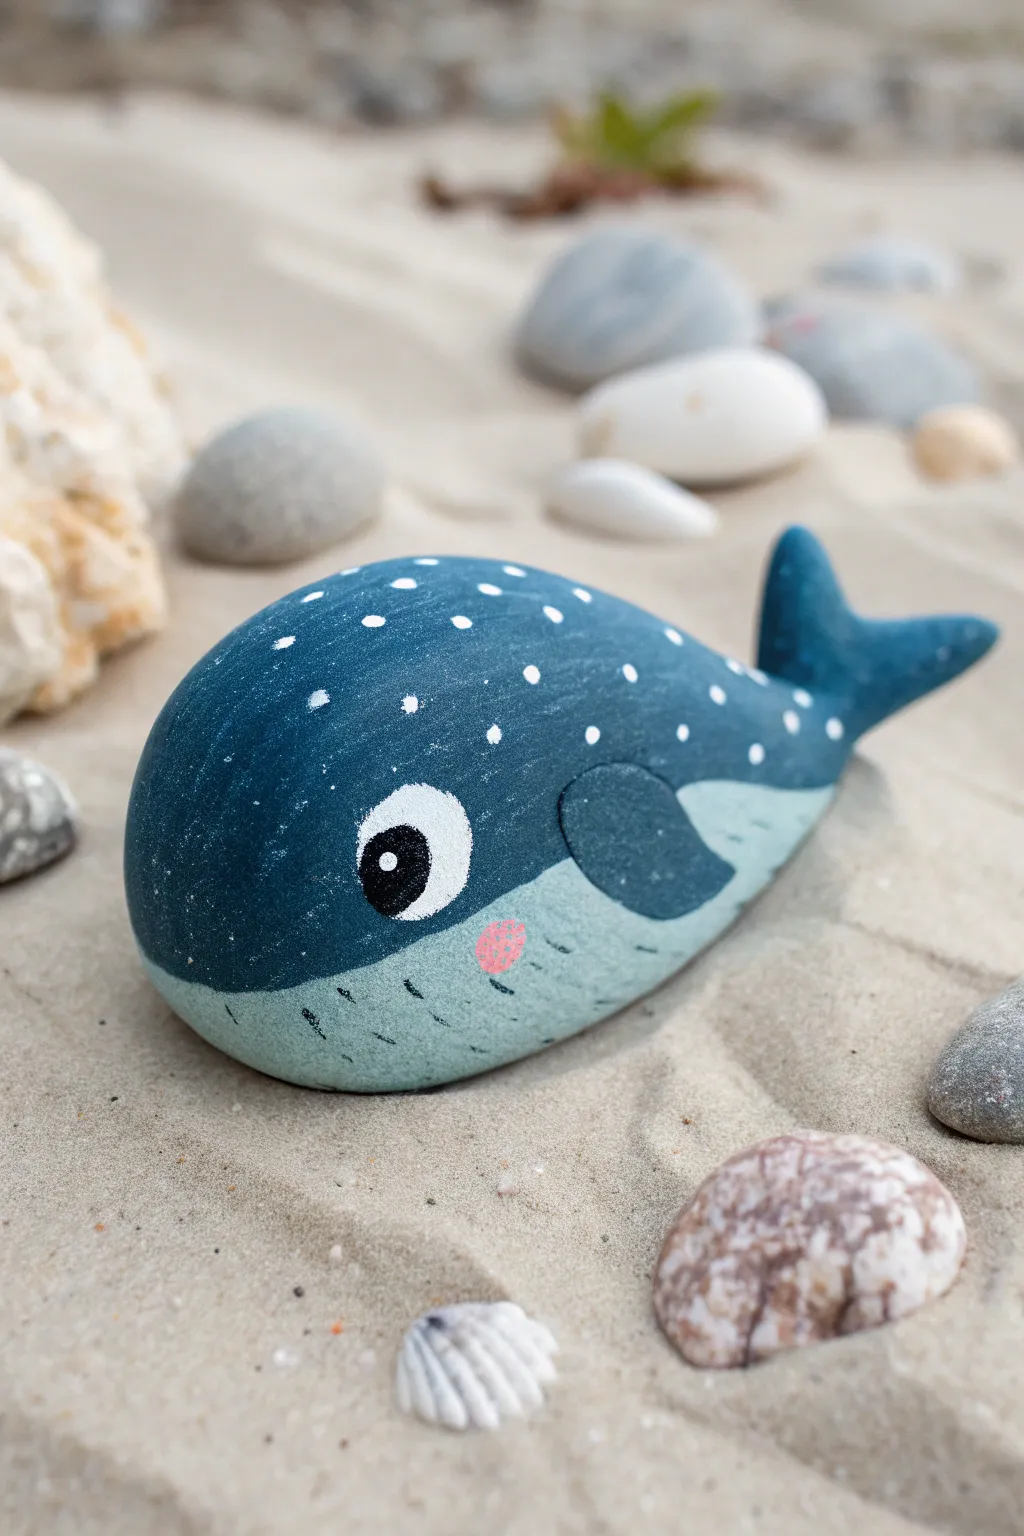
Transform a simple stone into an adorable baby whale by combining rock painting with a touch of clay sculpting. This mixed-media project features a characteristic polka-dotted back and a charming, oversized eye that gives it a friendly personality.
Step-by-Step Tutorial
Materials
- Smooth oval river rock
- Air-dry clay or epoxy putty
- Acrylic paints (dark blue, light blue, white, pink, black)
- Fine grit sandpaper
- Super glue or strong craft glue
- Paintbrushes (flat shader and fine liner)
- Dotting tool or toothpick
- Matte spray varnish
Step 1: Sculpting the Tail
-
Shape the tail:
Take a small walnut-sized amount of air-dry clay or epoxy putty. Knead it until pliable and shape it into a whale tail—creates two flukes and a short base. -
Attach to the stone:
Press the base of the tail firmly onto the narrower end of your rock. Blend the clay onto the stone’s surface slightly to create a seamless transition. -
Create the side fin:
Mold a small, flat teardrop shape from clay for the pectoral fin. Attach this to the side of the whale’s body, about halfway down the length. -
Dry and sand:
Allow the clay to dry completely according to package instructions. Once hard, use fine-grit sandpaper to smooth out any fingerprints or rough edges on the tail and fin.
Tail Trouble?
If the clay tail falls off after drying, don’t panic. Use a dab of super glue or two-part epoxy to reattach it securely to the stone.
Step 2: Base Painting
-
Prime the surface:
Apply a coat of white acrylic paint over the entire rock and clay additions. This helps the blue colors look vibrant. -
Paint the underbelly:
Mix a soft, pale blue-grey shade. Paint the bottom third of the rock with this color, curving the line upward slightly near the front to mimic a jawline. -
Paint the top coat:
Cover the top two-thirds of the whale, including the clay tail and fin, with a deep navy blue. carefully cut in along the line where it meets the light belly color. -
Second coat:
Let the paint dry, then add a second layer of navy blue to ensure solid, opaque coverage without streaks.
Make It Splash
Add a tiny spout of water by gluing a small tuft of white fibers or a twisted pipe cleaner to the very top of the whale’s head.
Step 3: Adding Details
-
Add the eye spot:
Using a small round brush, paint a large white circle on the dark blue section, positioned low and near the front of the face. -
Detail the eye:
Once the white circle is dry, paint a smaller black circle inside it, leaving a generous white border. Add a tiny white dot inside the black pupil for a ‘sparkle’ highlight. -
Create the cheek:
Dip a small brush into pale pink paint and dab a rough, textured circle just below and behind the eye, overlapping onto the lighter belly color. -
Dot the back:
Using a dotting tool or the non-brush end of a paintbrush, dip into white paint and create scattered spots across the dark blue back. Make them denser near the top and sparser near the sides. -
Add belly texture:
With a very fine liner brush and thinned dark grey or black paint, draw tiny, short scratch marks across the light blue belly to give it texture. -
Lowlight the fin:
If I want the fin to stand out more, I’ll sometimes run a very thin line of diluted black paint underneath the clay fin to create a subtle shadow.
Step 4: Finishing
-
Final inspection:
Check for any uneven edges between the blue and white sections and touch them up with a steady hand. -
Seal the work:
In a well-ventilated area, spray the entire piece with a matte varnish to protect the paint and clay from moisture.
Place your little whale in a sandy spot or on a shelf to enjoy its friendly gaze

PENCIL GUIDE
Understanding Pencil Grades from H to B
From first sketch to finished drawing — learn pencil grades, line control, and shading techniques.
Explore the Full Guide
Mom and Calf Pair on Two Rocks
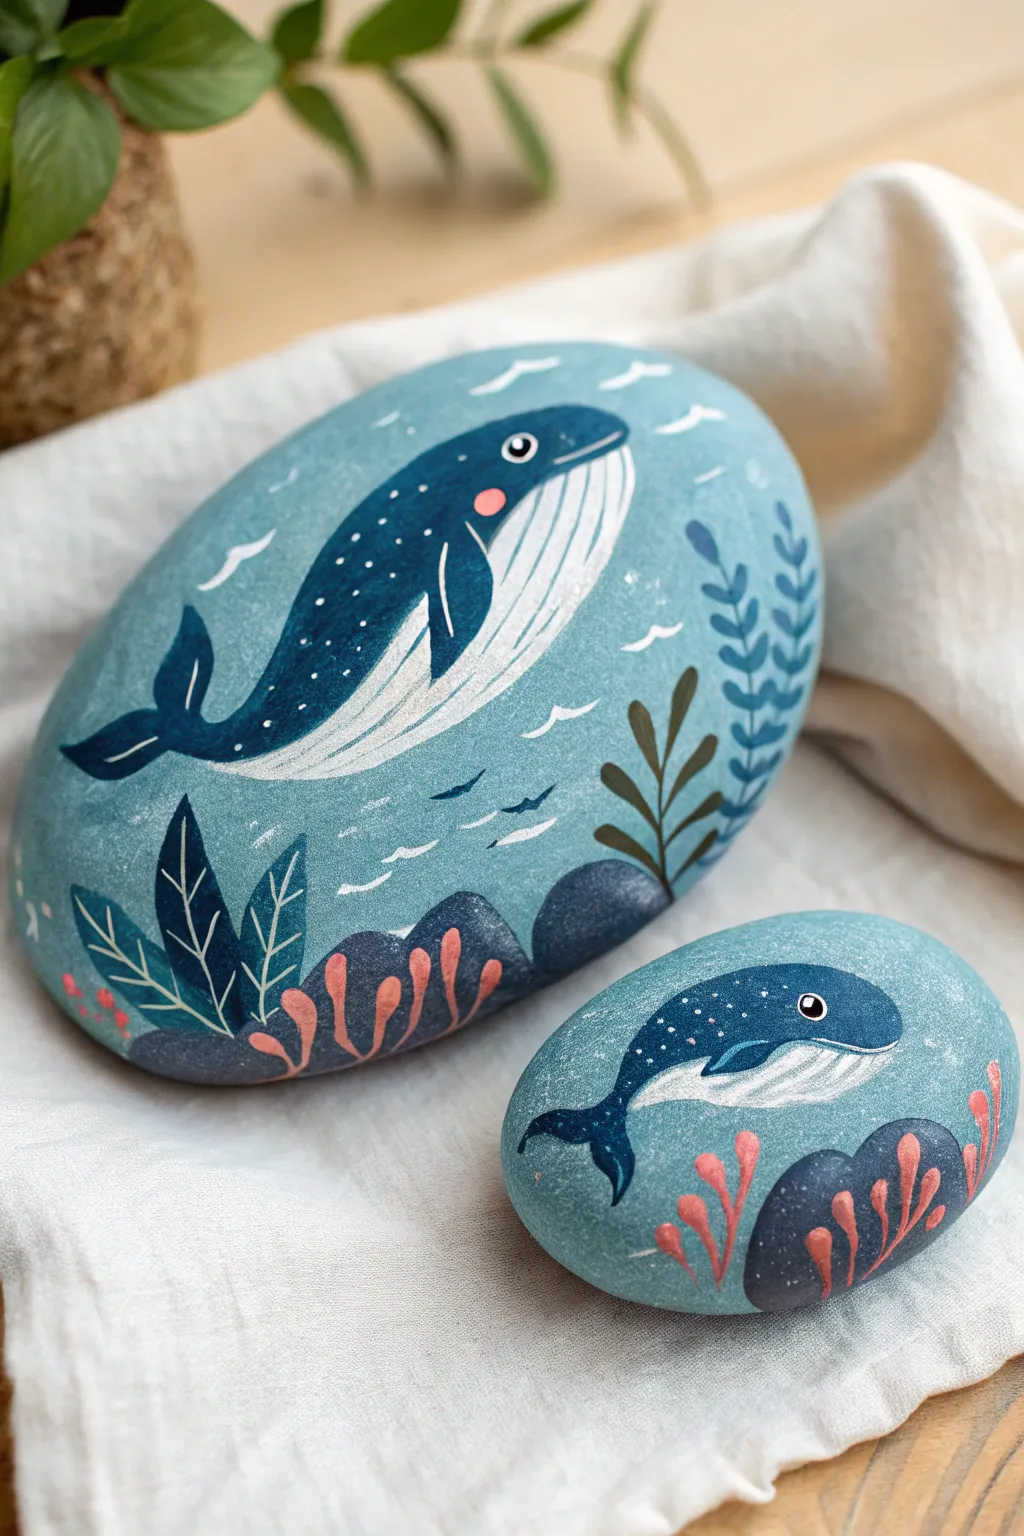
Create a heartwarming set of parent and baby whales painted across two matching stones. The soft teal background and whimsical underwater details give these rocks a gentle, storybook illustration quality perfect for a nursery or garden accent.
Step-by-Step
Materials
- One large oval river rock (smooth surface)
- One smaller oval river rock
- Acrylic paints (teal, navy blue, white, soft pink, dark olive green)
- Flat brush (medium size)
- Detail liner brush (size 0 or 00)
- Pencil for sketching
- Matte or satin spray sealant
- Palette for mixing
Step 1: Setting the Scene
-
Base Coat:
Start by mixing a lovely muted teal color using teal, a touch of white, and a tiny drop of grey if your teal is too bright. Paint the entire top surface of both rocks with this mixture. Let it dry completely, then add a second coat for solid, opaque coverage. -
Sketch the Outlines:
Once the base is bone dry, use a pencil to lightly sketch the whales. On the large rock, draw a large curving whale shape taking up most of the center. On the small rock, draw a smaller, similar shape. Add the distinct curve for the bellies and the tail flukes.
Paint Lifting?
If the blue paint lifts when painting the white belly, let the blue dry longer. Always wait for adjacent colors to set before painting next to them to keep lines crisp.
Step 2: Painting the Whales
-
Deep Blue Bodies:
Load a small flat brush or larger round brush with navy blue paint. Carefully fill in the upper body of the mama whale on the large rock, following the curve of the back and tail. -
Baby Blue:
Repat the process on the smaller rock, filling in the upper body of the calf with the same navy blue. I find steadying my hand against the table helps with these smooth curves. -
White Underbellies:
Clean your brush thoroughly. Use white paint to fill in the bottom belly section of both whales. Don’t worry about the texture lines yet; just get a solid white shape down that meets the navy blue line. -
Belly Ridges:
Mix a very light grey (white with a speck of black or navy). Using your liner brush, paint thin, curved lines running from the chin down towards the tail on the white belly section to create the signature throat grooves.
Pro Tip: Line Weight
For the tiny belly ridges and water currents, thin your paint slightly with water. Inky paint flows much smoother from a liner brush for detailed line work.
Step 3: Details & Features
-
Fins and Flukes:
Go back with your navy blue and add the pectoral fin on the side of the body. Make sure it sweeps backward. Refine the shape of the tail flukes on both rocks to ensure they have sharp, graceful points. -
Eye Contact:
Using the tip of a small brush or a dotting tool, place a small white circle near the front of the head. Once dry, add a black pupil inside, leaving a tiny white highlight speck to bring the whales to life. -
Rosy Cheeks:
Mix a soft salmon pink. Paint a small, soft circle just behind the eye on the mama whale for a cute, illustrative touch. -
Starry Texture:
Dip a toothbrush or stiff brush in watered-down white paint and gently flick it over the navy blue bodies to simulate skin texture or underwater sparkles. Alternatively, use a liner brush to add tiny white dots along the back.
Step 4: Underwater Flora
-
Seabed Stones:
At the very bottom of both rocks, paint rounded, lumpy shapes in a dark grey-blue to represent rocks on the ocean floor. -
Leafy Greens:
On the large rock, use dark olive green to paint simple plant stems rising from the seabed rocks. Add small, leaf-shaped strokes along the stems. -
Pink Coral:
Using the same salmon pink from the cheeks, paint delicate, finger-like coral strands growing out of the bottom rocks. Add these to both the large and small stones to tie the set together visually. -
Ocean Current:
Finally, use your liner brush with pure white paint to add small, wavy ‘v’ shapes and dashed lines in the teal background water, suggesting movement and currents around the whales. -
Seal the Deal:
Allow the rocks to dry overnight. Finish with a spray of matte sealant to protect your artwork without adding too much glare.
Now you have an adorable pair of swimming companions ready to decorate your space
Breaching Whale With Foam and Waves

Capture the majestic leap of a humpback whale against a stylized ocean backdrop with this stunning rock painting project. The design balances a cool blue-grey palette with dynamic white foam details, perfect for a smooth, palm-sized stone.
Step-by-Step Guide
Materials
- Smooth, oval-shaped river rock (cleaned and dried)
- Acrylic paints: Navy blue, light blue, turquoise, white, grey, light teal, dark grey
- Pencil (HB or lighter)
- Fine liner brush (size 00 or 000)
- Small flat brush
- Medium round brush
- Dotting tool or toothpick
- Matte or satin sealant spray
Step 1: Base Coat and Sketch
-
Prime the Surface:
Start by mixing a soft, muted blue-grey color (combine light blue, white, and a touch of grey). Paint the entire face of the rock with this mixture to create your background sky color. Let it dry completely, then apply a second coat if the stone’s texture is still showing through. -
Outline the Whale:
Using a pencil, lightly sketch the shape of the whale diagonally across the upper center of the rock. Think of a large teardrop shape that curves slightly, with the tail flipping downward. -
Draft the Waves:
Sketch broad, curving lines below the whale to map out where your ocean waves will flow. Draw a large wave cresting behind the whale’s back to emphasize the splashing motion.
Foam Texture Tip
For realistic sea foam, don’t just paint dots—cluster them! Use a dry brush technique or a tiny sponge for irregular, natural-looking splashes.
Step 2: Painting the Ocean
-
Block in Deep Water:
Mix a dark turquoise or teal shade. Using your medium round brush, fill in the wave sections directly beneath the whale and the large wave curling behind it. Don’t worry about the foam details yet; focus on solid color. -
Add Lighter Waves:
Create a lighter teal, almost sea glass color. Paint the wavy bands near the bottom edge of the stone, following the contours of your darker waves. This layering creates depth in the water. -
Define Wave Segments:
Once the wave colors are dry, use a very fine brush with white paint to outline the top edges of each wave band. Keep these lines relatively thick and flowing to stylize the water.
Shaky Hands?
Rest your painting hand’s wrist gently on the table or even on the dry part of the rock itself while doing the fine liner work for stability.
Step 3: The Whale
-
Fill the Body:
Paint the top half of the whale’s body in navy blue. This dark section should cover the head, back, dorsal fin, and the top of the tail flukes. -
Paint the Belly:
For the pleated underbelly, use a light grey or off-white. Leave a clear distinction between the navy top and the pale belly. -
Detail the Pleats:
With your finest liner brush and dark grey or thinned black paint, carefully draw the long, curved lines (pleats) running from the jaw toward the tail on the light belly section. -
Add the Pectoral Fin:
Paint the large pectoral fin sticking out from the side in navy blue. Add a few small white contour lines on the fin to show its ribbed texture. -
Enhance Body Texture:
Dip your dotting tool or the very tip of a brush into white paint. Add tiny dots along the navy blue back of the whale to mimic barnacles or light reflection. -
The Eye:
Place a tiny white spiral or circle near the corner of the mouth for the eye. A simple stylized swirl gives it character.
Step 4: Foam and Atmosphere
-
Create Crashing Foam:
Load your brush with pure white paint. Stipple (dab repeatedly) paint along the tops of the blue waves, especially where the water curls. This texture mimics sea foam. -
Splash Effects:
Using the tip of a toothpick or a fine brush, add scattered white dots and tiny clusters above the water line to look like spray from the whale breaching. -
Add Birds:
Use dark brown or black paint with your thinnest brush to add simple ‘V’ shapes in the sky area. Vary their sizes to suggest distance. -
Refine Edges:
Check the border between the whale and the background. If it looks messy, clean it up with a line of your original sky color or navy blue. -
Final Varnish:
Allow the rock to dry overnight to ensure all thick paint layers are set. Spray with a clear matte sealant to protect your artwork from chipping.
Place your finished nautical masterpiece on a desk or shelf as a serene reminder of the sea


Sunset Sky With Tiny Distant Whales
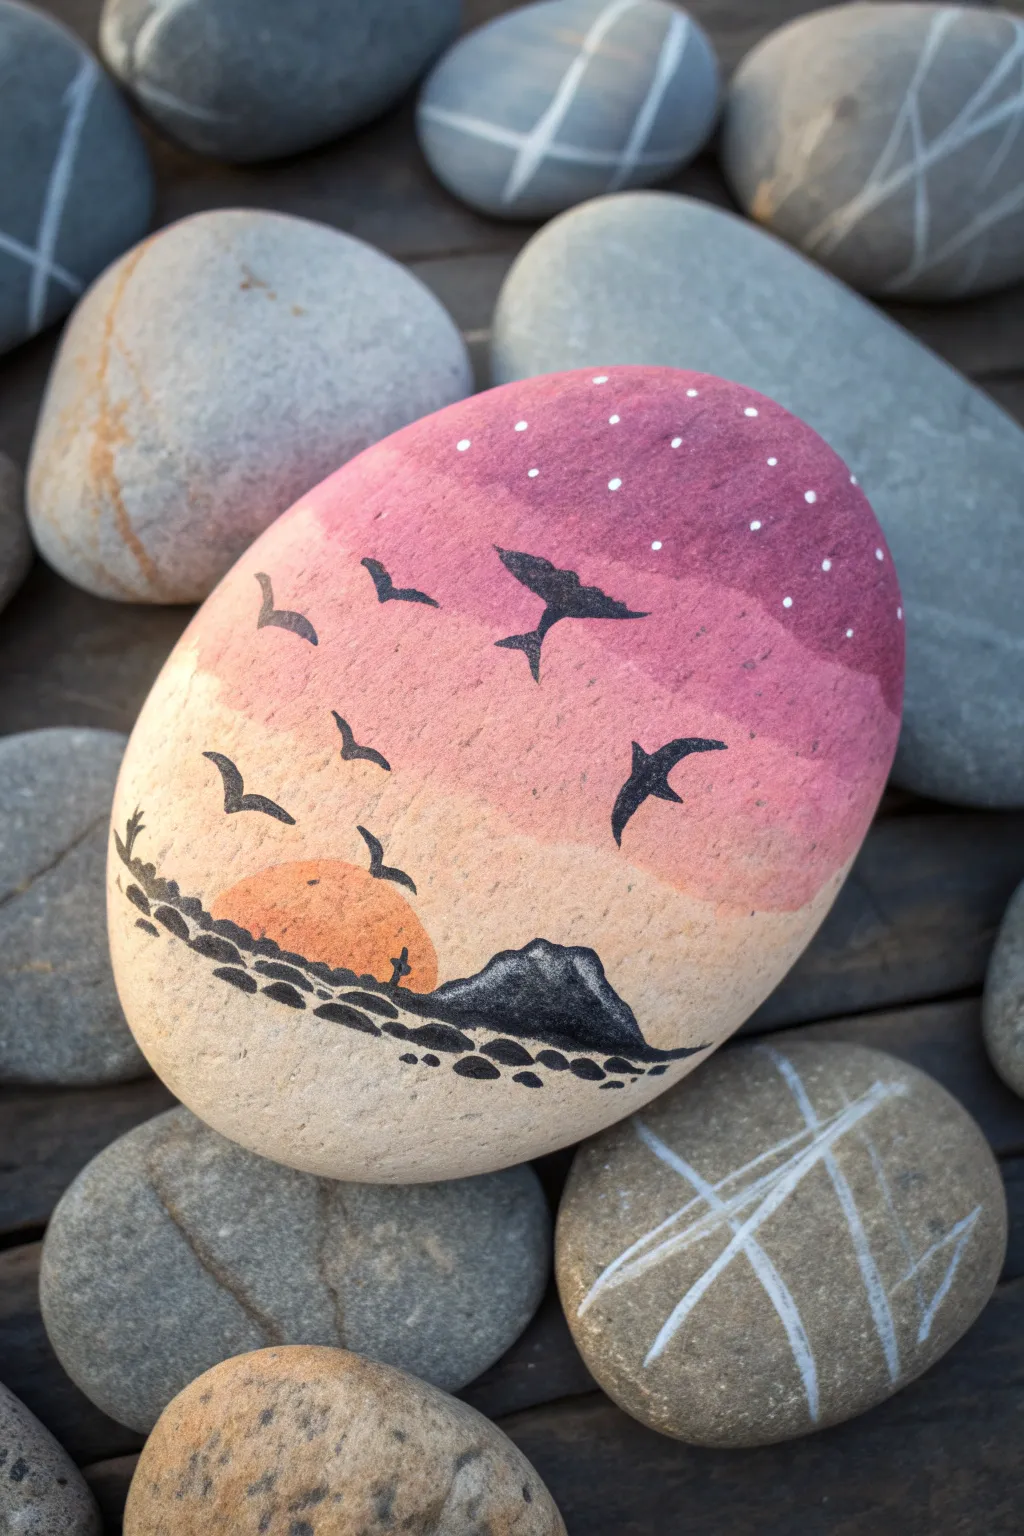
This dreamy rock painting features a stylized scene where the sky and sea blend together, showcasing distant whale silhouettes soaring against a gradient sunset. The natural texture of the stone warms the peach and violet tones, creating a peaceful, magical twilight effect.
Detailed Instructions
Materials
- Smooth, rounded river stone or beach pebble (light color preferred)
- Acrylic paints (Magenta, Violet, Peach/Coral, Black, White)
- Flat shader brush (small to medium)
- Detail liner brush (size 00 or 000)
- Sponging tool or cosmetic wedge (optional for blending)
- Water cup and palette
- Spray sealer or varnish (matte or satin finish)
Step 1: Setting the Sky Gradient
-
Clean surface:
Begin by washing your stone with soapy water and drying it completely. A clean surface ensures the paint adheres without peeling later on. -
Mix the base colors:
Prepare a gradient palette. You will need a deep violet-magenta for the top, a softer pink for the middle, and a pale peach or cream color for the horizon line. -
Paint the top band:
Using a flat brush, apply the deep violet-magenta paint to the top third of the stone. Don’t worry about a perfect straight line at the bottom edge; an uneven edge helps blending. -
Blend the middle:
While the top layer is still slightly wet, paint the middle band with your soft pink. Gently brush upward where the colors meet to blur the line between the purple and pink. -
Add the horizon glow:
Apply the peach or cream color to the lower third, leaving the very bottom of the rock bare to show the natural stone texture. Blend this upward into the pink layer for a seamless sunset transition. -
Soften the edges:
If your brushstrokes look too harsh, I like to lightly dab the transition areas with a slightly damp sponge or clean finger to create that hazy, atmospheric look. -
Sun detail:
Near the bottom left, paint a semi-circle rising from the ‘water’ using a slightly darker orange or coral tone to represent the setting sun. -
Dry completely:
Let this background layer dry fully. The gradient needs to be set before you add sharp black details on top.
Clean Lines
If your black paint is gloopy, mix in a tiny drop of water. Ink-consistency paint flows much smoother for sharp wing tips and tails.
Step 2: Silhouettes & Details
-
Anchor the scene:
Switch to your fine liner brush and black paint. Paint a rugged, uneven island or mountain shape along the bottom right, slightly overlapping your horizon line. -
Create the shoreline:
To suggest water or a rocky shore, paint a series of broken, horizontal dashes and simplified rock shapes extending from the mountain across the bottom of the design. -
Drafting the whales:
Instead of realistic birds, paint streamlined ‘flying whale’ shapes in the sky. Start with a gently curved body that tapers at both ends. -
Adding flukes:
At the tail end of your shapes, add the distinct ‘V’ shape of a whale fluke. These should look like distant silhouettes, so keep them simple and fluid. -
Varying sizes:
Paint the central whale the largest to create focus, and make the surrounding shapes smaller to suggest they are further away in the distance. -
Tiny birds:
In the lower left near the sun, add a few classic ‘V’ shaped birds to balance the composition and distinguish scale against the larger whale shapes. -
Starry details:
Once the sky is dry, dip the very tip of a toothpick or a dotting tool into white paint. Gently dot a constellation of stars into the darker purple section at the top. -
Seal the art:
When completely dry, finish with a spray sealer. A matte finish preserves the natural rock aesthetic, while gloss will make the colors pop like wet stone.
Sparkle Effect
Add a tiny touch of metallic gold or silver paint to the edges of the sun or the whale flukes for a magical, shimmering finish.
Place your finished stone in a garden or on a desk to bring a little piece of sunset magic into your day
Top-Down Whale View on a Flat Rock
Capture the serene beauty of the ocean with this painted stone featuring a humpback whale gliding through stylized waves. The cool teal and deep blue palette creates a calming, aquatic atmosphere perfect for a paperweight or garden accent.
Step-by-Step
Materials
- Smooth oval river rock (palm-sized)
- Acrylic paints (Titanium White, Phthalo Blue, Teal/Turquoise, Payne’s Gray, Black)
- Flat brush (medium)
- Small round brush (size 1 or 2)
- Fine liner brush (size 00 or 000)
- Pencil for sketching
- Water cup and palette
- Spray varnish (gloss or matte)
Step 1: Base Coat and Background
-
Clean the stone:
Begin by washing your rock with soap and water to remove any dirt or oils. Let it dry completely in the sun or with a hairdryer before painting. -
Mix the background color:
Create a dusty teal color by mixing Titanium White with a small amount of Teal and a tiny dot of Payne’s Gray to desaturate it. You want a soft, misty ocean color. -
Apply the base coat:
Using your flat brush, paint the entire top surface of the rock with your dusty teal mixture. Depending on the opacity of your paint, you may need a second coat once the first is dry. -
Sketch the whale:
Lightly sketch the outline of the humpback whale using a pencil. Position it centrally in the upper two-thirds of the rock, angling the body upward slightly.
Step 2: Painting the Ocean Waves
-
Block in the water:
Mix a deep ocean blue using Phthalo Blue and a touch of Black. Paint the bottom third of the rock with curved, sweeping strokes to emulate rolling waves. -
Add wave layers:
While the dark blue is wet, blend in some pure Teal on the upper ridges of the waves to create depth and movement. Keep the strokes fluid. -
Define the waterline:
Use the Teal color to paint a cresting wave shape just below where the whale will be, creating a separation between the deep water and the misty background.
Chalky Lines?
If your white wave details look transparent or chalky, your paint is too thin. Use high-flow fluid acrylic ink or do a second pass over the lines once dry for bright, crisp white foam.
Step 3: Detailing the Whale
-
Fill the whale body:
Mix a dark slate blue (Phthalo Blue plus Payne’s Gray and a little White). Fill in the body of the whale, carefully following your pencil lines. Leave the belly area empty for now. -
Paint the belly:
For the pleated belly, use a light beige or off-white. Fill in the underside area, extending from the chin halfway down the body. -
Add pleat lines:
Once the belly paint is dry, use your fine liner brush with thinned dark grey paint to draw thin, curved lines running lengthwise along the belly. -
Define the fins and tail:
Refine the shape of the pectoral fin and the tail flukes using the dark slate blue. Outline them sharply to make them stand out against the background. -
Highlights and texture:
Mix a lighter blue-grey and dab tiny spots along the whale’s back and on the fins to mimic the barnacles and skin texture typical of humpbacks.
Add Some Magic
Mix a tiny amount of iridescent medium or silver paint into your white when painting the bubbles and wave crests. The rock will catch the light beautifully just like real water.
Step 4: Final Flourishes
-
Ocean spray:
Load your fine liner brush with pure Titanium White. Paint delicate, frothy lines along the crests of the dark blue waves. -
Stippling foam:
Use a stippling motion (dabbing straight down) to add clusters of white dots where the waves are crashing, creating the look of sea foam. -
Atmospheric bubbles:
I like to add a magical touch here by painting random white dots of varying sizes in the background water around the whale, suggesting bubbles or suspended particles. -
Clean up edges:
Check the perimeter of your painted area. You can clean up any smudges or create a crisp border if you didn’t paint the entire rock. -
Seal the artwork:
Once the paint is completely cured (give it a few hours), spray the rock with a clear varnish to protect the paint and give the water a wet look.
Place your finished whale rock on a shelf or gift it to a sea-loving friend as a beautiful handmade keepsake
Split-Color Belly Gradient for 3D Form
Capture the graceful movement of a humpback whale on stone with this lovely painted rock project. The key to its dimensional look lies in the careful gradient shading along the belly, paired with crisp linework.
Detailed Instructions
Materials
- Smooth, oval river rock (light colored)
- Pencil and eraser
- Acrylic paints (Navy blue, royal blue, teal, white, black)
- Fine detail brushes (size 0 and 00)
- Small flat brush
- Spray sealer or varnish
Step 1: Sketching the Shape
-
Clean the Stone:
Begin by washing your rock with soap and water to remove any dirt or oils. Let it dry completely before starting your work to ensure the paint adheres properly. -
Draft the Whale’s Body:
Using a pencil, lightly sketch the main curve of the whale. Think of a large comma shape that tapers toward the tail. -
Add the Fluke and Flippers:
Draw the tail fluke at the narrow end of the body. Sketch a large, long pectoral flipper extending from the lower middle section, and a smaller hint of the second flipper underneath. -
Define the Belly Line:
Draw a curved line running from the chin to the tail, separating the dark upper body from the lighter underbelly. This separation is crucial for the 3D effect later.
Step 2: Painting the Base Layers
-
Mix the Navy Base:
Mix navy blue with a tiny touch of black to create a deep, midnight blue. Use your flat brush to fill in the entire upper body, flippers, and tail fluke. -
Refine the Edges:
While the navy paint is wet, use a size 0 brush to tidy up the edges of the silhouette, ensuring the tail points are sharp and the curves are smooth. -
Base the Belly:
Mix a very light blue using white and a dot of teal. Fill in the belly area completely with this solid pale color. -
Create the Gradient Transition:
While the belly paint is still slightly tacky, mix a mid-tone teal-grey. Paint along the top edge of the belly where it meets the dark jagged line, blending slightly downward to create a shadow. -
Second Coat:
I usually find that the dark blue needs a second coat to be fully opaque. Apply another layer once the first is dry to get that rich, deep color.
Paint Lifting?
If the bottom layer of paint starts lifting while you blend the belly gradient, let it dry completely. Then, use a dry-brush technique to layer the shadow on top instead of wet-blending.
Step 3: Adding Details and Texture
-
Paint the Throat Pleats:
Using a thinned-down version of your mid-tone blue and a very fine liner brush, paint curved lines along the white belly. These should contour with the shape of the rock to suggest roundness. -
Add the Eye:
Dip the backend of a small paintbrush into white paint and dot an eye just above the corner of the mouth line. Add a tiny black dot in the center once the white is dry. -
Stipple the Skin:
Mix a lighter blue shade. Using the very tip of your smallest brush, gently dot tiny spots along the back and dorsal area of the whale to simulate skin texture. -
Highlight the Flippers:
Add a thin line of light blue along the leading edge of the large pectoral flipper to separate it visually from the body. -
Define the Mouth:
Use your darkest black-blue mix to paint a thin, crisp line separating the upper jaw from the pleated belly. -
Add Background Splatter:
Dilute some grey or watered-down black paint. Flick a stiff brush or toothbrush to create tiny speckles around the whale on the bare rock, mimicking ocean debris or plankton.
Ocean Magic
To make the whale look more submerged, paint a very thin, translucent glaze of watery turquoise over the bottom third of the whale’s body before sealing.
Step 4: Finishing Up
-
Erase Guidelines:
Once the paint is 100% bone dry, gently erase any visible pencil marks from your initial sketch. -
Seal the Rock:
Finish by applying a spray varnish or sealer. This protects the paint from chipping and gives the whale a look of being underwater.
Now you have a serene ocean giant to use as a paperweight or a hidden treasure in your garden
Textured Whale Skin With Dot and Dash Marks
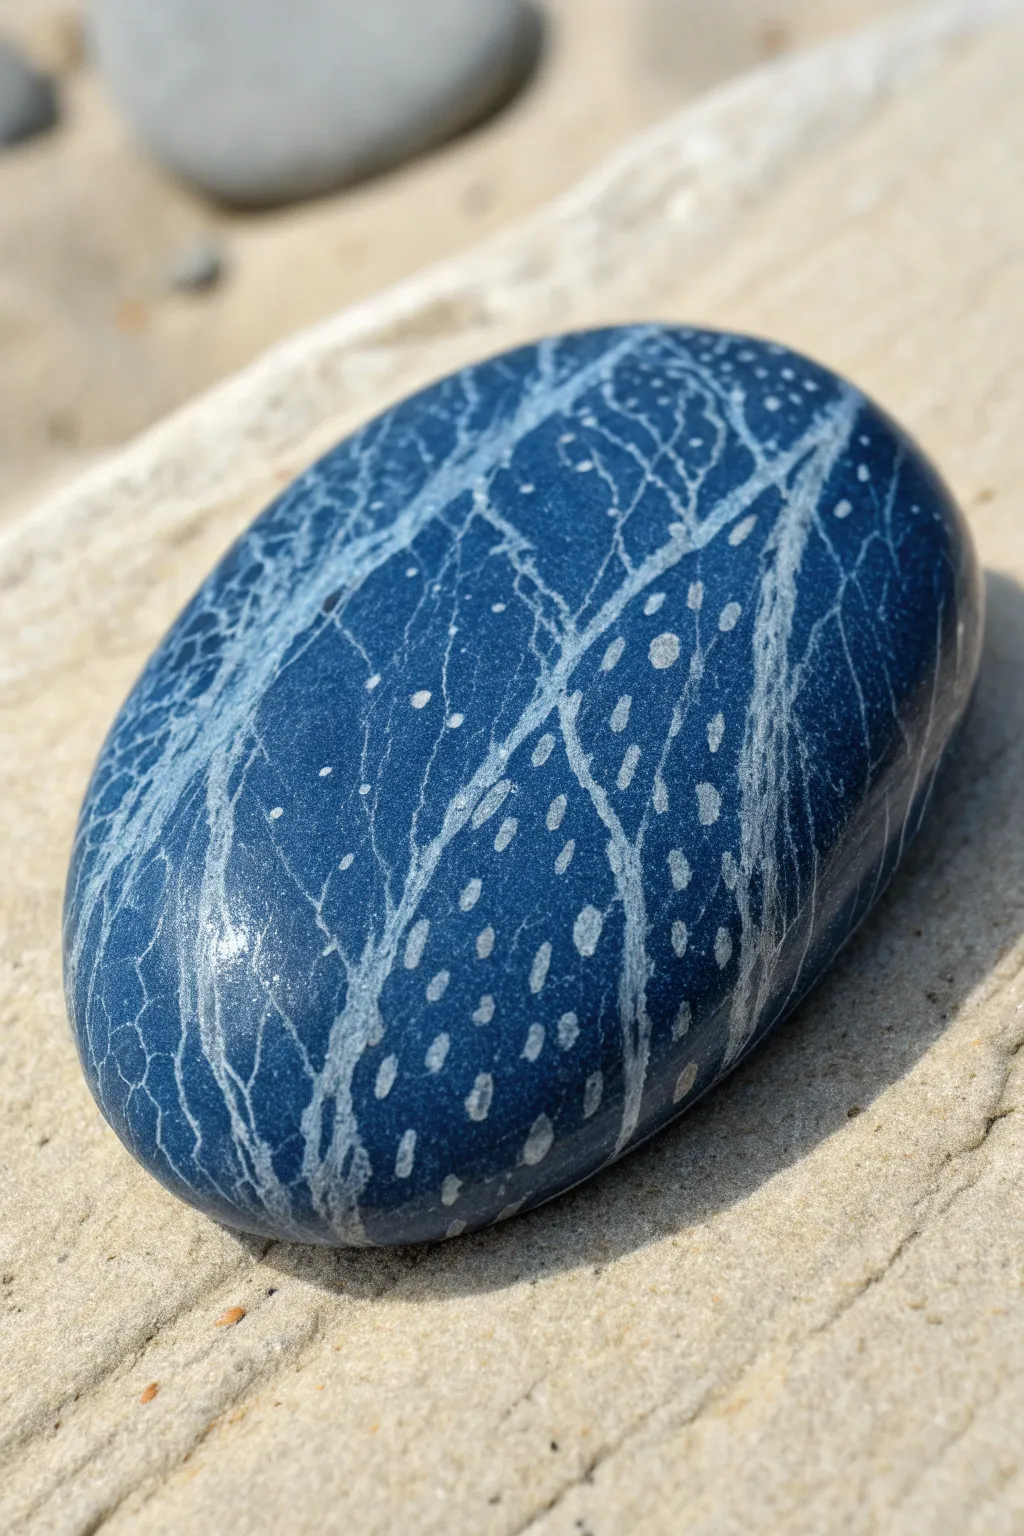
Transform a simple stone into a stunning piece of ocean art by mimicking the weathered skin of a whale. Using a deep blue base and delicate white markings, you’ll create a realistic texture full of scars, spots, and organic patterns.
Step-by-Step
Materials
- Smooth oval river rock
- Deep navy blue acrylic paint
- Titanium white acrylic paint
- Glazing medium or water
- Wide flat brush
- Fine liner brush (size 00 or 000)
- Small round sponge or stippling brush
- Gloss varnish or clear sealant
Step 1: Base Coat Preparation
-
Clean the surface:
Start by washing your rock thoroughly with soap and water to remove any dirt or oils. Let it dry completely before you begin painting to ensure the paint adheres properly. -
Apply the first layer:
Using your wide flat brush, coat the entire top surface of the rock with the deep navy blue acrylic paint. Lay it on smoothly, following the curve of the stone. -
Build opacity:
Allow the first coat to dry effectively. I prefer to apply a second or even third coat to get a truly solid, opaque blue background without any streaking. -
Dry thoroughly:
Ensure the base is bone-dry before moving on to the texture work. Wet paint will cause your fine lines to blur.
Natural Wobbles
Don’t try to paint straight lines. A shaky hand actually helps here; the natural jitter creates more realistic skin wrinkles than perfect straight strokes.
Step 2: Creating the Veining
-
Prepare the translucent white:
Mix a small amount of titanium white paint with a drop of water or glazing medium. You want a milky, semi-transparent consistency rather than solid white. -
Paint main veins:
Dip your fine liner brush into the thinned white mixture. Paint a few long, wavy lines running lengthwise across the rock to act as the primary ‘scars’ or veins. -
Branch out:
From your main lines, gently pull thinner, branching lines outward. Let them wiggle and fork naturally like lightning bolts or tree roots. -
Soften the lines:
If any lines look too harsh or thick, quickly dab them lightly with a clean, slightly damp finger to soften the edges and push the color back into the blue. -
Create a web effect:
Connect some of the branches with very faint, spidery cross-lines. This creates the intricate network of skin texture seen on whales.
Step 3: Adding Details and Dashes
-
Thicken the paint slightly:
Add a tiny bit more white paint to your mixture so it is slightly more opaque than the veining layer, but still not solid white. -
Add directional dashes:
In the open blue spaces between your veins, paint rows of small dashes or short strokes. Orient them generally in the same direction as the curve of the rock. -
Vary the sizes:
Make sure your dashes aren’t uniform. I like to mix tiny dots with slightly longer oblong shapes to keep the texture looking organic and natural. -
Cluster the marks:
Group some of your dots closer together near the vein lines, spreading them out as they move into the open blue areas. -
Highlight specific spots:
Using nearly pure white paint on the very tip of your brush, add a few bright, distinct dots on top of the faded dashes to create depth and interest.
Paint Too Bright?
If your white lines look too stark against the blue, wait for them to dry and wash over the whole rock with heavily watered-down navy paint to push them back.
Step 4: Finishing Touches
-
Assess and adjust:
Step back and look at your rock. If an area looks too dark, add faint veining. If it looks too busy, you can glaze over it with a very watered-down blue wash. -
Final drying time:
Let all the fine detail work dry completely. This might take a bit longer due to the layers of watery paint. -
Apply varnish:
Seal your artwork with a gloss varnish. This step is crucial as it deepens the navy blue background and makes the white markings pop, simulating a wet, underwater look.
Now you have a piece of the ocean’s gentle giant resting right in your palm
Mandala-Pattern Whale Tail
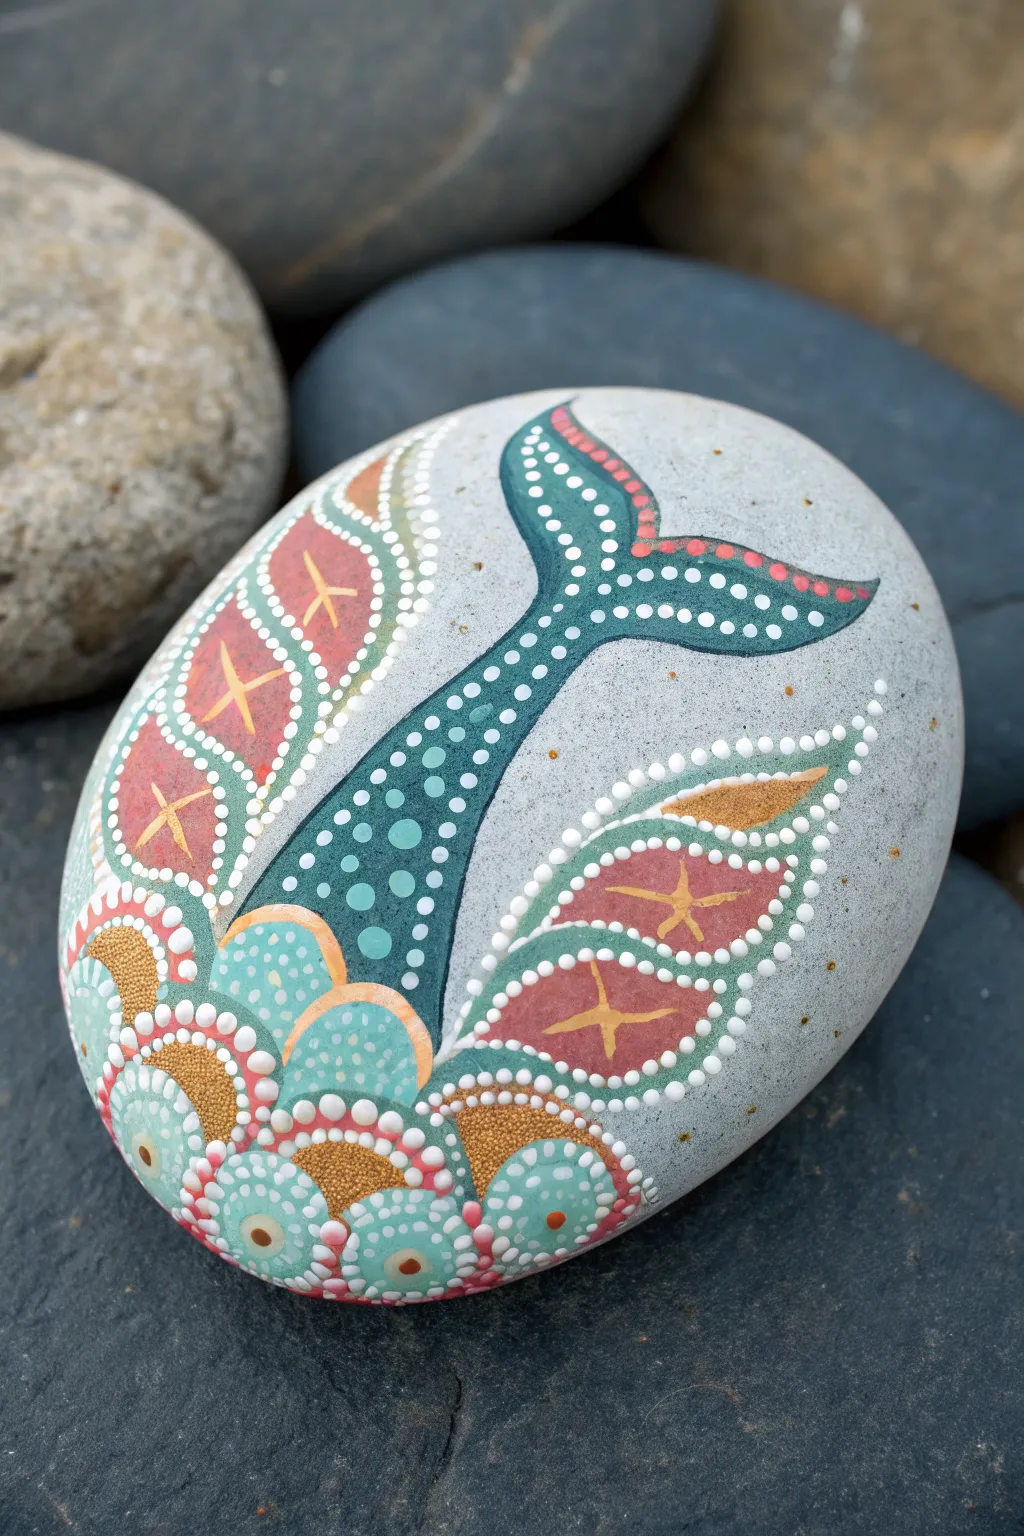
This project combines the serenity of the ocean with the precision of mandala art, featuring a stylized whale tail diving amidst decorative splashes. The design uses dotting tools to create intricate patterns in calming shades of teal, coral, and gold on a smooth grey stone.
Detailed Instructions
Materials
- Smooth, oval-shaped river rock (grey base)
- Acrylic paints (teal/dark turquoise, light aqua, coral/reddish-pink, gold/ochre, white)
- Pencil and eraser
- Fine detail paintbrush (size 0 or 00)
- Set of dotting tools (various sizes)
- Acrylic rock sealer or varnish (glossy or matte)
Step 1: Planning and Base Coats
-
Prepare the stone:
Begin by washing your stone with soap and water to remove any dirt or oils. Let it dry completely. The natural grey background is part of the design, so no base coat is needed, but ensure the surface is smooth. -
Sketch the outline:
Lightly sketch the central whale tail curving slightly. Then, sketch the two large ‘splash’ or leaf-like shapes flanking the tail, and the semi-circular scalloped pattern at the bottom representing the water ripples. -
Base coat the tail:
Fill in the whale tail shape with a deep teal or dark turquoise acrylic paint. You may need two thin layers to get opaque coverage. Let this dry fully. -
Base coat the side flourishes:
Fill in the large side shapes (which look like decorative leaves or splashes) with the coral or reddish-pink paint. Again, apply a second coat if the stone’s colour shows through. -
Base coat the water scallops:
At the bottom, paint the semi-circular scalloped shapes. Alternate the colors: use light aqua for the upper scallops and the coral pink or white for the lower transition areas as shown in your reference.
DottingConsistency
To keep your dots round and uniform, wipe your dotting tool clean after every few applications. Dried paint build-up on the tip will distort the shape.
Step 2: Adding the Details
-
Line the tail:
Using your finest brush, or a very small dotting tool dragged gently, outline the teal tail shape with dots of light aqua or white to define the edges. -
Dot the tail interior:
Dip a medium-small dotting tool into light aqua paint. Create a line of dots running up the center of the tail, starting larger at the base and getting smaller toward the flukes. Add random smaller dots around them for texture. -
Decorate the tail tips:
On the very tips of the flukes, paint small strips of coral pink to mirror the side patterns. -
Detail the side splashes:
Using a small brush and gold or ochre paint, draw a simple ‘star’ or cross shape in the center of each coral section. This adds a nice metallic contrast. -
Outline the side splashes:
Load a small dotting tool with white paint. Carefully place dots along the outer edge of the coral shapes. I find that reloading the tool every 2-3 dots keeps them consistent in size. -
Add inner dots to splashes:
Inside the white outline of the splashes, add a second row of smaller dots using light aqua or teal paint to create a layered effect.
Make It Shimmer
Swap the standard gold paint for a high-gloss metallic gold or a glitter glaze on the ‘star’ shapes. It catches the sunlight beautifully outdoors.
Step 3: Creating the Mandala Base
-
Pattern the water scallops:
Move to the bottom semi-circles. For the aqua scallops, add small white dots inside the shape. For the coral or lower scallops, fill the centers with gold/ochre paint to create a textured look. -
Outline the scallops:
Use white paint and a small dotting tool to outline every semi-circle at the bottom. This separates the shapes and gives that classic mandala definition. -
Add final gold accents:
Place a single, distinct gold or ochre dot in the center of the bottom-most teal scallops to tie the color palette together. -
Clean up:
Check your design for any smudges. If you made a mistake with a dot, wait for it to dry and then gently scratch it off or paint over it with the base color. -
Seal the artwork:
Once the paint is completely cured (I usually wait overnight just to be safe), apply a clear acrylic sealer. This protects the dots from chipping and makes the colors pop against the grey stone.
Place your finished whale tail mandala in a garden bed or on a desk for a peaceful reminder of the sea
Galaxy Whale on a Stone “Canvas”
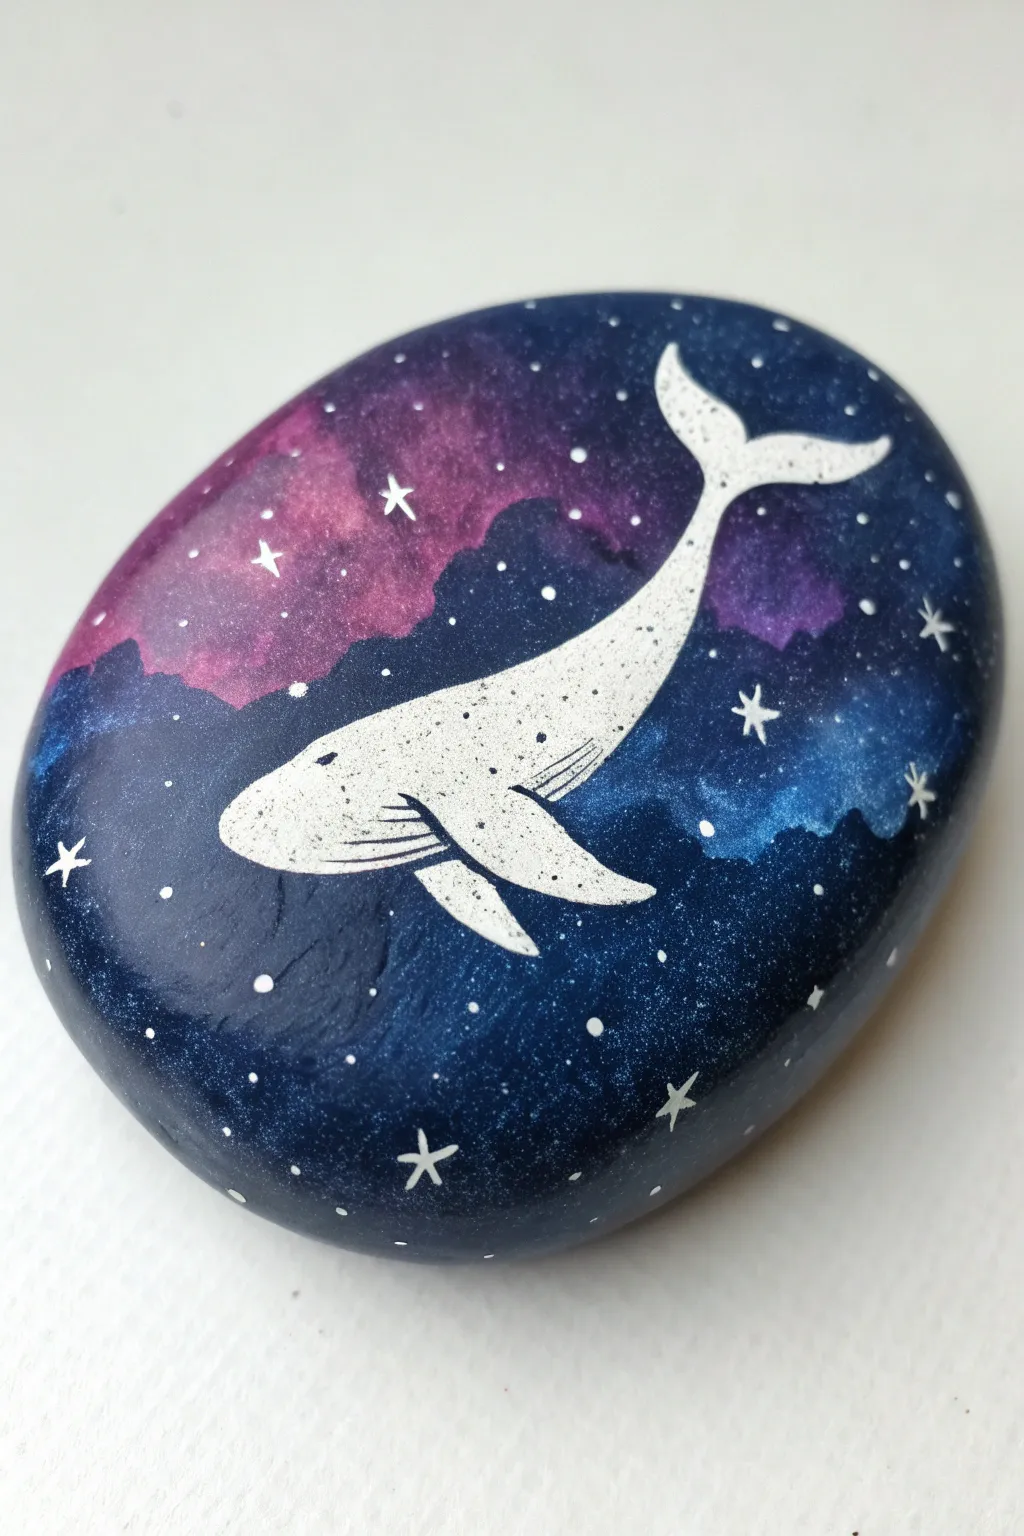
Transform an ordinary stone into a dreamy piece of cosmic art featuring a serene white whale swimming through a galaxy. This project layers deep blues and vibrant purples to create a stunning backdrop for a simple yet striking silhouette.
How-To Guide
Materials
- Smooth, oval river rock
- Gesso or white acrylic primer
- Acrylic paints: Navy Blue, Black, Indigo, Titanium White, Magenta or Purple, Teal
- Sponges (makeup wedges or sea sponge)
- Small round brushes (Size 0 and 00)
- Palette for mixing
- Water cup and paper towels
- Spray sealer or varnish (glossy)
Step 1: Preparing the Cosmic Void
-
Prime the Surface:
Begin by washing your stone thoroughly to remove any dirt or oils. Once dry, apply a coat of gesso or white acrylic paint to create a neutral surface that will make the dark galaxy colors pop. -
Establish the Base:
Paint the entire face of the rock with a deep navy blue. Don’t worry about perfect coverage on the first pass; a second coat ensures a rich, dark foundation for your galaxy. -
Create Depth:
While the navy base is still slightly tacky, dab a small amount of black paint around the edges of the rock using a sponge. Blend it inward softly to create a vignette effect, drawing the eye to the center.
Step 2: painting the Nebula
-
Add Purple Clouds:
Load a clean sponge with a mix of magenta and a tiny drop of white to make it opaque. Dab this diagonally across the upper-left portion of the rock to form the main nebula cloud. -
Layer in Teal Tones:
Using a fresh corner of your sponge, lightly dab some teal or lighter blue on the opposite side (lower right) of the rock. Keep the pressure light to create a wispy, cloud-like texture rather than a solid block of color. -
Blend the Transitions:
Where the purple and blue meet the dark background, use a mostly dry sponge to soften the edges. You want the colors to look like they are fading into the darkness of space, not sitting on top of it. -
Brighten the Highlights:
Add a tiny bit more white to your purple and teal mixtures. Dab these brighter highlight colors solely in the center of your colored patches to make the nebula appear glowing and three-dimensional. -
Adding Distant Stars:
Dilute some white paint with water until it has an inky consistency. Load a brush or toothbrush and flick the bristles to splatter tiny white specks across the entire rock. Let this layer dry completely before moving on.
Nebula looking muddy?
Let the dark base layer dry 100% before sponging on colors. If the paint is wet, the colors will mix into a grey mess rather than sitting on top.
Step 3: The Whale Silhouette
-
Outline the Shape:
Using a very fine liner brush (size 00) and thinned white paint, sketch a faint outline of the whale. Position the body diagonally, swimming downward from right to left, with the tail curved upward toward the top right. -
Fill the Body:
Once you are happy with the shape, fill in the whale’s body with opaque Titanium White. You will likely need two or three thin coats to get a solid, bright white against the dark galaxy background. -
Define the Tail:
Pay close attention to the flukes of the tail. Keep the edges crisp and sharp as they curve upward. I find it helpful to turn the rock upside down to get the angle of the tail just right. -
Add the Fins:
Paint the pectoral fin extending downward from the body. Give it a slightly curved shape that mimics the flow of the whale’s movement through the stars.
Sharper Bristles
For the crispest stars and whale outline, dampen your brush and reshape it to a fine point with your fingers before dipping it into the paint.
Step 4: Details & Finishing Touches
-
Texture the Whale:
Mix a very light grey wash (watered down white with a speck of black). Gently paint faint lines along the belly of the whale to suggest throat grooves. Add tiny dots of black or grey on the back for texture. -
Paint Major Stars:
Using your smallest detail brush and pure white paint, hand-paint several larger, four-pointed stars. Place them strategically in the dark blue areas to balance the composition, avoiding the whale body itself. -
Highlight the Eye:
Place a tiny black dot near the front of the head for the whale’s eye. Ensure it sits naturally above the line of the mouth/throat grooves. -
Seal the Artwork:
Allow the rock to dry for at least 24 hours to ensure all moisture has evaporated. Finish with a spray gloss varnish to protect the paint and give the galaxy a wet, shimmering look.
Place this cosmic creation on your desk or hide it in a park for someone lucky to find
Whale and Mini Ocean Scene Wraparound
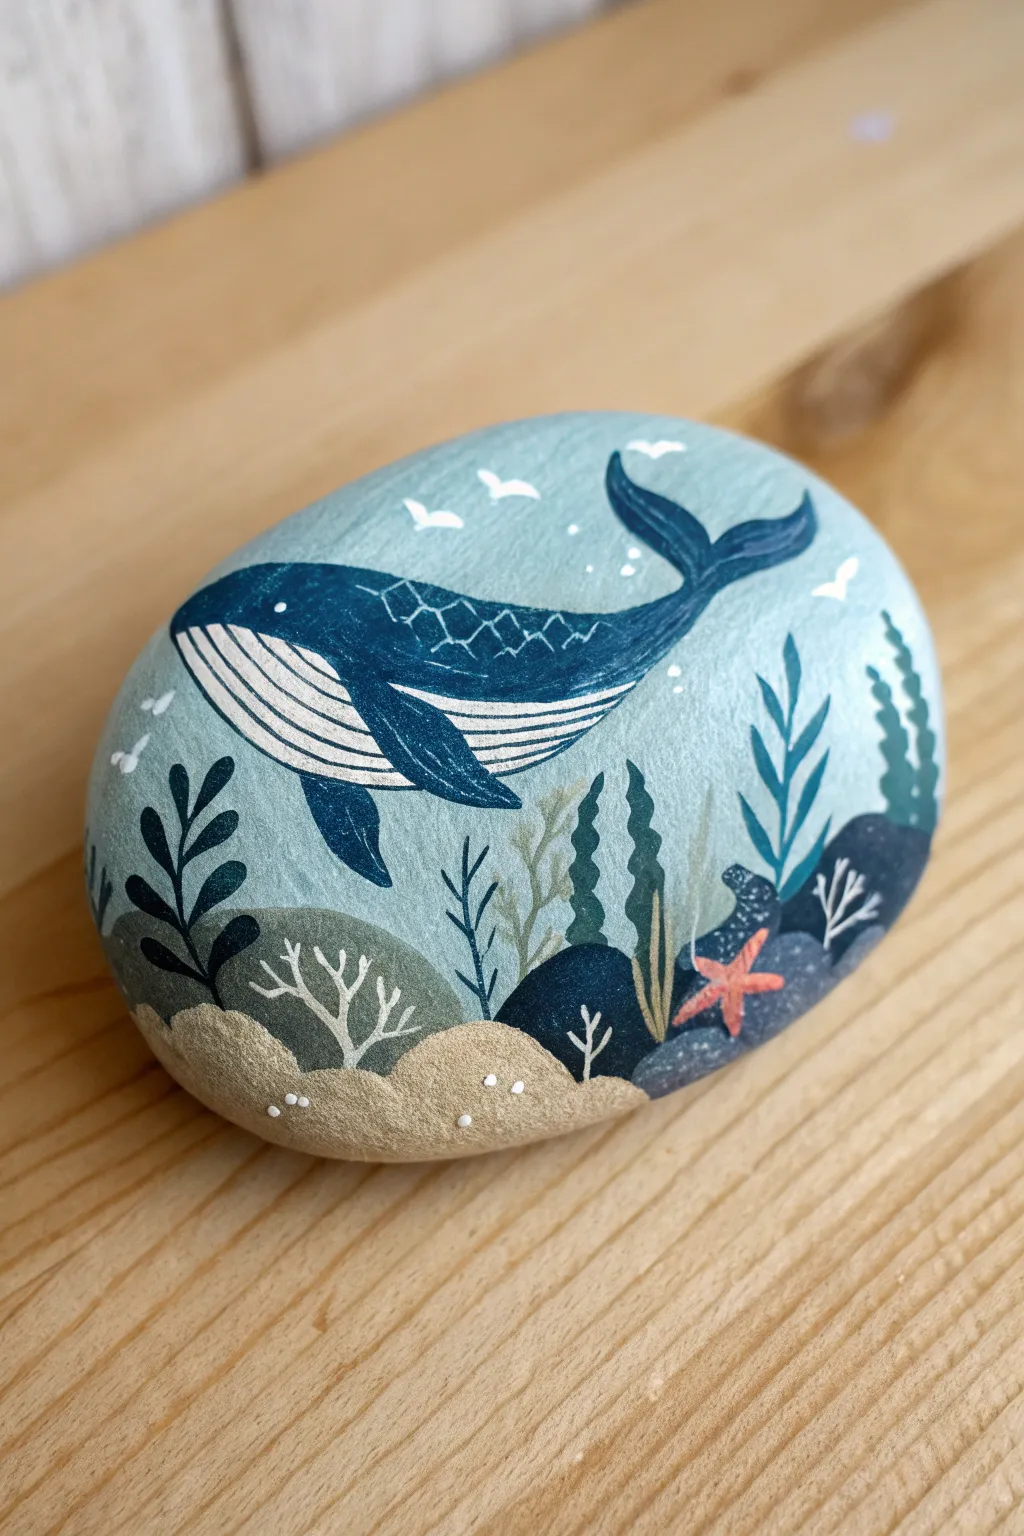
This charming painted rock captures the serene movement of a humpback whale gliding over a colorful ocean floor. The wrap-around design utilizes the stone’s natural shape to create depth, featuring layers of sea plants, coral, and rolling sandy dunes.
Step-by-Step Tutorial
Materials
- Smooth, oval river rock (approx. 4-6 inches wide)
- Acrylic paints (light blue, dark navy blue, white, sand/beige, sage green, teal, forest green, coral orange, grey)
- Flat shader brushes (medium and small)
- Fine liner or detail brushes (sizes 0 and 00)
- Pencil for sketching
- Spray sealer or varnish (matte or satin finish)
- Palette for mixing
- Water cup and paper towels
Step 1: Base Coat & Seafloor
-
Prepare the canvas:
Begin by washing your rock with soap and water to remove any dirt or oils. Let it dry completely before starting. -
Apply the background:
Mix a soft, pale blue with a touch of white to create a watery background color. Paint almost the entire surface of the rock, leaving only the very bottom edge unpainted if you wish, or cover it entirely. Apply two coats for opacity, letting the first dry before adding the second. -
Sketch the layout:
Once the blue base is bone-dry, lightly use a pencil to outline the whale’s shape in the center and the undulating curves of the seabed at the bottom. -
Paint the sandy dunes:
Mix a warm beige or sand color. Paint the bottom-most mounds using a small flat brush, dabbing gently to create a slightly textured look rather than smooth strokes. -
Layer the rocks:
Behind and beside the sand dunes, paint rounded shapes using dark grey and deep teal for underwater boulders. Varying the shades helps distinguish the different rock formations.
Smooth Operator
If your paint feels too thick or leaves ridges, mix in a tiny drop of water or flow medium. Thinner paint makes the fine liner work on the whale’s belly much easier.
Step 2: The Whale
-
Block in the body:
Using a rich navy blue, fill in the upper body of the whale. Be careful around the fins and tail flukes to keep the edges crisp. -
Add the belly:
For the pleated underbelly, mix white with a tiny drop of the background blue. Paint the lower section of the whale, swooping the line upward toward the tail. -
Detail the skin:
Take a fine liner brush and your background blue color (or a lighter blue). Carefully paint a cross-hatch or diamond pattern along the whale’s back to suggest texture. -
Define the pleats:
Using a thinned-down navy blue and your finest brush, paint the long, curved lines striking across the white belly section. Follow the contour of the whale’s body. -
Finishing the whale features:
Add a small white dot for the eye. Use the navy blue to define the pectoral fin overlapping the belly, ensuring it stands out against the white stripes.
Step 3: Ocean Flora & Details
-
Paint leafy plants:
Using deep forest green, paint broad, leafy plants on the left side. Press down to widen the stroke and lift up to create sharp tips for each leaf. -
Add tall seagrass:
Mix a sage or olive green. Paint wispy, vertical strands of seagrass reaching up from behind the rocks towards the middle of the stone. -
Create background kelp:
On the right side, use a teal or blue-green shade to paint taller, wavy kelp strands. Keeping these slightly more muted pushes them into the visual background. -
Detail the coral and starfish:
With a fine brush and white paint, create delicate branching coral shapes on top of the grey rocks. Add a small orange starfish nestled among the stones for a pop of warm color. -
Atmospheric touches:
Paint tiny white ‘v’ shapes near the top for distant seagulls. Add small clusters of white dots around the whale and seabed to represent bubbles or floating particles. -
Final highlights:
I like to add tiny white highlight lines on the dark green leaves and the top of the curved whale tail to make them look wet and three-dimensional. -
Seal the artwork:
Allow the rock to dry overnight to ensure no moisture is trapped. Finish with a spray sealer to protect your miniature ocean scene from chipping.
Fixing Shaky Lines
Smudged a fine line? Don’t wipe it! Wait for it to dry completely, then paint over the mistake with the background color. It serves as a perfect eraser.
Display your finished stone on a desk or shelf to bring a calming piece of the ocean into your home
Whale Shape Built From the Rock’s Odd Bumps
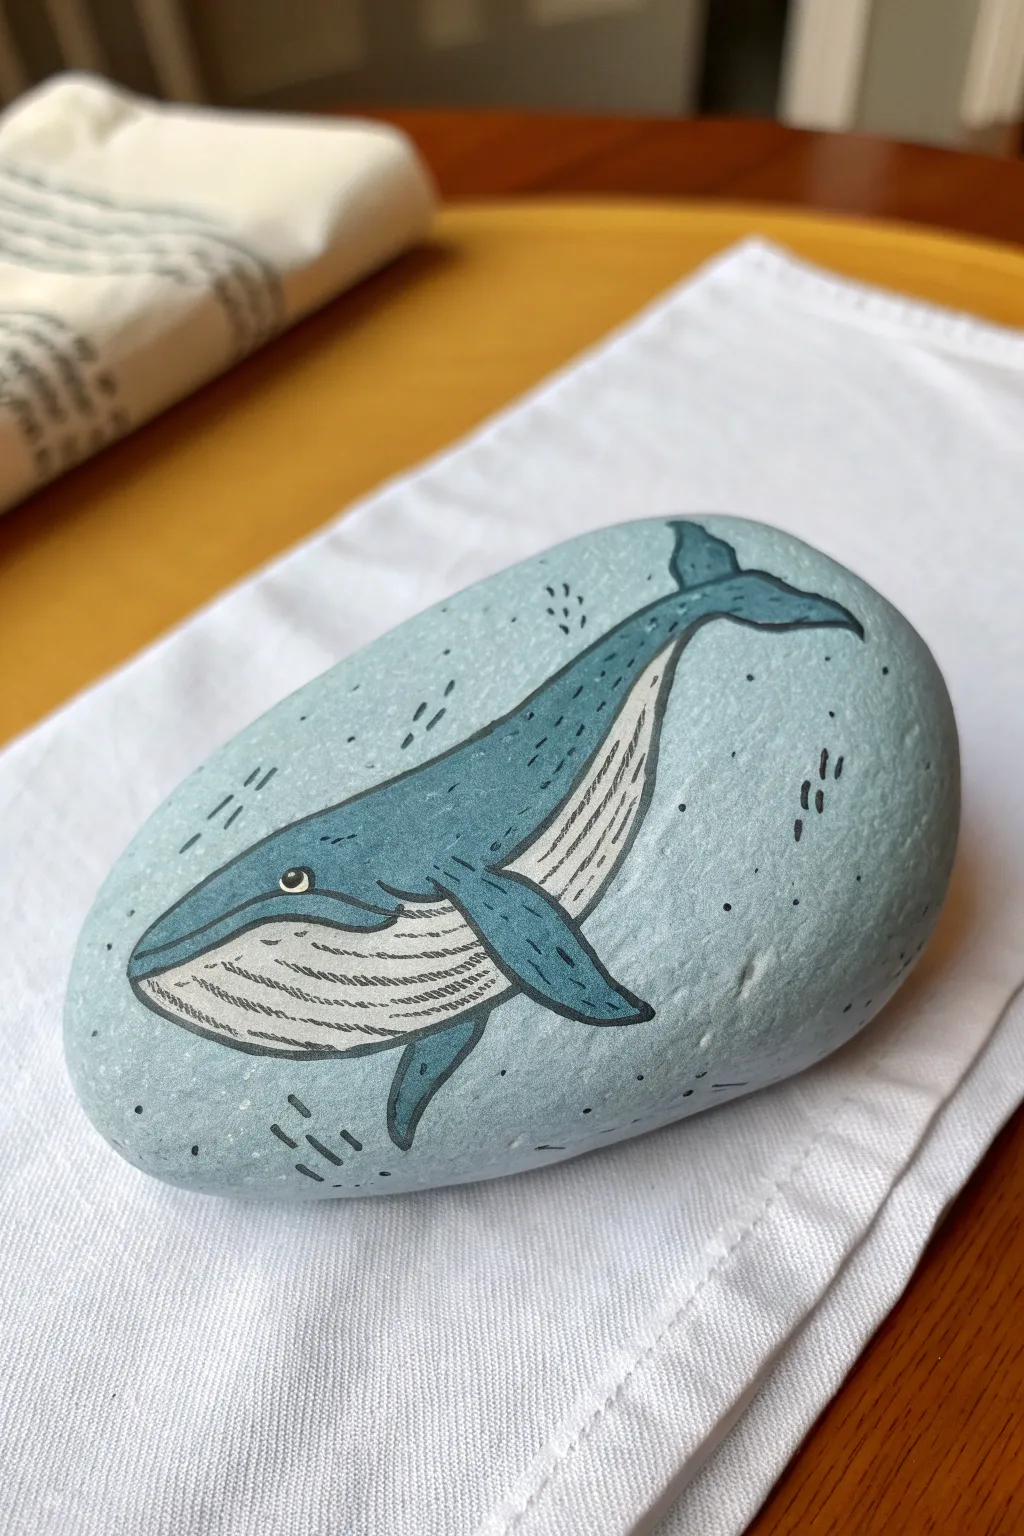
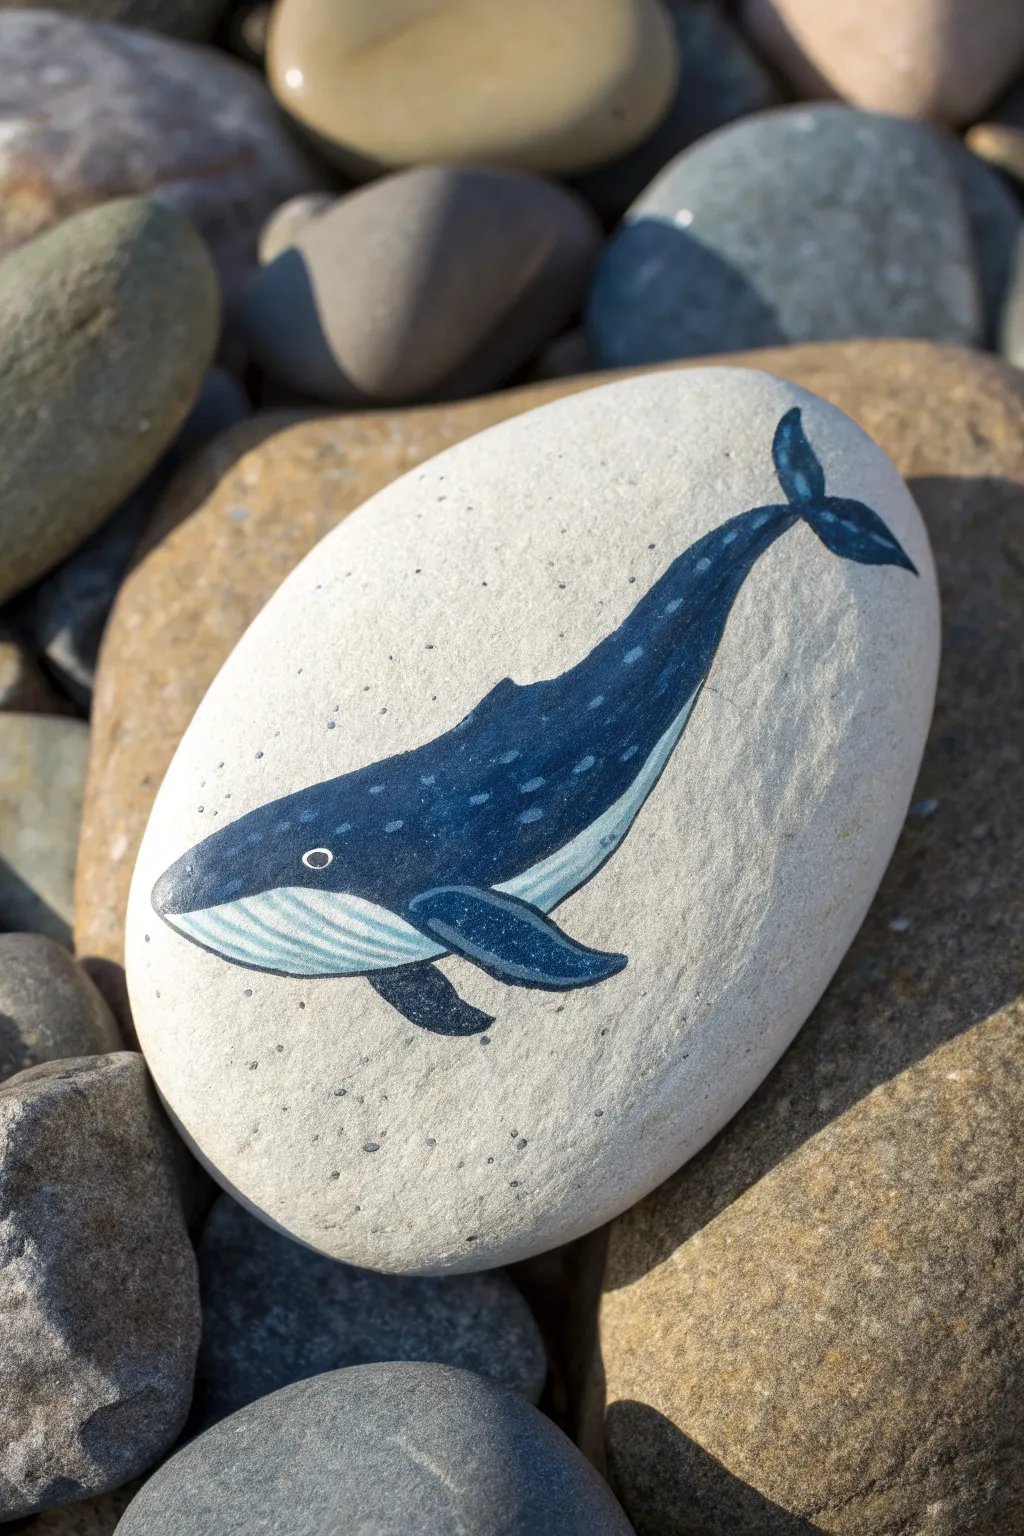
Embrace the natural curves of a smooth river stone to bring this gentle giant to life. Using muted blues and crisp line work, you’ll transform an ordinary rock into a stylized humpback whale that seems to swim right across the surface.
Detailed Instructions
Materials
- Smooth, oval-shaped river rock (approximately palm-sized)
- Acrylic paints: baby blue, warm grey, white, dark teal or navy
- Posca paint pens: black (fine tip), white (extra fine tip)
- Paintbrushes: wide flat brush for base coats, small round brush for details
- Pencil and eraser
- Matte spray varnish or sealant
- Cup of water and paper towels
Step 1: Preparing the Canvas
-
Clean the stone:
Scrub your rock with soap and warm water to remove any dirt or oils. Let it dry completely in the sun or with a hairdryer before starting. -
Apply the base coat:
Mix a soft, dusky baby blue color using blue, a touch of grey, and plenty of white acrylic paint. Paint the entire top surface of the rock. You might need two layers to get a solid, opaque finish; let the first dry before adding the second. -
Let it cure:
Allow the base coat to dry fully. It should feel chalky and dry to the touch, not tacky, before you try sketching over it.
Paint Pen Won’t Flow?
If the pen skips over the textured rock, press the nib down on a scrap piece of paper a few times to re-saturate it, then try again with lighter pressure.
Step 2: Sketching the Giant
-
Observe the rock’s shape:
Look for the natural ‘hump’ of the stone. This is where the whale’s back should curve. -
Draft the outline:
Using a blunt pencil and very light pressure, sketch the elongated teardrop shape of the whale’s body diagonally across the rock. The tail should curl slightly upward toward the narrower end of the stone. -
Add appendages:
Sketch a large pectoral fin extending from the lower third of the body. Draw the flukes of the tail at the end of the body, making them look flexible and curved. -
Define the belly:
Draw a curved line running from the chin to the tail to separate the dark upper body from the lighter belly area.
Pro Tip: Anchor Your Hand
Rest the side of your pinky finger on the table (or a dry part of the rock) to stabilize your hand while drawing the long contour lines.
Step 3: Coloring the Whale
-
Paint the upper body:
Mix a darker teal or slate blue for the whale’s back and fins. Carefully fill in the upper section you sketched, using a small round brush to keep the edges neat. -
Paint the belly:
For the underbelly, mix a very light cream or off-white color. Fill in the lower section of the whale, being careful not to blend it wet-on-wet with the blue section unless you want a blurred edge. -
Refine the tail:
I find it helpful to use the very tip of the brush to sharpen the points of the tail flukes here, ensuring they look distinct against the background. -
Dry thoroughly:
Wait for the paint to dry completely. Since the next step involves fine pens, any moisture in the paint will ruin the marker nibs.
Step 4: Inking and Details
-
Outline the body:
Using a fine-tip black paint pen (like a Posca), trace the outer perimeter of the whale. Keep your hand steady and pull the pen slowly to get a smooth line. -
Add belly grooves:
Draw the signature throat pleats on the whale’s belly. Start with long, curved lines near the jaw that get shorter as they move toward the tail. Don’t make them perfectly straight; a little wobble adds organic character. -
Define the eye:
Draw a small circle for the eye near the front of the head. Add a tiny white dot inside it later for a highlight to give it life. -
Add fin details:
Use short, dashed lines or small stippling dots on the dark blue fins and tail to suggest texture and barnacles. -
Create movement:
Around the whale, use the black pen to draw small dashed ‘motion lines’ and tiny dots. This simulates water movement and fills the empty negative space. -
Highlight the form:
With a white gel pen or extra-fine paint marker, add a subtle highlight line along the very top ridge of the whale’s back to show where the light hits. -
Seal the artwork:
Once the ink is absolutely bone dry (give it at least 20 minutes), take the rock outside and spray it with a matte varnish to protect your wobbly little lines from scratching.
Now you have a peaceful ocean swimmer ready to use as a paperweight or a hidden garden treasure


Have a question or want to share your own experience? I'd love to hear from you in the comments below!