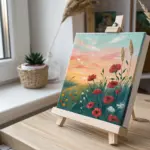
A white canvas can feel intimidating at first, but it’s also the best playground for light, contrast, and gorgeous negative space. Here are some of my favorite white canvas painting ideas—from classic crowd-pleasers to artsy experiments you’ll want to try right away.
Glowing Full Moon on a Dark Sky
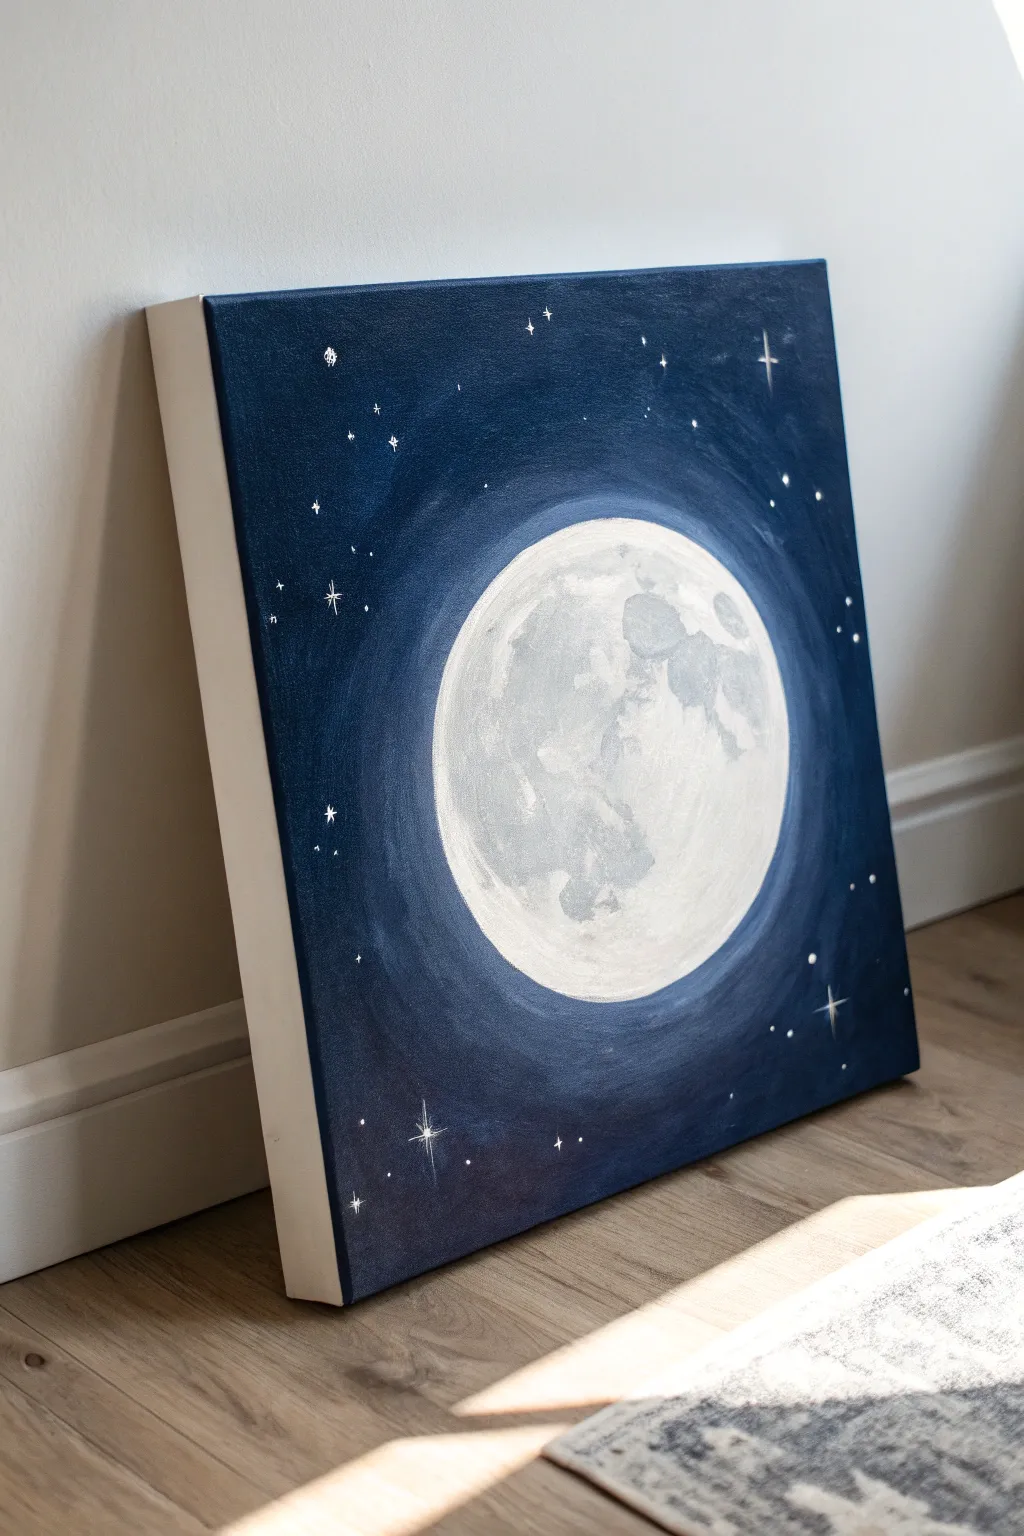
Capture the serene beauty of a midnight sky with this striking full moon painting. The deep indigo background makes the textured white moon pop, creating a luminous focal point for any room.
Step-by-Step
Materials
- Square stretched canvas (e.g., 12×12 or 16×16 inches)
- Acrylic paints (Titanium White, Mars Black, Phthalo Blue, Ultramarine Blue, hint of Purple)
- Large flat brush or sponge brush
- Medium filbert brush (rounded tip)
- Small round detail brush
- Palette or paper plate
- Cup of water and paper towels
- Compass or a circular object for tracing (bowl/plate)
Step 1: Setting the Scene
-
Define the Moon:
Start by positioning your circular object right in the center of the canvas. Lightly trace around it with a pencil to mark the moon’s shape. This gives you a clear boundary to work around. -
Mix the Background Base:
On your palette, mix a large amount of Phthalo Blue with a touch of Mars Black. You want a very deep, rich navy color that is almost black but still retains that cool blue undertone. -
Paint the Corners:
Using your large flat brush, apply this darkest mixture to the four corners of the canvas. Paint inwards towards the moon, but stop about two inches away from your pencil line. -
Create the Gradient:
Without washing your brush, pick up a little pure Ultramarine Blue and a tiny speck of White. Blend this slightly lighter blue into the wet edges of your dark corners, moving closer to the moon circle. -
The Lunar Halo:
Mix a lighter blue shade now (Ultramarine plus more White). Carefully paint around the pencil line of the moon, blending outwards into the darker blue. This lighter ring creates the ‘glow’ effect. -
Paint the Edges:
Don’t forget to paint the sides of your canvas with that deep midnight blue mixture so it looks finished from every angle when displayed.
Dry Brush for the Win
When painting the moon’s glow, use a very dry brush with minimal paint. Circular strokes help blend the light halo seamlessly into the dark night.
Step 2: Moonlight & Texture
-
Base the Moon:
Once the blue background is dry to the touch, fill in the moon circle with a solid coat of Titanium White. It’s okay if it looks flat right now; this is just the canvas for your texture. -
Mix Crater Greys:
Create two or three shades of grey on your palette by mixing tiny amounts of black into your white. You want a very pale grey, a medium grey, and a slightly darker slate grey. -
Sponging the Texture:
I like to use a scrunched-up paper towel or a dry sponge for this part. Dip it lightly into your greys and dab it onto the moon to create organic, random textures. -
Adding Geography:
Look at the reference or a photo of the real moon. Use the filbert brush to paint larger grey patches (the ‘maria’ or seas) focused mostly on the left and upper right quadrants. -
Softening the Edges:
While the grey paint is still wet, use a clean, dry brush to gently lightly tap over the edges of your grey shapes. This blends them into the white so they look like soft shadows rather than hard stains. -
Highlighting:
Load your brush with pure, thick Titanium White. Dab it onto the brightest parts of the moon, layering it over the lighter greys to create depth and a cratered surface.
Step 3: Starlight Details
-
Prepare the Stars:
Thin down some white paint with water until it has an inky consistency. This will make it much easier to paint sharp, crisp stars. -
Adding Distant Stars:
Dip the back end of your small brush handle into the paint and dot it onto the dark background. Vary the pressure to create different sized dots for distant stars. -
Painting North Stars:
Select 3 or 4 spots for larger, twinkling stars. Using your finest detail brush, paint a small cross or ‘plus’ sign, dragging the paint outward to taper the points. -
Final Touch:
Add a tiny white dot in the very center of your cross-shaped stars to make them shine intensely.
Add a Color Cast
Instead of pure grey shadows on the moon, mix in a tiny drop of purple or blue. It harmonizes the moon with the background for a cohesive look.
Hang your cosmic creation on the wall and enjoy the peaceful atmosphere it brings to your space


White Daisies on a Moody Background
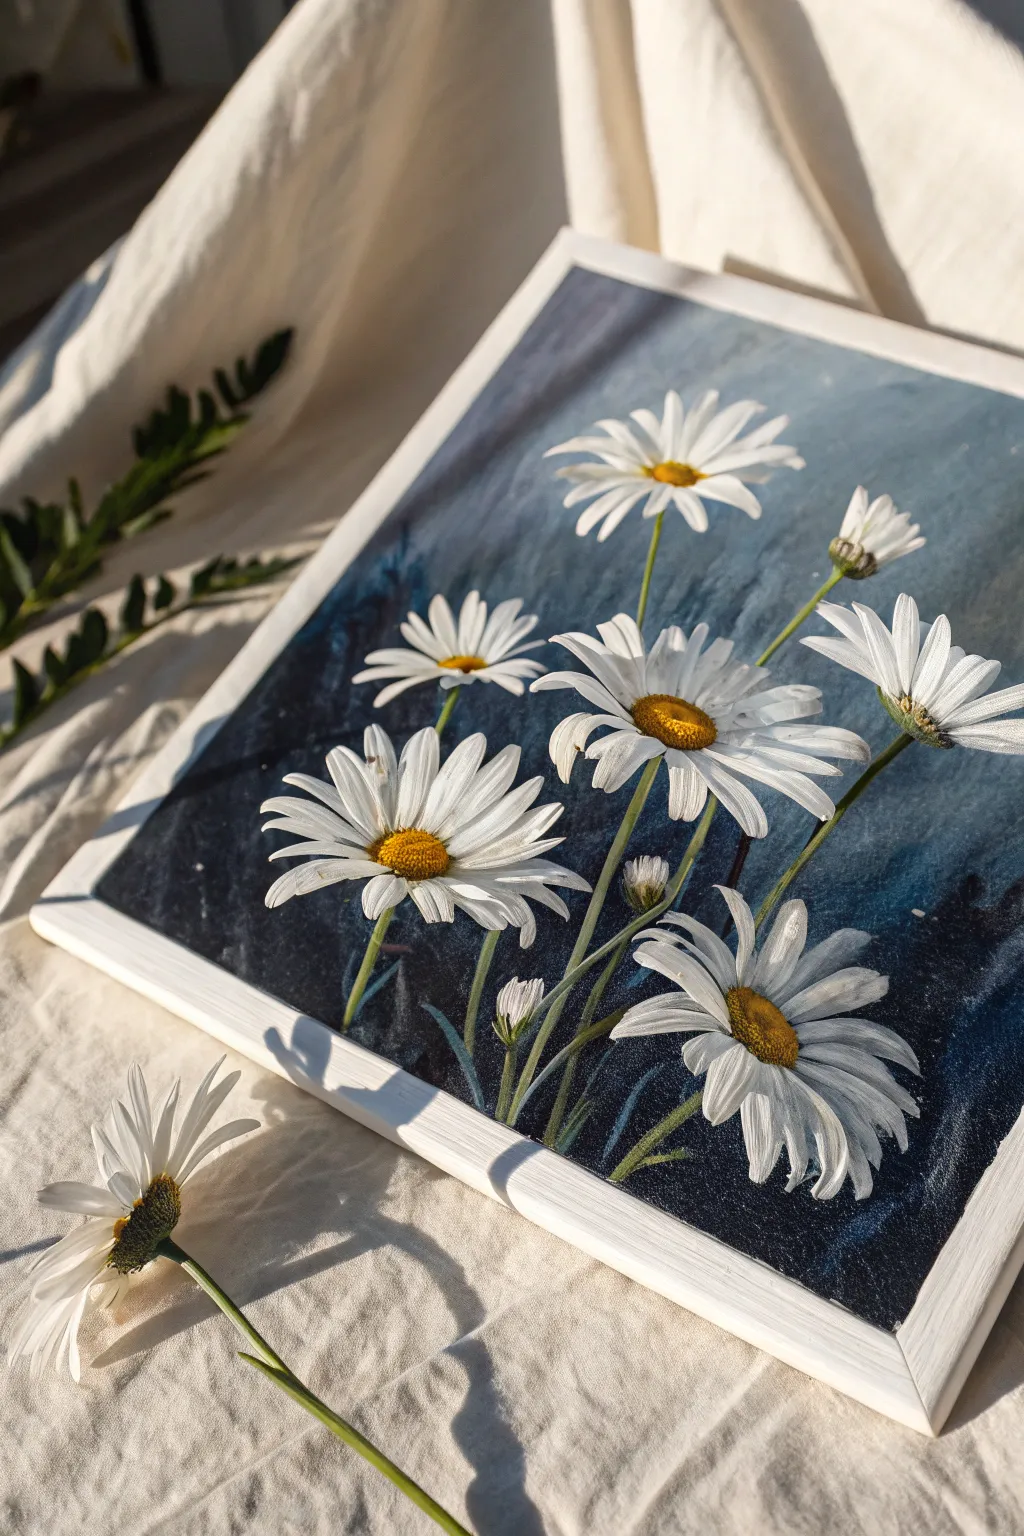
Capture the stark beauty of bright white blooms against a mysterious, stormy backdrop with this striking acrylic painting. The contrast between the moody darkness and the cheerful petals creates an artwork that feels both dramatic and serene.
How-To Guide
Materials
- Canvas board or stretched canvas (roughly 9×12 inches)
- Acrylic paints: Phthalo Blue, Mars Black, Titanium White, Cadmium Yellow Medium, Burnt Umber or Raw Sienna, Olive Green
- Flat shader brushes (3/4 inch and 1/2 inch)
- Round detail brushes (size 2 and 4)
- Small filbert brush
- Palette knife (optional for mixing)
- Water cup and paper towels
- White or light wood floating frame (optional)
- Slow-drying blending medium (optional)
Step 1: Setting the Mood
-
Mix the background color:
Start by creating a deep, moody base. Mix Phthalo Blue with a touch of Mars Black and a tiny bit of Titanium White. Aim for a darkness that feels like a stormy twilight sky or deep ocean water. -
Apply the first wash:
Using your largest flat brush, cover the entire canvas with your dark blue mixture. Don’t worry about perfect smoothness; some visible texture actually adds character to the background. -
Add atmospheric movement:
While the base is still slightly tacky, mix a slightly lighter blue-grey (add more white and a speck of black to your blue). Use diagonal, sweeping strokes to create a wispy, cloudy texture. -
Deepen the shadows:
Mix a very dark, near-black blue. Apply this to the bottom left and bottom right corners, blending upward to create a vignette effect that will make the white flowers pop later. -
Let it cure:
Allow the background to dry completely. Acrylics dry darker, so check the color once dry and apply a second coat if you want a richer, more opaque finish.
Brushwork Tip
For realistic petals, press the brush down firmly at the start of the stroke (petal tip) and lift up as you drag toward the center to create a tapered point.
Step 2: Blooming Brightly
-
Sketch the placement:
Using a thin round brush and watered-down white paint (or a white charcoal pencil), lightly map out where your flower heads will sit. Place the largest blooms off-center for a natural composition. -
Underpaint the petals:
With a filbert brush or small flat brush, paint the basic petal shapes using a mixture of Titanium White and a tiny drop of blue-grey. This isn’t the final bright white, so don’t worry about opacity yet. -
Define the stems:
Mix Olive Green with a little White and Yellow for the stems. Use a size 4 round brush to pull long, slender lines from the flower heads down to the bottom edge. Curve them slightly; perfectly straight stems look unnatural. -
Add stem buds:
Paint a few small, tight green buds on shorter stems peeking out between the main flowers. These add depth and variety to the floral arrangement. -
Layer pure white:
Now, load your brush with unmixed Titanium White. Paint over the petals again, starting from the tip and pulling toward the center. Leave some of the greyish underpainting visible near the center for shadow. -
Refine petal shapes:
Use a small round brush to sharpen the tips of the petals. Make some petals overlap others, and have a few foreshortened (shorter) petals to show the flower is tilting toward the viewer.
Level Up: Texture
Mix modeling paste into your white paint for the final petal layer. This creates physical ridges that catch actual light, making the daisies pop off the canvas.
Step 3: Golden Centers & Details
-
Base the centers:
Mix Cadmium Yellow with a tiny touch of Burnt Umber. Dab this into the center of each flower using the tip of a round brush to create a textured, circular shape. -
Shadow the disks:
Mix a darker brown-orange. Stipple this color onto the bottom-left edge of each yellow center to give them a 3D, dome-like appearance. -
Highlight the pollen:
Using pure yellow or yellow mixed with white, stipple tiny dots onto the top-right side of the centers where the light would hit. -
Add final crisp highlights:
Take fresh white paint and add very thin, crisp lines to the brightest edges of the petals. I personally find this step transforms them from flat shapes into delicate, light-catching forms. -
Frame it up:
Once fully dry, mount your canvas board into a simple white or light wood frame to echo the brightness of the petals.
Step back and admire how the simple white forms command attention against the dramatic dark hues you created.


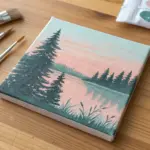
Snowy Mountain Ridge With Soft Mist
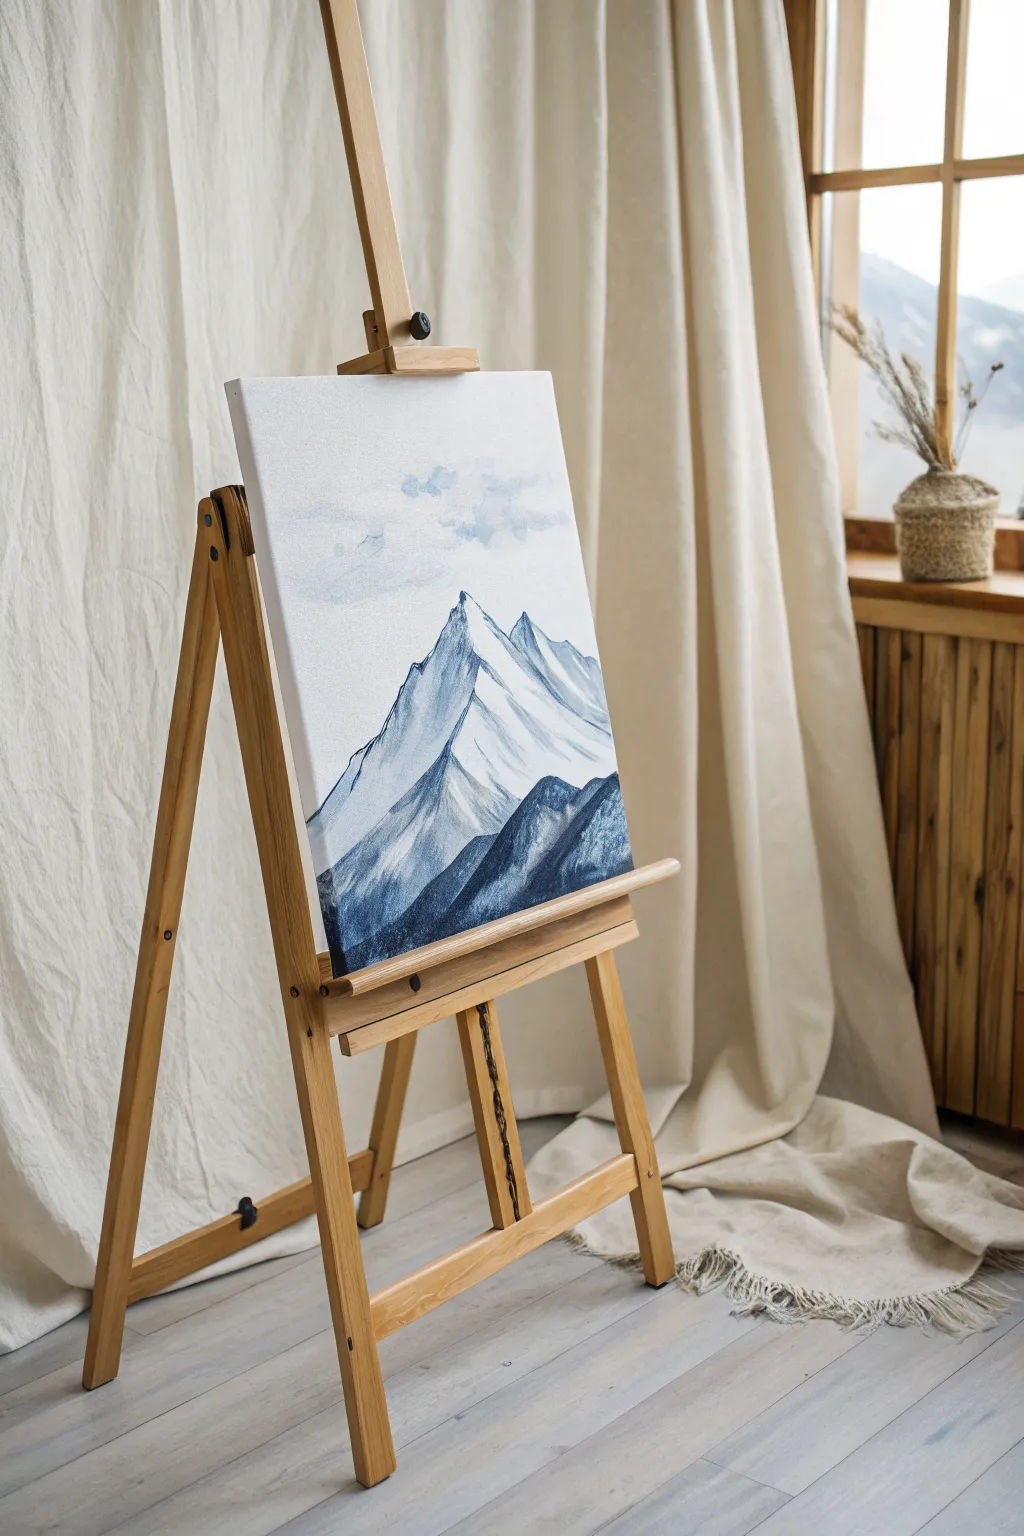
Capture the serene beauty of high-altitude peaks with this minimalist blue-and-white landscape. Using a simple color palette, you’ll learn to create atmospheric depth through layering and soft blending techniques.
Step-by-Step Tutorial
Materials
- Stretched canvas (16×20 or similar)
- Acrylic paints: Titanium White, Phthalo Blue (or Prussian Blue), Black
- Large flat brush (1-inch)
- Medium filbert brush
- Small round detail brush
- Palette knife (optional for mixing)
- Cup of water
- Paper towels
- Palette or paper plate
Step 1: Setting the Scene
-
Prepare your palette:
Squeeze out a generous amount of Titanium White and a moderate amount of Blue. Add a tiny dot of Black off to the side. You’ll be mixing various shades of blue-grey throughout this process. -
Map the composition:
Using a small round brush with very watered-down blue paint, sketch a faint outline of your main mountain peak. Position the highest point slightly off-center for a more dynamic composition. -
Establish the secondary peaks:
Sketch a second, smaller peak behind the main one and a lower ridge line in the foreground. These guide lines will help you visualize the layers of depth. -
Paint the sky base:
Mix a very pale blue using lots of white and a speck of blue. Using the large flat brush, paint the upper portion of the canvas, stopping just short of your mountain outlines. -
Add cloud wisps:
While the sky is still slightly damp, mix a slightly darker grey-blue. Use a dry-brush technique to scrub in horizontal, wispy clouds. Keep them irregular and soft for a natural, windy look. -
Soften the sky:
Take a clean, dry brush and gently feather the edges of your clouds to blend them into the background, creating that misty aesthetic.
Step 2: Sculpting the Peaks
-
Mix the shadow color:
Create a mid-tone blue by mixing your primary blue with a little white. This will serve as the base shadow color for the left side of the mountains. -
Block in mountain shadows:
Using the filbert brush, paint the left-facing slopes of the highest peak with your mid-tone blue. Follow the jagged line of the ridge down to the base. -
Add the highlights:
Rinse your brush thoroughly. Load it with pure Titanium White. Paint the right-facing slopes of the mountain, letting the white paint meet the blue shadow edge to create a sharp ridge line. -
Blend the transition:
Where the white meets the blue, you can add a tiny bit of texture. Sometimes I like to drag the white slightly over the blue to suggest snow blowing over the ridge. -
Create the distant peak:
For the peak behind the main one, mix a paler, lighter blue. Objects further away have less contrast. Paint this section similarly, but keep the values closer to the sky color.
Muddy Colors?
If your white snow looks grey, let the underlying blue paint dry completely before adding the white highlights on top. Wet-on-wet painting can sometimes over-blend.
Step 3: Foreground and Details
-
Darken the foreground:
Mix your darkest color yet: Blue with a small touch of Black. Do not make it solid black; keep it a rich, deep indigo. -
Paint the lower ridge:
Apply this dark indigo to the lowest mountain ridge in the foreground. The high contrast against the lighter mountains above will push this section forward visually. -
Add texture to the dark ridge:
While the dark paint is wet, mix a slightly lighter blue and dab it onto the highlight side of these dark rocks to create volume and rugged texture. -
Refine the snow:
Switch to your small detail brush. Use pure white to add distinct streaks of snow running down the blue shadow sides of the main mountain. -
Clean up edges:
Look for areas where the sky meets the mountain. If the edge is too fuzzy, use the small brush to sharpen the outline of the peak against the sky. -
Add final mist:
If you want more atmosphere, mix a watery white glaze. Lightly brush it over the very bottom of the mountains where they meet the dark ridge to simulate low-hanging fog.
Add Subtle Sparkle
Mix a tiny amount of iridescent medium or silver glitter paint into your white highlight color for the snowy peaks to catch the light beautifully.
Step back and admire the cool, crisp atmosphere you have created on canvas


Ocean Wave With White Foam Highlights
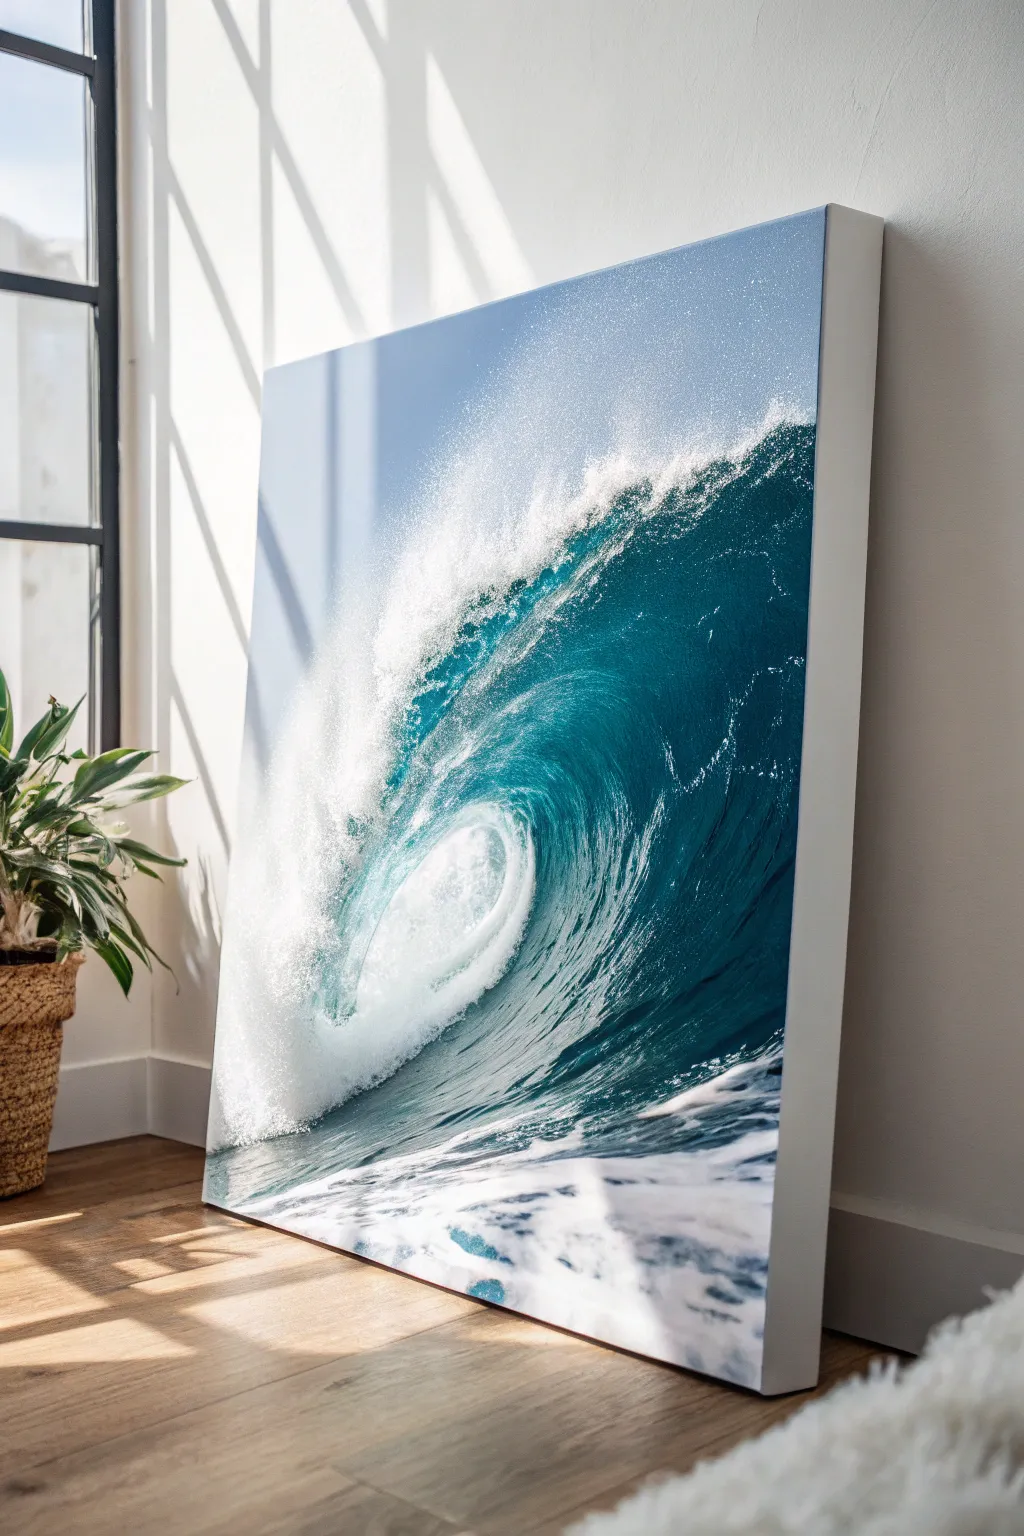
Capture the raw power and serenity of the ocean with this large-scale acrylic painting. This project focuses on building depth through layers of teal and blue before bringing the scene to life with explosive white foam highlights.
How-To Guide
Materials
- Large stretched canvas (24×36 inches or larger)
- Acrylic paints: Phthalo Blue, Phthalo Green, Titanium White, Ultramarine Blue, Mars Black
- Large flat brushes (2-3 inch) for background
- Medium filbert brushes
- Fan brush
- Small round detail brushes
- Sea sponge (natural)
- Palette knife
- Water spray bottle
- Blending medium or slow-drying medium
Step 1: Setting the Composition
-
Map the wave:
Begin by sketching the basic S-curve of the wave using a diluted light blue paint and a thin brush. Mark the horizon line slightly above the center and outline the curling lip of the wave and the foam splatter area. -
Base layer sky:
Mix a soft, pale blue using mostly Titanium White and a dot of Phthalo Blue. Apply this to the sky area in the upper left corner, blending it smoothly down toward the water line. -
Block in deep water:
Create a dark teal base for the body of the wave by mixing Phthalo Blue, Phthalo Green, and a touch of Mars Black. Apply this generously to the main curve of the wave where the water is thickest and deepest.
Transparency Trick
To make the wave look see-through at the top, glaze a tiny bit of transparent yellow over the teal. It warms the color like sunlight hitting water.
Step 2: Building Depth and Translucency
-
Create the gradient:
While the dark base is tacky, mix a lighter, more vibrant turquoise on your palette. Blend this into the upper, thinner part of the wave’s face, working wet-on-wet to simulate light passing through the water. -
Smooth the transitions:
Use a clean, dry large brush to sweep gently between the dark and light teal sections, removing harsh lines. A light mist of water can help the acrylics move more fluidly here. -
Paint the trough:
Fill the bottom foreground with a mix of deep Ultramarine and white to create the darker, churning water below the wave. Use horizontal strokes to suggest movement and surface tension. -
Add inner barrel details:
Inside the curl of the wave, add streaks of darker blue and shadow to emphasize the hollow cave-like structure before the water crashes down.
Step 3: The Crash and Foam
-
Initial foam structure:
Load a filbert brush with pure Titanium White. Paint the thick, rolling lip of the wave where it creates the barrel, using a stippling motion to suggest texture. -
Create the spray:
I like to use a dry fan brush for this effect. Dip just the tips in white paint and tap lightly along the top ridge of the wave to create the mist and fine spray launching into the air. -
Sponge textures:
Dampen a natural sea sponge and dip it into white paint. Press it gently into the ‘explosion’ area where the wave hits the water surface to create chaotic, organic foam patterns. -
Veining the water:
Dilute your white paint slightly with water or medium. Using a fine liner brush, paint delicate, web-like patterns on the face of the wave, following the curve of the water. -
Falling water droplets:
Flick the bristles of a toothbrush loaded with watery white paint near the crest of the wave to create tiny, realistic droplets flying off the edge.
Muddy Whites?
If your white foam is turning blue/gray because the background is wet, stop immediately. Let the teal layer dry completely, then apply fresh white on top.
Step 4: Final Highlights and Refinement
-
Foreground sea foam:
Paint the flat foam patterns in the immediate foreground. These should be looser and flatter, appearing like lace stretching across the water’s surface. -
Enhance the highlights:
Mix a very tiny amount of yellow or teal into white to create a ‘sunlit’ white. Apply this only to the very highest points of the foam and the curve to make them pop. -
Glazing for unity:
Once everything is fully dry, apply a very thin, watery glaze of Phthalo Blue over the shadowed parts of the white foam to integrate them into the scene so they don’t look pasted on. -
Varnish:
Protect your work with a high-gloss varnish. This is crucial for ocean paintings as it makes the darks deeper and gives the water a permanent ‘wet’ look.
Step back and admire the powerful motion you have captured on your canvas
BRUSH GUIDE
The Right Brush for Every Stroke
From clean lines to bold texture — master brush choice, stroke control, and essential techniques.
Explore the Full Guide
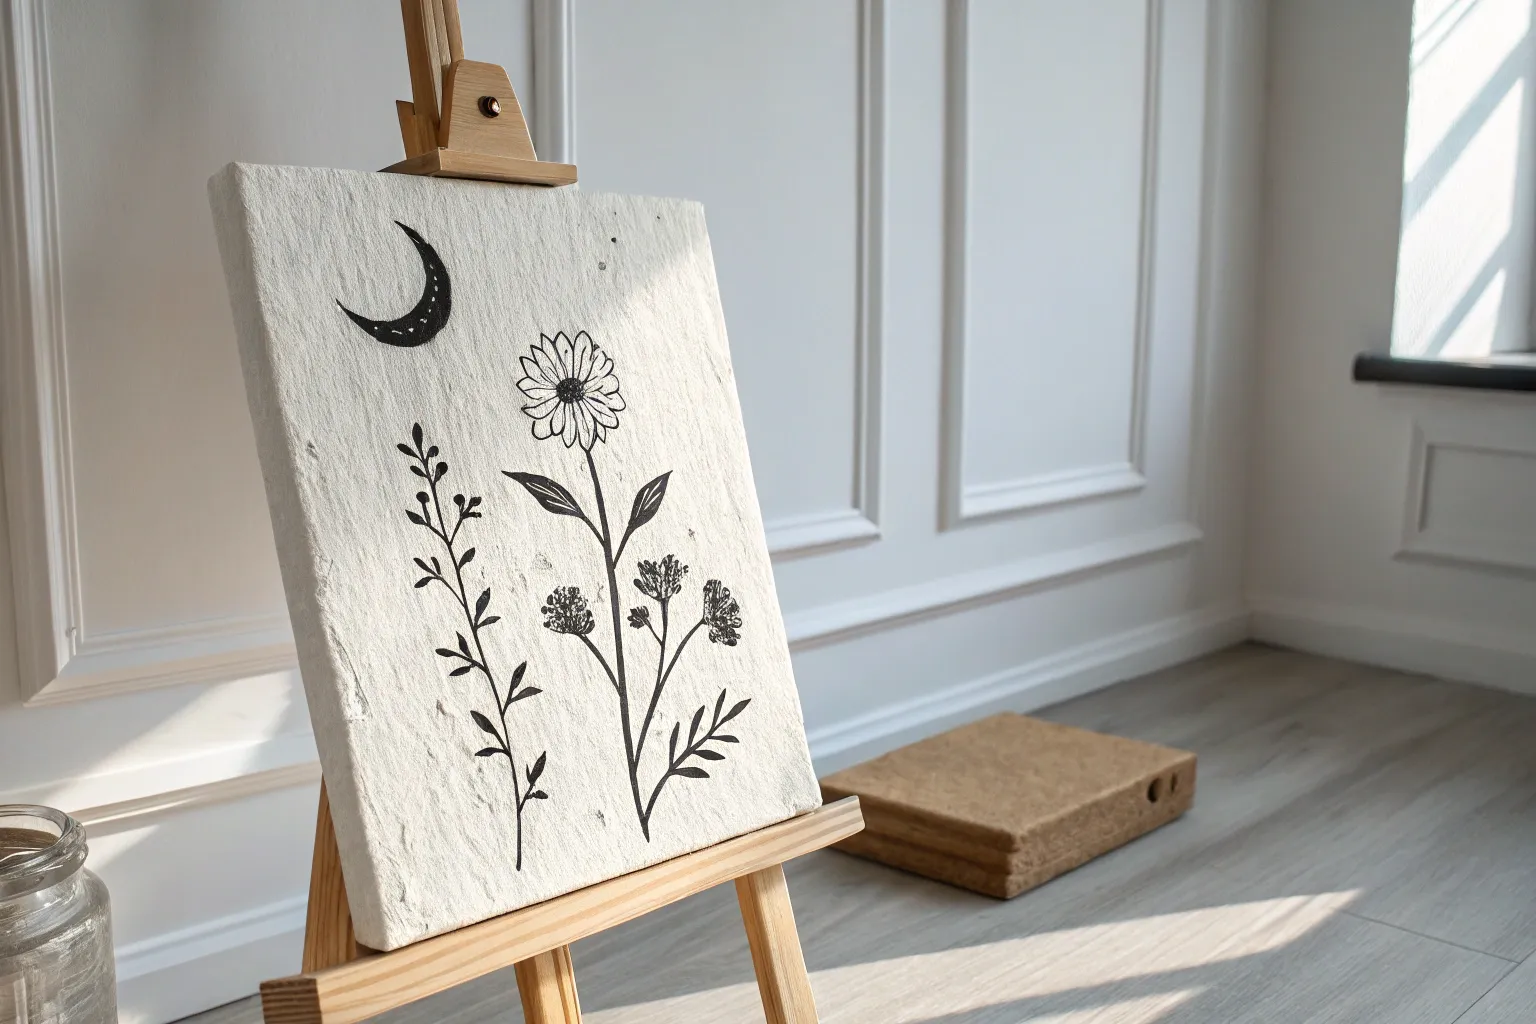
Minimal Black Line Botanical on White

Embrace the beauty of simplicity with this crisp, high-contrast botanical study that captures the elegance of a single branch. The project focuses on clean lines and negative space, making it a perfect exercise for practicing steady hand control and compositional balance on a pure white background.
Step-by-Step
Materials
- Pre-stretched white canvas (11×14 or similar size)
- White acrylic gesso (optional for priming)
- Black acrylic paint or high-flow acrylic ink
- Fine liner brush (size 00 or 1)
- Black permanent marker or paint pen (optional alternative)
- Pencil (HB or lighter)
- Kneaded eraser
Step 1: Preparation & Sketching
-
Prime the Surface:
Even if your canvas is pre-primed, applying a fresh coat of white gesso creates a smoother texture. This is crucial because heavy canvas texture can make drawing clean, thin lines difficult. Let it dry completely. -
Map the Main Stem:
Using your pencil very lightly, draw a single curved line starting from the bottom right quadrant and extending diagonally toward the top left. This acts as the spine of your botanical branch. -
Mark Leaf Positions:
Along the spine, make small tick marks where you want the base of each leaf to sit. Alternate sides—left, right, left—to create a natural growth pattern. -
Outline the Leaves:
Sketch the leaf shapes lightly. Aim for an elongated oval or lanceolate shape with pointed tips. Don’t worry about the veins yet; just focus on the outer silhouette. -
Refine the Leaf Attachment:
Connect each leaf to the main stem with a small petiole (stem stalk). Ensure the transition looks organic rather than like a stick figure.
Wobbly Lines?
If you struggle with unsteady hands, use a paint pen instead of a brush. The felt tip offers friction against the canvas, giving you significantly more control over long curves.
Step 2: Inking the Foundation
-
Prepare Your Medium:
If using black acrylic paint, thin it slightly with water or a flow improver until it has an inky consistency. It should flow off your brush smoothly without dragging. -
Trace the Main Stem:
Dip your fine liner brush (or paint pen) and carefully trace the main central line. I find it helps to lock my wrist and move my entire arm to keep curves smooth. -
Outline the Leaf Shapes:
Begin outlining the exterior of the leaves. Use varying pressure—press slightly harder on the curves for a thicker line and lift up toward the tips for a tapered finish. -
Correcting Edges:
If a line looks shaky, don’t panic. You can often go over it once more to thicken it slightly, hiding the wobble within the new line weight. -
Let the Outline Dry:
Allow the main black outlines to dry completely before adding internal details. This prevents smudging as your hand moves across the canvas.
Step 3: Adding Detail & Finishing
-
Draw Central Veins:
For every leaf, draw a central vein running from the base to just near the tip. Keep this line slightly thinner than your outer contour lines if possible. -
Add Side Veins:
Add the diagonal veins branching off the center. Keep them simple—just two or three pairs per leaf is enough to suggest texture without overcrowding the design. -
Check for Consistency:
Step back and look at the visual weight of the black lines. If some areas look too faint compared to others, carefully darken them to maintain a uniform graphic look. -
Erase Pencil Marks:
Once the black ink or paint is 100% dry (give it extra time just to be safe), gently dab a kneaded eraser over the canvas to lift any visible pencil sketches. -
Clean Up Background:
Inspect the white background for any accidental smudges. You can touch these up with a tiny dab of white acrylic paint or gesso to ensure the background remains pristine. -
Seal (Optional):
If desired, apply a spray matte varnish. Avoid brush-on varnish for this specific piece, as it risks smearing the delicate black lines.
Make It Pop
For a subtle modern twist, paint a large, soft beige or pale sage circle on the canvas behind where the leaves will go *before* you start the black line work.
Hang your new minimalist masterpiece in a bright spot where the stark contrast can really shine.
Negative Space Animal Silhouette
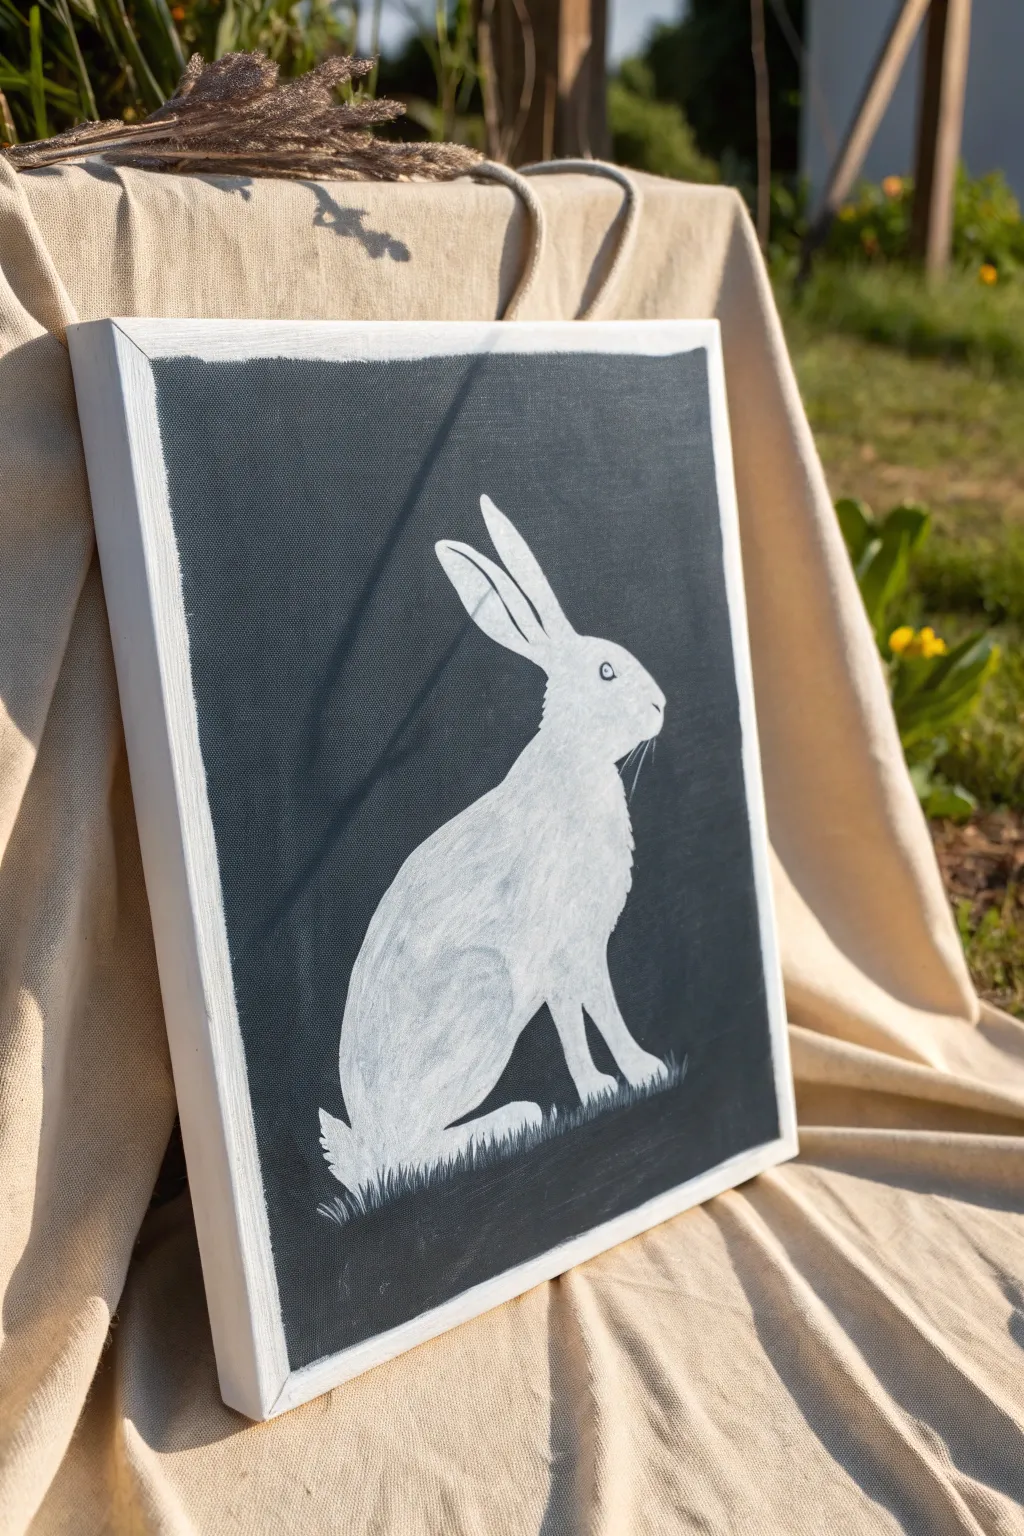
Create a striking piece of monochromatic art where a crisp white hare sits in solitude against a charcoal-dark background. This high-contrast negative space painting uses simple brushwork to capture the textured look of fur without requiring complex shading techniques.
Step-by-Step Guide
Materials
- Stretched canvas (rectangular, e.g., 11×14 or 16×20 inches)
- White Gesso or white acrylic paint
- Black acrylic paint (matte finish preferred)
- Wide flat brush (1-2 inches)
- Round pointed brush (size 4 or 6)
- Fine detail brush (size 0 or 1)
- Pencil (HB or lighter)
- Eraser
- Paper palette or plate
- Water cup and cloth
- Reference image of a hare profile
Step 1: Preparation and Sketching
-
Base layer:
Begin by ensuring your canvas surface is solid white. If it’s a raw canvas or looks a bit dull, apply a coat of white gesso or white acrylic paint over the entire surface, including the edges. Let this dry completely. -
Outline the subject:
Lightly sketch the outline of the hare in the center of your canvas using a pencil. Focus on the long ears, the curved spine, and the strong hind legs. -
Check proportions:
Step back to verify the size. The beauty of this piece relies on the silhouette, so ensure the ears are tall and the chest is slightly puffed. -
Define the ground:
Sketch a very faint, jagged line near the paws to represent the grass. This doesn’t need to be a straight horizon line; just a suggestion of where the animal connects to the earth.
Step 2: Blocking the Negative Space
-
Outline with paint:
Load a round brush with black acrylic paint. Carefully paint along the *outside* of your pencil sketch. Creating a clean edge here is crucial, as this defines the hare’s shape. -
Fill the background:
Switch to your larger flat brush to fill in the rest of the background with black. I find that brushing in multiple directions creates a flatter, more matte finish than painting in rigid rows. -
Paint the edges:
Don’t forget to paint the sides of the canvas black (leaving the front face of the frame white, or painting over the edge depending on your preference). The example shows a ‘floating’ white border, created by masking the very edge or painting carefully. -
Second coat:
Let the first layer dry. If the white canvas is peeking through the black, apply a second coat for a solid, opaque look. -
Create the border:
Notice the white border in the reference image? You can achieve this by painting the black block freely in the center, leaving a rough 1-inch white margin around the entire perimeter of the canvas.
Pro Tip: Masking Fluid
Apply masking fluid over the hare sketch before painting the black background. Peel it off later for perfect, crisp white edges without needing a steady hand.
Step 3: Detailing the Hare
-
Refine the white:
If your pencil lines are messy or you accidentally painted inside the hare’s shape, use white paint to clean up the silhouette. The interior needs to be bright white. -
Texturing the fur:
Mix a tiny drop of black into your white paint to create a very pale grey. Using a semi-dry brush, whisk faint strokes inside the body of the hare to suggest hip placement and shoulder muscles. -
The eye:
Using your smallest detail brush, paint a small black circle for the eye. Add a tiny white dot in the center for the ‘catchlight’ reflection, which brings the animal to life. -
Whiskers:
With the detail brush and slightly watered-down white paint (or a white gel pen), draw very thin, long whiskers extending from the nose into the black background. -
Ear details:
Use the pale grey mixture to define the separation between the two ears and the inner fold of the front ear. -
Grass blades:
With the black paint and a small brush, flick short, upward strokes at the base of the hare’s paws. These should overlap the white feet slightly to make the hare look grounded in the grass. -
Final touches:
Review the edges. If the silhouette looks too smooth, use a tiny brush to add small jagged white strokes along the back and neck to mimic fur tufts.
Troubleshooting: Streakiness
If your black background looks streaky or greyish, mix a tiny amount of blue into the black. This deepens the tone and often improves coverage opacity.
Hang your new monochromatic masterpiece in a well-lit spot to let that stark contrast really shine

PENCIL GUIDE
Understanding Pencil Grades from H to B
From first sketch to finished drawing — learn pencil grades, line control, and shading techniques.
Explore the Full Guide
White Birds in Flight Against Storm Clouds
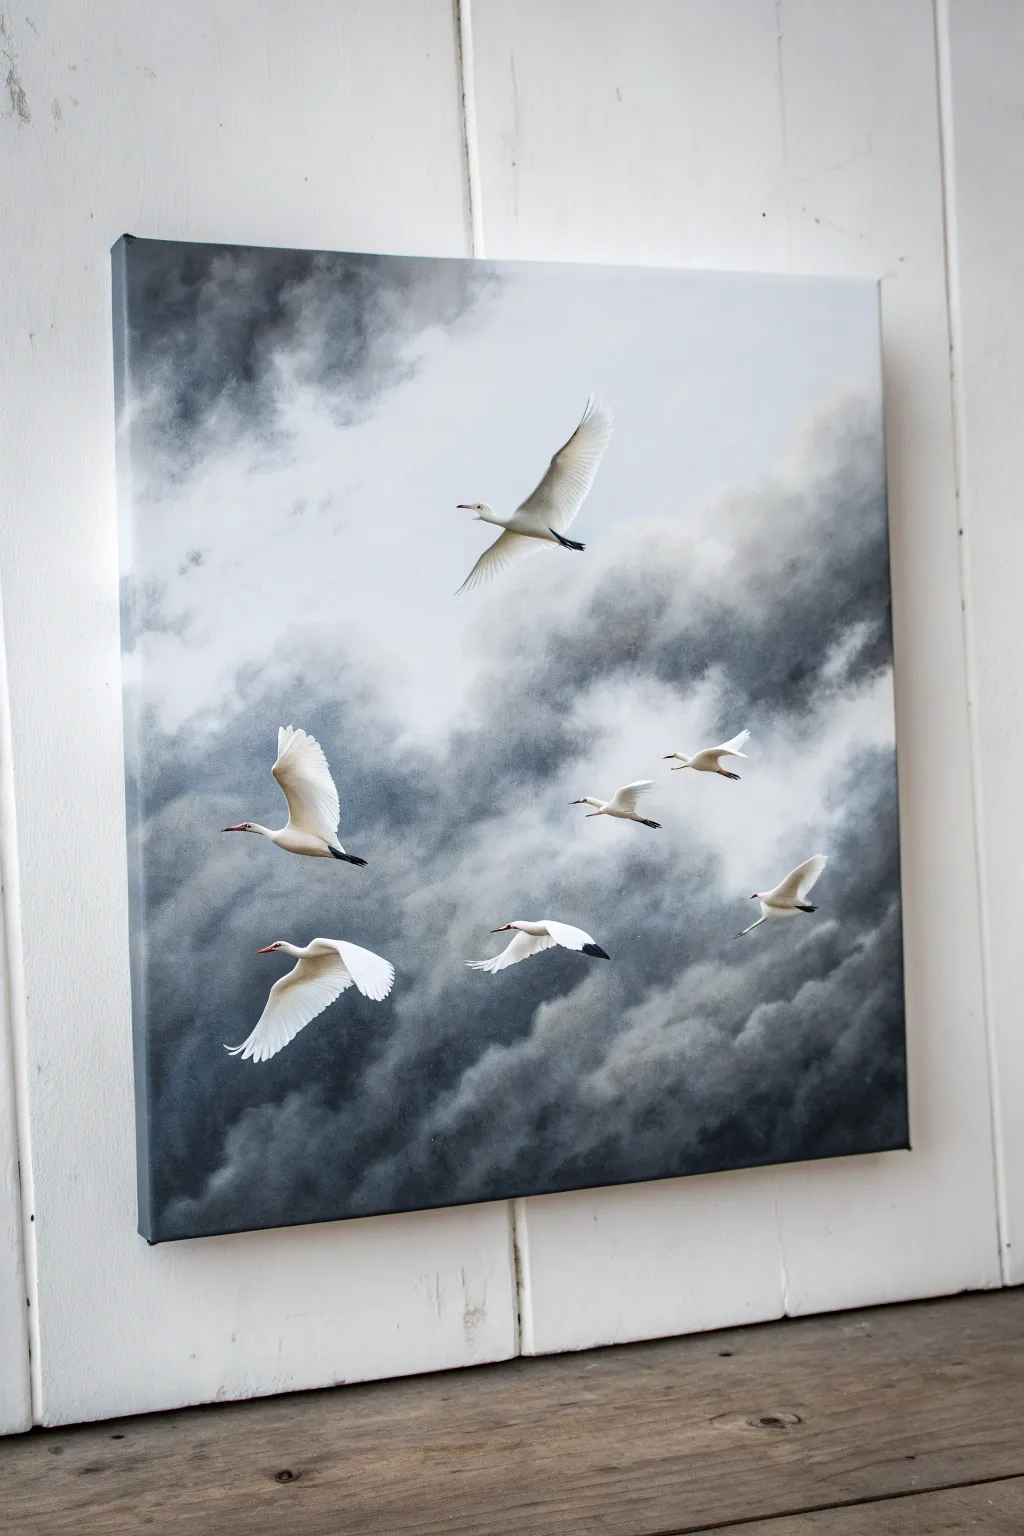
Capture the dramatic contrast between light and dark with this atmospheric acrylic painting of white birds against a tempestuous sky. You will build layers of moody clouds to create a stormy backdrop that makes the pristine white feathers of the flock truly pop.
Detailed Instructions
Materials
- Stretched canvas (square format, e.g., 20×20 inches)
- Acrylic paints: Titanium White, Payne’s Gray, Mars Black, Burnt Umber, Cadmium Orange
- Large flat wash brush (2 inch)
- Medium filbert brush
- Small round detail brush
- Clean water container
- Paper towels or rag
- Palette or mixing plate
- White charcoal pencil or chalk
Step 1: Creating the Atmosperic Sky
-
Base layer:
Begin by dampening your canvas slightly with clean water. Load your large flat brush with Titanium White and a tiny touch of Payne’s Gray. Cover the top third and scattered middle sections of the canvas in a loose, sweeping motion to establish the brightest light sources. -
Mid-tone mixing:
Mix a medium gray using Titanium White and Payne’s Gray. While the white base is still tacky, apply this color in swirling, cloud-like motions around the white areas, blending the edges softly to avoid harsh lines. -
Deepening the shadows:
Introduce Mars Black into your gray mixture to create a charcoal hue. Use the corner of your large brush or a filbert brush to scumble this dark color into the bottom third of the canvas and the corners, suggesting heavy, rain-laden clouds. -
Cloud structure:
Work back and forth between your light, medium, and dark greys. Use a dry brush technique—wiping most paint off your brush—to create soft, wispy edges where the dark clouds meet the lighter sky. -
Intensifying contrast:
Identify the darkest pockets of the storm. Add nearly pure Payne’s Gray or Black to these areas to create depth, ensuring the transitions remain misty rather than blocky. -
Refining the light:
Once the darks are placed, I like to take a clean brush with fresh Titanium White and re-establish the brightest highlights in the clouds, creating a ‘silver lining’ effect where the light breaks through. -
Drying time:
Allow the background to dry completely. This is crucial because you want the white birds to sit crisply on top without muddying the colors.
Softening Clouds
Keep a clean, dry blending brush handy. Immediately after applying cloud paint, tickle the edges with the dry brush to blur them perfectly.
Step 2: Painting the Flock
-
Sketching the composition:
Using a white charcoal pencil, lightly sketch the outlines of the seven birds. Arrange them diagonally across the canvas, varying their sizes to create a sense of distance and movement. -
Blocking in the bodies:
Load your medium filbert brush with pure Titanium White. Fill in the body shapes of the birds. You may need two coats to ensure the white is opaque enough to cover the dark storm clouds beneath. -
Adding wing transparency:
For the wingtips, mix a very faint grey wash (lots of water with a dot of grey). Glaze this over the back edges of the wings to show translucency and feather layering. -
Feather direction:
Using the small round brush and thick white paint, add texture strokes that follow the direction of the feathers—sweeping back along the wings and smoothing down the neck. -
Shadows on the birds:
Mix a pale blue-grey. Apply this sparingly to the underbellies of the birds and the underside of the wings to give them three-dimensional form. -
Beaks and legs:
Mix Cadmium Orange with a touch of Titanium White. Carefully paint the beaks with the detail brush. Use Mars Black for the legs and feet tucked underneath them. -
Facial details:
Add a tiny dot of black for the eyes. Use a darker grey or black to define the distinctive line extending from the beak to the eye. -
Final highlights:
Use your purest, unmixed white on the top edges of the wings and the heads where the light hits most directly. -
Clean up:
Step back and check your edges. If any cloud paint accidentally overlapped a bird, touch it up with white. If a bird looks too ‘stuck on,’ soften the edges slightly with a damp brush.
Birds Too Transparent?
If the dark background shows through your white birds, don’t just pile on thick paint. Apply multiple thin layers, drying in between, for smoothness.
Hang your finished piece and enjoy the serene movement of the birds against the dramatic sky
Birch Trees With Crisp White Trunks
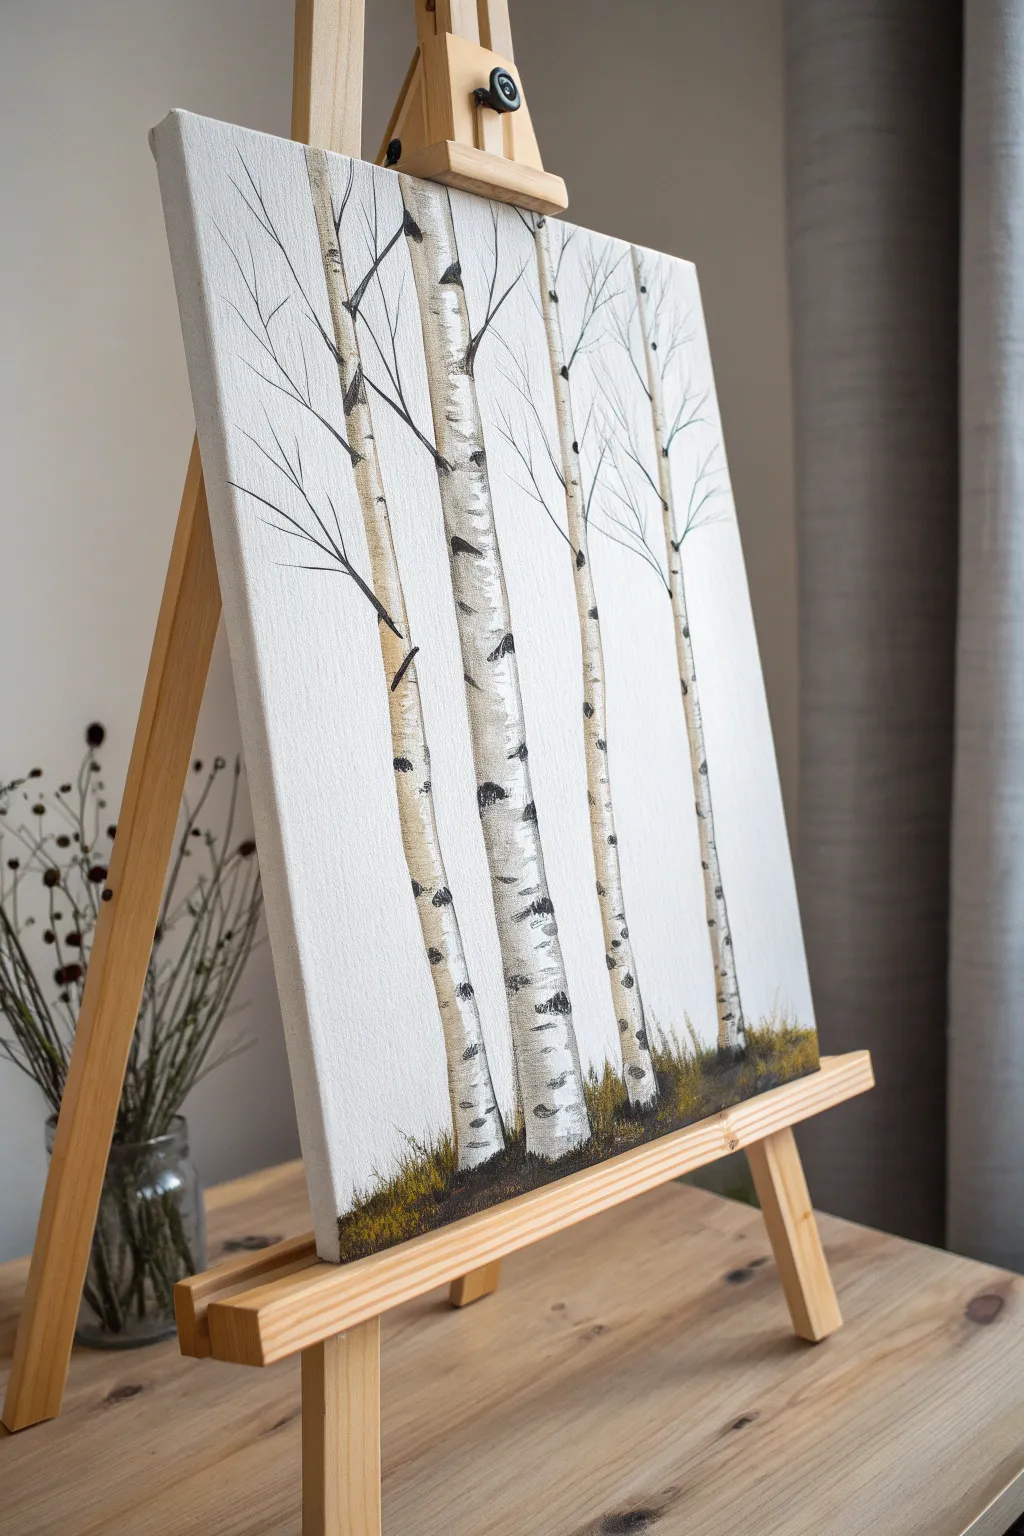
Capture the stark elegance of a winter forest with this striking birch tree painting. Using a simple palette and textured brushwork, you’ll create dimension and depth on a clean white background that feels modern and serene.
Step-by-Step
Materials
- Rectangular stretched canvas (16×20 or similar)
- Acrylic paints: Titanium White, Mars Black, Burnt Umber (or similar dark brown), Yellow Ochre, Sap Green
- Flat shader brush (medium, roughly 1/2 inch)
- Small round detail brush (size 1 or 0)
- Rigger brush or liner brush (optional, for fine branches)
- Palette knife (small)
- Pencil for sketching
- Jar of water
- Paper towels
Step 1: Preparation & Base Composition
-
Prime the surface:
Even if your canvas is pre-primed, apply fresh coat of Titanium White across the entire surface to ensure a bright, consistent background. Let this dry completely before sketching. -
Sketch the trunks:
Using a light pencil, lightly draw four or five vertical lines to represent the main tree trunks. Vary the spacing between them so they don’t look like fence posts, and make the trunks slightly wider at the bottom than the top. -
Outline layer:
Mix a very pale grey using a tiny dot of black into your white. Use the flat brush to paint the basic vertical shapes of the trunks, staying inside your pencil lines. This layer acts as a primer for the texture we’ll add later.
Step 2: Creating the Birch Texture
-
Mix your shading color:
Create a warm beige-grey tone by mixing white with a touch of Burnt Umber and the smallest amount of Yellow Ochre. This will give the trees a natural, organic feel rather than a stark, cold grey. -
Add vertical shading:
Using your flat brush, paint down the left or right side of each trunk (choose one side for your light source) with the beige-grey mixture. Keep this stroke loose and slightly broken to suggest bark texture. -
Highlight the bark:
Load your brush with pure Titanium White. Paint the opposite side of the trunk and the center, slightly overlapping the beige shadow. The goal is to make the trunk look round, not flat. -
Create the signature markings:
Mix Mars Black with a tiny bit of white to create a soft charcoal color. I like to use the edge of a flat brush or a palette knife for this step to keep it organic. -
Apply the horizontal striations:
Press the loaded tool horizontally against the trunk and drag it slightly inward. These marks should be irregular—some short, some wrapping halfway around the tree, focused closer to the edges. -
Deepen the contrast:
Go back with pure Mars Black on a small detail brush. Add darker, sharper accents inside the charcoal markings, particularly on the ‘shadow’ side of the trees.
Fixing “Ladder” Textures
If your black bark markings look too evenly spaced like a ladder, break them up by painting over gaps with white, then adding random, smaller dots between the main lines.
Step 3: Branches & Ground
-
Start the main branches:
Switch to your small round brush. Using a dark grey-brown mix, paint thin irregular lines extending upward from the main trunks. Remember that birch branches often fracture and zig-zag slightly. -
Refine the twigs:
Use a liner brush or the very tip of your round brush with watered-down black paint to add the finest twigs at the ends of the branches. Ensure your hand is loose; tightness makes branches look stiff. -
Connect branches to trunks:
Where a branch meets the white trunk, create a small triangular dark mark at the joint. This visually anchors the limb to the tree. -
Paint the base layer:
At the very bottom of the canvas, drag your flat brush upward using a mix of Burnt Umber and Mars Black to establish the dark earth beneath the trees. -
Add grassy texture:
Mix Sap Green with Yellow Ochre and a bit of Burnt Umber. Using a dry brush technique or an old splayed brush, flick upward strokes from the bottom edge to create withered, grassy ground cover. -
Final highlights:
Add a few touches of pure Yellow Ochre to the grass for warmth, and double-check your tree trunks. If the white highlights faded while drying, add a final pop of Titanium White to the brightest areas.
Natural Branch Tip
Add a tiny drop of water to your paint when doing fine branches. Because fluid paint flows off the brush smoother, you’ll get longer, uninterrupted lines without reloading.
Once dry, display your crisp winter woodland on a simple wooden easel or frame it to bring a touch of nature indoors


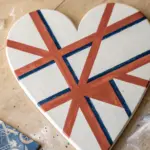
White Geometric Blocks With Metallic Accents
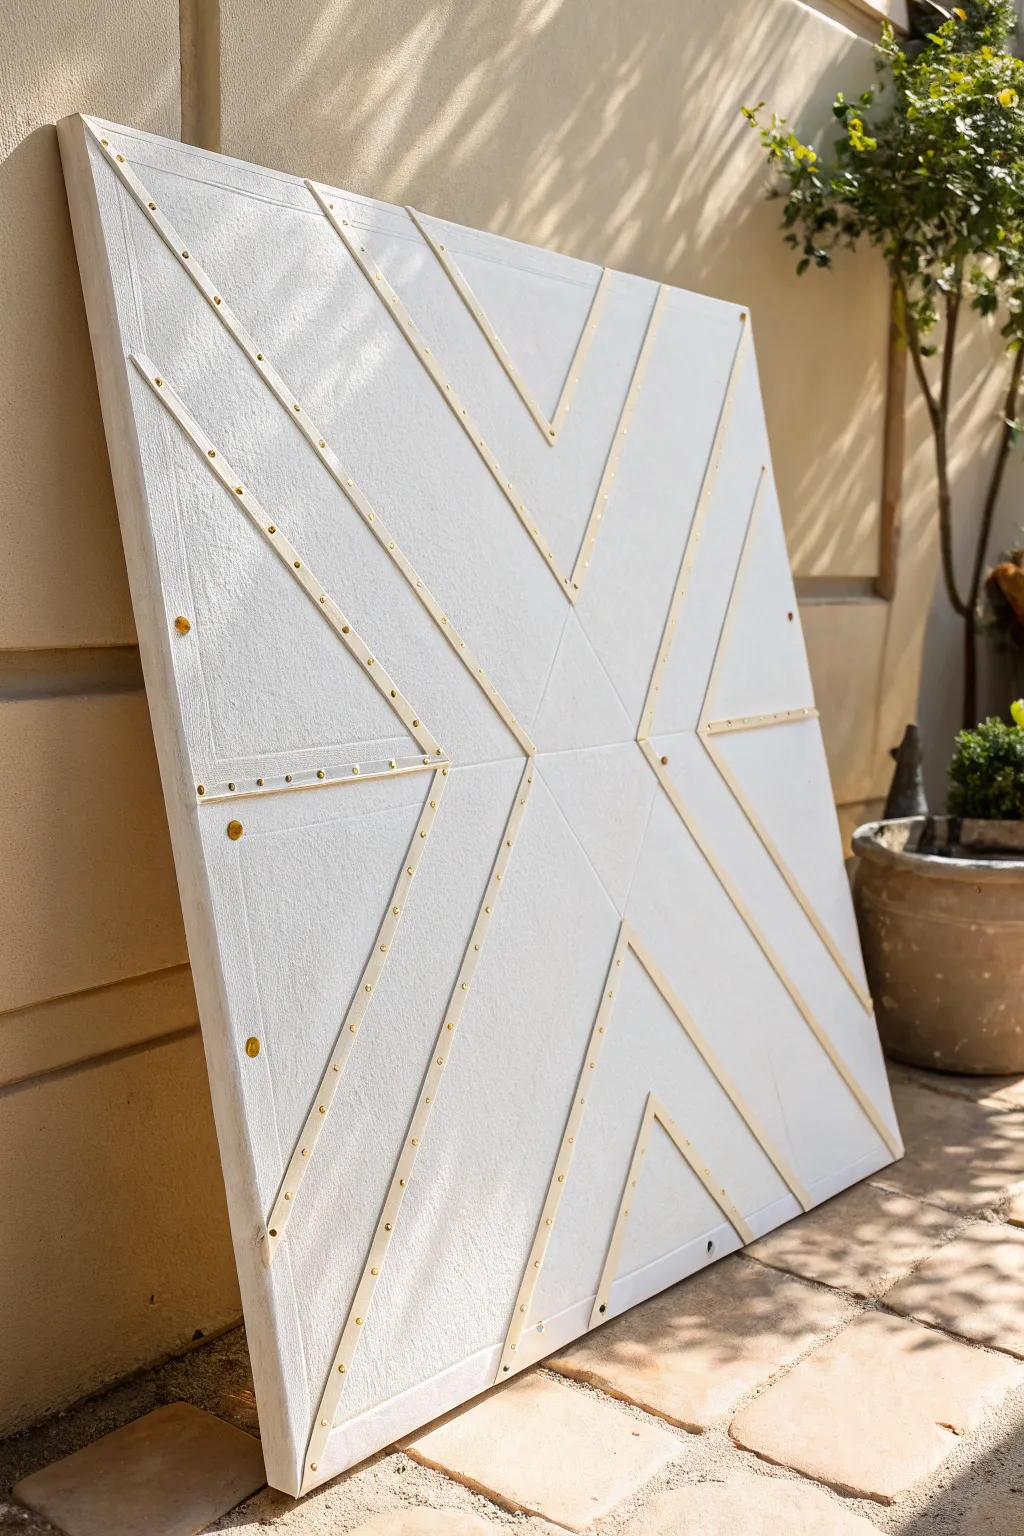
Transform a basic large canvas into a stunning sculptural statement piece using geometric lines and subtle metallic detailing. This project combines texture and reflectivity to create a sophisticated, architectural look that changes beautifully with the light.
How-To Guide
Materials
- Large square gallery-wrapped canvas (approx. 36×36 inches or larger)
- White textured spray paint or gesso mixed with sand
- Balsa wood strips or thin PVC molding strips (1/4 inch wide)
- Gold or brass metallic finish tape (1/8 inch wide) or adhesive metallic foil strips
- Brass upholstery tacks or small gold decorative nails
- Strong construction adhesive (e.g., Liquid Nails) or heavy-duty wood glue
- Miter saw or craft knife
- Pencil and long ruler/straight edge
- White acrylic paint (flat or matte finish)
- Small hammer
- Fine-grit sandpaper
Step 1: Planning and Surface Prep
-
Prime the Base:
Since we want a rich texture, start by coating your entire canvas with a textured white background. You can use a specific textured spray paint, or simply mix a little fine sand into white gesso and roll it on evenly. Let this dry completely. -
Mark the Grid:
Find the exact center point of your canvas. Using a pencil and a long straight edge, lightly draw a horizontal and vertical line to divide the canvas into four equal quadrants. This will be your anchor for the pattern. -
Map the Diagonals:
Draw diagonal lines extending from the center point out to the corners, creating an ‘X’ shape. This geometric design relies on symmetry, so take your time measuring these initial guidelines.
Step 2: Creating the Relief Structure
-
Cut the Center Diamond:
To create the central diamond shape, measure and cut four pieces of balsa wood or molding. These should connect the mid-points of your center guidelines. Use a miter box or careful knife cuts to get 45-degree angles on the ends for a seamless fit. -
Dry Fit the Center:
Place your cut pieces on the canvas without glue first to ensure the diamond shape is perfectly square and centered. -
Adhere the Center:
Apply a thin bead of construction adhesive to the back of the strips and press them firmly onto your pencil lines. Wipe away any excess glue immediately. -
Cut the Outer Rays:
Now, measure strips to create the V-shapes that radiate outward. You’ll need longer strips that run parallel to your central diamond lines, spaced about 3-4 inches apart. -
Fill the Quadrants:
Continue cutting and adhering strips to fill each quadrant with parallel chevrons. I find it easiest to work on one quadrant at a time to maintain symmetry. -
Sand Rough Edges:
Once the glue has fully cured (check manufacturer instructions), lightly sand any rough connection points on the wood strips so they look seamless.
Straight & Narrow
If you can’t find metallic tape, use gold leaf paint and a very thin liner brush. Mask off the wood strips with painter’s tape to keep lines crisp.
Step 3: Painting and Detailing
-
Paint the Structure:
Paint the wooden strips with matte white acrylic paint. You want them to blend somewhat with the textured canvas while standing out as raised relief, so 2-3 coats might be necessary to cover the wood grain. -
Apply Metallic Tape:
Once the paint is bone dry, carefully apply the thin gold metallic tape directly down the center of each wooden strip. Run your finger firmly over it to ensure strong adhesion. -
Secure Ends:
Trim the metallic tape flush with the ends of the wood strips using a sharp craft knife for a clean, professional finish. -
Add Decorative Tack Anchors:
To give the piece an industrial-chic feel, place a brass upholstery tack at the intersection points or the ends of specific lines. This mimics the look of bolted metal. -
Hammer Gently:
Tap the tacks gently into the wood strips. If your balsa wood is soft enough, you can often push them in by thumb, using the hammer only for the final tap. -
Final Touch-Ups:
Check for any scuffs on the white paint caused by the hammer or handling. Dab a little white paint over any flaws to ensure the background looks pristine against the gold accents.
Level Up: Backlight It
Install a small LED strip light frame behind the canvas. The light will bleed through the canvas texture and highlight the raised geometric shadows.
Hang your architectural masterpiece in a spot with good natural side-light to really show off the shadows and metallic gleam
Black-and-White Abstract Swirl Flow
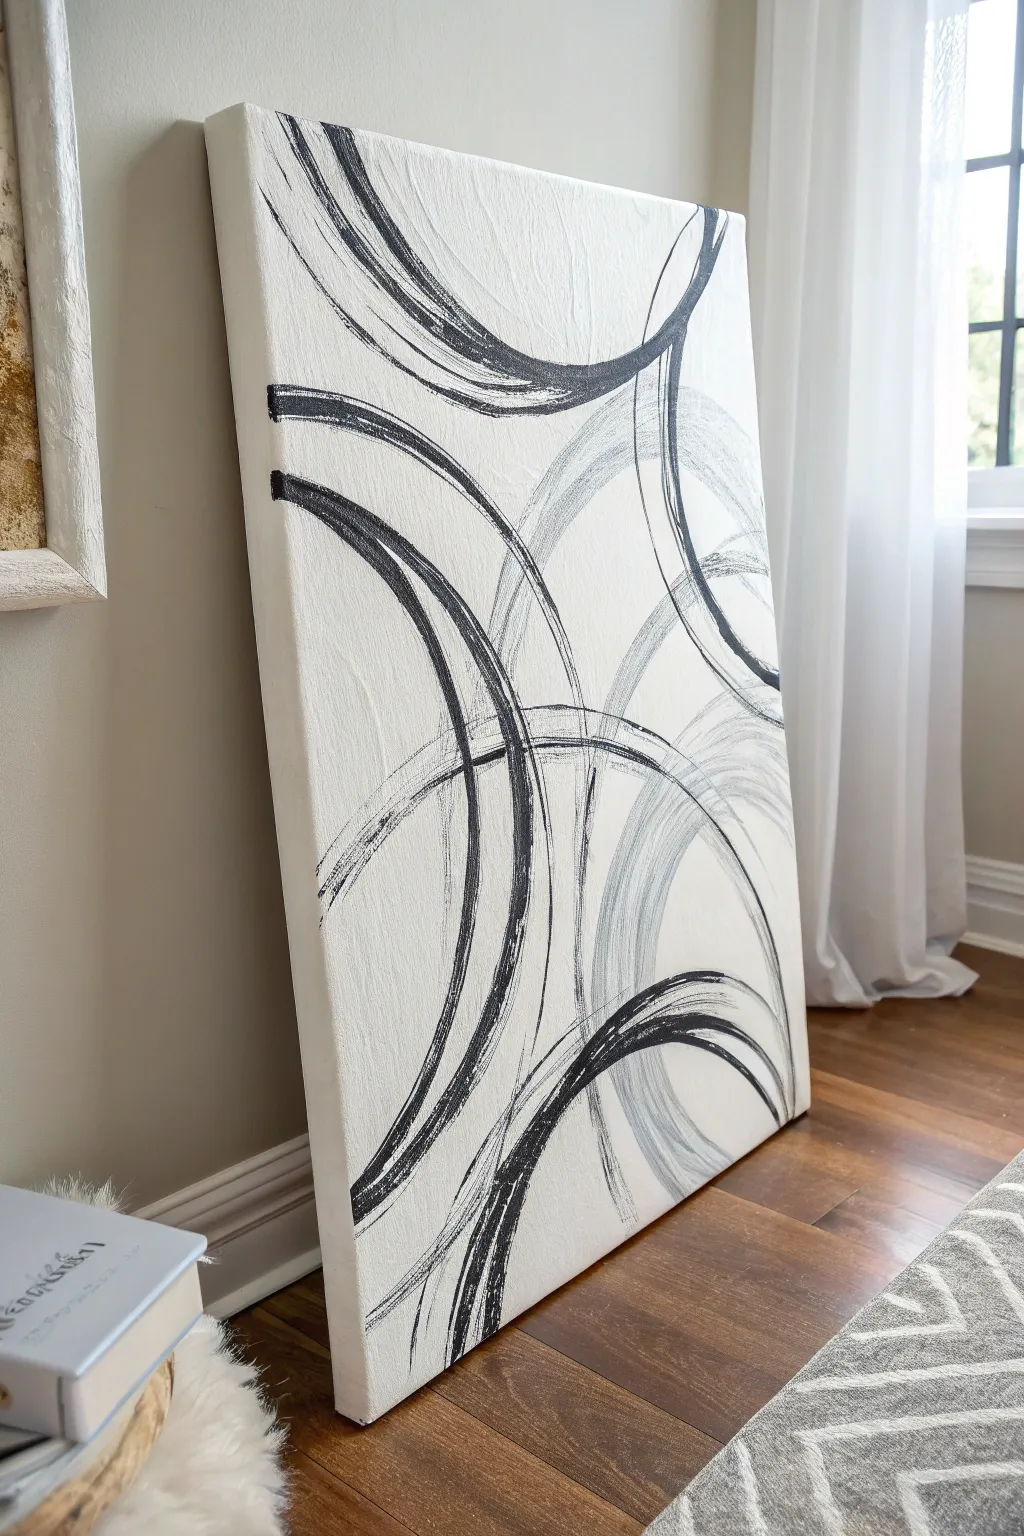
Embrace the beauty of movement with this striking black-and-white abstract piece featuring sweeping, intersected curves. The dry-brush technique creates organic texture and depth, making this minimalist design feel dynamic and sophisticated.
Step-by-Step Guide
Materials
- Large rectangular stretched canvas (24×36 or similar)
- White acrylic paint (heavy body) or gesso
- Black acrylic paint
- Grey acrylic paint (or mix black and white)
- Wide flat bristle brush (2-3 inch)
- Medium round bristle brush
- Paper plates or palette
- Paper towels or rag
- Pencil (optional)
- Large compass or string and tack (optional for guidelines)
Step 1: Base Preparation
-
Prepare the workspace:
Lay down a drop cloth or spread out newspapers to protect your flooring, as you will need room to move your arm freely for large gestural strokes. -
Prime the canvas:
Even if your canvas is pre-primed, add a fresh coat of white acrylic paint or gesso using a wide flat brush. -
Add texture:
While applying the white base, use cross-hatching strokes to create a subtle, uneven texture. This will help grab the black paint later for that fragmented look. -
Let it dry completely:
Ensure the white background is 100% dry to the touch before moving on. Any wetness will cause the black lines to bleed into grey mud.
Uneven Lines?
If your curves look shaky rather than sweeping, try painting faster. Speed creates smoother momentum. You can also practice the arm motion in the air before touching the canvas.
Step 2: Planning the Flow
-
Visualize the composition:
Study the reference image. Notice how the arcs start from off-canvas points and sweep inward, intersecting in the middle and bottom third. -
Sketch faint guidelines:
Very lightly, distinct from the texture, use a pencil to map out the main sweeping curves. Don’t worry about perfect circles; natural ellipses look more organic. -
Map the intersections:
Ensure you have a balance of curves entering from the top left, sweeping through the bottom right, and counter-curves intersecting them.
Step 3: Painting the Arcs
-
Load the brush correctly:
Squeeze a small amount of black heavy body paint onto your palette. Dip your medium round bristle brush, but do not overload it. -
Off-load paint:
Wipe the excess paint onto a paper towel or a spare part of the plate. The bristles should have paint but be relatively ‘dry’ to achieve the scratchy texture. -
Paint the primary black curve:
Start with the boldest curve. Commit to the movement and sweep your arm (not just your wrist) to create a long, continuous arc following your guide. -
Enhance the line thickness:
Go back over parts of the arc to thicken it, but keep the edges rough. Allow the texture of the canvas to show through the brushstrokes. -
Add secondary black curves:
Add the remaining bold black arcs. I find it helpful to rotate the canvas physically if the angle is awkward for your arm. -
Switch to grey paint:
Clean your brush thoroughly or switch to a fresh one. Mix a mid-tone grey or use tube grey. -
Apply grey accents:
Apply the grey arcs, often echoing the path of the black lines or intersecting them. These should be slightly more transparent or fainter than the black ones. -
Layering lines:
Where lines cross, decide which one is ‘on top’ by refreshing the paint slightly at the intersection, but don’t overwork it or you’ll lose the dry-brush effect. -
Check balance:
Step back five feet. Look for empty spots that feel unbalanced, but remember that negative white space is crucial for this style.
Add Metallic Depth
For a luxe variation, add a third set of curves using metallic gold or silver leaf paint. Apply it sparingly alongside the grey lines to catch the light.
Step 4: Refining and Sealing
-
Enhance texture:
If some lines look too solid, you can take a nearly dry brush with a tiny bit of white paint and lightly scuff over sections to break them up. -
Clean up edges:
If paint smeared where you wanted pure white, touch it up with your white base paint using a small detail brush. -
Final drying:
Allow the black and grey paints to cure completely, which ensures the thickest parts of the texture are set. -
Varnish (Optional):
Apply a coat of matte varnish to protect the surface without adding unwanted gloss, keeping the raw, organic look.
Hang your new abstract masterpiece in a well-lit area to highlight the subtle textures of the brushwork
White Mandala Over a Deep Color Field
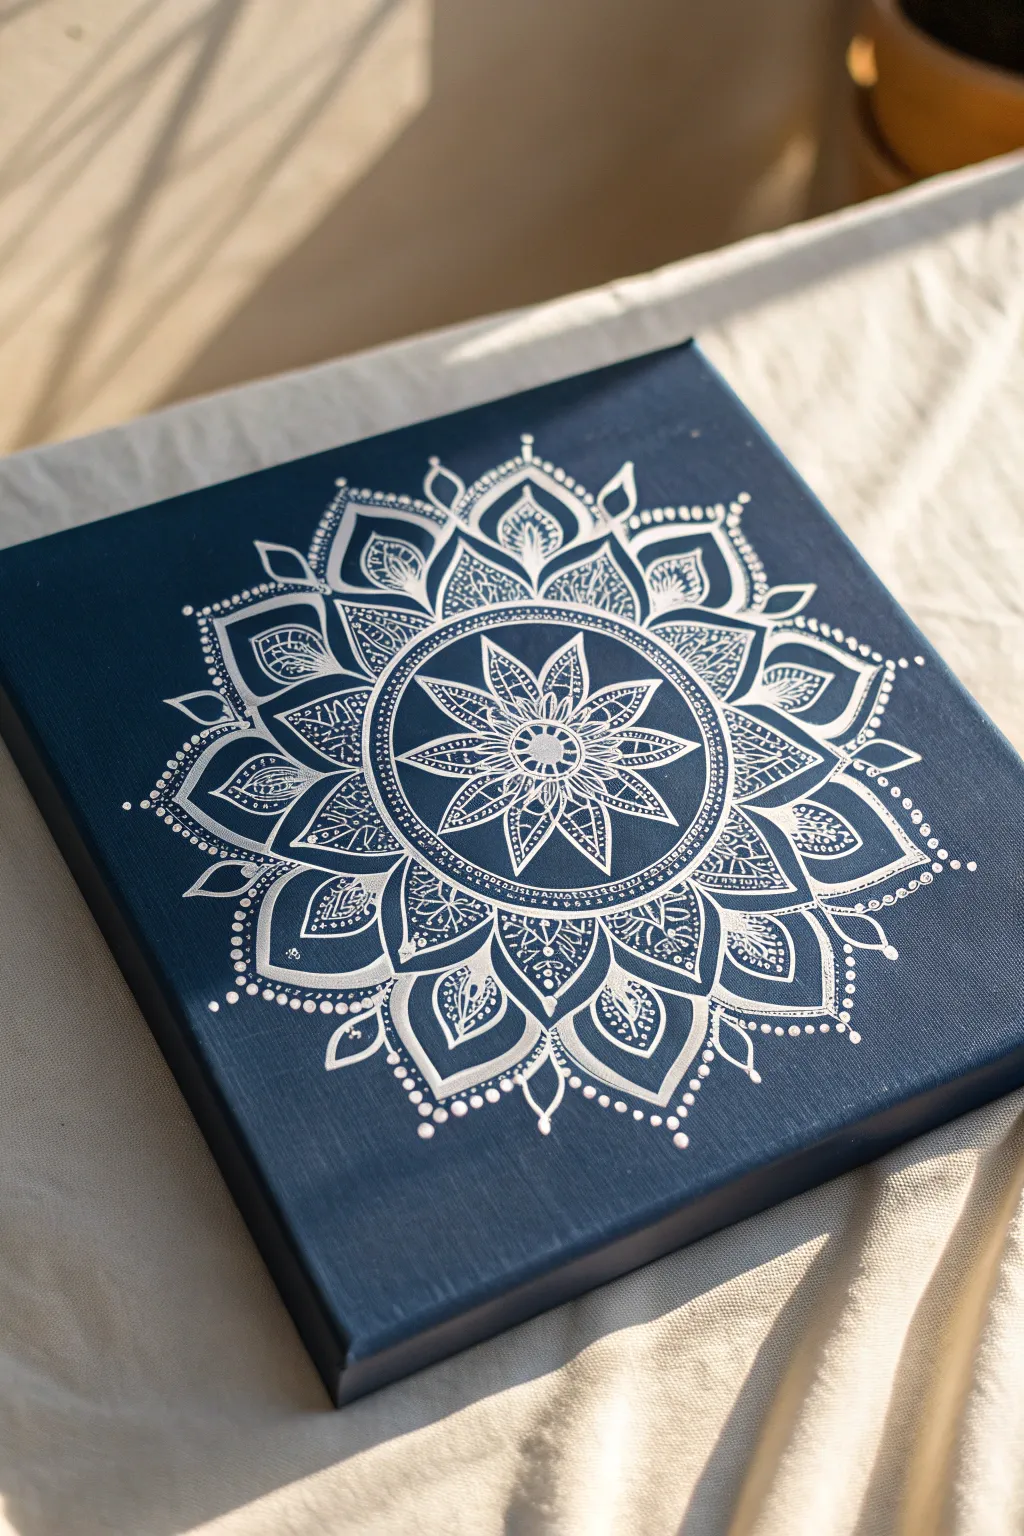
Contrast is key in this stunning piece, where a deep navy background makes delicate white linework pop with elegance. This project transforms a simple canvas into a sophisticated focal point using basic geometry and careful brushwork.
Detailed Instructions
Materials
- Square stretched canvas (e.g., 12×12 inches)
- Deep navy blue acrylic paint
- Titanium white acrylic paint (high flow or fluid acrylics work best)
- Wide flat brush (for background)
- Fine liner brush (size 0 or 00)
- Small round brush (size 1)
- Compass
- Ruler
- White or grey chalk pencil
- Palette for mixing
- Cup of water and paper towels
Step 1: Setting the Foundation
-
Prepare the vibrant background:
Start by coating your entire canvas with the deep navy blue acrylic paint. Use the wide flat brush and smooth strokes to ensure full coverage. -
Paint the edges:
Don’t forget to paint the sides of the canvas wrapping around the frame; this gives the finished piece a polished, gallery-ready look without needing a frame. -
Apply a second coat:
Once the first layer is dry to the touch, apply a second coat of navy blue to eliminate any streakiness and create a solid, velvety color field. Let this dry completely—I prefer waiting at least an hour to ensure the surface is hard.
Step 2: Drafting the Structure
-
Find the center point:
Using a ruler, lightly draw an ‘X’ from corner to corner with your chalk pencil to locate the exact center of the canvas. -
Draw concentric circles:
Place your compass point on the center mark. Draw a series of faint concentric circles expanding outward. These will serve as guidelines for your mandala layers—create a small inner circle, a medium middle band, and a larger outer ring. -
Divide the circle:
Use your ruler to draw straight lines through the center, dividing your circle into 8 or 16 equal pie slices. These guidelines help keep your petals symmetrical.
Trembling Hand Trouble?
If your lines feel shaky, rest your pinky finger on a dry part of the canvas while painting. This anchors your hand and acts as a pivot point for smoother curves.
Step 3: Painting the Core
-
Create the central star:
Load your fine liner brush with slightly thinned white paint. In the innermost circle, paint an eight-pointed star or flower shape, using the guide lines to keep the points even. -
Fill the inner details:
Inside each petal of this central star, paint delicate internal lines or tiny teardrop shapes to add texture without filling them in completely solid. -
Outline the first band:
Paint a solid white ring around your central star using the compass line as a guide. You can thicken this line slightly to separate the center from the next layer. -
Decorate the band:
Add a pattern to this ring, such as tiny dots or hatch marks, to create a textured border effect.
Paint Consistency Tip
Mix a drop of water or flow medium into your white paint. It should be the consistency of heavy cream; if it’s too thick, it won’t flow off the liner brush smoothly.
Step 4: Building the Layers
-
Paint the middle petals:
In the next concentric zone, paint larger, curved petals radiating outward. Ensure the tip of each petal lines up with your radial guide lines. -
Add petal details:
Inside these larger petals, paint a smaller version of the petal shape, leaving a gap. Fill that inner shape with fine cross-hatching or stippling to create a lace-like appearance. -
Create the outer leaves:
For the outermost layer, paint broad, sweeping leaf shapes that connect the previous layer to the outer circle guide. Give these a slightly pointed tip. -
Embellish the outer layer:
Add intricate details inside these large leaves. Try drawing a central vein and adding tiny dots or thin veins branching off it.
Step 5: Final Flourishes
-
Add floating elements:
In the negative space between the outer petal tips, paint small floating teardrops or diamonds to balance the composition. -
Dot the perimeter:
Dip the non-brush end (the handle) of your paintbrush into the white paint. Firmly press dots along the very outer edges of your main mandala design to create a dotted halo. -
Erase guidelines:
Allow the white paint to dry completely—give it several hours to be safe. Once bone dry, gently wipe away visible chalk lines with a damp cotton swab or cloth.
Hang your new masterpiece in a well-lit spot to admire the crisp contrast you created
Foggy City Shapes in Soft Whites and Grays
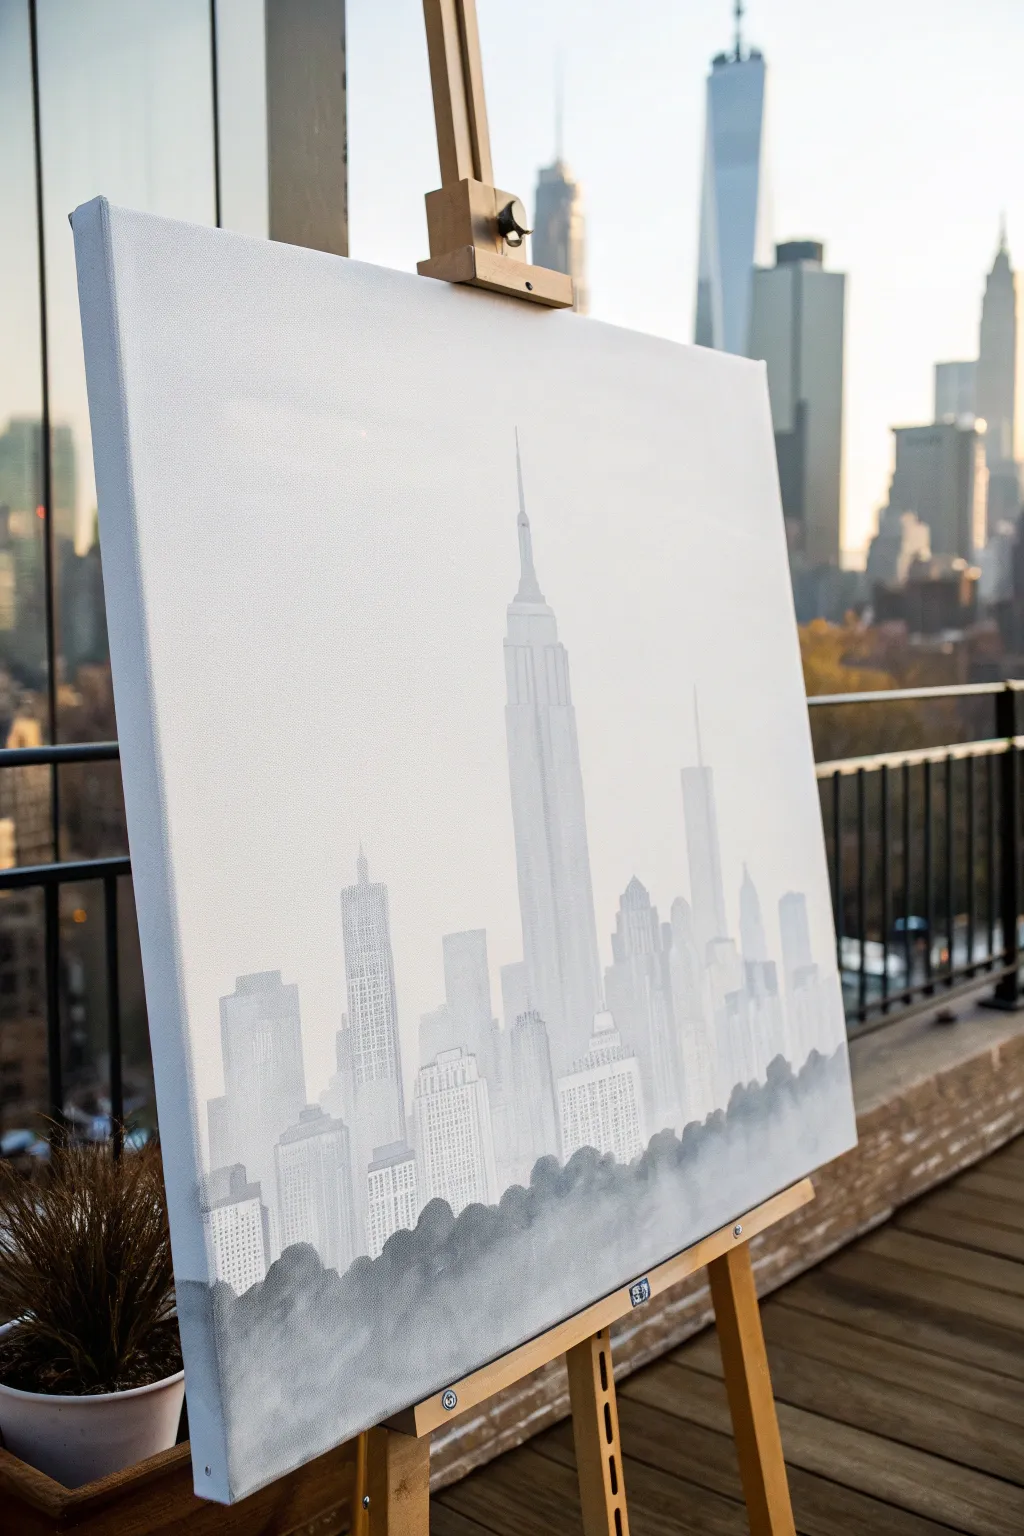
Capture the ghostly elegance of a city waking up in the fog with this high-key, monochromatic painting. By layering subtle gray washes over a stark white background, you will create a sense of atmospheric depth that feels both modern and timeless.
Step-by-Step Tutorial
Materials
- Stretched canvas (square or portrait orientation)
- Acrylic paints: Titanium White, Mars Black, Payne’s Gray (optional)
- Wide flat brush (2-3 inch) for background
- Medium flat brush (1 inch)
- Small round brush for details
- Ruler or T-square
- Pencil (H or HB)
- Palette knife (optional for mixing)
- Water container and paper towels
- Acrylic glazing medium
Step 1: Preparation and Sketching
-
Prime the canvas:
Even if your canvas is pre-primed, apply a fresh coat of Titanium White across the entire surface to ensure a bright, clean base. Let this dry completely before moving on. -
Establish the horizon:
Use a ruler to lightly mark a horizon line about one-quarter of the way up from the bottom edge. This will be the base for your buildings and the top of the tree line. -
Sketch the skyline skeleton:
Lightly sketch the vertical outlines of the buildings with your pencil. Place the tallest skyscraper (like the Empire State Building) slightly off-center for a balanced composition. -
Add building details:
Refine the shapes by adding distinct setbacks, spires, and antenna details. Keep lines extremely faint so they don’t show through the sheer paint layers later. -
Outline the treeline:
Sketch a rolling, organic shape along the bottom edge to represent the tree canopy. This area will eventually be the darkest part of the painting.
Unwanted Pencil Marks?
If your sketch lines are showing through the pale paint, don’t erase them, which can smudge. Instead, cover them with an extra layer of pure white paint before applying your gray washes.
Step 2: Painting the Skyline
-
Mix your base gray:
On your palette, mix a large amount of Titanium White with a tiny dot of Mars Black to create a very pale, misty gray. Using a glazing medium here helps keep the paint translucent. -
Block in distant buildings:
Identify the buildings that are furthest away in your composition. Fill them in with your palest gray mix using the medium flat brush, keeping the edges soft. -
Darken the mix slightly:
Add a pinhead-sized amount of black or Payne’s Gray to your mixture. Use this slightly darker tone for the mid-ground buildings, which includes the main skyscraper. -
Paint the main towers:
Carefully fill in the main skyscraper shapes. Use vertical strokes to mimic the architecture and ensure straight edges. -
Create atmospheric perspective:
While the paint is still wet, you can feather the bottom of the buildings with a dry brush to make them look like they are disappearing into mist. -
Add subtle definition:
I like to mix a slightly darker gray for the shadowed sides of the buildings. Apply this only to one side (left or right) of each structure to suggest a light source. -
Detail the windows:
Using your smallest round brush and a faint gray wash, tap in rows of tiny dots or dashes to suggest windows. Don’t overdo it—suggestions are more powerful than precise grids here.
Add Morning Glow
For a sunrise effect, mix a tiny drop of yellow ochre or pale pink into your white glaze and apply it only to the right side of the canvas where the light hits.
Step 3: Grounding and Atmosphere
-
Mix the treeline color:
Create the darkest gray on your palette so far—something akin to a charcoal or slate gray, but still not pure black. -
Paint the tree canopy:
Fill in the organic shapes at the bottom of the canvas. Use a stippling motion (tapping the brush straight down) to create the texture of leaves and bushes. -
Soften the transition:
While the treeline paint is wet, take a clean, damp brush and soften the top edge where the trees meet the buildings. This creates a foggy ‘rising mist’ effect. -
Apply a unification glaze:
Once everything is touch-dry, mix a very watery wash of Titanium White and glazing medium. Brush this swiftly over the entire sky and upper buildings to push them further into the background. -
Reinforce the foreground:
If the trees look too washed out after the glaze, go back in with your dark gray and re-stipple the very bottom edge to anchor the painting. -
Final highlights:
Use pure Titanium White to add tiny highlights on the tips of spires or the sunlit edges of the tallest buildings to catch the viewer’s eye.
Step back and admire your quiet, misty cityscape that brings a touch of urban serenity to any room
Galaxy Splatter With Bright White Stars
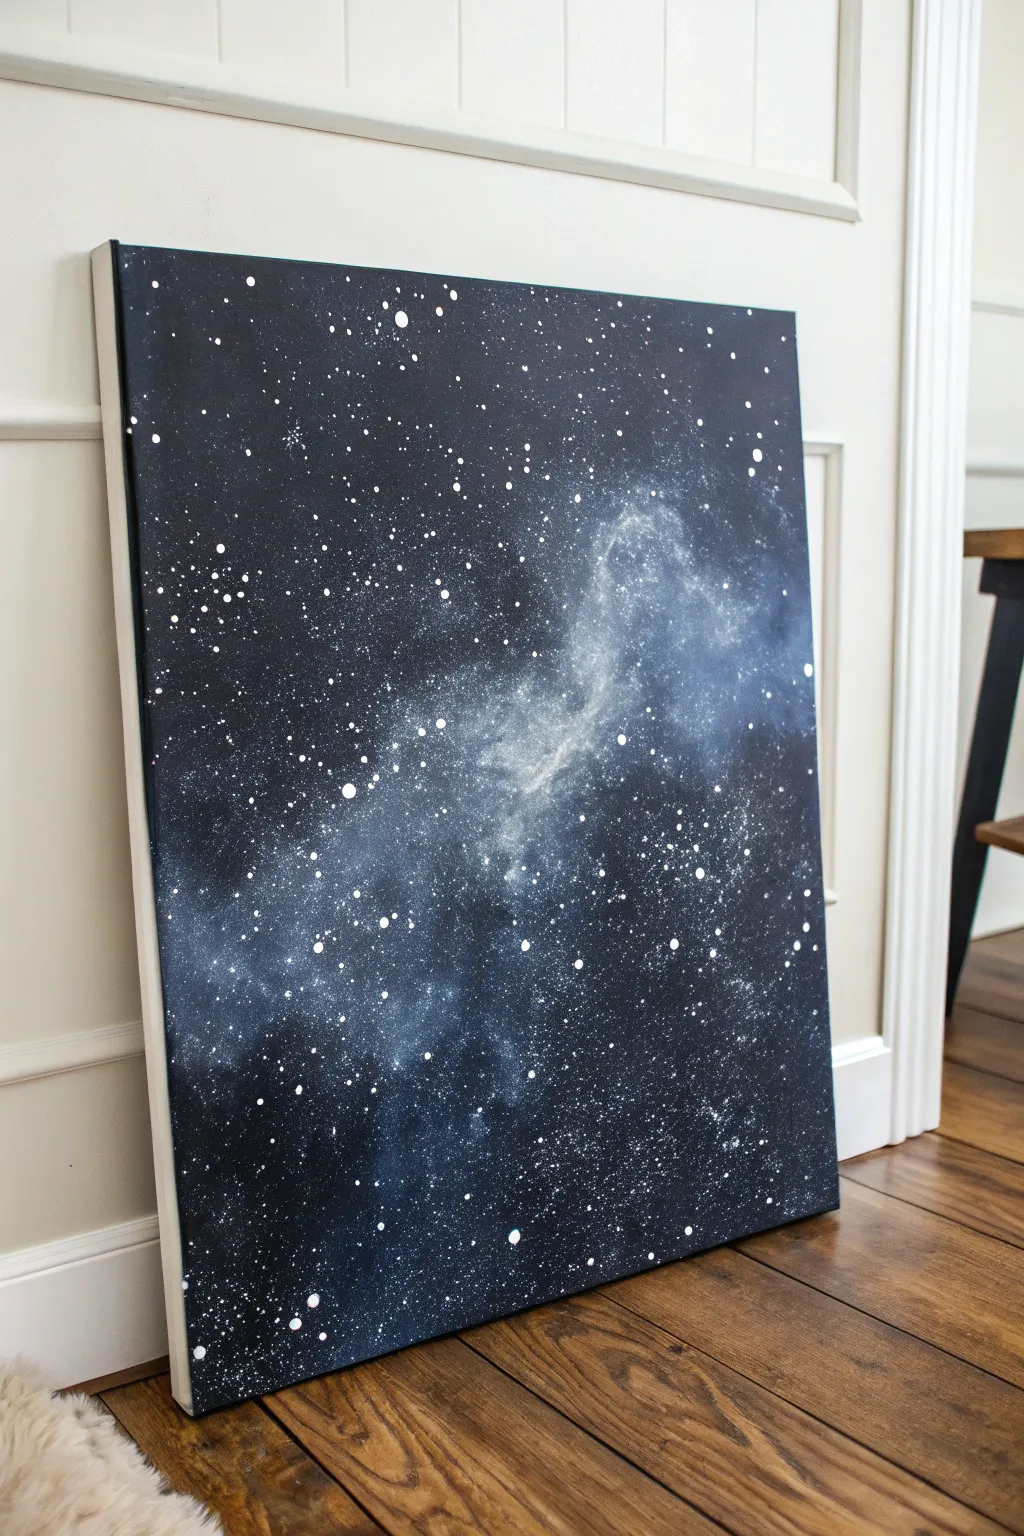
Transform a plain white canvas into a window to deep space with this moody and atmospheric painting project. Using simple blending techniques and a fun splatter method, you’ll create a nebulous galaxy filled with bright, contrasting stars.
Detailed Instructions
Materials
- Stretched canvas (rectangular)
- Black acrylic paint
- Dark navy blue acrylic paint
- Payne’s grey or deep charcoal acrylic paint
- Titanium white acrylic paint
- Large flat brush or foam brush
- Medium round brush
- Old toothbrush (for splattering)
- Palette or paper plate
- Water cup
- Paper towels
- Small detail brush
Step 1: Setting the Night Sky
-
Prepare the darkness:
Squeeze out a generous amount of black paint onto your palette, along with smaller amounts of navy blue and deep charcoal. You want the background to be rich and not flat, so having a few dark tones helps. -
Base coat coverage:
Using your large flat brush or foam brush, paint the entire canvas black. Work quickly to ensure full coverage, painting the sides of the canvas as well for a finished look. -
Adding depth while wet:
While the black base is still slightly wet, pick up some navy blue and charcoal on your brush. Blend these randomly into the black background using broad, crisscross strokes. This creates subtle variations found in the deep night sky. -
Let it dry completely:
Allow this dark base layer to dry fully. If the canvas shows any white spots coming through, apply a second coat of black and let it dry again.
Nebula Shape Tip
Don’t overthink the cloud shape! Use a ‘dabbing’ motion with a dry brush or sponge rather than long strokes. This texture mimics gaseous clouds better than smooth painting.
Step 2: Creating the Nebula
-
Mix a cloudy blue:
Create a mid-tone blue by mixing a little white into your navy paint. It should be significantly lighter than the background but not pure white yet. -
Map the galaxy shape:
Using a dry, medium round brush, lightly scumble (scrub) this lighter blue across the canvas in a diagonal, organic shape. I like to imagine a drifting cloud formation to keep it looking natural. -
Soften the edges:
Before the paint dries, use a clean, dry brush or even your finger to smudge the edges of the blue areas into the black background. You want a smoky, fading transition, not hard lines. -
Add highlights:
Mix a very pale blue-almost white. Apply this sparingly to the center of your existing blue clouds to create a glow effect. -
Blend the highlights:
Gently blend these brighter spots outward into the mid-tone blue. The goal is to have the ‘gas cloud’ look brightest in the center and fade into the darkness. -
Final nebula layer:
Take a tiny amount of pure white on a dry brush. Very lightly dust the absolute brightest parts of the nebula for maximum contrast.
Fixing Big Blobs
If a splatter lands as a giant puddle, don’t wipe it! Let it dry, paint over it with black, and retry. Wiping while wet creates a gray smear.
Step 3: The Starfield
-
Prepare splatter paint:
Mix a small amount of titanium white paint with water. You want a consistency similar to heavy cream or thin yogurt—fluid enough to fly off bristles, but thick enough to stay opaque. -
Test formatting:
Test your splatter consistency on a piece of scrap paper first to ensure you aren’t getting runny blobs. -
Create distant stars:
Dip an old toothbrush into the thinned white paint. Point the bristles toward the canvas and run your thumb across them to flick a fine mist of tiny stars over the entire painting. -
Vary the density:
Concentrate a few heavier sprays near the bright nebula areas, as stars often cluster in these regions. -
Add medium stars:
Switch to a stiff bristle brush. Dip it in the paint and tap the handle against another brush handle over the canvas to create slightly larger, more distinct stars. -
Paint hero stars:
Use your smallest detail brush to manually paint a few specific, larger dots. Place these deliberately in open dark spaces to balance the composition. -
Final drying:
Let the canvas sit undisturbed until the thickest white dots are completely dry to the touch.
Hang your new celestial masterpiece on a well-lit wall to really make those white specks pop against the deep background
White-on-White Textured Impasto Abstract
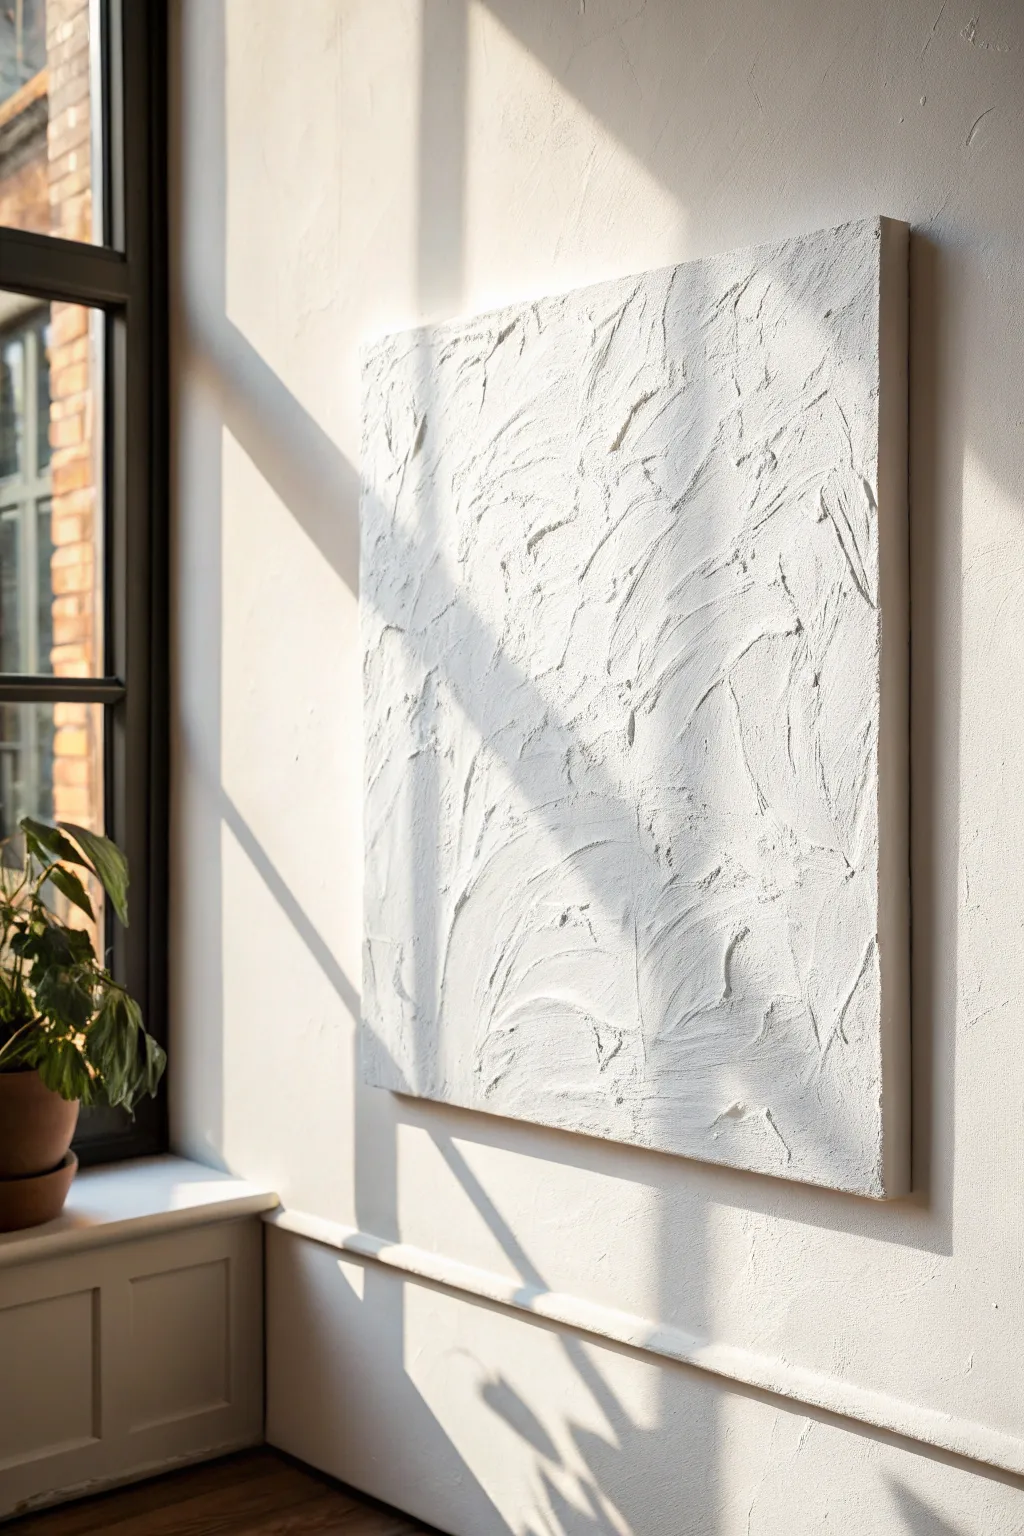
Embrace the elegance of simplicity with this stunning white-on-white textured artwork that plays beautifully with light and shadow. Using thick modeling paste and rhythmic trowel movements, you will create a surface that brings modern, organic movement to any minimalist space.
Step-by-Step Guide
Materials
- Large square canvas (pre-stretched and primed)
- Heavy body acrylic gel medium or modeling paste (large tub)
- Plaster or joint compound (optional alternative for more grit)
- Large palette knife or trowel
- Gesso (white)
- White acrylic paint (titanium white)
- Wide flat paintbrush (2-3 inch)
- Drop cloth or plastic sheet
Step 1: Preparation
-
Set up your workspace:
Lay down your drop cloth or plastic sheet on a flat, sturdy table. This project involves heavy pastes that can get messy, so ensure your surface is well-protected. Placing the canvas flat is crucial so the heavy texture doesn’t slide down while wet. -
Prime the surface:
Even if your canvas is pre-primed, apply a fresh coat of white gesso to ensure a toothy, receptive surface. Use your wide flat brush to apply it evenly, covering the entire face and the sides for a professional finish. -
Prepare your texturing medium:
Open your tub of modeling paste. If you want a rougher, more stone-like finish, you can mix in a small amount of plaster or joint compound, but straight modeling paste is more flexible and less prone to cracking. Stir it slightly to ensure a smooth consistency.
Shadow Play
Work near a window or side light source. Seeing the shadows cast by your ridges as you work helps you balance the composition in real-time.
Step 2: Building the Texture
-
Apply the base layer:
Scoop a generous amount of paste onto the center of the canvas. Use your trowel or large palette knife to spread a base layer about 1/8 inch thick across the entire surface. This doesn’t need to be perfectly smooth; it just provides a wet foundation. -
Create the first sweeping motions:
Start creating the primary texture by making long, sweeping arced motions with your trowel. Think of the movement of a windshield wiper or a wave. Press firmly on one edge of the trowel while lifting the other slightly to create ridges. -
Layering the movement:
Work diagonally across the canvas, overlapping your strokes. I like to keep the direction generally consistent (e.g., bottom left to top right) but vary the angle of the individual arcs to create a dynamic, organic feel. -
Adding depth with impasto:
Load more paste onto your knife for specific areas where you want higher peaks. Apply this thicker dollop and drag it quickly to leave a rough, broken edge. These high points will catch the light most effectively. -
Shattering the surface:
Use the flat side of the trowel to gently pat and lift straight up in a few random spots. This creates a stippled, rough texture that contrasts effectively with the smooth sweeping lines you made earlier. -
Refining the ridges:
Go back into your wet paste and sharpen any ridges that look too soft. You want defined ‘cliffs’ of paste rather than soft rolling hills, as sharp edges cast better shadows.
Step 3: Finishing Touches
-
Initial drying phase:
Let the canvas sit undisturbed for at least 24 hours. Because the paste is thick, the outer layer will dry first while the inside remains soft. Avoid moving it during this time. -
Check for cracks:
Once the surface is dry to the touch, inspect it for unwanted hairline cracks. If you find any significant ones, fill them with a tiny bit of fresh paste on your finger and smooth them out. -
Applying the white coat:
Mix titanium white acrylic paint with a little bit of water to improve flow. Using your wide brush, paint over the entire textured surface. The goal isn’t just to color it, but to unify the sheen of the paste and the canvas. -
Ensuring coverage:
Work the brush bristles into all the deep crevices and ridges. Unpainted pockets can look like shadows or dirt, so be thorough in getting the paint into every nook. -
Second coat for opacity:
Allow the first coat of white paint to dry completely. Apply a second coat if the texture paste looks slightly translucent or grayish compared to the bright white paint. -
Matte finish application:
For that velvety, plaster-like look seen in the photo, finish with a layer of spray matte varnish or a matte medium. This knocks back any glossiness from the acrylics and enhances the sculptural quality. -
Paint the edges:
Don’t forget the sides of your canvas. Paint them with the same solid white to give the artwork a clean, gallery-wrapped appearance, eliminating the need for a frame. -
Final cure:
Allow the entire piece to cure for another 24-48 hours in a dust-free area before hanging. This ensures the heavy texture is fully hardened all the way through.
Sand Mix-In
Mix fine white sand into your acrylic paint for the final topcoat. This adds a microscopic grainy texture that mimics real concrete or stone walls.
Hang your new masterpiece in a spot with changing daylight to watch the shadows evolve throughout the day.
Raised White Floral Texture on a Clean Ground
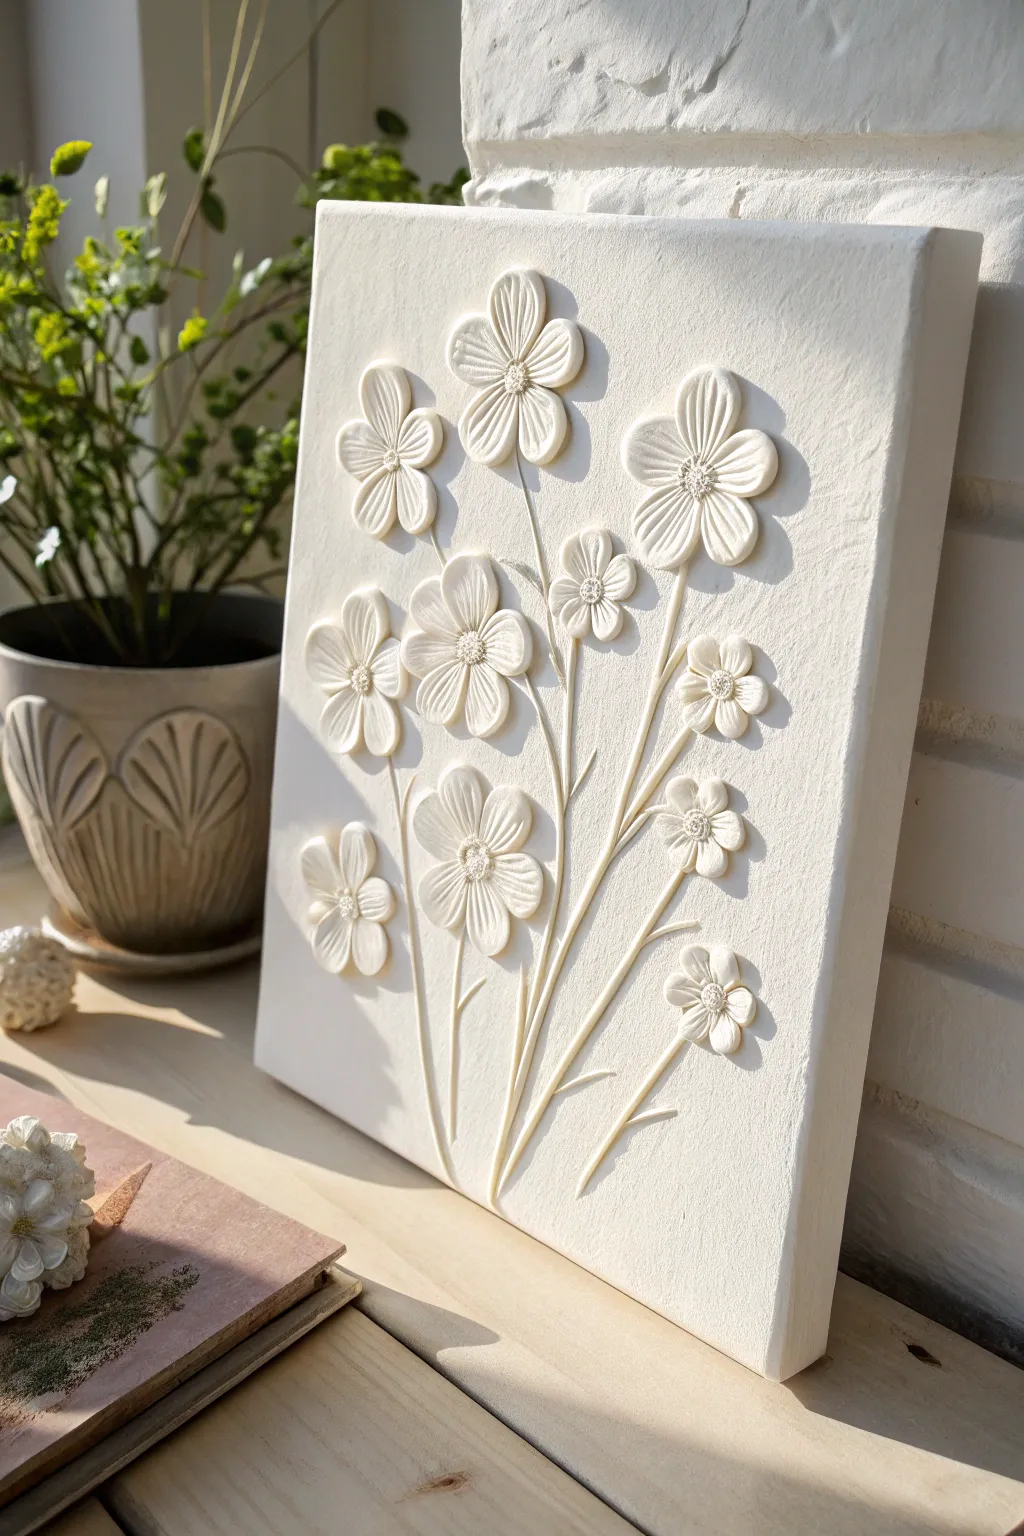
Embrace the elegance of minimalism with this stunning textured floral piece that relies on shadow and depth rather than color to make an impact. Using relief techniques on a blank canvas, you’ll sculpt delicate petals and stems that catch the light beautifully.
Detailed Instructions
Materials
- Stretched canvas (rectangular, e.g., 11×14 or similar)
- White modeling paste or texture paste (heavy body)
- Air-dry clay (white/paper clay) for larger petals
- Palette knives (assorted shapes)
- Sculpting tools (ball styluses, needle tools)
- Piping bag with round tip (optional, for stems)
- Gesso (white)
- Acrylic paint (titanium white)
- Soft synthetic brushes
- Pencil for sketching
- Sandpaper (fine grit)
Step 1: Preparation & Layout
-
Prime the Surface:
Begin by applying a fresh coat of white gesso to your canvas. Even if it’s pre-primed, this extra layer ensures a perfectly smooth, uniform starting point and helps the modeling medium adhere better. -
Sketch the Composition:
Once the gesso is bone dry, lightly sketch your floral design using a hard pencil (like a 2H) to keep lines faint. Draw simple stems radiating upward from the bottom center, topped with basic circle guides where the flower heads will go. -
Plan Varied Sizes:
Ensure your layout includes flowers of different sizes—large blooms near the center and smaller buds toward the edges—to create a balanced and organic composition.
Step 2: Sculpting the Stems
-
Create the Stem Base:
Mix a small amount of modeling paste with a tiny bit of white acrylic paint to increase fluidity. You can either roll very thin snakes of air-dry clay or, for a smoother look, pipe the modeling paste directly onto your pencil lines. -
Refine the Lines:
If using clay strips, press them gently onto the canvas, flattening them slightly so they aren’t fully cylindrical. If piping paste, use a damp palette knife to smooth down any ridges, creating a raised, flat line that tapers as it moves upward. -
Add Tiny Branches:
Extend smaller, thinner lines branching off the main stems. These will support the smaller buds and leaves later. Keep these connections seamless by smoothing the clay or paste at the join points with a damp brush.
Clean Cuts Matter
Keep a cup of water and a rag nearby. Wiping your sculpting tools constantly prevents clay buildup and ensures your petal veins deeply defined and crisp.
Step 3: forming the Petals
-
Prepare Clay Balls:
For the main blooms, pinch off small pieces of white air-dry clay. Roll them into smooth balls; you will need five balls for a standard five-petal flower. -
Shape Teardrops:
Roll each ball into a teardrop shape. Flatten these slightly between your thumb and forefinger to create a petal form that is thicker in the middle and thinner at the edges. -
Attach the Petals:
Apply a dab of modeling paste or clay glue to the canvas where a flower center marks your sketch. Press the tapered end of your petal teardrops into this center point, arranging them in a radial pattern. -
Sculpt Petal Details:
While the clay is pliable, use a modeling tool or the back of a knife to press delicate indentations or grooves along the length of each petal. This mimics the natural vein structure and adds crucial texture. -
Create Smaller Blooms:
Repeat the process for the smaller flowers, using significantly smaller bits of clay. For the tiniest buds, simple flattened circles with a single center indentation work well.
Warm White Glow
Mix a tiny drop of unbleached titanium or warm cream into your final white paint layer. It prevents the piece from looking sterile and adds a vintage plaster vibe.
Step 4: Refining and Finishing
-
Add Flower Centers:
Roll tiny spheres of clay and press them into the center of each bloom. Use a needle tool or a stiff bristle brush to stipple the surface of these centers, creating a pollen-like texture. -
Smooth the Edges:
Check the perimeter of your petals. I find dipping a soft brush in water and running it along the edges of the clay helps remove fingerprints and sharp angles, leaving a soft, organic look. -
Initial Drying Time:
Allow the sculpted elements to dry completely. This may take 24 to 48 hours depending on the thickness of your clay and the humidity in your workspace. -
Sand Imperfections:
Once fully cured, inspect the piece for any rough burrs or unwanted sharp peaks. Gently sand these down with fine-grit sandpaper, being careful not to damage the delicate petal veins. -
Unify with Paint:
To achieve that seamless, matte plaster look, paint the entire canvas—both the relief elements and the background—with a high-quality titanium white acrylic paint. -
Apply Second Coat:
Apply a second coat of white paint if needed to ensure opacity. Ensure you work the paint into all the nooks and crannies of the flower centers and petal grooves. -
Matte Varnish:
Finish with a spray of matte varnish to protect the surface from dust and yellowing while maintaining the non-reflective, stone-like aesthetic.
Hang your textured masterpiece near a window where changing daylight will dance across the relief surface.
Triptych White Wave Across Three Canvases
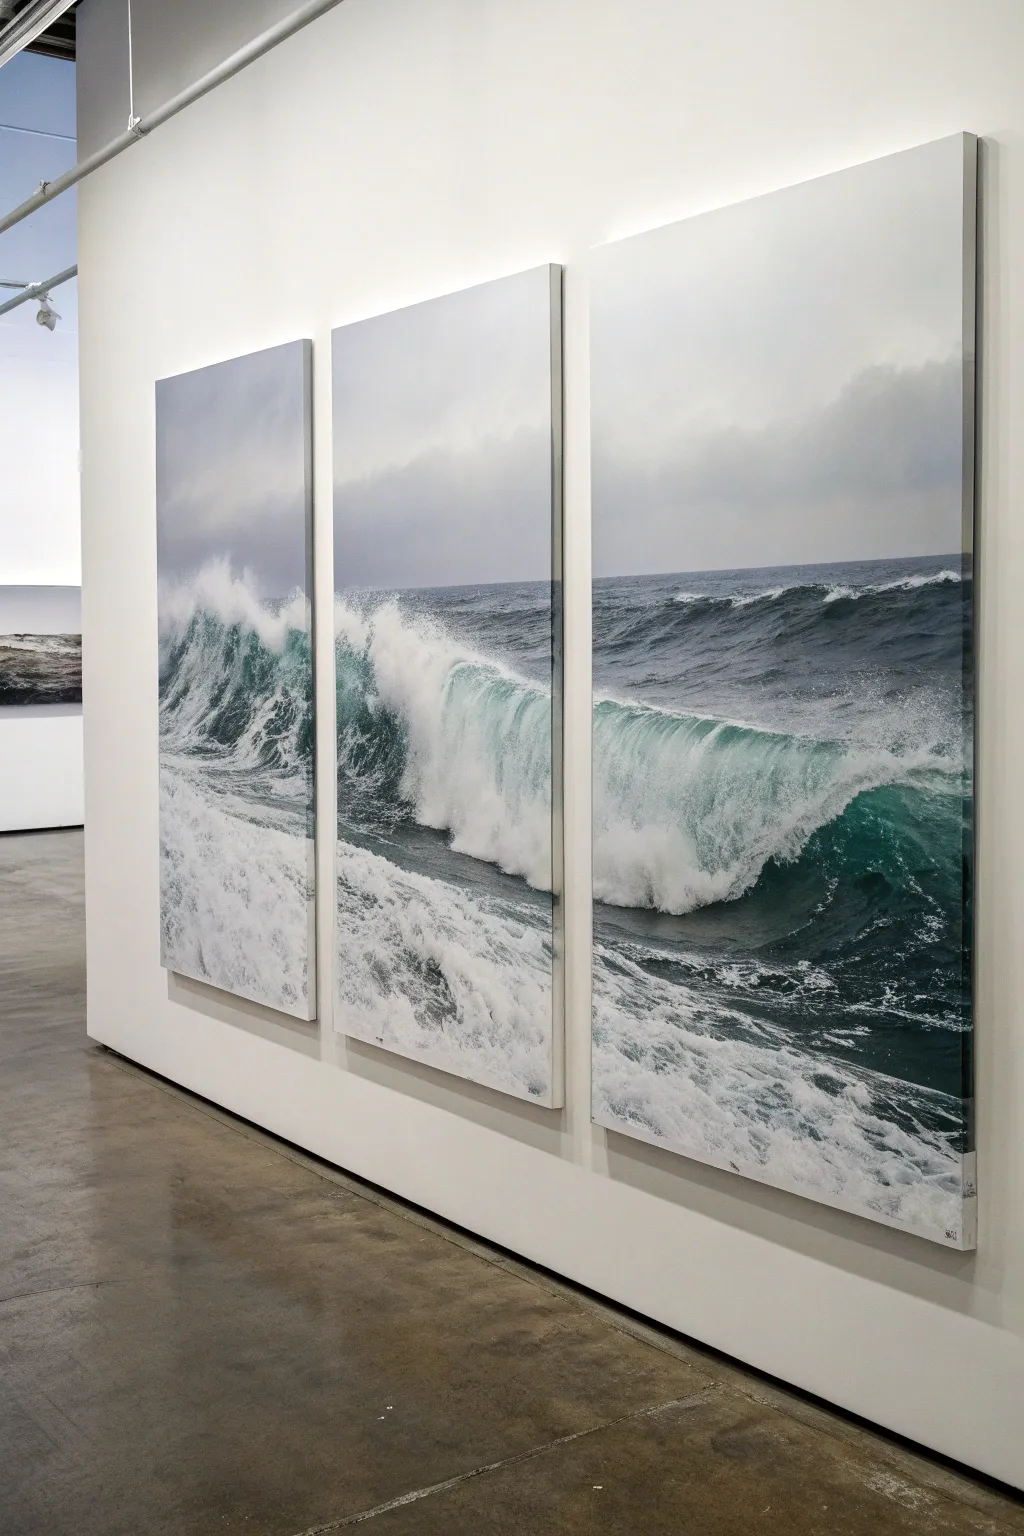
Capture the raw power of the ocean with this dramatic three-panel painting that effectively splits one continuous wave across separate canvases. This large-scale project focuses on mastering sea foam textures and the gradient shift from deep, stormy ocean blues to churning white water.
Step-by-Step
Materials
- 3 large vertically oriented canvases (e.g., 24×48 or 30×60)
- Acrylic paints (Phthalo Blue, Ultramarine Blue, Hooker’s Green, Paynes Grey, Titanium White, Raw Umber)
- Large flat brushes (2-3 inch)
- Medium filbert brushes
- Fan brush
- Sea sponge (natural)
- Acrylic glazing medium
- Spray bottle with water
- Painter’s tape or clamps (for securing canvases together)
- Easel or large wall space
Step 1: Preparation and Base Layer
-
Align the canvases:
Ideally, place all three canvases side-by-side on your easel or clamped together on a wall. Treat them as a single surface initially so the horizon line and wave motion flow seamlessly across the gaps. -
Sketch the composition:
Using a very diluted mix of Raw Umber and water, sketch the horizon line about two-thirds up the canvas. Roughly outline the shape of the crashing wave, making sure the crest peaks in the center or right-center panel. -
Block in the sky:
Mix Titanium White with a tiny touch of Paynes Grey for a moody, overcast sky. Paint the entire sky area, keeping the strokes horizontal and smooth. I like to blend quickly while wet for a hazy atmosphere. -
Paint the deep water:
Mix Phthalo Blue, Hooker’s Green, and Paynes Grey to create a dark, teal-black ocean color. Apply this to the area behind the wave and the deep trough in front where the water is unbroken.
Fixing Alignment
If wave lines don’t match up after separating canvases, lean them together again. Use a piece of chalk to bridge the gap and mark exactly where the line should continue.
Step 2: Building form and Volume
-
Establish the wave’s body:
Using a lighter teal mix (adding more White and Hooker’s Green to your base color), paint the translucent curve of the wave right before it breaks. This area should look like stained glass, letting light through from behind. -
Create the white water base:
Fill in the crashing foam area with a mid-tone grey-blue. Don’t use pure white yet; we need this shadow layer underneath to give the foam volume and weight. -
Add directional flow:
With a clean, dry brush, drag through the teal curved section of the wave to simulate the water being pulled upward toward the crest. -
Separate the panels:
If you painted across the gaps, separate the canvases now to paint the edges (gallery wrap style) so the image looks complete from the side. Let everything dry completely.
Pro Tip: Depth of White
Never use just one shade of white for foam. Mix slight blues, purples, or greys into your white for the shadows, saving pure white only for the sunlight hits.
Step 3: Detailing the Splash
-
Texture with a sponge:
Dip a natural sea sponge into thick Titanium White paint. Dab creating the chaotic texture of the churning water at the base of the wave and the crest. -
Refine the spray:
Switch to a fan brush or an old, splayed bristle brush. Load it with white and flick the bristles or tap gently to create the fine mist and spray rising off the back of the wave. -
Painting the foreground foam:
In the bottom third, paint the web-like patterns of sea foam. Use a thin brush to create interconnected, irregular ovals that stretch horizontally with the water’s movement. -
Glazing for depth:
Mix a small amount of Phthalo Blue with glazing medium. Lightly wash this over parts of the shadowed foam to deepen the contrast without losing the texture underneath. -
Brightest highlights:
Using pure, thick Titanium White straight from the tube, apply the final highlights on the absolute highest points of the splash and the thickest foam in the foreground. -
Softening transitions:
Use a dry brush to lightly sweep over areas where the mist meets the dark background water. This softens the edge and makes the spray look airy rather than stuck on. -
Final continuity check:
Rehang or align the canvases one last time. Ensure lines connect visually across the gaps; touch up any ‘jumpy’ lines where the wave moves from one panel to the next.
Hang your triptych with about 2-3 inches of space between panels to let the image breathe while maintaining the illusion of movement.
Reverse Silhouette Portrait Using White Canvas as Light
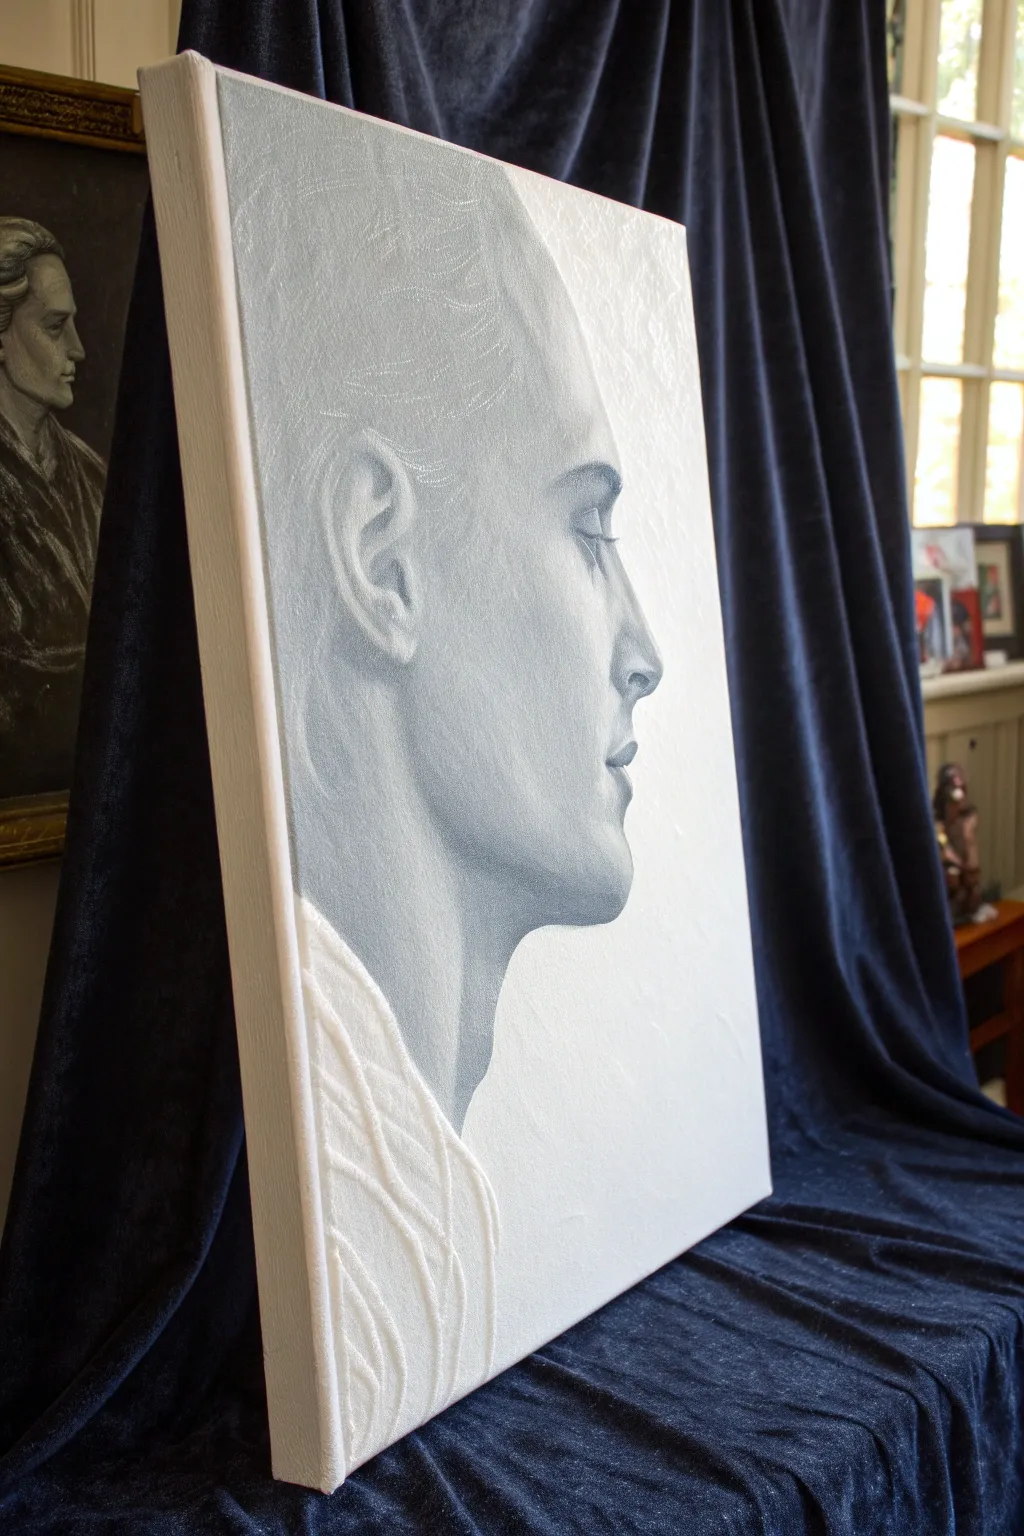
Master the subtle art of negative space with this striking high-key portrait, where the white of the canvas serves as your brightest light. By combining delicate grey washes with heavy textural elements, you will create a piece that feels both sculpturally modern and classically soft.
Detailed Instructions
Materials
- Stretched cotton canvas (medium to large size)
- White gesso
- Acrylic modeling paste or heavy body gel medium
- Cotton yarn or thick string (for texture)
- PVA glue or matte medium
- Graphite pencil (H or HB)
- Grey acrylic paint (payne’s grey or neutral grey)
- White acrylic paint
- Glazing medium
- Synthetic bright brushes (various sizes)
- Small round detail brush
- Palette knife
- Paper towels
Step 1: Preparation and Texturing
-
Prime the Surface:
Begin by applying a fresh coat of white gesso to your canvas to ensure a perfectly bright, non-porous surface. Let this dry completely before moving forward. -
Map the Composition:
With a hard graphite pencil (like an H), very lightly sketch the profile of your subject. Focus on the silhouette line of the nose, lips, and chin, but keep the lines faint enough to be easily covered. -
Prepare the Texture Material:
Cut lengths of cotton yarn or string. Dip them into a mixture of PVA glue and water (about 50/50) or coat them directly with matte medium so they become pliable but adhesive. -
Apply the Neck Texture:
Arrange the glue-soaked yarn on the canvas in the area representing the shoulder and clothing. Create overlapping, organic curves to mimic folds of fabric or abstract energy lines. -
Seal the Texture:
Once the string arrangement is dry, cover the entire textured area with a layer of modeling paste or thick white acrylic. Use a palette knife to smooth it slightly, integrating the string into the surface so it looks like a relief sculpture rather than glued-on craft supplies.
Uneven Washes?
If acrylics are drying with hard edges, add a retarder to your paint. This slows drying time, allowing you to blend the grey into the white canvas smoothly for that soft, foggy look.
Step 2: Painting the Values
-
Mix the Base Wash:
Create a very diluted wash of grey acrylic mixed with glazing medium. You want a transparency that is barely darker than the white canvas. -
Block in Shadows:
Apply this pale wash to the shadowy areas of the face—specifically roughly where the cheek hollows, eye sockets, and neck area would be. Leave the forehead, nose bridge, and high cheekbones purely white. -
Deepen the Mid-Tones:
Mix a slightly more opaque grey. Paint the structure of the ear, the underside of the jaw, and the side of the nose. Keep the edges soft by feathering them out with a clean, damp brush. -
Refine the Profile Line:
Using a smaller flat brush, carefully paint the negative space (the background) right up to the edge of the face’s profile. This defines the nose and lips without actually outlining them. -
Detail the Eye:
Switch to your smallest round brush. With a darker grey (less water, more pigment), paint the crease of the eyelid, the eyelashes, and the iris. Keep it subtle; sharp contrast will break the ethereal mood. -
Sculpt the Ear:
Use the mid-tone grey to define the complex cartilage of the ear. The contrast between the shadow inside the ear and the white rim is crucial for depth. -
Soften Transitions:
I like to take a dry soft brush and gently sweep over areas where the grey paint meets the white canvas to create a misty, airbrushed transition.
Pro Tip: Depth of Field
Make the eye and profile edge the sharpest parts of the painting. Let the back of the head and neck fade into blurriness to mimic a camera’s shallow depth of field.
Step 3: Finishing Touches
-
Highlight the Texture:
Return to the textured clothing at the bottom. Mix a pure white heavy body paint and dry-brush it over the raised ridges of the string/paste mixture to make the texture pop. -
Add Subtle Glints:
If your grey washes dulled any necessary highlights, use opaque white paint to reclaim the brightest spots on the tip of the nose or the center of the eye. -
Hair Suggestions:
Instead of painting individual strands, use a very dry brush with pale grey to whisk in the suggestion of hairline and flow. Fading the hair into the white background keeps the focus on the face.
Step back and admire how using the canvas itself as light brings a ghost-like elegance to your portrait


Have a question or want to share your own experience? I'd love to hear from you in the comments below!