If you’ve got a handful of smooth stones and a craving for spring color, Easter painted rocks are the sweetest little canvases. I’m sharing a mix of classic Easter egg, bunny, and chick designs plus a few unexpected twists you can still finish in an afternoon.
Classic Easter Egg Patterns
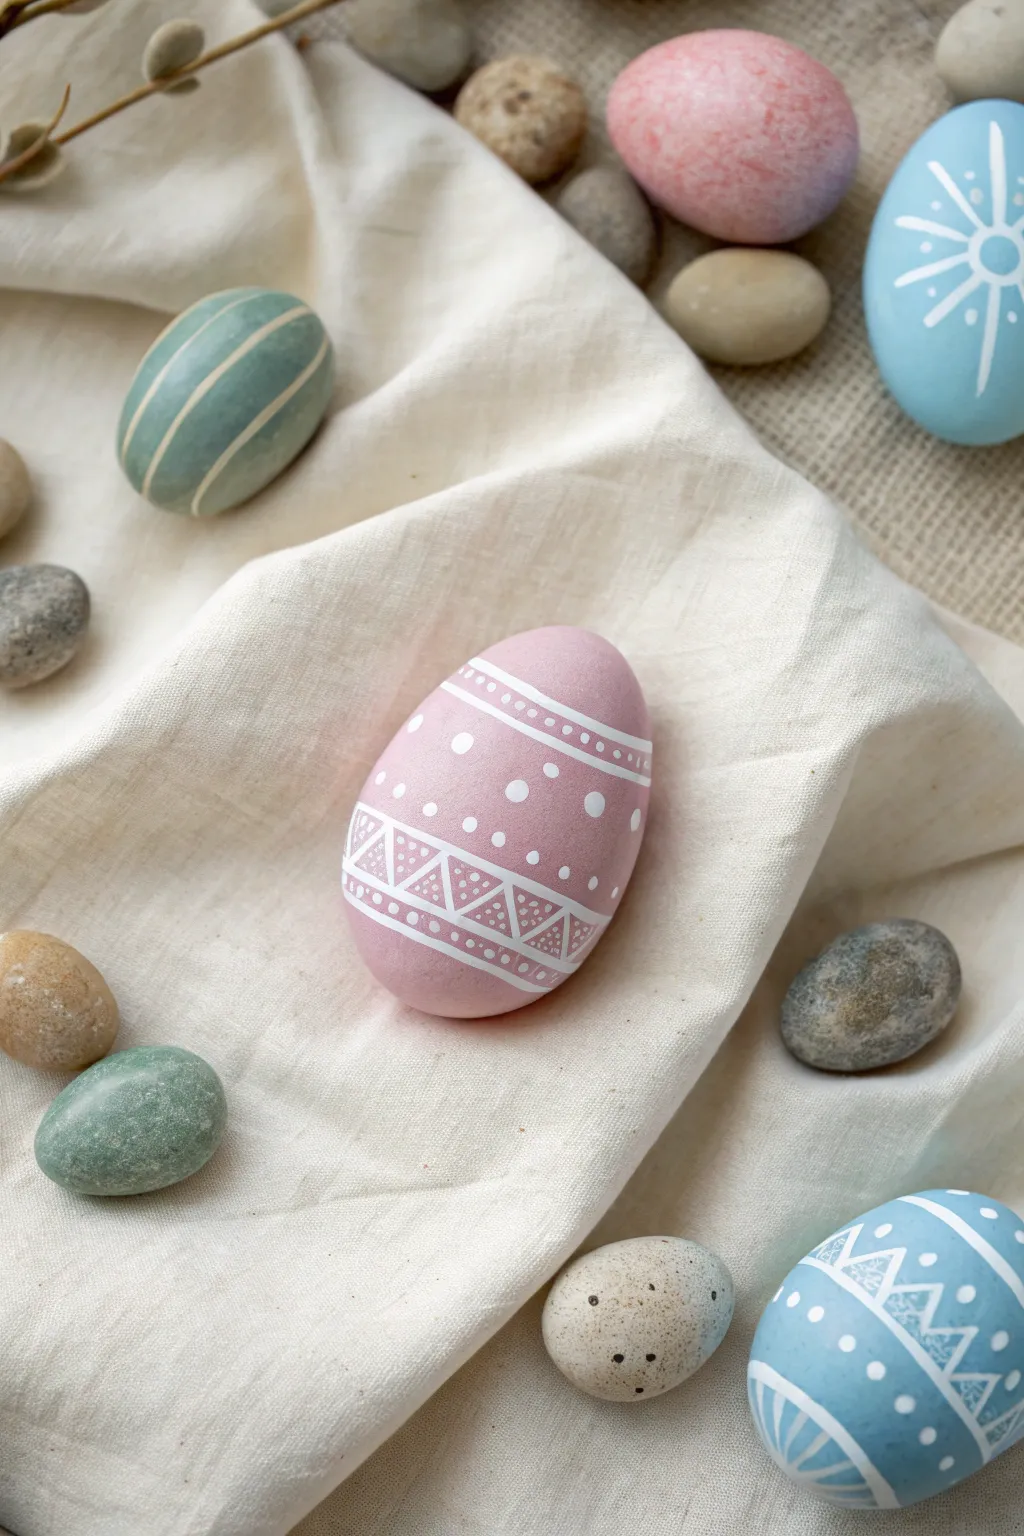
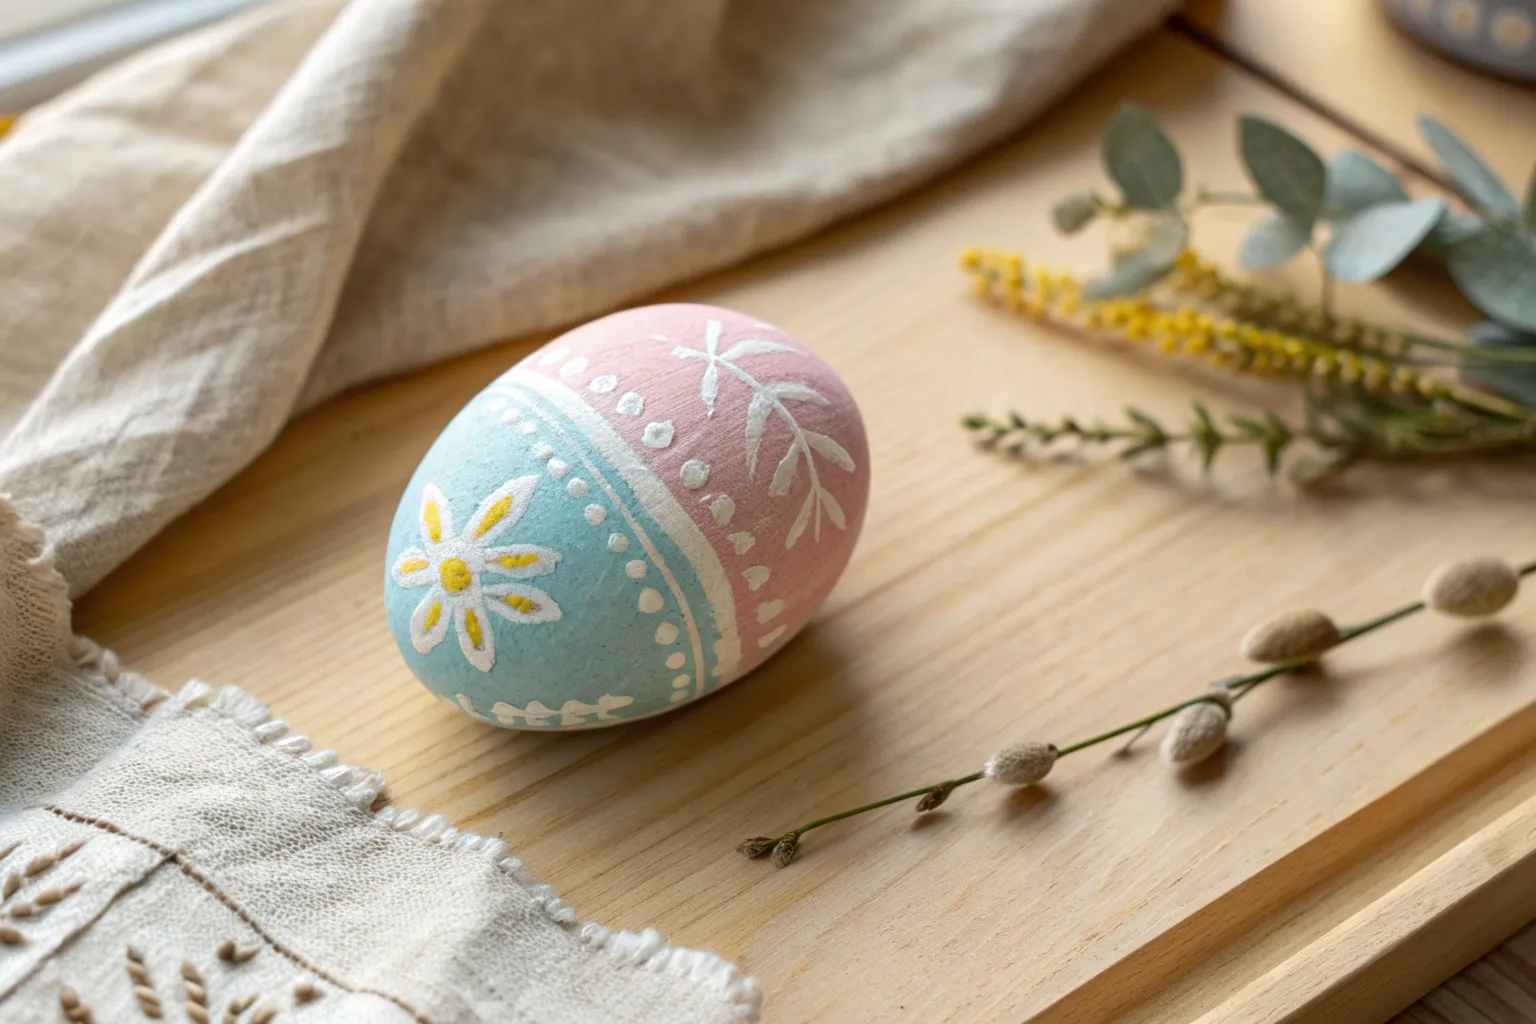
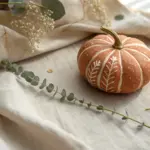
Transform smooth river stones into sophisticated Easter décor with soft pastel hues and crisp white detailing. This project captures the classic beauty of traditional Easter egg patterns using simple geometric designs for a clean, modern look.
Step-by-Step Tutorial
Materials
- Smooth, egg-shaped river rocks (various sizes)
- Acrylic craft paints (matte finish recommended): Pastel Pink, Soft Sage Green, Sky Blue, Terracotta/Brown
- White extra-fine tip paint pen (acrylic based) or liner brush
- Flat synthetic paint brushes (small and medium)
- Small old toothbrush or stiff bristle brush
- Matte spray sealant or clear varnish
- Palette or wax paper
- Water cup and paper towels
Step 1: Preparation and Base Coating
-
Select and clean:
Choose rocks that have a naturally smooth, oval shape similar to an egg. Scrub them thoroughly with warm soapy water to remove any dirt or oils, then let them dry completely. -
Mix your palette:
Prepare your acrylic paints. The goal is a soft pastel look, so if your colors are too vibrant, mix in a little titanium white to soften them. -
Apply the first coat:
Using a flat synthetic brush, paint the entire surface of your first rock with a solid pastel color, like the soft pink shown in the center. Brush in long, smooth strokes to minimize texture. -
Let it dry:
Acrylic paint dries relatively fast, but ensure the first side is dry to the touch before flipping to paint the bottom. A second coat is usually needed for full opacity. -
Create variety:
While the first rock dries, paint other stones in complementary shades like sage green or sky blue. I like to leave some rocks unpainted or just stained lightly if they have a nice natural gray tone.
Clean Lines Secret
To keep the white lines ultra-crisp, wipe the tip of your paint pen on a paper towel every few strokes. Dried paint buildup on the nib causes jagged lines.
Step 2: Detailing the Geometric Patterns
-
Plan the horizontal bands:
For the pink geometric rock, visualize the design in horizontal bands. Using your white paint pen, draw two parallel lines across the upper third of the rock. -
Add the dots:
Inside the band you just created, gently press the tip of the pen to create a row of evenly spaced small dots. Ensure the paint flows well on a scrap paper first so you don’t get globs. -
Create the central band:
Move to the lower third of the rock. Draw two more parallel lines, slightly wider apart than the top set. This will be your main pattern area. -
Draw the zigzag:
Inside this wider band, draw a continuous zigzag line from top to bottom, creating a series of triangles. -
Fill the triangles:
In the upper triangles formed by the zigzag, add a small dot in the center of each. For the lower triangles, carefully draw tiny horizontal lines to create a hatched texture. -
Add scattered accents:
In the large open space between your top and bottom bands, add larger polka dots. Stagger them loosely so the area feels filled but not cluttered. -
Detail the green rock:
For the sage green rock, switch to a simple vertical stripe pattern. Use the paint pen to draw long, curved lines from the top of the ‘egg’ to the bottom, following the rock’s natural contour. -
Detail the blue rock:
If painting a blue rock, try a radial sunburst pattern or a combination of zigzags and dots similar to the pink one, but vary the spacing.
Step 3: Creating the Speckled Stone Look
-
Prepare the speckling mix:
To recreate the natural speckled eggs in the scene, take a plain gray rock or one painted off-white. Mix a watery brown or black acrylic paint. -
Load the brush:
Dip an old toothbrush or stiff brush into the thinned dark paint. Test the consistency on paper; you want tiny droplets, not large drips. -
Flick the paint:
Hold the brush near the rock and run your thumb across the bristles to flick a fine mist of specks onto the surface. Rotate the rock to cover all sides. -
Final cure:
Allow all the painted designs and speckles to dry completely for at least 24 hours to ensure the paint has bonded to the stone. -
Seal the artwork:
Finish by spraying a light coat of matte sealant over the rocks. This protects the intricate white lines from scratching off and gives the paint a unified finish.
Go Golden
Swap the white paint pen for a metallic gold or copper liner. The metallic sheen against matte pastel backgrounds creates a luxurious, high-end aesthetic.
Arrange your beautiful stone eggs in a basket or scatter them on a linen cloth for a charming seasonal display


Pastel Polka-Dot Egg Rocks
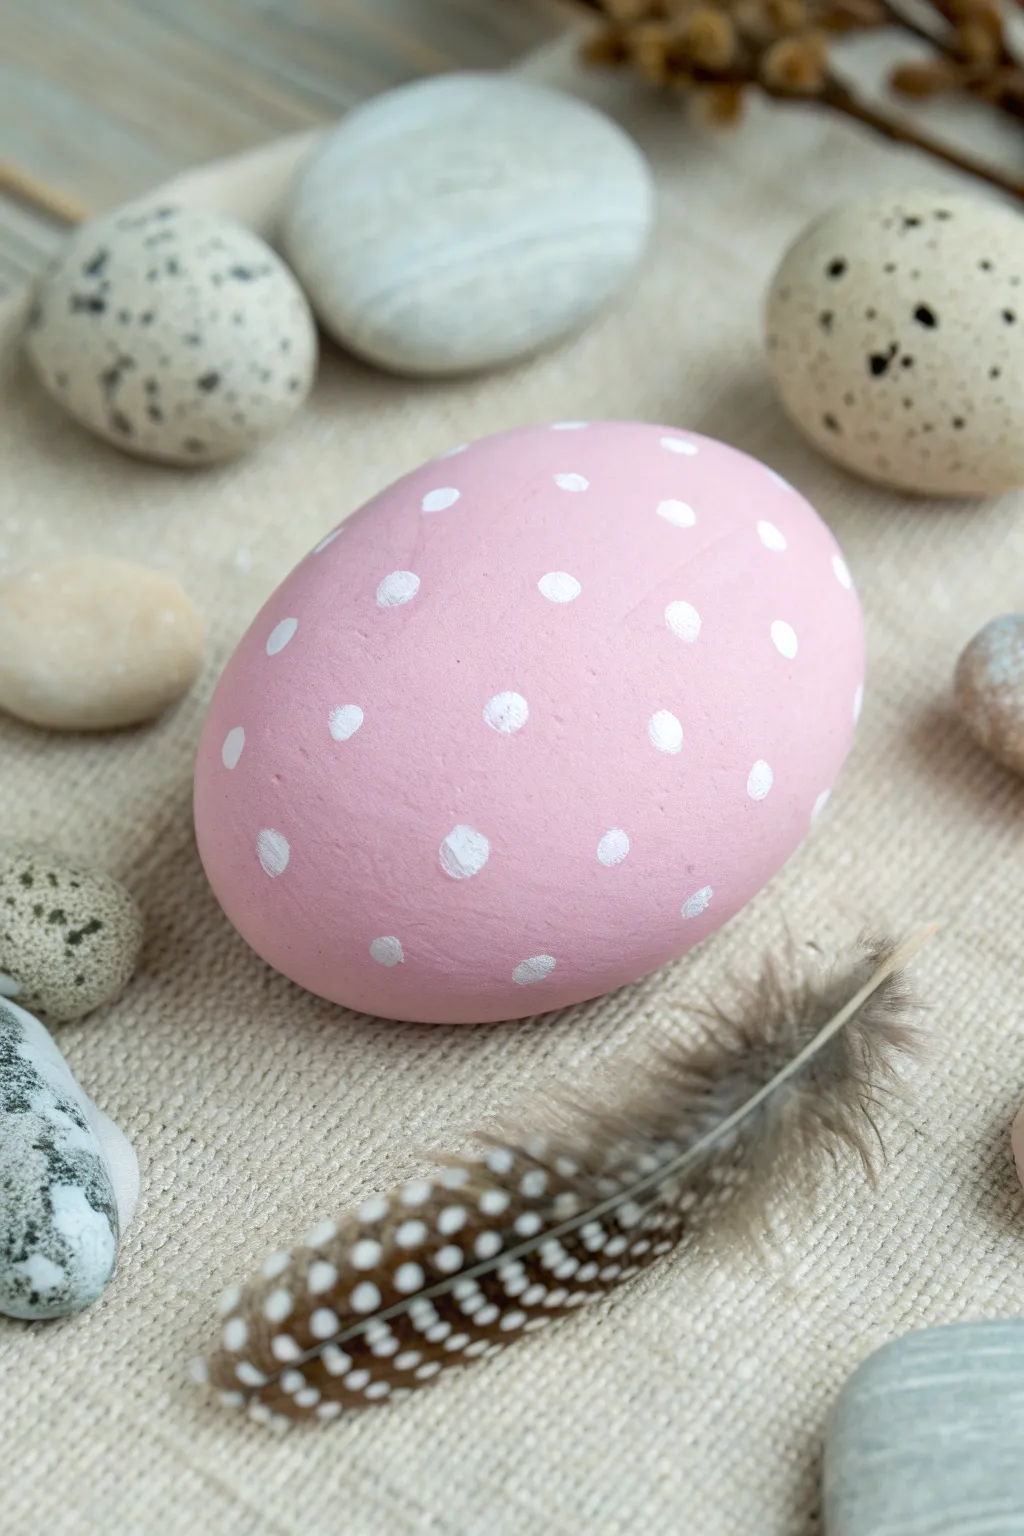
Transform a simple stone into a festive decoration with this charming polka-dot design. The soft matte finish and delicate white spots create a whimsical, classic Easter look that fits perfectly with natural spring decor.
Detailed Instructions
Materials
- Smooth, egg-shaped river rock
- Soft pink acrylic craft paint (matte finish)
- White acrylic craft paint
- Medium soft-bristle paintbrush
- Small dotting tool or the end of a paintbrush handle
- Fine-grit sandpaper (optional)
- Matte clear sealant spray
Step 1: Preparation & Base Coat
-
Clean the stone:
Begin by washing your egg-shaped rock thoroughly with soap and water to remove any dirt or oils that might prevent the paint from glowing. -
Dry completely:
Let the rock dry fully, preferably in the sun, to ensure no moisture is trapped inside the stone’s pores. -
Smooth the surface:
If your rock has any jagged edges or significant bumps, lightly sand them down with fine-grit sandpaper to create a smooth, egg-like canvas. -
Wipe away dust:
Use a barely damp cloth or a dry paper towel to remove any residual sanding dust. -
Mix your pink:
Select a soft, pastel pink acrylic paint. If your pink is too vibrant, mix in a tiny drop of white to soften it. -
Paint the first coat:
Apply an even layer of the pink paint over the entire top and sides of the rock. Don’t worry about the bottom just yet. -
Allow to dry:
Let the first coat dry completely for about 15-20 minutes. It should feel dry to the touch. -
Apply a second coat:
Paint a second layer of pink to ensure solid, opaque coverage where the grey of the stone doesn’t peek through. -
Flip and finish base:
Once the top is fully dry, flip the rock over and paint the bottom side so the entire stone is pink.
Dotting Perfection
If you don’t have a dotting tool, a Q-tip with the cotton removed (just the stick) makes perfectly round medium-sized polka dots.
Step 2: Detailing & Sealing
-
Prepare the white paint:
Squeeze a small amount of white acrylic paint onto your palette or a paper plate. You want a creamy consistency, not too watery. -
Select your tool:
Choose a dotting tool for perfect circles, or use the handle end of a small paintbrush for a more organic look. -
Practice your dots:
I always test a few dots on a piece of scrap paper first to gauge how much pressure creates the perfect size dot. -
Start the center row:
Begin by placing a few dots irregularly across the center band of the ‘egg’ to establish your spacing. -
Fill in the pattern:
Work your way outward, spacing the white dots randomly but evenly. Avoid creating perfect grids; a scattered look feels more natural. -
Vary paint load:
Reload your tool frequently to keep the dots distinct and opaque white. -
Check for consistency:
Look for any dots that appear too thin or translucent and carefully dab a tiny bit more white paint over them. -
Let the dots cure:
Allow the white polka dots to dry completely. This usually takes a bit longer than the base coat since the paint is thicker. -
Seal the rock:
finish by spraying a light coat of matte sealant over the rock to protect the paint without adding an artificial shine.
Texture Twist
Mix a tiny pinch of baking soda into your pink base coat paint to give the rock a chalky, realistic eggshell texture before adding dots.
Now you have a durable, delightful Easter egg that will last for seasons to come.


Bunny Face Rocks With Big Ears
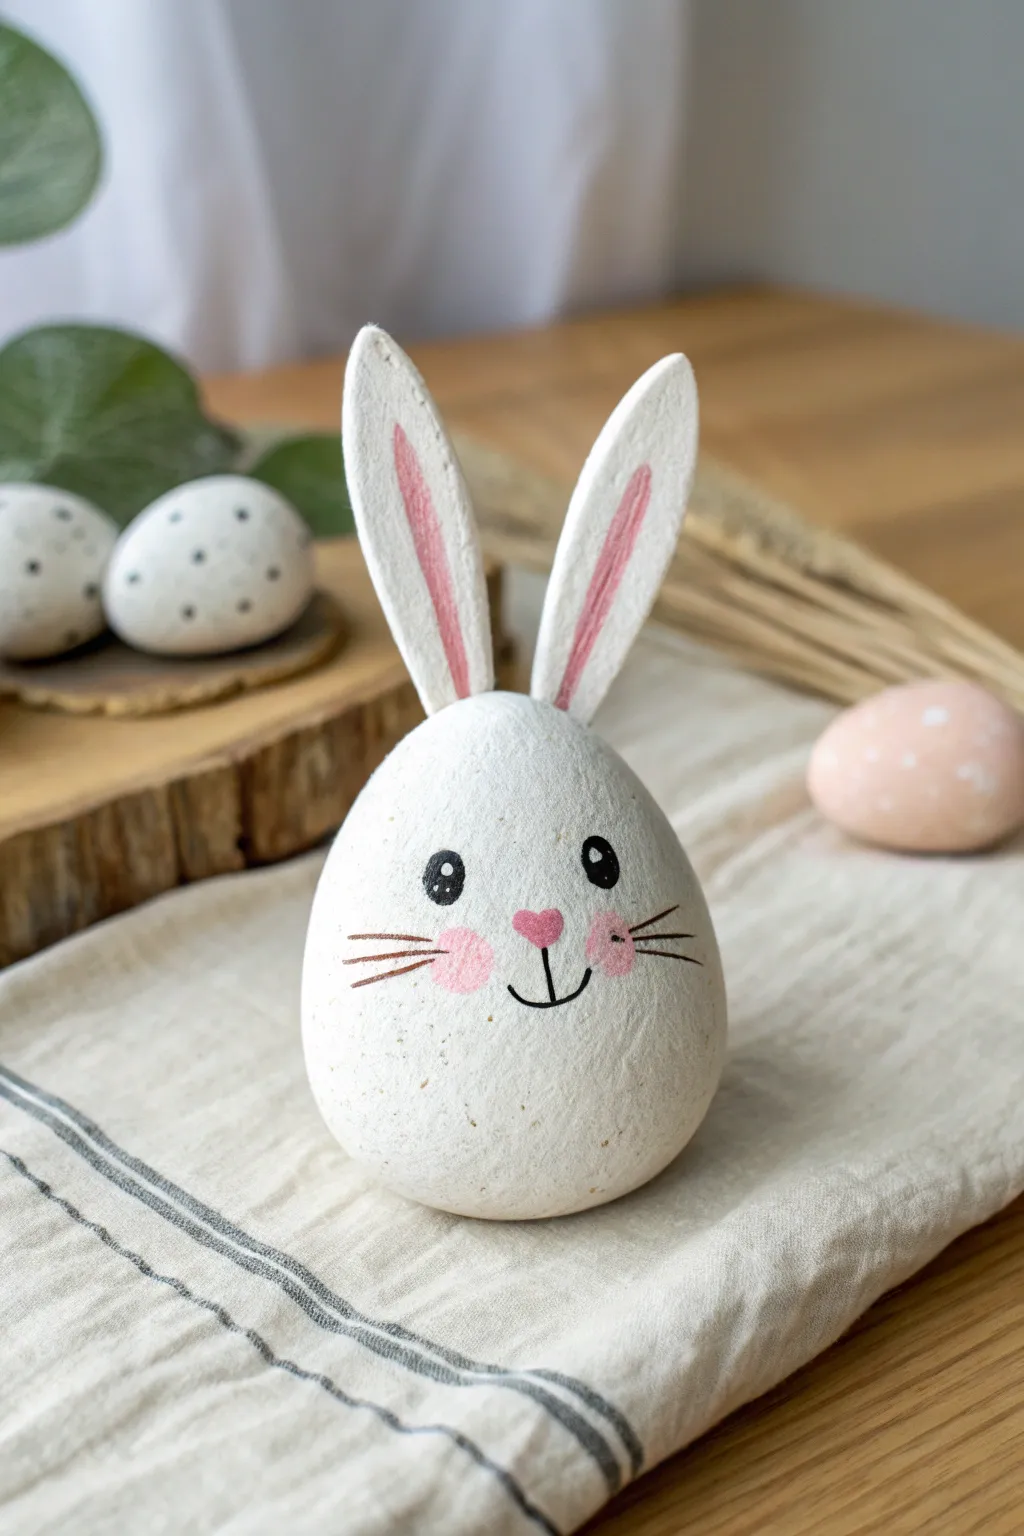
Transform a simple river stone into an adorable Easter character with this charming bunny rock project. The oversized ears add a whimsical touch that makes this little rabbit stand out in any spring display.
Step-by-Step
Materials
- Smooth, egg-shaped river rock
- White acrylic paint (matte finish)
- Pink acrylic paint
- Black acrylic paint or fine-tip paint pen
- Heavy white cardstock or stiff felt
- Strong craft glue or hot glue gun
- Paintbrushes (flat and fine detail)
- Scissors
- Clear matte sealant spray (optional)
Step 1: Preparing the Base
-
Clean the stone:
Begin by washing your rock thoroughly with soap and water to remove any dirt or oils. Let it dry completely in the sun or with a towel. -
Apply the white base coat:
Using a flat brush, paint the entire surface of the rock with white acrylic paint. You want a smooth, clean finish. -
Add a second coat:
Once the first layer is dry to the touch, apply a second coat of white paint. I like to dab the paint slightly here to create a subtle texture that mimics fur. -
Let it cure:
Allow the base to dry fully before moving on to the details so you don’t smudge the white background.
Step 2: Crafting the Ears
-
Sketch the ear shape:
On your white cardstock or stiff felt, draw two long, elongated oval shapes for the bunny ears. Make them slightly wider at the top and tapered at the bottom. -
Cut out the ears:
carefully cut out both ear shapes with sharp scissors, ensuring the edges are smooth and clean. -
Paint the inner ear:
Mix a soft pink color using your pink and white paints. Paint a smaller, elongated oval inside each white ear shape, leaving a white border around the edges. -
Add texture:
If you used cardstock, you can lightly brush a very small amount of white paint over the pink centers to give them a softer, blended look.
Sturdy Ears Tip
For outdoor bunnies, cut the ears from craft foam or a plastic milk jug instead of paper to make them weatherproof.
Step 3: Painting the Face
-
Paint the eyes:
About one-third of the way down the rock, paint two small black circles for eyes. Space them widely apart for a cute expression. -
Add eye highlights:
Dip the non-brush end of a paintbrush into white paint and dot a tiny reflection highlight onto the upper right of each black eye. -
Create the nose:
Using the pink paint, draw a small heart shape or an upside-down triangle centered below the eyes. -
Paint the cheeks:
Load a dry brush with a tiny amount of pink paint and light dab two rosy circles on either side of the nose. -
Draw the mouth:
With a fine liner brush or black paint pen, draw a small vertical line down from the nose, curving into a simple ‘U’ shape or anchor shape for the mouth. -
Whiskers:
Flick three thin, short lines outward from each cheek area using your finest brush or pen.
Wobbly Ears?
If the ears won’t stand up, glue a small toothpick supportive ‘spine’ to the back of each ear before attaching to the rock.
Step 4: Assembly
-
Fold the ear base:
Create a tiny fold or tab at the very bottom of your paper ears to give the glue a surface to adhere to. -
Attach the ears:
Apply a dab of strong glue to the bottom tabs of the ears and press them firmly onto the top of the rock. Hold them in place for a minute until the glue sets. -
Seal the project:
If you plan to display this outdoors, lightly mist the finished rock with a matte sealant spray to protect the paint.
Now you have a sweet, long-eared friend ready to hide in the garden or brighten up your desk


Bunny Silhouette Rocks at Sunset
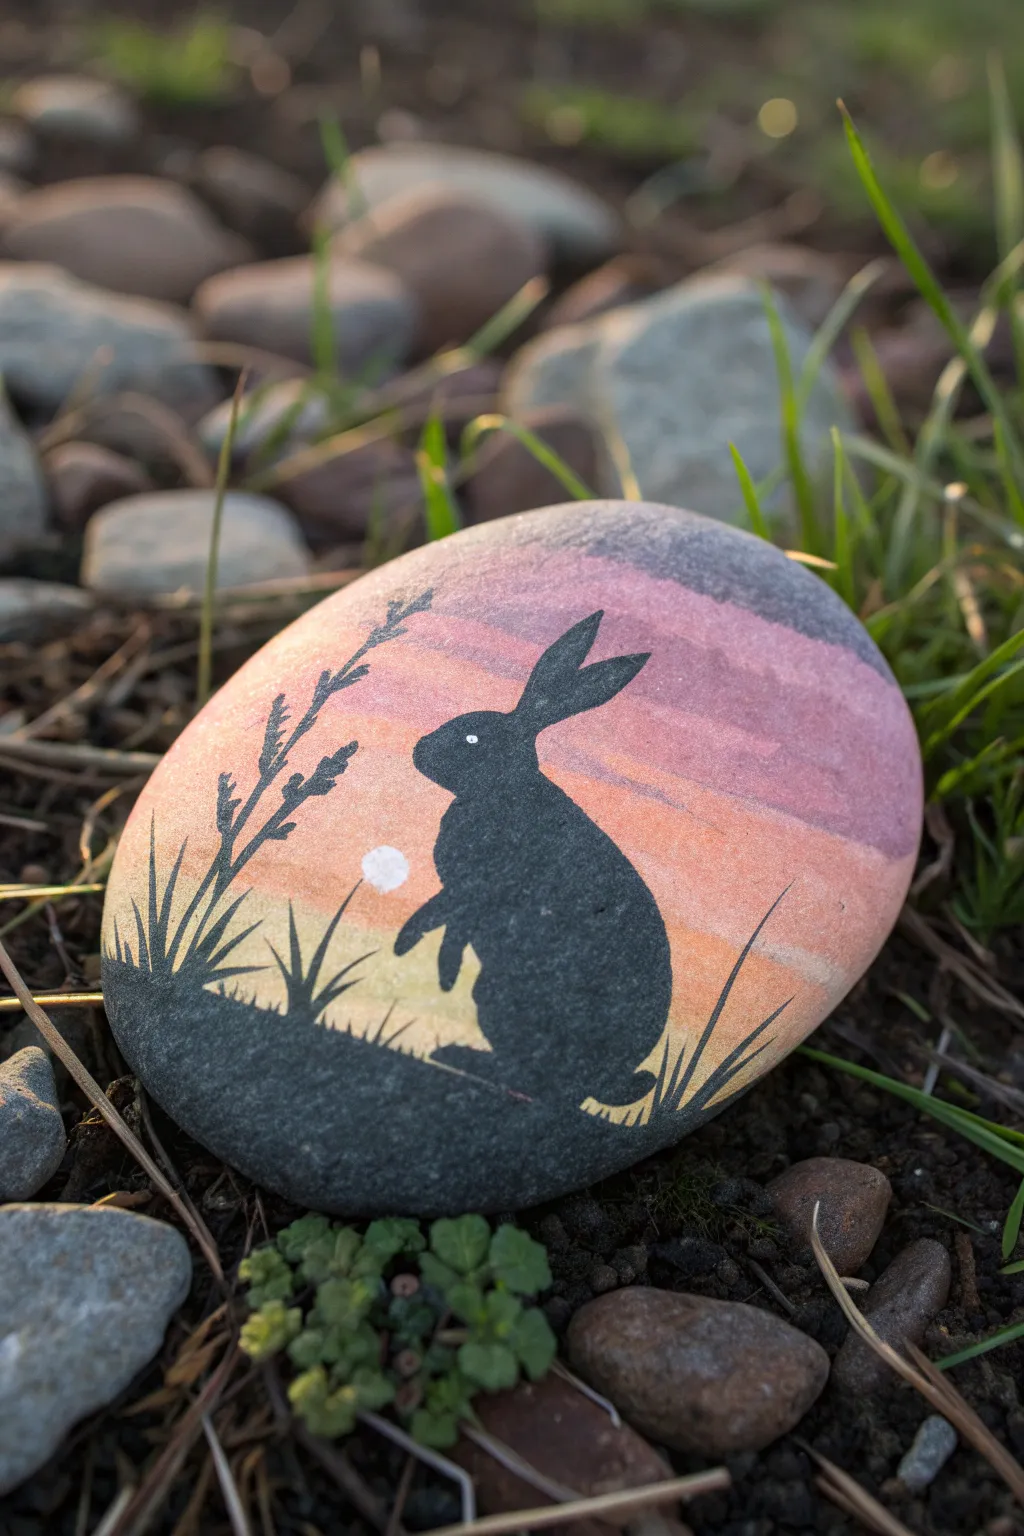
Capture the magic of twilight with this serene painting of a rabbit silhouette against a glowing sky. The soft gradient background creates a perfect canvas for the stark black details, making this a standout piece for any garden or Easter display.
Detailed Instructions
Materials
- Smooth oval river rock (medium to large size)
- Acrylic paints (Titanium White, Golden Yellow, Orange, Pink, Violet, Black)
- Flat shader brush (size 8 or 10)
- Small round detail brush (size 0 or 00)
- Palette or paper plate for mixing
- Cup of water and paper towels
- Pencil (optional for sketching)
- Matte or glossy spray varnish
Step 1: Painting the Sunset Background
-
Base coat the rock:
Start by scrubbing the rock clean and letting it dry completely. Apply a base coat of Titanium White over the entire top surface. This white layer is crucial because it makes the subsequent sunset colors pop rather than sinking into the grey stone. -
Mix your palette:
Squeeze out small amounts of yellow, orange, pink, violet, and white onto your palette. You want these colors ready to go so you can blend them while the paint is still wet. -
Start the horizon line:
Using your flat shader brush, paint a strip of yellow mixed with a touch of white across the lower-middle section of the rock. This will be the glowing horizon where the sun sets. -
Add the orange layer:
While the yellow is still slightly wet, pick up some orange paint. Apply a band of orange directly above the yellow, brushing horizontally. -
Blend the transition:
Clean your brush slightly, then gently brush back and forth where the orange meets the yellow to create a soft, blurry transition between the two bands. -
Introduce pink tones:
Move upwards and paint a band of pink above the orange. Repeat the blending technique at the seam so the orange fades naturally into the pink. -
Finish with the violet sky:
Paint the top curve of the rock with violet paint. Blend this down into the pink layer. I like to add a tiny dot of white to the very top edge to suggest fading light, then let the entire background dry completely.
Unwanted Texture?
If your gradient looks streaky, the paint might be drying too fast. Mix a tiny drop of water or acrylic retarding medium into your colors to keep them blendable for longer.
Step 2: Creating the Silhouette
-
Plan the composition:
Once the sky is bone dry, use a pencil to very lightly sketch the curve of the hill and the basic oval shape of the rabbit’s body. Keep the pencil lines faint so they don’t show through the yellow paint. -
Paint the ground:
Switch to your black paint. Fill in the bottom section of the rock to create the solid black ground, using a curved line to simulate a small hill or mound. -
Outline the bunny body:
Using your small round detail brush and black paint, carefully outline the rabbit’s body. Start with a pear shape for the torso and a smaller rounded shape for the head. -
Fill in the silhouette:
Fill the body shape with solid black paint. Apply a second coat if the background colors are showing through, ensuring opacity. -
Add the ears:
Paint two tall, pointed ears extending from the top of the head. Make the front ear slightly shorter and the back ear longer and angled back for a realistic look. -
Paint the paws and tail:
Add small details to the silhouette: a tiny bump for the tail at the back, and small front paws held up against the chest in a sitting pose. -
Add the eye detail:
Dip the very tip of your smallest brush handle or a festive toothpick into white paint. Place a tiny single dot on the rabbit’s head for the eye.
Step 3: Final Landscape Details
-
Paint the tall grass:
Load your liner brush with black paint thinned slightly with water. Paint inconsistent, flickering strokes upward from the ground to create blades of grass. -
Add the seed stalk:
On the left side, paint a taller, thin stem reaching up into the pink sky. Add small, scattered marks branching off the stem to represent a wild seed head or wheat. -
Create the setting sun:
find a spot near the horizon line, just behind the rabbit. Use the handle of a brush dipped in white to stamp a perfect circle for the distant sun or moon. -
Seal the artwork:
Allow the rock to cure for at least 24 hours. Finish by spraying it with a clear varnish to protect the paint from chipping and to deepen the sunset colors.
Add Sparkle
Mix a tiny amount of glitter glaze into the violet sky section before sealing, or add a dot of metallic gold paint to the center of the sun for extra shimmer.
Place this little piece of art on a windowsill to catch the evening light
BRUSH GUIDE
The Right Brush for Every Stroke
From clean lines to bold texture — master brush choice, stroke control, and essential techniques.
Explore the Full Guide
Carrot Treat Rocks for the Easter Bunny
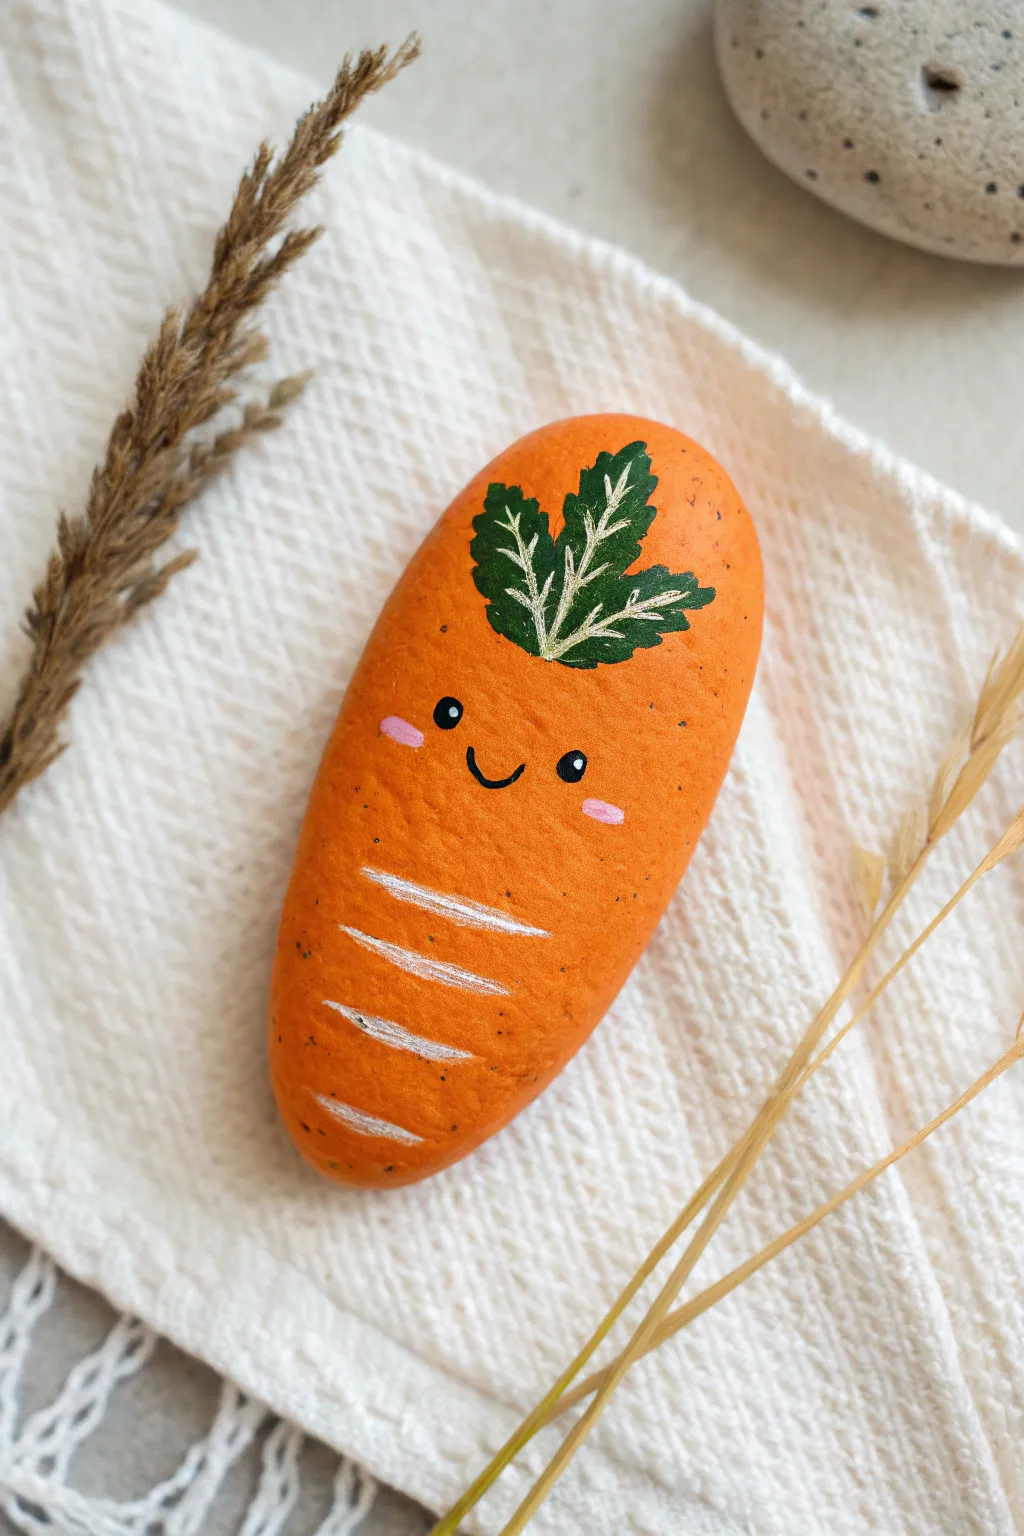
Transform a simple oblong stone into an adorable, smiling carrot perfect for hiding in the garden or adding to an Easter basket. This vibrant painted rock features charming facial details and leafy greens that make it unmistakably festive.
Detailed Instructions
Materials
- Smooth, elongated river rock (oval shape)
- Orange acrylic paint
- Dark green acrylic paint
- White acrylic paint or paint pen
- Black fine-point paint pen or liner brush
- Light pink acrylic paint
- Small flat brush
- Fine detail brush
- pencil
- Matte or satin sealant spray
Step 1: Base Coating
-
Clean the Stone:
Begin by scrubbing your rock with warm soapy water to remove any dirt or oils. Let it dry completely before starting, as moisture can trap bubbles under the paint. -
Apply the Base Orange:
Using a flat brush, coat the entire top surface of the rock with bright orange acrylic paint. You don’t need to paint the very bottom if you plan to leave it in the dirt. -
Add a Second Coat:
Once the first layer is dry to the touch, apply a second coat of orange to ensure the color is opaque and vibrant. Smooth out your brushstrokes as you go. -
Dry Completely:
Allow the orange base to dry fully. If the paint is tacky, your detail work might smudge or pull up the layer beneath.
Smooth Surface Secret
Apply a coat of white gesso before your orange paint. This primes the porous rock surface and makes your top colors pop much brighter.
Step 2: Face and Details
-
Sketch the Leaf:
Lightly sketch the outline of the carrot tops (leaves) near the taller, wider end of the rock using a pencil. -
Paint the Leaf Silhouette:
Fill in your leaf sketch with dark green paint. Aim for a jagged, organic shape that mimics carrot greens, rather than a perfect oval. -
Outline the Leaf Veins:
Once the green is dry, use a very fine brush or a white paint pen to draw a central stem and small veins radiating outward on the green shape. -
Draw the Eyes:
positioning them about a third of the way down from the top. Use a black paint pen or liner brush to make two small, solid black circles for the eyes. -
Add Eye Highlights:
Dip the tip of a toothpick or a dotting tool into white paint and add a tiny dot to the upper right corner of each black eye for sparkle. -
Create the Smile:
Draw a small, U-shaped mouth right between the eyes using your black liner. Keep the line thin for a delicate look. -
Paint Rosy Cheeks:
With light pink paint, dab two small ovals horizontally just below the eyes on the outer edges of the face.
Garden Markers
Instead of a face, paint the name of a vegetable on the carrot to use these as adorable, weather-proof garden row markers.
Step 3: Texture and Finishing
-
Add Texture Lines:
Using a thin brush and white paint, create 3-4 slightly curved horizontal lines on the lower half of the carrot to simulate ridges. -
Soften the Ridges:
If the white lines look too stark, you can gently dry-brush a tiny bit of orange over them to blend them into the background. -
Speckle Effect:
To give the carrot organic texture, mix a darker orange or diluted brown. Dip an old toothbrush or stiff brush into it and flick tiny specks onto the orange sections. I find cover the face area with a piece of paper first keeps it clean. -
Final Drying:
Let all the paint layers cure for at least a few hours. -
Seal the Rock:
Spray the rock with a clear matte or satin sealant. This protects the paint from weather if you plan to hide it outside for an Easter egg hunt.
Enjoy hiding your cheerful carrot rock for someone special to find
Spring Tulip Wreath Around an Egg
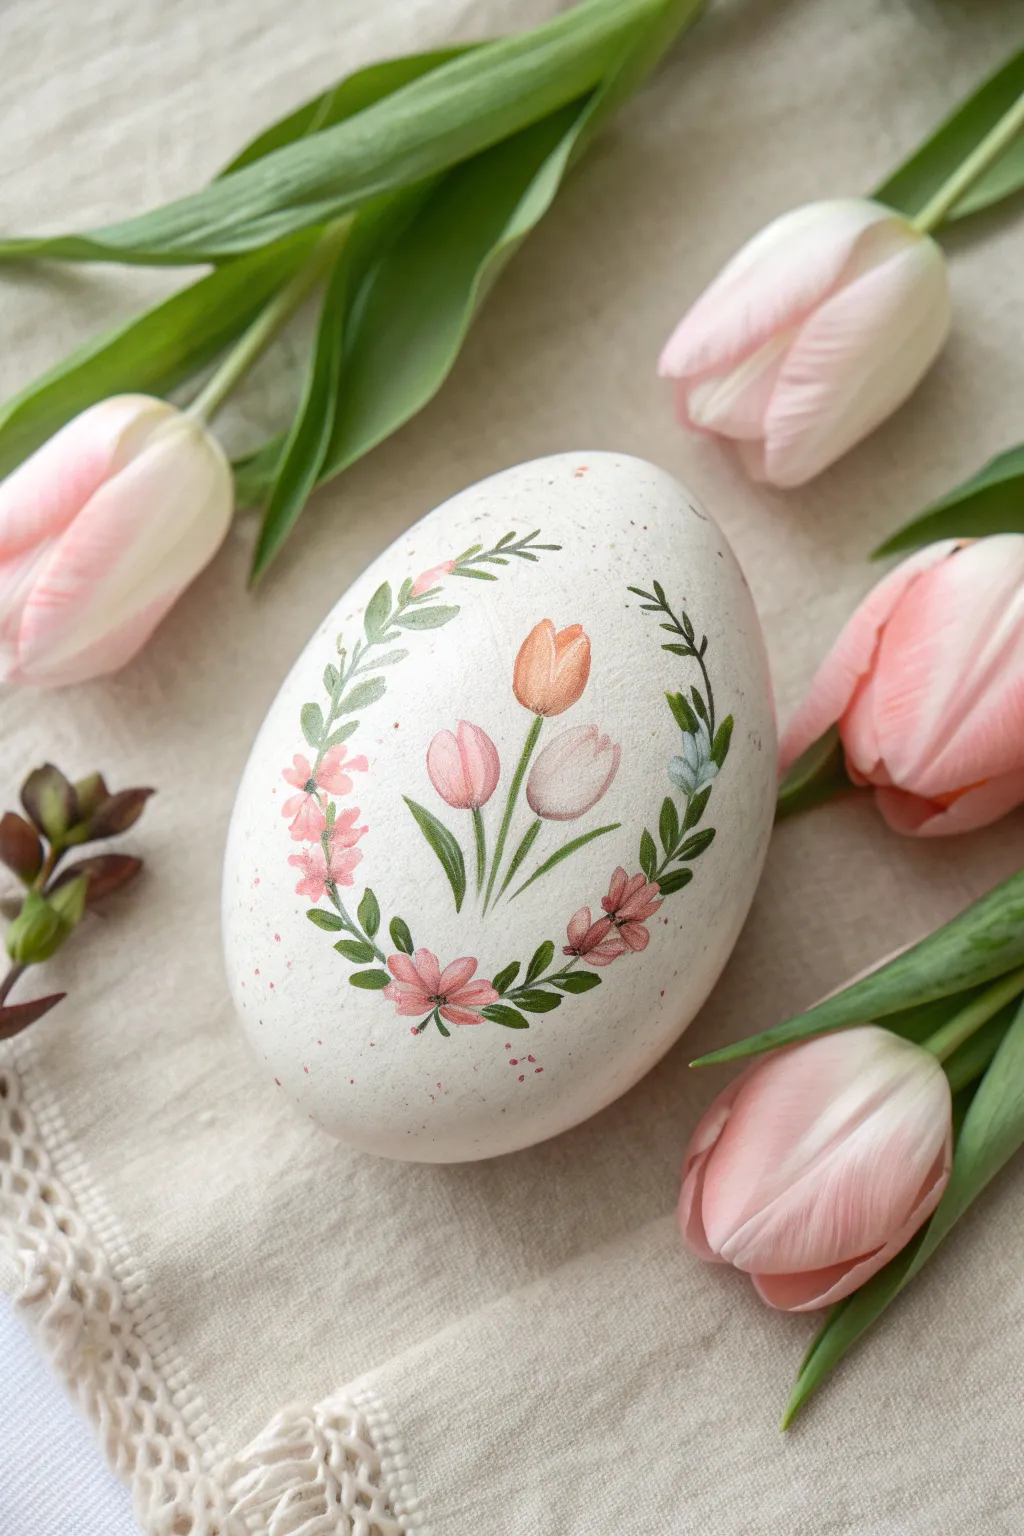
Celebrate the softness of spring with this elegant egg-shaped rock project featuring a gentle watercolor-style design. The central motif showcases three delicate tulips surrounded by a flowing wreath of greenery and tiny pink blossoms, all set on a speckled creamy background.
Step-by-Step Guide
Materials
- Large, smooth egg-shaped rock (or a wooden egg)
- Acrylic paints: Titanium White, Cream/Off-White, Salmon Pink, Soft Orange, Dusty Rose, Sage Green, Dark Olive Green, Burnt Umber
- Fine-grit sandpaper (400 grit)
- Pencil (HB or lighter)
- Paintbrushes: Flat shader (size 6), Round pointed brushes (size 0, 00, and 3)
- Old toothbrush (for speckling)
- Matte spray varnish or sealant
- Palette and water cup
Step 1: Preparation & Base Coat
-
Surface Prep:
Clean your rock thoroughly with soap and water to remove any dirt or grease. If the surface has rough texture, give it a quick sanding with fine-grit sandpaper to ensure your delicate brushstrokes glide smoothly. -
Base Color Mixing:
Mix a generous amount of Titanium White with a very small drop of Cream or a tiny touch of Burnt Umber. You want an off-white, eggshell tone rather than a stark, clinical white. -
Applying the Base:
Using your flat shader brush, paint the entire rock with your off-white mixture. Let it dry completely, then apply a second or third coat until the coverage is perfectly opaque and smooth. -
Adding Texture:
For that realistic eggshell look, dilute a tiny bit of Burnt Umber or Salmon Pink with water until it’s very runny. Dip an old toothbrush into this mixture and lightly flick the bristles with your thumb to mist tiny speckles onto the rock. Keep this subtle.
Fixing Wobbly Lines
If your vine lines get too thick or wobbly, let them dry completely. Then, use your background off-white color to “cut in” and paint over the mistake to thin the line back down.
Step 2: Sketching the Design
-
Mapping the Center:
Once the speckles are dry, lightly mark the center point of the egg. Sketch three simple teardrop shapes for the tulip heads: one taller central one, and two slightly shorter ones angled outward on either side. -
Drafting the Wreath:
Draw an oval or circle roughly surrounding your tulips to guide the wreath placement. Sketch simple curved lines following this oval to represent the main stems of the greenery.
Level Up: 3D Effect
Use a puffy paint or dimensional medium for the tiny flower centers or the tulip petals. This adds a tactile, raised texture that makes the painted rock feel more like a decorated sugar egg.
Step 3: Painting the Blooms
-
Central Tulips Layer 1:
Using a size 3 round brush, paint the basic shapes of the tulip heads. Use Soft Orange for the top center bloom, Salmon Pink for the left bloom, and a pale Dusty Rose mixed with white for the right bloom. -
Tulip Shading:
While the paint is still slightly tacky, mix a slightly darker version of each color. Add a shadow to the bottom of each flower head to create roundness and depth. I find blending this quickly while wet keeps it soft. -
Adding Petal Definitions:
Switch to your size 0 brush. Use a creamy white paint to add highlights on the upper curves of the tulips, suggesting where the light hits the petals. -
Pink Blossoms:
Moving to the wreath, paint small clusters of five-petal flowers using the Salmon Pink. Place a larger cluster at the bottom center and smaller ones climbing up the left side of the wreath. -
Blossom Centers:
Add tiny darker pink or red dots to the centers of these small flowers to give them dimension.
Step 4: Painting the Greenery
-
Tulip Stems:
Mix Sage Green with a touch of Olive. Using the size 0 brush, paint three slender stems originating from the bottom of the tulip heads, converging near the bottom of the wreath. -
Main Wreath Vines:
Load your brush with Sage Green. Follow your pencil guides to paint the main curved vines that form the oval wreath shape, connecting your floral clusters. -
Leaf Placement:
Paint small, pointed leaves growing off the main vines. Vary the direction—some pointing up, some angled out. Use a ‘press and lift’ motion with your round brush to get tapered tips. -
Darkening for Contrast:
Mix a Dark Olive Green (add a touch of brown/black to your green). Go back in and add darker leaves behind the lighter ones, particularly near the bottom of the wreath and around the pink flower clusters. This creates volume. -
Adding Wispy Details:
Use your finest 00 brush with watered-down Sage Green to add tiny, hair-thin wisps and tendrils extending outward from the main wreath, giving it a natural, wild look.
Step 5: Final Touches
-
Highlighting Leaves:
Mix a little white into your Sage Green. Add a tiny stroke of this lighter green to the top edge of a few prominent leaves to make them pop. -
Sealing:
Allow the paint to cure for at least 24 hours. Finish with a matte spray sealer to protect your artwork without adding a distracting glossy shine.
Display your painted egg in a small nest or bowl for a charming seasonal decoration that will last for years

PENCIL GUIDE
Understanding Pencil Grades from H to B
From first sketch to finished drawing — learn pencil grades, line control, and shading techniques.
Explore the Full Guide
Simple Cross on a Hill Rock
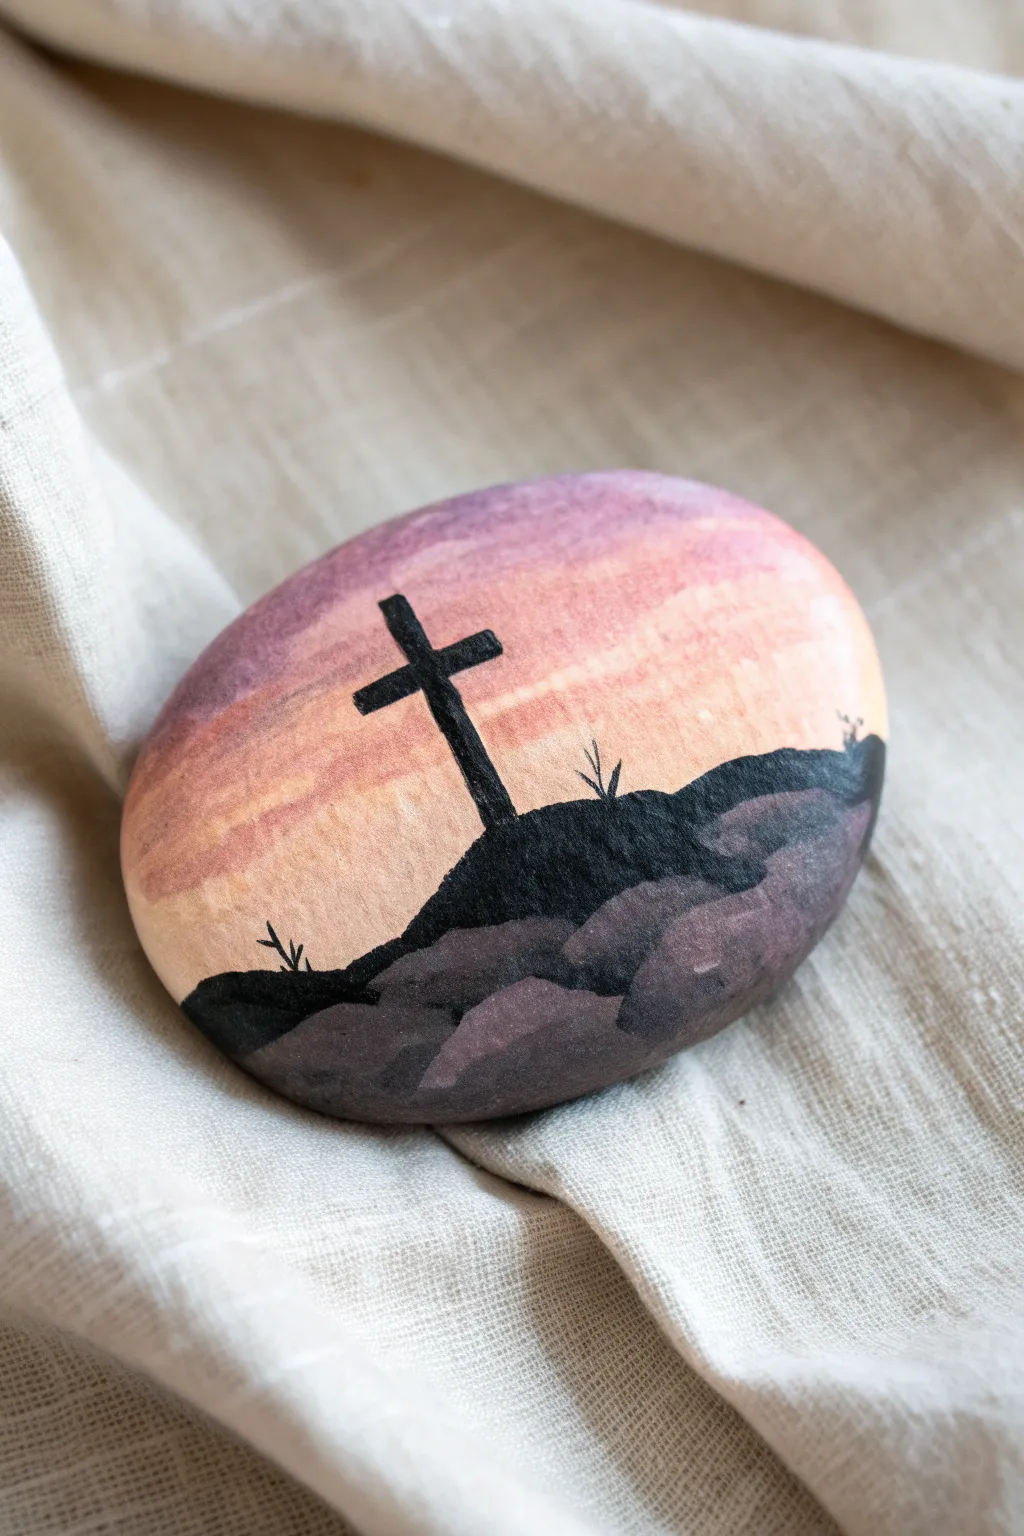
Capture the solemn beauty of Easter morning with this serene painted rock featuring a stark black cross against a soft, blending sunrise. The gradient sky creates a stunning backdrop for the hills, making this a meaningful holiday decoration or gift.
How-To Guide
Materials
- Smooth oval river rock
- White gesso or acrylic primer
- Acrylic paints (Violet, pink, peach/light orange, white, black, dark grey/purple)
- Flat shader brush (size 6 or 8)
- Small round detail brush (size 0 or 1)
- Sponge dabber (optional for blending)
- Matte sealer spray or varnish
Step 1: Preparing the Canvas
-
Clean the Stone:
Before starting, scrub your rock well with warm soapy water to remove any dirt or oils, then let it dry completely in the sun. -
Prime the Surface:
Apply a base coat of white gesso or white acrylic paint to the top face of the rock. This creates a bright foundation that will make your sunset colors pop rather than sinking into the stone.
Uneven Blending?
If your sky gradient looks streak, simply wait for the first layer to dry and apply a second coat. Acrylics blend much smoother on the second pass when the rock surface is already covered.
Step 2: Painting the Sky Gradient
-
Mix Your Sunset Colors:
Prepare your palette with a gradient scale: a dusty violet, a soft rose pink, a peach tone, and a very light cream or warm white. -
Start at the Top:
Using your flat brush, paint the top third of the rock with the dusty violet shade, following the curve of the stone. -
Add the Middle Tone:
While the violet is still slightly wet, pick up the rose pink and paint the middle section, overlapping the violet slightly to encourage blending. -
Finish the Horizon:
Apply the peach tone near the bottom third, and fade it into the light cream right where the horizon line will eventually be. I like to keep this lowest area brightest to simulate the rising sun. -
Blend the Transitions:
With a clean, slightly damp brush, gently stroke back and forth horizontally over the areas where the colors meet to create a smooth, seamless transition. Let this dry completely before moving on.
Step 3: Reviewing the Landscape
-
Mix a Shadowy Hue:
Instead of pure black for the foreground rocks, mix a dark grey with a touch of purple to create detail within the darkness. -
Block in the Hill Shape:
Using the dark grey-purple mixture, paint the undulating shape of the rocky ground across the bottom of the stone. Make the center slightly higher like a mound. -
Layer the Darkness:
Once the initial grey shape is dry, mix a wash of black (thinned slightly with water) and glaze it over the bottom-most parts of the rocks to create depth and shadows.
Level Up: Metallic Touch
Mix a tiny amount of gold metallic paint into your lightest horizon color. This adds a subtle, spiritual shimmer to the sunrise area that only catches the light at certain angles.
Step 4: The Cross Silhouette
-
Outline the Cross:
Switch to your smallest detail brush and pure black paint. Carefully paint a vertical line rising from the center mound. -
Add the Crossbar:
Paint the horizontal crossbar about two-thirds of the way up the vertical line. The edges don’t need to be ruler-straight; a slightly organic, rough edge looks more like wood. -
Thicken and Refine:
Go over the cross shape to make it opaque and bold black, ensuring it stands out sharply against the sunset background. -
Anchor the Cross:
Add a small amount of black paint at the base of the cross where it meets the hill, blending it slightly into the mound so it looks firmly planted in the ground.
Step 5: Final Details
-
Paint Small Grasses:
Using the very tip of your detail brush, flick tiny, quick strokes upward from the black hill silhouette to represent sparse grass blades. -
Add Texture to the Ground:
Use a darker black to add definition to the rocky foreground, creating distinct humps or boulders in the silhouette. -
Let it Cure:
Allow the paint to dry for fully 24 hours to ensure all layers are set. -
Seal the Artwork:
Finish by applying a matte spray sealer to protect the paint from chipping and UV fading without adding too much distracting shine.
Place this beautiful stone in a garden pot or on a mantle as a peaceful reminder of the season
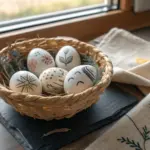
Basket of Eggs Rock
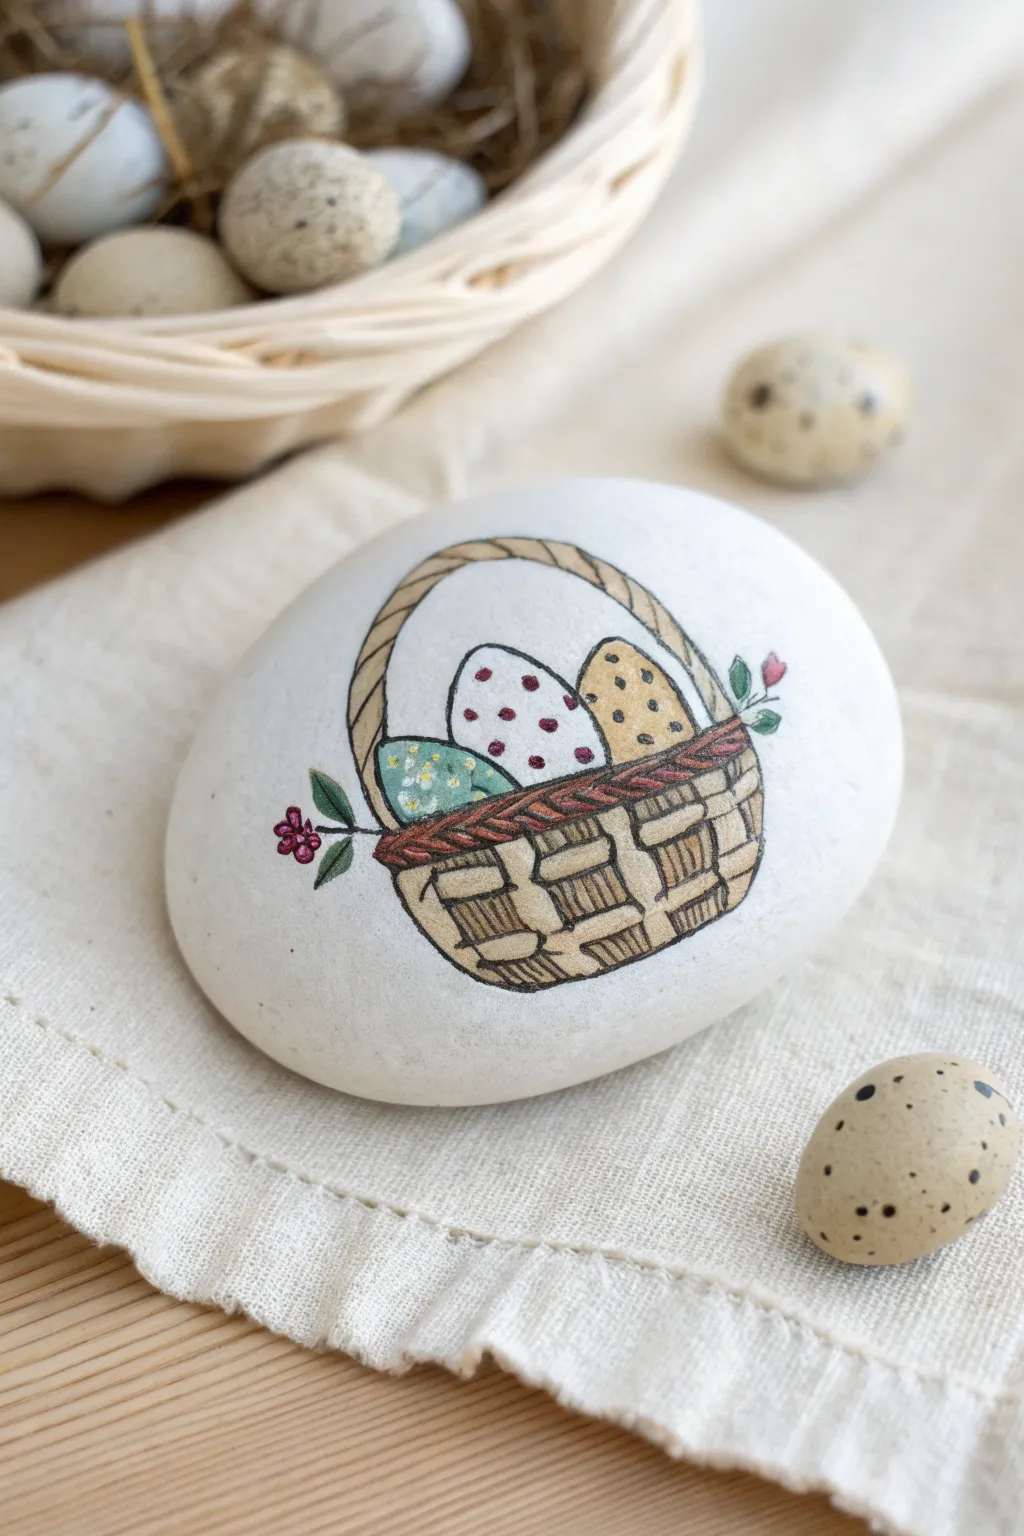
This delightful painted rock captures the essence of Easter with a quaint woven basket overflowing with decorated eggs. The design features soft, earthy tones and delicate floral accents, creating a warm, illustrative style perfect for holiday decor.
Detailed Instructions
Materials
- Smooth, flat white or light-colored river rock
- Fine-grit sandpaper (optional)
- Pencil and eraser
- Fine-point permanent markers (black, brown)
- Acrylic paints (brown, white, pastel blue, yellow, pink, green)
- Fine detail paintbrushes (sizes 0 and 00)
- Matte finish sealer or varnish
Step 1: Preparation and Sketching
-
Prepare the Surface:
Begin by washing your rock with soap and water to remove any dirt or oils. Let it dry completely. If the surface feels rough, lightly sand it with fine-grit sandpaper to create a smoother canvas for your detailed lines. -
Sketch the Basket Shape:
Using a pencil, lightly draw the outline of the basket. Start with a wide U-shape for the basket body and add a curved handle arching high above it. Keep your lines faint so they are easy to erase later if needed. -
Add the Eggs:
Inside the basket opening, sketch three oval shapes for the eggs. Position the central egg slightly higher than the two flanking it to create depth. Ensure they overlap naturally, hiding the bottom portions behind the basket rim. -
Detail the Rim:
Draw the rim of the basket where the handle meets the body. Sketch this as a slightly thicker, twisted band that runs horizontally across the top of the basket structure.
Ink Bleeding?
If your marker bleeds when you paint over it, switch to painting the color blocks first, then add the black outlines on top once the paint is completely dry.
Step 2: Outlining and Weave Detail
-
Ink the Main Outline:
Go over your pencil lines with a fine-point black permanent marker. Be steady and deliberate, tracing the eggs, basket shape, and handle. Allow the ink to dry for a moment before erasing any visible pencil marks. -
Create the Vertical Stays:
For the basket weave, draw vertical lines down the body of the basket. Space them unevenly or curve them slightly to mimic the rounded form of the basket. -
Draw the Horizontal Weave:
Connect the vertical lines with short, horizontal strokes. Offset these strokes row by row—like a brick pattern—to simulate a woven wicker texture. Don’t worry about perfection; a little irregularity adds to the rustic charm. -
Pattern the Handle:
Add diagonal lines across the handle strip to represent wrapping or twisting material.
Step 3: Painting the Design
-
Paint the Basket Base:
Using a very small brush, wash a diluted light brown or tan acrylic paint over the basket area. This acts as a base tone. Keep the paint thin enough so your black ink lines remain visible. -
Deepen the Shadow:
Mix a slightly darker brown tone. Carefully paint the ‘gaps’ in your weave pattern (the horizontal bands) or the bottom edges of the basket to add dimension and shadow. -
Color the Rim:
Paint the twisted rim of the basket with a reddish-brown or darker tan to distinguish it from the main body weave. -
Paint the Left Egg:
Fill the left egg with a soft pastel blue acrylic paint. You may need two thin coats for opaque coverage. -
Paint the Center Egg:
Paint the central, most prominent egg with white acrylic paint. This creates a clean background for the polka dots later. -
Paint the Right Egg:
Color the right-hand egg with a warm, sandy yellow or ochre shade.
Make it Shine
Add a touch of glitter paint or metallic gold to the decorated eggs for a subtle sparkle that catches the light.
Step 4: Finishing Details
-
Decorate the Eggs:
Once the base colors are fully dry, add patterns. Use a fine brush or paint pen to adding tiny white flowers to the blue egg, red polka dots to the white egg, and small black specks to the yellow egg. -
Add Floral Accents:
Paint small sprigs of greenery sticking out from the sides of the basket. Add tiny pink flowers to the tips of these stems to act as sweet, decorative fillers. -
Define the Basket Lines:
If painting obscured any of your initial ink work, go back over the main structural lines of the basket with the fine black marker to make them pop again. -
Seal the Rock:
Allow the entire design to cure for at least 24 hours. Finish by applying a coat of matte sealer to protect your artwork from chipping and fading over time.
Now you have a timeless little basket that captures the joy of the season


Peekaboo Bunny Behind a Painted Egg
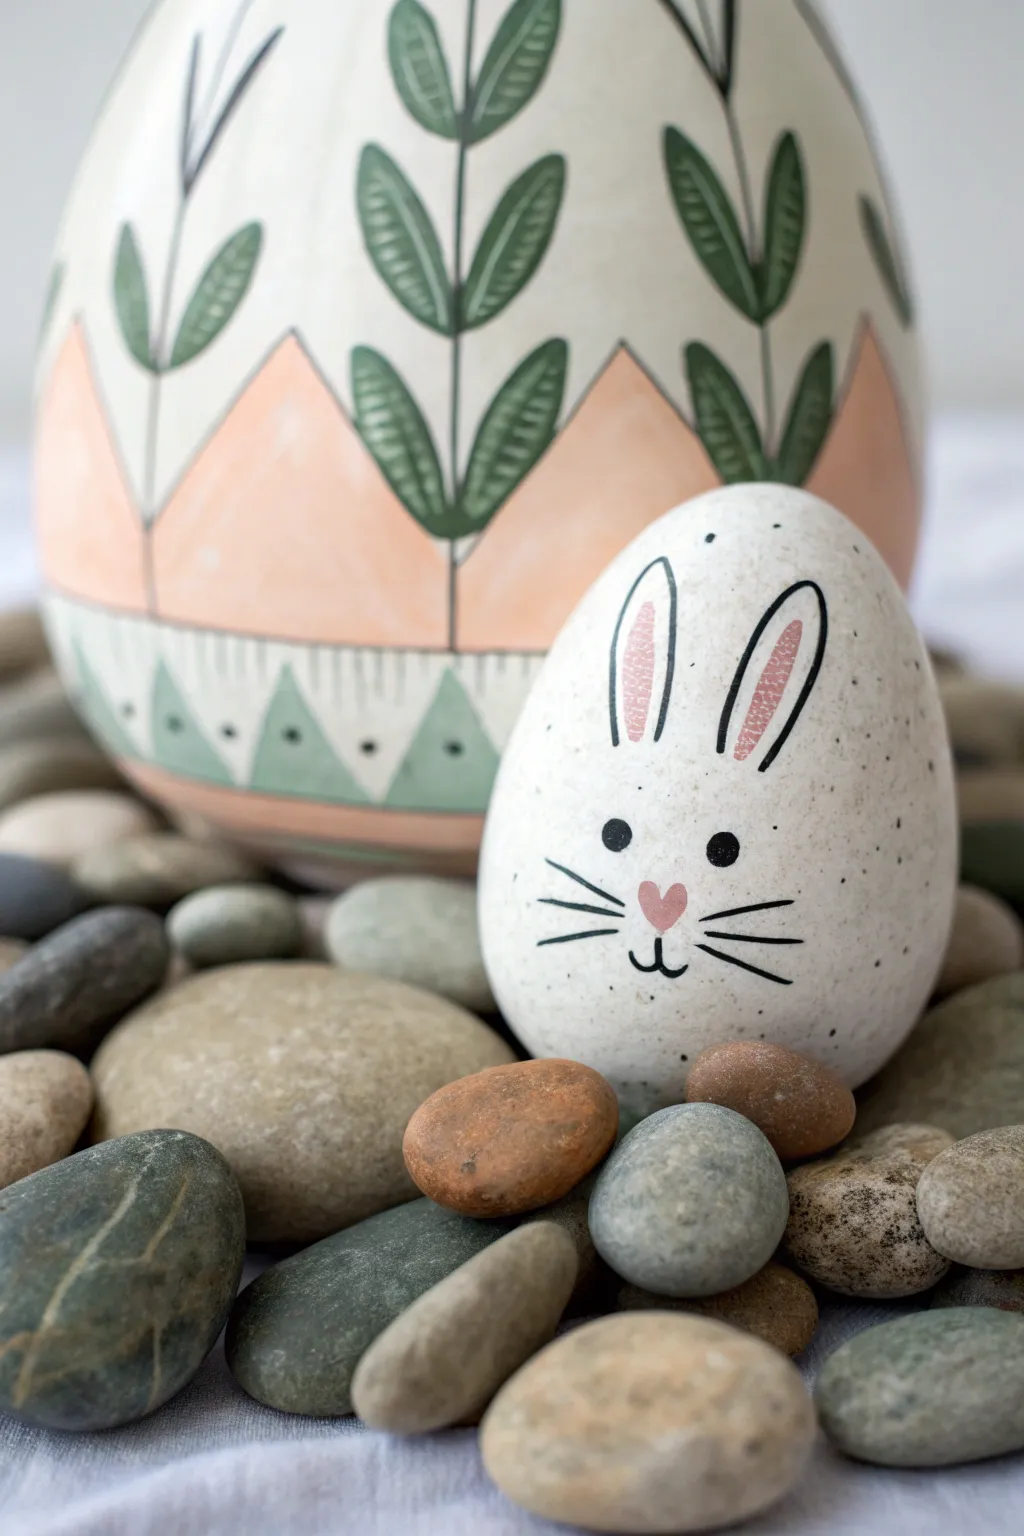
Transform a simple stone into a charming Easter decoration with this minimalist bunny design. The speckled finish gives it the look of a natural egg, while the simple line work adds a sweet, animated personality.
How-To Guide
Materials
- Smooth, egg-shaped rock
- Off-white or cream acrylic paint
- Light brown acrylic paint
- Pink acrylic paint
- Black fine-point paint pen or brush marker
- Old toothbrush or stiff bristle brush
- Small round paintbrush
- Matte finish sealer spray
Step 1: Base Coat & Texture
-
Clean surface:
Begin by washing your rock thoroughly with soap and water to remove any dirt or oils, then let it dry completely. -
Apply base color:
Paint the entire surface of the rock with an off-white or cream acrylic paint. This creates a warm, egg-shell background. -
Build opacity:
Let the first coat dry, then add a second or third coat until the natural rock color is completely covered and the finish is smooth. -
Prepare splatter paint:
Dilute a small amount of light brown acrylic paint with water until it has an inky consistency. -
Create speckles:
Dip an old toothbrush into the thinned brown paint. Hold it near the rock and run your thumb across the bristles to flick tiny speckles onto the surface. -
Let it set:
Allow the speckled paint to dry completely. I like to let this dry for at least an hour so the speckles don’t smear during the next steps.
Splatter Control
To avoid large blobs when speckling, test your flicking technique on a scrap piece of paper first. A drier brush creates finer mist-like dots.
Step 2: Face & Details
-
Outline the ears:
Using a black fine-point paint pen, draw two long, oval-shaped ears near the top of the rock. Leave a small gap at the bottom of each oval. -
Fill the ears:
With a small brush and pink paint, fill the inside of the ear outlines. Leave a distinct border of the cream background between the pink and the black line. -
Add texture to ears:
Once the pink paint is dry, use a very dry brush or the paint pen to add tiny, vertical scratch marks inside the pink area for a textured, sketched look. -
Draw the eyes:
Use the black paint pen to draw two small, solid black circles for eyes about a third of the way down the rock. -
Paint the nose:
Paint a small, upside-down heart shape in pink placed centrally below the eyes. -
Draw the mouth:
From the bottom point of the heart nose, draw a small vertical line down, splitting into two curves to form the mouth anchor. -
Add whiskers:
Finally, draw three horizontal whiskers on each cheek area using quick, confident flicks of your black pen.
Personalize It
Give your bunny extra character by painting accessories like a small bow tie at the bottom or a flower crown near the ears.
Step 3: Finishing Touches
-
Check details:
Look over your design for any uneven lines or needed touch-ups, correcting them carefully. -
Seal the artwork:
Spray the entire rock with a matte finish sealer to protect the paint without adding an artificial glossy shine.
Nestle your new bunny creation into a bed of stones or moss for a delightful hidden surprise in your garden
Bunny Pawprint Trail Rocks
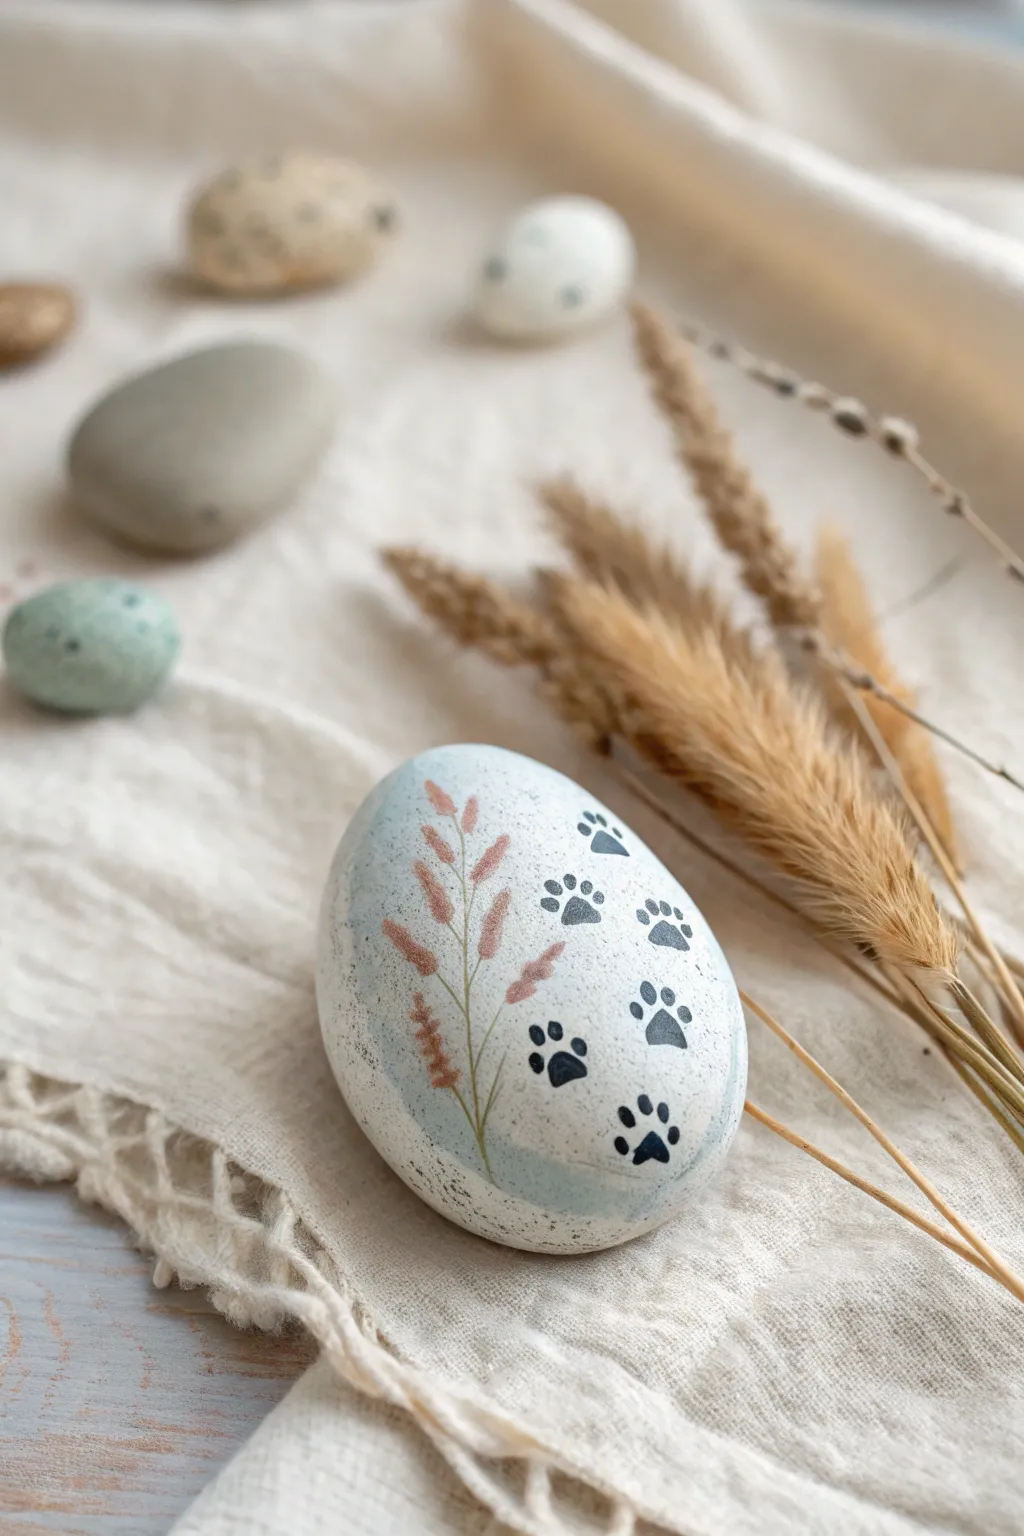
Transform a simple smooth stone into a charming Easter keepsake featuring delicate botanical sprigs and a playful trail of pawprints. The natural speckling and soft, muted tones give this painted rock a sophisticated, organic feel perfect for seasonal decor.
Detailed Instructions
Materials
- Smooth, egg-shaped river rock
- Gesso or white acrylic primer
- Acrylic paints: White, Pale Blue-Grey, Soft Brown/Rust, Black
- Old toothbrush or stiff bristle brush
- Small flat brush
- Fine liner brush (size 0 or 00)
- Small round sponge or foam pouncer
- Matte varnish or sealant
Step 1: Preparing the Canvas
-
Clean and Prime:
Begin by washing your stone thoroughly with soap and water to remove any dirt or oils. Once completely dry, apply a coat of gesso or white acrylic primer. This ensures your colors will pop and creates a consistent texture. -
Apply Base Color:
Mix a very small amount of pale blue-grey paint into your white acrylic to create a cool, off-white eggshell tone. Paint the entire surface of the rock. You may need two coats for full opacity. -
Create Texture:
To mimic the look of a natural speckled egg, dip an old toothbrush or stiff brush into watery black or dark grey paint. Run your thumb across the bristles to flick tiny speckles onto the rock. Keep this subtle and random. -
Add Soft Shadowing:
While the speckles dry, mix a translucent glaze of the pale blue-grey paint with water. Gently sponge or brush a hazy, uneven patch on the lower left side of the rock to create depth and a soft, misty background for the botanical element.
Natural Speckles Pro Tip
Make the paint for your splatter very watery—like ink consistency. Test flicking on paper first; closer creates dense spots, further away creates fine mist.
Step 2: Painting the Botanicals
-
Sketch the Stem:
Using a liner brush and a diluted soft brown or olive-green paint, draw a very thin, slightly curved vertical line on the left side of the rock. This will serve as the main stem for your plant. -
Branch Out:
From the main stem, pull out tiny, hair-thin branches angling upwards. Keep your hand loose to ensure the lines look organic rather than rigid. -
Add Leaves or Buds:
Switch to a rust or soft brown color. Using the very tip of a small round brush, press gently along the branches to create elongated, tear-drop shapes representing dried flower buds or autumnal leaves. -
Layering Details:
Once the first layer of leaves is dry, add a few smaller strokes of a slightly darker brown near the base of the leaves to imply volume and shadow.
Level Up: Metallic Hint
Mix a tiny drop of gold paint into your rust color for the plant leaves. It will catch the light subtly without overpowering the matte, natural look.
Step 3: The Pawprint Trail
-
Plan the Path:
Visualize a curved path walking up the right side of the rock. Use a pencil to faintly mark the placement if you aren’t confident freehanding. -
Paint Main Pads:
Using black acrylic paint and a small round brush (or the back end of a paintbrush handle), stamp the main triangular pad for the lowest paw print. -
Add Toe Beans:
Dip a smaller tool, like a dotting tool or a toothpick, into black paint. Place four small dots slightly above the main pad to create the toes. Adjust the pressure to keep them oval rather than perfectly round. -
Continue the Trail:
Repeat this process, moving upwards and slightly curving to the left. Vary the angle of the prints slightly to mimic a natural walking pattern. -
Vary Opacity:
For a worn, vintage look, you can lightly blot one or two of the paw prints with a paper towel before they dry fully, making them look slightly faded. -
Final Touches:
Check your botanical sprig and paw prints for any patchy areas. Use your liner brush to touch up edges or deepen the black if needed.
Step 4: Finishing Up
-
Dry Time:
Allow the rock to sit undisturbed for at least an hour to ensure all layers, especially the thick dots of the paw prints, are completely hardened. -
Seal the Artwork:
Apply a coat of matte varnish or sealant. A matte finish is crucial here to maintain the natural, stone-like aesthetic and avoid an artificial plastic shine.
Now you have a serene little piece of art that captures the quiet beauty of spring
Easter Egg Mandala Dot-Paint Rocks

Capture the soft, earthy elegance of a mandala on a perfectly smooth stone with this intricate dot-painting project. The design features a delicate central flower surrounded by expanding rings of white and terracotta dots, creating a soothing, textural piece of art.
How-To Guide
Materials
- Smooth, egg-shaped river rock (tan or beige base color)
- Acrylic craft paints: Titanium White, Terracotta/Burnt Sienna, Cream/Light Beige
- Dotting tools (various sizes, from fine stylus to rod)
- Small fine-tipped paintbrush
- Compass or white chalk pencil (for guidelines)
- Damp cloth or cotton swabs (for cleanup)
- Acrylic gloss or matte varnish (optional)
Step 1: Preparation & Center Design
-
Prepare the surface:
Begin by washing your rock with soap and water to remove any dirt or oils. Let it dry completely. If your natural rock isn’t the right shade, you can paint a base coat of tan or light beige acrylic paint over the entire stone. -
Mark guidelines:
Lightly find the center of the rock. Using a chalk pencil or compass, verify where your center point is, as this is crucial for symmetry. You can lightly sketch concentric circles if you struggle with freehand spacing. -
Paint the central flower:
Using a small brush or a fine dotting tool, paint a small white dot in the absolute center. Using a slightly larger tool, drag eight white teardrop shapes outward from the center dot to create the petals of the central daisy motif. -
Dot the petal border:
Once the petals are tacky or dry, use a very fine tool to place tiny terracotta-colored dots between the tips of the white petals. Surround the entire flower with a tight ring of small white dots.
Uneven Dots?
If your paint peaks or leaves ‘Hershey Kiss’ tips, add a drop of pouring medium or water to thin it slightly. The paint should self-level into a flat dome.
Step 2: Building the Inner Rings
-
Create the first color band:
Switch to your terracotta paint. Create a dense ring of medium-sized dots immediately surrounding the white border you just finished. Keep these dots close together to form a solid band of color. -
Add the white emphasis ring:
Using a larger dotting tool size, press a ring of bold white dots around the terracotta band. Try to align these so they sit in the ‘valleys’ of the previous row for a honeycomb effect. -
Detail the white ring:
I find that adding depth works best here by taking a finer tool and placing a tiny terracotta dot inside each large white dot. This creates a bullseye effect. -
Expand with spacing:
Create a new ring of small cream or light beige dots. Allow slightly more negative space between this ring and the previous one to let the stone’s natural color show through.
Level Up: Texture
Mix fine sand or baking soda into the terracotta paint used for the large outer circles. This adds a gritty, realistic texture that contrasts with smooth white dots.
Step 3: Outer Mandala Pattern
-
Establish the large outer circles:
Around the perimeter of your current design, place large, widely spaced terracotta dots. These will serve as the anchors for the outer pattern. -
Frame the anchors:
Using your smallest dotting tool or stylus, walk white dots around each large terracotta circle. Start at the top of the circle and dot down one side, then the other, until it is completely framed. -
Fill the gaps:
In the triangular spaces created between the large framed circles, place a cluster of medium white dots. This helps bridge the design and keeps the circular flow. -
Add top highlights:
Go back to the large terracotta circles you painted in step 8. Place a smaller cream or light peach dot in the center of each one to brighten them. -
Extend down the sides:
As the rock curves away, continue the pattern by adding another row of large terracotta circles below the previous set, nesting them in the gaps. Repeat the white dot framing technique.
Step 4: Finishing Touches
-
Micro-detailing:
Inspect the stone for any empty spaces that feel unbalanced. Use your finest tool to add tiny ‘dust’ dots of white in these gaps to soften the transitions. -
Centers of centers:
For a final pop of detail, place a microscopic white dot in the very center of the terracotta circles on the outer edge. -
Clean up guidelines:
Allow the paint to dry fully—overnight is best. Once hard, use a damp cotton swab to gently wipe away any visible chalk guidelines. -
Seal the rock:
To protect your intricate work, apply a coat of varnish. A matte spray keeps the stone looking natural, while gloss makes the dots look like enamel.
Now you have a beautifully symmetrical stone that captures the spirit of spring regeneration
Metallic Accent Egg Rocks
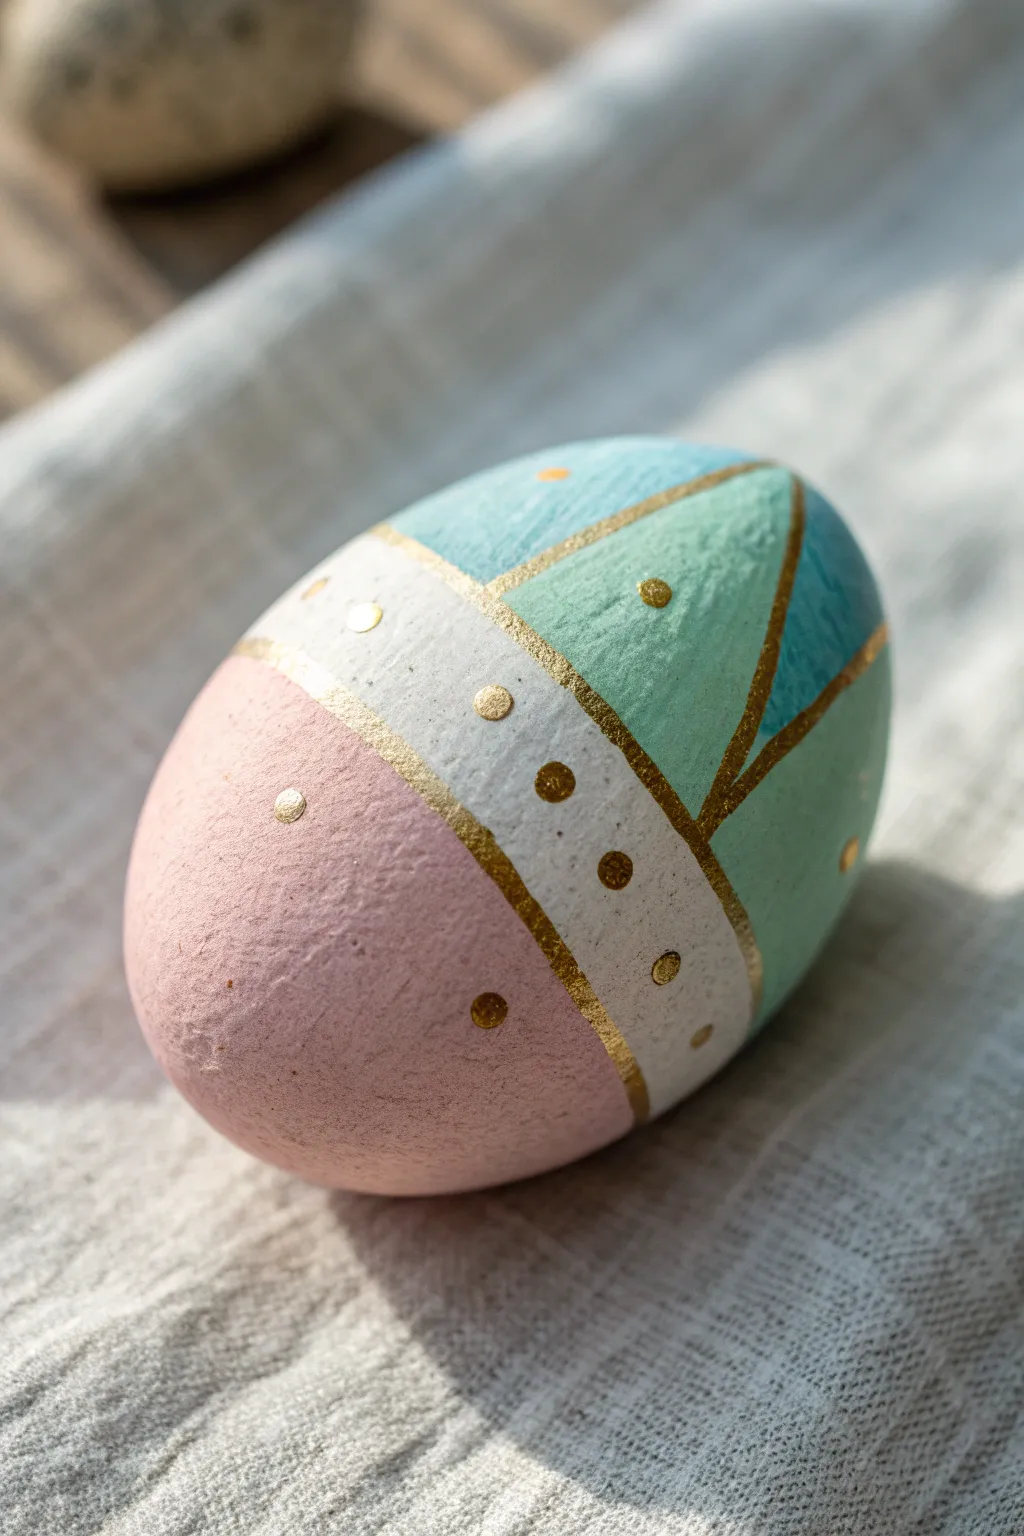
Transform a smooth river rock into an elegant Easter decoration with this geometric design combining soft matte pastels and luxurious metallic gold contours. The finish mimics a high-end porcelain ornament, making it a sophisticated addition to your holiday decor.
Step-by-Step Tutorial
Materials
- Smooth, egg-shaped river stone
- Acrylic paints: matte pastel pink, white, mint green, and teal
- Gold metallic paint pen or fine liner brush with gold fluid acrylics
- Fine-grit sandpaper
- Flat shader brushes (small sizes)
- Pencil for sketching
- Matte finish spray sealant
Step 1: Preparation & Base Blocking
-
Surface prep:
Begin by washing your stone thoroughly with soap and water to remove any dirt or oils. Once dry, lightly sand the surface if there are any rough patches; a smoother surface will make the geometric lines much crispier. -
Sketch the zones:
Using a pencil, lightly draw two horizontal bands that wrap around the circumference of the rock. This divides your egg into three main vertical sections: a bottom base, a middle band, and a top crown. -
Segment the top:
Inside the top crown section, sketch intersecting diagonal lines to create triangular segments. These will become the teal and mint facets later. -
Paint the base:
Load a flat shader brush with pastel pink acrylic paint. Fill in the entire bottom section defined by your lowest pencil line. You may need two coats here to ensure the rock’s natural color doesn’t show through. -
Fill the middle band:
Switch to white acrylic paint and fill in the central band. Be careful near the pink edge; getting the line perfectly straight isn’t crucial yet, as the gold trim will cover the transition, but try to keep it neat. -
Color the geometric top:
Paint the triangular segments in the top section, alternating between mint green and a slightly darker teal. This creates a faceted, jeweled look. -
Dry completely:
Allow all the base colors to dry fully. If the paint feels cool to the touch, it needs more time.
Step 2: Gold Detailing
-
Start the gold bands:
Using a gold paint pen or a very fine liner brush loaded with metallic gold paint, draw a thick dividing line between the pink bottom and the white middle band. -
Outline the triangles:
Continue with the gold pen to outline all the geometric shapes in the top section. Trace over the pencil lines separating the mint and teal triangles, making sure the lines connect seamlessly to the band below. -
Divide the top and middle:
Draw the final horizontal gold band separating the top geometric section from the white middle band. -
Add large dots:
In the white middle band, add a series of gold dots. Paint larger dots spaced evenly apart first to establish rhythm. -
Layer smaller accents:
In between the larger dots on the white band, add tiny gold specks or smaller dots to create texture and variety. -
Detail the pink base:
Move down to the pink base section. Randomly disperse small gold dots across the pink field. I like to keep these sparse to let the pastel color breathe. -
Detail the top sections:
Add a single gold dot to the center of each mint or teal triangle at the top for a studded effect. -
Refine lines:
Go back over your main gold dividing lines if they look thin or transparent. A second pass adds a richer, more raised metallic effect. -
Erase pencil marks:
If any pencil lines are still visible under the paint (unlikely with acrylics, but possible), carefully touch them up with a dab of correct base color before sealing. -
Seal the artwork:
Spray the entire rock with a matte clear coat. This protects the paint from chipping and keeps the finish looking like unglazed ceramic.
Uneven Gold Lines?
If your gold paint pen skips or creates jagged edges, the rock surface might be too textured. Lightly sanding before painting is crucial, or switch to a liner brush.
Pro Tip: Liquid Gold
For the brightest metallic shine, use liquid gold leaf instead of standard acrylic gold paint. It reflects light much better but requires an oil-based brush cleaner.
Place your finished rock in a small basket or nest to show off its elegant angles
Watercolor-Wash Easter Egg Rocks
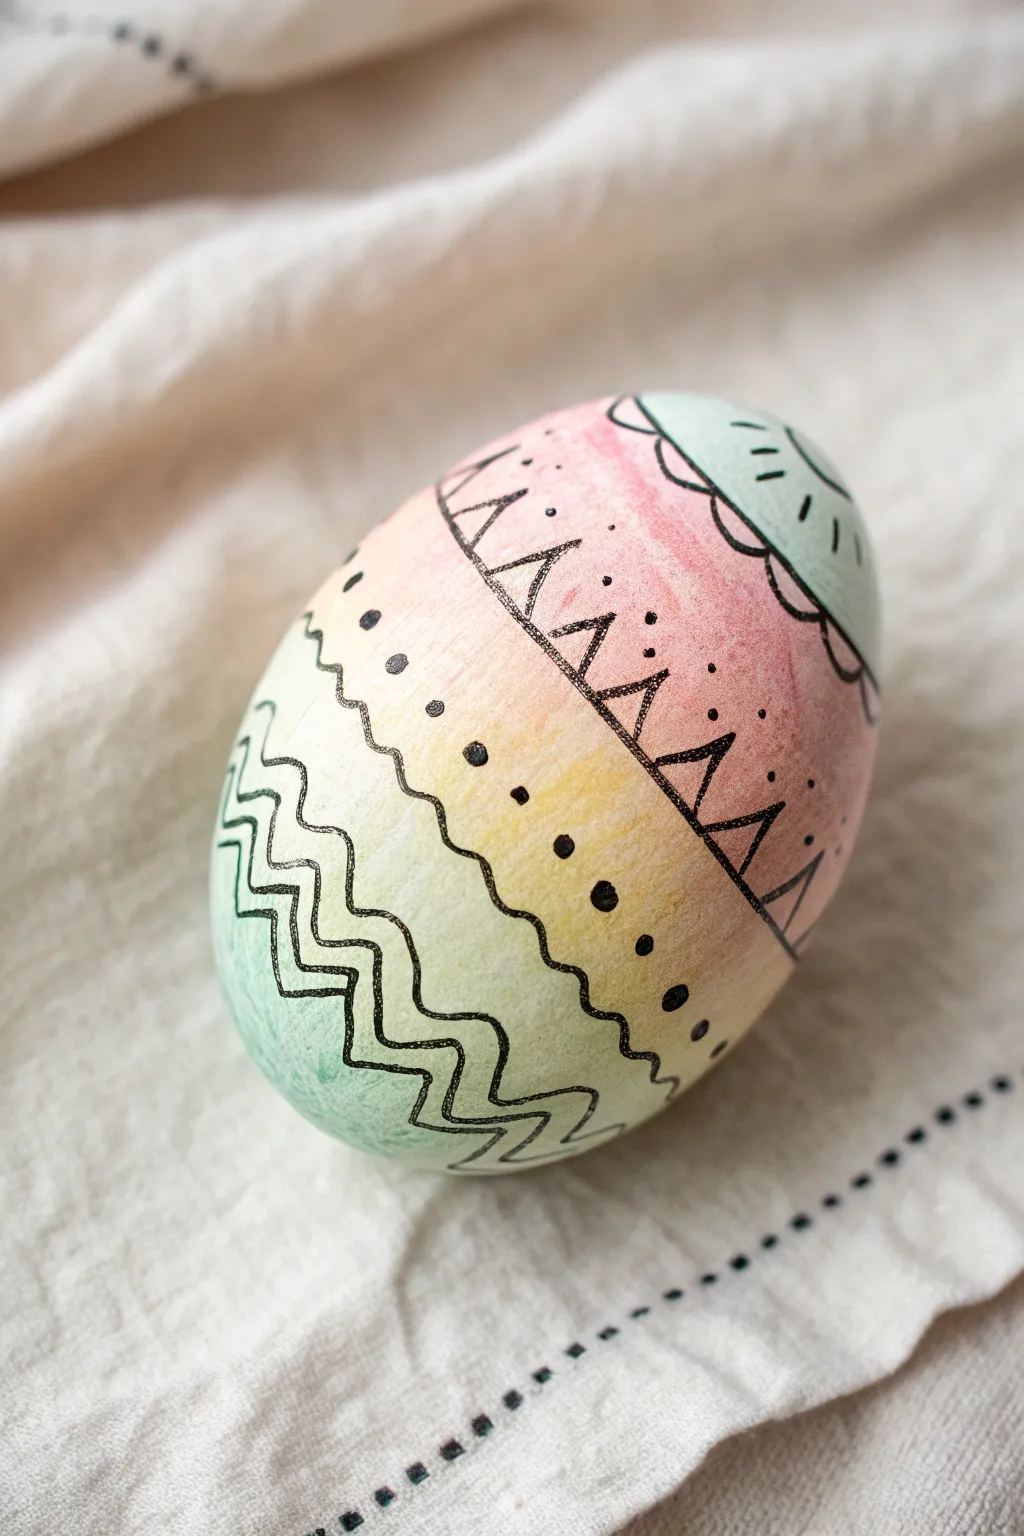
Transform a simple smooth stone into a delicate piece of Easter art with this faux-watercolor technique. The soft, blended pastel gradient pairs perfectly with stark black ink doodles for a modern, boho-chic look.
Step-by-Step Guide
Materials
- Smooth, oval-shaped river rock
- White acrylic paint (gesso preferred)
- Watercolor paints or fluid acrylics
- Soft synthetic paintbrush
- Fine-point black permanent marker or paint pen
- Small cup of water
- Paper towels
- Matte spray sealant
Step 1: Base Preparation
-
Clean the Stone:
Begin by washing your rock thoroughly with soap and water to remove any dirt or oils. Let it dry completely before starting. -
Apply a Base Coat:
Since watercolors won’t show up on a dark rock, prime the surface with a coat of white acrylic paint. This creates a bright canvas and helps the colors pop. -
Let it Dry:
Allow the white base coat to dry fully. If the rock’s natural color still shows through, apply a second thin coat for opaque coverage.
Bleed Prevention
If using a regular Sharpie, spray your sealant very lightly from a distance for the first coat. Heavy spray can cause permanent marker ink to run.
Step 2: Creating the Watercolor Wash
-
Mix Light Green:
Load your brush with a very watered-down light green paint. You want a translucent wash, not a thick opaque layer. -
Paint the Bottom:
Apply the green wash to the bottom third of the rock, brushing horizontally. -
Add Yellow:
Rinse your brush and pick up a watered-down yellow. Paint a stripe directly above the green, slightly overlapping the wet edge to encourage blending. -
Blend the Seam:
Use a clean, damp brush to gently run over the line where the green and yellow meet, softening the transition so there are no harsh lines. -
Introduce Pink:
Next, apply a band of diluted pink or coral paint above the yellow section. -
Blend Upward:
Again, use a damp brush to meld the yellow and pink together, creating a soft peachy transition zone. -
Top with Teal:
Finish the gradient by painting the very top tip of the egg with a light teal or mint blue wash, blending it down into the pink. -
Full Dry Time:
This is crucial: Let the paint dry completely. The surface must be bone-dry before you use a marker, or the ink will bleed and ruin the tip.
Step 3: Adding Ink Details
-
Plan Your Zones:
Visually divide the rock into horizontal bands corresponding roughly to your color changes. -
Draw Zig-Zags:
Starting near the bottom within the green zone, carefully draw two parallel zig-zag lines wrapping around the curve of the rock. -
Add Scallops:
Move up to the yellow/green transition area. Draw a scalloped line (bumpy waves) across the width of the stone. -
Dot the Band:
Just above your scalloped line, place a row of evenly spaced black dots to emphasize the curve. -
Create a Triangle Border:
In the pink section, draw a straight horizontal line. Top it with a series of triangles, like a mountain range. -
Hatch the Triangles:
Draw small vertical hatch marks inside the top half of the pink band to add texture. -
Top Accents:
Finish the top teal section with a simple curved line and a few radiating dashes, like a sunburst pattern at the apex. -
Seal the Art:
Once the ink is fully dry, finish with a matte spray sealant to protect your watercolor effect from moisture.
Metallic Touch
Trace over one of the zig-zag lines or the dots with a gold paint pen to add a shimmering, luxurious element to the design.
Now you have a charming, persistent Easter decoration that captures the softness of spring
Bunny vs. Egg Tic-Tac-Toe Rock Set
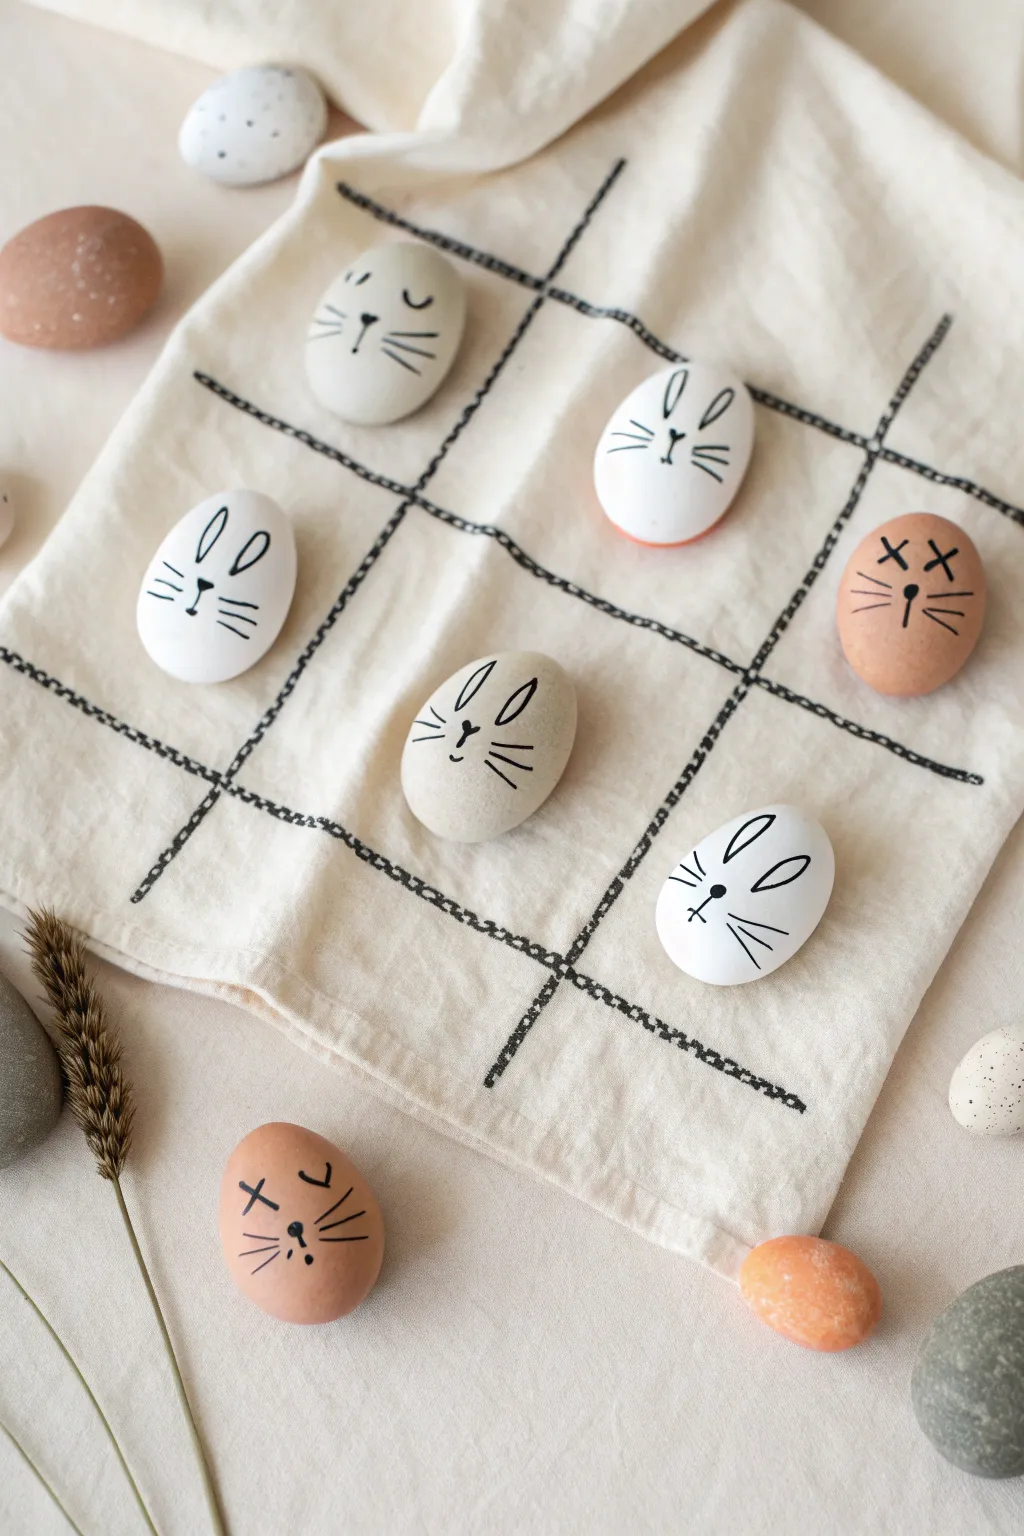
Turn a classic game into a festive Easter activity with this charming, minimalist rock painting project. Using smooth river stones and a simple piece of fabric, you’ll create a portable tic-tac-toe set featuring adorable bunny faces and decorated eggs.
Detailed Instructions
Materials
- 10 smooth, oval river rocks (roughly egg-sized)
- White acrylic paint (matte finish)
- Beige or light tan acrylic paint
- Small flat paintbrush
- Fine-point black paint pen or permanent marker
- Square of linen or cotton fabric (about 12×12 inches)
- Black fabric marker or paint pen
- Ruler
Step 1: Preparing the Game Pieces
-
Select your stones:
Sort through your collection of river rocks and choose ten that are relatively flat and oval-shaped to mimic eggs. Wash them thoroughly with soap and water to remove any dirt or oils, then let them dry completely. -
Base coat: The white team:
Take five of your rocks and paint the top surface with white acrylic paint. You may need two or three thin coats to get full, opaque coverage, letting each layer dry for about 15 minutes in between. -
Base coat: The tan team:
Paint the remaining five rocks with a beige or light tan acrylic paint to create a natural egg look. Applying thin layers helps avoid brush strokes and ensures a smooth finish for drawing later. -
Optional: Create accent rocks:
If you want the variety shown in the photo, you can leave one or two rocks unpainted if they have a nice natural stone color, or paint one in a terracotta shade.
Step 2: Drawing the Faces
-
Sketching the design:
Before committing with ink, I like to lightly sketch the face designs onto the dried paint with a pencil to ensure the spacing is just right. -
Drawing bunny ears:
Using your fine-point black paint pen, draw two long, narrow loops at the top of a white rock. These should look like simple bunny ears. -
Adding the bunny nose:
Slightly below the center of the rock, draw a small inverted triangle or a tiny ‘Y’ shape to form the bunny’s nose and mouth area. -
Whiskers and eyes:
Add three quick horizontal lines on each side of the nose for whiskers. For the eyes, you can draw two simple vertical ovals or small dots above the nose. -
The ‘X’ team design:
For the opposing team (the tan or terracotta rocks), draw two ‘X’ shapes for eyes to represent the traditional ‘X’ in tic-tac-toe, giving them a playful, sleeping expression. -
Completing the ‘X’ faces:
Add a simple vertical line and whiskers below the ‘X’ eyes to complete the face, keeping the style consistent with the white bunnies. -
Variation: The sleeping bunny:
On one of the white or natural stones, try drawing downward-curving semicircles for eyes to create a peaceful, sleeping bunny expression. -
Seal the rocks:
Once the ink is completely dry (give it at least an hour to prevent smearing), apply a clear matte sealer spray or varnish over the rocks to protect the paint from chipping during play.
Pro Tip: Pen Choice
Use a Posca pen or an oil-based marker for the faces. Standard Sharpies often turn purple or bleed when applied over acrylic paint.
Step 3: Creating the Board
-
Prepare the fabric:
Iron your square piece of linen or cotton fabric so it lies perfectly flat. Use pinking shears on the edges if you want to prevent fraying without sewing. -
Measure the grid:
Lay your finished rocks on the fabric to gauge spacing. Use a ruler to lightly mark a 3×3 grid with a pencil, ensuring the squares are large enough to hold your rocks comfortably. -
Draw the permanent grid:
Using a black fabric marker or paint pen, go over your pencil lines. To replicate the rustic look in the image, draw double or triple lines that overlap slightly loosely rather than one perfect straight line. -
Add cross-hatching detail:
For extra texture, make small, short hash marks along the main grid lines to simulate a stitched or sketched appearance. -
Final assembly:
Let the fabric ink dry completely before placing the rocks on top to play your first game.
Level Up: Travel Bag
Paint the grid onto a drawstring canvas pouch instead of a flat cloth. When game time is over, the board becomes the storage bag for the rocks.
This adorable set is now ready for backyard picnics or a cozy family game night
Easter Story Stone Mini Set
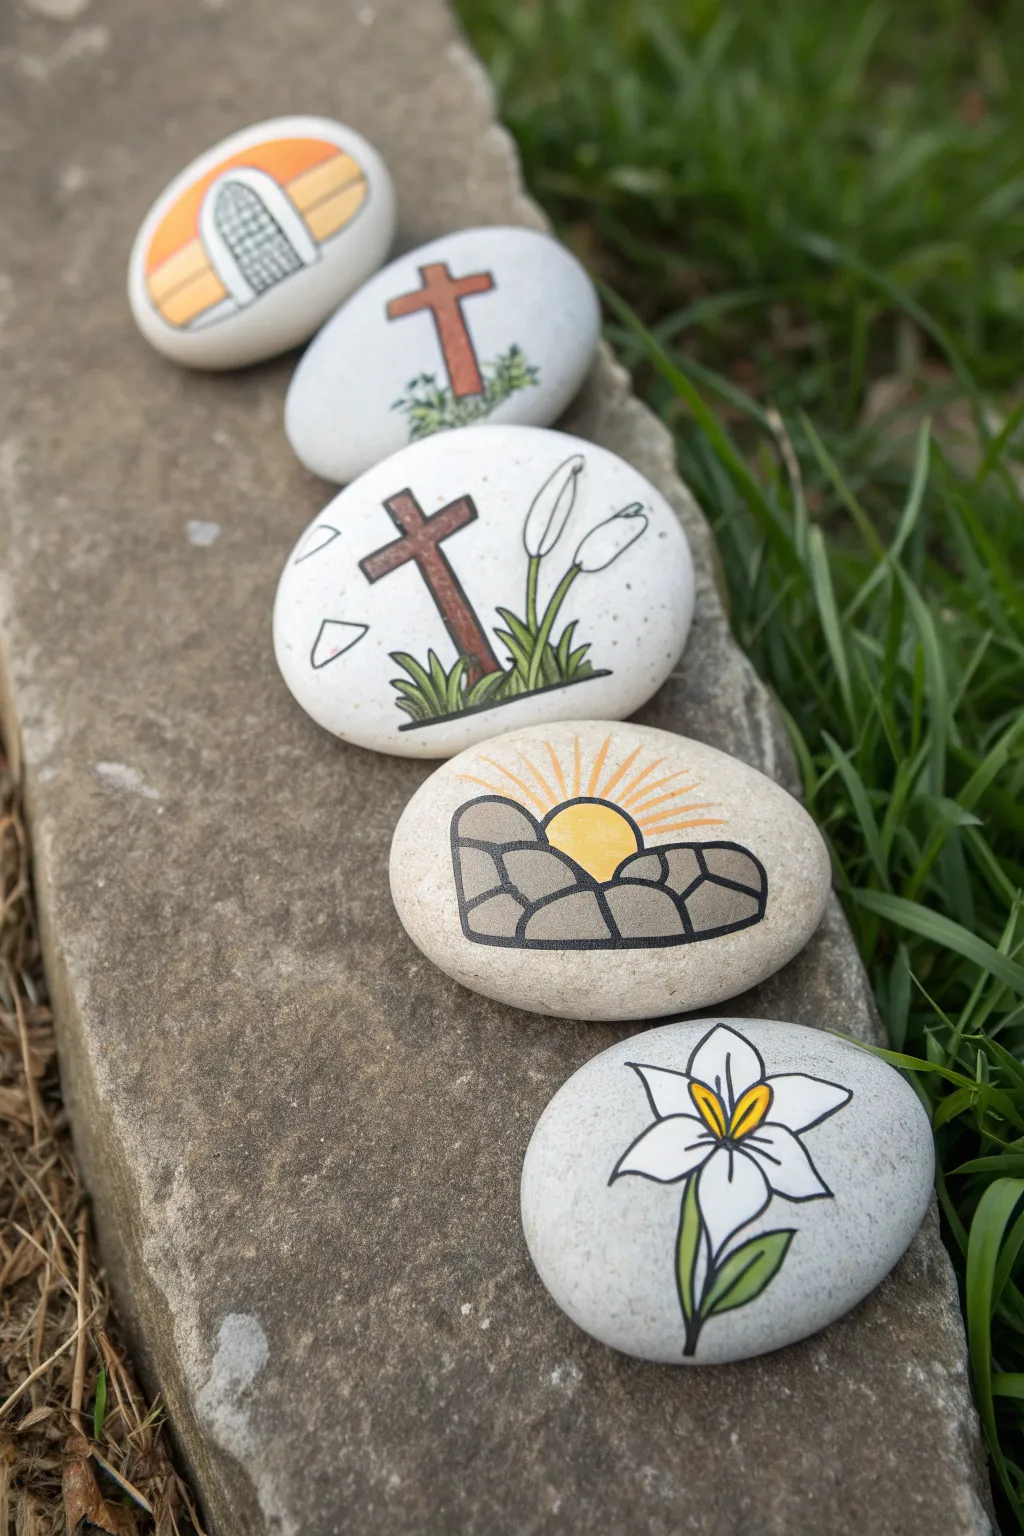
Tell the complete story of Easter with this beautiful set of five painted stones, starting from the empty tomb and culminating in the glorious lily. These smooth river rocks feature clean, illustrative designs with bold outlines that are surprisingly easy to replicate.
Step-by-Step Tutorial
Materials
- 5 smooth, oval river stones (roughly palm-sized)
- White acrylic paint or gesso
- Acrylic paints: orange, yellow, brown, green, grey
- Fine liner brushes (size 0 and size 1)
- Black fine-point paint pen or permanent marker (0.5mm or 0.7mm)
- Pencil and eraser
- Matte or satin spray sealant
Step 1: Preparing the Canvas
-
Stone Selection:
Choose five stones that are similar in size and relatively flat. A smooth surface is crucial for getting those clean black outlines later. -
Base Coating:
Paint a solid white base coat on the top surface of each stone. Depending on your paint’s opacity, you might need two coats to hide the natural stone color, but let the first layer dry completely before adding the second. -
Pencil Sketching:
Once the white base is bone dry, lightly sketch your five designs in pencil: the open tomb door, the single cross, the cross with lilies, the sunrise over rocks, and the single Easter lily.
Steady Hand Trick
If your hand shakes while outlining, hold the paint pen still and slowly rotate the stone underneath it to draw smooth curves.
Step 2: Stone 1: The Open Tomb
-
Painting the Sunset:
For the top stone, paint horizontal bands of yellow and orange in the upper third to create a sunset effect. -
Creating the Tomb:
Paint a curved grey or white shape for the tomb structure in the foreground, leaving an arch shape unpainted or painted a darker grey to represent the opening.
Fixing Smudges
If you smudge black ink onto the white background, wait for it to dry fully, then dab a tiny bit of white acrylic over the mistake.
Step 3: Stones 2 & 3: The Crosses
-
Painting the Crosses:
On the second and third stones, fill in your cross sketches with a medium brown acrylic paint. -
Adding Greenery:
Use a small brush to flick upward strokes of green at the base of both crosses to look like grass. On the third stone, extend these green lines upward to form stems for the lilies. -
Lily Buds:
Paint small white teardrop shapes at the ends of the tall stems on the third stone to represent closed lily buds.
Step 4: Stone 4: Sunrise & Rocks
-
Painting the Boulders:
Paint a cluster of grey rounded shapes at the bottom half of the fourth stone to represent the sealed tomb rocks. -
The Rising Sun:
Paint a yellow semi-circle rising from behind the grey rocks. Mix a little orange into your yellow to paint distinct rays radiating outward.
Step 5: Stone 5: The Easter Lily
-
Petals and Stamen:
Paint the large lily petals white (even if on a white background, a fresh coat helps texture). Add a vibrant yellow center for the stamen and two green leaves at the base.
Step 6: Defining Details
-
Outlining:
Once all colored paint is completely dry, take your black paint pen and carefully trace over all your pencil lines. I find resting my pinky on the table helps steady my hand for these curves. -
Adding Texture:
Use the pen to add small details: a grid pattern on the tomb door, wood grain lines inside the crosses, and cracks in the grey boulders. -
Highlighting:
Add tiny lines inside the lily petals and the sun rays to give them movement and separation. -
Sealing:
Finish by spraying all stones with a matte or satin sealant to protect the paint from chipping and to keep those white backgrounds bright.
Arrange your finished stones in a line or circle to share the Easter story in a tactile, artistic way


Have a question or want to share your own experience? I'd love to hear from you in the comments below!