I never get tired of painting the African savanna—those wide-open skies and strong animal shapes make everything feel instantly cinematic. If you’re hunting for safari painting ideas that are beginner-friendly but still look dramatic on the wall, these are my favorite directions to play with.
Sunset Silhouette Safari Scene
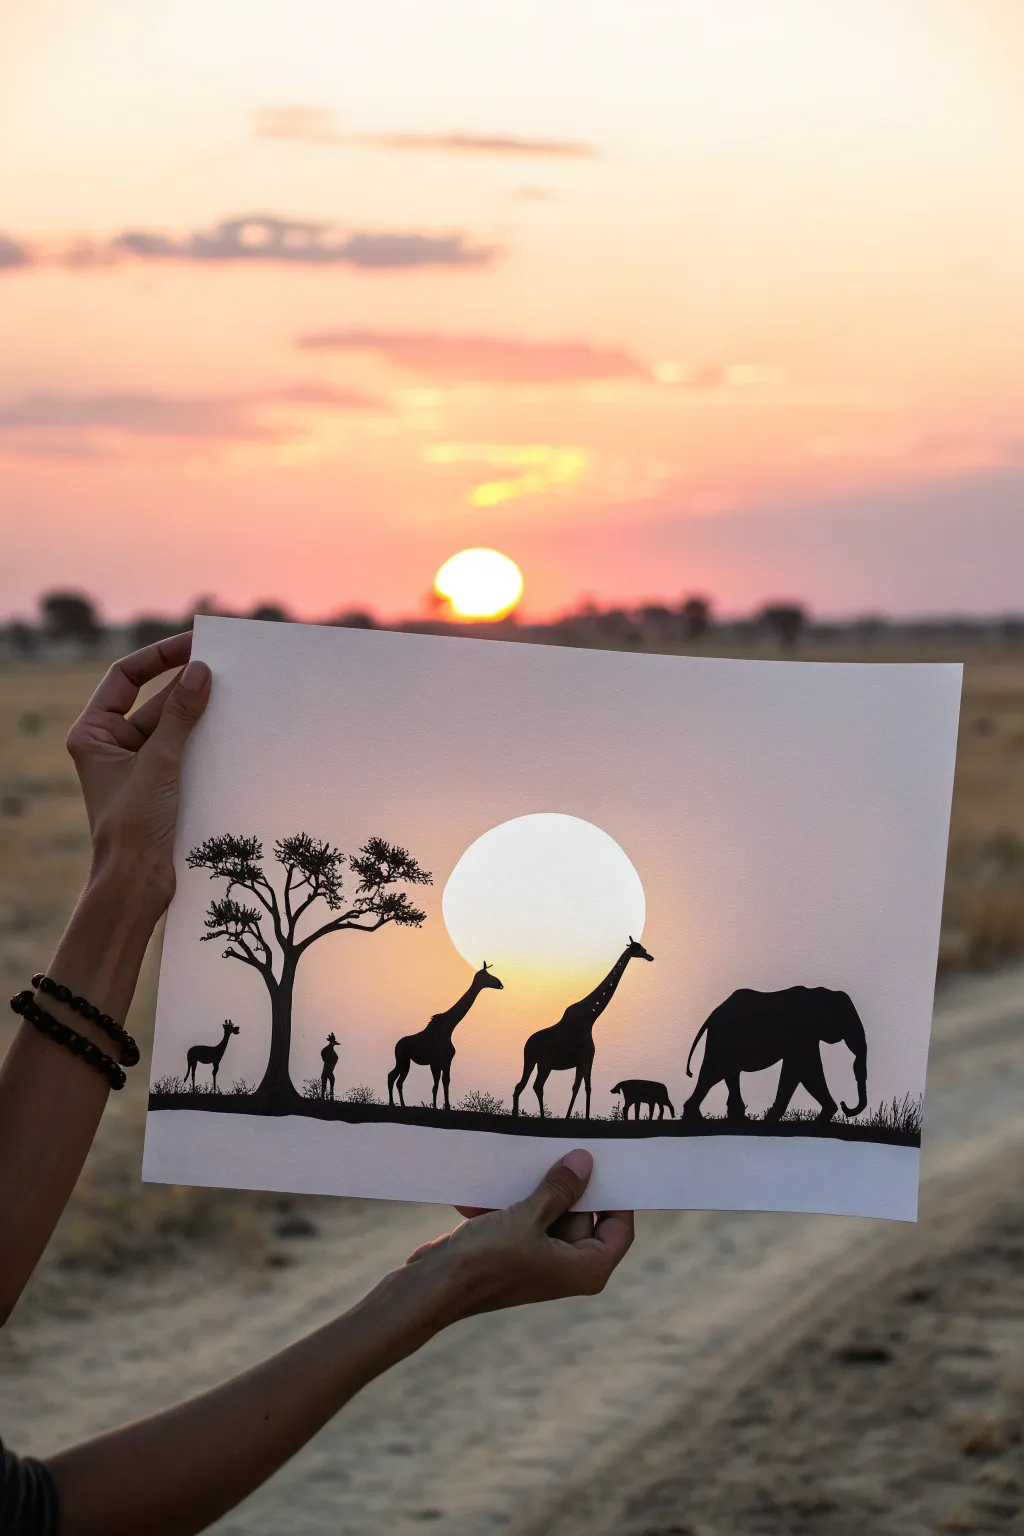
This clever mixed-media project combines the natural beauty of a real sunset with your own artistic touch. By creating a precise silhouette drawing and a strategic cutout, you can frame the changing sky as your living canvas.
Detailed Instructions
Materials
- High-quality heavy cardstock or watercolor paper (white)
- Fine-tip black drawing pens (0.1mm and 0.5mm)
- Black brush pen or black acrylic paint with a small brush
- Compass or circular object for tracing
- X-Acto knife or precision craft blade
- Cutting mat or thick cardboard
- Pencil and eraser
- Ruler
Step 1: Planning the Composition
-
Set the horizon:
Begin by lightly drawing a straight horizon line with your pencil and ruler across the bottom third of your paper. This anchors your entire scene. -
Position the sun:
Decide where you want the sun to be the focal point. Place your compass point or circular template centrally above the horizon line, ensuring roughly half of the circle sits ‘behind’ where your animal figures will stand. -
Draw the sun guide:
Lightly trace the full circle with your pencil. This circle will eventually be cut out, so don’t press too hard—you just need a guide for where your silhouettes will interact with the light.
Step 2: Creating the Cutout
-
Prepare for cutting:
Place your paper on a self-healing cutting mat or a piece of thick protective cardboard to avoid damaging your table surface. -
Cut the circle:
Using a sharp X-Acto knife, carefully cut along your pencil line for the sun. Rotate the paper slowly as you cut rather than twisting your wrist, which helps maintain a smoother curve. Remove the circular piece of paper.
Uneven Black Coverage?
If your marker strokes look streaky, wait for the first layer to dry fully, then apply a second coat in the perpendicular direction.
Step 3: Drafting the Silhouettes
-
Sketch the tree:
On the left side, lightly sketch an acacia tree. Start with a thick trunk that splits into Y-shaped branches, creating that iconic flat-topped canopy look. Be careful not to draw into the open circle space yet. -
Sketch the animals:
Outline your animal figures walking along the horizon line. I like to sketch the tallest giraffe closest to the sun cutout so its neck can overlap the opening, creating depth. Add an elephant family on the right and smaller antelopes or birds on the left. -
Bridge the gap:
Identify areas where your silhouettes need to cross *in front* of the sun. Unlike a normal drawing, you can’t draw on empty air. You will need to leave the paper intact where the silhouettes overlap the sun, or you can draw them on the paper borders and let the imagination fill in the rest. *Wait, looking closer at the reference:* The silhouettes actually stop at the edge of the circle or frame it. Let’s adjust. Actually, the reference image shows the paper *intact* where the silhouettes are, essentially blocking the light. The circle is the *background*. Ah, looking very closely at the prompt image again: The sun is a cutout, but the giraffe’s neck and head overlap it. That means the giraffe is drawn on the paper, and the sun is *behind* the giraffe? No, that’s impossible if it’s a single sheet. Let’s re-examine the image logic.Correction: The image is likely a *composite* or the sun is painted. But the user prompt says ‘recreate the project’. The visual trick is that the *sun* is the paper being backlit? No, the hand is holding the paper *up* to the sunset. The bright circle is the real sun shining through. But if the giraffe head is clear against the bright sun, the giraffe must be opaque on the paper. The only way the sun is perfectly round and bright behind the giraffe is if the paper is translucent or the sun is painted.
Actually, the most faithful recreation of the visual shown is a ‘paper cut’ style where the paper is white, silhouetted shapes are black ink, and the empty space is confusing. Let’s look at the ‘sun’. The ‘sun’ in the art looks like a physical hole cut out of the paper. However, the giraffe’s neck crosses it. That is physically impossible if it’s a simple hole.
Let’s assume the most logical craft method for this result: It is a drawing on paper, and the ‘sun’ is actually just blank white paper that is catching the light from behind, OR the ‘sun’ is cut out, but the animals are drawn on a clear acetate sheet overlay?
Let’s go with the most approachable interpretation that matches the visual: The ‘sun’ is a cutout. The artist has sketched the giraffe so it stands *next* to the sun or slightly overlapping the edge, but for the parts that fully cross the sun (like the neck), that section of paper must remain. **Wait, looking at the image again**: The sun cutout is BEHIND the giraffe. Therefore, the giraffe is drawn on the paper, and the hole is cut *around* the silhouette? That’s extremely delicate.
Alternative interpretation 2 (Easiest and most probable real-world method): This is a standard silhouette painting on white paper. The sun is NOT a hole. The sun is PAINTED or LEFT BLANK white, and the photo is just taken at sunset to match the colors. The prompt asks to recreate the project *shown*. The project shown is a sheet of paper with a drawing. The drawing has a white circle (the sun). The rest of the sky is the paper color? No, the paper is white. It creates an optical illusion.
Let’s pivot to the most reliable method to get this look: **The Paper Cutout Silhouette**. This involves cutting the ‘sun’ hole, but leaving the animal shapes intact *crossing* the hole is impossible without support.
Let’s look at the giraffe neck. It goes straight *through* the sun. This implies the ‘sun’ is not a hole, but a painted circle, OR the art is done on a transparent sheet, OR it’s digital art printed out.
Let’s assume the user wants to make a physical object. The best way to achieve the ‘glowing sun’ look physically is to cut the sun hole, stick a piece of tracing paper over the back, and draw the silhouette on the tracing paper. Or, stick the silhouette on clear acetate.
Let’s go with an even simpler method that looks like the photo: A standard silhouette drawing on paper, where the ‘sun’ is simply the white of the paper, and the photo is staged brilliantly.
**Revised Plan:** Create a high-contrast silhouette drawing. The ‘sun’ will be an unpainted circle of white paper. The rest of the sky will be lightly shaded or left white to catch the ambient sunset light when held up. This matches the visual of holding art against a scenery.
-
Refining the silhouettes:
Since we aren’t actually cutting a hole (which creates structural issues for the animals), trace a perfect circle to represent the sun. Draw your animals so they overlap this circle. The giraffe’s neck and head will be solid black inside the white circle.
Colored Sky Variant
Instead of white paper, use a watercolor wash of orange and yellow for the sky area before drawing your black silhouettes for a permanent sunset.
Step 4: Inking the Scene
-
Outline the figures:
Using your 0.1mm fine liner, carefully trace over all your pencil lines for the animals and the tree. Do not trace the full circle of the sun—only trace the parts of the sun that aren’t blocked by animals or ground. -
Fill in the blacks:
Switch to your brush pen or black paint. Fill in the bodies of the elephants, giraffes, and the tree trunk. Ensure the black is solid and opaque; patchy ink ruins the silhouette illusion. -
Detail the edges:
Use the 0.1mm pen again to add tiny details to the edges, like little tufts of hair on the giraffe’s ossicones (horns) or the rough texture of the tree bark. These tiny irregularities make the silhouettes look more organic.
Step 5: Adding the Ground and Texture
-
Create the terrain:
Using the brush pen, fill in the ground strip at the bottom. Start solidly black at the very bottom edge. -
Add grassy texture:
Where the black ground meets the white sky, use quick, upward flicking motions with your finest pen to create grass blades. This softens the horizon line and makes the animals look grounded rather than floating. -
Incorporate foliage:
For the acacia tree, use a stippling motion (lots of small dots) or tiny squiggles with the 0.5mm pen to create the canopy leaves. Keep the foliage airy so ‘light’ can poke through the branches.
Step 6: Final Touches
-
Erase guidelines:
Wait until the ink is completely dry—I usually give it at least 15 minutes to be safe. Gently erase visible pencil marks, especially the circle outline of the sun, leaving just the crisp painted edge. -
The Reveal:
Your painting is ready. To achieve the effect in the photo, take your artwork outside during the ‘golden hour’ (sunset) and hold it up so the real ambient light warms the white paper, making your painted sun glow.
Hold your masterpiece up to the evening sky and watch your safari shadows come to life.

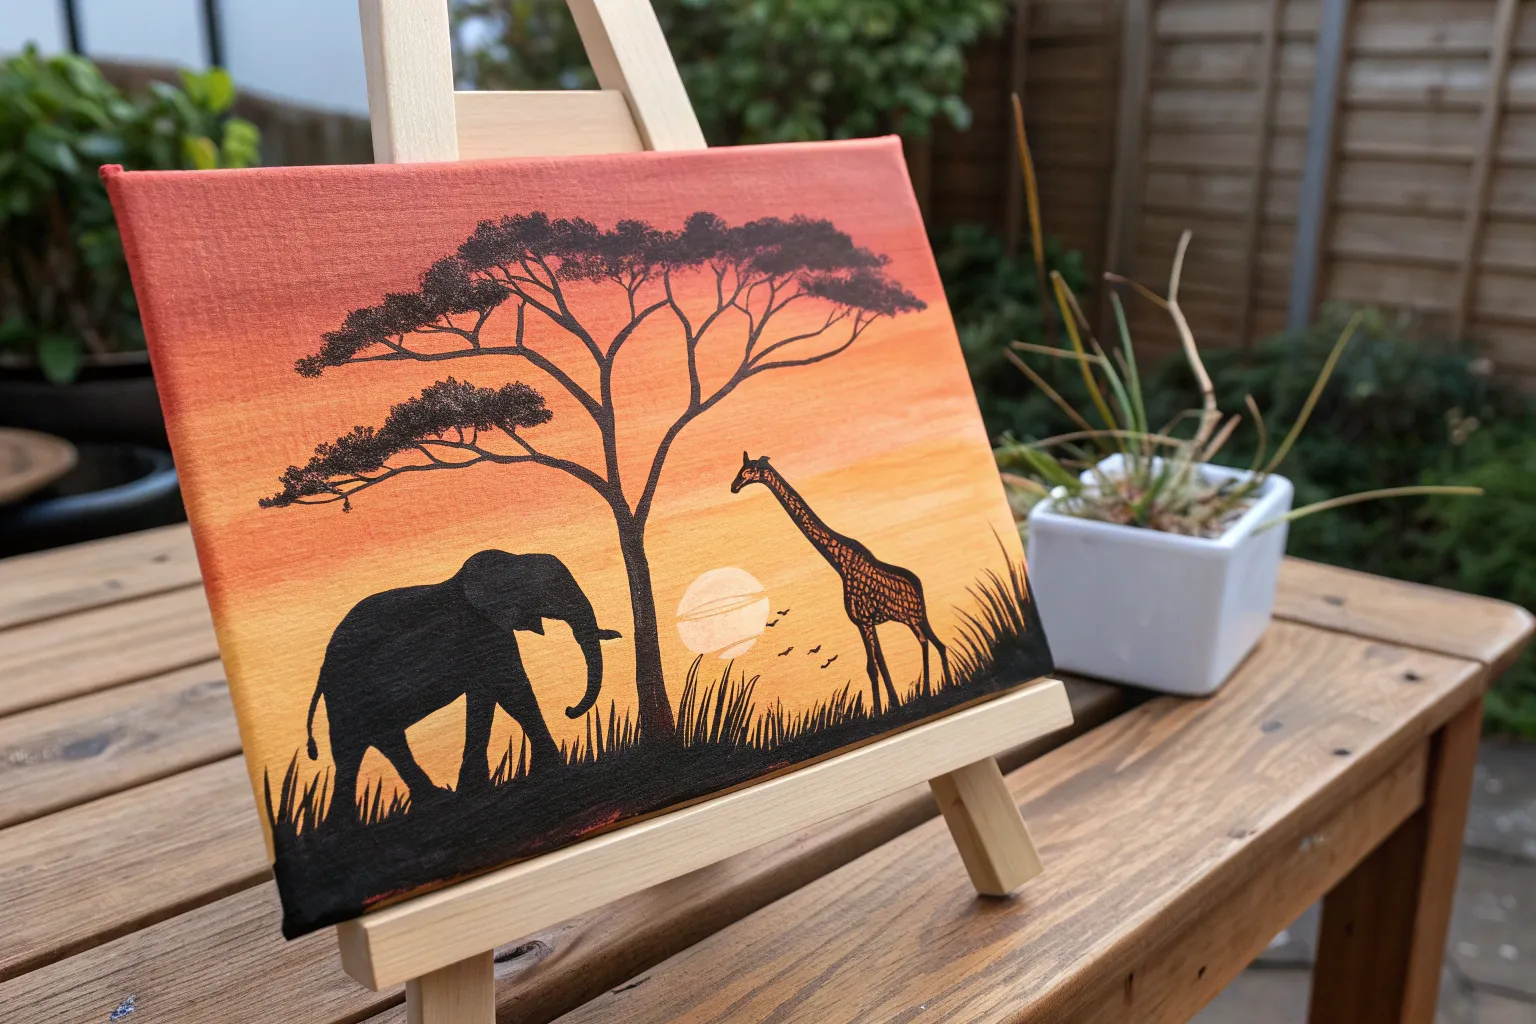
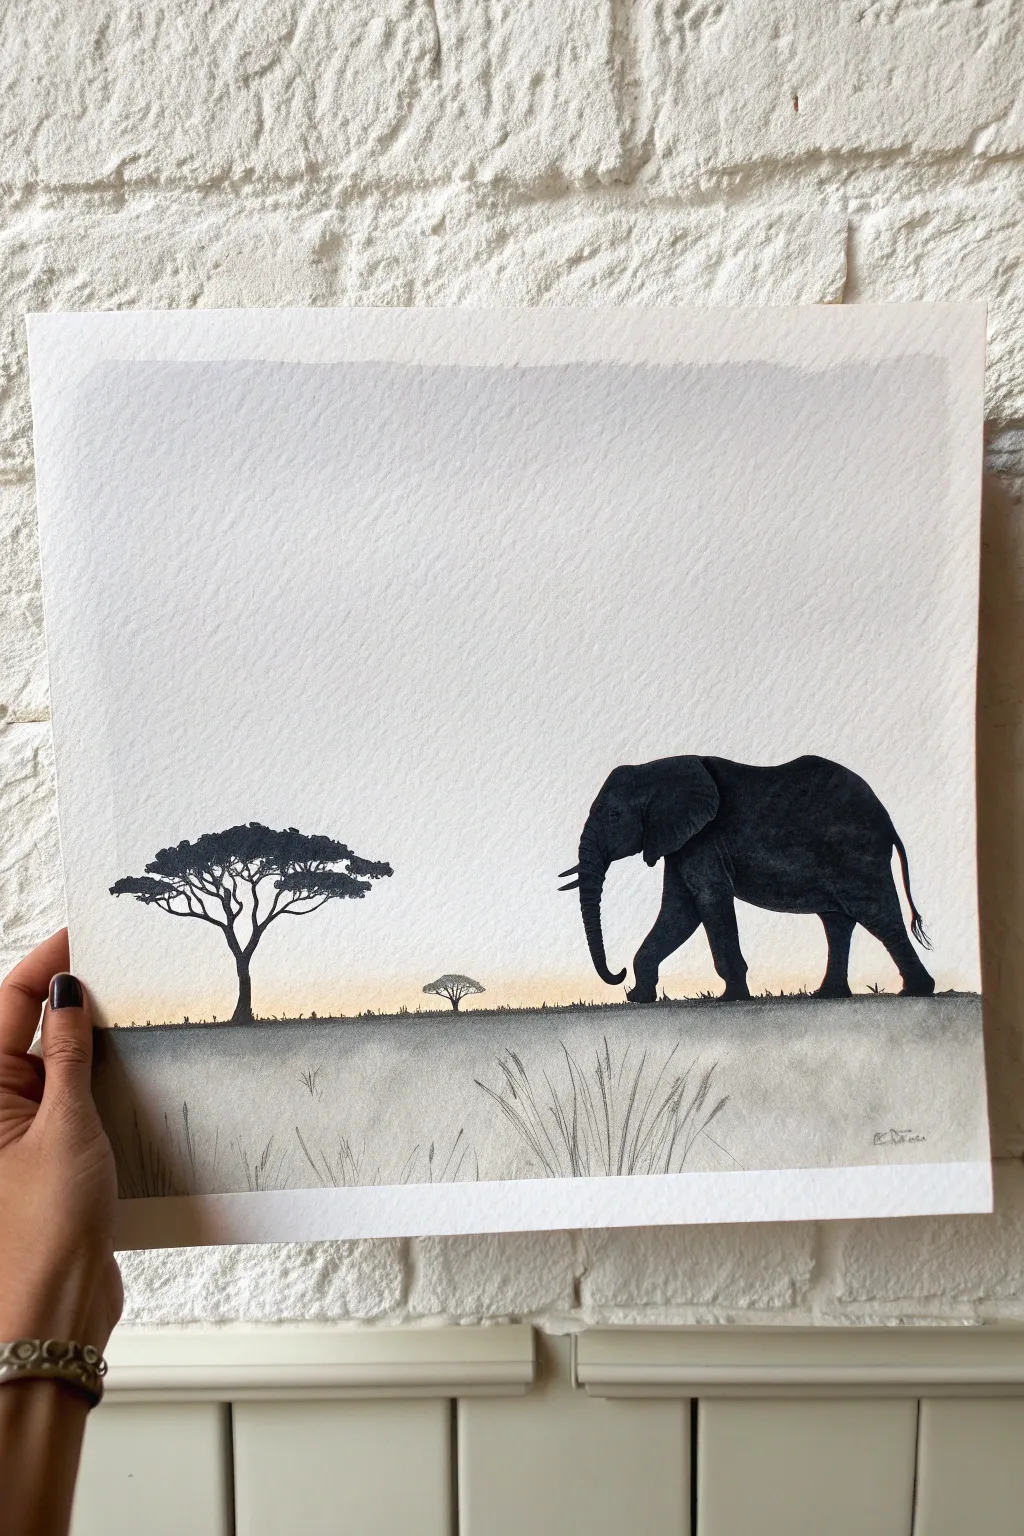
Elephant Herd at Dusk
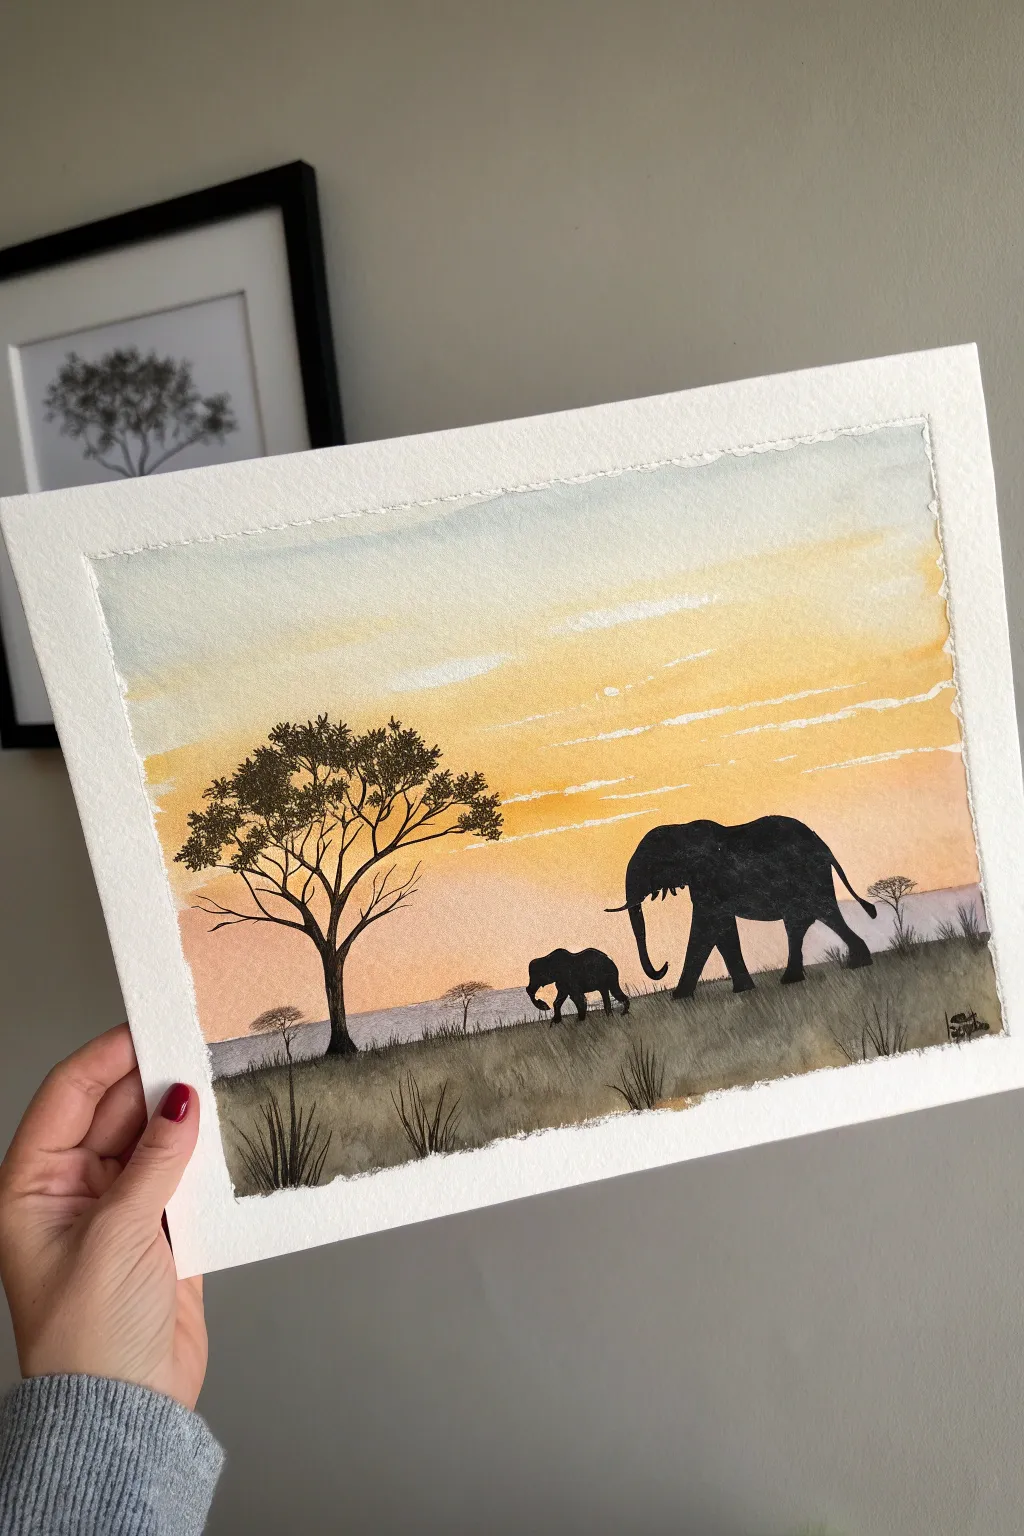
Capture the serene beauty of the African plains with this watercolor project featuring an elephant pair against a glowing sunset. The high-contrast silhouette style makes this an achievable piece even for beginners while delivering a striking, professional result.
Step-by-Step
Materials
- Cold press watercolor paper (300 gsm)
- Painter’s tape or masking tape
- Watercolors (Cerulean Blue, Yellow Ochre, Cadmium Orange, Burnt Sienna, Payne’s Grey or Black)
- Large flat wash brush
- Medium round brush (size 6 or 8)
- Fine detail brush (size 0 or 1)
- Two jars of water
- Paper towels
- Pencil and eraser
- White gouache (optional for resist/clouds)
Step 1: Preparation and Sketching
-
Secure the paper:
Tape down all four edges of your watercolor paper to a board using painter’s tape. Press the edges firmly to ensure clean borders later. -
Establish the horizon:
Lightly sketch a horizontal line about one-third of the way up from the bottom of the page to separate the sky from the ground. -
Outline the subjects:
Using very light pencil strokes, sketch the outline of the large elephant, the baby elephant, and the main trunk of the acacia tree. Don’t worry about filling them in yet; we just need the shapes.
Uneven Gradients?
If your sky colors are drying with hard lines between them, re-wet the entire sky area gently with clean water and tilt the paper to encourage the pigments to flow together.
Step 2: Painting the Sunset Sky
-
Pre-wet the sky:
With your large flat brush, apply clean water to the entire sky area above the horizon line. The paper should be glisten, but not hold puddles. -
Apply the top gradient:
Load your brush with a very watered-down Cerulean Blue. Paint the top third of the sky, letting the color naturally diffuse downwards. -
Add the golden glow:
Rinse your brush thoroughly. Pick up Yellow Ochre and paint the middle section of the sky, carefully blending it where it meets the blue so they don’t create green. -
Intensify the horizon:
Mix Cadmium Orange with a touch of Burnt Sienna. Apply this warmer color near the horizon line, blending it upward into the yellow. Leave thin, irregular horizontal strips unpainted or lift paint with a thirst brush to create the wispy cloud effects. -
Dry completely:
This is crucial: allow the sky layer to dry 100% before moving on. I like to use a hairdryer on a low setting to speed this up.
Step 3: Ground Layer
-
Base wash for the ground:
Mix a muddy wash using Burnt Sienna and a tiny drop of Payne’s Grey. Paint the ground area below the horizon line using horizontal strokes. -
Add texture:
While the ground wash is still damp, drop in slightly darker pigment (more Payne’s Grey) near the bottom edge and randomly throughout the grass area to simulate uneven terrain. -
Let it settle:
Allow the ground layer to dry completely. The paper must be bone-dry before we add the silhouettes.
Add a Heat Shimmer
Before the background trees dry, soften their bottom edges with a clean, damp brush. This blurs the line between land and tree, mimicking the heat haze often seen on the savannah.
Step 4: Painting Silhouettes
-
Mix the darkest dark:
Create a rich, opaque black color. If using watercolor, mix Payne’s Grey with Burnt Umber or use lamp black straight from the tube. The consistency should be like heavy cream. -
Fill the large elephant:
Using your medium round brush, carefully fill in the adult elephant shape. Pay attention to the curve of the trunk and the subtle bump of the shoulder. -
Paint the baby elephant:
Switch to your smaller brush to paint the baby elephant. Ensure distinct gaps between the legs so the sunset color peeks through, defining their movement. -
Tree trunk structure:
Paint the main trunk of the acacia tree on the left. Use a shaky hand on purpose here; natural branches are rarely perfectly straight. -
Foliage details:
Use the tip of your brush to stipple small dots and blotches for the tree canopy. Keep the foliage airy and separated rather than one solid blob.
Step 5: Final Details
-
Distant trees:
Dilute your black mixture significantly with water to create a soft grey. Paint tiny, faint tree shapes on the distant horizon line to add depth. -
Foreground grass:
Using the fine detail brush and your darkest black mixture, flick inconsistent upward strokes along the very bottom edge and around the elephants’ feet to create tall grass blades. -
The reveal:
Once you are certain every drop of paint is dry, slowly peel away the painter’s tape at a 45-degree angle to reveal the crisp white border.
Sign your name in the corner and frame this peaceful moment from the wild.

Giraffe Pair on the Horizon
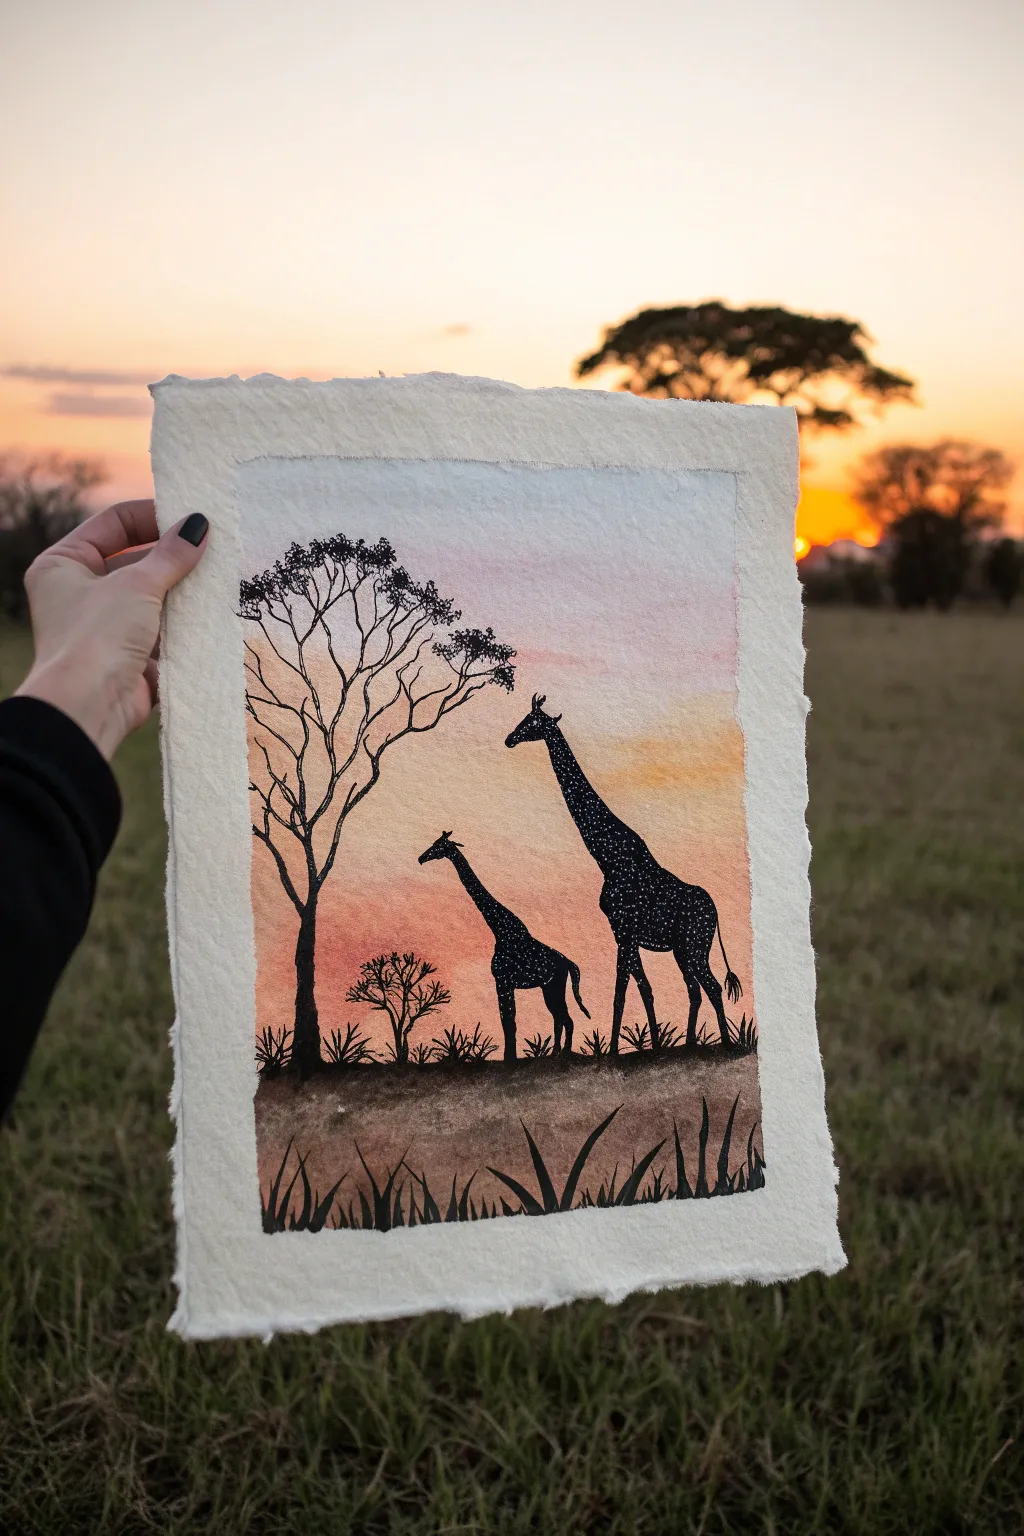
Capture the magic of the savanna with this mixed-media silhouette painting featuring a mother and baby giraffe. The project combines soft watercolor washes for a glowing sunset with crisp ink details on beautiful deckled-edge paper.
Step-by-Step Tutorial
Materials
- Deckled-edge watercolor paper (heavyweight, cold press)
- Watercolor paints (Yellow Ochre, Burnt Sienna, Alizarin Crimson, Light Blue)
- Painter’s tape or masking tape
- Large flat wash brush
- Medium round brush
- Black fine liner pen (waterproof) or black gouache
- White gel pen
- Pencil and eraser
- Jar of clean water
- Paper towels
Step 1: Setting the Scene
-
Prepare your paper:
Start by taping off a rectangular border on your deckled paper. Leave about an inch of the rough edge exposed around the outside to frame your painting naturally. -
Apply clean water:
using your large flat brush, coat the area inside the tape with a layer of clean water. You want the paper to be shiny and damp, but not swimming in a puddle. -
Paint the sky gradient:
While the paper is wet, load your brush with a watery Light Blue and apply it to the very top section. Rinse your brush slightly. -
add warmth:
Blend a soft pink or Alizarin Crimson into the blue as you move down, allowing them to mix naturally on the page. -
Create the golden horizon:
Switch to Yellow Ochre and paint the middle section, blending it into the pink above. As you reach the bottom third, deepen the color with Burnt Sienna to suggest the heat of the earth. -
Ground the painting:
For the very bottom strip (the ground), mix a darker brown using Burnt Sienna and a tiny touch of black or blue to desaturate it. Paint this horizontally across the bottom. -
Let it dry completely:
This is crucial—wait until the paper is bone dry and flat before adding any silhouettes, or the ink will bleed. You can use a hairdryer on a low setting to speed this up.
Spot Check
Don’t overdo the white dots on the giraffes. Cluster them slightly denser on the neck and back, fading them out toward the legs for a more organic look.
Step 2: Adding the Silhouettes
-
Sketch the outlines:
Use a pencil to very lightly sketch the shapes of the two giraffes and the large acacia tree on the left. Keep the pencil lines faint so they don’t show through later. -
Ink the tree trunk:
Using your black waterproof pen or a fine brush with black gouache, fill in the tree trunk on the left side. Make the branches squiggle and twist as they reach upward. -
Add delicate foliage:
Stipple small dots or tiny scribbles at the ends of the branches to represent the acacia leaves. Keep these clusters somewhat sparse to let the sunset show through. -
Outline the giraffes:
Carefully trace the outline of the tall adult giraffe and the smaller baby giraffe. Pay attention to the distinctive shape of their ossicones (horns) and sloping backs. -
Fill the silhouettes:
Solidly fill in the body shapes with your black ink or paint. Ensure the coverage is opaque and consistent. -
Add distant shrubbery:
Draw a smaller, simpler tree silhouette on the horizon line between the giraffes and the main tree. This adds depth to the landscape. -
Create the grass texture:
Along the horizon line where the animals stand, use quick, upward flicks of your pen to create grass blades. Vary the heights to make it look wild and natural.
Make it Shine
Instead of a white gel pen for the spots, use metallic gold ink or paint. When the light hits the artwork, the giraffes will shimmer against the matte black silhouette.
Step 3: Final Details
-
Foreground grasses:
I like to add bolder, taller grass silhouettes in the very foreground at the bottom edge. Use a brush or thicker pen to make broad, sweeping leaf shapes that frame the bottom of the scene. -
Add starlight magic:
Once the black ink is fully dry, take your white gel pen and add tiny dots inside the bodies of the giraffes. This artistic touch mimics their spots while adding a magical, starry effect. -
Peel the tape:
Very slowly peel away the masking tape at a 45-degree angle. This reveals the clean, crisp edge contrast against the rough texture of the paper.
Display your finished piece in a floating frame to show off that beautiful deckled edge


Lion Profile in Golden Light
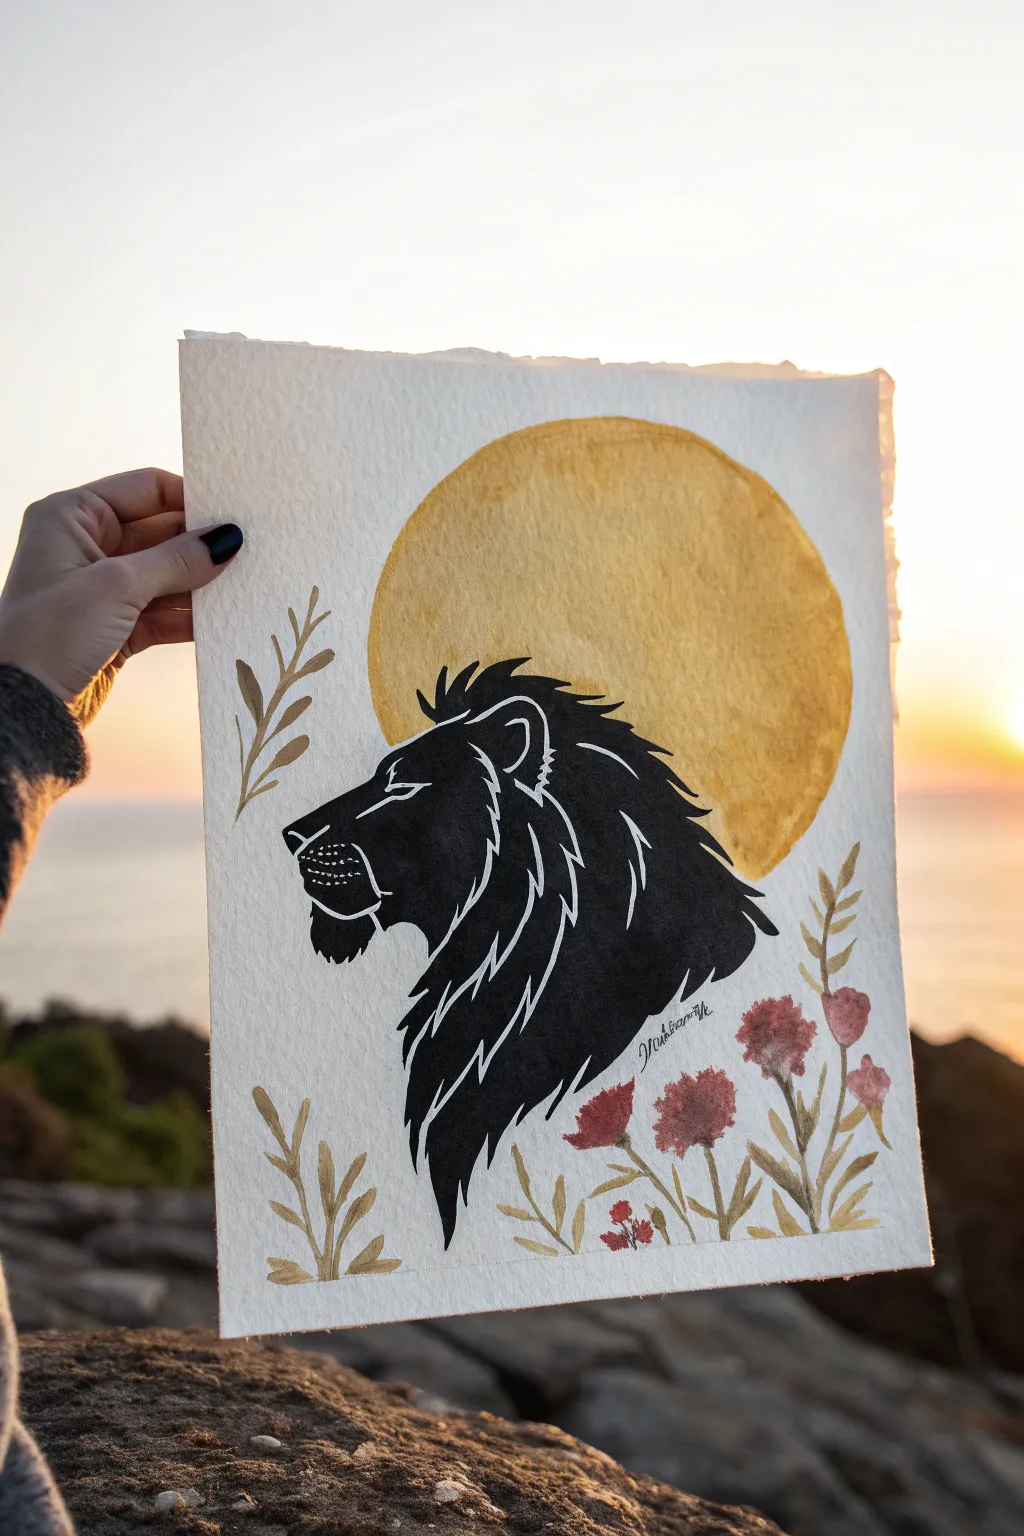
Capture the majestic silhouette of a lion against a shimmering sun in this striking mixed-media piece. By combining deep black ink with soft watercolor botanicals and metallic gold accents, you’ll create an artwork that feels both bold and ethereal.
How-To Guide
Materials
- Cold press watercolor paper (with rough edge optional)
- Gold metallic watercolor paint
- India ink or intense black watercolor
- White gel pen or fine white ink marker
- Watercolor paints (muted reds, browns, greens)
- Round watercolor brushes (sizes 2, 6, and 10)
- Fine liner brush for details
- pencil and eraser
- Compass or circular object (for tracing moon/sun)
Step 1: Planning and The Sun
-
Outline the sun:
Begin by lightly tracing a large circle in the upper right quadrant of your paper using a compass or by tracing around a bowl. This will be the golden sun that anchors the composition. -
Sketch the lion:
Lightly sketch the profile of the lion’s head inside the circle, ensuring the mane flows downwards and outwards to the bottom center. Focus on the silhouette shape rather than internal details for now. -
Add botanical elements:
Sketch simple leafy stems curving along the left side and a cluster of wildflowers growing up from the bottom right corner to frame the lion. -
Paint the golden orb:
Load your size 10 brush with metallic gold watercolor. Paint the entire circle, carefully working around the sketch of the lion’s head so you don’t paint over the area that will become black later. -
Creating texture:
While the gold paint is still wet, you can drop in slightly more concentrated pigment in random spots to create a subtle, crater-like texture on the sun. -
Let it dry completely:
Allow the gold layer to dry fully before moving on. I like to wait until the paper is no longer cool to the touch to ensure the black ink won’t bleed into the gold.
Clean Lines Tip
If you struggle to paint a perfect circle freehand or around the lion, use masking fluid on the lion sketch first, paint the gold sun freely over it, and rub the masking off once dry.
Step 2: The Lion’s Silhouette
-
Outline the profile:
Using a fine liner brush and black India ink (or very dense black watercolor), carefully outline the lion’s face profile, paying close attention to the nose, mouth, and chin details. -
Fill the silhouette:
Switch to a size 6 brush and fill in the entire head and mane area with solid black. Ensure the coverage is opaque and even, leaving no white paper showing through the mane. -
Refine the edges:
Use the tip of your brush to pull out small, jagged shapes along the back of the mane to simulate fur texture, making the silhouette look organic rather than smooth. -
Dry the black layer:
Wait for the black ink to dry completely. This is crucial because the white details added next will dissolve into wet ink and turn gray if you rush. -
Add white highlights:
With a white gel pen or fine brush with white ink, draw the closed eye sketch, add details to the nose, and stipple small dots near the muzzle for whisker pads. -
Define the mane:
Draw flowing, jagged white lines down the length of the mane on the dark silhouette. These lines suggest movement and separate different locks of hair.
Level Up: Deckled Edge
For that vintage, handmade look seen in the photo, tear your paper edges against a ruler instead of cutting them with scissors. It mimics expensive handmade paper.
Step 3: Botanical Details
-
Paint the flowers:
Mix a muted, dusty red watercolor shade. Paint the small flower heads in the bottom right corner using loose, dabbed strokes to mimic a clover or thistle texture. -
Add stems and leaves:
Using a murky olive green, connect the flowers with thin stems and add small, simple leaves. Paint the separate leafy branch on the left side of the paper using the same green or a brownish-gold ochre. -
Integrate gold accents:
Once the green leaves are dry, take your gold paint again and add small strokes or highlights over the leaves to tie the botanicals back to the golden sun. -
Final touches:
Review the piece for balance. You might add a few tiny gold or red specks near the flowers to simulate drifting pollen or seeds, adding a bit of movement to the scene.
Now you have a regal, shimmering piece of wildlife art ready to be framed or gifted
BRUSH GUIDE
The Right Brush for Every Stroke
From clean lines to bold texture — master brush choice, stroke control, and essential techniques.
Explore the Full Guide
Zebra Stripes with Simple Masking
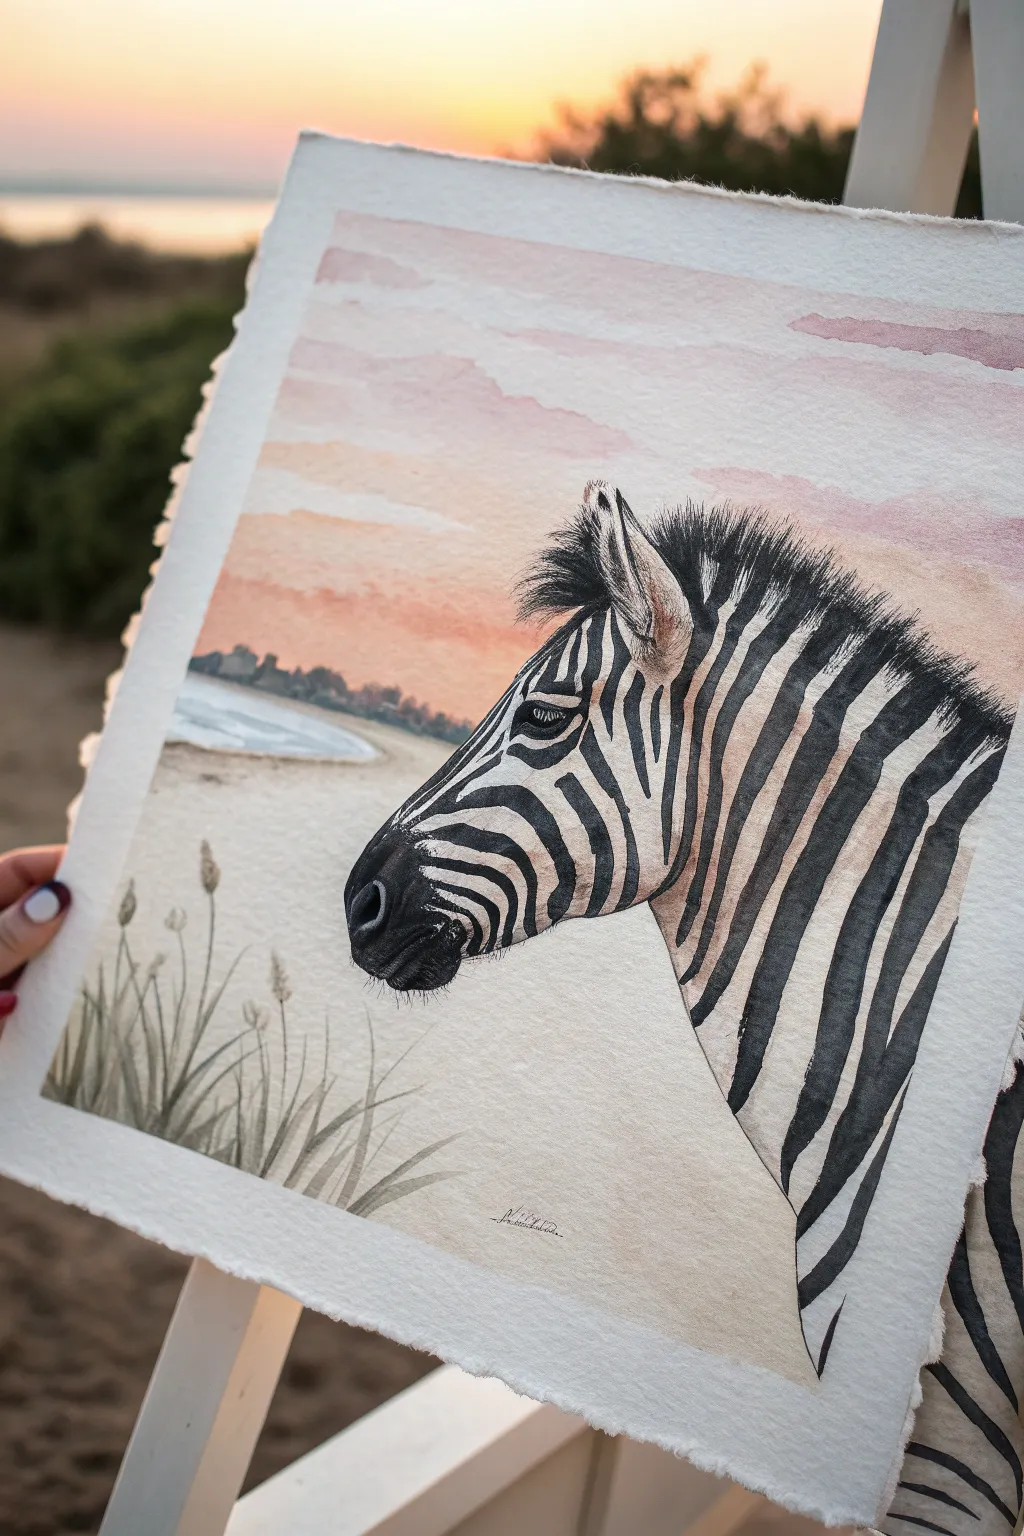
Capture the striking contrast of a zebra’s silhouette against a soft, glowing sunset in this detailed watercolor project. By using masking fluid to preserve the white of the paper, you can focus on building rich, dark stripes without worrying about accidental smudges.
Step-by-Step Tutorial
Materials
- Heavyweight cold-press watercolor paper (300gsm or higher)
- Masking fluid (drawing gum) and old brush
- Watercolor paints (Lamp Black, Paynes Grey, Burnt Sienna, Yellow Ochre, Alizarin Crimson, Sap Green)
- Round watercolor brushes (sizes 2, 6, and 10)
- Fine liner brush for details
- Pencil (H or HB) and eraser
- Painter’s tape or board for mounting
- Clean water and paper towels
Step 1: Preparation and Sketching
-
Paper Setup:
Tape your watercolor paper down to a board on all four sides. This prevents buckling when we add the wet washes later and creates that clean white border shown in the finished piece. -
Basic Outline:
Lightly sketch the profile of the zebra’s head and neck. Pay attention to the angle of the snout and the triangular shape of the ear. -
Mapping the Stripes:
Carefully draw the pattern of the stripes. Notice how they curve around the jawline and neck; this directionality gives the animal its 3D form. Don’t press too hard with your pencil. -
Background Horizon:
Sketch a low horizon line behind the zebra. Add faint outlines for distant trees or landmasses on the left side to establish the water’s edge.
Step 2: Masking and Background
-
Apply Masking Fluid:
Using an old brush (one you don’t mind ruining) or a silicone applicator, apply masking fluid over the areas that will remain white: specifically the white stripes of the zebra and the white glint on the eye. Let this dry completely. -
Wet-on-Wet Sky:
Wet the entire sky area with clean water. While moist, drop in a dilute mix of Yellow Ochre near the horizon, blending upward into a soft pinkish-purple made from Alizarin Crimson and a touch of Paynes Grey. -
Cloud Texture:
While the sky is still damp but not soaking, dab in slightly stronger purple-grey pigment to create soft, horizontal cloud streaks. Let them diffuse naturally. -
Distant Landscape:
Once the sky is dry, mix a muted purple-grey using Paynes Grey and Alizarin Crimson. Paint the distant land shapes along the horizon line, keeping edges soft to suggest distance. -
Sandy Foreground:
Paint the bottom foreground with a very pale wash of Yellow Ochre and Burnt Sienna to represent the sandy ground. Keep the area directly under the zebra’s chin lighter.
Masking Mishaps
If the paper tears when removing masking fluid, you likely removed it while the paper or gum was still damp. Ensure everything is bone dry and lift slowly.
Step 3: The Zebra’s Features
-
Remove Masking:
Only when the paper is 100% bone dry, gently rub off the masking fluid with your clean finger or a rubber cement pickup tool to reveal the pristine white paper underneath. -
Initial Black Layer:
Mix a strong Lamp Black. Using your size 6 brush, begin filling in the black stripes. I often start near the neck and work toward the nose to establish the rhythm of the pattern. -
Adding Warmth:
While painting the black stripes, occasionally drop in a tiny bit of Burnt Sienna or brown into the wet black paint, especially near the cheek and ear, to give the fur richness and avoid a flat, cartoonish look. -
Shadows on White:
The white stripes shouldn’t stay purely white. Mix a very watery grey wash and glaze over the white stripes on the underside of the neck and jaw to create shadow and volume. -
The Eye:
Paint the eye dark black, carefully preserving a tiny white highlight (or adding it back with white gouache later). Outline the heavy eyelids with a fine liner brush. -
Muzzle Detail:
For the nose and mouth area, use a stippling motion with a nearly dry brush to simulate the rough, short hair texture. Darken the nostril significantly.
Golden Hour Glow
Glaze a very thin, watery layer of orange or gold over the tips of the mane and the zebra’s outline to simulate the warm sunset light hitting the fur.
Step 4: Final Details
-
The Mane:
Use a rigger or fine liner brush to flick short, upright strokes along the neck for the mane. Vary the lengths slightly so it looks natural and tufted. -
Ear Texture:
Add fine hair strokes inside the ear using a mix of brown and black, leaving the rim light to show the sun catching it. -
Grass Blades:
Mix a muted Sap Green with some brown. In the bottom left corner, paint tall, thin blades of grass overlapping the foreground. Top them with small, dabbed seed heads. -
Final Contrast Check:
Step back and look at the whole piece. If the black stripes look faded after drying, apply a second layer of dense black to the darkest areas to make the portrait pop.
Carefully remove your tape to reveal crisp white edges and enjoy your serene safari scene
Waterhole Reflection Safari
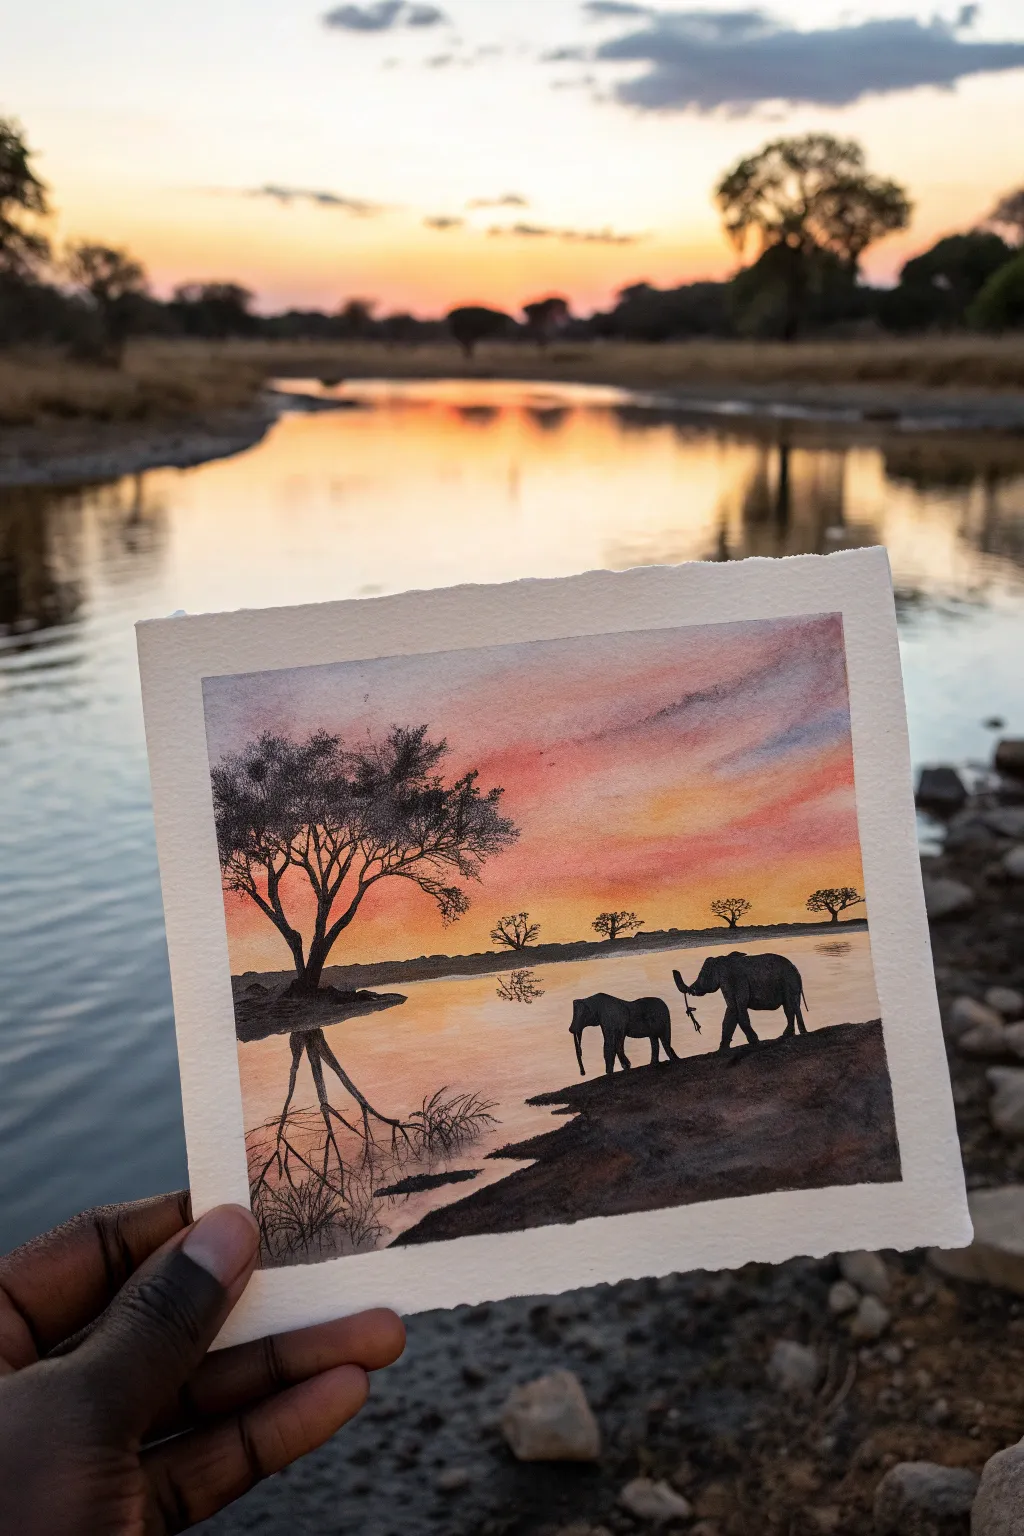
Capture the serene beauty of the African savannah with this striking watercolor composition. You will learn to blend a warm, glowing sunset sky that reflects perfectly into a calm body of water, framing stark tree silhouettes and gentle giants.
Step-by-Step Guide
Materials
- Cold press watercolor paper (approx. 140lb/300gsm)
- Artist masking tape
- Watercolor paints (Cadmium Yellow, Alizarin Crimson, Payne’s Gray, Burnt Umber, Ultramarine Blue, Ivory Black)
- Round brushes (large size 10-12 for washes, medium size 6, fine detail size 0-1)
- Clean water container
- Paper towels
- Painting board
- Pencil (HB or H)
Step 1: Preparation and Sketching
-
Prepare your surface:
Begin by taping down all four edges of your watercolor paper to your board. This creates a crisp white border and prevents the paper from buckling during the heavy washes. -
Establish the horizon:
Lightly draw a straight horizontal line across the paper, positioning it about one-third of the way up from the bottom. This will separate your sky from the water. -
Sketch the key elements:
using very light pressure, sketch the outline of the large acacia tree on the left. Add a smaller landmass on the right side of the horizon and outline the two elephant figures wading near the shore.
Step 2: The Glowing Sky and Water
-
Wet the sky area:
Load your large round brush with clean water and wet the entire sky area right down to the horizon line, ensuring an even sheen without puddles. -
Apply the sunset yellow:
Start near the horizon with a diluted wash of Cadmium Yellow. Paint upwards, letting the color fade slightly as you move higher. -
Blend in the oranges:
While the yellow is still wet, mix a soft orange using yellow and a touch of crimson. Introduce this color above the yellow, blending them softly where they meet. -
Add the dusky upper sky:
Mix a muted violet using Alizarin Crimson and a tiny touch of Ultramarine Blue or Payne’s Gray. Apply this to the very top of the sky, pulling it down in diagonal strokes to suggest clouds. -
Mirror the water:
Repeat this gradient process in the water section below the horizon. Keep the colors slightly more muted than the sky to distinguish the reflection. Leave small horizontal gaps of white paper to suggest surface ripples. -
Initial drying:
Let this foundational wash layer dry completely. The paper must be bone-dry before you paint the sharp silhouettes.
Reflection Reality
Make water reflections slightly duller and less detailed than the actual object. Break up the painted reflection with horizontal lines for ripples.
Step 3: Land and Distant Trees
-
Paint the distant horizon:
Mix a dark, neutral color using Burnt Umber and Payne’s Gray. Using a medium brush, paint the distant land strip right on the horizon line, keeping the edges relatively rough to simulate vegetation. -
Add small distant trees:
Switch to a smaller brush. Along the horizon line, paint tiny, simple tree shapes. These should be much smaller than your main subjects to create depth. -
Define the foreground bank:
Using a stronger mix of Burnt Umber and Black, paint the foreground riverbank on the bottom right. Make the top edge irregular and earthy.
Texture Twist
Sprinkle a tiny pinch of salt onto the wet sky wash before it dries. This creates bloom effects that look like distant stars or textured clouds.
Step 4: Silhouettes and Details
-
Paint the main tree trunk:
Load a size 6 brush with a thick, creamy mix of Black and Payne’s Gray. Follow your sketch to paint the twisting trunk of the large acacia tree on the left. -
Detail the branches:
Switch to your finest detail brush (size 0 or 1). Pull delicate branches outward from the main boughs, tapering them to fine points at the ends. -
Stipple the canopy:
I like to use an older, slightly frayed brush for this step. Dip it in the dark mix and gently dab (stipple) the ends of the branches to create the look of clustered leaves. -
Fill in the elephants:
Carefully paint the elephants using the dark silhouette mix. Pay close attention to the shape of their trunks and the curve of their backs to capture their movement. -
Create the reflections:
Paint the reflection of the tree and elephants into the water. Use slightly horizontal, wavy strokes to distort the mirror image, mimicking the movement of water. -
Add final textures:
Use your fine brush to add wispy grasses along the foreground bank and the base of the tree. These fine lines add realism to the stark silhouettes.
Peel off the tape carefully to reveal your crisp borders and enjoy your peaceful savannah sunset

PENCIL GUIDE
Understanding Pencil Grades from H to B
From first sketch to finished drawing — learn pencil grades, line control, and shading techniques.
Explore the Full Guide
Safari Jeep Point-of-View Scene
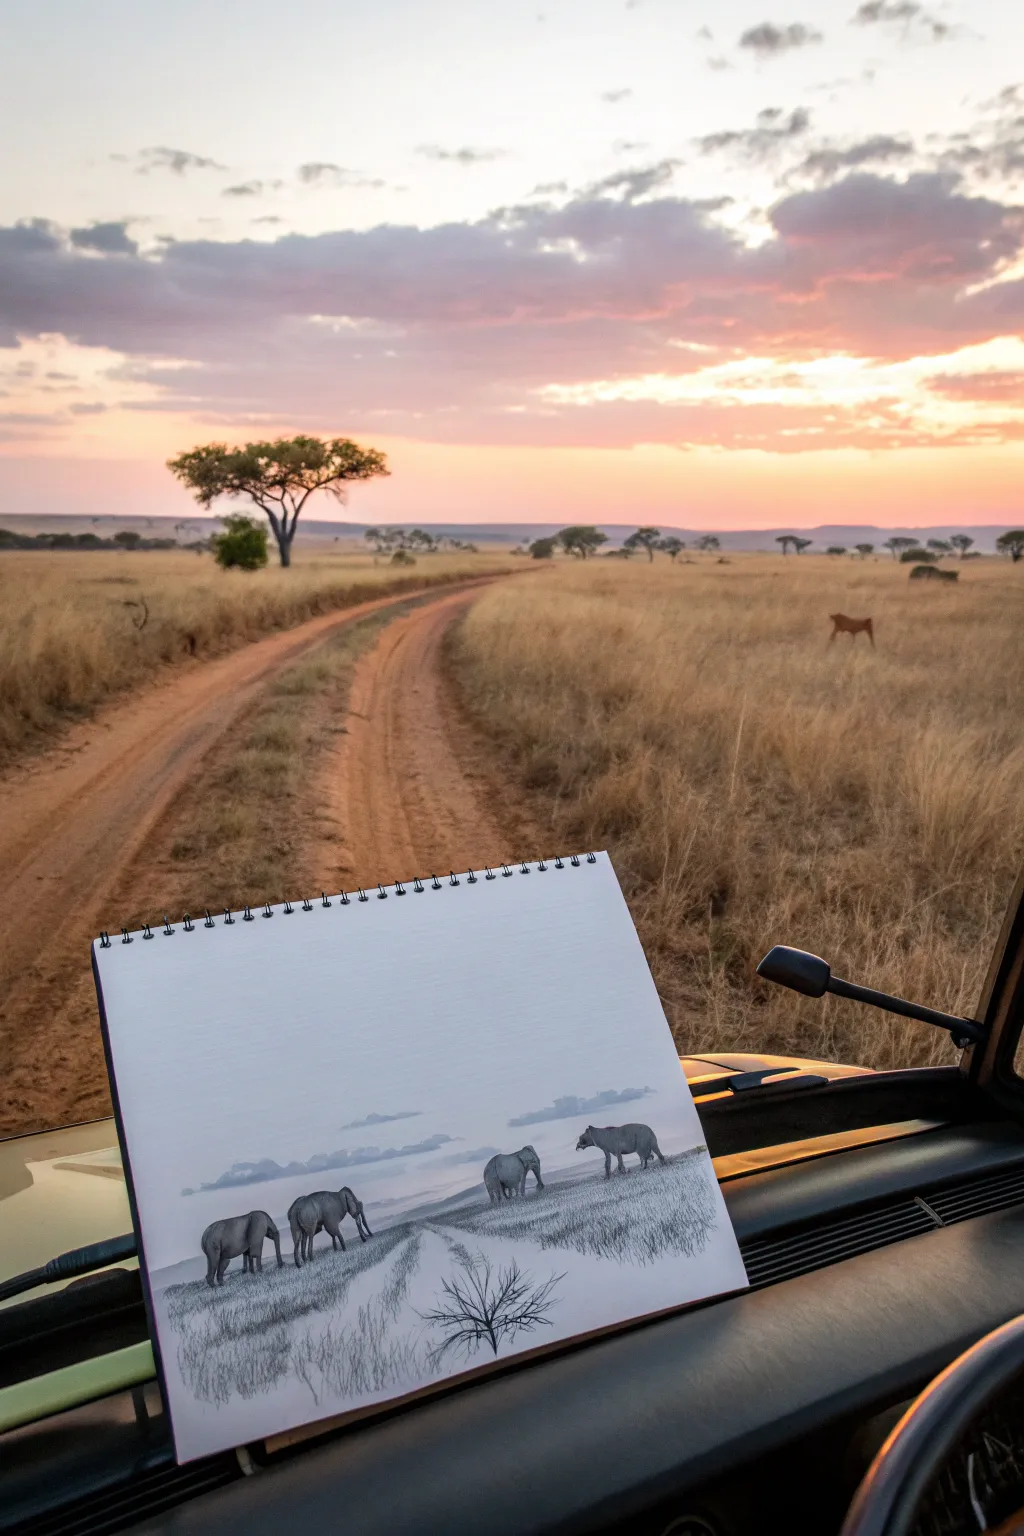
Capture the magic of an African safari with this monochromatic landscape sketch, designed to look as though you just drew it from the dashboard of a jeep. Using simple graphite shading, you will create a sense of depth with wandering elephants and sweeping grassy plains.
How-To Guide
Materials
- Spiral-bound sketchbook (A4 or A3 size, heavy drawing paper)
- Graphite pencils (HB, 2B, 4B, 6B)
- Kneaded eraser
- Blending stump or tortillon
- Ruler (optional for horizon line)
- Tissue or soft cloth for background blending
- Reference photo of elephants (optional)
Step 1: Setting the Scene
-
Establish the horizon:
Begin by lightly drawing a horizontal line across the lower third of your page using an HB pencil. This low horizon line emphasizes the vastness of the sky. -
Block in distant mountains:
Sketch irregular, undulating shapes just above the horizon line to represent distant hills or mountains. Keep these lines very faint for now. -
Map the road:
Draw the dirt road starting wide at the bottom center of the page and narrowing significantly as it winds toward the left side of the horizon. This perspective trick creates immediate depth. -
Place the elephants:
Lightly outline oval shapes to position your three elephants. Place the largest one in the foreground on the left, a slightly smaller one in the middle, and one more on the right side of the road.
Keep it clean
Place a scrap piece of paper under your drawing hand. This prevents your palm from smudging your work or transferring oils to the paper.
Step 2: Creating Atmosphere
-
Lay down the sky tone:
Using the side of a 2B pencil, lightly shade the entire sky area. Use a tissue or soft cloth to blend this graphite into a smooth, even gray tone. -
Define the clouds:
Use your kneaded eraser to lift out graphite in horizontal streaks, creating soft, wispy clouds against the gray sky. -
Darken the cloud bases:
With a 2B pencil, add slight shadows to the underside of your erased clouds, blending them softly downward to give them volume. -
Shade the distant hills:
Fill in the mountains on the horizon with a flat, medium-gray tone (HB or 2B). They should be darker than the sky but lighter than the foreground elements to simulate atmospheric perspective.
Step 3: Bringing the Animals to Life
-
Refine the elephant outlines:
Switch to a 4B pencil to firm up the outlines of your elephants. Pay attention to the curve of their backs and the shape of their trunks. -
Shade the elephant bodies:
Shade the elephants using a 4B or 6B pencil. Focus on the undersides of their bellies and legs to show weight and shadow. -
Add texture to the skin:
Use short, directional strokes on the elephants’ bodies to suggest wrinkled skin. I like to leave small slivers of white paper on their backs to indicate sunlight hitting them. -
Ground the animals:
Darken the area immediately beneath the elephants’ feet to anchor them to the ground so they don’t look like they are floating.
Muddy values?
If your greys are blending into one blob, use a clean eraser to restore bright white highlights on the cloud tops and animal backs.
Step 4: Foreground Textures
-
Grass textures:
Using a sharp 2B pencil, start drawing vertical, flicking strokes in the foreground fields. Make the strokes shorter and fainter as they get closer to the horizon. -
Define the road edges:
Concentrate your grass strokes along the edges of the dirt road to clearly define the path without drawing a solid line. -
Add the foreground bush:
In the immediate foreground (bottom center), sketch a leafless, scraggly bush using a 6B pencil. Press hard to make the branches dark and distinct. -
Final blending and contrast:
Use a blending stump to soften the road surface slightly. Then, go back with your darkest pencil (6B) to deepen the darkest shadows under the elephants and the foreground bush for high contrast.
Now you have a timeless travel sketch that brings the serenity of the savannah right into your sketchbook
Birds Crossing the Sun
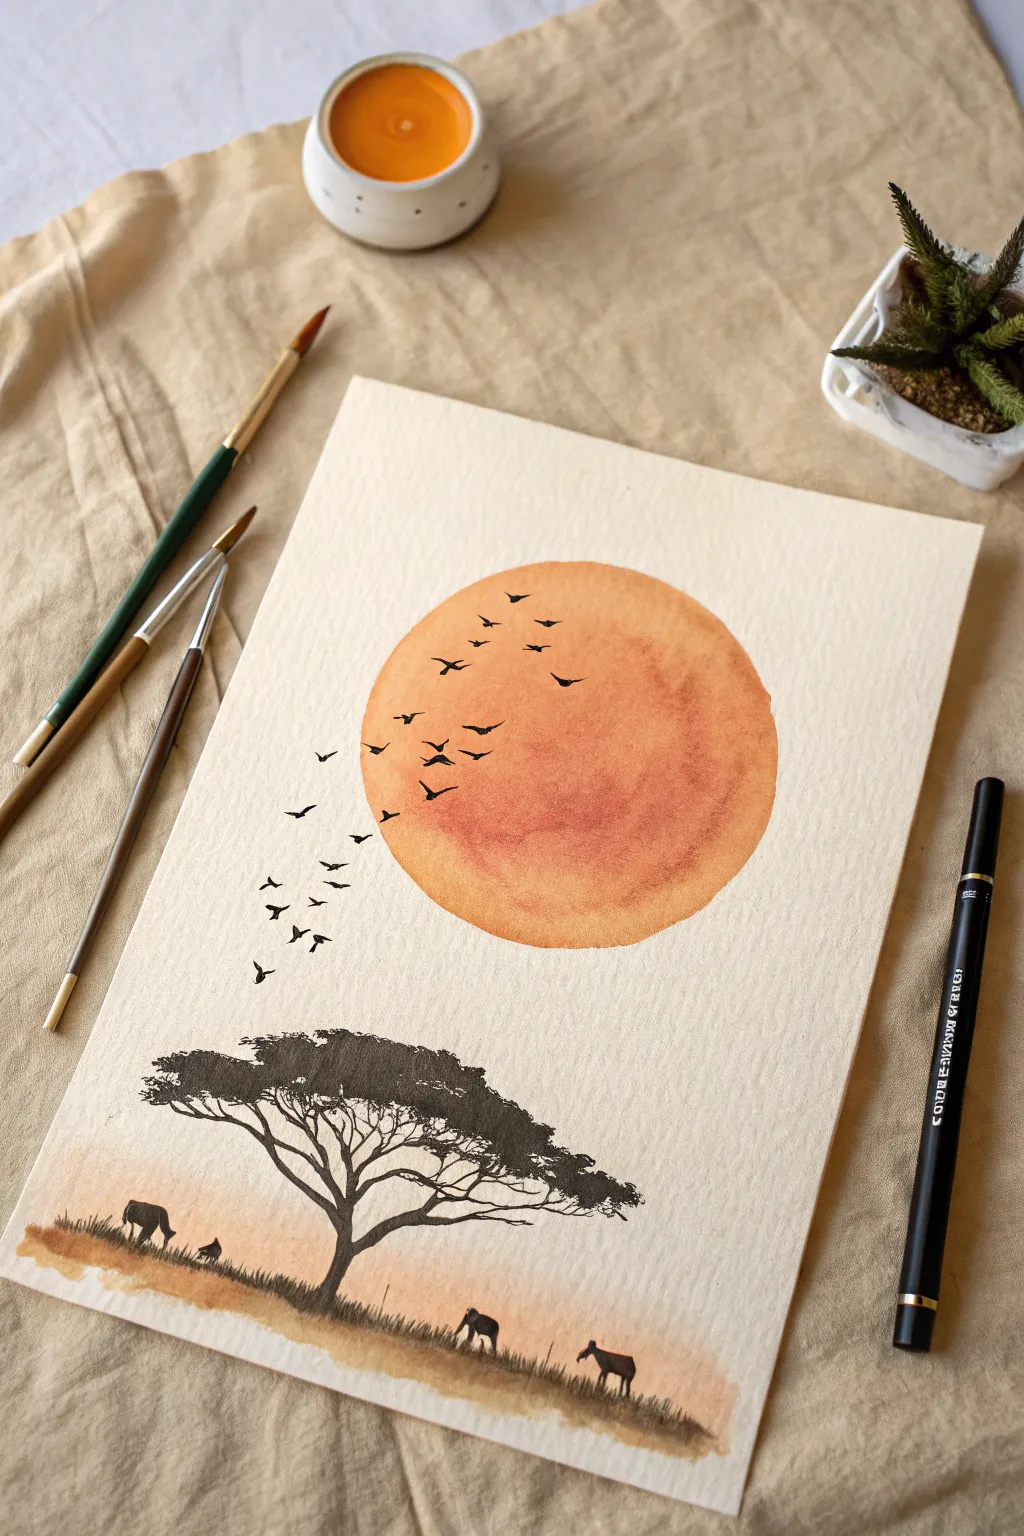
Capture the warmth of an African evening with this serene watercolor project featuring a glowing sun and stark silhouettes. The contrast between the soft, textured orange orb and the crisp black details creates a striking and professional-looking composition.
Detailed Instructions
Materials
- Cold press watercolor paper (A4 or similar size)
- Watercolor paints (burnt orange, yellow ochre, warm red)
- Black waterproof fine liner pen or black gouache
- Medium round watercolor brush (size 6 or 8)
- Small round detail brush (size 0 or 1)
- Circular object for tracing (like a roll of tape or large lid)
- Masking tape
- Pencil and eraser
- Clean water
Step 1: Painting the Sun
-
Trace the circle:
Start by lightly tracing a large circle in the upper center of your paper using a circular object like a masking tape roll. Keep the pencil lines very faint so they disappear under the paint. -
Prepare the wash:
Mix a generous amount of burnt orange with a touch of yellow ochre on your palette. You want a warm, sunset hue that is watery enough to flow but pigmented enough to be vibrant. -
Wet the circle:
Using your medium round brush and clean water, carefully wet the inside of the traced circle. Ensure the water goes right to the edge but doesn’t spill over. The paper should be glisten, not puddle. -
Drop in color:
Load your brush with the orange mix and touch it to the wet paper inside the circle. Watch the color expand. Add drops of slightly darker red-orange to the bottom or sides to create texture and depth. -
Create texture:
While the paint is still wet, you can lift out tiny spots with a dry tissue or add a drop of clean water to create a ‘bloom’ effect, giving the sun a cratered, moon-like appearance. -
Let it dry completely:
This is crucial. The sun must be bone-dry before you add any overlapping details, or the black ink will bleed into the orange.
Step 2: Creating the Ground Layer
-
Paint the horizon wash:
Mix a very dilute wash of watered-down orange or light brown. Near the bottom of the page, paint a loose, horizontal strip for the ground. Keep the edges ragged and uneven to look like grass. -
Add grassy texture:
While the ground wash is damp, dab a little concentrated brown or orange along the bottom edge to suggest shadows in the grass. -
Wait for drying:
Allow this bottom section to dry fully before moving on to the silhouettes.
Don’t Rush the Blur
If you want softer edges on your sun but the paper dried too fast, re-wet the whole circle gently with clean water before adding more pigment.
Step 3: Adding Silhouettes
-
Outline the tree:
Switch to your fine liner pen or a very small brush with black gouache. Sketch the main trunk of the acacia tree on the left side, starting thick at the base and branching out as you go higher. -
Thicken the canopy:
Acacia trees have distinct flat tops. Use small, scribbling motions or stippling with your pen to create dense clusters of leaves along the top branches. -
Draw the birds:
Using the fine liner, draw a flock of birds. Place some directly over the orange sun and some trailing off to the left. Vary their wing positions—some gliding flat, some flapping in a ‘V’ shape. -
Add the animals:
Along the horizon line, draw small, simplified shapes for grazing animals. Rounded backs with heads down work well for grazing gazelles or zebras. Keep them small to maintain the scale. -
Detail the grass:
Use quick, short upward flicks with your pen along the horizon line to create blades of grass. Overlap these slightly with the animals’ legs to ground them in the scene. -
Final assessment:
Step back and look at the composition. If the tree feels too light, darken the trunk with another layer of ink. Ensure the birds guide the eye toward the sun.
Try a Gradient
Instead of a solid orange sun, try a gradient wash from yellow at the top to deep red at the bottom for a more dramatic ‘setting sun’ effect.
Once the ink is dry, erase any visible pencil marks to reveal your striking savannah scene


Storm Clouds Over the Savanna
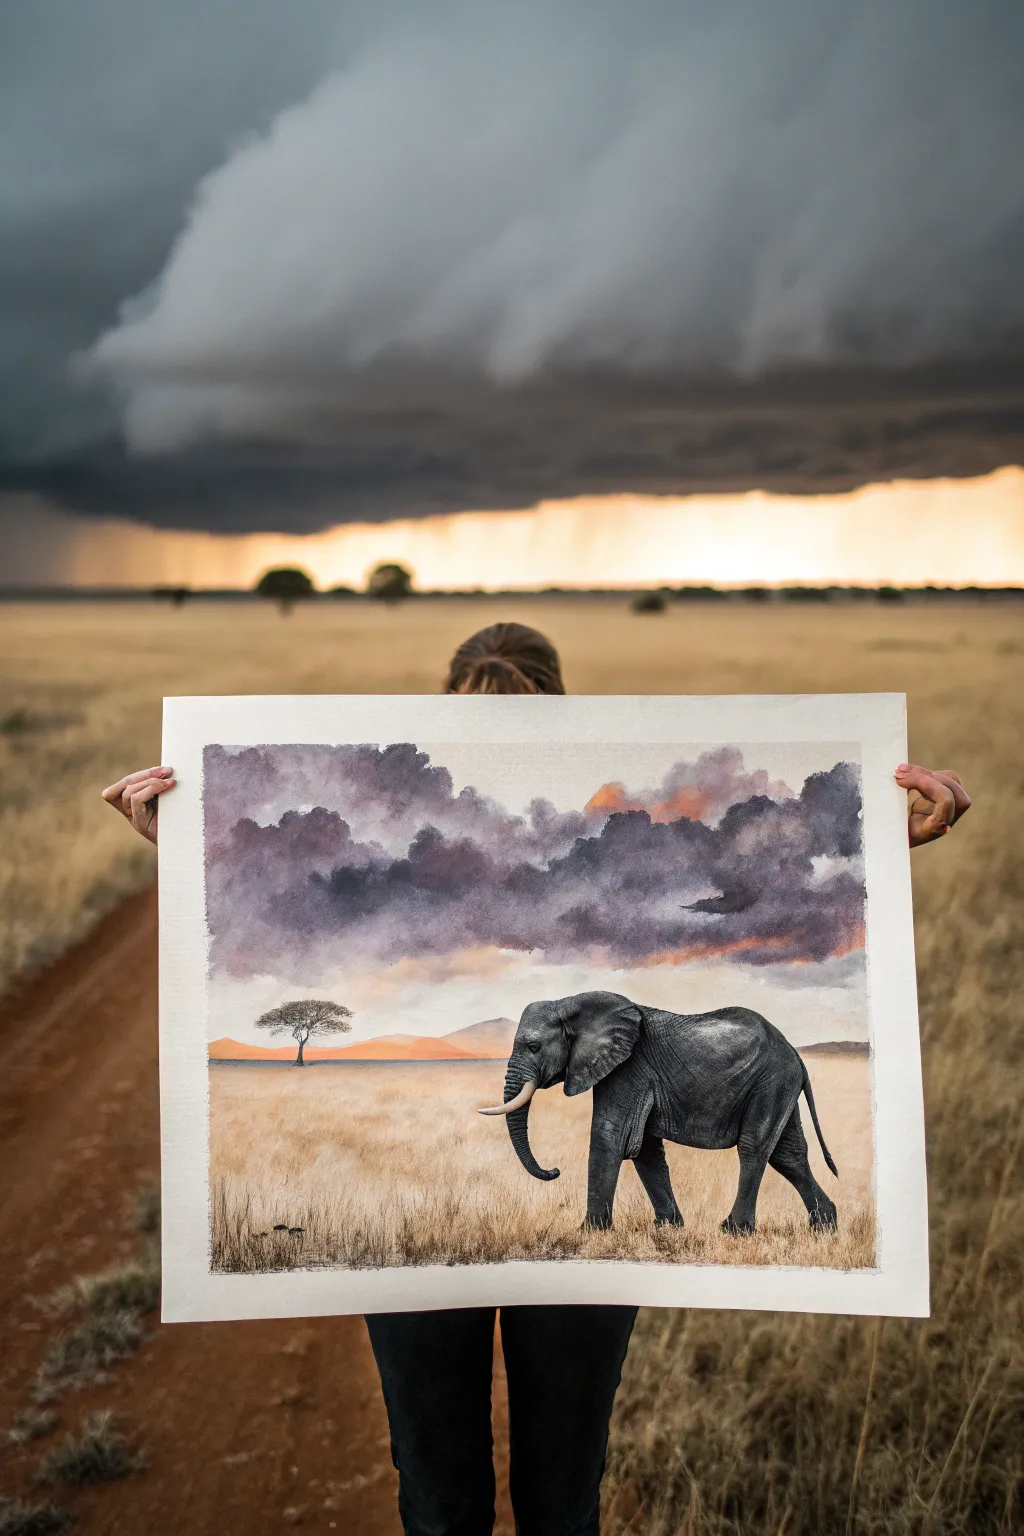
Capture the dramatic beauty of a savanna thunderstorm with this moody watercolor project. You’ll layer soft washes of color to build a turbulent sky, contrasted against the steady, detailed stride of an elephant on the plains.
Step-by-Step Guide
Materials
- Heavyweight watercolor paper (300gsm cold press recommended)
- Watercolor paints (Payne’s Grey, Violet, Burnt Sienna, Yellow Ochre, Lamp Black, Ultramarine Blue)
- Masking fluid
- Large flat wash brush (1-inch)
- Round brushes (sizes 4, 8, and 12)
- Fine liner brush (size 0 or 00)
- Two jars of water
- Painter’s tape
- Paper towels
- Pencil and eraser
Step 1: Preparation and Sketching
-
Secure the paper:
Tape down all four edges of your watercolor paper to a board using painter’s tape. This prevents buckling when we apply heavy washes later and creates that crisp white border. -
Sketch the horizon:
Lightly draw a straight horizon line a little below the center of the page using a pencil. Keep this line faint as watercolor is transparent. -
Outline the subject:
Sketch the outline of the elephant in the foreground, focusing on the large ear, the curve of the trunk, and the leg positions. Don’t worry about skin wrinkles yet; just get the proportions right. -
Add background elements:
Draw the silhouette of the distant acacia tree on the left and the low mountain range along the horizon line. -
Apply masking fluid:
Brush a thin layer of masking fluid over the elephant’s tusks to preserve the bright white of the paper. Let this dry completely before painting.
Cloud Control
To keep storm clouds from becoming mud, mix your greys on the palette rather than the paper. Let the distinct colors (purples/blues) sit next to each other.
Step 2: Painting the Sky
-
Wet-on-wet preparation:
Using your large flat brush, wet the entire sky area with clean water until it glistens but doesn’t have standing puddles. -
Laying the base glow:
Drop in a dilute mix of Yellow Ochre and a touch of Burnt Sienna just above the mountains to create the sunset glow peeking through. Keep the edges soft. -
Building the storm clouds:
While the paper is still damp, mix a strong wash of Payne’s Grey and Violet. Dab this into the upper sky area, letting the paint bloom naturally to form cloud shapes. -
Deepening the shadows:
Add more pigment—specifically Payne’s Grey and a little Lamp Black—to the bottoms of the cloud masses to give them volume and weight. I like to tilt the board slightly here to let the grey drift downward. -
Cloud details:
Use a thirsty, semi-dry brush to lift out some pigment from the tops of the clouds while they are still wet, creating soft, highlighted edges. -
Drying time:
Allow the sky to dry completely. It must be bone dry before you touch the horizon elements.
Rainy Season Effect
Before the sky dries completely, lightly spatter clean water onto the dark clouds. This creates ‘blooms’ that look like distant rain texture.
Step 3: Landscape and Texture
-
Distant mountains:
Paint the distant hills with a watery mix of Burnt Sienna and Violet. Keep them pale to push them into the background (atmospheric perspective). -
Acacia tree:
Using a size 4 brush and a dark mix of Green and Sepia, paint the distant acacia tree. Use tiny stippling motions for the canopy foliage. -
Initial ground wash:
Wash the foreground grass area with a mix of Yellow Ochre and raw sienna. While wet, streak in horizontal lines of pale brown to suggest uneven terrain. -
Grass texture:
Once the ground base is dry, use a dry-brush technique with Burnt Sienna to flick upward strokes across the bottom, simulating tall, dry savanna grass.
Step 4: The Elephant
-
Base shadow layer:
Mix a mid-tone grey using Ultramarine Blue and Burnt Sienna. Paint the entire elephant (avoiding the masked tusks) to establish the base value. -
Building form:
While the base is slightly damp, drop darker grey into the shadow areas: under the belly, the back legs, and under the trunk. -
Wrinkles and details:
Switch to your size 0 or fine liner brush. With a concentrated dark grey mix, paint the specific skin wrinkles on the trunk, knees, and ear flaps using broken, organic lines. -
Final highlights:
Once the paint is fully dry, gently rub off the masking fluid from the tusks. If they look too stark, add a tiny line of pale brown on the underside for shadow.
Peel off your tape carefully to reveal the crisp border and admire your atmospheric savanna scene
Night Safari with Moonlight Silhouettes

Capture the serene magic of a night safari with this breathtaking watercolor landscape. This project plays with a gradient sky, a glowing full moon, and striking black silhouettes to create depth and drama.
Step-by-Step Tutorial
Materials
- Cold press watercolor paper (300 gsm)
- Masking tape
- Watercolor paints (Indigo, Prussian Blue, Violet, Orange, Yellow Ochre)
- Black gouache or waterproof ink
- White gouache or white gel pen
- Round brushes (large size 10-12 for washes, medium size 6 for blending)
- Small liner brush (size 0 or 00 for details)
- Mixing palette
- Jar of clean water
- Paper towels
Step 1: Setting the Scene
-
Prepare your canvas:
Secure your watercolor paper to a flat board using masking tape on all four sides. This prevents the paper from buckling when wet and creates a beautiful crisp white border around your finished painting. -
Sketch the layout:
Using a pencil, lightly sketch the horizon line about one-third of the way up the paper. Draw a circle for the moon in the upper right quadrant—you can trace a coin or lid to get it perfectly round. -
Plan the trees:
Very faintly sketch the placement of the large acacia tree on the left and the smaller trees in the distance. You don’t need details yet, just positioning markers.
Step 2: Creating the Night Sky
-
Wet-on-wet technique:
Generously wet the entire sky area with clean water, carefully going around the moon circle. We want the paper glistening but not puddling. -
Paint the horizon glow:
Start at the horizon line with a band of Yellow Ochre mixed with a touch of bright Orange. Let it bleed upward slightly into the wet paper. -
Transition the colors:
Immediately above the orange, blend in a soft Violet or reddish-purple. Allow this to mix naturally with the orange below to create a sunset gradient. -
Deepen the night sky:
Switch unti your Prussian Blue and Indigo. Start at the very top of the paper with the darkest pigment and work your way down, diluting the paint slightly as you approach the violet band. -
Blend the gradients:
Use a clean, damp brush to smooth the transition where the blue meets the violet. Ensure the sky gets progressively darker as it goes higher. -
Define the moon:
While the sky dries, paint the moon using very diluted blue-grey paint. Dab in a few slightly darker spots to suggest craters, keeping the edges soft.
Fixing Sky Blooms
If water pushes pigment away creating ‘cauliflower’ rugged edges in the sky, don’t scrub it. Wait for it to dry, then gently glaze over it with a semi-transparent layer of the dark blue.
Step 3: The Grasslands
-
Paint the foreground wash:
For the ground, mix a very diluted wash of violet and grey. Apply this loosely below the horizon line, using horizontal strokes to suggest flat terrain. -
Add grassy texture:
While the ground wash is still damp, drop in slightly darker purple-grey tones near the bottom corners to create depth and texture in the grass. -
Let it dry completely:
I always take a break here. The paper must be bone-dry before we add the sharp silhouettes, or the black ink will bleed into the background.
Pro Tip: Masking Fluid
If you struggle to paint around the moon perfectly, apply masking fluid to the circle before wetting the sky. Rub it off once the sky paint is completely dry for a crisp edge.
Step 4: Silhouettes and Details
-
Paint the distant trees:
Using black gouache or concentrated watercolor, paint the distant tree line and small bushes along the horizon. Keep these shapes small and slightly less detailed. -
Outline the main tree:
Switch to your liner brush. Carefully paint the trunk and main branches of the large acacia tree on the left. Remember that acacia branches tend to grow outward and flatten at the top. -
Add canopy details:
Use a erratic stippling motion to fill in the foliage of the tree. Leave plenty of small gaps between the leaves so the sky shows through—this prevents the tree from looking like a solid blob. -
Add the lion silhouette:
Paint the seated lion silhouette in the foreground. Focus on the distinct shape of the mane and the curve of the tail resting on the ground. -
Detail the grass:
With the tip of your smallest brush, flick upward strokes of diluted black or dark grey at the bottom of the paper to create individual blades of tall grass around the lion. -
Create the stars:
Cover the bottom part of your painting with a scrap paper.Load a brush with white gouache and tap it against another brush to splatter tiny stars across the blue sky. -
Add the final touches:
Use a white gel pen or a fine brush with white gouache to add a tiny dot of highlight to the lion’s silhouette if desired, and verify your moon borders are clean.
Peel off the tape carefully to reveal those crisp white edges and enjoy your tranquil safari night scene
Cheetah Speed Gesture Painting
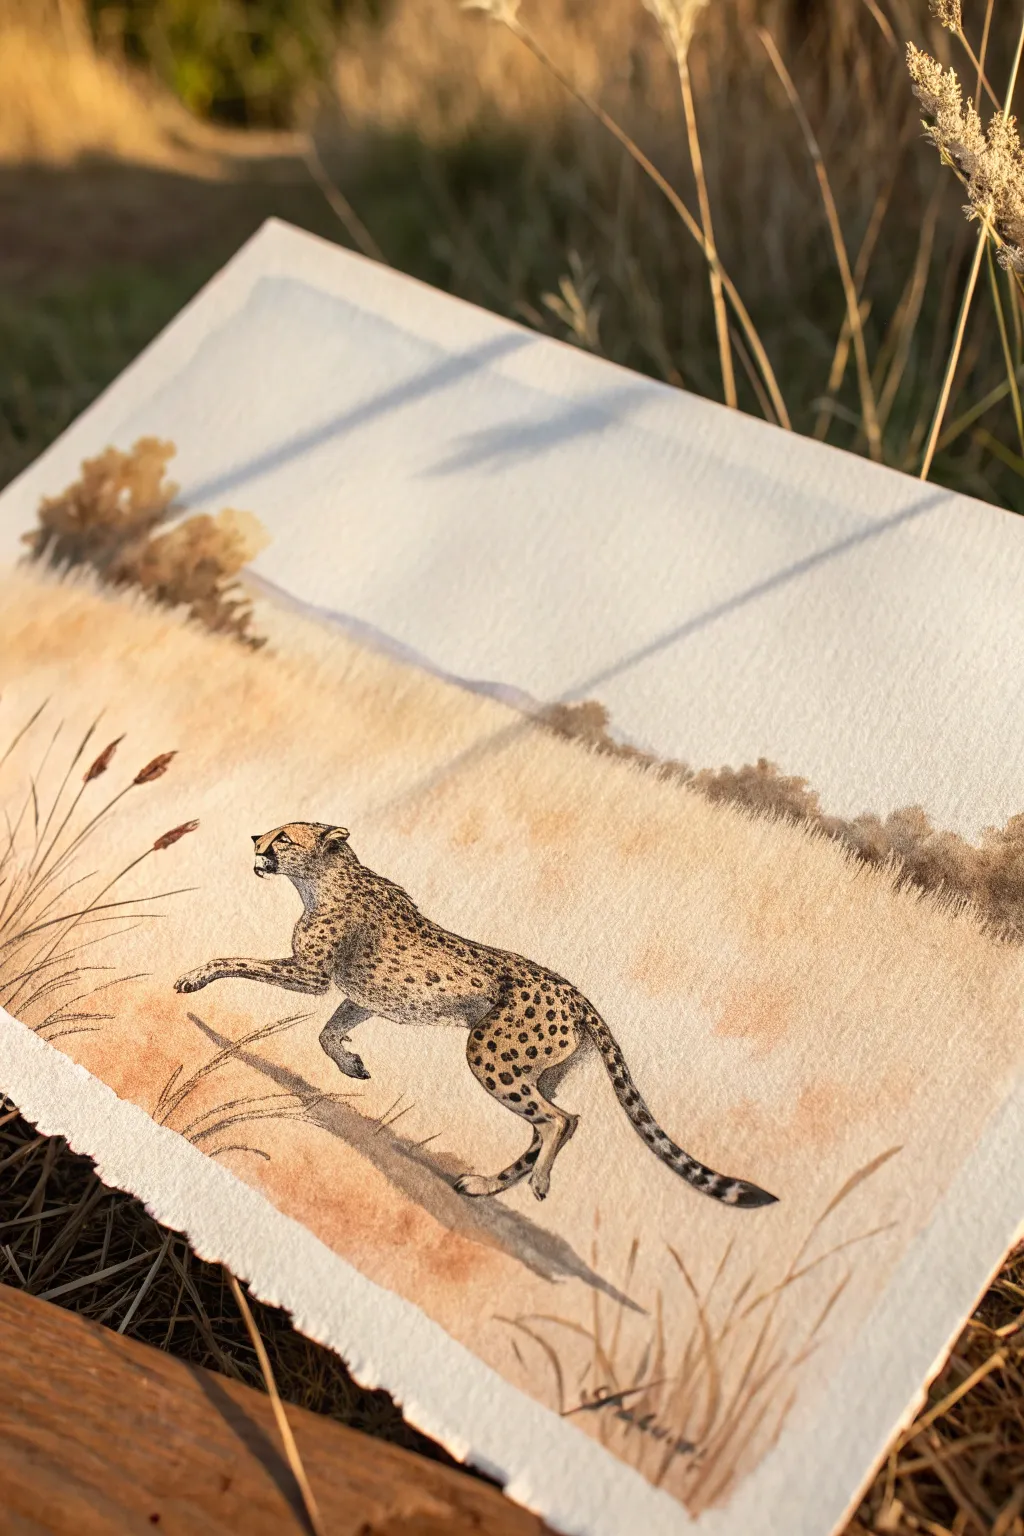
Capture the breathtaking speed of the world’s fastest land animal with this elegant watercolor and ink study. By combining loose, warm washes for the savannah with precise detailing for the cheetah, you’ll create a piece that feels both fluid and focused.
Detailed Instructions
Materials
- Cold press watercolor paper (300gsm, rough texture preferred)
- Watercolor paints (Yellow Ochre, Burnt Sienna, Raw Umber, Paynes Grey)
- Fine liner pens (Black and Dark Brown, sizes 0.1 and 0.5)
- Round watercolor brushes (Size 8 for washes, Size 2 for details)
- Pencil and eraser
- Masking tape
- Clean water and paper towels
Step 1: Sketching the Motion
-
Prepare your canvas:
Tape your watercolor paper down to a board to prevent warping. This project works beautifully on paper with a deckled edge if you have it available. -
Establish the horizon:
Lightly sketch a horizon line just below the halfway point of your paper. Keep it soft and slightly uneven to mimic natural terrain. -
Draft the cheetah’s form:
Sketch the cheetah in mid-stride. Focus on the ‘S’ curve of the spine and the extended legs. The back legs should be pushing off and the front legs reaching forward, with the tail acting as a rudder behind. -
Refine the anatomy:
Lightly draw the head, ensuring the ears are flattened back for aerodynamics. Define the shoulder blades and hip joints, but keep your pencil lines very faint so they don’t show through the paint later.
Muddy colors?
If your grass wash looks dirty, you likely overworked it while wet. Lay the wash down once and leave it alone. Don’t go back into drying paint with a wet brush.
Step 2: The Savannah Wash
-
Mix your background colors:
Create a watery mix of Yellow Ochre with a touch of Burnt Sienna. You want a warm, golden dry-grass color. -
Paint the foreground:
Using your size 8 brush, apply a loose wash to the bottom half of the paper. Leave some white gaps for texture, and let the color fade out gradually as you move up toward the horizon line. -
Add distant foliage:
While the paper is still slightly damp, drop in touches of Raw Umber along the horizon line to suggest distant bushes or trees. Let the pigment bleed slightly for a soft-focus effect. -
Suggest movement:
With a damp brush, sweep horizontally across the painted foreground to create motion blur streaks. This enhances the feeling of speed. -
Let it dry completely:
Wait until the background is bone dry before starting the animal. If the paper is cool to the touch, it’s still wet.
Step 3: Detailing the Cheetah
-
Base coat the cheetah:
Paint the cheetah’s body with a diluted mix of Yellow Ochre and a tiny bit of Paynes Grey to desaturate it slightly. Leave the belly and inner legs white. -
Shadow mapping:
While the base coat is drying, mix a darker shadow color using Burnt Sienna and Paynes Grey. Apply this to the underside of the limbs, the neck, and beneath the tail to give the form volume. -
Inking the outline:
Once dry, use your 0.1 fine liner to outline the cheetah. Use broken, flicking strokes rather than a solid line to mimic fur texture. -
The crucial spots:
Switch to a 0.5 pen or a small brush with concentrated dark brown paint. Dot the spots in a specific pattern: smaller and closer together on the head/neck, becoming larger and more spaced out on the flank. -
Facial details:
Carefully draw the distinctive ‘tear marks’ running from the inner corners of the eyes down to the mouth using black ink. This is the cheetah’s signature feature.
Keep it Moving
When painting the cast shadow under the cheetah, keep the edges soft and blurred. A sharp shadow looks static; a blurry shadow implies high-speed movement.
Step 4: Final Flourishes
-
Grass blades:
Use your fine liner to draw a few tall, thin grass stalks in the foreground on the left. Add seed heads to the tops. -
Cast shadow:
I like to mix a cool, purplish-grey wash and paint a stretched, elongated shadow directly underneath the cheetah giving the illusion of separation from the ground. -
Connect the scene:
Add a few loose pen scribbles or ink washes around the feet and shadow area to suggest dust being kicked up by the sprint. -
Review and sign:
Step back to check the values. If the cheetah needs more contrast, darken the spots or the cast shadow before signing your work in the corner.
Now you have a dynamic piece of wildlife art that captures the essence of the hunt
Rhino and Oxpecker Story Scene
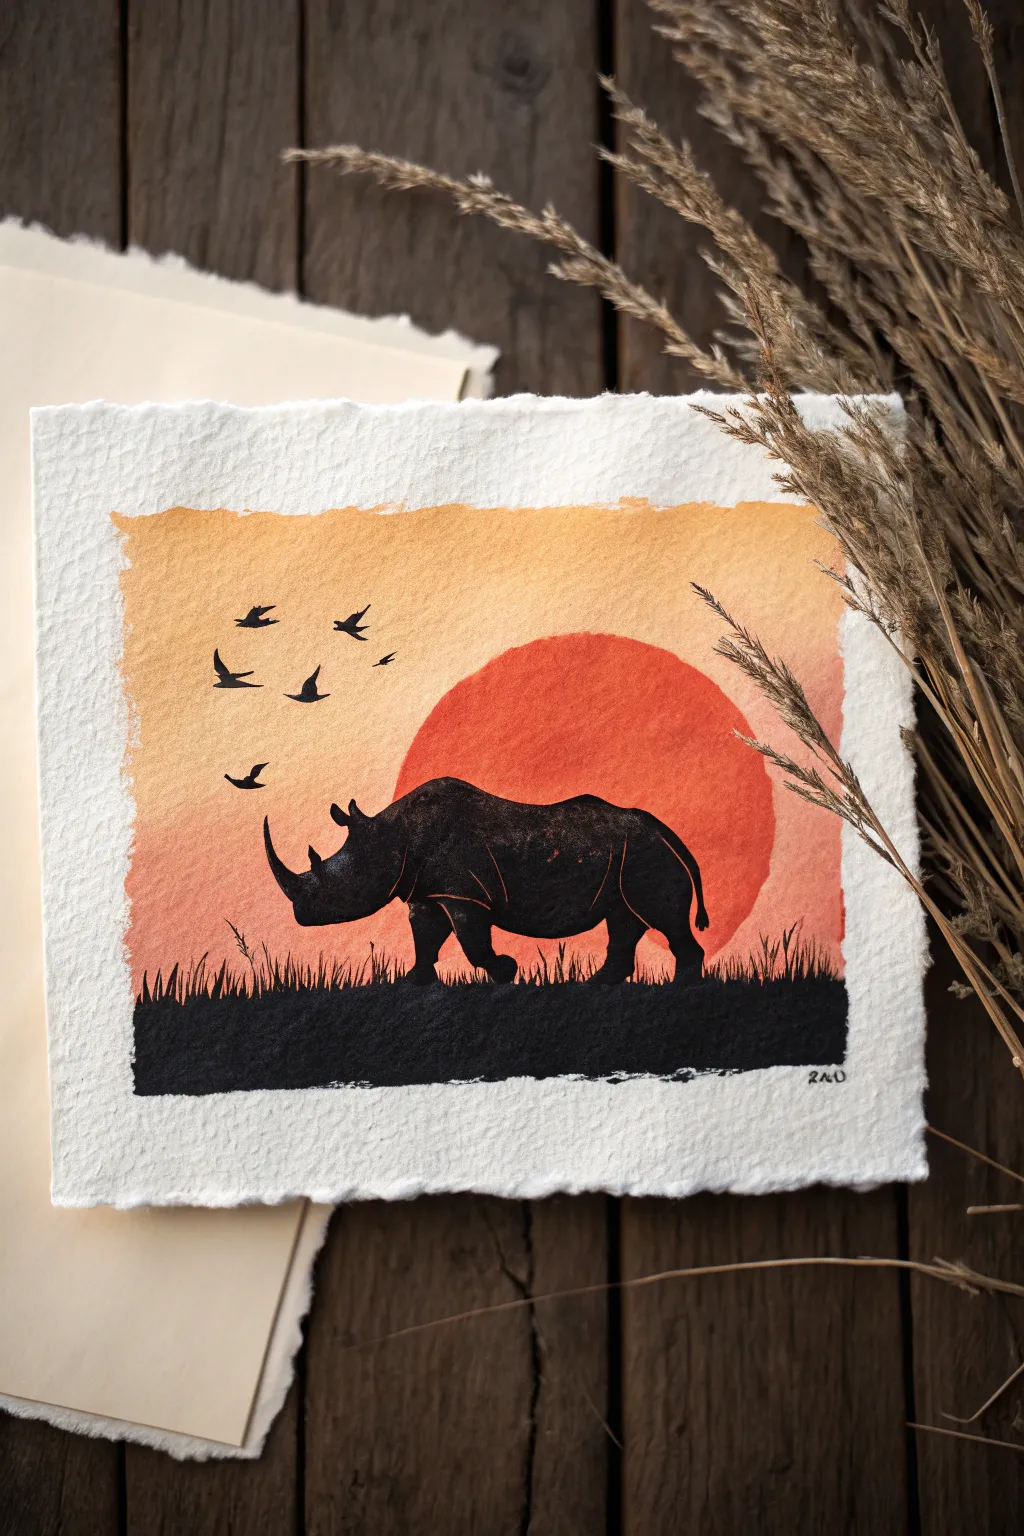
Capture the majestic atmosphere of the African savannah with this striking watercolor silhouette. This project combines a soft, warm gradient wash for the sky with bold, stark black details to create a high-contrast scene full of drama.
How-To Guide
Materials
- Cold press watercolor paper (deckled edge optional)
- Masking tape
- Watercolor paints (Yellow Ochre, Burnt Sienna, Cadmium Red, Black/Payne’s Gray)
- Wide flat wash brush
- Round brush (size 6 or 8)
- Fine liner brush (size 0 or 1)
- Pencil and eraser
- Compass or circular object for tracing
- Water cups and paper towels
Step 1: Setting the Scene
-
Prepare your paper:
If you want the rugged look shown in the photo, tear your watercolor paper carefully against a ruler to create deckled edges. Tape the paper down on a board, leaving a border of about half an inch all around to frame the composition later. -
Sketch the layout:
Lightly sketch the horizon line about a third of the way up from the bottom. Use a compass or a roll of tape to trace a large circle for the sun, positioning it slightly off-center to the right, sitting just on or slightly behind the horizon line. -
Outline the subject:
Very faintly sketch the rhinoceros silhouette. Focus on the big shapes: the hump of the back, the curve of the belly, and the two horns. Don’t press hard; you just need a guide for later.
Clean Edges Trick
To get that ragged ‘painted’ edge look without tape leaks, paint freely over the edge but stop your brush abruptly on the paper to leave dry, unpainted texture.
Step 2: Painting the Sky
-
Wet the sky area:
Using your large flat brush, apply clean water to the entire sky area, stopping right at the straight edges of your taped border but going right over your pencil sketch of the rhino. -
Apply the first wash:
Load your brush with a diluted Yellow Ochre. Start at the top of the sky and gently brush downward. While the paper is still wet, introduce a touch of Burnt Sienna as you move down, blending the colors smoothly. -
Create the gradient:
Continue darkening the wash slightly as you near the horizon line, perhaps mixing in the tiniest drop of red to warm it up. The goal is a seamless transition from light yellow-orange to a warmer, deeper peach tone. -
Paint the sun:
Once the background wash is dry to the touch, mix a vibrant, semi-opaque Cadmium Red. paint the interior of your sun circle carefully. You want this to stand out boldly against the softer sky, so apply enough pigment for good coverage. -
Let it dry completely:
This is crucial. Before moving to the black silhouettes, the background must be bone dry. If it’s cool to the touch, give it a few more minutes.
Blooms in the Sky?
If you see watermarks or cauliflower shapes drying in your sky, you added water when the paper was half-dry. Embrace it as clouds or glaze another layer over it.
Step 3: The Silhouettes
-
Paint the ground:
Mix a dense, opaque black. Using your round brush, fill in the solid ground below the horizon line. I like to keep the bottom edge uneven to mimic rough terrain. -
Add grass texture:
Before the black ground dries fully, or right after, switch to your fine liner brush. With quick, upward flicking motions, pull paint up from the horizon line to create individual blades of tall grass. -
Fill the rhino shape:
Using your round brush and the same dense black, carefully fill in the rhino shape you sketched earlier. Ensure the edges are crisp, especially around the horns and ears. -
Refine the legs:
Pay attention to the feet. They should be buried slightly in the grass you painted earlier, which helps ground the animal rather than making it look like it’s floating. -
Add highlights:
While the black paint is wet, you can lift a tiny bit of pigment with a thirsty brush along the shoulder or hip to suggest muscle definition, or use a white gel pen later once dry to add very subtle rim lighting. -
Paint the birds:
With your smallest detail brush, paint the flying birds. Make the ones closer to the rhino slightly larger and more detailed (V-shapes with bodies) and the distant ones simple ticks or V-shapes. -
Final touches:
Check your edges. If the paint bled anywhere, tidy it up with opaque black gouache or a black ink pen for sharpness. Add a tiny bird specifically near the rhino’s back if you want to include an oxpecker. -
Remove tape:
Peel your masking tape away slowly at a 45-degree angle to reveal the clean, white border surrounding your painterly, rugged edges.
Now step back and admire how simple silhouettes can tell such a powerful story.
Leopard Spots as a Design Focus
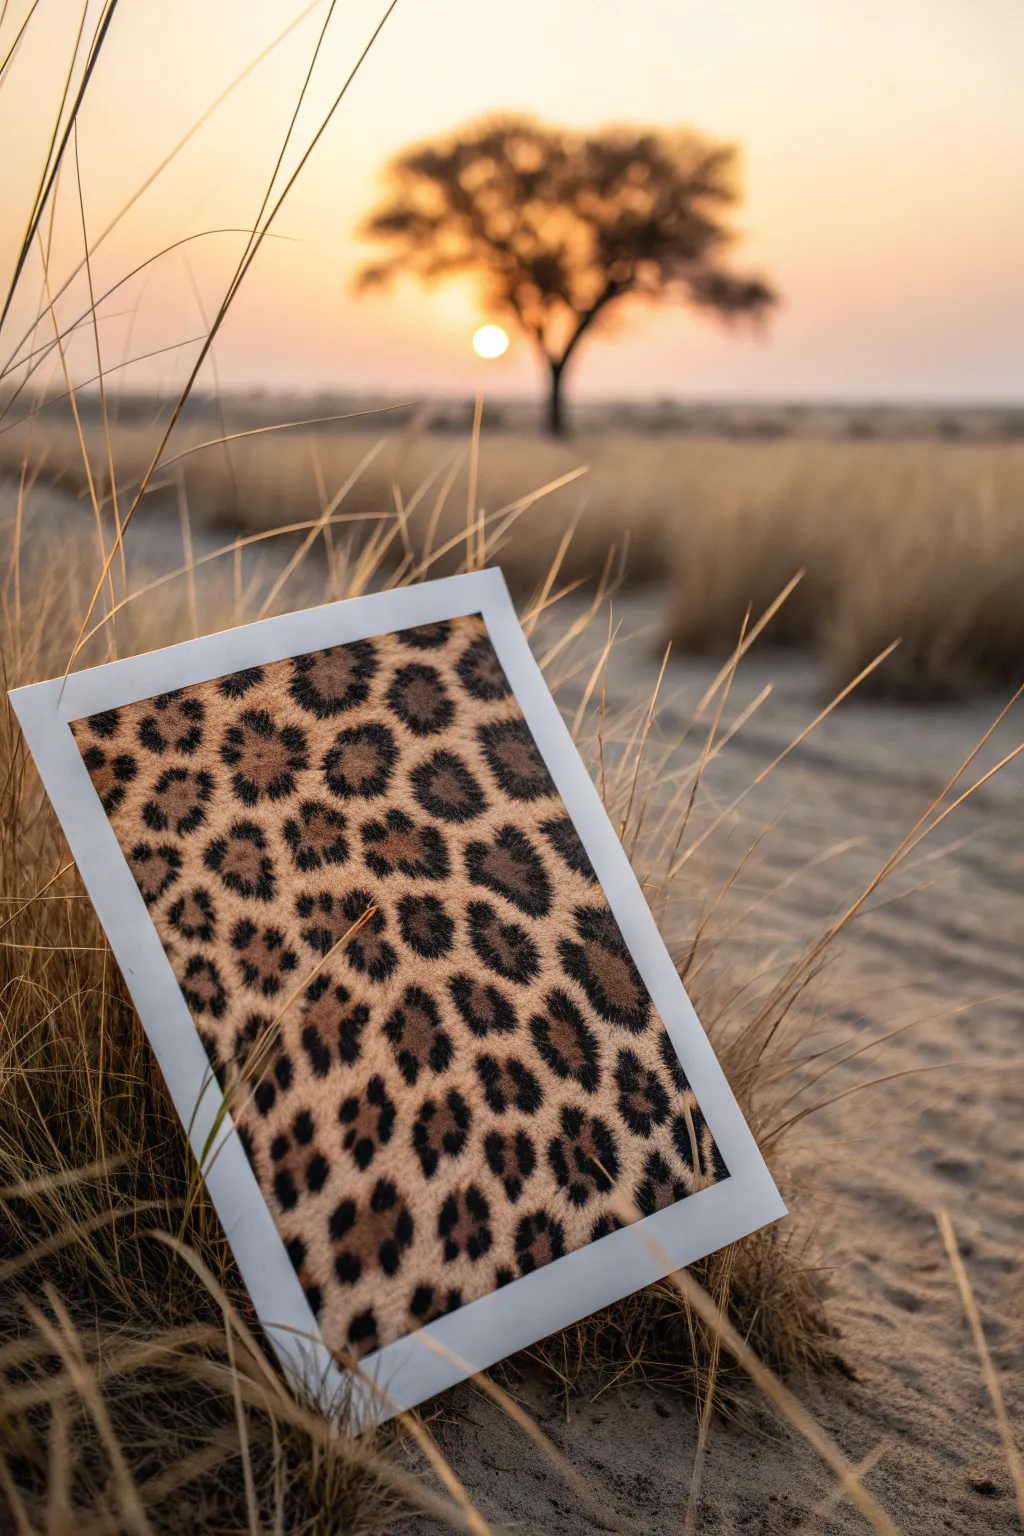
Capture the raw beauty of the African wilderness with this focused study of leopard rosettes. By simplifying the subject to just the pattern, you create a striking abstract piece that brings the warmth of the savannah into your home.
Step-by-Step
Materials
- Square canvas board or thick watercolor paper
- Acrylic paints: Burnt Sienna, Yellow Ochre, Raw Umber, Mars Black, Titanium White
- Medium flat brush (size 6 or 8)
- Small round brush (size 2 or 4)
- Fine detail brush (size 0)
- Palette for mixing
- Water cup and paper towels
- Painter’s tape (optional for clean borders)
Step 1: Base Texture
-
Prepare the Background:
Begin by squeezing out Yellow Ochre and Titanium White onto your palette. Mix a creamy, pale gold color that will serve as the fur’s base layer. -
Apply the Base Coat:
Using your medium flat brush, cover the entire canvas with the pale gold mixture. Use crisscross strokes rather than straight lines to mimic the chaotic, organic texture of animal fur right from the start. -
Add Depth:
While the base is still slightly tacky, mix a tiny amount of Burnt Sienna into your gold. Dab this warmer tone randomly across the canvas to create subtle variations in the fur color. -
Create Texture:
I like to take a dry, clean brush and lightly whisk it over the wet paint in short, flicking motions. This softens the brushstrokes and makes the surface look more like a soft coat. -
Let it Dry:
Allow this foundational layer to dry completely. Acrylics dry fast, but give it about 15-20 minutes to ensure your next layers don’t muddy the base.
Step 2: Painting the Rosettes
-
Mix the Inner Shadow:
Create the color for the center of the spots by mixing Burnt Sienna with a touch of Raw Umber. You want a rich, warm brown that stands out against the pale gold background. -
Map the Centers:
Using the small round brush, paint irregular, organic blobs across the canvas. These will be the centers of your rosettes. Keep them spaced out roughly evenly, but avoid a perfect grid pattern. -
Vary sizes:
Make sure some spots are larger and some smaller. Nature isn’t uniform, so imperfection is your friend here. -
Prepare the Black:
Squeeze out Mars Black. If it feels too stiff, add a single drop of water to make it flow smoothly from your brush. -
Outline the Rosettes:
Take your small round brush with the black paint. Paint broken rings around your brown centers. Instead of a perfect circle, paint two, three, or four separate curved bracket shapes that hug the brown center. -
Solid Spots:
In the empty spaces between the large rosettes, paint smaller, solid black spots using just the tip of the brush. These ‘satellite’ spots add realism to the pattern density. -
Feather the Edges:
Switch to your fine detail brush. Gently flick the black paint outward from the edges of the spots into the gold background. These tiny flicks simulate individual hairs overlapping the dark markings. -
Layering the Black:
Go back over the thickest parts of the black rings to ensure they are opaque and dark. This high contrast is key to the design’s impact.
Uneven Spots?
If your rosettes look too uniform, step back and squint. Add a few tiny, irregular black dots in the largest gaps to break up any obvious rows.
Step 3: Final Details
-
Highlighting Fur:
Clean your fine detail brush thoroughly. Mix a bit of Titanium White with Yellow Ochre to make a very pale highlight color. -
Adding Shine:
Paint extremely fine, short strokes in the golden areas between the spots. This suggests the sheen of the fur where the light hits it. -
Softening Harshness:
If any black spots look too like stickers, use a very slightly damp brush to gently blur one edge of the spot, blending it slightly into the background. -
Border Check:
For a professional finish, you can either paint the edges of your canvas board black or leave a clean white border if you taped it off earlier. -
Seal the Work:
Once fully dry (give it at least an hour), apply a clear matte or satin varnish to protect the paint and unify the sheen of the different colors.
Hair Texture Hack
Use an old, frayed brush for the base layer. The split bristles naturally create multiple fine lines that look exactly like fur texture.
Display your leopard print study in a spot with warm lighting to accentuate those golden tones
Patterned Folk-Art Safari Animals
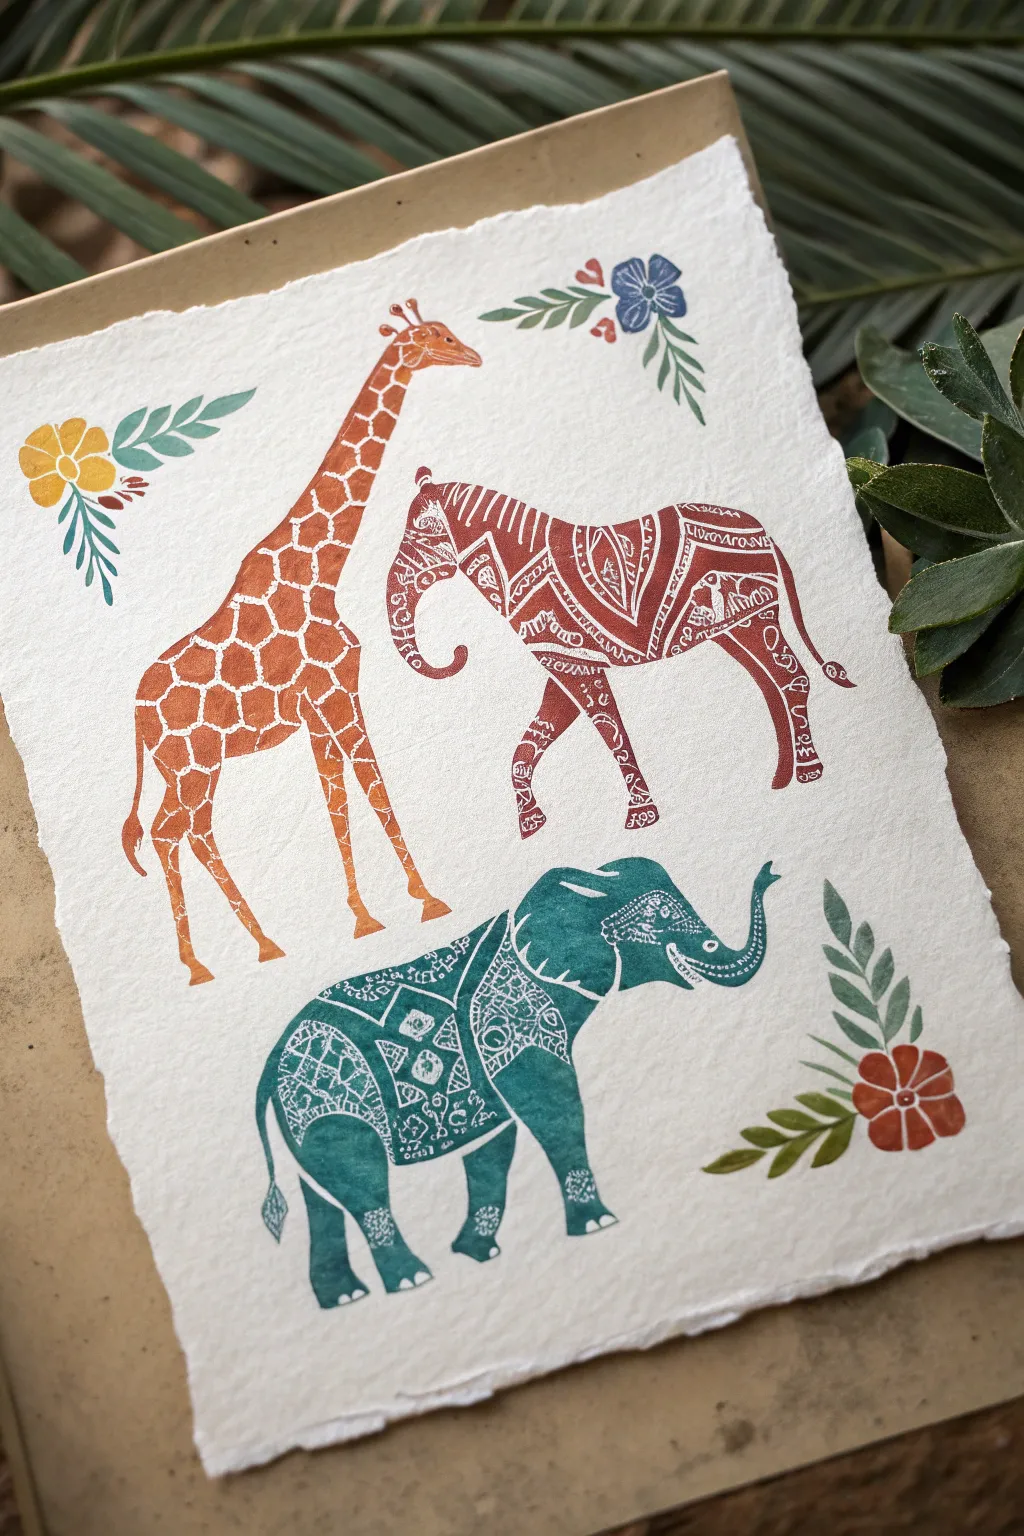
Capture the spirit of the savannah with these charming block-print style safari animals featuring intricate white linework. This project pairs earthy terracotta and teal tones with handmade paper for a textured, authentic folk-art finish.
Step-by-Step Guide
Materials
- Handmade cotton rag paper (deckle edge recommended)
- Linoleum carving block or soft-cut rubber block
- Carving tools (V-gouge and U-gouge)
- Block printing ink (Terracotta/Rust, Deep Teal, Golden Yellow, Green)
- Brayer (rubber roller)
- Glass plate or acrylic sheet (for rolling ink)
- Pencil and tracing paper
- Baren or wooden spoon (for burnishing)
- Fine-point white gel pen or acrylic paint marker (optional alternative)
Step 1: Designing the Motifs
-
Sketch your silhouettes:
Begin by drawing the outlines of a giraffe, a stylized zebra (or horse-like shape), and an elephant on plain paper. Keep the shapes simple and bold, focusing on recognizable profiles rather than realistic details. -
Add floral accents:
Sketch three distinct floral clusters: a yellow flower with leaves for the left, red hearts and blue posies for the top right, and a red flower with leaves for the bottom right. -
Plan the negative space:
Decide which inner patterns you want to carve away. For the zebra, draw angled stripes and geometric fillers. For the elephant, plan a decorative saddle blanket and mandala-style headpiece. The giraffe acts differently; its iconic spots will be the relief (printed) part, while the ‘grid’ between them is carved away. -
Transfer to block:
Trace your final designs onto tracing paper with a soft graphite pencil. Flip the tracing paper face-down onto your carving block and rub the back firmly to transfer the graphite image. Remember, the final print will be a mirror image of your carving.
Patchy Prints?
If your print looks too speckled, your paper might be too textured. Lightly mist the paper with water before printing to soften the fibers and grab the ink better.
Step 2: Carving the Blocks
-
Outline the shapes:
Using a fine V-gouge, carefully carve along the exterior outline of each animal and flower element. This creates a clean ‘stop’ line for when you clear away the background. -
Carve the zebra’s patterns:
Switching between fine and medium gouges, carve out the intricate lines inside the zebra. You are removing the material where you want the white paper to show through, creating the folk-art doodle effect. -
detail the elephant:
For the elephant, carve the fine lines of the tusks, the eye, and the ornate blanket patterns. I like to use the finest blade available here to keep the lines crisp and delicate. -
Create the giraffe texture:
Carving the giraffe is the inverse of the others. Carve away the lines *between* the spots, leaving the spots themselves raised to catch the ink. -
Clear the background:
Use a wide U-gouge to clear away all the rubber around your animal shapes. You can either cut them out completely as individual stamps or leave them on a larger block with the background deeply recessed.
Step 3: Printing the Scene
-
Prepare the paper:
Lay your handmade cotton rag paper on a flat, clean surface. Hand-torn or deckle-edged paper adds to the rustic aesthetic. -
Ink the giraffe:
Squeeze a small amount of terracotta or rust-colored ink onto your glass plate. Roll the brayer back and forth until it has a velvety texture, then roll it evenly over the giraffe block. -
Print the giraffe:
Position the giraffe on the left side of the paper. Press down firmly. Use a baren or the back of a wooden spoon to rub the back of the stamp in circular motions to ensure even ink transfer. -
Print the zebra:
Clean your brayer or use a fresh spot of rust ink. Ink the zebra block and stamp it in the upper right quadrant, slightly overlapping the center line. -
Ink and print the elephant:
Switch to a deep teal ink. Roll up your elephant block and stamp it in the lower center of the page, walking beneath the zebra. -
Add floral details:
Using small detail brushes or separate mini-stamps, print the floral elements. Use yellow and teal for the left flower, red and blue for the top cluster, and red and green for the bottom corner. -
Optional white detailing:
If your carving lines didn’t come out as crisp as you hoped, you can cheat a little! Once the ink is fully dry, use a white gel pen to define the zebra’s stripes or the elephant’s blanket patterns directly on top of the ink.
Stamp Positioning
Before inking, lay your dry carved blocks onto the paper to test the composition. Mark the corners lightly with a pencil so you know exactly where to press.
Let the ink cure fully for 24 hours before framing your beautiful safari trio
Triptych Savannah Panorama

Bring the warmth of the African plains into your home with this stunning three-panel landscape. This project breaks down a panoramic sunset scene into manageable sections, creating a cohesive and impressive wall display.
Detailed Instructions
Materials
- Three separate canvases (equal size, rectangular)
- Acrylic paints (Titanium White, Cadmium Yellow, Orange, Burnt Sienna, Burnt Umber, Mars Black)
- Wide flat brush (2-3 inch)
- Medium flat brush
- Small round brush
- Fine liner brush
- Easel or flat workspace
- Palette and container for water
- Pencil and eraser
- Ruler or straight edge
Step 1: Planning and Background
-
Arrange the canvases:
Lay your three canvases side-by-side on your workspace with a small gap (about 1 inch) between them. This gap mimics how they will hang on the wall, ensuring your continuous lines flow correctly across the breaks. -
Sketch the horizon:
Using a pencil and ruler, lightly mark the horizon line across all three panels. Place it in the lower third of the canvas to leave ample room for the dramatic sky. -
Outline the main subjects:
Lightly sketch the large acacia tree on the left, ensuring its branches reach across to the middle panel. Mark the position of the sun in the center panel, just hovering over the horizon. -
Base coat the sky:
Mix a pale yellow using White and a touch of Cadmium Yellow. Paint the area immediately around the sun circle, blending outward. We aren’t painting the sun itself just yet, keep that area white. -
Create the sunset gradient:
While the yellow is still wet, introduce Orange as you move further from the sun and higher up the canvas. Use horizontal strokes with your wide brush to blend the colors seamlessly. -
Darken the upper sky:
At the very top and corners, blend in a mix of Orange and a tiny bit of Burnt Sienna to create a deeper, duskier tone. -
Paint the sun:
Fill in the sun circle with pure Titanium White. While the edges are wet, soften them slightly into the surrounding yellow so it glows rather than looking like a sticker. -
Add cloud layers:
Mix a soft grey-purple using White, a touch of Black, and burnt Sienna. Using a dry brush technique, drag wispy, horizontal clouds across the sun and the lower sky to create depth.
Misaligned Branches?
If your branches don’t line up perfectly when hung, simply extend the branch tips on the receiving panel slightly to meet the incoming line creating a visual bridge.
Step 2: Landscape and Details
-
Block in the distant mountains:
Mix a hazy purple-brown using Burnt Sienna and a little White. Paint the distant mountain ranges just above the horizon line, making them lighter than the foreground to suggest atmospheric perspective. -
Paint the grassy foreground:
For the ground below the horizon, use a mix of Burnt Sienna and Ochre (or Yellow mixed with brown). Use vertical, flicking brushstrokes to simulate tall grass texture. -
Deepen the foreground shadows:
Mix Burnt Umber with a touch of Black. Apply this to the very bottom of the canvases, blending upward into the lighter grass color to ground the scene. -
Paint the main tree trunk:
Using Mars Black and a medium flat brush, paint the silhouette of the large tree trunk on the left panel. Focus on the organic, twisting shape characteristic of acacia trees. -
Extend the main branches:
Switch to a round brush to pull the thick branches out from the trunk. Ensure the branches flow naturally from the left canvas onto the middle canvas, bridging the gap visually. -
Add fine twigs:
With a fine liner brush and thinned black paint, add the intricate network of smaller twigs at the ends of the branches. I find that holding the brush loosely helps create more natural, shaky lines. -
Create the canopy foliage:
Use an old, scruffy brush or a sponge dabbed in Black. Lightly stipple widely spaced clusters of leaves on top of your twig branches to create the flat-topped canopy. -
Add secondary trees:
Paint the smaller silhouette trees in the background on the center and right panels. Keep these shapes simpler and smaller to push them into the distance. -
Final highlights:
Mix a warm orange-yellow. Carefully paint thin highlights on the side of the main tree trunk that faces the sun to give it volume.
Add Metallic Warmth
Mix a small amount of gold metallic paint into your yellow and orange sky layers. It adds a subtle, shimmering heat to the sunset when the light hits it.
Step back and admire how the three distinct panels come together to form one vast, warm horizon
Minimalist Negative-Space Animal Silhouettes
Capture the serene beauty of the savannah with this minimalist mixed-media piece that balances bold silhouettes against a soft, atmospheric sky. By combining watercolor washes with opaque black details, you’ll create a striking contrast that emphasizes the texture of the paper and the majesty of the elephant.
Step-by-Step Guide
Materials
- Cold-press watercolor paper (300 gsm or heavier)
- Black ink or high-quality black gouache
- Watercolors (Payne’s Gray, Burnt Sienna, Yellow Ochre)
- Flat wash brush (1 inch)
- Round brushes (sizes 2, 4, and 8)
- Fine liner brush or micron pen (0.3mm)
- Graphite pencil (HB) and kneadable eraser
- Masking tape
- Paper towels
- Two jars of water
Step 1: Planning and Sketching
-
Secure the paper:
Tape your cold-press watercolor paper down to a hard board on all four sides. This prevents buckling when we add the water washes and creates a clean, professional white border around the finished edge. -
Establish the horizon line:
Using a ruler, lightly draw a horizon line about one-third of the way up from the bottom of the paper. Keep this line very faint so it doesn’t show through later layers. -
Sketch the silhouettes:
Lightly sketch the outline of the elephant on the right side, ensuring it’s walking into the frame. Then, draw the distinctive flat-topped acacia tree on the left and a tiny one in the distance near the horizon to create depth. -
Refine the elephant shape:
Pay close attention to the elephant’s anatomy—the curve of the trunk, the large ear flap, and the heavy legs. I find it helpful to look at reference photos to get the gait just right.
Bleeding Lines?
If your black ink creates ‘spiderwebs’ into the sky, your background wash wasn’t dry enough. Let it dry fully, then gently scrape away the error with an X-Acto knife or cover with white gouache.
Step 2: Creating the Atmosphere
-
Pre-wet the sky area:
With a clean flat brush, apply a thin layer of clean water to the sky area, stopping just above the horizon line. The paper should be damp and glistening, not soaking wet. -
Paint a subtle wash:
Mix a very dilute wash of Payne’s Gray. Apply it starting from the top and fading out as you move down, leaving the bottom area near the horizon almost white. -
Add the dawn glow:
While the paper is still slightly damp near the horizon, introduce a touch of very diluted Yellow Ochre mixed with a tiny bit of Burnt Sienna. Let this bleed softly upwards to suggest a sunrise glow. -
Create the ground texture:
For the foreground below the horizon, use a mix of diluted Payne’s Gray. Apply it with a horizontal sweeping motion, but this time, lift your brush occasionally to create dry-brush textures that mimic distant terrain. -
Dry thoroughly:
Let these background washes dry completely. The paper must be bone dry before you start the silhouette work to prevent the black ink from bleeding.
Step 3: Painting the Silhouettes
-
Outline the elephant:
Using your size 4 round brush and black ink (or opaque gouache), carefully trace the outline of your elephant sketch. Keep your hand steady to capture the wrinkles on the trunk. -
Fill the form:
Fill in the body of the elephant with solid black. If using gouache, ensure the consistency is creamy enough to be opaque but fluid enough to not leave streaky brushstrokes. -
Paint the acacia tree:
Switch to a smaller brush (size 2) for the tree. Paint the trunk first, thickening it slightly at the base, and then branch out into the characteristic flat canopy shape. -
Add tree foliage:
Use a stippling motion (tapping the brush tip) to create the dense clusters of leaves on the acacia branches. Keep the edges ragged and natural, not perfect circles. -
Detail the distant tree:
Paint the tiny distant tree using the very tip of your smallest brush. It should be faint and small to push it into the background.
Pro Tip: Dry Brushing
For realistic grass in the foreground, draw lighter, quicker strokes as the ink runs out on your brush. This ‘dry brush’ effect creates whisper-thin lines that look more organic.
Step 4: Foreground Details
-
Ground the subjects:
Add a thin, broken line of black ink directly under the elephant’s feet and the tree trunk to ground them, so they don’t look like they are floating. -
Add foreground grasses:
Use a fine liner brush or a 0.3mm micron pen to flick quick, upward strokes in the immediate foreground. Vary the height and angle of these grasses to look natural. -
Suggest movement:
Add a few subtle horizontal lines or tufts of grass near the elephant’s feet to suggest it is walking through vegetation. -
Final assessment:
Step back and check your contrast. If the black looks patchy after drying, apply a second coat to ensure a deep, velvety silhouette. -
Remove tape:
Once everything is absolutely dry, slowly peel off the masking tape at a 45-degree angle to reveal your crisp, clean borders.
Frame this serene artwork in a simple black frame to emphasize the minimalist beauty of your safari scene.
Mixed-Media Safari Collage Sky
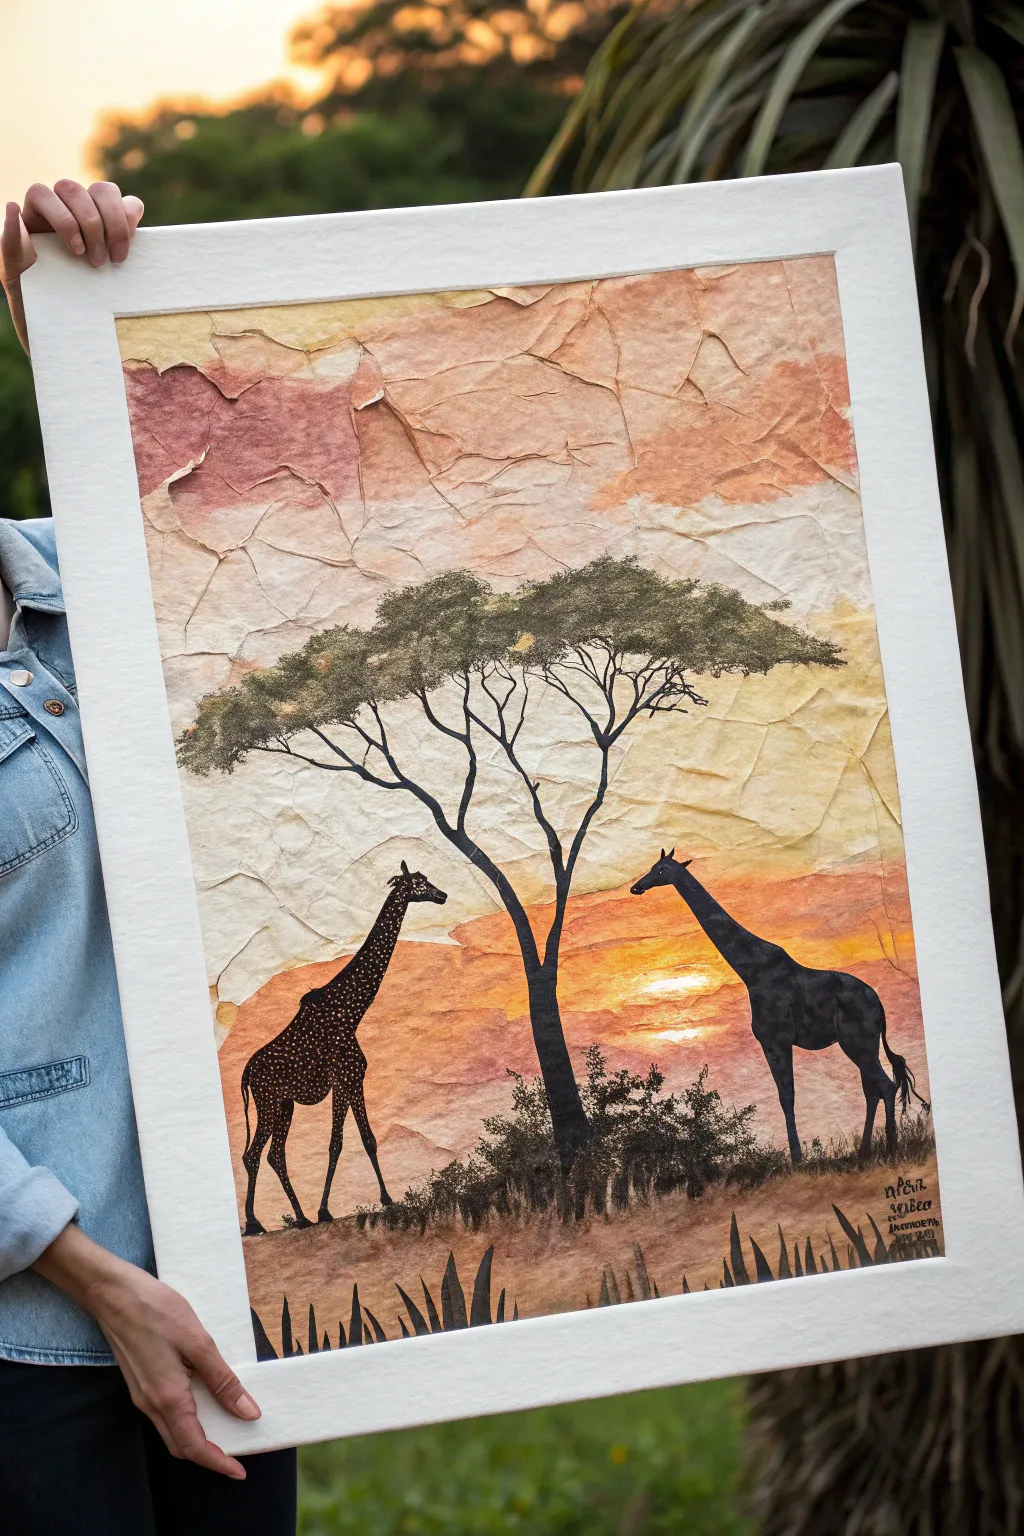
Capture the warmth of the African savanna with this stunning mixed-media collage that builds texture literally from the ground up. By layering dyed, crinkled tissue paper, you’ll create a tactile sunset sky that serves as the perfect backdrop for striking silhouette figures.
Step-by-Step Tutorial
Materials
- Large canvas or heavy watercolor paper (e.g., 18×24 inches)
- White tissue paper (several large sheets)
- Decoupage glue or watered-down PVA glue
- Wide foam brush
- Acrylic paints (warm yellow, orange, burnt sienna, dusty pink, black, gold/bronze)
- Medium and fine detail paintbrushes
- Water spray bottle
- Palette or paper plate for mixing
- Pencil for sketching
Step 1: Building the Textured Sky
-
Prepare the Base:
Start by laying your canvas or heavy paper on a flat, protected surface. Pour some decoupage glue into a dish and dilute it slightly with water if it feels too thick—you want a milky consistency that spreads easily. -
Crinkle the Paper:
Take your sheets of white tissue paper and ball them up tightly in your hands. Squeeze hard to create as many creases as possible, then gently uncrumple them so they remain textured but essentially flat. -
Apply the First Layer:
Brush a generous layer of glue onto the top third of your canvas. Place a sheet of crinkled tissue over it. Don’t smooth it out completely; let those wrinkles sit raised to catch the paint later. Gently dab more glue over the top to seal it. -
Cover the Canvas:
Continue tearing and adding overlapping pieces of crinkled tissue until the entire surface is covered. Ensure the wrinkles run primarily horizontally to mimic cloud lines and landscape horizons. Let this dry completely until it’s hard to the touch.
Wrinkles too Flat?
If the tissue smooths out too much when wet with glue, wait for it to become tacky, then use your fingers to pinch and push the paper back into small ridges before it dries hard.
Step 2: Painting the Sunset Gradient
-
Establish the Horizon:
Identify where your horizon line will be (about the bottom third). Mix a warm, pale yellow acrylic paint with a generous amount of water or glazing medium to make a wash. -
Wash the Sky:
Brush the yellow wash horizontally across the middle section of the canvas. The paint will naturally pool darker in the creases of the tissue paper, highlighting the texture. -
Add Warmth:
While the yellow is still damp, mix an orange wash and apply it above the yellow, blending the edges where they meet. Move upwards into a dusty pink or light rust color for the top of the sky. -
Create the Earth:
For the ground below the horizon, use thicker burnt sienna and brown washes. Dab the paint into the lower texture to create a sense of rough, dry earth. -
Add a Sun Glow:
Using a slightly brighter white or very pale yellow, dry-brush a small circular area near the horizon to suggest the setting sun peeking through the atmosphere.
Paint Pooling
Use a ‘dry brush’ technique for the silhouette layer. Too much water in your black paint will cause it to bleed into the tissue creases and ruin your crisp edges.
Step 3: Creating Silhouettes
-
Sketch the Composition:
Once the background is bone dry, lightly sketch the outline of a large acacia tree in the center and two giraffes on either side using a soft pencil. -
Paint the Tree Trunk:
Using dense black acrylic paint and a medium round brush, paint the trunk of the tree. Let the brush skip slightly over the paper texture to give the bark a natural, rough look. -
Add Branches:
Switch to a finer liner brush to extend the branches outward. Acacia trees have a distinctive flat-top canopy, so ensure the branches spread horizontally rather than just upward. -
Stipple the Leaves:
Load an old, stiff brush with black paint and dab it vertically completely upright to create the foliage clusters on top of the branches. Keep the clusters fairly dense but leave small sky gaps. -
Silhouette the Giraffes:
Paint the Giraffe on the right completely black. Focus on the distinctive slope of the back and the ossicones (horns) on the head. -
Detail the Left Giraffe:
For the left giraffe, paint a black outline first. However, instead of filling it solid black, fill the body with a dark brown. Once dry, use a gold or bronze metallic paint to add small irregular spots, giving it dimension against the light. -
Ground the Scene:
Use the black paint to add grassy tufts and low shrubs along the very bottom edge. This ‘grounds’ the animals so they don’t look like they are floating. -
Final Touches:
Add a few sharp, blade-like shapes in the foreground with black paint to simulate aloe or agave plants, adding depth to the nearest plane of the picture.
Step back and admire how the natural ridges of the paper bring your savanna sunset to life with shadow and light


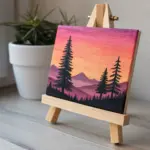
Have a question or want to share your own experience? I'd love to hear from you in the comments below!