If you love paint but crave that extra sparkle and texture, bead painting is such a satisfying way to push your art a step further. I like to think of it as mixed media magic: paint sets the mood, and beads bring the light-catching details to life.
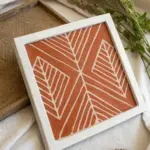
Mandala Dot Art With Bead Centers
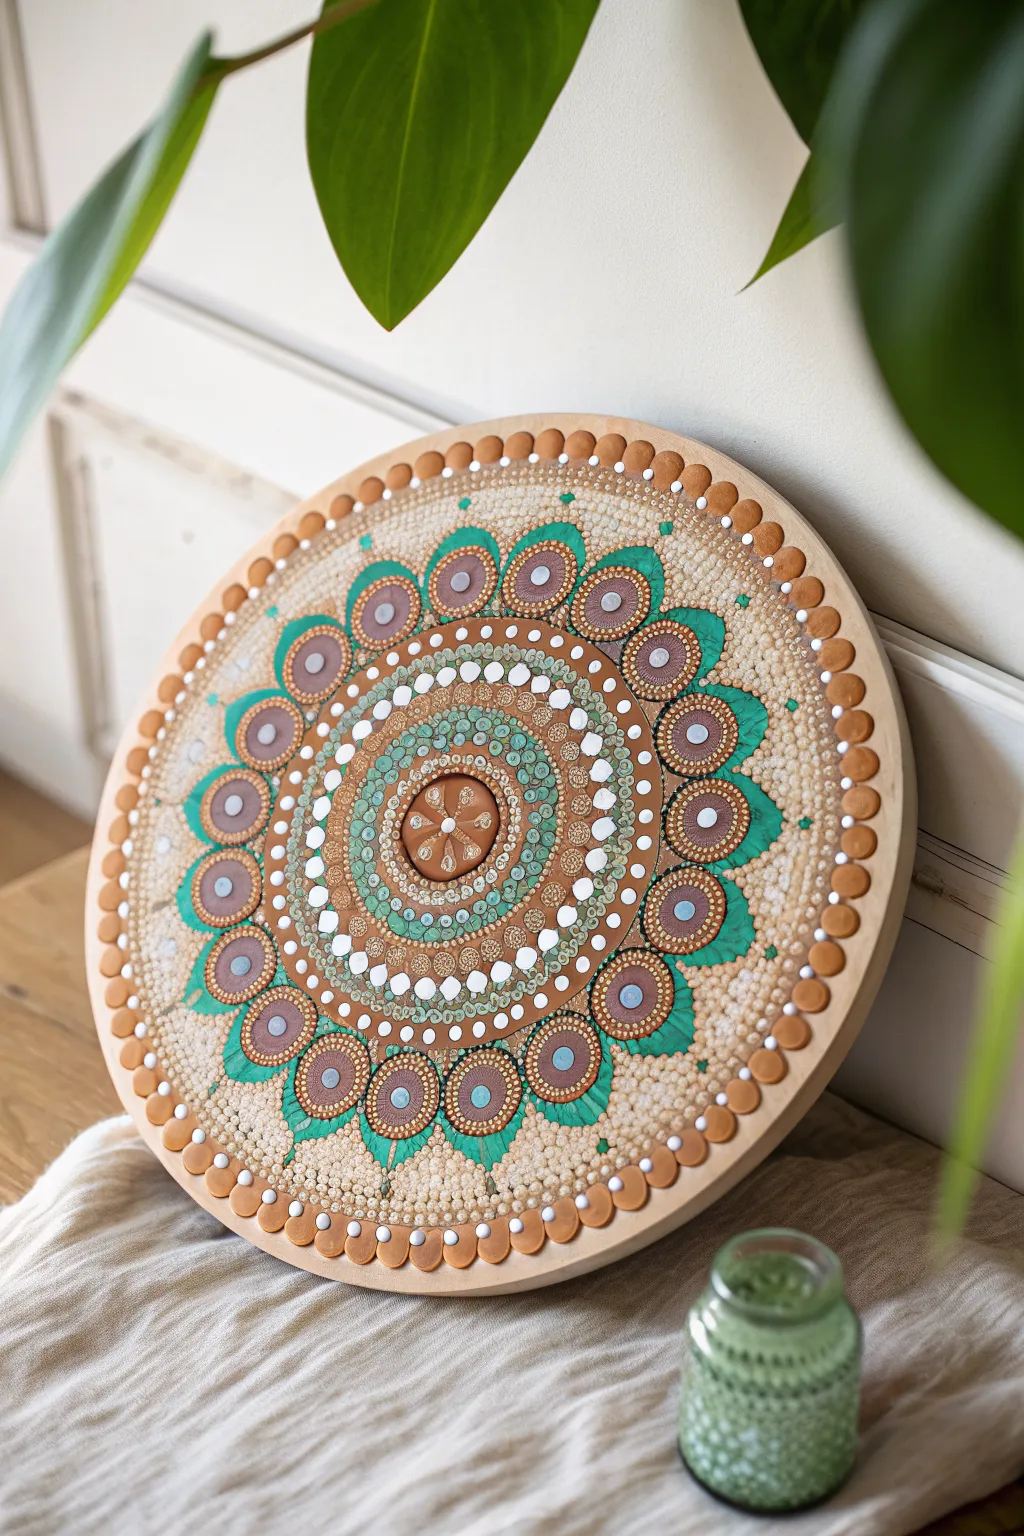
This soothing mandala project combines traditional dot painting techniques with textural bead accents on a natural wood surface. The design radiates outward in concentric circles of warm browns, crisp whites, and vibrant teal, creating a stunning piece of wall art that feels both bohemian and structured.
Step-by-Step Tutorial
Materials
- Round wooden panel (approx 12-14 inches diameter)
- Acrylic paints: Burnt sienna, chocolate brown, teal/turquoise, antique white, metallic gold
- Dotting tools (various sizes from stylus to large acrylic rods)
- Flat focal bead or cabochon for the center (brown)
- Small wooden split beads or half-round pearls (for the rim)
- Strong craft glue (like E6000 or tacky glue)
- Compass and pencil
- Ruler
- Matte or satin spray varnish
Step 1: Preparation & Foundation
-
Prepare the surface:
Ensure your wooden round is sanded smooth. You can apply a clear matte sealer first if the wood is very porous, but leaving it raw gives that lovely organic background shown in the photo. -
Mark the grid:
Find the exact center of your board. Using a compass and ruler, lightly draw concentric circles and dividing lines (8 or 16 segments) to guide your pattern symmetry. These lines will be essential for keeping your mandala straight. -
Set the centerpiece:
Glue your large focal bead or brown cabochon directly in the center. Let the glue set firmly so it doesn’t slide while you paint around it.
Oops! Smudged paint?
If you smudge a wet dot, don’t wipe it! Let it dry completely, then gently scrape it off with a craft knife or paint over it with a color matching the wood background.
Step 2: Building the Inner Rings
-
First paint layer:
Using burnt sienna paint and a medium dotting tool, place dots closely around your center bead. Follow this with a ring of smaller white dots to create high contrast right away. -
Teal accent ring:
Create a wider band using teal paint. Instead of simple dots, try creating small ‘swipes’ or teardrops that point inward toward the center, filling the circular band densely. -
Decorative details:
On top of the dried teal section, add tiny white top-dots to create depth. Add a ring of larger brown dots outside the teal band, spacing them evenly based on your pencil guidelines. -
The petal ring:
Paint a ring of large, distinct teal petal shapes. Use a paintbrush for the base shape rather than a dotting tool, ensuring the pointed ends face outward like a blooming flower.
Step 3: Expanding the Pattern
-
Inner petal decoration:
Inside each teal petal, paint a large chocolate brown circle. Let this dry completely. -
Layering the dots:
Once the brown circles are dry, add a slightly smaller mauve or light brown dot inside, followed by a tiny white center dot. This stacking technique creates the signature ‘eye’ look of the mandala. -
Gold outlining:
Use a small stylus and metallic gold paint to create a chain of tiny dots outlining each teal petal. This separates the petals from the background and adds a hint of shimmer. -
Textured white field:
The background between the teal petals and the outer edge is filled with texture. Use antique white or cream paint to stipple thousands of tiny, irregular dots, filling all the negative space on the wood.
Level Up With Texture
Instead of painting the outer rim beads, try gluing actual semi-precious stone beads like Tiger’s Eye or Jasper for an authentic, premium earthy feel.
Step 4: The Outer Rim & Finishing
-
Outer petal tier:
Create a second, larger ring of teal petals further out. Repeat the same internal decoration: a large brown circle, a smaller inner dot, and a white highlight center. -
Final background fill:
Continue the stippling effect with the cream paint, extending it all the way to the edge of the board. I find this part meditative, so take your time to get dense coverage. -
Rim bead placement:
Apply dabs of distinct craft glue along the very edge of the wooden round. Press the wooden split beads or large half-pearls into the glue, spacing them perfectly to frame the artwork. -
Painting the rim beads:
Paint the wooden half-beads in alternating shades of burnt sienna and soft brown to match the internal color palette. -
Erase and seal:
Once the paint is fully cured (give it 24 hours), gently erase any visible pencil guidelines. Finish with a light coat of spray varnish to protect the dots and beads without making it too glossy.
Hang your finished mandala in a well-lit spot to see the beautiful interplay between the raised dots and the smooth wood grain

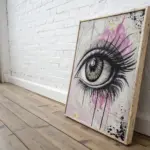
Animal Eyes That Actually Sparkle
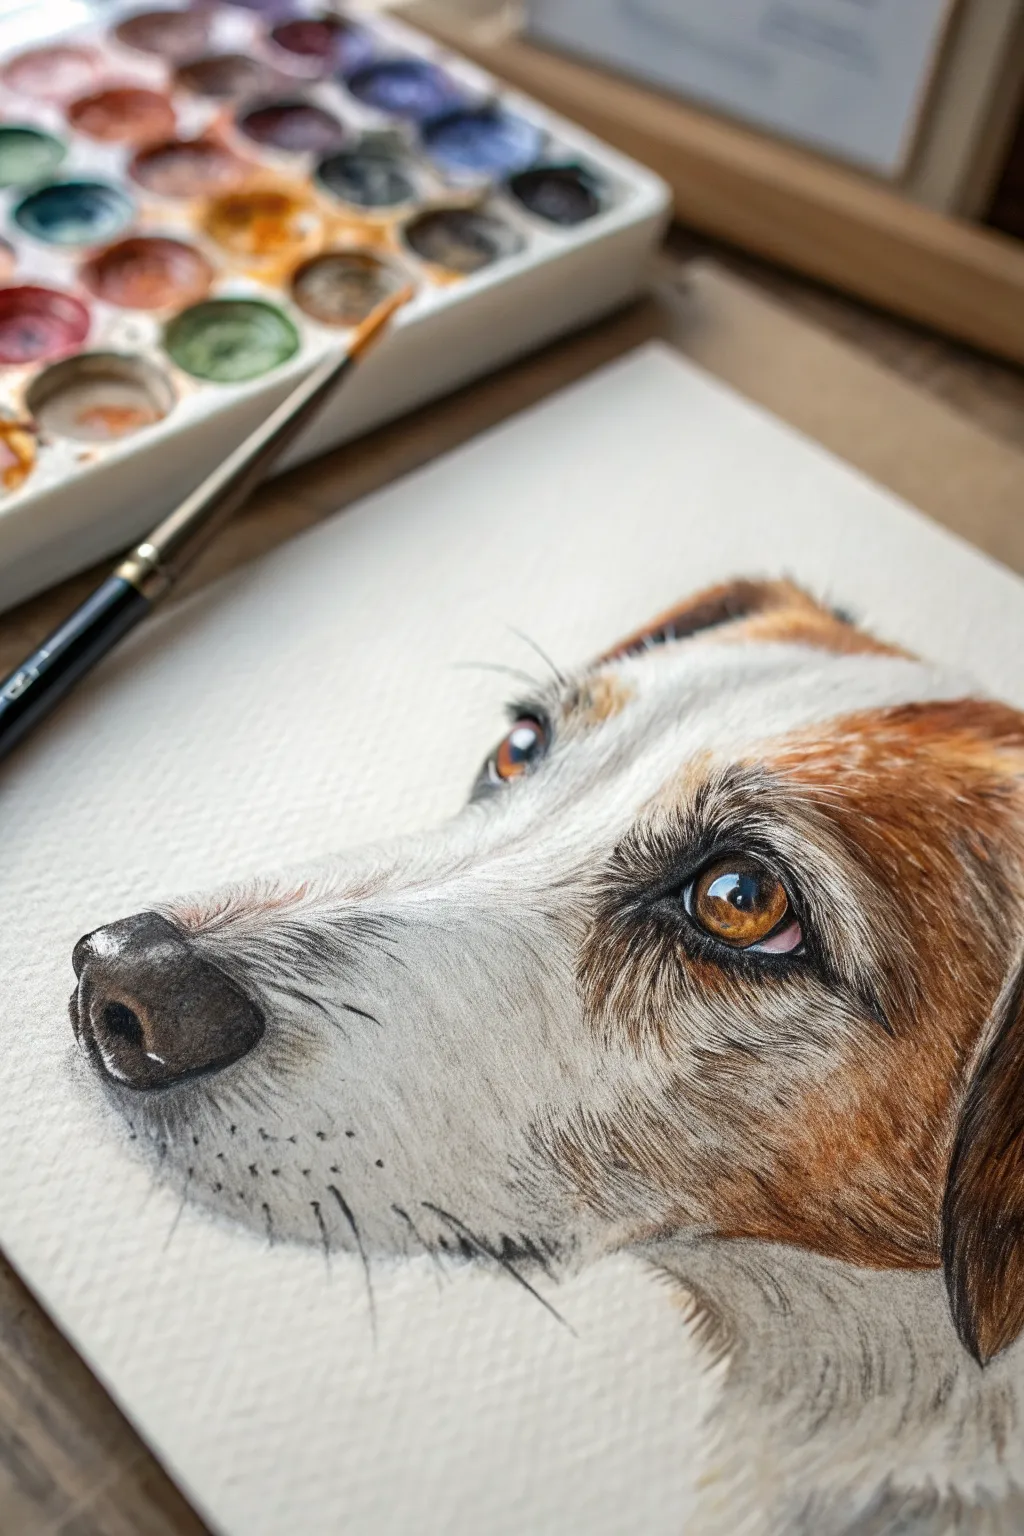
Create a stunningly realistic portrait of a Jack Russell Terrier, emphasizing the liquid shine of the eyes and the soft texture of the muzzle. This watercolor project uses layering techniques to build depth and realism, resulting in a piece that truly captures the dog’s gentle spirit.
Step-by-Step Guide
Materials
- Cold press watercolor paper (300 gsm)
- Watercolor paints (Burnt Sienna, Yellow Ochre, Ultramarine Blue, Burnt Umber, Lamp Black, Alizarin Crimson)
- Small round brushes (size 0, 2, and 4)
- Fine liner brush (size 000)
- Pencil (HB) and kneaded eraser
- Two jars of water
- Paper towels
- White gouache or white gel pen
Step 1: Sketch and Base Layers
-
Light Sketch:
Begin by lightly sketching the outline of the dog’s head, focusing on the placement of the eye, nose, and the angle of the snout. Use a kneaded eraser to lift up any heavy graphite lines so they don’t show through the paint later. -
Wet-on-Wet Base:
Lightly wet the area of the snout and forehead with clean water. Drop in a very pale wash of Burnt Sienna mixed with a touch of Yellow Ochre for the brown patches, allowing the edges to bleed softly into the white areas. -
Shadow Mapping:
While the paper is still slightly damp, mix a cool grey using Ultramarine Blue and a tiny bit of Burnt Sienna. Apply this shadow beneath the snout and around the eye socket to establish the three-dimensional form. -
Nose Foundation:
Paint the nose with a diluted wash of Lamp Black. Leave a few small, unpainted white shapes near the top of the nostril to serve as the initial highlights, which makes the nose look wet.
Step 2: Building Fur Texture
-
Initial fur strokes:
Switch to a size 2 brush. Once the base is dry, start painting short, flicking strokes in the brown areas using a more concentrated Burnt Sienna. Follow the direction of hair growth, which flows back from the nose towards the ears. -
Layering the White Fur:
For the white fur on the muzzle, use a very watery grey mix. Use the tip of the brush to create faint, directional hair marks. This adds texture without darkening the white fur too much. -
Deepening the Brown:
Mix Burnt Sienna with a little Burnt Umber. Apply a second layer of fur strokes over the darker parts of the brown patch, specifically around the eye and ear, to build volume and density. -
Nose Details:
Darken the nostrils with concentrated Lamp Black. Use a stippling motion (small dots) on the leather of the nose to create that bumpy texture, softening the edges with a clean, damp brush.
Muddled Fur?
If your fur texture looks like a blob, you’re painting into wet layers. Let the paper bone-dry completely between fur layers to keep crisp, individual hair strokes.
Step 3: The Eye
-
Iris Base:
Paint the iris with a golden-brown mix of Yellow Ochre and Burnt Sienna. Leave a specific, sharp white highlight unpainted to represent the reflection of light. -
Pupil and Depth:
Paint the pupil with solid Lamp Black. While the iris is still slightly damp, drop some darker brown creating a ring around the iris edge, letting it bleed inward slightly for a natural look. -
The Tear Duct:
Mix a tiny amount of Alizarin Crimson with white (or water it down heavily) to paint the pinkish skin of the tear duct in the inner corner of the eye.
Sparkle Boost
For the article’s ‘bead painting’ theme, try gluing a tiny clear glass seed bead right on the eye’s highlight. It catches real light and adds a magical 3D shine.
Step 4: Refining Details
-
Suggesting Fine Hairs:
Using the size 000 fine liner brush, paint individual, stray hairs along the bridge of the nose and above the eye. I like to keep these strokes loose and spontaneous. -
Whiskers and Pores:
On the muzzle, add small dots for whisker pores using a dark grey. Then, with quick, confident strokes of the fine liner, pull out a few long whiskers. -
Darkest Darks:
Revisit the eye and the deep crevices of the ear. Add pure, concentrated color to the darkest points to increase contrast and make the image pop. -
Final Highlights:
Use white gouache or a gel pen to add tiny specular highlights to the wettest part of the eye and the texture of the nose if the paper white was lost.
Step back and admire the soulful expression you’ve captured through careful layering and attention to detail.


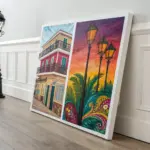
Abstract Swirls Guided by Bead Lines
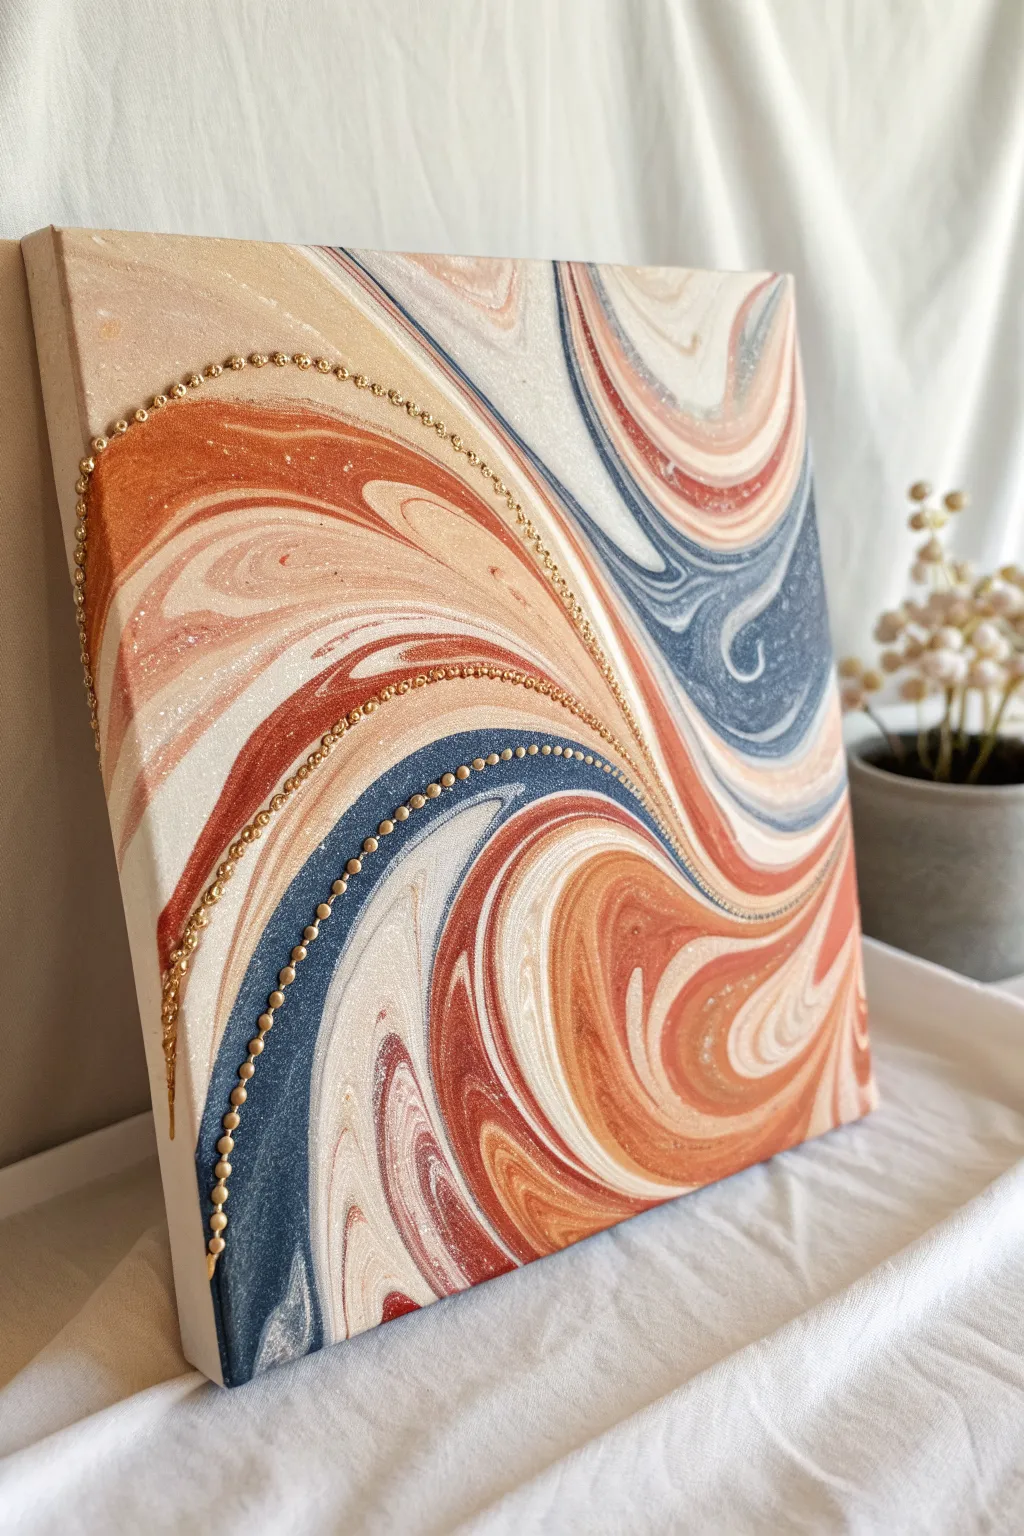
This elegant mixed-media piece combines the organic, marbled beauty of fluid art with delicate texture. By overlaying a dried acrylic pour with precisely placed gold ball chains, you create a sophisticated relief map of color and shine.
Detailed Instructions
Materials
- Square stretched canvas (approx. 10×10 or 12×12 inches)
- Acrylic fluid paints (terracotta orange, navy blue, cream, white)
- Pouring medium
- Gold ball chain (small bead size, approx. 1mm-2mm)
- Strong clear liquid adhesive (e.g., jewelry glue or precision craft glue)
- Tweezers
- Wire cutters or scissors (for the chain)
- Disposable cups
- Stir sticks
Step 1: Creating the Fluid Base
-
Mix your pouring medium:
Prepare four separate cups. Mix your acrylic paints with the pouring medium according to the manufacturer’s ratio (often 1:1 or 2:1 medium to paint). Aim for a consistency like warm honey so the colors flow but don’t become muddy. -
Layer your cup:
Take a larger, clean cup and begin layering your colors. Start with white, then add some terracotta, followed by navy, and cream. Repeat these layers until the cup is about three-quarters full. Do not stir this cup. -
Perform the dirty pour:
Place your canvas face down on top of the cup, then flip them together so the cup is upside down on the canvas. Lift the cup straight up and let the paint flow out naturally. -
Tilt and stretch:
Gently tilt the canvas in various directions. Guide the paint to the corners and edges, encouraging the creation of long, sweeping bands of color rather than chaotic splashes. Stop when you have a composition of swirls you love. -
Pop surface bubbles:
If you see tiny air bubbles on the surface, quickly pass a culinary torch or a heat gun over the wet paint to pop them. This ensures a smooth finish later on. -
Let it cure completely:
This is the patience step. Acrylic pours can take 24 to 72 hours to dry fully. Ensure the paint is hard to the touch before moving to the beading phase.
Sticky Situation?
If glue oozes out around the beads, wait until it becomes tacky/rubbery, then gently peel or roll it away with a toothpick rather than smearing it securely while wet.
Step 2: Applying the Golden Accents
-
Plan your lines:
Examine the dry canvas and identify the strongest curves where colors transition—for example, where a deep navy meets soft cream. These natural ‘fault lines’ are perfect for your bead placement. -
Measure the chain:
Lay a length of gold ball chain loosely along one of these curves to estimate the length needed. I usually cut it slightly longer than necessary to give myself wiggle room. -
Apply the adhesive trail:
Using a glue bottle with a fine precision tip, draw a very thin line of adhesive directly over the chosen color boundary. Work in sections of about 4-5 inches so the glue doesn’t dry out before you place the chain. -
Place the chain:
Starting from one edge of the canvas, gently press the gold chain into the glue. Use tweezers to nudge the chain into the exact curve of the paint swirl. -
Adjust the curves:
Before the glue sets, use the tip of your tweezers or a toothpick to push the chain into tighter curves if necessary, ensuring it flows organically with the marble pattern. -
Trim the excess:
Once the chain reaches the edge of your design or the canvas border, use your wire cutters to snip the excess chain cleanly. Press the final bead down firmly. -
Repeat for balance:
Select 2-3 other distinct curves to highlight. Don’t outline every swirl; less is often more. Aim for asymmetrical balance, perhaps highlighting one major dark curve and one lighter terracotta curve. -
Clean up edges:
Check closely for any visible globules of glue that might have squeezed out. Wipe them carefully with a damp cotton swab or toothpick before they harden. -
Final dry time:
Allow the adhesive to cure completely according to the package instructions, usually overnight, to ensure your golden lines are secure.
Add Extra Sparkle
For a glamorous touch, mix a tiny amount of fine gold glitter into your transparent pouring medium or topcoat to make the painted swirls shimmer under the light.
Hang your new textured masterpiece where the light can catch those golden ridges

Sunset Gradient With Bead Pointillism
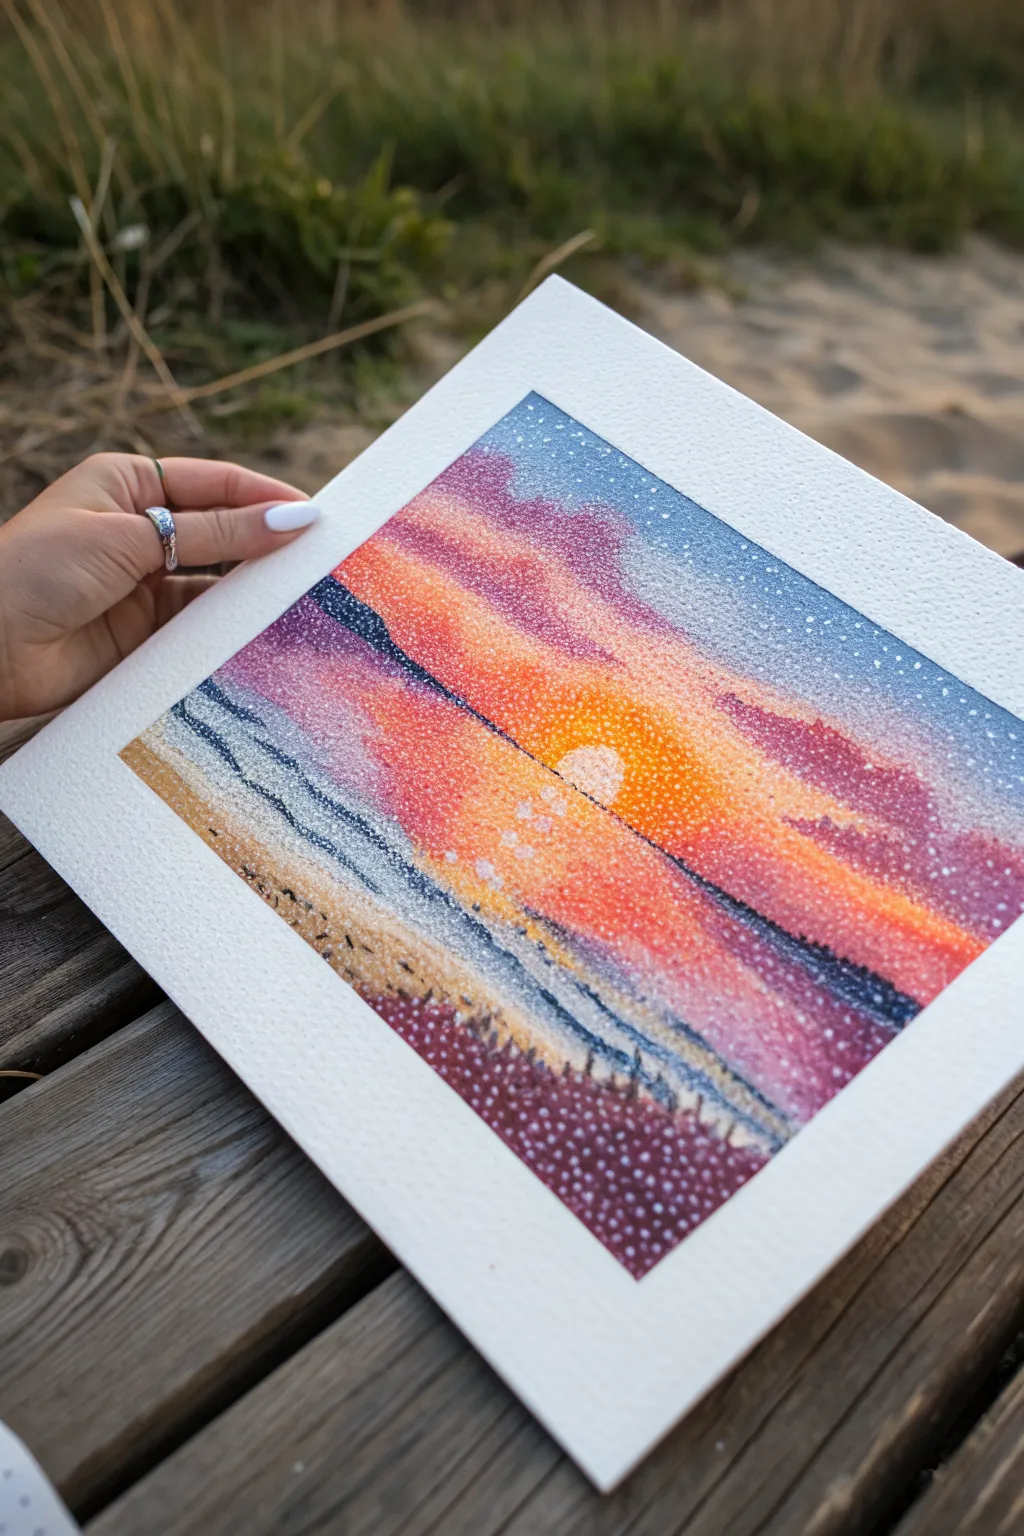
Capture the magic of golden hour with this stunning mixed-media landscape that blends soft color transitions with crisp, tactile pointillism. By layering precise white details over a vibrant watercolor gradient, you’ll create a shimmering effect that mimics light dancing on the horizon.
Step-by-Step Guide
Materials
- Heavyweight watercolor paper (300gsm, cold press)
- Watercolor paints (Indigo, Purple, Magenta, Orange, Yellow)
- Masking tape
- Flat wash brush (1 inch)
- Round detail brushes (size 2 and 4)
- White acrylic paint or white gouache (high opacity)
- Fine-tip dotting tool or toothpick
- Jar of water
- Paper towels
- White mat board frame (optional)
Step 1: Setting the Sky and Horizon
-
Prepare your canvas:
Begin by taping down the edges of your watercolor paper to a flat board using masking tape. This creates a clean, crisp border later and prevents the paper from buckling when wet. -
Establish the horizon line:
Lightly sketch a horizontal line roughly one-third up from the bottom of the page. This divides your composition into the vast sky and the textured foreground. -
Wet-on-wet sky technique:
With your large flat brush, apply a layer of clean water to the entire sky area above your horizon line. The paper should glisten but not have puddles. -
Apply the deep blues:
Starting at the very top corners, drop in diluted Indigo and Purple paint. Let the colors bleed naturally downwards, keeping the darkest values at the outer edges. -
Transition to warm tones:
While the paper is still damp, rinse your brush and pick up Magenta. Blend this into the lower edge of the blue/purple area, creating a soft violet transition zone. -
Create the sun’s glow:
Load your brush with bright Orange and then Yellow. Paint the area just above the horizon line, curving upward into the magenta. Leave a small, circular negative space unpainted in the center for the sun itself.
Step 2: Defining the Landscape
-
Paint the distant water:
Below the horizon line, mix a dark Indigo with a touch of Purple. Paint narrow, horizontal strokes to represent the distant ocean or hills. Ensure this layer is darker than the sky above for contrast. -
Add the foreground hills:
Using a mix of heavy Purple and a touch of brown or darker neutral tone, paint the sloping hill in the immediate foreground at the bottom. Use uneven, stippling strokes here to suggest grass texture rather than a smooth wash. -
Dry completely:
Allow the entire painting to dry fully. It must be bone-dry before the next step, or the white dots will bleed into the background colors.
Dot Consistency Tip
Reload your dotting tool frequently. The first dot is always the largest, and subsequent ones get smaller. Use this natural variaton to fade outlines.
Step 3: The Pointillist Detail
-
Prepare your white medium:
Squeeze out a small amount of white acrylic paint or opaque gouache. It needs to be thick enough to hold a shape, so don’t dilute it with water. -
Dot the sun:
Use a small dotting tool or the back of a paintbrush to fill the white sun circle you left blank earlier. Pack the dots tightly here to create a solid, bright core. -
Create the sun rays:
Moving outward from the sun, stamp dots in radiating lines into the orange and yellow sections. I find that spacing these dots slightly further apart as they move away helps simulate fading light. -
Highlight the clouds:
Add clusters of dots along the purple and magenta transitions in the sky. These represent cloud edges catching the light. Keep the dots smaller and more scattered towards the top darker corners. -
Texture the waves:
Switch to a very fine tool or toothpick. Apply tiny lines of dots horizontally across the dark blue water area to mimic cresting waves reflecting the sunset. -
detail the foreground:
In the dark purple foreground hill, use larger, denser dots to suggest wildflowers or dew on the grass. You can overlay dots heavily here to create significant texture. -
Final atmosphere check:
Stand back and look at the overall balance. Add a few stray ‘star’ dots in the darkest blue corners of the sky for a magical evening feel. -
Reveal the border:
Once the white paint is fully dry, carefully peel away the masking tape at a 45-degree angle to reveal your clean white edges.
Level Up: 3D Texture
Instead of white paint for the foreground dots, use actual tiny glass seed beads or dimensional fabric puffed paint for a tactile, raised effect.
Place your finished piece in a clean white mat to enhance the vibrancy of your sunset colors
BRUSH GUIDE
The Right Brush for Every Stroke
From clean lines to bold texture — master brush choice, stroke control, and essential techniques.
Explore the Full Guide
Mini Diamond-Style Bead Painting Panels
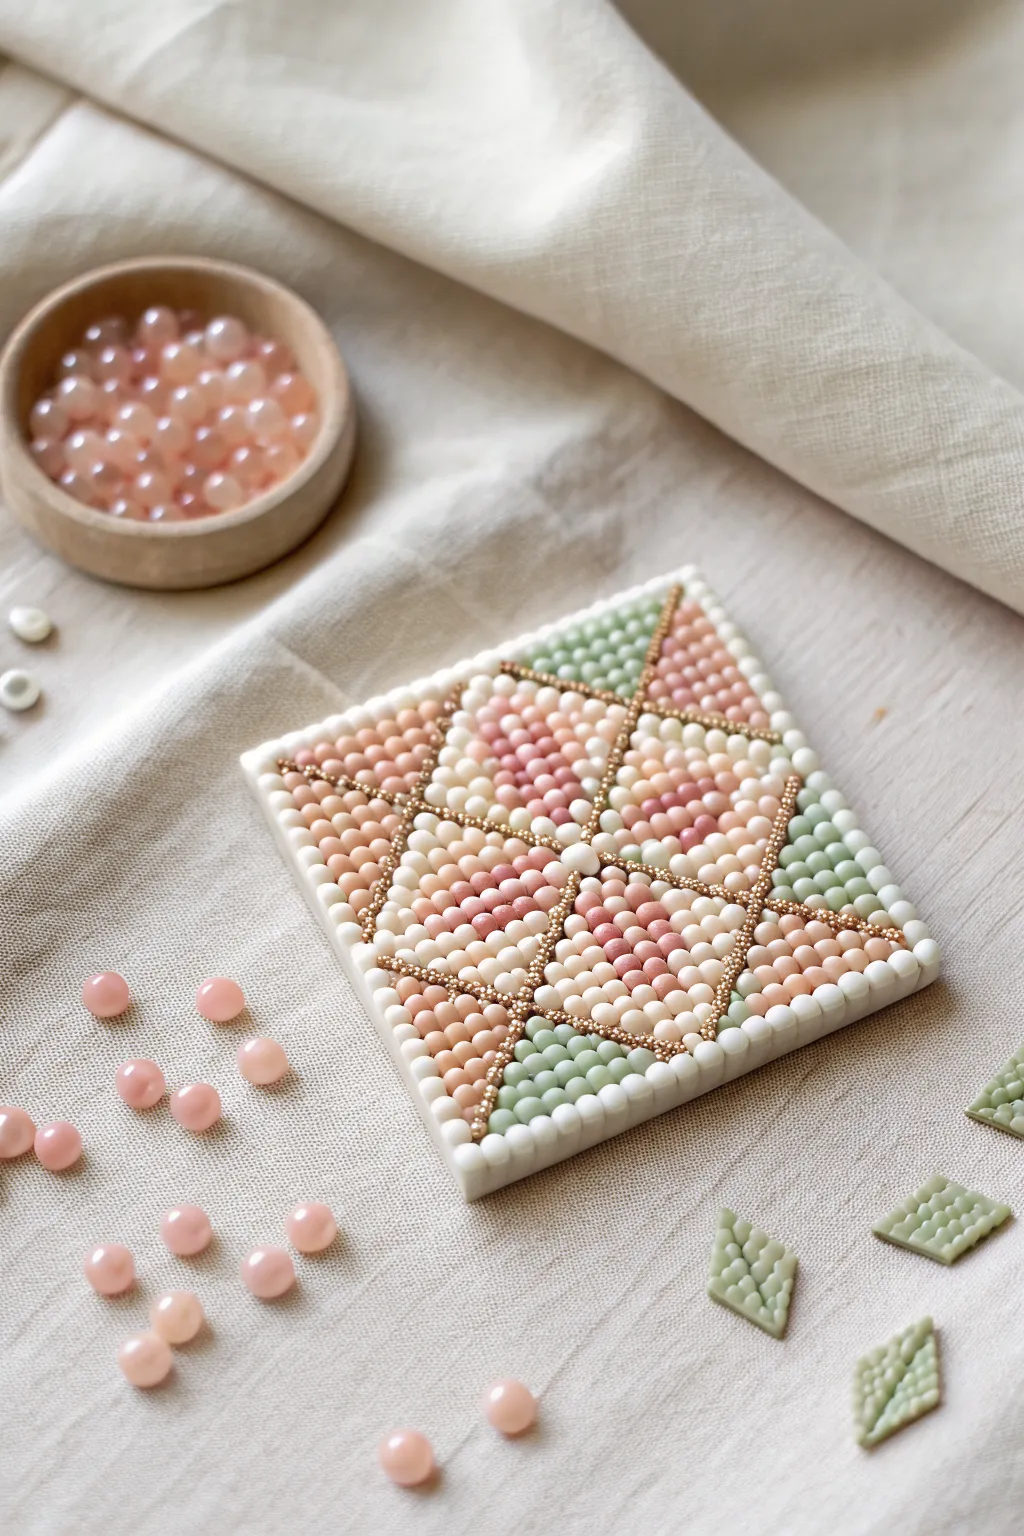
This soothing project combines the precision of diamond painting with the tactile charm of traditional beadwork. You’ll create a beautifully textured mini-panel featuring a stylized floral geometric pattern in soft pastels and elegant gold accents.
Detailed Instructions
Materials
- Small square wooden panel or heavy cardstock (approx. 4×4 inches)
- White polymer clay or air-dry clay (to cover the base)
- Round beads (approx. 3-4mm): Pastel pink, gradient pink/peach, sage green, and white/ivory
- Micro seed beads: Metallic gold
- Fine-point tweezers
- Strong craft glue or jewelry glue (clear drying)
- Ruler
- Pencil or clay sculpting tool (needle tool)
- Bead tray or small dishes for sorting
Step 1: Preparing the Canvas
-
Base Prep:
Begin by cleaning your wooden square to ensure good adhesion. If using a raw wood piece, a quick sanding helps create a smooth surface. -
Clay Application:
Roll out a thin, even layer of white polymer or air-dry clay. Lay this over your wooden square, trimming the edges flush with the sides to create a pristine, soft white foundation. -
Smoothing:
Use your fingers or a flat tool to smooth out any fingerprints on the clay surface. It needs to be relatively flat so the beads sit evenly.
Sorting Sanity
Work with a fuzzy bead mat or a lined tray. Smooth beads roll away easily, and a textured surface keeps your gradients organized while you work.
Step 2: Mapping the Design
-
Marking Central Lines:
While the clay is still slightly pliable (or using light pencil marks if dry), gently scribe an ‘X’ from corner to corner to find the center point. -
Grid Sketching:
Lightly sketch the main geometric diamond shapes. You need four large central diamonds forming a star, and triangular sections in the corners and sides. -
Pre-poking Holes (Optional):
If working with soft clay, I find it helpful to gently press a small indentation where the central beads will go, just to guide placement later.
Step 3: Placing the Primary Beads
-
Starting Center:
Apply a small dot of glue to the very center. Place a white or light pink bead at the junction where all four central diamonds meet. -
Central Petals:
Working one quadrant at a time, fill the central diamond shapes with your pink gradient beads. Place darker pinks near the center and fade to lighter peach or white as you move outward. -
Corner Triangles:
Move to the four corners of the square. Fill these triangular sections with the sage green beads to create a leafy contrast to the central pinks. -
Side Triangles:
Fill the remaining side triangles (between the central diamonds) with neutral white or ivory beads. Keep the rows straight and tight against each other. -
Adhesion Check:
Using the flat side of your tweezers, gently press down on the placed beads to ensure they are seated firmly in the glue or clay.
Glossy & Sealed
Once fully dry, brush a coat of clear gloss varnish or resin over the top. It locks the beads in place permanently and gives them a ceramic-like shine.
Step 4: Gold Detailing & Finishing
-
Applying Adhesive Lines:
Carefully run a very thin line of glue along the visible seams between your distinct colored sections (the pink diamonds and the green/white triangles). -
Gold Lining:
Using your finest tweezers, place the metallic gold micro seed beads into these seams. This creates the ‘grout’ line that defines the geometric pattern. -
Border Work:
For a polished look, add a final row of white beads along the outer perimeter of the square to frame the entire mosaic. -
Cleaning Up:
Check for any stray glue strands (spiderwebs) and remove them with tweezers before the glue fully cures. -
Final Cure:
Allow the project to dry completely. If you used air-dry clay beneath, this may take 24 hours; if using just glue on wood, 2-3 hours should suffice.
Display your shimmering mini-mosaic on a small easel or use it as a centerpiece for a larger mixed-media arrangement
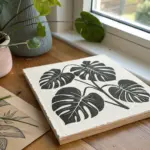
Bead Embroidery Over Painted Fabric Scenes
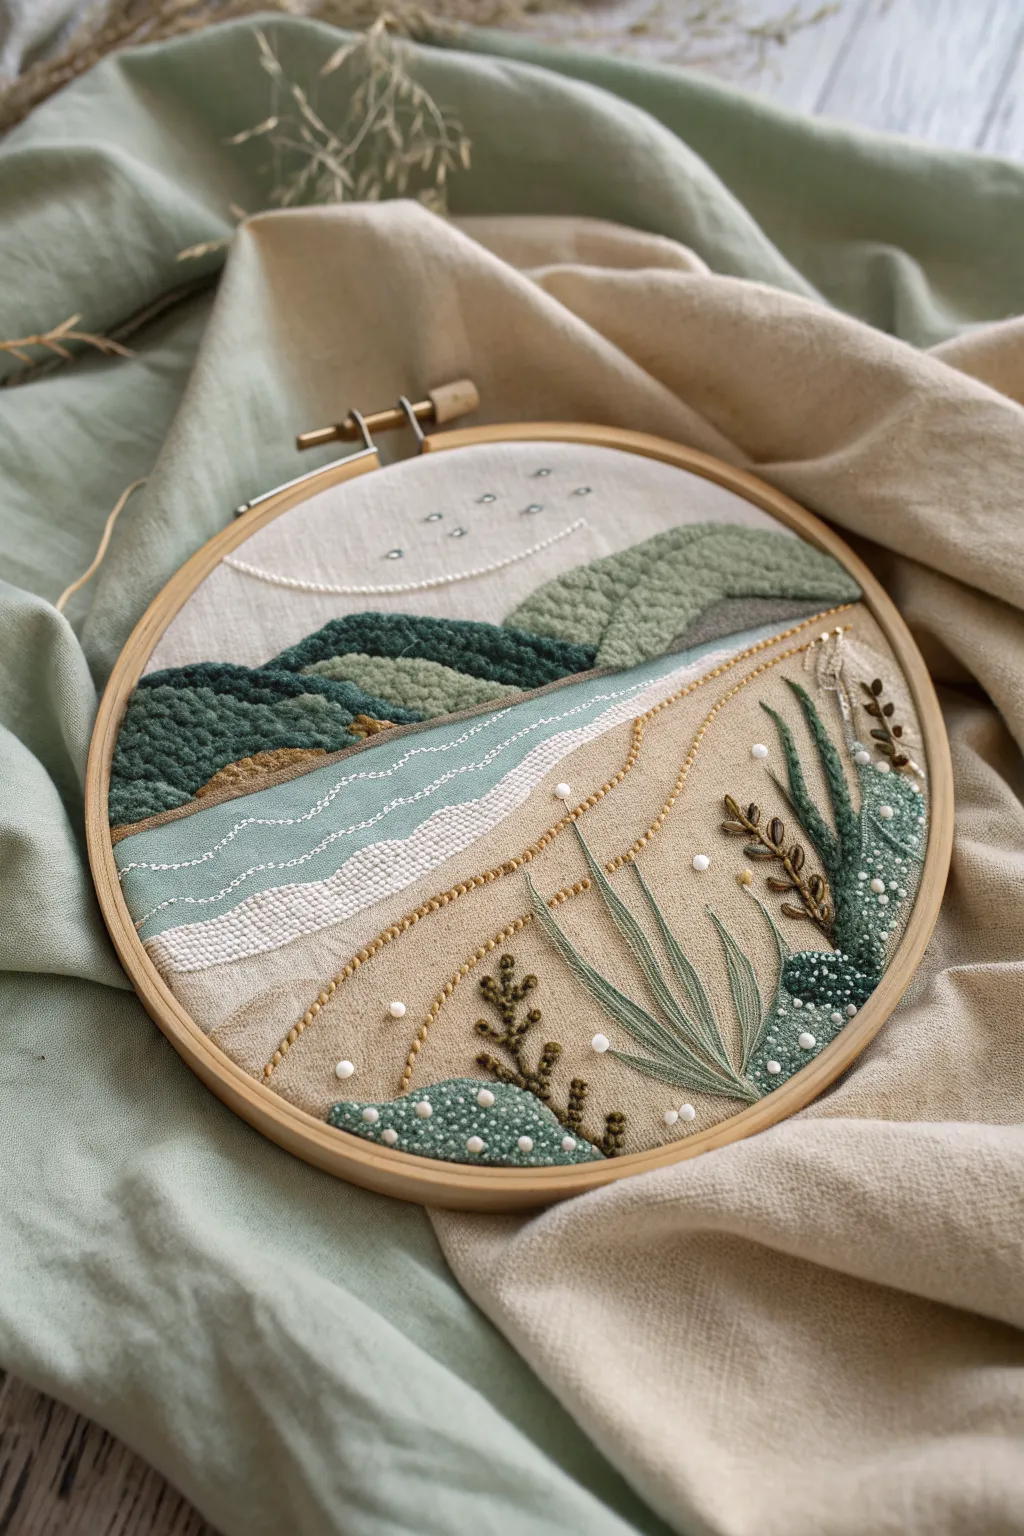
Capture the tranquil beauty of a shoreline using a mix of texture-rich embroidery stitches and delicate beadwork. This landscape piece combines muted greens and sandy beiges with French knots and pearls to create realistic topographical depth.
Step-by-Step
Materials
- 8-inch Bamboo embroidery hoop
- Cotton or linen fabric (beige or sand-colored)
- Embroidery floss (deep forest green, sage green, light olive, seafoam blue, white)
- Acrylic paint or fabric markers (seafoam blue/green)
- Beads: Small white seed beads and 3mm faux pearls
- Beading needle and embroidery needle
- Water-soluble fabric pen
- Scissors
Step 1: Planning and Background
-
Transfer the Horizon:
Begin by mounting your tight fabric into the hoop. Using a water-soluble pen, sketch the horizon line about 1/3 down from the top. Draw undulating lines below it to mark where the water meets the sand, and sketch the outlines of the rolling hills in the background. -
Paint the Water:
Using diluted acrylic paint or a fabric marker, color the middle section representing the water. Aim for a soft, seafoam green. Don’t worry about perfect edges, as stitching will cover the boundaries. Let this dry completely before stitching. -
Outline the Dunes:
Sketch the foreground dune shapes at the bottom right and left. Add guidelines for the tall grasses that will eventually overlap the scene.
Knotty Texture Tip
For fluffier hills, don’t pull your French knots too tight against the fabric. Keep them slightly loose to build volume.
Step 2: Stitching the Landscape
-
Background Hills – Dark:
Start with the furthest, darkest hills on the left. Fill this area densely with French knots using 4-6 strands of deep forest green thread to create a bumpy, distant tree texture. -
Background Hills – Light:
Move to the hill on the right. Switch to a sage green thread and fill this shape using a satin stitch or long-and-short stitch to create a smoother, grassy appearance compared to the knotted forest. -
Defining the Waterline:
Using 2 strands of white floss, stitch wavy lines across the painted water section to mimic rolling waves. A stem stitch works beautifully here for fluidity. -
Creating Foam:
At the very edge where the water meets the sand, add a thick line of French knots in white. This creates the frothy texture of waves crashing onto the shore. -
Sky Details:
In the open sky area, add a few tiny straight stitches in pale grey or blue to represent distant birds. You can also add a gentle curve of backstitch for a cloud line.
Make It 3D
Use turkey work stitch for the foreground grass instead of satin stitch. You can cut the loops to make real fuzzy tufts of grass.
Step 3: Foreground and Details
-
Foreground Vegetation Base:
On the bottom left and right dune shapes, use the French knot technique again with a mix of sage and olive greens. Vary the size of the knots by wrapping the thread once or twice to create uneven mossy textures. -
Stitching Tall Grass:
Using a light olive green, stitch long, sweeping satin stitch leaves rising from the bottom right dune. I like to curve them slightly so they look like they are bending in the breeze. -
Adding Fern Fronds:
Stitch the darker, brown-green fern shapes using a lazy daisy stitch for the leaves connected by a simple backstitch stem. -
Sand Texture:
To give the unpainted sand fabric some movement, add rows of running stitches or backstitches in a gold or tan thread. Follow the curve of the shoreline to suggest shifting dunes.
Step 4: Beading and Finishing
-
Pearl Accents:
Thread your beading needle. Sew 3mm faux pearls scattered across the sand and near the base of the plants. These mimic white pebbles or sea foam bubbles washed ashore. -
Seed Bead Texture:
In the mossy foreground areas (the green knots at the bottom), sew clustered white seed beads. Nestling them among the knots adds a sparkle that looks like dew or salt spray. -
Sky Sparkle:
Add three to four clear or silver seed beads in the sky area for a subtle shimmer reminiscent of stars or glinting light. -
Clean Up:
Check the back of your work and trim any loose threads. If any water-soluble ink lines are still visible, dab them gently with a damp Q-tip to remove them. -
Backing the Hoop:
Finish the piece by trimming the excess fabric to about 1 inch, gathering it with a running stitch behind the hoop, and covering the back with a circle of felt.
Hang your finished seascape in a sunny spot to let the beads catch the light

PENCIL GUIDE
Understanding Pencil Grades from H to B
From first sketch to finished drawing — learn pencil grades, line control, and shading techniques.
Explore the Full Guide
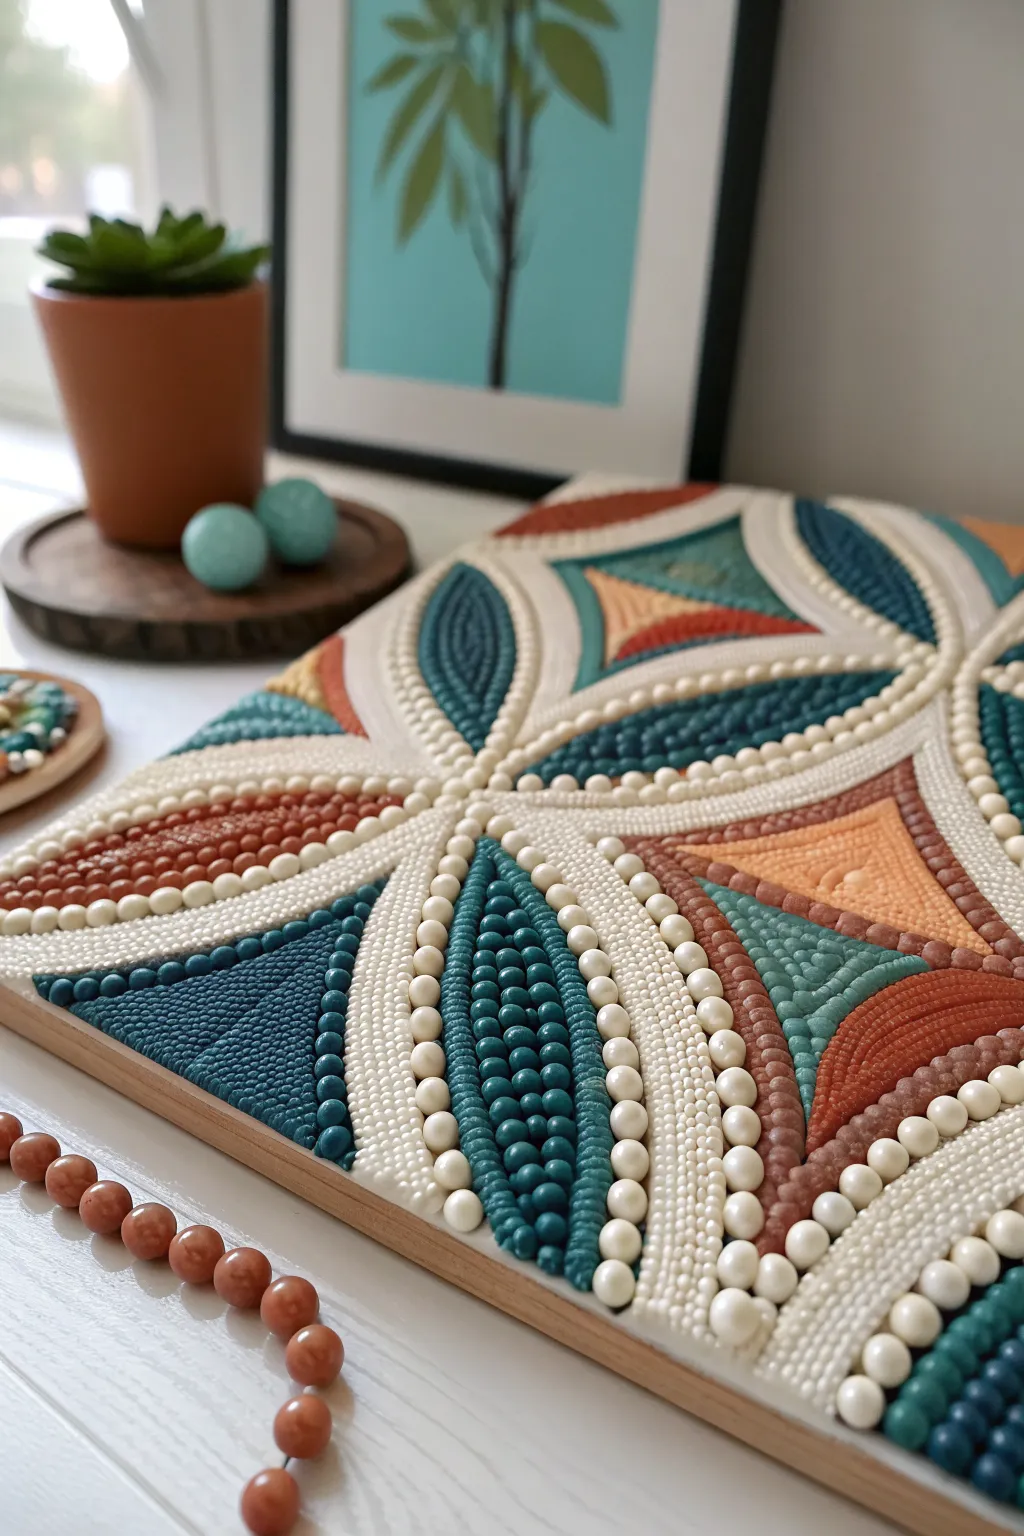
Raised Bead Relief on Heavy Gel Texture

This project combines the sculptural depth of heavy gel medium with the precision of beadwork, resulting in a striking, tactile piece of wall art. The interplay between the raised, bead-studded ridges and the smooth, painted depressions creates a sophisticated geometric floral pattern.
Step-by-Step
Materials
- Square wood panel or heavy canvas board
- Heavy body acrylic gel medium or modeling paste
- Palette knives (trowel and diamond shapes)
- Pencil and ruler
- Assorted beads: 6mm cream pearls, 4mm turquoise/teal rounds
- Micro beads or seed beads: white, teal, copper/rust
- Acrylic paints: Teal, Rust/Terracotta, Sand/Beige, White
- Fine detail paintbrush
- Tweezers
- Clear spray varnish (optional)
Step 1: Preparation and Base Design
-
Prepare the surface:
Begin with a sturdy wood panel. If it’s unfinished, give it a coat of white gesso to seal the wood and provide a good grip for the heavy gel you’ll be applying later. -
Draft the geometry:
Using a pencil and ruler, draw a large ‘X’ corner to corner to find the center. Sketch out the large petal shapes radiating from the center, followed by the triangular sections filling the corners. Symmetry is key here, so measure carefully.
Step 2: Sculpting the Relief
-
Apply the gel medium:
The raised white lines separating the colors are actually the ‘walls’ of the design. Use a palette knife or piping bag to apply thick cords of heavy gel medium or modeling paste along your pencil lines. -
Embed the primary beads:
While the gel is still wet, gently press the largest cream-colored pearl beads into these raised white ridges. Space them evenly, ensuring they seat firmly into the paste about halfway down. -
Create secondary textures:
For the interior sections (the petals and triangles), apply a thinner layer of modeling paste. Use a texturing tool or an old comb to create subtle ridges or stippling in the wet paste to differentiate the zones. -
Initial drying phase:
Allow the structure to dry completely. Because heavy gel is thick, this might take 24 hours. The paste must be rock hard before painting.
Clean Lines
Use a piping bag with a fine round tip to apply the initial gel ridges. It’s much cleaner than a palette knife and makes embedding the pearl borders significantly easier.
Step 3: Beading the Sections
-
Fill the teal petals:
Working on one petal at a time, apply a layer of heavy gel or strong craft glue. Using tweezers, place the 4mm teal beads in neat rows down the center of the petal shape. -
Add micro-texture:
Around the larger teal beads, sprinkle the tiniest micro-beads or seed beads to fill the gaps. Press them down gently with the back of a spoon to ensure adhesion. -
Create the rust zones:
Move to the outer triangular curves. Instead of individual large beads, these areas rely on a dense packing of smaller rust-colored seed beads. Spread your adhesive and pour the beads over the area, pressing firmly. -
Detail the corners:
The triangular corners use a mix of textures. I like to create a central focal point with a slightly raised mound of paste, then press tiny beige beads into it in a circular pattern.
Metallic Touch
Swap the matte beige beads for dull gold or copper metallic beads in the corner triangles to give the piece a subtle, luxurious shimmer when the light hits it.
Step 4: Refining and Painting
-
Clean up stray beads:
Once the adhesive phases are dry, brush away any loose beads that didn’t stick. Check for empty patches and fill them in individually with tweezers. -
Paint the raised ridges:
Use a fine liner brush and white acrylic paint to crisp up the edges of the gel ridges where you embedded the pearls. Avoid getting paint on the pearls themselves; wipe immediately if you do. -
Enhance color depth:
If your colored bead sections look a bit flat, create a watery wash (glaze) of the matching acrylic paint color. Gently dab it over the beads. This tints the glue or paste underneath and unifies the color. -
Highlighting texturs:
For the ‘bumpy’ texture areas without large beads (like the orange triangles), dry-brush a slightly lighter shade of orange over the top to make the texture pop. -
Seal the work:
After ensuring absolutely everything is dry, spray the entire piece with a matte or satin clear varnish. This locks the beads in place and protects the relief from dust.
Hang your textured masterpiece where side-lighting can catch the relief and really show off that dimension

Have a question or want to share your own experience? I'd love to hear from you in the comments below!