If you want a drawing that feels instantly meaningful, mother and son scenes are pure heart on paper. Here are my favorite mother and son drawing ideas—from classic, easy compositions to artsy twists that still keep that bond front and center.
Back View Hand-in-Hand Walk
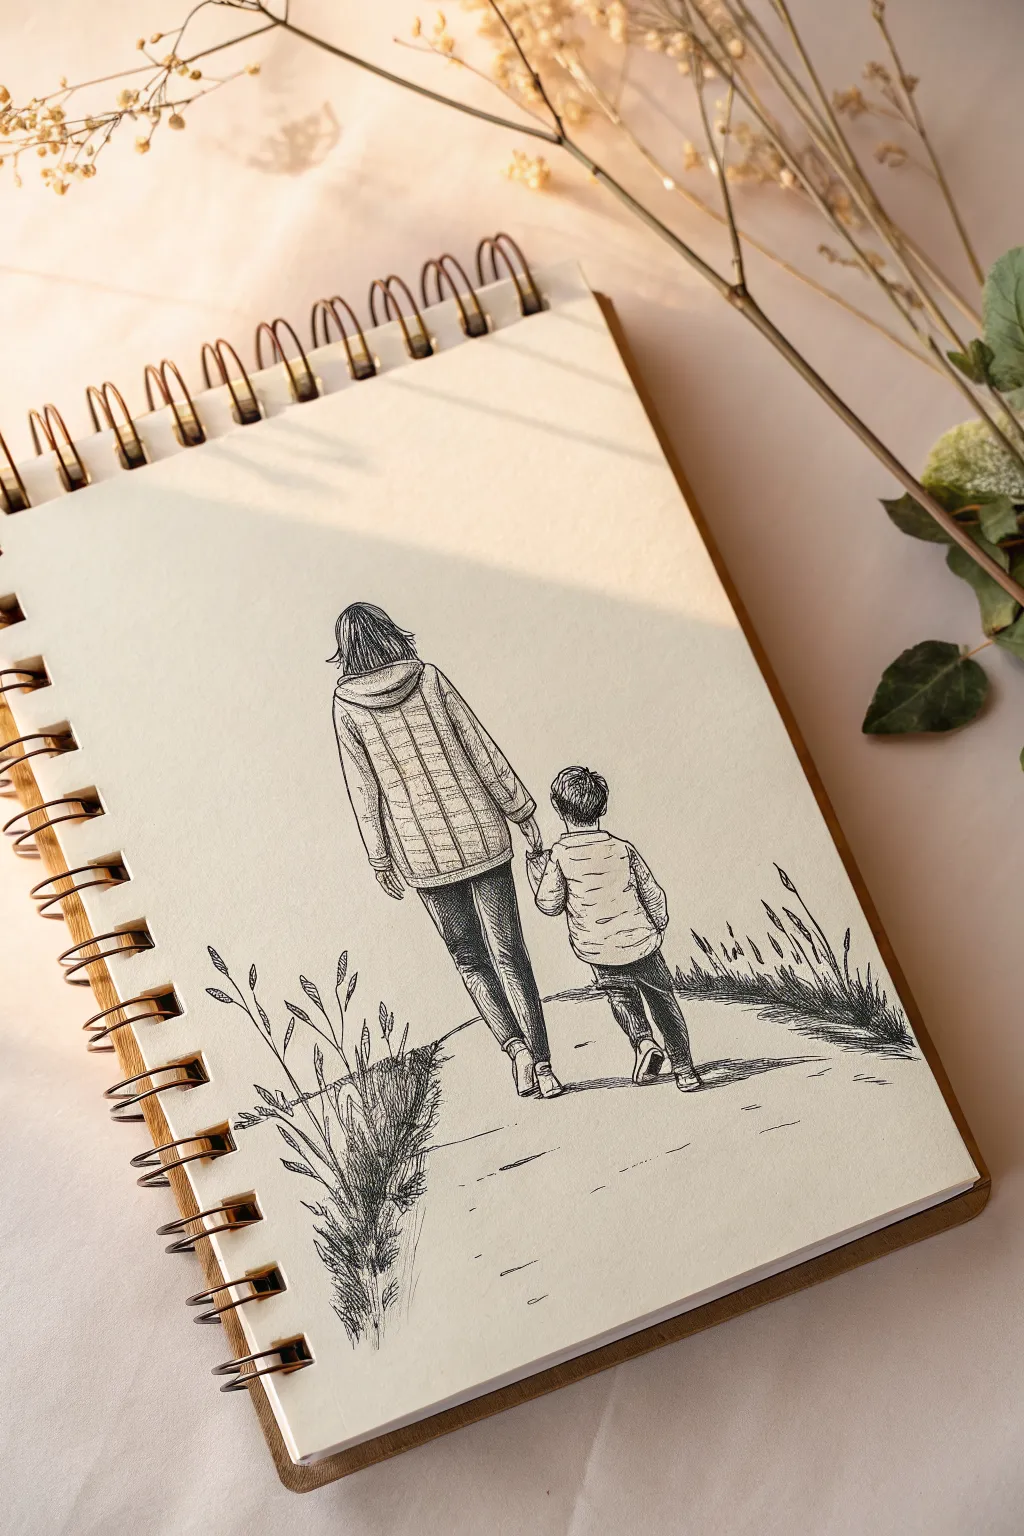
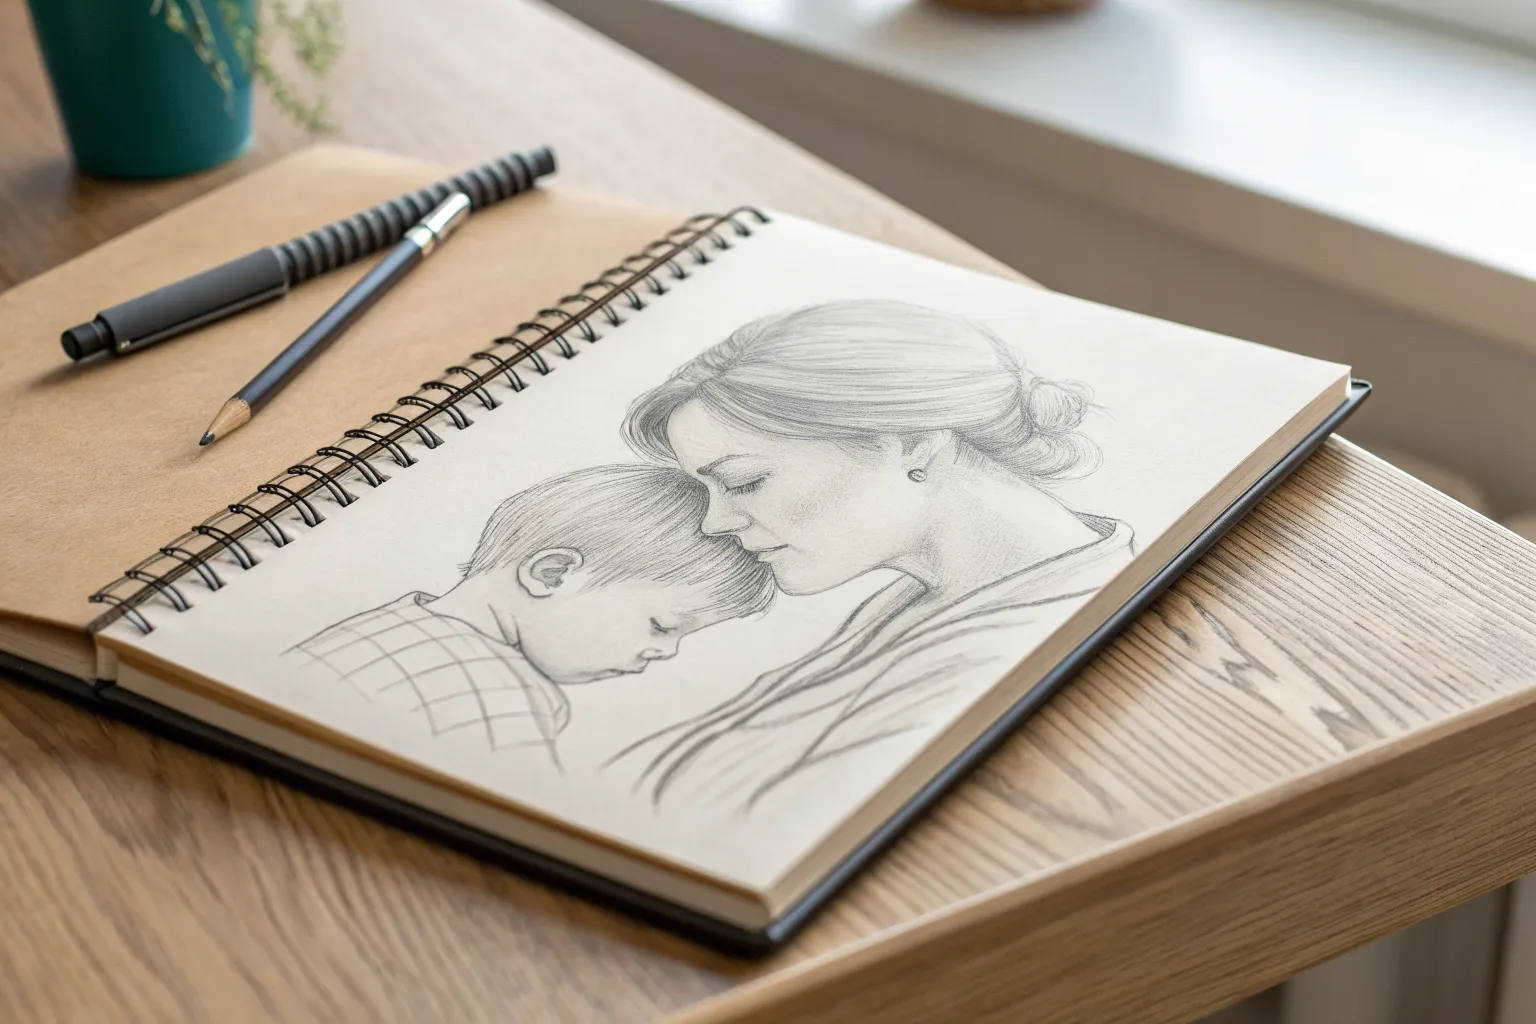
Capture a quiet moment of connection with this lovely ink drawing of a mother and son walking away hand-in-hand. This project focuses on clean linework and subtle cross-hatching to create texture on their clothing, all set against a clean paper background.
Step-by-Step
Materials
- Spiral-bound sketchbook (cream or off-white paper preferred)
- H or HB graphite pencil for underdrawing
- Kneadable eraser
- Fine liner pens (specifically sizes 0.1, 0.3, and 0.5)
- Ruler (optional for horizon line basics)
Step 1: Drafting the Forms
-
Establish the figures:
Begin with your graphite pencil. Draw two vertical center lines to place the figures side-by-side, leaving a small gap between them for their joined hands. The adult figure on the left should be roughly twice the height of the child on the right. -
Sketch the mother’s head and torso:
Draw an oval for the head and a slightly wider, rectangular shape for the torso. Slope the shoulders gently downwards to convey a relaxed walk. Add the hood of her jacket as a soft triangle resting on her back. -
Draft the child’s form:
Sketch a smaller, rounder head for the boy. His torso should look slightly boxier, representing a puffer jacket or sweater. Sketch his legs mid-stride, similar to the mother’s. -
Connect the hands:
Draw the mother’s right arm and the child’s left arm extending downward. Indicate their hands clasping together; keep the shapes simple—just a basic mitten-like shape for now is fine to get the connection right. -
Add gentle motion:
Detail the legs to show walking movement. One leg for each figure should be slightly bent at the knee and lifting off the ground, while the other is planted straight. This creates the ‘walking away’ perspective.
Step 2: Inking the Outlines
-
Start the main ink lines:
Switch to your 0.3 fine liner. Carefully trace over your pencil sketch, refining the shapes as you go. Focus on the folds of the mother’s coat—allow the lines to be slightly wavy to suggest fabric weight. -
Define the hair:
Use the 0.1 pen for the hair. For the mother, draw long, flowing strokes coming from the center of the head downward. For the boy, use short, choppy strokes to create a textured, short haircut. -
Outline the clothing details:
Draw the grid pattern on the back of the mother’s coat using the 0.3 pen. The lines should curve slightly around her body form, rather than being perfectly straight, to show volume. -
Ink the shoes and pants:
Outline the trousers and shoes. The mother’s jeans should look tighter, while the boy’s pants can be looser with a few scrunchy folds near the ankles.
Line Weight Magic
Use the 0.5mm pen for the outermost silhouette lines and the deepest shadows (like pant legs), but keep the 0.1mm pen strictly for internal texture like fabric weave or hair.
Step 3: Shading and Texture
-
Hatch the mother’s coat:
Using your 0.1 pen, add vertical hatching lines inside the grid pattern of the mother’s coat. Keep these lines consistently spaced to create a grey tone. -
Darken the pants:
Switch to the 0.5 pen for the mother’s leggings or jeans. Use dense, vertical hatching to make her legs significantly darker than the coat. Do the same for the boy’s pants, but perhaps leave a few white highlights on the thighs. -
Texture the boy’s jacket:
Add horizontal curved lines across the back of the boy’s jacket to suggest padded segments. Keep the shading very light here to distinguish his top from his darker pants. -
Add drop shadows:
With the 0.3 pen, draw scribbled, horizontal shadows directly under their feet. This grounds the figures so they aren’t floating in space.
Fixing Stiff Poses
If the figures look robotic, add more creases near the elbows and knees. Clothing folds where joints bend instantly communicate movement and relaxation.
Step 4: Environmental Details
-
Ground the path:
Lightly sketch a few broken horizontal lines across the page to suggest a wide dirt path or road. These don’t need to connect; just suggest the surface. -
Add foreground foliage:
In the bottom left corner, draw tall, grassy weeds using upward, flicking strokes with the 0.3 pen. Vary the height and overlap the leaves for a natural look. -
Sketch background grass:
On the right side of the path, draw a patch of shorter grass and reeds. Use quick, short vertical strokes, making the base of the grass clumps denser and darker. -
Erase and refine:
Once the ink is fully dry (I usually give it at least 5 minutes to be safe), gently erase all underlying pencil marks with your kneadable eraser to leave a crisp finish.
Now you have a timeless keepsake of a walk to remember.
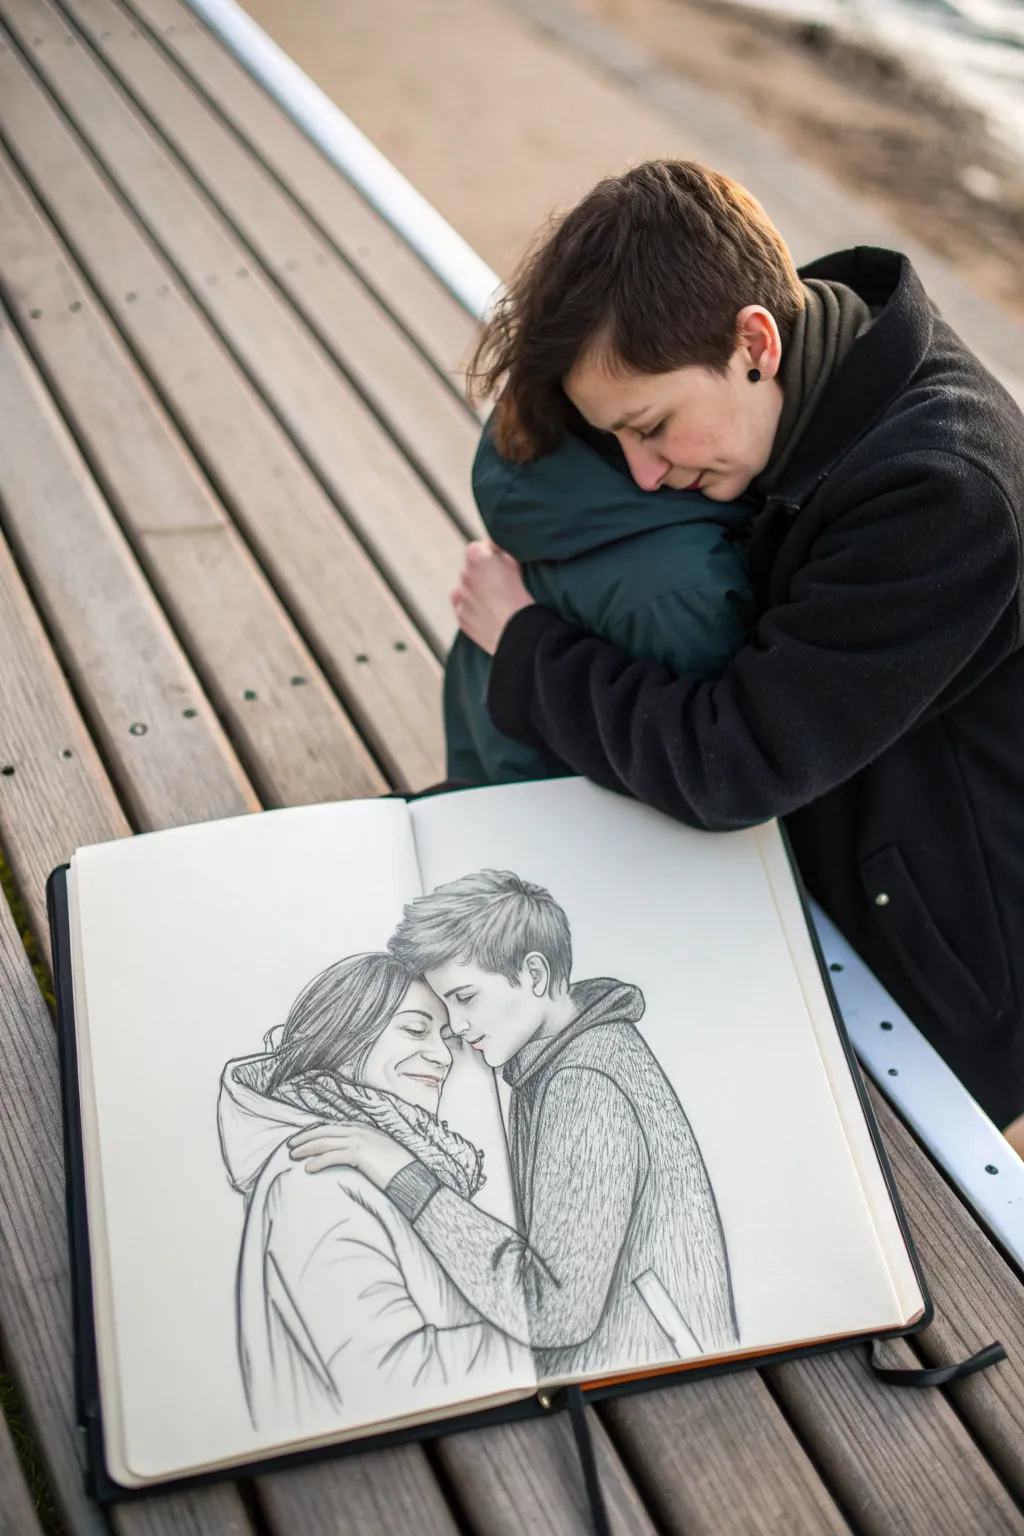
Protective Embrace Portrait
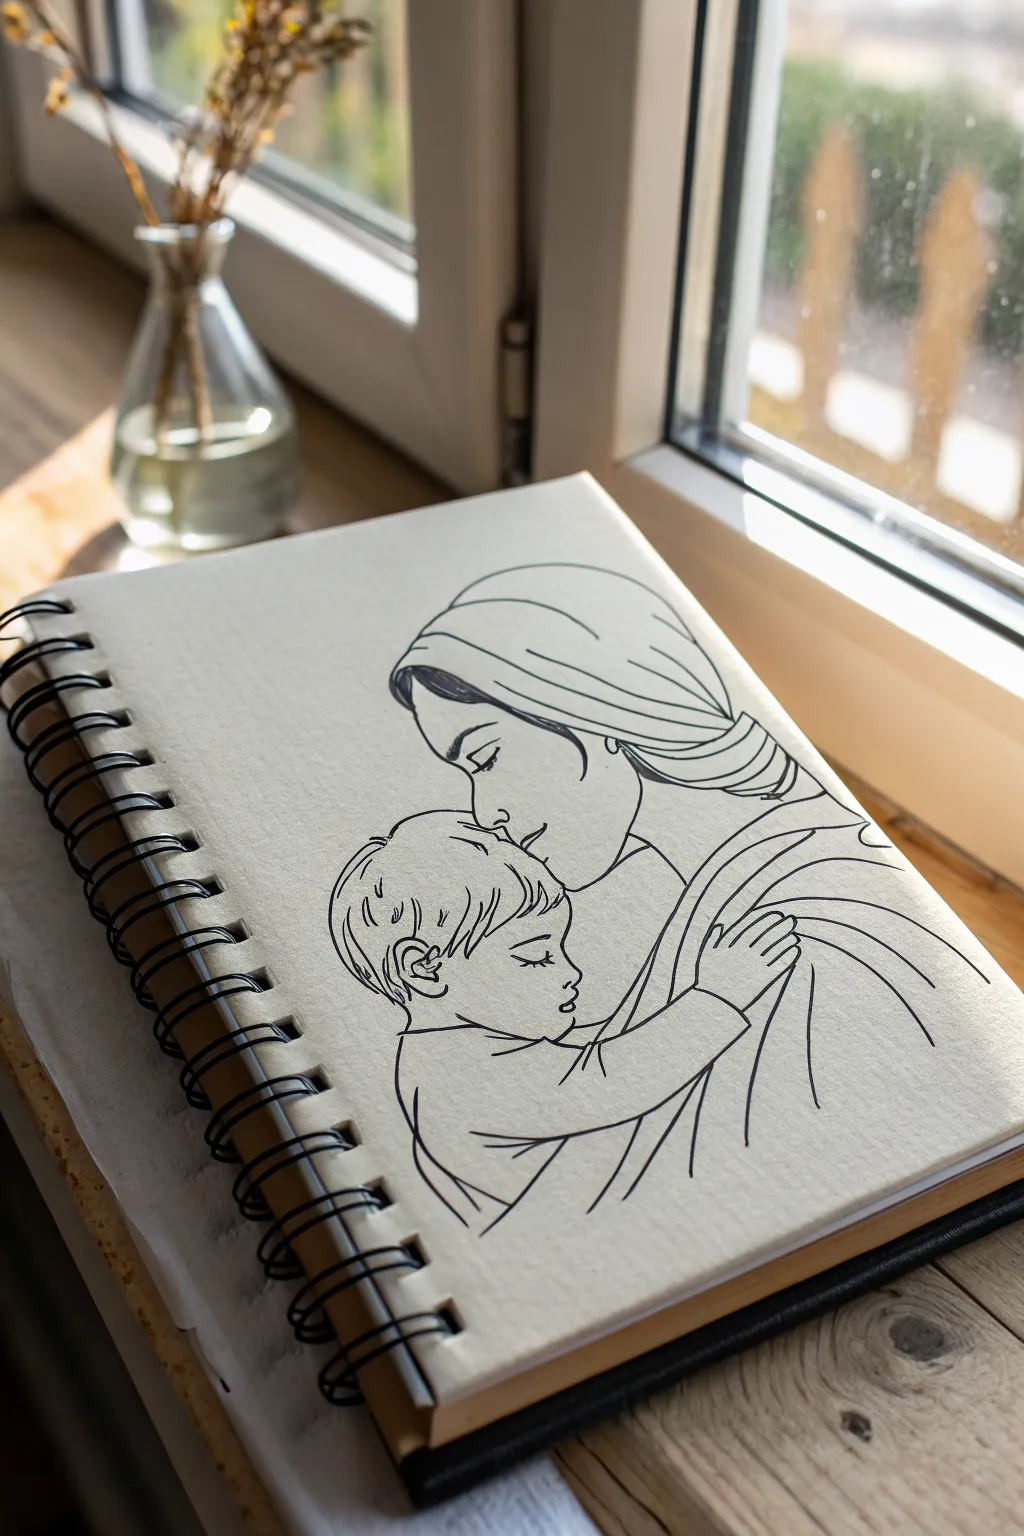
This tender sketch captures a profound moment of connection between mother and child using simple, flowing lines. The minimalist style emphasizes emotion over complex shading, making it a perfect project for practicing profile proportions and fabric drapes.
Step-by-Step Tutorial
Materials
- A5 or A4 spiral-bound sketchbook (medium weight paper)
- HB or 2B pencil for sketching
- Kneaded eraser
- Fine-point black drawing pen (0.3mm or 0.5mm)
- Ultra-fine black drawing pen (0.05mm or 0.1mm) for details
Step 1: Establishing the Composition
-
Sketch the head shapes:
Begin lightly with your pencil. Draw a larger oval for the mother’s head, tilting slightly downward. Slightly overlapping the lower left of her oval, draw a smaller, rounder circle for the child’s head. -
Mark the facial guidelines:
Draw faint vertical lines down the front of both ovals to determine where the profiles will meet. This is crucial for ensuring their foreheads and noses align intimately, just touching. -
Outline the embrace:
Sketch the rough shape of the mother’s shoulder and arm wrapping around the child. Add the basic block shape of the child’s arm reaching up towards the mother’s chest. -
Define the profiles:
Carefully refine the pencil profile of the mother’s forehead, nose, and lips. Do the same for the child, ensuring the child’s face is slightly upturned or neutral, nestled against the mother.
Fixing Wobbly Lines
If a long line goes astray, don’t erase. Thicken the line slightly in that area to disguise the wobble, turning it into a deliberate shadow or fold in the fabric.
Step 2: Refining the Pencil Sketch
-
Draft the mother’s veil:
Draw sweeping curves over the top of the mother’s head. Let the lines drape naturally around her face and flow down over her shoulder to suggest soft fabric. -
Detail the hair:
Sketch the mother’s hair peeking out from under the veil near her forehead. For the child, draft short, textured strokes to indicate a soft, boyish haircut. -
Draw the hands:
Focus on the child’s hand resting on the mother. Keep the fingers simple and slightly curved. Sketch the mother’s arm coming around the child’s back to complete the protective gesture. -
Add gentle facial features:
Mark the position of the closed eyes for both figures. A simple curved line with a few lashes works best to convey peace and sleep. -
Review proportions:
Take a moment to step back. Check if the heads relate well in size and if the embrace feels natural. Adjust your pencil lines now before committing to ink.
Elevate with Watercolor
Once the ink is waterproof-dry, add a very pale, diluted wash of blue or warm gray to the shadows in the fabric folds for instant dimension.
Step 3: Inking the Final Artwork
-
Start with the main profiles:
Switch to your 0.5mm pen. With a steady hand, trace the profiles of the faces first. I find that securing the focal point—where the faces touch—helps anchor the rest of the drawing. -
Ink the veil and hair:
Use long, fluid strokes for the veil to maintain a sense of smoothness. When inking the hair, lift your pen at the end of strokes to taper the lines. -
Inking the child’s hair:
Use the finer 0.1mm pen here if you have one. Create short, flicking motions to mimic the texture of fine hair, keeping the crown slightly messy but cute. -
Define the clothing folds:
Ink the drapery of the mother’s garment and the child’s sleeve. Use varying line weights—thicker where shadows would naturally fall in the folds, and thinner on the ridges. -
Detail the eyes and lashes:
Using the ultra-fine pen again, carefully ink the closed eyelids. Add tiny, delicate strokes for eyelashes, being careful not to overdo them to keep the look serene. -
Connect the hands and arms:
Trace over the arm and hand lines. Ensure the lines overlapping the body stop cleanly where one form passes behind another. -
Clean up the drawing:
Let the ink sit for at least five full minutes to ensure it is completely dry. Gently erase all underlying pencil marks with your kneaded eraser to reveal the crisp black lines.
Step back and admire the quiet emotion you’ve captured in this simple, linear moment


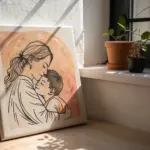
Mother Holding Baby Close
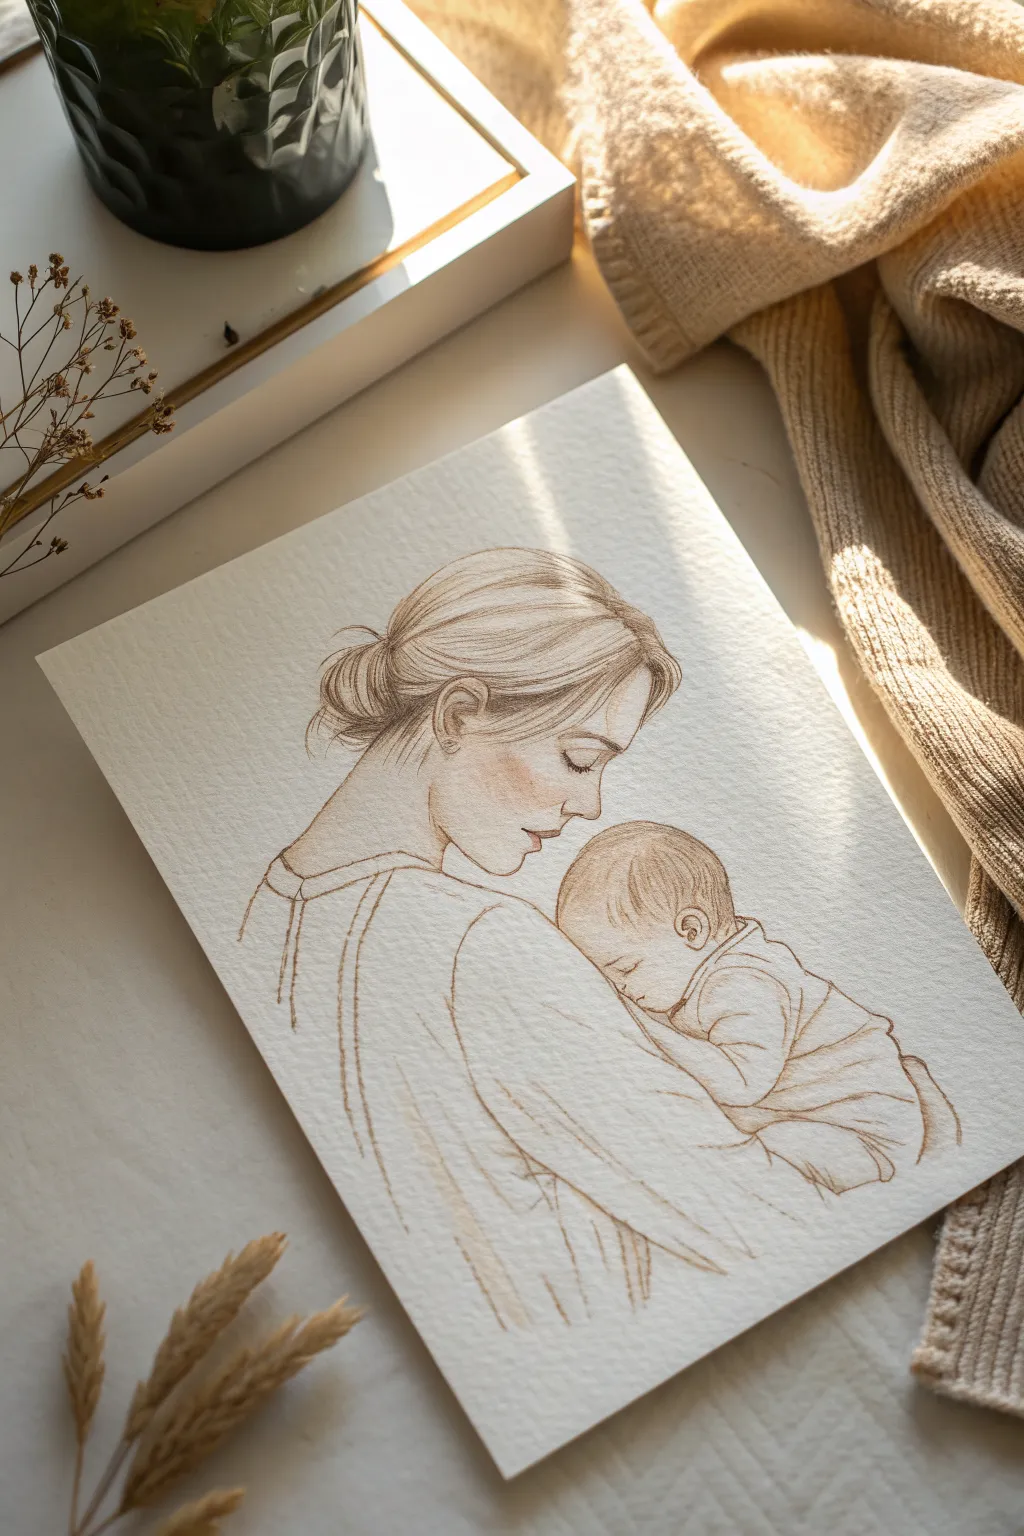
Capture the tender bond of motherhood with this gentle, monochromatic illustration. Using sepia-toned pencils on textured paper creates a timeless, vintage feel that focuses purely on emotion and connection, perfect for a nursery or thoughtful gift.
Step-by-Step Guide
Materials
- Cold press watercolor paper (300 gsm recommended for texture)
- Sepia or warm brown colored pencils (polychromos or wax-based)
- Hard graphite pencil (2H) for initial sketching
- Kneaded eraser
- Soft blending stump (tortillon)
- Pencil sharpener
Step 1: Laying the Foundation
-
Initial gesture lines:
Begin with your 2H graphite pencil using extremely light pressure. Sketch a simple oval for the mother’s head and a smaller, overlapping circle for the baby’s head nestled against her shoulder. -
Mapping the features:
Lightly mark guidelines for the facial features. For the mother, draw a profile line down the center of the oval. For the baby, the face is turned inward, so the ear will be a central anchoring point. -
Roughing in the hair and body:
Sketch the large shapes of the mother’s hair pulled back into a bun. Draw gentle, sloping lines for her shoulders and back, and sketch the rounded form of the baby’s back and arm resting on the mother’s chest. -
Refining the sketch:
Go over your shapes to define the profiles more clearly—the curve of the mother’s nose and lips, and the soft roundness of the baby’s cheek. Once satisfied, roll a kneaded eraser over the entire page to lift most of the graphite, leaving only a faint ghost image.
Too Heavy-Handed?
If your pencil lines look too dark or waxy, lightly press a kneaded eraser onto the area to lift pigment without smudging. Avoid rubbing.
Step 2: Defining the Heads
-
Starting the sepia outline:
Switch to your sharp sepia colored pencil. Begin tracing the mother’s profile with a delicate, steady line. Keep the pressure light; you want a softness, not a harsh cartoon outline. -
Drawing the eye and brow:
Place the mother’s closed eye. Instead of a single hard line, use a few short, feathery strokes for the eyelashes and a soft, curved line for the eyelid. Gently shade the eyebrow with short strokes following the hair growth. -
Adding the bun texture:
Work on the mother’s hair. Use long, sweeping strokes that follow the curve of the head toward the bun. Vary your pressure to suggest strands of hair catching the light, leaving some areas of the paper white for highlights. -
Baby’s features:
Move to the baby using an even lighter touch. Draw the small ear with simple C-curves. Suggestions of hair should be wispy and sparse at the top of the head. -
Adding subtle blush:
Turn your pencil on its side and very lightly shade the mother’s cheekbone area. I find using a circular motion helps avoid directional lines here. Use your blending stump to soften this patch of pigment into a gentle blush.
Add a Watercolor Wash
For a mixed-media look, lightly brush a very diluted tea stain or pale brown watercolor over the shadowed areas after the pencil work is set.
Step 3: Clothing and Connection
-
Shoulder and neckline:
Draw the neckline of the mother’s top. Use loose, sketchy lines to indicate seams or straps. The lines shouldn’t be perfectly continuous; broken lines add artistic character. -
Fabric folds:
Sketch the clothing on the mother’s arm. Use long, flowing lines that wrap around the form of her arm to show volume. These lines can be looser and sketchier than the facial features. -
Baby’s clothing details:
Outline the baby’s sleeve and back. Include small wrinkles where the fabric bunches at the elbow and shoulder to show that the baby is being held snugly. -
Lower arm shading:
Add shading to the mother’s lower sleeve area using diagonal hatching strokes. Keep the strokes parallel and fairly widely spaced to maintain the ‘sketchbook’ aesthetic.
Step 4: Final Touches
-
Deepening the shadows:
Look for the darkest points of the drawing—usually under the bun, the corner of the eye, and where the baby’s head creates a shadow on the mother’s chest. Use a sharper pencil tip to deepen these specific spots for contrast. -
Refining hair strands:
Add a few loose, stray hairs escaping the mother’s bun and around her forehead to make the portrait feel more natural and less stiff. -
Texture check:
Examine the clothing areas. If they look too flat, add a second layer of very light hatching in the shadow areas to suggest the texture of fabric without overworking it. -
Final clean up:
Use your kneaded eraser to tap away any stray graphite marks or accidental smudges, ensuring the white of the watercolor paper remains bright and clean.
Now you have a heartwarming, heirloom-style portrait capturing a quiet moment of love.


Mother Lifting Son in the Air
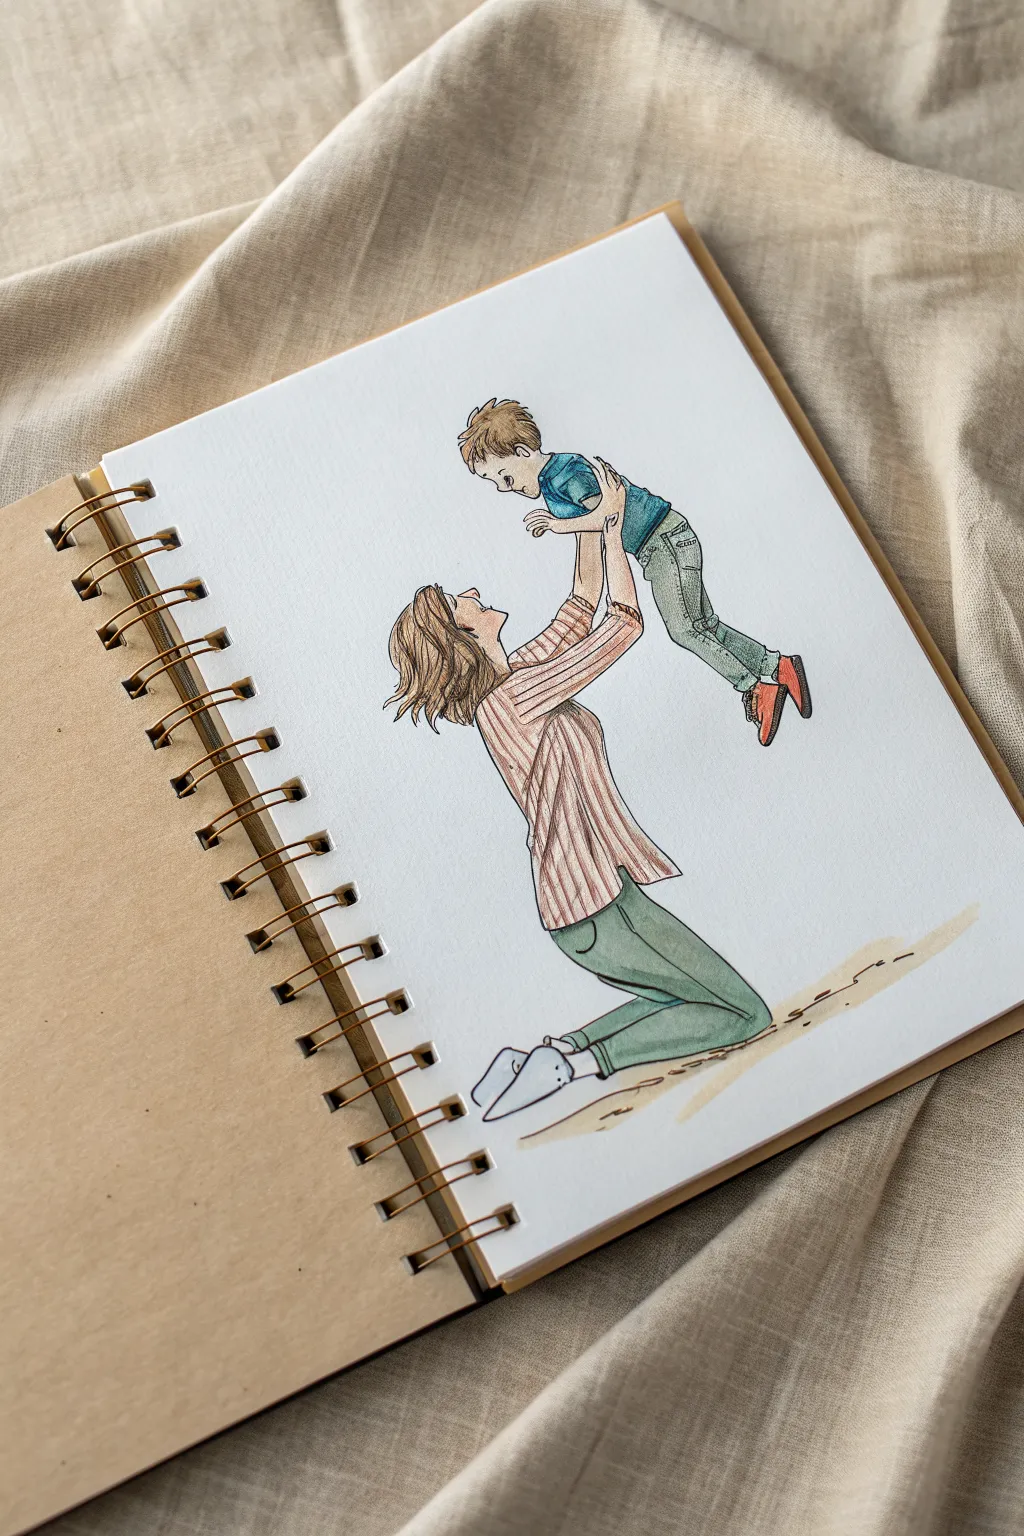
Capture the pure joy of movement in this charming illustration of a mother playfully lifting her son high into the air. This project utilizes delicate ink linework combined with soft watercolor or marker shading to create a breezy, affectionate scene on sketchbook paper.
Step-by-Step
Materials
- Spiral-bound sketchbook with tan/kraft paper cover (mixed media or watercolor paper inside)
- Graphite pencil (HB or 2B) for sketching
- Kneaded eraser
- Fine liner pen (black or dark sepia, 0.1mm and 0.3mm)
- Watercolor paints or alcohol-based markers (muted tones: dusty rose, sage green, denim blue, beige)
- Small round paintbrush (size 2 or 4)
- White gel pen (optional for highlights)
Step 1: Drafting the Composition
-
Establish the vertical axis:
Begin by lightly drawing a vertical line in the center of your page to guide the alignment. The figures will be stacked, so mark the ground level near the bottom third and the highest point (the boy’s head) near the top third. -
Block in the mother’s kneeling pose:
Sketch a simple L-shape for the mother’s kneeling legs using loose ovals and lines. Her torso should lean back slightly to counterbalance the weight of the child she is lifting. -
Outline the lifting arms:
Draw lines extending upward from the mother’s shoulders. The key here is tension—make sure her arms look straight and engaged as they reach up to hold the boy’s torso. -
Position the child:
Sketch the boy’s body hovering above. His torso should be slightly angled, as if he’s being tipped backward playfully. Add his legs dangling freely; drawing his feet pointed slightly downward adds a buoyant feel. -
Refine the anatomy and clothing:
Flesh out the shapes. Draw the mother’s striped sweater with loose folds, her hair falling back due to gravity, and her pants bunching at the knees. For the boy, outline a t-shirt and jeans, ensuring his hands rest on his mother’s arms for stability.
Fix Smudged Ink
If your waterproof pen smears when painting, stop immediately. Blot gently with a tissue, let it dry fully, and then cover the mistake with opaque watercolor or gouache later.
Step 2: Inking the Outlines
-
Trace the facial profiles:
Switch to your 0.1mm fine liner. Carefully ink the mother’s profile looking up and the son’s profile looking down. Keep the lines broken and light around the hair to suggest texture. -
Ink the clothing folds:
Use a 0.3mm pen for the clothing outlines to give them more weight. Focus on the creases where the fabric bends—at the mother’s elbows, waist, and behind the knees. I like to keep these lines slightly sketchy rather than perfectly solid. -
Add texture lines:
Draw the vertical stripes on the mother’s sweater using thin, possibly broken lines that follow the contour of her torso. Add pocket details and stitching lines on the boy’s jeans. -
Erase preparatory marks:
Once the ink is completely dry—give it a good five minutes—gently use the kneaded eraser to lift away all pencil guidelines, leaving a clean ink drawing.
Pro Tip: Gravity’s Effect
To make the lift look real, draw the mother’s hair flowing downward and the boy’s shirt riding up slightly. These gravity cues sell the motion.
Step 3: Adding Color and Depth
-
Paint the skin tones:
Mix a very dilute wash of beige or light peach watercolor. Apply it to the faces, hands, and the mother’s visible neck area. Keep this layer very transparent. -
Color the mother’s outfit:
Use a muted dusty rose or light brown for the stripes on her sweater. Once that dries, paint her pants with a sage or olive green wash. Let the color pool slightly in the shadowed areas, like under the thighs. -
Color the son’s outfit:
Paint the boy’s t-shirt a solid, cool blue. For his jeans, use a diluted wash of dull blue-grey, leaving the centers of the legs slightly lighter to suggest fading. -
Add hair details:
Use a light brown wash for the hair. While the paint is still damp, drop in a slightly darker brown near the roots and part lines to create volume. -
Ground the figures:
Mix a watery light brown or beige. Swipe a loose, horizontal patch under the mother’s knees to create an abstract ground or shadow, anchoring the figures so they don’t feel like they are floating in a void. -
Pop of contrasting color:
Paint the boy’s shoes a bright orange-red. This small accent draws the eye and balances the muted tones of the rest of the illustration. -
Final highlights:
If desired, use a white gel pen to add tiny dots to the eyes or a small sheen on the mother’s hair once the paint is bone dry.
Now you have a heartwarming illustration that captures a beautiful moment of connection.

PENCIL GUIDE
Understanding Pencil Grades from H to B
From first sketch to finished drawing — learn pencil grades, line control, and shading techniques.
Explore the Full Guide
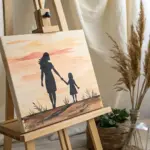
Silhouette at Sunset
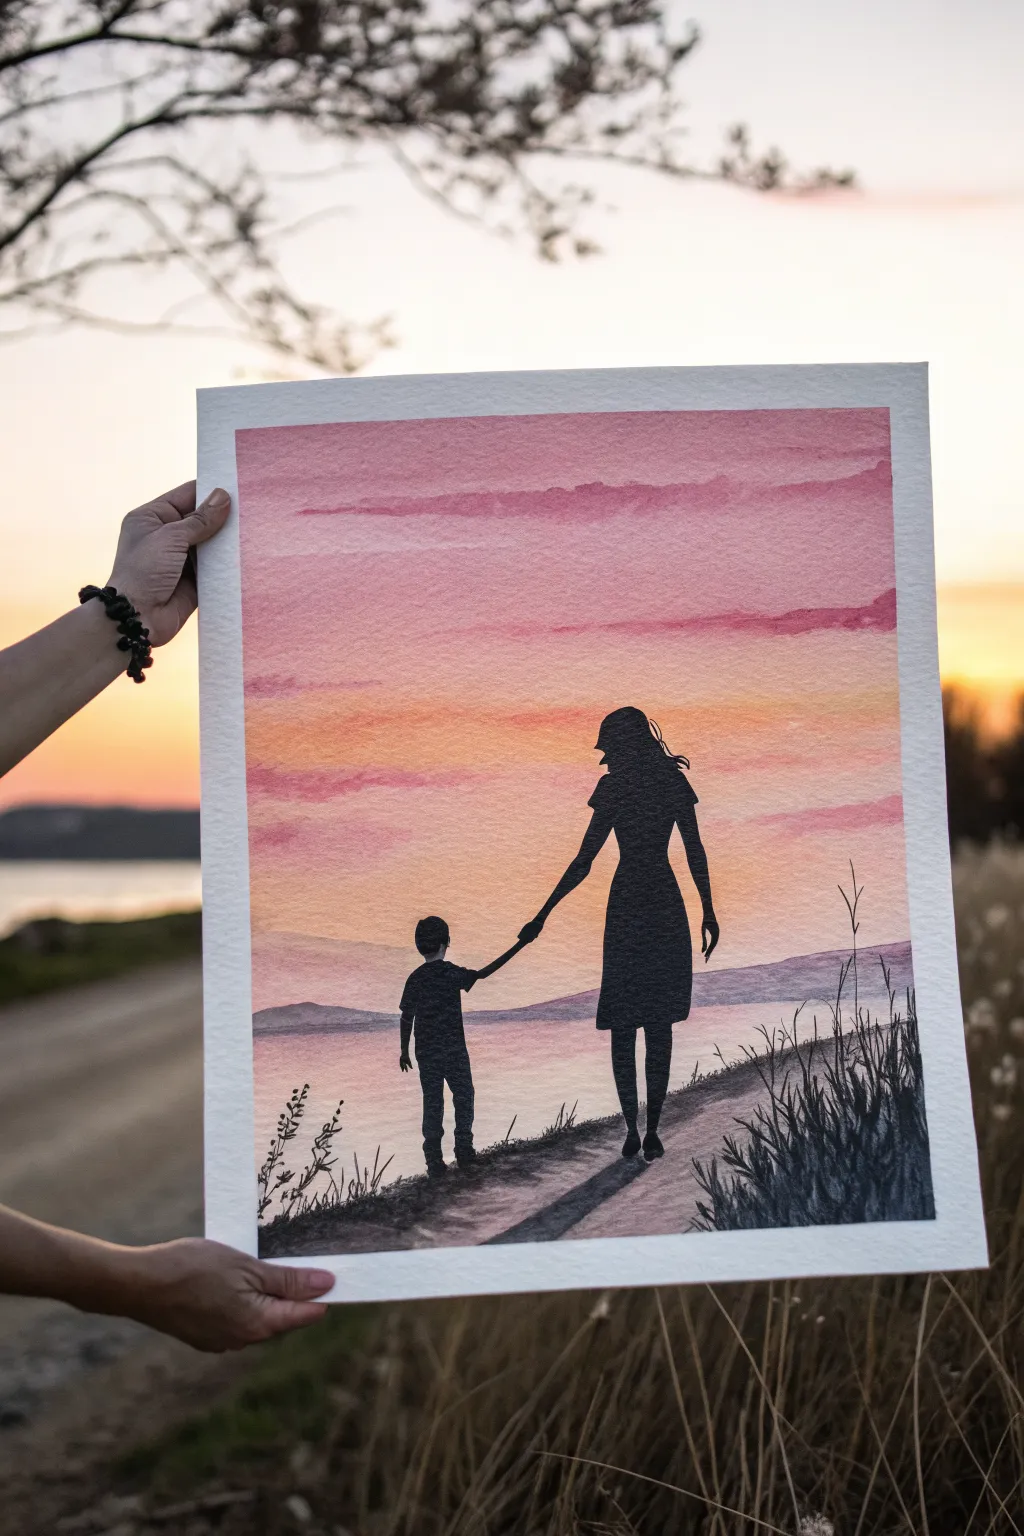
Capture a tender moment between mother and child with this vibrant mixed-media piece. By combining soft watercolor washes for the sky with the stark, crisp lines of black silhouettes, you’ll create an emotional scene full of contrast and warmth.
Detailed Instructions
Materials
- Cold press watercolor paper (preferably 140lb/300gsm)
- Watercolor paints (shades of pink, warm red, orange, and soft violet/blue)
- Black acrylic paint or black India ink
- Large flat wash brush (1 inch or larger)
- Medium round watercolor brush (size 6 or 8)
- Small liner brush or detail brush (size 0 or 00)
- Painters tape or masking tape
- Pencil and eraser
- Palette for mixing
- Water cups and paper towels
Step 1: Setting the Sky
-
Secure your surface:
Begin by taping down all four edges of your watercolor paper to a board or table. This creates that crisp white border seen in the final piece and prevents the paper from buckling when wet. -
Prepare the sky wash:
Pre-mix a generous amount of soft pink and a separate puddle of salmon-orange on your palette. For this expansive sky, you’ll need plenty of fluid paint. -
Wet-on-wet start:
Using your large flat brush, apply clean water to the upper two-thirds of the paper. You want the surface to be glistening but not forming paddles. -
Apply the first pink:
Load your brush with the soft pink mixture and sweep it across the top third of the paper in horizontal strokes. Let the pigment bleed downward naturally into the damp paper. -
Add warmth:
While the paper is still damp, introduce the salmon-orange color below the pink, blending the transition gently so there are no hard lines. -
Create distinct clouds:
While the base wash is slightly damp but losing its sheen, load a brush with a slightly thicker, darker pink-red pigment. Gently drag horizontal, somewhat jagged lines across the upper sky to mimic layered stratus clouds. -
Paint the horizon:
Near the bottom third of the paper, paint the distant landmass using a diluted violet or blue-grey wash. Keey the edges soft to suggest atmospheric distance. -
Water reflections:
Below the horizon line, reflect the sky colors faintly. Use very watery washes of the pink and orange, leaving some white paper showing to represent light shimmering on the water.
Silhouette Sharpness
For the absolute crispest edges on your silhouette, use a black waterproof drawing pen for the outline first, then fill the center with paint.
Step 2: Forming the Foreground
-
Dry completely:
This is crucial: allow the watercolor background to dry 100%. If you touch the paper and it feels cool, it’s still wet. Use a hair dryer on a low setting if you’re impatient. -
Sketch the figures:
Lightly sketch the outline of the mother and son holding hands, as well as the grassy path they are walking on. Keep your pencil pressure very light so you don’t indent the paper. -
Establish the ground:
Switch to your black acrylic paint or ink. Using a medium round brush, paint the sloping ground in solid black. Use choppy, upward brush strokes along the top edge of the slope to create the texture of grass blades. -
Outline the mother:
Start filling in the mother’s silhouette. Focus on the identifiable shapes—the flow of her dress and hair—rather than internal details, since the entire form will be black. -
Paint the child:
Carefully paint the child’s silhouette. Pay close attention to the proportions of the head relative to the body to ensure he looks like a young child. -
Connect the hands:
Use your smallest liner brush to paint their joined hands. This connection point is delicate, so steady your hand against the table surface if needed. -
Add foreground grasses:
With the liner brush, flick quick, confident strokes upward from the bottom right corner. Vary the height and angle of these grass blades to make the scene look natural and organic. -
Create the shadows:
Dilute a small amount of black acrylic with water (or use a grey watercolor). Paint long, diagonal cast shadows stretching from their feet to the right, anchoring them to the path. -
Final touches:
Inspect the black areas for any patchiness. Apply a second coat of black to the silhouettes if necessary to ensure they are completely opaque against the bright sunset. -
The reveal:
Once everything is bone dry, slowly peel away the masking tape at a 45-degree angle to reveal your clean white orientation border.
Fixing Sky Blooms
If ‘cauliflower’ blooms appear in your sky, don’t scrub them! Turn them into clouds by slightly lifting pigment with a damp brush or embracing the texture.
Now you have a touching keepsake that perfectly captures the bond of family against a stunning evening sky.
Bedtime Story Moment
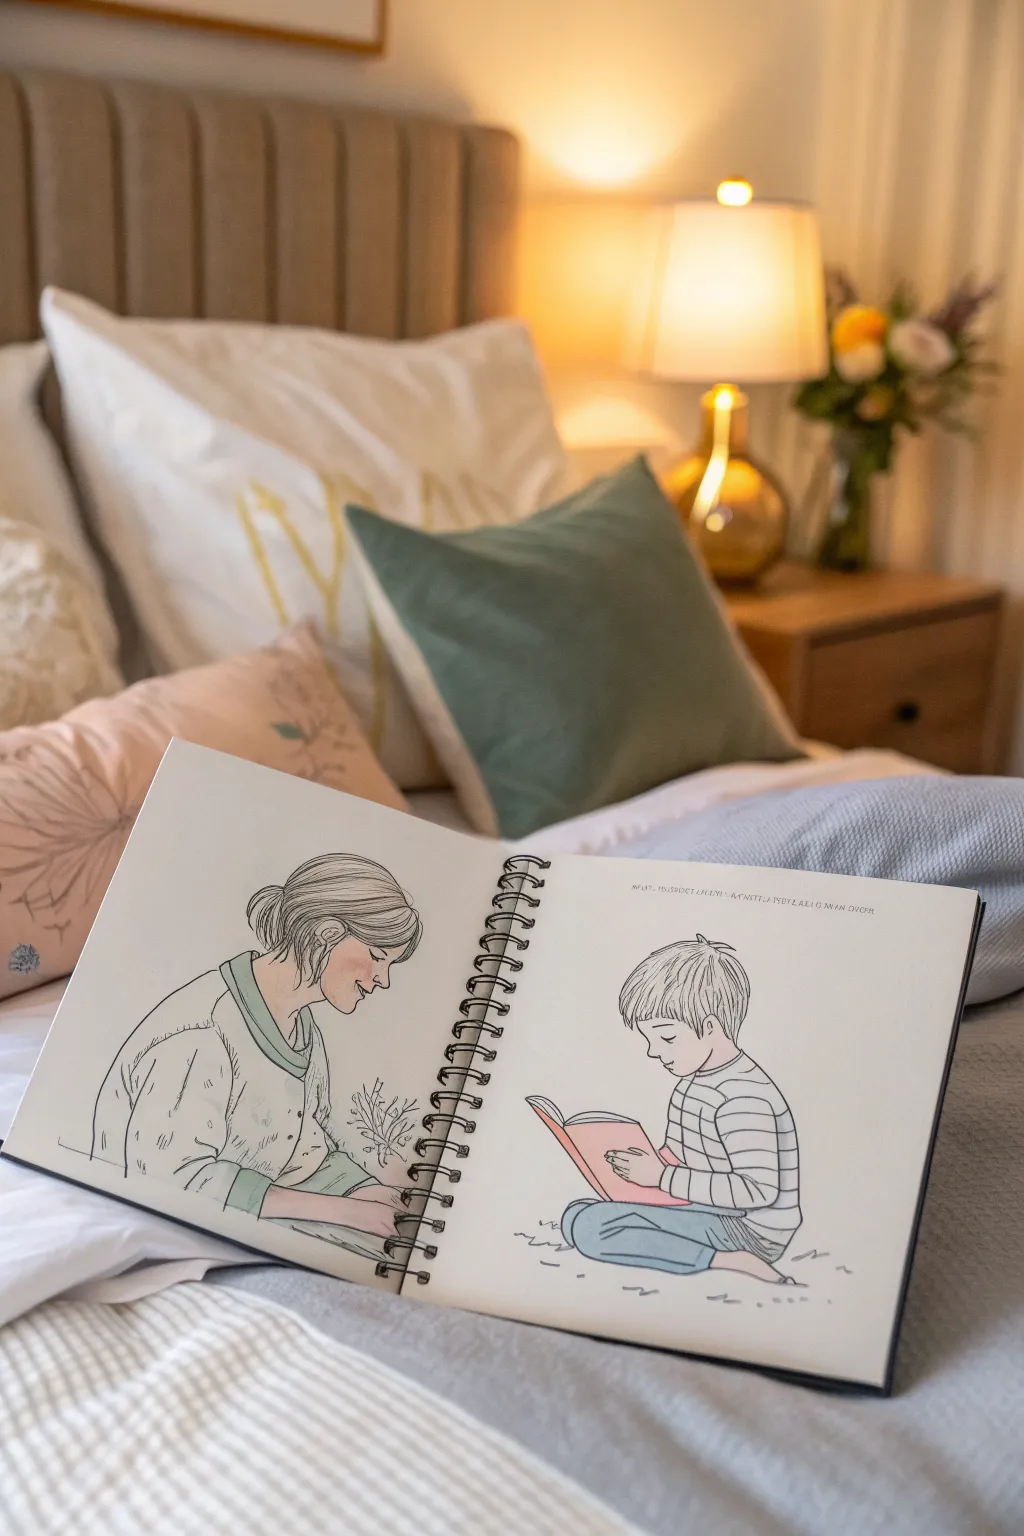
Capture the quiet intimacy of an evening read-aloud session with this gentle double-page illustration. Using clean ink lines and soft, muted marker tones, you’ll create a heartwarming scene that spans across your sketchbook.
How-To Guide
Materials
- Spiral-bound sketchbook (heavyweight paper)
- Pencil (HB or 2B)
- Kneaded eraser
- Fine liner pens (0.1mm, 0.3mm, 0.5mm, black)
- Alcohol-based markers (muted sage green, pale pink, denim blue, warm grey/beige)
- Colorless blender marker (optional)
- White gel pen
Step 1: Planning the Composition
-
Visualize the spacing:
Since this is a double-page spread, imagine the spiral binding as a divider. The mother figure will occupy the left page, facing right, and the son will sit on the right page, facing left. Leave generous negative space around them to keep the focus on their connection. -
Rough sketching: The Mother:
On the left page, lightly sketch the mother’s profile. Use simple shapes: an oval for the head, a curved cylinder for the torso, and bent lines for the arm reaching forward. Position her so she appears to be leaning slightly toward the right page. -
Rough sketching: The Son:
On the right page, sketch the boy sitting cross-legged. Draw a circle for his head, angled down toward his lap where the book will be. Block in the open book with rectangular planes resting on his legs. -
Refining the poses:
Go back over your rough shapes to define the clothing folds and anatomical details. Give the mother a loose, comfortable cardigan and a bun hairstyle. For the boy, sketch a striped long-sleeve shirt and jeans. Ensure their eyelines match up logically.
Ink Smudging?
If your fine liner smears when you apply marker over it, standard pens may not be alcohol-proof. Photocopy your line work onto marker paper first, or let the ink cure overnight before coloring.
Step 2: Inking the Outlines
-
Starting with the faces:
Use your finest 0.1mm pen for facial features. Carefully trace the mother’s profile and the boy’s down-turned eyelid and nose. Keep these lines delicate to convey softness. -
Hair texture:
Switch to a 0.3mm pen. Draw the hair in clumps rather than individual strands. For the mother, follow the curve of the bun; for the boy, use short, choppy strokes to suggest a slightly messy texture. -
Clothing contours:
Use the 0.3mm pen for the clothes. Focus on the folds in the mother’s sleeves and the boy’s jeans where the knees bend. I like to break the line slightly in areas where the fabric is smooth to keep it looking lively. -
Adding the stripes:
Carefully draw the horizontal stripes on the boy’s shirt. Don’t make them perfectly straight—curve them slightly around his torso and arms to show the volume of his body. -
The spiral binding:
This is a meta-detail shown in the reference: draw the spiral binding down the center if you are drawing on a flat sheet, or simply clean up the area near the real spine. -
Foliage detail:
Add the faint, sketchy sprig of leaves between the mother’s hands on the left page. Use very light, broken lines here so it doesn’t distract from the figures. -
Erase pencil marks:
Once the ink is completely dry—give it a solid five minutes—gently use the kneaded eraser to lift all the graphite guidelines.
Step 3: Adding Muted Color
-
Coloring the mother’s cardigan:
Take a pale, warm grey or very light beige marker. Fill in the main body of her cardigan. For the collar and cuffs, switch to a muted sage green. -
Coloring the book:
Use a soft pale pink for the book cover held by the boy. Color it flatly, leaving the pages white. -
Coloring the jeans:
Apply a light denim blue to the boy’s pants. To create a casual watercolor look with markers, you can go over the shadowed areas (under the leg, at the fold) a second time to deepen the tone. -
Adding texture to the mother’s top:
Using a 0.1mm pen, add tiny vertical dashes or small ticks all over the main body of the mother’s cardigan to simulate a knit texture. -
Grounding shadows:
Use a light grey marker to add quick, horizontal scribbles under the boy’s legs to ground him, suggesting a floor or rug without drawing one fully.
Loose Lines
Don’t try to close every shape perfectly. Leaving small gaps in the outline of clothing or hair makes the drawing feel lighter and more illustrative, rather than like a coloring book page.
Step 4: Final Touches
-
Text element:
At the top of the right page, use your smallest pen to add a line of tiny, illegible ‘scribble text’ or a meaningful quote about reading. Keep the lettering small and widely spaced. -
White highlights:
Use a white gel pen to add a tiny dot to the boy’s hair or the spine of the book to simulate a catchlight. -
Review and unify:
Step back and look at the spread as a whole. If the mother’s side feels too light, add slightly more shading to her hair with the warm grey marker.
Now you have a serene, storybook-style illustration that perfectly captures a quiet family moment.
BRUSH GUIDE
The Right Brush for Every Stroke
From clean lines to bold texture — master brush choice, stroke control, and essential techniques.
Explore the Full Guide
School Drop-Off With Backpack
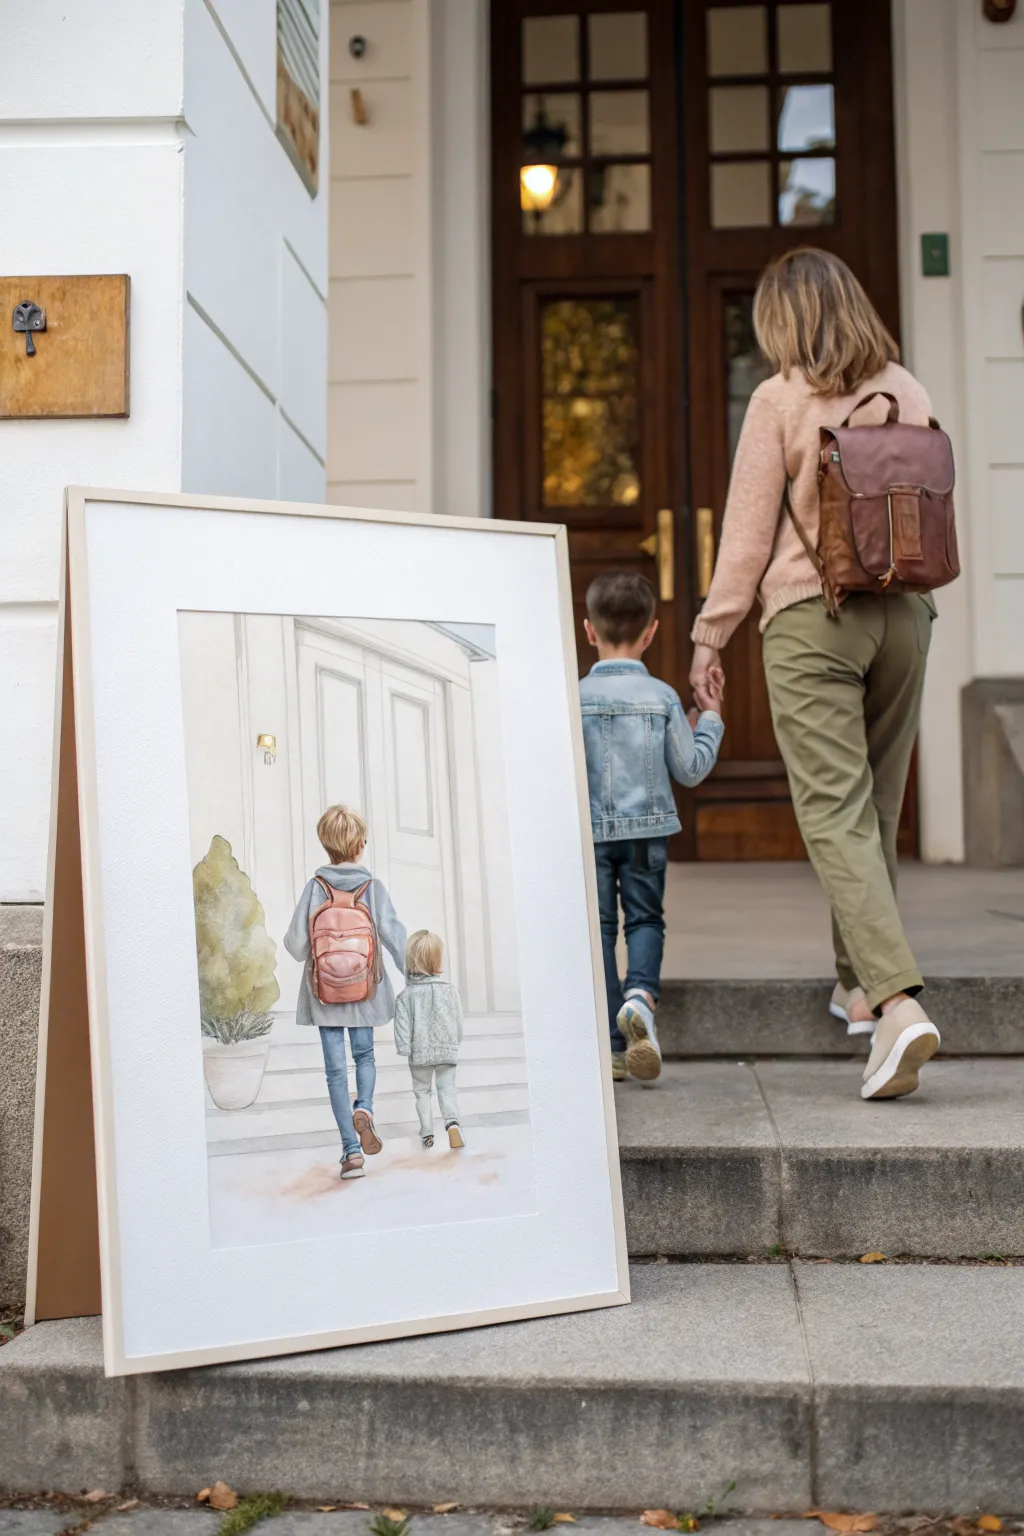
Capture the poignant moment of children heading off to school with this delicate watercolor illustration. The soft, airy composition focuses on the backs of two figures walking toward a grand doorway, freezing a fleeting memory in time with gentle washes and fine details.
Step-by-Step Guide
Materials
- Cold press watercolor paper (140 lb/300 gsm)
- Pencil (HB or 2B) for sketching
- Kneadable eraser
- Watercolor paints (Cobalt Blue, Burnt Sienna, Yellow Ochre, Paynes Grey, Rose Madder)
- Round watercolor brushes (sizes 4, 8, and a fine liner like 0 or 00)
- Two jars of water
- Paper towels
- Masking fluid (optional)
- Fine-tip waterproof ink pen (grey or brown)
Step 1: Planning and Sketching
-
Establish the composition:
Begin by lightly sketching the large double doors in the background. Keep the lines vertical and symmetrical, centering them on your paper to create a framing device for the figures. -
Draft the figures:
Sketch the two children from behind in the foreground. Place the taller child on the left and the smaller one on the right, holding hands. Focus on the simple shapes of their coats and legs rather than anatomical perfection. -
Add key details:
Lightly outline the backpack on the taller child. Sketch the potted plant to the left of the door to balance the composition, keeping the foliage shapes loose and cloud-like. -
Refine the environment:
Draw the horizontal lines of the steps leading up to the door. Ensure these lines are straight and parallel to give the drawing proper perspective and grounding.
Keep It Airy
Use two water jars: one for dirty rinse water and one for clean water. Use the clean water to soften hard paint edges for that dreamy look.
Step 2: Initial Watercolor Washes
-
Paint the door architecture:
Mix a very dilute wash of Paynes Grey and water to create a whisper-light grey. Fill in the door shadows and the molding details, keeping the main panels white to represent bright light. -
Base layer for clothing:
For the taller child’s coat, use a watery mix of Cobalt Blue with a touch of grey. Apply this loosely, letting the paint pool slightly at the bottom of the coat for natural shading. -
Paint the smaller coat:
Use a pale wash of blue-green or a very light grey for the smaller child’s jacket. Keep the edges soft to suggest a cozy, textured fabric like fleece or wool. -
Base instructions for the backpack:
Create a warm mix using Rose Madder and a tiny bit of Burnt Sienna. Apply this to the backpack area, leaving a small highlight of white paper near the top curve to suggest a shiny or leather material. -
Potted plant greenery:
Mix Yellow Ochre with a touch of blue for an olive green tone. Dao this onto the bush shape using a wet-on-dry technique to create texture, leaving small white gaps for airiness.
Muddy Colors?
If your shadows look dull or muddy, let the paper dry completely between layers. Watercolor transparency relies on patience; wet-on-wet can turn messy fast.
Step 3: Defining Details and Shadows
-
Deepen the denim:
Once the first layer is dry, mix a stronger concentration of Cobalt Blue and Paynes Grey. Paint the jeans on both figures, adding an extra layer of dark paint at the knees and hemlines to show folds. -
Hair texture:
Using a small number 4 brush, paint the hair using Yellow Ochre mixed with a little brown. Use quick, short strokes in the direction of hair growth, leaving some light areas for sheen. -
Backpack details:
Go back to the backpack with a darker version of your pink-brown mix. Define the pockets, zippers, and straps, adding shadows underneath the main compartment to give it weight. -
Grounding shadows:
Mix a cool purple-grey for the cast shadows. Paint horizontal strokes under the children’s feet and the potted plant to firmly place them on the ground so they don’t look like they are floating. -
Architectural emphasis:
Strengthen the lines of the door frame and the steps with a fine brush and a medium-grey mix. Keep these lines broken and imperfect to maintain the illustrative, hand-drawn charm.
Step 4: Final Touches
-
Ink outlining (optional):
If you prefer a crisper look, go over the main contours of the backpack and coats with a fine-tip grey pen. Keep the line weight very delicate to avoid overpowering the watercolor. -
Pot texture:
Add a little texture to the planter pot using a dry brush technique with a pale terracotta or grey color, implying a concrete or stone surface. -
Final highlights:
Use a white gel pen or opaque white gouache to add tiny highlights on the backpack buckles or the lantern by the door if you accidentally painted over them.
Frame your finished piece in a simple light wood or white frame to echo the clean aesthetic of the artwork
Piggyback Ride Sketch
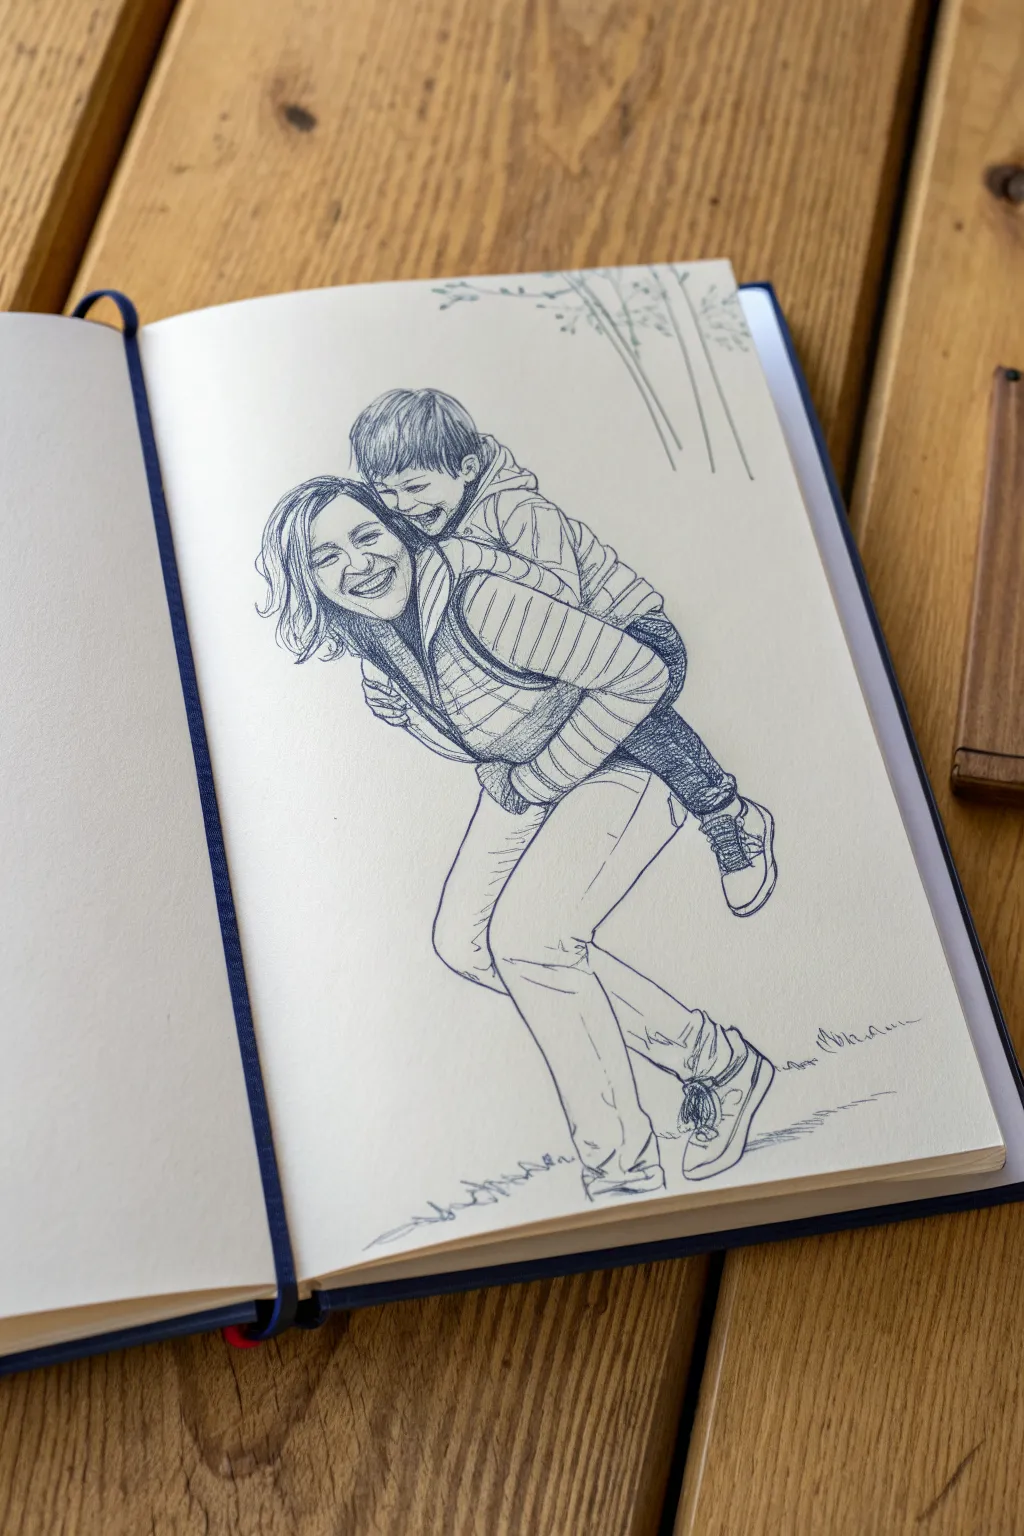
Capture the pure joy of maternal bonding with this lively ballpoint pen sketch. Using simple cross-hatching and relaxed line work, you will create a dynamic drawing that feels spontaneous yet carefully observed.
Detailed Instructions
Materials
- Sketchbook with smooth, off-white paper (A5 or similar size)
- Blue ballpoint pen (medium point, 1.0mm)
- Graphite pencil (HB or 2B) for under-drawing
- Kneaded eraser
Step 1: Establishing the Structure
-
Gesture Lines:
Begin with a very light pencil sketch to capture the motion. Draw a curved line representing the mother’s spine leaning forward, and map out the angle of her legs to support the weight. -
Blocking Shapes:
Sketch broad geometric shapes for the torso and hips. Add a smaller, overlapping shape on the upper back for the child’s torso to ensure they look connected, not floating. -
Positioning Limb:
Lightly sketch the mother’s legs with bent knees to show movement. Place her arms reaching back to hold the child’s legs, which should wrap around her waist naturally. -
Head Placement:
Draw the ovals for their heads. The mother’s head should be tilted up and smiling, while the child’s head leans forward, resting near her shoulder to show intimacy.
Ink Pressure Control
Vary your pen pressure constantly. Press hard for deep creases and shadows, but barely touch the paper for skin tones and hair highlights.
Step 2: Inking the Figures
-
Starting the Faces:
Switch to your blue ballpoint pen. Start with the mother’s eyes and smile, using delicate, broken lines to keep the expression soft. Do the same for the child’s laughing face. -
Defining Hair:
Use quick, sweeping strokes for the hair. Focus on the overall shape rather than individual strands, allowing the lines to flick outward at the ends for a windy texture. -
Clothing Outlines:
Outline the mother’s vest and the child’s hoodie. Pay close attention to where the fabric bunches, particularly under the child’s arms and at the mother’s elbows. -
Hands and Shoes:
Ink the mother’s hands gripping the child’s legs. Then, define the shoes, adding detail to the laces and soles to ground the figures.
Step 3: Adding Texture and Depth
-
Striped Patterns:
Carefully draw the horizontal stripes on the mother’s sleeves. Allow the lines to curb around the arm’s cylindrical form to create volume, rather than drawing them flat. -
Shadowing the Vest:
Use diagonal hatching lines on the mother’s vest to darken the side away from the light source. I like to keep these strokes loose to maintain the sketch’s energy. -
Darkening the Jeans:
Apply denser cross-hatching to the child’s jeans. Layer lines in multiple directions to build up a deeper blue value that contrasts with the lighter shirts. -
Leg Drapery:
Add long, fluid fold lines to the mother’s trousers. Focus on the knees and ankles where the fabric naturally wrinkles while walking. -
Refining Contours:
Go back over key outlines—like the separation between the two figures—making them slightly thicker to help the characters pop off the page.
Splatter Effect
Add liveliness by flicking your pen tip against your finger to create tiny, accidental ink dots around the feet, mimicking kicked-up dirt.
Step 4: Final Atmosphere
-
Grounding Shadows:
Sketch scribbly, horizontal zigzag lines beneath the feet. This hints at grass and a shadow, preventing the figures from looking like they are floating in space. -
Adding Background Hints:
In the upper right corner, lightly sketch a few vertical lines and scattered scribbles to suggest tree branches or foliage without overpowering the main subjects. -
Cleanup:
Once the ink is fully dry (give it a minute to avoid smearing), gently erase the initial pencil guide lines with your kneaded eraser.
This heartwarming sketch is now a timeless keepsake of playful affection


Cheek Kiss and Cuddle
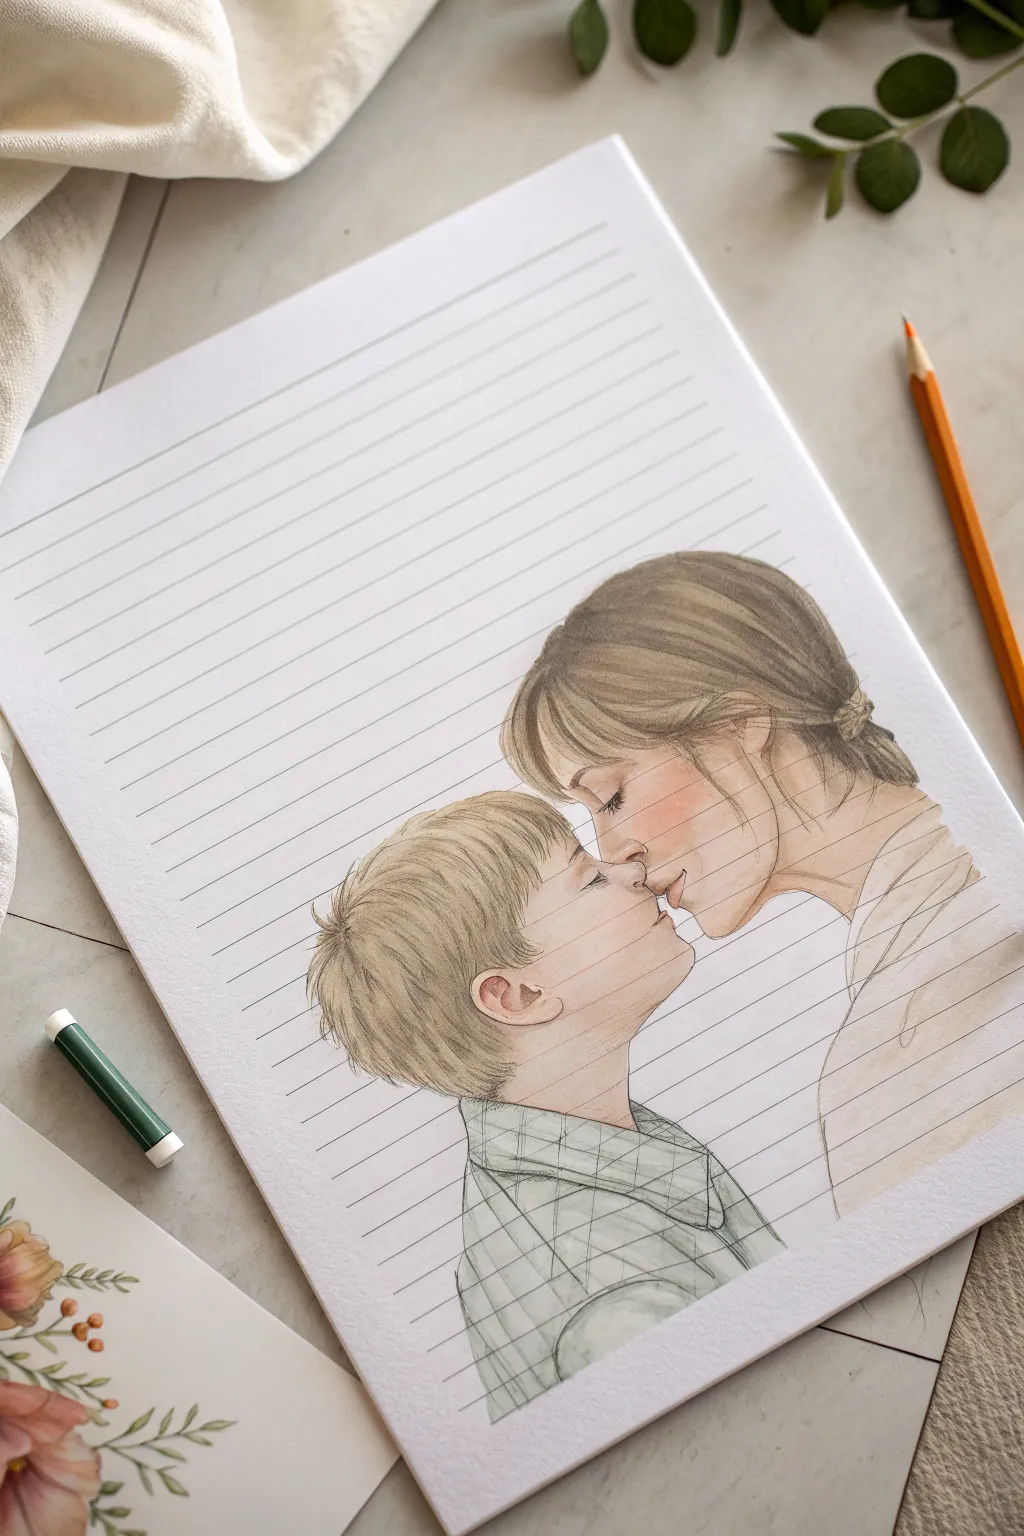
Capture a tender moment of affection with this delicate watercolor pencil illustration drawn directly onto ruled lines. The soft blending and realistic proportions create a heartwarming keepsake that feels both casual and intimate.
Detailed Instructions
Materials
- Heavyweight white drawing paper (A4 size)
- Ruler
- Gray fine-liner pen (0.1mm)
- Graphite pencil (HB or 2B) for sketching
- Kneaded eraser
- Watercolor pencils (skin tones, greens, browns)
- Small round paintbrush (size 2 or 4)
- Cup of water
- Paper towel
Step 1: Setting the Scene
-
Create the faux-notebook paper:
Since real notebook paper often ripples with water, start with high-quality drawing paper. Use your ruler and the gray fine-liner to draw evenly spaced horizontal lines across the entire page, leaving a slightly larger margin at the top. -
Map out the composition:
Visualize where the faces will meet. The mother’s head should be slightly higher on the right, tilting down, while the son’s head tilts up from the left. Their noses should be just touching in the lower-middle section of the page. -
Sketch the profiles:
Using your graphite pencil very lightly, outline the profiles. Focus on the forehead slopes, the bridge of the noses, and the curve of the chins. Don’t press hard; you want these lines to disappear under the color later. -
Detail features and hair:
Refine the shapes of the eyes (closed for a peaceful look), the gentle smile lines, and the overall hair volume. Sketch the boy’s collared shirt and the mother’s shoulder to ground the figures.
Rule Your World
Don’t use ink for the lines that pass through the faces. Stop the gray line before the face and restart after it to make the drawing look like it sits ‘on top’ of the paper.
Step 2: Applying Color
-
Base skin tones:
Select a pale peach or light beige watercolor pencil. Lightly shade the faces, leaving the areas like the bridge of the nose and center of the forehead almost white for highlights. -
Add warmth:
Layer a slightly darker pink or warm tan on the cheeks, eyelids, and under the chin to create dimension. I like to target the spot where their faces are closest to emphasize the warmth of the connection. -
Hair base layers:
For the mother, use light brown strokes following the direction of hair growth, pulling back into a low bun. For the boy, use short, textured strokes in a light sandy or ash brown tone. -
Deepen the hair values:
Go over the hair again with a darker brown pencil, focusing on the roots, the nape of the neck, and the shadowed areas behind the ears. Leave some lighter areas to suggest shine. -
Clothing sketch:
Use a mossy or sage green pencil to outline the grid pattern on the boy’s shirt. Keep the lines sketch-like and loose rather than rigid geometric squares.
Step 3: activating the Watercolors
-
Prepare the brush:
Dip your small round brush into clean water and dab it on a paper towel so it is damp, not dripping. You need precise control here to keep the paper from buckling. -
Blend the skin:
Gently gently brush over the skin layers, moving from light to dark areas. The pencil pigments will melt into a soft wash. be careful not to scrub the paper, just let the water do the work. -
Soften the hair:
Run the damp brush along the hair strands. Don’t blend fully; you want to keep visible pencil strokes to mimic individual hairs, simply softening the texture. -
Define the features:
Once the skin is semi-dry, use a sharpened brown pencil (not black, which is too harsh) to redefine the eyelashes, the line of the lips, and the nostril shape.
Muddy Faces?
If colors look muddy, wait for the paper to dry completely. Lift excess pigment with a clean damp brush, let dry again, and re-apply fresh color.
Step 4: Finishing Touches
-
Enhance the blush:
If the color faded after drying, add a dry layer of pink pencil to the cheeks and the tip of the nose for a fresh, rosy look. -
Detail the clothes:
Lightly shade the boy’s shirt with the green pencil, then go over the grid lines again to make them crisp. Use a neutral beige for the mother’s top. -
Integrate the lines:
Check the ruled lines you drew in the beginning. If the drawing has fully obscured them, you can carefully re-draw the gray lines *over* the hair or clothes specifically if you want a transparent, ghostly effect, though leaving them interrupted looks more natural. -
Final highlights:
Use a white gel pen or white pencil to add tiny highlights to the lips or the shine on the hair if needed to make the image pop.
Step back and admire the gentle emotion you have captured in this simple yet touching portrait.
Mother Teaching Son to Ride a Bike
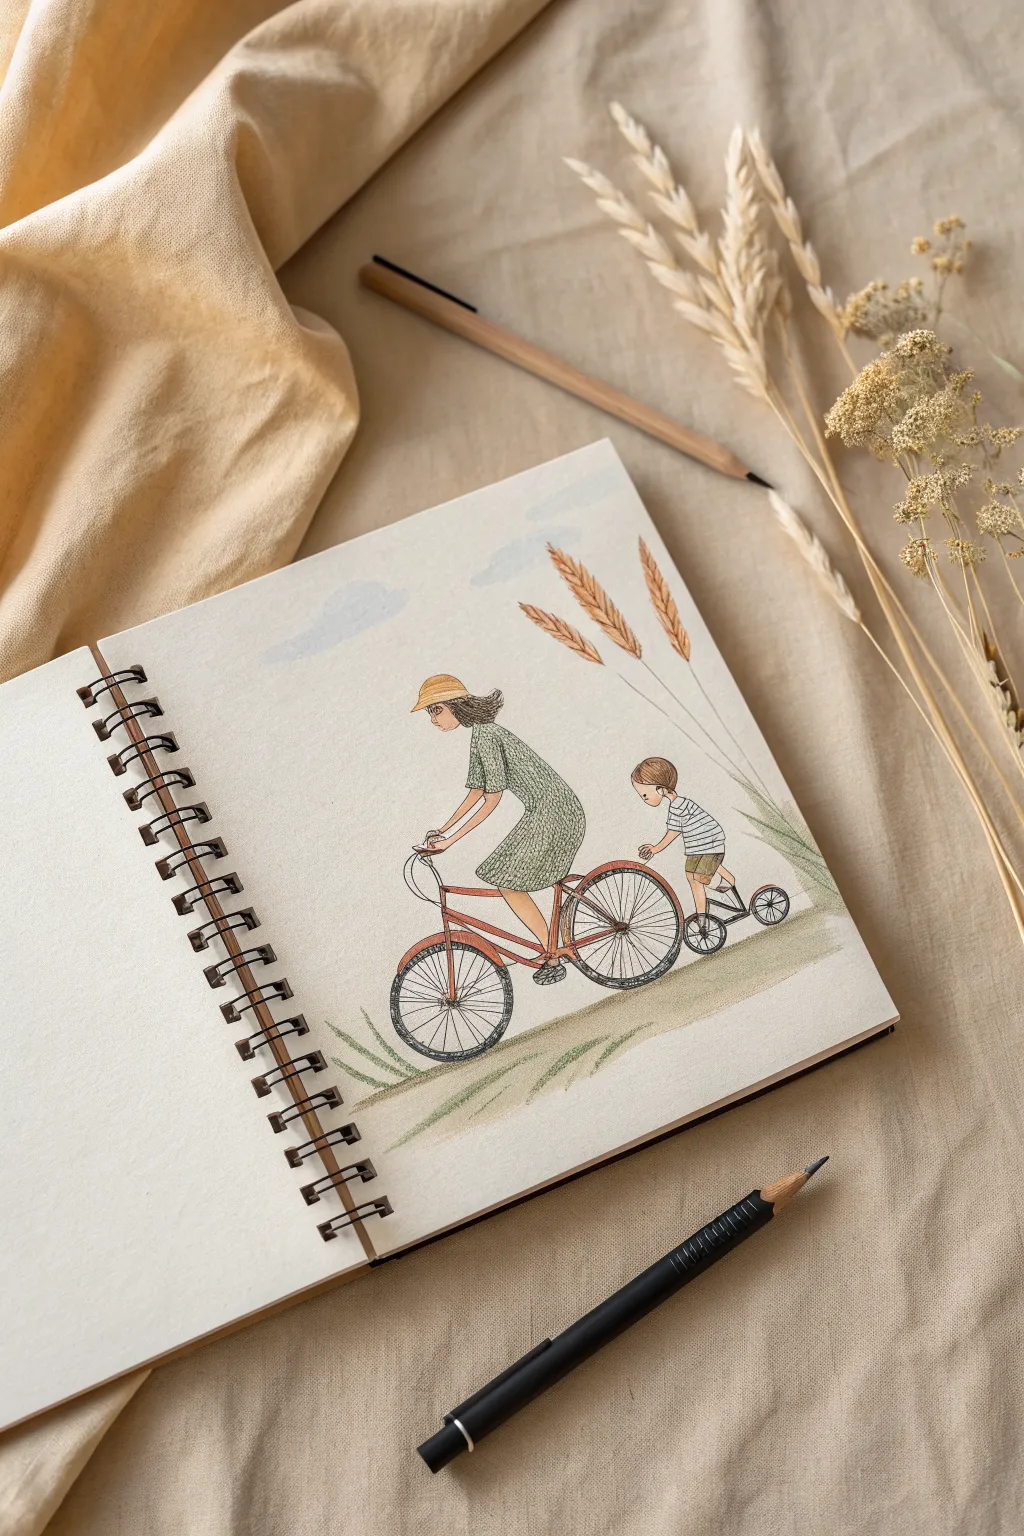
Capture a sweet moment of learning and togetherness with this gentle illustration of a mother and child cycling. Using warm earth tones and delicate pencil strokes, this project creates a serene, minimalist scene perfect for a sketchbook journal.
Step-by-Step Guide
Materials
- Sketchbook with cream or off-white paper (slight texture is good)
- H or HB graphite pencil for initial sketching
- Fine liner pens (Black, 0.1mm and 0.3mm)
- Fine liner or colored pencil (Brown/Sepia for softer outlines)
- Colored pencils (Sage Green, Rust Red/Terracotta, Mustard Yellow, Sand/Beige, Light Blue)
- Eraser (kneaded preferred)
- Pencil sharpener
Step 1: Drafting the Composition
-
Establish the ground line:
Begin by lightly sketching a sloping diagonal line near the bottom third of your page. This will be the path they are riding on, angled slightly upwards from left to right. -
Block in simple shapes:
Use your graphite pencil to draw circles for the wheels first. Place two large circles for the mother’s bike on the left side of the slope, and three smaller circles trailing behind for the child’s tricycle. -
Sketch the figures’ posture:
Lightly draw the stick-figure skeletons to get the pose right. The mother should be leaning forward slightly, arms extended to the handlebars. The child should look like they are standing or pushing off the ground with one foot. -
Flesh out the forms:
Add volume to the figures. Draw the outline of the mother’s dress billowing slightly backwards to show movement, and sketch the child’s t-shirt and shorts. Keep the lines very faint.
Wobbly Wheels?
If your bike wheels look uneven, don’t erase! Go over the lines a second time loosely. This “sketchy” double-line style makes imperfections look intentional and artistic.
Step 2: Inking the Details
-
Refine the bicycles:
Using a brown fine liner or a very sharp sepia pencil, trace the bike frames. Focus on the triangular frame of the mother’s bike and the simple bars connecting the tricycle wheels. Don’t worry about perfect straight lines; a little wobble adds charm. -
Draw the wheels:
Go over your wheel circles. For the spokes, draw thin lines radiating from the center hub to the rim. I find it easier to draw the vertical and horizontal spokes first, then fill in the diagonals. -
Outline the mother:
Ink the mother figure. Give her a messy bob haircut and a brimmed hat. Use jagged, sketchy strokes for the hair texture. Draw her profile simply—just a nose and mouth suggestion is enough. -
Outline the child:
Define the child’s features, keeping them round and soft. Add horizontal stripes to the tiny t-shirt and outline the shorts. Ensure the hand is gripping the handlebar. -
Erase guidelines:
Once your ink or colored outlines are completely dry, gently erase the graphite under-drawing. Be careful not to smudge the paper texture.
Step 3: Adding Color and Texture
-
Color the dress:
Take your sage green colored pencil. Use small, circular motions to fill in the dress. Leave tiny specks of the paper showing through to create a woven fabric texture. -
Add dress details:
With a slightly sharper green pencil or a darker shade, add small cross-hatching or dots over the dress to mimic a subtle pattern or shading in the folds. -
Color the bike frame:
Use a rust red or terracotta pencil for the mother’s bicycle frame. Press firmly to get a rich, solid color that contrasts with the softer clothing. -
Fill in the skin tones and hair:
Lightly shade the visible skin on the arms and legs with a beige or peach tone. Use a dark brown pencil for the hair, using directional strokes that follow the flow of the hairstyle. -
Dress the child:
Color the child’s shorts in a muted olive or khaki. For the shirt, careful shading between the inked stripes helps them pop. -
Add the background wheat:
In the background, draw three tall, slender stalks rising behind the figures using a brown or ochre pencil. At the tips, draw the wheat grains using short, V-shaped dashes stacked on top of each other. -
Sketch the grass:
Using muted greens and browns, draw quick, sweeping strokes along the ground line. Vary the pressure so some blades of grass are dark and sharp, while others fade into the paper. -
Create the sky elements:
Take a light blue pencil and very gently shade irregular, cloud-like blobs in the upper sky. Do not outline them; just let the soft color suggest the shape. -
Final shading:
Add a touch of grey or cool brown directly under the tires to ground the bikes, creating a soft shadow on the path.
Add a Breeze
Draw a few stray leaves or dandelion seeds floating in the air behind the bikes to enhance the sense of forward movement and wind.
Now you have a charming, nostalgic keepsake of a family ride captured in your sketchbook
Cooking Together in the Kitchen
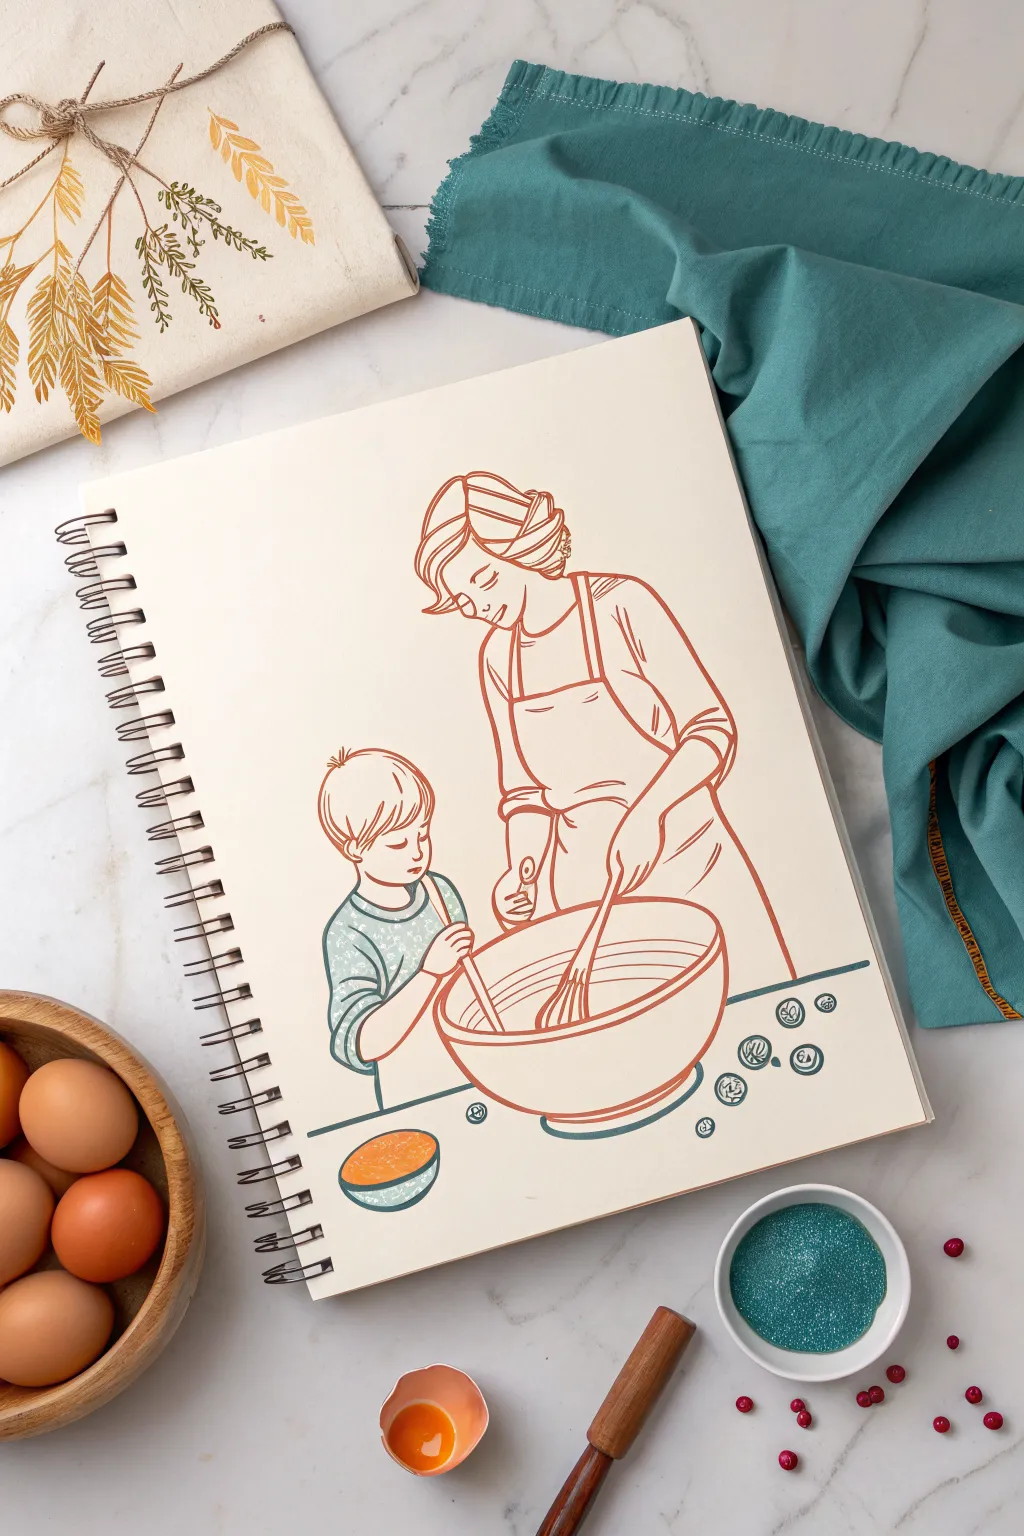
Capture a sweet moment of connection with this clean, line-art illustration of a mother and son baking together. Using a focused color palette of terracotta and teal creates a modern, cohesive look perfect for a sketchbook or greeting card.
Step-by-Step Tutorial
Materials
- Spiral-bound sketchbook or mixed media paper
- HB pencil for sketching
- Kneaded eraser
- Fine liner pen (terracotta/rust ink)
- Fine liner pen (teal/blue-grey ink)
- Brush pen or marker (terracotta)
- Brush pen or marker (teal)
- Ruler (optional)
Step 1: Drafting the Composition
-
Establish the table line:
Begin by lightly sketching a horizontal line near the bottom third of your page to represent the countertop. This anchors your figures. -
Block in the mother’s shape:
Sketch a simplified oval for the mother’s head and a larger, loose shape for her torso and apron. Position her slightly to the right of the center. -
Sketch the child’s form:
To the left of the mother, sketch the child’s head and shoulders. Ensure his eye level is lower than hers, roughly aligning with the top of the mixing bowl area. -
Place the mixing bowl:
Draw large oval shape overlapping the bottom of both figures. This will become the rim of the bowl. Add a curved line underneath to form the bowl’s body. -
Refine the poses:
Lightly detail the mother’s arm coming down to whisk, and the child’s hands reaching toward the bowl. Keep these lines faint as you adjust the anatomy.
Confident Lines
Don’t connect every single line perfectly. Leaving small gaps in the outlines (like on hair or apron folds) keeps the illustration feeling airy and modern.
Step 2: Refining the Lines
-
Detail the faces and hair:
Define the mother’s wavy hair tucked into a bun and her gentle profile. Sketch the child’s shorter haircut and profile looking down at the bowl. -
Add apron and clothing details:
Draw the straps of the apron, the folds in the fabric where her arm bends, and the texture of the child’s shirt. -
Sketch the whisk and ingredients:
draw the whisk handle in the mother’s hand and the wire loops inside the bowl. Add small circles on the table for spilled ingredients or eggs. -
Add the side bowl:
Sketch a smaller bowl near the bottom left corner to balance the composition.
Smudge Prevention
If your ink smears when erasing, switch to a harder lead like 2H for sketching (less graphite to remove) or place a scrap paper under your hand while drawing.
Step 3: Inking the Illustration
-
Outline the mother in terracotta:
Switch to your terracotta fine liner. Carefully trace the mother’s hair, face, apron, and arm. Use confident, smooth strokes. -
Ink the mixing bowl:
Continue with the terracotta pen to outline the large mixing bowl and the whisk. Vary your line weight slightly—thicker on the shadowy bottom curves, thinner on top. -
Ink the child in teal:
Using the teal fine liner, trace the child’s hair, face, and shirt. This color separation helps distinguish the two characters clearly. -
Define the table and props:
Use the teal pen to draw the horizon line of the table and the small scattered circles (or blueberries/chocolate chips) on the right side. -
Erase pencil guides:
Allow the ink to dry completely to prevent smudging. I usually wait at least five minutes before gently erasing all underlying pencil sketches.
Step 4: Adding Color Accents
-
Pattern the child’s shirt:
With the teal pen, add small stippling or tiny star patterns on the child’s shirt to give it texture without full coloring. -
Color the small bowl:
Use a teal marker to color the outside of the small bowl on the left. Use the terracotta marker or pen to color the ‘batter’ inside it. -
Detail the spilled ingredients:
Add small scribbles or spirals inside the scattered circles on the table using the teal pen to make them look like specific baking ingredients. -
Add final weight:
Go back over key intersection points (like under the arms or the bowl’s base) with your pens to slightly thicken the lines, adding subtle depth.
Now you have a charming keepsake of a shared kitchen moment that celebrates the simple joy of baking together.
Matching Outfits, Shared Style
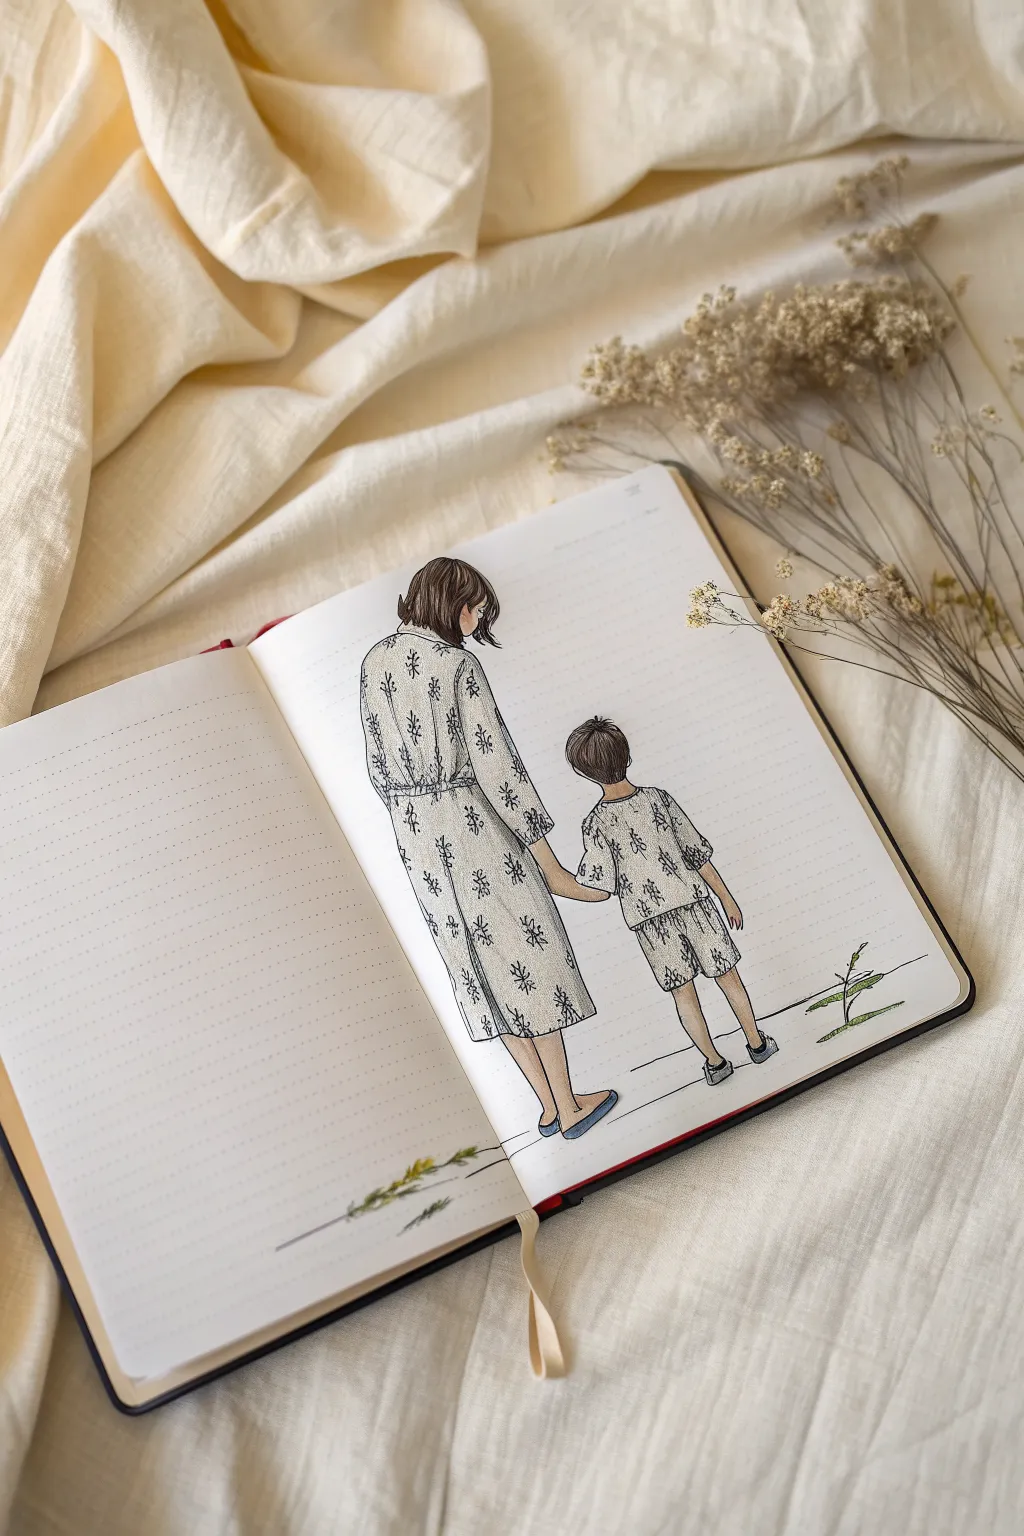
Capture a tender moment of togetherness with this charming illustration of a mother and son walking hand-in-hand wearing coordinating outfits. The style features delicate ink lines and soft shading on dotted journal paper, creating a cozy and intimate aesthetic perfect for memory keeping.
Detailed Instructions
Materials
- Dotted Grid Journal or Sketchbook
- Mechanical Pencil (0.5mm HB)
- Fine Liner Pen (Black, 0.1mm and 0.3mm)
- Colored Pencils (Warm Grey, Beige, Muted Blue, Green)
- Kneadable Eraser
- Ruler (optional)
Step 1: Sketching the Foundations
-
Establish the horizon line:
Begin by lightly marking a grounded line near the bottom quarter of your page. Since the figures are walking away, this helps place their feet correctly. -
Map out figure proportions:
Using your mechanical pencil, sketch two vertical center lines side-by-side. The left line (mother) should be roughly twice the height of the right line (son). Draw simple ovals for the heads and rectangles for the torsos to get the relative scale right. -
Refine the mother’s pose:
Sketch the mother’s outline. She is turned slightly away, so outline her hair falling over her shoulder. Draw her robe or long pajama top and pants, keeping the fabric loose and draped. -
Refine the son’s pose:
Sketch the boy next to her. His head is turned slightly to the right. Draw his short-sleeve shirt and shorts. Crucially, position his left arm reaching up and the mother’s right arm reaching down so their hands meet naturally in the middle. -
Add gentle details:
Lightly pencil in the folds of the clothing, focusing on the waist ties, hem lines, and where the fabric bunches at the elbows and knees. Keep these lines fluid to suggest movement.
Pattern Play
Draw the fabric pattern ‘flat’ first, then add wrinkle lines over it. This is easier than trying to distort the pattern into the folds as you draw.
Step 2: Inking the Outlines
-
Trace with fine liner:
Switch to your 0.3mm black fine liner. Carefully go over your pencil lines for the main body shapes. I find that lifting the pen slightly at the end of hair strands makes them look more natural. -
Detail the hair:
Use the thinner 0.1mm pen for the hair texture. Draw single, sweeping strokes following the curve of the head, leaving some white space for highlights. -
Add the matching pattern:
This is the key design element. Using the 0.1mm pen, draw small, repeating floral or geometric motifs on both outfits. Don’t worry about perfect spacing; the hand-drawn irregularity adds charm. -
Erase pencil guides:
Once the ink is completely dry—wait at least five minutes to prevent smudging—gently use your kneadable eraser to lift away the graphite guidelines.
Step 3: Shading and Finishing
-
Apply base shading:
Take a warm grey or beige colored pencil. Lightly shade the fabric of the pajamas, pressing slightly harder in the shadowed areas like under the arms, beneath the shorts, and along the inner legs. -
Color the skin tones:
Use a beige or soft peach pencil for the skin on the necks, arms, and legs. Keep the application very sheer to match the minimalist style of the journal sketch. -
Add subtle accents:
Use a muted blue pencil for the mother’s slippers and the boy’s shoes. Keep the coloring textured and sketchy rather than fully opaque. -
Ground the figures:
Draw faint horizontal lines beneath the feet using the black pen to create a floor or path. Add a small, simple plant sprig to the right using green pencil and fine liner to balance the composition. -
Add a vegetative border:
At the very bottom edge of the page, sketch a tiny, loose sprig of greenery or flowers lying horizontally. This acts as a visual anchor for the page.
Seasonal Switch
Adapt the outfits for the seasons: try chunky sweaters and jeans for autumn, or swimsuits and towels for a summer beach memory.
Now you have a sweet, personalized keepsake of shared style captured in your journal
Mother and Son Under an Umbrella
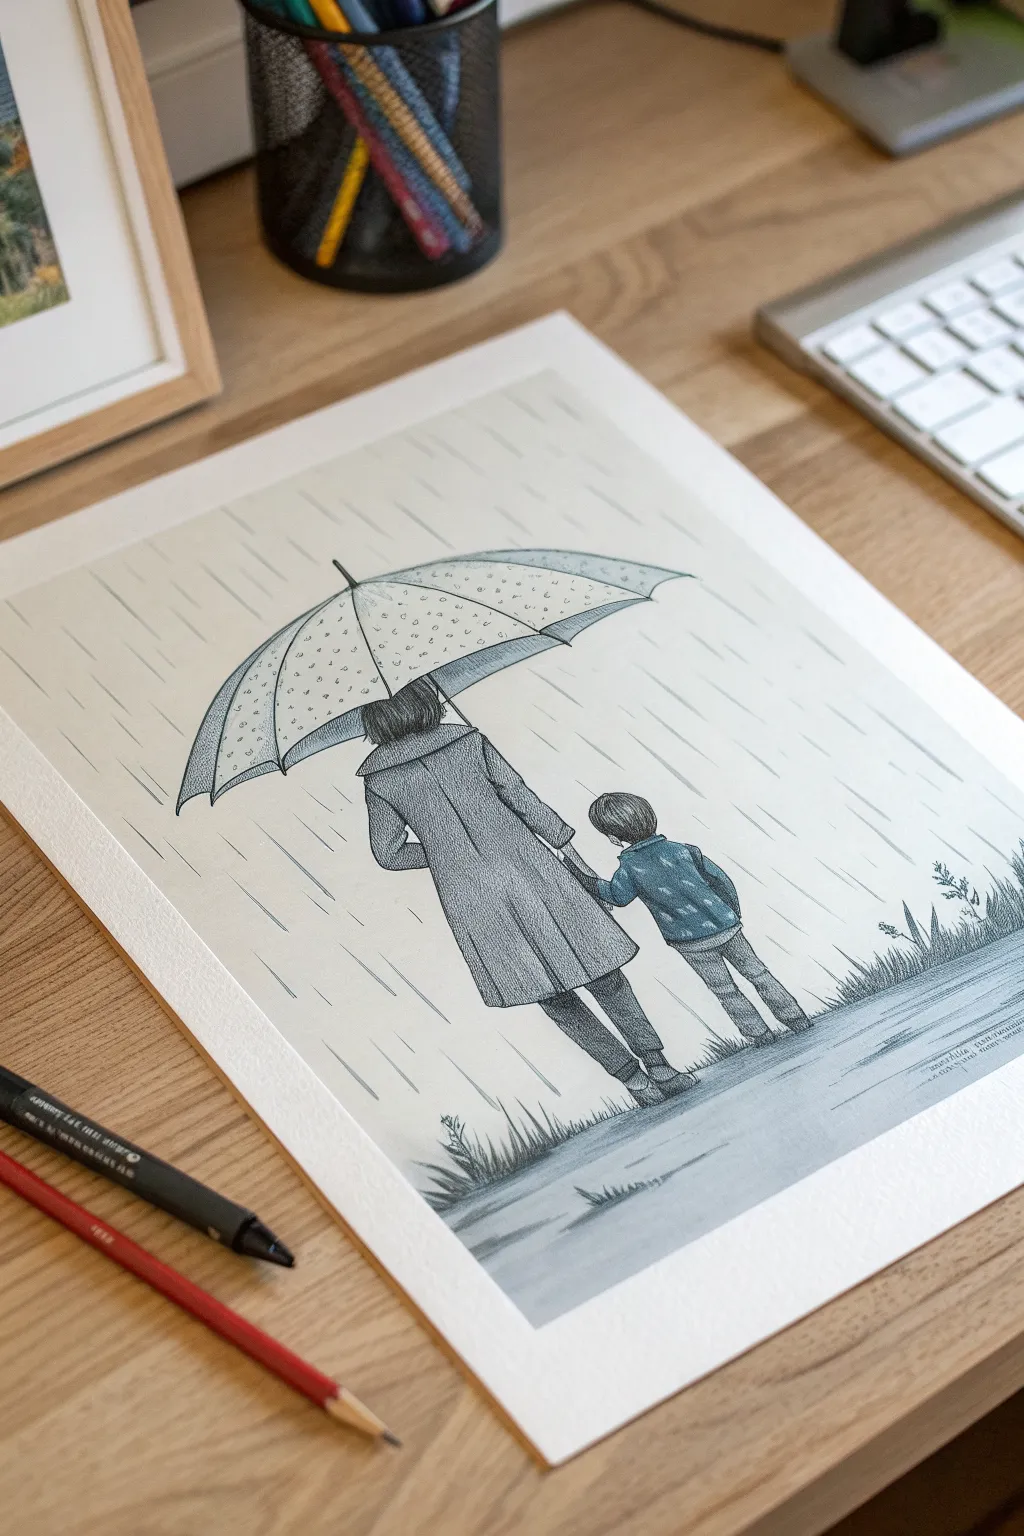
This touching illustration captures a quiet moment between mother and son braving a rainy day together, rendered in a classic pen-and-ink style with soft blue-grey washes. The focus is on the textured details of their coats and the rhythmic pattern of the falling rain.
Step-by-Step
Materials
- Heavyweight drawing paper or mixed media paper (A4 size)
- HB graphite pencil for sketching
- Kneaded eraser
- Fine liner pens (sizes 0.1, 0.3, and 0.5 mm in black)
- Grey and muted blue markers (alcohol or water-based) or watercolor paints
- Ruler or straight edge
Step 1: Initial Sketching
-
Establish the horizon:
Lightly draw a low horizon line near the bottom third of your paper to ground the figures. This will later become the damp path they are walking on. -
Block in the figures:
Sketch the mother’s form first, placing her slightly to the left of center. Use simple shapes: an oval for the head (mostly obscured), a trapezoid for the coat’s torso, and a wider rectangle for the skirt of the coat. -
Add the child:
Draw the son on the right, holding the mother’s hand. His head should reach roughly the mother’s waist level. Sketch his smaller jacket and trousers, ensuring his walking stride mirrors hers slightly. -
Position the umbrella:
Draw a large, wide arc above the mother’s head for the umbrella. Add the ribs of the umbrella radiating from the center point, creating curved triangular sections that dip slightly at the edges. -
Refine the pose:
Connect their hands naturally. Erase your blocking lines and refine the silhouette of the clothing, adding the collar of the mother’s coat and the folds where the fabric naturally bunches.
Uneven Wash?
If your marker or watercolor wash looks streaky on the coat, wait for it to dry fully, then apply a second layer of the same color in the opposite direction to even it out.
Step 2: Inking the Outlines
-
Define the main contour:
Using a 0.3 mm fine liner, carefully trace the outline of the figures and the umbrella. Keep your hand steady but allow for slight variations in line weight to give the drawing an organic, hand-drawn feel. -
Detail the umbrella ribs:
Switch to a finer 0.1 mm pen to draw the internal ribs of the umbrella and the small pattern details on the fabric, like the tiny dots or speckles shown in the reference. -
Erase pencil lines:
Once the ink is completely dry—I usually wait at least five minutes to be safe—gently erase all the underlying graphite sketch marks with your kneaded eraser.
Use a ruler trick
To keep rain consistent, tape your paper to a board. Use a ruler but lift the pen quickly at the end of each stroke so lines taper naturally rather than having abrupt stops.
Step 3: Adding Texture and Tone
-
Texturing the mother’s coat:
Use a technique called stippling (lots of tiny dots) or very very fine hatching with the 0.1 mm pen to create the texture of wool on the mother’s coat. Concentrate the dots in shadow areas—under the arms and along the side seams—to create volume. -
Texturing the son’s jacket:
For the boy’s jacket, use small, repetitive dashed lines or pattern shapes. This differentiates his clothing material from the mother’s coat. -
Apply base color:
Using a cool grey marker or a dilute grey watercolor wash, fill in the mother’s coat. Keep the value relatively flat but allow it to be slightly darker on the right side to suggest a light source from the left. -
Color the boy’s outfit:
Use a muted blue tone for the boy’s jacket. Apply a darker grey for the trousers, and use a dark charcoal tone for the umbrella canopy, leaving the patterned specks light if possible. -
Deepen the contrast:
Once the base color is dry, go back in with a 0.5 mm pen to darken the deepest shadows: the shoes, the hair, and the underside of the umbrella’s rim.
Step 4: Atmosphere and Final Touches
-
Create the rain path:
Use a ruler and a 0.05 or 0.1 mm pen to draw long, diagonal lines across the entire background to represent rain. Keep the pressure light; you want these lines to recede, not dominate the figures. -
Ground the scene:
Add horizontal hatching and wash strokes at their feet to simulate a wet pavement reflection. Use a soft grey wash to create a blurry shadow extending downwards from their shoes. -
Add grass details:
Sketch small tufts of grass on the right side of the path using quick, upward flicks of the pen. Use a mix of ink and grey wash to make them look wet and grounded. -
Final assessment:
Step back and check your contrast. If the figures look too flat against the rain, thicken the outer contour line on the ‘shadow’ side (the right side) of the figures to make them pop forward.
Now you have a serene, atmospheric illustration ready to frame or gift
Heart Balloon Gift Drawing
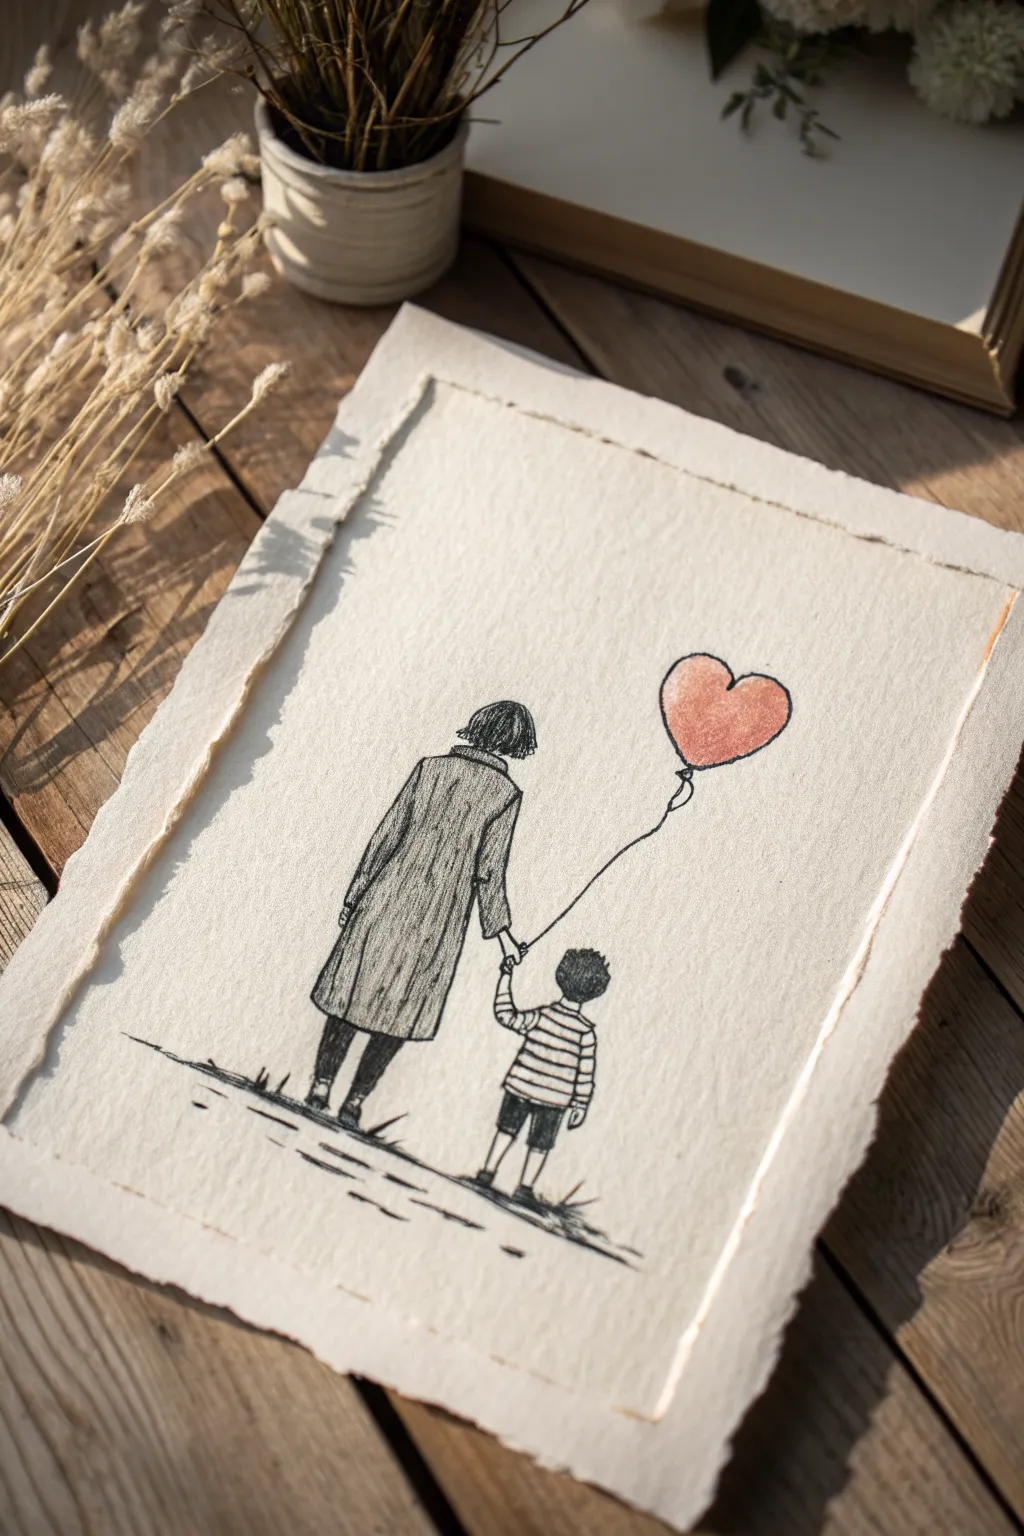
Capture a tender moment of connection with this charming pencil sketch of a mother and son walking hand-in-hand. The rough, textured paper and soft shading give this piece a timeless, nostalgic quality perfect for gifting.
Detailed Instructions
Materials
- Heavyweight textured paper (deckle edge cardstock or watercolor paper)
- HB graphite pencil (for sketching)
- 2B and 4B graphite pencils (for shading)
- Black ink fineliner (0.3mm or 0.5mm)
- Red colored pencil or pastel pencil
- Kneaded eraser
- Blending stump or cotton swab
Step 1: Initial Layout
-
Prepare your paper:
Select a piece of thick, textured paper with a torn or ‘deckle’ edge to match the rustic look. If you only have standard paper, you can carefully tear the edges yourself against a straight edge ruler to create that rough border. -
Position the figures:
Using your HB pencil, lightly mark the center line. Sketch the basic oval shape for the mother’s head and a smaller oval for the son’s head slightly lower and to the right. -
Block in the bodies:
Draw a trapezoid shape extending down from the mother’s head for her coat. For the boy, sketch a smaller, rectangular torso and shorts. Keep these lines very faint so they can be erased later. -
Define the connection:
Draw simple stick lines for the arms to establish where their hands meet. Their hands should be joined naturally in the space between the two figures. -
Place the balloon:
Sketch a large, tilted heart shape floating above and to the right of the boy. Connect it to his hand with a curved, wavy line to suggest a string specifically held by him.
Master the Texture
Place a piece of sandpaper underneath your drawing paper while shading. The pencil will pick up the grit pattern, creating an instant distinct texture.
Step 2: Refining the Figures
-
Sketch the hair:
Use short, choppy strokes to create the mother’s bob cut, allowing some strands to flip out slightly. For the boy, scumble or scribble tight little circles to create a textured, curly look on his head. -
detail the mother’s coat:
Switch to your 2B pencil. Define the outline of her long coat, adding a subtle collar and heavy vertical folds down the back to suggest thick fabric. -
Outline the legs:
Draw the mother’s legs tapering down into simple shoes. For the boy, draw his shorts ending above the knee and his thin legs leading into small shoes. -
Add stripe details:
Draw horizontal bands across the boy’s shirt. Don’t make them perfectly straight ruler lines; let them curve slightly around his torso to show volume.
Step 3: Shading and Texture
-
Shade the coat:
Using the 4B pencil, fill in the mother’s coat with long, vertical hatching lines. Apply more pressure near the folds and sides to create depth, leaving the center slightly lighter. -
Darken the boy’s hair:
Return to the boy’s hair with the 4B pencil, pressing firmly to make it a dense, dark mass that contrasts with his striped shirt. -
Fill the darker elements:
Shade the mother’s leggings or pants completely dark. Do the same for the boy’s shorts, ensuring a solid, dark tone to anchor the figures. -
Create the ground:
Beneath their feet, sketch quick, horizontal scribbles. These shouldn’t be a solid line but rather broken, dash-like strokes that imply a path or grassy ground. -
Ink the outlines (Optional):
If you want a sharper look, lightly trace the main contours—the coat edges, the balloon string, and the profiles—with a fine black pen. I prefer to keep this sparse to maintain the pencil sketch aesthetic.
Make It Personal
Change the balloon color to the recipient’s favorite color, or write a tiny name and date along the curve of the balloon string for a personalized touch.
Step 4: The Balloon & Finishing Touches
-
Color the heart:
Take your red colored pencil or pastel. Fill in the heart balloon using a circular motion for a soft texture. Leave the very top left curve of the heart slightly lighter to suggest a highlight. -
Add texture to the heart:
Layer a second pass of red, pressing harder on the bottom and right side of the balloon to give it a 3D, rounded form. -
Define the string:
Go over the balloon string with either a sharp pencil or your fineliner. Add a tiny knot right at the base of the balloon where the string attaches. -
Soft blending:
Use a blending stump to gently smudge the graphite on the mother’s coat, smoothing out the pencil strokes just enough to make the fabric look soft but not blurry. -
Final cleanup:
Use your kneaded eraser to lift any stray smudge marks from the white background, keeping the negative space clean and crisp to let the drawing breathe.
Once framed, this sweet illustration serves as a gentle reminder of the unbreakable bond you share
Continuous Single-Line Profile
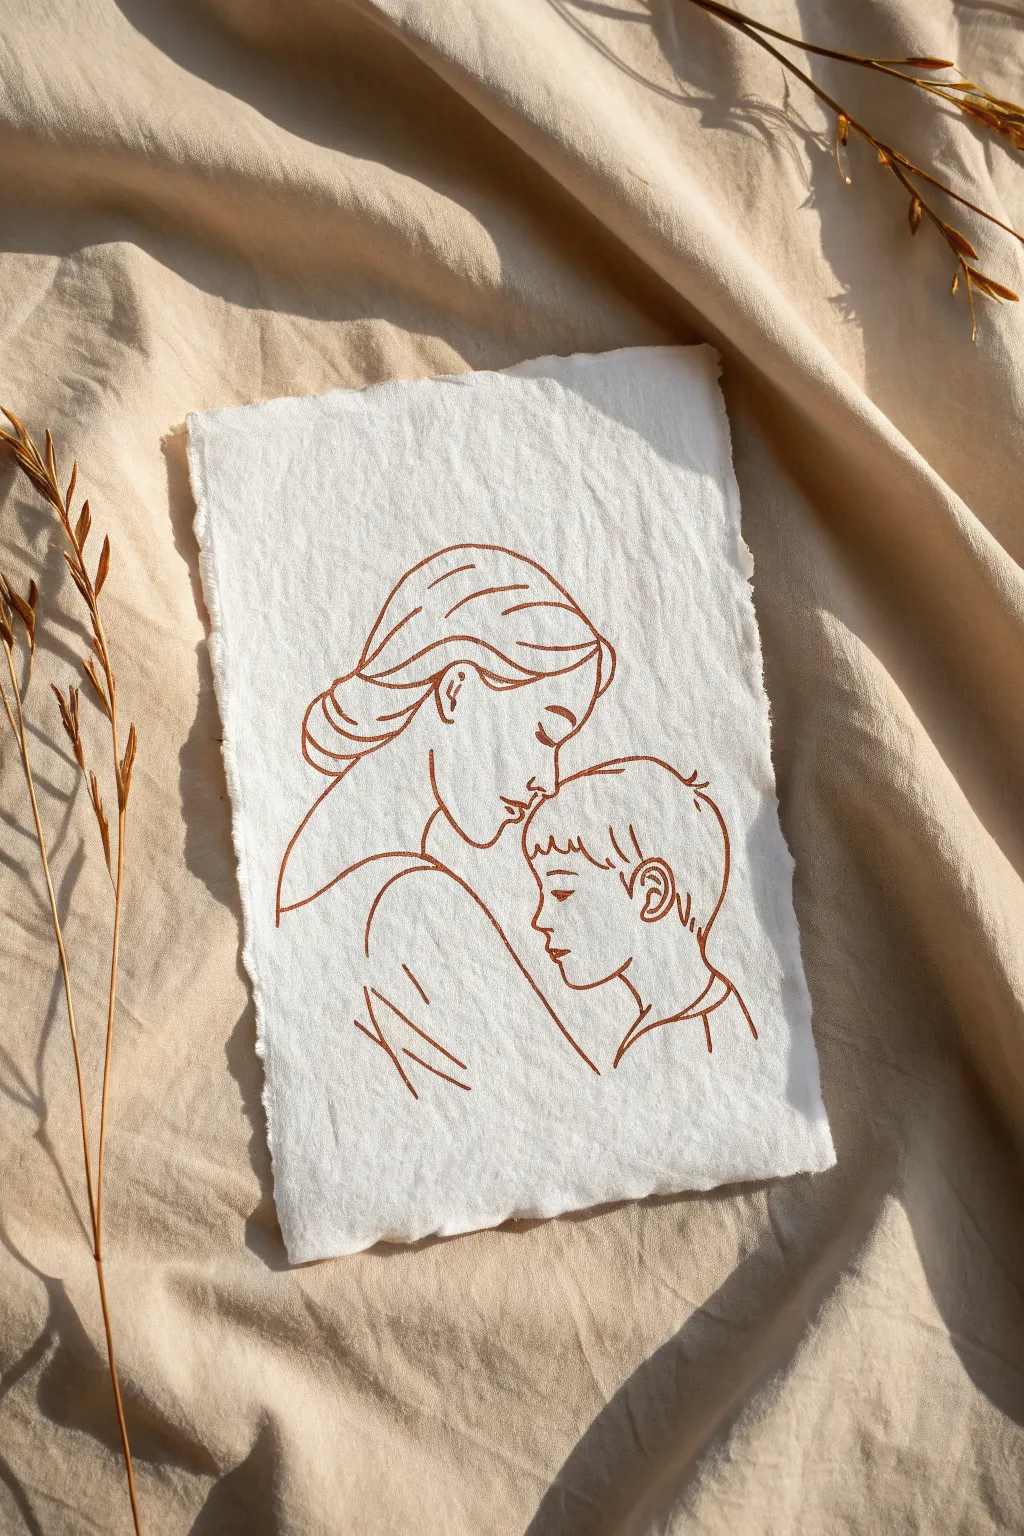
Capture the tender connection between mother and child with this minimalist contour drawing on textured paper. The result is a timeless, sketchbook-style piece that uses negative space and a single unified color to convey deep emotion.
Step-by-Step Tutorial
Materials
- White or cream handmade cotton rag paper (deckle edge recommended, approx. A5 or 5×7 inches)
- Fine-liner pen or gel pen in terracotta, burnt sienna, or sepia (0.5mm tip)
- Pencil (HB or 2H)
- Kneaded eraser
- Tracing paper (optional, for drafting the design)
- Masking tape (low tack)
Step 1: Planning the Composition
-
Draft the initial layout:
Before committing to your textured paper, sketch your design lightly on a scrap piece of paper or tracing paper. Focus on the profiles interlocking comfortably—the mother’s forehead resting gently against the child’s. -
Refine the simplified forms:
Look for the essential lines. You don’t need every eyelash or strand of hair. Simplify the hair into sweeping, contained shapes and keep facial features minimal. -
Prepare the handmade paper:
Secure your deckle-edged paper to a flat work surface using small pieces of low-tack masking tape on the corners. This prevents the textured paper from shifting while you work. -
Lightly transfer the guide:
Using your HB or 2H pencil, very faintly sketch the main shapes onto the cotton paper. Press lightly; this paper is soft and can scar easily if you press too hard.
Bleeding Lines?
Cotton paper is absorbent. If your ink feathers or bleeds, switch to a pigment liner (like a Pigma Micron) instead of a juicy gel pen, or test your pen on a scrap edge first.
Step 2: Drawing the Mother’s Profile
-
Start with the hairline:
Begin your ink work at the back of the mother’s head, where the bun meets the neck. Draw the sweeping curve of the hair bun first to establish the scale. -
Define the face shape:
Move the pen forward to outline the forehead and nose. Keep your hand relaxed to allow for a slightly organic, imperfect line that mimics the texture of the paper. -
Add facial details:
Draw the closed eye with two simple curved lines—one for the lid and one for the lashes. Add a small, gentle curve for the mouth and finish the chin. -
Complete the hair and neck:
Sweep the line back up to finish the ear and the strands of hair tucked behind it. Extend a line down to suggest the neck and shoulder, leaving the bottom open.
Step 3: Drawing the Child’s Profile
-
Position the child’s forehead:
Start the child’s drawing right where their forehead meets the mother’s. This connection point is crucial for the emotional impact of the piece. -
Outline the child’s hair:
Use short, slightly jagged strokes to suggest a boyish haircut, keeping the lines loose and not overly structured. -
Draw the child’s ear:
Carefully ink the ear, adding a small swirl inside for detail. This anchors the side of the head. -
Detail the child’s face:
Draw the downward-cast eye and the small nose. Ensure the nose doesn’t overlap awkwardly with the mother’s face; keep a tiny bit of breathing room or let them touch purposefully. -
Finish the profiles:
Complete the child’s chin and neck. Draw a curved line to suggest the collar of a shirt, echoing the curve of the mother’s shoulder.
Frame It Float-Style
Since you used beautiful deckle-edged paper, don’t hide it behind a mat! Use a floating frame to showcase the raw edges and texture against a neutral background.
Step 4: Finishing Touches
-
Add weight to lines:
Look for areas where shadows would naturally fall, like under the chin or at the nape of the neck. Go over these lines a second time to slightly thicken them. -
Create illustrative hatching:
Add a few diagonal hatch marks on the mother’s clothing or shoulder area. This minimalist shading adds artistic flair without cluttering the drawing. -
Let the ink dry:
Wait at least 10-15 minutes for the gel or fine-liner ink to fully set. The cotton fibers can hold moisture longer than standard paper. -
Erase pencil guides:
Gently roll a kneaded eraser over the drawing to lift any visible pencil marks. Do not rub vigorously, as this can pill the soft paper surface.
This delicate line art creates a touching keepsake that honors the quiet bond of motherhood
Hands Forming a Heart Together
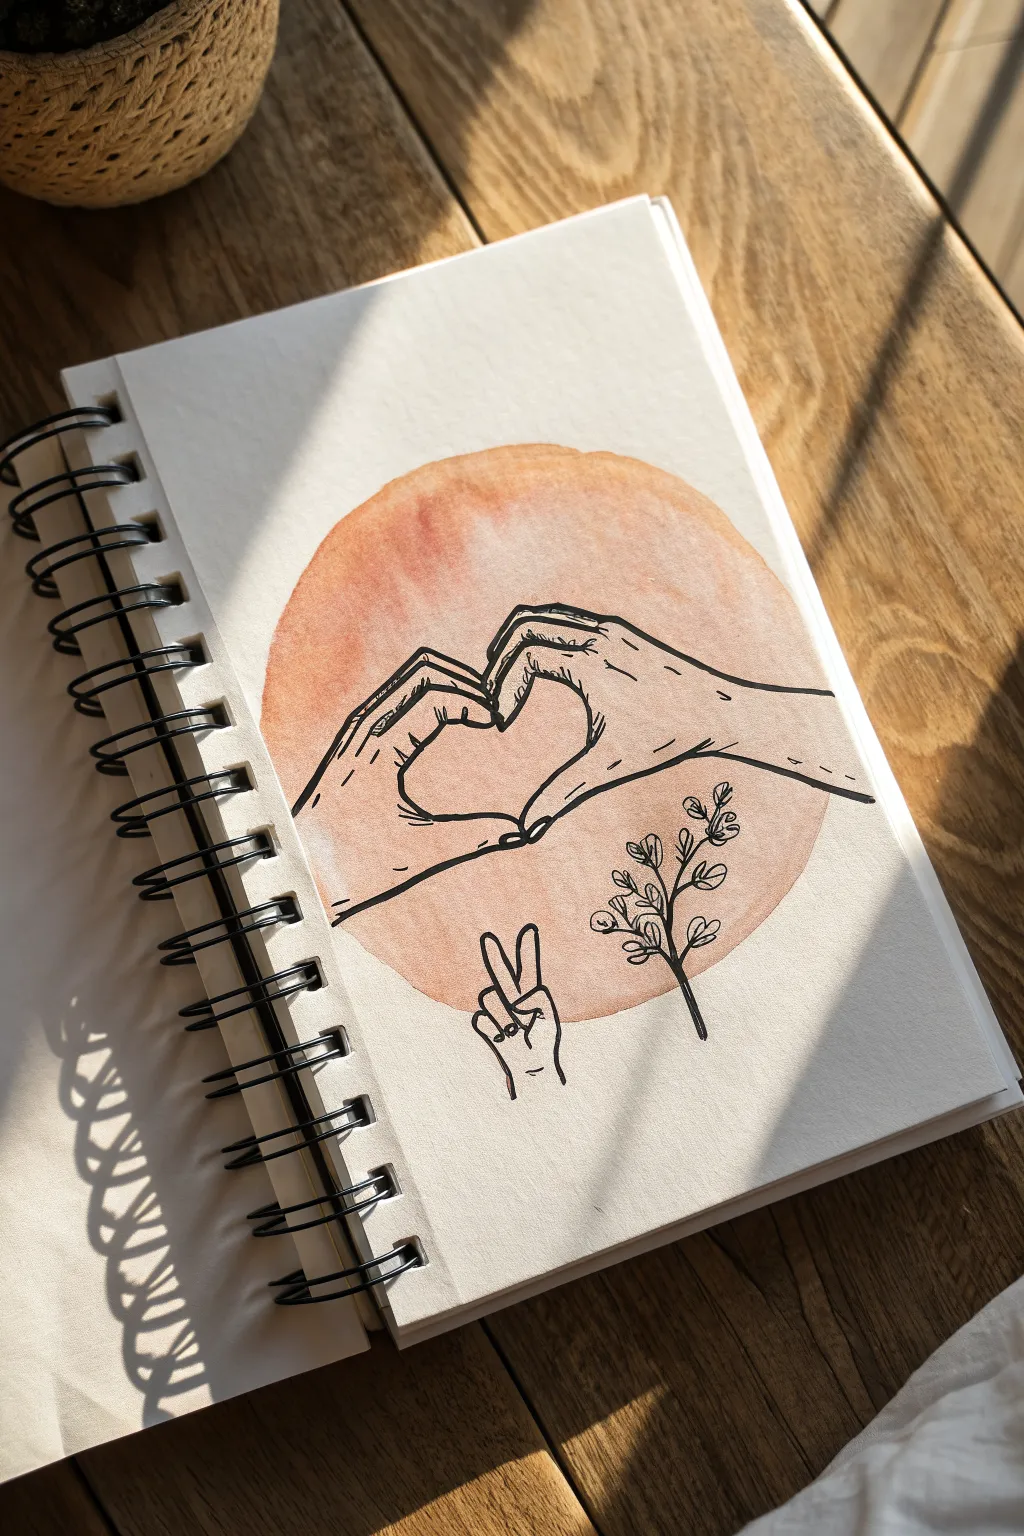
This tender artwork combines a simple line drawing of hands forming a heart with a warm, glowing watercolor backdrop. The juxtaposition of the crisp black ink against the soft, circular wash creates a beautiful symbol of connection.
How-To Guide
Materials
- Sketchbook with mixed media or watercolor paper
- Watercolor paints (shades of peach, terra cotta, or orange)
- Round watercolor brush (size 6 or 8)
- Fine liner pen (black, waterproof, size 0.3 or 0.5)
- Pencil (HB)
- Eraser
- Jar of water
- Paper towel
Step 1: Painting the Backdrop
-
Plan the placement:
Visualize where you want the circle to sit on your page. It should be centered but with plenty of white space around the edges to let the drawing breathe. -
Mix your colors:
Prepare a watery mix of warm tones. Look for a soft peach or a diluted terra cotta color. You want the paint to be fluid and transparent, not thick or opaque. -
Start the circle:
using your round brush, begin painting a loose circle shape. Don’t worry about using a compass; the organic, slightly uneven edge adds to the hand-drawn charm. -
Add color variation:
While the circle is still wet, drop in a slightly more saturated orange or reddish hue on the left side to create a subtle gradient. Let the water encourage the colors to bloom together naturally. -
Dry completely:
This is crucial. Let the watercolor circle dry entirely before moving on. If the paper is cool to the touch, it’s still damp. I like to wait an extra ten minutes just to be safe so the ink doesn’t bleed.
Uneven Circle?
Don’t stress if your watercolor circle isn’t perfect. A wobbly edge feels more artistic. If it’s too lopsided, just expand the smaller side with a damp brush.
Step 2: Sketching the Design
-
Position the hands:
Lightly sketch the hands with your pencil. Start by finding the center of the watercolor circle and drawing the negative space of the heart first. -
Shape the fingers:
Draw the thumbs touching at the bottom and index fingers touching at the top to form the heart shape. Keep the lines relatively simple; you don’t need to draw every knuckle wrinkle. -
Add the wrists:
Extend the wrists outwards toward the edges of the circle. The left wrist should angle down slightly while the right arm comes in a bit straighter. -
Sketch the extras:
Below the main hands, lightly sketch a smaller hand making a peace sign. To the right of that, sketch a simple stem with leaves. -
Refine the lines:
Go over your pencil marks to firm up the shapes. Make sure the proportions feel comfortable and the hands look relaxed.
Pro Tip: Transparency
Test your orange paint on a scrap paper first. It should be light enough that your black pen lines will show up clearly on top of it later.
Step 3: Inking and Finishing
-
Select your pen:
Use a waterproof fine liner. This ensures that if you accidentally touch a damp spot or want to add more paint later, the black lines won’t smear. -
Outline the main hands:
Begin inking the hands forming the heart. Use confident, continuous strokes where possible. Thicken the lines slightly where the fingers overlap or touch to suggest shadow. -
Ink the details:
Draw the fingernails using tiny, curved lines. Add just a few simple lines on the back of the hand and knuckles to indicate anatomy without overcrowding the drawing. -
Ink the ancillary elements:
Trace over the peace sign hand and the leafy branch. Keep the branch simple with a single line for the stem and small loops for leaves. -
Erase pencil marks:
Wait until the ink is completely dry—usually about five minutes. Gently erase all visible pencil lines, being careful not to rub the surface of the watercolor paper too aggressively. -
Final assessment:
Step back and look at your composition. If the hands need more definition, you can carefully re-trace purely the outer contour with a slightly thicker pen weight.
Once the ink is set, you have a heartwarming piece of art ready to frame or give as a gift
Mother and Grown Son Reunion Hug
Capture the tender moment of a reunion with this detailed graphite pencil sketch. This tutorial guides you through creating a realistic portrait that focuses on emotional connection through soft shading and textured clothing details.
Step-by-Step Guide
Materials
- High-quality sketchbook (heavyweight paper, smooth or vellum surface)
- Graphite pencils (HB, 2B, 4B, 6B)
- Mechanical pencil (0.5mm, HB lead)
- Kneaded eraser
- Precision vinyl eraser
- Blending stump (tortillon)
- Ruler
- Reference photo of two subjects
Step 1: Planning and Basic Structure
-
Establish the composition:
Begin by lightly marking the top and bottom boundaries of your figures on the paper to ensure they fit comfortably. Use your HB pencil with very light pressure. -
Map out the head shapes:
Sketch two ovals for the heads. The woman’s head should be slightly lower and tilted up, while the son’s head tilts down to meet hers. Pay close attention to the negative space between their foreheads. -
Draft the body positioning:
Draw loose, gestural lines to indicate the shoulders and arms. The son’s arm should reach across, creating a connecting line between the two figures. Keep everything geometric and simplified at this stage. -
Refine facial guidelines:
Lightly draw a vertical center line down each face to help with symmetry. Add horizontal guidelines for the eyes, nose, and mouth, ensuring they align with the tilt of each head.
Smudge Control
Place a scrap piece of paper under your drawing hand. This acts as a shield, preventing your skin oils from smearing the graphite you’ve already laid down.
Step 2: Defining Features
-
Sketch the profiles:
Using the mechanical pencil for precision, carefully outline the profiles. Focus on the touching foreheads and the nose placement. This connection point is the emotional center of the piece. -
Detail the eyes and expressions:
Draw the woman’s closed eyes with a soft, curved line to show contentment. Sketch the son’s eye looking downward or closed. Keep the lines delicate; heavy lines here will age the subjects unnecessarily. -
Outline the hair masses:
Block in the general shape of the hairstyles. For the son, indicate the direction of the short spikes. For the woman, map out the flow of her longer hair around her shoulders. -
Draw clothing folds:
Outline the collars and major folds in the clothing. Notice how the son’s hoodie bunches around the neck and how the woman’s coat has smoother, broader folds.
Pop of Life
Use a white gel pen to add tiny, singular dots of reflection in the eyes or moisture on the lips. This creates a wet, lifelike look that pencil alone can’t achieve.
Step 3: Shading and Texture
-
Begin facial shading:
Switch to a 2B pencil. Lightly shade the shadow areas of the faces—under the chin, the eye sockets, and the side of the nose. Use gentle hatching marks that follow the curvature of the skin. -
Establish hair values:
Use a 4B pencil to deepen the darkest parts of the hair. Use quick, confident strokes that mimic individual strands, leaving white paper showing for highlights. -
Texture the son’s sweater:
This is a key texture element. Use the side of a 2B or 4B pencil to create a rough, grainy texture for the knit fabric. I like to overlay small, repetitive vertical hatch marks to suggest the weave. -
Smooth the skin tones:
Use the blending stump to gently soften the graphite on the faces. Be careful not to over-blend; you want to retain some structure. Use the kneaded eraser to lift pigment back out for the highlights on the cheeks and forehead. -
Shade the woman’s coat:
Use broad, smooth strokes with an HB pencil for the woman’s coat, keeping the texture smoother than the son’s sweater. Focus on the shadows within the folds to create volume.
Step 4: Final Details and Contrast
-
Deepen the darkest darks:
Take your 6B pencil and revisit the deepest shadows—the pupils (if visible), the space where the clothes overlap, and the deepest hair shadows. This high contrast brings the drawing to life. -
Refine the hands:
Add detail to the son’s hand resting on her shoulder. Pay attention to the knuckles and fingernails, shading the underside of the fingers to show they are gripping the fabric. -
Clean up edges:
Use the precision vinyl eraser to clean up the background and sharpen the outer silhouette of the figures. This separates the subject clearly from the white page. -
Add final textures:
Look for small details like the stitching on the hoodie or flyaway hairs. Add these with the sharp mechanical pencil for a crisp finish.
Step back and admire how the interplay of texture and shadow captures a beautiful moment of connection
Constellation Bond in the Night Sky
This tender bullet journal spread captures a quiet moment of connection under the stars with a minimalist line art style. Combining simple ink outlines with a golden constellation makes for a striking yet gentle design.
Detailed Instructions
Materials
- Dotted bullet journal or heavyweight sketch paper
- Fine liner pen (01 or 03 nib, black)
- Pencil (HB or H for light sketching)
- Eraser (kneaded preferred)
- Gold gel pen or metallic marker
- Ruler (optional)
Step 1: Setting the Scene
-
Establish the ground line:
Begin by lightly sketching a rough, uneven horizon line near the bottom third of the page using your pencil. This suggests the grassy hill they are sitting on. -
Draft the figures’ shapes:
Sketch two oval shapes for the heads—one slightly larger and higher (the mother) and a smaller one nestled against her shoulder (the son). -
Outline the bodies:
Draw the basic torso shapes. The mother’s back should be slightly curved, while the son’s back leans into her. Use simple block shapes for the arms wrapping around each other. -
Draft the constellation:
Above the figures, lightly mark the positions of the stars using small dots. Create an arching pattern like the one shown, or choose a specific zodiac sign meaningful to you.
Star Power
If you don’t have a gold pen, use a yellow colored pencil and outline the stars with a very thin black pen for a pop-art comic book look.
Step 2: Inking the Figures
-
detail the hair:
Switch to your fine liner. Start with the mother’s hair, drawing a loose bun and sweeping lines to indicate strands pulled back. For the son, use shorter, shaggier strokes for a textured look. -
Define the embrace:
Ink the mother’s arm first, showing it wrapped protectively around the child’s shoulder. Keep the lines clean and continuous where possible. -
Draw the clothing folds:
Add subtle crease lines on the mother’s shirt near the armpit and waist to show the fabric bunching slightly as she sits. -
Add stripes:
Carefully draw horizontal stripes across the son’s shirt. I find it helpful to follow the curve of his back slightly rather than making them perfectly straight, which adds dimension. -
Complete the lower bodies:
Finish the outlines of their legs and waist. The drawing fades off at the bottom, so you don’t need to draw feet—just let the lines merge into the grass area.
Personalize It
Replace the generic star pattern with the actual zodiac constellations of the mother and child to make the spread deeply personal.
Step 3: Creating Atmosphere
-
Ink the grass:
Use quick, jagged flicking motions with your pen to create the grassy texture at the base. Make the strokes denser directly under the figures to ground them. -
Draw the stars:
Using the gold gel pen, draw five pointed stars over your pencil marks. Vary the sizes slightly, making a few ‘main’ stars larger than the others. -
Connect the constellation:
With the black fine liner, draw dashed or dotted lines connecting the gold stars. Keep your hand light so the dotted lines don’t overpower the stars. -
Add background stars:
Scatter tiny gold dots and small asterisks randomly around the main constellation to fill the empty sky space without cluttering it. -
Erase pencil marks:
Wait until the ink is completely dry—give it a few extra minutes just to be safe—then gently erase all underlying pencil sketches.
Now you have a timeless keepsake of a starry night bond


Have a question or want to share your own experience? I'd love to hear from you in the comments below!