When I’m craving whimsical drawing time, I like starting with familiar shapes and then giving them a little twist of magic. These ideas are all about simple line art that turns everyday stuff into tiny daydreams you can sketch in one sitting.
Shooting Stars and Wish Trails
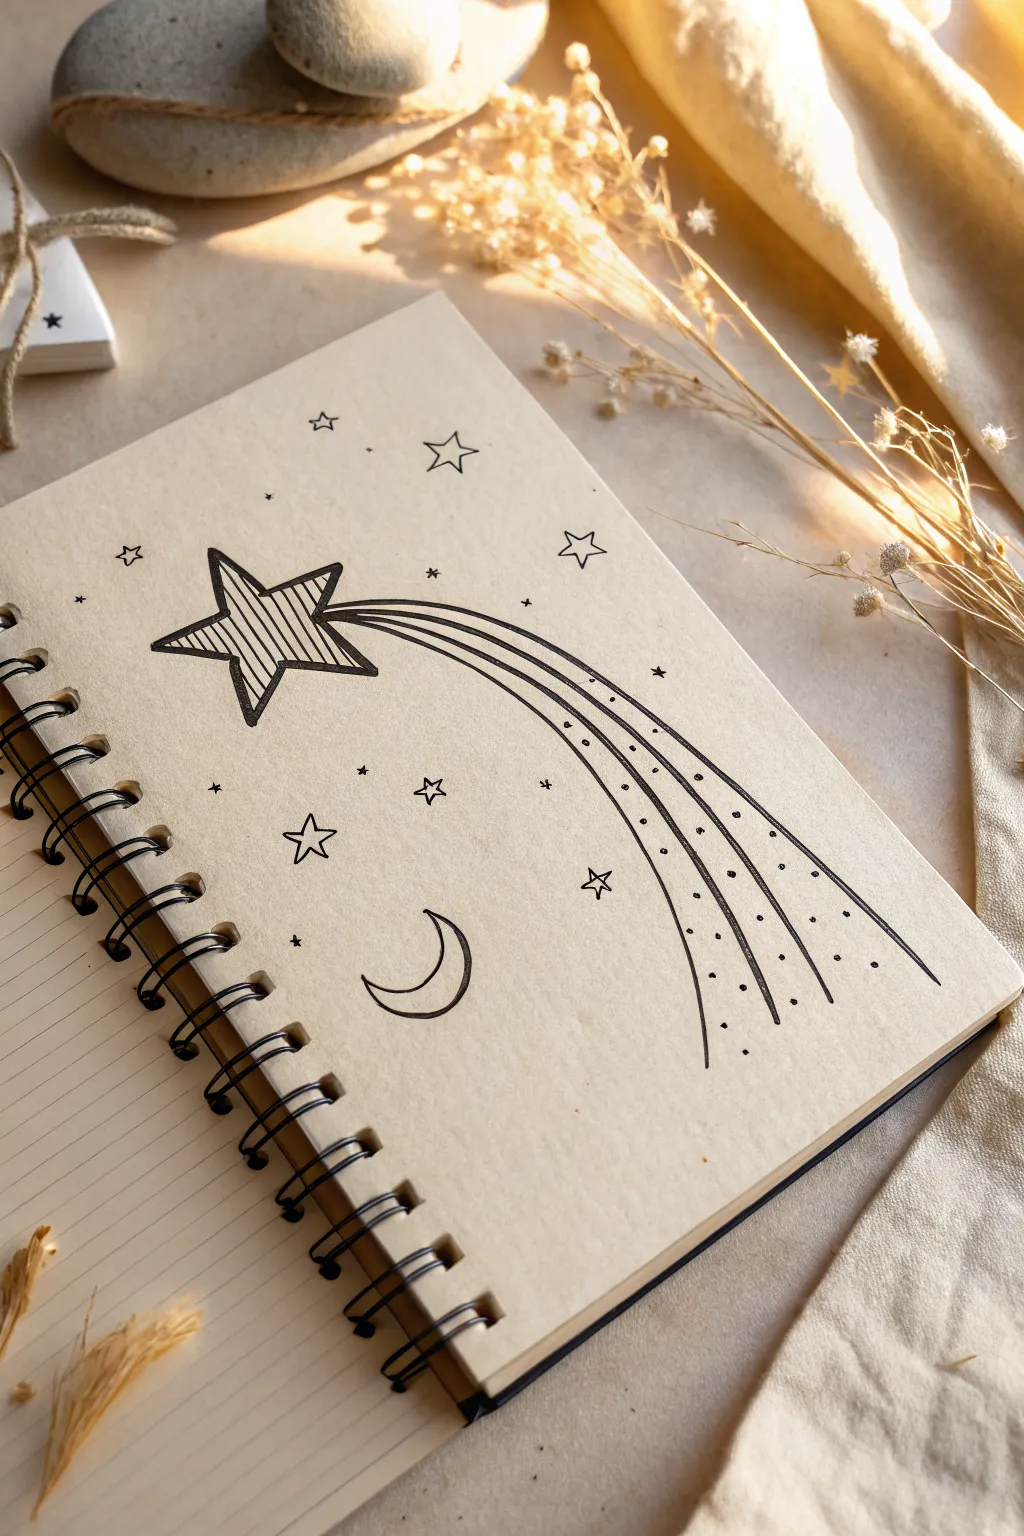
Capture the magic of a celestial night sky with this simple yet striking ink illustration. The design features a bold shooting star trailing wishes across a kraft paper page, accompanied by a scattering of twinkle stars and a peaceful crescent moon.
Detailed Instructions
Materials
- Spiral-bound kraft paper notebook (or lined paper with a beige tone)
- Fine liner pen (size 0.5mm, black)
- Fine liner pen (size 0.3mm or 0.1mm, black)
- Pencil (HB or 2B)
- Eraser
- Ruler (optional)
Step 1: Drafting the Celestial Shapes
-
Position the main star:
Begin by lightly sketching the outline of a five-pointed star with your pencil. Place it in the upper-left quadrant of the page, tilting it slightly so it looks like it’s diving downwards. -
Draft the moon:
In the lower-central area beneath where the star’s tail will flow, sketch a small, upward-facing crescent moon. -
Map out the tail:
Draw three long, curved guidelines extending from the right side of the main star. Arc them downwards towards the bottom right corner of the page, letting the lines fan out slightly as they get further from the star. -
Scatter the small stars:
Around the main elements, pencil in tiny five-pointed stars. I like to vary their sizes and rotations to make the sky feel vast and random.
Keep it fluid
When drawing the long tail lines, lock your wrist and move your whole arm from the elbow. This creates smoother, more natural curves than just moving your fingers.
Step 2: Inking the Outlines
-
Outline the main star:
Switch to your 0.5mm pen. Carefully trace the perimeter of your main star. If you want a hand-drawn feel, don’t worry about the lines being perfectly straight. -
Add the inner detail:
Draw a slightly smaller star shape inside the main one. Then, fill the space between the inner and outer star outlines with closely spaced diagonal lines (hatching) to give it texture. -
Ink the comet tails:
Trace the three long swooping lines for the tail. Try to do each line in one confident stroke to keep them smooth. -
Define the moon:
Go over your pencil sketch of the crescent moon with the 0.5mm pen to solidify its shape. -
Trace the scattered stars:
Ink the outlines of the scattered five-pointed stars you sketched earlier.
Smudged ink?
If you accidentally smudge wet ink, transform the mistake into a small galaxy or a filled-in dark star. Whimsical art works best when you embrace imperfections.
Step 3: Adding Whimsical Details
-
Create space dust:
Switch to the finer 0.1mm or 0.3mm pen. Inside the three swooping tail lines, add sets of tiny dots and small specks. -
Vary dot density:
Concentrate more dots closer to the star head and let them become more sparse as the tail flows outward. -
Add twinkle accents:
Draw tiny ‘starburst’ shapes (simple crosses or asterisks) in the empty spaces between the larger stars. These act as distant twinkling lights. -
Incorporate micro-dots:
Add singular, deliberate dots throughout the background to fill any awkward empty spaces without cluttering the design. -
Clean up:
Wait at least five minutes to ensure the ink is completely dry. Gently erase all visible pencil guidelines.
Now you have a dreamy page ready for journaling or just admiring

Sun and Moon Sharing a Sky
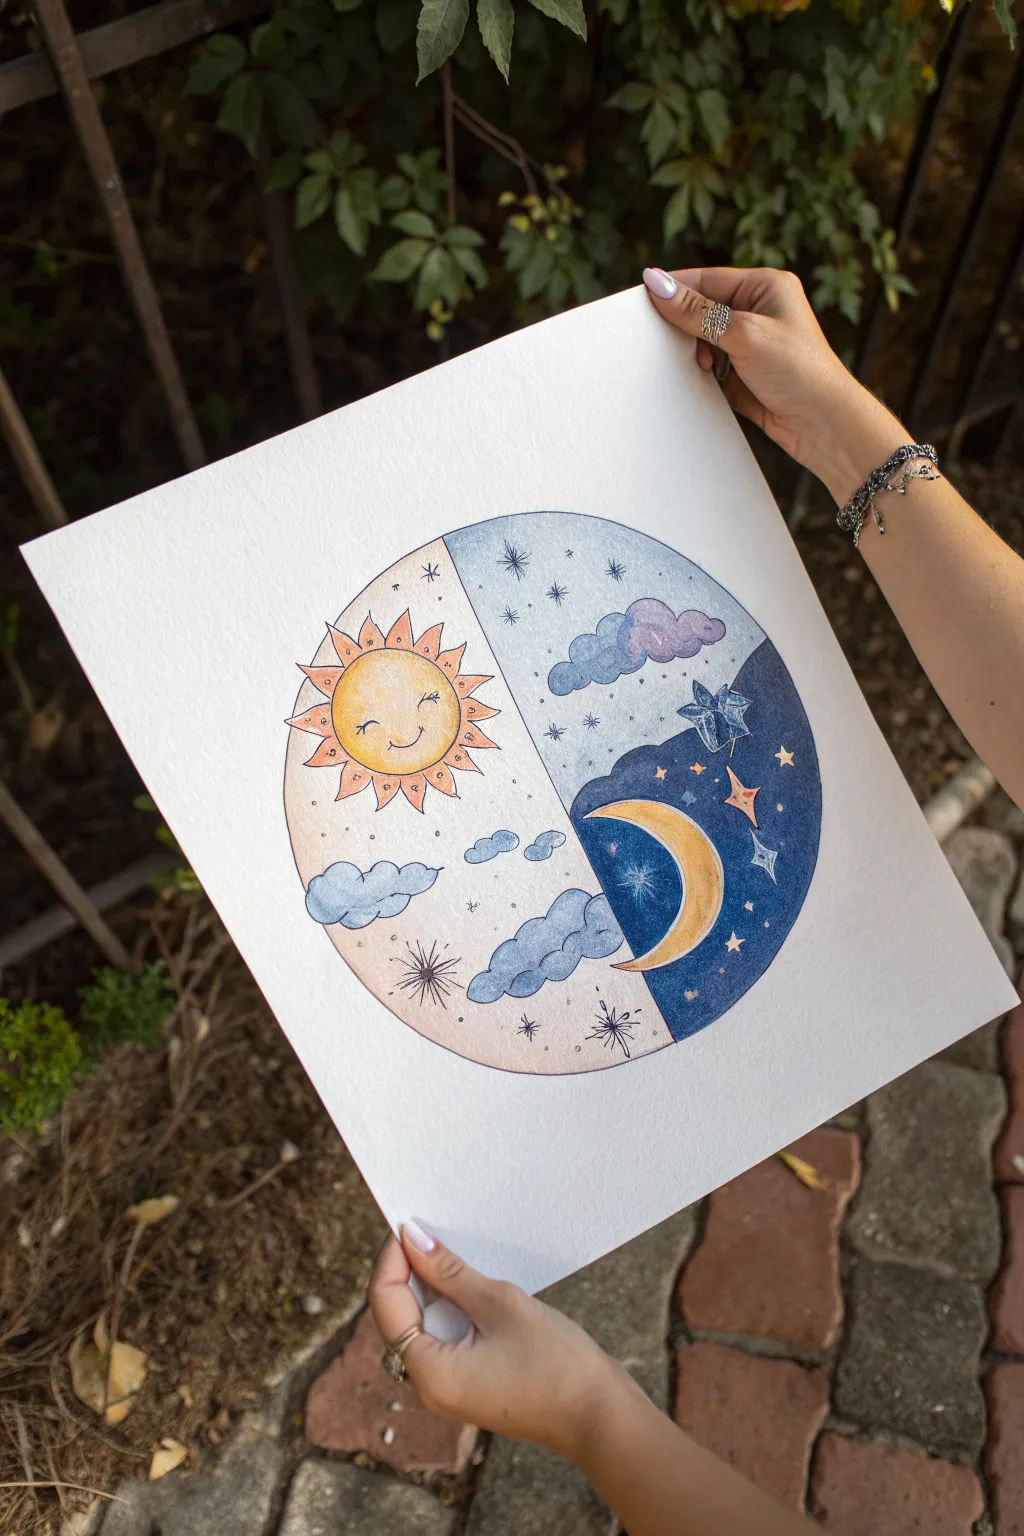
This charming illustration captures the sun and moon sharing a single circular sky, divided perfectly between day and night. With soft watercolor washes and delicate ink details, you’ll create a balanced piece that feels both whimsical and serene.
Step-by-Step Guide
Materials
- Cold press watercolor paper (heavyweight, e.g., 300gsm)
- Pencil (HB or H)
- Large compass or a round object to trace (approx. 6-8 inches diameter)
- Ruler
- Watercolor paints (pan or tube)
- Round watercolor brushes (sizes 2, 4, and 6)
- Fine liner pens (black, waterproof, sizes 0.1 and 0.3)
- White gel pen or gouache
- Eraser
Step 1: Planning and Sketching
-
Create the boundary:
Begin by drawing a perfect circle using your compass or by tracing a round plate. This will be the container for your entire scene. -
Divide the sky:
Using a ruler, draw a vertical line straight down the center of the circle to split your canvas into two equal halves. -
Sketch the celestial bodies:
On the left ‘day’ side, lightly sketch a round sun with triangular rays. On the right ‘night’ side, draw a crescent moon shape facing the center line. Give the sun a sweet, sleeping face. -
Add cloud outlines:
Sketch fluffy, scalloped cloud shapes on both sides. Place some near the bottom crossing the center line slightly, and a few floating higher up. -
Map out the night sky:
On the night side, sketch a few large, stylized stars. Draw a wavy line behind the moon to indicate a dark, starry background distinct from the lighter evening sky.
Clean Edges
For a super crisp outer circle, lightly tape over the area outside your circle with masking film, or simply paint carefully and cut the circle out after you are finished.
Step 2: Watercolor Application
-
Paint the day background:
Mix a very pale wash of peach or warm beige. Apply this to the entire background of the left semi-circle, carefully painting around the sun and clouds. -
Paint the night background:
For the right side, you’ll need two tones. Paint the upper section in a light silvery-blue wash. For the section behind the moon, use a deep, saturated indigo or navy blue to create contrast. -
Color the celestial characters:
Paint the sun’s face with a bright, warm yellow. Use a slightly more orange tone for the rays. Paint the crescent moon with a golden yellow to match the sun. -
Fill in the clouds:
Use a diluted slate blue or grey-purple for the clouds on both sides. Keep the wash transparent so the texture of the paper shows through. -
Add star details:
Paint the large stars on the night side. One can be deep blue, others might be a soft peach or yellow. Let everything dry completely.
Step 3: Inking and Details
-
Outline the sun:
Using a 0.3 fine liner, trace over your pencil lines for the sun’s face and rays. Add small lines inside the rays for texture. -
Ink the clouds:
Outline the fluffy clouds with the pen. To add volume, draw small curved hatching lines near the bottom edges of the clouds. -
Define the moon and stars:
Outline the crescent moon and the drawn stars. Use stippling (small dots) or cross-hatching inside the moon to give it a bit of dimension. -
Create background texture:
Look at the original image’s texture; use your fine pen to add tiny dots, sparkles, and small starbursts throughout the day side’s background. -
Enhance the night:
On the light blue section of the night side, draw simple four-point stars and small dots. I find this creates a magical, twinkling effect. -
Final highlights:
Use a white gel pen to add bright specks to the deep indigo section of the night sky, mimicking distant stars.
Metallic Touch
Swap the yellow watercolor on the moon and sun rays for gold metallic watercolor paint. It catches the light beautifully when the paper is tilted.
Now you have a stunning piece of art that perfectly balances the energy of day and night

Cute Animals in Fancy Hats
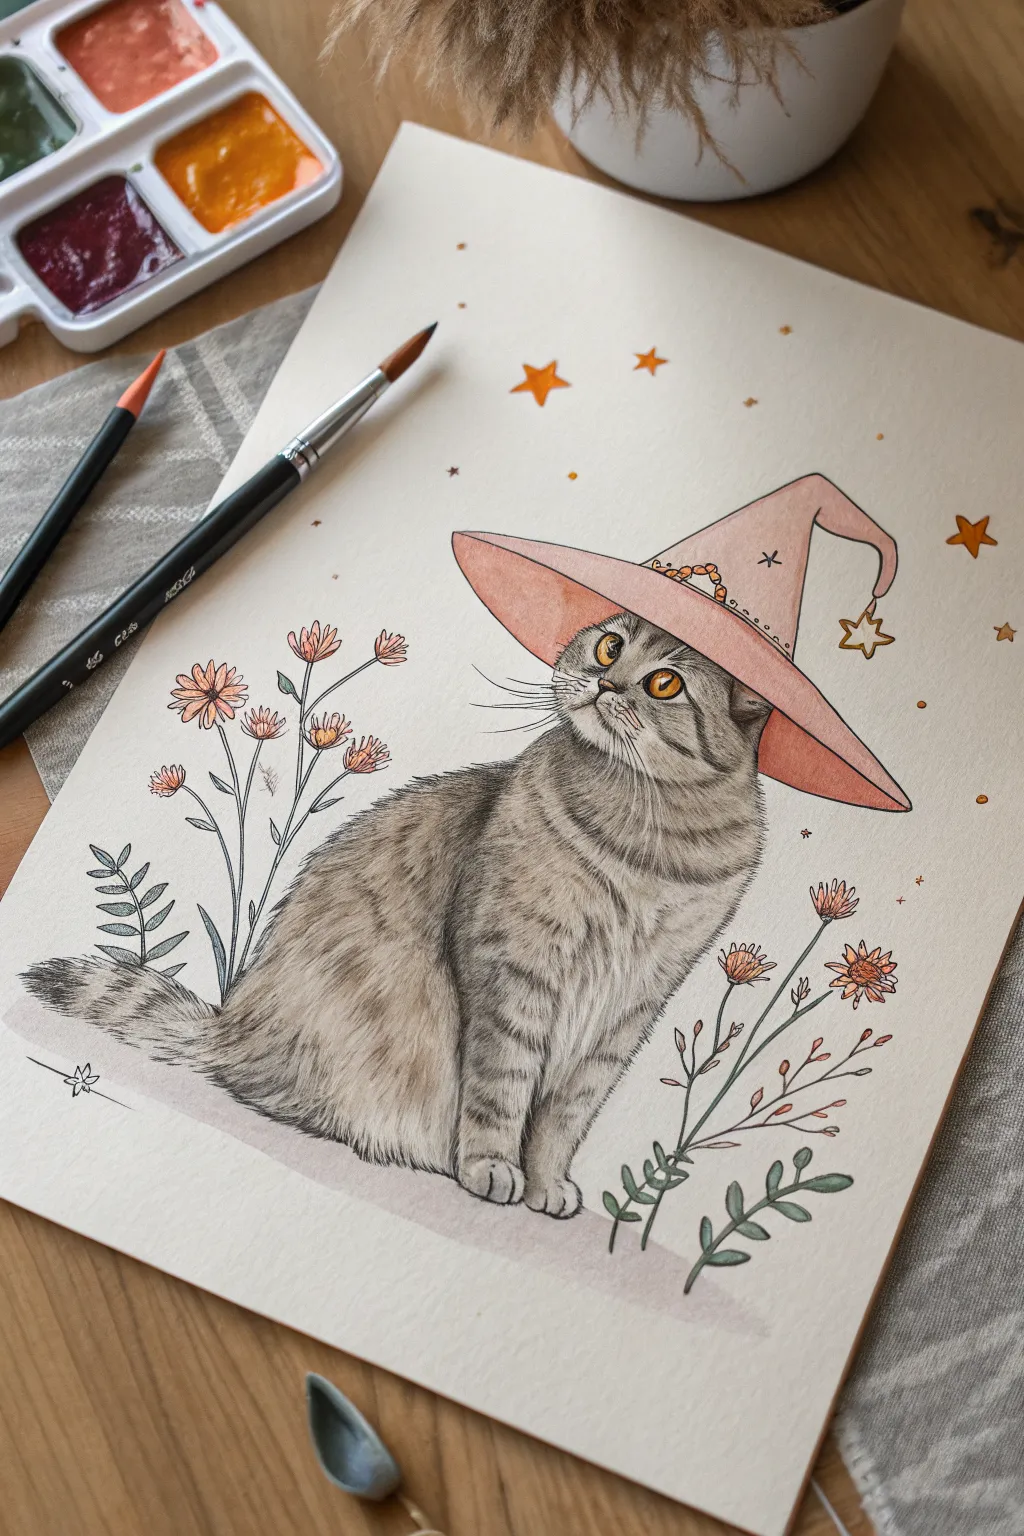
Capture the magic of the spookiest season with this adorable portrait of a grey tabby cat donning a soft pink witch’s hat. Using a combination of watercolors and colored pencils, you’ll create a piece that balances realistic fur textures with charming, illustrative details.
Step-by-Step
Materials
- Hot press watercolor paper (smooth texture)
- H or HB graphite pencil for sketching
- Watercolors (pans or tubes): Yellow ochre, burnt sienna, payne’s grey, alizarin crimson, dark brown
- Round watercolor brushes (sizes 2, 4, and 6)
- Colored pencils: Grey, black, white, muted pink, olive green
- Fine liner pen (brown or sepia, 0.1mm)
- White gel pen or gouache (optional)
Step 1: Planning and Sketching
-
Establish the composition:
Start by lightly marking the center of your paper. Draw a large oval shape for the cat’s body sitting in a slightly crouched position, angled toward the right. -
Position the head and hat:
Above the body, sketch a circle for the head. Immediately sketch the large, triangular hat shape resting on the head, making sure the brim is wide and tilts downwards. Add a curved tail to the hat and a dangling star. -
Add facial features:
Draw guidelines on the face to place the eyes, nose, and mouth. The cat is looking upward, so position the eyes slightly higher. Sketch the small ears poking out from under the hat brim. -
Sketch floral elements:
Lightly draw stems rising up on both sides of the cat. Keep the flower heads simple circles for now and add basic leaf shapes. Add tiny star shapes floating in the background.
Step 2: Watercolor Washes
-
Base layer for the hat:
Mix a watery, pale pink using alizarin crimson and a touch of yellow ochre. Paint the entire hat, keeping the wash transparent. Let the paint pool slightly at the brim’s edge for natural shading. -
Painting the eyes:
Use a mix of yellow ochre and burnt sienna for the irises. Leave a tiny white spot in each eye for the highlight, or lift the paint out with a dry brush while damp. -
Initial fur tonal layer:
Mix a very dilute grey wash. Apply this freely over the cat’s body, avoiding the lightest chest area and the muzzle. This establishes the shadow map without committing to texture yet. -
Floral colour blocking:
Dab diluted orange and pink onto the flower heads. Use a desaturated olive green for the stems and leaves. Don’t worry about staying perfectly inside the lines; a loose look is nice here.
Fur Texture Tip
Keep your pencil incredibly sharp. Dull pencils create smudge-like shading, but needle-sharp points create individual hairs that make the coat look realistic and soft.
Step 3: Building Texture with Pencils
-
Defining the features:
Once the paint is bone dry, use a black or dark grey colored pencil to outline the eyes, nose, and mouth. Draw the pupils as vertical slits. -
Creating fur direction:
Using a sharp grey pencil, start drawing short, quick strokes to mimic fur. Follow the curve of the body. The fur on the chest should point down, while the face fur radiates from the nose. -
Developing the tabby pattern:
With a darker grey or black pencil, begin layering the darker stripes. Focus on the ‘M’ shape on the forehead and the thick bands on the legs and tail. -
Adding warmth:
Lightly shade over the grey fur with a beige or warm brown pencil in select areas like the paws and cheeks to prevent the grey from looking too cold. -
Refining the hat:
Outline the hat with a sepia fine liner or dark brown pencil. Add decorative details like the moon and stars on the hat band using a gold or orange pencil.
Level It Up
Instead of yellow paint for the stars, use metallic gold watercolor or gold leaf. It will catch the light and make the magical elements truly sparkle.
Step 4: Final Details
-
Whiskers and highlights:
Use a very sharp black pencil or a fine liner to sweep out long, curved whiskers. Use a white gel pen to accentuate the highlights in the eyes and on the tip of the nose. -
Detailing the flora:
Go back to the flowers with your fine liner. Outline the petals loosely and add veins to the leaves. Add small dots or dashes to the flower centers for texture. -
Enhancing the magic:
Paint the floating stars with a solid coat of yellow-orange watercolor or marker. Outline them cleanly to make them pop against the paper. -
Grounding the subject:
Mix a faint purple-grey watercolor wash and paint a soft shadow underneath the cat and the plants so they don’t look like they are floating in empty space.
Step back and admire your enchanting feline friend, ready for a magical adventure


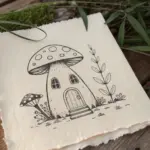
Mushroom Houses in Tiny Forests
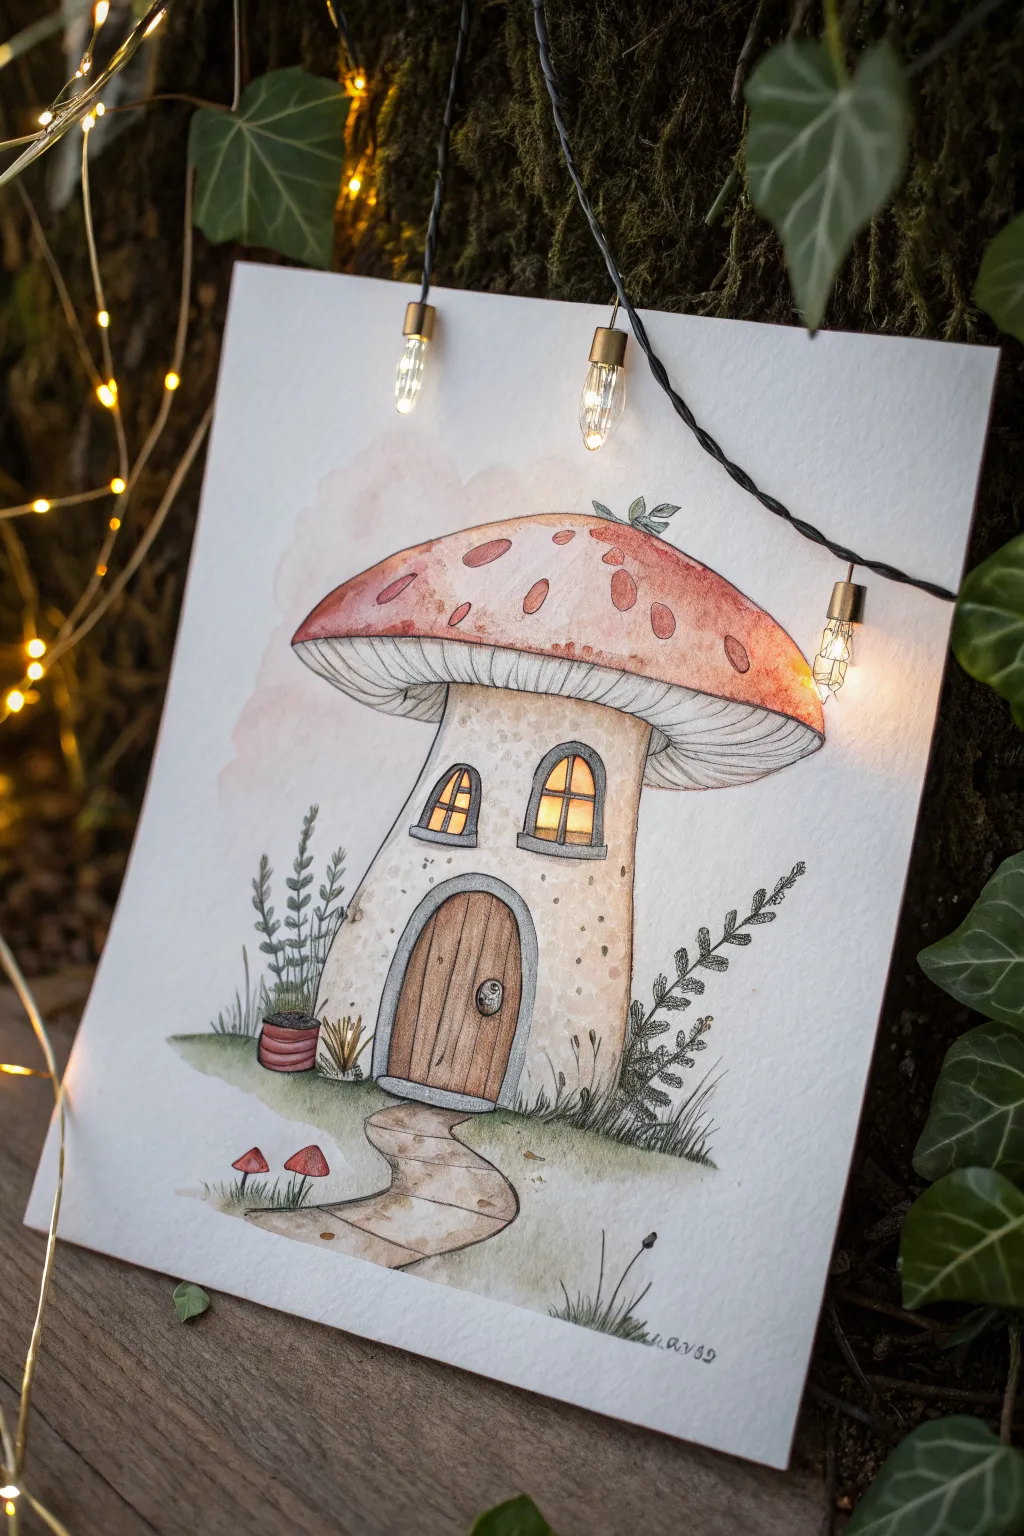
Step into a fairytale world by illustrating this charming mushroom abode, complete with glowing windows and a welcoming path. You’ll combine gentle watercolor washes with crisp ink lines to create a piece that feels both rustic and magical.
Step-by-Step
Materials
- Cold press watercolor paper (300 gsm)
- HB graphite pencil
- Kneadable eraser
- Waterproof fine liner pens (0.1, 0.3, and 0.5mm sizes, Black)
- Watercolor paint set with pan colors (Red, Yellow Ochre, Burnt Sienna, Sap Green, Paynes Grey)
- Round watercolor brushes (Size 4 and Size 2)
- White gouache or white gel pen
- Water cup and paper towel
Step 1: Sketching the Foundations
-
Outline the main shape:
Begin by lightly sketching the large mushroom cap using your HB pencil. Draw a wide, curved dome shape that flattens slightly at the bottom edges. Just below the center, sketch the stalk, which should be wider at the base than at the top to give the ‘house’ a sturdy look. -
Add architectural details:
Draw the arched doorway at the base of the stalk. Above the door, place two arched windows side-by-side. Make sure the frames look thick enough to be made of stone or wood. -
Sketch the surroundings:
Lightly pencil in a winding path leading from the door to the bottom edge of the paper. Add some simple leaf shapes on either side of the house and two tiny mushrooms near the bottom left corner to balance the composition. -
Refine the cap:
Sketch several irregular ovals on the mushroom cap for the classic toadstool spots. Draw the gills underneath the cap as curved lines radiating from the stalk outward to the cap’s edge.
Step 2: Applying Ink Lines
-
Ink the main structure:
Switch to your 0.3mm waterproof fine liner. Carefully trace over your pencil lines for the mushroom outline, door, and windows. Use a somewhat broken or jittery line for the stalk to suggest a natural, organic texture rather than perfect geometry. -
Detail the gills and wood:
Use the finer 0.1mm pen to draw the gills under the cap. Keep these lines very delicate. Switch back to the 0.3mm pen to draw vertical wood grain planks on the door. -
Draw foliage and texture:
Ink the surrounding plants. Use short, upward strokes for grass blades and jagged lines for the fern-like plants on the right. Add small stippling dots on the mushroom stalk to create a porous texture. -
Erase pencil marks:
Wait until the ink is completely dry to avoid smudging, then gently use your kneadable eraser to lift all remaining graphite lines.
Natural Texture Hack
When painting the stalk, sprinkle a few tiny grains of table salt onto the wet paint. Let it dry completely and brush it off to create unique, mottled textures perfect for fungus.
Step 3: Adding Watercolor Washes
-
Paint the cap:
Mix a watery Red with a touch of Burnt Sienna to get a rustic red. Paint the mushroom cap, carefully painting *around* the oval spots to leave them the white of the paper. While the paint is wet, drop in slightly darker pigment at the bottom edge for shading. -
Warm the stalk:
Dilute Yellow Ochre heavily with water until it’s a pale cream color. Wash this over the mushroom stalk. While it’s damp, dab a tiny bit of diluted Paynes Grey or Brown near the edges to create roundness. -
Creating the glow:
For the windows, use a bright yellow mixed with orange. Paint the panes to make them look lit from within. I like to let this bleed slightly into the surrounding frame for a hazy glow effect. -
Path and door:
Paint the wooden door with Burnt Sienna. Use a mix of Yellow Ochre and a tiny bit of brown for the stone path, keeping it lighter than the door. -
Greenery and ground:
Use Sap Green heavily diluted for the grass patches. For the fern and darker plants, use a more concentrated green mixed with a touch of blue or grey.
Bleeding Lines?
If your black ink bleeds when you apply watercolor, stop immediately. Your pen isn’t waterproof. Let it dry 24 hours or switch to painting first and inking last.
Step 4: Final Details & Background
-
Enhance shadows:
Once the first layers are dry, mix a shadow color using Paynes Grey and a little purple. Glaze this lightly under the mushroom cap (on the stalk) and under the foliage to ground the objects. -
Soft background wash:
To make the white house pop, mix a very pale, watery pink or peach color. Paint a loose, jagged shape behind the mushroom cap, fading it out into the white paper with clean water. -
Highlighting:
Use white gouache or a white gel pen to add tiny highlights to the window glass, the door knob, and the very tops of the grass blades for extra sparkle.
Now you have a charming little woodland dwelling ready to be framed or gifted

PENCIL GUIDE
Understanding Pencil Grades from H to B
From first sketch to finished drawing — learn pencil grades, line control, and shading techniques.
Explore the Full Guide
Doorways to Dream Places
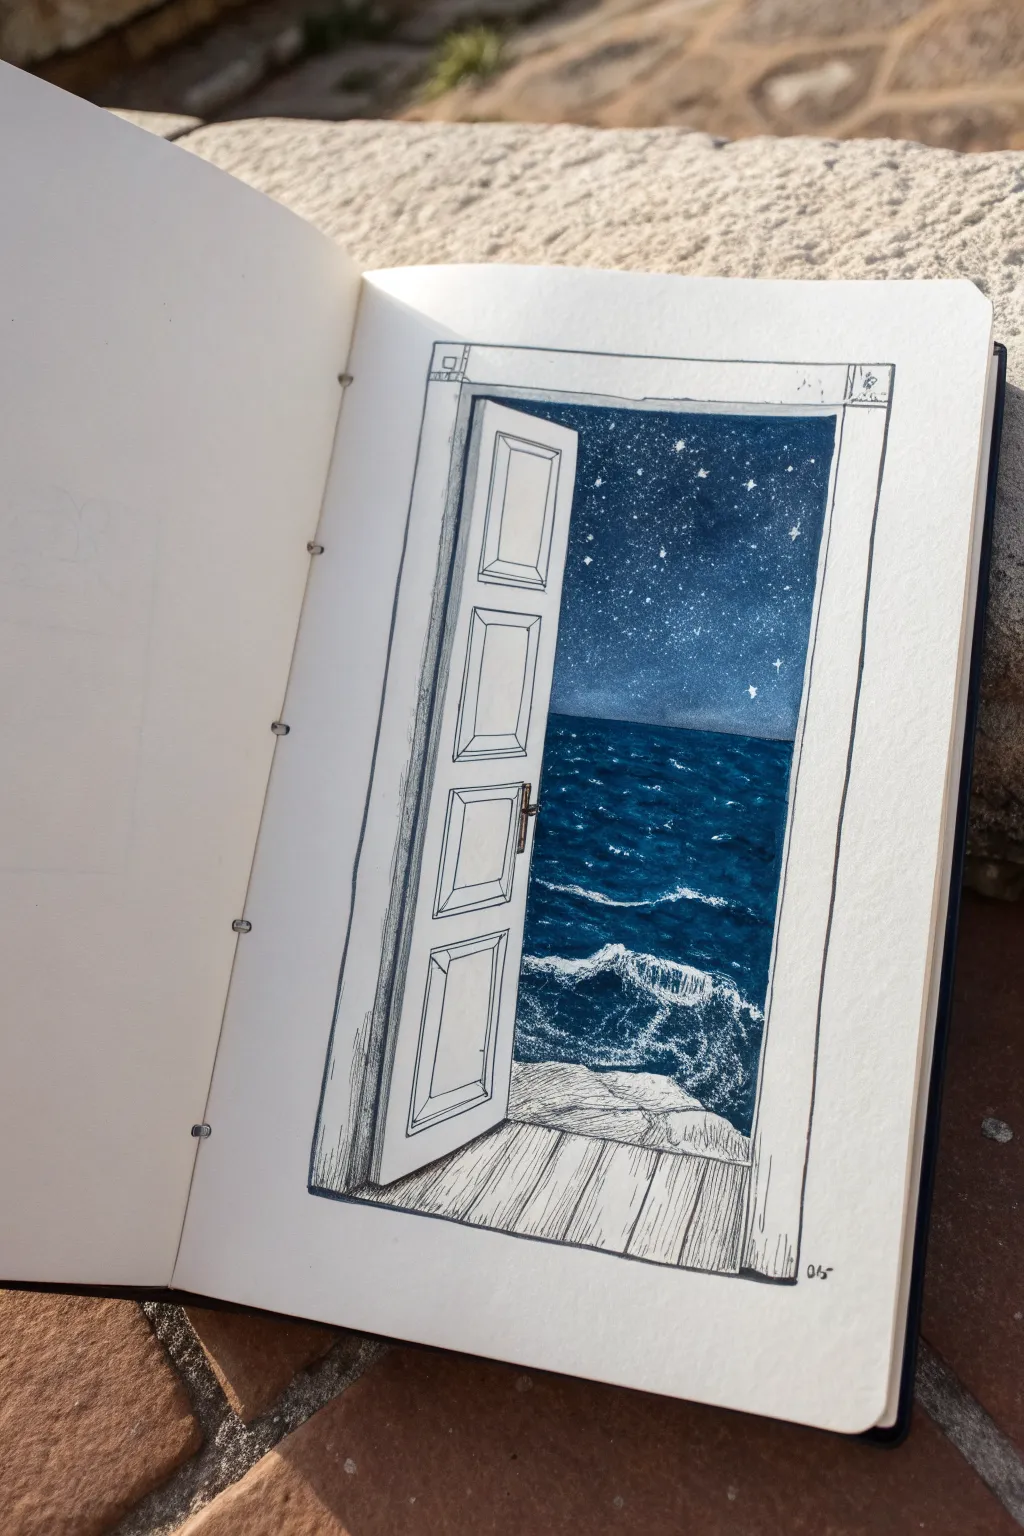
Transport yourself to a peaceful seascape with this magical doorway illustration. Using a combination of precise fineliner sketching and deep, moody watercolors, you’ll create a striking contrast between the mundane door frame and the infinite world beyond.
Step-by-Step Guide
Materials
- Heavyweight sketchbook paper (mixed media or watercolor)
- Pencil (HB or 2H)
- Ruler
- Waterproof fineliners (0.1, 0.3, and 0.5mm)
- Watercolor paints (Indigo, Prussian Blue, Black)
- White gouache or white gel pen
- Small round watercolor brush (size 2 or 4)
- Masking tape (optional)
Step 1: Planning the Gateway
-
Sketch the frame:
Begin with a light pencil sketch. Use your ruler to draw a tall rectangle slightly off-center on the page to serve as the door frame. Keep the lines faint so they can be erased later. -
Add dimension:
Draw a second, slightly smaller rectangle inside the first to give the frame thickness. Then, sketch the door itself swinging inward to the left. Remember to angle the top and bottom of the door slightly downward to the left to match the perspective. -
Detail the panels:
Lightly sketch the four rectangular panels on the door surface. They should also follow the perspective lines, appearing slightly narrower on the left side due to the angle. -
Define the threshold:
Draw the floorboards leading up to the door and the rocky ledge just beyond the threshold where the sea begins.
Don’t Overwork the Wood
Keep the wood grain hatching minimal on the door panels. Too many lines can make the door look dark and cluttered, distracting from the main focal point: the night sky.
Step 2: Inking the Structure
-
Outline the main lines:
Switch to your 0.3mm waterproof fineliner. Carefully ink the straight lines of the door frame and the door itself. You don’t need the ruler here; a slightly wavering hand-drawn line adds character to the wood texture. -
Add wood grain texture:
Use the 0.1mm pen to add vertical hatching lines on the door frame and the floorboards. I like to keep these lines loose and not perfectly parallel to simulate natural wood grain. -
Detail the door panels:
Ink the recessed panels on the door. Add double lines on the bottom and right inner edges of each panel to create depth and shadow. -
Draw the handle and hardware:
Carefully draw the small door handle and keyhole plate on the right side of the door using the 0.3mm pen. Fill in the small keyhole with solid black ink. -
Sketch the rocks:
Use a scribbly, organic hatching style with the 0.1mm pen to define the rocky ledge at the bottom of the doorway opening. Keep the top of the rocks light and add more hatching underneath for shadow.
Bleeding Lines?
If your black ink lines bleed when you add watercolor, your pen isn’t truly waterproof. Test your pen on a scrap piece of paper first. If it bleeds, do the painting first and ink later.
Step 3: Painting the Void
-
Preparing the background:
Ensure your ink is totally dry. Erase any visible pencil lines gently. If you want crisp edges, you can place masking tape around the outside of the door frame rectangle. -
Sky gradient:
Mix a deep Indigo watercolor. Start painting at the very top of the doorway opening. As you move down towards the horizon line, gradually dilute the paint with a tiny bit of water to make it slightly lighter near the horizon. -
Painting the ocean:
Switch to Prussian Blue mixed with a touch of Indigo. Paint the sea area, leaving horizontal slivers of white paper exposed where the waves will be. This wet-on-dry technique helps create hard edges for the water surface. -
Deepening the sea:
While the ocean layer is still damp, drop in concentrated dark blue or black paint into the troughs of the waves (the areas between the white caps) to create volume and depth. -
Blending the horizon:
Soften the line where the sky creates a horizon against the sea. It should be distinct but not razor-sharp.
Step 4: Celestial Details
-
Dry completely:
Let the paint dry fully. This is crucial—if the paper is damp, your stars will bleed and look fuzzy. -
Splatter the stars:
Load a small brush or toothbrush with white gouache diluted slightly with water. Tap the brush handle against a finger to flick tiny droplets onto the dark sky area. -
Brightest stars:
Use a white gel pen or a fine brush with white gouache to manually add a few larger, cross-shaped stars for emphasis. -
Highlight the waves:
Use the white gel pen or dry white gouache to add crisp highlights to the crashing wave crests and the foam hitting the rocks. Use small, scribbly motions to mimic sea foam.
Step back and admire the secret world you’ve just unlocked on the page.
Balloons Carrying Mini Landscapes
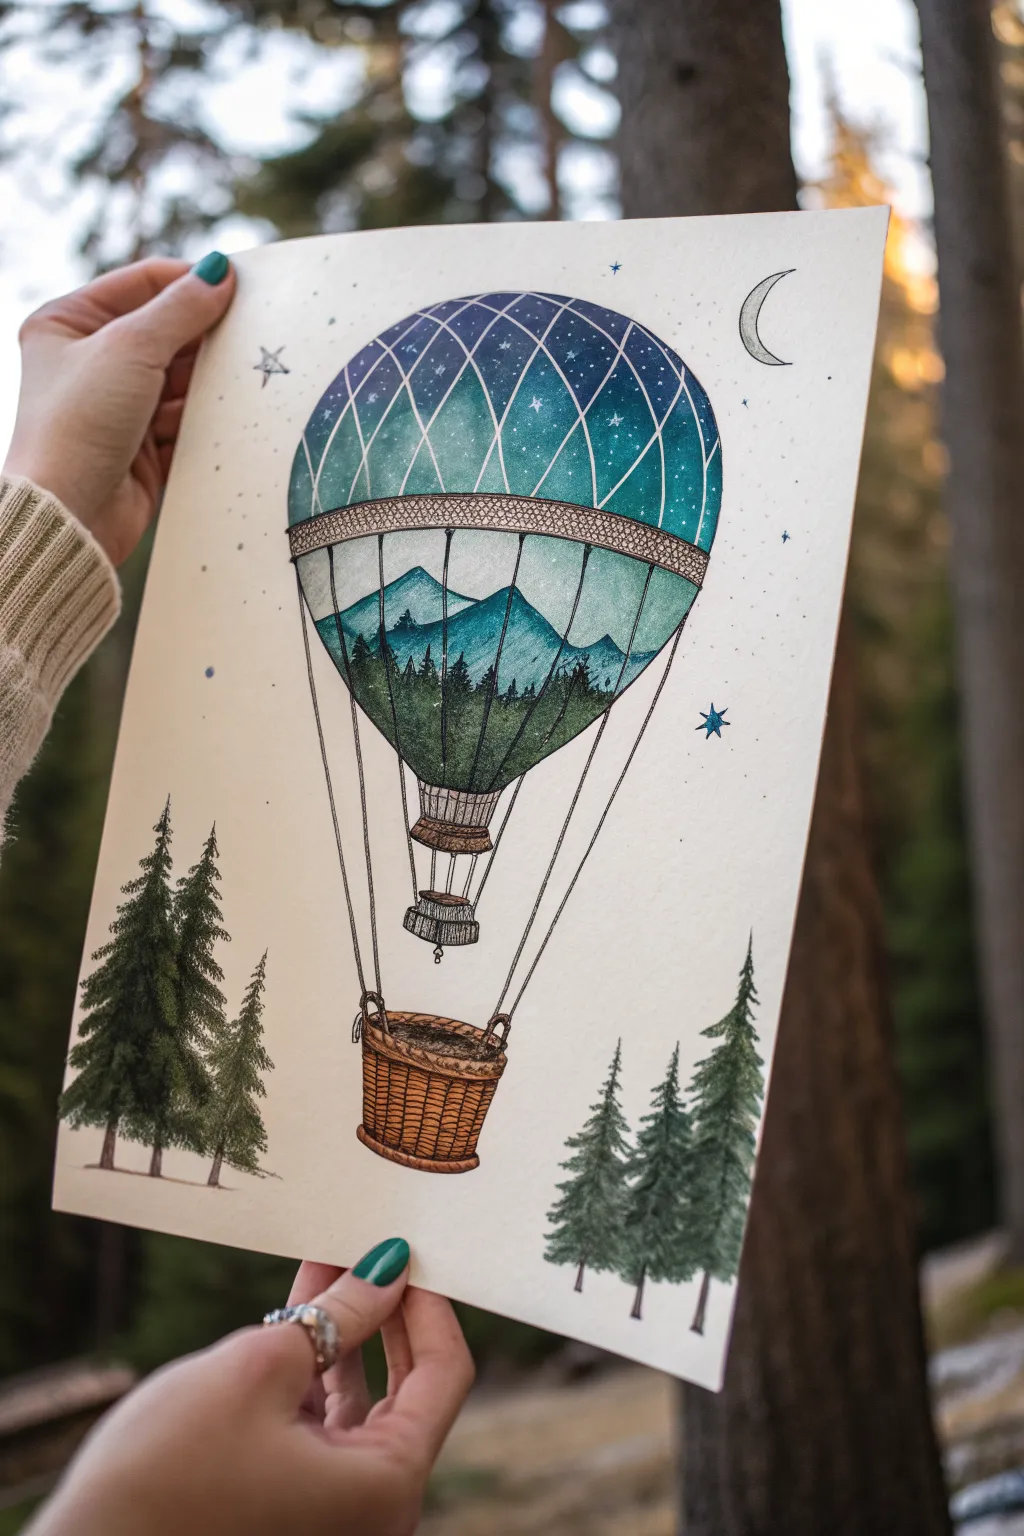
This whimsical project combines technical drawing with imaginative landscapes, featuring a hot air balloon that carries a starry mountain scene within its envelope. Using a mix of fine liners and watercolors, you’ll create a dreamy piece that feels like a window into another world.
Step-by-Step Tutorial
Materials
- Heavyweight watercolor paper or mixed media paper (smooth texture preferred)
- Watercolors (pan or tube): Phthalo Blue, Indigo, Sap Green, Burnt Sienna, Payne’s Gray
- Waterproof fine liner pens (sizes 005, 01, and 05)
- White gel pen or white gouache
- Pencil (HB or 2H)
- Eraser
- Ruler
- Compass or circular object for tracing
- Small round brushes (size 2 and 4)
Step 1: Drafting the Structure
-
Outline the balloon shape:
Start by using a compass or tracing a bowl to draw a large, perfect circle in the upper center of your paper. Sketch the bottom tapering shape of the balloon envelope attached to this circle, curving inward toward the basket connector. -
Add the conceptual landscape:
Inside the balloon shape, sketch a horizon line about a third of the way up. Draw jagged mountain peaks rising above this line, and fill the space below with vertical lines representing a dense pine forest. -
Sketch the geometric grid:
Lightly draw curved grid lines crisscrossing the upper portion of the balloon (the ‘sky’ area). These should follow the curvature of the sphere to give it volume. -
Detail the basket and ropes:
Draw the wicker basket floating well below the balloon. Connect it to the envelope with long, straight lines using a ruler. Add a small burner mechanism right above the basket. -
Ground the scene:
Sketch a few groups of pine trees at the very bottom corners of the paper to give the balloon a sense of scale and altitude.
Step 2: Inking the Details
-
Ink the main outlines:
vWith an 05 fine liner, trace the main outline of the balloon and the basket. Use a steady hand to ink the long suspension ropes. -
Detail the landscape:
Switch to an 01 pen. Ink the mountain ridges and use careful hatching to create the texture of the pine trees inside the balloon. Stipple the mountains slightly for a rocky texture. -
Pattern the basket:
Use the 005 pen to draw the intricate weave pattern on the basket. Horizontal and vertical dashes work correctly to mimic wicker. -
Erase pencil marks:
Wait until the ink is completely dry—I usually give it a full 10 minutes—then gently erase all the graphite guidelines.
Ink Smearing?
If your black ink bleeds when you add watercolor, your pen isn’t waterproof. Switch to pigment liners like Microns, or do the painting first and the inking last.
Step 3: Watercolor Application
-
Paint the night sky:
Wet the upper section of the balloon (the sky area). Drop in deep Indigo and Phthalo Blue near the top, fading to a lighter teal near the mountain peaks to create an ombre effect. -
Color the mountains:
Paint the mountains with a cool blue-grey mix. Keep the tops slightly lighter to suggest snow-capped peaks or atmospheric distance. -
Fill the inner forest:
Use a deep Sap Green mixed with a touch of Indigo for the forest inside the balloon. This needs to be dark and moody to contrast with the lighter mountains. -
Paint the basket:
Wash the basket with Burnt Sienna. Once dry, add a second layer of darker brown to the shadowed side for dimension. -
Paint the ground trees:
Paint the trees at the bottom of the page using a lighter, more natural green mix. Let the edges be soft and organic.
Make it Shine
Use metallic gold watercolor or a gold paint pen for the grid lines and stars instead of white. This adds a beautiful, vintage celestial map aesthetic.
Step 4: Magical Final Touches
-
Add the stars:
Once the sky paint is bone dry, use a white gel pen to draw diamond-shaped stars at the intersections of your geometric grid lines inside the balloon. -
Create the crescent moon:
Draw a small crescent moon outside the balloon in the upper right corner using a fine liner and stipple the inside for texture. -
Reference the grid:
Use the white gel pen to re-trace the geometric grid lines over the painted sky area, making them pop against the dark blue background. -
Add external stars:
Scatter a few tiny stars and dots around the outside of the balloon to integrate the object with the background paper.
Now you have a captured landscape ready to drift away on the breeze
BRUSH GUIDE
The Right Brush for Every Stroke
From clean lines to bold texture — master brush choice, stroke control, and essential techniques.
Explore the Full Guide
Tea Kettles Pouring Clouds
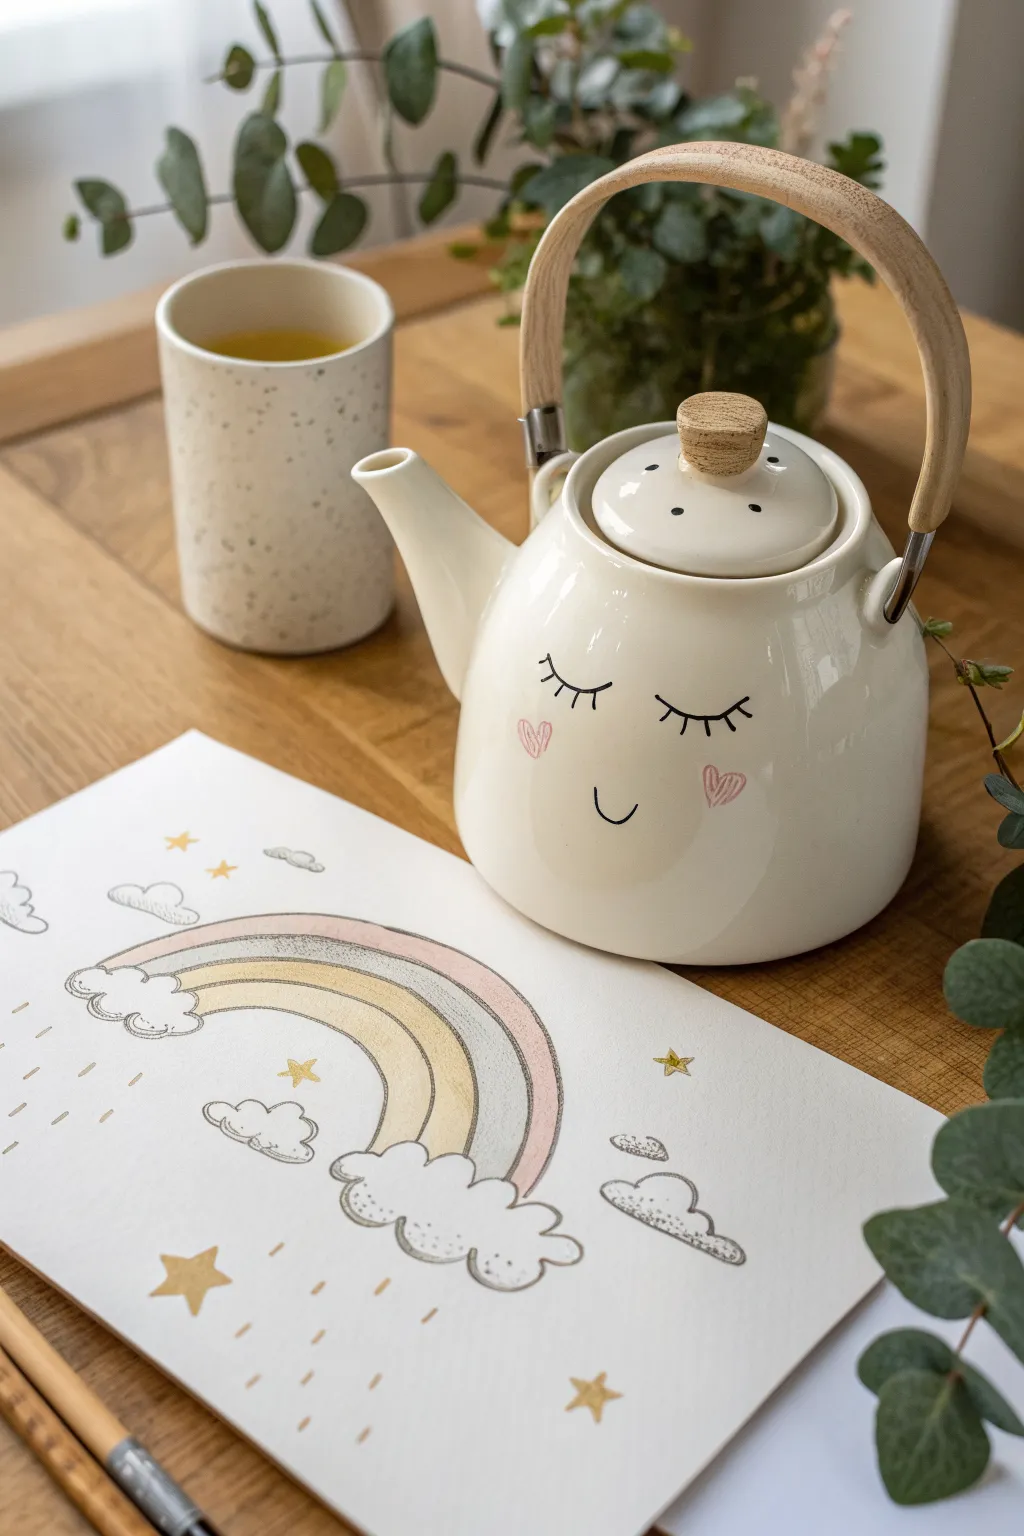
This delicate artwork combines soft watercolor washes with fine ink detailing to create a dreamy, charming scene perfect for a nursery or greeting card. The illustration features a classic pastel rainbow emerging from fluffy clouds, accented with golden stars and gentle raindrops on textured paper.
Step-by-Step Guide
Materials
- Cold press watercolor paper (A4 or similar size)
- Watercolor paints (pastel pink, yellow, blue/grey palettes)
- Fine liner pen (black, archival)
- Gold ink or gold metallic watercolor paint
- Round watercolor brushes (size 4 and 0 or detail brush)
- Pencil (HB)
- Kneaded eraser
- Water cups and paper towels
Step 1: Sketching the Layout
-
Placement:
Begin by lightly sketching the main components with your HB pencil. Position the primary cloud cluster comfortably at the bottom center-left of your paper. -
Arches:
Draw the rainbow arches extending from the bottom cloud, curving upward and to the right, disappearing off the page edge or fading out. -
Clouds:
Sketch additional smaller cloud puffs at the base of the rainbow’s other side and floating freely in the sky area. Keep the lines very faint so they don’t show through later. -
Details:
Mark the positions for the stars and the direction of the raindrops using simple dashes and star shapes. -
Refining:
Use a kneaded eraser to lift most of the graphite, leaving only the faintest guide lines visible for you to paint within.
Bleeding Lines?
If ink bleeds into the paper fibers, your paint wasn’t fully dry. Wait until the paper feels room temperature (cool means damp) or blast it with a hair dryer.
Step 2: Watercolor Application
-
Mixing pastels:
Prepare watered-down puddles of your paint. You want a dusty pink, a soft butter yellow, and a muted grey-blue. Using plenty of water creates that essential transparent look. -
Painting the first arch:
Using your size 4 brush, paint the top arch of the rainbow with the dusty pink. Apply it in a single smooth stroke if possible to avoid streaks. -
The yellow layer:
Leave a tiny gap of white paper (a hair’s breadth) below the pink arch, then paint the yellow band. This prevents the wet colors from bleeding into each other. -
Cool tones:
Finish the rainbow with the grey-blue band at the bottom. I find adding a touch of Payne’s Grey to the blue creates a more sophisticated, vintage tone. -
Cloud shading:
While the rainbow dries, use a very watery grey wash to add minimal shading to the bottom edges of the clouds. Keep the tops bright white. -
Gold accents:
Once the paper is bone dry, use a detail brush and gold metallic paint to fill in the star shapes scattered around the sky. -
Raindrops:
Using the same gold or a soft brown watercolor, dab in the small dashes for the rain falling beneath the clouds.
Pro Tip: Texture
Use cold press watercolor paper. The ‘tooth’ or texture of the paper catches the pigment and creates those lovely granulated effects seen in the sample image.
Step 3: Inking and Finishing
-
Outline preparation:
Ensure the paint is completely dry to the touch before uncapping your pen. -
Inking clouds:
Using the fine liner, trace the cloud shapes. Instead of a solid line, use a slightly broken, scalloped line to imply fluffiness and texture. -
Stippling details:
Add tiny stippled dots (pointillism) along the bottom curves of the clouds, right over your grey watercolor shading, to add depth without heavy lines. -
Rainbow definition:
Very lightly outline the rainbow arches. You don’t need to close every line; keeping it open in spots maintains the airy, whimsical feel. -
Final touches:
Go over any pencil stars that weren’t painted gold with a delicate outline, and add a few extra ink dots or tiny dashes in the empty negative space to balance the composition.
Frame your gentle creation in natural wood to match the soft, organic aesthetic
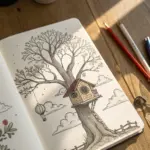
Books That Spill into Reality
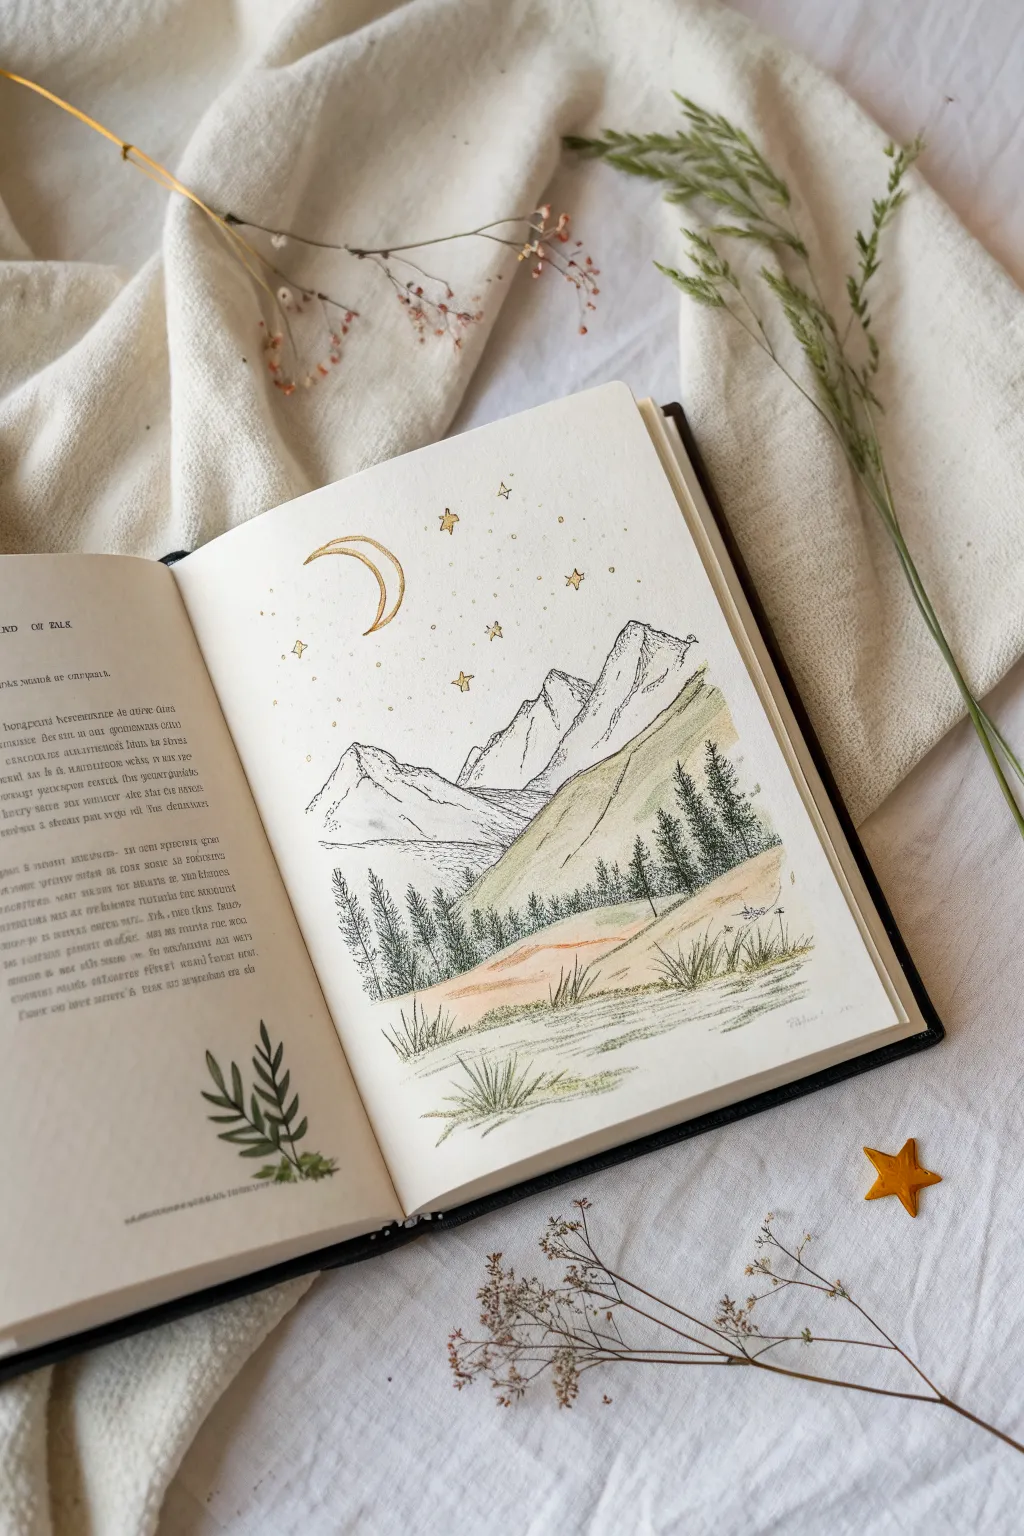
Transform a plain journal page into a magical escape with this delicate mountain landscape. Combining fine line work with soft watercolor washes creates a serene, dreamlike scene that looks as if it’s been pulled straight from a fairytale.
Step-by-Step
Materials
- Hardbound sketchbook or journal with thick pages
- Fine liner pens (0.1mm, 0.3mm, 0.5mm, black)
- Gold metallic marker or gel pen (for moon and stars)
- Watercolor set (pan or tube)
- Small round brushes (size 2 and 4)
- Pencil (HB or 2B)
- Kneaded eraser
- Water container and paper towel
Step 1: Sketching the Foundation
-
Layout the horizon:
Begin with a light pencil sketch. Draw a sloping line across the bottom third of the page to establish the foreground meadow. -
Draft the peaks:
Sketch three main mountain peaks rising from behind the foreground slope. Make the central peak slightly lower than the rightmost one for a balanced composition. -
Add celestial elements:
Above the mountain peaks, lightly draw a crescent moon shape and scatter small dots or star shapes across the upper sky. -
Erase guidelines:
Gently roll a kneaded eraser over your sketch to lift the heavy graphite, leaving just faint ghost lines to guide your ink work.
Ink Confidence
Don’t correct “mistakes” in line work. A wobbly line often looks like natural rock texture or wind-blown grass once the color is added.
Step 2: Inking the Landscape
-
Outline the mountains:
Using a 0.3mm fine liner, trace the jagged outlines of your mountains. Keep your hand loose to create natural, rocky textures. -
Texture the slopes:
Switch to a 0.1mm pen to add internal details to the mountains. Use broken lines and stippling to suggest snow caps and craggy rock faces. -
Create the foreground slope:
Define the grassy hill on the right with a clean, continuous line using the 0.3mm pen. -
Draw the tree line:
With the 0.1mm pen, draw a dense row of pine trees along the mid-ground ridge. Use quick, upward vertical strokes for the trunks and zig-zag motions for the needles. -
Detail the pines:
Go back over the larger foreground trees on the right slope with a 0.3mm pen to give them more definition and darkness compared to the distant ones. -
Ink the meadow grasses:
Add clusters of tall grass blades at the very bottom of the page in the foreground using quick, upward flicking motions. -
Add the botanical accent:
If you wish to match the photo exactly, draw a small sprig of leaves on the bottom left corner of the opposite (text) page.
Step 3: Adding Color and Magic
-
Wet the brush:
Load a size 4 round brush with clean water and pick up a very dilute wash of sage green. -
Paint the hillside:
Gently wash the green color over the right-hand foreground slope. Keep the edges soft and don’t worry about filling every white space. -
Tint the meadow:
Mix a touch of pale ochre or peach with your green and apply it horizontally across the flat foreground meadow area. -
Deepen the trees:
Using a size 2 brush and a more concentrated dark green, dab color into the pine trees. I find it helpful to let the ink show through by not painting them solid black-green. -
Add mountain shadows:
Mix a very watery grey-blue wash. Apply this only to the shadowed sides of the mountain peaks to give them dimension. -
Let it dry completely:
Wait until the paper is bone dry to prevent the metallic ink from bleeding. -
Gild the moon:
Use your gold metallic marker to carefully fill in the crescent moon shape you sketched earlier. -
Scatter the stars:
Dot the sky with the gold marker. Draw a few five-point stars and many tiny specks to create a glittering constellation effect. -
Final touches:
Add a few tiny ink dots (stippling) around the moon and between the trees to add density and atmosphere.
Make It 3D
Use a small pop-up mechanism or glue a dried pressed flower onto the foreground to make the illustration literally spill into reality.
Now you have a peaceful little world tucked away inside your book


Windows with Two Seasons at Once
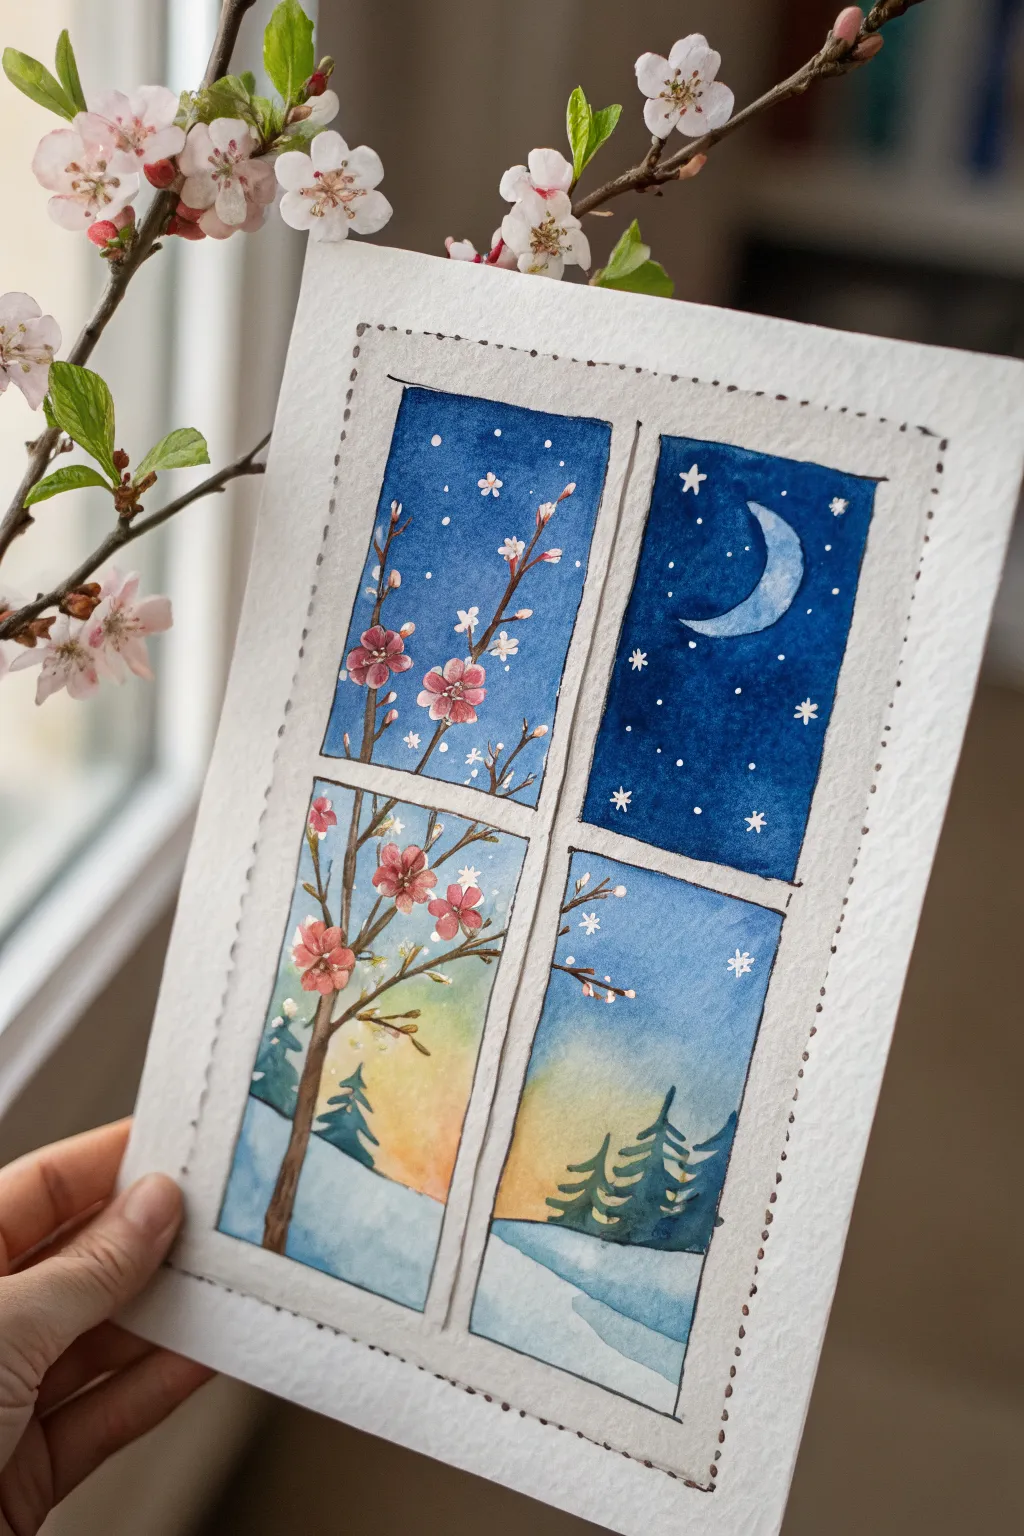
Capture the magic of transition with this enchanting watercolor window illustration, featuring a snowy winter landscape below and a blossoming spring evening above. The four-pane design creates a delightful juxtaposition between cold, starry nights and the warmth of blooming flowers.
Step-by-Step Tutorial
Materials
- Cold press watercolor paper (A5 size or larger)
- Watercolor paints (Indigo, Prussian Blue, Sap Green, Burnt Umber, Yellow Ochre, Alizarin Crimson)
- White gouache or white gel pen
- Fine liner pen (black or dark brown, water-resistant)
- Masking tape
- Ruler
- Round brushes (size 2 and 6)
- Pencil and eraser
- Palette for mixing
Step 1: Drafting the Window Frame
-
Define the borders:
Begin by lightly sketching a large rectangle in the center of your paper, leaving a generous margin around the edges. This will be the outer edge of your window frame. -
Create the panes:
Divide the large rectangle into four equal smaller rectangles. Draw a vertical line down the center and a horizontal line across the middle, then thicken these lines to create the crossbars (muntins) of the window frame. -
Sketch the scene:
Lightly sketch the contents of each pane. In the top right, outline a crescent moon. In the bottom two panes, draw rolling snow hills and triangular pine trees. Finally, sketch a tree branch growing upward from the bottom left pane, extending into the top left pane.
Bleeding Lines?
If your blue sky bleeds into the moon or flowers, wait for it to dry completely, then use opaque white gouache to paint over the mistake before recoloring.
Step 2: Painting the Sky and Background
-
Top panes: Deep night sky:
Mix a rich, dark blue using Indigo and Prussian Blue. Paint the background of the top two panes, carefully painting around the crescent moon shape and the flower buds on the branch. The color should be solid and opaque. -
Bottom panes: Winter glow:
For the bottom sky, create a gradient wash. Start with a pale yellow ochre near the horizon line (the bottom third of the pane) to suggest a sunset glow, blending it upward into a light blue. -
Paint the snow:
Use a very diluted blue wash to define the shadows on the snowy hills in the bottom panes. Leave the tops of the hills white to represent fresh snow.
Snowy Sparkle
Mix a tiny pinch of salt into the wet watercolor wash on the bottom pane’s snow. As it dries, it creates crystal-like textures that look like real frost.
Step 3: Adding Details and Foliage
-
Paint the pine trees:
Using a mix of Sap Green and Indigo, paint the pine trees in the bottom panes. Use jagged, horizontal strokes to mimic needle textures, letting the paint be darker at the bottom of the trees. -
Detail the main branch:
Paint the main tree branch climbing up the left side using Burnt Umber. Keep the line organic and slightly uneven. I like to let the brush skip slightly to create a bark-like texture. -
Add the blossoms:
Once the branch is dry, paint the small flowers. Use a watered-down Alizarin Crimson or pink for the petals. Paint five small dabs in a circle for open flowers, and small oval shapes for buds. -
Refining the blossoms:
Add a slightly darker dot of pink in the center of each flower for depth. If the background blue is too dark, you can mix a little white gouache into your pink to make it stand out.
Step 4: Magical Final Touches
-
Paint the moon:
Fill in the crescent moon shape with a very pale blue-white mixture. While it’s still damp, drop a tiny bit of darker blue on the inner curve to create a shadow. -
Add stars and snowflakes:
Using white gouache or a white gel pen, add small dots and star shapes to the dark blue sky in the top panes. In the bottom panes, add a few delicate snowflake shapes falling over the trees. -
Outline the frame:
Use your fine liner pen to outline the window frame. Don’t use a ruler here; a slightly shaky, hand-drawn line adds to the whimsical, illustrative feel. -
Add the stitched border:
Draw a dotted styling line around the entire outside of the artwork, about half an inch from the painted edge. This ‘stitched’ effect frames the piece beautifully. -
Highlight the flowers:
Add tiny white dots to the centers of your pink flowers to act as stamens, making them pop against the dark background.
Now you have a charming window view that captures the best of two beautiful seasons.
Galaxy Puddles on Sidewalks
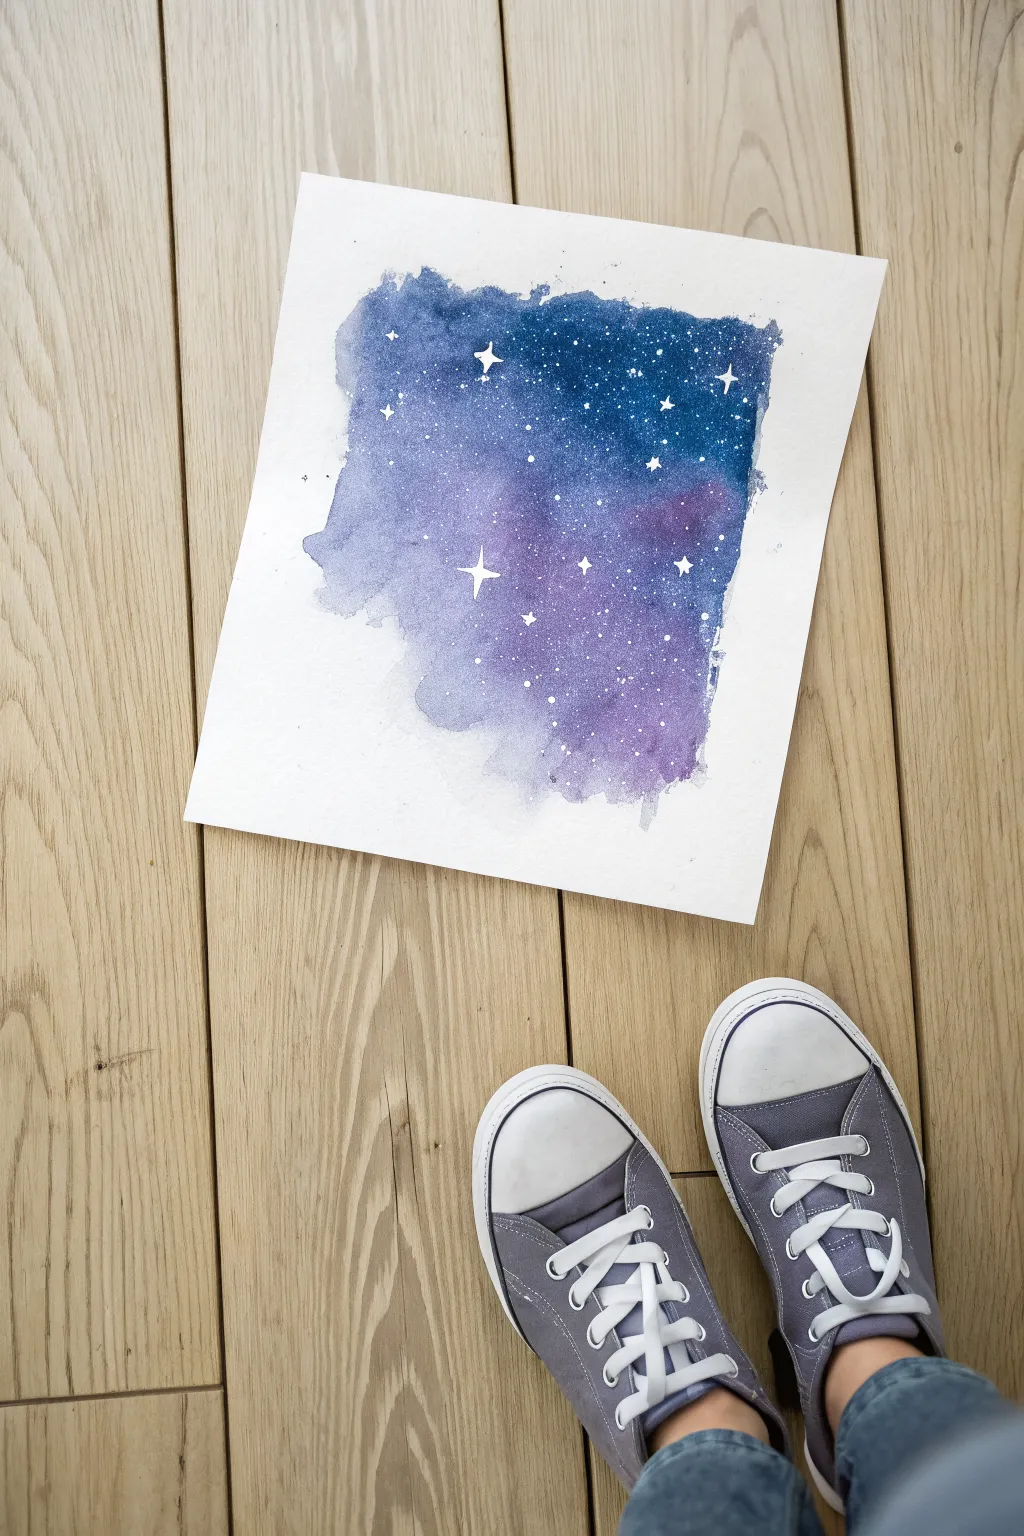
Transform a simple sheet of paper into a window to the universe with this dreamy galaxy watercolor project. The soft blend of blues and purples creates a celestial nebulas effect, while the crisp white stars add a touch of magic that makes the whole piece shimmer.
Step-by-Step Guide
Materials
- Cold press watercolor paper (square format)
- Watercolor paints (Indigo, Prussian Blue, Violet, Magenta)
- Round watercolor brushes (sizes 6 and 2)
- Clean water jar
- White gel pen or opaque white gouache
- paper towels
Step 1: Setting the Scene
-
Prepare your paper:
Start with a sturdy piece of watercolor paper. Since we are using a wet-on-wet technique, thicker paper (300gsm) works best to prevent buckling. -
Define the shape:
Instead of drawing an outline, use clean water on your larger brush to ‘paint’ an abstract, irregular puddle shape in the center of the paper. Keep the edges ragged and uneven for a natural look.
Step 2: Creating the Nebula
-
Drop in the first color:
Load your brush with a deep indigo or dark blue. While the paper is still wet, touch the brush to the upper corners of your water puddle. Watch the pigment explode and spread naturally. -
Add the purple tones:
Rinse your brush slightly and pick up a vibrant violet or purple. Drop this color into the lower and middle sections of the puddle, letting it touch the blue areas so they bleed together. -
Deepen the contrast:
While the paint is still damp, go back in with your darkest blue (Prussian blue or a mix of blue and black) on the very edges of the puddle to create depth. -
Soften the transitions:
If strong lines form between colors, use a clean, slightly damp brush to gently tickle the edges where the two colors meet, encouraging a smoother gradient. -
Create texture:
I like to sprinkle a tiny pinch of salt onto the wet paint in darker areas if I want extra texture, though plain blending works beautifully too. Let this base layer dry completely before moving on.
Fixing Hard Edges
If paint dried with harsh lines, re-wet the area slightly with clean water and lift pigment with a paper towel, then re-apply color.
Step 3: Stargazing Details
-
Prepare the stars:
Once dry, shake your white gel pen well to ensure smooth ink flow, or mix a creamy consistency of white gouache with a fine detail brush. -
Draw primary stars:
Select 3 or 4 points in the galaxy to place your brightest stars. Draw a small cross shape, extending the vertical and horizontal lines to create a twinkling effect. -
Thicken the centers:
Go back over the center of your cross-stars, making the middle convergence point slightly bolder and rounder to make them glow. -
Add secondary stars:
Draw several smaller four-point stars scattered randomly around the larger ones. Vary their sizes slightly to create a sense of distance. -
Create distant star fields:
Using the very tip of your pen or brush, dot tiny pinpricks of white throughout the colored area. Cluster some together to mimic the Milky Way. -
Splatter effect (Optional):
For a more organic look, load a toothbrush or stiff brush with white paint and flick fine speckles over the painting.
Pro Tip: Depth
Leave tiny slivers of the white paper unpainted within the colored nebula. This untouched white adds instant brightness and dimension.
Step back and admire your own personal piece of the universe captured on paper
Bandages for Broken Hearts and Skies
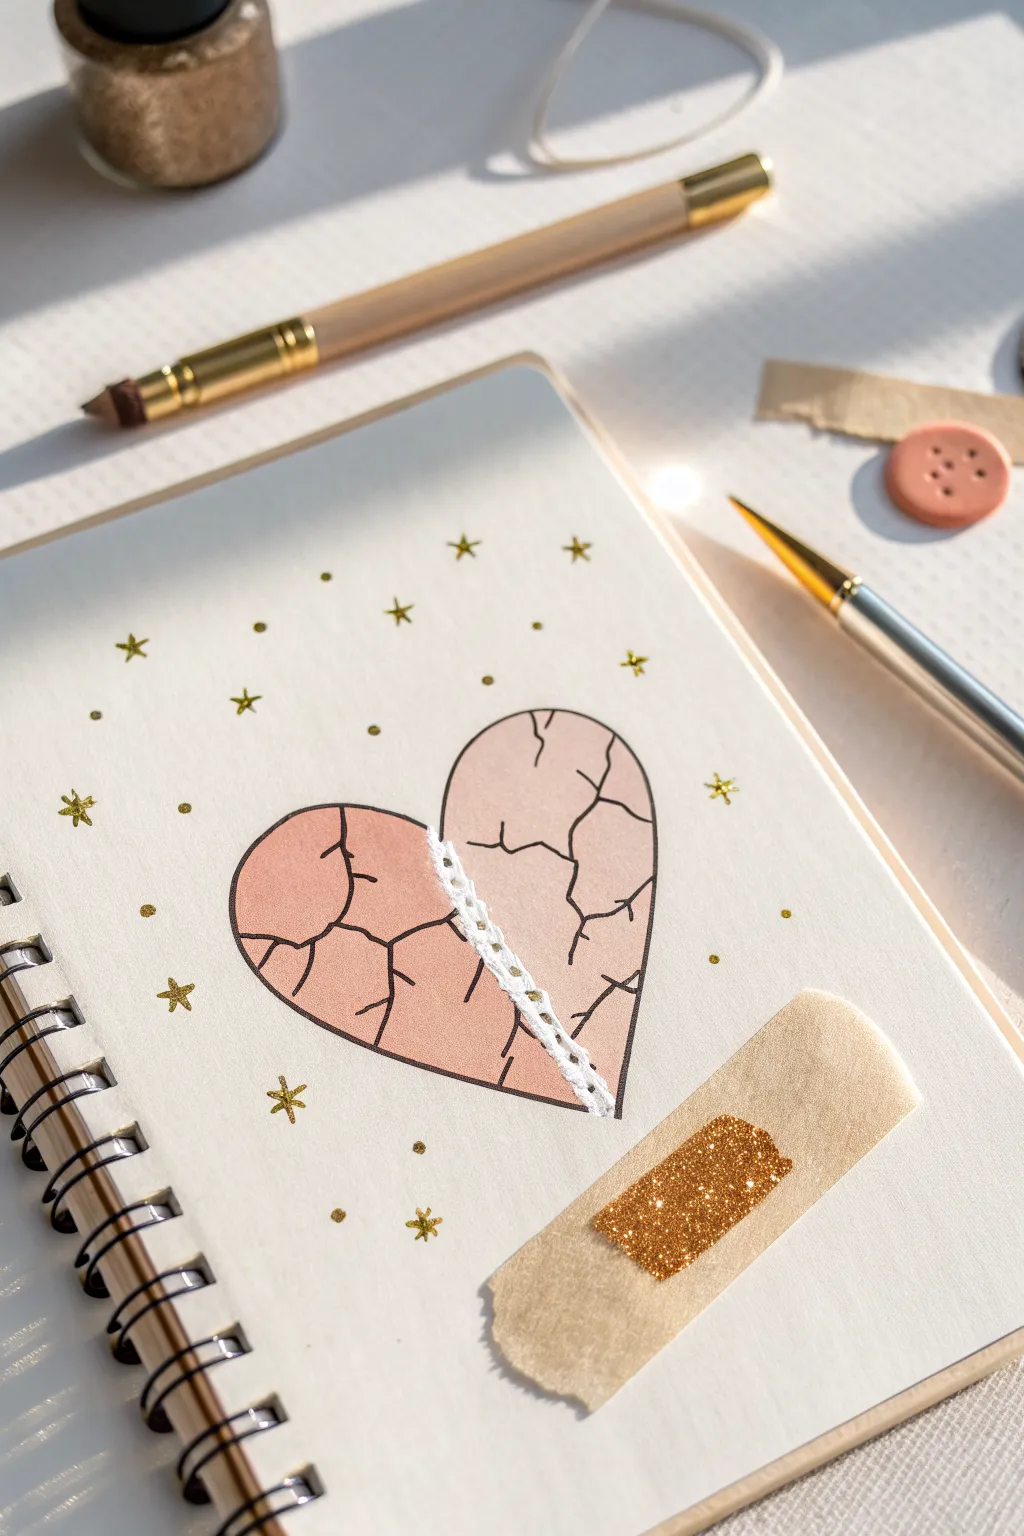
This tender illustration combines delicate line work with a touch of sparkle to symbolize healing. The soft pink heart, visibly cracked but held together by lace-like stitching, creates a poignant visual metaphor alongside a clever gilded bandage accent.
Step-by-Step Tutorial
Materials
- Spiral-bound sketchbook (smooth paper)
- Light pink or peach marker/watercolor pen
- Fine-point black pen (0.3mm or 0.5mm)
- White gel pen (extra fine)
- Gold metallic paint marker or glitter pen
- Pencil and eraser
- Washi tape or masking tape (beige/tan)
- Scissors
Step 1: Sketching the Foundations
-
Outline the Heart shape:
Begin by lightly sketching a standard heart shape in pencil near the center of your page. Make it large enough to hold detail, roughly 3-4 inches wide. -
Create the Split:
Draw a jagged, vertical line running from the dip at the top of the heart down to the pointed tip. Separate the two halves slightly to leave a gap about 3-5mm wide for the ‘stitching’ later. -
Map the Cracks:
Lightly pencil in spiderweb-like cracks radiating from the center split and edges. Keep these lines angular and random to look like fractured porcelain.
Gel Pen Glitches?
If your white gel pen isn’t showing up clearly over the pink marker, draw the lace pattern first, let it dry, and then color the heart around it carefully.
Step 2: Adding Color and Cracks
-
Fill the Heart:
Using your light pink or peach marker, color in both halves of the heart. Use smooth, even strokes to avoid streakiness, and be careful to leave the gap in the middle completely white. -
Ink the Outlines:
Once the marker ink is dry, take your fine-point black pen and trace the outer perimeter of the heart pieces. A steady hand works best here, but slight wobbles add character. -
Detail the Stress Lines:
Trace over your penciled crack lines with the same black pen. Vary your pressure slightly—press harder at the start of a crack and lift off at the end for a tapering effect.
Level Up
Instead of drawing the lace, glue a tiny strip of real lace or white thread across the gap for actual 3D texture.
Step 3: Stitching it Together
-
Draw the Lace Bridge:
With your white gel pen, draw a zig-zag or scalloped connection between the two heart halves. I find that creating tiny loops makes it look like delicate embroidery or lace. -
Add Texture:
Dot the white ink along the edges of the lace pattern to simulate thread holes or fabric texture. Let the white ink dry completely so it remains opaque.
Step 4: The Golden Touches
-
Atmospheric Elements:
Using a gold metallic marker or glitter pen, draw small stars and dots scattered around the heart. Alternate between 5-point stars and simple circles for variety. -
Create the Bandage Base:
Cut a strip of beige washi tape or masking tape, approximately 2 inches long. Round off the corners with scissors to mimic the shape of a fabric bandage. -
Apply the Bandage:
Stick the tape piece onto the bottom right corner of the page, angled slightly diagonally. -
Gild the Bandage:
Draw a rectangular patch in the center of the tape using your gold glitter pen or metallic marker. This represents the padded part of the bandage but turns it into something magical.
Step 5: Final Flourishes
-
Highlight the Bandage:
If your tape is textured, gently stipple the gold ink to help it sink into the paper fibers. -
Clean Up:
Wait until all ink—especially the white gel and gold paint—is fully set. Gently erase any visible pencil lines from your initial sketch.
This simple yet symbolic drawing serves as a beautiful reminder that there is gold to be found in the healing process
Friendly Monsters with Soft Shapes
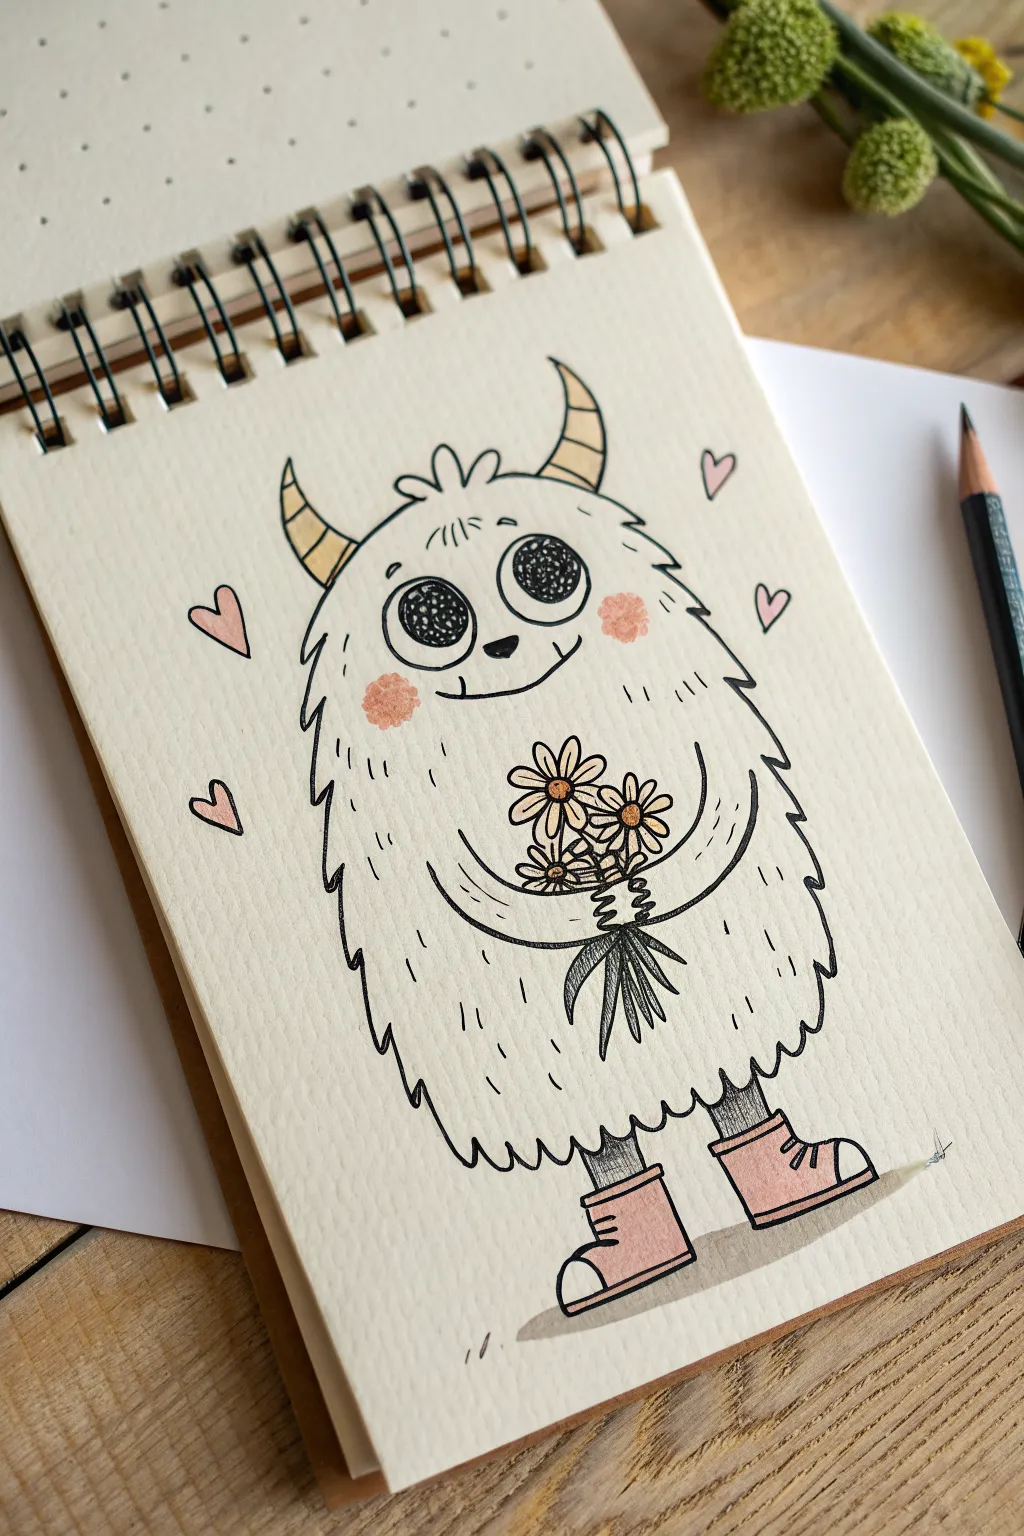
Embrace the sweeter side of spooky with this charming, furry creature clutching a bouquet of daisies. The simple lines and textured fur make this a perfect entry-point for drawing whimsical characters with personality.
How-To Guide
Materials
- Dotted or blank sketchbook paper (cream or off-white works best)
- Black fine-liner pens (0.3mm and 0.5mm)
- Graphite pencil (HB) and eraser
- Colored pencils (Peach/Pink, Yellow, Light Brown)
- White gel pen (optional for highlights)
Step 1: Planning the Shape
-
Sketch the base form:
Start by lightly sketching a large, vertical oval shape in the center of your page with your pencil. Make it slightly wider at the bottom, like a rounded potato. -
Add limb guidelines:
Draw two curved lines sweeping inward from the middle of the body for the arms. Then, add two short vertical rectangle shapes at the bottom for legs. -
Position the face:
Lightly mark a horizontal line across the upper third of the oval to guide eye placement. Sketch two large circles sitting on this line for the eyes.
Fixing Uneven Eyes
If the eyes look lopsided, thicken the outlines. The bold, scribbly pupil style allows for ‘mistakes’ to blend in naturally as part of the texture.
Step 2: Inking the Outline
-
Create the fur texture:
Using your 0.5mm fine-liner, trace over your oval outline with a jagged, zig-zag motion. Keep the spikes pointing downward to look like fur gravity is pulling on. -
Define the face:
Ink the large eye circles. Inside each, draw a smaller circle for the pupil, filling it with a scribbly, textured black shading rather than solid black for a fuzzy look. -
Add facial features:
Draw a simple curved line for a smile connecting beneath the eyes. Add a tiny triangular nose right in the middle. -
Draw the horns:
Add two curved, triangular horns on top of the head using the fine-liner. Draw small horizontal stripes across them for texture.
Step 3: Adding Details
-
Draw the arms:
Ink the arms coming from the sides of the body, curving toward the center chest. Instead of smooth lines, use short, broken strokes to suggest hairiness. -
Create the bouquet:
Where the hands meet, draw a cluster of simple daisy shapes. Start with small circle centers and add 5-6 loop petals around each. -
Claws and stems:
Draw simple, three-fingered claws holding the flower stems. Extend the stems downward below the hands, crossing over each other. -
Boots and legs:
Draw the legs with short, hairy strokes. For the feet, draw high-top sneakers with a simple toe cap and sole line.
Variation Idea
Swap the flowers for other objects to change the theme! Try a balloon, a cupcake, or a little sign saying ‘BOO’ for different seasons.
Step 4: Texture and Color
-
Add body fur details:
Switch to a finer pen (0.3mm) and scatter small, vertical tick marks and short lines throughout the body interior to create volume and fluffiness. -
Color the cheeks:
Take a peach or pink colored pencil and gently scribble two circular blush marks on the cheeks. Press lightly to keep the paper texture visible. -
Color the accessories:
Use the pink pencil for the boots and the floating hearts around the monster. I like to leave the toe caps white for contrast. -
Finish the horns and flowers:
Color the horns with a light brown or yellow pencil. Use yellow for the centers of the daisies. -
Ground the character:
Use a light grey marker or a very lightly pressed pencil to add a small shadow pool underneath the boots so the monster isn’t floating.
Now you have a friendly monster ready to brighten up any notebook page
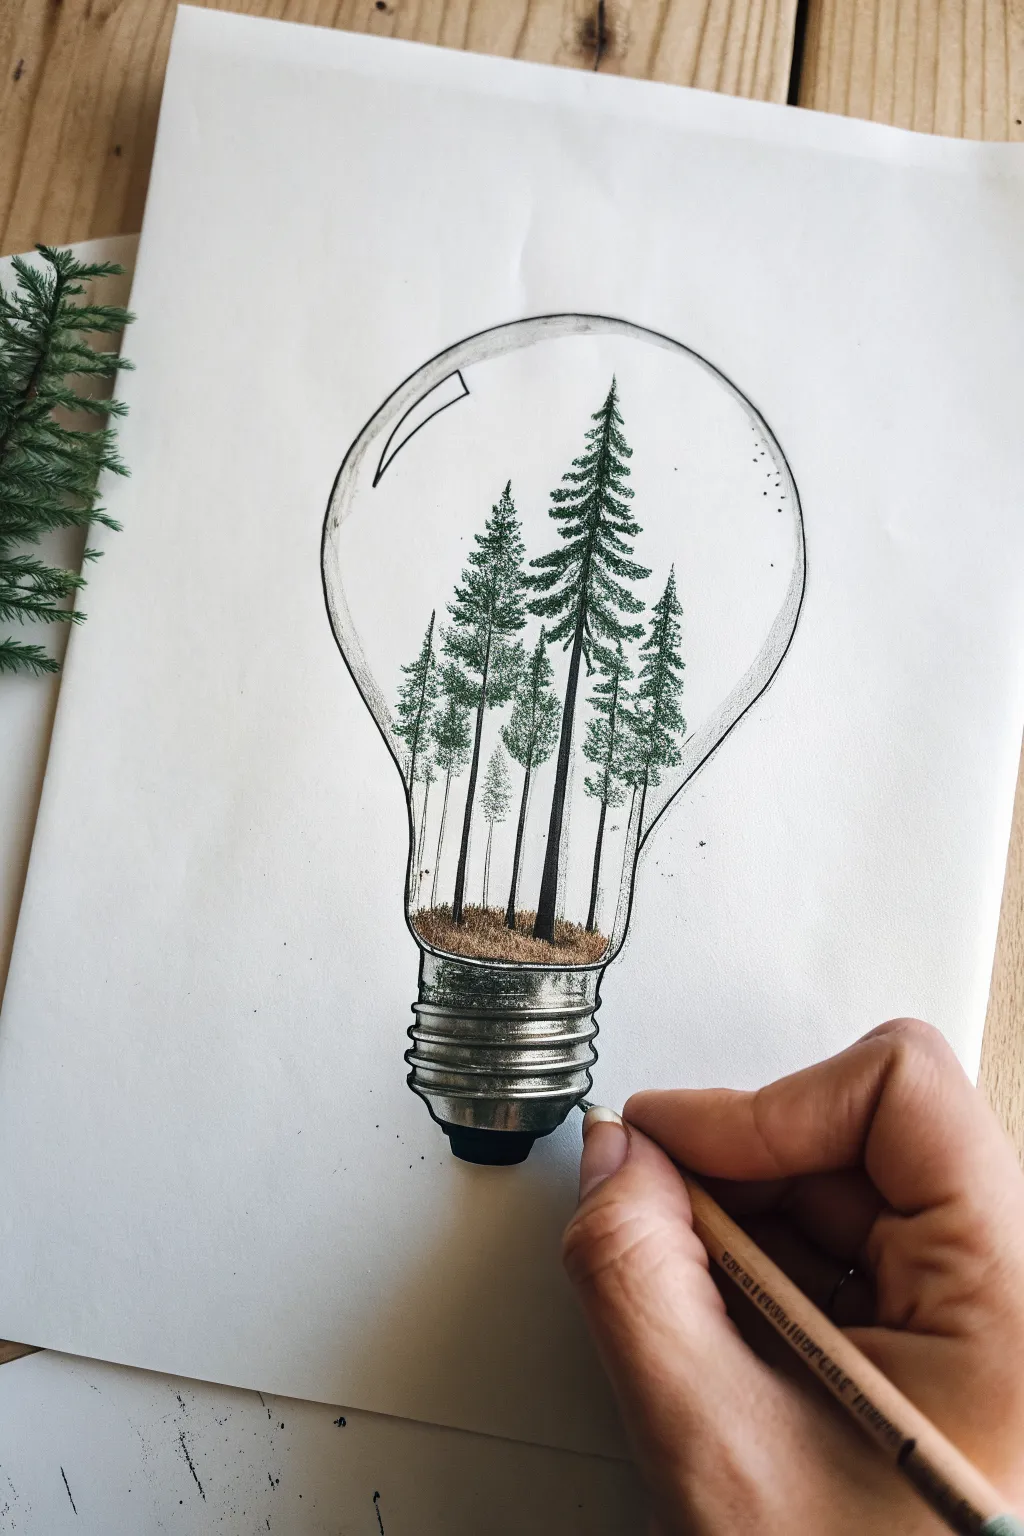
Surreal Mashups of Everyday Objects

Capture the magic of nature within an unlikely vessel by drawing a miniature pine forest inside a classic lightbulb. This surreal mashup uses fine lines and stippling to create a whimsical scene that feels both contained and expansive.
Step-by-Step
Materials
- Smooth bristol or mixed media paper
- HB graphite pencil
- Fine liner pens (sizes 0.1, 0.3, and 0.5)
- Green colored pencil or fine liner
- Brown colored pencil
- Eraser (kneaded preferred)
- Ruler (optional)
Step 1: Drafting the Glass Vessel
-
Outline the Bulb Shape:
Begin with your HB pencil using a very light touch. Sketch a large circle for the main body of the bulb, then taper the bottom downwards into a narrower neck. -
Add the Base:
At the bottom of the neck, draw a rectangular shape with rounded edges for the metal cap. Add the small, rounded contact point at the very bottom. -
Refine the Symmetry:
Check that both sides of your bulb curve evenly. It doesn’t need to be geometrically perfect, but a balanced shape sells the illusion of glass. -
Sketch the Floor:
Inside the bulb, near the bottom curve, draw a gentle, slightly curved horizontal line. This will be the ground where your trees will stand. -
Position the Trees:
Lightly mark vertical lines to indicate where your trees will grow. Vary their heights, placing the tallest, most dominant tree slightly off-center for a dynamic composition.
Glass Effect Tip
Don’t connect every line to close the shape. Leaving small gaps in the outline of the glass bulb tricks the eye into seeing transparency and light reflection.
Step 2: Inking the Structures
-
Ink the Bulb Outline:
Using a 0.3 fine liner, trace over your pencil outline of the glass bulb. Keep the line consistent, but leave a small gap or two near the top right to suggest a highlight. -
Detail the Metal Base:
Draw the screw threads on the metal base using curved, horizontal lines. Shade between the threads with your 0.5 pen to create metallic depth. -
Add Reflection Lines:
Draw a sleek, curved rectangle shape near the top left inside the glass. This simple shape mimics the reflection of a window or light source. -
Draw the Trunks:
Switch to your 0.1 pen. Ink the vertical lines for the tree trunks. Taper them so they are slightly thicker at the bottom and whisper-thin at the top.
Step 3: Growing the Forest
-
Start the Needle Texture:
Using either a green fine liner or a very sharp green colored pencil, begin adding branches. Start at the top of the trees with short, downward-angled strokes. -
Build Density:
As you move down the trunk, make the branches wider and denser. Use a scribbling or stippling motion to mimic the irregular texture of pine needles. -
Layer the Coloring:
Go back over the darkest areas of the trees with a second layer of green or a touch of black ink to create deep shadows within the foliage. -
Create the Forest Floor:
Use a brown colored pencil to fill in the ground area. Use short, vertical strokes to simulate grass or fallen pine needles rather than coloring it in solid.
Level Up: Seasonal Shift
Change the season inside the bulb. Leave the trees bare for winter and add white gel pen dots for snow, or use orange and red stippling for an autumn mood.
Step 4: Refining and Shading
-
Shade the Glass:
With a graphite pencil, add very faint shading along the inner edges of the bulb. This gradient gives the drawing volume and makes the glass look round. -
Deepen the Metal Contrast:
Darken the shadows on the metal screw base. High contrast is key here to make it look like shiny metal. -
Add Atmosphere:
I like to add a few tiny dots of ink floating around the trees inside the bulb. This creates a sense of dust motes or pollen caught in the contained air. -
Clean Up:
Once all ink is completely dry, gently erase the underlying pencil structure lines, being careful not to smudge your graphite shading on the glass.
Step back and admire your self-contained world, a perfect blend of industrial design and organic beauty


Have a question or want to share your own experience? I'd love to hear from you in the comments below!