Nothing beats watching kids turn a plain driveway into their own outdoor gallery with a handful of sidewalk chalk. Here are my favorite easy chalk drawing ideas for kids that come together fast, look super cheerful, and naturally turn into play.
Classic Hopscotch With Fun Shapes
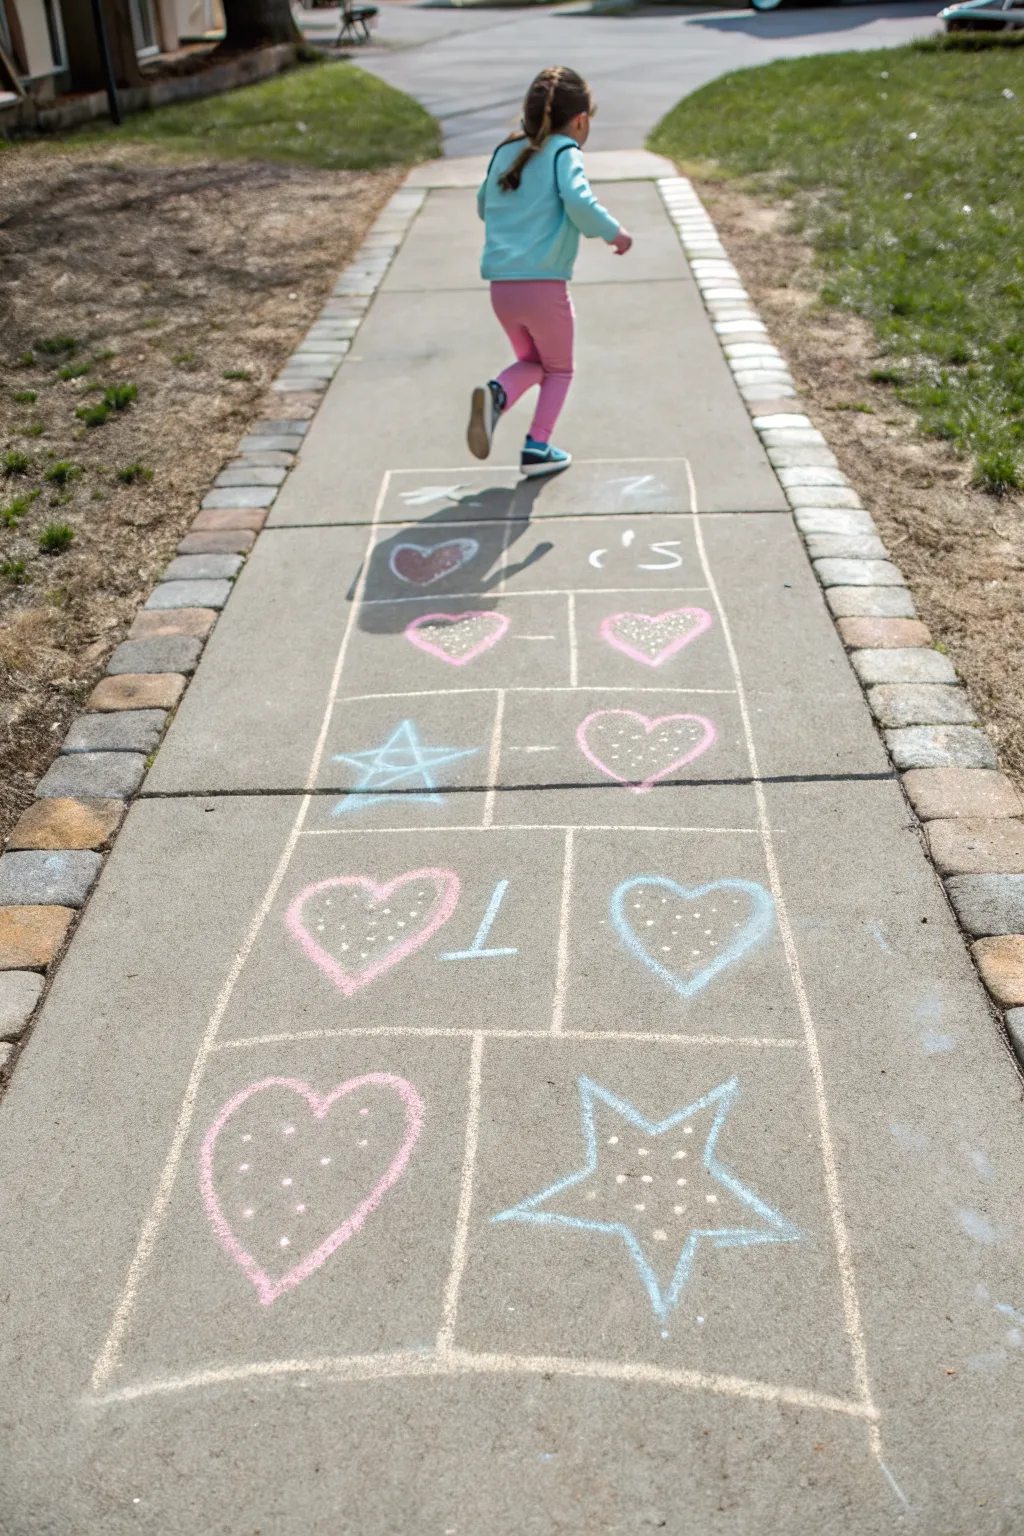
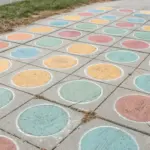
Transform a simple walkway into an engaging game zone with this shape-based hopscotch grid. Instead of just numbers, this design uses large, colorful hearts and stars to guide little jumpers down the path.
Step-by-Step Tutorial
Materials
- Sidewalk chalk in assorted colors (white, pink, light, blue, purple)
- Paved surface (sidewalk or driveway)
- Measuring tape (optional, for precision)
- Broom (to sweep the area first)
Step 1: Setting the Grid
-
Prep the surface:
Before you start drawing, give your chosen stretch of sidewalk a quick sweep. Removing loose dirt and pebbles ensures your chalk lines will be crisp and won’t skip. -
Outline the main lane:
Using a thick piece of white chalk, draw two long, parallel lines down the center of the sidewalk to define the width of your hopscotch board. Aim for about 2 to 2.5 feet wide so there is plenty of room to land. -
Box it out:
Draw horizontal lines between your parallel sides to create the individual squares. Start at the bottom (closest to you) and work your way up. Spacing them about 18-24 inches apart works well for most kids. -
Create the split markers:
For the traditional double-foot landing spots, take every couple of large squares and draw a vertical line right down the center, dividing that large rectangle into two smaller side-by-side squares. -
Add the end semi-circle:
At the very top of your long grid, draw a large semi-circle or arch. This serves as the ‘home’ or turning point of the game.
Step 2: Drawing the Shapes
-
Draw the starting heart:
In the very first square at the bottom, use pink chalk to draw a large heart. Make it fill most of the square but leave a little breathing room around the edges. -
Add the first star:
In the second square (the one adjacent to the first heart), use blue chalk to draw a five-pointed star. I find starting with an upside-down ‘V’ makes the star shape easier to balance. -
Fill the double squares:
Moving up to your first split level (the side-by-side squares), draw a pink heart in the left box and a blue heart in the right box. You can vary the colors here if you like, but alternating keeps it cohesive. -
Add the middle star:
In the single square following the double hearts, switch back to blue chalk for another large star outline. -
Continue the pattern:
Proceed up the grid, filling the remaining squares with alternating hearts and stars. In the upper sections, try adding smaller hearts inside the boxes for variety.
Chalk Snapping?
If your chalk keeps breaking, try drawing with the side of the stick rather than the tip for the thick grid lines. It covers more area and is less fragile.
Step 3: Adding Details & Polish
-
Number the doubles:
In the middle set of double squares, scratch a large number ‘1’ or ‘7’ (depending on your sequence preference) using white chalk. This adds a classic hopscotch element back into the shape design. -
Decorate the shapes:
Go back to your large pink hearts and blue stars. Use white chalk to add small dots inside the shapes. This ‘polka dot’ effect adds texture and makes them look sparkly. -
Thicken the outlines:
Retrace your main white grid lines a second time. Pressing harder on this pass will make the boundaries pop against the gray pavement. -
Add top doodles:
Inside the top ‘home’ arch, sketch a few loose scribbles or initials (like ‘Z’s or squiggles) to mark the finish line. -
Clean up smudges:
Check the edges of your grid. If you smeared any chalk while moving up the board, use a dry cloth or just your hands to brush the excess dust into the grass.
Make It Glow
Lightly dampen the pavement with a spray bottle before drawing. The wet surface turns the chalk into a paint-like paste that dries incredibly bright and vivid.
Now you have a colorful path ready for an afternoon of jumping and playing

Big Rainbow With Cloud Ends
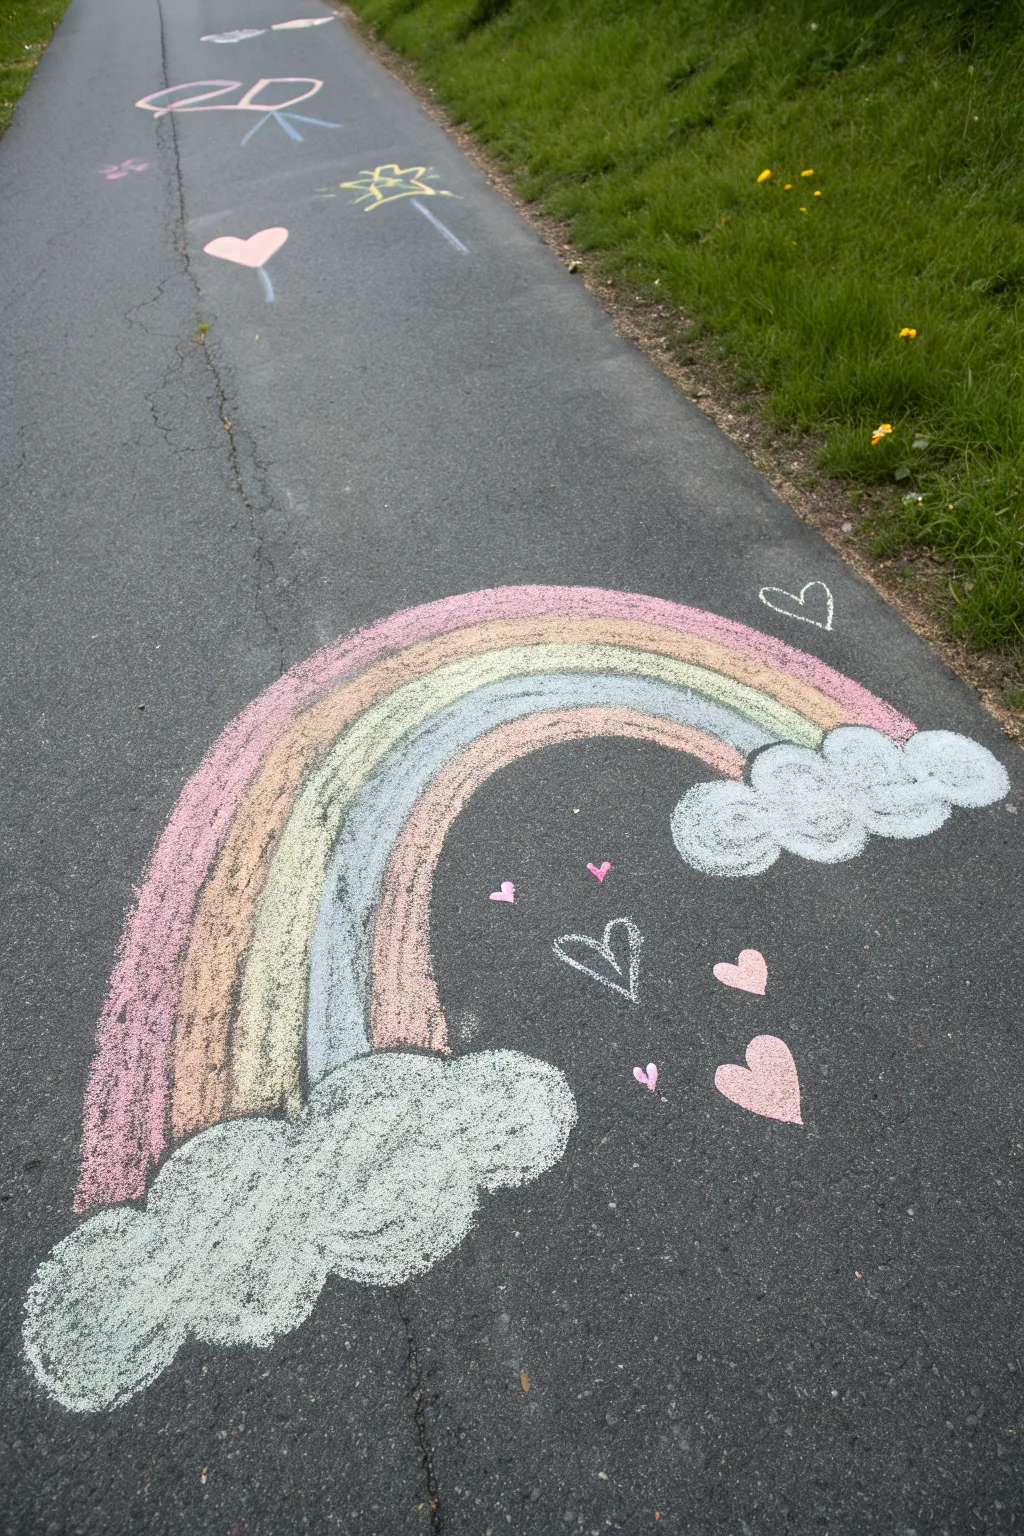
Brighten up the neighborhood sidewalk with this cheerful, oversized rainbow featuring fluffy clouds at each end. Using soft pastels and bold strokes, this project creates a welcoming arch of color perfect for sunny afternoons.
Step-by-Step
Materials
- Sidewalk chalk (jumbo size recommended)
- Pastel colors: pink, orange, yellow, green, blue
- White chalk
- Asphalt or concrete surface (clean and dry)
- Knee pads or a gardening mat (optional for comfort)
Step 1: Setting the Scene
-
Scout your location:
Find a smooth patch of asphalt or concrete. A darker asphalt surface makes the pastel colors pop more vibrantly than lighter concrete. -
Sweep the canvas:
Use a broom or your hand to clear away any loose pebbles, leaves, or dirt. This ensures your chalk glides smoothly and prevents breaks.
Blending Tool Trick
Use a dry sponge or an old piece of carpet to rub the chalk into the asphalt. This pushes the pigment into the cracks for a smoother, more paint-like finish.
Step 2: Drawing the Arch
-
Start the outer rim:
Begin with your pink chalk. Draw a large, high arch starting from the left side and curving over to the right. Don’t worry about perfect symmetry; a natural hand-drawn look adds charm. -
Fill the pink layer:
Thicken the pink line by coloring back and forth along the arch until it is roughly 2-3 inches wide. Press firmly to get a solid, opaque layer of color. -
Add the orange layer:
Take your orange (or peach) chalk and draw a second arch directly underneath the pink one so they are touching. Fill this strip in with the same width as the pink. -
Continue with yellow:
Draw the yellow band next, tucking it snugly under the orange. Rub the chalk back and forth vigorously to cover the texture of the ground. -
Add the green band:
Apply the green arch underneath the yellow. If you want softer transitions, you can let the colors slightly overlap at the edges. -
Finish the spectrum:
Draw the final blue band on the inside of the rainbow. Make sure this inner curve is just as thick and vibrant as the outer layers for balance.
Keep it Clean
Is chalk dust getting everywhere? Keep a damp rag or baby wipes nearby to clean your hands between colors so you don’t muddy up your yellow or white sections.
Step 3: Creating Fluffy Clouds
-
Outline the left cloud:
At the bottom of the left rainbow leg, use white chalk to draw a bumpy cloud outline. Ensure the cloud overlaps the bottom of the rainbow stripes so it looks like the rainbow is springing out of it. -
Outline the right cloud:
Repeat on the right side. I like to make one cloud slightly larger or shape them differently to give the drawing a playful, organic feel. -
Fill the clouds:
Color in the entire shape of both clouds with white chalk. Use a circular scribble motion to mimic the texture of fluffy cumulus clouds rather than straight lines. -
Brighten the white:
Go over the clouds a second time to make the white really dense and bright against the gray background.
Step 4: Adding Loving Details
-
Scatter small hearts:
Using pink chalk, draw several small, solid hearts floating in the empty space under the rainbow arch. -
Draw outline hearts:
Mix it up by drawing a few heart outlines in white chalk near the pink ones. Varying the sizes and styles adds visual interest. -
Decorate the surroundings:
If you have extra space, add a free-floating white heart outline near the top right of the rainbow or further up the path to extend the theme. -
Final touch-ups:
Step back and look at your work. If any rainbow bands look thin, give them one last heavy coat of color to ensure they stand out.
Enjoy watching passersby smile as they walk along your colorful creation


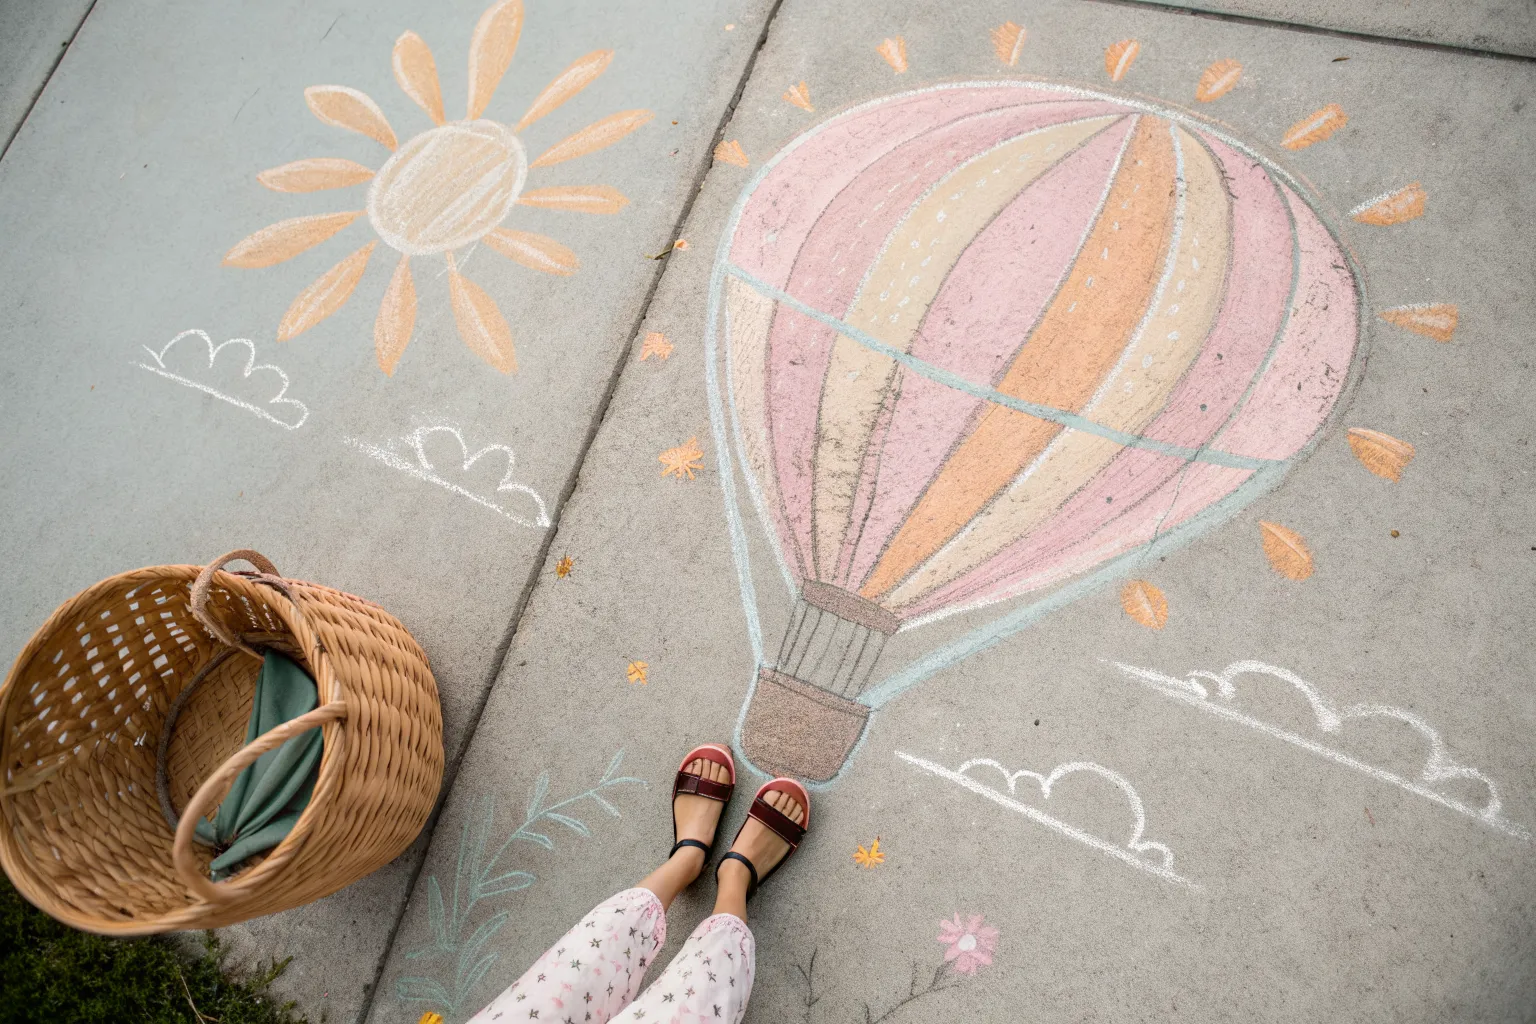
Smiling Sun and Giant Rays
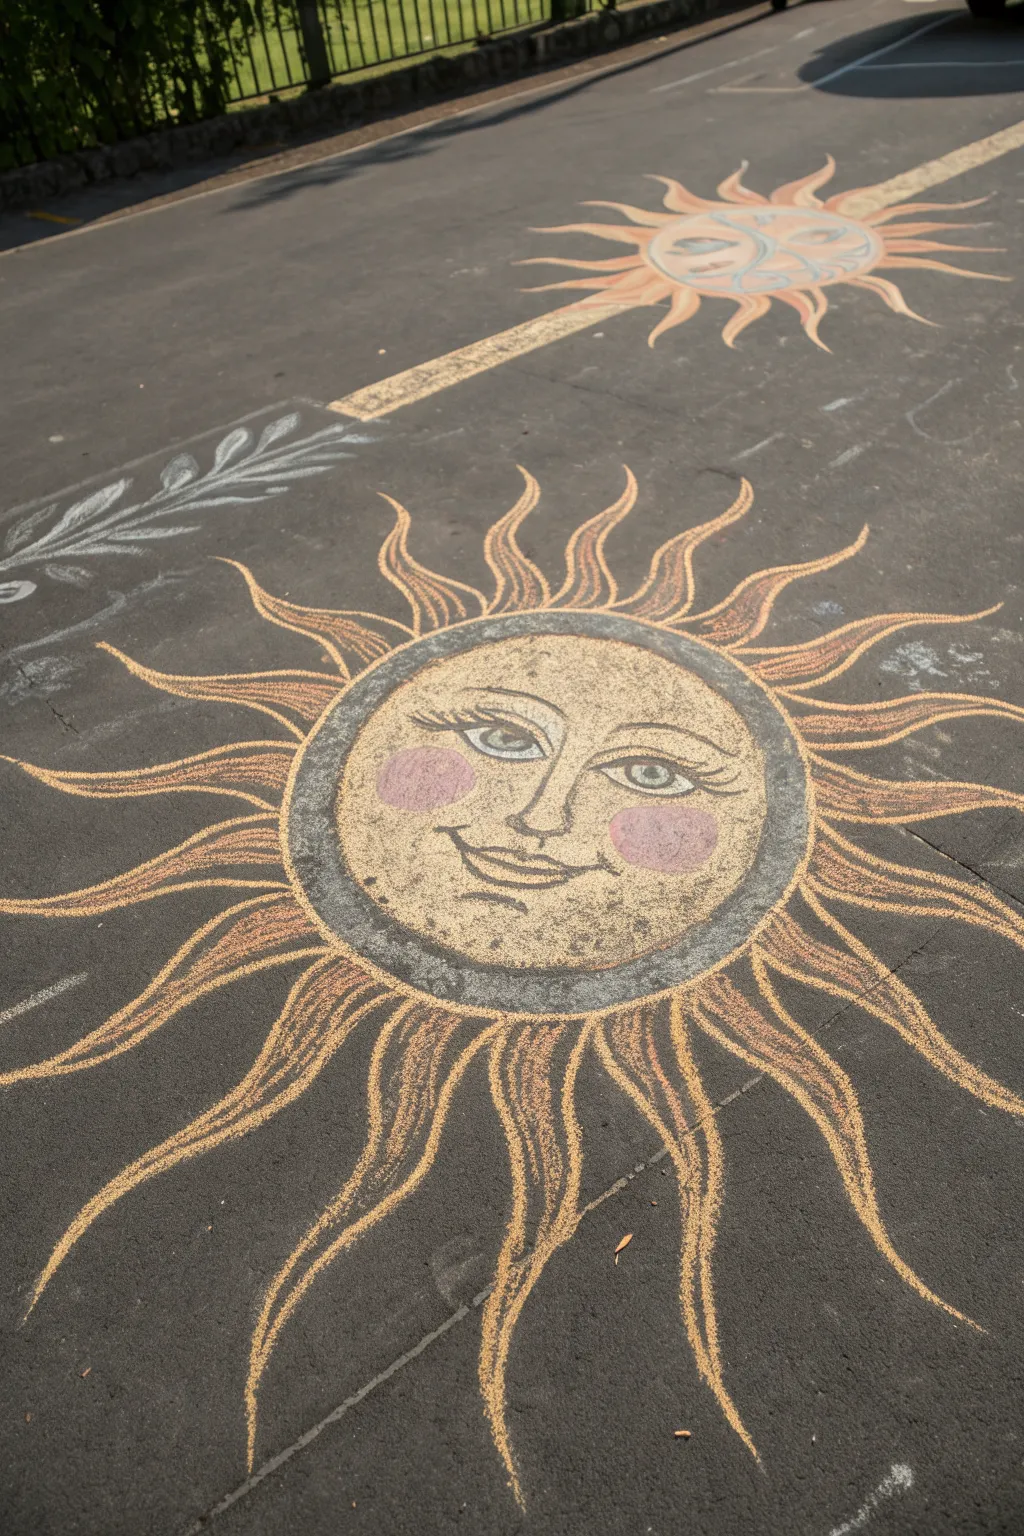
Brighten up the whole neighborhood with this expansive chalk mural featuring a cheerful, golden sun. The design combines a classic celestial face with giant, wavy rays that stretch across the pavement for a truly sunny disposition.
Step-by-Step Guide
Materials
- Sidewalk chalk (yellow, orange, white, pink, light blue, black/dark grey)
- Small blending sponge or old rag
- Measuring tape or string (optional for perfect circles)
- Broom or leaf blower (for surface prep)
Step 1: Setting the Celestial Stage
-
Prep the pavement:
Begin by sweeping the asphalt clean to remove loose pebbles and dirt, ensuring your chalk adheres smoothly to the surface. -
Draw the main circle:
Using white or pale yellow chalk, sketch a large, even circle on the ground. This will be the boundary for the sun’s face. -
Add the border rim:
Draw a second, slightly smaller circle inside the first one, leaving about a 3-inch gap between them to create a thick rim or frame around the face. -
Draft the facial features:
Lightly sketch the position of the eyes, nose, and mouth within the inner circle using a pale color so mistakes are easy to correct. -
Fill the background face:
Color in the entire inner circle face area with a pale yellow or cream chalk, avoiding the features you just sketched. -
Create the grey rim:
Fill the gap between your two circles with a dark grey or charcoal chalk to create a high-contrast border that makes the yellow pop.
Step 2: Adding Personality
-
Outline the eyes:
Using black or dark grey chalk, carefully draw the almond shapes of the eyes, adding distinct upper lids and eyelashes. -
Color the irises:
Fill the irises with a light teal or blue chalk, leaving a tiny spot of the underlying pavement or white chalk for a highlight reflection. -
Define the nose and mouth:
Trace the nose bridge and the smiling mouth with your dark outline color. I find adding small ‘c’ shapes at the corners of the mouth makes the smile look deeper. -
Blush the cheeks:
Rub in two circles of pink chalk on the cheeks. Use your finger or a rag to blend the pink into the yellow base for a soft, natural glow. -
Texture the face:
Lightly stipple or dab extra yellow and orange chalk over the face area to give it a bit of texture, rather than a perfectly flat color.
Uneven Asphalt?
If the road is very rough, dip your chalk in water for 10 seconds before drawing. The wet paste fills cracks better than dry dust.
Step 3: Radiant Rays
-
Sketch the ray guides:
Starting from the dark outer rim, lightly sketch long, wavy lines radiating outward. Alternate between shorter and longer waves. -
Thicken the rays:
Go back over your wavering lines with yellow chalk, drawing parallel lines to give each ray thickness and form. -
Add orange depth:
On one side of each ray (consistently, e.g., the bottom edge), layer in orange chalk to create a shadow effect and dimensionality. -
Draw secondary tendrils:
in between the main thick rays, draw single, thinner wavy lines in orange to fill the negative space and add movement. -
Blend the transitions:
Using a dry sponge or your hand, gently smudge the orange into the yellow on the rays so the color transition looks smooth and fiery. -
Final outlines:
Re-trace the outer edges of the yellow rays with a sharp piece of light orange or dark yellow to clean up any messy smudges. -
Clean the perimeter:
Blow away any excess chalk dust from the black asphalt background to ensure the contrast remains sharp and clear.
Make It Glow
Add thin lines of pure white chalk down the center of the largest rays to create a bright highlight that simulates shining light.
Step back and enjoy the warmth of your giant masterpiece as it greets everyone passing by


Balloon Bouquet Kids Can “Hold”

Transform your driveway into a whimsical scene with this clever interactive chalk art. By drawing a bright, oversized bouquet of balloons that tapers down to a single point, you create a perfect photo opportunity where your child looks like they are being lifted away.
How-To Guide
Materials
- Sidewalk chalk (assorted bright colors)
- White sidewalk chalk (for strings and highlights)
- Pavement or driveway surface
- A camera or smartphone
Step 1: Drafting the Bouquet
-
Choose your spot:
Find a clean, dry section of concrete. Look for an area with a darker surface if possible, as this will make the pastel chalk colors pop more vibrantly against the background. -
Mark the hand-hold point:
Decide where the ‘bottom’ of the drawing will be. This is where your child will eventually place their hand. You can make a tiny X mark here to guide your drawing. -
Outline the top layer of balloons:
Start near the top of your drawing area. Draw 4-5 oval or teardrop shapes using different colored chalks. These should be your highest, furthest-away balloons. -
Fill the middle section:
Below the top row, draw another layer of balloons. Make these slightly larger than the top ones to create a subtle sense of depth. Nestle them in the gaps of the first row. -
Add the bottom balloons:
Draw the final, lowest tier of balloons. These should be the largest and closest to the ‘hand-hold’ point. Arrange them so the bouquet tapers inward at the bottom, creating a general V-shape for the whole cluster.
Make it Pop
To make colors extra vibrant, dip the tip of your chalk in water for 15 seconds before drawing. The wet chalk goes on like paint and dries intensely bright.
Step 2: Coloring and Detailing
-
Fill in the color:
Methodically color inside each balloon outline. Use a back-and-forth motion to get solid coverage. Don’t worry if the texture of the concrete shows through; it adds to the charm. -
Blend the chalk dust:
For a smoother look, you can use your fingers or a dedicated foam brush to rub the chalk into the pavement, smoothing out the harsh crayon lines. -
Add highlights:
Take your white chalk and draw a small curved line or a little scratch mark on the upper right or left side of *every* balloon. Keep this consistent to show a light source. -
Draw the knots:
At the very bottom of each colored balloon oval, draw a tiny triangle or heavy dot in the matching color to represent the tied knot.
Blurry Photos?
If the drawing looks distorted in photos, you’re likely standing too low. Get directly above the artwork using a stepladder to correct the perspective.
Step 3: The Strings and Ribbon
-
Draw the primary strings:
Switch to a sharp piece of white chalk. Starting from the knot of each bottom-tier balloon, draw a straight line converging toward your initial X mark. -
Connect the upper balloons:
Carefully draw lines from the upper and middle balloons, passing *behind* the lower balloons (by skipping over the colored areas) and meeting at that same convergence point. -
Bundle the strings:
Where all the lines meet, draw a thick, tapered bundle of white lines extending downward about two feet. This creates the ‘handle’ or the tail of the bouquet. -
Create the bow:
Right where the strings bundle together, draw a simple bow tie shape with white chalk. Make two loops and two tails to make it look like the balloons are tied together. -
Extend the tail:
Feather out the bottom of the white string bundle so the lines fade away naturally, giving it a wispy, floating appearance.
Step 4: Final Touches and Photo
-
Clean up edges:
Blow away loose chalk dust. If any balloon edges look messy, re-outline them quickly to sharpen the shapes. -
Positon the model:
Have your child crouch or stand near the bottom of the drawing. Ask them to extend their hand so their fist rests exactly where the string bundle begins (below the bow). -
Capture the angle:
Stand on a chair or ladder if needed to get a high angle. Shoot directly downward or slightly angled to flatten the perspective and make the illusion convincing.
Now you have a permanent memory of a temporary masterpiece that looks like magic on the sidewalk
BRUSH GUIDE
The Right Brush for Every Stroke
From clean lines to bold texture — master brush choice, stroke control, and essential techniques.
Explore the Full Guide
Kindness Heart With Big Lettering
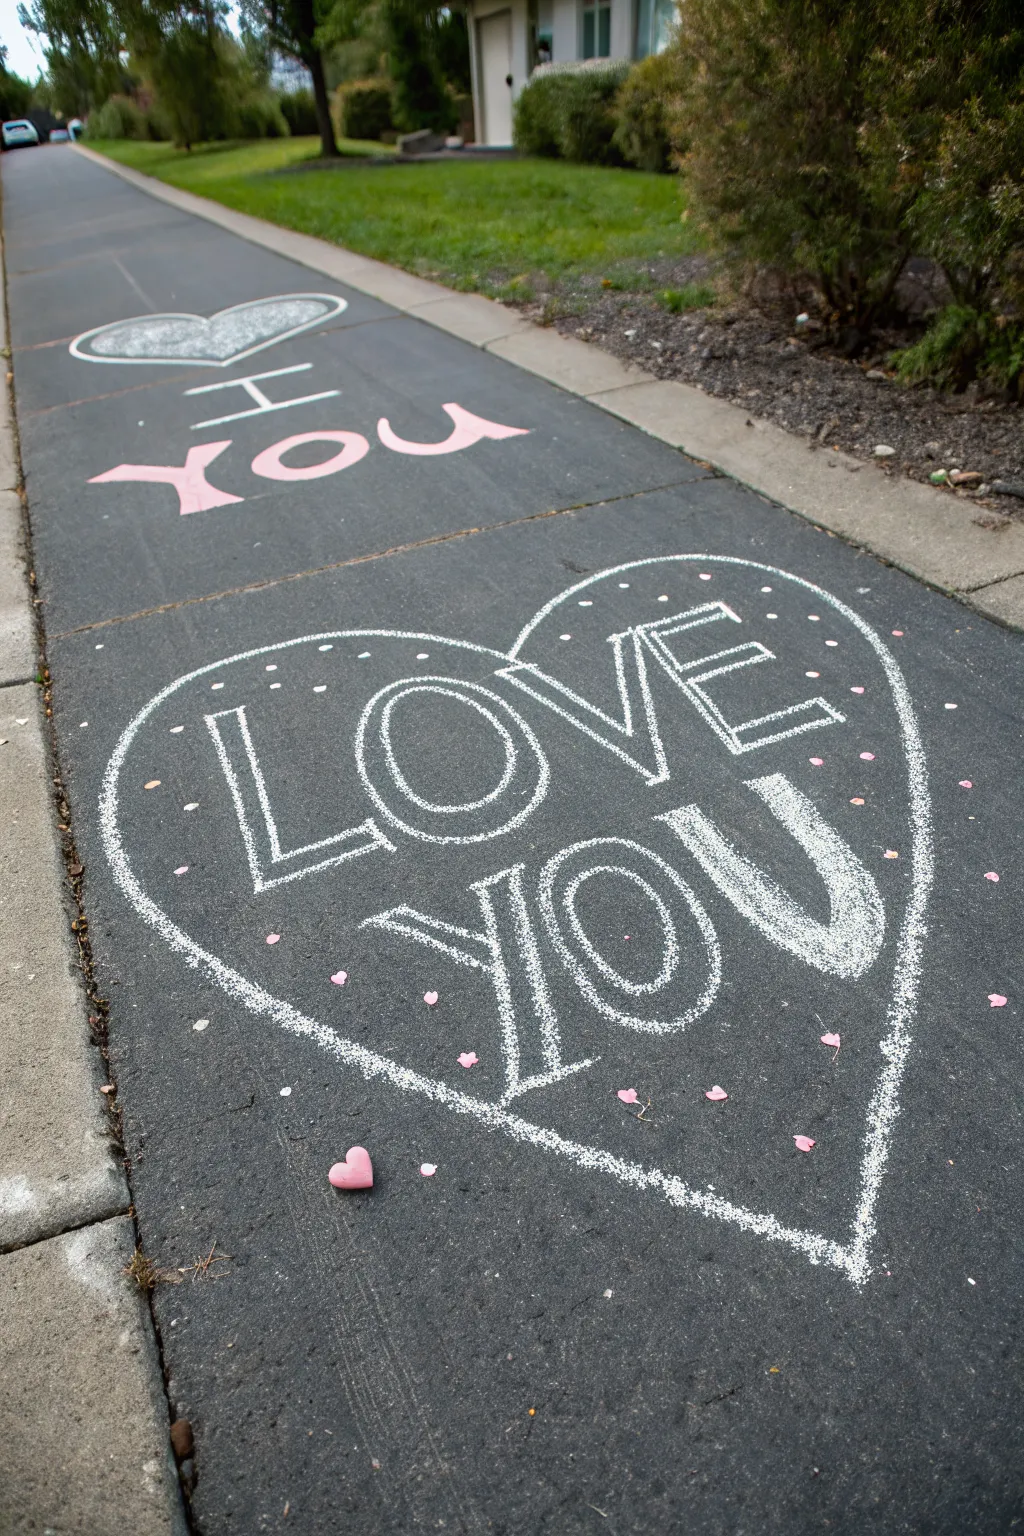
Spread a little unexpected joy to neighborhood walkers with this oversized, graphic heart design. Using bold lettering and simple shapes, you can transform a plain stretch of asphalt into a charming message of kindness.
Detailed Instructions
Materials
- White sidewalk chalk (thick stick)
- Pink or red sidewalk chalk (for accents)
- Broom or outdoor brush
- Small heart-shaped chalk pieces (optional, for decoration)
Step 1: Preparation & Outline
-
Clean the canvs:
Before you begin, use a broom or outdoor brush to sweep the section of sidewalk or driveway where you plan to draw. Removing loose pebbles and dirt ensures your chalk lines will be crisp and won’t skip. -
Draw the heart shape:
Using your thick white chalk, draw a very large heart shape. Start at the top center dip and curve down to the bottom point on one side, then repeat for the other side to keep it symmetrical. -
Refine the perimeter:
Go over the heart outline a second time. Press down firmly to make the line thick, bright, and highly visible against the dark asphalt.
Step 2: Text Construction
-
Sketch the ‘LOVE’:
Lightly sketch the word ‘LOVE’ in the upper half of the heart. Aim for block letters that follow the curve of the heart’s top arches. -
Sketch the ‘YOU’:
Lightly sketch the word ‘YOU’ in the lower half. The ‘Y’ and ‘U’ should angle slightly inward to follow the narrowing shape of the heart’s bottom point. -
Thicken vertical strokes:
Transform your stick letters into block letters by adding a second parallel line to every vertical stroke of the letters L, V, E, Y, and U. -
Thicken horizontal strokes:
Do the same for the horizontal bars on L, E, and the crossbar of H if you were writing something else, creating a consistent thickness for every letter. -
Create the ‘O’:
For the circular ‘O’s, draw a smaller circle inside the original one to create that open donut shape. -
Close the blocks:
Connect the parallel lines at the ends with flat or slightly curved caps to finish the block letter shapes. -
Solidify the outlines:
Trace over your final block letters with heavy pressure. I find that rotating the chalk periodically keeps a sharp edge available for these clean lines.
Sharper Lines
Is your chalk too dull? Rub the tip against a rough brick or a concrete curb for a few seconds to create a flat, angled edge perfect for outlining.
Step 3: Details & Polishing
-
Add internal shading:
Inside each block letter, use the side of your chalk to add a very light, scratchy texture. You don’t want to fill it in completely solid; leave some asphalt showing for a textured look. -
Create the polka dots:
In the negative space between the letters and the heart outline, tap the tip of your white chalk to create small, scattered dots. -
Vary dot density:
Place more dots near the outer edges of the heart and fewer near the letters to help the text pop out visually. -
Draw secondary hearts:
If you have extra space on the path, draw a second, smaller heart further up carefully writing ‘I’ above it and ‘YOU’ below it in pink chalk. -
Add physical accents:
Scatter a few real heart-shaped chalk pieces or small pink chalk drawings inside the main heart for a pop of color. -
Clean up edges:
Blow away any excess chalk dust that may have settled where you don’t want it to keep the black asphalt background stark.
Crooked Letters?
If your letters aren’t fitting, use water to ‘erase’ the mistake. Wait for the damp spot to dry completely before redrawing, or the new chalk quickly turns into a muddy paste.
Now your pathway is ready to brighten someone’s day as they stroll by
Simple Butterfly With Symmetry
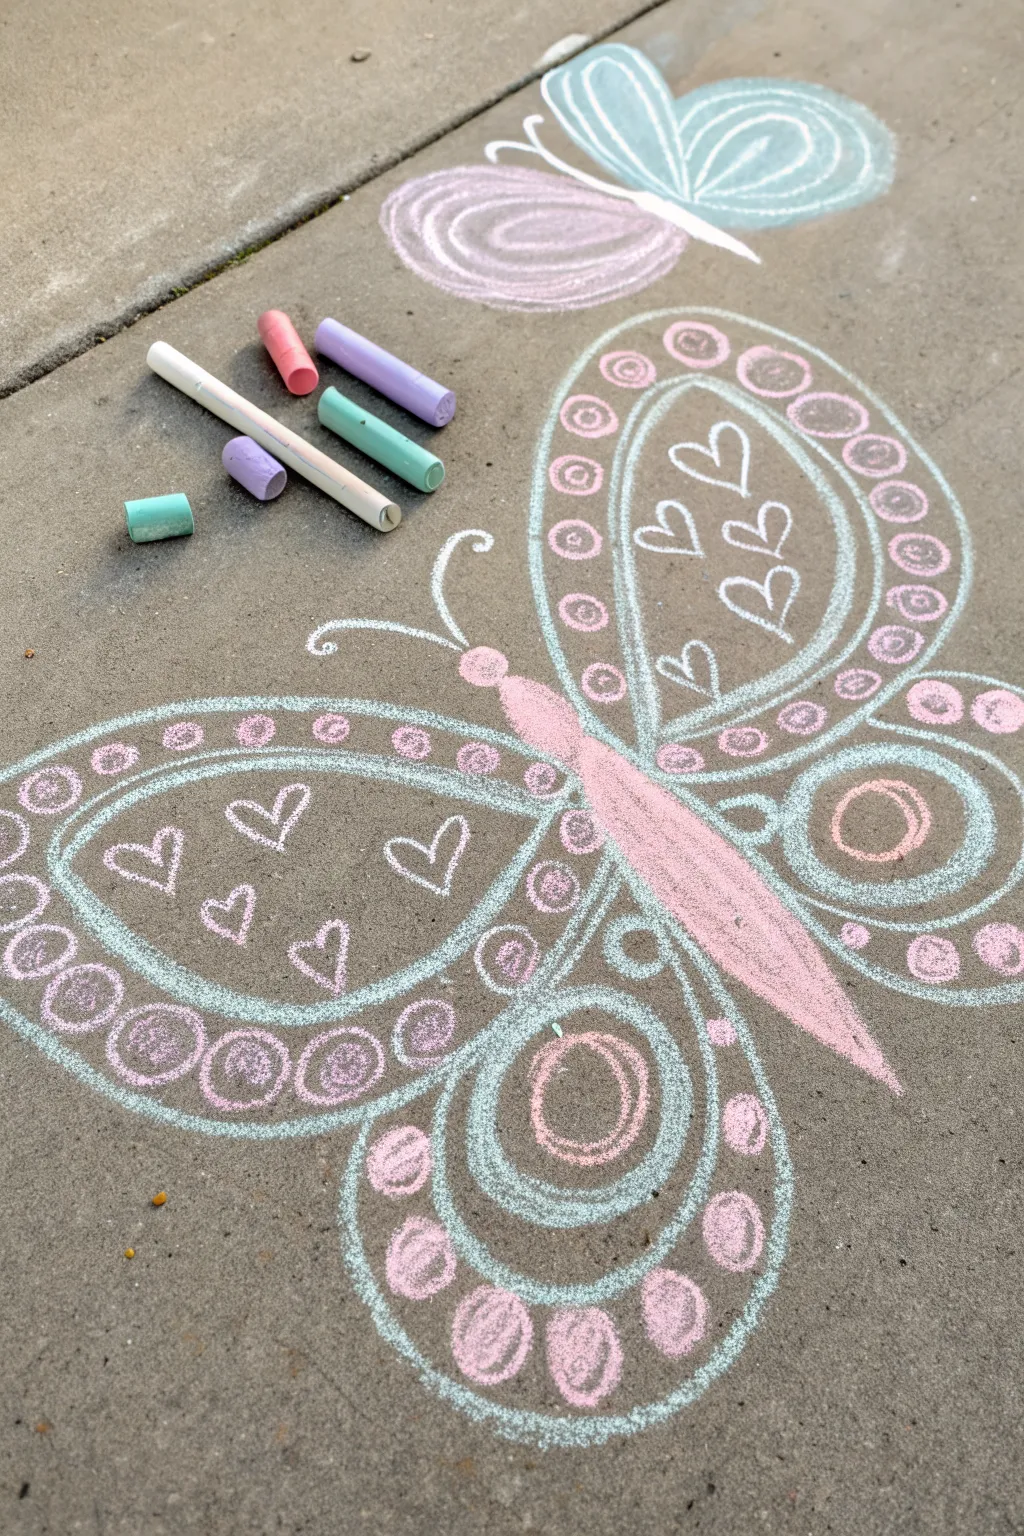
Transform your driveway into a whimsical garden with this large, symmetrical butterfly design featuring charming heart details. The soft pastel color palette of pink, teal, and purple creates a gentle, dreamy look that really pops against gray pavement.
How-To Guide
Materials
- Sidewalk chalk in pastel pink
- Sidewalk chalk in pastel teal or light blue
- Sidewalk chalk in light purple or lavender
- Sidewalk chalk in white
- A smooth patch of pavement or driveway
Step 1: Drawing the Body and Structure
-
Draw the body:
Start by drawing a long, slender oval shape for the butterfly’s abdomen using the pastel pink chalk. Make the top slightly rounded for the head and taper the bottom into a point. -
Fill the body color:
Color in the entire body shape solidly with the pink chalk, pressing firmly to get good coverage. -
Add the head:
Draw a small circle right on top of the body for the head using the same pink chalk, and fill it in completely. -
Outline the top wings:
Switch to your teal or light blue chalk. Begin at the neck area of the butterfly and draw a large, curved letter ‘D’ shape extending outward and upward. Repeat this on the other side to create the symmetrical top wing. -
Outline the bottom wings:
Continuing with the teal chalk, start from the bottom section of the top wing and draw a smaller rounded loop that connects back to the lower body. Mirror this on the opposite side. -
Thicken the borders:
Go over your teal wing outlines a second time, pressing a bit harder to create a thick, bold border that will stand out.
Step 2: Adding Decorative Details
-
Draw the inner wing shapes:
Inside each of the four wing sections, draw a smaller outline that follows the same curve as the outer wing. Leave about an inch of space between this new line and the outer border. -
Create the heart pattern:
Using the white chalk, draw three or four small hearts floating inside each of the upper wing sections. Try to angle them slightly so they flow with the shape of the wing. -
Add hearts to lower wings:
Draw three more small white hearts in the lower wing sections. I find it easiest to start with the center heart to keep the spacing even. -
Decorate the borders:
Take your pink chalk and draw a series of small circles (like pearls) filling the gap between the inner and outer teal lines on the top wings. -
Fill the border circles:
Lightly color in these pink circles. For variety, you can mix in a few purple circles on the bottom wing borders. -
Draw the big wing circles:
On the bottom wings, inside the main shape, draw a large circle using pink chalk. Add a smaller teal circle inside of that, and then color the very center in with pink. -
Add the antennae:
Switch to white chalk. Draw two long, curving lines extending from the head, curling them outward at the tips. -
Highlight the body:
Add a small white dash or dot on the pink head to make it look shiny.
Chalk Blending Trick
To make the wings look smoother, use your finger or a dry chalkboard eraser to gently rub the chalk into the pavement. This fills the tiny cracks.
Step 3: Optional Companion Butterfly
-
Draw a smaller friend:
If you have space above, draw a smaller butterfly using a simple white line for the body. -
Add colorful wings:
Use teal for the top wings and lavender for the bottom wings, coloring them in solidly with a circular scribbling motion. -
Outline in white:
Finish the small butterfly by outlining the wings in white chalk to make the edges crisp.
Uneven Symmetry?
If one wing looks bigger than the other, just thicken the outline on the smaller wing until they roughly match in size.
Step back and admire your beautiful, symmetrical artwork on the pavement

PENCIL GUIDE
Understanding Pencil Grades from H to B
From first sketch to finished drawing — learn pencil grades, line control, and shading techniques.
Explore the Full Guide
Jellyfish With Wiggly Tentacles
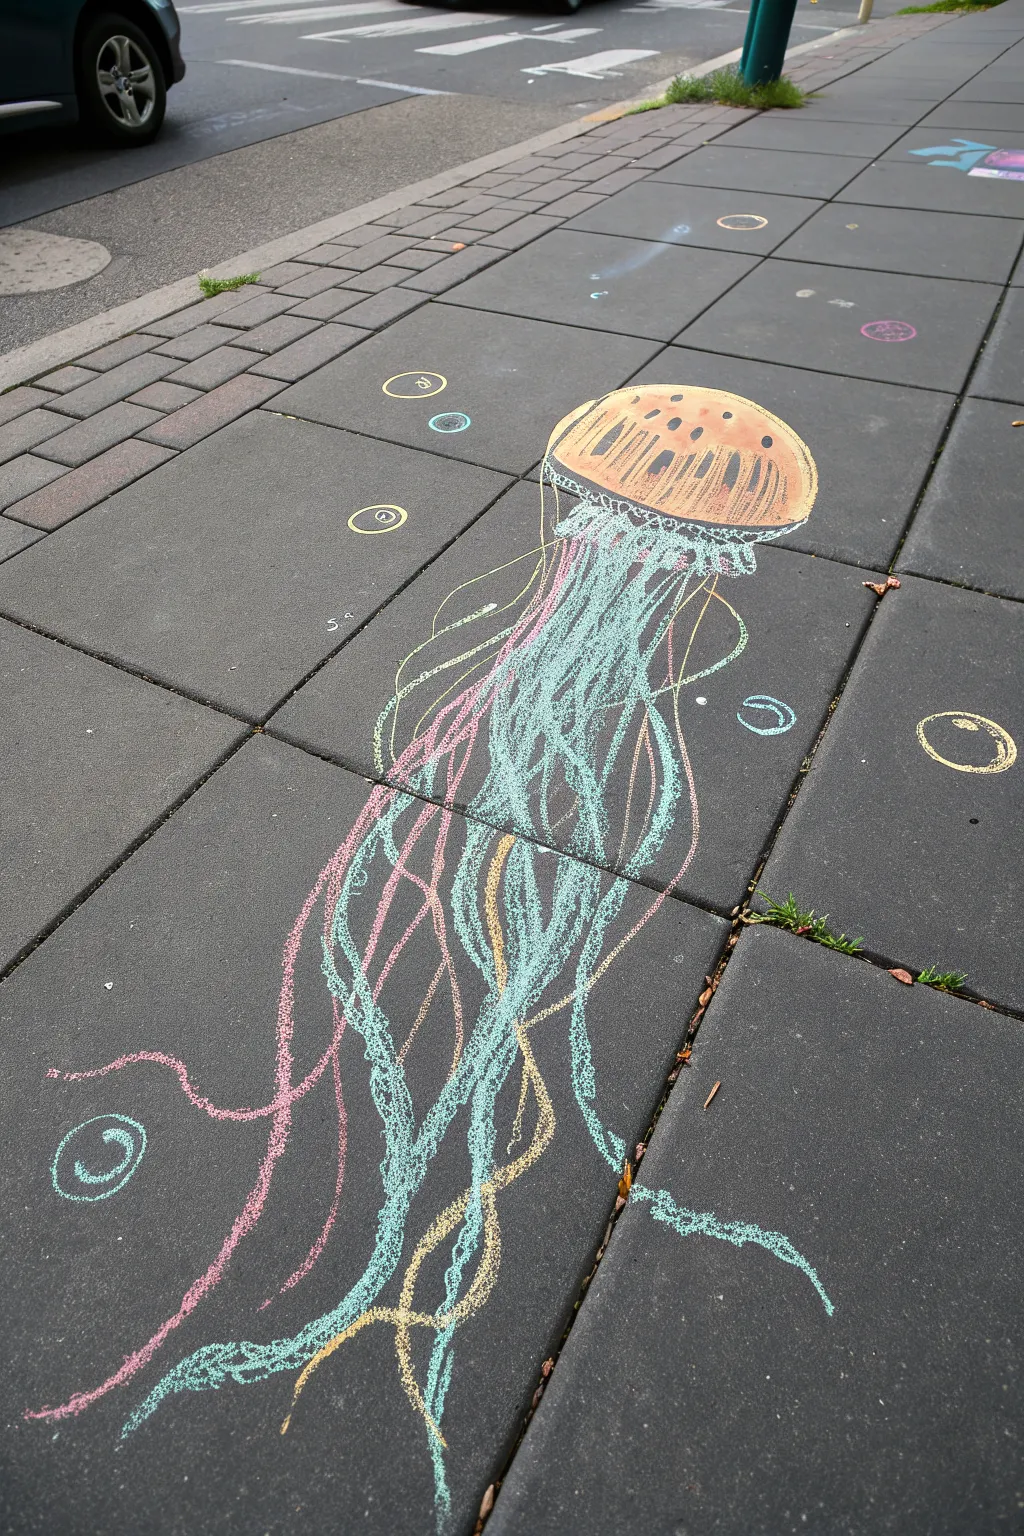
Bring the ocean to your driveway with this vibrant chalk jellyfish that seems to float right across the pavement. Its luminous bell and long, tangled tentacles in turquoise, pink, and yellow create a stunning aquatic effect that’s surprisingly easy to achieve.
Step-by-Step
Materials
- Sidewalk chalk (peach, bright orange, light blue/turquoise, pink, yellow, white, brown)
- Pavement or driveway surface
- A cloth or blending sponge (optional)
- Small cup of water (for wetting chalk if desired)
Step 1: Drawing the Bell
-
Outline the bell shape:
Start by drawing a large, rounded semi-circle for the top of the jellyfish’s body (the bell). Connect the bottom with a slightly curved line that isn’t perfectly straight, giving it a soft, organic feel. -
Fill in the base color:
Color the entire bell area with a warm peach or light orange chalk. Apply the chalk densely so the pavement texture starts to disappear. -
Add dimension with shadows:
Using a light brown or darker orange chalk, draw a series of vertical, curved lines along the bell. These should follow the curve of the dome, creating ridges that make the jellyfish look 3D. -
Highlight the dome:
Take your white chalk and specific spots on the very top of the bell to give it a shiny, wet appearance. You can also add a few dark brown spots for texture. -
Create the frilly edge:
At the bottom of the bell, draw a wiggly, ruffled line using white or very pale blue chalk. This is the oral arm skirt where the tentacles will emerge.
Smoother colors
Use your fingers or a piece of foam to rub the chalk into the pavement on the bell. This blends the peach and brown stripes for a smooth, gelatinous look.
Step 2: Creating the Tentacles
-
Map out the flow:
Lightly sketch the general direction of your tentacles. In the reference, they flow diagonally downwards to the left, which creates a sense of movement. -
Start with the main tentacles:
Using a bright turquoise or light blue chalk, draw thick, wavy lines originating from the ruffled skirt. Press firmly to get a vibrant, opaque line. -
Add the pink strands:
Interweave long, squiggly pink lines among the blue ones. Let some of these drift further out to the side, extending longer than the main cluster. -
Incorporate yellow accents:
draw a few yellow tentacles twisting through the mix. Contrast is key here, so try to place yellow lines near darker pavement areas or blue lines. -
Vary the line texture:
Instead of solid lines for everything, try making some tentacles look ‘braided’ or textured by using a squiggly motion back and forth as you draw down. -
Extend the reach:
Take a few blue and pink lines and extend them very far down the pavement, tapering them off so they look like fine threads drifting in the water.
Step 3: Bubbles and Final Details
-
Draw large bubbles:
Scattered around the jellyfish, draw circles of varying sizes using white and pale electric blue chalk. -
Add reflections to bubbles:
On one side of each bubble circle, thicken the line or add a small white curved mark to suggest a reflection on the spherical surface. -
Create small spiraling bubbles:
Draw small swirls or spirals near the ends of the tentacles to represent disturbed water or tiny bubbles trailing behind. -
Clean up the edges:
Check the outline of your bell dome. If it got messy, use a darker chalk or even a little water on your finger to define the edge against the grey pavement. -
Add final sparkle:
Add a few tiny white dots around the tentacle cluster to give the impression of magical sea dust or bioluminescence.
Make it glow
Outline your final tentacles with a thin line of damp white chalk. When it dries, the white will become incredibly bright, making the colors look neon.
Step back and admire your mesmerizing deep-sea creature as it swims across the concrete
Animal Footprint Trail to Follow
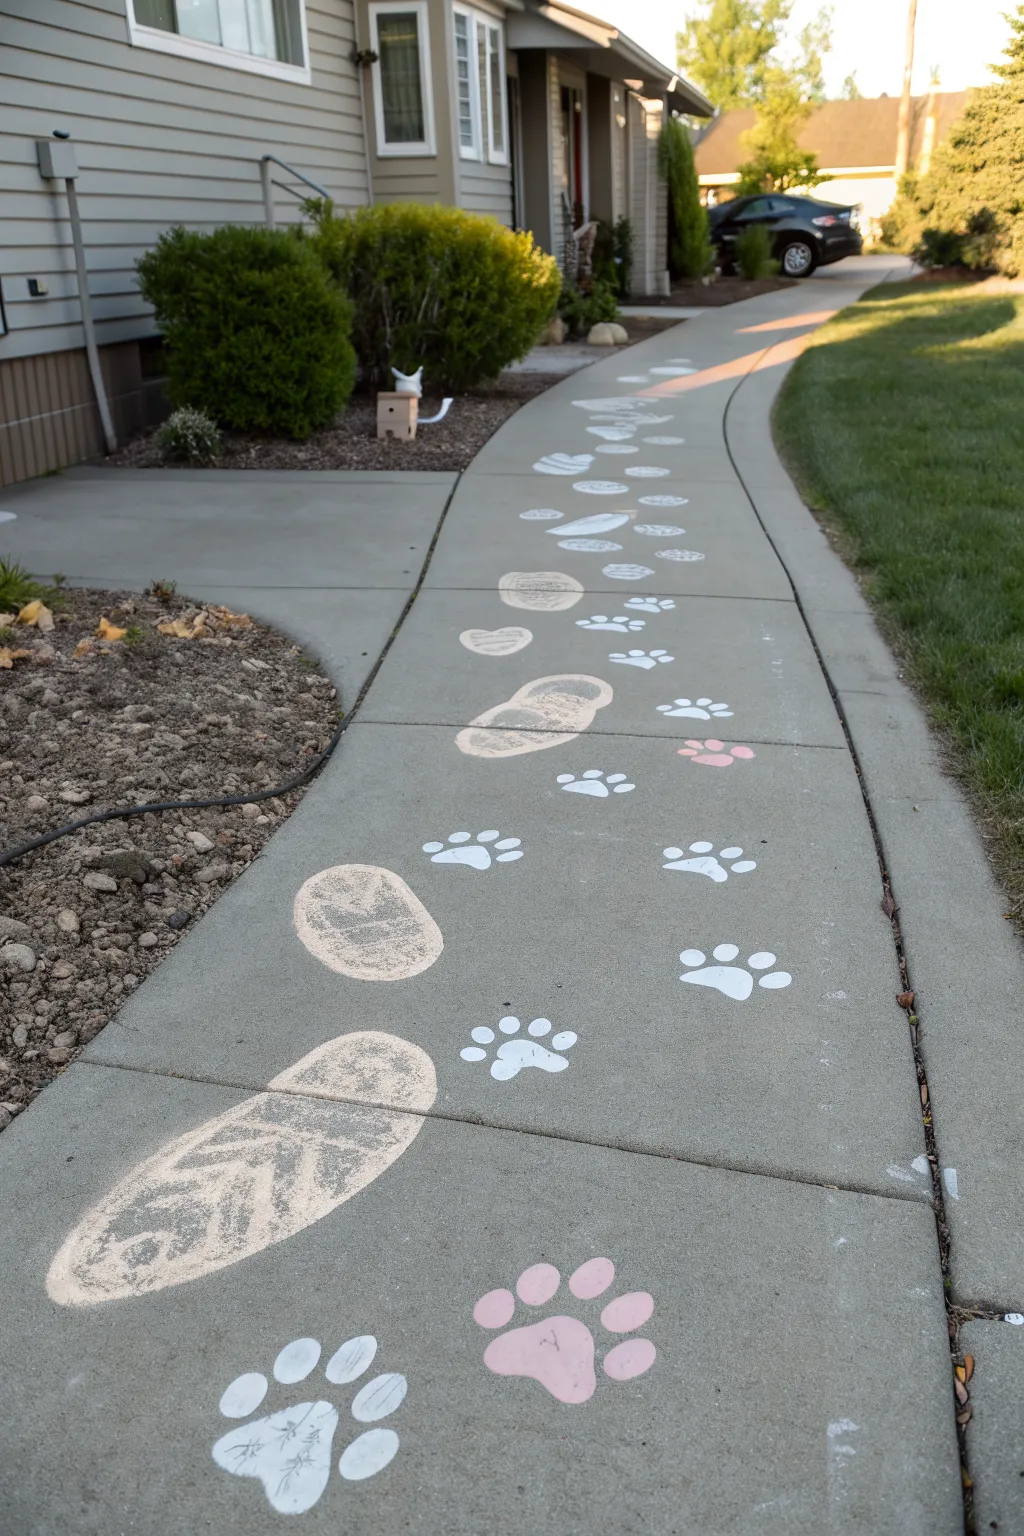
Transform your sidewalk into an adventurous trail with this playful combination of shoe prints and animal paws leading the way. Using simple chalk stencils and freehand techniques, you’ll create a durable and delightful path that invites kids to follow along.
Step-by-Step Guide
Materials
- Sidewalk chalk (white and pink)
- Cardboard or poster board for stencils
- Scissors or craft knife
- Pencil or marker
- Old shoe (for tracing)
- Painter’s tape (optional)
- Broom or brush (for cleaning surface)
Step 1: Preparation and Stencil Making
-
Clean the Canvas:
Before creating your masterpiece, sweep your sidewalk path thoroughly to remove dirt, pebbles, and debris. A clean surface ensures the chalk adheres better and your lines stay crisp. -
Trace a Shoe:
Grab a sturdy piece of cardboard or poster board. Take an old shoe (a sneaker works best for a recognizable shape) and trace closely around the sole with a pencil or marker to get your outline. -
Cut Out the Shoe Stencil:
Carefully cut out the shoe shape you just traced. I like to cut out the inside of the shape to create a negative stencil, leaving a sturdy border of cardboard intact to hold comfortably while drawing. -
Draft the Paw Print:
On a separate piece of cardboard, draw a large animal paw print. This should include one large, curved pad for the bottom and four smaller oval shapes for the toes above it. -
Create the Paw Stencil:
Cut out the paw shapes (the large pad and four toes) to create your second negative stencil. Keep the pieces close together to maintain the proper paw structure.
Wet Chalk Technique
Dip the tip of your chalk in water before drawing. This creates a paint-like paste that dries much brighter and lasts longer on the pavement.
Step 2: Laying the Track
-
Plan the Path:
Visualize a winding path down the center of your walkway. You want the prints to look like someone—and something—was walking naturally, not in a perfect straight line. -
Start with Shoe Prints:
Place your shoe stencil on the concrete at an angle. Heavily color inside the stencil edges with white chalk to create a thick outline. -
Add Sole Detail:
Remove the stencil carefully. Inside the outline, use the side of your chalk to lightly shade the interior. Then, draw zigzag or wavy lines across the shaded area to mimic the tread of a hiking boot. -
Space the Next Step:
Move a few feet forward generally alternating left and right positioning, just like real footsteps. Place the stencil down again and repeat the outlining and texturing process. -
Continue the Human Path:
Work your way down the sidewalk, creating a meandering trail of shoe prints. Leave enough space between them to weave the animal prints in later.
Smudged Edges?
If your stencil lines look blurry, press the cardboard firmly against the ground with your non-drawing hand closer to where you are coloring.
Step 3: Adding the Animal Companions
-
Position the First Paw:
Place your paw stencil near the first shoe print, as if a dog or creature is walking alongside the person. -
Fill with White:
Rub white chalk heavily inside the stencil cutouts. Use your finger to smudge the chalk into the concrete pores for a solid, opaque look. -
Add a Pop of Pink:
Select a few random spots along the trail for special prints. Use pink chalk instead of white for these paws to add visual interest and variety. -
Vary the Direction:
As you move down the path filling in paws, slightly rotate your stencil. This makes the animal look like it’s sniffing around or wandering rather than marching like a robot. -
Freehand Small Details:
If your stencil didn’t catch perfectly, use a sharp piece of chalk to touch up the edges of the toes to keep them distinct from the main pad. -
Create a Paw Cluster:
For a fun effect, group two or three smaller paw prints close together in one section, suggesting a quick scurry or a pause in the walk. -
Final Cleanup:
Blow away any loose chalk dust that may have settled outside your intended lines to keep the sidewalk look tidy and the prints sharp.
Step back and admire the adventurous trail you have created for the neighborhood to enjoy


Planets and Shooting Stars Scene
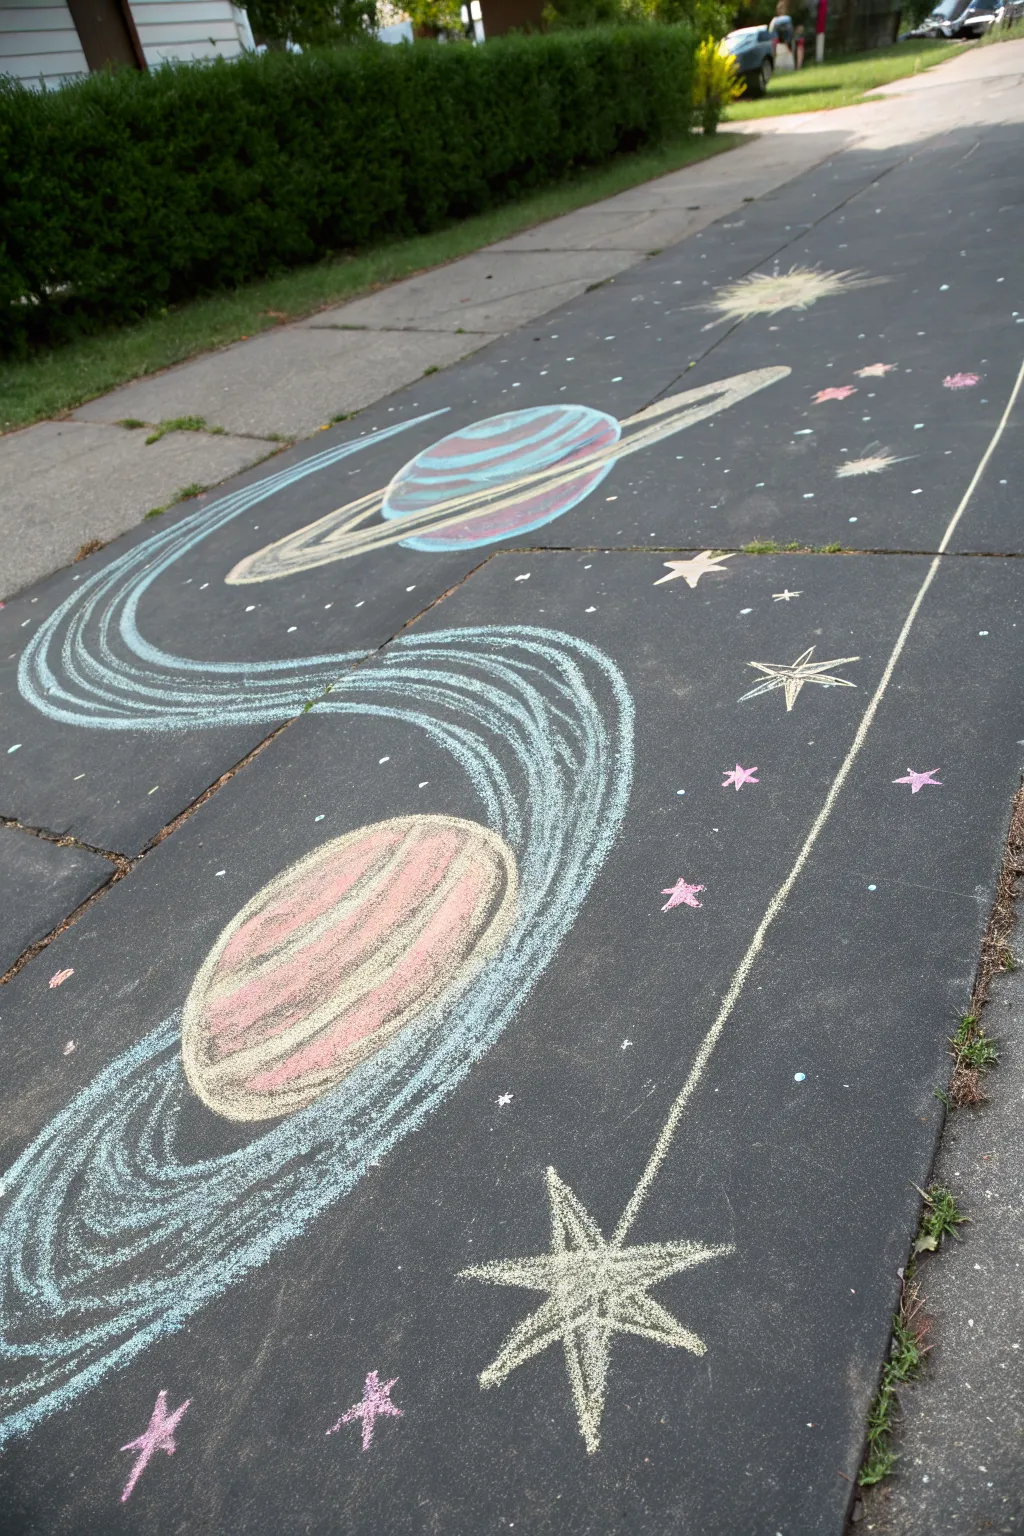
Transform a plain driveway into an intergalactic journey with this vibrant outer space scene. Featuring striped planets with rings and a swirling, starry nebula path, this chalk art captures the wonder of the night sky right at your feet.
Step-by-Step Tutorial
Materials
- Sidewalk chalk (white, light blue, pink, orange, purple)
- Blacktop driveway or smooth pavement
- A rag or blending foam (optional)
- Water (for washing hands)
Step 1: Setting the Scene & The First Planet
-
Plan the composition:
Visualize where you want your two main planets to sit. This artwork uses a diagonal layout, placing one large planet in the lower left and another in the upper middle area, connected by a long swooping path. -
Outline the bottom planet:
Start with the lower planet by drawing a large circle using pale orange or peach chalk. It doesn’t need to be perfectly round; a slight oval shape makes it look more three-dimensional. -
Fill the planet’s base color:
Color in the entire circle with your peach or light orange chalk. Apply it thickly so the blacktop doesn’t show through too much. -
Add stripe details:
Layer thick bands of pink and white chalk over the orange base. Curve these lines slightly to give the planet a spherical, 3D appearance. -
Sharpen the edges:
Go back around the perimeter of the planet with a bright white or light yellow line to make it pop against the dark pavement.
Step 2: The Connecting Nebula Path
-
Draw the main swirl lines:
Using light blue chalk, start at the bottom planet and draw long, sweeping curves that wind their way up toward where the second planet will be. I find drawing from the shoulder, not the wrist, helps create smoother curves. -
Thicken the path:
Add more parallel lines alongside your first curves. Vary the pressure so some lines are bright and opaque while others are faint and dusty. -
Create a glow effect:
Use the side of the chalk stick to shade lightly between your defined blue lines. This soft shading mimics the gaseous look of a space nebula. -
Add white highlights:
Intersperse thin white lines within the blue stream to add brightness and movement to the cosmic dust trail.
Smoother Blending
To make your planets look more realistic and less sketchy, use a dry rag or even your fingers to smudge the chalk stripes together where the colors meet.
Step 3: The Ringed Planet & Stars
-
Outline the top planet:
At the end of your blue nebula path, draw the second planet. This one should be an oblate spheroid (a flattened circle) to accommodate the rings. -
Color and stripe the top planet:
Fill this planet with cooler tones like purples and teals. Add horizontal stripes similar to the first planet, curving them downward to show perspective. -
Draw the rings:
Draw a large, flat oval that goes around the planet. Make sure the lines pass behind the planet (where you don’t draw) and in front of it to create depth. -
Detail the rings:
Use cream or light yellow chalk to fill in the rings, adding concentric lines to show the separate bands of rock and ice. -
Draw the large stars:
Find empty blacktop spaces and draw large, five-pointed stars. Start with an upside-down ‘V’, then cross the lines, or draw a standard star shape and fill it in with white chalk. -
Add starburst details:
For the biggest white star, extend the points outward with quick, flicking motions to make it look like it is twinkling brightly. -
Scatter small stars:
Draw smaller, simple five-pointed stars using pink chalk around the periphery of the nebula path. -
Final stardust sprinkles:
Finish by tapping the tip of your white and blue chalks firmly against the ground to create tiny dots throughout the empty space, simulating distant galaxies.
Chalk Too Dusty?
If the chalk keeps blowing away before you finish, try dipping the tip of the chalk in water for two seconds. It creates a paint-like paste that dries very bright.
Step back and admire your own slice of the galaxy before the next rain washes the canvas clean
Sidewalk Chalk Maze With Start and Finish
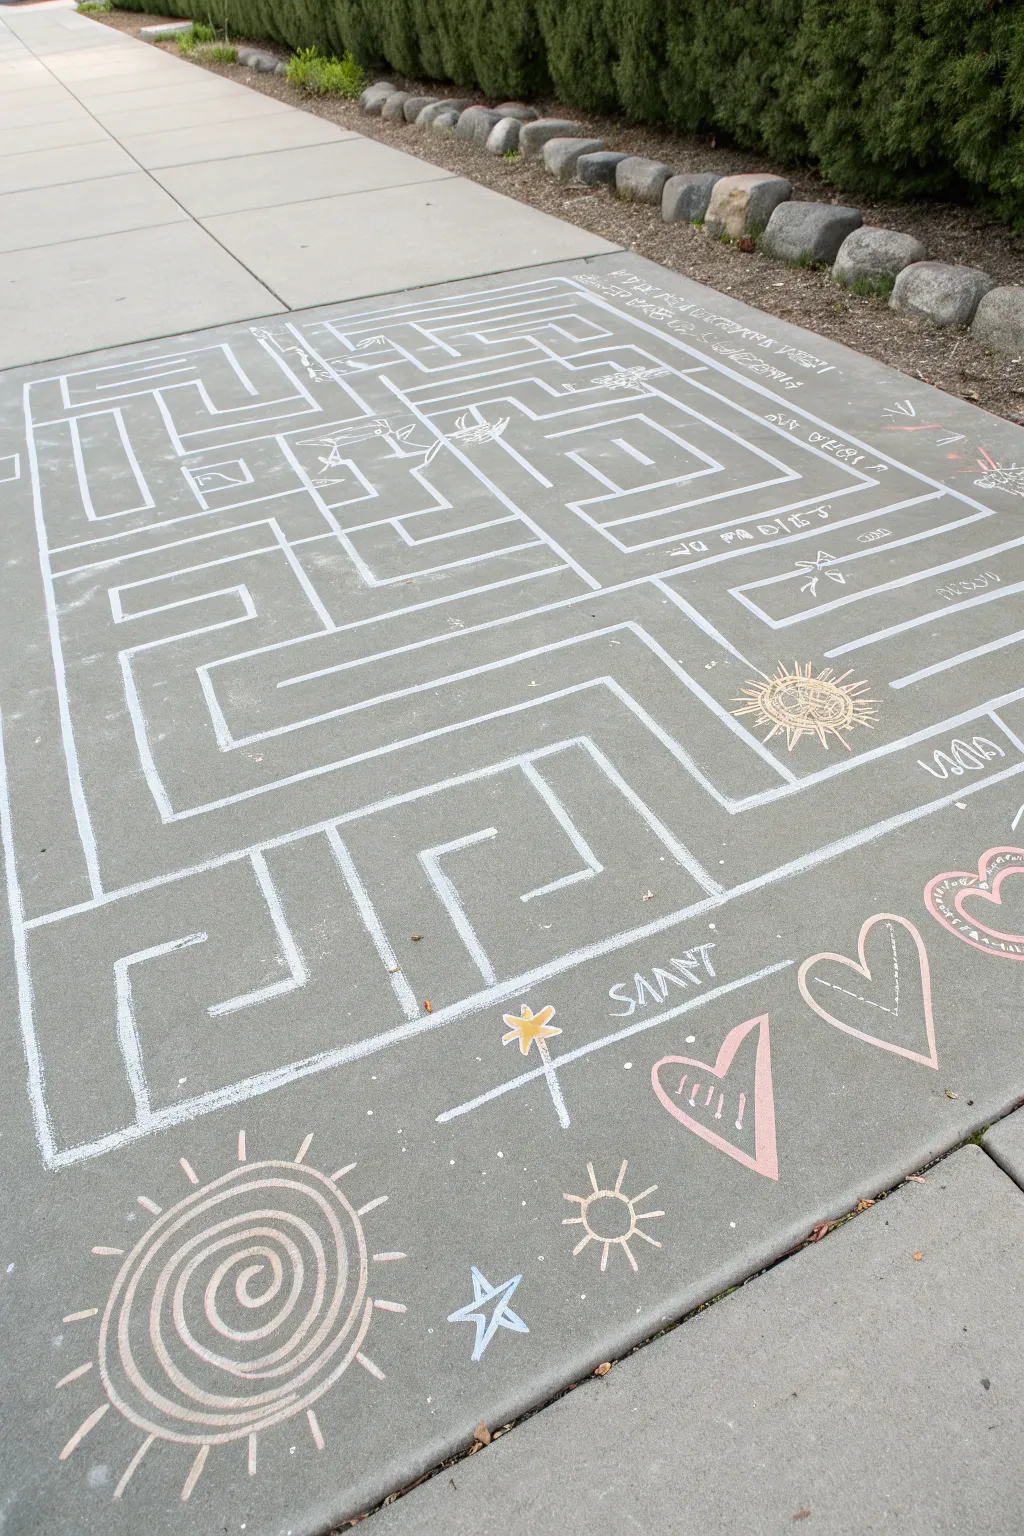
Transform a simple square of concrete into an engaging adventure with this elaborate sidewalk chalk maze. Featuring intricate pathways, cheerful celestial decorations, and clearly marked play zones, this project provides both artistic fun and an active game for kids.
Step-by-Step
Materials
- White sidewalk chalk (thick sticks for main lines)
- Colored sidewalk chalk (yellow, pink, blue)
- A broom or leaf blower
- Concrete sidewalk square or driveway section
- Measuring tape (optional)
- Water (for washing hands)
Step 1: Planning and Perimeter
-
Prep the surface:
Begin by sweeping the chosen concrete square thoroughly to remove small rocks, dirt, and debris that could snag your chalk or disrupt your lines. -
Establish the boundary:
Using a thick stick of white chalk, draw a large rectangle to serve as the outer boundary of your maze. If you are working on a standard sidewalk square, you can simply trace the expansion joints. -
Create the entry and exit points:
Decide where the ‘Start’ and ‘Finish’ will be. In this design, leave a small gap in the bottom centered boundary line for the start, and another gap elsewhere or just designate a clear end zone within the maze structure.
Uneven Lines?
If concrete is too rough for straight lines, stick a piece of painter’s tape down first, color over it heavily, and peel it up to reveal a perfect negative-space line.
Step 2: Constructing the Labyrinth
-
Draw the main axis lines:
Divide your large rectangle mentally into quadrants. Draw a few long, confident straight lines that cross through the middle but don’t quite touch the outer edges, creating the backbone of your corridors. -
Build the corridor walls:
Start adding parallel lines next to your main axis lines to create pathways wide enough for a child to walk through comfortably. A width of about 6-8 inches usually works best. -
Add dead ends and turns:
Now, start complicating the paths. Draw perpendicular lines that block off certain corridors, forcing the ‘player’ to turn left or right. Create boxy shapes and U-turns. -
Fill the empty spaces:
Look for large empty gaps in your grid. Fill them with smaller nested squares or spiral-like box patterns to maximize the usage of space and make the maze trickier. -
Double-check the solution:
Before moving on, walk the path with your finger or eyes to ensure there is actually a solvable route from the start to the finish line. -
Thicken the walls:
Go back over your white lines with a second pass of chalk. I like to press a bit harder here to make the walls bright and distinct against the grey concrete.
Step 3: Adding Decorative Flourishes
-
Draw the sunburst:
Locate an open spot near a corner or intersection inside the maze. Draw a small yellow circle and radiate wiggly or straight lines outward to create a sunburst icon. -
Add scattered details:
Throughout the maze corridors, draw small white sketches like arrows, tiny triangles, or abstract squiggles to add visual interest without confusing the path. -
Create the Start Zone:
Below the bottom boundary line, write the word ‘START’ (or ‘SAANT’ as seen in the playful kid-style lettering). Draw a line underneath the text to separate it from the decorative area.
Make It Interactive
Place small physical obstacles like rocks or pinecones on certain maze paths that kids must jump over or navigate around to reach the finish.
Step 4: The Decorative Border
-
Draw the main spiral sun:
At the bottom left, outside the maze, draw a large spiral using white and faint pink chalk. Add radiating lines around the outside to turn the spiral into a large, artistic sun. -
Add floating hearts:
Using pink chalk, draw outline-style hearts along the bottom right border. Vary their sizes and angles to make them look playful and floating. -
Fill in the celestial elements:
Draw a few small stars using blue or white chalk between the sun and hearts. Simple five-point stars or asterisk-style stars work perfectly here. -
Detail the hearts and suns:
Add tiny dashes inside the hearts or small dots around the sun rays for extra texture. This small step makes the drawings feel more finished. -
Clean up smudges:
Blow away any excess chalk dust. If you smudged a line with your hand while drawing the bottom details, quickly re-trace it with fresh white chalk for a crisp look.
Now step back and watch as neighborhood kids discover and conquer your puzzling creation
Color Dot Balance-and-Reach Game
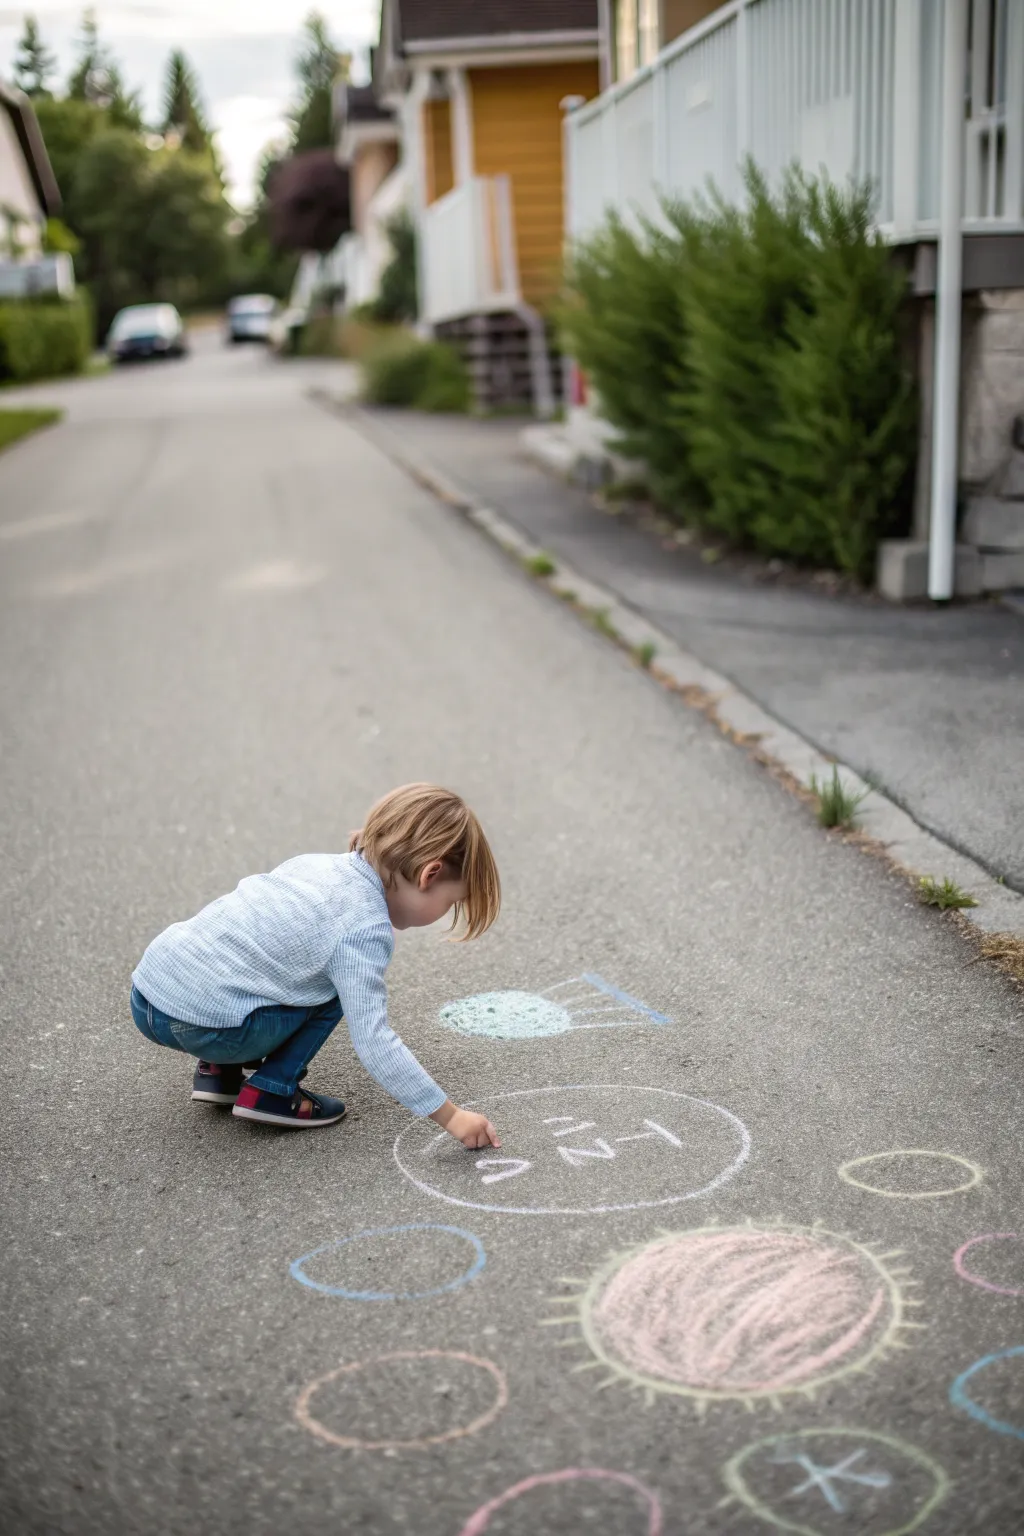
Transform your driveway into an engaging activity zone with this interactive chalk game designed to test coordination and reach. Using simple circles and colorful planets, you can create a layout that encourages kids to stretch, balance, and jump from spot to spot.
How-To Guide
Materials
- Sidewalk chalk in assorted colors (white, pink, blue, yellow, green)
- A paved driveway or sidewalk surface
- A broom (optional, for clearing the play area)
Step 1: Planning the Layout
-
Clear the area:
Before you begin drawing, sweep the pavement to remove loose gravel or leaves. A clean surface helps the chalk adhere better and keeps your lines crisp. -
Visualize the spacing:
Imagine where the child will stand. The goal is to create circles that are just far enough apart to be challenging to reach but close enough to be safe. I like to dry-run the distances by having a child stretch out their arm to see where a good target would be.
Chalk Brightness Tip
To make the colors pop on dark asphalt, dip the tip of your chalk in water for a few seconds before drawing. It goes on smooth and dries incredibly bright.
Step 2: Drawing the Base Circles
-
Draw the central hub:
Start by drawing a medium-sized white circle in the center of your play area. This can serve as the ‘home base’ or starting position for the game. -
Add target numbers:
Inside this central white circle, use the edge of your chalk to write simple numbers or letters. In the example, we see clear characters like ‘Z’ or ‘N’, but numbers 1-3 work great for sequencing games. -
Create the surrounding orbits:
Draw several empty outlined circles scattered around the central hub using different colors like blue, yellow, and green. Vary the sizes slightly—some large enough to stand in, others smaller as hand targets. -
Check the distance:
Ensure at least one or two circles are positioned within a lunge or stretch distance from the main circle so the player can reach them without moving their feet if that’s the rule.
Step 3: Adding Artistic Elements
-
Draw the sun planet:
Pick a spot for a feature element and draw a large circle using pink or red chalk. This will be the most visually striking target. -
Fill in the color:
Using the side of the chalk stick, color the inside of this large circle loosely. It doesn’t need to be solid; a scratchy, textured fill adds character and saves chalk. -
Add the rays:
Switch to a yellow or light green chalk. Draw short, radiating lines all around the circumference of your filled pink circle to turn it into a sun or glowing planet. -
Create a ringed planet:
Nearby, draw another medium circle in blue or white. Add a quick diagonal line or oval around it to represent planetary rings, making it distinct from the other targets. -
Draw a star target:
Find another spot for a small circle, perhaps in green. Inside this circle, draw a simple asterisk or star shape to mark it as a special bonus point zone.
Uneven Surface Fix
If the driveway is too bumpy for detailed letters, make the shapes larger and thicker. Use side-shading rather than drawing with the tip to avoid breaking the chalk.
Step 4: Final Touches
-
Add smaller satellites:
In the empty spaces between your main targets, draw very small circles—about the size of a grapefruit. These can be ‘tiptoe’ spots for harder balance challenges. -
Define the boundaries:
If you want to contain the game, you can draw a faint boundary line, but leaving it open allows you to expand the solar system later if needed. -
Clean up smudges:
Blow away any excess chalk dust that might have accumulated to keep the colors looking bright and prevent accidental slipping. -
Test the course:
Have a quick test run yourself or ask a helper to stand in the center and see if they can tap the ‘sun’ or the ‘blue planet’ while keeping one foot in the home circle.
Now you have a colorful, custom-made game course ready for an afternoon of active play
Chalk Obstacle Course With Mini Prompts
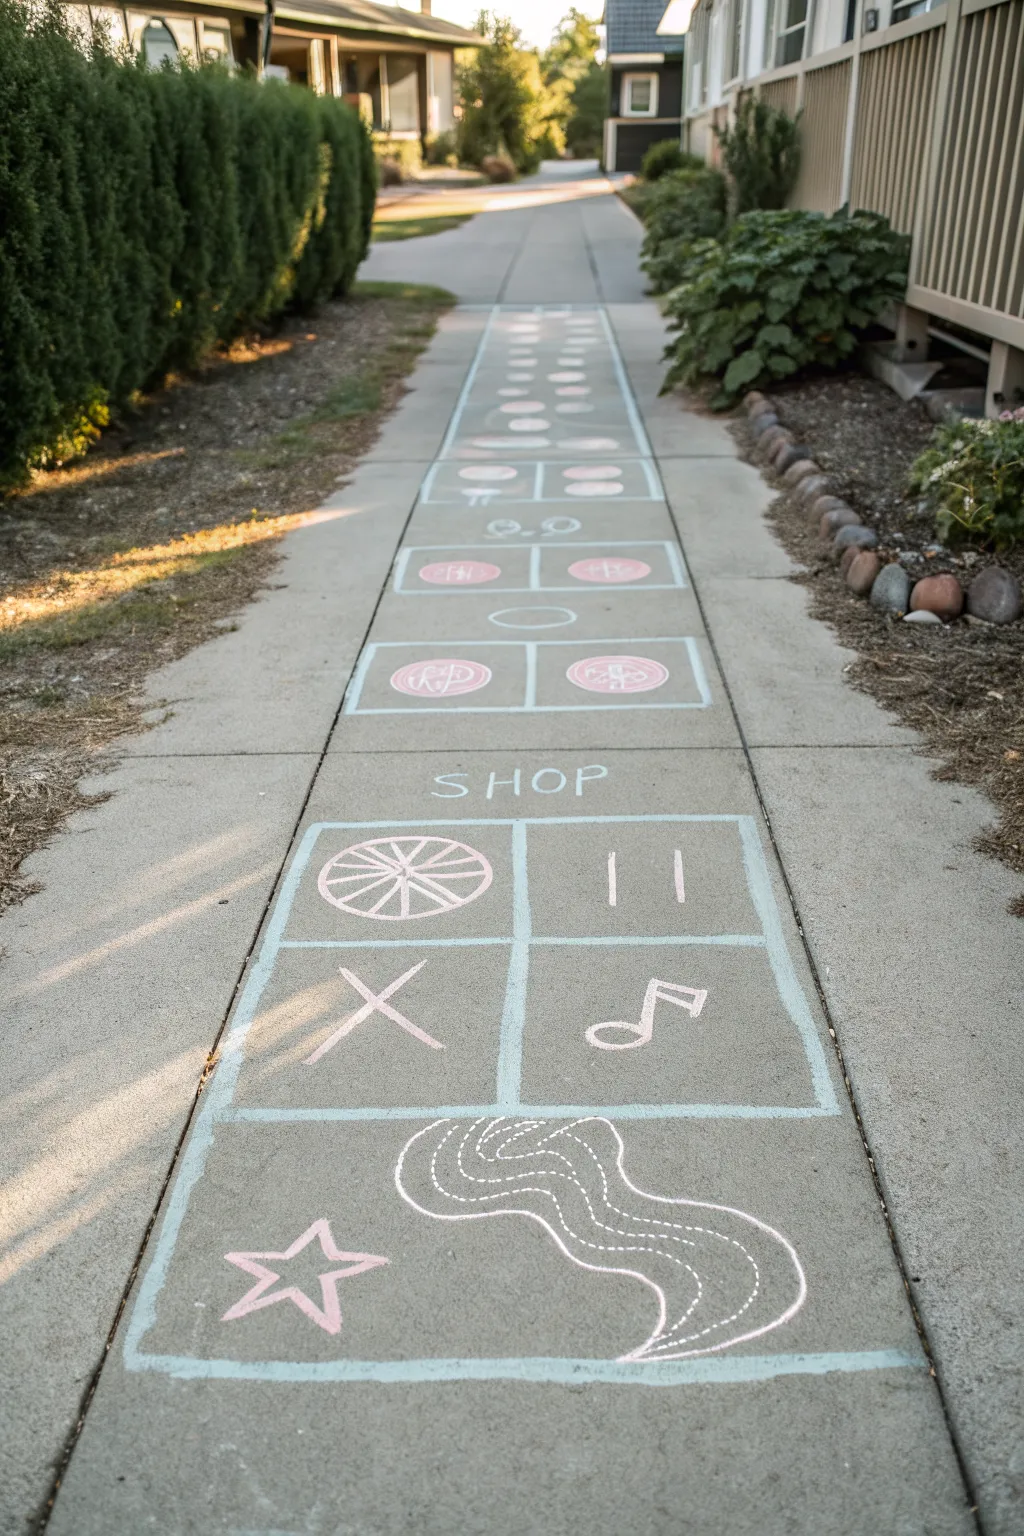
Turn an ordinary walkway into an interactive adventure with this extensive chalk obstacle course, featuring activity zones like spinning, jumping, and imaginative play. The whimsical pink and teal color palette makes it visually inviting for neighborhood kids to hop, skip, and twirl their way to the finish line.
Step-by-Step
Materials
- Sidewalk chalk (pack with teal, pink, and white)
- Measuring tape or ruler (optional, for spacing)
- Broom (to sweep the sidewalk clean)
- Knee pads or gardening mat (optional, for comfort)
Step 1: Preparation and Layout
-
Clear the Canvas:
Begin by sweeping the entire length of the sidewalk you plan to use. Removing loose sand, pebbles, and debris ensures your chalk lines will be crisp and won’t skip over rocks. -
Visualize the Sections:
Look down the path and mentally divide it into three main zones: the ‘action’ start, the ‘shop’ grid, and the long jump/hopscotch finish. I find it helpful to mark tiny dots every few feet just to keep the path centered.
Step 2: Zone 1: The Active Start
-
Draw the Starting Star:
At the very beginning of your path (closest to you), draw a large five-pointed star using pink chalk. Outline it first, then shade the points lightly but leave the center mostly open. -
Create the Wavy Path:
Above the star, draw a large, curvy shape that looks like a flowing river or a ribbon using white chalk. Make the outline bold. -
Add Texture Details:
Inside the white wavy outline, add dashed lines following the curve. This mimics a running path or water current, signaling the child to run or follow the line carefully. -
Draw the Action Grid Outline:
Just past the wavy path, draw a large rectangle using teal chalk. Divide this rectangle into four equal squares (a 2×2 grid) with thick lines. -
Fill the Action Squares: Spin:
In the top-left square of your grid, draw a wagon wheel shape in pink. This prompts the ‘Spin’ action. -
Fill the Action Squares: Jump:
In the top-right square, draw two vertical parallel lines. This is the symbol for ‘Jump’ or pause. -
Fill the Action Squares: Cross-Step:
In the bottom-left square, draw a large ‘X’ shape. This usually means ‘cross your legs’ or ‘criss-cross jump’. -
Fill the Action Squares: Dance:
In the bottom-right square, draw a musical note to prompt a dance move or a twirl.
Chalk It Up
Soak your chalk sticks in a cup of water for 5 minutes before drawing. This creates a vibrant, paint-like paste that dries opaque and lasts much longer.
Step 3: Zone 2: The Shop & Hop
-
Label the Next Section:
Above your action grid, write the word ‘SHOP’ in clear, capital letters using white chalk. This designates an imaginative play zone. -
Create the Shop Counters:
Draw two horizontal rectangles stacked vertically above the ‘SHOP’ text. Use teal for the outer borders. -
Add Buttons or Items:
Inside these rectangles, draw large pink circles. Detail them with squiggly lines or symbols to represent buttons to press or items to collect. -
Draw the Connector Loop:
Between the shop section and the next hopscotch area, draw a simple oval or circle in the center of the path to act as a stepping stone or resting point.
Level Up
Add a stopwatch element by drawing a ‘timer’ button at the start and finish, encouraging kids to race against their best time.
Step 4: Zone 3: The Long Path Finish
-
Outline the Long Track:
Moving further down the sidewalk, draw two very long parallel lines in teal that stretch toward the end of your course. Connect them at intervals with horizontal lines to create a ladder-like appearance. -
Create the Dashed Steps:
Inside the first few sections of this ladder, draw pairs of pink circles or ovals. These serve as foot placements for precise jumping. -
Add the Dashed Run:
For the furthest section of the path, switch to drawing dashed white lines down the center of the ladder, indicating a sprint or a speedy finish. -
Refine the Lines:
Walk back through your course. Retrace the teal borders of the squares and the long path to make them extra thick and visible. -
Clean Up Edges:
If any chalk smudged while you were working your way up the path, use a slightly damp cloth or your shoe sole to rub away the mistakes for a clean presentation.
Enjoy watching the neighborhood kids discover and master your creative new obstacle course
“Find and Count” Scavenger Grid
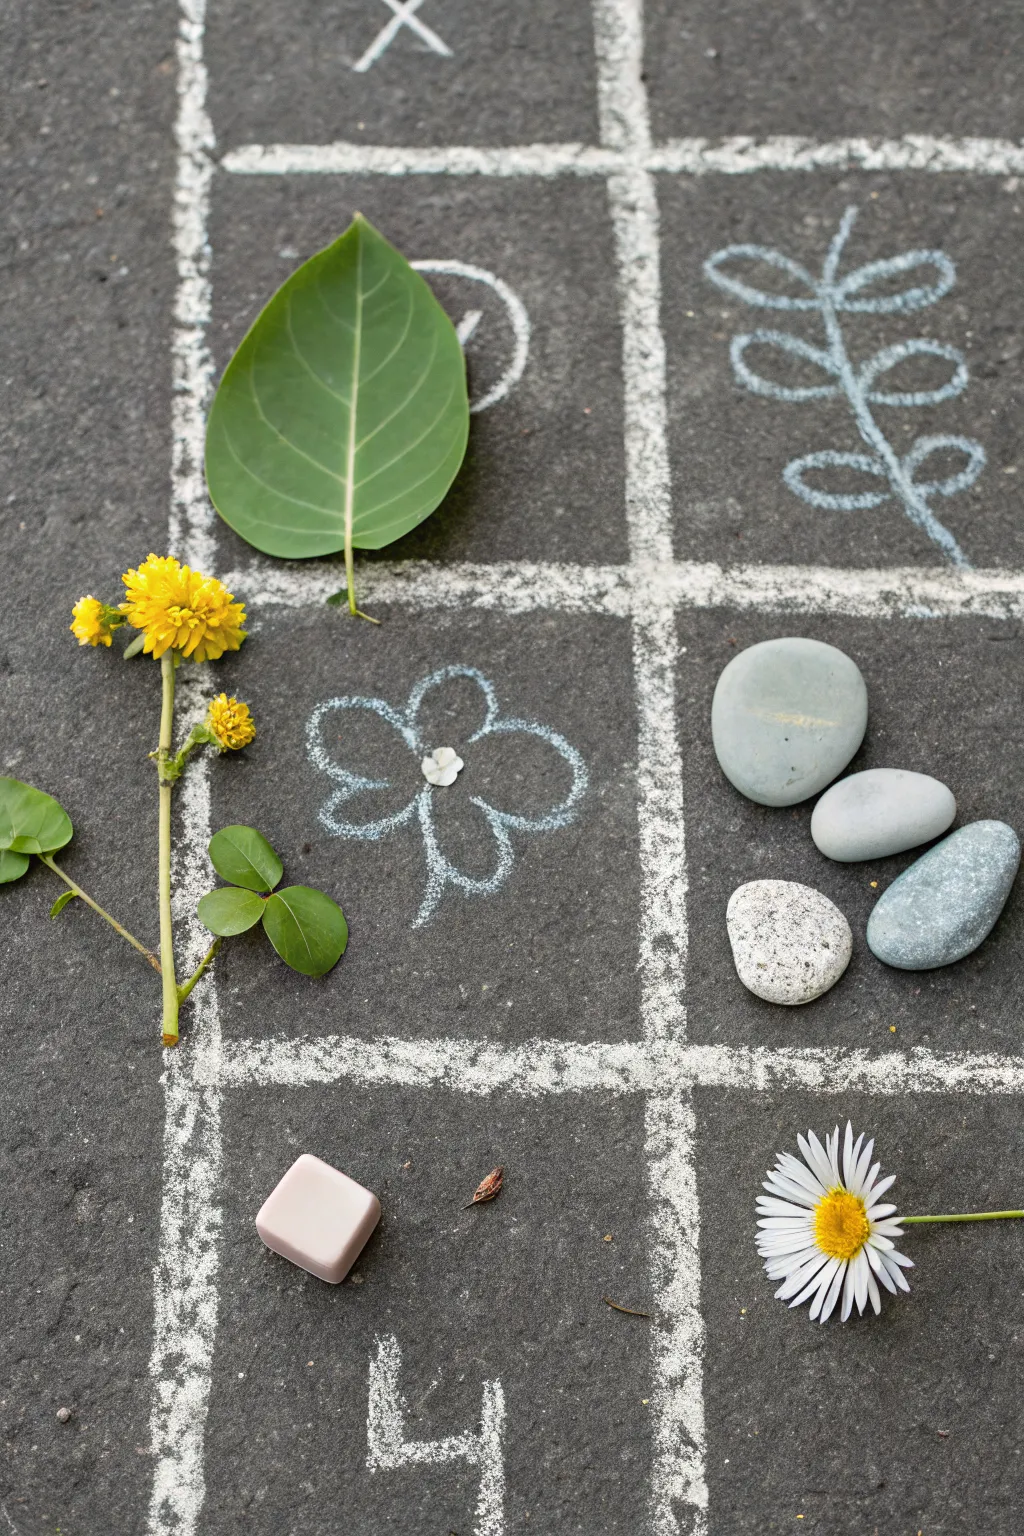
Transform your driveway into an interactive game board that combines art with a nature scavenger hunt. This project creates a simple chalk grid filled with doodles that prompt kids to find matching real-world treasures like stones, leaves, and flowers.
Step-by-Step Guide
Materials
- White sidewalk chalk
- Colored sidewalk chalk (optional, for variety)
- Pavement or driveway surface
- Nature items (stones, leaves, dandelion flowers, daisies)
- Small toy or die (optional)
Step 1: Setting the Stage
-
Draw the vertical lines:
Start by drawing two long, parallel vertical lines on the pavement. Space them about 10-12 inches apart to create nice, square playing spaces. -
Add the horizontal lines:
Cross your vertical lines with three or four horizontal lines to close off the boxes. You want to create a 2×3 or 2×4 grid structure, similar to a hopscotch board. -
Thicken the grid:
Go over your lines a second time. Press down firmly with the chalk to make the white borders thick and distinct against the dark asphalt.
Chalk breaking?
If your chalk snaps often, try drawing lightly first to map it out, then go back with firmer pressure to thicken the lines once the shape is right.
Step 2: Adding the doodles
-
Draw a leaf outline:
In the top left square, draw a simple circle or oval shape. This will serve as the placeholder for a large leaf. -
Sketch a branch:
Move to the top right square. Draw a vertical line with small loops coming off the sides to look like a fern or a leafy branch design. -
Create a flower shape:
In the middle left square, draw a basic five-petal flower outline. Keep the center open so a small object can be placed there later. -
Add a number:
At the bottom of the grid, write a large number, such as ‘4’. This indicates how many items need to be found for that specific scavenger hunt task. -
Leave blank spaces:
Keep some squares purely for placing objects without a drawing underneath, or draw simple geometric shapes like circles to hold stones.
Make it harder
Instead of drawings, write describing words in the squares like ‘Something fuzzy,’ ‘Something red,’ or ‘Something round’ to encourage creative finding.
Step 3: The Scavenger Hunt
-
Collect a big leaf:
Search the yard for a large, broad leaf. Place it directly over the circle or oval you drew in the top left square to cover the drawing. -
Find yellow flowers:
Gather a small handful of yellow wildflowers or dandelions. Lay them down on the left side of the grid, perhaps arranging them to grow out of the chalk lines. -
Gather stones:
Find four smooth stones. I like to look for ones with mismatched colors for visual interest. Place these in the middle right square. -
Pick a small daisy:
Find a single white daisy or small flower. Place it neatly in the bottom right corner of the grid. -
Add a center detail:
Take a tiny white petal or small pebble and place it right in the center of your chalk flower drawing to act as the flower’s pistil. -
Place extra markers:
If you have a die or a small square block, place it near the bottom grid line to mark the start of the game or just to add a geometric element.
Now step back and enjoy your beautiful nature collage organized neatly on the pavement
Chalk Wings on a Concrete Wall
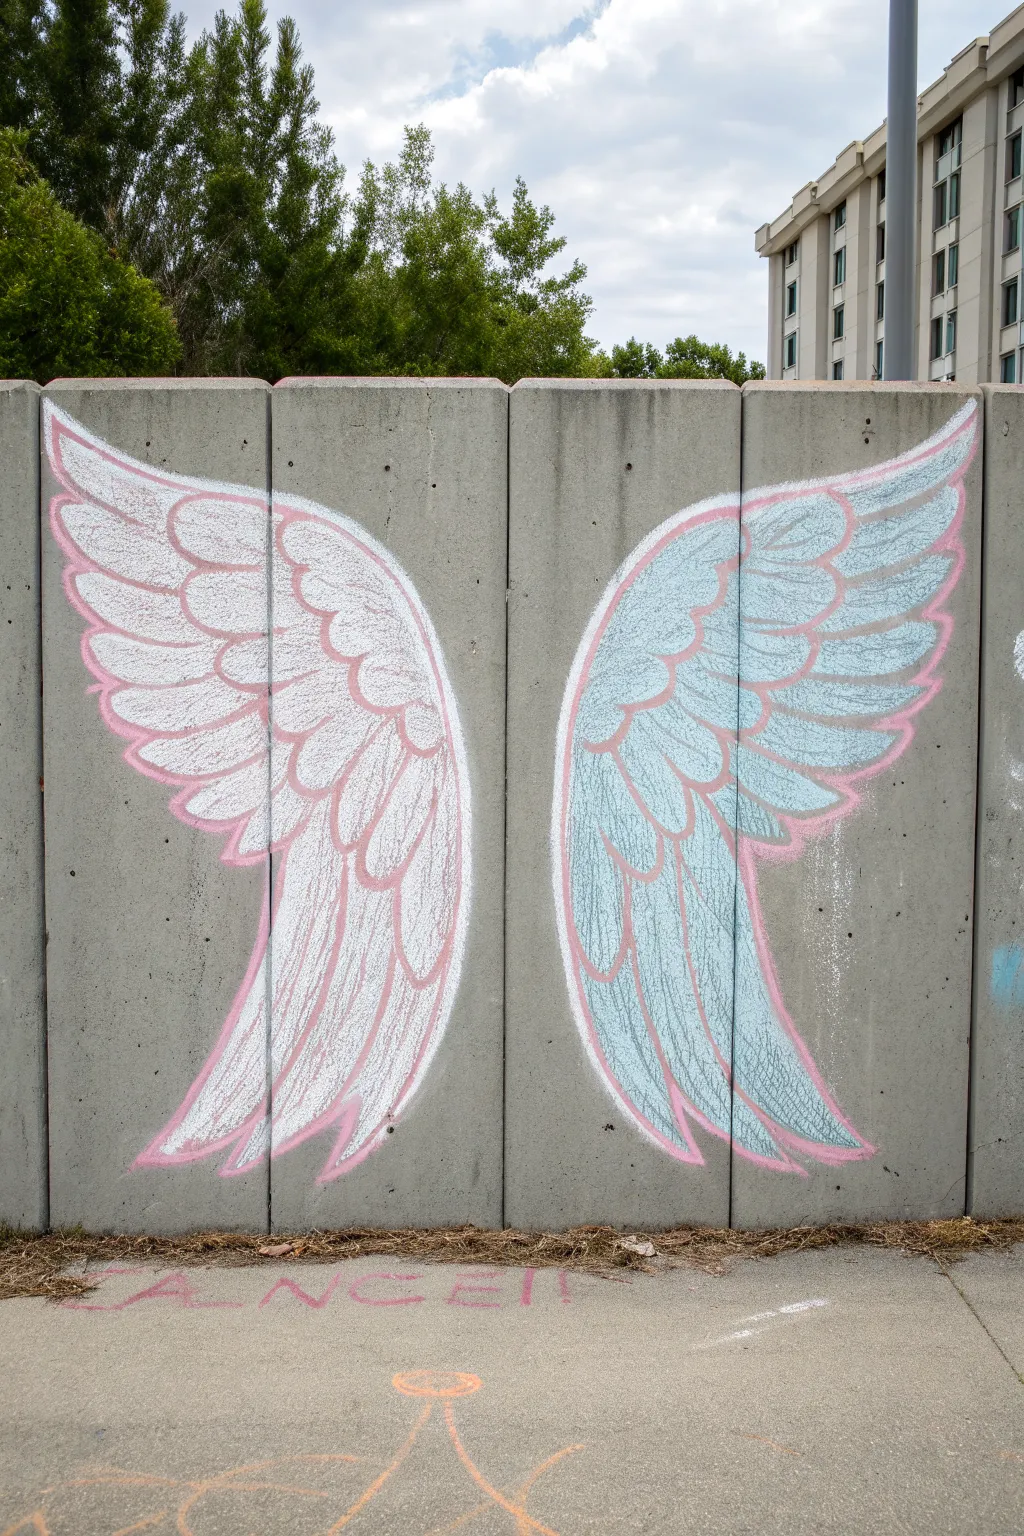
Transform a plain concrete wall into an interactive photo backdrop with these expansive angel wings. Using soft pastel and white chalks, you’ll create a feathery design that invites anyone passing by to step in and take flight.
Step-by-Step
Materials
- Jumbo sidewalk chalk (white, light pink, light blue)
- Standard blackboard chalk (white) for details
- A straight edge or yardstick (optional)
- A clean rag or blending sponge
- Water spray bottle (optional, for blending)
- Knee pads or a cushion (for drawing the lower feathers)
Step 1: Setting the Slopes
-
Find your canvas:
Locate a clean, dry section of a concrete or brick wall. A wall with vertical seams, like the one in the photo, can help you center your design perfectly. -
Determine the height:
Have your child (or the intended photo subject) stand against the wall. Mark the shoulder height lightly with chalk; this is where the tops of the wings should start. -
Outline the top curve:
Using pink chalk, draw a long, sweeping curve starting from your shoulder mark and arching upwards and outwards. Repeat this on the other side to create a mirror image. -
Define the wing span:
Draw the outer edge of the wing by bringing a line down from the tip of your top curve, gently curving it back inward as you go lower. -
Close the shape:
Complete the basic outline by drawing the inner edge of the wing, tapering it down to meet the outer line in a sharp point near the bottom. The overall shape should look like a glorious, elongated leaf.
Uneven Concrete?
If the wall is very pitted, wet the chalk slightly before drawing. This creates a creamy paste that fills holes better than dry chalk.
Step 2: Feathering and Filling
-
Create the feather rows:
Inside your pink outline, draw three or four curved vertical lines that follow the shape of the wing. These will act as guides for your tiered layers of feathers. -
Draw individual feathers:
Starting at the top, draw ‘U’ shapes along your guide lines using the pink chalk. Make the top feathers smaller and rounder, and gradually make them longer and more pointed as you move toward the bottom tips. -
Color the left wing:
Take your white jumbo chalk and fill in the feathers on the left wing. Use broad, side-to-side strokes to get good coverage on the rough concrete. -
Color the right wing:
Switch to your light blue chalk and fill in the feathers on the right wing, mimicking the white wing’s coverage. I find that pressing harder near the top adds a nice gradient effect. -
Initial blending:
Use your fingers or a dry rag to lightly smudge the chalk inside the feathers. This softens the harsh lines of the concrete texture and makes the wings look fluffier.
Step 3: Refining the Details
-
Reinforce the outlines:
Go back over your original pink outlines with a heavy hand to make the wing shape pop against the grey wall. -
Define the feathers:
Retrace the ‘U’ shapes of the individual feathers with the pink chalk. This separation is crucial so the wings don’t just look like solid blobs of color. -
Add texture strokes:
Using the sharp edge of a standard white chalk stick, draw quick, short lines inside the larger bottom feathers to mimic the texture of bird quills. -
Clean up the edges:
Step back and check your symmetry. If any chalk strayed outside the lines, rub it away with a damp cloth or a splash of water. -
Add a halo (optional):
If you want to complete the angelic look, draw a simple oval or ring floating above the space between the wings using yellow or orange chalk.
Make it Glow
Outline the outer edge with a second color, like neon yellow or bright orange, to give the wings a glowing, vibration effect.
Now stand in the middle and snap a picture of your flight-ready masterpiece


Have a question or want to share your own experience? I'd love to hear from you in the comments below!