
Whenever I need a quick creative reset, I grab sidewalk chalk and turn a plain slab of concrete into something cheerful in minutes. These easy beginner chalk art ideas are playful, forgiving, and designed to look impressive without needing fancy drawing skills.
Simple Rainbow Arc With Puffy Clouds
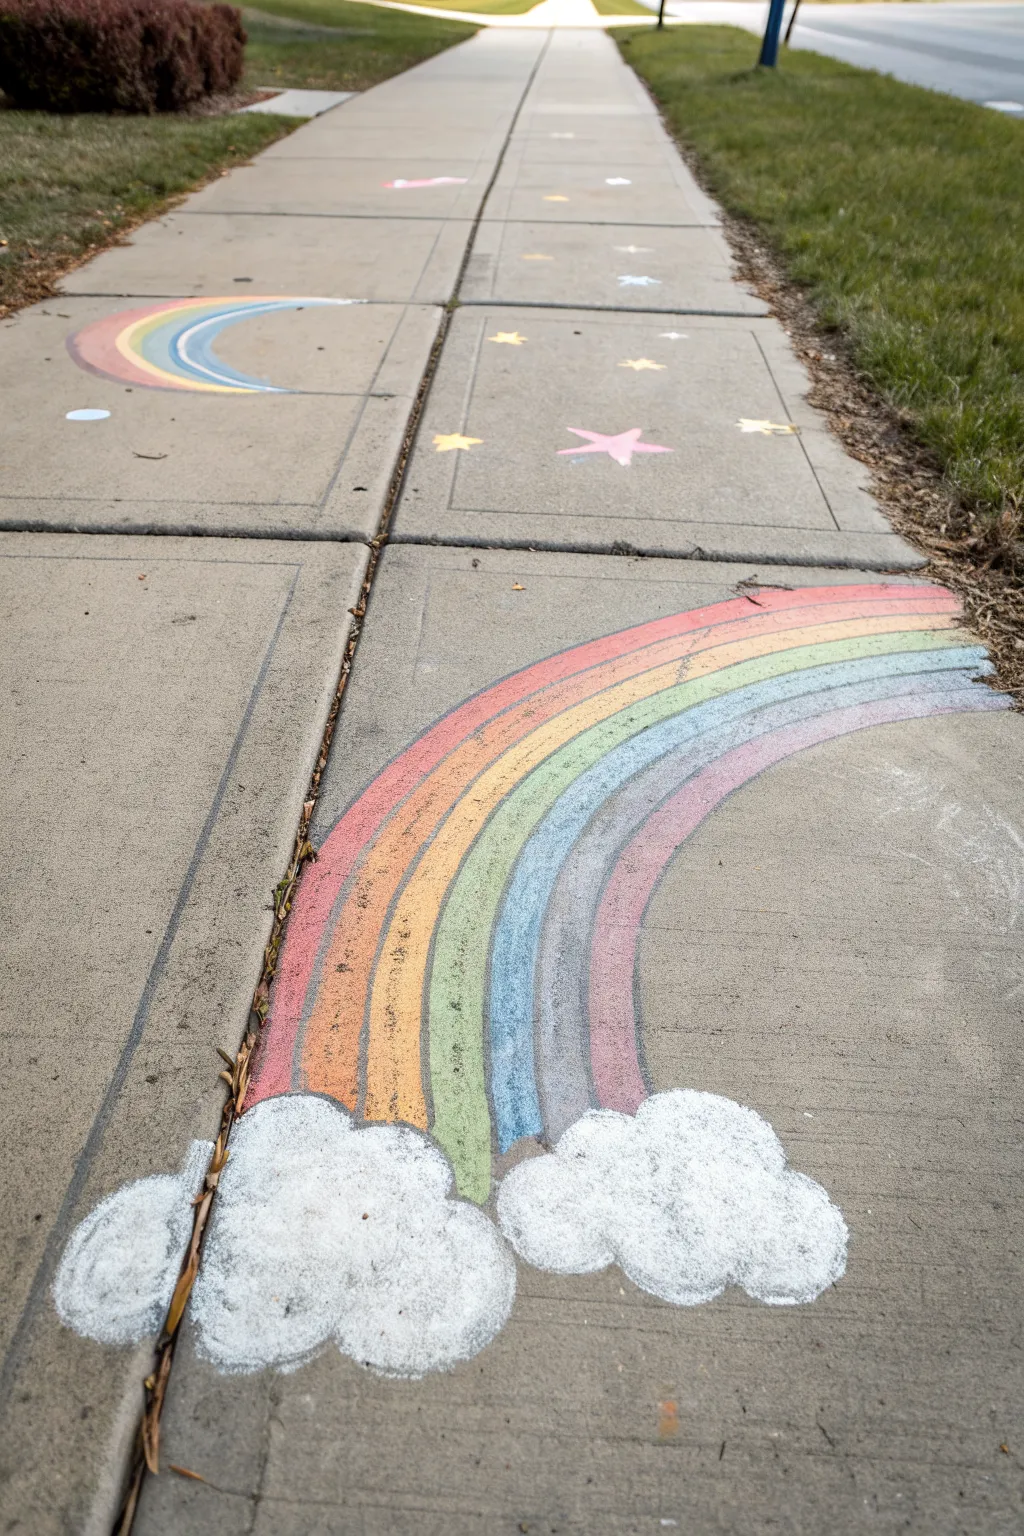
Brighten up the neighborhood with this classic, cheerful design that spans across sidewalk squares. This project features a vibrant, arching rainbow bursting out of soft, fluffy clouds, creating a whimsical path for anyone walking by.
How-To Guide
Materials
- Sidewalk chalk (red, orange, yellow, green, blue, purple/pink)
- White sidewalk chalk (thick stick ideal)
- Clean, dry sidewalk square
- Optional: Broom or brush for prep
Step 1: Preparation & Outline
-
Prep the surface:
Before you start drawing, give the sidewalk square a quick sweep. Removing loose pebbles and dirt helps the chalk lay down smoothly and prevents little bumps in your lines. -
Position the base:
Choose a corner or the bottom edge of a sidewalk square to anchor your drawing. This rainbow looks best when it feels like it’s springing up from the ground. -
Sketch the upper arc:
Using your red chalk, draw a large, sweeping curve. Start near the bottom edge of the sidewalk crack and extend it upwards and over toward the right side. Don’t press too hard yet; just establish the shape. -
Sketch the lower arc:
Now, take your purple or pink chalk and draw a smaller, inner curve parallel to the red one. Leave a nice wide gap between them to fit the other colors.
Step 2: Filling the Colors
-
Apply the red band:
Go back to your red top line and thicken it significantly. Color downwards from that line about an inch or two to create a bold red stripe. -
Add the orange stripe:
Directly beneath the red, draw your orange band. Try to slightly overlap the edges just a tiny bit where the colors meet to avoid gaps of grey concrete showing through. -
Draw the yellow band:
Continue the pattern with yellow. Since yellow is a lighter pigment, I find doing a second pass over this stripe helps it stand out against the grey pavement. -
Add the green stripe:
Draw your green stripe next. Keep your curve steady, following the flow of the lines above it. -
Add the blue stripe:
Fill in the blue band. Make sure the width matches the other stripes so the rainbow looks balanced. -
Finish with purple:
Complete the rainbow with the purple (or violet) stripe on the very bottom, filling the space down to your original guideline. -
Blend the transitions:
Use your fingers or a dry rag to lightly rub along the seams where colors touch. This softens the lines and creates a more cohesive gradient effect.
Smooth Blending
To make the rainbow look painted on, use a piece of foam or a carpet remnant to rub the chalk into the concrete pores. This removes grid lines.
Step 3: Creating the Clouds
-
Outline the first cloud:
At the bottom left base of your rainbow, draw a series of connecting semi-circles with white chalk to form a lumpy cloud shape. This one sits partly over the straight seam of the sidewalk. -
Outline the second cloud:
Draw a second, slightly smaller cloud shape at the other end of the rainbow arc. Make sure the rainbow ends appear to tuck behind these outlines. -
Fill the white centers:
Color heavily inside your cloud outlines. Use circular scribbling motions to mimic fluffiness and get good coverage on the rough concrete. -
Layer up the white:
Sidewalk concrete can absorb white easily, so apply a second heavy layer to make the clouds pop. I like to press harder on the top edges to catch the light. -
Clean up the edges:
If any rainbow colors strayed into the cloud area, color over them firmly with the white chalk to mask them. -
Dust off debris:
Blow away any loose chalk dust that isn’t stuck to the pavement so the colors stay clean and bright.
Ghosting Colors?
If lighter colors like yellow look too transparent, wet the chalk stick slightly before drawing. It creates a creamy, paint-like paste that dries opaque.
Step back and admire how much color you’ve added to the street


Big Daisy Flowers in Sidewalk Squares
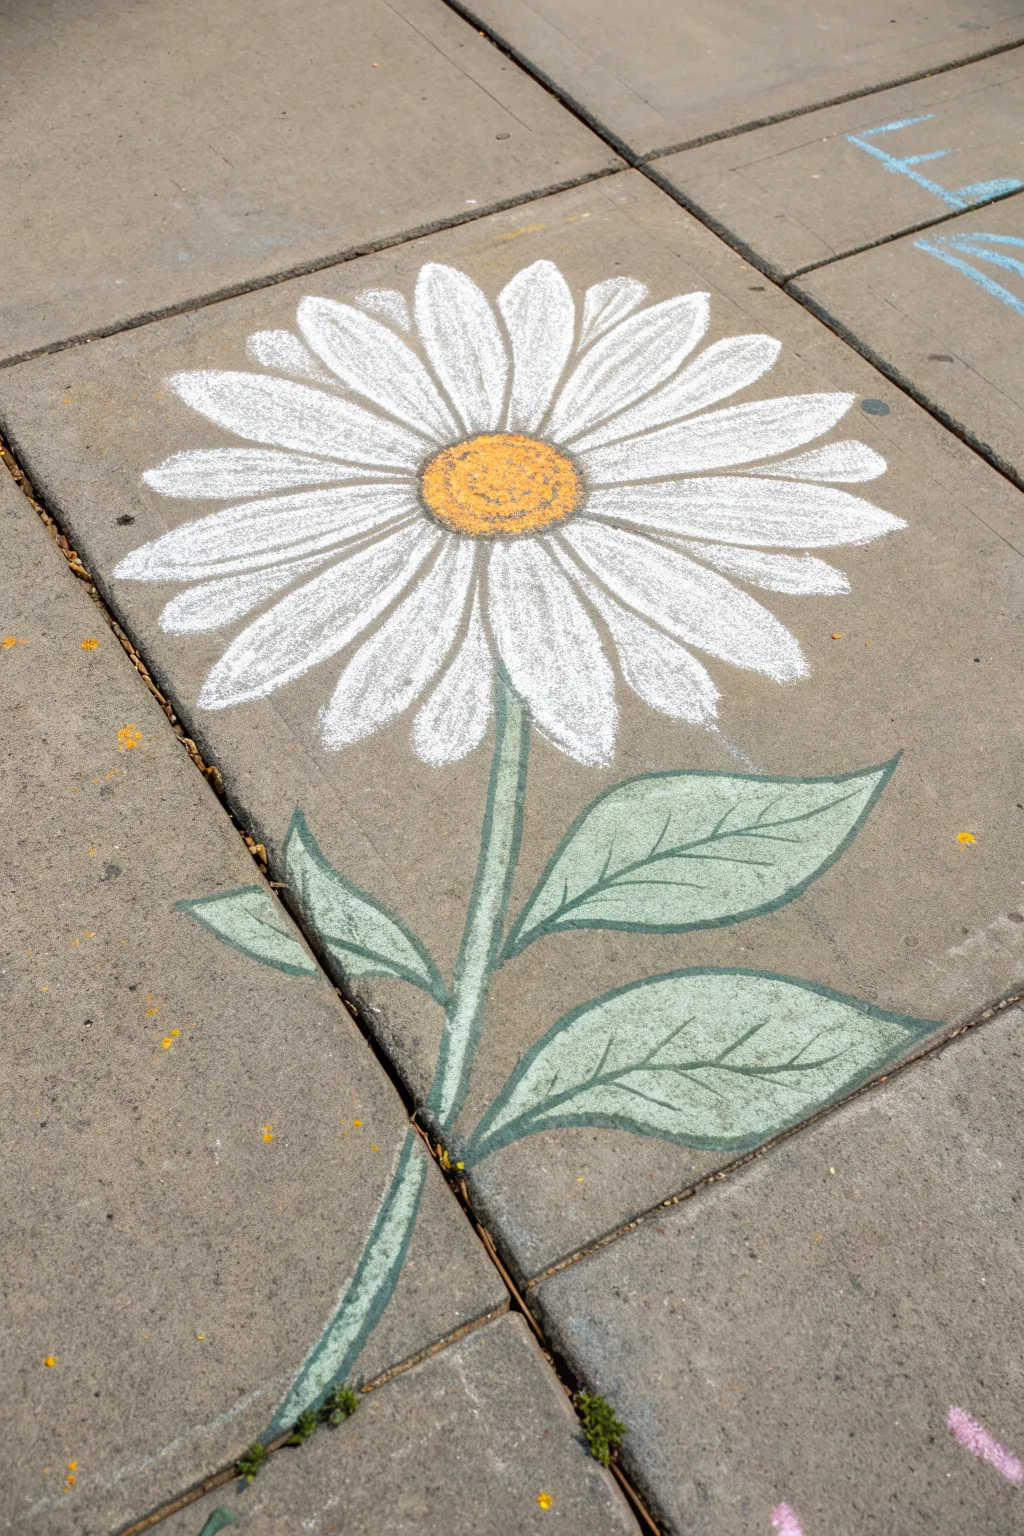
Brighten up the neighborhood with this classic, oversized daisy design that perfectly fills a single sidewalk square. Using simple shapes and bold chalk strokes, this cheerful flower is an ideal project for beginners looking to make a big impact.
Detailed Instructions
Materials
- Sidewalk chalk (white, yellow, green)
- Sidewalk square or concrete patio
- Broom or outdoor brush
- Water (optional in spray bottle)
- Blending sponge or rag (optional)
Step 1: Preparation and Center
-
Clean the canvas:
Before starting, verify your chosen sidewalk square is free of loose dirt, pebbles, and debris. A quick sweep with a broom ensures your chalk lays down smoothly and adheres better to the concrete surface. -
Outline the center:
Locate the upper-middle area of your square. Using yellow chalk, draw a medium-sized circle. It doesn’t need to be perfectly round; a slightly organic shape looks more natural. -
Fill the disk:
Color in the yellow circle heavily. Use a circular motion to grind the chalk into the pavement for solid coverage. -
Add texture:
To give the center that fuzzy pollen look, tap the chalk tip repeatedly over the yellow fill or outline the edge with a slightly darker orange if you have it, though plain yellow works beautifully on its own.
Chalk Too Dusty?
If the wind keeps blowing your design away, dip the tip of your chalk in water before drawing. This creates a semi-permanent paint-like paste.
Step 2: Petals
-
Mark cardinal points:
Grab your white chalk. To keep the flower symmetrical, lightly mark four small dashes around the yellow center: top, bottom, left, and right. These will guide your first four petals. -
Draw primary petals:
Draw four long, oval-shaped loops starting from the yellow center out to your marks. Make them extend quite far out, almost filling the width of the square. -
Fill the gaps:
Draw additional petals in the spaces between your first four. You want them close together so the flower looks full. -
Color the petals:
Fill in each petal with white chalk. I find using the side of the chalk stick covers the large areas faster and smoother than the tip. -
Outline for crispness:
Go back over the edges of each white petal with the tip of the chalk. Press firmly to create a distinct, bright white outline that separates the petals from the grey concrete. -
Detail the center connection:
Refine the area where the white petals meet the yellow center. You can slightly overlap the yellow to make the petals look attached.
Add a Bee Friend
Draw a small oval with black and yellow stripes hovering near the petals. Add two tiny loops for wings and a swirly dashed trail behind it!
Step 3: Stem and Leaves
-
Draw the stem guideline:
Switch to green chalk. Draw a single line extending from the bottom center of the flower down toward the bottom corner of the sidewalk square. It’s okay if it crosses a crack. -
Thicken the stem:
Draw a second parallel line next to the first one and color in the space between them to create a sturdy stem. -
Outline the leaves:
Sketch two large, pointed oval leaf shapes attached to the stem. Place one lower down pointing right, and a smaller one higher up pointing left. -
Color the leaves:
Fill the leaf shapes with your green chalk. Use lighter pressure if you want a softer green, or press hard for a vibrant look. -
Add leaf veins:
Using the sharp edge of the green chalk (or a darker green/black if available), draw a center line down the middle of each leaf. -
Detail the veins:
Add smaller diagonal lines branching off the center vein to the edges of the leaves for realistic botanical detail. -
Clean up edges:
Blow away any loose chalk dust. If any lines look fuzzy, re-trace the very outer edges of the petals and leaves one last time for a pop of contrast.
Step back and admire your giant, cheerful bloom brightening the path for everyone who walks by


Balloon Bouquet You Can “Hold”
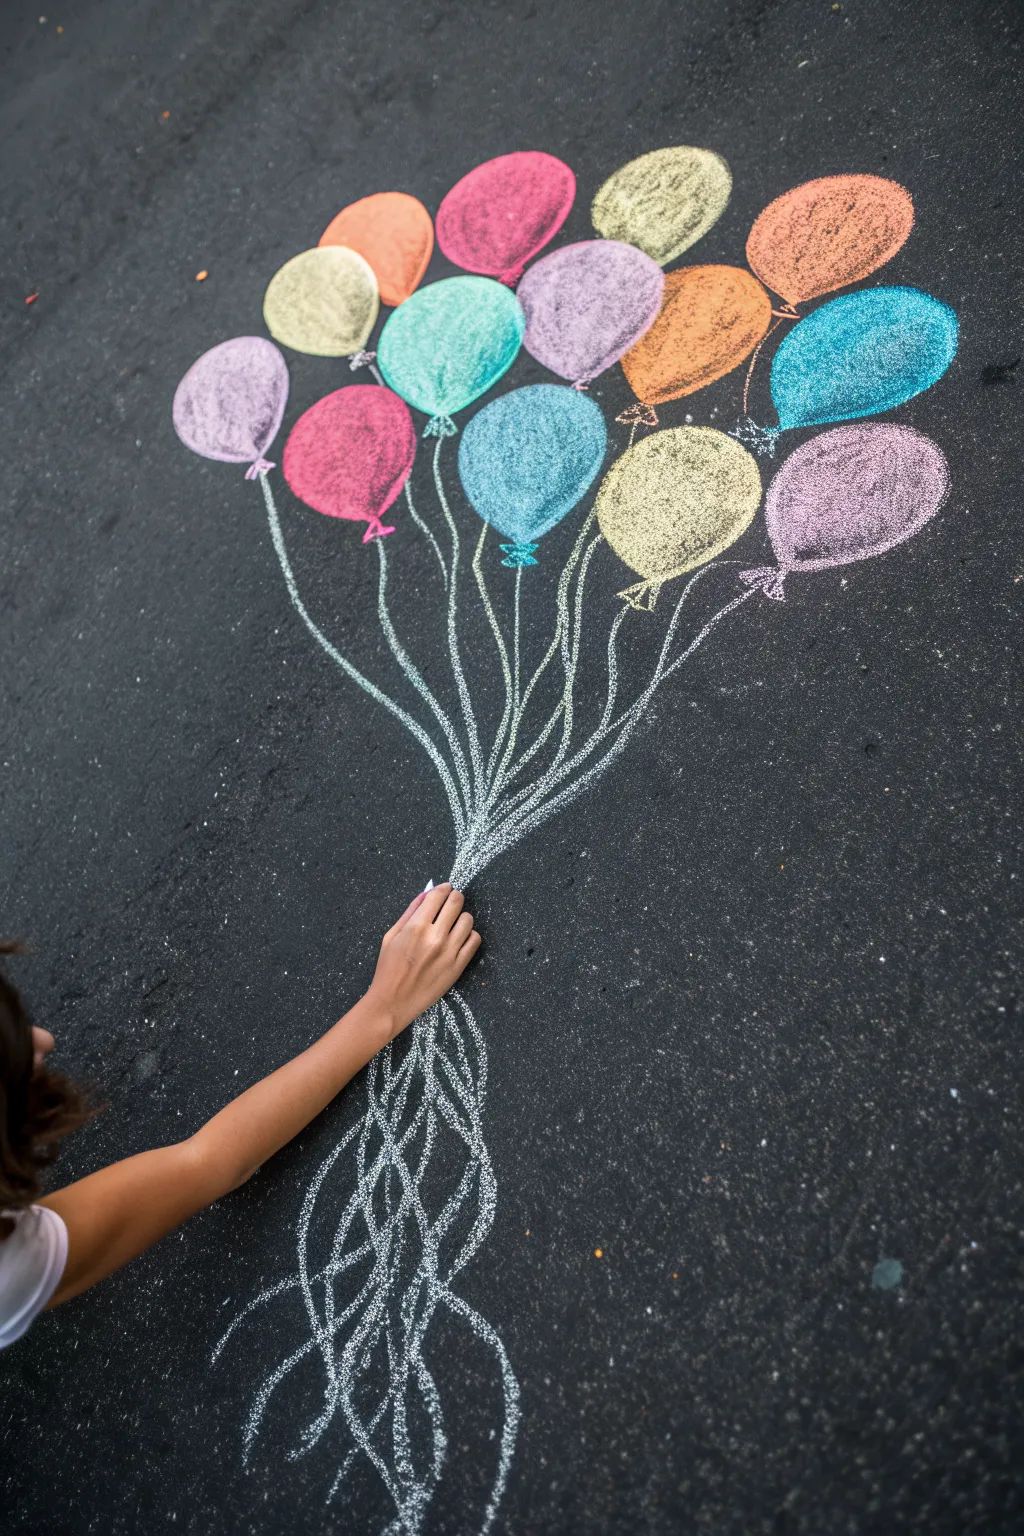
Transform your driveway into an interactive photo op with this vibrant cluster of chalk balloons. The design creates a clever optical illusion where the subject appears to be floating away, held up only by a bunch of colorful strings.
Step-by-Step
Materials
- Sidewalk chalk in assorted colors (pinks, blues, purples, yellows, orange)
- White sidewalk chalk
- Clean stretch of asphalt or pavement
- A cloth or rag for blending (optional)
Step 1: Drafting the Bouquet
-
Map out the top layer:
Start by drawing three or four large oval shapes near the top of your composition area. These will be the highest balloons in the bunch, so space them slightly apart to leave room for layers underneath. -
Add the middle tier:
Draw a second row of ovals slightly overlapping the bottom edges of the first few outlines. Vary the angles slightly so they don’t look too uniform. -
Fill the bottom section:
Sketch the final few ovals near the bottom of the cluster. These should be positioned closer together to create the tapered shape of a bouquet. -
Draw the knots:
At the bottom of each oval, sketch a tiny triangle or trapezoid shape to represent the tied knot of the balloon.
Chalk It Up
Make the balloons brighter by wetting the chalk stick first. Dip the tip in a cup of water for 10 seconds before drawing for paint-like opacity.
Step 2: Coloring and Shading
-
Select your palette:
Choose a mix of warm and cool tones. The original design uses shades like teal, lavender, lemon yellow, coral, and magenta. -
Fill the first color:
Pick your first oval and color it in completely using the side of the chalk stick for broader coverage. Try to keep the pigment dense so the asphalt doesn’t show through too much. -
Continue filling colors:
Move through the rest of the balloons, switching colors frequently to ensure no two adjacent balloons are the same shade. This variety makes each one pop. -
Blend for smoothness:
If you want a smoother look, use your fingers or a cloth to gently rub the chalk into the pavement, softening the texture of the asphalt. -
Add highlights:
Using a piece of white chalk, draw a small curved line or comma shape on the upper right or left side of every single balloon. Keep the light source consistent for all of them to make the 3D effect convincing.
Step 3: Creating the Strings
-
Define the focal point:
Decide exactly where the hand will be positioned. Mark a tiny dot on the ground about two feet below the bottom balloons to guide your lines. -
Draw the main lines:
Using the sharp edge of a white chalk stick, draw a wavy, organic line from the knot of each balloon down toward that central focal point. -
Bunch the strings:
As the lines approach the focal point, bring them tightly together so they look like they are being squeezed by a fist. This is the ‘handle’ of the bouquet. -
Extend the tails:
Draw the lines continuing past the focal point, fanning them back out slightly at the bottom. These loose ends should look wavy and free-flowing, drooping down toward the bottom of the frame.
Sky High Style
Draw a few small white clouds or birds in the background to enhance the illusion that the balloons are actually floating in the sky.
Step 4: The Final Photo Op
-
Clean up edges:
Use a damp cloth to wipe away any smudge marks or chalk dust outside the balloon outlines to sharpen the final look. -
Position the model:
Have your subject lie down on the pavement. Their arm should extend fully so their hand grasps the point where the chalk strings converge.
Now you have a permanent party decoration ready for a fun summer photoshoot


Smiley Sunburst With Radiating Lines
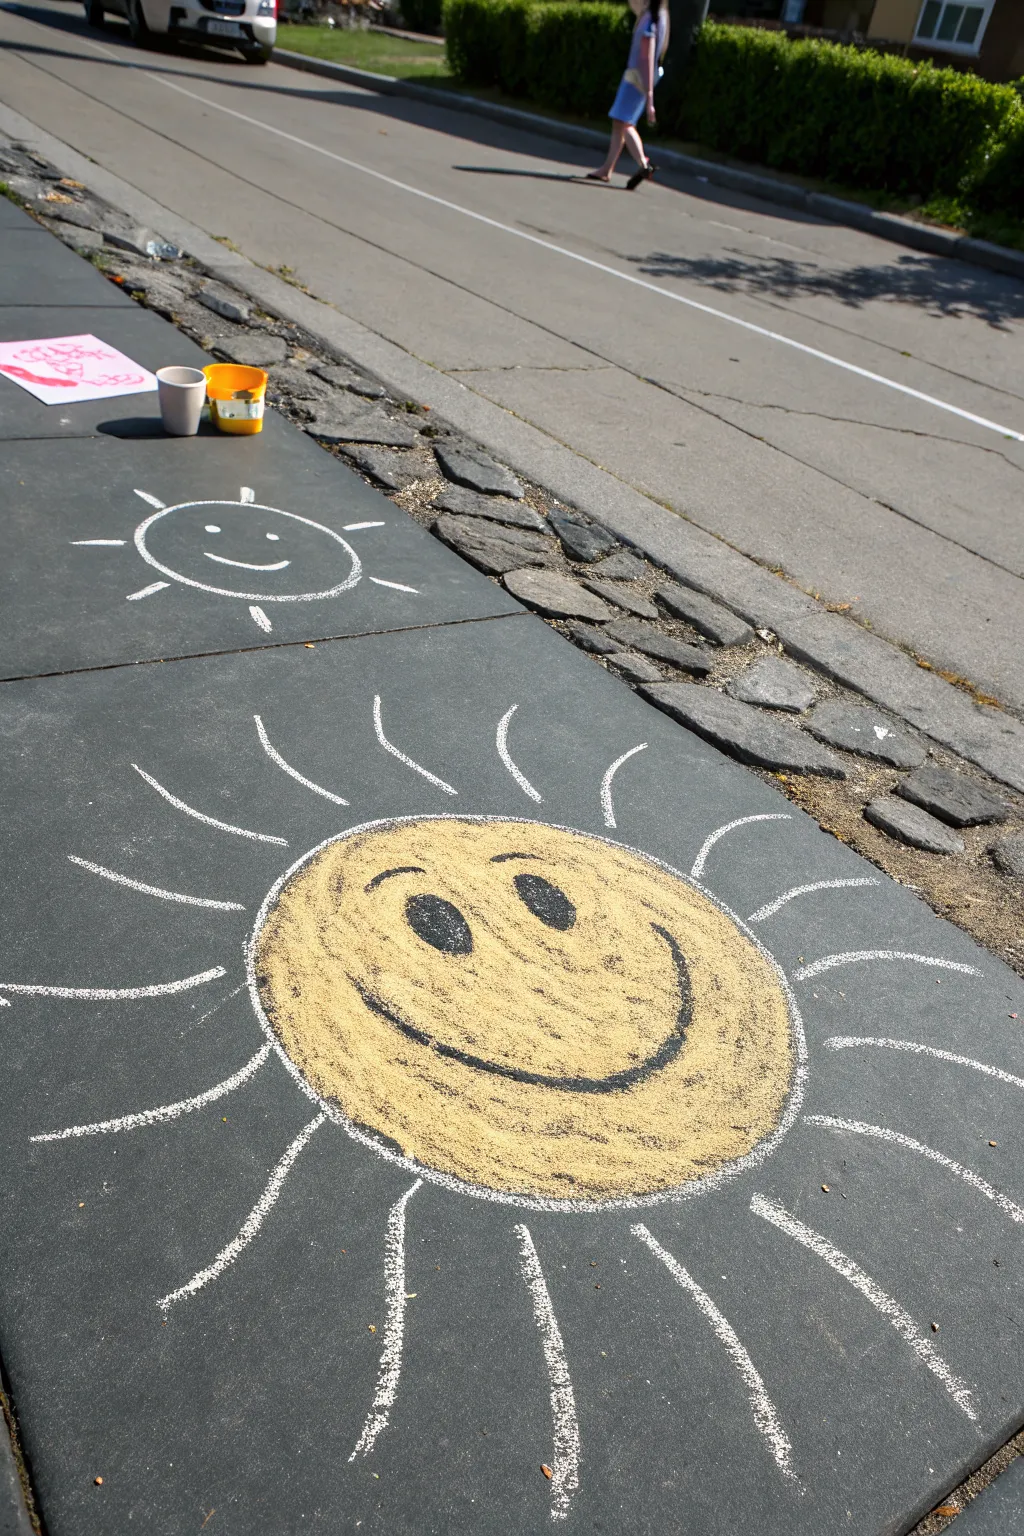
Brighten up the neighborhood with this cheerful, oversized sunburst that practically radiates happiness from the pavement. Using bold yellow fill and dynamic white lines, you’ll create a friendly character that adds a pop of sunshine to any gray walkway.
How-To Guide
Materials
- Thick sidewalk chalk (yellow)
- Thick sidewalk chalk (white)
- Black sidewalk chalk or charcoal stick
- Clean, dry pavement surface
- Small cup with water (optional, for blending)
- Old rag or paper towel
Step 1: Drafting the Shapes
-
Clear the canvas:
Find a smooth, dry section of sidewalk or driveway. Use your hand or a rag to sweep away any loose pebbles, leaves, or grit that might interfere with your drawing surface. -
Draw the main circle:
Using your white chalk, sketch a very light, large circle on the ground. It doesn’t need to be perfect; a loose, organic round shape works best for this friendly character. Aim for a diameter of about two feet. -
Fill with base color:
Take your thick yellow chalk and begin coloring inside the circle. Use the side of the chalk stick rather than the tip to cover more ground quickly and achieve a smoother texture. -
Layer the yellow:
Go over the yellow area a second time to make the color vibrant. Press firmly to pack the pigment into the pavement’s pores, creating a solid, cheerful disc of color. -
Smooth the texture:
If you want a really solid look, use your fingers or a dry rag to rub the yellow chalk into the cement. I find this helps blur out the stroke lines and makes the sun look like a cohesive shape.
Step 2: Adding Personality
-
Outline the face:
Switch to your black chalk or charcoal. Carefully draw a gentle curve for the smile near the bottom third of the yellow circle. Keep the line thick and confident. -
Add smile details:
Extend the smile line slightly up at the ends to give it distinct cheeks. Adding smaller curved lines at the corners can enhance the joyful expression. -
Draw the eyes:
Position two oval shapes above the smile for the eyes. Draw the outlines first to check spacing, ensuring they are symmetrical relative to the smile. -
Fill the eyes:
Color in the eye ovals completely with the black chalk. Press hard to get a deep, dark contrast against the bright yellow background. -
Clean up the edges:
Use your white chalk to trace a clean border around the yellow circle. This defines the edge and prepares the artwork for the rays.
Dusty lines?
If your black lines look gray because of yellow dust, blow the loose dust away gently before re-drawing the black. A damp chalk stick also draws darker.
Step 3: Radiating Rays
-
Plan the ray directions:
Visualize lines expanding outward from the center of the sun. You want them to look like they are spinning or bursting outward. -
Draw first distinct rays:
Starting at the white border, draw a few long, curved lines extending outward using the white chalk. Curve them slightly in a clockwise direction to create a sense of movement. -
Vary line lengths:
Draw more rays between the first ones. Make some slightly shorter and others longer. This variation adds energy and prevents the drawing from looking too stiff. -
Add secondary curves:
Between your main rays, you can add smaller, fainter curves or dashed lines. These act as ‘secondary’ light beams and fill out the empty gray space around the sun. -
Final touches:
Review the black facial features. If the yellow dust has dulled the black eyes or smile, go over them one last time with the black chalk to make them pop.
Go Bigger
Create a whole solar system! Add smaller suns nearby with different expressions—winking, laughing, or sleeping—to make a family of celestial friends.
Step back and enjoy the warmth of your new, smiling friend on the pavement
BRUSH GUIDE
The Right Brush for Every Stroke
From clean lines to bold texture — master brush choice, stroke control, and essential techniques.
Explore the Full Guide
Hearts With Patterned Fill-Ins
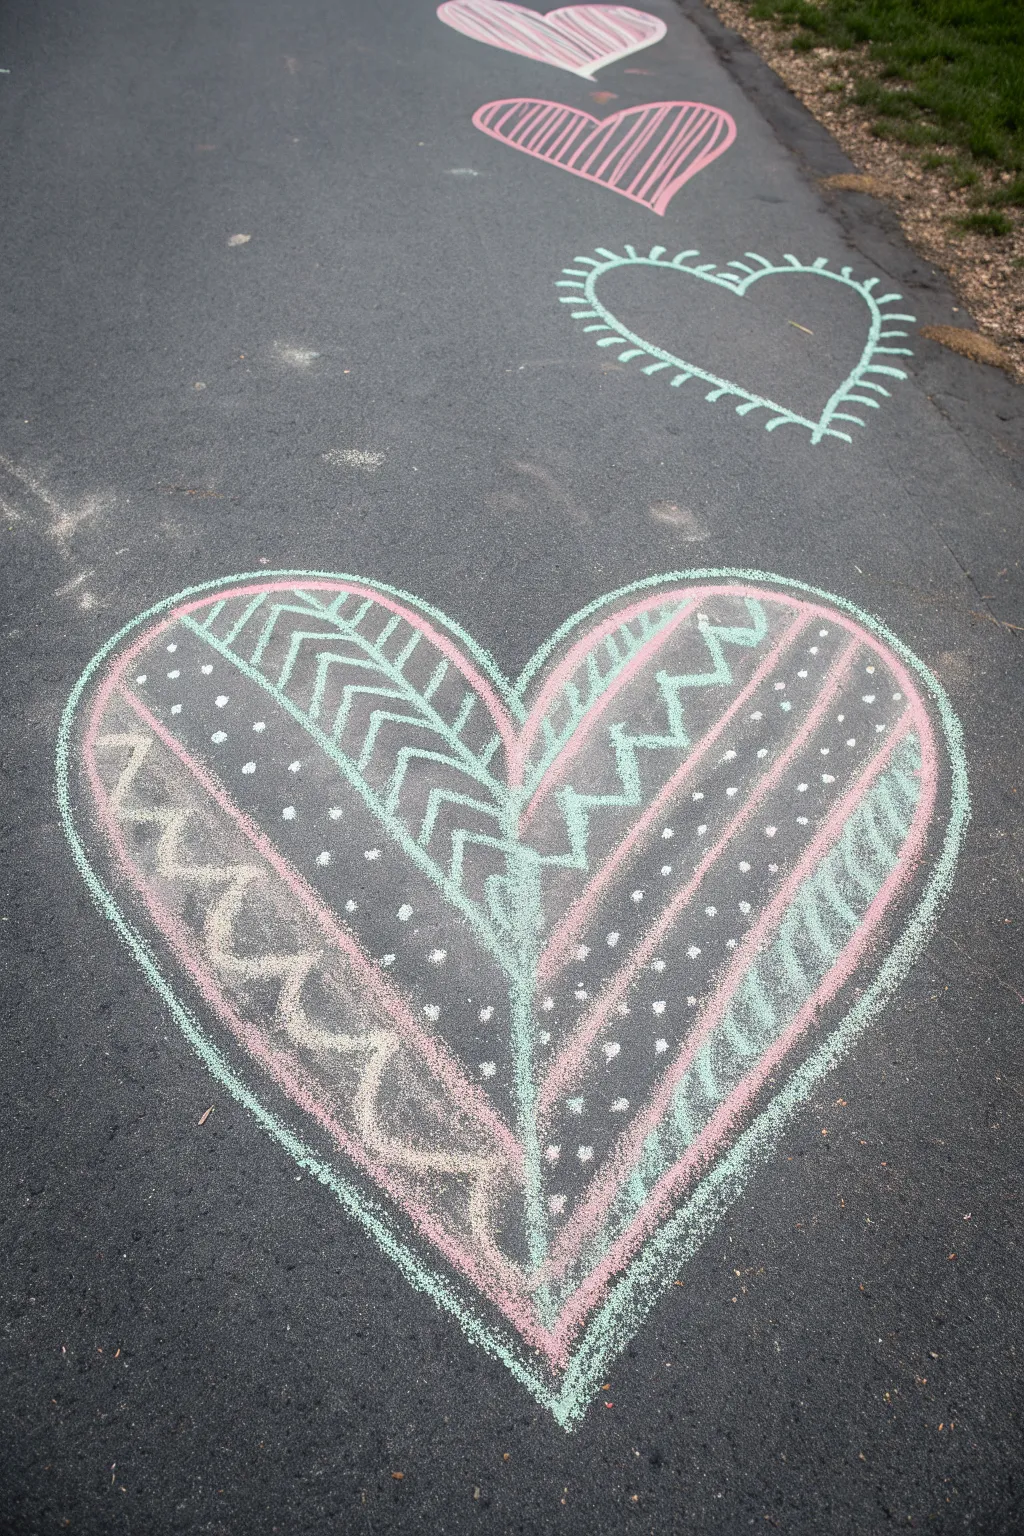
Transform a plain driveway or sidewalk into a gallery of love with these intricately patterned hearts. Using a simple combination of bold outlines and repeating internal designs, you’ll create a welcoming path that looks much more complex than it actually is.
Detailed Instructions
Materials
- Sidewalk chalk (specifically teal, light pink, and white)
- Broom or leaf blower (for surface prep)
- Knee pads or gardening mat (optional but recommended)
Step 1: Drawing the Base Outline
-
Prepare the canvas:
Before you begin, sweep the pavement area clean to ensure your chalk sticks well and your lines stay crisp without hitting little rocks. -
Establish the main heart:
Start with your largest heart at the bottom of your drawing space. Use the teal chalk to draw a very large heart outline. -
Thicken the border:
Go over your initial teal outline a second time to create a thicker, more defined border. This helps contain the patterns you’ll add later. -
Add the inner frame:
Switch to pink chalk and draw a second heart outline immediately inside the teal one, leaving no gap between the colors. -
Divide the space:
Draw a vertical line straight down the center of the heart, connecting the dip at the top to the point at the bottom, splitting the heart into left and right halves.
Chalk Snapping?
If your chalk keeps breaking on rough asphalt, try drawing with the side of the stick rather than the tip. This covers more surface area and prevents the point from catching.
Step 2: Filling with Patterns
-
Create main sections:
Starting from the center line and moving outward, use your pink chalk to draw curved lines that follow the heart’s shape, creating wide striped sections. -
Add chevrons:
In the wide section closest to the center line, use teal chalk to draw a series of stacked ‘V’ shapes or chevrons. Keep them evenly spaced for a tidy look. -
Outline the sections:
To make the sections distinct, use the teal chalk to trace over the dividing lines between your main patterned areas. -
Draw the zig-zags:
In the next available section moving outward, draw a continuous light blue or white zig-zag line running from the top curve down to the bottom point. -
Add decorative stripes:
On the right side of the heart, mirror the structure but mix up the patterns. Try adding a section filled with diagonal hatching lines in white. -
Detail with dots:
Find a dark or empty section within your stripes and fill it with evenly spaced white polka dots. I find pressing and twisting the chalk slightly makes the best circles. -
Fill the outer rim:
In the outermost section near the border, draw a simple wavy line using white chalk to add contrast against the dark asphalt.
Step 3: Extending the Path
-
Draw the second heart:
Move a few feet further up the path and draw a medium-sized heart using only a teal outline. -
Add radiating fringe:
Decorate this teal heart by drawing short, straight lines radiating outward from the entire perimeter, giving it a sunburst effect. -
Create the third heart:
Move further up again and draw a slightly smaller heart using pink chalk. -
Stripe the third heart:
Fill this pink heart completely with diagonal stripes, keeping the lines close together for a vibrant pop of color. -
Final touches:
Check your main large heart and reinforce any white highlights or dots that might have faded while you were working to ensure they pop.
Make It Glow
Take a cup of water and dip your chalk into it for 5-10 seconds before drawing. The wet chalk goes on like paint and dries intensely bright and opaque.
Enjoy walking along your beautiful new path of hearts
Shooting Stars and Tiny Sparkles
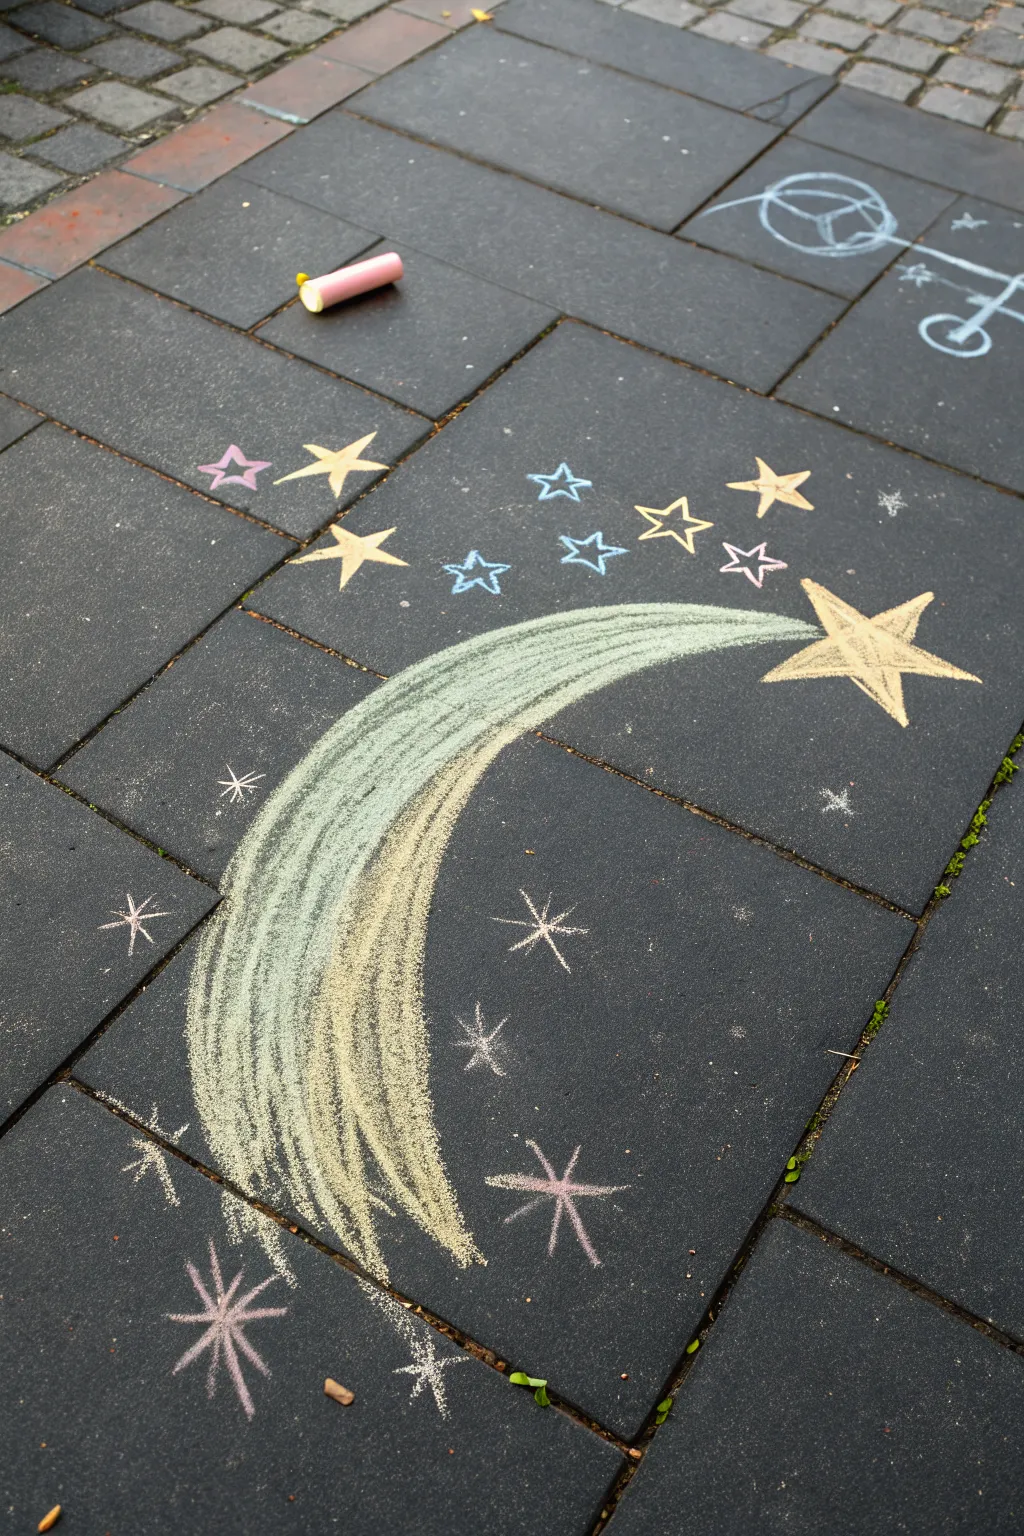
Turn a patch of pavement into a piece of the night sky with this sweeping shooting star design. Using soft pastels and simple geometric shapes, you’ll create a glowing comet tail and a scattering of twinkling constellations that look magical against dark asphalt.
Step-by-Step Tutorial
Materials
- Sidewalk chalk (assorted colors including yellow, pink, blue, purple)
- Black pavement or asphalt surface
- Knee pads or a gardening mat (optional but recommended)
Step 1: Drawing the Main Star
-
Choose the lead star location:
Pck a spot on the pavement for the head of your comet. It should be slightly off-center to leave room for the long, sweeping tail. -
Draw the star outline:
Using a pale yellow or cream-colored chalk, draw a five-pointed star. Start with an upside-down ‘V’, cross diagonally up to the left, straight across to the right, diagonally down to the left, and connect back to the start. -
Add a second outline:
Trace around your initial star with a slightly darker yellow or gold chalk to give it definition. Make the points sharp and distinct. -
Fill the star:
Color in the center of the star completely. Use firm pressure to make the yellow pop against the dark ground. -
Create the inner detail:
Take a lighter shade of yellow or white chalk and draw a smaller star shape inside the filled area to create a highlighted, 3D effect.
Step 2: Creating the Swooping Tail
-
Outline the tail shape:
Starting from behind the main star, draw a long, curved line that swoops downward and hooks slightly at the end, resembling a ‘C’ or crescent moon shape. -
Complete the tail boundary:
Draw the inner curve of the tail, making it wide near the star and tapering it into a thinner point at the bottom end. -
Fill with base color:
Using a seafoam green or pale blue chalk, fill in the top half of the sweeping tail with long, continuous strokes that follow the curve of the shape. -
Blend a second color:
Switch to a pale yellow or cream chalk for the bottom half of the tail. Overlap this slightly with the green section to create a soft gradient. -
Add texture strokes:
Go over the entire filled area with quick, parallel lines using the side of your chalk stick. This mimics the look of rushing movement and streakiness. -
Refine the edges:
Lightly smudge the outer edges of the tail with your fingertips to soften the lines, making it look like glowing gas rather than a solid object.
Chalk Too Dusty?
If your lines look messy, blow away loose dust before adding new layers. Avoid rubbing too hard with your hands, or the distinct stroking pattern will turn into a muddy smudge.
Step 3: Adding Sparkles and Constellations
-
Draw medium stars:
Around the main star and the top of the tail, draw 5-7 medium-sized open stars in various colors like blue, pink, and yellow. -
Create distinct star clusters:
Group these medium stars together slightly, perhaps placing three yellow ones near the top and a few blue ones just below them. -
Add tiny twinkle stars:
Scatter very small, simple star shapes (just crossing lines) further away from the main design to fill empty space. -
Draw large ‘burst’ sprinkles:
Near the bottom of the tail, create large sparkle bursts. Draw a simple cross, then add an ‘X’ over it to make an eight-pointed starburst. -
Highlight the bursts:
Use pink or lilac chalk for these bottom bursts to balance the colors used at the top. -
Final dust details:
Tap your chalk against the ground in a few spots to leave little dots of chalk dust, creating the illusion of distant, faint stars.
Make It Glow
To ruin the flatness of the asphalt, dip the tip of your chalk in water before drawing the main star. This creates a paint-like paste that dries incredibly bright and opaque.
Step back and admire your celestial creation, seeing how the colors pop against the pavement

PENCIL GUIDE
Understanding Pencil Grades from H to B
From first sketch to finished drawing — learn pencil grades, line control, and shading techniques.
Explore the Full Guide
Butterfly Wings Photo Spot
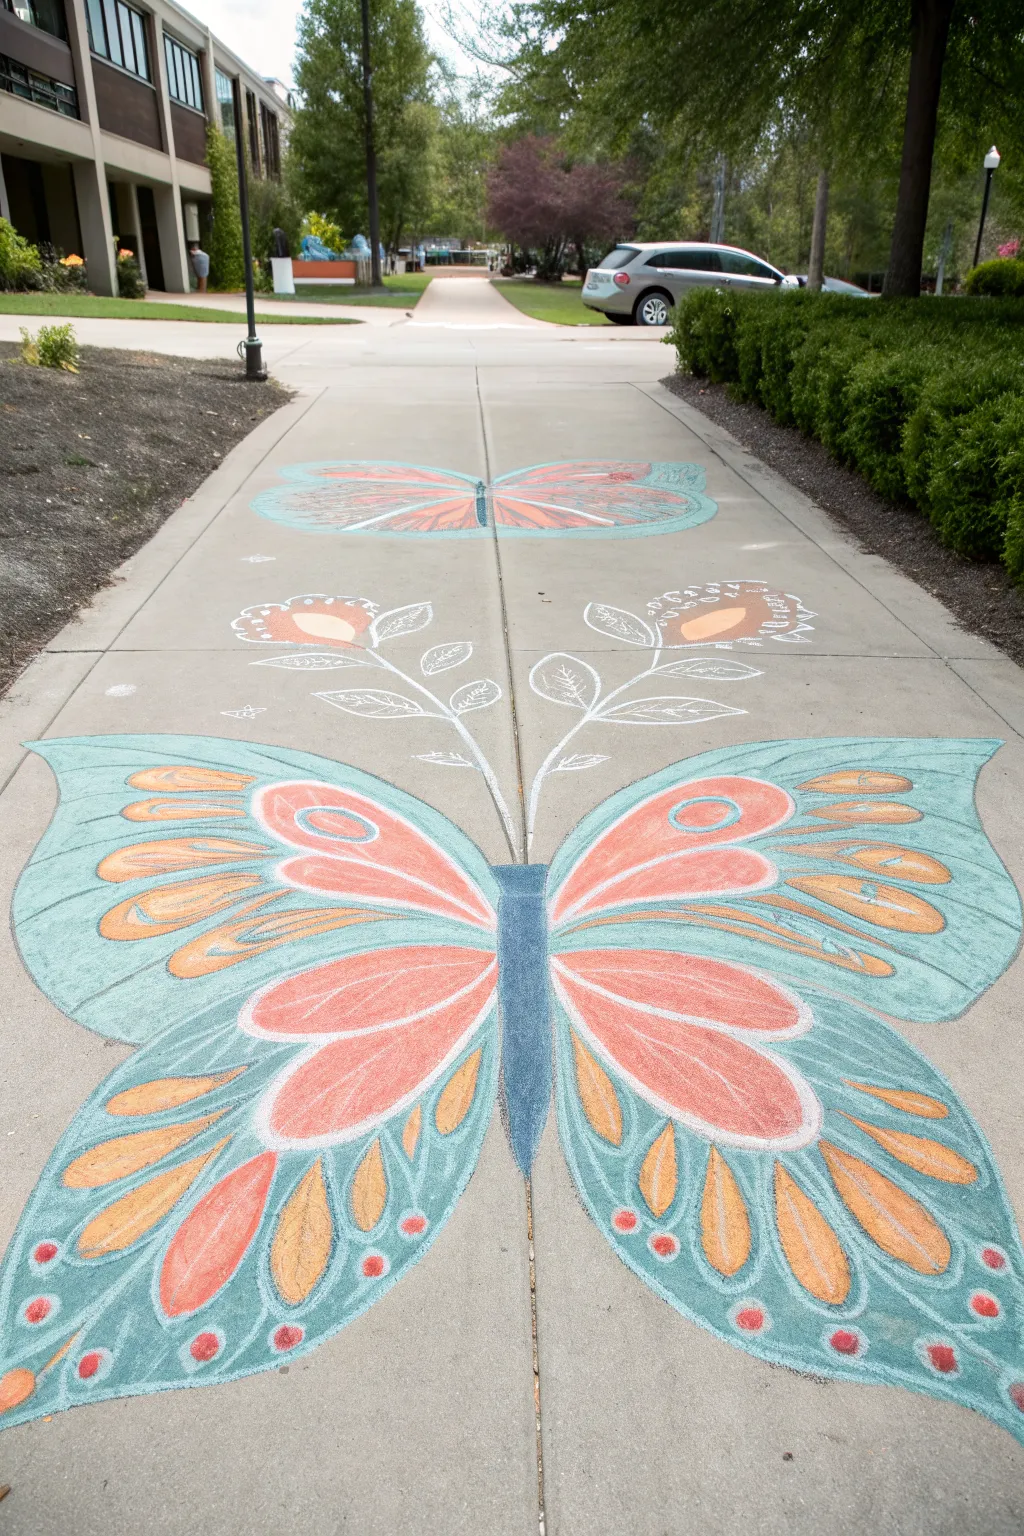
Transform a plain concrete path into an interactive photo opportunity with this stunning large-scale butterfly design. Featuring soft pastels and bold outlines, these wings are spacious enough for someone to stand between, creating the perfect whimsical moment.
Detailed Instructions
Materials
- Sidewalk chalk (jumbo size for fill)
- Chalk pastels (for details and blending)
- Measuring tape (optional)
- Piece of string or yardstick
- Blending foam or rags
- Knee pads or gardening mat
- Broom or leaf blower
Step 1: Planning and Outlining
-
Prep the surface:
Begin by sweeping the chosen section of the sidewalk thoroughly. Dirt and pebbles interfere with the chalk adhering smoothly, so get the concrete as clean as possible. -
Mark the center line:
Identify the center expansion crack of the sidewalk slab as your natural guide. This will be the spine of your butterfly and ensures perfect bilateral symmetry without measuring. -
Draft the upper wing shape:
Using a light-colored chalk (like white or pale yellow), sketch the broad curve of the top right wing. Start from the center line, arc upwards and outwards to the edge of the path, and swoop back in toward the middle. -
Mirror the upper wing:
Repeat the exact same swooping motion on the left side. Step back frequently to ensure both sides look roughly equal in size and curvature. -
Draft the lower wing shape:
Sketch the bottom wings, making them slightly longer and more teardrop-shaped than the top ones. They should extend downwards, almost filling the width of the concrete slab found in the photo. -
Draw the body:
Create a long, narrow oval directly over the center sidewalk crack connecting the wings. I find coloring this a dark blue or teal immediately helps anchor the design.
Step 2: Filling and Coloring
-
Base layer for the wings:
Take a large stick of teal or light blue sidewalk chalk and color the entire background of the wings. Use the side of the chalk stick, not the tip, to cover the large concrete area quickly. -
Smooth the base layer:
Using a blending foam or an old rag, rub the teal chalk into the specific pores of the concrete. This creates that smooth, painterly look seen in the reference image and removes stroke marks. -
Outline the inner patterns:
Switch to white chalk to draw the teardrop shapes and ovals inside the wings. Draw large teardrops in the center of each wing quadrant and smaller scallops along the outer edges. -
Fill the inner teardrops:
Color the large central teardrop shapes with a bright, warm coral or salmon pink. Apply the color heavily so it pops against the cool teal background. -
Fill secondary accents:
Use an orange or gold chalk to fill in the secondary pattern shapes—the smaller slivers and scallops near the outer edges of the wings. -
Blend the accent colors:
Gently rub these pink and orange areas with your finger or a clean corner of your rag. Be careful not to smear the blue base color into these bright warm tones.
Chalk Not Bright Enough?
If colors look dull on the gray concrete, dip the tip of your chalk in water for 5 seconds before drawing. The creates a paint-like paste that dries incredibly vibrant and opaque.
Step 3: Detailing and Connecting
-
Define the veins:
Use a white chalk pastel or sharpe-edged chalk to draw the veins. Press firmly to create crisp white lines that separate the pink and orange sections from the blue background. -
Add decorative dots:
Along the very bottom edge of the lower wings, draw a sequence of small red or dark pink circles. This adds a nice textural finish to the border. -
Refine the edges:
Go over the outermost perimeter line of the entire butterfly with a fresh layer of teal or a slightly darker blue to make the whole shape stand out from the gray concrete. -
Create the floral connector:
Move up the sidewalk about two feet. Draw two simple flower heads facing away from each other, using coral and orange chalk. -
Draw the stems:
Connect these flowers to a central point with long, white, curving lines. Add simple leaf outlines along the stems using a thin white line, keeping the style consistent with the butterfly veins. -
Repeat for a second butterfly:
If you have space further up the path, recreate a smaller version of the butterfly using softer peach and teal tones to create a sense of depth and distance.
Make It 3D
Add a small, dark shadow using black or charcoal chalk just underneath the bottom edge of the wings and body. This simple trick makes the butterfly look like it’s hovering off the ground.
Now you have a beautiful, large-scale piece of street art ready for neighborhood admirers to enjoy.
Underwater “Puddle” With Fish
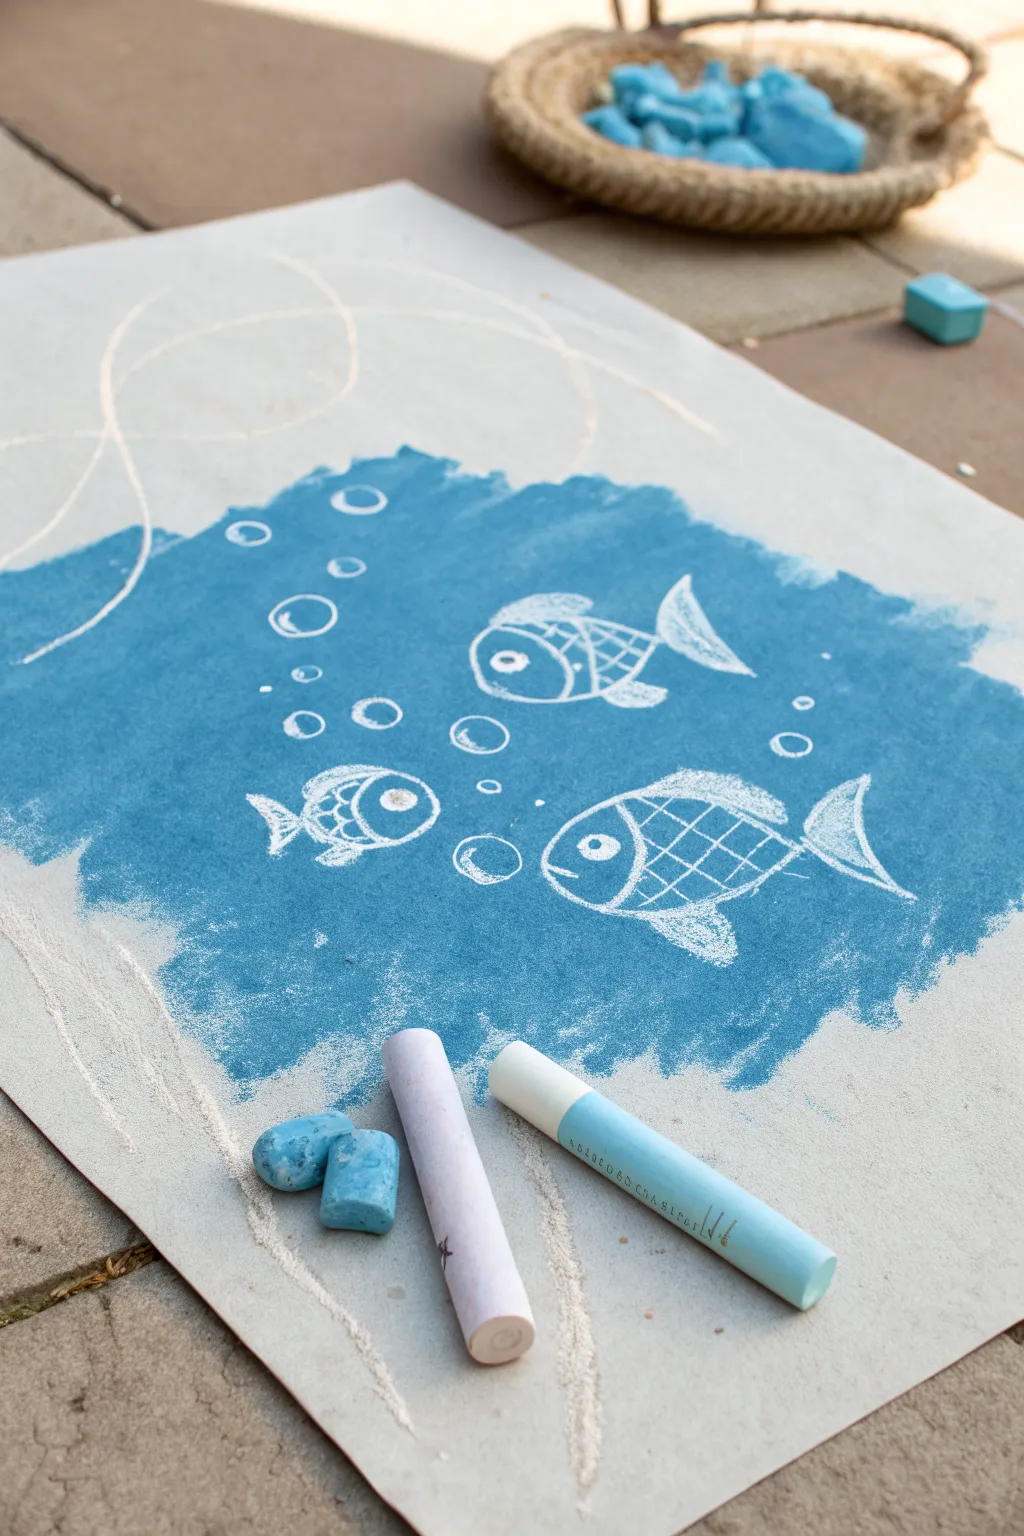
Create your own portable ocean scene with this charming chalk art project that works perfectly on paper or pavement. The soft, blended blue background makes the crisp white fish drawings pop, giving the illusion of looking into a clear pool of water.
Step-by-Step Tutorial
Materials
- Large sheet of sturdy grey packing paper or construction paper
- Blue sidewalk chalk or soft pastel (chunky stick)
- White sidewalk chalk or pastel
- Small piece of blue chalk (for blending)
- Tissues or blending cloth (optional)
Step 1: Setting the Scene
-
Prepare your surface:
Lay your large sheet of grey paper flat on a hard surface like a patio or driveway. If it’s windy, you might want to weigh down the corners with small stones. -
Create the water base:
Using the side of your large blue chalk stick, rub color heavily into the center of the paper. Create a rough, organic shape that resembles a puddle or a splash of water, rather than a perfect circle. -
Intensify the color:
Go over the blue area a second time to ensure the color is rich and opaque. The texture of the paper should still show through slightly, adding to the watery effect. -
Blend the edges:
Use your fingers or a tissue to gently smudge the blue chalk. I prefer to soften the edges to make them look more like liquid, while keeping the center somewhat textured.
Vibrant Colors
For a deeper blue water effect, wet the tip of your blue chalk slightly before coloring. It creates a paint-like paste that dries much brighter.
Step 2: Drawing the Fish
-
Outline the first fish:
Take your white chalk stick and draw a simple oval shape near the bottom right of the blue patch. Add a triangle at the back for the tail fin. -
Add basic details:
Draw a curved line near the front of the oval to separate the head from the body. Add a small dot for the eye. -
Create the scales:
Draw diagonal crisscross lines on the body section of the fish to create a classic scale pattern. -
Add fins:
Sketch a small triangle on top of the body for the dorsal fin and another below for the pectoral fin. -
Draw the second fish:
Repeat the process for a second, smaller fish near the top center. Orient this one swimming in the opposite direction for visual interest. -
Draw the baby fish:
Add a third, tiny fish swimming near the bottom left. Keep the details simpler on this one since it is smaller.
Smudged Lines?
If your white lines get muddy, clean the tip of your white chalk on the pavement before redrawing. Sharp, clean chalk keeps drawings crisp.
Step 3: Adding Life and Movement
-
Draw bubbles:
Scatter small white circles rising from the fish toward the surface. Vary the sizes, making some tiny dots and others larger, open circles. -
Highlight the reflection:
Add small, curved white lines on the larger bubbles to mimic light reflecting off the surface. -
Thicken main lines:
Go back over the outlines of your fish with the white chalk, pressing a bit harder this time to make them stand out boldly against the blue background. -
Add background whimsy:
Outside of the blue puddle area, use the white chalk to draw large, loose loops and swirls on the grey paper. This adds a playful sense of movement or ripples. -
Create sandy texture:
Lightly scribble some faint white lines near the edges of the paper to suggest sand or the ground around your water puddle. -
Final clean up:
Blow away any excess chalk dust gently. If you smudged white chalk into the blue water by accident, use your blue stick to carefully touch it up.
Enjoy your beautiful underwater scene before the next rain washes it away


Outer Space Planets in a Row
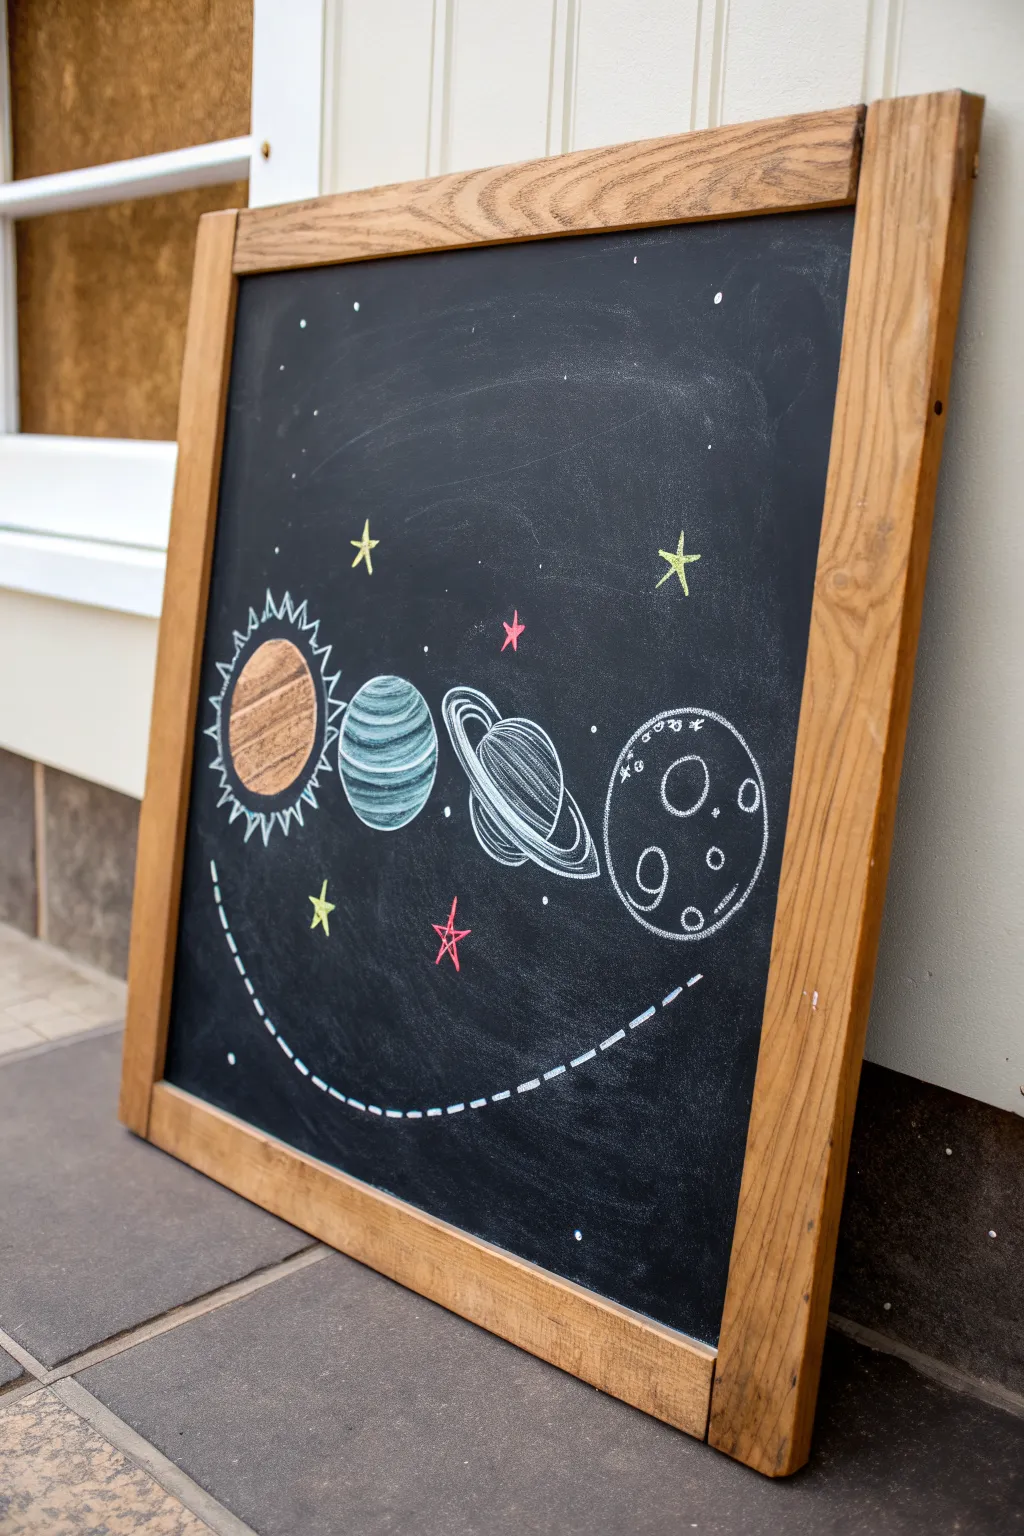
Transform a plain chalkboard into a whimsical slice of the galaxy with this beginner-friendly lineup of celestial bodies. Featuring a radiating sun, striped planets, and a cratered moon, this design uses simple shapes to create a charming outer space scene.
Detailed Instructions
Materials
- Chalkboard (framed)
- White stick chalk
- Colored chalk (orange/brown, teal/blue, pink, yellow)
- Chalk blending tool or cotton swab (optional)
- Damp cloth or paper towel
- Ruler (optional)
Step 1: Planning and Spacing
-
Prime the surface:
If your chalkboard is brand new, season it by rubbing the side of a white chalk stick over the entire surface and wiping it off. This prevents ‘ghosting’ later on. -
Mark the center line:
Visualize a straight horizontal line across the middle of your board where your planets will sit. You can lightly sketch this with a ruler if you need a guide, or just eyeball it for a more organic look. -
Outline the main shapes:
Using white chalk, lightly draw four circles in a row. Make the first circle (the sun) on the left slightly larger. The two middle circles (planets) should be medium-sized, and the final circle on the right (the moon) can be the largest or equal to the sun.
Step 2: Drawing the Celestial Bodies
-
Color the sun:
Take your orange or light brown chalk and fill in the first circle entirely. Apply steady pressure to get solid coverage. -
Add sun rays:
Switch back to white chalk. Draw a zigzag line around the circumference of the sun to create the rays. I like to make the points slightly irregular so they look like flickering energy. -
Create the striped planet:
Move to the second circle. Fill it in horizontally with alternating bands of teal/blue and white chalk. Leave little gaps between the bands to let the black board peek through for texture. -
Draw the ringed planet:
For the third circle, draw a flattened oval that cuts diagonally across the middle of the sphere to form the rings. Extend the oval significantly past the sides of the planet. -
detail the rings:
Add interior lines within that oval ring shape to give it depth. Ensure you erase any part of the sphere line that overlaps the front of the rings, making it look like the rings are passing in front. -
Create the moon:
Outline the fourth large circle clearly with white chalk. Inside, draw several smaller circles of varying sizes to represent craters. -
Detail the moon surface:
Lightly sketch tiny ‘x’ marks or small dots in the empty spaces between the craters to simulate the rough, dusty lunar surface.
Sharper Lines
To get crisp, thin lines for the sun’s rays or the dashed orbit, sharpen the tip of your stick chalk with a standard pencil sharpener with a large hole.
Step 3: Adding the Galaxy Background
-
Draw the orbit line:
Starting below the sun on the left, draw a dashed line that swoops down in a deep ‘U’ curve and comes back up to end below the moon. This frames the entire composition. -
Add large stars:
Using yellow chalk, draw simple five-pointed stars scattered around the planets. Try placing one high above the sun and another above the ringed planet. -
Add colorful stars:
Switch to pink or red chalk to draw a few smaller five-pointed stars. Place one nestled between the planets and one below the sun to balance the color. -
Create distant stars:
Take your white chalk and tap straight down onto the board to create simple dots. Scatter these freely across the background to represent distant stars. -
Smudge for effect:
If you want a softer look, gently rub the larger yellow stars with your fingertip to give them a glowing, hazy appearance. -
Clean up edges:
Take a slightly damp cotton swab or the corner of a rag and carefully wipe away any stray chalk dust or accidental smudges around your planet outlines to make them pop.
Make it Glow
Use a dry finger to smudge a small amount of white chalk dust around the sun and stars. This creates a soft ‘halo’ effect that looks like emitted light.
Step back and admire your hand-drawn galaxy, perfect for a playroom or a science-themed nook
Positive Quote in Bubble Letters

This encouraging project combines a sturdy aesthetic with a positive message, perfect for a hallway or desk. By using outline lettering and a simple speech bubble graphic, you create a design that pops against the black background.
Step-by-Step Tutorial
Materials
- Small framed chalkboard (approx. 8×10 or A4 size)
- White chalk marker or sharpened stick chalk
- Ruler
- Pencil
- Cotton swabs
- Damp cloth
- Paper for sketching (optional)
Step 1: Planning and Spacing
-
Sketch the layout:
Before touching the board, grab a piece of paper roughly the size of your chalkboard. Sketch out ‘YOU GOT THIS’ in three lines to get a feel for the spacing. -
Establish guidelines:
Using a ruler and a very light touch with your chalk or a pencil, mark three horizontal lines on the chalkboard where the base of each word will sit. Make sure to leave extra room at the bottom for the speech bubble tail. -
Rough in the letters:
Lightly sketch the skeletal structure of the letters first. Don’t worry about the thickness yet; just draw single lines to ensure the wrods are centered. -
Check the alignment:
Step back and look at your rough sketch. The ‘YOU’ should be centered over ‘GOT,’ and ‘THIS’ should anchor the bottom. Adjust any spacing now while the marks are easy to wipe away.
Step 2: Drawing the Bubble Letters
-
Outline the ‘Y’:
Starting at the top left, draw the outline of the ‘Y’. Instead of a single stick figure, draw distinct shapes with an empty center. Keep the lines thin and consistent. -
Complete the first word:
Move on to the ‘O’ and ‘U’. For the ‘O’, simply draw two concentric ovals. Try to keep the gap between the letters even. -
Draft the middle word:
Outline ‘GOT’ on the second line. The ‘G’ can be tricky; I find it easier to draw the outer curve first, then the inner curve to match it. -
Finish the lettering:
Draw the outline for ‘THIS’ on the bottom line. Ensure the vertical heights of these letters match the rows above for a cohesive look. -
Refine the lines:
Go over your outlines again with the chalk marker to make the white more opaque and crisp. If you’re using stick chalk, keep it sharp for clean edges.
Clean Lines
Keep a pencil sharpener handy if using stick chalk. A sharp point acts almost like a pen, allowing for the precise interior gaps needed for bubble letters.
Step 3: Adding the Speech Bubble
-
Start the curve:
Begin drawing a curved line to the left of the word ‘GOT’. It should swoop down and around ‘THIS’. -
Complete the enclosure:
Continue the line around the right side of the words, creating a partial circle that brackets the phrase. Don’t close the circle fully at the top or bottom yet. -
Draw the tail:
At the bottom right of the curve (under the ‘S’ in ‘THIS’), extend two lines downward to form a small point, creating the speech bubble tail. -
Connect the shape:
Ensure the tail connects smoothly back into the main curved line so it looks like one continuous shape. -
Light texturing:
If using traditional chalk, run your finger very lightly over the speech bubble line to soften it slightly, giving it a dusty, authentic texture.
Add Dimension
Add simple drop shadows to the right of each letter using a grey pastel or by lightly smudging white chalk to make the text pop off the board.
Step 4: Cleanup and Polish
-
Remove guidelines:
Once the ink or chalk is totally dry, use a cotton swab to carefully erase the initial skeletal lines visible inside your bubble letters. -
Tidy the edges:
Use a damp cotton swab to sharpen any blurry edges on the outside of your letters or the speech bubble frame. -
Final inspection:
Prop the frame up and check for smudges. Wipe down the black space around the words with a damp cloth to make the black background deep and rich.
Place your new sign in a spot where you see it daily for a boost of confidence
Wet Chalk “Paint” With a Brush
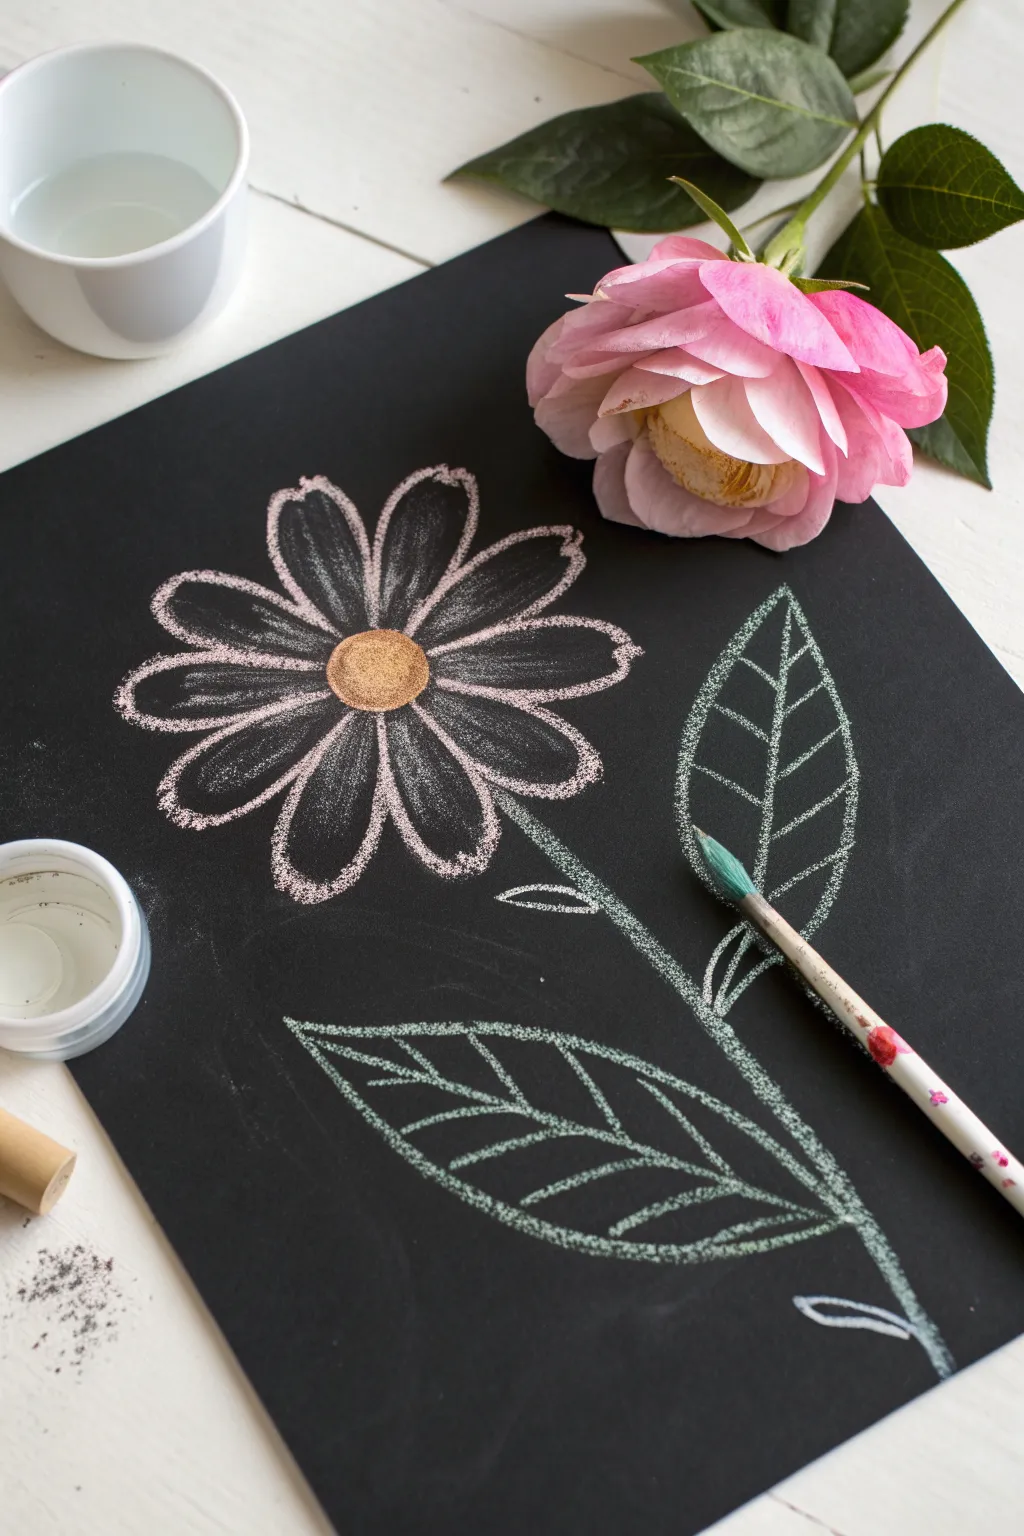
Transform ordinary sidewalk chalk into a vibrant, paint-like medium that pops beautifully against dark paper. This simple technique creates a lovely textured flower that combines the soft look of pastels with the control of watercolor.
Step-by-Step Tutorial
Materials
- Black construction paper or cardstock
- White stick chalk
- Green stick chalk
- Orange or yellow stick chalk for center
- Small cup of water
- Round paintbrush (size 6-8 recommended)
- Paper towel for blotting
Step 1: Preparation & Center
-
Prepare your workstation:
Lay down your black paper on a flat surface. Fill your small cup with clean water and set your chalks and brush nearby. -
Dip the warm chalk:
Take your orange or yellow chalk stick and dip the tip directly into the cup of water. Let it soak for just 2-3 seconds until the very end softens slightly. -
Draw the flower center:
Using the wet tip of the orange chalk, draw a solid circle in the upper-left quadrant of your paper. If the chalk feels scratchy, dip it again quickly. -
Fill it in:
Color in the circle completely with the wet chalk to create a solid, opaque center for your daisy.
Chalk Won’t Stick?
If the brush isn’t picking up color, the chalk might be too hard. Let the chalk tip sit in the water for 10-15 seconds longer to soften into a paste.
Step 2: Painting the Petals
-
Wet the white chalk:
Now, take your white chalk stick and dip the tip into the water. Swirl it briefly to get the chalk paste starting to form. -
Load the brush:
Instead of drawing directly, rub your wet paintbrush against the wet tip of the white chalk to load the bristles with pigment. -
Outline the first petals:
Start at the top of the orange center. Using your brush, paint an elongated loop shape extending outward to form your first petal. -
Complete the flower head:
Continue painting petal loops all around the center. Aim for about 8-10 petals, keeping them roughly the same size but allowing for natural variation. -
Strengthen the white:
If the white lines look too faint as they dry, I like to reload the brush heavily with wet chalk and trace over them a second time for brightness.
Step 3: Stem & Leaves
-
Prepare green pigment:
Dip your green chalk into the water. Like before, rub your clean, wet brush against the chalk stick to create green ‘paint’. -
Paint the stem:
Starting from the bottom gap between two petals, paint a single, slightly curved line extending all the way to the bottom right corner of the paper. -
Add leaf outlines:
Paint a large, leaf-shaped outline on the right side of the stem, and another larger one on the left side lower down. -
Draw the veins:
Inside each leaf outline, paint a central line for the vein. Then, add small diagonal lines branching off from the center to the edges. -
Add tiny details:
For a finishing touch, paint one or two tiny budding leaves or small shoots branching off the main stem near the flower head. -
Final touches:
Assess your drawing. If any chalk dust has fallen where you don’t want it, either blow it away gently or wait for everything to be bone dry before brushing it off.
Pro Tip: Texture
For a cooler texture, draw directly with the wet chalk stick instead of the brush. It creates rougher, more vibrant lines that look like oil pastels.
Now you have a charming floral piece that really stands out against the dark background
Driveway Road Map for Toy Cars
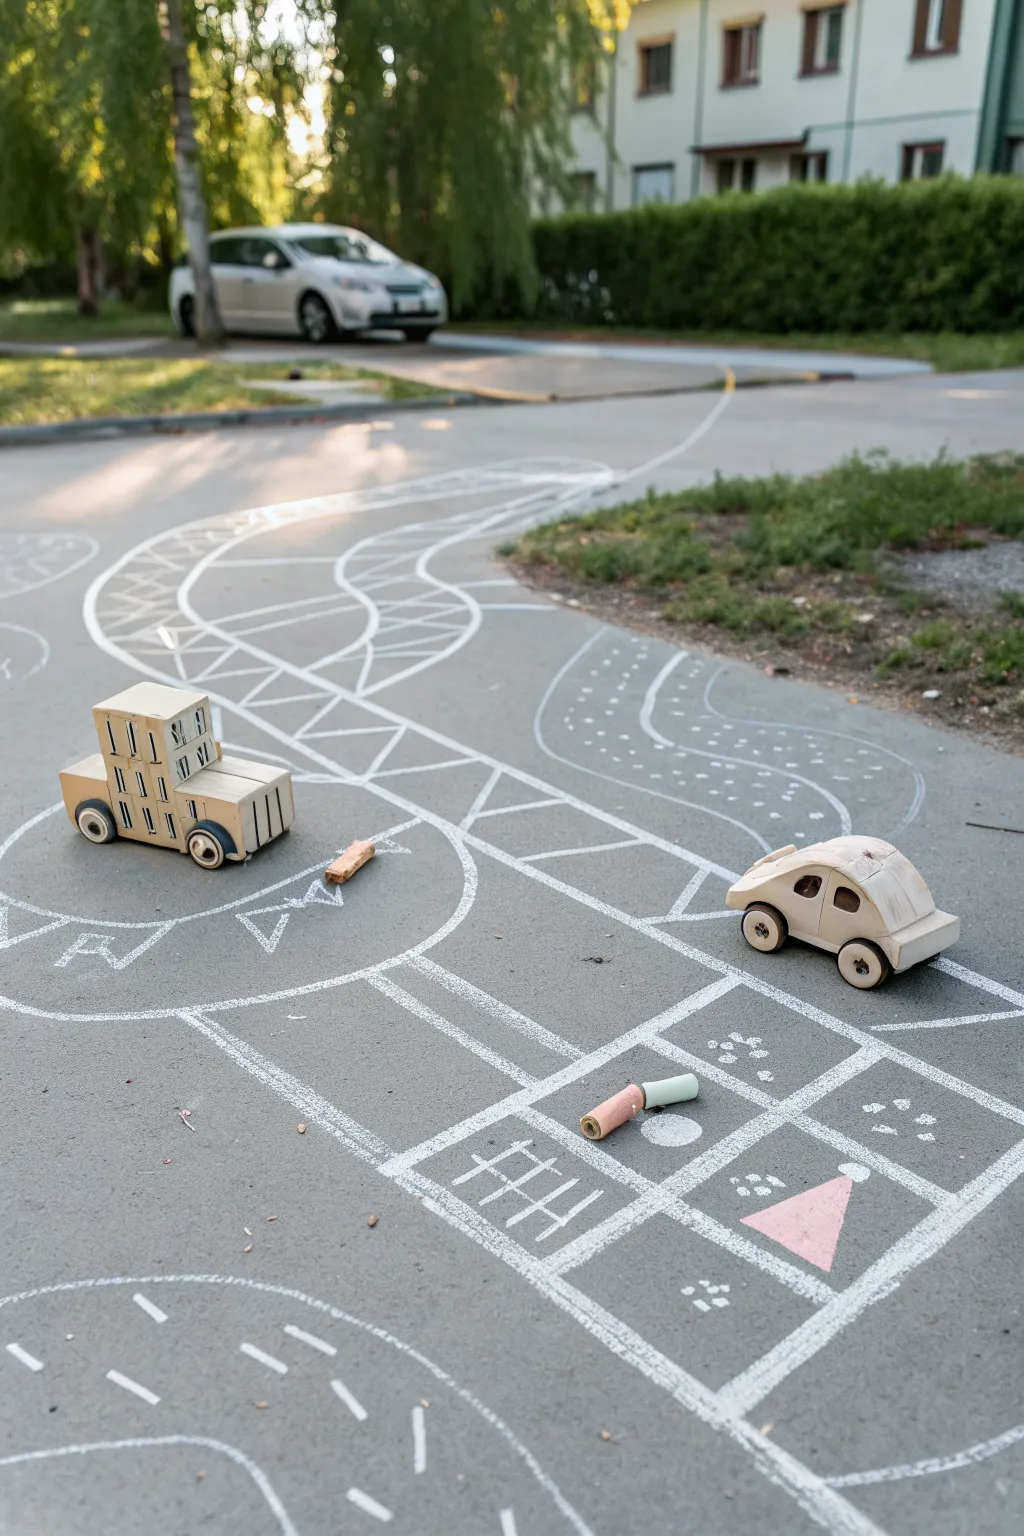
Transform your driveway into a bustling metropolis for toy cars with this engaging road map design. Featuring distinct lanes, roundabouts, and parking zones, this crisp white chalk layout invites hours of imaginative play.
How-To Guide
Materials
- Thick sidewalk chalk (white)
- Colored sidewalk chalk (optional, pink/green shown)
- Toy cars or trucks
- Knee pads or a gardening kneeling pad (optional)
- Broom or leaf blower
Step 1: Planning and Setup
-
Clear the canvas:
Start by sweeping the driveway thoroughly. Removing small pebbles and grit ensures your chalk lines will be smooth and unbroken, which is crucial for the wheels of small toy cars. -
Test the layout:
Before drawing solid lines, place your toy cars on the ground to gauge the necessary width for the lanes. I usually aim for lanes that are about twice the width of the biggest toy vehicle. -
Sketch the spine:
Lightly sketch a single, long guiding line that curves gently down the center of your play area to act as the main artery of your road system.
Step 2: Drawing the Main Roads
-
Define the outer edges:
Using your thick white chalk, draw parallel lines on either side of your guide sketch to create the road borders. Keep your pressure firm to get a solid, high-contrast line. -
Create the roundabout:
At a central intersection, draw a large circle. Inside that, draw a slightly smaller concentric circle to form the driving lane of the roundabout. -
Add the center dividers:
Draw a line down the middle of your straight roads. For variety, make some sections distinct by using a zig-zag down the center instead of a straight line, as seen in the reference. -
Hatch the medians:
In areas where roads split or merge, create safety islands by drawing triangular shapes and filling them with diagonal hatching lines.
Chalk Breaking?
If your chalk sticks keep snapping, try wearing down the sharp tip on a rough patch of concrete first. Avoid pressing straight down; angle the chalk at 45 degrees.
Step 3: Adding Traffic Details
-
Draw dashed lanes:
On curved sections or secondary roads, use short, dashed strokes to indicate passing zones or multi-lane highways. -
Create turning arrows:
Inside the roundabout lanes and approaching intersections, draw simple arrow shapes to direct the flow of imaginary traffic. -
Mark the crosswalks:
At key stopping points, draw a ladder-style crosswalk or a box with an ‘X’ inside to designate ‘do not block’ zones.
Build a 3D City
Enhance the flat map by adding small cardboard boxes or wooden blocks along the road edges to serve as houses, skyscrapers, and tunnels for the cars.
Step 4: Special Zones & Finishing Touches
-
Outline the parking grid:
To the side of the main road, draw a large square divided into four smaller quadrants, similar to a four-square or hopscotch court. -
Fill the grid details:
Decorate inside the grid squares. You can add texture by tapping the chalk to create dots, or drawing simple symbols like hashes. -
Add a pop of color:
Select one specific shape, like a triangle within your grid or a building zone, and fill it in solidly with colored chalk (like the pink shown) to create a visual focal point. -
Clean up edges:
Use a damp cloth or your finger to smudge away any planning sketches or jagged mistakes, leaving only the crisp final lines. -
Populate the scene:
Place your wooden cars at the starting line or in the parking spots to invite play immediately.
Now step back and watch the neighborhood traffic flow through your custom-designed streets


Have a question or want to share your own experience? I'd love to hear from you in the comments below!