Whenever I’m out on the sidewalk with chalk, I lean hard into easy cartoon chalk drawings—they’re quick, colorful, and instantly make people smile. If you can draw simple shapes and add big eyes with a bold outline, you can make any of these characters happen.
Smiley Face With Chunky Outline
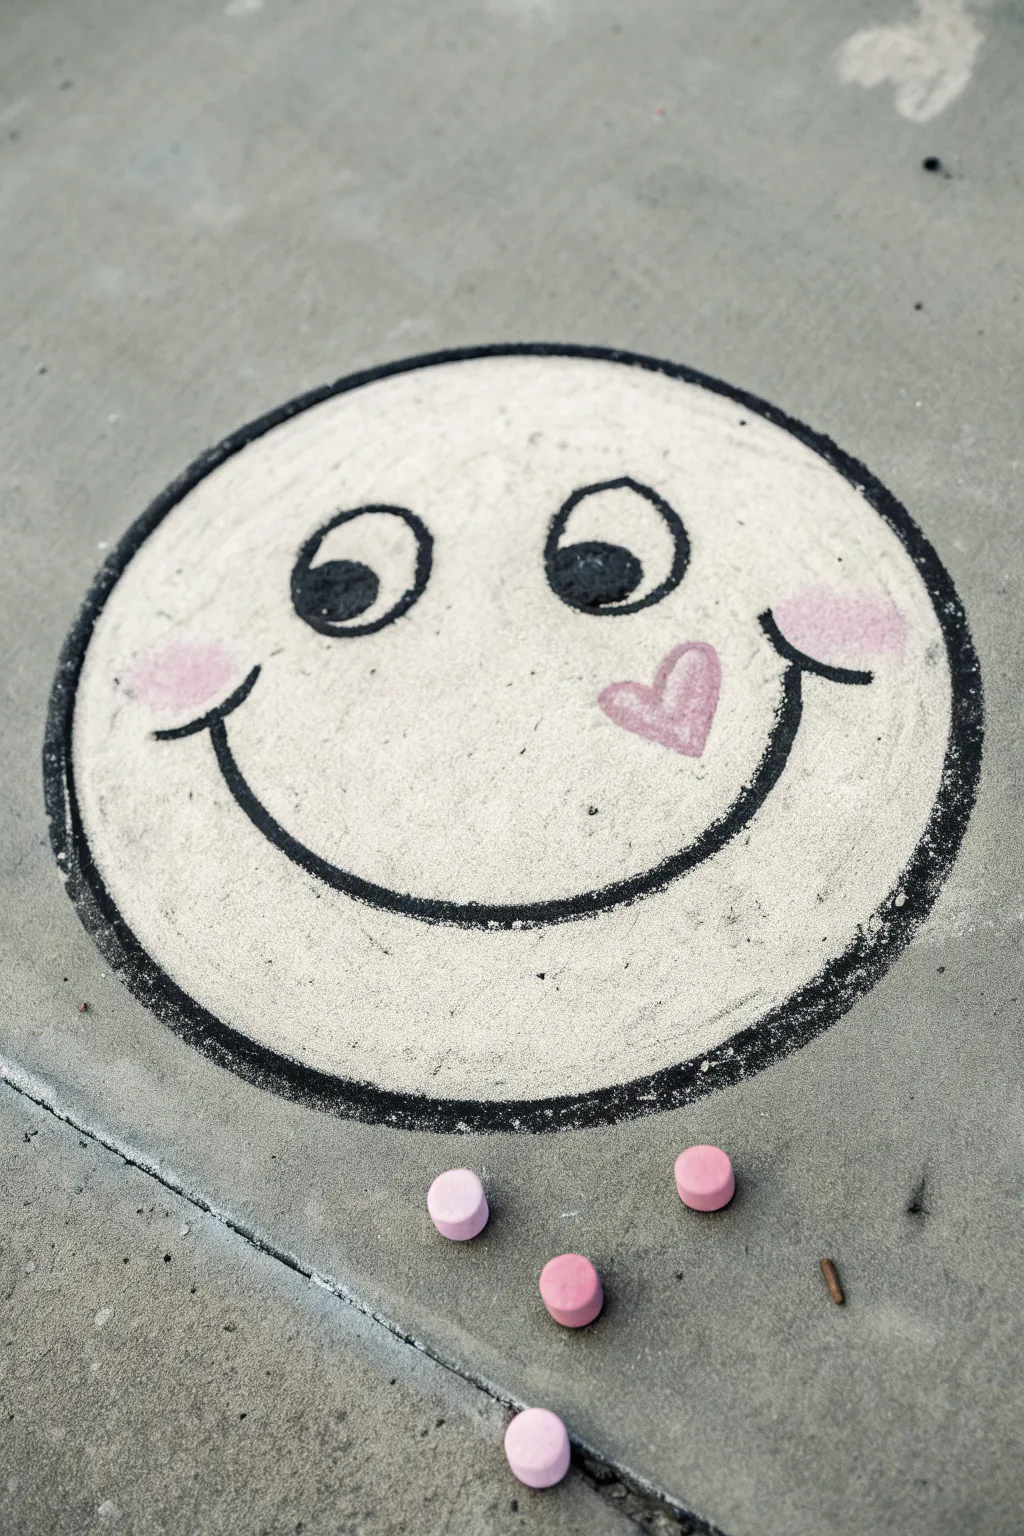
Bring some instant cheer to your driveway with this bold and expressive smiley face that pops against the gray pavement. The secret to this cartoon style is the thick, contrasting black outline and the soft pink accents that give it a sweet personality.
How-To Guide
Materials
- Sidewalk chalk (black, white, pink)
- Small blending sponge or cloth (optional)
- Pavement or driveway surface
Step 1: The Foundation
-
Draw the main circle:
Start with your black chalk and draw a large, perfect circle on the pavement. Make it big enough to fill comfortably with color, about the size of a dinner plate or slightly larger. -
Thicken the border:
Go over your initial circle line multiple times. Press down firmly to create a thick, heavy black band. This chunky outline is crucial for that cartoon sticker look. -
Fill the interior:
Take your white chalk and begin coloring inside the black circle. Use the side of the chalk stick to cover more ground quickly. -
Create opacity:
Apply a second layer of white chalk to ensure the gray pavement doesn’t show through. You want a solid, creamy white base. -
Define the edge:
carefully color the white chalk right up to the inner edge of your black border, leaving no gap between the fill and the outline.
Clean Lines Hack
To keep the white fill from muddying your black outline, color the white center first, then add the thick black border last.
Step 2: Facial Features
-
Outline the eyes:
Switch back to black chalk. Draw two large ovals in the upper third of the face. Space them slightly apart. -
Add the smile:
Draw a wide, U-shaped curve below the eyes. Extend the corners of the mouth upward excessively to create distinct cheek dimples. -
Thicken feature lines:
Just like the outer border, go back over the eye outlines and the smile line to make them bold and chunky. -
Place the pupils:
Inside the eye ovals, draw two solid black circles. Position them looking toward the left side to give the face a playful, distracted expression. -
Fill the pupils:
Color in the pupils heavily with black chalk so they are solid and dark.
Step 3: Sweet Details
-
Add rosy cheeks:
Grab your pink chalk. Draw a soft circle at the end of the left smile line. -
Smudge the blush:
I like to use my finger or a small piece of cloth to gently rub the pink chalk into the white base. This creates a soft, airbrushed effect for the blush. -
Draw the other cheek:
Repeat the process on the right side, adding a soft pink patch near the upper corner of the smile. -
Add the heart:
Using the pink chalk again, draw a small heart shape floating just above the right side of the smile. -
Fill the heart:
Color the heart in solid pink. Make sure the edges are crisp against the white background. -
Final clean up:
Blow away any loose chalk dust. If the white dust has fogged up your black lines, re-trace the black sections one last time to make them pop.
Make it Sparkle
Crush a tiny bit of glittery chalk or rubbing loose glitter onto the heart and cheeks while they are fresh to make the drawing shimmer in the sun.
Step back and enjoy the friendly face brighten up your walkway

Kawaii Cupcake With Sprinkle Hair
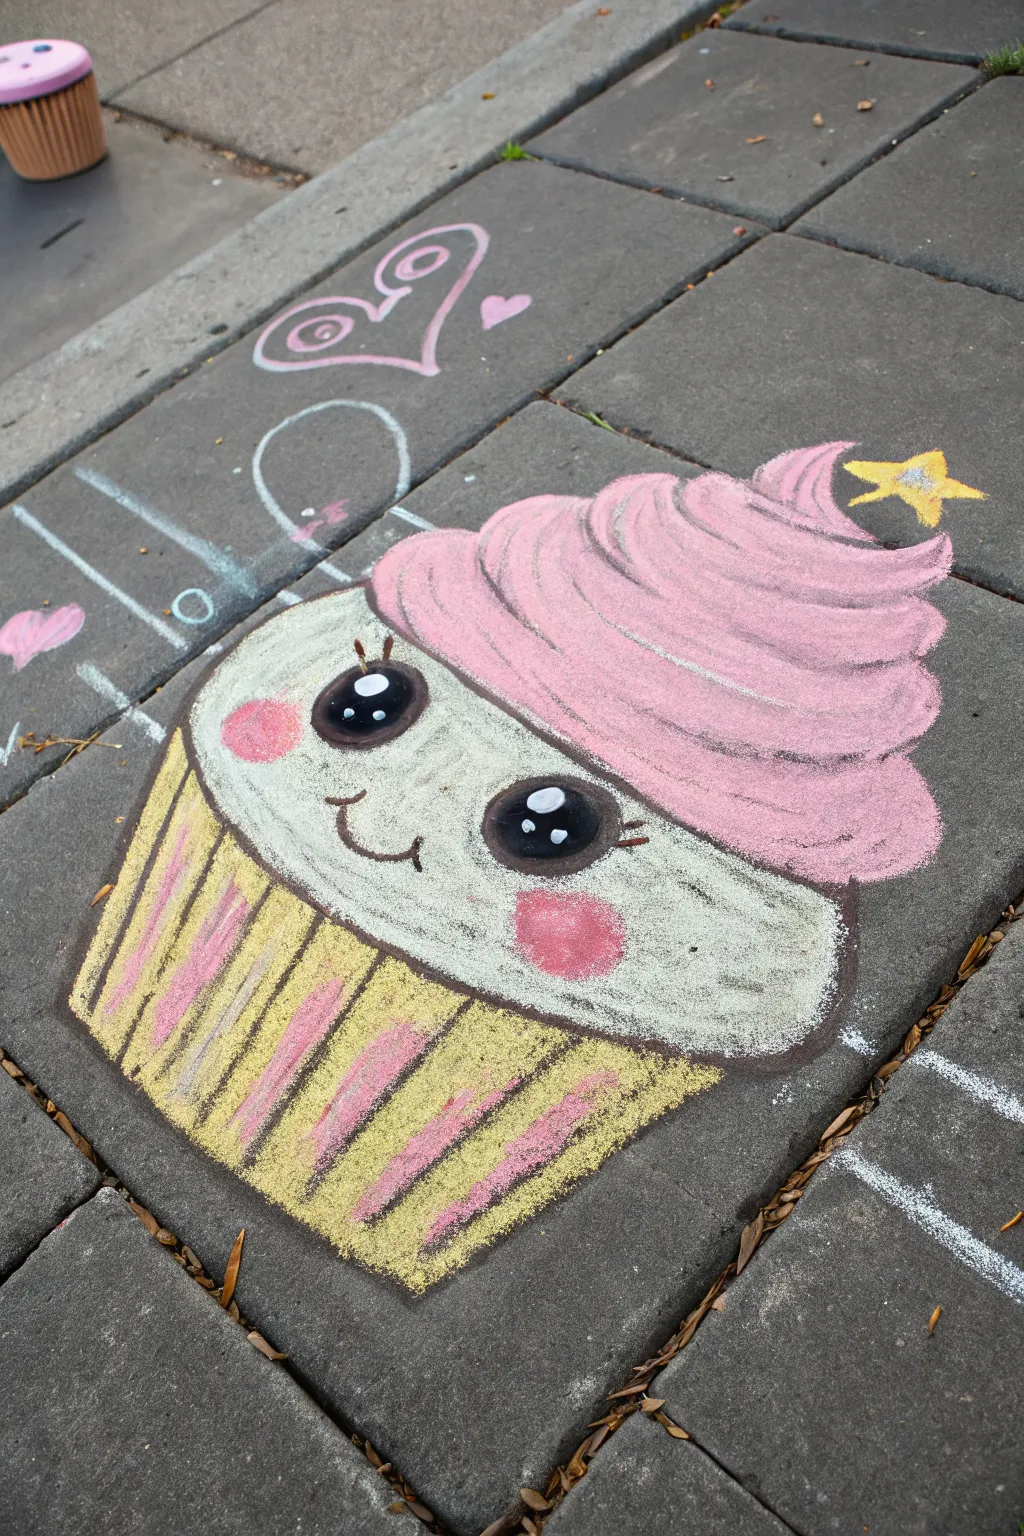
Bring some sweetness to your sidewalk with this adorable kawaii cupcake character. Featuring big, sparkling eyes and a generous swirl of pink frosting, this chalk art is perfect for beginners who want to draw something cute and colorful.
Step-by-Step
Materials
- Sidewalk chalk (yellow, pink, white, mint green/pale blue)
- Black chalk pastel or charcoal (for the eyes)
- Blending sponge or old rag
- Concrete or asphalt surface
Step 1: The Cupcake Base
-
Outline the wrapper:
Start by drawing a trapezoid shape for the cupcake wrapper. The top line should be wider than the bottom, and slight curved upwards. -
Fill with yellow:
Color in the entire wrapper shape using your bright yellow chalk. Apply it thickly to get good coverage on the pavement. -
Add pink stripes:
Using pink chalk, draw vertical lines down the wrapper to create the folded paper look. I like to shade in the alternating sections slightly to give it more volume.
Step 2: The Fluffy Face
-
Draw the cake shape:
On top of the wrapper, draw a wide, rounded oval shape using white or pale cream chalk. This is the actual ‘cake’ part where the face will go. -
Fill huge white area:
Color this oval in completely with white chalk. Make sure it overlaps slightly with the top of the yellow wrapper so there are no gaps. -
Blend the face:
Use your blending sponge or fingers to smooth out the white chalk. This creates a creamy texture perfect for a cute face. -
Draw the eyes:
Using black chalk or charcoal, draw two large circles in the middle of the white area. Space them out generously for maximum cuteness. -
Add eye details:
Inside the black circles, add two small white dots—one larger at the top and one smaller at the bottom—to create a sparkling reflection. -
Add cheeks and mouth:
Draw two pink circles under the eyes for rosy cheeks. Connect them with a small, curved ‘u’ shape in black for a smiling mouth.
Chalk dust control
If you make a mistake with the black eyes, don’t wipe it! Blow the loose dust away first, then dab deeply with a clean cloth.
Step 3: Frosting & Toppings
-
Create the first swirl:
Starting just above the face, use pink chalk to draw a wide, sausage-like shape that curves across the top of the head. -
Build the height:
Stack a slightly smaller, curved pink shape on top of the first one. Repeat this 2-3 times, getting narrower as you go up, to create a tall swirl. -
Peak the top:
Finish the frosting stack with a small, pointed dollop at the very top, curving slightly to the side like soft-serve ice cream. -
Fill and texturize:
Color in all the pink frosting sections. Use a darker pink or press harder in the creases between layers to show depth. -
Add the star:
Draw a small yellow star resting on the side of the top swirl. Outline it in orange if you have it to make it pop. -
Final clean up:
Take a black or dark grey piece of chalk and trace the outer edge of the entire cupcake to give it a sticker-like, cartoon finish.
Make it glitter
For a magical touch, spray the finished drawing gently with water and sprinkle biodegradable craft glitter over the wet frosting area.
Step back and smile at your sweet creation, ready to greet anyone walking by


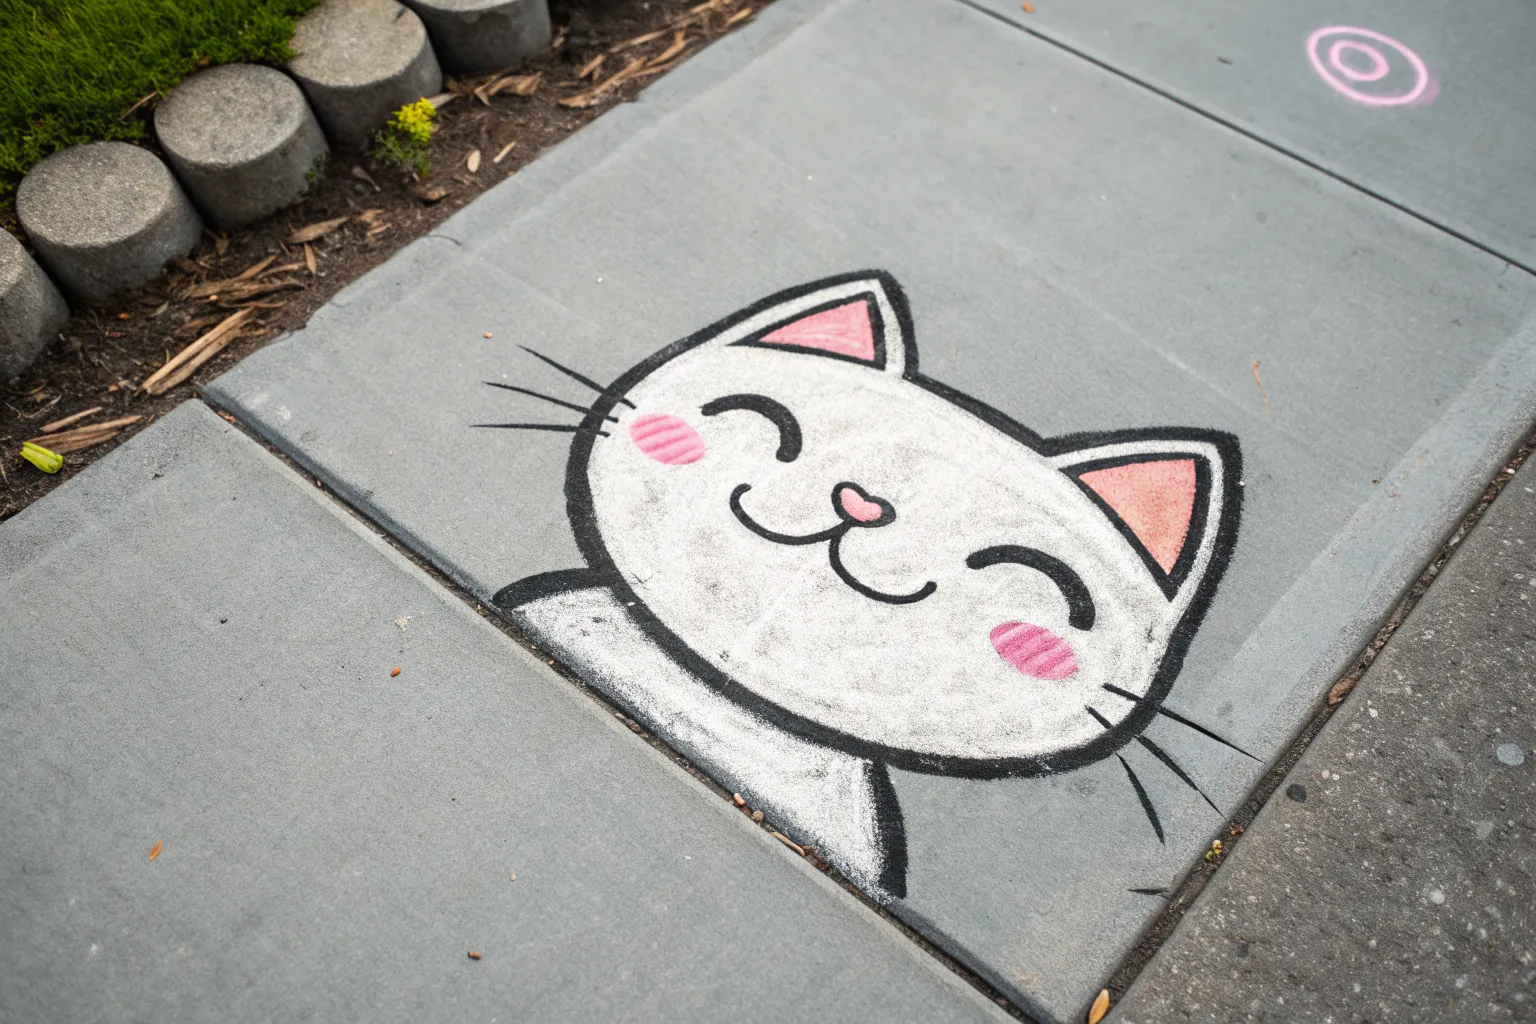
Cartoon Cat Head With Whiskers
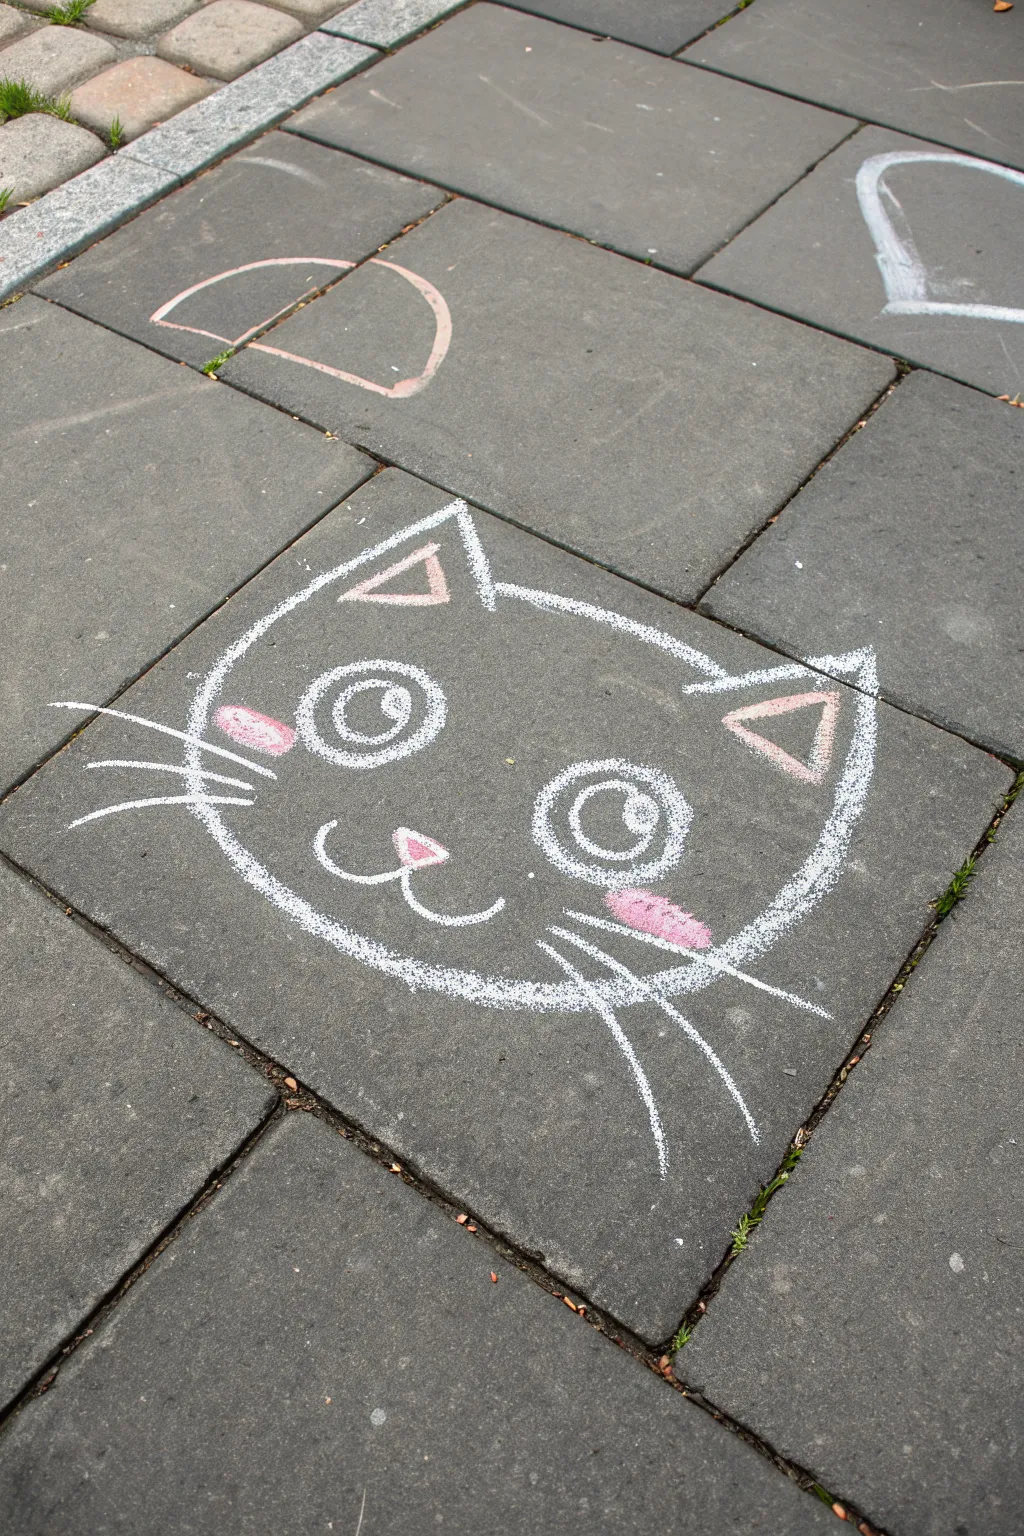
Transform a plain square of sidewalk into a friendly feline face with this simple line-art project. Using just white chalk for outlines and a touch of pink for warmth, this cartoon cat features big expressive eyes and long sweeping whiskers that make it pop against gray pavement.
Step-by-Step Tutorial
Materials
- White sidewalk chalk (thick stick)
- Pink or light red sidewalk chalk
- A clean, dry section of pavement or asphalt
- A cloth or sponge (for quick erasures)
Step 1: Planning and Outline
-
Visualizing the Space:
Find a single square paving stone or mark out a similar-sized area to frame your drawing. This cat fits perfectly within a standard square, leaving a little room at the edges. -
Drawing the Base Shape:
Start with white chalk. Draw a wide, curved ‘U’ shape for the bottom of the face. Keep it somewhat flattened at the bottom rather than perfectly round, like a wide bowl. -
Closing the Top:
Connect the top of your ‘U’ shape with a gentle, slightly upward-curving line. Don’t worry about the ears yet; just create the main head shape which should look like a soft oval or rounded rectangle. -
Adding the First Ear:
On the top left corner of the head, draw a large triangle pointing upwards. Make the lines slightly curved outward to give the ear a soft, cartoony feel. -
Adding the Second Ear:
Repeat the previous step on the top right side. Try to make this ear roughly the same size as the first one for balance. -
Refining the Outline:
Go over your main outline one more time with the white chalk to make the lines bold and visible against the dark ground.
Uneven Surface?
If the paver is very bumpy, draw slower and press harder. Thick ‘sidewalk’ chalk works better than thin chalkboard chalk here, as it doesn’t snap as easily in grooves.
Step 2: Facial Features
-
Creating the Eyes:
Draw two large circles in the middle of the face, spacing them apart slightly. These are the outer rims of the eyes. -
Adding Pupils:
Inside each large circle, draw a smaller circle. Position these slightly toward the center or wherever you want the cat to be looking. -
Making the Highlight:
Draw a tiny circle inside the pupil area, near the top right or top left. Color in the rest of the pupil solid white, leaving that tiny circle empty to look like a shine or reflection. -
Drawing the Mouth Anchor:
Directly between the eyes and slightly lower, draw a tiny, rounded triangle pointing downward. This will be the nose. -
Forming the Smile:
Starting from the bottom point of the nose, draw a curved line hooking up to the left (like a ‘J’). Then, do the same hooking up to the right. This creates the classic ‘3’ shape for the mouth.
Pro Tip: Eye Sparkle
Make the tiny uncolored circle in the eye (the highlight) larger for a cuter, ‘anime’ style look. It instantly makes the character look friendlier.
Step 3: Color and Details
-
Coloring the Nose:
Switch to your pink chalk. Gently fill in the small nose functionality triangle you drew earlier. -
Detailing the Ears:
Back inside the large ear triangles, draw smaller pink triangles. These represent the inner ear. Use a light touch so the pink doesn’t overpower the white outline. -
Adding Cheeks:
Underneath the eyes, scrub a small oval of pink chalk on the left and right sides of the face. This creates a cute blushing effect. -
Left Whiskers:
Switch back to white chalk. On the left cheek, draw three long, sweeping lines extending outward past the face outline. I like to make the top one slightly longer for a dynamic look. -
Right Whiskers:
Draw three corresponding long lines on the right side. Don’t worry about them being perfectly symmetrical; slight variation adds character. -
Final Cleanup:
Blow away any loose chalk dust. If any lines look thin, give them one final pass with the white chalk to ensure high contrast.
Now you have a cheerful companion to greet anyone walking by


Floppy-Eared Puppy With Tongue Out
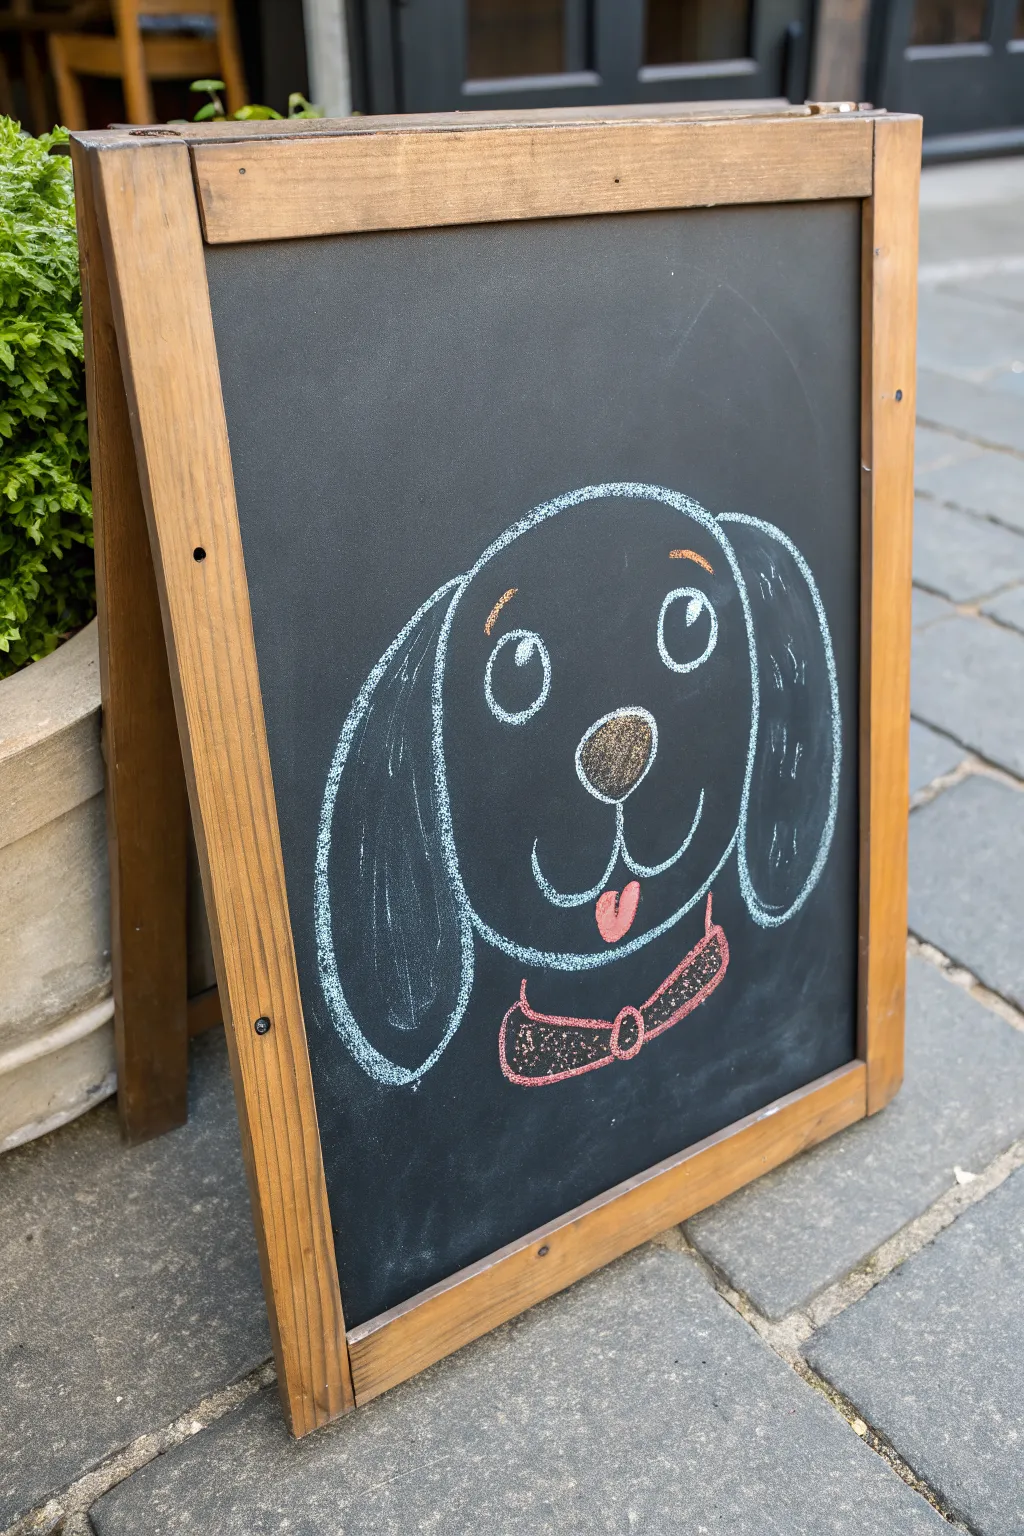
Brighten up your sidewalk sign or kitchen chalkboard with this adorable, floppy-eared puppy sketch. This simple line drawing uses just a few colors to create a friendly, cartoon-style dog that’s sure to bring a smile.
Step-by-Step Guide
Materials
- A-frame chalkboard or standard blackboard
- White creativity chalk or chalk marker
- Reddish-brown or rust-colored chalk
- Bubblegum pink chalk
- Damp cloth (for erasing)
- Dry microfiber cloth
Step 1: Drawing the Head Shape
-
Start the main curve:
Begin by drawing a large, upside-down ‘U’ shape in the center of your board. This will form the top of the puppy’s head. -
Add the cheeks:
Where the ‘U’ shape ends, curve the line slightly inward and then down to create the cheek area, leaving the bottom open for now. -
Close the jaw:
Connect the two cheek lines with a gentle, wide curve at the bottom to define the puppy’s chin and jawline.
Keep it Sharp
Rotate your chalk stick every few strokes. This keeps a sharp edge constantly available, ensuring your outlines stay crisp rather than getting thick and fuzzy.
Step 2: Adding Facial Features
-
Draw the nose:
In the center of the face, slightly below the middle point, draw a soft, rounded triangle or oval shape for the nose. -
Fill the nose:
Using your reddish-brown chalk, color in the nose completely. I like to use the side of the chalk stick here for smoother coverage. -
Create the mouth:
From the bottom center of the nose, draw a short vertical line down. Then, branch out to the left and right with two upward-curving hooks to make a happy smile. -
Add the tongue:
Right where the two mouth curves meet, draw a small ‘U’ shape below the line. Fill this in with your pink chalk to look like a panting tongue. -
Outline the eyes:
Draw two large oval shapes above the nose, spacing them evenly apart. -
Detail the pupils:
Inside each oval, draw a smaller circle near the top right or top left. Fill in the main oval with white chalk, but leave the small circle empty—or color the main oval black/negative space and add a white catchlight dot. -
Add eyebrows:
Sketch two small, floating curves above the eyes using the reddish-brown chalk to give the puppy an expressive look.
Step 3: Ears and Accessories
-
Draw the left ear:
Starting from the top left of the head curve, draw a long, floppy oval shape that hangs down beside the cheek. -
Draw the right ear:
Repeat this on the right side, trying to keep the size roughly symmetrical to the first ear. -
Add ear texture:
Make little scratchy marks inside the ear outlines using white chalk to suggest fur texture. -
Sketch the bow tie knot:
Below the chin, draw a small circle or oval with the reddish-brown chalk to act as the knot of a bow tie. -
Create the bow loops:
Extend a loop shape to the left and another to the right of the knot using the same color. -
Define the bow:
Go over the bow tie outline one more time with the reddish-brown chalk to make it pop, adding a few internal lines to show the fabric folds.
Make it Pop
Use a wet chalk marker for the eyes’ white highlights. The opaque liquid chalk stands out brilliantly against the dusty blackboard background.
Step back and enjoy your charming new chalkboard friend
BRUSH GUIDE
The Right Brush for Every Stroke
From clean lines to bold texture — master brush choice, stroke control, and essential techniques.
Explore the Full Guide
Friendly Dino With Big Belly
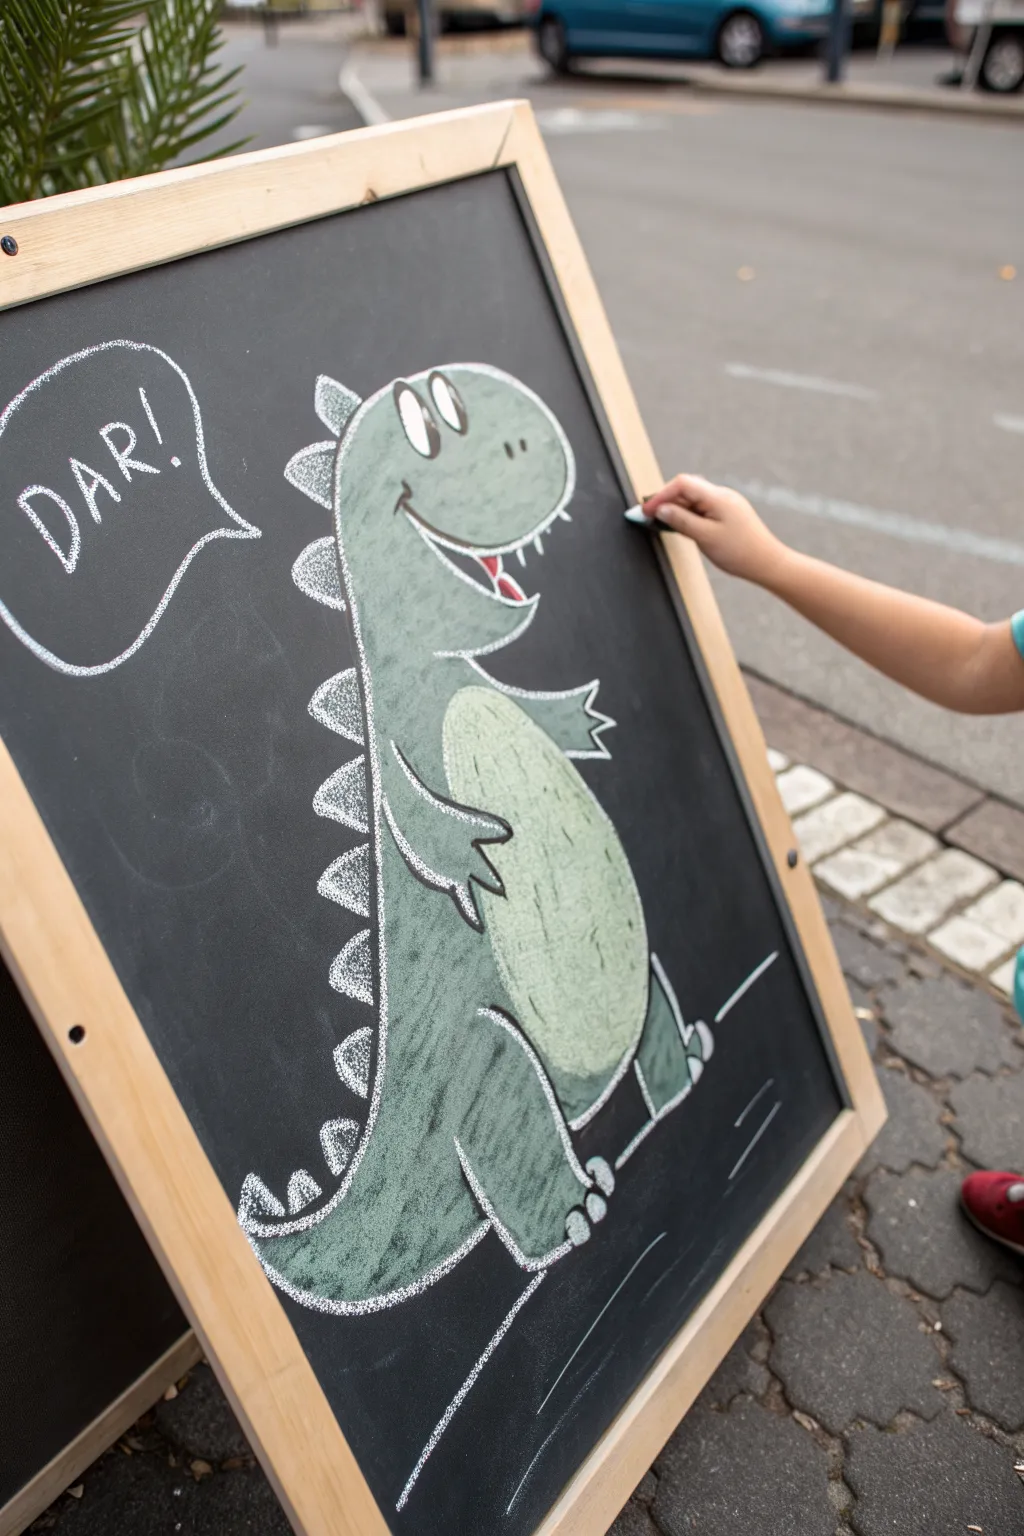
Bring prehistoric charm to your sidewalk or chalkboard with this friendly, big-bellied T-Rex. Using simple green shading and crisp white outlines, you can create a lovable character that looks ready to roar a greeting.
Step-by-Step
Materials
- Black chalkboard or smooth paved surface
- Green sidewalk chalk (thick stick)
- White chalk (thin stick or sharpened)
- Red chalk (small piece for mouth detail)
- Damp cloth or sponge for erasing mistakes
- Kneadable eraser (optional, for blending)
Step 1: Shaping the Green Body
-
Outline the head:
Start with your green chalk. Draw a large, rounded oval shape near the top of your workspace for the head. Leave the bottom right side open where it will connect to the neck. -
Form the body:
From the bottom of the head, extend a long, curved line downwards and out to the right to create a pear-shaped body. Make the bottom area wide to accommodate that big belly. -
Add the tail:
At the bottom left of the body, curve a line upwards and outwards to form a thick, pointed tail that balances the figure. -
Draw the legs:
Sketch two thick stumps for legs at the base of the body. Make the near leg slightly larger and the far leg tucked slightly behind the belly. -
Fill with color:
Using the side of your green chalk stick, fill in the entire shape you’ve just drawn. I prefer using broad horizontal strokes here for nice, even coverage. Don’t worry about being perfectly neat yet. -
Create the belly highlight:
Rub the chalk lightly in the center of the stomach area to create a lighter green patch. If your green is too dark, you can blend a tiny bit of white chalk over the belly area and smudge it with your finger to suggest roundness.
Step 2: Adding Details and Outlines
-
Outline the main form:
Switch to your white chalk. Press firmly to trace a clean, bold line around the entire outer edge of the green dinosaur shape. -
Define the belly:
Draw an oval shapes line inside the body to clearly separate the lighter belly area from the rest of the green skin. -
Add the arms:
Draw two small, short arms jutting out from the upper chest. Give them three little pointed fingers each. Outline them in white and fill lightly with green if needed. -
Draw the spikes:
Starting from the back of the head, draw a series of triangles running all the way down the back to the tail tip. Outline them in white and lightly scumble some white chalk inside each triangle for texture. -
Sketch the face:
Draw two tall oval eyes near the top of the head. Fill the pupils with black (or leave the board negative space) and add white highlights. Draw two tiny dots for nostrils. -
Create the smile:
Draw a long, curved smile line. Add a small U-shape below it for the open mouth. Use your red chalk to color a small tongue inside. -
Add the teeth:
Along the top lip of the smile, draw several small, white triangles pointing downward for teeth. -
Detail the feet:
Draw three small semi-circles at the bottom of each foot to create toes or claws.
Chalk Blending Tip
For a smoother look on the green skin, use a piece of felt or an old sock to rub the chalk into the board before adding the white outline on top.
Step 3: Finishing Touches
-
Create the speech bubble:
To the left of the head, draw a wobbly, cloud-like speech bubble shape using the white chalk. -
Write the roar:
Inside the bubble, write the word ‘DAR!’ in capital letters. -
Add motion lines:
Draw a few quick, short strokes behind the feet and tail to suggestion motion, as if the dinosaur is stomping forward. -
Clean up:
Use a damp cloth or your finger to sharpen any smudged edges, making sure the white outline pops against the dark board.
Make It 3D
Add personality by drawing a tiny party hat on its head or placing a patterned texture like polka dots or stripes inside the belly area.
Step back and admire your prehistoric pal coming to life on the pavement
One-Eyed Monster Blob
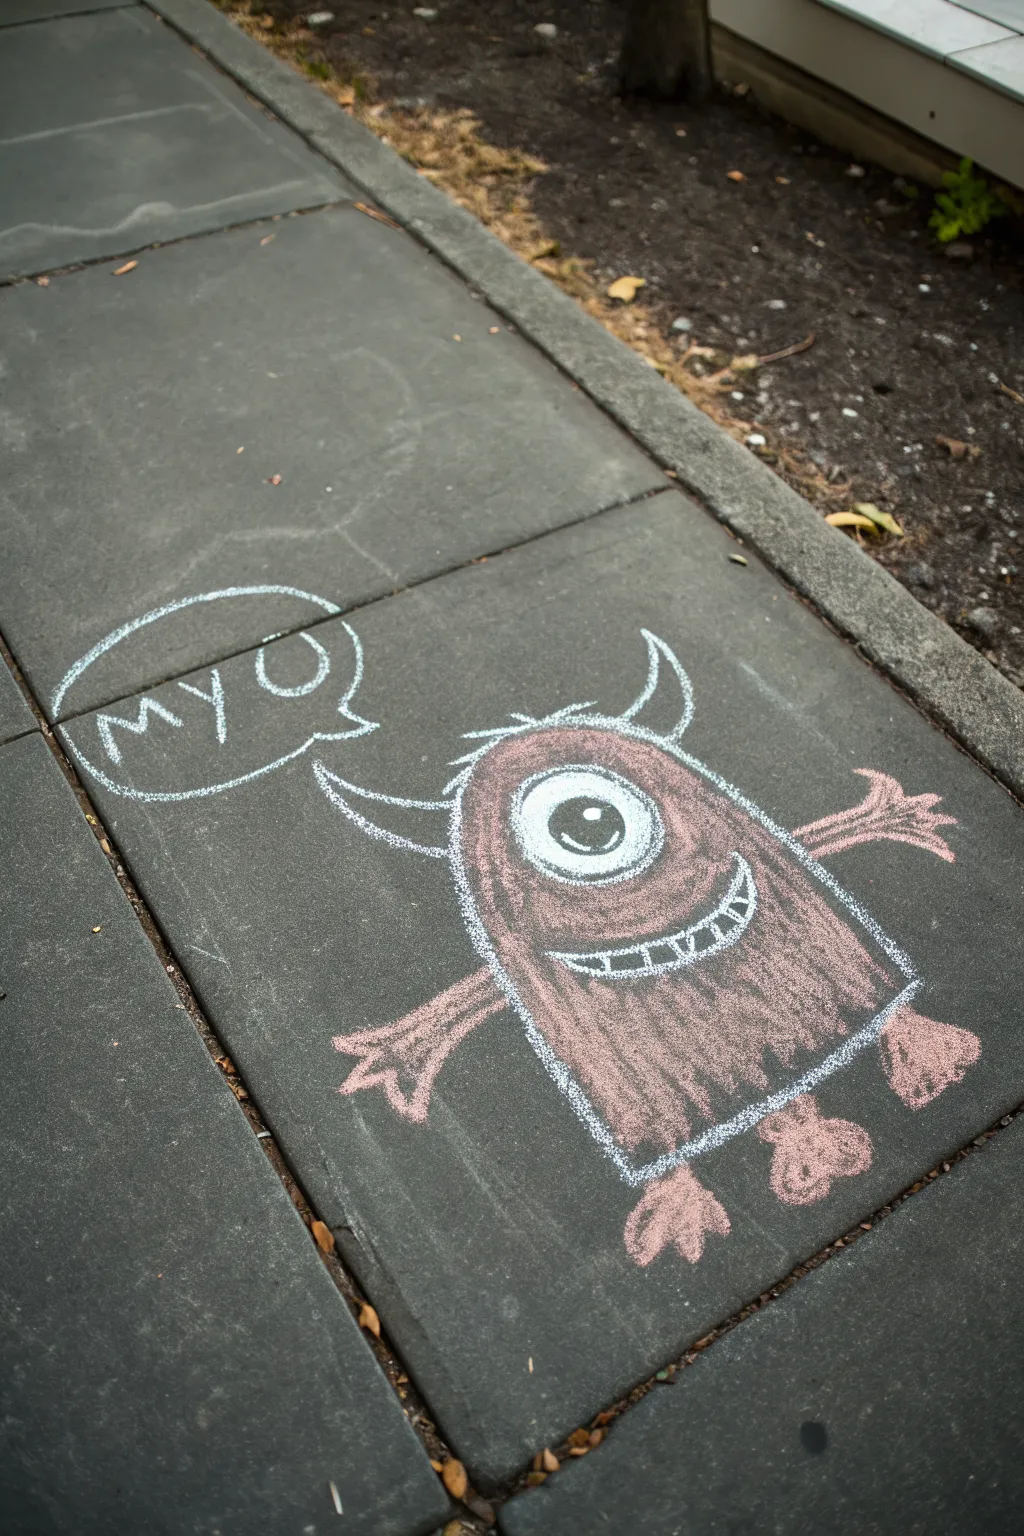
Bring your sidewalk to life with this friendly, fuzzy one-eyed creature that’s simpler to draw than it looks. This project uses basic shapes and contrasting outline work to make the character pop right off the pavement.
Detailed Instructions
Materials
- White sidewalk chalk
- Reddish-brown or maroon sidewalk chalk
- Clean section of pavement or concrete
- Cloth or sponge (for quick blending or corrections)
Step 1: Drawing the Base Outline
-
Start the body shape:
Begin by drawing a large, rounded arch shape with your white chalk. Think of it like an upside-down ‘U’ or a tombstone shape, keeping the bottom open for now. -
Close the bottom:
Draw a slightly curved line connecting the bottom ends of your arch to complete the main body shape. -
Add the horns:
On the top curve of the head, draw two small crescent shapes pointing outward. The left horn should curve to the left, and the right horn to the right, resembling little hooks or sharp ears. -
Draw the arms:
Extending from the middle sides of the body, sketch two simple arms stretching outward. Keep them fairly straight, ending in jagged, three-fingered hands. -
Sketch the feet:
At the bottom of the body, draw two feet. Similar to the hands, give them three toes each, making them look a bit like bird feet or dinosaur tracks.
Chalk Not Sticking?
If the pavement is too smooth, dip the chalk tip in water for 5 seconds. Wet chalk draws much creamier, creating opaque, paint-like lines that dry very bright.
Step 2: Filtering and Features
-
Create the eye outline:
In the upper center of the body, draw a large circle with white chalk. Make it nice and prominent as this is the monster’s main feature. -
Fill the body color:
Take your reddish-brown chalk and start coloring inside the body. Scumble the chalk—using the side of the stick gives a nice textured coverage—around the large eye circle. -
Color the limbs:
Continue filling in the arms, hands, and feet with the same reddish-brown color. I prefer to press a bit lighter here so the white outline doesn’t get overwhelmed. -
Add the pupil:
Switch back to your white chalk. Inside the large eye circle, draw a smaller, filled-in circle for the pupil, leaving a tiny dot of empty space (dark pavement) in the center for the iris. -
Add a highlight:
Place a small, solid white dot in the upper right part of the pupil to give the eye a shiny, lively look. -
Draw the mouth:
Below the eye, draw a wide, curved ‘U’ shape for the smile using white chalk. Draw a straight line across the top to close the mouth shape.
Step 3: Refining Details
-
Add the teeth:
Inside the mouth shape, draw vertical lines to create a row of blocky teeth. -
Enhance the texture:
Go over your reddish-brown fill again if needed to make the color solid, but leave the edges a little rough to simulate fur. -
Re-trace the outer lines:
Take your white chalk and go over the main body outline again. Press firmly to create a bold, bright border that separates the monster from the grey pavement. -
Add hair wisps:
At the very top of the head between the horns, draw three small, quick white lines flicking upward to look like a tuft of hair. -
Create the speech bubble:
to the left of the monster’s head, draw an oval speech bubble. Add a small triangular tail pointing toward the monster’s mouth. -
Write the message:
Inside the bubble, clearly write ‘MYO’, or any other short monster sound you like, to give your creature a voice.
Level Up: Texture Trick
Use your finger to smudge the reddish-brown chalk outward slightly past the white outline in a few spots to make the monster look extra fuzzy and energetic.
Step back and admire your friendly sidewalk creature as it greets everyone who walks by

PENCIL GUIDE
Understanding Pencil Grades from H to B
From first sketch to finished drawing — learn pencil grades, line control, and shading techniques.
Explore the Full Guide
Balloon Bunch With Smile Faces
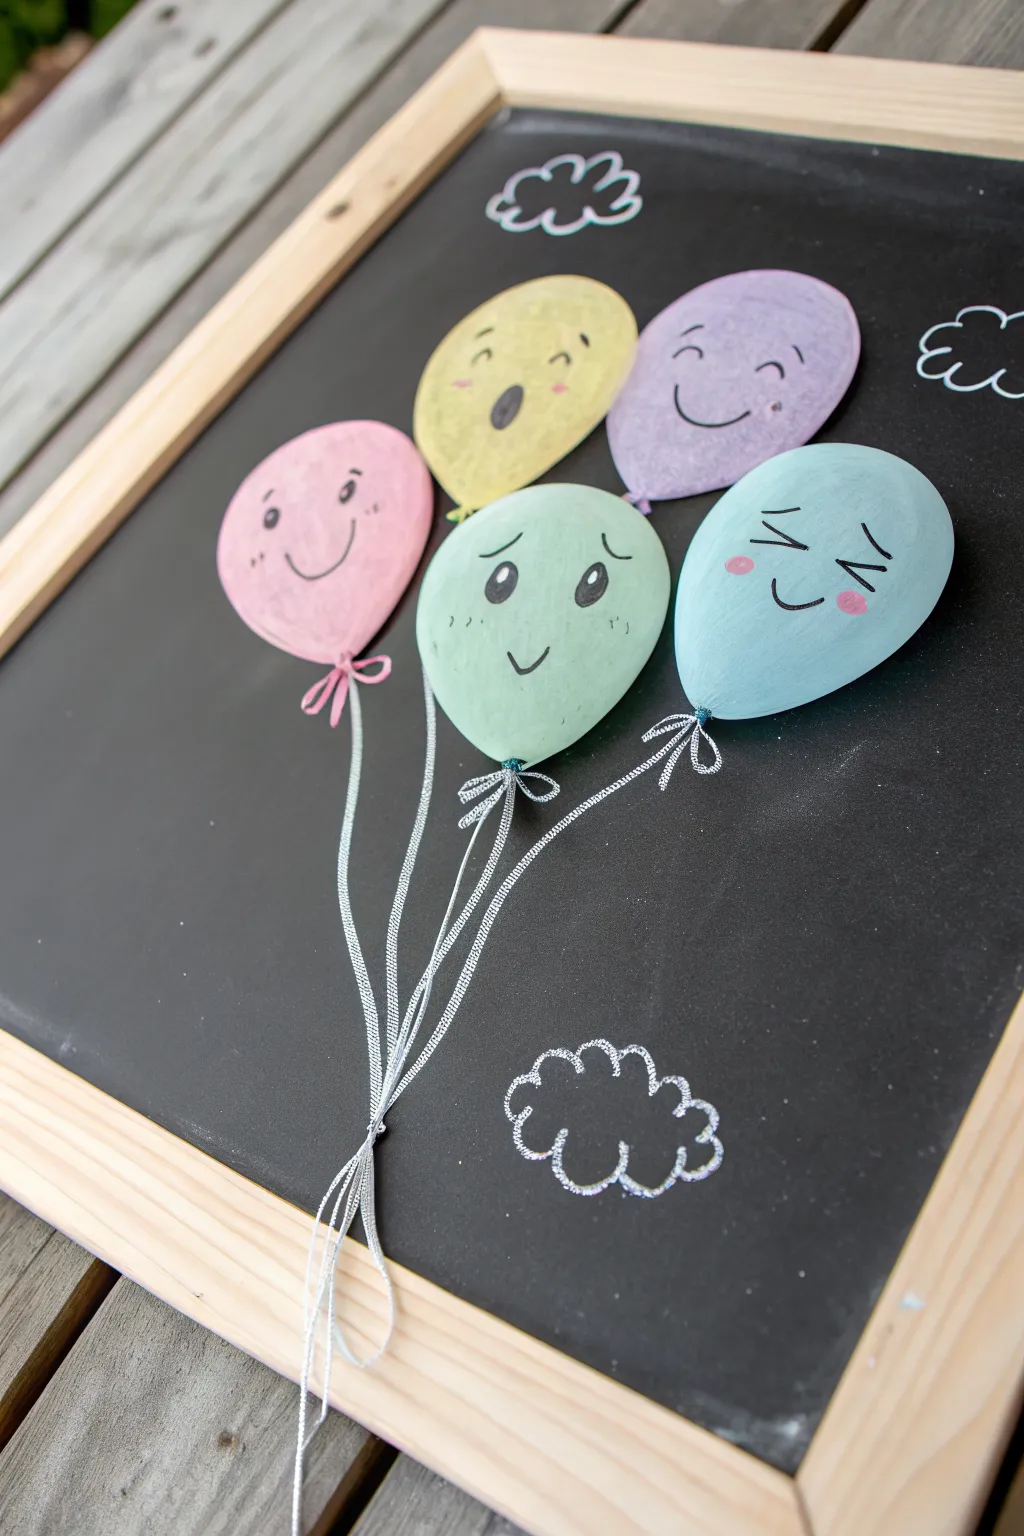
Brighten up any chalkboard with this adorable bunch of expressive balloons that seem to pop right off the surface. By combining chalk markers or pastels with real ribbon, you create a charming mixed-media effect perfect for parties or playful decor.
How-To Guide
Materials
- Small chalkboard (framed)
- Chalk markers (liquid chalk) or soft pastels in pink, yellow, purple, green, and blue
- Standard white chalk stick
- Black fine-tip chalk marker or permanent marker (if the surface allows)
- Silver or white curling ribbon
- Hot glue gun or strong tape
- Damp cloth or sponge
Step 1: Drawing the Balloons
-
Outline the shapes:
Start by lightly sketching five oval balloon shapes using a standard piece of white chalk. Arranging them in a staggered cluster creates a natural, floating look. -
Base color application:
Using your liquid chalk markers or pastels, fill in each oval with a different color. You’ll need pink, yellow, purple, green, and blue for this specific palette. -
Create opacity:
If the black board shows through too much on your first pass, let the layer dry completely and add a second coat for vibrant, solid color. -
Add highlights:
While the color is set, take a white chalk marker or pastel and add a small, curved highlight near the top left or right of each balloon to make them look shiny and round.
Chalk Marker Ghosting
If your markers stain the board, use a ‘magic eraser’ sponge or a chalkboard cleaner spray to remove the pigment completely when you’re ready to erase.
Step 2: Adding Expressions
-
Plan the faces:
Decide on a unique emotion for each balloon. You might want a winking face, a surprised ‘o’ mouth, a simple smile, or a worried look. -
Draw the features:
Using a fine-tip black marker, carefully draw the eyes and mouths. Simple lines work best for the smiles and winks. -
Detail the eyes:
For the open eyes, draw black ovals and leave tiny white dots inside for the ‘sparkle,’ or fill them in and dot them with white later. -
Add blushing cheeks:
Take a pink chalk marker or a bit of pink pastel on your finger and gently dab small circles on the cheeks of the blue, yellow, and green balloons for a rosy effect.
Make It Pop
Draw a faint white shadow line along one side of the balloon edges to give them even more 3D dimension against the dark background.
Step 3: Strings and Finishing Touches
-
Draw the knots:
At the very bottom of each balloon shape, draw a tiny triangle of the matching balloon color to represent the tied knot. -
Prepare the ribbons:
Cut five lengths of silver curling ribbon. They should be long enough to bunches together at the bottom of the board. -
Attach the ribbons:
Use a tiny dot of hot glue or a strong piece of clear tape to attach the top of a ribbon to the bottom center of each balloon drawing. -
Tie tiny bows:
To hide the connection point, tie extremely small pieces of ribbon into bows and glue them right over where the string meets the balloon. -
Gather the bunch:
Pull all the loose ribbon ends together toward the bottom center of the frame and secure them so they hang naturally. -
Draw clouds:
Use your white chalk stick to sketch simple, fluffy cloud outlines in the empty black space around the balloons. -
Clean up:
I always do a final pass with a damp cotton swab to clean up any smudged edges or chalk dust around the vibrant balloons.
Step back and admire your cheerful, permanent party decoration
Rainbow With Cheeky Clouds
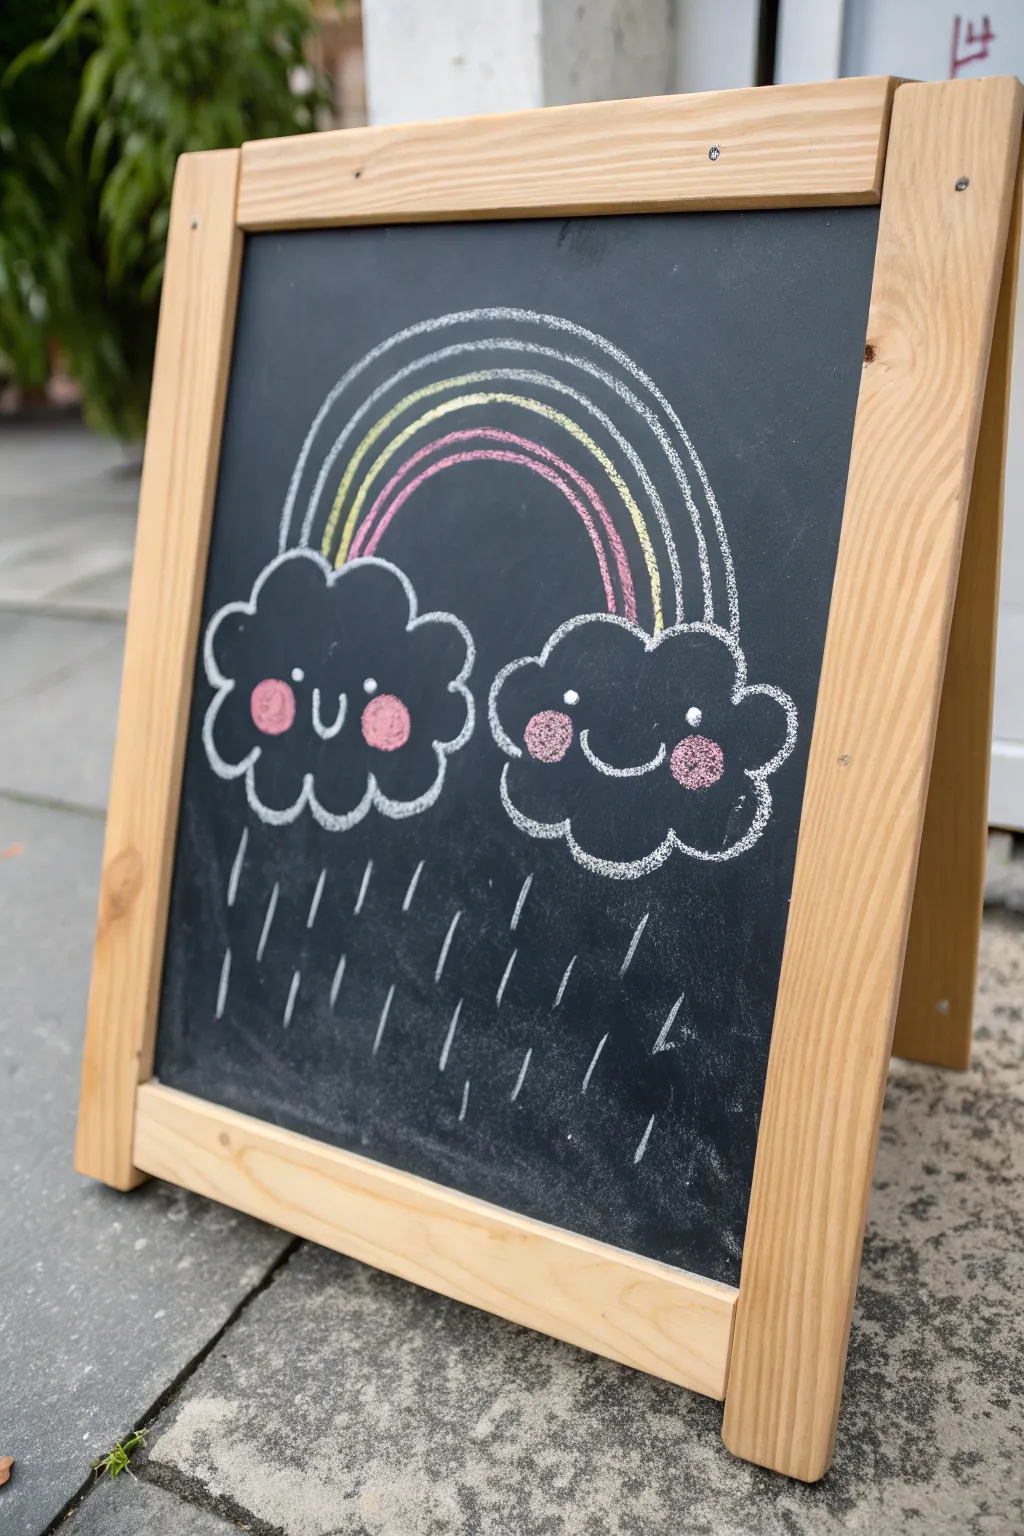
Brighten up any sidewalk or chalkboard with this cheerful scene featuring two happy rain clouds connected by a simple rainbow. The playful expressions and gently falling rain make this a sweet, welcoming design for anyone walking by.
Detailed Instructions
Materials
- Blackboard or chalkboard easel
- White chalk stick
- Pink chalk stick
- Yellow chalk stick
- Blue chalk stick
- Damp cloth or sponge (for erasing mistakes)
- Dry cloth (for blending or cleaning dust)
Step 1: Drawing the Cloud Outlines
-
Position the first cloud:
Start on the left side of your board, about halfway down. Draw a fluffy cloud outline using your white chalk. Aim for a shape that looks like a lumpy oval with about five or six distinct bumps. -
Draw the second cloud:
Move to the right side of the board and draw a second, similar cloud outline. Try to keep it roughly level with the first one so the rainbow will have a balanced place to land. -
Thicken the lines:
Go over your cloud outlines a second time with the white chalk. Press a little harder this time to make the white pop against the dark background.
Sharper Lines
Dip the tip of your chalk in water for 10 seconds before drawing. The lines will go on pasty but dry ultra-bright and sharp.
Step 2: Adding the Rainbow
-
Create the outer arch:
Starting from the top of the left cloud, draw a large white arch that curves up and lands on the top of the right cloud. This defines the outer boundary of your rainbow. -
Add the inner arch:
Draw a smaller, parallel white arch just inside the first one. This creates the basic container for your colors. -
Draw the yellow band:
Take your yellow chalk and draw an arch right in the middle of your rainbow shape. It doesn’t have to fill the space completely; a single distinct line works perfectly for this style. -
Draw the pink band:
Using your pink chalk, draw another arch directly below the yellow one. Keep the spacing consistent so the stripes look neat. -
Add the blue band:
Use your blue chalk to draw a final arch above the yellow one. You should now have a simple three-color rainbow framed by white lines.
Step 3: Creating Happy Faces
-
Draw the left rosy cheeks:
Inside the left cloud, draw two solid pink circles for cheeks. Use a circular motion to fill them in completely so they look bright and rosy. -
Add the left smile:
With white chalk, draw a small, U-shaped curve right between the pink cheeks. It should look like a simple, happy smile. -
Add the left eyes:
Draw two small white dots just above the cheeks for eyes. Placing them wide apart gives the cloud a cute, ‘kawaii’ look. -
Draw the right rosy cheeks:
Repeat the process on the right cloud, coloring in two solid pink circles for its cheeks. -
Add the right smile:
Draw a wider, shallow curve connecting the two pink cheeks on the right cloud. This gives the second cloud a slightly different, broader grin. -
Add the right eyes:
Place two white dots above the cheeks of the right cloud to finish its face.
Crooked Rainbow?
If your arch is lopsided, mark the highest center point first with a tiny dot, then draw your curves up to meet it from each side.
Step 4: Adding the Rain
-
Start the rain lines:
Beneath the clouds, use your white chalk to draw short, vertical dashes. Start directly under the cloud shapes. -
Vary the angles:
As you move toward the center of the board, tilt your dashes slightly. I find this makes the rain look like it’s falling naturally rather than just hanging straight down. -
Fill the bottom space:
Continue adding dashes all the way to the bottom of the board. Scatter them randomly but keep the density fairly even across the width of the drawing. -
Clean up:
Blow away any loose chalk dust. If you have any smudges, use a slightly damp cloth to tidy up the black space around your drawing.
Step back and enjoy the playful charm your new chalkboard friends bring to the space


Jellyfish With Curly Tentacles
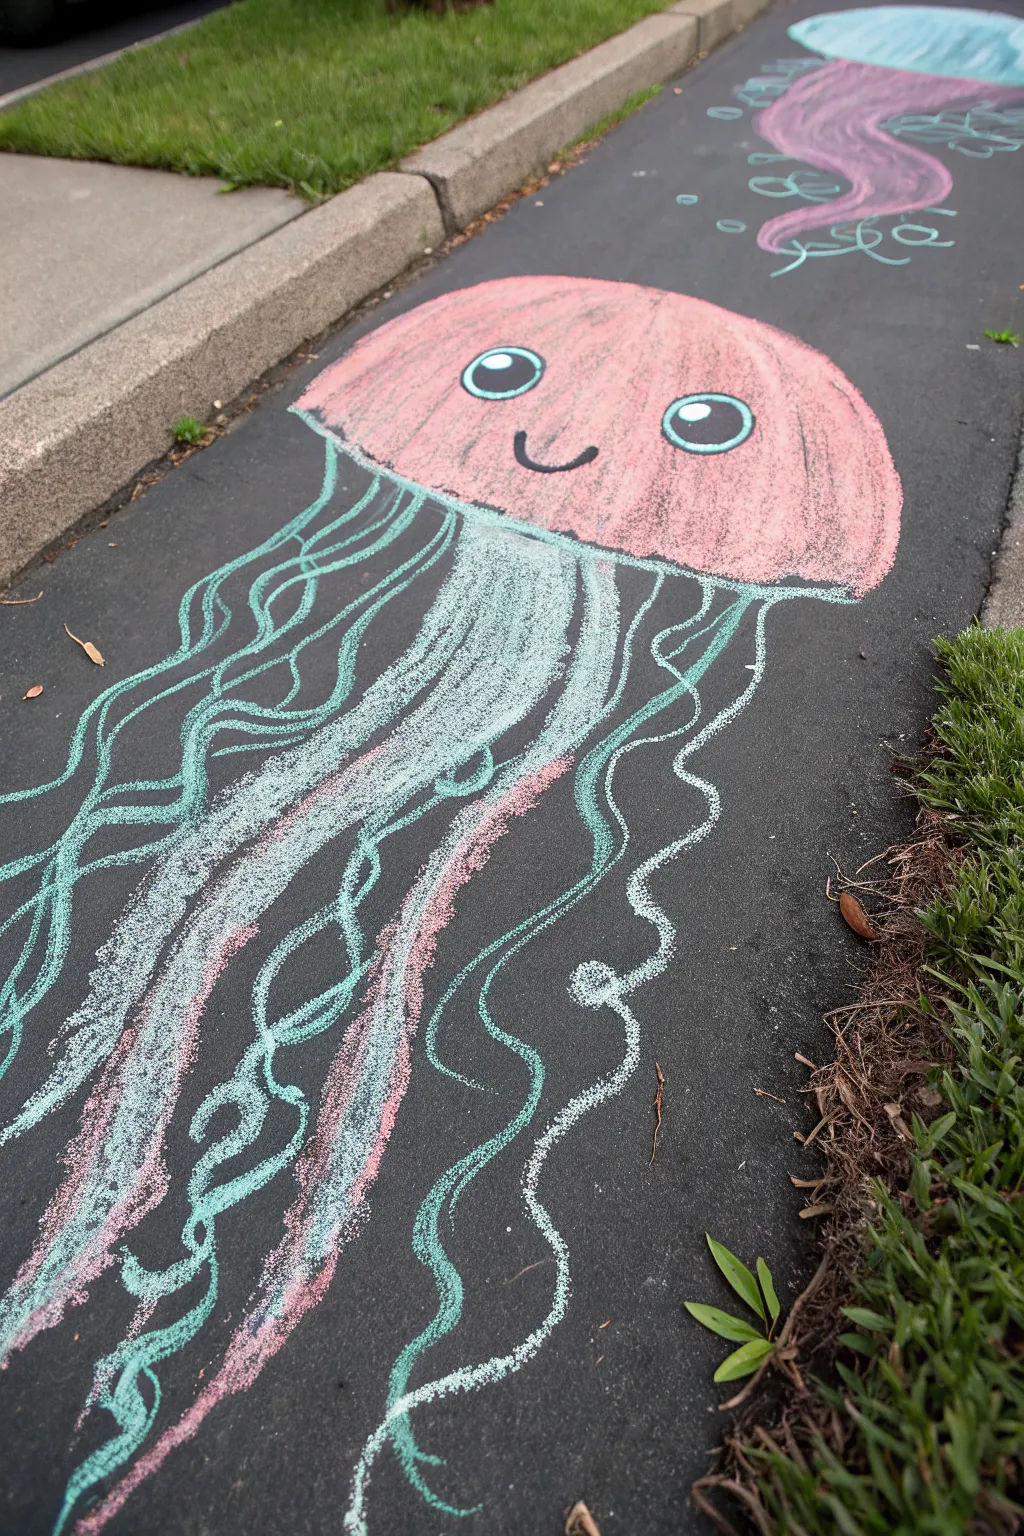
Transform your driveway into an underwater scene with this adorable pink jellyfish sketch. This large-scale chalk art features vibrant colors against dark pavement, making its smiling face and long, flowing tentacles pop perfectly.
Step-by-Step Guide
Materials
- Sidewalk chalk (pink, teal/light blue, white, black)
- Black pavement or driveway
- Small blending sponge or rag (optional)
- Knee pads or a gardening cushion (recommended)
Step 1: Drawing the Head
-
Outline the bell:
Start by drawing a large semi-circle or mushroom cap shape using your pink chalk. Make the bottom line slightly wavy rather than perfectly straight to give it an organic, jelly-like feel. -
Fill in the color:
Use the side of your pink chalk stick to fill in the entire head shape. Press firmly to get a solid, opaque layer of color that hides the dark pavement underneath. -
Blend for smoothness:
If you want a smoother look, use your fingers or a blending sponge to gently rub the pink chalk into the pavement, evening out the texture. -
Create the face outline:
Switch to white chalk to map out where the eyes will go. Draw two large circles spaced widely apart on the pink face.
Chalk Too Dusty?
If your lines are blowing away, dip the tip of your chalk in water for 10 seconds before drawing. It creates a paint-like paste.
Step 2: Adding Facial Features
-
Fill the eyes:
Color in around the white circles with black chalk. Be careful not to smudge the pink into the black too much. -
Add eye details:
Inside the black circles, draw smaller white circles for the pupils, and tiny white dots for highlights to make the eyes look shiny and cute. -
Outline the eyes:
Use teal or light blue chalk to draw a thick ring around each black eye circle. This makes them stand out against the pink head. -
Draw the smile:
Using black chalk, draw a simple, curved ‘U’ shape between the eyes for a happy little smile. Add small tick marks at the ends of the smile for cheeks.
Step 3: Creating the Tentacles
-
Start the main tendrils:
Using white chalk, draw thick, wavy lines extending down from the center of the jellyfish’s body. Let these be the longest, central tentacles. -
Thicken the center:
Go back over these central white lines with many strokes to create a dense, ‘cloudy’ look in the middle mass of tentacles. -
Add side curls:
Switch to your teal or light blue chalk. On the left and right sides, draw long, singular squiggly lines that curl and meander down the pavement. -
Mix in accent colors:
I like to weave a few pink wavy lines into the main white section to tie the tentacles back to the body color. -
Add decorative loops:
With the white chalk, add some very curly, loopy lines on the outer edges. Think of drawing loose springs or ribbons. -
Extend the length:
Continue these lines down the driveway as far as you like. Making them uneven lengths adds to the natural flow. -
Final touches:
Check for any gaps in the head coloring or smudge marks on the pavement and touch them up for a clean finish.
Bubble Buddy
Draw small circles of differing sizes ascending around the jellyfish to look like bubbles floating to the surface.
Now you have a cheerful ocean friend brightening up your walk
Bee And Honey Pot Sidekick Duo
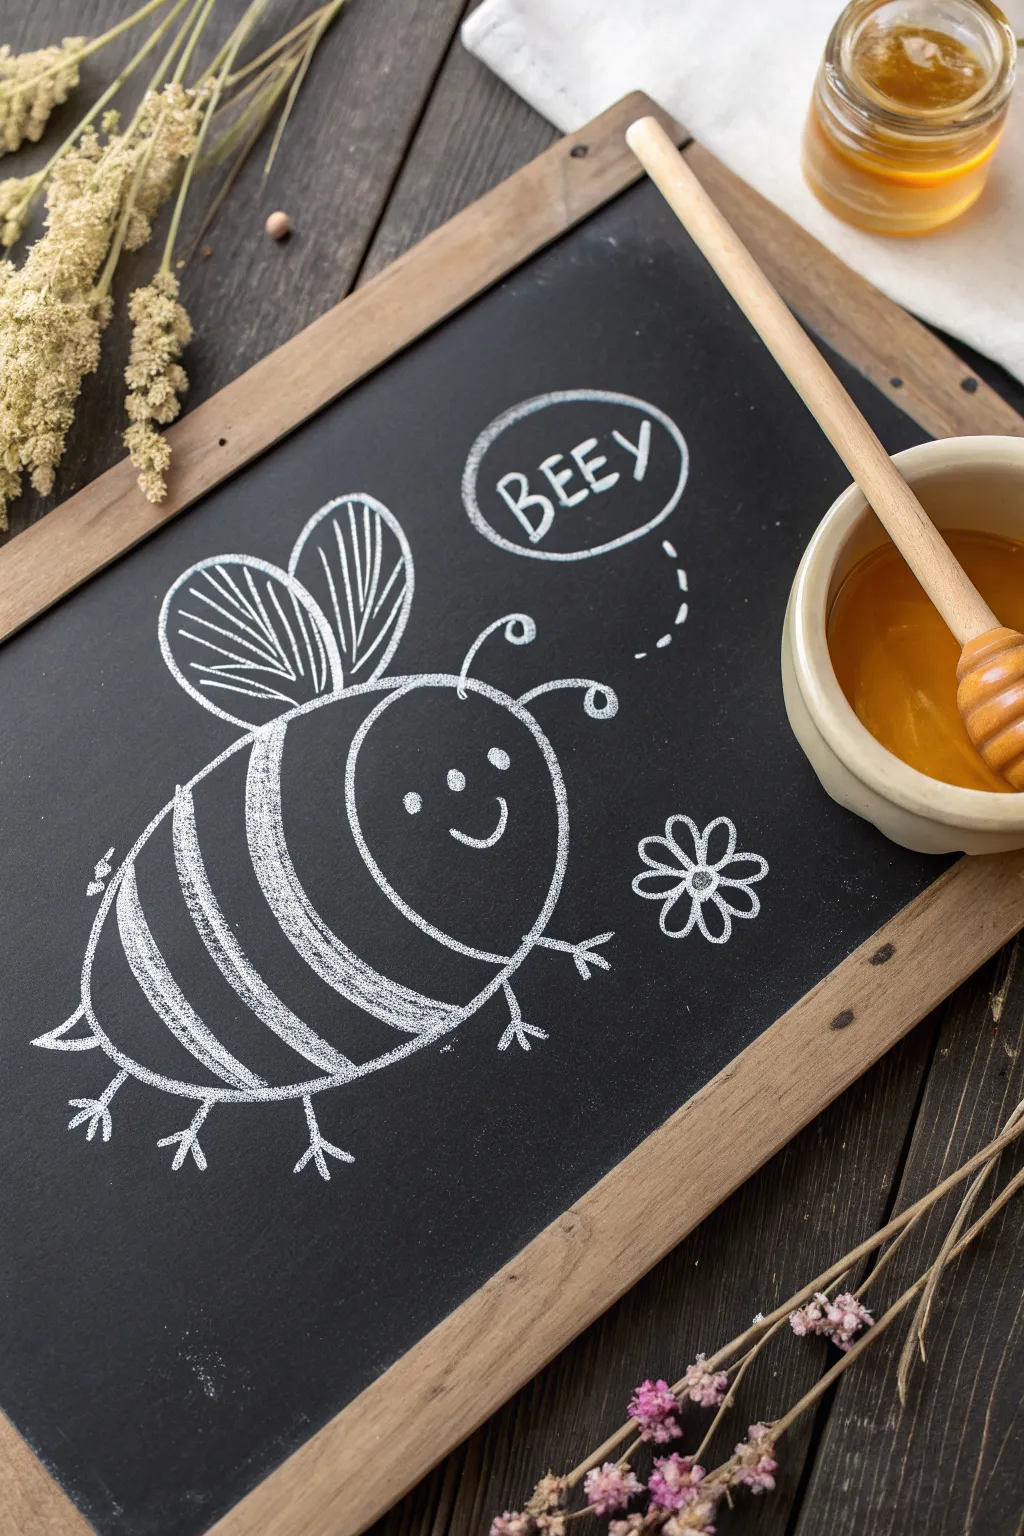
Brighten up your kitchen or playroom with this cheerful, buzzing bee illustration. Using simple shapes and bold lines on a dark chalkboard surface creates a high-contrast doodle that feels effortless and sweet.
Step-by-Step
Materials
- Small chalkboard (framed)
- White stick chalk
- Cotton swab or blending stump
- Damp cloth (for erasures)
- Small bowl of honey with wooden dipper (optional prop for styling)
Step 1: Drawing the Body
-
Outline the main shape:
Start by drawing a large, tilted oval in the center of your board. This will serve as the bee’s main body, so make it nice and plump. -
Define the head:
Visualize the right third of the oval as the head. Draw a curved vertical line inside the oval to separate the face area from the rest of the body. -
Sketch the stripes:
Draw two thick, curved stripes across the body section. Instead of moving the chalk back and forth too much, I like to press firmly to create a dense, solid white fill for these bands. -
Refine the edges:
Go back over the outer contour of the oval to make the outline crisp and bright, ensuring it stands out against the dark background.
Sharpen Your Stick
For the thin lines like the legs and antennae, rub the side of your chalk stick on a piece of scrap paper first to create a sharp, chiseled edge.
Step 2: Adding Wings and Limbs
-
Draw the front wing:
Above the body stripes, draw a large teardrop shape pointing upwards and slightly back. This is the primary wing. -
Draw the back wing:
Tuck a second, slightly smaller teardrop shape behind the first one to create depth. -
Add wing details:
Inside each wing, draw three or four simple lines radiating from the base to the tip to mimic the texture of veins. -
Attach the antennae:
Draw two curved lines extending from the top of the head area. Curl the ends into little spirals for a whimsical touch. -
Sketch the legs:
Add six little stick legs along the bottom of the body. Draw three vertical lines, ending each with three tiny toes sticking out like a bird’s foot. -
Add a stinger:
Place a small, sharp triangular point at the very back of the bee’s body.
Step 3: Face and Fun Touches
-
Create the eyes:
Draw two solid white dots in the face area. Place one slightly lower than the other to match the tilt of the head. -
Draw the smile:
Under the eyes, draw a simple, small upward curve for a happy smile. -
Add the speech bubble:
To the right of the bee, draw a wandering dashed line moving upward. At the end of the dashes, draw a rough circle. -
Letter the text:
Inside the bubble, write the word ‘BEEY’ in capital, slightly playful letters. -
Draw a flower:
Near the bee’s face, sketch a small circle for a flower center. Surround it with six simple loop petals. -
Clean up dust:
Blow away any loose chalk dust. If you have smudge marks, use a slightly damp cotton swab to clean the black space between the lines.
Add Some Color
Use a yellow piece of chalk to lightly color in the stripes or the flower center, giving your drawing a pop of traditional bumblebee color.
Now you have a charming little chalkboard companion to keep your kitchen sweet
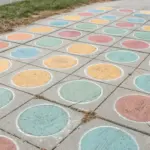
Flower Patch Of Smiling Blooms
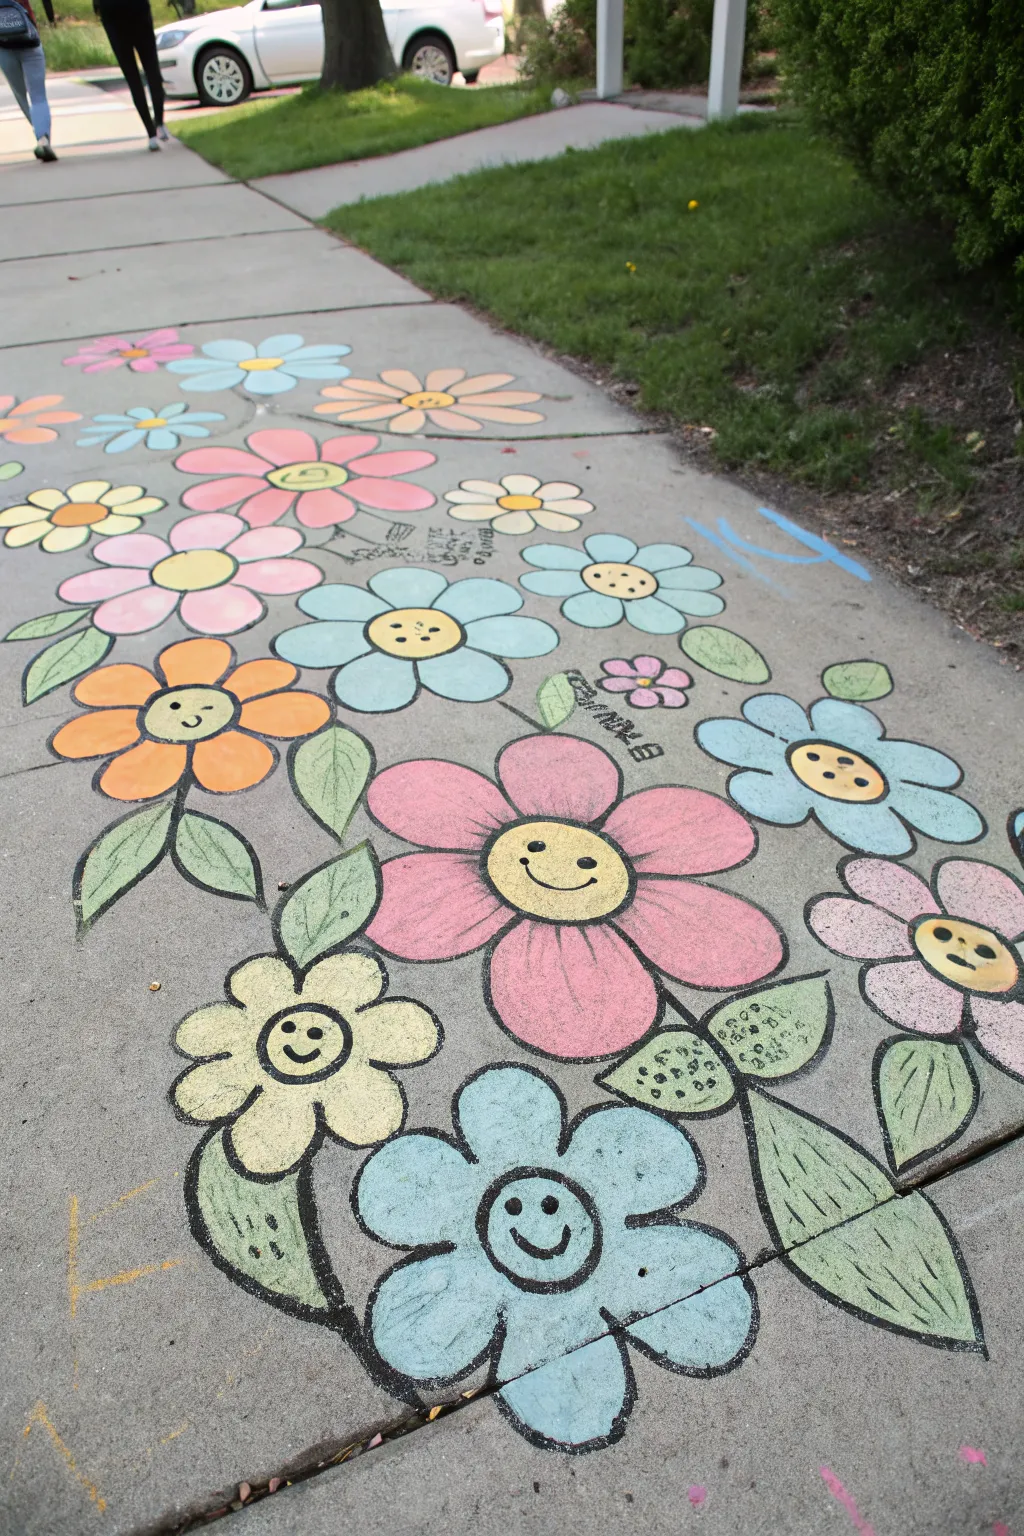
Transform a plain sidewalk slab into a cheerful garden with this whimsical chalk art project. Featuring bright, smiling flowers and lush leaves, this design uses bold black outlines to make the colors truly pop against the concrete.
Detailed Instructions
Materials
- Sidewalk chalk (assorted colors including pink, yellow, blue, orange, green)
- Black sidewalk chalk or charcoal stick (for outlining)
- Knee pads or a gardening kneeling mat (optional)
- Blending sponge or cloth
Step 1: Planning and Basic Shapes
-
Map out the centers:
Begin by drawing small circles scattered across your sidewalk canvas using a light color like pale yellow. These will be the faces of your flowers, so space them out to leave room for petals. -
Add petal outlines:
Around each center circle, lightly sketch the petal shapes. Vary the styles—try rounded daisy petals for some and pointed star-like petals for others to create variety. -
Sketch the stems and leaves:
Connect your flower heads with curving lines for stems, and add large, teardrop-shaped leaves coming off the sides. Don’t worry about perfection; rough sketches are fine here.
Smudgy Black Lines?
If your black outlines are smearing into the yellow faces, try blowing the dust away frequently. Always work from the center of the flower outward to keep the “face” clean.
Step 2: Color Filling
-
Fill the centers:
Color in the center circles heavily with yellow or light orange chalk. Rub the chalk in a circular motion to get good coverage on the concrete. -
Color the blue flowers:
Select a bright sky blue and fill in the petals of several flowers. For the larger blooms at the bottom, make sure to color all the way to your sketched edge. -
Add pink and orange blooms:
Use pink for the large central flower and orange for the one on the left. Press firmly to make these primary colors stand out. -
Create pastel variations:
For the flowers in the background, use lighter strokes or mix white chalk with your colors to create softer, pastel versions of pink, blue, and yellow. -
Fill the greenery:
Color the stems and leaves with a vibrant green. For the larger leaves at the bottom, apply a solid layer of color. -
Blend for smoothness:
Using a blending sponge or just your fingers, gently rub the filled areas to push the chalk dust into the concrete pores. I find this helps the colors look more like paint and less scratchy.
Step 3: Outlining and Faces
-
Outline the large petals:
Take your black chalk or charcoal and trace firmly around the outer edges of the pink, blue, and orange flower petals. The thick black line is key to the cartoon look. -
Define the leaves:
Outline the green leaves with the same thick black line. Add a central vein line down the middle of the larger leaves. -
Add leaf texture:
Inside the leaves, draw small hash marks or little dashes with the black chalk to simulate texture without coloring over the green entirely. -
Outline the centers:
Draw a clean black circle around the yellow centers of your main foreground flowers. -
Draw the faces:
In the yellow centers, verify you have a nice flat surface. Draw two small dots for eyes and a simple U-shape or curved line for a smiling mouth. -
Add facial details:
Give some flowers a winking expression by drawing a sideways ‘V’ instead of a dot for one eye. You can also add tiny eyebrows for extra personality. -
Detail the background:
For the smaller background flowers, use thinner outlines or skip the black outline entirely to make them look further away. -
Clean up edges:
Blow away any loose chalk dust. If you smudged black into the bright colors, touch them up with the original color chalk to keep the faces bright.
Wet Chalk Technique
For super vibrant colors that last longer, dip the tip of your colored chalk in water for 15 seconds before drawing. It applies like paint and dries intensely bright.
Step back and enjoy the happy little garden you have created for everyone to walk through
Speech Bubble With A Punny Line
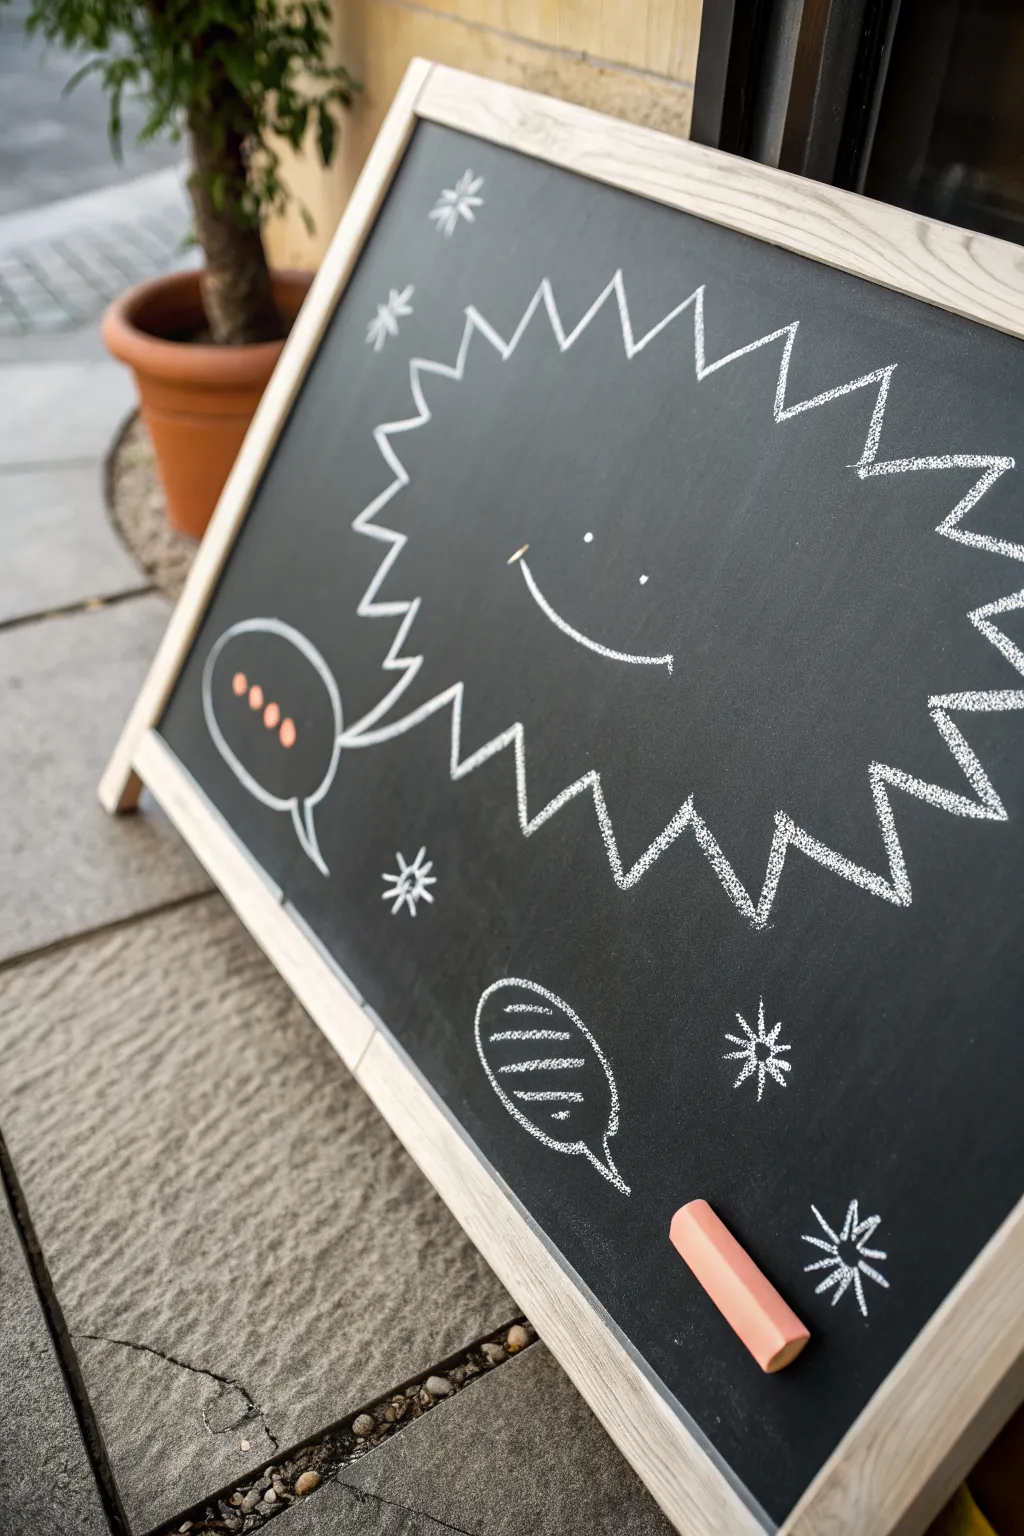
Transform a plain sidewalk chalkboard into a friendly conversation starter with this bold, cartoon-style design. Featuring an energetic, jagged speech bubble and playful accent doodles, this project uses simple lines to create a welcoming vibe right outside your door.
How-To Guide
Materials
- A-frame wooden chalkboard
- White stick chalk (standard)
- Pastel orange or pink stick chalk
- Microfiber cloth or chalkboard eraser
- Paper towel (damp, for corrections)
- Ruler (optional, if you want precise spacing)
Step 1: Setting the Stage
-
Clean the surface:
Before you begin, ensure your chalkboard is completely free of old dust or ghosting. Wipe it down with a slightly damp cloth and let it dry fully to provide a crisp black background. -
Establish the center:
Visualize the center of the board. I like to make a tiny, faint mark right in the middle to help orient where drawing’s main character—the big smiley face—will live.
Sharper Points
Rotate your chalk stick frequently while drawing the zig-zags. This keeps a fresh edge on the chalk, preventing the lines from becoming too thick or fuzzy.
Step 2: Drawing the Main Character
-
Create the smile:
Using your white chalk, draw a wide, gentle curve in the center area for the mouth. Add small hash marks or tiny curves at the ends of the smile to give it personality. -
Add the eyes:
Place two simple dots above the smile for eyes. Keep them relatively wide apart to enhance the cute, cartoonish aesthetic. -
Outline roughly:
Lightly sketch a large, loose circle around your face using very faint pressure. This will serve as a guide for your jagged edges in the next step. -
Draw the zig-zag border:
Go over your guide circle with firm pressure, creating a continuous zig-zag line. Make the spikes vary slightly in size to keep the energy dynamic. -
Form the tail:
On the bottom left of your spiky bubble, extend two lines outward that meet at a point, creating the speech bubble’s tail pointing toward the viewer.
Step 3: Adding Conversation
-
Draw the left bubble:
To the left of the main tail, draw a classic oval speech bubble shape. Keep the line weight consistent with your main drawing. -
Add the ellipses:
Switch to your pastel orange or pink chalk. Inside the oval bubble, drawn three or four distinct dots in a horizontal line to suggest thinking or pausing. -
Draw the bottom bubble:
Move to the bottom center area. Draw a slightly flatter, more elongated oval bubble. -
Fill with scribbles:
Using the white chalk again, draw loose, horizontal scribbles inside this bottom bubble to represent mumbled or fast speech.
Color Pop
Use different colored chalks for each speech bubble’s contents (dots, scribbles) to code different emotions or speakers.
Step 4: Final Flourishes
-
Add starbursts:
scatter three to four starburst shapes around the empty black space. Draw a small ‘x’ and then a cross ‘+’ through it to create an eight-point star. -
Emphasize the spikes:
Go back over the points of your main jagged bubble. Pressing a bit harder on the tips makes the design pop against the black background. -
Clean up edges:
Check for any chalk dust that fell into unwanted areas. Use a dry Q-tip or the corner of a cloth to lift away stray smudges without smearing your lines. -
Check the balance:
Step back about five feet to view the composition. If one side looks too empty, a small extra starburst or simple dot can balance it out effortlessly.
Place your finished masterpiece on the sidewalk to bring a smile to passersby
Mini Space Alien In A Bubble Helmet
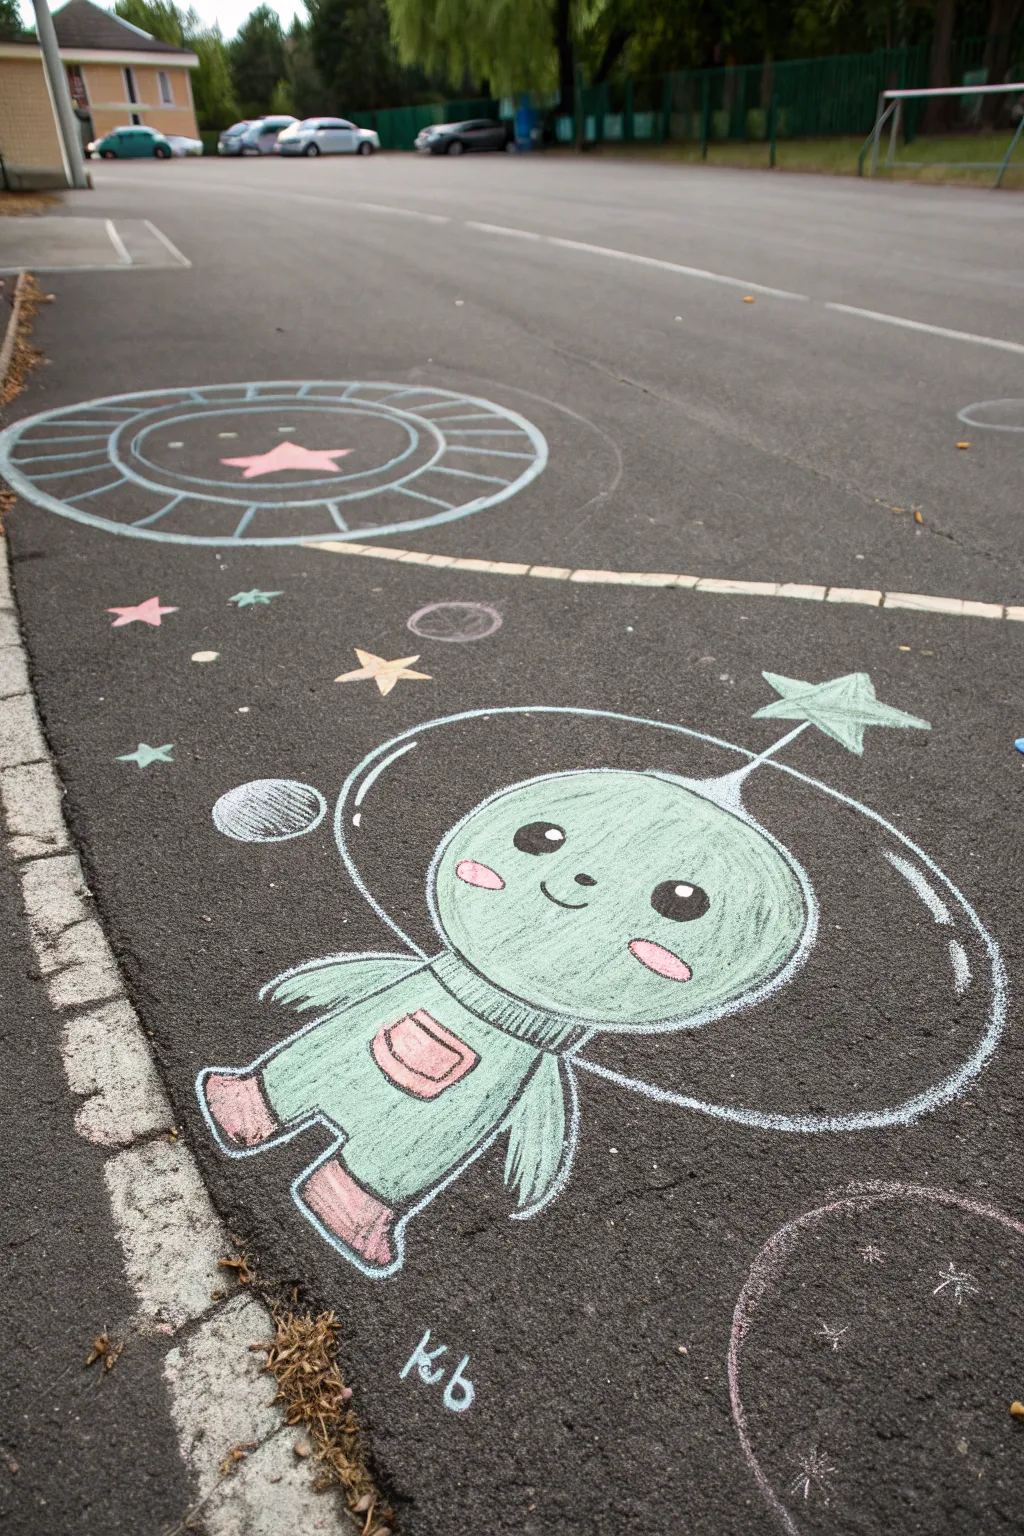
Blast off into creativity with this adorable pastel green alien exploring the galaxy right on your driveway. This charming chalk art features a cute extraterrestrial in a bubble helmet surrounded by a doodle-style solar system.
Detailed Instructions
Materials
- Sidewalk chalk (mint green, white, pink, light yellow)
- Pavement or asphalt surface (clean and dry)
- Small blending sponge or rag (optional)
- Water spray bottle (optional, for wetting chalk)
Step 1: Sketching the Alien
-
Initial Outline:
Start with a white stick of chalk to sketch the basic shapes lightly. Draw a large, slightly squashed circle for the head. -
Adding the Body:
Below the head, draw a small, rectangular body shape. Include two stubby legs extending downwards. -
Arms and Hands:
Add two arms hanging at the alien’s sides. Draw the hands almost like mittens or fringes, giving them a simple, graphic look. -
Antenna Details:
At the very top of the head, draw a small point that extends into a thin line, capped with a five-pointed star shape.
Smoother Coverage
If the asphalt is very rough, dip the tip of your chalk in water for 5 seconds before drawing. It creates a creamy, paint-like paste.
Step 2: Coloring and Features
-
Filling the Base Color:
Take your mint green chalk and fill in the entire head, body, arms, and legs. Use broad strokes to get good coverage on the rough asphalt. -
Blending the Green:
Using your fingertips or a small rag, gently rub the green chalk into the pavement to create a smoother, more solid color base. -
Pink Accents:
Switch to a soft pink chalk. Locate the cheeks on the face and draw two small ovals. I like to press a bit harder here to make them pop against the green. -
Boots and Pocket:
Use the same pink chalk to color in the feet to look like boots, and add a small semi-circle pocket on the chest. -
Drawing the Face:
With a charcoal stick or black chalk (or very dark grey), draw two large, wide-set circles for eyes. Leave a tiny speck of negative space (or use white later) for a highlight. -
The Smile:
Add a tiny, curved line between the eyes for a nose and a gentle, U-shaped mouth right below it. -
Defining the Collar:
Use your white chalk to draw a series of short, parallel lines around the neck area to create a ribbed collar texture.
Step 3: The Bubble Helmet and Space
-
Outer Ring:
Draw a large, wide oval surrounding the alien’s head using supreme white chalk. This forms the glass bubble. -
Adding Dimension:
Trace over the top left and bottom right curves of the bubble helmet with a slightly thicker white line to suggest light reflection on glass. -
Helmet Inner Line:
Add a second, thinner white line just inside the main bubble outline to give the glass some thickness. -
Antenna Connector:
Make sure the white line of the antenna star connects cleanly through the helmet bubble to the head. -
Final Outline:
Go back around the main green body shape with a crisp white line to make the character stand out clearly against the dark pavement.
Chalk Too Dusty?
Blown away by the wind? Spray a fine mist of water or cheap hairspray over the finished drawing to help set the powder in place.
Step 4: Background Elements
-
Planets:
Nearby, draw a small circle with a ring around it using white chalk. Shade one side of the planet body lightly. -
Stars:
Scatter several five-pointed stars around the alien. Color some solid white, and make others yellow or pink. -
Space Debris:
Add small dots and tiny diamond shapes in the empty spaces to represent distant stars. -
Signing Off:
Sign your masterpiece with your initials at the bottom near the alien’s feet.
Step back and admire your new intergalactic friend ready to greet the neighbors
Mermaid Tail Splash With Big Eyes
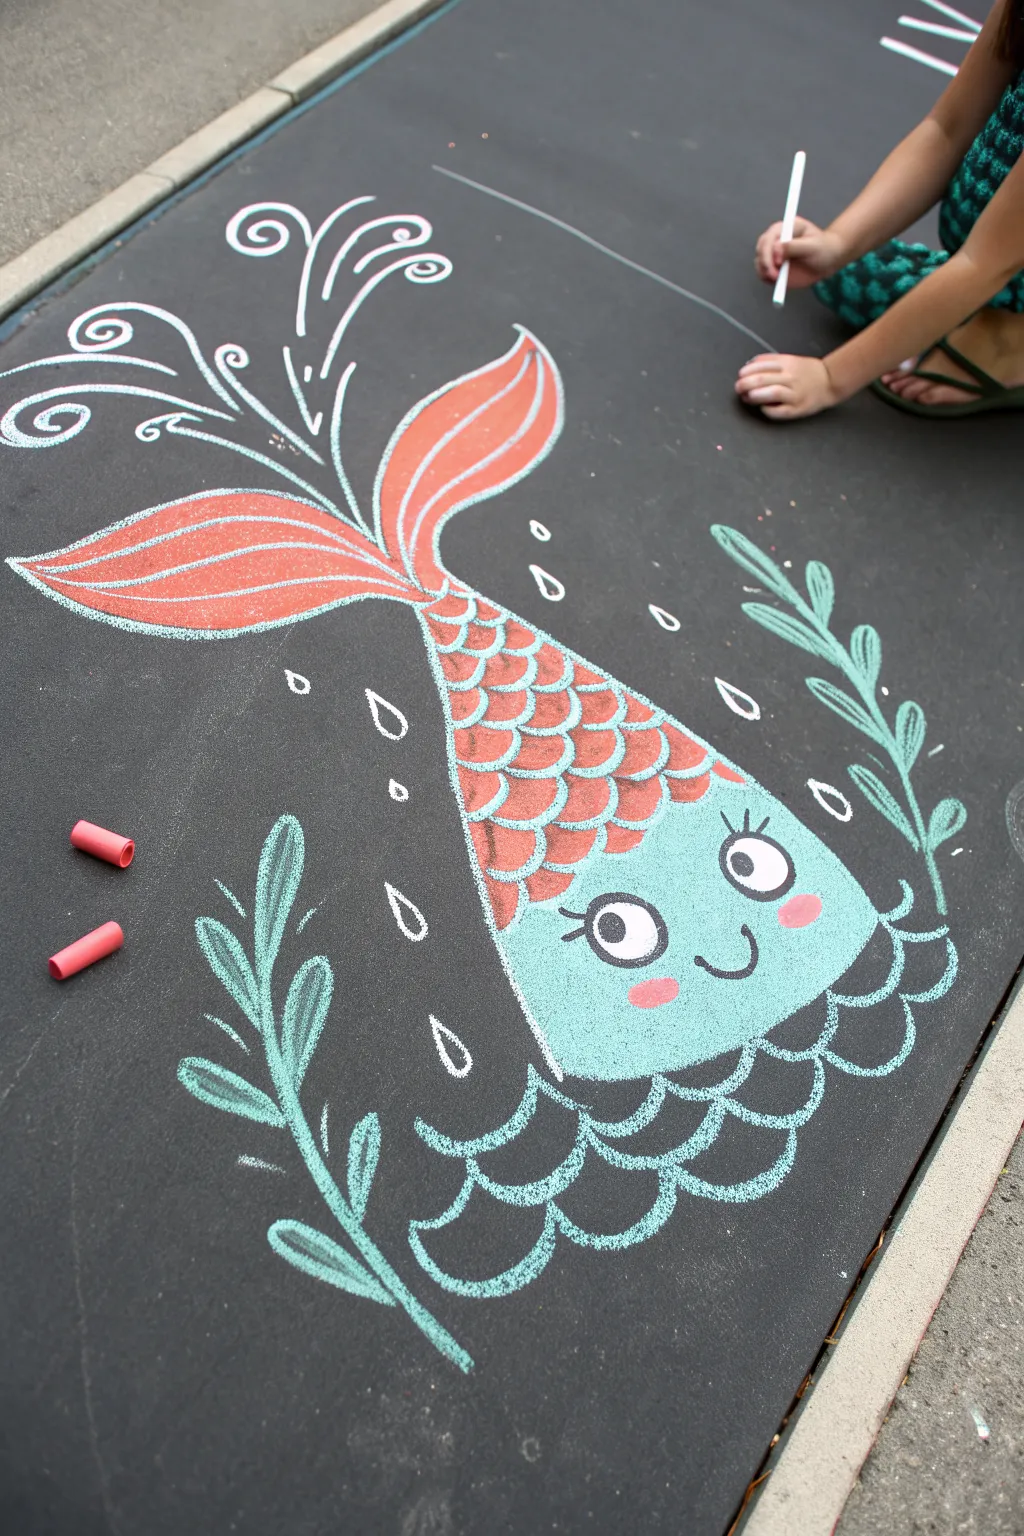
Transform your driveway into an ocean scene with this adorable mermaid tail splashing into the depths. Combining vibrant coral and teal hues with playful white swirls, this chalk art captures the magic of a summer swim perfectly.
Step-by-Step Guide
Materials
- Sidewalk chalk (white, coral/orange, teal/light blue, pink, black)
- Pavement or chalkboard surface
- Damp cloth or sponge for blending (optional)
Step 1: Shaping the Tail
-
Outline the main body:
Start with your white chalk to sketch the basic shape. Draw a large, curved triangular shape pointing downward for the body, rounding off the bottom where the face will be. -
Sketch the fin:
At the top point of your triangle, draw two large, leaf-shaped fins curving outward in opposite directions to create the classic mermaid tail silhouette. -
Define the face area:
Lightly draw a curved line across the lower third of the body. This separates the scaled tail section from the smooth face area at the bottom.
Chalk dust troubles?
If the colors look dusty or faded, dip the chalk tip in water for 5 seconds before drawing. This creates a creamy, paint-like paste that dries vibrant and opaque.
Step 2: Coloring the Base
-
Fill the fins:
Using coral or bright orange chalk, fill in the two top fins completely. Use the side of the chalk stick for broad, even coverage. -
Color the face:
Switch to your teal or light blue chalk and color the bottom rounded section of the drawing. I find that coloring in circular motions helps get into the texture of the pavement better. -
Create the scale background:
Fill the middle section of the body (between the fins and the face line) with a light layer of the coral chalk. You can blend this slightly with your finger or a cloth if you want a smoother look.
Step 3: Adding Details & Scales
-
Draw the scales:
With white chalk, draw rows of small ‘U’ shapes across the coral body section. Start from the bottom near the face and work your way up toward the fins, layering them like roof shingles. -
Outline the fins:
Go over the outline of the top fins with white chalk to make them pop. Add a central curved line inside each fin for detail. -
Highlight the fin tips:
Add a little white shading to the bottom edges of the orange fins to give them a bit of dimension.
Pro Tip: Clean Lines
Keep a dry rag handy to wipe your hands between color changes. This prevents the orange scales from accidentally smudging into the clean teal face area.
Step 4: Bringing the Face to Life
-
Draw the eyes:
On the teal section, use black chalk to draw two large circles for eyes. Leave a small white circle inside each pupil for a sparkle, or add it with white chalk afterwards. -
Add lashes and brows:
Add three small eyelashes sticking out from the side of each eye and draw tiny curved eyebrows floating above them using the black chalk. -
Create a smile:
Draw a small, simple ‘U’ shape between the eyes for a happy little mouth. -
Add rosy cheeks:
Take a pink chalk stick and draw small ovals horizontally underneath each eye to give her a blushing look.
Step 5: The Splash Decor
-
Draw water ripples:
Underneath the face, use teal or light blue to draw scalloped lines that look like waves. Add a second row of scallops below the first for depth. -
Add white accents to waves:
Outline the tops of your blue waves with white chalk to make them look foamy and distinct against the dark pavement. -
Create the big splash:
At the very top, above the tail fins, use white chalk to draw large, elaborate swirls and curved lines spraying outward, mimicking a water splash. -
Add droplets:
Draw tear-drop shapes floating around the tail and splash to represent water droplets flying through the air. -
Draw seaweed accents:
On the sides of the main drawing, sketch two long, wavy lines in teal. Add small leaves coming off the stems to frame your artwork with seaweed.
Step back and admire your adorable underwater creation as it brightens up the neighborhood sidewalk
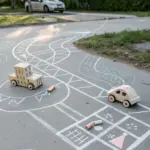
Tiny City Street With Cartoon Cars
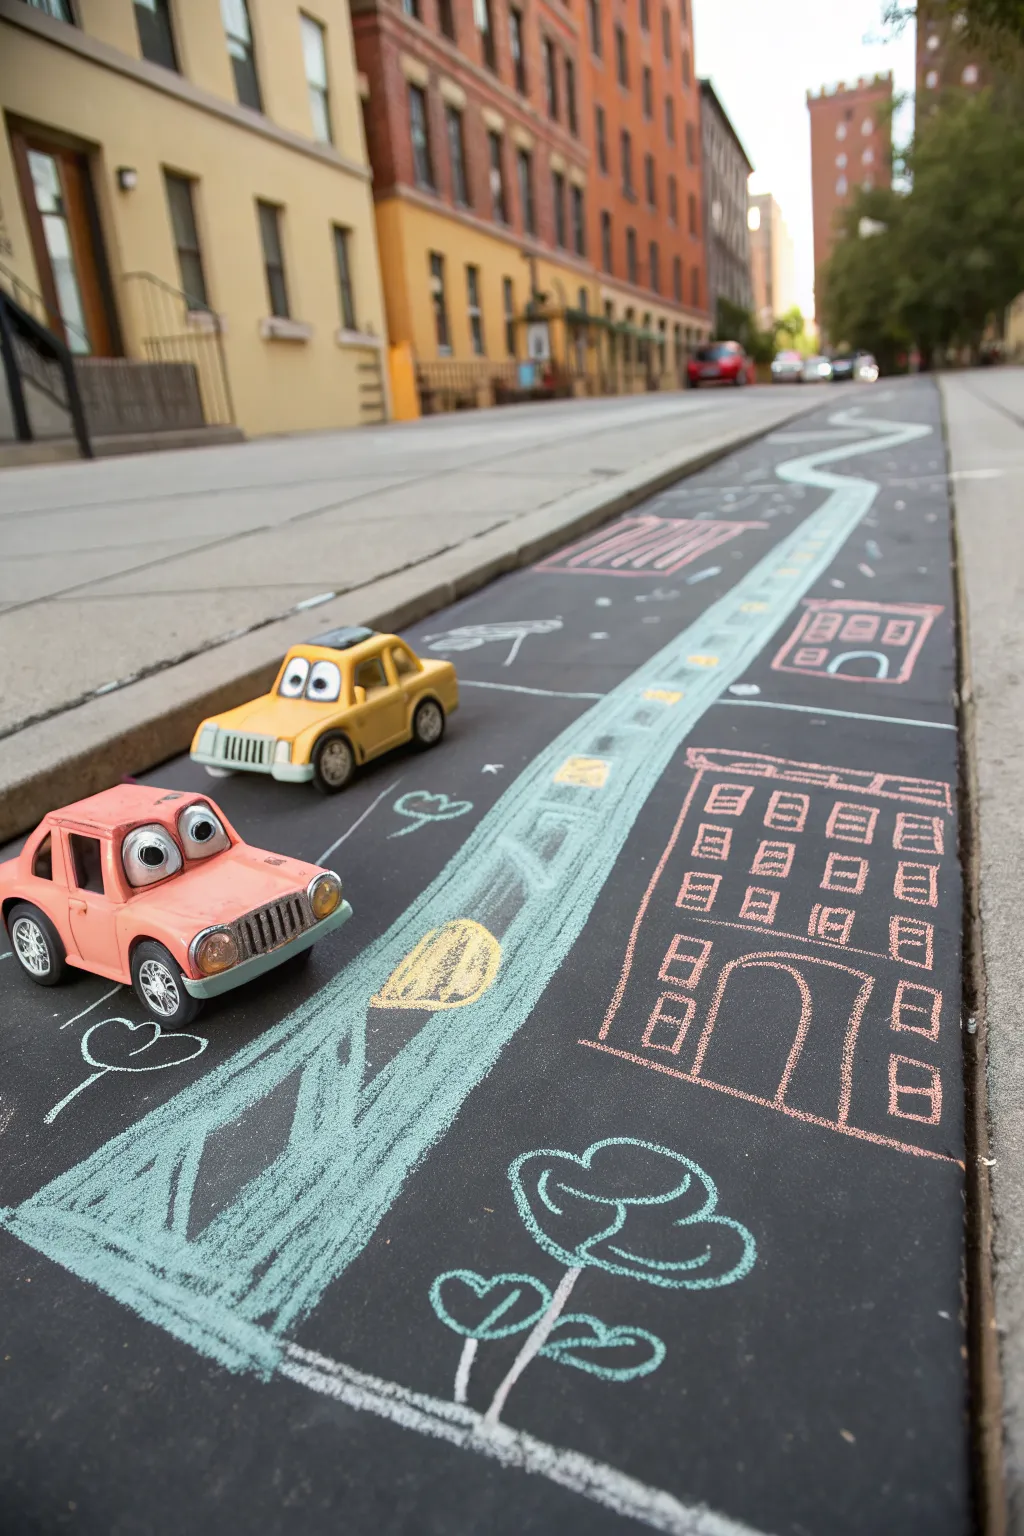
Transform a simple strip of sidewalk into a bustling metropolis for tiny travelers. This project combines imaginative chalk art with playful toy hacks to create an interactive scene that looks fantastic from a low-angle perspective.
How-To Guide
Materials
- Sidewalk chalk (light blue, light pink, white, yellow, green)
- Two toy cars (sedan style works best)
- Large googly eyes (self-adhesive or with glue dots)
- Painter’s tape or masking tape (optional)
- Clean, dry pavement or asphalt surface
Step 1: Setting the Scene
-
Clean the surface:
Begin by sweeping a long, narrow strip of pavement. A smoother surface, like asphalt or polished concrete, will give you sharper lines than rough cement. -
Outline the road:
Using light blue chalk, draw a long, winding road that stretches away from your viewpoint. Make the road wider at the bottom (foreground) and narrower as it goes back to create a forced perspective effect. -
Fill the pavement:
Color in the entire road surface with the light blue chalk. Use the side of the chalk stick to cover ground quickly and create a solid, even texture. -
Add road markings:
Switch to white chalk to draw the lane markers. Sketch a segmented line down the center of your blue road, keeping the dashes smaller as they get further away. -
Draw a crosswalk:
Near the middle distance, use pink chalk to draw a series of horizontal dashes across the road to imply a pedestrian crossing.
Step 2: Building the City
-
Draft the main building:
To the right of the road in the foreground, draw a large rectangle using light pink chalk. This will be your main apartment block. -
Add windows:
Draw rows of small squares inside the rectangle. I find it helps to draw the top row first to space them out evenly. -
Detail the entrance:
Create an arched doorway at the bottom center of the building for a classic city look. -
Sketch distant buildings:
Further up the road, draw smaller, simpler box shapes. Vary the colors—perhaps a yellow roof or a reddish outline—but keep the details minimal to enhance the depth. -
Add nature elements:
In the immediate foreground, use white and green chalk to draw a simple flower or shrub. This anchors the front of the scene and adds a nice organic shape against the straight lines. -
Include playful details:
Scatter a few extra doodles, like a heart or a sun shape on the road itself, to give it that authentic ‘kid-drawn’ vibe.
Chalk Not Sticking?
If the pavement is too rough, dip your chalk in water for 10 seconds before drawing. The wet chalk goes on like paint, fills crevices better, and dries super bright.
Step 3: The Tiny Drivers
-
Prepare the eyes:
Select pairs of large googly eyes. If they aren’t self-adhesive, apply a small glue dot or double-sided tape to the back of each one. -
Attach to cars:
Stick the eyes onto the windshields of your toy cars. Placing them slightly close together gives the cars a cute, focused expression. -
Position the lead car:
Place the pink car in the foreground on the left side of the road, angling it slightly inward as if it’s changing lanes. -
Position the second car:
Set the yellow car a few inches behind the first one, perhaps in the opposite lane or following closely, to create a sense of movement. -
Check the angle:
Get down low on the ground to check your composition. The cars should block the start of the road drawing, blending the 3D toys with the 2D art.
Perspective Trick
To make the road look infinitely long, make the blue line extremely thin at the very top. Blurring the top edge with your finger helps fade it into the distance.
Now get your camera down low and snap a picture of your miniature traffic jam
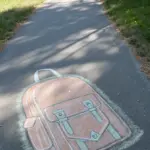
Three-Panel Sidewalk Comic Strip
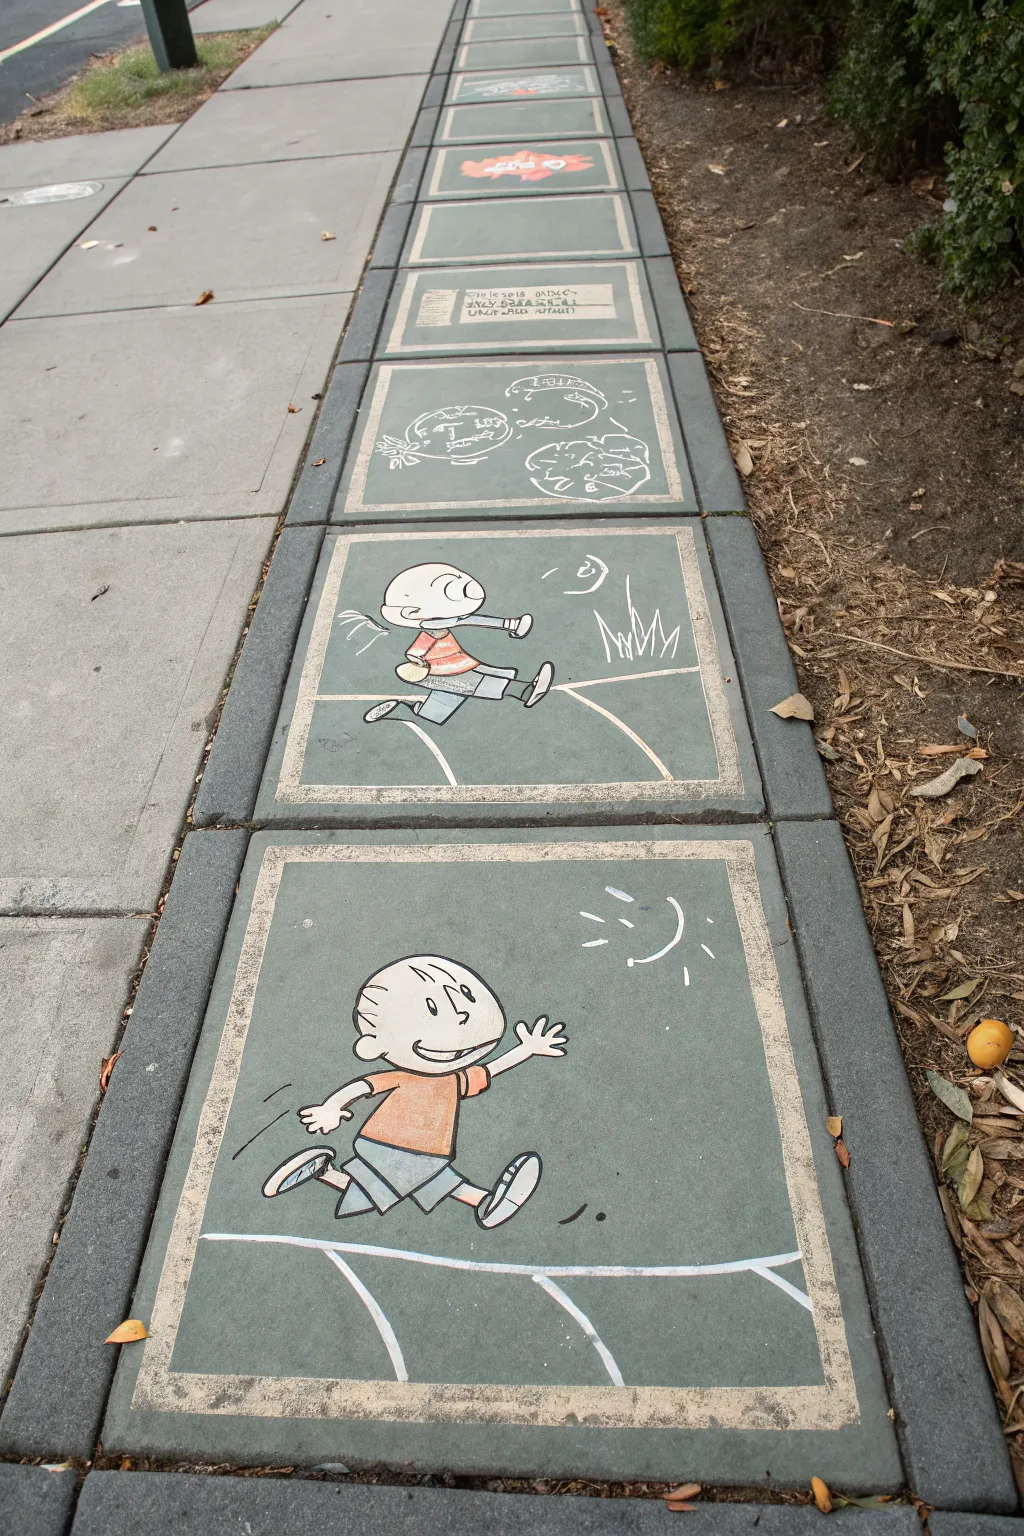
Bring the Sunday funnies to your garden path with this charming, sequential comic strip project. These weatherproof pavers feature a simply drawn character in motion, perfect for guiding visitors down a walkway with a touch of nostalgia.
Step-by-Step Guide
Materials
- Square concrete garden pavers (smooth surface works best)
- Pressure washer or stiff scrub brush
- Outdoor acrylic patio paints (sage green, white, peach/skin tone, orange, blue, black)
- Wide foam brushes or flat paintbrushes
- Thin liner brushes for outlining
- Chalk or pastel pencil (for sketching)
- Clear outdoor concrete sealer (matte or satin finish)
- Painter’s tape (optional)
Step 1: Preparing the Base
-
Clean the surface:
Before you start any artistic work, ensure your pavers are completely clean. Use a pressure washer or a stiff brush with soapy water to remove moss, dirt, and debris. -
Let it dry completely:
Concrete holds moisture, and paint won’t adhere to damp stone. Allow the pavers to bake in the sun for at least a full day until bone dry. -
Create the border:
Using a flat brush and a neutral grey or dark pigment, paint a clean 1-inch border around the perimeter of the paver. Alternatively, you can leave the raw concrete exposed as a natural frame. -
Apply the background color:
Fill the inner square with a muted sage green or teal outdoor paint. This creates that classic chalkboard or vintage panel look. I find two thin coats cover better than one thick one.
Step 2: Sketching and Blocking
-
Draft the sequence:
Once the background is dry, lightly sketch your character poses with white chalk. For this project, draw a running boy in three progressive stages: entering the frame, running through, and exiting. -
Paint the skin tones:
Start blocking in color by painting the circular head and hands with a peach or light skin tone mixture. Don’t worry about outlines yet; just get the solid shapes down. -
Fill the clothing:
Paint the shirt with a soft orange and the shorts with a muted blue. Keep the shapes simple and flat, mimicking the comic strip style. -
Add white details:
Use white paint for the shoes and the whites of the eyes. This high contrast helps the character pop against the green background.
Paint Peeling?
If paint peels, the concrete likely wasn’t clean or dry enough. Strip the loose area, sand it lightly, clean diligently, and repaint once fully dry.
Step 3: Detailing and Sealing
-
Outline the character:
Using your thinnest liner brush and black outdoor paint, carefully trace the outline of your character. Vary your line weight slightly—thicker on the bottom of shapes—to add dimension. -
Add facial features:
Paint the simple C-shaped ear, button nose, wide smile, and simple dot eyes. Add the signature three hairs on top of the head. -
Create movement lines:
Behind the feet and hands, paint short, swift black strokes to indicate motion. This is crucial for making the character look like they are running. -
Draw the environment:
With a thin white brush, add simple, loose lines for the ground beneath the feet. In the middle panel, you might add a few jagged lines for grass, or a simple sun in the corner. -
Include ‘ghost’ sketches:
For an artistic touch seen in the reference image, create a faint, scribbly white line drawing of a pumpkin or object in the panel before the character, making it look like a chalkboard sketch. -
Add highlights:
Place tiny white dashes on the nose and shoes to simulate light reflection. -
Seal the artwork:
Once the paint has cured for 24-48 hours, apply two coats of clear outdoor concrete sealer. This protects your hard work from rain and foot traffic.
Make it a Story
Don’t stop at running! Create a longer narrative where the character trips, finds an object, or meets a friend on subsequent stones.
Now you have a whimsical pathway that tells a story with every step you take
Interactive Cartoon Wings Photo Spot
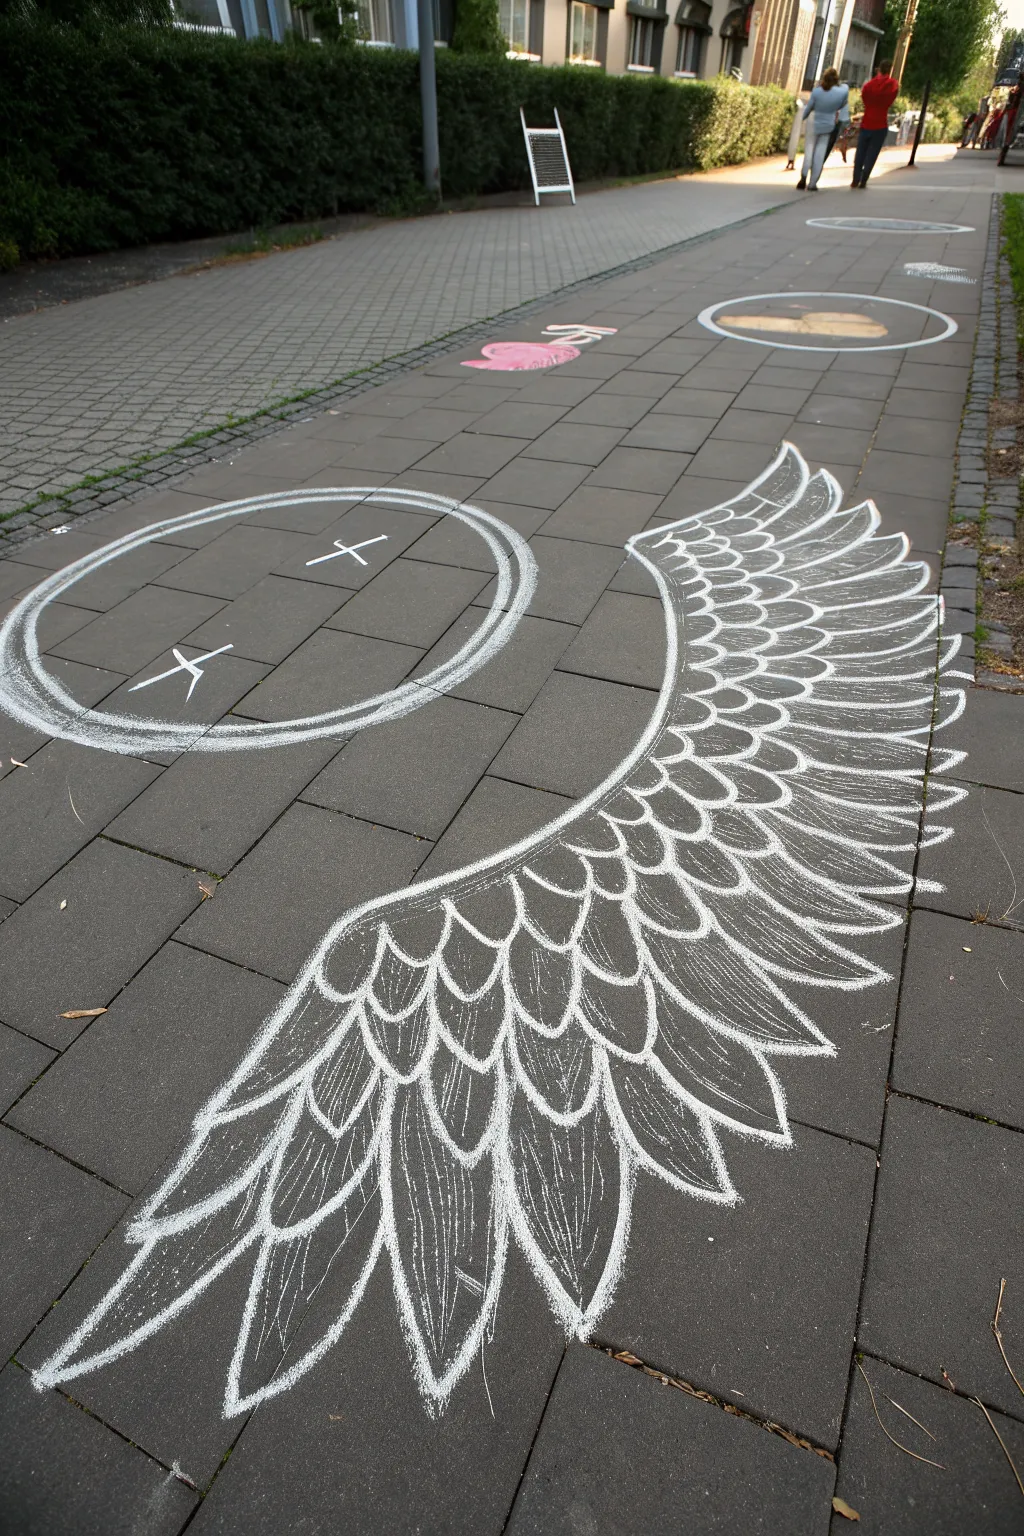
Transform an ordinary patch of pavement into an interactive photo opportunity with this large-scale angel wing design. Using simple white chalk, you’ll build up layers of feathers to create a stunningly detailed wing that lets anyone step in and take flight.
Step-by-Step
Materials
- White sidewalk chalk (thick sticks)
- White chalk pastels (optional, for finer details)
- Pavement or asphalt surface (clean and dry)
- Broom or stiff brush
- Kneeling pad or cardboard
- Water spray bottle (optional, for blending)
Step 1: Setting the Foundation
-
Prep the surface:
Before you begin, sweep the pavement area thoroughly to remove loose grit, pebbles, and dirt. A clean surface helps the chalk adhere better and prevents your lines from getting bumpy. -
Establish the curve:
Start by drawing the top edge of the wing. Create a large, sweeping ‘C’ shape or arch that starts high and curves gently downward to the right, mimicking the leading edge of a bird’s wing. -
Define the primary feather length:
From the right end of your top arch, draw a long, curving line downwards and back towards the left to establish the tip of the longest wing feather. This sets the total span of your artwork. -
Mark the wing pit:
Connect the bottom of your longest feather line back up to the starting point of your top arch, closing the shape loosely but leaving plenty of space inside for the feathers. This outlines the general silhouette.
Uneven Pavement?
If the ground is too rough, wet your chalk slightly before drawing. This creates a paste-like consistency that fills cracks better and dries brilliant white.
Step 2: Building the Feathers
-
Draw the primary feathers:
Starting at the outer tip, draw large, elongated ‘V’ or ‘U’ shapes for the primary flight feathers. These should be the longest feathers in the design, extending outward from the main curve. -
Layer the second row:
Move inward from the tips and draw a second row of slightly shorter, rounded feathers overlapping the first row. Think of these like scales; the tip of one feather should emerge from between two feathers in the row above it. -
Continue layering upward:
Continue adding rows of feathers, making them progressively shorter and more rounded as you move toward the top ‘shoulder’ of the wing. I find it helps to keep the curves consistent to maintain a cohesive look. -
Fill the shoulder area:
At the very top left (the shoulder), draw the smallest feathers. These can be simple, small scalloped lines that look like soft downy feathers.
Step 3: Adding Texture and Detail
-
Thicken the outlines:
Go back over your main structural lines—the outer edges of the feathers and the top arch—and make them thicker. Press harder on the chalk or do a quick double pass to make the white pop against the grey pavement. -
Add the rachis:
Draw a central line (the rachis or shaft) down the middle of the largest primary feathers. It doesn’t need to be perfectly straight; a slight curve adds movement. -
Sketch the barbs:
Inside the larger feathers, use lighter pressure to draw quick, diagonal strokes branching off the central shaft. This mimics the barbs and gives the feathers a realistic texture. -
Detail the mid-sized feathers:
Add simpler, smaller central lines to the second and third rows of feathers. You don’t need full barb detailing here, just a suggestion of the spine. -
Highlight the tips:
Rub the chalk heavily on the very tips of the feathers to create bright white highlights. This creates a sense of depth and separates the layers visually. -
Refine the edges:
Check the outer silhouette of the wing. If any lines look shaky, smooth them out with a confident, heavy stroke. Clean lines make the photo op look much more professional. -
Clean up:
Blow away any excess chalk dust that might have gathered in the grooves of the pavement to keep your drawing crisp. -
Add interactive elements (Optional):
Draw the simple smiley face or additional graphic shapes seen in the background if you want to expand the scene, or just leave the wing as the main attraction.
Add a Splash of Color
Use pastel chalks to add subtle shading at the base of each feather (grey, blue, or pink) to give the wing 3D volume before outlining with bright white.
Step back and have a friend pose against the wing to see your artwork take flight
Sticker-Style Doodle Collage With Outlines
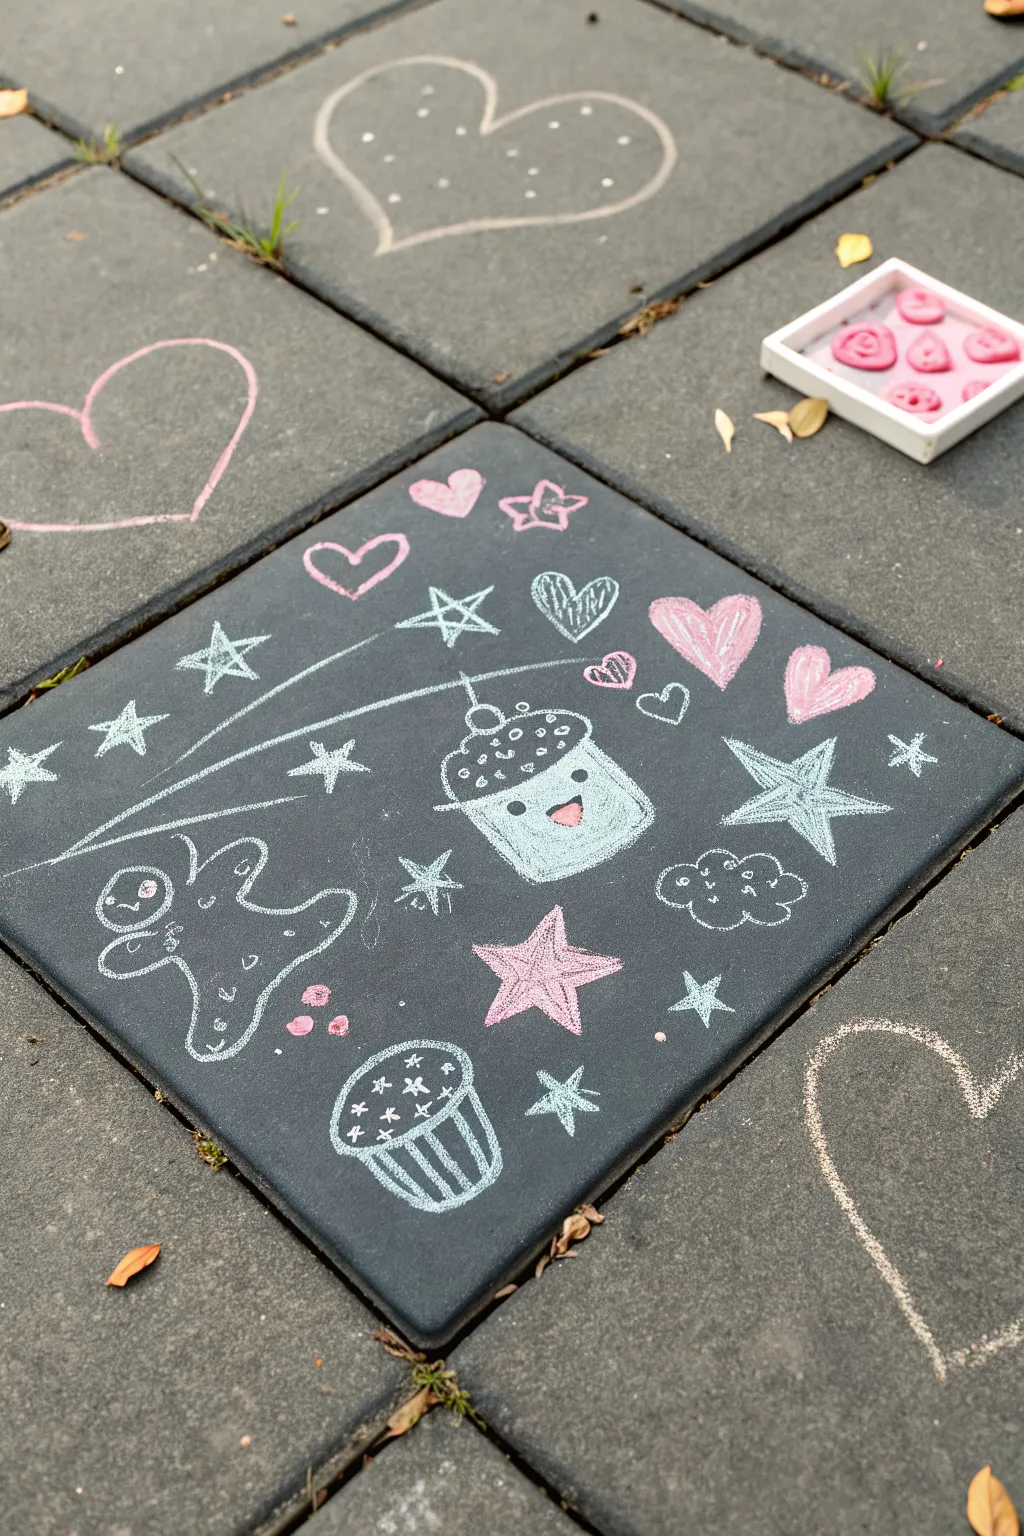
Transform a single flagstone or paver into a canvas for a collection of kawaii-inspired doodles. This sticker-style collage technique uses bold outlines and simple shapes to create a charming, unified composition that pops against dark pavement.
Detailed Instructions
Materials
- Sidewalk chalk (pastels for specialized colors)
- White chalk (for outlines)
- Individual paving stone or sidewalk square
- Small foam cushion (for kneeling)
- Damp cloth (for erasing mistakes)
Step 1: Planning and Centerpiece
-
Select your canvas:
Choose a single, square paving stone or section of sidewalk. Creating a frame or using the natural separation of the stones helps contain the art and makes it feel like a framed picture. -
Draw the cupcake liner:
Start with your central figure to anchor the collage. Using light blue chalk, draw a trapezoid shape slightly wider at the top for the cupcake liner. -
Add the frosting:
Draw a fluffy, cloud-like shape sitting on top of the liner. Add a little cherry stem and circle on the very top. -
Fill the color:
Gently fill in the liner with light blue. Don’t press too hard; you want a soft texture. Leave the frosting mostly uncolored so the dark pavement acts as the ‘chocolate’ or ‘dark’ frosting, or fill it lightly if you prefer. -
Add the face:
Using black or dark grey chalk (or charcoal if you have it), add two small circles for eyes and a wide U-shape for a smile. Add a tiny pink tongue inside the mouth for cuteness. -
Outline the centerpiece:
Take your sharpest white chalk and trace a bold, continuous line around the entire cupcake shape. This creates that die-cut sticker look.
Chalk Pop Trick
To make colors brighter on asphalt, dip the tip of your chalk in water for 5 seconds before drawing. It applies like paint and dries intensely bright.
Step 2: Adding Supporting Characters
-
Sketch the gingerbread man:
In the bottom left corner, draw a simple gingerbread contour. Think of it as drawing a continuous bubbly line: round head, stubby arms, and legs. -
Decorate the cookie:
Add three small dots for buttons down the chest using white chalk. Give him a simple face with eyes and a mouth. -
Draw the second cupcake:
Place a muffin-style cupcake near the bottom center. Instead of filling this one with color, just use white lines to draw the wrapper stripes and the star sprinkles on top. -
Create the shooting star:
Above the main blue cupcake, draw a five-pointed star. From the left side of the star, sweep two or three long, curved lines across the top left corner to create a motion trail. -
Add the large star element:
To the right of the center cupcake, draw a large five-pointed star using light blue chalk. Fill it in slightly, then outline it heavily in white.
Step 3: Filling the Negative Space
-
Scatter small hearts:
Use pink chalk to draw solid hearts of various sizes in the empty spaces. I like to tilt them at different angles to make the scene feel dynamic. -
Add simple outline hearts:
Mix in a few hearts that are just white outlines to vary the visual weight of the drawing. -
Draw filler stars:
Using white chalk, draw simple five-pointed stars or asterisks (a vertical line crossed with an X) in the smaller gaps. -
Include a cloud:
Draw a small, fluffy cloud shape near the large star using white loops. You can add a few dots inside for texture. -
Refine the outlines:
Go back over your white outlines one last time. Making them slightly thicker than the interior lines is the secret to making the drawings pop off the ground. -
Clean up:
Blow away any loose chalk dust. If you smudged the pavement background, you can carefully dab it with a damp cloth to restore the dark contrast.
Smudge Control
Working from the center outward helps prevent your hand from smearing finished sections. If kneeling, place a towel under your hand.
Step back and admire your adorable collection of pavement art that looks just like a giant sticker sheet


Have a question or want to share your own experience? I'd love to hear from you in the comments below!