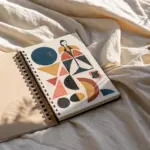
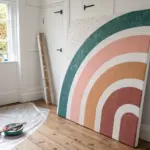
If you’re craving art that looks fresh and gallery-worthy without needing perfect drawing skills, easy modern art is your sweet spot. I’m sharing my favorite modern art ideas that feel relaxing to make and look so good on a clean wall.
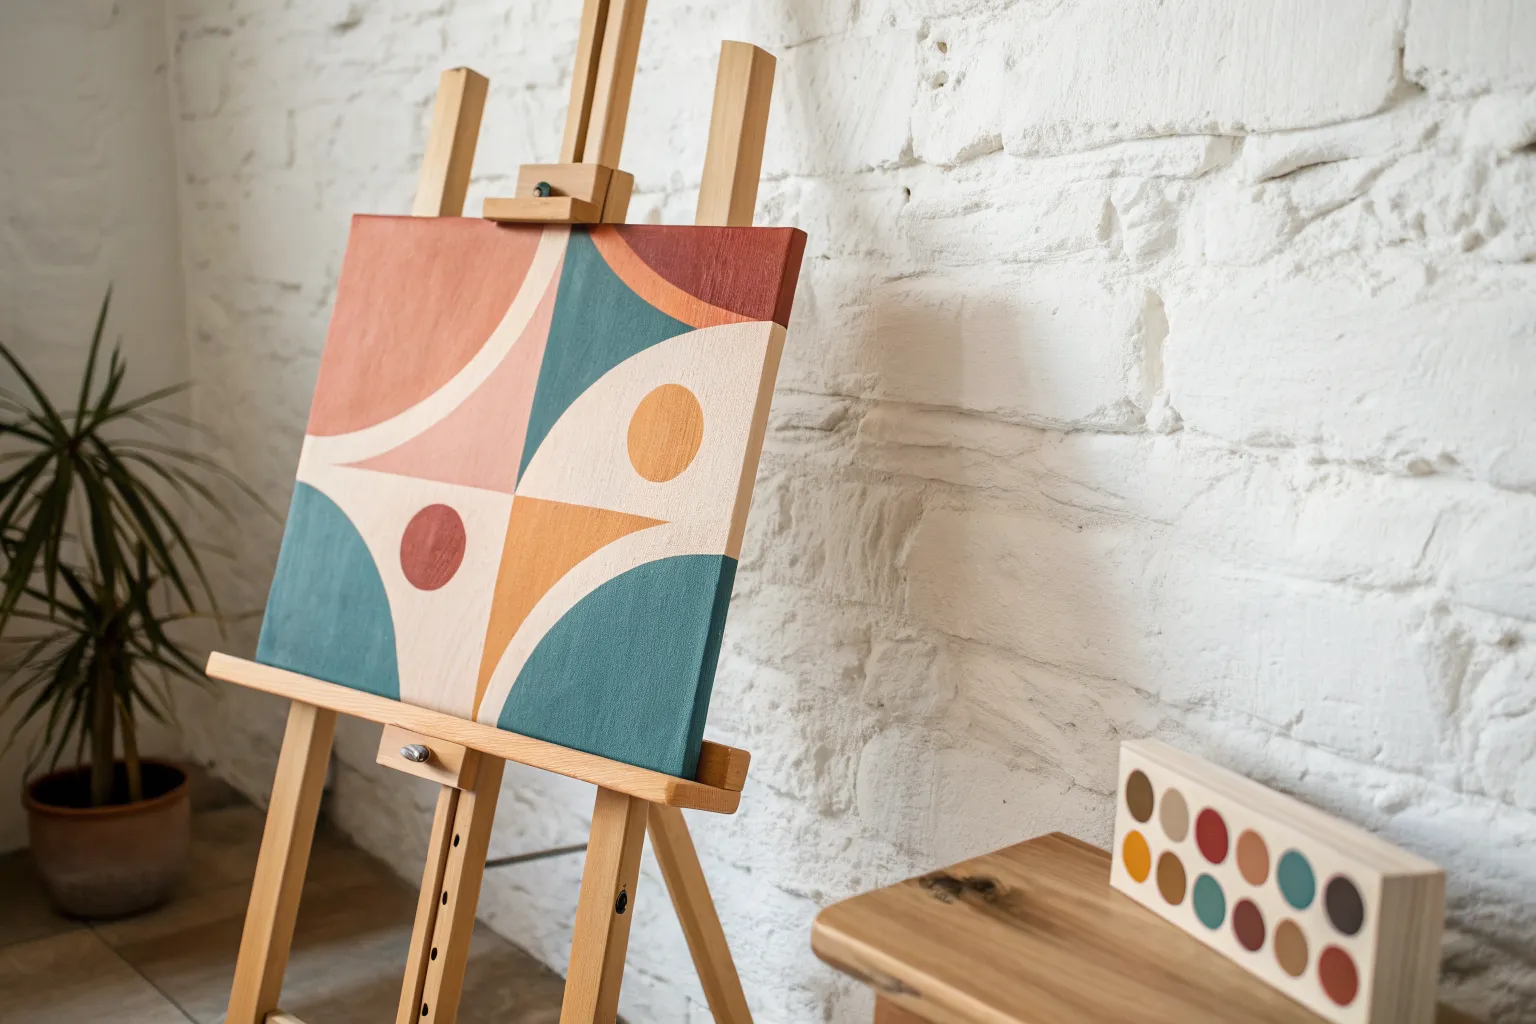
Tape-Resist Geometric Color Blocks
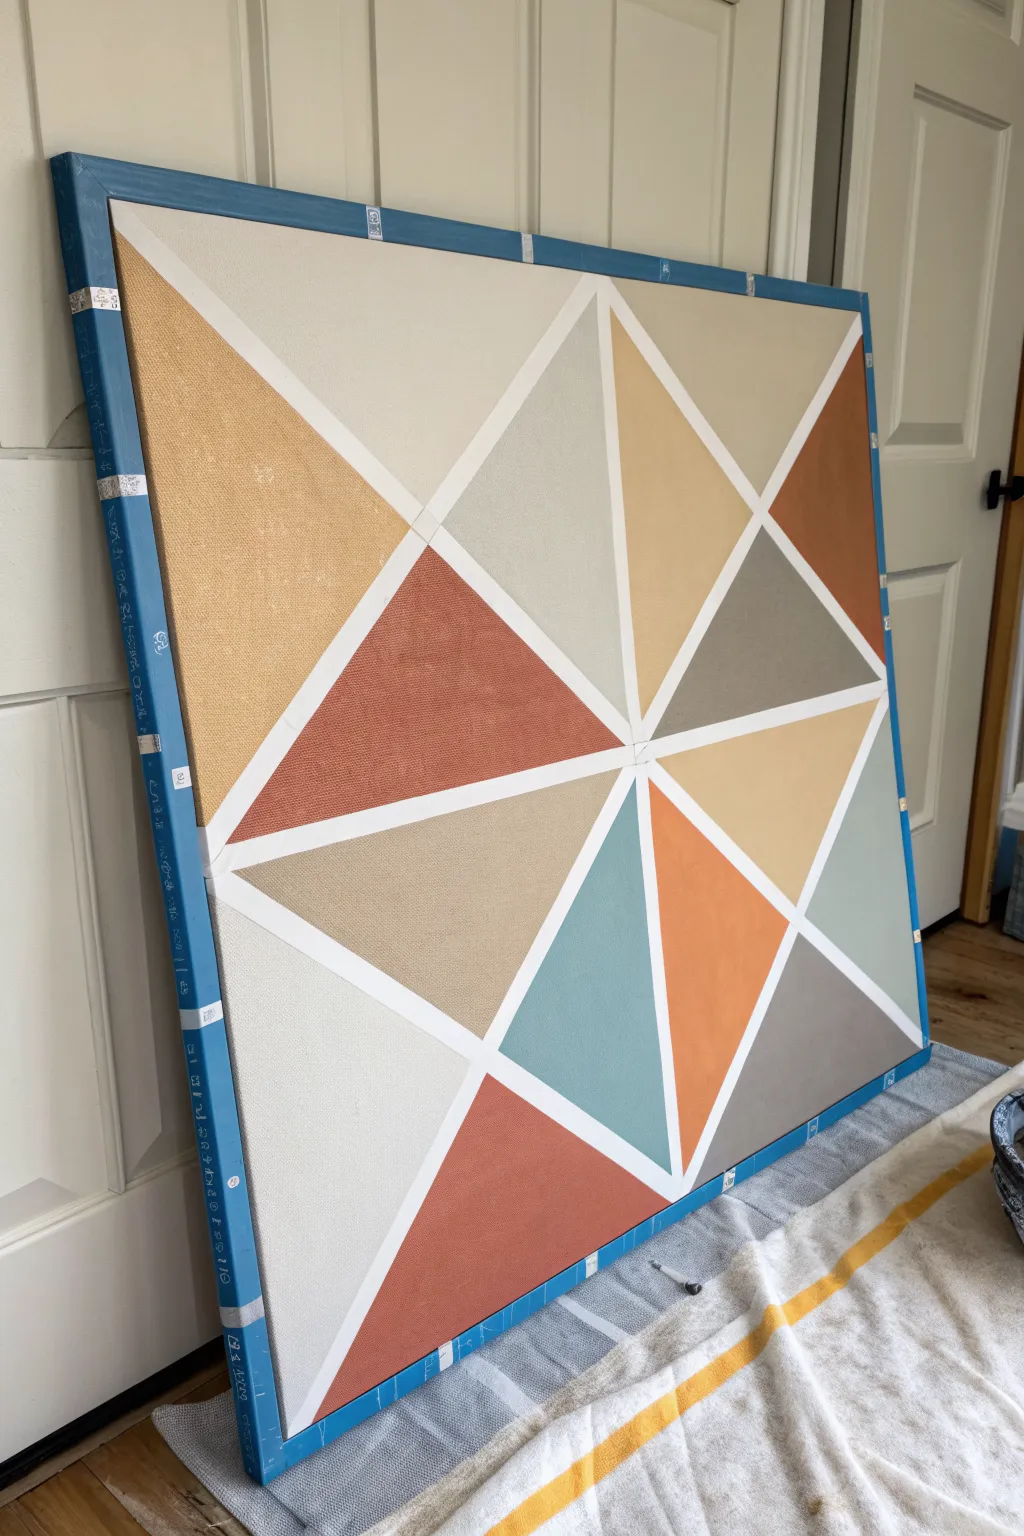
Transform a blank canvas into a stunning kaleidoscope of modern shapes using simple painter’s tape and a warm, earthy color palette. This tape-resist technique creates crisp, professional lines and allows you to play with symmetry and balance without needing advanced drawing skills.
Step-by-Step
Materials
- Large square canvas (approx. 36×36 inches)
- Painter’s tape (1/4 inch width for internal lines, 1 inch for border)
- Acrylic paints (rust orange, teal blue, beige, light grey, white, mustard yellow, brown)
- Small foam roller or flat synthetic brushes
- Palette or paper plates for mixing
- Ruler or yardstick
- Pencil
- Drop cloth
- Gesso (optional, for priming)
Step 1: Preparation & Taping
-
Prepare the workspace:
Lay down your drop cloth in a well-lit area. If your canvas is raw, apply a coat of white gesso and let it dry completely to ensure the paint adheres smoothly. -
Mark the center:
Using your ruler, measure both the height and width of the canvas to find the exact center point. Mark this lightly with a pencil. -
Create the border:
Apply the wider 1-inch painter’s tape along the four outer edges of the canvas face. This creates a clean negative space frame around your design. -
Wrap the edges:
I like to wrap extra tape around the sides of the canvas canvas to protect them from drips, ensuring a tidy finish later. -
Place the diagonal guides:
Run strips of the thinner 1/4 inch tape from corner to corner, crossing directly over your center mark to form a large ‘X’. -
Add vertical and horizontal lines:
Run a vertical strip and a horizontal strip through the center point, creating an eight-section ‘pie’ layout. -
Form the triangles:
Now, use tape to connect the distinct lines you’ve made, creating triangles within the sections. You don’t have to be perfectly symmetrical; vary the connection points to create visual interest. -
Seal the tape:
Run your finger or a dry cloth firmly over all tape edges. To get super crisp lines, paint a thin layer of your base white color over the tape edges to seal them.
Bleeding Lines?
If paint seeps under the tape, don’t panic. Wait for it to dry completely, then gently scrape the excess with an X-Acto knife or cover it with white paint.
Step 2: Painting the Shapes
-
Plan your palette:
Pour out your acrylic colors onto the palette. Mix a few custom shades like a soft sage green or a muted terra cotta to match the earthy vibe. -
Start with light colors:
Begin painting the sections you want to be beige, white, or light grey. Painting lighter colors first is easier to correct if you make a mistake. -
Apply the bold colors:
Move on to the darker, bolder hues like rust orange, deep teal, and brown. Use a separate brush or rinsing your foam roller thoroughly between colors. -
Balance the composition:
Try not to put two identical colors right next to each other. Step back occasionally to ensure the distribution of colors feels balanced across the canvas. -
Apply a second coat:
Most acrylics will need a second layer for full opacity. Let the first coat dry to the touch before applying the second to avoid lifting the paint. -
Check for coverage:
Look closely at the canvas texture. Ensure paint has filled the weave of the canvas completely for a solid, professional look. -
Dry thoroughly:
Let the painting sit undisturbed until the paint is completely dry. This usually takes about 1-2 hours depending on humidity.
Level Up: Texture
Mix a texture medium or sand into one specific paint color (like the rust orange) to add physical dimension to just those geometric sections.
Step 3: The Reveal
-
Remove the tape:
Slowly peel the tape off at a 45-degree angle. Pulling slowly helps prevent the paint from peeling up with the tape. -
Touch up:
If any paint bled under the tape, use a tiny detail brush and white paint to tidy up the lines.
Hang your new masterpiece in a hallway or living room to add a sophisticated splash of color to your space


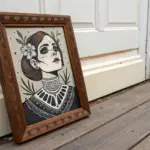
Minimalist Abstract Line Art Faces
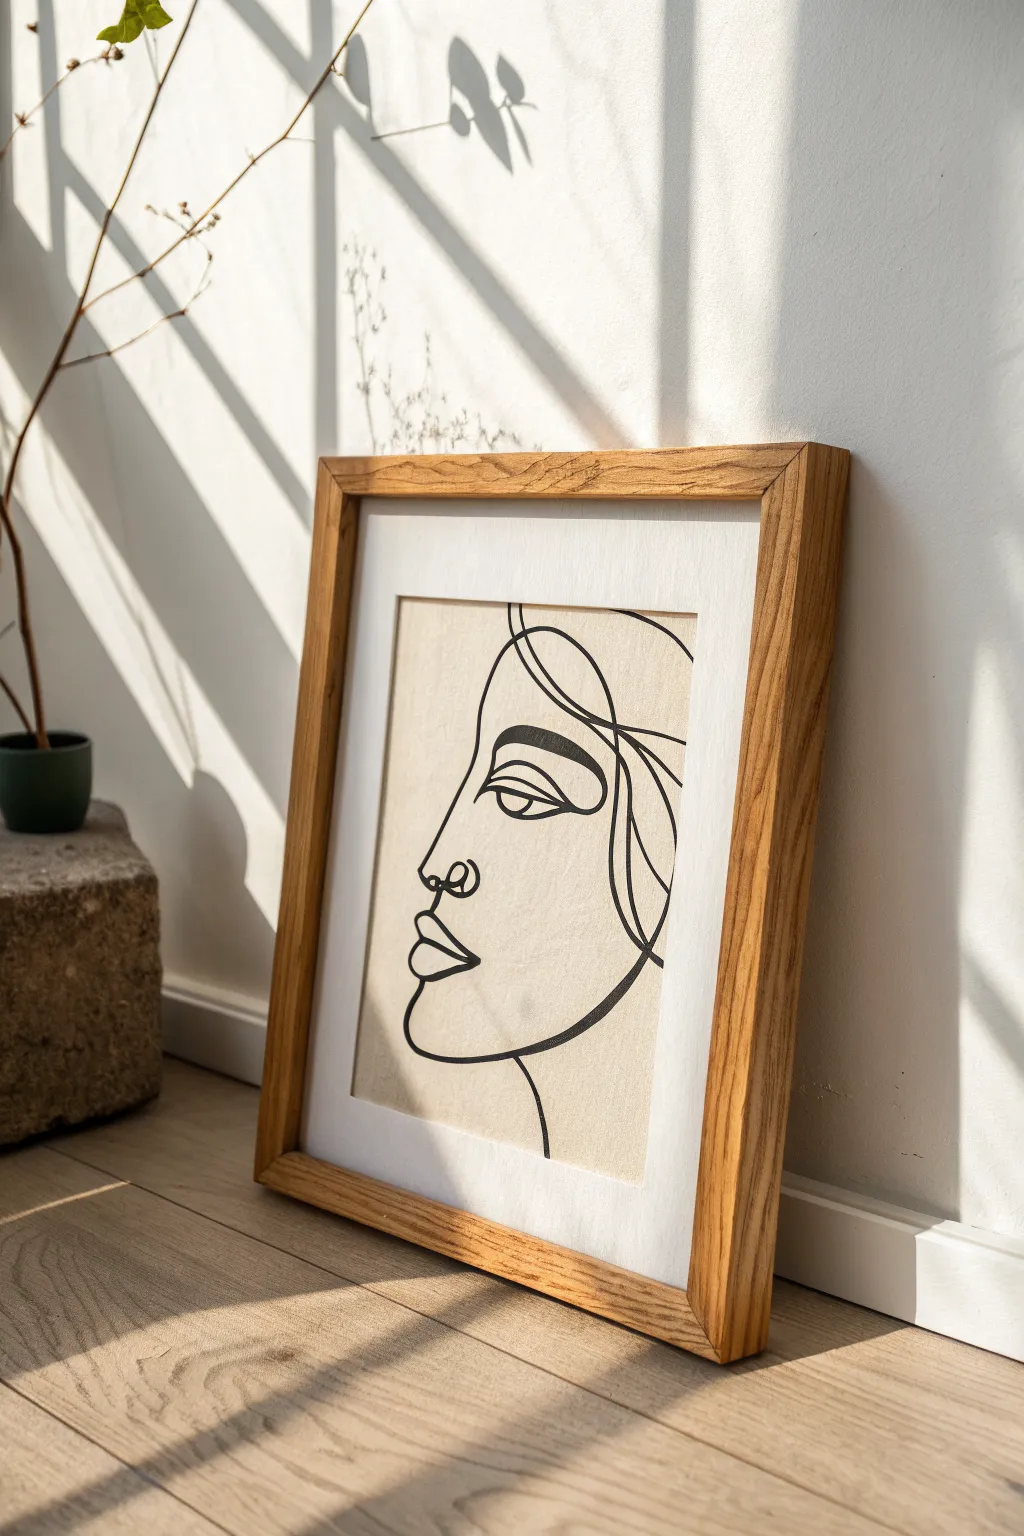
Achieve a sophisticated gallery look with this minimalist single-line portrait that celebrates negative space and flow. The combination of raw canvas texture and bold black ink creates a striking piece of modern decor that looks far more expensive than it is to make.
How-To Guide
Materials
- Heavyweight unbleached canvas fabric or textured beige paper (approx 11×14 inches)
- Black acrylic paint or India ink
- Round detail brushes (size 2 and 4)
- Pencil (HB or H)
- Kneaded eraser
- Carbon transfer paper (optional)
- White mat board (to fit frame)
- Wooden frame (oak finish recommended)
- Masking tape or painter’s tape
- Work surface/board
Step 1: Preparation & Sketching
-
Prepare the canvas:
Cut your unbleached canvas or textured paper to size, ensuring it is slightly larger than the mat opening. If using loose canvas fabric, tape the edges down to a hard board to keep it taut and flat while you work. -
Draft the profile shape:
Using a light pencil grip, begin sketching the profile. Start with the forehead curve, moving down to the nose. Don’t worry about perfection yet; focus on the general proportions of the face. -
Refine the features:
Lightly sketch the lips and chin. The lips in this style are stylized and plump, while the chin curves gently back towards the neck. Keep your lines loose. -
Add internal details:
Draw the eye, eyebrow, and fluid hair strands. The beauty of this style is the illusion that the line never breaks, so look for ways to connect the eyebrow to the nose bridge or the hair to the cheek. -
Review the flow:
Step back and look at your sketch. Erase any distracting lines and solidify the final path you want your brush to take. For a true continuous line look, I like to trace the air over the paper to ensure the loops feel natural.
Practice Makes Perfect
Before painting the final canvas, practice the continuous motion on scrap paper 5-10 times. Muscle memory helps your hand move confidently for smoother curves.
Step 2: Inking & Painting
-
Mix the paint:
Squeeze a small amount of black acrylic paint onto a palette. Add a tiny drop of water to improve the flow; you want a consistency like heavy cream so standard brushstrokes don’t drag on the canvas texture. -
Load the brush:
Fully saturate a size 4 round brush with the black paint or ink. A round brush allows for variation in line thickness, which adds character to the piece. -
Paint the major contours:
Begin painting over your pencil lines, starting with the main profile of the face. Apply steady pressure for a consistent line, but allow for slight natural variations where the brush lifts or presses. -
Define the eye and brow:
Painting the eye requires a steadier hand. Switch to a size 2 brush if needed for finer details like the eyelid crease and the pupil detail. Make the eyebrow line thicker and bolder to anchor the expression. -
Detail the nose and lips:
Carefully trace the nose ring detail and the curves of the lips. Ensure the corners of the mouth connect smoothly to the overall face shape. -
Add hair strands:
Use long, sweeping motions for the hair lines. These lines should feel the most fluid and energetic, swooping down the side of the face and neck. -
Refine line weights:
Once the initial pass is done, look for areas that feel too thin. Go back and carefully thicken specific curves—like the underside of the chin or the outer hair swoops—to add visual weight and drama. -
Clean up edges:
If any lines look shaky, use the very tip of your brush to smooth out the edges. Let the paint dry completely, which usually takes about 20-30 minutes for acrylics.
Step 3: Finishing & Framing
-
Erase guidelines:
Once you are absolutely certain the black ink is bone dry, gently use a kneaded eraser to lift any visible pencil marks remaining around the paint. -
Secure to the mat:
Position your artwork behind the white mat. Center the face so there is comfortable ‘breathing room’ on all sides, then tape the canvas to the back of the mat using masking tape. -
Assemble the frame:
Clean the glass of your wooden frame to remove dust or fingerprints. Place the matted artwork into the frame, add the backing board, and secure the clips.
Shaky Lines?
Don’t panic! Simple line art forgives imperfections. Just thicken the line slightly at the wobble to disguise it, making it look like intentional line weight variation.
Now you have a stunning, remarkably simple piece of art that brings a touch of calm sophistication to your room.
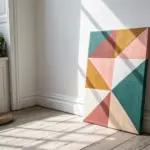
Two-Color Arch Painting
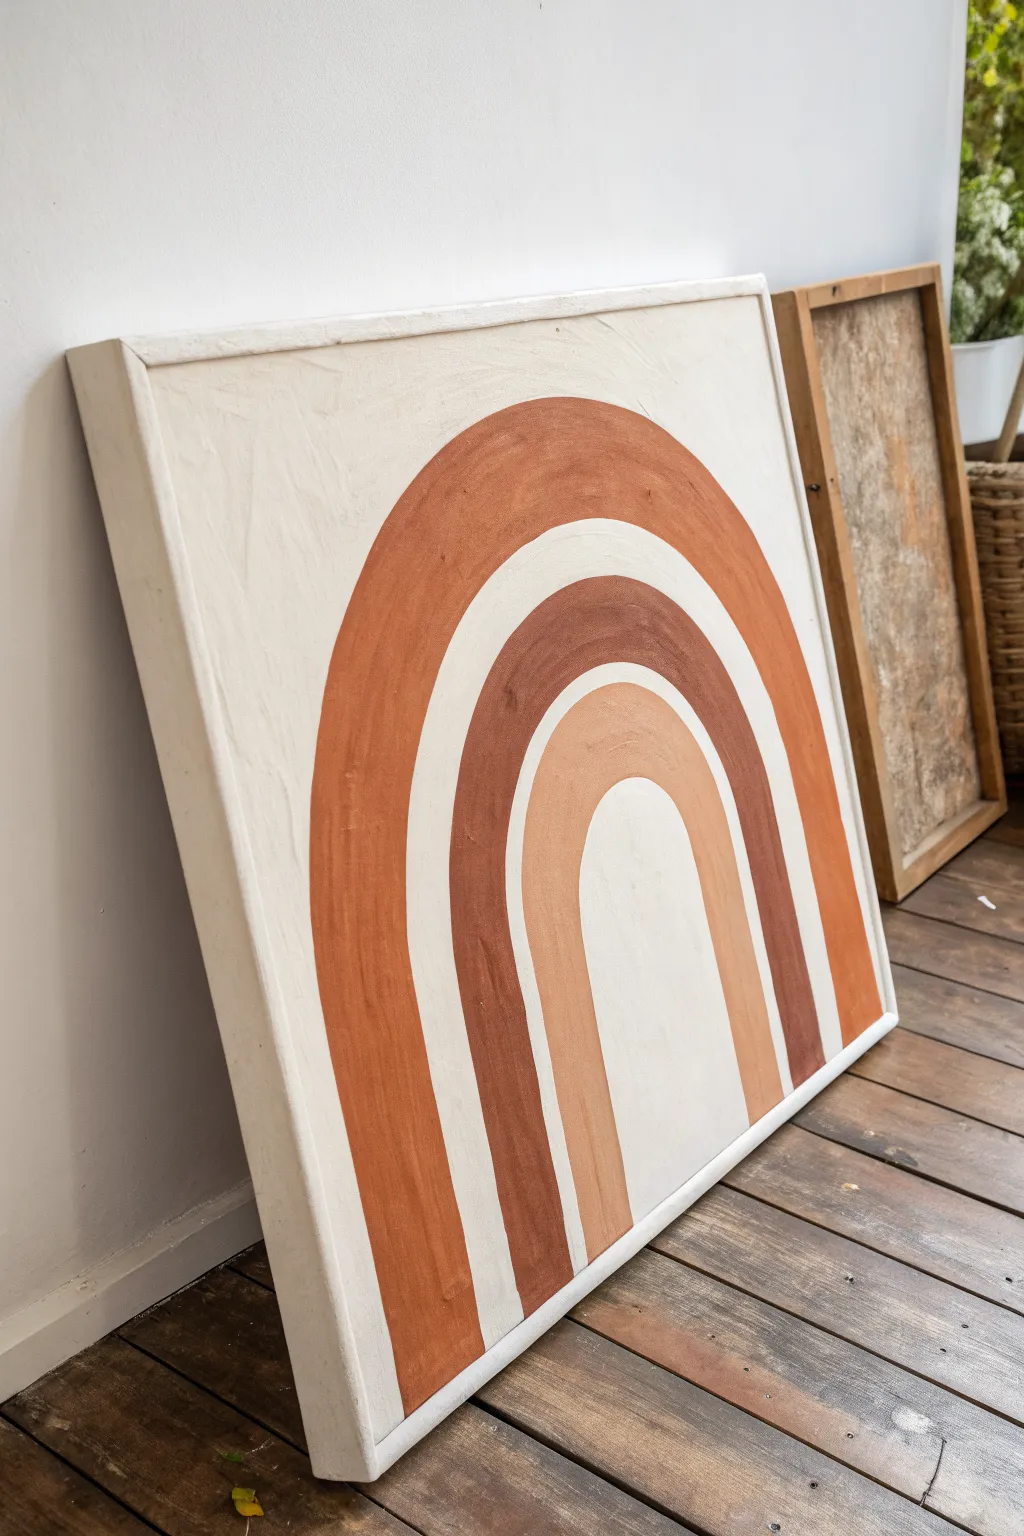
Embrace the warmth of desert hues with this abstract arch painting, featuring a soothing progression of terracotta, rust, and peach tones. The minimalist geometric design relies on clean curves and textured brushwork to create a statement piece that feels both organic and modern.
Step-by-Step Tutorial
Materials
- Large square canvas (approx. 24×24 inches or larger)
- Acrylic paints (Burnt Sienna, Raw Umber, Titanium White, and Yellow Ochre)
- Wide flat paintbrush (2-3 inches)
- Medium round brush (for edges)
- Pencil
- String/twine
- Pushpin or tape
- Palette or paper plate
- Measuring tape
- Texturizing medium (optional, for thicker strokes)
Step 1: Preparing the Canvas
-
Prime the background:
Start by mixing a large amount of Titanium White with a tiny drop of Yellow Ochre or Raw Umber to create a warm, creamy off-white. Coat the entire canvas, including the sides, with this base color. -
Add texture:
While the base coat is still wet, use your wide brush to create intentional, subtle brushstrokes in alternating directions. This adds that organic, plaster-like feel visible in the background. -
Let it cure:
Allow the background to dry completely. If you want a smoother surface for your arches, lightly sand the area where you’ll be painting, but leaving the texture usually adds character.
Curve Control
Don’t try to paint the curve in one continuous motion. Use short, overlapping strokes, rotating the canvas as you go to keep your hand at a natural angle.
Step 2: Drafting the Design
-
Find the center:
Measure the width of your canvas to find the exact horizontal center point at the bottom edge. Mark this lightly with your pencil. -
Create a compass:
To get perfectly symmetrical arches, tie a piece of string to your pencil. Secure the other end of the string to the bottom-center mark using a pushpin or strong tape. -
Sketch the outer arch:
Extend the string to define the top of your largest arch. Keep the string taut and trace a semi-circle from the left base to the right base. -
Define the first band:
Shorten the string by about 3-4 inches (depending on how thick you want the color band) and draw a second inner arch. The space between these two lines will be your outer color (rust/terracotta). -
Sketch the middle arch:
Shorten the string again by another 2 inches to create a gap of negative space (the cream background). Shorten it once more by 3-4 inches to outline the second color band. -
Sketch the inner arch:
Repeat the process one last time: leave a gap for the background, then define the smallest, innermost arch.
Step 3: Mixing and Painting
-
Mix the outer color:
Combine Burnt Sienna with a touch of Titanium White to create a soft, rusty terracotta. Aim for a muted, earthy orange rather than a bright primary color. -
Paint the large arch:
Using a flat brush, fill in the largest outer band. I like to tackle the curved edges slowly with the corner of the brush first, then fill the center with long, sweeping strokes. -
Mix the middle color:
Create a deep chocolate brown by mixing Raw Umber with a tiny bit of Burnt Sienna to warm it up. This will be your high-contrast middle band. -
Paint the middle arch:
Fill in the second band you sketched. Be careful to maintain the ‘negative space’ gap between this arch and the terracotta one. -
Mix the inner color:
For the smallest arch, mix Titanium White, a drop of Burnt Sienna, and a hint of Yellow Ochre to create a pale clay or peach tone. -
Paint the center arch:
Carefully paint the smallest arch. Since the curves are tighter here, you may want to switch to a slightly narrower brush to navigate the bend smoothly.
Uneven Arches?
If your hand shakes and the lines get wobbly, don’t worry. Wait for the paint to dry completely, then use the cream background color to ‘cut back’ into the arch shape.
Step 4: Refining and Finishing
-
Clean up edges:
Once the colors are dry, inspect your negative space gaps. If any paint drifted into the cream areas, use your background color and a small detail brush to touch up and crisp the lines. -
Apply a second coat:
Earth tones can sometimes be semi-transparent. Apply a second coat to each arch to ensure rich, opaque coverage creating a solid, modern look. -
Seal the artwork:
Finish with a matte varnish spray to protect the surface without adding unwanted gloss, preserving the raw, natural aesthetic.
Hang your new canvas in a bright corner to bring a grounding, earthy element to your space

Color Field Fade Ombre
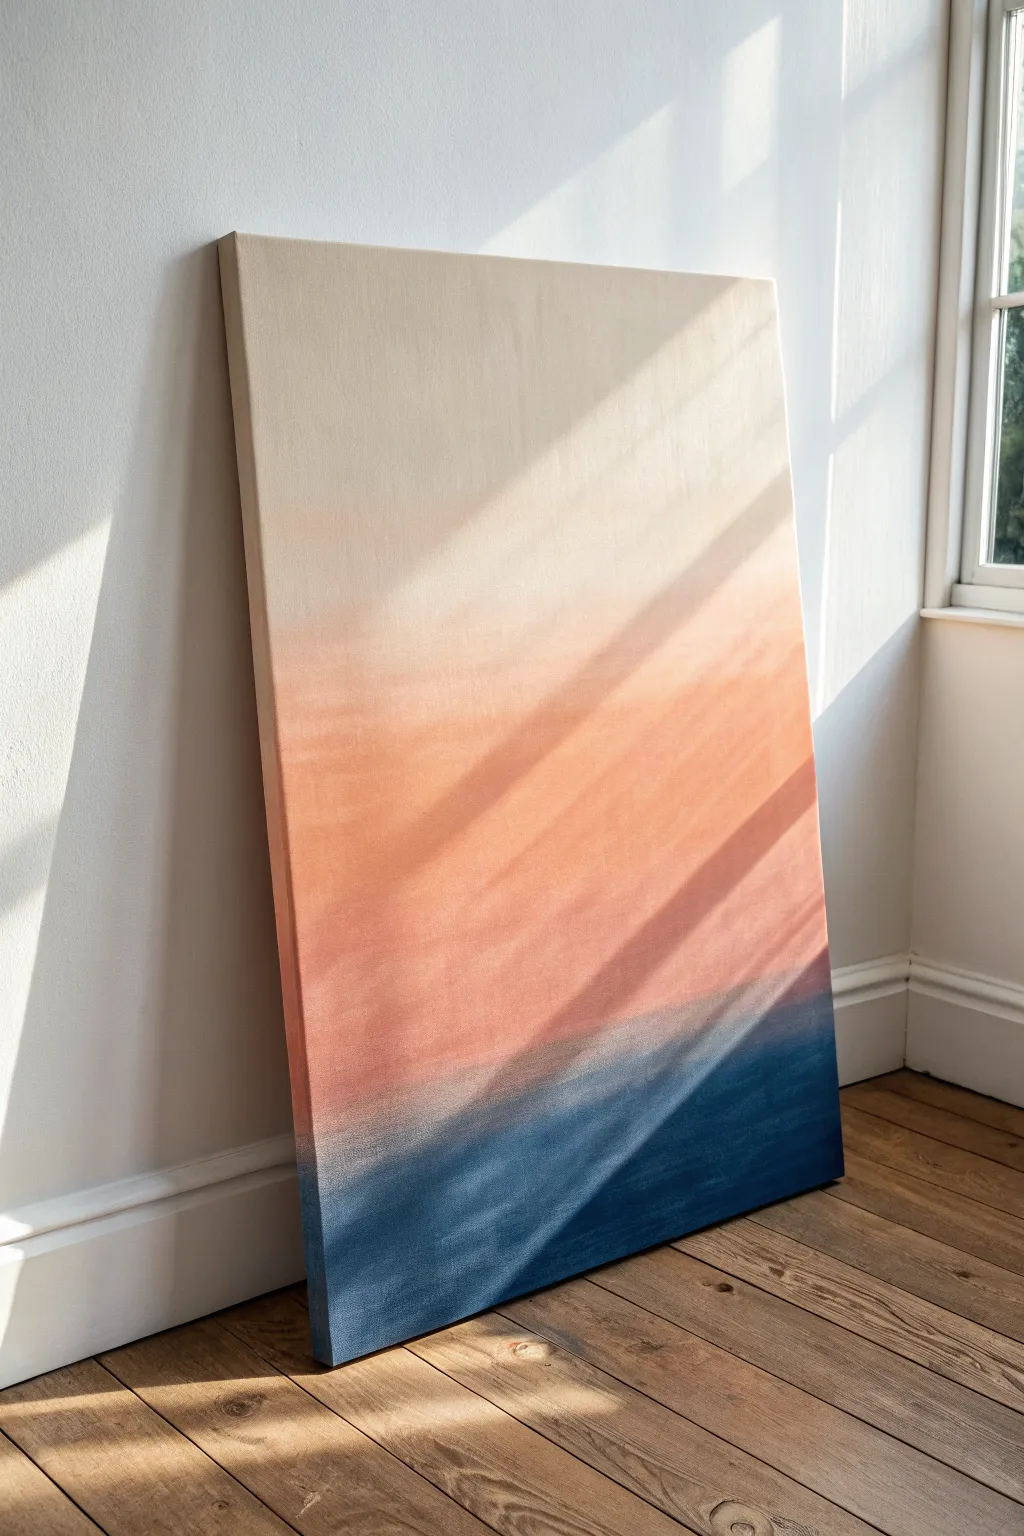
Capture the serene essence of twilight with this large-scale ombre painting that transitions effortlessly from deep ocean blue to soft cream. This project relies on patient blending to create a soothing, modern statement piece that adds warmth and depth to any room.
How-To Guide
Materials
- Large stretched canvas (24×36 inches or larger)
- Acrylic paints: Navy Blue, Burnt Sienna (or Terracotta), Titanium White
- Large flat paintbrush (2-3 inch width)
- Medium soft blending brush
- Water spray bottle (mister setting)
- Palette or disposable paper plates
- Water cup
- Paper towels or rag
- Gesso (optional, for priming)
Step 1: Preparation & Base Layers
-
Prime the Surface:
If your canvas isn’t pre-primed, apply a coat of white gesso and let it dry completely. This ensures the paint glides smoothly, which is crucial for blending. -
Set Up Your Palette:
Squeeze out generous amounts of Navy Blue, Burnt Sienna, and White onto your palette. You will need more paint than you expect for a large canvas. -
Create Intermediate Shades:
Pre-mix a few transitional colors: a lighter blue (Navy + tiny bit of White), a muted orange (Burnt Sienna + White + tiny touch of Navy to desaturate), and a creamy beige (White + tiny dot of Burnt Sienna).
Step 2: Applying the Color Blocks
-
Paint the Deep Base:
Using your large flat brush, apply the pure Navy Blue to the bottom 15% of the canvas. Use horizontal strokes to cover the width fully. -
Introduce the Transition:
Immediately above the navy, paint a stripe of your pre-mixed lighter blue. Allow the wet edges to touch but don’t worry about perfect blending yet. -
Add the Rusty Tone:
Wash your large brush thoroughly. Paint a wide band of the Burnt Sienna/Terracotta color above the blue section, covering the middle portion of the canvas. -
The Creamy Top:
Clean the brush again and fill the remaining top section with your creamy beige mixture. Your canvas should now be covered in distinct blocks of color.
Muddy Middle?
If the orange and blue mix into an ugly brown, let it dry. Paint a thin layer of white over the transition area, let dry again, and then re-blend fresh colors on top.
Step 3: The Blending Process
-
Mist the Canvas:
Lightly mist the entire surface with your water sprayer. You want the paint to be damp and workable, not dripping wet. -
Blend the Top Transition:
Take a clean, dry blending brush. Start where the cream meets the terracotta. Use rapid, horizontal back-and-forth strokes to marry the two colors. -
Soften the Middle:
Move down to the transition between the terracotta and the blue. This is the trickiest part as these colors can turn muddy. Use a very light hand and I find it helps to wipe the brush onto a rag frequently to keep the colors clean. -
Deepen the Bottom Blend:
Blend the lighter blue into the deep navy at the bottom. Since these are in the same color family, you can be more aggressive with your strokes here. -
Check for Hard Lines:
Step back five feet to look at the canvas. Identify any harsh horizontal lines. -
Feather Out Imperfections:
Return to those harsh lines with a slightly damp brush. Use a ‘feathering’ motion—light X-shaped strokes—to break up the lines. -
Add a Second Layer (Optional):
If the coverage looks thin after the first blend, let it dry completely, then repeat the color blocking and blending process for a richer finish.
Gold Horizon Line
Once fully dry, use painter’s tape to mark a thin horizontal line across the most dramatic color shift. Fill it with gold leaf for a luxe, modern accent.
Step 4: Finishing Touches
-
Paint the Sides:
Don’t forget the edges of the canvas. Extend the ombre colors around the sides for a professional, gallery-wrapped look. -
Final Dry:
Let the painting sit undisturbed for at least 24 hours. Acrylics dry fast to the touch, but thick blended layers need time to set. -
Varnish:
Once fully cured, apply a matte or satin varnish to protect the surface and unify the sheen of the different paint colors.
Step back and enjoy the calming atmosphere your new gradient artwork brings to the space
BRUSH GUIDE
The Right Brush for Every Stroke
From clean lines to bold texture — master brush choice, stroke control, and essential techniques.
Explore the Full Guide
Abstract Landscape Suggestion
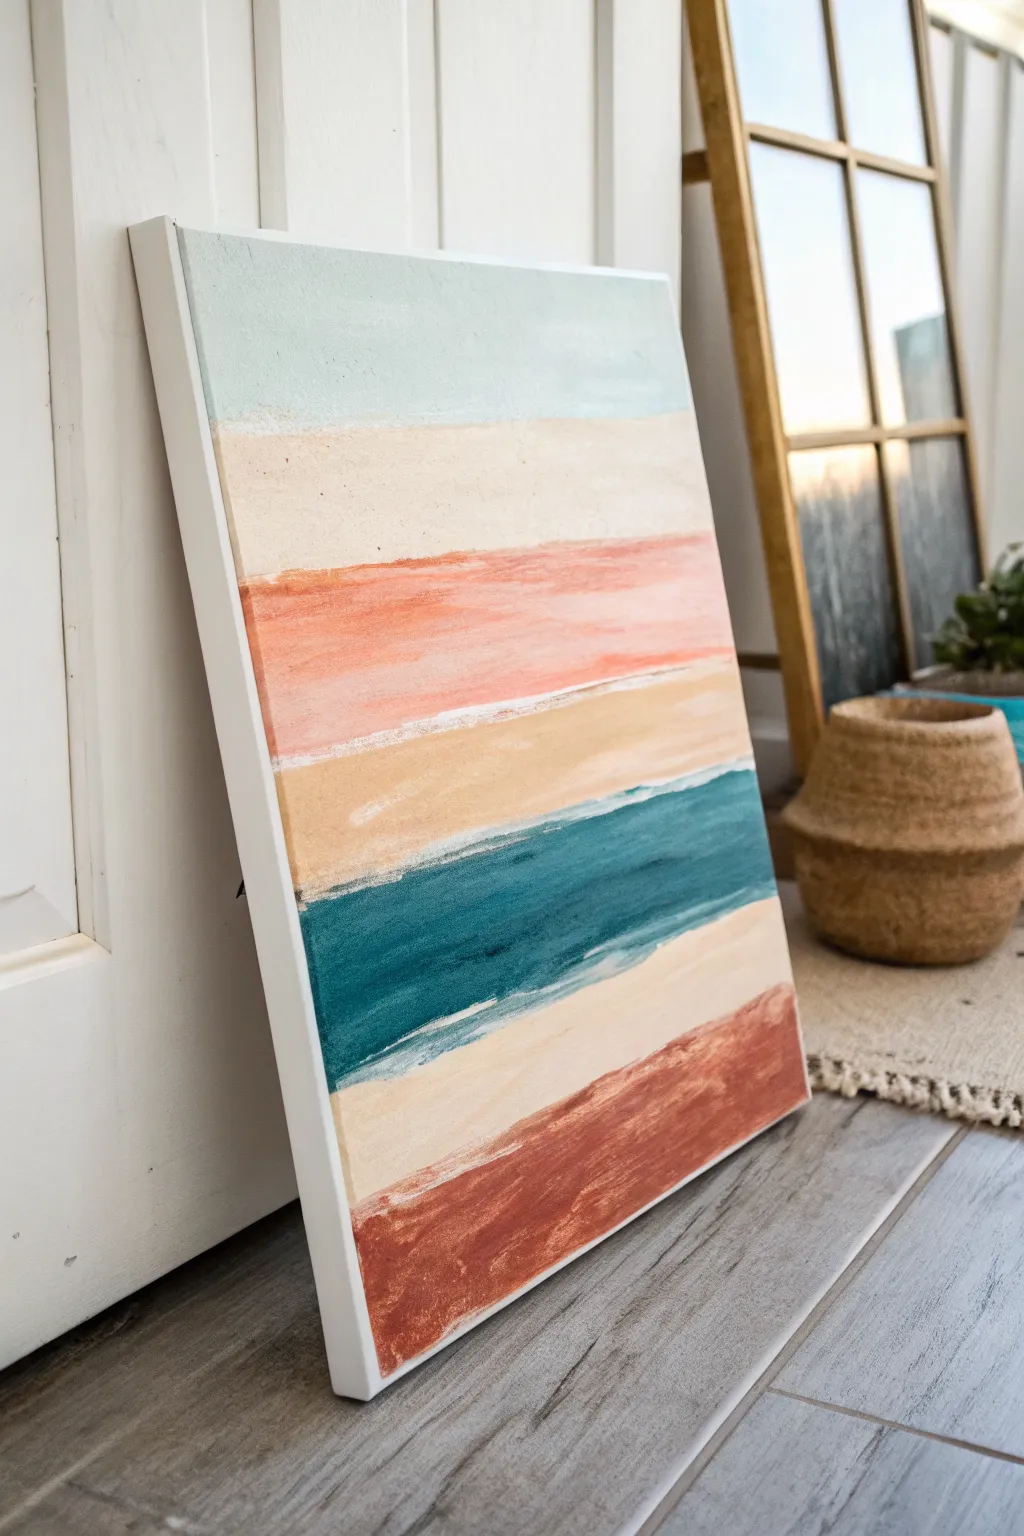
Capture the essence of a tranquil beach sunset with this beginner-friendly abstract landscape. Using horizontal bands of color and soft, sweeping brushwork, you’ll create a modern piece that feels organic and calming.
Detailed Instructions
Materials
- Rectangular stretched canvas (e.g., 16×20 inches)
- Acrylic paints (Titanium White, Unbleached Titanium/Cream, Light Blue, Peach or Coral, Ochre/Tan, Deep Teal, Burnt Sienna/Rust)
- Large flat brush (1.5 or 2 inches)
- Medium flat brush (3/4 inch)
- Palette or paper plate
- Cup of water
- Paper towels
- White or natural wood floating frame (optional)
Step 1: Preparation and Base
-
Set the Stage:
Lay down your canvas on a protected surface. If your canvas isn’t pre-primed, apply a coat of gesso and let it dry completely. -
Analyze the Palette:
Squeeze out your colors onto the palette. You want a distinct gradients feel: a cool sky tone, warm sandy middle tones, a bold water accent, and earthy ground tones. -
Mix the Sky Shade:
Start by mixing a very pale, muted blue. Combine a touch of Light Blue with plenty of Titanium White to get a soft, airy mint.
Muddy Colors?
If your stripes are blending into brown mush, let each layer dry for 10 minutes before painting the adjacent stripe. A dry boundary keeps colors crisp.
Step 2: Painting the Bands
-
Applying the Sky:
Using your large flat brush, paint the top 1/5 of the canvas with your sky mix. Don’t worry about a perfectly straight bottom edge; a little wavering adds character. -
Transition to Cream:
Clean your brush slightly, but leave a little moisture. Pick up the Unbleached Titanium or Cream paint. Apply a wide band directly under the blue sky, blending slightly where they meet if you like a softer look. -
Adding the Sunset Band:
Mix a soft coral shade using Peach and a tiny bit of White. Paint the next horizontal stripe below the cream section. Keep your strokes loose and horizontal. -
Creating the Sand Layer:
Below the coral, apply a band of Ochre or Tan. I like to keep this layer slightly thinner than the others. Allow the brush to drag a bit to create texture. -
The Deep Ocean Stripe:
This is your focal point. Load a medium brush with Deep Teal. Paint a bold, dark stripe below the tan layer. Let the edges be rough and jagged to mimic waves crashing or distant water texture. -
Lower Sandy Band:
Clean your brush well. Apply another band of the Unbleached Titanium/Cream color beneath the teal. This creates a visual break and represents the shore closest to the viewer. -
Deep Earth Foundation:
For the bottom-most section, use Burnt Sienna or a Rust color. Paint heavily at the bottom edge of the canvas and fade it upward slightly into the cream band above it.
Step 3: Refining Texture
-
Dry Brushing Edges:
Once the main blocks of color are down but not fully dry, take a clean, dry brush. Lightly drag it horizontally over the boundaries between colors to soften harsh lines. -
Adding White Highlights:
Dip a brush sparingly into Titanium White. Drag it lightly over the teal section and the transition between the coral and tan to suggest light reflecting on water or clouds. -
Scumbling Technique:
To get that rustic look shown in the image, rapid, scrubby strokes known as scumbling work well. Use a brush with very little paint to add rough patches of cream over the tan or peach areas. -
Enhancing the Teal:
Go back into the teal stripe with a slightly darker blue or green mixed in. Add short, horizontal dashes to give the ‘water’ depth and movement. -
Checking the Balance:
Step back and look at your composition. If one stripe feels too heavy, layer a bit of the neighboring color over its edge to shrink it down. -
Painting the Sides:
Don’t forget the edges of the canvas. Extend your horizontal stripes around the sides for a finished, gallery-wrapped look.
Texture Trick
Add a tiny pinch of sand or baking soda to your tan and rust paint colors. It physically builds grit that mimics the feeling of a real shoreline.
Step 4: Finishing Touches
-
Final Adjustments:
Look for any areas where the canvas weave shows through unintentionally and touch them up with the appropriate color. -
Drying Time:
Allow the painting to dry strictly undisturbed for at least 24 hours. Acrylics dry fast to the touch, but thick layers need time to cure. -
Framing:
Once fully dry, place the canvas into a floating frame. A simple white or light wood frame complements the earthy tones perfectly.
Hang your new abstract landscape in a bright room and enjoy the calm coastal vibes it brings to your space
Metallic Accents on Abstract Shapes
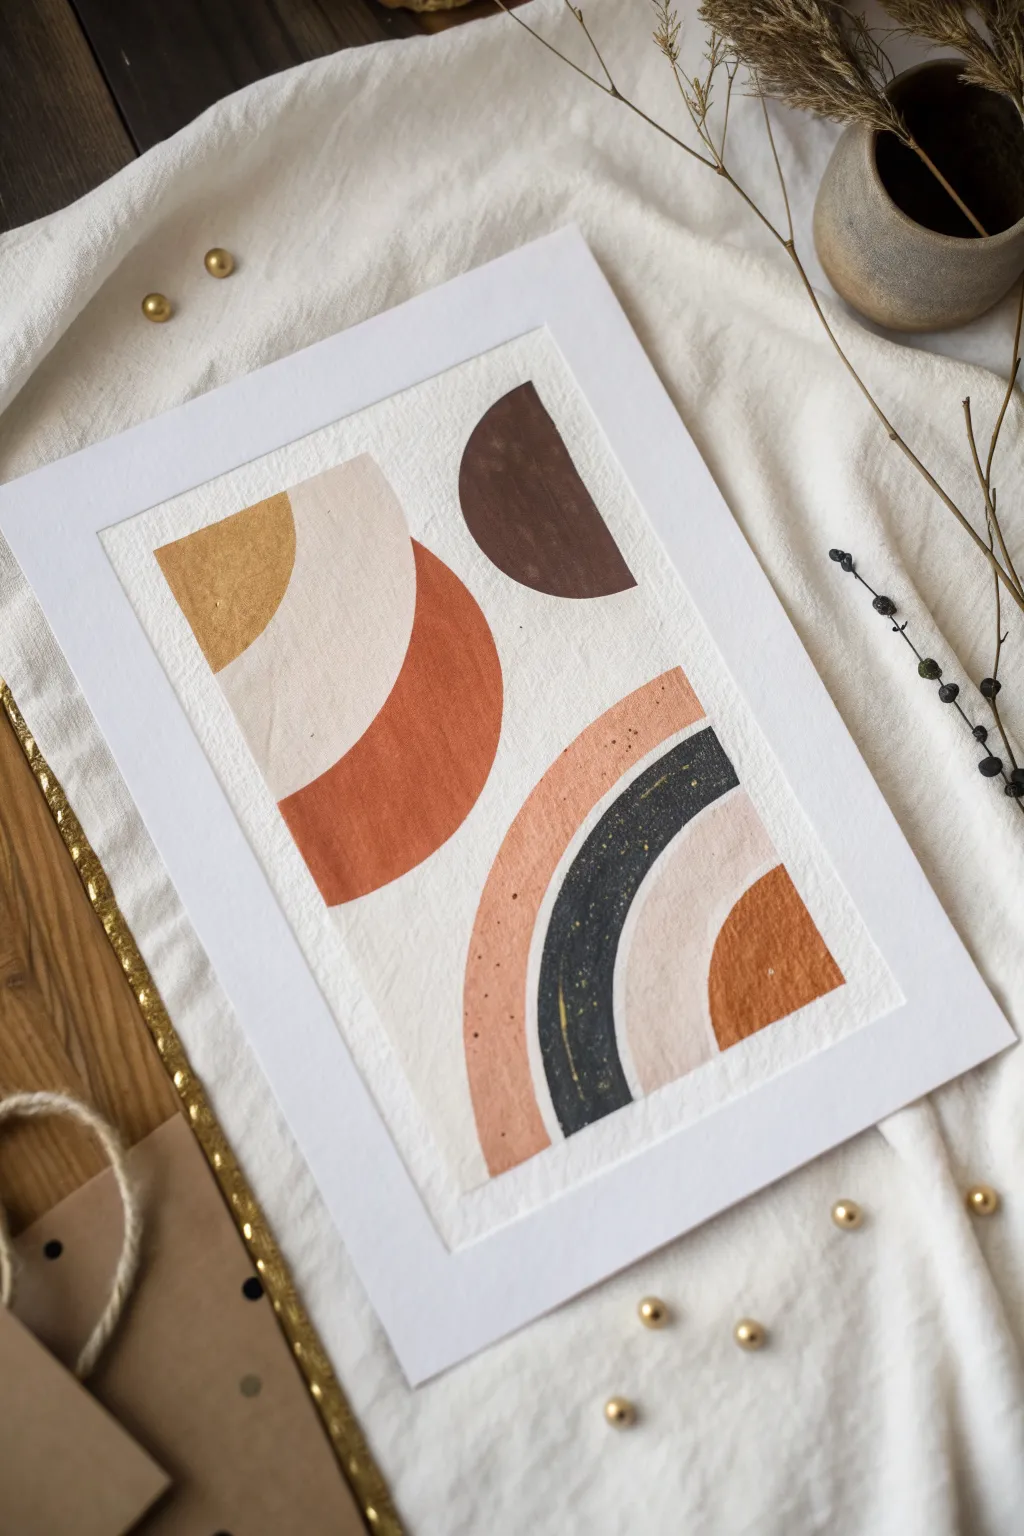
This project combines warm, earthy tones with geometric minimalism to create a piece that feels both grounded and sophisticated. By layering matte colors with subtle metallic speckles, you’ll achieve a textured, high-end look perfect for modern interiors.
Step-by-Step Tutorial
Materials
- Heavyweight watercolor paper or mixed media paper (at least 300gsm)
- Gouache paints (burnt sienna, ochre, white, black, dark brown)
- Gold metallic watercolor paint or gold ink
- Flat shader brushes (medium and small)
- Pencil and eraser
- Compass or circular objects for tracing
- Ruler
- Palette for mixing
- Two jars of water
- Paper towels
- Pre-cut mat board (withe)
Step 1: Planning and Sketching
-
Prepare your paper:
Start by cutting your watercolor paper to fit the opening of your mat board, leaving a slightly larger margin so you can tape it down if desired. This ensures your composition is centered. -
Sketch the layout:
Lightly draw a central rectangle that represents your visible painting area. Inside this space, you will draft your shapes. Start with a large semi-circle on the left side, slightly overlapping the middle. -
Add intersecting arches:
Draw a smaller semi-circle nested inside the first one on the upper left. Then, sketch a bold, dark semi-circle floating in the upper right corner. -
Draft the bottom rainbow:
In the lower right, sketch a multi-layered arch shape that looks like a quarter-rainbow. It should have three distinct bands: an outer wide band, a middle dark band, and a smaller inner arch.
Don’t Over-mix
For a more organic look, don’t mix your gouache too thoroughly on the palette. Slight streaks of unmixed color can add lovely visual texture to the flat shapes.
Step 2: Painting the Base Colors
-
Mix the terracotta shade:
Combine burnt sienna with a touch of white and a tiny dot of ochre to create a warm, muted terracotta. Paint the large semi-circle on the left side with this color, keeping your edges crisp. -
Create the beige tone:
Mix a large amount of white with a very small amount of ochre and brown. This should be a soft, creamy beige. Paint the section nestled inside your terracotta shape on the upper left. -
Fill the dark accent:
Use dark brown mixed with a hint of black to create a deep espresso color. Carefully paint the floating semi-circle in the upper right. Gouache dries fast, so work confidently to avoid streakiness. -
Paint a gold accent shape:
Using your metallic gold paint or ink, fill in the small, remaining section at the very top left of your first shape cluster. This solid block of gold will catch the light beautifully.
Fixing Wobbly Lines
If an edge isn’t straight, wait for the paint to dry fully. Re-wet a clean, stiff brush and gently scrub the mistake away, blotting with a paper towel.
Step 3: Constructing the Lower Arch
-
Outer band color:
Mix a soft, dusty pink or salmon color by adding more white to your terracotta mix. Paint the outermost band of the bottom-right rainbow shape. -
Inner dark band:
Mix a charcoal grey using black and a touch of white (or use a dark navy-grey). Paint the middle band of the rainbow, ensuring a clean separation from the pink band. -
The innermost arch:
For the smallest, innermost arch on the bottom right, use the remaining terracotta paint. If it has dried, remix a small amount to match the top shape. -
Clean up edges:
Once the main shapes are dry, take a slightly damp, clean brush or a detailed eraser to tidy up any pencil marks that are still visible around the painted forms.
Step 4: Adding Texture and Detail
-
Prepare the splatter:
Load a small brush with watery gold metallic paint. I prefer to test the consistency on a scrap piece of paper first to ensure the droplets aren’t too large. -
Apply gold speckles:
Gently tap the handle of your brush against another brush or your finger over the dark charcoal band and the pink band. This creates a subtle ‘starry night’ effect. -
Highlight the charcoal:
Using a very fine brush and the gold paint, add a few thin, deliberate curved lines or strokes within the charcoal band to mimic texture and movement. -
Let it cure:
Allow the entire piece to dry completely for at least an hour. Gouache can smudge if handled while damp. -
Frame your work:
Place the white mat over your painting. Secure the artwork to the back of the mat using artist tape, ensuring the composition is perfectly centered in the window.
Place your framed piece near natural light to watch those metallic details shimmer throughout the day

PENCIL GUIDE
Understanding Pencil Grades from H to B
From first sketch to finished drawing — learn pencil grades, line control, and shading techniques.
Explore the Full Guide
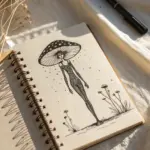
Scribble-Style Modern Marks
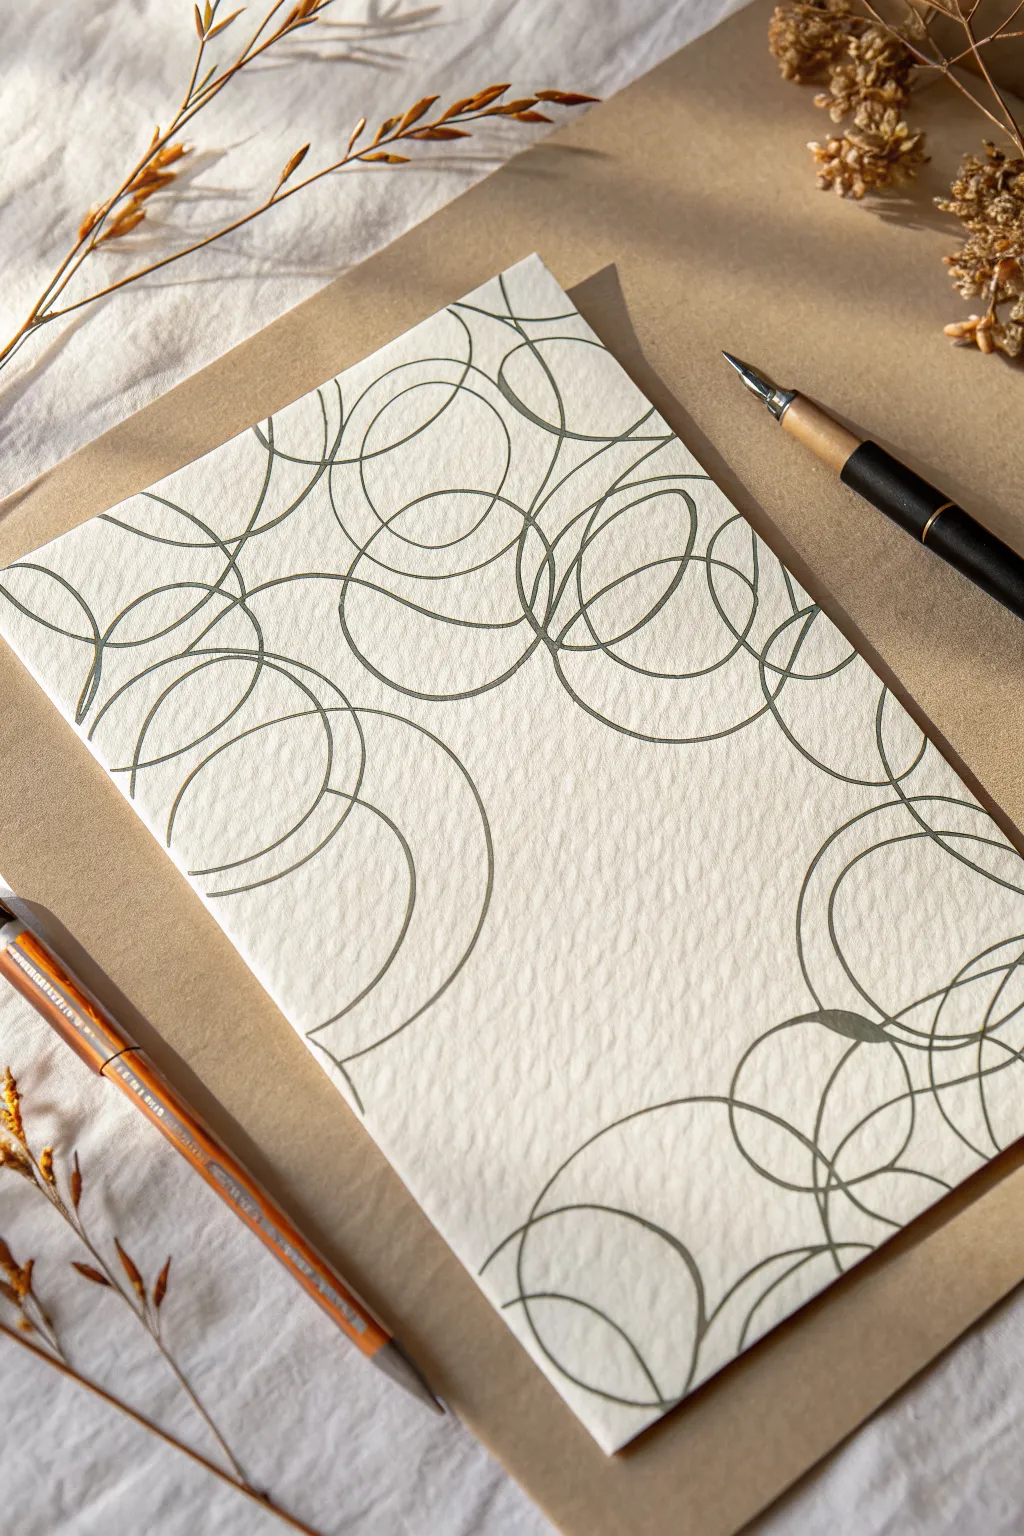
Embrace the imperfect beauty of wabi-sabi with this soothing line art project. Using simple overlapping circles on textured paper, you’ll create a modern abstract composition that feels both organic and structured.
Step-by-Step
Materials
- Cold press watercolor paper (A5 or A4 size)
- Black or dark grey fountain pen (or fine liner, 0.5mm)
- Drafting pencil (optional, for sketching)
- Kneaded eraser
- Ruler for borders (optional)
- Smooth work surface
Step 1: Preparation & Composition
-
Select your paper:
Choose a high-quality cold press watercolor paper. The rough texture is crucial here, as it will break up your ink lines slightly, adding character to the circles. -
Define the negative space:
Visualize a diagonal channel of empty space running through the center of your page. This negative space is just as important as the drawing itself. -
Lightly sketch the boundary (optional):
If you’re nervous about spacing, use a drafting pencil to faintly mark general areas where the clusters of circles will live—focus mainly on the top-left and bottom-right corners.
Wrist Motion
Lock your fingers and move your entire arm from the shoulder, not the wrist. This creates smoother, more confident curves rather than shaky, small arcs.
Step 2: Drawing the Upper Cluster
-
Start at the corner:
Begin in the top-left corner with your fountain pen. Draw a medium-sized circle, keeping your wrist loose. Don’t worry about closing the circle perfectly; a slight overlap or gap is stylish. -
Overlap the first shape:
Draw a second circle that intersects the first one. Let the lines cross freely. The goal is transparency, seeing all the lines rather than hiding them. -
Vary the sizes:
Add a few smaller circles nested within the larger ones, and some larger loops that extend further out. -
Extend inward:
Continue drawing interlocking circles, moving slowly towards the center of the page but stopping before you cross the middle diagonal. -
Create density:
In the very corner, draw layers of circles closer together to create a darker, denser focal point compared to the airy edges.
Step 3: Drawing the Lower Cluster
-
Anchor the bottom right:
Moving to the opposite corner (bottom-right), repeat the process. Start with a large anchor circle that touches the edge of the paper. -
Build the structure:
Add intersecting circles, ensuring they look like they belong to the same family as the top cluster. Try to replicate the same curvature and line weight. -
Balance the composition:
Step back often to look at the whole page. If the top cluster is very heavy, add a few more loops to the bottom section to balance the visual weight. -
Check the nib angle:
If using a fountain pen, varying your holding angle slightly can create interesting thick and thin variations as the nib moves over the rough paper grain. -
Connect the edges:
Allow some of your circles to ‘fall off’ the edge of the paper. This makes the pattern feel expansive, like it continues beyond the frame.
Gold Accents
Once the ink is dry, trace over just one or two select circles with a gold gel pen or metallic watercolor for a sophisticated touch of contrast.
Step 4: Refining & Finishing
-
Review the flow:
Look at the empty channel in the middle. If it feels too wide, add one or two very large, light loops that just barely reach into the negative space to soften the transition. -
Clean up pencil marks:
Once the ink is completely dry (give it at least 15 minutes to be safe), gently dab—don’t rub—with a kneaded eraser to lift any pencil guidelines. -
Flatten the paper:
If the heavy ink application has buckled the paper slightly, place the artwork under a heavy book overnight once fully dry. -
Final inspection:
Check for any smudge risks before handling. The texture of watercolor paper can hold wet ink in its valleys longer than smooth paper.
Enjoy the calm satisfaction of your finished abstract composition
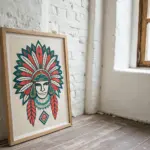
Negative Space Botanical Line Art
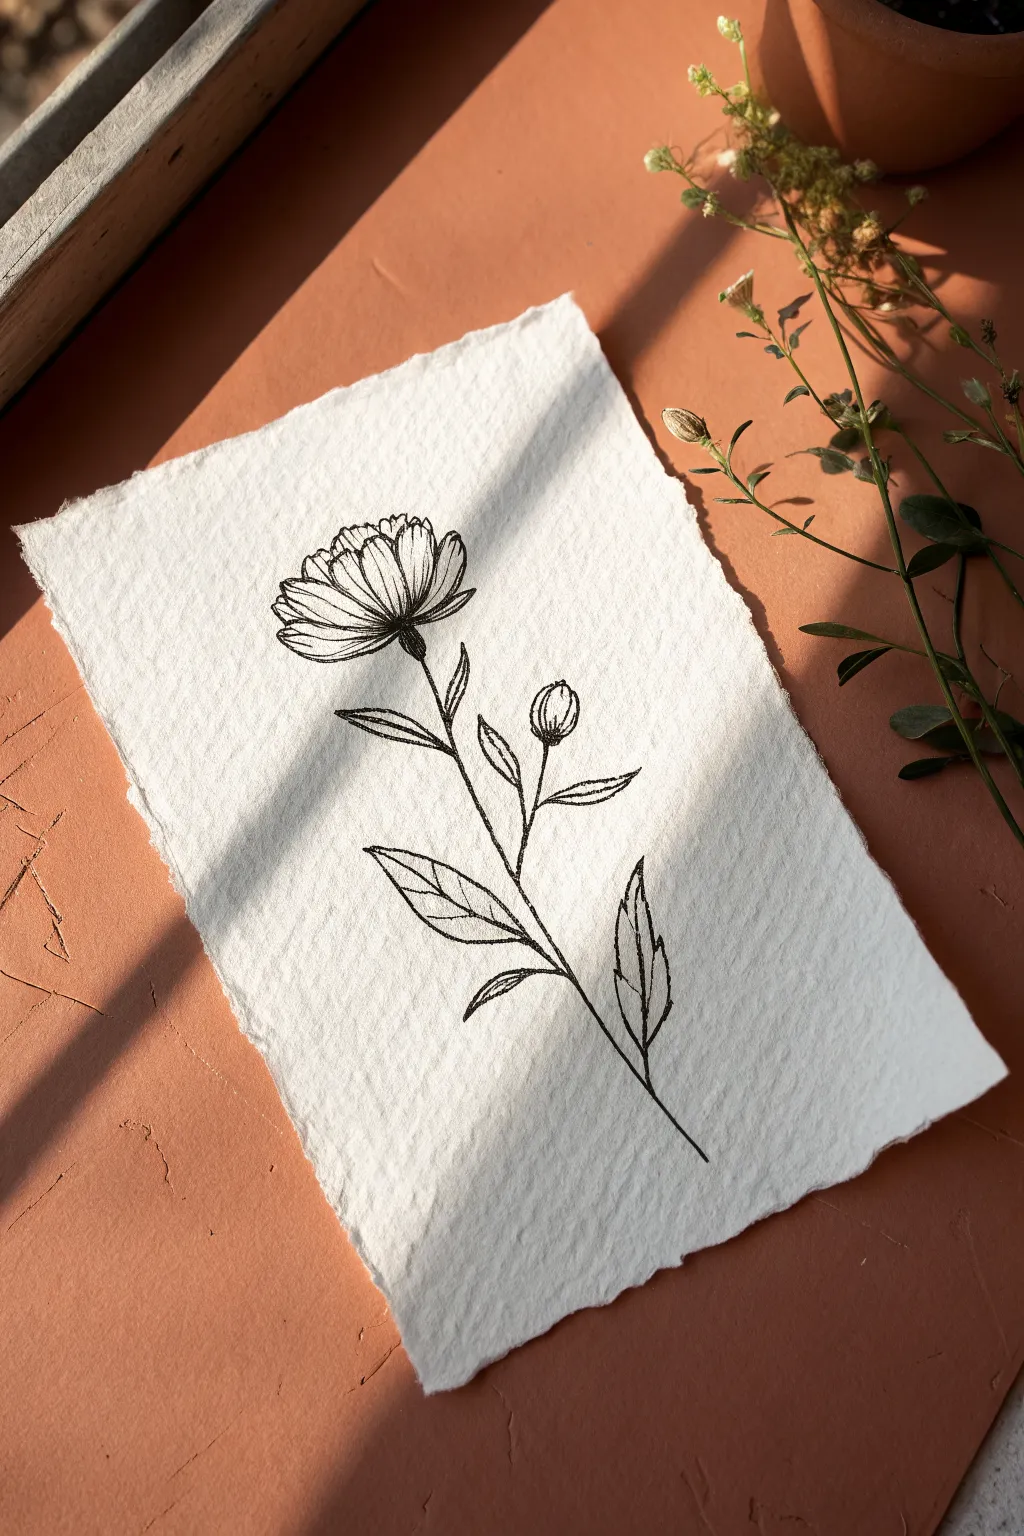
Capture the delicate beauty of nature with this simple yet elegant line art project. Using rich black ink on textured cotton paper creates a striking contrast that feels both modern and timeless.
Step-by-Step Tutorial
Materials
- Heavyweight handmade cotton paper (roughly A5 size)
- Fine liner pen (01 or 03 micron size)
- Slightly thicker black marker or brush pen
- Pencil (HB or H)
- Kneaded eraser
- Ruler (optional)
- Fresh flower or reference photo
Step 1: Preparation and Sketching
-
Paper selection:
Begin by sourcing a beautiful piece of handmade paper. The texture and deckled edges are crucial for this specific look, so avoid standard printer paper. -
Find the center axis:
Lightly visualize or very faintly pencil a central curved line down the middle of your page. This will serve as the main stem of your flower to guide the composition. -
Outline the blossom:
near the top of your stem line, softly sketch a flattened oval shape. This acts as the placeholder for the main flower head. -
Draft the petals:
Inside your blossom oval, lightly draw U-shapes tightly packed together. Start from the center and work outward, creating layers of petals. -
Mark leaf placement:
Sketch short lines branching off the main stem where your leaves will go. Alternate sides—left, then right—down the stem for a balanced look. -
Add the bud:
Draw a smaller shoot branching off to the right, slightly lower than the main bloom. Add a small teardrop shape at the end to represent a closed flower bud. -
Refine the sketch:
Go over your pencil lines one last time to define the exact shapes of the leaves and petals, ensuring you are happy with the proportions before committing to ink.
Ink Bleeding Control
Handmade paper loves to absorb ink. Work quickly with your pen strokes. If you pause too long in one spot, the ink will bloom outward and lose crispness.
Step 2: Inking the Details
-
Ink the main stem:
Switch to your thicker pen or brush marker. Carefully trace the main stem line, starting from just under the flower head and pulling the stroke downward to the bottom edge. -
Outline the petals:
Using the finer 01 or 03 pen, trace the petals. Keep your hand loose; slight wobbles actually add to the organic, sketched charm of the piece. -
Center detailing:
Add small, concentrated stippling dots or tiny lines at the very base of the petals where they meet the stem. This adds depth and suggests a shadow. -
Draw the leaves:
Ink the leaf outlines using the fine liner. Make the tips pointed and the bases slightly rounded where they attach to the stem. -
Add leaf veins:
Draw a central vein down each leaf. If you like, add a few diagonal veins branching off, but keep these very light and broken to maintain a clean aesthetic. -
Ink the bud:
Trace the small bud shape. Add two or three vertical curved lines inside the bud to show the tightly wrapped petals waiting to bloom. -
Connect the elements:
Use the thicker pen again to darken the connections where the leaf stems meet the main stalk. This slight variation in line weight makes the drawing pop.
Step 3: Finishing Touches
-
Let it dry completely:
Wait at least 15 minutes to ensure the ink is totally set. The textured paper holds ink longer than smooth paper, and smudging now would be a shame. -
Erase guidelines:
Gently roll the kneaded eraser over the drawing to lift away any visible pencil marks. Avoid scrubbing, as this can damage the delicate paper surface. -
Final assessment:
Step back and look at the line weights. If the drawing feels too light, re-trace the bottom curve of a few petals to add a shadow effect.
Vintage Tea Stain
Before drawing, lightly brush parts of the paper with strong black tea and let it dry. This enhances the antique, textured vibe of the final piece.
Place your finished drawing near a window where natural light can highlight the beautiful paper texture


Paper Collage Color Blocking
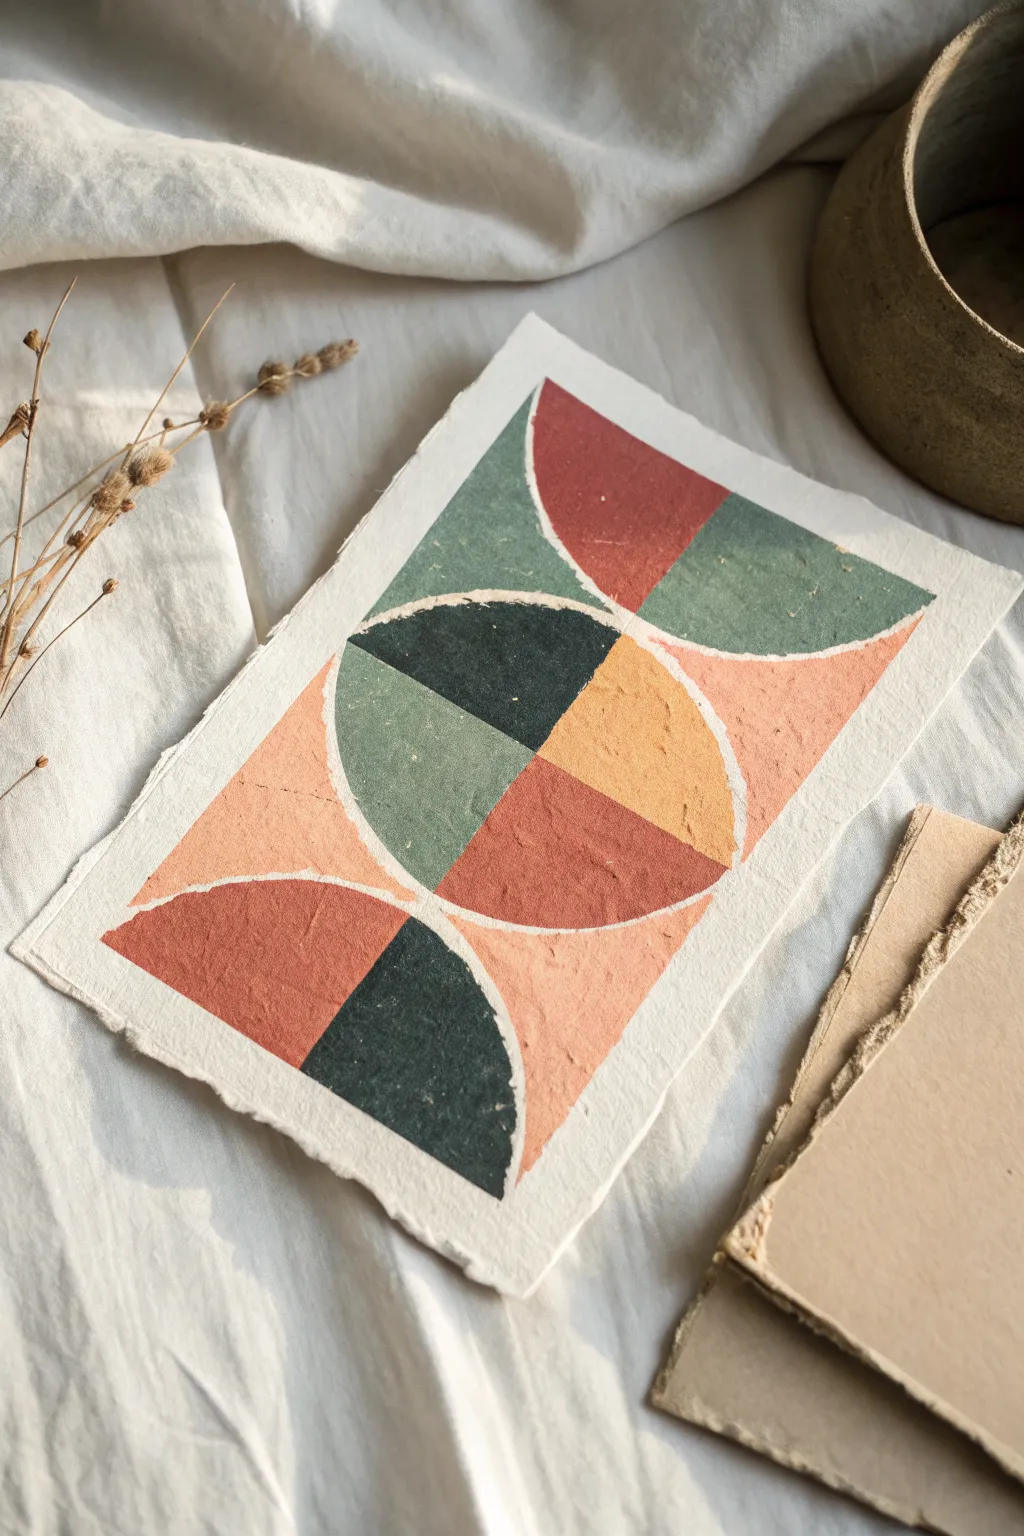
This project embraces the imperfect beauty of handmade paper to create a soothing, earthy modern art piece. By combining torn textures with precise geometric forms, you’ll craft a composition that feels organic yet structured.
How-To Guide
Materials
- heavyweight handmade textured paper (white or cream)
- assorted colored handmade paper (terracotta, sage, teal, mustard, peach)
- pencil
- compass or circular objects for tracing
- ruler
- scissors
- water brush or small paintbrush
- cup of water
- matte gel medium or archival glue stick
- brayer or clean cloth
Step 1: Preparing the Base
-
Create the base:
Start with your heavyweight white handmade paper. If it doesn’t already have deckled edges, you can create them. Draw a light rectangle guide for your desired size. -
Outline moisture line:
Dip a small paintbrush in water and trace over your pencil lines. Let the water soak in for about 30 seconds to weaken the fibers. -
Tear the edges:
Gently pull the paper apart along the wet line. This water-tearing technique creates that characteristic soft, fuzzy edge rather than a sharp cut.
Water Tearing Tip
For more control when tearing wet paper, hold a ruler firmly along the wet line and pull the paper specifically away from the ruler’s edge.
Step 2: Designing the Elements
-
Planning the layout:
Lightly sketch a 2×3 grid on a piece of scrap paper to plan your composition. The artwork relies on semicircles and quarter-circles fitting into rectangular blocks. -
Tracing circles:
On your colored papers, use a compass or trace a cup to create several circles. I find that a diameter of about 3-4 inches works well for a standard greeting card size. -
Creating the shapes:
Cut your colored circles out first using scissors for general shaping, but leave a little margin. -
Adding texture:
Just like the base paper, use the water-brush technique to create deckled edges on the curved sides of your shapes. This adds cohesive texture throughout the piece. -
Cutting straight edges:
For the straight sides of the semicircles and quarter-circles, use scissors or a craft knife and ruler. Having crisp straight lines contrast with the torn curved edges makes the design pop.
Step 3: Assembly
-
Dry fit the composition:
Arrange your loose shapes onto the white base paper without glue. Play with the color balance—try placing the dark teal next to the light peach for high contrast. -
Establish spacing:
Ensure you leave a consistent gap of white space between the shapes. This ‘grout line’ is crucial for the modern blocked look. -
Apply adhesive:
Lift one piece at a time. Apply a thin, even layer of matte gel medium to the back. A glue stick works too, but gel medium is better for thick, textured papers. -
Position the first row:
Start adhering pieces from the top left corner. Align the straight edges with your invisible grid lines, keeping the white gaps consistent. -
Press and smooth:
Once a piece is placed, press it down firmly. Use a brayer or a clean cloth to smooth it out, ensuring full contact with the textured base. -
Continue the pattern:
Work your way down the paper, completing the middle and bottom sections. Double-check your alignment as you go so the grid doesn’t drift. -
Refine the edges:
If any colored paper overhangs the white base where it shouldn’t, gently trim it or tear it away carefully to maintain the rectangular bounds. -
Final press:
Place a heavy book over the finished artwork while it dries to prevent the wet glue from warping the paper.
Add Metallic Details
Once dry, use a fine-tip gold leaf pen to trace the thin white gaps between shapes. This adds a subtle, luxurious shine to the rustic texture.
Frame your mini collage in a floating glass frame to show off those beautiful rough edges
Modern “Stone” Shapes and Pebble Forms
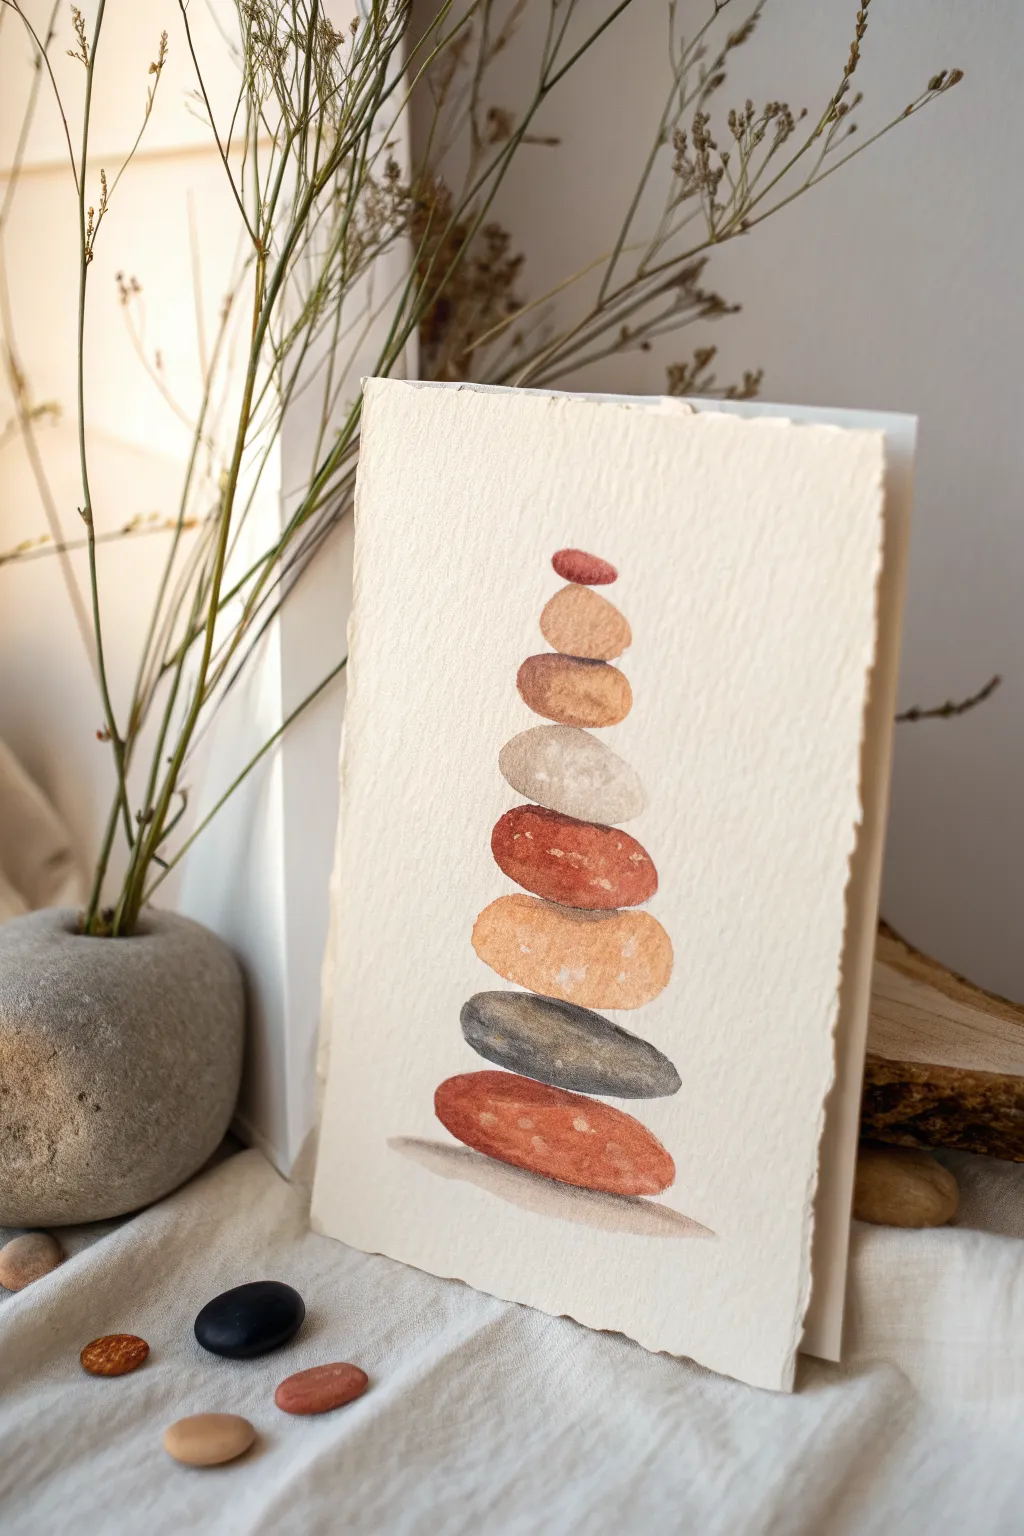
Capture the serenity of a balanced rock cairn with this minimalist watercolor project. Using earthy tones and a simple stacking composition, you’ll create a piece that feels both grounded and delicately poised on beautiful textured paper.
Detailed Instructions
Materials
- Cold press watercolor paper (deckle edge recommended)
- Watercolor paints (Burnt Sienna, Yellow Ochre, Payne’s Grey, Burnt Umber)
- Round watercolor brushes (Size 4 and 6)
- Pencil (HB or lighter)
- Kneaded eraser
- Jar of water
- Paper towels
- White gel pen or white gouache (optional for details)
Step 1: Planning and Sketching
-
Choose your paper:
Select a heavy, cold-press watercolor paper. If you want the exact look from the photo, tear the edges carefully against a ruler or use pre-cut deckle-edged paper to give it that raw, handmade feel. -
Visualize the stack:
Imagine a vertical line running down the center of your page. This imaginary axis will help keep your stones balanced so the stack doesn’t look like it’s about to topple over. -
Sketch the base stone:
Lightly draw a wide, flat oval near the bottom of the page. This is your foundation stone, so it should be one of the largest forms. -
Build the tower:
Sketch 6-7 more oval and bean-like shapes on top of the base stone, getting generally smaller as you move upward. Vary the tilt slightly for a natural look, but keep the center of gravity aligned. -
Refine the shapes:
Go back and soften any sharp angles on your ovals to make them look like smooth river stones. Use a kneaded eraser to lighten the pencil lines until they are barely visible.
Muddy Colors?
If your stones are bleeding together, ensure each shape is bone-dry before painting its neighbor. Use a hairdryer on low heat to speed up the process between layers.
Step 2: Painting the Stones
-
Prepare your palette:
Mix puddles of your earth tones. You’ll want a reddish-brown (mix Burnt Sienna with a touch of red), a sandy beige (Yellow Ochre with lots of water), a charcoal grey (Payne’s Grey), and a deep brown. -
Paint the first stone:
Starting with the large bottom stone, load your size 6 brush with the reddish-brown mix. Fill the shape using the wet-on-dry technique for crisp edges. -
Create volume:
While the paint is still wet, drop a slightly darker concentration of pigment along the bottom edge of the stone. This creates a shadow and gives the flat shape 3D weight. -
Work on non-adjacent stones:
Skip the stone immediately above the one you just painted to prevent colors from bleeding into each other. Move to the gray stone (third from the bottom) using your Payne’s Grey mix. -
Paint the middle layer:
Fill the fourth stone (the sandy orange one) and the sixth stone (the top beige one) with your lighter, warmer mixes. Vary the water-to-paint ratio so each stone has a unique opacity. -
Fill the gaps:
Once the first set of stones is completely dry to the touch, go back and paint the remaining stones (the second, fifth, and the tiny top pebble). Use contrasting earth tones so no two similar colors touch directly. -
Add texture:
For a speckled, granitic look, wait until a stone is damp (not soaking wet) and splatter minute droplets of clean water or darker paint onto it. This creates ‘blooms’ that mimic stone texture. -
Ground the stack:
Mix a very watery grey wash. Paint a simple, horizontal shadow underneath the bottom red stone to anchor the stack to the ground.
Step 3: Details and Finishing
-
Evaluate the values:
Step back and look at your contrast. If any stones look too flat after drying, add a second glaze of color to the bottom curve of the rock to deepen the shadow. -
Add detailed markings:
I like to use a size 4 brush with a fairly dry mixture of dark brown to add tiny specks or faint lines on one or two stones for realism. -
Highlighting:
If you lost your highlights during the painting process, use a white gel pen or a tiny dot of white gouache to add speckles to the reddish stones, mimicking mineral inclusions. -
Create separation:
If the boundary between two stones is indistinct, use a fine liner brush with a dark grey mix to paint a hair-thin line right where they touch, emphasizing the weight of the top stone pressing down. -
Final check:
Erase any remaining stray pencil marks once the painting is 100% dry.
Framing Idea
Since the paper has a lovely texture, don’t hide it behind a mat. Float-mount the artwork on a backing board within a deep shadow box frame to showcase the deckle edges.
Place your finished piece in a quiet corner of your home to bring a sense of balance to the space
DIY Triptych With Shared Color Palette
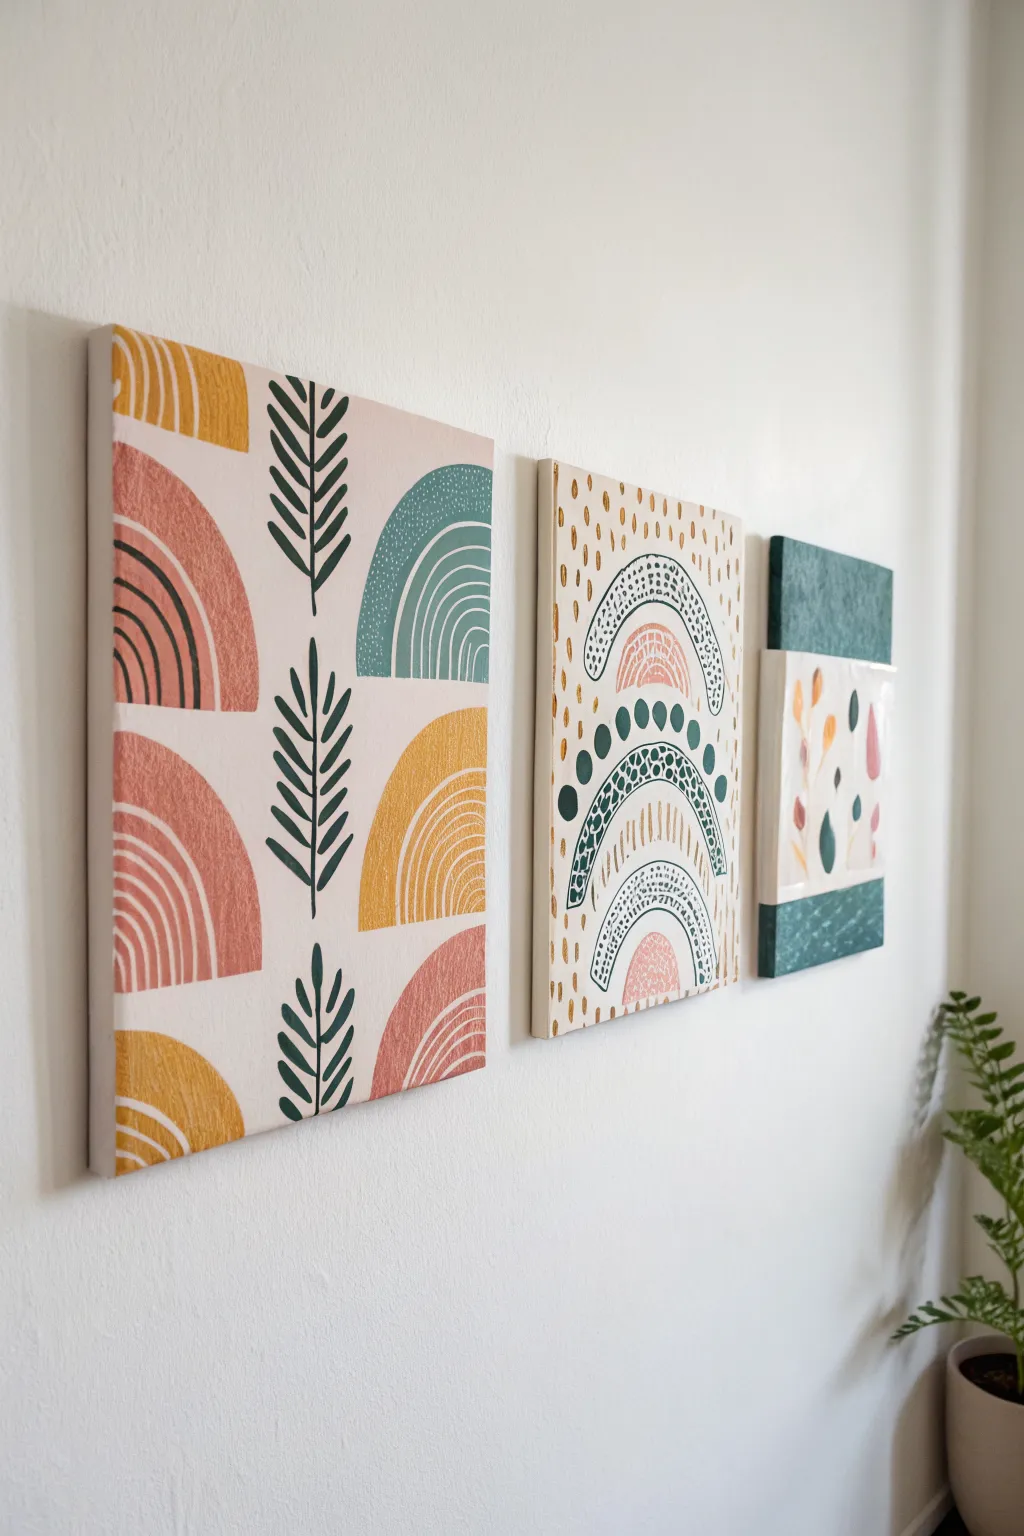
Bring warmth and modern style to your walls with this coordinated three-piece canvas set. Featuring organic arches, simple botanical leaves, and a unified palette of terracotta, teal, mustard, and cream, this DIY art project looks tailored and expensive but is surprisingly simple to achieve.
Step-by-Step
Materials
- Three stretched canvases (two square, one rectangular)
- Acrylic paints (terracotta/dusty rose, mustard yellow, deep teal, light cream/off-white, forest green, gold)
- Painter’s tape or masking tape
- Assorted paintbrushes (flat brush for backgrounds, round brush for details)
- Pencil and eraser
- Paper plate or palette
- Ruler or straight edge
- Cup of water and paper towels
Step 1: Planning and Prepping
-
Prepare the workspace:
Lay down a drop cloth or old newspaper to protect your surface. Set out your three canvases side-by-side to visualize how the designs will flow together. -
Base coat the backgrounds:
Mix a small amount of warm white or cream acrylic paint. Apply an even base coat to the two larger canvases (left and middle) to create a clean, neutral surface. Let this dry completely. -
Tape the third canvas:
For the smallest rectangular canvas on the right, use painter’s tape to block off a central rectangle, leaving wide borders at the top and bottom. Press the tape edges down firmly to prevent bleeding. -
Paint the blocked sections:
Paint the top and bottom exposed sections of the third canvas in a deep teal or forest green. Paint the central taped-off rectangle in your cream color. Peel the tape while the paint is still slightly tacky for a crisp line.
Step 2: Canvas 1: Arches & Leaves
-
Sketch the layout:
Lightly sketch a vertical column of simplified leaf stems down the center of your first (leftmost) canvas. Draw half-circles (arches) on either side of the leaves, alternating their direction. -
Paint the arches:
Fill in the sketched arches using alternating colors—terracotta, mustard yellow, and deep teal. I usually apply two thin coats rather than one thick one for a smoother finish. -
Add arch details:
Once the base colors are dry, use a thinner brush to paint contrasting concentric lines inside each arch. Use cream paint over the dark teal arches, and darker tones over the lighter arches. -
Paint the central leaves:
Using a dark forest green or almost-black paint and a fine round brush, paint the central stem line. Add simple, almond-shaped leaves branching off symmetrically.
Clean Lines Hack
For the defined arches, cut a piece of cardboard into a curve and use it as a stencil to trace, ensuring all your rainbow shapes remain uniform.
Step 3: Canvas 2: Dotted Rainbows
-
Create the background texture:
Dip a small brush into mustard or gold paint. Create a scattered pattern of small dashes or ‘rain’ marks all over the background of the middle canvas, keeping the spacing loose and organic. -
Draft the central motifs:
Lightly mark the placement for two large, stacked rainbow shapes in the center of the canvas. -
Painting the rainbow arcs:
Instead of solid lines, build these arches using patterns. Paint one arc with solid dots in deep teal, another with a solid mustard line, and another with a dashed terracotta line. -
Layering details:
Fill the innermost arch with a solid terracotta color, then add delicate white hatching lines over it once dry for visual interest. -
Adding dark contrast:
Use your dark forest green to paint a prominent arc with a ‘giraffe print’ or mosaic pattern to tie it visually to the dark leaves on the first canvas.
Textured Effect
Mix a teaspoon of baking soda into your acrylic paint before applying the solid arches. This creates a trendy, plaster-like matte texture.
Step 4: Canvas 3: Mini Botanical
-
Sketch the foliage:
On the dry cream center of your third canvas, lightly sketch a scattering of small, floating leaves and berries. -
Paint loose leaves:
Paint these shapes using watered-down terracotta and mustard yellow to give them a softer, almost watercolor-like appearance compared to the graphic leaves on the other canvases. -
Add final details:
intersperse a few tiny dark green dots or small leaves to connect the palette back to the deep teal borders you painted earlier.
Step 5: Finishing Touches
-
Clean uph edges:
Check the edges of your canvases. If paint has spilled over the sides, you can either paint the sides a solid matching color for a gallery wrap look or clean them up with white paint. -
Erase pencil marks:
Once all paint is 100% dry to the touch, gently erase any visible pencil sketch lines. -
Seal the artwork:
Apply a coat of matte or satin varnish to protect your new art pieces and unify the sheen across all three canvases.
Hang your new triptych with a little space between each canvas to let the designs breathe and transform your room.

Have a question or want to share your own experience? I'd love to hear from you in the comments below!